

Page 1
* Caller Identification requires Telkom’s Identicall service. Subscription may be required
Page 2

1. Important safety instructions ..............................
2. Maintenance ......................................................
3. Installation precautions ......................................
4. Caution ..............................................................
5. User controls ......................................................
6. Setting up ...........................................................
6.1 Important Information .........................................
6.2 Contents of package ..........................................
6.3 Installing batteries ..............................................
6.4 Connecting the handset and line cord ...............
6.5 Mounting the phone ...........................................
6.6 Setting the telephone.........................................
6.7 Setting the Year, Month, Date and Time.............
6.8 Set menu ...........................................................
7. Telephone Operations .......................................
7.1 Dialing a number ................................................
7.2 Receiving incoming calls ...................................
7.3 Handsfree facility ...............................................
7.4 Speakerphone receiver volume .........................
7.5 Ringer volume control ........................................
7.6 Using Redial ......................................................
7.7 Recall .................................................................
7.8 Using Pause ......................................................
7.9 PAUSE/VIP Button .............................................
8. Message waiting ...............................................
Contents
1
3
3
3
3
4
6
6
6
6
6
7
7
8
8
9
9
9
9
10
10
10
10
11
11
11
Page 3

9. Storing a number ...............................................
10. Calling line identification (Identicall
subscription required).........................................
10.1 The list of callers ................................................
10.2 Deleting numbers from the calls list ...................
10.3 Dialing a number from the outgoing calls list ....
10.4 Dialing a number from the callers list ................
11. Troubleshooting .................................................
Calller ID System Troubleshooting table ...........
Telephone Unit Troubleshooting table ..............
12. Service Enquiries ...............................................
12
13
14
14
15
15
16
16
18
19
2
Page 4

3
1. Important safety instructions
Read the instruction manual carefully before connecting and
operating your telephone. The telephone has no user
serviceable components and service should therefore be
referred to authorized service centers only.
2. Maintenance
· Only use a damp cloth to clean the cabinet. A mild
soap will help to remove grease or oil. Never use
polish, solvents, abrasives or strong detergents since
these can damage the telephone.
· Your phone should be situated away from heat
sources such as radiators, heaters, stoves or any
other appliance that produces heat.
3. Installation precautions
· Never install telephone wiring during a lightning
storm.
· Never touch un-insulated telephone wires or terminals
unless the telephone line has been disconnected at
the network interface.
4. Caution
To reduce the risk of fire or injury read and follow these
instructions:
· Use only the batteries specified in this manual.
· Do not dispose of the batteries in a fire.
· When inserting the batteries into this product, the
proper polarity or direction must be observed.
Reverse insertion of the batteries can damage the
telephone.
· Remove the batteries from this product if the product
will not be used for a long period of time (several
months or more).
· Discard the “dead” batteries as soon as possible.
Page 5
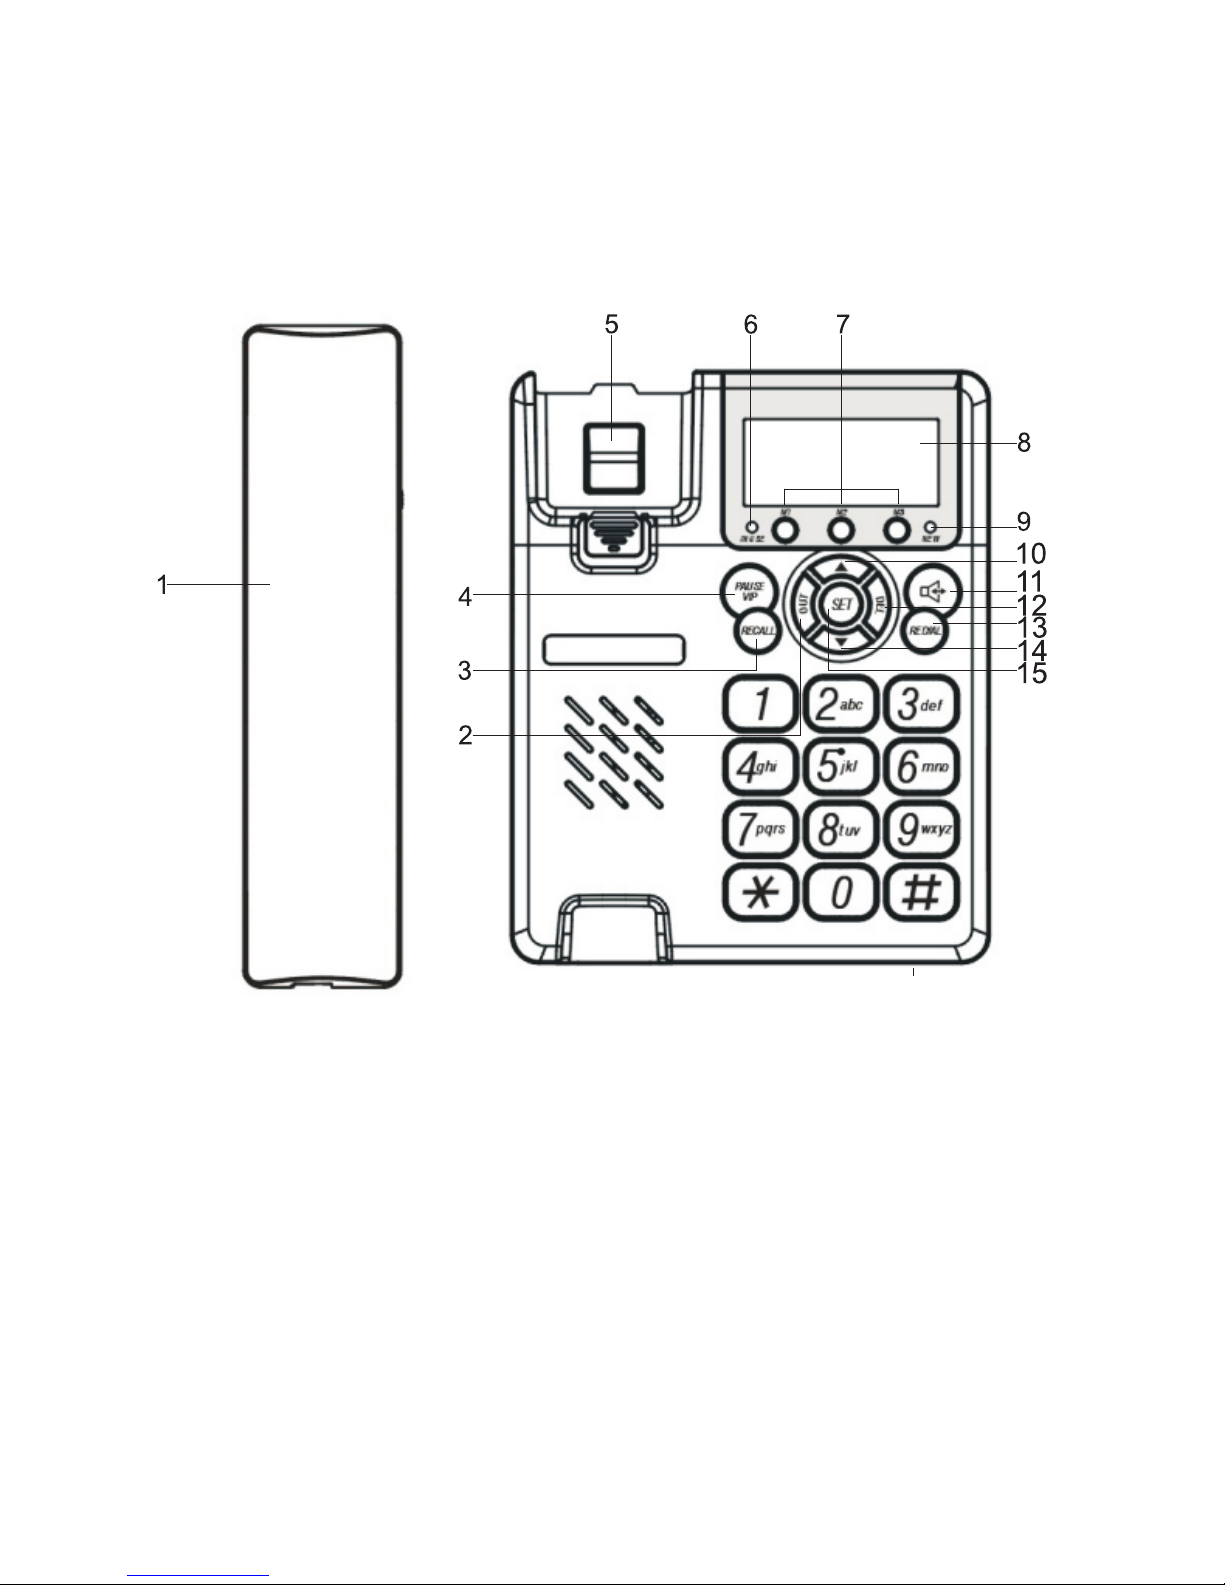
1. Handset 2. Out button
3. Recall button 4. Pause / VIP button
5. Hook switch 6. In use indicator
7. M1-M3 memory buttons 8. LCD display
9. New call indicator 10. Up button
11. Speaker button 12. Delete button
13. Redial button 14. Down button
15. Set button
5. User controls
4
FRONT VIEW
Page 6
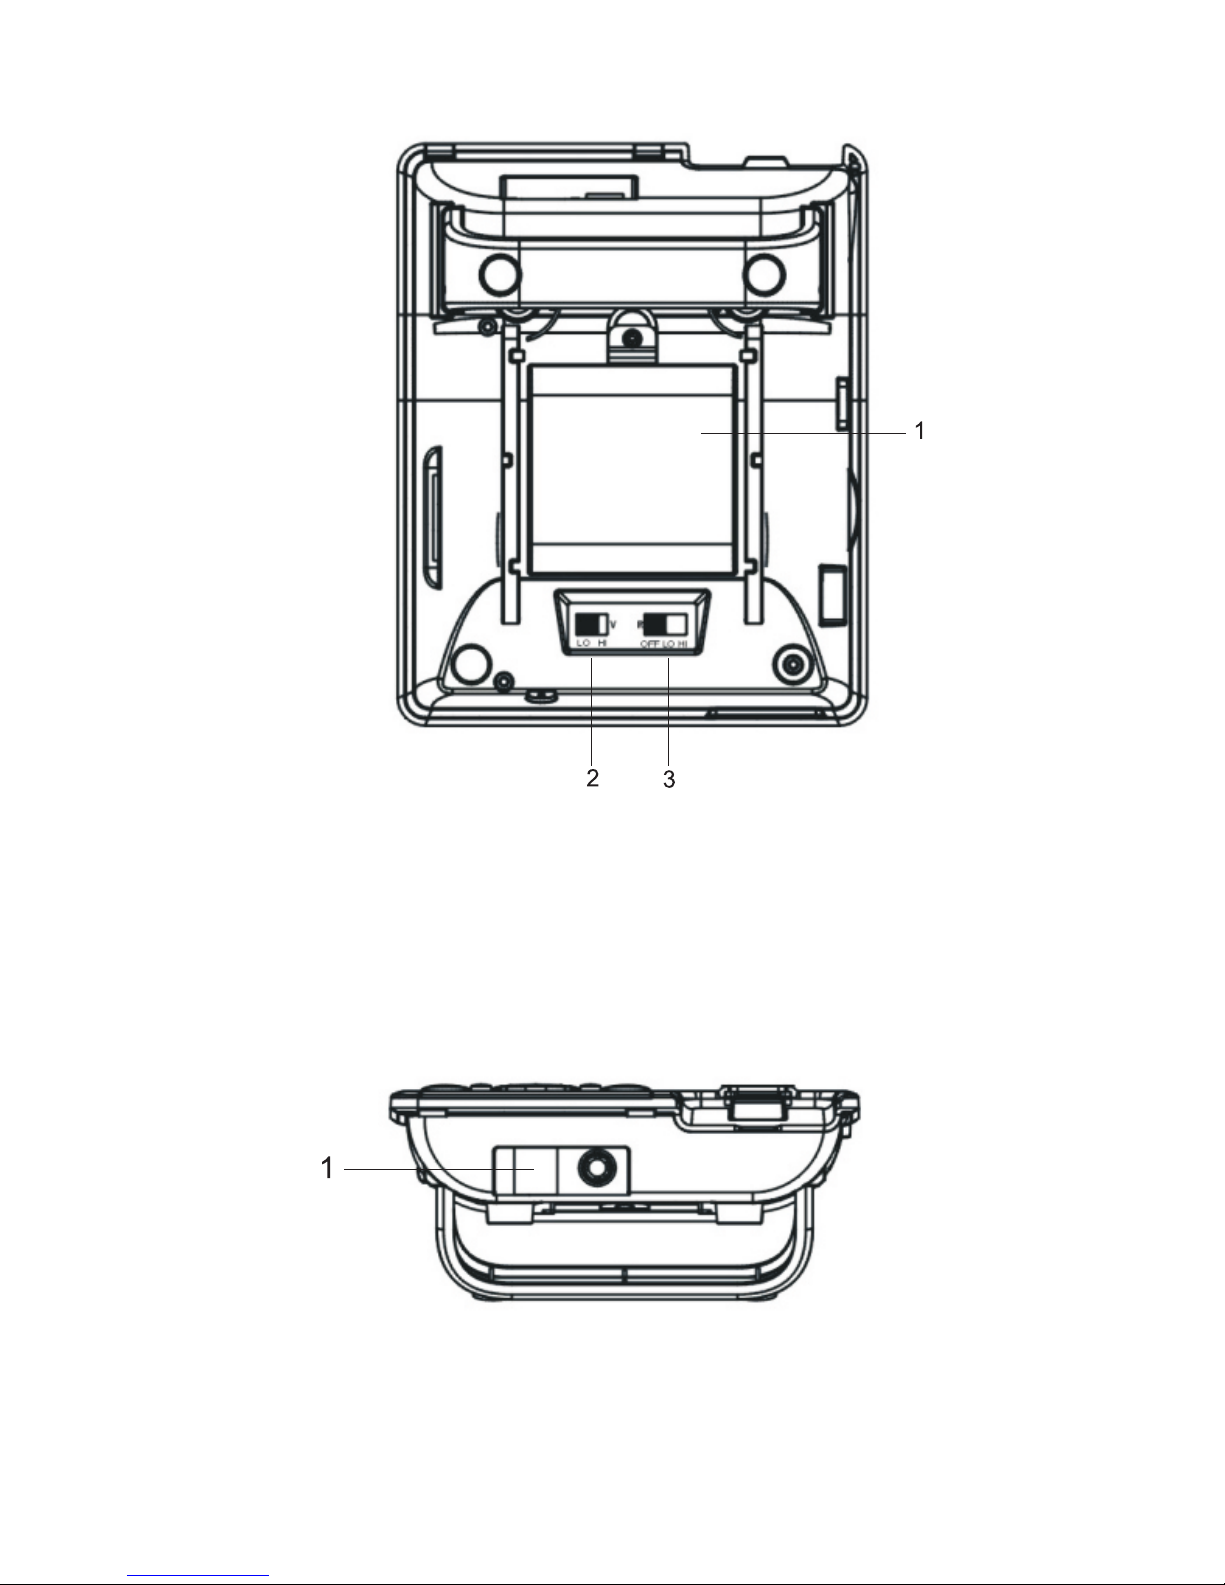
5
BOTTOM VIEW
1. Battery compartment 2. Speakerphone volume switch
3. Ringer volume switch
BACK VIEW
1. Line jack
Page 7

6. Setting up
6.1 Important Information
NOTICE: Before connecting, please read the general
instructions at the beginning of this manual.
6.2 Contents of package
The package contains:
Base station, one handset with handset cord, one telephone line
cord, one desktop bracket, four AA batteries and this instruction
manual.
6
6.3 Installing batteries
Your phone requires four AA batteries. These are standard
batteries not rechargeable batteries.
NOTICE: Please do not insert batteries while the telephone is
connected to the telephone line.
1. Remove the screw from the battery compartment
door. Press down on the upper edge of the battery
compartment cover and slide it away from the
handset.
2. Insert four AA batteries into the compartment as
indicated by the polarity symbols.
3. Snap the battery compartment door back into place.
4. Replace the screw.
6.4 Connecting the handset and line cord
1. Plug one end of the supplied line cord into the line
jack at the back of the base.
2. Plug the cord’s other end into a telephone line outlet.
Page 8

7
3.
4. Plug the other end of the coil cord into the handset
socket.
Plug one end of the coil cord into the handset socket
at the back of the base.
6.6 Setting the telephone
There are 4 setting modes for setting the telephone.
These are:
SET 1: Date and Time (YY, MM, DD, Hr and Min)
SET 2: Access Code
SET 3: Flash Default setting 3 (110 mS)
SET 4: LCD Default setting 3
NOTE: The programming sequence of each facility and the
method of access to the SET mode follows the same procedure
as to setting the Year, Time and Date sequence which are
detailed below for clarity.
°
6.5 Mounting the phone
You can mount your telephone directly against a wall, or place it
on a shelf, desk or table.
The unit can be mounted to any wall surface using two selftapping screws (not supplied).
1. Drill two holes in the wall 67mm horizontally apart.
2. Insert wall plugs into each hole.
3. Then thread a screw into each hole, letting the heads
extend about 5mm from the wall. Position the base
over the two screw heads and push downward.
4. Slide out the handset hook on the base, rotate it 180
and replace it. The handset will rest on the hook when
wall mounted.
Page 9

8
6.7 Setting the Year, Month, Date and Time
1. Press SET.
2. Set 1 Date will be displayed “1” flashes. (At this
stage any of the setting sequences may be
selected by pressing the up and down buttons.
The display will indicate the setting mode.)
3. To accept press SET.
4. 2000 will be displayed with the third and fourth digits
00 flashing. To change press the up or down buttons.
5. To accept press SET.
6. Continue with this method of setting the telephone
until the minute setting has been completed.
7. To accept press SET.
8. The setting program will switch to SET 2 with digit 2
flashing. A choice can now be made to select another
mode which may be required by pushing the up and
down buttons or to terminate the procedure by briefly
lifting the handset.
6.8 SET menu
Item 2 is reserved for future use, item 3 is to change the recall
button timing (not recommended) and item 4 can be used to
change the LCD contrast. Items 5, 6, 7 and 8 are not supported
on this phone. Item 6 is used to change the phone from tone to
pulse dialing mode, which is not recommended on modern
exchanges. Item 5 is an alarm function, and although it appears
to be set, the alarm sounder is not fitted to this model so when
the alarm time is reached, only a soft beep is heard. Items 7
and 8 are reserved for future use.
Page 10

9
7. Telephone Operations
7.1 Dialing a number
1. Lift the handset and wait for dial tone or press the
button. The “ In Use” LED lights.
2. Press the keypad for the telephone number you wish
to dial. The number will be shown on the display.
3. When you complete your call, replace the handset or
press the button again.
7.2 Receiving incoming calls
When you receive a call the phone rings.
To answer the call, proceed as follows:
1. Lift the handset or press the button.
2. To end the call, replace the handset or press the
button.
7.3 Handsfree facility
button at the start of or during a call. You will now
hear the dialing tone or the person you are speaking to over the
loudspeaker instead of in the handset.
Handsfree lets you dial a number and talk to your caller without
holding the handset. It also enables other people in the room to
listen to both sides of your conversation.
Press the
Lift the handset to change back from the handsfree mode.
End a call made using the handsfree facility by pressing the
button.
Page 11

10
7.4 Speakerphone receiver volume
The receiver volume can be adjusted to one of two sound
levels, (HI or LO). The receiver volume switch is on the bottom
of the phone.
7.5 Ringer volume control
The ringer can be adjusted to one of two sound levels, (HI or
LO) . To turn the ringer off, slide the ringer switch to the OFF
position. You can still make outgoing calls without being
disturbed by incoming calls.
7.6 Using Redial
To redial the last number dialed, proceed as follows:
1. Lift the handset or press the button.
2. Press the REDIAL button.
7.7 Recall
Your telephone supports the CallWaiting service. If you
subscribe to this service you can use this feature to put a call on
hold and answer another call on the same line by pressing the
RECALL button.
NOTICE: If you do not have CallWaiting, pressing RECALL
might disconnect the current call.
NOTICE: A subscription is required to use the CallWaiting
services. Please call 10210 to subscribe to this service.
Page 12
11
7.8 Using Pause
In some telephone systems, you must dial an access code (9,
for example) and wait for a second dial tone before dialing an
outside number. When you manually dial a number, or when
you store a number in memory, you can have your telephone
pause anywhere during the dialing sequence. Press the
PAUSE/VIP button anywhere at the desired location.
7.9 PAUSE/VIP Button
1. When Pre-Dialing a number insert a pause where
required by pressing the PAUSE/VIP button.
2. Where important incoming numbers are to be safe
guarded against accidentally deleting, scroll up and
down keys to identify the number, then press the
PAUSE/VIP button to safe guard the number. The
symbol will be shown on the display. To delete this
number access, as before, re-press the PAUSE/VIP
button then delete. The symbol will disappear.
8. Message Waiting
If the line is busy or in use and the caller is forwarded to a voice
mailbox, Message Waiting and Mail icons will be shown on the
display once the current call is finished.
NOTE: A subscription is required to use the MessageWaiting
services. Please call 10210 to subscribe to this service.
Page 13

12
9. Storing a number
You can store up to 3 numbers in your phone’s one-touch
memory for quick and easy dialing. The maximum stored
number length is 32 digits.
1. In the on-hook or off-hook state, use the p q
buttons to select a number from the incoming list or
the OUT button to select a number from the outgoing
list or enter the desired number from the keypad.
2. Press the SET button. The display shows STORE IN.
3. Press the desired memory location (M1, M2 or M3).
4. The number will then automatically be stored.
NOTE: To update the number stored in the one-touch memory,
repeat above steps and the new number will replace the old
one.
To dial a number from the one-touch memory:
1. Lift the handset or press the button.
2. Press the relevant one-touch button (M1, M2 or M3).
3. The number will then automatically be dialed.
To review a number in the one-touch memory:
1. In the on-hook state, press the desired memory
location (M1, M2 or M3).
or
Page 14

13
- NEW CA SLL
hen a
ew
cal is rece ved the displ
y wil
sh
w
a the W
n
l i , a l
o
EW
N
nd
ne call ndi ator will fl sh. er the w all has been w i
c
a Aft
ne
c
vi we , will
sa
ear from the
sp
ay a
d the
w al re e d NEW
di pp di
l
n ne
c l
i ic
or will turn of
nd at
f.
- INC MI G C L
O
N A
LS
Wh
n rev ewing t incomi g numbers,
the di
pl s
ow
.
e i
he
n s
ay
h
s IN
- O TGO
G C L
U IN
A
LS
W
n rev ewing e outg
ing n
mbers, the isp ay hows .
he
i th o
u d
l s
UT
O
- PRIVA
TE
the n e a
num er are n
displayed du
to the
al er
If am
nd
b
ot e
c
l
res rict
ng i s d
spl yed
t i t - - - P - - - i i
a
.
OUT OF
AR
A- E
If e name and
mbe s n
t av
lab
e . e . ca ls from
road,
th nu
r i o ai
l .g l ab
- - O - -
is displayed. - -
10. Calling line identification (IdentiCall subscription
required)
The calling line identification display shows the origin of
incoming calls.
The NEW CALL indicator on your phone will flash to indicate
new calls.
The calling numbers are stored in a list so that you can return
missed calls easily. A total of 63 calling numbers can be stored
in the list. Once the list is full, the oldest number is automatically
deleted each time a new call is received.
NOTICE: A subscription is required to use the IdentiCall
services. Please call 10210 to subscribe to this service.
Page 15

14
10.1 The list of callers
In order to see the list of callers on the display, proceed as
follows:
1. Press the q button to show the last calling number
received on the display.
2. Press the p button to search upwards through the
list. Use the q button to search down the list in the
opposite direction.
3. Press the OUT button to review the last number
dialed. Subsequent presses of the OUT button will
show previously dialed numbers.
10.2 Deleting numbers from the calls list
Deleting single entries:
1. Use the p q buttons to select a number from the
incoming list or the OUT button to select a number
from the outgoing list that you wish to delete.
2. Press the DEL button. The display shows the next
number in the list of callers.
3. Press the DEL button again to delete the next
number in the list.
Deleting the entire list:
1. Use the q button to display the incoming list or the
OUT button to display the outgoing list.
2. Hold down the DEL button for 4 seconds and the
entire list will be deleted.
or
REPEA
T
-
f a call c mes in
epeated y, t
e di pla
sh
ws
.
I
o
r
l h s y o EP
R
- ERR
RO
If t
e p one can
ot eco
niz
the info ma
ion ithi
the cal r h
h
n r
g e
r
t
w
n le
dis
lay
me
sag s,
- -
- -
-
-
E
is displayed.p
s
e
Page 16

15
10.3 Dialing a number from the outgoing list
The phone can store up to 16 outgoing numbers. To dial an
outgoing number, proceed as follows:
1. Lift the handset and press the OUT button to display
the last dialed number.
2. Continue to press the OUT button to select the
number you wish to dial.
3. To dial the number shown on the display, press the
REDIAL button.
10.4 Dialing a number from the callers list
The phone can store up to 63 incoming numbers. To dial an
incoming number, proceed as follows:
1. Lift the handset and use the p q buttons to select
the number you wish to dial.
2. To dial the number shown on the display, press the
REDIAL button.
or
NOTE: While pressing the RECALL button while the phone is
on hook will seem to allow you to change ring tones, this is not a
feature on this model of phone as it does not contain a
polyphonic ringer.
Page 17

11. Troubleshooting
16
CALLER ID SYSTEM TROUBLESHOOTING TABLE
SYMPTOM
SOLUTION
The Caller ID LCD
panel is blank
The Caller ID LCD
panel does not show
the caller’s phone
number
!
Check the telephone line cord
connections.
!
Check the batteries for proper
installation.
!
Ensure the batteries are not
discharged.
!
The Caller ID unit will not function
until you have the IdentiCall
service provided by Telkom
activated. Call Telkom on 10210
to have the IdentiCall service
activated on your telephone line.
!
Check your telephone line
connections. Make sure all
connections are secure and
connected.
!
If you have picked up the phone
before the second ring, the caller
information will not be correctly
received. If you have a telephone
answering device (TAD) connected
with the unit, set the TAD to
answer after two rings or more.
!
If it is a private call or an out-ofarea call, the caller’s name and/or
phone number will not appear on
the display. Please refer to the
section
for more details.
“Reviewing call records”
X
Page 18

17
“NO NUMBER”
appears on the LCD
panel
Cannot erase call
records in memory
!
information sent by the exchange
may have an error during data
transmission. This is not the fault
of your telephone. It can
only capture and store the data
that it received.
!
The DEL button must be quickly
pressed to erase a single call
record. To erase all call records,
press and hold the DEL button for
at least four seconds.
!
Make sure all new calls have been
reviewed.
On rare occasions, the Caller ID
Page 19

18
TELEPHONE UNIT TROUBLESHOOTING TABLE
SYMPTOM
No dial tone
Will not ring
Static
SOLUTION
!
The handset cord or telephone
line cord may have a bad
connection. Push in firmly at
both ends to establish good
contacts.
!
Test the phone at a different
telephone wall socket and listen
for dial tone.
!
Test a different phone in the wall
socket and listen for dial tone to
check if the line is in order.
!
Check the RINGER HI/LO/OFF
switch. It may be in the OFF
position.
!
The phone or another phone
connected to the same line may
be in the off-hook (in-use)
position. Place the phone in the
on-hook position to receive
incoming calls.
!
Try a different phone; if the
problem persists the fault is not
with the telephone.
!
Some atmospheric conditions
such as very low humidity can
cause static build-up.
Page 20

19
12. Service Enquiries
For any service or product information queries relating to this
telephone, please call our SharedCall number 0860 2C HELP
(0860 22 43 57) or visit our website on
www.telkomphones.co.za
NOTE: Your telephone is guaranteed for a period of 12 calendar
months from the date of purchase as indicated on your till slip.
Keep your till slip in a safe place as it will be required for
guarantee repairs. It is however not guaranteed against damage
caused by misuse, riot damage, lightning or power surge
damage, damage caused by using the unit for purposes other
than which it was intended or any damage that can be deemed
an act of God.
 Loading...