

Telkom ADSL 5100 Instruction Manual
Telkom ADSL 5100 Router
INSTRUCTION MANUAL
DISCLAIMER:
Even though this modem supports many features it does not
necessarily mean that Telkom are currently providing
services that support all these features.

Table of Contents
Chapter 1................................................................5
1.1 Introducing the TELKOM ADSL 5100.......................................5
1.2 Features of the TELKOM ADSL 5100.......................................5
1.3 Applications for the TELKOM ADSL 5100.................................8
Chapter 2................................................................9
2.1 Web Configurator Overview......................................................9
2.2 Accessing the TELKOM ADSL 5100 Web Configurator............9
2.3 Navigating the TELKOM ADSL 5100 Web Configurator.........10
2.4 Configuring Password.............................................................10
2.5 Resetting the TELKOM ADSL 5100........................................11
Chapter 3..............................................................13
3.1 Wizard Setup Introduction ......................................................13
3.2 Encapsulation.........................................................................13
3.3 Multiplexing.............................................................................14
3.4 VPI and VCI............................................................................14
3.5 Wizard Setup Configuration: First Screen ..............................14
3.6 IP Address and Subnet Mask .................................................15
3.7 IP Address Assignment...........................................................16
3.8 Nailed-Up Connection (PPP)..................................................17
3.9 NAT.........................................................................................17
3.10 Wizard Setup Configuration: Second Screen.......................17
3.11 DHCP Setup .........................................................................22
3.12 Wizard Setup Configuration: Third Screen........................... 22
3.13 Wizard Setup Configuration: Connection Tests....................24
3.14 Test Your Internet Connection...............................................25
Chapter 4..............................................................26
4.1 LAN Overview.........................................................................26
4.2 DNS Server Address...............................................................26
2

4.3 DNS Server Address Assignment...........................................27
4.4 LAN TCP/IP............................................................................27
4.5 Configuring LAN .....................................................................29
Chapter 5..............................................................31
5.1 WAN Overview........................................................................31
5.2 PPPoE Encapsulation.............................................................31
5.3 PPTP Encapsulation...............................................................32
5.4 Traf fic Shaping........................................................................32
5.5 Configuring WAN Setup..........................................................33
Chapter 6..............................................................37
6.1 NAT Overview.........................................................................37
6.2 SUA (Single User Account) Versus NAT.................................40
6.3 SUA Server.............................................................................40
6.4 Selecting the NAT Mode.........................................................42
6.5 Configuring SUA Server..........................................................42
6.6 Configuring Address Mapping.................................................44
6.7 Editing an Address Mapping Rule...........................................45
Chapter 7..............................................................46
7.1 Dynamic DNS.........................................................................47
7.1.1 DYNDNS Wildcard...............................................................47
7.2 Configuring Dynamic DNS......................................................47
Chapter 8..............................................................49
8.1 Configuring Time Zone ...........................................................49
Chapter 9..............................................................52
9.1 Remote Management Overview.............................................52
9.2 Telnet......................................................................................53
9.3 FTP.........................................................................................53
9.4 Web ........................................................................................53
3

9.5 Configuring Remote Management..........................................53
Chapter 10............................................................55
10.1 Universal Plug and Play Overview........................................55
10.2 Cautions with UPnP..............................................................55
10.3 Installing UPnP in Windows Example...................................56
10.4 Using UPnP in Windows XP Example..................................59
Chapter11.............................................................62
11.1 Maintenance Overview .........................................................62
11.2 System Status Screen...........................................................62
11.3 DHCP Table Screen..............................................................65
11.4 Diagnostic Screens...............................................................66
11.5 Firmware Screen...................................................................69
Appendix..............................................................71
A.1 Using LEDs to Diagnose Problems........................................ 71
A.2 Console Port...........................................................................72
A.3 Telnet......................................................................................72
A.4 Web Configurator...................................................................73
A.5 Login Username and Password.............................................73
A.6 LAN Interface .........................................................................74
A.7 WAN Interface........................................................................74
A.8 Internet Access.......................................................................75
A.9 Remote Management.............................................................75
A.10 Remote Node Connection....................................................75
Product Support and Contact Information ....................................76
4

Chapter 1
Getting to Know the TELKOM ADSL 5100
This chapter describes the key features and applications of TELKOM ADSL 5100.
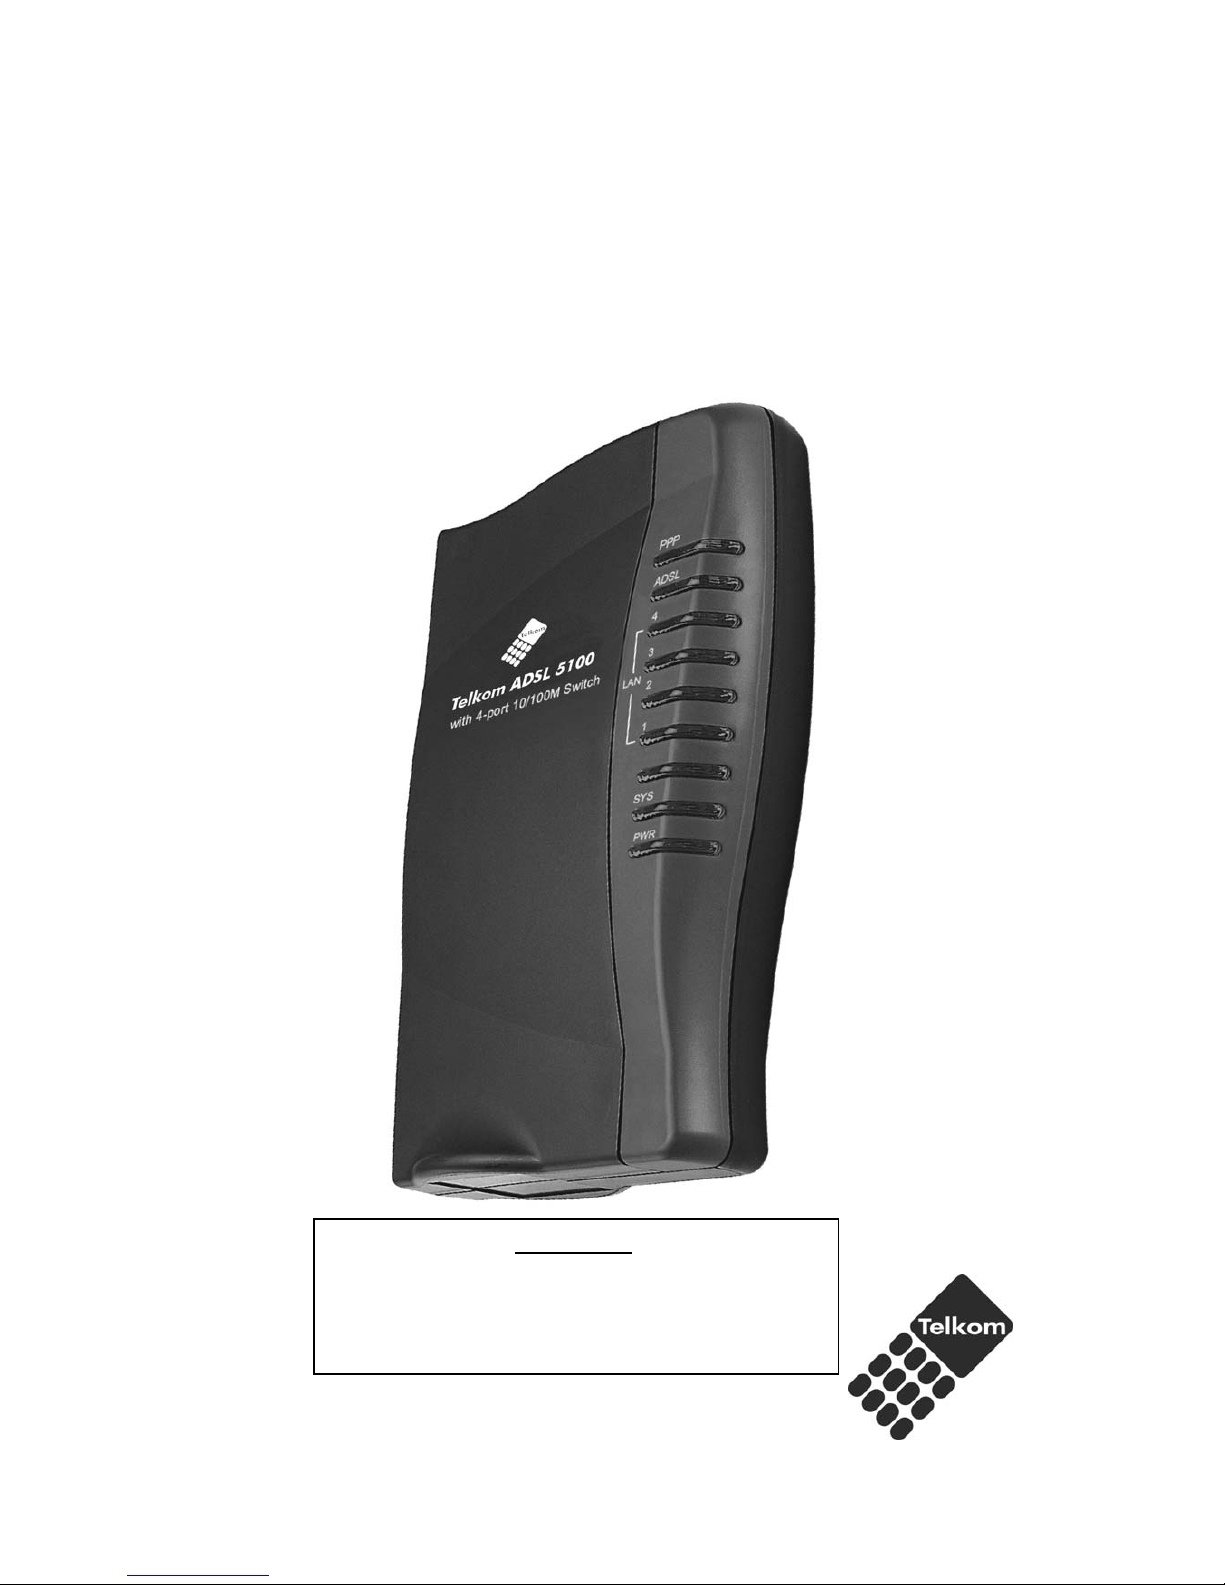
1.1 Introducing the TELKOM ADSL 5100
The TELKOM ADSL 5100 integrates high-speed 10/100Mbps auto-negotiating LAN interface(s)
and a high-speed ADS L port into a single package. The TELKOM ADSL 5100 is ideal for
high-speed Internet browsing and making LAN-to-LAN connections to remote networks. By
integrating DSL and NA T, the TELKOM ADSL 5100 provides super-fast Internet access to multiple
users at minimum cost.
The TELKOM ADSL 5100 is a brid ge/router and the web browser-based Gra phical User Interface
provides easy management and is totally independent of the operating system platform you use.
1.2 Features of the TELKOM ADSL 5100
The following sections describe the features of the TELKOM ADSL 5100.
¾
Four-Port Switch
A combination of switch an d router makes the TELKOM ADSL 5100 a cost-eff ective and viable
network solution. You can connect up to four computers to the LAN ports on you TELKOM ADSL
5100 without the cost of a hub.
¾
High Speed Internet Access
The Telkom ADSL 5100 can support downstream transmission rates of up to 8 Mbps and
upstream transmission rates of 1 Mbps.
¾
PPPoE Support (RFC2516)
PPPoE (Point-to-Point Protocol over Ethernet) emulates a dial-up connection. It allows your ISP
to use their existing network configuration with newer broadband technologies such a s ADSL.
The PPPoE driver on the TELKOM ADSL 5100 is transparent to the computers on the LAN, which
see only Ethernet and are not aware of PPPoE thus saving you from having to manage PPPoE
clients on individual computers.
¾
Network Address Translation (NAT)
Network Address Translation (NAT) allows the translation of an Internet protocol address used
within one network (for example a private IP address used in a local network) to a different IP
5

address known within another network (for example a public IP address used on the Internet).
¾ Universal Plug and Play (UPnP)
Using the standard TCP/IP protocol, the TELKOM ADSL 5100 and other UPnP enabled devices
can dynamically join a network, obtain an IP address and convey its capabilities to other devices
on the network.
¾ 10/100M Auto-negotiation Ethernet/Fast Ethernet Interface
This auto-negotiation feature allows the TELKOM ADSL 5100 to detect the speed of incoming
transmissions and adjust appropriately without manual intervention. It allows data transfer of
either 10 Mbps or 100 Mbps in either half-duplex or full-duplex mod e depending on the Ethernet
network.
¾
Dynamic DNS Support
With Dynamic DNS support, you can have a static hostname alias for a dynamic IP address,
allowing the host to be more easily accessible from various locations on the Internet. You must
register for this service with a Dynamic DNS client.
¾
Multiple PVC (Permanent Virtual Circuits) Support
The TELKOM ADSL 5100 supports up to 8 PVC’s.
¾ ADSL Standards
♦ Full-Rate (ANSI T1.413, Issue 2; G.dmt (G.992.1) with line rate support of up to 8
Mbps downstream and 1 Mbps upstream.
♦ G.lite (G.992.2) with line rate support of up to 1.5Mbps downstream and 512Kbps
upstream.
♦ Supports Multi-Mode standard (ANSI T1.413, Issue 2; G.dmt (G.992.1); G.994.1 and
G.996.1 (for ISDN only); G.991.1;G.lite (G992.2)).
♦ Supports OAM F4/F5 loop-back, AIS and RDI OAM cells.
♦ ATM Forum UNI 3.1/4.0 PVC.
♦ Supports up to 8 PVCs (UBR, CBR, VBR).
♦ Multiple Protocols over AAL5 (RFC 1483).
♦ PPP over AAL5 (RFC 2364).
♦ PPP over Ethernet (RFC 2516).
¾ DHCP Support
DHCP (Dynamic Host Configuration Protocol) allows individual clients (computers) to obtain
TCP/IP configuration at start-up from a centralized DHCP server. The TELKOM ADSL 5100 has
built-in DHCP server capability enabled by default. It can assign IP addresses, an IP default
gateway and DNS servers to DHCP clients. The TELKOM ADSL 5100 can now also act as a
surrogate DHCP server (DHCP Relay ) where it relays IP address assignm ent from the actual real
DHCP server to the clients.
6

¾ IP Alias
IP Alias allows you to partition a physical network into logical networks over the same Ethernet
interface. The TELKOM ADSL 5100 supports three logical LAN interfaces via its single physical
Ethernet interface with the TELKOM ADSL 5100 itself as the gateway for each LAN network.
¾ IP Policy Routing (IPPR)
Traditionally, routing is based on the destination address only and the router takes the shortest
path to forward a packet. IP Policy Routing (IPPR) provides a mechanism to override the default
routing behavior and alter the packet forwarding based on the policy defined by the network
administrator.
¾ Protocol Support
♦ PPP (Point-to-Point Protocol) link layer protocol.
- PPP over PAP (RFC 1334).
- PPP over CHAP (RFC 1994).
♦ RIP I/RIP II
♦ IGMP Proxy
♦ ICMP support
♦ MIB II support (RFC 1213)
♦ PPPoE feature
- PPPoE idle time out
- PPPoE dial on demand
¾ Networking Compatibility
The TELKOM ADSL 5100 is comp atible with major ADSL DSLAM (Digital Subscriber Li ne Access
Multiplexer) providers.
¾ Multiplexing
The TELKOM ADSL 5100 supports VC-based and LLC-based multiplexing.
¾ Encapsulation
The TELKOM ADSL 5100 series supports PPPoA (RFC 2364 - PPP over ATM Adaptation Layer
5), RFC 1483 encapsulation over ATM, MAC encapsulated routing (ENET Encapsulation) as well
as PPP over Ethernet (RFC 2516).
¾ Network Management
♦ Embedded Web Configurator
♦ CLI (Command Line Interpreter)
♦ SNMP manageable
♦ DHCP Server/Client
♦ Built-in Diagnostic Tools
♦ Syslog
♦ TFTP/FTP server, firmware upgrade and configuration backup/support supported
7
¾ Diagnostics Capabilities
♦ The TELKOM ADSL 5100 can perform self-diagnostic tests. These tests check the
integrity of the following circuitry:
- FLASH memory
- ADSL circuitry
- RAM
- LAN port
¾ Filters
The TELKOM ADSL 5100's packet filtering functions allows added network security and
management.
¾ Ease of Installation
The TELKOM ADSL 5100 is designed for quick, intuitive and easy installation.
¾ Housing
The TELKOM ADSL 5100's all new compact and ventilated housing minimizes space
requirements making it easy to position anywhere in your busy office.
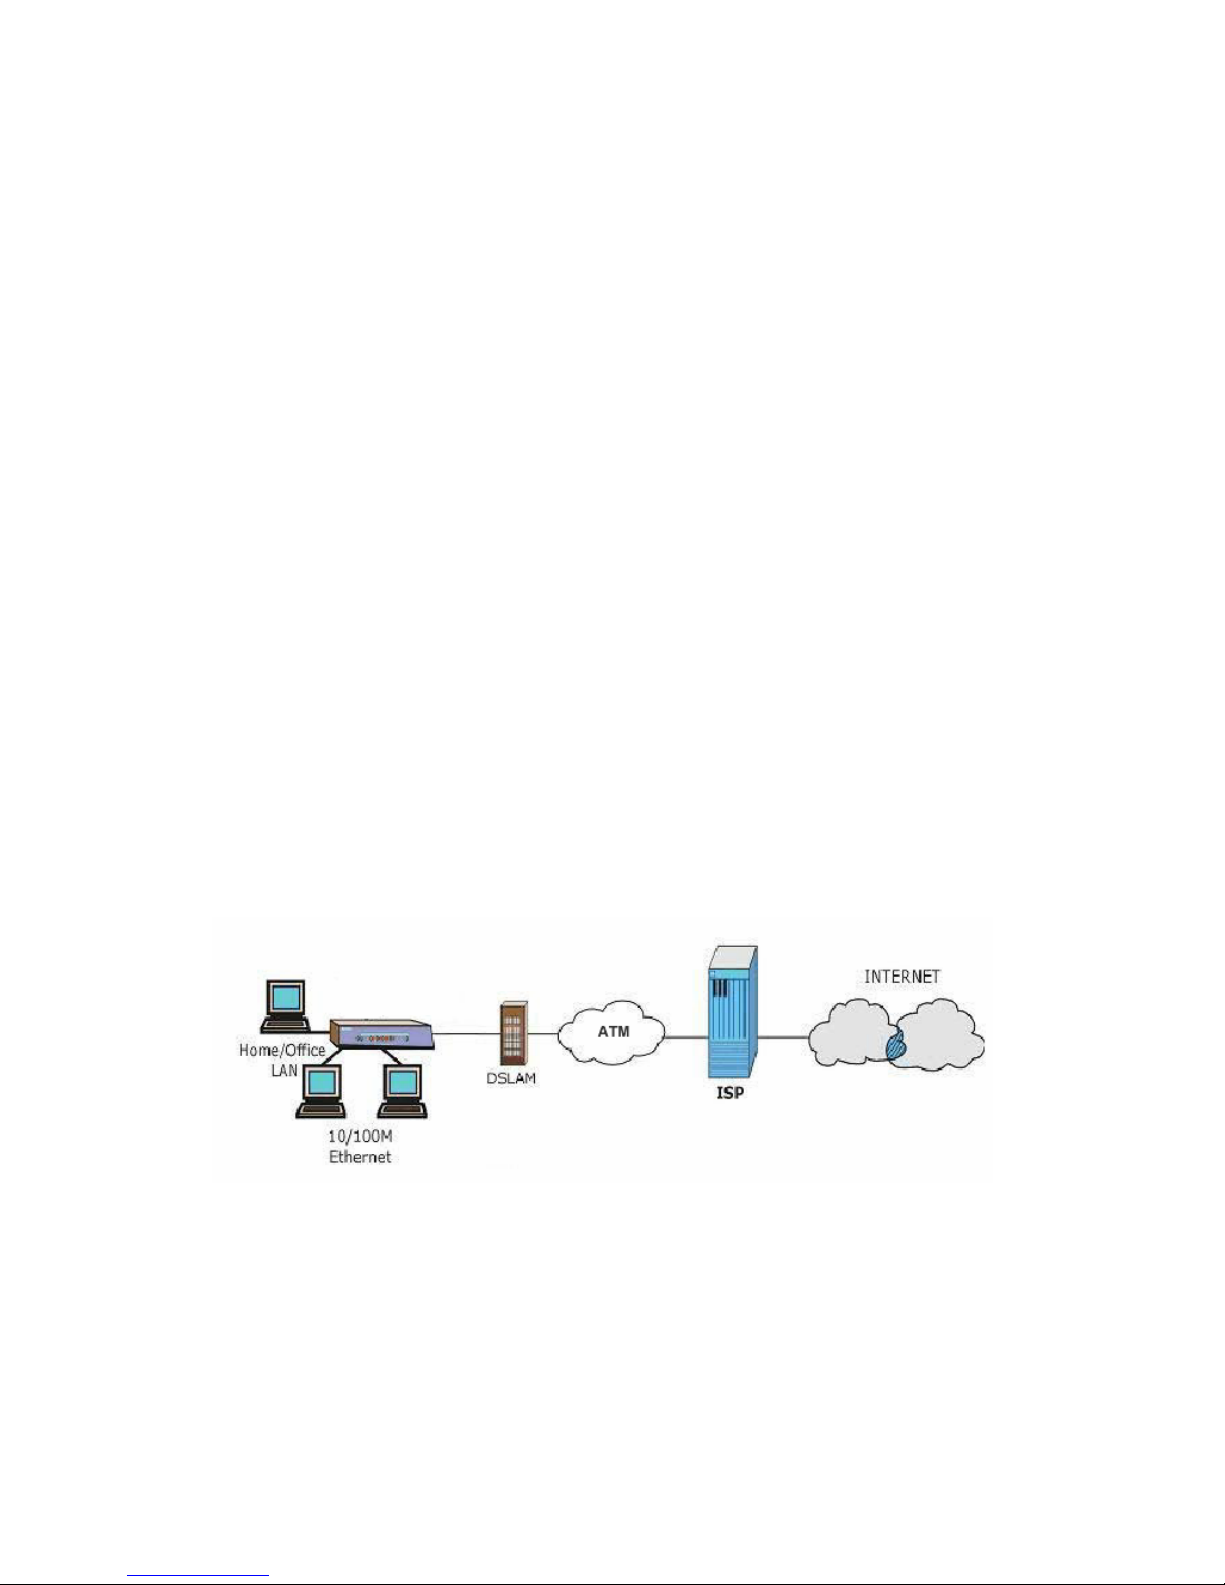
1.3 Applications for the TELKOM ADSL 5100
The TELKOM ADSL 5100 is the ideal high-speed Internet access solution. The TELKOM ADSL
5100 supports the TCP/IP proto col, which the Internet uses exclusively.
A typical Internet applic ation is shown below:
8
Chapter 2
Introducing the Web Configurator
This chapter describes how to access and navigate the web configurator.
2.1 Web Configurator Overview
The embedded web configurator allows you to manage the TELKOM ADSL 5100 remotely
through a browser such as Microsoft Internet Explorer or Netscape Navigator. Use Internet
Explorer 6.0 and later or Netscape Navigator 7.0 and later versions with JavaScript enabled. It is
recommended that you set your screen resolution to 1024 by 768 pixels
2.2 Accessing the TELKOM ADSL 5100 Web Configurator
Step 1. Make sure your TELKOM ADSL 5100 hardware is properly connected (refer to the Quick
Start Guide)
Step 2. Prepare your computer/computer network to connect to the TELKOM A DSL 5100 (refer to
the Quick Start Guide ).
Step 3. Launch your web browser.
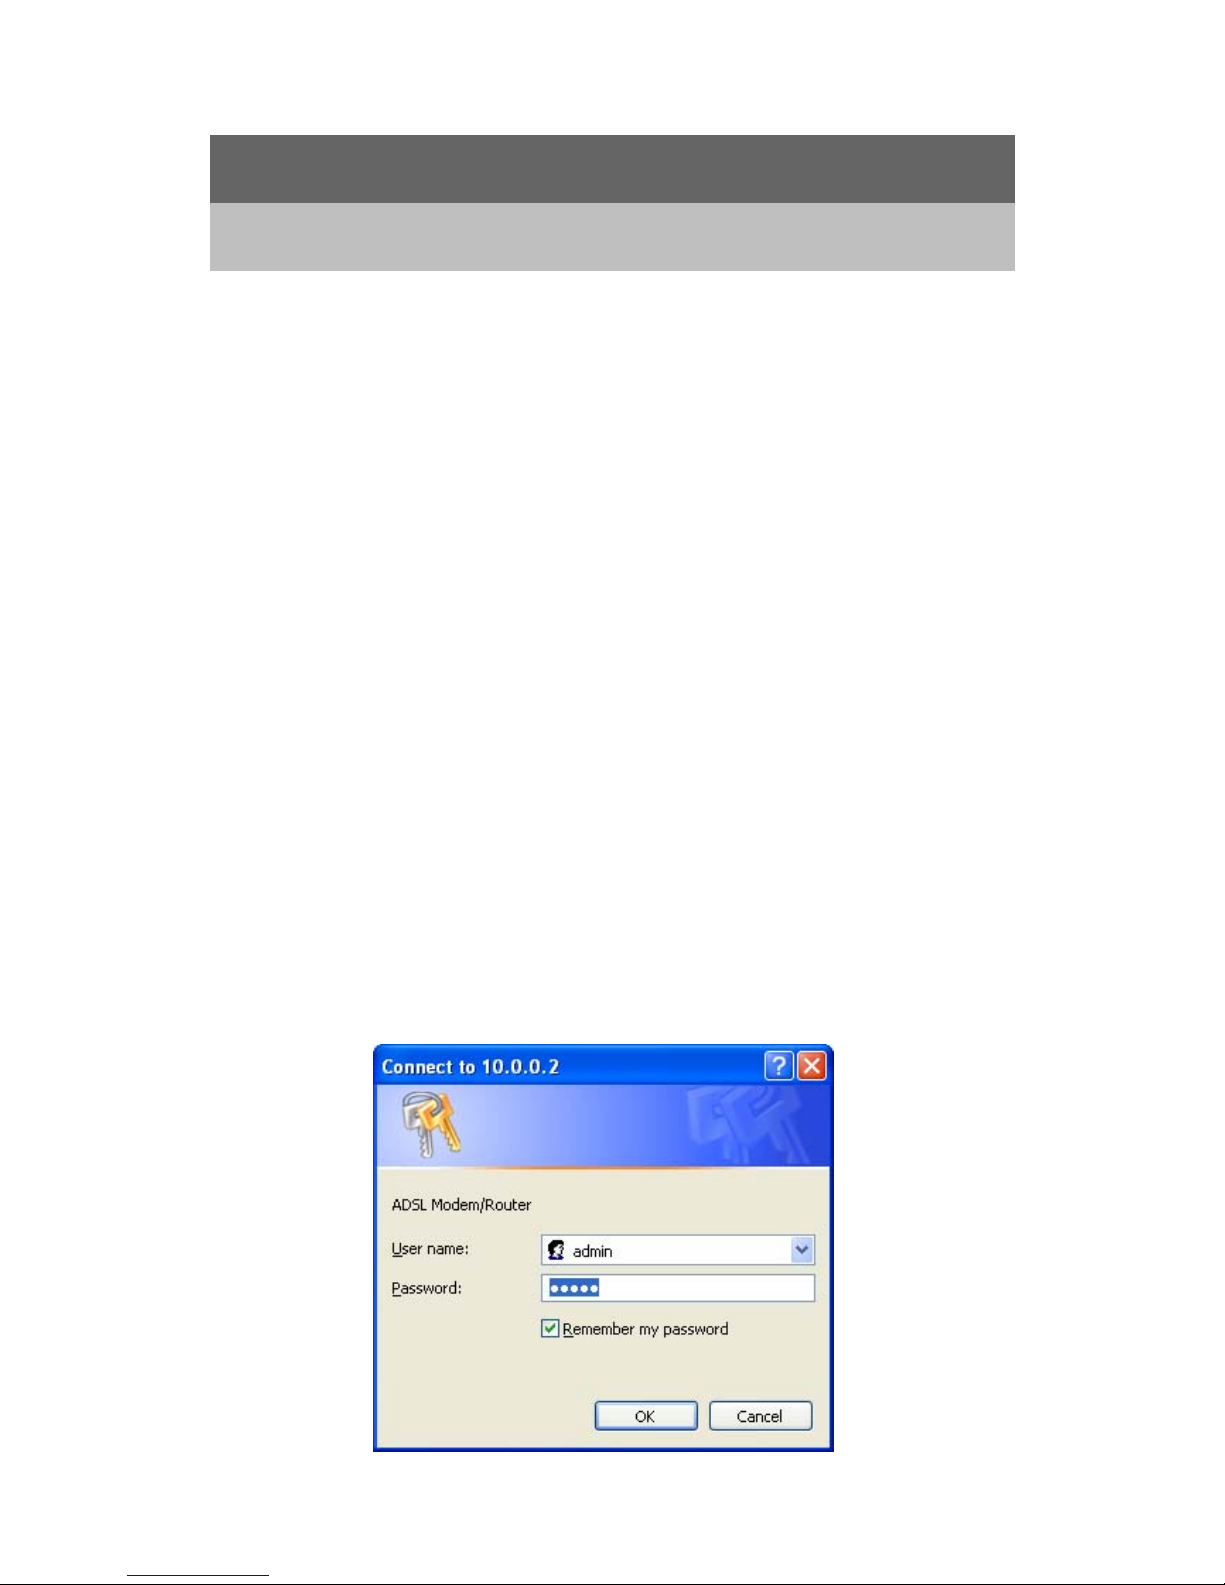
Step 4. Type "10.0.0.2" as the URL.
Step 5. An Enter Network Password window appears. Enter the user name (“admin” is the
default), password (“admin” is the default) and click OK.
9
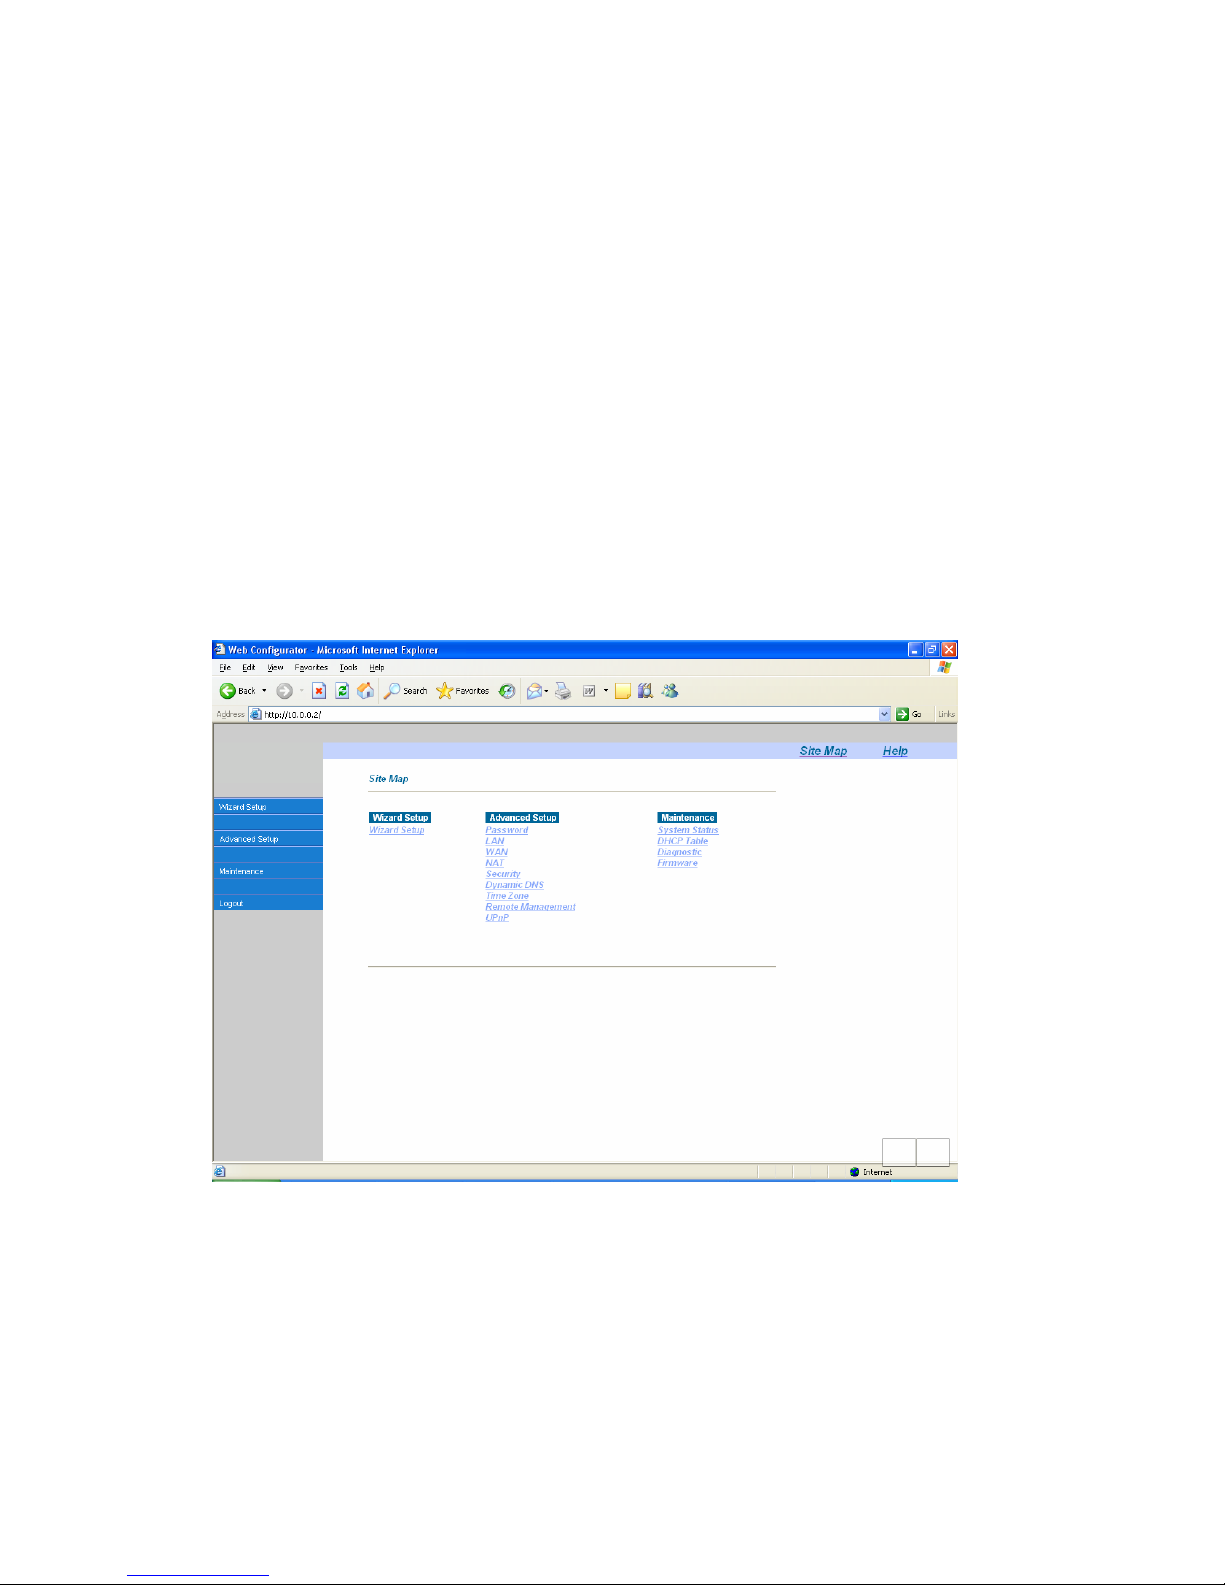
Step 6. You should now see the Main Menu screen.
2.3 Navigating the TELKOM ADSL 5100 Web Configurator
The following summarizes how to navigate the web configurator from the Main Menu screen.
Screens vary slightly for different TELKOM ADSL models.
¾ Click Wizard Setup to begin a series of screens to configure the TELKOM ADSL 5100 for the
first time.
¾ Click a link under Advanced Setup to configure advanced TELKOM ADSL 5100 features.
¾ Click a link under Maintenance to see TELKOM ADSL 5100 performance statistics, upload
firmware.
¾ Click Logout in the navigation panel when you have finished a TELKOM ADSL 5100
management session.
2.4
Co
nfi
gu
rin
g
Password
It is highly recommended that you change the password for accessing the TELKOM ADSL 5100.
To change the TELKOM ADSL 5100’s password, click Advanced Setup and then Password. The
10
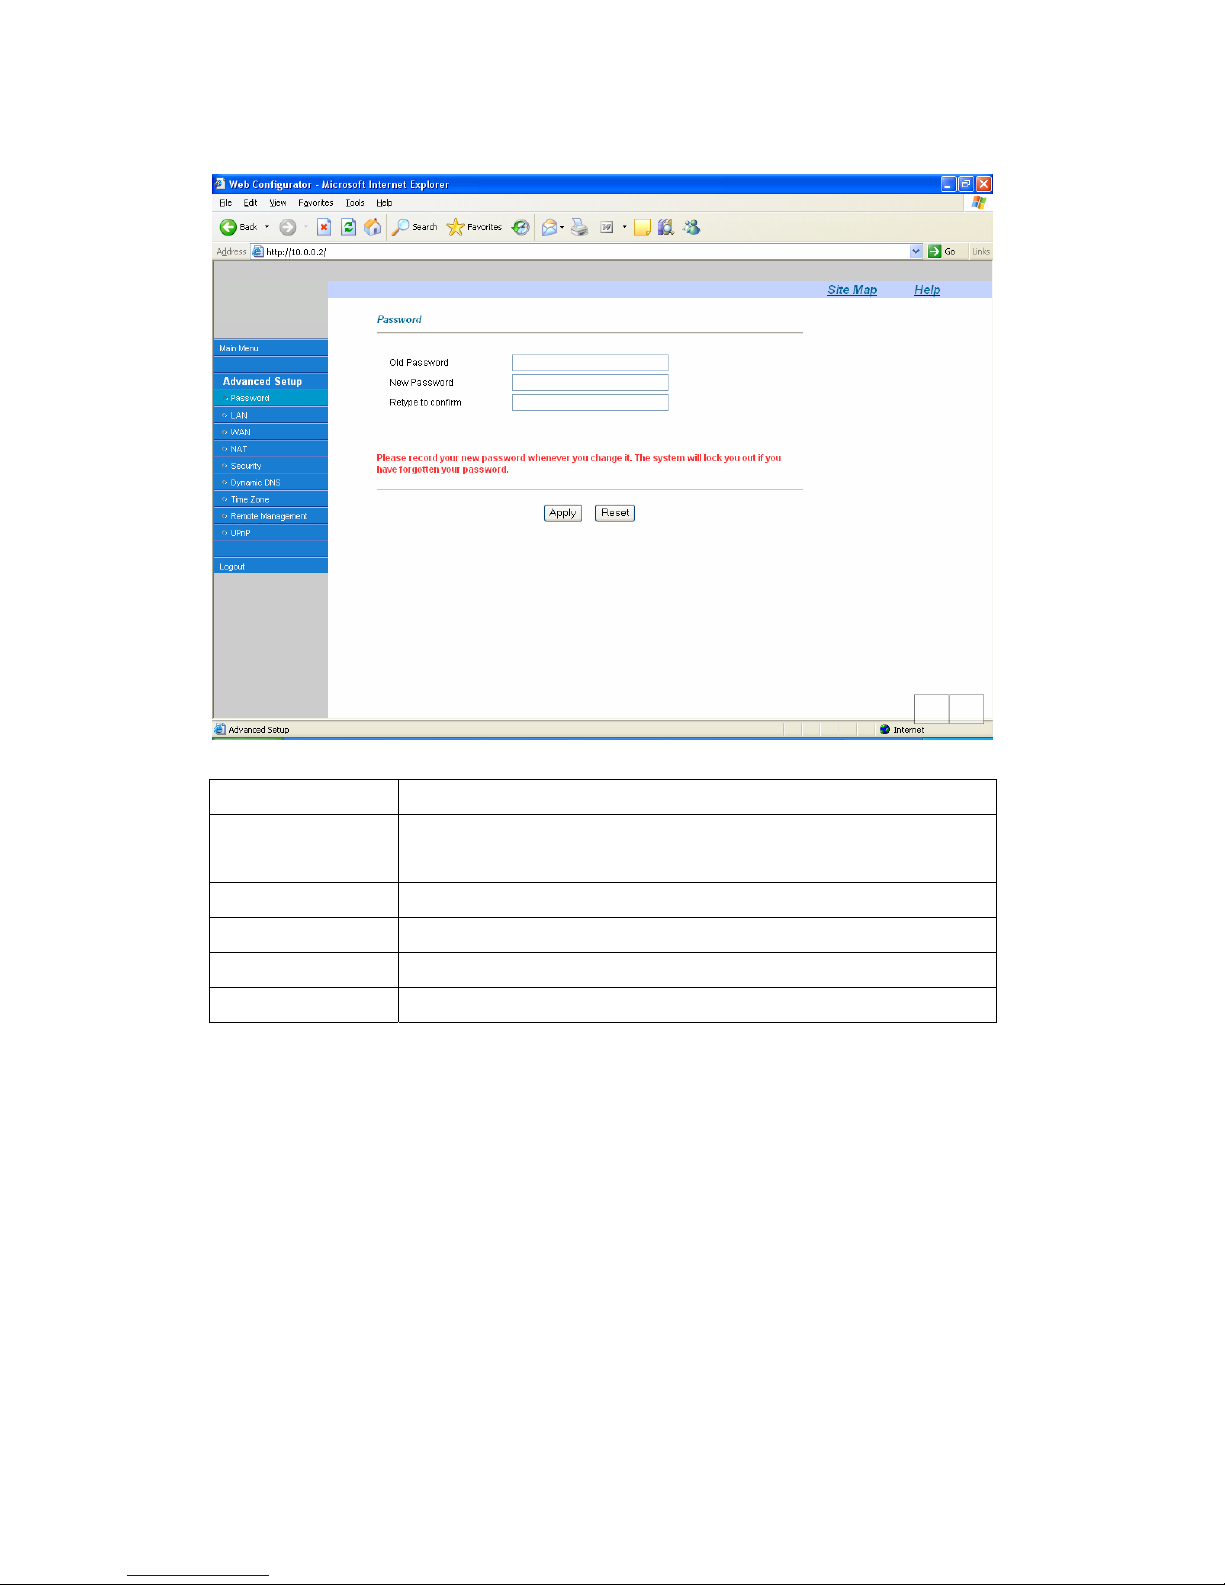
screen appears as shown.
The following table describes the labels in this screen.
LABEL DESCRIPTION
Old Password Type the default password or the existing password you use to access the
system in this field.
New Password Type the new password in this field.
Retype to Confirm Type the new password again in this field.
Apply
Click Apply to save your changes back to the TELKOM ADSL 5100.
Cancel
Click Cancel to begin configuring this screen from the start..
2.5 Resetting the TELKOM ADSL 5100
If you forget your password or cannot access the TELKOM ADSL 5100, you will need to use the
RESET button the back of the TELKOM ADSL 5100. This means that you will lose all
configurations that you had previously made and the speed of the console port will be reset to the
default of 9600Mbps with 8 data bit, no parity, one stop bit and flow control set to none. The
password will be reset to “admin”, also. If this does not work then contact the helpdesk 0860 2C
HELP (0860 22 43 57) as you might need to upload a new configuration file. (Do not attempt this
unless requested to do so by the helpdesk)
11
2.5.1 Using The Reset Button
Step 1. Make sure the SYS LED is on (not blinking).
Step 2. Press the RESET button for more than 6 seconds, and then release it. When the SYS
LED begins to blink, the defaults have been restored a nd the TELKOM ADSL 5100 rest arts.
2.5.2 Uploading a Configuration File Via Console Port
Download the default configuration file from the website www.telkomphones.co.za, unzip it and
save it in a folder.
Step 1. Turn off the TELKOM ADSL 5100, begin a terminal emulation software session and turn
on the TELKOM ADSL 5100 again. When you see the message "Press Any key to enter
Debug Mode within 3 seconds", press any key to enter debug mode.
Step 2. Enter "atlc" after "Enter Debug Mode" message.
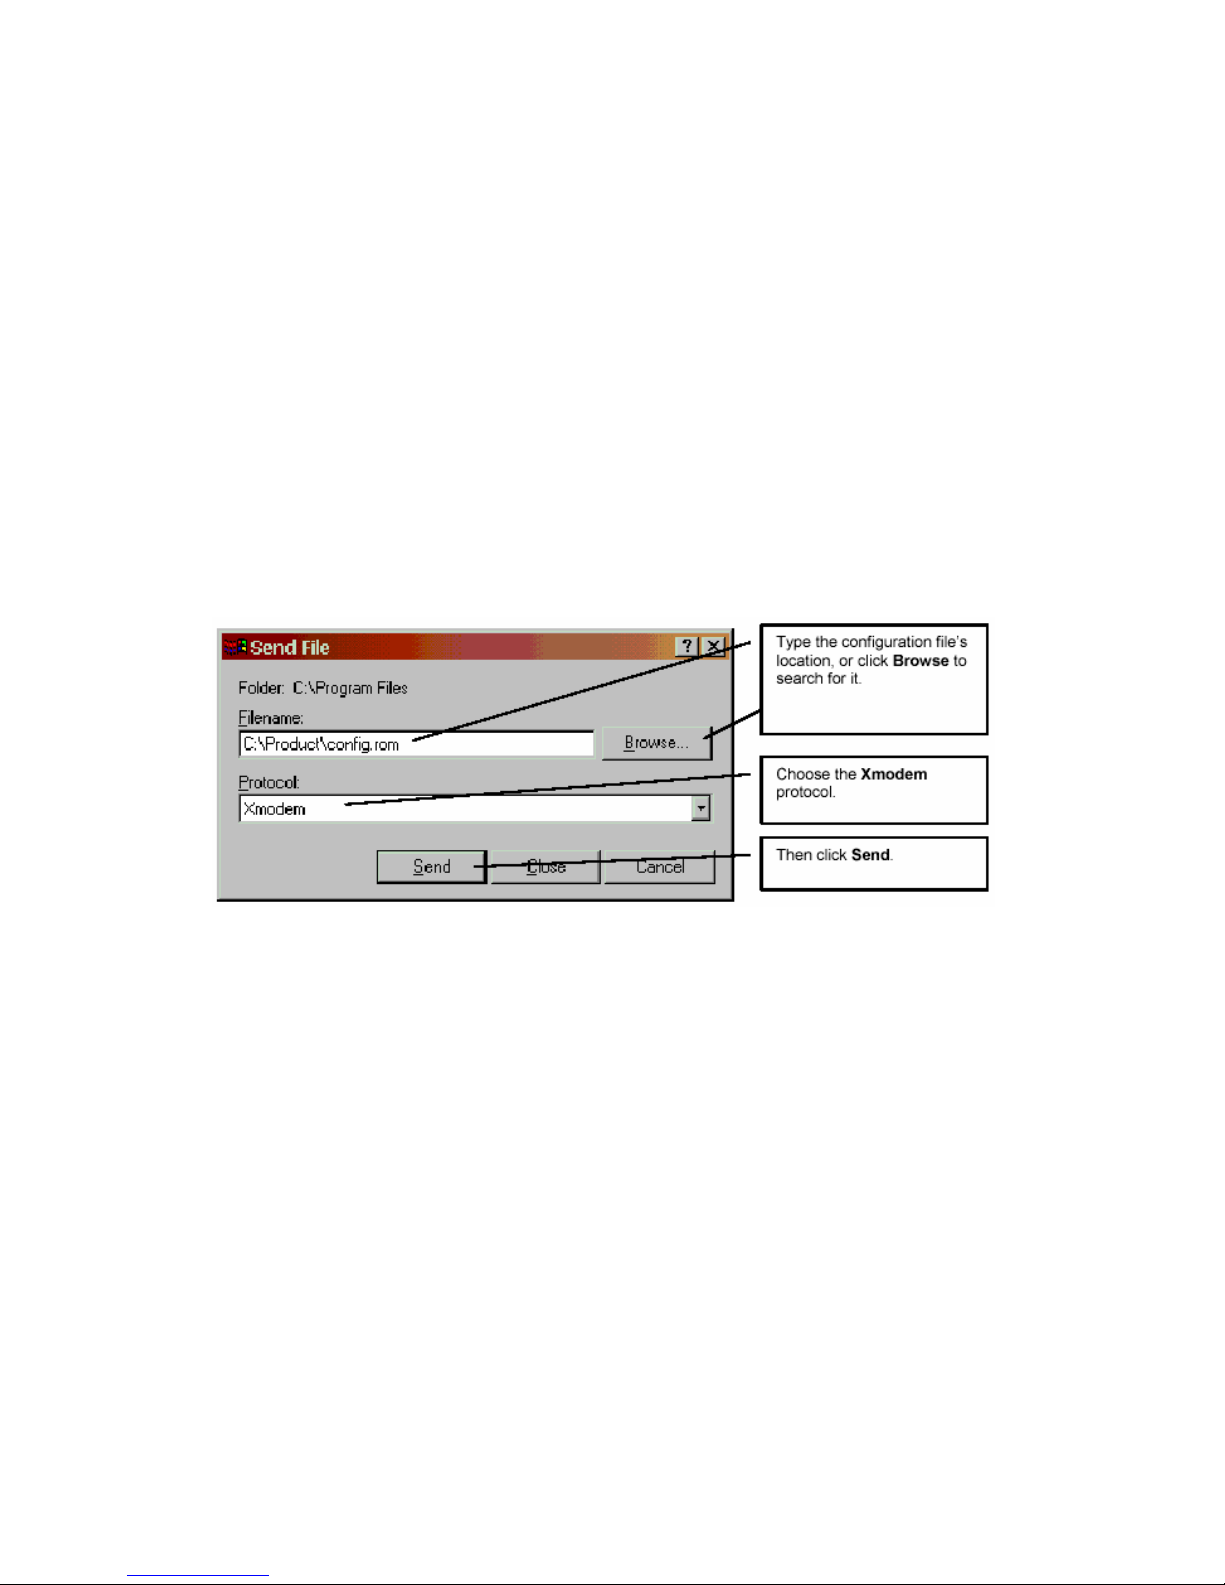
Step 3. Wait for "Starting XMODEM upload" message before activating Xmodem upload on your
terminal. This is an example Xmodem configuration upload using HyperTerminal.
Step 4. Click Transfer, then Send File to display the following screen.
Step 5. After successful firmware upload, enter "atgo" to restart the router.
12

Chapter 3
Wizard Setup
This chapter provides information on the Wizard Setup screens in the web configurator.
3.1 Wizard Setup Introduction
Use the Wizard Setup screens to configure your system for Internet access.Your ISP may have
already configured some of the fields in the wizard screens for you.
3.2 Encapsulation
At the moment Telkom use Routed PPPoE (Par. 3.2.2) or Bridge RFC1483 (Par. 3.2.4). The
TELKOM ADSL 5100 supports the following methods.
3.2.1 ENET ENCAP
The MAC Encapsulated Routing Link Protocol (ENET ENCAP) is o nly implemented with the IP
network protocol. IP packets are routed between the Ethernet interface and the WAN interface
and then formatted so that they can be understood in a bridged environment. For instance, it
encapsulates routed Ethernet frames into bridged ATM cells. ENET ENCAP requires that you
specify a gateway IP address in the Ethernet Encapsulation Gateway field in the second wizard
screen. You can get this information from your ISP.
3.2.2 PPP over Ethernet
PPPoE provides access control and billing functionality in a manner similar to dial-up services
using PPP. The TELKOM ADSL 5100 bridges a PPP se ssion over Ethernet (PPP over Ethernet,
RFC 2516) from your computer to an ATM PVC (Permanent Virtual Circuit) which connects to
ADSL Access Concentrator where the PPP session terminates. One PVC can support any
number of PPP sessions from your LAN. For more information on PPPoE, see the appendix.
3.2.3 PPPoA
PPPoA stands for Point to Point Protocol over ATM Adaptation Layer 5 (AAL5). It provides access
control and billing functionality in a manner similar to dial-up services using PPP. The TELKOM
ADSL 5100 encapsulate s the PPP session based on RFC148 3 and sends it through an ATM PVC
(Permanent Virtual Circuit) to the Internet Service Provider's (ISP) DSLAM (digital access
multiplexer). Please refer to RFC 2364 for more information on PPPoA. Refer to RFC 1661 for
more information on PPP.
13

3.2.4 RFC 1483
RFC 1483 describes two methods for Multiprotocol Encapsulation over ATM Adaptation Layer 5
(AAL5). The first method allows multiplexing of multiple protocols over a single ATM virtual circuit
(LLC-based multiplexing) and the second method assumes that each protocol is carried over a
separate ATM virtual circuit (VC-based multiplexing). Please refer to the RFC for more detailed
information.
3.3 Multiplexing
There are two conventions to identify what protocols the virtual circuit (VC) is carrying. Currently
Telkom only use LLC multiplexing (Par. 3.3.2)
3.3.1 VC-based Multiplexing
In this case, by prior mutual agreement, each protocol is assigned to a specific virtual circuit; for
example, VC1 carries IP, etc. VC-based multiplexing may be dominant in environments where
dynamic creation of large numbers of ATM VCs is fast and economical.
3.3.2 LLC-based Multiplexing
In this case one VC carries multiple protocols with protocol identifying information being con tained
in each packet header . Despite the extra bandwidth and processing overhead, this method may
be advantageous if it is not practical to have a separate VC for each carried protocol, for example,
if charging heavily depends on the number of simultaneous VCs.
3.4 VPI and VCI
Be sure to use the correct Virtual Path Identifier (VPI) and Virtual Channel Identifier (VCI)
numbers assigned to you. For Internet over ADSL use VPI – 8 & VCI – 35. The valid range for the
VPI is 0 to 255 and for the VCI is 32 to 65535 (0 to 31 is reserved for local management of ATM
traffic). Please see the appendix for more information.
3.5 Wizard Setup Configuration: First Screen
On the Main Menu screen click Wizard Setup to display the first wizard screen.
14
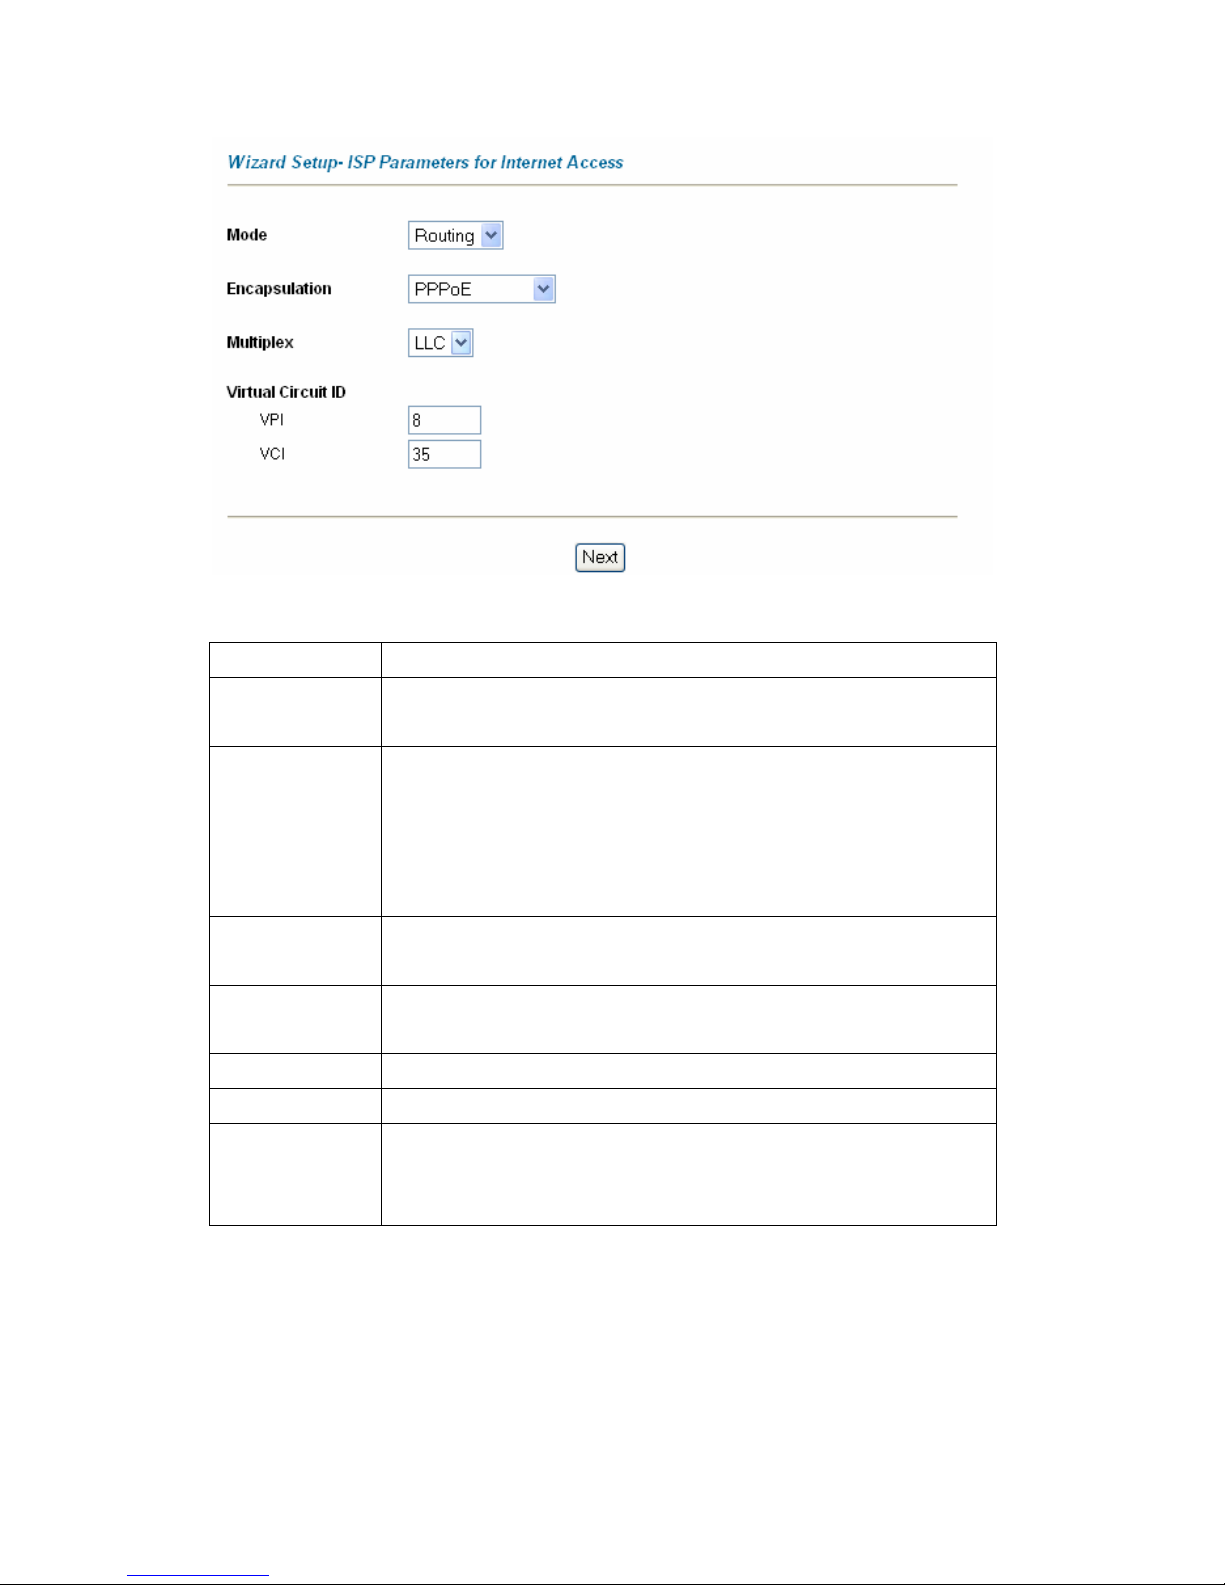
The following table describes the labels in this screen.
LABEL DESCRIPTION
Mode
From the Mode drop-down list box, select Routing (default) if your ISP allows
multiple computers to share an Internet account. Otherwise select Bridge.
Encapsulation
Select the encapsulation type your ISP uses from the Encapsulation drop-down
list box. Choices vary depending on what you select in the Mode field.
If you select Bridge in the Mode field, select either PPPoA or RFC 1483.
If you select Routing in the Mode field, select PPPoA, RFC 1483, ENET ENCAP
or PPPoE.
Multiplex
Select the multiplexing method used by your ISP from the Multiplex drop-down list
box either VC-based or LLC-based.
Virtual Circuit ID VPI (Virtual Path Identifier) and VCI (Virtual Channel Identifier) define a virtual
circuit. Refer to
VPI Enter the VPI assigned to you. This field may already be configured.
VCI Enter the VCI assigned to you. This field may already be configured.
Next Click this button to go to the next wizard screen. The next wizard screen you see
depends on what protocol you chose above. Click on the protocol link to see the
next wizard screen for that protocol.
3.6 IP Address and Subnet Mask
Similar to the way houses on a street share a common street name, so too do computers on a
LAN share one common network number.
Where you obtain your network number depends on your particular situation. If the ISP or your
15

network administrator assigns you a block of registered IP addresses, follow their instructions in
selecting the IP addresses and the subnet mask.
If the ISP did not explicitly give you an IP network number, then most likely you have a single user
account and the ISP will assign you a dynamic IP address when the connection is established. If
this is the case, it is recommended that you select a network number from 10.0.0.0 to 10.0.255.0
and you must enable the Network Address T ranslation (NAT) feature of the TELKOM ADSL 5100.
Let's say you select 10.0.0.0 as the network number; which covers 254 individual addresses, from
10.0.0.1 to 10.0.0.254 (zero and 255 are reserved). In other words, the first three numbers specify
the network number while the last number identifies an individual computer on that network.
Once you have decided on the network number, pick an IP address that is easy to remember, for
instance, 10.0.0.2, for your TELKOM ADSL 5100, but make sure that no other device on your
network is using that IP address.
The subnet mask specifies the network number portion of an IP addre ss. Your TELKOM ADSL
5100 will compute the subnet mask automatically based on the IP address that you entered. You
don't need to change the subnet mask computed by the TELKOM ADSL 5100 unless you are
instructed to do otherwise.
3.7 IP Address Assignment
A static IP is a fixed IP that your ISP gives you. A dynamic IP is not fixed; the ISP assigns you a
different one each day. The Single User Account feature can be enabled or disabled if you have
either a dynamic or static IP. However the encapsulation method assi gned influences your
choices for IP address and ENET ENCAP Gateway. Currently only Dynamic IPs is available for
the Internet over ADSL service offered by Telkom.
3.7.1 IP Assignment with PPPoA or PPPoE Encapsulation
If you have a dynamic IP, then the IP Address and ENET ENCAP Gateway fields are not
applicable (N/A). If you have a static IP, then you only need to fill in the IP Address field and not the
ENET ENCAP Gateway field.
3.7.2 IP Assignment with RFC 1483 Encapsulation
In this case the IP Address Assignment must be static with the same requirements for the IP
Address and ENET ENCAP Gateway fields as stated above.
3.7.3 IP Assignment with ENET ENCAP Encapsulation
In this case you can have either a static or dynamic IP. For a static IP you must fill in all the IP
Address and ENET ENCAP Gateway fields as supplied by your ISP. However for a dynamic IP,
the TELKOM ADSL 5100 acts as a DHCP client on the WAN port and so the IP Address and
ENET ENCAP Gateway fields are not applicable (N/A) as the DHCP server assigns them to the
TELKOM ADSL 5100.
16

3.7.4 Private IP Addresses
Every machine on the Internet must have a unique address. If your networks are isolated from the
Internet, for example, only between your two branch offices, you can assign any IP addresses to
the hosts without problems. However, the Internet Assigned Numbers Authority (IANA) has
reserved the following three blocks of IP addresses specifically for private networks:
10.0.0.0 - 10.255.255.255
172.16.0.0 - 172.31.255.255
192.168.0.0 - 192.168.255.255
You can obtain your IP address from the IANA, from an ISP or it can be assigned from a private
network. If you belong to a small organization and your Internet access is through an ISP, the ISP
can provide you with the Internet addresses for your local networks. On the other hand, if you are
part of a much larger organization, you should consult your network administrator for the
appropriate IP addresses.
3.8 Nailed-Up Connection (PPP)
A nailed-up connection is a dial-u p line where the connection is always up regardless of traffic
demand. The TELKOM ADSL 5100 does two things when you specify a nailed-up connection.
The first is that idle timeout is disabled. The second is that the TELKOM ADSL 5100 will try to
bring up the connection when turned on and whenever the connection is down. A nailed-up
connection can be very expensive for obvious reasons.
Do not specify a nailed-up connection unless your telephone company offers flat-rate service or
you need a constant connection and the cost is of no concern
3.9 NAT
NA T (Network Addre ss T ranslation - NAT , RFC 1631) is the tran slation of the IP address of a host
in a packet, for example, the source address of an outgoing pa cket, used within one net work to a
different IP address known within another net work.
3.10 Wizard Setup Configuration: Second Screen
The second wizard screen varies depending on what mode and encapsulation type you use. All
screens shown are with routing mode. Configure the fields and click Next to continue.
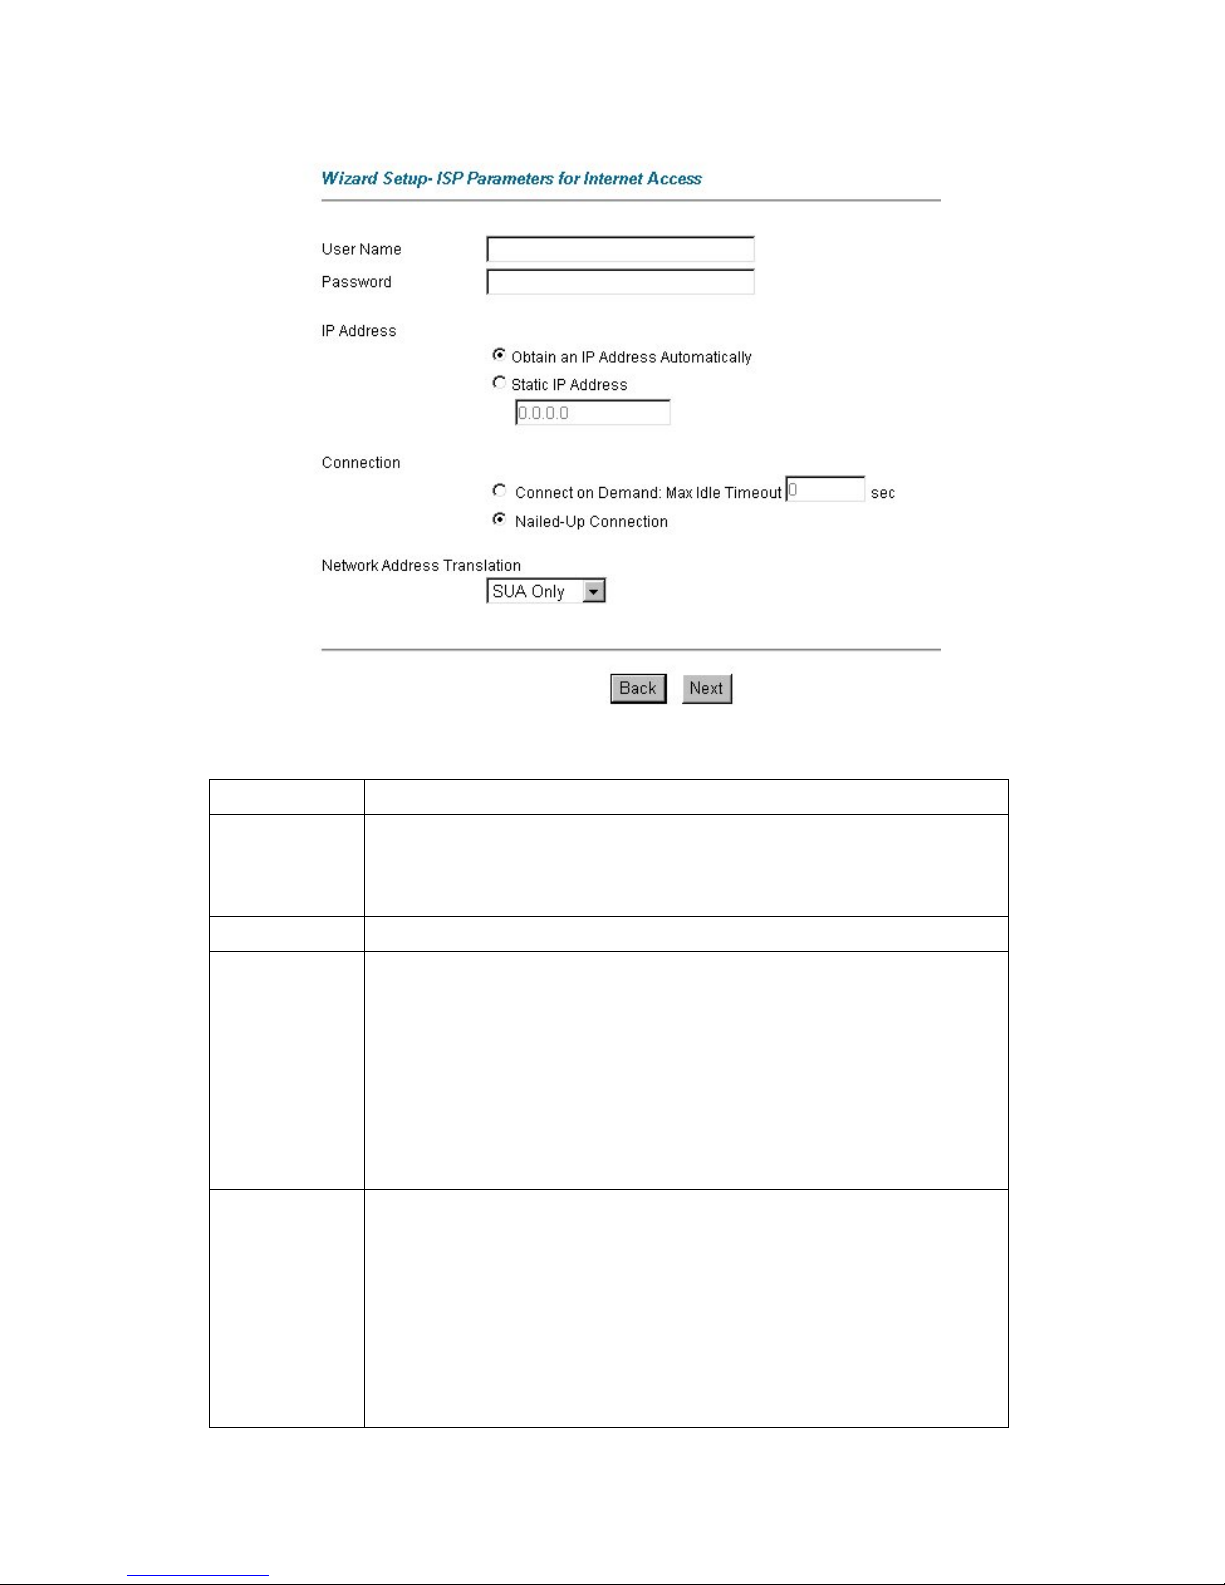
3.10.1 PPPoE
Select PPPoE from the Encapsulation drop-down list box in the first wizard screen to display the
screen as shown.
17
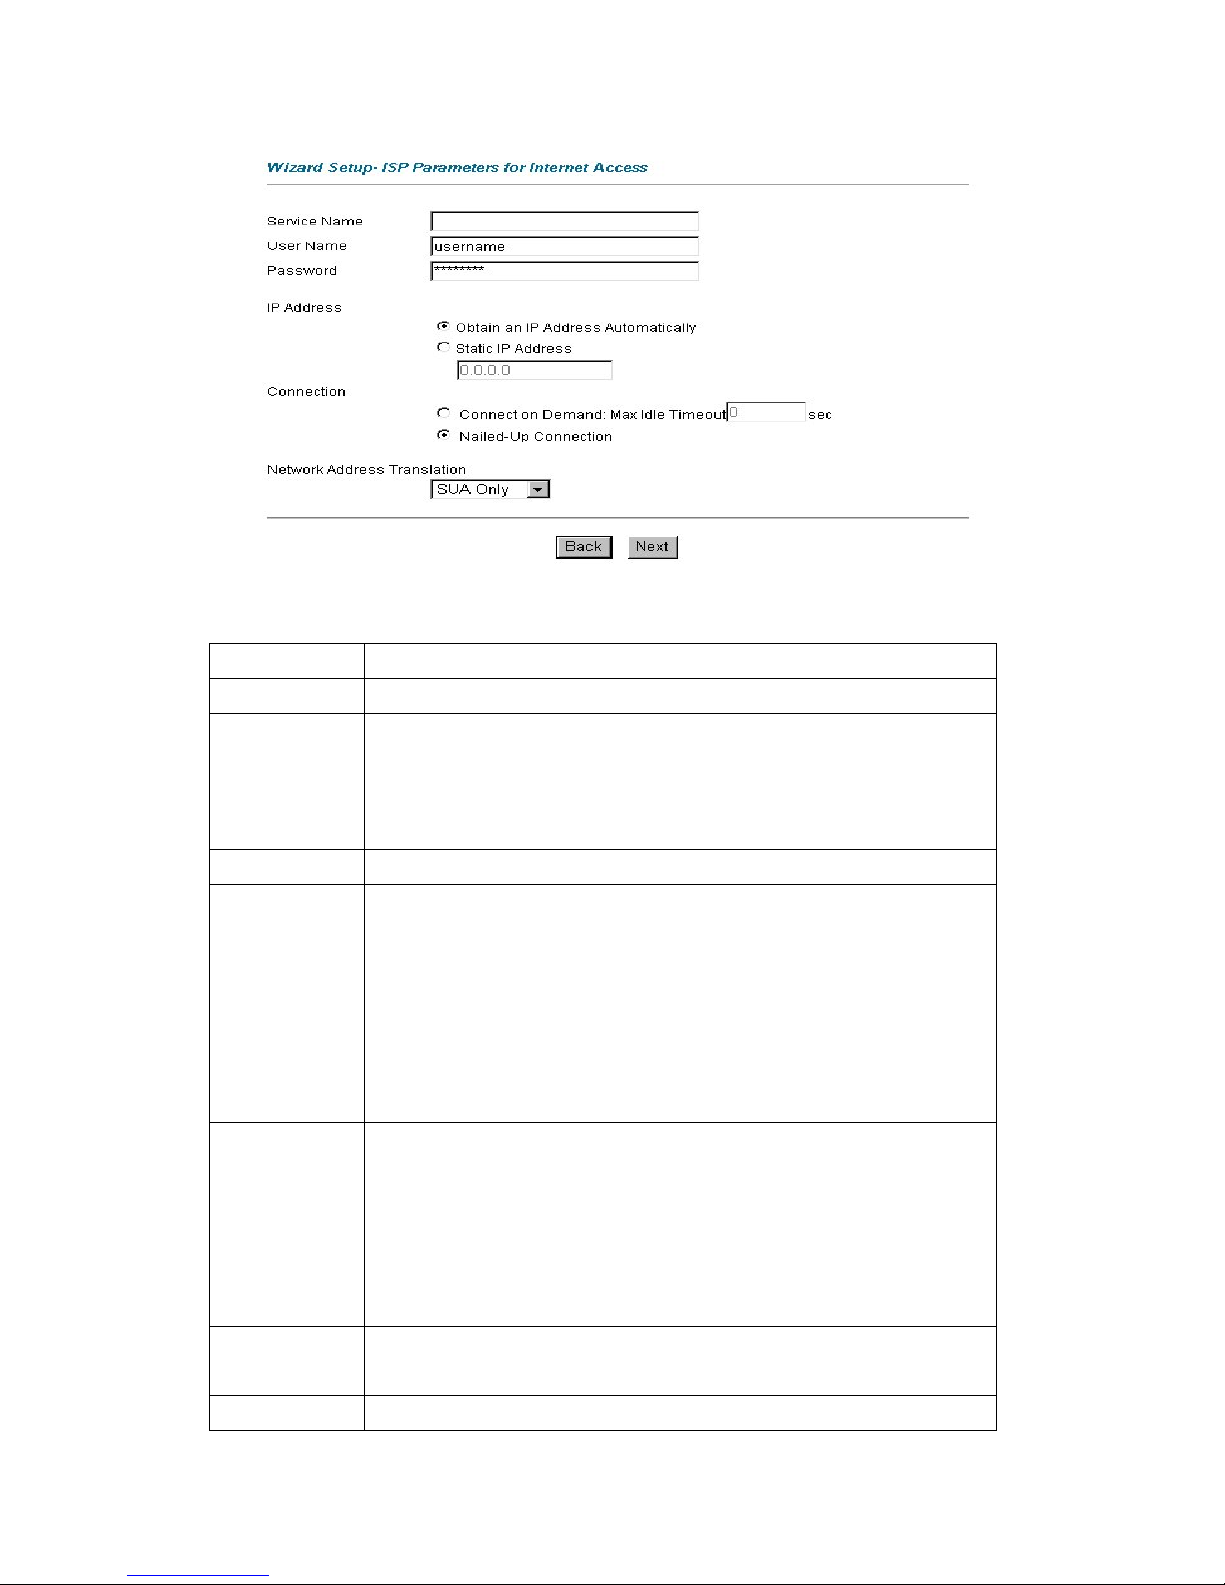
The following table describes the labels in this screen.
LABEL DESCRIPTION
Service Name Type the name of your PPPoE service here.
User Name
Configure User Name and Password fields for PPPoA and PPPoE encapsulation
only. Enter the user name exactly as your ISP assigned. If assigned a name in the
form user@domain where domain identifies a service name, then enter both
components exactly as given.
Password Enter the password associated with the user name above.
IP Address A static IP address is a fixed IP that your ISP gives you. A dynamic IP address is not
fixed; the ISP assigns you a different one each time you connect to the Internet. The
Single User
Account feature can be used with either a dynamic or static IP address.
Select Obtain an IP Address Automatically if you have a dynamic IP address;
otherwise select Static IP Address and type your ISP assigned IP address in the IP
Address text box below.
Connection
Select Connect on Demand when you don't want the connection up all the time and
specify an idle time-out (in seconds) in the Max. Idle Timeout field. The default
setting selects Connection on Demand with 0 as the idle time-out, which means the
Internet session will Select Nailed-Up Connection when you want your connection
up all the time. The TELKOM ADSL 5100 will try to bring up the connection
automatically if it is disconnected.
Network Address
Translation
Select None, SUA Only or Full Feature from the drop-sown list box. Refer to the
NAT chapter for more details.
Back
Click Back to go back to the first wizard screen.
18
Next
Click Next to continue to the next wizard screen.
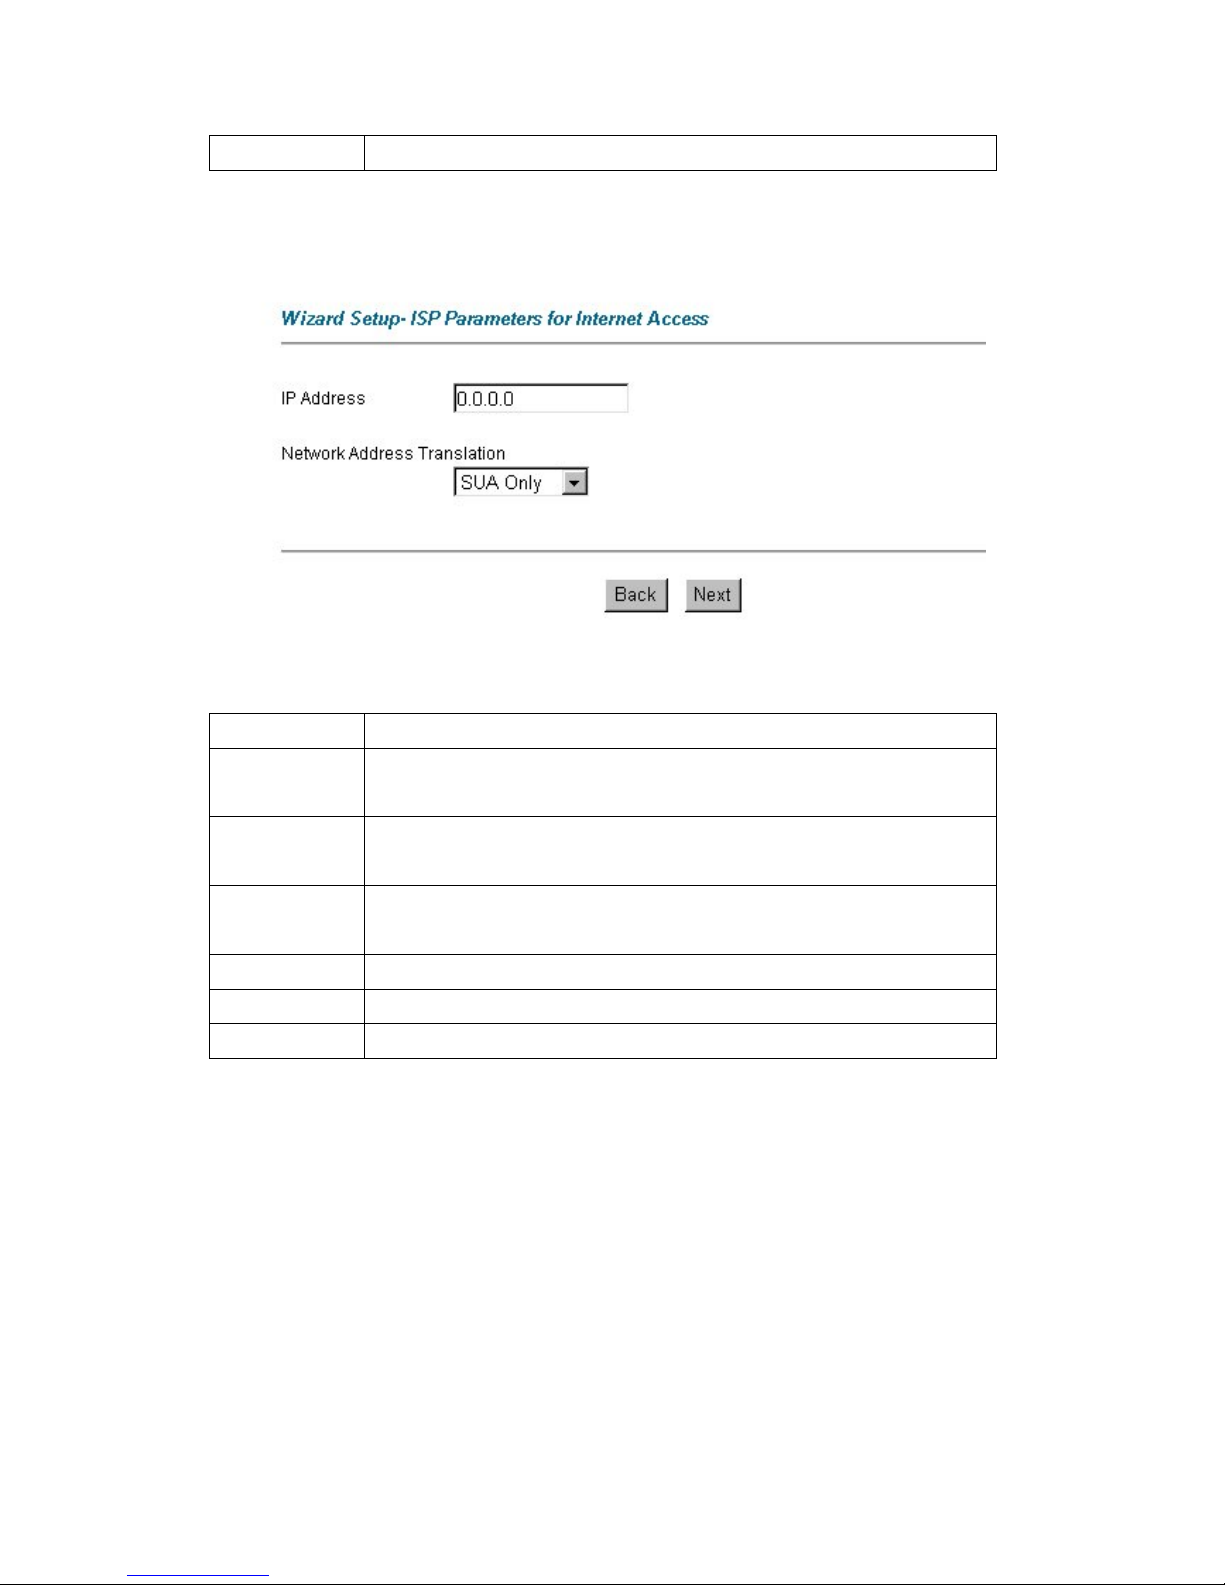
3.10.2 RFC 1483
Select RFC 1483 from the Encapsulation drop-down list box in the first wizard screen to displa y
the screen as shown.
The following table describes the labels in this screen.
LABEL DESCRIPTION
IP Address
This field is available if you select Routing in the Mode field.
Type your ISP assigned IP address in this field.
Network Address
Translation
Select None, SUA Only or Full Feature from the drop-sown list box. Refer to the
NAT chapter for more details.
Network Address
Translation
Select None, SUA Only or Full Feature from the drop-sown list box. Refer to the
NAT chapter for more details.
LABEL DESCRIPTION
Back
Click Back to go back to the first wizard screen.
Next
Click Next to continue to the next wizard screen.
3.10.3 ENET ENCAP
Select ENET ENCAP from the Encapsulation drop-down list box in the first wizard screen to
display the screen as shown.
19
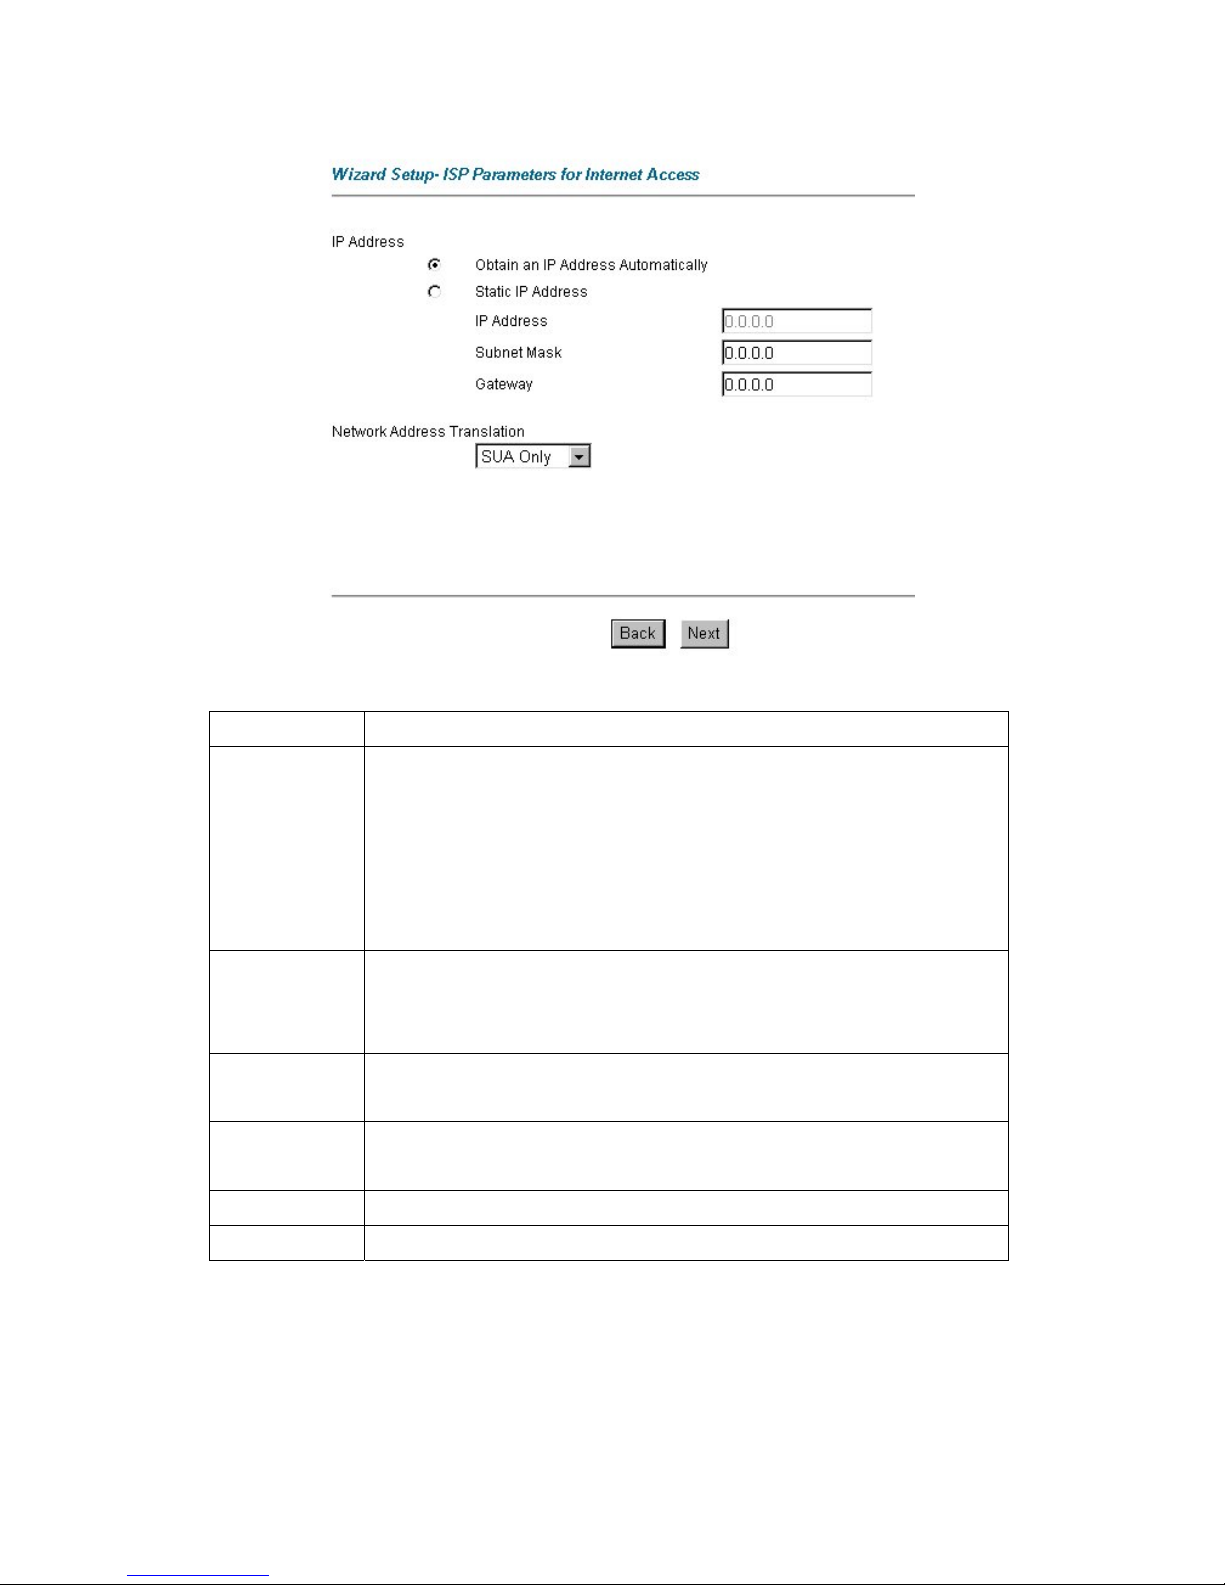
The following table describes the labels in this screen.
LABEL DESCRIPTION
IP Address A static IP address is a fixed IP that your ISP gives you. A dynamic IP address is not
fixed; the ISP assigns you a different one each time you connect to the Internet. The
Single User Account feature can be used with either a dynamic or static IP address.
Select Obtain an IP Address Automatically if you have a dynamic IP address;
otherwise select Static IP Address and type your ISP assigned IP address in the IP
Address text box below.
Subnet Mask Enter a subnet mask in dotted decimal notation.
Refer to the IP Subnetting appendix to calculate a subnet mask If you are
implementing subnetting.
ENET ENCAP
Gateway
You must specify a gateway IP address (supplied by your ISP) when you use ENET
ENCAP in the Encapsulation field in the previous screen.
Network Address
Translation
Select None, SUA Only or Full Fe ature from the drop-sown list box. Refer to the NAT
chapter for more details.
Back
Click Back to go back to the first wizard screen.
Next
Click Next to continue to the next wizard screen.
3.10.4 PPPoA
Select PPPoA from the Encapsulation drop-down list box in the first wizard screen to display the
screen as shown.
20
The following table describes the labels in this screen.
LABEL DESCRIPTION
User Name Enter the user name exactly as your ISP assigned. If assigned a name in the form
user@domain where domain identifies a service name, then enter both compon ents
exactly as given.
Password Enter the password associated with the user name above.
IP Address
This option is available if you select Routing in the Mode field.
A static IP address is a fixed IP that your ISP gives you. A dynamic IP address is not
fixed; the ISP assigns you a different one each time you connect to the Internet. The
Single User Account feature can be used with either a dynamic or static IP address.
Click Obtain an IP Address Automatically if you have a dynamic IP address;
otherwise click Static IP Address and type your ISP assigned IP address in the IP
Address text box below
Connection
Select Connect on Demand when you don't want the connection up all the time and
specify an idle time-out (in seconds) in the Max. Idle Timeout field. The default setting
selects Connection on Demand with 0 as the idle time-out, which means the Internet
session will not timeout
Select Nailed-Up Connection when you want your connection up all the time. The
TELKOM ADSL 5100 will try to bring up the connection automatically if it is
disconnected.
21

Network Address
Translation
This option is available if you select Routing in the Mode field.
Select None, SUA Only or Full Fe ature from the drop-sown list box. Refer to the NAT
chapter for more details.
Back
Click Back to go back to the first wizard screen.
Next
Click Next to continue to the next wizard screen.
3.11 DHCP Setup
DHCP (Dynamic Host Configuration Protocol, RFC 2131 and RF C 2132 ) allows individual cli ent s
to obtain TCP/IP configuration at start-up from a server. You can configure the TELKOM ADSL
5100 as a DHCP server or disable it. When configured as a server, the TELKOM ADSL 5100
provides the TCP/IP configuration for the clients. If you turn DHCP service off, you must have
another DHCP server on your LAN, or else the computer must be manually configured.
3.11.1 IP Pool Setup
The TELKOM ADSL 5100 is pre-configured with a pool of 100 IP addresses starting from
10.0.0.100 to 10.0.0.200 for the client machines.
3.12 Wizard Setup Configuration: Third Screen
Verify the settings in the screen sho wn n ext. To change the LAN information on the TELKOM
ADSL 5100, click Change LAN Configurat ions. Otherwise click Save Settings to save the
configuration and skip to section 3.13.
22
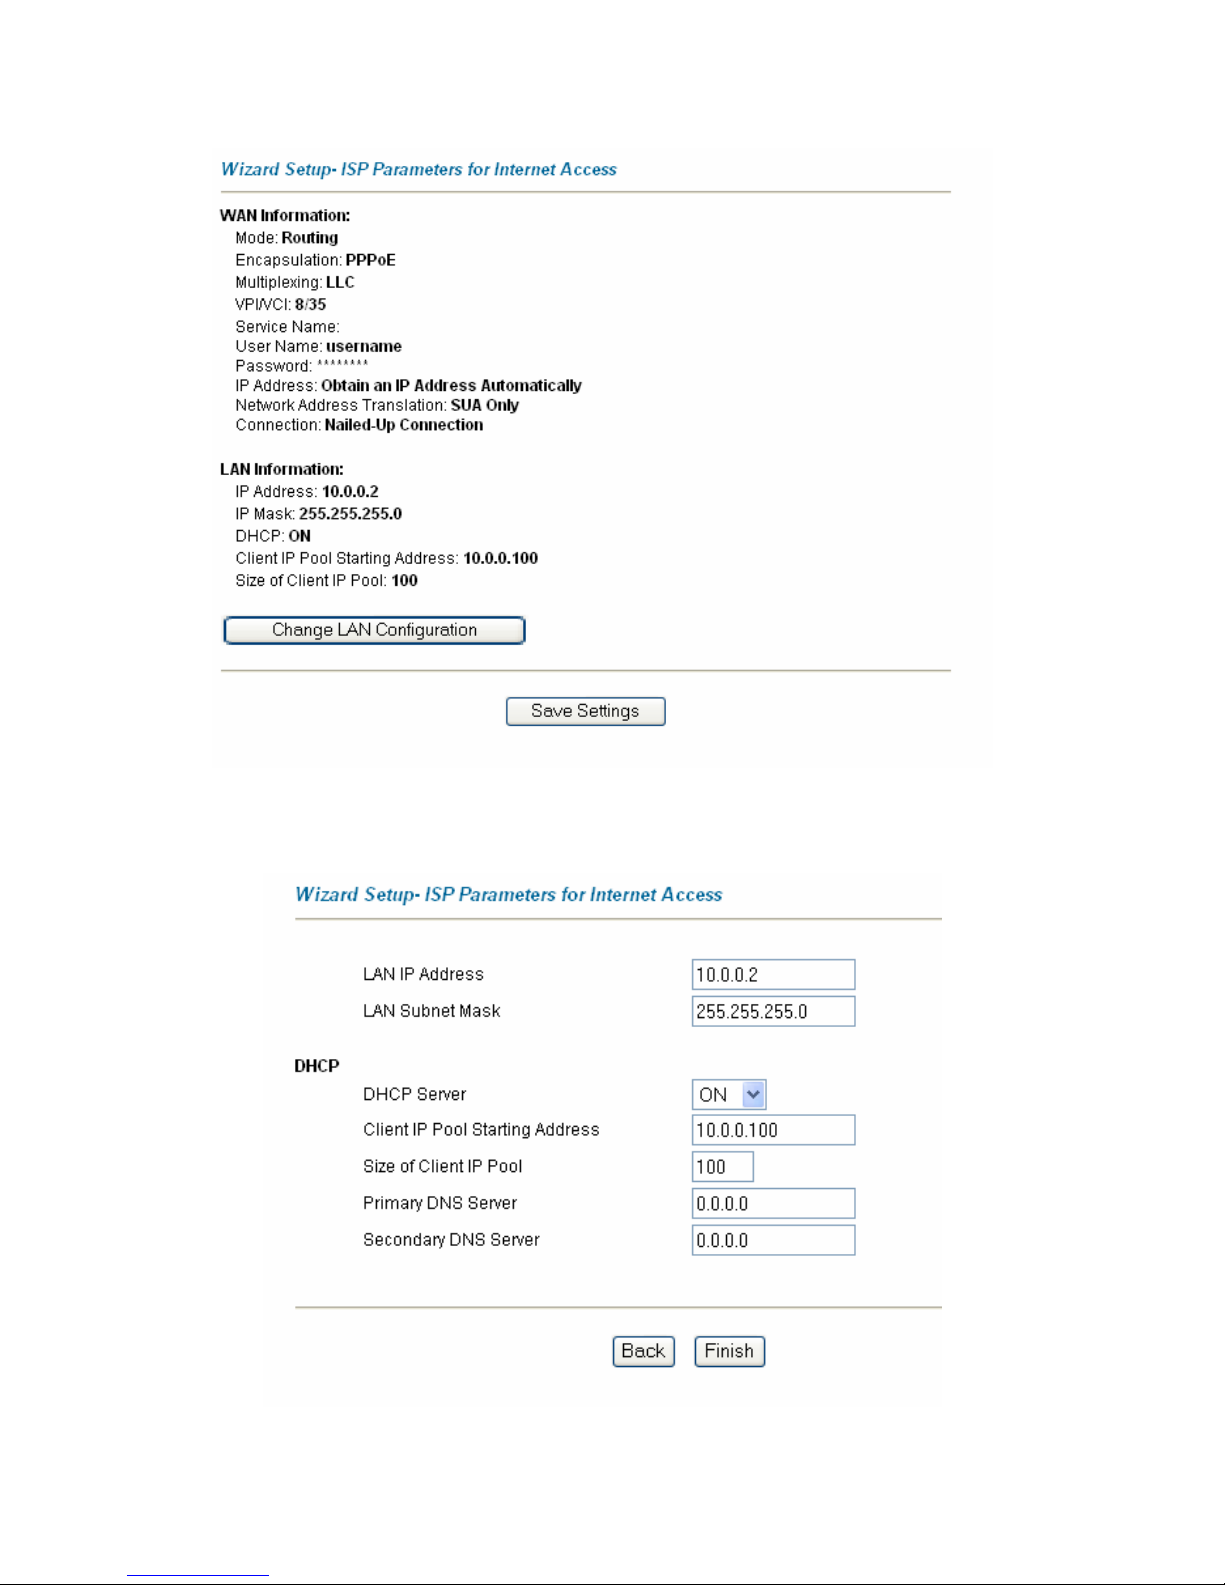
If you want to change your TELKOM ADSL 5100 LAN settings, click Cha nge LAN Configuration to
display the screen as shown next.
The following table describes the labels in this screen.
23
 Loading...