

Page 1
USER'S MANUAL
INTRODUCTION
Congratulations, and thank you for buying a Telit cellular phone.
This cellular phone is a tri-band unit. Thanks to its compatibility with
EGSM 900 MHz, DCS 1800 MHz, and PCS 1900 MHz networks, it can be
used in all European Union member countries, and in other Countries
where a GSM 900/1800/1900 MHZ network is available.
By exploiting the phone's standard MMS (Multimedia Messaging System)
compatibility, the CCD camera installed on the back of the phone allows
you to take photographs as you would with a normal digital camera. You
can save the photos and send them to other cell phones or to a pc, via email or IrDA connection.
A Java Virtual Machine allows the G83 to execute Java applications; you
can download them from the web in a WAP session or from a pc,
connecting it to the phone with the optional data cable.
Polyphonic SMAF sound system allows you to use your favorites
melodies as ringtones, downloading them from the web or installing the
ones you received from other users.
CE CONFORMITY MARKING
This phone conforms to European Union Standards:
•R&TTE 99/5/CE
•89/336/CEE
•73/23/CEE
In order to comply with European Directive 99/5/CE, this phone was made in accordance
with the following directives:
•GSM (Radio spectrum). Standards: EN 301 511 and 3GPP 51.010-1
•EMC (Electromagnetic compatibility). Standards: EN 301 489-1 and EN 301 489-7
•SAFETY (Safety Standards for electric devices and SAR). Standards: EN 60950 and EN
50361
In order to make continuous improvements to the product, technical
specifications, design, or any other information described in this manual
are subject to changes without notice.
2003 © Dai Telecom S.p.A. All rights reserved.
1
Page 2

S
C
USEFUL NUMBERS & ACCESS CODES
To receive more information about the product, or to send suggestions
write to
info@telit.net or visit our website at www.telit.net
To use the telephone, there are a few numbers and access codes you need to
save.
It may prove useful to write the information on this page, cut it out, and keep
it in a safe place!
IMEI ____________________________________
Security access code _____________________
Autolock access code _____________________
Telephone number ____________________
SIM number __________________________
PIN ______________ PIN2 ______________
PUK______________ PUK2 _____________
ARD 1
IM
Voice Mail Access Code _______________
Telephone number ____________________
SIM number __________________________
PIN _____________ PIN2 ______________
PUK _____________ PUK2 _____________
Voice Mail Access Code _______________
SIM CARD 2
2
Page 3

G83: SEVERAL WAYS TO MAKE THE MOST OF IT
With the G83 you can enjoy features beyond the normal use of a phone, limited
to SMS messages or calls.
The quality of sound has been greatly improved with the introduction of the
polyphonic ringtones.
The G83 allows you to send and receive e-mail and MMS; with the IrDA
connection or the optional data cable you can send and receive ringtones,
images, vCalendar and vCard.
What is a vCard? it’s a standard format for a business card, conceived for the
exchange of personal informations (PDI, Personal Data Interchange) between
different devices (websites, e-mail, mobile phones, PDA (Personal Data
Assistant).
With a vCard, besides your name and surname, you can also send and receive
many other useful informations: addresses (home, office, etc.), phone numbers
(mobile, home, office, fax...), URL of your website, e-mail addresses, and even
images and sounds)
What is a vCalendar? Similarly to vCard, vCalendar allows you to exchange
informations about task and appointments you saved in your calendar, or about
your to do list (to do: a memo you make to remember a task, for example
“bring the car to the garage”).
Connecting your G83 to a personal computer via the data cable, you ‘ll be able
to:
• edit and modify the phonebook
• write, send and save into your pc
• manage your vCard and vCalendar
• send to the pc the pics you took with the phone, or, vice versa, send new
images to your phone
• manage the voice memo feature
• edit and modify the connection parameters of the phone
• manage the Java applets (see “Java” on page 30)
In order to connect a G83 to a Personal Computer using the data cable, the
MsSync application must be installed on it.
You can download MsSync, free of charge, from Telit website, www.telit.net
3
Page 4
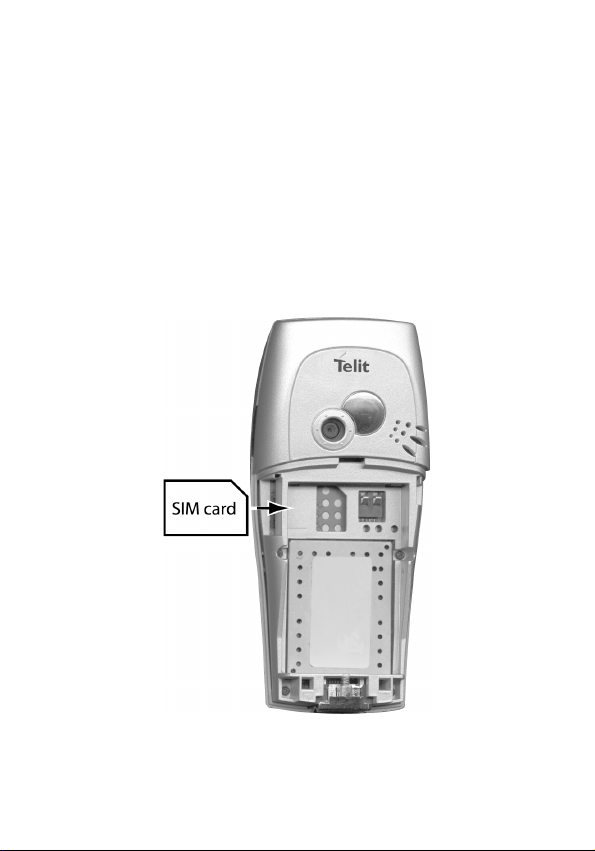
INSTALLING THE SIM CARD
In order to activate the phone on a GSM network, you must use a valid “plugin" (small) format SIM card. The SIM card is available through your network
operator or service provider.
• Turn OFF the phone
• Press the chromium-plated button on the bottom of the phone and remove
the rear cover, lifting the bottom side.
• Looking at the rear side of the phone, the SIM slot is on the left, as shown in
the image below. Insert the SIM card with the cutted edge in the upper right.
• Put the cover back, by laying the upper side first, just below the CCD
window, then push the bottom side till the chromium-plated button is
fastened.
4
Page 5

CHARGING THE BATTERY
This cell phone is powered by a rechargeable Lithium battery.
Lithium batteries are not subject to the so-called "memory-effect" (progressive
loss of energy efficiency if incorrectly charged); you can connect the phone to
the charger anytime, irrespective of the level of in the battery.
•Charge the unit only when the battery is installed
•Use only original Telit batteries and battery chargers.
How to charge the battery
• Connect the charger lead to the plug on the bottom of the phone assuring it
is completely inserted - the arrow on the charger connector should be on the
same side as the keypad; finally, plug the charger into a wall outlet.
• If the level of the battery is too low, a small time lag may occur before
the recharge begins; in case, wait a little bit longer.
• If the unit is turned off, the LED (light-emitting diode) in the upper right-hand
corner of the screen will light up;
steady red LED: charging
steady green LED: charging completed
blinking red LED: problems encountered while charging; unplug the
batterycharger from the wall outlet and from the phone, then retry. If the
problem persists, contact the nearer after-sales service.
an animation on the display shows that the unit is recharging
• You can charge the battery while the phone is turned on; the operation will
take longer to complete.
• for the battery to charge properly, the temperature must be between 0°C
and +45°C.
PIM mode
If you turn ON the phone holding the button down till the phone starts
vibrating, you will access the "PIM MODE". In this mode all the mobile phone's
transmission functions are deactivated; the unit cannot receive or transmit any
information. This lets you use it in situations where cell phones might be a
problem. Features like Organizer, Games, Phonebook, and Camera work
normally, and are actually faster in this mode because the microprocessor is
freed from managing transmission functions. To use the phone in PIM MODE
you need no SIM card
To reactivate the functions you temporarily disabled while using the PIM MODE,
turn the unit OFF and then ON again normally.
IMPORTANT WARNINGS
5
Page 6
GETTING STARTED AND BASIC FEATURES
t
To turn the phone on, after installing a SIM card and a charged battery, press
.
Press the same button for a second to turn OFF the phone.
Once turned ON (if requested, enter the PIN access code and reconfirm by
pressing ), the unit goes into stand-by.
If you are in an area with service coverage, the cell phone will pick up the
network signal of your SIM card operator. When abroad, it will connect to the
network of the service provider that your operator has ROAMING agreements
with. This lets you take advantage of phone services even when you are in
another country.
If you are in an area with no service coverage, the phone will be unable to place
or receive data.
SUGGESTION
features by semply using the following 2 keys and main joystick:
(Joystick)press during stand-by mode to access the main menu, or move
You can navigate through most menus, and se
to confirm your selection
to exit the menu you are in without changing anything, or delete
a character.
it:
downward to access shortcuts (instructions on how to use this
menu are on page 13 of this manual);
leftward to access the text editor and create a new SMS
message;
upward to access the calendar
rightward to activate the CCD camera
When navigating the menu press the joystick to confirm the
current selection.
6
Page 7
KEYPAD
Key Function:
Soft Keys: press this key to confirm a selection, an entry, a request
from the phone.
press it to exit the current menu level and go back to the upper level,
to delete a character in the text editor; press and hold it to go back to
stand-by.
Places a call, once you have dialed the number; quick access to
calls log
Press the joystick in stand-by mode to access the main menu;
move it to the left or right to return to the previous menu level, or to
go to the next one; move it up and down to browse through and
highlight the items on the current menu level.
In stand-by, moving it in the four directions, you can access the most
frequently used features (see see page 6).
turns the phone ON and OFF; hangs up or rejects a call, rejects a
selection, exits the current menu without saving any change.
- Use the number keys to enter phone numbers, or to enter the
characters corresponding to each individual key.
press to enter the » character; use this key to insert pauses (P) in
DTMF tone sequences, or after entering at least 1 number in the
stand-by mode.
In addition to its use as the # character, press this key after entering
a digit to pull up the contact in the phone book corresponding to that
digit; press and hold in stand-by to lock or unlock the keypad.
During WAP Internet sessions and while using T9, a number of keys will have
distinct features.
7
Page 8
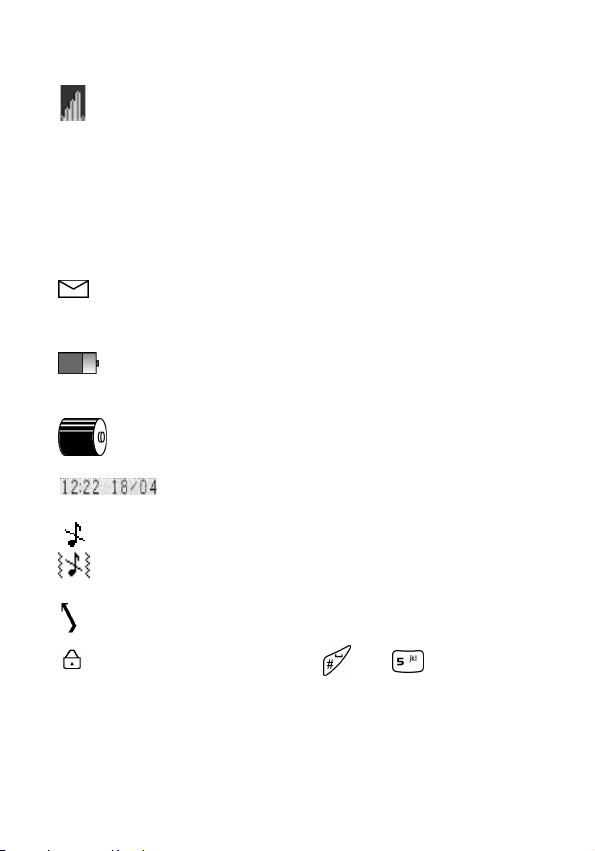
DISPLAY INDICATORS AND ICONS
Network signal strength (maximum 5 bars); when the name of the GSM
network is not displayed, but the bars are, you can make calls to
emergency numbers only.
The alarm clock feature is turned on.
A
Earphones or another hands-free device is connected
You have unread EMS messages in your Inbox; if it’s red, it means that
the memory is full: cancel one or more EMS messages to be able to
receive others.
Battery power level: goes from 3 solid lines (battery fully charged)
down to blinking icon (battery low.
Battery charging phase: the lines displayed inside the battery light
up one-by-one, and stay on once the battery has finished charging
date and time display. To set the date and time, see see
page 44
The note with a slash through it means that all ring signals have been
turned OFF - silent mode; the jagged lines indicate vibro-call is on.
incoming calls will be forwarded.
keypad is locked. To unlock it, hold , then .
P your phone is in roaming status (the telephone is on a GSM network
outside its home network, meaning that any calls made may be subject
to additional charges).
g You are registered on a GSM network that does not support roaming -
only calls to emergency numbers are possible in this case.
8
Page 9

T Shows your home zone status (ask your network operator or service
provider for further information on this feature).
During a call several icons may appear:
You have an active call
you have a call on hold
Call waiting: receiving a call while another one is active. In case,
press to put the current conversation on hold and respond to
the new call; by pressing you can continue with the
conversation already in progress and reject the new call.
If you accept the new call, press to put the conversation on hold and
return to the other one.
In addition, press the joystick to access a menu with the following options:
1 End call number 1
2 End call number 2
3 Perform switch: put call on hold and return to the previous one
4 Use the number pad to transmit DTMF tones
5 Join the two calls into one multiparty conference call
6 Access the main menu to open the phonebook or read an SMS message
for example.
After enabling the Multiparty feature, the same menu will give you the option of
using the "Split" function to divide the calls and continue separately with your
two (or more) conversations.
DTMF - what is it, and what is its use
The DTMF (Dual Tone Multi-Frequency) system allows you to transmit standard
frequency tones. These tones are often used for voice mail, answering
machines, telephone cards, etc.
9
Page 10

BASIC FUNCTIONS
Placing a call
In stand-by, dial the phone number you wish to call, including the area
code, and then press .
Press to clear the last digit entered.
To dial an international number, hold down and enter the + sign, then
insert the area code number.
If the number you are trying to call is busy, you have the option of automatically
redialing the same number at intervals. These intervals become longer and
longer as the number of retries increases.
To quit the redialing mode at anytime, press
Answering a call
When somebody calls:
the phone plays the selected ringtone (see “Audio profiles” on page 45); the
screen and keypad light up; the word "Incoming", and the caller's number
appear on the display (when available); If the number is already in your
phonebook, the corresponding caller's name will be displayed.
If the Vibro-call feature is active, the unit vibrates to alert you of an incoming call
(page 45).
Press:
to answer the incoming call
to reject the incoming call (the caller will hear a dial tone when your
phone initially rings, and a busy signal when you reject the call).
With this key you can also transfer the incoming call to your voice mail.
To hang up, press .
10
Page 11

While talking on the phone, you can...
Adjust the speaker or earphone volume by moving the joystick to the right or left
enable and disable the microphone by pressing for a second
dial a number on the keypad, and call it without ending the first call by
pressing
Emergency numbers
As long as there is GSM network coverage, you can make a free emergency
call at anytime, even when a SIM card is not installed in the phone.
In stand-by mode dial the emergency telephone number of your country and
press . Most of the times the number is 112; anyway, before making any
type of emergency call, consult your network operator's rules about this service.
Without a SIM card: press and confirm by pressing .
IMPORTANT: DO NOT ABUSE THIS SERVICE.
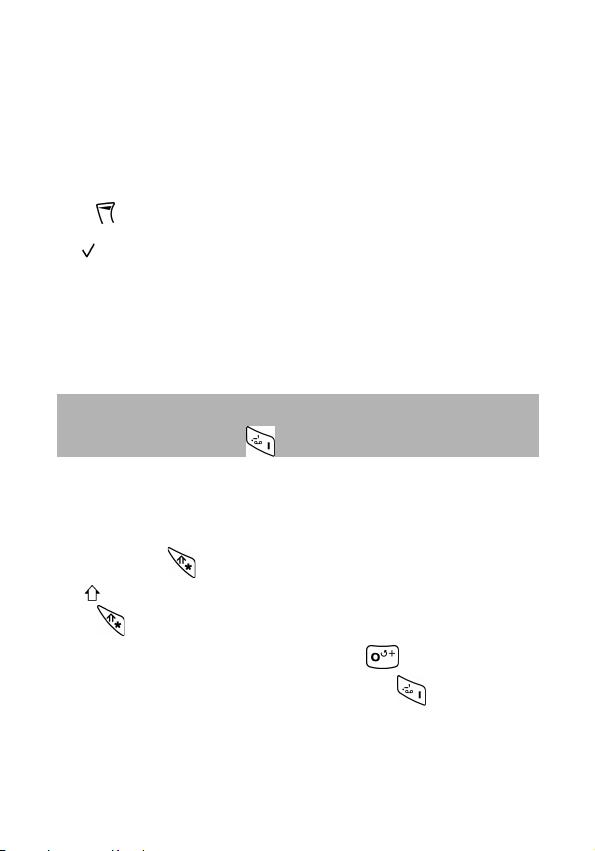
Locking and Unlocking the Keypad
The key lock protects against involuntary key presses when the phone is not in
use. To lock the keypad while the display is in stand-by, press and hold .
On the display the symbol will appear.
to unlock the keypad press for 1 second followed by .
When the phone is in key lock mode, you can only make emergency calls.
11
Page 12

MENU
This unit has two menus allowing you to access the phone's many features and
controls:
• The main menu, containing all the phone's features and controls
• A shortcuts menu: with just a few "clicks" you can set up a menu with the most
frequently used features. You can customize it according to your needs and
preferences.
Main menu
In stand-by, press the joystick to access the main menu.
ADepending on the kind of SIM card you are using, you may enter the (SIM
Too lk it) 9 menu. Availability of the SIM Toolkit depends on your network service
provider.
Depending on the settings in menu 5-1-5 “Main menu style” (page 44), icons
may be arranged on a fictitious circumference (3D display) or set in rows and
columns (2D display).
Rotational menu: move the joystick to the left or right to rotate the
circumference on which the icons are positioned; press the joytick or to
confirm the icon in the foreground and access the respective menu.
Grid menu: the selected icon appears bigger than the others; move the joystick
to change the selection; press it or to confirm the selection and access the
menu.
The menu is treelike in its design. The first menu level has eight (or nine, with
the SIM Toolkit menu) branches.
Each tree branch has a number that goes along with it. After pressing the
joystick, you can access the desired feature by entering the number sequence
corresponding to the path you would like to follow in the menu.
For example, to adjust the duration of the backlight, you can access the main
menu by pressing the joystick, then press:
(Settings) - (Display) - (Backlight duration).
12
Page 13
Shortcuts
In stand-by, move the joystick downward without pressing it.
Number of icons will appear on the left part of the display - each of these icons
allows you to directly access one of the unit's basic functions.
Move the joystick up or down to select the desired function, then press it to
confirm and access the related function.
Shortcuts can be personalized.
Press when the shortcut icons are on the display to access the complete list
of all the functions you can join a shortcut to; press the joystick to add or delete
the symbol, to add or remove the function from the shortcuts menu .
Writing letters and digits - normal mode.
To insert alphanumeric symbols 3 modes are available.
To write a new SMS message, T9 technology is really handy and useful;
sometimes, fot example when writing a dialect text whose words are not
recognized by the T9, the “normal” mode is more suitable.
Normal mode
To insert a character, press the corresponding letter key repeatedly until
the letter appears on the screen; repeat this with the next key;
To insert a blank space, press
When the next character you want to enter is written with the same key,
wait a moment for the cursor to automatically move one space over.
Move the joystick to the left and right to move the cursor back and forth
between characters.
By pressing the key you can quickly change the insertion mode.
The symbol means that the subsequent character will be capital; if you press
again , all the following characters will be upper-case.
To insert special characters and symbols, press ; punctuation symbols
and arithmetic operators can be accessed by pressing .
13
Page 14

Writing a message text using T9 technology
T9 helps you write a message more quickly, even in other languages
(languages are determined by which software version is installed in the cell
phone).
You can also use s to write multilingual messages. Simply change the dictionary
using the menu provided ( “IT9/EMS menu” on page 25).
How does T9 technology work?
There is a database in the unit containing a large number of terms.
Press each of the letter keys one time only to write a word.
For example, to write the word "telephone", press (one time each) the following
keys: 8-3-5-3-7-4-6-6-3.
The software processes the series of key commands, determines which of the
terms in the dictionary is most likely to be the one you want, and then writes it.
The characters on the screen may change as you are writing, meaning that the
word you want will only be displayed once you have finished pressing the keys.
In most cases, the phone will choose the term you wanted.
If the term that is displayed is not the one you wanted, press to see
all the alternative terms - e.g. all the other terms you could write by pressing the
same keys.
For example, by pressing 2-2-5-3 you can write "cake" or "able".
If the word you want to write is not among the options, you can add it to the
dictionary.
How to add new words to T9 database
If the T9 database doesn’t include any word that could be composed with the
keys you pressed, you are asked whether you want to save a new word in the
database. Confirm by pressing or reject with ; if you accept, a separate
text editor will be opened to compose the new word in “normal” mode. The new
word, confirmed with , will be automatically saved in the database and will
be recognized by T9.
14
Page 15

CAMERA
The optoelectronic sensor on
the back of the phone allows
you to take pictures as you
would do with a normal digital
camera. You can save the
photos in the phone's memory and send them via e-mail, MMS (Multimedia
Messaging System) or IrDA (infrared connection).
When you access menu 1 - Camera, or by moving rightward the joystick while
the unit is in stand-by, the screen automatically displays the image the optical
sensor captures. In some cases (i.e. during a GSM network search), you may
have to wait a few seconds before the camera display feature becomes active.
On the left side of the display the icons for the management and the settings of
the camera will appear; to activate or adjust a function or a parameter, select its
icon moving up or down the joystick, then move it to the left or right.
The available functions and settings are:
Viewfinder mode: to activate or deactivate the full-screen visualization
Zoom (1x - 2x- 4x) to set the zoom
Exposure: to set the brightness of the image
Day-night mode: for low-light environments, set the camera to night mode; the
sensitivity of the CCD sensor will increase.
Filter: different type of lighting affect the result of a photo, adding chromatic
aberrations; to avoid it, three different filters are available: sunlight, exterior with
cloudy sky, artificial lighting.
Quality: in order to save as much memory as possible, photos will be saved in
compressed format (jpg). To obtain a higher quality image, the compression
level can be reduced, but the image will take much more room in memory.
to save the picture on the screen, press - he picture is saved and the screen
goes back to the camera display.
To return to the camera display without saving the image, press or .
By pressing during the live camera display mode (not with a frozen image)
you can access the list of the images you saved in the phone memory.
In some places it is forbidden or unseemly
to take pictures! Please avoid misuses of
this unit!
To take a picture, press
the image freezes on the display
15
Page 16

Select an image by moving up or down the joystick, then press to
access the menu of the image options:
1 Open to view the selected image on the display; move up or down the joystick
while looking at a photo to open the previous/subsequent image in the list
2 Send allows the user to send the image via MMS, email or IrDA
3 Delete to delete the selected image (you can also select the image to be
deleted in the list and press )
4 Rename to rename the file (the default names are “Image001” - “Image002”
- “Imagexxx”) in order to recognize the images in the list.
5 Info shows the information on the image: date and time, image format and
dimensions of the file.
6 Set as wallpaper: substitutes the current background (the image that
appears in stand-by) with the selected picture.
7 Set as screensaver: the image can be used as screensaver (e.g. it will
appear on the display after the elapsing of a certain period of time from the
last key press.
8 Delete all to delete all the images in the list.
16
Page 17

PHONEBOOK
To access the phonebook, press while the unit is in stand-by, or confirm the
icon nr. 2 of the main menu.
Phonebook Characteristics
The phonebook is made up of a list of names and numbers memorized on the
SIM card, and another list saved to the phone's memory.
Depending on which of the two has been activated, an icon representing a SIM
card or a phone will appear on the display.
The SIM card (memory capacity of the SIM depends on the type of card) can
hold one string of text and its corresponding number (name and phone number)
for each contact.
The unit’s phonebook memory can store up to 300 numbers, and allows you
to memorize additional data for every single entry. Specifically:
• Name
• Last name
• Home number
• Work number
• Mobile phone number
• E-mail address
• Melody to be played when receiving a call from this contact
• Image to be shown on the display when receiving a call from this contact
• Fax number
• Company name
• Title
• Address
• Town
• State
You can use a number you have memorized in the phonebook to make calls, or
to designate the recipient of an EMS/SMS message without having to enter the
number manually.
You can manage your phonebook through the menu. Access these functions
by pressing the joystick while viewing a name.
Since in the unit’s phonebook memory you can save more numbers/data for
each contact, data will be displayed in different folders (for example, one for
mobile phone, one for e-mail address, etc.); to select another folder and display
another type of data, move the joystick to left and right.
Note: for further information about the different insertion modes, see page 13
17
Page 18

Phonebook menu
Press while any name is displayed to access the phonebook menu:
1 New: enter a new phonebook contact
2 Modify current contact
3 Delete current contact
4 Speed dials the Speed Dials option controls 9 numbers in the phonebook
that you can call by simply pressing and holding down - in stand-by mode the number key corresponding to the contact.
5 Memory in use lets you choose Phone memory or SIM memory as your
phonebook.
6 Fixed numbers allows you to limit outgoing calls to a series of numbers
protected by your PIN2.
7 Barred numbers allows you to block or unblock outgoing calls to certain
numbers.
8 Here you can access and manage the so-called Service numbers. These
numbers vary according to your SIM card operator, and relate certain
services, such as voice mail or information.
9 Option menu: the sub-menu structure is as follows:
1 Delete all: to delete all the contacts from the phonebook
2 Memory status: includes information about the number of contacts which
can be memorized and the number of free spaces
3 Copy: To copy part of the SIM card phonebook to your phone's memory and
vice versa, insert the number corresponding to the first and last records in
the phonebook you would like to copy. All the numbers between those two
records will be copied. To copy a single record, enter the record's position in
the phonebook twice.
4 Sort (this function is only available for the unit’s phonebook memory): this
feature lets you sort the phonebook by first or last names. This is due to the
fact that you can enter two character sequences for every number (i.e. first
and last names).
18
Page 19

Adding a number to the SIM card memory
You can save a new contact to the phonebook in three ways:
• while the unit is in stand-by, insert the number to be saved and press
(you will be asked to insert the name, the category and the group of this new
contact)
• while viewing the calls log (lost, incoming or outgoing) press and
confirm the menu item “Phonebook”
• access the phonebook menu by pressing the joystick while looking at any
contact in the phonebook, then confirm menu item number 2 (“New”). Insert
the data in the fields, than press to save the new contact. To insert a data
in a field, select the field with the joystick and press it to confirm the selection.
Insert the data, then confirm by pressing
Whichever is the way you choose, the new contact will be saved in the currently
active phonebook (SIM card or unit memory); be sure to activate the one you
need before saving a new contact.
When all the needed fields have been filled in, press to save the new
contact and exit. To create a new contact at least one phone number or an email address must be saved - other fields are optional.
Searching for a name in your Phonebook
While looking at the phonebook list:
• Scroll through the names and make a selection by moving the joystick, or:
• Press the keys corresponding to the first characters of the name you are
looking for; as every key is pressed, the selection scrolls to the first contact
that complies with your request. If the contact that appears on the lower part
of the display is not the one you are looking for, insert one or more further
characters, or press to point the selection at that contact in the list and
scroll with the joystick to the one you want.
Press to call the selected number or send a new e-mail to the address
on the display.
19
Page 20

Voice Dial
This unit includes the voice dial option. This feature enables you to make a call
to a number in your phone memory (not in the SIM phonebook) by simply
saying a previously recorded word that has been set for that number.
To set voice recognition for a number in your phonebook:
• access your phonebook (phone memory)
• search for and display the number you would like to add voice dial to
• access the phonebook menu by pressing
• access the menu item nr. 2 - “Modify”
• select the phone number (home, work, mobile) you want to add voice dial to
• press (“Extra”) and select menu 2, “Vo ice dia l”.
Save allows the user to record his voice. Confirm this selection and follow the
instructions (you will be asked to pronounce the word twice).
IMPORTANT: the word you pronounce must be the name of the contact (do not
use a different word)
Delete: use this function to delete the voice dial for the current contact.
To make a call using the voice command, press , while the unit is in
stand-by, then pronounce the word
If the phone senses a similarity between the "vocal labels" and the word you
have pronounced, it will ask you to confirm you want to make the call to the
name and number it recognized.
The names and numbers in the phonebook you use the voice dial option
for are designated as such with this icon
20
Page 21

CALLS LOG
Your phone saves the main information on the most recent calls received
(caller's number, if available; call start time; call type).
Incoming calls include those you did not answer.
Information relates to incoming calls placed when your phone is on, and in an
area with coverage. Some operators can send you information via SMS about
the calls that were made to your number when your phone was turned OFF, or
off-network.
To access the call list, enter the main menu and confirm “4 - Calls”.
Select and confirm the menu “List”; now you can choose among the following
categories: “Unanswered”, “Received”, “Sent”, and “All” calls.
Confirm “Delete all” to erase all the memorized calls data.
While looking at the call list, move the joystick up and down to select a particular
row; press to call the number, or to delete the call from the list.
By pressing the joystick you can access the options menu, organized as
follows:
• Info shows the available data about the selected call (phone number, name
of the contact - if previously saved in the phonebook - date, time and duration
of the call).
• Phonebook allows you to save the phone number in thew phonebook (see
page 19).
• SMS: select this feature to send a new SMS to the selected number
• Estrai n° makes the number available in stand-by condition, as if it had been
dialed by the users
“N. X Missed calls” means that you didn’t answer to x incoming calls.
By pressing while the unit is in stand-by condition, the list of the last calls
(incoming, sent and unanswered) will appear.
21
Page 22

EMS/SMS MESSAGES
This unit can send and receive traditional
SMS messages. It has two additional
message features: T9 and EMS, which
speed up the writing of messages and let
you insert drawings, animation, and audio
into the messages.
T9 is a registered
trademark of Tegic
Communications, Inc.
and is patented
technology in Europe
and in other Countries.
Ems: what they are and how to use them
EMS (Enhanced Messages Services) are one of the most recent innovations in
the field of SMS text messaging. In addition to normal text messages, you can
now send sounds, melodies, pictures and animation.
When the recipient reads the message (the recipient's phone must support
EMS), melodies play automatically, and any animation or pictures inserted in
the message appear alongside the text.
Setting the SMS parameters
Before sending any messages, you will need to set some functional
parameters. Most of these settings are determined by your SIM card operator.
You can create several profiles containing different settings (i.e. if you use
different network operators with separate SMS message centers, or if you send
differently classed messages).
Select Parameter profiles (3-1-4) - a list of the existing profiles is displayed.
Choose the one you would like to edit by pressing
To enable an SMS profile select it with the joystick, then press
Profile name (menu 3-1-4-x-1)
This is the assigned profile name under which you are operating. It appears in
the available profile list.
Service centre (menu 3-1-4-x-2)
This is a telephone number given by your network operator (you can ask your
service provider for it) to deliver messages. Do not confuse this number with
the phone number of the person to whom you are sending your message.
Validity (menu 3-1-4-x-3)
This network service lets you set a period during which time SMS messages
remain at the Message Center while it continues attempting to send them.
Use or , to make your selection.
22
Page 23

Delivery report (menu 3-1-4-x-4)
Enable this function to get delivery confirmation for every message you send.
Confirmation will be made by SMS; the only text will be a heading with the
recipient's number, and the date and time the message was received.
Destination (menu 3-1-4-x-5)
This feature lets you memorize the telephone number of the recipient of your
new messages, and is particularly useful if you plan on sending many EMS/
SMS messages to one number.
Under this option, the number you set will automatically be designated as the
number to send the message to; by pressing you can change the
designated number so as to send a message to someone else.
Typ e (menu 3-1-4-x-6)
This network service lets you convert EMS messages into different formats,
such as: ISDN and PSTN services, Pager, E-mail, Fax, etc.
Change the preset "text" value only after contacting your network operator to
verify that the other formats are supported.
Extended Alphabet (menu 3-1-4-x-7)
This feature is useful when you have to use special characters (i.e. a different
alphabet) that occupy more memory space. The total text length allowed for the
SMS decreases to 70 characters.
IMPORTANT: cellular phones that do not support a wide variety of characters
may have difficulty in reading messages sent using this option.
Class (menu 3-1-4-x-8)
There are different classes of SMS messages. You can choose between them
using this menu.
Store in SIM the message is stored in the recipient's SIM card memory
Store in mobile the message is stored in the cell phone memory
Show immediately the message is not memorized; it is displayed and then
deleted after being read.
23
Page 24

Reply Path (menu 3-1-4-x-9)
When you enable this option, recipients of messages sent from your phone will
be able to use the same SMS Message Center as you. This is essential for a
number of SMS services, such as automatic substitution of messages in
memory with incoming messages.
Contact your network administrator for more information.
SMS info (menu 3-1-5)
This feature provides information on the EMS messages on the SIM card.
Specifically: the number of messages memorized, total SIM capacity, and the
SMS Message Center number.
Delete all (menu 3-1-6): this feature allows you to delete all the memorized
messages (both written and received).
Concatenated messages
This unit supports concatenated messages. This option lets you write
messages longer than 160 characters. The total number of characters are
divided into two or more messages (maximum 5) and sent to the same number.
A digit indicating the number of messages it will take to send your text appears
to the left of the characters counter in the editor.
Writing and sending a new SMS/EMS message...
Enter menu 3 - “Messages” and press twice to confirm menu “SMS” “Write new”.
Writing message text
You can write message text using one of two different options:
In the lower part of the display you will find an icon indicating which writing
mode you are in: either or ABC (normal mode).
The 123 icon indicates you are in the digit mode, where each key corresponds
to a digit.
For more informations on how to insert alphanumerics, see page 13
To switch writing mode, press briefly.
The icon means that the next character will be a capital letter. If, after the
first capital character, you press again, ALL the subsequent characters
will be upper-case.
24
Page 25

IT9/EMS menu
Press while writing a message to access the T9/EMS menu; it lets you:
• insert special characters (punctuation, currency symbols, etc); you can select
them in a table you can access by selecting “Add symbol”
• switch input method: “Input method” (ABC, T9, 123)
• insert graphics or audio in the message - "Insert Obj.”
• change the font dimension or apply special text formats (bold, italic,
underlined
• Change the T9 dictionary to write text in another language - "Language"
• Read the T9 help guide - "Help”
When you insert an object into the message, an icon representing it appears in
the text editor and a certain number of text characters are used up in the
process. There is an indicator in the lower right-hand portion of the screen that
tells you how many characters are left.
) - “Format text”
There are two kinds of EMS items....
Specifically, Predefined items and User-defined items.
In the first case, the items are sent from one phone to another using standard
EMS defined codes. This option takes up less message space, but the items
are displayed by the recipient's phone according to its own settings.
User-defined items are not standard EMS encoded, and are sent in their
entirety. This means more message space is taken up; however, unlike above,
what is displayed is the original item.
How to send the message you have written
When you have finished writing the message, press
Enter the phone number of the person you want to send it to, and press ;
choose one of the following menu options:
• Preview message (available when at least one EMS item is inserted)
• Send: the message
• Store the message
• Send & Store il messaggio
• Parameter profiles allows you to use for the current message a specific
profiles, different from the default (see “Setting the SMS parameters” on
page 22)
25
Page 26

Reading the messages in your inbox
When a message is received in your inbox, the phone emits a brief tone or ring
(to set them see page 46);the symbol B appears on the display.
To read the new message you can access the shortcuts menu, whose first icon
will be “Read SMS”.
The unread messages list appears; if only one new message arrived, it will be
automatically opened.
While reading an SMS, press to access the option menu:
• Reply open a text editor to write a reply
• Delete delete current message
• Get number gets the list of the numbers in the message (phone number of
the sender and possible further numbers in the text (only if they’re longer than
4 digits) to save them in the phonebook, call them, etc.
• Forward to to send current message to another user
• Save to MS: the message will be saved into unit’s memory (otherwise il would
have been saved into the SIM card, unless differently set in the related
parameter)
If the number you receive the message from is already stored in the
phonebook, the corresponding name appears when you read it. This feature is
very useful when your network operator sends you messages with the numbers
of your missed calls.
To display your read and stored messages again...
Access menu 3-1-2 ( Messages - SMS - Receiv./Written).
A list of messages and their sender or recipient details will appear. To read a
message, select it and press ; to delete it, press .
To delete all the messages...
Access menu 3-1-6 (Messages - SMS - Delete all), then confirm by pressing
When the SIM card and the unit’s memory can’t hold no more messages, the
symbol B becomes red and you can’t receive any new message.Delete
unnecessary messages to make room for new messages.
26
Page 27

Reading an EMS message
To read an EMS message, use the same procedure as for SMS messages
(“Reading the messages in your inbox” on page 26).
Pictures and animations will appear alongside the text exactly as the sender
intended. A musical note on a staff appears in the text to signal sounds and
melodies.
While displaying a message, you can select the items in it by using the joystick.
A broken line surrounds the selected item.
When you select a sound or melody, the phone plays the audio.
Saving an EMS item
You can save user-defined items (see “There are two kinds of EMS items....” on
page 25) to the phone's memory for reuse in future messages.
To save an item
• select it as described earlier, then press to access the option menu
• select and confirm the option “Save ....[item type]”
27
Page 28

MMS MESSAGES
This phone supports the MMS (Multimedia Messaging System) standard, which
allows transmission and receipt of multimedia messages.
You can insert photo images into messages and send them with a WAP
connection (see “WAP browser” on page 37 for the necessary connection
settings). This holds for pictures taken with the phone's camera, pictures
received from others, or images downloaded from a PC. When you are sent an
MMS, you receive a WAP message that includes the link you need to download
the MMS.
Enter the Messages submenu from the main menu, and select item 2 - MMS.
Choose Write New to compose a new message; then fill in the requested fields:
To: insert the phone number or the e-mail address of the main addressee.
CC: insert the phone number or the e-mail address of further possible
adressees
Bcc: if you want to send the message to an addressee whose phone
number or email must remain unknown to the other addresses, insert here
his address
Subject: subject of the message
Picture: choose the image to inseret in the message
Sound: it is possible to insert a voice memo file or a polyphonic ringer to
be attached to the message (the receiver’s phone, if MMS compatible, will
play it during the reading of the message)
Tes to : insert the text of the message.
Once the message is complete, press and choose amoing the following
options:
• Send: send the message
• Preview: shows the preview of the message as it will appear to the
addressees
• Save template saves the message in the unit’s memory, so that it will be
available to reuse it.
MMS inbox: use this option to access the received messages.
By pressing the joystick after having selected a message, an option menu will
appear; it allows to: send again the current message, open it, delete it, 5
(addressee’s number, date and time, file dimension, subject), get the numbers
from the text (as you can do with SMS messages, see page 26), reply, forward
the message to other users and Delete all the messages in the Inbox
MMS Outbox: the list of sent MMS appears. By pressing the joystick you can
access the option menu, whose format is similar to the Inbox one.
Tem pl ate s: the list of the messages you saved in order to reuse them is shown.
You can access, modify and send them as many times as you need.
28
Page 29

Settings is the function that allows you to manage the parameters of the
connection for MMS mailing; in particular:
Preferred connection: to choose the connection profile to be used to send the
MMS messages, or modify its parameters. Some of the profiles may have been
previously set, to match those of the network operators.
Type of reception: two sub-menus are available: Settings allows you to
decide whether an incoming message must be downloaded automatically as
soon as the WAP browser receives the notice, rather than manually or in
roaming mode; the latter means that if you are connected to your network
operator, the message will be downloaded automatically; if you are connected
with roaming service, you’ll have to start the download manually. Mode manage
the limits of connection for the download, fixing the number limit of Attempts
or the Time of the download.
Receive adverts: MMS standard provides that advertising messages carries a
flag that allows the unit to recognize them, so that the user can decide whether
he wants to receive them or not.
Receive reports: to activate/deactivate the reception of the receive reports.
Validity: the Service Centre tries to deliver the message to the addressee, for
a cartain period of time. If the maximum time you decided elapses without
results, the message is deleted.
Images: to set the dimension of the images in the messages.
29
Page 30

JAVA
Java is an object-oriented programming language created by Sun
Microsystems.
It is platform indipe ndent; once a Java Virtual Machine (JVM) has been installed
on a computer (no matter the type or the architecture) any Java application can
be executed.
On the G83 the JVM MIDP 1.0 / CLDC 1.0 has been installed.
Normally Java applications are executed runtime, that is compiled in full every
time you launch the program; this implies a certain slowness; the G83, on the
contrary, compiles the application just once, and the resulting bytecode is
saved for the use to come (that will be remarkably faster).
You can download Java applications (known as midlets) from the web
(sometimes even for free) or transfer to the phone the ones you have on your
PC, (MsSync 4.0 or higher and data cable needed).
To access Java features, select and confirm menu 7 - Plus , then press 3 Java.
Execute: the list of the available applications (already compiled) is shown.
Select the one you need, press the joystick and follow the instructions on the
screen.
Install: to compile a midlet and save the bytecode (only once).
Download: use this feature to connect to a remote server and download new
midlets. Depending on the software configuration of your phone, some server
parameters may have been preset.
Configure allows you to manage the parameters of the connection to the
server.
30
Page 31

Plus
The "Plus" menu (menu 7) offers the following options:
Gallery per la gestione delle immagini memorizzate
Games
Java
Info
Gallery (menù 7-1)
Three sub-menus are available: Images, Ringers and Audio. Each one leads
to the list of the respective files.
By pressing the joystick while the images list is on the screen, the option menu
will be activated. It allows you to:
1 open and view the selected image
2 send current image via MMS, e-mail or IrDA connection
3 delete current file
4 rename current file (default names are Image001.jpg, Image002.jpg....)
5 get the available info about the file
6 set current image as wall-paper
7 set current image as screen-saver
8 delete all the images
Analogously, a similar option menu for ringers allows you to:
1 open the file and listen to the ringer
2 send the file via MMS, e-mail or IrDA connection
3 get the available info about the file
4 set current ringer to play for incoming calls
5 delete all ringers (except the ones that were in the phone by default)
And for audio files:
1 New: to record a new voice memo
2 Open: to open current file and listen to the memo
3 Send current file via MMS, e-mail or IrDA connection
4 Delete current file
5 Rename current file
6 Get available informations about current file
7 Delete all voice memo
31
Page 32

Games
4 games are available:
Menu 7-2-1 Cards
Menu 7-2-2 Pegs
Menu 7-2-3 Apples&Snake
Menu 7-2-4 Shoot ‘em all
This game follows general poker rules.
You start with a fixed bet of $50, and $1000 in hand. If your 5
cards do not prove to be a winning hand, you can draw from the
deck. Your winnings are automatically added to the sum
appearing in the upper left-hand corner of the display. The
number of cards left in the deck appears in the lower left-hand
corner. When all the cards have been used, the deck is
automatically shuffled. The game ends when you lose all your
money.
Choose which cards to discard/change by pressing . Play your
cards and make your bet with the joystick, and then press it again
to deal a new hand.
The objective of this game is to take all the pegs until only one is
left, just like in classic checkers.
To make a move press the joystick; move it to the left or right to
choose the peg you want to move, and push it to confirm your
selection. Finally, choose where you want to move the peg (i.e.
which peg you want to take). Take the peg and start again until no
more moves can be made.
To cancel last command, press .
Use the joystick to move the snake and make him eat the apples
appearing on the display. The snake can enter the door on one
side of the display and come out the door on the opposite side.
Your goal is to accumulate points and keep the snake from eating
its tail and hitting the walls.
Use the joystick to control the cannon and destroy the aliens
invading the earth. Move the joystick to the right or left to move
the cannon, and press it to shoot. You get bonus points if you hit
the mother ship that appears periodically.
Java
For the informations about this feature, see “Java” on page 30
32
Page 33

Voice memo
This feature allows you to record voices and sounds as if the phone was a
portable recorder; afterwards, you can also listen to the audio files, as
described on page 31. If no filename appear in the list, only the first menu item
will be available
Info
A great deal of information relating to your SIM card and phone is available from
the Info menu
Software Version displays your phone's software version.
SIM Card displays the SIM card phase (1 or 2), the country code (MCC), and
your service provider's GSM network code (MNC.
Own number displays the phone number corresponding to your SIM card. If
the number does not appear, or to change it, press . Any incorrect digits will
be erased; enter the correct number and confirm by pressing .
IMEI displays the phone's serial number.
IMPORTANT: keep the phone's packaging, or the first page of this manual with
the phone's important information, including IMEI code.
If you lose your phone, or if it is stolen, provide your network operator with the
IMEI code immediately. This allows you to block use of your phone on GSM
networks offering this service.
Total data displays the total amount of data your phone has sent or received
during GPRS connections.
Total life visualizza il tempo totale di conversazione (chiamate entranti e
uscenti) del cellulare; questo dato non è azzerabile
Free memory shows the quantity of available memory of the phone.
33
Page 34

APPLICATIONS (menù 6)
Alarm: to enable the alarm, confirm menu 6-1 and set the time, then press .
In the following screen you can turn ON or OFF the alarm. Sounds and
vibrations of the alarm can be adjusted in the Audio profiles.
Organizer: displays your weekly schedule. to insert a task, select the day by
moving the joystick and confirm by pressing ; then select the type of the task
(meeting, birthday, call, anniversary, memo) and the time of the alarm. Press
again to confirm, then choose how often do you need the alarm to be
repeated (No repeat, Every day, Every week, Every month, Every year). Now a
text editor allows you to insert a text message that will appear on the display at
the expiration of the alarm.
Memo Pad: this is a space for you to write and save brief notes; you can use
the ABC or T9 mode to write the text. Add allows you to create a new memo,
Select to open and read one of the saved memo. Delete and Delete all to
delete current or all memo.
To d o lis t : The Add option lets you enter a reminder for future tasks. By
pressing the joystick you access the option menu: use Add to add a new item,
Delete to delete current item and Delete all to delete all the items in the list.
While looking at the list, by pressing you can add or remove the symbol
to remind you have/have not performed the task.
Calculator
The unit's calculator works just like a normal calculator; insert numbers by
pressing keys ... ; select which operations to perform by moving the
joystick and then press to read the result.
Press to cancel last digit.
To enter a digital point, press .
34
Page 35

Currency converter: in the upper and lower part of the screen there are two
fields; each one is labelled with the name of a currency. Insert the value to be
converted in one of the fields, then press to perform the conversion; the
converted value will appear in the other field. In the middle of the screen you
can see the exchange rate.
By pressing the joystick you can access the option menu: Euro converter
allows you to choose among several preset currencies; Custom allows to
create new currencies, inserting their respective names and the exchange rate.
Unit converter: this feature works similarly to the currency converter. When
you press the joystick, a list of measurements appears (length, area, volume,
weight), as well as the units you can convert to.
SyncML
Using a WAP connection, this phone unit can access a server and save your
personal phonebook and organizer contents to it. This feature provides you with
more memory space and the possibility of updating ("Synchronizing") the
server with your phone's data, and viceversa.
Synchronize (menu 6-8-1) establishes a WAP connection with the specified
server, and updates the database according to menu 6-8-2 Server Setting.
1 WAP Profile: Choose which of the preset profiles you would like to use for
the synchronization
2 Server User ID: Set the user ID you access the server with
3 Server Password: Enter your password to access services
4 Server URL: Enter the URL (address) of the server you want access
5 Phonebook Server Name: Enter the name of the phonebook you want to
update. This option is available in cases where you can save several
different phonebooks on the server, all under different names
6 Calendar Server Name: Name of the organizer you want to update
(saved to the server)
7 Database to be synchronized: Select this option to establish a
connection and update the Phonebook or Calendar.
35
Page 36

GPRS
GPRS (General Packet Radio Service) is an evolution of the GSM system. It
leaves the voice transmission mode unchanged, but at the same time greatly
improves data transmission performance by using a "packet" system.
Your phone uses the GPRS system. You can connect the phone to a PC with a
special small cable and establish a fast data connection. You can also hitch it
up to the Internet whenever the fixed network connection is not available
(option available on certain models).
The main features of the GPRS connection:
Speed
The fastest connection speed reaches about 40Kbits per second.
This speed is much higher than with the normal GSM network.
Connecting Speed
GPRS gives you immediate connection to the network, meaning you can send
and receive information whenever you need to.
Efficiency
Packet switching means that the phone only occupies radio frequencies while
receiving or transmitting data.
Operators can maximize their network efficiency by allocating resources in a
more dynamic way, based on actual need. They can dedicate circuit switching
and infrastructure to voice traffic only, and reduce SMS center traffic by using
the interface between the SMS and GPRS systems.
Rates
You pay for the GPRS service on the basis of data transferred, not on the basis
of connection time.
The GPRS unit lets you display how much data you have sent and received
during the GPRS connection. It will then allow you to estimate the connection
cost based on your menu settings.
Before establishing a GPRS connection you have to select a few parameters in
menu 5-9-1 Settings.
This information is given to you by your service provider.
36
Page 37

WAP BROWSER
Per collegarsi ad Internet con il browser WAP
• You must have a call details enabled SIM card, and a subscription with your
network operator or service provider.
• Find a place where the signal is strong and where it will stay so - this will
greatly improve the quality of your connection.
• Access the main menu and select 8 - WA P B ro ws er
• Confirm option 1 - WAP B ro ws er to connect.
If you have enabled Call waiting (see page 43) and you receive a call during
an Internet session, the standard incoming c all signal will appear on the display;
press to accept the call and close the internet connection, or to reject
the call.
If call waiting is disabled, an incoming call will not interrupt your Internet
session.
When you use WAP for the first time, you may be requested to activate the
security feature; confirm with .
During an Internet connection, several keys have special functions:
Browse WAP page contents by moving the joystick.
In the text editor press this key to delete the character to the left of
the cursor, or press and hold to delete the entire text;
have Soft Key functions
37
Page 38

WAP settings (menù 8-4)
Before making your first WAP connection, you will need to define a number of
settings - your service provider will supply you with most of this information, if it
is missing.
Your phone may already be configured for Internet access; in this case, the
menu will be Internet ready with the corresponding settings: repeatedly press
to exit the menu and return to the stand-by display.
Factory settings let the phone hold up to six "Profiles".
The WAP menu has the following design:
8 WAP browser
1 WAP browser > connection
2 Last page > Link to the last opened WAP page
3 Go to URL > to access a site by inserting its URL
4 Settings
1 Proxy 1
2 Proxy 2
3 Proxy 3
4 Proxy 4
5 Proxy 5
6 Proxy 6
1 Connection name > insert name
2 IP address > __.__.__.__
3 IP port > nr. porta
4 Hompage > ind. homepage
5 Linger time > ins. linger time
6 Connections > selezionare
Entering configuration data...
• Choose the setting you would like to define by moving the joystick up or down,
and then press it to select the desired item
• enter data and confirm with .
• go to the next item by moving the joystick up or down
Move the joystick to the left to go back a level on the menu (without confirming
changes), or move it up and down to scroll through the options;
press to delete the displayed information.
38
Page 39

Settings Needed to Connect with WAP browser....
1 Connection Name: this is the name corresponding to each of the three
available profiles; it appears on the upper menu level when you are given the
option of choosing the profile settings you want to view/change. If no profile
has been set, the options are displayed as Proxy 1...Proxy 6.
2 Indirizzo IP: Enter the IP address (Proxy) by using the joystick to move the
cursor through the settings. When the field is not blank the cursor
automatically moves to the next field.
3 Porta IP: Enter the requested data (usually 9201 or 9203).
4 Homepage: Enter the home page's URL (if it is not the same as the WAP
Proxy, it may not be accepted). It will usually start "http://wap…".
5 Linger-Time: this is the amount of time (in seconds) that has to go by
without data transmission, before the connection is aborted.
6 Connections: this feature lets you choose your connection type (i.e. GPRS
or GSM).
Once you have entered all the information correctly, return to the WAP
Browser menu, and go to menu 1 WAP Browser submenu to connect.
Browser menu
During a WAP Internet session, press and hold to access the browser
menu (the menu's design is shown below). It offers a series of very useful
features for Internet navigation.
DaAt this point, move the joystick up or down to scroll through the menu
options, and press to select the f eature you want, as indicated by the icons.
Nota: The WAP Browser uses the phone's preset languages for Soft Key
features and error messages, even though you may be using different
languages when connected to the Internet.
39
Page 40

The Browser Menu design is as follows:
1Back
2Home
3 Exit
4 Bookmarks
5Inbox
6 Show URL
7 Save items
8Reload
9 Impostazioni
10 Settings
1 Homepage
2 Scroll mode
1 Block
2 Smooth
Scroll speed is
1Fast
2 Medium
3Slow
3 Send referrer
4 Key PressTimeout
1Fast
2 Medium
3Slow
4OFF
5 Circuit prompt
6Security
1 Secure prompt
On
Off
2 Current certificate
3 CA Certificate
4 Authentication
Authentication cache is:
on
8 Avanzato
1 Go To URL
2Restart Browser
3 Downloads
4 View Title Region
5 About...
off
View Title region
Wrap text in Title region
40
Page 41

FUNCTIONS IN DETAIL
Camera (menu 1)
For information on using the camera and its features, see “CAMERA” on
page 15.
Phonebook (menu 2)
For information on the phonebook and its features, see “PHONEBOOK” on
page 17.
Messages (menu 3)
For information on sending and reading EMS/SMS messages (menu 3
"Messages"), see “EMS/SMS MESSAGES” on page 22.
For details on MMS, refer to page 28
Voice mail (menu 3-3): insert the number to be dialed to connect to your voice
mailbox.
Push messages (menù 3-4) Your service provider may send you special SMS
messages containing WAP addresses, or links your WAP browser can read.
You can subscribe to any number of services that provide you with the latest
news for example. An SMS message you receive may contain an article title; in
this case, by pressing the corresponding key you can directly connect to the site
with the full article.
Importing the connection settings to the WAP browser is another common
feature of WAP push messages. Thanks to this feature you can avoid entering
settings manually.
Reading a WAP push message: when you receive a message, the @ symbol
appears; Enter menu 3-4 and choose the message you want to read; confirm
your selection with .
Email (menu 3-5): You can send and receive email just like with a PC.
Read: using your server address and password, you can connect to your
mail server and read any mail in your Inbox.
Write: After filling in each of the following items press : e-mail
address of recipient, the subject, and the message itself. The text editor
for email is the same as for SMS messages - including use of T9
41
Page 42

Configure: use this menu to define the settings for your phone connection
to the mail server, so that you can send and receive email. The following
information is needed:
Profile name
User name
Password
POP3 server
SMTP Server
E-mail address
Connections (GPRS/GSM)
Zone messages (menu 3-6): zone messages are freee messages sent by the
network operators, that appear onthe display when the unit is in stand-by
condition. The most common is the name of the area you are in.
In order to manage this feature, the following sub-menus are available:
Reception: choose whether or not to display the messages you receive from
your network operator (the kinds of messages you will receive, and the way to
enable this service varies from operator to operator).
Type filter: Select this option to see the different kinds of filters you can use to
allow only certain types of messages to be displayed. Press or to
activate/deactivate selected filter.
Language filter: by pressing or you can select the languages you
would like to receive messages in.
Read: use this function to show active messages.
Calls (menu 4)
List is the first menu item and lets you display the information relating to your
most recent outgoing, incoming, and missed calls ( see “Calls log” on page 21)
The Cost (menù 4-2) feature lets you manage the cost of your calls.
Last call displays the cost of your most recent call.
All Calls displays the total cost.
Credit displays the amount of credit you have left (this feature depends on
your operator and the kind of SIM card you have).
Cost Control lets you set the currency and the unit value using the two
submenus. To define these settings, enter your PIN2.
Reset Costs: to reset the costs stored under this feature, enter PIN2.
Call duration (menu 4-3) lets you know how long your calls last. Select and
confirm the item you want information for: Last Call, Received calls, Sent calls.
Delete lets you reset the counters.
42
Page 43

Call Waiting (menu 4-4): is a feature provided by your network operator. This
service lets you know you have an incoming call while you are on the phone.
You have three options: Activate, Deactivate the service, or query the network
to Check the current status.
Barring (menu 4-5) lets you create a filter for incoming and outgoing calls, so
you can block undesired ones. You can block: all Incoming calls, Incoming
Abroad calls, Originated calls; all outgoing International calls, or all Outgoing
International calls except for calls to home Country. Clear All eliminates all the
filters, so you can receive and make any type of call. Change Code gives you
the option of changing the security code needed to block calls.
Divert (menu 4-6) gives you the option of forwarding an incoming call to
another number. You can forward unanswered calls (No reply option), calls you
receive while the phone is out of signal range (No reachable) , or when your
phone is busy. You can also divert all the calls that don’t below to any of the
last three categories (All unconditionally).
Send Number (menu 4-7) lets you decide whether or not to allow your number
to be displayed on the phone you are calling - select Preset to use the the
default network setting, Send always to send your number whenever you call,
or Hide number to hide your number.
SMS messages ALWAYS contain the sender's number, irrespective of the
above settings.
Calls Control (menu 4-8) lets you enable an audio signal that will beep after
every 60 seconds of conversation, so you can control the length of calls.
43
Page 44

Settings (menu 5)
These menu features let you manage the phone's numerous settings, from the
ringer, display brightness, and SMS alert volume, all the way to the security
codes.
The menu option Display (menu 5-1) gives you access to the display settings
controling the screen and everything on it.
you can set the Brightness (5-1-1) and the Backlight duration (5-1-2).
The phone has a Screen saver (5-1-3) option. You can choose the design
you would like to appear on the screen after a certain amount of time (to
set delay time - menu 5-1-3-3 Delay) has gone by since the last key touch.
Use Select (menu 5-1-3-1) to choose a screen saver from the list.
Select Enable (5-1-3-2) to enable or disable the screen saver option.
Wallpaper (5-1-4): choose this option to select the picture that you would
like to appear on the screen in stand-by mode.
Select (5-1-4-1) to choose between the available pictures.
To use the pictures taken with the phone's CCD camera as a background,
refer to page 31 of this manual.
With Enable (5-1-4-2) you can choose whether or not to turn the
background display on.
Use Operator Logo (5-1-4-3) to choose whether or not to display your SIM
card operator's logo.
Main menu style (5-1-5): choose the appearance of the main menu
(Rotational menu - 3D or Grid menu - 2D).
In the Color settings menu (5-1-6) you can modify the colors used on the
display (there are a number of preset styles, each of which corresponds to
a different background color composition, text color, etc..
Date and time (menu 5-2): set the clock (Time setup), set current date (Date
Setup), change Date format (month/day/year - day/month/year - year /
month/day); enable or disable Internet time, Daylight summer time and
choose the World timezones.
Automatic Power OFF (menu 5-2-4) is a feature that allows the phone to
switch OFF at a certain time; select Time Setup (5-2-4-1) to set the time, and
Enable (5-2-4-2) to activate/deactivate the feature.
The Fonts (menu 5-3) menu lets you choose one of four fonts to use in writing
text: You ng, Thin, Classic and Narrow.
Security (menu 5-4) this menu manages all the security codes and settings, as
well as automatic keylock.
PIN (5-4-1): enable PIN request (menu 5-4-1-1) when you turn on the
phone, change current PIN (menu 5-4-1-2), change PIN2 (menu 5-4-1-3).
Phone lock (menu 5-4-2): only those knowing the 5 digit code you must
enter when first turning on the unit can use the phone lock (when you first
buy the phone the code is 00000); to change the code, select Change
Code (menu 5-4-2-3). When you choose No Lock (menu 5-4-2-1) you are
44
Page 45

not required to enter a code. To request code verification, select Lock
(menu 5-4-2-2).
Autolock keyboard: when you enable this feature, the keypad locks
automatically after 30 seconds without use. The keypad lock mode works
in the same way as manual lock ( see “Locking and Unlocking the Keypad”
on page 11)
Networks (menu 5-5)
This menu manages the phone's GSM network connection.
Using Search Network, the phone searches for available networks and
lists them. Access the network you want with . The ones with a
crossed-out phone receiver near them are not accessible.
Home net displays the name of your SIM card operator.
Network list lets you create a list of GSM networks the phone will try to
connect to when it does not succeed in accessing the default SIM card
network
Selection gives you the option of Automatic or Manual GSM network
selection.
Select Band: to use this unit in EU Countries, choose 900-1800. In
Countries using GSM DCS 1900 MHz (i.e. Canada and the United States),
choose 900-1900.
Network led allows you to choose whether a LED on the phone has to
blink or not to signal the network connection.
Audio profiles
There are 6 preset audio profiles, along with one user-defined, Custom profile.
For each one, you can change the ringer, vibro-call, and audio signal settings.
After defining the settings, all you need to do is use the most appropriate profile
for your present situation. In a single touch, you can change a full group of
settings all-at-once.
To activate a different audio profile, access the profile list from the shortcuts
see “Shortcuts” on page 13, or from the main menu 5-6, select the profile you
want to enable and confirm with .
To edit an audio profile’s settings, select it and press the joystick.
45
Page 46

Each profile manage the following parameters:
Ringer (profile X - menu 1)
With this option you can set the following:
Ring volume: controls the volume of the ringer that sounds when you
have an incoming call. Move the joystick to the right or left to change the
volume level, and then confirm with .
Ring type: choose among the melodies available in the Gallery the one
you would like the phone to play to signal an incoming call.
Ringer Mode: gives you a list of different call alert styles:
1 Only ringer
2 Ringing after vibro
3 Ringing and vibro
4 Vibro
5 Ringer OFF (no sound, no vibro)
Manner Mode: when you choose this option, the ringer volume will be on
low when the phone first rings and will gradually increase with each
subsequent ring until it reaches the maximum.
Alarm
Just like with the normal ringer, you can choose the alarm's settings. The menu
is very similar: melody, volume, vibrating alert, etc
Klick vol.: when you enable this feature, the phone emits a tone each time you
press a key. You can set the volume for this feature under each audio profile.
Move the joystick to the right or left to change the volume, and press to
confirm and return to the menu.
Warning tones (profilo x - menu 4): he unit sounds these alerts in the presence
of certain events.
Every event (New SMS or MMS, New Class Zero SMS, Battery Low, Power
On, Power Off, connection to the Network, No network available) has
corresponding menu options letting you change the Volume, ring Type, and
warning ring Mode.
When you access the audio profile list, you will see the option DTMF. This
option lets you turn DTMF tones ON or OFF (see “DTMF - what is it, and what
is its use” on page 9).
Answer mode (menu 5-7): this option lets you choose how to respond to
incoming calls.
Preset allows you to answer by pressing .
Any Key Answer: answer a call by pressing any key except or .
46
Page 47

Auto Answer gives you the option of answering the phone automatically after
a preset number of rings. This feature is particularly useful when using a
hands-free device.
Language (menu 5-8) lets you set the language for the menus and prompts. If
you choose Automatic, the phone will select the language of the country where
your SIM card comes from. If the phone does not support the language, it will
choose English by default.
Connection (menu 5-9) this option’s features allow you to edit and manage the
connections settings, including activating the IrDa port. See also “GPRS” a
pag. 36.
Restore F.P. restores the phone to its original factory settings.
Applications (menu 6)
For informations about this menu and its functions, see “APPLICATIONS
(menù 6)” on page 34.
Plus (menu 7)
For informations about this menu and its functions, see “Plus” on page 31
Hereby, Dai Telecom, declares that this phone is in compliance with the
essential requirements and other relevant provisions od Directive 1999/5/EC.
The related Declaration of Conformity is available on request by Dai Telecom
headquarter, viale Stazione di Prosecco, 5b 34100 Sgonico - Trieste - Italy
Declaration of Conformity
47
Page 48

FCC STATEMENTS
Modification statement:
Any changes or modifications made to this device that are not expressly approved by DAI
Telecom S.p.A. may void the user's authority to operate the equipment.
Interference statement:
This device complies with Part 15 of the FCC Rules. Operation is subject to the following two
conditions: (1) this device may not cause harmful interference, and (2) this device must
accept any interference received, including interference that may cause undesired
operation.
Your phone may cause TV or radio interference (for example, when using a telephone in
close proximity to receiving equipment). The FCC or Industry Canada can require you to stop
using your telephone if such interference cannot be eliminated. If you require assistance,
please contact your local service facility.
RF exposure information
THIS MODEL PHONE MEETS THE FCC REQUIREMENTS FOR EXPOSURE TO RADIO
WAVES.
WARNING: This equipment must not be used for data transmission via GPRS when it
is placed in the waist or head.
Your mobile phone is a radio transmitter and receiver. It is designed and manufactured not
to exceed the emission limits for exposure to radio-frequency (RF) energy. These limits are
part of comprehensive guidelines and establish permitted levels of RF energy for the general
population.The guidelines are based on standards that were developed by independent
scientific organisations through periodic and thorough evaluation of scientific studies.The
guidelines include a substantial safety margin designed to assure the safety of all persons,
regardless of age and health. The exposure standard for wireless mobile phones employs a
unit of measurement known as the Specific Absorption Rate, or SAR.The SAR limit set by
public authorities such as the Federal Communications Commission of the US Government
(FCC), the Australian Communications Authority (ACA) or by Industry Canada, is 1.6 W/kg
averaged over 1 gram of body tissue.
Tests for SAR are conducted using standard operating positions with the phone transmitting
at its highest certified power level in all tested frequency bands.Although the SAR is
determined at the highest certified power level, the actual SAR level of the phone while
operating can be well below the maximum value. This is because the phone is designed to
operate at multiple power levels so as to use only the power required to reach the network.
In general, the closer you are to a wireless base station antenna, the lower the power output
of the phone. Before a phone model is available for sale to the public, compliance with
national regulations and standards must be shown. While there may be differences between
the SAR levels of various phones and at various positions, they all meet the government
requirement for RF exposure.
For body-worn operation, the phone meets FCC RF exposure guidelines provided that it is
used with a non-metallic accessory with the handset at least 2 cm from the body. Use of other
accessories may not ensure compliance with FCC RF exposure guidelines.
Your telephone is equipped with a built-in antenna. For optimal operation, you should avoid
touching it or degrading it.
:
48
Page 49

49
 Loading...