

Telikou UTS-200, SPK-200 Instruction Manual

TELIKOU Intercom System
UTS-200 Two-Channel Speaker Station
Instruction Manual
© 2006 TELIKOU Systems
All Rights Reserved
TELIKOU UTS-200 Two-Channel Speaker Station
1
I. Introduction
Thank you for choosing TELIKOU intercom product. The UTS-200 Two-channel main
station is a powerful, yet user friendly unit that server as a heart of a TELIKOU intercom
system. We recommend you read through this manual to better understand the function
of UTS-200. If you have any question that does not addressed on this manual, please
contact your dealer or call us. We are standing by to assist you.
Description
The UTS-200 suits for TV station, communication command center, outside broadcast
vehicle, theater, project test field, and other applications which communication is required.
This system adopts wired connection, and has following features, free of external
emission interference, stable and reliable performance, flexible configuration, full-duplex
communication, clear and loud communication sound, easy operation, and strong noise
resistance.
II. Characteristics
All operations can be finished on panel easily.
Remote Microphone kill Switch (RMK).
The level of speaker will lower when talk button is activated.
XLR and 1/4 inch compatible microphone jack.
Automatic circuit short protection and indication.
Sidetone Null adjustment.
III. Basic operations

TELIKOU UTS-200 Two-Channel Speaker Station
2
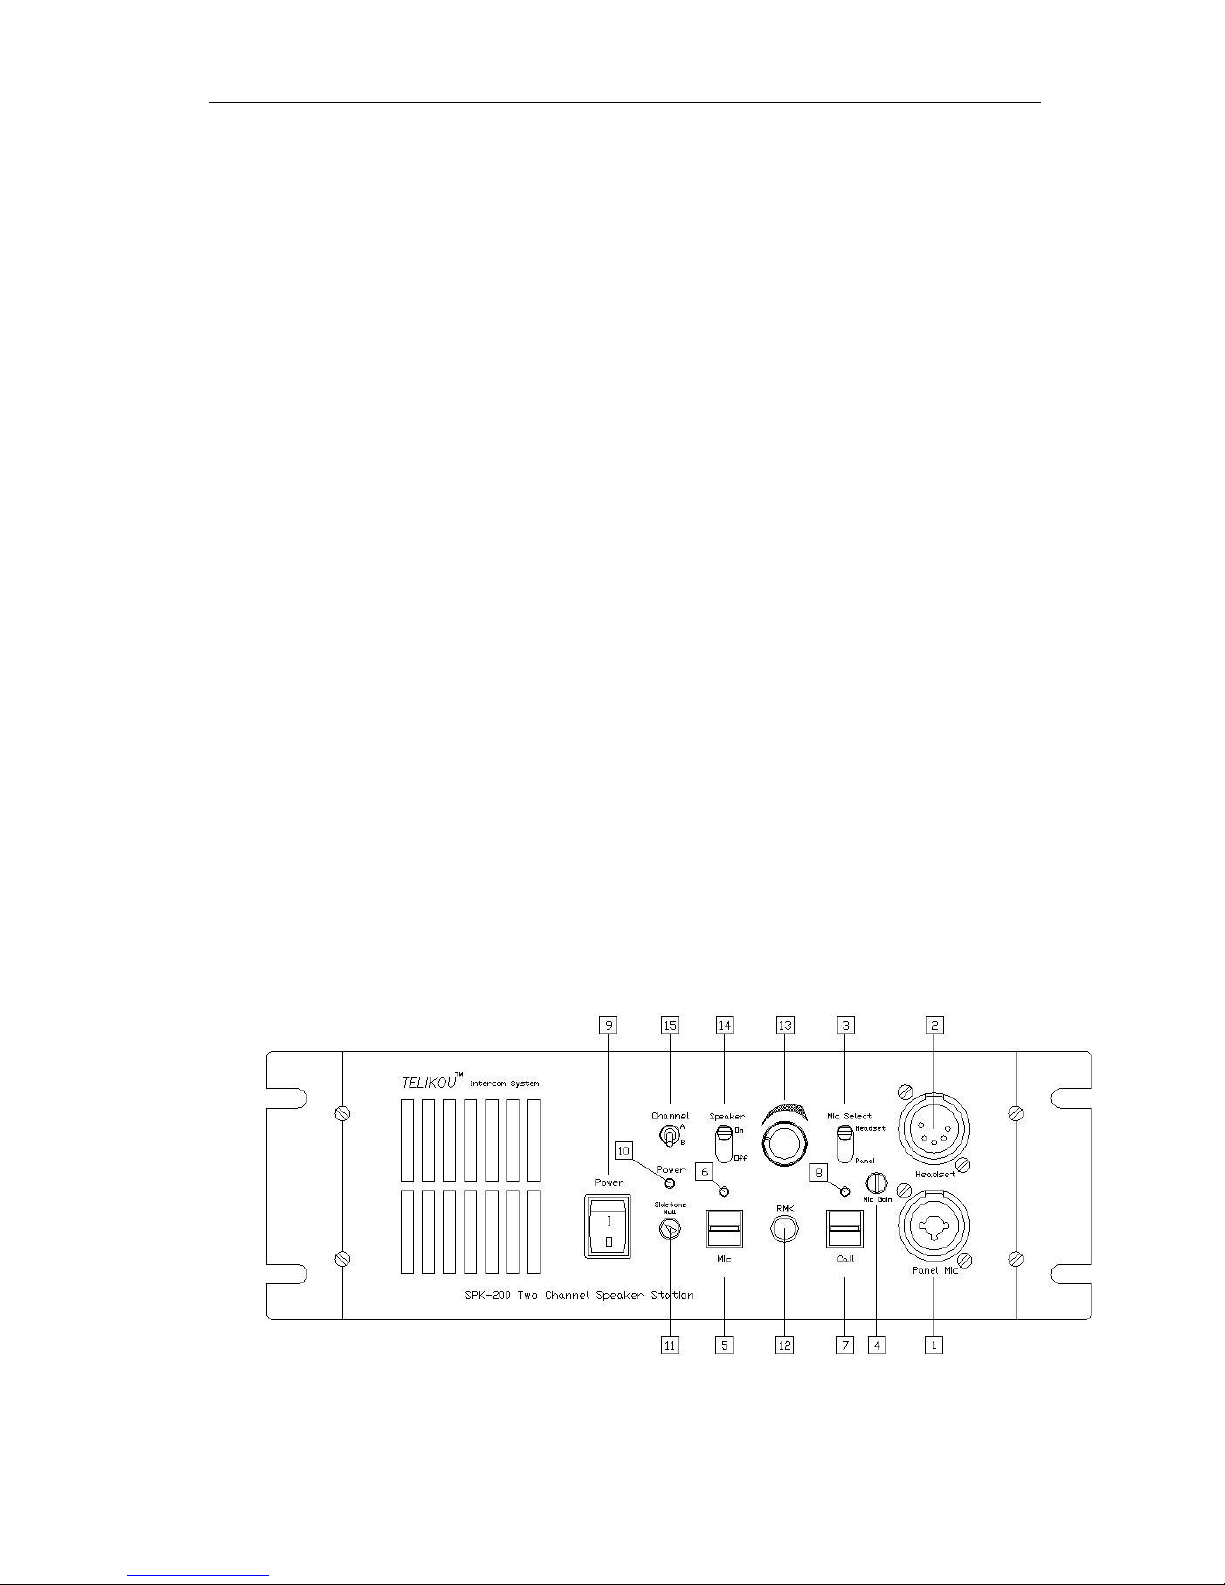
Front Panel
1. Headset connector
4-pin XLR Male or 5-pin XLR female connector.
EARPHONE: Dynamic 50-2000 ohm
MICROPHONE: Dynamic 100-600 ohm
The wiring of headset to be as follow:
Pin 1--Mic common
Pin 2--Mic hot
Pin 3--headphone common
Pin 4--headphone hot
Pin 5—Null
2. Panel Mic Connector
This is a double-purpose connector, supports both of unbalanced input microphone with
XLR plug and 1/4inch plug.
The wiring of 3-pin XLR microphone to be as follow :
Pin 1 -- Mic common
Pin 2 -- Mic hot
Pin 3 -- parallel connected with Pin 2 internal
3. Mic Select Switch
Set the Mic select switch to select whether the panel microphone or the headset
microphone is active.
4. Panel Mic Gain
It is used to increase or decrease the gain for panel microphone to achieve proper
microphone output level. It has no effect on the sensitivity of the headset microphone.
Note: For earlier models, this adjustment button is in cabinet, and you can find this
adjustment potentiometer at the right side of front panel after opening the top cover of
cabinet. The microphone is set according to the Electret type before delivery. If the type
of panel microphone is changed, re-adjustment is required.
5. Mic Switch (Mic)
Turn up or down the Mic switch handle will send microphone signal intercom line after
amplification. When the switch is turned to ON or PTT, the LED (6) above will light. The
settings are as follow:
ON: The selected microphone is activated, the switch is self-locked.

TELIKOU UTS-200 Two-Channel Speaker Station
3
OFF: The selected microphone is off.
PTT: The selected microphone is activated, release and reset.
6. Mic LED
This LED lights when Mic switch (5) turns to ON or PTT.
7. Call Switch
Send call signal from host to the channel. Turn up or down the handle of call switch, the
LED (8) above selected channel will light (RED). This switch is without self-locking
function, release and reset.
8. Call LED
This LED will light under two cases: a) called: when the call signal from communication
channel is received; b) call: the call switch (7) is turned on.
9. Power Switch
Power switch is turned on, Power LED (10) light.
10. Power LED
This green LED lights on when the UTS-200 is receiving AC power. This LED will flash
when the UTS-200 senses a short or overload on the circuit. When the fault is removed,
the power supply will automatically reset and LED
11. Sidetone zero-adjusting
The UTS-200 uses full-duplex audio (the same as a conventional telephone line) in which
the talk and listen audio are sent and received on the same line. Thus, when you talk on a
channel, you will also here your own voice back in the speaker or headphones. This is
called sidetone. If you are using the UTS-200 with a microphone and speaker, sidetone
could cause unwanted feedback, since the microphone may pick up your returned voice
audio and reamplify it. This could also happen if you are using a headset where the ear
cushions do not completely cover the ears, although it is probably much less likely. In
either of these cases, you should minimize the amount of sidetone.
Typically, different sidetone null settings are needed depending upon whether you are
using the gooseneck panel microphone along with the speaker or not. Use one the
following procedures to correctly set the sidetone level controls.
A) Sidetone Adjustment Procedure for Gooseneck Microphone with Speaker turned
on:
1 Turn on the Mic switch. Set Mic select switch to panel.
 Loading...