

Page 1

FCC ID: NPQFCS8900
ATTACHMENT N: USER`S MANUAL
Copyright Ⓒ 2005, DIGITAL EMC Co., Ltd.
Page 2

FCS-8900
(Avvio8000)
Page 3

CONTENTS
1. SAFETY INFORMATION-----------------------------------------------------------------------
2. PREPARE YOUR PHONE FOR USE --------------------------------------------------------
2.1 Install the battery ----------------------------------------------------------------------------
2.2 Charge the battery ---------------------------------------------------------------------------
2.2.1 Base
2.2.2 Handy
3. FEATURE HIGHLIGHTS ----------------------------------------------------------------------
4. ABOUT THE PHONE ---------------------------------------------------------------------------
4.1 Name and function ---------------------------------------------------------------------------
4.2 Key functions ----------------------------------------------------------------------------------
4.3 Display indicators -----------------------------------------------------------------------------
4.3.1 Idle screen ----------------------------------------------------------------------------
4.3.2 Scroll Bar -----------------------------------------------------------------------------
4.4 Icons --------------------------------------------------------------------------------------------
5. BASIC OPERATIONS ----------------------------------------------------------------------------
5.1 Power ON and OFF----------------------------------------------------------------------------
5.2. Make a call --------------------------------------------------------------------------------------
5.3 Answer a call -----------------------------------------------------------------------------------
5.4 Adjust the volume -----------------------------------------------------------------------------
5.5 Redial the recent call number ----------------------------------------------------------------
5.6 Caller ID ----------------------------------------------------------------------------------------
5.7 Out of Range display and warning tone ---------------------------------------------------
5.8 Paging-------------------------------------------------------------------------------------------
5.9 Handy and Base ID settings------------------------------------------------------------------
1
Page 4

5.10 SMS and Voice mail--------------------------------------------------------------------------
6. USE PHONE MENUS ---------------------------------------------------------------------------
6.1 Navigate menus -----------------------------------------------------------------------------
6.1.1 Scroll through menus --------------------------------------------------------------
6.1.2 Use a shortcut------------------------------------------------------------------------
6.1.3 Exit menu levels --------------------------------------------------------------------
6.2 List of Menus ---------------------------------------------------------------------------------
7. ENTER LETTERS AND NUMBERS -----------------------------------------------------------
7.1 Enter Letters -----------------------------------------------------------------------------------
7.1.1 Edit name -----------------------------------------------------------------------------
7.1.2 Change case of letters and numbers -----------------------------------------------
8. USE THE PHONE BOOK -------------------------------------------------------------------------
8.1 About the phone book -------------------------------------------------------------------------
8.2 Add a new phone book Entry ----------------------------------------------------------------
8.3 Edit Entry----------------------------------------------------------------------------------------
8.4 Search Entry ------------------------------------------------------------------------------------
8.5 Search Name -----------------------------------------------------------------------------------
8.6 Erase ---------------------------------------------------------------------------------------------
8.7 My Phone # -------------------------------------------------------------------------------------
9. USE CALL LOGS ----------------------------------------------------------------------------------
9.1 Check Missed / Received / Dialed Calls---------------------------------------------------
9.2 Erase Logs -------------------------------------------------------------------------------------
9.3 Call Duration-----------------------------------------------------------------------------------
10. USE SMS (SHORT MESSAGE SERVICE) --------------------------------------------------
10.1 Send a Text Message -----------------------------------------------------------------------
10.2 View Inbox / Outbox------------------------------------------------------------------------
10.3 Erase a message -----------------------------------------------------------------------------
10.4 Message Settings ----------------------------------------------------------------------------
2
Page 5

10.5 Use Voice mail ------------------------------------------------------------------------------
11. SET SOUND ---------------------------------------------------------------------------------------
11.1 Set Ring Type -------------------------------------------------------------------------------
11.2 Set Ring Tone -------------------------------------------------------------------------------
11.3 Set Ring Volume ----------------------------------------------------------------------------
11.4 Set Key Tone --------------------------------------------------------------------------------
11.5 Set Sound Setting----------------------------------------------------------------------------
11.6 Set Alarm-------------------------------------------------------------------------------------
12. USE SETTINGS ------------------------------------------------------------------------------------
12.1 Set Auto Redial -----------------------------------------------------------------------------
12.2 Set Lift Answer -----------------------------------------------------------------------------
12.3 Set One Touch ------------------------------------------------------------------------------
12.4 Set Voice Privacy ---------------------------------------------------------------------------
12.5 Set Back-Light ------------------------------------------------------------------------------
12.6 Set LCD Contrast ---------------------------------------------------------------------------
12.7 Set Language --------------------------------------------------------------------------------
12.8 Set Data Service ---------------------------------------------------------------------------
13. SECURITY ----------------------------------------------------------------------------------------
13.1 Set Auto Lock -------------------------------------------------------------------------------
13.2 Set Change Code ----------------------------------------------------------------------------
13.3 Set Restrict -----------------------------------------------------------------------------------
13.4 Set Reset -------------------------------------------------------------------------------------
14. REFERENCE INFORMATION ----------------------------------------------------------------
14.1 Emergency Calls ---------------------------------------------------------------------------
14.1.1 Make an emergency call ----------------------------------------------------------
14.2 Troubleshooting ----------------------------------------------------------------------------
14.2.1 No Service ---------------------------------------------------------------------------
14.2.2 What if the call does not go through? --------------------------------------------
3
Page 6

15. TECHNICAL INFORMATION ------------------------------------------------------------------
1
SAFETY INFORMATION FOR FIXED PHONES
For the safe and efficient operation of your phone, observe the following guidelines:
EXPOSURE TO RADIO FREQUENCY (RF) ENERGY
Your wireless telephone is a high power radio transmitter and receiver. When it is ON, it
receives and also sends out radio frequency (RF) signals. When you communicate using
your phone, the system handling your call controls the power level at which your phone
transmits.
In August 1996, the Federal Communications Commissions (FCC) adopted RF exposure
guidelines with safety levels for handheld wireless phones. Those guidelines are consistent
with the safety standards previously set by both U.S. and international standards bodies:
ANSI C95.1 (1992)*
SAFETY INFORMATION
NCRP Report 86 (1986)*
ICNIRP (1996)*
★ American National Standards Institute; National Council on Radiation Protection and
Measurements; International Commission on Non-Ionizing Radiation Protection
Those standards were based on comprehensive and periodic evaluations of the relevant
scientific literature. For example, over 120 scientists, engineers, and physicians from
universities, government health agencies, and industry reviewed the available body of
research to develop the ANSI Standard (C95.1)
The design of your phone complies with the FCC guidelines (and those standards).
ANTENNA CARE
Use only the supplied or an approved replacement antenna. Unauthorized antennas,
modifications, or attachments could damage the phone and may violate FCC regulations.
PHONE OPERATION
This device complies with Part 15 of the FCC Rules. Operation is subject to the following
4
Page 7

two conditions:
1) This device may not cause harmful interference.
2) This device must accept any interference received, including interference that may
cause undesired operation.
RF ENERGY INTERFERENCE / COMPATIBILITIES
Note : Nearly every electronic device is susceptible to RF energy interference from external
sources if in adequately shielded, designed, or otherwise configured for RF energy
compatibility. In some circumstances your phone may cause interference.
MEDICAL DEVICE
Pacemakers
Pacemaker manufacturers recommend that a minimum separation of 6 inches
(15centimeters) be maintained between a handheld wireless phone and a pacemaker.
Persons with pacemakers should :
z ALWAYS keep the phone more than 6 inches (15 centimeters) from your
pacemaker when the phone is turned ON.
z Not carry the phone in the breast pocket
z Use the ear opposite the pacemaker to minimize the potential for interference.
z Turn OFF the phone immediately if you have any reason to suspect that
interference is taking place.
Hearing Aids
Some digital wireless phones may interfere with some hearing aids. In the event of such
interference, you may want to consult your hearing aid manufacturer to discuss alternatives.
Other Medical Devices
If you use any other personal medical device, consult the manufacturer of your device to
determine if it is adequately shielded from RF energy. Your physician may be able to assist
you in obtaining this information.
OPERATIONAL WARNING
For Vehicles With an Air Bag
Do not place a phone in the area over an air bag or in the air bog deployment area. Air bags
5
Page 8
inflate with great force. If a phone is placed in the air bag deployment area and the air bag
inflates, the phone may be propelled with great force and cause serious injury to occupants
of the vehicle.
Potentially Explosive Atmospheres
Turn off your phone prior to entering any area with a potentially explosive atmosphere. Do
not remove, install, or charge batteries in such areas. Sparks in a potentially explosive
atmosphere can cause an explosion or fire resulting in bodily injury or even death.
Note : The areas with potentially explosive atmospheres referred to above include fueling
areas such as below decks on boats, fuel, or chemical transfer or storage facilities, areas
where the air contains chemicals or particles, such as grain, dust or, or metal powders.
Areas with potentially explosive atmospheres are often but not always posted.
BATTERIES
Batteries can cause property damage and / or bodily injury such as burns if a conductive
material such as jewelry, keys or beaded chains touches exposed terminals. The conductive
material may complete an electrical circuit (short circuit) and become quite hot. Exercise
care in handling any charged battery, particularly when placing it inside a pocket, purse or
other container with metal objects. Use only Avvio9000 original batteries and chargers.
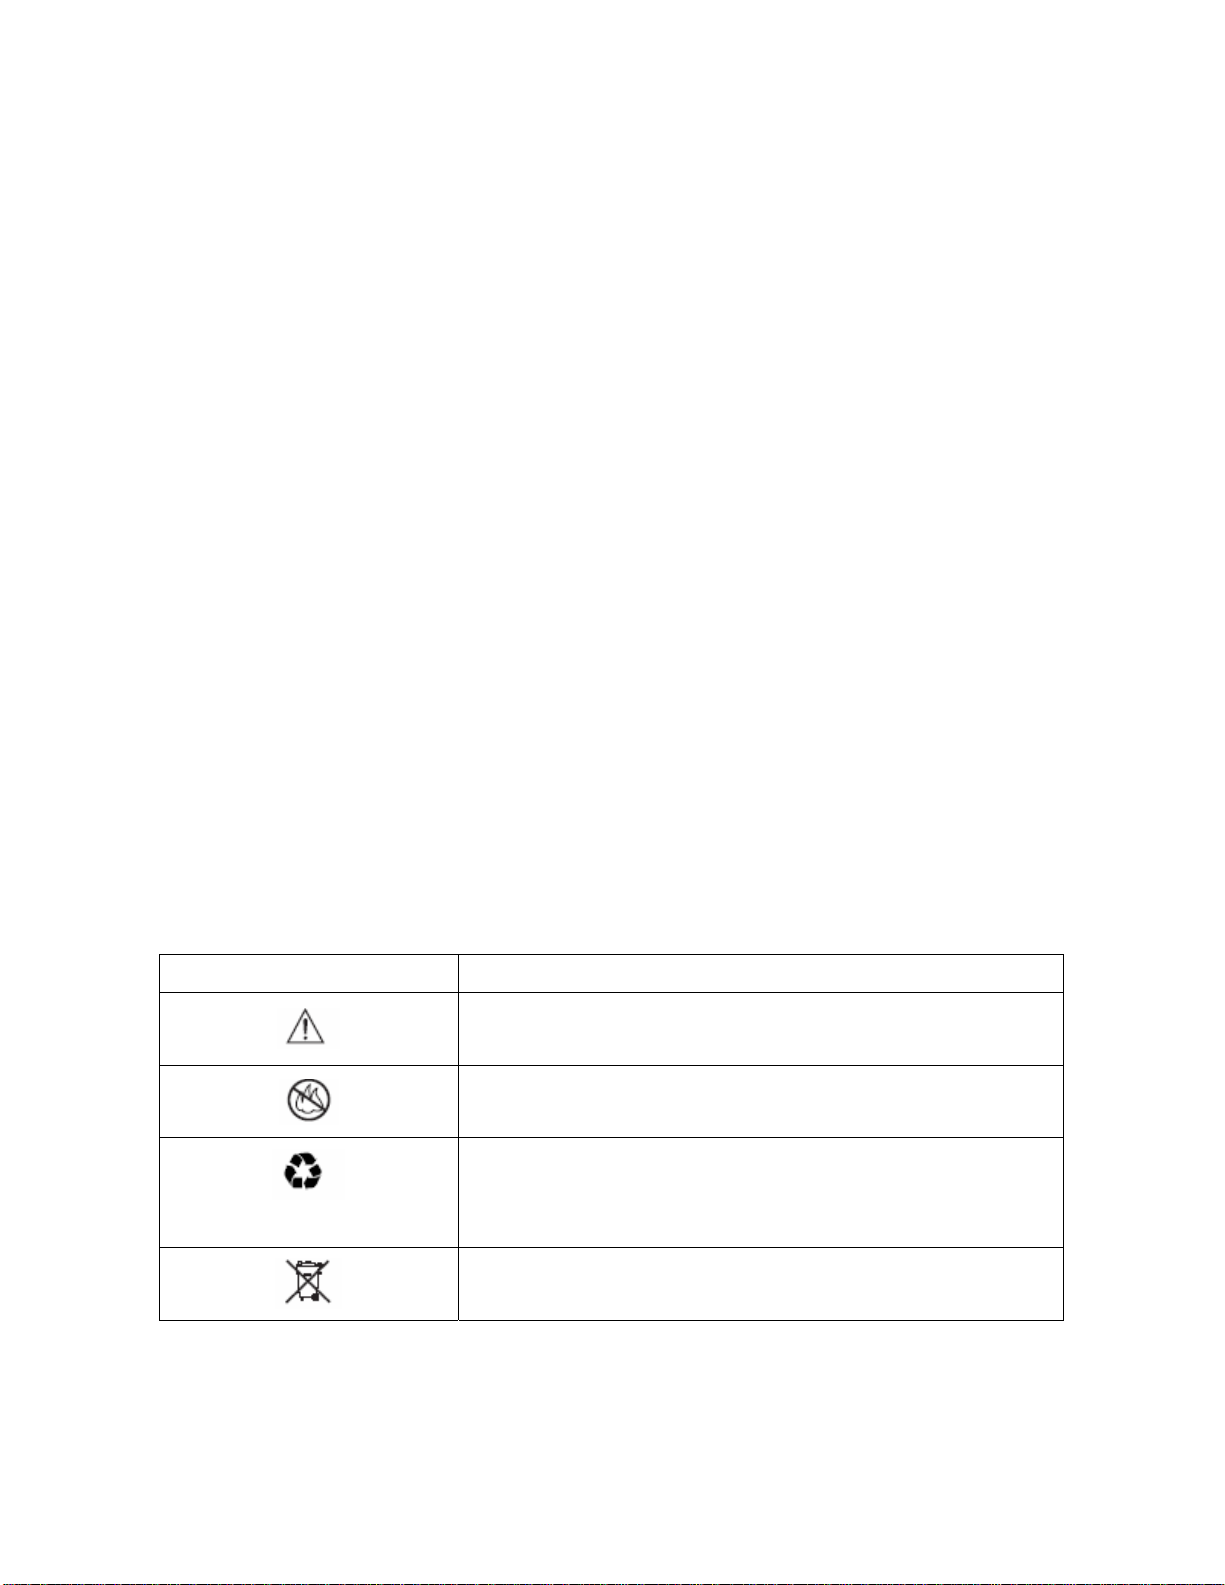
Your battery or phone may contain symbols, defined as follows.
Symbol Definition
Important safety information will follow
Your battery or phone should not be disposed of in a fire
Your battery or phone may require recycling in accordance
with local laws. Contact your local regulatory authorities for
more information.
Your battery or phone should not be thrown in the trash
Seizures / Blackouts
Some people may be susceptible to epileptic seizures or blackouts when exposed to
6
Page 9

flashing lights, such as when watching television or playing video games. These seizures or
blackouts may occur even if a person never had a previous seizure or blackout.
If you experienced seizures or blackouts, or if you have a family history of such
occurrences, please consult with your doctor.
7
Page 10
2
PREPARE YOUR PHONE FOR USE
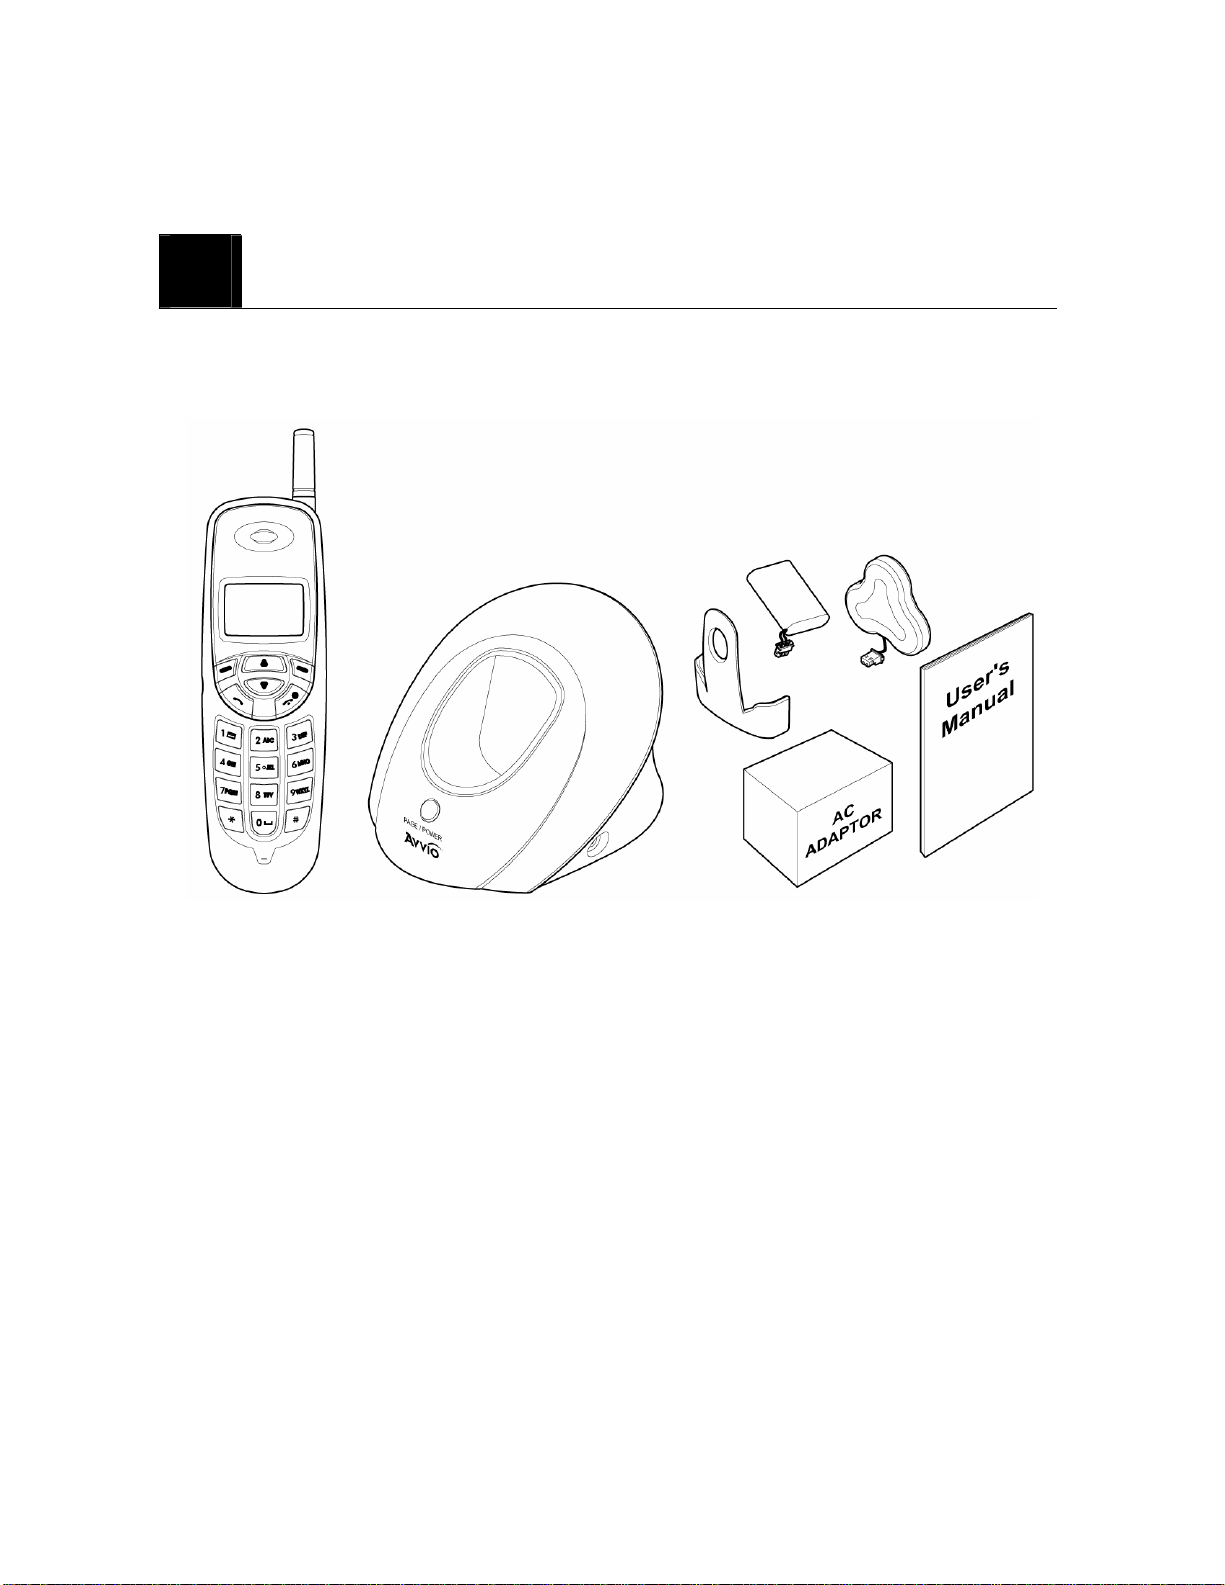
2.1 Install Battery
- Base
8
Page 11
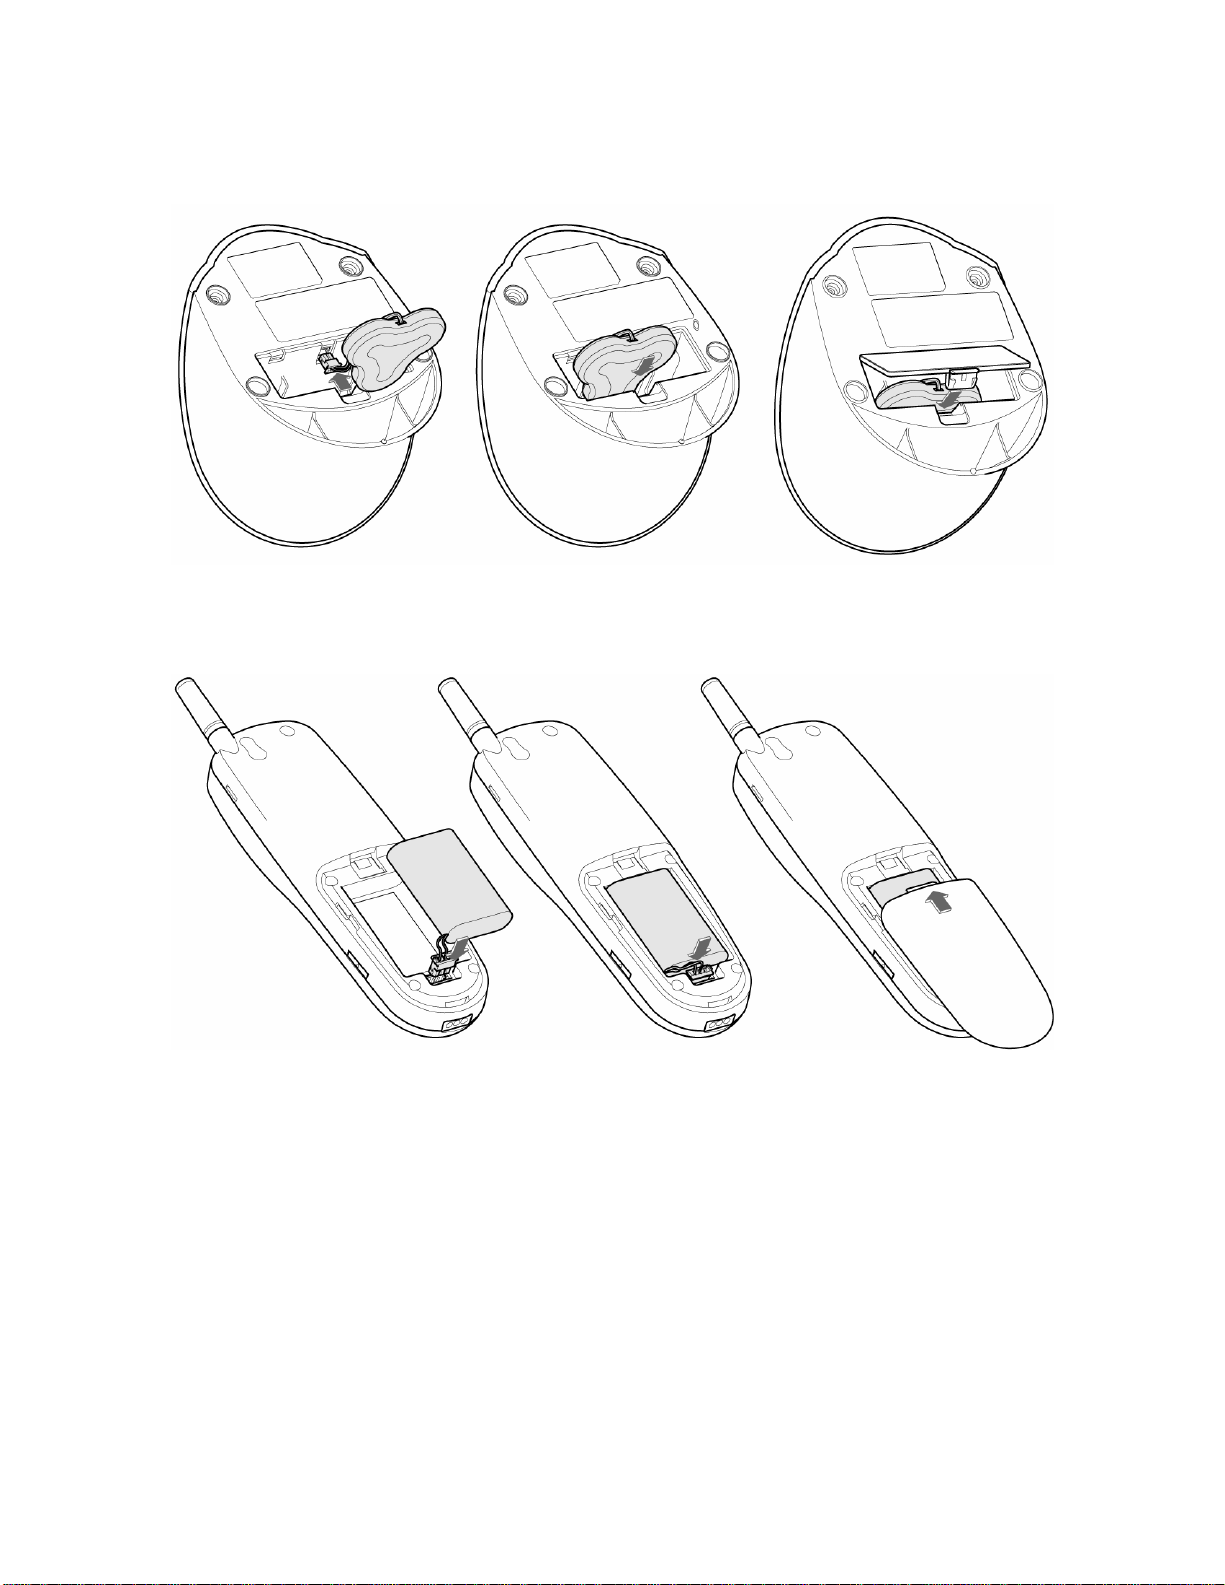
- Handy
Note : To use when sudden power failure, the base battery shall be installed at all times.
Charge after you insert the battery to the handset.
Caution : To prevent injury or burns, do not allow metal objects to contact the battery
terminals. Do not disassemble. Use only the original batteries. Batteries must be disposed
of property.
2.2 Charge the battery
9
Page 12

Caution: At initial charging, phone should be charged at least 4 hours. After the phone is
fully charged, battery icon stops scrolling.
2.2.1 Base
① Connect the lead from the charger to the side of the Base.
② Connect the charger to an AC wall outlet.
Note : When you turn on the power, red LED is on. If the handset is on the base, blue LED
is on, which shows charging status.
2.2.2 Handy
① Put the handset on the base and check if charging indication appears on the display.
② If the battery is discharged, it may take a few minutes before the charging indication
appears on the display.
③ After the phone is fully charged, battery icon stops scrolling. Charging time
depends on a charger and battery used.
10
Page 13

3
FEATURE HIGHLIGHTS
z Dial tone generation
z Auto Dialing
z Auto answer
z Voice mail
z Short Message Service (160 characters x 20ea)
z Emergency call
z Call logs
z Call restriction
z Caller ID
z Clock with alarm
z Cordless function (Out of range display and warning tone)
z Blue back light for LCD and keypad
z Multiple ring tones
z Profile setting
z Pager button
z Graphic display
z Multi language (English, Spanish, Portuguese)
z 200 phone book memory
z Antenna bar
z Battery bar
11
Page 14

z Ear phone / microphone jack
z PC FAX
z Data communication through Mini USB
z Phone Lock
4
ABOUT THE PHONE
This phone is operated in digital mode within 800MHz frequency band.
4.1 Name and function
12
Page 15
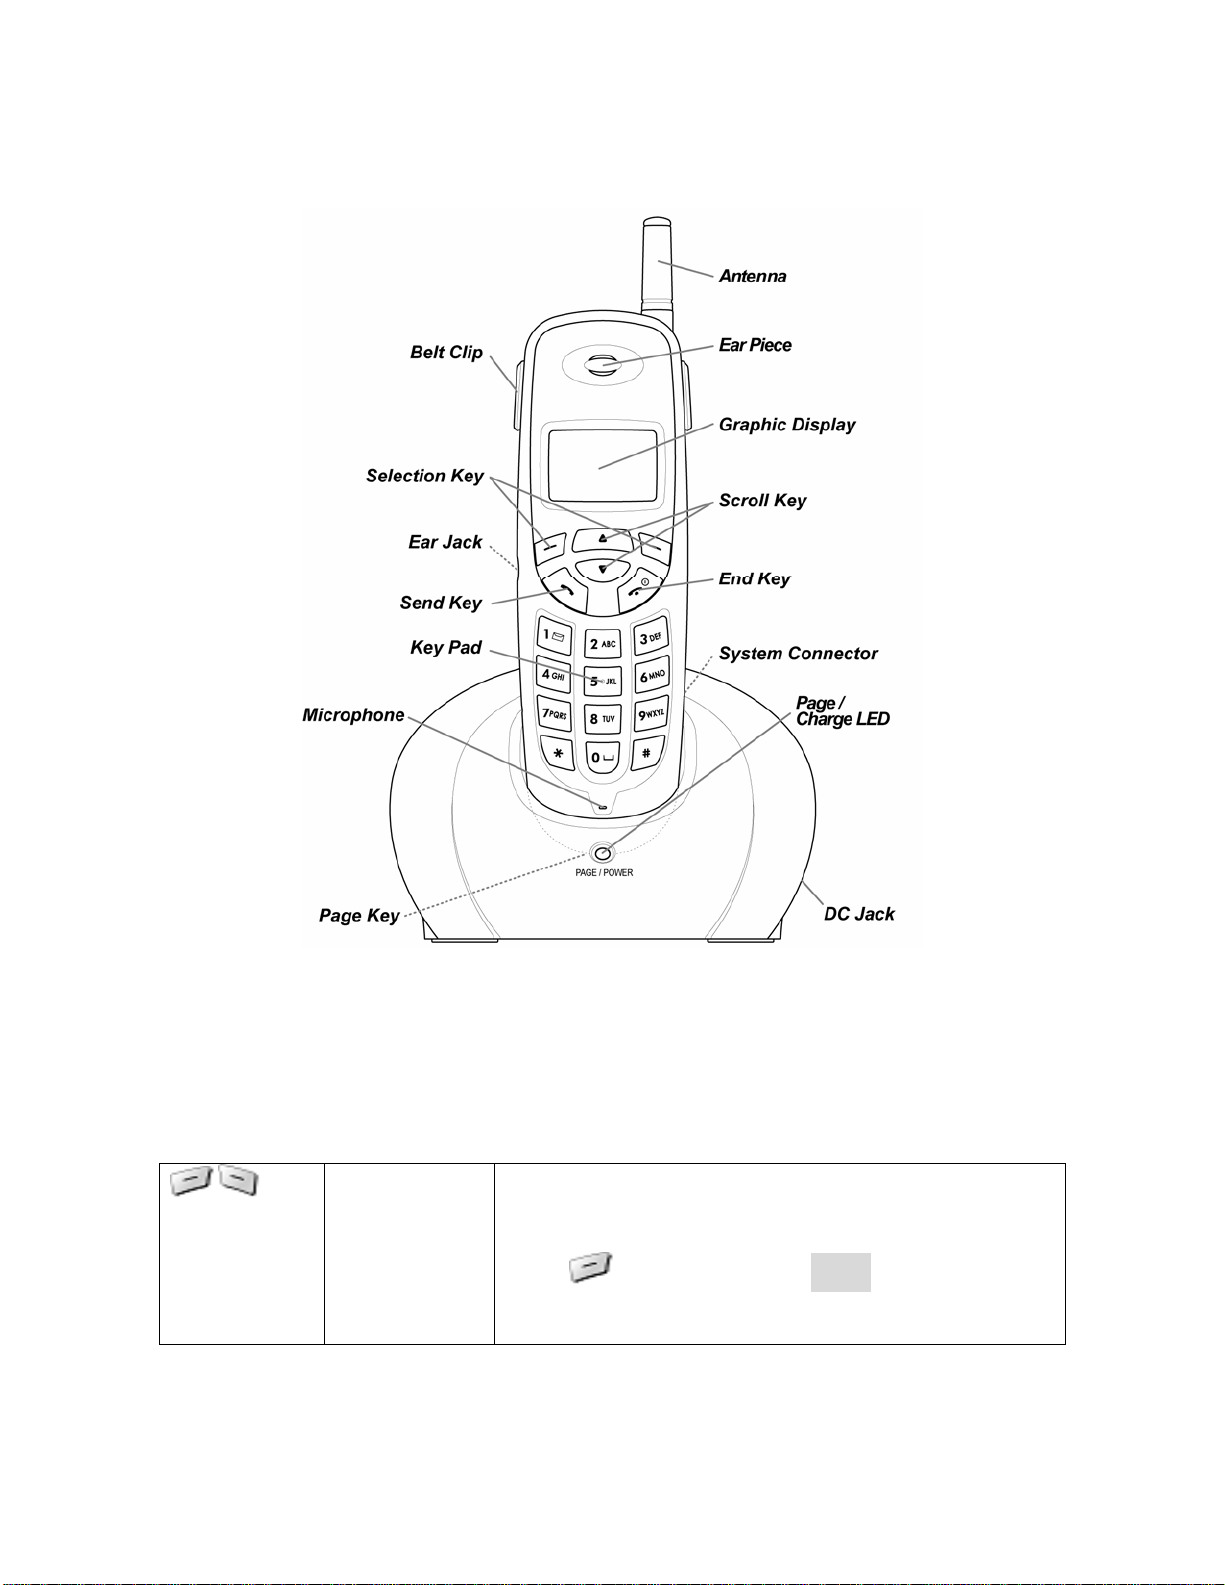
4.2 Key functions
Menu /
Selection Key
The functions of the selection keys depend on the
guiding texts shown above the keys.
Press to directly go to Menu indicated on the
screen above the key.
13
Page 16
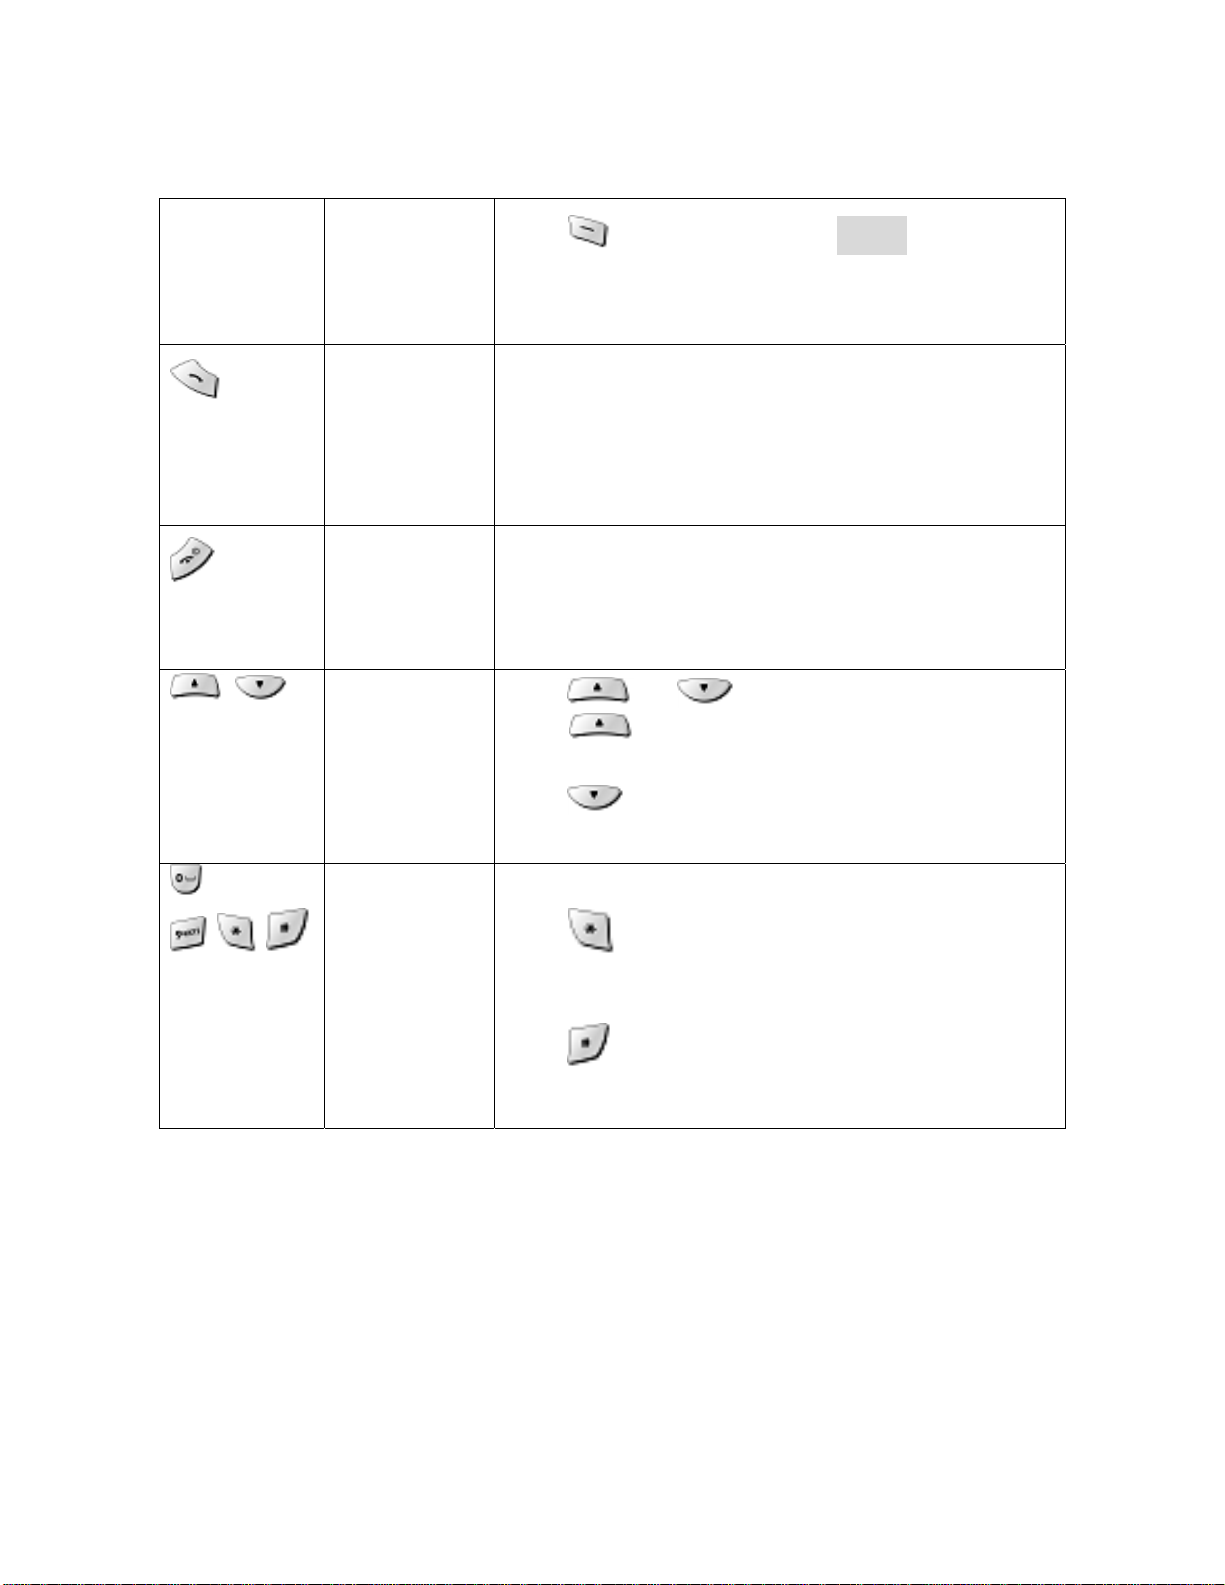
Press to directly access to Search to search the
phone book.
Send key Press to make a call to name / number shown on the
screen.
Press to answer a call.
Press once to enter the list of recently dialed numbers.
End key Press to end a call.
Press once to exit a function and to return to the idle
screen.
Scroll keys
Numeric/Text
key, Toggle
, ,
key
4.3 Display indicators
Press or to scroll the menu.
Press to go to Message Menu from standby
status.
Press to go to Sound Menu from standby status.
Used for entering numbers and letters.
Press to toggle between upper case and lower
case in text mode.
Press to cycle among numeric mode and special
character mode and text mode.
4.3.1 Standby screen
The standby screen displays when the phone is turned on. Several features can be used only
when the phone is at the idle screen.
14
Page 17
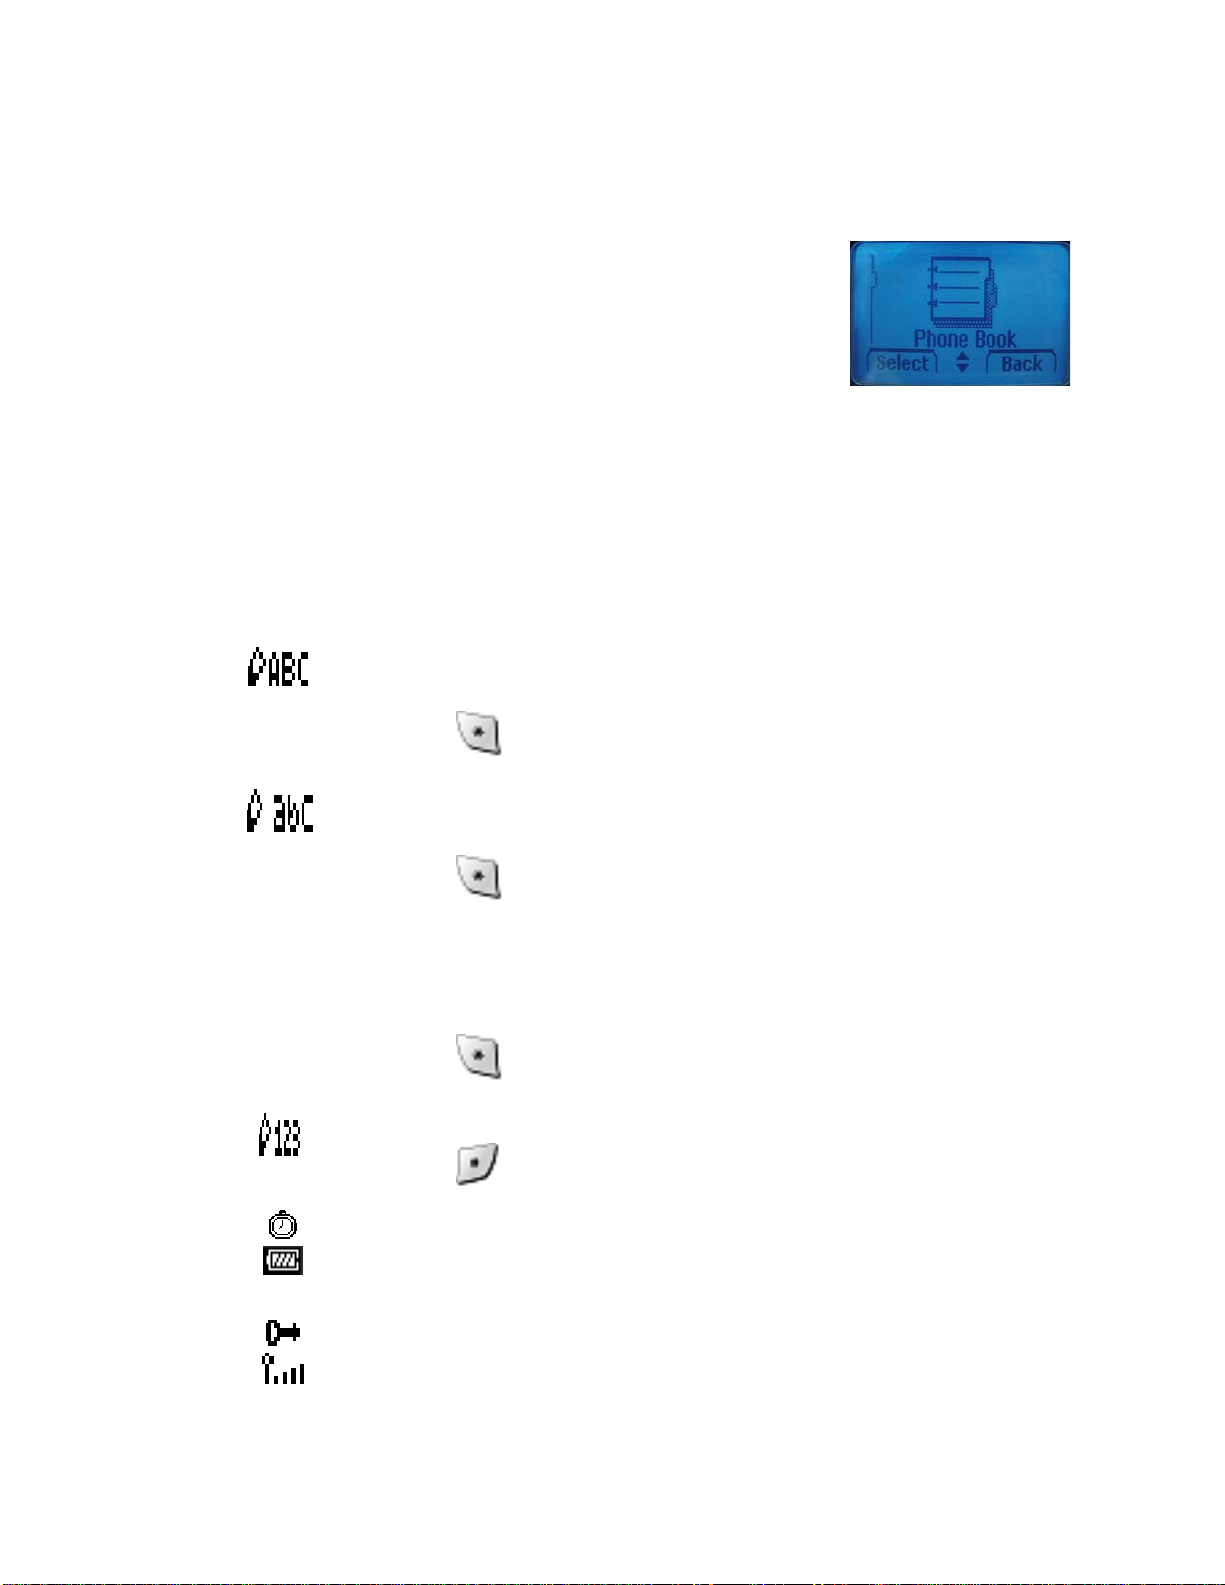
4.3.2 Scroll bar
When you access the phone’s menu, there is a scroll bar
at the far left or right of the screen. This bar indicates
user’s location in the menu: each “tab” on the bar represents
a different menu item.
4.4 Icons
Icons are graphical representations of a specific item or situation.
The list below shows what each icon means.
You have one or more new voice or text messages waiting.
Text mode icon.
This indicates that the characters you enter will be uppercase.
Press to switch to lowercase or first-uppercase.
Text mode icon.
This indicates that the characters you enter will be lowercase.
Press to switch to numeric mode or first-uppercase.
Text mode icon.
This indicates that the first character you enter will be uppercase
and the next characters will be lowercase.
Press
to switch to lowercase or uppercase.
Numeric mode icon.
Press to switch to numeric mode or text mode.
The alarm clock is set.
Charger indicator
Mute (Silent)
Phone lock
Signal strength indicator.
15
Page 18

This indicator shows the signal strength of the wireless network at
your current location. The higher the bar, the stronger signal.
Roaming Status
5
5.1 Power ON and OFF
Case 1 :
BASIC OPERATIONS
z To turn the phone on, press and hold
Or, handy is automatically powered on when you place the handy on the base.
.
16
Page 19

z To turn the phone off, press and hold .
5.2 Make a call
Case 1:
① Enter the phone number including the are code and press
② Press to end the call or to cancel the call attempt. If handy is placed in a
base, call is automatically terminated.
Note : The phone may generate heat during longer calls.
Case 2:
① Press to hear dial tone
② Enter the phone number including the area code and press .
③ Press to end the call or to cancel the call attempt. If handy is placed in a
base, call is automatically terminated.
Note: If you dial a phone number after the handy generates the dial tone, the call is
automatically made 6 seconds later.
5.3 Answer a call
Case 1:
① When the handy is resting in its base, and the phone rings, lift the handy.
② The ringing will stop and get into talk mode appearing talk time in the display.
Case 2:
① When the handy is out of its base, and the phone rings, press any key to answer a
call.
5.4 Adjust the Volume
You can adjust the earpiece volume during a call by pressing the scroll keys on the phone.
17
Page 20

z Press to increase the volume.
z Press to decrease the volume.
5.5 Redial the recent call number
You can redial the recent call number. The maximum recent call can be stored up to 30
recently dialed or received call numbers. Stored numbers may be up to 32 digits long.
① Press for about two seconds, and then dial tone is generated and recent call
numbers appear in the display.
② Press or to scroll to the number you wish to dial.
③ Press once.
Note: If no recently dialed or received call numbers are stored, you are not able to use
this function.
5.6 Caller ID
Caller ID is a network service that identifies incoming calls. Contact your service provider
to find out how to get this feature.
When Caller ID is active, your phone shows the caller’s phone number during an incoming
call, as long as this number is a part of your service provider’s wireless network.
The wireless network lets you know if it does not recognize the caller’s phone number. The
wireless network will also let you know if the calling party has blocked the Caller ID
feature.
If you have stored the name and number of the calling party in your phone book and that
number is supported by the wireless network, the caller’s name can also appear.
5.7 Out of Range display and warning tone
If handy is out of range from the base, display shows “Out of Range”. In this state, you are
not able to make or receive a call, and also SMS function does not work.
① Standby
If handy is far away from the base, the handy displays “Out of Range” on the screen, and
18
Page 21
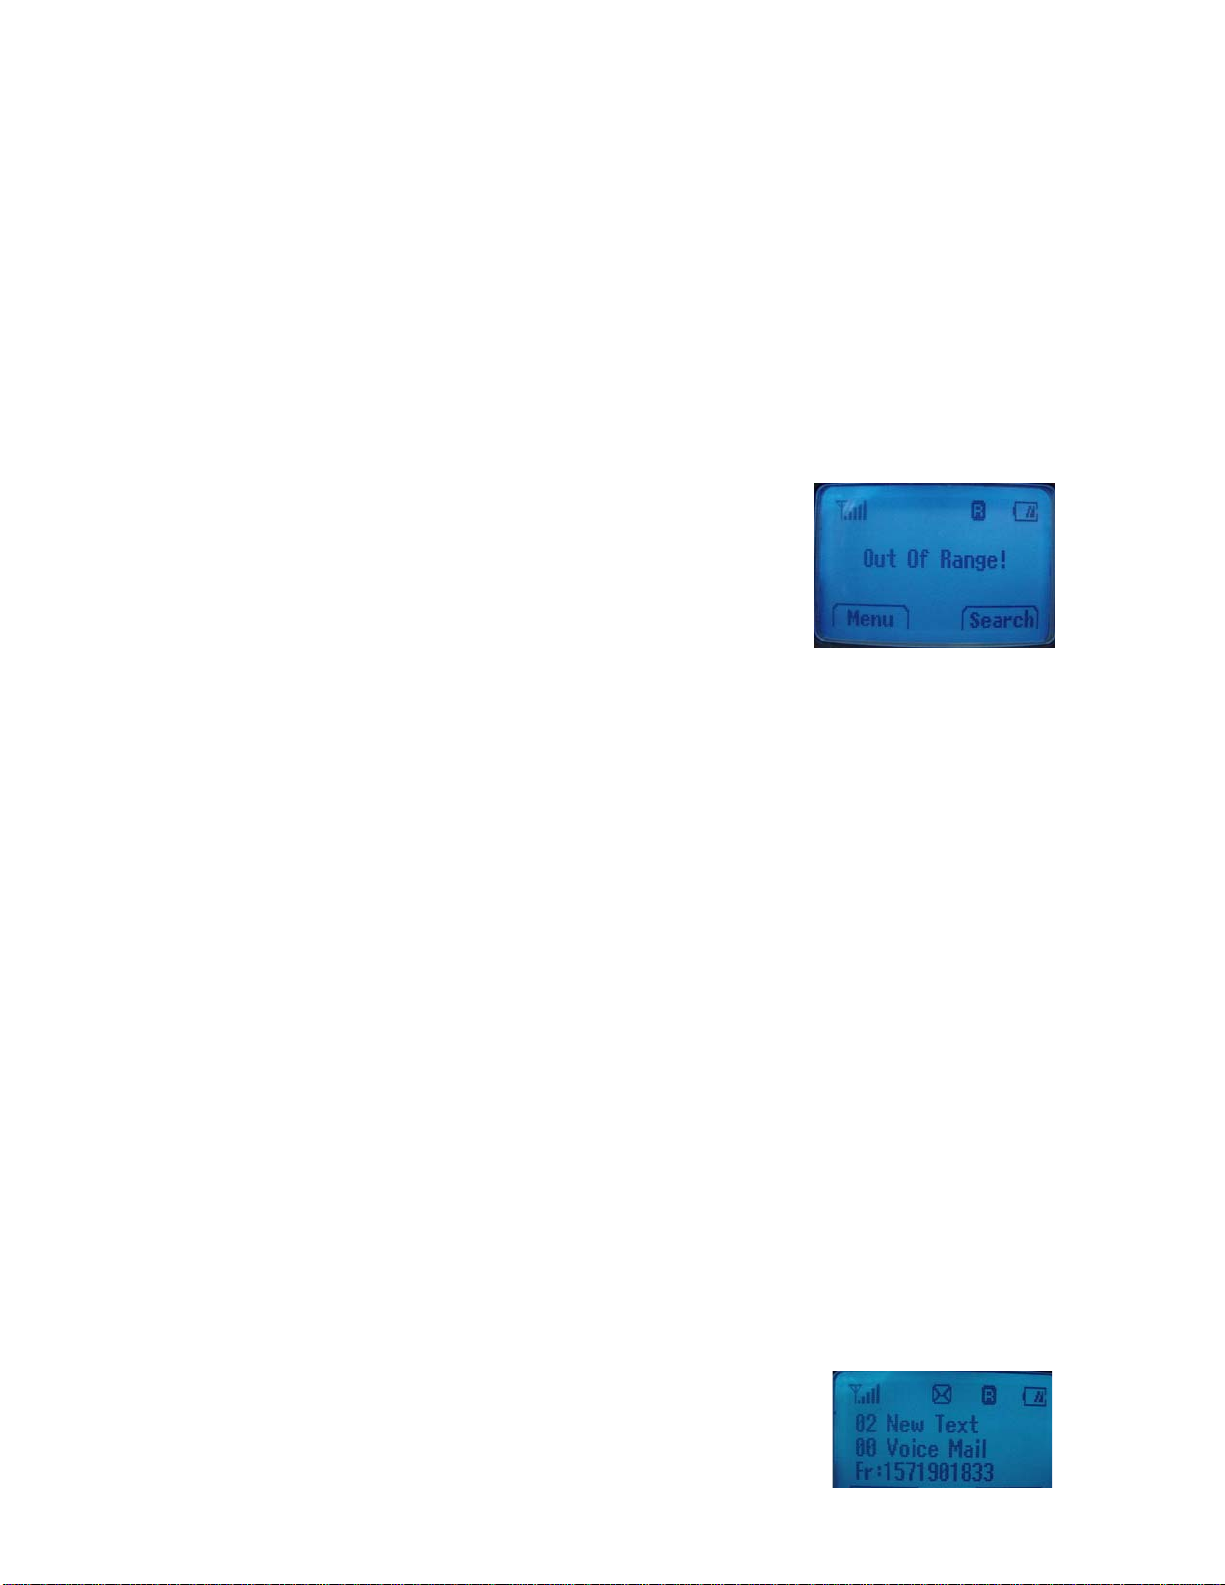
generates “Out of Range” warning beep sound every 2 minutes. This tone lasts for 20
minutes until you close to the base. If you try to make a call during this state, handy
generates error beep sound and display “Hand-Out of Range”.
When handy is close to the base, “Out of Range” disappears.
② During a call
During a call, if handy is far away from the base,
the handy displays “Out of Range” on the screen
and generates “Out of Range” warning beep sound
every 3 second. You can continue the call if the handy
closes to the base within 30 seconds after beep
sound started. If not, call is automatically dropped.
Note: Exceptionally, you can make an emergency call although the handy is “Out of
Range” from the base.
5.8 Paging
Press the page button to find handy, and then handy beeps.
After you find it, press any key on the handy to stop the beep sound. You can stop the
beep by pressing page key one more time.
5.9 Handy and Base ID Settings
Once battery in the handy or in the base is replaced, you must configure ID settings as
follows.
① Place handy on the base when a charger is connected to the base.
② When handy beeps and LED is on, ID setting is completed.
Caution: If ID setting is not properly completed, handy displays “Out of Range”. Retry 5.9
Procedure to properly configure ID settings.
5.10 SMS and Voice Mail
19
Page 22

A new SMS or Voice mail arrives, the back light of the handy
is on and the handy displays “XX New Text” or “XX Voice Mail”
and call back number on the screen.
6
6.1 Navigate menus
A menu is a list of choices you can make. Your phone has 6 main menus. Each main menu
contains numerous submenus that allow you to use the phone book, change the ringing tone,
and so on. You can use menus and submenus in two ways: by scrolling or by using
shortcuts.
USE PHONE MENUS
20
Page 23

6.1.1 Scroll through menus
From the idle screen, press Menu, and then scroll through the menu using the and
.
6.1.2 Use a shortcut
You can use a shortcut to get to options directly without scrolling through lists.
6.1.3 Exit menu levels
z To return the previous menu level, press Back or No.
z To return to the idle screen, press . No menu setting changes are saved.
6.2 List of Menus
Your phone’s menu may differ from the following list, depending on the network services
to which you have subscribed and the accessories you are using. For more information,
contact your service provider.
1. Phone Book
1. Add New
2. Search Entry
3. Search Name
4. Erase
5. My Phone #
2. Call Logs
1. Missed Calls
2. Received Calls
3. Dialed Calls
4. Erase Logs
1. Missed Calls
2. Received Calls
3. Dialled Calls
4. All Logs
5. Call Duration
21
Page 24

1. Last Call
2. All Calls
3. Received Calls
4. Dialled Calls
3. Message
1. Write Message
2. Inbox
3. Outbox
4. Erase Message
1. Inbox
2. Outbox
3. Voice Mail
4. Erase All
5. Settings
1. Save Sent SMS
2. Default CB#
3. Message Alert
1. Bell
2. Silent
3. Bell & remind
4. Delivery Ack
5. Auto Erase
1. Inbox
2. Outbox
4. Sound
1. Ring Type
1. Ringer
2. Slide Ringer
3. Silent
2. Ring Tone
1. Bell
2. Melody
22
Page 25

3. Ring Volume
4. Key Tone
1. Tone Length
1. Long DTMF
2. Short DTMF
2. Tone Volume
5. Sound Settings
1. Minute Alert
2. Connect Alert
3. Release Alert
4. Charge Alert
5. Error Alert
6. Alarm
1. Alarm #1
2. Alarm #2
3. Alarm #3
5. Settings
1. Auto Redial
1. Retry Time
2. Repeat
2. Lift Answer
3. One Touch
4. Voice Privacy
1. Standard Mode
2. Enhanced Mode
5. Back-Light
6. LCD Contrast
7. Language
1. English
2. Espanol
3. Portuguese
8. Data Service
1. Receive Mode
23
Page 26

1. Voice
2. Data
3. Fax
2. Baud Rate
1. 230400bps
2. 115200bps
3. 19200bps
6. Security
1. Auto Lock
2. Change Code
3. Restrict
1. Receiving
2. Dialling
3. International
4. Reset
7
You can enter letters or numbers with phone key pad to save the information into your
phone. To enter letters, press the key associated with the letter you wish to enter until it
appears on the screen (numbers also appear).
7.1 Enter Letters
When you want to add new names or when you search names in the phone book, your
phone automatically switches to the text mode and displays the Abc icon.
ENTER LETTERS AND NUMBERS
24
Page 27
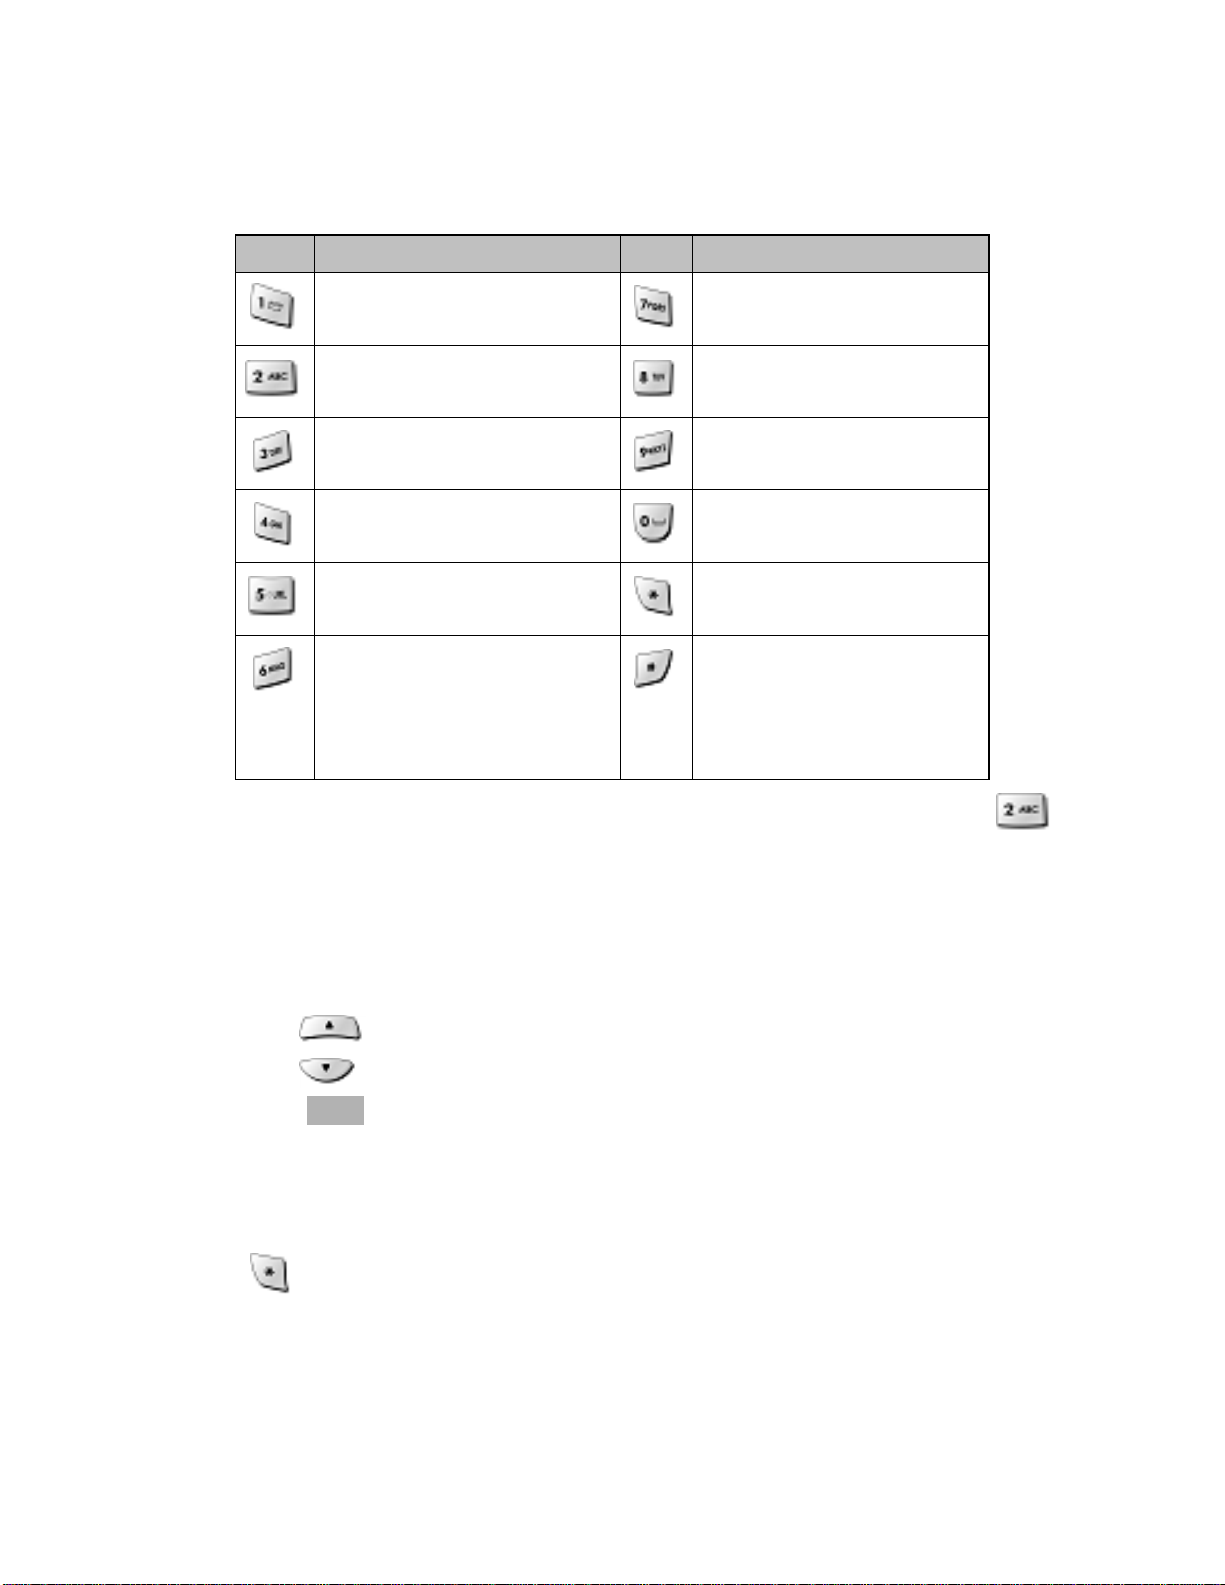
Key Characters Key Characters
1 . @ - ' , / : ? ( P Q R S 7
A B C 2 T U V 8
D E F 3 W X Y Z 9
G H I 4 Enter an empty space
J K L 5 Changes "Abc", "ABC",
M N O 6 Changes "Abc", "123",
"abc"
Special character as below
! @ # % & * < > - ; \ ? . ,
{ } $ [ ] ^_+ = : " ' ( ) / ~
Press a key once or several times to enter the letter(s) you want. For example, press
three times to enter the letter C.
7.1.1 Edit name
To edit a name in the phone book:
z Use to scroll the cursor to the left.
z Use to scroll the cursor to the right.
z Press Clear to correct any mistakes.
7.1.2 Change case of letters and numbers
You can switch the mode among uppercase and lowercase letters and numbers by
pressing
.
25
Page 28

8
8.1 About the phone book
You can store up to 200 entries in the phone.
Entries stored in phone allow numbers of up to 32 digits,
and names of up to 33 characters.
In the idle screen, you can press (Search) on the right
USE THE PHONE BOOK
26
Page 29

and (Search) on the left to enter immediately
Phone Book List.
8.2 Add a new phone book Entry
To create a phone book entry:
① Press Menu > Phone book.
② Scroll to Add New and press Select.
③ Enter the number you want to store and press Next.
④ Check entry number shown in the display or change entry number and press Next.
⑤ Enter the name you want to store and press Save.
⑥ Select one of labels among Mobile, Home and Office where you want to store the
number and press Select to complete.
9 To store the number into other storing option :
① Press Search and enter the name you want to find or press Select to find all list.
8.3 Edit Entry
To edit a phone book entry:
① Press Menu > Phone book.
② Scroll to Search Name or Search Entry to find the number you want to edit.
③ Select the entry to edit and press Detail.
④ Press Edit and change the name or the number.
⑤ Press Save to complete the change.
To add the number into other storing option:
① Press Menu > Phone book.
② Scroll to Search Name or Search Entry to find the number you want to add.
③ Select the entry to edit and press Detail.
④ Scroll to one of storing options (Mobile, Home, Office) you want to add and press
Edit.
⑤ Enter the number and press Save to complete the change.
8.4 Search Entry
27
Page 30

To search a phone book list by Entry:
① Press Menu > Phone book.
② Scroll to Search Entry and press Select.
③ Entry?____ appears in the display and enter the number
you want to find, or press Search to list all entries stored
in the phone book.
Note : You can make a call by pressing long the last digit of Entry number stored in the
phone book from idle screen.
8.5 Search Name
To search a phone book list by name:
① Press Menu > Phone book.
② Scroll to Search Name and press Select.
③ Enter one or two characters to match the phone book
stored and press Search.
④ The character you entered is included in the name stored
and entries appear in the display.
If you press Search without entering a character, all entries are listed.
⑤ Scroll to the number you want to call and press .
Note : You also can directly go to this function by pressing Search from the idle screen
8.6 Erase
To delete phone book entries:
① Press Menu > Phonebook.
② Scroll to Erase and press Select.
③ Scroll to One by One or Erase All to decide the way you want to delete phone
book entries and press Select.
④ Select Yes (or Ok) if you want to delete, or select No (or Back) to go back to
previous menu.
Caution : Note that this action cannot be undone once you perform this function..
28
Page 31

8.7 My Phone #
To store your own phone number in the phone:
① Press Menu > Phonebook.
② Enter your number to store and press Save to complete.
9
USE CALL LOGS
The Call History keeps track of:
z Missed Calls
z Received Calls
z Dialled Calls
z Erase Logs
z Call Duration
29
Page 32

Note: Your phone can store up to 30 call numbers including missed, received and dialed
calls. (
확인요망
)
When you miss a call(s), the message of missed call number,
time and call back number appears on the screen. You can press
OK after check the screen and go back to Standby. The records
will be stored in Call Logs.
You are notified of missed calls only when your phone is turned
on in the service area.
9.1 Check Missed / Received / Dialed Calls
① Press Menu > Call Logs.
② Select Missed Calls, Received Calls or Dialled Call
and press Select.
③ From the list of records, select the number listed
in the display and press Detail to see the detail call log
like date and time.
④ Scroll to the number and press Option for the following options.
z Store Save the number to the phone book.
z Erase Delete the chosen number.
9.2 Erase Logs
You can choose to delete Missed Calls, Received Calls and Dialled Calls or delete All.
① Press Menu > Call Logs.
② Select Erase Logs and press Select.
③ Scroll to Missed Calls, Received Calls, Dialed Calls or All Calls and press
Select.
④ Press Yes to delete or press No to quit.
Caution : Note that this action cannot be undone once you perform this function.
9.3 Call Duration
30
Page 33

You can check the call time in below:
z Last Calls Check the call duration of the last call.
z All Calls Check the total call times and call duration of all outgoing
calls.
z Received Calls Check the total times and call duration of all received calls.
z Dialled Calls Check the total times and call duration of all dialed calls.
① Press Menu > Call Logs.
② Scroll to Last Calls, All Calls, Received Calls or Dialled Calls and press Select.
10
USE SMS (SHORT MESSEAGE SERVICE)
Your phone can send or receive text message. It supports 20 messages with 160 characters
per each and you can use Template (already installed in your phone) to shorten the editing
time.
After completion of a message, you can choose to send it out right away, or to save it as a
draft.
z Write Messages
z Inbox [00/00]
31
Page 34

z Outbox [00]
z Erase Message
z Settings
z Voice Mail [00]
10.1 Send a Text Message
You can send a text message to one or more recipients. You can manually enter each
recipient’s phone number, or you can select the number from the phone book.
Note: The maximum length of a text message differs depending on the capabilities of the
network from which it originated. Also, text messages may be delayed according to network
service condition because messages can be originated in networks.
Contact your service provider for more information.
① Press Menu > Message.
② Scroll to Write Message and press Select.
③ You can enter text, numbers and special characters to create a message. A
maximum 160 characters is supported to send a message.
Or, press Temp to use template stored in the phone and select one of the message
templates in below.
- Where are you?
- Hello, How are you?
- Tell me, urgently.
- I will call you later.
- Contact me when available.
- I will be late.
- Received message. Will reply later.
- What are you doing?
- When can I see you?
- What time is the meeting?
④ Press Next to complete the message.
⑤ Press Search to find the number stored in the phone book. Or, manually enter the
number and press Next.
32
Page 35
⑥ Choose one of the options in below and press Select.
z Send Send message to only one number.
z Edit Message Edit the message you wrote.
z Edit Number Edit the number you entered.
z Save Message Save message to the draft.
z Priority Select priority between Urgent and Normal.
z Call Back Enter the call back number.
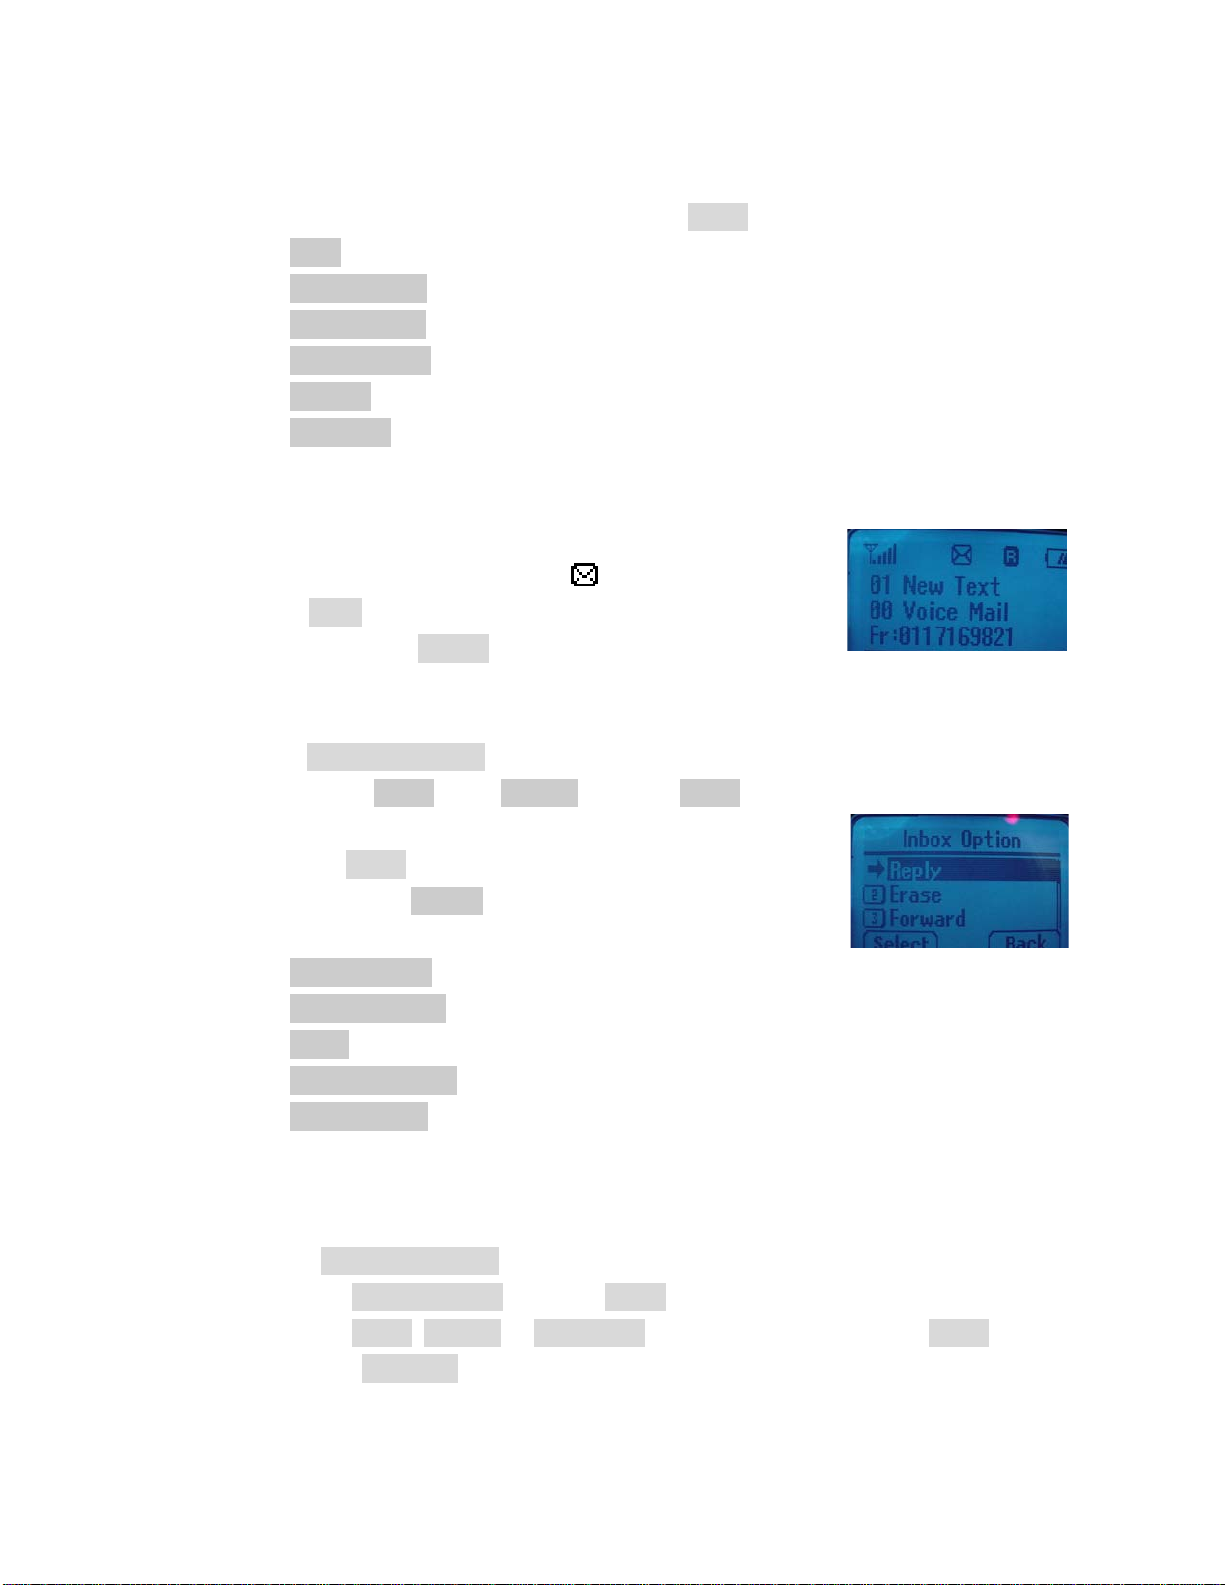
10.2 View Inbox / Outbox
When you receive a message, call back number displays with
a message alert, and a new message icon appears as picture.
You can press Read to read it right away, or ignore it and check it
later in Inbox by pressing Cancel.
Outbox stores messages sent and saved.
① Press Menu > Message.
② Scroll to the Inbox or the Outbox and press Select.
③ From the list, select the message you received or sent
and press Select.
④ When you press Option, you can scroll to one of
the message options:
z Reply (Inbox) Reply the chosen message.
z Send (Outbox ) Send the chosen message.
z Erase Delete the chosen message.
z Forward(Inbox) Forward the chosen message.
z Save Address Save the call back number to the phone book.
10.3 Erase a message
To delete messages stored in Inbox and outbox :
① Press Menu > Message.
② Scroll to Erase Message and press Select.
③ Scroll to Inbox, Outbox or Voice Mail you want to delete and press Select.
Or, select Erase All to delete all.
33
Page 36

④ Select One by one to delete a message one by one and press Select.
Or, select Erase All to delete all in the message box.
⑤ Press Erase to delete or press Back to quit.
Caution : Note that this action cannot be undone once you perform this function.
10.4 Message Settings
To configure the message settings :
① Press Menu > Message.
② Scroll to Settings and press Select.
③ From the list, select one option you need and press Select.
9 Save Sent Message You can save the sent message
9 Default CB # Enter the default call back number.
9 Message Alert Select Bell, Silent or Bell & remind.
9 Delivery Ack Press Yes to check message delivery or press
No to quit.
9 Auto Erase Set to erase Inbox or Outbox automatically.
10.5 Use Voicemail (Network Service)
You can listen to your voice messages by calling your network voice mail phone number.
Voice messages are stored to the network voice mail box, not to your phone.
① Press Menu > Message.
② Scroll to the Voice mail and press Select. If there is no network service
numbers listed, “Empty” is displayed; press Ok and then select Edit to create
one.
③ From the list, select one option you need and press Ok
z Empty & Edit Enter or modify the network service number.
z Erase Delete all pre-saved info of the chosen Voice Mail Server.
z Connect to Voice Dial the network service number and connects you to the
voice mail service.
34
Page 37

11
SET SOUND
You can set your own preference on the following functions.
z Ring T ype
z Ring T one
z Ring Volume
z Key T one
z Sound Settings
z Alarm
35
Page 38
11.1 Set Ring Type
① Press Menu > Sound > Ring Type.
② Scroll to one of the below options you want and press Select.
9 Ringer
9 Slide Ringer
9 Silent
11.2 Set Ring Tone
① Press Menu > Sound > Ring Tone.
② Scroll to one of the below options you want and press Select.
9 Bell
9 Melody
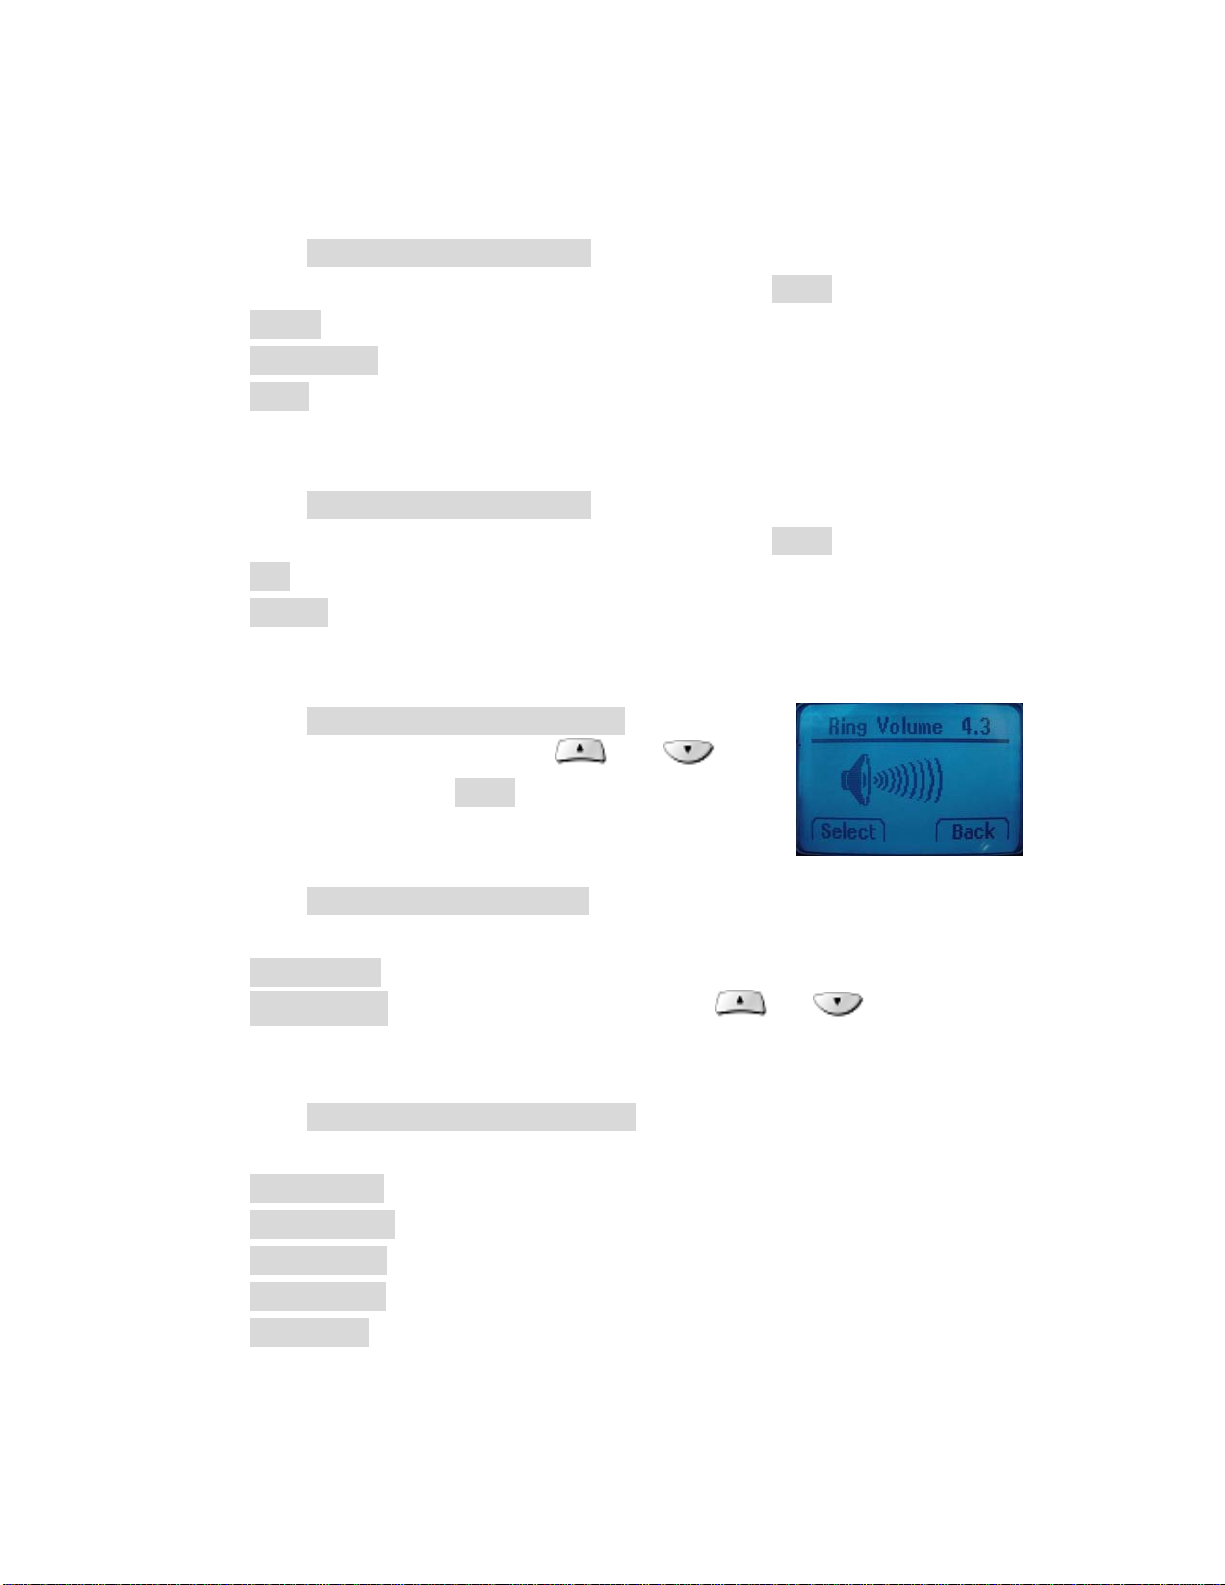
11.3 Set Ring Volume
① Press Menu > Sound > Ring Volume.
② Adjust the volume by pressing and
scroll keys and press Select.
11.4 Set Key Tone
① Press Menu > Sound. > Key Tone.
② Scroll to one of the below options you need and press Select.
9 Tone Length Select Long DTMF or Short DTMF
9 Tone Volume Adjust the volume by pressing or scroll keys.
11.5 Set Sound Setting
① Press Menu > Sound > Sound Settings
② Scroll to one of the below options you need and press Select.
9 Minute Alert
9 Connect Alert
9 Release Alert
9 Charge Alert
9 Error Alert
36
Page 39
11.6 Set Alarm
When Alarm is set, the icon
appears on the idle screen. You can set up to three Alarms.
① Press Menu > Sound > Alarm.
② Scroll to Alarm # you want to set and press Select.
③ Select Off, Once or Daily and press Next.
④ Set Time and press Next.
⑤ Select Off or On to use Snooze function and press Next to save the change.
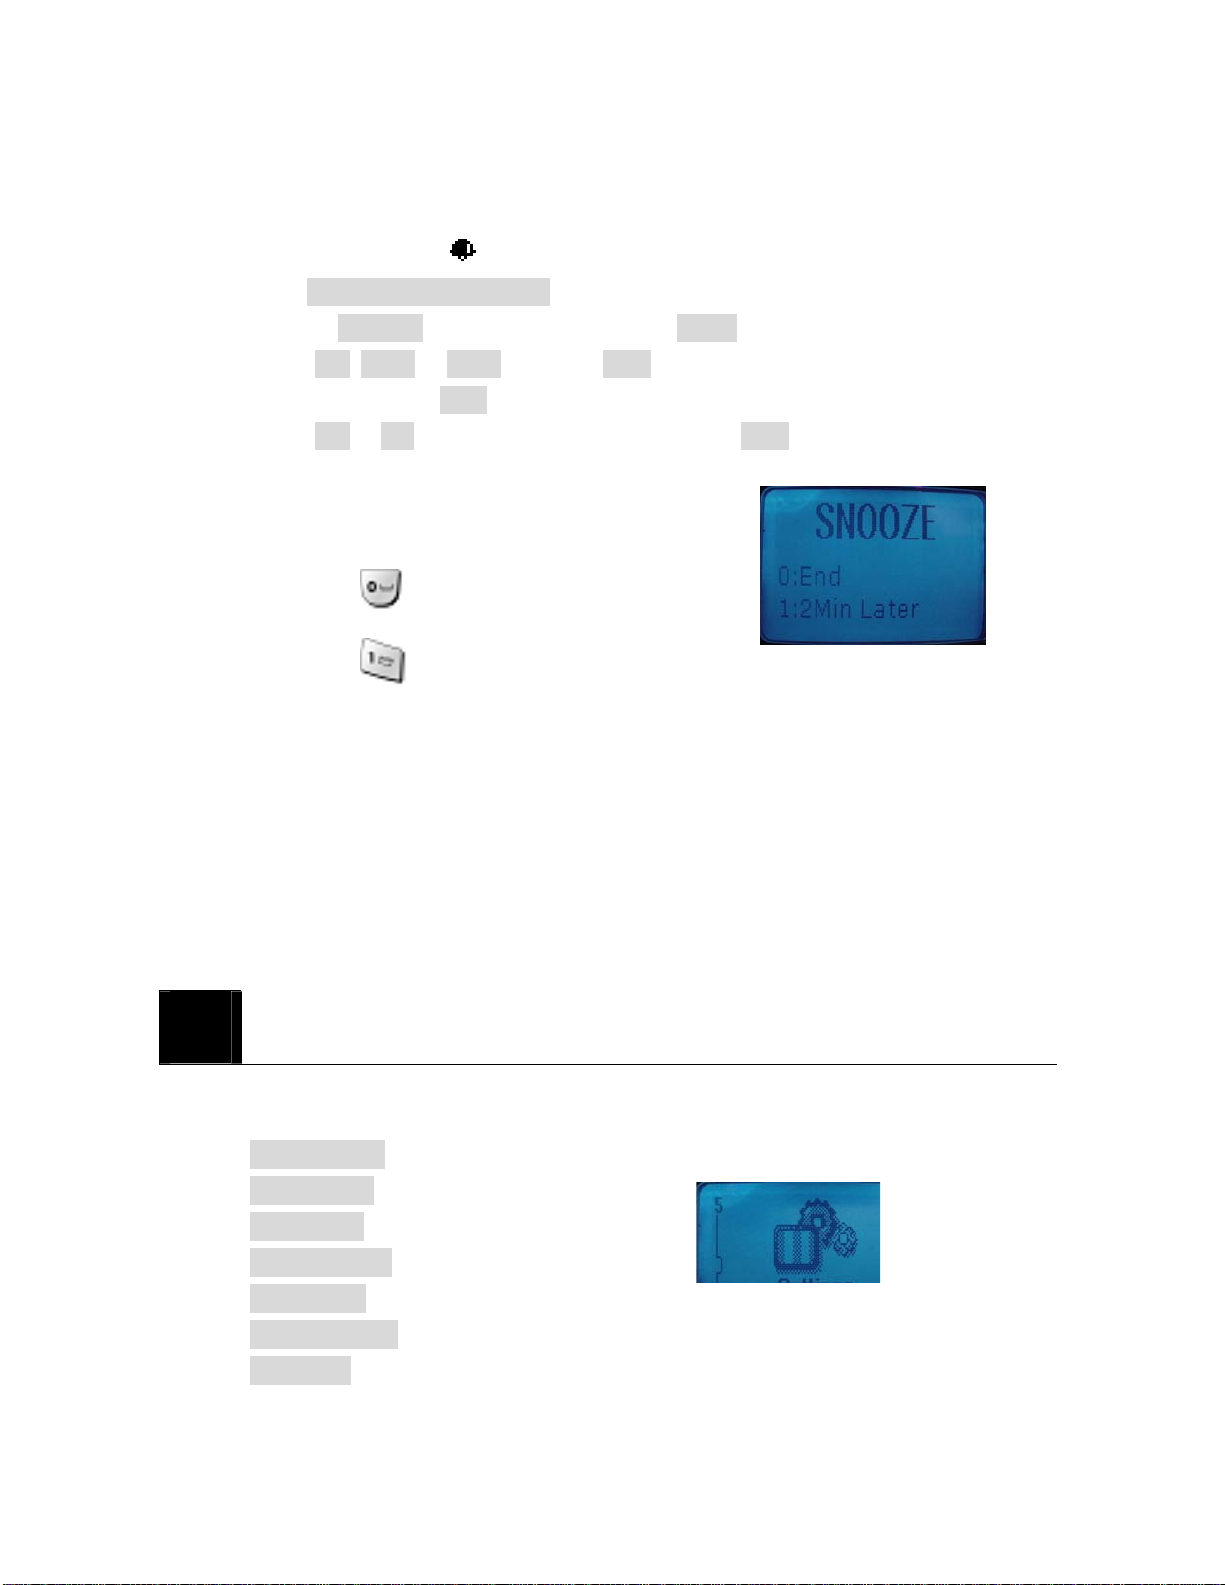
⑥ When the phone alarms at the time you set,
press any key to stop the alarm.
⑦ If you set Snooze function,
9 Select : end
9 Select : Snooze
12
USE SETTINGS
Setting menu includes :
z Auto Redial
z Lift Answer
z One Touch
z Voice Privacy
z Back-Light
z LCD Contrast
z Language
37
Page 40

z Data Service
12. 1 Set Auto Redial
You can set Auto Redial to enable the phone to keep trying dialing if the called party is not
available.
① Press Menu > Settings > Auto Redial
② Scroll to Retry time and press Select.
③ You can choose one of the options you need and press Select.
9 Off
9 3 Seconds
9 5 Seconds
9 7 Seconds
9 10 Seconds
Or, you can scroll to Repeat and press Select.
9 1 time
9 3 times
9 5 times
12. 2 Set Lift Answer
This allows you to set answer mode.
① Press Menu > Settings > Lift Answer.
② Select On to answer a call by lifting the handy from the base or Off to answer by
pressing (Send).
12.3 Set One Touch
① Press Menu > Settings > One Touch
②
12.4 Set Voice Privacy
12.5 Set Back-Light
① Press Menu > Settings > Back-Light
② Scroll to one of the below options you want and press Select.
38
Page 41
9 10 Seconds
9 20 Seconds
9 30 Seconds
9 Off
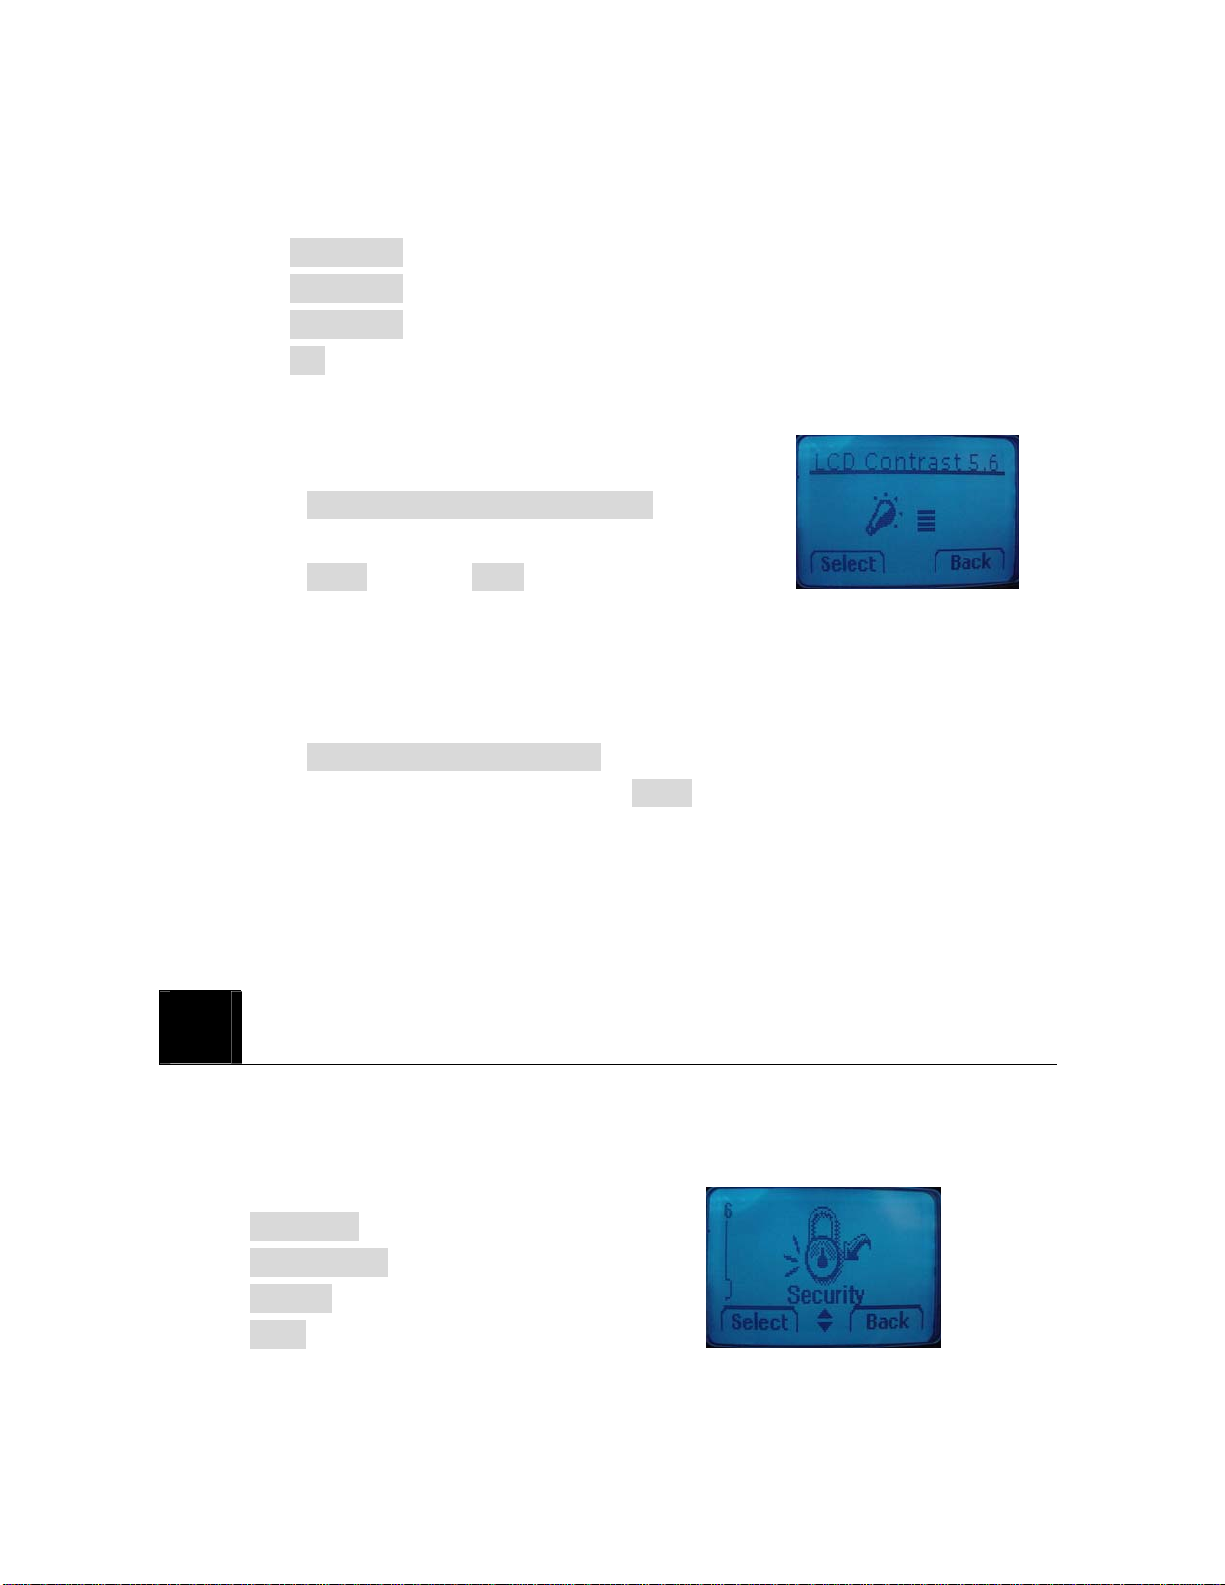
12.6 Set LCD Contrast
There are 7 levels for LCD Contrast.
① Press Menu > Settings > LCD Contrast.
② Adjust contrast using and key
③ Press Select to save or Back to quit.
12.7 Set Language
You can select the language you need. The phone currently supports three languages
(English, Spanish, and Portuguese).
① Press Menu > Settings > Language.
② Select the language you need and press Select to complete.
12.8 Set Data Service
Voice / Data / Fax
230400 bps / 115200 bps / 19200 bps
13
Your phone is equipped with a versatile security system that prevents the unauthorized
change of the below phone settings.
SECURITY
9 Auto Lock
9 Change Code
9 Restrict
9 Reset
39
Page 42
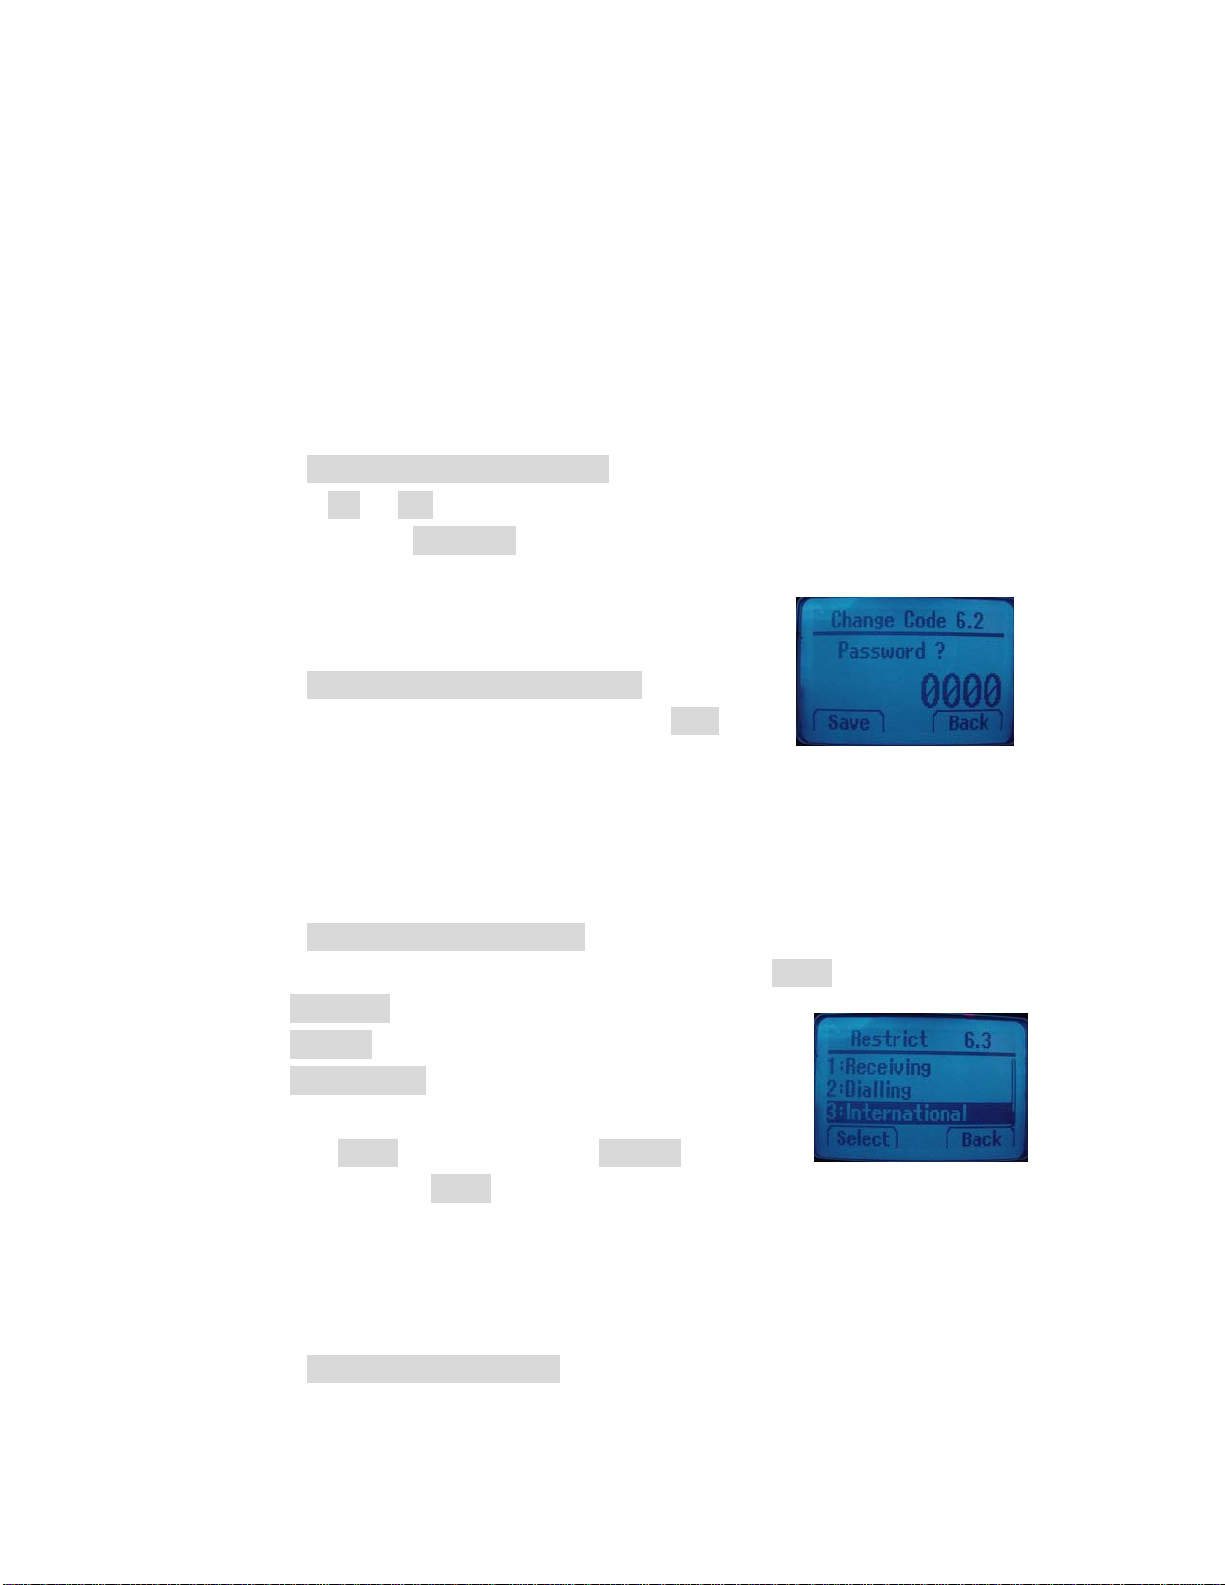
You must press default security code “0000” to enter into this menu and you can change
security code as you want.
13.1 Set Auto Lock
You can lock the phone to prevent unauthorized use of phone. Even though your phone is
locked, you still can make a call to the emergency number programmed into your phone,
such as 911 or any other official emergency number.
① Press Menu > Security > Auto lock.
② Toggle On or Off to lock or unlock phone. If you want to lock the phone after
power on, select Power On .
13.2 Set Change Code
You can change security code in four digits.
① Press Menu > Security > Change Code
② Enter the number you want to set and press Save.
Caution: Contact your service provider if you forget the security code.
13.3 Set Restrict
You can restrict incoming and outgoing calls.
① Press Menu > Security > Restrict.
② Scroll to one of the below options you want and press Select.
9 Receiving
9 Dialling
9 International
③ Scroll to Allow to allow the calls or Restrict to restrict
the calls and press Select to complete.
13.4 Set Reset
This feature resets the current settings to factory default values. All the phone book and
messages stored in the phone is erased and cannot be undone once performed.
① Press Menu > Security > Reset
40
Page 43

② Press Yes to reset the phone or No to quit.
14
14.1 Emergency Calls
IMPORTANT!
This phone, like any wireless phone, operates using radio signals, wireless and landline
networks, and user-programmed functions. Because of this, connections in all conditions
cannot be guaranteed. Therefore, you should never rely solely on any wireless phone for
essential communications (e.g. medical emergencies).
Remember, to make or receive any calls, the phone must be switched on and be used in a
service area that has adequate signal strength. Emergency calls might not be possible on all
REFERENCE INFORMATION
41
Page 44

wireless phone networks or when certain network services and/or phone features are in use.
Check with local service providers.
14.1.1 Make an emergency call
Enter the emergency number for your present location (for example, 911 or any ①
other official emergency number emergency numbers vary by location).
② Press .
If certain features like restrict calls are in use, you might first need to turn those features off
before you can make an emergency call. Consult this guide and your local cellular service
provider.
When making an emergency call, remember to give all of the necessary information as
accurately as possible. Remember that your wireless phone might be the only means of
communication at the scene of an accident do not terminate the call until given permission
to do so.
14.2 Troubleshooting
14.2.1 No service
If you are outside the wireless service area, No service will display on your phone. No
calls can be made or received, however, emergency calls may still be possible.
14.2.2 What if the call does not go through?
Your phone can make and receive calls only when it is switched on and in the wireless
network’s service area.
No service means that you are probably outside the wireless service area. No calls can be
made or received.
This number is restricted means calls to the phone number you tried to call are restricted
42
Page 45

15
The model wireless phone meets the government’s requirements for exposure to radio
waves.
Your wireless phone is a radio transmitter and receiver. It is designed and manufactured not
to exceed limits for exposure to radio frequency (RF) energy set by the Federal
Communications Commission(FCC) of the U.S. Government. These limits are part of
comprehensive guidelines and establish permitted levels of RF energy for the general
population. The guidelines are based on standards that were developed by independent
TECHNICAL INFORMATION
43
Page 46

scientific organizations through periodic and thorough evaluation of scientific studies. The
standards include a substantial safety margin designed to assure the safety of all persons,
regardless of age or health.
The exposure standard for wireless fixed phone employs a unit of measurement known as
the Specific Absorption Rate, or SAR. The SAR limit set by the FCC is 1.6W/kg. Tests for
SAR area conducted using standard operating positions accepted by the FCC with the
phone transmitting as its highest certified power level in all tested frequency bands.
Although the SAR is determined at the highest certified power level, the actual SAR level
of the phone while operating can be well below the maximum value. This is because the
phone is designed to operate at multiple power levels so as to use only the power required
to reach the network. In general, the closer you are to a wireless base station, the lower the
power output.
Before a phone model is available for sale to the public in the U.S. and Canada, it must be
tested and certified to the FCC that it does not exceed the limit established by each
government for safe exposure. The tests area performed in positions and location (e.g., at
the ear and worn on the body) reported to the FCC. The highest SAR value for this model
phone when tested for use at the ear is 1.000W/kg, and when worn on the body, as
described in this user guide, is 0.526W/kg.
While there may be differences between the SAR levels of various phones and at various
positions, they all met the governmental requirements for safe exposure. Please note that
improvements to this product model could cause differences in the SAR value for later
products; in all cases, products are designed to be within the guidelines.
2. Body-worn Operation
For body-worn operation, the SAR testing of the device was performed using a 0.8 cm air
gap, which corresponds to using clips and holsters that contain no metallic components and
meets FCC RF exposure guidelines. The use of accessories that do not satisfy these
requirements may not comply with FCC RF exposure compliance and should be avoided.
44
Page 47
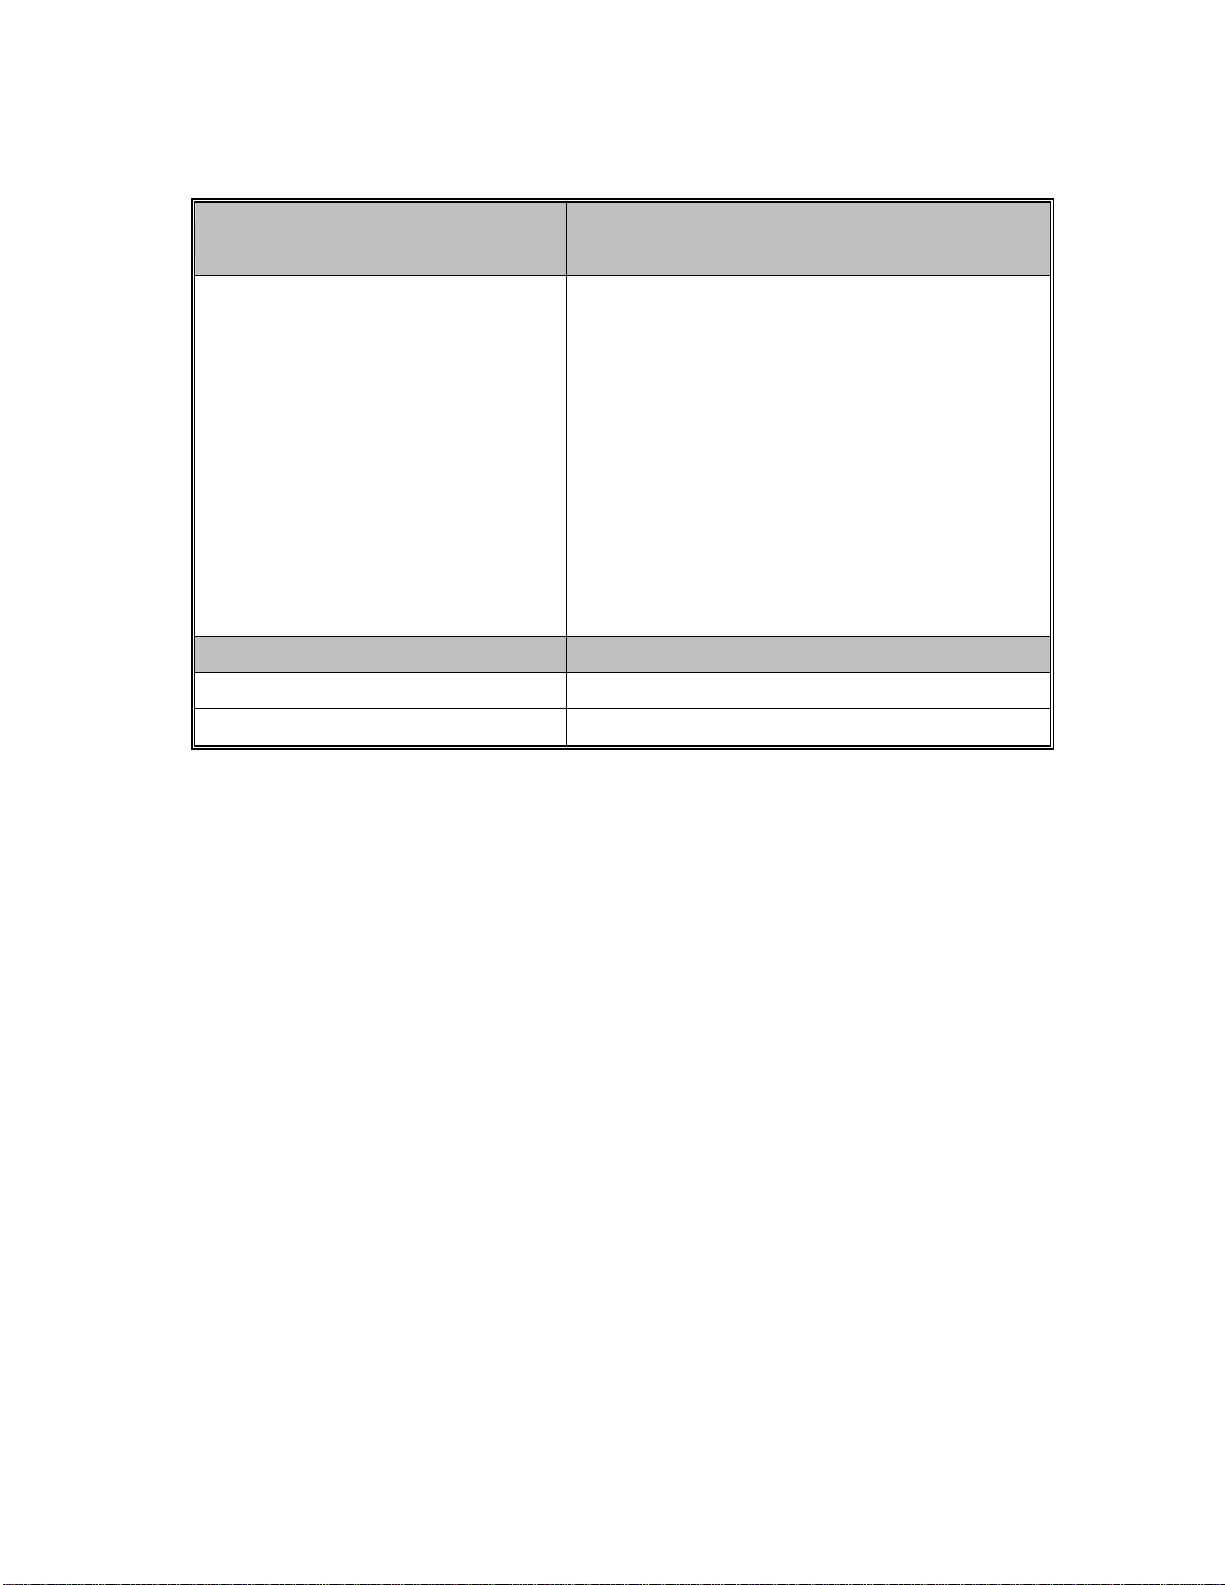
Weight
Handy : 168.0grams(0.37 lbs)
Base : 153.5 grams(0.33 lbs)
Handy :
160.3mm(H) x 50.0mm(W) x 34.8(T)
(Antenna adds 27.0mm to the height)
Size (H x W x D)
Wireless Networks
TX Frequency Range
Back up Battery
5.31”(H) x 1.96”(W) x 1.37”(T)
(Antenna adds 1.06” to the height)
Base :
83.2mm(H) x 125.0mm(W) x 133.7mm(T)
3.27”(H) x 4.92”(W) x 5.26”(T)
CDMA 800
824.7 ~ 848.31 MHz
3.6V 280mAh rechargeable battery
45
 Loading...