

Page 1

www.telexper.com
Quick Installation Guide
Commander Station
Page 2
1
nCS Quick Installation Guide
Commander Station:
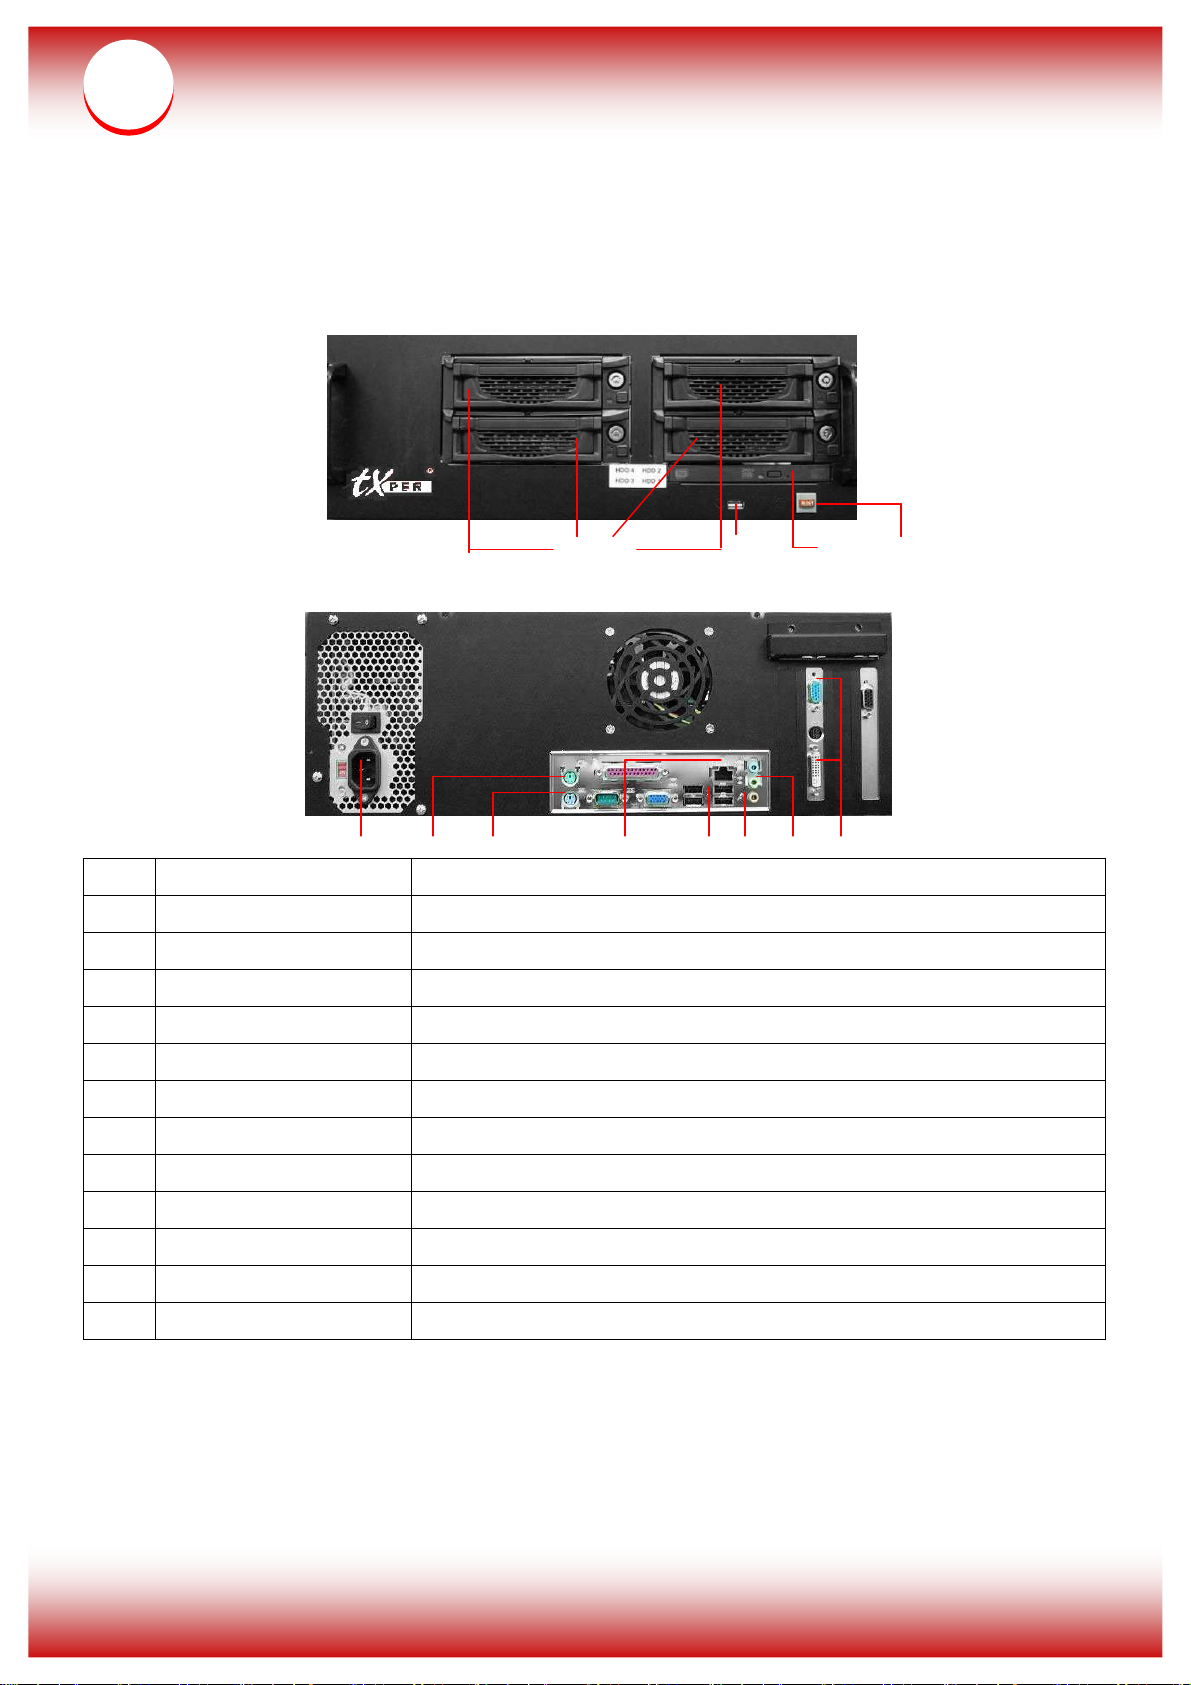
- Product Front View
4
- Product Rear View
3 2
1
12 11 10 9
Item Component Description
1 Power button Press to turn the nCS on.
2 Recordable DVD Drive Use this drive to install programs, store files onto recordable DVDs.
3 USB port Plug USB devices.
4 HDD Caddy * 4 For HDD installation.
5 Video Out Video output connector for Monitors.
6 Speaker Out Plug an external speaker into this jack to listen voice.
7 Mic In Plug an external microphone into this jack to transmit voice.
8 USB ports * 4 Plug USB devices.
9 Ethernet Jack Plug 10/100/1000 Ethernet network cable into the jack.
10 Keyboard Plug the keyboard.
11 Mouse Plug the Mouse.
12 Power In jack Plug the power cord into the port.
Note: For dual monitor function (
Live view + E-Map
), please have 2 monitors connected to video
8 7 6 5
output connectors on the back of nCS before staring the system.
。
Page 3
2
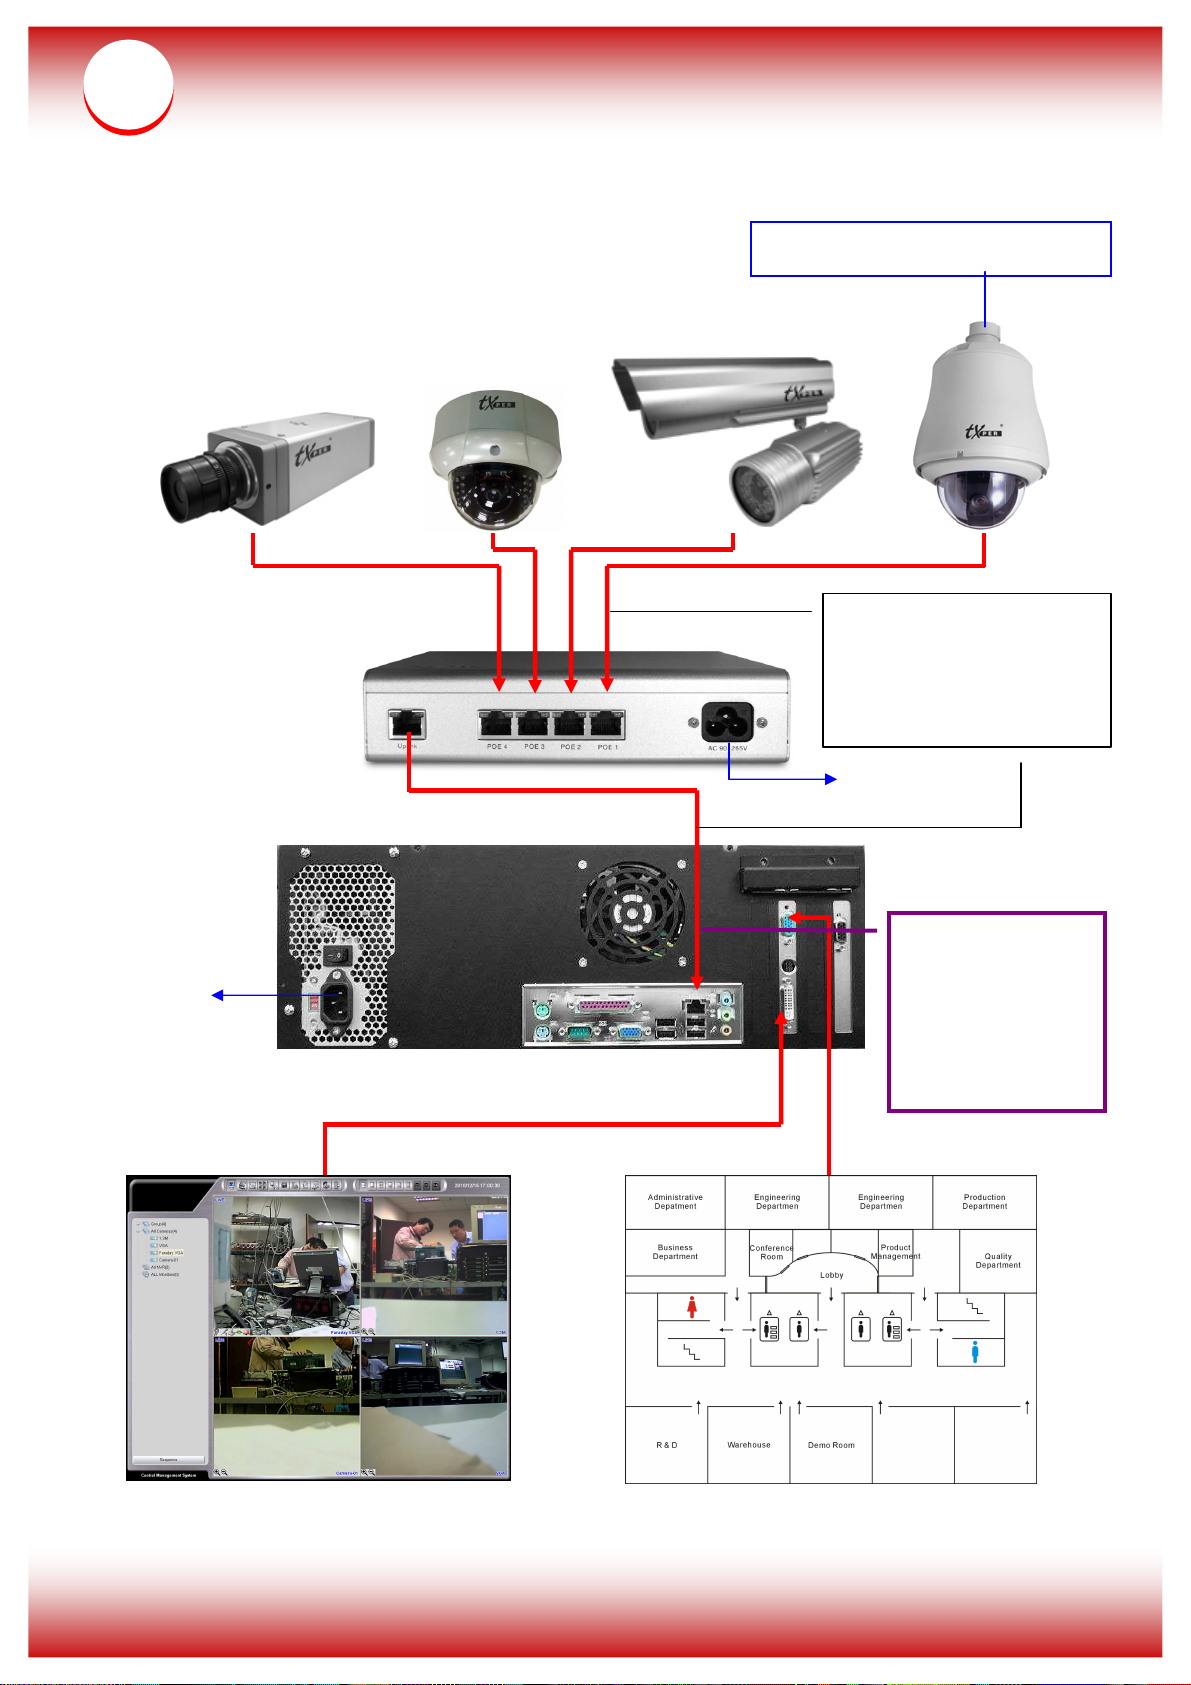
Installation Diagram
Connect DC 12V or AC 24V
Connect the nCAM
using the CAT-6 RJ-45
cable to the PoE hub
Power Cord
Power Cord
Connect the
PoE Hub by
using the CAT-6
RJ-45 cable to
nCS.
Page 4
Check the Monitors, Keyboard,
3
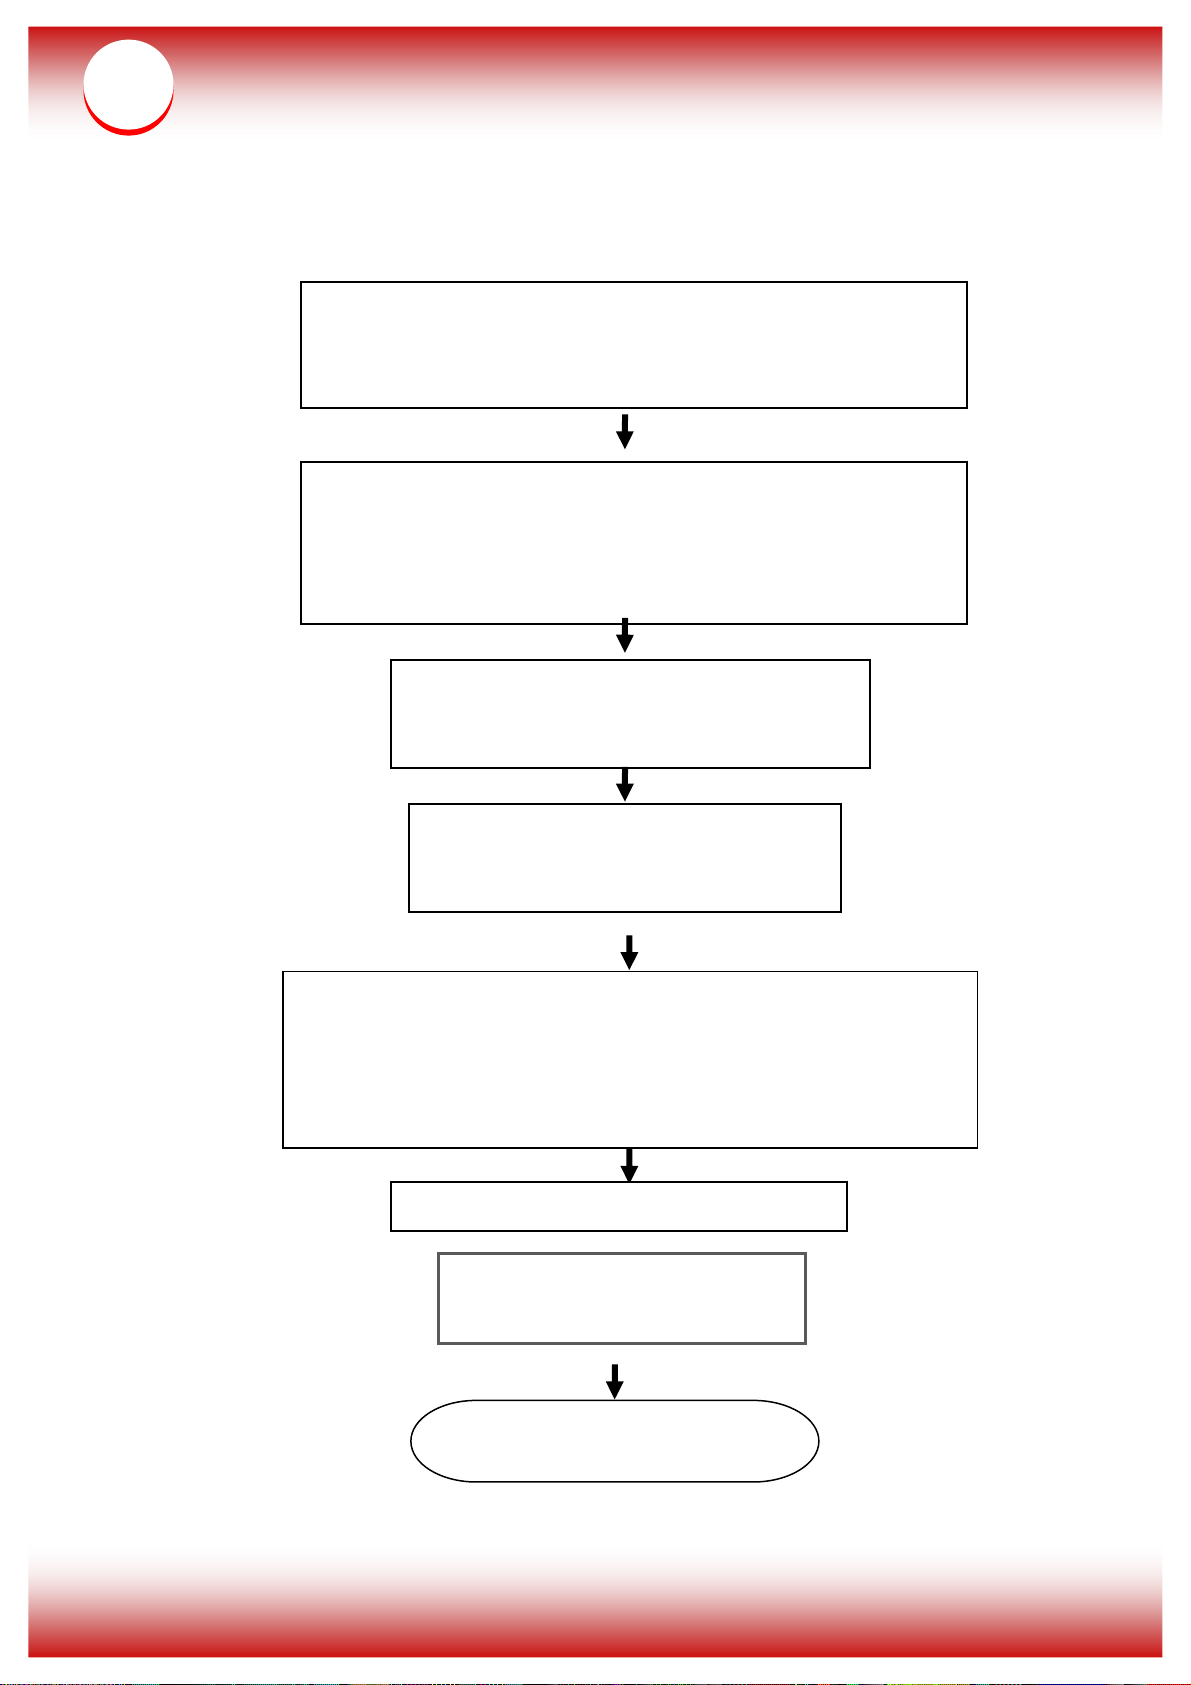
System Setup Flow Chart
(Important: Please ensure power-in switch on the back
recommended. Ensure to lock the HDD power switch or
Take out nCS from the carton box
of nCS is local voltage)
Install HDD to caddy case
(Important: 3.5” SATAII, III HDD is strongly
else the system will not detect the HDD!)
Ensure connection of IP cameras to
PoE Hubs, PoE Hubs to nCS.
Mouse, Power cord…etc are
connected
Power on the system, it would auto-setup at first launch
First-time launch with new HDD: Choose Format ALL
Adding new HDD to the system: Choose Format
(For first time installation, CMS will start after 3-5 times
reboot)
Log in to CMS
Username: admin
Password: 99999999
Finish, system start working
Page 5
4
CMS Setup
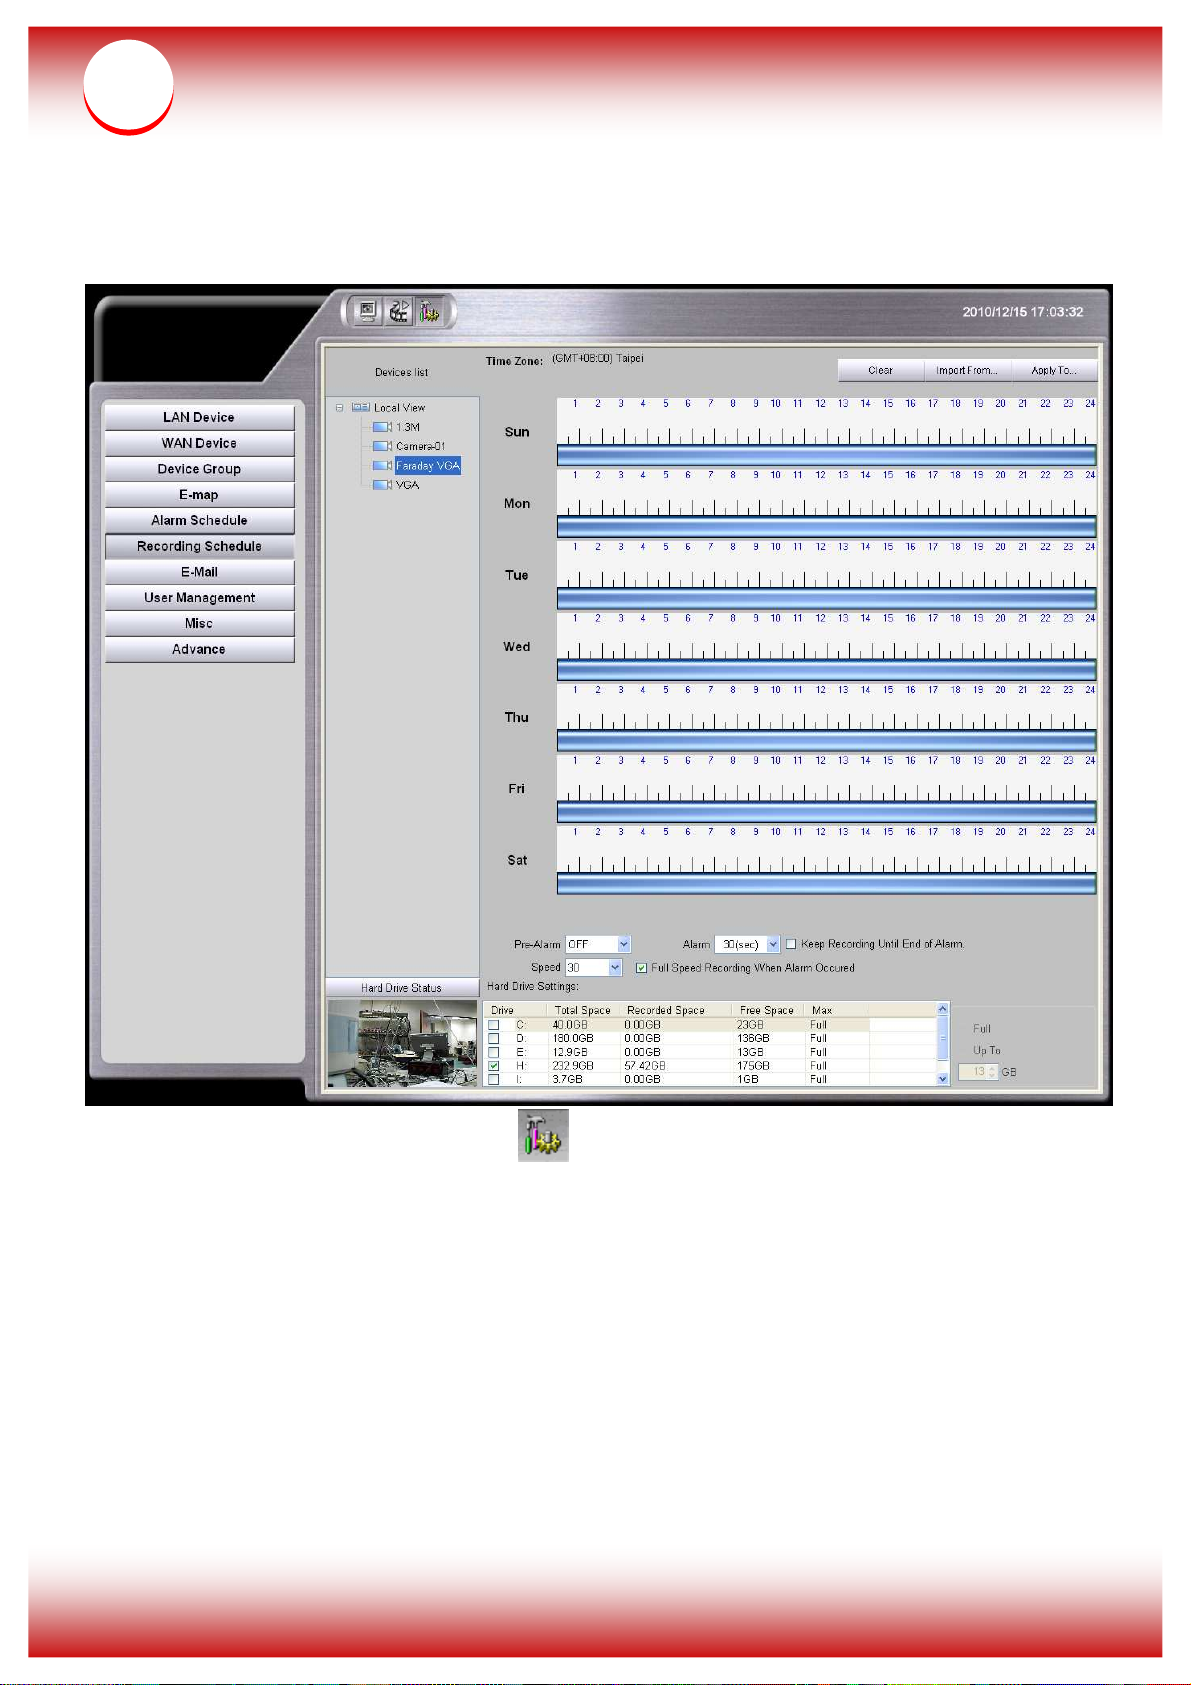
Set up Recording Schedule
1. On the Main screen, enter Setup page.
2. On the Setup page, enter Recording Schedule.
3. Hard Drive Selection:
Select the Hard Drive you want to save for recording video/audio files.
CMS will display the Estimated Total Hard Drive Storage automatically.
4. Setup Storage Space: At least 1GB shall be reserved for REC.
5. REC Speed Setting: Recording speed: 1~30 fps for the cameras
6. Full Speed Recording When Alarm
Check on the box to enable Full speed recording (30fps) when alarm.
7. REC Schedule Setting
Draw time bar to schedule and enable video/audio REC for each camera.
Page 6
5
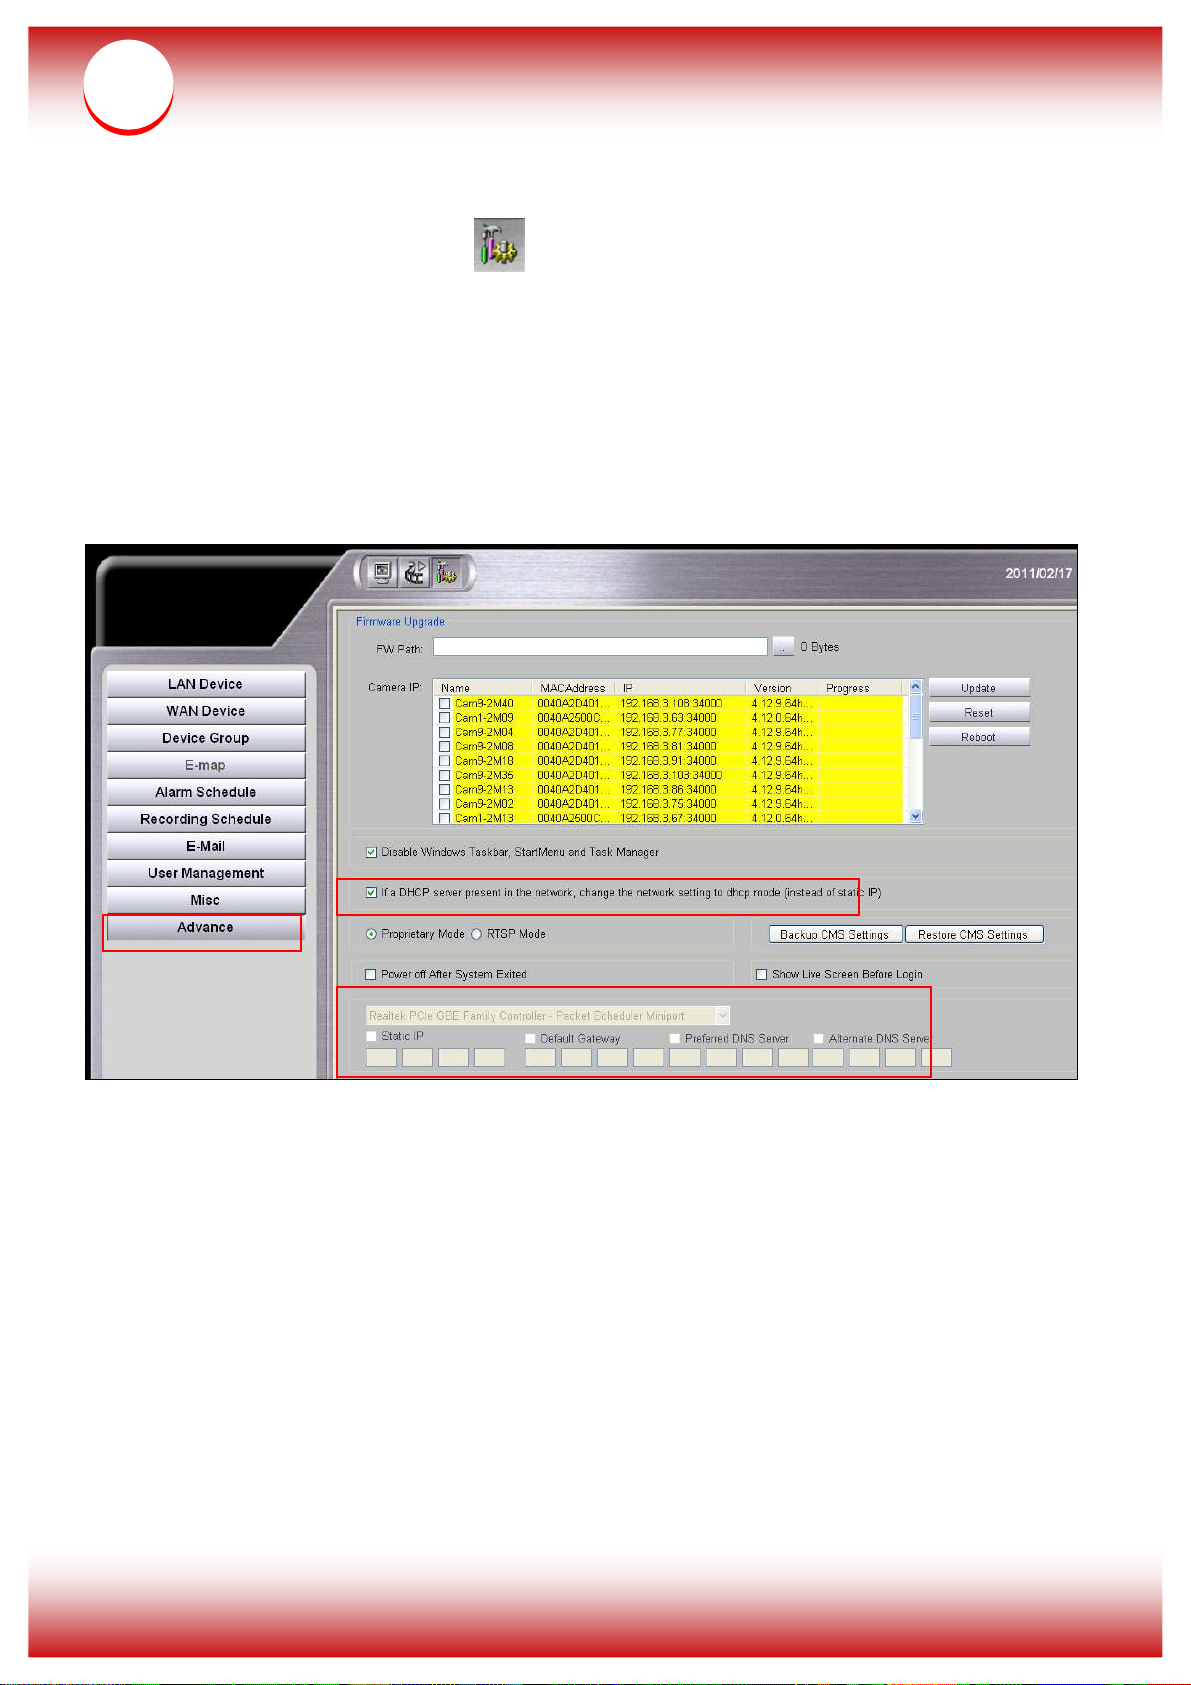
How to Set up Static IP
1. On the Main screen, enter Setup page.
2. On the Setup page, enter Advance.
3. Uncheck ““If a DHCP server present in the network, change the network setting to dhcp
mode (instead of static IP)”
4. Select Realtek Ethernet Card, and then insert information such as Static IP and Default
Gateway.
5. Before returning to Live Mode, the system will ask if you want to save the changes. Click Yes
to complete setup.
Page 7
6
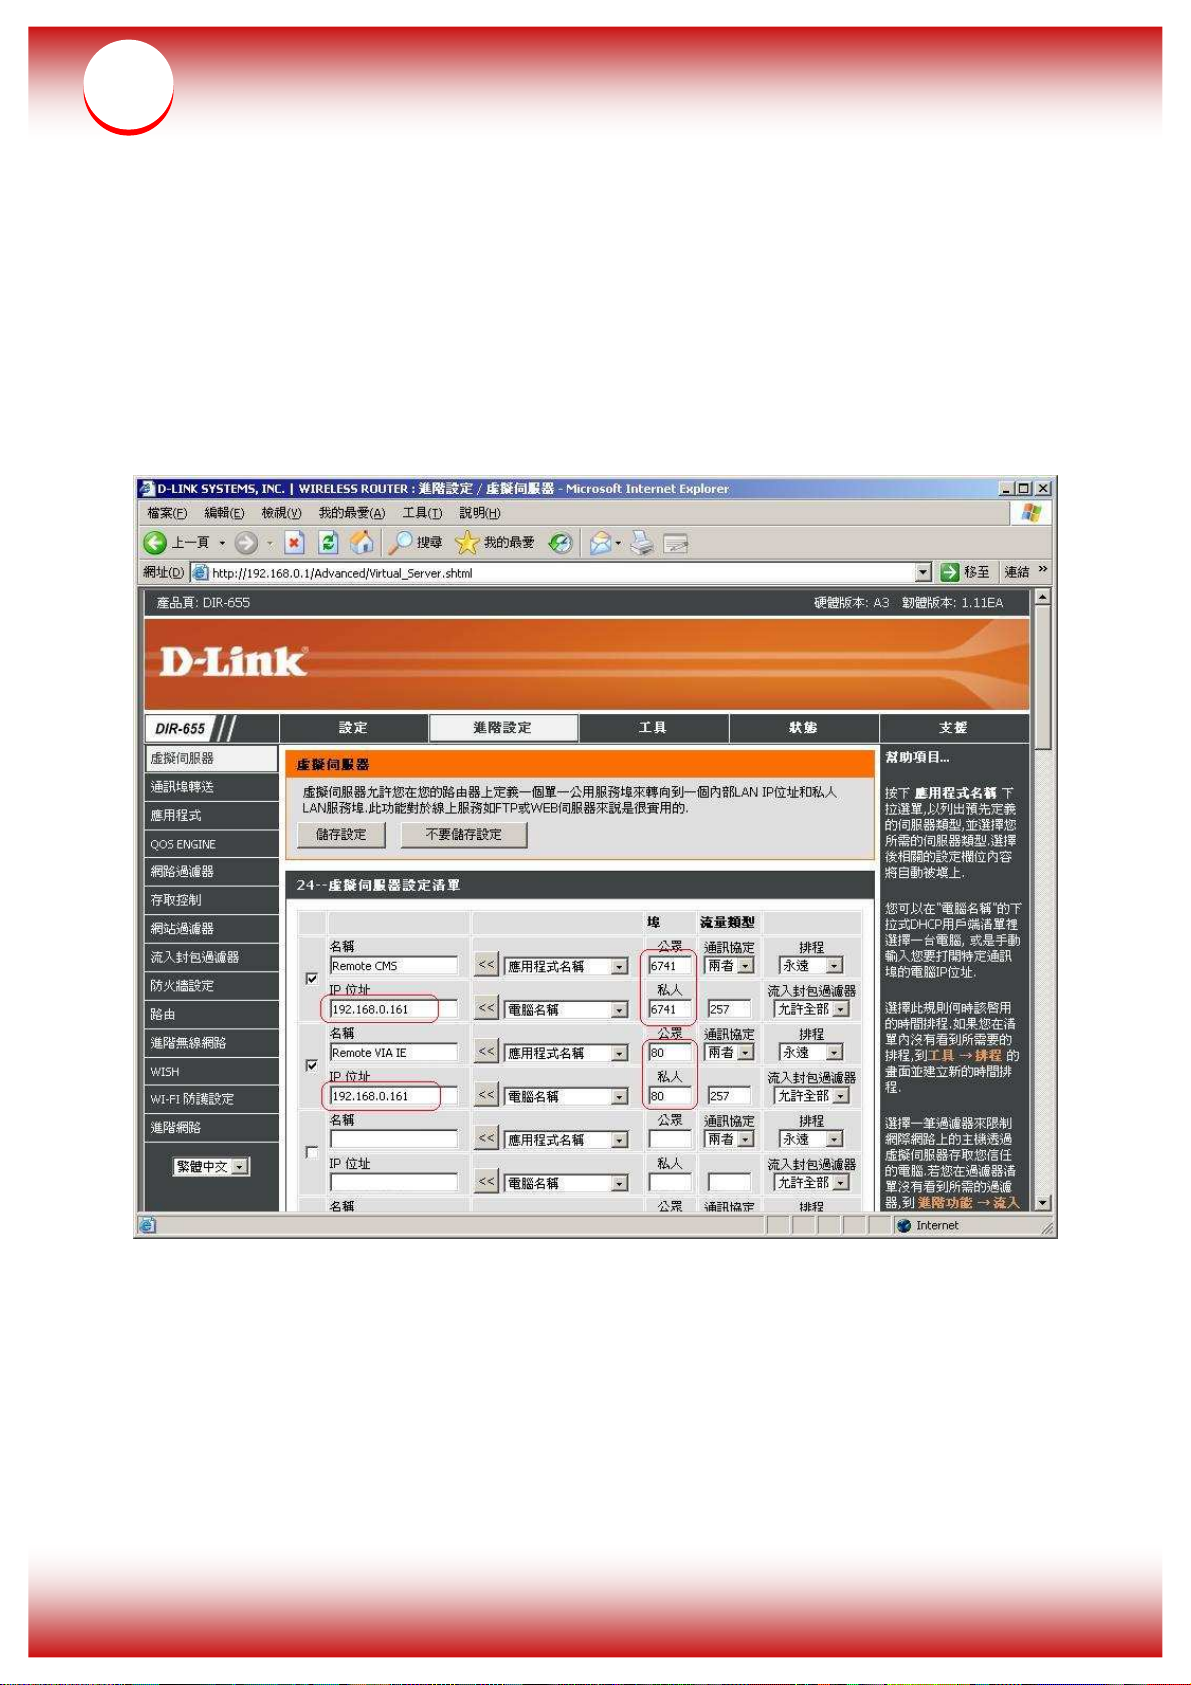
When the Network Environment is managed by Router,
how to Set up Port Forwarding
1. Please log in to your router
2. Enter the Virtual Server, set port “80” and “6741” for nCS.
For example, if the nCS’s IP is 192.168.0.161, please set assign port “80” and “6741” for
IP 192.168.0.161
3. After finishing set up, please save and log out the router.
 Loading...