

Page 1

Forum FOH
User Manual
Klark Teknik Building
Walter Nash Road
Kidderminster
Worcestershire
DY11 7HJ
Tel: +44 (0) 1562 741515
Fax: +44 (0) 1562 745371
Email: info@uk.telex.com
Website: www.ddaconsoles.com
Forum FOH User Manual
Telex Communications (UK) Limited
In line with the company’s policy of continual improvement, specifications and function maybe subject
to change without notice. This Operator Manual was correct at the time of writing. E&OE.
Page 2

FORUM OPERATION AND MAINTENANCE MANUAL 9601 PAGE 2
Contents
DECLARATION OF CONFORMITY......................................................... 3
INTRODUCTION ........................................................................................ 4
SAFETY PRECAUTIONS........................................................................... 5
TRANSPORT ............................................................................................... 6
ATTENTION................................................................................................ 6
WARRANTY................................................................................................ 7
SPECIFICATIONS ...................................................................................... 9
GLOSSARY ................................................................................................11
MODULE DESCRIPTIONS...................................................................... 16
MONO INPUT MODULE ......................................................................... 18
MONO MUTE INPUT............................................................................... 23
STEREO INPUT MODULE ...................................................................... 25
THE STEREO MUTE INPUT MODULE ................................................. 31
THE DUAL EFFECT RETURN MODULE.............................................. 32
6 INTO 1 MICROPHONE INPUT ............................................................ 34
THE DIGITAL STEREO INPUT MODULE ............................................. 36
10 WAY SELECTOR MODULE ............................................................... 41
THE STANDARD OUTPUT MODULE ................................................... 44
THE MATRIX OUTPUT MODULE ......................................................... 49
COMPOSER OUTPUT MODULE............................................................ 53
STEREO MASTER MODULE.................................................................. 57
GENERAL SERVICING............................................................................ 61
POWER SUPPLY....................................................................................... 62
Page 3

FORUM OPERATION AND MAINTENANCE MANUAL 9601 PAGE 3
Declaration of Conformity
The Manufacturer of the Products covered by this Declaration is
Klark Teknik Building, Walter Nash Road, Kidderminster, Worcestershire, DY11 7HJ.
The Directives Covered by this Declaration.
89/336/EEC Electromagnetic Compatibility Directive, amended by 92/31/EEC & 93/68/EEC
73/23/EEC Low Voltage Equipment Directive, amended by 93/68/EEC.
The Products Covered by this Declaration.
Equipment type Product Name Variants
Audio Mixing Console Q2 Q2 VCA
Audio Mixing Console Q2 Monitor Meterbridge
Audio Mixing Console QMR Meterbridge
Audio Mixing Console FMR
Audio Mixing Console Forum PA,Matrix,Mute
Audio Mixing Console Forum Monitor Meterbridge
Audio Mixing Console XL200
Audio Mixing Console XL250
The Basis on which Conformity is being Declared
The products identified above comply with the protection requirements of the EMC Directive and with the principal elements of
the safety objectives of the Low Voltage Directive, and the manufacturer has applied the following standardsQ
EN 55013 Q 1990
Limits and methods of measurement of radio disturbance characteristics of Broadcast Receivers and Associated Equipment.
EN 50082-1 Q 1992
Electromagnetic Compatibility - Generic Immunity Standard Part 1. Residential, commercial and light industry.
EN 60065 Q 1994
Safety requirements for mains operated electronic related apparatus for household and similar general use.
The technical documentation required to demonstrate that the products meet the requirements of the Low Voltage Directive has
been compiled by the signatory below and is available for inspection by the relevant enforcement authorities. The CE mark was
first applied in 1996.
SignedQ ................................ G.M.Squires
AuthorityQ Product Support Manager.
DateQ 1st, January 1997.
Attention
The attention of the specifier, purchaser, installer, or user is drawn to special measures and limitations to use which must be
observed when these products are taken into service to maintain compliance with the above directive. Details of these special
measures and limitations to use are available on request, and are also contained in product manuals.
Page 4

FORUM OPERATION AND MAINTENANCE MANUAL 9601 PAGE 4
The Forum console is a high quality console, designed for use in
live sound and recording applications. Two output modulesR a
standard output module and a matrix output module are available,
along with a number of input modules as follows Q-
! mono standard input and mono mute input
! stereo input and stereo mute input
! dual effect return
! digital stereo input
! 10 way selector
! 6 into 1 microphone module
The Forum is normally supplied as a FORUM P.A. or as a FORUM
MATRIX and the frame will accommodate up to 60 modules.
Normally the master module, a double blank module and the 8
output modules will occupy 12 of those positions with the
remainder being available for input modules. An 8 module wide
frame extender can be fitted where additional modules are required
on an existing console or to increase the maximum frame size to 68
modules.
INTRODUCTION
Page 5

FORUM OPERATION AND MAINTENANCE MANUAL 9601 PAGE 5
SAFETY
PRECAUTIONS
IMPORTANT - PLEASE READ BEFORE
INSTALLING YOUR FORUM CONSOLE
Strong sources of electromagnetic radiation e.g. high power
cabling, video monitors and radio transmitters may cause
degradation of of the audio quality due to induced voltages in the
chassis and connection leads. Site the console away from such
sources. For the same reason it is advisable to site the power supply
away from the console.
! Electronic components are susceptible to conditions of
excessive heat or extreme cold so take care not to use
your console under such conditions.
! Before powering up the console make sure that the
power supply voltage selection matches the local mains
supply.
! Never connect or disconnect the power cable with out
switching off the power supply. Similarly switch of the
console before removing or servicing modules.
! Do not attempt to wipe clean the console with a
cleaning liquid. Most surfaces can be simply cleaned
with a soft dry brush. Should the chassis or channel
ident strips need cleaning use only water or an alcohol.
Solvent based products should not be used as they will
damage these parts.
If you spill any liquids in the console e.g. coffee on the faders
switch off the power supply immediately. Consult you authorised
dealer before attempting any cleaning.
Page 6

FORUM OPERATION AND MAINTENANCE MANUAL 9601 PAGE 6
TRANSPOR T
We recommend that you retain all the packing from your FORUM
console should you ever need to return it for service or move the
console to other prenises.
If the console has to be moved regularly then we suggest that you
purchase a foam lined flight case available from your distributor if
you cannot purchase one locally.
Only use the power supply and cables provide. Your warranty is
invalidated if other supplies or cables are used.
If you experience any problem with the local mains, or during
thunder storms, switch off the power supply and unplug it from the
mains supply.
CABLES
This product should only be used with high quality , screened
twisted pair audio cables, terminated with metal bodied 3-pin XLR
connectors. The cable shield should be connected to Pin 1. Any
other cable type or configuration for the audio signals may result in
degraded performance due to electromagnetic interference.
ELECRIC FIELDS
Should this product be used in an electromagnetic field that is
amplitude modulated by an audio frequency signal P20Hz 20Khz), the signal to noise ratio may be degraded. Degradation of
up to 60dB at a frequency corresponding to the modulation signal
may be experienced under extreme conditions P3V/m, 90%
ATTENTION
Page 7

FORUM OPERATION AND MAINTENANCE MANUAL 9601 PAGE 7
WARRANTY
If within a period of twelve months from the date of delivery of the
equipment to the End User it shall prove defective by reason only
of faulty materials and/or workmanship Pbut no faulty design) to
such an extent that the effectiveness and/or the usability thereof is
materially affected, the Equipment or the faulty component shall be
returned to the Distributor or DDA and subject to the following
conditions the Distributor or DDA will repair or at its option
replace the defective components. Any components replaced will
become the property of DDA.
Any Equipment or component returned will be at the risk of the
End User whilst in transit Pboth to and from the Distributor or
DDA) and postage and/or freight charges must be prepaid.
This Warranty shall only be available ifQ-
i) The Equipment has been properly installed in accordance
with the instructions contained in this manual.
ii) The End User has notified the Distributor or DDA in writing
within 14 days of the defect appearing.
iii) No persons other than authorised representatives of DDA or
the Distributor have effected any replacement of parts,
maintenance adjustments or repairs to the Equipment.
iv) The End User has used the Equipment for such purposes as
DDA recommends with only such operating supplies as meet
DDAís specifications or approval and otherwise in all
respects in accordance with DDAís recommendations.
Defects arising as a result of the following are not covered by this
Warranty Q -
Faulty or negligent handling, chemical or electro-chemical or
electrical influences, accidental damage, Acts of God, neglect,
defficiency in electrical power , air conditioning or humidity
control.
Page 8

FORUM OPERATION AND MAINTENANCE MANUAL 9601 PAGE 8
DDA shall not be liable for any damage caused to persons
or property due to Q-
i) Incorrect usage of the Equipment
ii) Other equipment attached to the Equipment, which is not
approved by DDA
iii) Modifications made by non-authorised persons, or by using
non-recommended parts, or incorrectly made.
In no circumstances shall DDA be liable for any indirect or
consequential costs, damages or losses Pincluding loss of business
profits, operating time or otherwise) arising out of the use or
inability to use the product, whether or not the likelihood of
damage was advised to DDA or its distributor.
Fuses and lamps are specifically excluded from this warranty .
This notice does not affect your statuatory rights.
Benefit of this Warranty may not be assigned by the End User.
End Users who are consumers should note that their rights
under this Warranty are in addition to and do not affect any other
rights to which they may be entitled against the seller of the
Equipment.
Page 9

FORUM OPERATION AND MAINTENANCE MANUAL 9601 PAGE 9
SPECIFICATIONS
Note Q All specifications relate to dBu, ie 0dBu = 0.775V RMS
Maximum Gain
Mic Input to Mix OutputQ 86dB
Line Input to Mix OutputQ 30dB
Frequency Response
Mic Input to Mix OutputQ 20Hz , -0.50dB
Pgain 55dB) 20kHz, -0.20dB
Line Input to Mix Output 20Hz , -0.50dB
Pgain 0dB) 20kHz, -0.20dB
Noise, DIN Audio Weighted
Microphone Input
Gain 55dB, EIN Ref 200 Ohm S-127.5dBu
Line Input to Mix Output
Gain 0dB, 16 inputs routed S-84dBu
Distortion
Microphone Input to Mix Output
-50dBu input, +4dBu output S0.005%
Line Input to Mix Output
+4dBu input, +4dBu output S0.005%
Crosstalk
Adjacent Channel, 1kHz S-100dBu
Group to Mix, 1kHz S-78dBu
Fader Attenuation, 1kHz S-85dBu
Panpot Isolation, 1kHz S-72dBu
Page 10

FORUM OPERATION AND MAINTENANCE MANUAL 9601 PAGE 10
LED Bargraph Metering P20 segment)
Rise Time to 0dBu Peak Q 1mS
Average Q 150mS
Release Time to -20dBu Peak Q 2 S
Average Q 250mS
Accuracy Prelative to 0dB) +/-0.5dB
Forum Power Supply specifications
AC Mains Voltage selecti onQ
Internal link settings for 90V, 100V, 120V, 220V, 230V, and 240V
Power Consumption Pmax) Q
AC Mains frequency Q 50Hz...60Hz
Fuse ratingsQ 220/230/240V - 6.3A
90/100/120V - 10A
Cooling MethodQ Internal fan
DC Power OutputsQ
+17 Volts, 6A max
-17 Volts, 6A max
+48 Volts, 0.35A max
Page 11

FORUM OPERATION AND MAINTENANCE MANUAL 9601 PAGE 11
This section provides a simple explanation of some of the terms
used when describing the console features.
ìAî GAUGE JACK
This is a 1/4O jack which has a large tip diameter compared with a
ìBî gauge jack which has a smaller diameter tip and is usually
found in broadcast use.
AFL
After fade listen. For listening to post fade signals.
AUXILIARY SENDS
These are extra signal paths out of the console which are separate
from the main mix and group outputs. Each auxiliary output is like
a separate mixer and can be controlled independently of the main
faders. They are used to provide special mixes to artistes as they are
recording Pnormally called FOLDBACK) or as a signal to be sent
to an effect such as a reverberation or delay device.
BUS
This is the term used to describe the summing or mixing of
a number of signals. A number of signals routed to the same bus
will appear as one signal at the output of the bus mixing
amplifier.
BUS TRIM
A control used to adjusted the level of all signals
going to a Group Output.
CHANNEL PATH
The path used by the signal going to tape in an in-line console.
D.I.
Direct Inject is an input used for high level devices such
as keyboards where the line input would not be sensitive enough.
DIM
This reduces the monitor level by a preset amount, usually
20dB in DDA products.
GLOSSARY
Page 12

FORUM OPERATION AND MAINTENANCE MANUAL 9601 PAGE 12
DIRECT OUTPUT
This refers to the individual output of a channel which is available
even if the channel is not routed.
EBO
Electronically Balanced Output.
EQ
Equalizer or Tone Control.
FOLDBACK
This is the signal which is usually fed to the artistes
headphones.
GROUND SENSING OUTPUT
An output stage where any ground noise is injected into the
feedback loop in such a way that it appears on the amplifier output.
As the ground should be the reference for the following stage, if it
is moving and the signal is moving in the same way then no net
signal results.
GROUP OUTPUT
An output usually routed to a multi-track tape
recorder input. This output is derived from a bus and one group
output stage is required for each bus. PDMR12 excepted)
HF
High Frequency
HIGH PASS FILTER
A filter which cuts out frequencies below its
operating frequency. It can be used to filter out rumble picked
up by a microphone for example.
INSERT POINT
Sometimes referred to as a patch point. This is an
interruption to the signal path to allow for the insertion of a
signal processing device. In an in-line console such as the DCM
it can be in either the mix or channel path Pswitchable).
Page 13

FORUM OPERATION AND MAINTENANCE MANUAL 9601 PAGE 13
LF
Low Frequency .
LINE INPUT
An input designed to accept high level signals as
opposed to microphone level signals. The expected level is
usually +4dB but increasingly inputs and outputs are being
designed so that they can be altered to operate at -10dBV which
is now quite a common operating level.
LOW PASS FILTER
This is the inverse of a HIGH PASS filter and is used to reduce
frequencies above the operating frequency
MASTER
This normally refers to the main stereo output section
which controls the level of the stereo mix and associated
functions such as monitoring.
MIX PATH
The path used by the signal going to the stereo mix.
PARAMETRIC EQ
An equaliser section which has variable frequency, level and Q.
PAN
A pan control or Pan Pot or Panoramic Potentiometer is used
to spread a mono signal across a stereo bus. In the centre the
signal is reduced by 4.5dB to compensate for the effects of
summing to mono.
PEAKING EQ
In this form of equaliser the response is tailored to enhance a
selected frequency relative to the frequencies above
and below it. Peaking equalisers are normally used as the mid
sections of an equaliser.
PFL
Pre-fade listen. For listening to pre fade signals.
Page 14

FORUM OPERATION AND MAINTENANCE MANUAL 9601 PAGE 14
PRE
A signal derived before a fader and therefore not dependant
upon the position of the fader.
POST
A signal derived after a fader and therefore dependant upon
the position of the fader.
Q
Associated with peaking equalisers the Q is the factor which
describes how wide the peak or trough of enhancement is. The
smaller the Q the wider the bandwidth of the equaliser will be.
Typically a fixed Q equaliser will have a Q of about 1.5 equating
to a bandwidth of about 1 octave.
QUASI BALANCED
An arrangement whereby a bus is terminated with a differential
input. The bus however is not truly balanced, instead a bus
common is used to pick up any interference which will also be
picked up by the true bus. The interference then
appears as a common mode signal at the mixing amplifier.
RETURN
Any signal that is sent out of the console and is returned after some
form of processing.
ROUTING
The sending of a signal to a bus normally by pressing a switch.
Signal can be routed to several buses simultaneously
if required.
SEND
The output from a channel insert point is called the send.
SHELVING EQ
This means that the response of the equaliser becomes constant
after the turnover or corner frequency has been passed. Thus a high
frequency shelving equaliser operating at 10k will have a rising
response as the frequency approaches 10k but will be flat after 10k.
This is normally used on the high and low frequency sections of an
equaliser.
Page 15

FORUM OPERATION AND MAINTENANCE MANUAL 9601 PAGE 15
SLATE
The ability to talk to tape from the operating position of the
console. On the DCM it is possible to slate both the multi-track
group outputs and the stereo mix bus.
SIP
Solo in Place
SWEEP FREQUENCY
A control which selects a centre frequency to operate around. Most
often used with peaking equalisers but it can also be used to
determine the roll off point of shelving EQs as well.
VCA
Voltage Controlled Amplifier. An amplifier whose gain can be
controlled by a DC Voltage applied to its control port.
XLR
The XLR Pin fact a specific manufacturer's model reference) is an
industry standard connector of high quality and is normally used
for balanced signals, primarily microphones and balanced outputs.
The most common is a three pin version, although there are types
with more pins for ther purposes.
Page 16

FORUM OPERATION AND MAINTENANCE MANUAL 9601 PAGE 16
MODULE DESCRIPTIONS
The input modules are provided with rear panel connectors for
Microphone Pon XLR), and Line Pjack), both balanced. Insert send
and return signals are available on a single stereo jack socket, and
are unbalanced. A Direct Output, unbalanced and ground sensing,
is also available via a jack socket on the rear panel.
Wiring of the XLR and jack connectors follows normal
conventions, so that compatibility with existing cables is provided
where possible.
XLRQ Pin 1 Ground
Pin 2 Signal +ve Phot)
Pin 3 Signal -ve Pcold)
Jack Line Insert Direct Output
Tip Hot P+ve) Send Hot P+ve)
Ring Cold Return Ground Sense
Sleeve Ground Ground Ground
Blanking panels are fitted to the main chassis to allow the fitting of
multiway connectors. Consult your authorised dealer for more
information.
All balanced XLR inputs are wired to the international standard of
Pin 2 HOT. If you need to connect unbalanced equipment to inputs
or outputs, wire the cold terminal to Pin 3 for XLRs or the Ring for
jacks.
The microphone input is suitable for use with balanced, low
impedance microphones P150-200 ohms).
Do not use dynamic, unbalanced or battery powered microphones
with the +48 volt phantom power switched on damage to the
microphone may result.
The gain of this section is variable from 6dB to 76dB, to give an
output of +4dB at the stereo mix outputs. This corresponds to a
sensitivity of -2dBu to -72dBu.
Page 17

FORUM OPERATION AND MAINTENANCE MANUAL 9601 PAGE 17
With the gain control at minimum, the maximum input level is
+14dBu without the 20dB pad.
The gain of the line input may be adjusted from -10dB to +20dB
corresponding to a sensitivity of +14dBu to -16dBu to give an
output of +4dBu at the stereo mix outputs.
The impedance of the line input is approximately 20Kohms, so
instruments with high impedance outputs such as electric guitars
are best fed through a DI box to the microphone input to avoid
being loaded down by the line input impedance.
.
Page 18
FORUM OPERATION AND MAINTENANCE MANUAL 9601 PAGE 18
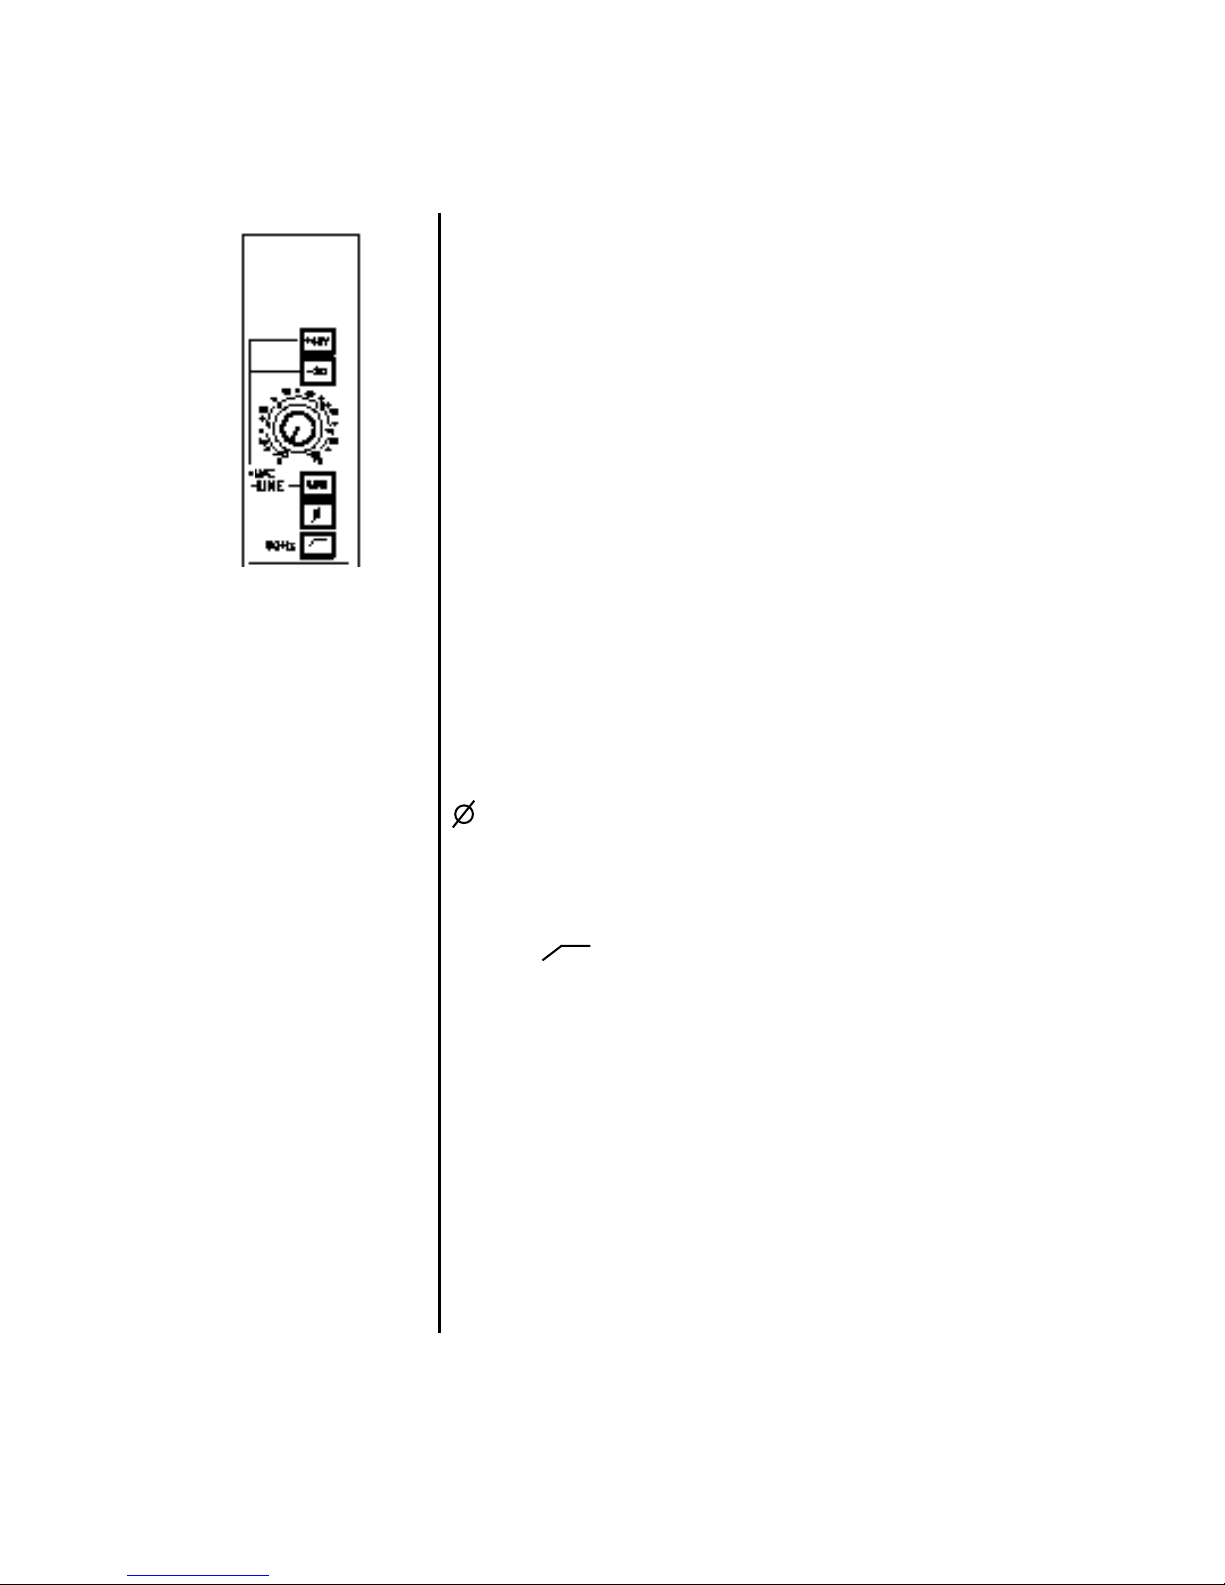
+48V
Provides 48 volt phantom power for a condenser microphone, or DI
box. Optional balancing transformers may be fitted on the Mic
input.
PAD
Switching in PAD inserts a 20dB attenuator in circuit with the
microphone input. This may be used when high-output
microphones are employed, or to enable the use of the mic input for
line-level signals.
GAIN
The gain control is a wide range rotary potentiometer, and is active
on both Mic and Line Inputs. On Mic, the gain can be adjusted
from 6dB to 76dB. For Line inputs, the adjustment is from -10dB
to +20dB.
LINE
The LINE switch selects the signal on the line input socket to feed
the channel path when it is down. In this case, the Mic signal is
disconnected.
The PHASE REVERSE switch inverts the phase of the selected
input, Mic or Line, to allow compensation for different wiring
standards.
FILTER
The Filter switch inserts a 80Hz highpass filter with a rolloff of
12dB per octave into circuit after the input amplifier. This may be
used to eliminate unwanted low-frequency noises such as rumble,
or camera buzz.
MONO INPUT MODULE
Page 19
FORUM OPERATION AND MAINTENANCE MANUAL 9601 PAGE 19
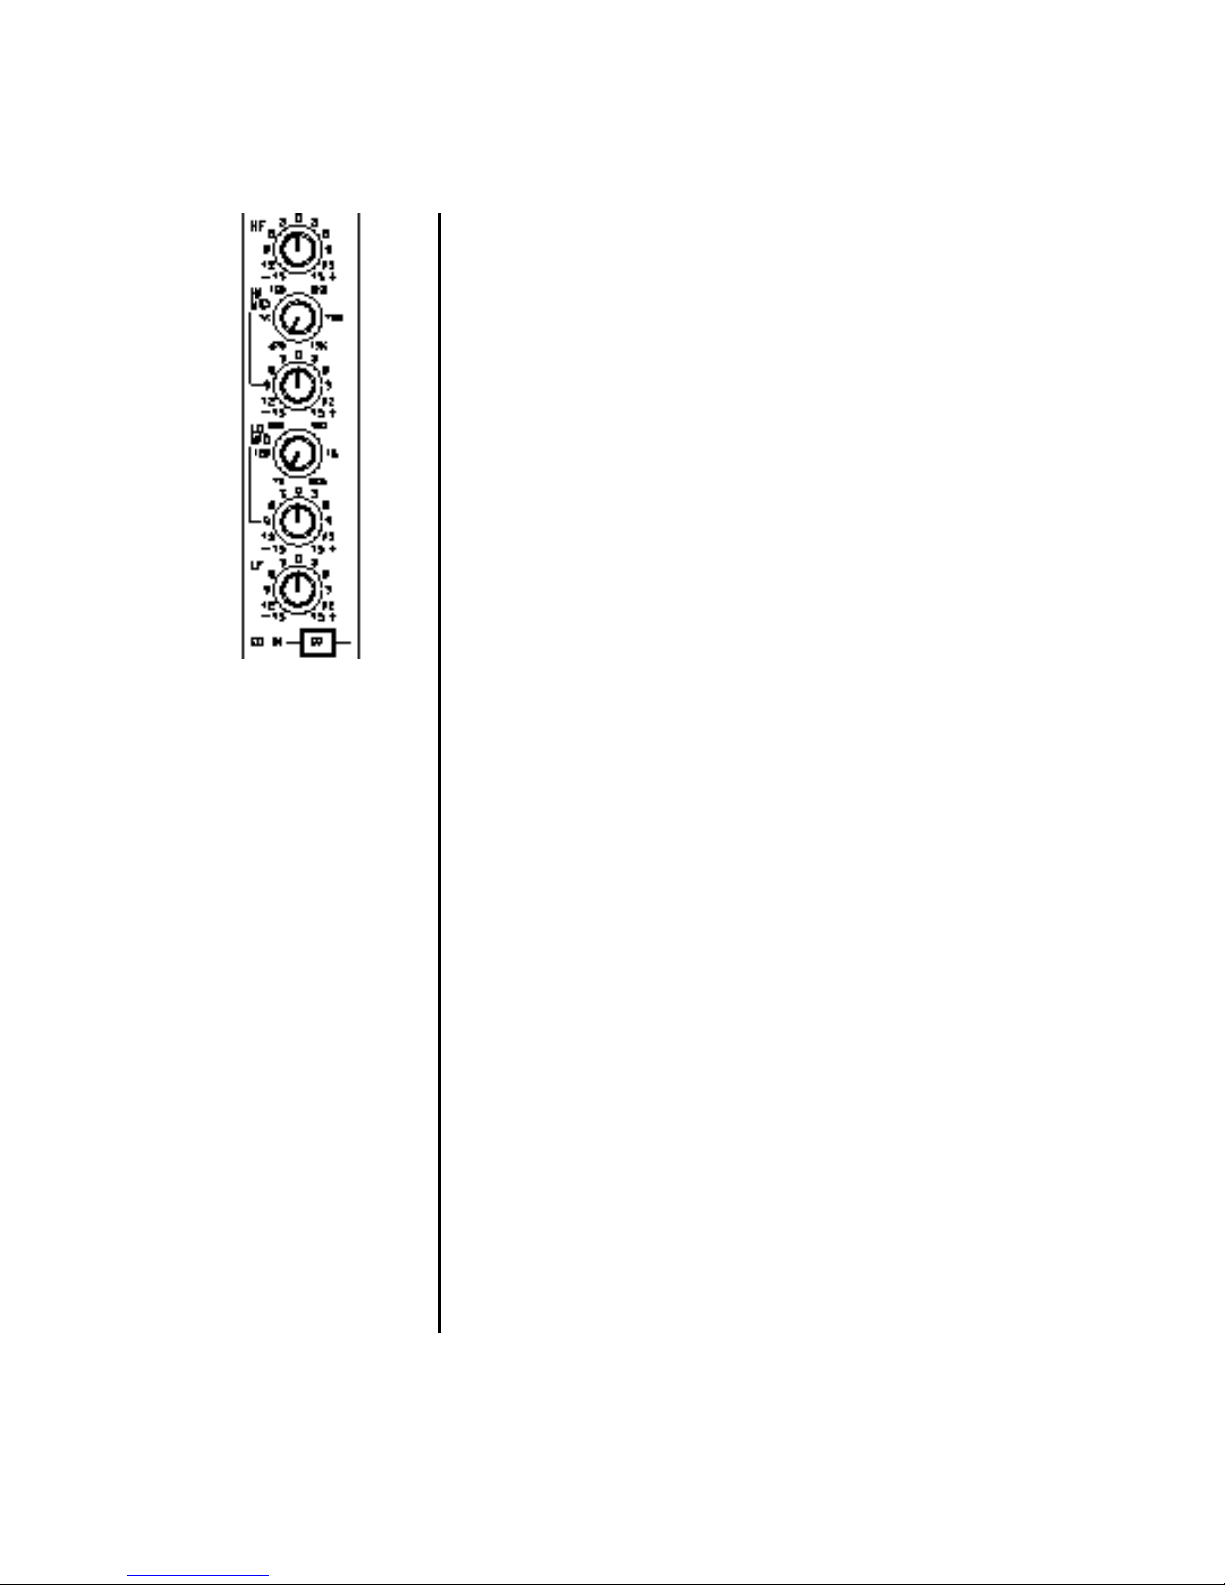
EQUALISER
The equaliser on the mono input module is a four band design,
incorporating two sweepable peaking mid-range sections and fixed
frequency shelving high and low controls.
HF
Shelving section, providing +/-15dB of gain at 12kHz.
HI MID
Peaking section, providing +/- 15dB of gain, at frequencies from
470Hz to 15kHz.
LO MID
Peaking section, providing +/- 15dB of gain, at frequencies from
70Hz to 2.2kHz.
LF
Shelving section, providing +/- 15dB of gain at 50Hz.
EQ IN
The EQ switch inserts the entire equaliser circuit into circuit.
When switched out, the equaliser is totally bypassed, keeping the
signal path to a minimum.
The Insert point is located after the EQ section.
Page 20

FORUM OPERATION AND MAINTENANCE MANUAL 9601 PAGE 20
AUXILIARIES
The Forum console has six auxiliary buses, accessed on the
Standard Input module from 4 controls. In addition, the channel
direct output may be controlled via one pot, to provide extended
auxiliary sends.
AUX 1
Controls the level of the channel signal fed to the Aux 1 bus. This
signal is normally post-fader, unless the PRE button, just below, is
depressed.
DIR
Re-routes the signal on the Aux 1 control to feed the Channel
Direct output. The signal no longer feeds the Aux 1 bus, and can be
used either as an additional single effects send, or as a feed to a
multitrack, for example.
PRE
Feeds the Aux 1 and Aux 2 controls with a signal taken pre-fader,
instead of post-fader. In this case, the signal on the Aux 1 & 2
buses is unaffected by the position of the channel fader.
AUX 2
Controls the level of the channel signal fed to the Aux 2 bus. This
signal is normally post-fader, unless the PRE button, just above, is
depressed.
AUX 3
Controls the level of the channel signal fed to the Aux 3 bus, and is
internally linkable to be pre or post-fader. When the 5-6 switch is
depressed, this control feeds the Aux 5 bus instead of the Aux 3
bus.
AUX 4
Controls the level of the channel signal fed to the Aux 4 bus, and is
internally linkable to be pre or post-fader. When the 5-6 switch is
depressed, this control feeds the Aux 6 bus instead of the Aux 4
bus.
NoteQ DIR, PRE, and 5-6 are local to the module, they do not affect
signal flow on any other module than the one on which they are
located.
Page 21

FORUM OPERATION AND MAINTENANCE MANUAL 9601 PAGE 21
ROUTING AND STATUS
MIX
Routes the post-fade, post-pan channel signal to the stereo mix bus.
1-2 P3-4, 5-6, 7-8)
Routes the post-fade, post-pan channel signal to output buses 1 and
2 P3 & 4, 5 & 6, 7 & 8).
PAN
When PAN is set to centre, equal levels are sent to both buses, with
a 4.5dB drop relative to fully clockwise or anti-clockwise. Setting
the PAN control fully anticlockwise sends full level to the Left/1/3/
5/7buses, cutting the send to the Right/2/4/6/8 busesR fully
clockwise rotation sends full level to the Right/2/4/6/8 buses,
cutting the feed to Left/1/3/5/7.
ON
The ON switch enables the channel signal path, and is indicated by
an led in the switch when the channel is active. When OFF, all
post-fade auxiliary sends and routing assignments are muted.
PFL
The PFL button Por SOLO) feeds the post-EQ, pre-fader signal to
the Monitor section Ploudspeakers or headphones), replacing the
selected monitor source. The main stereo output of the console is
not affected. The red led in the PFL switch will illuminate when the
PFL function is active. PFL signals from different sources that are
active simultaneously will be summed.
A five segment led signal meter shows when signal is present,
above a threshold of -13dBu, and will show peak signals up to
+17dBu. If the top led is on partly or continuously, the signal is
close to clipping, or severe distortion, and the channel gain should
be reduced.
The fader is the main signal level control for the channel, and is a
long-throw type which gives smooth control of the channel level.
Page 22

FORUM OPERATION AND MAINTENANCE MANUAL 9601 PAGE 22
CONNECTORS AND PIN DEFINITIONS
Mic Input Q 3 Pin XLR type, Balanced
Nominal Input LevelQ -72dBu to -2dBu
Pin 2 Q Signal +ve PHot)
Pin 3 Q Signal -ve PCold)
Pin 1 Q Ground
Input Impedance Q >2 kOhm
Line Input Q 1/4O TRS Jack Socket, ëAí Gauge, Balanced
Nominal Input LevelQ -16dBu to +14dBu
Tip Q Signal +ve PHot)
Ring Q Signal -ve PCold)
Sleeve Q Ground
Input Impedance Q >10 kOhm
Insert Point Q 1/4O TRS Jack Socket, ëAí Gauge, Unbalanced
Nominal Input/Output levelQ -2dBu
Tip Q Insert Send
Ring Q Insert Return
Sleeve Q Ground
Output ImpedanceQ S75 Ohm
Input Impedance Q >10 kOhm
Direct Output Q1/4O TRS Jack Socket, ëAí Gauge, Ground
Compensated
Nominal Output levelQ -2dBu
Tip Q Signal
Ring Q Signal Ground PGround Compensated)
Sleeve Q Ground
Output ImpedanceQ S75 Ohm
Page 23

FORUM OPERATION AND MAINTENANCE MANUAL 9601 PAGE 23
MONO MUTE INPUT
The input and equaliser sections on this module are the same as
those on the Mono Standard Input Module. The differences occur
in the remainder of the module as follows.
AUXILIARIES 1 and 2
Independent level control is provided for these two auxiliaries with
a common switch to select the prefade signal as the source. Internal
jumpers are available to further select the prefade signal between
the pre and post equaliser signal. Auxiliary 1 can be used to control
the direct output of the channel by depressing the DIR button. If
PRE is also selected then the direct output will be independent of
the channel fader position and can be totally controlled by the AUX
1 level control.
AUXILIARIES 3 and 4
Independent level control is provided for these two auxiliaries with
a common switch to select the prefade signal as the source. Internal
jumpers are available to further select the prefade signal between
the pre and post equaliser signal.
AUXILIARIES 5 and 6
Independent level control is provided for these two auxiliaries with
a common switch to select the prefade signal as the source. Internal
jumpers are available to further select the prefade signal between
the pre and post equaliser signal.
ROUTING
Independent routing is provided to the 8 audio groups and the PAN
control can be used to pan signal across odd and even buses.
MUTE GROUPS
There are 8 mute group switches which will assign the channel to
one or more of the 8 mute groups. The mute grouping is
independent of the audio grouping and a mute group can of course
traverse audio groups. Thus when a master mute is operated all
channels assigned to that mute group will cut although they may be
assigned to different audio groups. The muting on this module is
carried out electronically and thus there is the possibility of using
other remote control systems such as the DDA Midi Mute system.
The SAFE button can be used to prevent a channel from responding
to a master mute without de-assigning it.
Page 24

FORUM OPERATION AND MAINTENANCE MANUAL 9601 PAGE 24
CONNECTORS AND PIN DEFINITIONS
Mic Input Q 3 Pin XLR type, Balanced
Nominal Input LevelQ -72dBu to -2dBu
Pin 2 Q Signal +ve PHot)
Pin 3 Q Signal -ve PCold)
Pin 1 Q Ground
Input Impedance Q >2 kOhm
Line Input Q 1/4O TRS Jack Socket, ëAí Gauge, Balanced
Nominal Input LevelQ -16dBu to +14dBu
Tip Q Signal +ve PHot)
Ring Q Signal -ve PCold)
Sleeve Q Ground
Input Impedance Q >10 kOhm
Insert Point Q 1/4O TRS Jack Socket, ëAí Gauge, Unbalanced
Nominal Input/Output levelQ -2dBu
Tip Q Insert Send
Ring Q Insert Return
Sleeve Q Ground
Output ImpedanceQ S75 Ohm
Input Impedance Q >10 kOhm
Direct Output Q1/4O TRS Jack Socket, ëAí Gauge, Ground
Compensated
Nominal Output levelQ -2dBu
Tip Q Signal
Ring Q Signal Ground PGround Compensated)
Sleeve Q Ground
Output ImpedanceQ S75 Ohm
Page 25

FORUM OPERATION AND MAINTENANCE MANUAL 9601 PAGE 25
The Stereo Input module has two stereo input sources. Input A is
for a stereo Microphone, while input B is for a line-level stereo
input, which can be optionally configured as a phono PRIAA
equalised) input by purchasing the RIAA adapter card.
Sum-and-Difference, or MS decoding is provided either at Mic or
line level signals using a combination of the mono and phase
reverse switches.
+48V
Switches 48 volt phantom power to the Mic input A.
INPUT B
Selects the source on the input B connectors. Normally this is a line
input, but may be internally adapted to be a phono input from a
turntable using the RIAA adapter.
GAIN
The Gain control is wide range rotary control, and is active on both
inputs A and B. On input A PMic), the gain is adjustable from 16 to
66dB, while on input B PLine or Phono), the gain range is from -10
to +20dB.
LEFT CUT
This switch mutes the left channel signal, so only the right channel
signal is heard.
RIGHT CUT
This switch mutes the right channel signal, so only the left channel
signal is heard.
MONO
When both Left Cut and Right Cut switches are pressed, the input
signal is combined to give a mono signal, which is fed to both
signal paths through the module.
PHASE REVERSE
Under normal conditions, this reverses the phase of the right
channel.
If both the CUT switches above are pressed, additionally pressing
Phase Reverse will allow the input to be used for MS decoding,
either from a microphone or line level signal.
STEREO INPUT MODULE
Page 26

FORUM OPERATION AND MAINTENANCE MANUAL 9601 PAGE 26
EQUALISER
The equaliser on the stereo input module is a four-band design with
two swept mids, and shelving high and low frequencies.
HF
Shelving section, providing +/-15dB of gain at 12kHz.
HI-MID
Peaking section, providing +/-15db of gain, at a centre frequency
adjustable from 470Hz to 15kHz.
LO-MID
Peaking section, providing +/-15db of gain, at a centre frequency
adjustable from 95Hz to 1.1kHz.
LF
Shelving section, providing +/-15dB of gain at 50Hz.
Auxiliaries The FORUM console has six Auxiliary buses,
accessible on the input module via 4 controls. On the Stereo Input
module, the Aux buses are fed from a mono sum of the left and
right channels.
Page 27

FORUM OPERATION AND MAINTENANCE MANUAL 9601 PAGE 27
AUX 1
Controls the level of the channel signal fed to the Aux 1 bus. This
signal is normally post-fader, unless the PRE button just below the
AUX 1 control is pressed.
PRE
Feeds the AUX 1 control with a signal taken pre-fader instead of
post-fader. In this case, the signal fed to the Aux 1 bus is unaffected
by the position of the channel fader.
AUX 2
Controls the level of the channel signal fed to the Aux 2 bus. This
signal is normally post-fader, unless the PRE button just above the
AUX 2 control is pressed.
PRE
Feeds the AUX 2 control with a signal taken pre-fader instead of
post-fader. In this case, the signal fed to the Aux 2 bus is unaffected
by the position of the channel fader.
AUX 3
Controls the level of the channel signal fed to the Aux 3 bus, and
can be linked internally to be pre or post-fader. When the 5-6
switch is pressed, this control feeds the Aux 5 bus.
AUX 4
Controls the level of the channel signal fed to the Aux 4 bus, and
can be linked internally to be pre or post-fader. When the 5-6
switch is pressed, this control feeds the Aux 6 bus.
Page 28

FORUM OPERATION AND MAINTENANCE MANUAL 9601 PAGE 28
ROUTING
When any routing button is pressed, the BAL control is
automatically inserted into circuit, allowing the signal to be
balanced in the stereo image. If the channel is selected to mono Psee
Left/Right Cut switches) the Balance control will operate in a
similar manner to the Pan control on mono inputs, but with a
limited range of control P+/-3dB).
MIX
Routes the post-fade, post-bal signal to the stereo mix bus.
1-2
Routes the post-fade, post-bal signal to output buses 1 and 2.
3-4
Routes the post-fade, post-bal signal to output buses 3 and 4.
5-6
Routes the post-fade, post-bal signal to output buses 5 and 6.
7-8
Routes the post-fade, post-bal signal to output buses 7 and 8.
BAL
When BAL is set to its centre, equal levels are sent to both buses,
with a 3 dB drop relative to fully clockwise or anti-clockwise.
Setting the BAL control fully clockwise sends a level of 3dB higher
on the right bus and a level of 3dB lower on the left bus.
Page 29

FORUM OPERATION AND MAINTENANCE MANUAL 9601 PAGE 29
ON
The ON switch enables the channel signal path, and is indicated by
an LED in the switch when the channel is active. When OFF, all
post-fade auxiliary sends and routing assignments are muted.
PFL
The PFL button Por SOLO) feeds the post-EQ, pre-fader signal to
the monitor section Ploudspeakers or headphones), replacing the
master signal. The main stereo output is not affected. The red LED
in the PFL switch illuminates when the PFL function is active.PFL
signals from different sources that are active simultaneously are
summed.
SIGNAL METER PLED)
A five segment LED signal meter shows when a signal is present
above a threshold of -13dBu, and will show peak signals of up to
+17dBu. If the top led is on partly or continuously, the signal is
close to clipping. The meter shows the higher of the left or right
channel signals.
STEREO FADER
The fader is the main signal level control for the channel, and is a
long-throw type which gives smooth control of the channel level.
Page 30

FORUM OPERATION AND MAINTENANCE MANUAL 9601 PAGE 30
CONNECTORS AND PIN DEFINITIONS
Input AQ Mic Input Q 3 Pin XLR type, Balanced
Nominal Input LevelQ -72dBu to -2dBu
Pin 2 Q Signal +ve PHot)
Pin 3 Q Signal -ve PCold)
Pin 1 Q Ground
Input Impedance Q >2 kOhm
Input BQ Line Q 1/4O TRS Jack Socket, ëAí Gauge, balanced
Nominal Input levelQ -16dBu to + 14dBu
Tip Q Signal +ve PHot)
Ring Q Signal -ve PCold)
Sleeve Q Ground Input ImpedanceQ >10 kOhm
Input B can also accept Phono PRIAA) signals with the optional
RIAA card fitted.
RIAA Input sensitivity Q 2mV at maximum gain RIAA Input
Impedance Q 47 kOhm / 100pF
Page 31

FORUM OPERATION AND MAINTENANCE MANUAL 9601 PAGE 31
THE STEREO MUTE INPUT MODULE
This module is identical to the standard stereo input module other
than for the addition of the 8 mute group switches. These switches
assign the channel to one or more mute groups and will cause the
channel to CUT if the master cut for the assigned mute group is
operated. The mute groups do not have to be the same as the audio
groups and great flexibility can be achieved by having different
assignments. A SAFE switch is provided to prevent a channel from
responding to a master cut while retaining the assignment.
Page 32

FORUM OPERATION AND MAINTENANCE MANUAL 9601 PAGE 32
THE DUAL EFFECT RETURN MODULE
This module contains two independent signal paths which can be
used to bring line level signals down onto the stereo mix bus of the
console. As both signal paths are identical it is only neccessary to
describe one.
GAIN
This adjusts the gain of the input between -10dB and +20dB.
HF
Provides +/-15dB of gain at 12kHz for high frequency equalisation.
MID
A gain control provides +/-15dB of gain over the frequency range
extending from 240Hz to 7kHz. A second control determines the
frequency of operation.
LF
Provides +/-15dB of gain at 50Hz for low frequency equalisation.
AUX 1, AUX 2
The controls determine the level of signal sent to auxiliaries 1 and
2. The signal will normally be Pre-fade/Post-EQ but internal links
allow either Pre-fade/Pre-EQ or Post Fader to be selected.
AUX 3, AUX 4
Similar to AUX 1 and 2 but the default signal is Post-fader. Internal
links allow the Pre-fade/Post-EQ and Pre-fade/Pre-EQ signals to be
selected. Note that no routing is possible to auxiliaries 5 and 6.
PAN
Pans the signal across the stereo bus.
LEVEL
Controls the signal level onto the stereo bus.
ON
Allows the signal to the stereo bus to be cut. This also affects the
post fader auxiliary signals.
PFL
Places the Post Fader or Pre-Fade/Post EQ signal onto the solo bus.
The default signal is Prefade.
Page 33

FORUM OPERATION AND MAINTENANCE MANUAL 9601 PAGE 33
CONNECTORS AND PIN DEFINITIONS
Line Input Q 3 Pin XLR type, Balanced
Nominal Input LevelQ -16dBu to +14dBu
Pin 2 Q Signal +ve PHot)
Pin 3 Q Signal -ve PCold)
Pin 1 Q Ground
Input Impedance Q >10 kOhm
Line Input Q TRS Jack Socket, ëAí Gauge, Balanced
Nominal Input LevelQ -16dBu to +14dBu
Tip Q Signal +ve PHot)
Ring Q Signal -ve PCold)
Sleeve Q Ground
Input Impedance Q >10 kOhm
Page 34

FORUM OPERATION AND MAINTENANCE MANUAL 9601 PAGE 34
6 INTO 1 MICROPHONE INPUT
Six microphone inputs are available on this dual width module.
Individual gain and level controls and an ON switch are available
to each input.
GAIN
The gain of a microphone input can be adjusted from 6dB to 76dB.
VOL
This adjusts the level of any input before being mixed with the
other input signals.
ON
This allows an input signal through to the remainder of the module.
SIG
Indicates the presence of signal above. The internal signal level of
the module will be about -18dBu when this indicator comes on.
PEAK
Indicates that the signal level is approaching clipping and that the
gain should be reduced. The internal signal level of the module will
be about +12dBu when this indicator comes on. The maximum
signal level inside the module is +20dBu and thus about 6dB of
headroom is left when the PEAK led is on.
Both the above indicators are located after the gain control stage
but before the VOL control.
The remainder of the module is identical to a standard mono input
module as described on page 17.
Page 35

FORUM OPERATION AND MAINTENANCE MANUAL 9601 PAGE 35
CONNECTORS AND PIN DEFINITIONS
Mic Input Q 3 Pin XLR type, Balanced
Nominal Input LevelQ -72dBu to -2dBu
Pin 2 Q Signal +ve PHot)
Pin 3 Q Signal -ve PCold)
Pin 1 Q Ground
Input Impedance Q >2 kOhm
Page 36

FORUM OPERATION AND MAINTENANCE MANUAL 9601 PAGE 36
THE DIGITAL STEREO INPUT MODULE
The Digital Stereo Input module accepts any one of 3 analog or 2
digital stereo signal sources. The signal source is selected by
electronically latching push-buttons.
Three pairs of phono/cinch PRCA) connectors are provided for the
3 analog signal sources PPhono, CD, Line). Digital signals from CD
players and DAT recorders may be fed into the module directly via
a coaxial connector or an optical connector .
For the coaxial connector we recommend a 75 ohm cable, and for
the optical input a special fibre-optic cable is required.
Both Digital inputs process the SPDIF PSony-Philips Digital
Interface) Hi-Fi standard format. It is possible to internally set
which of the inputs is selected when the console is switched on.
GAIN
The gain control is a wide range rotary potentiometer with a range
of 30dB, so that the different output levels of the sources may be
adapted to the input.
PHONO
Selects the Stereo Phono PRIAA equalised) input as the source for
the channel. All other sources are switched off.
CD
Selects the Stereo CD input as the source for the channel. All other
sources are switched off.
LINE
Selects the Stereo Line input as the source for the channel. All
other sources are switched off.
DIGITAL
Selects a digital stereo signal from the co-axial digital input. At
the same time a D/A converter is looped into the signal path. All
other sources are switched off.
OPTICAL
Selects a digital stereo signal from the optical digital input. At the
same time a D/A converter is looped into the signal path. All other
sources are switched off.
Page 37

FORUM OPERATION AND MAINTENANCE MANUAL 9601 PAGE 37
STEREO EQUALISER
The Digital Input EQ is a four-band design.
HF
Shelving section, providing +/-12dB of gain at a frequency of
12kHz.
HI MID
Peaking Pbell) section, providing +/-12dB of gain at a centre
frequency of 3kHz.
LO MID
Peaking Pbell) section, providing +/-12dB of gain at a centre
frequency of 300Hz.
LF
Shelving section, providing +/-12dB of gain at a frequency of
50Hz.
EQ IN
The EQ switch inserts the entire equaliser into the circuit. When
switched out, the equaliser is totally bypassed.
Auxiliaries
The Digital Stereo input can feed all 6 auxiliary buses.
AUX 1
Controls the level of a mono sum of the channel signal fed to the
AUX 1 bus. This signal is normally post-fader, unless the PRE
button just below the AUX 1 control is pressed.
AUX 2
Controls the level of the channel signal fed to the AUX 2 bus. This
signal is normally post-fader, unless the PRE button just above the
AUX 2 control is pressed.
NoteQ Internal links allow the AUX 1 control to send the left
channel signal and AUX 2 the right channel. This gives a stereo
AUX output. The signal is post-fader, and the PRE switches then
have no function.
Page 38

FORUM OPERATION AND MAINTENANCE MANUAL 9601 PAGE 38
AUX 3
Controls the level of the mono sum of the channel signal fed to the
AUX 3 bus. Internal links determine whether the feed is pre or
post-fader.
AUX 4
Controls the level of the mono sum of the channel signal fed to the
AUX 4 bus. Internal links determine whether the feed is pre or
post-fader Ppaired with Aux 3).
5-6
Switches the Aux Controls 3 and 4 to feed Aux buses 5 and 6.
ROUTING
When any routing button is pressed, the BAL control is
automatically inserted into circuit allowing the signal to be
balanced in the stereo image.
MIX
Routes the post-fade, post BAL stereo channel signal to the main
stereo PLeft/Right) mix bus.
1-2
Routes the post-fade, post-BAL stereo channel signal to group
buses 1 and 2.
3-4
Routes the post-fade, post-BAL stereo channel signal to group
buses 3 and 4.
5-6
Routes the post-fade, post-BAL stereo channel signal to group
buses 5 and 6.
7-8
Routes the post-fade, post-BAL stereo channel signal to group
buses 7 and 8.
Page 39

FORUM OPERATION AND MAINTENANCE MANUAL 9601 PAGE 39
BAL
When BAL is set to centre, equal levels are sent to both buses, with
a 3dB drop relative to fully clockwise or anti-clockwise. Setting the
BAL control fully clockwise sends a level of 3dB higher on the
right bus and a level of 3dB lower on the left bus.
ON
The ON switch enables the channel signal path, and is indicated by
an led in the switch when the channel is active. When OFF, all
post-fade auxiliary sends and routing assignments are muted.
PFL
The PFL Por SOLO) button feeds the post-EQ, pre-fader signal to
the monitor section Ploudspeakers or headphones), replacing the
master signal. The main stereo output of the console is not affected.
The red led in the PFL switch illuminates when the PFL function is
active. PFL signals from different sources that are active
simulataneously are summed.
SIGNAL METER
A five segment LED signal meter shows when a signal is present
above a threshold of -13dBu, and will show peak signals up to
+17dBu. The meter displays the higher signal of the left or right
channels.
STEREO FADER
The fader is the main signal level control for the channel, and is a
long-throw type which gives smooth control of the channel output.
Page 40

FORUM OPERATION AND MAINTENANCE MANUAL 9601 PAGE 40
CONNECTORS AND PIN ASSIGNMENTS
Line Input Q Cinch/Phono/RCA, unbalanced PCD, Line)
Nominal Input Level Q -20dBu to +10dBu
Phono Tip Q Signal PHot)
Phono OuterQ Ground
Input Impedance Q >10 kOhm
Phono Input PRIAA) Q Cinch/Phono/RCA, unbalanced
Nominal Input level Q -54dBu to -24dBu
Phono Tip Q Signal PHot)
Phono OuterQ Ground
Input Impedance Q 47 kOhm / 100pF
Digital Input Q Optical / Co-axial
Nominal Input Level Q -28dBFS to 0dBFS
Digital Interface Q SPDIF
D/A Converter Q 18 bit / linear
Oversampling Q 8 Times
Page 41

FORUM OPERATION AND MAINTENANCE MANUAL 9601 PAGE 41
10 WAY SELECTOR MODULE
This module provides additional inputs for the 2 TRK position of
the monitor selection switch on the master module. An EDAC
connector is used to provide the 10 stereo input connections while 2
male XLR connectors provide outputs which can then be connected
by external cables to the 2 track input of the master module.
The module could also be used as a 10 way source selector for the
stereo input module for example.
Each button is associated with an identification strip to allow for
source labelling.
An alternative version of this module, fitted with female XLR
connectors may be used to expand the Monitor Output of the
console for use with other monitoring systems.
Page 42

FORUM OPERATION AND MAINTENANCE MANUAL 9601 PAGE 42
EDAC TABLE FOR Q EXTERNAL SELECTOR MODULE
PAIR + , - DESCRIPTION
1 d,f 1 LEFT
2 V,Z 1 RIGHT
3 K, P 2 LEFT
4 C,D 2 RIGHT
5 A,B 3 LEFT
6 F,E 3 RIGHT
7 R,L 4 LEFT
8 W,s 4 RIGHT
9 b,a 5 LEFT
10 h,e 5 RIGHT
11 k,l 6 LEFT
12 v,p 6 RIGHT
13 z,u 7 LEFT
14 KK,DD 7 RIGHT
15 LL,EE 8 LEFT
16 MM,F 8 RIGHT
17 JJ,NN 9 LEFT
18 CC,H 9 RIGHT
19 t,y 10 LEFT
20 j,n 10 RIGHT
Page 43

FORUM OPERATION AND MAINTENANCE MANUAL 9601 PAGE 43
E
-
AB
F
+
+
-
5
6
C
HJ
+
4
D
K
+
-
P
V
Z
+
-
-
2
3
N
TU
Y
LM
S
WX
+
-
8
R
+7
a
-
10
b
e
h
+
-
9
cd
f
j
+
+
-
1
n
t
y
+
-
-
19
20
m
s
wx
l
rp
v
+
-
-
+
11
12
k
u
+
-
D
D
-
13
14
zA
A
E
E
K
KL
L
++
+
-
15
B
B
F
FH
H
M
M
+
--
16
C
C
J
J
N
N
+
+
- 17
18
VIEWED FROM SOLDER SIDE
All unlabelled pins are bussed as Audio Ground
Page 44

FORUM OPERATION AND MAINTENANCE MANUAL 9601 PAGE 44
THE STANDARD OUTPUT MODULE
The FORUM Group Output Module supplies the Group Output
signal, and also two return inputs, for use with multitrack tape
machines, or external effects devices. The group outputs are
electronically balanced, but may also be transformer balanced as a
cost-option.
Return A is permanently routed to the stereo mix. Return B can be
routed to the stereo mix, or to the sub-group bus. The group output
can be routed to the return B input. The Return B section can be
used either in ìPAî mode, or ìRecordingî mode. These modes are
described under the appropriate section below. An Insert point is
provided in the group signal path, which allows the connection of
external processing devices such as limiter/compressor units. The
Insert connector is on the rear panel of the Group module, and
plugging in the jack automatically breaks the normal signal path
and inserts the external device.
LED METERING
The twenty segment led meter reads the signal present on the
Group output, or the pre-EQ signal present at the return input B.
This latter signal may be the return signal, or the group signal,
depending on the setting of the PA/RECORDING mode switch.
The metering reads post-fader when reading group signals so will
vary with fader position. In TAPE mode, it will read the actual
signal present before the level control of the return section PB). An
internal link allows the meter to display with average PVU) or peak
PPPM) characteristics.
Page 45

FORUM OPERATION AND MAINTENANCE MANUAL 9601 PAGE 45
RETURN SECTION A Pto stereo mix)
EQUALISER
The two band equaliser features +/- 15dB of gain at 8kHz PHF),
and 60Hz PLF), with a shelving characteristic on each band.
AUX 1
The return signal PA) can be fed to the Aux 1 bus via this level
control, allowing the tape return signal to be fed to an external
processing device or artist headphone monitoring system. The
signal feed is taken pre the level control, and is therefore unaffected
by the position of the return level pot.
PAN
Positions the return signal within the stereo image, with a 4.5dB
relative drop in the centre.
RET LEV
This is the level control for the return signal, and adjusts the
amount of level sent to the stereo mix.
SOLO
The return signal may be soloed to the monitoring system. This
solo signal is pre- the return level control. The led in the switch
illuminates when solo is pushed.
ON
The ON switch enables the Return A signal to the stereo mix bus,
and has led indication when enabled.
Page 46

FORUM OPERATION AND MAINTENANCE MANUAL 9601 PAGE 46
RETURN SECTION B
RET/BUS
This switch selects the input to the return section with its EQ. In the
RET position, the input comes from the normal return input, is fed
via the EQ, ON switch and PAN to the stereo mix. In the Bus
position, the signal is taken from the group output, and fed as above
to the stereo mix.
In the PA mode Pdescribed below) RET allows the return input to
be used as an effects return with EQ. Selection of Bus sends the
Return B input direct to its own group bus as an extender input to
mix buses, and sends the group bus signal to mix with EQ, to use as
an EQíd sub-group to the mix with an auxiliary send.
If the console is being used for recording, this switch allows A/B
monitoring of the tape send and track return signals. If the PA/
RECORDING switch is set to Recording, the metering will follow
the selection of Return or Bus on the input of the return section.
EQUALISER
The two band equaliser features +/- 15dB of gain at 8kHz PHF),
and 60Hz PLF), with a shelving characteristic on each band.
AUX 1
The return signal PB) can be fed to the Aux 1 bus via this level
control, allowing the tape return signal to be fed to an external
processing device or artist headphone monitoring system. The
signal feed is taken pre- the level control, and is therefore
unaffected by the position of the return level pot.
PAN
Positions the return signal within the stereo image, with a 4.5dB
relative drop in the centre.
Page 47

FORUM OPERATION AND MAINTENANCE MANUAL 9601 PAGE 47
PA/RECORDING
This switch determines the way in which the return input is routed.
In the PA mode, the metering will always read the group signal. If
the Ret/Bus switch is also set to Bus at this time, the return input
will take the group signal, and the external return signal will be
routed to the same group bus. This is useful for adding in submixersR for example, a stereo feed of a mix of keyboards from
another small console, which all then go off to the group output.
If the switch is set to Recording, the signals follow the Ret/Bus
switch selection, and no signals are routed from the return input
back to the group buses.
RET LEV
This is the level control for the return signal, and adjusts the
amount of level sent to the stereo mix.
SOLO
The return signal may be soloed to the monitoring system. This
solo signal is pre the return level control. The led in the switch
illuminates when solo is pushed.
ON
The ON switch enables the Return B signal to the stereo mix bus,
and has led indication when enabled.
SUB-LEFT
This will route the group output signal to the left channel of the
stereo mix bus.
SUB-RIGHT
This will route the group output signal to the right channel of the
stereo mix bus.
If both SUB-LEFT and SUB-RIGHT are pressed, the signal will
be fed via the Return 2 PAN pot to both left and right stereo buses.
Note that in this case, Return B can not be used.
FADER
The long throw fader controls the level of the group output. When
the SUB buttons are pressed, or BUS is selected, the fader will also
control the level of the signal sent to the stereo mix.
Page 48

FORUM OPERATION AND MAINTENANCE MANUAL 9601 PAGE 48
CONNECTORS AND PIN ASSIGNMENTS
Group Output Q 3 Pin XLR Type, Balanced
Nominal Output LevelQ +4dBu Por -10dBV)
Pin 2 Q Signal +ve PHot)
Pin 3 Q Signal -ve PCold)
Pin 1 Q Ground
Output Impedance Q S75 Ohm
Aux/Return Input Q TRS Jack Socket, ëAí Gauge, Balanced
Nominal Input LevelQ +4dBu Por -10dBV)
Tip Q Signal +ve PHot)
Ring Q Signal -ve PCold)
SleeveQ Ground
Input Impedance Q >10 kOhm
Insert Point Q TRS Jack Socket, ëAí Gauge, Unbalanced Nominal
Input LevelQ -2dBu
Tip Q Insert Send
Ring Q Insert Return
SleeveQ Ground
Output Impedance Q S75 Ohm
Input Impedance Q >10 kOhm
Page 49

FORUM OPERATION AND MAINTENANCE MANUAL 9601 PAGE 49
The Forum Matrix output module features the Group output
Pnormally fader controlled), with a matrix sub-mix section
comprising the group feed to the eight matrix buses, plus two
external inputs to the matrix bus on that module. The Group output
is normally controlled by a fader and the Matrix output by a rotary
pot, but these two functions may be switch-reversed. Both Group
and Matrix outputs are electronically balanced, and may be
optionally transformer-balanced.
METER
The 20 segment LED meter indicates the level of the GROUP
signal, unless the METER MATRIX button is depressed, in which
mode it reads the level of the MATRIX output signal. The meter
may be internally linked to show with either peak or VU
characteristics.
METER MATRIX
This button changes the input to the meter from the group signal to
the matrix signal.
EXTERNAL / L
This control adjusts the level of the External / Left input to the
matrix bus on the module Pie Bus 1 on Module 1). The sensitivity
of this input is internally link selectable to be +4dBu or -10dBV.
EXTERNAL / R
This control adjusts the level of the External / Right input to the
matrix bus on the module Pie Bus 1 on Module 1). The sensitivity
of this input is internally link selectable to be +4dBu or -10dBV.
1 This adjusts the level of the GROUP signal fed to the MATRIX
bus 1. On Module 1, the matrix bus 1 is on the same module.
2 Adjusts the level of the GROUP signal fed to MATRIX bus 2.
3 Adjusts the level of the GROUP signal fed to MATRIX bus 3.
4 Adjusts the level of the GROUP signal fed to MATRIX bus 4.
THE MATRIX OUTPUT MODULE
Page 50

FORUM OPERATION AND MAINTENANCE MANUAL 9601 PAGE 50
5 Adjusts the level of the GROUP signal fed to MATRIX bus 5.
6 Adjusts the level of the GROUP signal fed to MATRIX bus 6.
7 Adjusts the level of the GROUP signal fed to MATRIX bus 7.
8 Adjusts the level of the GROUP signal fed to MATRIX bus 8.
FADER MTRX
Normally the GROUP output is controlled by the long fader, and
the MATRIX signal by the rotary potentiometer. Pressing F ADER
REVERSE changes the mode so that the fader now controls the
MATRIX output, with the rotary pot controlling the GROUP
output. This button has led indication.
MATRIX LEVEL
Adjusts the level of the MATRIX output signal fed to the XLR
connector on the rear panel.
MATRIX ON
Enables the matrix output, with led indication.
MATRIX SOLO
Feeds the selected post-level control MATRIX signal to the SOLO
system and Monitors, with led indication.
GROUP SOLO
Feeds the selected post-fader GROUP signal to the SOLO system
and Monitors, with led indication.
Page 51

FORUM OPERATION AND MAINTENANCE MANUAL 9601 PAGE 51
MIX/SUB L
Routes the GROUP signal to the main LEFT bus, post-fader.
MIX/SUB R
Routes the GROUP signal to the main RIGHT bus, post-fader.
FADER
Controls the output level of the GROUP signal, unless FADER
REVERSE has been pressed, when it will control the level of the
MATRIX output signal.
Page 52

FORUM OPERATION AND MAINTENANCE MANUAL 9601 PAGE 52
CONNECTORS AND PIN ASSIGNMENTS
Group Output Q 3 Pin XLR Type, Balanced
Nominal Output LevelQ +4dBu
Pin 2 Q Signal +ve PHot)
Pin 3 Q Signal -ve PCold)
Pin 1 Q Ground
Output Impedance Q S75 Ohm
Matrix Output Q 3 Pin XLR Type, Balanced
Nominal Output LevelQ +4dBu
Pin 2 Q Signal +ve PHot)
Pin 3 Q Signal -ve PCold)
Pin 1 Q Ground
Output Impedance Q S75 Ohm
Group Insert Point Q 1/4O TRS Jack Socket, ëAí Gauge, Unbalanced
Nominal Input LevelQ -2dBu
Tip Q Insert Send
Ring Q Insert Return
SleeveQ Ground
Output Impedance Q S75 Ohm Input Impedance Q >10 kOhm
External Input Q 1/4O TRS Jack Socket, ëAí Gauge, Unbalanced
Nominal Input LevelQ +4dBu Por -10dBV)
Tip Q Signal 1 / Left
Ring Q Signal 2 / Right
SleeveQ Ground
Input Impedance Q >10 kOhm
Page 53

FORUM OPERATION AND MAINTENANCE MANUAL 9601 PAGE 53
This module was fitted in the FORUM COMPOSER which is no
longer available. This information is included for the sake of
existing owners.
The Composer Output module provides control of the Group output
signal, and monitoring of three tape returns. This provides 24-track
monitoring on the eight group output modules.
On each module, one return is provided with a 2-band EQ section,
and all returns have feeds to Auxiliary buses 1 and 2. All returns
are automatically routed to the stereo mix bus.
TAPE RETURN 3 PTop section of module)
Tape Returns 3 and 2 are indentical in operation. Only T ape Return
3 is described here.
AUX 1
Adjusts the amount of Tape 3 signal fed to Auxiliary bus 1. The
signal is taken pre or post- the level control, depending on the
position of the PRE/POST switch below the AUX 2 control.
AUX 2
Adjusts the amount of Tape 3 signal fed to Auxiliary bus 2. The
signal is taken pre or post- the level control, depending on the
position of the PRE/POST switch below the AUX 2 control.
PRE/POST
Takes the signal feed for the Auxiliary buses from before or after
the return level control.
PAN
Adjusts the position of the Tape Return signal within the main
stereo mix. When the PAN is hard left, full signal is sent to the left
bus, and similarly for hard right. When the pan is in the centre,
equal signal,approximately 4.5dB down, is fed to both left and right
buses.
COMPOSER OUTPUT MODULE
Page 54

FORUM OPERATION AND MAINTENANCE MANUAL 9601 PAGE 54
RET LEV
Controls the overall level of the Tape return feed to the stereo mix
bus.
ON
When pressed Pled illuminated) the tape return signal is enabled, or
ON.
SOLO
Feeds the tape return signal to the monitoring outputs and main
stereo meters. The feed is internally selectable to be pre- or postthe level control.
TAPE RETURN 1
HF
A shelving high frequency equaliser section, with gain adjustable
by +/-15dB, at a fixed frequency of 12kHz.
LF
A shelving low frequency equaliser section, with gain adjustable
by +/-15dB, at a fixed frequency of 80Hz.
AUX 1
Adjusts the amount of Tape 1 signal fed to Auxiliary bus 1. The
signal is taken pre or post- the level control, depending on the
position of the PRE/POST switch below the AUX 2 control.
AUX 2
Adjusts the amount of Tape 1 signal fed to Auxiliary bus 2. The
signal is taken pre or post- the level control, depending on the
position of the PRE/POST switch below the AUX 2 control.
PRE/POST
Takes the signal feed for the Auxiliary buses from before or after
the return level control.
PAN
Adjusts the position of the Tape Return signal within the main
stereo mix. When the PAN is hard left, full signal is sent to the left
Page 55

FORUM OPERATION AND MAINTENANCE MANUAL 9601 PAGE 55
bus, and similarly for hard right. When the pan is in the centre,
equal signal, approximately 4.5dB down, is fed to both left and
right buses.
RET LEV
Controls the overall level of the Tape return feed to the stereo mix
bus.
SOLO
Feeds the tape return signal to the monitoring outputs and main
stereo meters. The feed is internally selectable to be pre or post the
level control.
TAPE
Selects the Tape 1 Return signal to the monitoring section, instead
of the BUS output. The led illuminates when TAPE is selected.
MIX L
Routes the BUS Pgroup) signal to the stereo mix left channel.
MIX R
Routes the BUS Pgroup) signal to the stereo mix right channel.
FADER
The long-throw fader always controls the level of the Group BUS
output signal to tape.
Page 56

FORUM OPERATION AND MAINTENANCE MANUAL 9601 PAGE 56
CONNECTORS AND PIN DEFINITIONS
Group OutputQ 3 pin XLR type, balanced
Nominal Output LevelQ +4dBu P-10dBV)
Pin 2 Q Signal +ve PHot)
Pin 3 Q Signal -ve PCold)
Pin 1 Q Ground
Output Impedance Q S75 Ohm
Tape ReturnsQ 1/4O TRS Jack Socket, ëAí Gauge, balanced
Nominal Input LevelQ +4dBu P-10dBV)
Tip Q Signal +ve PHot)
Ring Q Signal -ve PCold)
SleeveQ Ground
Input Impedance Q >10 kOhm
Group InsertQ 1/4O TRS Jack socket, ëAí Gauge, unbalanced
Nominal Input LevelQ -2dBu
Tip Q Insert Send
Ring Q Insert Return
SleeveQ Ground
Output Impedance Q S75 Ohm
Input Impedance Q >10 kOhm
Page 57

FORUM OPERATION AND MAINTENANCE MANUAL 9601 PAGE 57
The Stereo Master module contains the main stereo outputs, the
Auxiliary master outputs, the monitoring section, and talkback
microphone input. In addition, a BNC connector is provided for a
gooseneck light if the console is to be operated under low or poor
light conditions Pmaximum power 12 Volts, 5 watts). In consoles
where mute input modules are fitted the master module will also
have the master mute group switches located on it.
The main stereo outputs have delayed-turn-on circuitry to prevent
potential damage caused to speakers by transients. The stereo
outputs are electronically balanced, and may also be transformer
balanced as a cost option.
Insert points are provided in the stereo output signal and plugging
in the jack automatically breaks the normal signal path and inserts
the external equipment.
The Stereo Mix, Group, and Auxiliary outputs have a nominal
operating level of +4dBu, with the facility to interface at -10dBV.
All these main outputs may be fitted with transformers.
LED Metering
The two led bargraph meters follow under normal operating
conditions the output of the stereo mix. If any SOLO button is
pressed, they show the level of the soloíed signal, in mono.
SET 0
These sub-panel presets are used to calibrate the led meters for 0dB
signal.
AUX 1
This adjusts the master output level of the Auxiliary 1 bus.
AFL 1
Pressing the associated AFL button will send the auxiliary 1 signal,
at whatever level the master is set, to the main monitoring system,
overiding the stereo signal on the monitors, and meters. The main
stereo output is not affected.
AUX 2-6/AFL 2-6
The five other Auxiliary master level controls and associated AFL
button operate in the same way as the Aux 1 controls.
STEREO MASTER MODULE
Page 58

FORUM OPERATION AND MAINTENANCE MANUAL 9601 PAGE 58
TALKBACK MIC
A microphone may be plugged in to this socket to provide talkback
facilities to the output buses for artists or tape. The microphone
may be a Dynamic type, or using an internal link for phantom
powering, may be a condenser microphone.
TB GAIN
This adjusts the level of the talkback microphone signal.
1-2 / AUX
If 1-2 is pressed, the talkback microphone signal is sent to the
Auxiliary 1 and 2 buses. If these buses are being used as artists
headphone feeds, this switch allows the engineer to talk directly to
the artist via the headphones. To avoid feedback the control room
output is muted when talkback is used.
ALL
If the ALL button is pressed, the talkback microphone signal is sent
to all the main outputs, including all auxiliary buses, group outputs
and the stereo mix, for use in global announcements. The control
room monitor outputs are muted completely when ALL is pressed.
OSC LEVEL
This pot controls the level of the internal tone oscillator, which may
be used for signal path testing or equipment alignment. The
oscillator operates at a frequency of 1kHz.
ON
Switches on the oscillator for use as above, and routes the oscillator
signal to all the buses Q stereo mix, auxiliary outputs and group
outputs. If either of the Talkback assign switches are pressed, the
oscillator signal is overridden.
MONITOR LEVEL
This controls the level of the control room monitoring system. The
signal feed to the monitoring system is selected from the stereo mix
output, an external stereo input Pfor example, a master stereo tape
machine), or any signal on the mixer which is SOLO'ed.
The output Pcontrol room) will feed an external power amplifier
and speakers. Alternatively, stereo headphones may be used via the
headphone jack on the front panel of the master module.
Page 59

FORUM OPERATION AND MAINTENANCE MANUAL 9601 PAGE 59
MIX/2 TRK
This switch selects the input to the monitoring system, from the
stereo mix output or the external stereo input P2 Track).
Selection of any SOLO/AFL signal will override the MIX/2 Track
selection. The 10 way selector module may be connected to the 2
track input to increase the range of available sources.
PFL/AFL
If any SOLO or AFL button is pressed, this led will light to show
that a signal has been soloíed.
MONO LEVEL
There is a separate mono output available which is a sum of the
stereo mix output, and can be taken as a pre-or post-master fader
feed, with its own level control.
PRE
When the switch is up, the mono sum is taken after the main stereo
faders. When depressed, the signal is taken pre-fader , so is
unaffected by the master fader positions. HEADPHONE/MON As
well as to its own output connector, the mono signal can be fed to
the control room monitor outputs or the headphones.
FADERS
Independant left and right main faders are provided, allowing
smooth control and balancing of the stereo output signal.
HEADPHONES Stereo headphones with impedances from 100
ohms to 600 ohms may be plugged into the headphone socket.
Page 60

FORUM OPERATION AND MAINTENANCE MANUAL 9601 PAGE 60
CONNECTORS AND PIN DEFINITIONS
Mix Output Q 3 Pin XLR type, Balanced
Nominal Output LevelQ +4dBu Por -10dBV)
Pin 2 Q Signal +ve PHot)
Pin 3 Q Signal -ve PCold)
Pin 1 Q Ground Output Impedance Q S75 Ohm
Mono Output Q 3 Pin XLR type, Balanced
Nominal Output LevelQ +4dBu Por -10dBV)
Pin 2 Q Signal +ve PHot)
Pin 3 Q Signal -ve PCold)
Pin 1 Q Ground
Output Impedance Q S75 Ohm
Tape Return Inputs Q TRS Jack Socket, ëAí Gauge, Balanced
Nominal Input LevelQ +4dBu Por -10dBV)
Tip Q Signal +ve PHot)
Ring Q Signal -ve PCold)
SleeveQ Ground
Input Impedance Q >10 kOhm
Insert Points Q 1/4O TRS Jack socket, ëAí Gauge, Unbalanced
Nominal Input levelQ -2dBu
Tip Q Insert Send
Ring Q Insert Return
SleeveQ Ground
Output ImpedanceQ S75 Ohm
Input ImpedanceQ >10 kOhm
Control Room Outputs Q 1/4O TRS Jack socket, ëAí Gauge,
Nominal Output levelQ +4dBu Ground compensated
Tip Q Signal +ve Phot)
Ring Q Ground Compensated signal -ve
SleeveQ Ground
Output ImpedanceQ S75 Ohm
Headphone Output Q TRS Jack Socket, ëAí Gauge
Nominal Output levelQ +14dBu
Tip Q Left Channel
Ring Q Right Channel
SleeveQ Ground
Page 61

FORUM OPERATION AND MAINTENANCE MANUAL 9601 PAGE 61
GENERAL SERVICING
Servicing should be referred to factory personnel, or your
authorized DDA distributor.
If you require to remove a module then follow the steps below .
Remove the upper and lower identification strips by pulling
carefully up at one end, then along, unclipping each section very
carefully.
Remove three screws which hold the module in place located at the
bottom, top, and rear, near the bottom of the connector panel.
To remove the module, lift the bottom of the panel, then pull the
module back about 2cms. so that the top is disengaged from the
frame.
Unplug the ribbon cable from the module along with any earth
wires that may be attached.
Replacement is a reversal of the above.
Page 62

FORUM OPERATION AND MAINTENANCE MANUAL 9601 PAGE 62
POWER SUPPLY
The FORUM power supply is a rack mounting unit, occupying 2U
of rack space. The unit is fan cooled but should still be given
adequate ventillation and air circulation when installed.
The AC mains input to the power supply can be between 90 volts
and 240 volts 50 - 60Hz AC, with the operating voltage set by
internal switches.
There are four internal switches which determine the operating
voltage of the unit. DO NOT CONNECT THE POWER SUPPLY
TO THE MAINS WITHOUT CONFIRMING YOUR VOLTAGE
SETTING.
Use a screwdriver to move the switches to the correct setting.
The DC output voltages are +17V, -17V and +48V.
The fuse ratings areQ
240/230/220 T3.15A
120/100/90 T6.3A
NOTE. The PSU has a ground lift switch, which when operated,
can leave the console floating with respect to ground.
100 volts
120 volts
240 volts
230 volts
220 volts
 Loading...