

Page 1
SSA-324
System Interface
(System to System Adapter)
System B
System A
9350697900 Rev G 11/2006
RTS SYSTEMS SSA324 System Interface
Page 2

PROPRIETARY NOTICE
The product information and design disclosed herein were originated by
and are the property of Telex Communications, Inc. Telex reserves all
patent, proprietary design, manufacturing, reproduction, use and sales
rights thereto, and to any article disclosed therein, except to the extent
rights are expressly granted to others.
COPYRIGHT NOTICE
Copyright 2006 by Telex Communications, Inc. All rights reserved.
Reproduction, in whole or in part, without prior written permission from
Telex is prohibited.
WARRANTY NOTICE
See the enclosed warranty card for further details.
SHIPPING TO THE MANUFACTURER
All shipments of product should be made via UPS Ground, prepaid (you
may request from Factory Service a different shipment method). Any
shipment upgrades will be paid by the customer. The equipment should
be shipped in the original packing carton. If the original carton is not
available, use any suitable container that is rigid and of adequate size. If
a substitute container is used, the equipment should be wrapped in paper
and surrounded with at least four (4) inches of excelsior or similar
shock-absorbing material. All shipments must be sent to the following
address and must include the Proof of Purchase for warranty repair.
Upon completion of any repair the equipment will be returned via
United Parcel Service or specified shipper, collect.
Factory Service Department
Telex Communications, Inc.
8601 East Cornhusker Hwy.
Lincoln, NE 68507 U.S.A.
Attn: Service
CUSTOMER SUPPORT
Te chnical questions should be directed to:
Customer Service Department
RTS/Telex Communications, Inc.
12000 Portland Avenue South
Burnsville, MN 55337 USA
Telephone: 800-392-3497
Fax: 800-323-0498
RETURN SHIPPING INSTRUCTIONS
Customer Service Department
Telex Communications, Inc. (Lincoln, NE)
Telephone: 402-467-5321
Fax: 402-467-3279
Factory Service: 800-553-5992
Please include a note in the box which supplies the company name,
address, phone number, a person to contact regarding the repair , the type
and quantity of equipment, a description of the problem and the serial
number(s).
This package should include the following:
Page 3
TABLE
OF
CONTENTS
0
PROPRIETARYNOnCE
COPYRIGHTNOTICE
PATeNTNO
UNPACKING
WARRANTYINFORMATION 2
RETURN
SECTION
1.2 SPECIFICATONS .....................................................
SECTION
2.1 MECHANICAL INSTALLATION
SHIPPING INSTRUCTIONS
1;
1.2.1 FUNCTIONAL SPECIFICATIONS
2:
........................................................
TICE
AND
DESCRIPTION AND SPECIFICATIONS
INSTALLATION
....................................................
.....................................................
INSPECTION
...............................................
.................................................
............................................
..................................
.........................................
................................................
.............................................
............................................. 2.2 ELECTRICALINSTALLATION
2
2
2
2
2
5
5
5
9
9
9
i
.
8
SECTION
3.1 CONTROW: AND CONNECTORS ............................................ 11
SECTION
S:
OPERATION
7:
DIAGRAMS
..................................................
...................................................
11
12
SSA324
User
Manual
3
Page 4
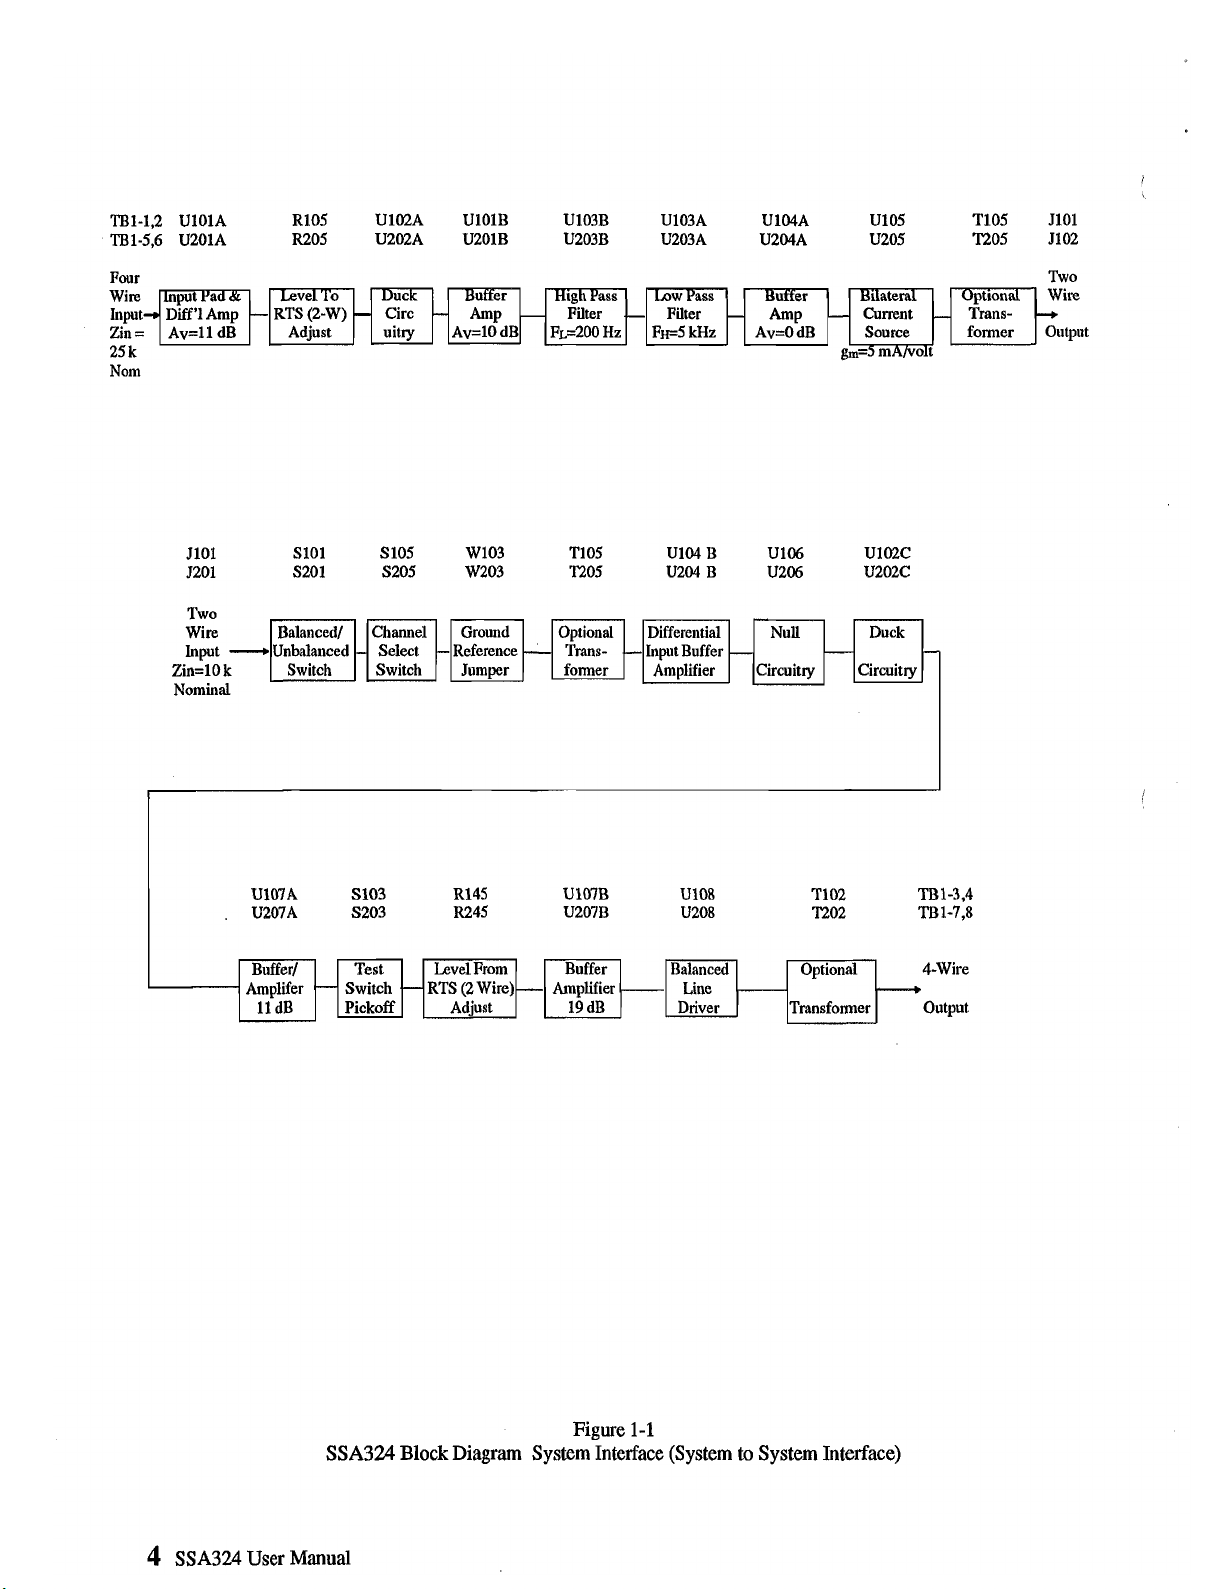
TB1-1,2
TB1-5,6
UlOlA
U201A R205
R105 U102A UlOlB
U202A U201B
U103B
U203B
U103A
U203A U204A U205
U104A U105
T105 JlOl
T205 J102
Four
25k
Nom
Filter Pir
S
JlOl SlOl
5201 S201
Two
wire
Input
-
Zin=lO k Switch Switch Jumper former
Nominal
Unbalanced Reference
rFt%&TH-t
105 W103 TI05 U104 B
S205 W203 T205
U204 B
Differential
Input
Buffer
Amplifier
Buffer
-
Amp
U106 U102C
U206 U202C
Null
-
Circuitry
-
-
@=5
Bilateral
Current
Source
mA/volt
Duck
Circuitry
-
-
Optional
Trans-
former
Two
Wire
-+
Output
-
Buffed
Amplifer
11
dB
Test Level From
-
-
Switch
Pickoff
-
RTS (2 Wire)-
Adjust
[~~~l
Amplifier
19
dB
Figure
Driver Transformer Output
1-1
SSA324 Block Diagram System Interface (System
rt4-wire
to
System Interface)
4
SSA324 User
Manual
Page 5
j)
SECTION
1.1
DESCRIPTION (See
,
The Model SSA324
face). It interconnects the voice signals between different
intercom systems. In addition, it can optionally interconnect
"Calls" or tally signals between systems. Each SSA324 in-
cludes two two-wire
interface can deliver and accept high level signals such
those from the McCurdy intercom system.
also function as a two-wire to two-wire interface by intercon-
necting the two individual interfaces at the four-wire level.
SSA324 carries two voice channels when used as a dual
The
two-wire to four-wire interface, and one voice channel when
functioning as a two-wire to two-wire interface.
A front panel channel select switch for each of the two
interfaces (A and B) will select one of two, two-wire chan-
nels. For
position. For Audiocom use, a rear panel switch will select
balanced two-wire operation.
Front panel controls include
ducking, 2) switches for monitoring and channel select.
Rear
the two-wire connection of each interface.
nectors include two
terminals for two four-wire interconections, one
connector for duplicate four-wire connections plus options
connections. The terminals
tions. The
time-to-repair
The SSA324 replaces the Model TWI224 and TWI222 inter-
faces where powering from the intercom is not required.
Differences between the Model TWI224
and
Model SSA324 include the following:
self (locally) powered, the TWI224 / TWI222 is usually
powered from the
SSA324 has a maximum output at the four-wire output port
of +22 dBm, the TWI224
dBm.
1:
DESCRIPTION AND SPECIFICATIONS
Block
Diagram,
is
a System to System Adapter (or inter-
to
four-wire converters. The four-wire
Figure
An
ClearCom use, the switch will be in the Channel 2
1)
adjustments for null, level,
panel controls include balance/unbalance switches for
Rear
D
connector
is
an issue
XLR3
TW
connectors for two-wire, eight
are
useful for rapid field connec-
aids
rapid replacement where mean-
and
also
allows option strapping.
/
TWI222 interface
1)
The SSA324
line or may be locally powered. 2) The
/
TWI222 maximum output is
1-1)
as
SSA324 can
panel con-
25
pin D
is
Converter A's two-wire port is driven by an active balanced
bilateral current source
added). Converter B's two-wire port is similar to Converter
A's.
Converter A's four-wire output
balanced voltage line driver (or via an optional transformer).
A build-out resistor (about 33 ohms) in each leg of the
differential output maintains stability driving long cables.
Converter B's four-wire output port is similar to converter
A's.
The optional transformers can be used to provide higher
common mode voltage isolation between the four-wire sys-
tem(~) and the two-wire systems.
Converter A's four-wire input port is active balanced,
ing, ten thousand ohms impedance. Converter B's four-wire
is
input port
former
.
Adjustable, 0
other (threshold is factory set). There
interface A and one for interface B. Each interface has depth
level adjustment (front panel).
similar to converter A's.
is
available for the four-wire input(s).
to
30
(an
optional transformer may be
port
is driven by an active
(An
optional trans-
dB.
Toggles from one direction to the
is
one adjustment for
Monitoring
Uses standard headset. Front Panel has six pin female
type headset connector.
Switch on front panel activates the monitoring function. User
uses headset microphone or a built in oscillator to adjust for
null in headset earphones (or via a built-in oscillator which is
jumper selected by a jumper on
There
are
three null adjustments associated with each two-
are
wire port. These
and inductive (low) nulls. Medium, High, and Low refers to
9
frequency ranges; medium centers about
kilohertz, low, 300 hertz.
resistive (medium), capacitive (high),
the printed circuit board).
1
kilohertz, high,
biidg-
XLR
3
1.2.1
FUNCTIONAL SPECIFICATIONS
The Model SSA324 consists of two two-wire
converters in a single package (converter A and converter
If the two converters are interconnected, the Model SSA324
then functions as two-wire to two-wire converter. The
is
as
method of interconnection
wire output is connected to converter B's four-wire input;
converter A's four-wire input is connected to converter B's
output.
follows: converter A's four-
to
four-wire
B).
There are two level adjustments for interface
two-wire) and two for interface B (to-from two-wire).
SSA324 User Manual
A
(to-from
5
Page 6

Application
The Model SSA324 aljplications include the following:
1Lterface audio signals between intercom systems
Number of Channels Interfaced with the Model SSA324 by System
McCurdy/
Generic 4W Audiocom Clearcorn RTS/2WB RTS/2WU RTSI4'WB
as
2W
shown in Table 1-1, below.
1-1
Table
System 2
2!inhM
2d!Jkd
2W
il2ima!
2. Interface (using optional plug
Audiocom call signal to Audiocom call signal.
RTS Systems call signal to RTS Systems call signal.
RTS Systems call signal to form C relay contact transfer.
Audiocom call signal to form C relay contact transfer.
to
Contact closure
Contact closure
ClearCom to RTS Systems call and vice versa.
RTS Systems call signal generation.
to
Audiocom call signal generation.
in
boards) the following non-audio signals:
6
SSA324 User Manual
Page 7

j7/
13.1
ELECTRICAL SPECIFICATIONS
(Specifications
Individual Interface Specification
(each of two dividual interfaces)
Two-Wire Input
Impedance:5,000 ohms +loo%, -20% single ended,
10,000 ohms +100%, -20% differential
Operating Levels:-20 dBu
at
120VAC line voltage)
to
+O
dBu, nominal
Signal-to-Noise Ratio (Reference: 1 kilohertz, 0 dBu
-60
Two-Wire to Four-Wire:
Four-Wire to Two-Wire: -60 dB
Crosstalk (Reference:
System A to System
Two-wire to Two-wire
200 hertz to 5 kilohertz: -50 dB,
B,
dB
1
kilohertz, 0 dBu)
at
two-wire)
Two-Wire Output
Impedance:5,000 ohms 20% single ended,
10,000 ohms 2Wo differential
mA
to 10
mA,
Operating Leve1s:O.l
Four-Wire Input
Impedance: 10,000 ohms minimum single ended,
20,000 ohms minimum differential
to
Operating Levels:-10 dBu
Four-Wire Output
Impedance:ohms single ended or differential
Operating Levels:-10 dBu
Transfer Functions (Duck Level set to no ducking)
Voltage Gain, Four-Wire
Level Pot 100% rotation:O 3 dB
Level Pot 50% rotation:-15 dB 4
+8
to
In
nominal
dBu,
nominal
+
8 dBu, nominal
to Two-Wire Out*
dB
Environmental
Temperature
Operating:OO to 50' celsius
Storage:-40° to 85O celsius
Humidity0 to 95%, non-condensing
Mains Voltage
Standard: 120 volts
*P Option:230 volts lo%, 50-60 hertz
#D 0ption:lOO volts
Mains Amperes
StandarkO.2OA
*P 0ption:O.lOA
#D
Option:0.22A @ 100 volts + lo%,-5%, 50-60 hertz
Dimensions
lo%, 50-60 hertz
+
10%. -5%, 50-60 hertz
@
120 volts lo%, 50-60 hertz
@
230 volts 10%. 50-60 hertz
Transfer Functions (Duck Level set to no ducking)
In
Voltage Gain, Two-Wire
Level Pot 100% rotation:22
Level Pot 50% rotation:8 dB 4
Frequency Response (Reference: 1 kilohertz, 0 dBu input)
Four-Wire Input
Two-Wire Output:200 hertz to 5 kilohertz, +1,-4 dB, typical
Two-Wire Input to
Wire Output:250 hertz
Four
Notes
*
Where two-wire output voltage is output current times termination impedance, and termination impedance is 200 ohms 33nF.
**
Null pots set for
***
SSA324 weight with optional transformers in place.
to
maximum
to Fow-Wire Out**
dB
3
dB
dB
to
5 kilohertz,
null, 200 ohm 33nF nominal two-wire lie.
+1,
-4
dB, typical
Height:1.72 inches
Widh8.19 inches (208 millimeters)
Deph8.00 inches (204 millimeters)
Weight
SSA324***:5.0 pounds (2.3 kilograms)
MCP1:l.O
MCP2.1.0
Fiish:Thermoplastic front panel, aluminum case, light gray finish.
pounds
pounds
(
44
millimeters)
(0.45 kilograms)
(0.45 kilograms)
SSA324
User
Manual
7
Page 8

8
SSA324
User
Manual
Rear
Panel, Model
Figure
SSA324
2-1
System Interface
Page 9

SECTION
2.1
MECHANICAL INSTALLATION
The Model SSA324 can be installed in 3 ways: a single unit
mounted in a half rack space using an optional Model MCP2
Kit for
mounted side by side using the optional MCPl Kit for rack
mounting two units side by side; or
optional MCP8 Kit for adding side channels for non-rack
mounting portable use.
2.2
The connection for the headset used to set-up the interface is
on the Eront panel,
Figure 2-1 shows the rear panel connections.
two-wire connection is at
XLR-3-3
wire connections
connections to the option card, when installed. Low voltage
alternating current power is applied to
Connector Pin-outs
2:
INSTALLATION
rack
mounting a single unit; or two SSA324 supplies
free
standing using the
ELECTRICAL INSTALLATION
all
other connections are on the rear panel.
J101, System B, 5102. These are
1
(female) type connectors. System A and B four-
are
at both TI31 and 5103. J103 also contains
5104 (16 volts, AC).
are
listed below.
System A
Earth
16VAC 2
16VAC
No Conn. 4
1 Earth
2
15 4-Wire Audio In Lo, System
3
16 4-Wire Audio Out Lo, System A
4
17
5
18
6 Call Send
19 Call Send Hi (A)
7
20
1
3
4-Wire Audio In Hi, System A
A
4-Wire Audio Out Hi, System
4-Wire Audio In Hi, System B
4-Wire Audio In Lo, System B
4-Wire Audio Out Hi, System B
4-Wire Audio Out Lo, System B
GND
(A)
GND
DC Call Sig En
DC Call Sig En Hi (A)
(A)
A
Two-Wire
Com
*S101 (System
for balanced operation.
**
If option board installed and ClearCom call light operation
is required, move jumper W103 (System A) and/or jumper
W203 (System
J103- 7,20 for System A, andlor J103- 12,25 for System B.
Audio In
Audio In
Audio Out Hi
Audio Out
(LUJl@
Audiocom ClearCom RTS RTS
*
*
1 1
B)
B)
on motherboard to 2,3 position. Jumper
System A
Hi
Lo
Lo
and/or S 102 (System A) set to in position
TB
1-
1 5
2
3
4 8
1 1
System B
TB
1-
6
7
8
9 Relay Contact COM (A)
21 Relay Contact
22 Relay Contact NO
23 Relay Contact COM (B)
10 Relay Contact NC (B)
11 Call Send
24
12
25
1
2 Mic Hi
3 Headphone Com
4 Left Headphone
5
6 No Connection
Place jumper on W2 for tone test signal, W3 for voice test
signal. Test signal used with headset and front panel nulling
adjustments to null
Relay Contact NO (A)
NC
(A)
(B)
GND
(B)
Call Send Hi (B)
En
DC Call Sig
DC
Call Sig
Mic
Lo
Right Headphone Hi
GND
En
Hi (B)
Hi
return
two-wire signal.
(B)
SSA324 User Manual
9
Page 10

f
U
System
A
System
B
CHI-Out
CH2
-
In
'
I
.,,.I
NN//
Level
Nu\\
@I
C"
Page 11

SECTION 3: OPERATION
3.2 OPERATION
0
I
3.1 CONTROLS AND CONNECTORS
F'ront
Panel
Switches
1.
2.
3.
4.
5.
sAI&ds
6.
7.
Channel Select switch,
Press momentary switch for nulling System A
Two-wire.
Channel Select switch, CHI out / CH2
Press momentary switch for nulling System
Two-wire.
XLR6-31
(DYN
Monitor headphone level (VOLUME).
Indicator (Power) Green
Female 6 pin headset connector
MIC HEADSET)
CHl
LED.
out / CH2
in,
in,
Sys.
Sys.
B
A.
B.
3.2.1 NULLING
Preset Controls
Press
Test Switch
If test signal tone, adjust
If test signal voice, say ahhh into microphone, adjust
null, then
Release Test Switch
3.23 LEVEL SETTING
Have Talkers 1 and 2 on Fout-Wire System, Talkers 3 and 4
on Two-Wire System. Adjust To /From RTS Controls so that
all Talkers can hear other at about the same level regardless
of which system the other talkers may be on.
as
Follows:
ToProm RTS
Duck Level
Low
Med
Hi
Volume
Hi,
then Low.
Set to Midway
Set to CW
Set to Midway
Set to Midway
CCW
Set to
10
O'clock
Med
for null, then Hi, then Low.
Med
for
/OF
-
I
9.
10.
11.
12.
13.
14.
15.
16.
17.
18.
19.
Rear Panel
Switches
20.
21.
LEVEL
LEVEL
DUCK Level, System A.
Inductive (LOW) null, System
Resistive (MEDium) null, System
Capacitive (HIgh) null, System A.
LEVEL
LEVEL
DUCK Level, System
Inductive
Resistive (MEDium) null, System
Capacitive (HIgh) null, System
Unbalance (Out) Balance (In) / Select Two-Wire,
System A
.
Unbalance (Out) Balance (In) / Select Two-Wire,
System
To
RTs, System A.
FROM
TO
FROM
B
RTS,
RTS, System
RTS wire, System
(LOW)
null, System
system
B.
B.
A.
A.
B.
B.
A.
B.
B.
3.2.3
DUCK SETTING
Adjust DuckLevel only if full duplex operation is not possible
because of feedback. Adjust Duck Level carefully
towards CCW. Only a very small amount of ducking should
be
used.
from
CW
SSA324 User Manual
11
Page 12

SECTION
7:
Document
NumberSizem
DIAGRAMS
SD6926
SD6926
SD6926
AS6926
B
B
B
B
Schematic Diagram- System
Schematic Diagram- System
Schematic Diagrarn- System
Assembly Diagram,
PCA,
System
To
System Adapter, Model SSA324, Sht 1 of
To
System Adapter, Model SSA324, Sht 2
To
System Adapter, Model SSA324, Sht 3 of
To
System Adapter, Model SSA324
of
3
3
3
12
SSA324 User
Manual
Page 13

+-WIRE
IN
4-WIRE
OUT
LAST USED: Cleo ~103.?103:~i10.~103 Dl30 El03 JlOi.Ri77.
NOT USED: R126.Rl27
1
!
TRANSFORMERS Ti02 AND T202 NORMALLY NOT INSTALLED.
TRANSFORMERS TlOl AND T201 NORMALLY NOT INSTALLED.
TRANSFORMERS TI03 AND T203 NORMALLY NOT INSTALLED.
CUT TRACES ON
TO BE USED.
NOTES: UNLESS OTHERWISE SPECIFIED
P.C.B.
AS SHOWN IF TRANSFORMERS ARE
I
I
Page 14

22K
CALL SEND
b>
S205 CHI-OUT
FRONT
PANELCH~-*~
0
N.C.
NOT USED: R226.R227
I
I
CONTRACT NO.
1.
Drown SCHEMATIC DIAGRAM- SYSTEM TO SYSTEM
RTS
SYSTEMS
ADAPTER. MODEL SSA324
eurtmnk.
calltornla
Page 15

OPTION CAR0
&CALL SENO GNO (A)
-'
CALL SENO HI (A)
'3
OC CALL SIG EN GNO (A)
'4
OC CALL SIG EN HI
'5
RELAY CONTACT NO (A)
&RELAY CONTACT NC (A)
'7
RELAY
@-
@RELAY CONTACT CON 18) XLR-3-39 PIN
&
.la
CONTACT
RELAY CONTACT NO
RELAY CONTACT NC (8)
CALL SEN0 GNO (8)
CALL SENO HI (8)
OC CALL SIG EN GNO (81
oc
CALL
SIG
(A)
con
(A)
(8)
EN
HI
(8)
-3-31 PIN 2 (A) OF 4401
CALL RECEIV
XLR-3-33 PIN 2 I81 OF 4102
1
(8)
OF 4302
FRONT PANEL
-
A
(REAR
LAST
USEO
(THIS SHEET).
NOT USEO (THIS SHEET) : 05.06. J6
AS.
C26. 031. OSi. Ft. J4. P7. 02.
R41. U7. W3. 22
-EN
+7.5V SOURCE
SOURCE
-7.6V SOURCE
I
i
I
I
CONTRACT NO.
OPBW"
R.T.C-
ChecNed
lasued
-
LAST USEO: C24. OSI. 016. J2.02.
RTS
SCHEMATIC OIAGRAM- SYSTEM TO SYSTEM
SIZE FSCN
0
160572
DATE W3/U
R43. U7
SYSTEMS
ADAPTER. NOOEL SSA324
Burnenk. celitonnis
OWG NO
SD6926
1
Page 16

TI01 AND T201 ARE OPTIONAL
DO NOT INSTALL
nooooooo
n-
000000000000
0
moooooooooooo
mmmmmmmmmmm
CWSRW~34R259e236R253R2MlG82C244
uwwwmwumumm
0
TI02 AND T202 ARE OPTIONAL
DO NOT INSTALL
TI03 AND T203 ARE OPTIONAL
DO NOT INSTALL
COMPONENT SIDE
A4VlD HEATSINK #576802804000
 Loading...