

TeleWell TW-LTE/4G Wlan User Manual

TW-LTE/4G Wlan User Guide
Copyright © TeleWell Oy
1. Overview
The device provides a simple way to use 4G connect to the Internet with any WIFI-enabled device
and to fulfill needs of sharing your internet connection during outside home.
1.1 Introduction
Indicator Description
1. LCD screen: Displays current status of the device
2. USB interface: Connect the USB cable to power adapter or PC/Laptop
3. Networking buttons: Connect/Disconnect Internet access
4. WPS / WiFi button:
a. long press (5 seconds) to turn on/off WiFi
b. abort press (less than 2 seconds) to open the WPS PBC mode
5. Power button:
a. Long press (5 seconds) to start on/off the device
b. Sleep mode short press (less than 2 seconds) to exit sleep
c. Equipment work properly and the LCD screen, backlight is turned on, display SSID
number and WiFi password short press (less than 2 seconds)
6. Reset button:
a. Short press (less than 2 seconds) equipment to restart
b. Long press (more than 5 seconds) to restore the factory settings
SIM card installation instruction
! Open the back cover, remove the battery.
! Insert SIM card into the slot.
1.2 LCD Specification
1.3 System Requirements
Operating System:
- Windows XP 64bit,32bit(SP3)/Vista 64bit,32bit(SP2)/ Windows7 64bit,32bit(SP1)/ Windows 8
- Mac x 10.5 or higher, but not higher than x 10.8.0
- Linux (only Wlan)
Browser
- Internet Explorer
- Safari
Network: 2G, 3G, 4G, LTE
2. Equipment installation
2.1 Connect the Device
Before you want to use the device, setup your device as following:
1. Insert SIM;
2. Insert Micro SD Card;
3. Insert the battery;
4. Hold the Power/Connect button to power on;
5. Connect this device to your terminal device.

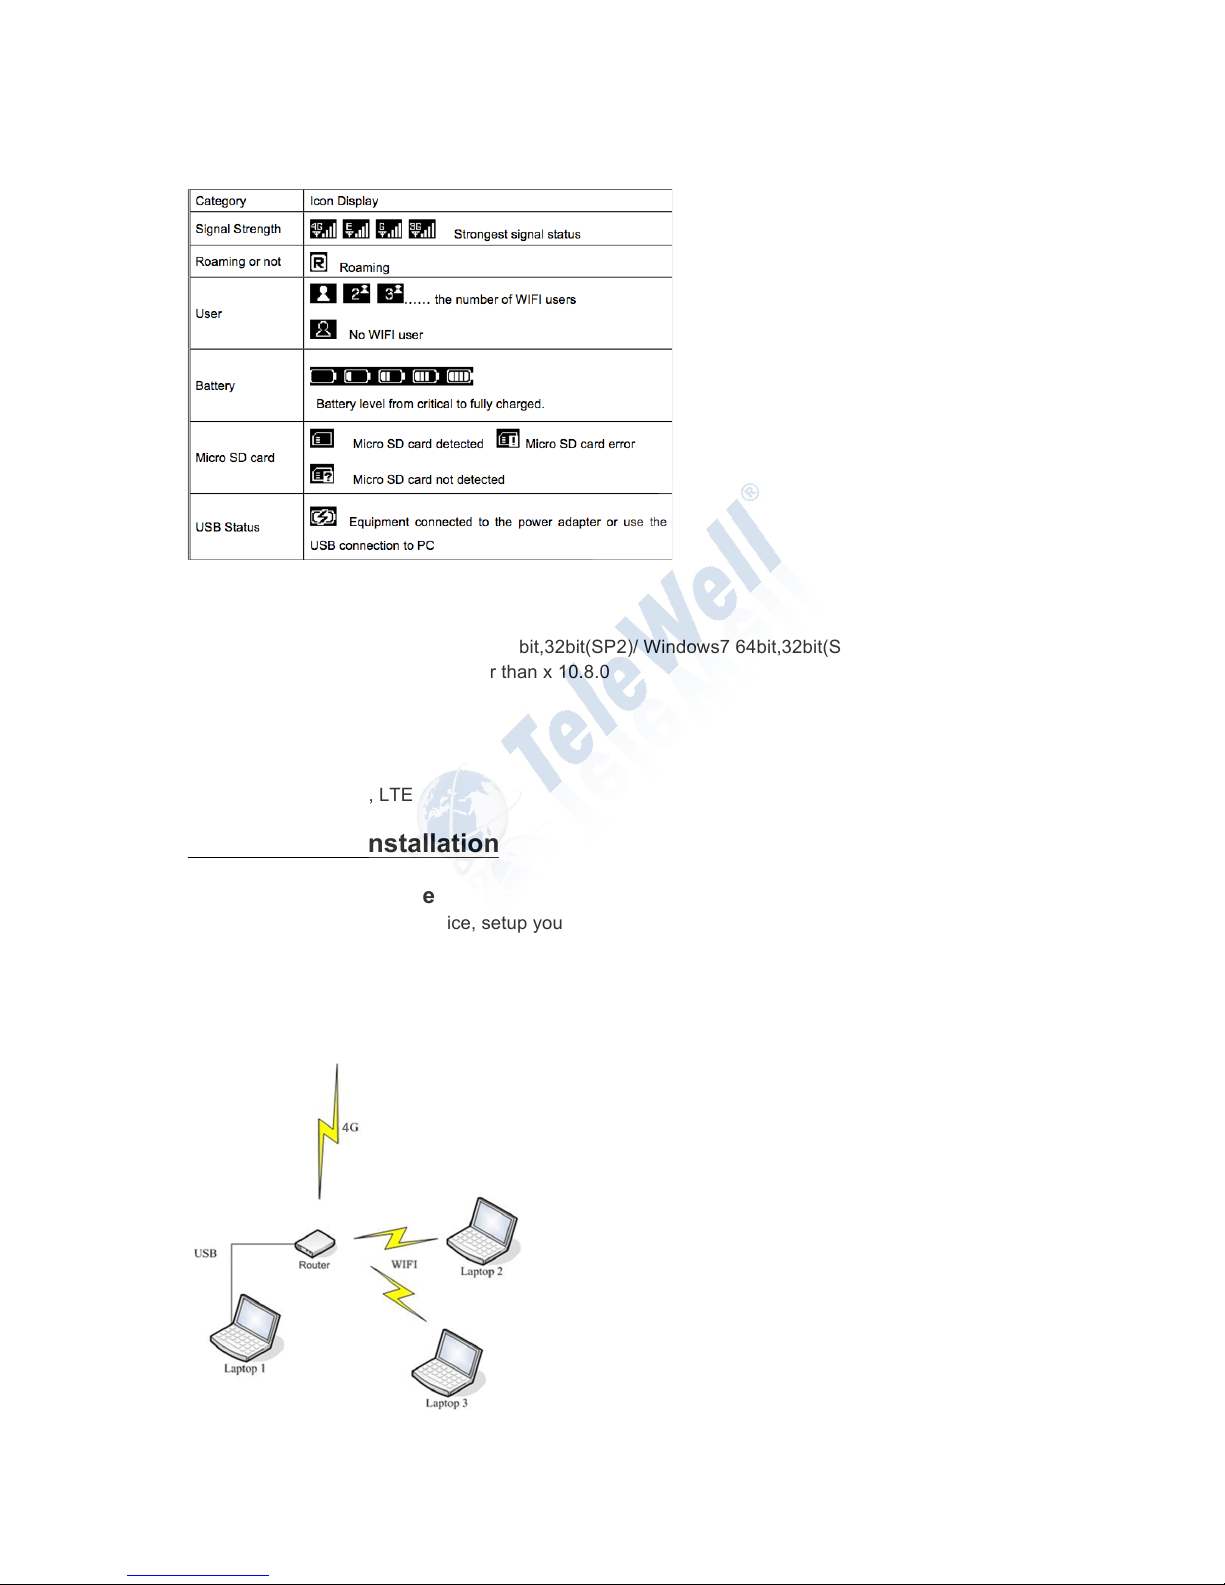
The device applications scenes Figure
PC devices can be connected via USB or via WIFI network. Micro-SD card inside the device provides
network storage sharing function.
Note:
- If the computer does not have a CDROM auto-run function when the device is connected to the
computer via USB and install the drivers, please click on the "My Computer" to open the CDROM,
and manually install the driver.
- If automatic installation failed, please check whether the antivirus and security software is working. If
it is, close it and reinstall.
2.2 Startup
Power up the device
- After all installation is complete, Press and hold the power button over 5 second to power up the
device.
Restart the device
- Some configurations may take effect after system reboot. The device will reboot automatically once
these configurations to be modified. After reboot the webpage will be automatically redirected to
Homepage and need you to re-login for further changes.
Shutdown the device
- Hold the power button over 5 second when the device is powered on, the device will automatically
shutdown.
2.3 Battery charging and using time
- Battery can be charged using USB cable via PC or power adapter
- Battery charging time is about two hours
- Battery using time in LTE mode is upto 8 hours and in 3G mode upto 10 hours
3. Description for Client Interface
3.1 Activate Client
Open the browser, and then enter the IP address http://192.168.0.1 device interface will open in your
browser. Note: If the user enters the IP address can’t open the device software interface, double-click
the shortcut icon the desktop client to re-enter the IP address in the browser and refresh the page
 Loading...