

TeleWell TW-EA515 User Manual

1
TW-EA515 User Manual

2
Copyright
The contents of this publication may not be reproduced in any part or as a whole, stored,
transcribed in an information retrieval system, translated into any language, or transmitted in
any form or by any means, mechanical, magnetic, electronic, optical, photocopying, manual,
or otherwise, without the prior written permission from TeleWell oy
Trademarks
All products, company, brand names are trademarks or registered trademarks of their
respective companies. They are used for identification purpose only. Specifications are subject
to be changed without prior notice.
CE Declaration of Conformity
This equipment complies with the requirements relating to electromagnetic compatibility, EN
55022/A1 Class B.

3
Table of contents
COPYRIGHT ............................................................................................................................. 1
CHAPTER 1 INTRODUCTION .................................................................................................. 5
1.1 PACKAGE LIST ............................................................................................ 5
1.2 HARDWARE INSTALLATION ...................................................................... 6
CHAPTER 2 GETTING STARTED WITH EASY SETUP UTILITY ........................................... 9
2.1 EASY SETUP BY WINDOWS UTILITY ......................................................... 9
2.2 EASY SETUP BY CONFIGURING WEB PAGES ....................................... 13
CHAPTER 3 MAKING CONFIGURATION ............................................................................. 17
3.1 BASIC SETTING ........................................................................................... 17
3.1.1 NETWORK SETUP ............................................................................. 19
3.1.2 DHCP SERVER .................................................................................. 35
3.1.3 WIRELESS SETTINGS ...................................................................... .37
3.1.4 CHANGE PASSWORD ....................................................................... 41
3.2 FORWARDING RULES ................................................................................. 42
3.2.1 VIRTUAL SERVER ............................................................................. 42
3.2.2 SPECIAL AP ....................................................................................... 43
3.2.3 MISCELLANEOUS ............................................................................. 44
3.3 SECURITY SETTING .................................................................................... 45
3.3.1 PACKET FILTERS………….….…………………………………..……….46
3.3.2 DOMAIN FILTERS ………………………………………………………….48
3.3.3 URL BLOCKING ................................................................................. 49
3.3.4 MAC CONTROL ................................................................................. 50
3.3.5 VPN-L2TP CLIENT ............................................................................. 51
3.3.6 VPN-PPTP CLIENT ............................................................................ 54
3.3.7 MISCELLANEOUS ............................................................................. 56
3.4 ADVANCED SETTING .................................................................................... 58
3.4.1 System Log…………………………….…………………………………59
3.4.2 DYNAMIC DNS………….….………….…………………………..……….60
3.4.3 OS …………………………………….…………………………………….61
3.4.4 SNMP .................................................................................................. 67
3.4.5 ROUTING ............................................................................................ 68
3.4.6 SYSTEM TIME .................................................................................... 69
3.4.7 SCHEDULING ..................................................................................... 70
3.4.8 IPV6 ..................................................................................................... 71
3.4.9 VLAN ................................................................................................... 75
3.6 TOOL BOX ...................................................................................................... 82
3.6.1 SYSTEM INFO .................................................................................... 83
3.6.3 FIRMWARE UPGRADE ............................................................................... 84
3.6.4 BACKUP SETTING ............................................................................ 84
3.6.5 RESET TO DEFAULT ......................................................................... 85
3.6.6 REBOOT ............................................................................................. 85
3.6.7 MISCELLANCEOUS ........................................................................... 85
CHAPTER 4 TROUBLESHOOTING ....................................................................................... 86

4
APPENDIX A. SPEC SUMMARY TABLE .............................................................................. 90
APPENDIX B. LICENSING INFORMATION ........................................................................... 91
5
Chapter 1 Introduction
The TW-EA515 ADSL router is a high-performance tool that supports wireless networking at
home, work, or in a public place. The TW-EA515 ADSL router supports a USB 3G modem
card, either WCDMA or EVDO and even HSDPA as well, and supports wireless data transfers
up to 300M bps, and wired data transfers up to 100Mbps. The TW-EA515 ADSL router is
compatible with industry security features.
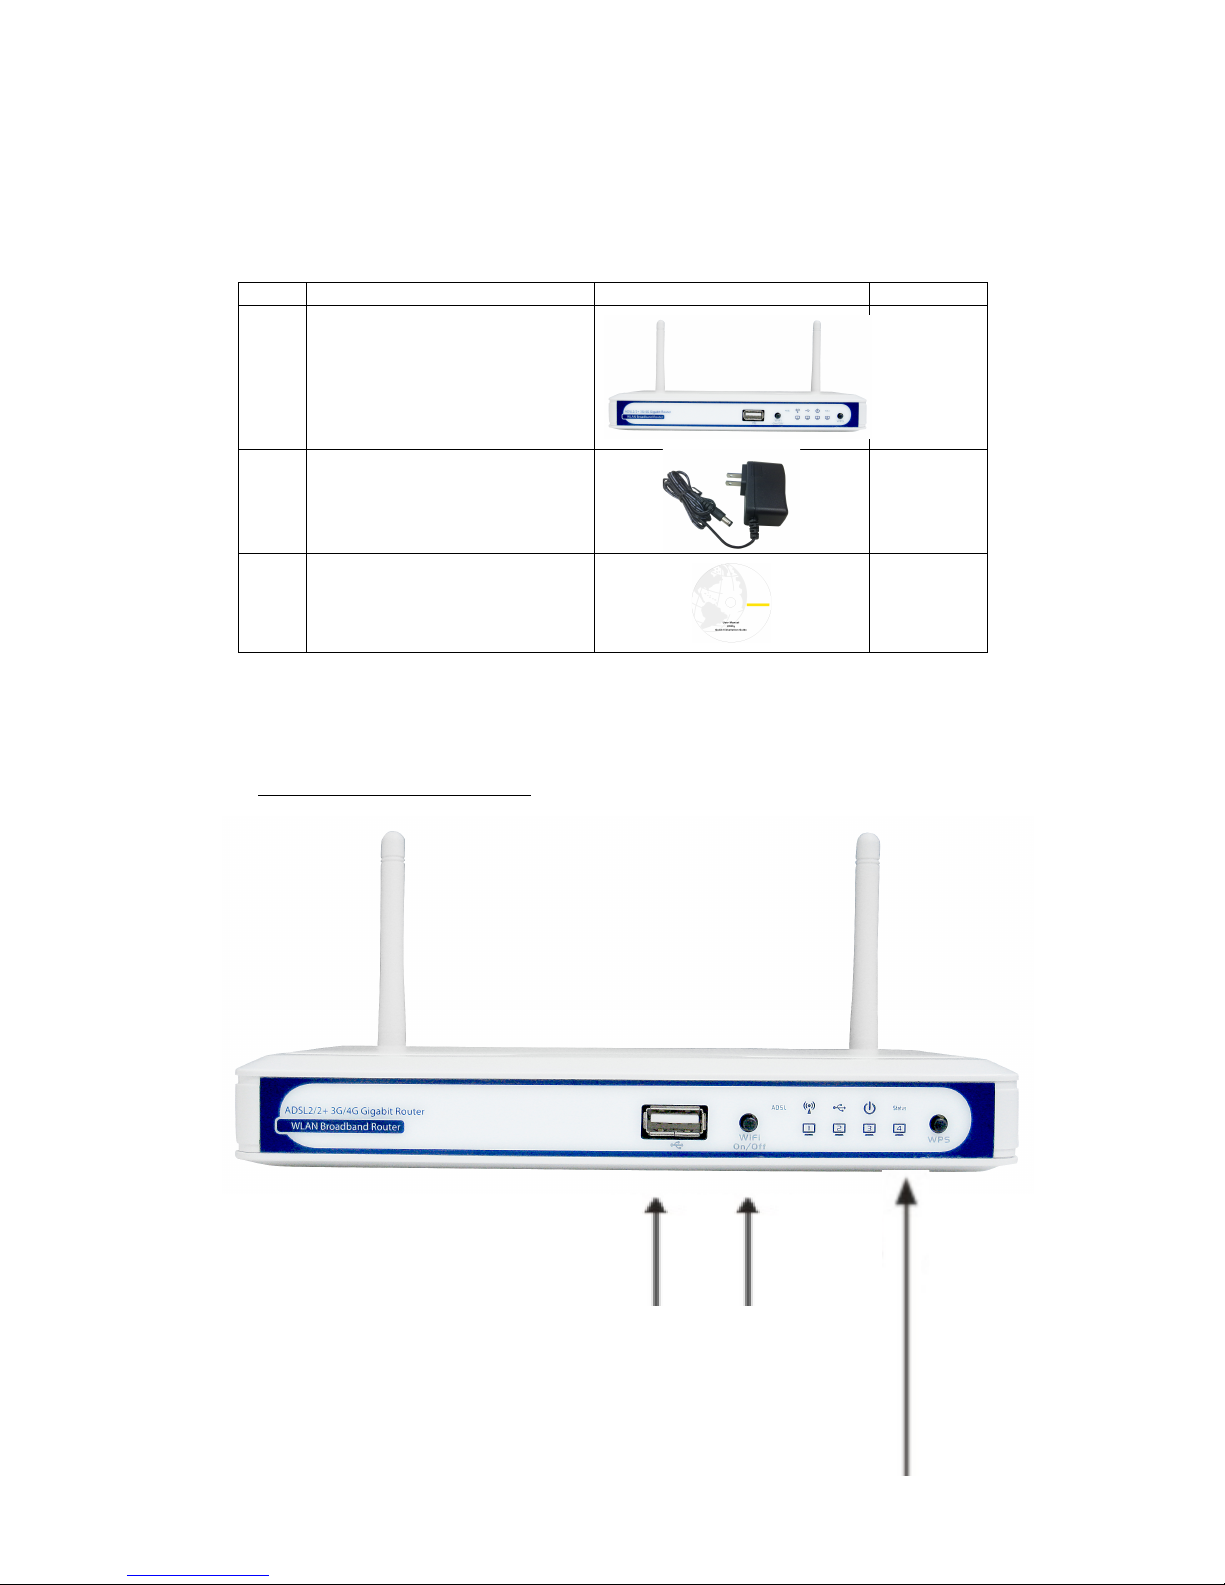
1.1 Package List
Items
Description
Contents
Quantity
1
TW-EA515 ADSL router
1
2
Power adapter
1
3
CD 1
1.2 Hardware Installation
A. Hardware configuration
USB port for 3G/4G dongles WiFi on/off
LED’s for ADSl, LAN port 1-4 , Status
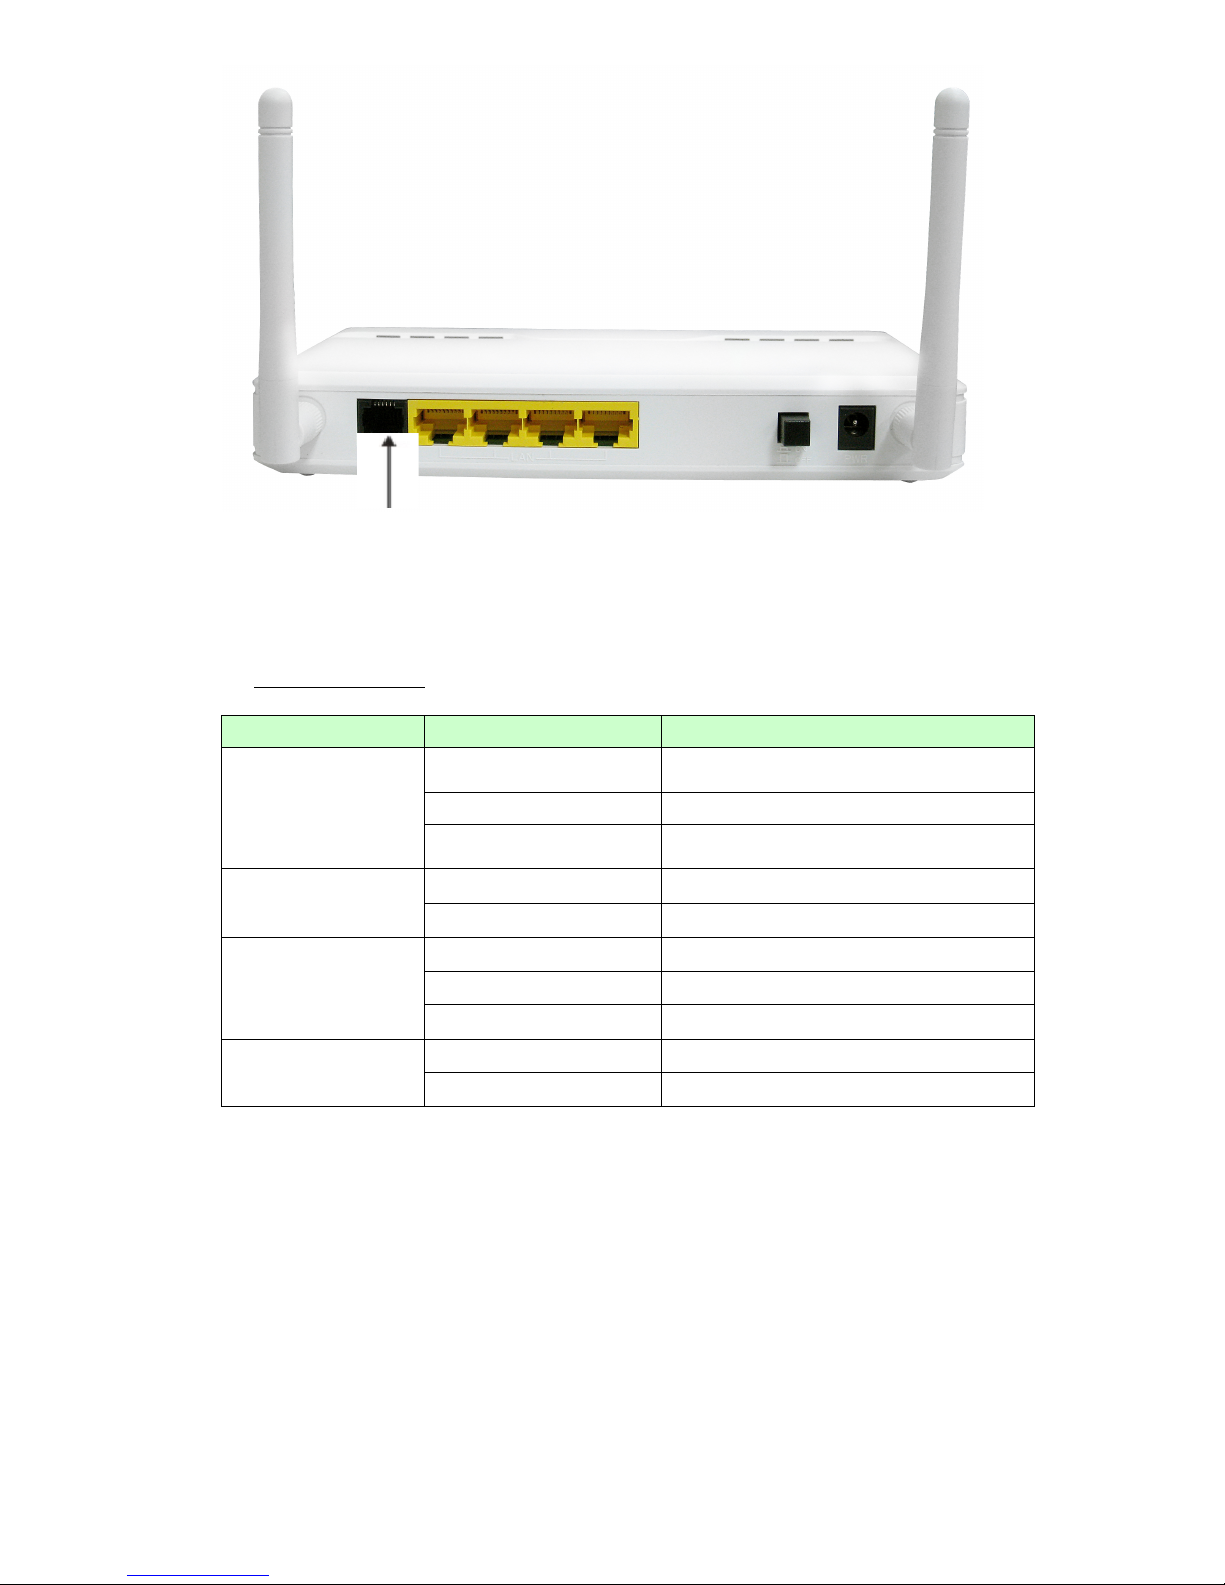
6
ADSL port and Ethernet ports
B. LED indicators
LED
Indicator
Description
Status/USB
Green and Blink once per
second
No external USB device is attached, and
this router is working.
Green and Steady On
An external USB device is attached
Green and Blinking
Data packet transferred via attached USB
device (e.g. USB drive, 3G dongle)
Ethernet WAN
Green and Steady On
Ethernet WAN connection is established
Green and Blinking
Data packet transferred via Ethernet WAN
W.LAN
Green and Blinking
Data packet transferred via WiFi
Green and Fast Blinking
In WPS PBC mode
OFF
WiFi radio is disabled
Ethernet LAN 1~4
Green and Steady On
Ethernet LAN connection is established
Green and Blinking
Data packet transferred via Ethernet LAN
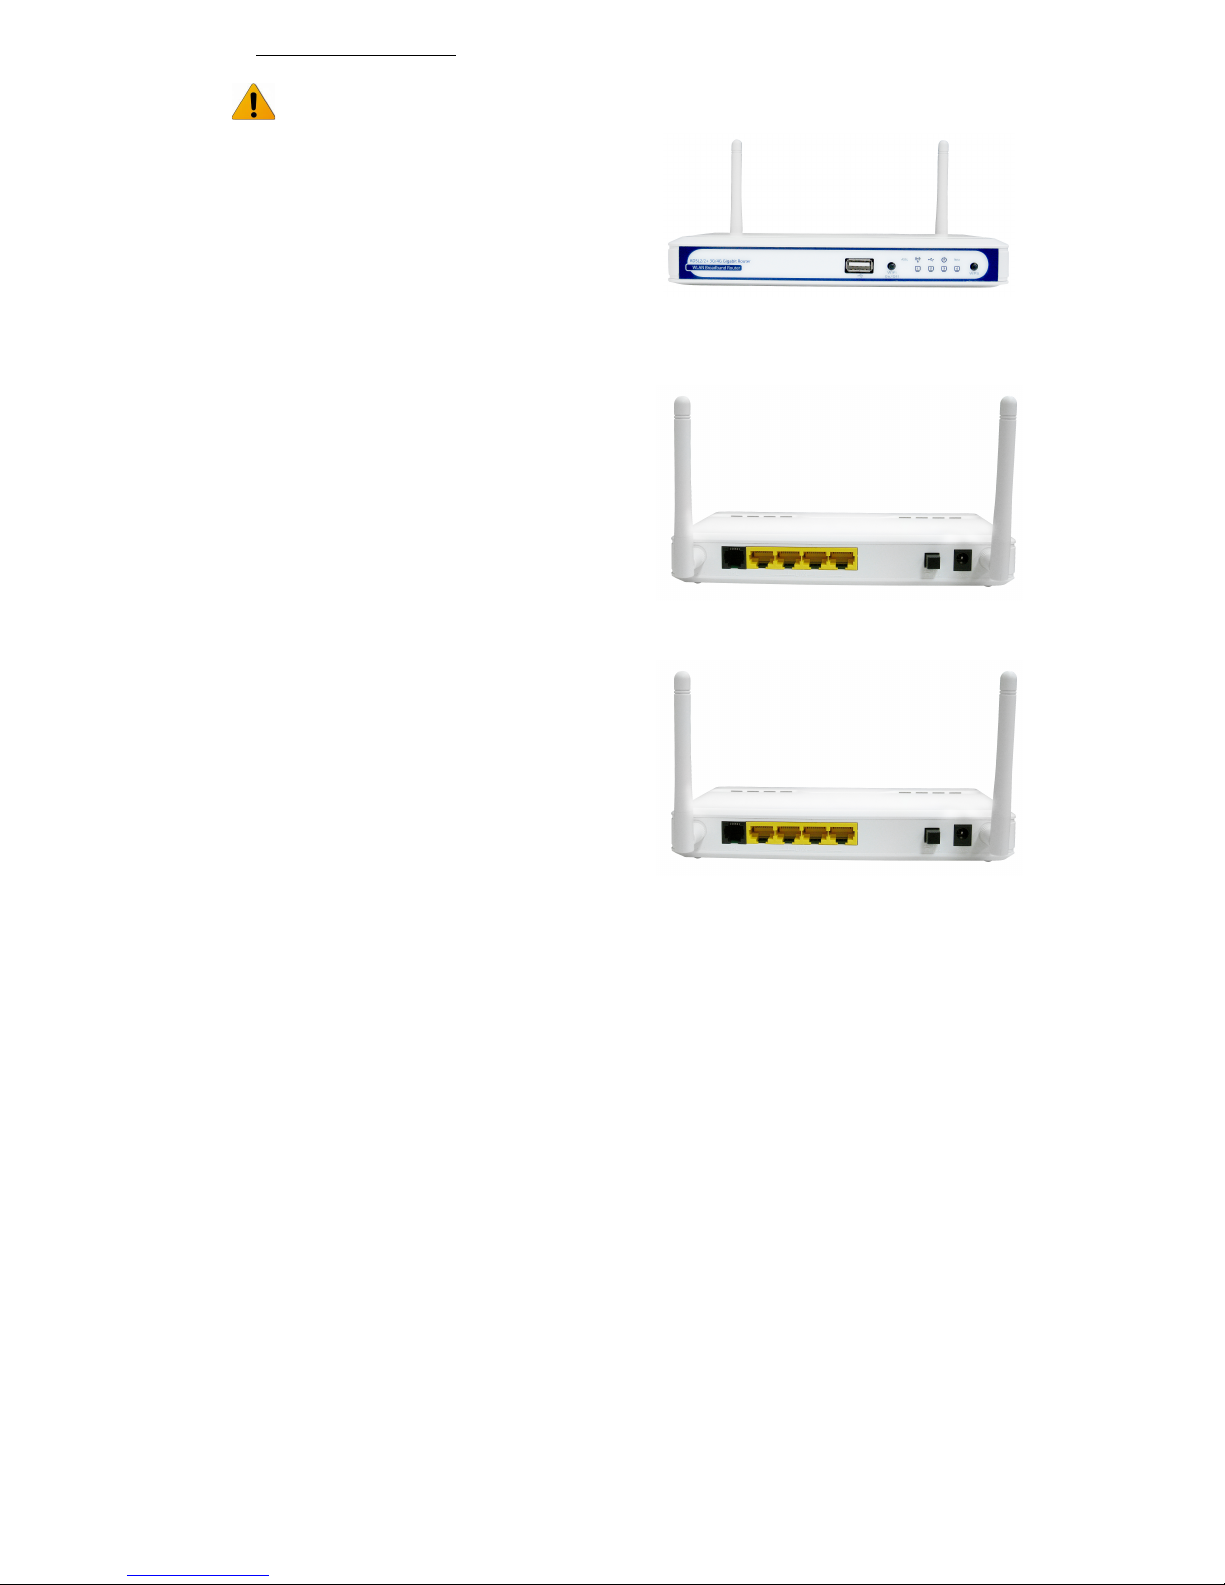
7
C. Installation Steps
Note: DO NOT connect the router to
power before performing the installation
steps below.
Step 1.
Plug a USB modem into USB port.
Step 2.
Insert RJ45 cable into LAN Port on the back
panel of the router. Then plug the other end of
into computer.
Step 3.
Plug the power jack into the receptor on the
back panel of the router. Then plug the other
end into a wall outlet or power strip.
8
Chapter 2 Getting Started with Easy Setup Utility
There are two approaches for you to set up the TW-EA515 ADSL router quickly and easily.
One is through executing the provided Windows Easy Setup Utility on your PC, and the other
is through browsing the device web pages and configuration.
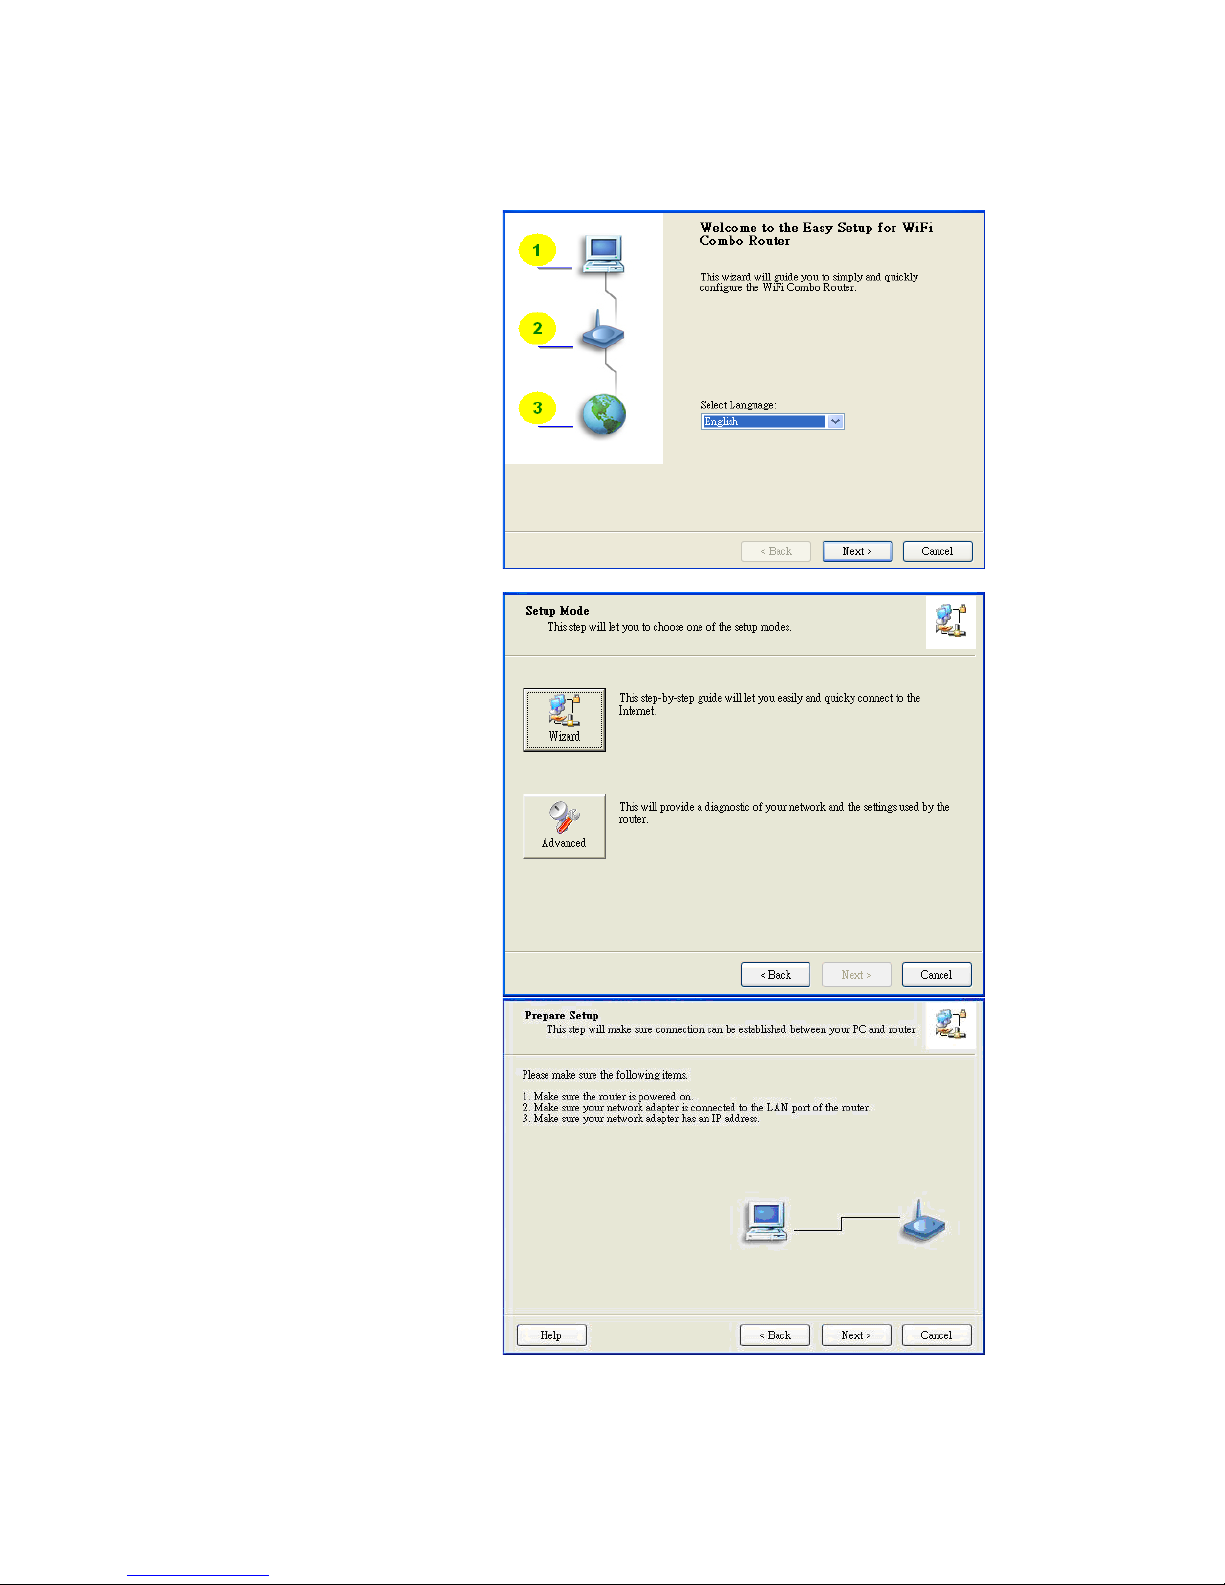
2.1 Easy Setup by Windows Utility
Step 1:
Install the Easy Setup Utility
from the provided CD then
follow the steps to configure
the device.
Step 2:
Select Language then click
“Next” to continue.
Step 3:
Then click the “Wizard” to
continue.
Step 4:
Click “Next” to continue.

9
Step 5:
Select Wireless Enable, and
then click “Next” to continue.
Step 6:
Enter SSID, Channel and
Security options, and then
click “Next” to continue.
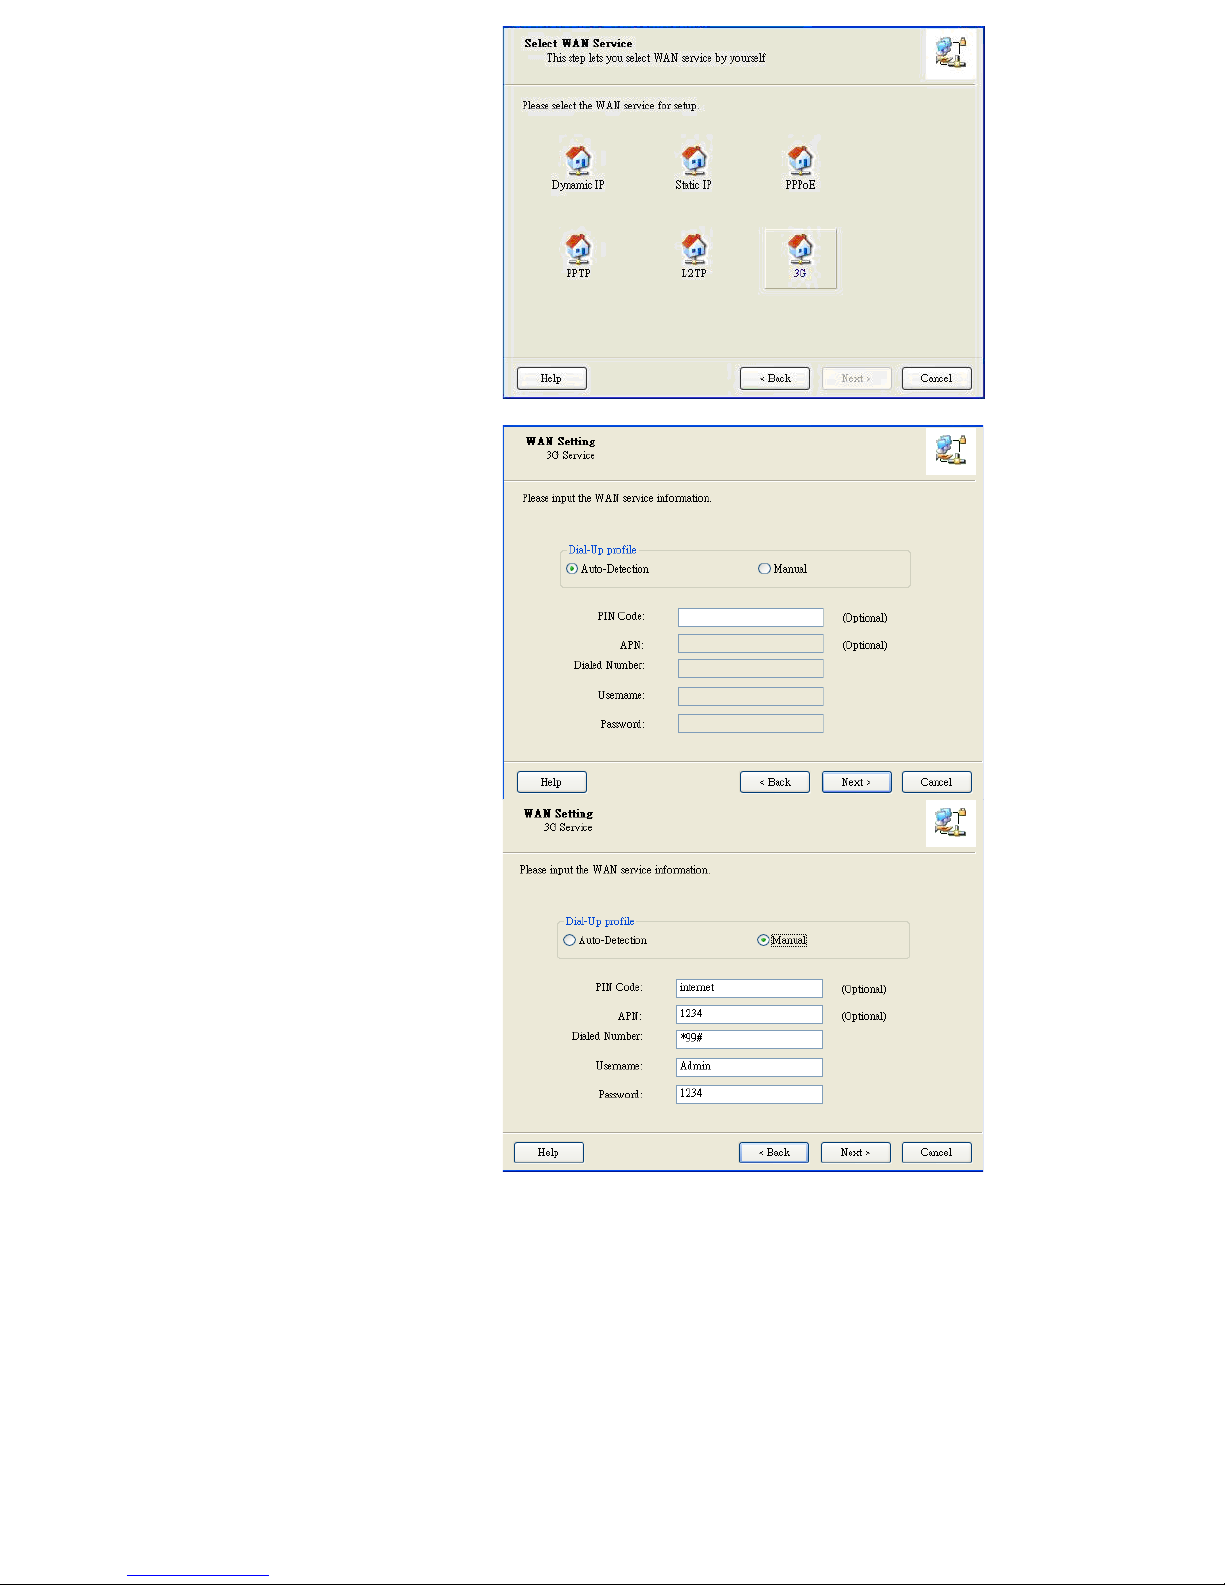
Step 7:
Click” Let me select WAN
service by myself” to select
WAN service manually.
10
Step 8:
Select 3G Service by clicking
3G icon to continue.
Step 9-1:
Select “Auto-Detection” and
the Utility will try to detect and
configure the required 3G
service settings automatically.
Click “Next” to continue.
Step 9-2:
Or you can select “Manual”
and manually fill in the
required 3G service settings
provided by your ISP.
Click “Next” to continue.
11
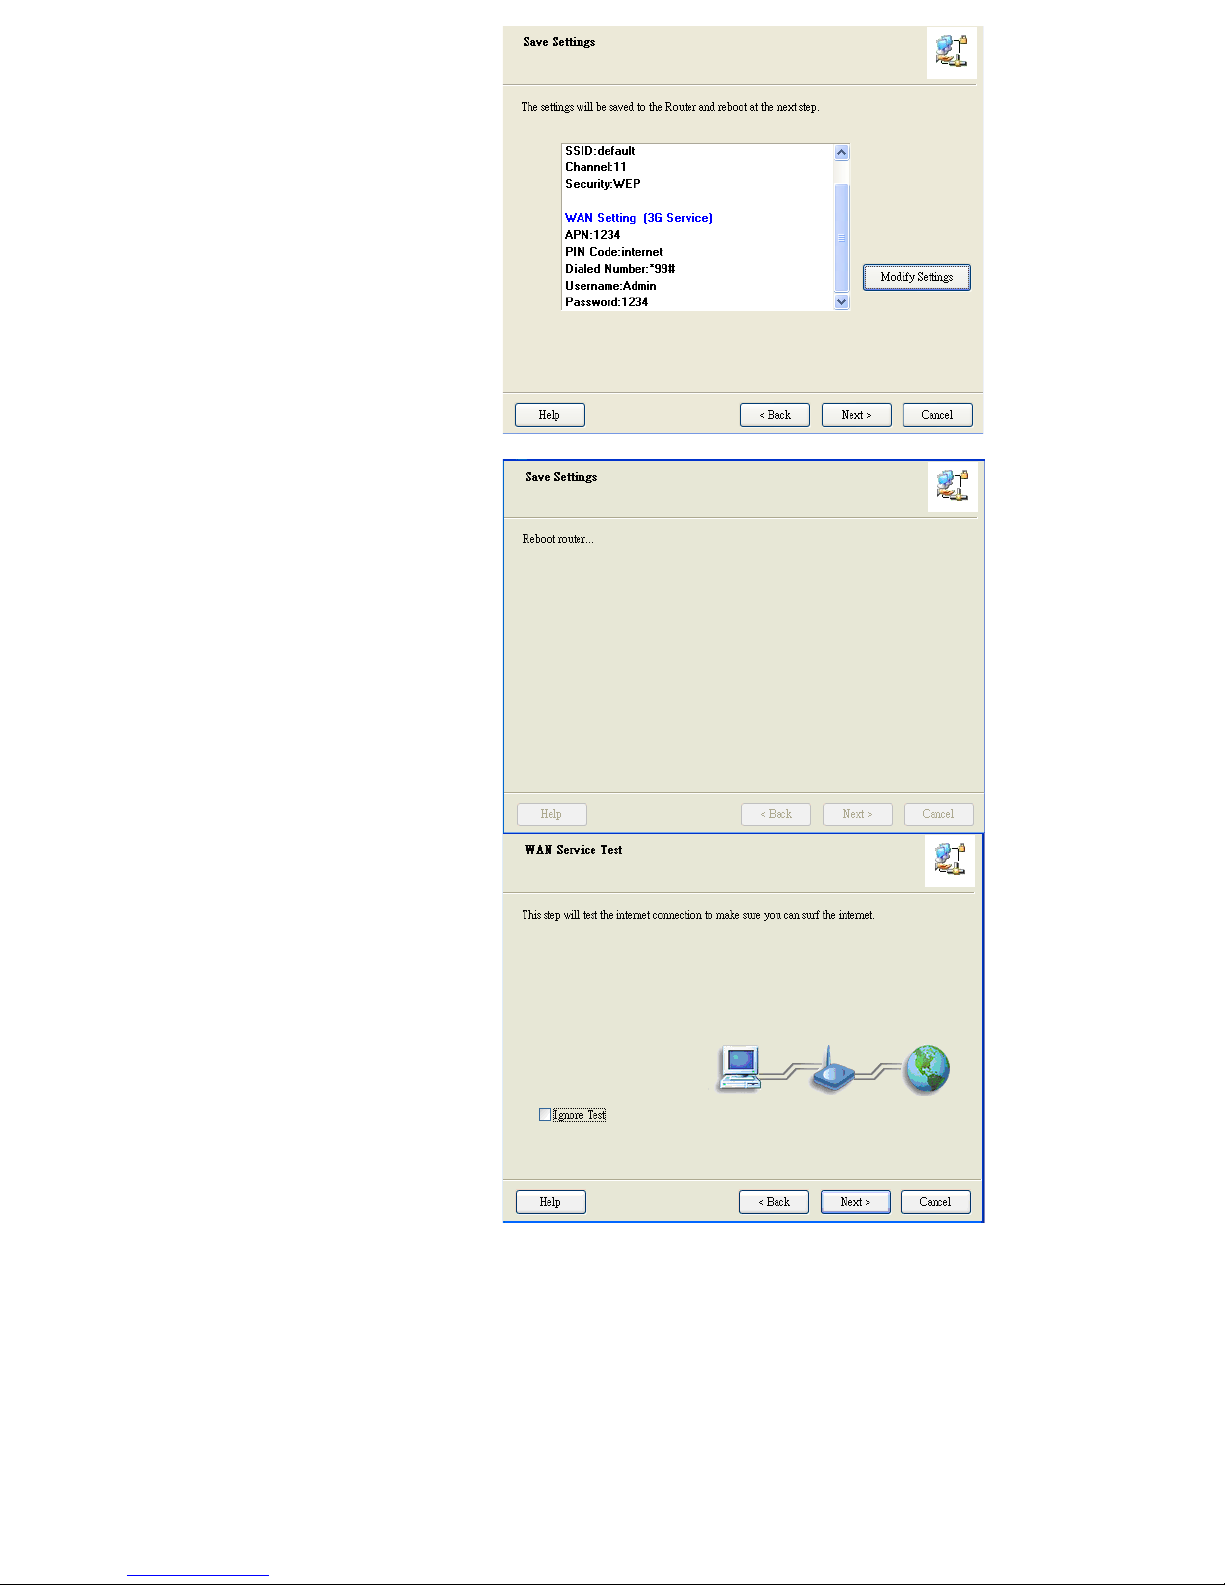
Step 10:
Click “Next” to save your
setting.
Step 11:
The TW-EA515 ADSL router
is rebooted to make your
entire configuration take
effect.
Step 12:
Click “Next” to test the
Internet connection or you
can ignore test.
12
Step 13:
Click “Next” to test WAN
Networking service.
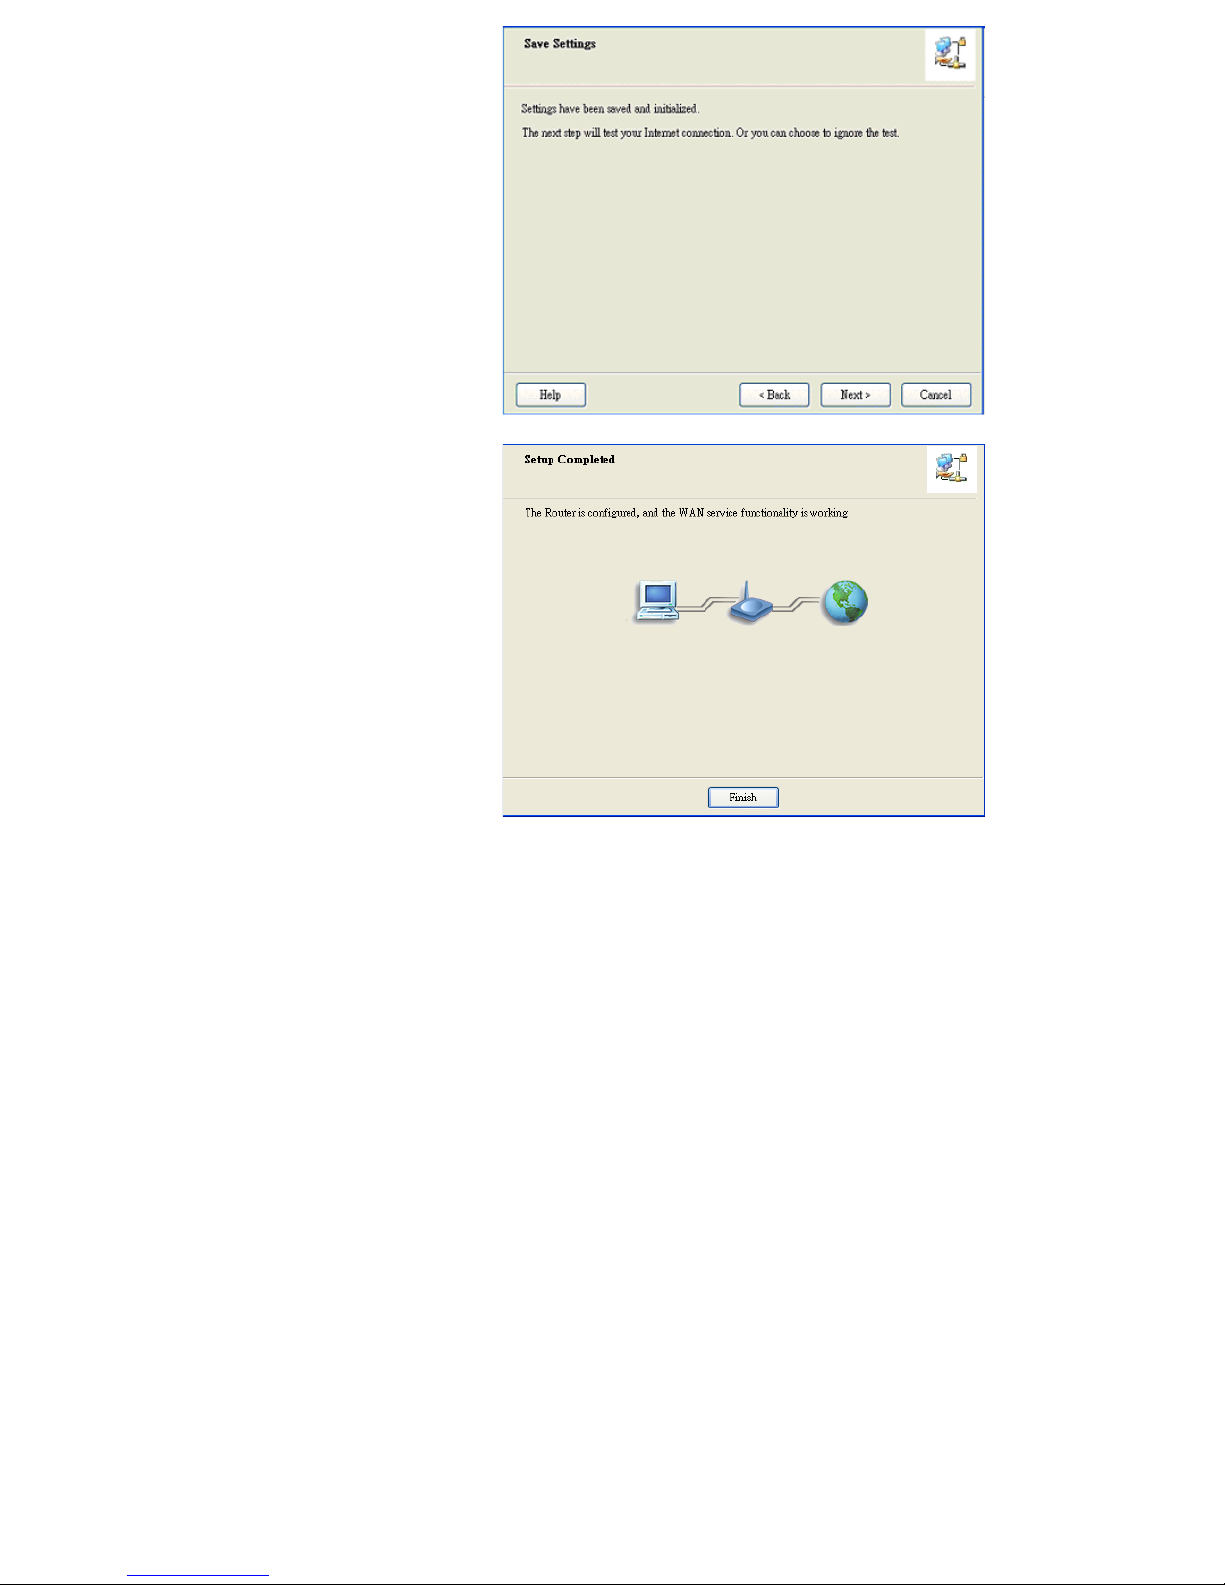
Step 14:
Setup is completed.

13
2.2 Easy Setup by Configuring Web Pages
You can also browse web UI to configure the device.
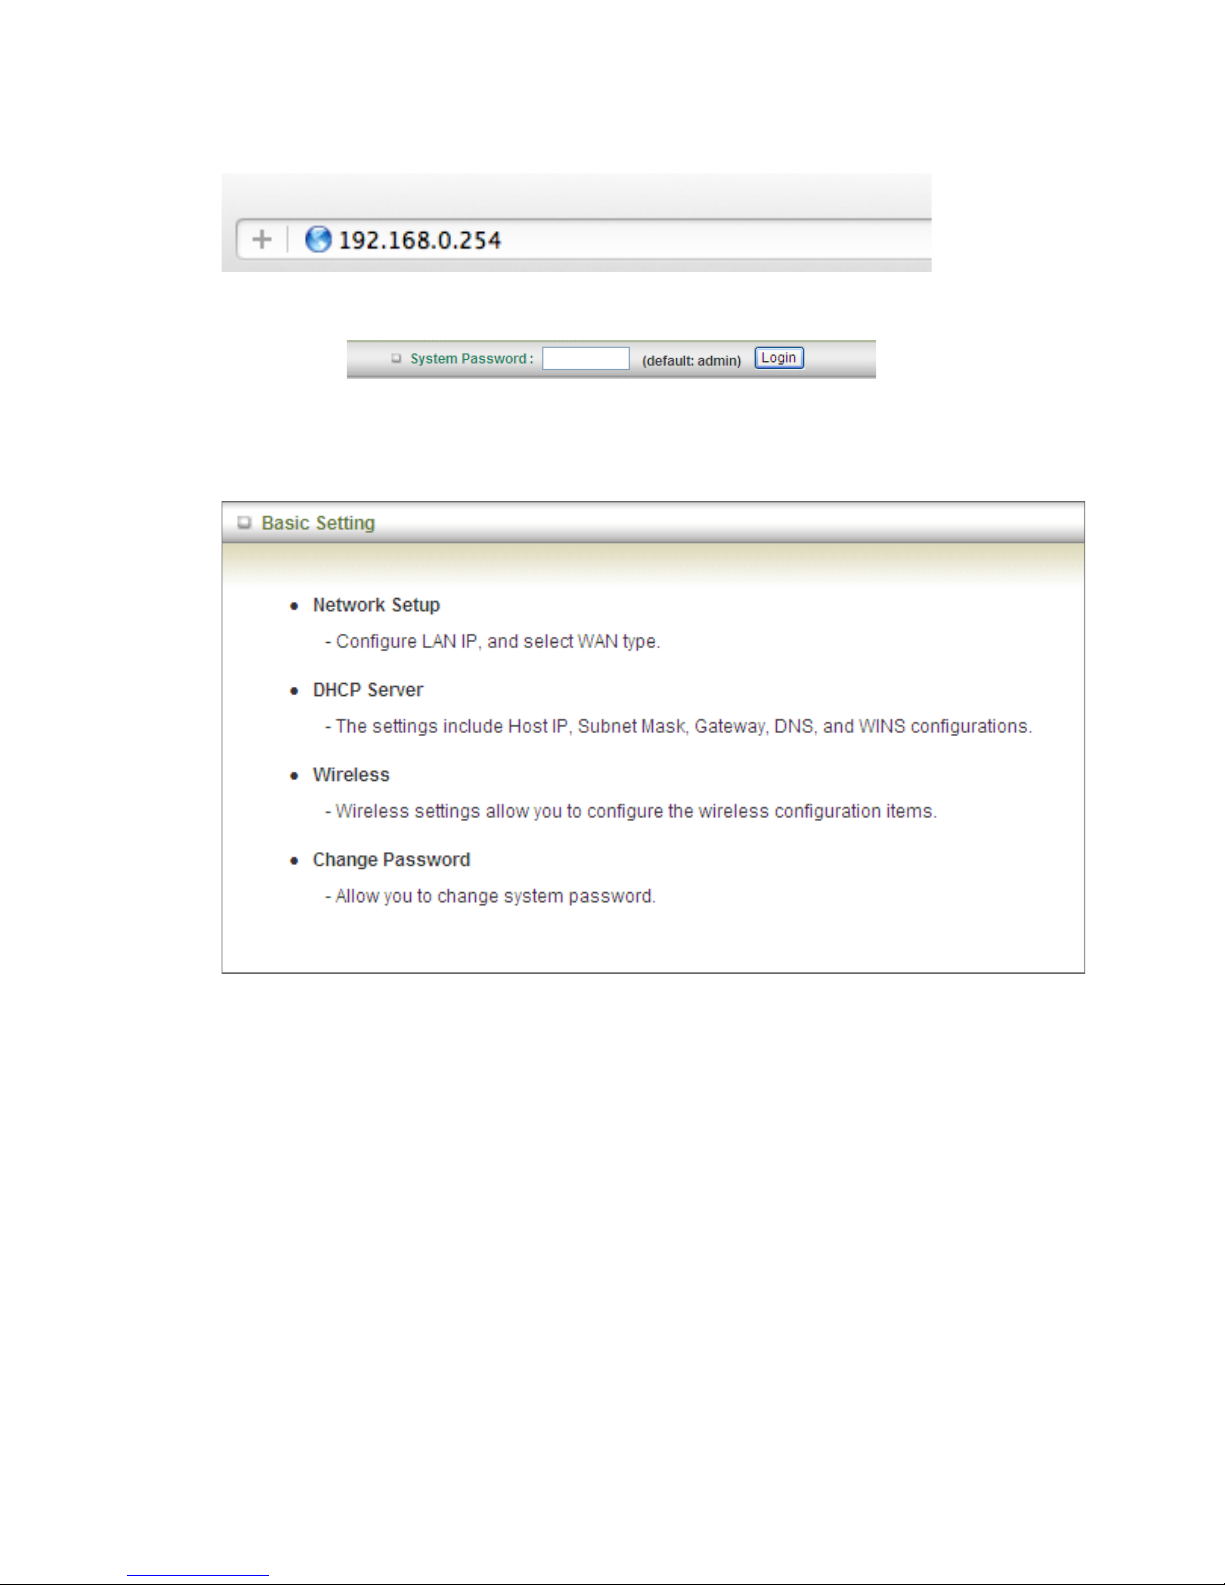
Browse to Activate the Setup Wizard
Type in the IP Address
(http://192.168.0.254/)
Type in the default password
“admin” in the System
Password and then click
‘login’ button.
Select your language.
Select “Wizard” for basic
settings with simple way.
Press “Next” to start the Setup
Wizard.
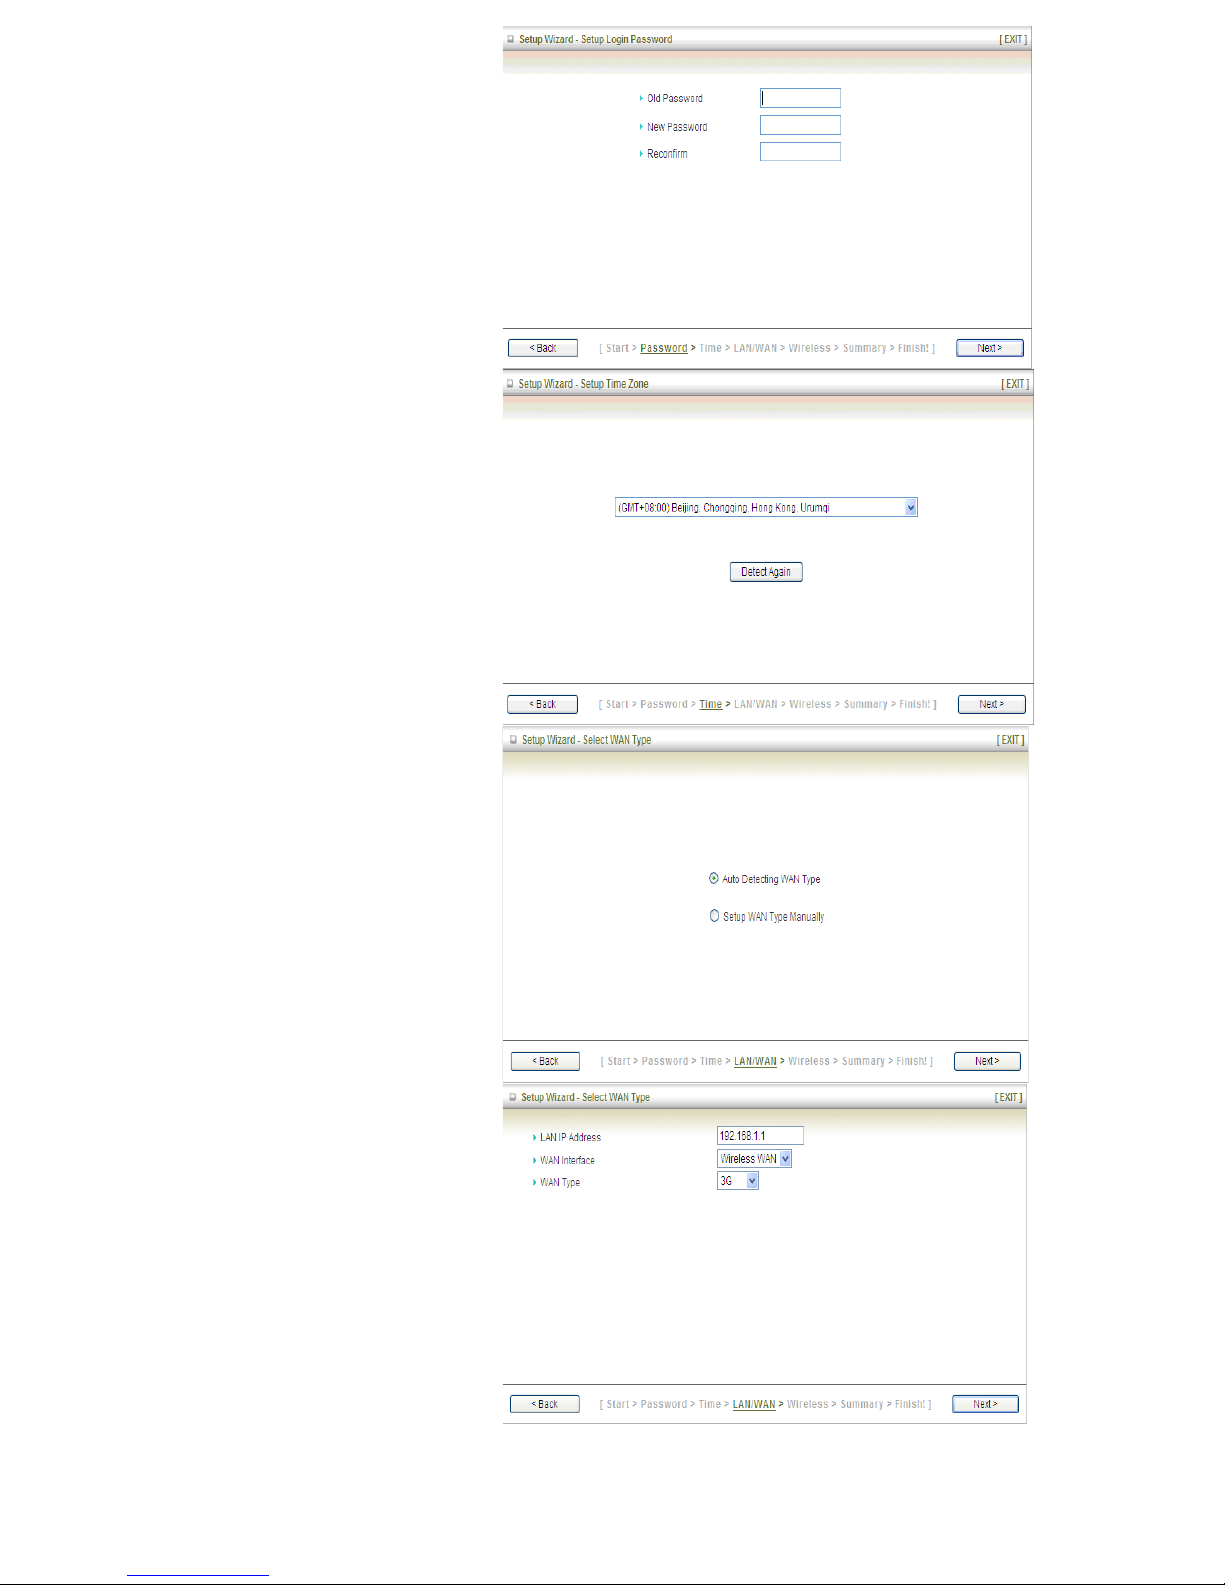
Configure with the Setup Wizard
14
Step 1: Change System
Password.
Set up your system password.
(Default:admin)
Step 2: Select Time Zone.
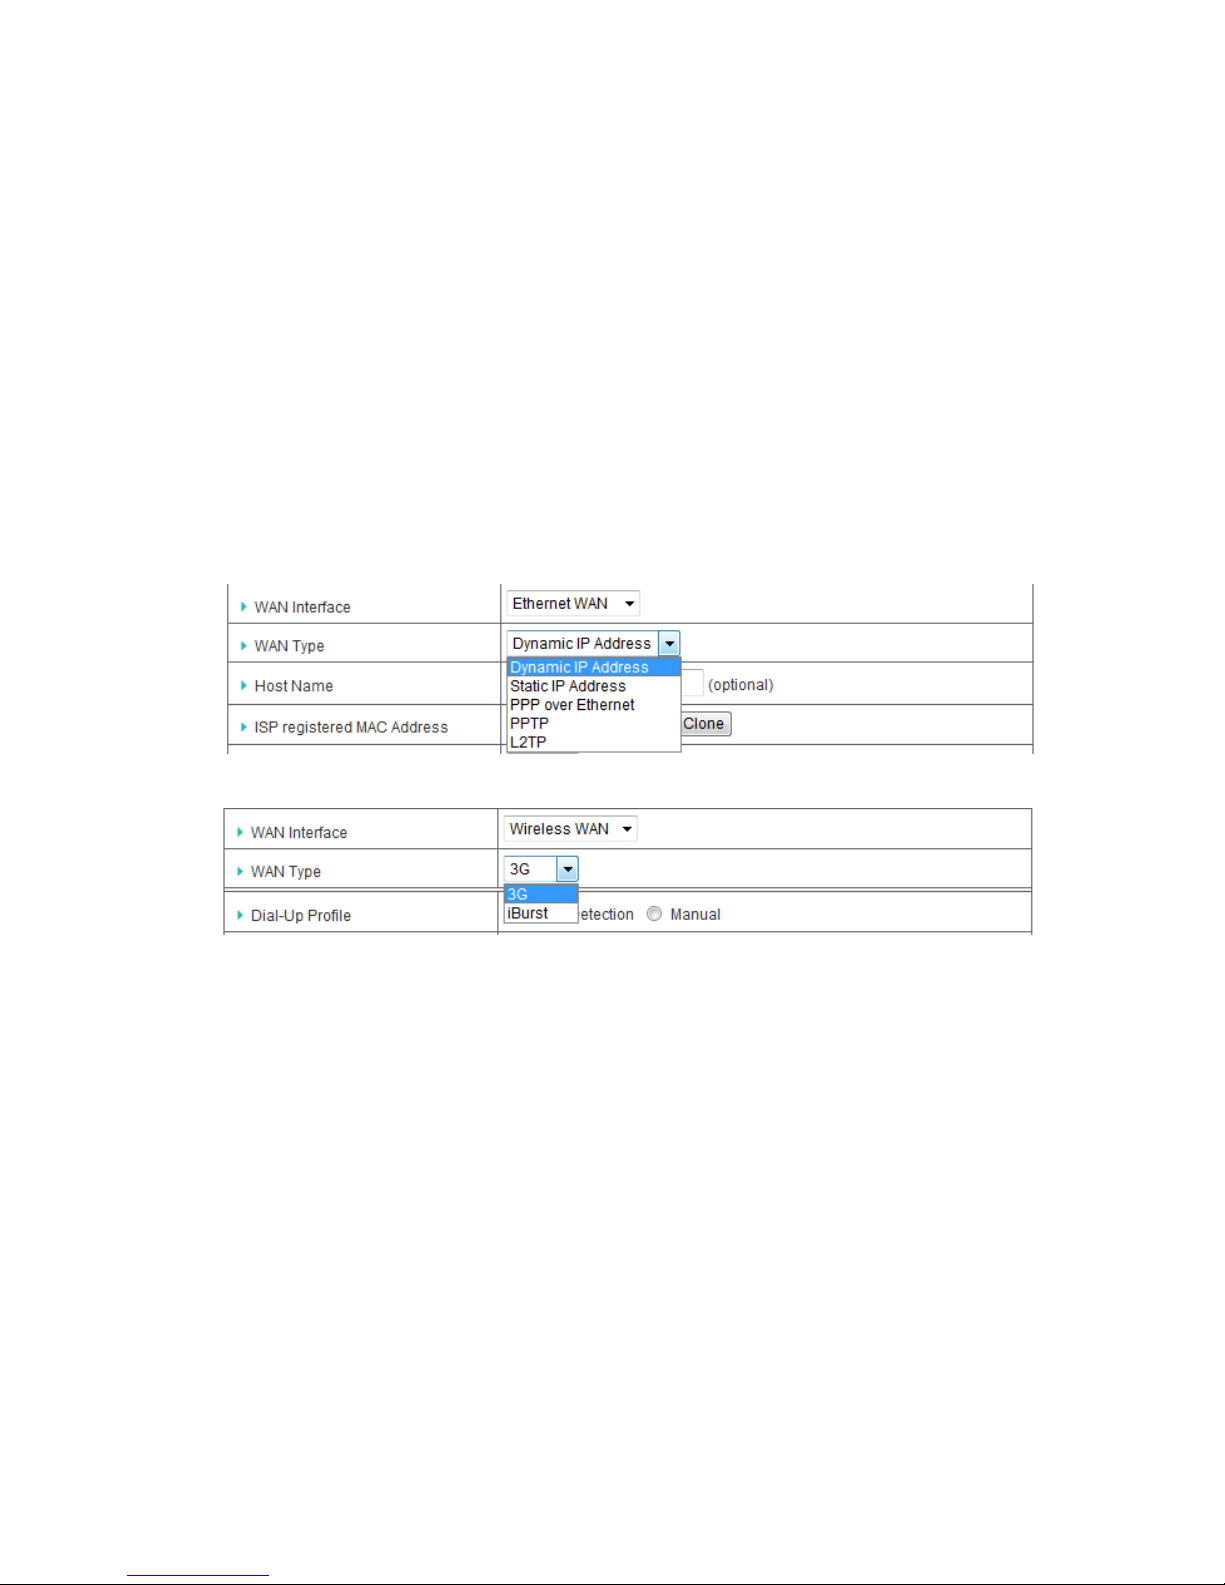
Step 3: Select WAN Type.
Choose Auto-Detecting or
Manually to set WAN Type.
Step 4: Select Wan Type.
If you want to use 3G service
as the main internet access,
please set the WAN interface
as “Wireless WAN” and the
WAN type as “3G”.
15
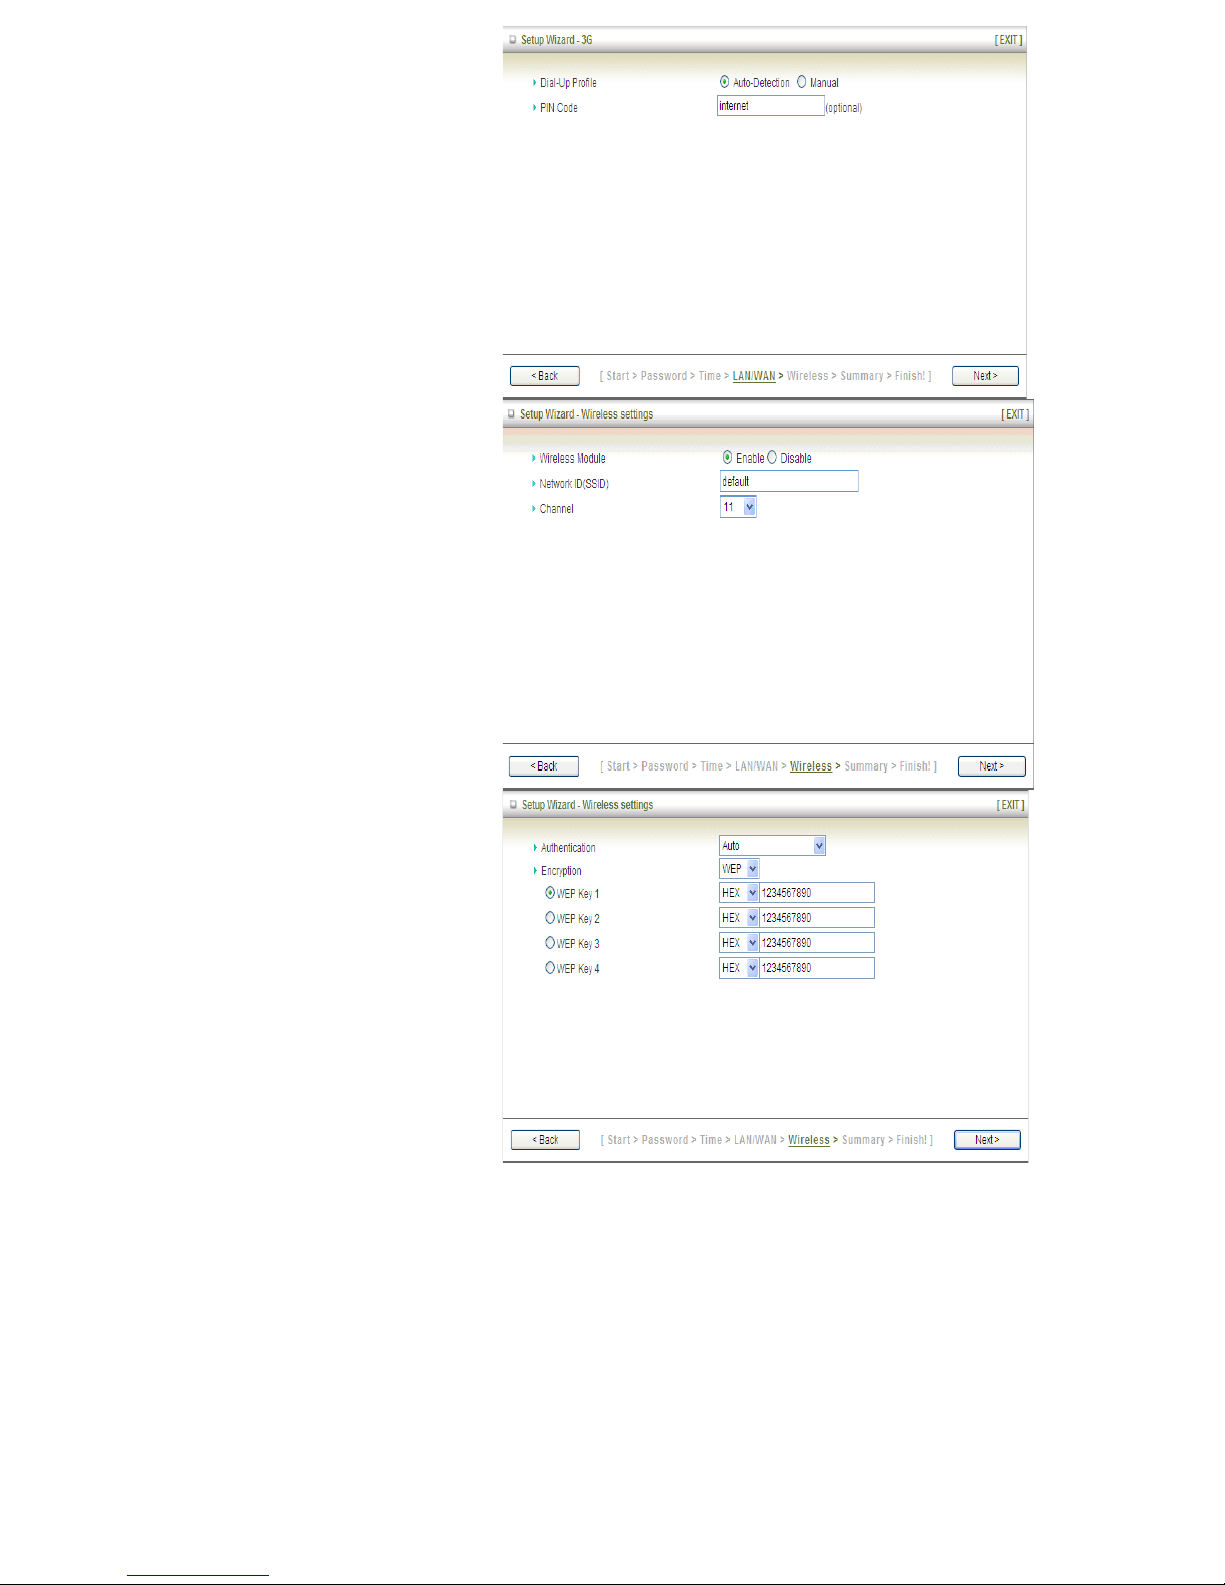
Step 5: 3G Mode.
Select Auto-Detection then
click “Next” to continue.
Step 6: Set up your Wireless
Network.
Set up your SSID.
Step 7: Setup your Encryption
Key here, then click”Next” to
continue.
16
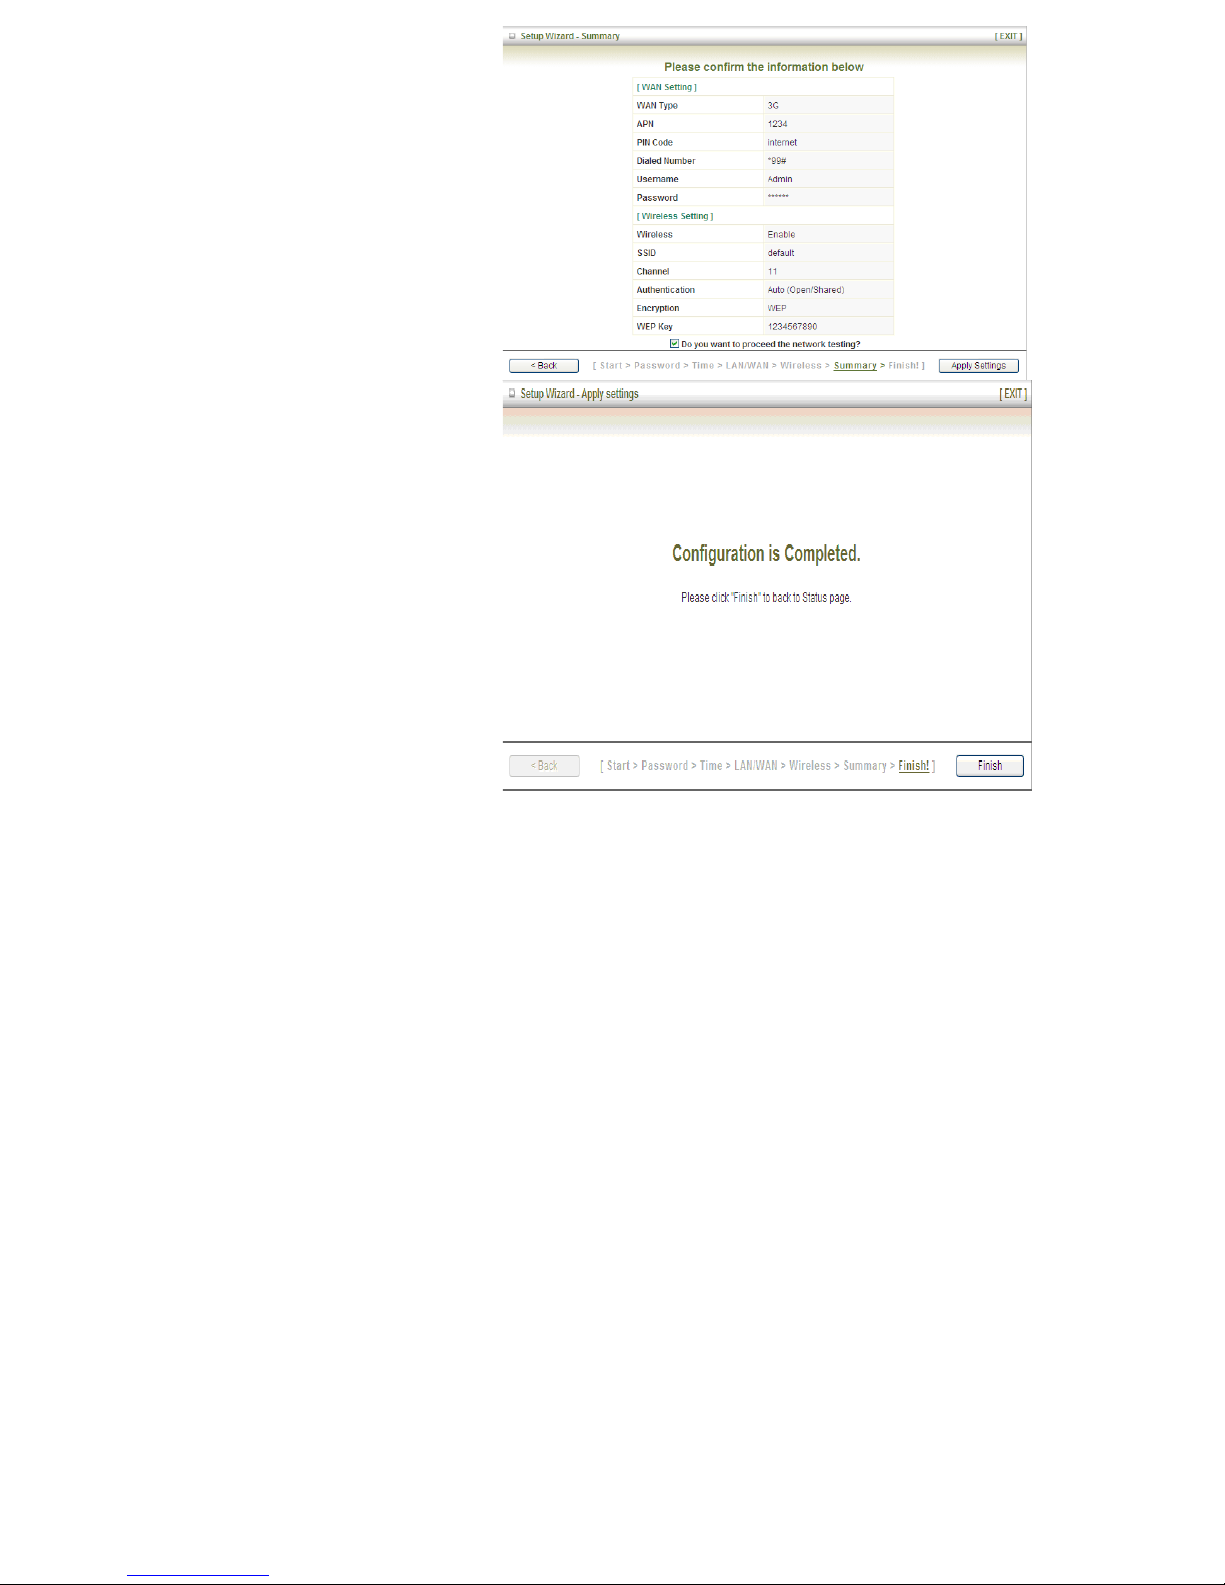
Step 8: Apply your Setting.
Then click Apply Setting.
Step 9:
Click Finish to complete it.
17
Chapter 3 Making Configuration
Whenever you want to configure your network or this device, you can access the Configuration
Menu by opening the web-browser and typing in the IP Address of the device. The default IP
Address is: 192.168.0.254
Enter the default password “admin” in the System Password and then click ‘login’ button.
Then, you can browse the “Advanced” configuration pages for configuring this device.
3.1 Basic Setting
18
3.1.1. Network Setup
1. LAN IP Address: The local IP address of this device. The computers on your
network must use the LAN IP address of this device as their Default Gateway. You
can change it if necessary.
2. Subnet Mask: Input your Subnet mask. (All devices in the network must have the
same subnet mask.) The default subnet mask is 255.255.255.0.
3. Combo WAN Status: Display status of combo WAN. With Combo WAN feature,
you can choose one primary WAN connection, and set another WAN connection for
backup. Otherwise, you can also choose “Load Sharing” to use Ethernet WAN and
3G WAN simultaneously. The combo WAN status will be showed here. Press
“Settings” button to configure this feature.
4. WAN Interface: Select Ethernet WAN or Wireless WAN to continue.
5. WAN Type: WAN type of your Internet connection. You can choose a correct one
from the following options.
A. 3G
This device supports different WAN types of connection for users to connect to remote
wireless ISP, such as 3G (WCDMA, HSxPA, HSPA+, CDMA2000, EV-DO, TD-SCDMA),
iBurst, or Wi-Fi Hotspot.
Note. Users need to insert USB modem card for 3G WAN connections.
19
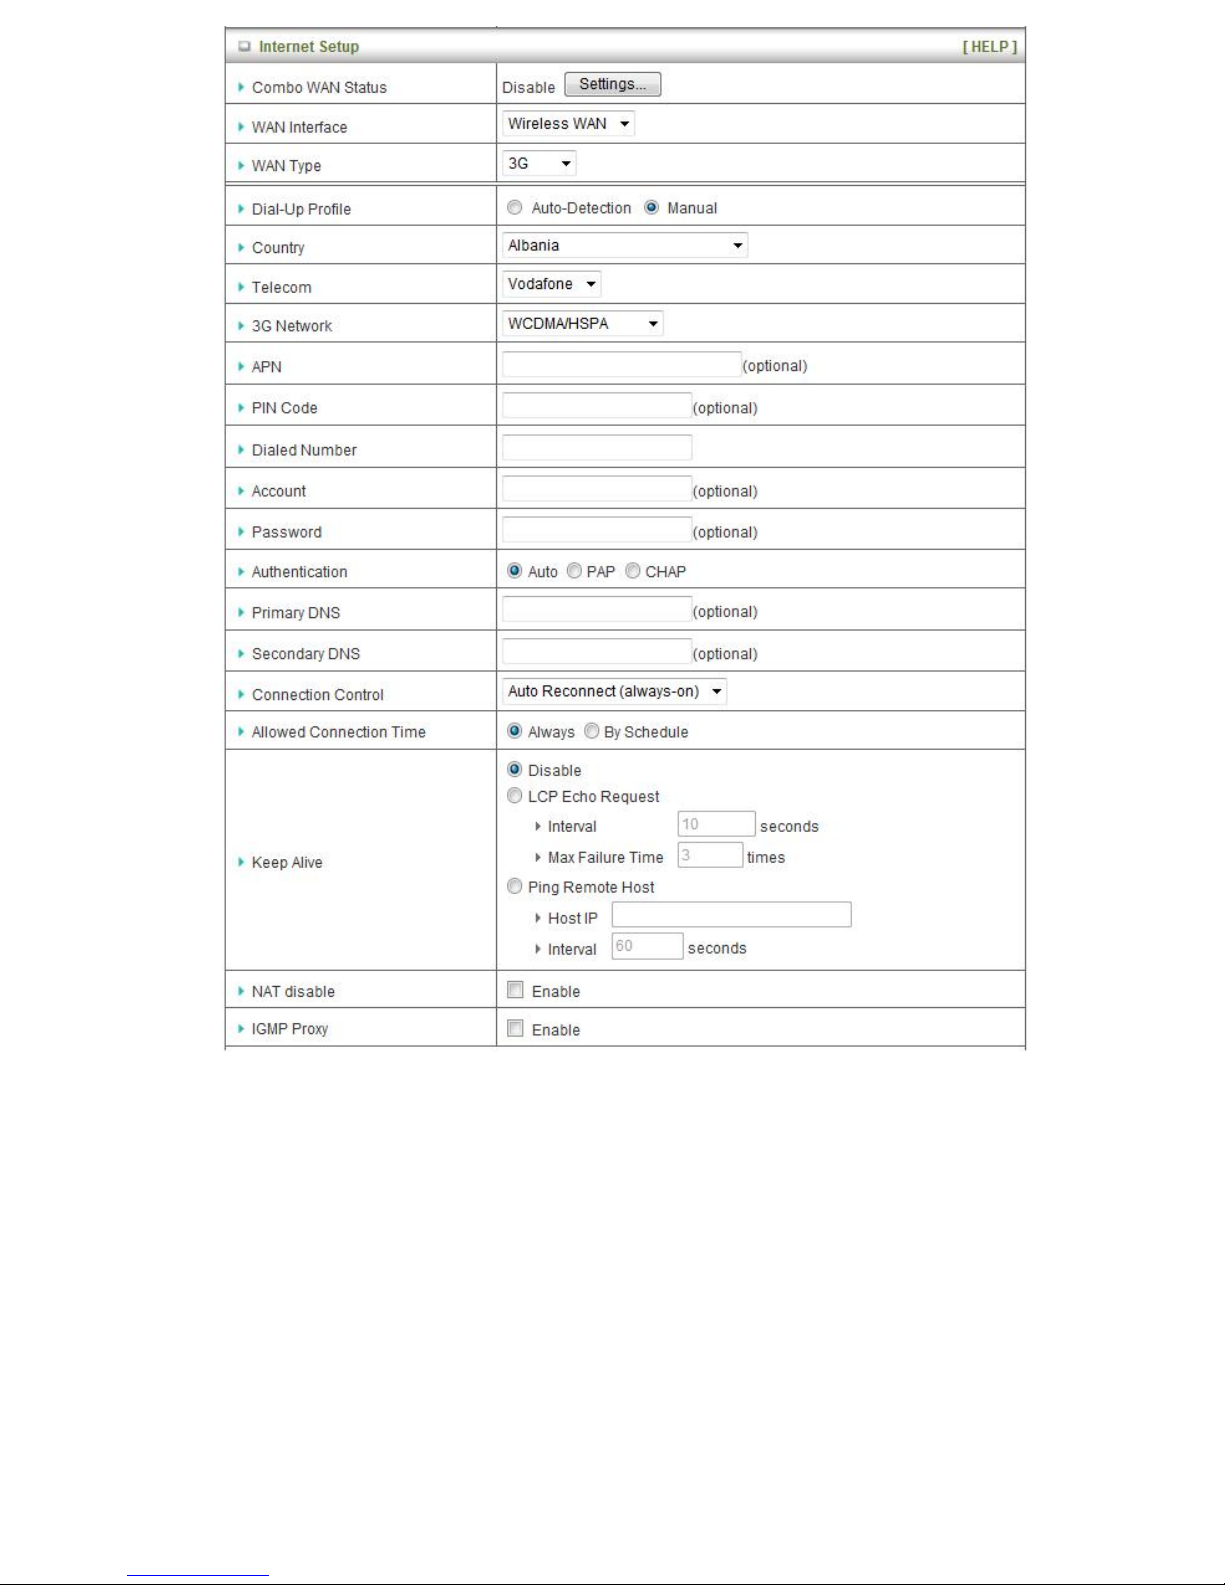
1. WAN Type: Choose 3G for WAN connection.
2. Dial-Up Profile: Please select Auto-Detection or Manual. You can choose
“Auto-Detection”, and the router will try to detect and configure the required 3G service
settings automatically. Otherwise, you can select “Manual”, and manually fill in the
required 3G service settings provided by your carrier or ISP.
3. Country*: select your country.
4. Telecom*: select your telecom.
5. 3G Network*: select the 3G network
6. APN*: APN information for your 3G data card. It will show a value after you choose
country and telecom. You can also change it manually.
7. PIN Code: Enter the PIN Code for your SIM card if required. (Optional)
8. Dialed Number*: It will show a value after you choose country and telecom. You can

20
also change it manually.
9. Account*: The user name for 3G connection. It will show a value after you choose
country and telecom. You can also change it manually.
10. Password*: The password for 3G connection. It will show a value after you choose
country and telecom. You can also change it manually.
11. Authentication*: Choose authentication of 3G connection. You can leave it as “Auto” if
you are not sure.
12. Primary DNS*: You can assign a Primary DNS server if required. (Optional)
13. Secondary DNS*: You can assign a Secondary DNS server if required. (Optional)
14. Connection Control: There are 3 options to start connection:
Auto Reconnect (Always-on): The device will always try to link to Internet.
Connect-on-demand: The device won’t try to connect to Internet until LAN PCs or
devices try to go to Internet. Once Internet connection is established,
this device will drop the connection if maximum idle time is reached.
Manually: The device won’t try to connect to Internet until users press “connect”
button at Status page. Once Internet connection is established, this
device will drop the connection if maximum idle time is reached.
15. Allowed Connection Time: You can limit WAN connection in a period of time if
required.
16. Keep Alive: There are three options for keep alive feature as below.
Disable: Disable keep alive feature.
LCP Echo Request: The device will constantly send LCP packets for keeping alive.
Enter the time interval and the maximum failure count.
Ping Remote Host: Enter the Remote host IP address and the time interval to send the
ping packets for keeping alive.
17. NAT Disable: You can disable NAT feature if required.
18. IGMP Proxy: Enable this feature allows multicast stream (e.g. IPTV stream) to
pass-through this device.
Note. The items with * above are only available when choosing Manual for Dial-up Profile.
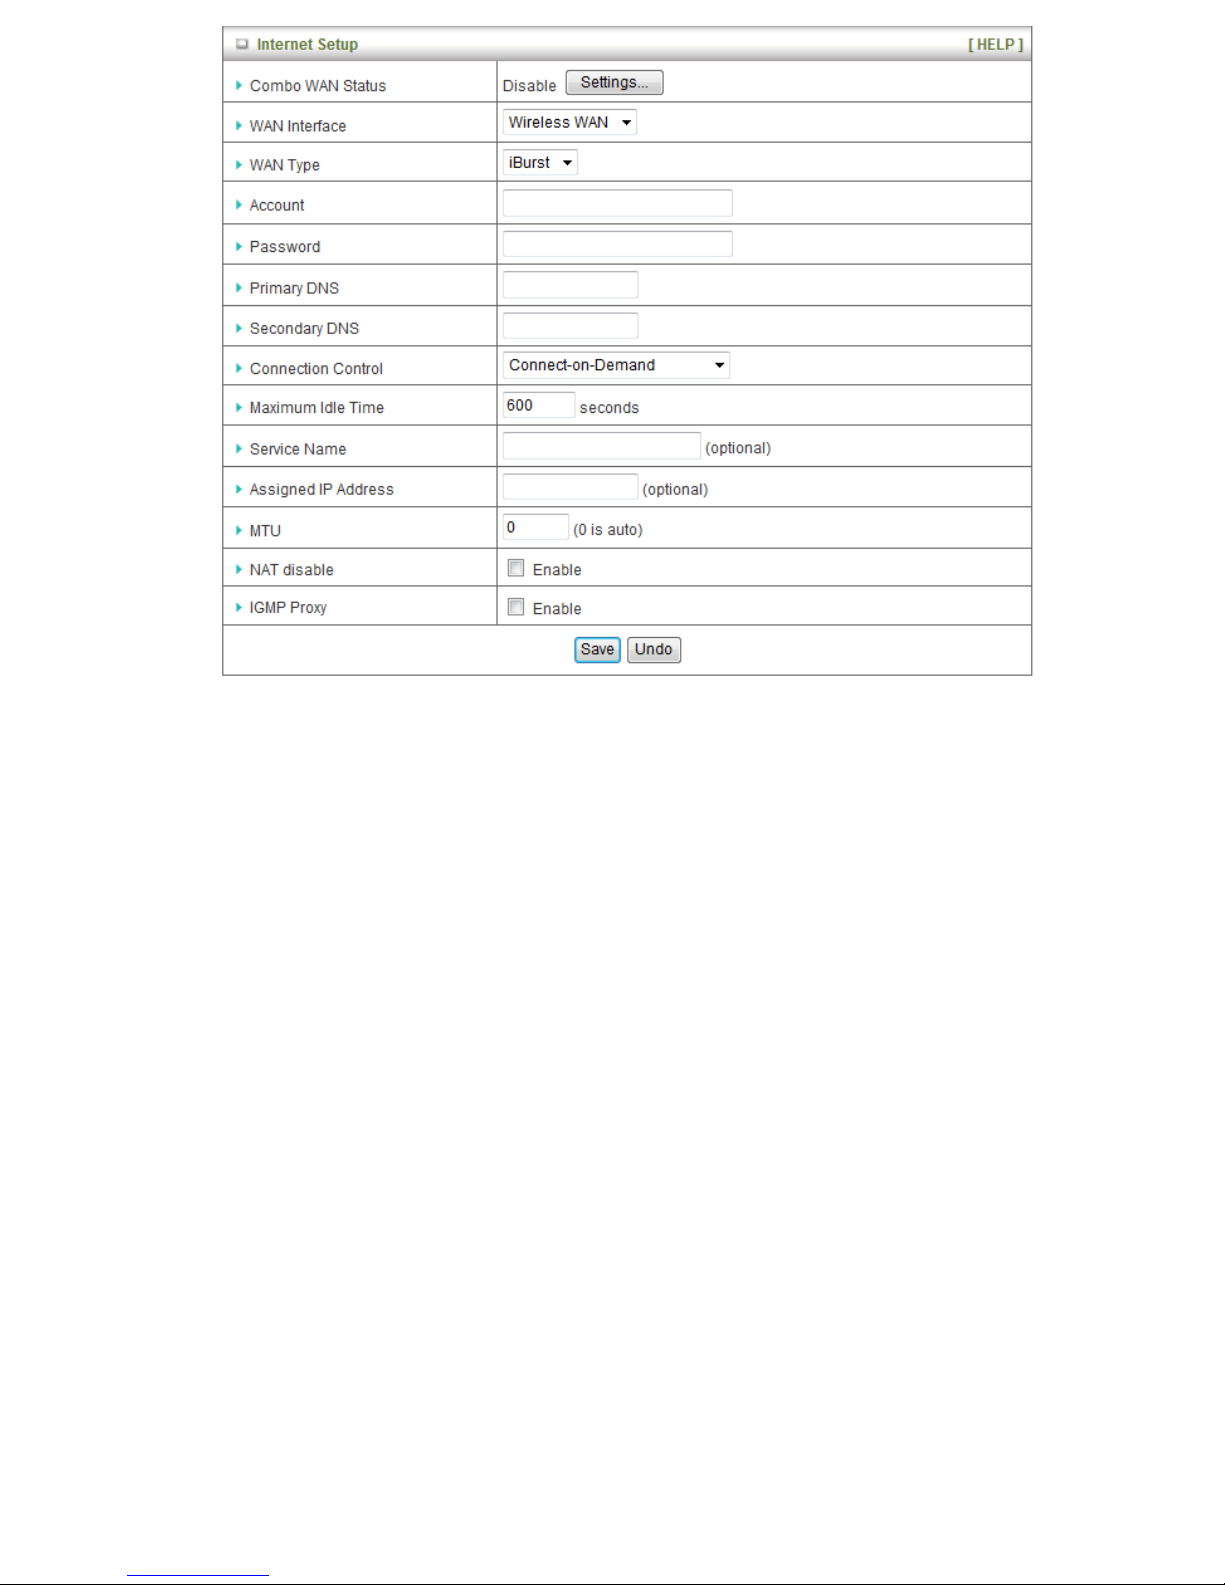
B. iBurst
Note. Users need to insert USB modem card for iBurst WAN connections.
21
1. WAN Type: Choose iBurst for WAN connection.
2. Account: Enter the User Name for iBurst connection.
3. Password: Enter new Password for iBurst connection.
4. Primary DNS: You can assign a Primary DNS server if required. (Optional)
5. Secondary DNS: You can assign a Secondary DNS server if required. (Optional)
6. Connection Control: There are 3 options to start connection:
Auto Reconnect (Always-on): The device will always try to link to Internet.
Connect-on-demand: The device won’t try to connect to Internet until LAN PCs or
devices try to go to Internet. Once Internet connection is established, this device will
drop the connection if maximum idle time is reached.
Manually: The device won’t try to connect to Internet until users press “connect” button
at Status page. Once Internet connection is established, this device will drop the
connection if maximum idle time is reached.
7. Maximum Idle Time: The amount of time of inactivity before disconnecting Internet
connection. Set it to zero, or choosing “Auto-reconnect” mode to disable this feature.
8. Service Name: Input the service name if your ISP requires it. (Optional)
9. Assigned IP Address: Input a IP address if your ISP requires it. (Optional)
10. Maximum Transmission Unit (MTU): You can change MTU value if required. The default
MTU value is set to 0 (auto).
11. NAT disable: You can disable NAT feature if required.
12. IGMP Proxy: Enable this feature allows multicast stream (e.g. IPTV stream) to
pass-through this device.
22
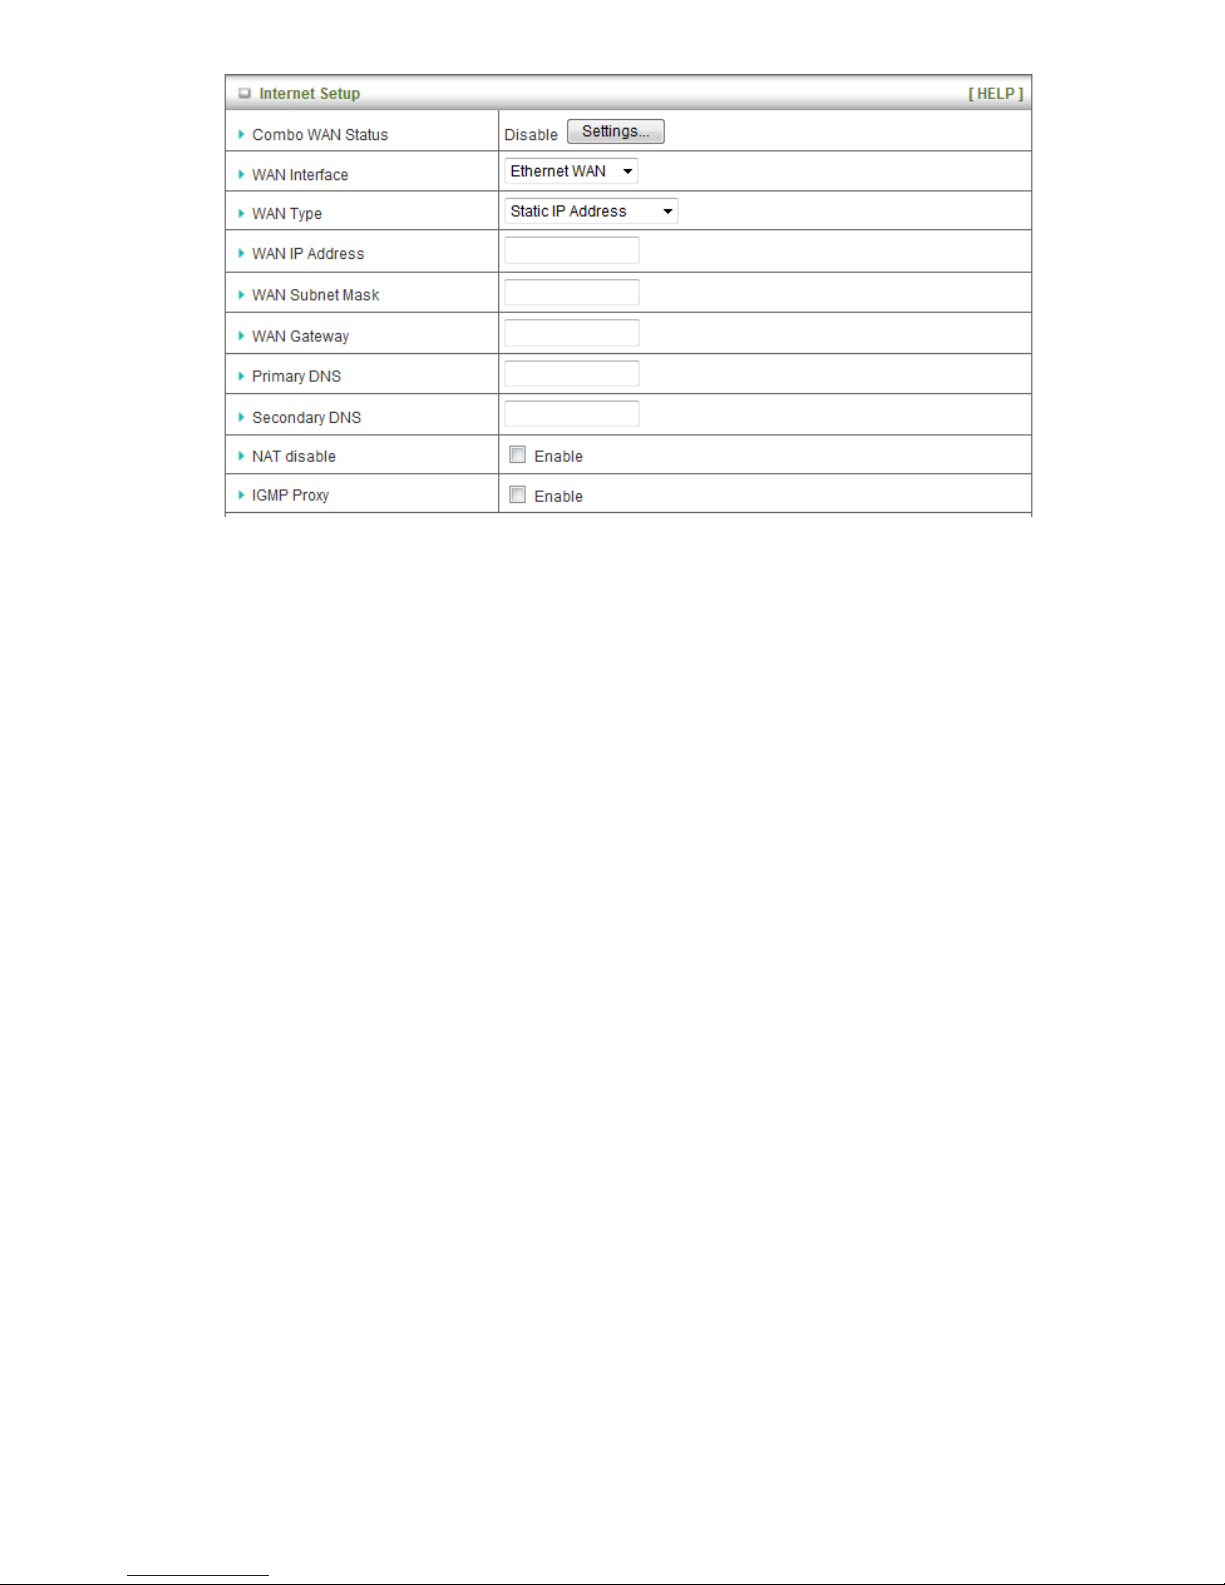
C. Static IP Address
1. WAN Type: Choose Static IP Address.
2. WAN IP Address: Input the IP address you got from ISP.
3. Subnet Mask: Input the subnet mask of IP address you got from ISP.
4. WAN Gateway: Input the IP address of WAN gateway you got from ISP.
5. Primary DNS: Input the IP address of primary DNS you got from ISP.
6. Secondary DNS: Input the IP address of secondary DNS you got from ISP.
7. NAT disable: You can disable NAT feature if required.
8. IGMP Proxy: Enable this feature allows multicast stream (e.g. IPTV stream) to
pass-through this device.
 Loading...