

TeleWell TW-EA510v3(c) 3G/4G User Manual

TW-EA510v3(c) & 3G/4G
ADSL2+ Wireless Router
User Manual

Table of Contents
ADSL2+ Wireless Router ....................................................... 0
Chapter 1 ......................................................................... 3
1.1 Introducing the TW-EA510v3(c) & 3G/4G .................... 3
1.2 Features ............................................................ 4
ADSL Compliance ............................................................... 4
Network Protocols and Feathers ............................................ 4
Quality of Service Control .................................................... 5
ATM and PPP Protocols ...................................................... 6
USB Application Server ...................................................... 6
Management ................................................................... 6
Chapter 2 ......................................................................... 8
2.1 Important Notes .................................................. 8
2.2 Package Contents ................................................ 9
2.5 Cabling ............................................................ 12
Chapter 3 ........................................................................ 13
3.1 Before Configuration ........................................... 13
3.2 Factory Default Settings ....................................... 20
3.4 Information from your ISP ..................................... 21
3.5 Configuring with your TW-EA510v3(c) & 3G/4G .......... 21
Chapter 4 ........................................................................ 23
Device Information .......................................................... 24
Port Status .................................................................... 24
WAN ..................................................................... 24
4.3 WAN ................................................................ 26
Security Parameters ........................................................ 32
Chapter 5 ........................................................................ 34
WAN ..................................................................... 36
5.1.1 ADSL Status .................................................... 37
5.1.3 DHCP Table .................................................... 39
5.1.4 System Log ..................................................... 40
5.1.5 Firewall Log .................................................... 40
5.1.6 UPnP portmap ................................................. 40
5.2 Quick Start ........... Virhe. Kirjanmerkkiä ei ole määritetty.
5.3 Configuration ........ Virhe. Kirjanmerkkiä ei ole määritetty.
5.3.1 LAN (Local Area Network) .................................. 41
5.3.1.4 Wireless Distribution System (WDS) ........................... 44
5.3.2 WAN (Wide Area Network) .................................. 50
5.3.3 System .......................................................... 55
5.3.4 Firewall ......................................................... 60
5.3.5 QoS (Quality of Service) ..................................... 69
QoS: Keeping Your Net Connection Fast and Responsive ........... 69
VoIP application ............................................................. 74
5.3.6 Virtual Server ................................................. 75
5.3.7 Time Schedule ................................................ 80
5.3.8 Advanced ....................................................... 81

Embedded Web Server: .................................................... 85
Universal Plug and Play (UPnP): .......................................... 85
SNMP V1 and V2: ............................................................ 92
SNMP V3: ............................................................... 93
SNMP Version: SNMPV2c and SNMPv3 ..................................... 93
From RFC 1213 (MIB-II): .................................................... 93
From RFC1650 (EtherLike-MIB): .......................................... 93
From RFC 1493 (Bridge MIB): ............................................. 93
From RFC 1471 (PPP/LCP MIB): ........................................... 94
From RFC 1472 (PPP/Security MIB): ..................................... 94
From RFC 1473 (PPP/IP MIB): ............................................. 94
From RFC 1474 (PPP/Bridge MIB): ....................................... 94
From RFC1573 (IfMIB): ..................................................... 94
From RFC1695 (atmMIB): .................................................. 94
From RFC 1907 (SNMPv2): ................................................. 94
5.4 Save Configuration to Flash ................................... 96
5.5 Restart ............................................................. 96
5.6 Logout ............................................................. 97
Chapter 6 ........................................................................ 98

Chapter 1
Introduction
1.1 Introducing the TW-EA510v3(c) & 3G/4G
Thank you for purchasing the TW-EA510 v3(c) & 3G/4G ADSL2+ Router.
Your new router has Multiple Options for Internet Access It offers its USB port for connecting to a
4G/ 3G / HSPA+ USB modem, enabling you to use a 4G, 3G HSPA+, UMTS, EDGE, GPRS, or
GSM Internet connection. Aiming for convenient and constant Internet access for event or meeting
organizers - allowing you to watch movies, download music on the road, or access e-mail no matter
where you are. The auto fail-over feature ensures maximum connectivity and minimum interruption
by quickly and smoothly connecting to a 3G network in the event once your ADSL line fails. This
feature allows TW-EA510v3(c) & 3G/4G automatically reconnect to the ADSL connection when it’s
restored, reducing connection costs.
The TW-EA510v3(c) & 3G/4G router complies with ADSL2+ standards for deployment worldwide
and supports downstream rates of up to 24 Mbps and upstream rates of up to 3,5 Mbps. Designed
for small office, home office and residential users, the router enables even faster Internet
connections. You can enjoy ADSL services and broadband multimedia applications such as
interactive gaming, video streaming and real-time audio much easier and faster than ever before.
The TW-EA510v3(c) & 3G/4G supports PPPoA (RFC 2364 – PPP (Point-to-Point Protocol) over
ATM Adaptation Layer 5), RFC 1483 encapsulation over ATM (bridged or routed), PPP over
Ethernet (RFC 2516) to establish a connection with your ISP. Your new router also supports VC-
based and LLC-based multiplexing.
The perfect solution for connecting a small group of PCs to a high-speed broadband Internet
connection, the TW-EA510v3(c) & 3G/4G allows multiple users to have high-speed Internet access
simultaneously.
Your new router also serves as an Internet firewall, protecting your network from access by outside
users. Not only does it provide a natural firewall function with Network Address Translation (NAT), it
also provides rich firewall features to secure your network. All incoming data packets are monitored
and filtered. You can also configure your new router to block internal users from accessing the
Internet.
The TW-EA510v3(c) & 3G/4G provides two levels of security support. First, it masks LAN IP
addresses making them invisible to outside users on the Internet, so it is much more difficult for a
hacker to target a machine on your network. Second, it can block and redirect certain ports to limit
the services that outside users can access. To ensure that games and other Internet applications
run properly, you can open specific ports for outside users to access internal services on your
network.
The Integrated DHCP (Dynamic Host Control Protocol) client and server services allow multiple
users to get IP addresses automatically when the router boots up. Simply set local machines as a
DHCP client to accept a dynamically assigned IP address from the DHCP server and reboot. Each
time a local machine is powered up; the router recognizes it and assigns an IP address to instantly
connect it to the LAN.
For advanced users, Virtual Service (port mapping) functions allow the product to provide limited
visibility to local machines with specific services for outside users. For instance, a dedicated web
server can be connected to the Internet via the router and then incoming requests for web pages

that are received by the router can be rerouted to your dedicated local web server, even though the
server now has a different IP address.
Virtual Server can also be used to re-task services to multiple servers. For instance, you can set the
router to allow separated FTP, Web, and Multiplayer game servers to share the same Internet-
visible IP address while still protecting the servers and LAN users from hackers.
Features
• Dual-WAN approach – ADSL2+ and 3G connections
• Dual-WAN approach –ADSL2+ and Ethernet WAN for Broadband Connectivity
• USB 2.0 port for plugging a 3G / HSPA+ modem as backup (available from your service
provider)
• Storage feature through USB 2.0 port: FTP Server, Samba server
• 1x USB 2.0 port for multiple functions: 3G network, FTP server and Samba server
• Auto fail-over feature to ensure an always-on connection
• High-speed wireless connection up to 300Mbps
• Wireless-N Access Point with Wi-Fi Protected Setup (WPS), Wi-Fi Protected Access (WPA-PSK/
WPA2-PSK) and Wired Equivalent Privacy (WEP) support
• Wireless On/Off time schedule control
• High speed Internet access with ADSL2/2+; also compatible with ADSL
• Integrated with 4-port Ethernet switch, port #1 can be configured as WAN port to connecting
to ADSL/Cable/VDSL/ Fiber modem device
• SOHO firewall security with DoS prevention and SPI
• Universal Plug and Play (UPnP) Compliant
• Supports Virtual Private Network (VPN) pass-through
• Quality of Service Control
• Dynamic Domain Name System (DDNS)
• Supports IPTV application
ADSL Compliance
• Compliant with ADSL Standards
• Full-rate ANSI T1.413 Issue 2
• G.dmt (ITU G.992.1)
• G.lite (ITU G.992.2)
• G.hs (ITU G.994.1)
• ADSL over ISDN/U-R2
• Compliant with ADSL2 Standards
• G.dmt.bis (ITU G.992.3)
• ADSL2 Annex M (ITU G.992.3 Annex M) (available for A
• Compliant with ADSL2+ Standards
• G.dmt.bis plus (ITU G.992.5)
• ADSL2+ Annex M ITU G.992.5 Annex M)
Network Protocols and Feathers

• NAT, static routing and RIP-1/2
• Universal Plug and Play (UPnP) Compliant
• Transparent Bridging
• Dynamic Domain Name System (DDNS)
• Virtual Server and DMZ
• SNTP, DNS relay and IGMP proxy
• IGMP snooping for video service
• Management based-on IP protocol, port number and address
• SMTP Client
• PPTP client and server
Firewall & Virtual Private Network (VPN)
• Built-in NAT Firewall
• Stateful Packet Inspection (SPI)
• Prevents DoS attacks including Land Attack and Ping of Death, etc.
• Remote access control for web base access
• Anti probe function
• Packet filtering, MAC filtering, URL content filtering
• Password protection for system management
• VPN pass-through
• PPTP client/server
Quality of Service Control
• Supports the DiffServ approach
• Traffic prioritization and bandwidth management based-on IP protocol, port number and
address IPTV Applications
• GMP Snooping
• Virtual LAN (VLAN)
• Quality of Services (QoS)
• IGMP Snooping & IGMP Proxy
Wireless LAN
• Compatible with IEEE 802.11n, IEEE 802.11g, 802.11b standards.
• Up to 300Mbps wireless operation rate
• 2.4 GHz–2.484 GHz frequency range
• WPS (Wi-Fi Protected Setup)
• 64/128 bits WEP supported for encryption
• Wireless Security with WPA-PSK/ WPA2-PSK support
• 802.1x radius supported
• WDS repeater function support
• WLAN on/off time schedule control

ATM and PPP Protocols
• ATM Adaptation Layer Type 5 (AAL5)
• Multiple Protocol over AAL5 (RFC 2684, formerly RFC 1483)
• Bridged or routed Ethernet encapsulation
• VC and LLC based multiplexing
• PPP over Ethernet (PPPoE)
• PPP over ATM (RFC 2364)
• MAC Encapsulated Routing (RFC 1483 MER)
• OAM F4/F5
USB Application Server
• 3G-network sharing
• Storage: FTP server, samba server
Management
• Web-based GUI for remote and local management
• Firmware upgrades and configuration data transfer via web-based interface
• Embedded Telnet server for remote and local management
• TR-069 supports remote Management option
• Available syslog
• Supports DHCP server/client/relay
• SNMP v1/v2/v3, MIB supported
• Wake on LAN
• Mail Alert for WAN IP changed, IDS, Failover/Failback management
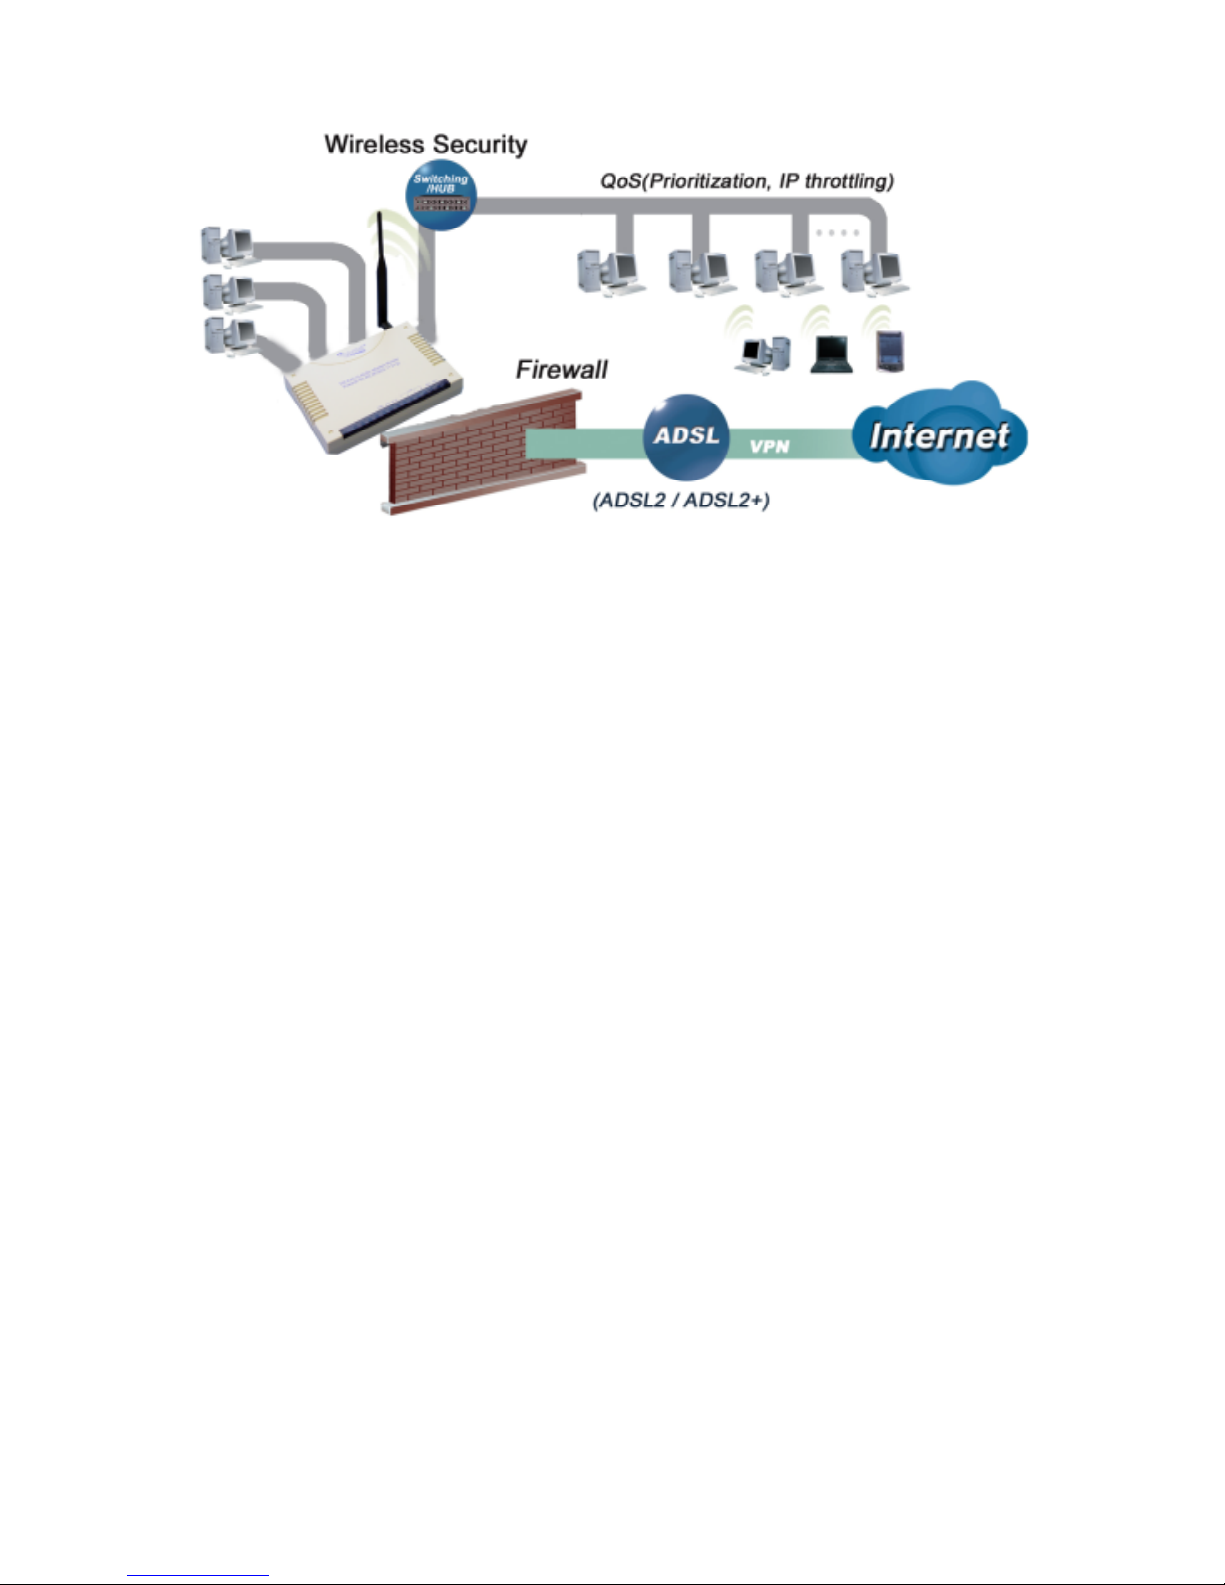
1.3 Applications of the TW-EA510v3(c) & 3G/4G

Chapter 2
Product Overview
Standards-Based Technology
The TW-EA510v3(c) & 3G/4G Wireless Router utilizes the 802.11n standard. The IEEE 802.11n
standard is an extension of the 802.11g and 802.11b standards. It increases the data rate up to
around 300Mbps within the 2.4GHz band, utilizing OFDM technology. This means that in most
environments, within the specified range of this device, you will be able to transfer large files quickly
or even watch a movie in MPEG format over your network without noticeable delays. This
technology works by transmitting high-speed digital data over a radio wave utilizing OFDM
(Orthogonal Frequency Division Multiplexing) technology. OFDM works by splitting the radio signal
into multiple smaller sub-signals that are then transmitted simultaneously at different frequencies to
the receiver. OFDM reduces the amount of crosstalk (interference) in signal transmissions. The
TW-EA510v3(c) & 3G/4G is backwards compatible with 802.11g and 802.11b devices. This means
that if you have an existing 802.11g or 802.11b network, the devices in that network will be
compatible with 802.11n devices at speeds of up to 11Mbps in the 2.4GHz range.
Installation Considerations
The TW-EA510v3(c) & 3G/4G Wireless Router lets you access your network, using a wireless
connection, from virtually anywhere within its operating range. Keep in mind, however, that the
number, thickness and location of walls, ceilings, or other objects that the wireless signals must
pass
Keep the number of walls and ceilings between the TW-EA510v3(c) & 3G/4G and other network
devices to a minimum - each wall or ceiling can reduce your TW-EA510v3(c) & 3G/4G wireless
product’s range from 3-90 feet (1-30 meters).
Position your devices so that the number of walls or ceilings is minimized. Be aware of the direct
line between network devices. Position the devices so that the signal will travel straight through a
wall or ceiling (instead of at an angle) for better reception. Building Materials can impede the
wireless signal - a solid metal door or aluminium studs may have a negative effect on range.
Try to position wireless devices and computers with wireless adapters so that the signal passes
through drywall or open doorways and not other materials. Keep your product away (at least 3-6
feet or 1-2 meters) from electrical devices or appliances that generate extreme RF (radio frequency)
noise.
2.1 Important Notes
! Do not use the TW-EA510v3(c) & 3G/4G in high humidity or high
temperatures.
! Do not use the same power source for the TW-EA510v3(c) &
3G/4G as other equipment.
! Do not open or repair the case yourself. If the TW-EA510 v3(c) &
3G/4G is too hot, turn off the power immediately and have it
repaired at a qualified service center.
Warning

2.2 Package Contents
Tele W e l l TW-EA510v3 (c) ADSL 3G/4G Modem Router Firewall
WLAN AP (802.11 b+g+n)
CD containing the on-line manual and QSG
RJ-11 ADSL/ telephone cable
Ethernet (RJ-45) cable
Two 2dBi detachable antennas
Power adapter 12V DC, minimum 1.2A
Quick Start Guide
Telephone plug (Micro-filter Optional)
! Place the TW-EA510v3(c) & 3G/4G on a stable surface.
! Only use the power adapter that comes with the package.
Using a different voltage rating power adaptor may damage
the router.
Attention
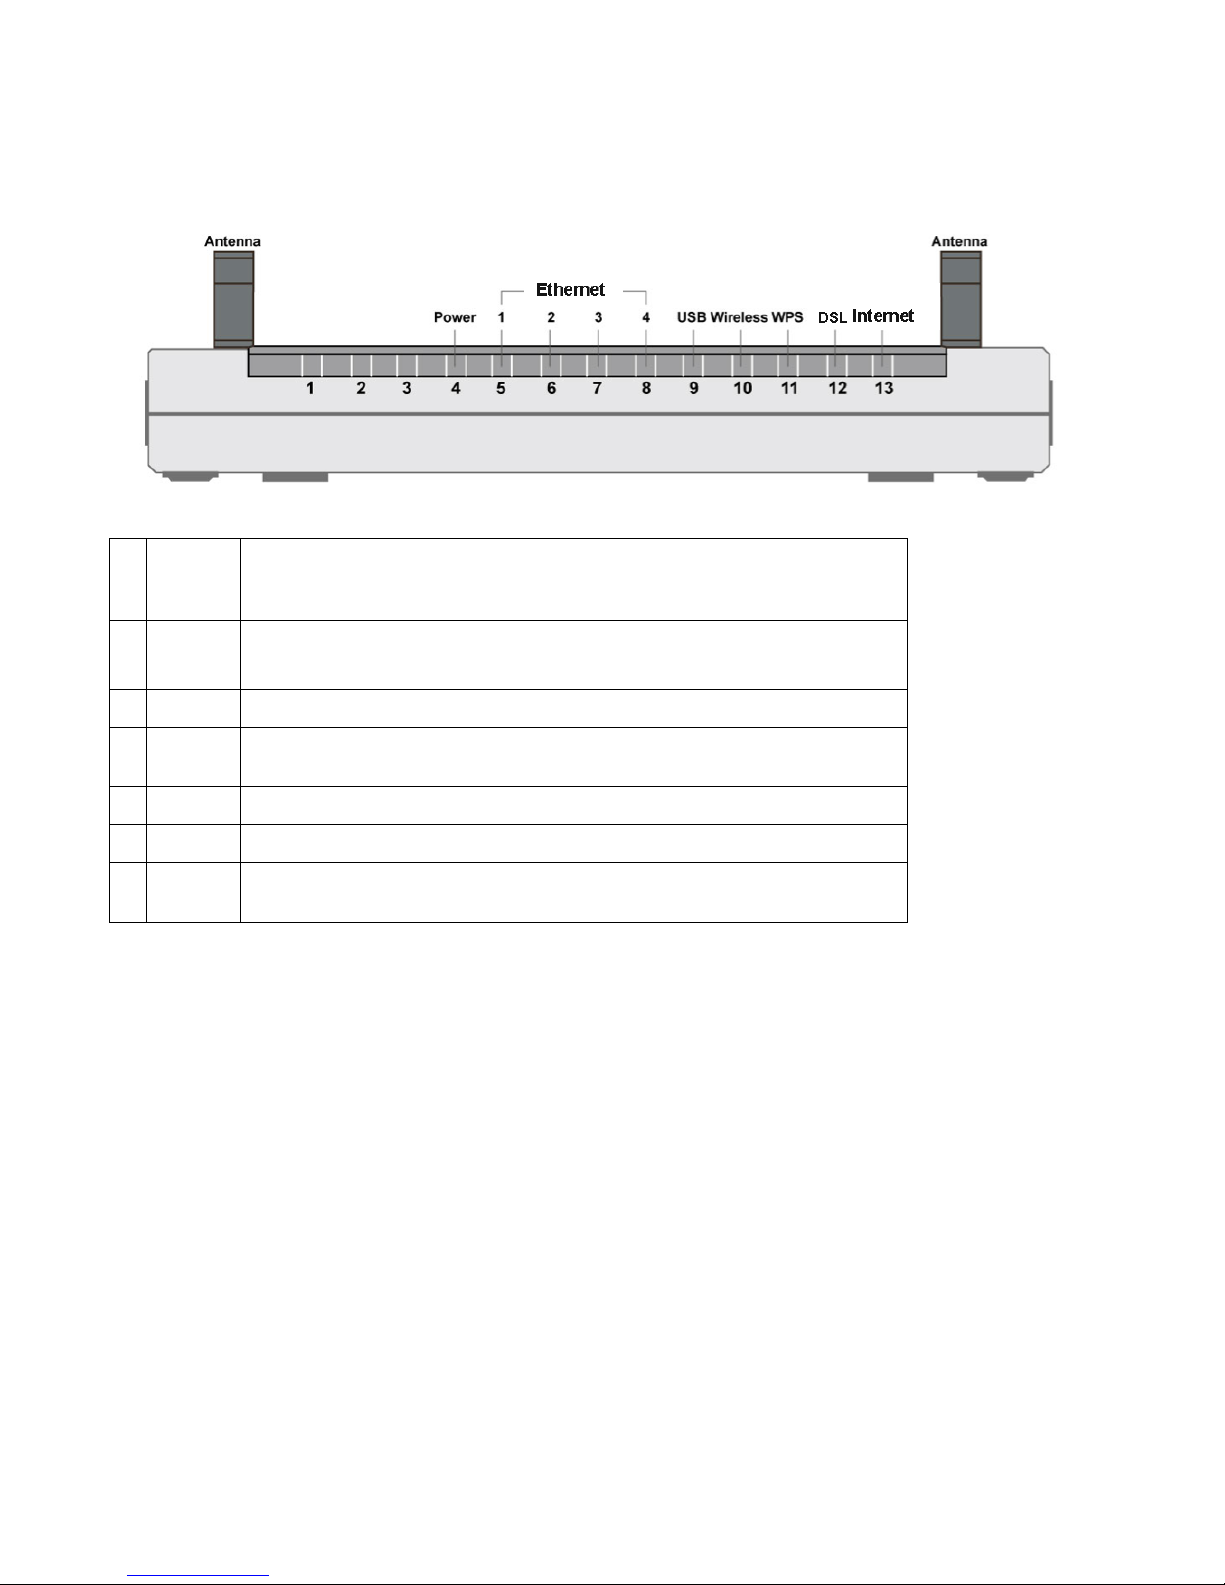
2.3 The Front LEDs
DSL
1
Power
Lit red while the flash is damage and cannot bring the system up. Lit green
when the system is ready. Flashes green when the system is rebooting or
firmware upgrading.
2
Ethernet
Port 1-4
Lit green when connected to an Ethernet device. Blinking when data is
transmitted / received.
3
USB
Lit when the router is connected to an USB device/ modem
4
Wireless
Lit green when the wireless connection is established. Flashes when sending
/ receiving data.
5
WPS
Blinking when WPS is in progress.
6
DSL
Lit green when successfully connected to an ADSL DSLAM (“linesync”)
7
Internet
Lit red when WAN port fails to get IP address. Lit green when WAN port gets
IP address successfully.
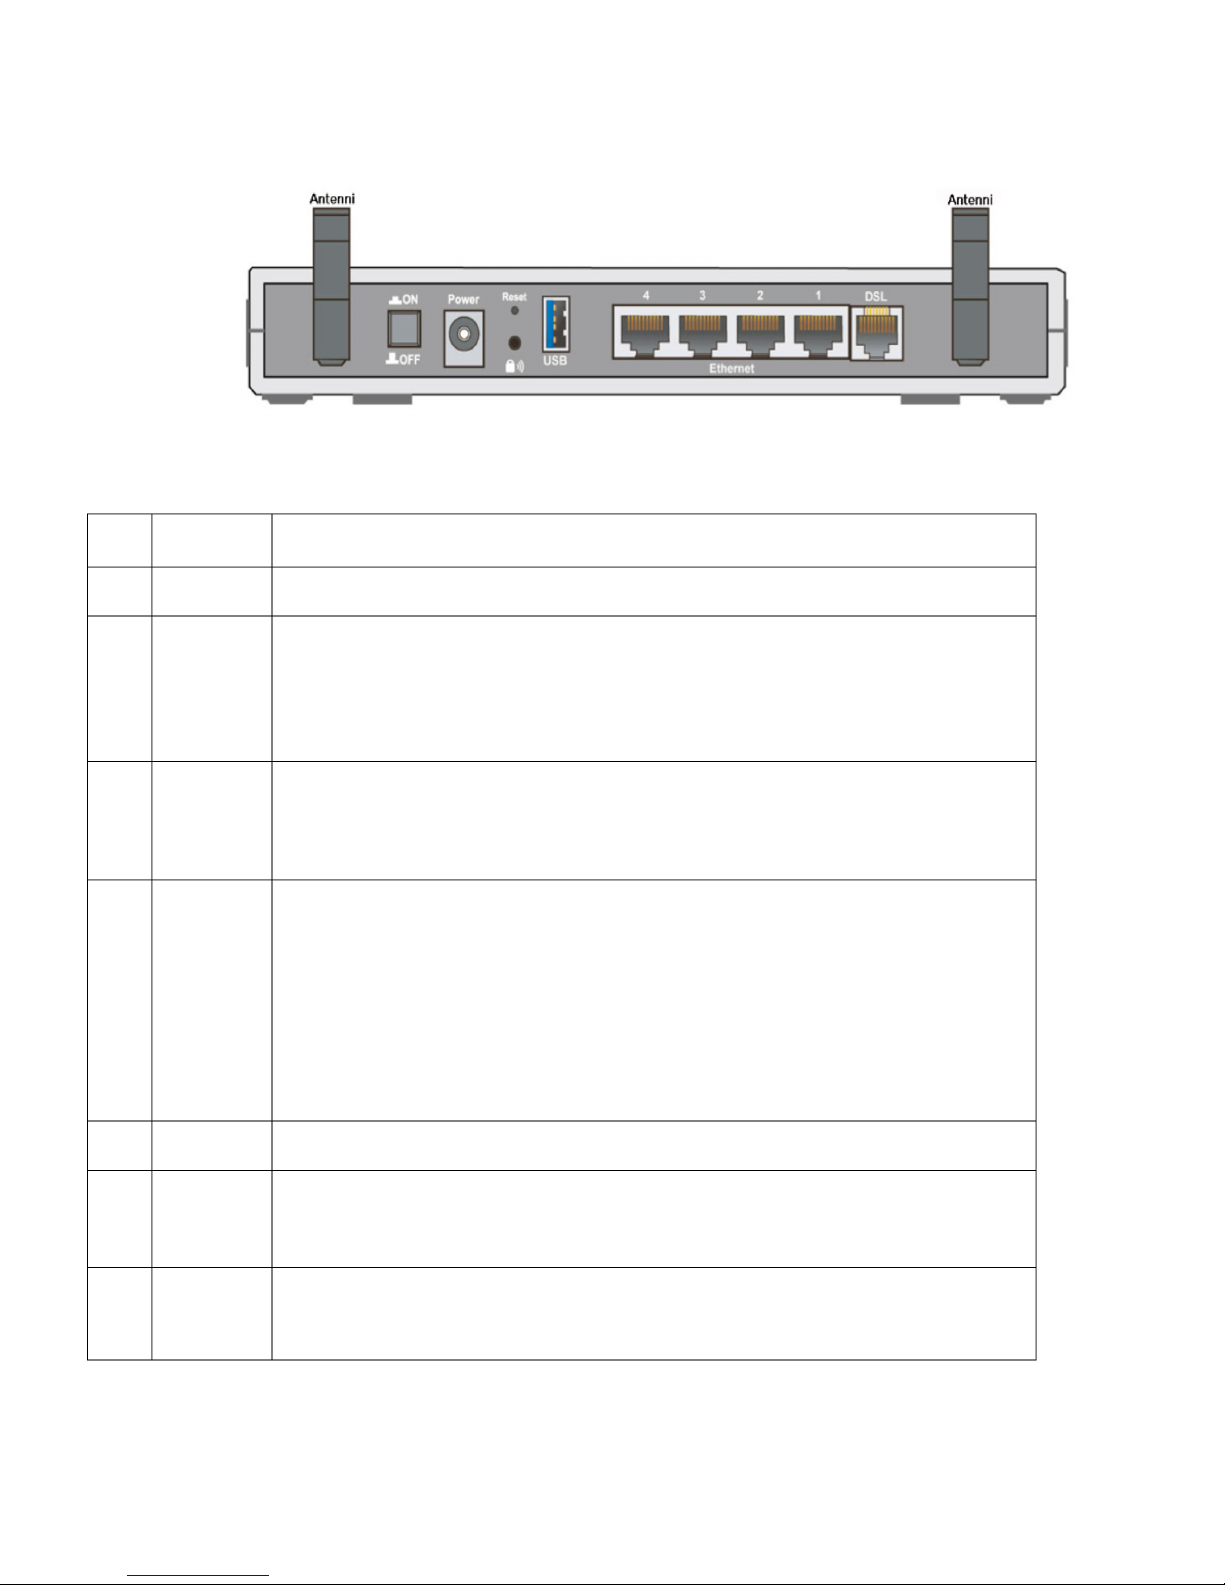
2.4 The Rear Ports
1
Antenna
Connect the antenna to this port.
2
ON/OFF
Power ON/OFF switch.
3
Power
Connect the supplied power adapter to this jack. After the router is powered
on, press this reset button using the
end of paper clip or other small pointed object for 6 seconds and
above to restore it to factory default settings.
4
Reset
1. Recovery procedures for non-working routers (e.g. after a
failed firmware upgrade flash).
2. Recovery procedures for a lost web interface password.
5
WPS
Press the WPS button according to the following two to achieve
different functions.
(1) WPS: Press 2-6 seconds until WPS LED flashes green to
trigger WPS function
(2) Wireless ON/OFF Switch: Press over 6 seconds after WPS
LED is off to switch on wireless function. Press over 6 seconds
again for disable wireless function.
6
USB
Connect the USB cable to this port.
7
Ethernet
Connect a UTP Ethernet cable (Cat-5 or Cat-5e) to one of the
four LAN ports when connecting to a PC or an office/home
network of 10Mbps or 100Mbps.
8
DSL
Connect the supplied RJ-11 (“telephone”) cable to this port when
connecting to the ADSL/telephone network.

Before powering on the router to enter the recovery process, please
configure the IP address of the PC as 192.168.0.1 and proceed with the
following step by step guide.
1. Power the router off.
2. Hold the "Reset Button”.
3. Power on the router. Then Router's IP will reset to Emergency IP
address (Say 192.168.0.254)
4. Download the firmware.
2.5
Cabling
One of the most common causes of problems is because of bad cabling or ADSL line(s). Make sure
that all connected devices are turned on. On the front of the product is a bank of LEDs. Verify that
the LAN Link and ADSL line LEDs are lit. If they are not, verify that you are using the proper cables.
Ensure that all other devices connected to the same telephone line as your router (e.g. telephones,
fax machines, analog modems) have a line filter connected between them and the wall socket
(unless you are using a Central Splitter or Central Filter installed by a qualified and licensed
electrician), and to ensure that all line filters are correctly installed and the right way around. Missing
line filters or line filters installed being the wrong way around can cause problems with your ADSL
connection, which includes frequent disconnections.

Chapter 3
Installation
You can configure the TW-EA510v3(c) & 3G/4G router through the convenient and user-friendly
interface of a web browser. Most popular operating systems such as Mac, Linux and Windows
98/NT/2000/XP/Me/Vista and Windows 7 include a web browser as a standard application.
3.1 Before Configuration
PCs must have a properly installed Ethernet interface that connects to the router directly or through
an external repeater hub. In addition, PCs must have TCP/IP installed and configured to obtain an
IP address through a DHCP server or a fixed IP address that must be in the same subnet as the
router. The default IP address of the router is 192.168.0.254 and the subnet mask is 255.255.255.0
(i.e. any attached PC must be in the same subnet, and have an IP address in the range between
192.168.0.1 and 192.168.0.253). The easiest way is to configure the PC is to obtain an IP address
automatically from the router using DHCP. If you encounter any problems accessing the router’s
web interface you are advised to uninstall any kind of software firewall on your PCs, as they can
cause problems when trying to access the 192.168.0.254 IP address of the router.
Please follow the steps below for installation on your PC’s network environment. First of all, check
your PC’s network components. The TCP/IP protocol stack and Ethernet network adapter must be
installed. If not, please refer to your Windows-related or other operating system manuals.
Any TCP/IP capable workstation can be used to communicate with
or through the TW-EA510v3(c) & 3G/4G. To configure other types of
workstations, please consult the manufacturer’s documentation.
Network Configuration
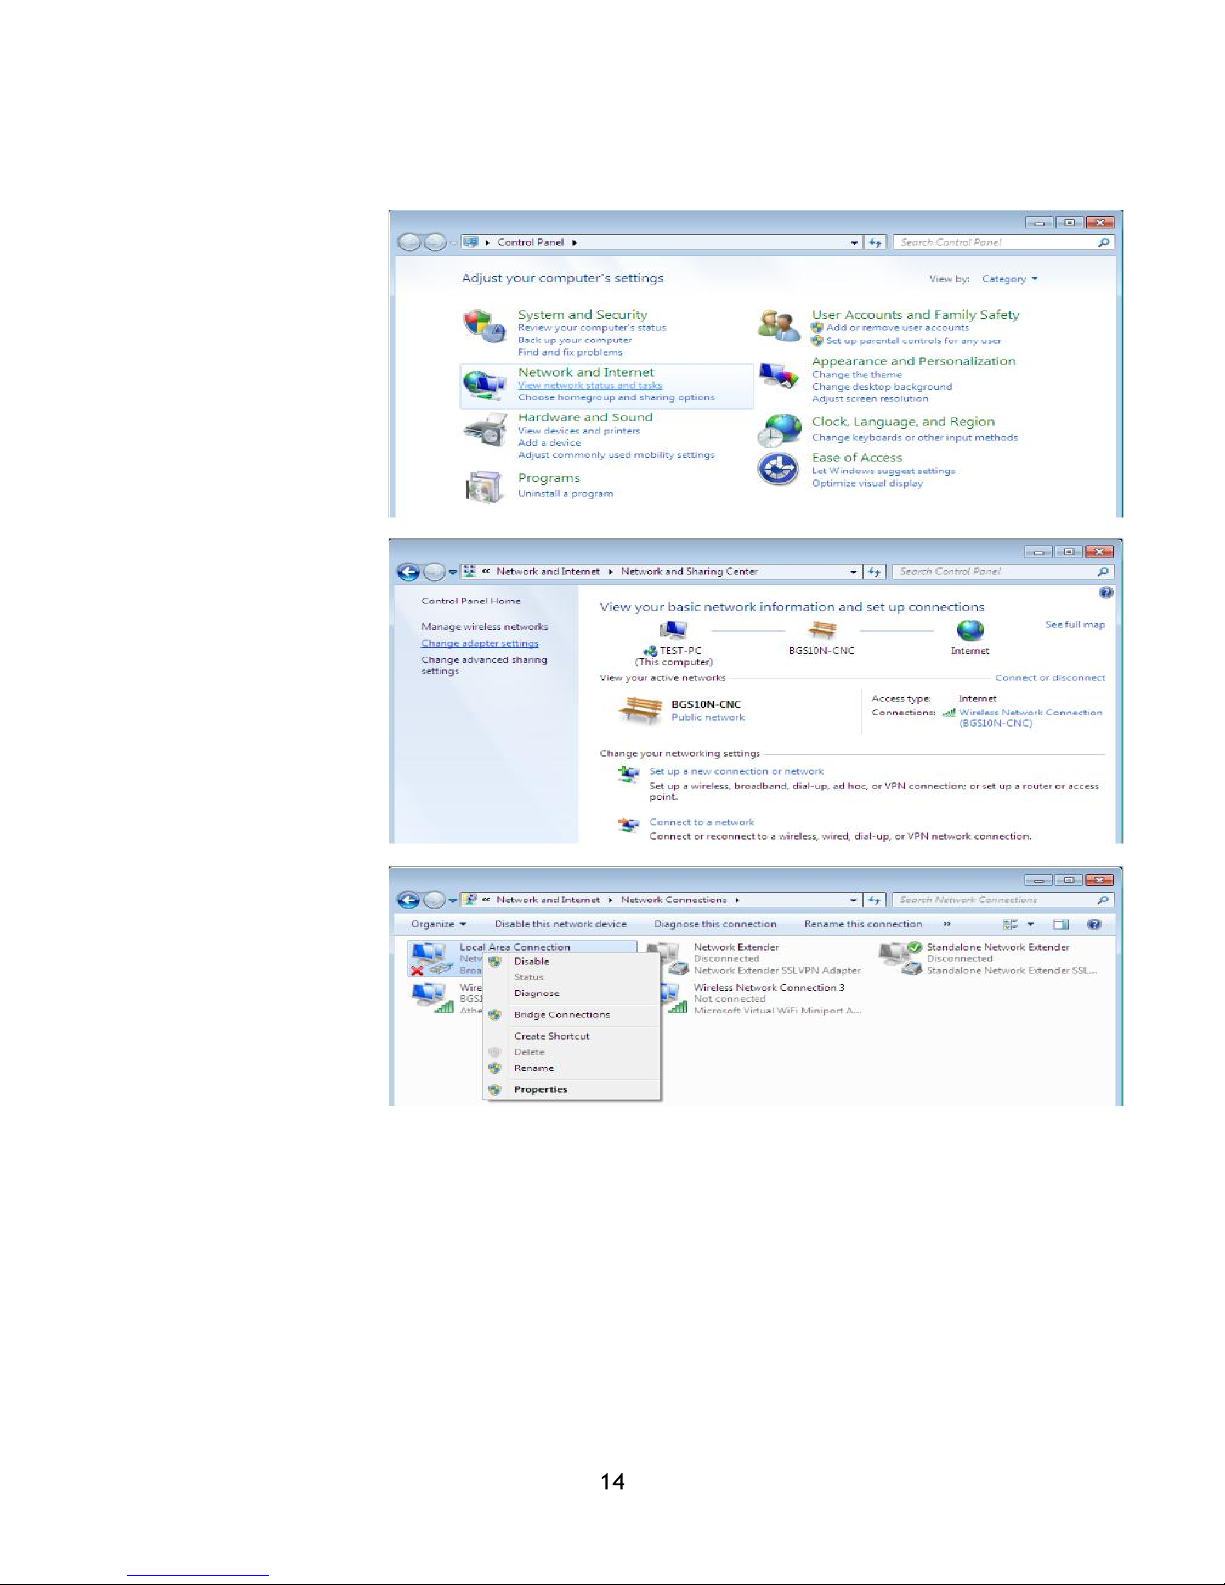
Computer configuration Windows 7
1. Select “Start”.
Click control panel.
2. Select ”Network and
Internet”.
3. When internet
connection sharing
starts, select Adapter
settings.
4. Select “Local area
connection”, and
select properties.
5. Select TCP / IPv4 and
choose
properties
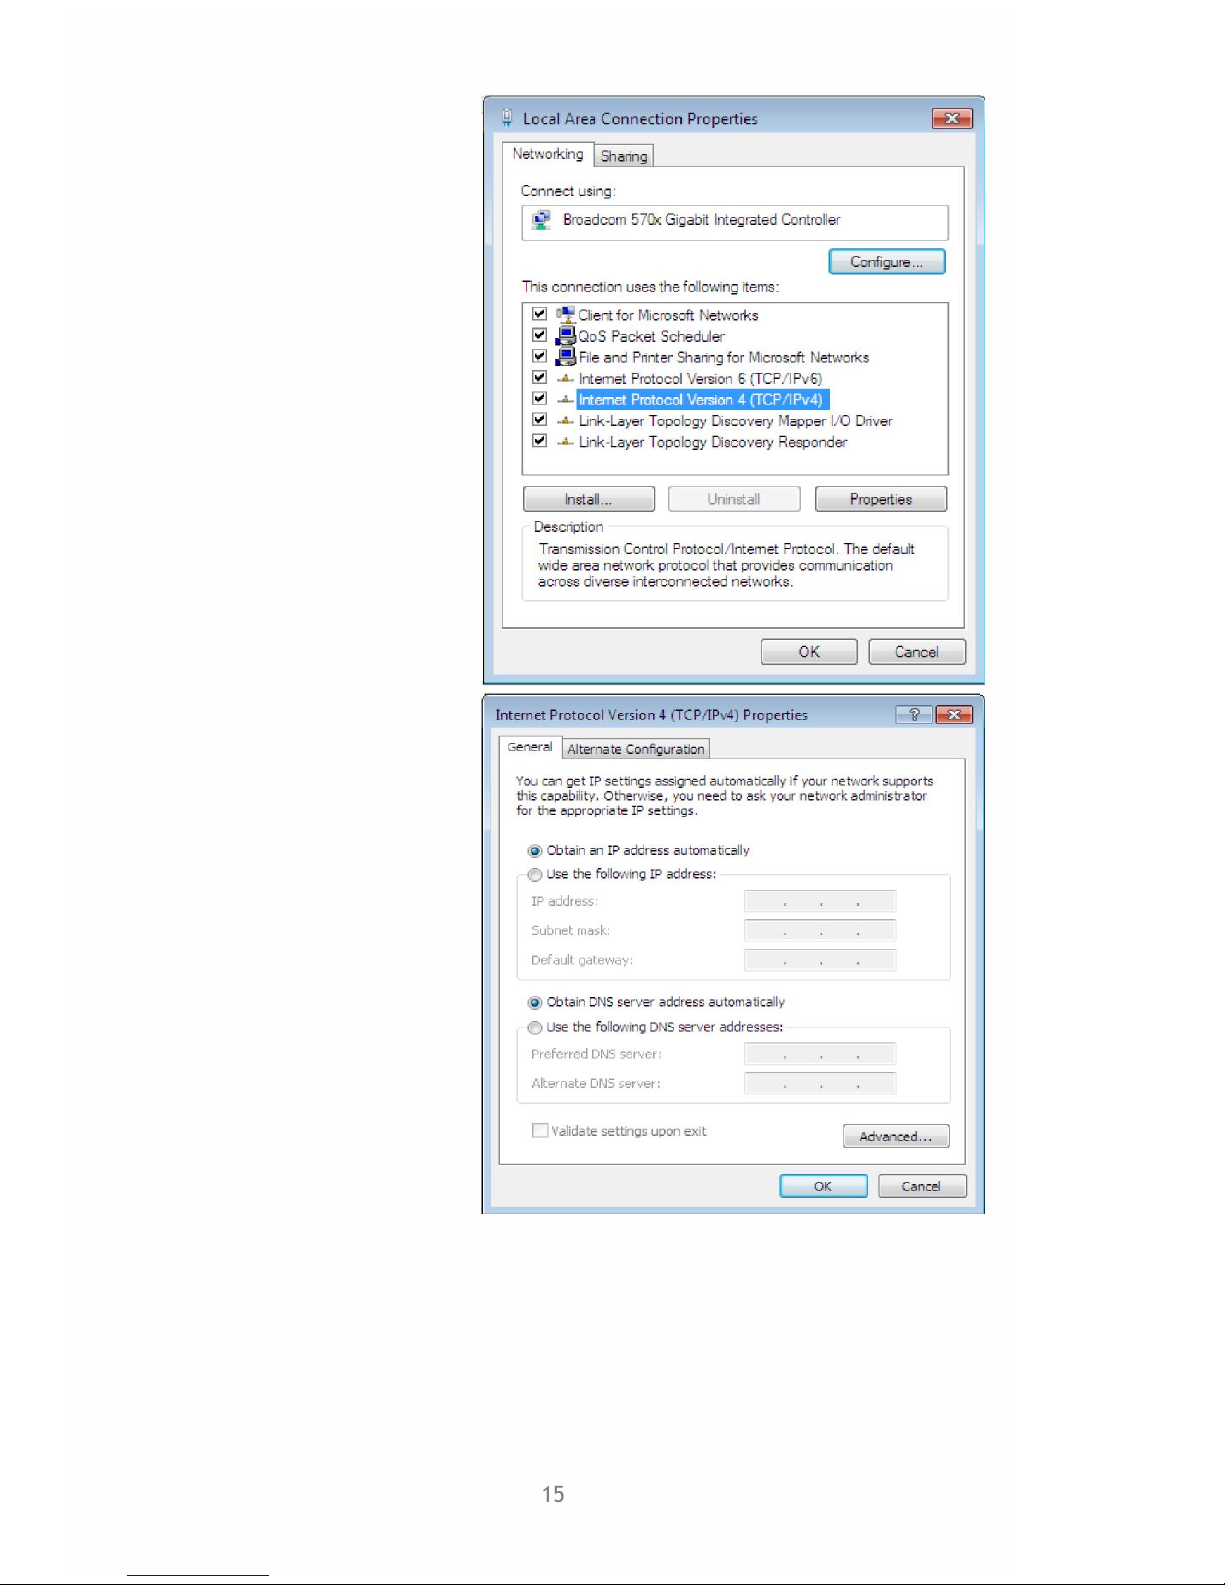
15
6. TCP / IPv4 “Properties” –
selection
"”Obtain IP automatically
and "Obtain DSN
automatically
Select -"OK”.
7. Select OK.
16
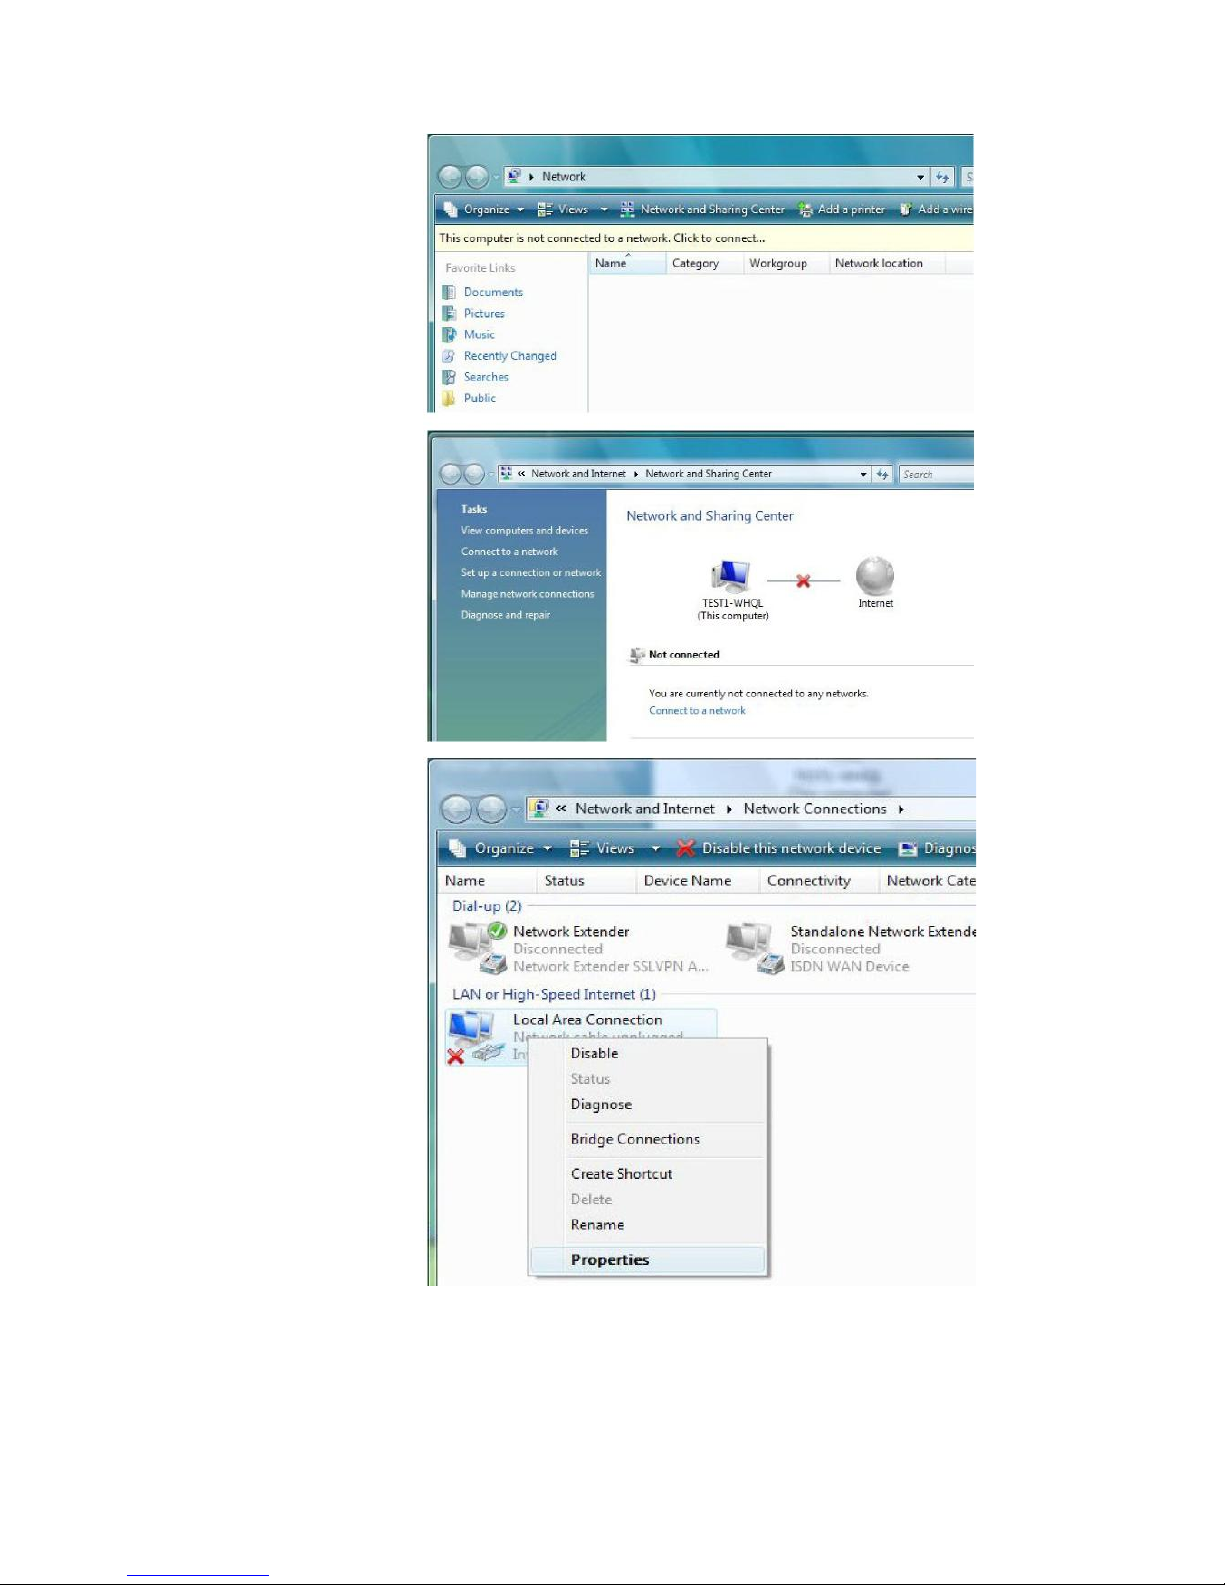
Configuring PC in
Windows Vista
1. Go to Start. Click on
Network.
2. Then click on Network
and Sharing Center at
the top bar.
3. When the Network and
Sharing Center window
pops up, select and click
on Manage network
connections on the left
window column.
4. Select the Local
Area Connection, and
right click the icon to
select Properties.
17
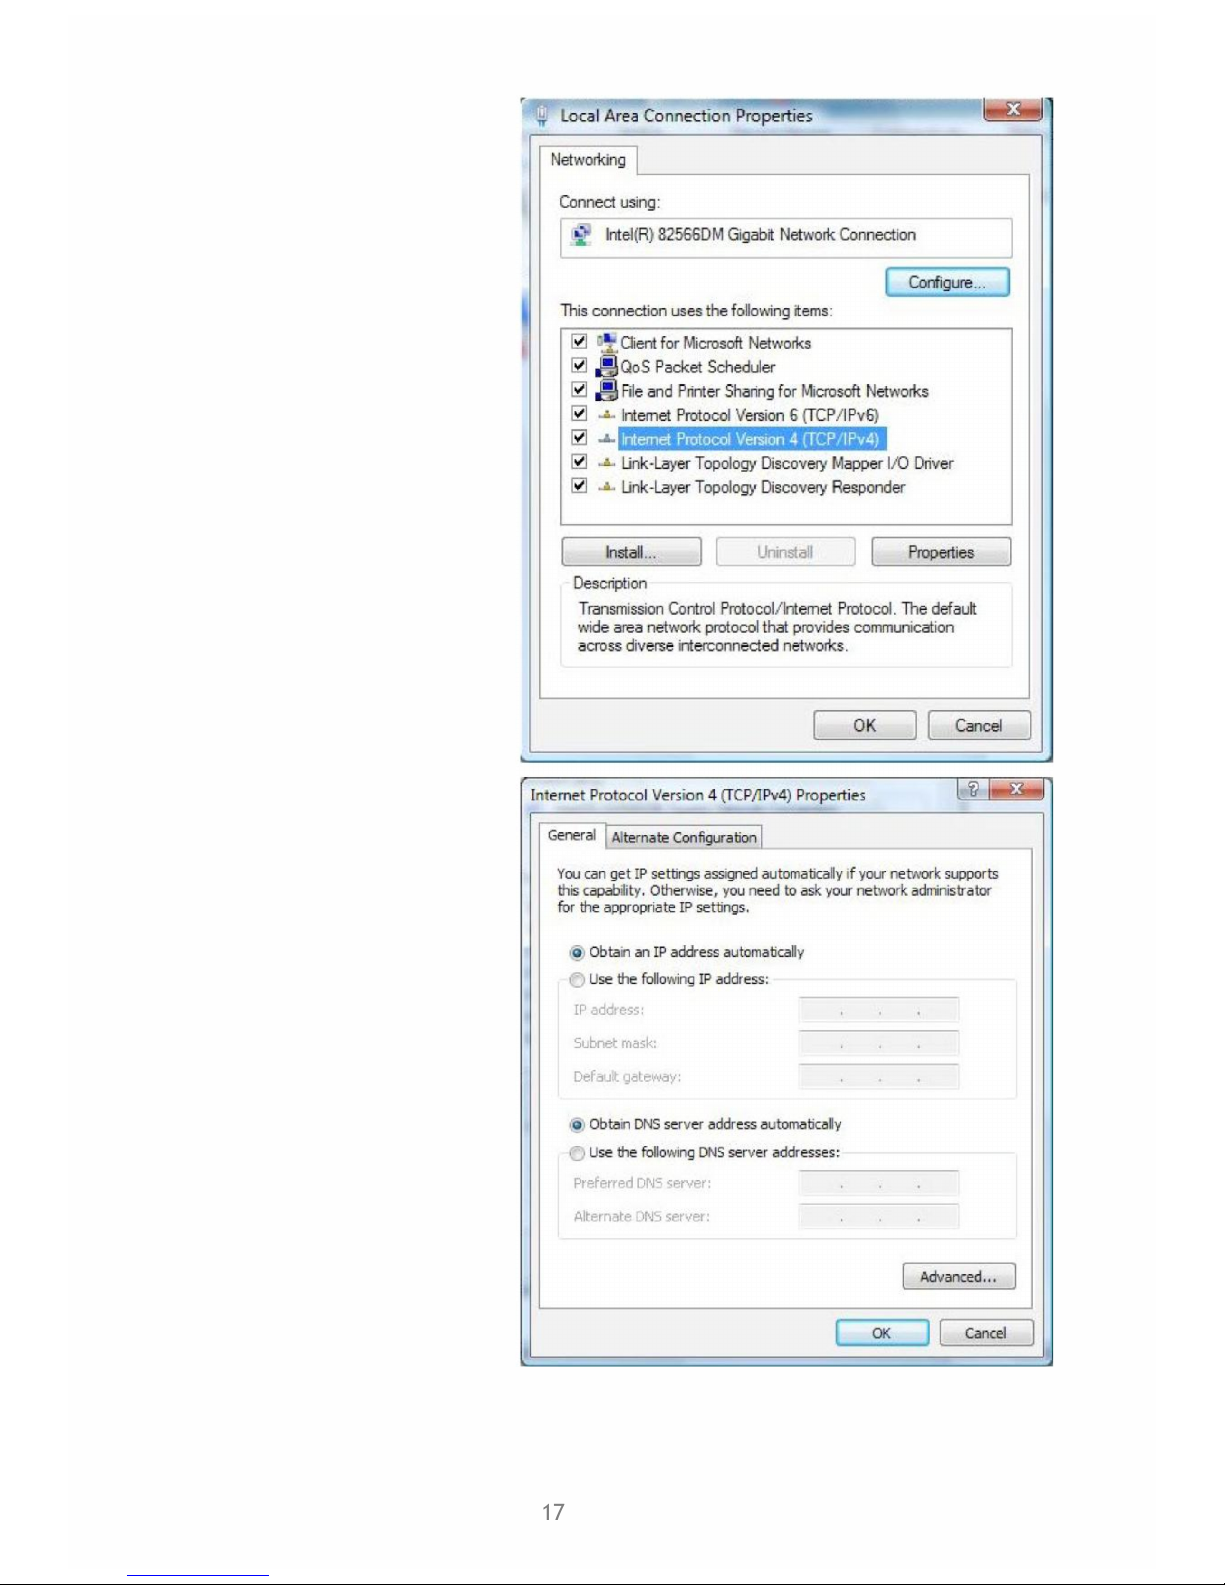
5. Select Internet Protocol Version 4
(TCP/IPv4) then click Properties.
6. In the TCP/IPv4 properties window,
select the Obtain an IP address automatically and Obtain DNS Server
address automatically radio buttons. Then click OK to exit the setting.
7. Click OK again in the Local Area
Connection Properties window to
apply the new configuration.
18
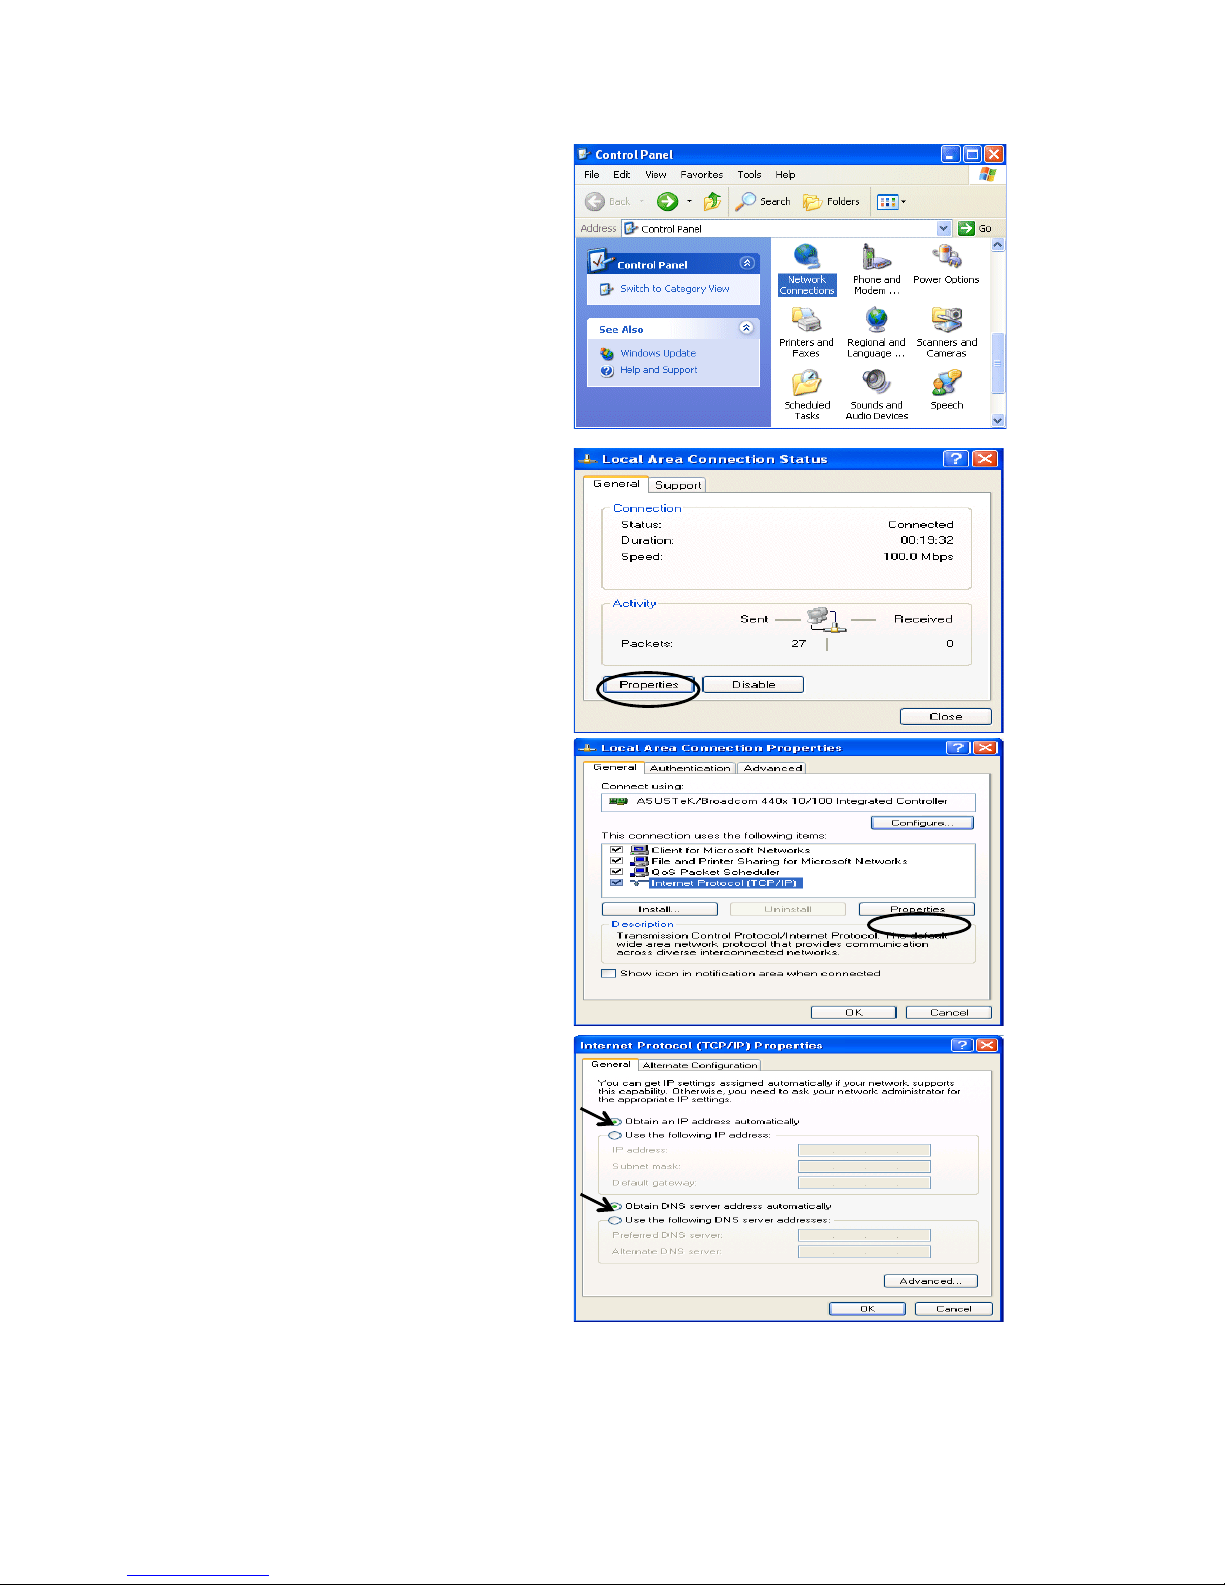
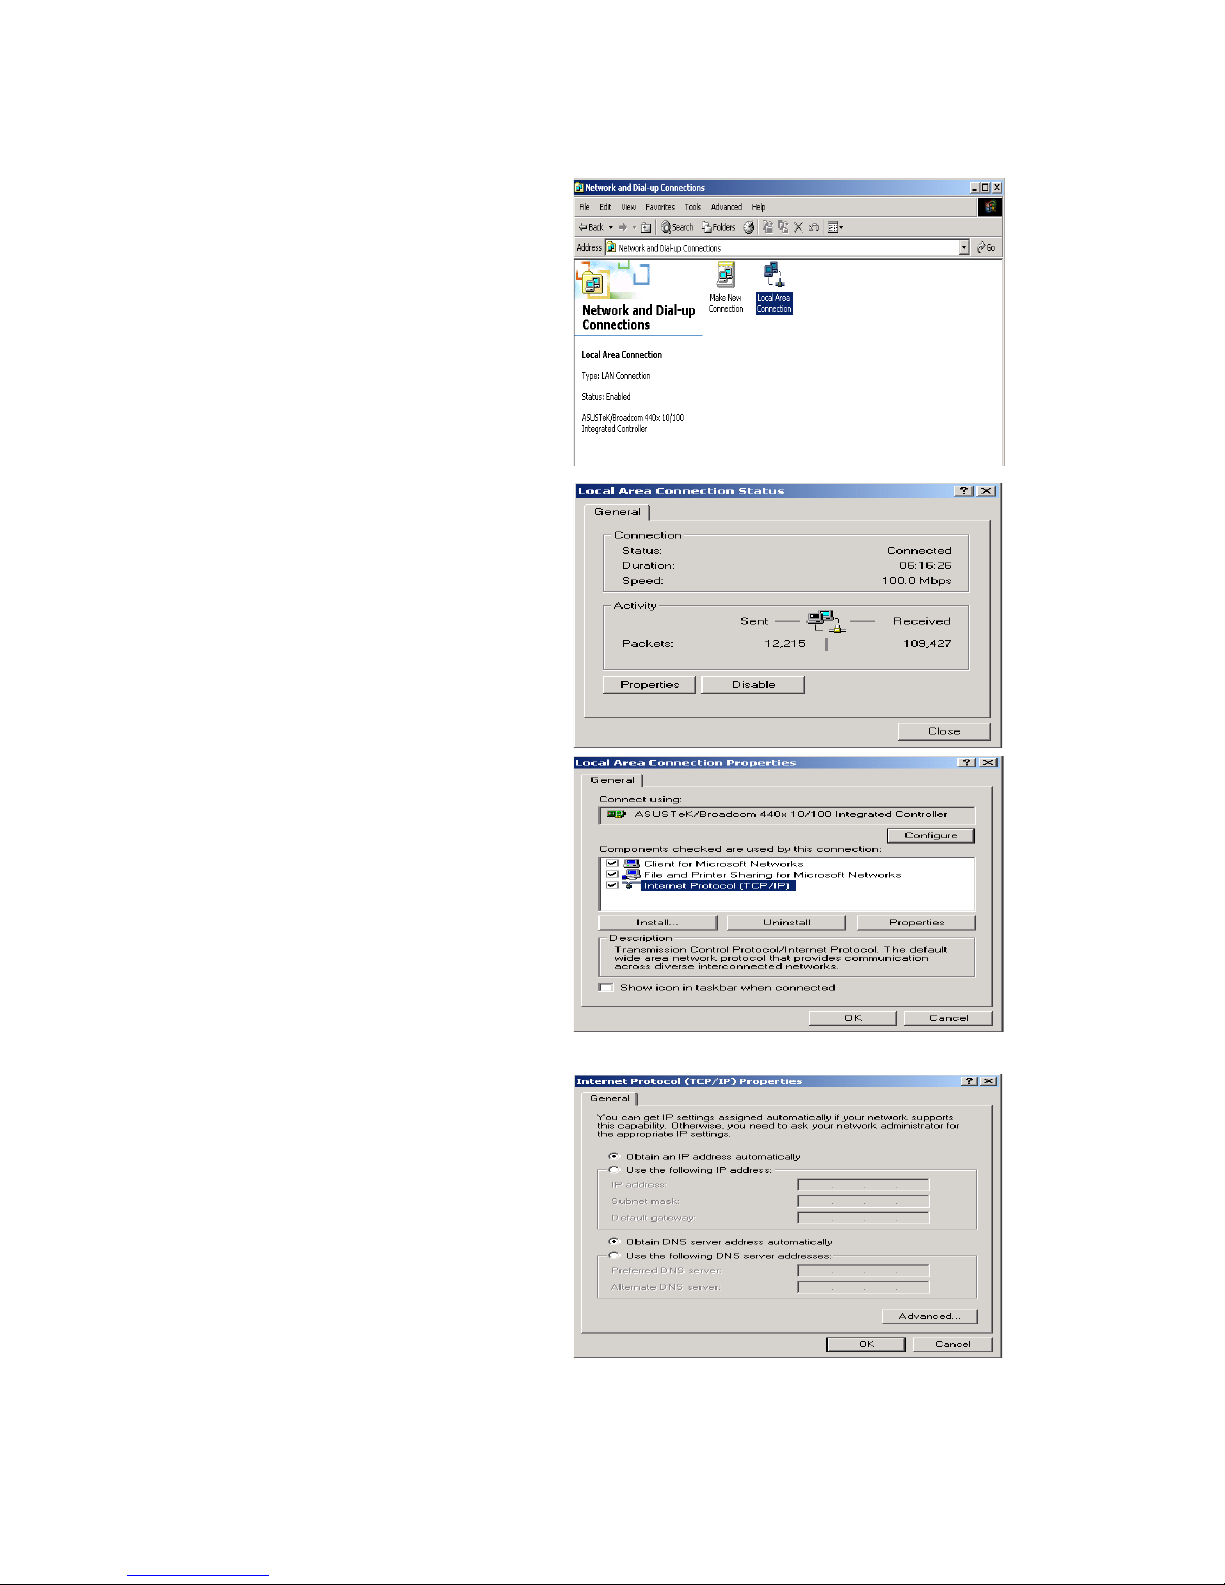
Configuring a PC in Windows XP
1. Go to Start / Control Panel (in Classic
View). In the Control Panel, doubleclick on Network Connections
2. Double-click Local Area Connection.
3. In the Local Area Connection Status
window, click Properties.
4. Select Internet Protocol (TCP/IP) and
click Properties.
5. Select the Obtain an IP address
automatically and the Obtain DNS
server address automatically radio
buttons.
6. Click OK to finish the configuration.
19
Configuring a PC in Windows 2000
1. Go to Start / Settings / Control Panel.
In the Control Panel, double-click on
Network and Dial-up Connections.
2. Double-click Local Area Connection.
3. In the Local Area Connection Status
window click Properties.
4. Select Internet Protocol (TCP/IP) and
click Properties.
5. Select the Obtain an IP address
automatically and the Obtain DNS
server address automatically radio
buttons.
6. Click OK to finish the configuration.

20
3.2 Factory Default Settings
Before configuring the TW-EA510v3(c) & 3G/4G router, you need to know the following default
settings.
Web Interface: (Username and Password)
The default username and password are “admin” and “admin” respectively.
LAN Device IP Settings:
IP Address: 192.168.0.254
Subnet Mask: 255.255.255.0
ISP setting in WAN site:
RFC 1483 LLC Bridge
Auto support for VPI = 0, 14 and VCI = 24, 33, 50, 100 if auto-scan fails
Default profile:
Type 8 profile: ports 1, 2 and WLAN behind NAT, ports 3 and 4 in bridge mode
DHCP Server and NAT:
DHCP server and NAT is enabled in ports 1 and 2, ports 3 and 4 are in bridged mode
Start IP Address: 192.168.0.100
IP pool counts: 100
WLAN Access Point:
Default name: WLAN-AP
Encryption: Default key is the device’s MAC address, see bottom label
21
3.3 LAN and WAN Port Addresses
The parameters of LAN and WAN ports are preset at the factory. The default values are shown
below.
LAN Port
WAN Port
IP address
192.168.0.254
The RFC1483 Bridged IP
LLC function is enabled to
automatically get the WAN
IP address from the ISP
Subnet Mask
255.255.255.0
DHCP server function
Enabled in ports 1 and 2
IP addresses for
distribution to PCs
100 IP addresses continuing
from 192.168.0.100 through
192.168.0.199
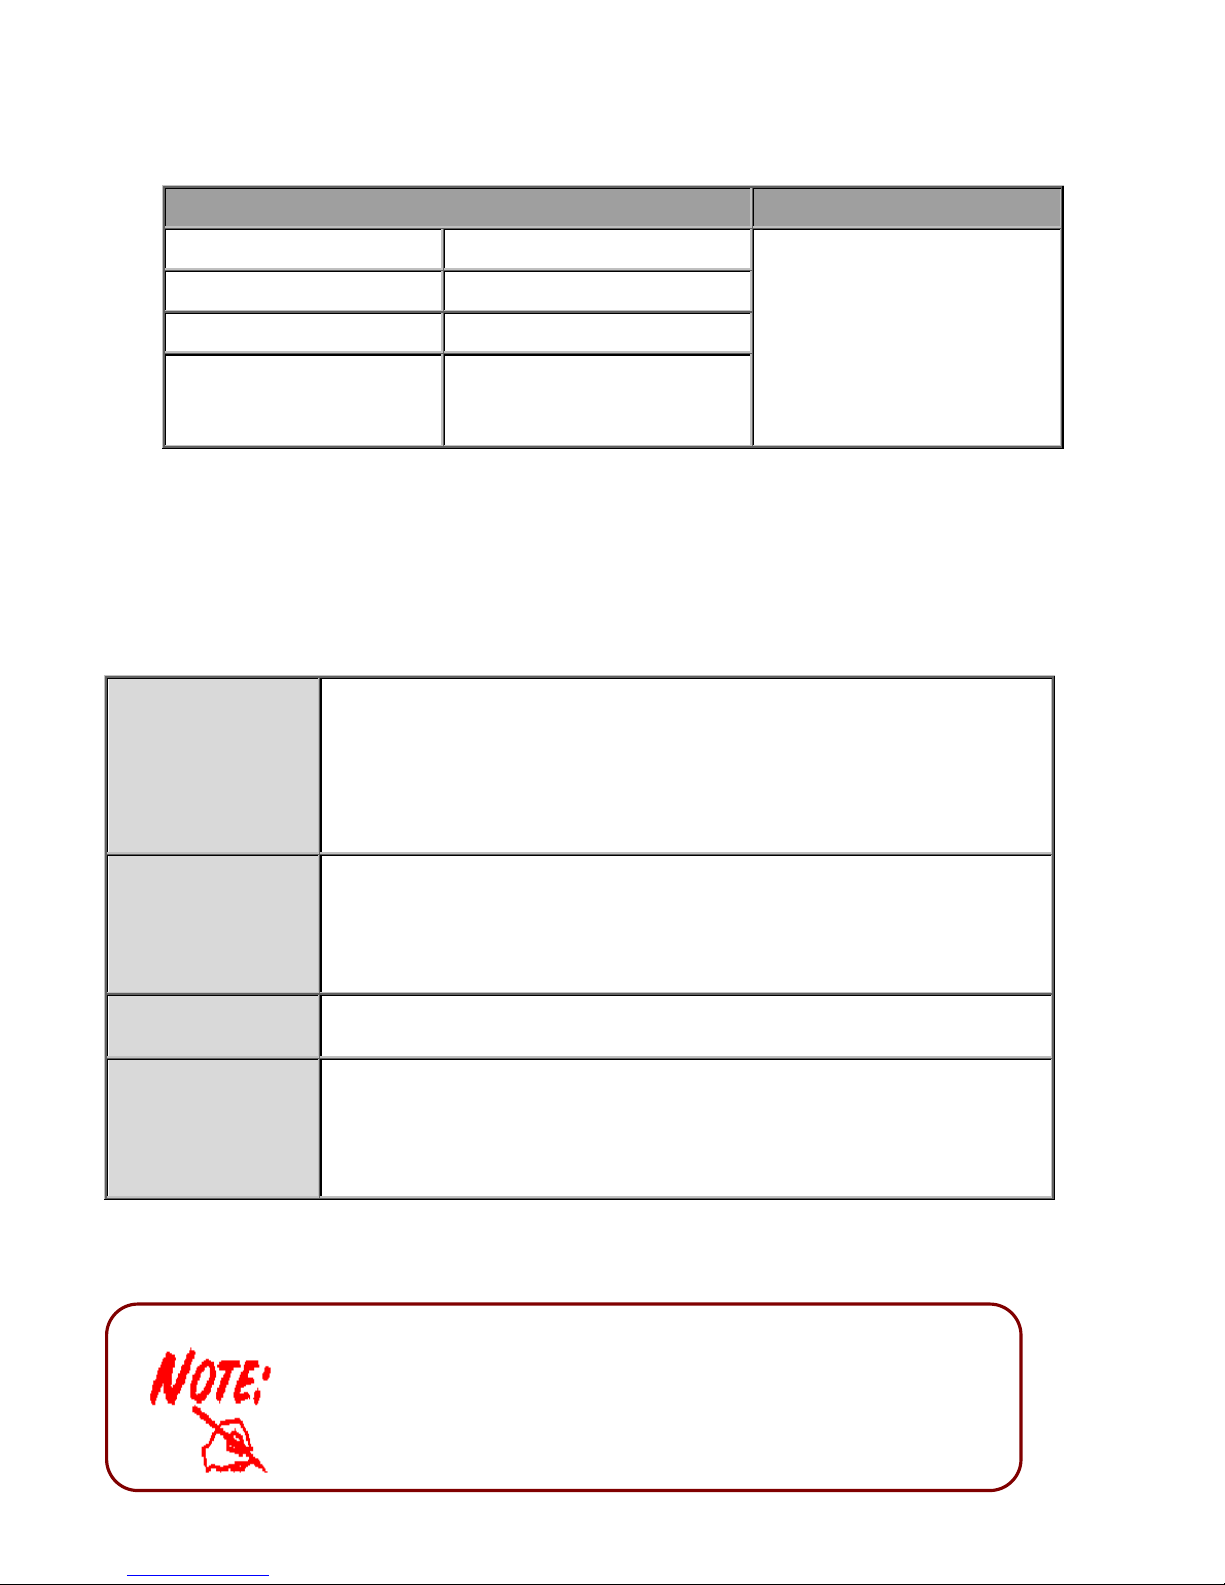
3.4 Information from your ISP
Before configuring this device, you have to check with your ISP (Internet Service Provider) what kind
of services are provided, such as PPPoE, PPPoA, MPoA or Pure Bridge.
Gather the information as illustrated in the following table and keep it for reference.
PPPoE
VPI/VCI, VC-based/LLC-based multiplexing, Username, Password,
Service Name, and Domain Name System (DNS) IP address (it can be
automatically assigned by your ISP when you connect or be set
manually).
PPPoA
VPI/VCI, VC-based/LLC-based multiplexing, Username, Password,
and Domain Name System (DNS) IP address (it can be automatically
assigned by your ISP when you connect or be set manually).
RFC1483 Bridged
VPI/VCI, VC-based/LLC-based multiplexing to use Bridged Mode.
RFC1483 Routed
VPI/VCI, VC-based/LLC-based multiplexing, IP address, Subnet mask,
Gateway address, and Domain Name System (DNS) IP address (it is
fixed IP address).
3.5 Configuring with your TW-EA510v3 (c) & 3G/4G
1. To configure this device, you must have IE 5.0, Netscape 4.5,
Firefox, Google Chrome, safari or above installed
2. You may configure the router for Internet access in two ways:
22
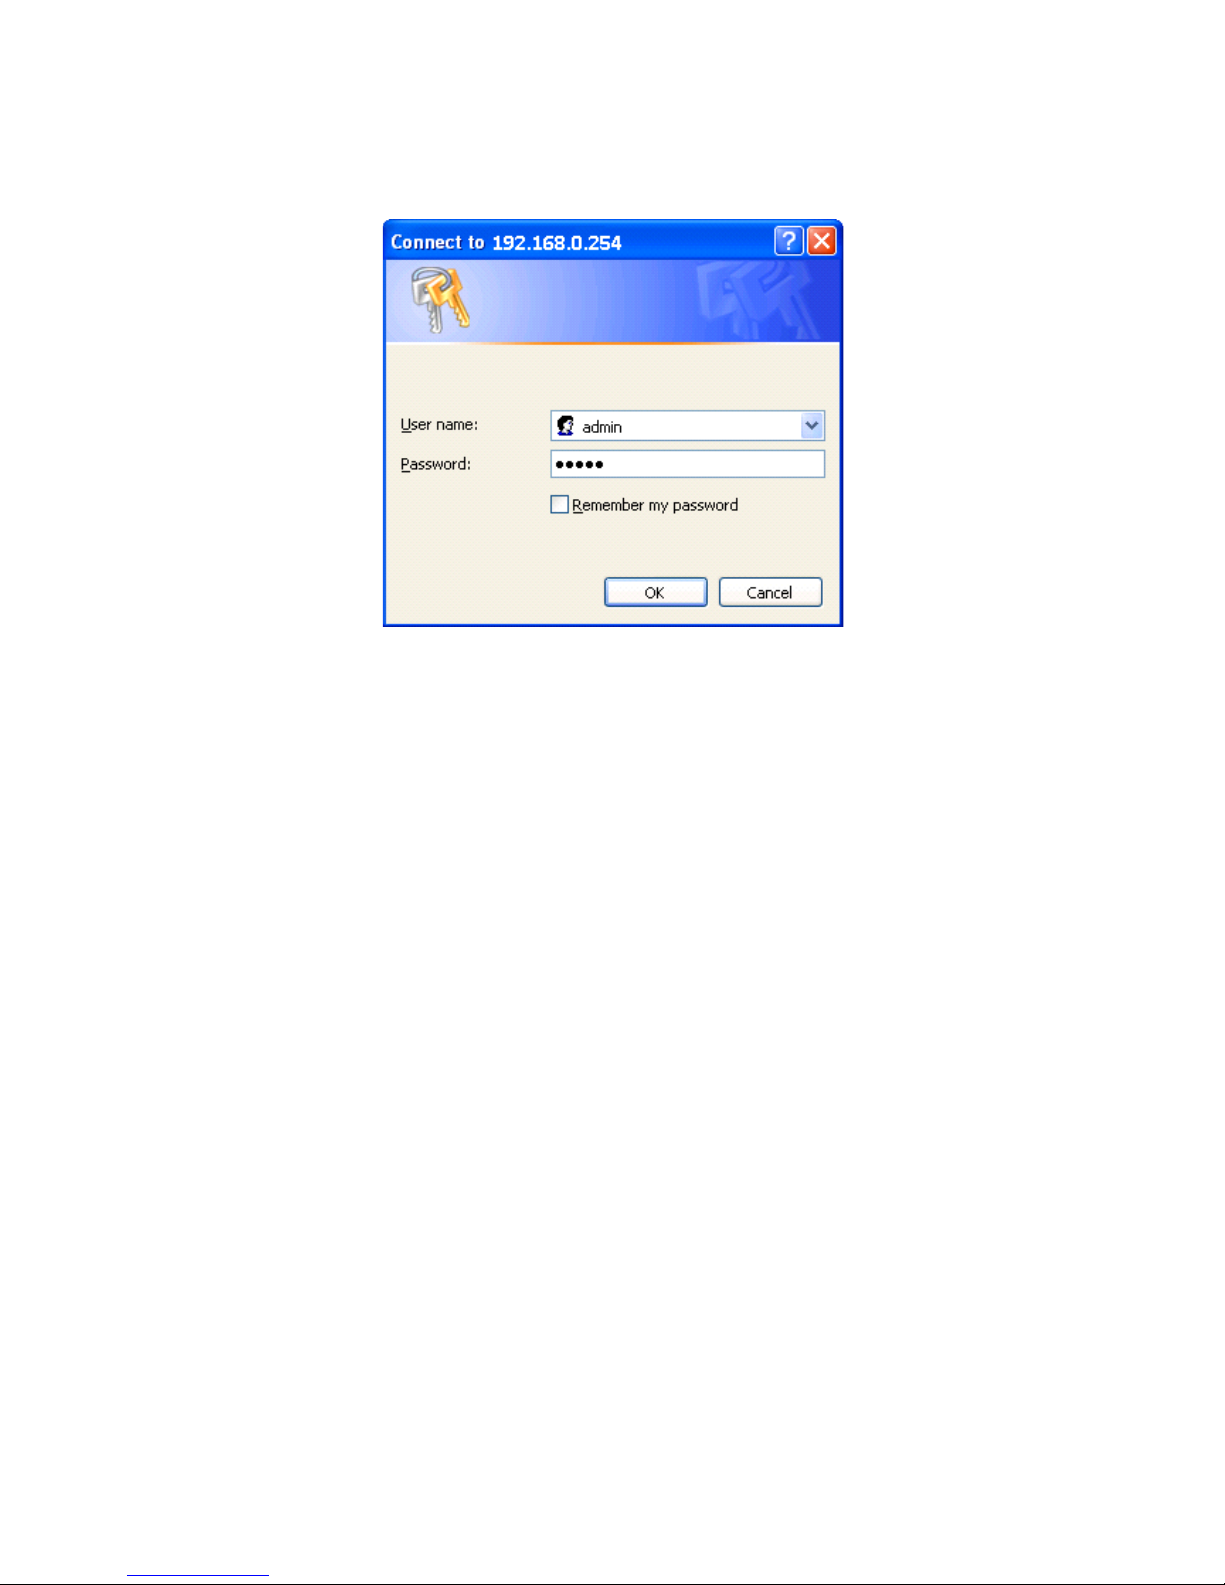
Web Configuration:
Open your web browser, enter the IP address of your router, which by default is 192.168.0.254,
and click “Go”, a user name and password window prompt appears. The default username and
password are “admin” and “admin”.
Congratulations! You have successfully logged on to your TW-EA510v3(c) & 3G/4G ADSL2+ Router!
23
Chapter 4
Basic Configuration
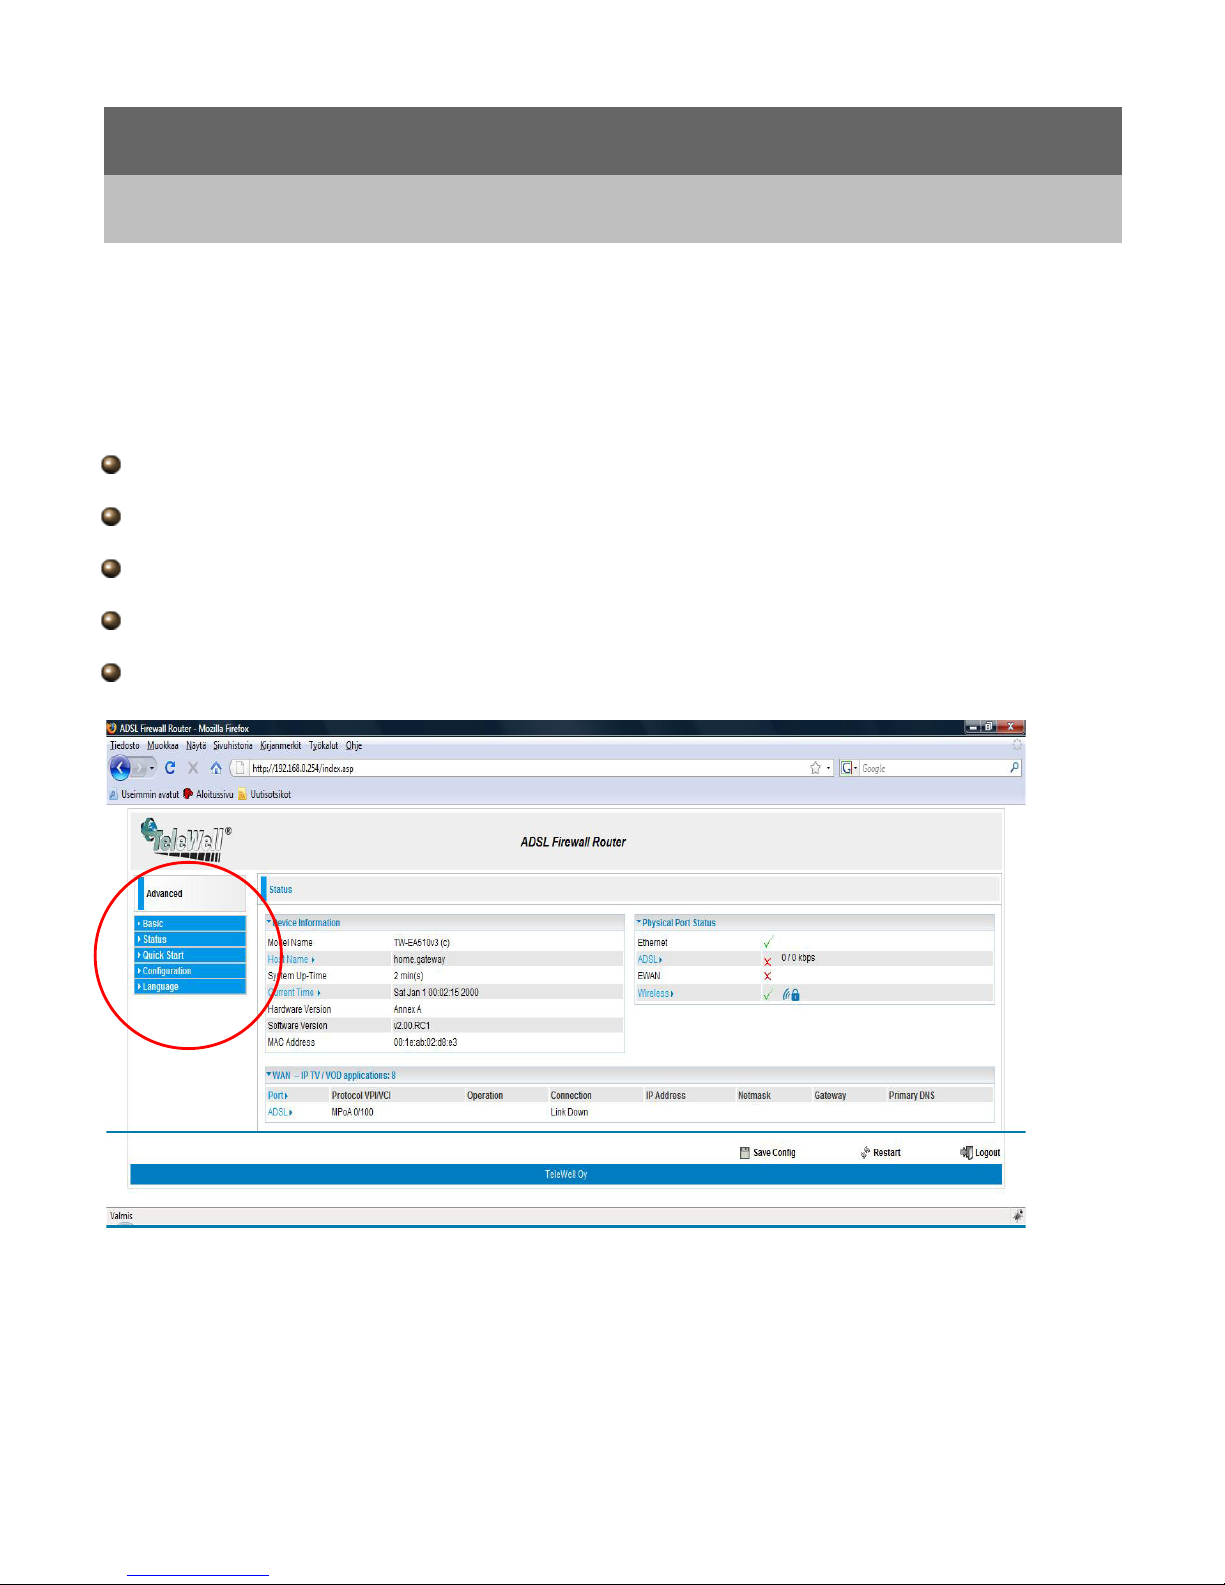
Once you have logged on to your TW-EA510v3(c) & 3G/4G ADSL2+ Router via your web browser,
you can begin to set it up according to your requirements. On the configuration homepage, the left
navigation pane links you directly to the setup pages, which include:
Advance a Switch to Advanced Configuration mode
Status
Quick Start
Configuration
Language

24
4.1 Status
Device Information
Model Name: Provide a name for the router for identification purposes.
System Up-Time: Records system up-time.
Hardware Version: Device version
Software Version: Firmware version
Port Status
Port Status:User can look up to see if they are connected to Ethernet, ADSL or Wireless.
WAN
Port: Name of the WAN connection.
Protocol VPI/VCI: Virtual Path Identifier and Virtual Channel Identifier
Operation: The current status in WAN interface.
Connection: The current connection status.
IP Address: WAN port IP address.
Primary DNS: The IP address of the primary DNS server.
Net mask: WAN port IP subnet mask.
Gateway: The IP address of the default gateway.
25
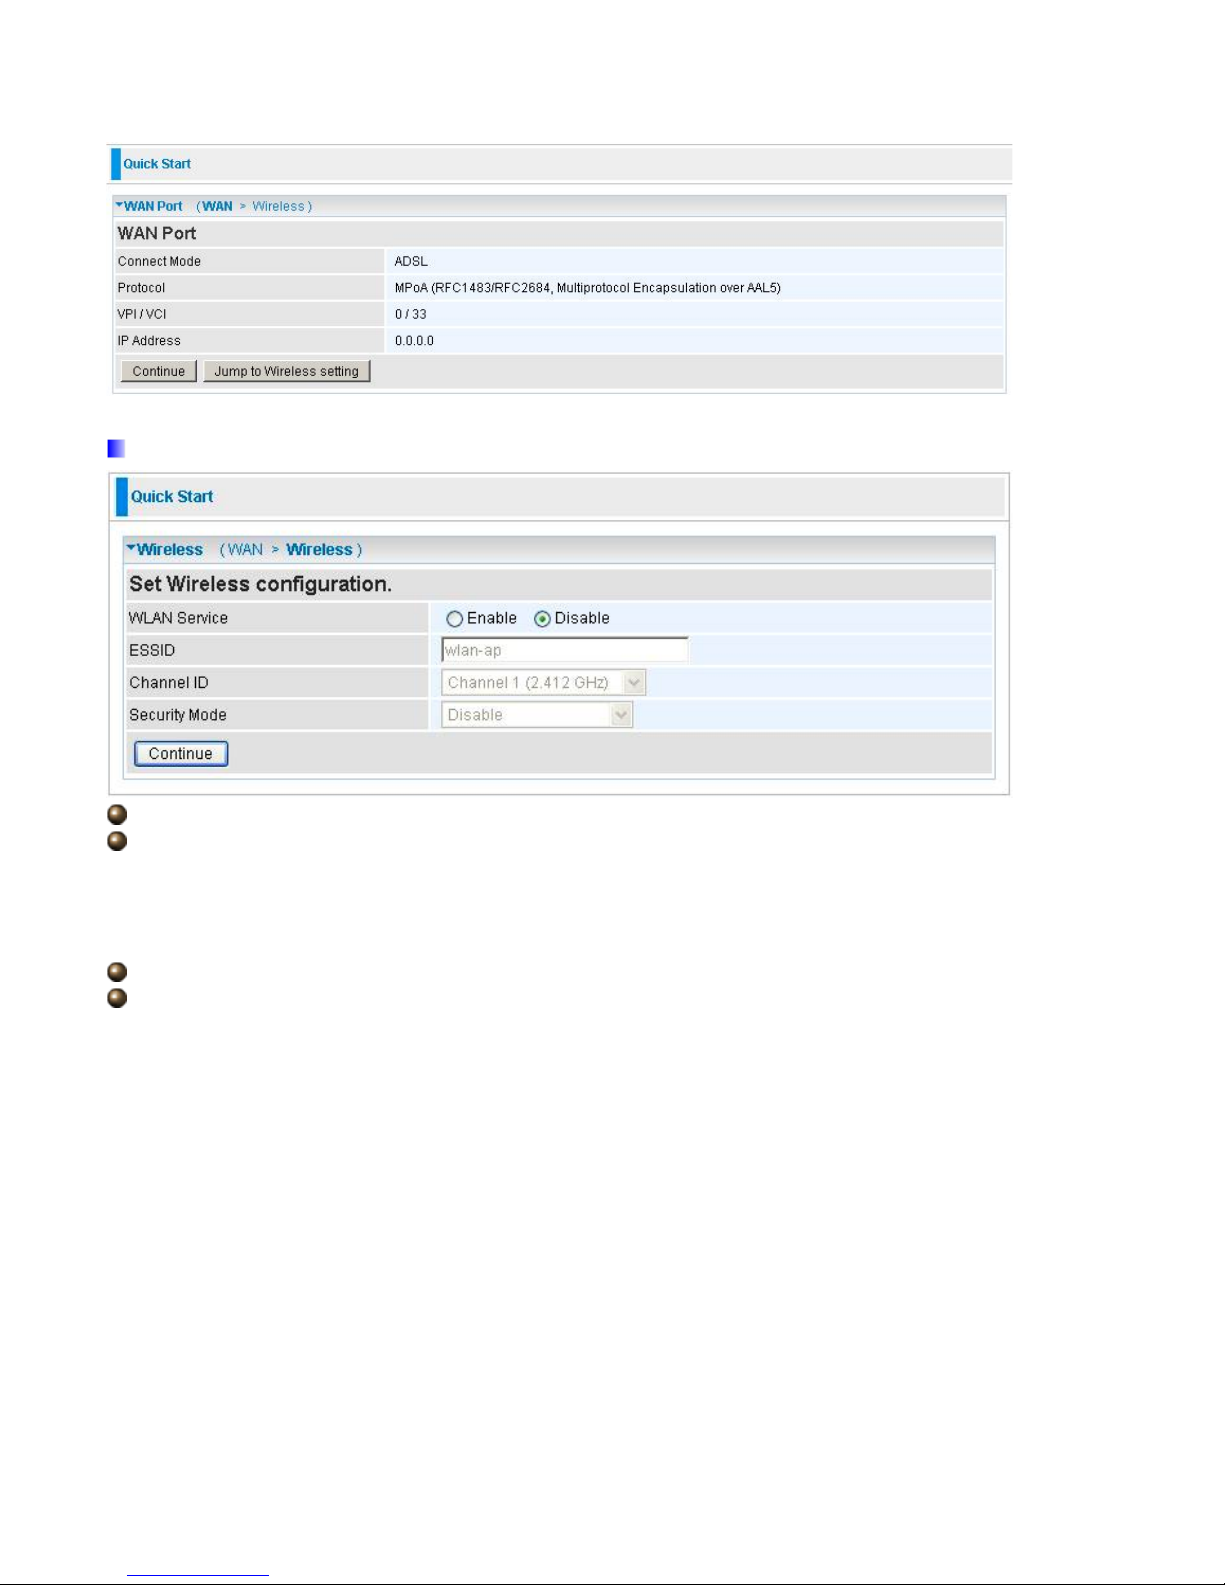
4.2 Quick Start
Set Wireless configuration
WLAN Service: Default setting is set to Enable.
ESSID: The ESSID is the unique name of a wireless access point (AP) to be distinguished from
another. For security propose, change to a unique ID name to the AP which is already built-in to
the router’s wireless interface. It is case sensitive and must not excess 32 characters. Make sure
your wireless clients have exactly the ESSID as the device, in order to get connected to your
network.
Channel ID: Select the ID channel that you would like to use.
Security Mode: You can disable or enable with WPA or WEP for protecting wireless network. The
default mode of wireless security is Enable, WPA-TKIP and ID is unit MAC –address which must be
changed at the first time when using the modem.
26
4.3 WAN
27
ADSL Mode
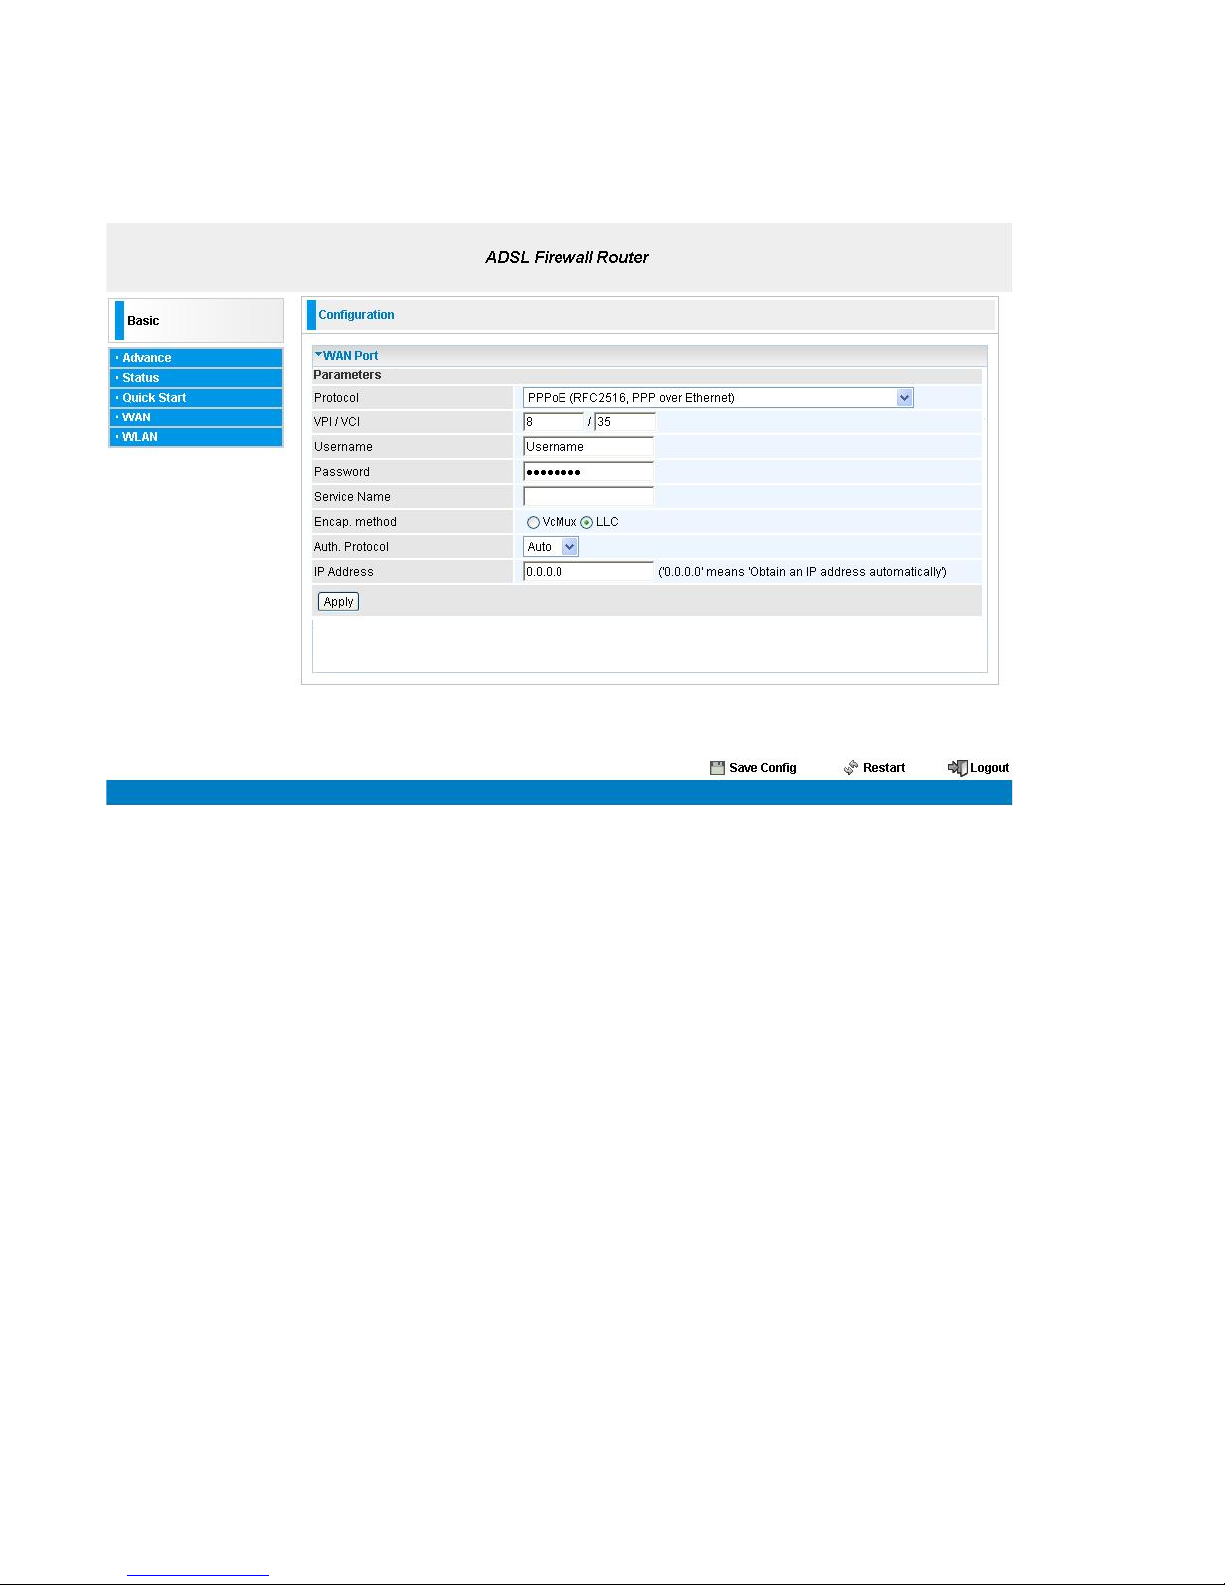
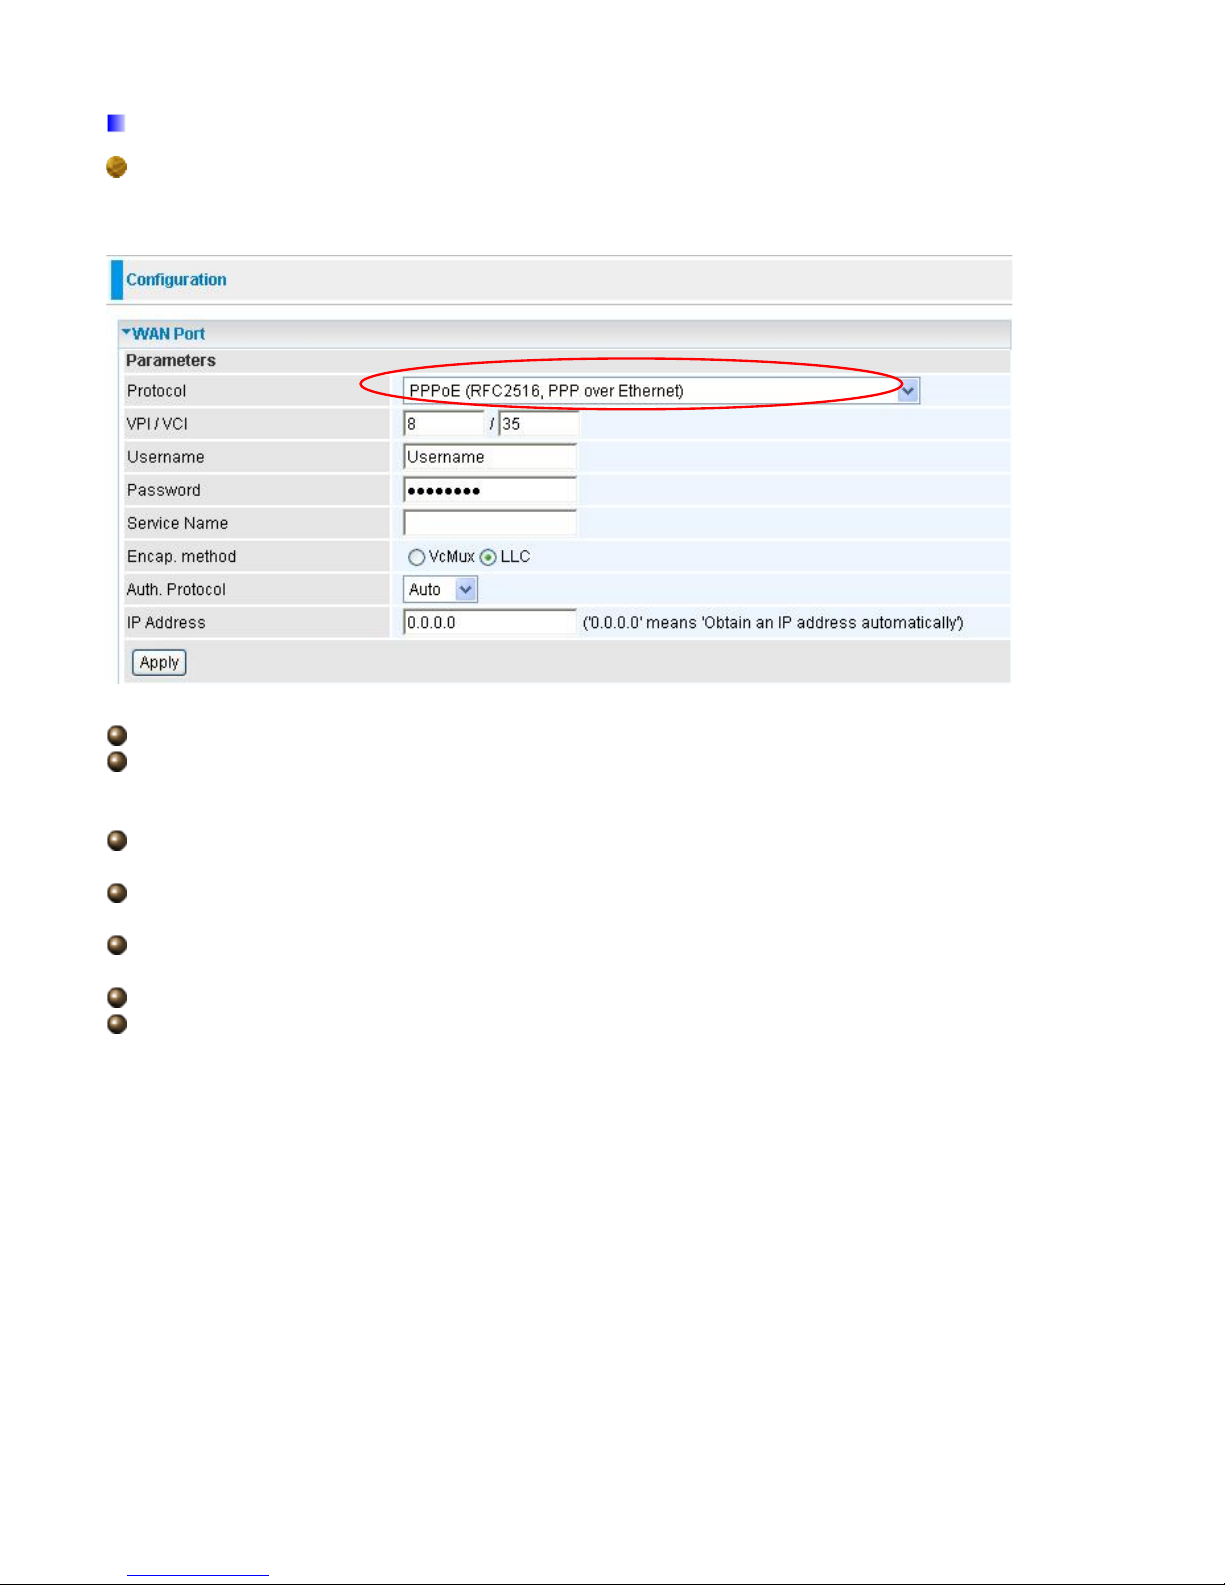
PPPoE Connection
PPPoE (PPP over Ethernet) provides access control in a manner similar to dial-up services using
PPP.
VPI/VCI: Enter the VPI and VCI information provided by your ISP.
Username: Enter the username provided by your ISP. You can input up to 128 alphanumeric
characters (case sensitive). This is in the format of “username@ispname” instead of simply
“username”.
Password: Enter the password provided by your ISP. You can input up to 128 alphanumeric
characters (case sensitive)
Service Name: This item is for identification purposes. If it is required, your ISP provides you
the information. Maximum input is 15 alphanumeric characters.
Encap. method: Select the encapsulation format, the default is LLC. Select the one provided by
your ISP
Auth. Protocol: Default is Auto. Your ISP advises on using Chap or Pap.
IP Address: Your WAN IP address. Leave this at 0.0.0.0 to automatically obtain an IP address
from your ISP.
28
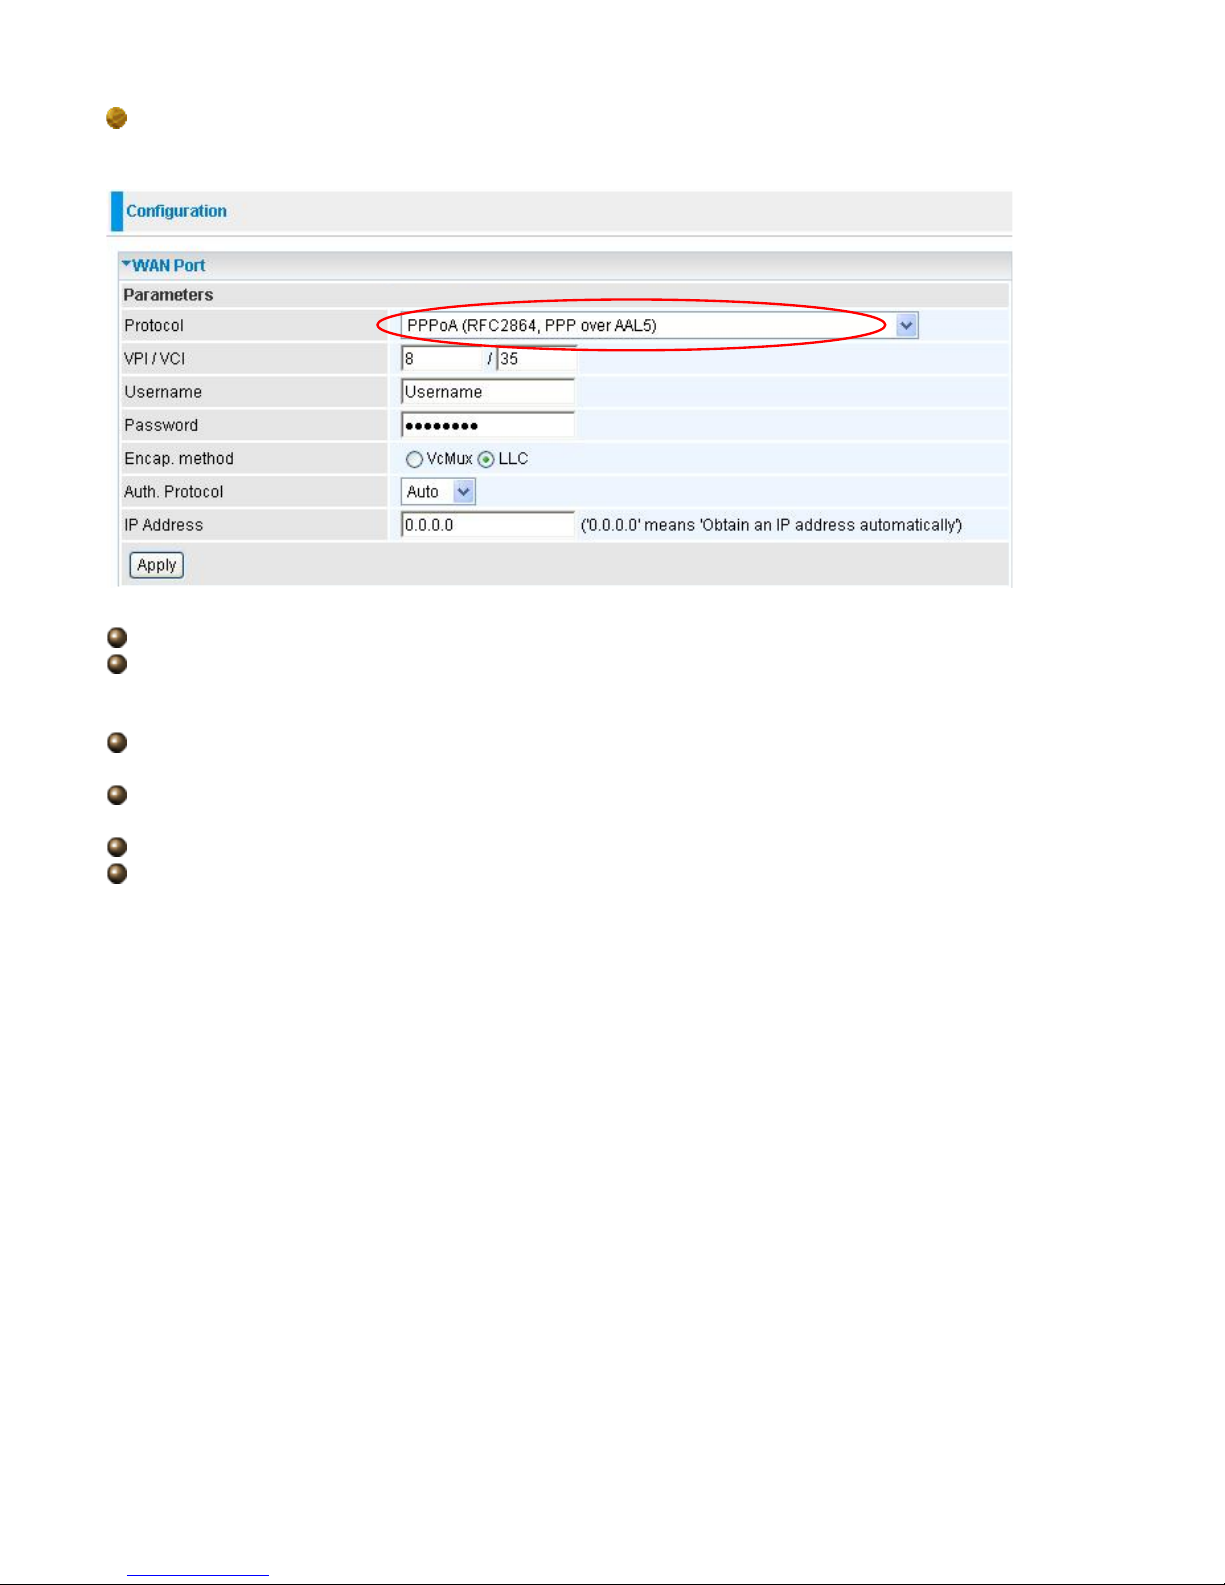
PPPoA Connection
PPPoA stands for Point to Point Protocol over ATM Adaptation Layer 5 (AAL5). It provides access
control and billing functionality in a manner similar to dial-up services using PPP.
VPI/VCI: Enter the VPI and VCI information provided by your ISP.
Username: Enter the username provided by your ISP. You can input up to 128 alphanumeric
characters (case sensitive). This is in the format of “username@ispname” instead of simply
“username”.
Password: Enter the password provided by your ISP. You can input up to 128 alphanumeric
characters (case sensitive).
Encap. method: Select the encapsulation format, the default is LLC. Select the one provided by
your ISP
Auth. Protocol: Default is Auto. Your ISP should advises you on whether to use Chap or Pap.
IP Address: Your WAN IP address. Leave this at 0.0.0.0 to automatically obtain an IP address
from your ISP.
29
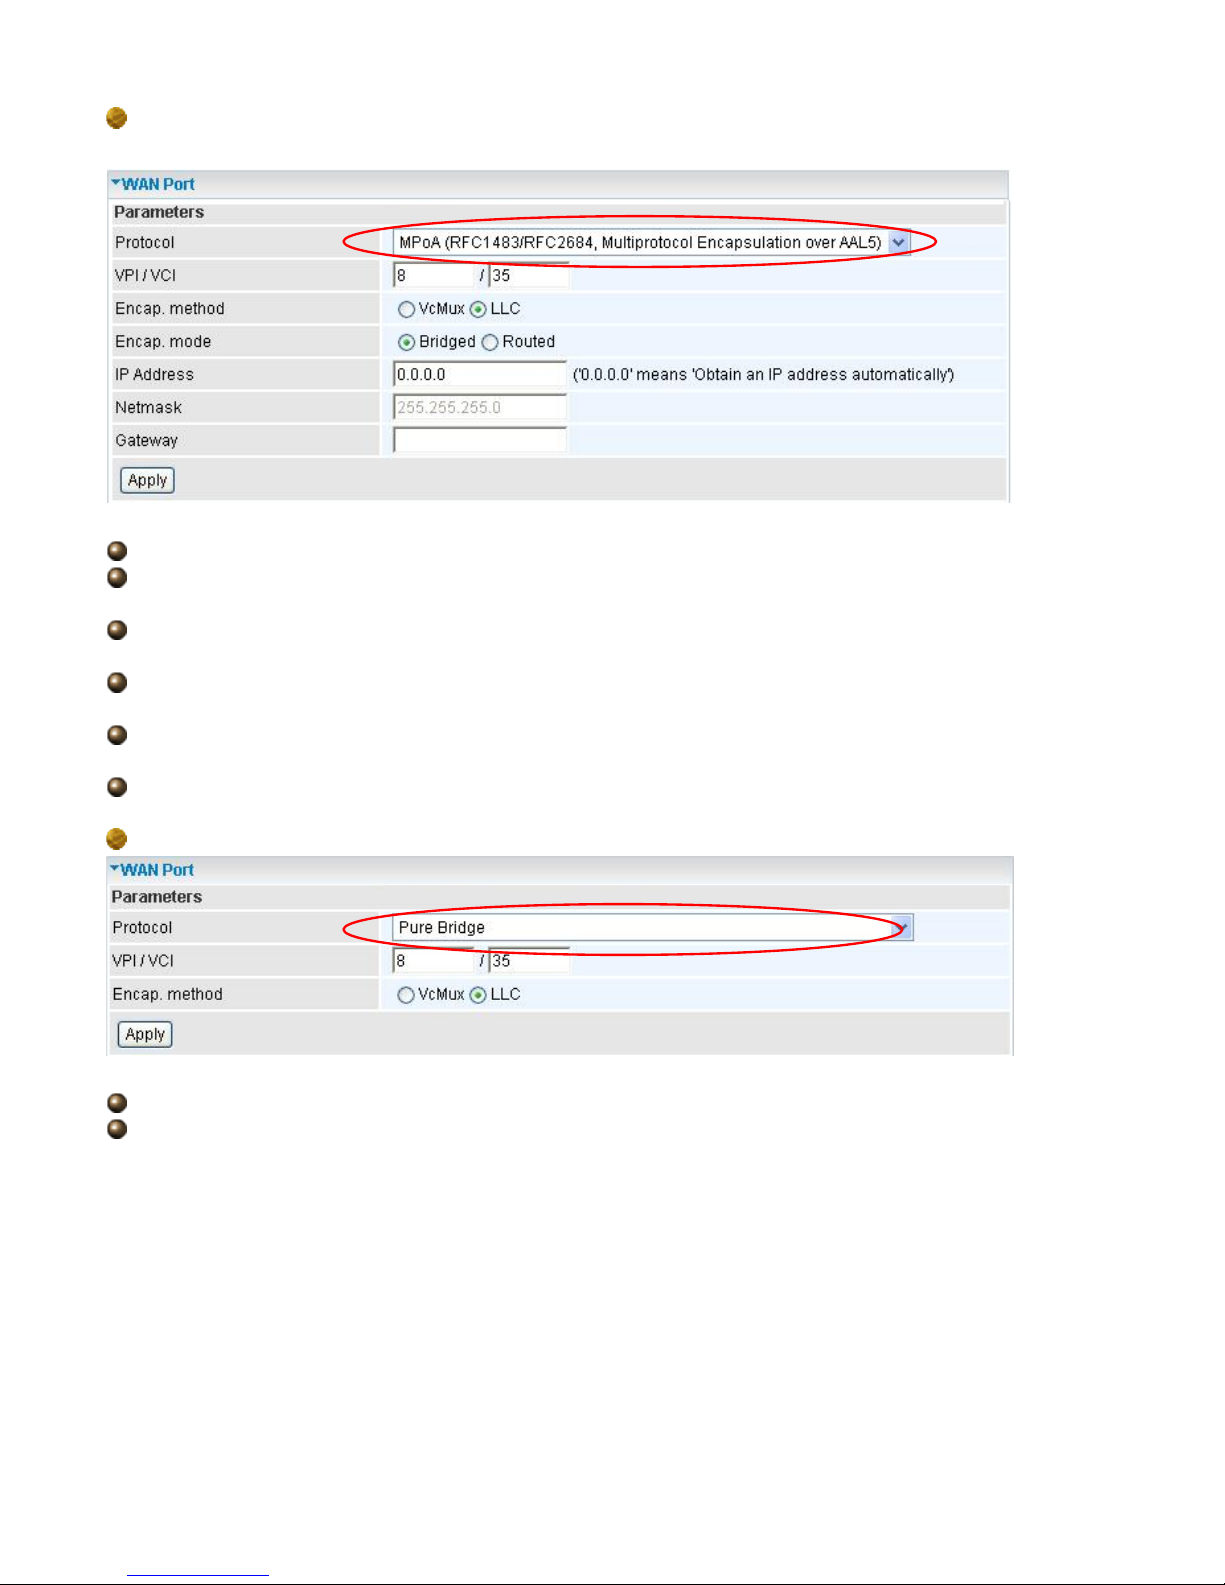
MPoA Connection
VPI and VCI: Enter the VPI and VCI information provided by your ISP.
Encap. method: Select the encapsulation format, the default is LLC. Select the one provided by
your ISP.
Encap. mode: Choose whether you want the packets in WAN interface as bridged packet or
routed packet.
IP Address: Your WAN IP address. Leave this at 0.0.0.0 to automatically obtain an IP address
from your ISP.
Netmask: The default is 255.255.255.0. User can change it to other such as 255.255.255.128.
Type the subnet mask assigned to you by your ISP (if given).
Gateway: Enter the IP address of the default gateway (if given).
Pure Bridge Connections
VPI/VCI: Enter the VPI and VCI information provided by your ISP.
Encap. method: Select the encapsulation format, this is provided by your ISP.
 Loading...