

TeleWell TW-3G Router User Manual

TW-3G Router
(USB interface)
Wireless access Point
802.11b/g/n 300 Mbps
User Guide

2

3
INDEX
!"#$%&'()*+&$(%#"""""""""""""""""""""""""""""""""""""""""""""""""""""""""""""""""""""""""""""""""""""""""""""""""""""""""#,!
1.1.#Package#contents#...................................................................................................................................................#4!
1.2.#Features#....................................................................................................................................................................#5!
1.3.#System#requirements#for#configuration#......................................................................................................#5!
1.4.#Rear#ports#.................................................................................................................................................................#6!
-"#+(%.$/*'$%/#&012/#'34567#""""""""""""""""""""""""""""""""""""""""""""""""""""""""""""""""""""""""""""""""""""#8!
2.1.#Installation#Considerations#..............................................................................................................................#7!
2.2#Installation#Instructions#......................................................................................................................................#7!
2.3#Establishing#WAN#connection#..........................................................................................................................#9!
2"##9:&&$%/9#0$;<')#""""""""""""""""""""""""""""""""""""""""""""""""""""""""""""""""""""""""""""""""""""""""""""""""""#!!!
,"#<))$&$(%<=#9:&&$%/9#"""""""""""""""""""""""""""""""""""""""""""""""""""""""""""""""""""""""""""""""""""""""""""""#!>!
4.1.#Status#.......................................................................................................................................................................#20!
4.2.#Main#Settings#.......................................................................................................................................................#20!
Main%Settings%>%Quick%Start%....................................................................................................................................%20!
Main%Settings%>%DHCP%Server%.................................................................................................................................%24!
Main%Settings%>%Wireless%..........................................................................................................................................%25!
Main%Settings%>%Change%Password%......................................................................................................................%26!
4.3.#Forwarding#Rules#...............................................................................................................................................#27!
Forwarding%Rules%>%Virtual%Server......................................................................................................................%27!
Forwarding%Rules%>%Miscellaneous%......................................................................................................................%28!
4.4#Security#Settings#..................................................................................................................................................#29!
Security%Settings%>%Packet%filters%..........................................................................................................................%29!
Security%Settings%>%Domain%Filters%......................................................................................................................%30!
Security%Settings%>%URL%Blocking%.........................................................................................................................%31!
Security%Settings%>%MAC%Control%...........................................................................................................................%32!
Security%Settings%>%PPTP%Client%.............................................................................................................................%33!
Security%Settings%>%PPTP%Server%...........................................................................................................................%34!
Security%Settings%>%Miscellaneous%........................................................................................................................%35!
4.5#Advanced#Settings#..............................................................................................................................................#36!
Advanced%Settings%>%System%Log%..........................................................................................................................%36!
Advanced%Settings%>%Dynamic%DNS%.....................................................................................................................%37!
Advanced%Settings%>%QoS%..........................................................................................................................................%38!
Advanced%Settings%>%SNMP%.....................................................................................................................................%39!
Advanced%Settings%>%Routing%.................................................................................................................................%40!
Advanced%Settings%>%System%Time%.......................................................................................................................%41!
Advanced%Settings%>%Scheduling%...........................................................................................................................%42!
4.6#Tools#.........................................................................................................................................................................#43!
Tools%>%System%Info%.....................................................................................................................................................%43!
Tools%>%Firmware%Upgrade%.....................................................................................................................................%44!
Tools%>%Backup%Setting%.............................................................................................................................................%44!
Tools%>%Reset%to%Default%............................................................................................................................................%44!
Tools%>%Reboot%..............................................................................................................................................................%44!
Tools%>%Miscellaneous%...............................................................................................................................................%45!

4
1. INTRODUCTION
With TeleWell TW-3G+WLAN Router it's possible to share one 3G or Flash-OFDM
connection to multiple PC's. Device includes USB interface for 3G or Flash-OFDM
card (not included).
3G or Flash-OFDM connection can be used via Ethernet or Wlan interfaces. It's
also possible to share xDSL connection by connecting extrenal xDSL modem* to
the devices WAN port.
3G or connection can be used as main WAN connection or as secondary backup
connection for external xDSL.
When used as backup connection, in case of main WAN xDSL connection failure
device can automatically connect to 3G or Flash-OFDM network.
1.1. Package contents
TW-3G Router package should contain the items listed below. If any of the
items are missing, please contact your reseller.
• TW-3G Router
• 3db Antenna
• RJ45 cable
• Power adapter 5VDC 3A
• Manual
Caution: Using a power supply with a different voltage rating than the one
included with the TW-3G Router will cause damage and void the warranty
for this product.

5
1.2. Features
• Automatic take over back up with 3G connection as Ethernet WAN
failover.
• Implementation within 3 minutes allows the network to go where wires
cannot go – even outside the home or office.
• Fully compatible with the 802.11n standard to provide a wireless data
transfer rate of up to 300Mbps.
• Backwards compatible with the 802.11g standard to provide a wireless
data rate of up to 54Mbps.
• Backwards compatible with the 802.11b standard to provide a wireless
data rate of up to 11Mbps.
• Utilizes OFDM technology (Orthogonal Frequency Division Multiplexing).
• User-friendly configuration and diagnostic utilities.
• Operates in the 2.4GHz frequency range.
• Advanced Firewall features.
• Supports NAT with VPN pass-through, providing added security.
o MAC Filtering
o IP Filtering
o Port Scheduling
• DHCP server enables all networked computers to automatically receive
IP addresses.
• Web-based interface for Managing and Configuring.
• Access Control to manage users on the network.
• Supports special applications that require multiple connections.
• Equipped with 5*10/100 Ethernet ports, 4 for LAN and 1 for WAN access,
and an USB port for 3G network connection and Flash-OFDM connection.
• Connects multiple computers to a Broadband either WCDMA or EV-DO
even HSDPA modem to share the Internet connection.
Note: TW-3G Router is designed to work with either EVDO or WCDMA
(UMTS) even up to 3.5G HSPA PC interface.
Please refer to your service provider for detailed feature information.
1.3. System requirements for configuration
• A compatible USB 3G modem card with service (Pin code disabled)
Note: Subject to services and service terms available from your carrier.
• Computers with Windows, Macintosh, or Linux-based operating systems
with an installed Ethernet adapter.
• Internet Explorer version 6.0 or Netscape Navigator version 7.0 and above.
WiFi System Requirements
• A 802.11b, 802.11g, 802.11n Adapter
6
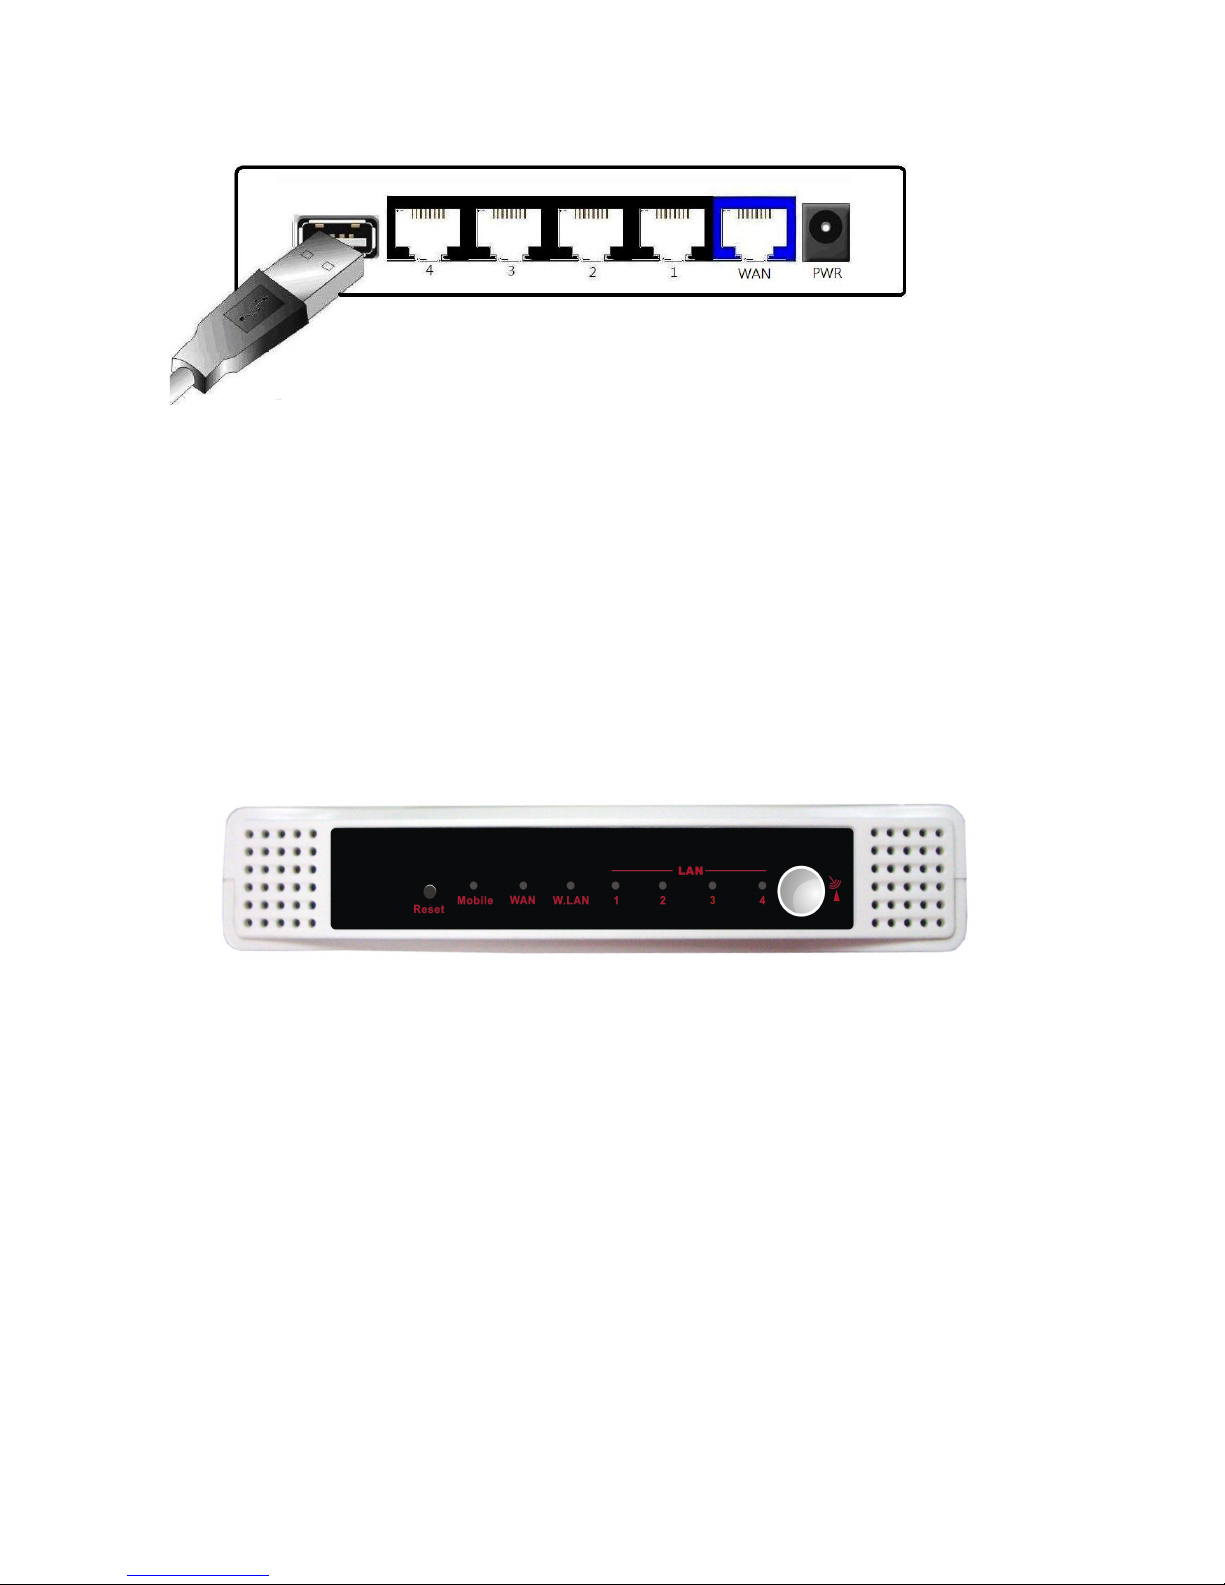
1.4. Rear ports
WAN
WAN port for ADSL cable
LAN 1-4
LAN ports for Ethernet cables
USB
USB port for connecting with 3G USB modem
POWER
Receptor for Power adapter
1.5. Front LEDs
Mobile
Green light as 3G card is connected and ready
LAN 1-4
Green light as connected to local Ethernet and blinks during
data transmission
WAN
Green light as WAN is connected
WLAN
Blue light when connection on WLAN available
7
2. CONFIGURING TW-3G Router
2.1. Installation Considerations
TW-3G Router allows you access your network using a wireless connection,
from virtually anywhere within its operating range. Keep in mind however,
that the number, thickness, and location of walls, ceilings, or other objects
that the wireless signals must pass through, may limit this range.
Typical ranges vary depending on the types of materials used, and
background RF (radio frequency) noise in your home or business.
To maximize your wireless range, please follow these guidelines:
1. Keep the number of walls and ceilings between the TW-3G Router and
other network devices to a minimum. Each wall or ceiling can reduce the
TW-3G Router’s range from 3-90 feet (1-30 meters).
Note! The same considerations apply to your broadband EVDO connection.
2. Keep your product aware from electrical devices (such as microwaves, air
conditioners, and televisions) that emit large quantities of RFI (Radio
Frequency Interference).
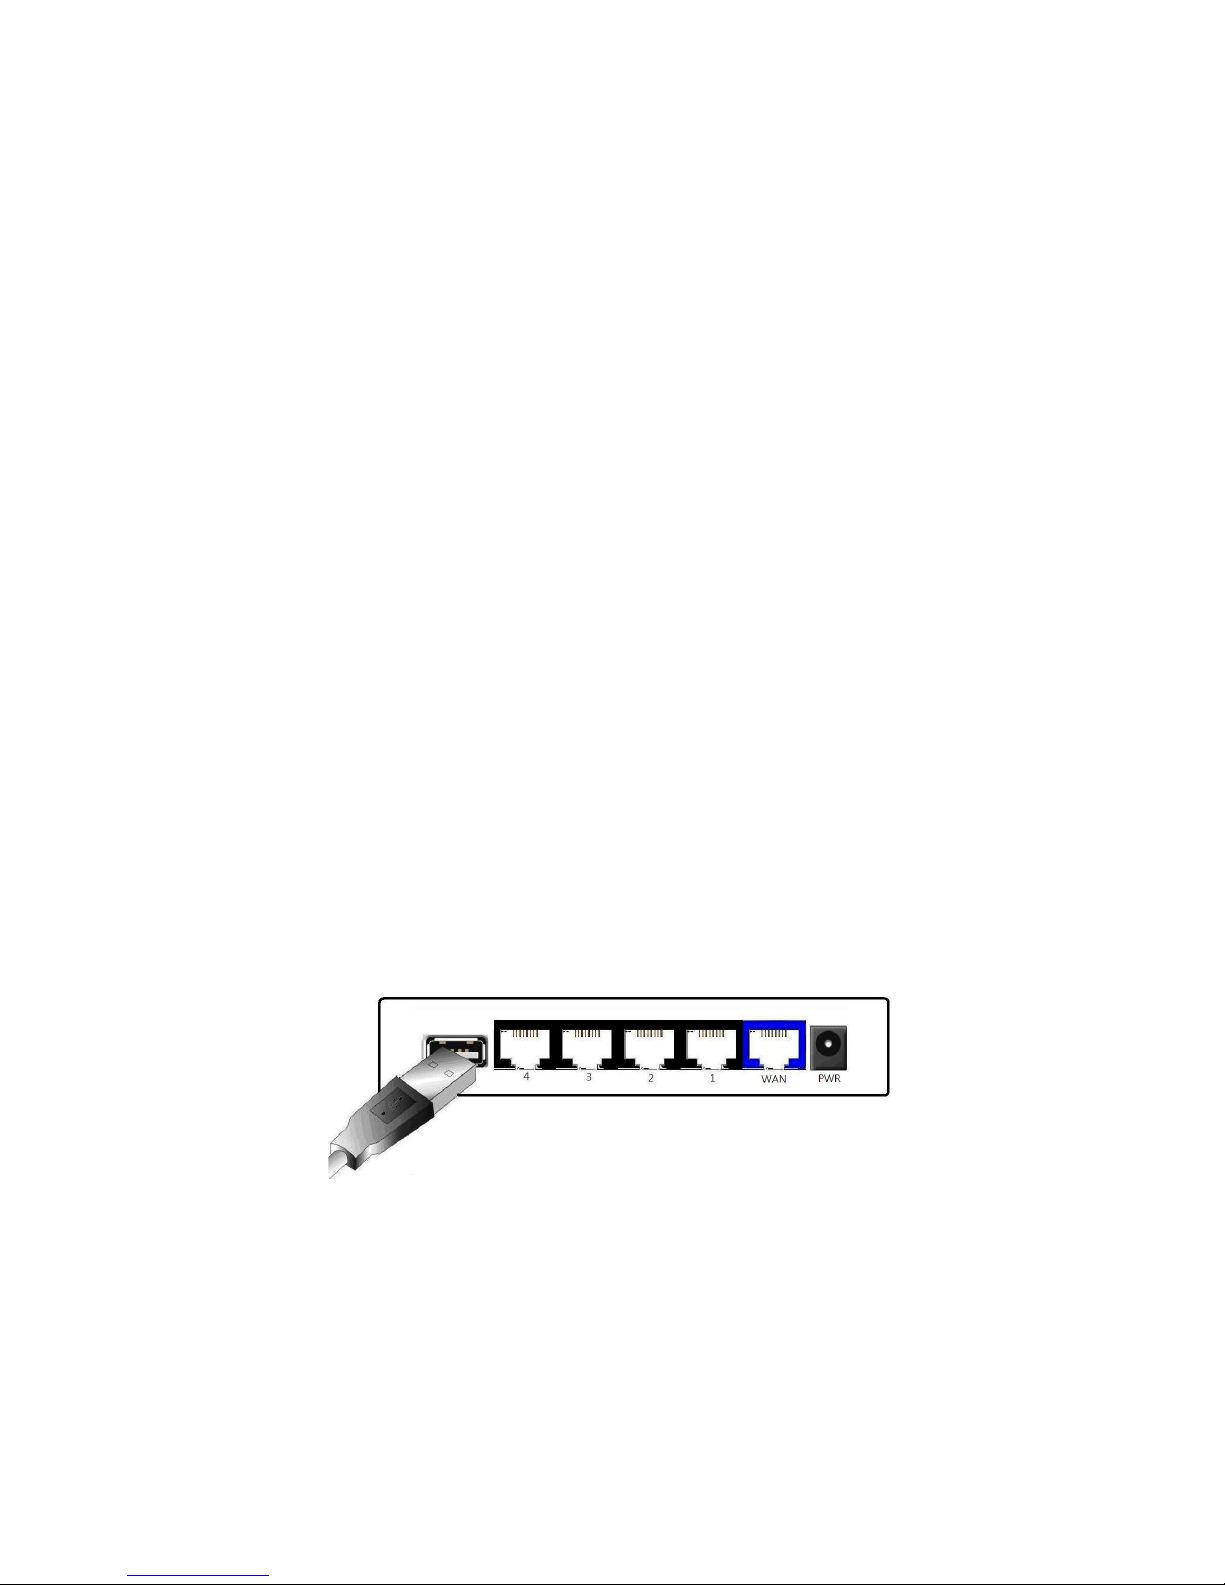
2.2 Installation Instructions
Connect the Wireless Router to Your Network
Note: DO NOT connect TW-3G Router to power before performing the
installation steps below.
1. Connect an USB modem with service to the TW-3G Router
Note! Always use, at least 10 cm long USB cable between your 3G
modem and 3G router.
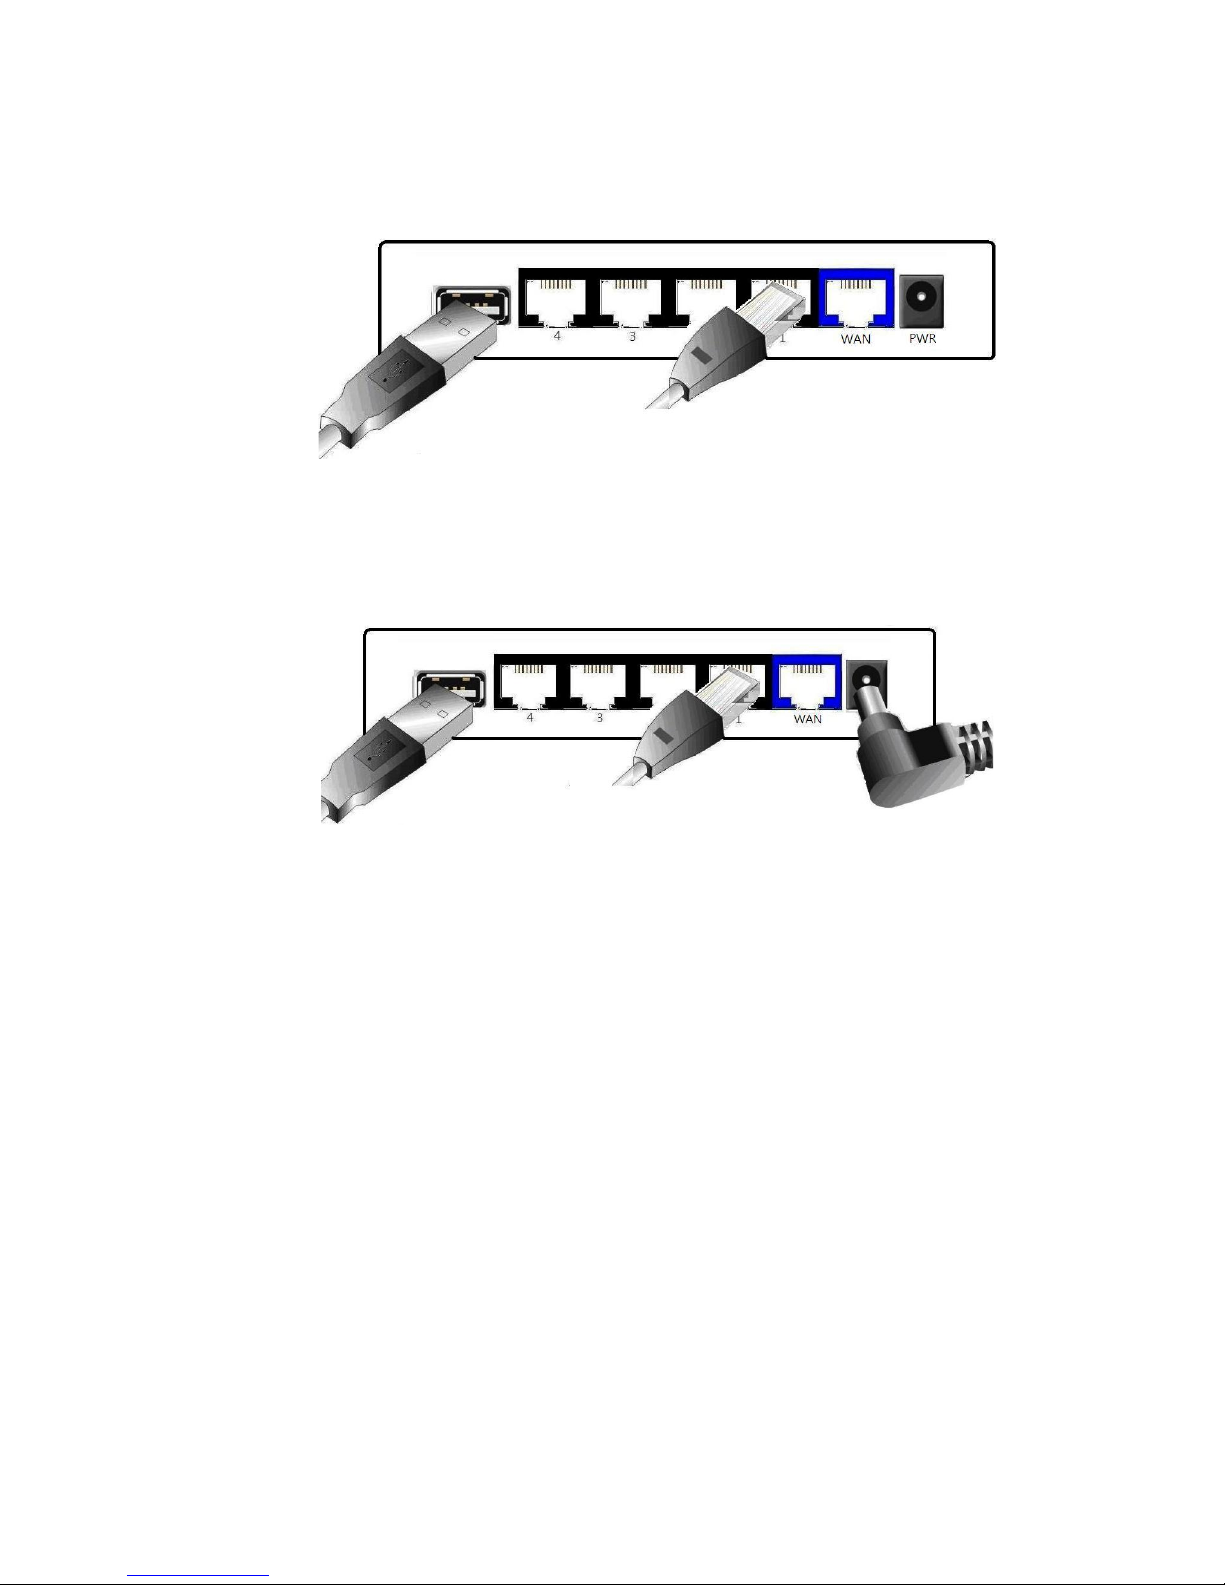
8
2. Insert the Ethernet patch cable into LAN Port on the back panel of
the TW-3G Router, and an available Ethernet port on the network
adapter in the computer you will use to configure the unit.
3. Connect the power adapter to the receptor on the back panel of your
TW-3G Router. Then plug the other end of the power adapter into a
wall outlet or power strip.
When router’s power has been applied, LEDs will flash ON and OFF as
the TW-3G Router performs initialization and Internet connection
processes. This will take a few minutes. When complete, the
following LEDs will illuminate green: Mobile and LAN. WLAN LED will
illuminate blue when device is ready.
9
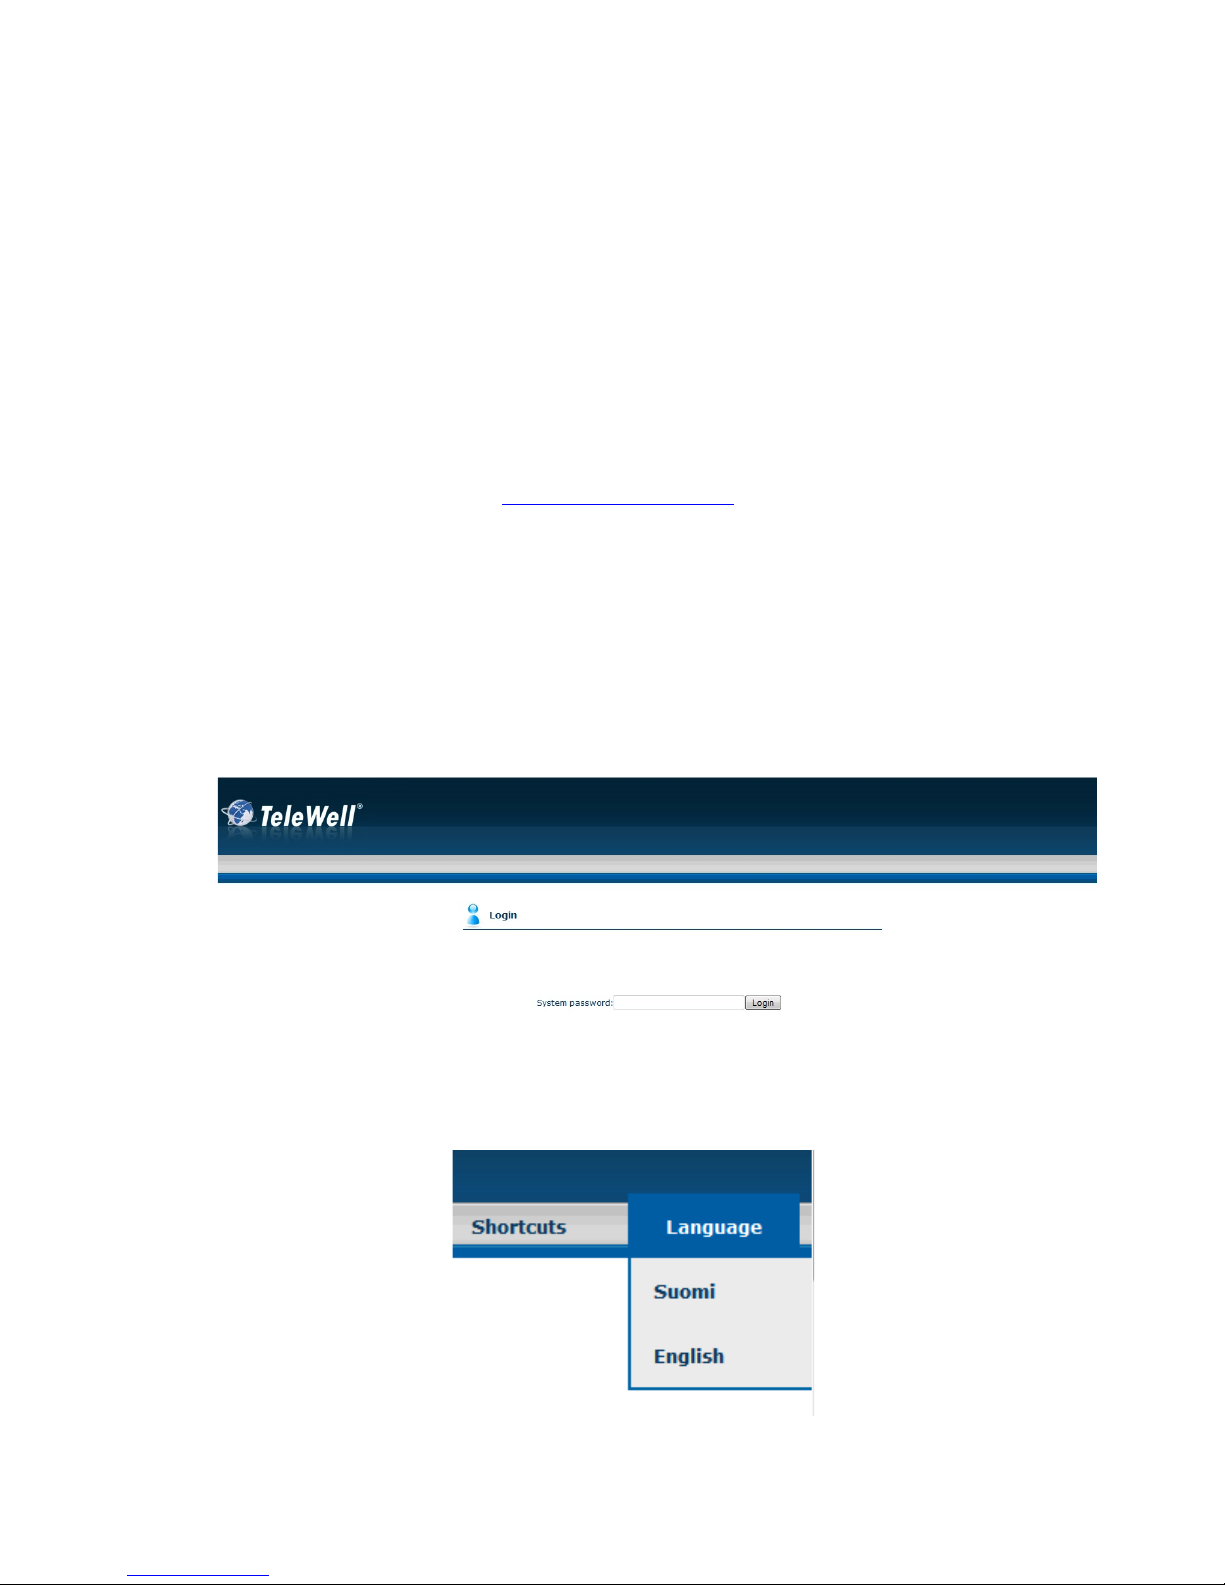
2.3 Establishing WAN connection
Once properly configured, TW-3G Router will obtain and assign IP address
information automatically. Configuration settings can be established through
the TW-3G Router Configuration Menu. You can access this interface by
performing the steps listed below:
NOTE: THE ROUTER’S SETTINGS SHOULD ONLY BE MODEFIED VIA
ETHERNET CABLE; NOT THROUGH WIRELESS CONNECTION!
1. Open a web-browser.
2. Type in the IP Address (http://192.168.0.254) of the TW-3G Router
Note: If you have changed the default IP Address assigned to the TW-3G
Router, ensure you enter the correct IP Address now.
3. The default language of the web GUI is English. You can change the
language settings after logging in. Type “admin” in the Password field.
-> Click “login” button.
4. Language settings can be modified from the “language”-menu at the top
right corner
10
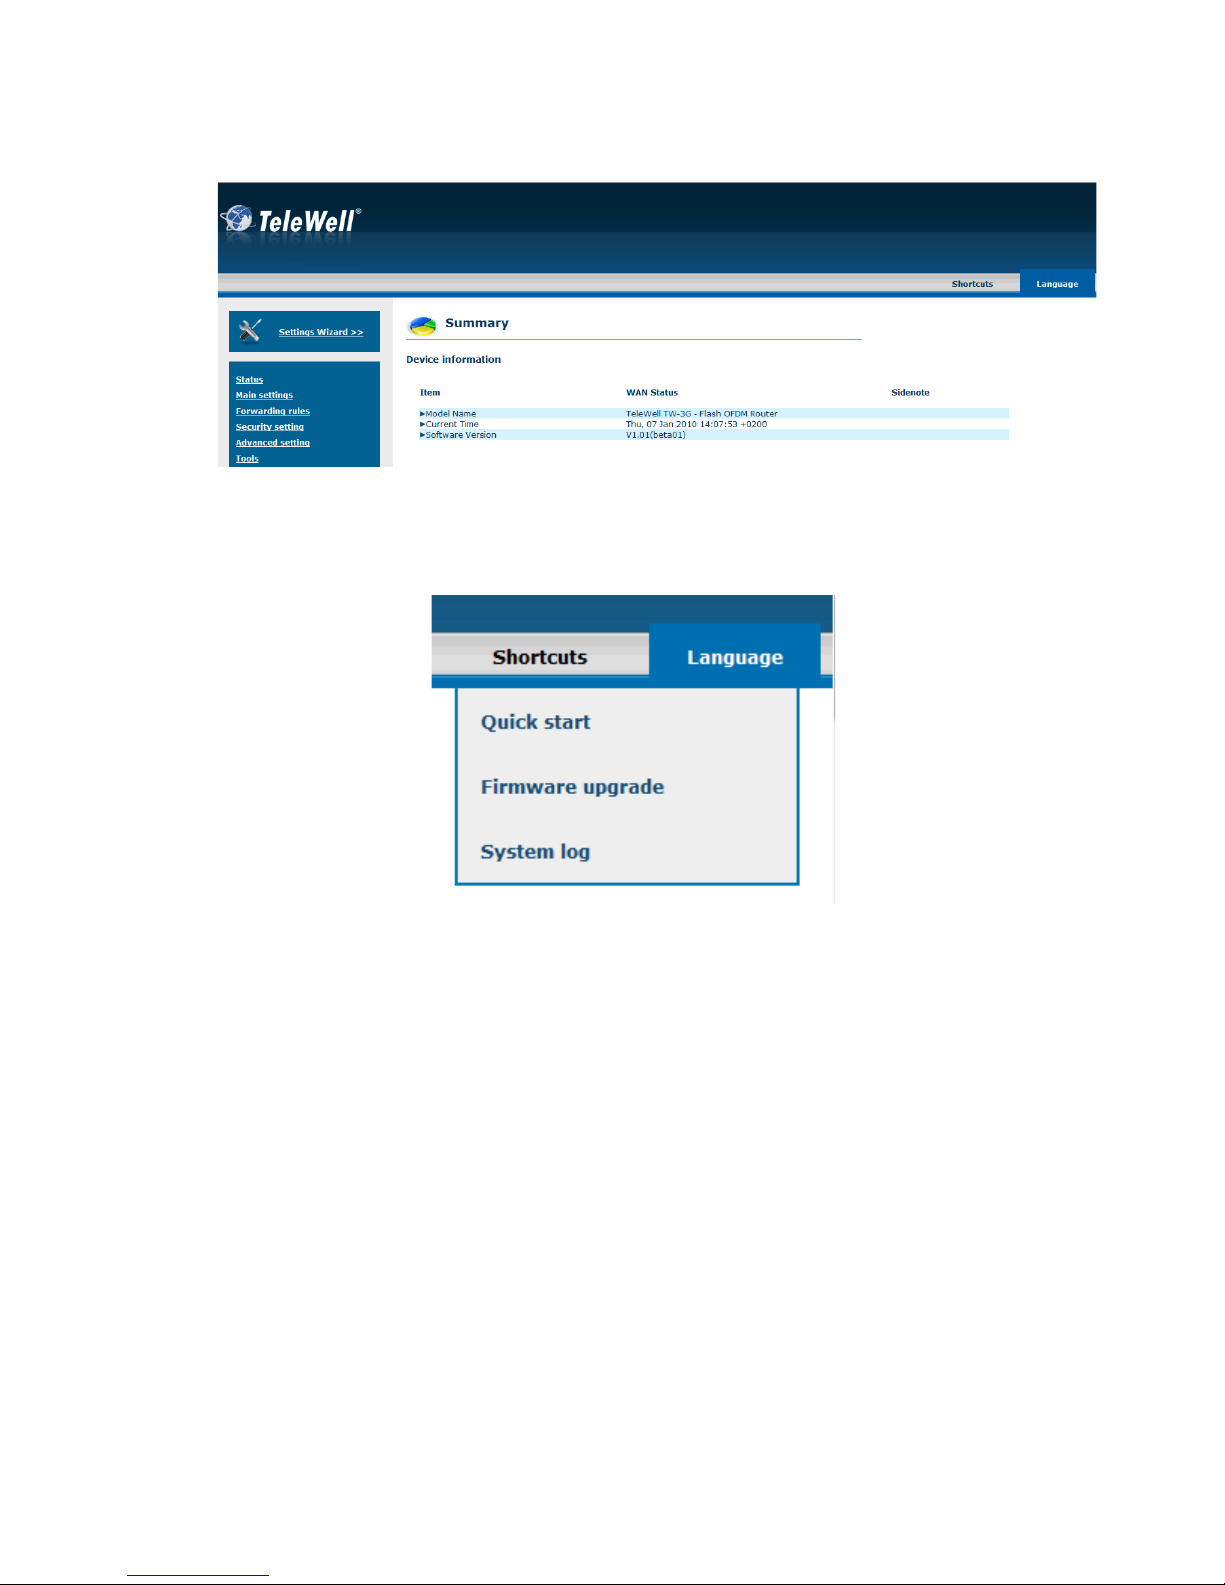
5. From the left sidebar you can choose between Settings wizard (chapter 3)
or modifying all settings separately (chapter 4)
6. At the top right corner you can also find shortcuts to quick start, firmware
upgrade and system log.
11
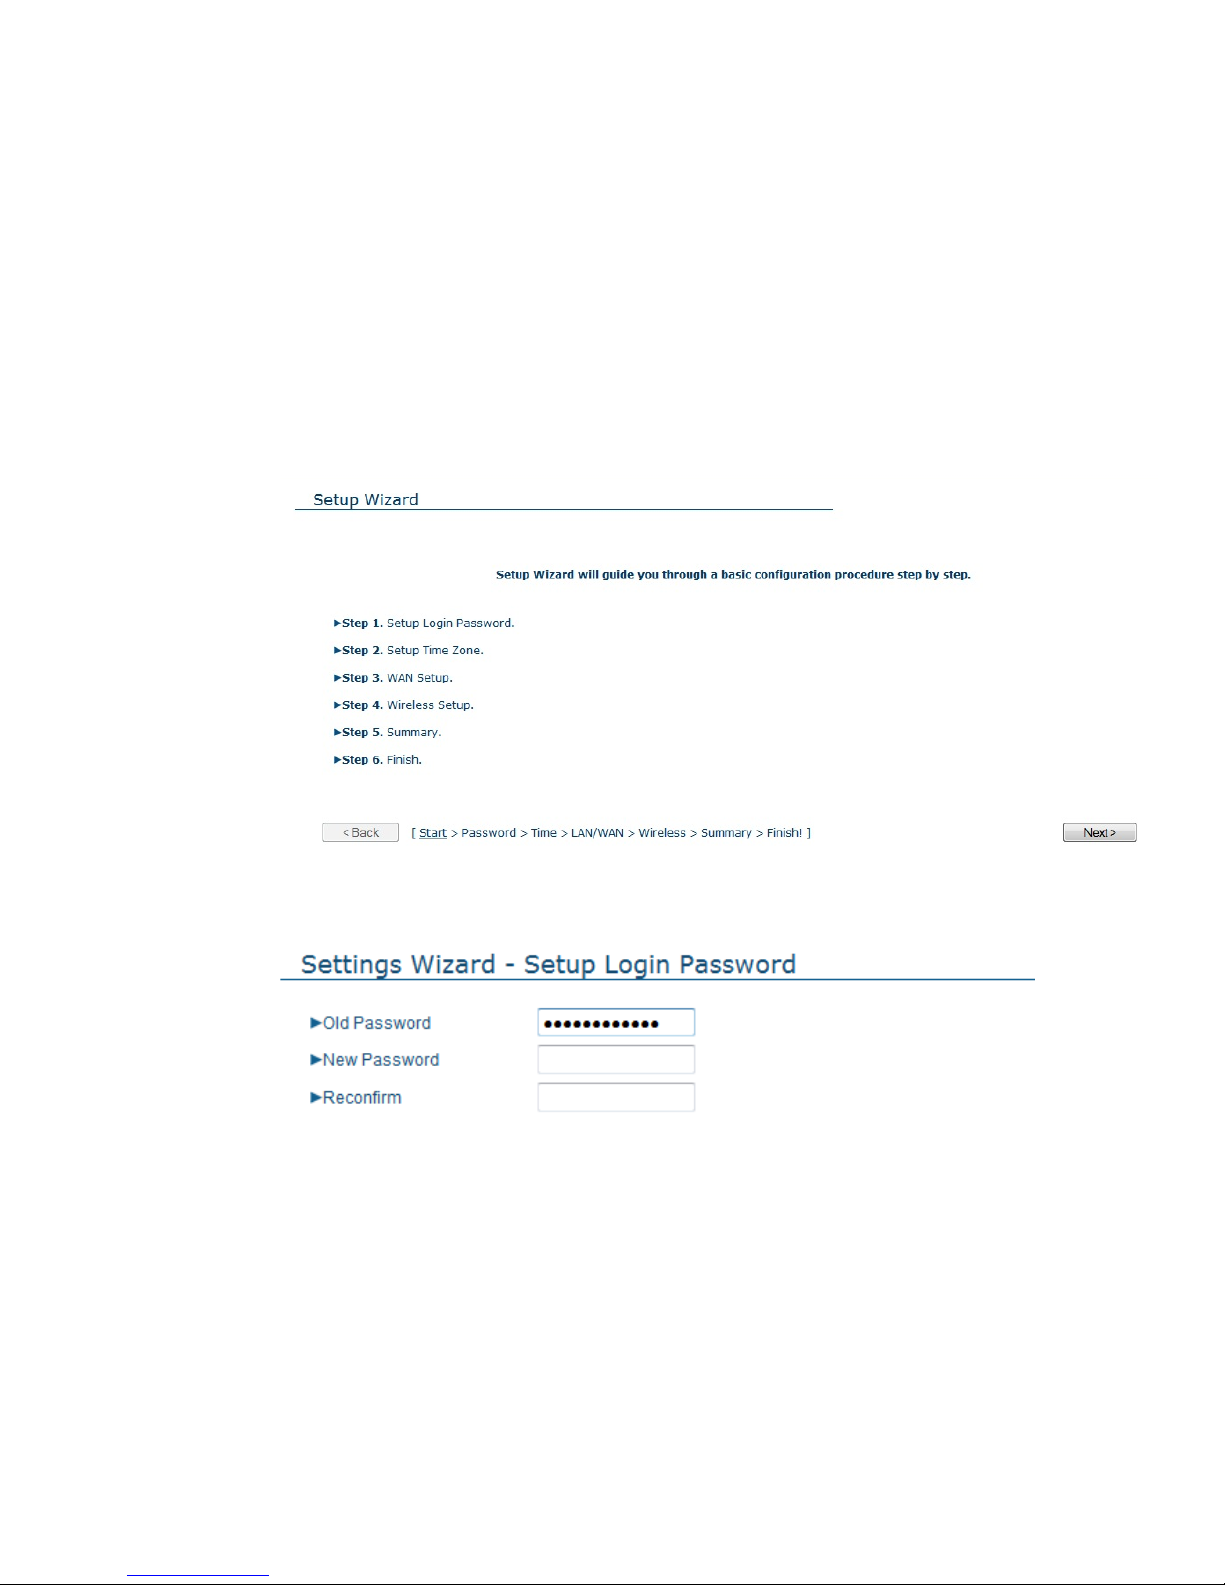
3. SETTINGS WIZARD
With wizard setting steps, you could configure the router in a very simple way.
This configuration wizard includes settings of
a. Login Password,
b. Time Zone Setup
c. WAN Setup
d. Wireless Setup,
Press “Next” button to start configuration.
Step 1: Allow you to change the system password.
It is recommended that you change the system password into the one
you prefer to on the basis of security
• Key in your Old Password (if it is the first initiation, the “admin” will be
the defaulted one.
• Enter your New Password
• Enter your Password again for confirmation; it must be the same as the
New Password.
-> Next
12
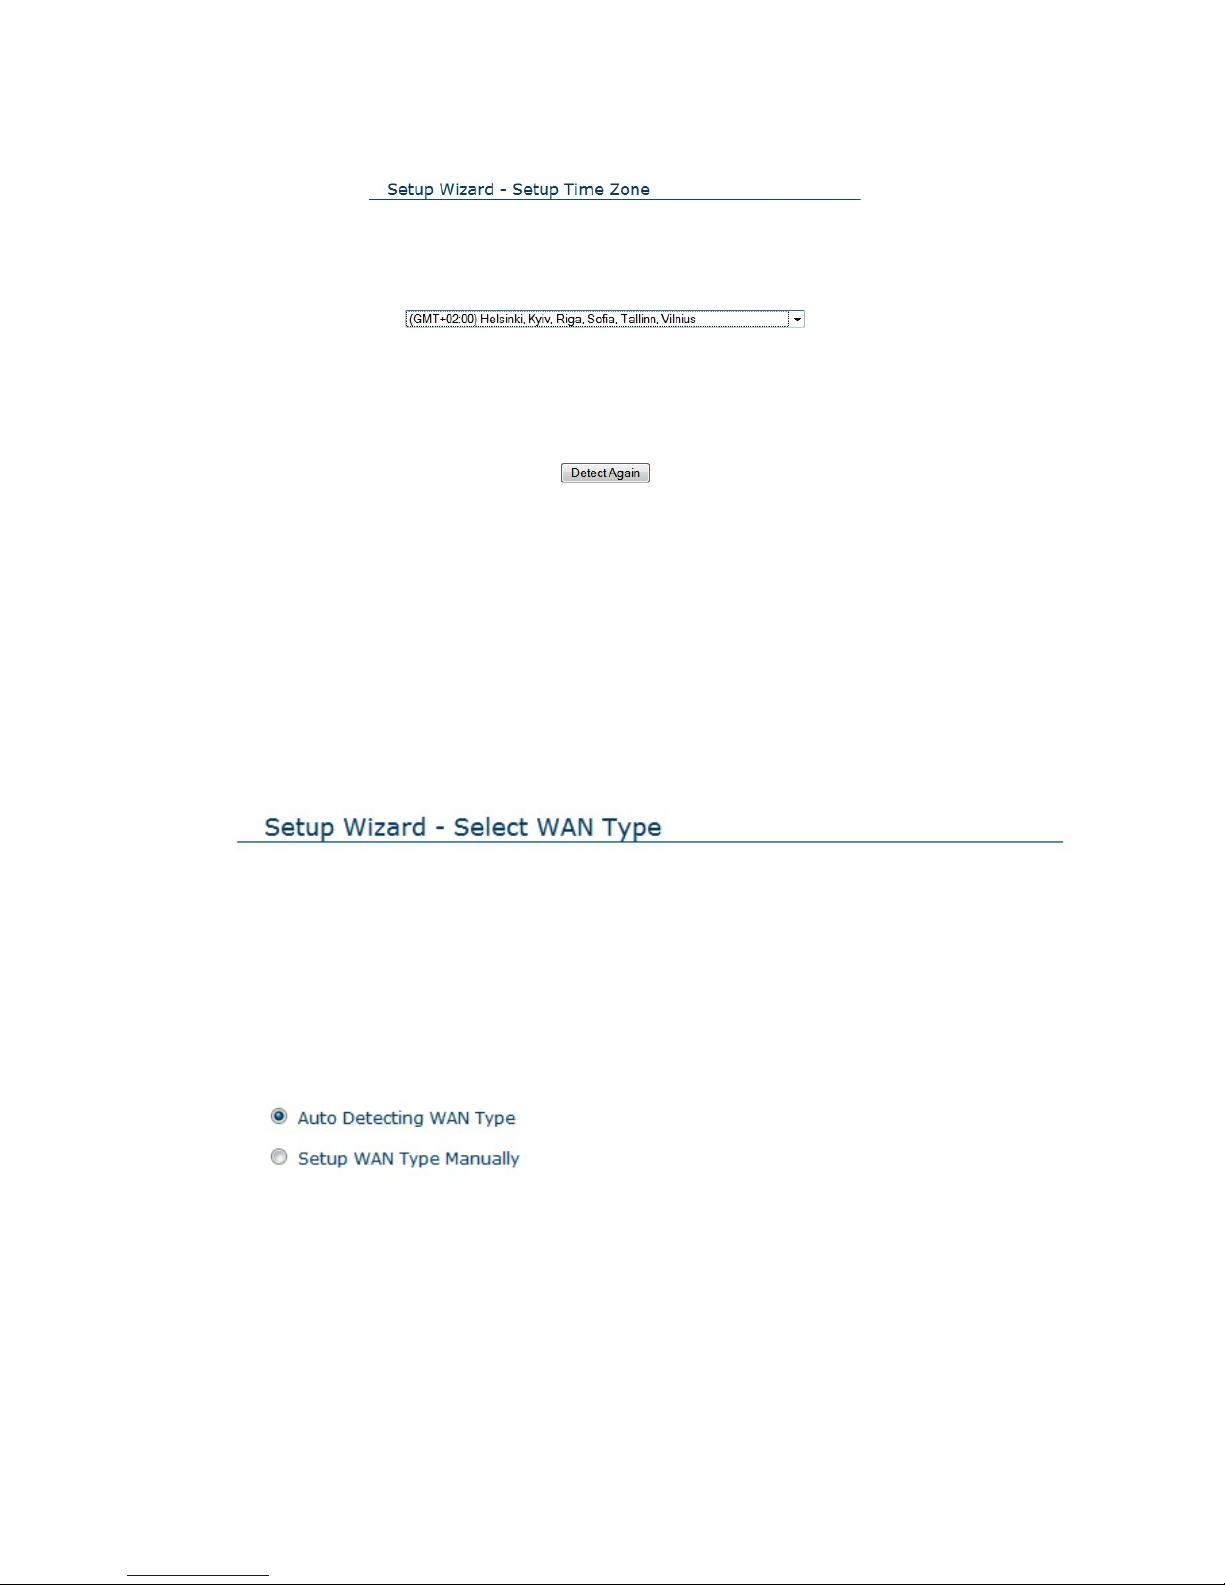
Step 2:Setting up the Time Zone
• Your TW-3G Router automatically detect the right Time Zone, if not press
“Detect Again” to let router automatically search the right Time Zone
• You can also select the right Time Zone from the dropdown menu
Step 3:Select WAN Types will be used for Internet connection
-> Next
13
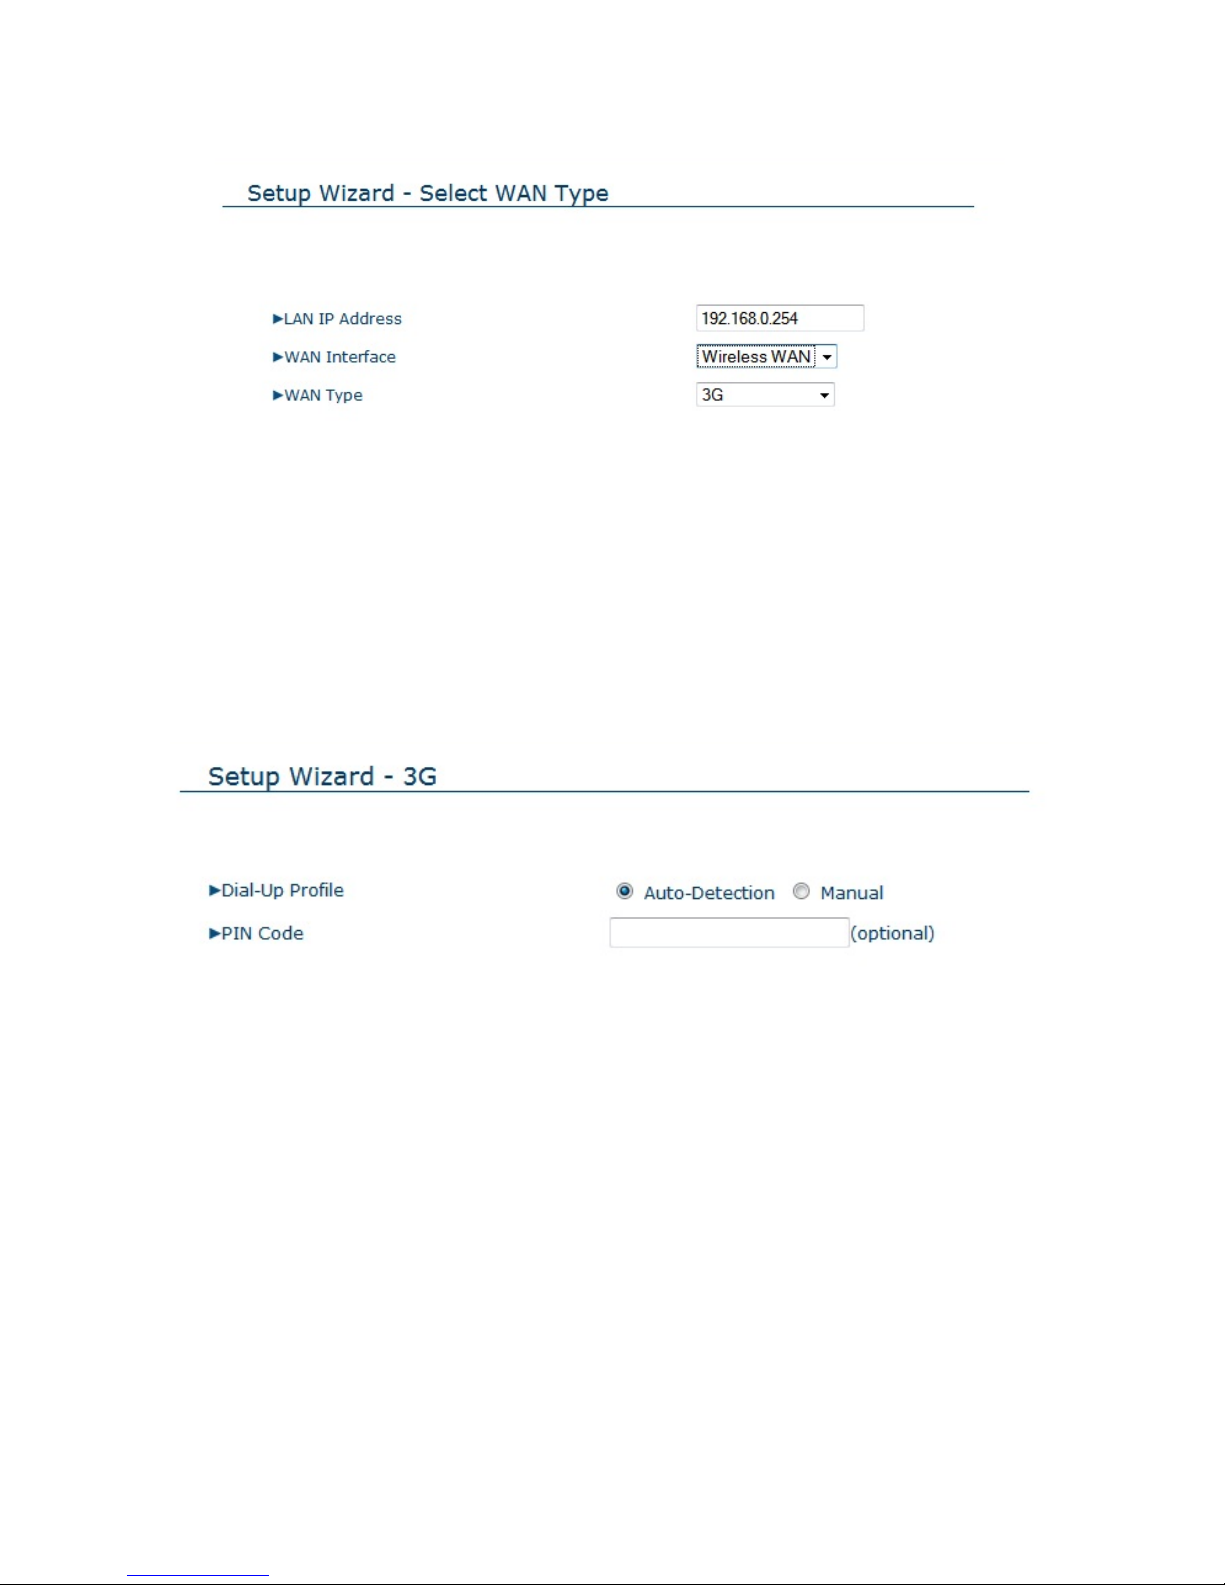
Step 3:If chosen Setup WAN type manually, configure the WAN settings
• LAN IP Address: Change your LAN IP Address (Default is 192.168.0.254)
• WAN Interface: Select your WAN type from dropdown menu, Wireless or
Ethernet
• WAN Type: Select WAN type for WAN Interface.
-> Next
Step 3:If chosen Wireless WAN and 3G, configure the 3G settings
• Dial-Up Profile: If you want manually configure your Dial-Up Profile select
Manual.
• PIN Code: Enter your SIM card PIN code here.
-> Next

14
Step 3:Configuring 3G Dial-Up Profile manually
• Country: Select your country from dropdown menu
• Telecom: Select your 3G operator from dropdown menu
• 3G Network: Select the right 3G network from dropdown menu
• APN: Enter the APN for your 3G modem here.
• Pin Code: Enter the Pin Code for your SIM Card
• Dialed Number: This field should not be altered except when required by
your service provider.
• Account: Enter the new Username for your PC card here.
• Password: Enter the new Password for your PC card here.
-> Next
Step 3:If chosen Wireless WAN and Flash-OFDM, configure the Flash-OFDM
settings
• Change your Host Name (Optional)
-> Next
 Loading...