

TeleWell BT-G300 User Manual
BT-G300 Bluetooth Phone Manual
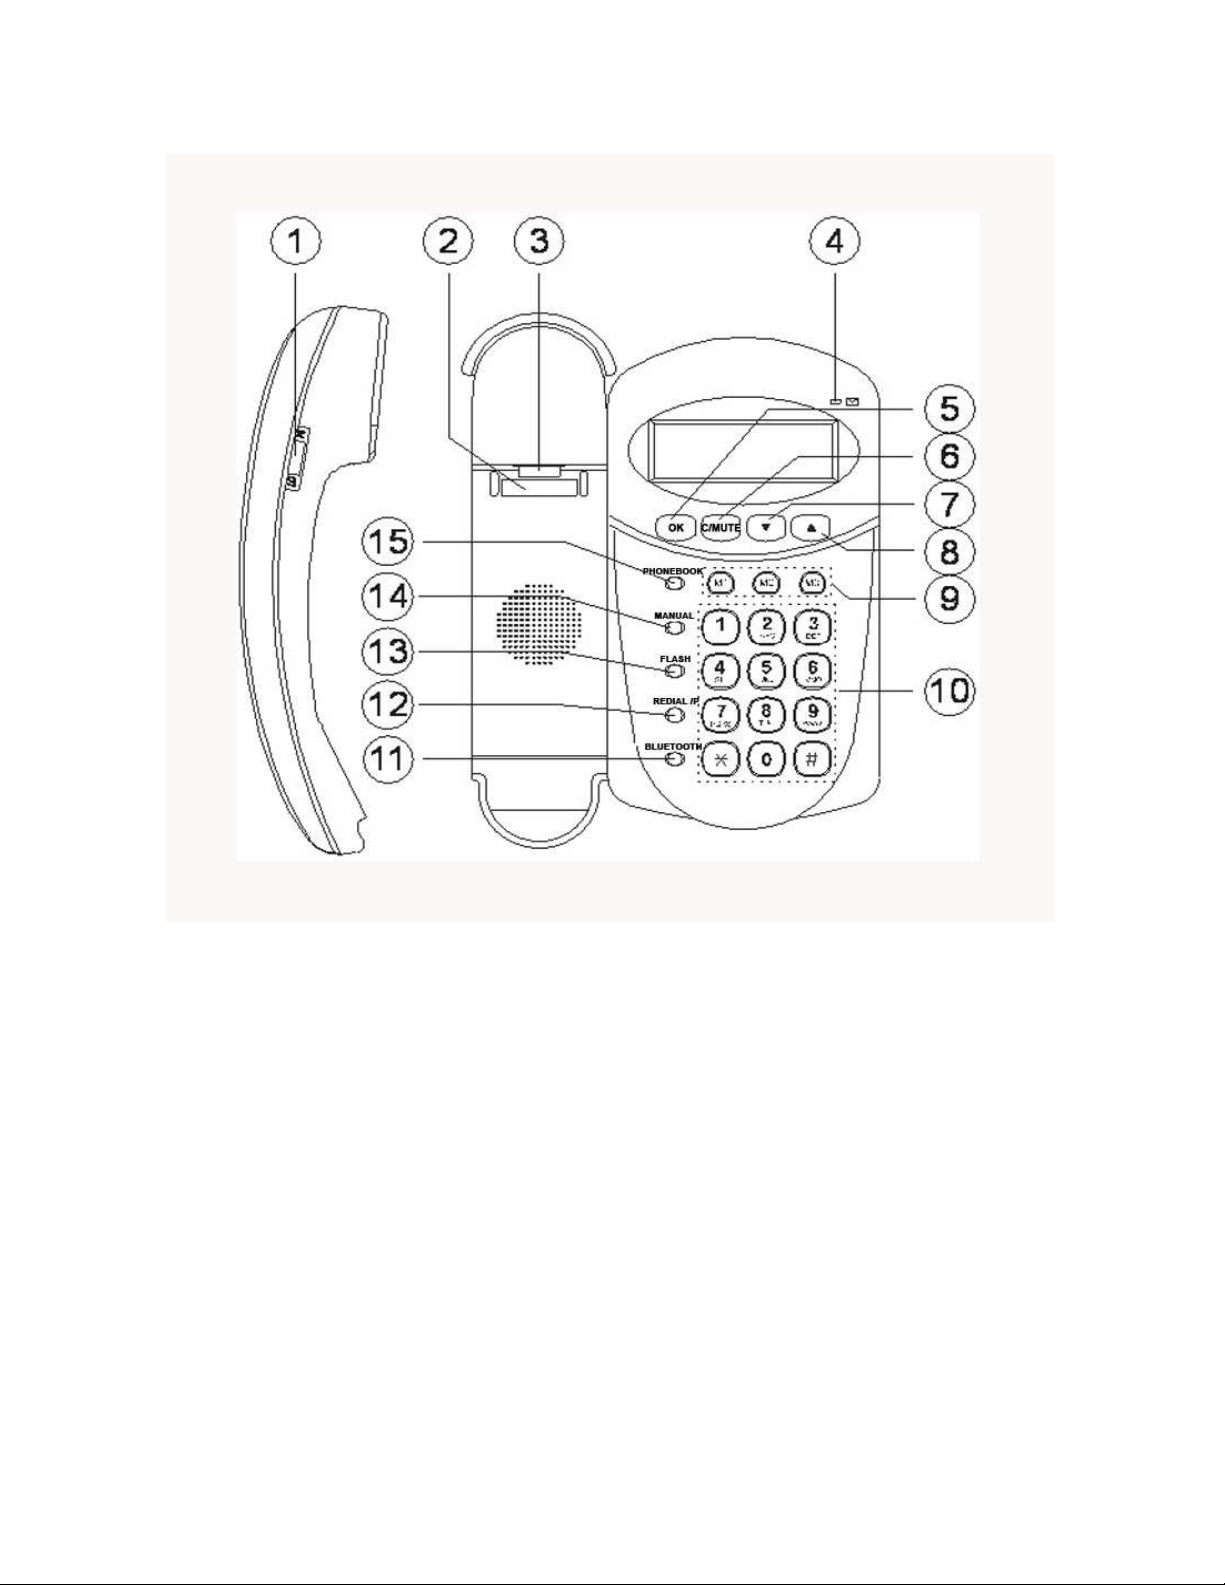
1. Handset Volume Control
2. Hook switch
3. Hanger Hook for Wall Mounting
4. New Caller ID & Message Waiting LED
5. OK Button
6. C /Mute Button
7. Scroll Button(Down)
8. Scroll Button(Up)
9. M1~M3 three direct memory button
10. Number Button
11. Bluetooth button
12. Redial /Pause Button
13. Flash Button
14. Manual Button
15. Phone Book Button
V1.1
1

NOTE:
The changes or modifications not expressly approved by the party responsible for
compliance could void the user’s authority to operate the equipment.
To comply with the FCC RF exposure compliance requirements, this device and its
antenna must not be co-located or operating to conjunction with any other antenna or
transmitter.
This equipment has been tested and found to comply with the limits for a Class B Digital
Device, pursuant to part 15 of the FCC Rules. These limits are designed to provide
reasonable protection against harmful interference in a residential installation. This
equipment generates, uses and can radiate radio frequency energy and, if not installed
and used in accordance with the instruction, may cause harmful interference to radio
communication. However, there is no grantee that interference will not occur in a
particular installation. If this equipment dose cause harmful interference to radio or
television reception, which can be determined by turning the equipment off and on , the
user is encouraged to try to correct the interference by one or more of the following
measures:
--Reorient or relocate the receiving antenna.
--Increase the separation between the equipment and receiver.
--Connect the equipment into an outlet on a circuit different from that to which the
receiver is connected.
--Consult the dealer or an experienced radio/TV technician for help.
V1.1
2

Installation
HAC Volume Control (Hearing Aid Compatibility)
HAC switch is specially designed for deaf person, HAC switch located in side of battery
box at the bottom of telephone. Before turn it on please open the cover of battery box. To
turn it on please set the switch to “H” position, and to turn it off please set the switch to
“L” position!
Adapter
To ensure that the memory and announcement message are retained during Adapter must
be installed.
If adapter not installed, the symbol will be visible in the display.
Bluetooth key can be functioned when the adapter is connected.
Connection
Once the Adapter have been installed:
1. Connect the curly cord to the handset and to the socket left side of the telephone.
2. Connect the telephone line cord to the socket on the back of the telephone and then to
a telephone network wall socket.
3. A click will be heard when the modular plug is correctly in place.
4. Position the cables in the grooves underneath the telephone.
5. Lift the handset and listen for the dial tone.
Your telephone is now operational.
Wall Mounting
1. Press the wall mount adapter in the base and slide it toward the rear until it locks in
place.
2. Secure two screws, vertically positioned 83 mm apart.
3. The screws should locate into the two ‘keyholes’ on the back of the telephone.
4. Remove the hanging peg (located by the hook switch) by pushing it upwards.
5. Rotate the hanging peg 180 degrees, and then replace it.
The Display
In the standby mode (handset down, no dial tone) the display will show the time, total
number of new phone calls and the total number of telephone numbers (30/60 maximum)
that have been stored in the Caller ID memory.
※ Choose either 30 Caller ID with name or 60 Caller ID memory without name.
V1.1
3

Handset Volume Control
The handset earpiece volume may be adjusted during a call, use switch on the handset
right side to increase or decrease the volume.
Ringer
On the right side of the telephone there are switches to adjust the ringing tone and
volume.
There are three choices for ringer volume: high, low and off.
Setting the Time and Date
1. Press MANUAL, “MEMORY” will be displayed.
2. Scroll until “SETTINGS” is displayed using / Press OK
3. “TIME/DATE” will be displayed. Press OK.
4. The hour digits will now flash. Scroll until the desired hour (24-hour format) is
displayed using / . Press OK.
5. The minute digits will now flash. Scroll until the desired minutes are displayed using
/ . Press OK.
6. The date digits will now flash. Scroll until the desired date is displayed using / .
Press OK.
7. The month digits will now flash. Scroll until the desired month is displayed using
/ . Press OK.
8. Confirm the programmed settings by pressing C.
Language
The display messages can be shown more then one languages
1. Press MANUAL, “MEMORY” will be displayed.
2. Scroll until “SETTINGS” is displayed using / . Press OK.
3. Scroll until “LANGUAGE” is displayed using / . Press OK.
4. Scroll until the desired language you require is shown using / . Press OK.
5. Confirm the programmed settings by pressing C.
V1.1
4
 Loading...