

Page 1
AZIMUTH
ENCODER
ASSEMBLY HOLES
BEARING COVER
DISK
CRADLE
AZIMUTH
ENCODER
BUSHING
ENCODER SHAFT
HOLE
ALTITUDE
ALIGNMENT
MARK
BRASS
BEARING
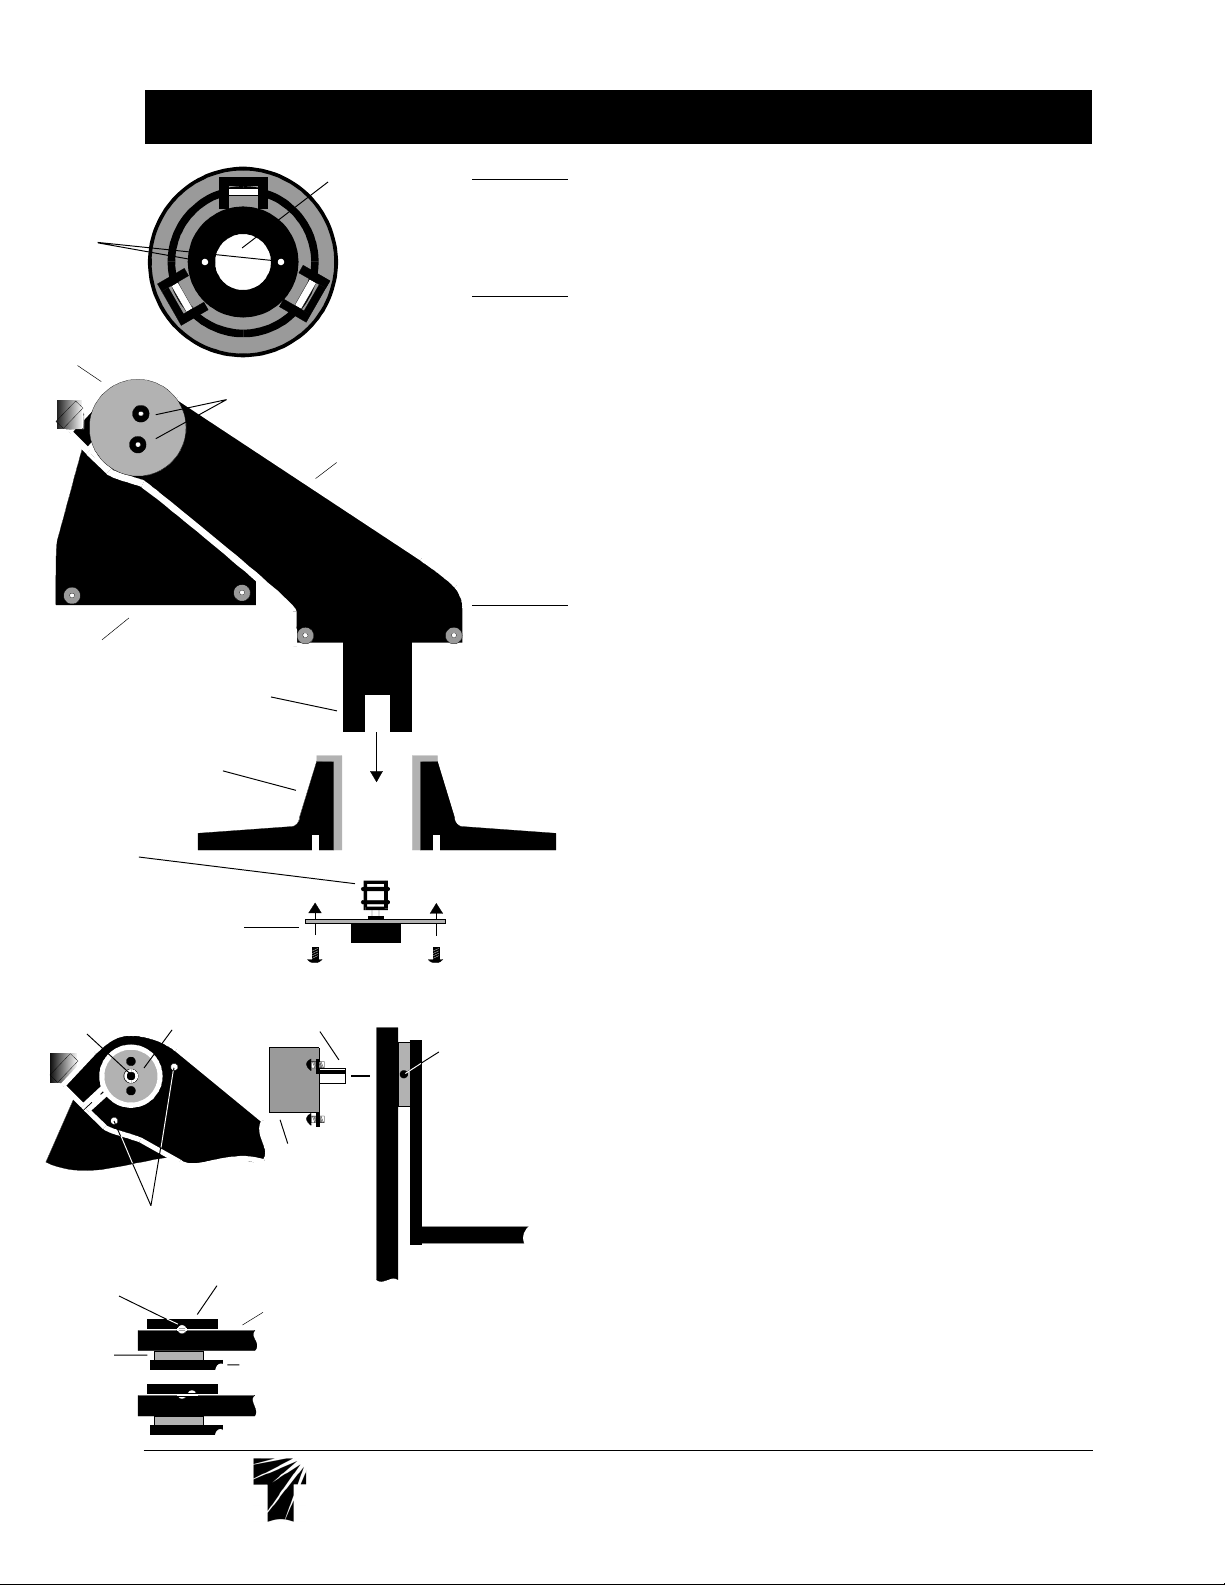
ORIGINAL STYLE GIBRALTAR - ENCODER ATTACHMENT
IMPORTANTIMPORTANT
IMPORTANT: Read these instructions fully and carefully before installing encoders. This
IMPORTANTIMPORTANT
instruction sheet gives the attachment points for the optical encoder kit supplied with Tele
Vue’s Sky Tour computer. These instructions also basically apply to other computer kits
designed for the Gibraltar mount.
Azimuth Encoder
IMPORTANTIMPORTANT
IMPORTANT: Remove the
IMPORTANTIMPORTANT
Gibraltar Mount HeadGibraltar Mount Head
Gibraltar Mount Head from the tripod before installing the
Gibraltar Mount HeadGibraltar Mount Head
azimuth encoder.
1) With the tripod upside-down, tray removed and legs spread, note the 2, #6-32 tapped
holes in the underside of the
metal strap onto the
Tripod HeadTripod Head
Tripod Head, making sure the electrical pins don't contact the metal
Tripod HeadTripod Head
Tripod HeadTripod Head
Tripod Head. Lay the encoder assembly with the attached
Tripod HeadTripod Head
head. Thread the #6-32 socket head screws into the head, leaving them loose enough
so the encoder assembly can slide for positioning.
2) Turn the tripod right side-up and re-attach the triangular tray.
3) Gently lower the
Gibraltar Mount HeadGibraltar Mount Head
Gibraltar Mount Head into the
Gibraltar Mount HeadGibraltar Mount Head
seated. Expect some resistance when the
Encoder BushingEncoder Bushing
Encoder Bushing. Reach under the
Encoder BushingEncoder Bushing
Tripod HeadTripod Head
Tripod Head and tighten the azimuth encoder
Tripod HeadTripod Head
Azimuth Bearing ShaftAzimuth Bearing Shaft
Azimuth Bearing Shaft engages the
Azimuth Bearing ShaftAzimuth Bearing Shaft
Azimuth Bearing HoleAzimuth Bearing Hole
Azimuth Bearing Hole until it is fully
Azimuth Bearing HoleAzimuth Bearing Hole
assembly.
Altitude Encoder
IMPORTANTIMPORTANT
IMPORTANT: Note which arm of the
IMPORTANTIMPORTANT
(drilled mark straddling the
Yoke ArmYoke Arm
Yoke Arm and
Yoke ArmYoke Arm
Mount HeadMount Head
Mount Head has the
Mount HeadMount Head
Bearing Cover DiskBearing Cover Disk
Bearing Cover Disk,
Bearing Cover DiskBearing Cover Disk
Altitude Alignment MarkAltitude Alignment Mark
Altitude Alignment Mark
Altitude Alignment MarkAltitude Alignment Mark
see drawing below).
NEVER loosen the 2 screws from this disk, or you will lose the accuracy of the alignment
mark.
1) Note the
Yoke ArmYoke Arm
Yoke Arm and
Yoke ArmYoke Arm
this arm has 2, #6-32 tapped holes that accept an encoder assembly. (The
DiskDisk
Disk almost covers them) Remove the two screws holding this
DiskDisk
Bearing Cover Disk Bearing Cover Disk
Bearing Cover Disk
Bearing Cover Disk Bearing Cover Disk
without
the alignment mark. The side of
Bearing Cover DiskBearing Cover Disk
Bearing Cover Disk in place.
Bearing Cover DiskBearing Cover Disk
Bearing CoverBearing Cover
Bearing Cover
Bearing CoverBearing Cover
Wipe any excess grease from the exposed surfaces and save the parts for possible future
use.
2) Push the
3) Next, place the bell shaped
Altitude Encoder ShaftAltitude Encoder Shaft
Altitude Encoder Shaft into the
Altitude Encoder ShaftAltitude Encoder Shaft
Brass BearingBrass Bearing
of the
Brass Bearing. Lock it to the bearing by tightening the Allen key
Brass BearingBrass Bearing
Encoder Shaft Set ScrewEncoder Shaft Set Screw
Encoder Shaft Set Screw located in the side of the
Encoder Shaft Set ScrewEncoder Shaft Set Screw
Encoder Housing Encoder Housing
Encoder Housing over the altitude encoder. Securely
Encoder Housing Encoder Housing
tighten one of the shorter #6-32 button head screws into the side of the
encoder accuracy, squeeze the sides of the
Encoder Housing Encoder Housing
Encoder Housing so that you feel it press
Encoder Housing Encoder Housing
against the encoder body as you tighten the second button head screw to the
Encoder ShaftEncoder Shaft
Encoder Shaft
Encoder ShaftEncoder Shaft
Yoke ArmYoke Arm
Yoke Arm. To ensure
Yoke ArmYoke Arm
HoleHole
Hole in the center
HoleHole
Brass BearingBrass Bearing
Brass Bearing.
Brass BearingBrass Bearing
Yoke ArmYoke Arm
Yoke Arm.
Yoke ArmYoke Arm
This will prevent the encoder body from moving within the housing while the shaft rotates.
Electrical Connectors
Plug the phone jacks into the receptacles, noting the longer wire connects to the
ENCODER
SHAFT SET
SCREW
altitude encoder.
Getting Started With Your Computer
1) Mount the telescope within
Gibraltar’s Cradle Gibraltar’s Cradle
Gibraltar’s Cradle and balance it using the
Gibraltar’s Cradle Gibraltar’s Cradle
Gibraltar Mount instructions.
2) Turn the computer on. The Sky Tour will request “ALIGN MARK” (other
computers might say “level me”). Swing the
Alignment MarksAlignment Marks
Alignment Marks come together to form a circle. (The mark was precision drilled
Alignment MarksAlignment Marks
Cradle Cradle
Cradle so that the two semi-circle
Cradle Cradle
in a fixture with the cradle base carefully set 90° to the azimuth axis.) A low
power eyepiece such as a 32mm or 40mm Plössl used in reverse will make a
great magnifier to assist in aligning the semi-circles.
3) Follow your computer’s instructions for “STAR FIX” alignment to the night sky.
“I've found the computer a lot of fun and very educational even after 40 years
as an amateur who disdains the complexity of setting circles. It's great for locating objects,
learning the names of stars, and identifying objects. I hope you enjoy the Gibraltar mount
with our telescope and its computer capabilities. Please write me with your comments and
suggestions on all aspects of its operation and use.”
- Al Nagler
AzimuthAzimuth
Azimuth
AzimuthAzimuth
BEARING COVER
SCREWS
AZIMUTH
BEARING
SHAFT
TRIPOD
HEAD
AZIMUTH
ENCODER
ASSEMBLY
BRASS
BEARING
ALTITUDE ENCODER
ASSEMBLY HOLES
BEARING COVER
DISK
CRADLE
AZIMUTH
BEARING HOLE
BOTTOM VIEW
OF TRIPOD
HEAD
GIBRALTAR
MOUNT HEAD
YOKE ARM
ALTITUDE
ENCODER
SHAFT
ENCODER HOUSING
YOKE ARM
MARKS
ALIGNED
MARKS NOT
ALIGNED
Tele Vue
Visionary
®
32 Elkay Dr., Chester, New York 10918 (845) 469-4551 televue.com
 Loading...