

Page 1
®
Tele Vue
-
Operating Guide
540mm f/5.4
4-ELEMENT APO REFRACTOR
Thank you for purchasing the Tele Vue-NP101. It has been our pleasure to craft this fine instrument for
you. Though instructions for use are as simple as mounting the scope, removing the lens cover, and
inserting an eyepiece, please take a moment to review the information here.
Thirty-plus years ago Al Nagler took Petzval’s portrait lens concept using widely spaced doublets,
and patented a fast telescope design version for the purpose of testing eyepieces. The 5” f/4 MPT
(Multi-Purpose Telescope) with its fast speed, wide and flat field, led to a series of continuous improvements, primarily in color correction. The “Halley Commemorative,” 4” f/5.5 started the parade where
more advanced glasses including special dispersion, fluorite and fluorite substitute glasses brought steady
improvements. The 4” f/5 Genesis employed fluorite in the rear doublet and the SDF version at f/5.4
and subsequent Tele Vue-101 version brought us closer to perfection. Maintaining the f/5.4 speed while
reducing tube length in a totally new design, with new glasses allowed virtually ideal color correction and
improved field flatness. The NP101 (Nagler-Petzval) is the ultimate culmination of 30-years of refinement
toward optical perfection. Al’s “spacewalk” dream from his 1960’s NASA simulator days is yours to live.
Bon Voyage!
WARNING: NEVER try to look at the sun or point the telescope toward or near the sun without
professional solar observing equipment rigidly secured in front of the objective lens. When
observing the sun with the proper filters, use only the Tele Vue “Sol-Searcher” (SSF-1006) for
finding the Sun. Remove any finding devices such as Starbeam from the telescope. Instant and
permanent eye damage may result from viewing the sun directly, even during a solar eclipse, or when
viewing through thin clouds, or when the sun is near the horizon.
Standard Features - sliding dew shield, screw-on lens cover, 2” focuser with 10:1 reduction, 2” Everbrite
diagonal, 2” to 1¼” adapter, ring mount and custom hard-shell case.
Mounting - For attaching the Tele Vue-NP101 to any Tele Vue mount, you will receive the two ¼-20 studs,
wing knobs, Allen wrench and complete mount assembly instructions with the mount. Tele Vue makes various adapter plates for popular German equatorial mounts. Please consult your dealer.
Finders - We particularly recommend using the Starbeam reflex sight (part# SFT-2003), which attaches to
the Ring Mount. The telescope will fit in the case with the Starbeam attached. Movement of the mount ring
may be necessary. The Quick Release Universal Finder Bracket (QFM-1008) holds a traditional 50mm
finderscope and also attaches to the mount ring channels.
Terrestrial Viewing Considerations - The Tele Vue 55mm Plössl or 41mm Panoptic in a 2” diagonal will
provide the maximum true field of 4.9°. This can serve as a finder, for rich field viewing or for terrestrial
use. (Image is upright, but left-right reversed using diagonal mirrors.)
Tele Vue
Visionary
®
32 Elkay Dr., Chester, New York 10918 (845) 469-4551. televue.com
Page 2
However, Tele Vue developed the 1¼” 60° Everbrite Diagonal (part# DPC-6012) specifically for
terrestrial observers who appreciate the highest levels of image performance. The 60° angle is far more
comfortable for terrestrial observing than the standard 90°, and the 99% reflective Everbrite dielectric
coating gives the truest color rendition of any mirror or prism, and is sharpest at the highest powers.
For correct left-right viewing, use the Tele Vue 45° erector (part# AMI-0011). Barlows, Powermates
and Bino Vue are not recommended with the 45° erector. For 1¼” diagonals and prisms, the 32mm
Plössl, or 24mm Panoptic offers the maximum field. 2.9° at 17x and 22.5x respectively.
Getting Acquainted with the Tele Vue-NP101
1.1 Optical tube assembly
The optical tube consists of an air-spaced doublet within the front cell. The front cell is attached to the
tube via three alignment locking screws which you’ll see when sliding the dew shield forward. (Warning:
Loosening these screws will ruin the collimation.) The rear doublet, making up the rest of the objective is
housed in the cell that threads between the back of the tube and the focuser. Do not stick any long objects
into the focuser or you will hit the rear most lens surface.
1.2 Focuser
The 2” focuser is a custom fitted rack and pinion type which is capable of supporting the heaviest accessories without slipping. The left side focuser knob and inner knob on the right side are a 1:1 ratio. The outer
(smaller) knob on the right side is a 10:1 ratio, which will help in fine focusing for planets and photography.
The two tension screws on the top of the focuser body can be adjusted to add resistance when
using heavy eyepieces or cameras. These tension screws tighten against a brass clamp ring, which then
cinches down on the Teflon sleeve in which the draw tube slides. For photography it is not necessary to
tighten beyond the need to keep a camera stationary. Even when sufficiently tight, the focuser knobs can
still drive the draw tube.
The focuser body is pre-drilled to accept the Digital Indicator Kits (RMK-2002/RMF-2003) for focus
accuracy down to 1-micron. The dual speed pinion assembly is pre-drilled to mount the 10:1 Focusmate
Driver (FDF-2004). (See section 1.5 Photography)
The two lock screws in the end of the draw tube also tighten against a brass clamp ring for extra
holding power on the diagonal or other accessories.
1.3 Ring Mount
The Ring Mount permits easy telescope balancing. Simply loosen the “bat handle,” reposition the O.T.A.
and re-lock the bat handle. The Ring Mount base is blind tapped with three ¼”-20 threaded holes so
screws cannot hit the tube. The two accessory channels are tapped with #10-32 threaded holes.
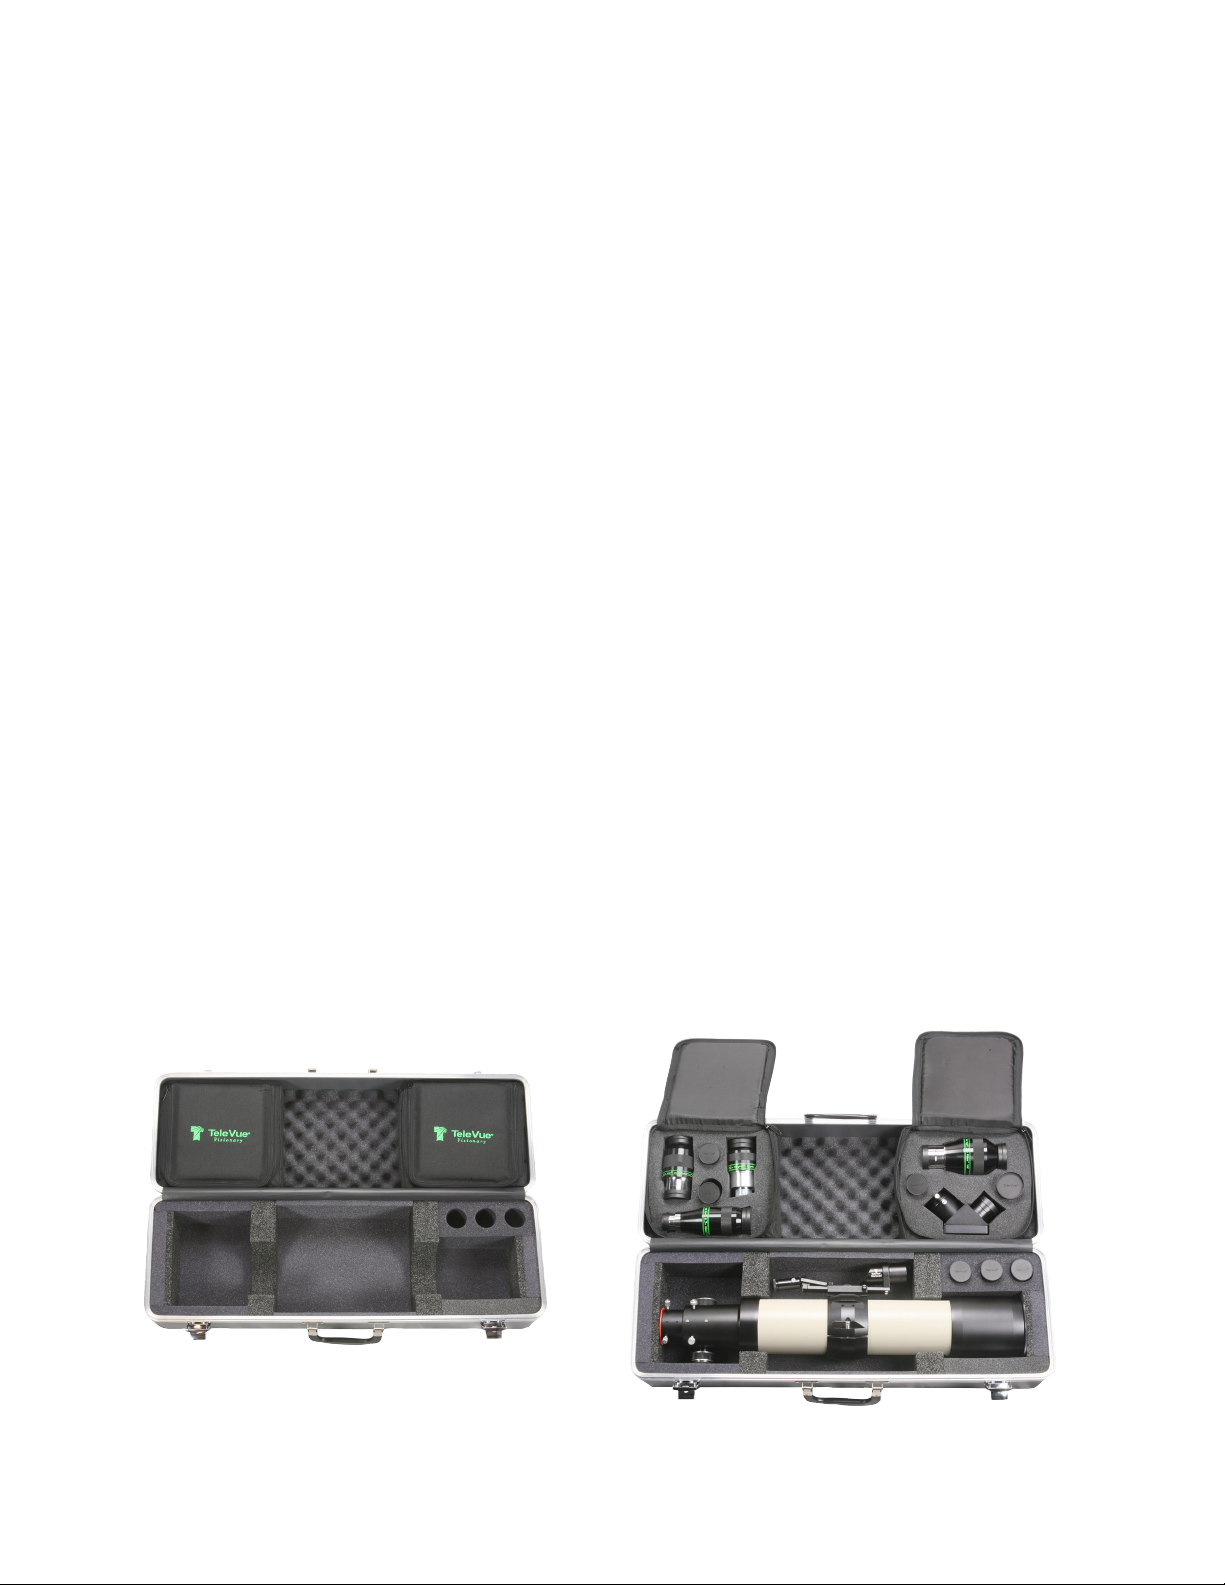
1.4 Case
When opening the case, we recommend always lifting the lid while holding the handle. The lid opens a
Optional Accessories Shown
full 180° and holding the handle will give you a better grasp to insure that the lid doesn’t slip out of your
hand. The interior of the case was designed to store your scope with the optional Starbeam, Focusmate
Motor Driver and Digital Indicator Kit installed. To fit the Starbeam, you may have to slide your ring mount
so that the Starbeam fits in the lid of the case between the accessory bags.
Page 3
Sliding Dew Shield
(retracted over Front Cell)
Tube
Ring Mount
Accessory
Channel
Bat Handle
Digital
Micrometer
Attachment
Points
2” to 1¼”
Adapter
1¼” Accessory
Focuser Tension
Knobs (2)
Lock Screw
2” Accessory
Lock Screw
Diagonal Lock
Screws (2)
Draw Tube
Diagonal
1:1 Focus Knob
10:1 Focus Knob
1:1 Focus Knob
10:1 Focus Knob
1:1 Focus Knob
Page 4

Tele Vue recommends choosing low and medium power eyepieces in ratios of field stop diameters. For
example, factors of 1.4 or 2.0. When choosing higher power eyepieces, use ratios of magnification.
Tele Vue-NP101/NP101is
Focal
Length
(mm)
Type Product Code
Apparent
Field (deg)
Field Stop Dia.
(mm)
Eye Relief
(mm)
Weight
(lb.)
Mag.
2" Eyepieces for Wide True Fields
55 Plössl EPL-55.0 50 46.0 38 1.1 9.8 4.88 10.3 4 Y
41 Panoptic EPO-41.0 68 46.0 27 2.1 13.2 4.88 7.7 6 Y
31 Nagler 5 EN5-31.0 82 42.0 19 2.2 17.4 4.46 5.8 6 Y
35 Panoptic EPO-35.0 68 38.7 24 1.6 15.4 4.11 6.5 6 Y
21 Ethos ETH-21.0 100 36.2 15 2.3 25.7 3.84 3.9 - Y
26 Nagler 5 EN5-26.0 82 35.0 16 1.6 20.8 3.71 4.9 6 Y
22 Nagler 4 EN4-22.0 82 31.1 19 1.5 24.5 3.30 4.1 7 Y
27 Panoptic EPO-27.0 68 30.5 19 1.0 20.0 3.24 5.1 6 Y
17 Ethos ETH-17.0 100 29.6 15 1.6 31.8 3.14 3.2 - Y
20 Nagler 5 EN5-20.0 82 27.4 12 1.0 27.0 2.91 3.7 6 Y*
17 Nagler 4 EN4-17.0 82 24.3 17 1.6 31.8 2.58 3.2 7 Y
1¼" Eyepieces for Wide True Fields
40 Plössl EPL-40.0 43 27.0 28 0.4 13.5 2.87 7.5 4 Y
32 Plössl EPL-32.0 50 27.0 22 0.4 16.9 2.87 6.0 4 Y
24 Panoptic EPO-24.0 68 27.0 15 0.5 22.5 2.87 4.5 6 Y*
13 Ethos ETH-13.0 100 22.3 15 1.3 41.5 2.37 2.4 - Y
16 Nagler 5 EN5-16.0 82 22.1 10 0.4 33.8 2.35 3.0 6 N
19 Panoptic EPO-19.0 68 21.3 13 0.4 28.4 2.26 3.6 6 Y*
25 Plössl EAP-25.0 50 21.2 17 0.3 21.6 2.25 4.7 4 N
17.3 Delos EDL-17.3 72 21.2 20 0.9 31.2 2.25 3.2 - Y
10 Ethos ETH-10.0 100 17.7 15 1.1 54.0 1.88 1.9 - Y
13 Nagler 6 EN6-13.0 82 17.6 12 0.4 41.5 1.87 2.4 7 Y*
14 Delos EDL-14.0 72 17.3 20 0.9 38.6 1.84 2.6 - Y
20 Plössl EAP-20.0 50 17.1 14 0.2 27.0 1.81 3.7 4 N
12 Nagler 4 EN4-12.0 82 17.1 17 1.0 45.0 1.81 2.2 6 Y
1¼" Eyepieces for Medium Powers
12 Delos EDL-12.0 72 15.0 20 0.9 45.0 1.59 2.2 - Y
11 Nagler 6 EN6-11.0 82 14.9 12 0.4 49.1 1.58 2.1 7 Y*
10 Delos EDL-10.0 72 12.7 20 0.9 54.0 1.35 1.9 - Y
15 Plössl EAP-15.0 50 12.6 10 0.2 36.0 1.34 2.8 4 N
9 Nagler 6 EN6-09.0 82 12.4 12 0.4 60.0 1.32 1.7 7 Y*
11 Plössl EAP-11.0 50 9.1 8 0.1 49.1 0.97 2.1 4 N
1¼" Eyepieces for Higher Powers
8 Ethos ETH-08.0 100 13.9 15 1.0 67.5 1.47 1.5 - Y
6 Ethos ETH-06.0 100 10.4 15 1.0 90.0 1.10 1.1 - Y
8 Delos EDL-08.0 72 9.9 20 1.0 67.5 1.05 1.5 - Y
7 Nagler 6 EN6-07.0 82 9.7 12 0.5 77.1 1.03 1.3 7 Y*
4.7 Ethos SX ETH-04.7 110 8.9 15 1.3 114.9 0.95 0.9 - Y
6 Delos EDL-06.0 72 7.6 20 1.0 90.0 0.81 1.1 - Y
3.7 Ethos SX ETH-03.7 110 7.0 15 1.1 145.9 0.75 0.7 - Y
5 Nagler 6 EN6-05.0 82 7.0 12 0.5 108.0 0.74 0.9 7 Y*
8 Plössl EAP-08.0 50 6.5 6 0.1 67.5 0.69 1.5 4 N
4.5 Delos EDL-04.5 72 5.6 20 1.1 120.0 0.59 0.8 - Y
3.5 Nagler 6 EN6-03.5 82 4.8 12 0.5 154.3 0.51 0.7 7 Y*
3.5 Delos EDL-03.5 72 4.4 20 1.1 154.3 0.47 0.7 - Y
2.5 Nagler 6 EN6-02.5 82 3.4 12 0.5 216.0 0.36 0.5 7 Y*
1¼" Zoom Eyepieces for Medium and Higher Powers
6-3 Nagler Zoom ENZ-0306 50 5.1-2.6 10 0.3
4-2 Nagler Zoom ENZ-0204 50 3.3-1.7 10 0.4
NOTE: True Field in degrees = (Field Stop dia./Telescope Focal Length) X 57.3° *Indicates additional Dioptrx Adapter required
90.0-
180.0
135.0-
270.0
True
Field
(deg)
0.54-
0.28
0.35-
0.18
Exit
Pupil
(mm)
1.1-
0.6
0.7-
0.4
# of
Elem.
5 N
5 N
Dioptrx
Ready
Page 5

The two accessory bags within the case lid are
removable. IMPORTANT: Whenever carrying your
telescope in the case, the accessory bags must be in
place as they act to hold the telescope down. Failure to
do so may result in the telescope rolling into the lid of the
case and damage to the telescope may occur. These bags
are held in place by Velcro and can be easily lifted out.
Each bag will hold a variety accessories, so remove the
foam inserts as your needs require. The right side bag is
where you’ll find the Everbrite diagonal with 2” to 1¼”
adapter inserted. You will also find an extra plug for your
Optional Accessories Shown
diagonal, should you choose to store the 2” to 1¼” adapter elsewhere. Remember to zipper the bags
closed before closing the case lid!
Using Your Tele Vue-NP101
2.1 Eyepieces
Tele Vue eyepieces offer a range of magnifications from 10x to 270x (if the atmosphere allows), with the
Tele Vue-NP101. We recommend choosing low and medium power eyepieces in ratios of field stop
diameters. For example, factors of 1.4 or 2.0. When choosing higher power eyepieces, use ratios of
magnification. (See reference chart in the “Choosing Your Eyepieces” article.)
2.2 Photography
For 35mm SLR, prime focus photography at 540mm, f/5.4, use our 2” camera adapter (part# ACM-2000)
and appropriate camera T-Ring. To extend the focal length, we recommend using Tele Vue Powermates
with their corresponding T-ring Adapters and our 3.5” extension tube. Afocal photography can be done
using our various digital camera to eyepiece adapters. For Piggyback 35mm SLR photography, attach the
Piggy-Cam platform, (part# PGC-1001) to the Ring Mount.
For cameras with APS sized or smaller CCD chips, the optional 0.8x Reducer (part# NPR-1073) is
available for increased field size. The NP101 then functions at 432mm and f/4.3. Mounting the reducer
also requires the 2” Focuser Adapter (part# RAD-1074) and T-Ring adapter (part# TRG-1072).
Mounting points are provided on top of the focuser body and draw tube for easy installation of the
Digital Micrometer Kits (part#s RMK-2002 or RMF-2003). These kits allow imagers to index focus position
to within 0.0001”, providing a very convenient way of finding best focus, returning to it, or checking that
it hasn’t changed. The 10:1 Focusmate Driver (part# FDF-2004) adds hands- and vibration-free motorized focusing and the Focusmaster permits remote PC focusing via ASCOM compliant focusing software.
For installation, setup and use of the Digital Micrometer Kit, Focusmate Driver, and Focusmaster™ see the
instructions included with each.
Caring for the Tele Vue-NP101
Tele Vue-NP101 requires no special care. Treat it as you would any fine camera lens. Use the lens cap
when the telescope is being stored or not in use. The captive dew shield provides protection from glare,
helps protect the lens from dust or spray blown in by the wind and minimizes dew formation on the lens.
If dew forms on the lens during cold weather, it is best to use a hair dryer (on the lowest setting) to
gently warm it away. A few specks of dust will have no effect on image quality and may be gently blown
off with a squeeze bulb. Do not use compressed air cans to blow dust off optical surfaces.
To prevent dew formation when bringing the scope in from the cold, we advise to close the cold
scope in its case before bringing it into the warm indoors. Do not open the case until the scope has come
up to room temperature.
Fingerprints or oils should be cleaned off the lens surface. Though the anti-reflection coatings are
durable, they can be scratched. The simplest cleaning method is to moisten a very soft, lint-free tissue,
cloth, “Q-Tip” or surgical cotton with a lens or glass cleaner and working in a circular motion, gently whisk
away the stain. Do not apply any solutions directly to the glass surfaces. After every cleaning stroke, use
a fresh applicator. The fewer strokes the better! Any residual “film” will not affect visual performance.
Page 6

Collimation of your Tele Vue-NP101 has been locked at the factory. With reasonable care it will
remain aligned. However, rough handling can cause misalignment. WARNING: The button head screws
in the front lens cell are filled with epoxy. Loosening these screws will cause misalignment. If necessary,
contact Tele Vue for re-collimation.
Your star diagonal employs a first-surface mirror. Like all first-surface mirrors, it should be cleaned
only when absolutely necessary. First blow loose dust away with a squeeze bulb. CAUTION: Do not
clean mirror with water or water based cleaners such as Windex or any other commercial lens cleaners;
this is not a lens. All contain too much water and will leave stains. Moisten a “Q-Tip” with pure acetone,
methanol or Isopropyl alcohol, reagent grade. Clean gently using only the weight of the cotton swab.
Use light pressure and never rub. Slight residual stains or dust have no visible effects in observing.
The tube is powder-coated for durability and can be waxed with any nonabrasive car wax. Black
anodized surfaces can be cleaned with Windex. If you have any questions about the care, operation or
performance of your Tele Vue-NP101, please call us at (845) 469-4551 from 9:30 am to 5:00 pm EST.
3.1 Warranty
The Tele Vue-NP101 is warranted to be free of manufacturing or workmanship defects for 5 (five) years from
the date of purchase, to the original owner. Please return the warranty card as validation of your ownership and for easy identification. If your Tele Vue-NP101 requires warranty service, please call Tele Vue to
discuss the problem, upon which you will receive a return authorization. NO RETURNS ARE ACCEPTED
WITHOUT PRIOR AUTHORIZATION.
The warranty does NOT include: collimation, defects caused by mishandling, defects of subjective
nature, coverage for any telescope purchased through an unauthorized Tele Vue dealer.
Warranty work will be performed at Tele Vue’s discretion and may only be performed by Tele Vue
Optics. The telescope must be shipped in its case with proper inner and outer packaging. All shipping
and insurance charges are the purchaser’s responsibility.
Specifications
(subject to change without notice.)
Type 4-element, flat field, APO refractor, Fully Multi-Coated
Clear Aperture 4 inches (101.6mm)
Aperture Gain 212, compared to a 7mm exit pupil
Focal Length 540mm
Focal Ratio f/5.4
Resolution (visual) 1.1 arc-sec. (Dawes Limit for a 4 inch aperture)
Resolution (photographic) 267 line pairs per mm
Magnification 10x to 270x using Tele Vue eyepieces
Field, Visual 4.9o maximum
Focuser 2-inch, rack and pinion type
Diagonal 2-inch 99% reflective dielectric coating, with 1¼” adapter
Finder Optional Starbeam or 55mm Plössl or 41mm Panoptic for 10x, 4.9o field
Mounting Adjustable ring mount with ¼-20 tapped holes for photographic tripods or optional
Tele Vue mounts. Optional mounting adapter plates available other mount types.
Weight 10 lbs. (tube assembly) 19 lbs. in case, 28 lbs. shipping
Length 26-inches (O.T.A. only)
Accessories included as standard: custom fitted case, screw-on lens cover, sliding dew (glare)
shield, ring mount, 2” diagonal, 2”-1¼” adapter
Tube Powder-coated aluminum
Page 7

1.9 Photo-visual Configurations
 Loading...