

Page 1
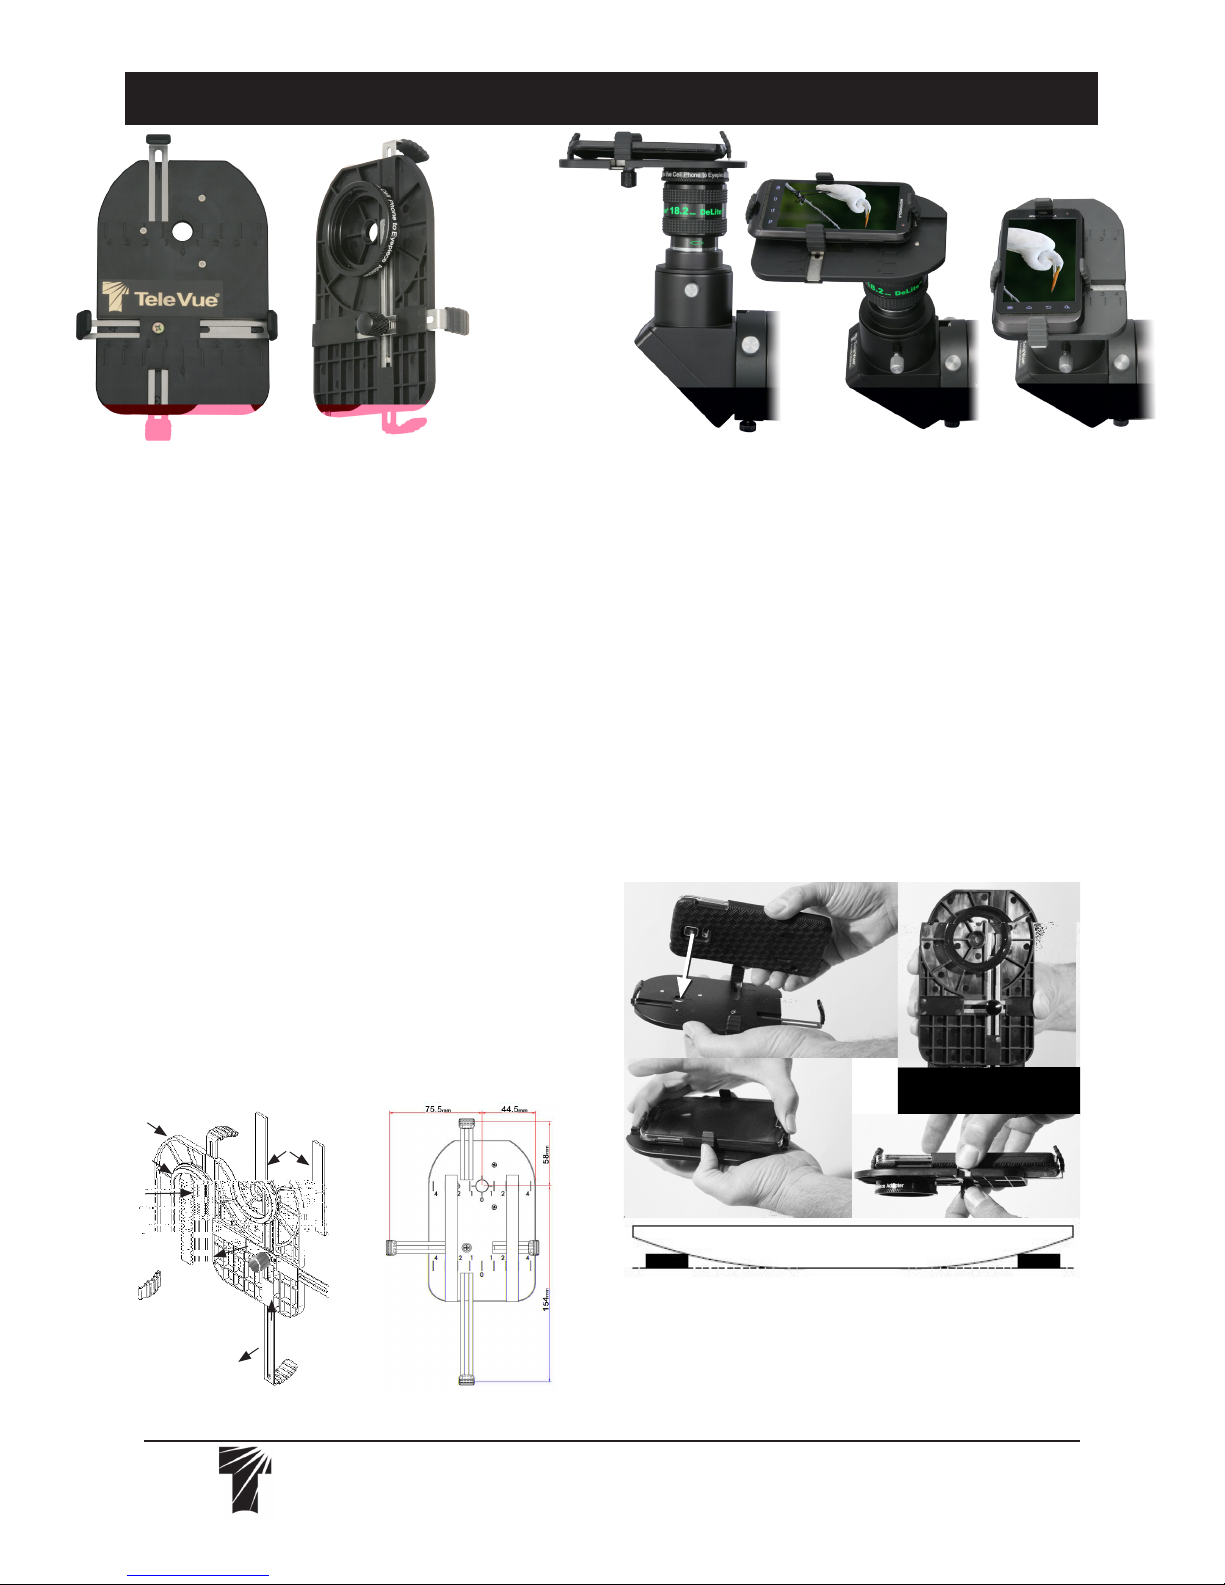
FoneMate™ Smart Phone to Tele Vue Eyepiece Adapter
SFA-0001 FoneMate
Smart Phone Adapter
fits all Dioptrx™
compatible eyepieces.
Rotate eyepiece and
diagonal to frame
target as desired.
Back Plate
Eyepiece
Adapter Ring
Introduction
FoneMate™ can connect with any
Dioptrx™-compatible eyepiece and phones
from about 60-mm x 114-mm (width x
height) to 120-mm x 212-mm in size. Note
that some eyepieces require an adapter to
be Dioptrx™-compatible. See the Eyepiece
Specification page at TeleVue.com for a
complete list of Dioptrx™-compatible eyepieces. Delos and DeLite eyepieces, with
their sliding, locking, eyeguards work particularly well in this application.
Adapter Pre-Installation Notes
•If using short eye relief eyepieces, you
may have to remove any form-fitting phone
case in order to avoid vignetting. For large
phones, removing the case can give you
more “wiggle” room for centering the phone
once the clamp limits are reached.
•Familiarize yourself with the parts diagram. Note that right horizontal clamp does
not extend past the back plate.
Nomenclature and Parts Diagram
Back
Plate
Pads
Top Clamp
Install Smart Phone on FoneMate™
•Adjust knurled knob to the point where
the clamps can slide by hand – but not slide
on their own. Pull out clamps.
•Place smart phone on back plate so
the camera lens is roughly centered over
the camera hole (Fig A) and push opposing clamps simultaneously snug against the
phone body (Fig B). Tighten the knurled
knob (Fig C).
•Flip the assembly over (Fig D). If the
camera lens is not centered in the lens hole,
support the camera with one hand and just
loosen the knurled knob enough to move the
clamps. Using both hands, nudge opposing
(A)
(D)
Lens Hole
Knurled
Knob
Cell Phone
Clamps (4)
Left
Horizontal
Clamp
Approximate
maximum setting
from lens hole
center to inside
of clamp.
Bottom Clamp
Tele Vue
Visionary
(B)
Right
Horizontal
Clamp
(E)
clamps to center the lens. Tighten the knob.
•Flip the assembly over to check if the
phone rocks in the cradle when pressing
buttons, or does not lie flat. This may be
due to phone contours and hard buttons.
®
32 Elkay Dr., Chester, New York 10918 (845) 469-4551. televue.com
(C)
V11/10/15
Page 2

In these cases, consider using the supplied
back plate pads to correct the fit. The pads
should be stuck on the back plate underneath the phone and not interfere with the
clamps around the phone body (Fig E).
Before removing the phone to place the
padding, note the position of the opposing clamps on the engraved scale. Keep
the padding within these positions. Trim the
padding as necessary and peel off the selfadhesive backing before applying to the
back plate.
Telescope Pre-Installation Notes
•Make sure the telescope is locked down
and stable before attaching FoneMate™ to it.
•Visually focus the desired eyepiece while
on the scope before attaching the adapter to it.
•Depending on the size of the eyepiece,
it may be easier to connect the phone to it
while off the telescope. Mounting the parts
off the scope also prevents decentering the
target in the field of view.
•If the eyepiece has an adjustable eyeguard, lock it in place to prevent sudden movement before attaching it to the FoneMate™.
•Become familiar with which direction to
turn the adapter ring to lock and unlock it
to the eyepiece. When FoneMate™ is rest-
ing on top of the eyepiece, the ring is locking when turned counter clockwise. Fewer
threads will be showing.
•CAUTION, if the eyepiece is placed
standing on a flat surface, the unbalanced
weight of the FoneMate™ plus smart phone
may cause the eyepiece to topple.
Installation on Eyepiece
1. Remove rubber eyeguard from eyepiece.
2. Rotate eyepiece adapter ring, located
on the underside of the FoneMate™, out into
the unlocked position so that four threads are
visible. Do not rotate the ring further out than
this (there are only five threads holding it on).
3. Plah7( ph)4on 7( ada12(p)15t)83e ect9(7( ada12(p)16t)83e)56ro
Tele Vue
Visionary
®
32 Elkay Dr., Chester, New York 10918 (845) 469-4551. televue.com
V11/10/15
 Loading...