

Page 1
OPERATING GUIDE
TV60isOG 0805
PRICE $5.00
Printed in U.S.A.
Tele Vue-
60is
IMAGING SYSTEM
Te l e V u e
Visionary
360mm f/6.0
APO REFRACTOR
®
32 Elkay Dr., Chester, New York 10918 (845) 46 9 - 4551 www.televue.com
Page 1
Page 2
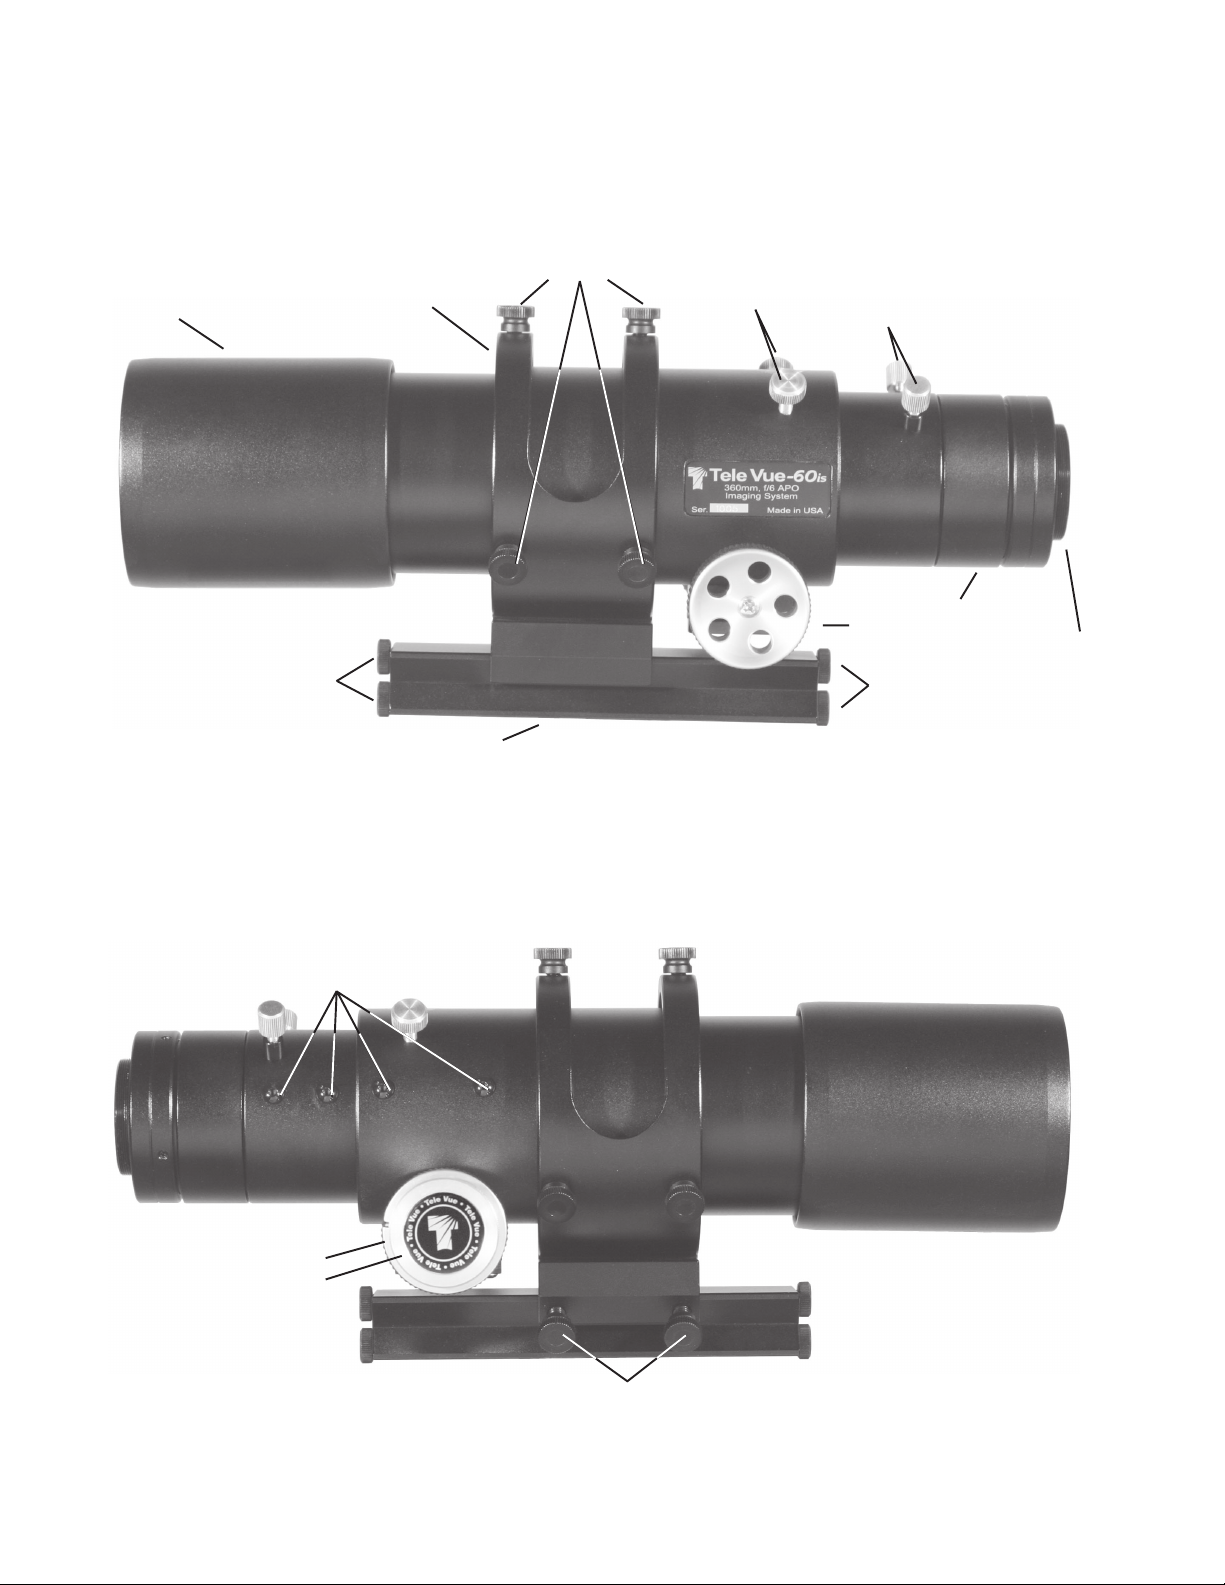
Retractable
Dew Cap
Tube Ring
Tube
Positioning
Screws
Focus
Tension
Screws
Field Flattener/
Diagonal
Lock Screws
Field Flattener
1:1 Focus Knob
T-ring Threads
Safety Stops
Micrometer
Cap Screws
Focusmate
1:1 Knob
6:1 Knob
Safety Stops
Dovetail
Balance Bar
tm
Dovetail Position
Lock Screws
Page 2
Page 3
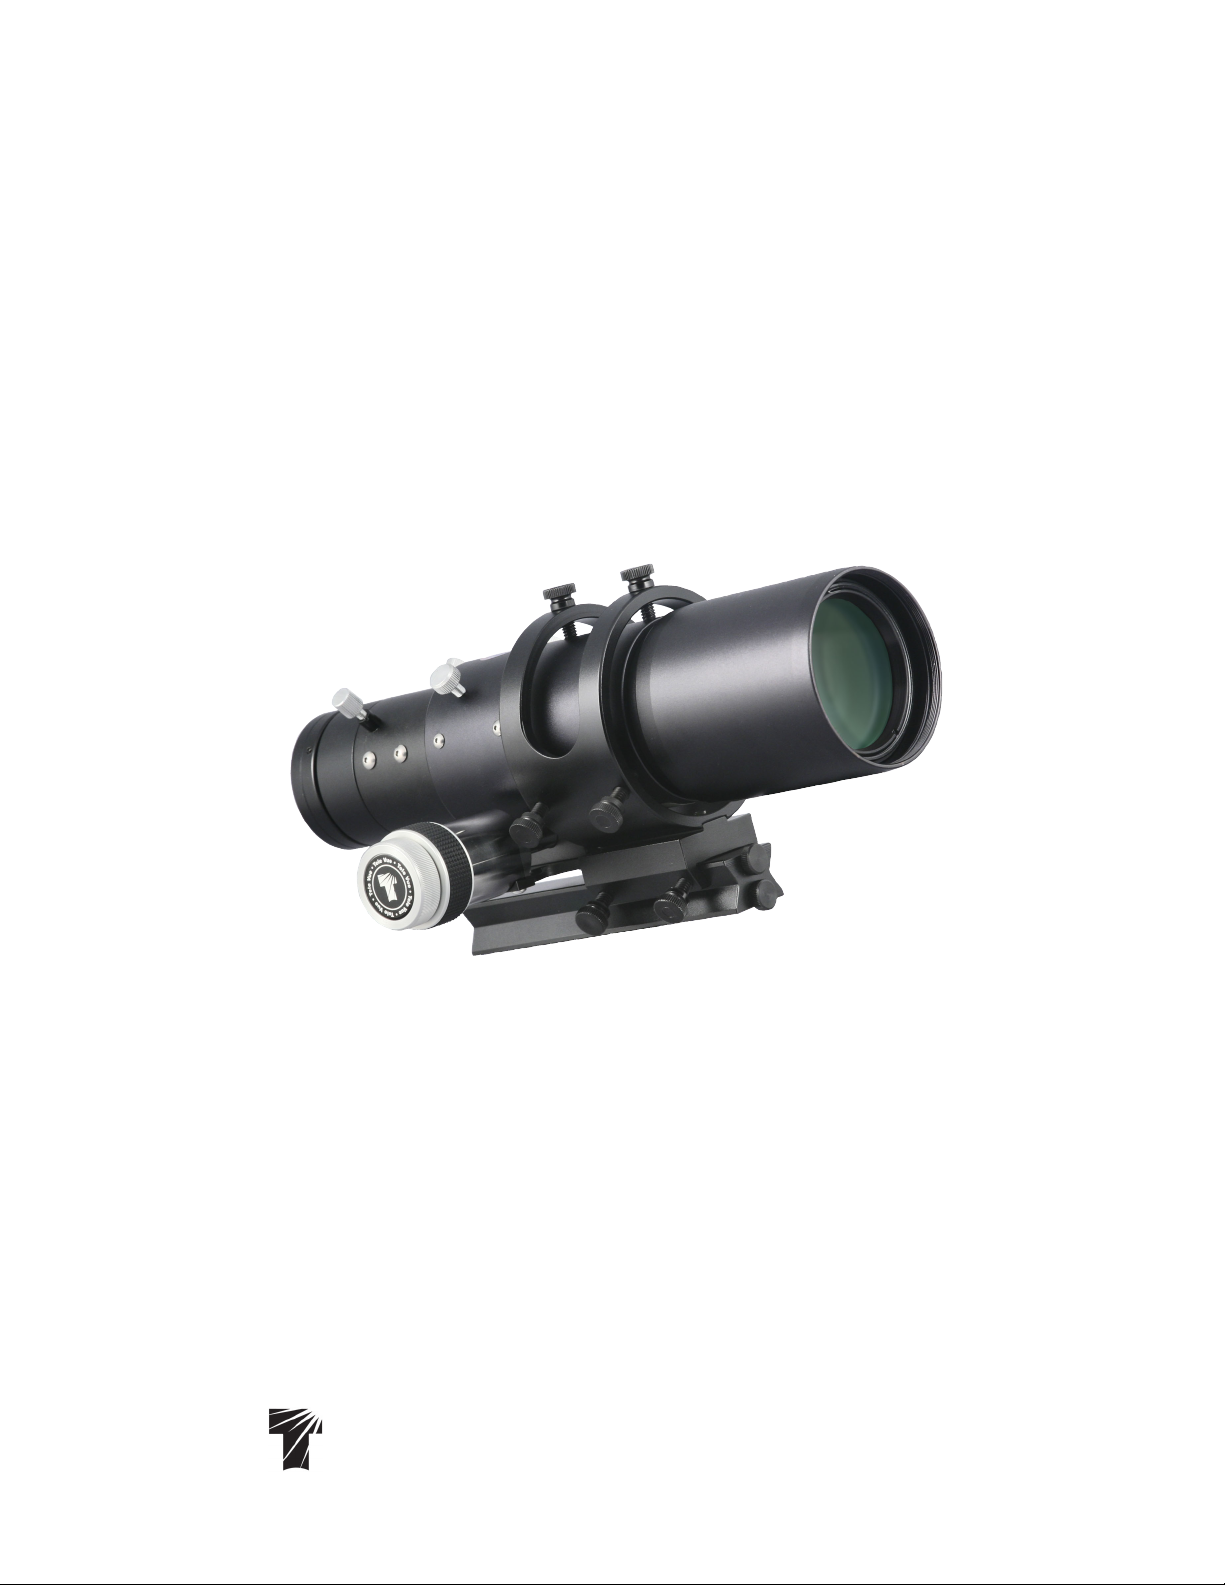
Congratulations on purchasing the Tele Vue-60is (imaging system) APO telescope. This instrument is diffraction
limited, and will perform visually up to the same standard as its sibling 1¼" focuser model, while having the enormous
field capability of accepting 2" eyepieces, with an optional 2" diagonal.
Its primary goal, of course, is imaging. To that end the Tele Vue-60is features a 2" focuser with double locking
screws bearing against brass clamp rings in both the body and drawtube, Focusmatetm 6:1 fine focus mechanism, screwon field flattener which covers typical cameras such as the Canon 20DA without vignetting, and a heavy duty balance
bar with a selection of bolt holes for balance and to mate with imaging platforms and adapters. An optional digital
micrometer, with available RS232 port connection, can measure focus position down to 0.00005".
WARNING: NEVER look at or photograph the sun, or point the telescope toward or near the sun without
proper solar observing equipment rigidly secured in front of the objective lens. Instant and permanent
eye damage will result from viewing the sun directly, even during a solar eclipse, or when viewing through
thin clouds, or when the sun is near the horizon. Your CCD camera can also be damaged.
Getting Acquainted
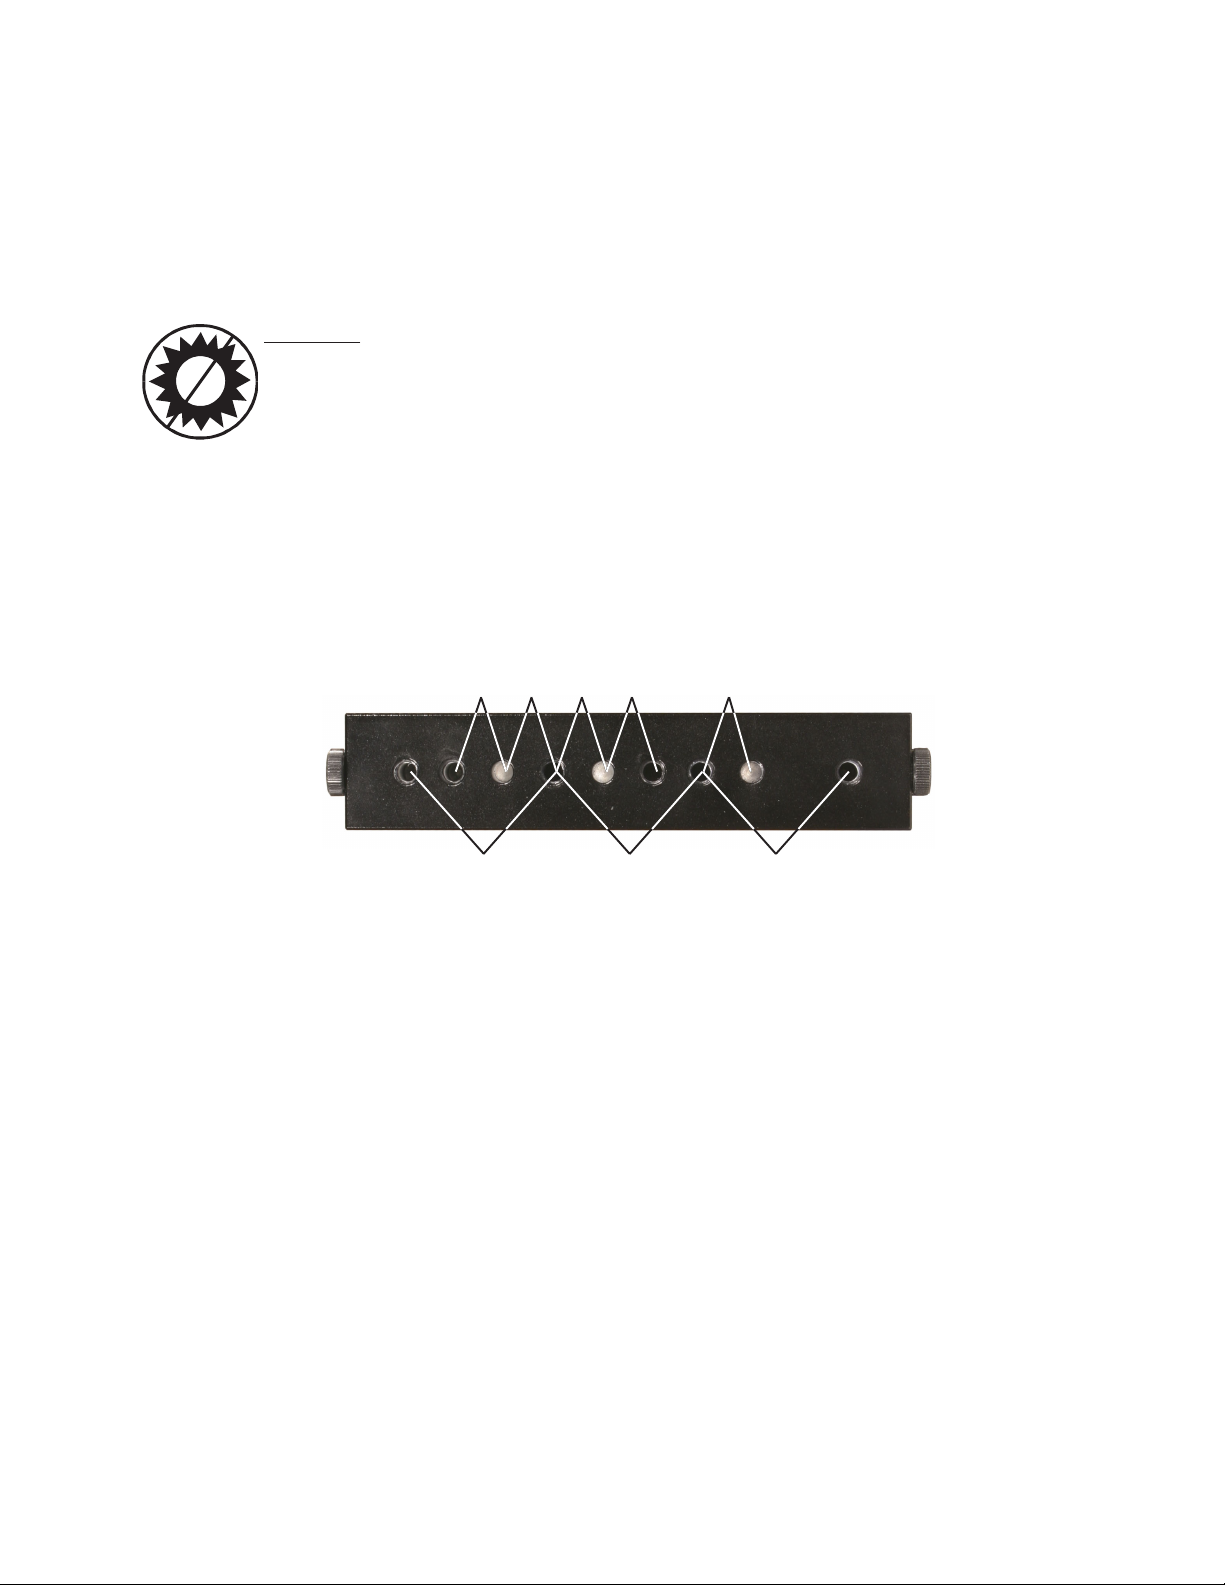
1) Dovetail Balance Bar: Moving the telescope fore and aft by means of the Dovetail Balance Bar will permit balancing
for smooth operation of your mount. To move the scope, loosen the two Dovetail Position Lock Screws on the side of the
Dovetail Channel. Slide the scope fore or aft along the Dovetail Balance Bar until balance is achieved. Tighten the
Position Lock Screws. The top two Safety Stop Screws will prevent the telescope from accidentally sliding off the
Dovetail Balance Bar. The bottom two Safety Stop Screws will prevent the Dovetail Balance Bar from sliding though the
Tele Vue QRB-1002 Quick Release Bracket which can be used to piggyback the Tele Vue-60is on other telescopes.
1/4-20 threaded holes and corresponding video pin holes for Bogen mounts
Threaded holes for various Tele Vue adapter plates and Tele Vue mounts
The threaded holes in the bottom of the Dovetail Balance Bar are spaced for Tele Vue alt-azimuth mounts and also correspond
to Tele Vue equatorial mount adapters which are listed on the Tele Vue website. The series of identically spaced mounting
holes provide additional fore/aft balancing freedom. Should more weight need to be added to the front of the scope even with
the scope pushed all the way forward, then attach the Dovetail Balance Bar to your mounting adapter plate by the rear group
of holes.
2) Tube Ring: The Tube Ring is machined from a single piece of aluminum with two, 3-point suspension rings. The scope
is shipped with the top screws bottomed against the Tube Ring. For maximum adjustment range: hold the telescope,
loosen both top screws halfway through their travel, and tighten each of the lower screws until the telescope is held firmly
against the top screws. Some tube rotation is possible, however complete image orientation can be had by loosening
the Field Flattener and rotating the camera for the most pleasing image composition. (See section 6)
3) Dew Shield: Extend the Dew Shield by simply pulling it forward. Stops on either end retain it on the tube. Two #10-32 button
head screws cover threaded holes in the dew shield. Use these holes to mount a light weight finder such as the Tele Vue QwikPoint. The button head screws may be discarded after installing such a finder.
4) Lens Cap: The Tele Vue-60is objective sits close to the end of the front cell. It is safest to pull the dew shield forward
before removing the lens cap. The plastic will not scratch the objective should it accidentally fall against the first
surface of the objective. Squeeze the two tabs to remove the lens cap from the dew shield.
5) Focuser: The Tele Vue-60is provides a smooth operating rack and pinion focuser plus the dual speed 6:1 reduction
of the Focusmate
tm
. This level of control permits focusing as fine as 0.00005” as measured by the optional Digital
Micrometer Kit.
Appropriate focus tension and locking is achieved by loosening or tightening the two 10-32 Focus Tension
Page 3
Page 4

Screws on top of the focus body. A brass clamp ring sits in a recessed
groove within the interior wall of the focuser body and the Focus
Tension Screws tighten against it. The brass clamp ring in turn,
cinches around the Teflon sleeve within which the Draw Tube rides.
The end of the Draw Tube is threaded to accept the Field
Flattener. It also contains two 8-32 screws which tighten against
a brass clamp ring to hold either the Field Flattener or 2” star
diagonal.
The single knob on one side of the focuser is a direct 1:1
drive. The other side has the Focusmate
tm
. Focusmate
tm
contains
both 1:1 and 6:1 ratios, with the outer knob being the finer of the
two. If so desired, the Focusmatetm can be switched to the left
side of the instrument. Please call Tele Vue for instructions.
6) Field
Flattener: The two-element Tele Vue-60is Field Flattener simply
threads into the end of the focuser Draw Tube. The input side is
threaded for 48mm filters. The output side is threaded for camera
T-rings. When attaching a camera, it is recommended to leave the
Field Flattener in the telescope and thread your T-ring on to it. Then,
attach the camera to the T-ring.
The Field Flattener is optimized for 55mm back focus as
used by 35mm SLR and DSLR cameras. Extension tubes may be
required to achieve the 55mm distance from the face of the Field
Flattener to the CCD chip for other camera types.
To change the orientation of the camera for image composition, leave the Lock Screws loose and unscrew the Field
Flattener until the desired camera angle is achieved (remember,
less than 180° is required). Tighten the two 8-32 Lock Screws
Field Flattener optimized for 55mm distance from T-ring’s
mating face to image plane.
to solidly lock your camera in place.
7) Diagonal Bushing and insert tool: When you want to use the
Tele Vue-60is visually you will need to insert a 2” Star Diagonal
into the draw tube in place of the Field Flattener. The Diagonal
Bushing will add more bearing surface for the diagonal. Holding
the scope horizontally, unscrew the Field Flattener. Thread the
Diagonal Bushing, with the spanner slots facing out, into the
Focuser Draw Tube. As the bushing threads in you may find it
easier to continue by using the insert tool. The tool will also
make removal of the bushing easier. To use the tool, just span
the shorter length of the tool across the slots and continue to
turn. The Diagonal Bushing only needs to be threaded in until
the face is flush with the end of the draw tube.
Detail showing the threading for the Field Flattener, Field
Flattener Lock screws and brass clamp ring.
Optional Digital Micrometer Kit
provides an easy way to index
focus position when focusing by
finding smallest diameter of a
star using the full width
halfmaximum value of a star.
Insertion of the Diagonal Bushing using the insert tool. It is
easiest to start the threading with your finger and use the tool
for removal.
8) Optional Micrometer: Focusing for CCD imaging
can be frustrating. The combination of the
Focusmatetm and Digital Micrometer Kit, which can
detect 0.00005” of focus travel, can make the task
easier and quicker. By having an index, the photographer can always go back to a previous focus point.
For installation, set-up and use of the Micrometer Kit
see the instructions included with the kit.
Page 4
Page 5

9) Case: The Tele Vue-60is case is fitted for the
telescope with a DSLR camera attached. When
packing the scope in the case be sure to place the
rigid ethafoam filler over the scope’s objective.
The top two screws in the mount ring will protrude
through the aperture in the ethafoam.
CARE:
The Tele Vue-60is requires no special care. Treat
it as you would any fine camera lens. Use the lens
cap when the telescope is not in use.
If you leave your scope idle in dewy conditions it is always a good idea to tilt the telescope
slightly up. If dew forms on the lens during cold
weather, it is best to use an electric hair dryer (on the lowest setting) to gently warm it away. A few specks of dust will
have no effect on the quality of the image, and may be gently blown off with a squeeze bulb.
air cans to blow dust off any optical surfaces.air cans to blow dust off any optical surfaces.
air cans to blow dust off any optical surfaces.
air cans to blow dust off any optical surfaces.air cans to blow dust off any optical surfaces.
Fingerprints should be cleaned off. Though the anti-reflection coatings are durable, they can be scratched. The
simplest cleaning method is to moisten a very soft, lint-free tissue, cloth, “Q-Tip” or surgical cotton with a lens or glass
cleaner and gently whisk away the stain. Do not apply any solutions directly to the glass surfaces. After every cleaning
stroke use a fresh applicator. The fewer strokes the better! Any residual “film” will not effect visual performance.
The star diagonal has a first-surface mirror. It should be cleaned only when absolutely necessary. The Tele Vue
60° and 90° diagonal mirror should be removed for cleaning by removing the back cover's four screws, lifting the back
off the diagonal body and cleaning the entire mirror surface. First blow loose dust away with a squeeze bulb.
Do not clean mirror with water or water based cleaners such as Windex or any other commercial lens cleaners: thisDo not clean mirror with water or water based cleaners such as Windex or any other commercial lens cleaners: this
Do not clean mirror with water or water based cleaners such as Windex or any other commercial lens cleaners: this
Do not clean mirror with water or water based cleaners such as Windex or any other commercial lens cleaners: thisDo not clean mirror with water or water based cleaners such as Windex or any other commercial lens cleaners: this
is not a lens. All contain too much water and will leave a residueis not a lens. All contain too much water and will leave a residue
is not a lens. All contain too much water and will leave a residue. Use a Q-Tip moistened with pure acetone or methanol
is not a lens. All contain too much water and will leave a residueis not a lens. All contain too much water and will leave a residue
or Isopropyl alcohol (reagent grade). Wipe the surface gently.
stains or dust spots will have no visible effects in observing. Clean the Porro or 45° prisms just like the mirror diagonal.
The black anodized surfaces of the Tele Vue-60is can be cleaned with “Windex.”
Use very light pressure and never rub. Use very light pressure and never rub.
Use very light pressure and never rub. Slight residual
Use very light pressure and never rub. Use very light pressure and never rub.
Do not use compressedDo not use compressed
Do not use compressed
Do not use compressedDo not use compressed
CAUTION:CAUTION:
CAUTION:
CAUTION:CAUTION:
WARRANTY
The Tele Vue
to be free of manufacturing or workmanship defects
for 5 (five) years from the date of purchase. Please return the warranty card for easy identification. If your
Tele Vue
Tele Vue to discuss the defect, upon which you will
receive a return authorization. NO RETURNS ARE ACCEPTED WITHOUT PRIOR AUTHORIZATION.
defects caused by mis-handling, defects of subjective
nature, coverage for any telescope purchased through
an unauthorized Tele Vue dealer, or purchased outside the home country where Tele Vue has representation. Warranty work will be performed at Tele Vue’s discretion and may only be performed by Tele Vue Optics. The telescope must be shipped in its case with
proper inner and outer packaging. Return shipping and
insurance charges are the purchaser’s responsibility.
--
-60is is warranted to the original owner,
--
--
-60is requires warranty service, please call
--
The warranty does NOT include: collimation,
A LAST WORD
Please contact us with any thoughts, experiences or
questions regarding your Tele Vue-60is. Finally, we
hope you feel as much pride in owning the Tele Vue60is as we have had in building it for you.
SPECIFICATIONS:
Type 2-element APO refractor
Clear Aperture 2.4 inches (60mm)
Aperture Gain 73, compared to a 7mm eye pupil
Focal Length 14.2 inches (360mm)
Focal Ratio f/6
Resolution
(visual) 1.9 arc-sec. (Dawes Limit)
Resolution
(photographic) 240 line pairs per mm
Magnification 9x to 150x using Tele Vue eyepieces
Close Focus Approx. 10 ft.
Field Visual 7.3° at 6.5x (55 Pl), 8.7x (41 Pan)
Field, 35mm film 3.8° by 5.7° (6.8° diagonal)
Image Scale 4.0° per inch
Focuser 2" rack and pinion, plus 6:1 fine focus
Mounting 6-pt. adjustable mount ring. Balance
bar with ¼-20 holes for optional Tele
Vue mounts or equatorial adapters
Weight approx. 6 lbs. (OTA only)
Length 10" (OTA only) 11.5" (with f.f.)
Tube Black anodized aluminum
Accessories Standard: Carry bag
Page 5
Page 6

ngiseD
htgneL
)mm(
lacoF
lerraB
retemaiD
)hcni(
feileReyE
)mm(
xrtpoiD
ydaeR
tnerappA
)°(dleiF
dleiFeurT
)°(
rewoP
.wrewoP
wolraBx2
ro
etamrewoP
.wrewoP
x5.2
etamrewoP
.wrewoP
wolrabx3
.wrewoP
x4
etamrewoP
.wrewoP
x5
etamrewoP
lssölP55283Y053.75.61.31-- 2.62-
citponaP 14 2 72 Y 86 3.7 8.8 6.71 - - 1.53 -
5TrelgaN13291Y 287.66.112.32--5.64-
citponaP 53 2 42 Y 86 2.6 3.01 6.02 - - 1.14 -
sohtE12251Y 0018.51.713.43-- 6.86-
5TrelgaN 62 2 61 *Y 28 6.5 8.31 7.72 - - 4.55 -
4TrelgaN22291Y280.54.617.23--5.56-
citponaP 72 2 91 Y 86 9.4 3.31 7.62 - - 3.35 -
sohtE71251Y 0017.42.124.24--7.48-
5TrelgaN 02 2 21 *Y 28 4.4 0.81 0.63 - - 0.27 -
lssölP04¼182Y343.40.90.815.220.720.630.54
lssölP 23 ¼1 22 Y 05 3.4 3.11 5.22 1.82 8.33 0.54 3.65
citponaP42¼151*Y863.40.510.035.730.540.060.57
4TrelgaN 71 2 71 Y 28 9.3 2.12 4.24 - - 7.48 -
sohtE31¼1/251Y 0016.37.724.552.961.388.0115.831
5TrelgaN 61 ¼1 01 N 28 5.3 5.22 0.54 3.65 5.76 0.09 5.211
citponaP91¼131*Y864.39.819.734.748.658.577.49
lssölP 52 ¼1 71 N 05 4.3 4.41 8.82 0.63 2.34 6.75 0.27
naidaR81¼102Y069.20.020.040.050.060.080.001
sohtE 01 ¼1/2 51 Y 001 8.2 0.63 0.27 0.09 0.801 0.441 0.081
6TrelgaN31¼121*Y288.27.724.552.961.388.0115.831
lssölP 02 ¼1 41 N 02 7.2 0.81 0.63 0.54 0.45 0.27 0.09
citponaP51¼101N867.20.420.840.060.270.690.021
4TrelgaN 21 ¼1/2 71 Y 28 7.2 0.03 0.06 0.57 0.09 0.021 0.051
6TrelgaN11¼121*Y284.27.235.568.182.899.0316.361
naidaR 41 ¼1 02 Y 06 3.2 7.52 4.15 3.46 1.77 9.201 6.821
sohtE8¼1/251Y 0012.20.540.095.2110.531RNRN
lssölP 51 ¼1 01 N 05 0.2 0.42 0.84 0.06 0.27 0.69 0.021
6TrelgaN9¼121*Y280.20.040.080.0010.0210.061RN
sohtE 6 ¼1/2 51 Y 001 7.1 0.06 021 RN RN RN RN
6TrelgaN7¼121*Y285.14.159.2016.8213.451RNRN
lssölP 11 ¼1 8 N 05 4.1 7.23 5.56 8.18 2.89 9.031 6.361
naidaR8¼102Y063.10.540.095.2110.5310.081RN
XS-sohtE 7.3 ¼1/2 51 Y 011 1.1 3.79 RN RN RN RN RN
6TrelgaN5¼121*Y281.10.270.4410.081RNRNRN
lssölP 8 ¼1 6 N 05 0.1 0.54 0.09 5.211 0.531 0.081 RN
naidaR6¼102Y060.10.060.0210.0510.081RNRN
naidaR 5 ¼1 02 Y 06 8.0 0.27 0.441 0.081 RN RN RN
6TrelgaN5.3¼121*Y288.09.201RNRNRNRNRN
naidaR 4 ¼1 02 Y 06 7.0 0.09 0.081 RN RN RN RN
6relgaN5.2¼121*Y285.00.441RNRNRNRNRN
naidaR 3 ¼1 02 Y 06 5.0 0.021 RN RN RN RN RN
relgaN
mooZ
relgaN
mooZ
-3
6
-2
4
¼101N05
¼1 01 N 05
-4.0
8.0
-3.0
5.0
-0.021
0.06
-0.081
0.09
-0.042
0.021
RNRNRNRN
RN RN RN RN RN
Page 6
Page 7

PHOTO/VISUAL CONFIGURATIONS
Page 7
Page 8

Page 8
 Loading...