

Page 1
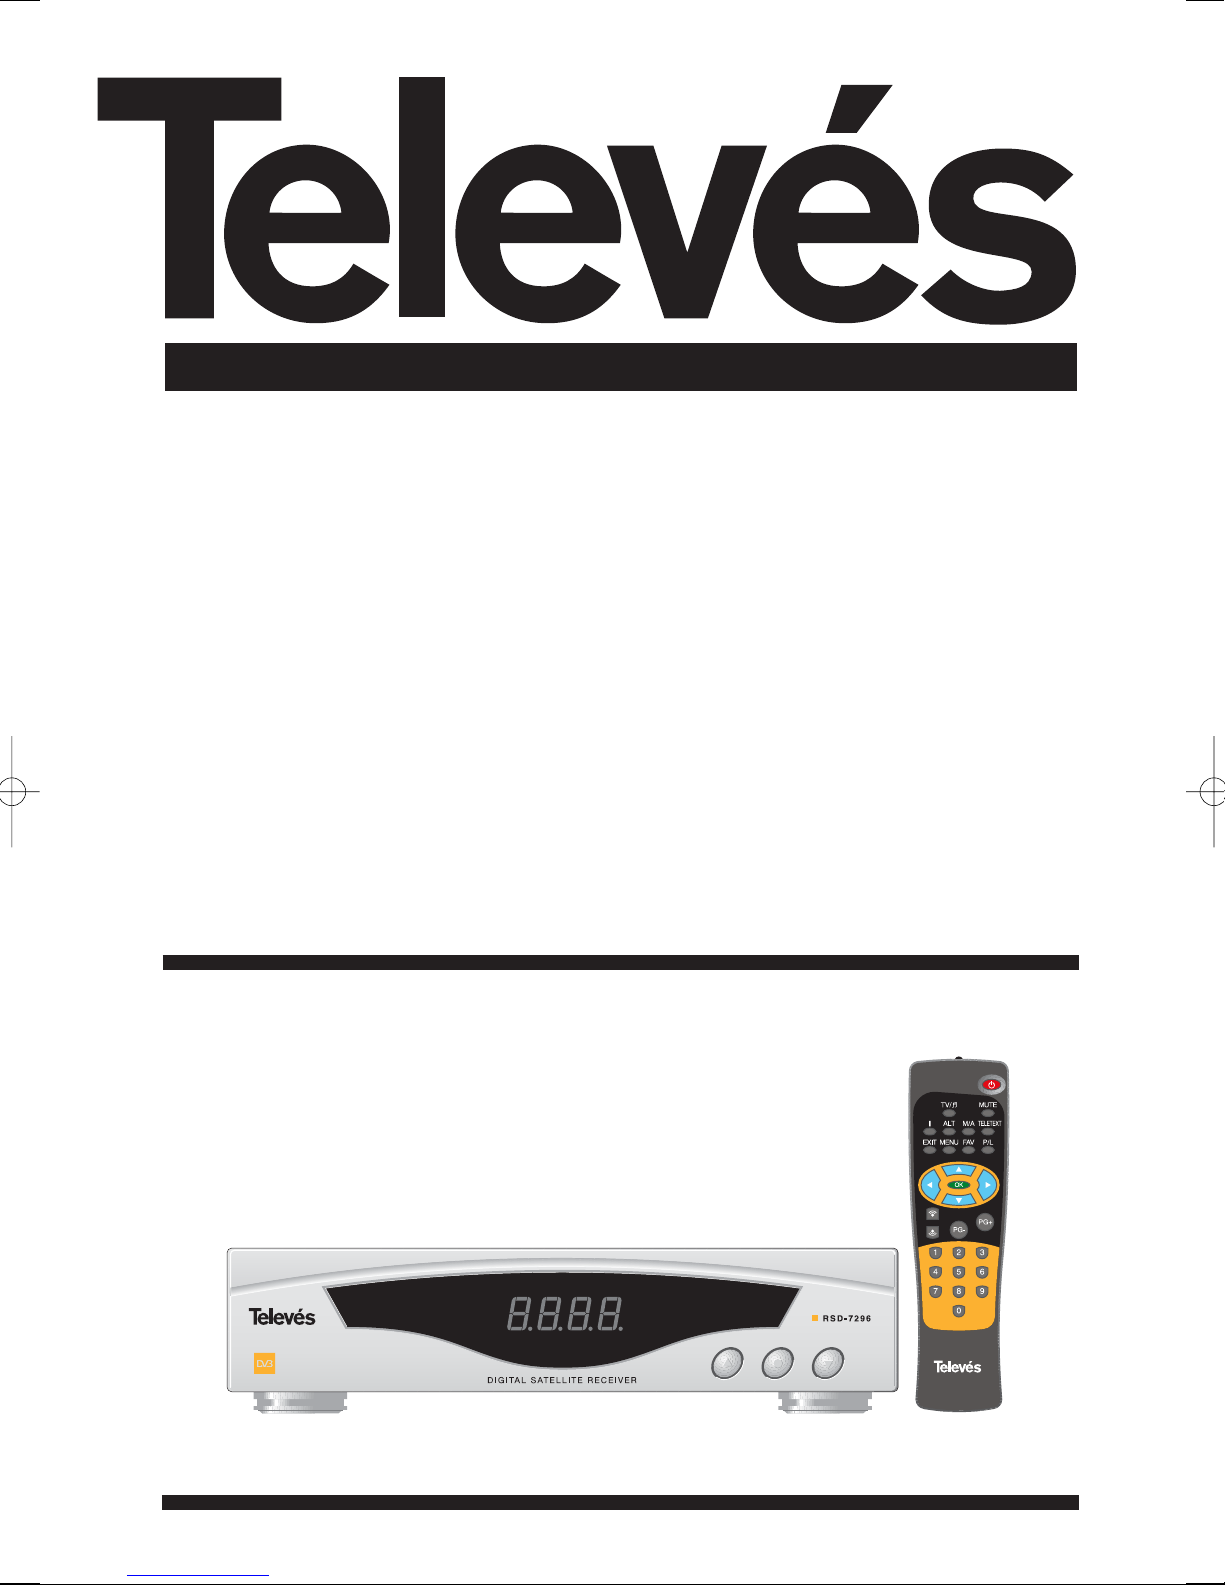
Receptor Satélite Digital Instrucciones de uso
Digital Satellite Receiver User manual
“RSD - 7296”
© Copyright, Televés, S.A.
Page 2

Page 3
Instrucciones de uso
“
RSD - 7296”
3
ESPAÑOL
ÍNDICE . . . . . . . . . . . . . . . . . . . . . . . . . . . . . . . . . . . . . . . . . . . . . . . . . . . . . . . . . . . . . . . . . . . . . . . . . . . . . . . . . . Pág.
1.- Precauciones . . . . . . . . . . . . . . . . . . . . . . . . . . . . . . . . . . . . . . . . . . . . . . . . . . . . . . . . . . . . . . . . . . . . . . . . . . . . . . . . . 4
2.- Antes de empezar . . . . . . . . . . . . . . . . . . . . . . . . . . . . . . . . . . . . . . . . . . . . . . . . . . . . . . . . . . . . . . . . . . . . . . . . . . . . . 5
2.1.- Prefacio . . . . . . . . . . . . . . . . . . . . . . . . . . . . . . . . . . . . . . . . . . . . . . . . . . . . . . . . . . . . . . . . . . . . . . . . . . . . . 5
2.2.- Características generales . . . . . . . . . . . . . . . . . . . . . . . . . . . . . . . . . . . . . . . . . . . . . . . . . . . . . . . . . . . . . . . 5
2.3.- Composición . . . . . . . . . . . . . . . . . . . . . . . . . . . . . . . . . . . . . . . . . . . . . . . . . . . . . . . . . . . . . . . . . . . . . . . . . 5
3.- Descripción de paneles y conexiones . . . . . . . . . . . . . . . . . . . . . . . . . . . . . . . . . . . . . . . . . . . . . . . . . . . . . . . . . . . . . 6
4.- Primera instalación . . . . . . . . . . . . . . . . . . . . . . . . . . . . . . . . . . . . . . . . . . . . . . . . . . . . . . . . . . . . . . . . . . . . . . . . . . . . 8
4.1.- Conexiones / Menú inicial . . . . . . . . . . . . . . . . . . . . . . . . . . . . . . . . . . . . . . . . . . . . . . . . . . . . . . . . . . . . . . . 8
4.2.- Instalación Fija . . . . . . . . . . . . . . . . . . . . . . . . . . . . . . . . . . . . . . . . . . . . . . . . . . . . . . . . . . . . . . . . . . . . . . . . 10
4.3.- Instalación con Motor . . . . . . . . . . . . . . . . . . . . . . . . . . . . . . . . . . . . . . . . . . . . . . . . . . . . . . . . . . . . . . . . . . 12
5.- Listo para comenzar . . . . . . . . . . . . . . . . . . . . . . . . . . . . . . . . . . . . . . . . . . . . . . . . . . . . . . . . . . . . . . . . . . . . . . . . . . . 14
5.1.- Funcionamiento básico . . . . . . . . . . . . . . . . . . . . . . . . . . . . . . . . . . . . . . . . . . . . . . . . . . . . . . . . . . . . . . . . . 14
5.2.- Como seleccionar canales TV o RADIO . . . . . . . . . . . . . . . . . . . . . . . . . . . . . . . . . . . . . . . . . . . . . . . . . . . . 14
5.3.- Como ajustar el volumen . . . . . . . . . . . . . . . . . . . . . . . . . . . . . . . . . . . . . . . . . . . . . . . . . . . . . . . . . . . . . . . . 14
5.4.- Supresión del sonido (Mute) . . . . . . . . . . . . . . . . . . . . . . . . . . . . . . . . . . . . . . . . . . . . . . . . . . . . . . . . . . . . . 15
5.5.- Idioma del Audio . . . . . . . . . . . . . . . . . . . . . . . . . . . . . . . . . . . . . . . . . . . . . . . . . . . . . . . . . . . . . . . . . . . . . . 15
5.6.- Llamada al canal anterior . . . . . . . . . . . . . . . . . . . . . . . . . . . . . . . . . . . . . . . . . . . . . . . . . . . . . . . . . . . . . . . 15
5.7.- Regreso al último canal y autoguardado del mismo . . . . . . . . . . . . . . . . . . . . . . . . . . . . . . . . . . . . . . . . . . . 15
5.8.- Congelado de la imagen (PAUSA) . . . . . . . . . . . . . . . . . . . . . . . . . . . . . . . . . . . . . . . . . . . . . . . . . . . . . . . . . 15
5.9.- Guía electrónica de programación (EPG) . . . . . . . . . . . . . . . . . . . . . . . . . . . . . . . . . . . . . . . . . . . . . . . . . . . 16
5.10.- Como usar la Lista de Canales Favoritos . . . . . . . . . . . . . . . . . . . . . . . . . . . . . . . . . . . . . . . . . . . . . . . . . . 17
5.11.- Función Teletexto . . . . . . . . . . . . . . . . . . . . . . . . . . . . . . . . . . . . . . . . . . . . . . . . . . . . . . . . . . . . . . . . . . . . 17
6.- Menú principal . . . . . . . . . . . . . . . . . . . . . . . . . . . . . . . . . . . . . . . . . . . . . . . . . . . . . . . . . . . . . . . . . . . . . . . . . . . . . . . . 18
7.- Menú Idioma OSD . . . . . . . . . . . . . . . . . . . . . . . . . . . . . . . . . . . . . . . . . . . . . . . . . . . . . . . . . . . . . . . . . . . . . . . . . . . . . 18
8.- Menú Instalación del Receptor . . . . . . . . . . . . . . . . . . . . . . . . . . . . . . . . . . . . . . . . . . . . . . . . . . . . . . . . . . . . . . . . . . . 19
8.1.- Organizar canales . . . . . . . . . . . . . . . . . . . . . . . . . . . . . . . . . . . . . . . . . . . . . . . . . . . . . . . . . . . . . . . . . . . . . 19
8.2.- Cambiar código secreto (PIN) . . . . . . . . . . . . . . . . . . . . . . . . . . . . . . . . . . . . . . . . . . . . . . . . . . . . . . . . . . . . 21
8.3.- Ajuste del reloj . . . . . . . . . . . . . . . . . . . . . . . . . . . . . . . . . . . . . . . . . . . . . . . . . . . . . . . . . . . . . . . . . . . . . . . . 21
8.4.- Temporizador VCR . . . . . . . . . . . . . . . . . . . . . . . . . . . . . . . . . . . . . . . . . . . . . . . . . . . . . . . . . . . . . . . . . . . . 22
8.5.- Programas de fábrica (Restaurar valores por defecto) . . . . . . . . . . . . . . . . . . . . . . . . . . . . . . . . . . . . . . . . . 23
8.6.- Selección de audio . . . . . . . . . . . . . . . . . . . . . . . . . . . . . . . . . . . . . . . . . . . . . . . . . . . . . . . . . . . . . . . . . . . . 23
8.7.- Formato TV . . . . . . . . . . . . . . . . . . . . . . . . . . . . . . . . . . . . . . . . . . . . . . . . . . . . . . . . . . . . . . . . . . . . . . . . . . 24
8.8.- Acerca del receptor . . . . . . . . . . . . . . . . . . . . . . . . . . . . . . . . . . . . . . . . . . . . . . . . . . . . . . . . . . . . . . . . . . . . 24
9.- Menú Instalación de sistema . . . . . . . . . . . . . . . . . . . . . . . . . . . . . . . . . . . . . . . . . . . . . . . . . . . . . . . . . . . . . . . . . . . . . 25
9.1.- Instalación de LNB . . . . . . . . . . . . . . . . . . . . . . . . . . . . . . . . . . . . . . . . . . . . . . . . . . . . . . . . . . . . . . . . . . . . 25
9.2.- Instalación de Antena . . . . . . . . . . . . . . . . . . . . . . . . . . . . . . . . . . . . . . . . . . . . . . . . . . . . . . . . . . . . . . . . . . 26
9.3.- Instalación de satélite . . . . . . . . . . . . . . . . . . . . . . . . . . . . . . . . . . . . . . . . . . . . . . . . . . . . . . . . . . . . . . . . . . 27
9.4.- Instalación de transpondedor . . . . . . . . . . . . . . . . . . . . . . . . . . . . . . . . . . . . . . . . . . . . . . . . . . . . . . . . . . . . 29
9.5.- Posicionador DiSEqC 1.2 . . . . . . . . . . . . . . . . . . . . . . . . . . . . . . . . . . . . . . . . . . . . . . . . . . . . . . . . . . . . . . . 30
9.6.- Actualización de código (software) . . . . . . . . . . . . . . . . . . . . . . . . . . . . . . . . . . . . . . . . . . . . . . . . . . . . . . . . 32
10.- Búsqueda automática . . . . . . . . . . . . . . . . . . . . . . . . . . . . . . . . . . . . . . . . . . . . . . . . . . . . . . . . . . . . . . . . . . . . . . . . . 33
Estructura del menú . . . . . . . . . . . . . . . . . . . . . . . . . . . . . . . . . . . . . . . . . . . . . . . . . . . . . . . . . . . . . . . . . . . . . . . . . . . . . . 34
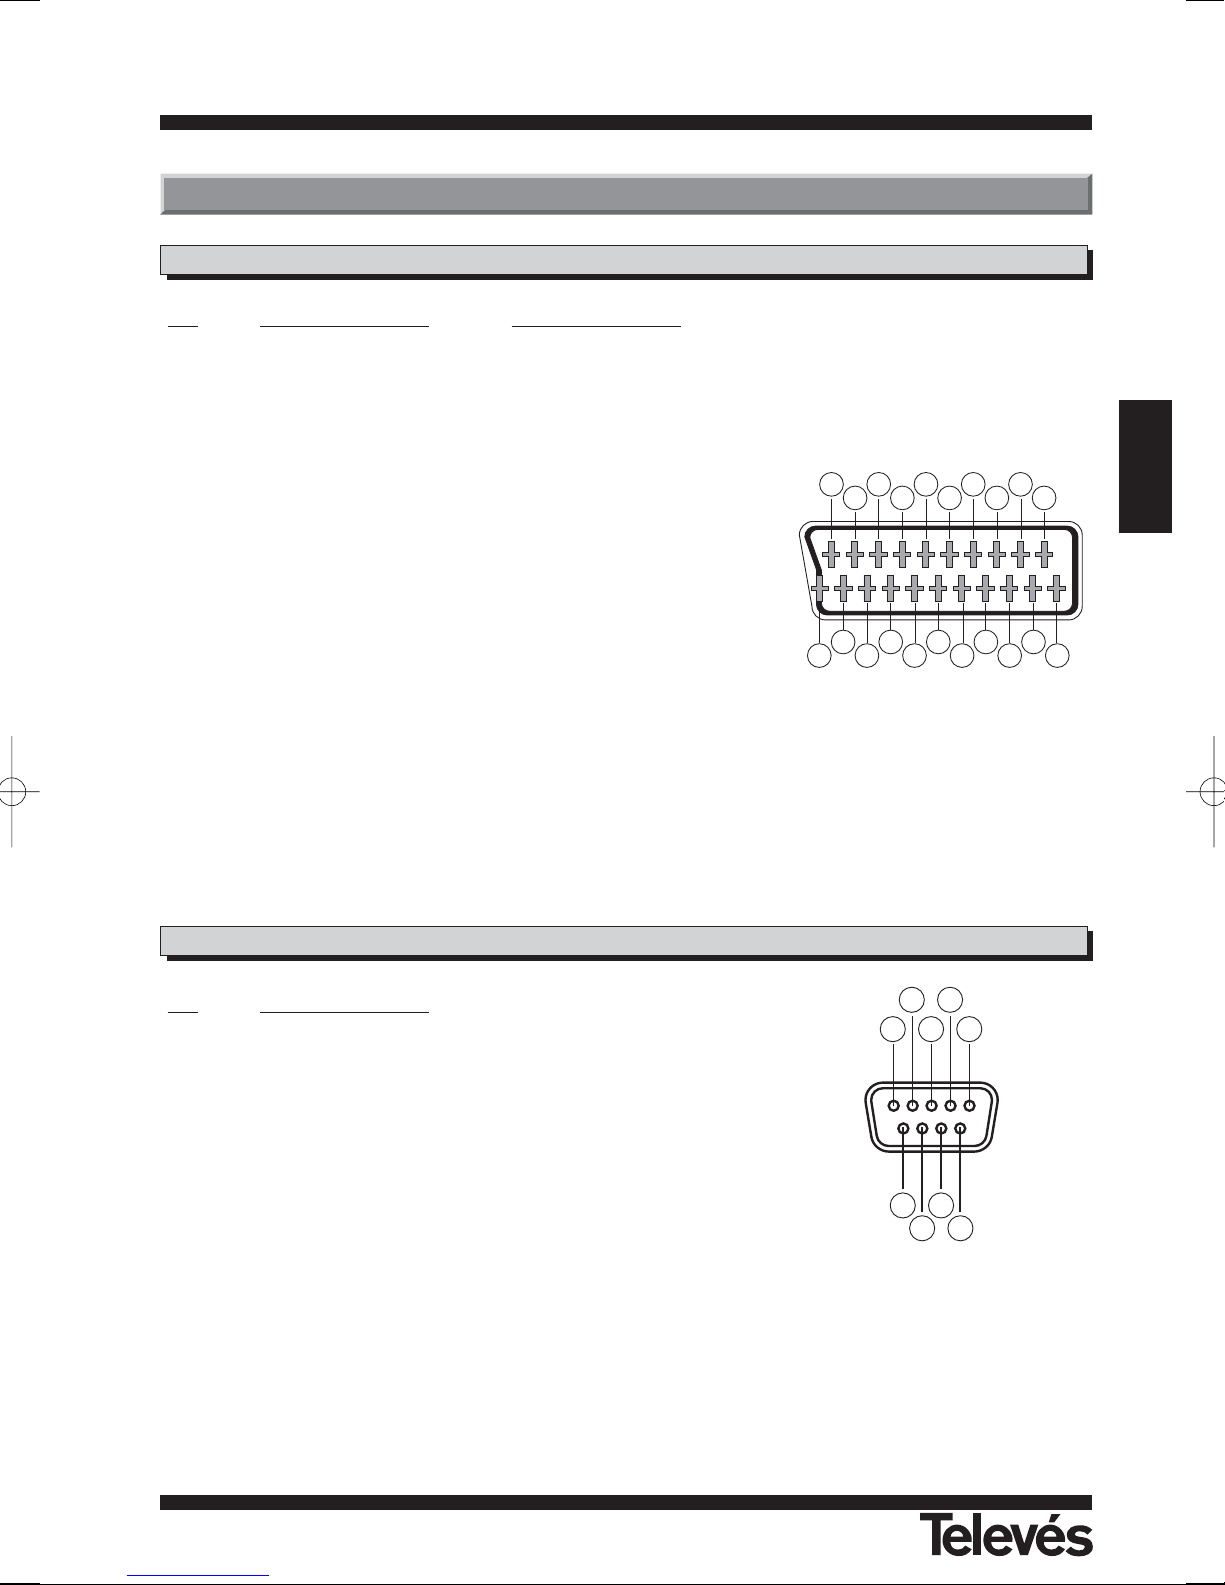
Descripción de conectores . . . . . . . . . . . . . . . . . . . . . . . . . . . . . . . . . . . . . . . . . . . . . . . . . . . . . . . . . . . . . . . . . . . . . . . . . 35
Características técnicas . . . . . . . . . . . . . . . . . . . . . . . . . . . . . . . . . . . . . . . . . . . . . . . . . . . . . . . . . . . . . . . . . . . . . . . . . . . 36
Garantía . . . . . . . . . . . . . . . . . . . . . . . . . . . . . . . . . . . . . . . . . . . . . . . . . . . . . . . . . . . . . . . . . . . . . . . . . . . . . . . . . . 71
Page 4
Instrucciones de uso
“
RSD - 7296”
4
El Receptor que acaba de adquirir ha sido construido conforme las normas internacionales de seguridad.
Le aconsejamos que lea atentamente los siguientes consejos de seguridad.
ALIMENTACIÓN:
90 - 260 V~ 50/60 Hz.
SOBRECARGA:
No sobrecargar las tomas, prolongaciones o adaptadores para evitar el riesgo de incendio o descarga eléctrica.
LÍQUIDOS:
No exponer el Receptor a la caída o salpicaduras de agua.
No situar objetos o recipientes que contengan líquido sobre o en las proximidades del aparato.
PEQUEÑOS OBJETOS:
Evitar la proximidad de pequeños objetos metálicos. Estos podrían entrar por las ranuras de ventilación del Receptor
y causar graves daños.
LIMPIEZA:
Desenchufar el Receptor de la red antes de efectuar la limpieza.
Utilizar un paño suave, ligeramente humedecido en agua (sin detergentes) para limpiar el exterior del Receptor.
VENTILACIÓN:
Colocar el Receptor en un lugar bien ventilado con las ranuras al descubierto.
Evitar la exposición al sol o a fuentes de calor.
No colocar encima otros equipos.
CONEXIONES:
Efectúe solamente las conexiones recomendadas para evitar posibles daños.
CONEXIONES AL LNB:
Apague el Receptor antes de conectar o desconectar el LNB.
NO ACTUANDO ASI, PODRÍA DAÑAR EL LNB.
CONEXIÓN AL TV o VCR:
Apague el Receptor antes de conectar o desconectar a un TV o VCR.
NO ACTUANDO ASI, PODRÍA DAÑAR EL TV o VCR.
UBICACIÓN:
Colocar el Receptor en un local interior protegido de descargas, lluvia o sol directo.
Instale el Receptor en posición horizontal.
1.- Precauciones
WARNING
RISK ELECTRICAL SHOCK
DO NOT OPEN
PARA REDUCIR EL RIESGO DE DESCARGA ELÉCTRICA, NO RETIRAR LA TAPA.
NO HAY PARTES REPARABLES POR EL USUARIO EN EL INTERIOR.
PARA UNA REPARACIÓN, CONSULTE CON UN TÉCNICO CUALIFICADO
Este símbolo indica "voltaje peligroso" dentro del producto que puede presentar un
riesgo de descarga eléctrica o daños personales.
Este símbolo indica que existen instrucciones importantes para este producto.
Page 5
Instrucciones de uso
“
RSD - 7296”
5
ESPAÑOL
- Instalación guiada (Easy Menú).
- Menú en pantalla de fácil uso.
- Listado de canales favoritos.
- Compatible DiSEqC 1.2 / USALS.
- Video y audio de alta calidad.
- Gestión de canales mediante las
opciones de “mover”, “bloquear”,
“favoritos”, "borrar" y “añadir”.
- Información de eventos mediante
EPG (Electronic Program Guide).
- Función Teletexto
- Mando a distancia.
- Ofrece varios tipos de conmutación,
de LNBs, de modos de salida y tipos
de monitores.
- Transpondedores pre-programados
de diferentes satélites.
- Muestra la información de los transpondedores.
- Búsqueda de nuevos transpondedores añadidos.
- Control de acceso.
- Sistema automático de soporte
PAL/NTSC.
- Auto guardado del último canal
usado y función de auto retorno.
- Display de 4 dígitos.
- Función temporizador.
- Función actualización software.
- Indicación horaria.
Un Receptor de Satélite Digital es un
producto que le permite ver una gran
variedad de canales suministrados por
un satélite. Este manual de instrucciones explica desde como se instala el
Receptor hasta los pasos necesarios
que hay que dar para mejorar una serie
de prestaciones. Además este manual
explica en detalle una serie de prestaciones solo disponibles en el Receptor,
para que usted pueda hacer buen uso
de las mismas.
Tanto para la instalación del Receptor
como para su correcto uso, asegúrese
de leer el manual así como de guardarlo para futuras consultas.
2.1.- Prefacio
2.2.- Características generales
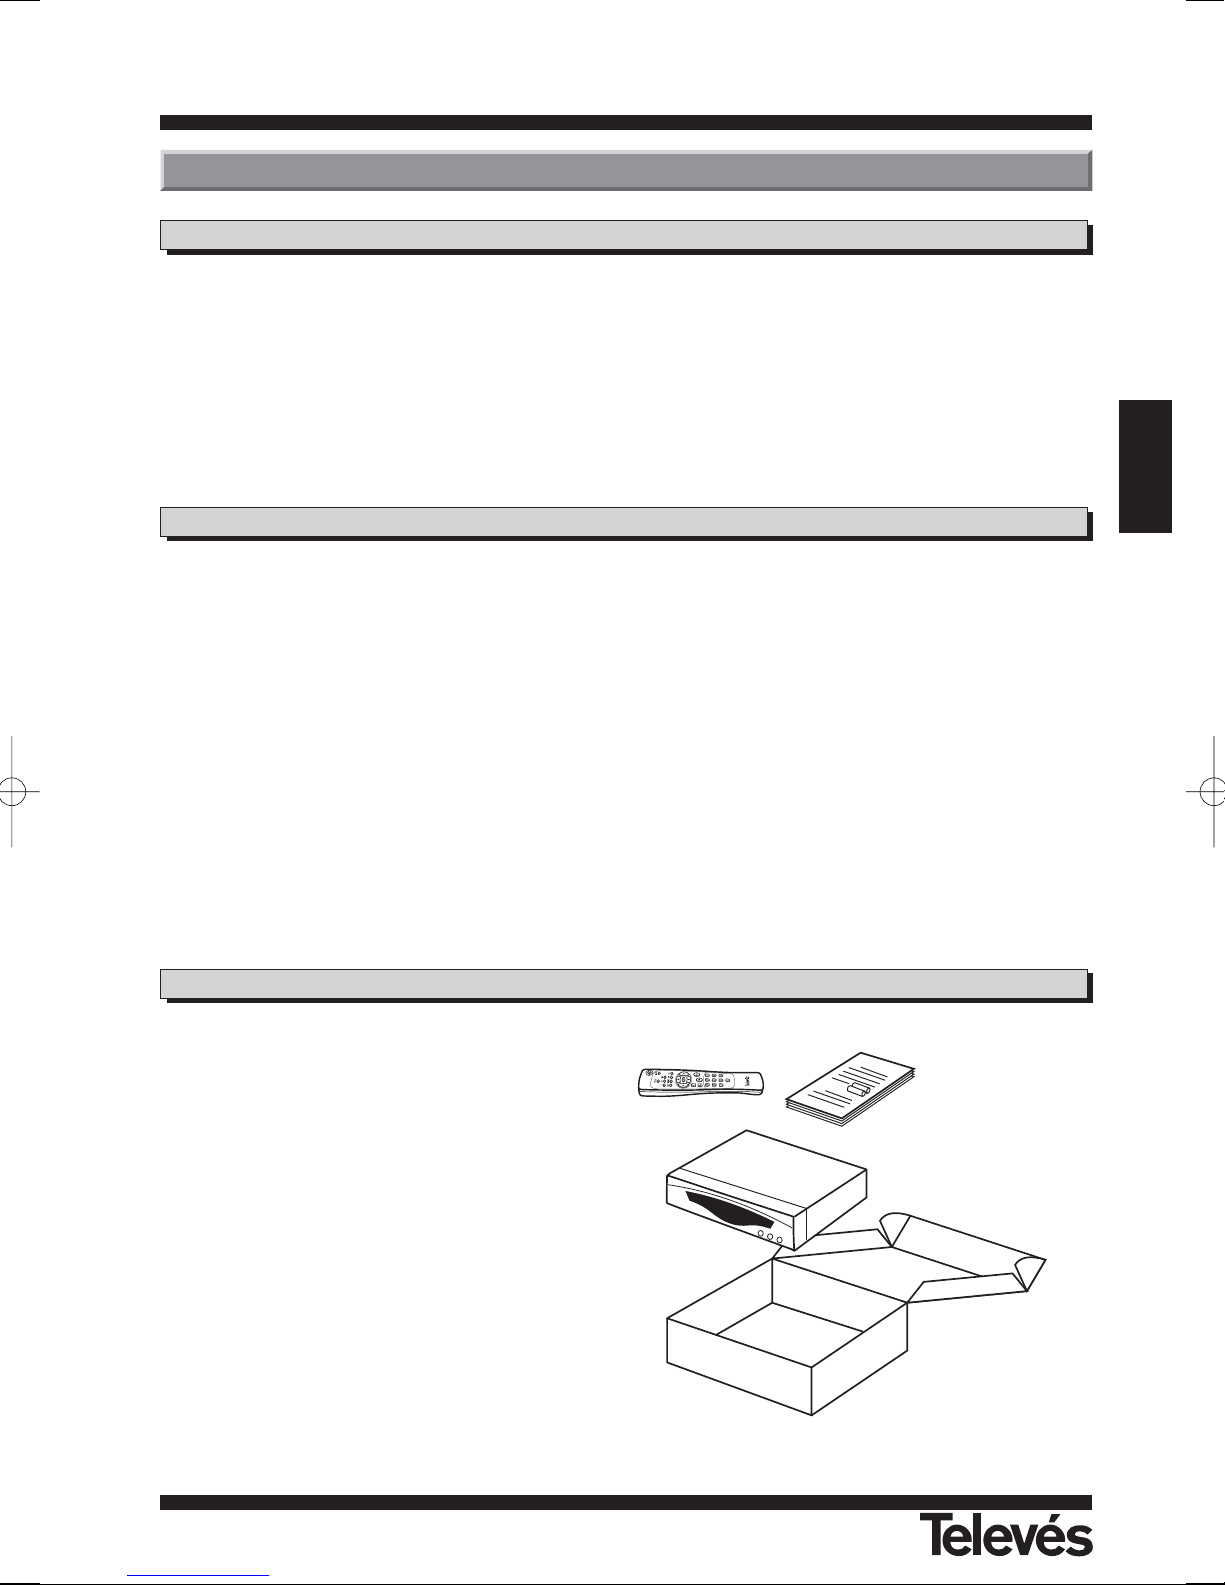
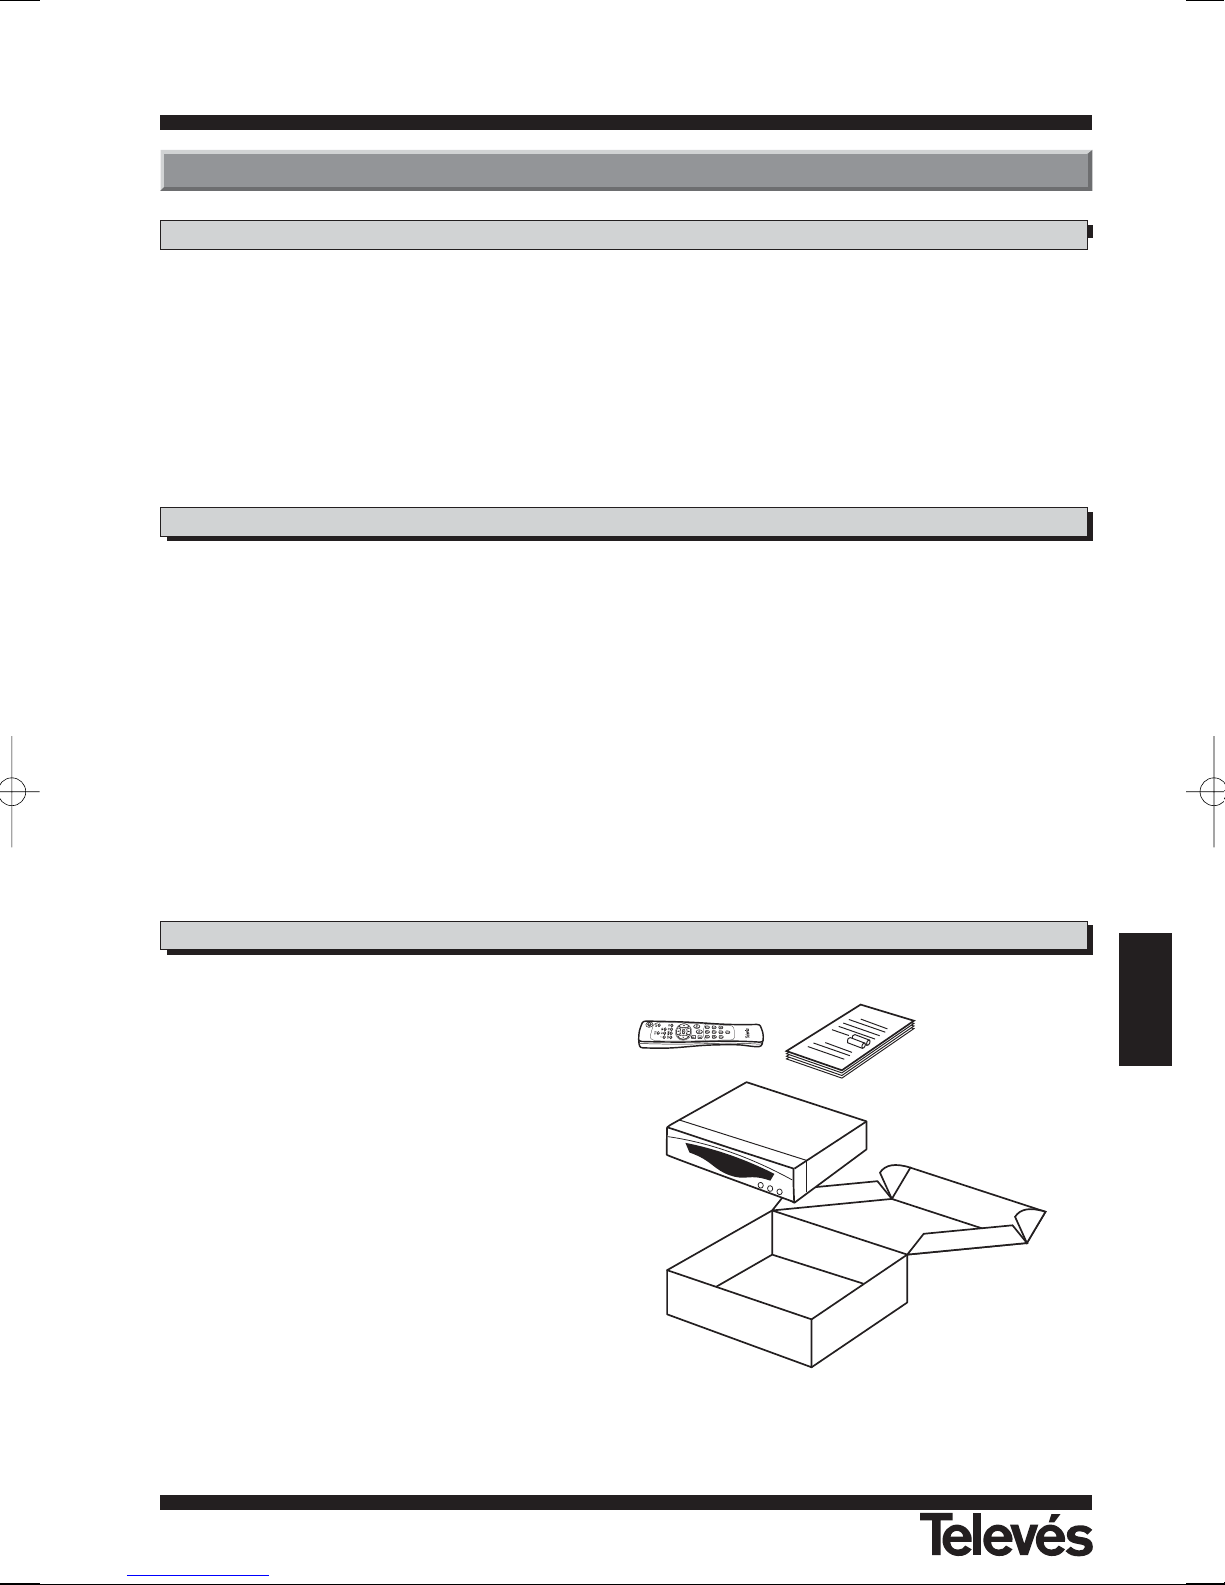
Compruebe que todos los artículos
siguientes vienen incluidos en la caja:
1 - Receptor de satélite RSD-7296
1 - Mando a distancia
2 - Pilas tipo “AAA”, “LR03” o “AM-4”
- - Manuales de instrucciones
2.3.- Composición
2.- Antes de empezar ...
Page 6
Instrucciones de uso
“
RSD - 7296”
6
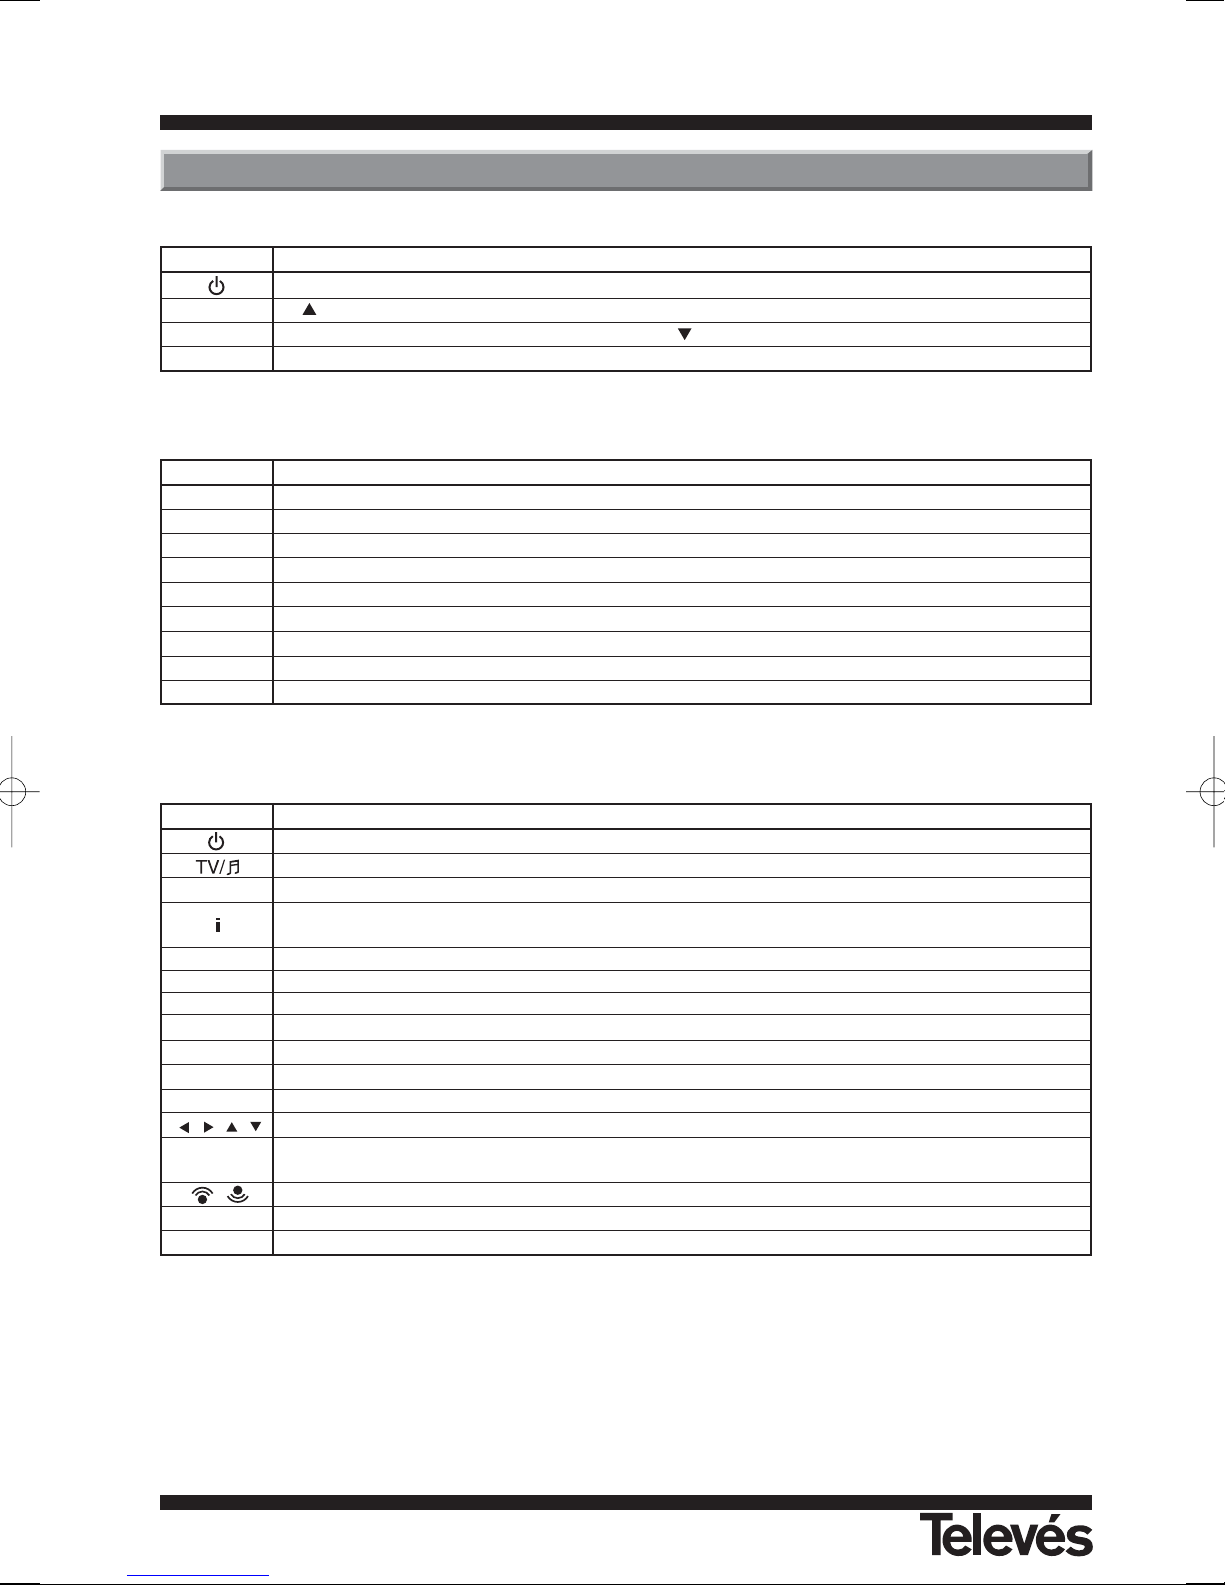
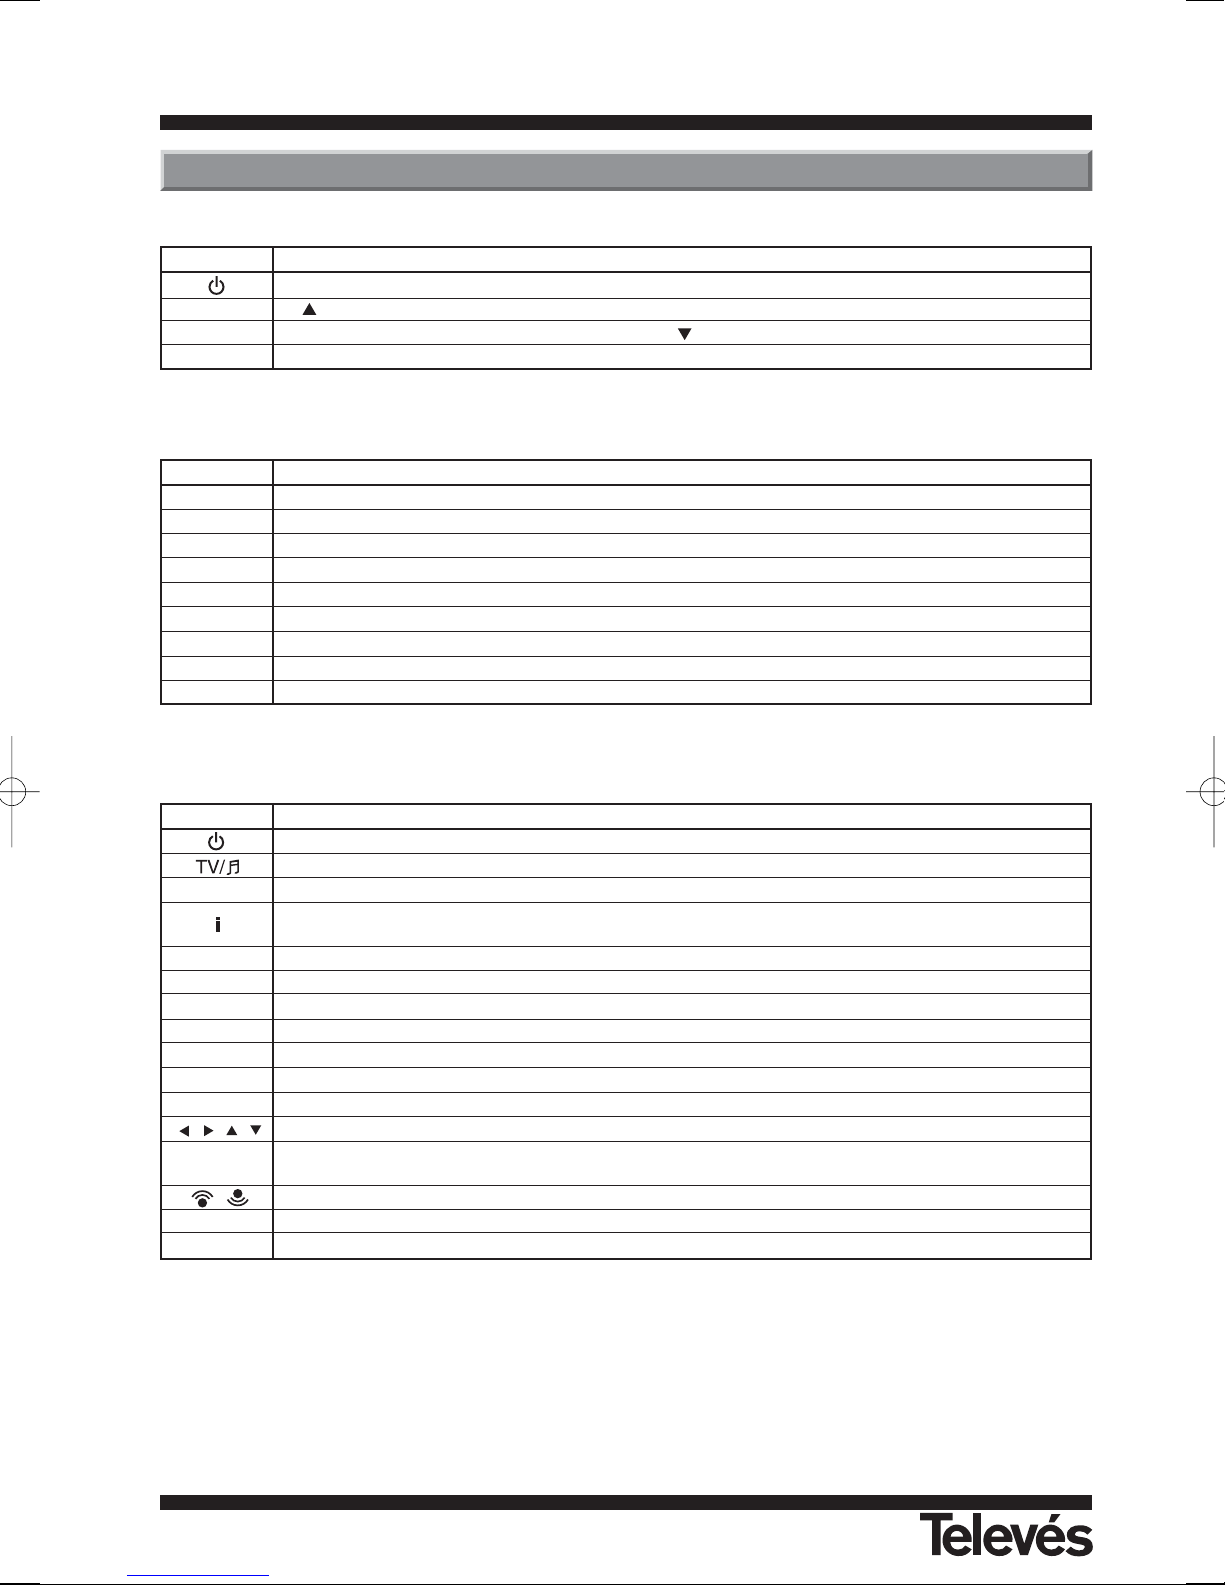
Tecla Función
Conmuta entre el modo de funcionamiento normal y standby.
Incrementa un nº de programa.
Disminuye un nº de programa.
Display En modo normal muestra el nº de canal; en
Tecla Función
Conmuta entre el modo de funcionamiento normal y standby.
Conmuta entre canales de TV o RADIO. Conmuta entre Lista TV y Lista Radio.
MUTE Suprime el sonido.
Muestra información sobre el canal que se está visualizando.
Si se vuelve a pulsar se muestra en pantalla la guia de programación electrónica (EPG).
ALT Retorna al canal anterior.
M/A Selecciona los diferentes tipos de audio.
TELETEXT Activa el menú Teletexto, si éste es emitido.
EXIT Para volver al menú anterior dentro de los menús.
Menú Nos muestra el menú principal en pantalla.
FAV Activa la lista de canales favoritos.
P/L Activa una lista con todos los canales bloqueados.
, , , Cursores para desplazarse por las opciones del menú.
OK
Ejecuta la opción seleccionada en el menú o introduce el valor deseado en cualquier modo de entrada o
muestra la lista de canales mientras se está visionando un programa.
,
Aumenta o disminuye el sonido.
PG-/PG+ Selecciona un nº de canal arriba o abajo.
0 ... 9 Selección de un canal para visionar. Entrada directa de datos en el menú.
Nombre Función
LNB IN Entrada de señal de la antena satélite.
IF OUT Salida de señal de satélite para conectar a otro receptor.
TV Para conectar un TV mediante Euroconector.
VCR Para conectar un VCR mediante Euroconector.
VIDEO Salida de señal de video.
AUDIO R Salida de audio (Canal derecho).
AUDIO L Salida de audio (Canal izquierdo).
RS232 Conexión a un puerto serie u otro receptor para actualización de software.
POWER Interruptor encendido/apagado.
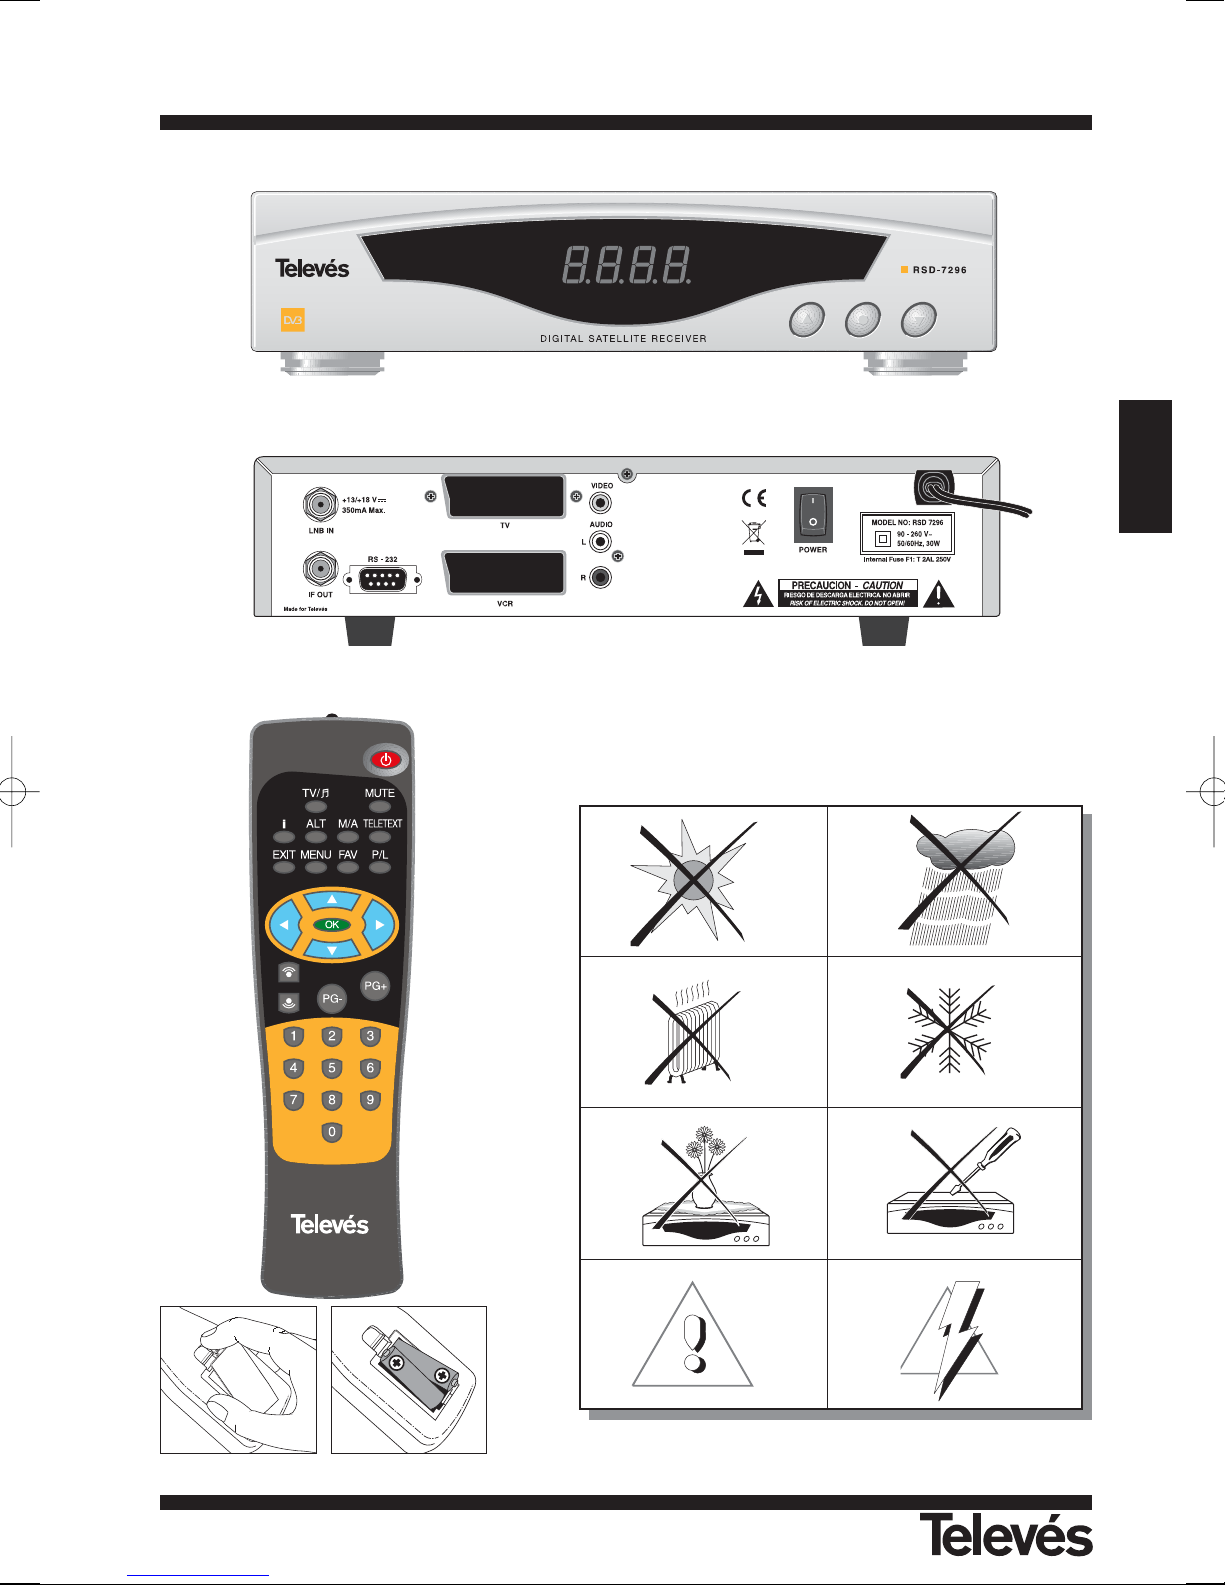
Fig. 3 - Mando a distancia
Fig. 2 - Panel Posterior
Fig. 1 - Panel Frontal
3.- Descripción de paneles y conexiones
Page 7
Instrucciones de uso
“
RSD - 7296”
7
ESPAÑOL
< -5°C
> 95 %
> 50°C
Fig. -1-
Fig. -2-
Fig. -3-
Page 8
Instrucciones de uso
“
RSD - 7296”
8
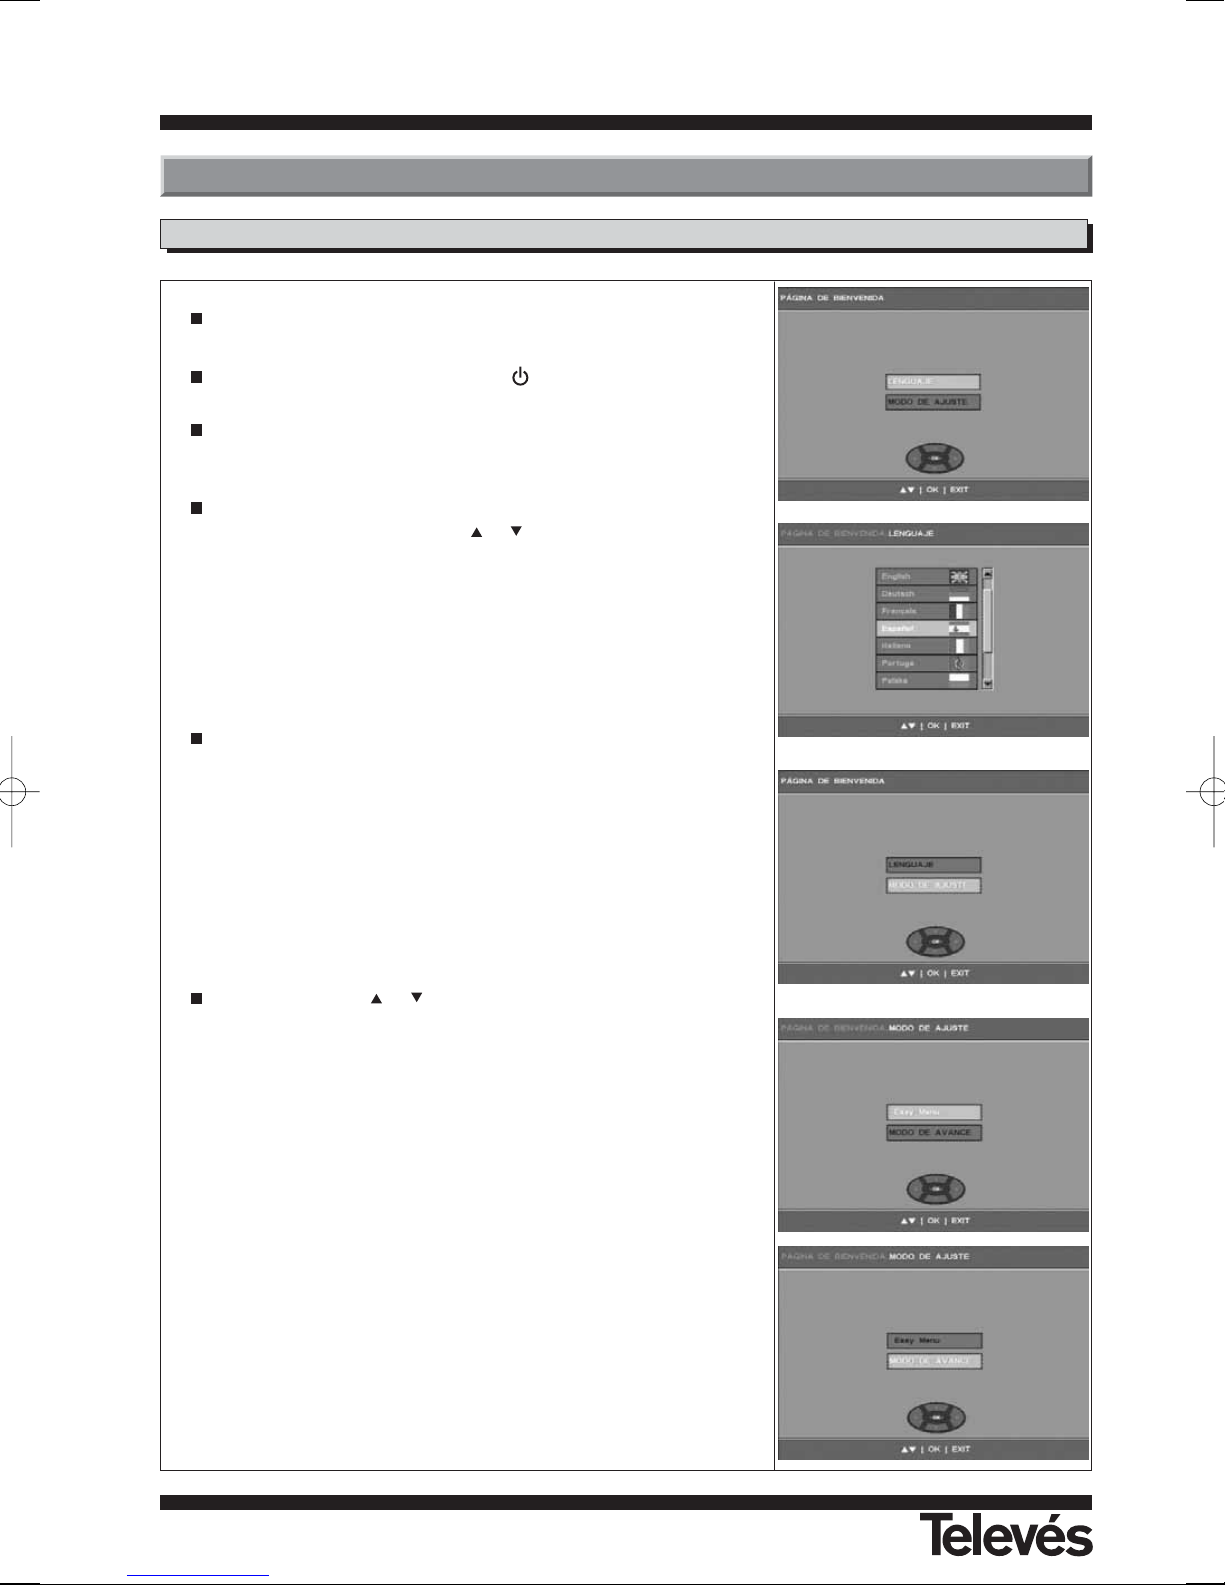
Conecte el TV y todos los equipos periféricos conectados al sistema.
Encienda el receptor pulsando la tecla ( ) del mando a distancia.
Por defecto siempre aparece activa la opción - Idioma -.
Pulse la tecla OK del mando.
Para seleccionar el idioma con el que se mostrarán los textos de los
menús en pantalla, use las teclas o .
Una vez seleccionado el idioma pulse la tecla OK.
Automáticamente aparece la opción - Modo de ajuste -.
Pulse la tecla OK para acceder al menú.
Mediante las teclas o seleccione uno de los dos tipos de instalación posibles: - Easy Menú - (Instalación Guiada) o bien - Modo
Avanzado - y pulse la tecla OK para confirmar la opción.
Si ha elegido la opción - Modo Avanzado - pase directamente al apartado 9.- Instalación del Sistema.
Si ha optado por una - Instalación Guiada - continúe en este punto.
4.1.- Conexiones / Menú Inicial
4.- Primera Instalación
Page 9
Instrucciones de uso
“
RSD - 7296”
9
ESPAÑOL
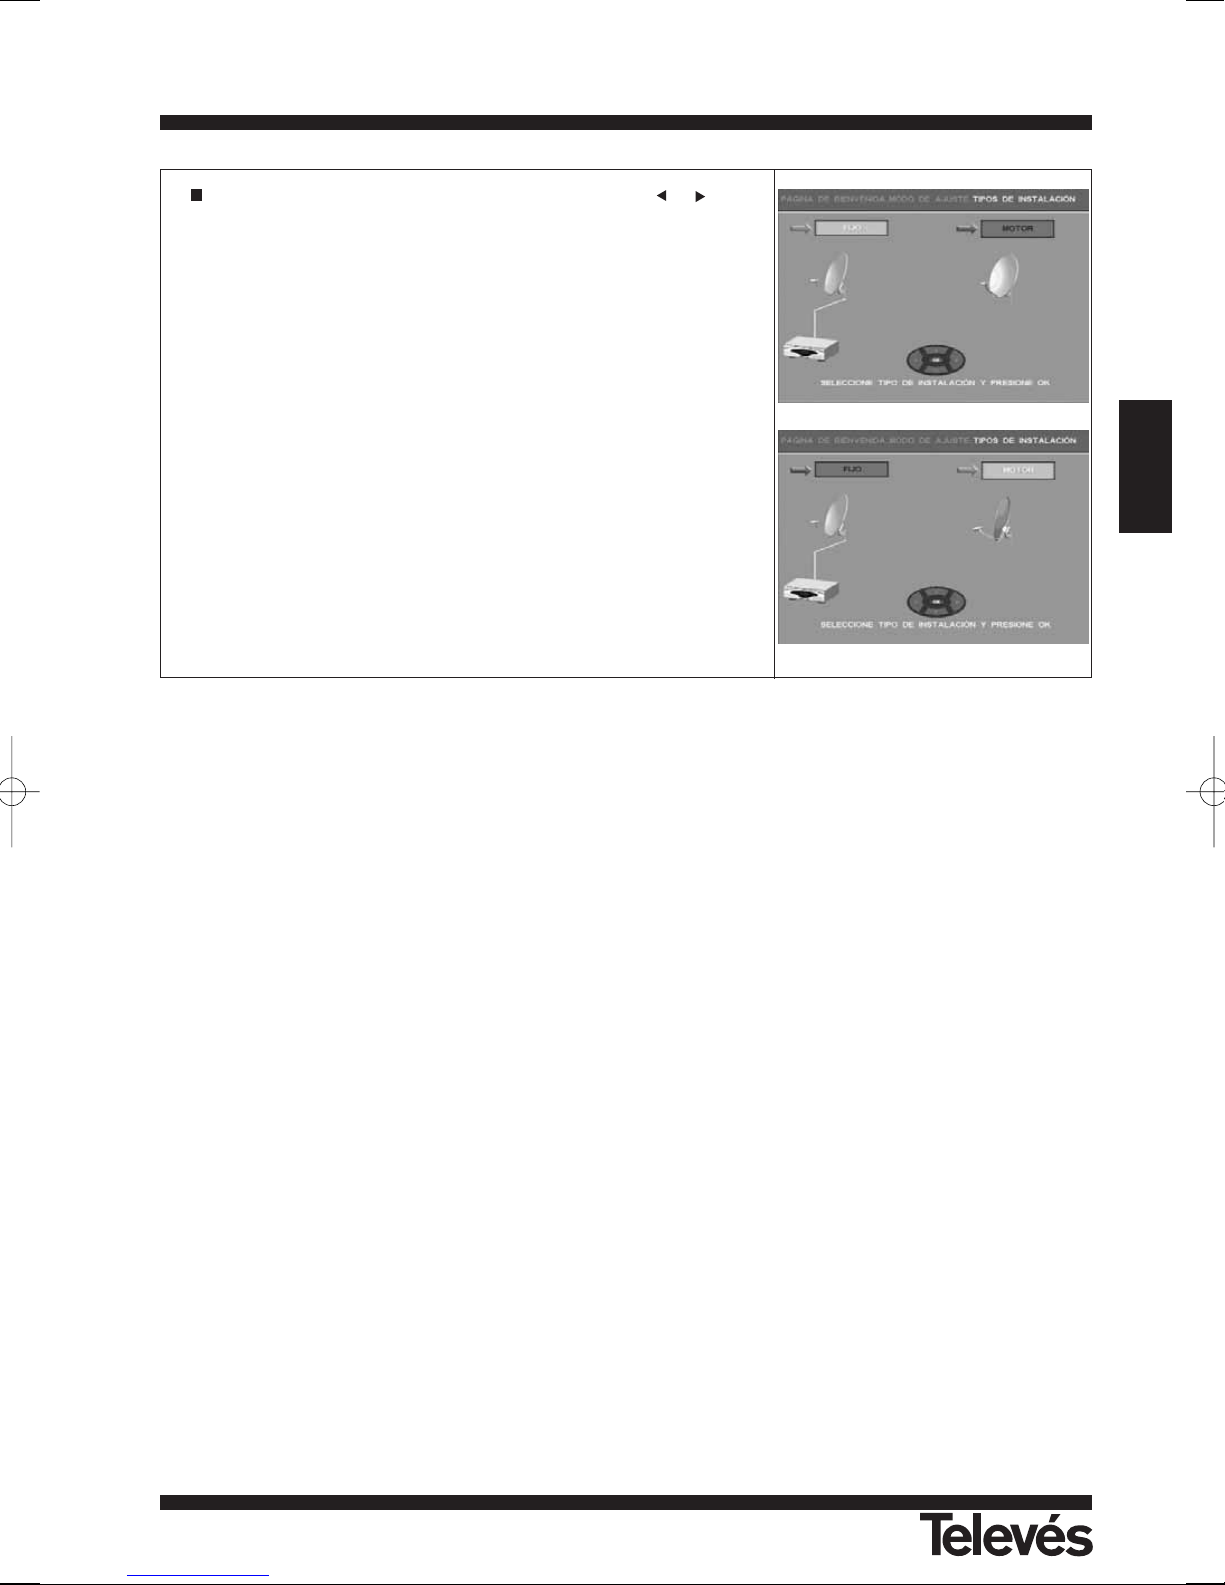
Seleccione el tipo de instalación disponible con las teclas o y pulsela tecla OK para confirmar.
La instalación puede ser:
Fijo: Instalación con una o mas antenas fijas.
Motor: Instalación con un sistema móvil DiSEqC 1.2 / USALS.
Seleccionando esta opción pasamos directamente al apartado 4.3.Instalación móvil.
Page 10
Instrucciones de uso
“
RSD - 7296”
10
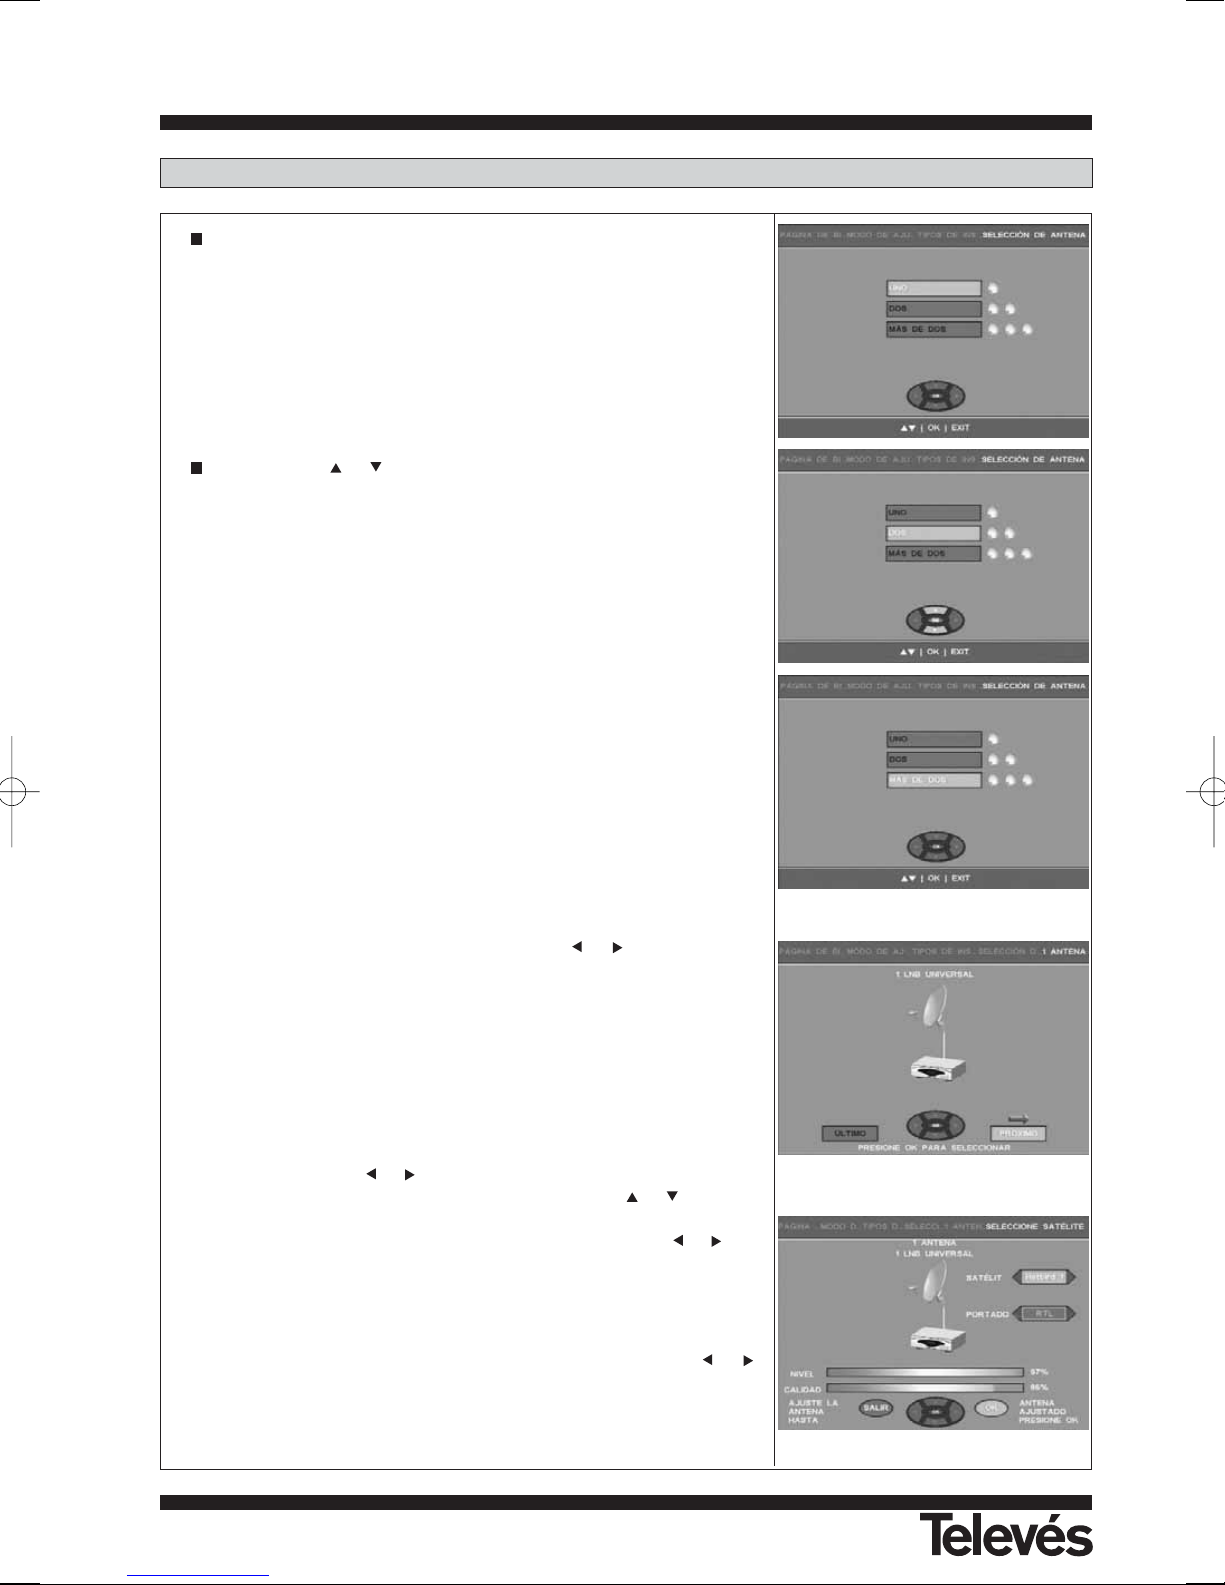
Dentro de la instalación Fija tenemos las siguientes opciones:
- Una antena.
- Dos antenas
- Mas de dos antenas. Seleccionando esta opción pasamos directa-
mente al apartado 9.- Instalación del Sistema.
Con las teclas o seleccione una de las opciones y confírmela pulsando la tecla OK del mando.
- Una antena.
Seleccione el tipo o los tipos de conversores que están presentes en
su instalación, utilizando para ello las teclas o, confirmando su
selección con la tecla OK.
Las opciones disponibles son:
- Un LNB universal
- Dos LNB universales
- LNB Monoblock
- LNB Twin
- LNB Quad
Con las teclas o , en la ventana “Satélite” seleccione el satéli-
te deseado, a continuación y mediante las teclas o acceda a
la ventana “Portadora” donde podrá seleccionar a varios operadores (transpondedores) del satélite elegido con las teclas o .
Ahora mediante una brújula oriente la antena hacia el satélite deseado hasta obtener el mejor nivel de señal posible.
En el caso de que no obtenga un nivel superior al 60%, proceda de
la siguiente manera:
- Sitúese en la ventana “Portadora” y mediante las teclas o
modifique el operador comprobando si el nivel ha aumentado.
- Confirme la inclinación y posición de la antena.
- Verifique la posición del LNB en su soporte.
4.2.- Instalación Fija
Page 11
Instrucciones de uso
“
RSD - 7296”
11
ESPAÑOL
Cuando la antena esté orientada pulse la tecla OK.
Antes de iniciar una búsqueda automática en el satélite, con las
teclas o seleccione el tipo de búsqueda que desea (sólo
canales libres - FTA, todos los canales - ALL, solo los canales de
TV o bien sólo los canales de Radio). Con las teclas o acce-
da a la ventana “Organizado por” para poder definir el tipo de organización que se le dará a los canales encontrados. Mediante las
teclas o seleccionamos entre ordenados por “Satélite” o por
orden alfabético (de “A a Z” o bien de “Z a A”).
Pulse la tecla OK para comenzar la búsqueda.
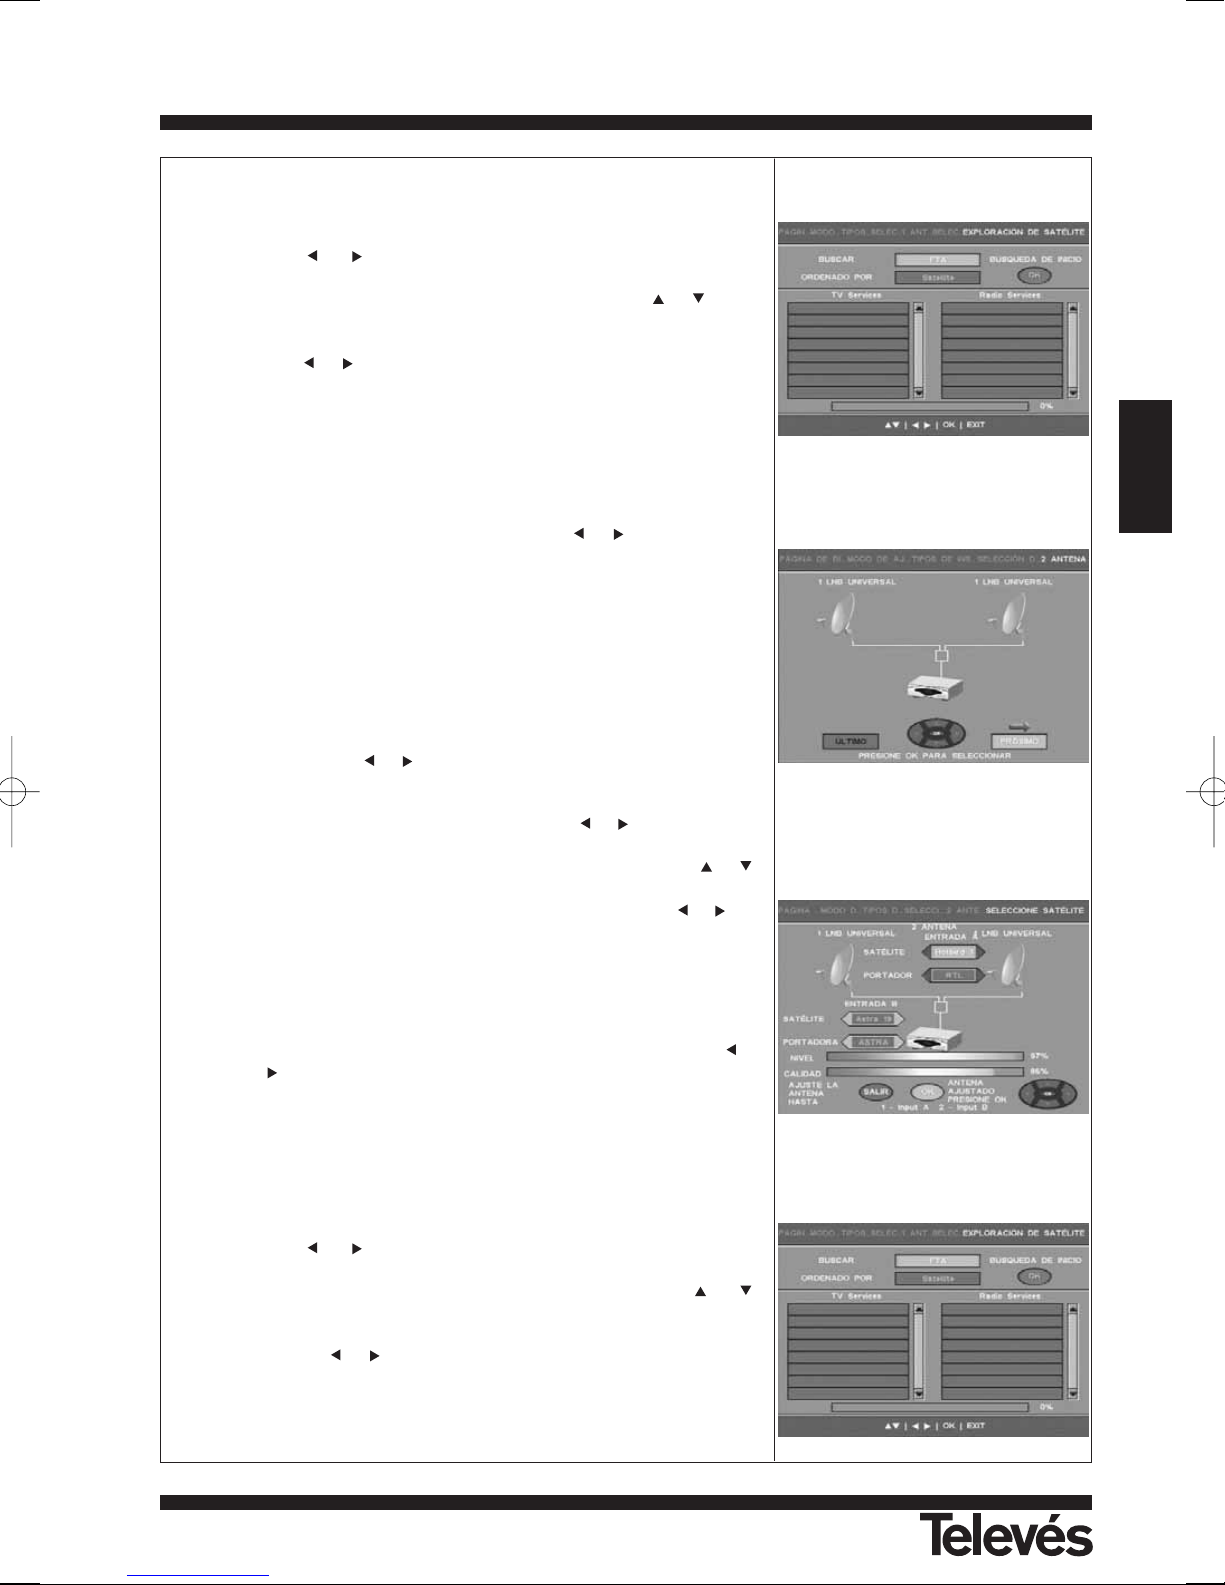
- Dos antenas.
Seleccione el tipo o los tipos de conversores que están presentes en
su instalación, utilizando para ello las teclas o, confirmando su
selección con la tecla OK.
Las opciones disponibles en el menú son:
- Un LNB universal (1 LNB en cada antena)
- Un LNB universal más Dos LNB universales
- Un LNB universal más Un LNB Twin
- Un LNB universal más Un LNB Quad
Con las teclas o , en la ventana “Satélite” (Entrada A) seleccione el satélite deseado para la entrada “A” del conmutador. Para
modificar los parámetros de la entrada “B” pulse la tecla 2 del
mando y a continuación mediante las teclas o sobre la ventana
“Satélite” (Entrada B) seleccione el deseado. Para volver a los pará-
metros de la entrada “A” pulse la tecla 1. Usando las teclas o
se accede a la ventana “Portadora” donde podrá seleccionar a los
varios operadores del satélite seleccionado con las teclas o .
Ahora con la ayuda de una brújula oriente las antenas hacia los
satélites deseados hasta obtener el mejor nivel de señal posible.
En el caso de que no obtenga un nivel superior al 60%, proceda de
la siguiente manera:
- Sitúese en la ventana “Portadora” de la entrada “A” o “B” dependiendo del satélite en el que estemos y mediante las teclas o
modifique el operador comprobando si el nivel ha aumentado.
- Confirme la inclinación y posición de la antena.
- Verifique la posición del LNB en su soporte.
Cuando las antenas estén orientadas pulse la tecla OK.
Antes de iniciar una búsqueda automática en el satélite, con las
teclas o seleccione el tipo de búsqueda que desea (sólo
canales libres - FTA, todos los canales - ALL, solo los canales de
TV o bien sólo los canales de Radio). Con las teclas o
acceda a la ventana “Organizado por” para poder definir el tipo de
organización que se le dará a los canales encontrados. Mediante
las teclas o seleccionamos entre ordenados por “Satélite” o
por orden alfabético (de “A a Z” o bien de “Z a A”).
Pulse la tecla OK para comenzar la búsqueda.
Page 12
Instrucciones de uso
“
RSD - 7296”
12
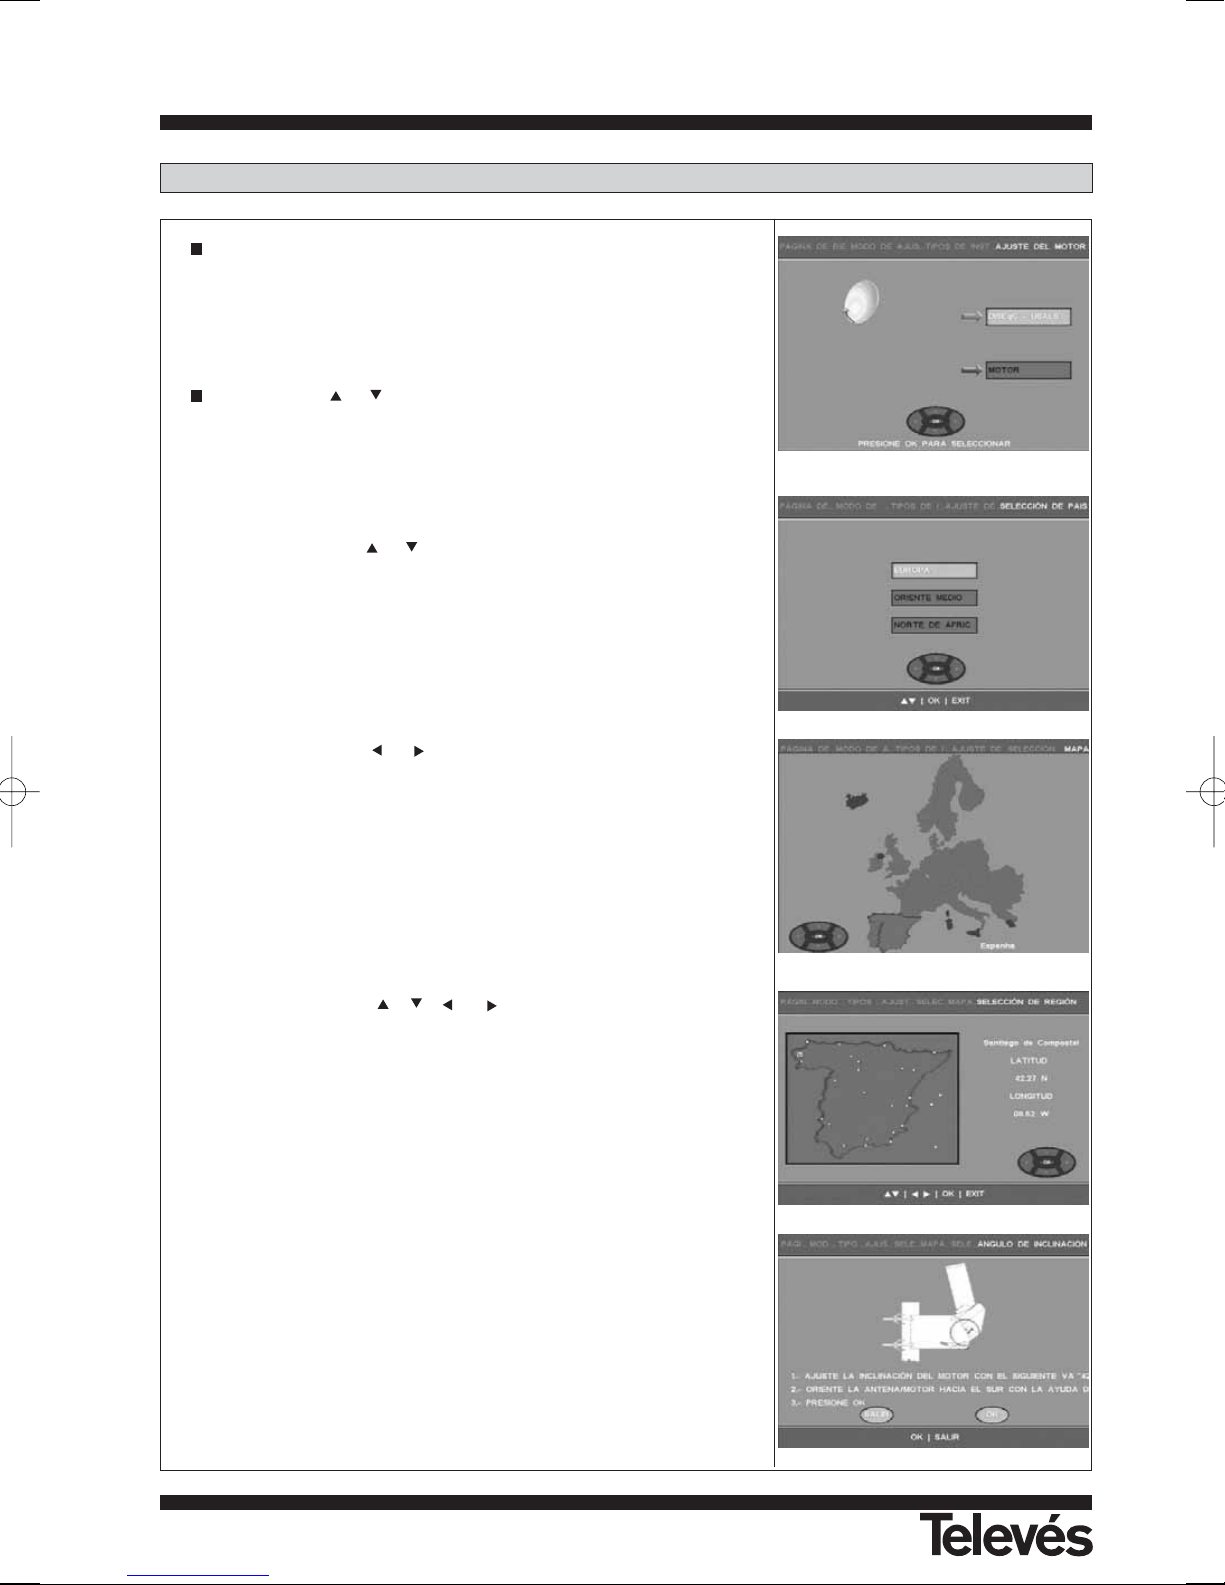
Dentro de la instalación móvil tenemos las siguientes opciones:
- DiSEqC - USALS. Para instalaciones con motor USALS.
- Motor. Para instalaciones con motor DiSEqC 1.2 que no dispongan de
USALS (seleccionando esta opción, deberá ir al apartado 9.5.-
Posicionador DiSEqC 1.2).
Con las teclas o seleccione una de las opciones y confírmela pulsando la tecla OK del mando.
- USALS
Con las teclas o seleccione el Continente donde se encuen-
tra la instalación y acepte con la tecla OK.
Con las teclas o seleccione el País donde se encuentra la
instalación y acepte con la tecla OK.
Con las teclas
,,
o seleccione la Región donde se
encuentra la instalación y acepte con la tecla OK.
Con la ayuda de una brújula apunte la antena hacia el Sur y ajuste
la inclinación del motor en concordancia con el valor indicado por
el receptor.
Pulse la tecla OK
4.3.- Instalación móvil
Page 13
Instrucciones de uso
“
RSD - 7296”
13
ESPAÑOL
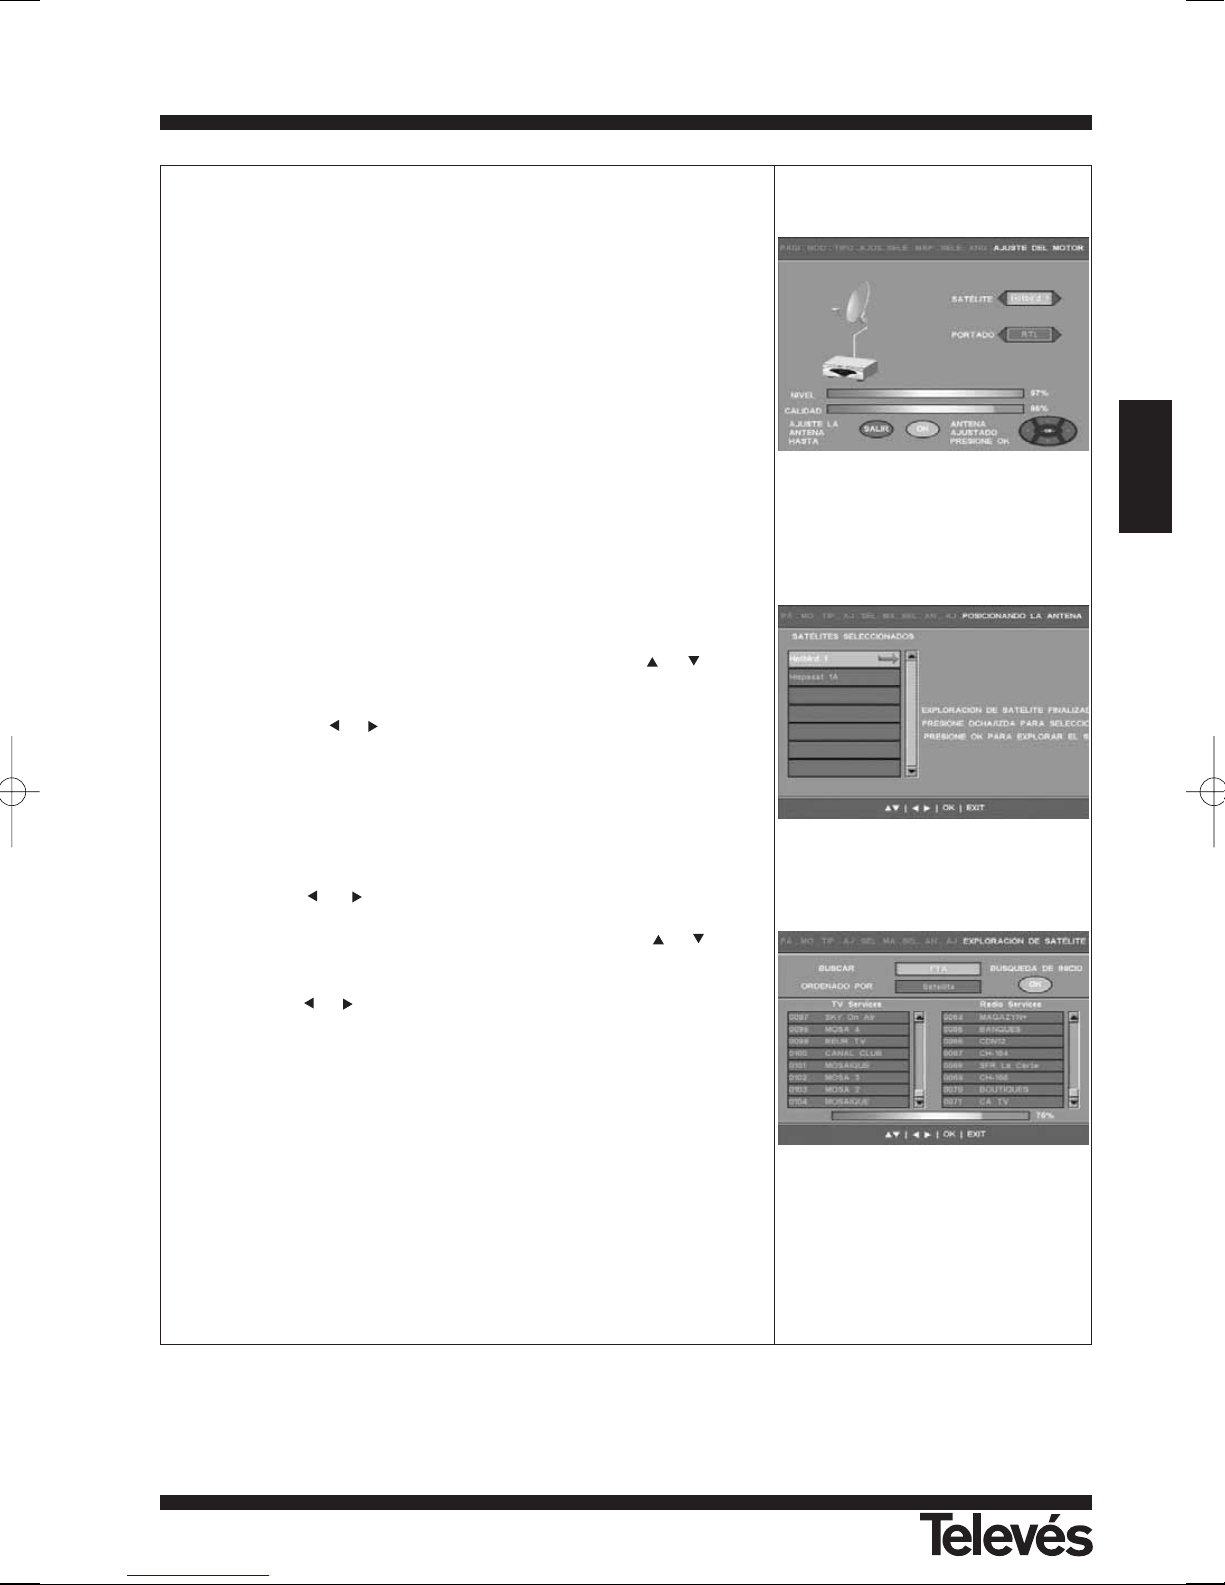
La antena se moverá automáticamente hacia el satélite Hot Bird
(13º E). Este proceso durará un instante. Espere, por favor.
El motor ha colocado la antena en la posición exacta del satélite
HotBird. Si el nivel de señal detectado es superior al 60% pulse la
tecla OK.
Si no obtiene nivel de señal suficiente, proceda de la siguiente
forma:
- Actúe sobre la inclinación de la antena, fijación de ésta al motor,
intentando mejorar la señal.
- Verifique el valor de inclinación del motor.
- Mueva el conjunto motor/antena lateralmente, intentando obtener
el máximo nivel de señal.
Si el nivel de señal detectado es superior al 60% pulse la tecla OK.
En este momento el receptor hará un barrido reconociendo todos
los satélites que su sistema podrá captar y los muestra en la ventana “Satélites detectados”. Este proceso necesitará algunos minutos (15min.). Espere, por favor.
Una vez finalizado el proceso, mediante las teclas o seleccione los satélites hacia los que tiene apuntadas las antenas. Para
activar o desactivar la búsqueda en un determinado satélite pulse
las teclas o . Los satélites marcados para realizar la búsqueda
aparecen indicados con el símbolo ==>.
Pulse la tecla OK.
Antes de iniciar una búsqueda automática en el satélite, con las
teclas o seleccione el tipo de búsqueda que desea (sólo
canales libres - FTA, todos los canales - ALL, solo los canales de
TV o bien sólo los canales de Radio). Con las teclas o acce-
da a la ventana “Organizado por” para poder definir el tipo de organización que se le dará a los canales encontrados. Mediante las
teclas o seleccionamos entre ordenados por “Satélite” o por
orden alfabético (de “A a Z” o bien de “Z a A”).
Pulse la tecla OK para comenzar la búsqueda.
Page 14
Instrucciones de uso
“
RSD - 7296”
14
5.1.- Funcionamiento básico
5.- Listo para comenzar
Encienda el TV y todos los equipos periféricos conectados al sistema.
Encienda el receptor de satélite, pulsando la tecla de encendido ( )
del
receptor o del mando a distancia.
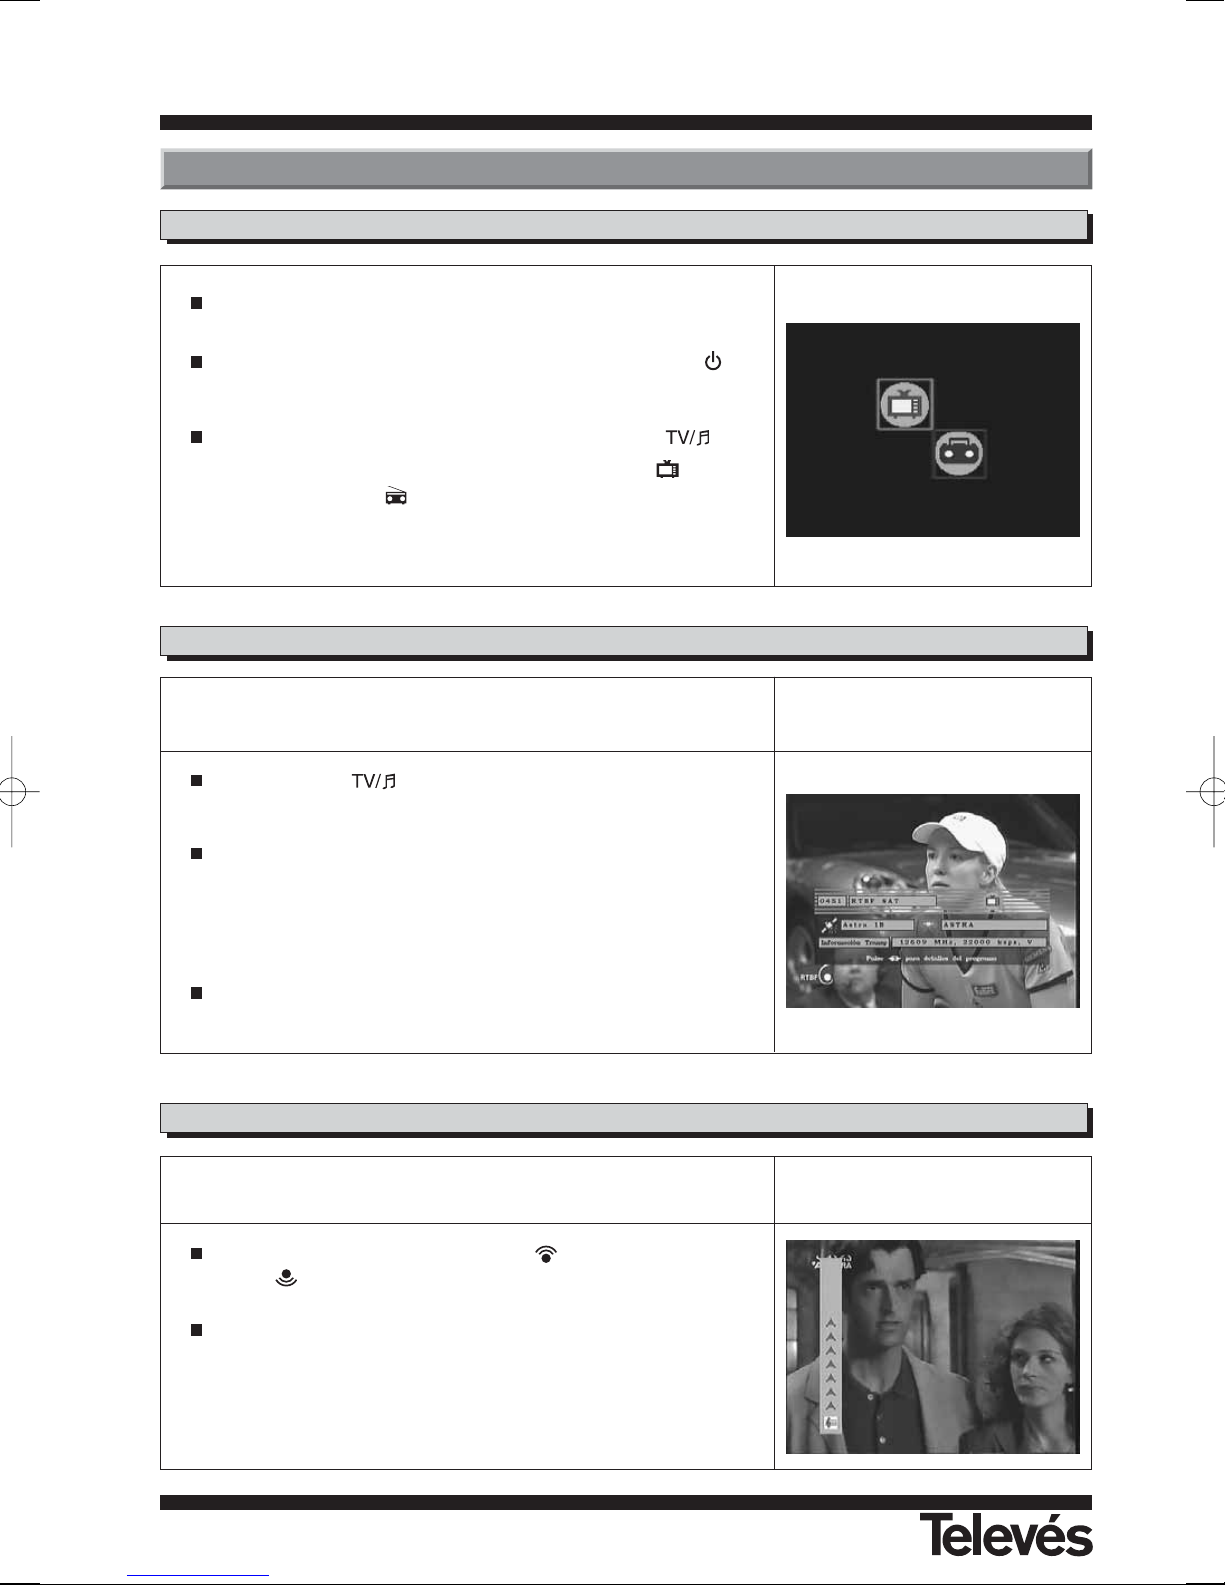
Seleccione uno de los modos TV o Radio mediante la tecla .
Los canales del modo TV se muestran con el símbolo
y los de
Radio con el símbolo .
(El modo TV viene establecido de fábrica por defecto).
Los canales de TV/Radio se pueden seleccionar usando tanto el mando a
distancia como las teclas del receptor.
Presione la tecla para seleccionar el modo de servicio deseado
(canales de TV o canales de radio).
Cuando ya esté visualizando un canal, presione la tecla PG+ para seleccionar el siguiente canal, o la tecla PG- para seleccionar el canal anterior.
Los canales seleccionados aparecerán al momento con su información
correspondiente en la pantalla.
Pulsando la tecla i, se muestra en pantalla una ventana con la información relativa a dicho programa.
5.2.- Como seleccionar canales de TV o RADIO
5.3.- Como ajustar el volumen
El volumen puede ser ajustado usando el mando a distancia.
Para aumentar el volumen, pulse la tecla , y para disminuirlo, pulse
la tecla del mando a distancia.
Los niveles de volumen existentes pueden ser identificados mediante el
indicador de nivel de volumen que aparece en pantalla.
Page 15
Instrucciones de uso
“
RSD - 7296”
15
ESPAÑOL
5.4.- Supresión del sonido (Mute)
Pulse la tecla MUTE para suprimir el sonido de la emisión.
Para devolver el sonido a la misma, pulse la misma tecla una vez más.
Se recuperará el sonido con el mismo volumen que antes.
Para ajustar el volumen pulse las teclas o .
5.5.- Idioma del audio
Algunos canales son transmitidos con varios audios. Esta función depende
de si la transmisión incluye esta información en la señal enviada al
Receptor.
En el caso de canales de TV los diferentes audios suelen corresponder a
distintos idiomas en los que es emitido el canal (p. ej. en el caso del
“Euronews” - HOTBIRD, el idioma español se recibe actualmente en el 5º
audio).
En cuanto a canales de Radio, cada audio identifica a una emisora diferente
(p. ej. el canal “Radio Esp” - ASTRA contiene 10 emisoras de radio españolas - 40 principales, M80, etc...-).
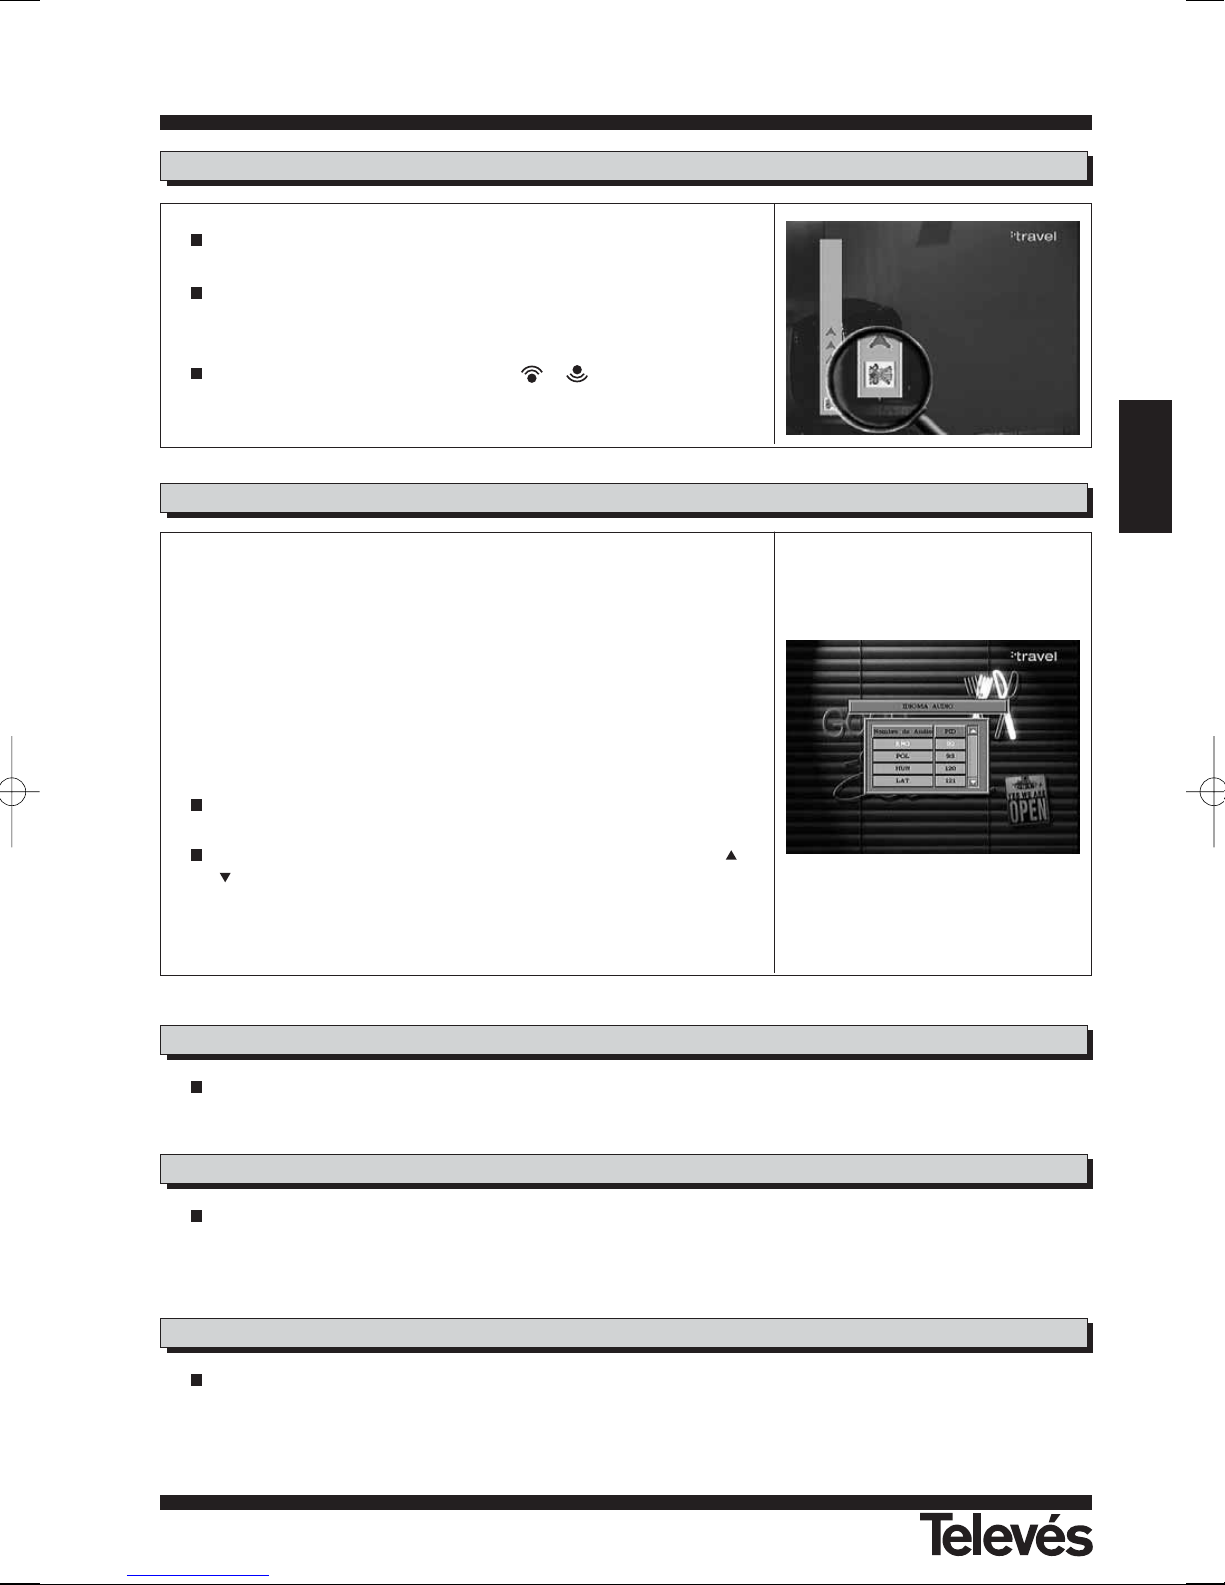
Pulse la tecla M/A para activar el menú que contiene los distintos idiomas de la transmisión.
Seleccione el audio deseado de entre los existentes con las teclas ó
y pulse OK.
En caso de un fallo en el suministro de la energía eléctrica, ya sea por desenchufar el receptor de satélite o por la
falta de corriente eléctrica, al enchufar de nuevo el receptor o al volver la corriente eléctrica, el canal de TV/RADIO
que estaba sintonizado, aparece en la pantalla con el último Audio seleccionado sin tener que pulsar tecla alguna.
5.7.- Regreso al último canal y autoguardado del mismo
Si desea ver el último canal que ha estado visionando y no recuerda que nº de canal era, pulse la tecla ALT.
5.6.- Llamada al canal anterior
Si desea congelar una imagen en pantalla mientras esté visionando un programa, pulse la tecla 0. Para continuar
viendo el programa, vuelva a pulsar la tecla 0.
Tenga en cuenta que al congelar una imagen en pantalla, el canal que estaba visionando continúa con su emisión
normalmente, por lo que se perdería lo sucedido durante el tiempo que permanezca la imagen congelada en pantalla.
5.8.- Congelado de la imagen
Page 16
Instrucciones de uso
“
RSD - 7296”
16
El RSD-7296 recibe y almacena la información sobre los canales de TV y
Radio en curso. Esta información incluye el horario de la próxima programación en detalle. Esta guía es muy fácil de usar, ya que muestra toda la
información en una ventana en la pantalla.
La información que proporciona dicha guía está formada por: nº de programa, nombre del programa, fecha y hora de emisión (hora de inicio y de finalización) así como una pequeña pantalla donde se puede ver el canal seleccionado.
Con la tecla puede cambiar de la lista de TV a la de Radio.
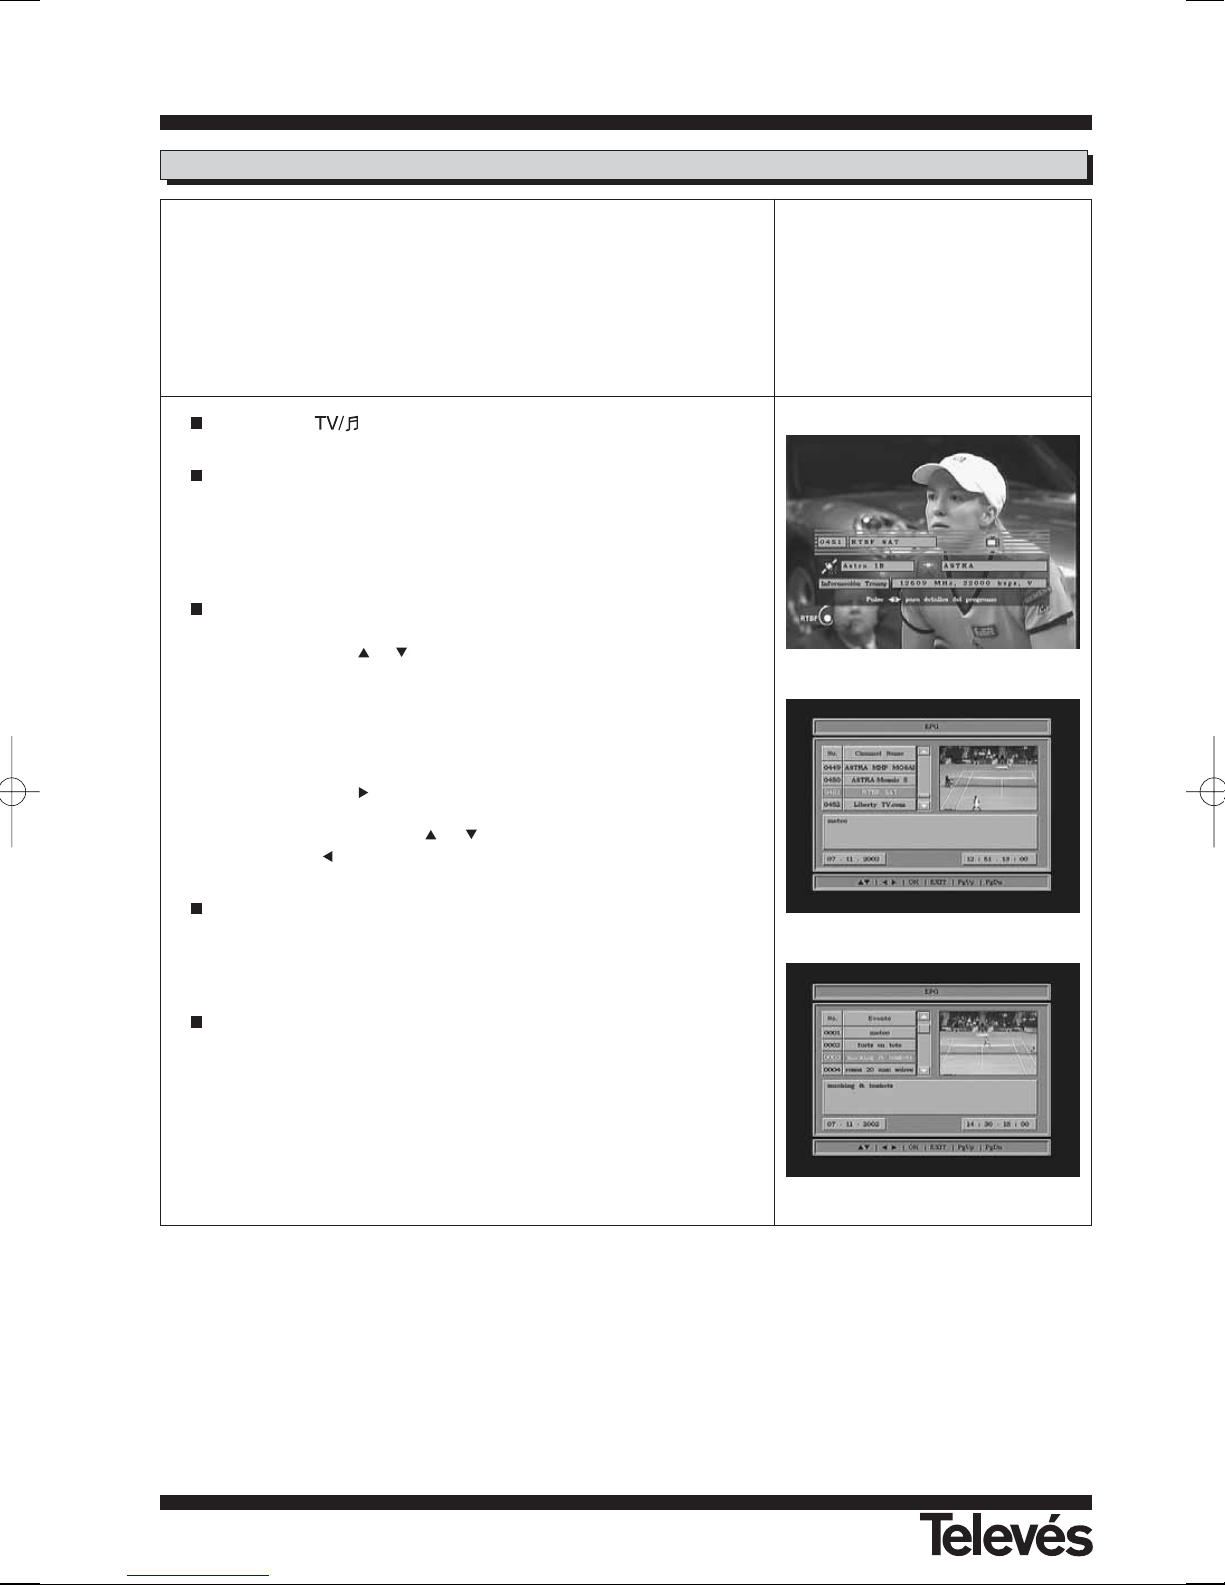
Presione la tecla i mientras esta sintonizando canales de TV o Radio,
Aparecerá la ventana de información donde muestra datos relativos al
canal que esté seleccionado en ese momento. Vuelva a pulsar la tecla i
mientras permanece visible la ventana de información y accederá a la
guía electrónica de programación (EPG).
La EPG aparece configurada básicamente en tres apartados.
Uno de ellos es una lista donde aparecen el nº y el nombre de los canales. Con las teclas ó puede moverse de un canal a otro.
Inmediatamente a su derecha hay una pequeña pantalla donde se
muestra la imagen del canal seleccionado en la lista.
Finalmente aparece una ventana donde se muestra información del
evento que se está emitiendo por ese programa; asi como la hora de inicio y de finalización.
Pulsando la tecla podrá acceder a una lista con todos los eventos
que se emiten por ese canal así como su hora de emisión. Para moverse por ellos use las teclas ó . Para regresar a la lista de canales
pulse la tecla .
La información contenida en la guía viene con las señales suministradas
por el proveedor. En el caso de que un canal no contenga datos para la
información de la guía, en pantalla aparecerá el mensaje "Sin información".
Pulse la tecla EXIT para salir de la EPG y acceder directamente al canal
seleccionado.
5.9.- Guía Electrónica de Programación (EPG)
Notas:
- Para recibir los horarios de emisión en la guía de una forma correcta, deberá ajustar primero como referencia su HORA
LOCAL con referencia al GMT (horario del meridiano de Greenwich).
- El horario que aparece en la pantalla es suministrado por el proveedor, por lo que a veces estos datos pueden aparecer
incorrectos en determinados canales.
Page 17
Instrucciones de uso
“
RSD - 7296”
17
ESPAÑOL
5.10.- Como usar la Lista de Canales Favoritos
5.11.- Función Teletexto
Usted puede seleccionar fácilmente sus canales favoritos de TV o Radio
mediante la Lista de Canales Favoritos. En esta lista sólo aparecen los
canales de TV o Radio marcados como favoritos en la lista de canales principal.
Pulse la tecla para seleccionar la lista de canales de TV o Radio.
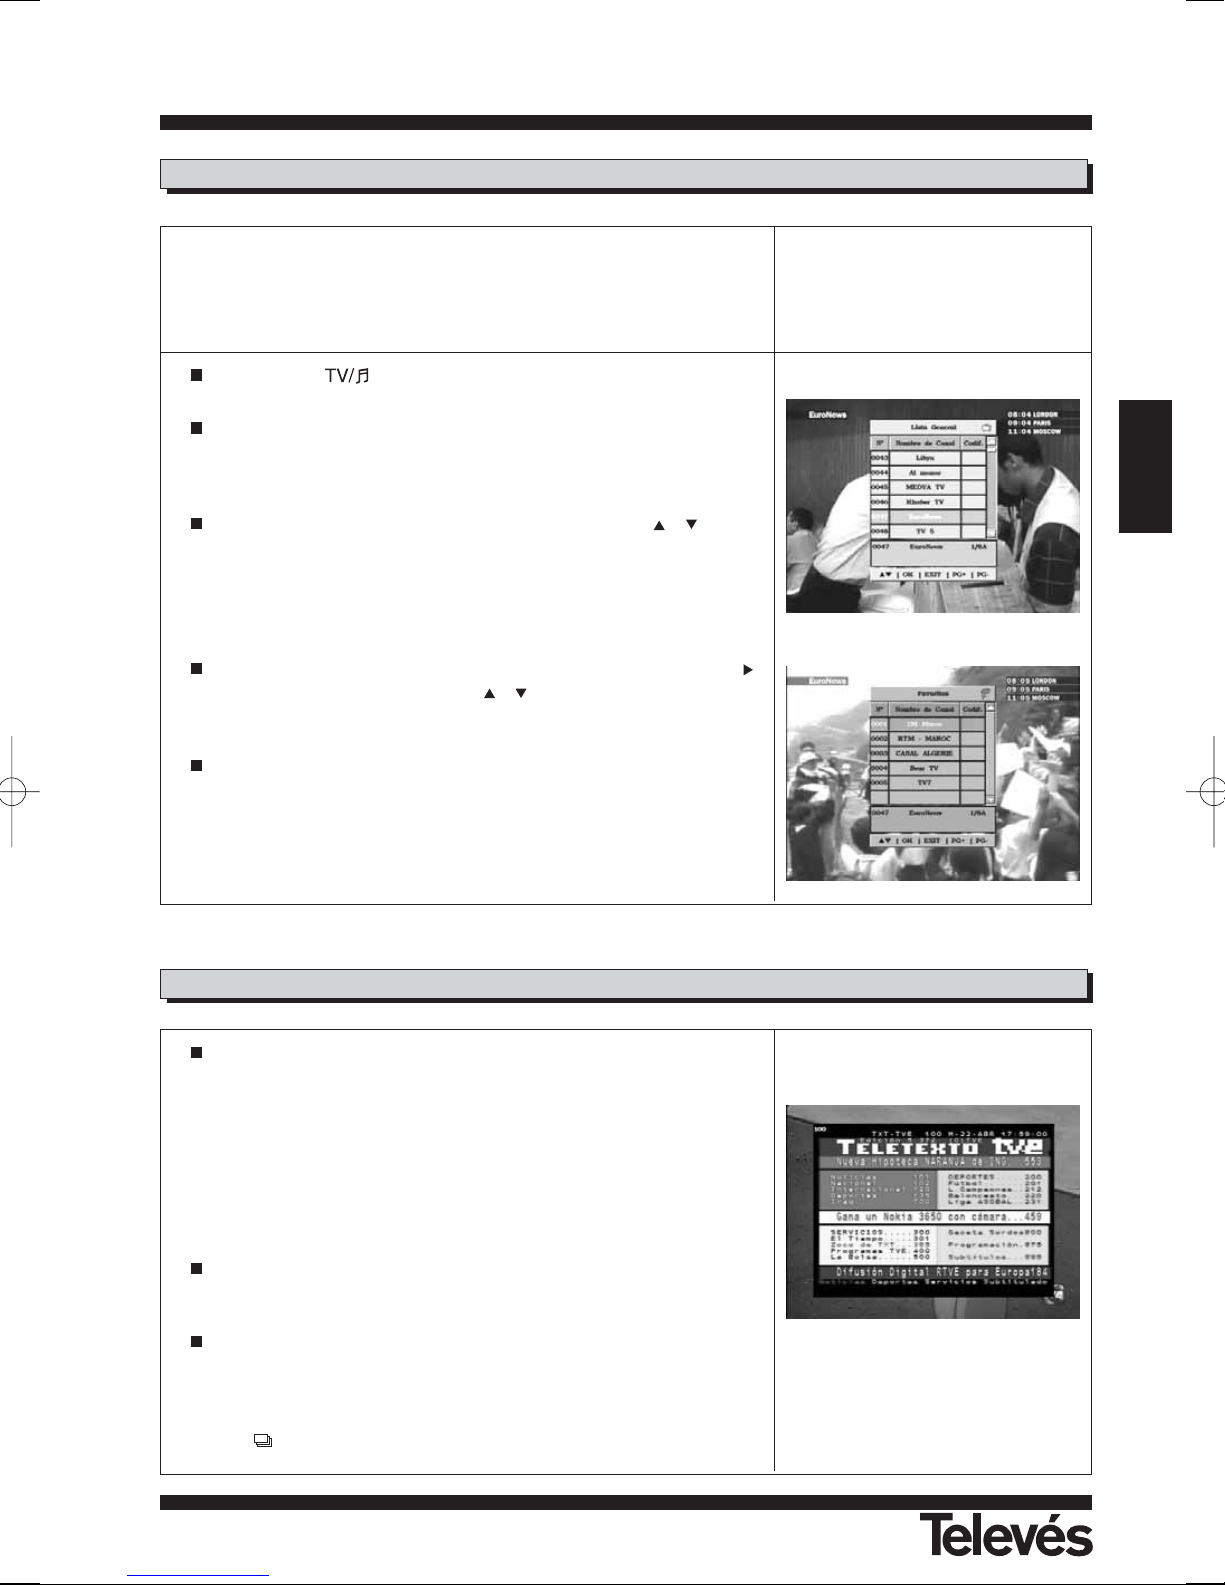
Visionando un canal de TV o escuchando un canal de Radio, pulse la
tecla OK para ver la Lista General de Canales. Pulse a continuación la
tecla FAV para acceder a la lista de Canales Favoritos.
Seleccione cualquier canal de la lista mediante las teclas ó y pulse
la tecla OK para ir a dicho canal.
Si no hay canales en la lista de favoritos, el menú de favoritos no se
muestra en pantalla y aparece el mensaje “Ningún canal preferido”.
Para conmutar entre las diferentes listas de satélites, pulse la tecla
del mando y después las teclas o y confirme con la tecla OK
sobre el nombre del satélite elegido.
Pulse la tecla EXIT para salir de la lista de canales favoritos.
Vea el apartado 8.1.- “Organizar canales” de la sección 8.- “Menú
Instalación del receptor” para saber como elaborar la Lista de canales
Favoritos.
Pulse la tecla TELETEXT del mando para activar el menú Teletexto.
En este menú podrá seleccionar todos los servicios de teletexto propor-
cionados por el proveedor de servicios.
Los servicios de teletexto se visualizarán de la manera habitual.
Incluso si su TV no dispone de descodificador de Teletexto, Ud. podrá
visualizarlo en pantalla, ya que el Receptor lo genera automáticamente.
Si su TV dispone de descodificador de Teletexto, Ud. también puede
visualizarlo utilizando el mando a distancia de su TV.
Pulsando la tecla OK del mando, puede hacer que el color de fondo de
la página del teletexto sea mas o menos transparente.
Para salir del menú “Teletexto” pulse la tecla EXIT.
NOTA: No todos los proveedores proporcionan este tipo de información.
Los canales que disponen de esta función muestran la indicación
en la ventana de información.
Page 18
Instrucciones de uso
“
RSD - 7296”
18
Pulse la tecla Menú cuando esté visionando un canal y el menú principal aparecerá en la pantalla.
Seleccione una de las opciones del menú con las teclas o y presione la tecla OK para ejecutarlo.
Pulse la tecla EXIT para salir del menú principal y regresar al canal de
TV o Radio que estaba visionando.
6.- Menú Principal
7.- Menú Idioma OSD
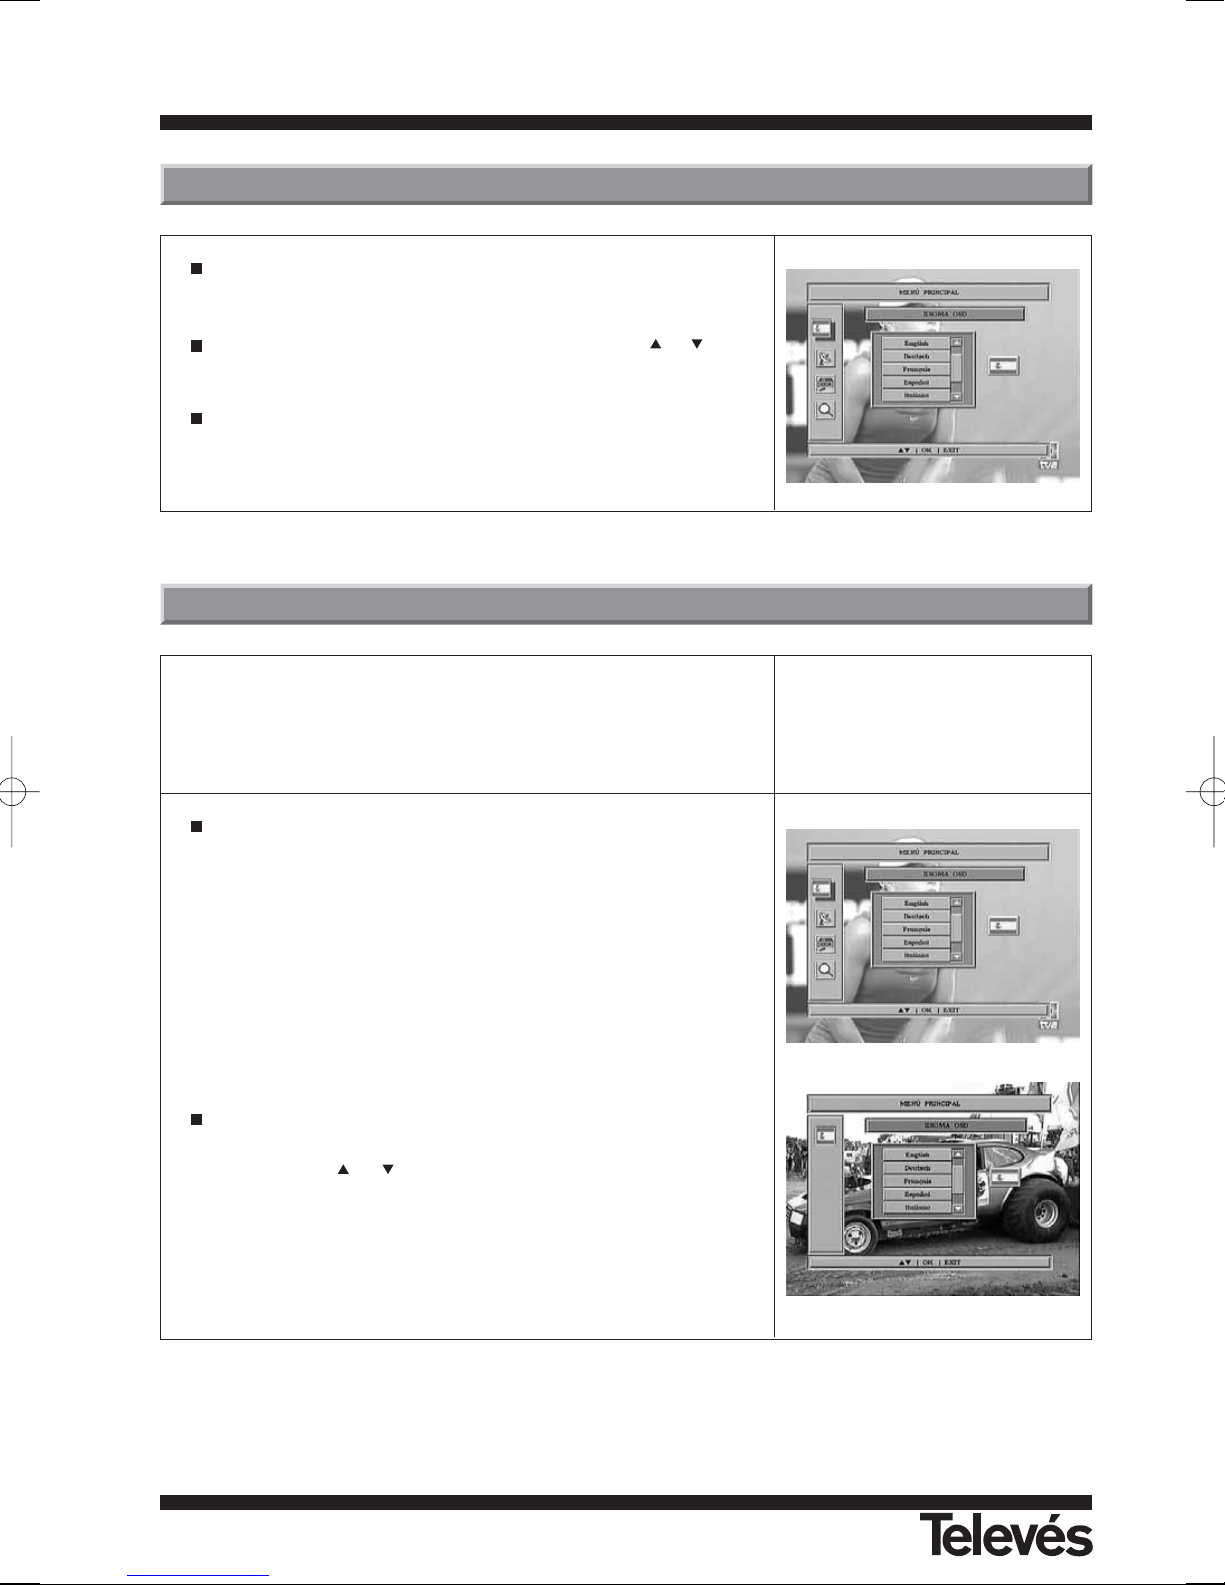
En este menú puede elegir el idioma con que aparecen los menús en pantalla.
Los idiomas disponibles en el receptor son: Inglés, Alemán, Francés,
Español, Italiano, Portugués, Polaco y Turco.
Pulse la tecla Menú en el mando a distancia para activar el menú principal en su pantalla.
La primera opción del menú que aparece seleccionada por defecto es el
-Idioma OSD-.
Puede observar que aparece el icono de una bandera que corresponde
al idioma seleccionado actualmente.
Si desea cambiar ese idioma pulse la tecla OK para acceder a los idiomas.
Con las teclas o seleccione el nuevo idioma deseado y pulse
OK.
Al desplazarse por los distintos idiomas, el menú va mostrando la bandera correspondiente a cada uno.
Page 19
Instrucciones de uso
“
RSD - 7296”
19
ESPAÑOL
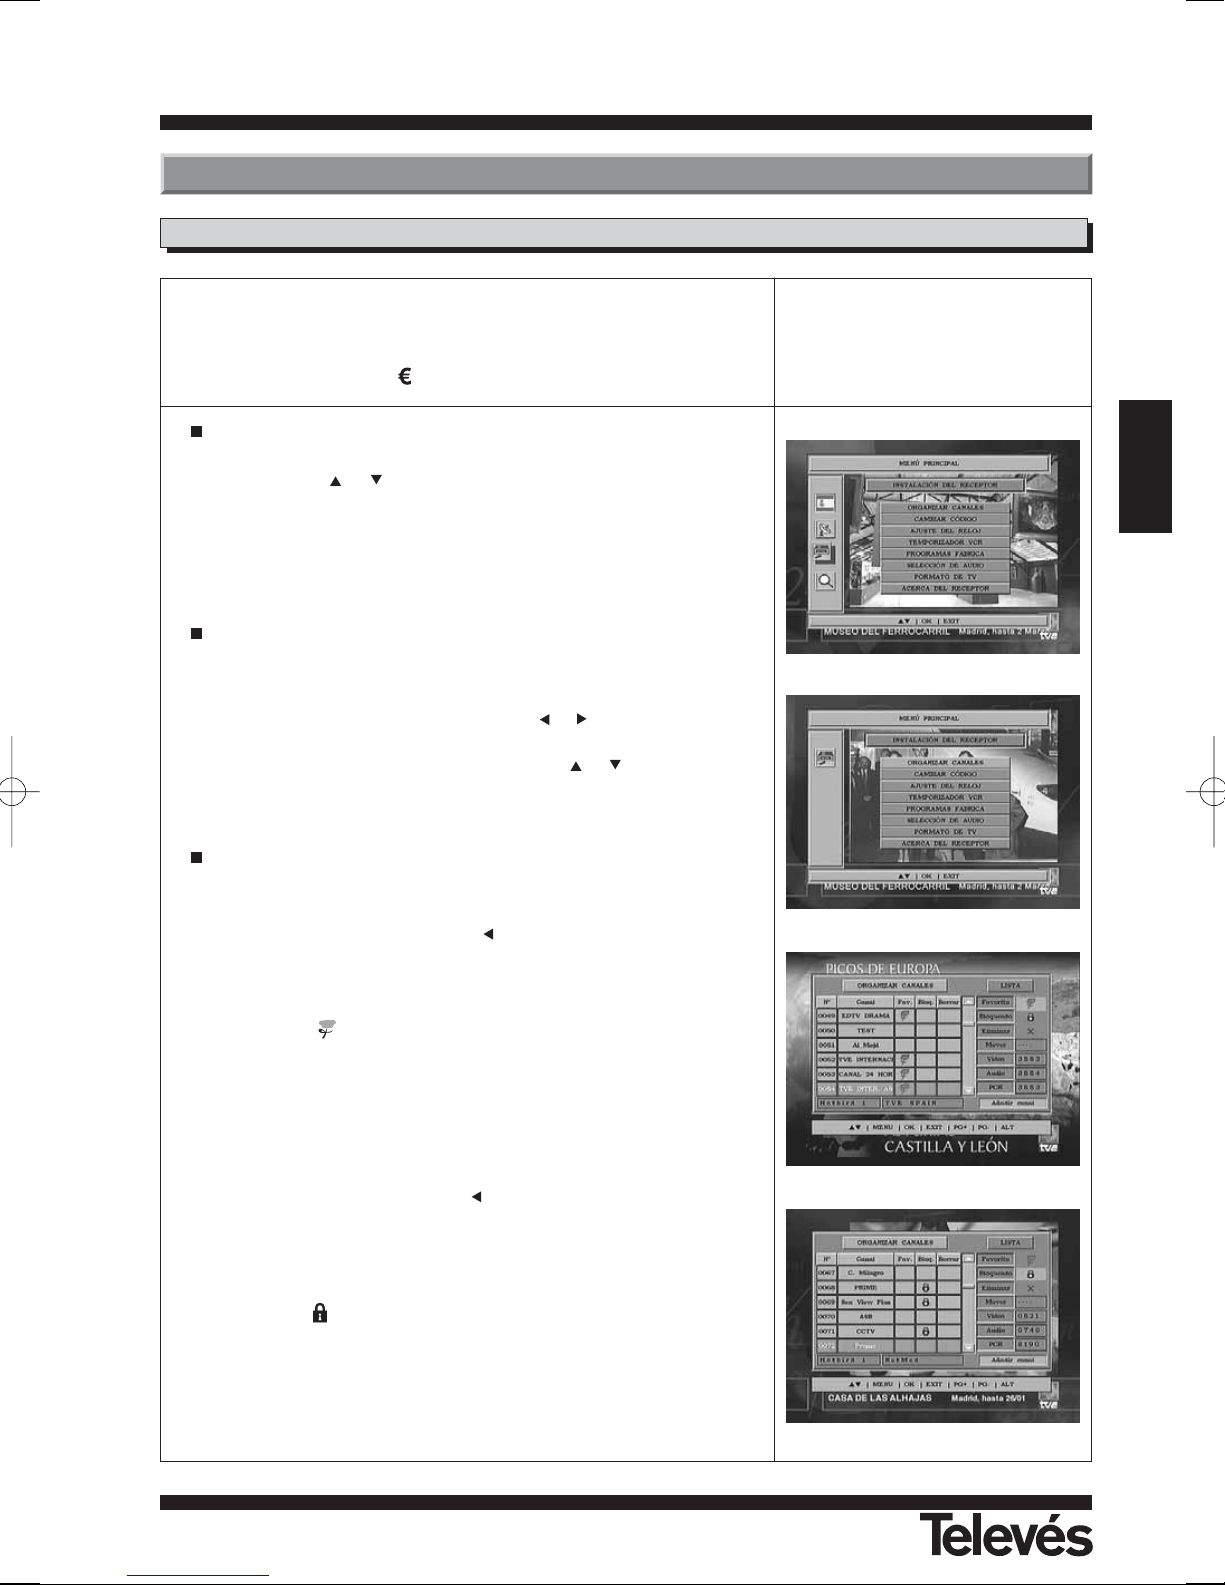
En este menú puede crear/editar la lista de canales favoritos, puede mover,
bloquear, borrar y añadir nuevos canales a la lista.
Después de la edición, los restantes canales se fijan automáticamente.
Los canales con el símbolo están codificados.
Pulse la tecla Menú en el mando a distancia para activar el menú principal en su pantalla.
Con las teclas o
sitúese en la opción -Instalación del Receptor- y
pulse OK para acceder a este submenú. Seleccione la opción
-Organizar canales- y pulse OK. Aparecerá entonces el menú
“Organizar canales”, donde se muestran las distintas opciones de edición de los canales y una lista con todos los canales memorizados en el
receptor.
Este menú aparece organizado básicamente en dos grupos. A la
izquierda el denominado -Organizar canales- donde aparecen todos los
canales disponibles en el receptor. A su derecha el denominado -Lista-
donde figuran las acciones que puede realizar sobre los canales. Puede
moverse de un grupo a otro con las teclas y
.
Tanto si está en el grupo de los canales como en el de las acciones,
puede seleccionar unos u otros con las teclas
y
, mientras que en
el grupo de los canales es posible acceder directamente mediante la
introducción del número de canal deseado
Las funciones para editar canales son:
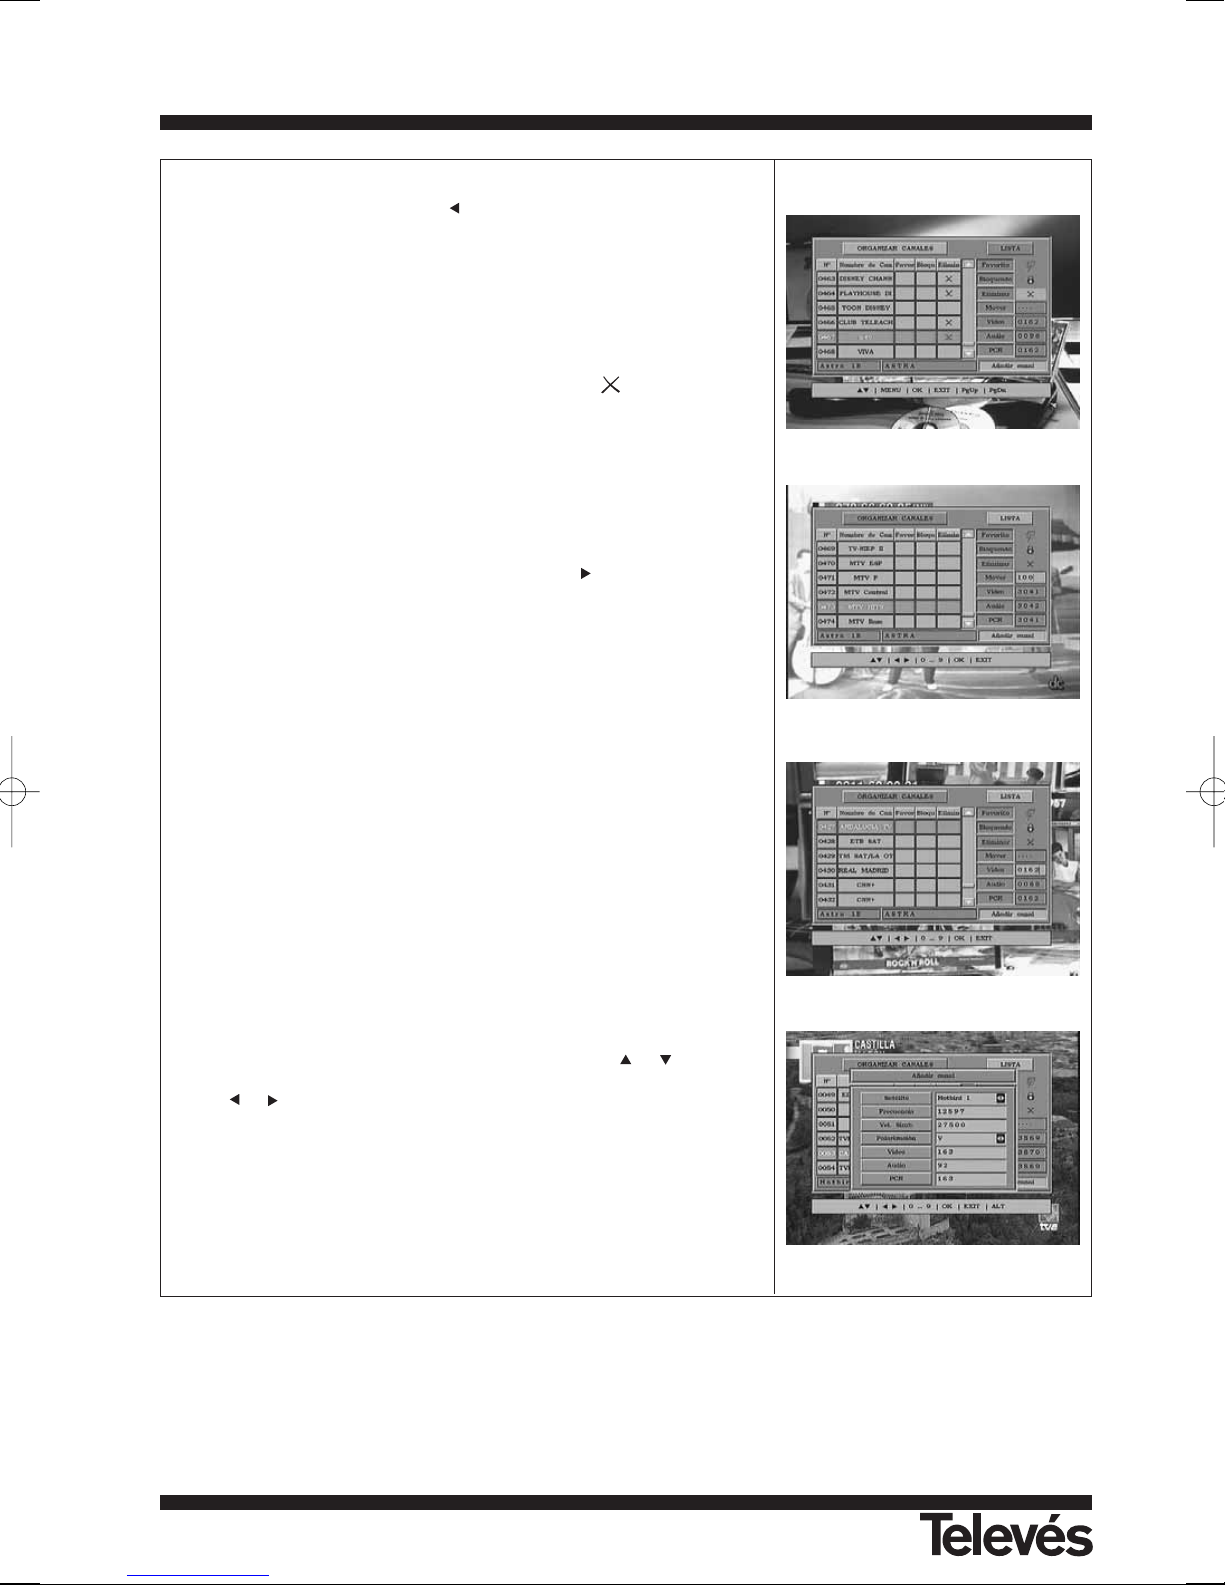
- Canales favoritos: Con el cursor situado sobre ésta opción, despláce-
se al grupo izquierdo con la tecla .
Para añadir un canal a la Lista, pulse la tecla OK sobre el nuevo canal.
Aparecerá el símbolo que indica favorito. Para sacarlo de la lista vuelva
a pulsar la tecla OK sobre el nombre del canal.
El símbolo ( ) sobre un canal indica que éste pertenece a la lista de
canales favoritos.
Todos los canales que marque pulsando sobre ellos la tecla OK, pasa-
rán a formar parte de la Lista de Favoritos cuando salga de este menú.
Para salir del menú pulse la tecla EXIT.
- Bloquear canales: Con el cursor situado sobre esta opción, despláce-
se al lado izquierdo con la tecla .
Para bloquear un canal, pulse la tecla OK sobre el canal elegido, con lo
que aparece un símbolo indicando la nueva condición del mismo. Si
desea desbloquearlo vuelva a pulsar la tecla OK sobre el canal, con lo
que el símbolo desaparece.
El símbolo ( ) sobre un canal indica que éste se encuentra bloqueado.
El nuevo estado de los canales estará disponible cuando salga de este
menú.
Para salir del menú pulse la tecla EXIT.
Para acceder a cualquier canal que esté bloqueado deberá introducir
la contraseña.
8.1.- Organizar Canales
8.- Menú Instalación del Receptor
Page 20
Instrucciones de uso
“
RSD - 7296”
20
- Borrar canales: Con el cursor situado sobre ésta opción, desplácese
al lado izquierdo con la tecla .
Para borrar un canal, pulse la tecla OK sobre el canal elegido, con lo
que aparece un símbolo indicando la nueva condición del mismo. Se
pueden seleccionar varios canales para borrar a un tiempo pulsando la
tecla OK sobre cada uno de ellos. Al volver a pulsar la tecla OK sobre
un canal que ya estaba marcado, se elimina la selección y éste no será
borrado.
Para suprimir todos los canales de una vez sola, pulse la tecla ALT y
todos los canales serán marcados por el símbolo ( ).
Para borrar los canales que hayan sido marcados pulse la tecla EXIT.
Tanto si desea borra un canal, varios o todos, aparece una nueva ven-
tana pidiendo confirmación para borrarlos (SI) o para salir del menú de
borrado sin realizar modificaciones (NO).
- Mover canales: Si lo que desea es mover un canal de su actual posi-
ción en la lista general, deberá primero seleccionar dicho canal en la
lista y luego pasar al lado derecho con la tecla .
Sitúe el cursor en la opción “Mover”, teclee con el mando a distancia
el nº de la nueva posición que ocupará el canal. Pulse la tecla OK.
Para salir del menú pulse la tecla EXIT.
- Editar los valores PID y PCR: Si desea modificar los parámetros PID
de Audio y Video o bien el PCR de un canal, puede hacerlo en este
menú.
Sitúe el cursor en la opción “Video”, “Audio” o “PCR” y teclee con el
mando a distancia el nº del nuevo valor para estas opciones.
Para salir del menú pulse la tecla EXIT.
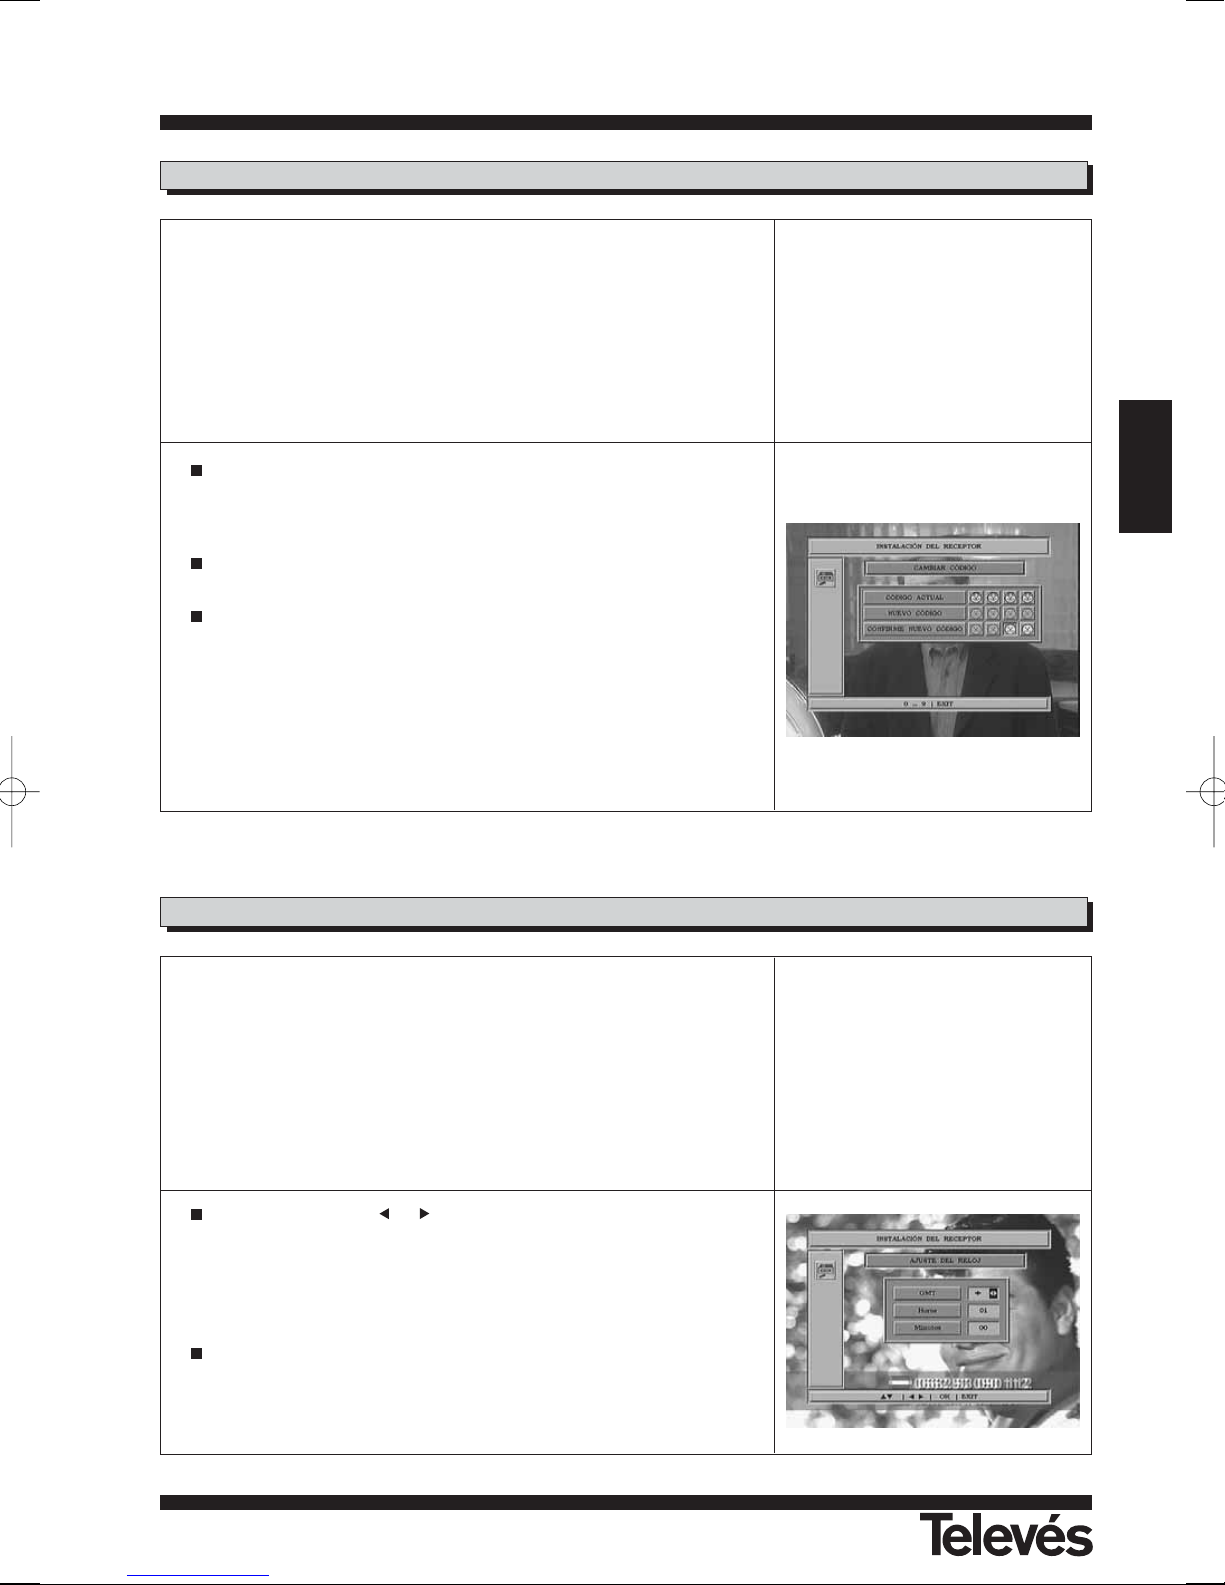
- Añadir canales (Búsqueda Manual): Si lo que desea es implementar
un canal de nueva emisión a la lista de canales pero no desea realizar
una búsqueda automática, esta opción le permite hacerlo. Para ello
deberá conocer los valores del PID Video, PID Audio y PCR del nuevo
canal asi como los datos de Frecuencia, Velocidad de Símbolo y
Polaridad.
Sitúe el cursor en la opción -Añadir PID- y pulse la tecla OK.
Aparecerá un nuevo menú donde podrá teclear los valores solicitados
para la búsqueda del nuevo canal.
Para desplazarse por las opciones utilice las teclas y . Los valo-
res de “Satélite” y “Polarización” deberá seleccionarlos con las teclas
y .
Una vez haya introducido todos los valores, pulse la tecla OK. El nuevo
canal será añadido a la lista.
Page 21
Instrucciones de uso
“
RSD - 7296”
21
ESPAÑOL
8.2.- Cambiar Código
La contraseña esta formada por 4 números, los cuáles nunca aparecerán
visibles en la pantalla. En su lugar aparecen unos iconos amarillos y cada
vez que marque un número pasará a color verde.
Cuando seleccione en el menú alguna de las opciones que implique el uso
del código secreto (acceso a canales bloqueados, modificar lista de canales, etc.) en la pantalla aparecerá el mensaje "Intro. Código", indicándole
que teclee su contraseña.
En el caso de que la contraseña introducida sea incorrecta, aparecerá en la
pantalla el mensaje "Código invalido", negándole el acceso.
Para cambiar el código existente, mediante el teclado numérico del
mando introduzca el código actual en el apartado “Código Actual”. El
valor que trae por defecto el Receptor de fábrica es el “0 0 0 0”.
Introduzca una nueva contraseña en el apartado “Nuevo código”.
Confirme la nueva contraseña volviendo a introducirla en el apartado
“Confirme nuevo código”. Si ambas no coinciden, aparecerá en la pantalla un mensaje de error. Si por el contrario es correcta, indicará
“Código corregido”.
A partir de este momento, deberá utilizar siempre el nuevo código cuando ésta le sea requerido.
8.3.- Ajuste del reloj
El receptor dispone de un Reloj para indicar la hora. Este Reloj se ajusta
automáticamente con la información suministrada por el proveedor de servicios en la propia señal de satélite.
El proveedor de servicios envía dos tipos de información horaria, una relativa a la hora actual (para ser visualizada en el Reloj) y otra informando de los
horarios de emisión de los distintos eventos (que es la utilizada en la EPG).
Ambos tipos de información horaria son enviados en formato GMT, por lo
que Ud. deberá ajustar el Receptor introduciendo el offset de la zona horaria de su país en esta opción.
Mediante las teclas y indique si lo que desea es aumentar (+) o
disminuir (-) a la hora GMT el tiempo indicado en las opciones “Horas” y
“Minutos”.
La opción “Horas” se incrementa y decrementa en pasos de una hora,
mientras que la opción “Minutos” lo hace en pasos de 30 minutos.
Pulse la tecla OK para memorizar los datos.
NOTA: No todos los proveedores proporcionan este tipo de información
Page 22
Instrucciones de uso
“
RSD - 7296”
22
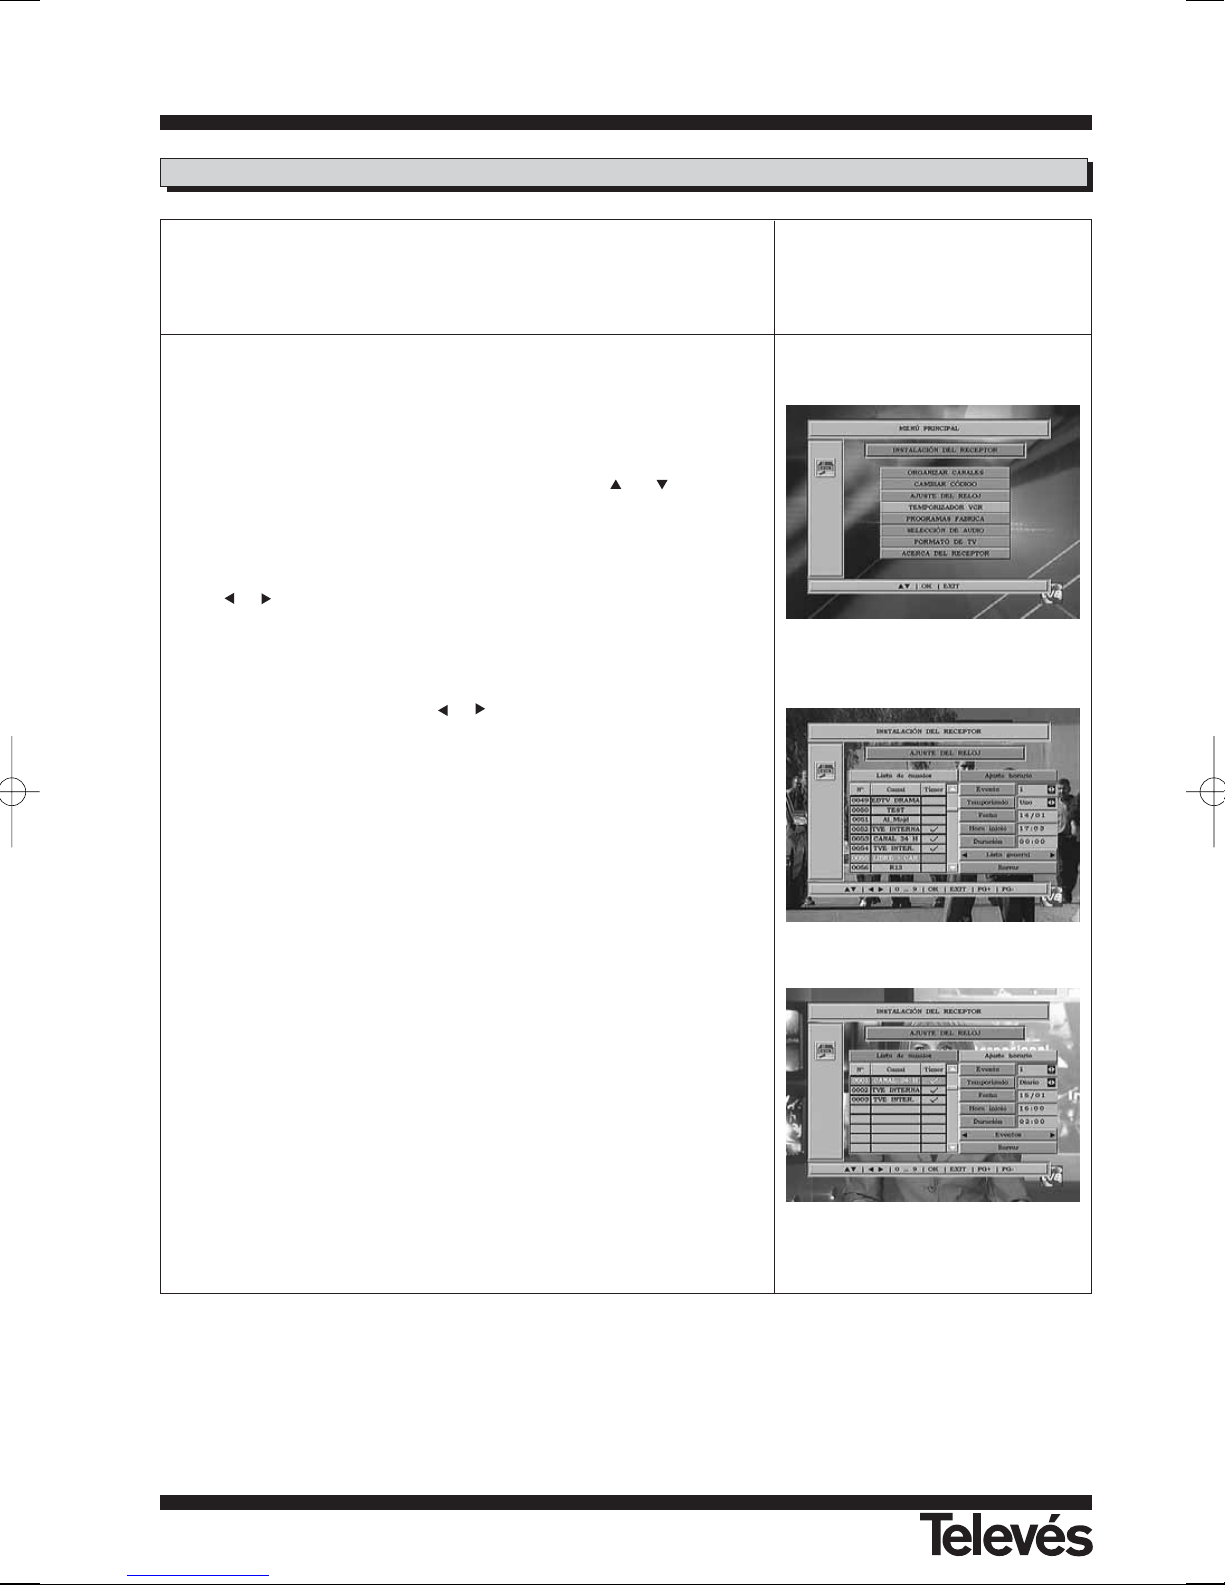
El receptor dispone de un temporizador para el encendido y apagado automático del mismo a una hora predeterminada. Consta de 8 posiciones, en
las cuáles puede programar otros tantos eventos. Solo tiene que introducir
los siguientes datos.
Este menú aparece distribuido en dos columnas. Una a la izquierda -Lista
de canales- donde aparece la lista de todos los canales disponibles en el
receptor y otra a la derecha -Ajuste horario- donde podrá introducir los
datos deseados.
Por defecto, el cursor aparecerá siempre en la lista de canales. Comience
seleccionando el canal que desea que aparezca sintonizado en el momento
de encenderse el receptor. Utilice para ello las teclas o . Pulse OK
sobre el canal seleccionado y automáticamente pasaremos a la columna
derecha para introducir datos:
- Evento.- Seleccione uno de los 8 eventos disponibles mediante las teclas
o .
- Temporizado.- Por defecto aparece el modo “Uno” (una sola vez),
pudiendo seleccionar además “Día” (todos los días), “Semana” (una vez a
la semana), “Mes” (una vez al mes) o bien “Off” (desactivado). La selección
se realiza pulsando las teclas o .
- Fecha.- Por defecto aparece el Día y mes actual. Puede modificar esta
fecha con el teclado numérico (0 .. 9) del mando.
- Hora inicio.- Mediante el teclado numérico introduzca la hora de inicio
del evento.
- Duración.- Mediante el teclado numérico introduzca el tiempo estima-
do de duración del evento.
Pulse la tecla OK para confirmar todos los datos del evento. Volverá de
nuevo a la lista de canales.
Repita los mismos pasos si desea programar otros eventos.
La opción “Lista general” / “Eventos” le permite volver a la lista general en
cualquier momento o bien listar los eventos creados.
Si lo que desea es eliminar alguno de estos eventos, puede hacerlo seleccionándolo el la lista de eventos y pulsando OK sobre la opción “Borrar”.
Para salir del menú pulse la tecla EXIT.
8.4.- Temporizador VCR
Page 23
Instrucciones de uso
“
RSD - 7296”
23
ESPAÑOL
Instrucciones de uso
“
RSD - 7296”
8.5.- Programas Fábrica
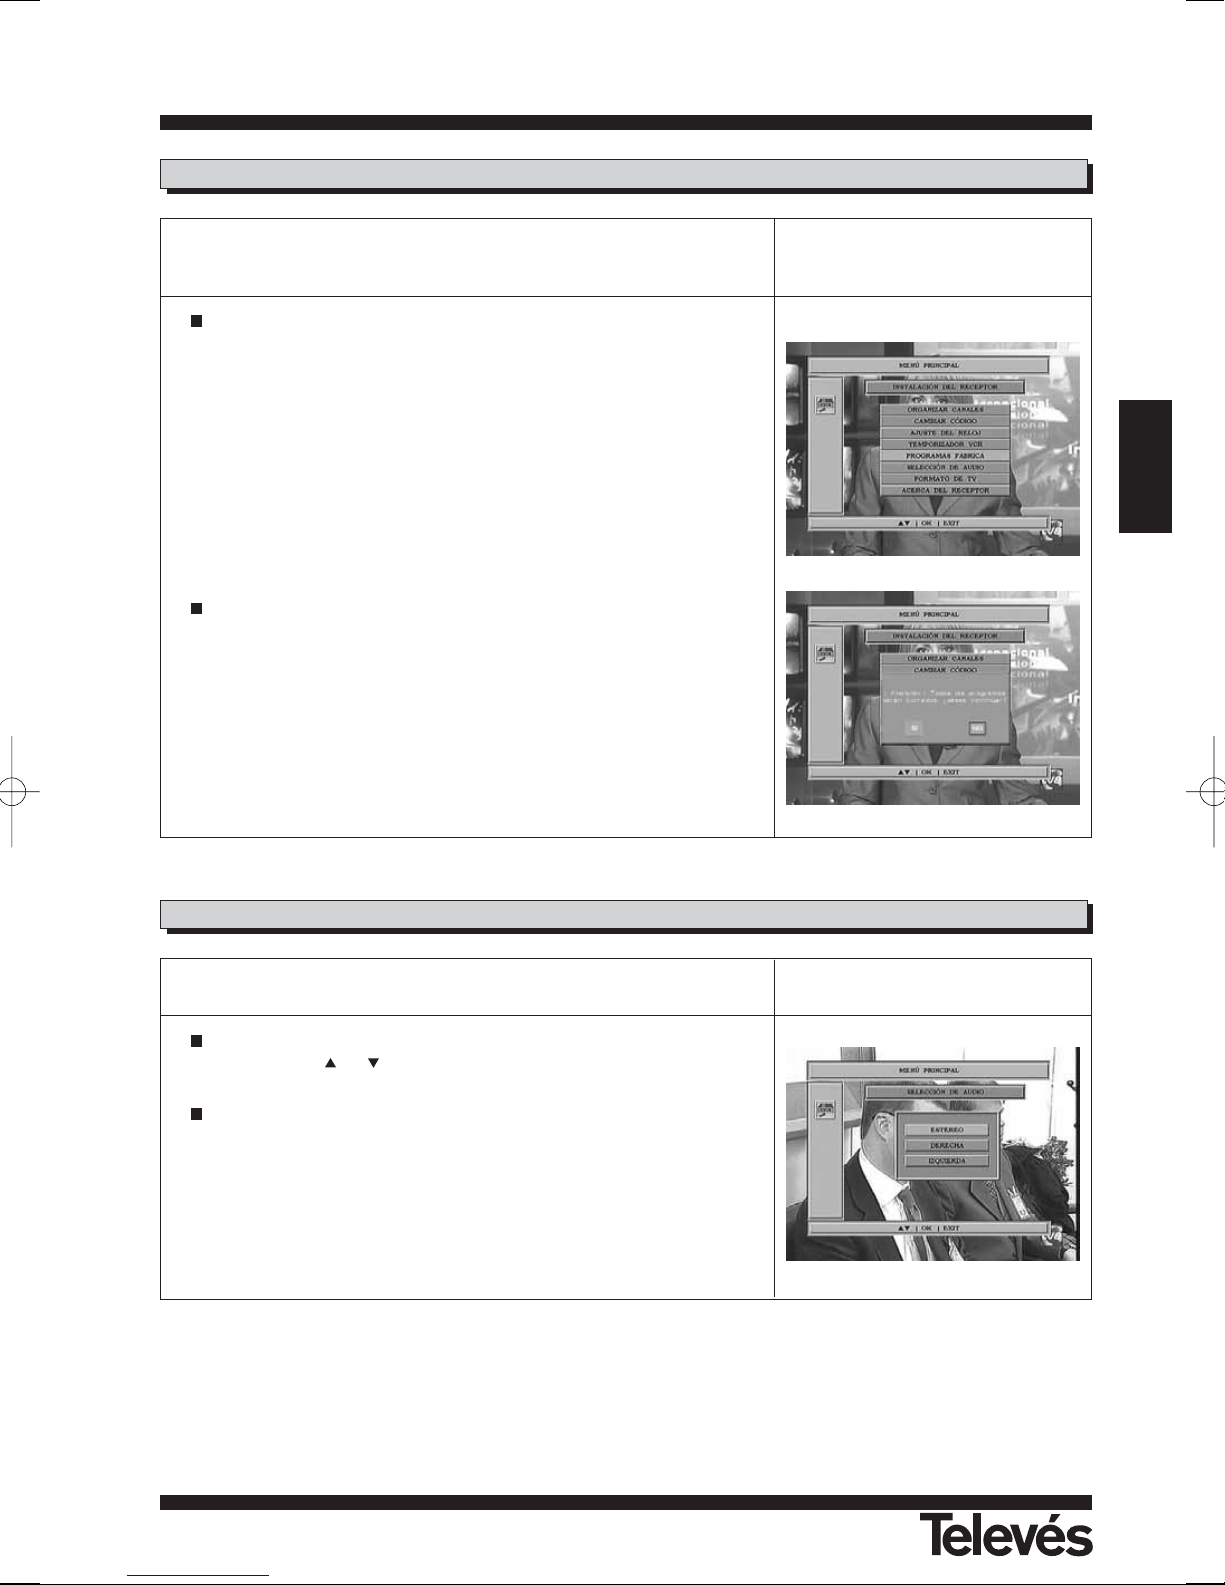
Esta función cambiará todos los parámetros introducidos por aquellos preestablecidos en fábrica por defecto.
El receptor hará los siguientes cambios cuando pulse la tecla OK sobre
“Programas fábrica”:
- Todas las especificaciones introducidas para los transpondedores, serán cambiadas por aquellas preestablecidas en fábrica.
- Todos los canales de la lista serán borrados y reemplazados por
los preestablecidos en fábrica.
- Todas las opciones instaladas por el usuario se cambiarán por
aquellas preestablecidas de fábrica.
Cuando elija esta opción, en la pantalla aparecerá un mensaje de aviso
pidiendo confirmación.
8.6.- Selección de audio
En este menú puede seleccionar el tipo de audio aplicado a los altavoces.
Seleccione una de las tres opciones “Estéreo”, “Izquierda” o “Derecha”
con las teclas o .
Si desea que la selección sea permanente pulse OK una vez haya
seleccionado el audio deseado.
Page 24
Instrucciones de uso
“
RSD - 7296”
24
8.7.- Formato de TV
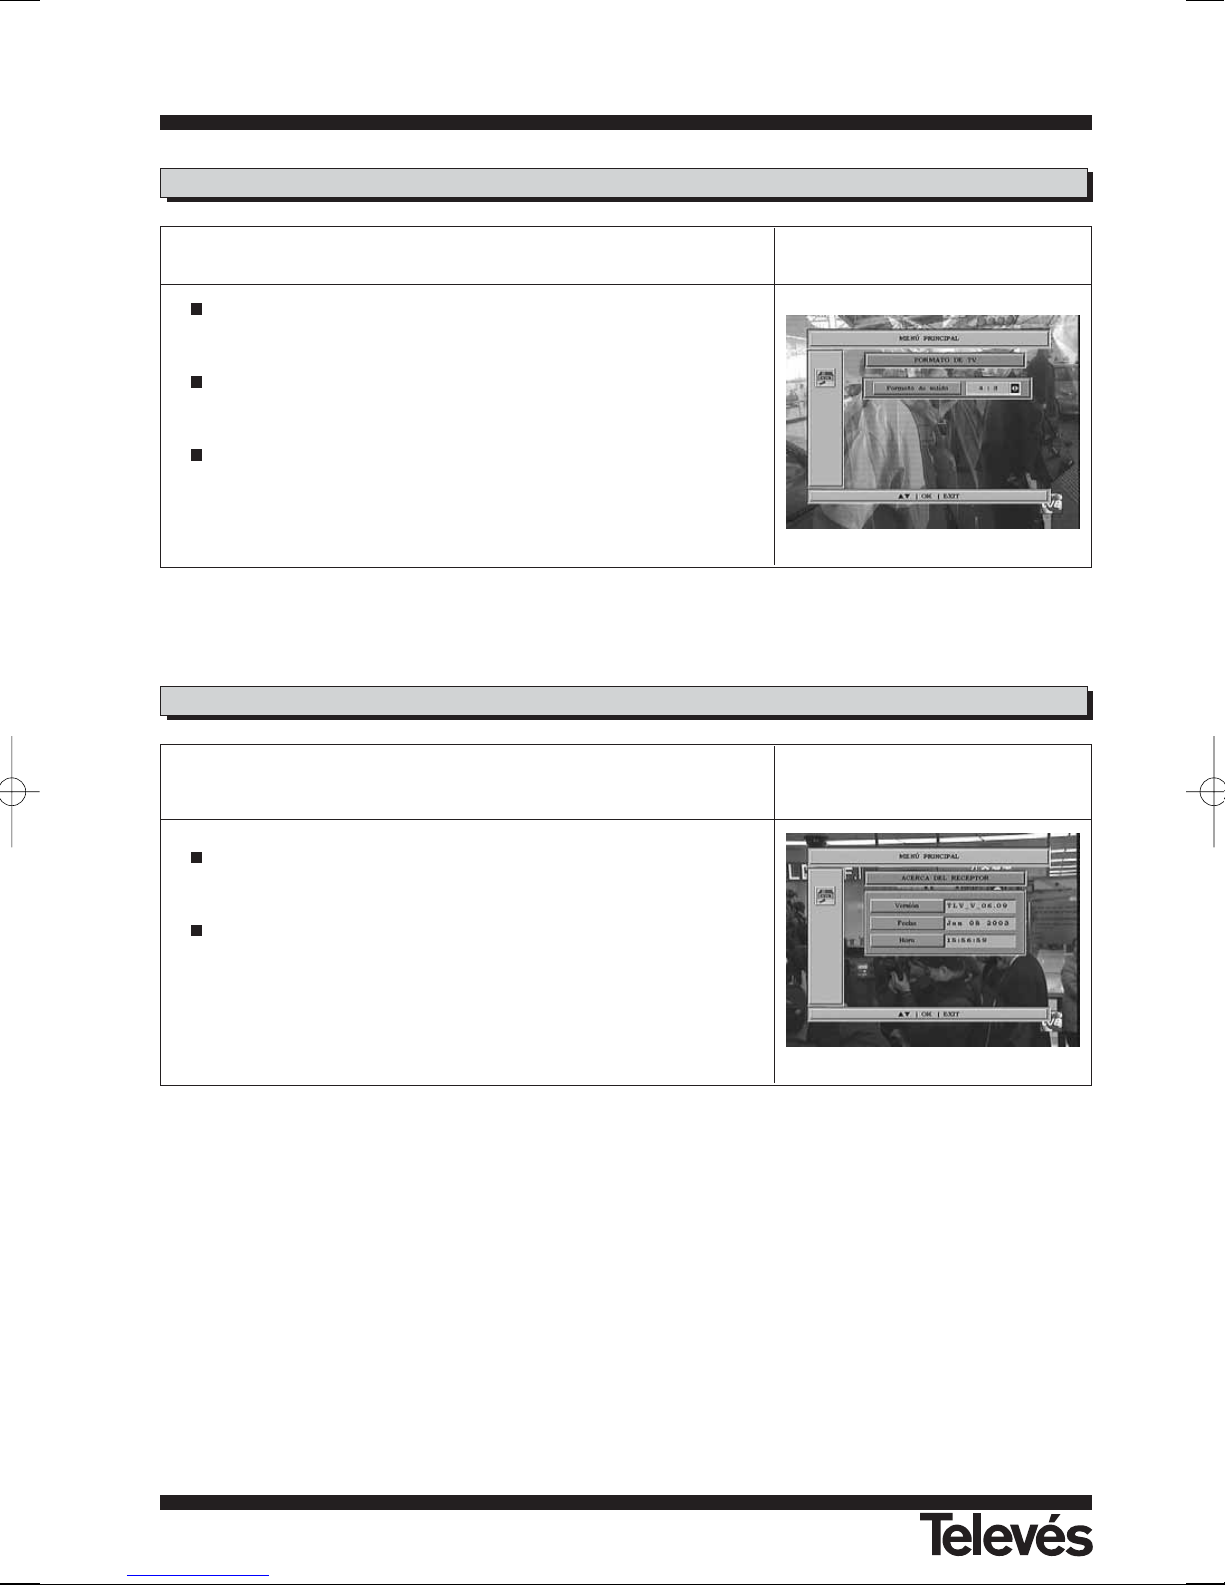
En este menú puede seleccionar el tipo formato para visualizar la pantalla.
El formato de pantalla presenta una relación que puede ser "4 : 3" o
"16 : 9".
Si se selecciona 4:3, todos los programas se visualizarán con esta relación de aspecto.
Si se selecciona 16:9, el formato de pantalla se ajustará automáticamente según la relación de aspecto del programa a visualizar.
8.8.- Acerca del receptor
Esta opción muestra una ventana en pantalla con información del receptor.
Para activar este menú pulse la tecla OK sobre la opción “Acerca del
receptor” del menú -Instalación del receptor-.
Pulse la tecla EXIT para salir del menú.
Page 25
Instrucciones de uso
“
RSD - 7296”
25
ESPAÑOL
Este menú le permite introducir los parámetros de configuración del sistema.
Acceda al menú pulsando la tecla OK sobre la opción “Instalación de siste-
ma” del menú principal. Puede asignar satélites, LNBs, y conmutadores a
16 antenas en este menú.
Aqui puede guardar hasta 16 tipos de configuraciones para la antena.
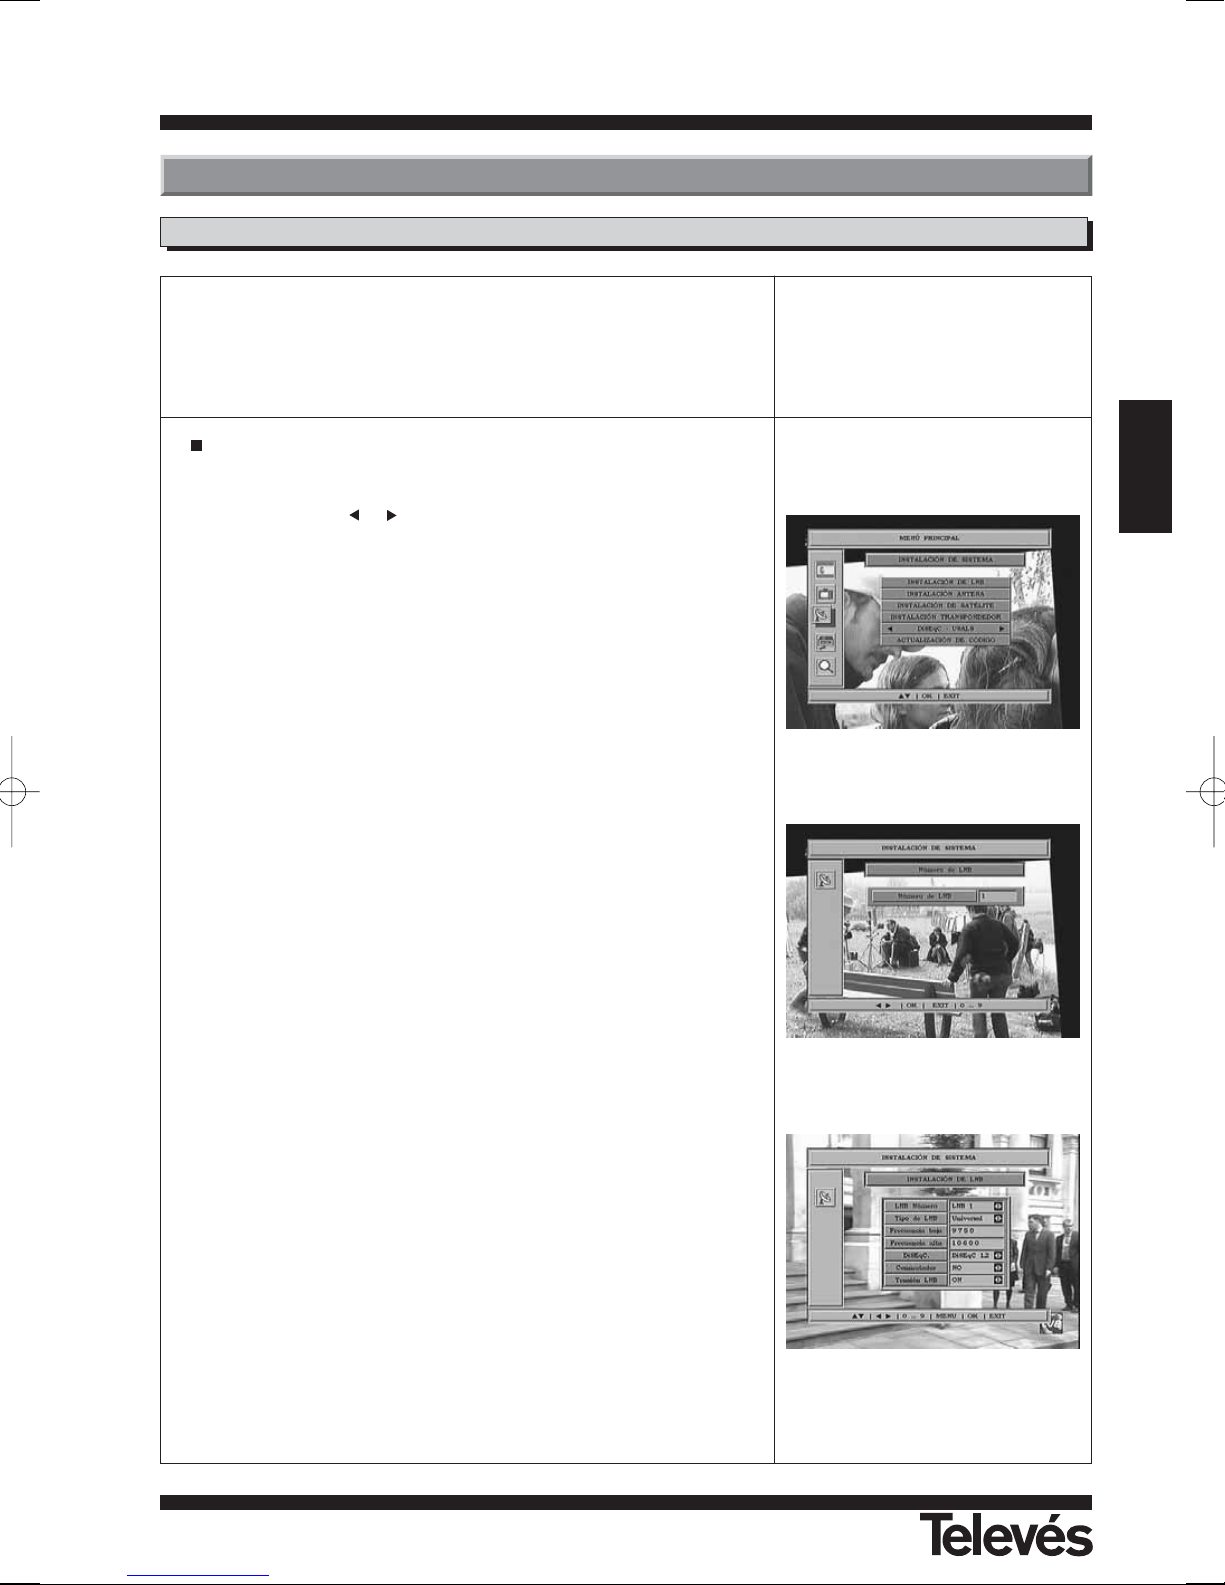
Seleccione la opción “Instalación de LNB” en el menú -Instalación de
sistema- pulsando sobre ella la tecla OK. Mediante el teclado numérico
o con las teclas y seleccione el nº total de LNBs disponibles en
su instalación y vuelva a pulsar la tecla OK.
Asigne los valores adecuados en cada una de las siguientes opciones
correspondientes a cada configuración de LNB:
- Tipo de LNB: Indique si el LNB colocado en la antena es universal o
no. En caso afirmativo las opciones “Frecuencia alta” y “Frecuencia
baja” permanecerán inactivas.
- Frecuencia alta / Frecuencia baja: Introduzca la frecuencia adecua-
da para cada una de las bandas (alta y baja) en caso de no usar un
LNB universal.
- DiSEqC: Si en la opción -Número de LNB- ha seleccionado “1”, la
opción que aparece por defecto es DiSEqC 1.2, correspondiente a una
antena de tipo móvil y gobernada por un motor compatible DiSEqC
1.2. La opción “< DiSEqC 1.2 desactivado >” pasará a estar activa
inmediatamente.
Si en la opción -Número de LNB- ha seleccionado “2”, dispondrá de
las opciones “DiSEqC 1.0” o “Tone Burst”, correspondientes a una
antena de tipo fijo y con un sistema multisatélite; o bien dos antenas
fijas orientadas a distintos satélites.
Finalmente si en la opción -Número de LNB- ha seleccionado un nº de
LNB > “3”, dispondrá de las opciones “DiSEqC 1.0” o “DiSEqC 1.1”,
correspondientes a varias antenas.
- Conmutador: Con la opción -DiSEqC- en modo “Tone Burst” puede
seleccionar una de las opciones “None”, “A” o “B”.
Con la opción -DiSEqC- en modo “DiSEqC 1.0” puede seleccionar una
de las opciones “None”, “A”, “B”, “C” o “D”.
Si por el contrario, la opción -DiSEqC- está en modo “DiSEqC 1.1”
puede seleccionar una de las opciones “None”, “1”, “2”, ... “16”.
Independientemente del tipo de conmutador, cada entrada del mismo
se corresponderá a un LNB concreto.
- Tensión LNB: Seleccione una de las opciones “On” u “Off” para ali-
mentar cada LNB.
9.- Menú Instalación de Sistema
9.1.- Instalación de LNB
Page 26
Instrucciones de uso
“
RSD - 7296”
26
Instrucciones de uso
“
RSD - 7296”
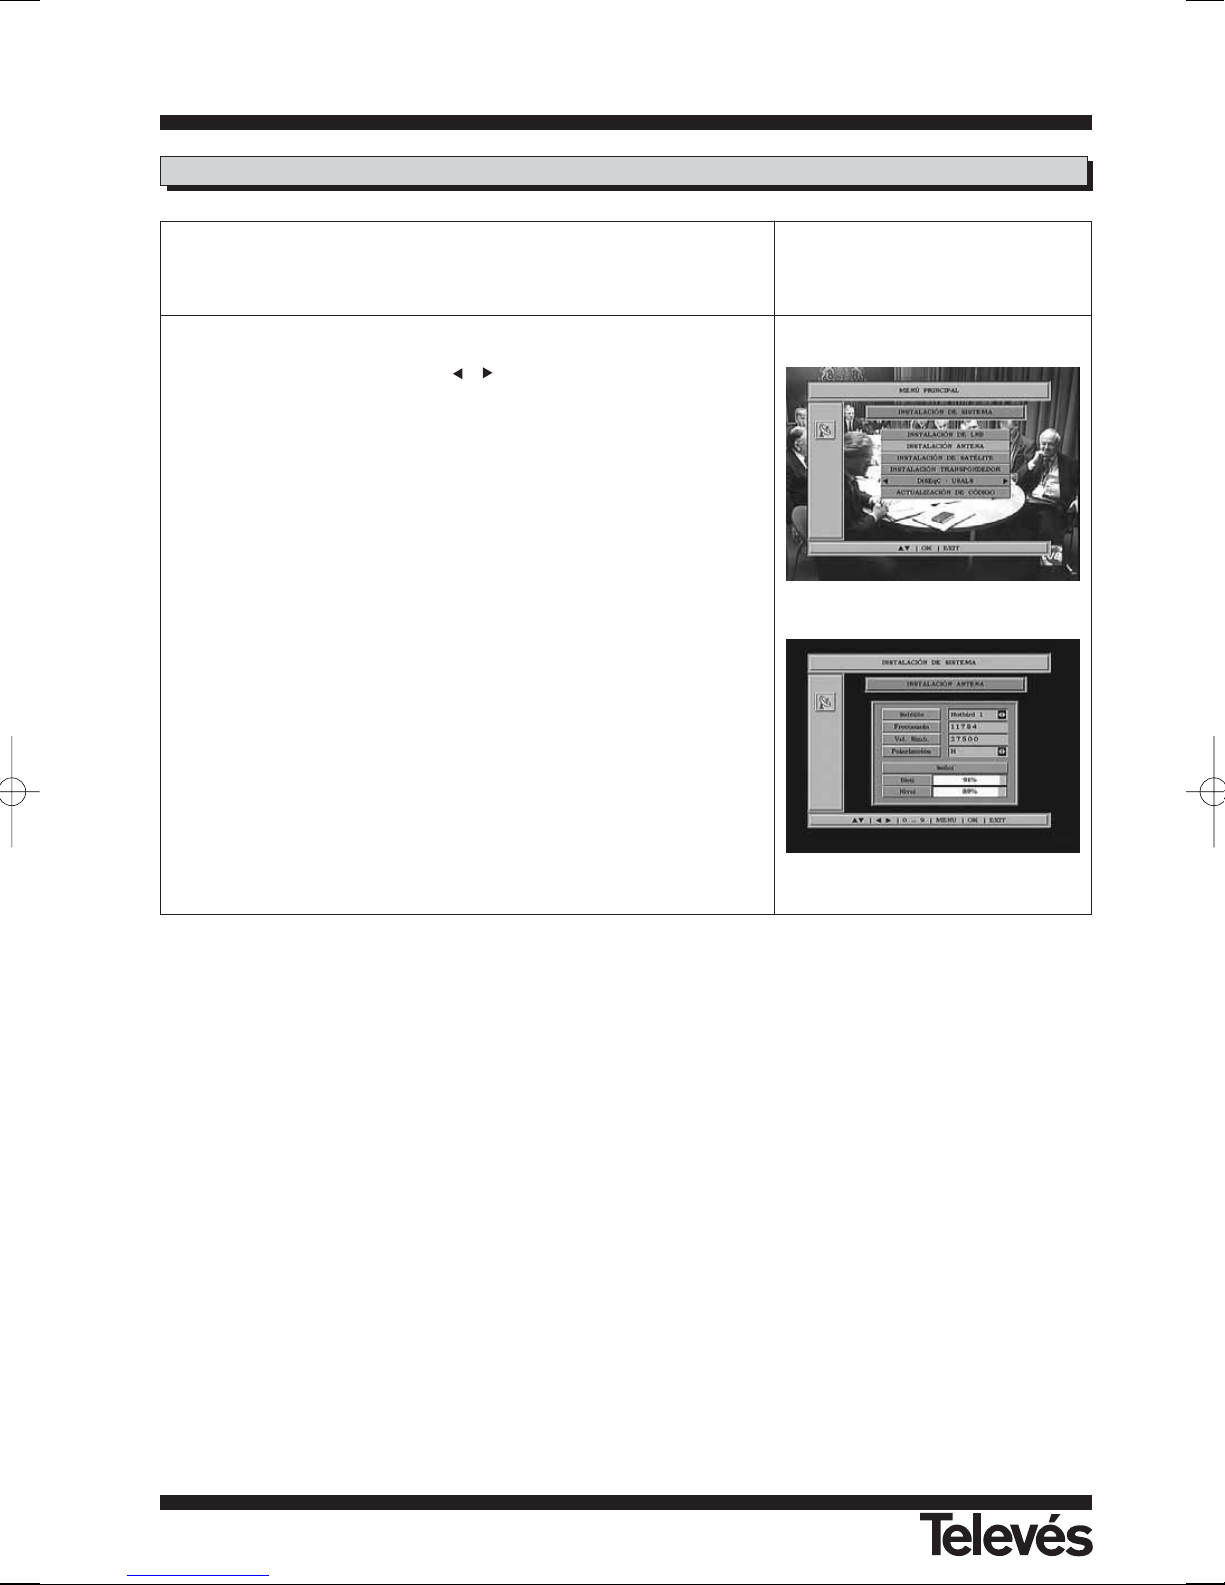
En este menú puede asignar un satélite a una determinada posición de
antena.
- Satélite: Seleccione uno de los satélites que aparecen pre-programa-
dos en el receptor las teclas , o pulsando la tecla OK para acti-
var el menú emergente.
- Frecuencia: Mediante el teclado numérico introduzca la frecuencia
correspondiente.
- Veloc. símbolo: Mediante el teclado numérico introduzca la Velocidad
de Símbolo correspondiente.
- Polarización: Indique si es polarización horizontal (H) o vertical (V).
La ventana Nivel de señal nos permite saber con que potencia de señal
se recibe un satélite.
Esto es de utilidad cuando se está instalando la antena, ya que sirve
como guia para saber cuando estamos apuntando a un satélite.
9.2.- Instalación Antena
Page 27
Instrucciones de uso
“
RSD - 7296”
27
ESPAÑOL
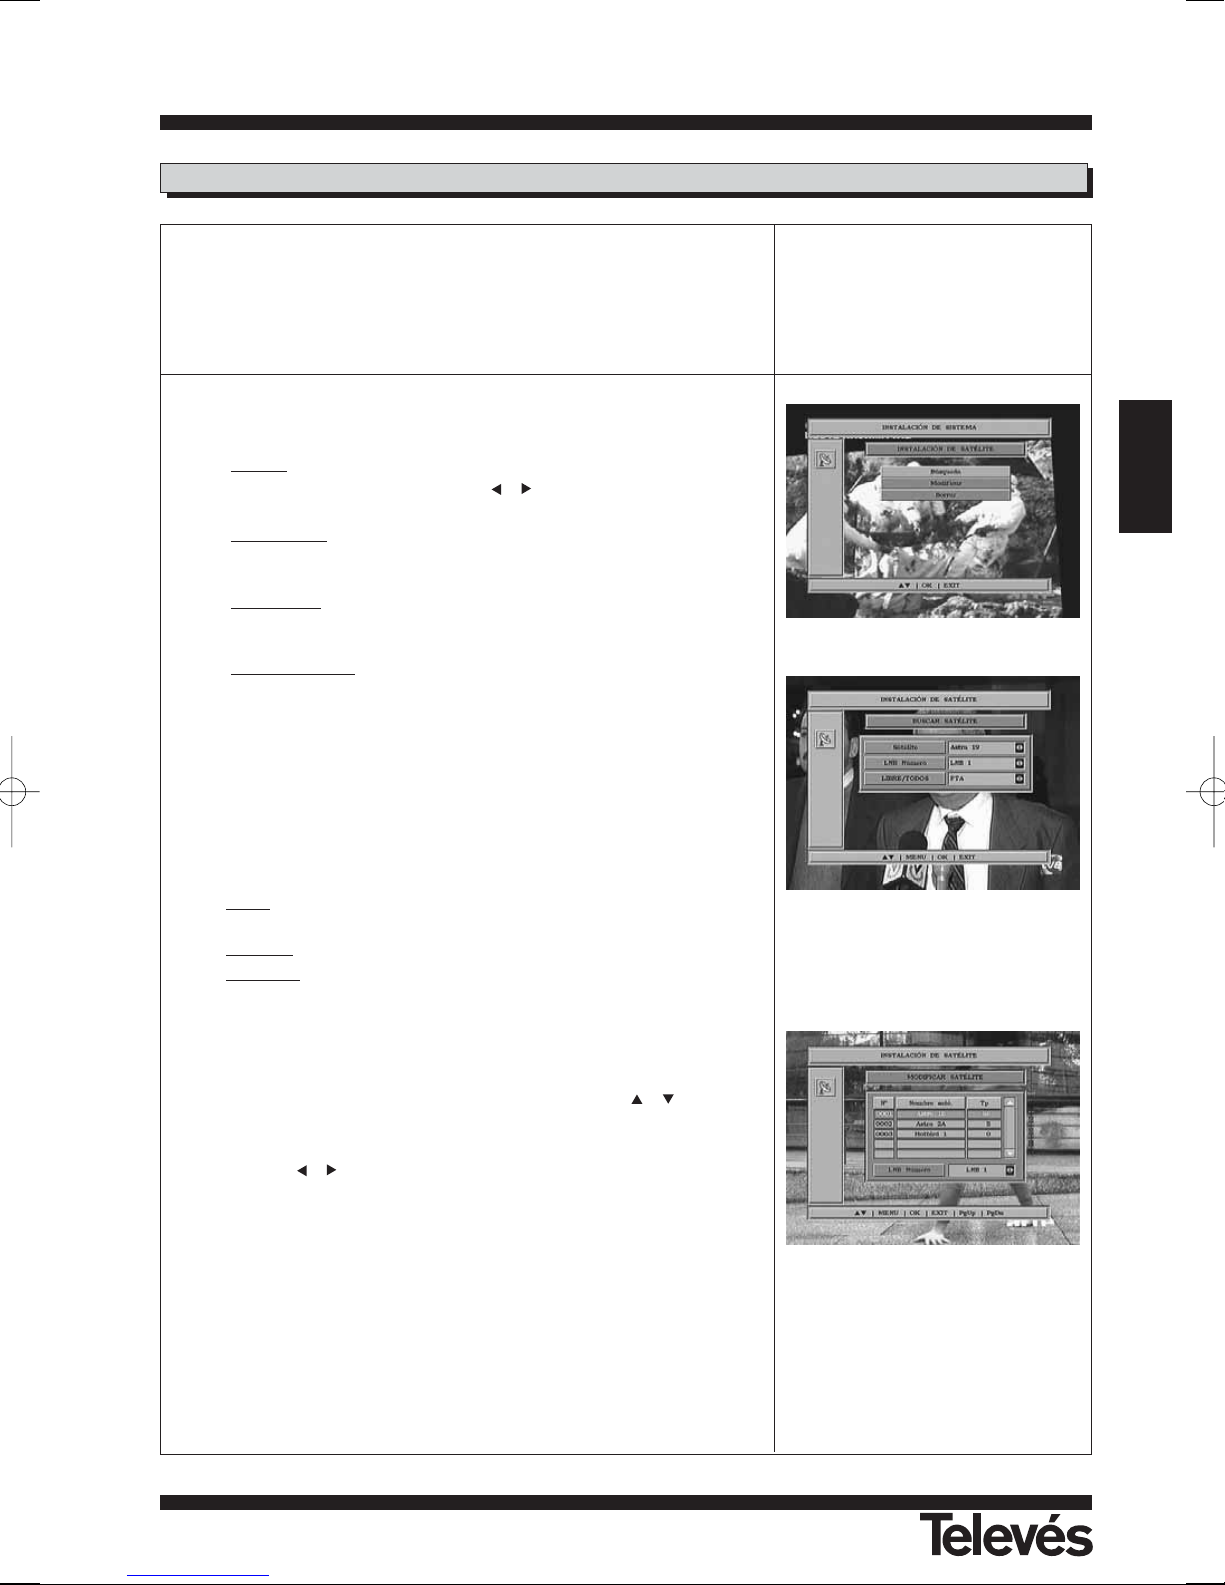
Mediante este menú puede modificar las características correspondientes a un posición de satélite. Para ello pulse la tecla OK sobre la opción
-Instalación satélite-. En el submenu que aparece puede realizar una
búsqueda de canales, modificar los existentes, eliminar los que no
desee o editar el nombre asignado a un satélite.
Búsqueda:
- Satélite
: Seleccione uno de los satélites que aparecen pre-programa-
dos en el receptor con las teclas , o pulsando la tecla OK para
activar el menú emergente.
- LNB númer
o: Asigne un nº de LNB a ese satélite. El número de LNB
disponibles depende de los creados en el apartado “Instalación de
LNB”.
- Libr
e/Todos: Indique si lo que desea es buscar todos los canales del
satélite (ALL), sólo los que emitan en abierto (FTA), solo los canales de
TV o solo los canales de Radio.
- Or
ganizados por: Permite organizar los canales encontrados por saté-
lite, por orden alfabético (A a Z) o bien (Z a A).
Pulse la tecla OK para guardar los datos.
En la ventana de confirmación que se muestra, indique si desea realizar
la búsqueda (SI) o bien cancelar la operación (NO).
Si durante la búsqueda pulsa la tecla EXIT, aparece una pequeña venta-
na donde deberá indicar que desea hacer con la operación de búsqueda:
- Saltar
: Elimina los datos encontrados hasta el momento de cancelar y
guarda los posteriores.
- Cancelar
: Elimina todos los datos encontrados en el satélite.
- Continuar
: Continua con la búsqueda de datos.
Modificar:
Esta opción le permite cambiar el LNB asignado a un satélite.
Seleccione uno de los satélites activos con las teclas o y pulse la
tecla OK.
El cursor se posiciona en la opción “LNB Número” para que mediante
las teclas o seleccione el deseado.
Pulse la tecla OK para guardar los datos.
9.3.- Instalación de satélite
Page 28
Instrucciones de uso
“
RSD - 7296”
28
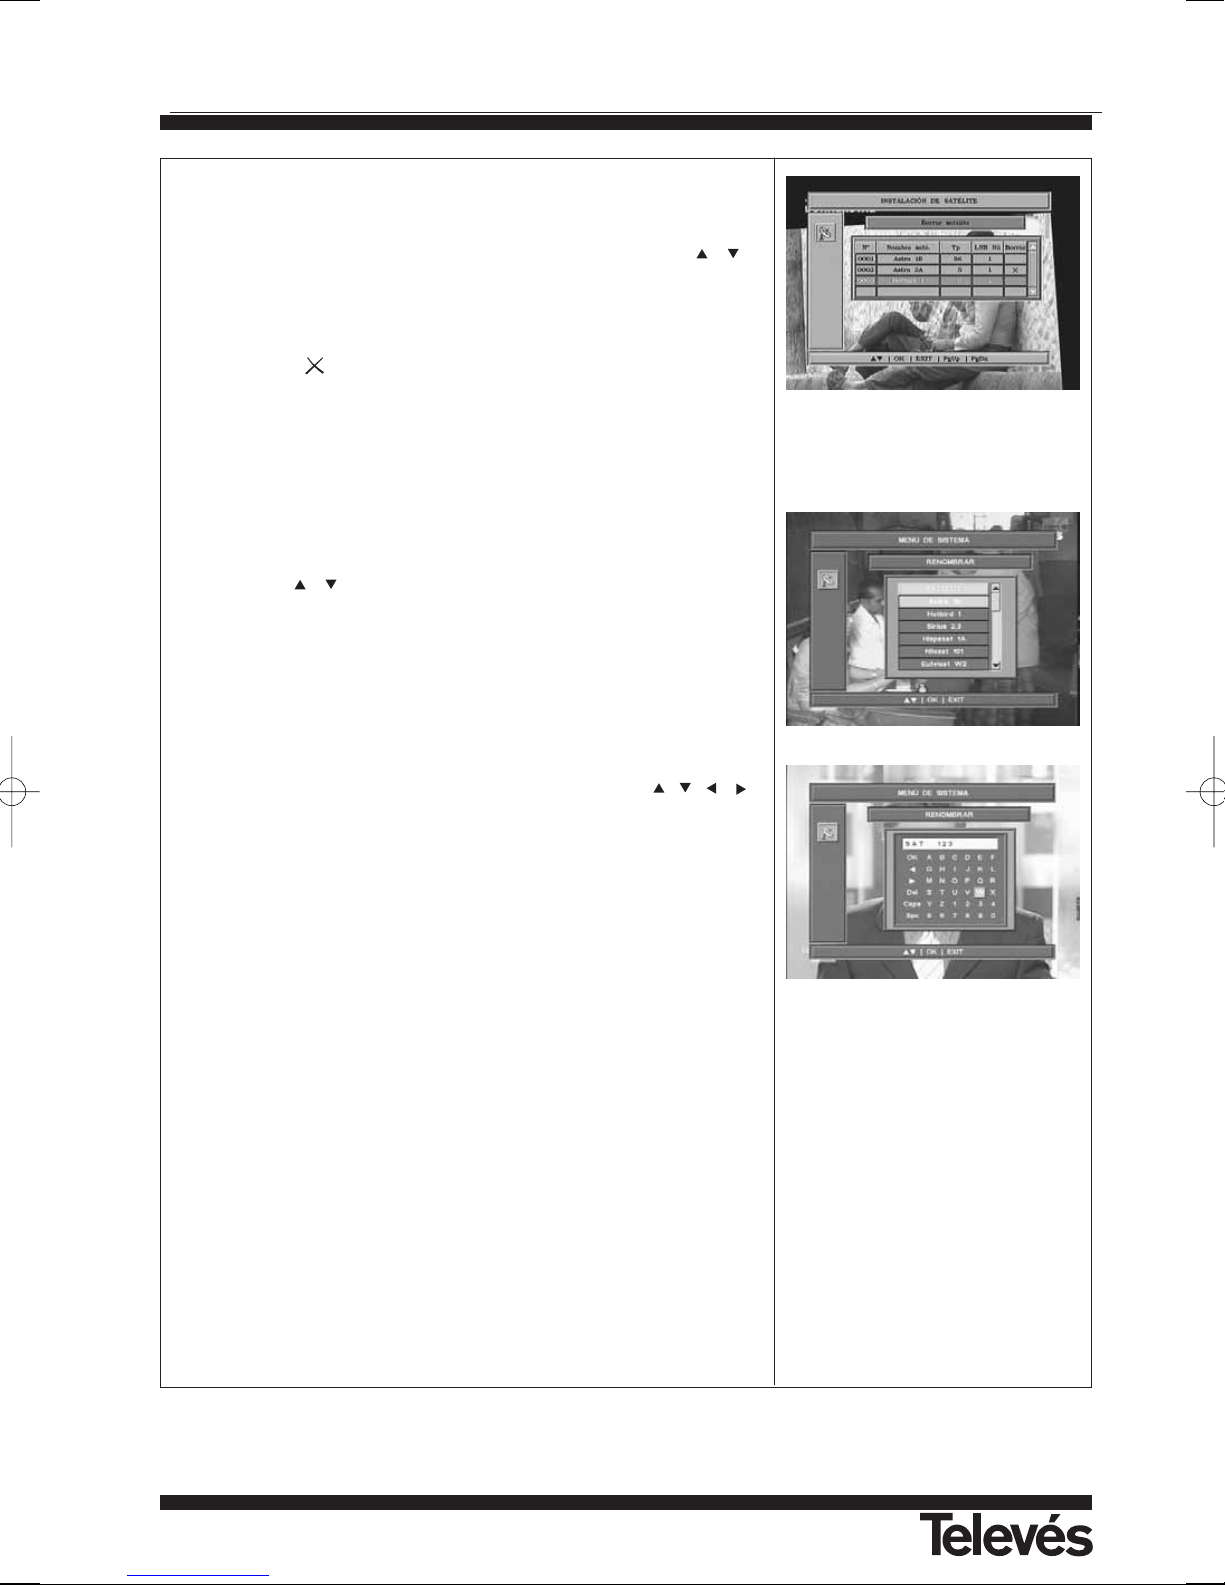
Borrar:
Esta opción le permite borrar todos los datos correspondientes a un
satélite.
Para eliminar un satélite, selecciónelo en la lista con las teclas o y
pulse la tecla OK sobre el elegido, con lo que aparece marcado con un
símbolo indicando la nueva condición del mismo. Si desea sacarle la
marca vuelva a pulsar la tecla OK sobre el satélite, con lo que el símbolo
desaparece. Puede marcar para borrar cuantos satélites desee.
El símbolo ( ) sobre un satélite indica que éste se encuentra marcado
para ser eliminado.
Pulse la tecla EXIT. Una pequeña ventana pide confirmación para eliminar el satélite (SI) o bien cancelar la operación (NO).
Renombrar:
Esta opción le permite editar el nombre de los satélites.
Para editar el nombre de un satélite, selecciónelo en la lista mediante
las teclas o y a continuación pulse la tecla OK para seleccionarlo.
Aparecerá una ventana conteniendo el alfabeto y algoritmos (0 a 9).
Mueva el cursor por el alfabeto mediante las teclas , , o .
Seleccione el caracter deseado y pulse la tecla OK del mando.
Cuando tenga el nombre completo, sitúe el cursor en la opción OK y
pulse la tecla OK del mando.
Pulse la tecla EXIT para salir sin modificar el nombre.
Page 29
Instrucciones de uso
“
RSD - 7296”
29
ESPAÑOL
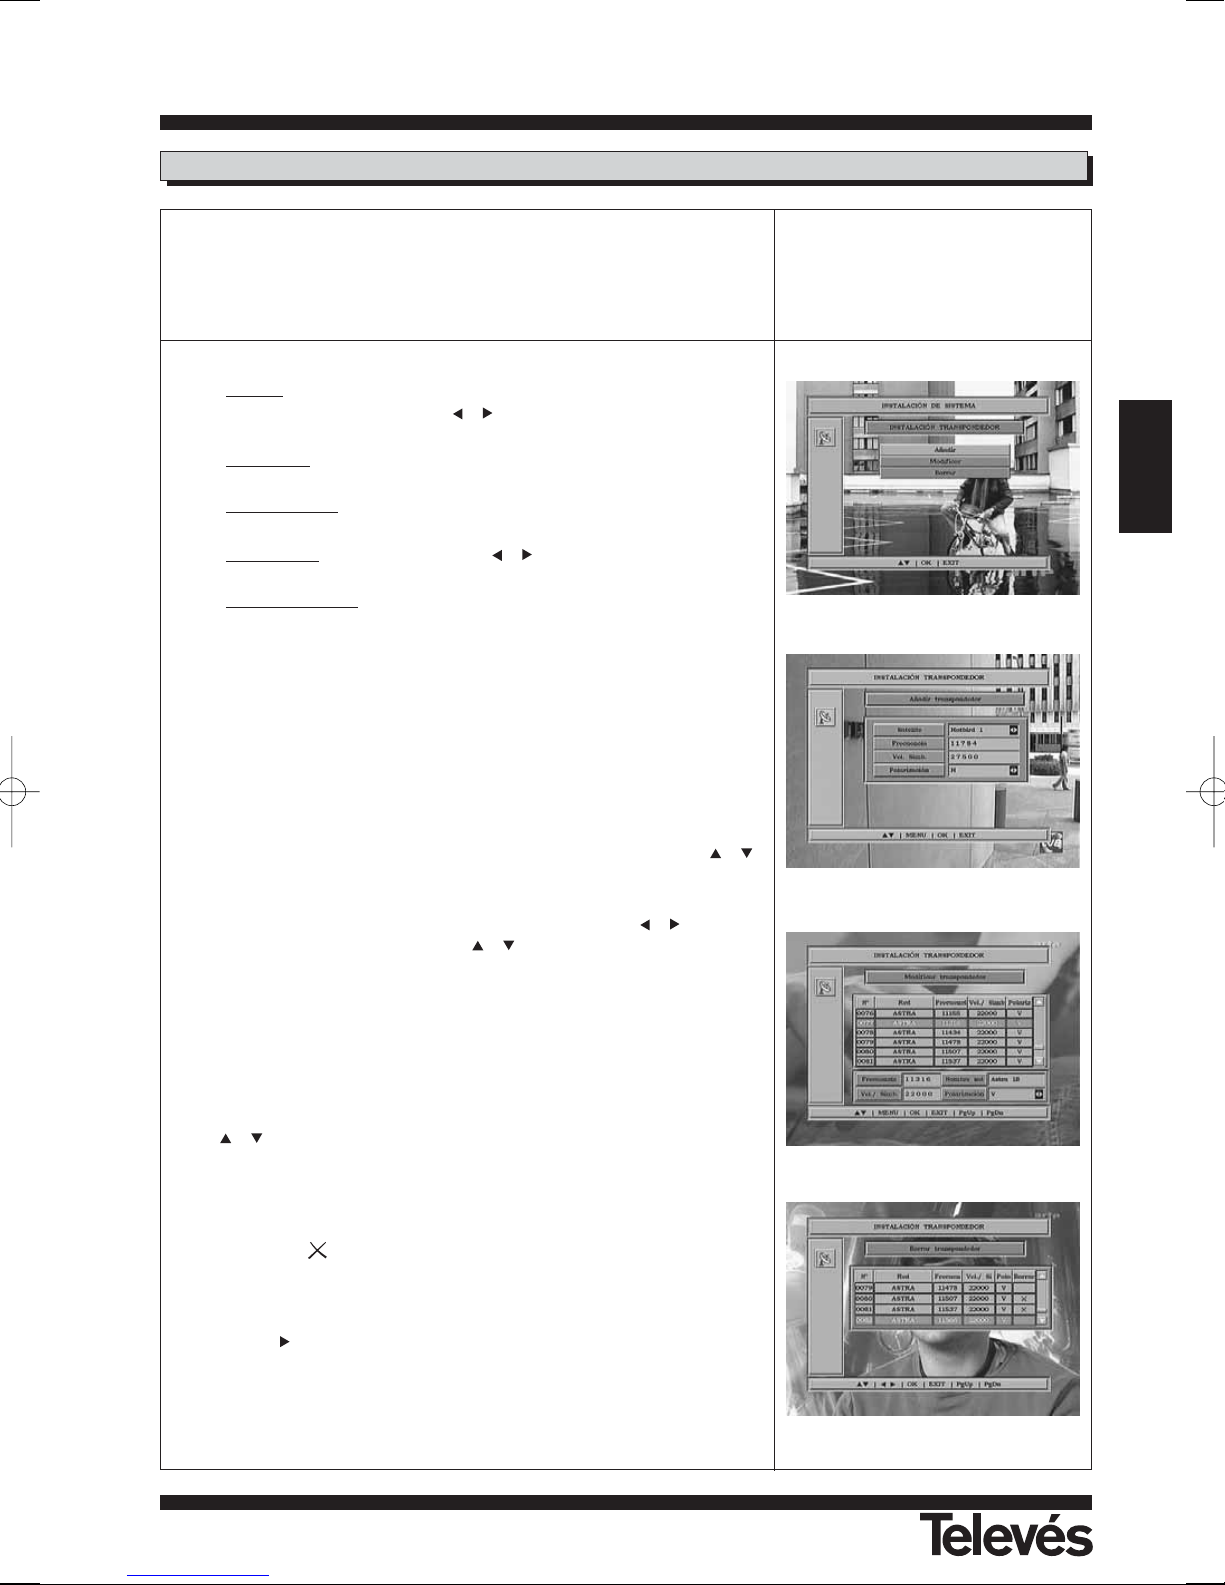
Mediante este menú puede modificar las características correspondientes a un transpondedor. Para ello pulse la tecla OK sobre la opción
-Instalación transpondedor-. En el submenu que aparece puede añadir
un nuevo transpondedor, modificar los existentes o eliminar los que no
desee.
Añadir:
- Satélite
: Seleccione uno de los satélites que aparecen pre-programa-
dos en el receptor las teclas , o pulsando la tecla OK para activar el menú emergente.
- Fr
ecuencia: Mediante el teclado numérico introduzca la frecuencia
correspondiente a ese transpondedor.
- V
eloc. símbolo: Mediante el teclado numérico introduzca la Velocidad
de Símbolo correspondiente a ese transpondedor.
- Polarización
: Mediante las teclas o indique el tipo de polaridad
correspondiente al transpondedor.
- Búsqueda de r
ed
: Con este tipo de búsqueda, el receptor lee la tabla
NIT y lista todos los canales que aparecen en la misma, sin verificar el
funcionamiento de cada canal de su propio transpondedor. Esta
opción puede estar activa o inactiva.
Pulse la tecla OK para comenzar la búsqueda de canales en el transpondedor.
Modificar:
Esta opción le permite cambiar la frecuencia, velocidad de símbolo y
polaridad asignada a un transpondedor.
Seleccione uno de los transpondedores de la lista con las teclas o
y pulse la tecla OK.
El cursor se posiciona en el primer recuadro para introducir los nuevos
datos. Para ello utilice el teclado numérico o las teclas o . Pase de
un recuadro a otro con las teclas o
.
Pulse la tecla OK para guardar los datos. Se realizará una nueva búsqueda en el transpondedor con los nuevos datos.
Borrar:
Esta opción le permite borrar todos los datos correspondientes a un
transpondedor.
Para eliminar un transpondedor, selecciónelo en la lista con las teclas
o y pulse la tecla OK sobre el elegido, con lo que aparece marca-
do con un símbolo indicando la nueva condición del mismo. Si desea
desmarcarlo vuelva a pulsar la tecla OK sobre el transpondedor, con lo
que el símbolo desaparece. Puede marcar cuantos transpondedores
desee.
El símbolo ( ) sobre un transpondedor indica que éste se encuentra
marcado para ser eliminado.
Para poder comprobar que canales pertenecen exactamente a un
determinado transpondedor antes de proceder a su eliminación, pulse
la tecla sobre dicho transpondedor. Se mostrará una lista con todos
los canales incluidos en ese transpondedor.
Pulse la tecla EXIT. Una pequeña ventana pide confirmación para eliminar el transpondedor (SI) o bien cancelar la operación (NO).
9.4.- Instalación Transpondedor
Page 30
Instrucciones de uso
“
RSD - 7296”
30
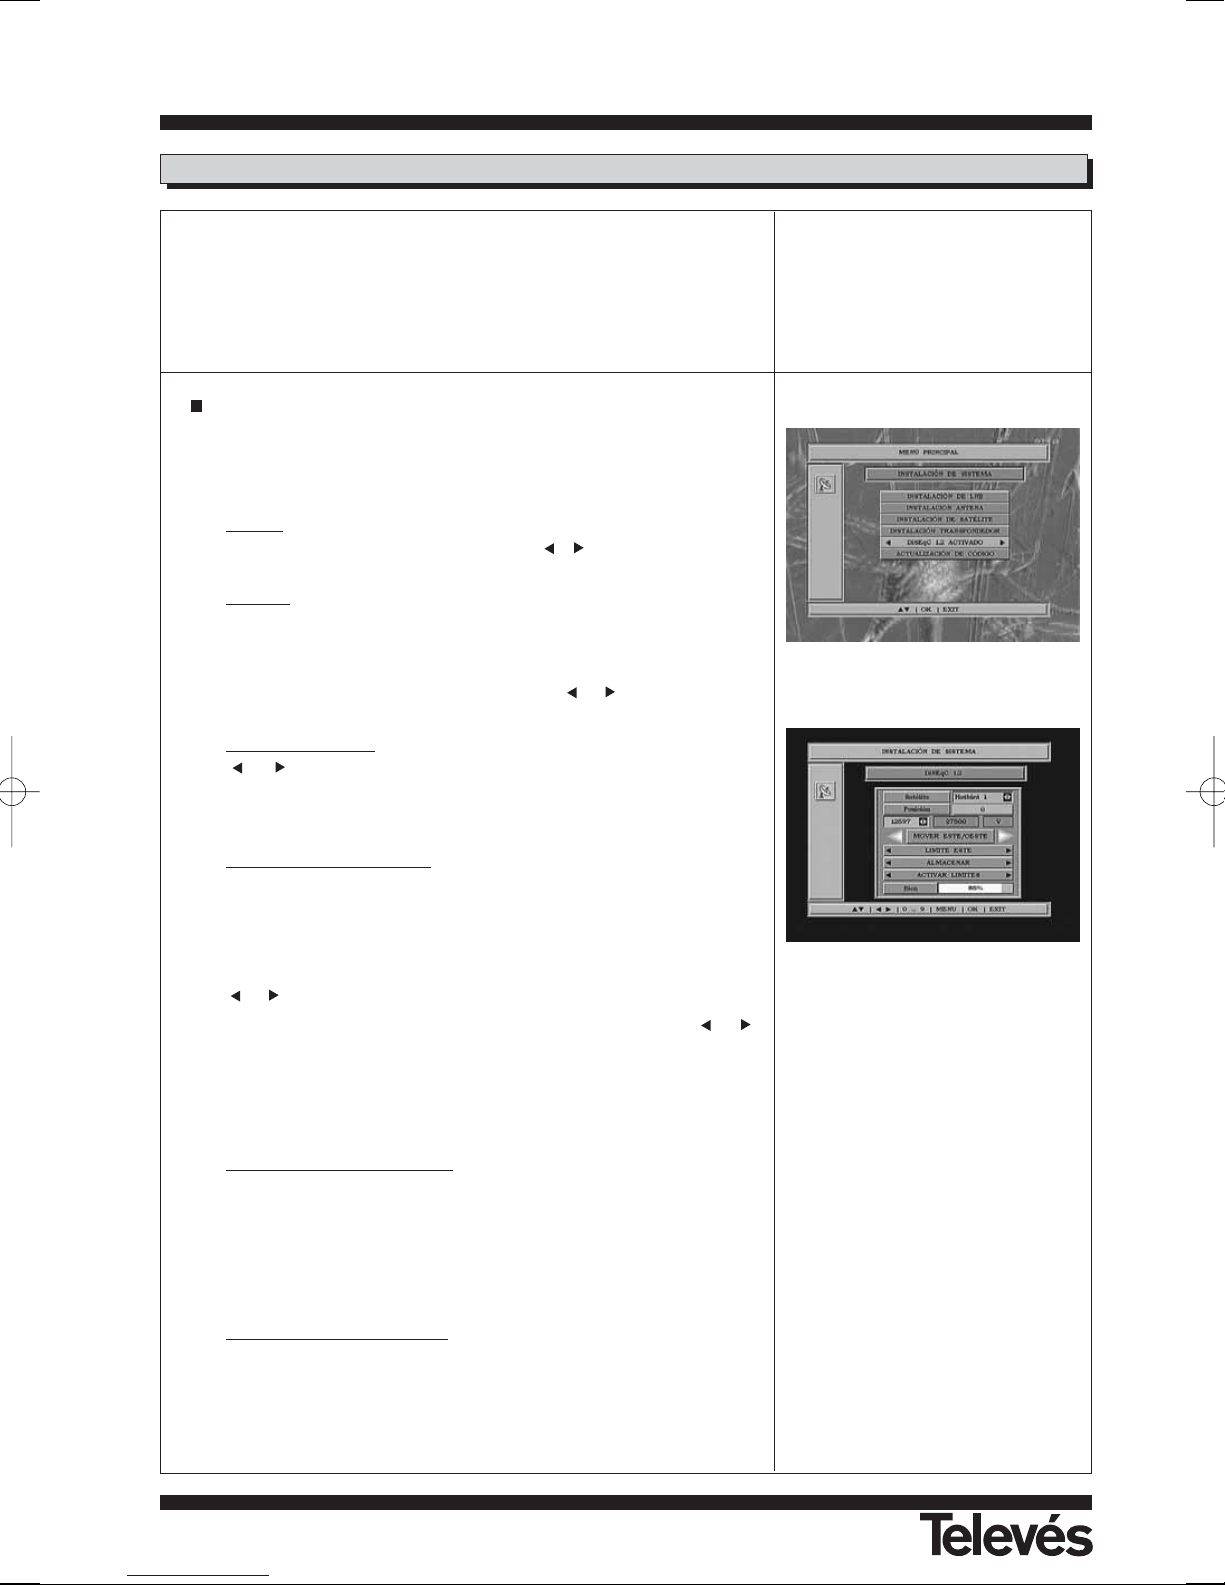
Si en la opción -Número de LNB- ha seleccionado “1”, el menú para posicionador DiSEqC 1.2 mostrará las opciones “< DiSEqC 1.2 activado >”,
“< DiSEqC USALS >” y “< DiSEqC 1.2 desactivado >”.
Pulsando la tecla OK sobre cada una de las opciones DiSEqC, entramos
en el entorno para el posicionado del disco de cada opción.
DiSEqC 1.2 activado
Este menú le permite variar la orientación de la antena móvil para seleccionar nuevas posiciones orbitales de los distintos satélites o bien corregir la posición de satélites ya memorizados.
- Satélite
. Debemos definir los satélites que vamos a utilizar. Para ello
seleccionaremos uno mediante las teclas o .
- Posición
. Cada satélite tendrá un número de posición distinto. Dispone
de 50 posiciones. Asigne un nº de posición al satélite definido.
- Especifique un transpondedor sobre el que poder comprobar el nivel
de señal recibida usando para ello las teclas o .
- Mover Este / Oeste
. Moverá la antena al Este u Oeste con las teclas
o . Cada pulsación de la tecla equivale a mover la antena un
paso. Si mantiene pulsada la tecla, el giro será constante. Para memorizar la posición pulse la tecla OK sobre la opción “Almacenar”.
- Límite Este / Límite Oeste
. Son posiciones que limitan el giro de la
antena en ambos extremos del arco.
Esta opción permanecerá bloqueada siempre que la opción “Activar
límites” esté activa.
Para establecer los límites, después de la memorización de las posiciones orbitales, seleccione el límite a fijar (este u oeste) con las teclas
o .
Suba a la opción “Mover Este/Mover Oeste” y con las teclas o
mueva el disco hasta establecer el límite. Para grabar el límite, deberá
seleccionar la opción “Almacenar” y pulsar OK.
Vuelva a la opción “Límite Este/Oeste”, seleccione el otro límite y proceda de la forma que para el anterior.
- Almacenar / Inicio / Recalcular
.
La opción “Almacenar” graba los límites y las posiciones de cada satélite pulsando sobre ella la tecla OK.
La opción “Inicio” dirige el apuntamiento de la antena al Sur.
La opción “Recalcular” ordena todas las posiciones después de incluir
las nuevas o eliminar alguna existente.
- Activar límites / Quitar límites
. Habilita o deshabilita el uso de los límites. Si no utiliza los límites corre el riesgo de dañar físicamente elementos del motor o la antena.
9.5.- Posicionador DiSEqC 1.2
Page 31

Instrucciones de uso
“
RSD - 7296”
31
ESPAÑOL
DiSEqC USALS
Este menú le permite la orientación de la antena móvil a un satélite de
forma automática conociendo tan solo la posición orbital del satélite y la
posición exacta (longitud / latitud) en que Ud. se encuentra.
Desplácese por las diferentes opciones con las teclas o
.
- Satélite
. Debemos definir los satélites que vamos a utilizar. Para ello
seleccionaremos uno mediante las teclas o .
- Especifique un transpondedor sobre el que poder comprobar el nivel
de señal recibida usando para ello las teclas o .
- Ángulo
. Indique el ángulo correspondiente a la posición orbital del
satélite en grados. Indique si esta posición está hacia el Este o hacia
el Oeste con las teclas o
.
- Longitud
. Indique la longitud de su posición exacta en grados. Indique si
esta posición está hacia el Este o hacia el Oeste con las teclas o
.
- Latitud
. Indique la latitud de su posición exacta en grados. Indique si
esta posición está hacia el Norte o hacia el Sur con las teclas o
.
Pulse la tecla OK para mover la antena a la posición del satélite.
Una barra en la parte inferior nos indica el nivel de señal disponible en el
transpondedor.
Page 32
Instrucciones de uso
“
RSD - 7296”
32
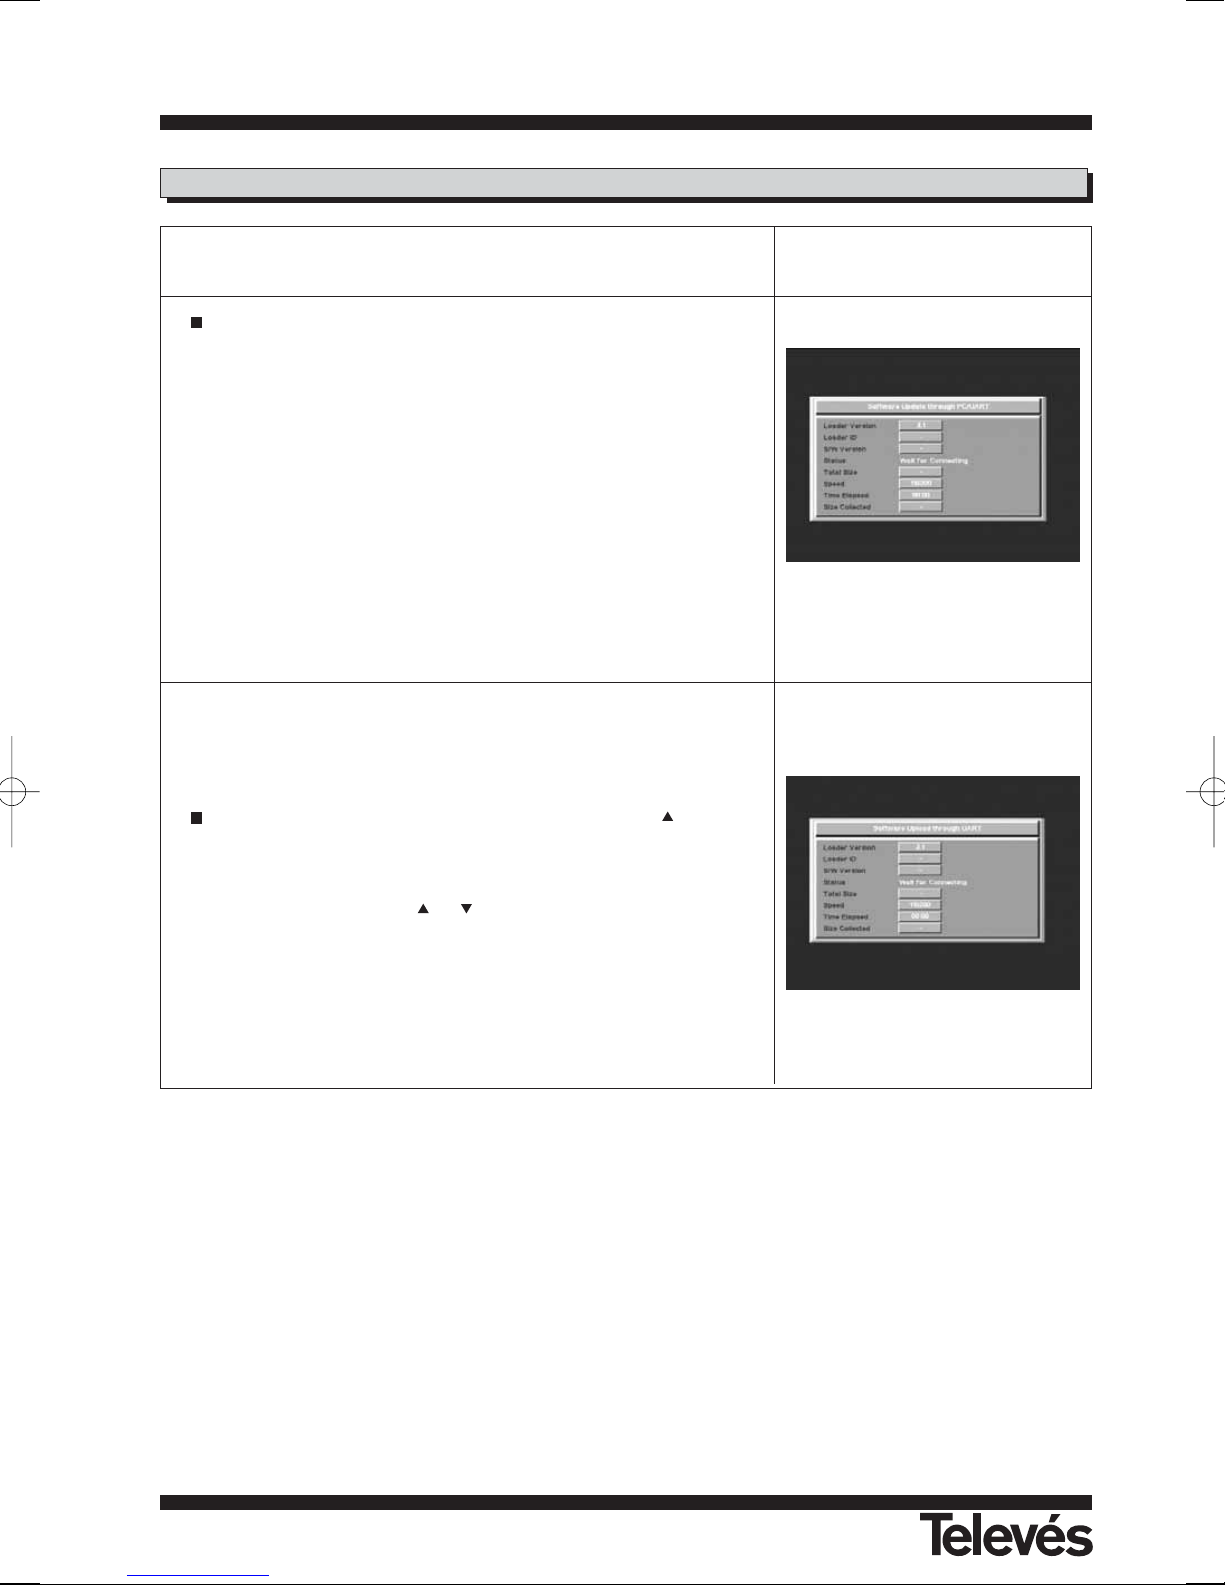
Mediante este menú puede actualizar el software del receptor directamente
de internet mediante un PC.
Deberá conectar el receptor a un PC mediante un cable RS-232 y disponer en él de la última versión del software.
Pulse OK sobre la opción -Actualización de código-. En la pequeña ventana que aparece deberá indicar si desea actualizar el software (SI) o
bien cancelar la operación (NO).
En caso afirmativo, comenzará entonces la actualización del software,
durante el cual irán apareciendo en la pantalla mensajes con detalles
del progreso.
Después de la actualización el receptor comenzará a funcionar.
Nota: Si sólo ha realizado una actualización de la lista de programas, nece-
sitará ejecutar la opción “Programas Fábrica” para que estos pasen a
estar disponibles.
Si desea tener el mismo software y la misma lista de canales en varios
receptores, puede hacer un duplicado del mismo (volcado entre receptores)
simplemente disponiendo de un cable RS-232 (hembra-hembra).
En el receptor Principal (MASTER) deberá pulsar la tecla al tiempo
que enciende el receptor mediante el interruptor trasero (POWER). Entra
así el receptor en el modo “Transmitir SW”.
Configure el receptor Secundario (ESCLAVO) para recibir el software.
Para ello pulse las teclas y al tiempo que enciende el receptor
mediante el interruptor trasero (POWER). Entra así el receptor en el
modo “Actualizar SW”.
El proceso de volcado (copia) dura unos 3 minutos y estará finalizado
cuando ambos receptores pasen a un estado de funcionamiento normal.
El receptor Secundario terminará el proceso unos segundos después
que el Principal.
9.6.- Actualización de código (software)
Page 33
Instrucciones de uso
“
RSD - 7296”
33
ESPAÑOL
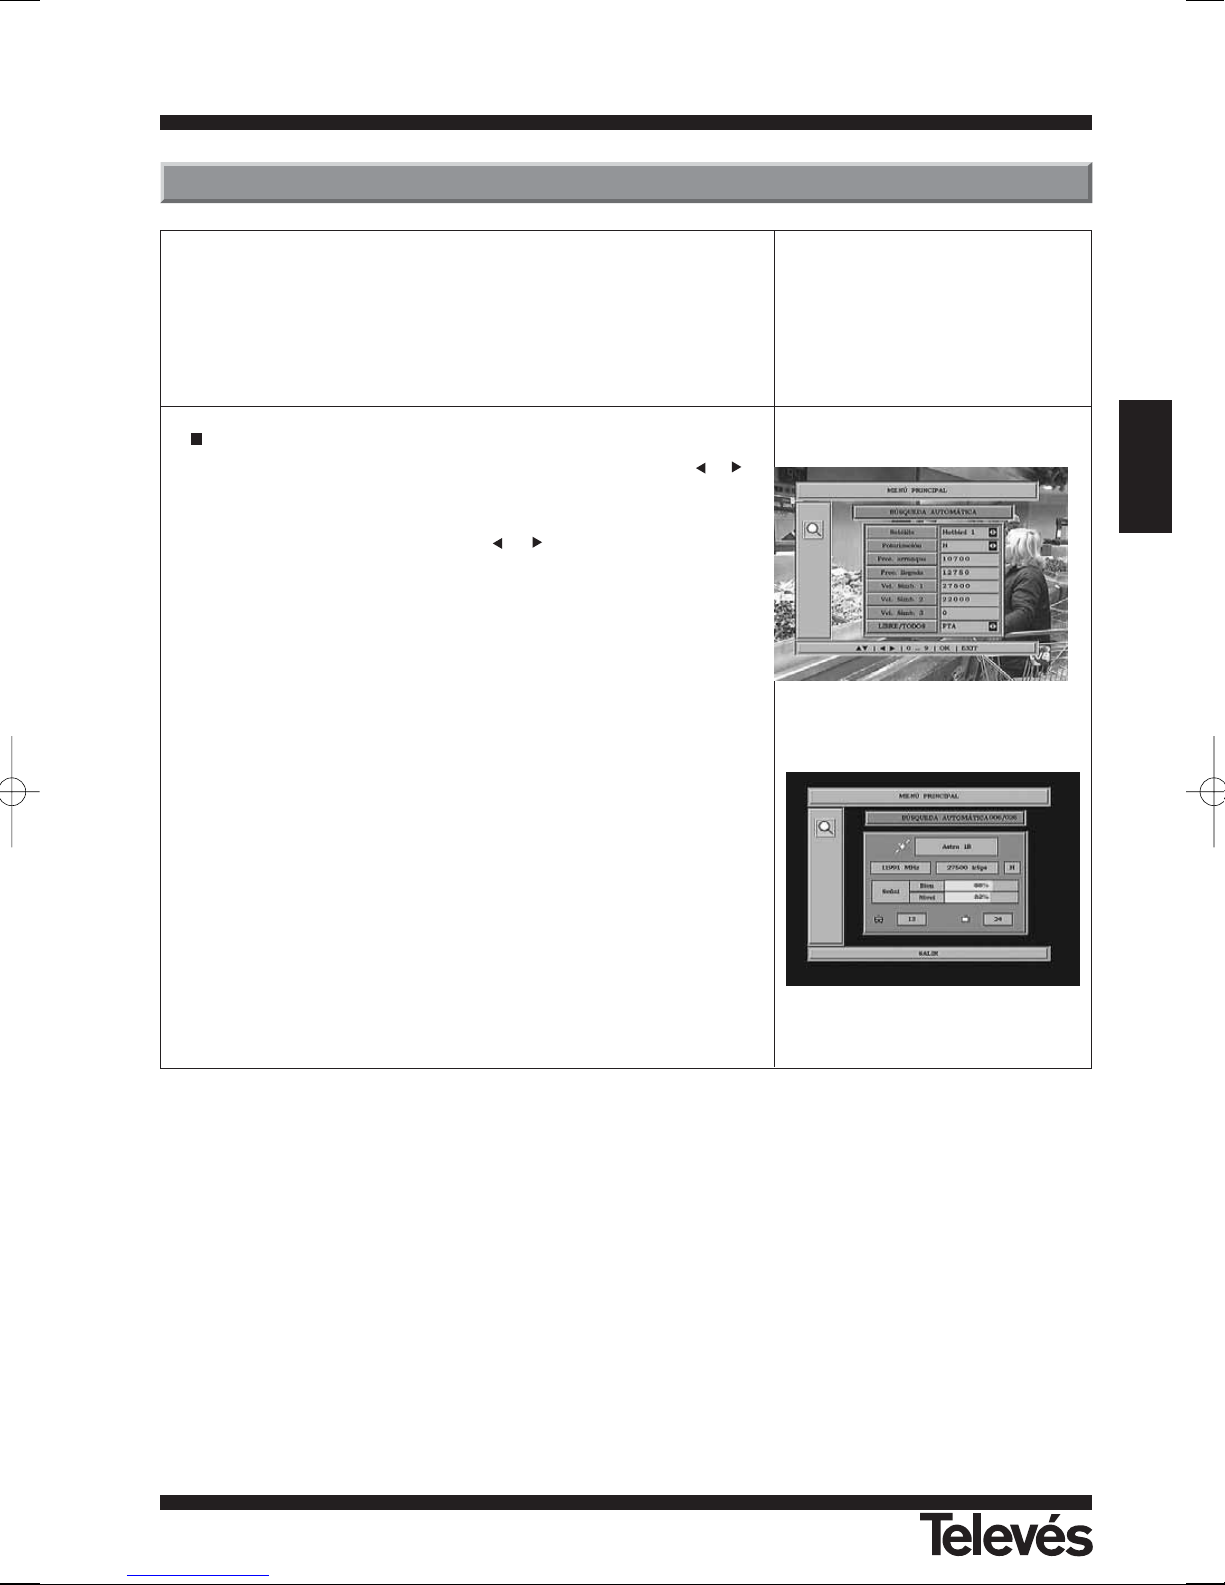
Para realizar la búsqueda de canales ofrecidos por cualquiera de los satélites de su instalación, pulse la tecla OK sobre la opción -Búsqueda automáti-
ca- en el menú principal.
Puede realizar la búsqueda de canales de un satélite, suponiendo que el
satélite seleccionado en el menú -Instalación antena- esté correctamente
asignado a una antena.
Las opciones a modificar son:
- Satélite: Para seleccionar uno de los satélites use las teclas /
o
bien pulse OK para activar el menú emergente.
- Polarización: Mediante las teclas o seleccione el tipo de polari-
dad que desea usar para realizar la búsqueda. Las opciones son
Horizontal (H) , Vertical (V) y Horizontal + Vertical (H+V).
- Frec. arranque: Indique mediante el teclado numérico la frecuencia
inicial desde donde se va a realizar el barrido.
- Frec. llegada: Indique mediante el teclado numérico la frecuencia
final hasta donde se va a realizar el barrido.
- Vel. símbolo 1/2/3: Indique mediante el teclado numérico la frecuen-
cia de símbolo que va a usar para realizar el barrido. Si solo desea utilizar una, deberá indicar el valor “0” en las demás.
- Libre / Todos: Indique si lo que desea es buscar todos los canales del
satélite (ALL) o sólo los que emitan en abierto (FTA) durante el barrido
del satélite.
Si desea detener el proceso de búsqueda antes de su finalización, deberá
pulsar la tecla EXIT del mando.
10.- Búsqueda automática
Page 34
Instrucciones de uso
“
RSD - 7296”
34
Borrar
Modificar
Búsqueda
Instalación
Satélite
Instalación
del receptor
Nombre satélite, Frecuencia, Vel. Símbolo, Polar.
Instalación
Antena
Número LNB
Instalación
de LNB
DiSEqC 1.2 Activado, DiSEqC 1.2 Desactivado, DiSEqC - USALS
Añadir
Organizar canales
Temporizador VCR
Programas Fábrica
Selección de audio
Favorito, Bloqueado, Eliminar, Mover, Añadir, ...
English, Deutsch, Français, Español, Italiano, Português, Polska, Türkçe, Russe ..
Idioma OSD
Búsqueda
Automática
Instalación
de Sistema
Cambiar Código
Ajuste del reloj
Borrar
Modificar
Actualización
de Código
Nuevo Código, Confirmar nuevo Código
GMT, Hora, Minutos
Hora inicio, Hora final, Programa, ...
Reset
Estéreo, Canal izquierdo, Canal derecho
MENU
PRINCIPAL
Instalación
Transpondedor
Nombre satélite, Polaridad, Frec. inicio, Frec. final, Todos, FTA, ...
Formato TV
Acerca del receptor
4:3, 16:9
Renombrar
Versión SW, Versión HW
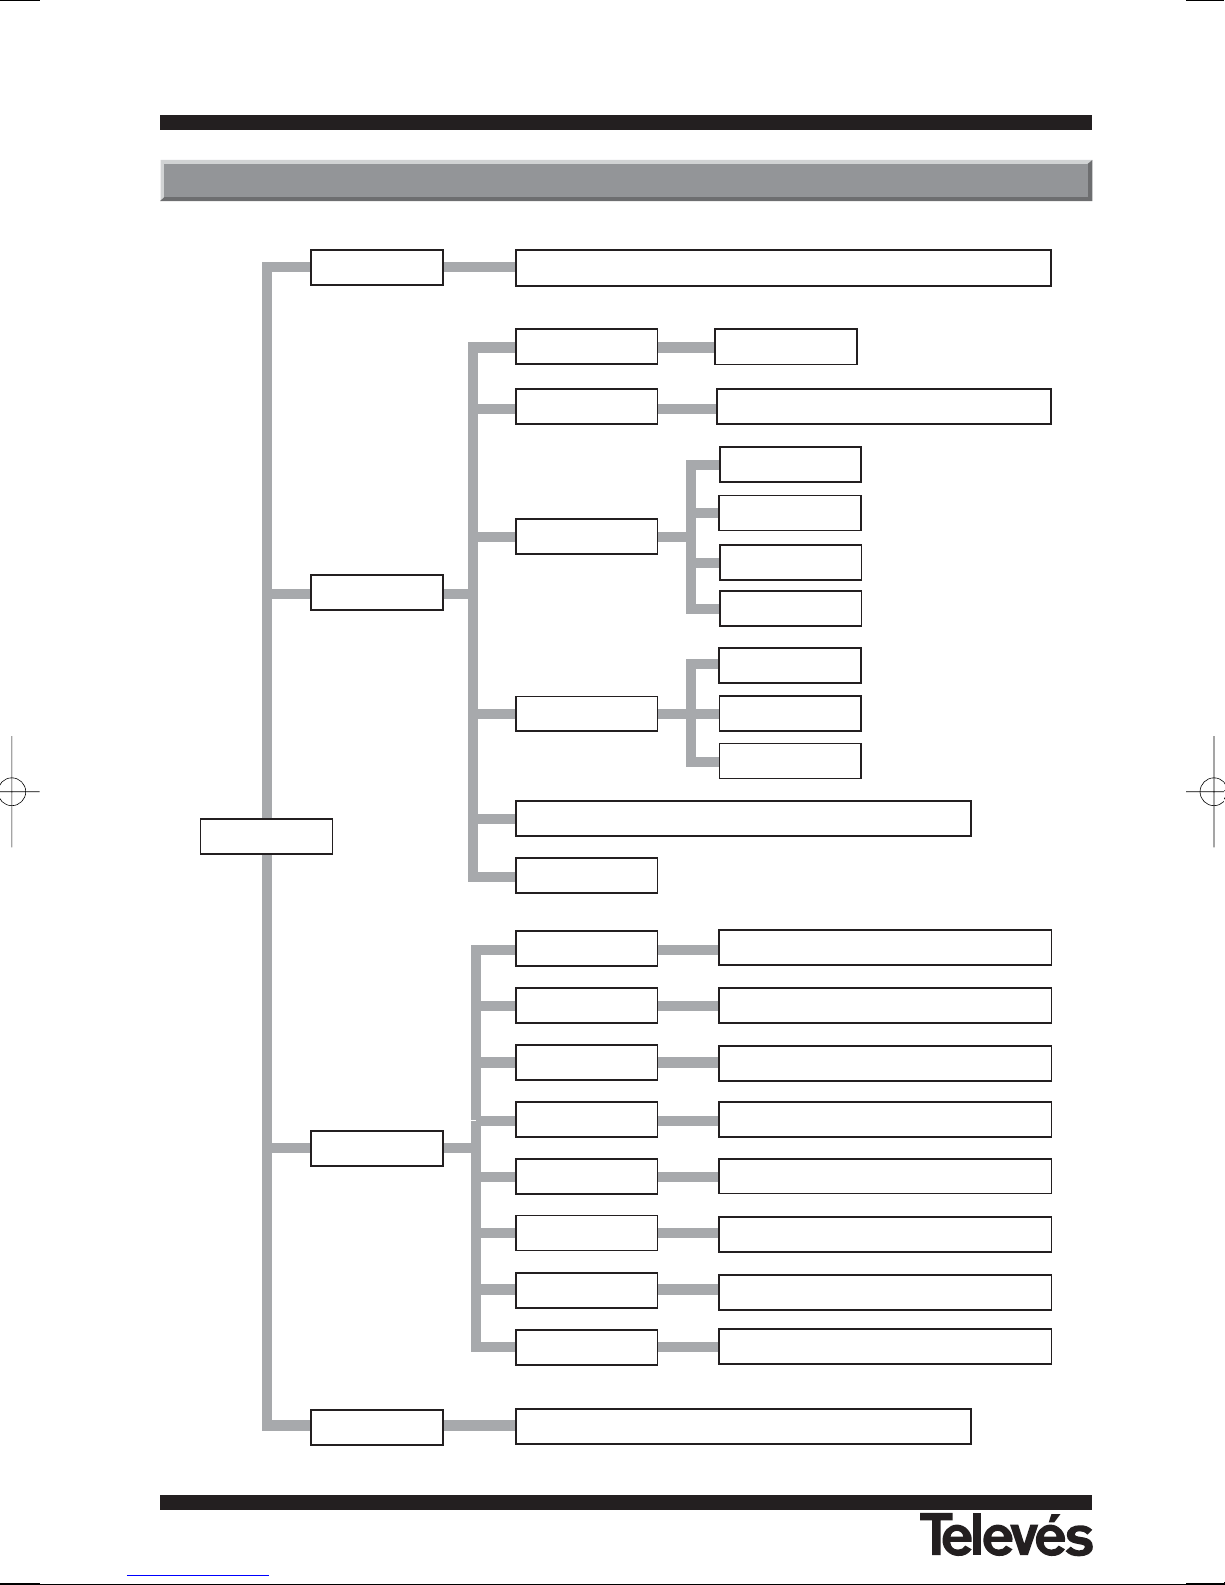
Estructura del menú
Page 35
Instrucciones de uso
“
RSD - 7296”
35
ESPAÑOL
PIN TV VCR
1 Salida audio (D) Salida audio (D)
2 N/C Entrada audio (D)
3 Salida audio (I) Salida audio (I)
4 Masa audio Masa audio
5 Masa azul Masa azul
6 N/C Entrada audio (I)
7 Salida azul Entrada azul
8 Tens. conmutac. Tens. conmutac.
9 Masa verde Masa verde
10 N/C N/C
11 Salida verde Entrada verde
12 N/C N/C
13 Masa rojo Masa rojo
14 Masa “Fast Blanking” Masa “Fast Blanking”
15 Salida rojo Entrada rojo
16 Salida “Fast Blanking” Entrada “Fast Blanking”
17 Masa video Masa video
18 Masa video Masa video
19 Salida video Salida video
20 N/C Entrada video
21 Masa Masa
PIN Descripción
1 N/C
2 RXD (Entrada de datos)
3 TXD (Salida de datos)
4 N/C
5 Masa
6 N/C
7 N/C
8 N/C
9 N/C
201816
14
12
1086
4
2
1
3
5
7
9
11
13
15
17
19
21
1 3 5
2 4
6 8
7 9
Descripción de conectores
Euroconectores (SCART)
RS 232C
Page 36
Instrucciones de uso
“
RSD - 7296”
36
Sistema totalmente compatible con normas DVB
Descodificador de video
MPEG-2 Main Profile @ Main Level
Velocidad de proceso hasta 15Mbits/s
Formato de video 4:3, 16:9
Descodificador de audio
MPEG-1 layer I & II (Musicam Audio)
Mono, Dual, Estéreo, “Joint Stereo”
Recursos del sistema
Memoria RAM 2 Mbyte
Memoria Flash 1 Mbyte
Gráficos 720 x 576 (PAL)
720 x 480 (NTSC)
Entrada LNB / sintonizador
Conector 2 x tipo “F”
Frecuencia de entrada 950 - 2150 MHz
Alimentación LNB 13/18V, max. 350 mA
Conmutación de banda Tono 22 KHz
Conmutación DiSEqC Versión 1.0, Tone Burst A/B
Posicionador DiSEqC 1.2 / USALS
Demodulación QPSK
Velocidad de símbolo 2 - 45 Msps
Cubre las bandas C y Ku
Cubre SCPC y MCPC
Euroconector TV RGB, CVBS, Audio L/R
Euroconector VCR CVBS (entrada/salida), Audio L/R (entrada/salida)
Salida de audio Hi-Fi
Conector 2 x RCA (L/R)
Interfaze de datos serie
Conector 9-pin D-sub
Señales RS232 max.19,2K baud
Conectores totales
2 x entrada LNB (tipo F)
2 x euroconectores (TV/VCR)
3 x jacks RCA (VIDEO, AUDIO L/R)
1 x RS232 (9-pin D-sub)
Alimentación 90 - 260V~, 50/60 Hz
Consumo 30W
Medidas 280 x 210 x 60 mm
Peso aprox. 1,6 Kg
Características técnicas
Page 37
User Manual
“
RSD - 7296”
37
ENGLISH
ÍNDEX . . . . . . . . . . . . . . . . . . . . . . . . . . . . . . . . . . . . . . . . . . . . . . . . . . . . . . . . . . . . . . . . . . . . . . . . . . . . . . . Pág.
1.- Safety measures . . . . . . . . . . . . . . . . . . . . . . . . . . . . . . . . . . . . . . . . . . . . . . . . . . . . . . . . . . . . . . . . . . . . . . . . . . . . . . 38
2.- Before beginning . . . . . . . . . . . . . . . . . . . . . . . . . . . . . . . . . . . . . . . . . . . . . . . . . . . . . . . . . . . . . . . . . . . . . . . . . . . . . . 39
2.1.- Preface . . . . . . . . . . . . . . . . . . . . . . . . . . . . . . . . . . . . . . . . . . . . . . . . . . . . . . . . . . . . . . . . . . . . . . . . . . . . . 39
2.2.- General specifications . . . . . . . . . . . . . . . . . . . . . . . . . . . . . . . . . . . . . . . . . . . . . . . . . . . . . . . . . . . . . . . . . . 39
2.3.- Equipment . . . . . . . . . . . . . . . . . . . . . . . . . . . . . . . . . . . . . . . . . . . . . . . . . . . . . . . . . . . . . . . . . . . . . . . . . . . 39
3.- Description of panels and connections . . . . . . . . . . . . . . . . . . . . . . . . . . . . . . . . . . . . . . . . . . . . . . . . . . . . . . . . . . . . . 40
4.- First Installation . . . . . . . . . . . . . . . . . . . . . . . . . . . . . . . . . . . . . . . . . . . . . . . . . . . . . . . . . . . . . . . . . . . . . . . . . . . . . . 42
4.1.- Connections / Start Menu . . . . . . . . . . . . . . . . . . . . . . . . . . . . . . . . . . . . . . . . . . . . . . . . . . . . . . . . . . . . . . . 42
4.2.- Fixed Installation . . . . . . . . . . . . . . . . . . . . . . . . . . . . . . . . . . . . . . . . . . . . . . . . . . . . . . . . . . . . . . . . . . . . . . 44
4.3.- Motorised Installation . . . . . . . . . . . . . . . . . . . . . . . . . . . . . . . . . . . . . . . . . . . . . . . . . . . . . . . . . . . . . . . . . . 46
5.- Ready to begin . . . . . . . . . . . . . . . . . . . . . . . . . . . . . . . . . . . . . . . . . . . . . . . . . . . . . . . . . . . . . . . . . . . . . . . . . . . . . . . . 48
5.1.- How to start . . . . . . . . . . . . . . . . . . . . . . . . . . . . . . . . . . . . . . . . . . . . . . . . . . . . . . . . . . . . . . . . . . . . . . . . . . 48
5.2.- How to select TV or RADIO channels . . . . . . . . . . . . . . . . . . . . . . . . . . . . . . . . . . . . . . . . . . . . . . . . . . . . . . 48
5.3.- How to adjust the volume . . . . . . . . . . . . . . . . . . . . . . . . . . . . . . . . . . . . . . . . . . . . . . . . . . . . . . . . . . . . . . . 49
5.4.- Mute . . . . . . . . . . . . . . . . . . . . . . . . . . . . . . . . . . . . . . . . . . . . . . . . . . . . . . . . . . . . . . . . . . . . . . . . . . . . . . . 49
5.5.- Audio language . . . . . . . . . . . . . . . . . . . . . . . . . . . . . . . . . . . . . . . . . . . . . . . . . . . . . . . . . . . . . . . . . . . . . . . 49
5.6.- Recalling previous channel . . . . . . . . . . . . . . . . . . . . . . . . . . . . . . . . . . . . . . . . . . . . . . . . . . . . . . . . . . . . . . 49
5.7.- Recalling previous channel and auto-saving . . . . . . . . . . . . . . . . . . . . . . . . . . . . . . . . . . . . . . . . . . . . . . . . . 49
5.8.- Onscreen pause . . . . . . . . . . . . . . . . . . . . . . . . . . . . . . . . . . . . . . . . . . . . . . . . . . . . . . . . . . . . . . . . . . . . . . . 49
5.9.- Electronic Programming Guide (EPG) . . . . . . . . . . . . . . . . . . . . . . . . . . . . . . . . . . . . . . . . . . . . . . . . . . . . . . 50
5.10.- How to use the Favourite Channels List . . . . . . . . . . . . . . . . . . . . . . . . . . . . . . . . . . . . . . . . . . . . . . . . . . . 51
5.11.- Teletext function . . . . . . . . . . . . . . . . . . . . . . . . . . . . . . . . . . . . . . . . . . . . . . . . . . . . . . . . . . . . . . . . . . . . . 51
6.- Main Menú . . . . . . . . . . . . . . . . . . . . . . . . . . . . . . . . . . . . . . . . . . . . . . . . . . . . . . . . . . . . . . . . . . . . . . . . . . . . . . . . . . 52
7.- OSD Menú language . . . . . . . . . . . . . . . . . . . . . . . . . . . . . . . . . . . . . . . . . . . . . . . . . . . . . . . . . . . . . . . . . . . . . . . . . . . 52
8.- Box Setup Menú . . . . . . . . . . . . . . . . . . . . . . . . . . . . . . . . . . . . . . . . . . . . . . . . . . . . . . . . . . . . . . . . . . . . . . . . . . . . . . 53
8.1.- Channels setup . . . . . . . . . . . . . . . . . . . . . . . . . . . . . . . . . . . . . . . . . . . . . . . . . . . . . . . . . . . . . . . . . . . . . . . 53
8.2.- Changing the Password (PIN) . . . . . . . . . . . . . . . . . . . . . . . . . . . . . . . . . . . . . . . . . . . . . . . . . . . . . . . . . . . . 55
8.3.- Ajdusting the clock . . . . . . . . . . . . . . . . . . . . . . . . . . . . . . . . . . . . . . . . . . . . . . . . . . . . . . . . . . . . . . . . . . . . 55
8.4.- VCR timer . . . . . . . . . . . . . . . . . . . . . . . . . . . . . . . . . . . . . . . . . . . . . . . . . . . . . . . . . . . . . . . . . . . . . . . . . . . 56
8.5.- Factory values (Restore default values) . . . . . . . . . . . . . . . . . . . . . . . . . . . . . . . . . . . . . . . . . . . . . . . . . . . . . 57
8.6.- Audio selection . . . . . . . . . . . . . . . . . . . . . . . . . . . . . . . . . . . . . . . . . . . . . . . . . . . . . . . . . . . . . . . . . . . . . . . 57
8.7.- TV Format . . . . . . . . . . . . . . . . . . . . . . . . . . . . . . . . . . . . . . . . . . . . . . . . . . . . . . . . . . . . . . . . . . . . . . . . . . . 58
8.8.- Box Info . . . . . . . . . . . . . . . . . . . . . . . . . . . . . . . . . . . . . . . . . . . . . . . . . . . . . . . . . . . . . . . . . . . . . . . . . . . . . 58
9.- System Setup Menú . . . . . . . . . . . . . . . . . . . . . . . . . . . . . . . . . . . . . . . . . . . . . . . . . . . . . . . . . . . . . . . . . . . . . . . . . . . . 59
9.1.- LNB Setup . . . . . . . . . . . . . . . . . . . . . . . . . . . . . . . . . . . . . . . . . . . . . . . . . . . . . . . . . . . . . . . . . . . . . . . . . . 59
9.2.- Dish Setup . . . . . . . . . . . . . . . . . . . . . . . . . . . . . . . . . . . . . . . . . . . . . . . . . . . . . . . . . . . . . . . . . . . . . . . . . . 60
9.3.- Satellite Setup . . . . . . . . . . . . . . . . . . . . . . . . . . . . . . . . . . . . . . . . . . . . . . . . . . . . . . . . . . . . . . . . . . . . . . . 61
9.4.- Transponder Setup . . . . . . . . . . . . . . . . . . . . . . . . . . . . . . . . . . . . . . . . . . . . . . . . . . . . . . . . . . . . . . . . . . . . 63
9.5.- DiSEqC 1.2 . . . . . . . . . . . . . . . . . . . . . . . . . . . . . . . . . . . . . . . . . . . . . . . . . . . . . . . . . . . . . . . . . . . . . . . . . . 64
9.6.- Code download (software) . . . . . . . . . . . . . . . . . . . . . . . . . . . . . . . . . . . . . . . . . . . . . . . . . . . . . . . . . . . . . . 66
10.- Automatic scan . . . . . . . . . . . . . . . . . . . . . . . . . . . . . . . . . . . . . . . . . . . . . . . . . . . . . . . . . . . . . . . . . . . . . . . . . . . . . . 67
Menú structure . . . . . . . . . . . . . . . . . . . . . . . . . . . . . . . . . . . . . . . . . . . . . . . . . . . . . . . . . . . . . . . . . . . . . . . . . . . . . . . . . . 68
Connector description . . . . . . . . . . . . . . . . . . . . . . . . . . . . . . . . . . . . . . . . . . . . . . . . . . . . . . . . . . . . . . . . . . . . . . . . . . . . 69
Technical specifications . . . . . . . . . . . . . . . . . . . . . . . . . . . . . . . . . . . . . . . . . . . . . . . . . . . . . . . . . . . . . . . . . . . . . . . . . . . 70
Guarantee . . . . . . . . . . . . . . . . . . . . . . . . . . . . . . . . . . . . . . . . . . . . . . . . . . . . . . . . . . . . . . . . . . . . . . . . . . . . . . . . . . 71
Page 38
User Manual
“
RSD - 7296”
38
The Receiver you have just purchased has been manufactured to meet international safety standards.
We recommend that you carefully read the safety instructions below.
POWERING:
90 - 260 V~ 50/60 Hz.
OVERLOAD:
Do not overload the sockets, extenders or adapters to avoid a fire hazard or risk of electric shock.
LIQUIDS:
Take care not to spill any liquids over the Receiver, or splash it.
Avoid placing recipients or objects with liquids on or next to the Receiver.
SMALL OBJECTS:
Avoid placing small metallic objets close to the unit. These could accidentally enter through the ventilation slots and
cause serious damage.
CLEANLINESS:
Unplug the Receiver from the mains before cleaning it.
Use a slightly damp, soft cloth (no detergent) to clean the outside of the Receiver.
VENTILATION:
Place the Receiver in a well-ventilated area so that the slots are not blocked in any way.
Avoid exposure to the sun or to other sources of heat.
Do not place on top of other equipment.
CONNECTIONS:
Carry out the recommended connections only to avoid any possible damage.
LNB CONNECTIONS:
Switch the Receiver off before connecting or disconnecting the LNB.
IF YOU DO NOT DO THIS, YOU MAY DAMAGE THE LNB.
TV or VCR CONNECTIONS:
Switch the Receiver off before connecting or disconnecting the TV or VCR.
IF YOU DO NOT DO THIS, YOU MAY DAMAGE THE TV OR VCR.
LOCATION:
Place the Receiver inside where it is protected from the rain, lightning and direct sunlight.
Install the Receiver in a horizaontal position.
1.- Safety measures
WARNING
RISK ELECTRICAL SHOCK
DO NOT OPEN
TO REDUCE THE RISK OF ELECTRIC SHOCK, DO NOT TAKE THE COVER OFF.
NO PART OF THE RECEIVER CAN BE REPAIRED BY THE USER.
PLEASE CONSULT A QUALIFIED TECHNICIAN FOR ANY REPAIRS
This symbol indicates "dangerous voltage" - there is the risk of an electric shock.
This symbol indicates that there are some important instrutions for this particular
product.
Page 39
User Manual
“
RSD - 7296”
39
ENGLISH
- Easy Menú.
- User-friendly onscreen Menú.
- Favourite channels list.
- Compatible DiSEqC 1.2 / USALS.
- High quality video and audio.
- Channel control via the “move”,
“lock”, “favourites”, "delete" and
“add”.
- Program information on the EPG
(Electronic Programming Guide).
- Teletext function
- Remote control.
- It offers various types of LNB switching, output modes and monitors.
- Transponders that have been preprogrammed to various satellites.
- Displays the transponder information.
- Scans for recently added transponders.
- Access control.
- Automatic support system
PAL/NTSC.
- Auto-saving of previous channel and
auto-return.
- 4 digit display.
- Timer.
- Software upgrade function.
- Clock.
A Digital Satellite Receiver is a product
that enables you to see a large variety
of channels that are supplied by a satellite. This User manual explains everything from how to install the Receiver to
the steps that need to be taken to
improve various different functions.
This manual also describes in detail a
series of functions that are only available in this Receiver, so that you can use
them properly.
Please be sure to read this manual so
that the Receiver is installed and used
correctly, and make sure to keep it in a
safe place for future reference.
2.1.- Preface
2.2.- General specifications
Check that all of the parts are in the
box:
1 - Satellite Receiver RSD-7296
1 - Remote control
2 - “AAA”, “LR03” or “AM-4” batteries
- - User manuals
2.3.- Equipment
2.- Before beginning ...
Page 40
User Manual
“
RSD - 7296”
40
Button Function
It switches from normal operational mode to standby.
Goes up through the channels.
Goes down through the channels.
Display In normal mode, this displays the channel num-
Button Function
Switches between normal operational mode and standby.
Switches between TV or RADIO channels. Switches between TV list and Radio list.
MUTE Switches the sound off.
Displays information on the channel that you are watching.
If you press it again, the Electronic Programming Guide appears onscreen.
ALT Returns to the previous channel.
M/A Selects the different types of audio.
TELETEXT Activate the Teletext Menú, if this is emitted.
EXIT Returns to the previous Menú within the larger menus.
Menú Displays the main Menú onscreen.
FAV Activates the favourite channel list.
P/L Activates a list with all of the locked channels.
, , , The cursors to move through the Menú options.
OK
Executes the selected option in the Menú and enters the value in any input mode or it displays the channel list while watching a program.
,
Increases or decreases the volume.
PG-/PG+ Goes up or down through the channel numbers.
0 ... 9 Selection of a channel to watch. Direct input of data in the Menú.
Name Function
LNB IN Satellite antenna’s signal input.
IF OUT Satellite signal output to connect to another receiver.
TV To connect to the TV via a SCART connector.
VCR To connect to a VCR via a SCART connector.
VIDEO Video signal output.
AUDIO R Audio output (Right channel).
AUDIO L Audio output (Left channel).
RS232 Connection to a serial port or another receiver to update the software.
POWER ON/OFF switch.
Fig. 3 - Remote control
Fig. 2 - Rear Panel
Fig. 1 - Front Panel
3.- Description of panels and connections
Page 41
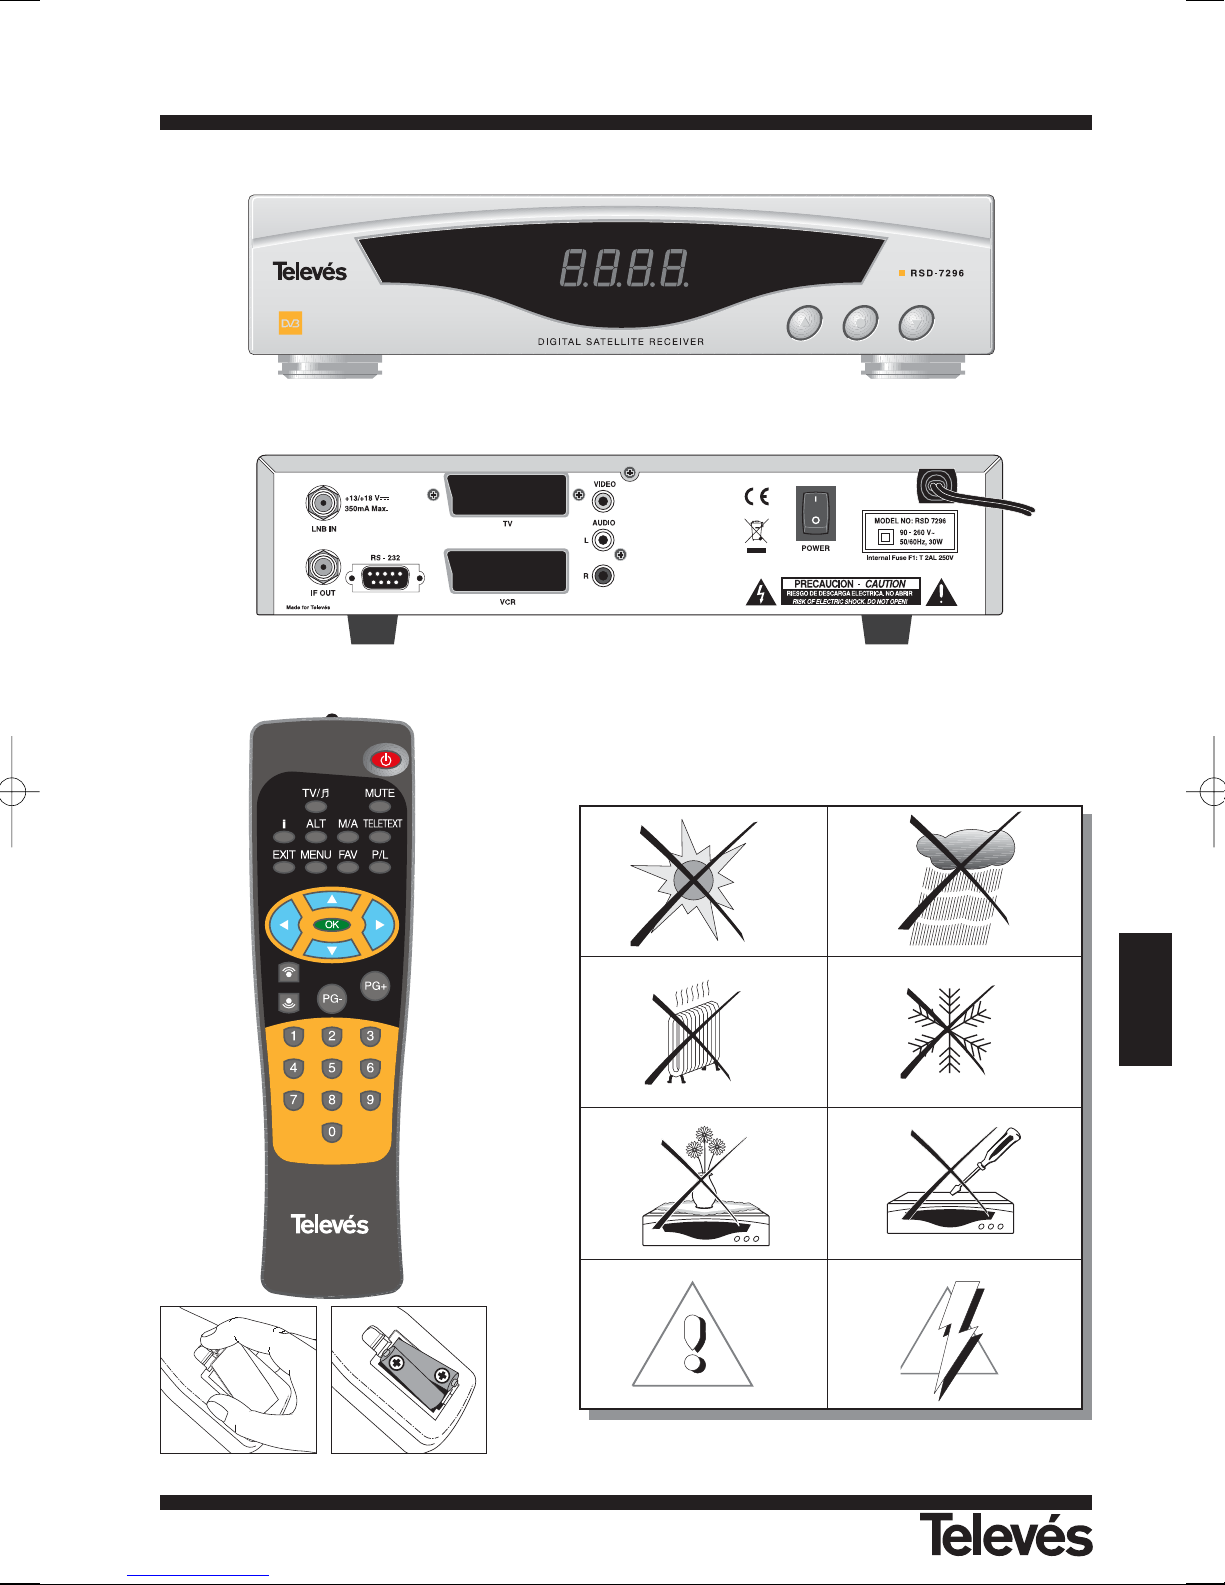
User Manual
“
RSD - 7296”
41
ENGLISH
< -5°C
> 95 %
> 50°C
Fig. -1-
Fig. -2-
Fig. -3-
Page 42
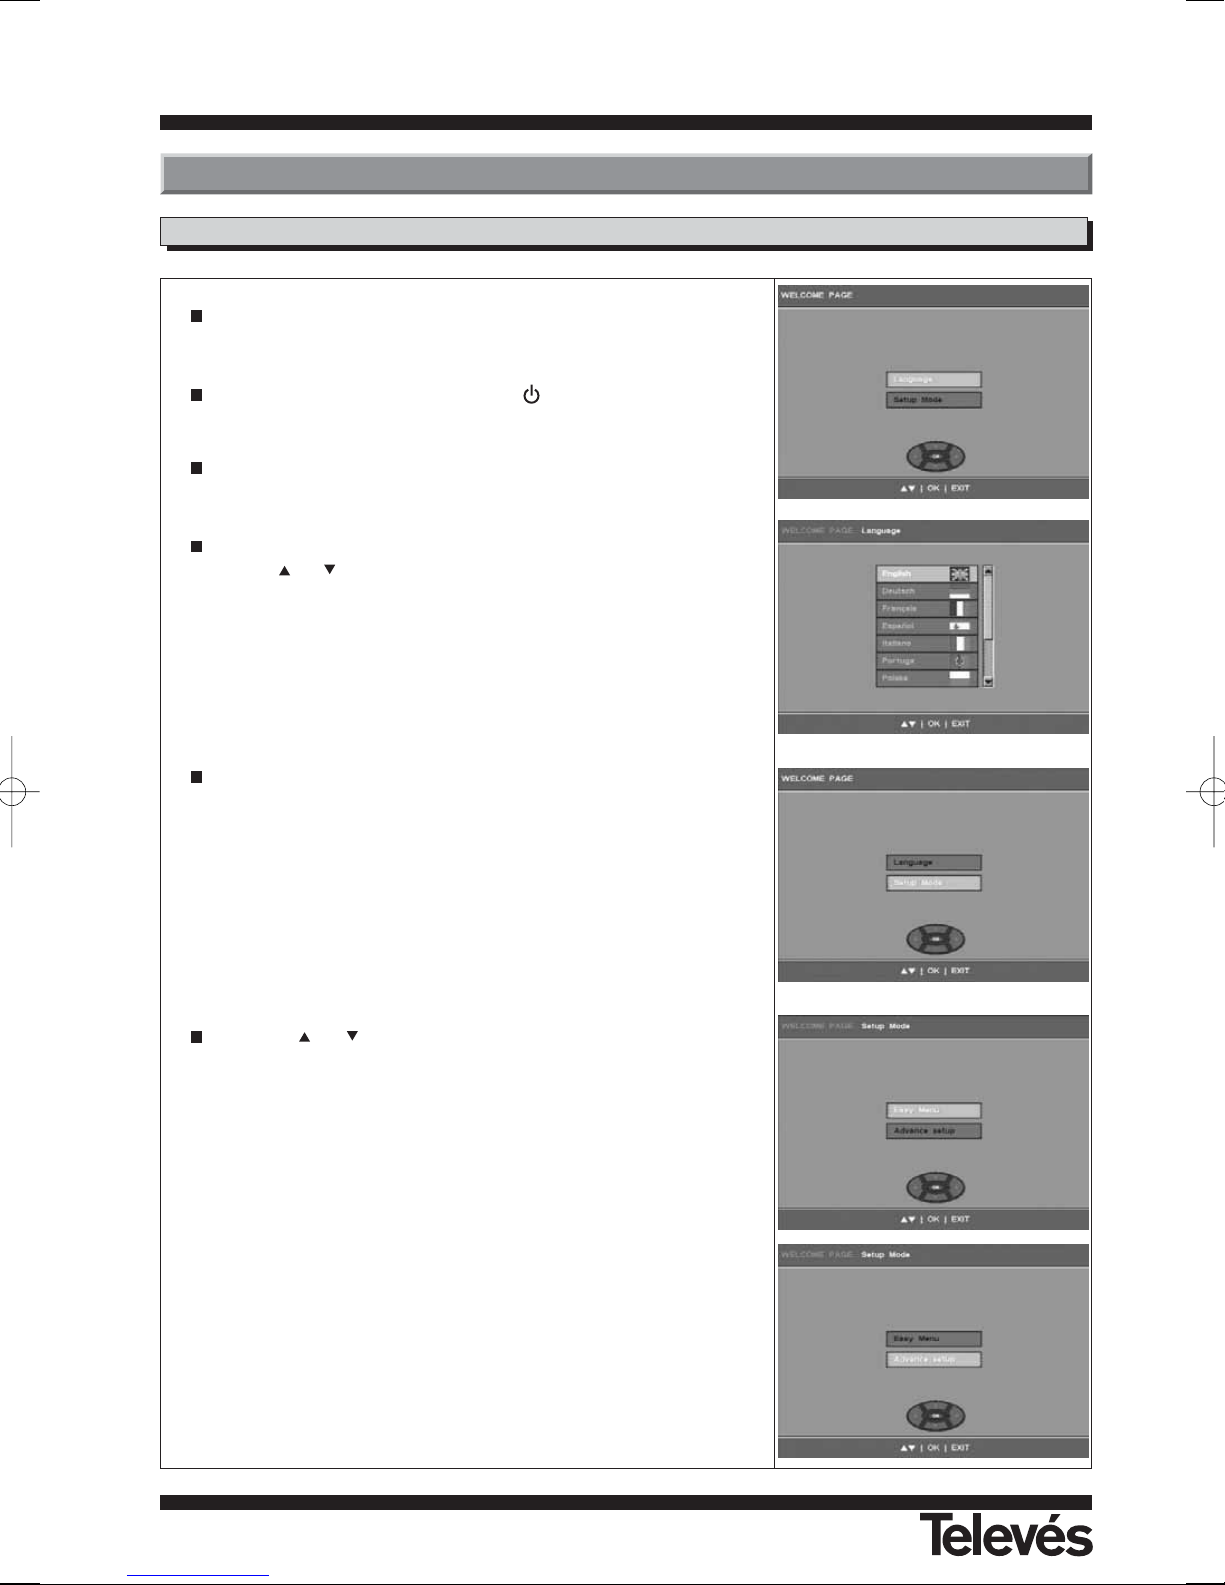
User Manual
“
RSD - 7296”
42
Connect the TV and all the other equipment that is connected to the
system.
Switch the receiver on by pressing the ( ) button on the remote control.
By default, the -Language- option always appears active.
Press OK on the remote control.
To select the language that will be used for the onscreen menu texts,
use the or buttons.
Once the language has been selected, press OK.
The -Setup Mode- option automatically appears.
Press OK to access this menu.
Using the or buttons, select one of the two types of installation
options: - Easy Menú - (guided installation) or - Advance Setup - and
press the OK button to confirm the selection.
If you have chosen the - Advance Setup - option, go directly to section
9.- System Setup menu.
If you have chosen the - Easy Menú - option, continue with this process.
4.1.- Connections / Start Menu
4.- First Installation
Page 43
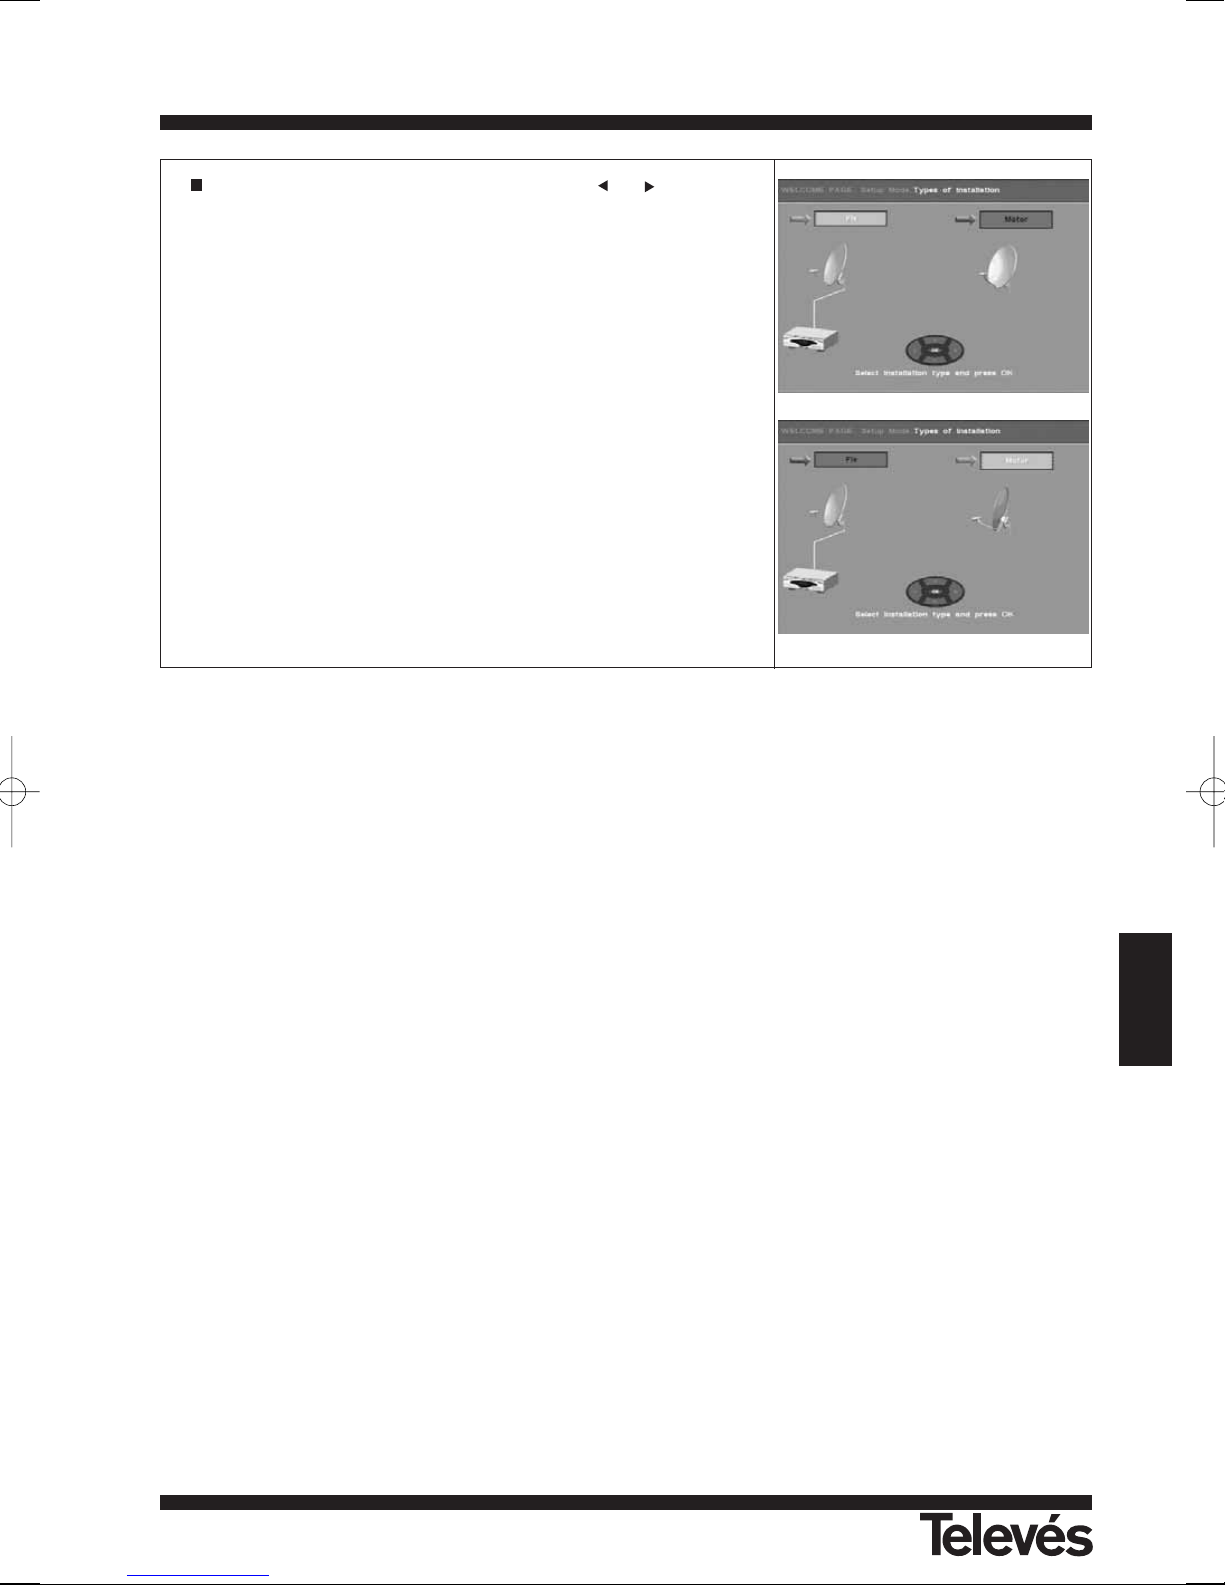
User Manual
“
RSD - 7296”
43
ENGLISH
Select the type of available installation using the or buttons and
press OK for confirmation.
The installation can be:
Fix: Installation with one or more fixed antennas.
Motor: Installation with a motorised system DiSEqC 1.2/USALS. If you
select this option, you will go directly to section 4.3.- Motor Setup-.
Page 44
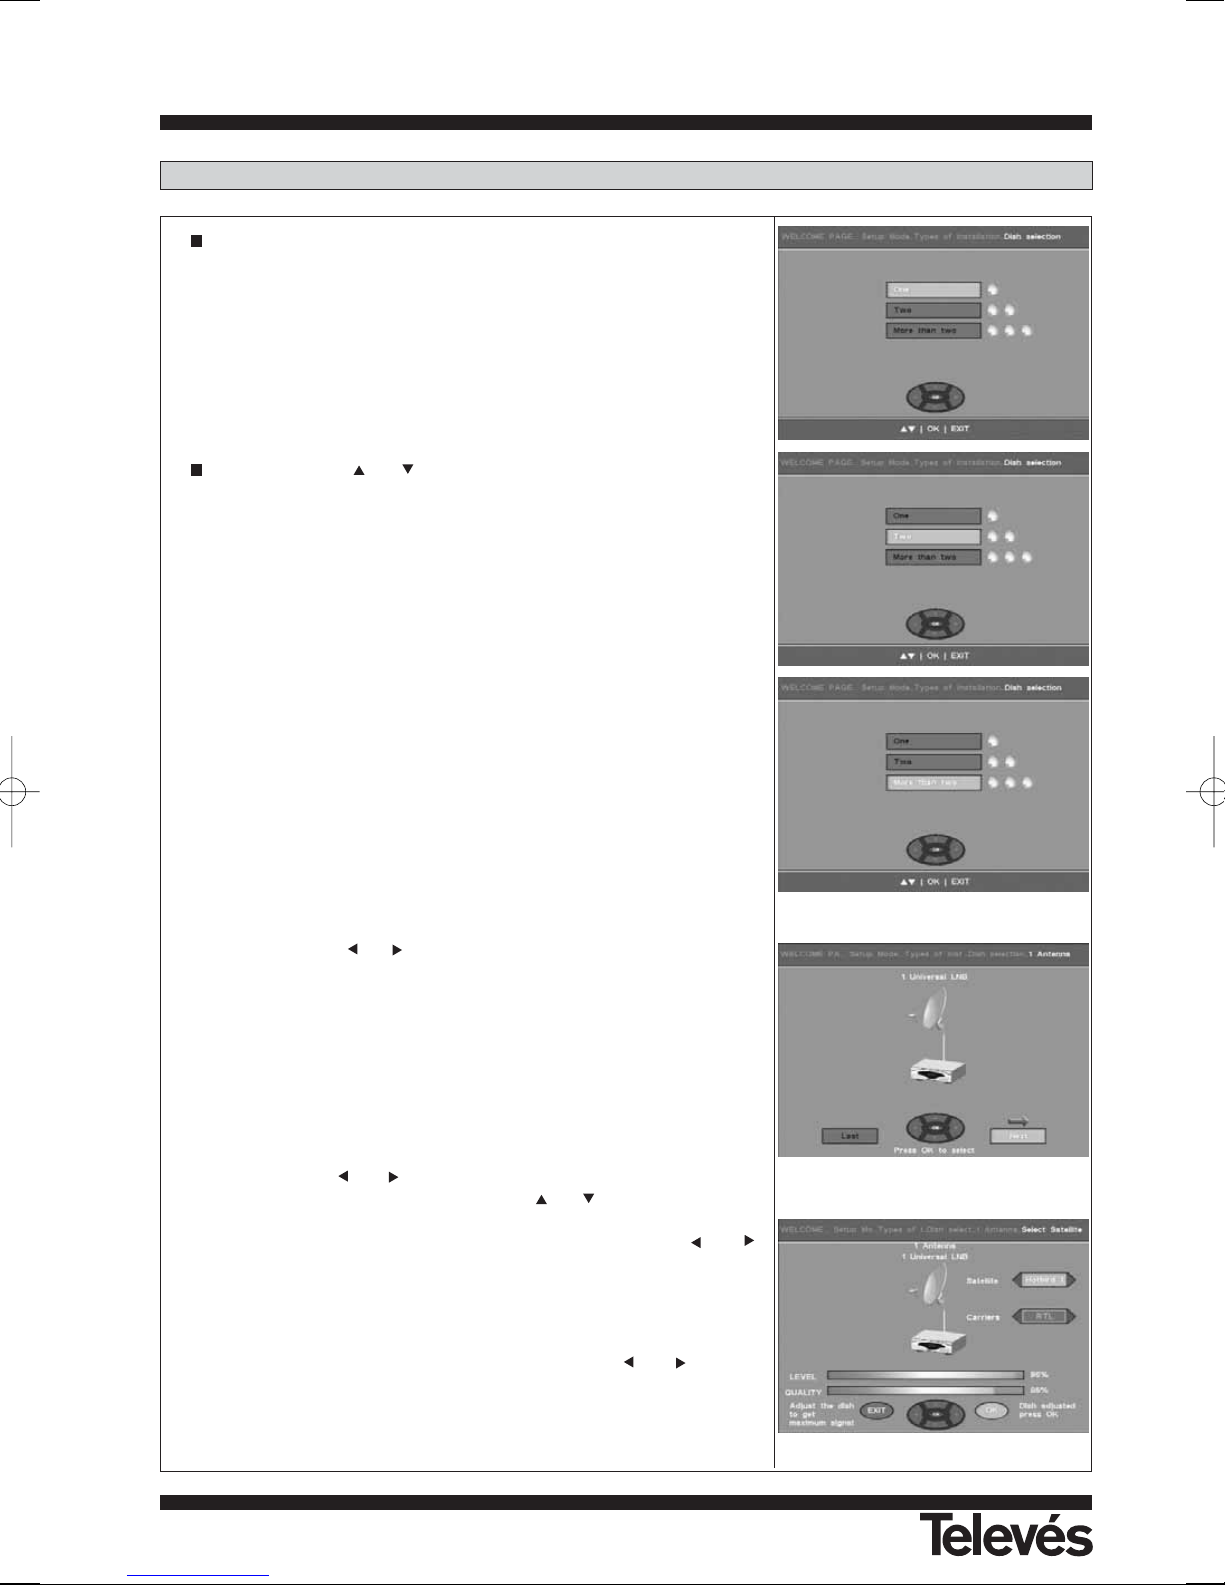
User Manual
“
RSD - 7296”
44
There are the following options:
- One antenna.
- Two antennas
- More than two antennas. If you select this option, you will go directly
to section 9.- System Setup menu.
By pressing the or buttons, you can select one of the options
and confirm it using the OK button on the remote control.
- One antenna.
Select the type of types of converters that you have in your installation
by pressing the or buttons, and confirm your selection using the
OK button.
The options that are available are:
- One universal LNB
- Two universal LNBs
- Monoblock LNB
- Twin LNB
- Quad LNB
Using the or buttons, in the "Satellite" window, select the
desired satellite, and then using the or buttons, access the
"Carriers" window where you will be able to select various operators (transponders) of the selected satellite using the or
buttons.
Using a compass, direct the antenna towards the desired satellite
until you receive the best possible signal level.
If you do not receive a level higher than 60%, follow these steps:
- Go to the "Carriers" window and using the or buttons
modify the operator checking to see if the level has increased.
- Confirm the inclination angle and the position of the antenna.
- Check the position of the LNB.
4.2.- Fix Setup
Page 45
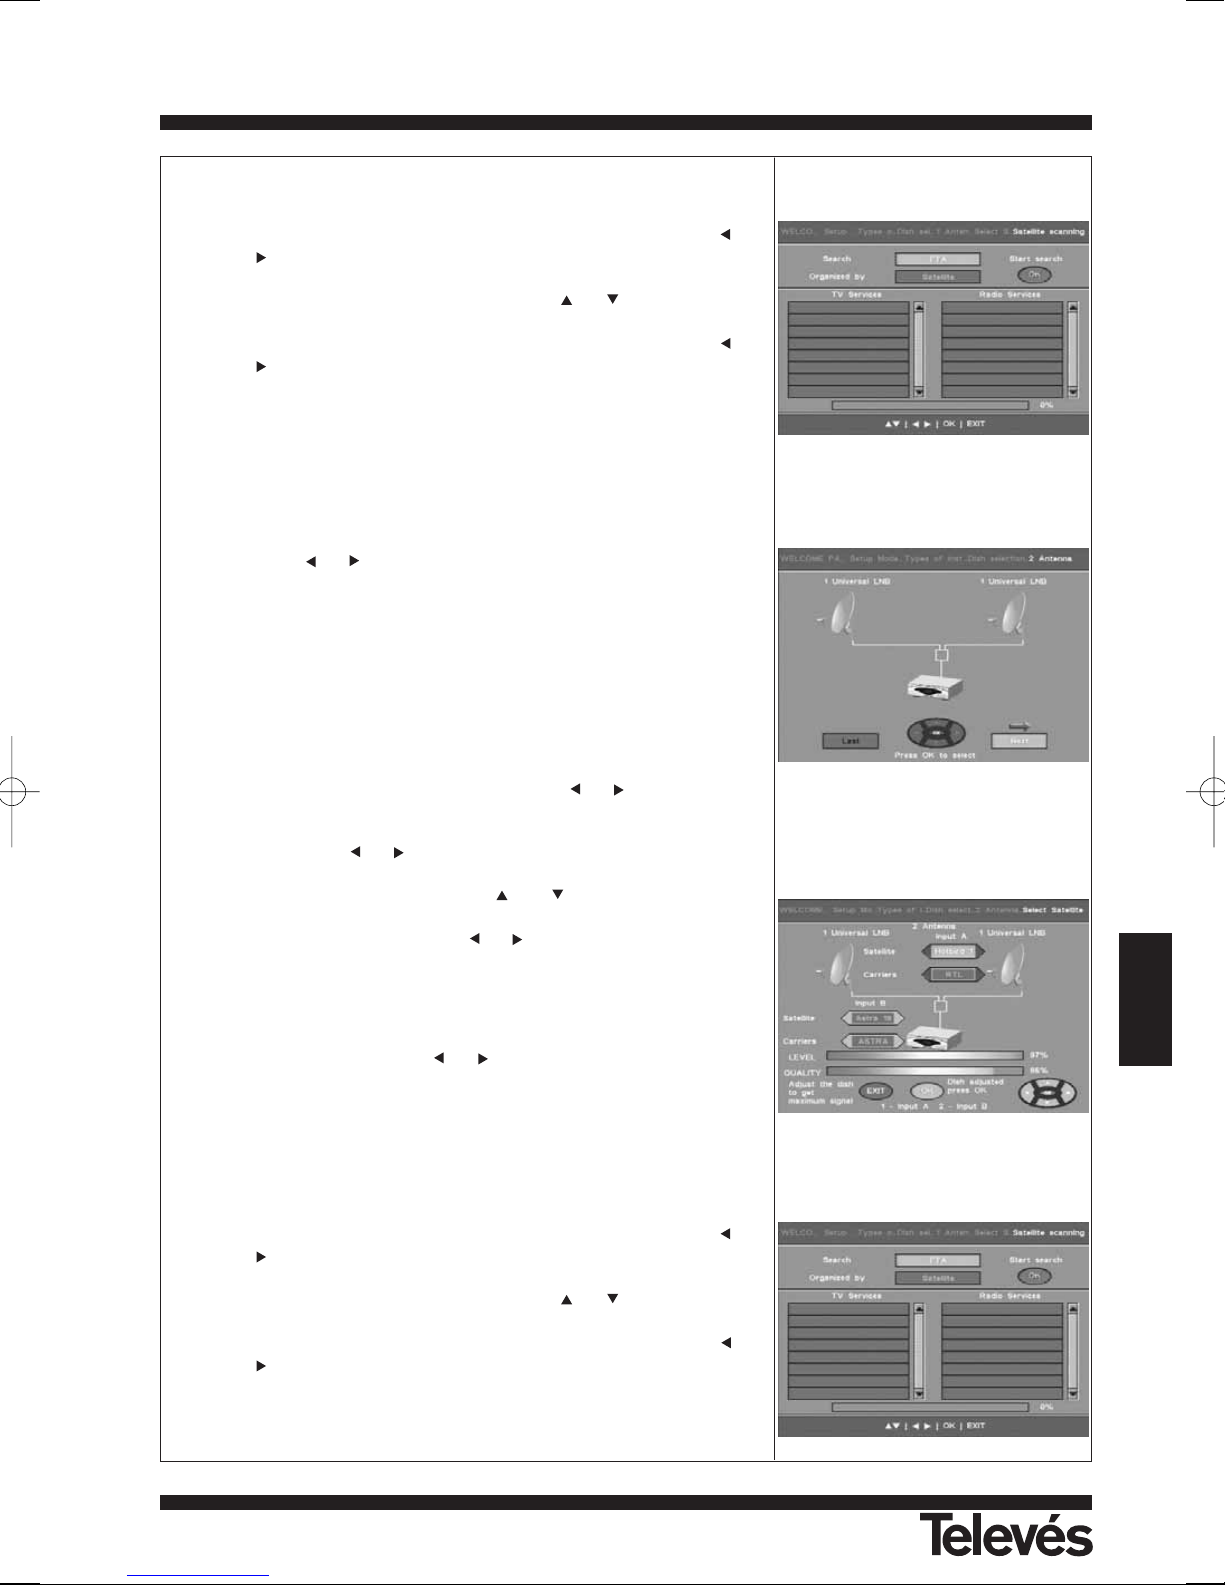
User Manual
“
RSD - 7296”
45
ENGLISH
When the antenna is orientated correctly, press the OK button.
Before starting an automatic search in the satellite, use the or
buttons to select the type of search that you want to carry out
(only free-to-air channels - FTA, all channels - ALL, only TV chan-
nels or only Radio channels). Using the or buttons, you can
access the "Organised by" window in order to be able to define the
way to organise the channels that have been found. Use the or
buttons to select the order according to the "Satellite" or to
select alphabetical order (from "A to Z" or from "Z to A").
Press OK to start searching.
- Two antennas.
Select the type or types of converters that you have in your installation,
using the or buttons, and confirm this selection by pressing the
OK button.
The options that are available are:
- One universal LNB (1 LNB per antenna)
- One universal LNB plus Two universal LNBs
- One universal LNB plus One Twin LNB
- One universal LNB plus One Quad LNB
In the "Satellite" window (input A), use the or buttons to select
the desired satellite for input A of the multiswitch. To change the
parameters of input “B” press the button 2 on the remote control and
then use the or buttons over the "Satellite" window (input B) to
choose which one you desire. To return to the input “A” parameters
press the button 1. Use the or buttons to access the
"Carriers" window where you will be able to select various operators
of the selected satellite using or buttons.
Now with the help of the compass, direct the antennas towards the
desired satellites until you receive the best possible signal level.
If you do not receive a level higher than 60%, follow these steps:
- Go to the "Carriers" window if input “A” or “B” depending on the
satellite and using the or buttons modify the operator checking to see if the level has increased.
- Confirm the inclination angle and the position of the antenna.
- Check the position of the LNB.
When the antennas are orientated correctly, press the OK button.
Before starting an automatic search in the satellite, use the or
buttons to select the type of search that you want to carry out
(only free-to-air channels - FTA, all channels - ALL, only TV chan-
nels or only Radio channels). Using the or buttons, you can
access the "Organised by" window in order to be able to define the
way to organise the channels that have been found. Use the or
buttons to select the order according to the "Satellite" or to
select alphabetical order (from "A to Z" or from "Z to A").
Press OK to start searching.
Page 46
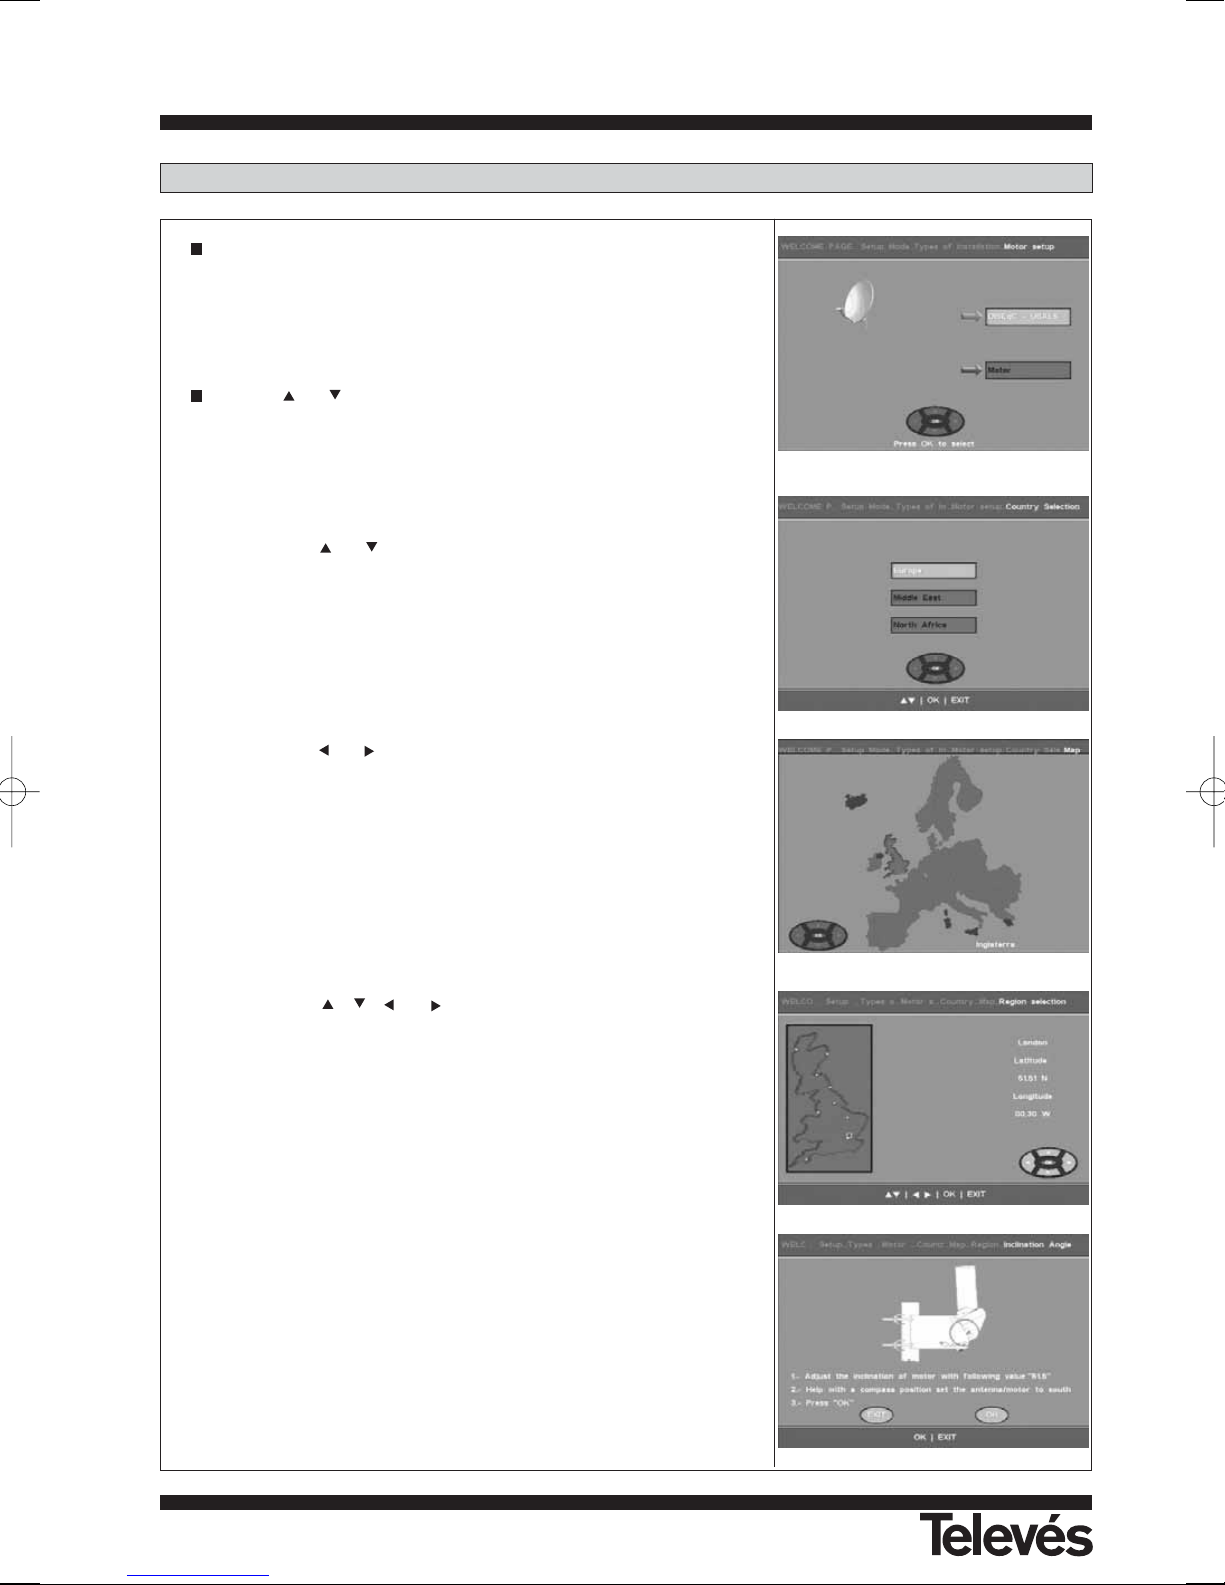
User Manual
“
RSD - 7296”
46
There are the following options:
- DiSEqC - USALS. For installations with a USALS motor.
- Motor. For installations with DiSEqC 1.2 motor that do not dispose of
USALS (if you select this option, you must go to section 9.5.-
DiSEqC 1.2).
Use the or buttons to select one of the options and confirm it by
pressing the OK button on the remote control.
- USALS
Use the or buttons to select the Continent where the insta-
llation is, and confirm this by pressing the OK button.
Use the or buttons to select the Country where the installation is, and confirm this by pressing the OK button.
Use the
,,
or buttons to select the Region where the
installation is, and confirm this by pressing the OK button.
Using a compass, direct the antenna towards the South and adjust
the inclination of the motor according to the value that is indicated
by the receiver.
Press the OK button
4.3.- Motor Setup
Page 47
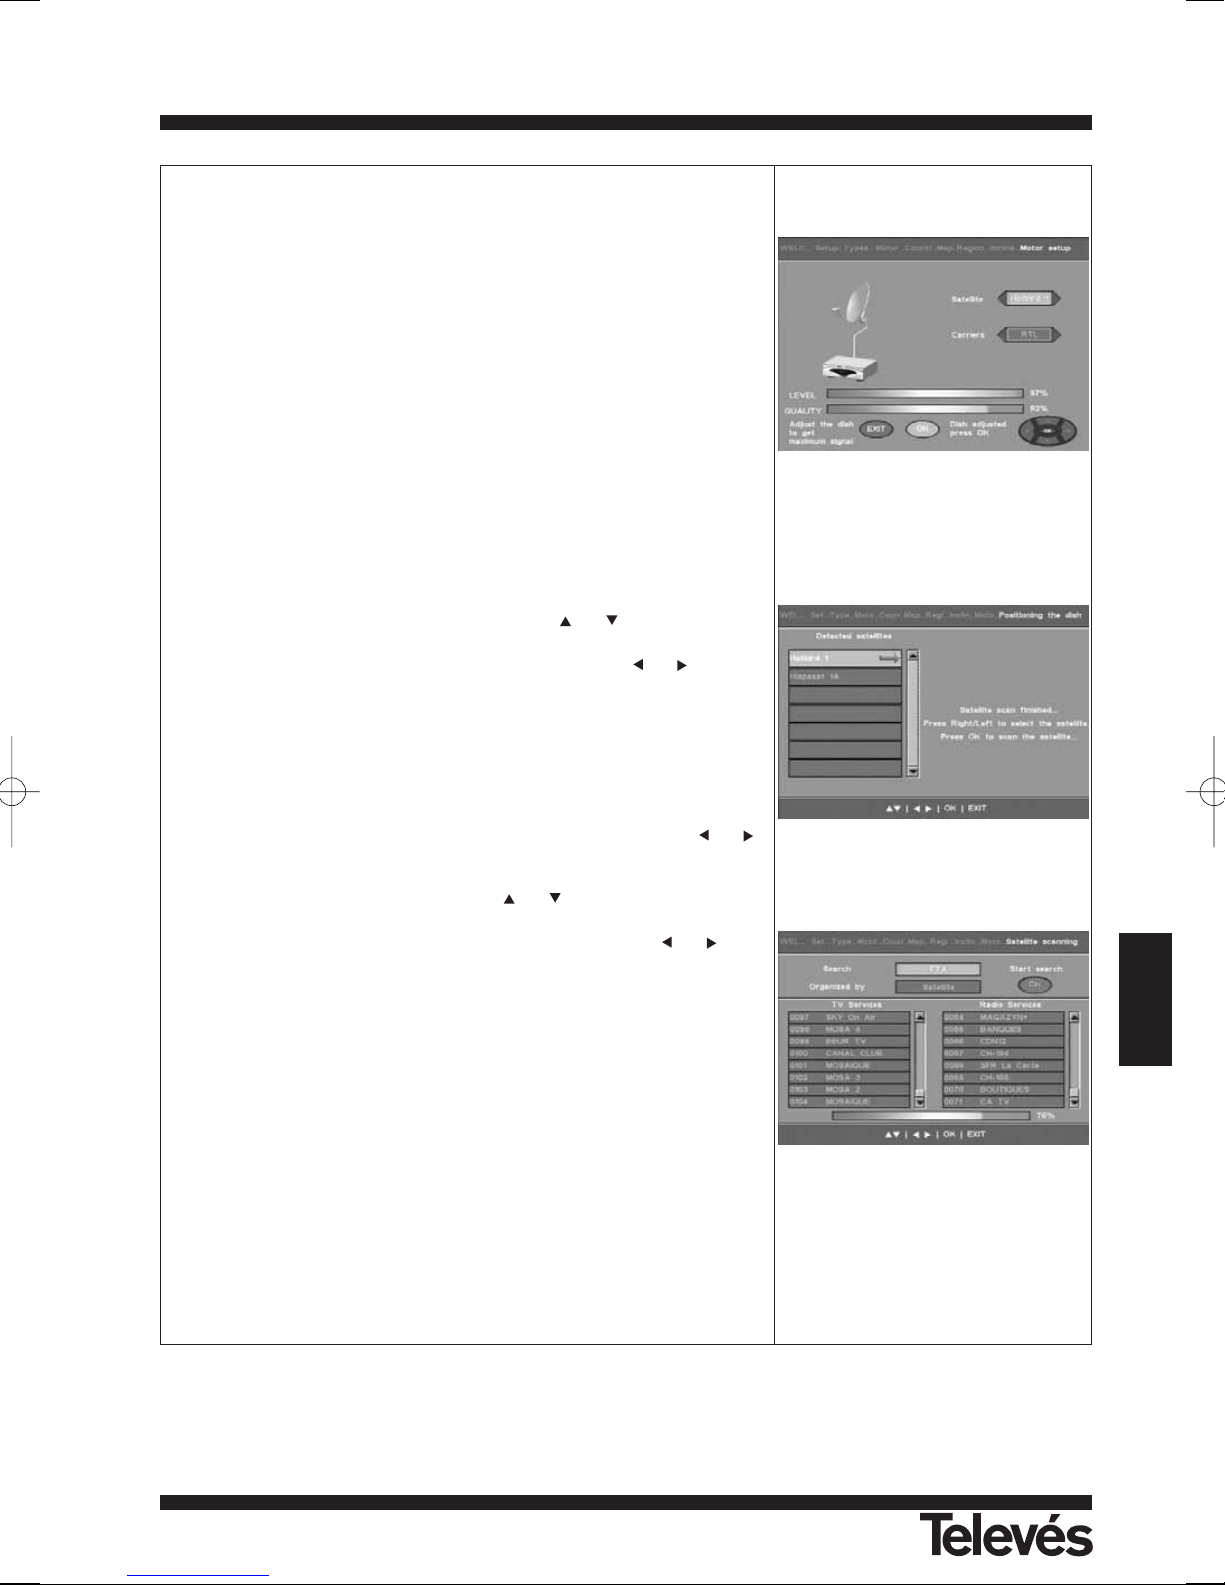
User Manual
“
RSD - 7296”
47
ENGLISH
The antenna will automatically move towards the Hot Bird satellite
(13º E). This will take a moment. Please wait.
When the motor has directed the antenna to the exact position of
the Hot Bird satellite (13º E), check to see if the signal level is greater than 60%. If it is, press OK.
If you do not receive an adequate signal level, follow these steps:
- Adjust the inclination angle of the antenna, and the meeting point
of the antenna and the motor, trying to improve the signal level.
- Check the inclination value of the motor.
- Move both the antenna and the motor to the sides, trying to
obtain the maximum signal level.
If the signal level is greater than 60%, press OK button.
The receiver will scan the satellites that its system can detect and it
will display them in the "Detected satellites" window. This process
will take some time (15 minutes). Please wait
Once the process has finished, use the or buttons to select
the satellites that the antennas are pointing towards. To enable or
disable the search in a specific satellite, press the or buttons.
The satellites that are going to be searched have the ==> symbol
next to them.
Press the OK button.
Before starting an automatic search in the satellite, use the or
buttons to select the type of search that you want to carry out (only
free-to-air channels - FTA, all channels - ALL, only TV channels or
only Radio channels). Using the or buttons, you can access
the "Organised by" window in order to be able to define the way to
organise the channels that have been found. Use the or buttons to select the order according to the "Satellite" or to select alphabetical order (from "A to Z" or from "Z to A").
Press OK to start searching.
Page 48
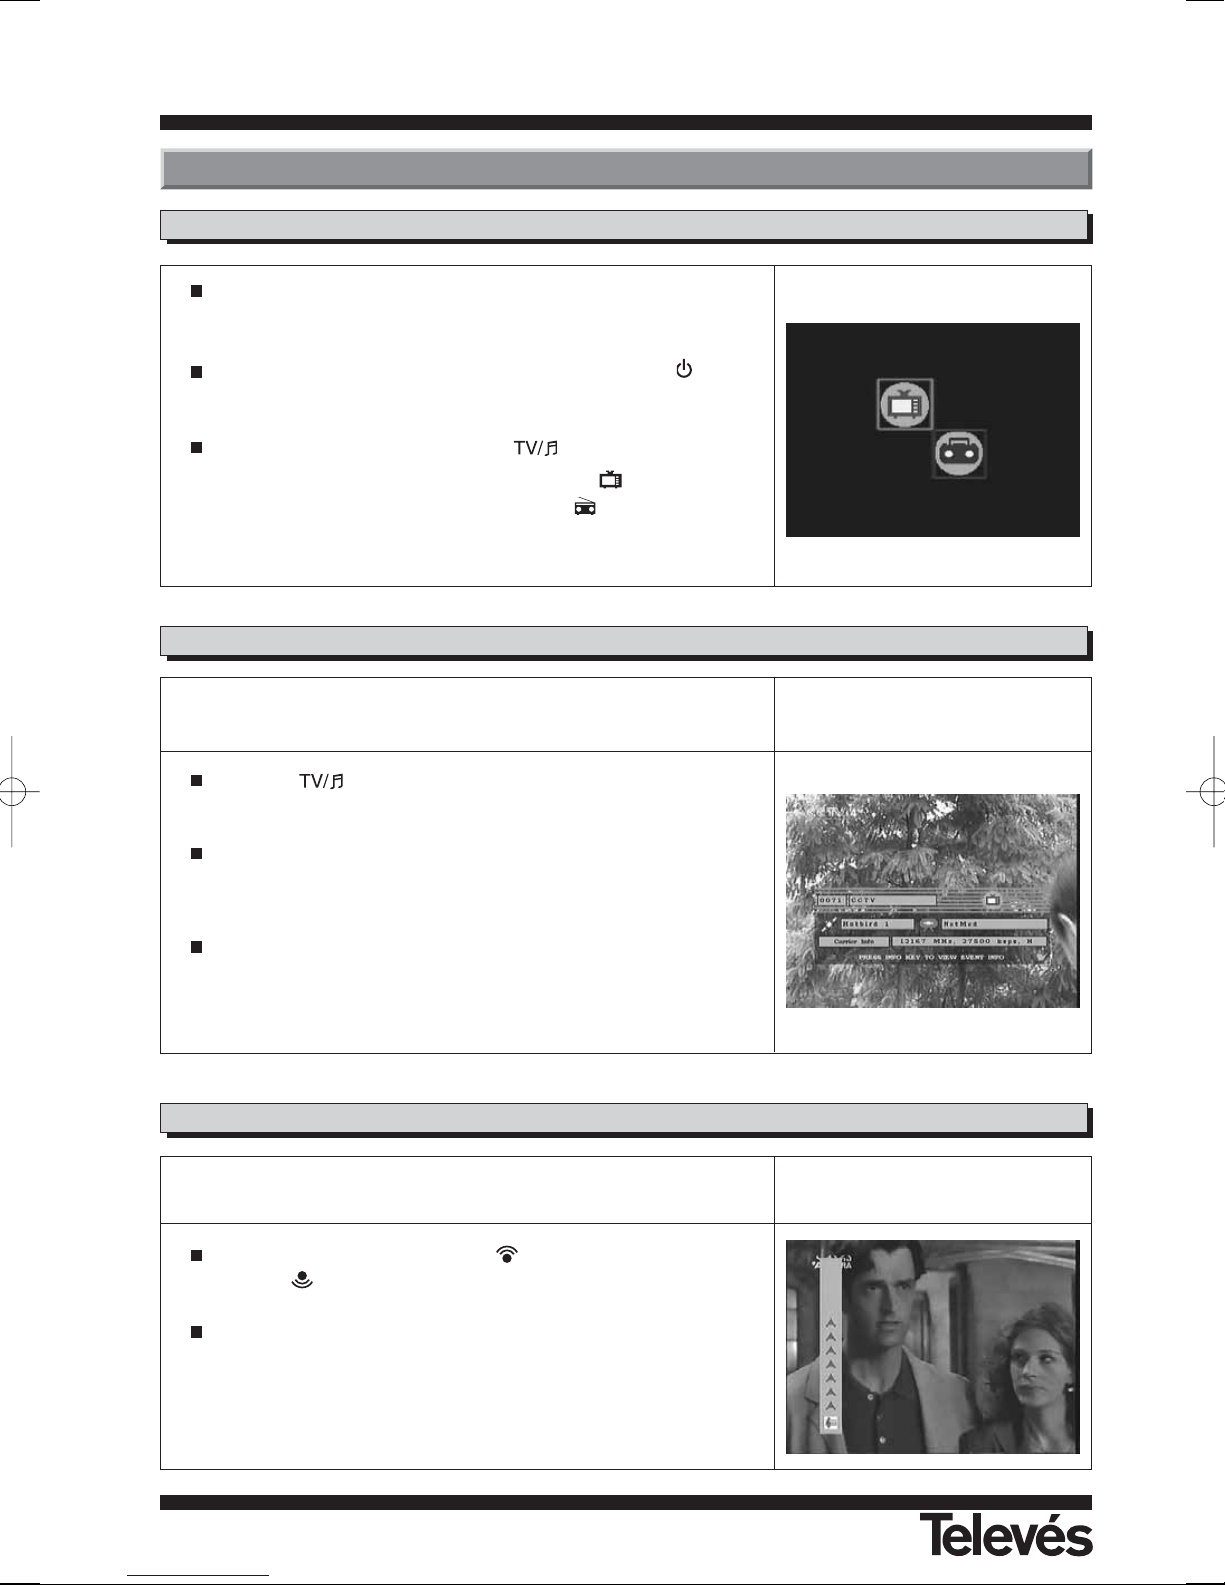
User Manual
“
RSD - 7296”
48
User Manual
“
RSD - 7296”
5.1.- How to start
5.- Ready to begin
Switch the TV on as well as all the additional equipment that may be
connected to the system.
Switch the satellite receiver on, by pressing the ON button ( )
on the
receiver or on the remote control.
Select the TV or Radio mode using the button.
The TV mode channels can be identified by the
symbol and the
Radio mode channels can be identified by the
button.
(The default mode is the TV mode).
The TV/Radio channels can be selected using both the remote control and
the buttons on the receiver.
Press the button to select the desired service mode (TV channels or radio channels).
When you can see the channel, press the PG+ button to select the following channel, or the PG- button to select the previous channel.
The selected channels will appear straight away with the corresponding
information at the bottom of the screen.
By pressing the i button, a window appears on the screen with information about the programme you are watching.
5.2.- How to select TV or RADIO channels
5.3.- How to adjust the volume
The volume can be adjusted using the remote control.
To increase the volume, press the button, and to decrease it,
press the button on thre remote control.
The volume levels can be seen on the indicator that appears
onscreen.
Page 49
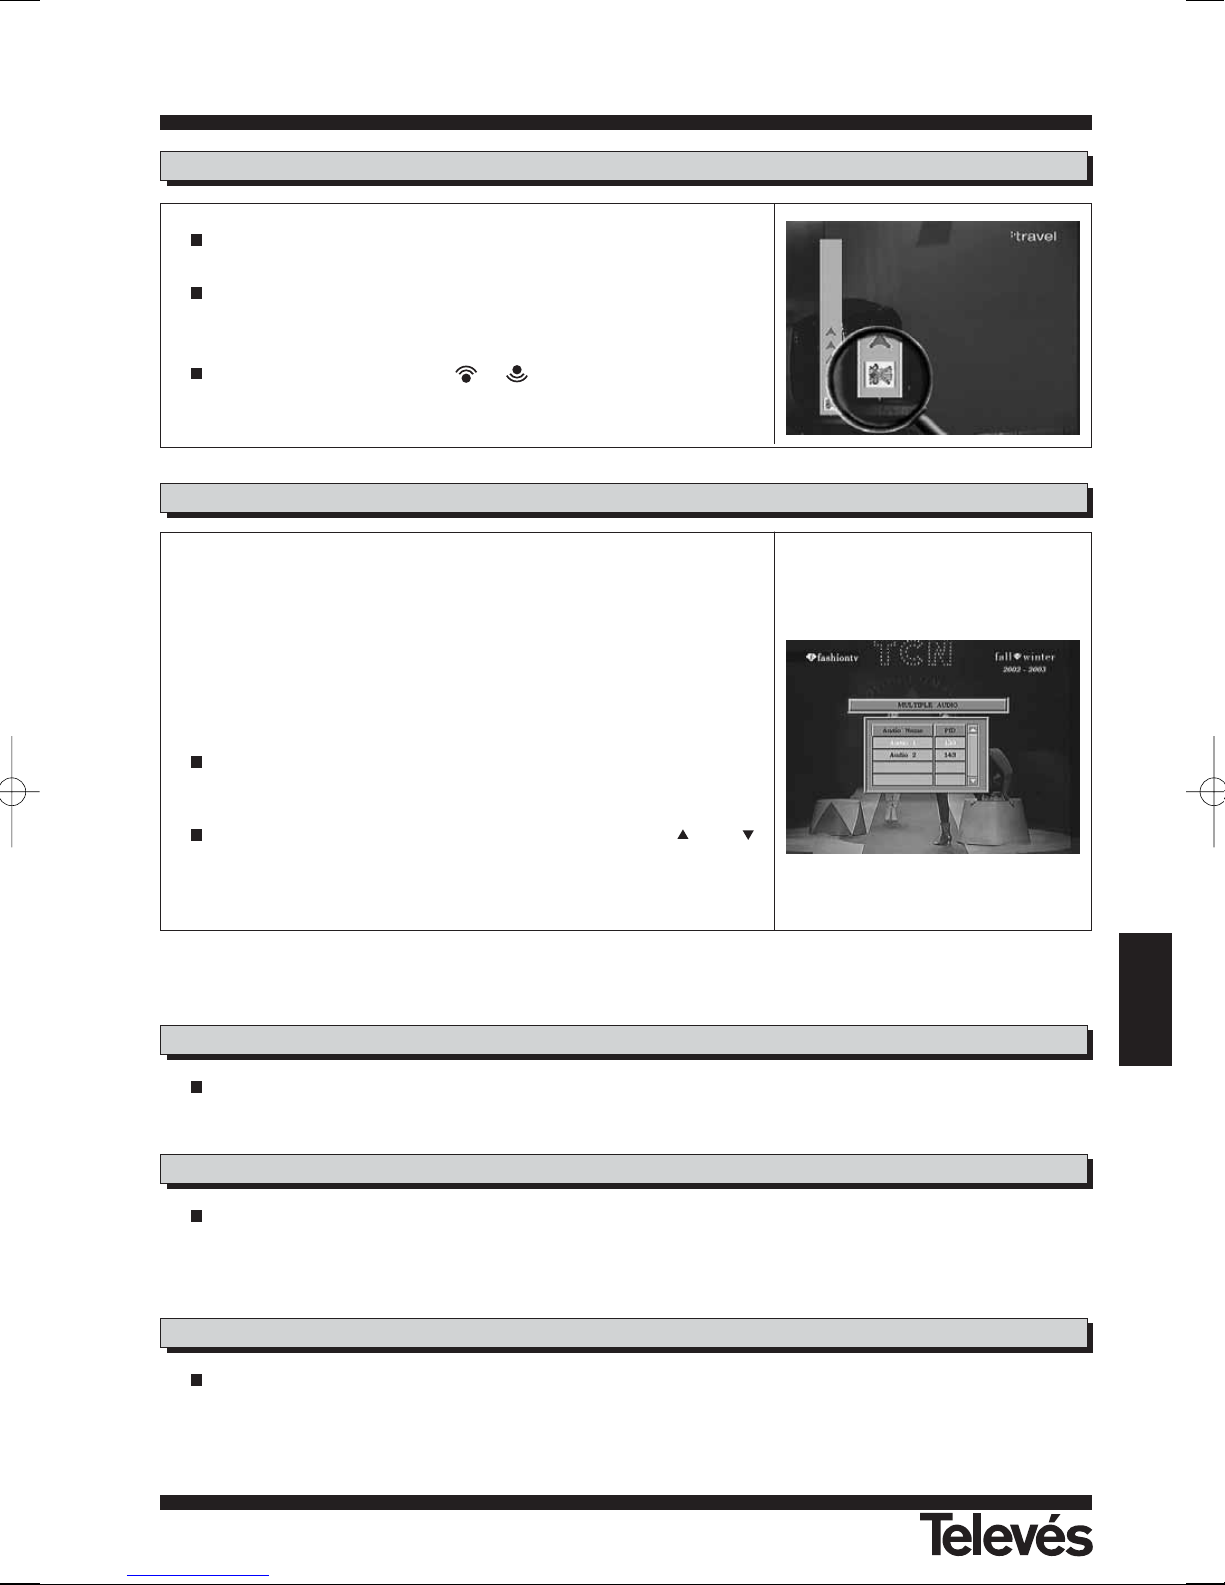
User Manual
“
RSD - 7296”
49
ENGLISH
User Manual
“
RSD - 7296”
5.4.- Mute
Press the MUTE button to mute the sound.
To switch the sound back on again, pres the same button again.
The sound will return with the same volume as before.
To adjust the volume press the or buttons.
5.5.- Audio language
Some channels are transmitted in various audios. This depends on whether
this information is included in the signal that is sent to the Receiver.
In the case of TV channels, the different audios tend to correspond to the
different languages in which the channel is emited (for example, in the case
of “Euronews” - HOTBIRD, the Spanish language is received in the fifth
audio). As regards Radio programmes, each audio identifies a different radio
station (for example, the programme “Radio Esp” - ASTRA, contains 10
Spanish radio stations - 40 principales, M80, etc...-).
Press the M/A button to activate the Menú that contains the different
transmission languages.
Select the desired audio from those available using the and
buttons and press OK.
If the flow of electricity is interrupted for any reason (the receiver is unplugged or the electricity supply interrupted),
when the receiver is connected once again to the current, the TV / RADIO channel that you were watching automatically appears onscreen with the Audio that was selected without having to press any buttons.
5.7.- Recalling previous channel and auto-saving
If you want to watch the channel that you were just previously watching but you cannot remember the channel
number, simplly press ALT.
5.6.- Recalling previous channel
If you wish to pause the image onscreen while watching a programme, press the 0 button. To return to the programme, press 0 again.
It is necessary to point out that when you pause an image onscreen, the programme that you were watching continues with its transmission as normal, so that during the time that the Pause is on, you will be missing the programme.
5.8.- Onscreen pause
Page 50
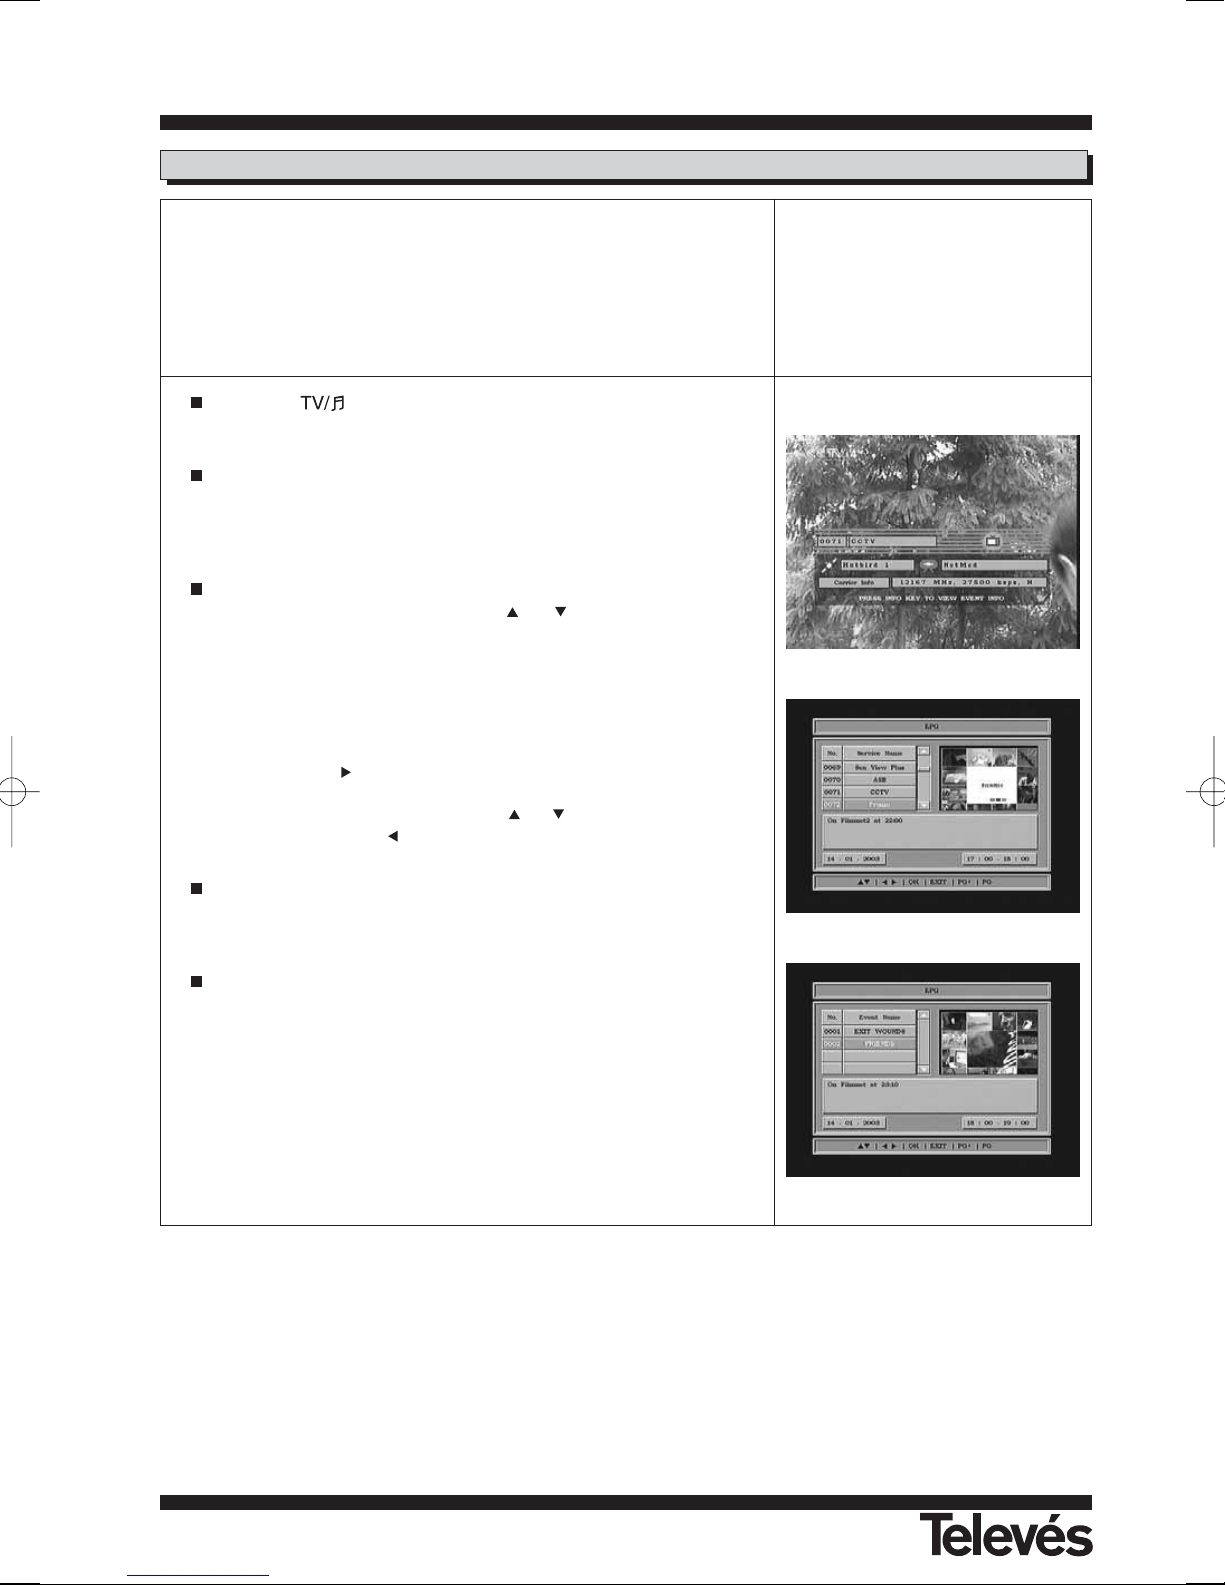
User Manual
“
RSD - 7296”
50
User Manual
“
RSD - 7296”
The RSD-7296 receives and stores information on the TV and Radio channels that are being watched. This includes detailed information on the time
schedule of the next programme. This guide is very easy to use, as it displays all the information in a single window onscreen.
The information provided by this guide consists of the channel number, the
channel name, the programme name and the date and time of emission
(when it starts and when it finishes).
Using the button you can change from the TV list to the Radio
list.
Press the i button while tuning the TV or Radio channels. The information window will appear with info on the channel that is selected at that
moment. Press the i button again while the information window is visible
and you will see the Electronic Programming Guide (EPG).
The EPG has three main sections. One of these is a list of the number
and name of the channels. With the or buttons, you can move
from one channel to another.
Immediately to the right, there is a small screen where you can see the
channel that you have selected in the list.
Finally, a window appears where you can see information on the programme that is on at the moment, as well as the starting and finishing
times.
By pressing the button, you can access a list with all of the programmes that are transmitted by that channel as well as their transmission
times. To move through them, use the or buttons. To return to the
channel list, press the button.
The information that appears in the guide comes with the signals transmitted by the service supplier. If a channel does not have any data for
the EPG, a message will appear onscreen indicating this.
Press the EXIT button to exit the EPG and access the selected channel.
5.9.- Electronic Program Guide (EPG)
Note:
- To receive the programme schedule correctly, you must first adjust the LOCAL TIME to the GMT (Greenwich Mean Time).
- The time that appears onscreen is provided by the supplier, so this information may be incorrect in certain channels.
Page 51
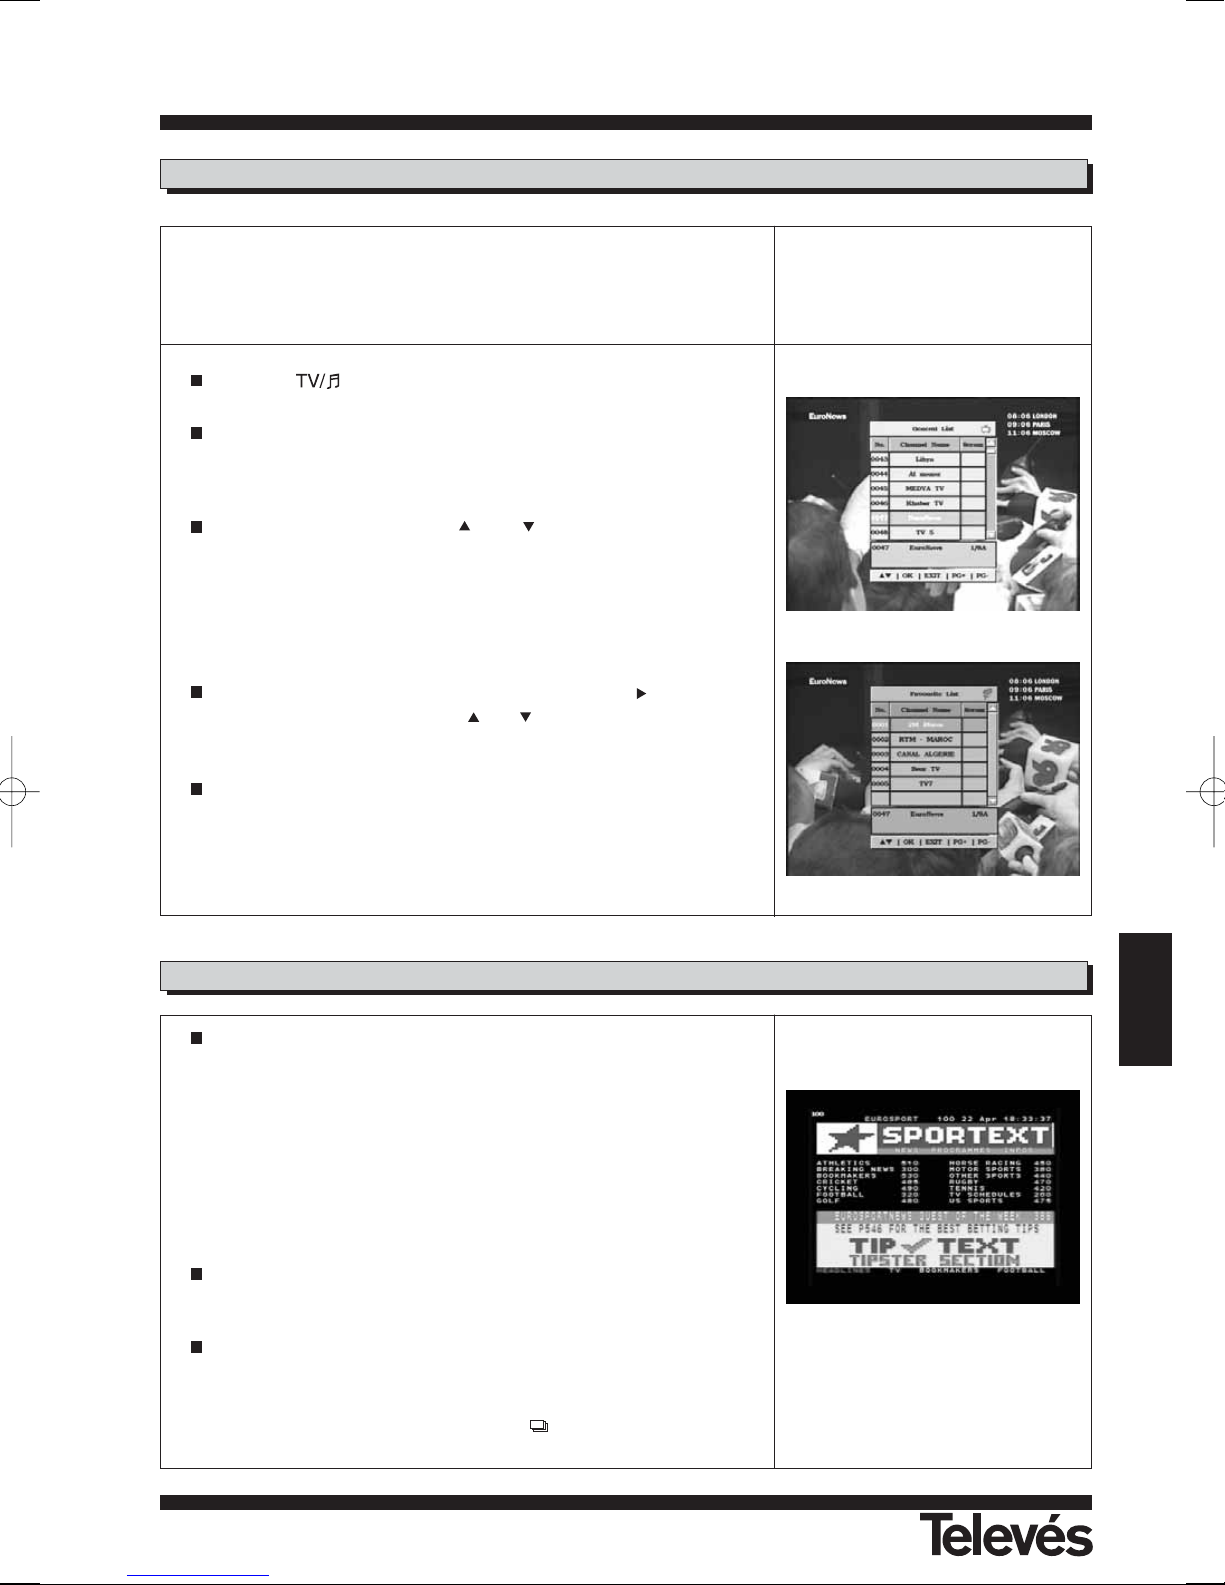
User Manual
“
RSD - 7296”
51
ENGLISH
User Manual
“
RSD - 7296”
5.10.- How to use the Favourite Channels List
5.11.- Teletext function
You can easily select your favourite TV or Radio channels using the
Favourite Channels List. This list only contains your personally selected
favourite TV or Radio channels.
Press the button to select the TV or Radio channels list.
While watching a TV channel or listening to a Radio channel, press the
OK button to see the General Channels List. Next press the FAV button
to access the Favourite Channels List.
Select any channel using the and buttons and press the OK
button to go to this channel.
If there are no channels in the Favourites List, the favourites Menú will
not appear onscreen and instead, the message "No preferred channels"
will appear.
To switch between the different satellite lists, press the button on the
remote control and then press or and confirm it with the OK
button over the name of the chosen satellite.
Press the EXIT button to exit the Favourite Channel List.
See point 8.1.- “Channel Setup” from section 8.- “Box Setup Menú” to
find out how to create the Favourite Channels List.
Press the TELETEXT button on the remote control to activate the
Teletext Menú.
In this Menú you can select all of the teletext services that are supplied
by the service supplier.
The teletext service will be displayed as normal.
Even if your TV does not dispose of a Teletext decoder, you can still see
it onscreen, as the Receiver decodes it automatically.
If your TV already has a Teletext decoder, you can also see it using the
TV remote control.
By pressing the OK button on the remote control, you can make the
background colour of the teletext page more or less transparent.
To exit the "Teletext" Menú, press the EXIT button.
NOTE: Not all service providers supply this type of information.
The channels with this function have in the information window.
Page 52
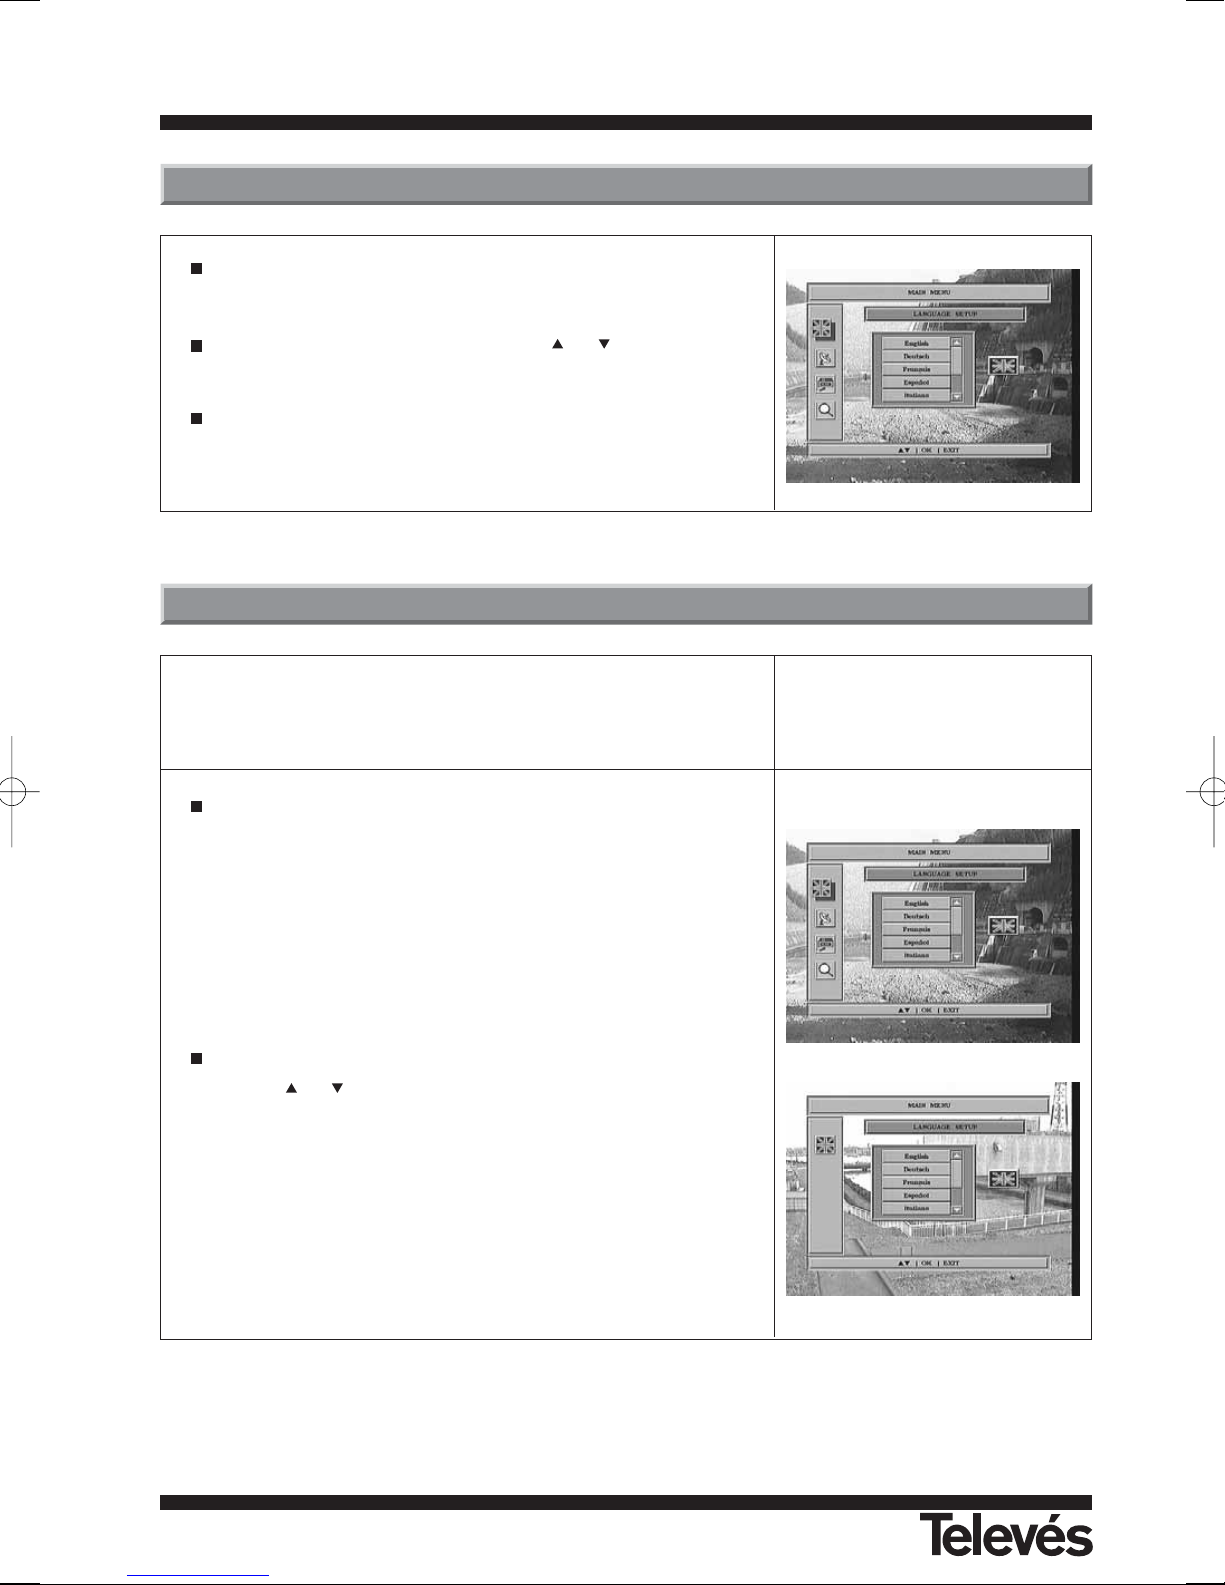
User Manual
“
RSD - 7296”
52
User Manual
“
RSD - 7296”
Press the Menú button when watching a channel and the main Menú
will appear onscreen.
Select one of the Menú options by pressing or buttons and press
OK to execute it.
Press the EXIT button to exit the main Menú and return to the TV or
Radio channel you were watching.
6.- Main Menú
7.- OSD Menú language
In this Menú you can choose the language of the onscreen menus.
The languages that are available are: English, German, French, Spanish,
Italian, Portuguese, Polish and Turkish.
Press the Menú button on the remote control to activate the main Menú.
The first Menú option that appears selected by default is the -Language
Setup-.
You can see that a flag icon appears next to the chosen language.
If you want to change this language, press OK to access the languages.
With the or buttons, select the new language and press OK.
When you go through the different languages, the Menú displays the
flag that corresponds to each one.
Page 53
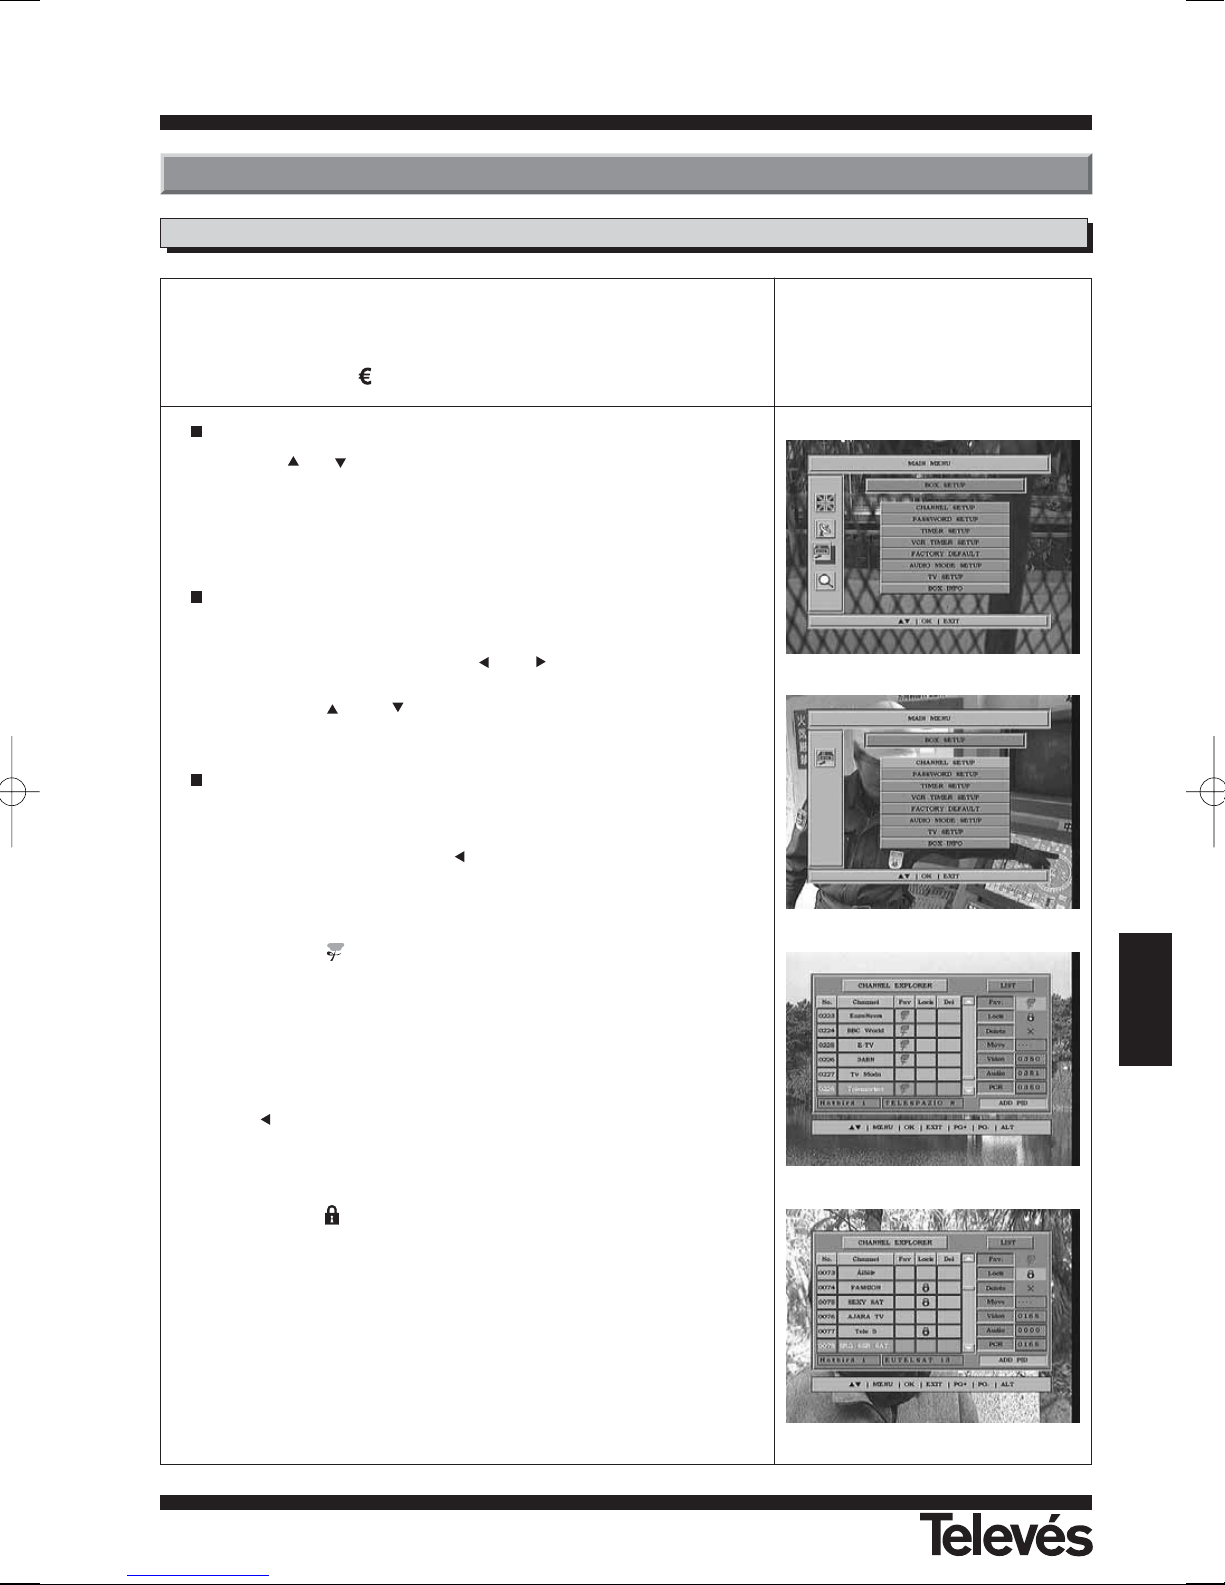
User Manual
“
RSD - 7296”
53
ENGLISH
User Manual
“
RSD - 7296”
This Menú lets you create / edit the favourite channels list, it can move,
lock, delete and add new channels to the list.
After editing, the remaining channels are organised automatically.
The channels with the symbol are scrambled.
Press the Menú button on the remote control to activate the main Menú.
With the or
button, select the -Box Setup- option and press
OK
to access this submenu. Select the -Channel Setup- option and press
OK. The Menú “Channel Explorer” will appear, where you will see the
different editing options available and the list of all the channels that
have been stored in the receiver.
This Menú is divided into two groups. To the left, -Channel Explorer-
where all of the channels that are available appear. To the right, -List-
where the options that you have are displayed. You can move from one
group to the other by pressing the and buttons.
If you are in either group, you can select the options within each group
by using the
and buttons, while in the channel group, direct
access is possible by entering the desired channel number.
The options for editing the channels are:
- Favourite channels: With the cursor on this option, move to the group
on the left-hand side with the button.
To add a channel to the List, press the OK button over the new channel. The symbol which indicates Favourite, will appear. To remove it
from the list, press the OK button again over the channel name.
The symbol ( ) over a channel indicates that this channel belongs to
a favourite channels list.
All of the channels that you mark by pressing OK over them, will become part of the Favourite Channels List when you exit the Menú.
To exit the Menú, press EXIT.
- Lock channels: With the cursor on this option, move to the left using
the button.
To block a channel, press the OK button over the chosen channel. A
symbol will appear indicating this new status. If you wish to unblock it,
press OK again over the channel, and the symbol will disappear.
The symbol ( ) over a channel indicates that this channel is blocked.
The channels’ new status will come into effect when you exit this
Menú.
To exit the Menú, press EXIT.
To access any channel that is blocked, you must enter the password.
8.1.- Channels Setup
8.- Box Setup Menú
Page 54
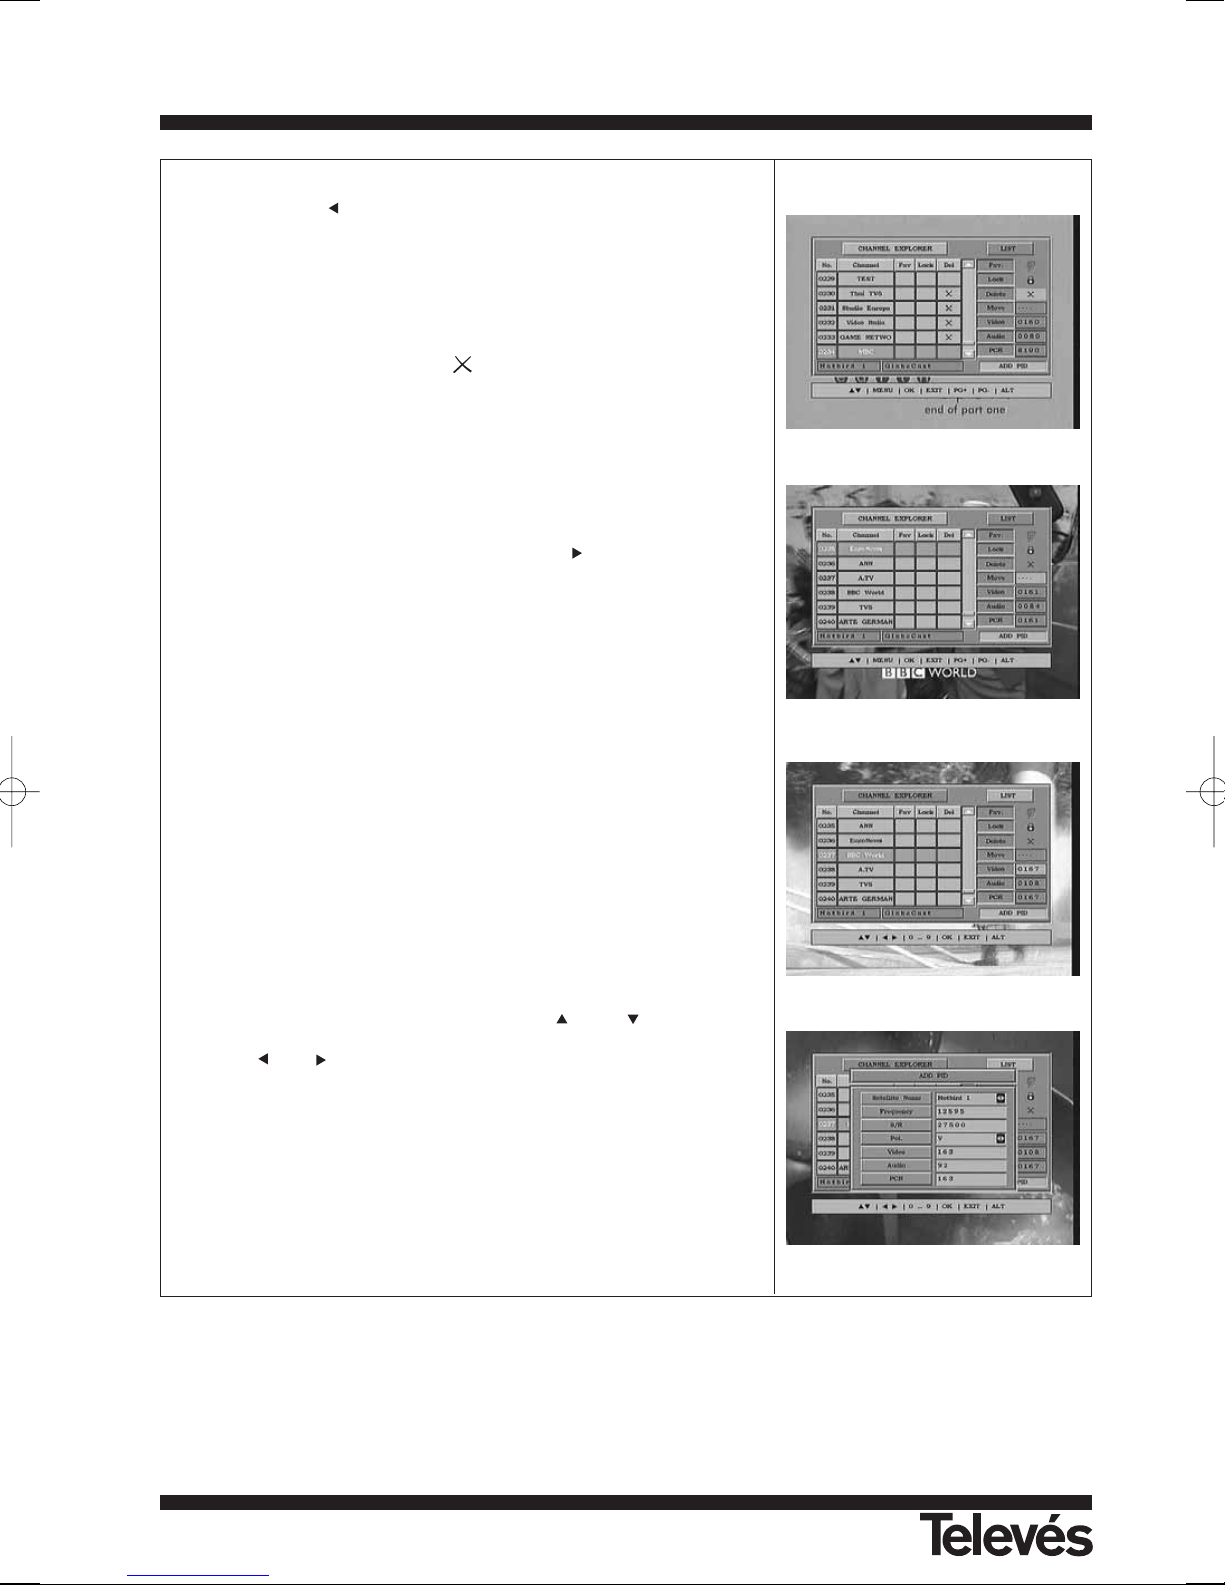
User Manual
“
RSD - 7296”
54
User Manual
“
RSD - 7296”
- Delete channels: With the cursor over this option, move to the left by
pressing the button.
To erase a channel, press the OK button over the chosen channel. A
symbol will appear indicating its new status. You can select various
channels to erase in one go, by pressing OK over each one. By pressing OK again over a channel that was already marked, you de-select
the channel and it will not be erased.
To erase all channels of one alone time, press ALT key and all channels
will be marked by the symbol ( ).
To erase channels that have been marked, press EXIT.
Whether you want to erase one channel, various channels or all of
them, a new window will appear asking for confirmation to erase them
(YES) or to exit the Menú without carrying out any modifications (NO).
- Move channels: If you want to move a channel from its current posi-
tion in the general list, you must first select this channel in the list and
then go to the right-hand side by pressing the button.
Place the cursor on the “Move” option, enter the number of the new
position of the channel into the remote control. Press OK.
To exit the Menú press the EXIT button.
- Edit the PID and PCR values: If you want to modify the Audio and
Video PID parameters or the PCR of a channel, you can do so using
this Menú.
Place the cursor on the “Video”, “Audio” or “PCR” option and enter the
new values for these option in the remote control.
To exit the Menú press the EXIT button.
- Add PID (Manual Scan): If you want add a new channel to the list of
channels but you do not want to carry out an automatic search, this
option allows you to do so. First, you must know the Video PID, Audio
PID and PCR values of the new channel as well as the frequency, symbol rate and polarity.
Place the cursor on the -Add PID- option and press OK.
A new Menú will appear where you will be able to enter the values
required in order to scan for the new channel.
To move through the options, use the and buttons. The
“Satellite name” and “Polarisation” values should be selected using
the and buttons.
Once all of the values have been introduced, press OK. The new chan-
nel will be added to the list.
Page 55
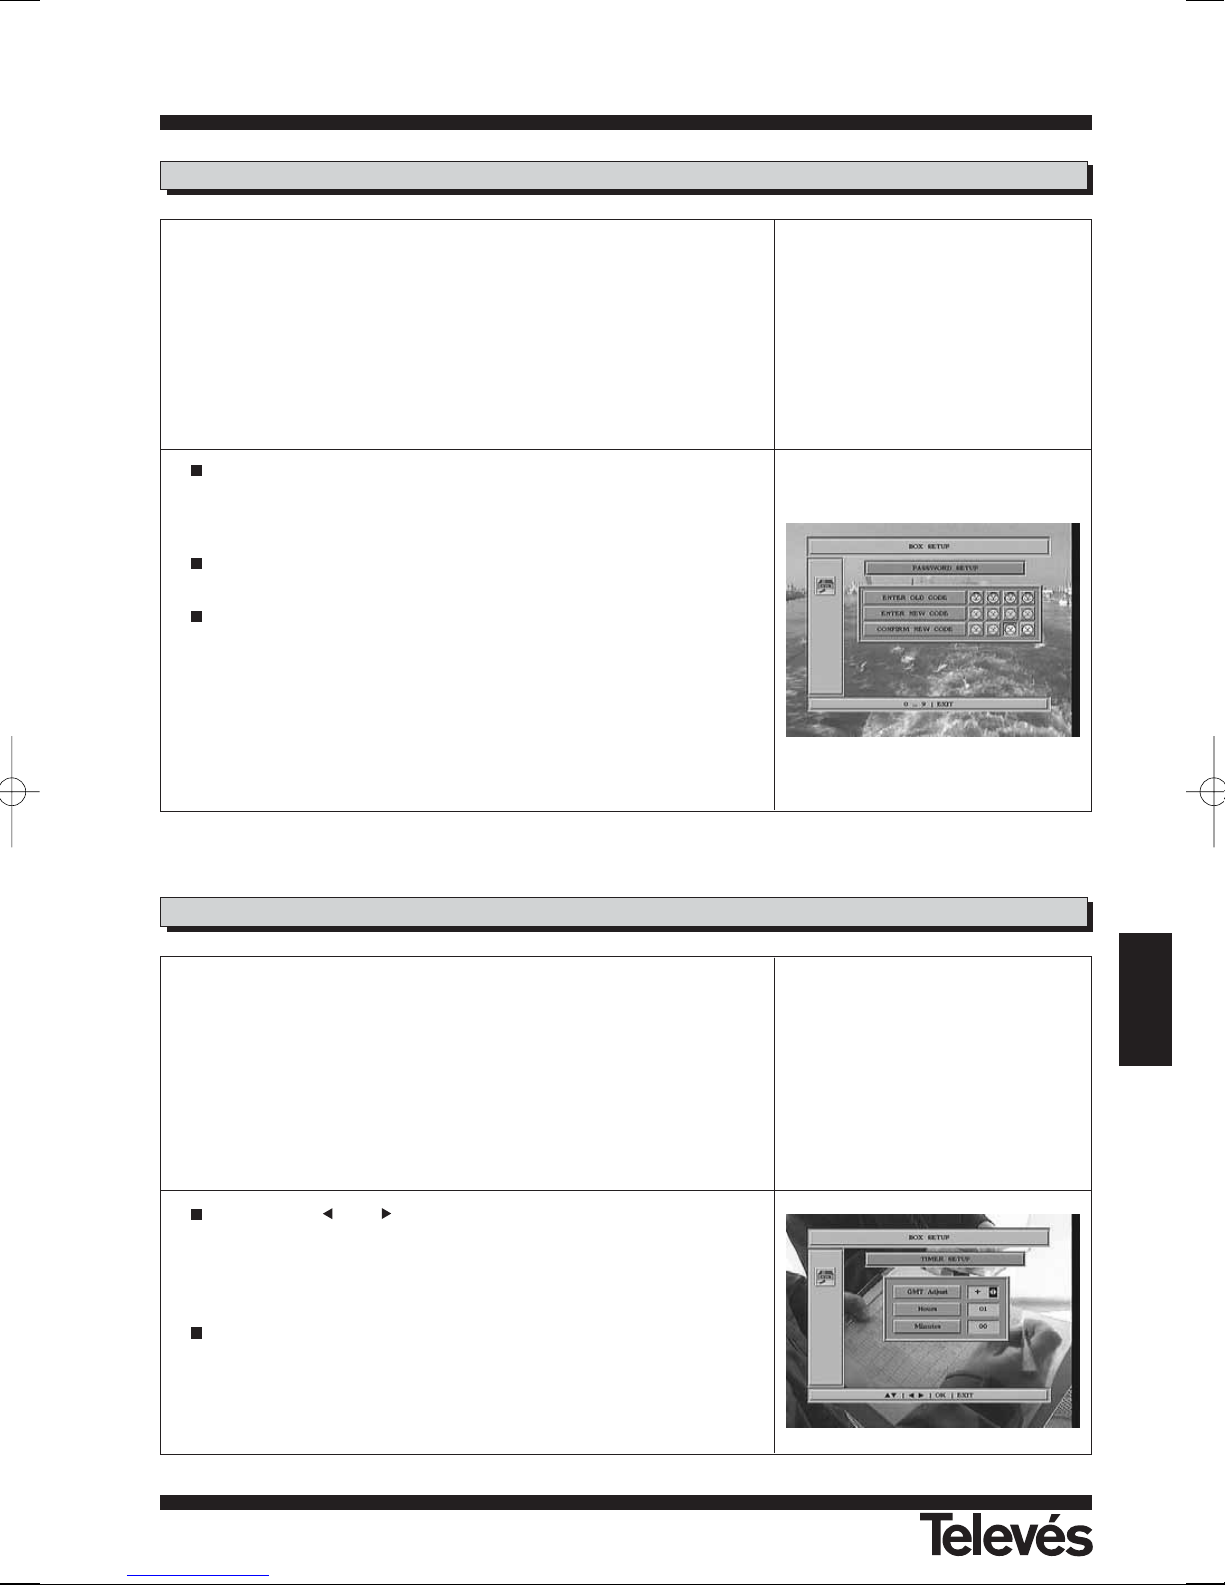
User Manual
“
RSD - 7296”
55
ENGLISH
User Manual
“
RSD - 7296”
8.2.- Changing the Password
The password consists of 4 numbers, which will never appear onscreen.
Instead, some yellow icons appear and each time you enter a number, this
will change to green.
When you select any of the options in the Menú that imply theuse of the
secret code (access to blocked channels, changing the channel list, etc.)
the message “Enter Code” will appear onscreen, asking you to enter your
password.
If the password that is entered is incorrect, the message “Invalid code” will
appear onscreen, which denies access.
To change the current code, enter the current code using the numeric
buttons on the remote control in the field “Enter Old Code”. The factoryset default value is “0 0 0 0”.
Enter the new password in the field “Enter New Code”.
Confirm the new password by entering it again in the field “Confirm New
Code”. If the two do not coincide, an error message will appear onscreen. If they do coincide however, the message “Password changed” will
appear.
From now on, you should always use the new code when this is required.
8.3.- Adjusting the clock
The receiver disposes of a Clock to indicate the time. This Clock adjusts
automatically to the information provided by the service supplier within the
actual satellite signal.
The service supplier sends two types of time information, one that is relativ
e to the current time (to be displayed by the Clock) and another that informs
the user of the time schedules of the different programmes (which is used
by the EPG).
Both types of information are sent in GMT format, so you must adjust the
Receiver by entering the time difference in your country.
By using the and buttons you can increase (+) or decrease (-) the
time as indicated in the “Hours” and “ Minutes” options as regards GMT.
The “Hours” option increases and decreases in one-hour steps, while
the “Minutes” option increase and decreases in thirty-minute steps.
Press OK button to store.
NOTE: Not all suppliers provide this type of information
Page 56
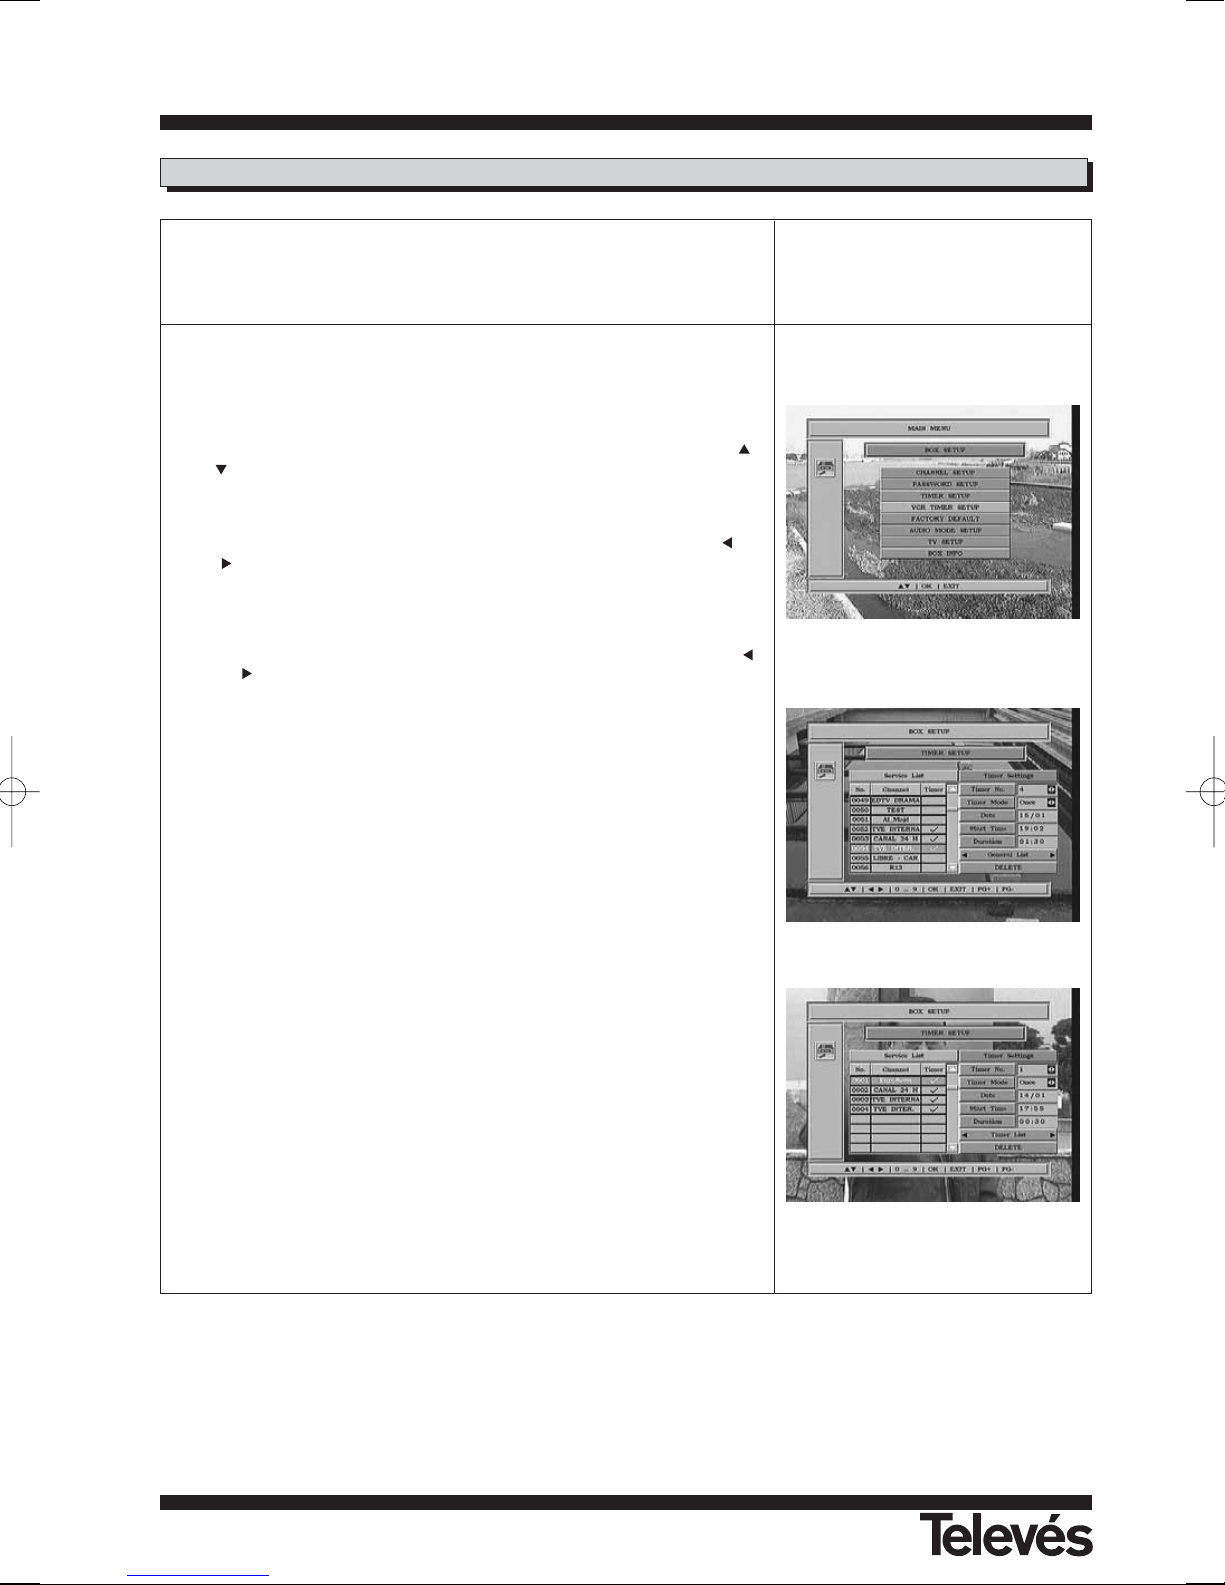
User Manual
“
RSD - 7296”
56
User Manual
“
RSD - 7296”
The receiver has a timer which can automatically switch the Receiver on
and off at a specified time. It has 8 positions, in which you can record the
same amount of programmes. You simply have to enter the following data.
This Menú has two columns; the left-hand column -Service List- where the
list of all the available channels appears and the right-hand column -Timer
Settings - where you can enter the data that you wish.
By default, the cursor always appears on the channel list. First select the
channel that you want to see when you switch the receiver on. User the
or buttons to do this. Press OK over the selected channel. The cursor
will now automatically appear on the right-hand column to enter the data:
- Timer no..- Select one of the 8 available programmes by using the or
buttons.
- Timer Mode.- By default, this appear in “Once” mode (one time), but you
can select “Daily” (everyday), “Weekly” (once a week), “Monthly” (once a
month) or “Off” (de-activated). Select one of these options by using the
or buttons.
- Date.- By default the current day and month appear. You can change
this date by using the numeric buttons (0 .. 9) on the remote control.
- Start time.- Using the numeric buttons, enter the time that the pro-
gramme starts.
- Duration.- Using the numeric buttons, enter the estimated duration of
the programme.
Press OK to confirm all of the programme data. This will take you back to
the service list.
Repeat these same steps to record other programmes.
The “General List” / “Timer List” option lets you return to the general list
whenever you wish or else see a list of the timers set to record.
If you wish to eliminate any of these settings, you can do so by selecting it
from the programme list and pressing OK over the “Delete” option.
To exit this Menú, press EXIT.
8.4.- VCR Timer
Page 57
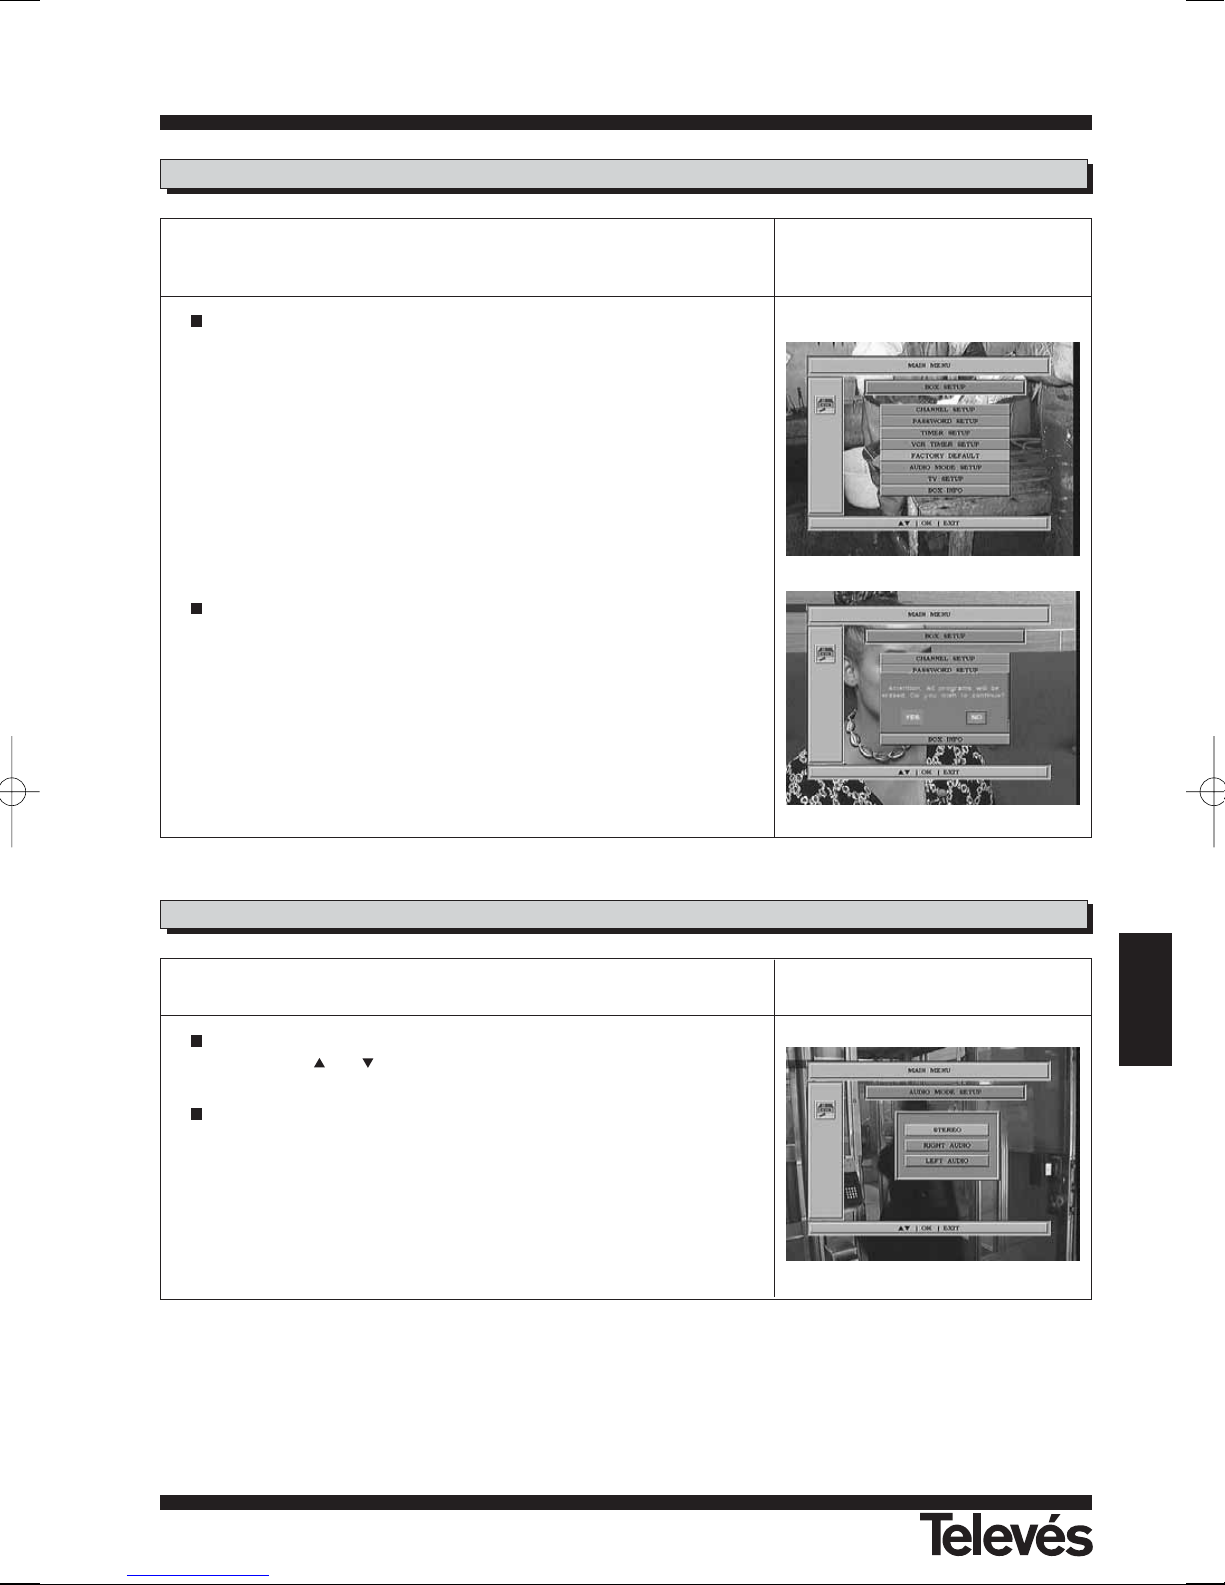
User Manual
“
RSD - 7296”
57
ENGLISH
User Manual
“
RSD - 7296”
8.5.- Factory values (Restore default values)
This option will change all of the parameters that you have entered back to
those established by default at the factory.
The receiver will carry out the following changes when you press OK
over the “Factory Default”:
- All of the specifications entered for the transponders, will return
back to the default values set at the factory.
- All of the channels on the list will be erased and replaced by those
pre-set at the factory.
- All of the options installed by the user will be replaced by those
pre-set at the factory.
When you select this option, a warning message will appear onscreen
requesting confirmation.
8.6.- Audio selection
In this Menú, you can select the type of audio used by the loudspeakers.
Select one of the three options; “Stereo”, “Left Audio” or “Right Audio”
by using the or buttons.
If you want the audio that you have chosen to be permanent, press OK.
Page 58
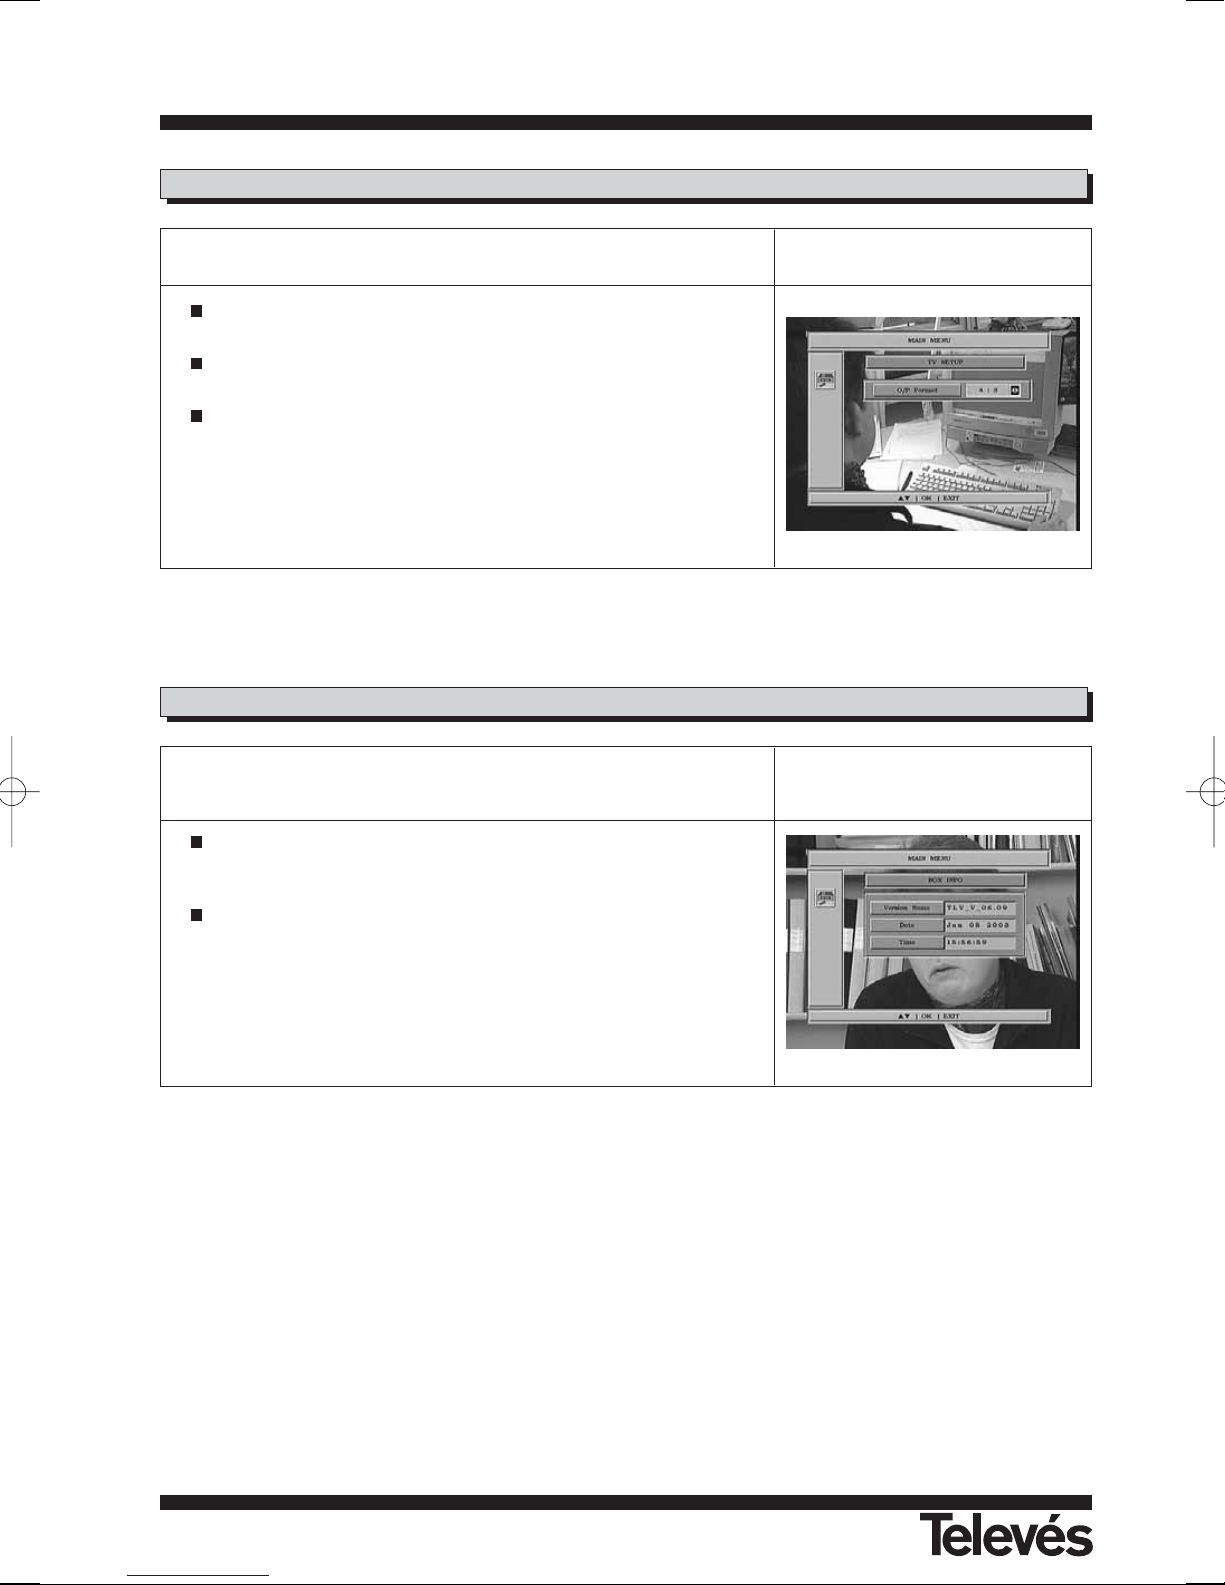
User Manual
“
RSD - 7296”
58
8.7.- TV Setup
In this Menú, you can select the screen format.
The screen format can be "4 : 3" or "16 : 9".
If you select 4:3, all the channels will be displayed in this format.
If you select 16:9, the screen format will adjust automatically to the format of each individual channel.
8.8.- Box Info
This option opens an onscreen window with some basic information about
the receiver.
To activate this Menú, press OK over the “Box Info” option in the
-Box Setup- Menú.
Press the EXIT button to exit the Menú.
Page 59
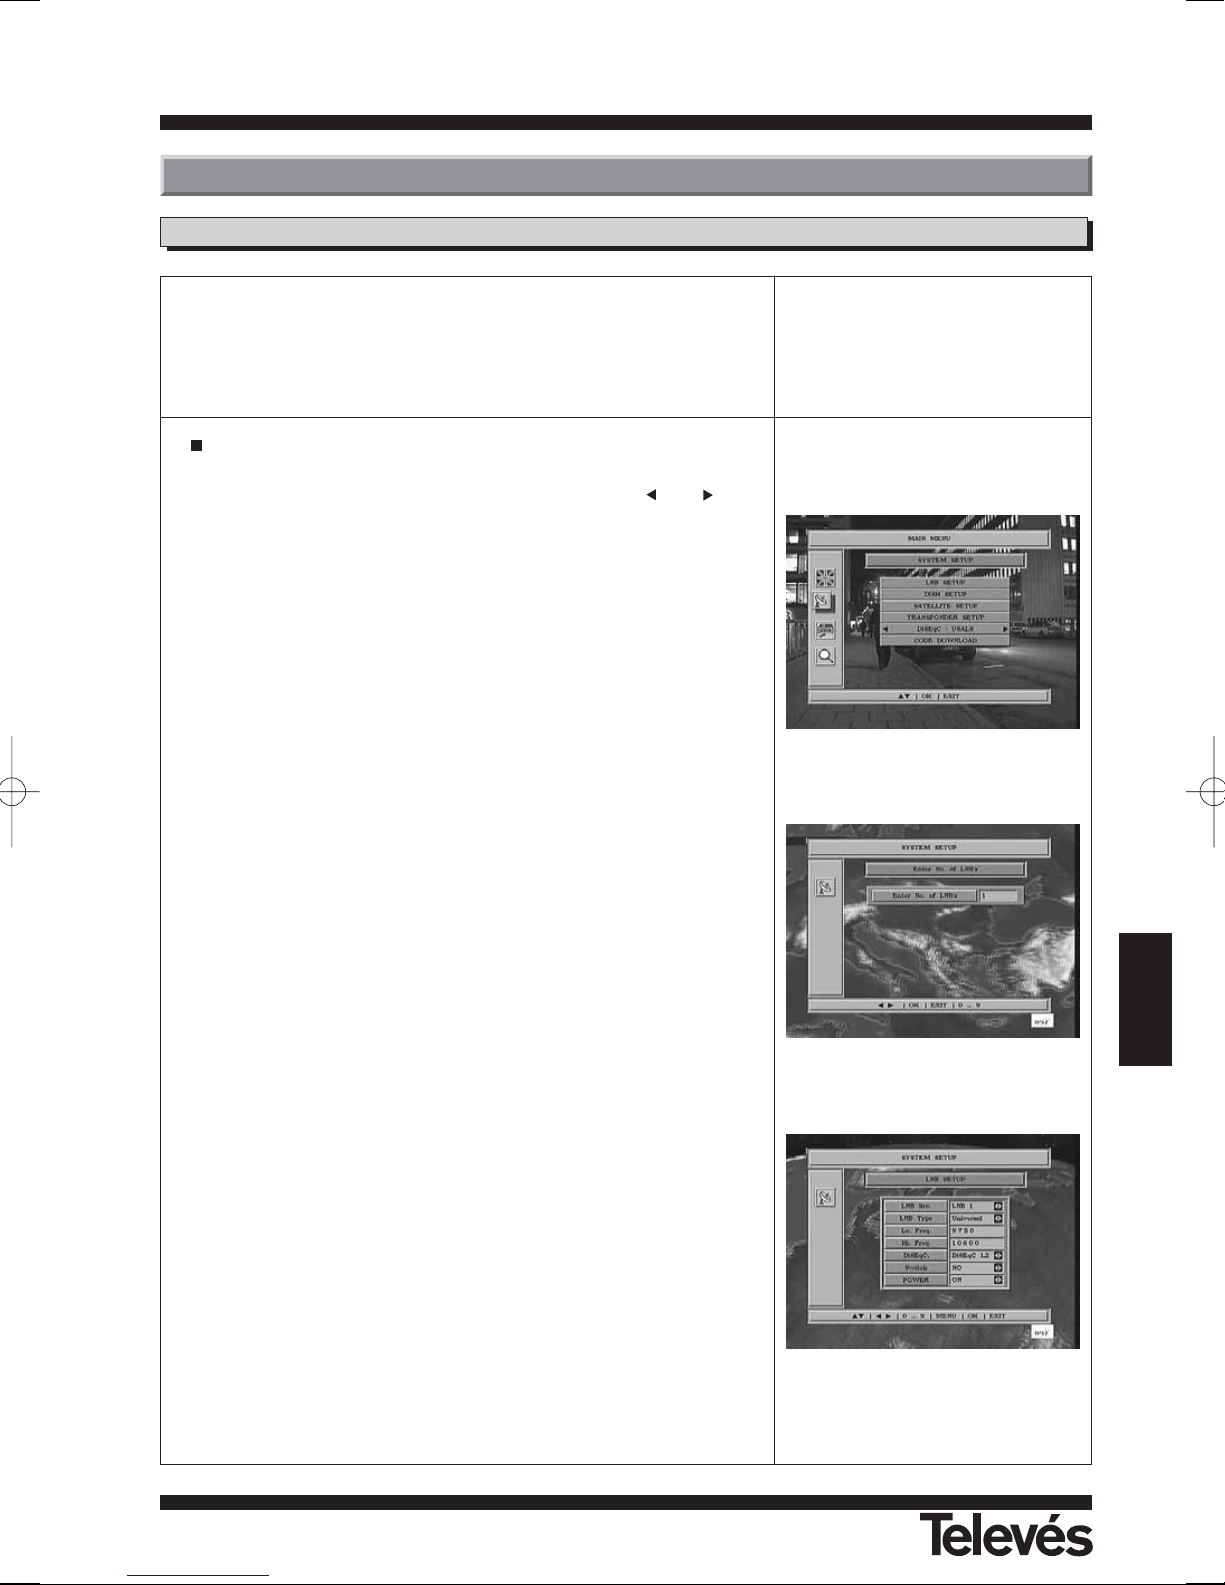
User Manual
“
RSD - 7296”
59
ENGLISH
User Manual
“
RSD - 7296”
This Menú lets you enter the configuration parameters of the system.
Access the Menú by pressing with the OK button over the “System Setup”
option of the main Menú. You can assign satellites, LNBs and switches to
16 antennas in this Menú.
You can save up to 16 types of configuration for the antenna.
Select the “LNB Setup” option in the -System Setup- Menú by pressing
the OK button over it. Use the numberic buttons or the and but-
tons to select the total nº of LNBs that are available in your installation
and press the OK button again.
Assign the appropriate values to each of the following options, which
correspond to each LNB configuration:
- Type of LNB: Indicate if the LNB located on the antenna is universal or
not. If it is, the “High Frequency” and “Low Frequency” option remain
inactive.
- Lo. Freq. / Hi. Freq.: Enter the appropriate frequency for each of the
bands (high and low) if you are not using a universal LNB.
- DiSEqC: If in the -Number of LNB’s- option you have selected “1”, the
option appears as DiSEqC 1.2 by default, corresonding to a motorised
antenna and controlled by a compatible DiSEqC 1.2 motor. The
“< DiSEqC 1.2 disabled >” option will become active immediately.
If in the -Number of LNB’s- option you have selected “2”, you will dis-
pose of the “DiSEqC 1.0” or “Tone Burst” options, corresponding to a
fixed antenna and a multisatellite system; or else two fixed antennas
orientated towards different satellites.
Finally if in the -Number of LNB’s- option you have selected the LNB nº
> “3”, you will dispose of the “DiSEqC 1.0” or “DiSEqC 1.1” options,
corresponding to various antennas.
- Switch: With the -DiSEqC- option in “Tone Burst” mode you can select
one of the following options: “No”, “A” or “B”.
With the -DiSEqC- option in “DiSEqC 1.0” mode you can select one of
the following options “No”, “A”, “B”, “C” or “D”.
With the -DiSEqC- option in “DiSEqC 1.1” mode you can select one of
the following options “No”, “1”, “2”, ... “16”.
Regardless of the type of switch, each input corresponds to a specific
LNB.
- Power: Select “On” or “Off” for the LNB powering.
9.- System Setup Menú
9.1.- LNB Setup
Page 60
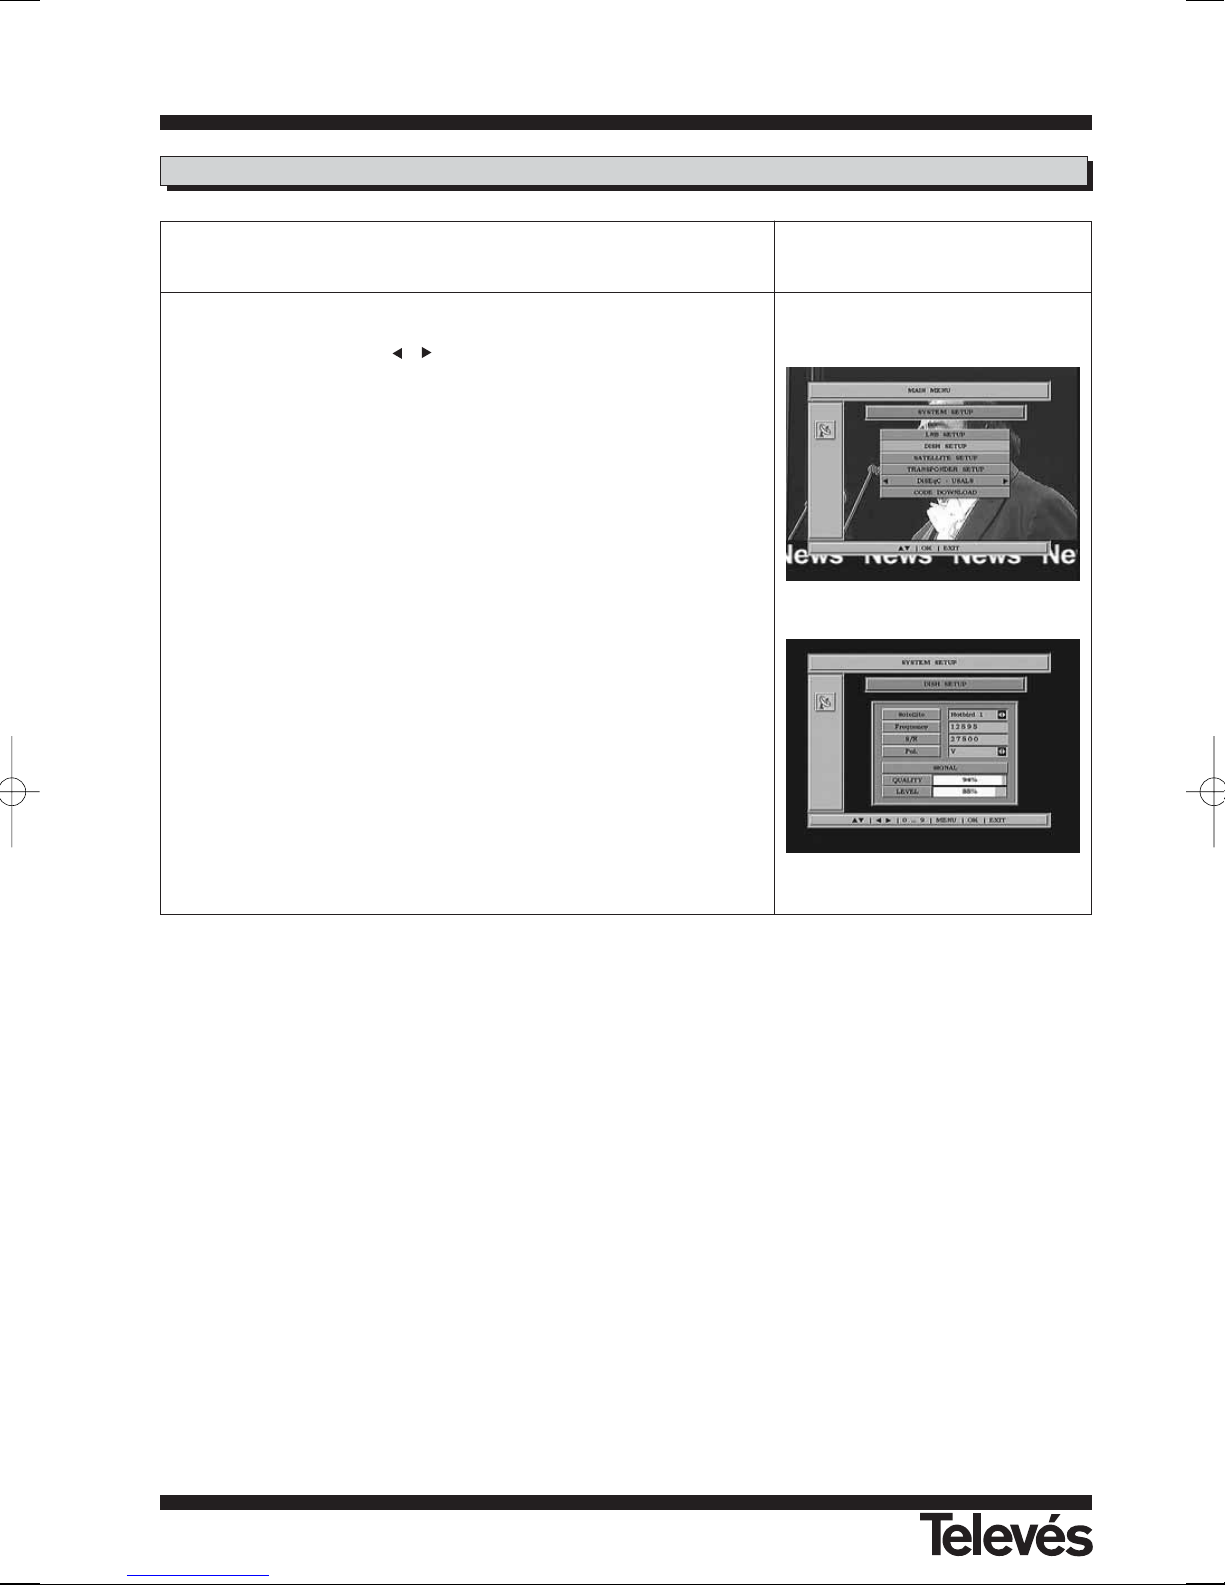
User Manual
“
RSD - 7296”
60
User Manual
“
RSD - 7296”
In this Menú you can assign a satellite to a specific antenna position.
- Satellite: Select one of the satellites that have been pre-set in the
receiver by using the , buttons or pressing the OK button to acti-
vate the pop-up Menú.
- Frequency: Enter the corresponding frequency using the numeric but-
tons.
- S/R: Enter the corresponding symbol rate using the numeric buttons.
- Polarisation: Indicates if it is horizontal (H) or vertical (V) polarisation.
The Signal Level window tells us the satellite signal level.
This is useful when installing an antenna, as it serves as a guide for
when we are pointing the antenna towards a satellite.
9.2.- Dish Setup
Page 61
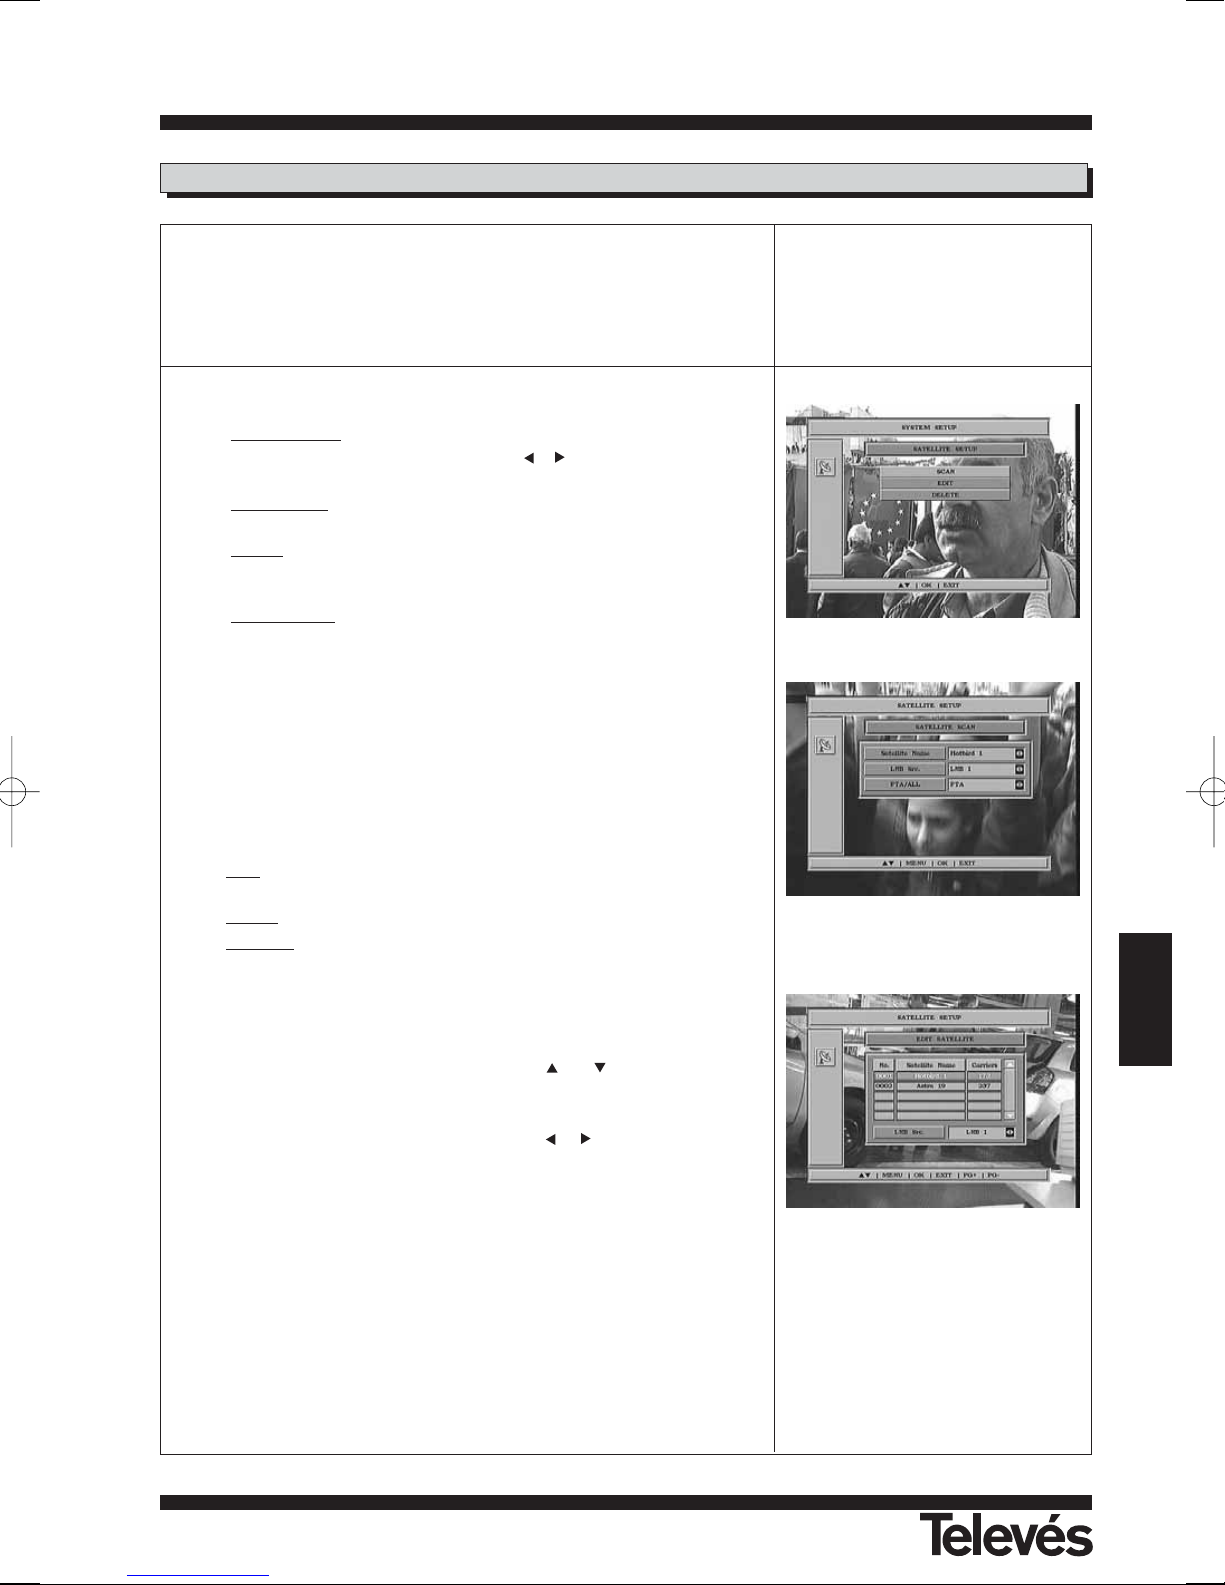
User Manual
“
RSD - 7296”
61
ENGLISH
User Manual
“
RSD - 7296”
This Menú lets you modify the specifications concerning a satellite position. To do this, press OK over the -Satellite Setup- option. In the submenu that appears you can carry out a channel scan, modify the existing channels, eliminate those that do not interest you or edit the satelline name.
Scan:
- Satellite name
: Select one of the satellites that have been pre-pro-
grammed into the receiver using the , buttons or press OK to
activate the pop-up Menú.
- LNB number
: Assign an LNB number to that satellite. The LNB num-
ber depends on those created in the “LNB Setup” section.
- FT
A/All: Indicate if you want to scan all of the satellite channels (ALL) ,
only the free-to-air channels (FTA), only TV channels or only Radio
channels.
- Or
ganised by: This lets you organise the channels that have been
found by the satellite into alphabetical order (A to Z) or backwards
(Z to A).
Press the OK button to save the data.
In the confirmation window that appears, indicate if you want to carry
out the scan (YES) or if you want to cancel the operation (NO).
During the scan, if you press the EXIT button, a small window will appear
where you must indicate what you would like to do with the scanning
operation:
- Skip
: Eliminates all the data found until the cancellation command and
saves the rest.
- Cancel
: Eliminates all the data found in the satellite.
- Continue
: Continues to search for data.
Edit:
This lets you change the LNB that has been assigned to a satellite.
Select one of the active satellites with the or buttons and press
OK.
The cursor will appear on the “LNB Number” option so that you can
select which number you require using the or buttons.
Press the OK button to save the data.
9.3.- Satellite Setup
Page 62
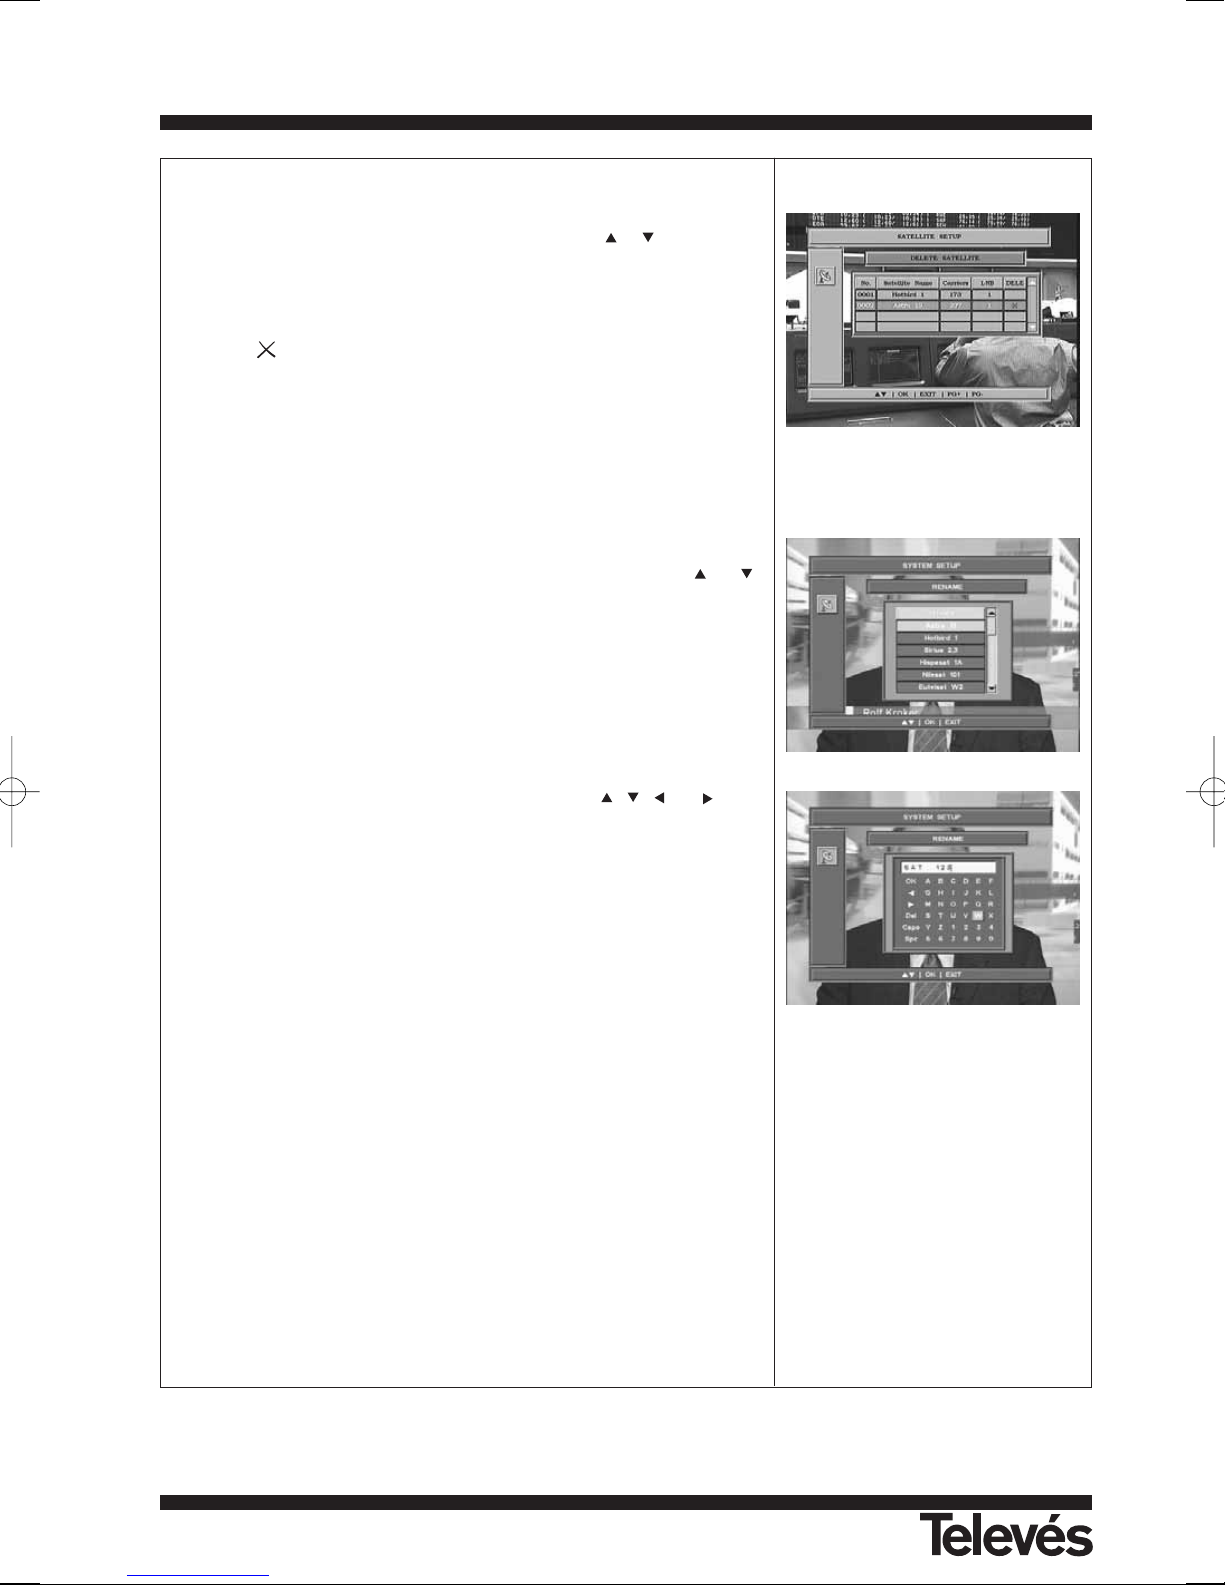
User Manual
“
RSD - 7296”
62
Delete:
This option lets you erase all of the data of a satellite.
To eliminate a satellite, select it in the list with the or buttons and
press the OK button over the one you have chosen. A mark will appear
with a symbol indicating its new status. If you wish to de-select it, press
the OK button again over the satellite, and the symbol should disappear. You can mark as many satellites as you wish.
The ( ) symbol over a satellite indicates that this satellite has been
selected for elimination.
Press the EXIT button. A small window appears asking for confirmation
to eliminate the satellite (YES) or cancel the operation (NO).
Rename:
This option lets you edit the name of the satellites.
To edit the name of a satellite, choose it in the list by using the or
buttons and then press the OK button to select it.
A window will appear with the alphabet and the algorithms (0 to 9).
Move the cursor through the alphabet using the , , or but-
tons. Select the letter that you want and press the OK button on the
remote control.
When you have written the whole name, place the cursor on the OK
option and press the OK button on the remote control.
Press the EXIT button to exit without changing the name.
Page 63
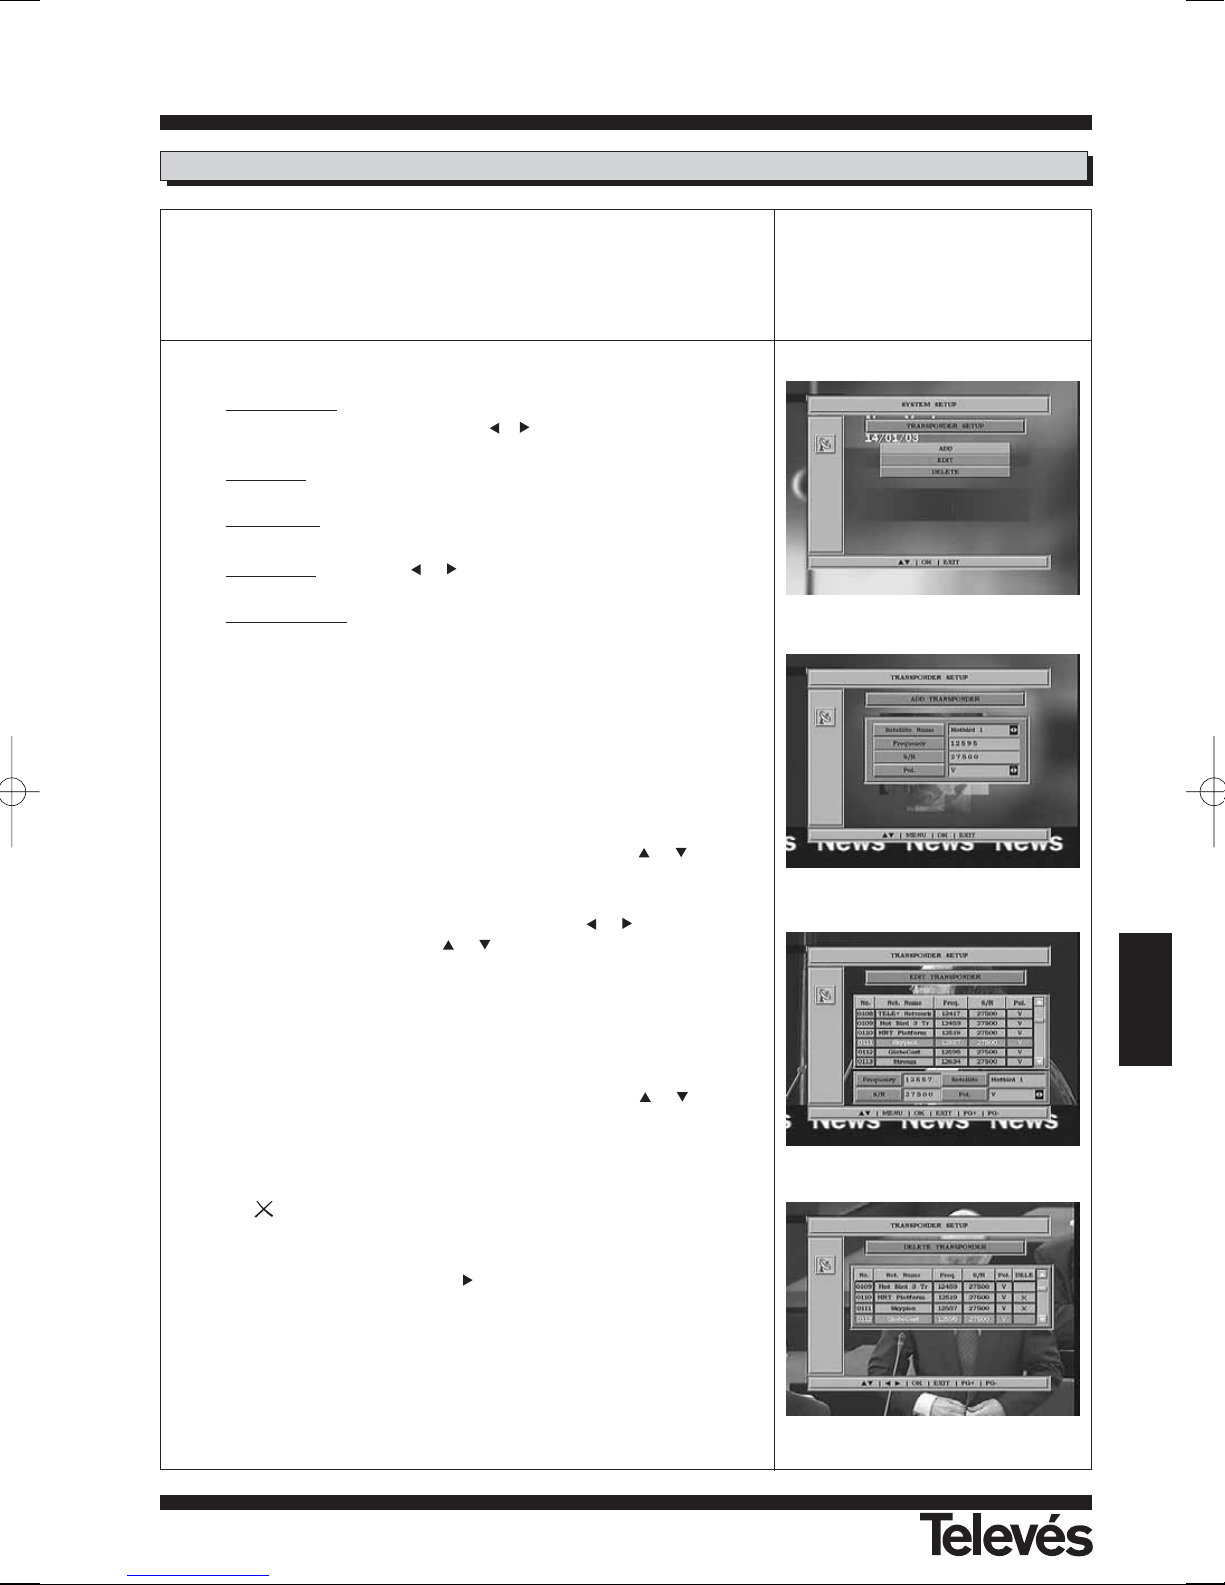
User Manual
“
RSD - 7296”
63
ENGLISH
User Manual
“
RSD - 7296”
This Menú lets you modify the specifications that correspond to a transponder. To do so, press OK over the -Transponder Setup- option. In the
submenu that appears you can add a new transponder, modify the existing transponders or eliminate those that you do not want.
Add:
- Satellite name
: Select one of the satellites that have been pre-pro-
grammed in the receiver with the , buttons or press OK to activate the pop-up Menú.
- Fr
equency: Using the numeric buttons, enter the frequency that
corresponds to that transponder.
- Symbol rate
: Using the numeric buttons, enter the symbol rate that
corresponds to that transponder.
- Polarisation
: Using the or buttons, indicate the type of polarisa-
tion that corresponds to that transponder.
- Network sear
ch: With this type of search, the receiver reads the NIT
table and lists all the channels that appear in it, without checking the
operacional status of each chanel of its own transponder. This option
can be enabled or disabled.
Press the OK button to start the channel scan in the transponder.
Edit:
This lets you change the frequency, symbol rate and polarity that has
been assigned to a transponder
Select one of the transponders from the list with the or buttons
and press OK.
The cursor is situated in the first field so that you can enter the new
data. To do so use the numeric buttons or the or buttons. Go to
the next field by pressing the or buttons.
Press the OK button to save the data. A new scan will take place with
the new data.
Delete:
This option lets you erase all the data of a transponder.
To eliminate a transponder, select it in the list with the or buttons
and press OK over it. It will now be marked with a symbol thereby indicating its new status. If you want to de-select it, press OK again over
the transponder and the symbol will disappear. You can mark as many
transponders as you wish.
The ( ) symbol over a transponder indicates that this transponder has
been selected for elimination.
To be able to check which channels belong to a specific transponder
before eliminating it, press the button over that transponder. A list
will appear with all of the channels that are included in the transponder.
Press the EXIT button. A small window will appear requesting confirmation to eliminate the transponder (YES) or to cancel the operation
(NO).
9.4.- Transponder Setup
Page 64
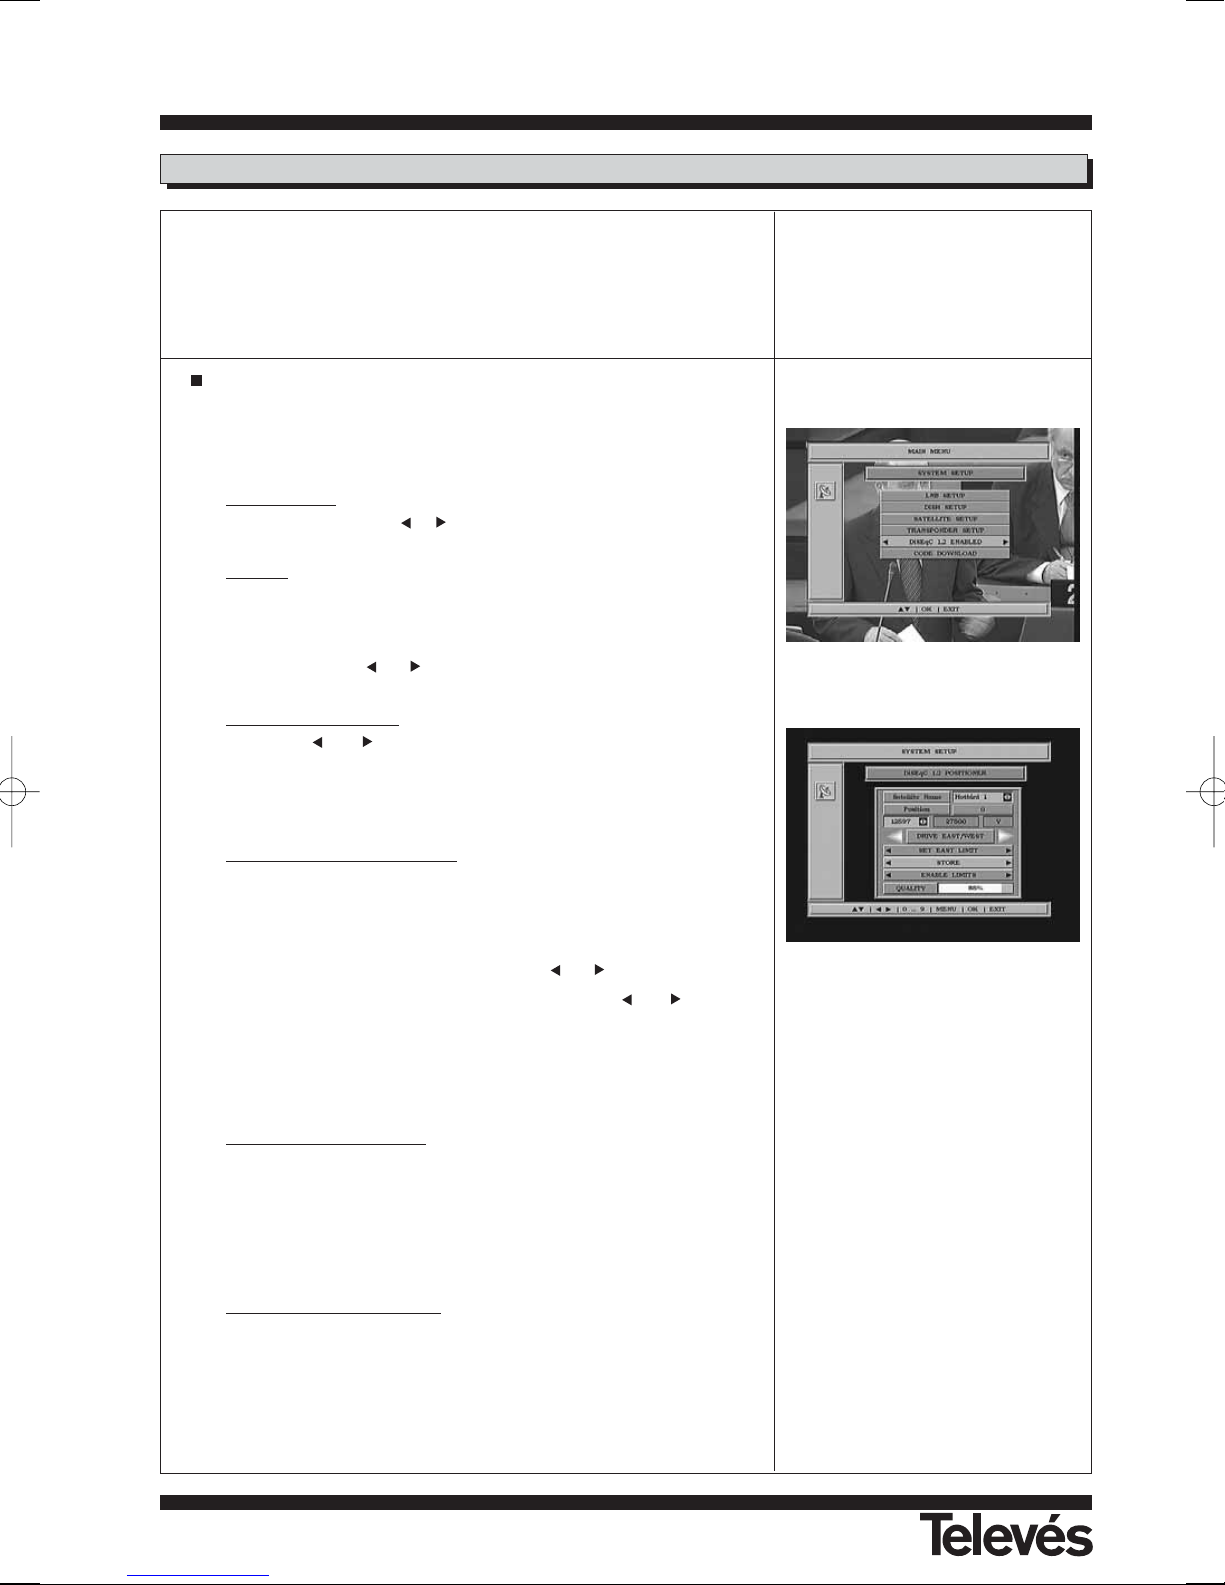
User Manual
“
RSD - 7296”
64
User Manual
“
RSD - 7296”
If in the -LNB number- option, you have selected “1”, the Menú for the
DiSEqC 1.2 positioner will display the following options: “< DiSEqC 1.2
activated >”, “< DiSEqC USALS >” and “< DiSEqC 1.2 de-activated >”.
By pressing the OK button over each of the DiSEqC options, we can
access the area where we position the disk.
DiSEqC 1.2 activated
This Menú lets you change the dish’s orientation so that you can select the
new orbital positions of the different satellites or correct the satellite positions that you have already saved.
- Satellite name
. We should define the satellites that we are going to
use. To do so, use the or buttons.
- Position
. Each satellite has a different position number. There are 50
positions. Assign a position number to the satellite.
- Specify the transponder that you will use to check the received signal
level by using the or buttons.
- Drive East / Drive W
est. You can move the dish to the East or West by
using the or buttons. If you press the buttons once, this will
move the antenna just one step. If you keep the buttons pressed
down, the antenna will rotate smoothly. To save the position, press OK
over the “Store” option.
- Set East limit / Set W
est limit. These are the positions that limit the
orientation of the dish at each end of the arch.
This option will remain blocked as long as the "Limits Enable" option in
activated.
To set the limits after saving the orbital positions, select the limit that
you want to change (east or west) with the or buttons.
Go to the “Drive East / Drive West” and with the or buttons,
move the dish until you have reached the desired limit. Press OK over
the “Store” option to set it.
Return to the “Set East limit / Set West limit” option, select the other
limit and repeat the process.
- Stor
e / Reset / Recalculate.
The “Store” option saves the limits and positions of each satellite if you
press the OK button over it.
The "Reset" option directs the antenna towards the South.
The "Recalculate" option orders the positions after adding new ones or
eliminating existing ones.
- Enable limits / Disable limits
. This activates or de-activates the use of
the limits. If you do not use the limits, you run the risk of damaging the
motor elements or the dish.
9.5.- DiSEqC 1.2 positioner
Page 65
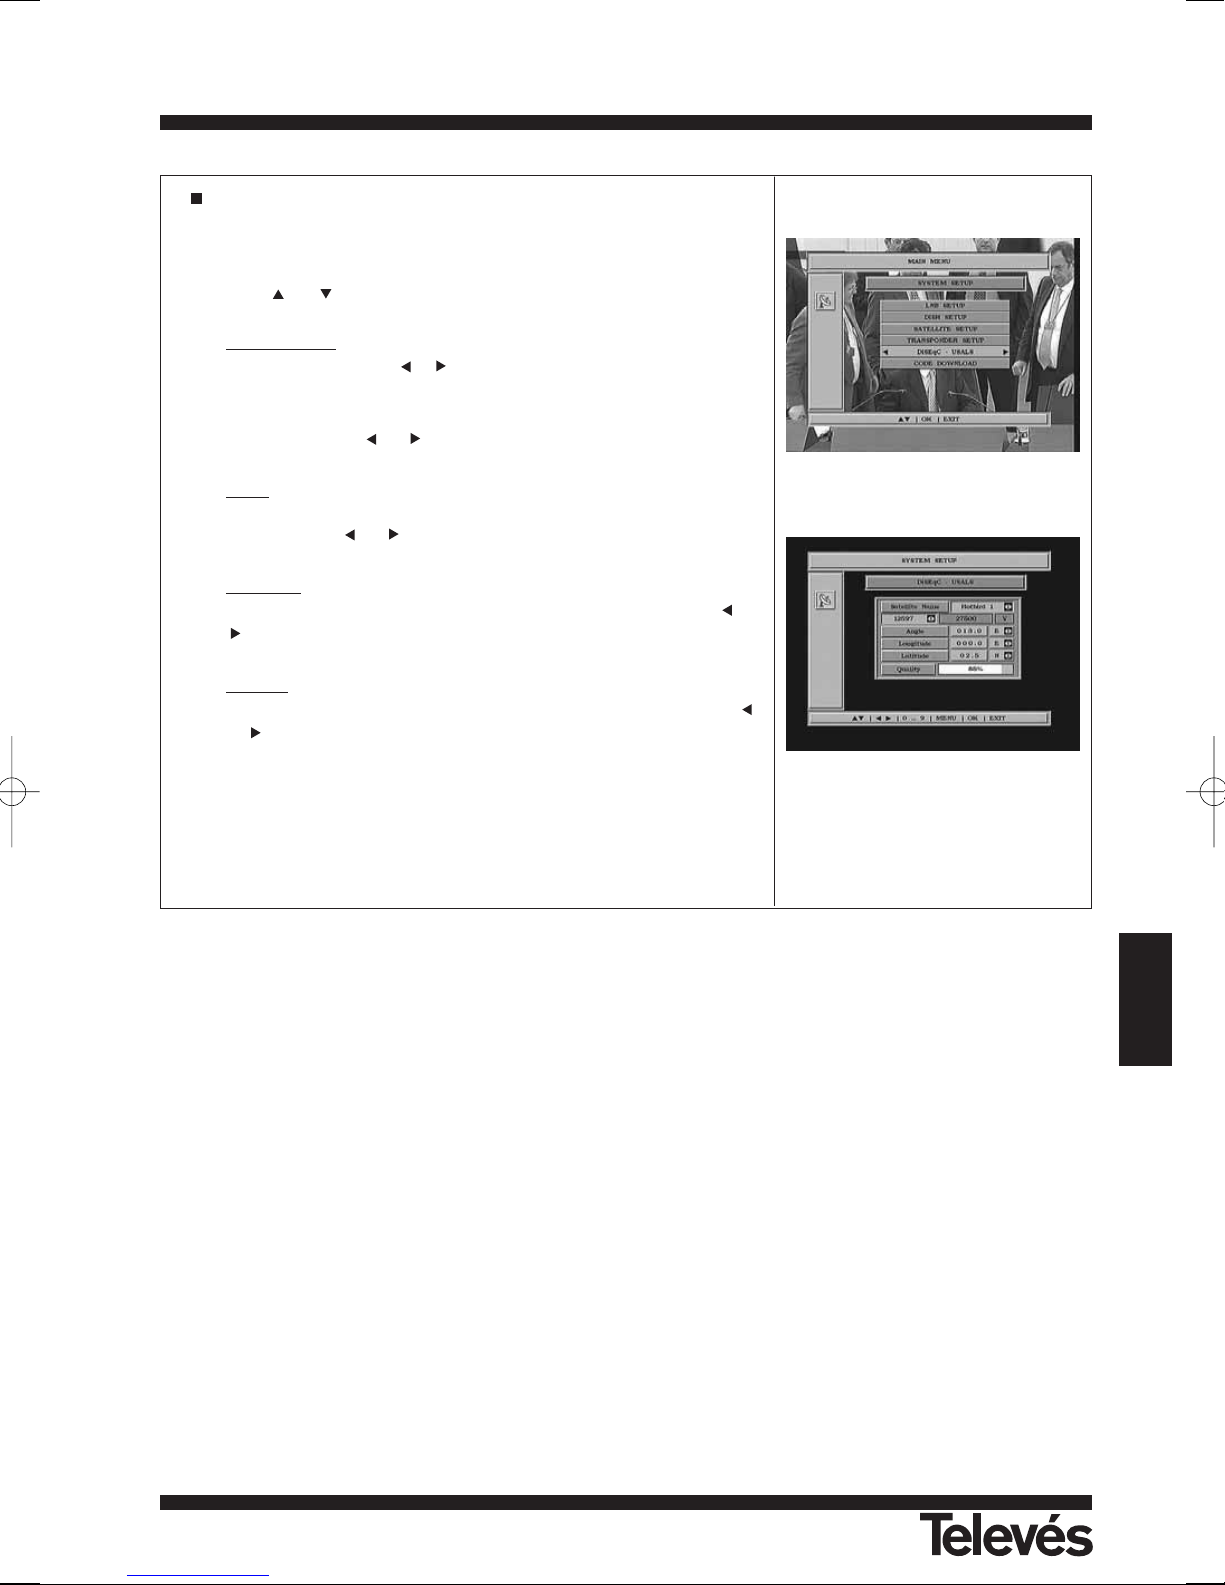
User Manual
“
RSD - 7296”
65
ENGLISH
User Manual
“
RSD - 7296”
DiSEqC USALS
This Menú automatically orientates a dish towards a satellite by simply
knowing the orbital position of the satellite and the exact position (longitude/latitude) of where you are.
Use the or buttons to choose the different options.
- Satellite name
. We should define the satellites that we are going to
use. To do so, use the or buttons.
- Specify the transponder that you will use to check the received signal
level by using the or buttons.
- Angle
. Indicate the angle that corresponds to the satellite’s orbital
position in degrees. Indicate if this is towards the East or towards the
West with the or buttons
.
- Longitude
. Indicate the exact longitude of where you are in degrees.
Indicate if this is towards the East or towards the West using the or
buttons.
- Latitude
. Indicate the exact latitude of where you are in degrees.
Indicate if this is towards the North or towards the South with the
or buttons.
Press the OK button to move the antenna to the satellite position.
A bar will appear that indicates the signal level that is available in the
transponder.
Page 66
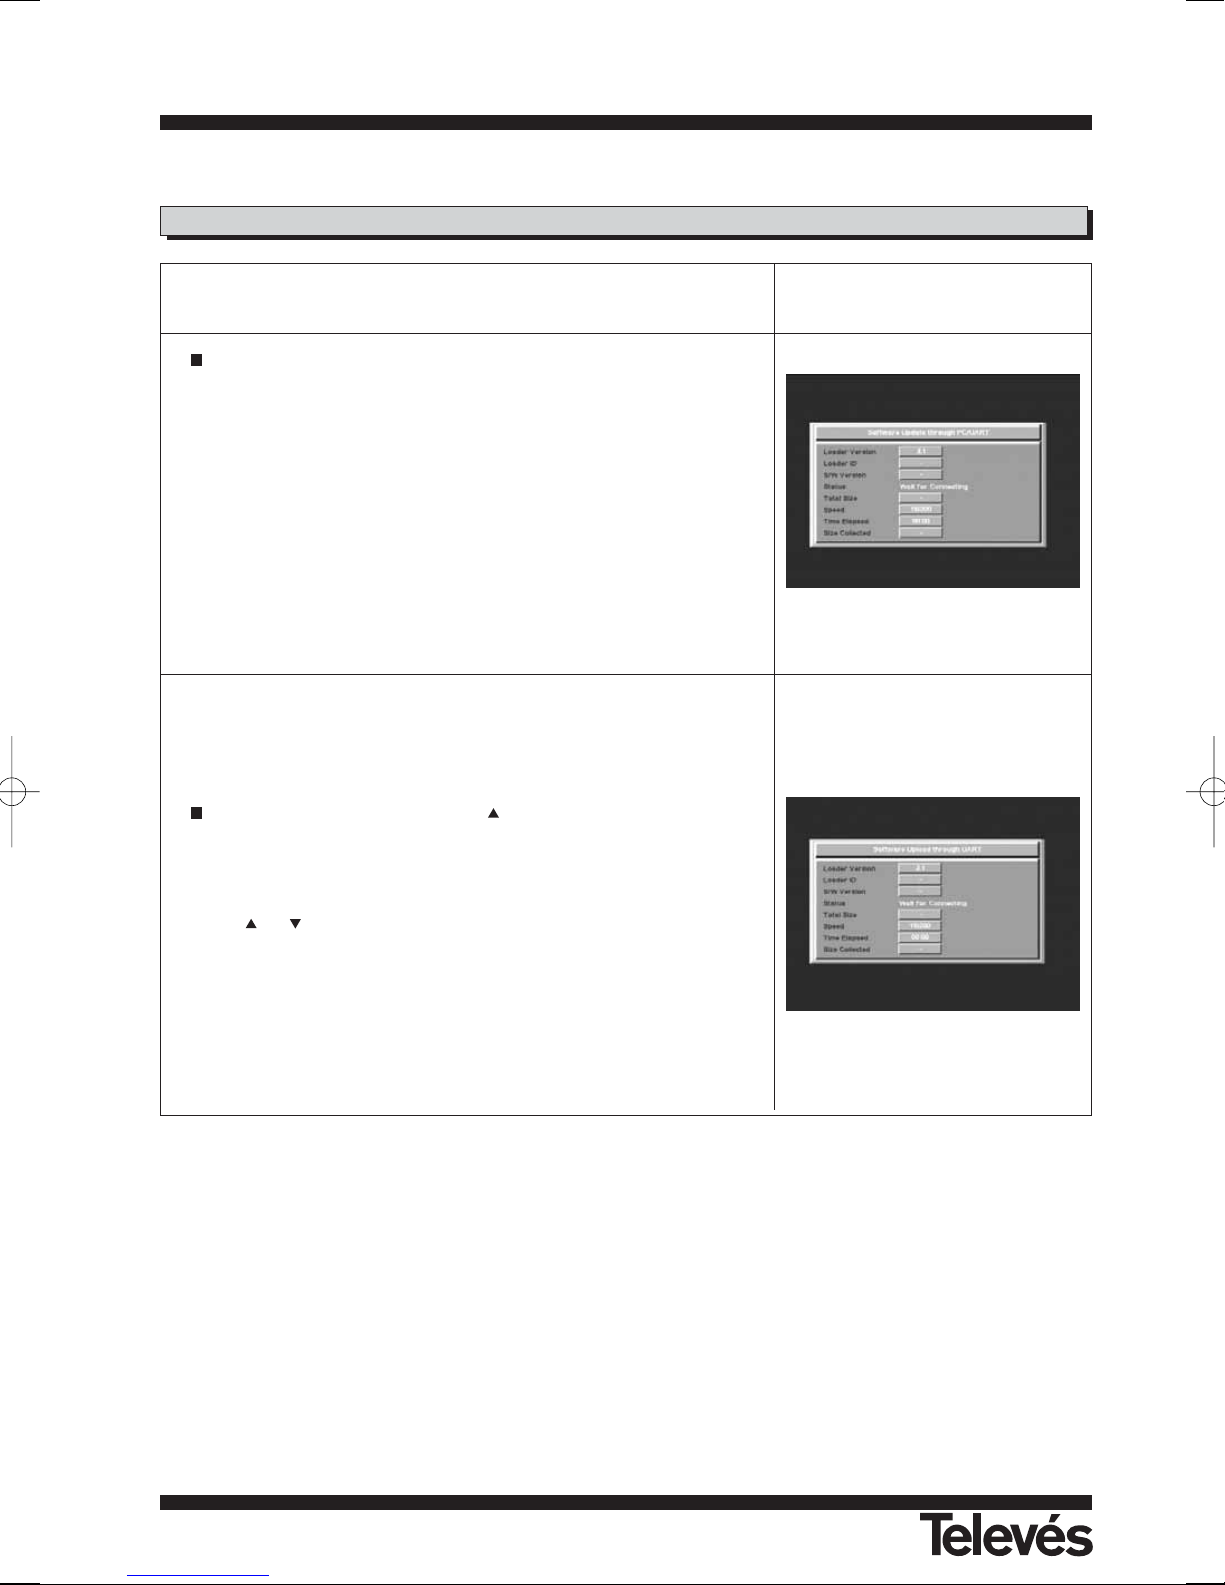
User Manual
“
RSD - 7296”
66
Using this Menú you can upgrade the receiver’s software directly from the
Internet using a PC.
You need to connect the receiver to a PC via an RS-232 cable and you
need to have the latest software version.
Press OK over the -Code upgrade- option. In the small window that
appears, you need to indicate if you wish to upgrade the software (YES)
or cancel the operation (NO).
If you press YES, the upgrading process will begin, and various progress
messages will appear onscreen.
After the receiver has been upgraded, it will begin to function.
Note: If you have only carried out an update of the channel list, you need to
execute the "Factory Default" option so that these become available.
If you would like to have the same software and the same channel list in
various receivers, you can duplicate this information (between the receivers)
if you dispose of a RS-232 cable (female - female).
On the MASTER receiver press the button at the same time as switching the receiver on via the switch at the back of the equipment
(POWER). By doing this, the receiver has entered “Transmitir SW”
mode.
Configure the SLAVE receiver to receive the software. To do this, press
the & buttons at the same time as switching the receiver on via
the switch at the back of the equipment (POWER). By doing
this, the receiver has entered the “Actualizar SW” mode.
The duplicating process (copy) takes around 3 minutes and is over when
both receivers return to their normal operational mode.
The SLAVE receiver will finish the process a few seconds after the MASTER receiver.
9.6.- Code upgrade (software)
Page 67
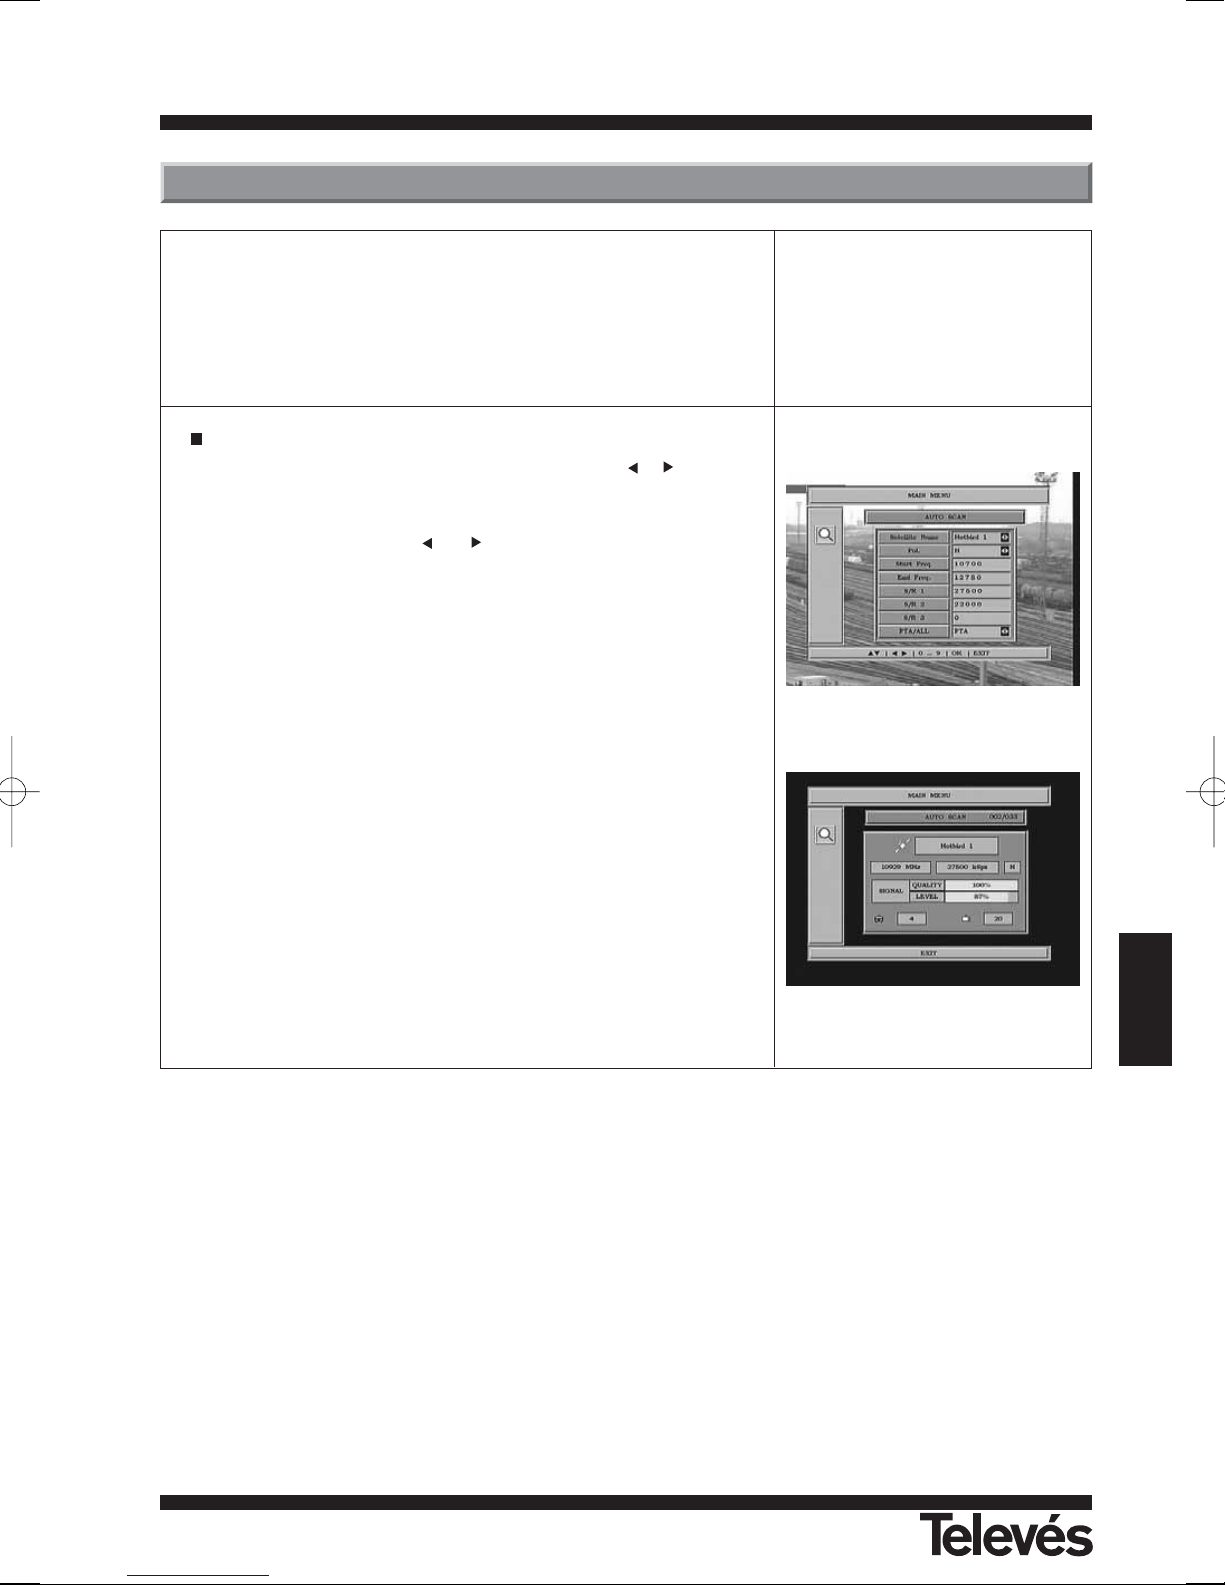
User Manual
“
RSD - 7296”
67
ENGLISH
User Manual
“
RSD - 7296”
To carry out an automatic scan for the channels offered by the satellites in
your installation, press OK over the -Automatic scan- option in the main
Menú.
You can carry out the channel scan in a satellite if the satellite that has been
selected in the -Dish Setup- Menú has been correctly assigned to an antenna.
The options are:
- Add channels: To select one of the satellites use the /
buttons or
press OK to activate the pop-up Menú.
- Polarisation: Using the or buttons, select the type of polarity
that you wish to use to carry out the scan. The options are Horizontal
(H) , Vertical (V) and Horizontal + Vertical (H+V).
- Starting frequency: Using the numeric buttons, indicate the frequency
at which you want the scan to start.
- Ending frequency: Using the numeric buttons, indicate the frequency
at which you want to the scan to stop.
- 1/2/3 symbol rate: Using the numeric buttons, indicate the symbol
frequency that you are going to use for the scan. If you only want to
use one, you must enter a “0” in the rest.
- FTA / All: Indicate if you want to search for all of the satellite channels
(ALL) or only for those that are free-to-air (FTA).
If you want to stop the scanning process before it has finished, you must
press the EXIT button on the remote control.
10.- Automatic scan
Page 68
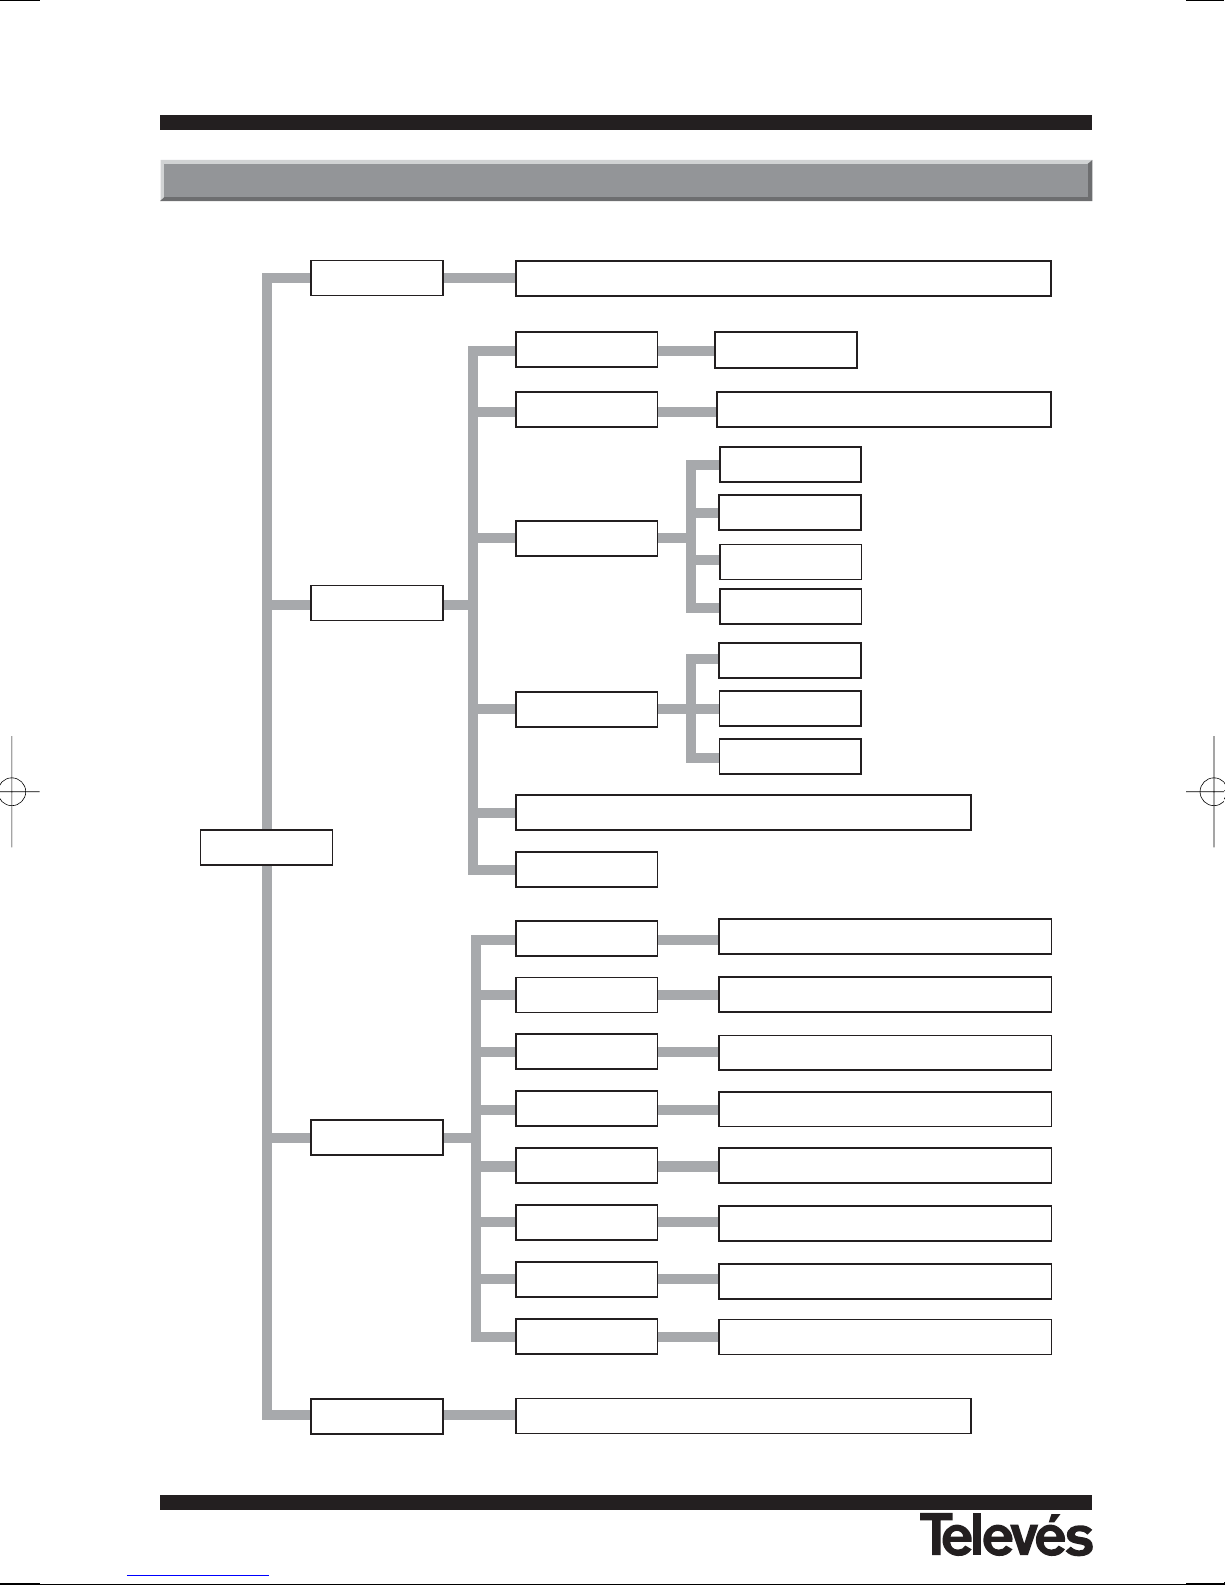
User Manual
“
RSD - 7296”
68
User Manual
“
RSD - 7296”
Delete
Edit
Scan
Satellite Setup
Box Setup
Satellite, Frequency, S/R, Polarity
Dish Setup
No. of LNB's
LNB Setup
DiSEqC 1.2 Enabled, DiSEqC 1.2 Disabled, DiSEqC - USALS
Add
Channel Setup
VCR Timer Setup
Factory Default
Audio Mode Setup
Favourite, Lock, Delete, Move, Add, ...
English, Deutsch, Français, Español, Italiano, Português, Polska, Türkçe, Russe ..
Language Setup
Auto Scan
System Setup
Password Setup
Timer Setup
Delete
Edit
Code Download
Old Code, New Code, Confirm New Code
GMT Adjust, Hours, Minutes
Start Time, Duration, Channel, ...
Reset
Stereo, Left Audio, Right Audio
MAIN MENU
Transponder Setup
Satellite, Polarity, Start Freq, End Freq, S/R, All, FTA, ...
TV Setup
Box Info
4:3, 16:9
Rename
SW version, HW version
Menú structure
Page 69
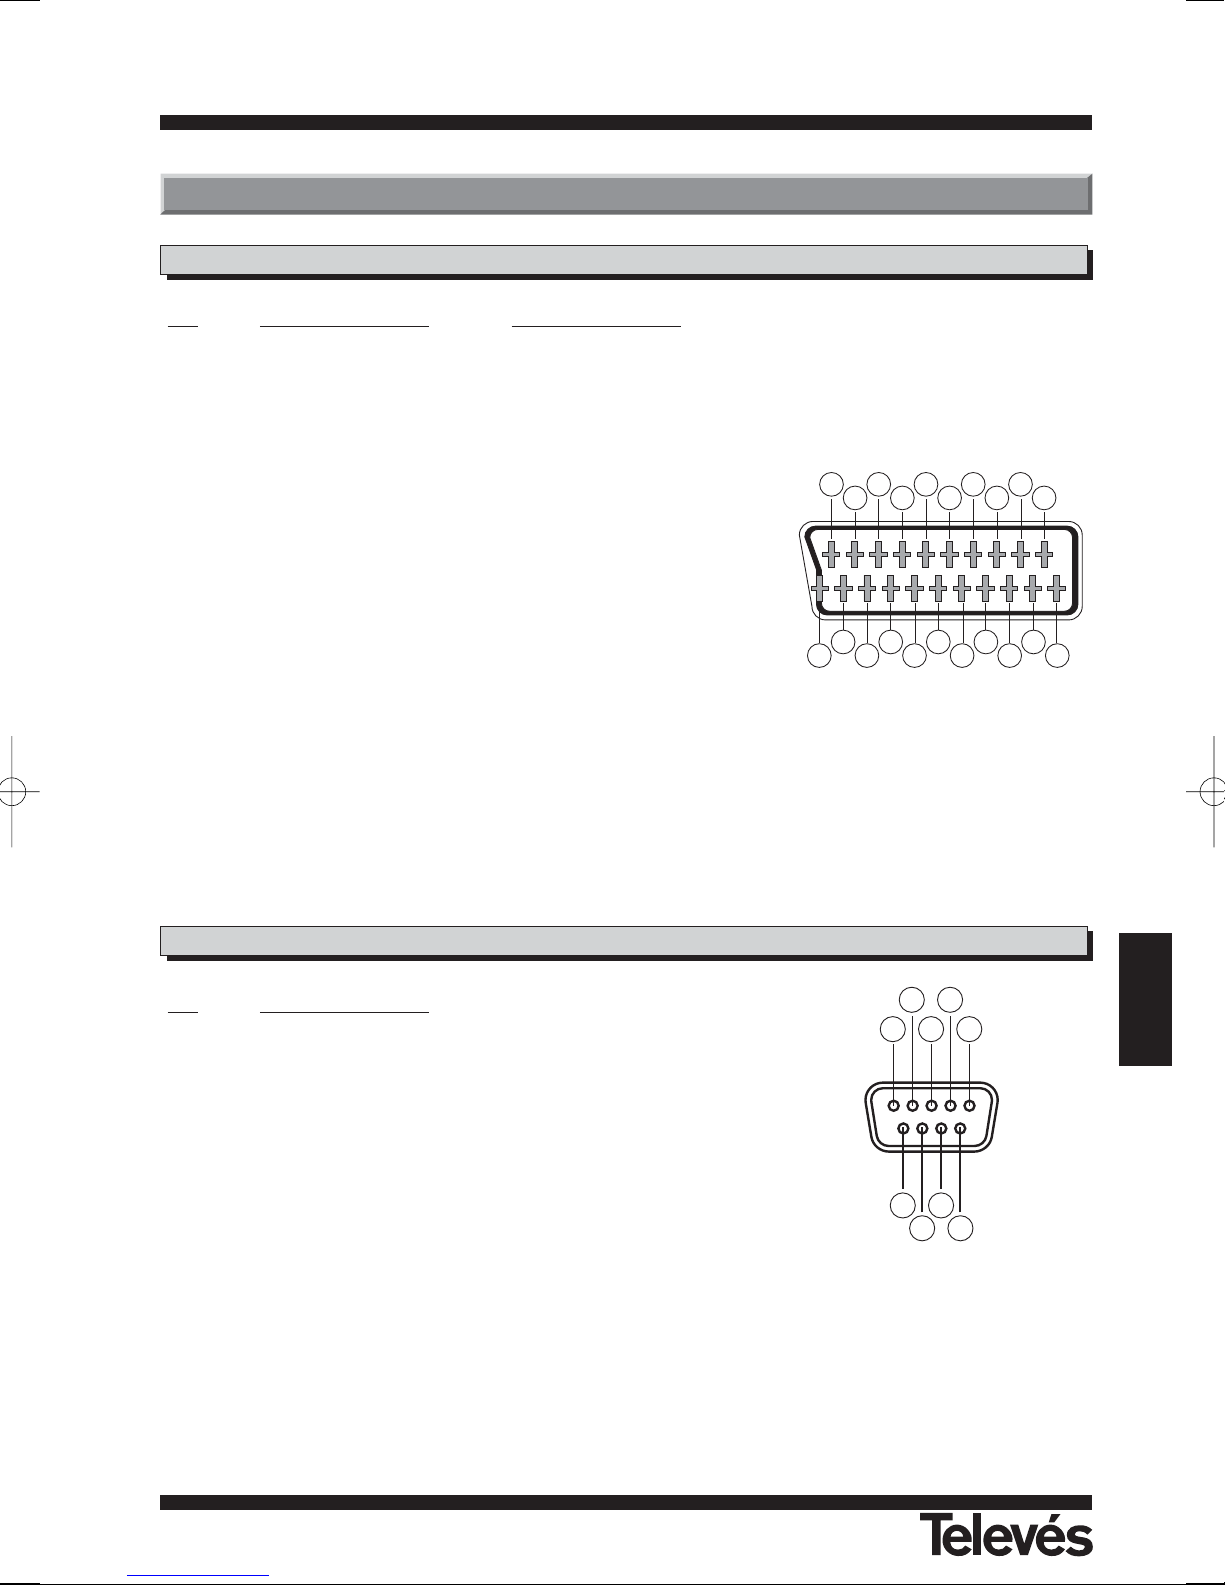
User Manual
“
RSD - 7296”
69
ENGLISH
User Manual
“
RSD - 7296”
PIN TV VCR
1 Audio output (D) Audio output (D)
2 N/C Audio input (D)
3 Audio output (I) Audio output (I)
4 Ground: audio Ground: audio
5 Ground: blue Ground: blue
6 N/C Audio input (I)
7 Blue output Blue input
8 Switching voltage Switching voltage
9 Ground: green Ground: green
10 N/C N/C
11 Green output Green input
12 N/C N/C
13 Ground: red Ground: red
14 Ground: “Fast Blanking” Ground: “Fast Blanking”
15 Red output Red input
16 “Fast Blanking” output “Fast Blanking” input
17 Ground: video Ground: video
18 Ground: video Ground: video
19 Video output Video output
20 N/C Video input
21 Ground Ground
PIN Description
1 N/C
2 RXD (Data input)
3 TXD (Data output)
4 N/C
5 Ground
6 N/C
7 N/C
8 N/C
9 N/C
201816
14
12
1086
4
2
1
3
5
7
9
11
13
15
17
19
21
1 3 5
2 4
6 8
7 9
Connector description
SCARTs
RS 232C
Page 70
User Manual
“
RSD - 7296”
70
User Manual
“
RSD - 7296”
Fully compatible with DVB
Video decoder
MPEG-2 Main Profile @ Main Level
Process rate > 15Mbits/s
Video format 4:3, 16:9
Audio decoder
MPEG-1 layer I & II (Musicam Audio)
Mono, Dual, Stereo, Joint Stereo
System
RAM 2 Mbyte
Flash memory 1 Mbyte
Graphics 720 x 576 (PAL)
720 x 480 (NTSC)
LNB input / tuner
Connector 2 x “F”
Input frequency 950 - 2150 MHz
LNB powering 13/18V, max. 350 mA
Band switching 22 KHz tone
DiSEqC switching Version 1.0, Tone Burst A/B
Positioner DiSEqC 1.2 / USALS
Demodulation QPSK
Symbol rate 2 - 45 Msps
Covers the C and Ku bands
Covers SCPC and MCPC
TV scart RGB, CVBS, Audio L/R
VCR scart CVBS (input/output), Audio L/R (input/output)
Hi-Fi output
Connector 2 x RCA (L/R)
Serial data interface
Connector 9-pin D-sub
Signals RS232 max.19.2K baud
Total connectors
2 x LNB input (F type)
2 x SCART (TV/VCR)
3 x jacks RCA (VIDEO, AUDIO L/R)
1 x RS232 (9-pin D-sub)
Powering 90 - 260V~, 50/60 Hz
Consumption 30W
Size 280 x 210 x 60 mm
Approx. weight 1.6 Kg
Technical specifications
Page 71
“RSD - 7296”
71
Garantía
Televés S.A. ofrece una garantía de dos años calculados a partir de la fecha de compra para los países de la UE. En
los países no miembros de la UE se aplica la garantía legal que está en vigor en el momento de la venta. Conserve la factura
de compra para determinar esta fecha.
Durante el período de garantía, Televés S.A. se hace cargo de los fallos producidos por defecto del material o de fabricación. Televés S.A. cumple la garantía reparando o sustituyendo el equipo defectuoso.
No están incluidos en la garantía los daños provocados por uso indebido, desgaste, manipulación por terceros, catástrofes o cualquier causa ajena al control de Televés S.A.
Guarantee
Televés S.A. offers a two year guarantee, beginning from the date of purchase for countries in the EU. For countries
that are not part of the EU, the legal guarantee that is in force at the time of purchase is applied. Keep the purchase invoice
to determine this date.
During the guarantee period, Televés S.A. complies with the guarantee by repairing or substituting the faulty equipment.
The harm produced by improper usage, wear and tear, manipulation by a third party, catastrophes or any other cause
beyond the control of Televés S.A. is not included in the guarantee.
Page 72
Rúa B. de Conxo, 17
15706 SANTIAGO DE COMPOSTELA
Tel. 981 52 22 00 Fax 981 52 22 62
[email protected] www.televes.com
MADRID C.P. 28005
Paseo de los Pontones 11
Tfnos.: 91 474 52 21 /91 474 52 22
Fax: 91 474 54 21
[email protected]
MÁLAGA C.P. 29006
C/ La Boheme 55
Pol. Ind. Alameda 2
[email protected]
MURCIA C.P. 30010
Polígono Conver - C/ Rio Pliego 22
Tfnos.: 968 26 31 44 /968 26 31 77
Fax: 968 25 25 76
[email protected]
PALMA DE MALLORCA C.P.
07007
Ferrer de Pallares 45. bajo D.
Tfno.: 971 24 70 02
Fax: 971 24 53 42
[email protected]
PAMPLONA C.P. 31007
Avda. Sancho el Fuerte 5
Tfno.: 948 27 35 10
Fax: 948 17 41 49
[email protected]
SEVILLA C.P. 41008
Pol. Ind. Store - C/ A-6. Nave 5
Tfnos.: 95 443 64 50 /95 443 58 00
Fax: 95 443 96 93
[email protected]
A CORUÑA C.P. 15011
Gregorio Hernández 8.
Tfnos.: 981 27 47 31 /981 27 22 10
Fax: 981 27 16 11
[email protected]
ALMERÍA C.P. 04008
Campogrís 9.
Tfno.: 950 23 14 43
Fax: 950 23 14 43
[email protected]
BADAJOZ C.P. 06010
C/Jacobo Rodríguez,
Pereira, nº11-Oficina
Tfno.: 924 20 74 83
Móvil: 670 70 21 93
Fax: 924 20 01 15
[email protected]
BARCELONA C.P. 08940
C/ Sant Ferrán, 27
Cornellá - Barcelona
Tfnos.: 93 377 08 62 /93 474 29 50
Fax: 93 474 50 06
[email protected]
BILBAO C.P. 48150
Iberre kalea, módulo 16, pabellón 15-B
Sangroniz-Sondika
Tfnos.: 94 471 12 02 /94 471 24 78
Fax: 94 471 14 93
[email protected]
RReedd CCoommeerrcciiaall NNaacciioonnaall
RReedd CCoommeerrcciiaall IInntteerrnnaacciioonnaall
TELEVES ELECTRONICA PORTUGUESA
MAIA - OPORTO
Via . Dr Francisco Sa Carneiro. Lote 17.
ZONA Ind. MAIA 1. Sector-X MAIA. C.P. 4470 BARCA
Tel.: 351 22 9418313
Fax: 351 22 9488719/9416180
[email protected]
LISBOA
C.P. 1000 Rua Augusto Gil 21-A.
Tel.: 351 21 7932537 Fax: 351 21 7932418
[email protected]
TELEVES FRANCE S.A.R.L.
1 Rue Louis de Broglie
Parc d'Activités de l'Esplanade
77400 St Thibault des Vignes FRANCE
Tél.: +33 (0)1 60 35 92 10
Fax: +33 (0)1 60 35 90 40
[email protected]
TELEVES ITALIA S.r.l.
S.op.Viale Liguria 24
20068 Peschiera Borromeo (MI) Italia
Tel.: (+39)-0251650604 (RA)
Fax: (+39)-0255307363
[email protected]
TELEVES MIDDLE EAST FZE
P.O. Box 17199
JEBEL ALI FREE ZONE DUBAI,
UNITED ARAB EMIRATES
Tel.: 9714 88 343 44 Fax: 9714 88 346 44
[email protected]
TELEVES UNITED KINGDOM LTD
Unit 11 Hill Street, Industrial State
CWMBRAN, GWENT NP44 7PG.
(United Kingdom)
Tel.: 44 01 633 87 58 21
Fax: 44 01 633 86 63 11
[email protected]
BURGOS C.P. 09188
C/Real, s/n, San Adrián de Juarros
Tfno.: 947 56 04 58
Móvil: 670 73 75 86
[email protected]
GIJÓN C.P. 33210
C/Japón, 14
Tfnos.: 985 15 25 50 /985 15 29 67
Fax : 985 14 63 89
[email protected]
JAÉN C.P. 23007
Hermanos Pinzón, 8-bajo
Tfnos.: 953 29 50 40 /953 29 52 11
Móvil: 636 984489
Fax: 953 29 52 10
[email protected]
LAS PALMAS C.P. 35006
Gral. Mas de Gaminde 26
Tfnos.: 928 23 11 22 /928 23 12 42
Fax: 928 23 13 66
[email protected]
LOGROÑO C.P. 26004
San Prudencio 19. bajo
Tfno.: 941 23 35 24
Fax: 941 25 50 78
[email protected]
TENERIFE C.P. 38108
Avda. El Paso, 25 Los Majuelos- La Laguna
Tfnos.: 922 31 13 14 /922 31 13 16
Fax: 922 31 13 33
[email protected]
VALENCIA C.P. 46022
Plaza Jordi San Jordi s/n
Tfnos.: 96 337 12 01 /96 337 12 72
Fax: 96 337 06 98
[email protected]
VIGO C.P. 36204
Escultor Gregorio Fernández, 5
Tfnos.: 986 42 33 87 /986 42 40 44
Fax: 986 42 37 94
[email protected]
VALLADOLID C.P. 47008
C/ Arrecife 12
Tfno.: 983 22 36 66
Fax: 983 22 36 66
[email protected]
ZARAGOZA C.P. 50002
C/ Monasterio de Alahón 1-3
Tfno.: 976 41 12 73
Fax: 976 59 86 86
[email protected]
CANARIAS
TENERIFE
A CORUÑA
GIJÓN
LUGO
SANTIAGO
VIGO
LAS PALMAS
OURENSE
OPORTO
LISBOA
ASTURIAS
LEÓN
ZAMORA N
VALLADOLID
ZAMORA
SALAMANCA
CÁCERES
BADAJOZ
CÓRDOBA
HUELVA
SEVILLA
CÁDIZ
CEUTA
CANTABRIA
PALENCIA
ÁVILA
TOLEDO
CIUDAD REAL
MÁLAGA
Empresa
Registrada
ER 224/1/94
BURGOS
SORIA
SEGOVIA
GUADALAJARA
MADRID
JAÉN
GRANADA
MELILLA
BILBAO
ÁLAVA
LA RIOJA
CUENCA
ALBACETE
ALMERÍA
Miembro de número del
GUIPÚZCOA
NAVARRA
ZARAGOZA
VALENCIA
MURCIA
TERUEL
CASTELLÓN
ALICANTE
HUESCA
TARRAGONA
GIRONA
BARCELONA
PALMA DE
MALLORCA
BALEARES
SUCURSALES
DELEGACIONES
FÁBRICAS
 Loading...