

Page 1
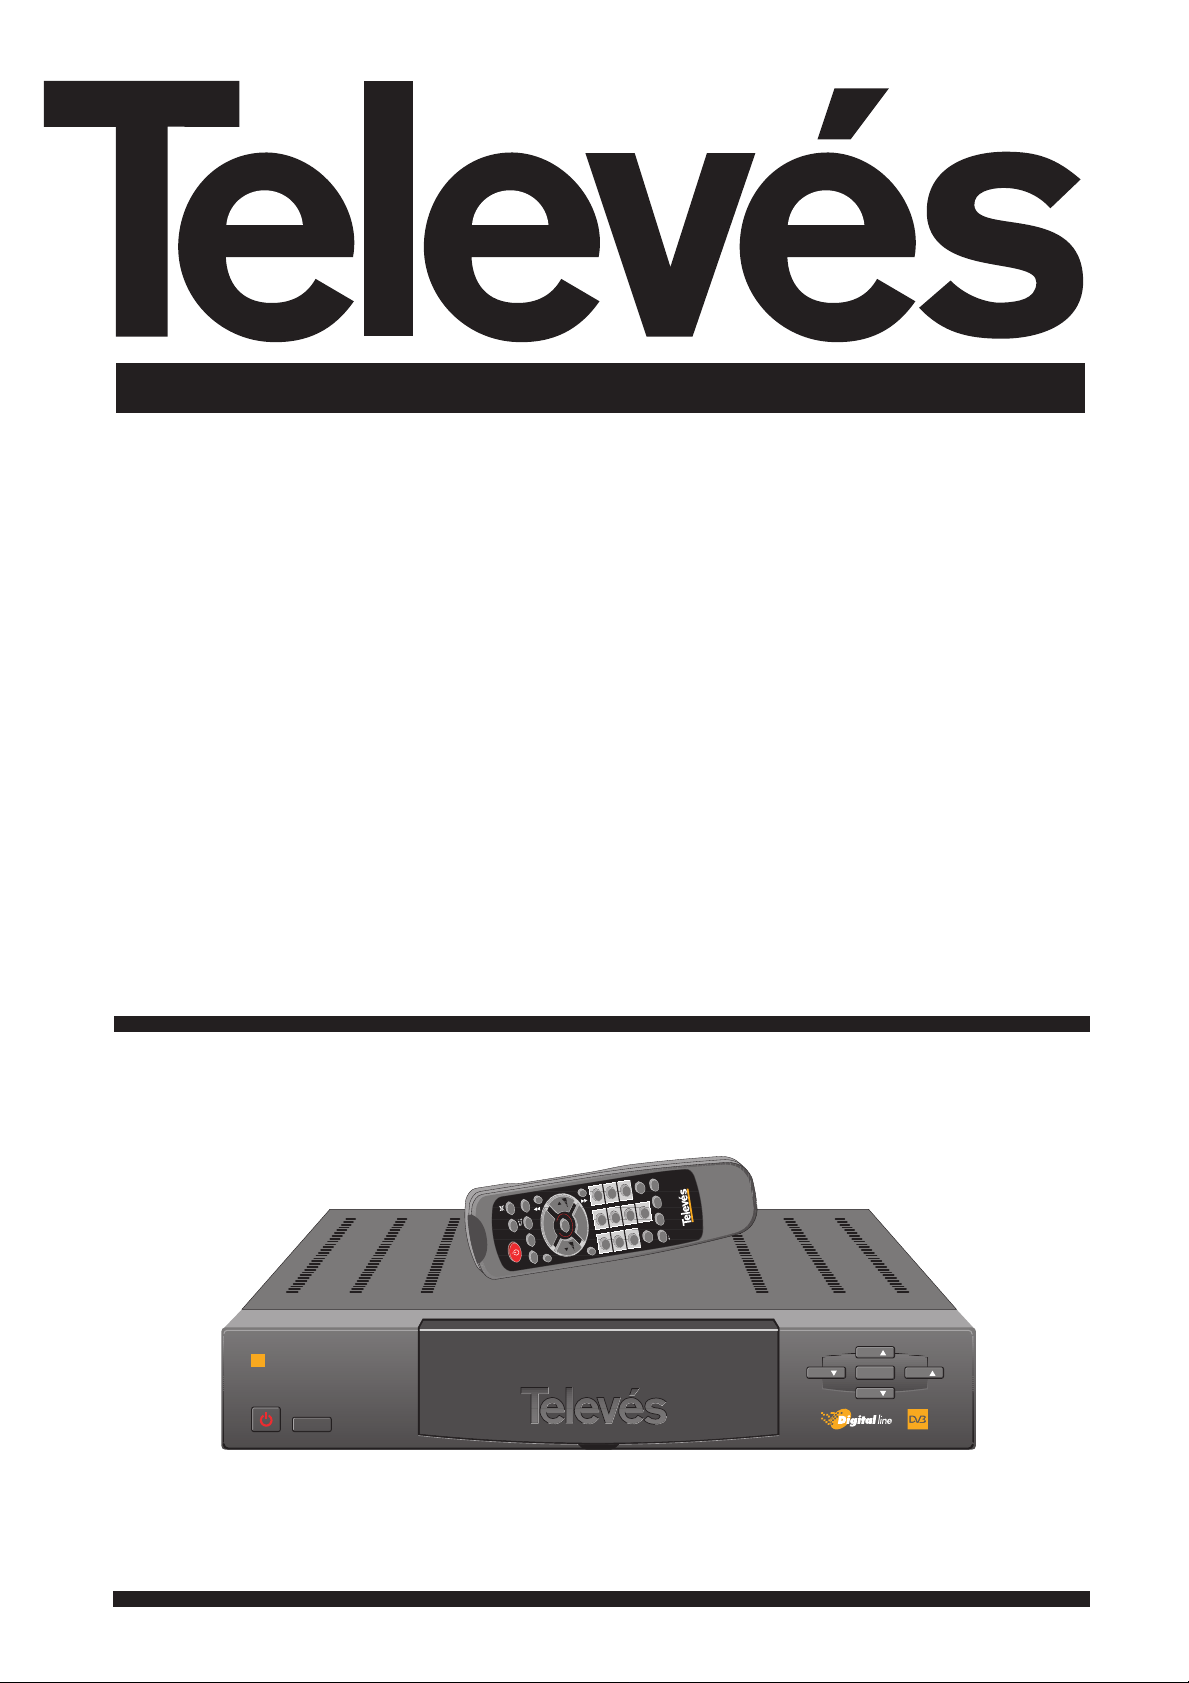
Digital Satellite Receiver
User instructions
“RSD - 7255”
"RSD-7255"
TV/RADIO
ALT-AUDIO
INFO
FUNC.
MENU
EXIT
PR
TV/AV
TV GUIDE PAUSE
PR ▲
PR ▼
OK
PR ▲
PR ▼
UHF TXT
OK
LIST
123
456
789
0
Menu
RECEPTOR DE SATELITE DIGITAL
RSD 7255
OKVol Vol
Ch
Ch
© Copyright, Televés, S.A.
Page 2
“RSD - 7255”
2
Menu
RECEPTOR DE SATELITE DIGITAL
RSD 7255
OKVol Vol
Ch
Ch
S-VHS
TV/VCR
ANT
0/12V
VIDEO
AUDIO R
TV OUT
VCR IN/OUT
RS 232
LNB IN
LNB OUT
CAUTION
RISK OF ELECTRIC SHOCK
DO NOT OPEN!
100 / 240~, 50/60Hz, 35W
MODEL NO: RSD - 7255
AUDIO L
TV/RADIO
ALT-AUDIO
INFOFUNC.
MENU
EXIT
1 2 3
4 5 6
7 8 9
0
PR TV/AV
TV GUIDE
PAUSE
PR ▲
PR ▼
OK
UHF TXT
LIST
< 15°C
> 80 %
> 45°C
Fig. -1-
Fig. -2-
Fig. -3-
Page 3

User instructions “RSD - 7255”
3
ENGLISH
INDEX . . . . . . . . . . . . . . . . . . . . . . . . . . . . . . . . . . . . . . . . . . . . . . . . . . . . . . . . . . . . . . . . . . . . . . . . . . . . . . . Page
Before Start . . . . . . . . . . . . . . . . . . . . . . . . . . . . . . . . . . . . . . . . . . . . . . . . . . . . . . . . . . . . . . . . . . . . . . . . . 4
Preface . . . . . . . . . . . . . . . . . . . . . . . . . . . . . . . . . . . . . . . . . . . . . . . . . . . . . . . . . . . . . . . . . . . . . . . . 4
Product characteristics . . . . . . . . . . . . . . . . . . . . . . . . . . . . . . . . . . . . . . . . . . . . . . . . . . . . . . . . . . . . 4
Unpacking . . . . . . . . . . . . . . . . . . . . . . . . . . . . . . . . . . . . . . . . . . . . . . . . . . . . . . . . . . . . . . . . . . . . . 4
Pannels and connections description . . . . . . . . . . . . . . . . . . . . . . . . . . . . . . . . . . . . . . . . . . . . . . . . . 5
Installation . . . . . . . . . . . . . . . . . . . . . . . . . . . . . . . . . . . . . . . . . . . . . . . . . . . . . . . . . . . . . . . . . . . . . . . . . . . 6
Connection Method . . . . . . . . . . . . . . . . . . . . . . . . . . . . . . . . . . . . . . . . . . . . . . . . . . . . . . . . . . . . . . 6
Getting Started . . . . . . . . . . . . . . . . . . . . . . . . . . . . . . . . . . . . . . . . . . . . . . . . . . . . . . . . . . . . . . . . . . . . . . . 7
Basic Usage . . . . . . . . . . . . . . . . . . . . . . . . . . . . . . . . . . . . . . . . . . . . . . . . . . . . . . . . . . . . . . . . . . . . 7
How to Select TV/Radio Channel. . . . . . . . . . . . . . . . . . . . . . . . . . . . . . . . . . . . . . . . . . . . . . . . . . . . . 7
How to Adjust the Volume . . . . . . . . . . . . . . . . . . . . . . . . . . . . . . . . . . . . . . . . . . . . . . . . . . . . . . . . . 8
Mute . . . . . . . . . . . . . . . . . . . . . . . . . . . . . . . . . . . . . . . . . . . . . . . . . . . . . . . . . . . . . . . . . . . . . . . . . . 8
Audio . . . . . . . . . . . . . . . . . . . . . . . . . . . . . . . . . . . . . . . . . . . . . . . . . . . . . . . . . . . . . . . . . . . . . . . . . 8
Audio Language Selection . . . . . . . . . . . . . . . . . . . . . . . . . . . . . . . . . . . . . . . . . . . . . . . . . . . . . . . . . 8
How to use “Favorite TV/Radio Channel” list . . . . . . . . . . . . . . . . . . . . . . . . . . . . . . . . . . . . . . . . . . . 9
Electronic Program Guide (EPG) . . . . . . . . . . . . . . . . . . . . . . . . . . . . . . . . . . . . . . . . . . . . . . . . . . . . 9
Last Channel Auto-Saving and Recall . . . . . . . . . . . . . . . . . . . . . . . . . . . . . . . . . . . . . . . . . . . . . . . . 10
RF Tuning Function . . . . . . . . . . . . . . . . . . . . . . . . . . . . . . . . . . . . . . . . . . . . . . . . . . . . . . . . . . . . . . 10
Teletext Function . . . . . . . . . . . . . . . . . . . . . . . . . . . . . . . . . . . . . . . . . . . . . . . . . . . . . . . . . . . . . . . . 11
Previous Channel Recall . . . . . . . . . . . . . . . . . . . . . . . . . . . . . . . . . . . . . . . . . . . . . . . . . . . . . . . . . . 11
Screen Pause . . . . . . . . . . . . . . . . . . . . . . . . . . . . . . . . . . . . . . . . . . . . . . . . . . . . . . . . . . . . . . . . . . . 11
Main Menu . . . . . . . . . . . . . . . . . . . . . . . . . . . . . . . . . . . . . . . . . . . . . . . . . . . . . . . . . . . . . . . . . . . . . . . . . . . 12
Channel Manager Menu . . . . . . . . . . . . . . . . . . . . . . . . . . . . . . . . . . . . . . . . . . . . . . . . . . . . . . . . . . . . . . . . 12
TV/Radio Channels . . . . . . . . . . . . . . . . . . . . . . . . . . . . . . . . . . . . . . . . . . . . . . . . . . . . . . . . . . . . . . 12
Timer . . . . . . . . . . . . . . . . . . . . . . . . . . . . . . . . . . . . . . . . . . . . . . . . . . . . . . . . . . . . . . . . . . . . . . . . . 13
User Installation Menu . . . . . . . . . . . . . . . . . . . . . . . . . . . . . . . . . . . . . . . . . . . . . . . . . . . . . . . . . . . . . . . . . . 14
Antenna Setup . . . . . . . . . . . . . . . . . . . . . . . . . . . . . . . . . . . . . . . . . . . . . . . . . . . . . . . . . . . . . . . . . . 14
Auto Channel Search . . . . . . . . . . . . . . . . . . . . . . . . . . . . . . . . . . . . . . . . . . . . . . . . . . . . . . . . . . . . . 16
TP Setup . . . . . . . . . . . . . . . . . . . . . . . . . . . . . . . . . . . . . . . . . . . . . . . . . . . . . . . . . . . . . . . . . . . . . . 17
Parental Lock . . . . . . . . . . . . . . . . . . . . . . . . . . . . . . . . . . . . . . . . . . . . . . . . . . . . . . . . . . . . . . . . . . . 19
Data Transfer . . . . . . . . . . . . . . . . . . . . . . . . . . . . . . . . . . . . . . . . . . . . . . . . . . . . . . . . . . . . . . . . . . . 20
Options Menu . . . . . . . . . . . . . . . . . . . . . . . . . . . . . . . . . . . . . . . . . . . . . . . . . . . . . . . . . . . . . . . . . . . . . . . . 21
OSD Language . . . . . . . . . . . . . . . . . . . . . . . . . . . . . . . . . . . . . . . . . . . . . . . . . . . . . . . . . . . . . . . . . 21
Time Offset . . . . . . . . . . . . . . . . . . . . . . . . . . . . . . . . . . . . . . . . . . . . . . . . . . . . . . . . . . . . . . . . . . . . . 21
Summer Time . . . . . . . . . . . . . . . . . . . . . . . . . . . . . . . . . . . . . . . . . . . . . . . . . . . . . . . . . . . . . . . . . . . 21
LNB Power . . . . . . . . . . . . . . . . . . . . . . . . . . . . . . . . . . . . . . . . . . . . . . . . . . . . . . . . . . . . . . . . . . . . . 21
Screen Format . . . . . . . . . . . . . . . . . . . . . . . . . . . . . . . . . . . . . . . . . . . . . . . . . . . . . . . . . . . . . . . . . . 21
Video Output . . . . . . . . . . . . . . . . . . . . . . . . . . . . . . . . . . . . . . . . . . . . . . . . . . . . . . . . . . . . . . . . . . . 21
TV Type . . . . . . . . . . . . . . . . . . . . . . . . . . . . . . . . . . . . . . . . . . . . . . . . . . . . . . . . . . . . . . . . . . . . . . . 21
UHF Standard . . . . . . . . . . . . . . . . . . . . . . . . . . . . . . . . . . . . . . . . . . . . . . . . . . . . . . . . . . . . . . . . . . 21
UHF Channel . . . . . . . . . . . . . . . . . . . . . . . . . . . . . . . . . . . . . . . . . . . . . . . . . . . . . . . . . . . . . . . . . . . 21
Factory Default . . . . . . . . . . . . . . . . . . . . . . . . . . . . . . . . . . . . . . . . . . . . . . . . . . . . . . . . . . . . . . . . . . 22
Receiver Info . . . . . . . . . . . . . . . . . . . . . . . . . . . . . . . . . . . . . . . . . . . . . . . . . . . . . . . . . . . . . . . . . . . . . . . . . 22
Technical Specifications . . . . . . . . . . . . . . . . . . . . . . . . . . . . . . . . . . . . . . . . . . . . . . . . . . . . . . . . . . . . . . . . 23
Flow Chart of Menu . . . . . . . . . . . . . . . . . . . . . . . . . . . . . . . . . . . . . . . . . . . . . . . . . . . . . . . . . . . . . . . . . . . . 24
Guarantee . . . . . . . . . . . . . . . . . . . . . . . . . . . . . . . . . . . . . . . . . . . . . . . . . . . . . . . . . . . . . . . . . . . . . . . . . . . 25
Page 4
User instructions “RSD - 7255”
4
- Provide high quality video and sound.
- Provide easy-to-use menu system.
- Convenient remote control unit.
- Channel moving, skipping, locking,
favorite, deleting and 5 sorting
functions.
- Automatic digital satellite signal
detecting function.
- Various sorting function of EPG
(Electronic Program Guide).
- Provide various switch types, various
LNB types and NTSC/PAL Monitor
types.
- User programmable Transponder
Information.
- Information Automatic support for
PAL/NTSC system.
- Parental control facilities.
- Last channel auto-saving and recall
function.
- Function Preprogrammed
transponders from many satellites.
- Channel name change function.
- Hi-speed software upgrade through
RS-232.
- RF tuning function.
- Favorite Channel list.
- Automatically search for newly added
transponders.
- Antenna Positioning Help feature.
- 4 digits LCD display.
- Selectable Video output - CVBS,
RGB.
- Timer function, automatically turns
receiver On.
- TELETEXT function.
- RSD to RSD Data Transfer and
software upgrade function.
- Time Display function.
A Digital Satellite Receiver is a conve nient product that allows you to view a
variety of programs provided through
satellite. This user's manual covers the
installation of the RSD-7255 and the
necessary steps to implement various
features. This also explains special
features available only in this RSD7255 in detail, which will allow you to
make full use of these features.
To install the RSD-7255 or before using
it after installation, be sure to read this
user's manual and keep it handy for
future reference.
Preface
Product Characteristics
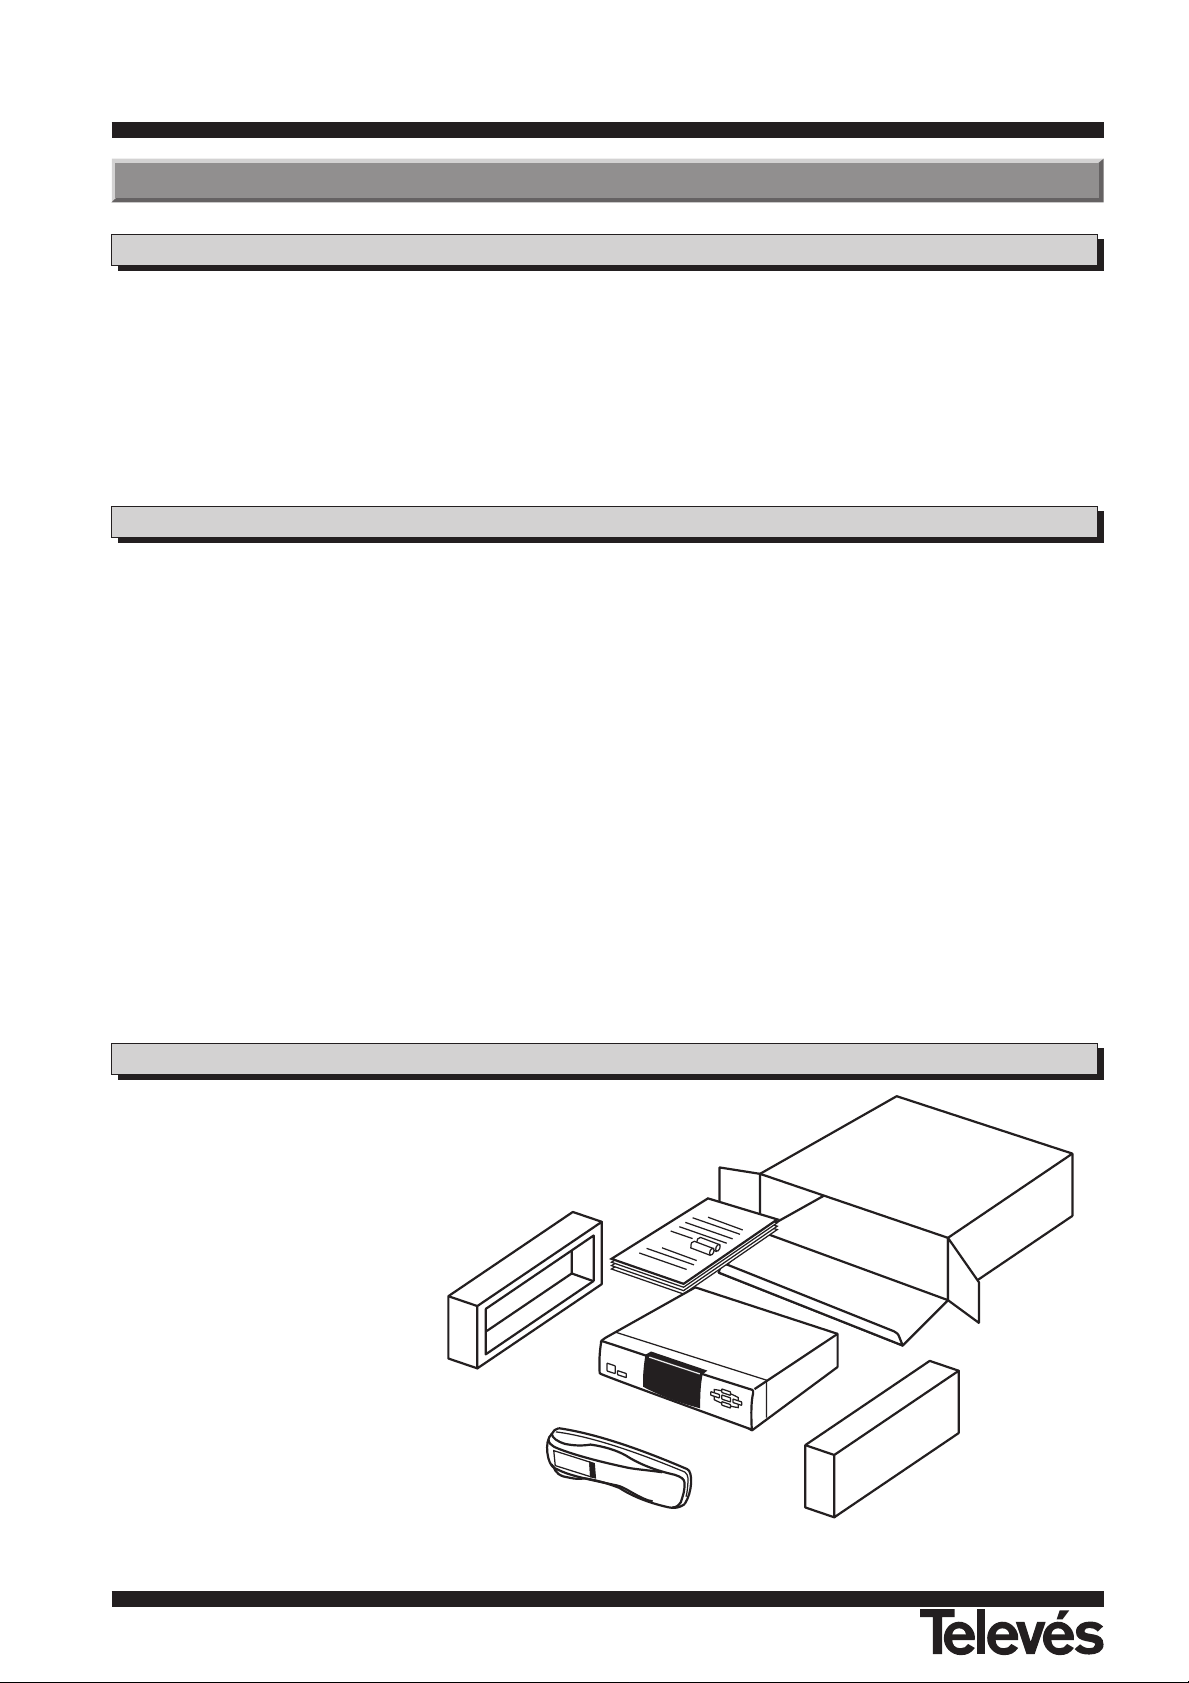
After purchasing the RSD-7255,
unpack it and check to make sure that
all of the following items are included in
the packaging:
1 - RSD-7255
1 - Remote Control Unit (RCU)
2 - AAAbatteries
1 - User manual
Unpacking
Before Start ...
Page 5
User instructions “RSD - 7255”
5
ENGLISH
Panel and Control descriptions
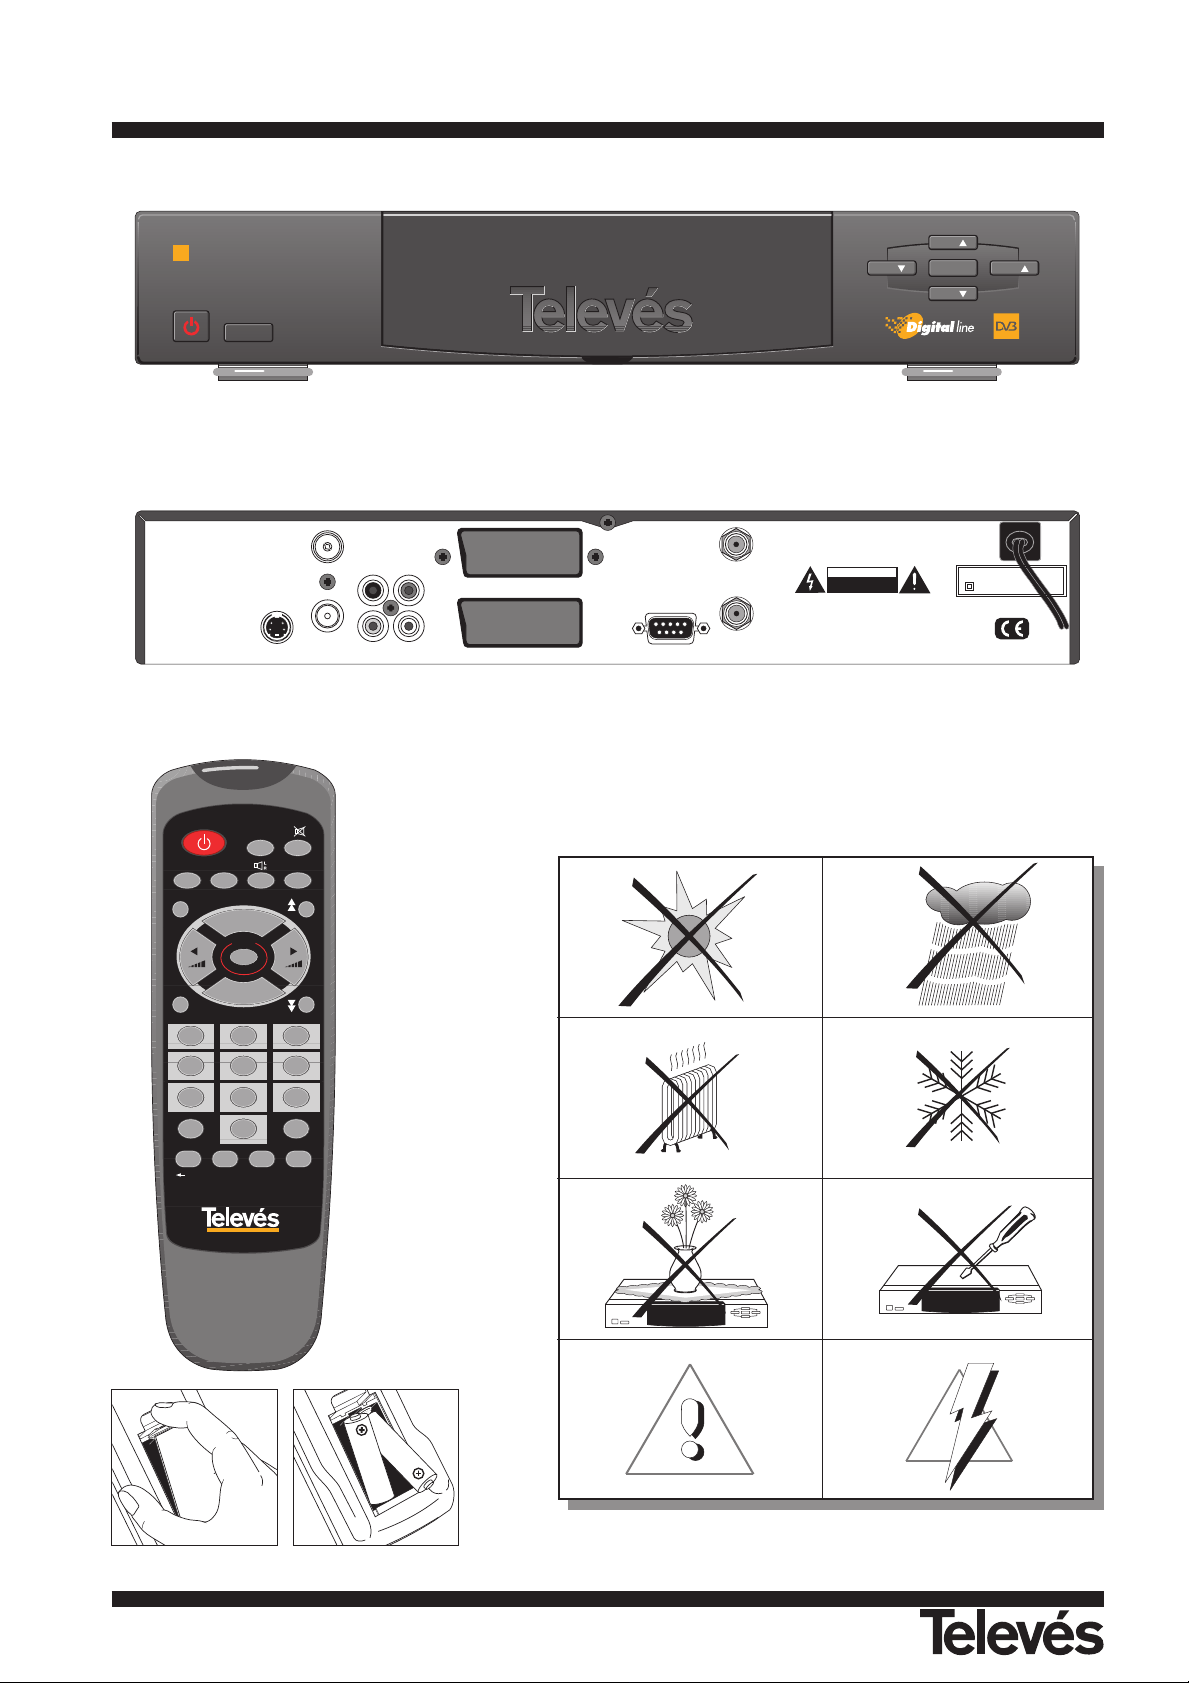
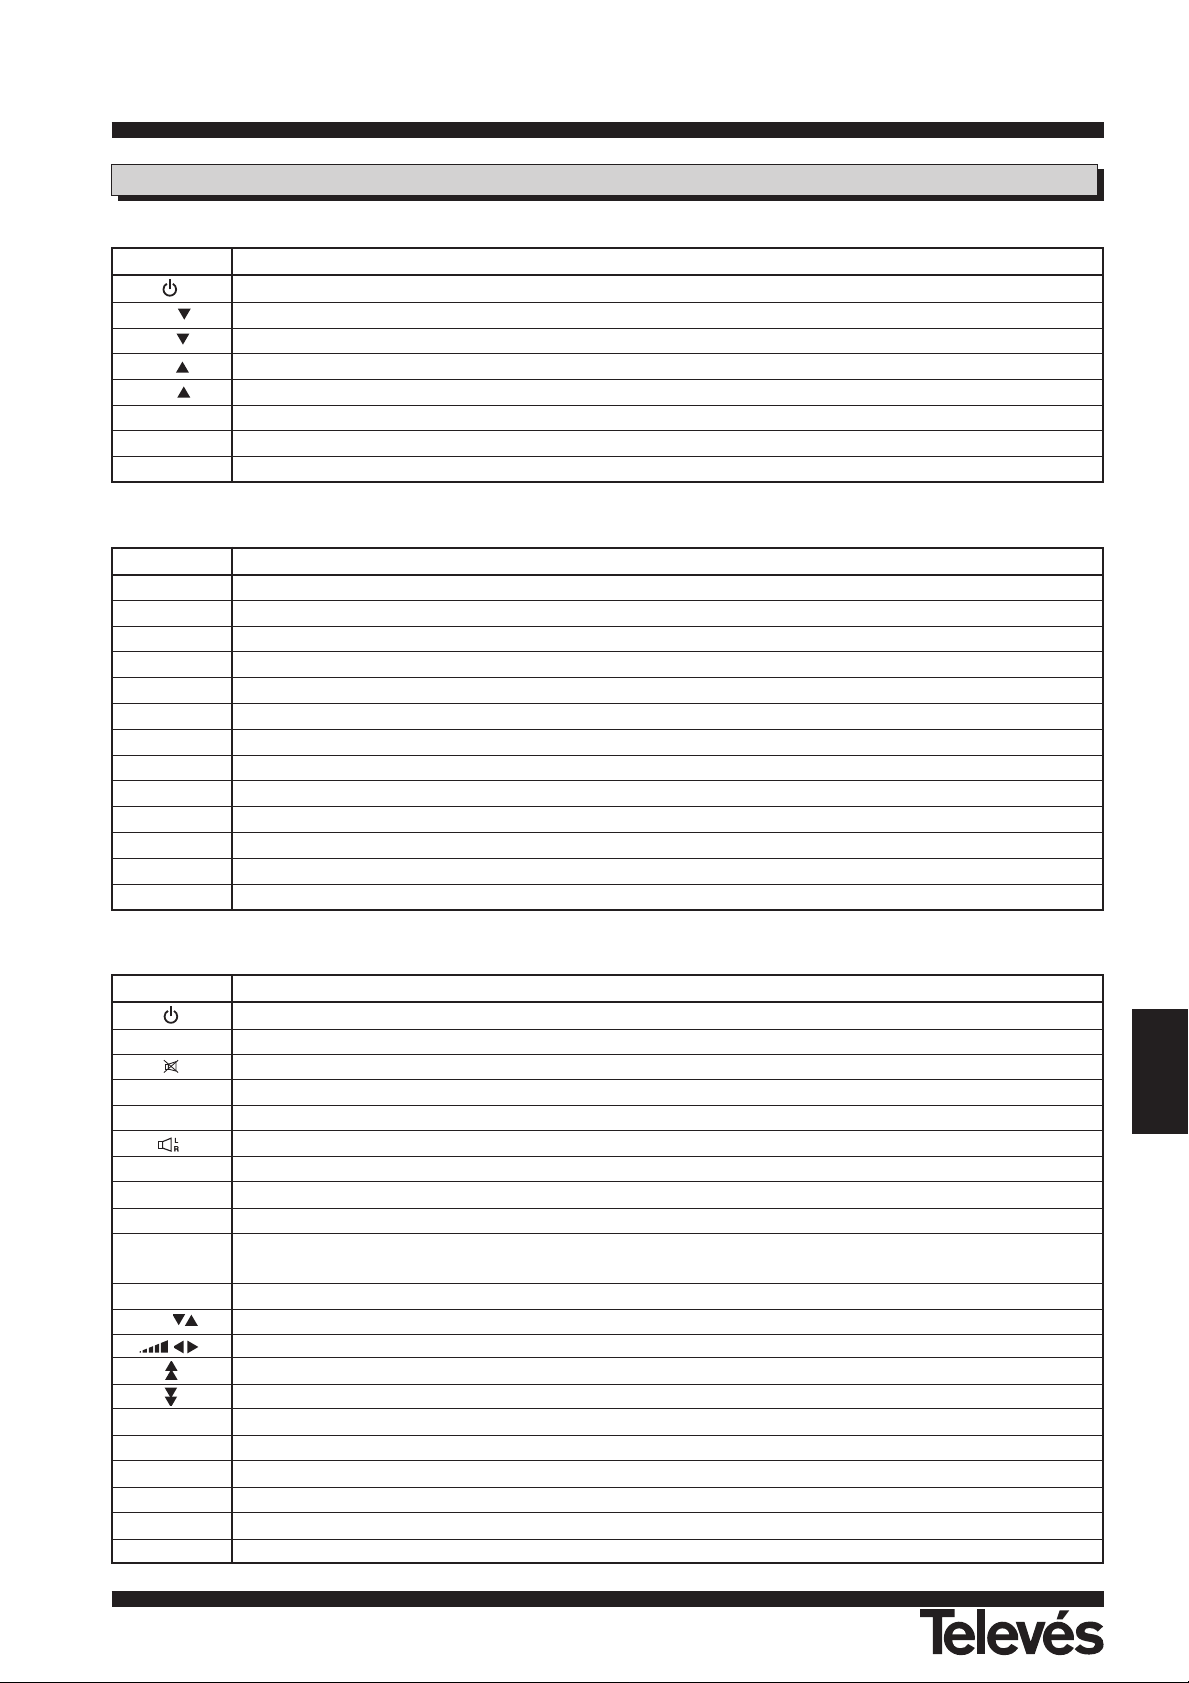
Key Function
Turns on and off the power of the receiver
Vol When watching, decreases the volume, or in the menu, moves to the left item.
Ch When watching, changes to the previous channel, or in the menu, moves to the lower item.
Ch When watching, changes to the next channel, or in the menu, moves to the upper item.
Vol When watching, increases the volume, or in the menu, moves to the right item.
MENU Shows the main menu on the screen, or in the menu, moves to the previous menu.
OK Execute the selected item in the menu and show the program list when watching.
Display When watching shows the current channel number, or in stand-by mode, shows the current time.
Key Function
Turns power ON/OFF of the RSD-7255 (Green lamp lights up when ON, Red lamp lights up when OFF).
TV/RADIO Switches between TV & Radio mode or switches between "TV List" & "Radio List" in the program list menu.
When watching a channel, mutes the sound.
FUNC. Reserved.
INFO Shows information of the current channel.
Selects the different audio modes.
ALT-AUDIO When watching a channel, switches the audio languages.
MENU Press this key one time to run menu screen.
EXIT Returns to the previous menu on the menu screen.
OK (LIST)
Executes the selected item in the menu screen, or enters the desired value in any input mode or show the
program list menu when watching.
0 ... 9 Enter number of the required menu item or select a channel number to watch.
PR When watching, changes channels, or moves to the next higher or lower item in the menu.
When watching, adjust the volume, or move to the left or right item in menu.
Moves up a page in the channel list and menu list.
Moves down a page in the channel list and menu list.
UHF Calls up the UHF Tuning menu.
TXT Switches to the Teletext mode.
<-- PR Switches back to previous channel.
TV/AV Switches between TV or AV mode.
TV GUIDE Calls up the EPG (Electronic Program Guide).
PAUSE Pause screen when watching.
Name Function
TV/VCR Connect the receiver to a TV or VCR.
ANT Connect to the TV antenna input and/or CATV cable.
TV Scart Connect the receiver to a TV using a SCART cable.
VCR Scart Connect the receiver to a VCR using a SCART cable.
AUDIO R Connect the AUDIO R output jack to the TV AUDIO R input or the AUDIO R input of an audio amplifier.
AUDIO L Connect the AUDIO L output jack to the TV AUDIO Linput or the AUDIO Linput of an audio amplifier.
VIDEO Connect to the external VIDEO input of the TV.
0/12V Connect to an external 0/12 V switch.
RS232 Connect to PC or another RSD-7255 for software upgrades.
LNB IN Connect to satellite antenna.
LNB OUT Connect to the LNB IN of a second receiver.
AC IN Connect to the main AC Power, (110 - 220 V~).
S-VHS Connect to the S-VHS jack of the TV or VCR.
Fig. 3 - Remote Control Unit (RCU)
Fig. 2 - Rear Panel
Fig. 1 - Front Panel
Page 6
User instructions “RSD - 7255”
6
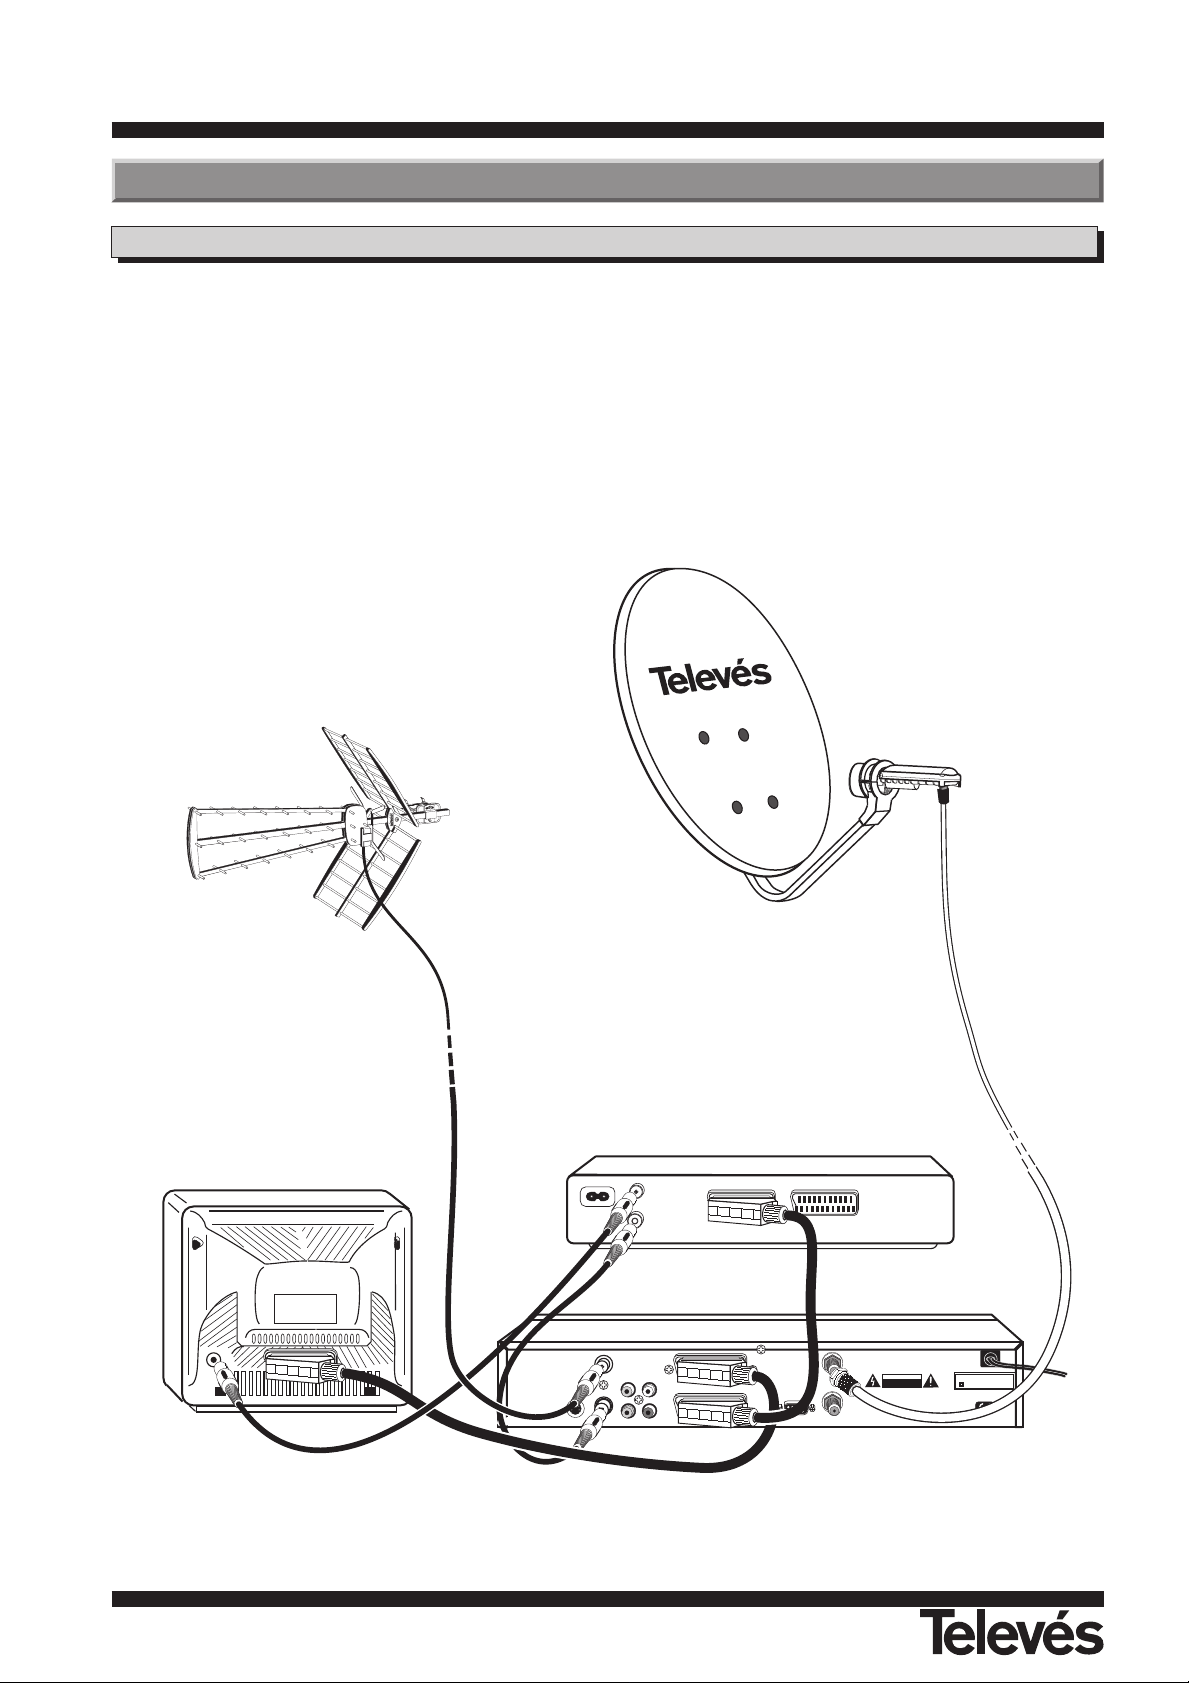
This section explains the installation of
the RSD-7255. Refer to the manuals
supplied with the equipment for the
installation of outdoor equipment such
as the dish antenna. When adding new
equipment, be sure to refer to the
related parts of the manual for the
installation.
1- Install an antenna and point it in the
exact direction of the satellite. Then
connect the RSD-7255 to the
antenna cable.
2- Connect the RSD-7255 to your TV
and if applicable to other peripheral
equipment.
3- Setup the Installation menu items of
the RSD-7255 in accordance with
the peripheral equipment used in the
installation.
4- Tune to the required broadcast
channels.
Now, the RSD-7255 is ready to use.
Connection Method
Terrestrial Reception
Satellite Reception
VCR
RSD-7255
TV
Installation
RS232
LNB IN
LNB OUT
CAUTION
RISK OF ELECTRIC SHOCK
DO NOT OPEN!
MODEL NO: RSD - 7255
100 / 240~, 50/60Hz, 35W
12V
AUDIO R
ANT
S-VHS
OUT
TV/VCR
AUDIO L
VIDEO
TV OUT
VCR IN/OUT
Page 7
User instructions “RSD - 7255”
7
ENGLISH
INFO
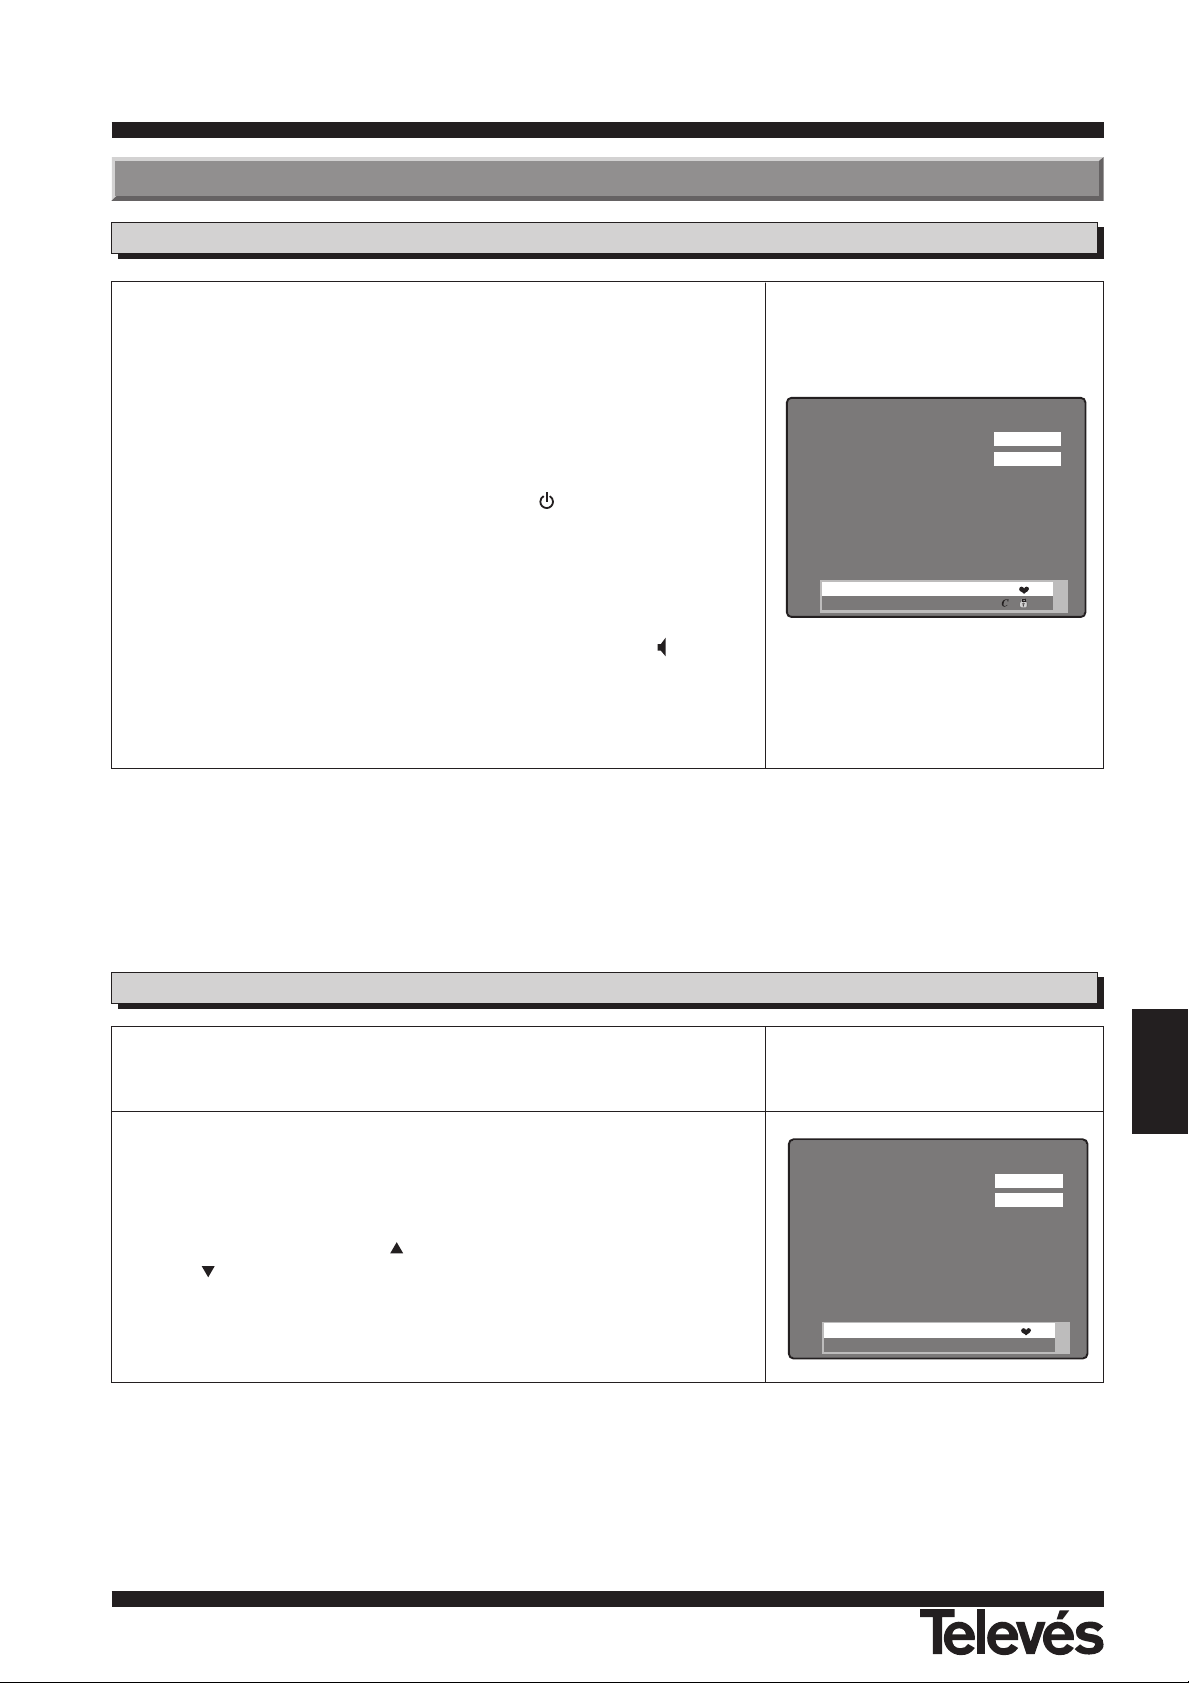
Basic Usage of the RSD-7255
Getting Started
1
Turn on the TV and connect the peripheral equipment to the system.
2
Set the TV mode to A/V, or tune the TV to the appropriate RF
channel. Please consult the Operating Manual of the TV for more
information on how to do this.
3
Turn on the RSD-7255 by pressing the ( )
key. The LED on the
front panel of the RSD-7255 will change from red to green, indicating
that it is on.
4
Select TV/Radio mode.
The channels in the Radio mode are differentiated by the symbol.
(TV mode is set from factory).
The TV/Radio channels can be adjusted using either the remote control or
the corresponding buttons on the front part of the satellite receiver.
1
Press the TV/RADIO key to select TV or Radio mode.
2
When watching, press key to select the next channel and press
key to select the previous channel.
When a channel is selected, the channel information will be shown at
the bottom of the screen. At the right hand side of the screen, audio
selection box and language alternation box will turn up.
How to select TV or RADIO channels
(( S ))
Language 1/5
1. ASTRA TP1
2 CANAL 99
INFO
(( S ))
Language 1/5
1. ASTRA TP2
3 RTL Telev
Page 8
User instructions “RSD - 7255”
8
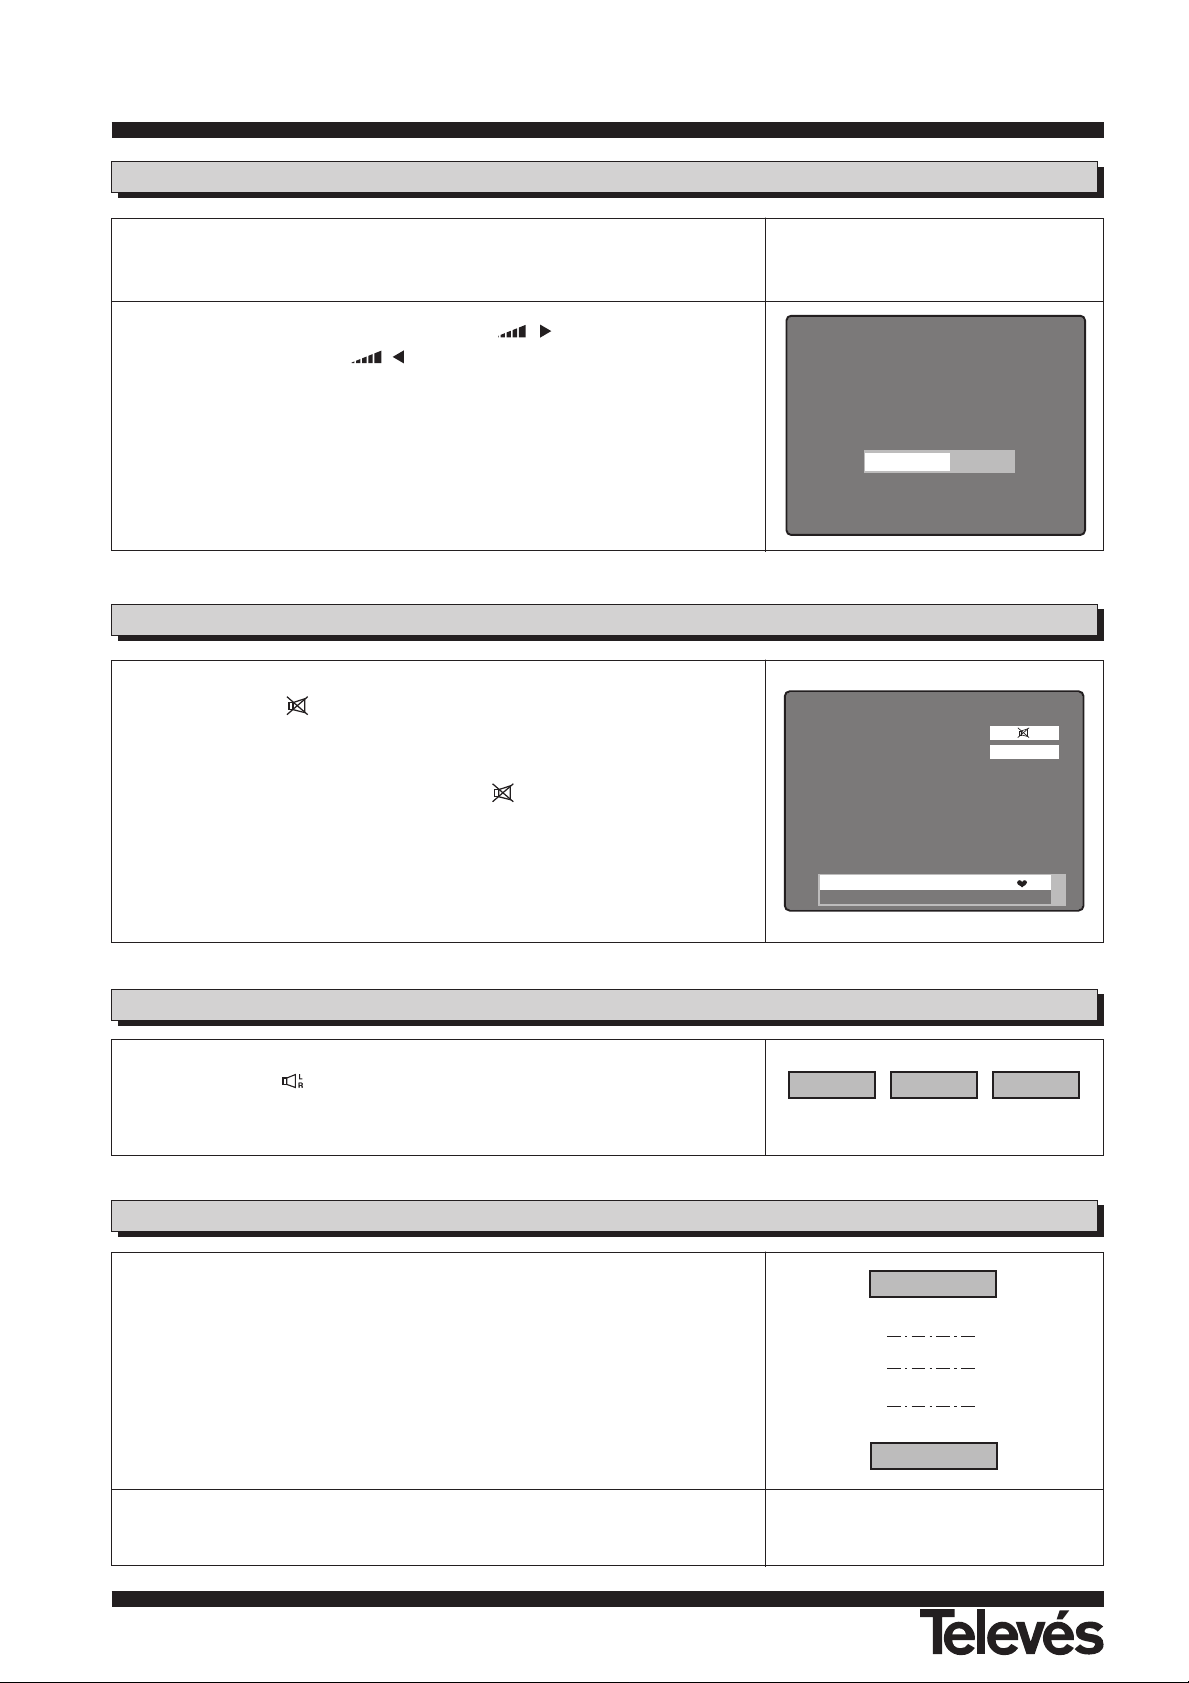
Mute
1
Press the key to mute the sound when watching.
2
To bring back the sound, press the key once more. The sound
returns to the same volume level as before.
INFO
Language 1/5
1. ASTRA TP1
2 CANAL 99
Audio
1
Press the key repeatedly to select one of three possible settings
(Left, Right, Stereo).
(( S )) (( L )) (( R ))
Audio Language Selection
Volume
The volume can be adjusted using either the remote control or the
corresponding buttons on the front part of the satellite receiver
1
To increase the volume, press the
( ) key, and to decrease
volume, press the ( ) key.
2
The 33 steps of volume level can be identified by the volume level
indicator on the screen.
Some programmes are transmitted with various audios. This depends on
whether the transmission includes this information in the signal sent to the RSD.
In the case of TV programmes, the different audios tend to correspond to the
different languages in which the programmes are emitted (for example: in
the case of the "TNT", English is currently received in the 2nd audio; in the
case of "Euronews", it is received in the 7th audio).
Regarding radio programmes, each audio identifies a different transmitter
(for example: the "Radio Esp" programme contains 10 Spanish radio
transmitters - "40 principales", "M80", etc . . .)
1
Press the ALT-AUDIO button repeatedly to select the different
transmission language.
Language 1/8
Language 8/8
Page 9
User instructions “RSD - 7255”
9
ENGLISH
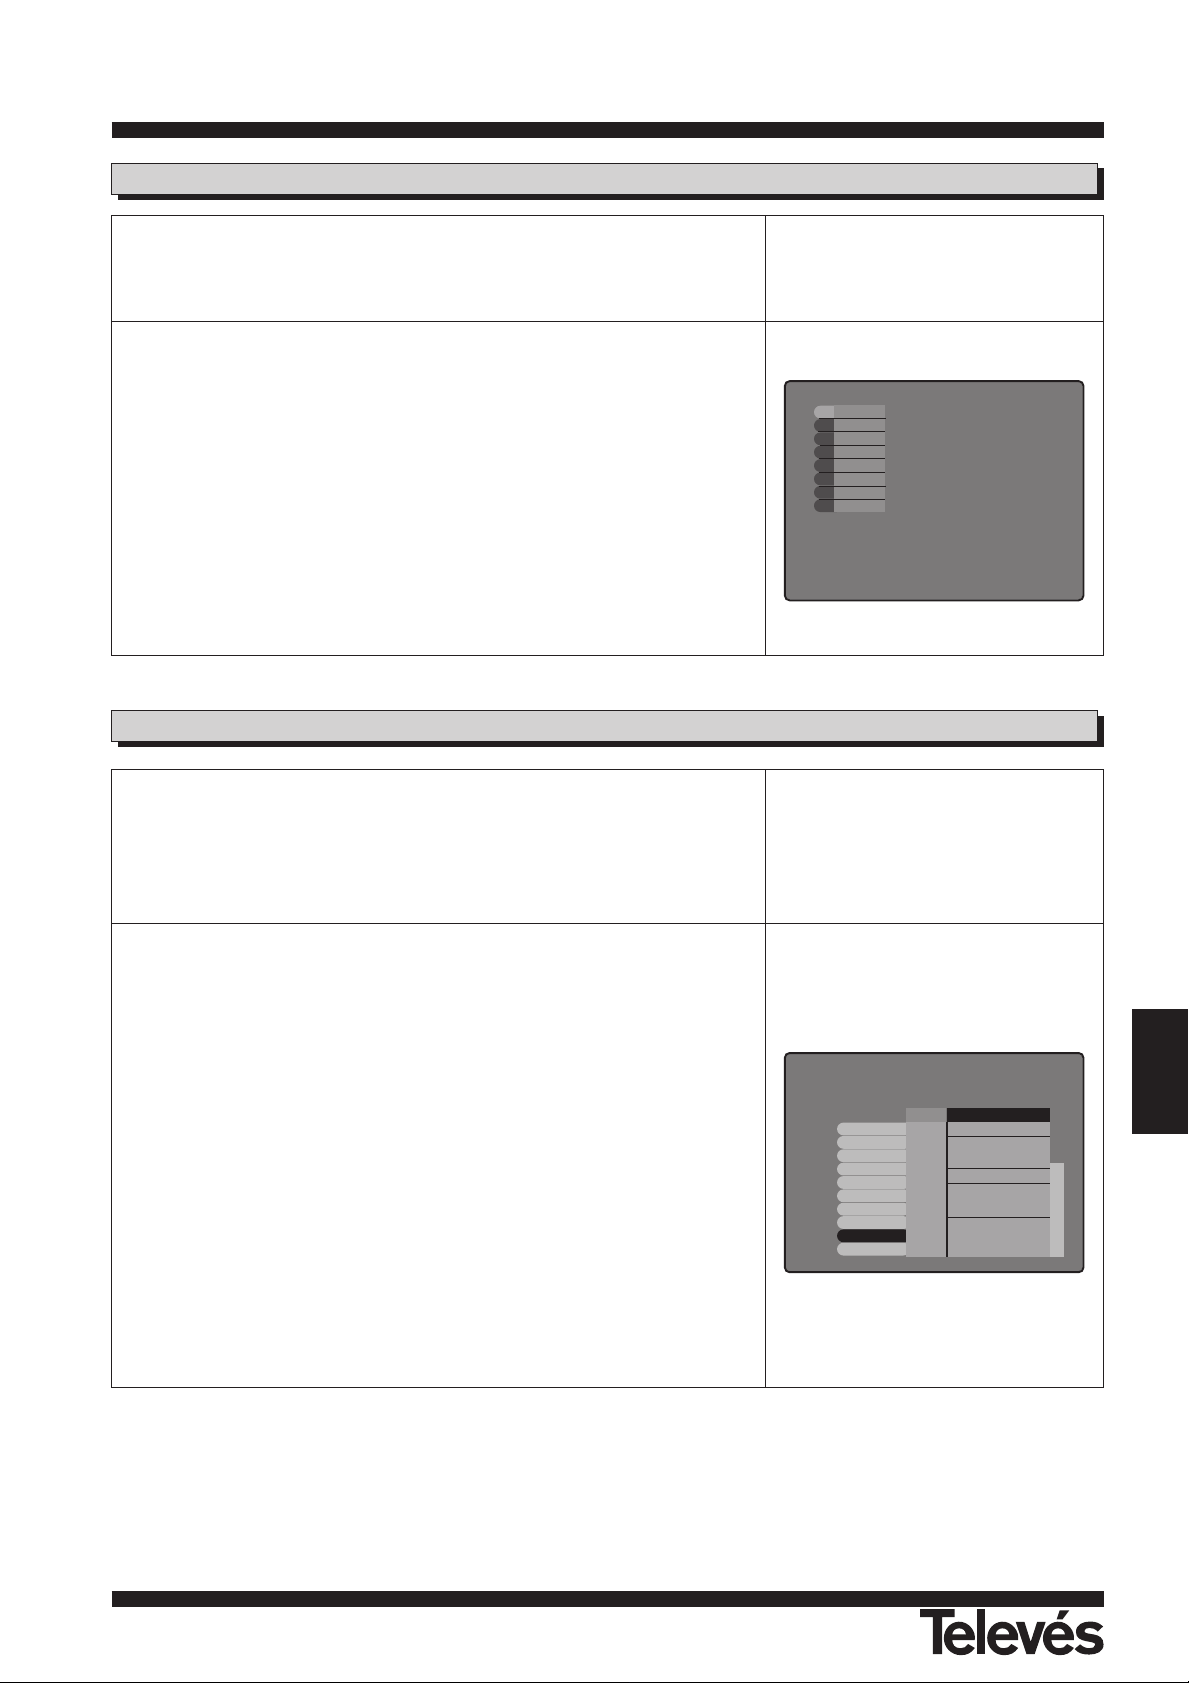
The RSD-7255 receives and stores the current TV and Radio channel
information. This channel information includes detailed information on the
next scheduled program. The EPG is an easy-to-use function to see this
information on screen. EPG information is made up of Channel No, Program
Name, Channel Name, Date and Broadcasting Time (start and end time).
1
Press TV GUIDE key when watching TV or listening Radio or press
the OK (LIST) key after selection of "Program Guide" in the main
menu. Then, EPG box will turn up on the screen.
2
Press the TV/RADIO key to switch between TV or Radio EPG
information.
3
EPG data is transmitted together with the signals provided by the
program provider. A "No data available" message will be shown if the
selected channel does not provide EPG data.
4
Select the desired channel by pressing the OK (LIST) key, which will
cause the selected channel to immediately appear on the screen.
Electronic Program Guide (EPG)
12 : 00 -
13 : 00 -
14 : 00 -
15 : 00 -
16 : 00 -
Program Guide
4. 20 Apr. 20 12:32
Far and away
Music Heaven
Magic & Music
Music Video Collection
1 Das Erste
2 ZDF
3 RTL Telev
4 ProSieben
5 KiKa
6 DSF
7 3sat
8 WDR FER
9 Star Movie
10 MCM
For reference:
- For correct EPG time, please set your local time with reference to the UTC .
- The time of the receiver is derived from the currently selected channel, so it sometimes may not be correct on particular
channels.
How to use "Favorite TV/RADIO Channel" List
When watching, you can easily select favorite TV/RADIO channels through
the "Favorite TV/RADIO Channel" list. This list shows only the TV/RADIO
channels which are selected to be favorites in the main channel list.
1
When watching TV or when listening to a radio channel, press the
OK (LIST) key to see the "Favorite TV/RADIO Channel" list.
2
Press the TV/RADIO key repeatedly to see the "Favorite TV
Channel" or "Favorite RADIO Channel".
3
Select any channel you want and press the OK (LIST) key to go to
that channel.
4
Press the EXIT key to escape from the channel list.
CANAL99
RTL T elev
N4
TNT
RAI 1
SICILIAN
TV Galici
POLSAT
2
3
4
5
40
41
42
43
Page 10
User instructions “RSD - 7255”
10
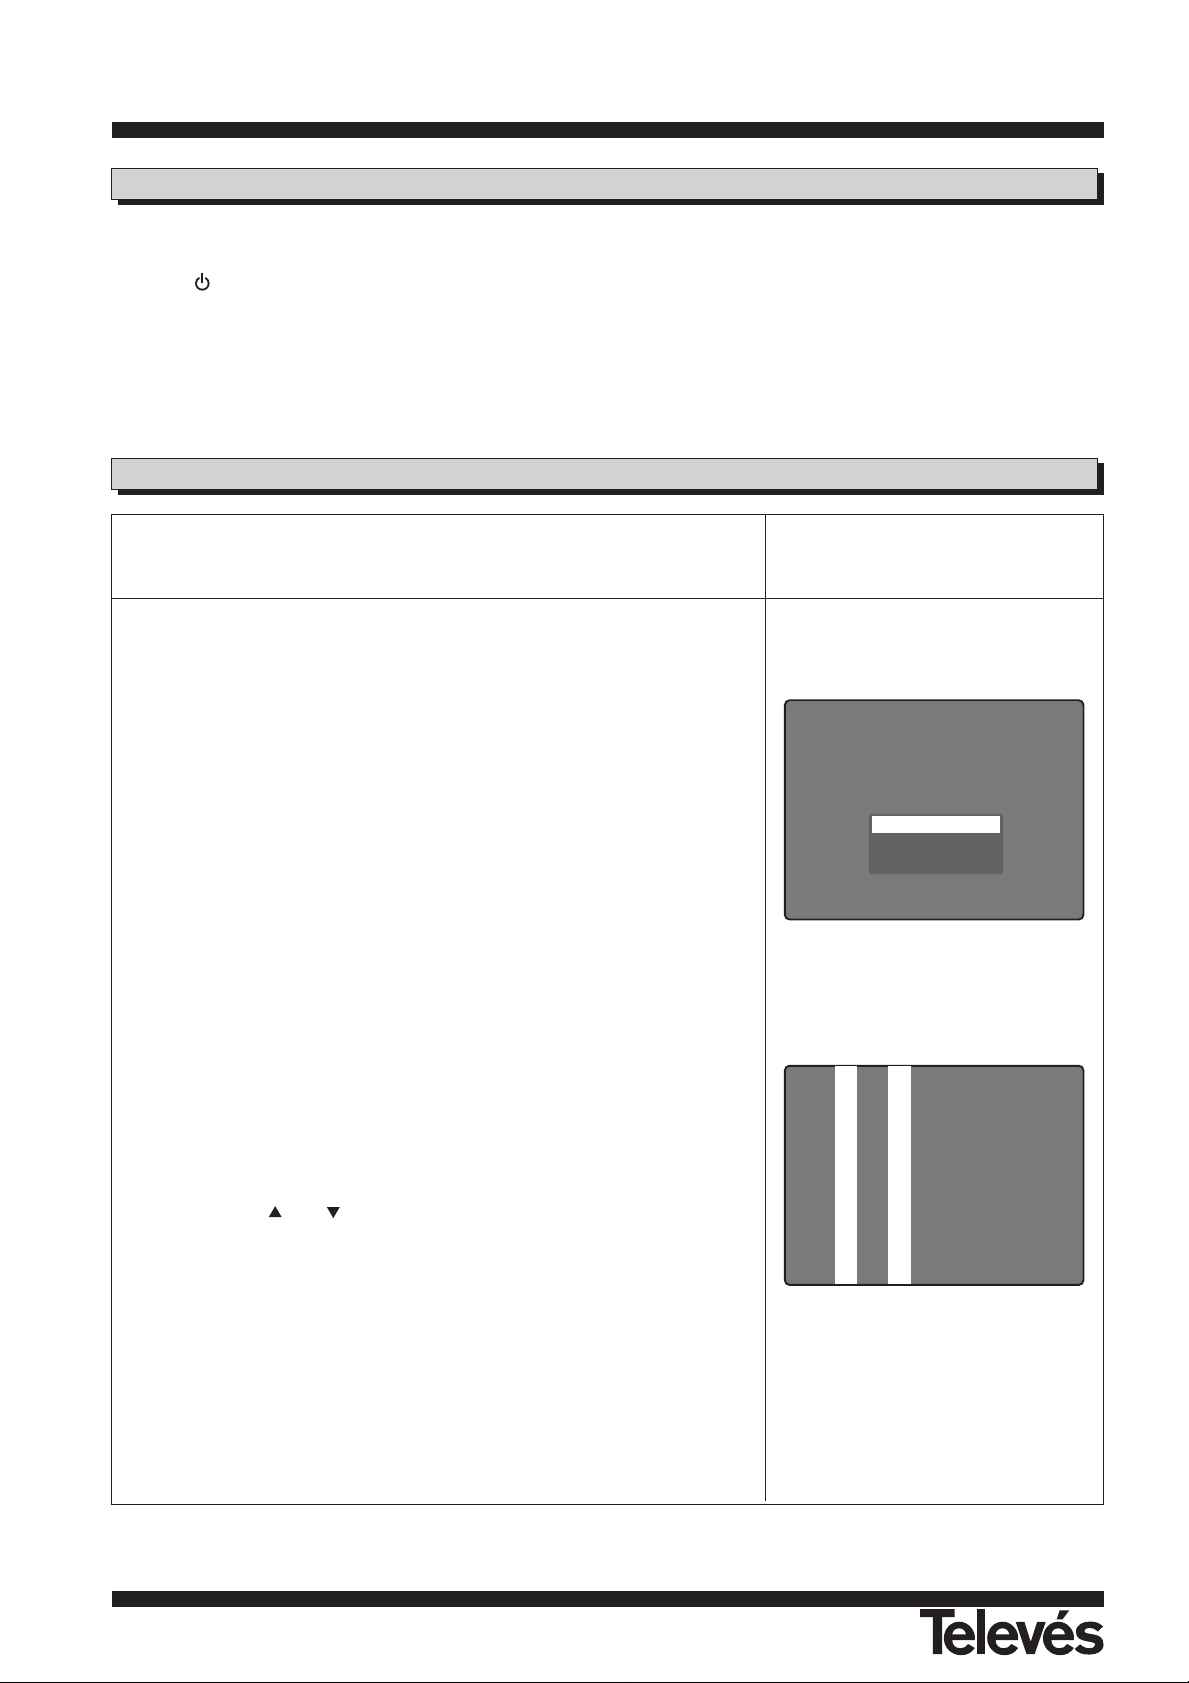
RF Tuning Function
You can watch Satellite channels and Terrestrial Broadcasting channels
using the RF Modulator.
1
Connecting to a TV which has direct RF channel “21” to “69” (“14” to
“83”-USA Channel) selection.
- Connect your TV RF input to the TV/VTR terminal of the RSD-7255.
Connect the terrestrial antenna cable to the ANT terminal of the
RSD-7255's RF Modulator.
- Tune the RF channel of your TV to channel “40”. (The factory
default RF channel is “40”).
2
Connecting to a TV which does not support direct RF selection.
- Connect your TV RF input to the TV/VTR terminal of the RSD-7255.
Connect the terrestrial antenna cable to the ANT terminal of the
RSD-7255's RF Modulator.
- Try to find the channel by using the Channel Search tuning function
of the TV.
3
If it is not possible to tune to the RF channel in the above-mentioned
cases, please try following steps for tuning RF channel:
- Connect your TV RF input to the TV/VTR terminal of the RSD-7255.
Connect the terrestrial antenna cable to the ANT terminal of the
RSD-7255's RF Modulator.
- Tune the TV to any RF channel “21” to “69” (“14” to “83”-USA
Channel) and press UHF key on the remote control. The front panel
display will show "No." followed by the RF channel number.
- Press or key of the RCU repeatedly until the TV screen
shows the TPSG (Test Pattern Signal Generator).
- Press EXIT or OK (LIST) key on the remote control to exit the RF
tuning mode.
- Go to the "Option" menu of the RSD-7255 and select the
appropriate "PALType" in the "UHF Standard" menu.
4
Press EXIT key to scape from the menu.
PALG
NO. 40
Test Pattern Signal
UHF TUNING MODE ...
If there is an interruption of AC power caused by pulling out the main plug of the RSD-7255 or brown-outs (power
interruptions), once AC power is reapplied the previous TV channel and last selected Audio mode, appears without having to
press the key.
Last Channel Auto-Saving and Recall
Page 11
User instructions “RSD - 7255”
11
ENGLISH
TELETEXT Function
Only TELETEXT supported TV users can use this function.
1
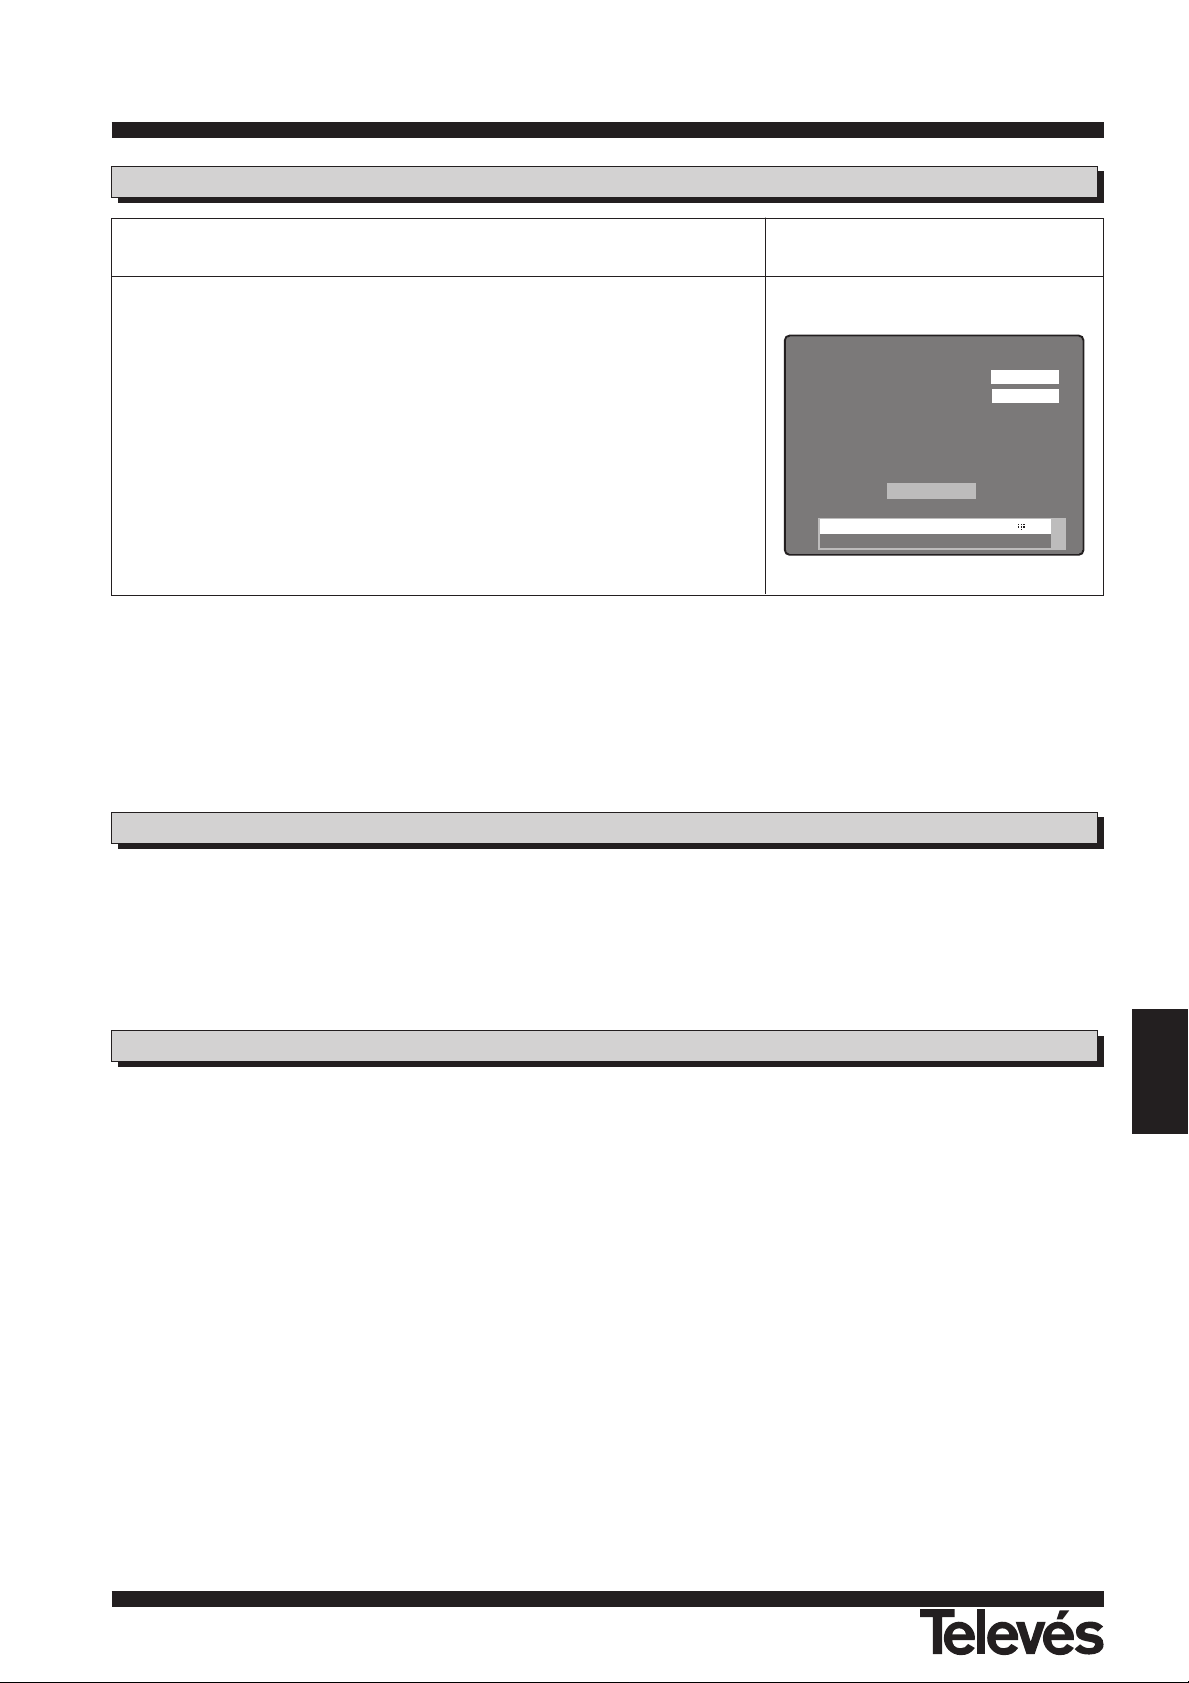
Press the TXT key of the RCU. If the channel have TELETEXT
service, "Teletext ON" will be displayed. Press TXT key one more
time, "Teletext OFF" will come up, the TELETEXT service will be
stopped.
2
If the channel does not have TELETEXT service, "NO TELETEXT"
will be displayed.
3
After selection of "Teletext ON", operate the TELETEXT function of
TV set to watch the TELETEXT service.
INFO
(( S ))
Language 1/5
Teletext ON
1. ASTRA TP1
2 CANAL 99
For reference:
In the case of a channel is reserved for future TELETEXT service but actual TELETEXT data are not transmitted, then there
is no teletext service even though "TELETEXT ON" is on the screen.
If you want to watch the previous channel when watching, press <--- PR key.
Previous Channel Recall
If you want to have still picture on the screen when watching, press PAUSE key once. Press PAUSE key one more time to
watch the channel again.
It is necessary to take into account that if an image is frozen on the screen, the programme that was being watched will
continue with its transmission as normal, so all that occurs during the time that the image maintains on the screen will not be
viewed.
Screen Pause
Page 12
User instructions “RSD - 7255”
12
TV Channel Manager .
1
When watching TV, press MENU key on the RCU or on the front
panel of the RSD-7255. The main menu will appear on the screen.
2
Select an item on the menu and press the OK (LIST) key to execute.
3
Press the EXIT key to exit from the current menu and return to the
previous menu step by step.
Main Menu
Channel Manager Menu
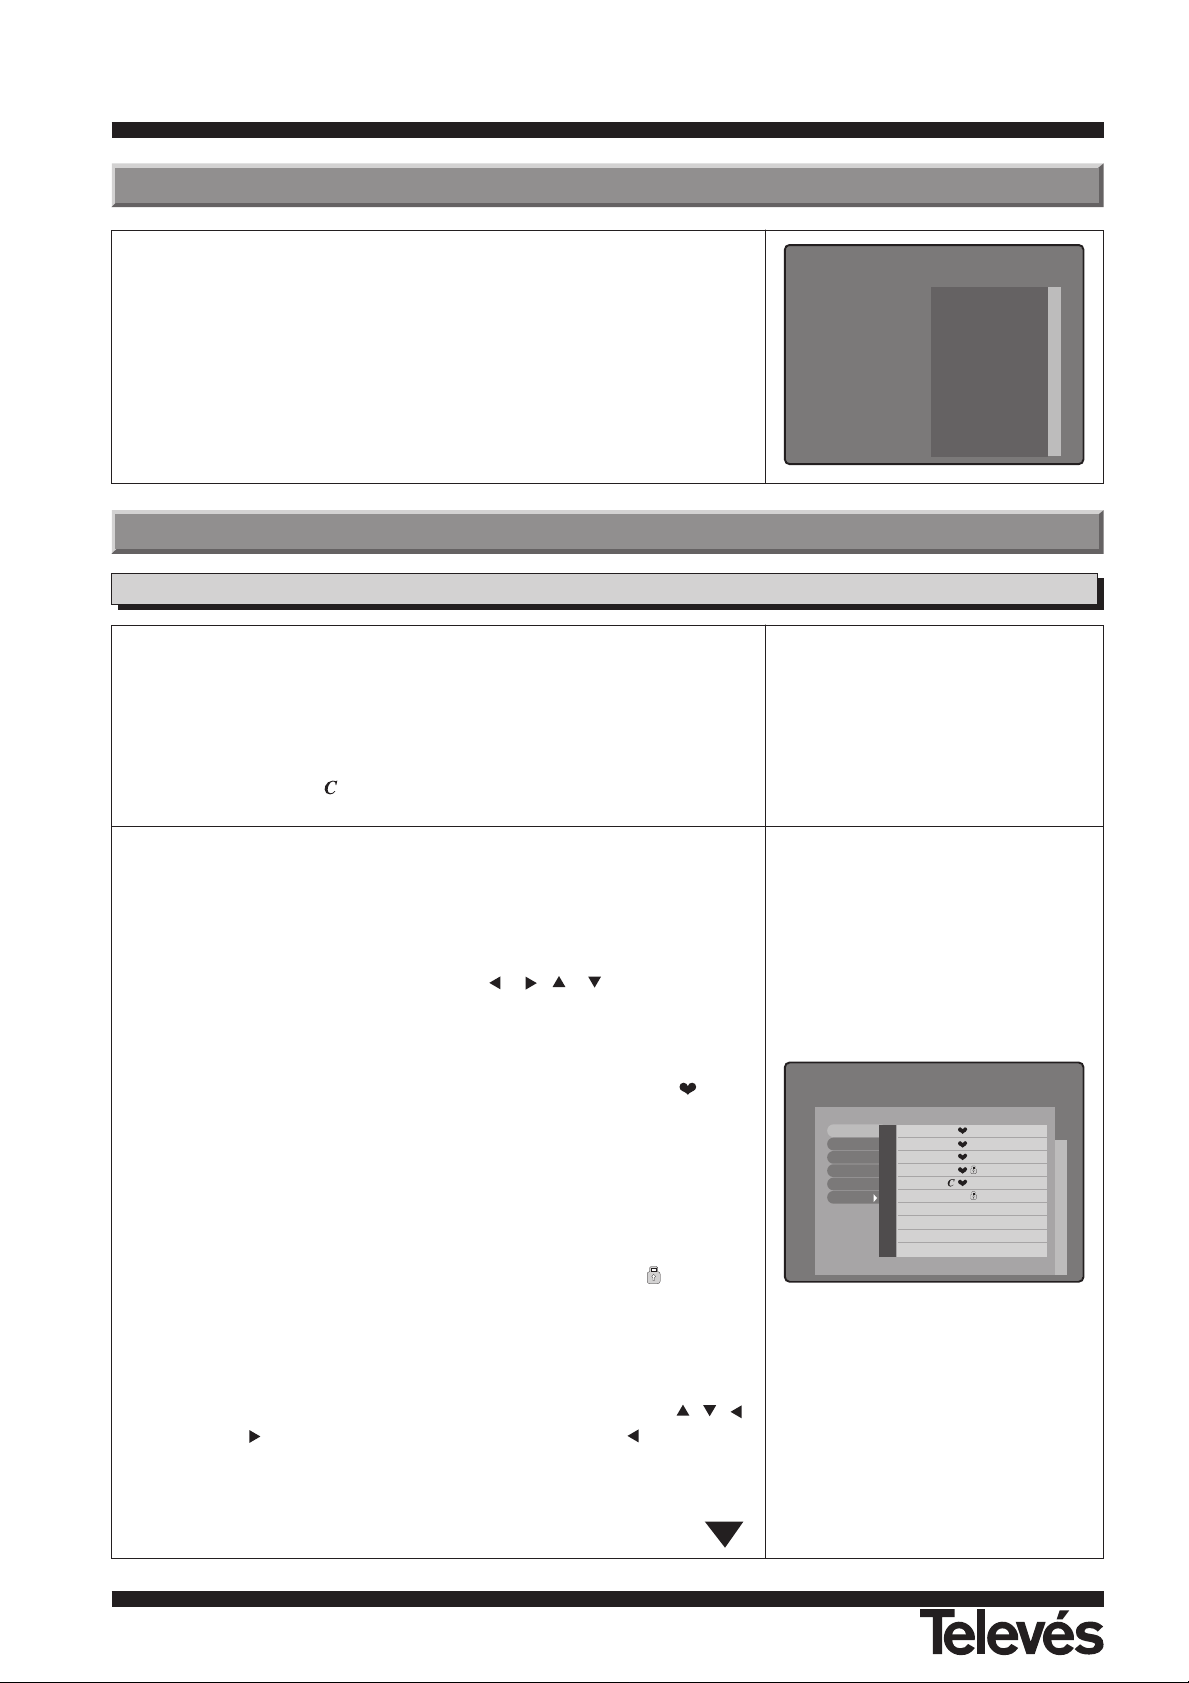
Channel Manager consists of TV channel and Radio channel. Channel
editing function can be performed in the channel manager. Favorite, Move,
Lock, Rename, Delete and Sort are all possible. Especially, there are five
ways of sorting functions.
After the edition, the remaining channels are automatically fixed.
The channels with the symbol are encoded.
1
Select TV or Radio channel in the main menu and press OK (LIST)
key to call up “TV/Radio Channel Manager”.
2
Press the OK (LIST) key on any one function you want in the "Control
Menu" at the left side of the "Channel Manager". You can move from
left to right or up and down by using , , , key.
3
Editing Functions:
- Favorite: When a channel is selected to be a Favorite, ( ) sign
will appear. Selected channel will be found in the "Favorite TV/Radio
Channel". (When you are watching TV or Radio you can use
"Favorite TV/Radio Channel" list by pressing OK (LIST) key
followed by TV/RADIO key.
- Move: When a channel is selected the colour of "No" column will be
changed to be yellow. Move the selected channel to the preferred
place. Press OK (LIST) key on the place you want to move.
- Lock: When a channel is selected to be locked ( ) sign will
appear. Selected channel will be locked and you have to know the
password to watch the locked channel.
- Rename: If you want to change the name of a channel, please take
steps as follows. Select a channel which you want to change name
then, press OK (LIST) key to call up the alphanumeric character
table. Enter the name by selecting the characters using , ,
and keys followed by OK (LIST) key. Press the character to
table characters. Press “OK” column to confirm the changed name.
Press EXIT key to save the changed name and then it will return to
the previous menu.
TV/RADIO Channels
The TV or Radio channel list is
empty before searching channel.
Be sure to search channels
automatically or manually before
you use Channel Manager.
Menu .
Channel Manager
TV Channel
Radio Channel
Program Guide
Timer
User Installation
Antenna Setup
Auto Search
TP Setup
Parental Lock
Option
Data Transfer
Factory Default
Receiver Info.
ANDALU ... ASTRA Tp1
CANAL 99 ASTRA Tp1
RTL T elev ASTRA Tp2
N4 ASTRA Tp4
TNT ASTRA Tp3
Bayerisch ASTRA Tp4
BR-alpha ASTRA Tp4
CNN Int. ASTRA Tp3
Das Erste ASTRA Tp4
hessen fe ASTRA Tp4
1
2
3
4
5
6
7
8
9
10
Favorite
Move
Lock
Rename
Delete
Sort
Page 13
User instructions “RSD - 7255”
13
ENGLISH
The "Timer" function allows you to program when the receiver switches ON
and OFF.
1
To activate the "Turn On" and/or the "Turn Off", press the OK (LIST)
key on the "Timer" in the main menu.
2
You can enter the time required time by pressing numeric key.
3
Press EXIT key to scapes from menu.
Timer
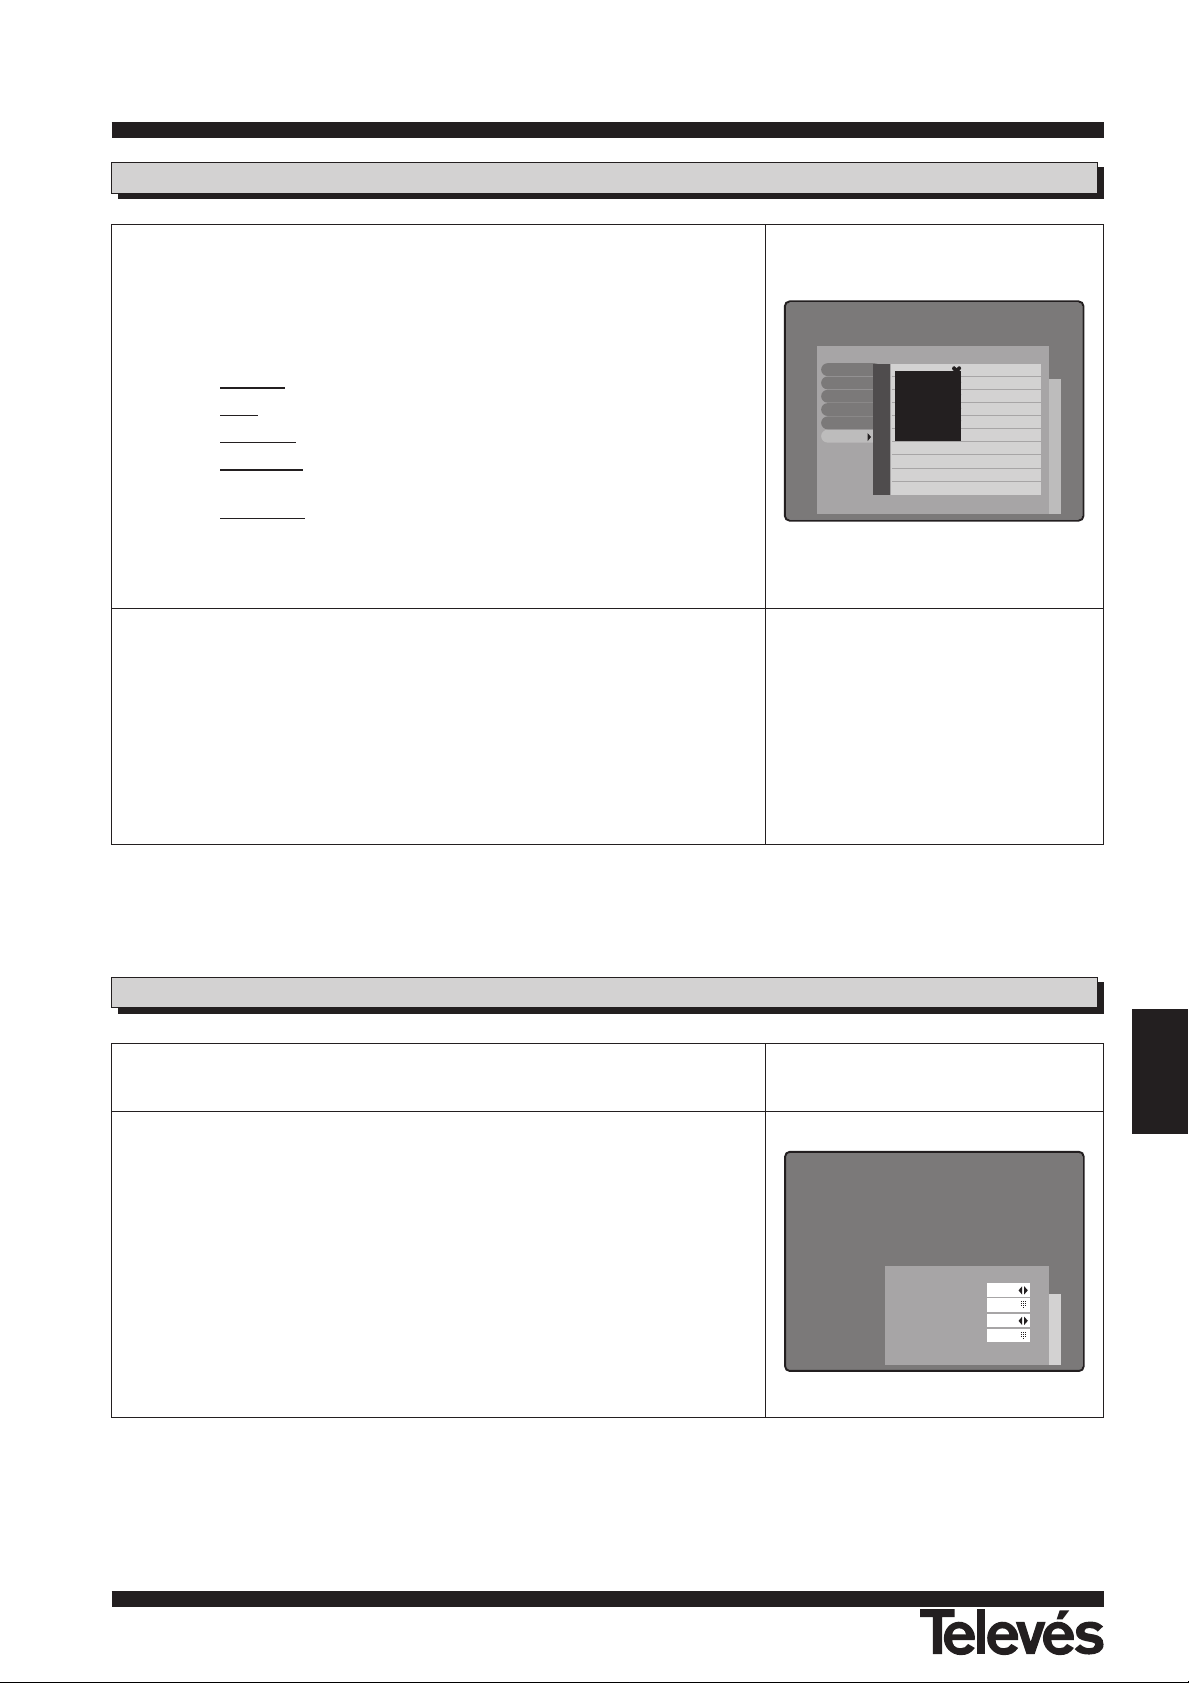
- Delete: When a channel selected to be deleted, the colour of "No"
column will be changed to be yellow. Selected channel will be
deleted on the channel list. Press EXIT key then the dialog box will
come up. Select "OK" or "CANCEL".
- Sort: There are five ways to sort the channels. When you select any
one sort, the channels will be sorted accordingly.
• Favorite: It will place the favorite channels at the top of the list.
• Lock
: It will place the locked channels to the last at the list.
• Scramble
: It will place scrambled channels to the last of the list.
• Sat Name
: It will rearranged the channels by satellite names in
alphabetical order from Ato Z.
• Ch. Namel
: It will rearranged the channels by name in alphabetical
order from Ato Z.
4
After finishing channel editing, press EXIT key then the dialog box will
come up.
5
There are 5 ways to sort the channels. When you select any one sort,
the channels will be sorted accordingly.
TV/RADIO Channels
Timer
Turn ON
Turn ON Time
Turn OFF
Turn OFF Time
NO
00:00
NO
00:00
TV Channel Manager .
ANDALU ... ASTRA Tp1
CANAL 99 ASTRA Tp1
RTL T elev ASTRA Tp2
N4 ASTRA Tp4
TNT ASTRA Tp3
Bayerisch ASTRA Tp4
BR-alpha ASTRA Tp4
CNN Int. ASTRA Tp3
Das Erste ASTRA Tp4
hessen fe ASTRA Tp4
1
2
3
4
5
6
7
8
9
10
Favorite
Move
Lock
Rename
Delete
Sort
Favorite
Lock
Scramble
SATName
CH Name
Page 14
User instructions “RSD - 7255”
14
Antenna Setup
Signal Level
Go to Auto Search
Positioning Help
Antenna Setup
Antenna Setup
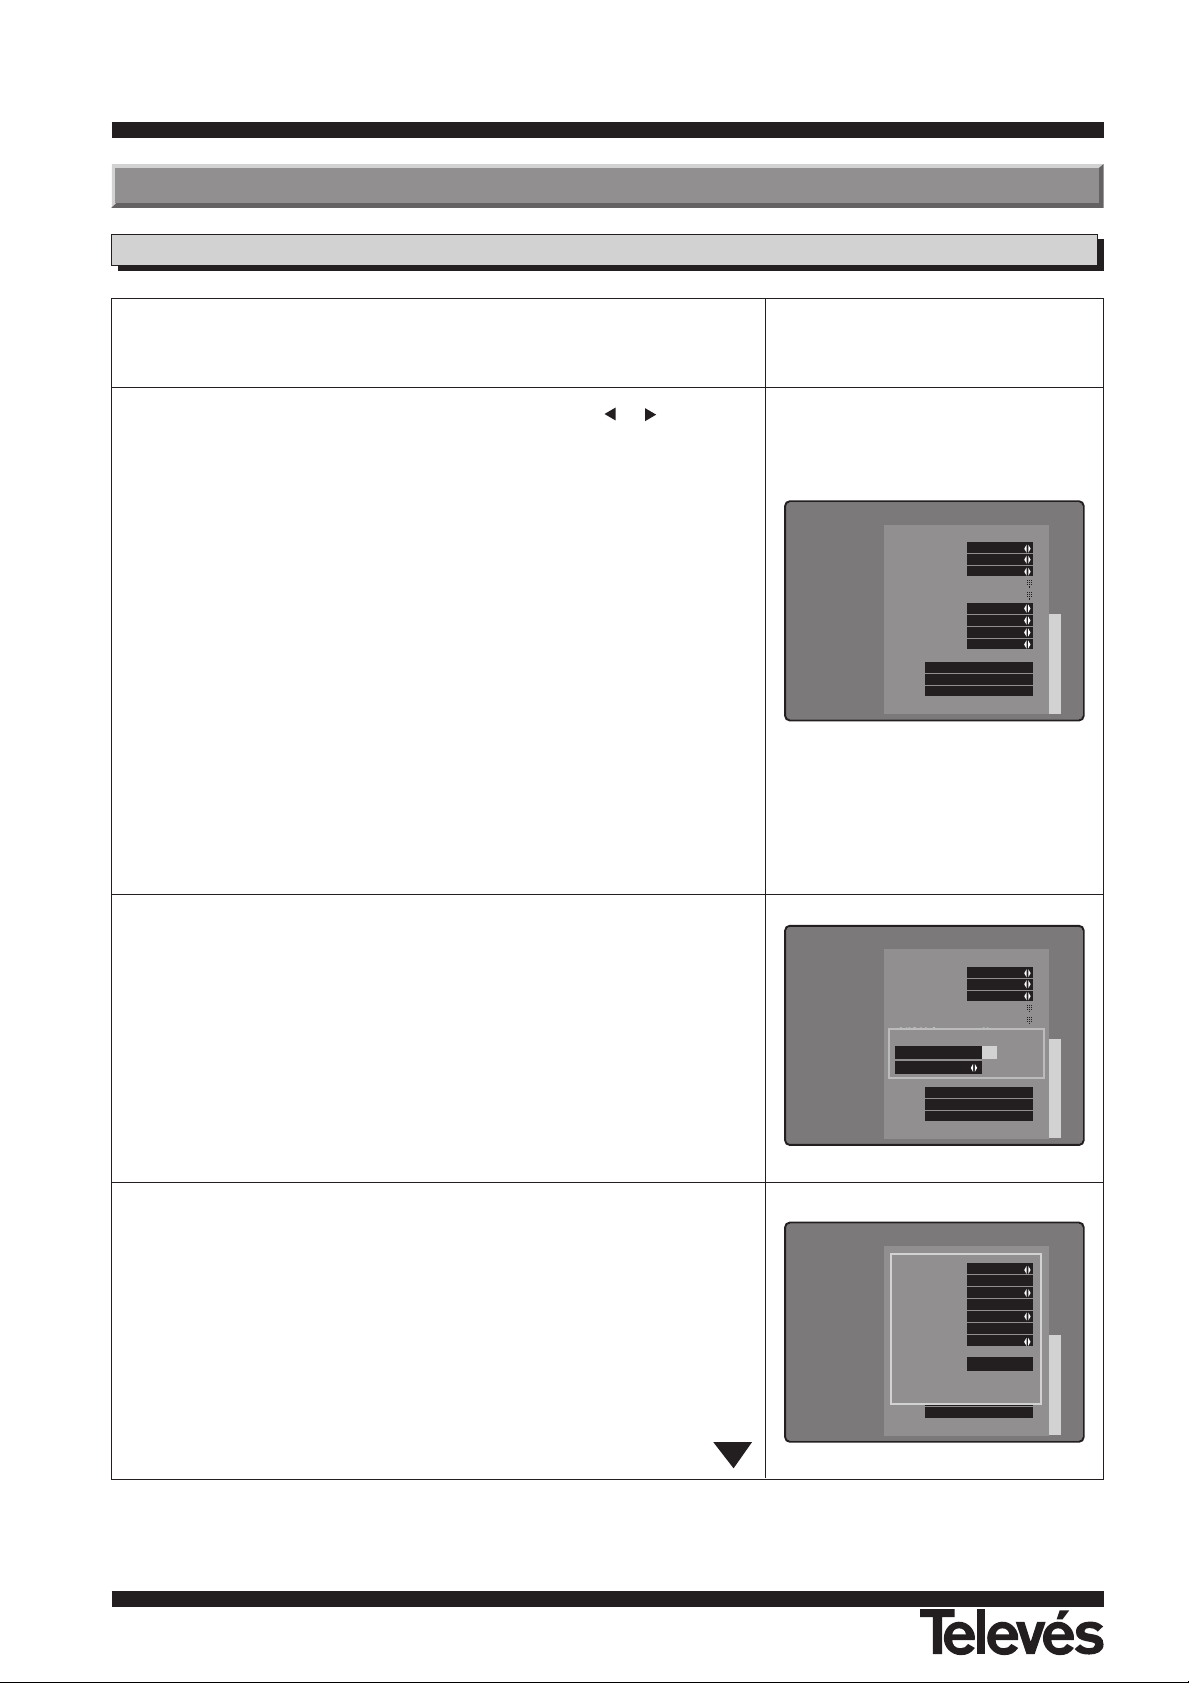
You can assign satellites, LNBs and switches to 16 antennas in this
"Antenna Setup" menu.
1
Select any one antenna among 16 antennas using or key.
2
Assign satellite, LNB and switch to the selected antenna:
- Satellite: Select any one satellite among 20 satellites preprogram-
med. The first four antennas are, by defect, assigned to the ASTRA,
HOTBIRD, HISPASAT and EUTELSAT F2 satellites.
They also dispose of 11 free satellite positions for incorporated or
future satellites.
- Universal LNB: Select the LNB to be universal or not.
- LNB1/LNB2: Input the High/Low local frequencies.
- 0/12V switch: Select any one out of "NONE", “0V” or “12V”.
- 14/18V switch: Select any one out of "NONE", “14V” or “18V”, with
“Univ. LNB” select “None”.
- 22KHz switch: Select any one out of "NONE", “0Hz” or “22KHz”,
with “Univ. LNB” select “None”.
- DiSEqC switch: Select any one out of "NONE”, “Port A”, “Port B”,
“Port C” or “Port D”.
3
When you select the "Signal Level", you can cheek the strength of an
antenna connected satellite.
4
When you select "Go to Auto Search", you can go to " Auto Search"
menu.
5
When you install the dish antenna, the receiver can calculate the
elevation angle and the azimuth angle for you and display this
information on the screen.
- Input the position of the satellite you want to direct your antenna to
the "Satellite Position" field.
- Input the longitude and latitude where the antenna is installed in
"Your Longitude" and "Your Latitude" fields respectively.
- Select "Compute" to show the result of the elevation angle and
azimuth angle.
User Installation Menu
Signal Level
Go to Auto Search
Positioning Help
Antenna 1
Satellite ASTRA
Univ. LNB YES
LNB Freq. 1 9750
LNB Freq. 2 10600
0/12 Volt None
14/18 Volt None
22KHz Tone None
DiSEqC Port A
Antenna Setup
Signal Level
Go to Auto Search
Positioning Help
Antenna 1
Satellite ASTRA
Univ. LNB YES
LNB Freq. 1 9750
LNB Freq. 2 10600
0/12 Volt None
14/18 Volt None
22KHz Tone None
DiSEqC Port A
Signal Level
0 Unlocked
TP1
Satellite ASTRA
19.2°
EAST
Longitude 000.0°
EAST
Latitude 000.0°
North
Compute
Page 15
User instructions “RSD - 7255”
15
ENGLISH
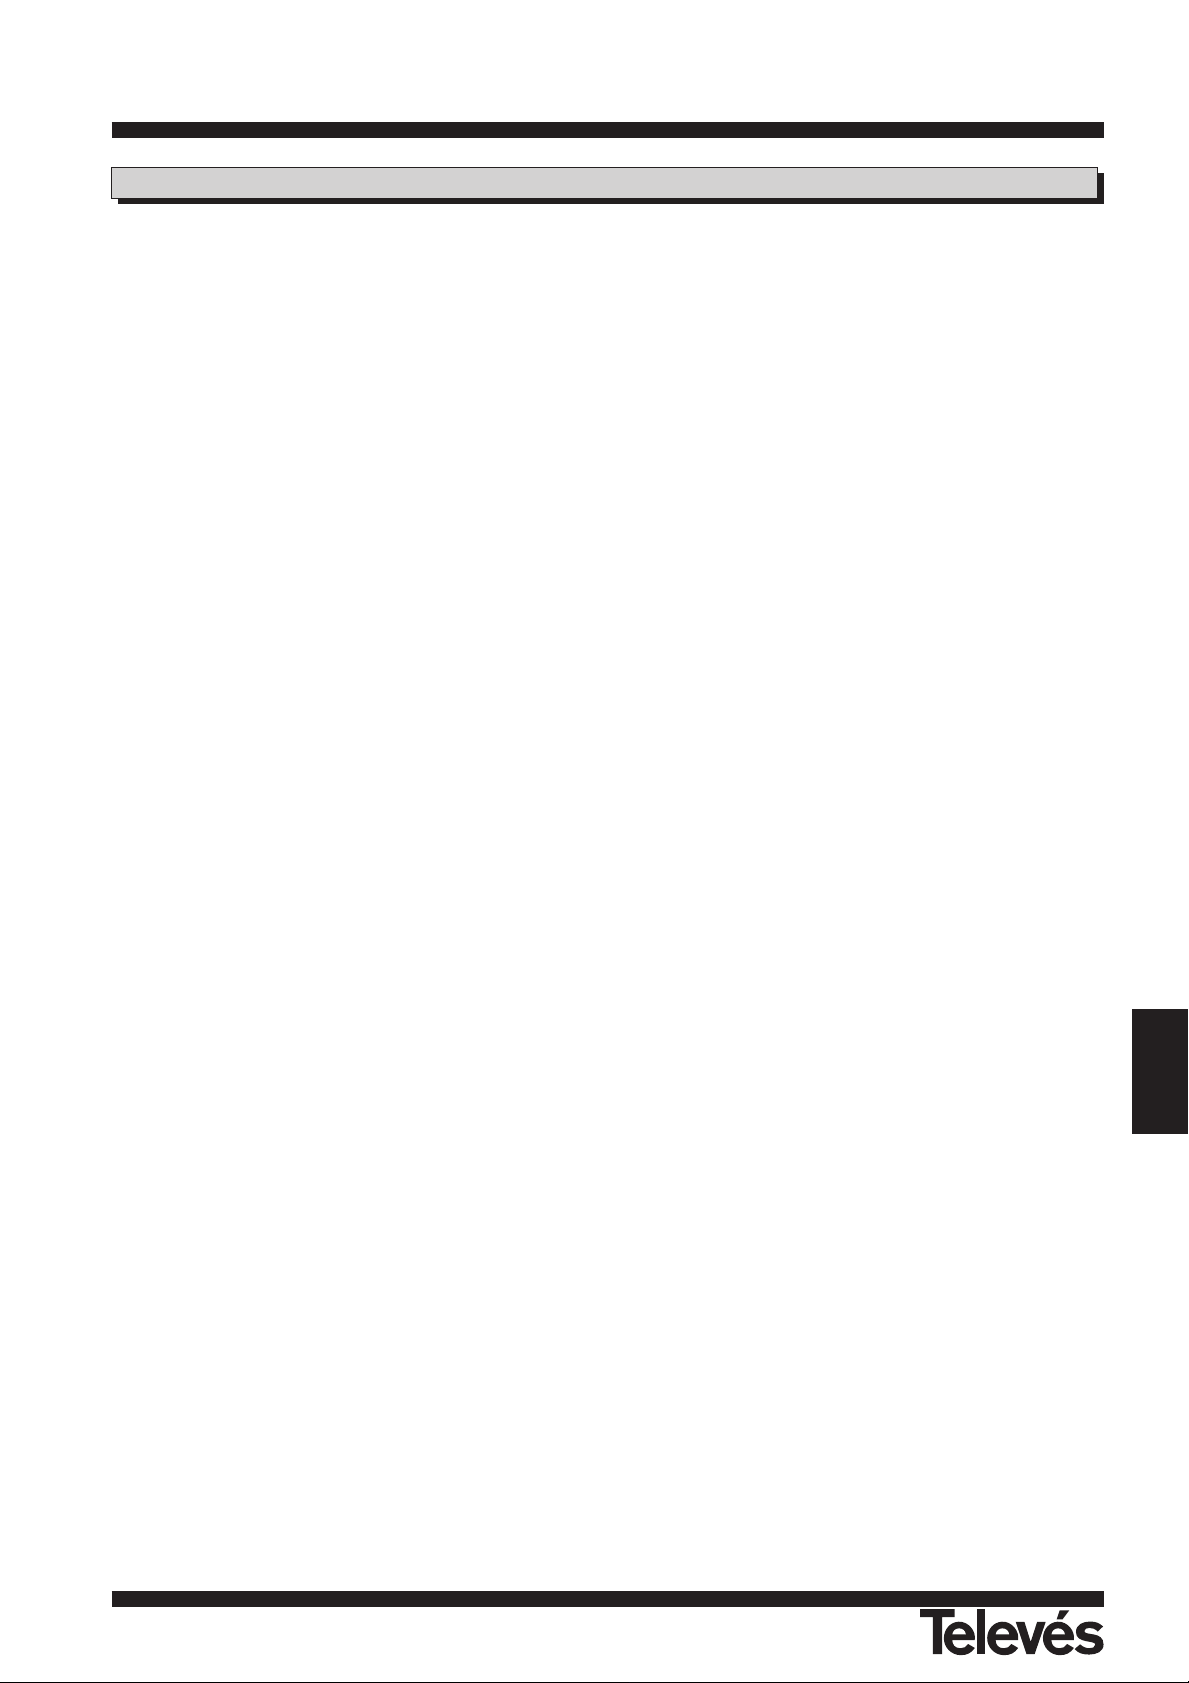
For reference:
- In the case of using switch, please keep in mind the combination of antenna and each switch ports.
- It is not allowed to use 22KHZ tone switch and DiSEqC switch at the same time because the attributes of both switches are
utilizing the same 22KHZ tone.
- If you wish to use a "Tone Burst" switch even when it is not possible to select it in the menu, you can use it via the DiSEqC
option. When the antenna that is connected to the "A" input of the "Tone Burst" switch has been configured, select Input "A"
in the "DiSEqC" option in the "Antenna Setup” menu. Proceed in the same way when configuring the antenna that is connected to the "B" input of the "Tone Burst" switch, and in this case, select Input "B" in the DiSEqC option.
- It is possible to manually look for the channels that directly indicate band "L" frequencies (950 - 2150 MHz). To do this,
select an available antenna in "Antenna Setup” and assign it to one of the free satellite positions (for example: NEWSAT1).
Then select "NO" in "Univ. LNB" (Univ. LNB), and enter "0" as the frequency of the local oscillator in both cases.
Antenna Setup
Page 16
User instructions “RSD - 7255”
16
Auto CH Search
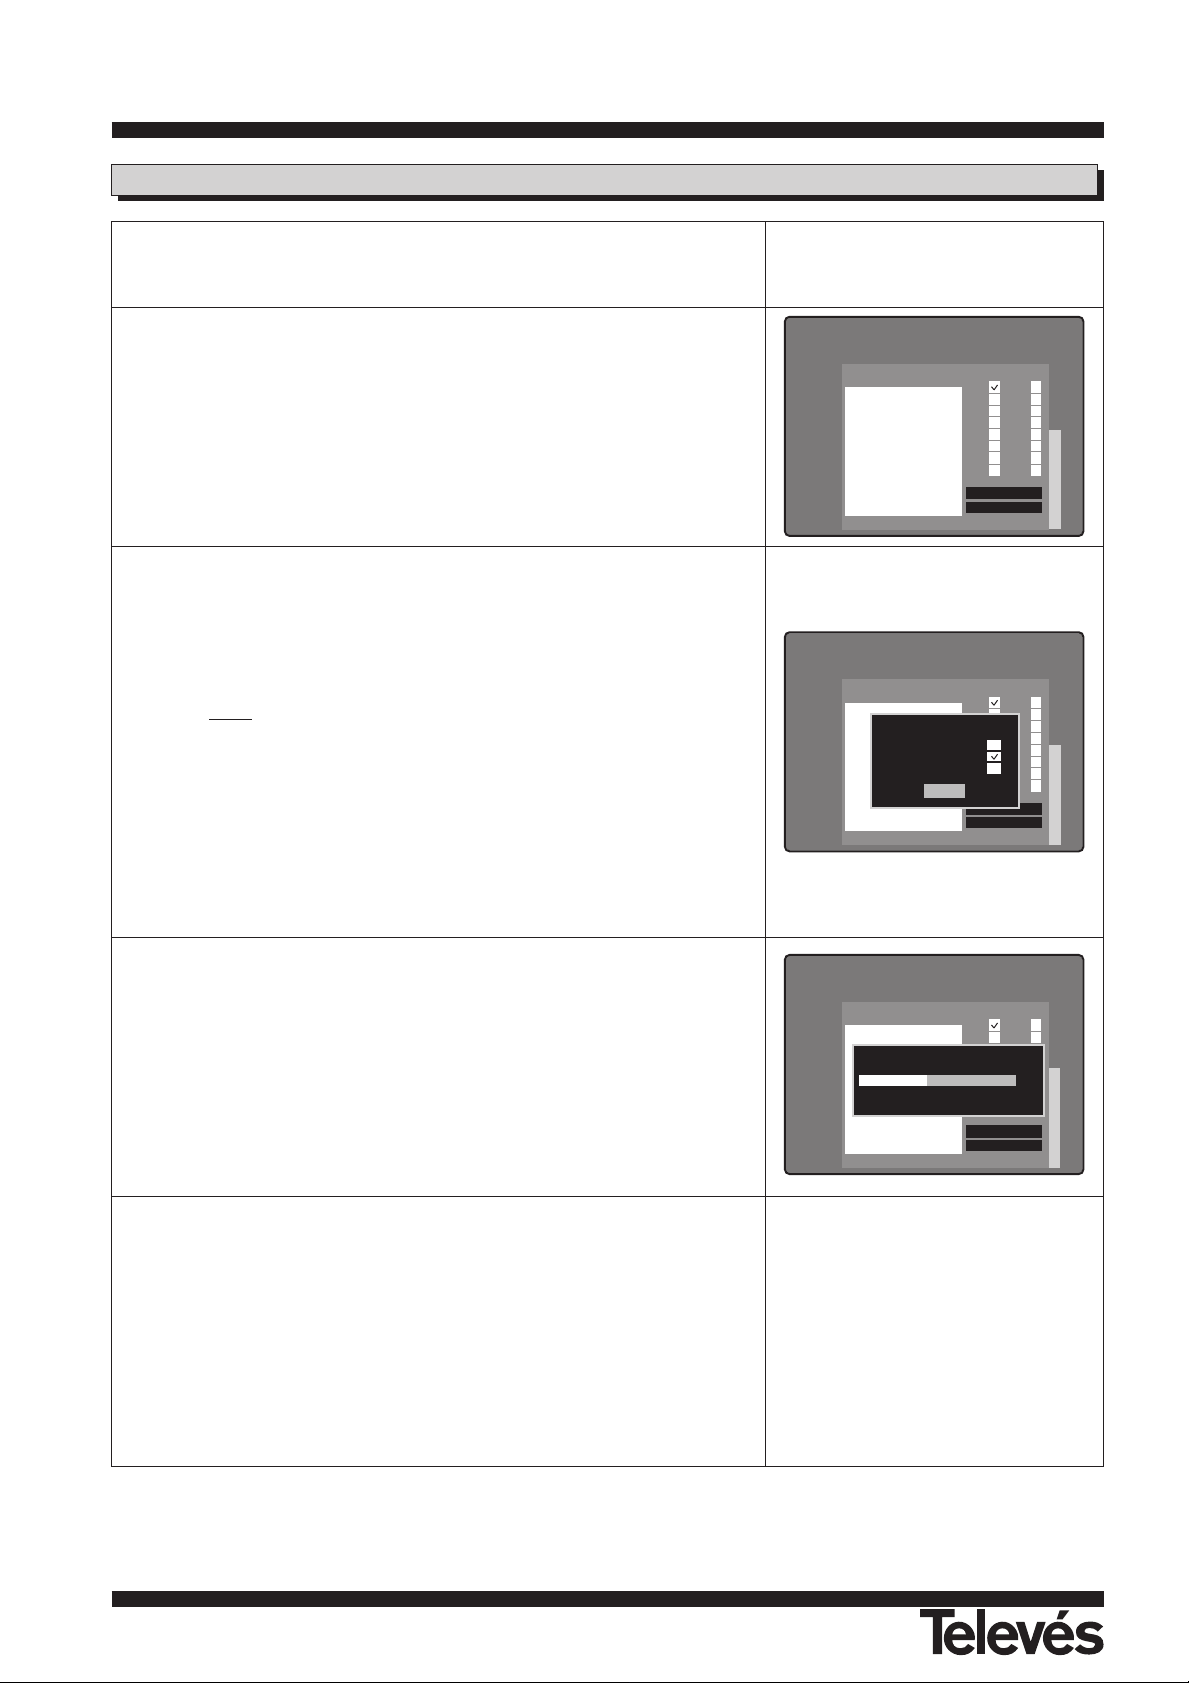
All of the channels can be searched supposed that the selected satellite is
properly assigned to antenna in the "Antenna Setup" menu.
1
When you place the cursor on an antenna, the related information will
be displayed automatically. Then, select antenna as many as
necessary from 1 to 16 to search channels by pressing OK (LIST)
key.
2
Select any one search option:
- New TP: This will search only for newly added transponders in the
selected satellite.
- FTA Only: This will search all channels except scrambled channels
in the selected satellite.
Note: To avoid having an excessively long list of channels due to the
inclusion of encoded channels, it is advisable to activate this option
when the automatic search is activated.
This option is already activated by defect.
- Sort by Scramble: This will search all channels in the selected
satellite and place scrambled channels to the last of the list.
3
Select “OK” box and press OK (LIST) key.
4
Select "Start" and press OK (LIST) key to start searching channels.
5
When you start to search channels, the following will be shown on the
screen:
- The name of satellite being searched.
- The number of transponder being searched.
- The percentage of searching progress.
- The name of channels found.
6
If you want stop the searching during “Auto Searching”, press EXIT
key on the RCU, then, "Please wait for closing" message will turn up
on the screen.
7
When searching is completed, the numbers of channels found will be
displayed on the screen.
8
When you go out of the "Auto Ch. Search" menu by pressing EXIT
key, "Please wait for saving data" message will turn up on the screen
to save the found channels in the list.
Auto Search
Search Option
Start
Antenna Select
Information
Antenna 1
Satellite ASTRA
Univ. LNB YES
LNB Freq. 1 9750
LNB Freq. 2 10600
0/12 Volt Not Used
14/18 Volt Not Used
22KHz Not Used
DiSEqC Port A
1 9
2 10
3 11
4 12
5 13
6 14
7 15
8 16
Auto Search
Search Option
Start
Antenna Select
Information
Antenna 1
Satellite ASTRA
Univ. LNB YES
LNB Freq. 1 9750
LNB Freq. 2 10600
0/12 Volt Not Used
14/18 Volt Not Used
22KHz Not Used
DiSEqC Port A
1 9
2 10
3 11
4 12
5 13
6 14
7 15
8 16
Search Option
New TP
FTAOnly
Sort by Scramble
OK
Auto Search
Search Option
Start
Antenna Select
Information
Antenna 1
Satellite ASTRA
Univ. LNB YES
LNB Freq. 1 9750
LNB Freq. 2 10600
0/12 Volt Not Used
14/18 Volt Not Used
22KHz Not Used
DiSEqC Port A
1 9
2 10
3 11
4 12
5 13
6 14
7 15
8 16
Searching 1.ASTRA TP/20/49
42%
Found The Following Channel(s) ...
For reference:
- The number of transponders can be bigger than the preprogrammed because this RSD-7255 utilizes the NIT information
transmitted by satellite to add up channels automatically.
- If you wish to search for channels directly indicating band "L" frequencies (950 - 2150 MHz) see "TP Setup" .
Page 17
User instructions “RSD - 7255”
17
ENGLISH
TP Setup
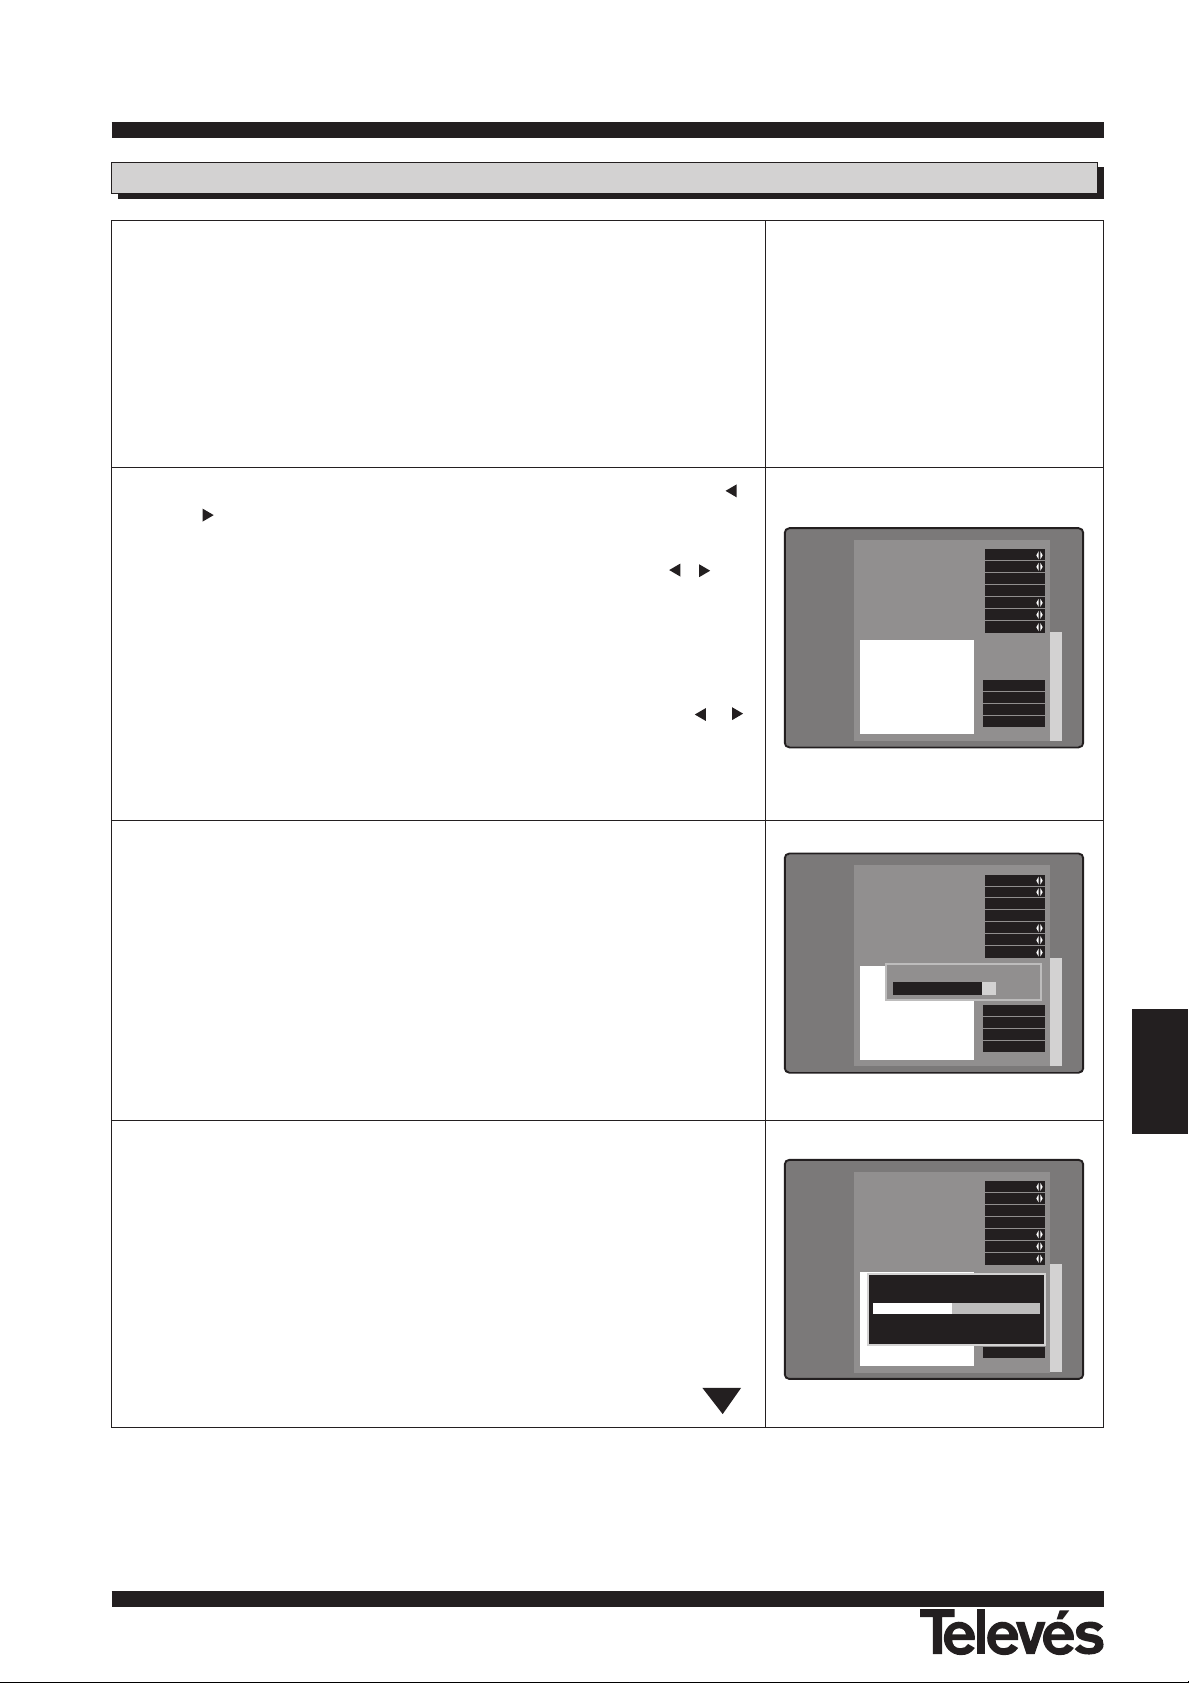
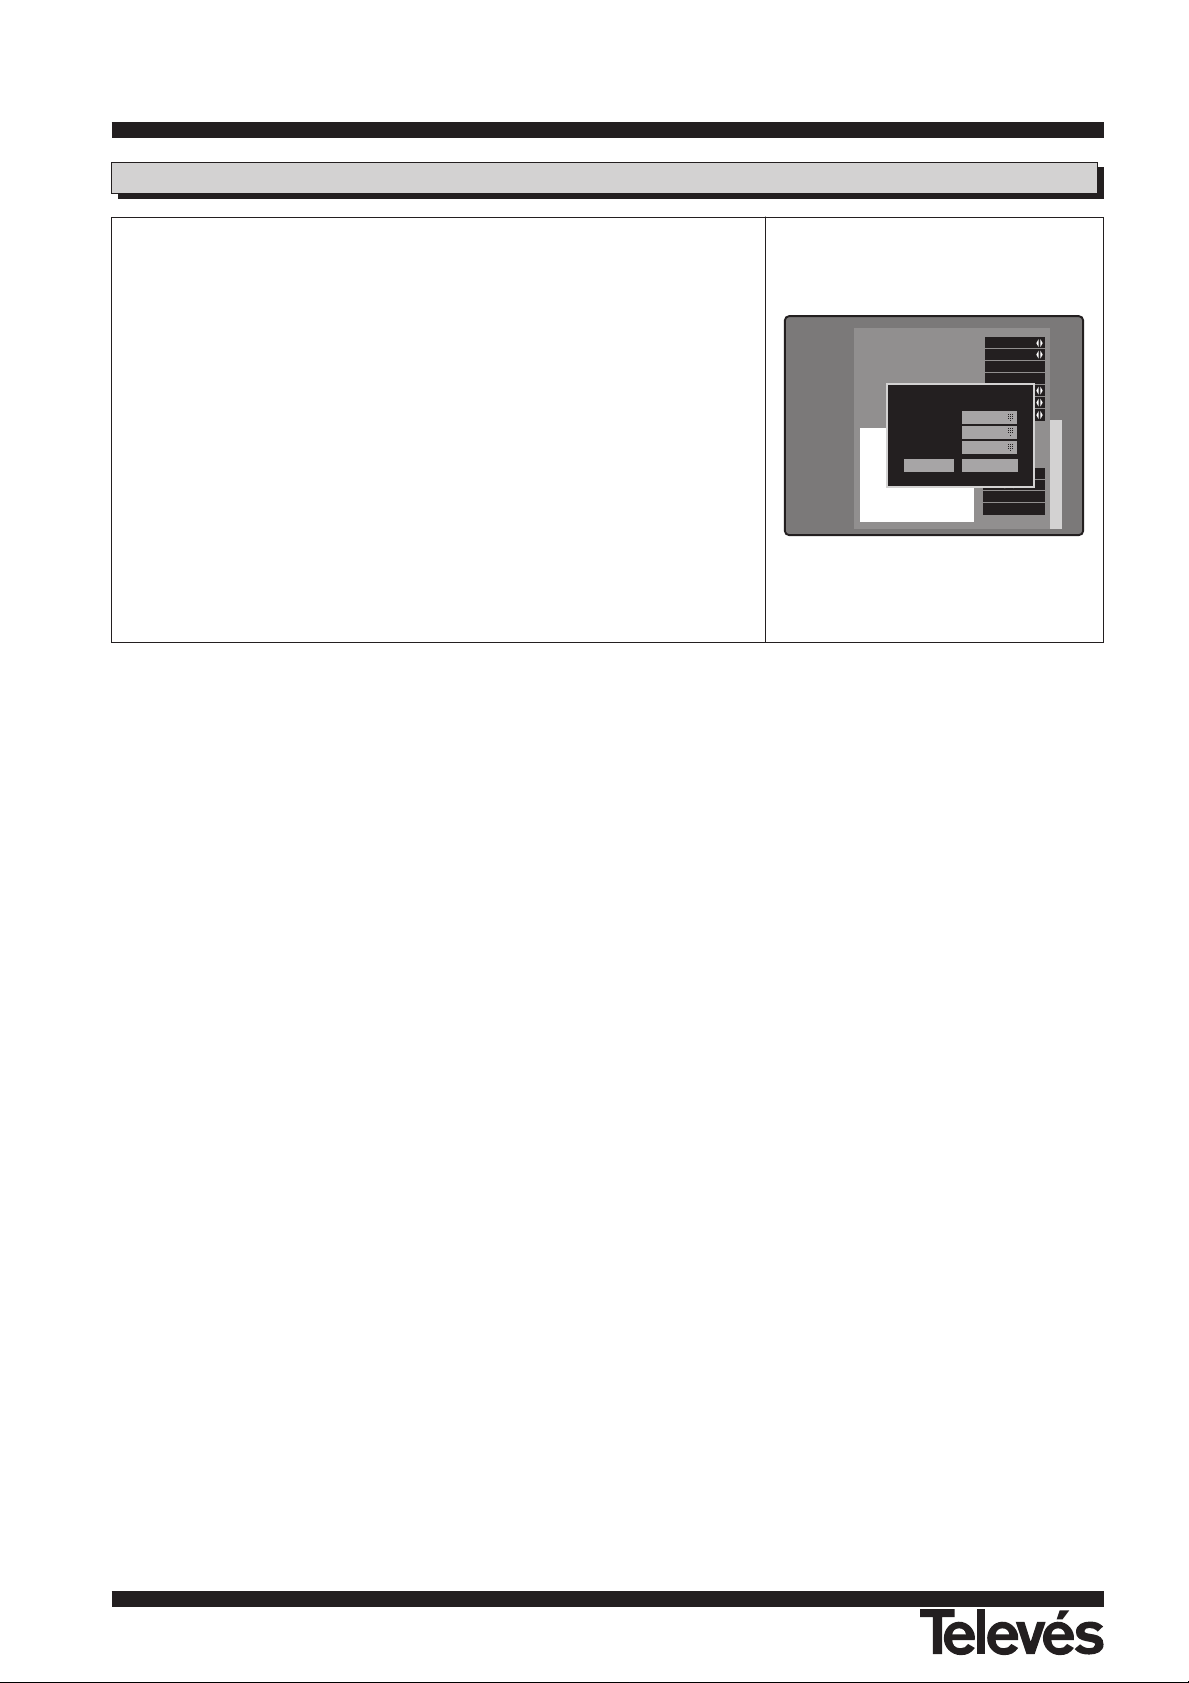
"TP Setup" can be used to search channels in a transponder or add up,
change and delete transponder on an existing satellite.
Some operators indicate that their programmes are encoded when in fact
they are shareware programmes.
If an automatic search has been carried out with the recommended option
(FTAOnly), these programmes will not be incorporated into the channel list.
In cases such as this one, it is also useful to use the "TP Setup” option.
1
Place cursor in the “Antenna” field. Select an antenna by pressing ,
key or press OK (LIST) key for pull down menu.
2
Select a transponder in the "Transponder" box by pressing , key
or by pressing OK (LIST) key. You can also go to the end of the list to
enter the values of a new transponder
3
“Frequency”, “Symbol Rate”, “Polarization”, “FEC”, and “22KHZ” of
the selected transponder will be displayed in each field. When you
want to change the value of each field, press numeric keys, /
and OK (LIST) key as needed.
4
To check the signal level of the active transponder, select “Check
Signal”. Then, the signal level will be displayed.
The following message can be seen in the signal level box:
- Lock: This means that the antenna and transponder data are
properly set and the RSD-7255 can search channels by selecting
"Start".
- Unlock: This means that the antenna and transponder data are not
properly set, therefore, the RSD-7255 is not in the condition to
search channels.
5
Selection of “Start” will show the followings on the screen: The name
of satellite/transponder searched and The name of channels found.
6
Upon completing the “Searching”, number of channels found will be
shown on the screen. When the number is “0”, the searching is failed.
TP Setup
Check Signal
Start
Set PID
Delete TP
Satellite ASTRA
Univ. LNB YES
LNB Freq. 1 9750
LNB Freq. 2 10600
0/12 Volt None
14/18 Volt None
22KHz None
DiSEqC Port A
Antenna 1
Transponder TP52
Frequency 12168
Symbol Rate 27500
Polarization Ver
FEC AUTO
22KHz ON
TP Setup
Check Signal
Start
Set PID
Delete TP
Satellite ASTRA
Univ. LNB YES
LNB Freq. 1 9750
LNB Freq. 2 10600
0/12 Volt None
14/18 Volt None
22KHz None
DiSEqC Port A
Antenna 1
Transponder TP52
Frequency 12168
Symbol Rate 27500
Polarization Ver
FEC AUTO
22KHz ON
TP Setup
Check Signal
Start
Set PID
Delete TP
Satellite ASTRA
Univ. LNB YES
LNB Freq. 1 9750
LNB Freq. 2 10600
0/12 Volt None
14/18 Volt None
22KHz None
DiSEqC Port A
Antenna 1
Transponder TP52
Frequency 12168
Symbol Rate 27500
Polarization Ver
FEC AUTO
22KHz ON
Signal Level
0 Unlocked
Searching ASTRA TP1
Found The Following Channel(s) ...
Page 18
User instructions “RSD - 7255”
18
TP Setup
7
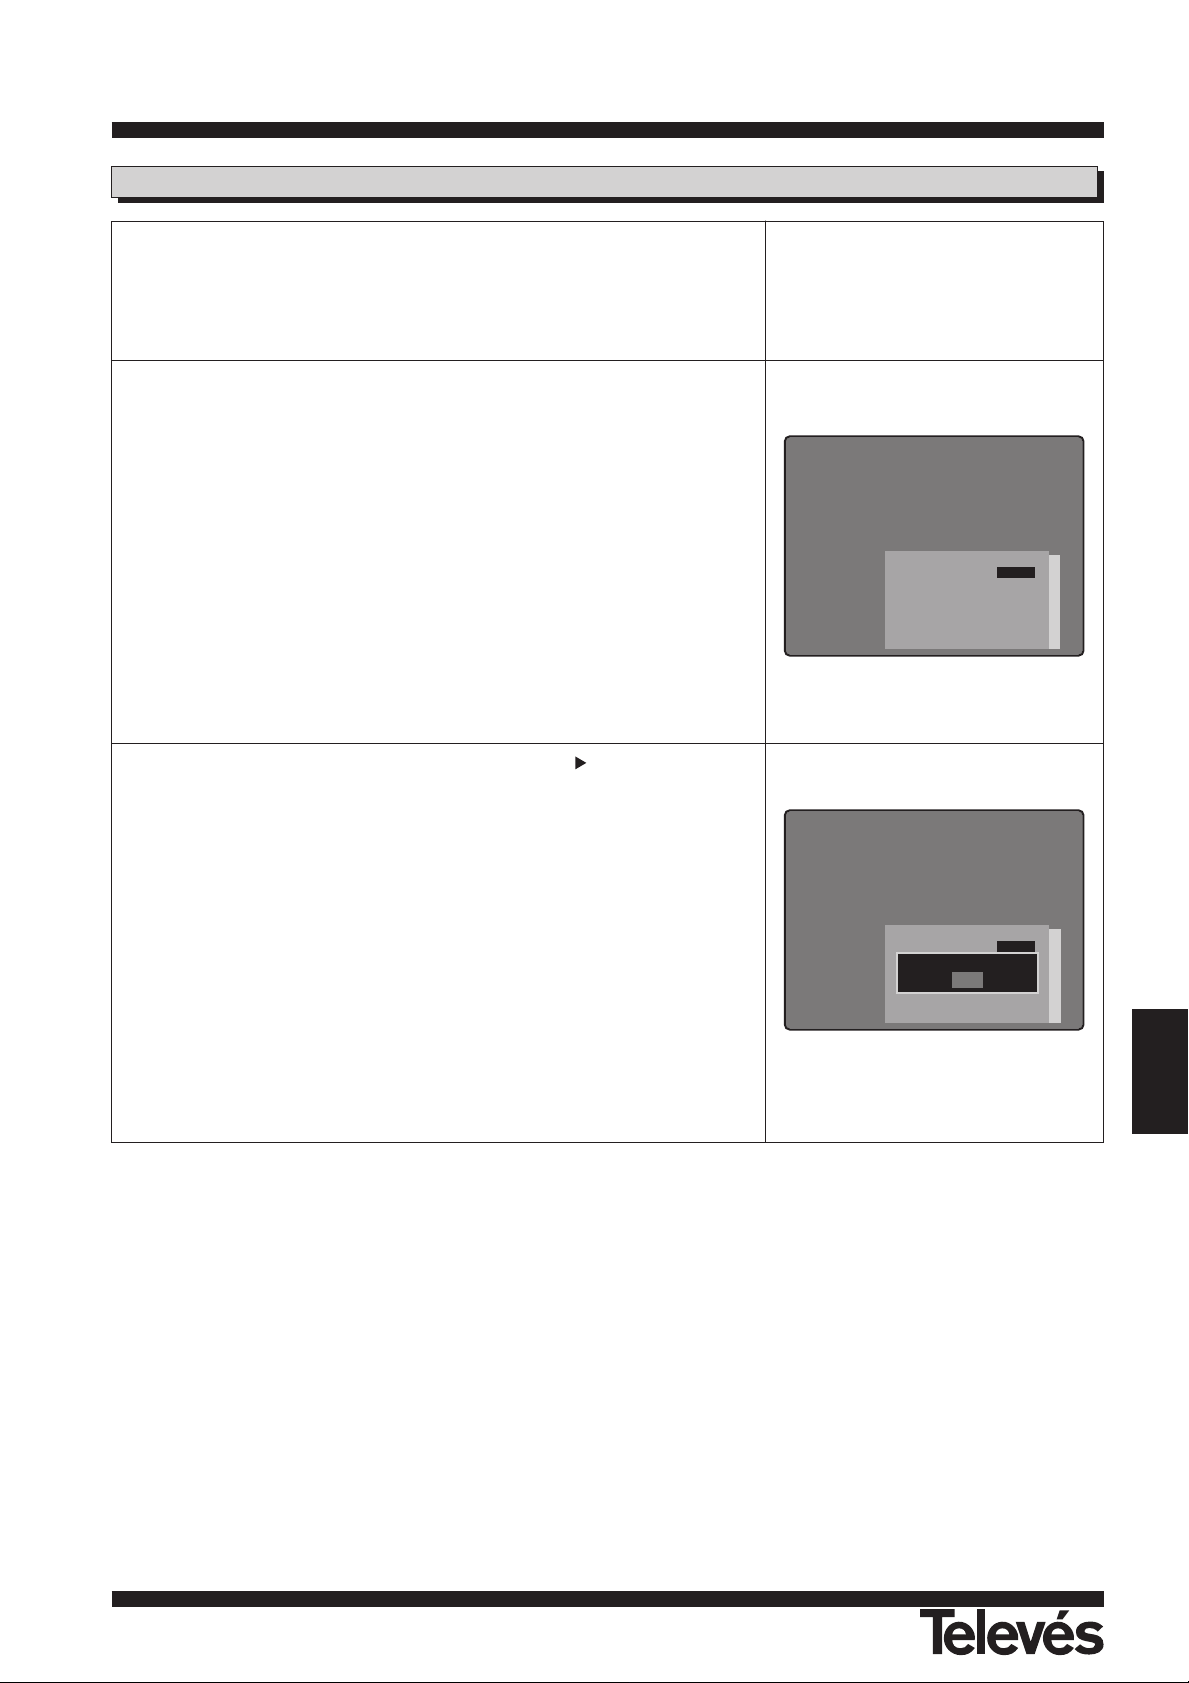
In general this option does not need to be used, as the receiver
automatically detects all the programmes contained in the
transponder.
However, some of the programmes transmitted in test mode do not
have the adequate information available.
In these cases, it is possible to manually introduce the PIDs of the
desired programme, so that this programme can be recognised by
the IRD.
Each PID can be entered as decimal value. When the PID search is
finished, the following will be shown.
8
When you select “Delete TP”, then, a dialog box which is confirming
that you want to delete the active transponder or not. Select “Yes” for
deletion, “No” for cancel.
TP Setup
Check Signal
Start
Set PID
Delete TP
Satellite ASTRA
Univ. LNB YES
LNB Freq. 1 9750
LNB Freq. 2 10600
0/12 Volt None
14/18 Volt None
22KHz None
DiSEqC Port A
Antenna 1
Transponder TP52
Frequency 12168
Symbol Rate 27500
Polarization Ver
FEC AUTO
22KHz ON
Set PID
Video PID 0
Audio PID 0
PCR PID 0
OK Cancel
For reference:
Please check the following points when the signal level message is “Unlock”:
- Adjust the position of antenna until the signal level to be “Lock”
- Change the settings of transponder data up to be “Lock”.
Page 19
User instructions “RSD - 7255”
19
ENGLISH
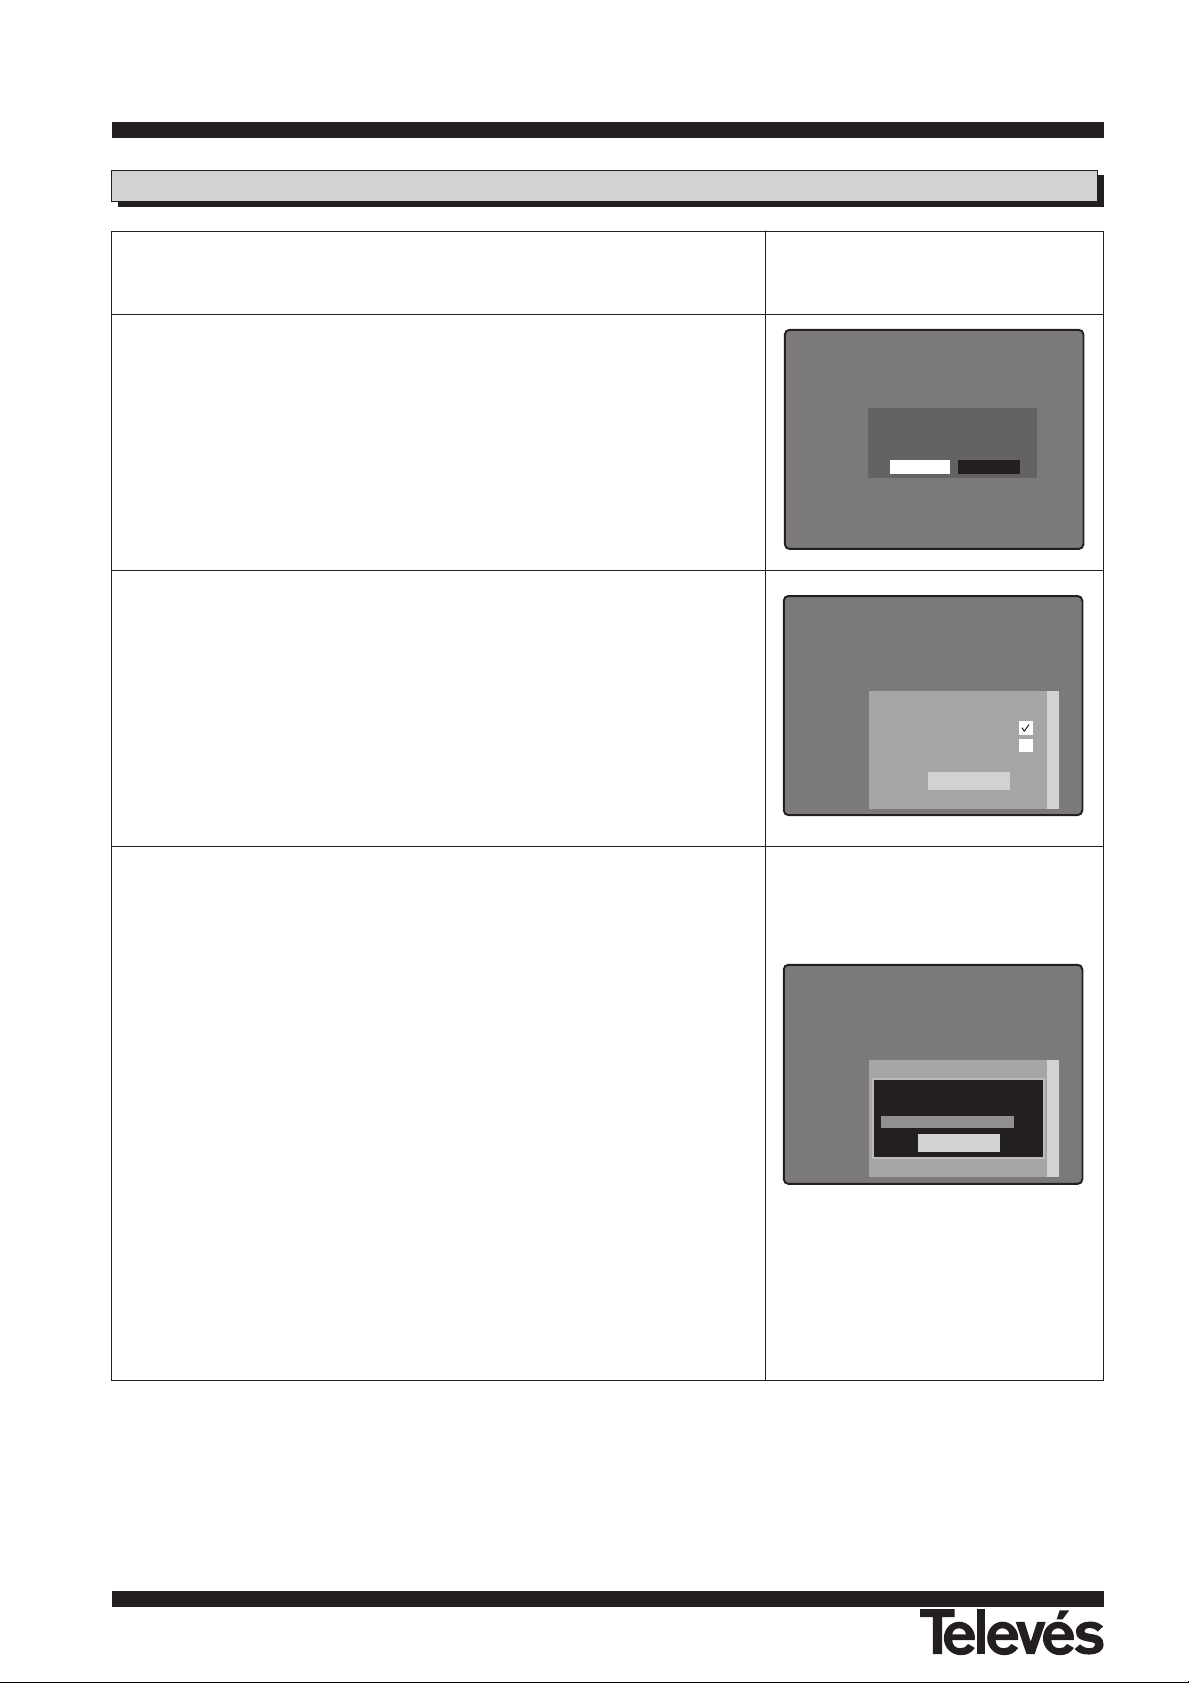
If you would like to restrict access to some channels, you can set a "Parental
Lock" on these channels. And then you can prevent your children from
watching channels, which are unsuitable for them.
Only the person who knows the password can watch the locked channels.
1
The Password is made up of 4 digits, which are not shown on the
screen. Only asterisks appear as you key in the password.
2
In order to set “Parental Lock”, key in the current password. The
factory default password is “0000”.
3
When you select a locked channel in the "Favorite TV/Radio" or
"TV/Radio Channel Manager", the message "Key in password" will
be shown. Enter the current password to watch or listen to the
selected channel.
4
An "Access denied" message will be shown on the screen when
you key in the wrong password.
5
Select “On” or “Off of the “Parental Lock” using key .
6
When you select the "Parental Lock" to be on, almost all of the
functions can be accessed only after keying in the correct
password.
7
Enter the new password when you want to change passwords.
8
Confirm the password by entering the same password a second
time in the “Confirm Password” field, if the password do not match
the message "Password not matched!" appears.
Parental Lock
For reference:
- Once you have entered the correct password in the channel list, there is no need to enter the password again, unless you
switch off the receiver.
- The receiver disposes of a General Password that will give you access to the "Parental Lock" menu if you have forgotten
your personal password. This Password is: 1 2 5 0.
Parental Lock
Current Password
****
Parental Lock OFF
New Password
****
Confirm Password
****
Parental Lock
Current Password
****
Parental Lock OFF
New Password
****
Confirm Password
****
Access Denied
OK
Page 20
User instructions “RSD - 7255”
20
Please Connect Both Receivers
Using RS-232 Communication Cable.
Select OK to Continue.
Data Transfer
RSD-7255 to RSD-7255 software upgrade and data transfer are possible
through RS-232 cable.
1
Connect TV with the master RSD-7255. Select "Data Transfer" of
the master RSD-7255
2
Connect slave RSD-7255 (should be in stand-by mode) with master
RSD-7255 using RS-232 cable when "Please connect both
receivers using RS-232 communication cable, Select OK to
continue" message is on the screen and select “OK”.
3
In the menu of “Data Transfer”, please place a mark on the item as
needed. If you want to transfer both “User Data” and “Software”,
please check both of them at one time:
- User Data Transfer: This will upgrade the Satellite, Transponder
and Channel data.
- Software Transfer: This will upgrade software of RSD-7255.
4
Start the data transfer by selecting “Start” button.
5
The following message will turn up on the screen:
- Connecting...: This means connecting both receivers by RS-232
cable.
- Connecting .... complete: Connecting is successful.
- Uploading .... blocks x/x: Shows the numbers of blocks
unloading
- Writing ... data (In the software transfer menu.): This is writing
the uploaded software into the flash ROM of slave RSD-7255.
- Data Transfer Complete: Data transfer is completed.
6
If you want to stop data transfer during the User Data Transfer or
Software Transfer, select “Stop” and press OK (LIST) key. Then, the
previous menu will come up.
7
Upon the completion of Data Transfer, the power of the slave RSD7255 will be Off and On.
If a “Software transfer” has taken place once, switch the secondary
receiver on again and carry out the "Factory Default" operation.
OK CANCEL
Data Transfer
User Data Transfer
Software Transfer
Start
Data Transfer
User Data Transfer
Conecting ...
0%
Stop
Precaution:
Please be sure to prevent from interrupting power in the process of "Writing ... Data". In case of power interruption, the slave
RSD-7255 will lose the software.
Page 21
User instructions “RSD - 7255”
21
ENGLISH
Options Menu
OSD Language
Time Offset
Summer Time
LNB Power
Screen Format
TV Type
UHF Standard
Select the appropriate language.
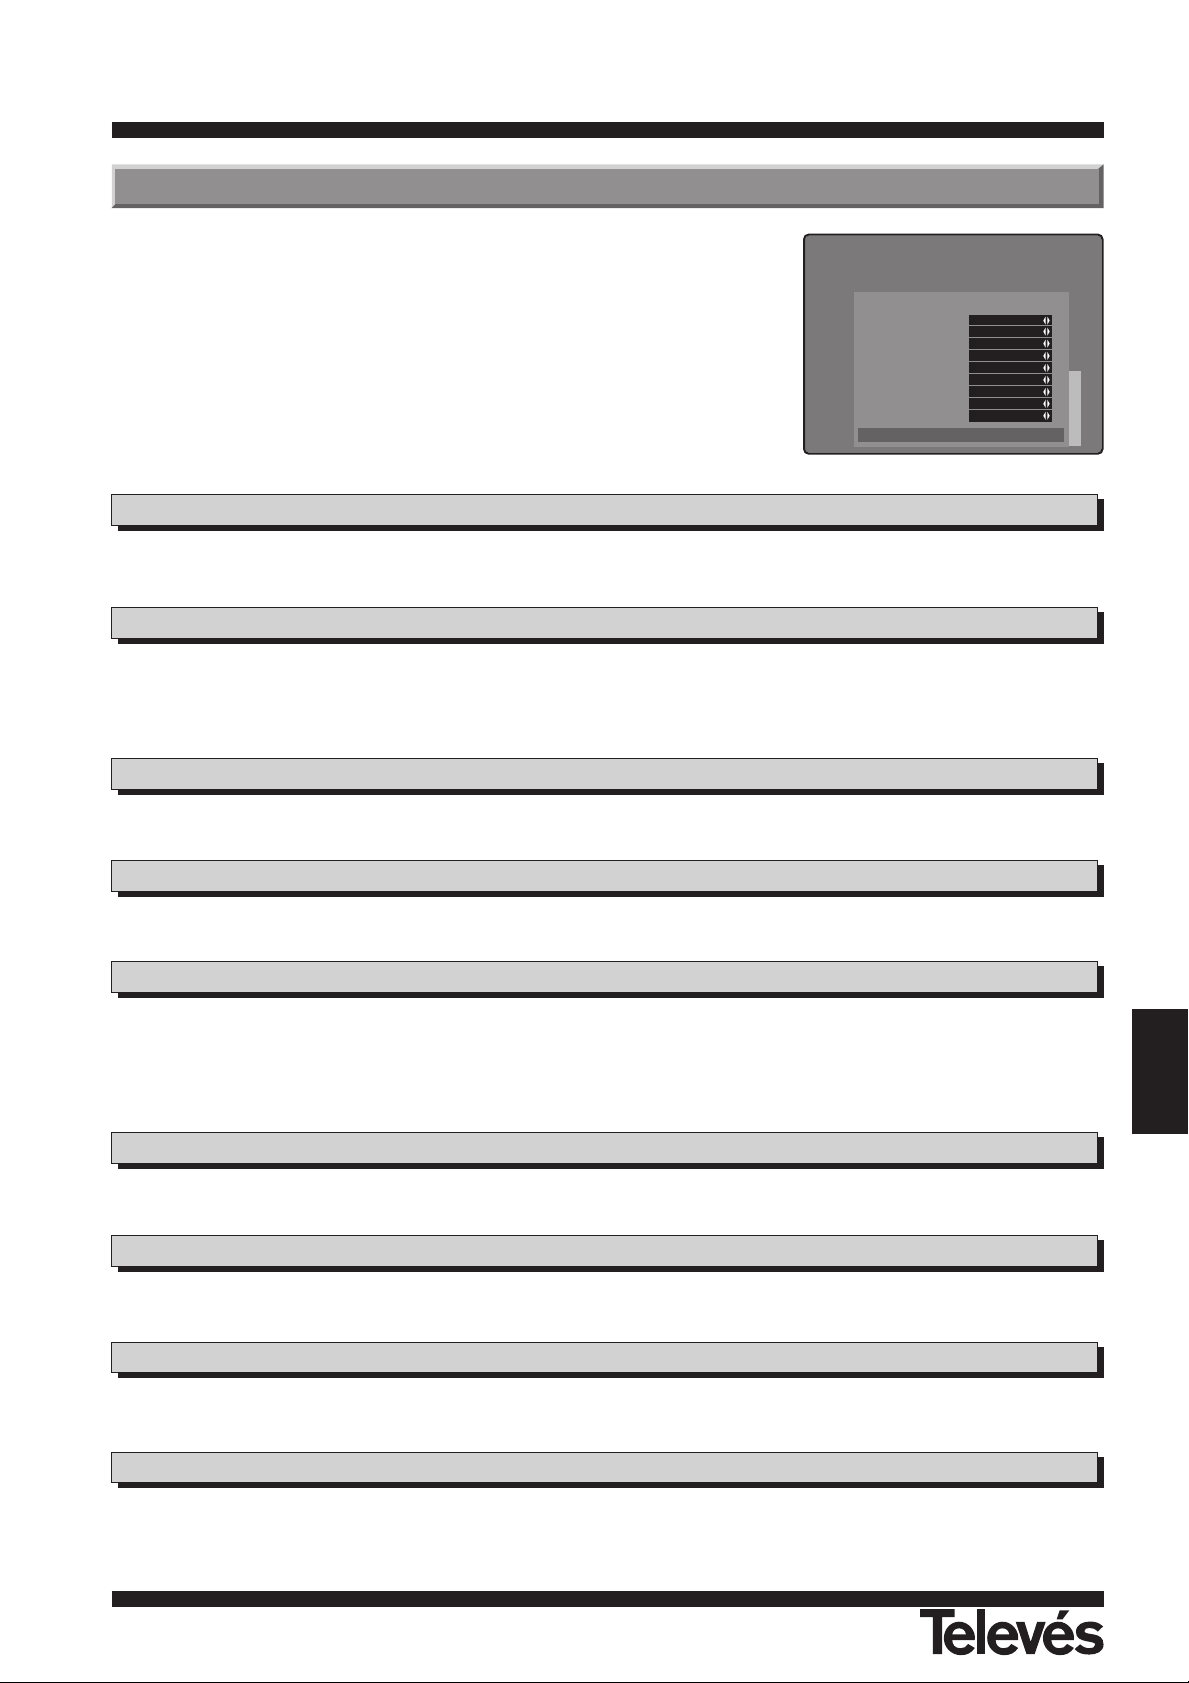
The "Options" menu allows the user to customize to his/her personal preference and location.
Local time can be adjusted within +/- 12 hours referring to UTC.
For your reference, when you adjust the time, the name of cities in the same time zone will be shown at the bottom of screen.
Summer Time can be set to "ON" or "OFF" depending on your location and season of a year.
LNB power can be switched "ON" or "OFF" depending on the installation the receiver is used in.
Screen Ratio can be changed from "4 : 3 " to " 1 6 : 9" as per the preference of the user.
If 4:3 has been selected, all the programs will be seen according to this.
If 16:9 has been selected, the screen format will be automatically adjusted according to the program being viewed.
Video Output
Two video output modes are supported: "CVBS" and "RGB".
Three monitor types are supported: "PAL", "NTSC" and "PAL & NTSC".
You can select the PALoutput type for the RF modulator. Types are: "PALG", “PALI”, "PALK" and “NTSC M”.
UHF Channel
You can select a RF channel ranging from "21" to "69" (14 to 83 “USA Channel”), through the PLL type RF modulator for
tuning terrestrial TV channel. The default channel of the receiver is "40”.
Options
ENG. GER. SPA. FRE. POR. ARB.
OSD Language English
Time Offset +1:00
Summer Time ON
LNB Power ON
Screen Format 4:3
Video Output CVBS
TV Type PAL
UHF Standard PAL G
UHF Channel NO. 40
Page 22
User instructions “RSD - 7255”
22
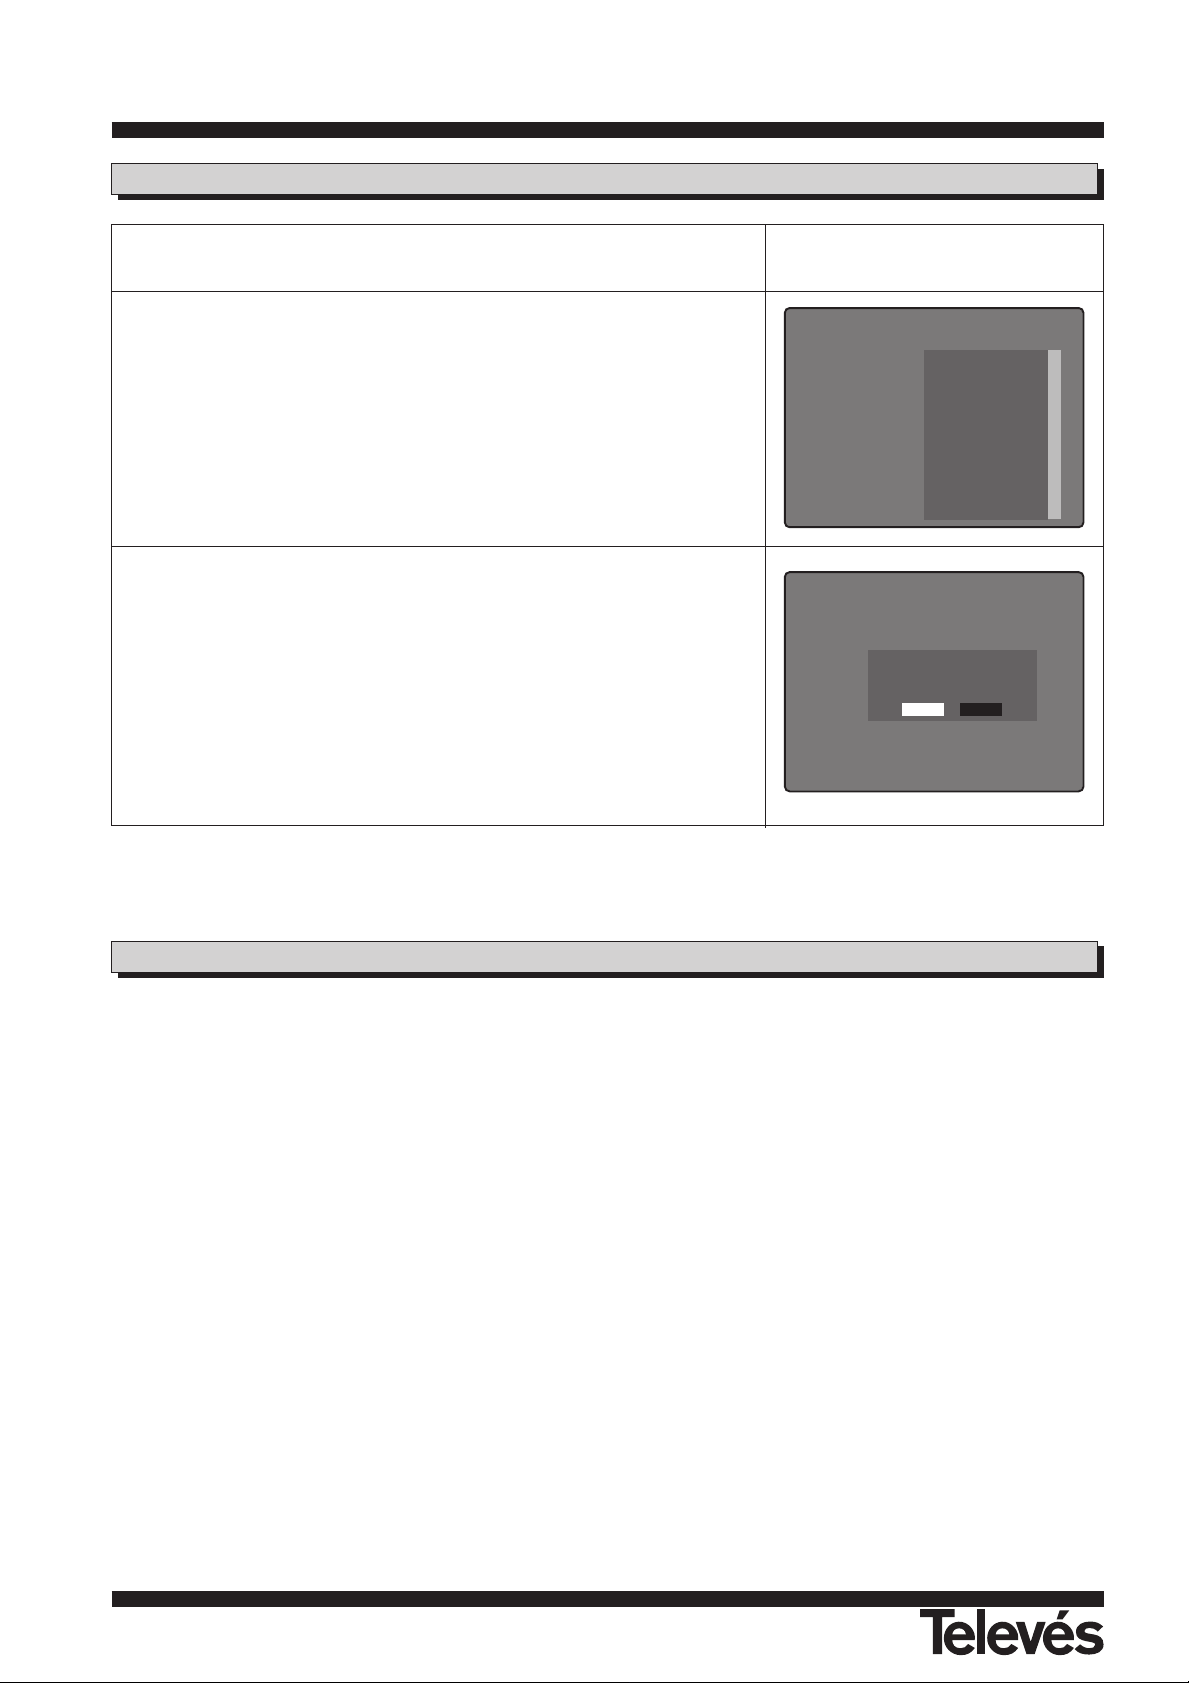
Warning!
All Channel will be DELETED
And all TPData will be INITIALIZED!
Factory Default
This function will reset all of the parameters to the factory default values.
1
If you select and press OK (LIST) key on the "Load Factory", the
following will happen:
- All data for each transponder will be changed to the factory default
value.
- All channels in the list will be deleted.
- User installed options will be changed to their factory default value.
2
When this menu is selected, a message will be shown on the
screen.
Menu .
Channel Manager
TV Channel
Radio Channel
Program Guide
Timer
User Installation
Antenna Setup
Auto Search
TP Setup
Parental Lock
Option
Data Transfer
Factory Default
Receiver Info.
YES NO
Receiver Info
"Receiver Info" section has a brief introduction of the RSD-7255.
Page 23

User instructions “RSD - 7255”
23
ENGLISH
Technical Specifications
System capabilities Fully DVB compliant
Demodulator
Waveform QPSK
Symbol rate 1-45Msps
Video decoder
MPEG-2 Main Profile @ Main Level
Data Rates > 15Mbits/s
Video formats 4:3, 16:9
Audio decoder
MPEG-1 layer I & II (Musicam Audio)
Mono, Dual channel, Stereo, Joint stereo
Application system resources
Processor STi 5500
RAM memory 2 Mbyte
Flash memory 1 Mbyte
Graphic display 720 x 576 (PAL)
720 x 480 (NTSC)
LNB / Tuner input
Connector 2 x “F” type
Input frequency 950 - 2150 MHz
LNB Supply 13/18V, max. 400 mA
Band switch control 22 KHz
C & Ku Band capable
SCPC and MCPC capable
TV Scart RGB, CVBS, Audio L/R
RF Modulator
Input connector IEC Female
Output connector IEC Male
CCIR channel 21 to 69
USA channel 14 to 83
RF signal PALB/G, I, D/K, NTSC M
VCR Scart CVBS IN/OUT, Audio L/R IN/OUT
Control Output (0/12)
Connector 1 x RCA
Voltage 0/12 volts
Composite video output
Connector 1 x RCA
Hi-Fi quality audio output
Connector 2 x RCA(L/R)
Serial data interface
Connector 9-pin D-sub
Signals RS232 max.19,2K baud
S-VHS Output
Connector 1 x 4 pin Mini Din
Connector summary
1 x LNB input (F-type)
1 x LNB output (F-type)
2 x SCARTS(TV, VCR)
4 x RCA jacks (VBS, 0/12V, AUDIO L/R)
1 x RS232 (9-pin D-sub)
1 x S-VHS (4-pin MIni Din)
2 x RF Modulator (IEC)
Input voltage AC 100 - 240V, 50-60 Hz
Power consumption 35W
Dimension (W x D x H) 370 x 250 x 60 mm
Weight 2,5 Kg
Page 24
User instructions “RSD - 7255”
24
Check Signal
Start
Set PID
TP DataTransponderAntenna Select
TP Search
Installation
Search Option
Antenna Select
Auto Search
Start
Antenna, Satellite, LNB, 0/12V
14/18V, 22KHz, DiSEqC
Antenna Setup
Parental Lock Password ON/OFF
OSD Language
Time Offset
Summer Time
LNB Power
Screen Format
Video Output
TV Type
Eng. Ger. Spa.
Fre. Por. Arb.
-12:00~+12:00
ON, OFF
4:3, 16:9
RGB, CVBS
PAL, NTSC,
PAL&NTSC
Option
Radio Channel
TV Channel
Channel Manager
Factory Default
Receiver Info
Program Guide
Signal Level
Go to Auto Search
Positioning Help
Delete TP
UHF Standard
PAL G, I, K
NTSC M
UHF Channel
21 - 69 (14 - 83)
ON, OFF
Data Transfer
User Data Transfer
Software Transfer
Timer
Turn OFF
Turn ON
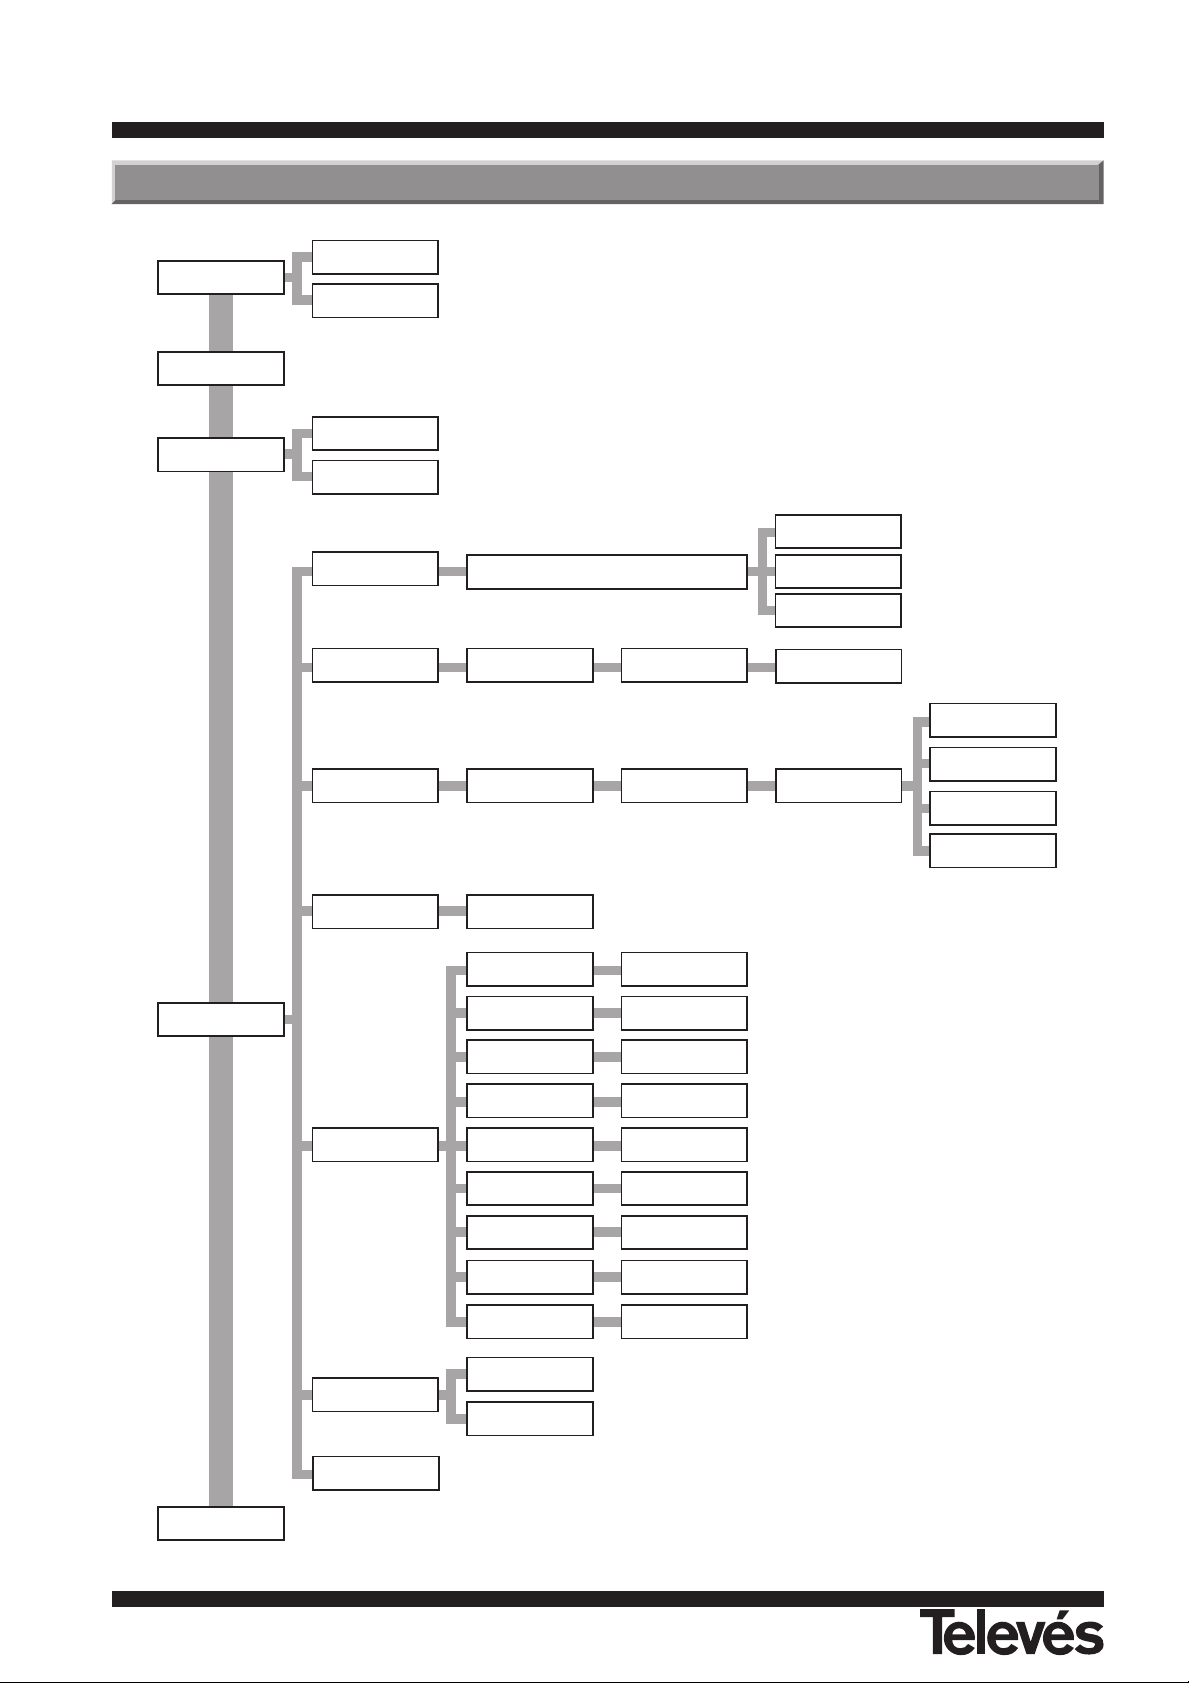
Flow Chart of Menu
Page 25

“RSD - 7255”
25
Garantie
Televés S.A offre une garantie de 6 mois calculée à partir de la date d'achat, c'est pourquoi, il est important de conser-
ver la facture d'achat car elle vous servira de justificatif.
Pendant la période de garantie, Televés S.A. prend à sa charge les failles dues au matériel ou à sa fabrication. Televés
S.A. assure la garantie en réparant ou substituant le produit défectueux selon la nécessité.
Ne sont pas inclus dans la garantie les failles provoquées par un usage inadéquate, l'usure du produit, la manipulation
de tiers, les catastrophes ou d'autres causes que Televés S.A. ne peut contrôler.
Guarantee
Televes S.A. offers a six-month guarantee, beginning from the date of purchase. Retain the receipt to determine this
date.
During the guarantee period, Televes S.A. is responsible for the faults produced due to the defects of the equipment or
manufacturing. Televes S.A. complies with the guarantee by repairing or substituting the faulty equipment as it believes
necessary.
The harm produced by improper usage, wear and tear, manipulation by a third party, catastrophes or any other cause
beyond the control of Televes S.A, is not included in the guarantee.
Page 26
A CORUÑA
SANTIAGO
VIGO
VALENCIA
OPORTO
LISBOA
MADRID
ZARAGOZA
BILBAO
BARCELONA
MURCIA
MALAGA
SEVILLA
OVIEDO
LUGO
OURENSE
CANTABRIA
GUIPUZCOA
LEON
BURGOS
ALAVA
NAVARRA
LA RIOJA
HUESCA
TARRAGONA
SEGOVIA
GUADALAJARA
AVILA
CUENCA
TOLEDO
CIUDAD REAL
TERUEL
CASTELLON
BADAJOZ
CORDOBA
HUELVA
CADIZ
JAEN
GRANADA
ALMERIA
ALBACETE
ALICANTE
SALAMANCA
PALENCIA
ZAMORA
VALLADOLID
GIRONA
PALMA DE
MALLORCA
BALEARES
CANARIAS
TENERIFE
LAS PALMAS
SUCURSALES
DELEGACIONES
FABRICAS
SORIA
CACERES
ZAMORA N
DELEGACIONES
ALMERIA C.P. 04008
Campogrís 9.
Tfno. 950 23 14 43
Fax 950 23 14 43
[email protected]
BADAJOZ C.P. 06010
Jacobo Rodriguez Pereira 11
Oficina.
Tfno. 924 20 74 83
Fax. 924 20 01 15
[email protected]
BURGOS C.P. 09080
C/ Juan Vazquez 32.
Tfno. 947 22 78 47 / 909 41 91 95
Fax 947 21 07 31
CACERES C.P.10005
Residencial San Francisco
Blq.1 1ºD.
Tfno. 927 23 14 56 / 900 40 25 00
Fax. 927 23 17 29
CORDOBA C.P. 14012
C/Sta. Rafaela Mª del
Sagrado Corazon 2.
Tfno. 957 27 09 80 / 919 55 55 73
Fax 957 40 30 44
GRANADA C.P. 18008
C/ Alhamí 16. Bajo
Tfno. 958 81 22 81 / 908 95 83 32
Fax 958 81 22 81
[email protected]
JAEN C.P. 23007
Hermanos Pinzón 8.
Tfno. 953 29 50 40 / 953 29 52 21
639 98 44 89
Fax 953 29 52 10
LA RIOJA C.P. 26004
San Prudencio 19. bajo
Tfno. 941 23 35 24
Fax 941 25 50 78
MALAGA C.P.29004
Polígono de Santa Bárbara
C/ Fidias 13.
Tfno. 95 223 98 81
Fax 95 217 37 30
[email protected]
NAVARRA C.P.(Pamplona) 31007
Avda. Sancho el Fuerte 9.
Tfno. 948 27 35 10
Fax 948 17 41 49
[email protected]
OVIEDO C.P.33006
Avda. Buenavista 16.
Tfno. 98 524 43 33
Fax 98 524 41 44
GIRONA C.P. 17190 (Salt)
Ramón Sambola. 9º Ent. 1ª.
Tfno. 972 23 25 43 / 907 23 88 40
PALMA DE MALLORCA C.P. 07007
Ferrer de Pallares 45. bajo D.
Tfno. 971 24 70 02
Fax 971 24 53 42
SALAMANCA
ZAMORA
VALLADOLID C.P. 47008
C/ Arrecife 12.
Tfno. 983 22 36 66
Fax 983 22 36 66
HUESCA
ZARAGOZA C.P. 50002
C/ Monasterio de Alahón 1-3.
Tfno. 976 41 12 73
Fax 976 59 86 86
TELEVES ELECTRONICA
PORTUGUESA
MAIA - OPORTO
Via . Dr Francisco Sa Carneiro. Lote 17.
ZONA Ind. MAIA 1. Sector-X MAIA.
C.P. 4470 BARCA
Tfno. 351 2 9418313
Fax 351 2 9488719/9416180
E-mail: [email protected]
LISBOA
C.P. 1000 Rua Augusto Gil 21-A.
Tfno. 351 1 7932537
Fax 351 1 7932418
E-mail: [email protected]
TELEVES UNITED
KINGDOM LTD
Unit 11 Hill Street, Industrial State
CWMBRAN, GWENT NP44 7PG.
(United Kingdom)
Tfno. 44 01 633 87 58 21
Fax 44 01 633 86 63 11
E-mail: [email protected]
TELEVES FRANCE S.A.R.L.
Parc des Arpents
12 Rue du Pré des Aulnes.
77340 PONTAULT-COMBAULT.(France)
Tfno. 33 01 60 18 30 40.
Fax 33 01 60 18 30 49.
E-mail [email protected]
TELEVES MIDDLE EAST FZE
P.O. Box 17199
JEBELALI FREE ZONE DUBAI
UNITED ARAB EMIRATES
Tel. 971 4834 344
Fax. 971 4834 644
E-mail [email protected]
SUCURSALES
BARCELONA C.P. 08940
C/ Sant Ferrán, 27
Cornellá - Barcelona
Telfs. 93 377 08 62 / 93 474 29 50
Fax 93 474 50 06
E-mail [email protected]
BILBAO C.P. 48002
Mendipe 12.
Tfnos. 94 421 50 44 / 443 80 66
Fax 94 444 89 92
[email protected]
A CORUÑA C.P. 15011
Gregorio Hernández 8.
Tfnos. 981 27 47 31 / 27 22 10
Fax 981 27 16 11
[email protected]
LAS PALMAS C.P. 35006
Gral. Mas de Gaminde 26.
Tfnos. 928 23 11 22 / 23 12 42
Fax 928 23 13 66
[email protected]
MADRID C.P. 28005
Paseo de los Pontones 11.
Tfnos. 91 474 52 21 / 474 52 22
Fax 91 474 54 21
[email protected]
MURCIA C.P. 30010
Polígono Conver - C/ Rio Pliego 22.
Tfnos. 968 26 31 44 / 26 31 77
Fax 968 25 25 76
[email protected]
SEVILLA C.P. 41008
Pol. Ind. Store - C/ A-6. Nave 5
Tfnos. 95 443 64 50 / 443 58 00
Fax 95 443 96 93
[email protected]
TENERIFE C.P. 38108
Avda. El Paso, 25 - Los Majuelos
La Laguna.
Tfnos. 922 31 13 14 / 31 13 16
Fax 922 31 13 33
[email protected]
VALENCIA C.P. 46021
Avda. del Puerto 21.
Tfnos. 96 337 12 01 / 337 12 72
Fax 96 337 06 98
[email protected]
VIGO C.P. 36204
Escultor Gregorio Fernández, 5
Tfnos. 986 42 33 87 / 42 40 44
Fax 986 42 37 94
[email protected]
ER 224/1/94
SEDE CENTRAL
SANTIAGO DE COMPOSTELA C.P. 15706
Rúa B. de Conxo, 17
Tfno. 981 52 22 00
Fax 981 52 22 62
Apartado 444
E-mail: [email protected]
www.televes.com
103035/0 - 0-04
 Loading...