

Page 1
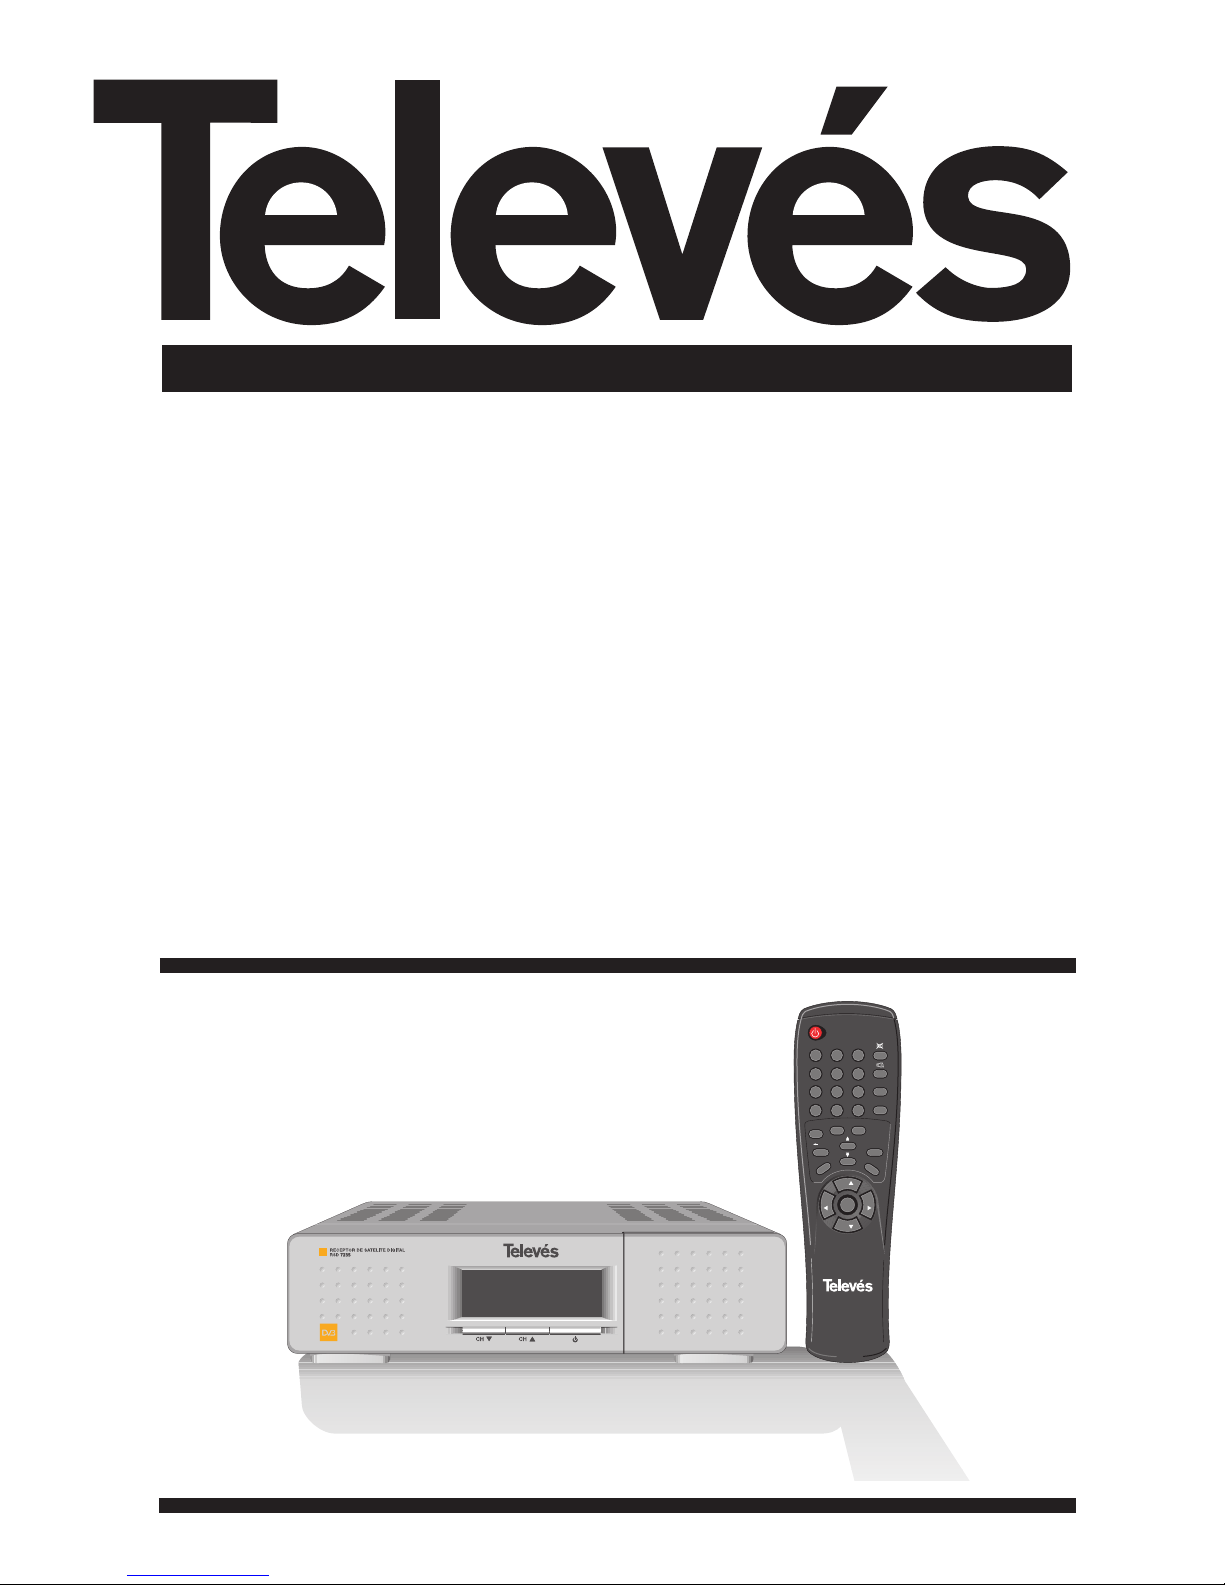
Receptor Satelite Digital Manual do utilizador
Digital Satellite Receiver
User instructions
“RSD - 7235”
FUNC PAUSE
EPG
ALT
TV/SAT TV/RADIO
PR INFO
EXIT
MENU
CH
VOL VOL
TXT
123
456
789
0
CH
OK
© Copyright, Televés, S.A.
Page 2

User instructions “RSD - 7235”
31
ENGLISH
INDEX . . . . . . . . . . . . . . . . . . . . . . . . . . . . . . . . . . . . . . . . . . . . . . . . . . . . . . . . . . . . . . . . . . . . . . . . . . . . . . . . . . Pg.
1.- Safety . . . . . . . . . . . . . . . . . . . . . . . . . . . . . . . . . . . . . . . . . . . . . . . . . . . . . . . . . . . . . . . . . . . . . . . . . . . . . . . . . . 32
2.- Before beginning . . . . . . . . . . . . . . . . . . . . . . . . . . . . . . . . . . . . . . . . . . . . . . . . . . . . . . . . . . . . . . . . . . . . . . . . . . . . . . 33
2.1.- Preface . . . . . . . . . . . . . . . . . . . . . . . . . . . . . . . . . . . . . . . . . . . . . . . . . . . . . . . . . . . . . . . . . . . . . . . . . . . . . 33
2.2.- General specifications . . . . . . . . . . . . . . . . . . . . . . . . . . . . . . . . . . . . . . . . . . . . . . . . . . . . . . . . . . . . . . . . . . 33
2.3.- Equipment . . . . . . . . . . . . . . . . . . . . . . . . . . . . . . . . . . . . . . . . . . . . . . . . . . . . . . . . . . . . . . . . . . . . . . . . . . . . 33
3.- Description of panels and connections . . . . . . . . . . . . . . . . . . . . . . . . . . . . . . . . . . . . . . . . . . . . . . . . . . . . . . . . . . . . . 34
4.- Installation of equipment . . . . . . . . . . . . . . . . . . . . . . . . . . . . . . . . . . . . . . . . . . . . . . . . . . . . . . . . . . . . . . . . . . . . . . . . 36
4.1.- Connections . . . . . . . . . . . . . . . . . . . . . . . . . . . . . . . . . . . . . . . . . . . . . . . . . . . . . . . . . . . . . . . . . . . . . . . . . . 36
5.- Ready to begin . . . . . . . . . . . . . . . . . . . . . . . . . . . . . . . . . . . . . . . . . . . . . . . . . . . . . . . . . . . . . . . . . . . . . . . . . . . . . . . 37
5.1.- How to start . . . . . . . . . . . . . . . . . . . . . . . . . . . . . . . . . . . . . . . . . . . . . . . . . . . . . . . . . . . . . . . . . . . . . . . . . . 37
5.2.- How to select TV or RADIO channels . . . . . . . . . . . . . . . . . . . . . . . . . . . . . . . . . . . . . . . . . . . . . . . . . . . . . . 37
5.3.- How to adjust the volume . . . . . . . . . . . . . . . . . . . . . . . . . . . . . . . . . . . . . . . . . . . . . . . . . . . . . . . . . . . . . . . 37
5.4.- How to mute the sound . . . . . . . . . . . . . . . . . . . . . . . . . . . . . . . . . . . . . . . . . . . . . . . . . . . . . . . . . . . . . . . . . 38
5.5.- Audio language . . . . . . . . . . . . . . . . . . . . . . . . . . . . . . . . . . . . . . . . . . . . . . . . . . . . . . . . . . . . . . . . . . . . . . . 38
5.6.- How to return to the previous channel . . . . . . . . . . . . . . . . . . . . . . . . . . . . . . . . . . . . . . . . . . . . . . . . . . . . . . 38
5.7.- How to return and automatically save the last channel . . . . . . . . . . . . . . . . . . . . . . . . . . . . . . . . . . . . . . . . . 38
5.8.- Electronic Programming Guide (EPG) . . . . . . . . . . . . . . . . . . . . . . . . . . . . . . . . . . . . . . . . . . . . . . . . . . . . . . 39
5.9.- Audio output modes . . . . . . . . . . . . . . . . . . . . . . . . . . . . . . . . . . . . . . . . . . . . . . . . . . . . . . . . . . . . . . . . . . . . 39
5.10.- How to use the Favorite Channel List . . . . . . . . . . . . . . . . . . . . . . . . . . . . . . . . . . . . . . . . . . . . . . . . . . . . . 40
5.11.- Teletext . . . . . . . . . . . . . . . . . . . . . . . . . . . . . . . . . . . . . . . . . . . . . . . . . . . . . . . . . . . . . . . . . . . . . . . . . . . . . 40
5.12.- Pause . . . . . . . . . . . . . . . . . . . . . . . . . . . . . . . . . . . . . . . . . . . . . . . . . . . . . . . . . . . . . . . . . . . . . . . . . . . . . . 40
6.- Main Menu . . . . . . . . . . . . . . . . . . . . . . . . . . . . . . . . . . . . . . . . . . . . . . . . . . . . . . . . . . . . . . . . . . . . . . . . . . . . . . . . . 41
6.1.- Menu structure . . . . . . . . . . . . . . . . . . . . . . . . . . . . . . . . . . . . . . . . . . . . . . . . . . . . . . . . . . . . . . . . . . . . . . . . 41
7.- Channel Manager Menu . . . . . . . . . . . . . . . . . . . . . . . . . . . . . . . . . . . . . . . . . . . . . . . . . . . . . . . . . . . . . . . . . . . . . . . . 42
7.1.- TV / RADIO channels . . . . . . . . . . . . . . . . . . . . . . . . . . . . . . . . . . . . . . . . . . . . . . . . . . . . . . . . . . . . . . . . . . . 42
8.- User Installation Menu . . . . . . . . . . . . . . . . . . . . . . . . . . . . . . . . . . . . . . . . . . . . . . . . . . . . . . . . . . . . . . . . . . . . . . . . . . 44
8.1.- Antenna Setup . . . . . . . . . . . . . . . . . . . . . . . . . . . . . . . . . . . . . . . . . . . . . . . . . . . . . . . . . . . . . . . . . . . . . . . . 44
8.2.- Auto Search (satellite exploration) . . . . . . . . . . . . . . . . . . . . . . . . . . . . . . . . . . . . . . . . . . . . . . . . . . . . . . . . . 46
8.3.- TP Setup (transponder exploration) . . . . . . . . . . . . . . . . . . . . . . . . . . . . . . . . . . . . . . . . . . . . . . . . . . . . . . . . 48
8.4.- Parental Lock (access control) . . . . . . . . . . . . . . . . . . . . . . . . . . . . . . . . . . . . . . . . . . . . . . . . . . . . . . . . . . . 50
8.5.- Options . . . . . . . . . . . . . . . . . . . . . . . . . . . . . . . . . . . . . . . . . . . . . . . . . . . . . . . . . . . . . . . . . . . . . . . . . . . . . 51
- OSD Language . . . . . . . . . . . . . . . . . . . . . . . . . . . . . . . . . . . . . . . . . . . . . . . . . . . . . . . . . . . . . . . . . . . . 51
- 1st Audio languange . . . . . . . . . . . . . . . . . . . . . . . . . . . . . . . . . . . . . . . . . . . . . . . . . . . . . . . . . . . . . . . . 51
- 2nd Audio language . . . . . . . . . . . . . . . . . . . . . . . . . . . . . . . . . . . . . . . . . . . . . . . . . . . . . . . . . . . . . . . . 51
- Time Offset . . . . . . . . . . . . . . . . . . . . . . . . . . . . . . . . . . . . . . . . . . . . . . . . . . . . . . . . . . . . . . . . . . . . . . . 51
- Summer Time . . . . . . . . . . . . . . . . . . . . . . . . . . . . . . . . . . . . . . . . . . . . . . . . . . . . . . . . . . . . . . . . . . . . . 51
- LNB Power . . . . . . . . . . . . . . . . . . . . . . . . . . . . . . . . . . . . . . . . . . . . . . . . . . . . . . . . . . . . . . . . . . . . . . . 51
- Screen Format . . . . . . . . . . . . . . . . . . . . . . . . . . . . . . . . . . . . . . . . . . . . . . . . . . . . . . . . . . . . . . . . . . . . 51
- TV Type . . . . . . . . . . . . . . . . . . . . . . . . . . . . . . . . . . . . . . . . . . . . . . . . . . . . . . . . . . . . . . . . . . . . . . . . . . 51
- Video output . . . . . . . . . . . . . . . . . . . . . . . . . . . . . . . . . . . . . . . . . . . . . . . . . . . . . . . . . . . . . . . . . . . . . . 51
8.6.- Data Transfer. (receiver download) . . . . . . . . . . . . . . . . . . . . . . . . . . . . . . . . . . . . . . . . . . . . . . . . . . . . . . . . . 52
8.7.- How to reset the Receiver to the factory settings . . . . . . . . . . . . . . . . . . . . . . . . . . . . . . . . . . . . . . . . . . . . . . 53
9.- Electronic Programming Guide (EPG). . . . . . . . . . . . . . . . . . . . . . . . . . . . . . . . . . . . . . . . . . . . . . . . . . . . . . . . . . . . . . . 54
10.- Timer Menu . . . . . . . . . . . . . . . . . . . . . . . . . . . . . . . . . . . . . . . . . . . . . . . . . . . . . . . . . . . . . . . . . . . . . . . . . . . . . . . . . 54
11.- Receiver Info . . . . . . . . . . . . . . . . . . . . . . . . . . . . . . . . . . . . . . . . . . . . . . . . . . . . . . . . . . . . . . . . . . . . . . . . . . . . . . . . 54
Annex 1.- Motor Position Setting . . . . . . . . . . . . . . . . . . . . . . . . . . . . . . . . . . . . . . . . . . . . . . . . . . . . . . . . . . . . . . . . . . . . 55
Technical specifications . . . . . . . . . . . . . . . . . . . . . . . . . . . . . . . . . . . . . . . . . . . . . . . . . . . . . . . . . . . . . . . . . . . . . . . . . . . 57
List of pre-programmed channels . . . . . . . . . . . . . . . . . . . . . . . . . . . . . . . . . . . . . . . . . . . . . . . . . . . . . . . . . . . . . . . . . . . . 59
Guarantee . . . . . . . . . . . . . . . . . . . . . . . . . . . . . . . . . . . . . . . . . . . . . . . . . . . . . . . . . . . . . . . . . . . . . . . . . . . . . . . . . . 63
Page 3
User instructions “RSD - 7235”
32
The Receiver which you have just purchased has been manufactured to meet international safety standards.
We recommend that you carefully read the safety instructions below.
POWERING:
110 - 240 V~ 50/60 Hz.
OVERLOAD:
Do not overload the mains sockets, extenders or adapters to avoid fire hazard.
LIQUIDS:
Do not spill any liquids over the Receiver.
SMALL OBJECTS:
Avoid placing small metallic objects close to the unit. These could accidentally enter through the ventilation slots of the
Receiver and cause serious damage.
CLEANLINESS:
Unplug the Receiver from the mains before beginning to clean it.
Use a slightly damp, soft cloth (no detergent) to clean the outside of the Receiver.
VENTILATION:
Place the Receiver in a well-ventilated area so that the slots are not blocked in any way.
Avoid exposure to the sun or to other sources of heat.
Do not place on top of other equipment.
CONNECTIONS:
Only carry out the recommended connections to avoid any possible damage.
LNB CONNECTIONS:
Switch the Receiver off before connecting or disconnecting the LNB.
IF THIS IS NOT DONE, THE LNB COULD BE DAMAGED.
TV or VCR CONNECTION:
Switch the Receiver off before connecting or disconnecting it to a TV or VCR.
IF THIS IS NOT DONE, THE TV or VCR COULD BE DAMAGED.
LOCATION:
The Receiver should be kept inside where it is protected against lightening, rain and direct sunlight.
1.- Safety
WARNING
RISK ELECTRICAL SHOCK
DO NOT OPEN
TO AVOID THE RISK OF AN ELECTRIC SHOCK, DO NOTTAKE THE COVER OFF.
NO PART OF THE RECEIVER CAN BE REPAIRED BYTHE USER.
PLEASE CONSULTA QUALIFIED TECHNICIAN FOR ANY REPAIR WORK.
This symbol indicates that there is the risk of an electric shock.
This symbol indicates that there are some important instructions for this particular product
Page 4
User instructions “RSD - 7235”
33
ENGLISH
- High quality video and audio.
- Easy-to-use onscreen menu.
- Remote control unit.
- Control over the channels using the
“Favorites”, “Move”, “Lock”,
“Rename”, “Delete” options, as well
as five ways of “Sort” them.
- Automatic search of the satellite’s
digital signal.
- Information of events using the EPG
(Electronic Programming Guide).
- It offers various types of LNB
switching, output modes and types of
monitors.
- It displays information about the
transponders.
- Automatic PAL/NTSC processing.
- Access control.
- Automatic saving of last channel and
return function.
- Transponders preprogrammed from
the different satellites.
- Satellite name change.
- Channel name change.
- Fast software.
- Favourite channel list.
- Automatic search of any recently
added transponders.
- DiSEqC 1.2 compatible.
- Assistance in positioning the
antenna.
- 4 digit display.
- Selectable video output (CVBSRGB).
- Timer.
- Teletext.
- Data transfer from receiver to
receiver.
- Clock.
A Digital Satellite Receiver is a product
that enables you to see a large variety
of channels that are supplied by a
satellite. This User manual explains
everything from how to install the
Receiver to the steps that need to be
taken to improve various different
functions. This manual also describes
in detail a series of functions that are
only available in this Receiver, so that
you can use them properly.
Please be sure to read this manual so
that the Receiver is installed and used
correctly, and make sure to keep it in a
safe place for future reference.
2.1.- Preface
2.2.- General specifications
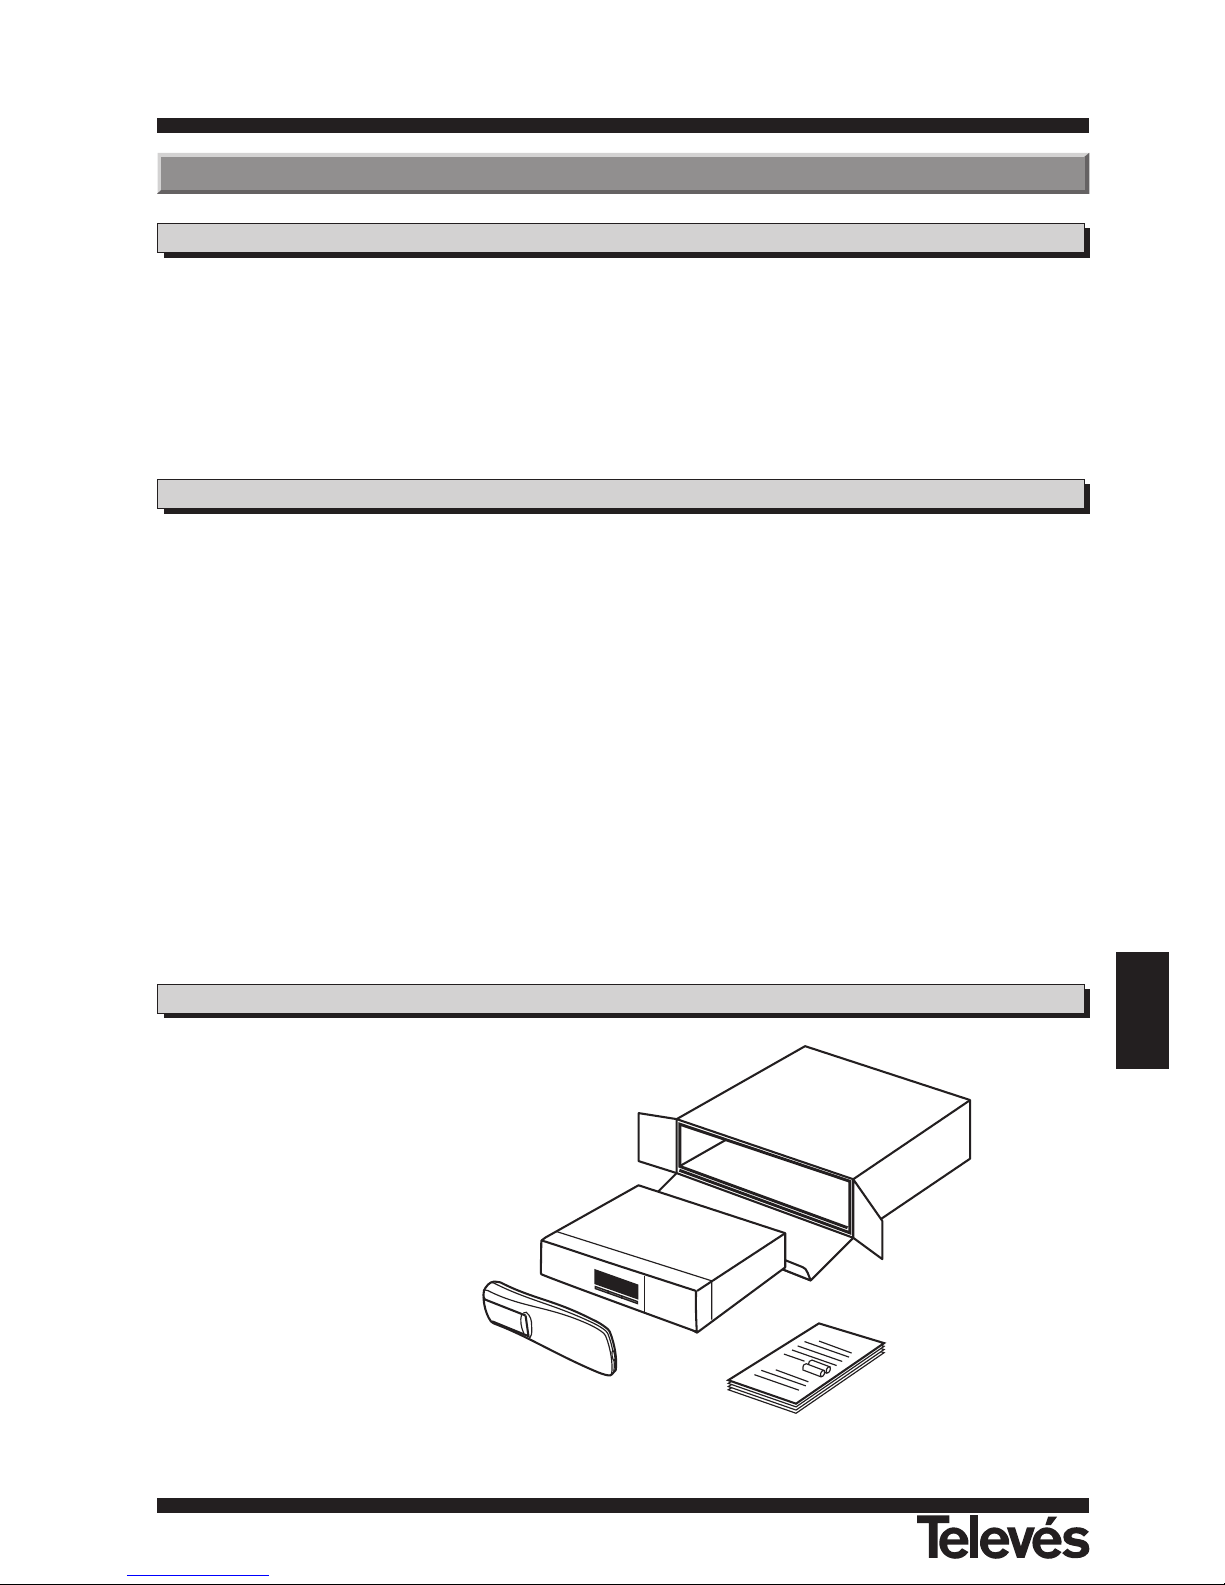
Check that all of the following parts are
in the box:
1 - Satellite Receiver RSD-7235
1 - Remote Control Unit
2 - “AA”, “R6” or “UM-3” batteries
1 - User manual
2.3.- Equipment
2.- Before beginning ...
Page 5
User instructions “RSD - 7235”
34
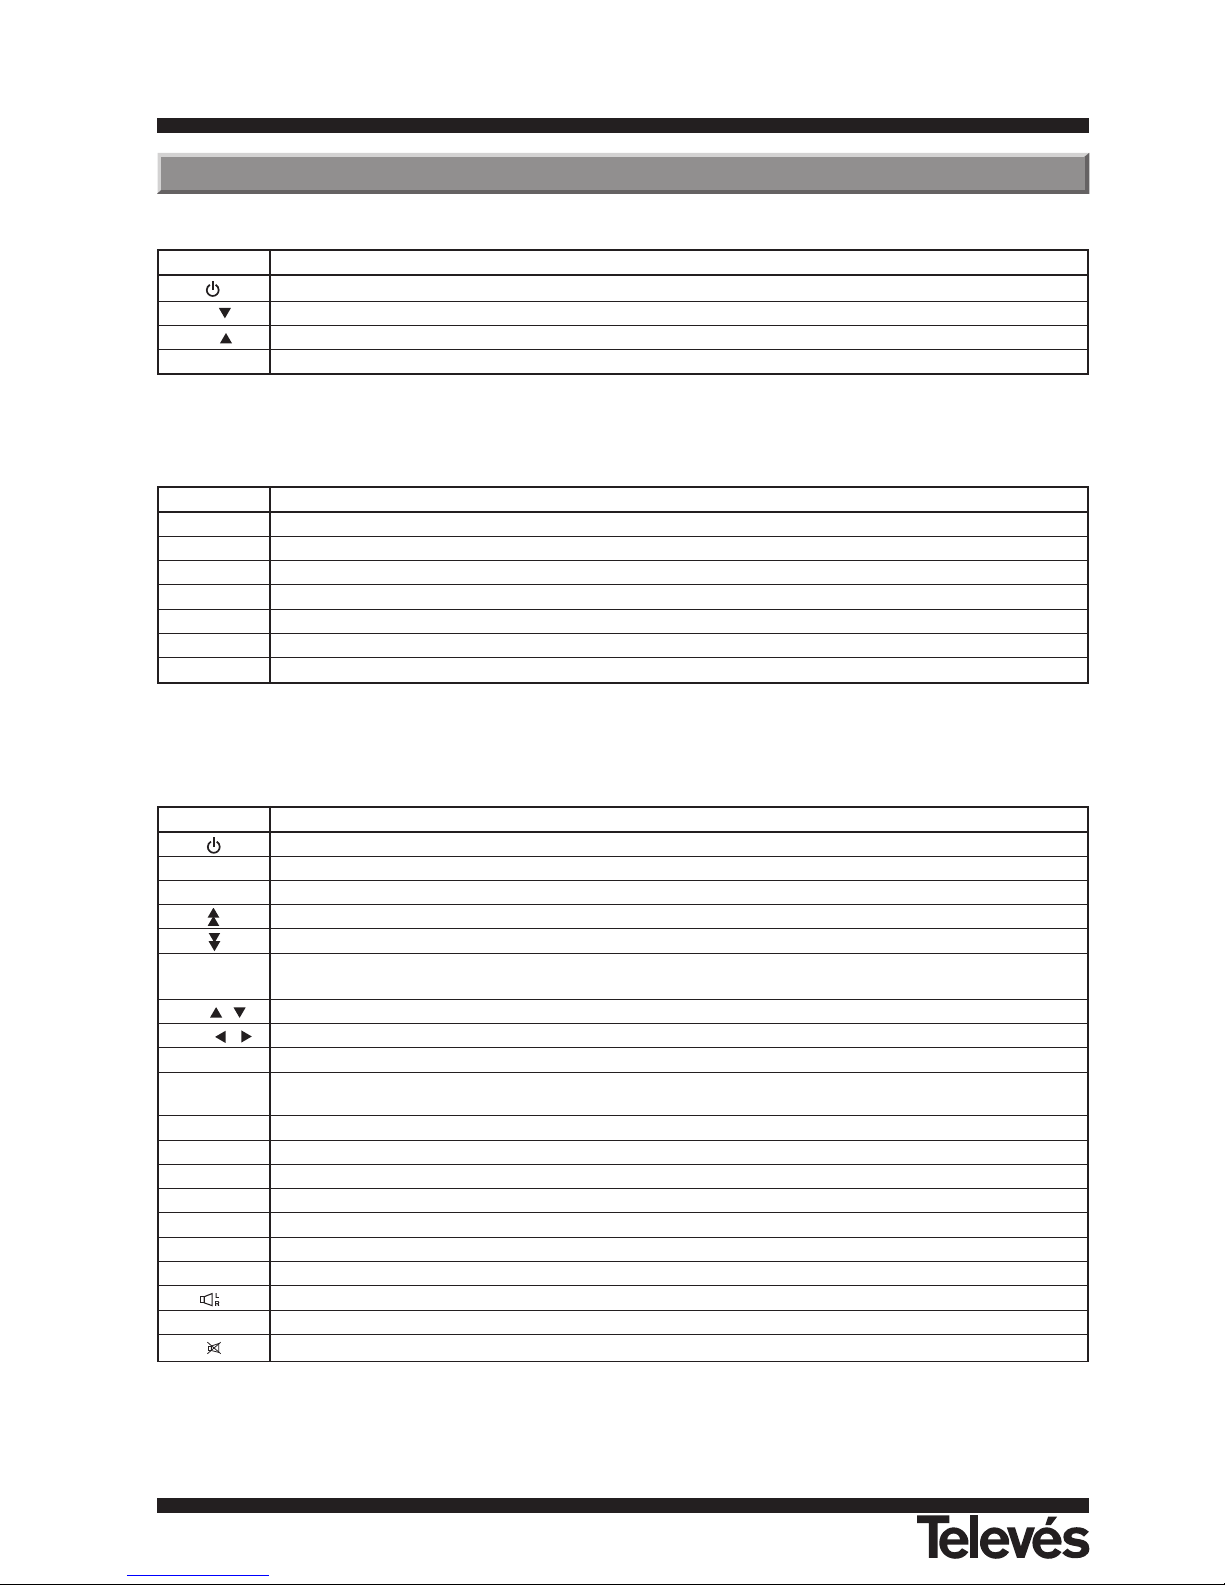
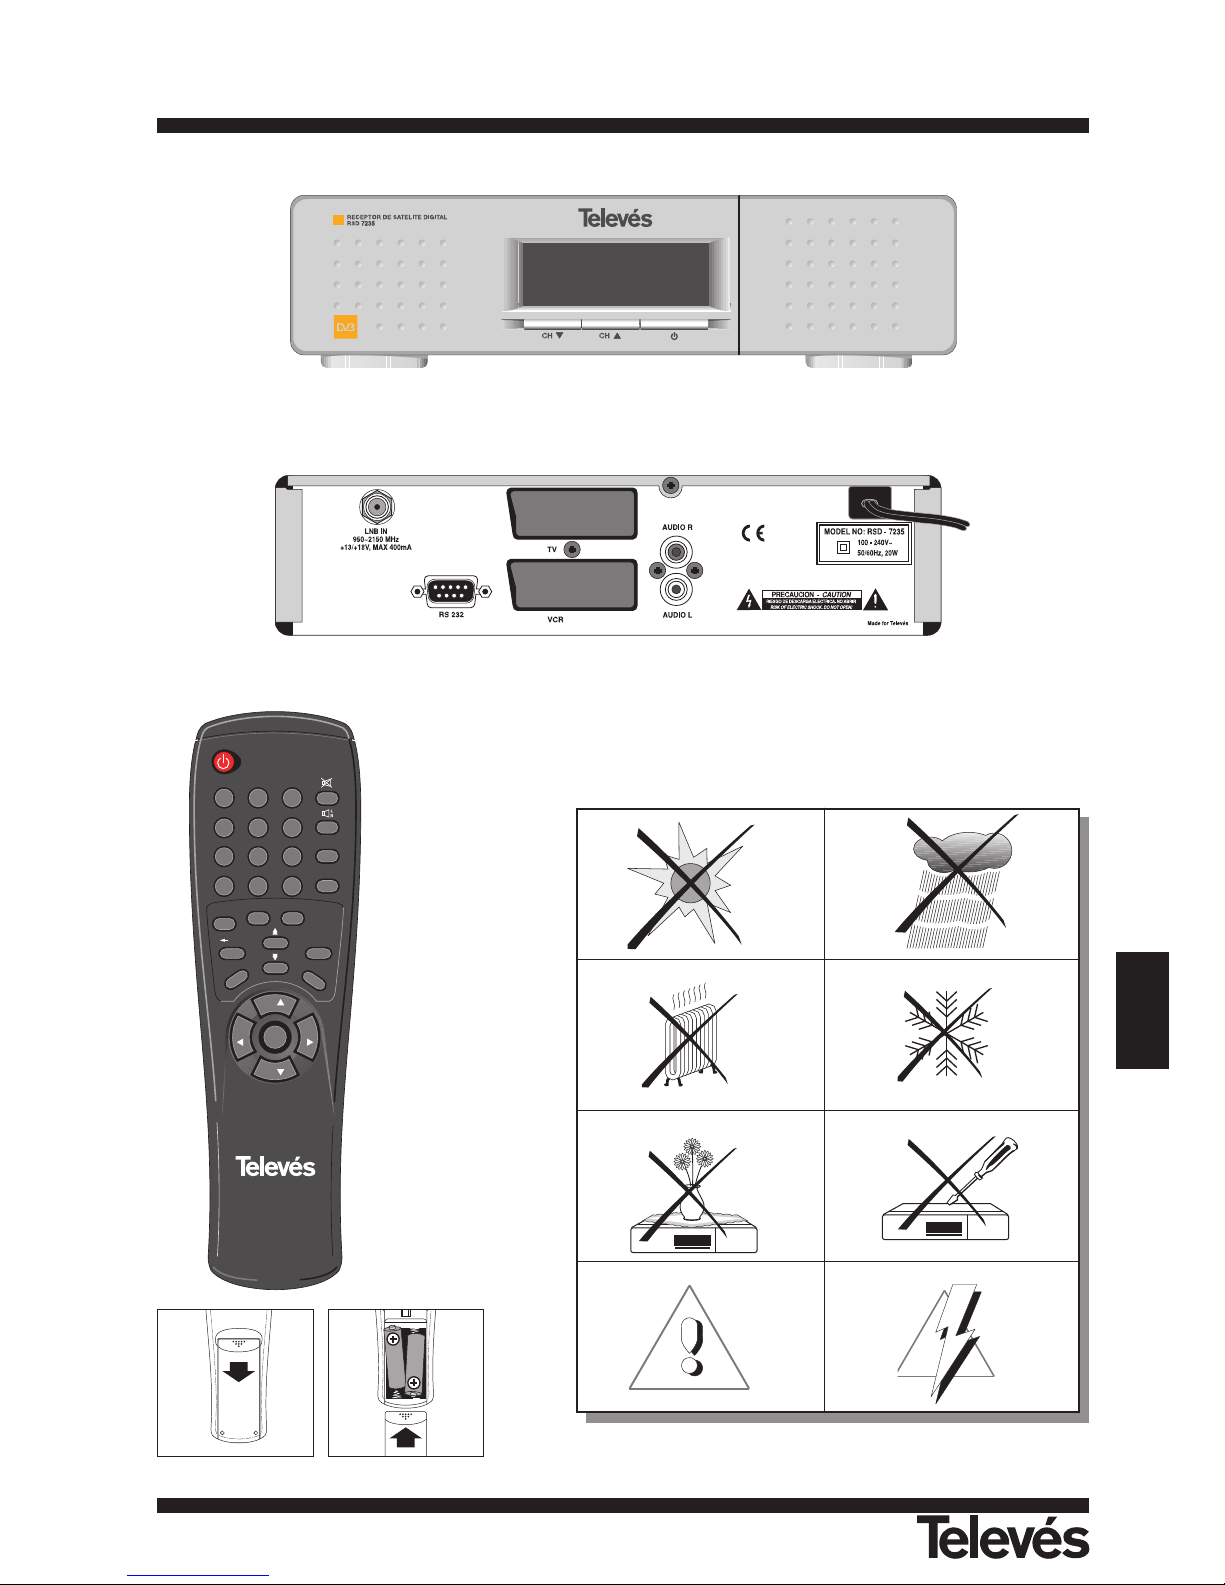
Button Function
To switch the Receiver on and off
Ch In normal mode, this goes down through the channels; in a menu, it selects the previous element.
Ch In normal mode, this goes up through the channels; in a menu, it selects the next element.
Display In normal mode, this displays the channel nº; in STANDBY mode this displays the time.
Button Function
To switch the Receiver on and off.
MENU To display the main menu on the TV screen. If it is pressed again, the menu disappears.
EXIT To return to the previous menu within the menus.
To advance onto the next page on the screen.
To return back to the previous page on the screen.
OK
To execute the selected option in the menu or enter the desired value in any input mode or display the
channel list while watching a programme.
CH , To select a programme nº above or below; in menu mode, it selects the following or previous element.
VOL , To increase or decrease the volume; in menu mode, it selects the element to the right or to the left.
0 ... 9 To directly enter the data in a menu. These buttons are also used to select a programme to watch.
FUNC.
To activate the menu to select the subtitles language.
In the Channel List, it lets you erase all the programmes.
<-- PR To return to the previous channel.
TV/SAT To switch between the TV and SAT modes.
PAUSE To pause the picture on the screen.
EPG To display the Electronic Programming Guide (EPG).
TXT To switch the Teletext on.
INFO To display information on the channel that is being watched.
TV/RADIO To switch between different TV or RADIO programmes. It switches between TV List and Radio List.
To select the different types of audio.
ALT This activates the menu to be able to select the audio language.
To mute the sound.
Name Function
TV To connect the TV using a SCART connector.
VCR To connect the VCR using a SCARTconnector.
AUDIO R Audio output (Right channel).
AUDIO L Audio output (Left channel).
RS232 Connection to a serial port or to another receiver to update the sofware.
LNB IN Signal input from the satellite antenna.
AC IN Connection to the mains (110 - 240 V~).
Fig. 3 - Remote Control
Fig. 2 - Rear Panel
Fig. 1 - Front Panel
3.- Description of panels and connections
Page 6
User instructions “RSD - 7235”
35
ENGLISH
FUNC PAUSE
EPG
ALT
TV/SAT TV/RADIO
PR INFO
EXIT
MENU
CH
VOL VOL
TXT
1 2 3
4 5 6
7 8 9
0
CH
OK
< -5°C
> 95 %
> 50°C
Fig. -1-
Fig. -2-
Fig. -3-
Page 7
User instructions “RSD - 7235”
36
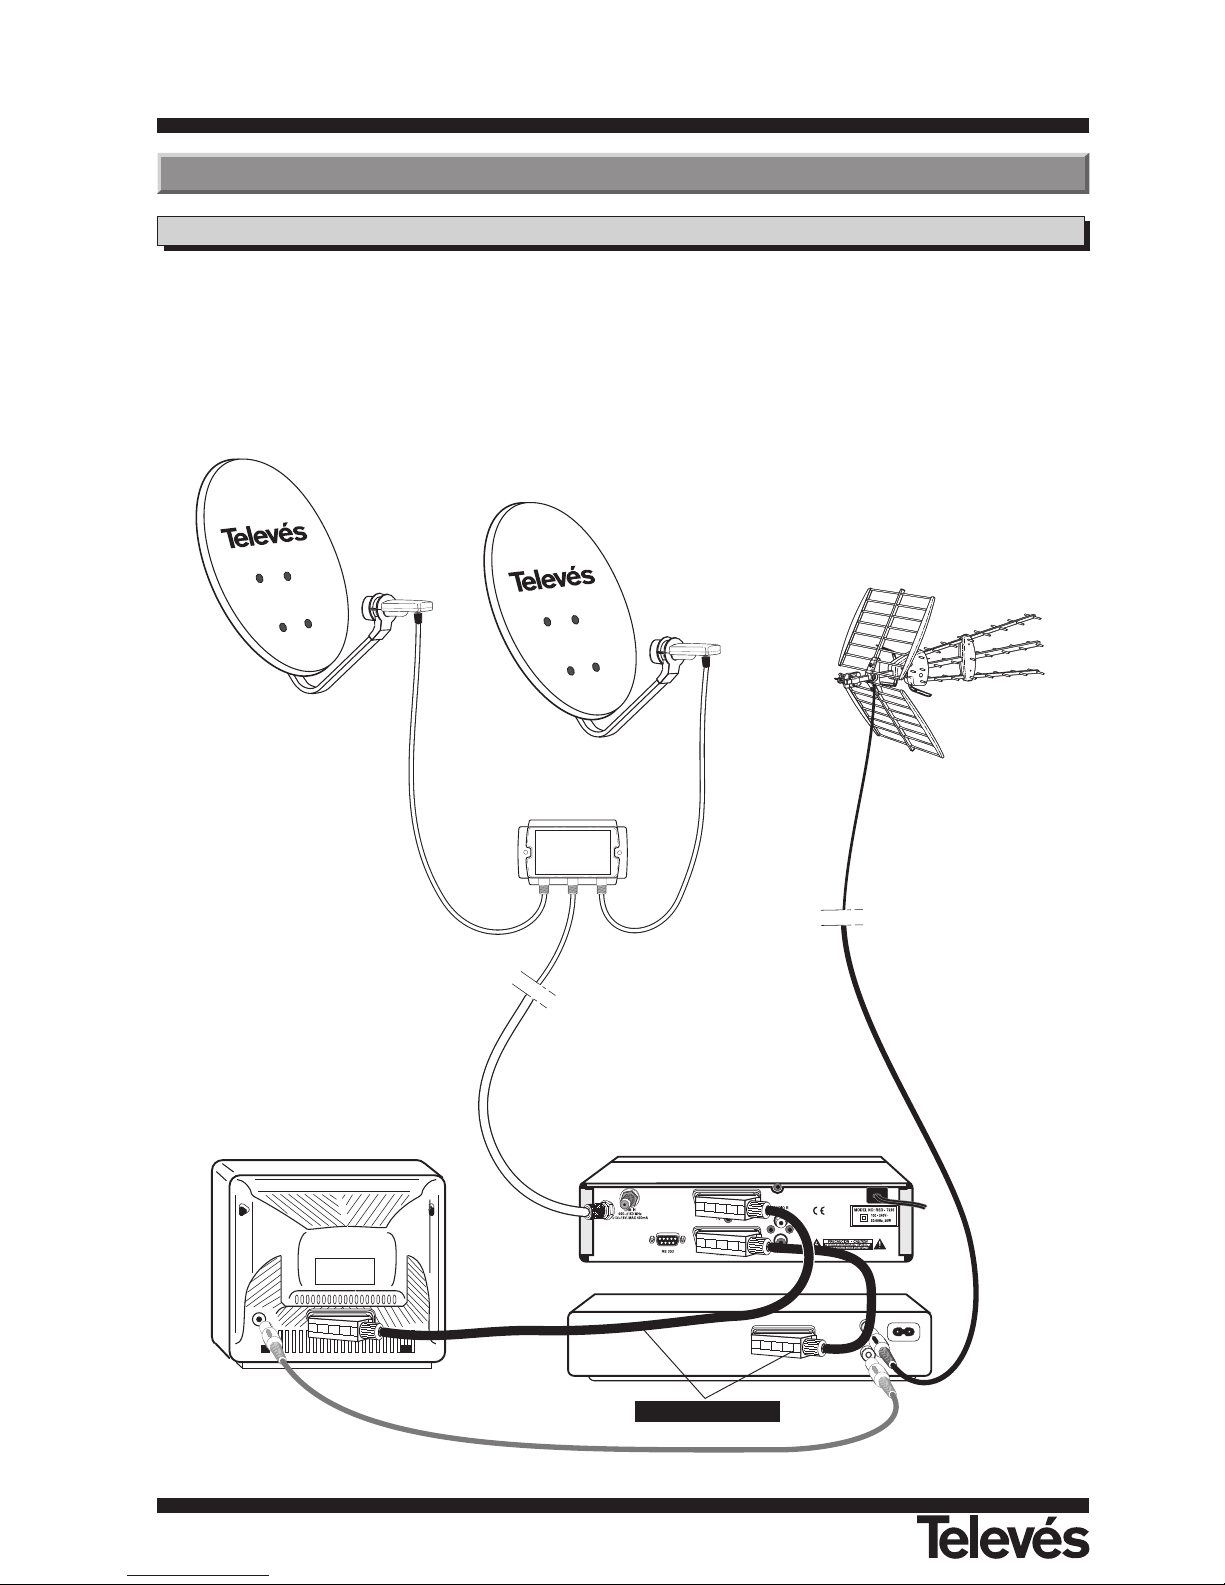
This section explains how to install the
satellite receiver. Please consult the
manual that comes with the equipment
to carry out the installation of the
outdoor equipment such as the
antenna. If you wish to add extra
equipment, make sure to read the
section of the manual that deals with
this type of installation.
1- Install the antenna and fix it so that it
is facing directly towards the
satellite. After this, connect the
antenna cable to the satellite
receiver.
2- Connect the satellite receiver to the
TV and to the other additional
equipment.
3- Set the receiver’s menu elements
according to the TV and the other
additional equipment.
The receiver is now ready to use.
4.1.- Connections
7268
Terrestrial reception
Satellite reception
VCR
RSD-7235
DiSEqC
TV
4.- Installation of equipment
(Recommended)
DO NOT PLUG THE
RECEIVER INTO THE
MAINS until all the cables
have been correctly
connected.
Note:
- All of the cables
that are used in
connection to the
Receiver are
shielded.
Page 8
User instructions “RSD - 7235”
37
ENGLISH
INFO
5.1.- How to start
5.- Ready to begin
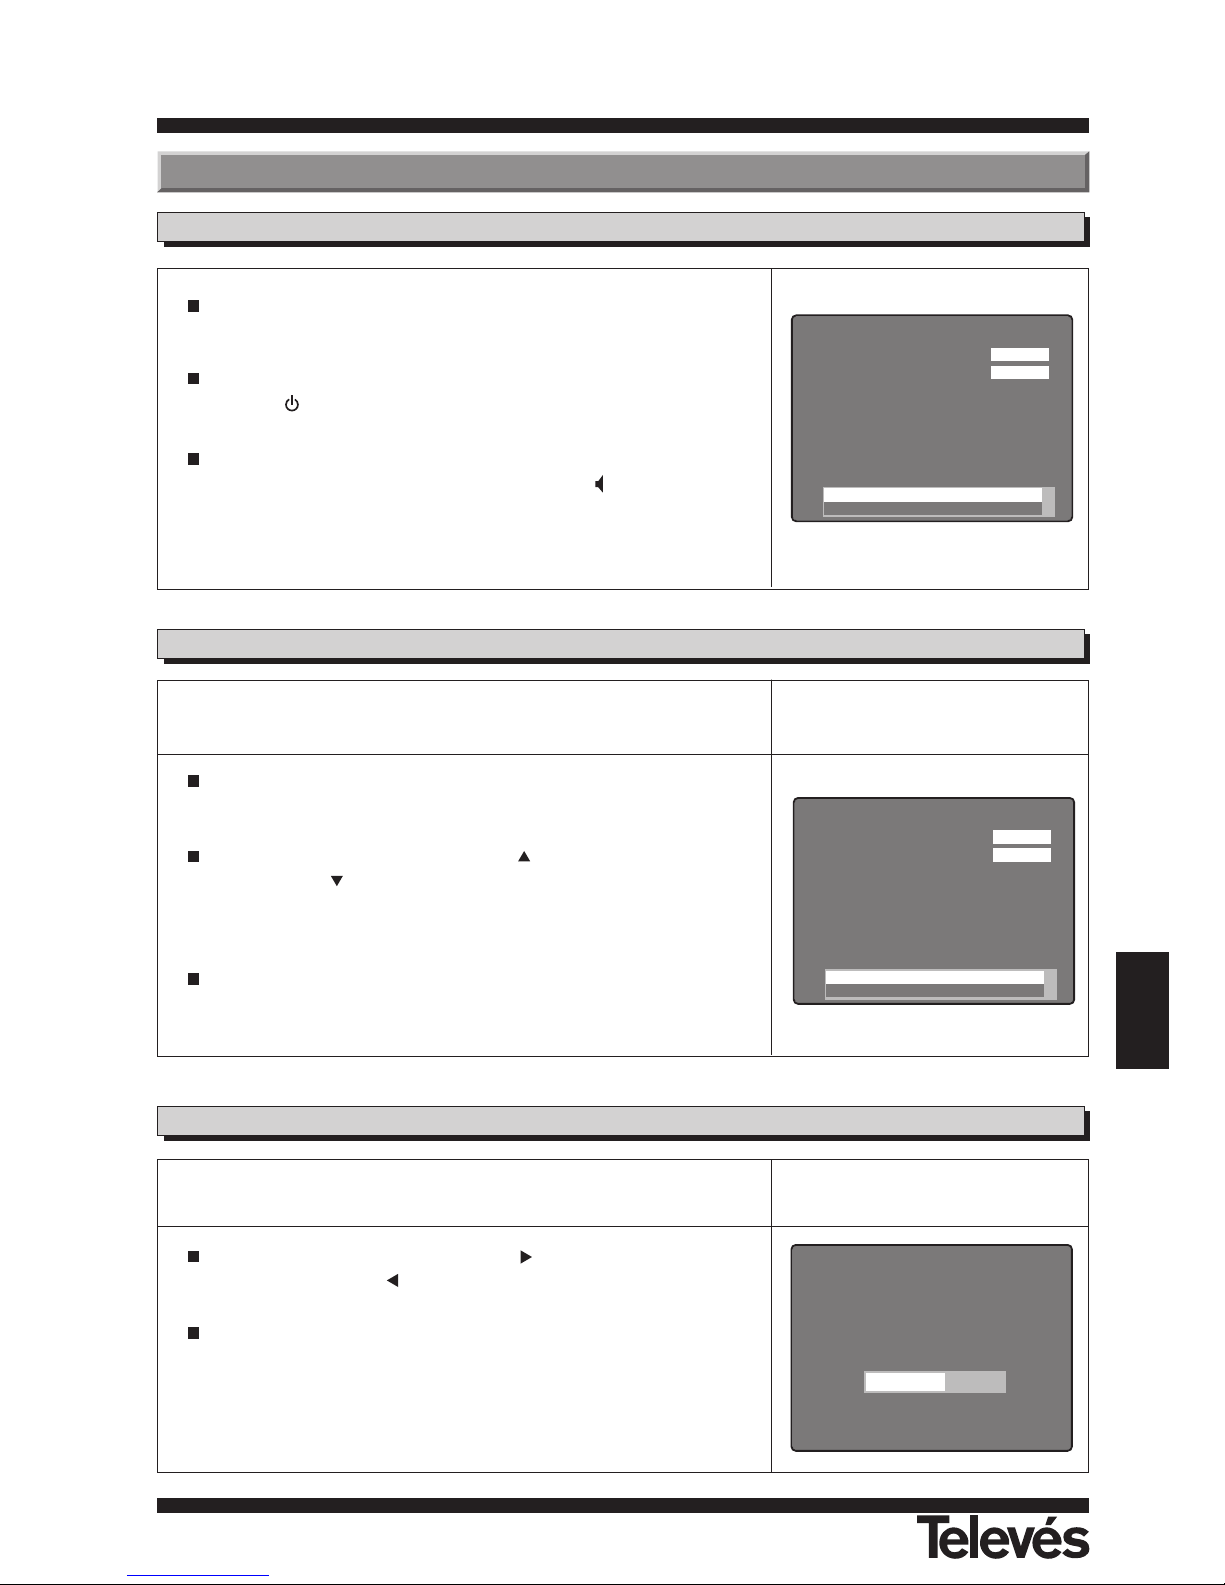
Switch the TV on as well as all the additional equipment that may be
connected to the system.
Switch the satellite receiver on
, by pressing the ON button on the
receiver ( )
or on the remote control unit.
Select the TV or Radio mode using the TV/RADIO button.
The Radio mode channels can be identified by the symbol.
(The equipment is set to TV mode by default).
The TV/Radio channels can be selected using both the remote control and
the buttons on the receiver.
Press the TV/RADIO button to select the desire service mode (TV
channels or radio channels).
When you can see a channel, press the button to select the following
channel, or the button to select the previous channel.
The selected channels will appear straight away with the corresponding
information at the bottom of the screen.
By pressing the INFO button, a window appears on the screen with
information about the programme you are watching.
5.2.- How to select TV or RADIO channels
(( S ))
2/ 8: eng
1. ASTRA TP1 Apr. 20 13 : 24
2 CANAL 99
INFO
(( S ))
2/ 8: eng
1. ASTRA TP1 Apr. 20 13 : 24
3 RTL Telev
5.3.- How to adjust the volume
The volume can be adjusted using the remote control.
To increase the volume, press the VOL button, and to decrease the
volume, press the VOL button on the remote control.
There are 33 volume levels that can be seen on the volume level
indicator that appears onscreen.
Page 9
User instructions “RSD - 7235”
38
5.4.- How to mute the sound
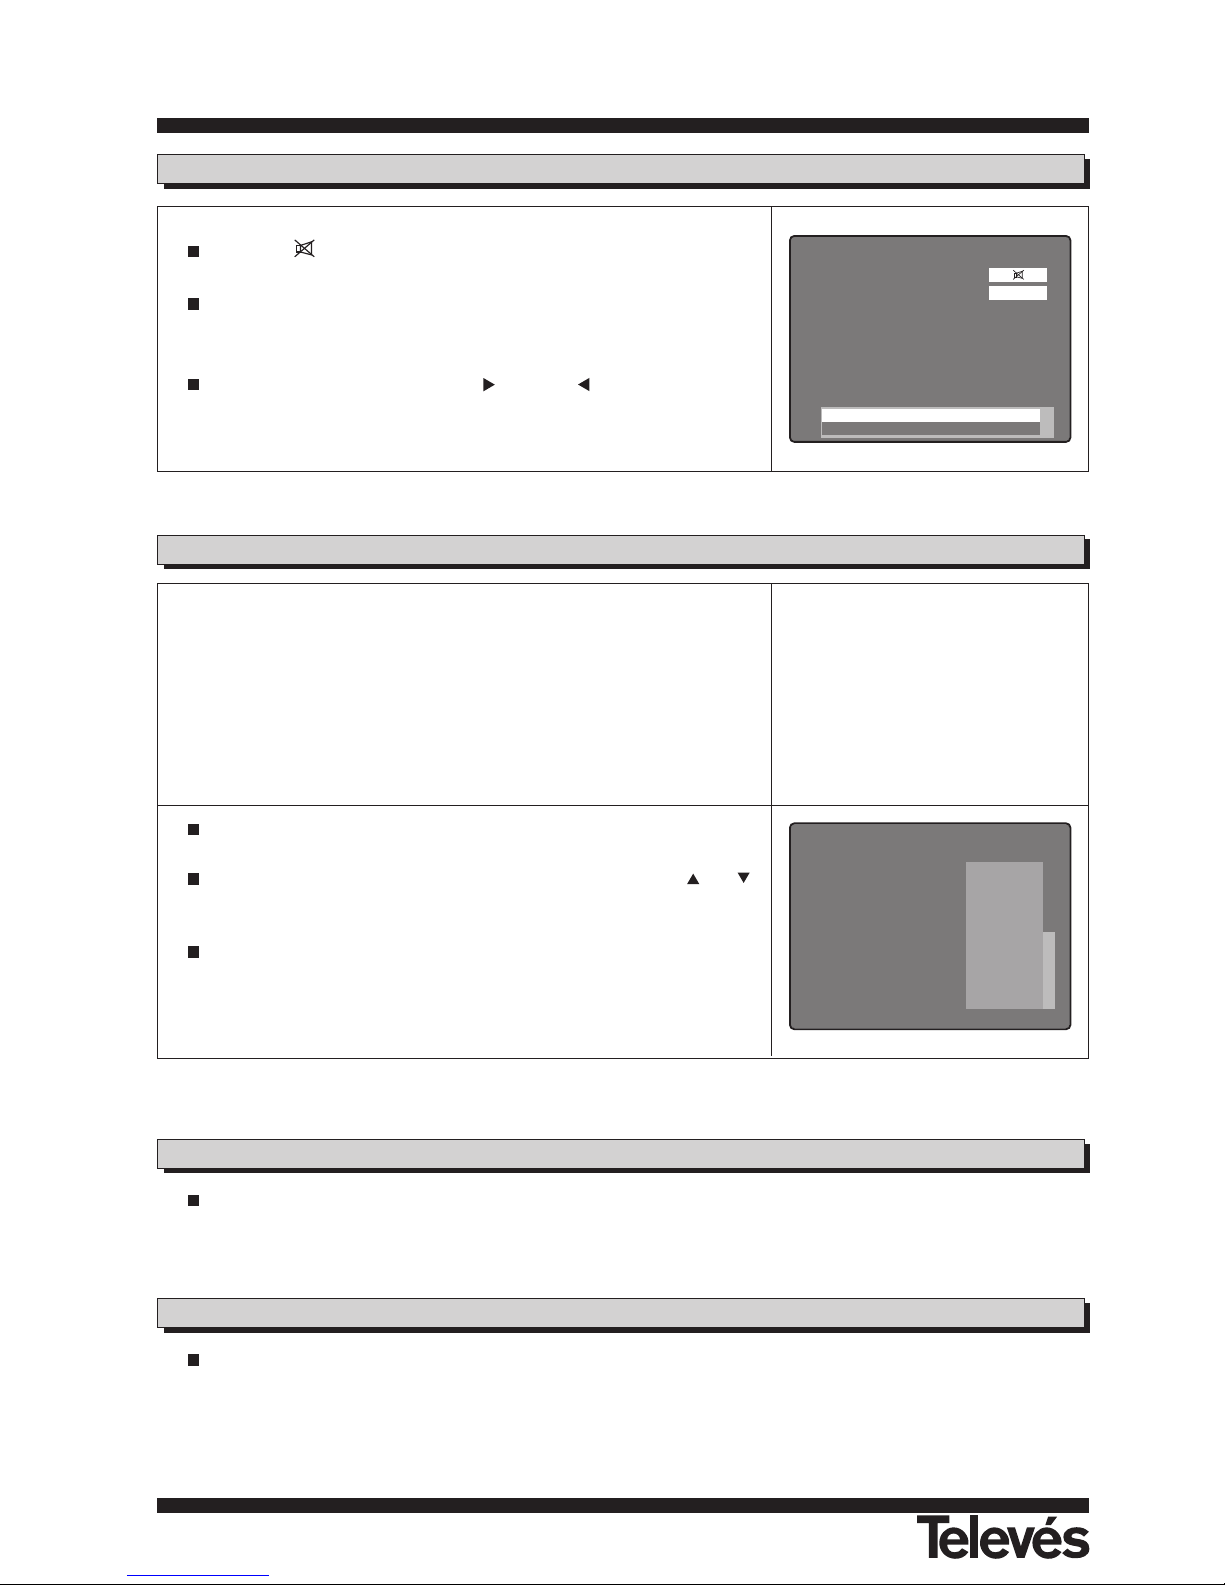
Press the button to mute the sound.
To switch the sound back on again, press the same button once more.
The sound returns with the same volume as before.
To adjust the volume press the VOL and VOL buttons.
INFO
2/ 8: eng
1. ASTRA TP1 Apr. 20 13 : 24
2 CANAL 99
Audio Language
1/ 8 : fre
2/ 8 : eng
3/ 8 : ger
4/ 8 : ita
5/ 8 : spa
6/ 8 : por
7/ 8 : eng
8/ 8 : Lang.
5.5.- Audio language
Some programmes are transmitted in various audios. This depends on
whether this information is included in the signal that is sent to the Receiver.
In the case of TV programmes, the different audios tend to correspond to the
different languages in which the programme is emited (for example, in the
case of “Euronews” - HOTBIRD, the English language is received in the
second audio).
As regards Radio programmes, each audio identifies a different radio station
(for example, the programme “Radio Esp” - ASTRA contains 10 Spanish
radio stations - 40 principales, M80, etc...-).
Press the ALT button to activate the menu that contains the different
transmission languages.
Select the desired audio from those available using the and
buttons and press OK.
To exit the menu press EXIT or ALT.
If the flow of electricity is interrupted for any reason, when the receiver is re-connected to the current, the TV/RADIO
channel that you were watching automatically appears onscreen with the Audio that was selected, without having to
press any buttons.
5.7.- Automatic saving of the last channel
If you want to see the channel that you were just previously watching and you cannot remember the programme
number, press the <--- PR button.
5.6.- How to return to the previous channel
Page 10
User instructions “RSD - 7235”
39
ENGLISH
1 Das Erste
2 ZDF
3 RTL Telev
4 ProSieben
5 KiKa
6 DSF
7 3sat
8 WDR FER
9 Star Movie
10 MCM
12 : 00 -
13 : 00 -
14 : 00 -
15 : 00 -
16 : 00 -
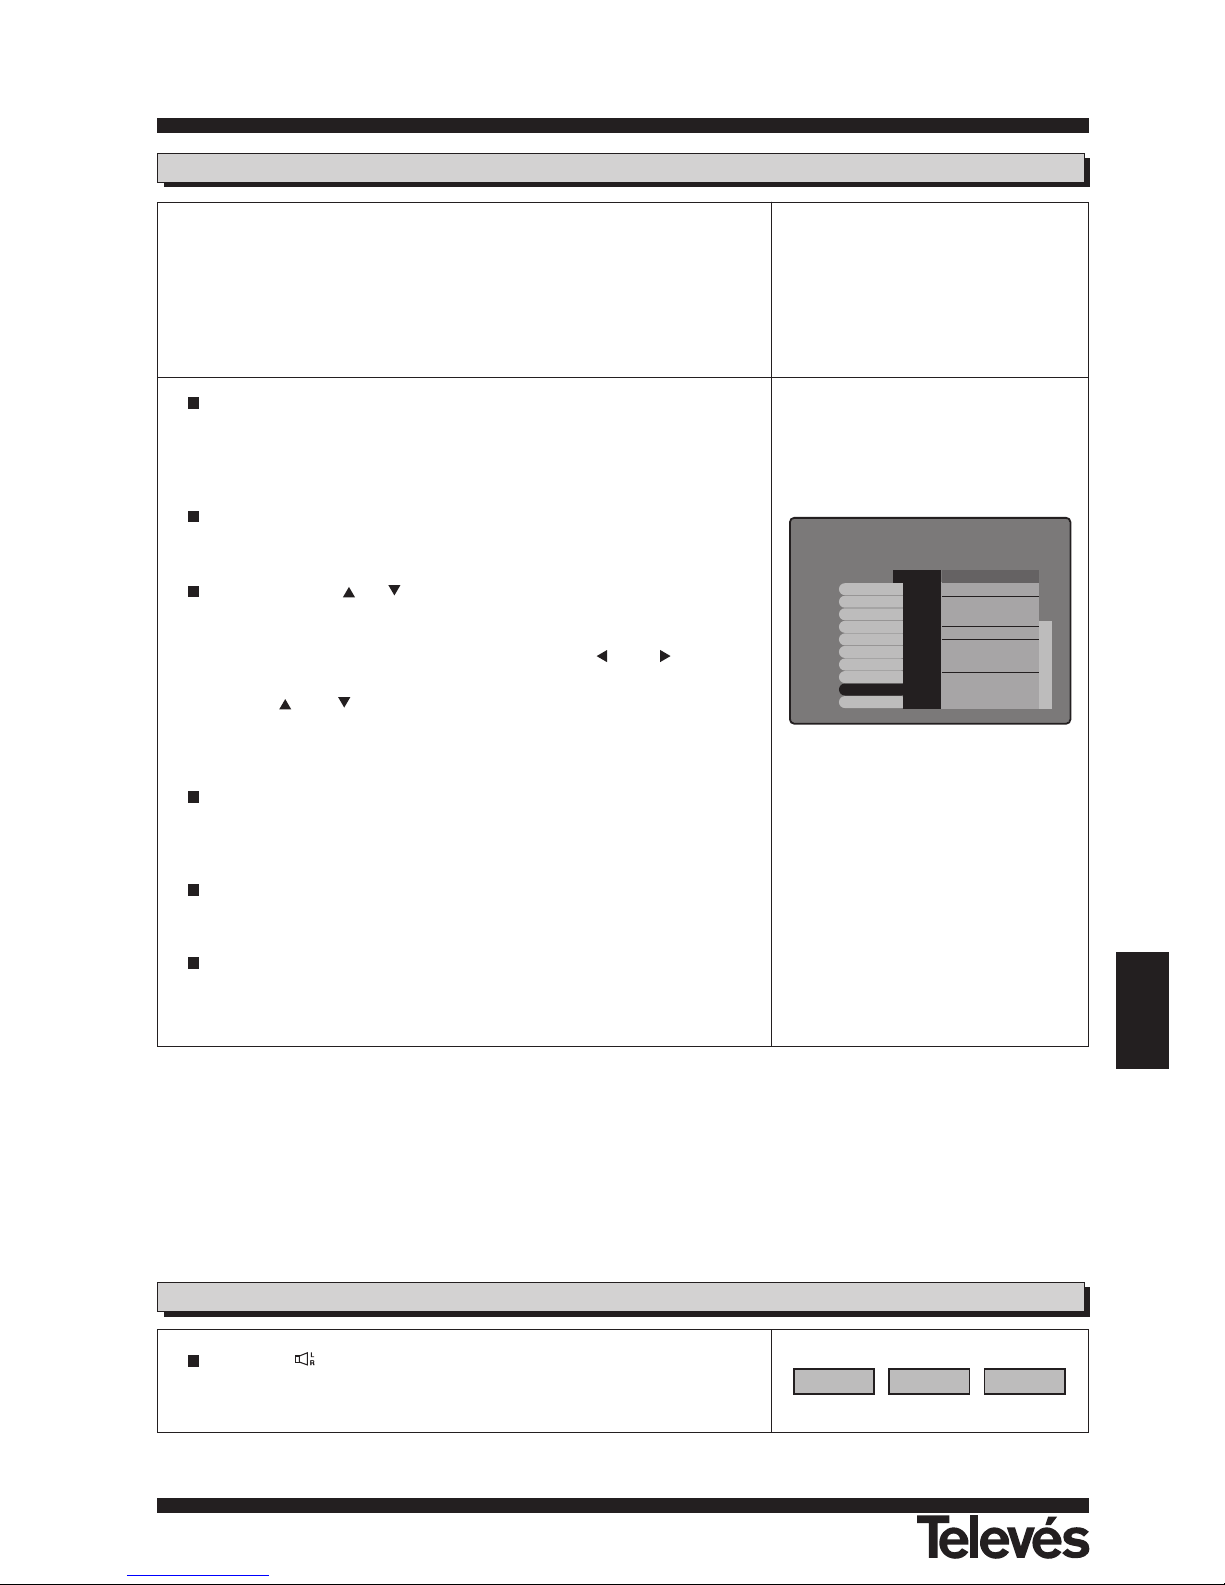
The RSD-7235 receives and stores information on the TV and Radio
channels that are being watched. This includes detailed information on the
time schedule of the next programme. This guide is very easy to use, as it
displays all the information in a single window onscreen.
The information provided by this guide consists of the channel number, the
programme name, the channel name and the date and time of emission
(when it starts and when it finishes).
Press the EPG button while you are tuning in the TV and Radio
programmes or press the OK button after selecting the “Program Guide”
option in the main menu, this will make the Electronic Programming
Guide appear on screen (EPG).
Press the TV/RADIO button to change the Information from the TV guide
to the Radio Information.
Y ou can use the or buttons to go from one channel to another. To
the right of the channels you can see the time schedule for that particular
channel in black; to its right you can see the different programmes of that
channel and their corresponding times. Use the and buttons to
move between the columns.
Use the and buttons to move between the different programmes.
To see more detailed information about a particular programme, press
the OK button over this event.
The information provided in the guide comes with the signal from the
supplier. If a particular channel has no data or information in the guide,
the following message will appear onscreen "No data available".
If you press the OK button over a programme name, the receiver
switches to this programme.
To exit the menu press the EXIT button.
5.8.- Electronic Programming Guide (EPG)
Program Guide
Apr. 20 Apr. 20 12:32
Far and away
Music Heaven
Magic & Music
Music Video Collection
Note:
- To see the programme schedule correctly, you must first adjust the LOCAL TIME to the GMT (Greenwich Mean Time).
- The time that appears onscreen is provided by the supplier, so this information may be incorrect in certain channels.
5.9.- Audio output Modes
Press the button repeatedly to select the three types of available
audio output modes: left channel (L), right channel (R) or stereo (S).
(( S ))(( L )) (( R ))
Page 11
User instructions “RSD - 7235”
40
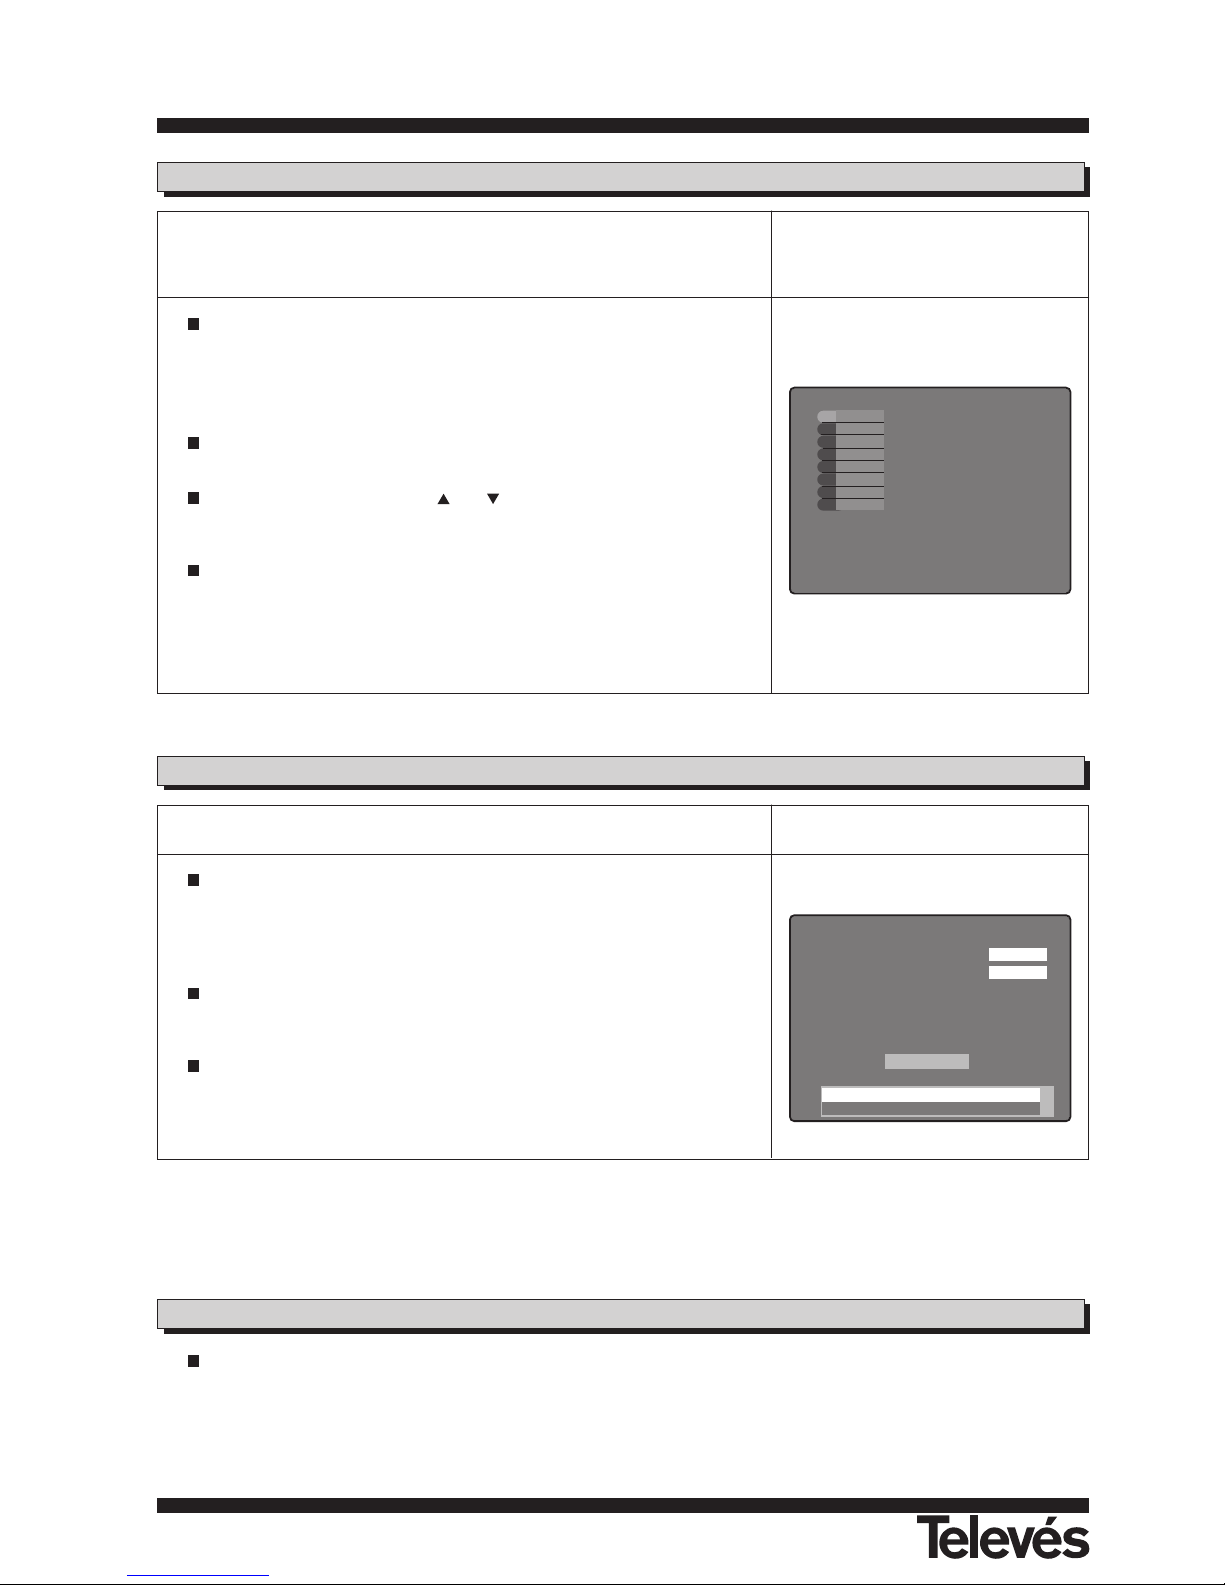
5.11.- Teletext
Only users who have a TV with the Teletext function can use this option.
Press the TXT button on your remote control. If the channel that you are
watching disposes of the Teletext service, the message “Teletext ON” will
appear. If you press the TXT button again, the message “Teletext OFF”
will appear and the Teletext service will be switched off.
If the channel does not dispose of the Teletext service, the message “No
teletext” will appear.
After activating Teletext, you can use it as you normally would.
INFO
(( S ))
2/ 8 : eng
Teletext ON
1. ASTRA TP1 Apr. 20 13 : 24
2 CANAL 99
Note:
If a particular channel is to have the Teletext services in the near future but does not yet transmit them, this means that it will
not dispose of these services eventhough the message “TXT activated” appears onscreen.
5.10.- How to use the Favourite Channel List
You can easily select your favourite TV or Radio channels using the
Favourite Channel List. This list only contains your personally selected
favourite TV or Radio channels.
While watching a TV channel or listening to a Radio channel, press the
OK button to see the Favourite Channel List.
If there are no channels in your Favourite Channel List, this menu will not
appear onscreen.
Press the TV/RADIO button to select the TV or Radio channel list.
Select any channel using the and buttons and press the OK button
to go to this channel.
Press the EXIT button to exit the Favourite Channel List.
See section 7.1.- “TV/Radio Channels” in section 7.- “Channel Manager
Menu” to learn how to create the Favourite Channel List.
CANAL99
RTL Telev
N4
TNT
RAI 1
SICILIAN
TV Galici
POLSAT
2
3
4
5
40
41
42
43
If you want to pause the image onscreen while watching a programme, press the PAUSE button. To continue
watching the programme, press the PAUSE button again.
It is necessary to take into account that when you pause an image onscreen, the programme that you were watching
continues as normal, which means that you will miss this programme during the time that the image is paused.
5.12.- Pause
Page 12
User instructions “RSD - 7235”
41
ENGLISH
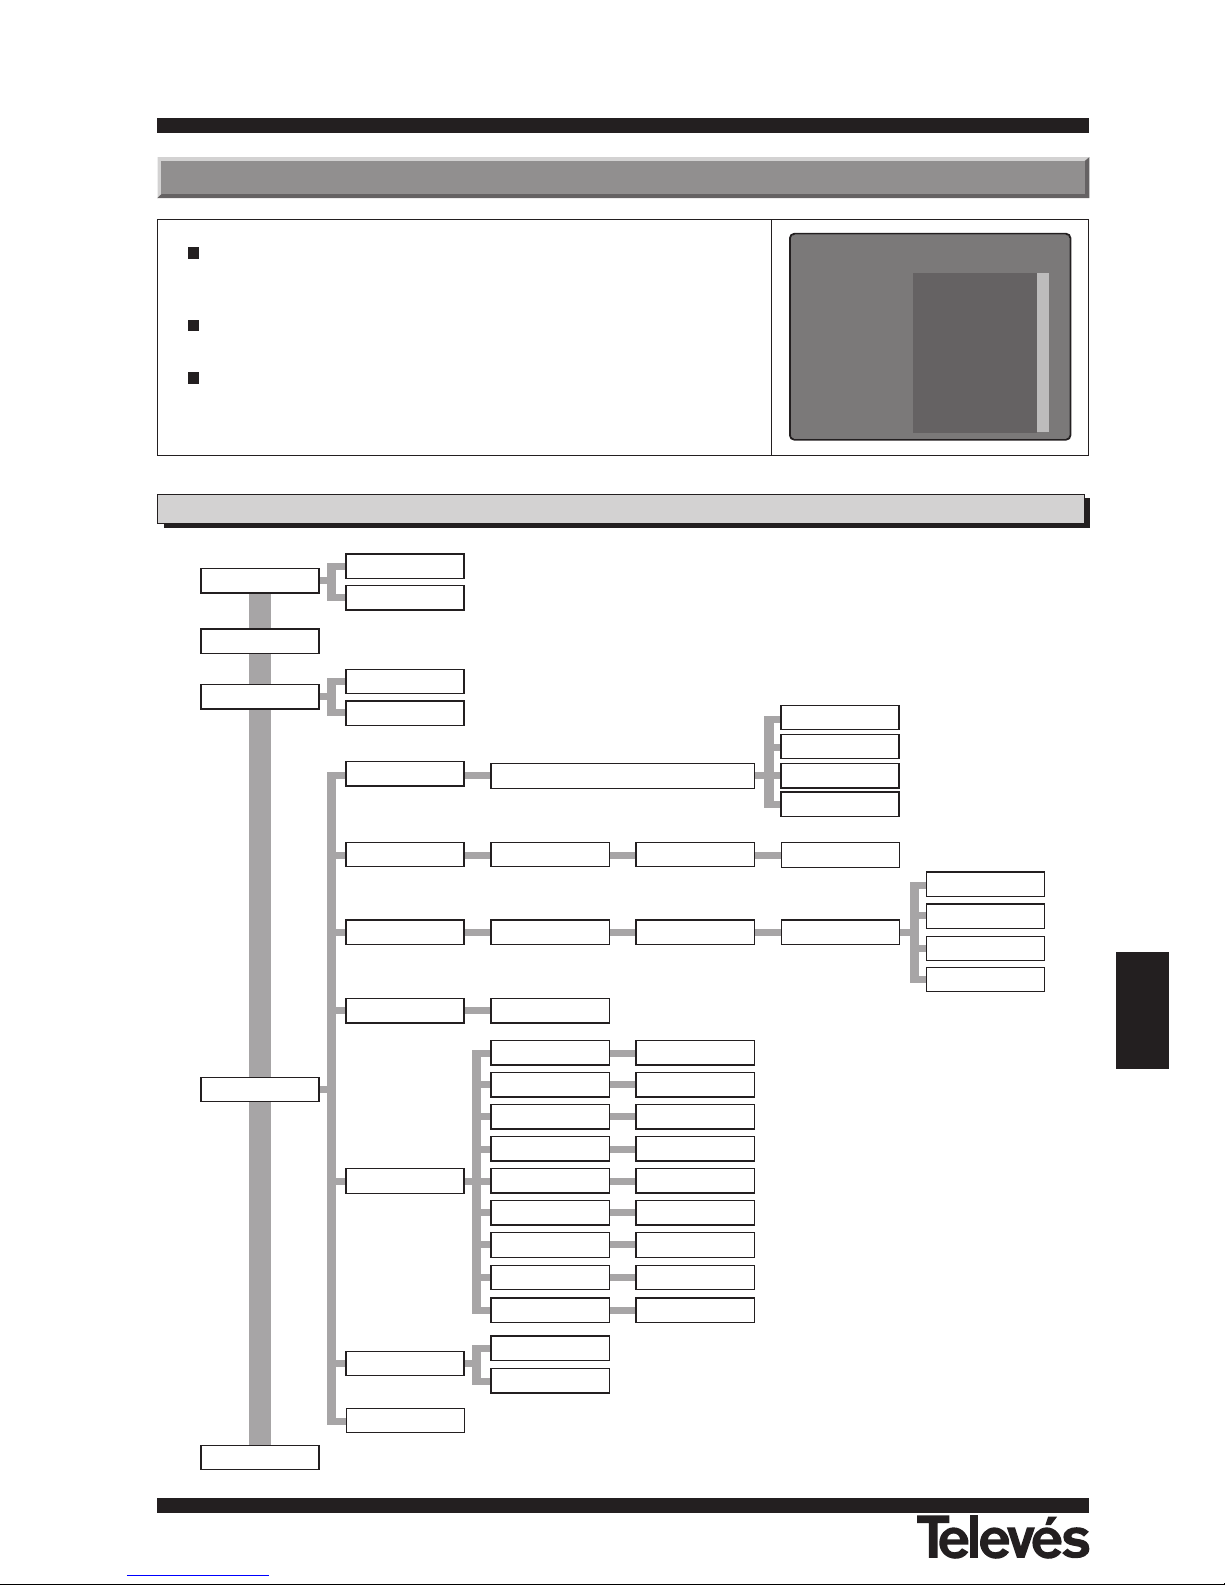
Press the MENU button when you a watching a programme and the
main menu will appear on screen.
Select one of the menu options and press the OK button.
Press the EXIT button or the MENU button to exit from the main menu
and return to the TV or Radio channel that you were watching.
6.-Main Menu
Menu .
Channel Manager
TV Channel
Radio Channel
Program Guide
Timer
User Installation
Antenna Setup
Auto Search
TP Setup
Parental Lock
Options
Data Transfer
Factory Default
Receiver Info.
Check Signal
Start
Set PID
TP DataTransponderAntenna Select
TP Set Up
Installation
Search Option
Antenna Select
Auto Search
Start
Antenna, Satellite, LNB,
14/18V, 22KHz, DiSEqC
Antenna Setup
Parental Lock Password ON/OFF
OSD Language
1st Audio Lang.
2nd Audio Lang.
Time Offset
Summer Time
LNB Power
Screen Format
Eng. Ger. Spa.
Fre. Por. Ita. Arb.
Not used. Eng. ...
-12:00~+12:00
ON, OFF
ON, OFF
4:3, 16:9
Options
Radio Channel
TV Channel
Channel Manager
Factory Default
Receiver Info
Program Guide
Signal Level
Go to Auto Search
Positioning Help
Delete TP
TV Type
PAL, NTSC,
AUTO
Video Output
RGB, CVBS
Not used. Eng. ...
Data Transfer
User Data Transfer
Software Transfer
Timer
Turn OFF
Turn ON
Motor Position
Setting
6.1.- Menu structure
Page 13
User instructions “RSD - 7235”
42
TV Channel Manager .
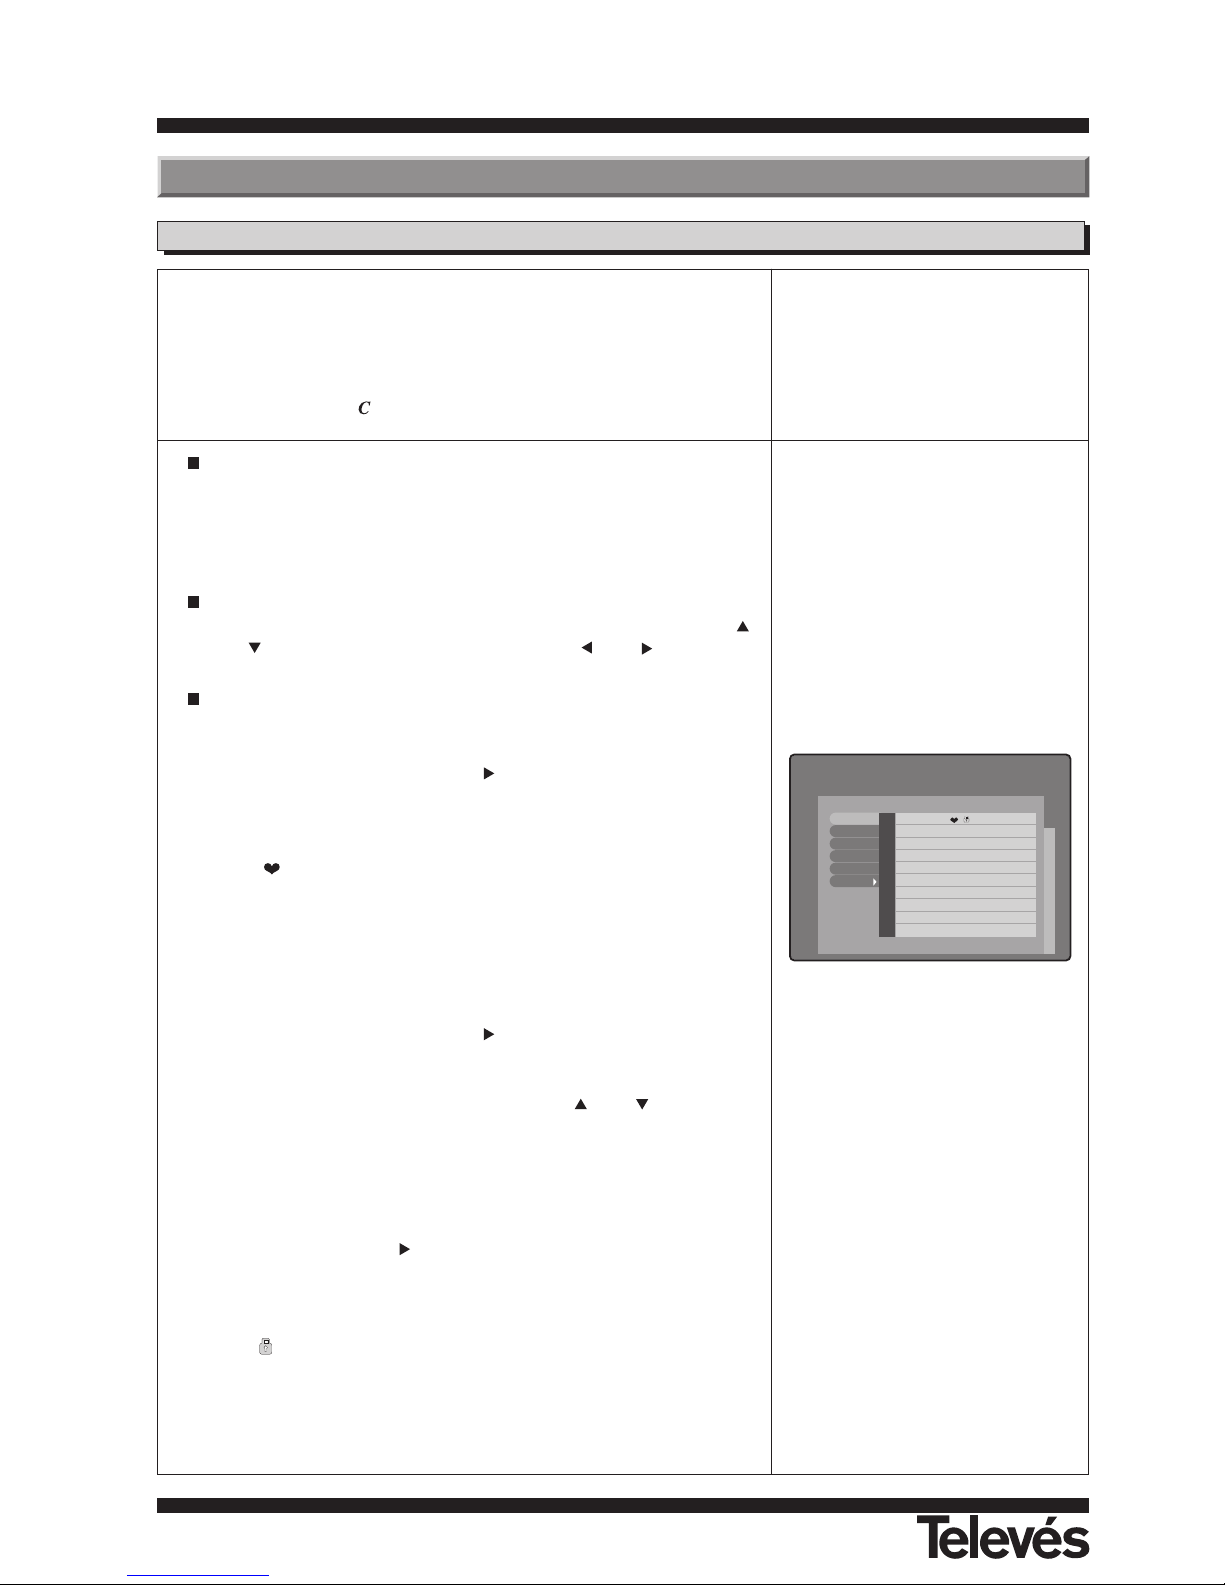
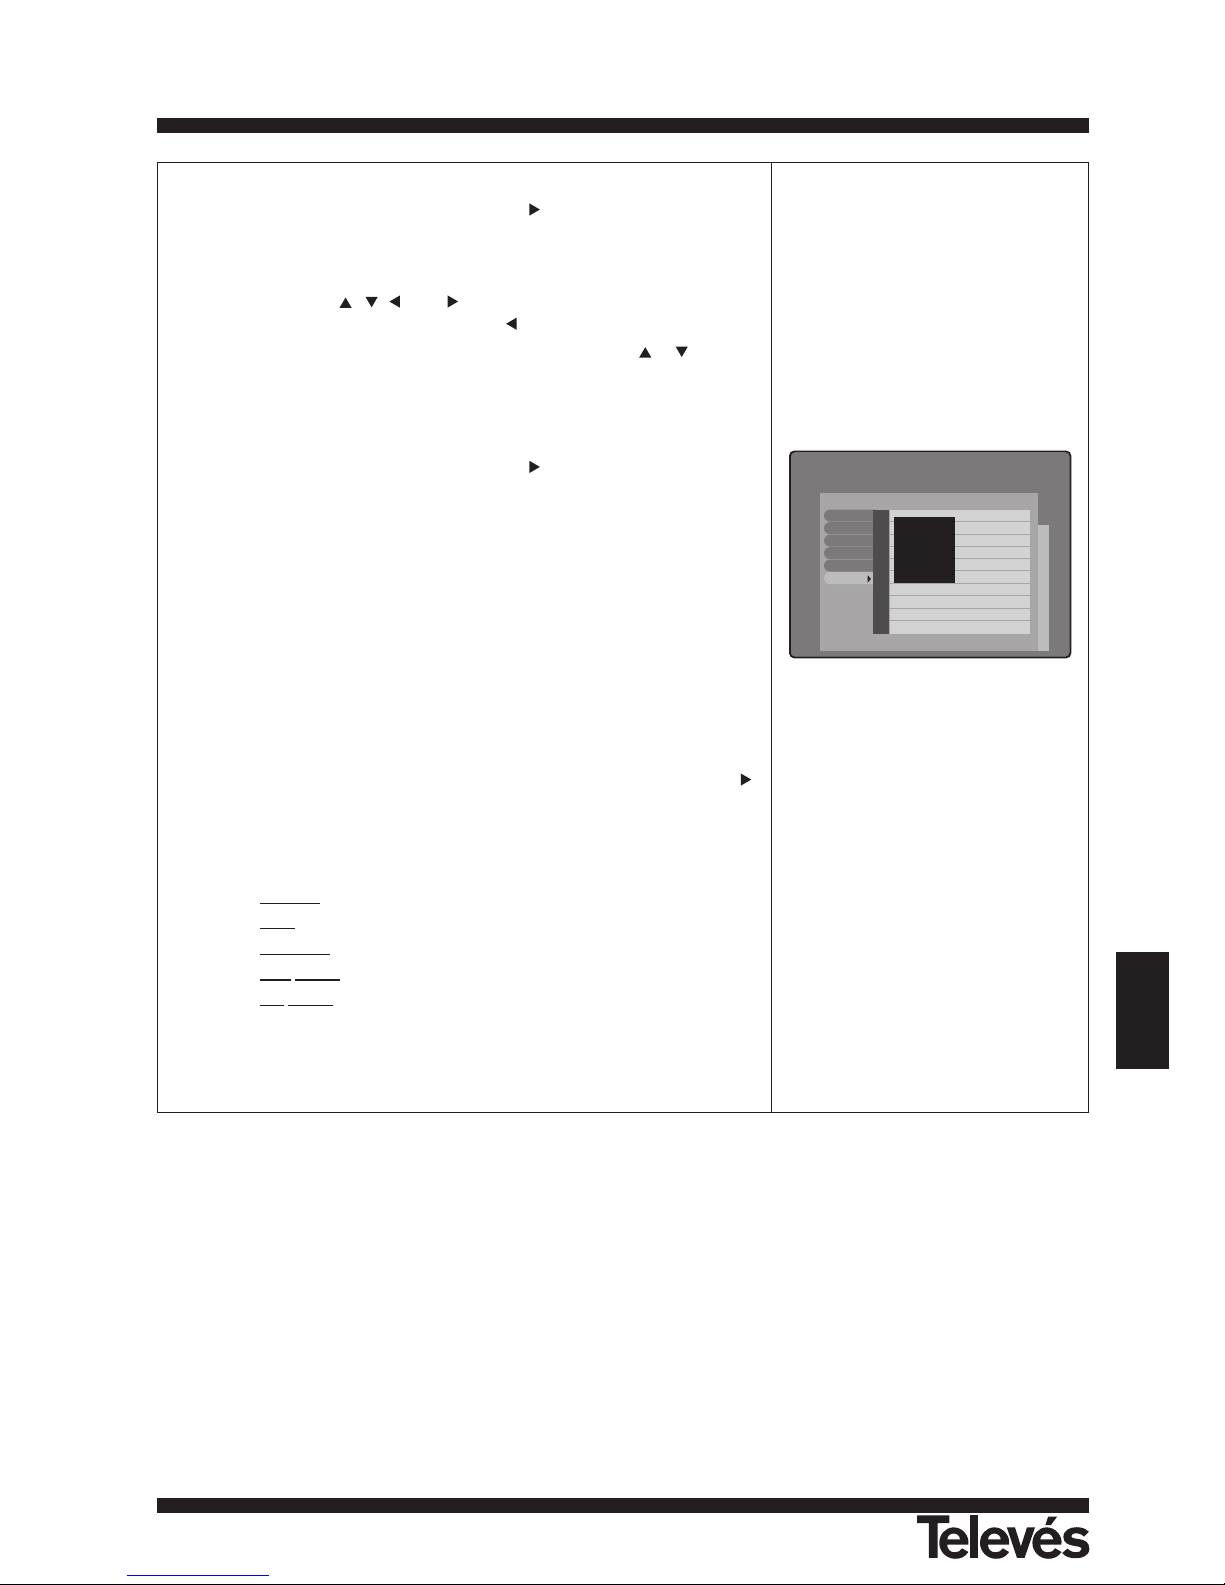
Channels can be controlled directly with the TV and Radio channels list. The
functions of the channels can be edited when you are watching them. In this
menu, you can create/edit favourite programmes, move, lock, rename, erase
and organise your programmes in 5 different ways.
After editing, the remaining channels are set automatically.
The channels with the symbol are encoded.
Press the OK button over one of the options “TV channel” or “Radio
channel” in the main menu.
The menu “TV Channel Manager” or Radio appears. Here you can see
the different editing options and a list of all the memorised programmes
(TV and Radio) in the receiver.
Press the OK button over one of the functions that you want to edit on
the left-hand side of the menu. You can move up and down using the
and buttons and to the right and left using the and buttons.
The functions that are used to edit the channels are:
- Favorite channels: Placing the cursor over this option, you can move
to the right-hand column using the button.
To add a channel to the List, press the OK button over the new channel.
The symbol which indicates “favourite” appears. To take it out of the
List, press the OK button over the channel’s name again.
The ( ) symbol over a channel indicates that this channel belongs to
the Favourite Channel List.
All of the programmes which you press OK over, will become part of the
Favourite Channel List when you exit this menu.
To exit this menu, press the EXIT button.
- Move channels: By placing the cursor over this option, you can move
to the right-hand column using the button.
When you select a channel (pressing the OK button over it), the column
that indicates its channel number changes to yellow. Move the selected
channel to the place that you want using the and buttons, and
press the OK button to leave it in its new location.
This new programme order will be available when you exit this menu.
To exit, press the EXIT button.
- Lock channels: With the cursor over this option, move to the right-
hand column using the button.
To lock a channel, press the OK button over the selected channel. A
symbol will appear indicating the new status. If you wish to unlock it,
press the OK button again over the channel - the symbol will disappear.
The ( ) symbol over a channel indicates that this channel is locked.
This new programme status will become available when you exit this
menu.
To exit, press the EXIT button.
To access any channel that is locked, you must enter the password.
7.1.- TV/RADIO Channels
The TV channel list (or radio) is
empty before the channel search.
Make sure to search for channels,
either automatically or manually
before using the channel list.
ANDALU ... ASTRA Tp1
CANAL 99 ASTRA Tp1
RTL Telev ASTRA Tp2
N4 ASTRA Tp4
TNT ASTRA Tp3
Bayerisch ASTRA Tp4
BR-alpha ASTRA Tp4
CNN Int. ASTRA Tp3
Das Erste ASTRA Tp4
hessen fe ASTRA Tp4
1
2
3
4
5
6
7
8
9
10
Favorite
Move
Lock
Rename
Delete
Sort
7.- Channel Manager Menu
Page 14
User instructions “RSD - 7235”
ENGLISH
43
TV Channel Manager .
ANDALU ... ASTRA Tp1
CANAL 99 ASTRA Tp1
RTL Telev ASTRA Tp2
N4 ASTRA Tp4
TNT ASTRA Tp3
Bayerisch ASTRA Tp4
BR-alpha ASTRA Tp4
CNN Int. ASTRA Tp3
Das Erste ASTRA Tp4
hessen fe ASTRA Tp4
1
2
3
4
5
6
7
8
9
10
Favorite
Move
Lock
Rename
Delete
Sort
Favorite
Lock
Scramble
SATName
CH Name
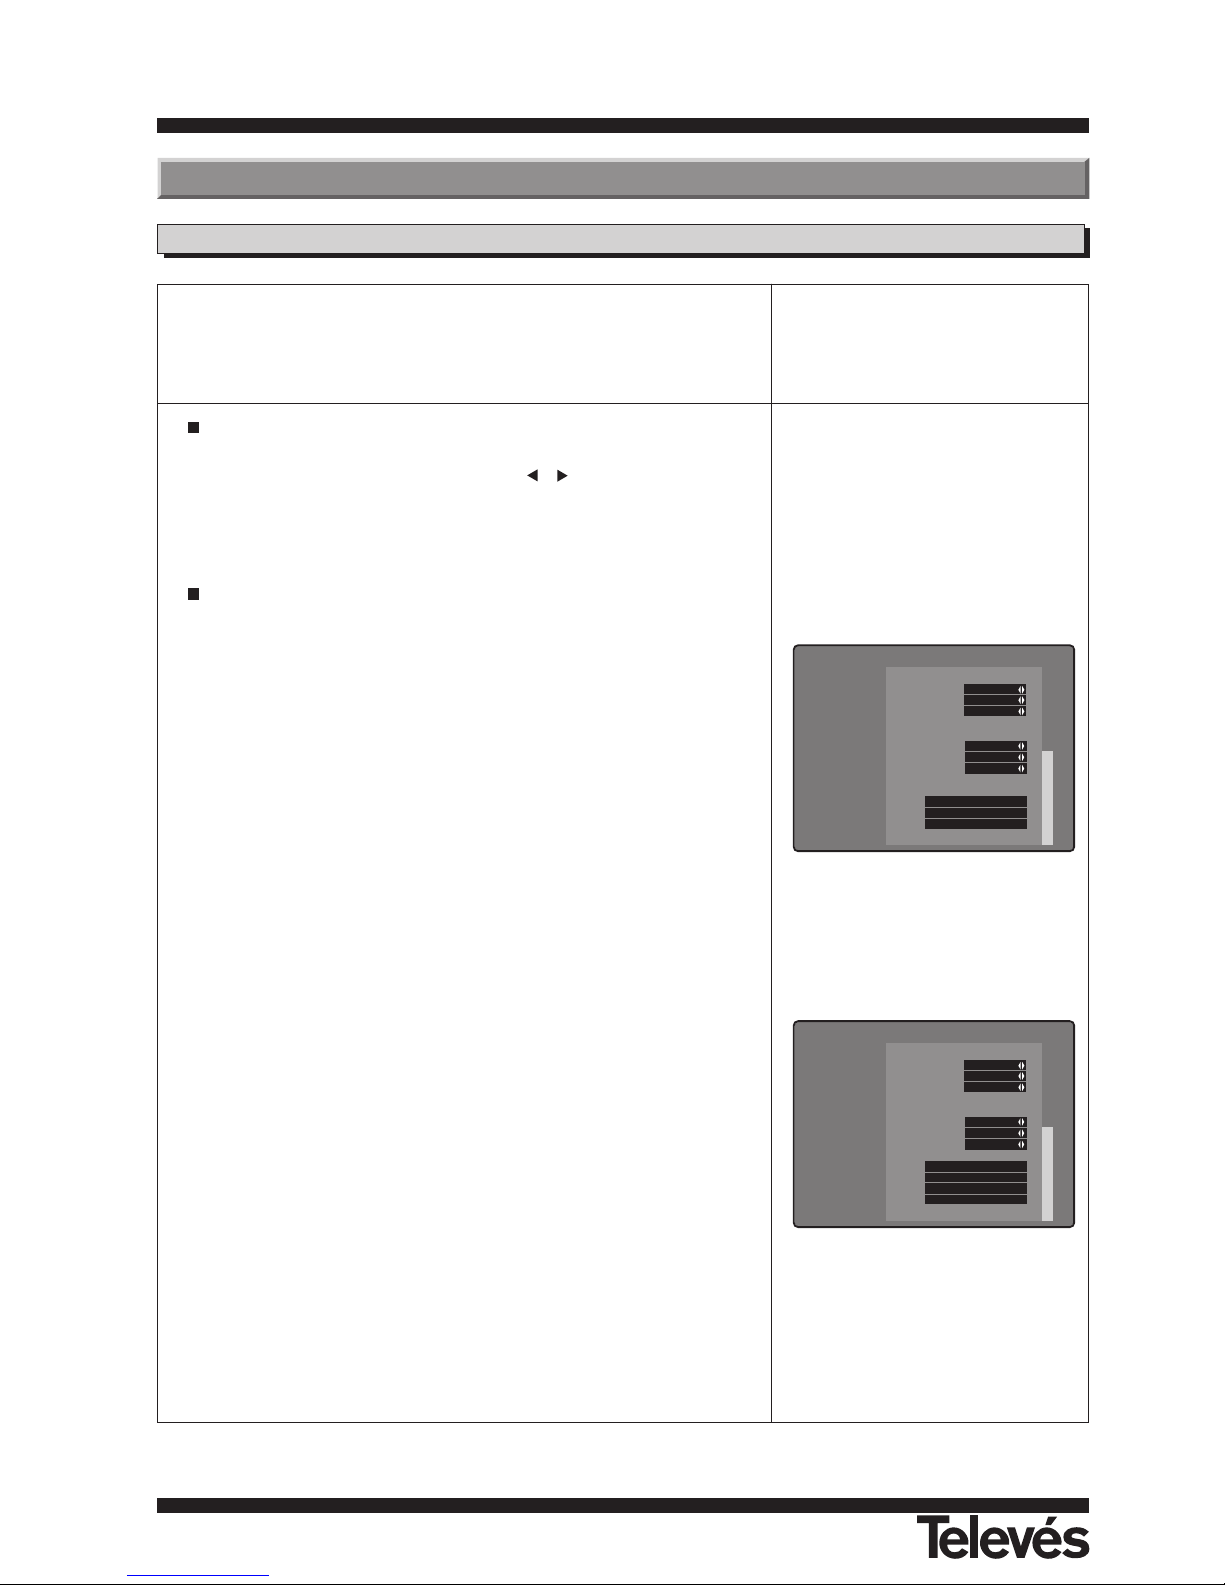
- Rename channels: By placing the cursor over this option, you can
move to the right-hand column using the button.
Select the channel with the name that you want to change and then
press OK.
An alphanumeric table appears. Write the new name selecting the
letters with the , , and buttons, and accepting each one, one
by one with the OK button. Select the button to erase.
To confirm the new name, select the “OK” box with the or
buttons
and then press the OKbutton
. If you want to exit the menu without
changing the name, press the EXIT button or select the “Cancel” option.
- Delete channels: With the cursor situated over this option, you can
move to the right-hand column using the button.
When you select a channel to erase by pressing OK over its name, the
column that indicates its number changes colour to yellow. You can
select various channels to erase at the same time by pressing OK over
each of them. When you press OK over a channel that was already
marked, this will be unmarked and will not be erased.
To erase the channels that have been marked, press the EXIT button. If
you want to erase all of the channels on the List, press the FUNC.
button.
If you want to erase one, some or all the channels, a window will always
appear asking for confirmation (OK) or cancellation of the command
(CANCEL) which would mean that you exit the menu without erasing
any channels.
- Sort channels: With the cursor situated over this option, press the
button to activate a popup menu where you must indicate how you
would like the channels ordered.
As you can see, there are 5 different ways of organising them:
• Favorite
: This puts the favourite channels at the start of the list.
• Lock
: This puts the locked channels at the end of the list.
• Scramble
: This puts the encoded channels at the end of the list.
• SA
T Name: Orders the channels alphabetically by satellite (A-Z).
• CH
Name: Orders the channels alphabetically by name (A-Z).
Page 15
User instructions “RSD - 7235”
44
8.1.- Antenna Setup
This menu lets you enter the configuration parameters of the antenna.
Y ou can access this menu by pressing the OK button over the “Antenna
Setup” option of the main menu. You can assign satellites, LNBs and
switches to 16 antennas in this menu.
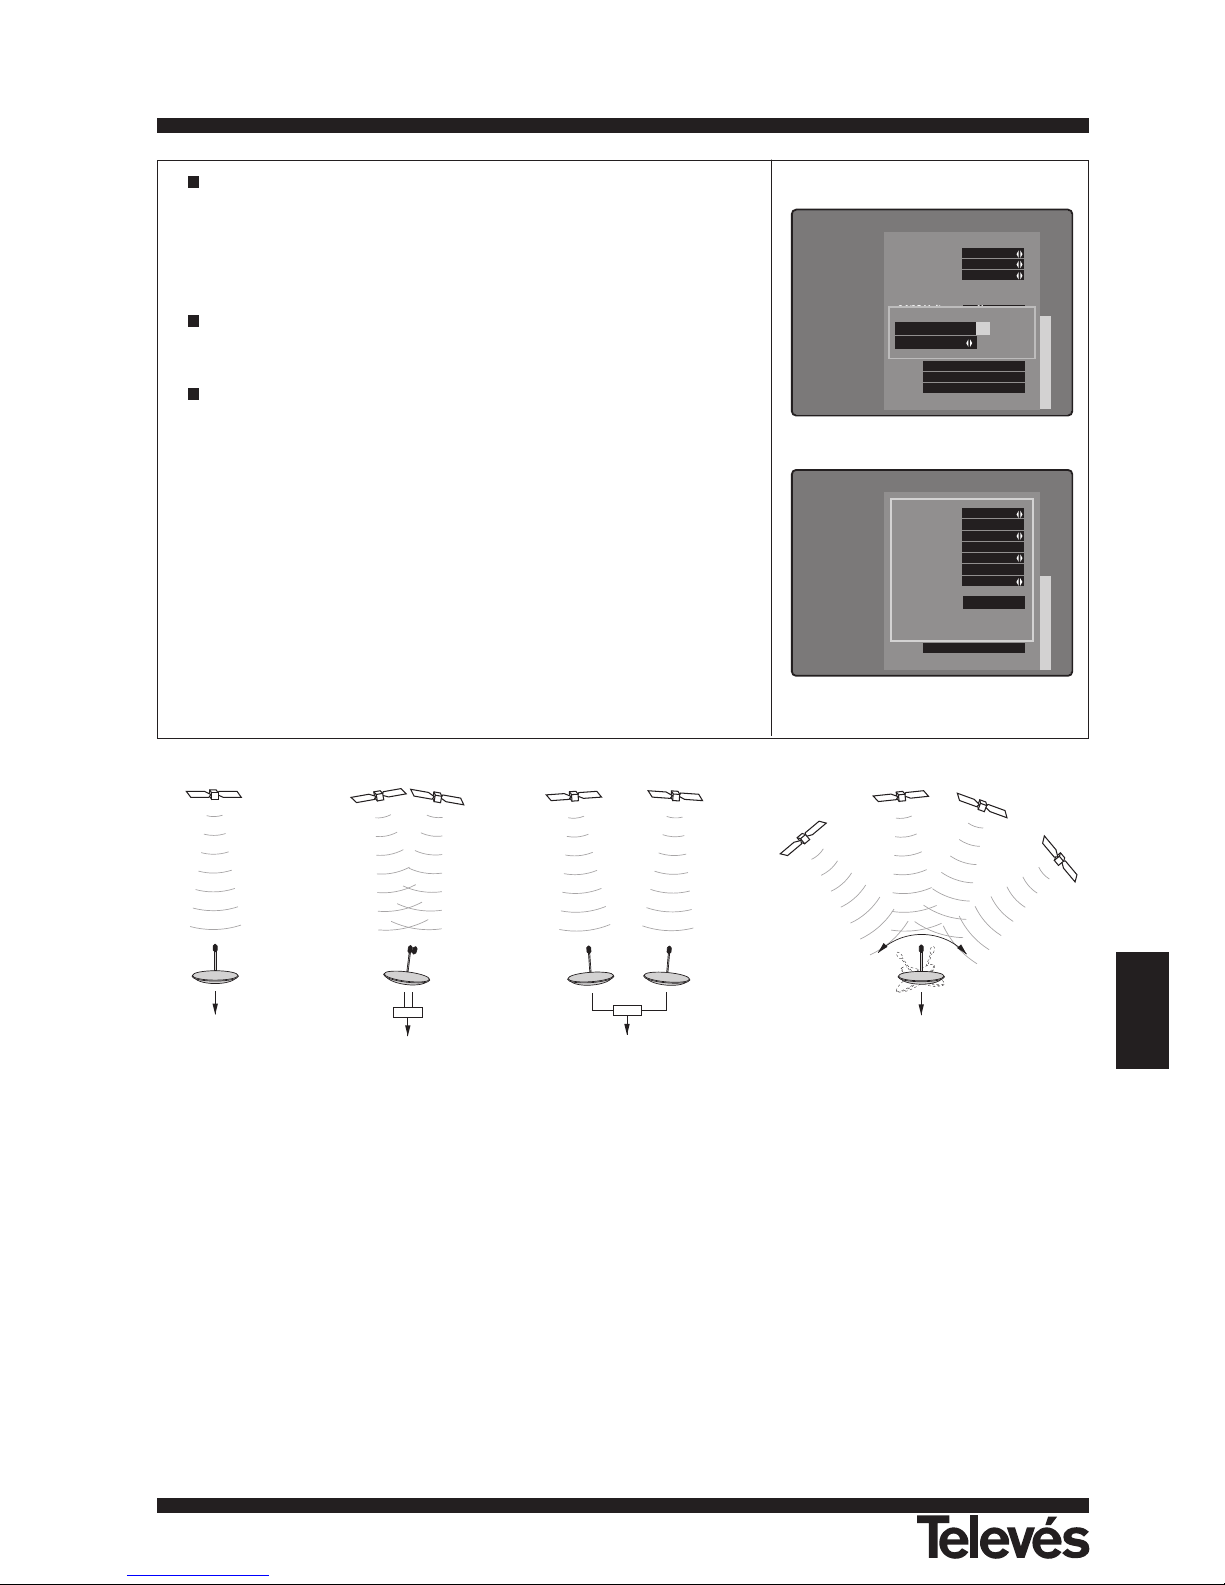
One of the options available in this menu is “Antenna” which has 16
positions to which you can individually assign a specific satellite.
Select one of the 16 antennas using the , buttons or by pressing
the OK button to activate the popup menu.
The first four antennas are assigned by default to the ASTRA, HOTBIRD,
HISPASAT and EUTELSAT F2 satellites.
Assign the appropriate values for each of the following options:
- Satellite: Select one of the 17 satellites that have been preprogrammed
in the receiver.
It also disposes of 14 free satellite positions for future satellites or for
any extra ones which may interest you.
You can deactivate the antenna by selecting the “None” option.
- Universal LNB: Indicate if the LNB in the antenna is universal or not. If
it is, the options “LNB Freq. 1” and “LNB Freq. 2” will remain inactive.
- LNB Freq. 1 / 2: Enter the appropriate frequency for each of the bands
(high and low) if you are not using a universal LNB.
- 14/18V: Select one of the options “None”, “14Volt” or “18Volt” to power
the LNB. With the universal LNB, select “None”.
- 22KHz: Select one of the options “None”, “0KHz” or “22KHz”. With the
universal LNB, select “None”.
- DiSEqC: If you have a fixed antenna with one LNB, select the "None"
option.
Select one of the following: "Port A", "Port B", "Port C" or "Port D" if your
antenna is a fixed antenna and if it disposes of a multisatellite system,
or if you have two fixed antennas that are pointing to different satellites.
If your antenna is motorised and is controlled by a compatible DiSEqC
1.1 or 1.2 motor, select "Motor". The "Motor Position Setting" option will
be enabled inmediately.
See Annex 1 - "Motor Position Setting" for more information on how it
works.
8.- User Installation menu
Antenna Setup
Motor Position Setting
Signal Level
Go to Auto Search
Positioning Help
Antenna 1
Satellite ASTRA
Univ. LNB YES
LNB Freq. 1 9750
LNB Freq. 2 10600
14/18 Volt None
22KHz Tone None
DiSEqC Port A
Antenna Setup
Motor Position Setting
Signal Level
Go to Auto Search
Positioning Help
Antenna 1
Satellite ASTRA
Univ. LNB YES
LNB Freq. 1 9750
LNB Freq. 2 10600
14/18 Volt None
22KHz Tone None
DiSEqC Motor
Page 16
User instructions “RSD - 7235”
45
ENGLISH
Note:
- If you are using a switch, please take into account the combination of the antenna with each of the switches in each input.
- You cannot use the 22 KHz tone switch and the DiSEqC switch at the same time as both switches may use the same 22
KHz tone.
- If you want to use a “Tone Burst” switch even when this cannot be selected in the menu, you can use it by choosing the
DiSEqC option. When you configure the antenna connected to the “A” input of the Tone Burst Switch, select the “Port A” in
the DiSEqC option in the “Antenna Setup”. Carry on in the same way when configuring the antenna connected to the “B”
Input of the Tone Burst Switch, in this case selecting the “Port B” in the DiSEqC option.
- You can search manually for the channels by directly indicating the frequencies in the “L” band (950 - 2150 MHz). To do this,
select an available antenna (not assigned to any satellite) in “Antenna Setup” and assign it to one of the free satellite
positions (for example, NEWSAT1). Next, in “Univ. LNB” select “NO”, and enter “0000” as the oscilator frequency in both
cases.
You can now begin to use the “Manual Search” option, select the previously configured antenna and enter the IF
frequencies (950 - 2150 MHz).
In the menu, when we select the “Signal level” option and press the OK
button over it, we are informed of the signal level with which we receive
the satellite.
This is useful when we are installing the antenna, as it serves as a guide
to know when we are pointing it towards a satellite.
In the menu, when we select the “Go to Auto Search” option, we are
given direct access to the “Auto Search” menu.
During the installation of the satellite antenna, the receiver can calculate
the elevation and azimuth angles for a satellite and display these on the
screen.
- Enter the position of the desired satellite to which you are going to point
the antenna in the “Satellite” section, of the “Positioning Help” option of
the “Antenna Setup” menu.
- In the same way, enter the longitude and latitude of the place where
you are going to install the antenna in the “Longitude” and “Latitude”
sections.
- Select “Compute” and press the OK button. The receiver will calculate
the elevation and azimuth angles, and will display these on screen.
To exit this menu press the EXIT button.
Antenna Setup
Signal Level
Go to Auto Search
Positioning Help
Satellite ASTRA
19.2°
EAST
Longitude 000.0°
EAST
Latitude 000.0°
North
Compute
Antenna Setup
Signal Level
Go to Auto Search
Positioning Help
Antenna 1
Satellite ASTRA
Univ. LNB YES
LNB Freq. 1 9750
LNB Freq. 2 10600
14/18 Volt None
22KHz Tone None
DiSEqC Port A
Signal Level
0 Unlocked
TP1
DiSEqC
DiSEqC
Fixed
antenna
Fixed
antenna
with
multisat
Various
fixed
antennas
Antenna with
motor
DiSEqC 1.2
Page 17
User instructions “RSD - 7235”
46
8.2.- Auto Search (Satellite exploration)
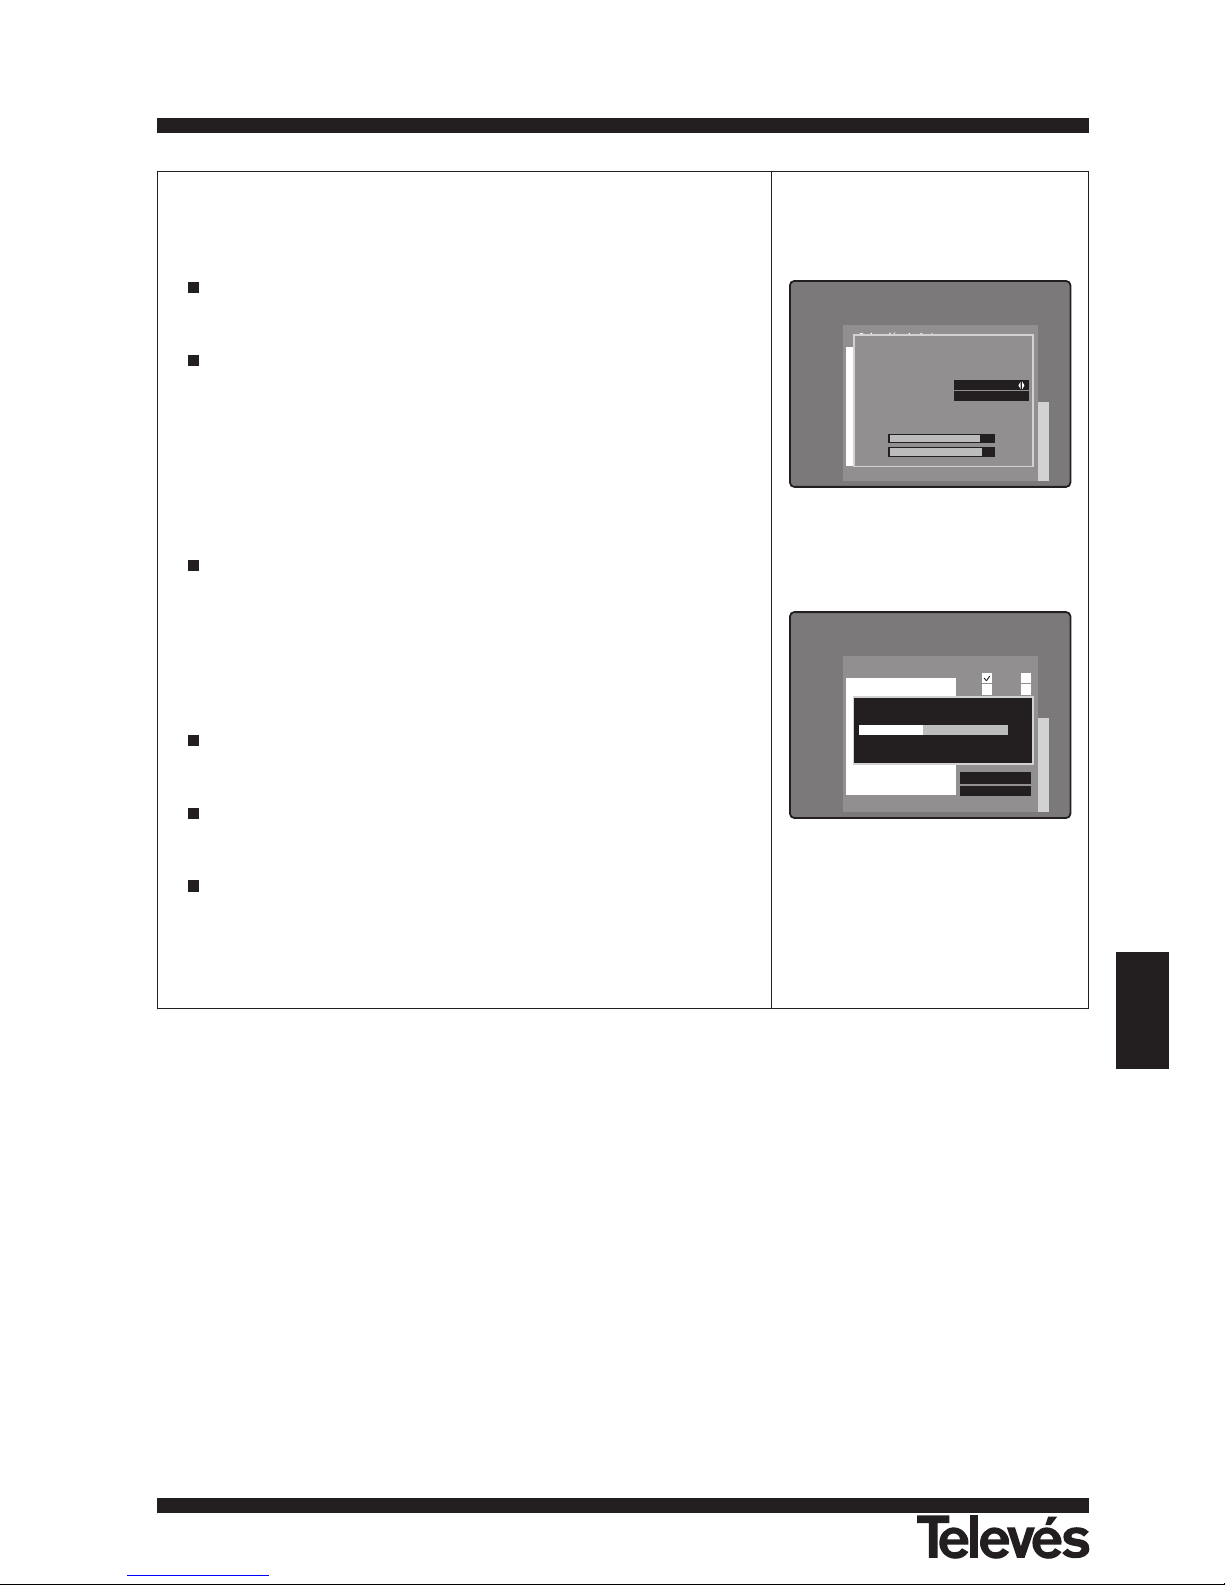
To carry out the search of programmes offered by any of the satellites in your
installation, press the OK button over the “Auto Search” option in the main
menu. If you are in the “Antenna Setup” section, you can go directly to this
menu by pressing the OK button over the “Go to Auto Search” option.
You can search for the programmes of a particular satellite, assuming that the
satellite that has been selected in the “Antenna Setup” menu is correctly
assigned to an antenna. If the antenna has no satellite assigned to it, the
search cannot be carried out.
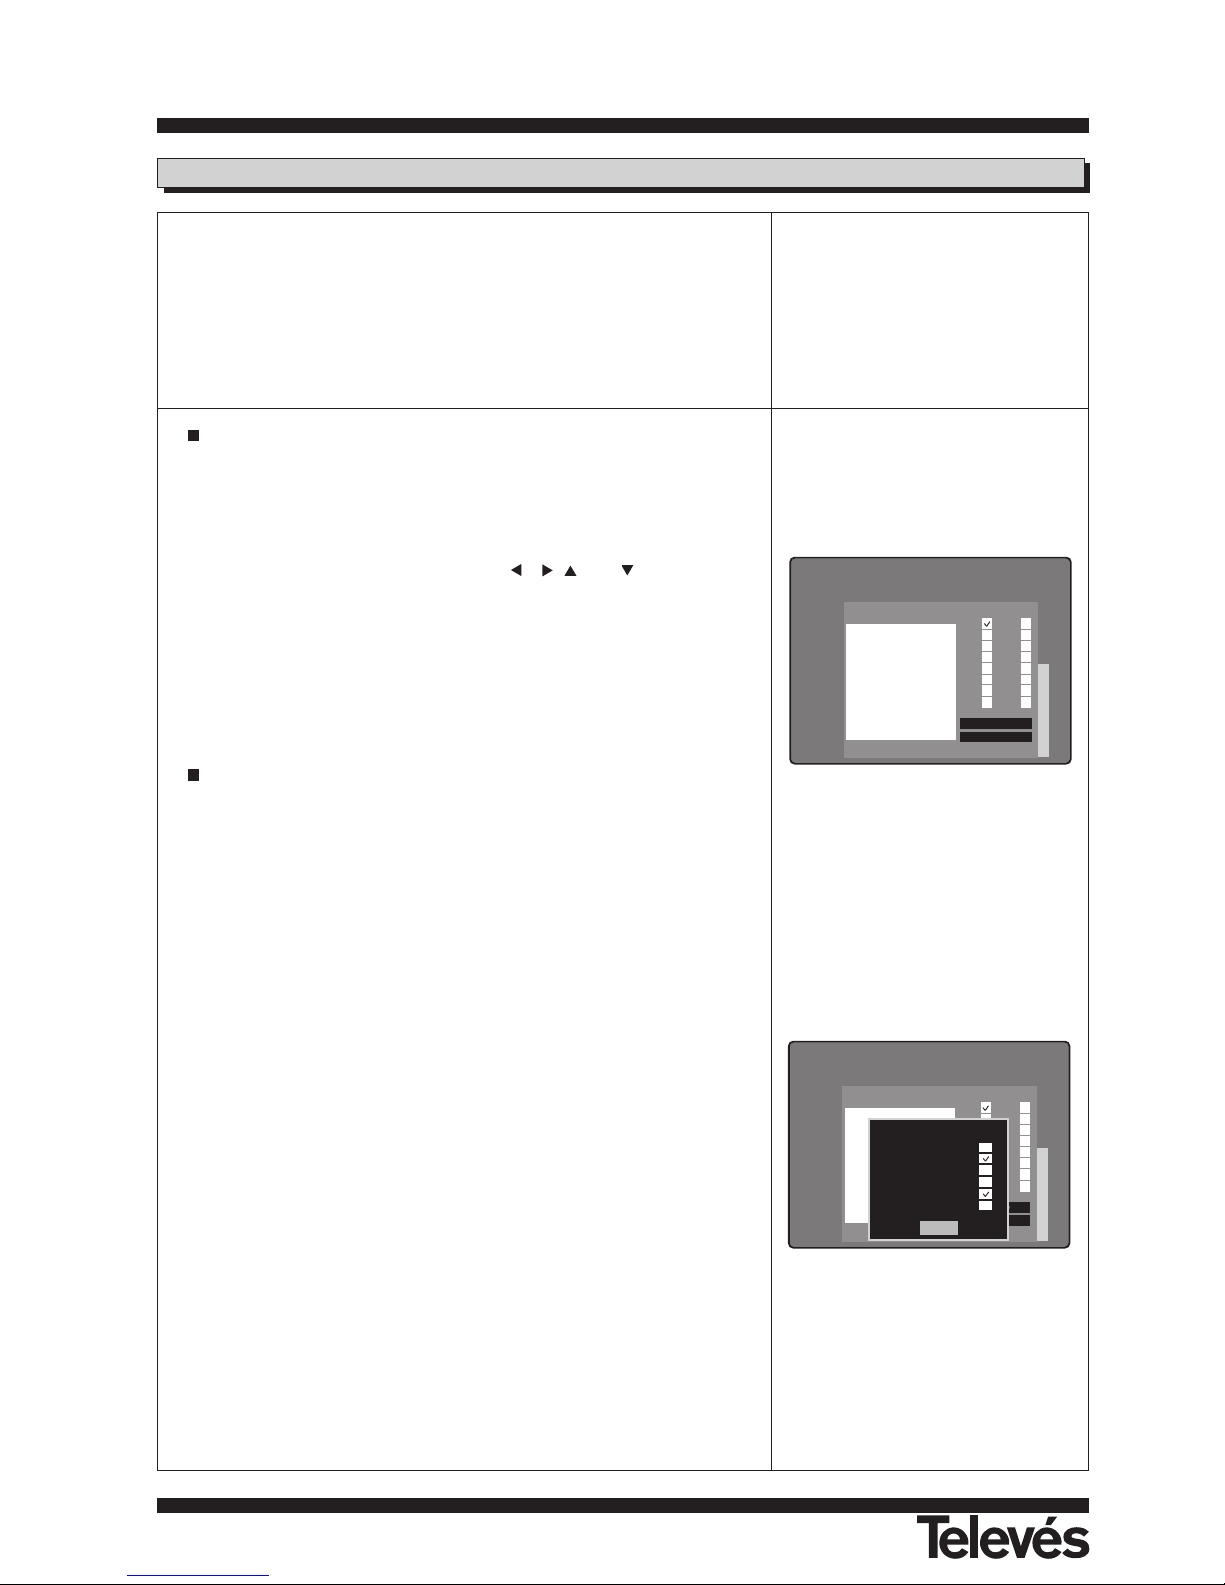
As you can see, this menu shows the 16 antenna positions. Each
position corresponds to a satellite, if you have previously assigned one to
that position in the “Antenna Setup” menu.
The active position is indicated by the colour yellow and in the window
you can see the information regarding the satellite that is assigned to that
position.
To select one of the antennas use the , , and buttons. Press
the OK button over the position nº that corresponds to that antenna. The
square will show a (√) sign, thereby indicating that the satellite has been
selected. If you press the OK button again over the same position, this is
deselected.
To mark more that one position, press OK over those that interest you.
A position that does not have an antenna assigned to it cannot be
marked.
Place the cursor over “Search Option” and press the OK button.
Select one of the following options by pressing the OK button over the
one that appears in yellow. The (√) sign indicates the active options.
When you press OK again, this sign disappears and it is deselected.
- New TP: This will search for the new transponders that have been
added to the selected satellite.
- FTA Only: This will search for all the channels except those which are
encoded in the selected satellite.
Note: To avoid having a list of channels that is excessively long due to
the inclusion of the encoded channels, we recommend that you activate
this option when the automatic search is carried out.
This option is activated by default
.
- Sort by Scramble: This will search for all the channels in the selected
satellite and will place the encoded ones at the end of the list.
- NIT ON: This will search for all the channels in the selected satellite
including the new transponders that were created automatically from
the satellite data.
- Fast Scan ON: This will search for all the channels in the selected
satellite in the shortest time possible.
- Detail Scan: This will search for all the channels in the selected satellite
within the frequency range and symbol rate that are specified in the
values.
The RF frequency range is from 950 to 2150 MHz.
Auto Search
Search Option
Start
Antenna Select
Information
Antenna 1
Satellite ASTRA
Univ. LNB YES
LNB Freq. 1 9750
LNB Freq. 2 10600
14/18 Volt Not Used
22KHz Not Used
DiSEqC Port A
1 9
2 10
3 11
4 12
5 13
6 14
7 15
8 16
Auto Search
Search Option
Start
Antenna Select
Information
Antenna 1
Satellite ASTRA
Univ. LNB YES
LNB Freq. 1 9750
LNB Freq. 2 10600
14/18 Volt Not Used
22KHz Not Used
DiSEqC Port A
1 9
2 10
3 11
4 12
5 13
6 14
7 15
8 16
Search Option
New TP
FTAOnly
Sort by Scramble
NIT ON
Fast Scan ON
Detail Scan
OK
Page 18
User instructions “RSD - 7235”
47
ENGLISH
This input frequency range is based on the frequency values of the local
oscillator that is assigned to each transponder.
The frequency range covers all the values.
Press the OK button over the “OK” box in the menu to confirm the type of
search.
Place the cursor on “Start” and press OK to start the search.
If an antenna position has not been marked, the search will not be
carried out.
When you start the channel search and if you dispose of a motorised
antenna, you may find that the antenna is not directed towards the
selected satellite, in which case, it will begin to move towards the position
that it has stored in its memory for this satellite. This position is shown on
your TV screen.
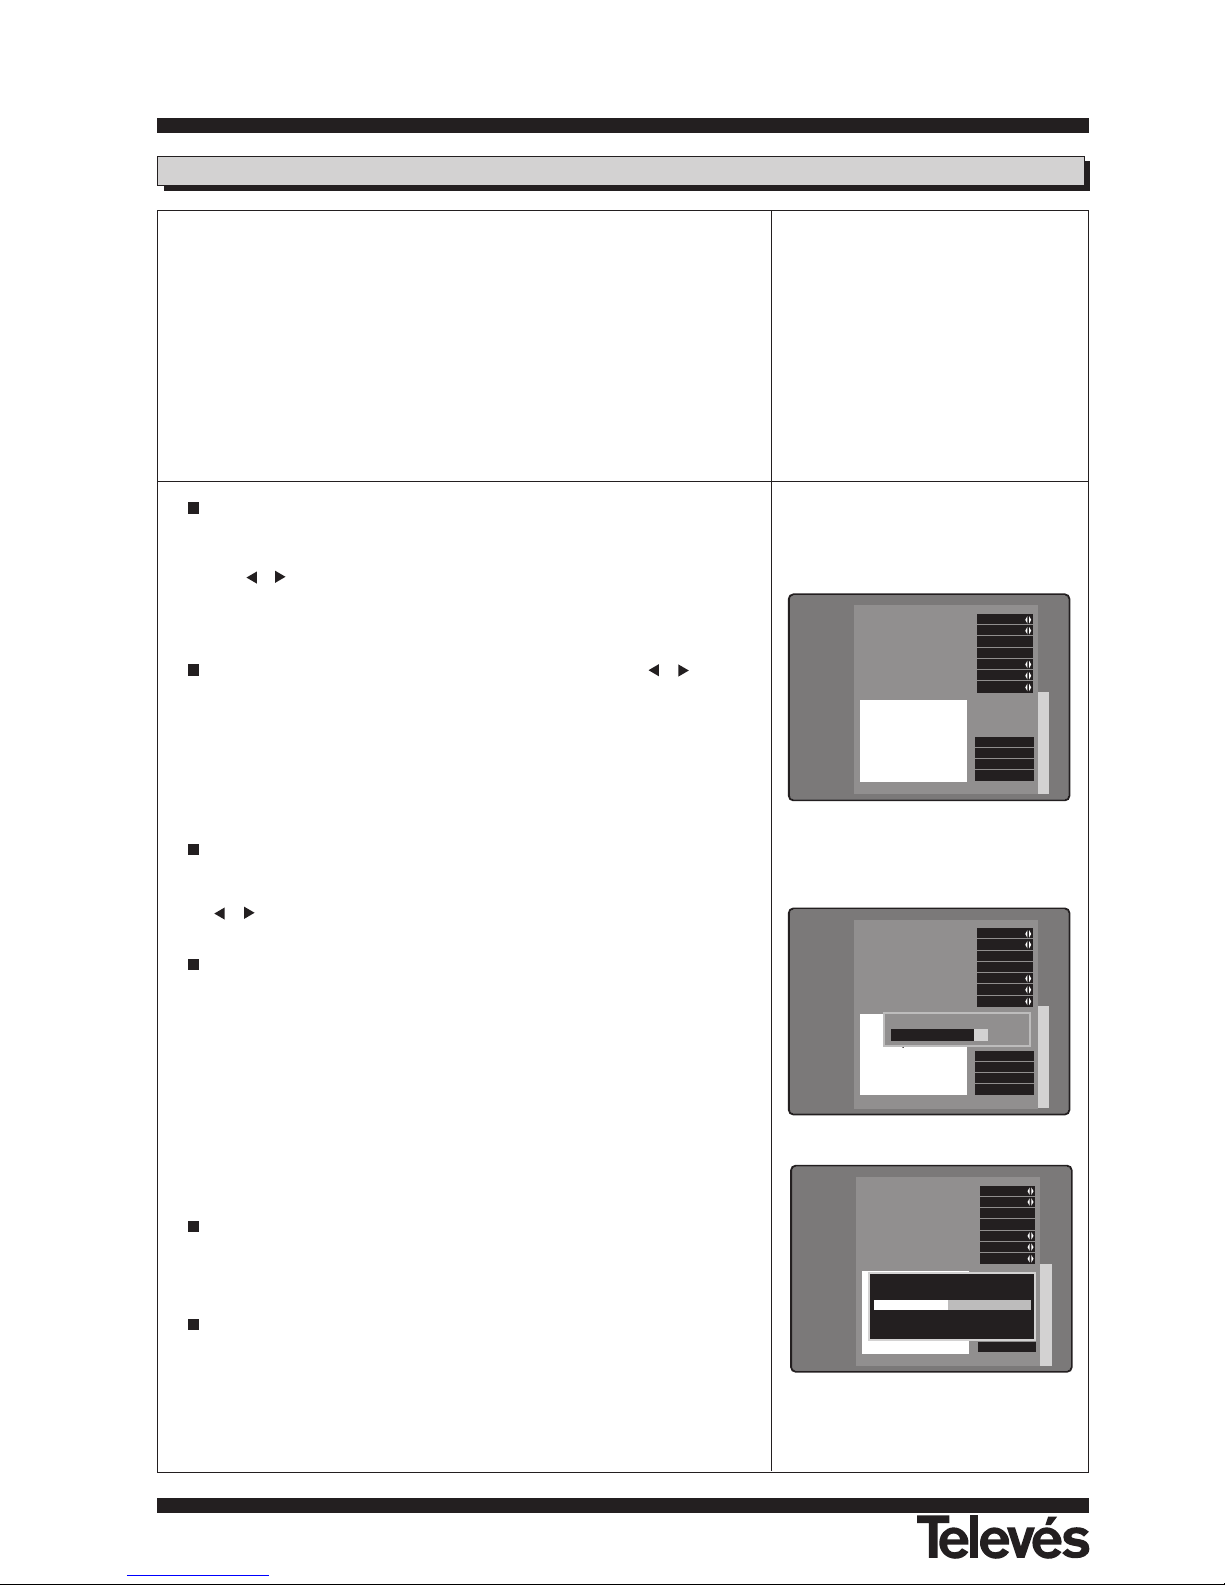
During the channel search, the following information will be displayed
onscreen:
- The name of the satellite that is being explored.
- The number of transponders that have been found.
- The progress of the process (in percentage).
- The names of the channels that have been found.
If you want to stop this search before it has finished, you must press the
EXIT button on the remote control.
When the search has finished, the number of the channels that have
been found is displayed onscreen.
When you exit the “Auto Search” menu by pressing EXIT on the remote
control, the following message appears: “Saving data ...”.
Note:
- The number of transponders can appear to be greater than the amount that was preprogrammed. This is because this
receiver uses the NIT information transmitted by the satellite to add any new channels automatically.
- If you want to look for channels indicating the “L” band frequencies directly (950-2150 MHz) see the “TP Setup” option.
Auto Search
Search Option
Start
Antenna Select
Information
Antenna 1
Satellite ASTRA
Univ. LNB YES
LNB Freq. 1 9750
LNB Freq. 2 10600
14/18 Volt Not Used
22KHz Not Used
DiSEqC Port A
1 9
2 10
3 11
4 12
5 13
6 14
7 15
8 16
Searching 1.ASTRA TP/20/49
42%
Found The Following Channel(s) ...
Auto Search
Opciones
Iniciar
Selección de Antena
Información
Antena 1
Satélite ASTRA
Univ. LNB SI
Frec. OL 1 9750
Frec. OL 2 10600
14/18 Volt NO
22KHz NO
DiSEqC Entrada A
1 9
2 10
3 11
4 12
5 13
6 14
7 15
8 16
Moving motor !
If motor moved,
You can start scan.
ASTRA19 TP15
Start
11778V / 27500 / 3/4 / 22KHz(ON)
Signal Level Locked
88%
90%
Page 19
User instructions “RSD - 7235”
48
8.3.- TP Setup (Transponder exploration)
If you want to look for new channels in a recently launched satellite, or in one
that has only recently been programmed into the Receiver, or in a newly
installed transponder of a satellite that already existed, the best way to do
this is to use the “TP Setup” option, although this function can, of course, be
used to search for channels in satellites and transponders that already
existed.
Some of the operators indicate that their programmes are encoded when
they are actually free.
If an automatic search has been carried out with the recommended option
(only free), these programmes wil be included in the channel list.
In these types of cases, the “TP Setup” option is also useful.
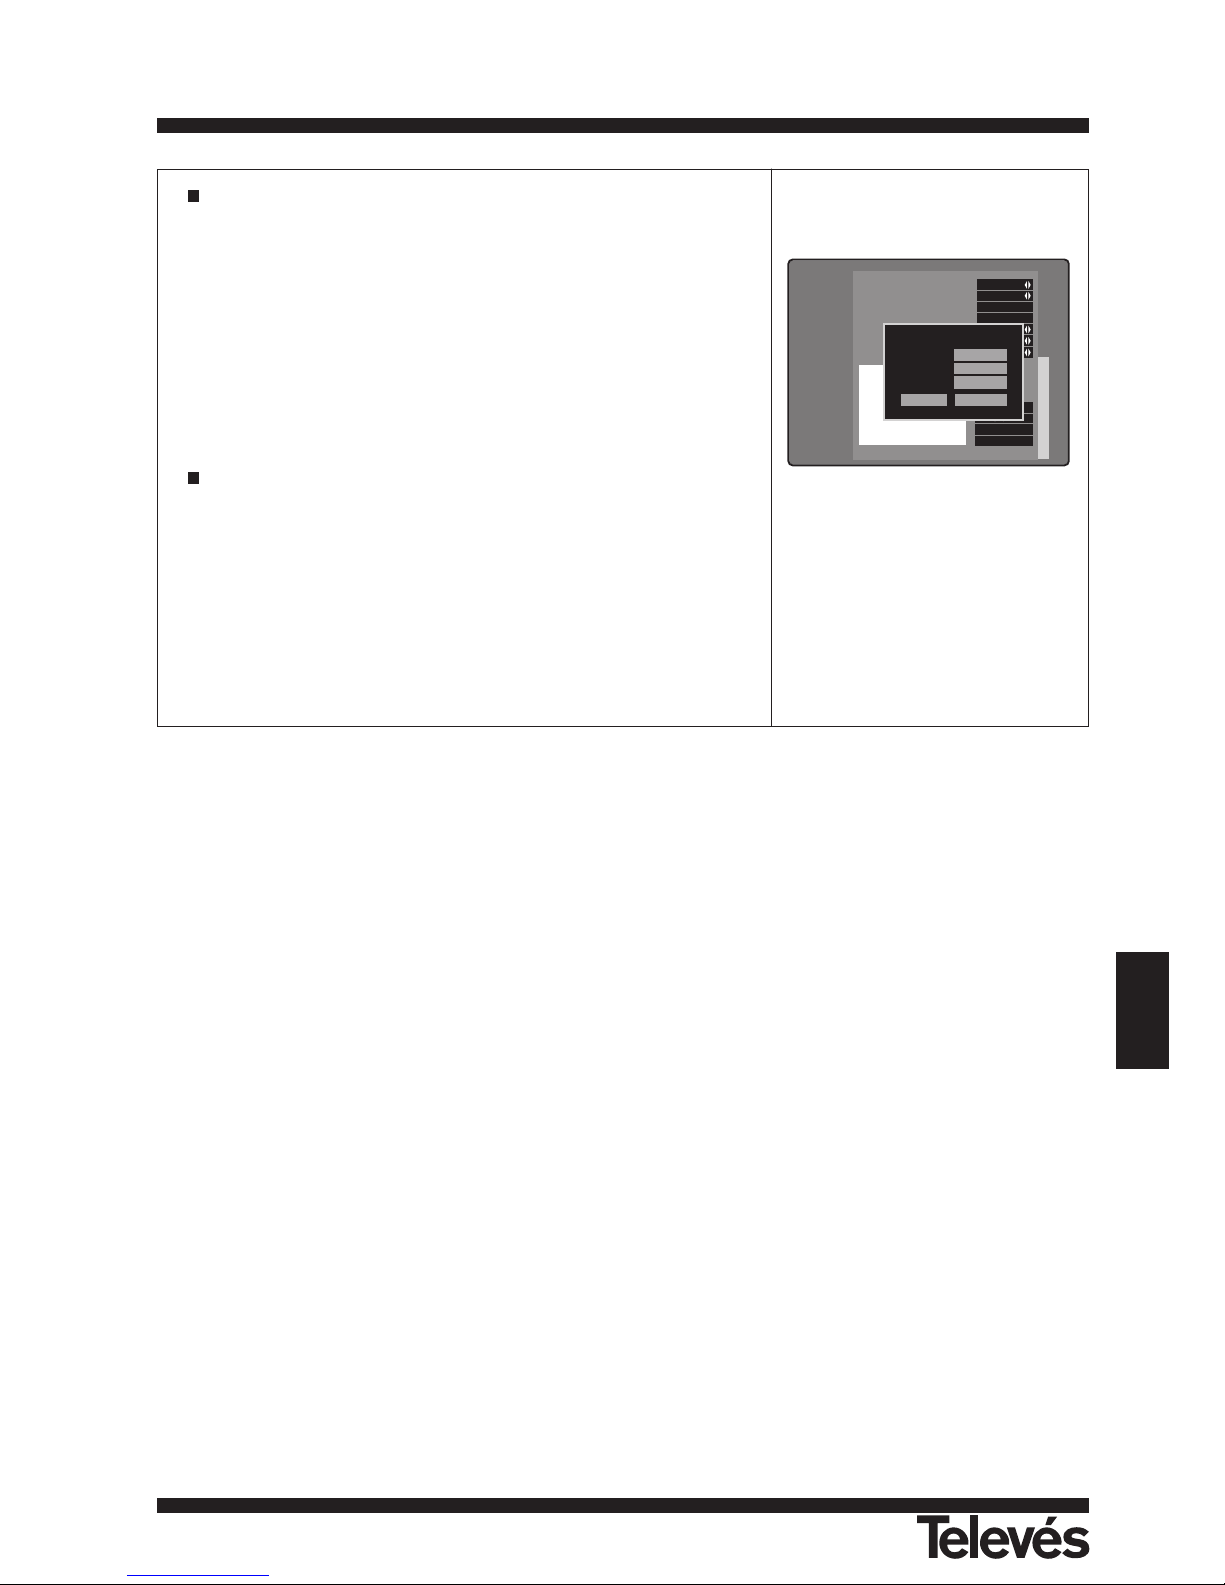
Y ou can access this menu by pressing the OK button over the “TP
Setup” option in the main menu.
Place the cursor over the “Antenna” option and select an antenna using
the , buttons or by pressing the OK button to activate the popup
menu. The data that corresponds to the satellite that is assigned to each
antenna can be seen in the information window.
Select a transponder in the “Transponder” box using the , buttons
or by pressing the OK button.
If you want to look for programmes in a specific transponder and this
does not appear on the list, you can go to the end of the list, select one
of the positions that appear as “New” and enter the values of the new
transponder. You must know the data that corresponds to this new
transponder.
The frequency, symbol rate, polarisation, FEC and 22 KHz tone are the
data of the selected transponder that can be seen in each field. To
modify any of these values, use the numbers on the remote control, the
, buttons or the OK button depending on each case.
To find out what the signal level received by the selected transponder is,
click on the “Check Signal” option.
The signal level information contains the following:
- Locked: This means that the antenna and transponder data is correct
and that the receiver can begin to search for channels, once “Start” has
been pressed.
- Unlocked: This means that the antenna and transponder data is
incorrect, so the receiver cannot search for channels.
To exit the “Check Signal” menu, press the EXIT button.
Press the OK button over the “Start” option to start the programme
search on the specified transponder.
The window displaying the progress of the operation now apears.
Once the search has finished, the number of the channels that were
found appears onscreen. If this is “0”, the search was not carried out
correctly.
TP Setup
Check Signal
Start
Set PID
Delete TP
Satellite ASTRA
Univ. LNB YES
LNB Freq. 1 9750
LNB Freq. 2 10600
14/18 Volt None
22KHz None
DiSEqC Port A
Antenna 1
Transponder TP52
Frequency 12168
Symbol Rate 27500
Polarization Ver
FEC AUTO
22KHz ON
TP Setup
Check Signal
Start
Set PID
Delete TP
Satellite ASTRA
Univ. LNB YES
LNB Freq. 1 9750
LNB Freq. 2 10600
14/18 Volt None
22KHz None
DiSEqC Port A
Antenna 1
Transponder TP52
Frequency 12168
Symbol Rate 27500
Polarization Ver
FEC AUTO
22KHz ON
Signal Level
0 Unlocked
TP Setup
Check Signal
Start
Set PID
Delete TP
Satellite ASTRA
Univ. LNB YES
LNB Freq. 1 9750
LNB Freq. 2 10600
14/18 Volt None
22KHz None
DiSEqC Port A
Antenna 1
Transponder TP52
Frequency 12168
Symbol Rate 27500
Polarization Ver
FEC AUTO
22KHz ON
Searching ASTRA TP1
Found The Following Channel(s) ...
Page 20
User instructions “RSD - 7235”
49
ENGLISH
Note:
When the message “Unlocked” appears in the signal level, you must check the following points:
- Adjust the antenna’s position until the level changes to “Locked”
- Modify the transponder values.
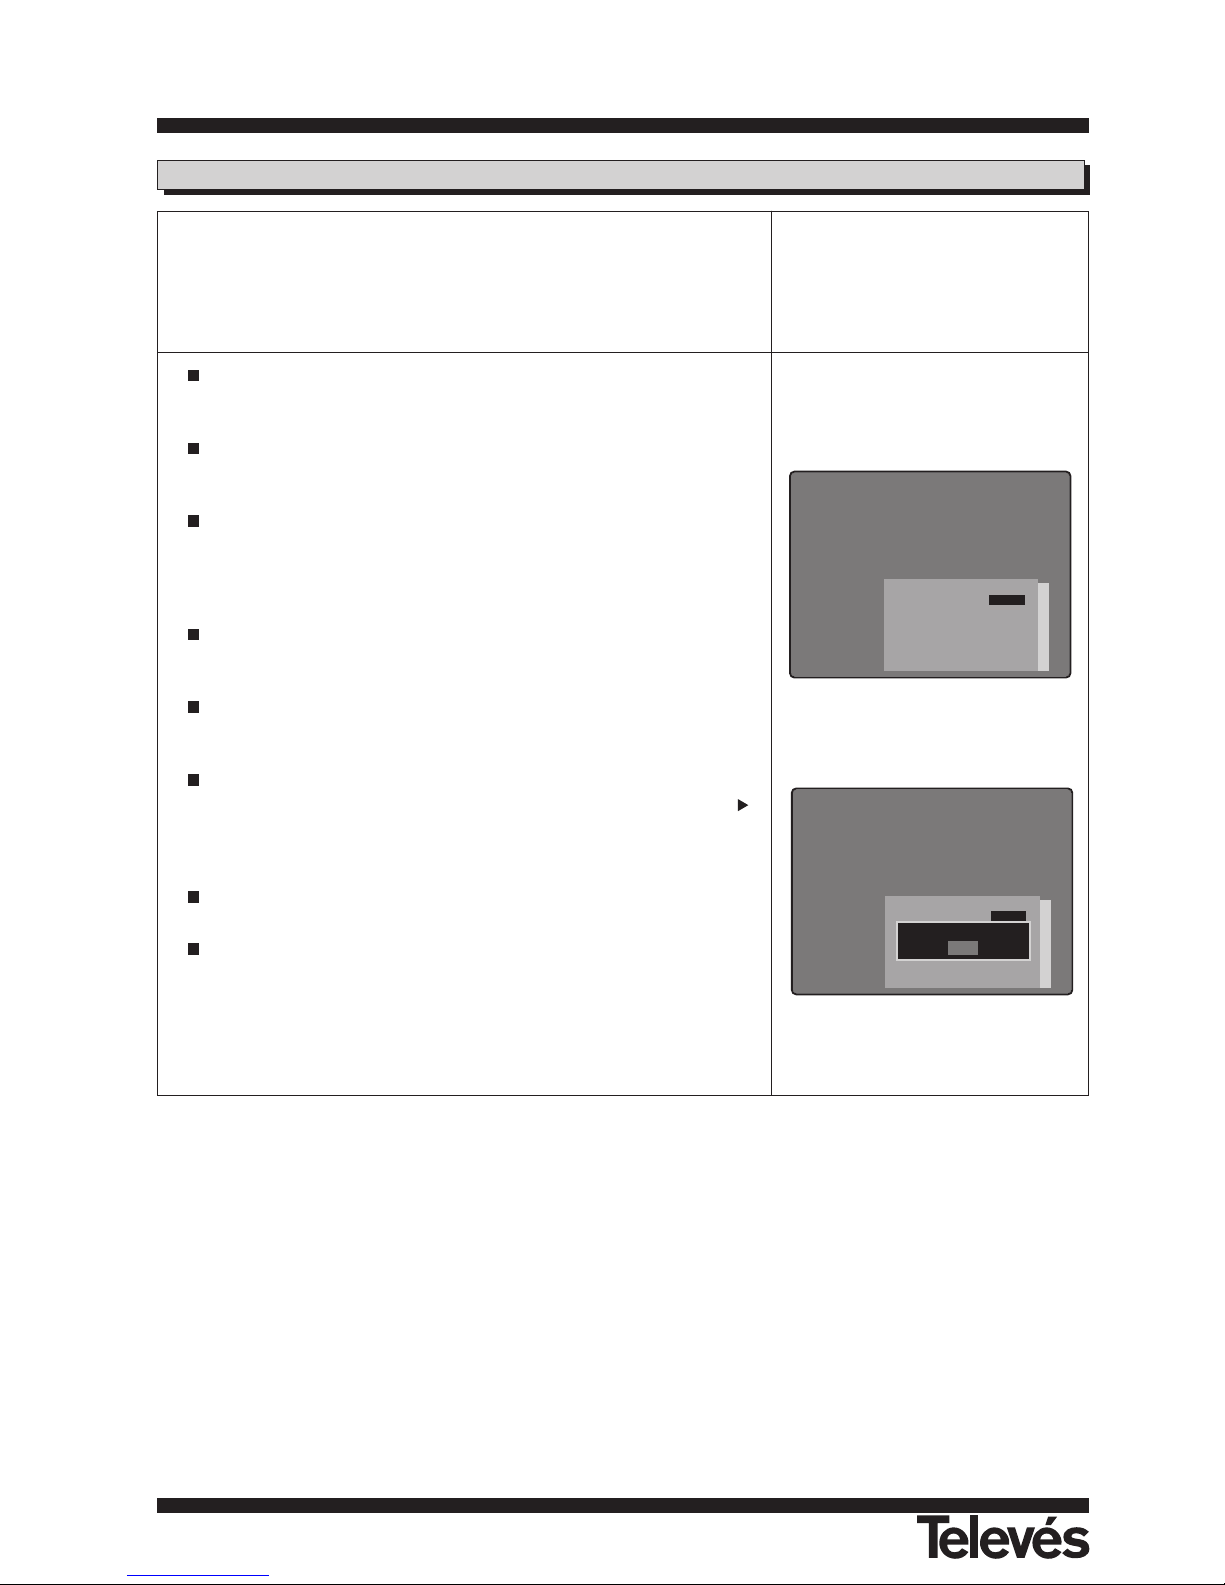
The receiver also disposes of the manual “Set PID” option, although it
should know this data.
In general, this option does not need to be used as the receiver
automatically detects all the programmes contained in the transponder.
However, for some programmes that are transmitted in test mode, we
don’t dispose of the appropriate information.
In cases such as these, you can manually enter the PID’s of the desired
programme, so that this is recognised by the Receiver.
Each PID can be entered as a decimal value.
To confirm the data that has been entered, select the “OK” box and then
press the OK button.
The option “Delete TP” lets you erase the transponder data that is
selected in the menu.
When this option is selected, a message will appear asking us to confirm
if we want to erase the transponder (YES) or if we want to cancel the
command (NO).
TP Setup
Check Signal
Start
Set PID
Delete TP
Satellite ASTRA
Univ. LNB YES
LNB Freq. 1 9750
LNB Freq. 2 10600
14/18 Volt None
22KHz None
DiSEqC Port A
Antenna 1
Transponder TP52
Frequency 12168
Symbol Rate 27500
Polarization Ver
FEC AUTO
22KHz ON
Set PID
Video PID 0
Audio PID 0
PCR PID 0
OK Cancel
Page 21
User instructions “RSD - 7235”
50
When you consider it necessary, you can lock certain channels with the
“Parental Lock” option.
With this option, you can stop your children from seeing channels which you
believe to be inappropriate for them. Only those who know the password can
access these channels to watch them.
The password is made up of 4 numbers, which will never appear
onscreen. An asterix will appear instead.
To access the “Parental Lock” you must enter the current password. By
default, the password is “0000”.
When you select one of the “Favorite channel” or “User Installation”
options or when you select a locked channel in the “TV or RADIO
channels” menus, the following message will appear onscreen “Key in
password”, which you must do.
If the password is incorrect, the following message appears on screen
“Access denied”.
To activate the locking device, select the “Parental Lock” option in the
main menu. The “Parental Lock” menu will appear on screen.
Here you will be able to see that the “Parental Lock” option is not
activated (OFF). If you want to use the locking device, press the
button to change it to “ON” and therefore activate it. You must first enter
the password to be able to do this.
Enter a new password when you want a new one.
Confirm the new password by entering it once again. If these are not the
same, a message indicating an error will appear onscreen.
8.4.- Parental Lock (access control)
Note:
- You must take into account that when a channel is unlocked, all of the other channels that were also locked, are also
unlocked. When you switch the receiver Off and back On again, these return to their locked status.
- The receiver disposes of a Master Password that lets you access the “Parental Lock” menu when you have forgotten your
password. The Master Password is: 1 2 5 0.
Parental Lock
Current Password
****
Parental Lock OFF
New Password
****
Confirm Password
****
Parental Lock
Current Password
****
Parental Lock OFF
New Password
****
Confirm Password
****
Access Denied
OK
Page 22
User instructions “RSD - 7235”
51
ENGLISH
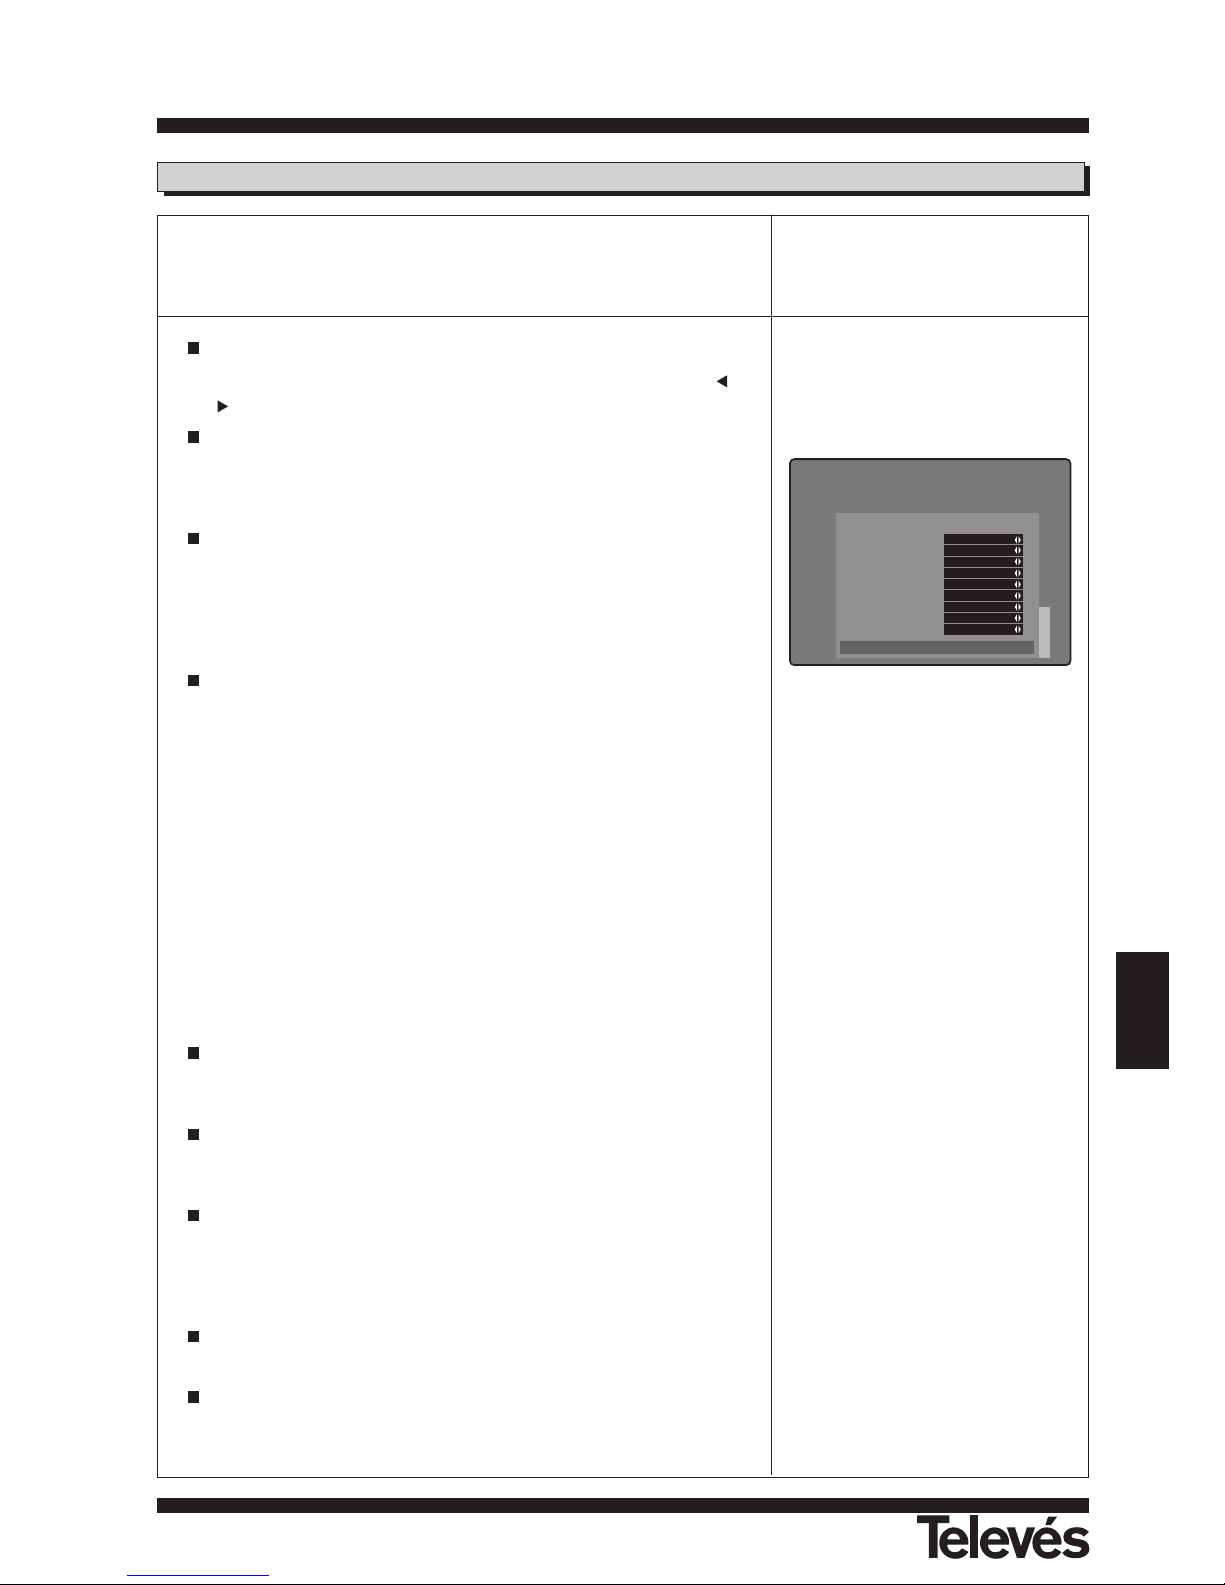
Options
ENG. GER. SPA. FRE. POR. ITA. ARB.
OSD Language English
1º Audio Language English
2º Audio Language Spanish
Time Offset +1:00
Summer Time ON
LNB Power ON
Screen Format 4:3
TV Type PAL
Video Output RGB
In this menu, you can select the parameter values indicated below.
Y ou can access this menu by pressing the OK button over the “Options”
option in the main menu.
OSD Language
You can change the language that is used for the menus using the or
buttons in the “OSD language”.
1st Audio Language
Some programmes can be listened to in various languages. Select the
language that you prefer to use. If the programmes do not have this
language, the receiver will automatically select the 2nd audio language.
2nd Audio Language
Select the 2nd language that you prefer to listen to the programmes with,
if the programmes do not dispose of the 1st audio language. If the
programmes do not dispose of this second audio language, then the
receiver automatically selects the first language as it appears in the
emission signal.
Time Offset
The receiver disposes of a Clock that indicates the time. This Clock
automatically adjusts to the information provided in the satellite signal by
the service supplier.
The service supplier sends two types of information regarding the time,
one that is relative to the curren time (this will be seen on the Clock) and
another that indicates the time schedule of the different programmes (this
is used by the EPG).
This information is sent in GMT format, so that you must adjust the
Receiver using the offset of the time zone of the country that you live in.
When you modify the local time, the names of the cities that are affected
appear.
NOTE: Not all suppliers provide this type of information and some do not
do so correctly
.
Summer Time
The option of adjusting the clock to the summer time can be activated
(ON) or disactivated (OFF).
LNB Power
This option can be activated (ON) or disactivated (OFF) according to the
preferences of the user.
Screen Format
The screen format can be either "4 : 3" or "16 : 9".
If you select 4:3, all the programmes will be seen in this format.
If you select 16:9, the screen format will be adjusted automatically.
TV Type
There are 3 output standards, "PAL", "NTSC" or "AUTO".
Video output
It disposes of a video output in the CVBS and RGB formats.
8.5.- Options
Page 23
User instructions “RSD - 7235”
52
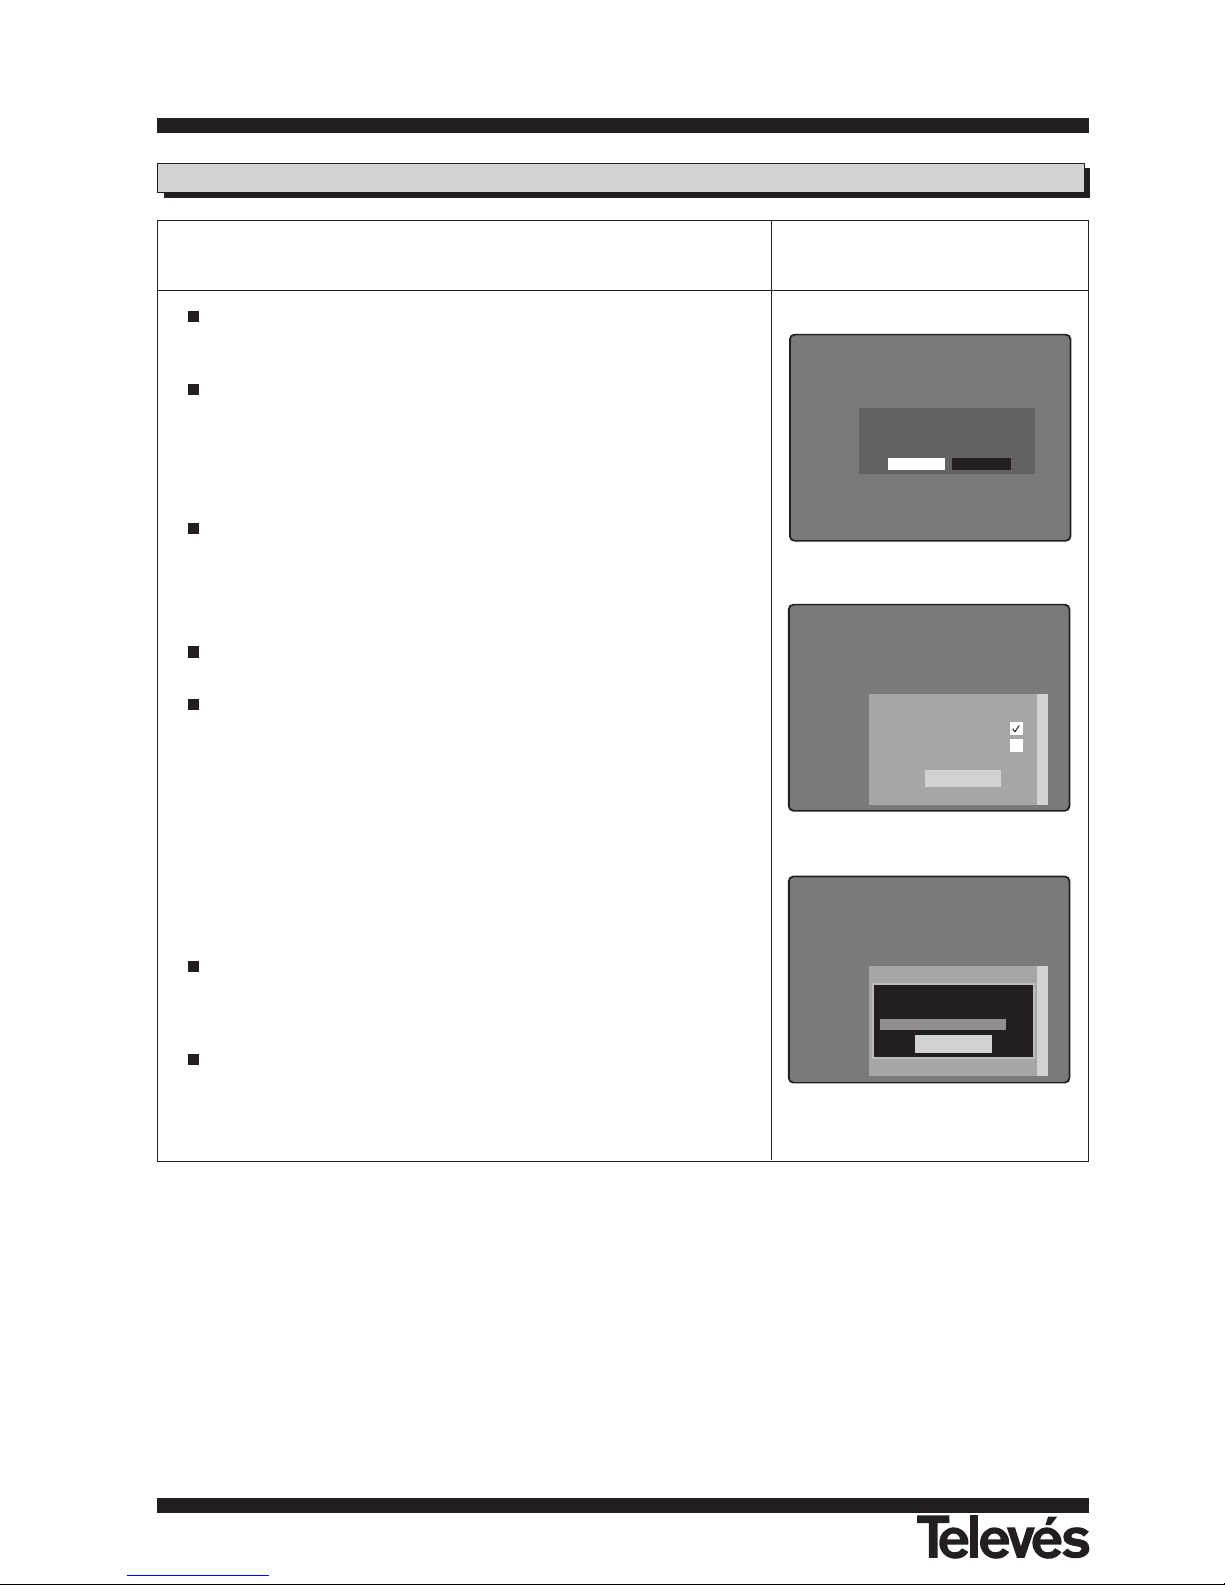
Please Connect Both Receivers
Using RS-232 Communication Cable.
Select OK to Continue.
8.6.- Data transfer (Receiver download)
This RSD receiver disposes of the possibility of transfering data and
software to another RSD receiver via an RS-232 cable.
Connect the TV to the main RSD receiver and select “Data Transfer” in
the main menu.
Connect the secondary RSD receiver (it should be in STANDBY mode)
to the main RSD receiver via an RS-232 cable when the following
message appears on screen: “Please Connect Both Receivers. Using
RS-232 Communication Cable. Select OK to Continue”.
Next select the “OK” box and press the OK button.
In the “Data Transfer” menu mark the options that you need:
- User Data transfer: Transfers the satellite, transponder and channel
data.
- Software transfer: Transfers the RSD software.
Begin the data transfer by selecting “Start”.
During the transfer, the following messages will appear onscreen:
- Connecting...: This means that the receivers are being connected via
the RS-232 cable.
- Connection completed: The connection has been carried out
succesfully.
- Loading .. blocks: Displays the number of blocks that have been
loaded.
- Writing data: Writing the software into the memory of the secondary
receiver.
- Data transfer completed: The data transfer has finished.
If you want to cancel the transfer, either of data or of software, select the
“STOP” option and press the OK button. You will then return to the
previous menu.
Once the data transfer has finished, you should switch the secondary
receiver off and then back on again.
If you have transferred software, switch the secondary receiver back on
again and select “Factory Default”.
OK Cancelar
Data Transfer
User Data Transfer
Software Transfer
Start
Data Transfer
User Data Transfer
Conecting ...
0%
Stop
Note:
Take care to avoid producing an interruption in the flow of electricity during the transfer of data, because the Receiver would
lose the data.
Page 24
User instructions “RSD - 7235”
53
ENGLISH
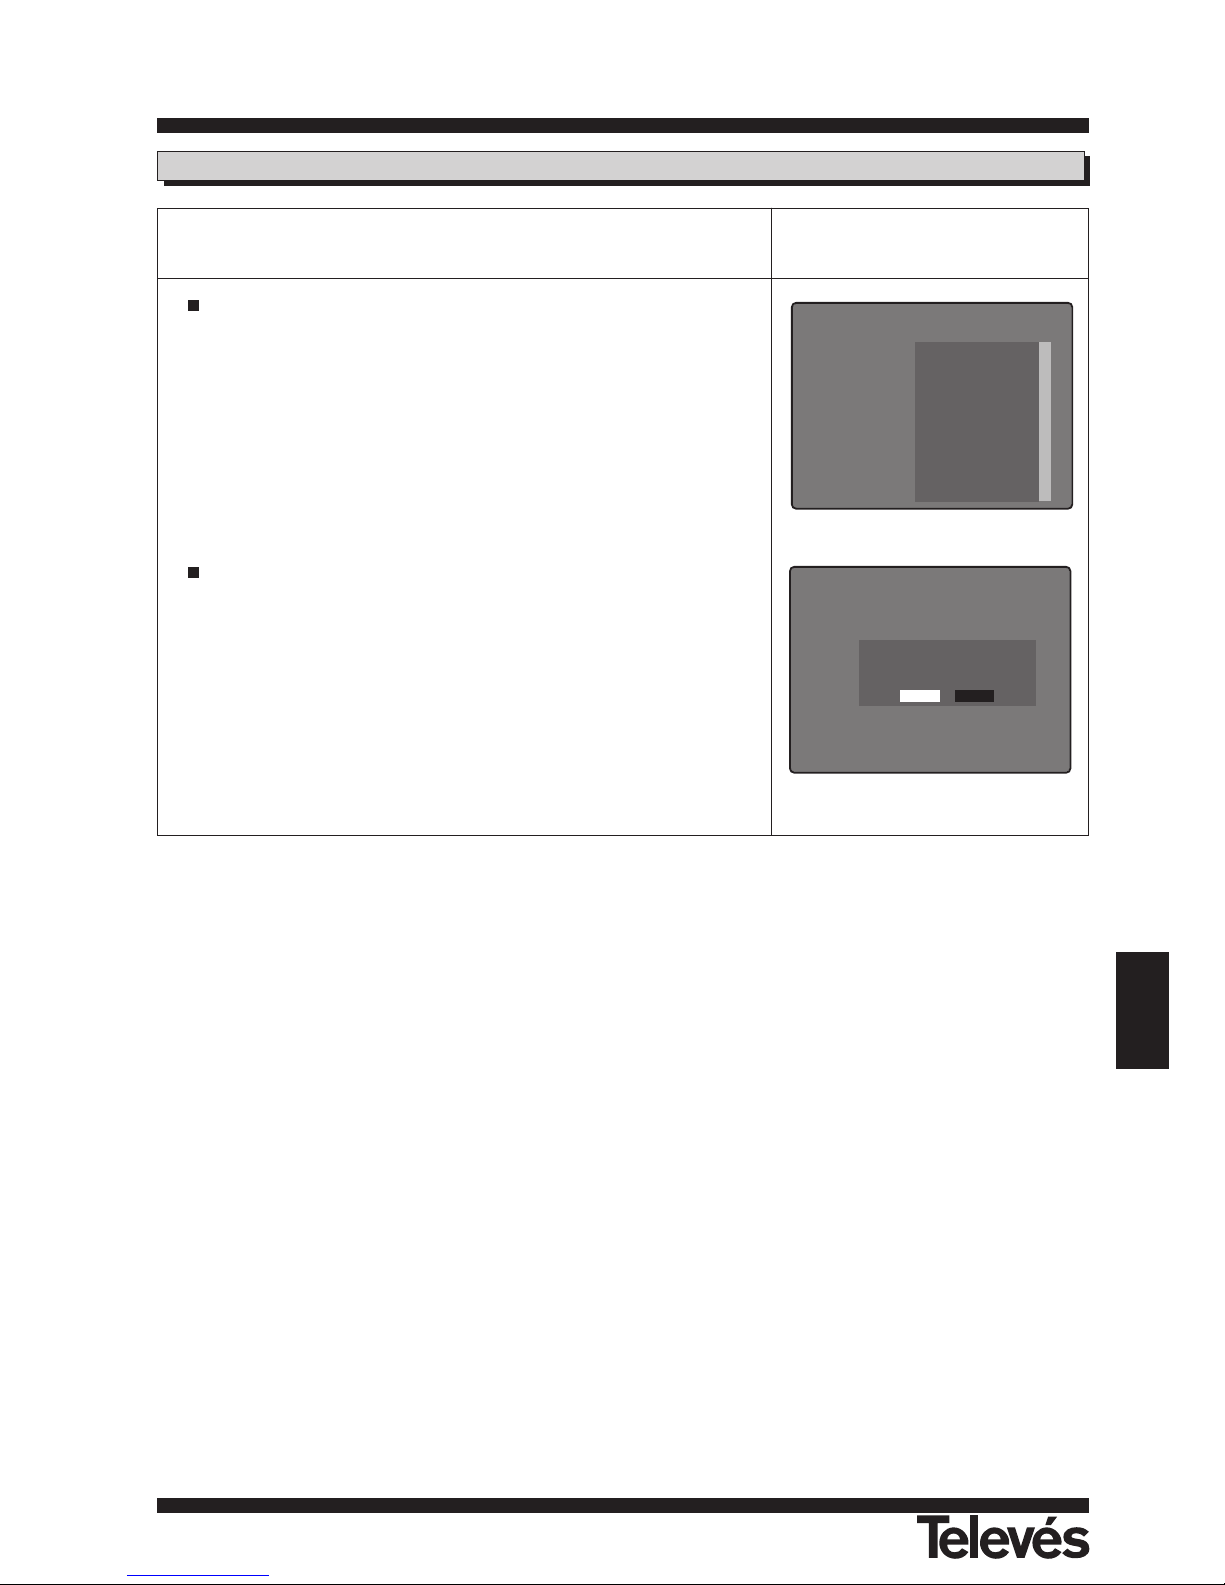
Warning!
All Channel will be DELETED
And all TPData will be INITIALIZED!
8.7.- How to reset the Receiver to the factory settings
This function changes all the parameters that you may have entered back to
to those set at factory.
The receiver will carry out the following changes when you press the OK
button over “Factory Default”:
- All of the specifications entered for the transponders will change
back to those set at the factory.
- All of the channels on the list will be erased.
- All of the options installed by the user will change back to those
set at the factory.
When you choose this option, a warning message will appear onscreen.
YES NO
Menu .
Channel Manager
TV Channel
Radio Channel
Program Guide
Timer
User Installation
Antenna Setup
Auto Search
TP Setup
Parental Lock
Option
Data Transfer
Factory Default
Receiver Info.
Page 25
User instructions “RSD - 7235”
54
9.-Electronic Programming Guide
10.- Timer
11.- Receiver Info.
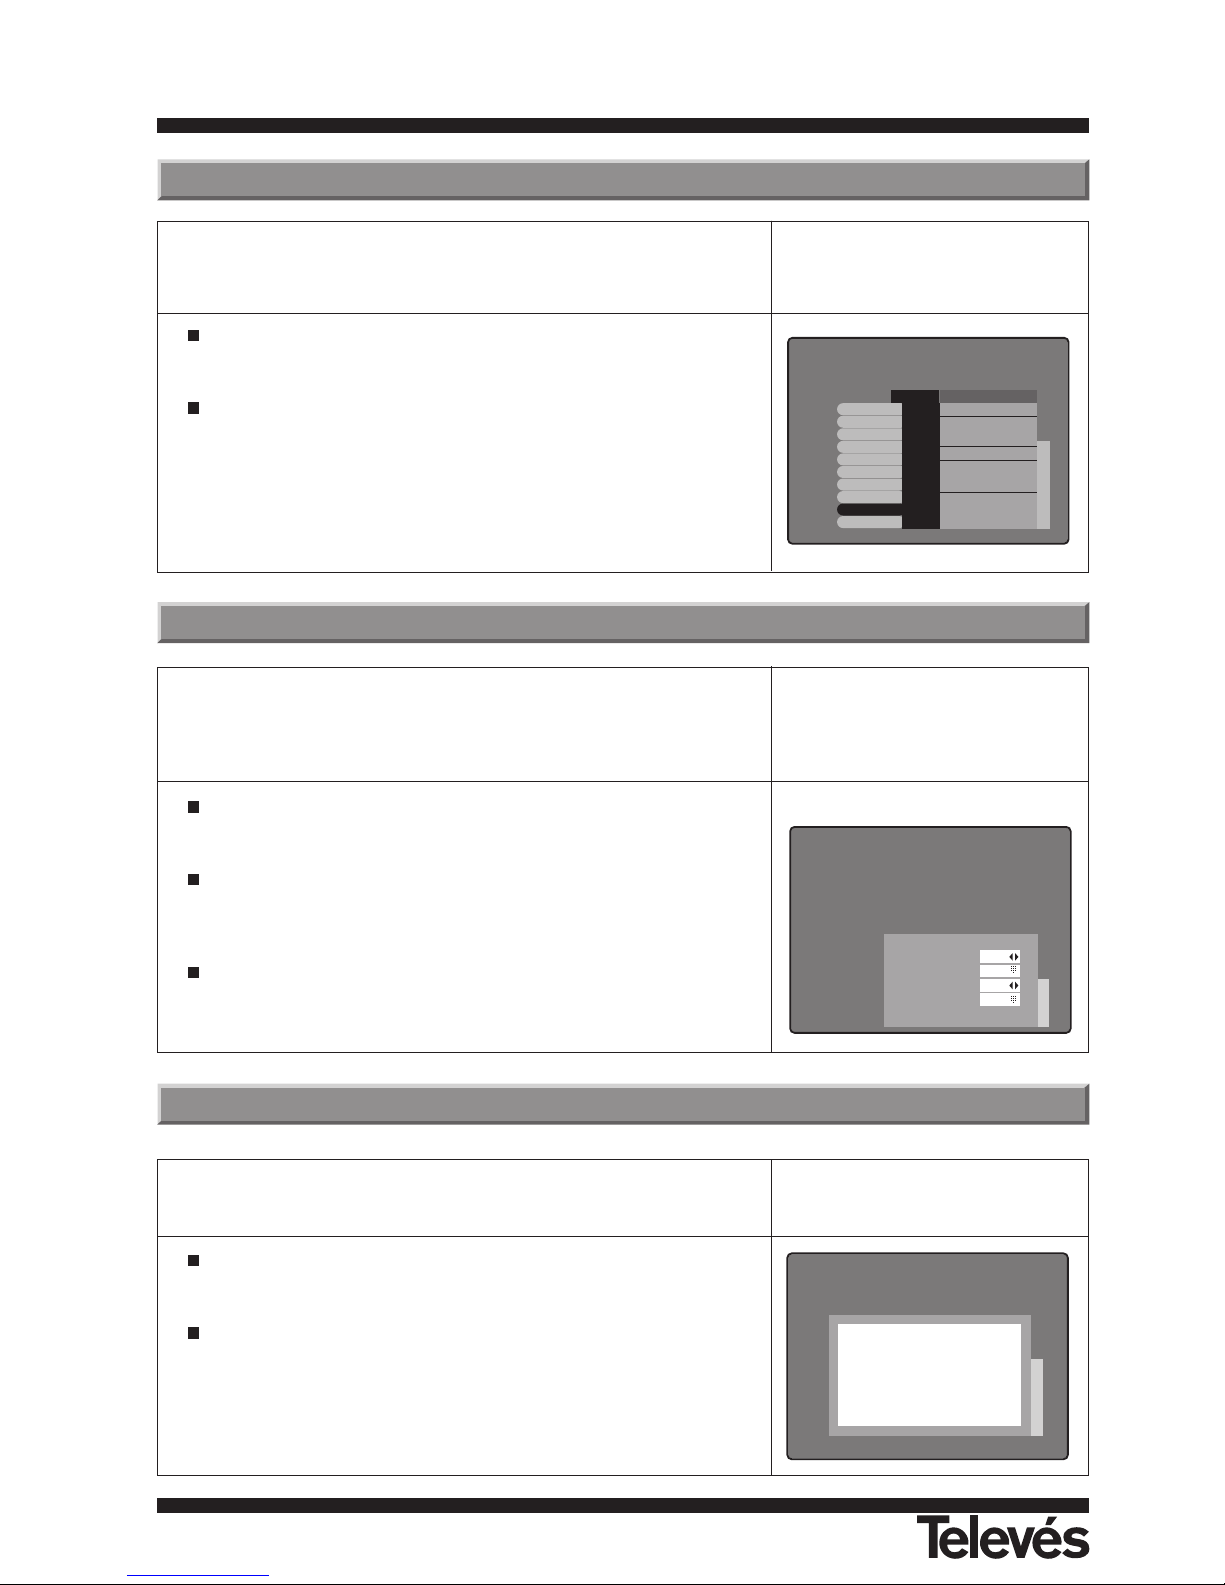
The timer lets you select the moment that you want to switch the receiver
ON or OFF automatically.
This can be useful when used together with your VCR to tape programmes
when you are out or when these are shown at inconvenient times.
To activate the “Turn ON” or “Turn OFF” function, press the OK button
over the “Timer” option in the main menu.
Enter the time that you desire in each option (ON/OFF) using the
numeric pad. You must always enter the time using 4 digits (24 hour
clock).
Press the EXIT button to exit this menu.
This option displays an on screen window with some basic information on
the receiver.
To activate this menu press the OK button over the “Receiver Info.”
option on the main menu.
Press the EXIT button to exit this menu.
Timer
Turn ON
Turn ON Time
Turn OFF
Turn OFF Time
NO
00:00
NO
00:00
Receiver Info.
Product: RSD-7235
SW Version: 1.03d(102F)
HW Version: 1200-130-L
ROM Version: D1.02
Televés S.A.
Rúa B. Conxo, 17
15706-SANTIAGO DE COMPOSTELA
LA CORUNA-SPAIN
The Electronic Programming Guide or EPG lets you surf through the
available channels in your Digital Receiver, and it informs you of the times of
the different programmes.
Access the Programme Guide by pressing the OK button over the
“Program Guide” in the main menu.
Y ou can also access the EPG by pressing the EPG button on your
remote control.
See section 5.8.- “Electronic Programme Guide” for more information.
1 Das Erste
2 ZDF
3 RTL Telev
4 ProSieben
5 KiKa
6 DSF
7 3sat
8 WDR FER
9 Star Movie
10 MCM
12 : 00 -
13 : 00 -
14 : 00 -
15 : 00 -
16 : 00 -
Program Guide
Apr. 20 Apr. 20 12:32
Far and away
Music Heaven
Magic & Music
Music Video Collection
Page 26
User instructions “RSD - 7235”
55
ENGLISH
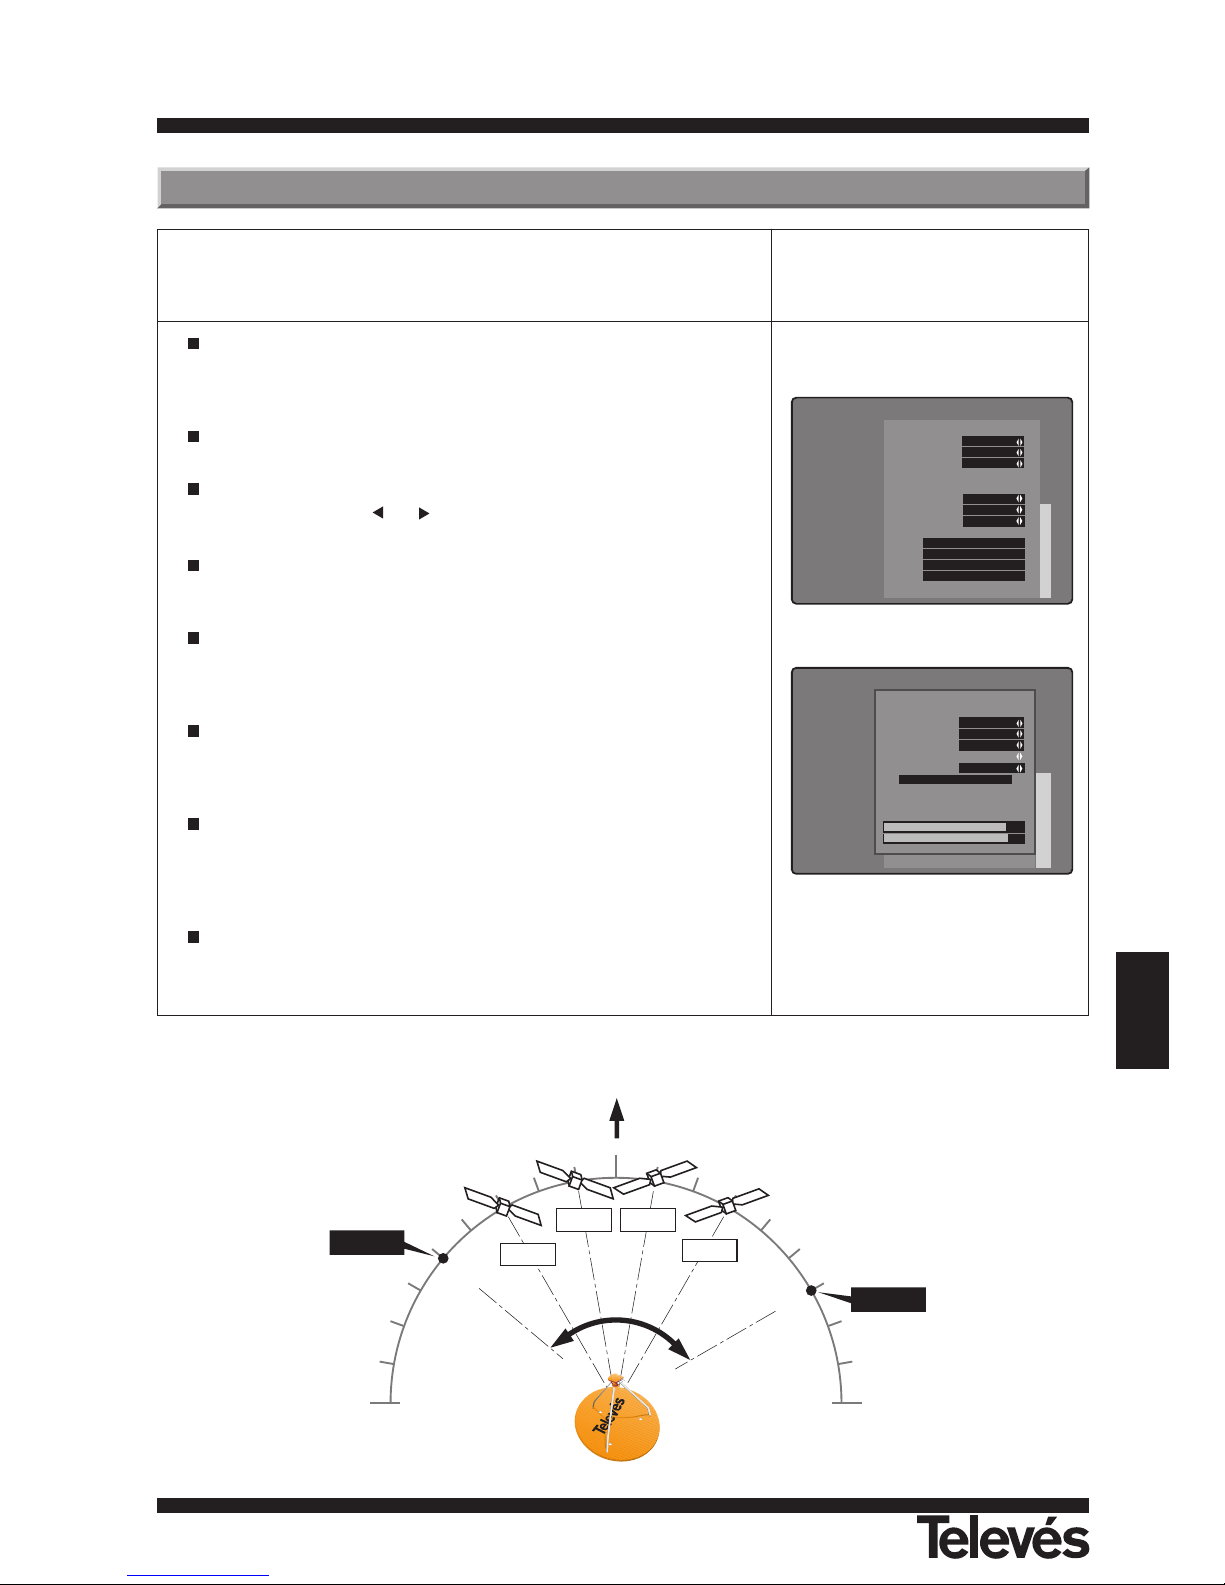
Annex 1.- Motor Position Setting
This menu lets you change the orientation of the motorised antenna to select
the new orbital positions of the different satellites or to correct the satellite
positions that have already been stored.
In "Antenna Setup" we can define that satellites that we are going to use.
Each one will have a different Antenna number and we will select the
"Motor" option in the DiSEqC section.
Motor Position Setting is where you can position the dish.
Specify the transponder that you are going to use to check the signal
level by pressing the or buttons.
Move Motor. This will move the antenna to the East or West - you can
stop it by selecting Stop.
In the "Install Mode" section, there are two ways of carrying out the
search for the orbital position. The "User" mode allows you to move the
antenna towards the east or west step by step.
Set Limit. To establish the limits after the orbital positions have been
stored in the memory. These are the positions that limit the orientation of
the antenna at each end of the arch.
Control/Function. This stores the satellite positions. The other
alternatives are "Go to 0" that moves the antenna so that it is pointing to
the south and "Go to" that moves the antenna to the latest position that it
has stored.
Finally, when you select "Recalculate Position" the receiver places the
positions that it has found in a correlative order and stores them in its
memory.
ASTRA
INTELSAT
HISPASAT
Pos. 1
Pos. 3
Pos. 4
E W
S
Limit. E
Limit. W
EUTELSAT
Pos. 2
Antenna Setup
1. ASTRA19 Motor Position Setting
Select TP TP14
Install Mode User
Move Motor Stop
Set Limit
Disable Limits
Control Go to
Recalculate position
11758 / 27500 / 3/4 / 22KHz(ON)
Signal Level Locked
Antenna Setup
Motor Position Setting
Signal Level
Go to Auto Search
Positioning Help
Antenna 1
Satellite ASTRA
Univ. LNB YES
LNB Freq. 1 9750
LNB Freq. 2 10600
14/18 Volt None
22KHz Tone None
DiSEqC Motor
Page 27

Page 28

User instructions “RSD - 7235”
5757
Fully compatible with DVB norme
Video decoder
MPEG-2 Main Profile @ Main Level
Process rate up to 15Mbits/s
Video format 4:3, 16:9
Audio decoder
MPEG-1 layer I & II (Musicam Audio)
Mono, Dual, Stereo, Joint Stereo
System resources
Processor STi 5500
RAM memory 2 Mbyte
Flash memory 1 Mbyte
Graphics 720 x 576 (PAL)
720 x 480 (NTSC)
LNB input / tuner
Connector 1 x “F”
Input frequency 950 - 2150 MHz
LNB power 13/18V, max. 400 mA
Band switching 22 KHz tone
DiSEqC switching Version 1.2, Tone Burst A/B
Demodulation QPSK
Symbol rate 1 - 45 Msps
Covers the C and Ku bands
Covers SCPC and MCPC
TV SCART RGB, CVBS, Audio L/R
VCR SCART CVBS (input/output), Audio L/R (input/output)
Hi-Fi audio output
Connector 2 x RCA (L/R)
Series data interface
Connector 9-pin D-sub
Signals RS232 max.19,2K baud
Total connectors
1 x LNB input (F type)
2 x SCARTS (TV/VCR)
2 x jacks RCA (AUDIO L/R)
1 x RS232 (9-pin D-sub)
Powering 100 - 240V~, 50/60 Hz
Consumption 20W
Measurements 250 x 188 x 66 mm
Weight 1,6 Kg
Technical Specifications
Page 29

Page 30

“RSD - 7235”
59
1 Euronews Français Hot Bird
2 TV5 Europe Français Astra
3 TV5 Français Astra
4 TV5 Français Hot Bird
5 Arte Français Astra
6 Arte Français Hot Bird
7 La 5 Français Astra
8 Canal + Français Astra
9 LCP Français Astra
10 Chamber TV Français Astra
11 No Zap Français Astra
12 KTO Français Astra
13 Liberty TV Français Hot Bird
14 Liberty TV Français Astra
15 Motors TV Français Astra
16 ‘ZIK Français Astra
17 RTBF Sat Français Astra
18 Credit Agr. TV Français Hot Bird
19 Fashion Hot Bird
20 Fashion TV Astra
21 Passions Français Hot Bird
22 Tango TV Astra
23 VIVA Allemand Astra
24 VIVA Plus Allemand Hot Bird
25 VIVA Pols Allemand Hot Bird
26 MTV Allemand Astra
27 Onyx Allemand Hot Bird
28 DeeJay TV Hot Bird
29 123SAT/69 Italien Hot Bird
30 Eurosport Allemand Astra
31 CNN Int Anglais Astra
32 CNN Int Anglais Astra
33 CNBC Anglais Astra
34 Bloomberg Anglais Hot Bird
35 Euronews Allemand Astra
36 Sky News Anglais Astra
37 Sky News Anglais Astra
38 Fox News Anglais Hot Bird
39 BBC World Anglais Hot Bird
40 CNBC Anglais Astra
41 DW-Tv Allemand Hot Bird
42 Neuen Live Allemand Astra
43 N24 Allemand Astra
44 ZDF Doku Allemand Astra
45 ZDF Theat Allemand Astra
46 Sat 1 Allemand Astra
47 Sat 1 A Allemand Astra
48 DSF Allemand Astra
49 Kabel 1 Allemand Astra
50 Kabel 1S Allemand Astra
51 Kabel 1A Allemand Astra
52 RTL Allemand Astra
53 VOX Allemand Astra
54 Super RTL Allemand Astra
55 RTL Tele Allemand Astra
56 Prosieben Allemand Astra
57 Prosieben Allemand Astra
58 Prosieben Allemand Astra
59 RTL2 Allemand Astra
60 EinsFestival Allemand Astra
61 ZDF Info Allemand Astra
62 EinsMuXx Allemand Astra
63 MDR Fersehen Allemand Astra
64 ORB Fersehen Allemand Astra
65 B1 Berlin Allemand Astra
66 Kika Allemand Astra
67 EinsXtra Allemand Astra
68 3Sat Allemand Astra
69 ZDF Allemand Astra
70 Sudwest R Allemand Astra
71 Phoenix Allemand Astra
72 Sudwest B Allemand Astra
73 Bloomberg Allemand Astra
74 NDR Fernsehen Allemand Astra
75 BR Alpha Allemand Astra
76 Hessen Fers. Allemand Astra
77 SR Fers. Allemand Astra
78 Das Erste Allemand Astra
79 n-TV Allemand Astra
80 Bayerish Allemand Astra
81 RTL Telev. Allemand Hot Bird
82 ZDF Allemand Hot Bird
83 NBC Allemand Hot Bird
84 WDR Fers. Allemand Astra
85 Suoer RTL Allemand Hot Bird
86 ARTE Germany Allemand Hot Bird
87 RTL2 Aus Allemand Hot Bird
88 Vox Allemand Hot Bird
89 ARD Allemand Hot Bird
90 RTL 2 Ch Suisse Hot Bird
91 TVE Int. Espagne Hot Bird
92 Canal 24 H Espagne Hot Bird
93 Telesierra Espagne Hot Bird
94 Canal Canarias Espagne Astra
95 TVC Int. Espagne Astra
96 Andalucia Espagne Astra
97 ETB Espagne Astra
98 Tele Madrid Espagne Astra
99 Antena 3 Espagne Hispasat
100 TV Galicia Espagne Hispasat
101 Parlamento Espagne Hispasat
102 Escaparate Espagne Hispasat
103 Punto Venta Espagne Hispasat
104 Fashion TV France Astra
105 Mosaico Espagne Astra
106 Taquilla Espagne Astra
107 RTPI Portugal Astra
108 SOL Portugal Portugal Hispasat
109 RAI 1 Italien Astra
110 RAI 1 Italien Hot Bird
111 RAI 2 Italien Hot Bird
112 RAI 3 Italien Hot Bird
113 RaiNews Italien Hot Bird
114 Raisports Italien Hot Bird
115 RaiNettun Italien Hot Bird
116 RaiNettun Italien Hot Bird
117 SAT2000 Italien Hot Bird
118 RaiMed Italien Hot Bird
119 RaiLab Italien Hot Bird
120 Telepace Italien Hot Bird
121 Canale La Italien Hot Bird
122 Camera Italien Hot Bird
123 RAIeducat Italien Hot Bird
124 I1 Italien Hot Bird
125 C5 italien Hot bird
126 R4 italien Hot bird
127 24ore.tv Italien Hot Bird
128 Sailing C Italien Hot Bird
129 Coming Soon Italien Astra
130 SaluteBen Italien Hot Bird
131 Alice Italien Hot Bird
132 Nuvolari Italien Hot Bird
133 Leonardo Italien Hot Bird
134 Mediolanu Italien Hot Bird
135 Video It Italien Hot Bird
136 MAGIC Italien Hot Bird
137 102.5 Hit Italien Hot Bird
138 Countdown Italien Hot Bird
139 TBNE Italien Hot Bird
140 Telemarket Italien Hot Bird
141 Montecarlo Italien Hot Bird
142 Game Network Italien Hot Bird
143 ItaliaSat Italien Hot Bird
144 Napoli Italien Hot Bird
145 Sicilia Italien Hot Bird
146 Studio Eu. Italien Hot Bird
147 S. verde Italien Hot Bird
148 HSE Italia Italien Hot Bird
149 Raimosaic Italien Hot Bird
150 Snaï Italien Hot Bird
151 TV MODA Italien Hot Bird
152 2M Maroc Maroc Hot Bird
153 RTM Maroc Astra
154 TV7 Tunisie Astra
155 Canal Algerie Algerie Astra
156 ESC1 Egypte Astra
157 Nile News Hot Bird
158 Khalifa N Hot Bird
159 Khalifa TV Hot Bird
160 EDTV1 Dubai Hot Bird
161 EDTV Sport Dubai Hot Bird
162 EDTV Business Dubai Hot Bird
163 EDTV Drama Dubai Hot Bird
164 Sahar1 Iran Hot Bird
165 Sahar2 Irana Hot Bird
166 IRINN Iran Hot Bird
167 Sharjah Sharjah Hot Bird
168 Qatar Qatar Hot Bird
169 Saudi 1 Arabie S. Hot Bird
170 Kuwait Kuwait Hot Bird
171 Libya Libye Hot Bird
172 Sudan Soudan Hot Bird
173 Oman Oman Hot Bird
174 Iraq Iraq Hot Bird
175 Iqra I Hot Bird
176 Al Jazeera Qatar Hot Bird
177 TV7 Tunisie Hot Bird
178 ANN I Hot Bird
179 Abu Dhabi Abu Dhabi Hot Bird
180 MBC Dubai Hot Bird
181 Jordan TV Hot Bird
182 Kurdsat Kurdistan Hot Bird
183 MTA INTL I Hot Bird
Nº Programa Idioma Satelite
No. Program Language Satellite
Nº Programa Idioma Satelite
No. Program Language Satellite
Nº Programa Idioma Satelite
No. Program Language Satellite
Page 31

“RSD - 7235”
60
184 Tv.nrw I Hot Bird
185 TV Polonie Pologne Hot Bird
186 EWTN I Hot Bird
187 Multivision France Hot Bird
188 Alpha Pro Grece Hot Bird
189 Grece Hot Bird
190 TRT Int Turkie Hot Bird
191 Noello SAT Italie Hot Bird
192 TVN . Hot Bird
193 K TV Hot Bird
194 TV Romania Roumanie Hot Bird
195 3 ABN Gréce Hot Bird
196 Ultra Blue I Hot Bird
197 TLC SAT Hot Bird
198 Pro SAT Hot Bird
199 Channel S Hot Bird
200 Bloomberg Hot Bird
201 Stream1 Italie Hot Bird
202 Stream ne Italie Hot Bird
203 MOSAICO Italie Hot Bird
204 VETRINA Italie Hot Bird
205 PALCO Italie Hot Bird
206 PALCO Italie Hot Bird
207 TIZIANASA Italie Hot Bird
208 C. Milagro Italie Hot Bird
209 UBN Italie Hot Bird
210 GAY TV Italie Hot Bird
211 CCTV Chine Hot Bird
212 Promo Grece Hot Bird
213 Grece Hot Bird
214 RTS SAT Hot Bird
215 TV Magic Grece Hot Bird
216 ERT Grece Hot Bird
217 EXTRA Grece Hot Bird
218 TRIAL Grece Hot Bird
219 MKTV Grece Hot Bird
220 TVN1 Hot Bird
221 Arirang I Hot Bird
222 RR Feed Hot Bird
223 BKTV I Hot Bird
224 DCTV I Hot Bird
225 DCTV I Hot Bird
226 DCTV I Hot Bird
227 DCTV I Hot Bird
228 DCTV I Hot Bird
229 DCTV I Hot Bird
230 DCTV I Hot Bird
231 Ajara TV I Hot Bird
232 KURDISTAN I Hot Bird
233 BVN-TV Hot Bird
234 RTB Internat. Hot Bird
235 Euro Medi. Hot Bird
236 TelSell Hot Bird
237 Syrian TV Hot Bird
238 Sat7 Hot Bird
239 Bangladesh TV Hot Bird
240 RTV Montenegr Monteneg. Hot Bird
241 SRG SSR Suisse Hot Bird
242 IRIB 1 Iran Hot Bird
243 IRIB 1 Iran Hot Bird
244 IRIB 2 Iran Hot Bird
245 IRIB 2 Iran Hot Bird
246 Ebs Iran Hot Bird
247 MOU.2 Hot Bird
248 SardegnaTV I Hot Bird
249 Videolina Hot Bird
250 Nile TV Hot Bird
251 Bulgaria TV Bulgarie Hot Bird
252 DBE Italie Hot Bird
253 Thai TV5 Thailand Hot Bird
254 ESC Egypte Hot Bird
255 Al manar Hot Bird
256 Medya TV I Hot Bird
257 AB Sat Promo Hot Bird
258 Polonia 1 Pologne Astra
259 Tele5 Astra
260 Arte France Astra
261 TV Puls Pologne Astra
262 OK Plus Astra
263 Mosaique Alemagne Astra
264 Canal Club I Astra
265 Home Shop Astra
266 Astra Vision Holland Astra
267 QVC Germany Astra
268 BVN Astra
269 TV-NIEP Astra
270 TW1 Astra
271 Simaye-Az Telstar12
272 Simaye-Az Telstar12
273 PTV Telstar12
274 TZUCHI Telstar12
275 MAC Telstar12
276 NITV Iran Telstar12
277 PARS Iran Telstar12
278 ITV Iran Telstar12
279 TAPESH Telstar12
280 Jam-e-Jam Telstar12
281 Service 1 Telstar12
282 aTV Turkie Turksat
283 SuperSport Turkie Turksat
284 Cinesport Turkie Turksat
285 Gala Turkie Turksat
286 Viva Turkie Turksat
287 BRTK KKTC Turkie Turksat
288 Tiernan 1 Turkie Turksat
289 Kanal 7 Turkie Turksat
290 Kanal 7 I Turkie Turksat
291 Best TV Turkie Turksat
292 STV World Turkie Turksat
293 CNN Turk Turkie Turksat
294 Super Kanal Turkie Turksat
295 Tatlises Turkie Turksat
296 Genc TV Turkie Turksat
297 Fashion TV Turkie Turksat
298 Number One Turkie Turksat
299 Discovery Turkie Turksat
300 E TV Turkie Turksat
301 Ege TV Turkie Turksat
302 ULUSAL Turkie Turksat
303 Star 2 Turkie Turksat
304 STAR Turkie Turksat
305 KANAL 6 Turkie Turksat
306 TEST Turkie Turksat
307 TSIK Turkie Turksat
308 Bahrain Arabsat 2
309 Saudi 1 Arabsat 2
310 Kuwait Arabsat 2
311 Libya Arabsat 2
312 Sudan Arabsat 2
313 Saudi 2 Arabsat 2
314 Almajd TV Arabsat 2
315 Oman Arabsat 2
316 Abudhabi Arabsat 2
317 Iraq Arabsat 2
318 TV CH Arabsat 2
319 TV CH Liban Arabsat 2
320 TV CH Liban Arabsat 2
321 TV CH
322 MTV Liban Liban Arabsat 2
323 NBN Arabsat 2
324 AlManar Arabsat 2
325 NEW TV Arabsat 2
326 Test Arabsat 2
327 Test Arabsat 2
328 RTV21SAT Eutel W2
329 KTV SAT Eutel W2
330 TMF Holland Eutel W2
331 La 7 Italie Eutel W2
332 TMC 2 Eutel W2
333 Elpitel R Eutel W2
334 BTV 1 Eutel W2
335 Georgian Eutel W2
336 Rickenbac Eutel W2
337 RAGLEY ME Eutel W2
338 RTK Prish Albania Eutel W2
339 TVSH-SAT Eutel W2
340 Ajara TV Georgie Eutel W2
341 T---S Eutel W2
342 T---S Eutel W2
343 Liguria S Eutel W2
344 CNBC-e Eutel W1
345 POP TV Turkie Eutel W1
346 TGRT.com Turkie Eutel W1
347 IHLAS New Eutel W1
348 Meltem TV Turkie Eutel W1
349 APTN1 Eutel W1
350 D17/3 4:2 Eutel W3
351 World Feed Eutel W3
352 EULA Eutel W3
353 EULB Eutel W3
354 EULC Eutel W3
355 Satlink 9 Eutel W3
356 TV Polonia Eutel W3
357 OCCA W3 Eutel W3
358 Pgm2 Eutel W3
359 M6 Suisse Eutel W3
360 EDP2 Eutel W3
361 EDP3 Eutel W3
362 EDP 4 Eutel W3
363 BFB S4 Eutel W3
364 BFB S5 Eutel W3
365 BFB S6 Eutel W3
366 DIDITURK Eutel W3
Nº Programa Idioma Satelite
No. Program Language Satellite
Nº Programa Idioma Satelite
No. Program Language Satellite
Nº Programa Idioma Satelite
No. Program Language Satellite
Page 32

“RSD - 7235”
61
367 Service2 Eutel W3
368 ISIK TV Eutel W3
369 Galaxie S Eutel W1
370 Novy Kana Ukraine Sirius
371 Enter Film Ukraine Sirius
372 Viasat Sirius
373 BSTV Sirius
374 Channel 2 Sirius
375 Channel 3 Sirius
376 Channel 4 Sirius
377 Channel 5 Sirius
378 Channel 6 Sirius
379 Channel 7 Sirius
380 BTOU Sirius
381 Channel 9 Sirius
382 TV6 Conno Sirius
383 TV6 Viasat Sirius
384 GLOBAL Sirius
385 ICTV Ukraine Sirius
386 TV Puls 2 Pologne Sirius
387 Compel fo Sirius
388 Realitate Roumanie Sirius
389 Enter Ukraine Sirius
390 Etno TV Roumanie Sirius
391 Teracom S Sirius
392 TET Sirius
393 TV CH Ukraine Sirius
394 INTER Ukraine Sirius
395 Telnor 1 THOR1°
396 Gospel CH Sirius
397 TV Danmark Sirius
398 Kiosk 1 UK THOR1°
399 PPV UK THOR1°
400 New film UK THOR1°
401 Test 4 UK THOR1°
402 SKAT TV UK THOR1°
403 Tegnprat UK THOR1°
404 CCTV-9 UK THOR1°
405 SEB UK THOR1°
406 BBC World UK THOR1°
407 TA3 UK THOR1°
408 Mreza+ UK THOR1°
409 NIAL4 UK Astra 28°
410 TV Travel UK Astra 28°
411 BLs UK Astra 28°
412 Screenshop UK Astra 28°
413 TV Travel UK Astra 28°
414 TV Travel UK Astra 28°
415 TV Travel UK Astra 28°
416 TV Travel UK Astra 28°
417 Ideal World UK Astra 28°
418 ITN News UK Astra 28°
419 B4U Music UK Astra 28°
420 QVC UK Astra 28°
421 Q_I UK Astra 28°
422 QVC UK Astra 28°
423 Q-I UK Astra 28°
424 Q-I dir UK Astra 28°
425 TV Jobshop UK Astra 28°
426 Bid-up tv UK Astra 28°
427 TCM UK Astra 28°
428 Boomerang UK Astra 28°
429 CNN UK Astra 28°
430 Travel Ch UK Astra 28°
431 Travel De UK Astra 28°
432 Sky Sport UK Astra 28°
433 BBC Parlamant UK Astra 28°
434 You TV UK Astra 28°
435 Simply-Head UK Astra 28°
436 Symply Ho UK Astra 28°
437 TV CH UK Astra 28°
438 Spts Extr UK Astra 28°
439 Sky News UK Astra 28°
440 Sky News UK Astra 28°
441 Sky News UK Astra 28°
442 Sky News UK Astra 28°
443 Sky News UK Astra 28°
444 The racing Ch. UK Astra 28°
445 Game Network UK Astra 28°
446 Brightblue UK Astra 28°
447 Brightblue UK Astra 28°
448 Brightblue UK Astra 28°
449 PIN UK Astra 28°
450 asTV UK Astra 28°
451 Shopping UK Astra 28°
452 CEE I TV UK Astra 28°
453 Shop America UK Astra 28°
454 TVWareshop UK Astra 28°
455 Txt me UK Astra 28°
456 TV CH UK Astra 28°
457 stfs UK Astra 28°
458 Vibe TV UK Astra 28°
459 CPD TV UK Astra 28°
460 Community UK Astra 28°
461 Simply Shop Test Astra 28°
462 Simply Shop Astra 28°
463 Simply Hol Astra 28°
464 syne Astra 28°
465 HSE Shopp Astra 28°
466 PlayJam Astra 28°
467 NOELLO Astra 28°
468 Gay TV Astra 28°
469 Fortress Astra 28°
470 TV Astra 28°
471 HSE ITA Astra 28°
472 Deejay TV Astra 28°
473 TV3 Astra 28°
474 Thomas Cook Astra 28°
475 LBC Europe Astra 28°
476 ART Movie Astra 28°
477 ART Music Astra 28°
478 ART Europe Astra 28°
479 Shop Aid Astra 28°
480 Motors TV Astra 28°
481 Shop on TV Astra 28°
482 Thane Astra 28°
483 avo Astra 28°
484 ST Astra 28°
485 Open Access Astra 28°
486 rtv Astra 28°
487 sas Astra 28°
488 srtt Astra 28°
489 Fasion TV Astra 28°
490 Einstein TV Astra 28°
491 Letsgosh Astra 28°
492 BestDirect Astra 28°
493 Auction TV Astra 28°
494 Dating Ch Astra 28°
495 Al Jazeera Astra 28°
496 Health Channel Astra 28°
497 Health Channel Astra 28°
498 Tel sell Astra 28°
499 Mta-muslim Astra 28°
500 SouthforY Astra 28°
501 Telsell Astra 28°
502 adtv Astra 28°
503 Extreme Sports Astra 28°
504 Euronews Astra 28°
505 GodChannel Astra 28°
506 D-Classics Astra 28°
507 TBN Europe Astra 28°
508 Gobarking Astra 28°
509 Bangla TV Astra 28°
510 Gbm+ Astra 28°
511 GOD Reviv Astra 28°
512 TLMR4 Astra 28°
513 GOP2BRTV Telec. 2C
514 BRTV Telec. 2C
515 Occ 1 Telec. 2C
516 Channel 2 Telec. 2C
517 VT4 Telec. 2C
518 Magdalena Telec. 2C
519 4FM Telec. 2C
520 C Dance Telec. 2C
521 Bahn TV Telec. 2D
522 Elpitel 4 Telec. 2D
523 Elp CH Telec. 2D
524 lp CH Telec. 2D
525 lp CH Telec. 2D
526 TizSat Telec. 2D
527 GCPE1 Telec. 2D
528 GCPE2 Telec. 2D
529 Eurosport Telec. 2D
530 G-Link Telec. 2D
531 Euronews Telec. 2D
Nº Programa Idioma Satelite
No. Program Language Satellite
Nº Programa Idioma Satelite
No. Program Language Satellite
Nº Programa Idioma Satelite
No. Program Language Satellite
E mais de 700 canais de rádio com qualidade digital.
And more than 700 radio channels with digital quality.
Page 33

Page 34
“RSD - 7235”
6363
Garantía
Televés S.A. oferece uma garantia de 6 meses calculados a partir da data de compra. Conserve a factura de compra a
fim de poder comprovar essa data.
Durante o período de garantia, Televés S.A. assume os encargos inerentes à reparação de avarias provocados por
defeito do produto ou fabrico. Televés S.A. cumpre a garantia, reparando ou substituindo o equipamento de acordo com o
que entender mais conveniente.
Não se encontram incluídos na garantia os defeitos provocados pela utilização indevida, desgaste, manipulação por
terceiros, catástrofes ou qualquer outra causa alheia ao controlo da Televés S.A.
Guarantee
Televes S.A. offers a six-month guarantee, beginning from the date of purchase. Retain the receipt to determine this
date.
During the guarantee period, Televes S.A. is responsible for the faults produced due to the defects of the equipment or
manufacturing. Televes S.A. complies with the guarantee by repairing or substituting the faulty equipment as it believes
necessary.
The harm produced by improper usage, wear and tear, manipulation by a third party, catastrophes or any other cause
beyond the control of Televes S.A, is not included in the guarantee.
Page 35

A CORUÑA
SANTIAGO
VIGO
VALENCIA
OPORTO
LISBOA
MADRID
ZARAGOZA
BILBAO
BARCELONA
MURCIA
MALAGA
SEVILLA
OVIEDO
LUGO
OURENSE
CANTABRIA
GUIPUZCOA
LEON
BURGOS
ALAVA
NAVARRA
LA RIOJA
HUESCA
TARRAGONA
SEGOVIA
GUADALAJARA
AVILA
CUENCA
TOLEDO
CIUDAD REAL
TERUEL
CASTELLON
BADAJOZ
CORDOBA
HUELVA
CADIZ
JAEN
GRANADA
ALMERIA
ALBACETE
ALICANTE
SALAMANCA
PALENCIA
ZAMORA
VALLADOLID
GIRONA
PALMA DE
MALLORCA
BALEARES
CANARIAS
TENERIFE
LAS PALMAS
SUCURSALES
DELEGACIONES
FABRICAS
SORIA
CACERES
ZAMORA N
CEUTA
MELILLA
Rúa B. de Conxo, 17 -15706 SANTIAGO DE COMPOSTELA
Tel. 981 52 22 00 Fax 981 52 22 62
www.televes.com
Miembro de número del
PR
ER 224/1/94
Empresa
Registrada
TELEVES ELECTRONICA
PORTUGUESA
MAIA - OPORTO
Via . Dr Francisco Sa Carneiro. Lote 17.
ZONA Ind. MAIA 1. Sector-X MAIA.
C.P. 4470 BARCA
Tel. 351 22 9418313
Fax 351 22 9488719/9416180
[email protected]
LISBOA
C.P. 1000 Rua Augusto Gil 21-A.
Tel. 351 21 7932537
Fax 351 21 7932418
[email protected]
TELEVES UNITED
KINGDOM LTD
Unit 11 Hill Street, Industrial State
CWMBRAN, GWENT NP44 7PG. (United Kingdom)
Tel. 44 01 633 87 58 21
Fax 44 01 633 86 63 11
[email protected]
TELEVES FRANCE S.A.R.L.
Parc des Arpents, 12 Rue du Pré des Aulnes.
77340 PONTAULT-COMBAULT.(France)
Tel. 33 01 60 18 30 40.
Fax 33 01 60 18 30 49.
[email protected]
TELEVES MIDDLE EAST FZE
P.O. Box 17199
JEBEL ALI FREE ZONE DUBAI,
UNITED ARAB EMIRATES
Tel. 9714 88 343 44
Fax. 9714 88 346 44
[email protected]
BURGOS C.P.09188
C/Real, s/n,
San Adrián de Juarros
Tfno. 947 56 04 58/
670 73 75 86
CACERES/ BADAJOZ
C.P. 06010
C/Jacobo Rodríguez
Pereira, nº11-Oficina
Tfno. 924 20 74 83
670 70 21 93
Fax. 924 20 01 15
[email protected]
GIRONA C.P. 17190 (Salt)
Ramón Sambola. 9º Ent. 1ª.
Tfno. 972 23 25 43
607 23 88 40
[email protected]
GRANADA
Tfno. 958 13 78 29
Móvil: 609 62 70 96
[email protected]
JAEN C.P. 23007
Hermanos Pinzón, 8-bajo
Tfnos. 953 29 50 40 / 953 29 52 21
639 98 44 89
Fax 953 29 52 10
[email protected]
MALAGA C.P.29004
Polígono de Santa Barbara
C/ Fidias 13.
Tfno. 95 223 98 81
Fax 95 217 37 30
[email protected]
MELILLA C.P.52006
Pº Marítimo Mir Berlanga, 17
Edif. Antares, C, 4ºB
Tfno. 600 45 35 13
Fax 600 43 35 14
[email protected]
NAVARRA C.P.(Pamplona) 31007
Avda. Sancho el Fuerte 9.
Tfno. 948 27 35 10
Fax 948 17 41 49
[email protected]
PALMA DE MALLORCA
C.P. 07007
Ferrer de Pallares 45. bajo D.
Tfno. 971 24 70 02
Fax 971 24 53 42
[email protected]
SALAMANCA
ZAMORA
VALLADOLID C.P. 47008
C/ Arrecife 12.
Tfno. 983 22 36 66
Fax 983 22 36 66
[email protected]
HUESCA
ZARAGOZA
C.P. 50002
C/ Monasterio de Alahón 1-3.
Tfno. 976 41 12 73
Fax 976 59 86 86
[email protected]
SUCURSALES
BARCELONA C.P. 08940
C/ Sant Ferrán, 27
Cornellá - Barcelona
Telfs. 93 377 08 62
93 474 29 50
Fax 93 474 50 06
E-mail [email protected]
BILBAO C.P. 48150
Iberre kalea, módulo 16, pabellón 15-B
Sangroniz-Sondika
Tfnos. 94 471 12 02/94 471 24 78
Fax 94 471 14 93
[email protected]
A CORUÑA C.P. 15011
Gregorio Hernández 8.
Tfnos. 981 27 47 31 / 27 22 10
Fax 981 27 16 11
[email protected]
LAS PALMAS C.P. 35006
Gral. Mas de Gaminde 26.
Tfnos. 928 23 11 22 / 23 12 42
Fax 928 23 13 66
[email protected]
MADRID C.P. 28005
Paseo de los Pontones 11.
Tfnos. 91 474 52 21 / 474 52 22
Fax 91 474 54 21
[email protected]
MURCIA C.P. 30010
Polígono Conver - C/ Rio Pliego 22.
Tfnos. 968 26 31 44 / 26 31 77
Fax 968 25 25 76
[email protected]
SEVILLA C.P. 41008
Pol. Ind. Store - C/ A-6. Nave 5
Tfnos. 95 443 64 50 / 443 58 00
Fax 95 443 96 93
[email protected]
TENERIFE C.P. 38108
Avda. El Paso, 25 - Los Majuelos
La Laguna.
Tfnos. 922 31 13 14/ 31 13 16
Fax 922 31 13 33
[email protected]
VALENCIA C.P. 46020
Plaza Jordi San Jordi s/n
Tfnos. 96 337 12 01/ 337 12 72
Fax 96 337 06 98
[email protected]
VIGO C.P. 36204
Escultor Gregorio Fernández, 5
Tfnos. 986 42 33 87/42 40 44
Fax 986 42 37 94
[email protected]
DELEGACIONES
103251/6 - 03-01
 Loading...