

Page 1
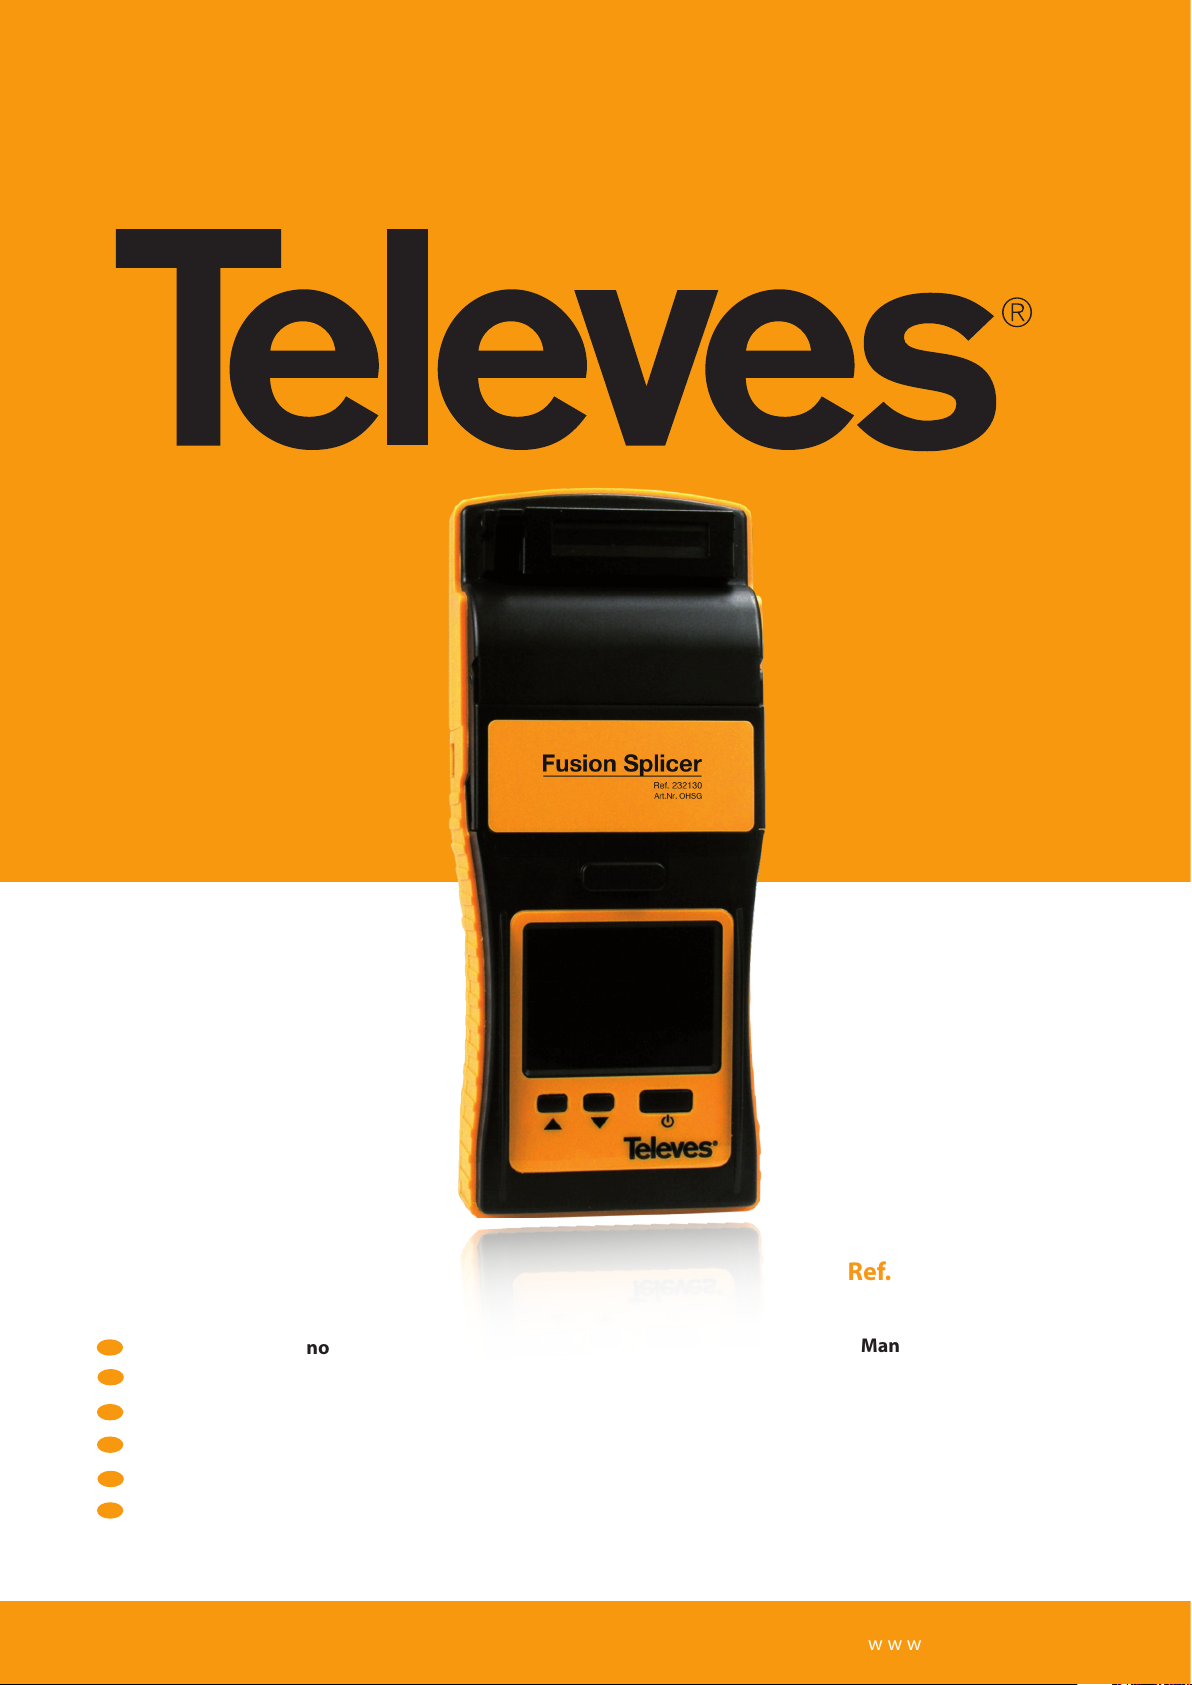
Ref. 232130, 232131
ES
Fusionadora de mano
EN
Hand-held fusion splicer
FR
Fusionneuse de poche
IT
Giuntatrice palmare
DE
Handspleißgerät
PL
Spawarka podręczna
Manual de Instrucciones
Operating instructions
Manuel d’utilisation
Manuale d’utilizzo
Bedienungsanleitung
Instrukcja obsługi
w w w . t e l e v e s . c o m
Page 2

Page 3

Hand-held fusion splicer
Ref. 232130, 232131
Contents
1 General Information . . . . . . . . . . . . . . . . . . . . . . . . . . . . . . . . . . . . . . . . . . . . . . . . . . . . . . . . . . . . . . . . . . . . . . . . . 21
2 Fusion splicer . . . . . . . . . . . . . . . . . . . . . . . . . . . . . . . . . . . . . . . . . . . . . . . . . . . . . . . . . . . . . . . . . . . . . . . . . . . . . . . 22
3 Keyboard . . . . . . . . . . . . . . . . . . . . . . . . . . . . . . . . . . . . . . . . . . . . . . . . . . . . . . . . . . . . . . . . . . . . . . . . . . . . . . . . . . . 23
4 Use . . . . . . . . . . . . . . . . . . . . . . . . . . . . . . . . . . . . . . . . . . . . . . . . . . . . . . . . . . . . . . . . . . . . . . . . . . . . . . . . . . . . . . . . . 23
5 Main menu . . . . . . . . . . . . . . . . . . . . . . . . . . . . . . . . . . . . . . . . . . . . . . . . . . . . . . . . . . . . . . . . . . . . . . . . . . . . . . . . . . 25
6 Conguration . . . . . . . . . . . . . . . . . . . . . . . . . . . . . . . . . . . . . . . . . . . . . . . . . . . . . . . . . . . . . . . . . . . . . . . . . . . . . . . 27
7 Advice for the appropriate handling of bre . . . . . . . . . . . . . . . . . . . . . . . . . . . . . . . . . . . . . . . . . . . . . . . . . . . 30
8 Cleaning . . . . . . . . . . . . . . . . . . . . . . . . . . . . . . . . . . . . . . . . . . . . . . . . . . . . . . . . . . . . . . . . . . . . . . . . . . . . . . . . . . . . 32
9 SD Card . . . . . . . . . . . . . . . . . . . . . . . . . . . . . . . . . . . . . . . . . . . . . . . . . . . . . . . . . . . . . . . . . . . . . . . . . . . . . . . . . . . . . . 33
10 Specications . . . . . . . . . . . . . . . . . . . . . . . . . . . . . . . . . . . . . . . . . . . . . . . . . . . . . . . . . . . . . . . . . . . . . . . . . . . . . . . . 33
EN
ENGLISH
Page 4
Hand-held fusion
20
WARNINGS
Read this manual carefully before using the fusion splicer.
PRECAUTIONS
1 The charging voltage of this fusion splicer is limited.
Always use the power supply unit provided with the
equipment to charge the battery. The enclosed power
supply unit is correctly set for a given input power (AC)
and output power (DC); this is why you should not use
any other values.
2 Should the fusion splicer show any of the following ano-
malies:
- Weird smoke, smell or noise.
- Extreme heat.
- Weird liquid or matter inside the equipment.
- Breakdown or damage caused by falling o crashing.
You should immediately remove the power supply adap-
tor and turn the fusion splicer o, if it happened to be
turned on. Then, contact Technical Support of Televes in
order to proceed with its inspection or repair.
3 Internal manipulation of the fusion splicer involves
loosing the product warranty (do not take the equipment apart).
Bear in mind that if you ignore the warnings or use the
fusion splicer incorrectly, you may suer from severe injuries; this is why you should always follow the safety rules
recommended for this equipment.
Always use safety goggles when working with optical -
bre.
4 Any errors in the external maintenance of the equip-
ment may cause fusion splicer malfunction or injuries to
the maintenance operator (carefully follow the maintenance instructions).
5 Never use the fusion splicer in the presence of amma-
ble gases or liquids. Otherwise, it may lead to res, explosions or other serious consequences.
6 This fusion splicer is only used for optical bre fusion,
and should not be used for any other purposes.
7 Do not expose the fusion splicer to high temperature
or humidity.
8 Avoid working in environments that are dusty or con-
tain airborne particles. This situation may cause failure
in the fusion operations or damage to the equipment.
9 Using the fusion splicer under dierent climatic condi-
tions (going from a cold to a warm environment, for instance) may generate condensation in the equipment.
Wait for the condensation to completely disappear before working with it.
10 In order to keep the appropriate performance of the
fusion splicer (based on the use that is made of it) we
recommend to clean the equipment periodically.
11 The fusion splicer is calibrated in factory. Avoid strong
vibrations or impacts, and use its own case for transport and storage.
12 Due to the high complexity of this equipment, it
should only be repaired by Televes.
Page 5
1. General Information
This electric arc hand-held fusion splicer includes
everything an operator in this industry may require; it is a
high-precision instrument to be handled with care.
Warning
Televes reserves the right to modify the product without
due notice.
Under no circumstances shall Televes be held responsible
for damages or harm of any nature, that could derive from
this manual or the information contained in it.
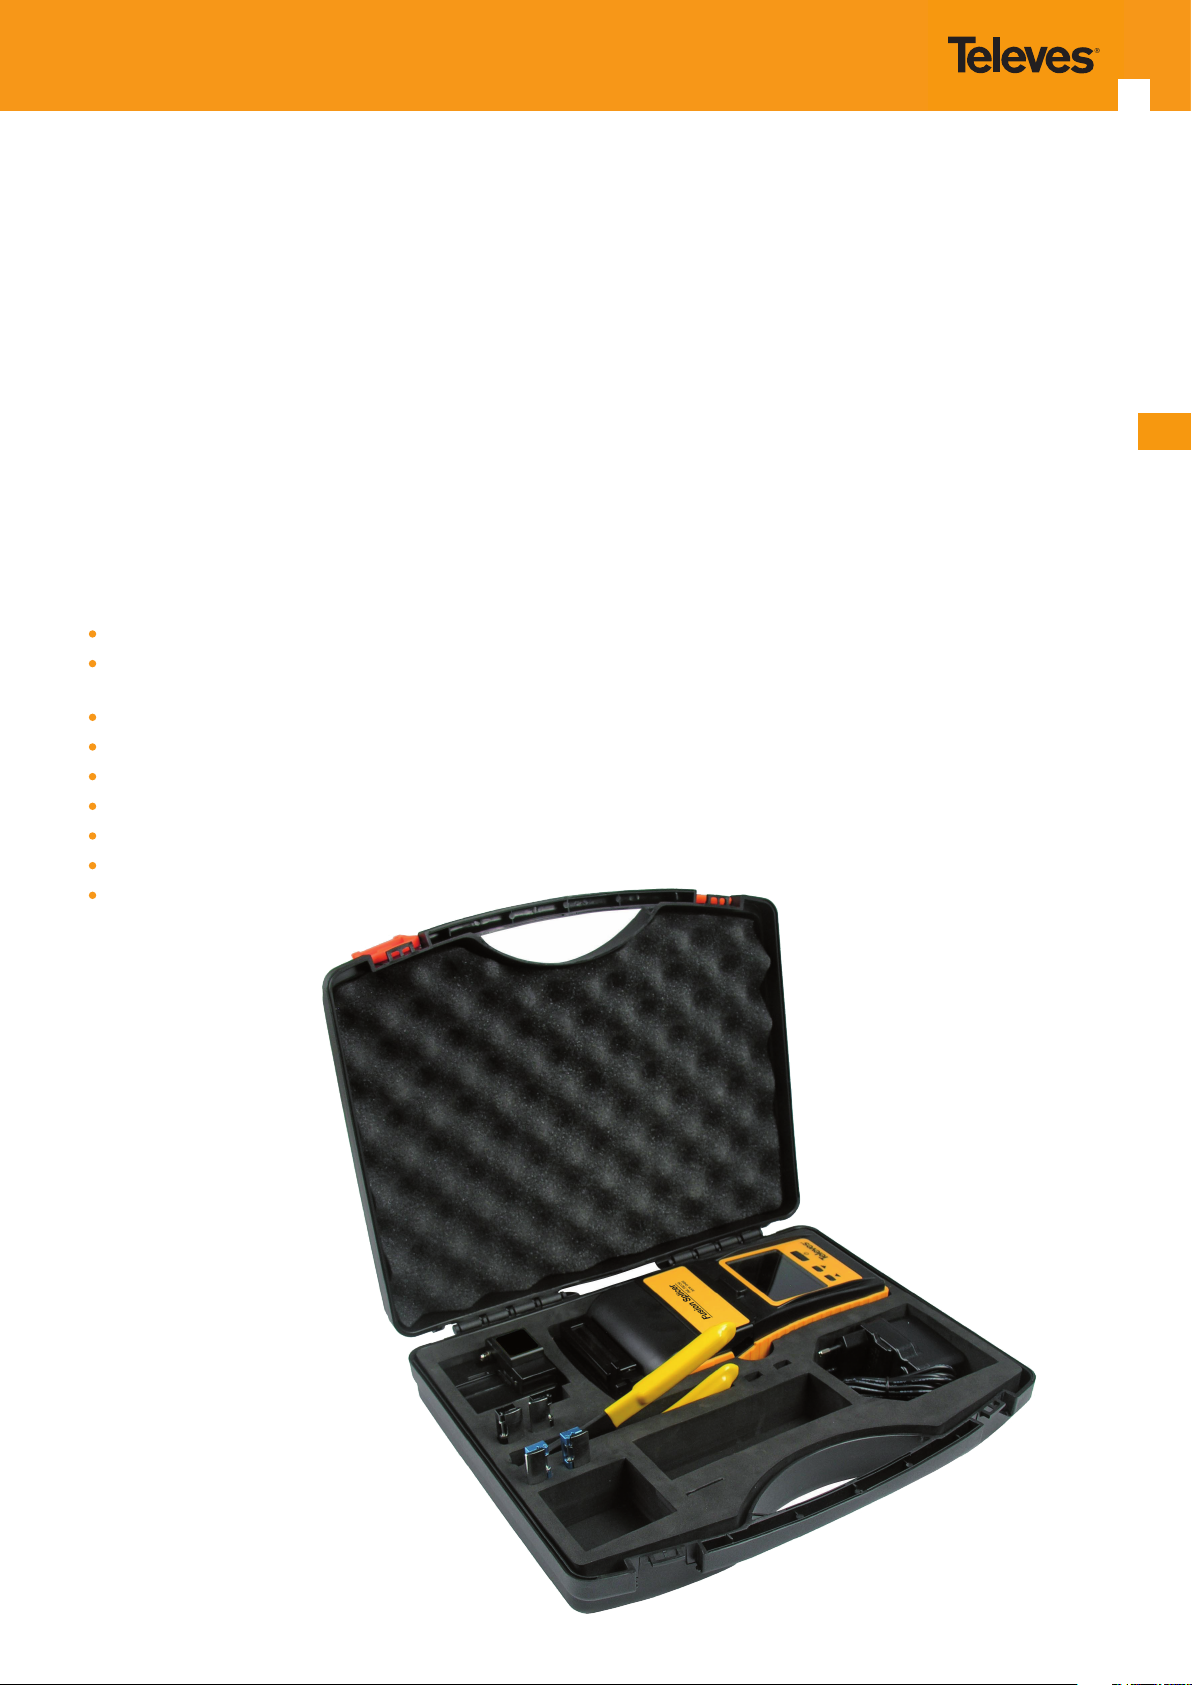
Composition
Hand-held fusion splicer.
Fibre cleaver with head insertion (cutting blade specied
for 16,000 cuts).
Fibre stripper (pre-set for 250 and 900 microns).
Heads for 900 μm-bre (2 units, blue).
Heads for 250 μm-bre (2 units, black).
Network adaptor.
Internal battery Li-ION (3000 mA h).
Carrying case.
User manual.
21
EN
Page 6
Hand-held fusion
2. Fusionadora
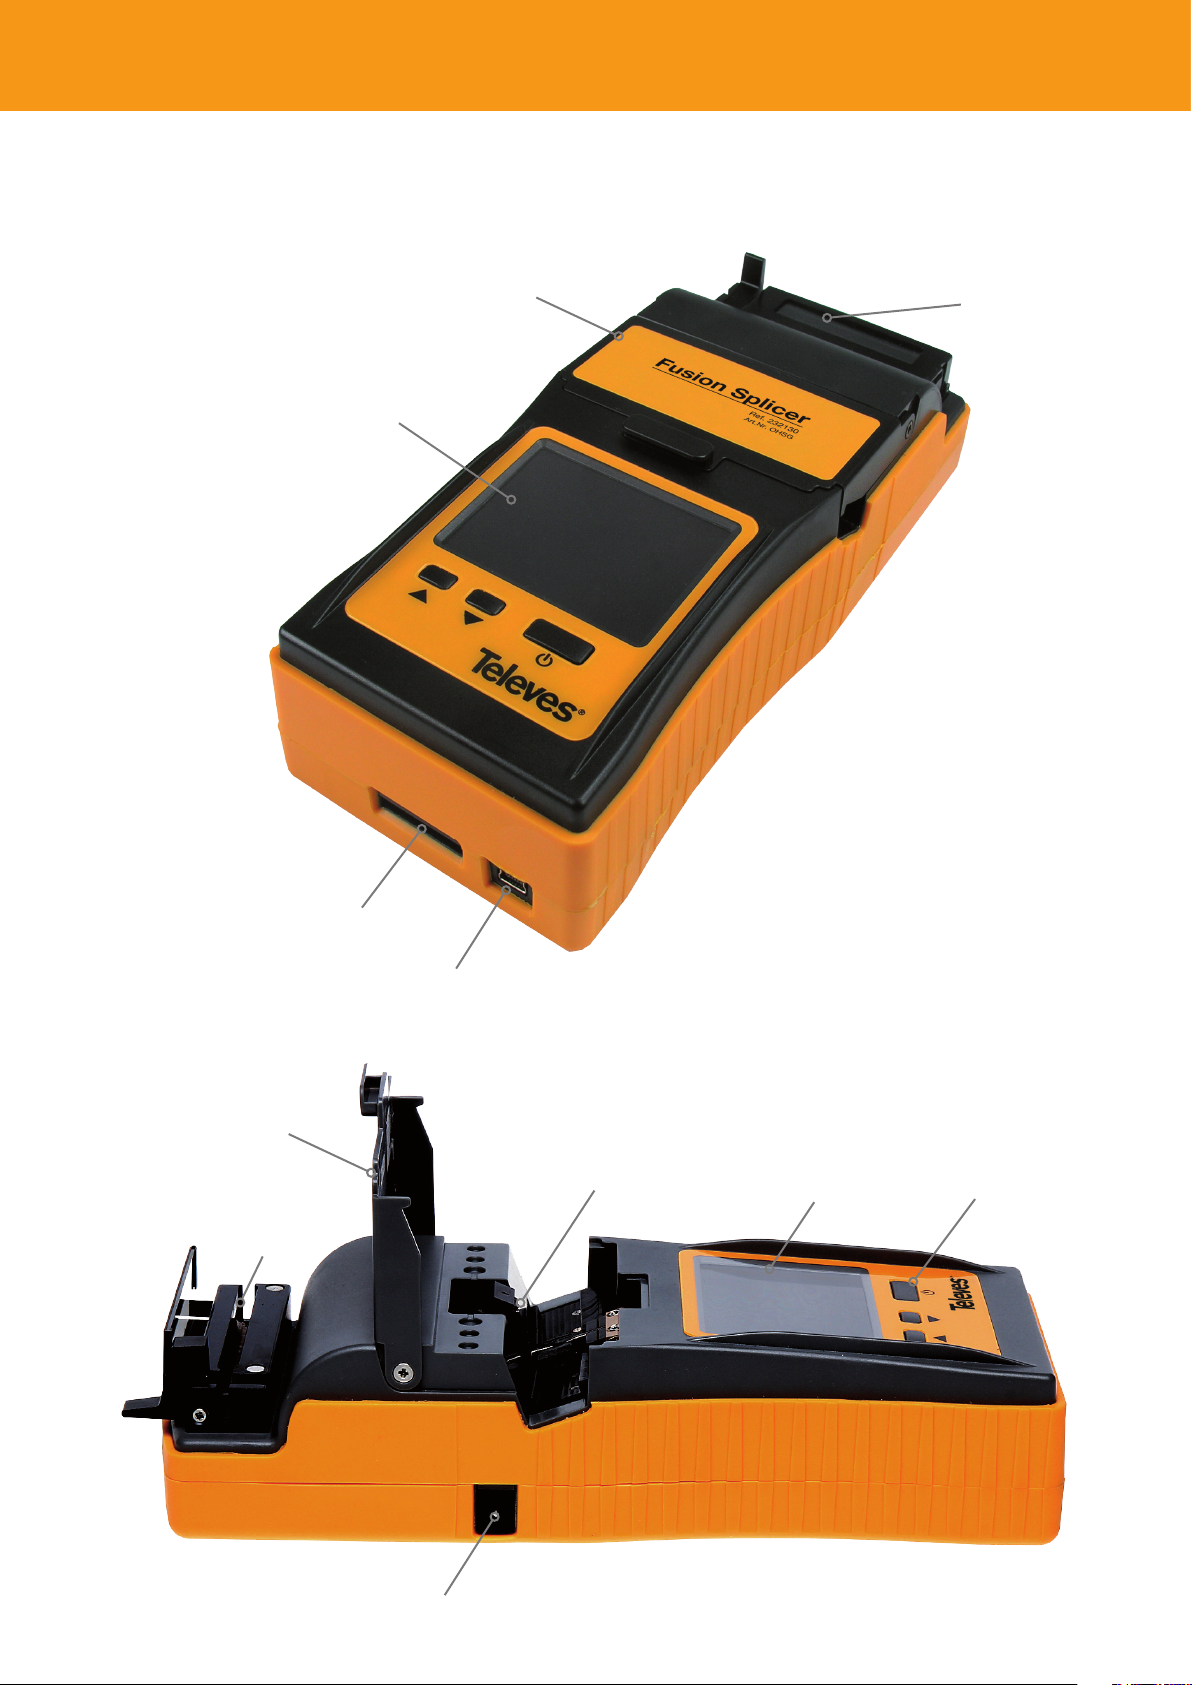
2. Fusion splicer:
Front view:
22
LCD screem
Cover
Over
Top view:
SD card port
Cover
Oven
USB port
Fibre clamp
LCD screen keyboard
External changer connection
Page 7
23
3. Keyboard
The keyboard has only 3 buttons, enough for handling all
of the equipment’s functions and menus.
The keyboard operation will depend on the working mode.
On top of each button, the fusion splicer screen will display
the button’s function for the menu in use.
Button Main functions
Turn on / Turn o the fusion splicer, splice
and push accept selection button
Lower the selection bar highlighted on
the screen / Access the menu
Take up the selection bar highlighted on
the screen / Reset
4. Use
Basic guide
NOTE: This is a basic guide to start using the fusion splicer.
Should you encounter any problems or wish to see
the processes in detail, please refer to section 7 of
the manual “Advice for the appropriate handling of
bre and tools”.
EN
4.1 Quick start
Turning the fusion splicer on:
Connect the fusion splicer to the power supply unit.
Once connected, the equipment will start automatically. Push any button to exit the charging mode.
Make sure the unit is charging correctly. (Charge
the unit for at least 6 to 8 hours before using it for
the rst time).
Once charged for the rst time, bear in mind that
this equipment allows you to recharge the battery
while in use.
Turn on the fusion splicer by pushing the “ON”
button. The fusion splicer will start in “Ready Mode”
after a few seconds.
(If you wish to change the language of the fusion
splicer: Press “MENU” and go to the “LANGUAGE”
option by means of the “DOWN” button, push “SELECT” to enter, push “DOWN” or “UP” to select the
desired language, and nally conrm by pushing
“SELECT”.
4.2 Single-mode or multimode
When it comes to fusing, selecting the right type of bre in
the fusion splicer beforehand is essential. If you are using
single-mode bre, for example, select that type of bre in
the “Menu”; to do this, follow these steps:
Push the “MENU” button. With the “DOWN” button go to
“SETTINGS” and push “SELECTION”. Once there, go to “FIBRE
SELECTION” with the “DOWN” button and select the desired bre type. Select either “SINGLE-MODE”, “MULTIMODE”
or “OM1”.
4.3 Calibration
After checking the electrodes, we need to calibrate the fusion splicer in order to adapt it to the work environment
(temperature, humidity...). (See section 5.2, “Calibration”).
Page 8
Hand-held fusion
4.4 Fusion
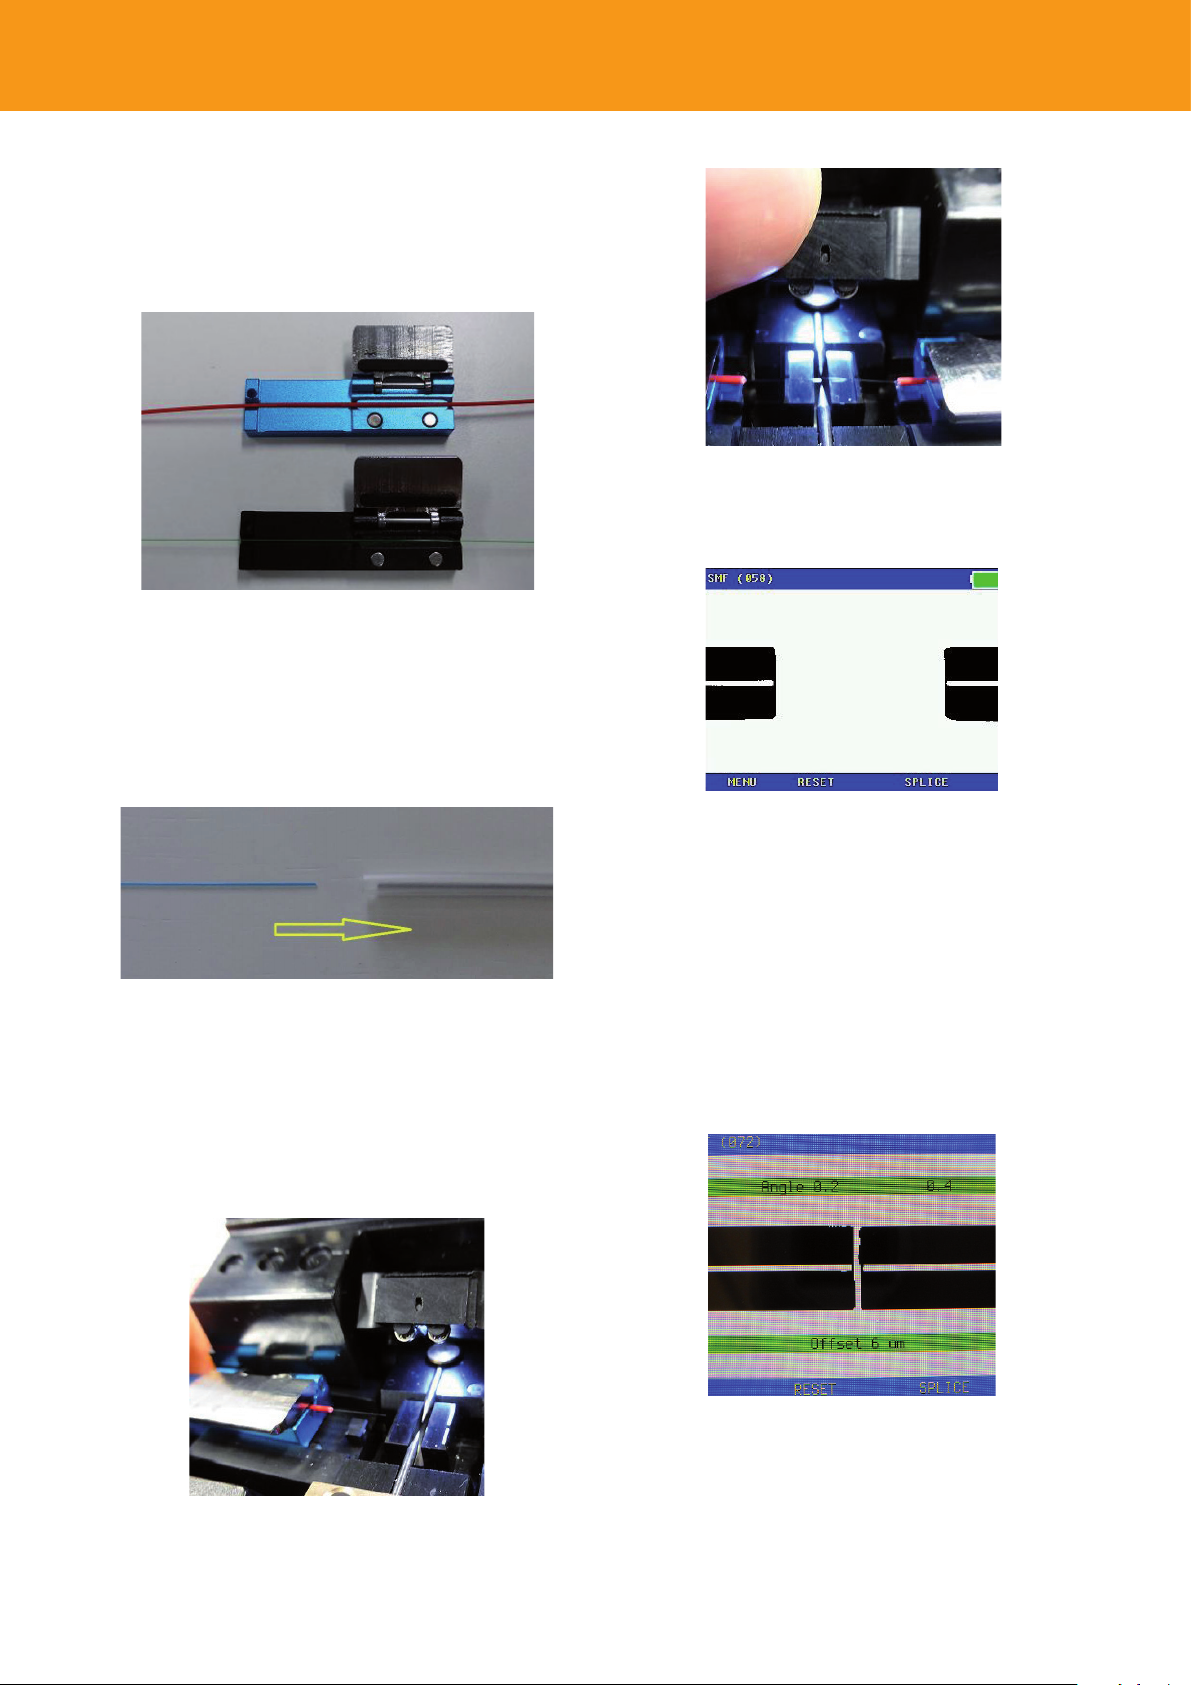
Place the bre in the heads (250 μm on the black bracket
and 900 μm on the blue bracket). The bre should stick out
around 3 or 4 cm.
Do not forget to put some heat-shrink tubing on one of
the bre ends before starting.
24
Both bre ends should be visible on the screen:
NOTE: You should swap heads with other machines. The
fusion splicer is factory calibrated for heads with which
it´s supplied, they are unique and interchangeable.
Follow these steps:
1. Strip and clean the bre.
2. Introduce the head in the cleaver and cut the bre.
3. Place the bre head inside the fusion splicer.
4. Repeat steps 1,2 and 3 with the other bre.
5. Shut the bre clamp.
If necessary, push the “RESET” button for the engines to go
back to the starting point (should you not see the bres correctly).
Now press “FUSE”. Fibres will get aligned and spliced. The
whole process will show on the screen in around 10 seconds. (An automatic traction test will be carried out after
fusion).
Finally, if the process was performed correctly, the splicer
will display the estimated loss in dB, in green colour. If the
process went wrong, the splicer may display either the estimated loss in red colour or the message “Bad splicing”.
Page 9
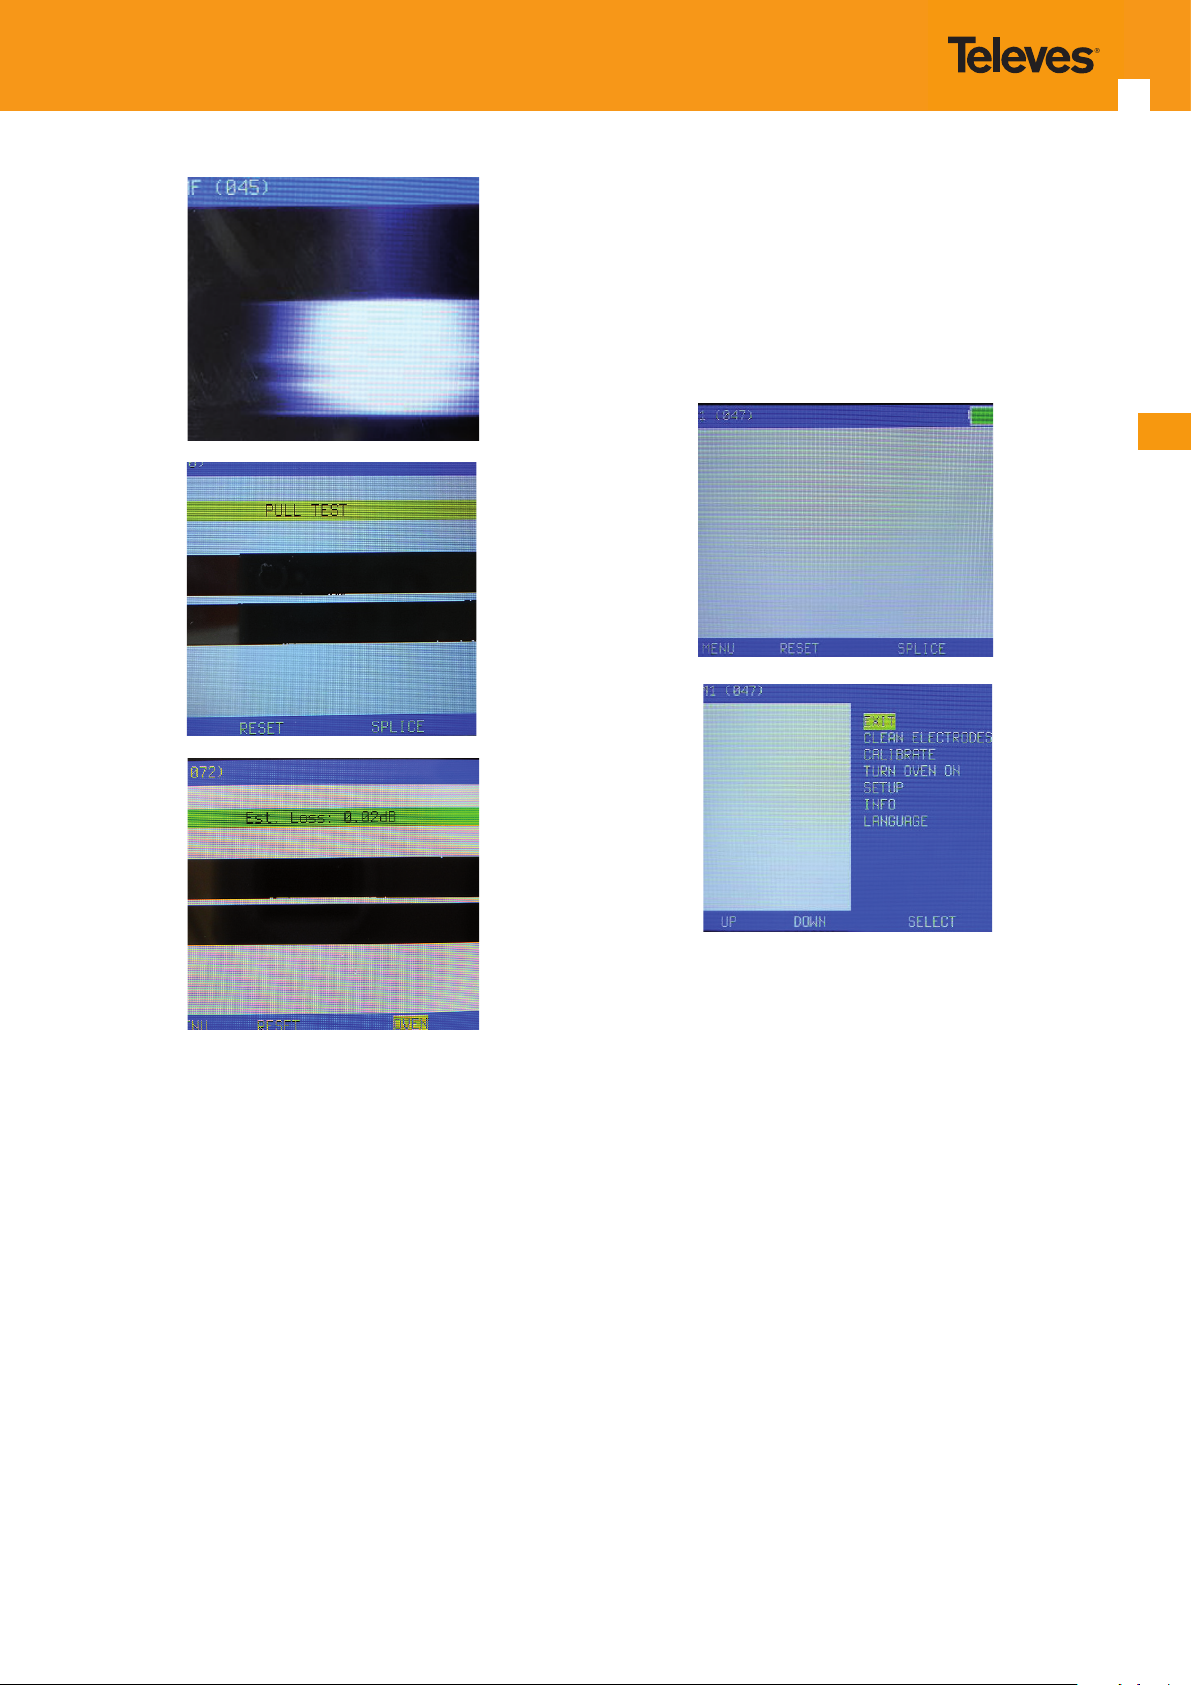
5.Main menu
To access the main menu, push “MENU” on the initial
screen. To go through the menu options, use the up and
down buttons.
Select the desired option by pushing the “SELECTION”
button.
25
4.5 Oven operation - Fusion protection
Open the oven (use the small arm on the left side of the
oven).
Lift the cover and open both bre heads. Push the heatshrink tubing over the spliced area and put it in the centre
of the oven. Close the oven door.
Start the oven operation by pushing “OVEN”. Although the
oven is programmed to operate for around 60 s, several
combinations can be carried out (see section 6.3, “Oven”).
The splicer is ready for a new splicing operation while the
oven is working. Push the “RESET” button if you do not
need to work with the oven.
EN
5.1 Electrode cleaning
Run the “ELECTRODE CLEANING” programme to get rid of
dirt and impurities on the electrodes. An additional electric arc will be produced to burn any residues and clean the
electrodes. The “ELECTRODE CLEANING” programme will
automatically show on the screen every 10 splicing operations.
If necessary, run the programme several times for better results. Bear in mind that it will have an impact on electrode
duration.
5.2 Calibration
This operation should be carried out whenever there is
a change in the environment, e.g. at the start of the day,
when the splicer has not been used for a few days, when
changing bre type, etc.
Performing a calibration:
Take out the coating and protection residue of the bre
you are going to use (around 5 or 6 cm).
Clean the bre with isopropyl alcohol. Make sure you do
not touch the bre after cleaning, since it would get dirty.
Page 10
Hand-held fusion
26
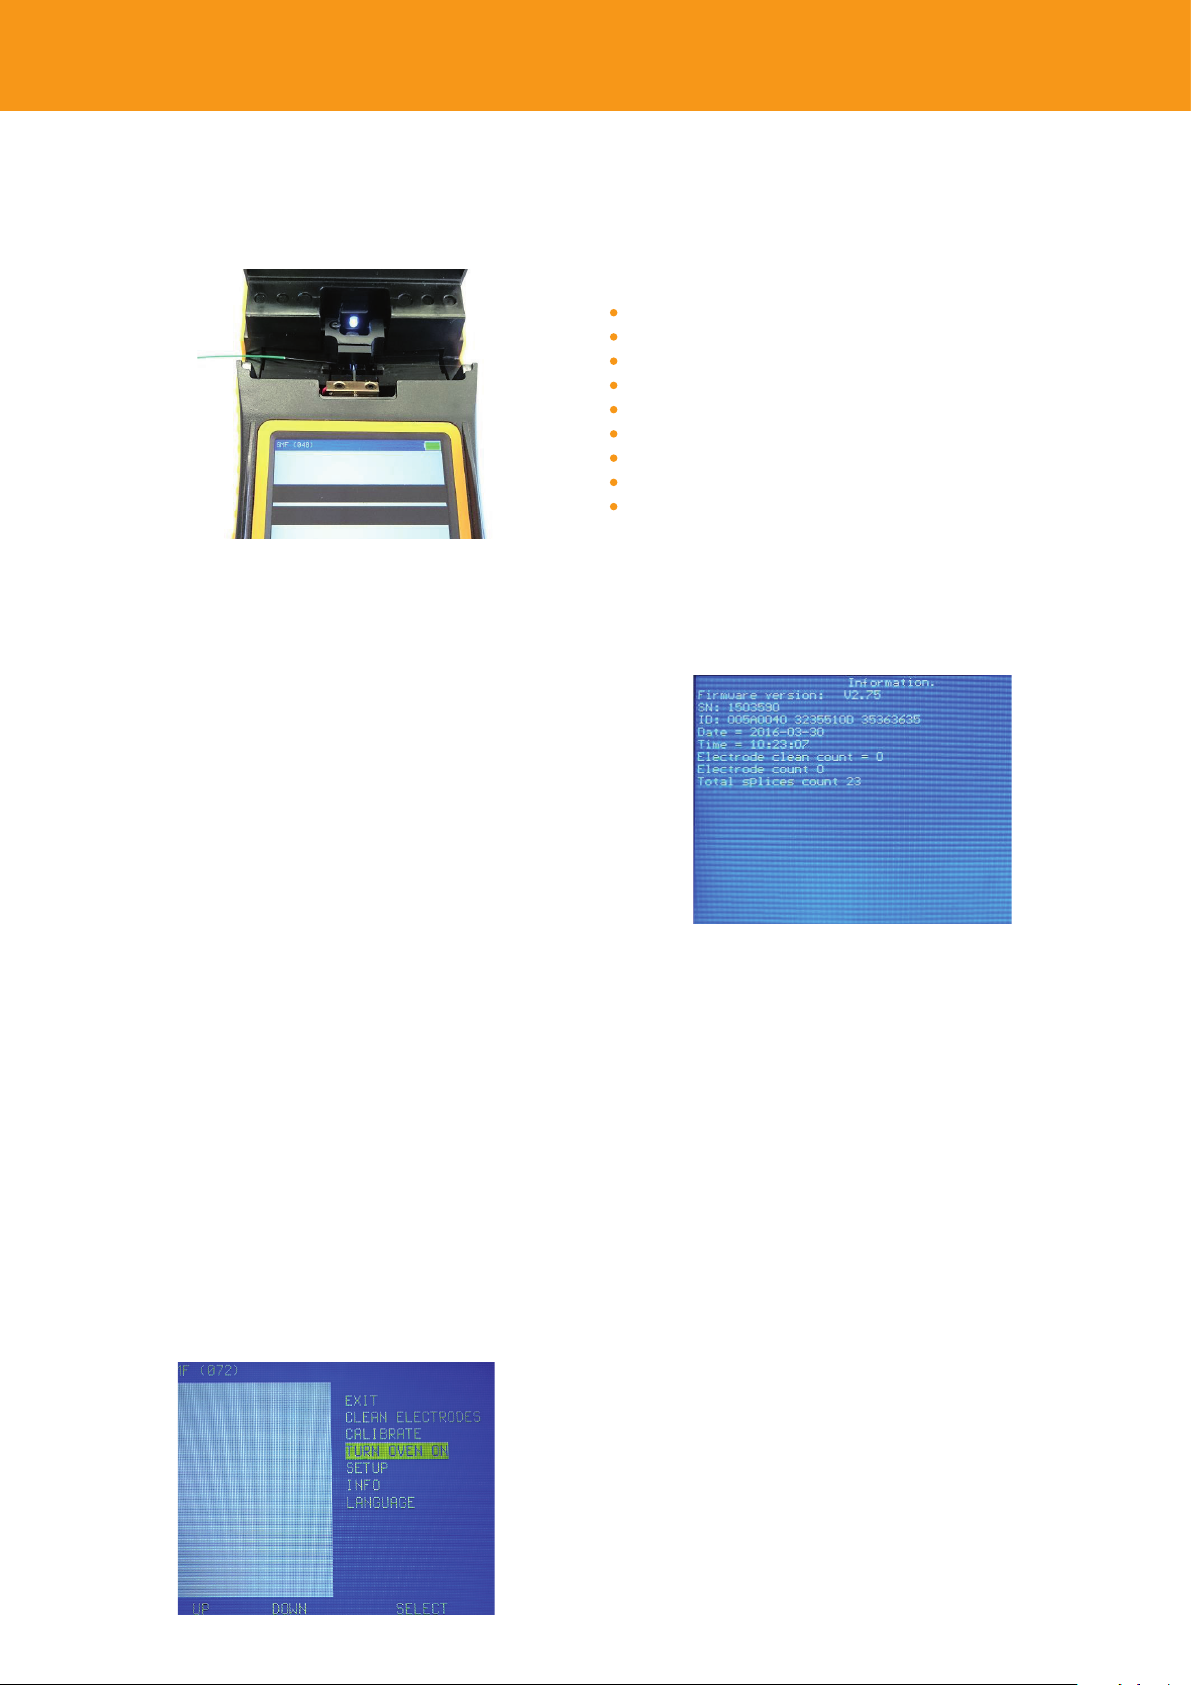
Put the bre directly on the V-groove (V-shaped
groove) without bre head (see image) and shut the bre
clamp.
Once the bre is on the V-groove (V-shaped groove) enter
the “Main menu” and go to the “CALIBRATE” option. Select
this option and the fusion splicer will start calibrating.
The screen will show how the electric arc generates and
goes through the bre.
After around 10 seconds, the operation will come to an
end. If the calibration was performed correctly, the screen
will display “OK”. Otherwise, the screen will display the following text: “CALIBRATE AGAIN”.
5.4 Settings
The settings menu displays the following functions (see
section 6, “Conguration”, for further details):
Fibre selection
Set time
Oven
Language
Fibre position
Electrodes
Auto mode
Start cleaning
Pause fusion
5.5 Information
It shows dierent kinds of information about the fusion
splicer.
NOTE: The fusion splicer will adjust to the calibration values
in small steps after each splicing operation. However, after
any environment changes, new calibration is required.
If the “Auto mode” function inside the “Settings” sub-menu
is activated, you will be able to introduce one single bre,
and the calibration process will start automatically just by
shutting the cover.
5.3 Turning the oven on
This function is used to manually run the oven’s programme. The oven’s programme is usually executed automatically when a fusion is carried out (see previous page “Oven
operation”), but under some circumstances you may wish
to operate the oven, occasionally. If so, put the heat-shrink
tubing in the oven compartment and push “TURN OVEN
ON” in the menu. The oven will start working for the programmed duration (factory settings: 60 s. To change the
duration, see section 6.3, “Oven”).
*Electrode cleaning counter: Indicates the number of fusions carried out so far without the electrodes having
been cleaned (this number is reset once the electrodes are
cleaned).
*Electrode counter: Indicates the number of fusions carried out using the current electrodes (it resets when the
function “ELECTRODES CHANGED” in menu “ELECTRODES”
is executed).
* Total fusions counter: Indicates the total number of fusions performed by the fusion splicer.
Page 11
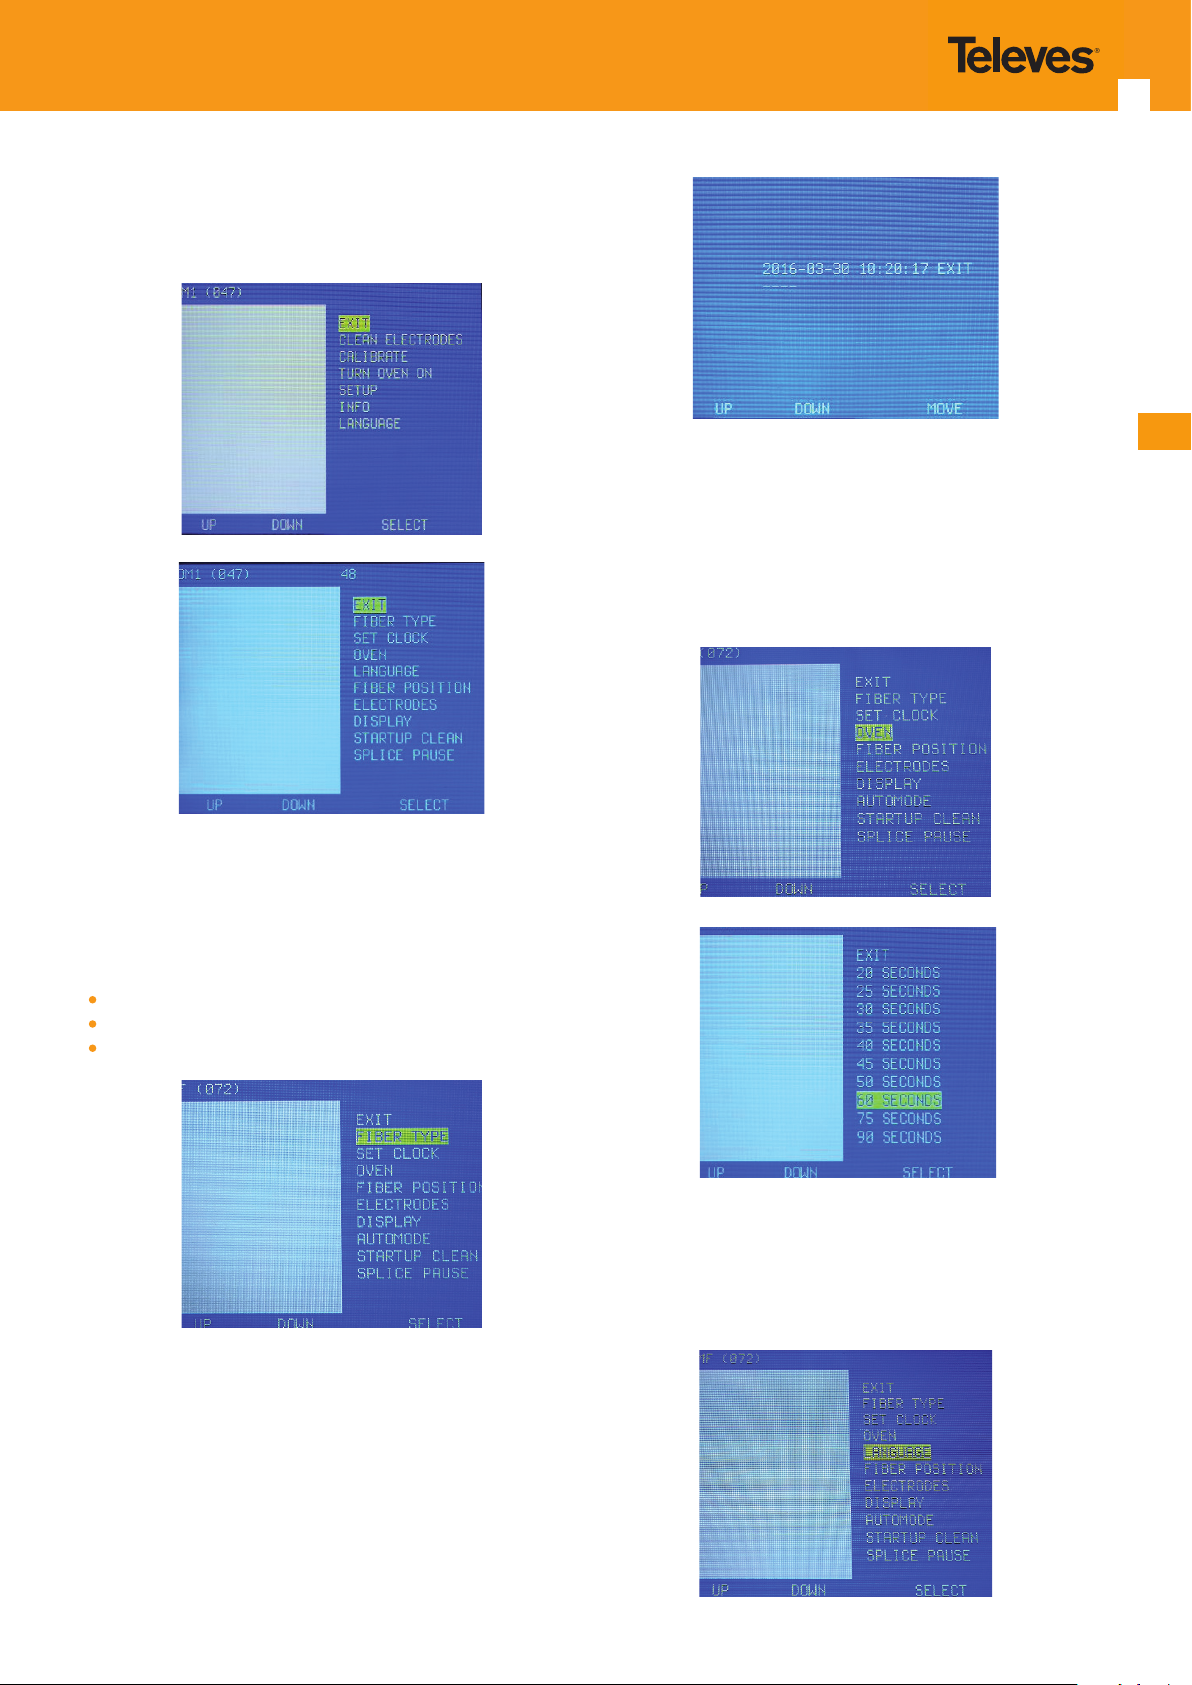
6. Conguration
In order to congure the dierent parameters of the fusion
splicer, we need to access the “SETTINGS” menu.
27
EN
6.3 Oven
6.1 Fibre selection
Choose the type of bre you wish to use and push “SELECTION” so that the fusion splicer charges the appropriate
parameters for the selected bre. You may choose among:
Single-mode bre
Multimode bre
OM1 bre
Adjust the oven operation duration by pushing “UP” and
“DOWN”. Push “SELECTION” to choose the new value, or go
to the top and select “EXIT” if you do not wish to make any
changes.
6.2 Set time
Adjust date and time with the “UP” and “DOWN” buttons. To
go through year, month, day, etc., press the “MOVE” button.
Once you are done with the adjustment, select “EXIT” to
exit this function and save the changes.
6.4 Language
Select the desired language by pushing the “UP” and
“DOWN” buttons. Push the “SELECTION” button to choose a
new language (push “EXIT” to exit without changes).
Page 12
Hand-held fusion
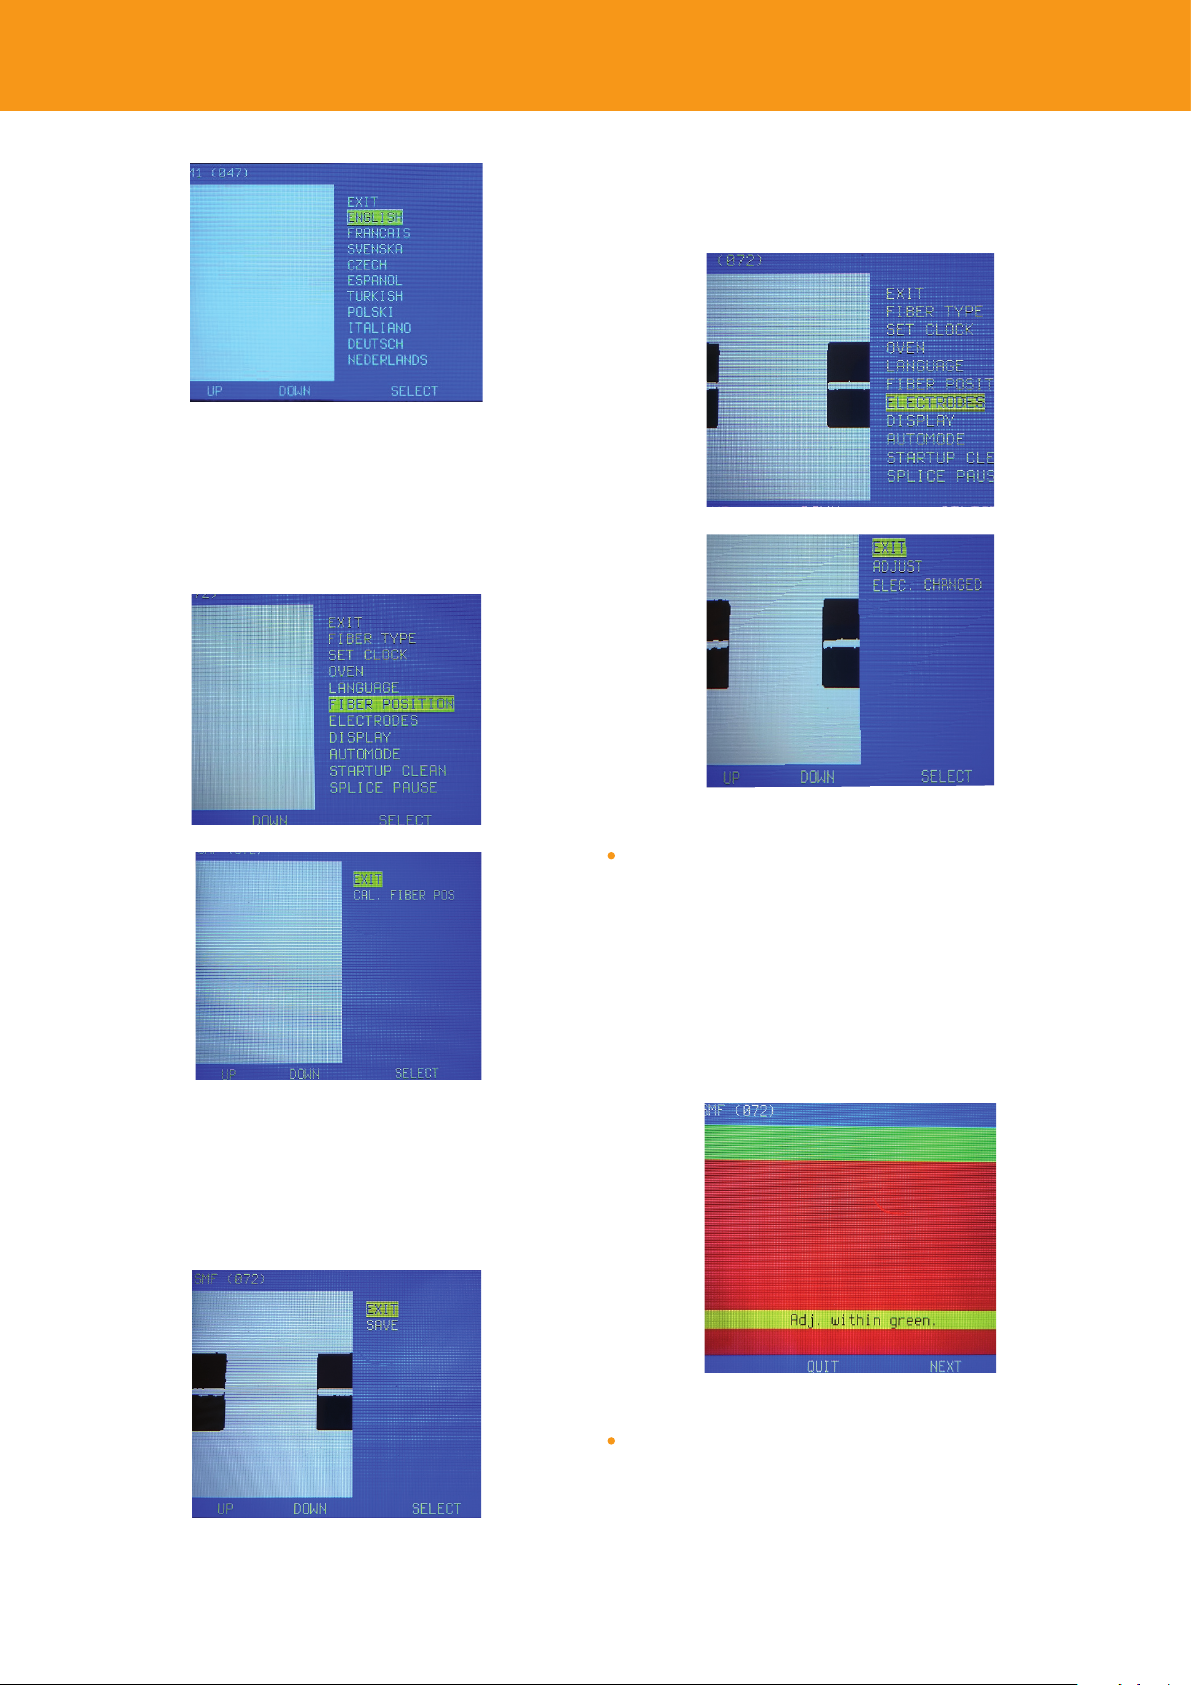
6.5 Fibre position
This option helps us calibrate bre positions when they are
not in the correct position on the V-groove (V-shaped groove).
28
6.6 Electrodes
The “ELECTRODES” menu has the following options:
In order to calibrate bre position, bres must be in their
heads, stripped and cleaved, just as if they were ready to be
fused. Once prepared, you should introduce the bres into
the fusion splicer, select the menu “SETTINGS”>” FIBRE POSITION”-> “CAL. FIBRE POSITION” and carry out
the calibration with “SELECTION”.
““ADJUST”.
In order to adjust the electrodes, you need to have a single
stripped bre on both V-grooves (shut the bre clamp).
Once the bre ready, access the “ADJUST” menu and push
“NEXT”. We will then proceed with the adjustment of the
upper electrode, followed by the lower electrode. You need
to have the tips of both electrodes inside the green strip.
Never allow it to go into the red zone.
If the bres are visible and in the correct position (see image above), the new position should be stored by pushing
“SELECTION” on the “SAVE” option.
“NEW ELECTRODES”.
This option resets the electrode counter in the “INFORMATION” menu (use only when changing the electrodes).
Page 13
29
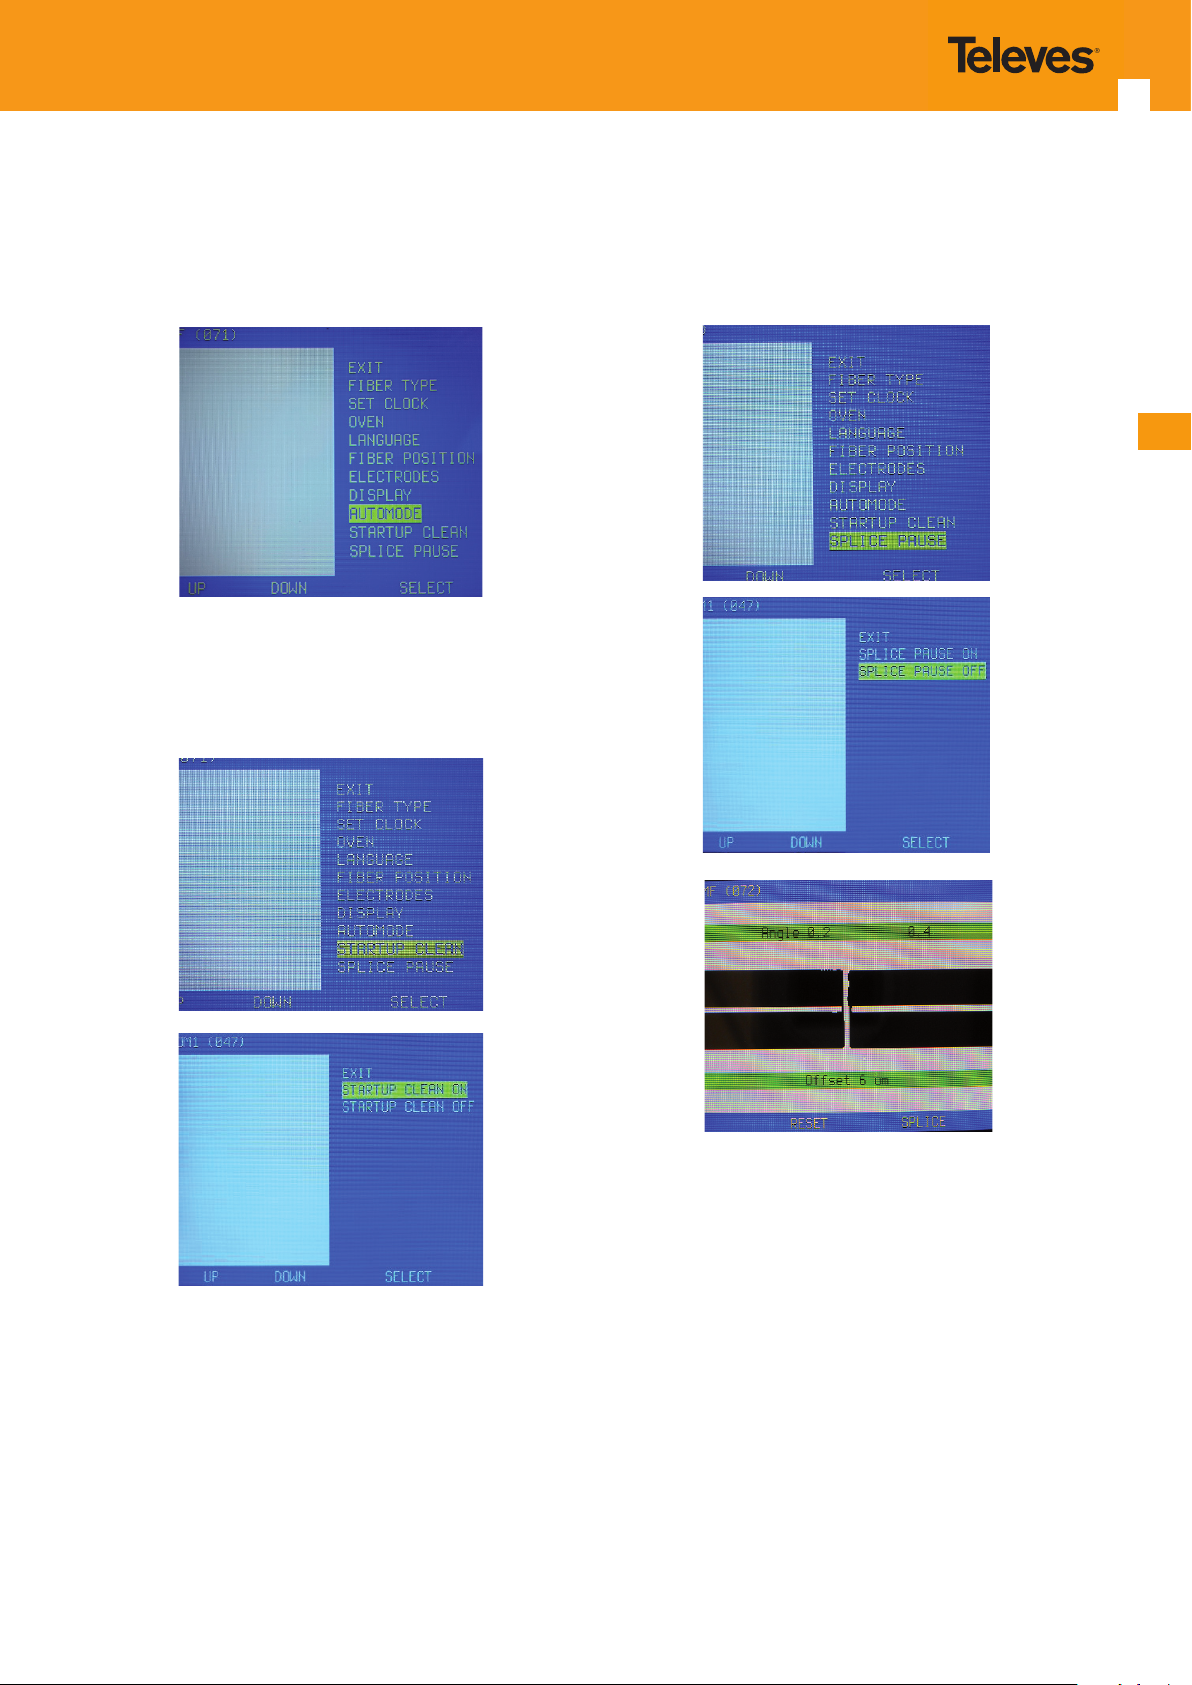
6.7 Auto mode
When this function is activated, the fusion splicer will start
the fusion operation by just shutting the cover (no need to
push any other buttons).
6.8 Start cleaning
When this function is activated, the fusion splicer will automatically clean the electrodes when turned on, as long
as the cover is shut and no bres are present.
6.9 Pause fusion
When this function is selected, the fusion splicer will pause and display the bre angles before proceeding with the
fusion; it will wait until the “FUSE” button is pushed to proceed with the splicing action.
EN
VERY IMPORTANT: Activating this option increases bat-
tery consumption and reduces electrode working life. The
fusion splicer regularly warns about the need to clean the
electrodes after 10 fusion operations; this is why we recommend to carry out the cleaning manually (see section
5.1, “Electrode cleaning”).
Page 14
Hand-held fusion
7. Advice for the appropriate handling of bre
Incorrect bre handling or preparation often produces bad
quality splices. One key aspect is working with very clean
tools, bre and materials. The time spent in learning the
correct handling of both bre and tools is largely made up
by the reduction in the eort required to solve an incident.
7.1 Do not forget heat-shrink protection
Before proceeding with the splicing, it is very important to
make sure that the heat-shrink protective cover is in place..
30
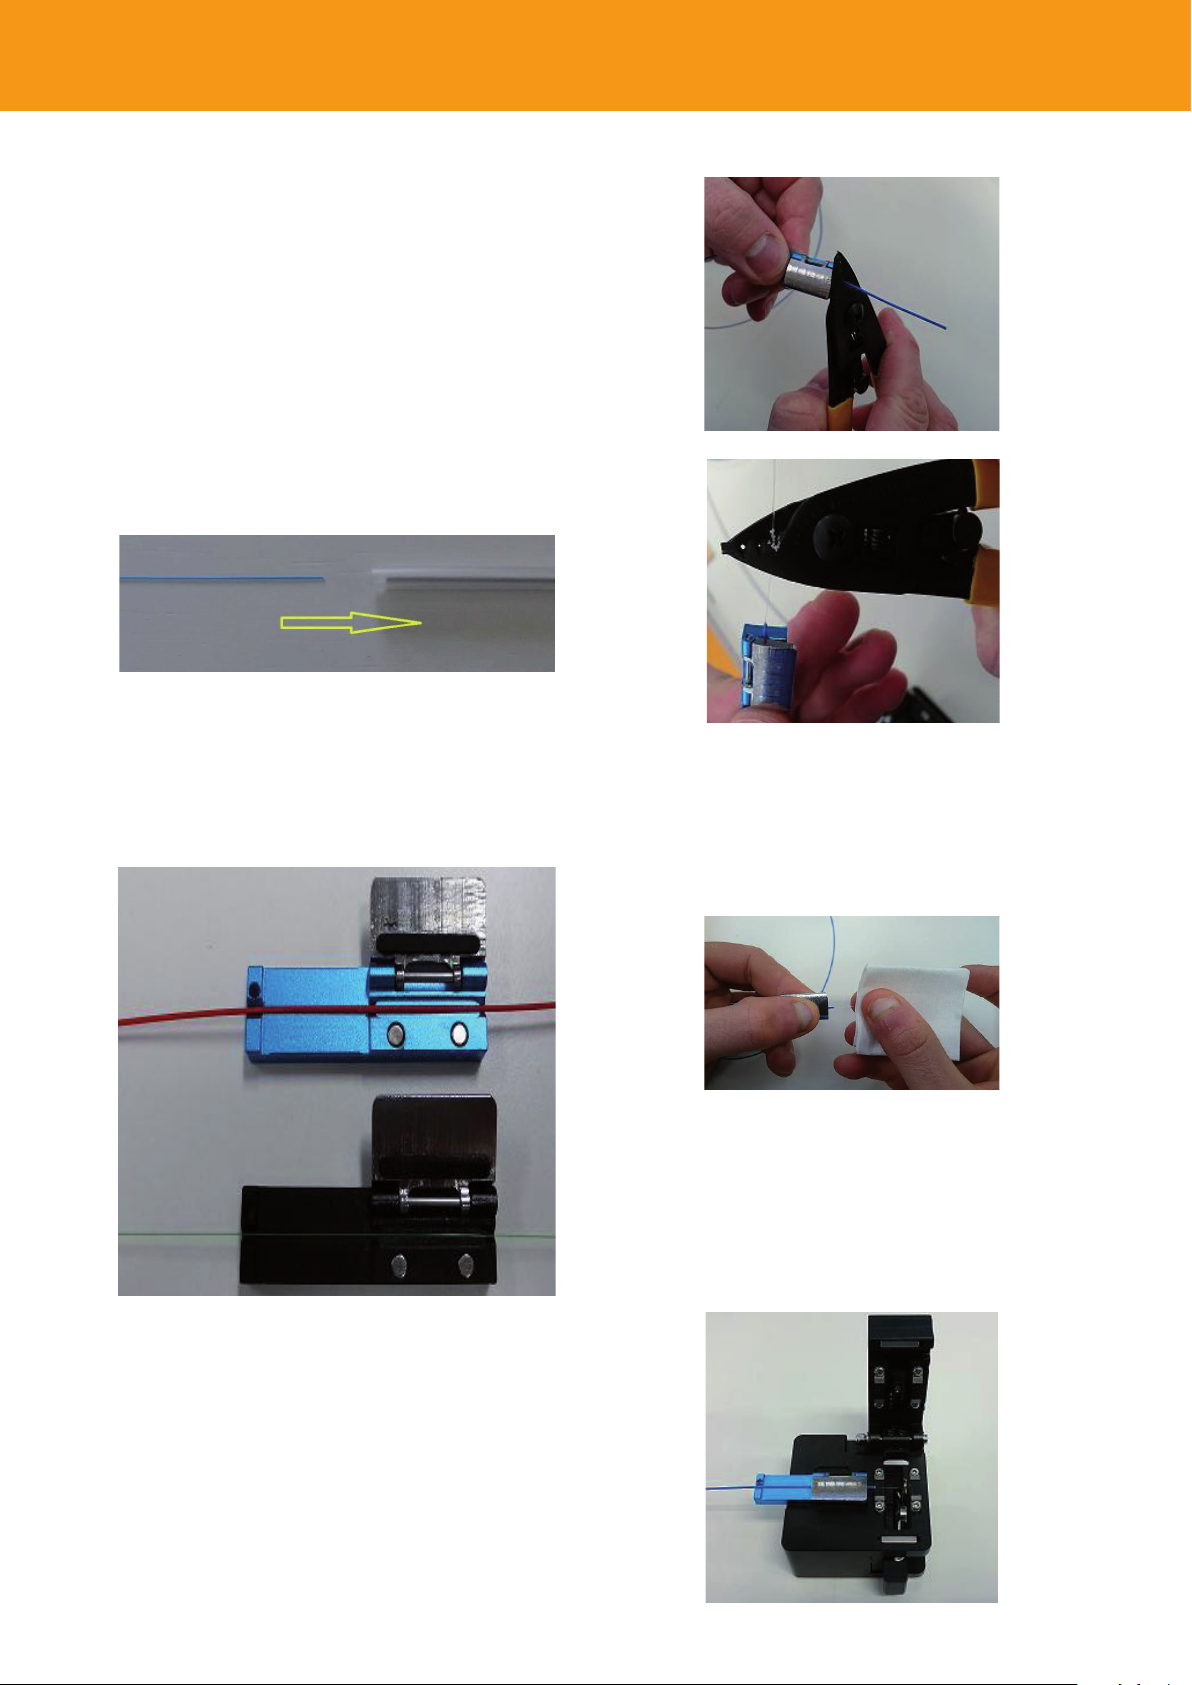
7.2 Each bre on its bracket
Put 250-μm bre on the black brackets and 900-μm bre
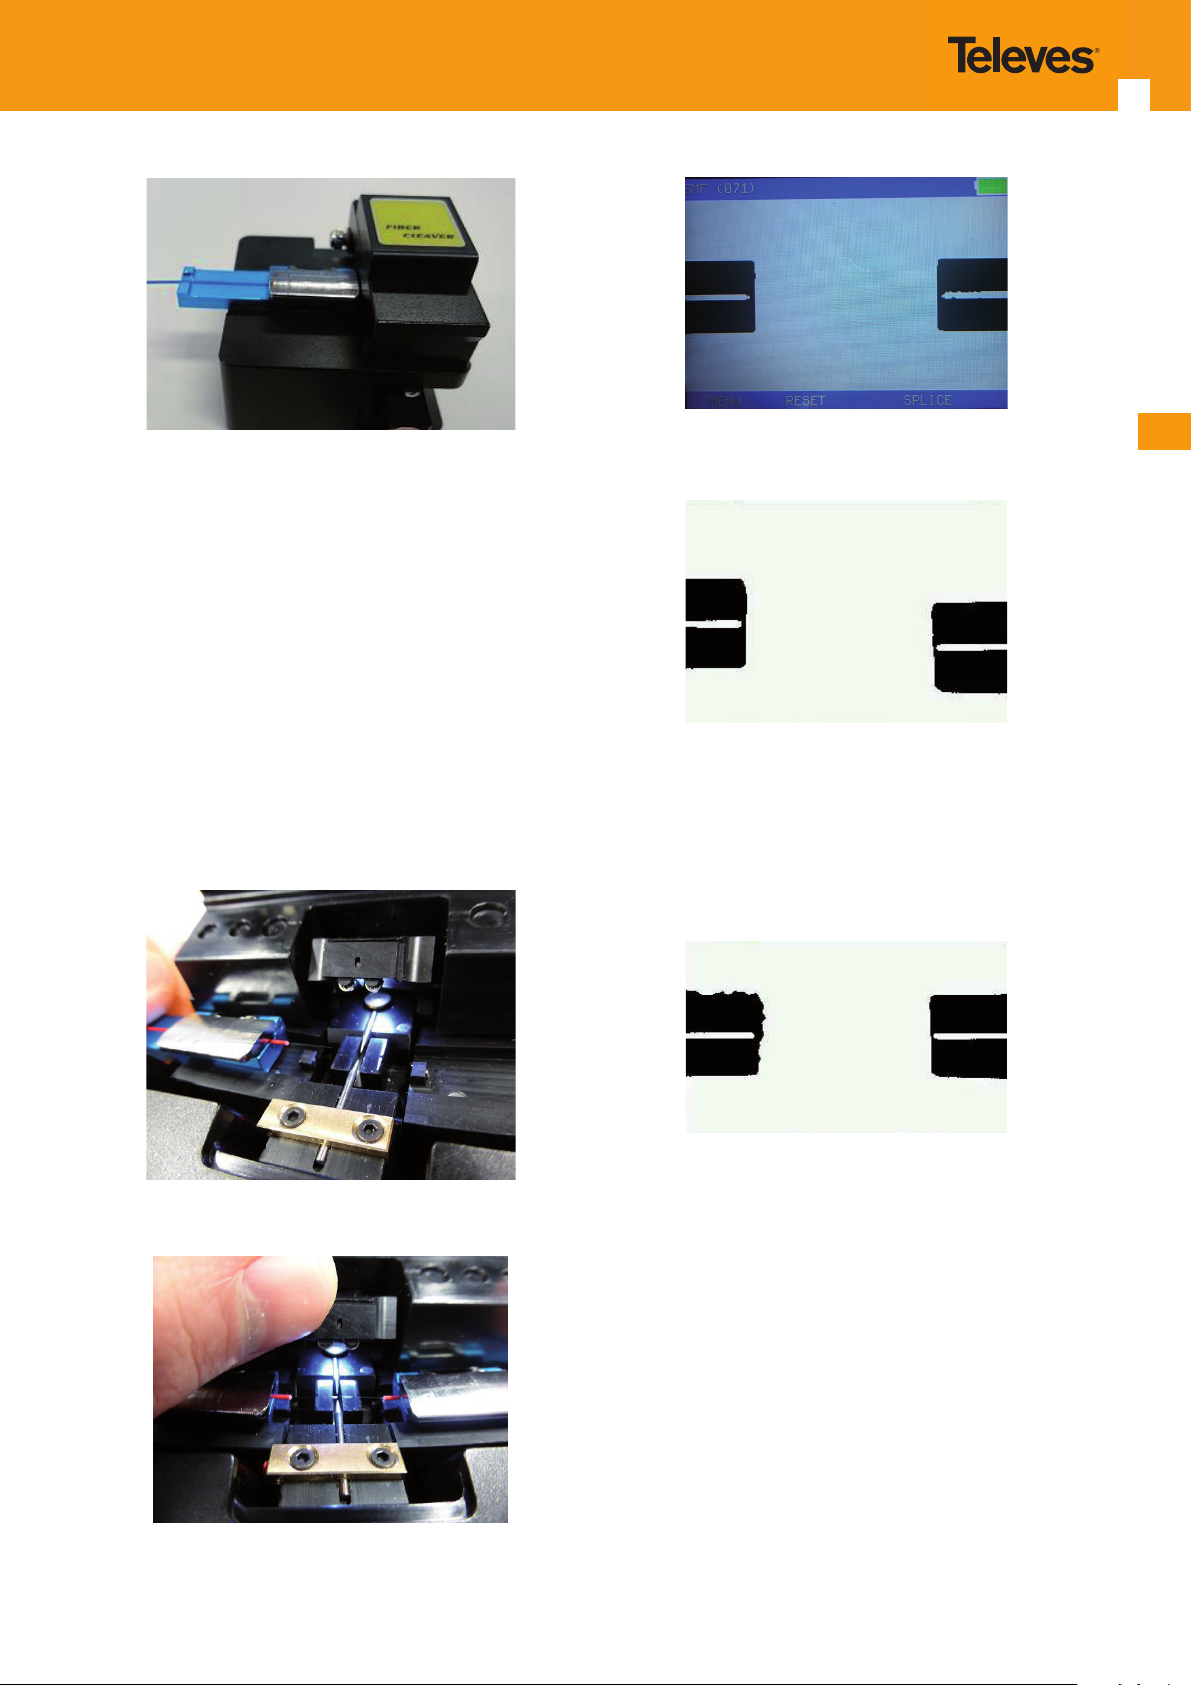
on the blue brackets. (See image).
7.4 Fibre cleaning
Use isopropyl alcohol impregnated wipes, specic for the
cleaning of bre. Make sure there are no bre residues before proceeding with the next step.
7.5 Fibre cleaving
Prepare the bre cleaver and put the cutting blade in operating position.
Shut the cleaver’s cover and push the sliding part of the
blade up with a single, fast and rm touch.
Remember: Not exchange heads between fusion split-
ters, as previously indicated, the fusion splitter is factory calibrated for heads supplied; if they were exchange, the splice doesn’t work properly.
7.3Fibre stripping
Take the tool to the edge of the bre head. Firmly close
the stripping tool and remove the bre protective layers
(remove 3 to 4 cm).
Page 15
31
La bra se cortará y obtendrá una bra con un corte a 90º .
Abra la tapa y retire la bra.
7.6 Placing the bre
Put the cut and ready bres in the splicer; to do so:
1.- Open the fusion splicer main cover and lift the bre
clamp.
2. Introduce the bre head into its track, leaning its front
slightly to avoid the bre hitting the V-groove, and place
it over the latter.
(It should butt with the incorporated magnets; never force
the brackets to bring the bre in).
Correct
Incorrect
The image above shows a deviation of the bre, possibly
due to bad bre positioning or to a dirty V- groove.
If the bre is aligned correctly but not appropriately
centred, check section 6.5, “Fibre position”, to calibrate its
position.
EN
3.-Shut the bre clamp, blocking the bres.
4.- Shut the main cover. Fibres should now be visible in the
screen, as shown below:
Very bad
The image above shows one of the bres is damaged, badly cut or dirty.
7.7 Fusing the bre
To carry out the fusion, we need to make sure that we selected the right fusion programme in the “SETTINGS”->”
FIBRE SELECTION” menu, and then select the appropriate
bre. (See section 6.1, “Fibre selection”).
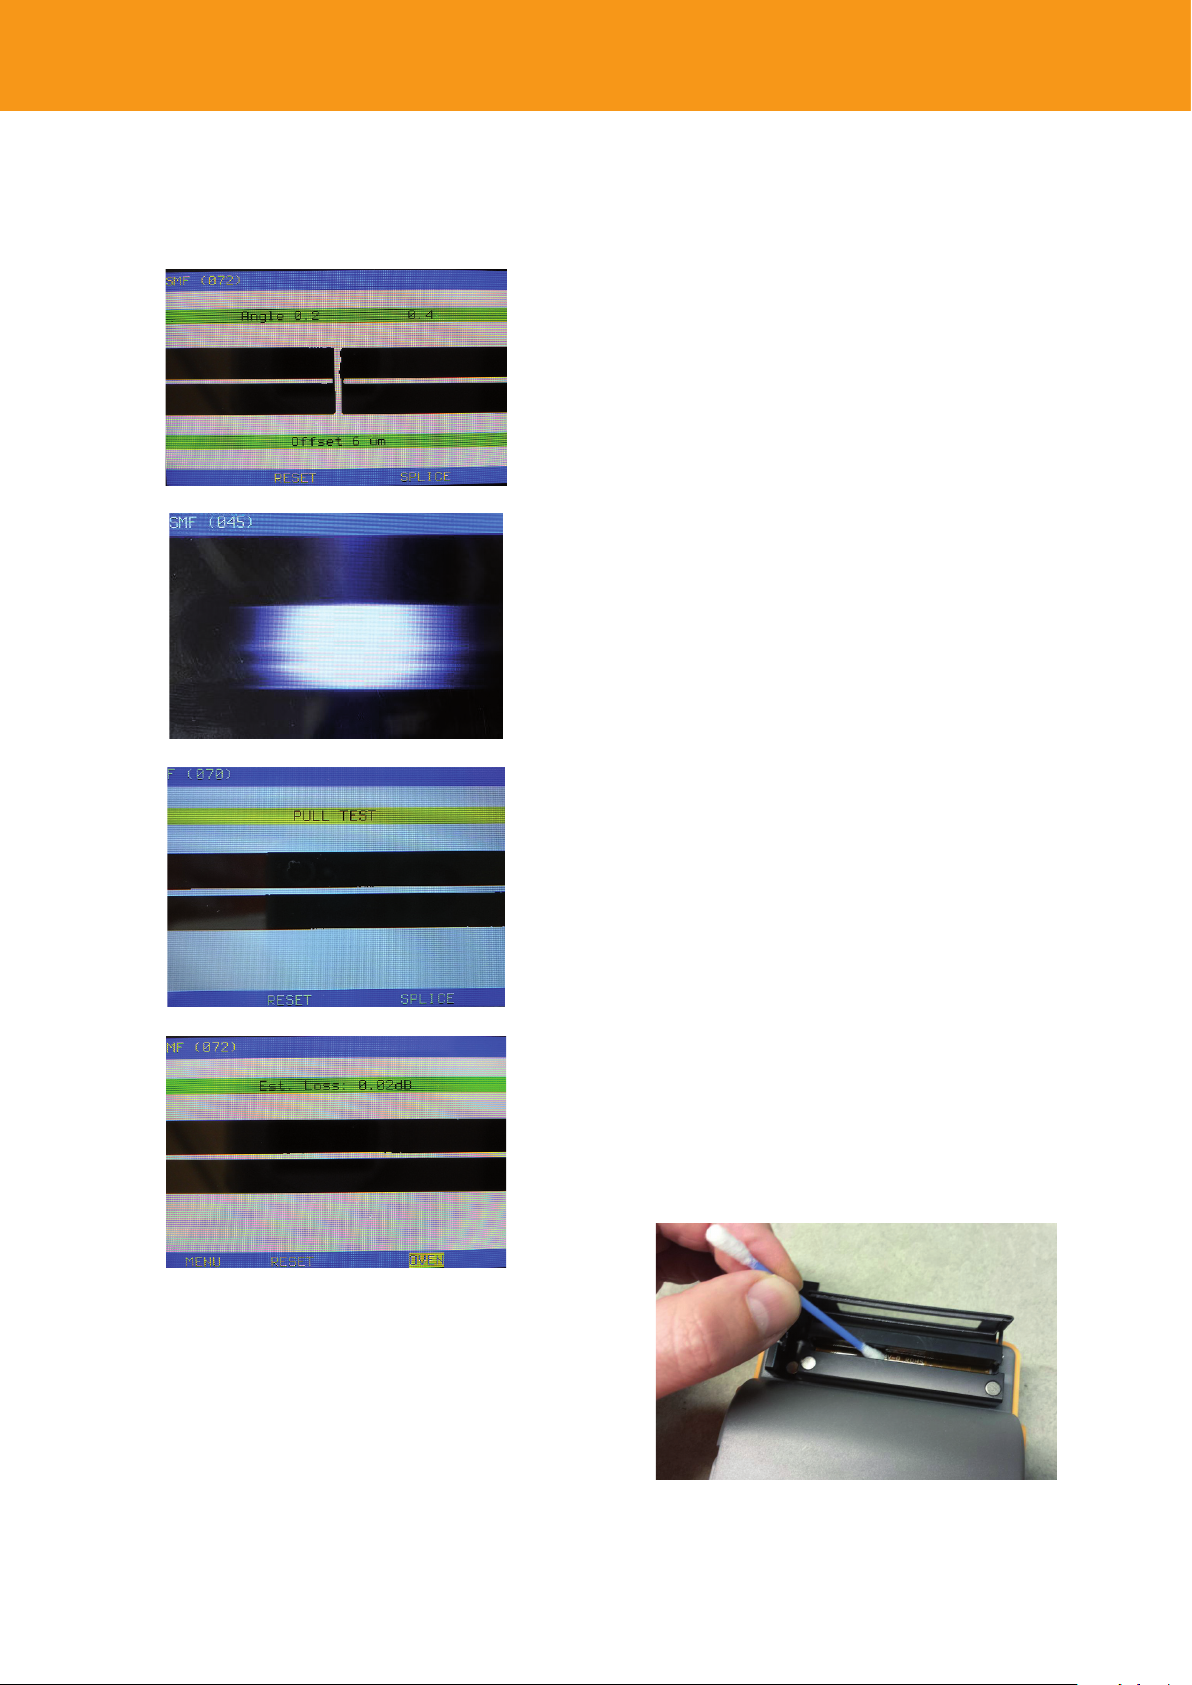
If both bres look correct on the screen, push the fusion
button; automatically, the bres will come together, the
electric arc will be generated, and the fusion of the bre
will be done, as well as the traction test, and the estimation of the loss in dB (Green colour = OK / Red colour =
WRONG).
Page 16
Hand-held fusion
32
Should the estimated loss be equal or higher than 0.1 dB
(loss highlighted in red), fusion would be incorrect, and the
whole fusion process should be repeated from the start.
8. Equipment cleaning
8.1 Cleaning the splicer’s V-shaped groove (V-groove)
The V-groove’s high-precision surface is very sensitive and
should be kept clean.
It is easily contaminated and should be frequently cleaned.
Whenever a constant bre oset problem appears (screen
displays “OFFSET ERROR”), it always comes to V-groove being dirty and needing a clean-up.
Follow these steps to clean the V-groove:
Prepare a clean bre (cut in the cleaver) and push it several
times on the V-groove at a 45o angle, always in the same
direction.
You may see some small particles of dust being swept
away with the bre during this process.
Besides the mentioned method, you can also clean the Vgroove with a cotton swab moistened with isopropyl alcohol. Preferably, combine both methods.
8.2 Electrode cleaning
The fusion splicer electrodes are sensitive and can accumulate impurities due to humidity, dirt, the splicer not having been cleaned for some time, etc. To avoid this, regular
cleaning is recommended.
Use the “ELECTRODE CLEANING” function in the menu. It
is recommended as a precautionary measure, to keep the
electrodes clean and problem free.
In extreme circumstances, impurities could be so rmly
xed that the “ELECTRODE CLEANING” function is not able
to burn the dirt completely. Should it be the case, take a
cotton swab moistened with isopropyl alcohol and sweep
the electrodes to remove the impurities. If this was not
enough, you can use a blade to remove them.
8.3 Oven maintenance
Should the heat-shrink tubes adhere to the oven, you
can grease the oven’s lower part with silicone grease. You
should only moisten it, without creating a layer.
Page 17

9. SD Card
It allows the downloading of the values extracted for each fusion to the card (provided the card is inserted). The values can
thus be read or extracted into a PC later on.
10. Specications
Manufactured in Europe.
Accepted bre types: SM (9/125 micron, with 250-micron or
900-micron protection), MM (50/125 micron and 62.5/125 micron).
Fusion and oven capacity (per battery charge):
+/- 60.
Fusion modes: 2. Predened (Single-mode (SM) and multimo-
de (MM) bre).
Fibre alignment: Cladding alignment.
33
EN
Typical loss after fusion:
SM 0.03 dB /MM 0.01 dB.
Detection of possible anomalies in the bre (prior to fusion).
Loss estimation (after fusion).
Indication of the cutting angle of each bre.
Time required for the fusion operation: 7 seconds.
Time required for the heat-shrink tubing adjustment (35 se-
conds for 45-mm, and 60 seconds for 60-mm tubes).
Equipment languages: ES-EN-DE-IT-FR-SV-CS-TR-PL-NL-RU.
Interfaces:
Mini USB (for possible upgrades).
SD-Extreme (not included) for the recording and ex-
traction of the parameters used in the fusion operation.
Lens magnication: 140X.
Colour LCD screen, 2.8”, 320 x 240 pixels.
Equipment dimensions: 230 mm (height) x 98 mm (width) x
54 mm (depth).
Weight: 0.8 kg.
7.4V, 3000 mA battery (Li-Ion).
External power supply unit: 6V, 1.5A, 100-240V AC / 50-60 Hz.
Work environment: From 0 oC to 45 oC / 95% Maximum relati-
ve humidity (with no condensation).
Page 18

televes.com
 Loading...