

Page 1
Page 2

WorldNav Navigation Software
© 2014 TeleType Co.
All rights reserved. No parts of this work may be reproduced in any
form or by any means - graphic, electronic, or mechanical,
including photocopying, recording, taping, or information storage
and retrieval systems - without the written permission of the
publisher.
Products that are referred to in this document may be either
trademarks and/or registered trademarks of the respective
owners. The publisher and the author make no claim to these
trademarks.
While every precaution has been taken in the preparation of this
document, the publisher and the author assume no responsibility
for errors or omissions, or for damages resulting from the use of
information contained in this document or from the use of
programs and source code that may accompany it. In no event
shall the publisher and the author be liable for any loss of profit or
any other commercial damage caused or alleged to have been
caused directly or indirectly by this document.
Page 3
Contents
4
5
WorldNav Navigation Software
Table of Contents
Part I Introduction
..........................................................................91 Disclaimer
..........................................................................112 Welcome
Part II Getting Started
..........................................................................151 QuickStart Truck Routing
..........................................................................212 Vehicle Specifications
..........................................................................243 Launching Navigation
..........................................................................254 Navigation Overview
..........................................................................275 Map Mode
..........................................................................296 Set Home Address
..........................................................................307 Finding an Address
..........................................................................418 Routing to an Address
..........................................................................439 Routing to an Intersection or Exit
..........................................................................4510 Routing by Business or Service (POI)
..........................................................................4911 Search Along Current Route
..........................................................................5012 Recent Location History
..........................................................................5213 Avoid Road Ahead and Clear Route
..........................................................................5314 Your GPS Settings
..........................................................................5415 Navigation Mode
..........................................................................5816 Main Menu Review
Part III Working with My Points
..........................................................................651 Create a My Point
..........................................................................672 Mark My Point at Current Position
..........................................................................703 Finding a My Point
9
15
65
..........................................................................714 Using My Points
..........................................................................745 Routing Via My Points
Part IV Navigation Preferences
..........................................................................791 Selecting Route Preferences
..........................................................................852 Choosing a System of Units
3 Selecting Navigation Panel
Preferences
..........................................................................86
..........................................................................904 Setting the Services Preferences
..........................................................................925 Voices & Languages
..........................................................................936 Changing the Time
Part V Special Features
..........................................................................971 Truck Restrictions
..........................................................................992 Map Information
..........................................................................1013 Auto Zoom
..........................................................................1044 2D/3D Views
..........................................................................1055 Cursor
..........................................................................1066 Adjusting Sound
..........................................................................1087 Day/Night Mode
..........................................................................1098 Trip Information
..........................................................................1129 Simulating a Route
..........................................................................11310 Lane Assist
..........................................................................11411 Junction View
..........................................................................11512 Repeat Instruction
..........................................................................11613 Split Screen
..........................................................................11814 Weigh Station Alert
79
97
Page 4
Contents
6
Part VI Troubleshooting Questions
Index
121
124
Page 5

Part
I
9
WorldNav Navigation Software
1 Introduction
1.1 Disclaimer
Use the WorldNav at your own risk. To reduce the
risk of unsafe operation, please carefully review and
understand this user manual.
It is the user's responsibility to use this product
prudently. This product is intended to be used only as
a navigational aid and must not be used for any
purpose requiring precise measurement of direction,
distance, location, or topography. Statistics provided
such as trip time are best estimates and may not
accurately reflect true conditions.
The Global Positioning System (GPS) is operated by
the United States Government, which is solely
responsible for its accuracy and maintenance. The
system is subject to changes which could affect the
accuracy and performance of all GPS equipment.
For use in vehicles, it is the sole responsibility of the
owner/operator of the TeleType GPS WorldNav to
place and secure the GPS unit so that it will not
interfere with the vehicle operating controls and
safety devices, obstruct the driver's view of driving
conditions, or cause damage or personal injury in the
event of an accident. Do not mount the TeleType
GPS WorldNav in a place where the driver or
passengers are likely to impact it in an accident or
collision. The mounting hardware supplied by
TeleType Co. is not warranted against collision
Page 6
Introduction
10
11
WorldNav Navigation Software
damage or the consequences thereof.
When used in vehicles, it is the sole responsibility of
the driver of the vehicle to operate the vehicle in a
safe manner, to maintain full surveillance of all
driving conditions at all times, and not become
distracted by the GPS system to the exclusion of safe
driving practices. It is unsafe to operate the controls
of the GPS system while you are driving. Failure by
the driver of a vehicle equipped with a TeleType GPS
system to pay full attention to operation of the vehicle
and road conditions while the vehicle is in motion
could result in an accident or collision with property
damage and personal injury.
IN NO EVENT SHALL TELETYPE CO BE LIABLE
FOR ANY INCIDENTAL, SPECIAL, INDIRECT OR
CONSEQUENTIAL DAMAGES, WHETHER
RESULTING FROM THE USE, MISUSE, OR
INABILITY TO USE THIS PRODUCT OR FROM
DEFECTS IN THE PRODUCT. SOME STATES DO
NOT ALLOW THE EXCLUSION OF INCIDENTAL
OR CONSEQUENTIAL DAMAGES, SO THE ABOVE
LIMITATIONS MAY NOT APPLY TO YOU.
1.2 Welcome
Congratulations on your purchase of a WorldNav
Truck GPS! This document will provide you with
information on how to use the GPS software. Please
refer to the GPS hardware user guide for information
regarding the GPS device. To be informed of
program and map updates please register your
WorldNav purchase at www.teletype.com/register.
Please note that the software functionality is the
same for all newer generation WorldNav models
regardless of screen size. The pictures in this guide
may appear differently from your screen based on
which device you are using. The guide will appear in
color when viewed on line.
Page 7
Introduction
12
Page 8
Part
TIP - Turn on the truck before powering up
your GPS to avoid potentially damaging
power surges to the GPS.
II
15
WorldNav Navigation Software
2 Getting Started
2.1 QuickStart Truck Routing
TeleType offers commercial truck drivers the ability to
specify the characteristics of the vehicle and type of
load being carried in order to provide suitable routing
taking into account road restrictions such as bridge
clearances, load limits, dangerous turns, hazmat,
and more. If you have purchased a device which
offers the commercial truck routing feature, you can
follow the information below to learn more about the
features designed for truck drivers. For complete
details on how to enter addresses you can review the
remainder of this user guide.
1. Attach your GPS system to the windshield by
putting the suction cup on the window (moisten
cup if necessary). It is best to allow the device to
rest on the dash (while also mounted to the
windshield) so as to minimize the possibility of
damage to the device. Apply power using the
cord provided to the device (if needed).
2. Turn the device on, press the “Navigation”
button.
3. Press the <I Agree> button.
Page 9
Getting Started
5. The WorldNav GPS will automatically lock into
your current position provided that the device
has clear view of the sky; assuming you are
driving a standard over the road truck (13"6'
high, 80,000 lb, 53' trailer), no configuration is
required as these are the default values for the
GPS. The GPS will know your direction of travel
once you begin to move.
6. If the GPS has not yet locked into position, you
will see <Where To> and <Menu> at the top of
the map screen. The map will display the last
known position centered into the target area.
Press <Where To> on the screen to create new
route.
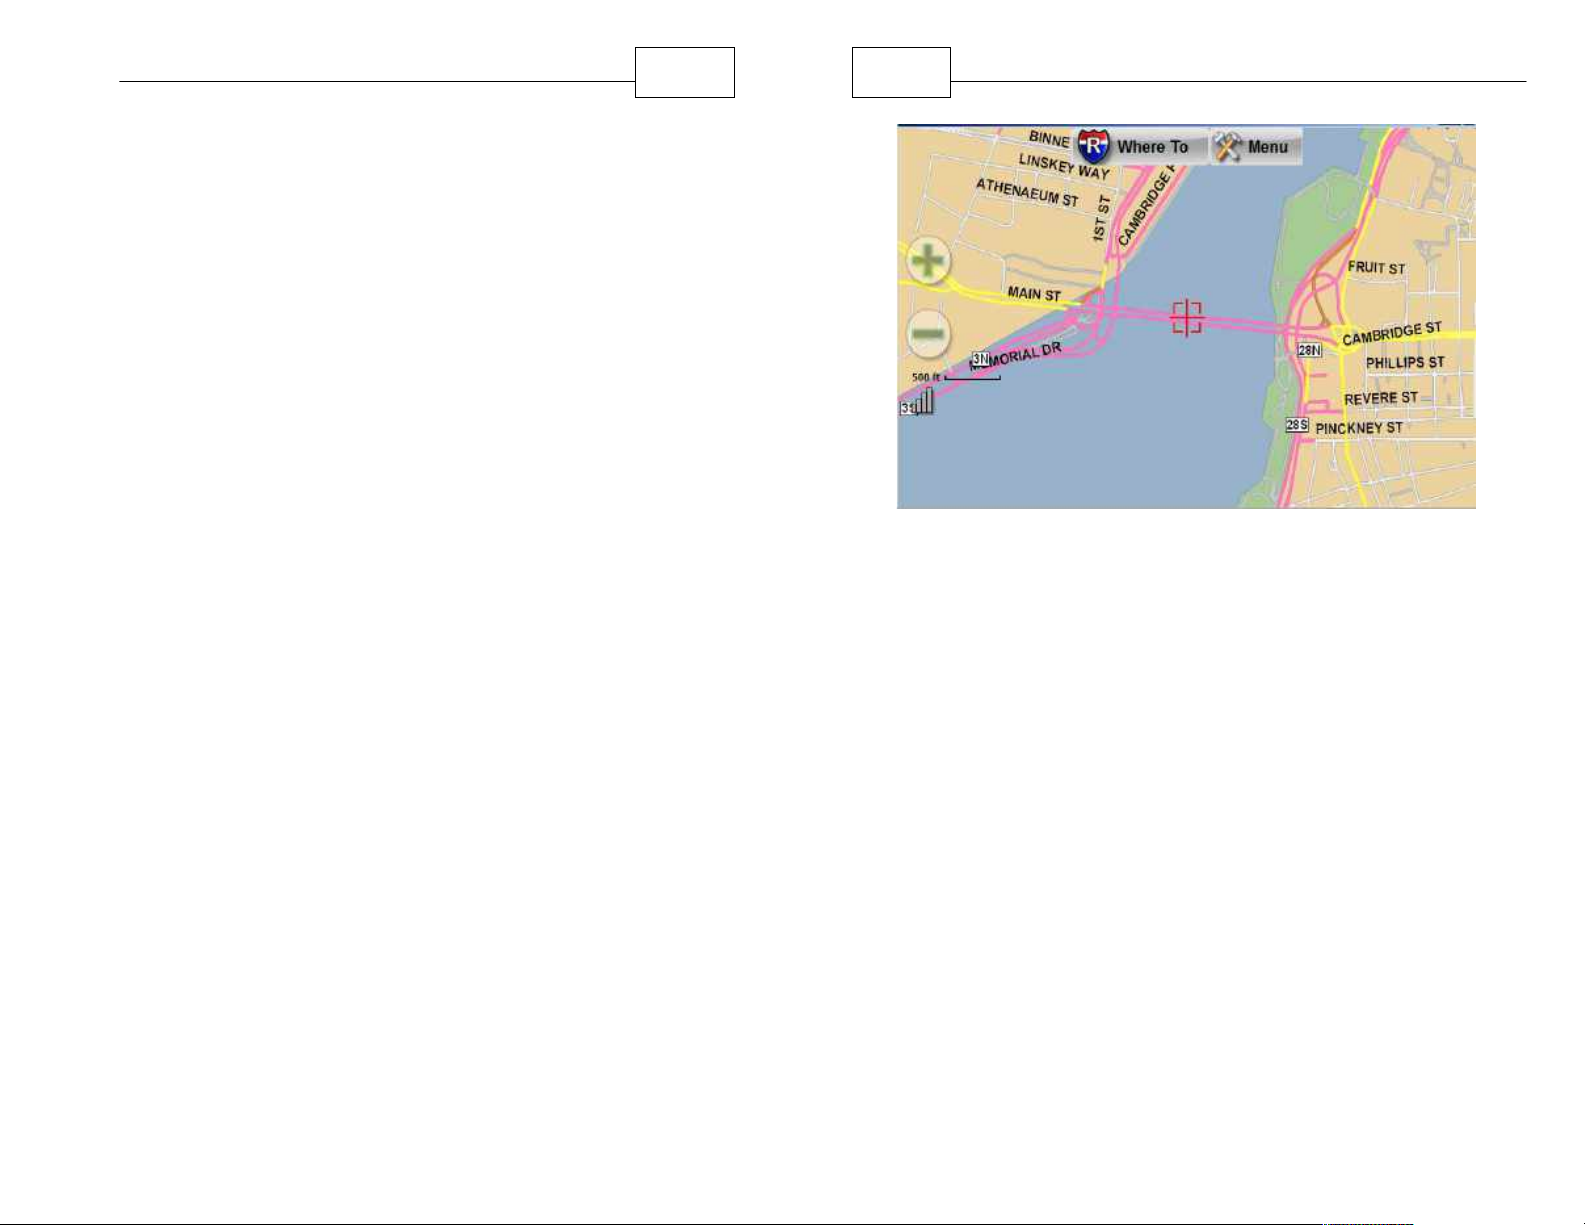
7. Notice the bright pink lines on the map indicating
restricted roads for trucks. When you are in any
of the Truck routing modes, the GPS will attempt
to avoid these areas.
16
17
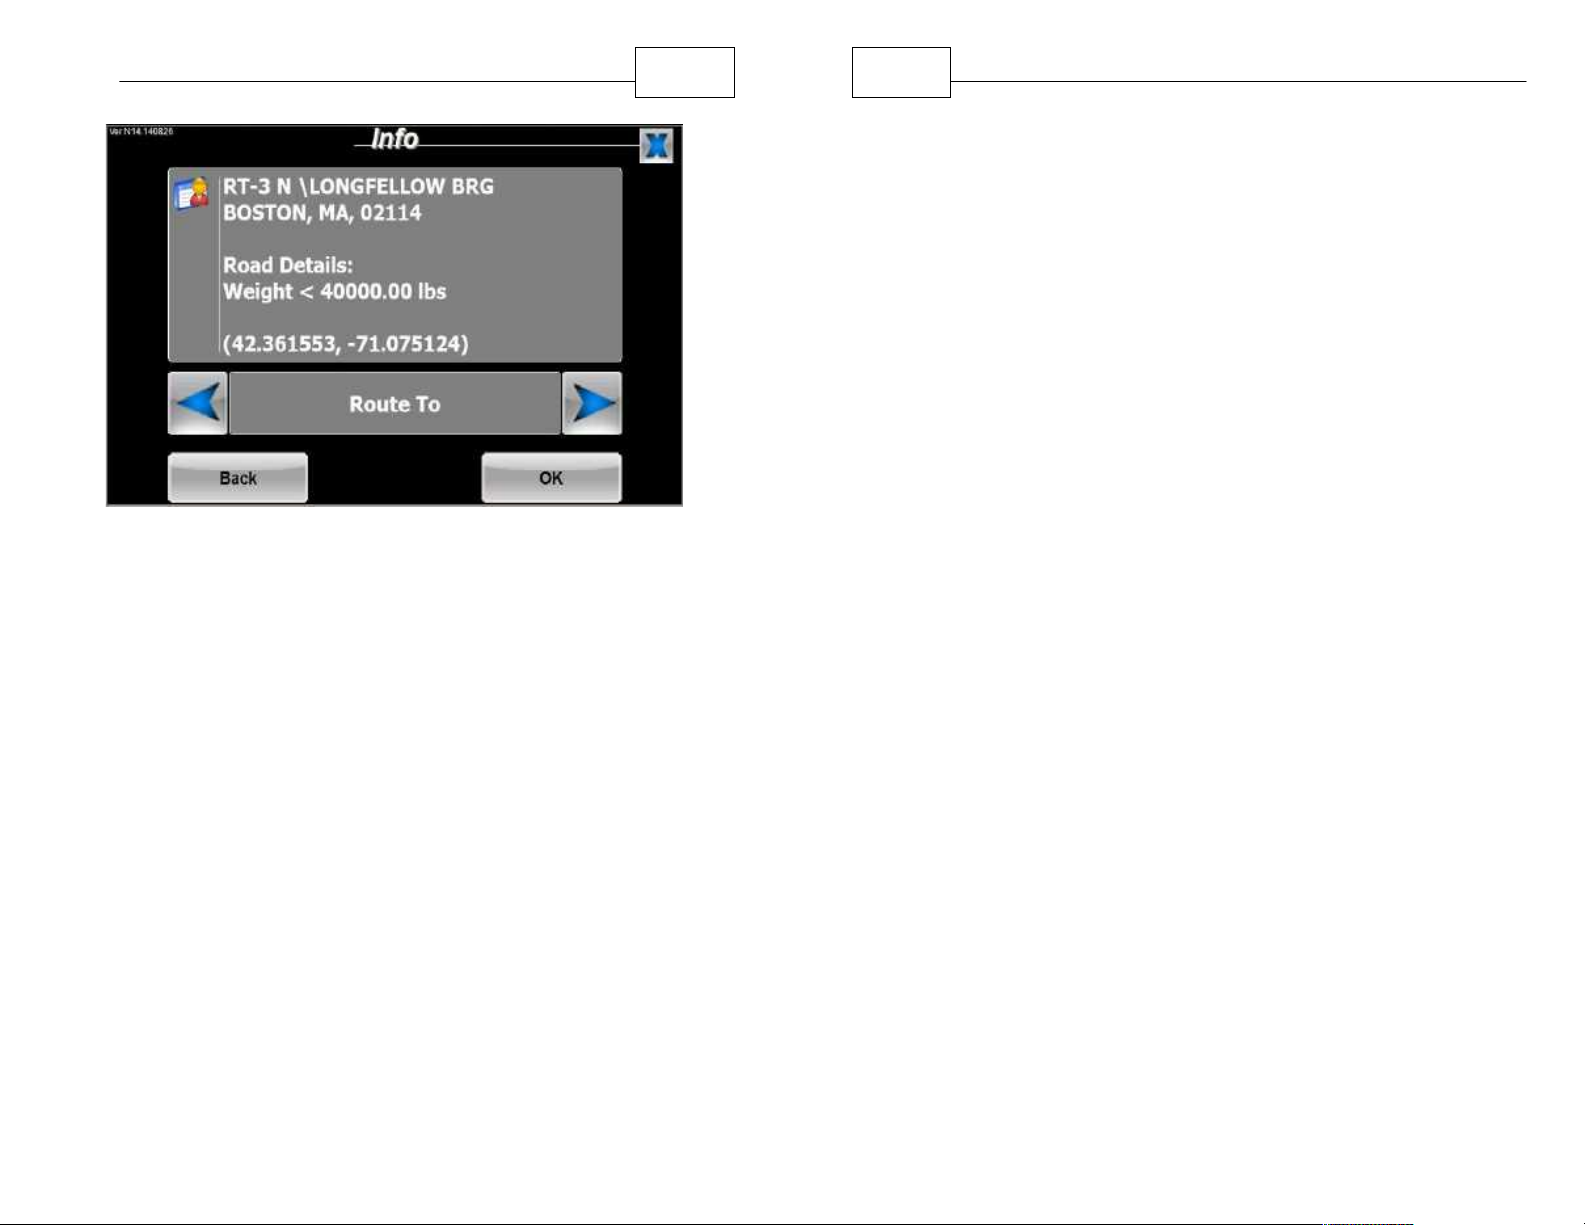
8. To learn more about why the road is restricted,
WorldNav Navigation Software
Restricted Roads Shown in Pink Color
place your target point over the pink road and
press <Menu> then press <Info>. The display
will provide restriction information for that point.
In the example below, the restriction is due to
weight restriction of less than 40,000 lbs.
Page 10
Getting Started
18
19
11. Once the route has been created, the GPS will
12. When the GPS is locked into position you will
WorldNav Navigation Software
use with local roads; they are not intended for
use in finding Exits on highways.
display the route from your current location to
the selected location.
hear “GPS position fixed, ready to navigate.”
You will also see your position on the map
indicated by the big red arrow. The <Where To>
and <Menu> buttons will disappear.
Restriction Information
9. When entering addresses, the GPS will first
prompt you to enter the State (you can spell the
state or the abbreviation), the next screen is
used for entering the City, the third screen is for
entering the house number (leave blank if you do
not know the street), press Next and enter the
street name (leave blank if unknown). Note that if
the street name contains a number such as 61st
Street, you can toggle the ABC button to become
123 so that you can enter the number. For
details see Getting Started, Finding or Routing to
an Address section earlier in this guide.
10. Enter your destination by Address, Intersection
or Service (a chain Truck Stop such as Loves,
Flying J’s, Pilot or Petrol, as well as independent
truck stops). Note that intersections are only for
13. To hear a repeat of the upcoming navigation
instruction, tap the upper left hand portion of the
screen.
14. You may feel that routing and re-rerouting may
take longer than expected, keep in mind this
system is analyzing over 350,000 miles of truck
restrictions before creating the best route.
15. Your GPS has already been updated before it
was shipped to you so please do not try to
connect the GPS to a computer for updating. If
you have purchased an update policy you will
receive the update on a memory card which will
self install. Consult the appropriate WorldNav
GPS Hardware Guide for details.
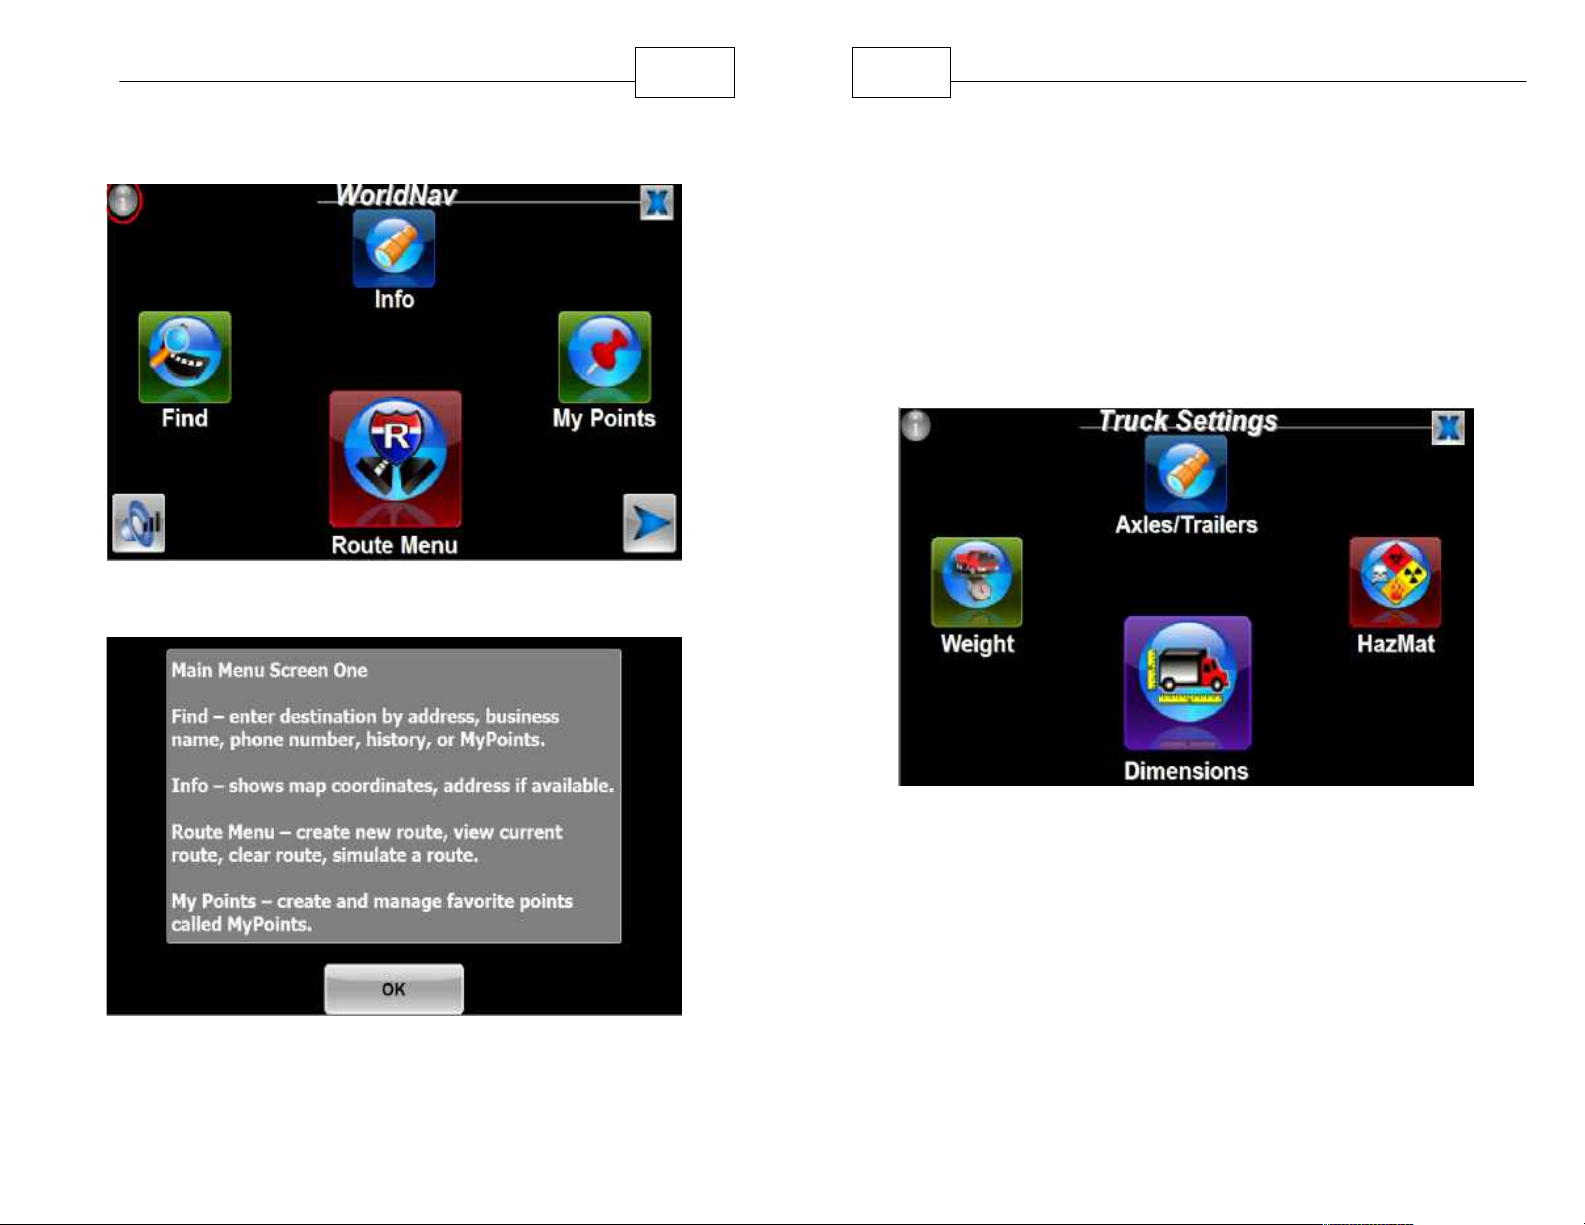
16. Tap the round Info <I> button appearing on the
top left of the menu screen to learn more about
Page 11
Getting Started
20
21
WorldNav Navigation Software
a specific menu page.
Info Button found on the top left of main screens
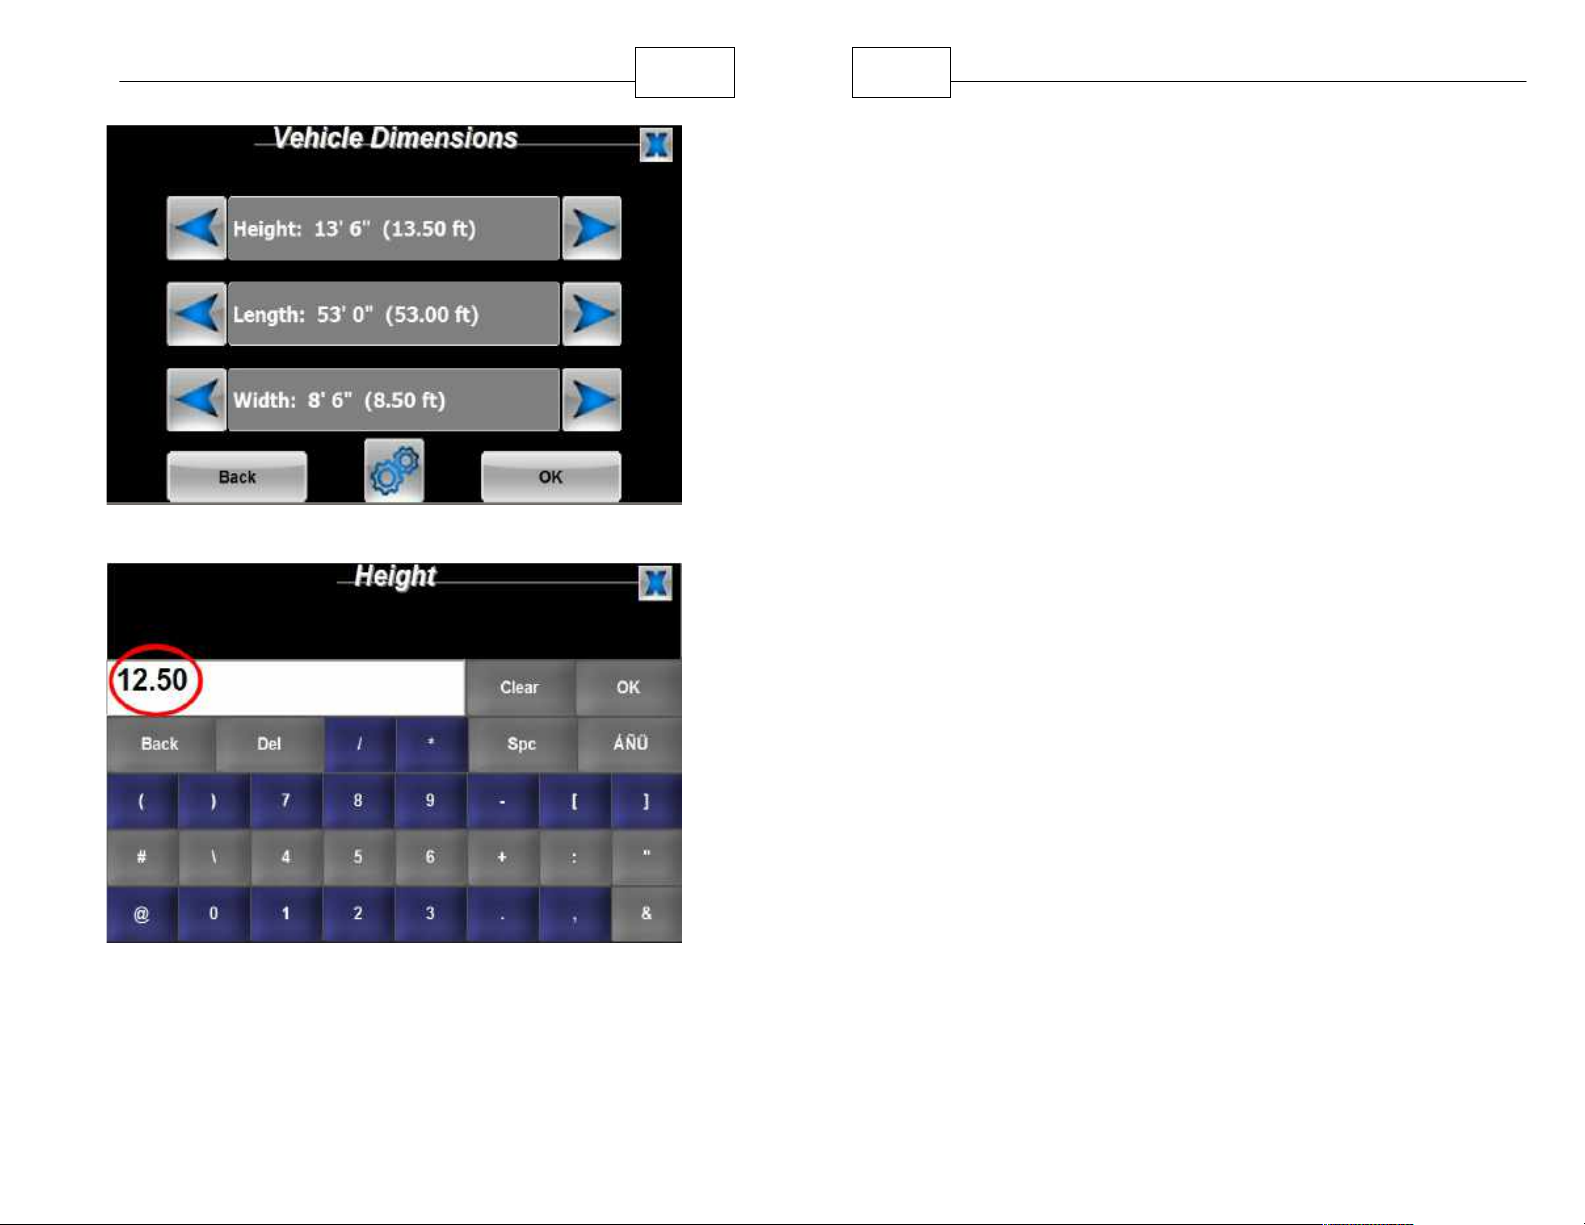
2.2 Vehicle Specifications
The WorldNav Truck GPS is already set up to create
routes that are suitable for trucks having the following
specifications: 13'6" high, 53' trailer, 8'6" width, no
hazmat, 80,000 pounds, 5 Axles, 1 trailer. If you wish
to change any of these settings you should access
the Vehicle Specifications menu. Tap each of the
items in the menu to make changes.
Example of a quick reference Information screen
Truck Settings
Page 12
Getting Started
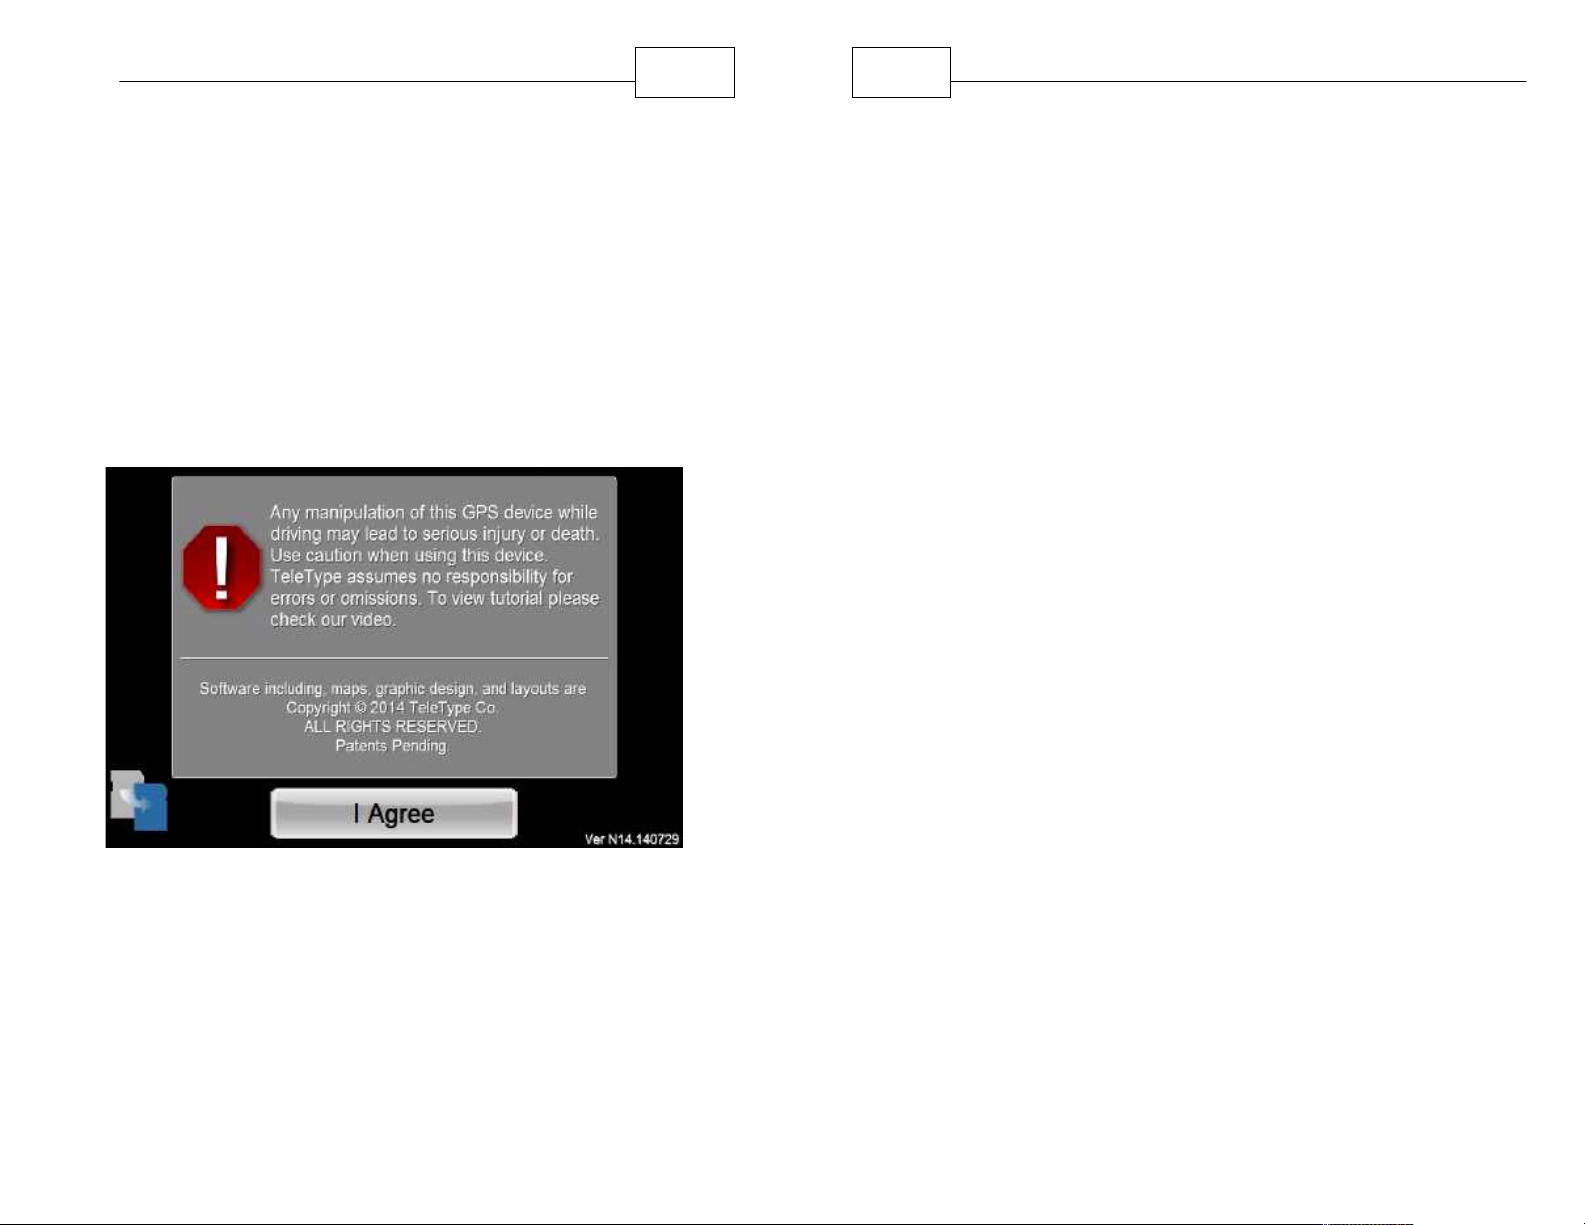
Vehicle Dimensions
22
23
WorldNav Navigation Software
arrows to make the adjustment. If the change is
major, you can save time by tapping inside the box
such as "Height", and you will then be able to enter
the new height by typing in the number directly.
Repeat this process for any of the specifications you
wish to change such as Weight, Axles, and HazMat
class.
Changing Values by Typing can be faster rather than
using arrows. This example shows changing the height
from 13'6" to 12'6".
If the change is minor, you can use the left and right
Page 13
Getting Started
24
25
WorldNav Navigation Software
2.3 Launching Navigation
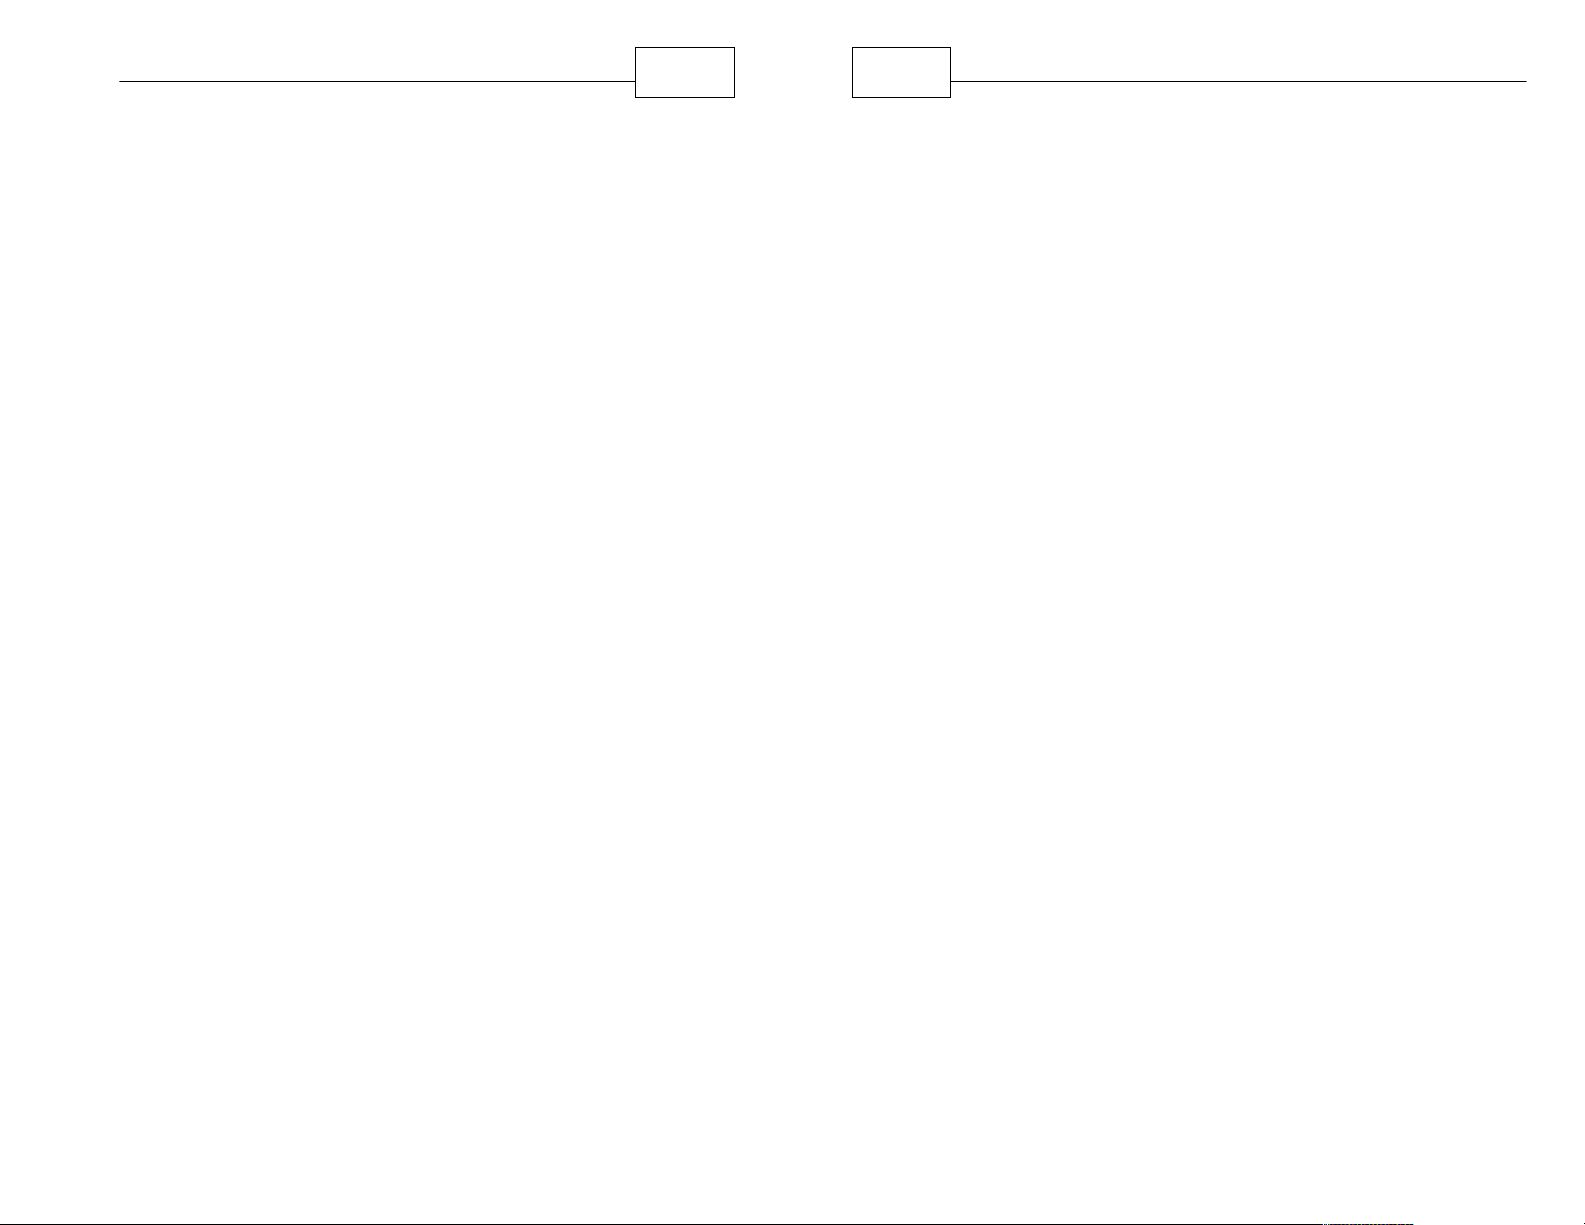
Depending upon how your GPS is configured you
may need to press the Navigation icon to launch the
program. Once the program is launched you will see
the following screen which we call the "I Agree"
screen. You will need to press "I Agree" each time
you use the GPS. Notice on the bottom right of the
screen you will see the version number of the
software you are using. This may be helpful to you
when contacting TeleType customer service.
I Agree Screen
2.4 Navigation Overview
Now that you are familiar with WorldNav set up you
are ready to begin navigating. When you turn on
your device, the GPS will search to acquire satellite
signals. Once you have picked up sufficient signal
strength and position accuracy we call this "Locked
In" or "Locked into Position", at which time you can
simply press <Where To> and enter a destination to
navigate from your current location. If you are
indoors or unable to pick up satellite signals, you
may want to set your home address manually. You
can also create routes by entering start and end
addresses for later use.
When you are driving, the screen will display your
location en route and you will be given voice
instructions for when and where to turn. State
borderlines are displayed on the screen which allow
you to more easily document crossing state lines.
The Odometer function keeps track of the miles
driven in each state. Your destination will be
indicated on the map with a checkered flag. You can
configure the screen to display information of
importance to you such as Distance to Go, Current
Speed, and more. Once you have reached your
destination, the route will be cleared and will be
ready to navigate to your next destination. Notice
that the roads shown in pink indicate that they are
restricted against truck travel. The software
automatically routes you around these areas. If you
care to know the reason for the restriction you can
tap on the road and the information screen will
Page 14
Getting Started
26
27
WorldNav Navigation Software
display the reason for the restriction such as a height
restriction (low bridge), weight restriction, or
Commercial Restriction (No Trucks Allowed). More
detail about this function is found in the section called
Special Features under "Truck Restrictions."
2.5 Map Mode
The WorldNav software allows you to switch between
Navigation and Map mode. You will automatically be
in Navigation mode when you travel with the GPS
locked into position. If you care to browse the map,
simply touch the screen anywhere on the map area,
you will then see a plus and minus symbol which will
allow you to zoom in and out. You can use your
finger to drag the map in any direction as desired.
Road colors will vary based on the type of road.
For example, in Day Mode, the colors of the roads
are as follows:
Gray - Residential
Yellow - County or State
Orange - Highway
Green - State Preferred Truck Route
Pink - Truck Restricted Road
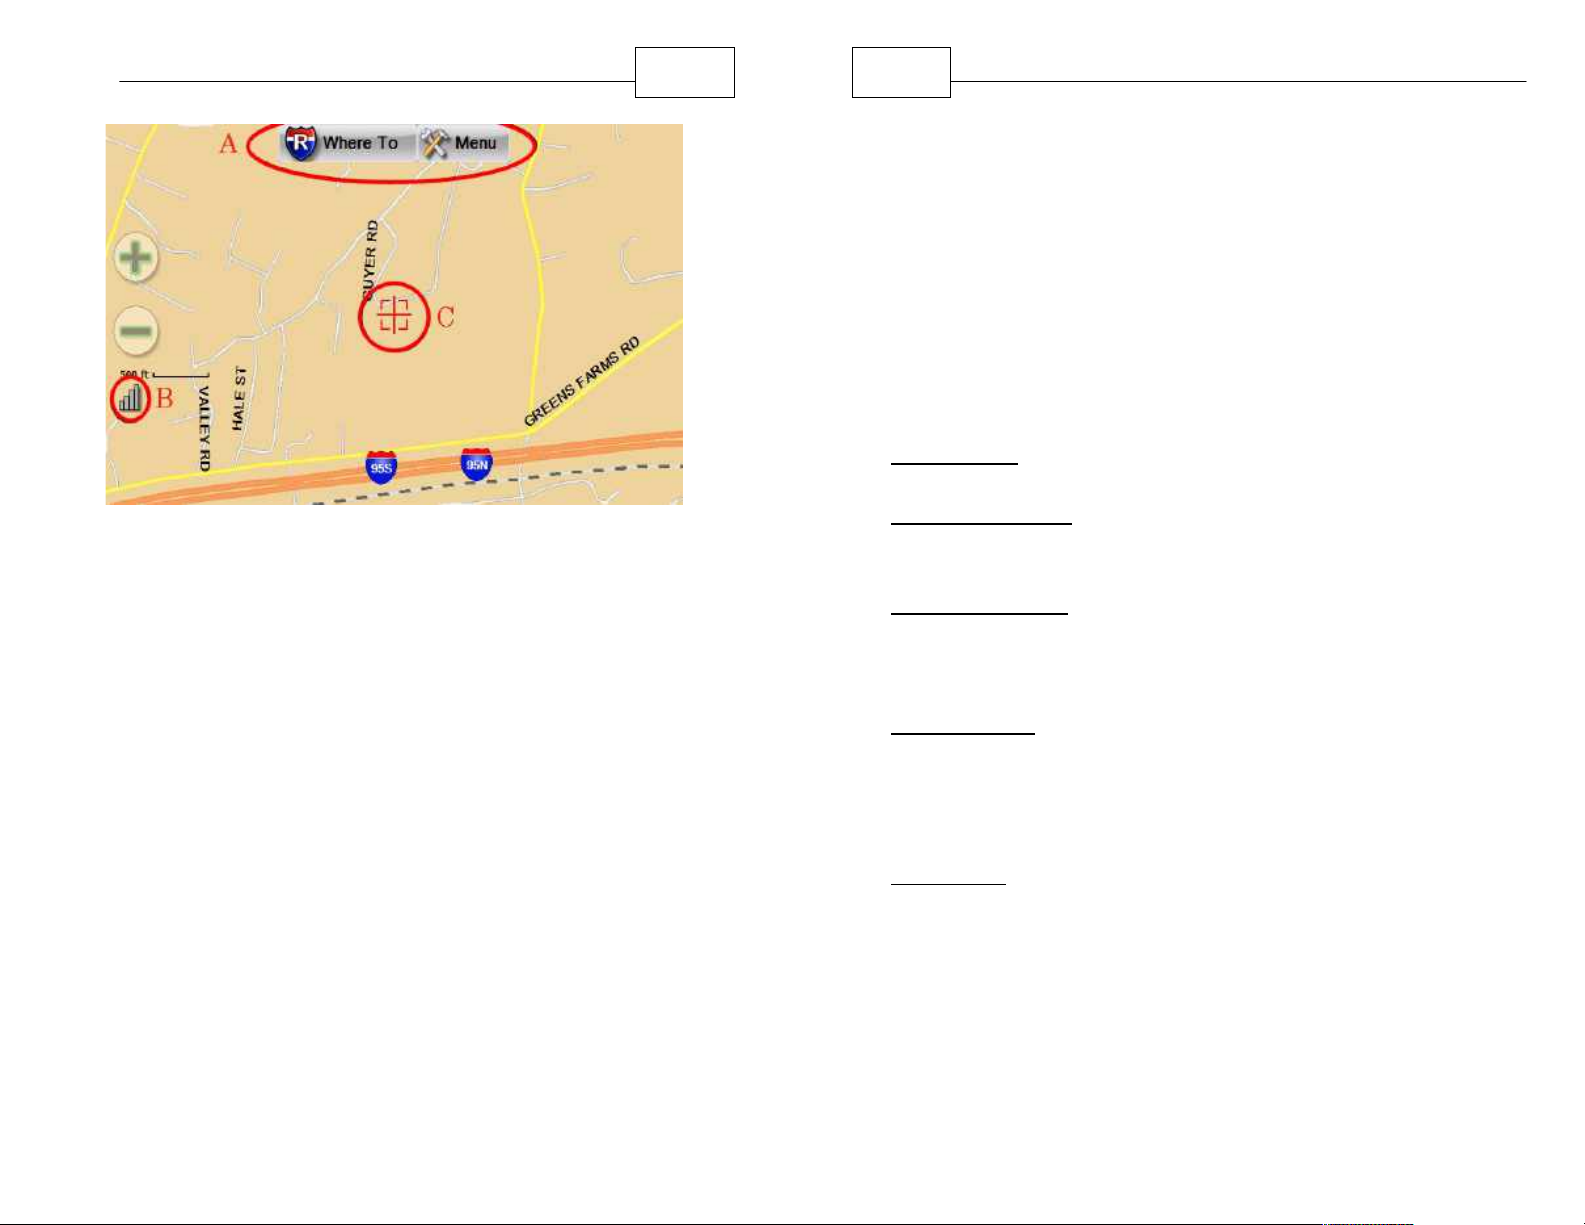
When you see "Where To" and "Menu" on the screen
that means you are in Map mode. If your GPS is
locked into position you can touch the red arrow on
the bottom left of the screen to return to navigation
mode.
Page 15
Getting Started
Not Locked In - Map Mode
A. Where To / Menu - these buttons appear in
Map Mode
B. GPS Signal strength - tap to access the GPS
Status Menu
C. Target - indicates not not locked into position,
this square changes to a red arrow when the
GPS is locked into position
When the "Where to" and "Menu" buttons disappear
it means you are in Navigation mode rather than Map
mode, the map will automatically orient in the
direction of travel.
28
29
WorldNav Navigation Software
2.6 Set Home Address
When you travel away from home it is convenient to
be able to route "Home" easily. Some drivers prefer
to set the "Home" address as their Yard or Terminal
where trips start and end. Set your home (or yard)
address by pressing <Menu>, <My Points>, <Set
Home>, choose from the various options for
recording the location.
Options for setting home address:
By Address - will prompt you to search for your
address then select the address when done.
By GPS position - assuming your GPS is locked into
position, it will set your address to the current
position.
By Map position - position the square target at the
location you wish to call Home, then select this
option, an approximation of the address will appear
on the screen
By My Points - select a previously entered point (you
will not have any points when you use the GPS for
the first time, however this feature can be helpful if
later you wish to change the home address using a
previously stored point).
By Recent - select an address you may have visited
in the past (once again, this will not be likely when
you first use the GPS, you may want to use this
feature a later time).
Press <OK> when done.
Page 16
Getting Started
30
31
WorldNav Navigation Software
2.7 Finding an Address
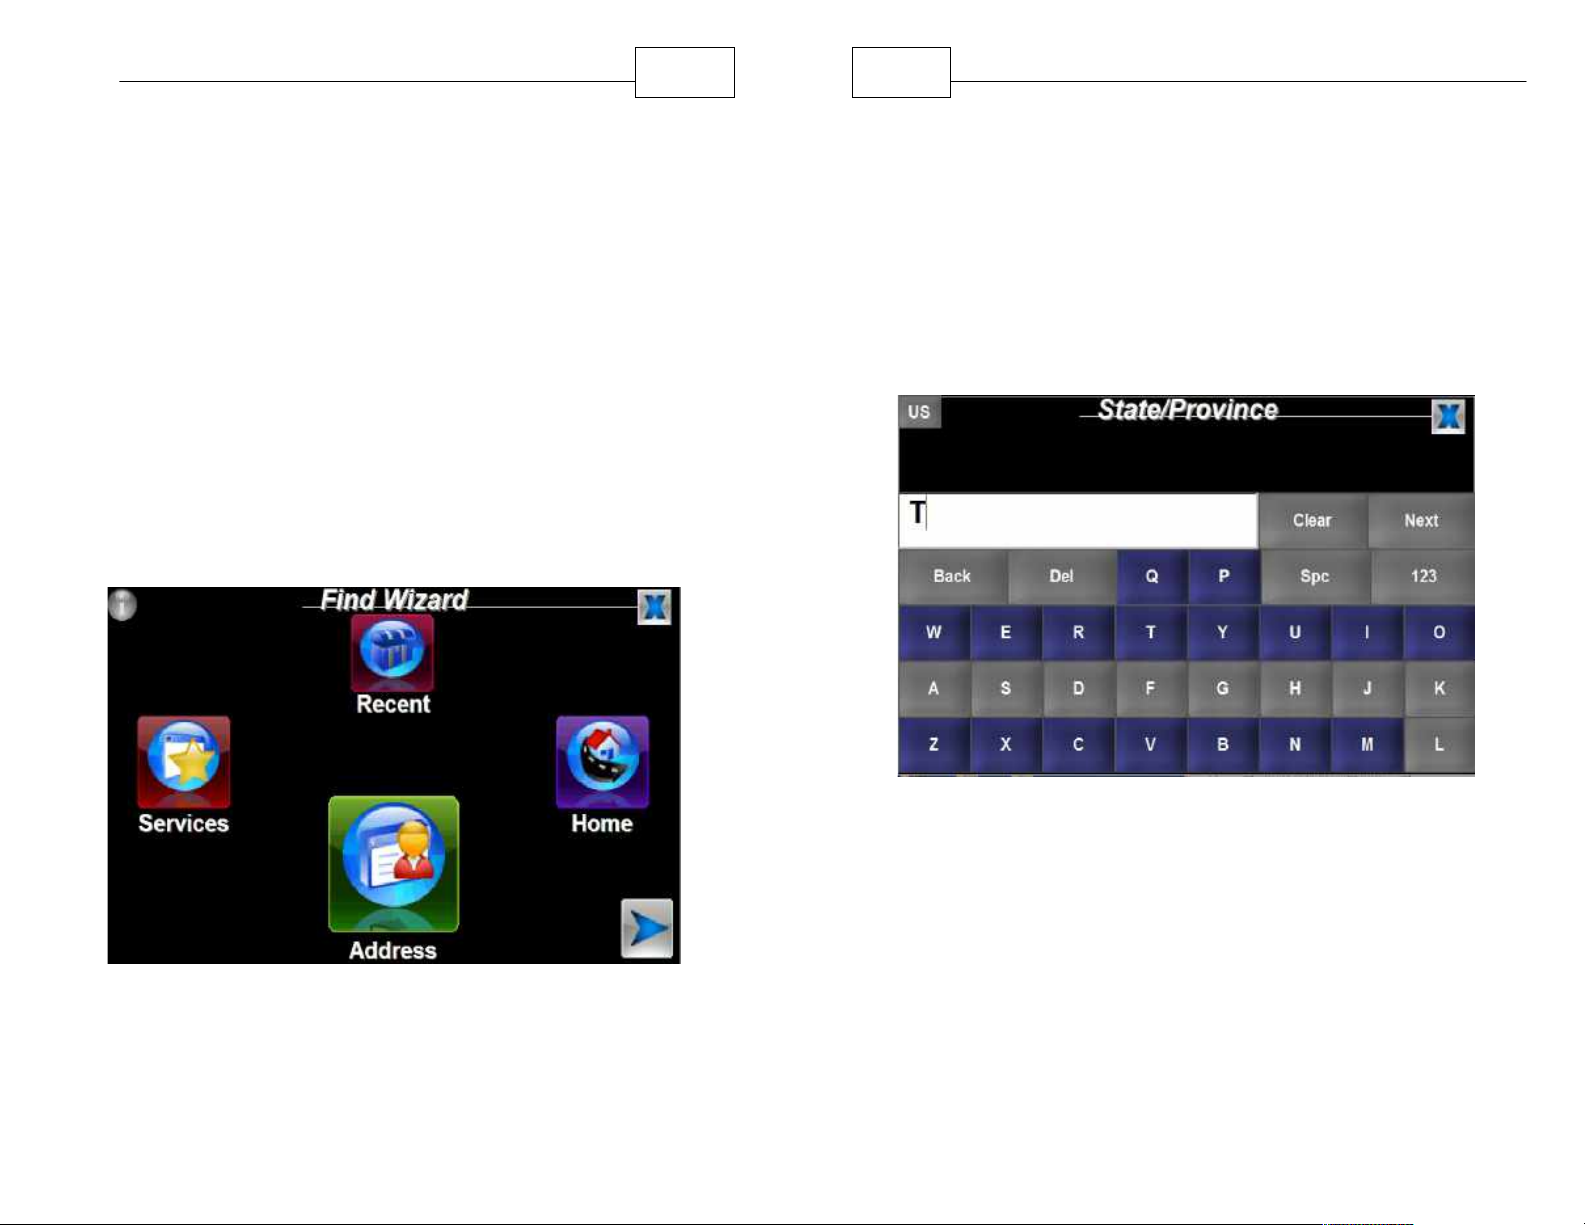
Use the Find Wizard to search for an address that
you may want to use as a destination for a route. You
can either find the address ahead of time and it will
be in the <Recent> history section, for use at a later
time, or you can use the <Where To> button or
<Menu> ,<Route Menu>, <New Route> to create a
new route at which time you will be prompted to enter
the destination address. Either way, you will use the
Find Wizard to help you enter the destination.
Press <Menu>, then <Find> to get to the Find Wizard
Menu.
Smart Search feature will generate results for each
component of your address entry based on the first
few letters you type.
2. Most addresses will follow this pattern (when using
the device in English language, for Spanish, the
system will prompt for street name before the
house number):
Find Wizard Menu
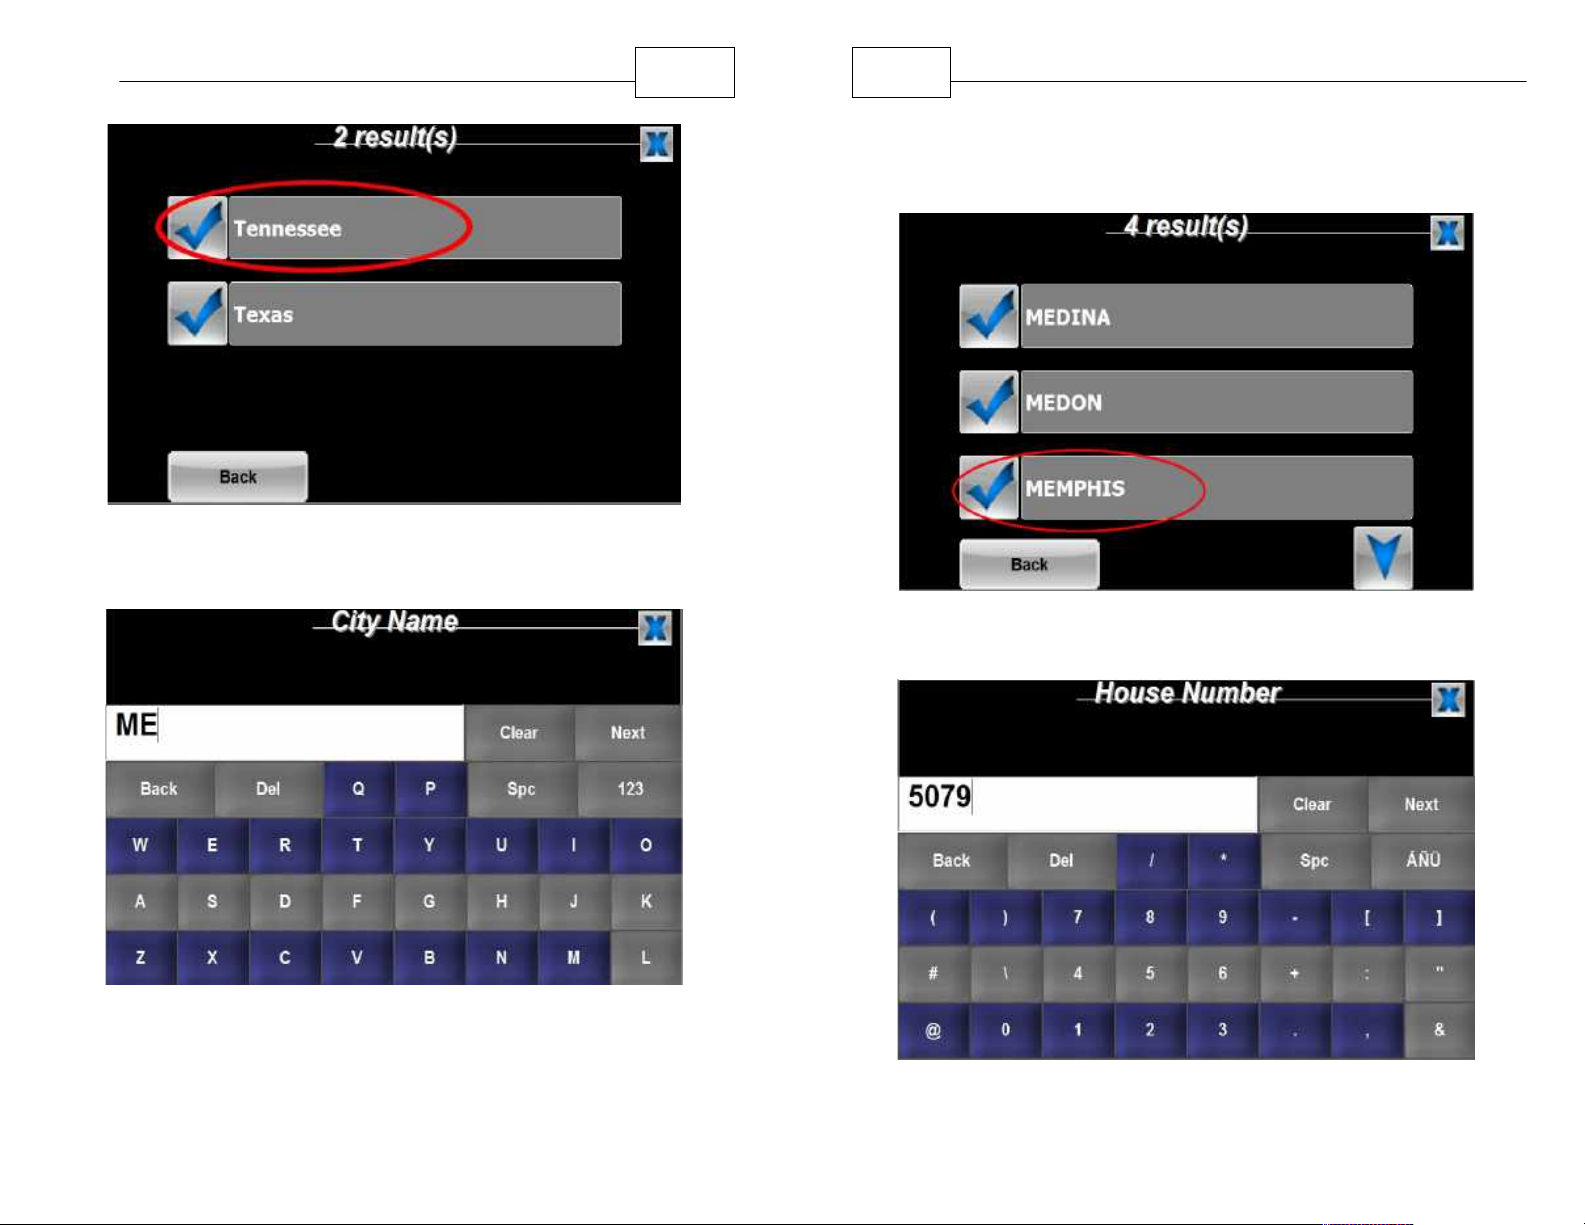
1. Press the <Address> button. You will be prompted
to enter an address beginning with the State. The
Enter First Letter or Two of the State
Page 17
Getting Started
Tap the check mark or inside the box that
shows the desired State
32
33
WorldNav Navigation Software
Select the desired City (in this case "Memphis")
Enter the first few letters of the City
(in this case "Memphis")
Enter the "house" number
Page 18

Getting Started
TIP - If there are multiple results that seem to
match, choose the address that matches the zip
code your dispatcher provided you with the
address destination.
34
35
WorldNav Navigation Software
Enter the first few letters of the Street name
Select the desired Street name
Select the desired destination from the list of results
Page 19
Getting Started
36
37
WorldNav Navigation Software
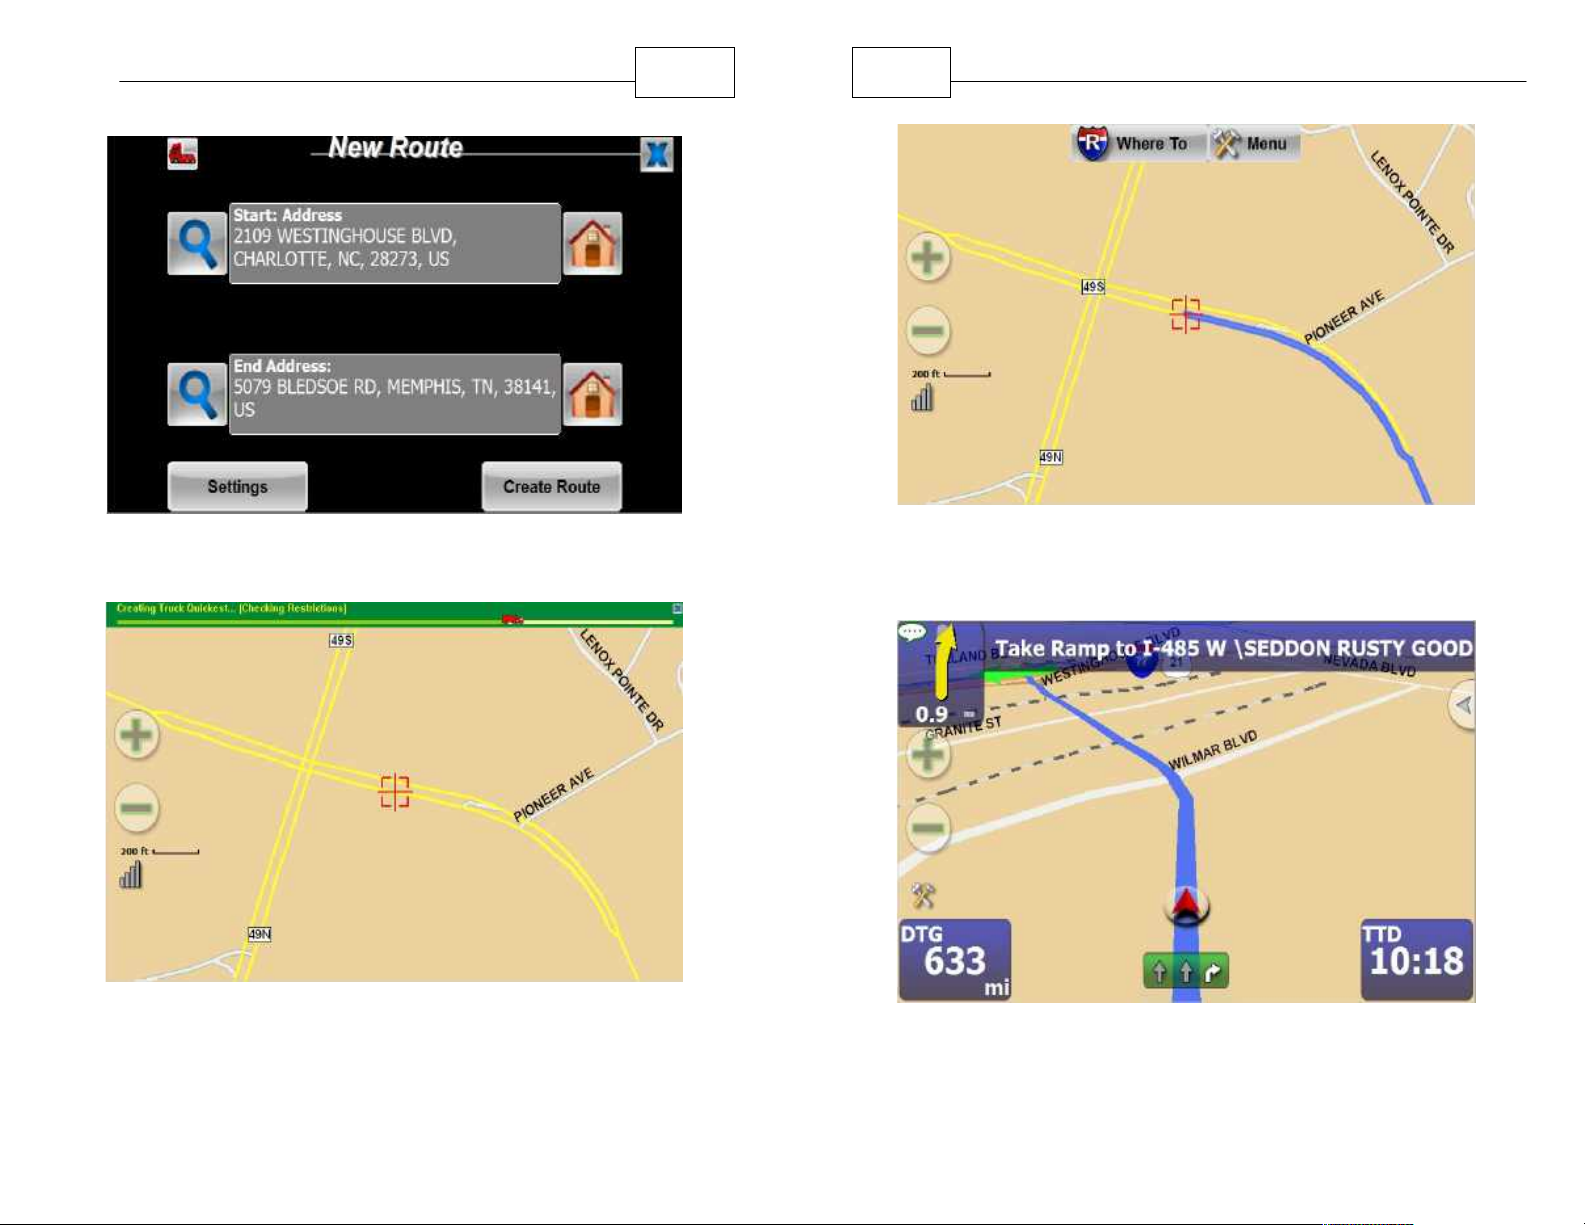
Press Create Route
Route is being created to your destination.
Route will display in "Map Mode" if the GPS
is not locked into position
Route will display in "Navigation Mode" if the GPS
is locked into position
Page 20
Getting Started
TIP - If your destination address is complicated,
such as SW 49th Ave, and you are not sure how
to enter just enter the numerical portion such as
"49" as the street name and then WorldNav will
produce a list of results from which to make your
selection.
3.For street names that include direction (N, S, SE,
NW, etc...) and/or numbers, (5th Ave, 32nd St,
etc...), you will need to switch between the alpha
and numerical keyboard displays. This can be
done by pressing the <123> and respective <abc>
key once. To access special characters press
<123>. <ÁÑÜ>, then <ABC> to return back to the
regular keyboard.
38
39
WorldNav Navigation Software
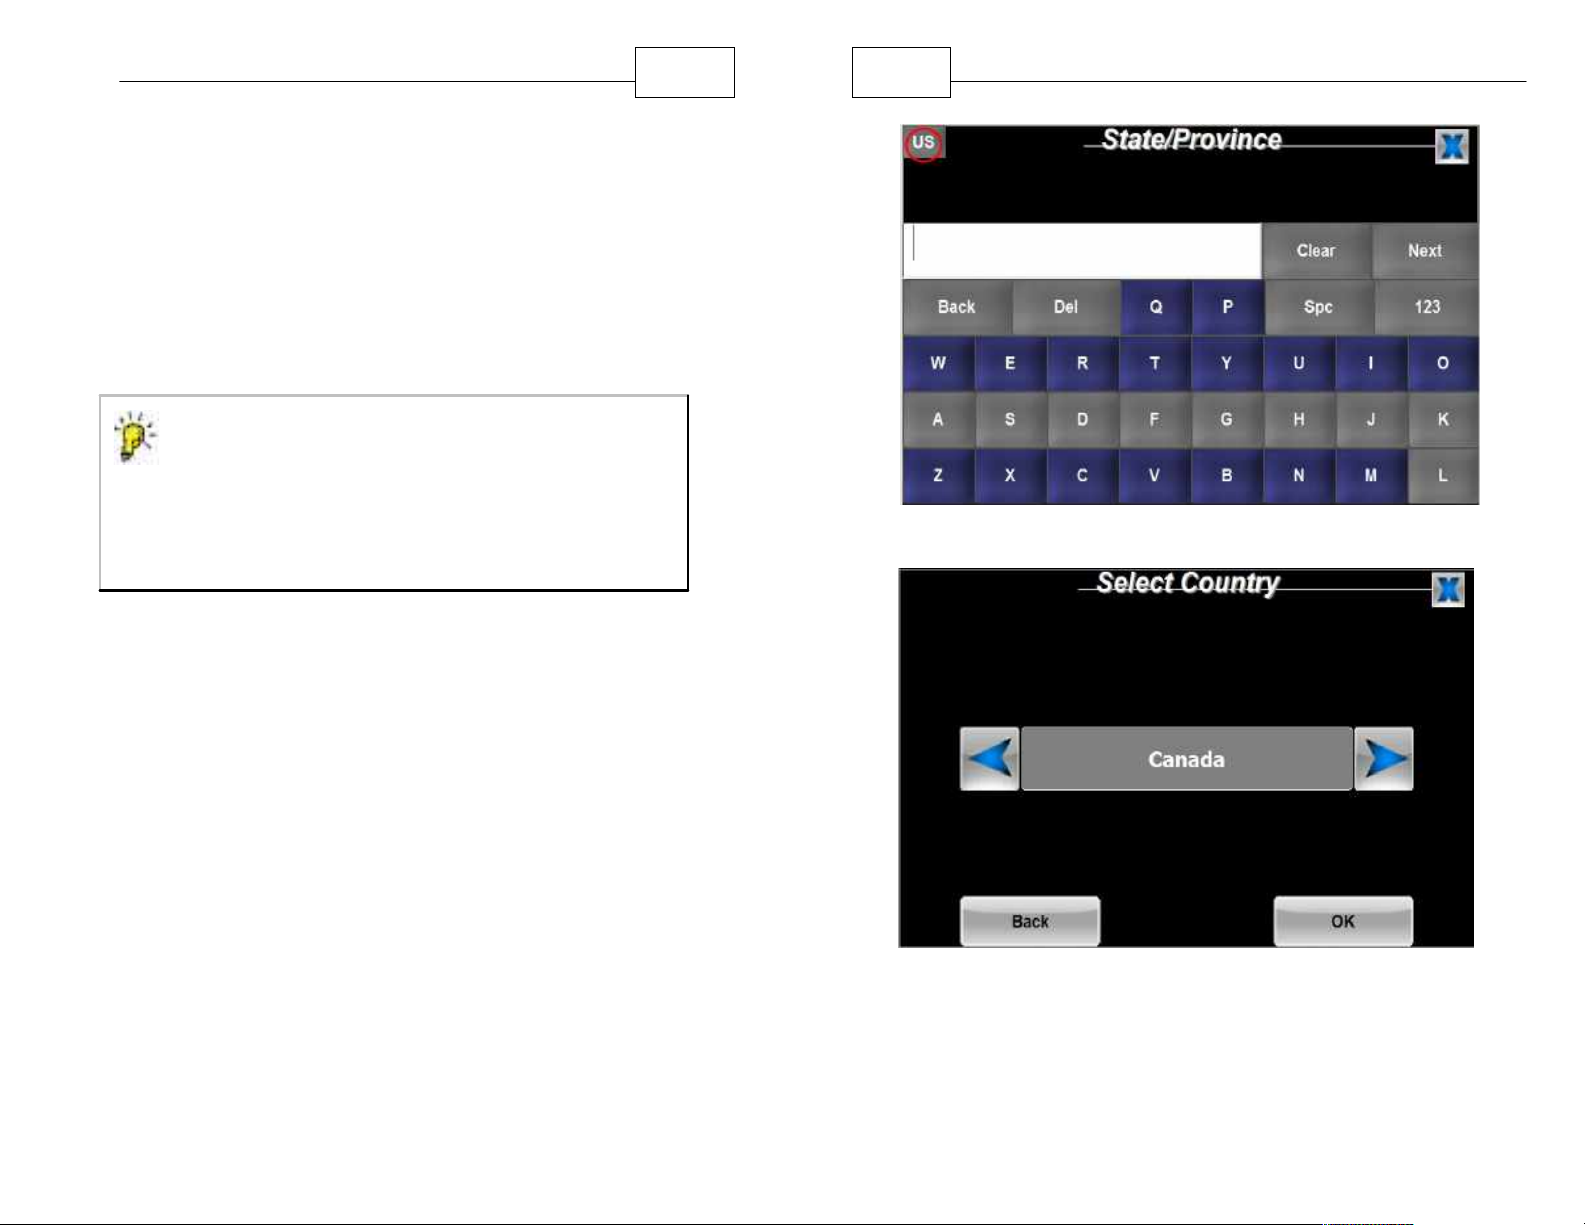
Use the "State/Province" Screen to Change Country
4. The GPS defaults to searching for U.S. addresses,
however, if you have purchased a TeleType
product which offers multiple countries, you can
select the country by following the instructions
below. For example, assuming Canadian maps are
provided and you wish to locate a Canadian
address, press <Where To> then press <Address>
on the next screen.
5. Click the <US> in the top left corner.
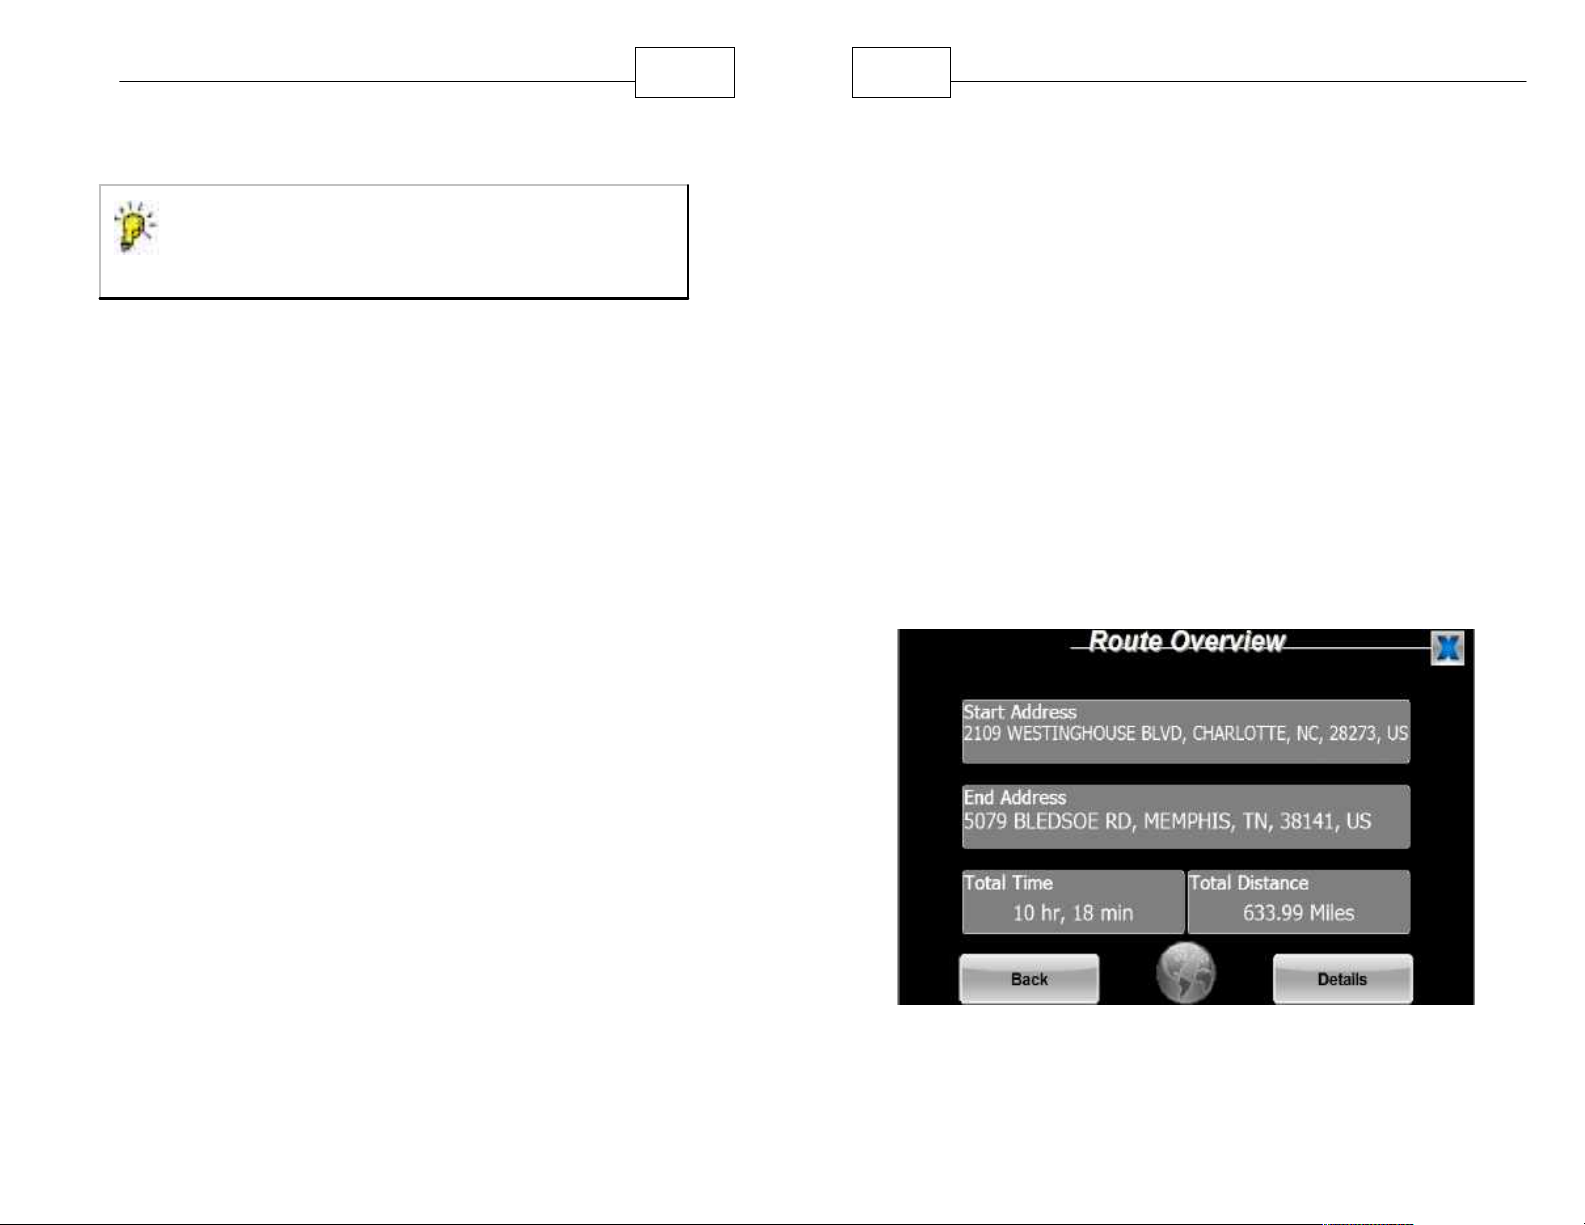
Switch from USA to Canada
6. Use the blue selection arrow (left or right will work),
to rotate from <USA> to <Canada>, then press
<OK> in the bottom right corner. Continue
Page 21
Getting Started
TIP - To access special characters Press <123>.
<ÁÑÜ>, then <ABC> to return back to the regular
keyboard.
40
41
WorldNav Navigation Software
entering information as prompted.
2.8 Routing to an Address
To route to a specific address, follow the instructions
in the section above called "Finding an Address".
1.
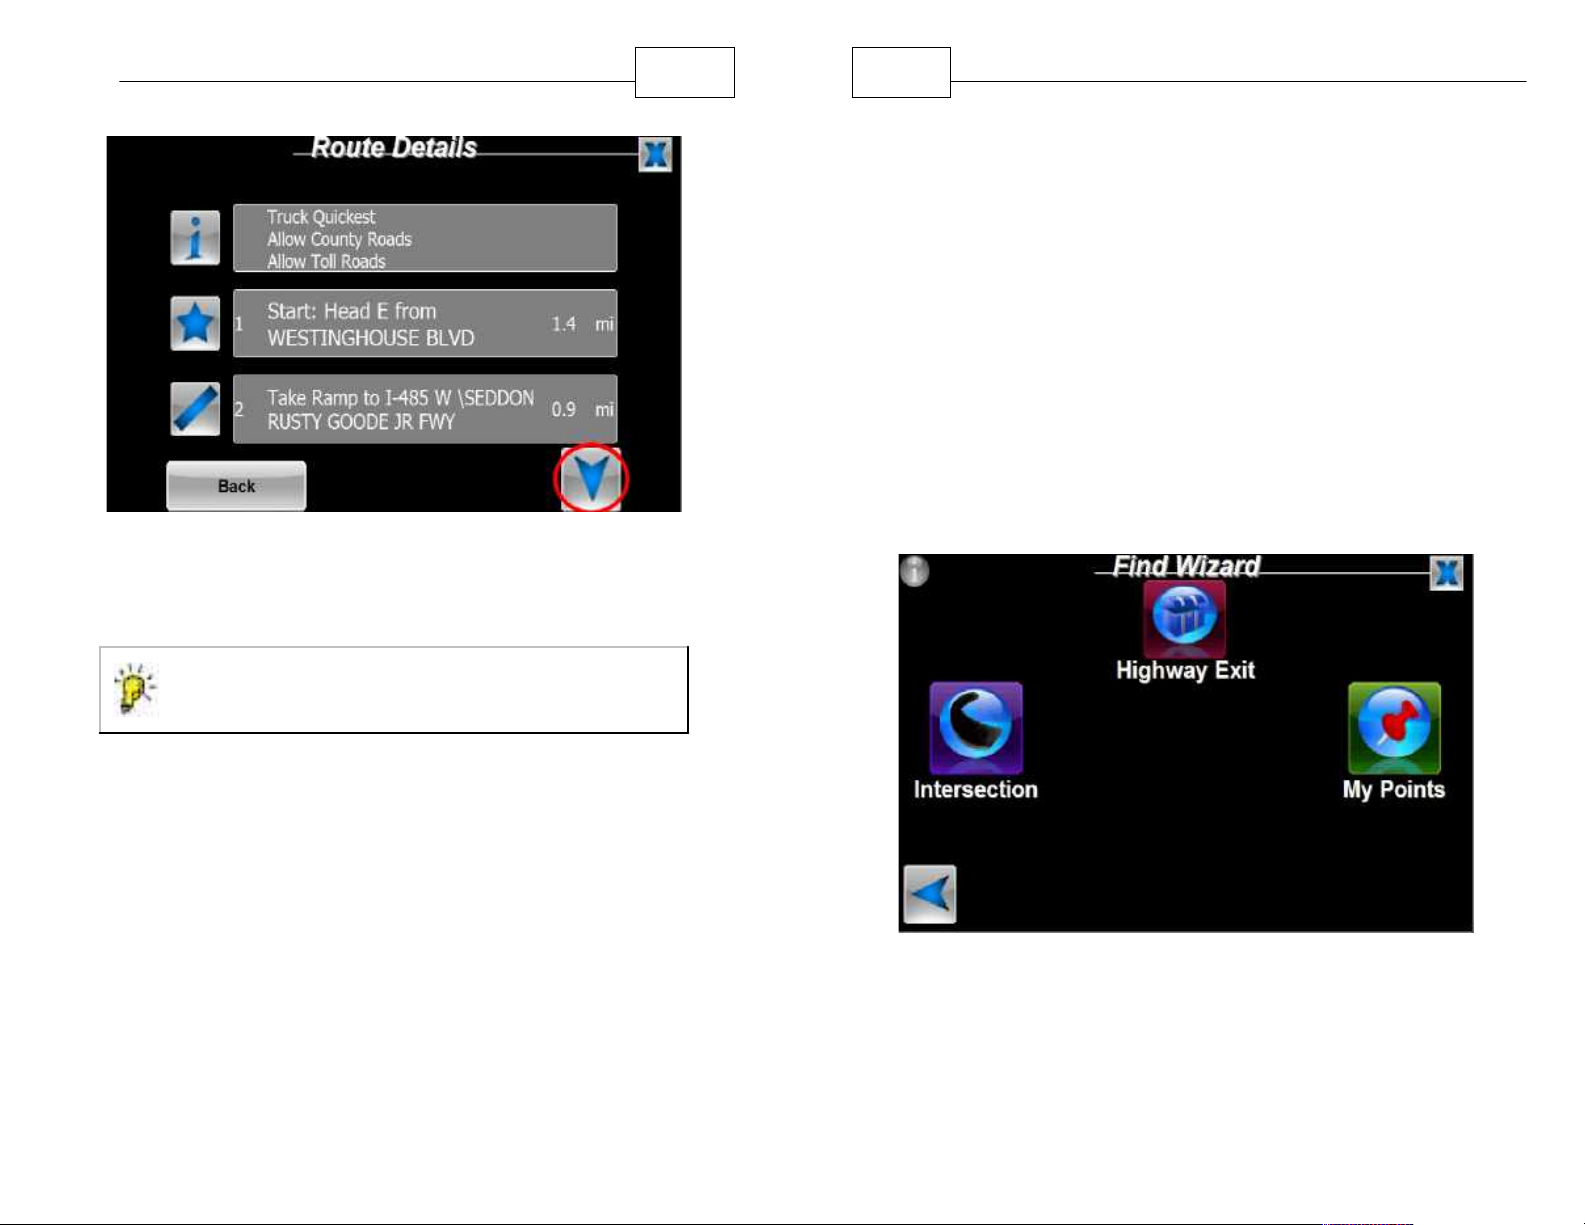
Press <Details> to reveal step by step
instructions.
2.
Once you are in Navigation mode, you are ready to
drive. The GPS will prompt you at turns and you
can choose which parameters you would like
displayed on the Navigation Panels. You can also
see the turn by turn maneuver list from the Map
Mode, Press <Menu> , <Route>, <View Route>,
<Details>.
3.
Press the globe icon found at the bottom center of
the screen to display the entire route on the map.
View Route Results
Page 22
Getting Started
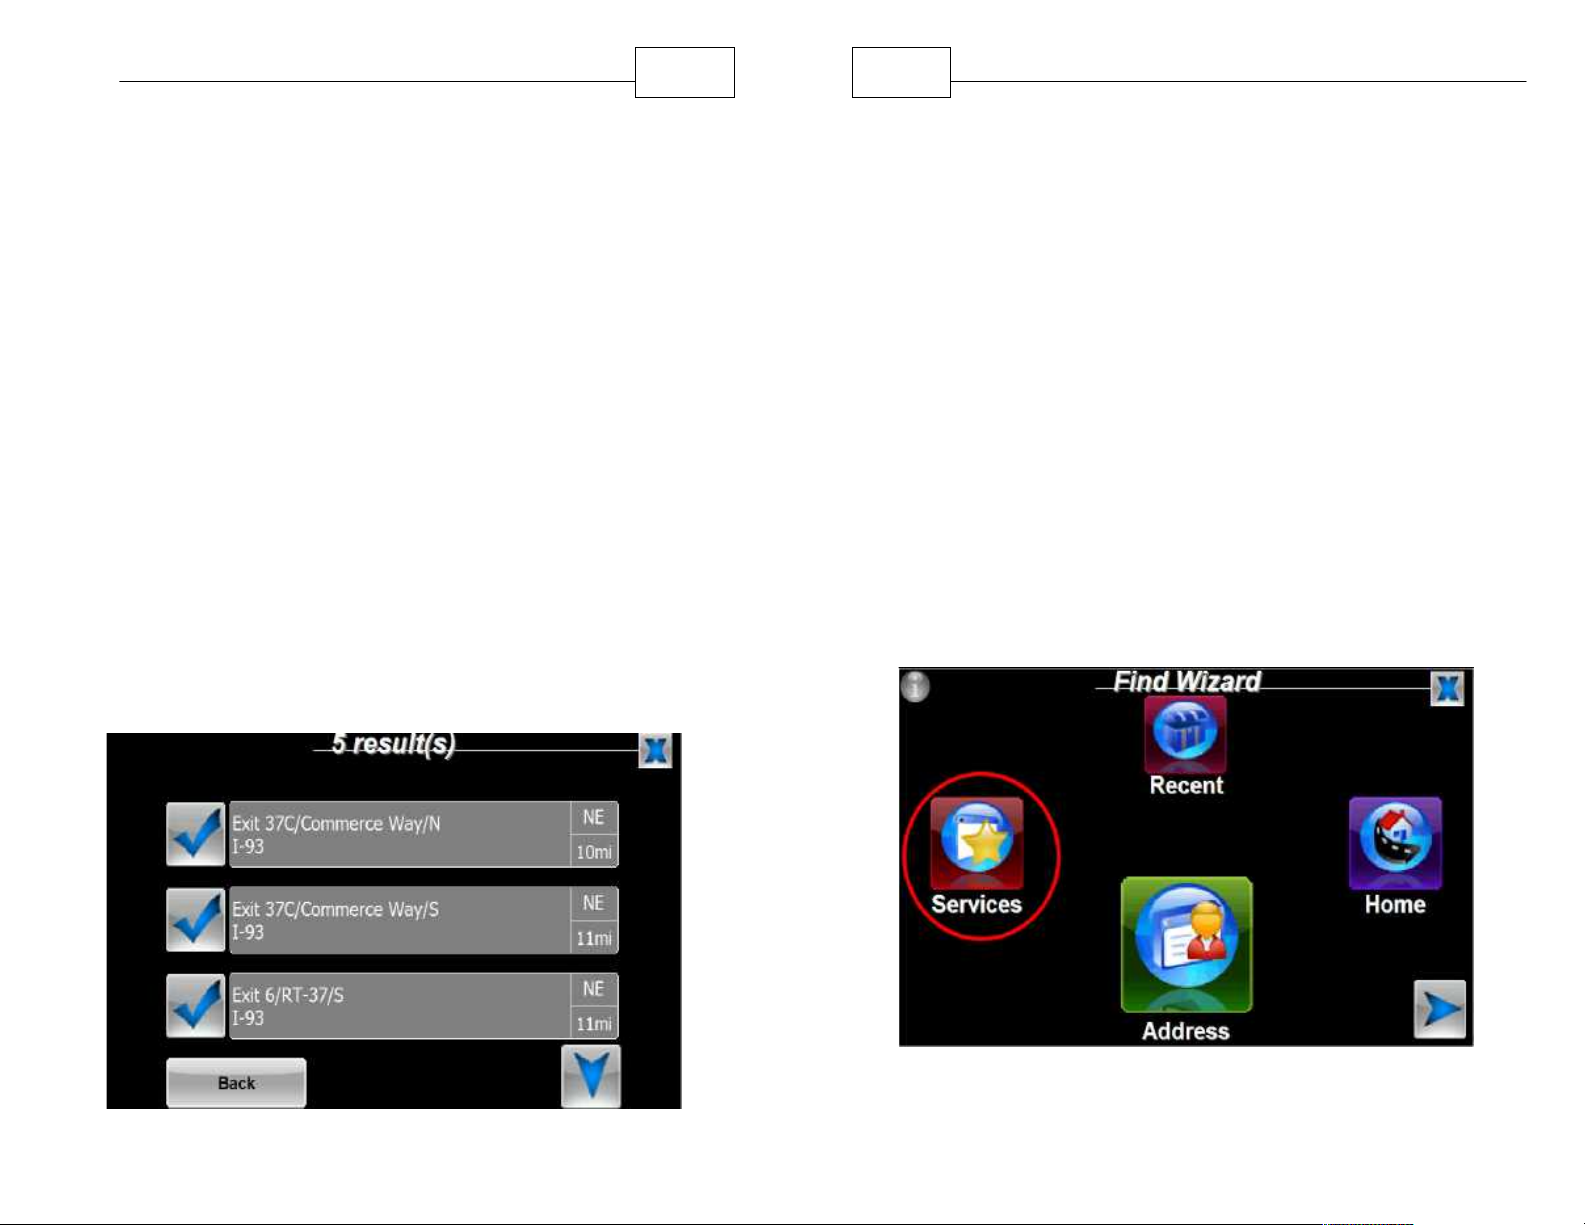
TIP - Tap any instruction to display that specific
turn on the map.
Route Details - Press the Blue down arrow to advance
to the next screen to see more instructions.
42
43
WorldNav Navigation Software
2.9 Routing to an Intersection or Exit
WorldNav allows you to route to a street intersection
or highway exit if you do not know the exact address
of where you are going. Note: Intersections are for
streets only. Use the "Highway Intersection" feature
to route to a freeway or highway Exit.
1. Press the <Menu> button and then the <Find>
button, press the right blue arrow to advance to the
second page of options which will display
<Intersection>, <Highway Exit>, and <My Points>.
2.Press the button labeled <Intersection>.
Find Wizard Menu Second Page
3. You will be prompted to enter the first street name.
Make your selection by touching the check mark
next to the street name in the list of possible
Page 23
Getting Started
44
45
WorldNav Navigation Software
streets. Enter second Street name.
4.Select the correct intersection.
5. You can now display the route to this intersection
from your current location simply by pressing
<Create Route>. You will automatically be taken
into driving mode and guided to your destination.
If you would like to view the route you can select
<View Route> from the Route Menu at any time.
To route to a specific Exit number use the "Highway
Exit" feature to Use the same process to enter a
Highway Exit as your destination. In this example the
search was for exit number 37 on I-93 in the state of
Massachusetts. You will be prompted to enter state
name, highway (or freeway) number, and finally the
exit number. A list of results will be displayed.
Select the desired Exit number from the search results.
The My Points routing feature is described in the
section called "Working with My Points".
2.10 Routing by Business or Service (POI)
There are a variety of names used to refer to Points
of Interest (POI), sometimes they are called
"Businesses" and sometimes they can be called
"Services". The WorldNav software refers to these
types of points as "Services" such as a restaurant,
gas station, truck stop, rest area, or CAT scale
location. Truck Stops are searchable by brand name,
resulting in faster and easier access to desired
location.
1. Select <Menu> and then <Find>.
Find Truck Stops, Restaurants, and more
Page 24
Getting Started
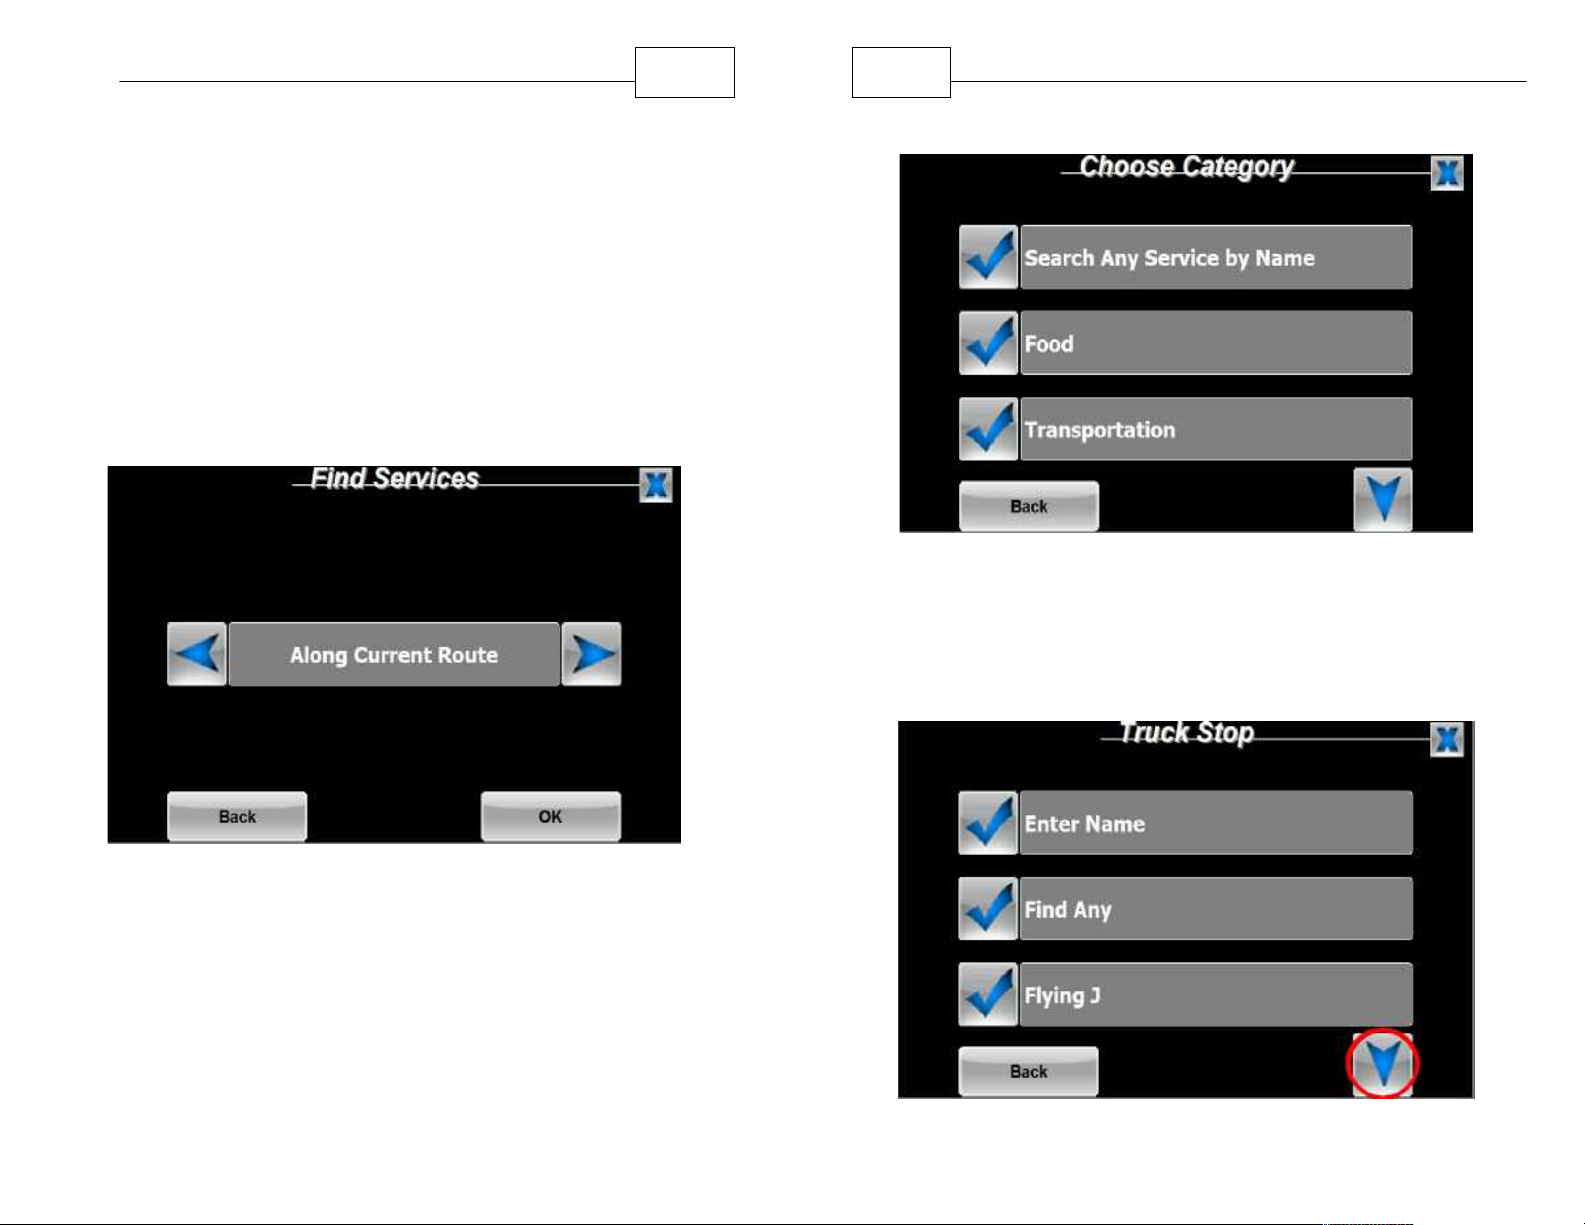
2. In the Find Wizard, select <Services>.
3. Use the right and left arrow icons in order to select
your service search option. You may choose from
<By Phone Number>, <By Nearest>, <By
City/Town> or <Along Current Route>. <Along
Current Route> works only when there is a route
entered. When your preferred Route option is
displaying in the text field, press <OK>.
46
47
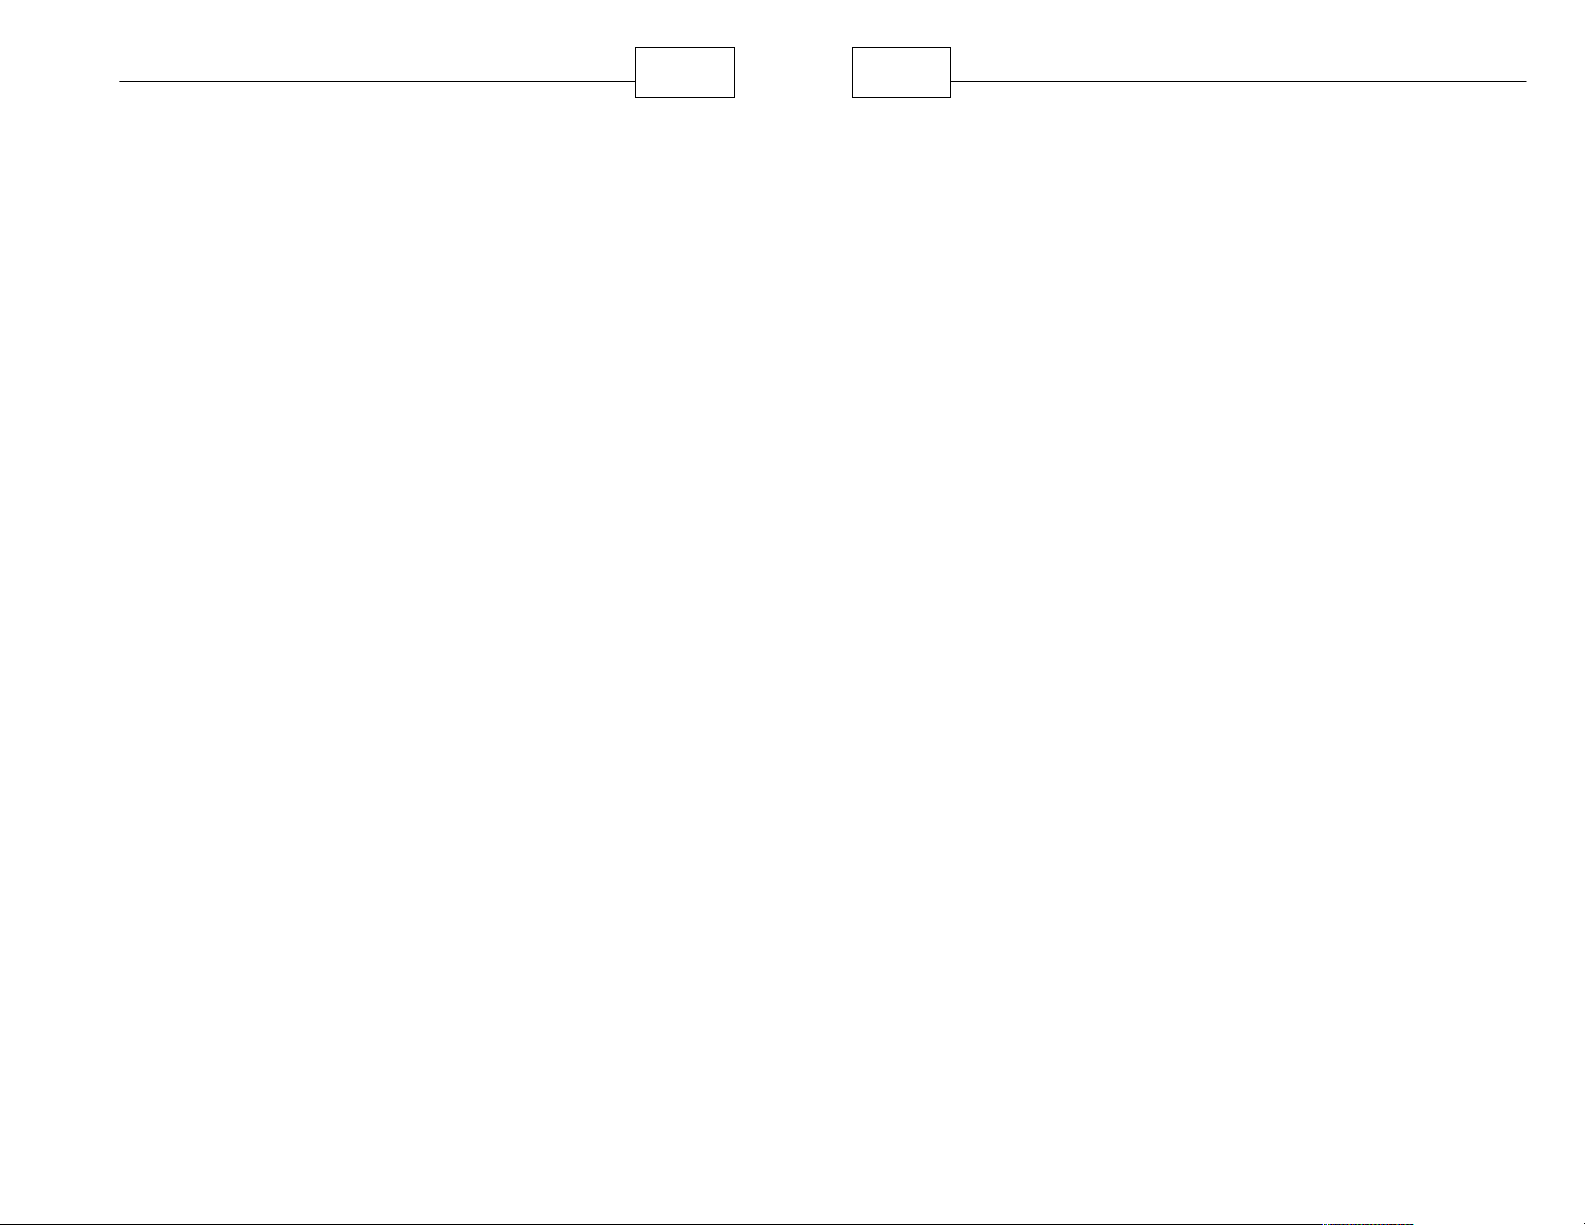
6. To find Truck Stops press "Transportation", then
WorldNav Navigation Software
Select Service Category
choose the desired brand or type in the name.
Services Search Option Screen
4. Select <By Nearest> when you do not know the
address or need to find something close by.
5. Select a category such as Food, Transportation,
or Other. If you are unsure, select the category
"Other", (found on the second page of the menu).
Page 25
Getting Started
48
49
WorldNav Navigation Software
Search for Truck Stops by name or brand
7.Select the desired brand, use the down arrow to
access additional pages of options, in this case the
second page shows Loves, Petro, Pilot. Choose
the desired truck stop. This location will now be
clearly visible along your current route and you will
now be able to route via this location.
2.11 Search Along Current Route
Searching <Along Current Route> allows you to
search for Services such as truck stops or gas
stations from your current position forward along the
route. The corridor along the route is approximately
2-3 miles from the road and works only when there is
a route entered. Your position does not need to be
fixed. Refer to the section above called "Routing by
Business or Service" to learn how to find points of
interest (which we call "Services") along your desired
route.
Page 26
Getting Started
NOTE - You are only able to manage your Find
History by accessing it through the Main Menu.
When accessed through the Where To menu, the
GPS will assume that the location you have
chosen location is your desired End Address.
50
51
WorldNav Navigation Software
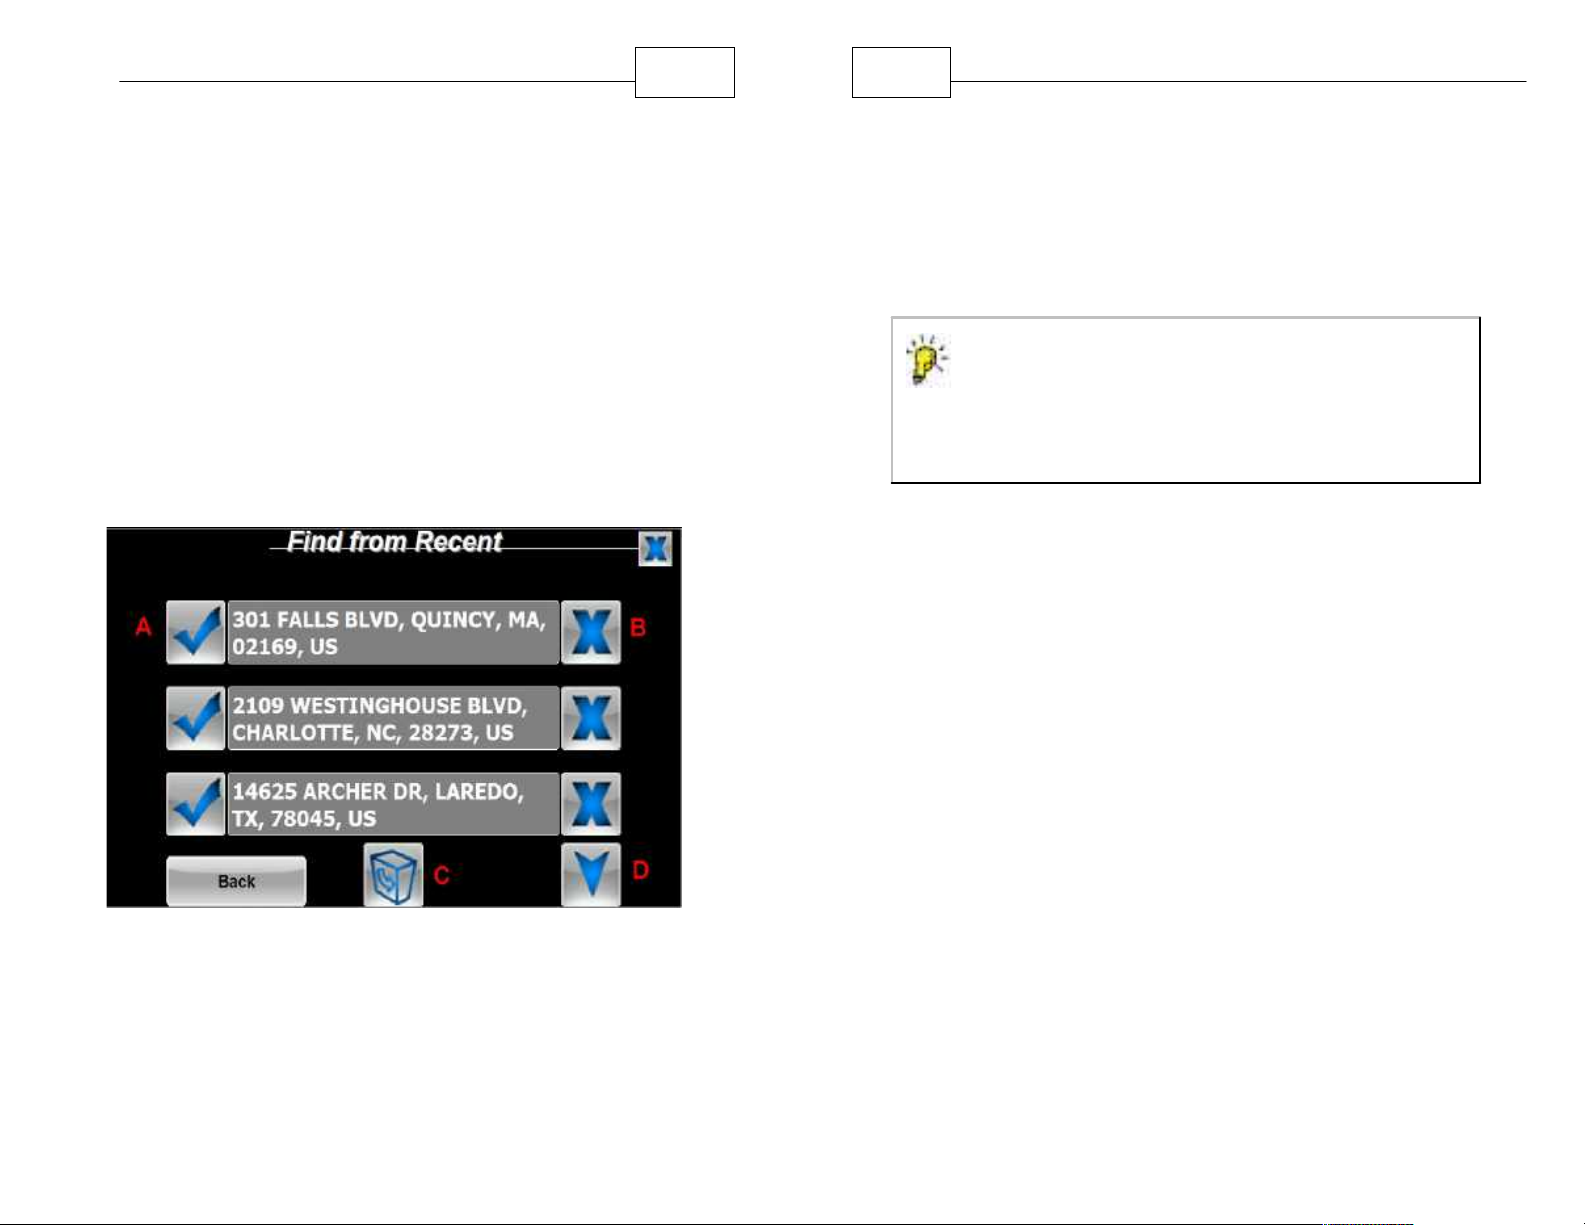
2.12 Recent Location History
WorldNav retains approximately the last 20
addresses you have visited, this is called "Recent" in
the Find Menu area. If you need to keep more
locations, use the My Points feature. There are two
ways of accessing your Recent History. First, by
selecting <Where To> then <Find>, right arrow, and
then <Recent>. From here you may press a
corresponding check mark to show the address,
delete a listing, route to the point, or view more
listings within the history. Press the trash icon to
delete the entire history.
C.Press the Trash Can icon to delete all points
including those found on another page within the
recent history.
D.Press the blue down arrow to advance to the next
page of points in the listing.
History of Previous Search Results
A.Press the Check Mark to reveal choices such as
route to the point.
B.Press the big blue X next to the listing to delete
that point.
Page 27
Getting Started
52
53
WorldNav Navigation Software
2.13 Avoid Road Ahead and Clear Route
If you would like to avoid an upcoming stretch of your
route due to an accident, delay or detour and return
back to your desired route, you can check the map
for any pink areas before starting your detour. You
can also use the Detour function which allows you to
avoid a portion of the route by distance such as 1, 3,
or 5 miles. If you need to avoid further than 5 miles it
is best to detour manually. Change the Route Setting
to another option such as Truck Shortest, and
generate a new route. The GPS will automatically
re-route you if you decide to veer from your original
route.
If for some reason you do not wish to follow a route,
you can clear the existing route from the screen by
pressing <Clear Route>.
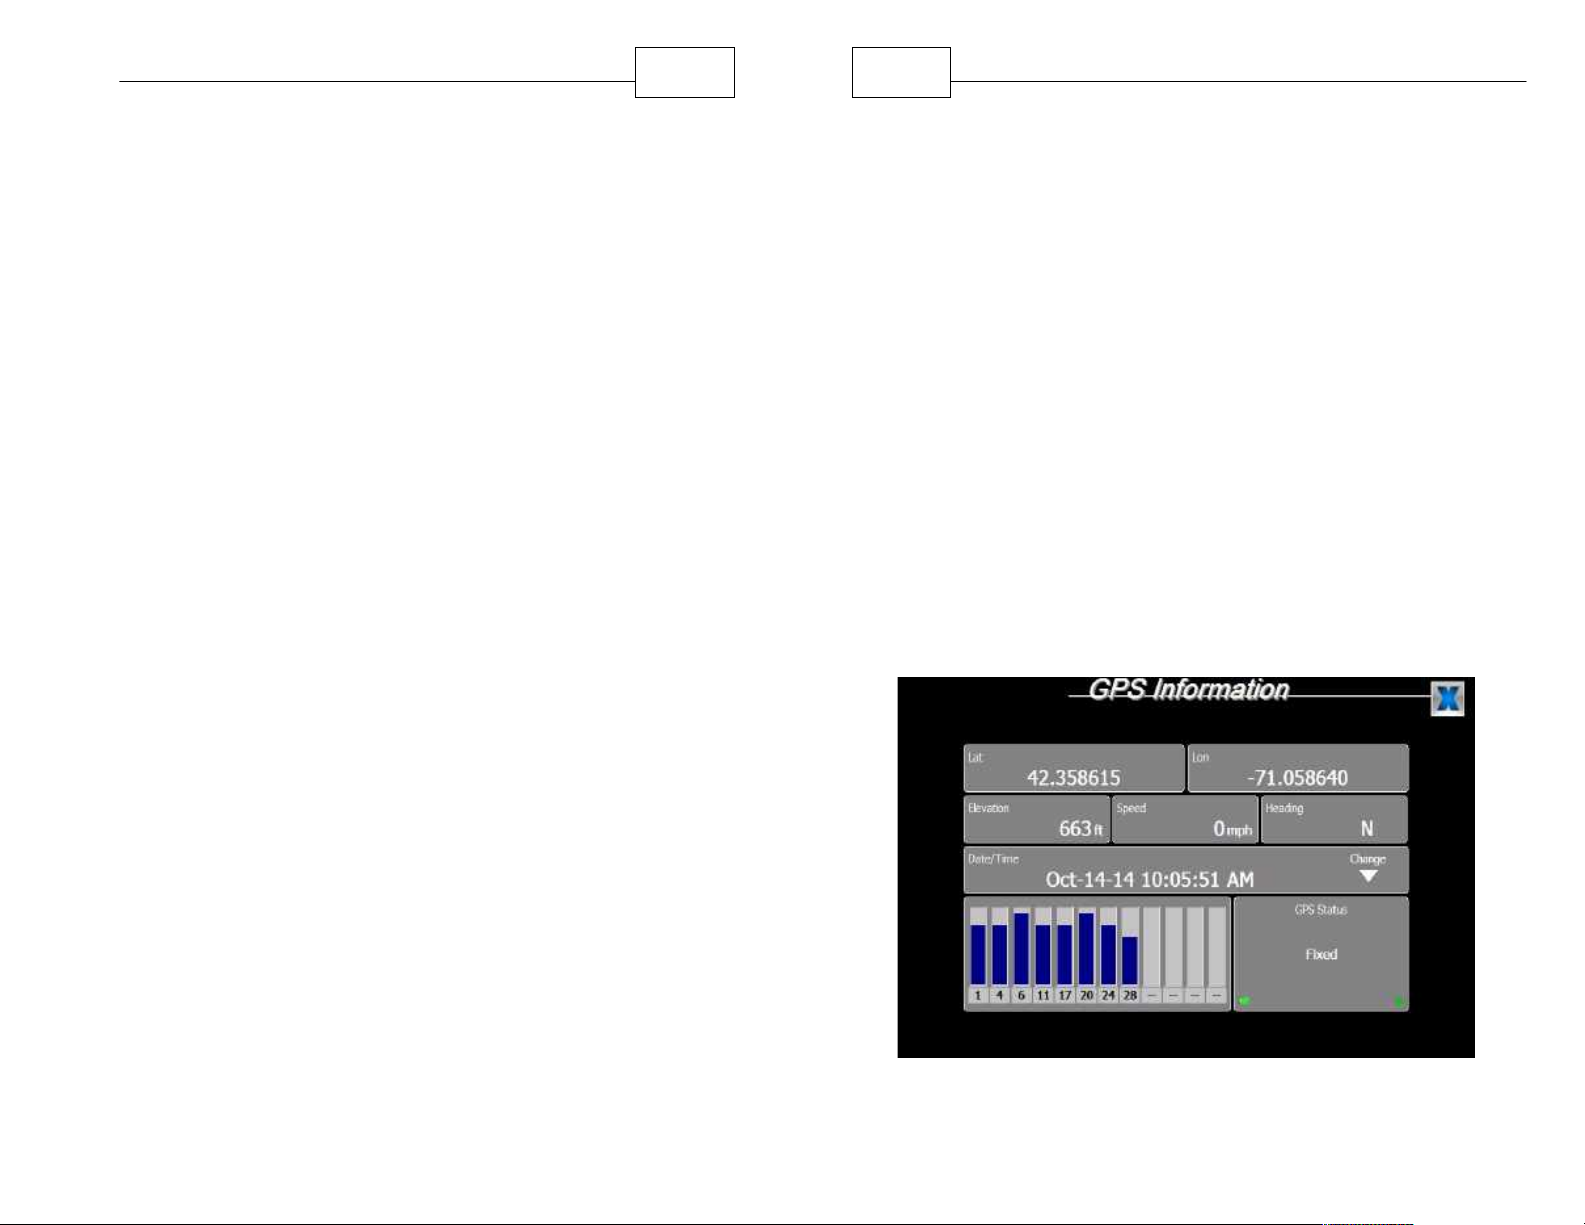
2.14 Your GPS Settings
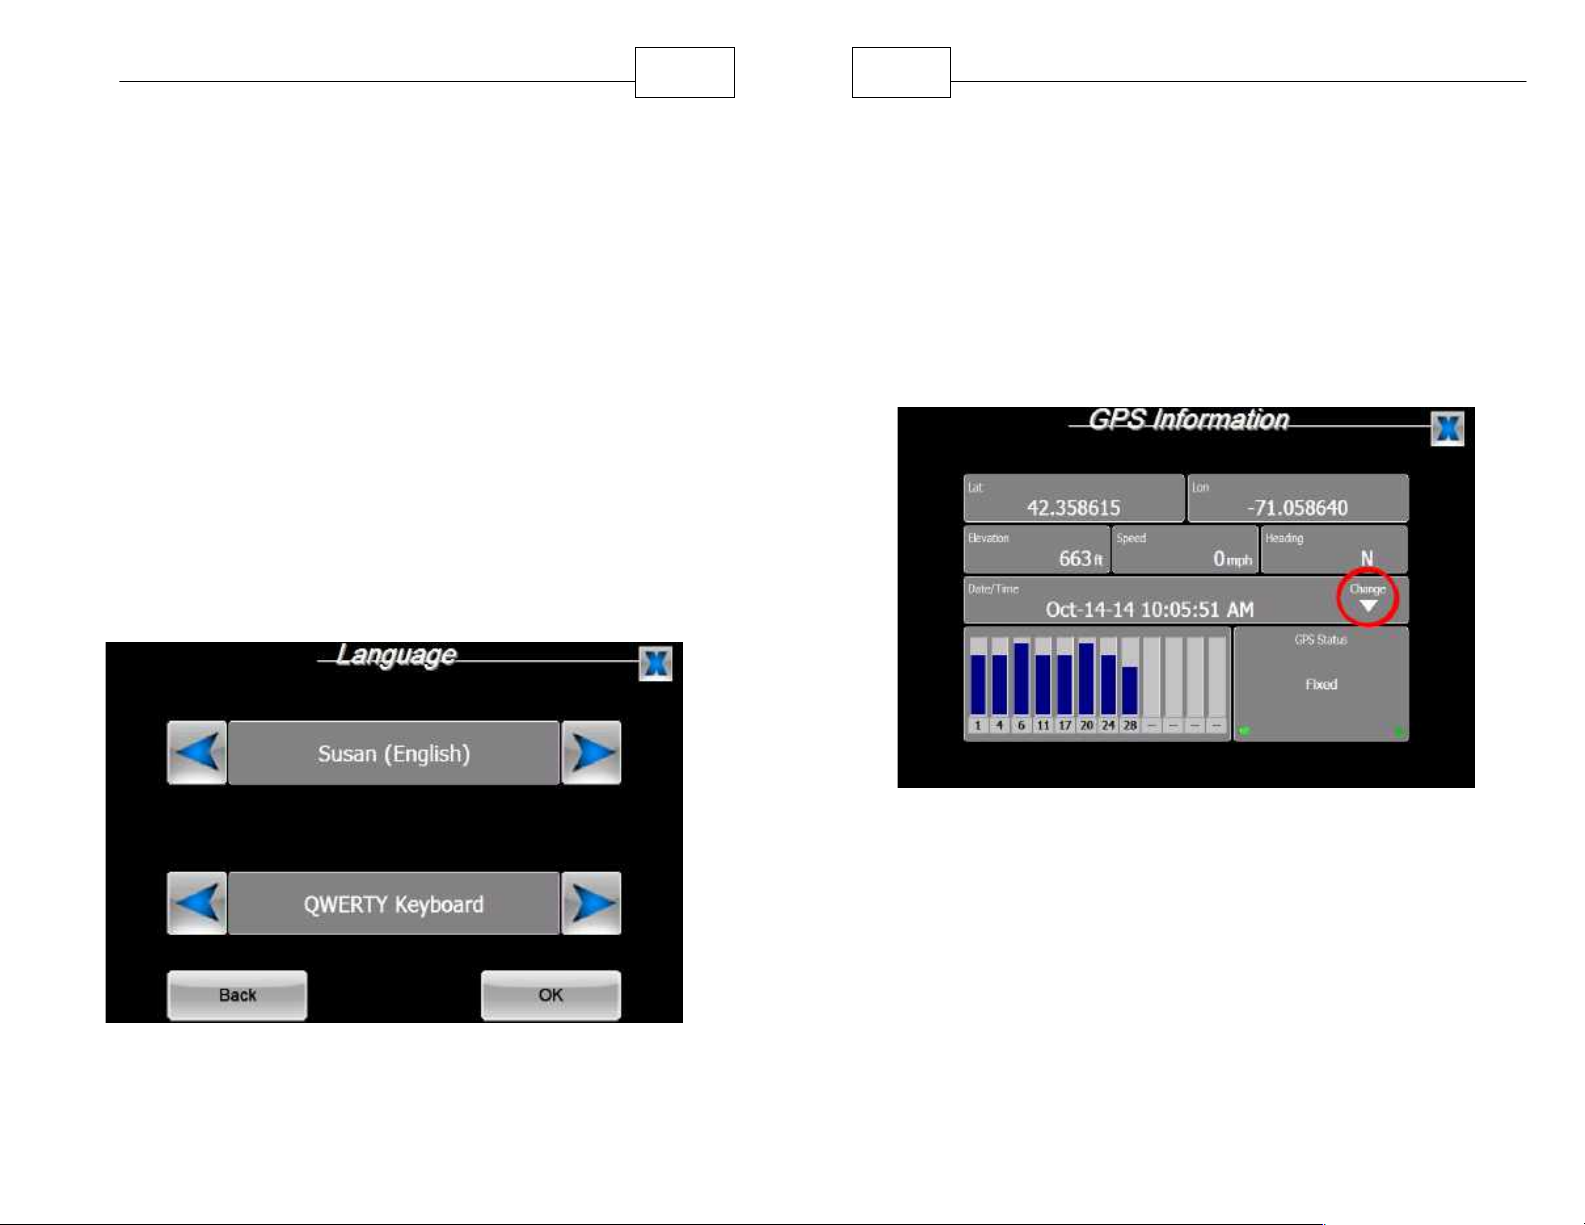
Press <Menu>, press the right arrow icon twice,
<GPS Status>. The GPS information screen shows
your latitude, longitude, elevation, speed, heading
(direction of travel), date/time, the total number and
strength of satellite signals. The green dot on the
bottom right of the panel indicates the GPS is locked
in. The dot will change colors based on the following
status: Red - not locked in; Yellow - Acquiring
Satellites; Blinking Green - getting close to locking
in; Green - position fixed. The bars at the bottom left
of the screen show you the strength of the signal for
each satellite found. You will need at least 3 satellites
to lock into position, and 4 satellites or more for best
accuracy. In the example below, there are eight
satellites locked into position indicating a very strong,
accurate position. See Section 4.6 to adjust time.
GPS Information Screen
Page 28
Getting Started
2.15 Navigation Mode
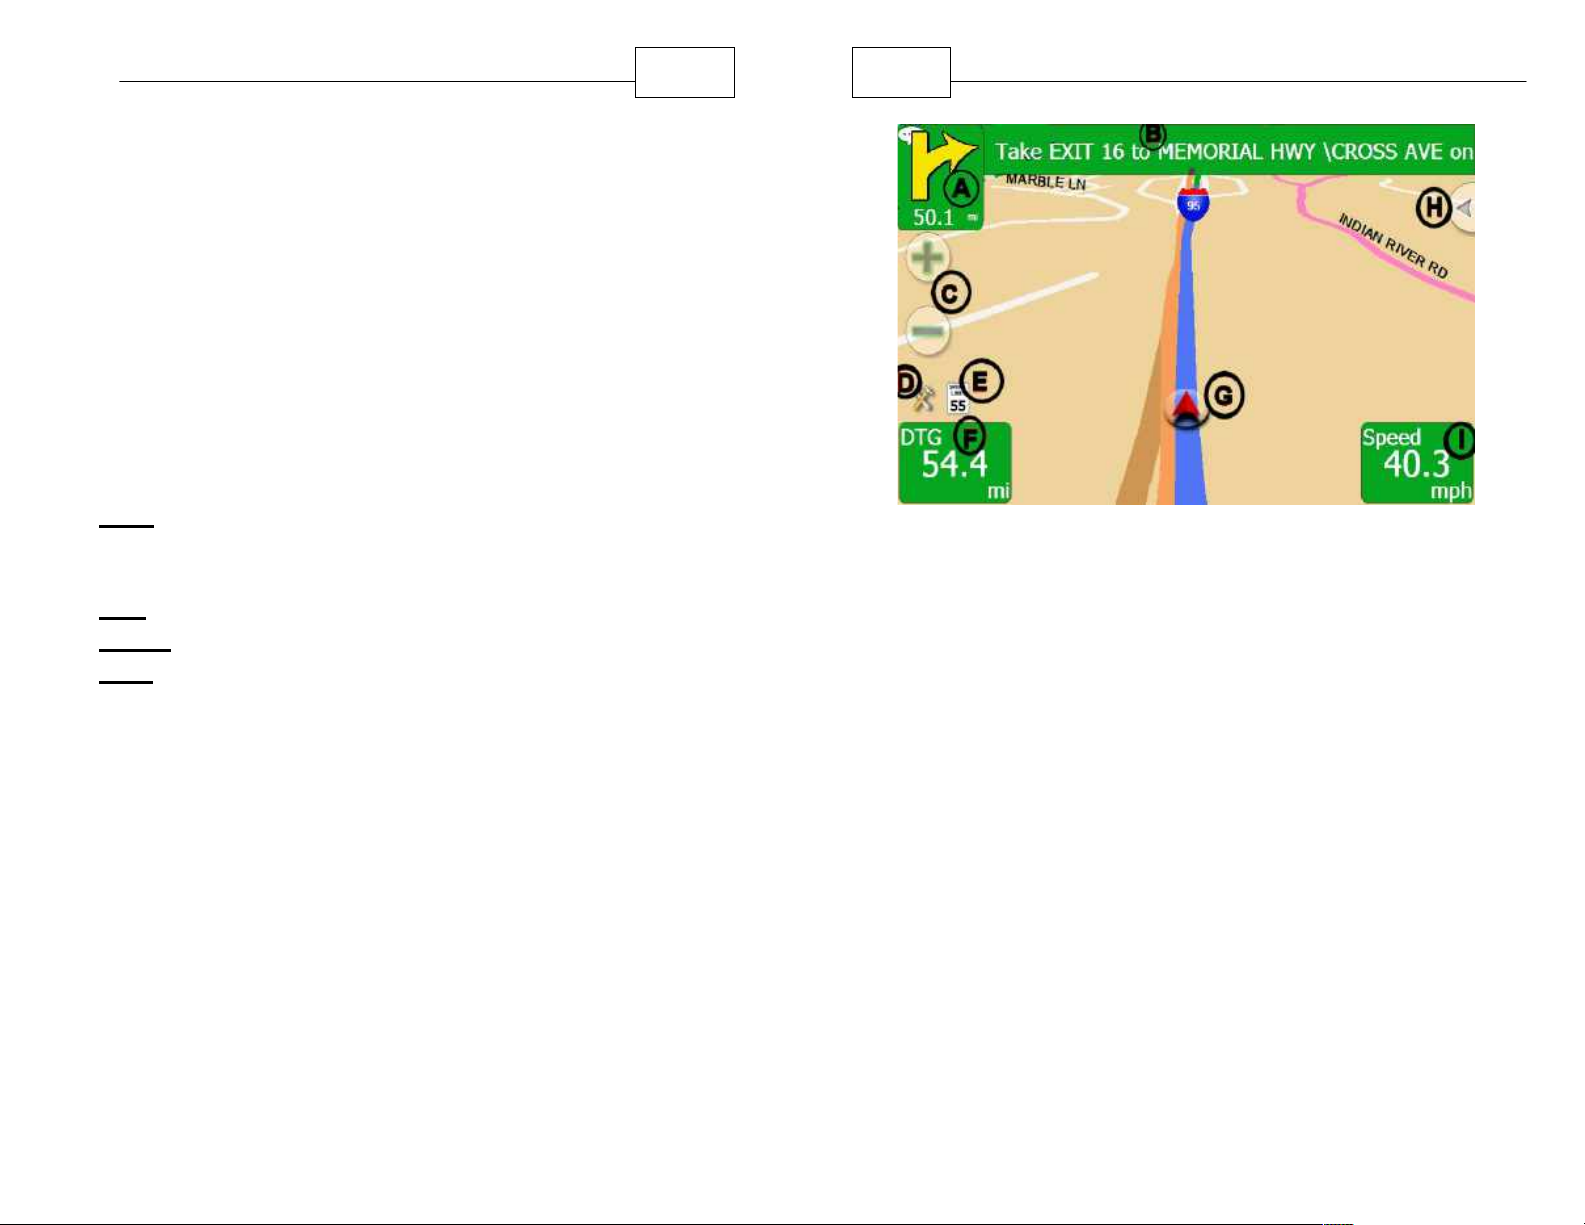
Once the GPS is locked in and a route is set, you'll
be in "Navigation Mode". The picture below shows
the basic description of the functionality of the
Navigation screen.
The Nav Panel colors will vary based on type of road.
The Navigation information is displayed on the
screen and also functions as shortcuts to several
features.
The Nav Panel colors are as follows: (Colors are
visible when viewing this guide on line).
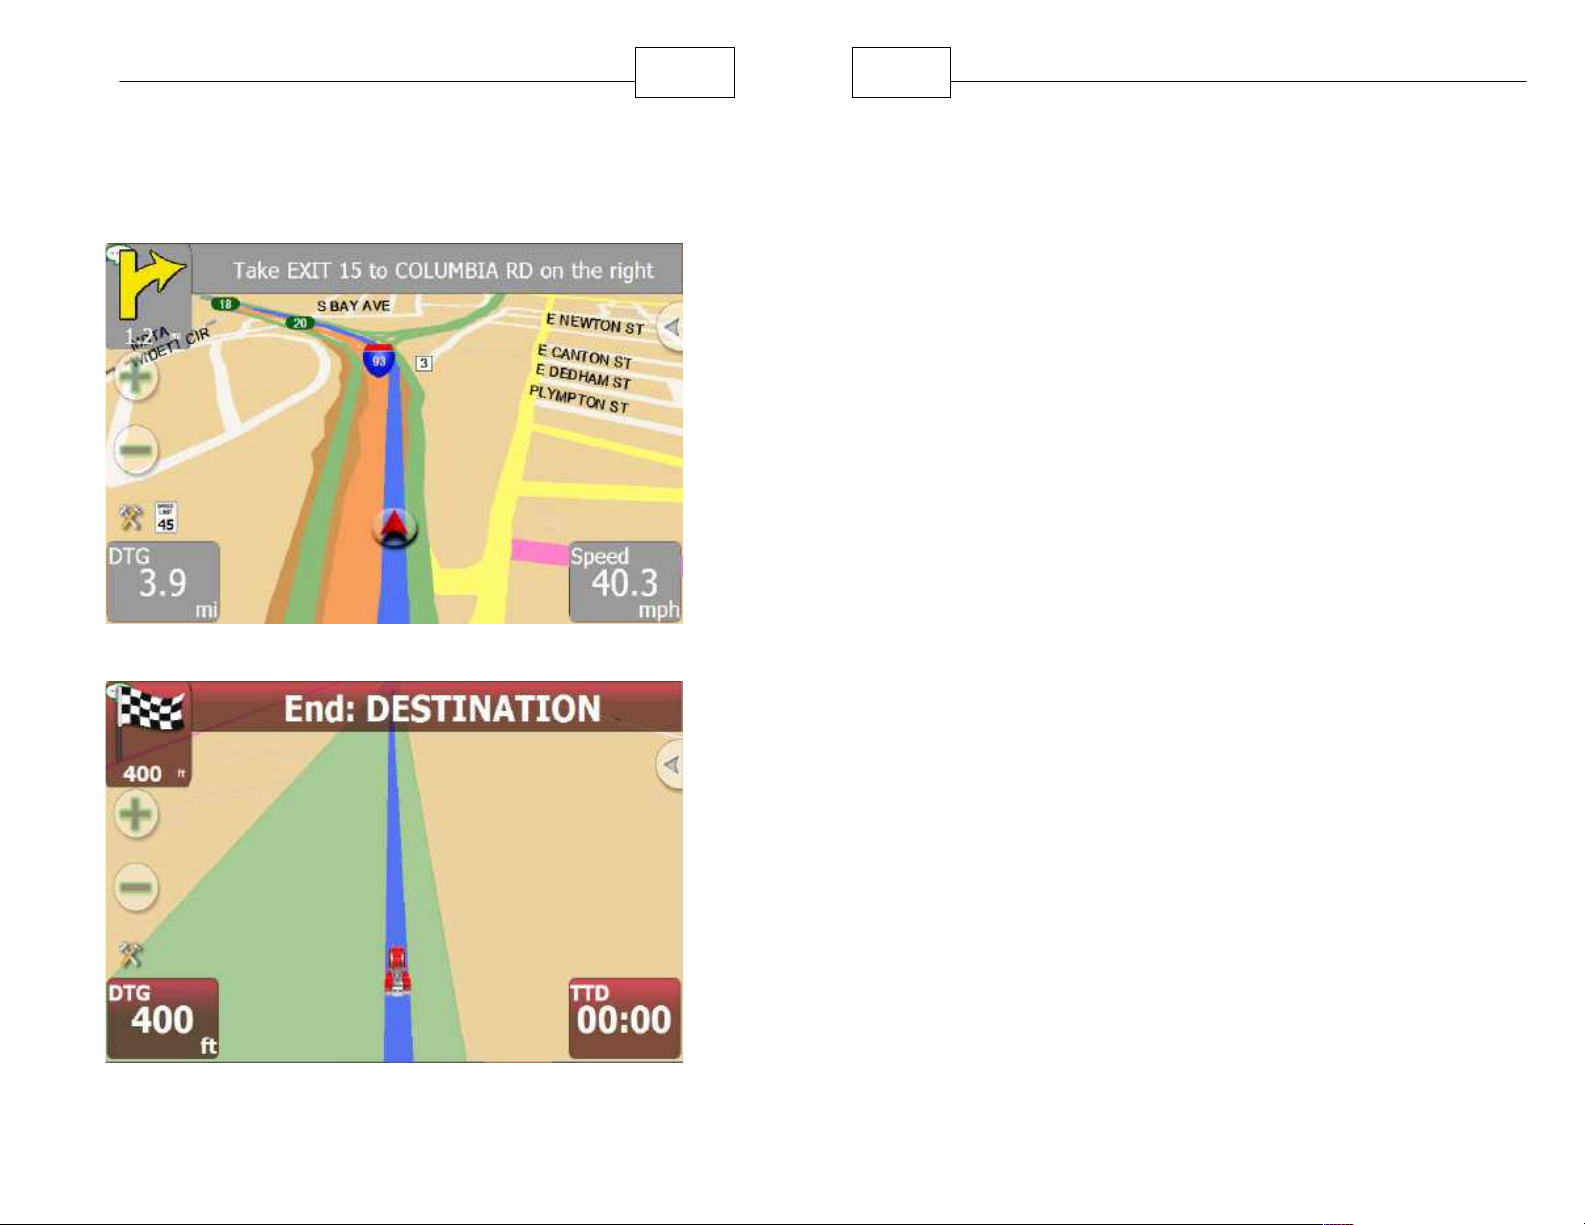
Gray - Lost Signal temporarily (such as a tunnel), it it
is a prolonged time then the navigation menu will
disappear and you will be returned to Map Mode.
Red - Restricted Area (get out!)
Green - Navigation Mode
Blue - Simulation Mode (used for training and
documentation)
54
55
A. Distance to Next Turn, and Repeat Voice
Instruction (see "Special Features" Repeat Voice to
learn more.
B. Next Turn Instruction - name of road and exit
number when appropriate. Tap to display "Route
Details".
C. Zoom In (+)/Out (-)
D. Tools Menu - tap to get back to Map Mode with
access to the WorldNav menus.
E. Speed Limit - turns red and blinks if you exceed
the limit
F. Tap the blue left panel to independently configure
both the left and right blue areas to display the
desired data such as Distance to Go, Estimated Time
of Arrival, Speed, and much more.
G. Current position on the route
H. Tap the arrow to reveal the split screen, it will
WorldNav Navigation Software
Navigation Screen
Page 29
Getting Started
change to an X, tap the X to go back to full screen
I. Tap the right bottom panel for quick access to the
Trip Statistics menu.
Lost Signal / Tunnel - Navigation Screen Turns Gray
56
57
Your destination will be marked with a checkered flag
icon on the map. Every attempt has been made to
route you so that you end up on the right side of the
road so that the approach is made easy.
Touch the screen to exit Navigation mode and return
to Map Mode. This can be helpful if you want to look
at the map in greater detail or access some of the
other menus of the GPS navigation software.
WorldNav Navigation Software
Restricted Area - Navigation Screen Turns Red
Page 30
Getting Started
TIP - Tap the top left letter I icon to obtain
information about the specific screen being
displayed.
58
59
WorldNav Navigation Software
2.16 Main Menu Review
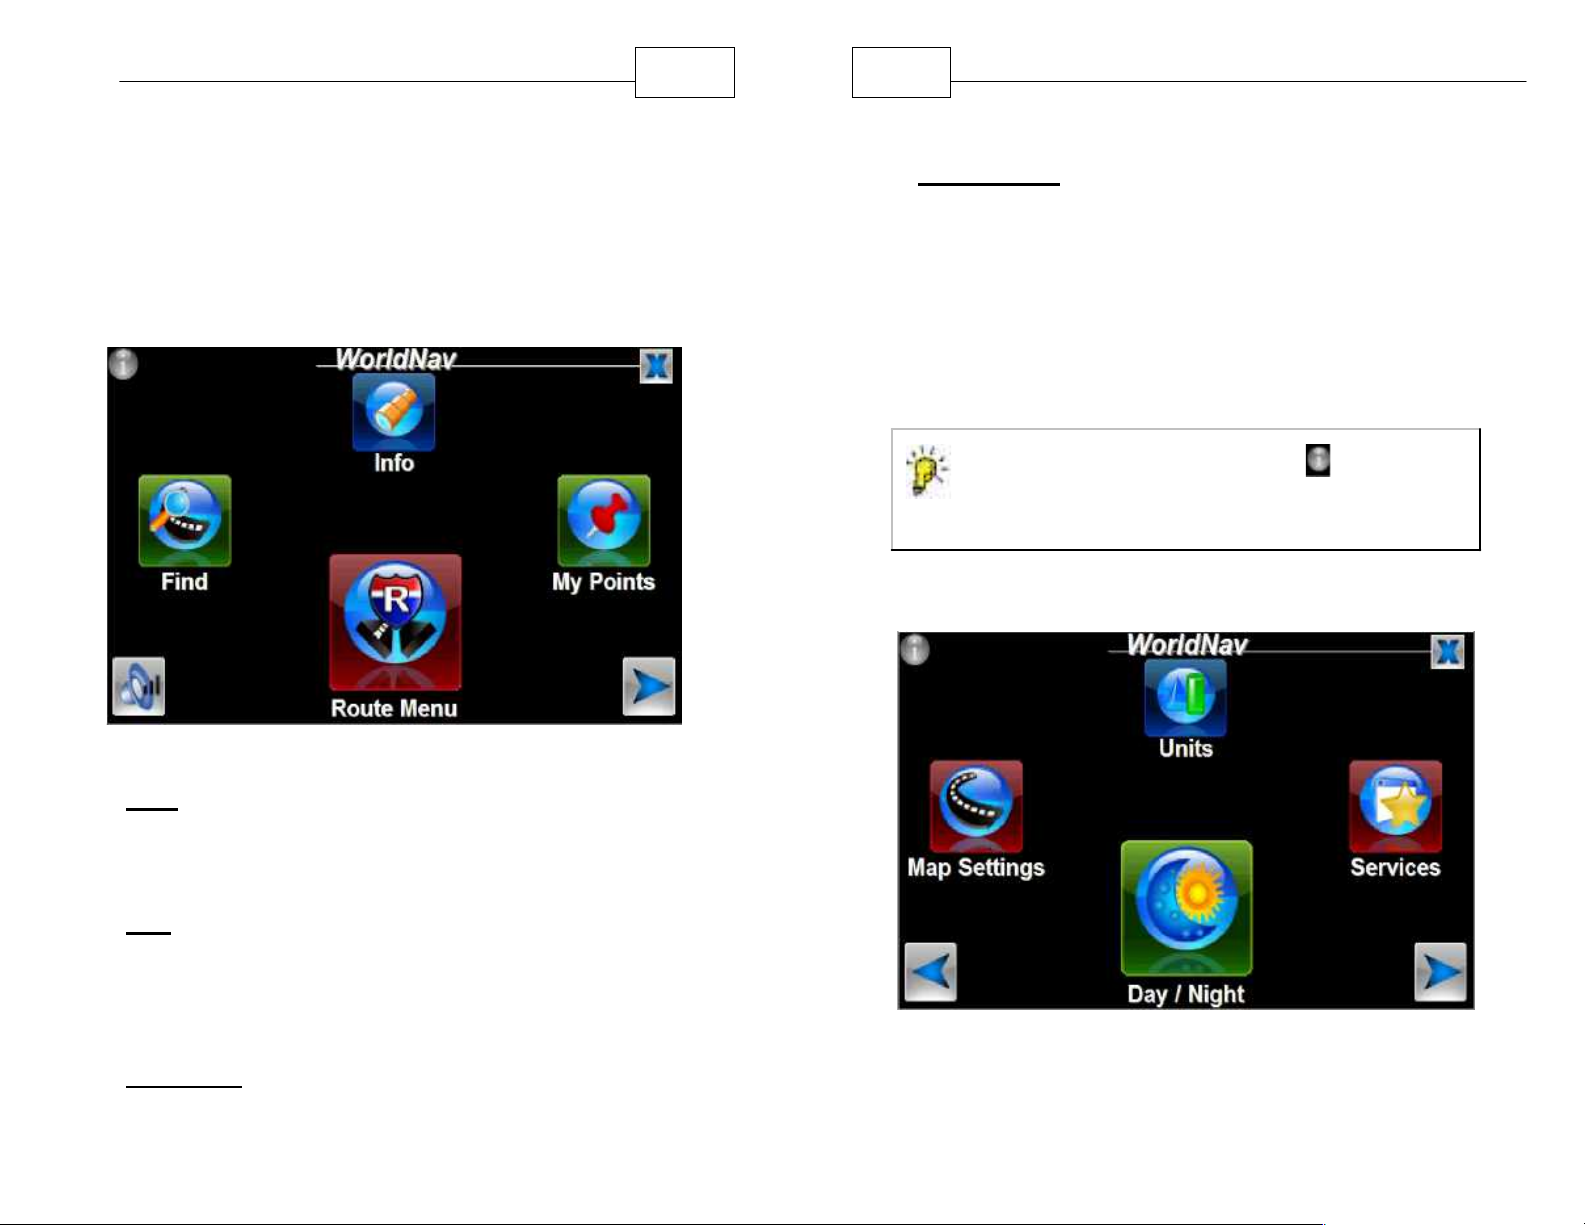
The WorldNav main <Menu> is spread out over four
screens. To advance to the next screen press the
bottom right arrow icon. Likewise, to go back to a
menu, press the left arrow icon found on the bottom
of the screen.
My Points (favorites) and set your Home address.
Route Menu—lets you into the Route Menu,
situated on two separate screens, in which you can
view a route, create a new route, clear an existing
route, start a simulation route or select route
settings where you can indicate your preference of
Quickest Route, Shortest Route, Avoid Highways
or Truck Route. (Details in Section 4.1)
Menu Screen One
Find— provides access to the Find Wizard,
situated on two separate screens. Locate an
Address, Service (such as a Truck Stop), Home,
Intersection, My Points, or view your Find History.
Info—provides information on your current location
(useful for filling out your IFTA reports), and also
allows you to mark your current position or route
directly to that point on the map, as well as provide
easy access to the program version number.
My Points—allows you to mark or manage your
Menu Screen Two
Page 31
Getting Started
TIP - Truck Stops are set to be shown at all
times. Attempting to display all of the other points
all the time will slow down the functioning of
navigation. The system will find points when you
search even if they are not displayed on the map.
TIP - Tap the Odometer field to reveal the total
miles traveled in each state. After you fill out your
IFTA report you can reset the odometer. Reset
each odometer independently.
Map Settings
2D/3D—lets you change between two and three
dimensional views and offers another method of
accessing the Split Screen feature. Note: You will
not see the names of most roadways on the 3D
view however the map will look more realistic.
Units—lets you choose to navigate in either
English or Metric units.
Services— allows you to display services such as
Restaurants, Gas Stations, Truck Stops, CAT
scale locations and Rest Stops.
Day/Night—switches from a night screen to a day
screen and vice versa to allow for improved
visibility.
60
61
WorldNav Navigation Software
Menu Screen Three
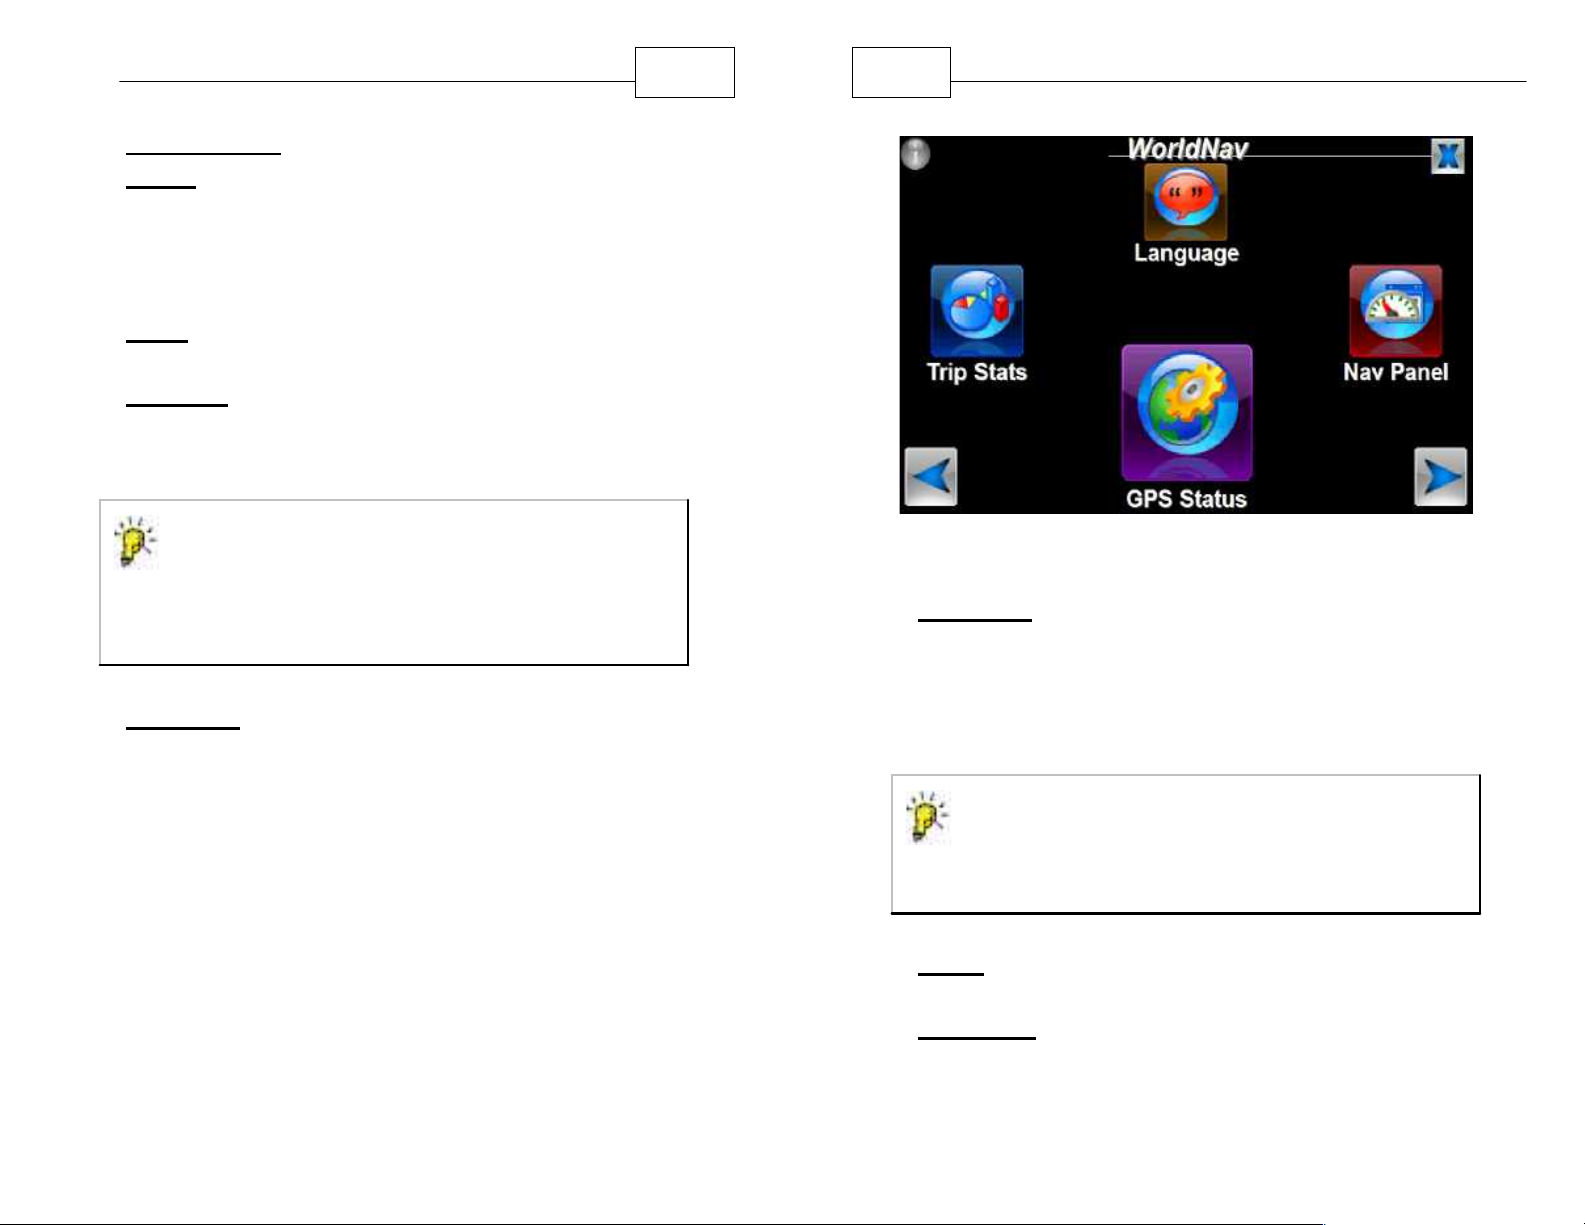
Trip Stats—displays trip statistics such as total
time, distance traveled, current speed, and
provides access to two odometer settings and
distance traveled per state (useful for IFTA
reports).
Voice—allows you to change the voice and
language of the WorldNav.
Nav Panel—lets you set two identifying panels on
your navigation screen including Distance To Go,
Speed, Odometers, Satellite Info, Estimated Time
Page 32
Getting Started
of Arrival, Current Street Name, and more. Also
includes rotating information display.
GPS Status—provides GPS information such as
latitude, longitude, elevation, speed, heading,
date/time and strength of signal.
62
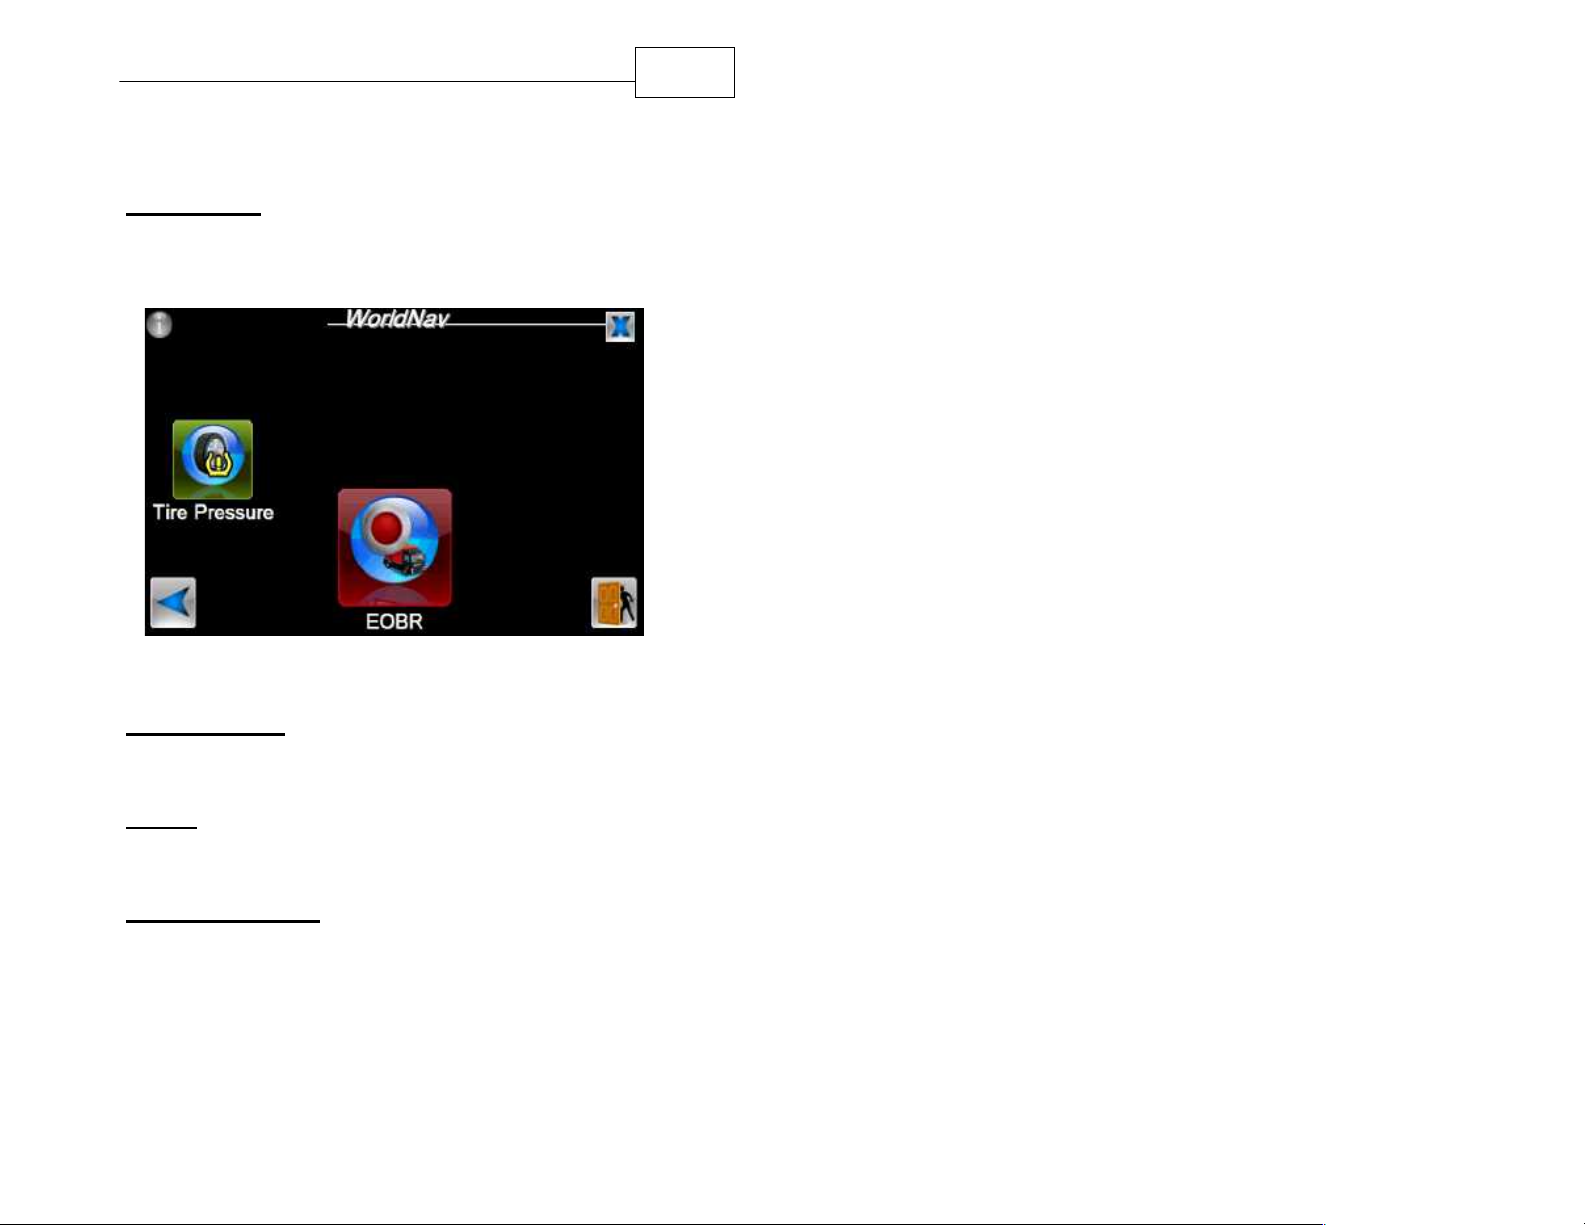
Menu Screen Four
Tire Pressure— function available for WorldNav
7400 model only. Requires tire pressure sensors
and transmitter sold separately.
EOBR — The Electronic On Board Recorder
provides an easy way for you to keep track of
hours in service by type.
Application Exit — provides easy access to the
hardware functions of the GPS.
Page 33

Part
III
65
WorldNav Navigation Software
3 Working with My Points
3.1 Create a My Point
A "My Point" is a position marker that can be used to
help create a multiple point route or to mark a
position for future reference. You can think of the My
Points area as a listing of your favorite places. You
can create My Points regardless of whether the GPS
device is active or inactive. Center the map on the
position for the My Point, press <Menu> , <My
Points>, <Mark Position>. The Mark Position Screen
will come up allowing you to enter a name, and then
you may assign an icon to your new My Point from
the icon gallery. The position will now be saved as a
My Point and can be accessed for future use.
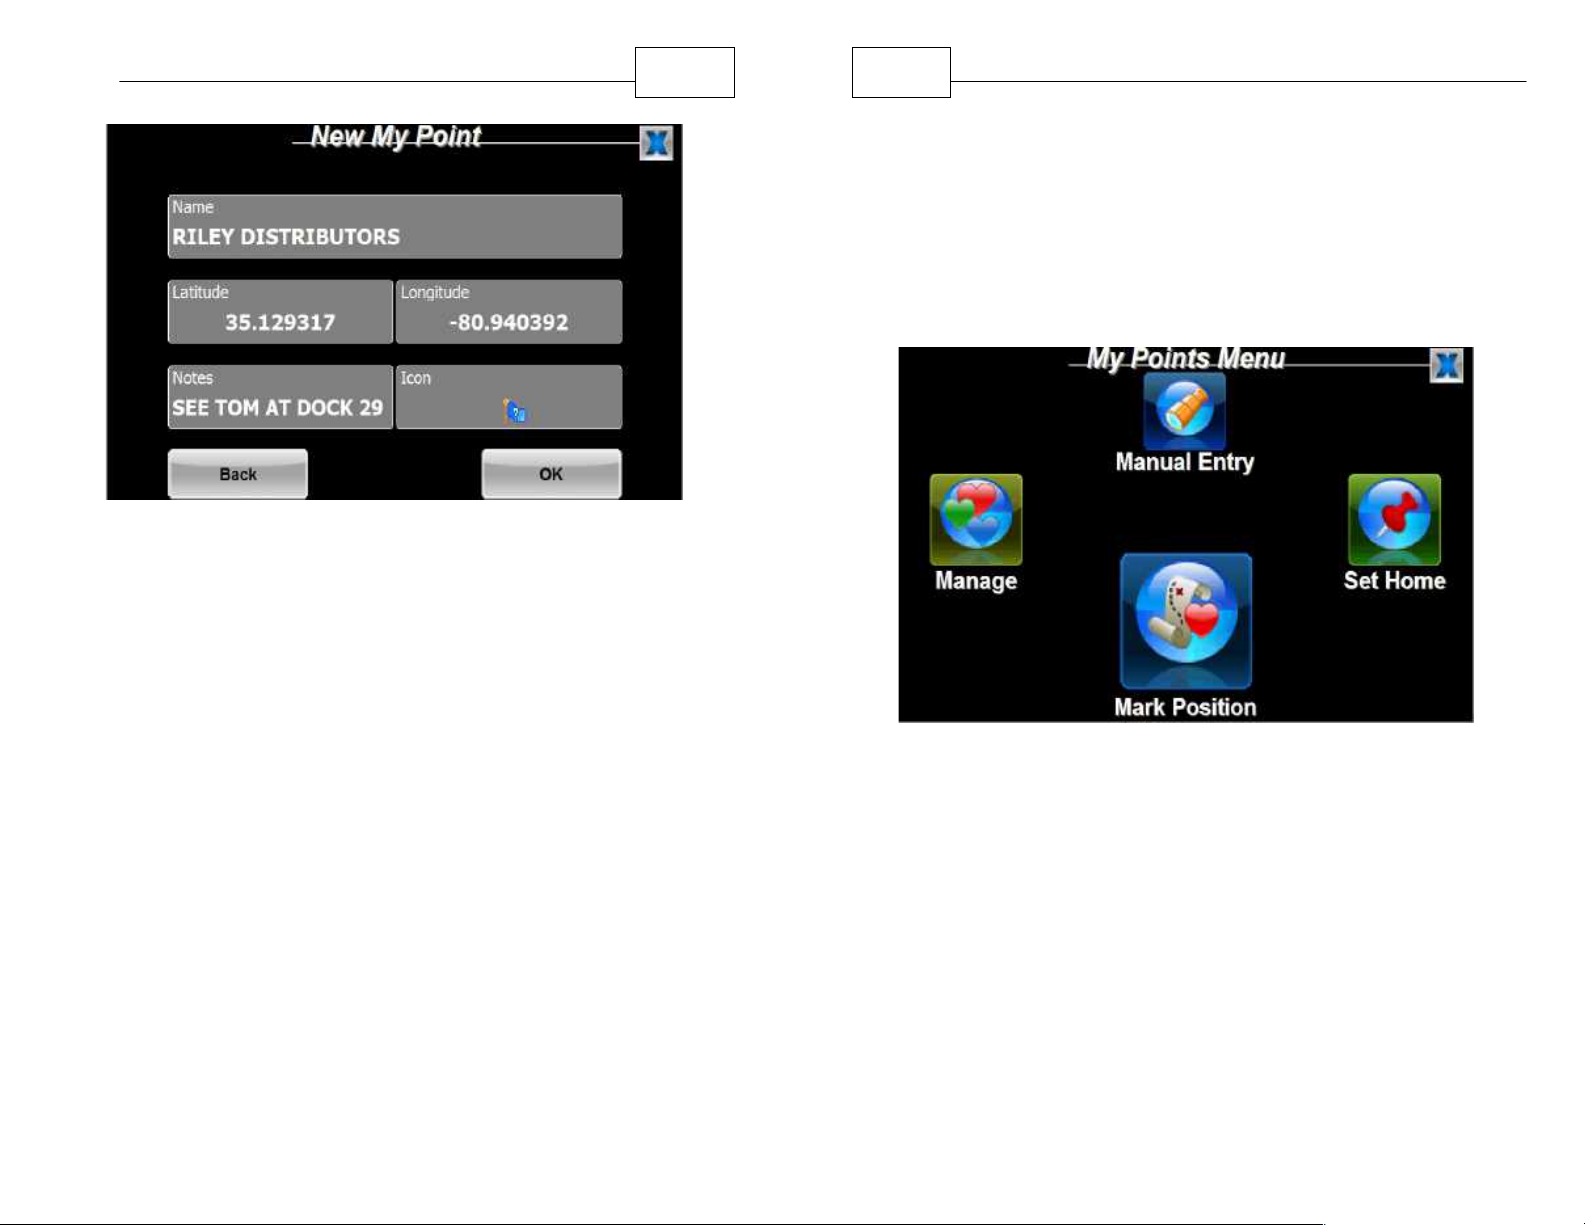
You can also manually enter a point using GPS
coordinates (latitude and longitude). Use the "Manual
Entry" feature and tap each window to enter the
desired information. You can even store notes for a
specific point.
Page 34
Working with My Points
Manual MyPoint entry using GPS coordinates
66
67
WorldNav Navigation Software
3.2 Mark My Point at Current Position
While in Map Mode, press <Menu> and then <My
Points>.
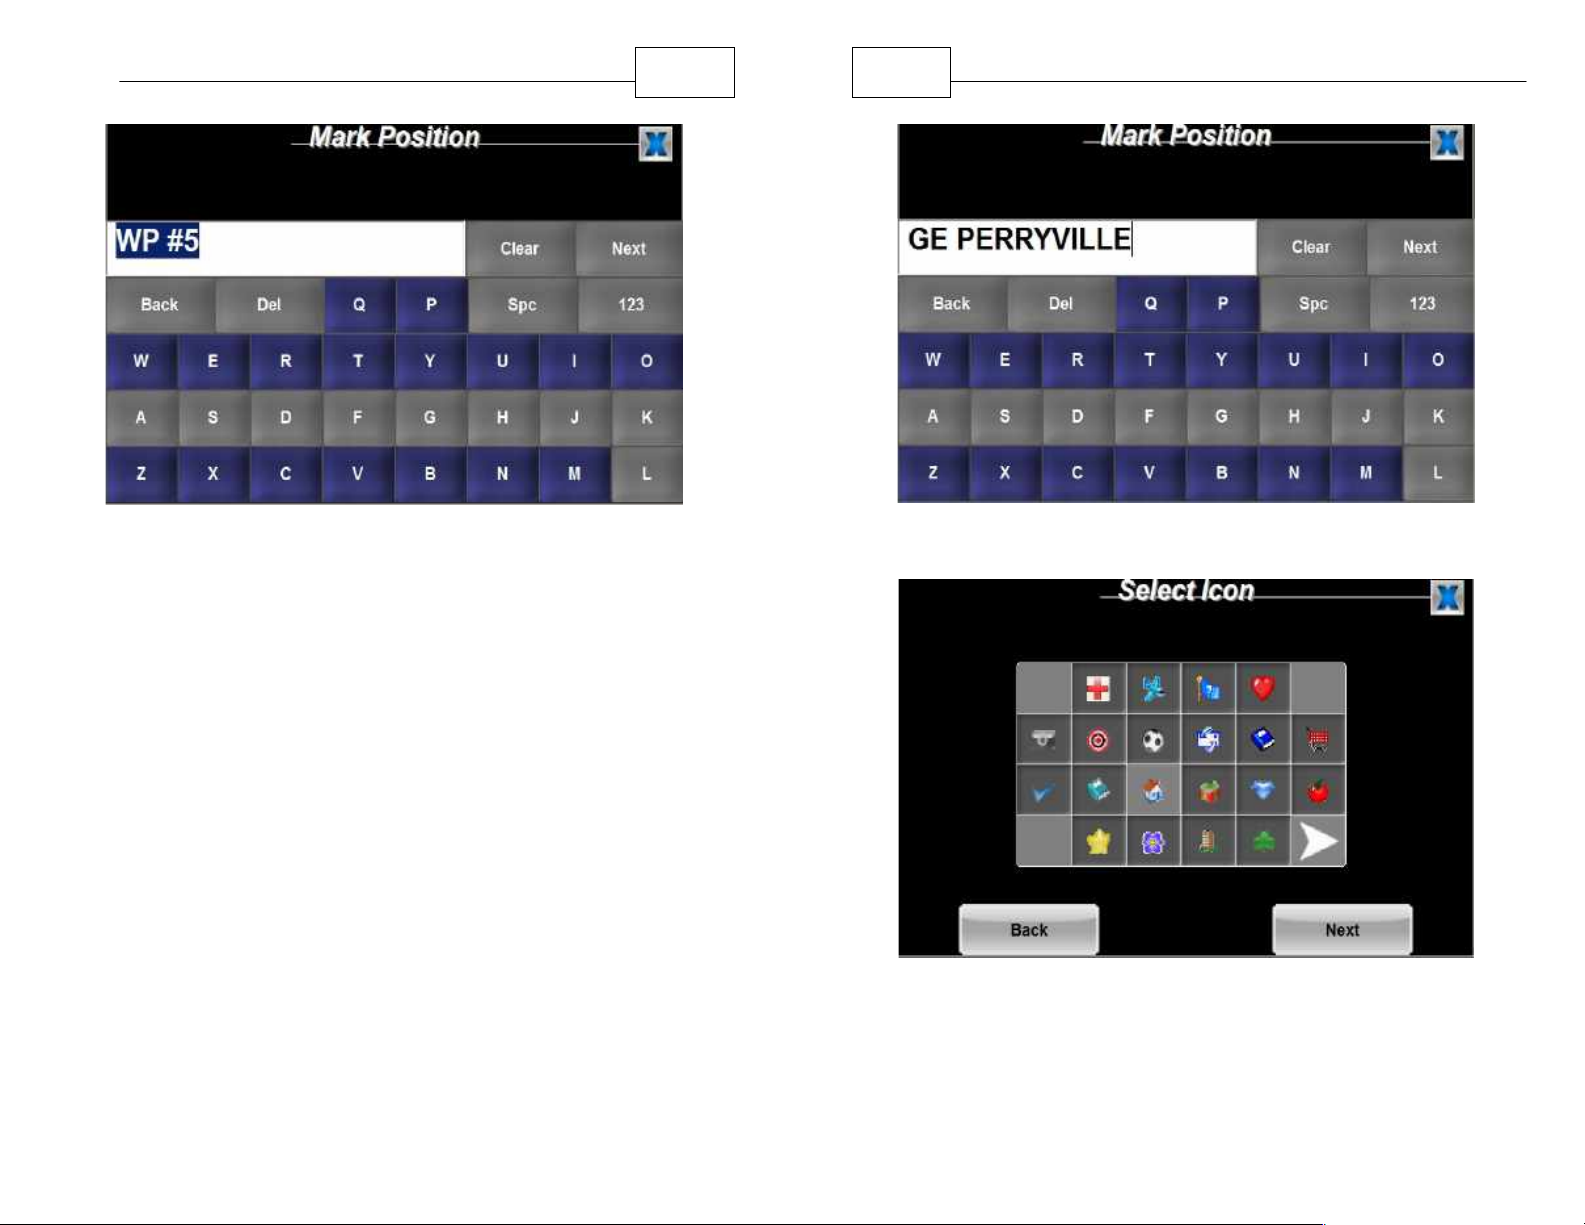
1. Press <Mark Position> to mark your current
position.
My Points Menu
2. Enter the name for your current position and select
an icon to represent the position.
Page 35
Working with My Points
68
69
WorldNav Navigation Software
Default Naming of MyPoints Start with WP#
3. Your current position is recorded and will appear
on the map. You can change the name of the
MyPoint and assign an icon as desired.
Rename the MyPoint for easy reference.
Selecting a My Point Icon
4. Press <Next> to finish, and the point will be
displayed on the map. You can easily reference
Page 36
Working with My Points
this point later in case your recent history is full,
this point will remain in your GPS for future use.
70
71
3. Press the check mark next to the desired point to
WorldNav Navigation Software
access MyPoint routing and editing.
3.3 Finding a My Point
Find previously created MyPoints using the FInd
Wizard menu.
1. Press <Menu>, right arrow icon, then <My
Points>.
2. Press the corresponding check mark to proceed.
3.4 Using My Points
When you create a MyPoint there is a default naming
convention, the first point will be labeled WP #1, the
next one will be WP #2, and it will continue for
several hundred points. You can rename the point
for easier reference.
To edit your My Points, press <Menu> and then <My
Points>. This will take you to the My Points menu.
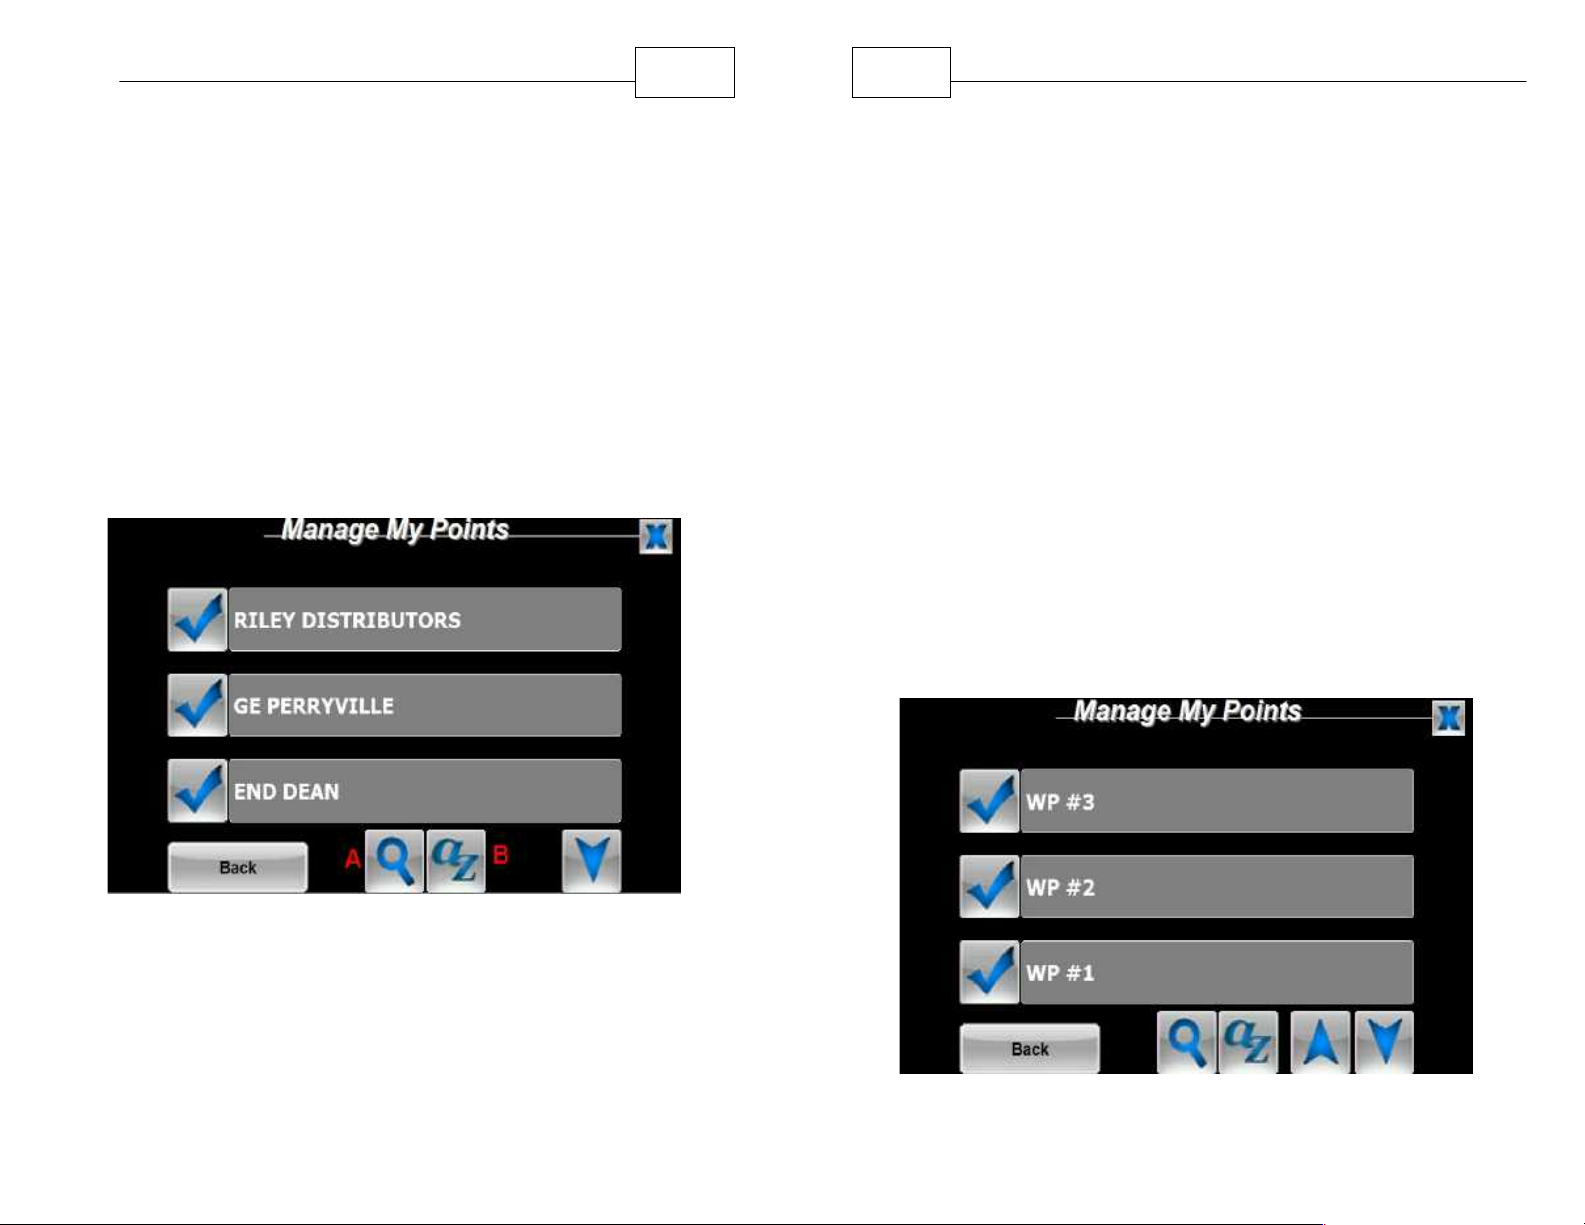
1. Select <Manage>, then press "Manage My
Points". Press the check mark icon next to the My
Point you wish to edit.
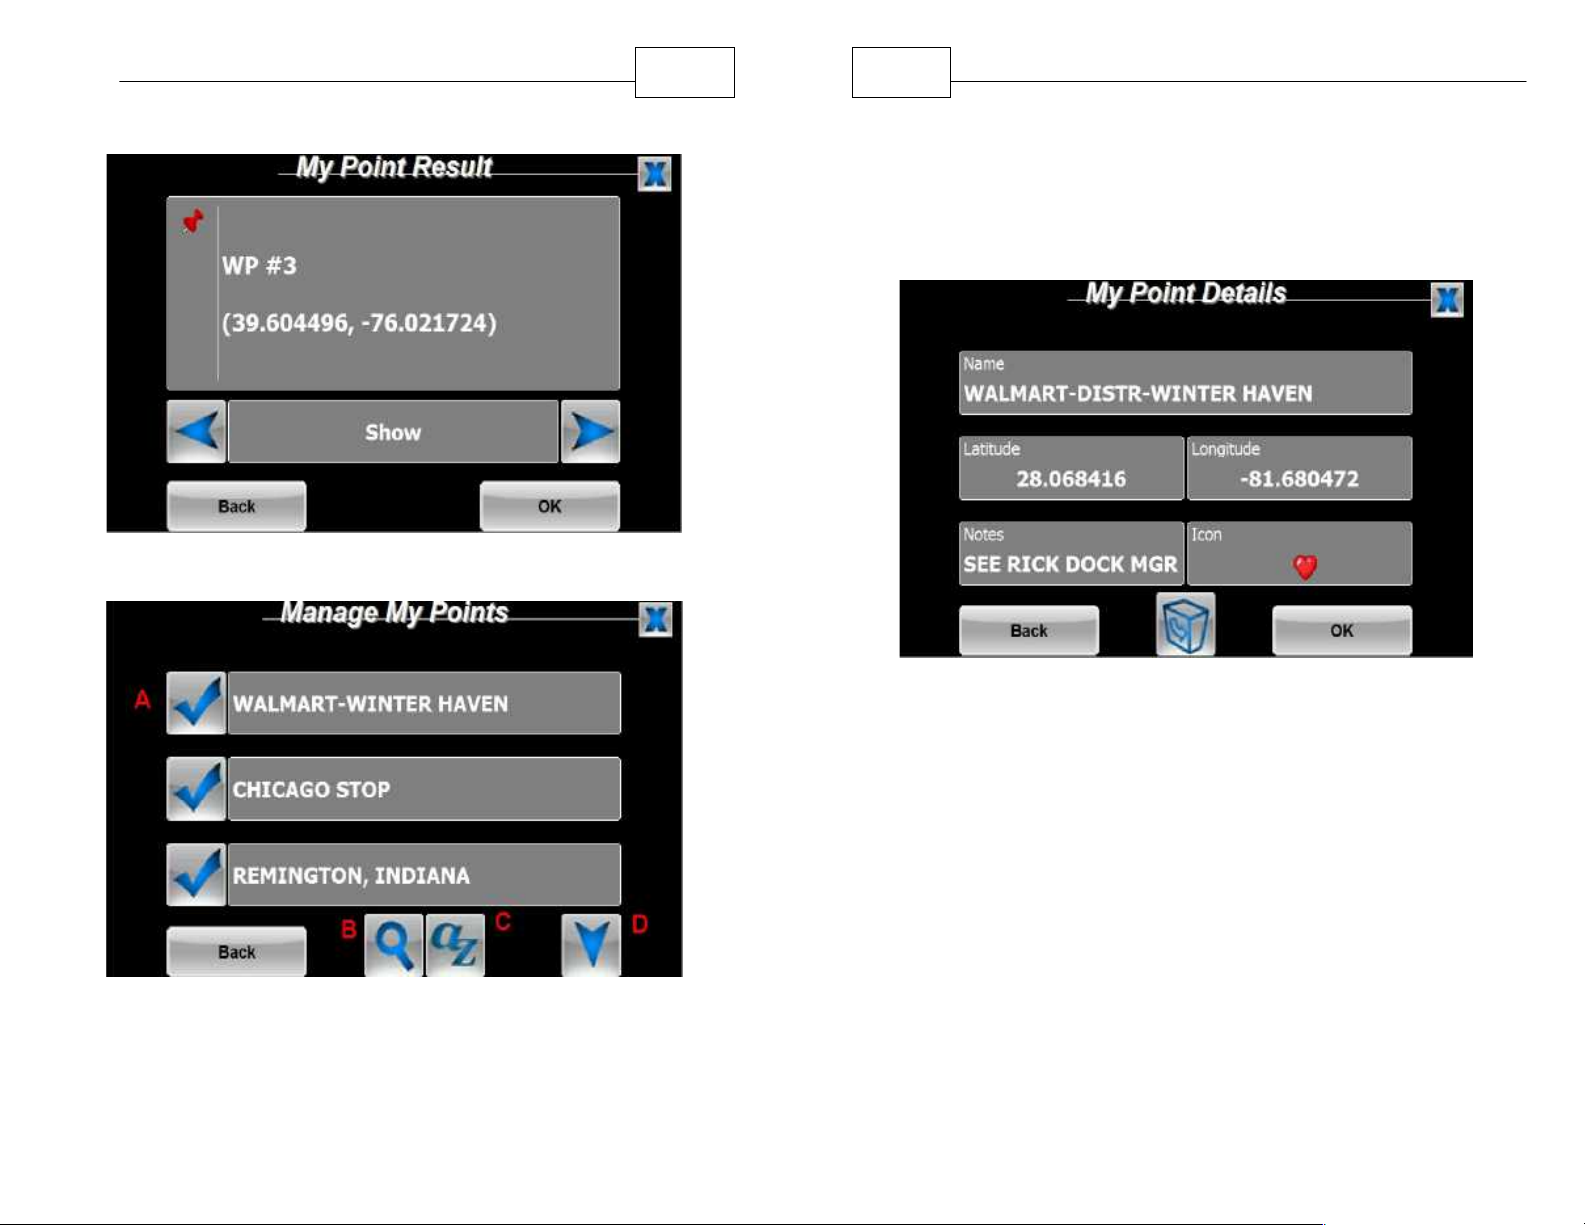
Manage My Points
A. Use the magnifier tool to search for
MyPoints by name.
B. Use the AZ button to sort the list of points
alphabetically.
Manage MyPoints Default Naming
Page 37
Working with My Points
Default My Point Details
72
73
WorldNav Navigation Software
to points
B. Search for Points by name
C. Alphabetize the list of points
D. Scroll to the next page of the listing
Manage My Points
A. Tap the check mark or the text in the gray
box to access options of editing or routing
Editing your My Points
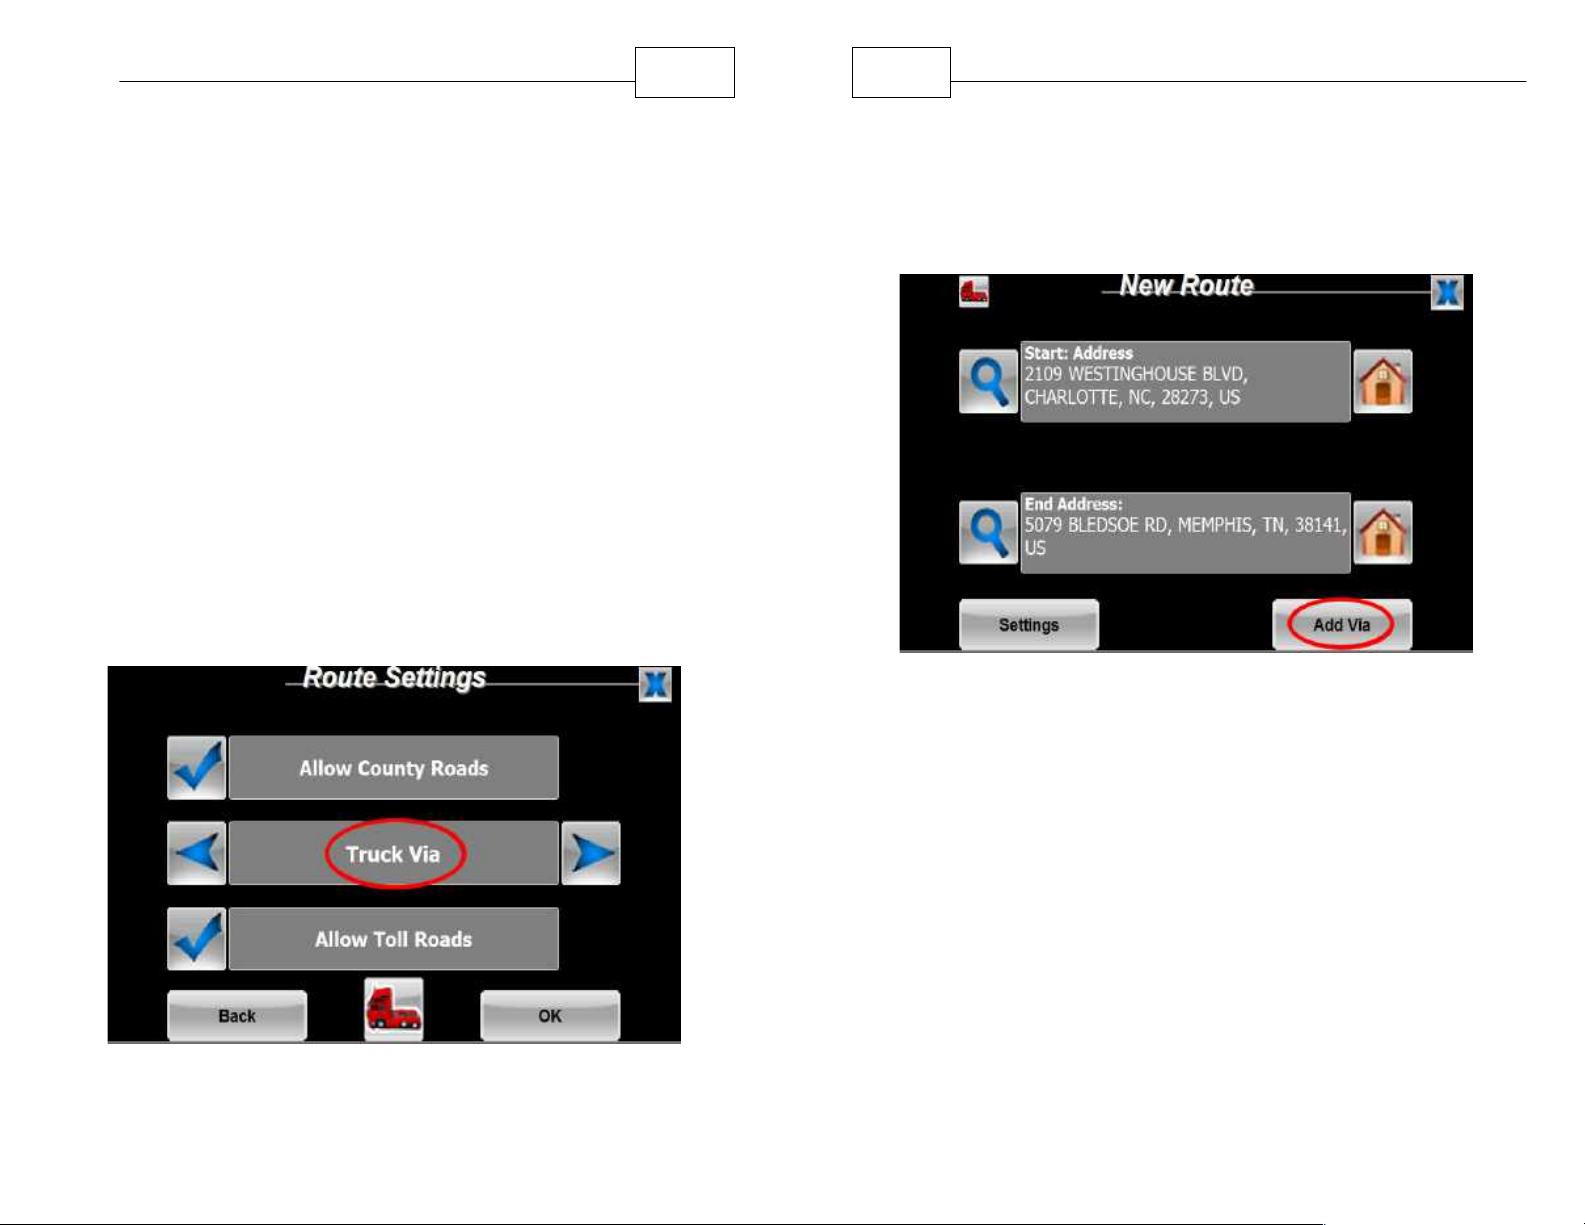
2. Use the blue arrows to select <Show>, <Route
To>, <Route Via>, <Edit> or <Delete>. If you want
to see the coordinates of a particular point, press
<Edit>. You can change any of the values such as
name or coordinates by tapping on the appropriate
field.
3. When you are finished with any edits to that
particular My Point, press <Back>.
4. To delete a point, select the trash can icon.
Page 38
Working with My Points
74
75
WorldNav Navigation Software
5. To view your edited My Point, press the check
mark icon next to it. Select the "Show" option
displayed in the text field and press <OK>. This will
take you to the map with your My Point centered
on the screen.
3.5 Routing Via My Points
Using your My Points feature, it is possible to create
a route with up to 10 stops by selecting the "Truck
Via My Points" options in your Route Settings.
To create a route with VIA points, select <Menu>,
<Route Menu>, <New Route>. Once you have your
route selected, tap the <Settings> button.
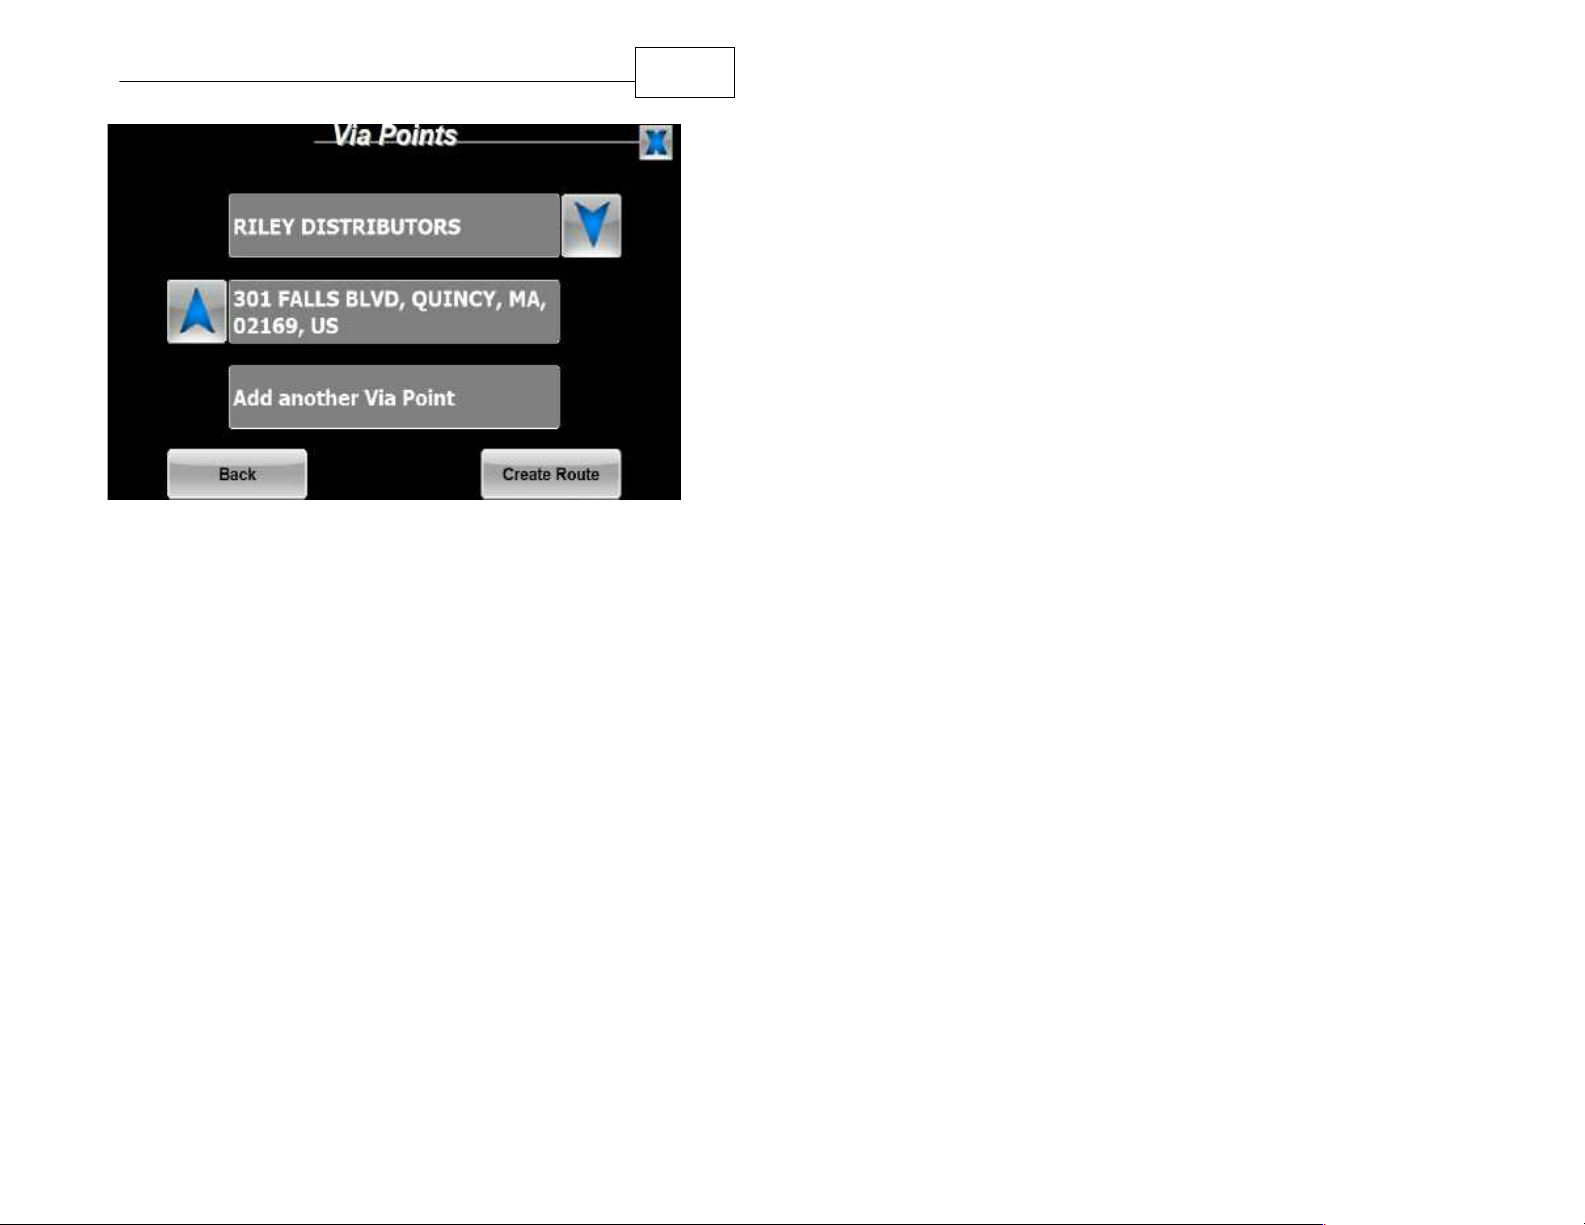
1. Use the right or left arrow icons to select
<Truck Via> in the middle panel.
2. Press <OK>, notice that the button that is
normally called <Create Route> is now <Add
Via>. Press the <Add Via> button to begin
adding your desired stops.
Select Desired My Point
Route Settings Page
3. You will be returned to the "Find Wizard" which
will allow you to choose your stop points from
any one of the methods normally used to select
destinations such as MyPoints, Recent History,
Services, Address, and Home. Use the Up and
Down blue arrows to change the order of the
points along your trip.
Page 39
Working with My Points
Choose Order of My Points
4. Press <Create Route> when you are finished
adding your Via Points into your route.
76
Page 40
Part
IV
79
WorldNav Navigation Software
4 Navigation Preferences
4.1 Selecting Route Preferences
Using your Route Settings, it is possible to select the
desired method of routing and truck setting that best
suits your trip. You can choose from Quickest Route,
Shortest Route, toll road avoidance, and more. You
can also adjust your truck's height, weight, length,
and Hazmat level.
There are two ways to access the Truck Routing
Settings. Regardless of how you end up on the Route
Settings page once you are there, the process is the
same for making selections.
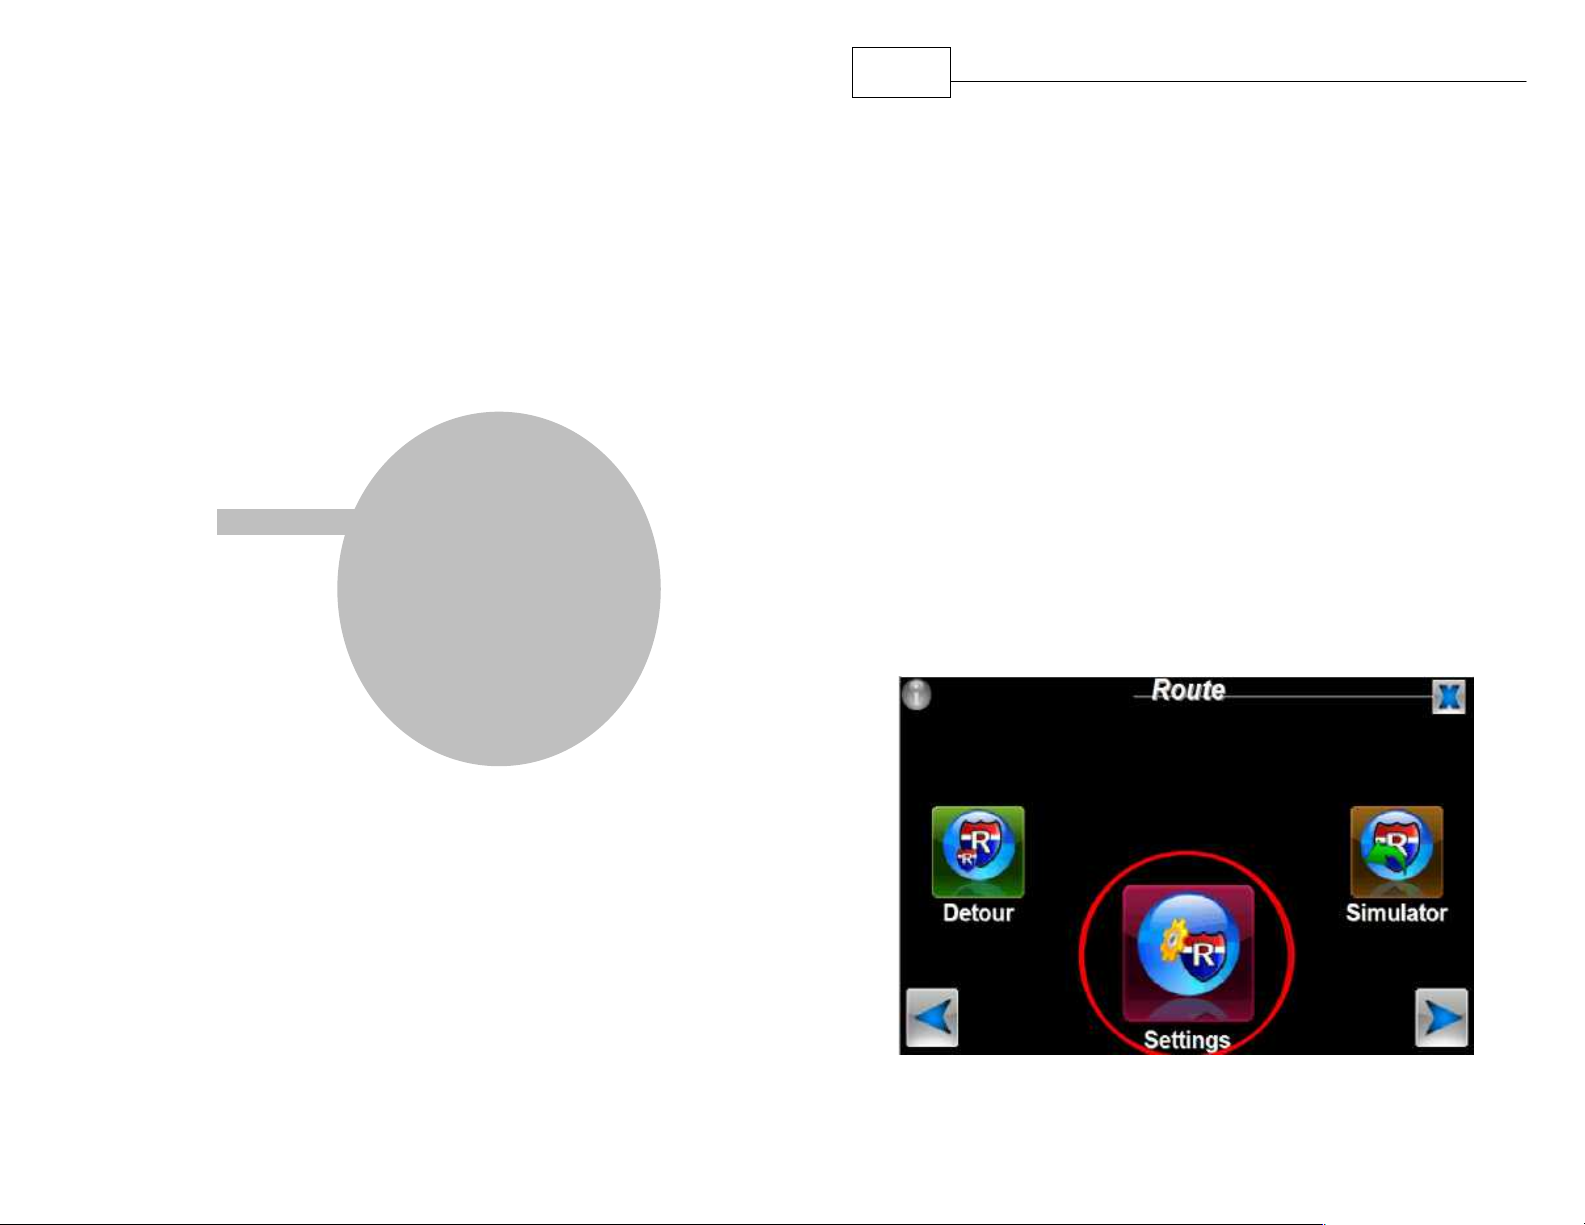
1. Press <Menu>, <Route Menu>, right arrow, and
then <Settings>.
Route Menu
Page 41
Navigation Preferences
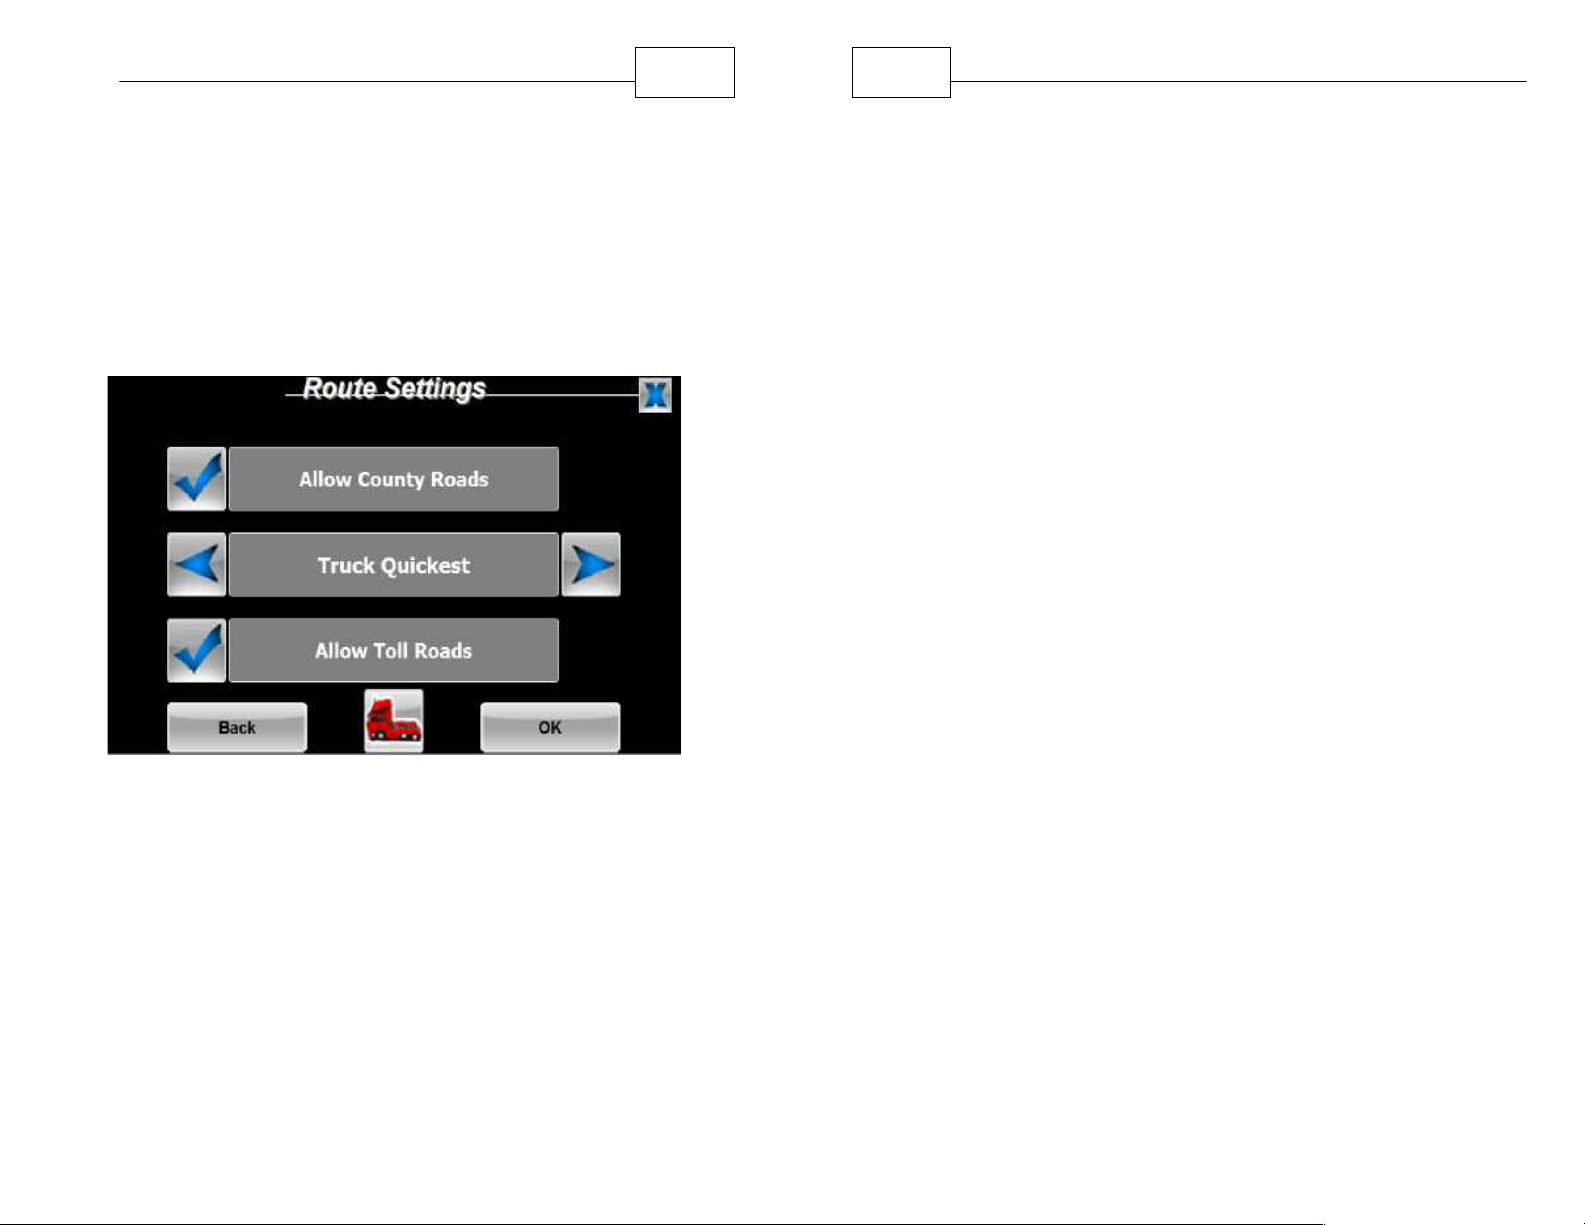
2. Use the Route Settings Screen to select your
route preferences. Allowing County Roads* and
Allowing Toll Roads are indicated by a blue check
mark. You can deselect these options by pressing
the icon once. A grey "X" icon will display when
the feature is not activated.
80
81
To insure that you will be routed using roads that are
suitable for trucks, be sure to keep the routing setting
on Trucks. The default truck configuration is: 13' 6",
53', 80,000 lbs, no Hazmat. To change this
configuration follow the steps below.
WorldNav Navigation Software
Truck Freeways - favors highways - it will route
around major cities
Truck Quickest - will result in the fastest route,
usually results in a route taking the least time
Truck Shortest Distance - will result in the
shortest route, likely to require more turns but may
save gas due to shorter distance
Truck Emergency - disregards all road
restrictions EXCEPT low bridges
Truck Via My Points - allows route to be created
through user-defined points
Route Settings
You also have the choice of several route methods
depending upon the product you are using. Use the
right and left arrow icons to choose the desired
method of routing. In most cases the route will
change based on your choice. Keep in mind that in
some cases the same route will be generated
regardless of the setting. You can select from:
3. Press the Truck logo found at the bottom (middle)
of the Route Settings screen. This will display your
truck settings screen.
Page 42
Navigation Preferences
82
83
WorldNav Navigation Software
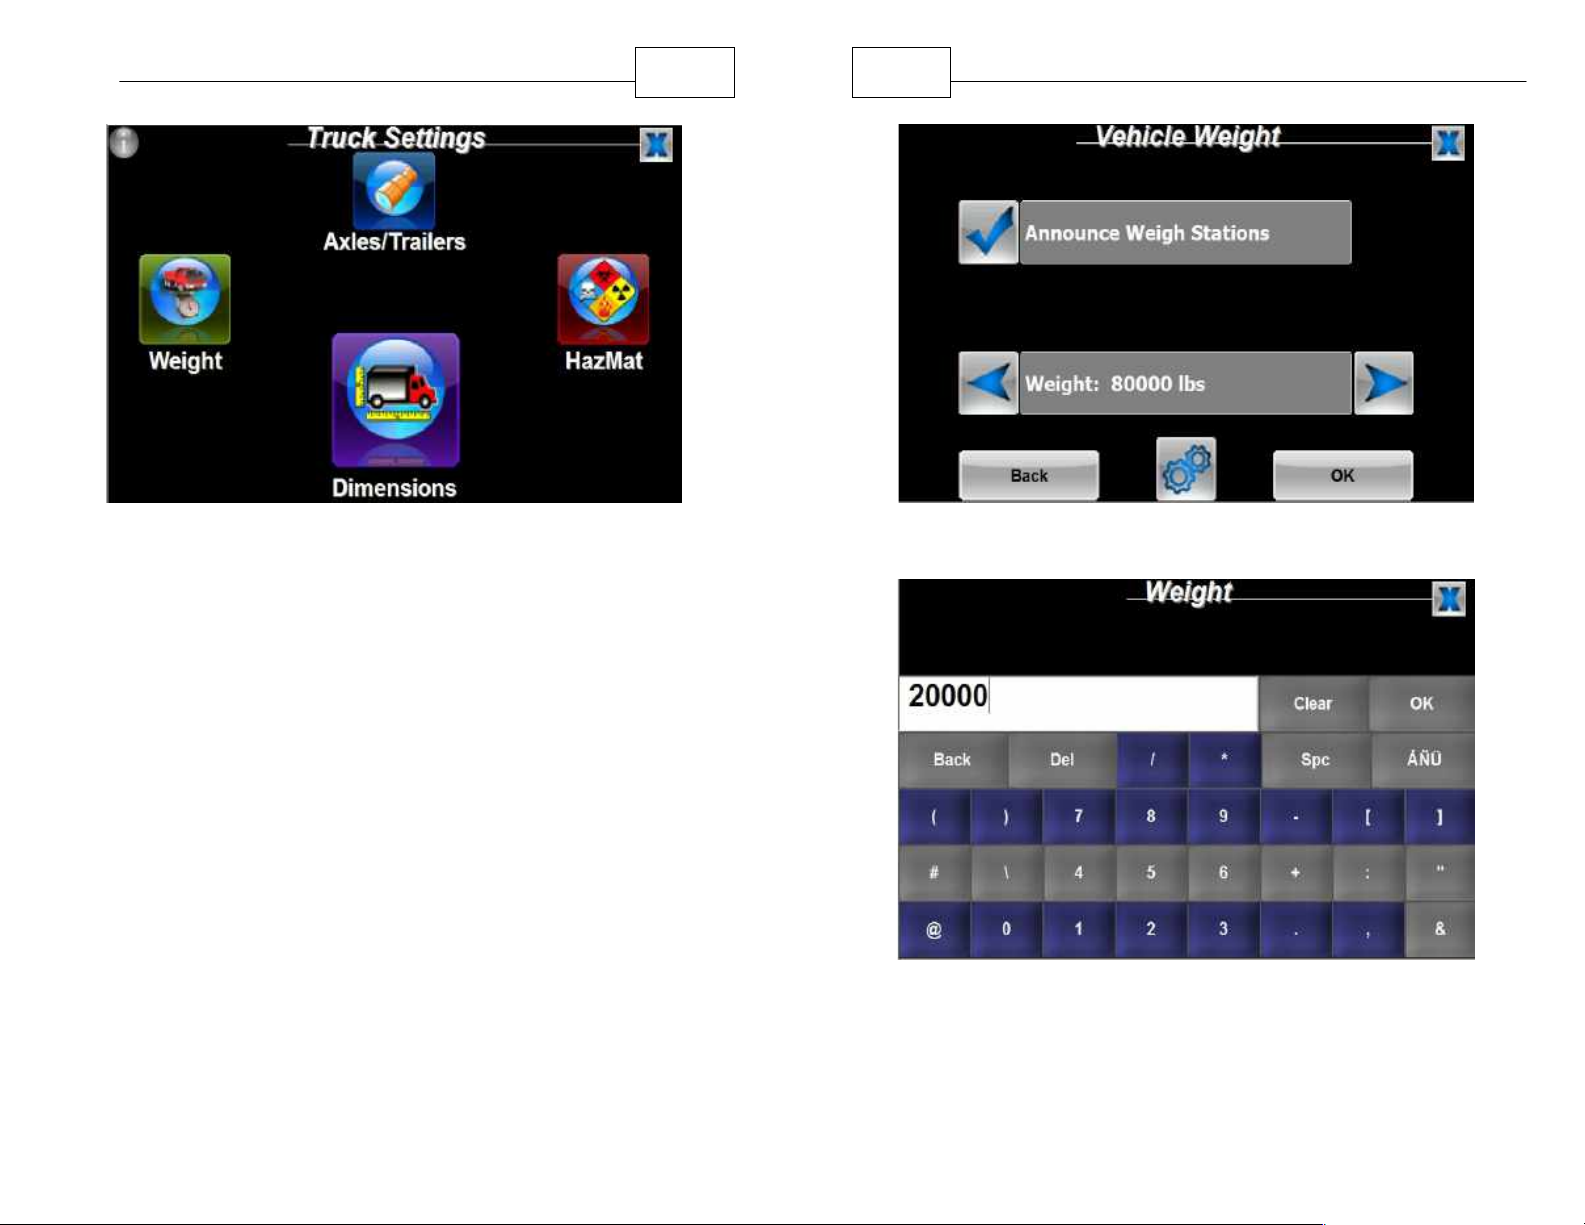
Truck Settings
4. Use the white arrows to change the values a little
at a time. For example, to change the height to 13'
9" (instead of 6"), press the right arrow button 3
times. You will see that the value changes from 6"
to 7" to 8" to 9". If however, you need to make
larger changes, it is better to press the word
"Height" - then a keyboard menu will appear and
you will be able to enter the value faster, such as
12 feet. Select the Weight icon to allow you
access to change the value to another value.
Changing Truck Specification Values
Easily enter a new weight value such as 20, 000
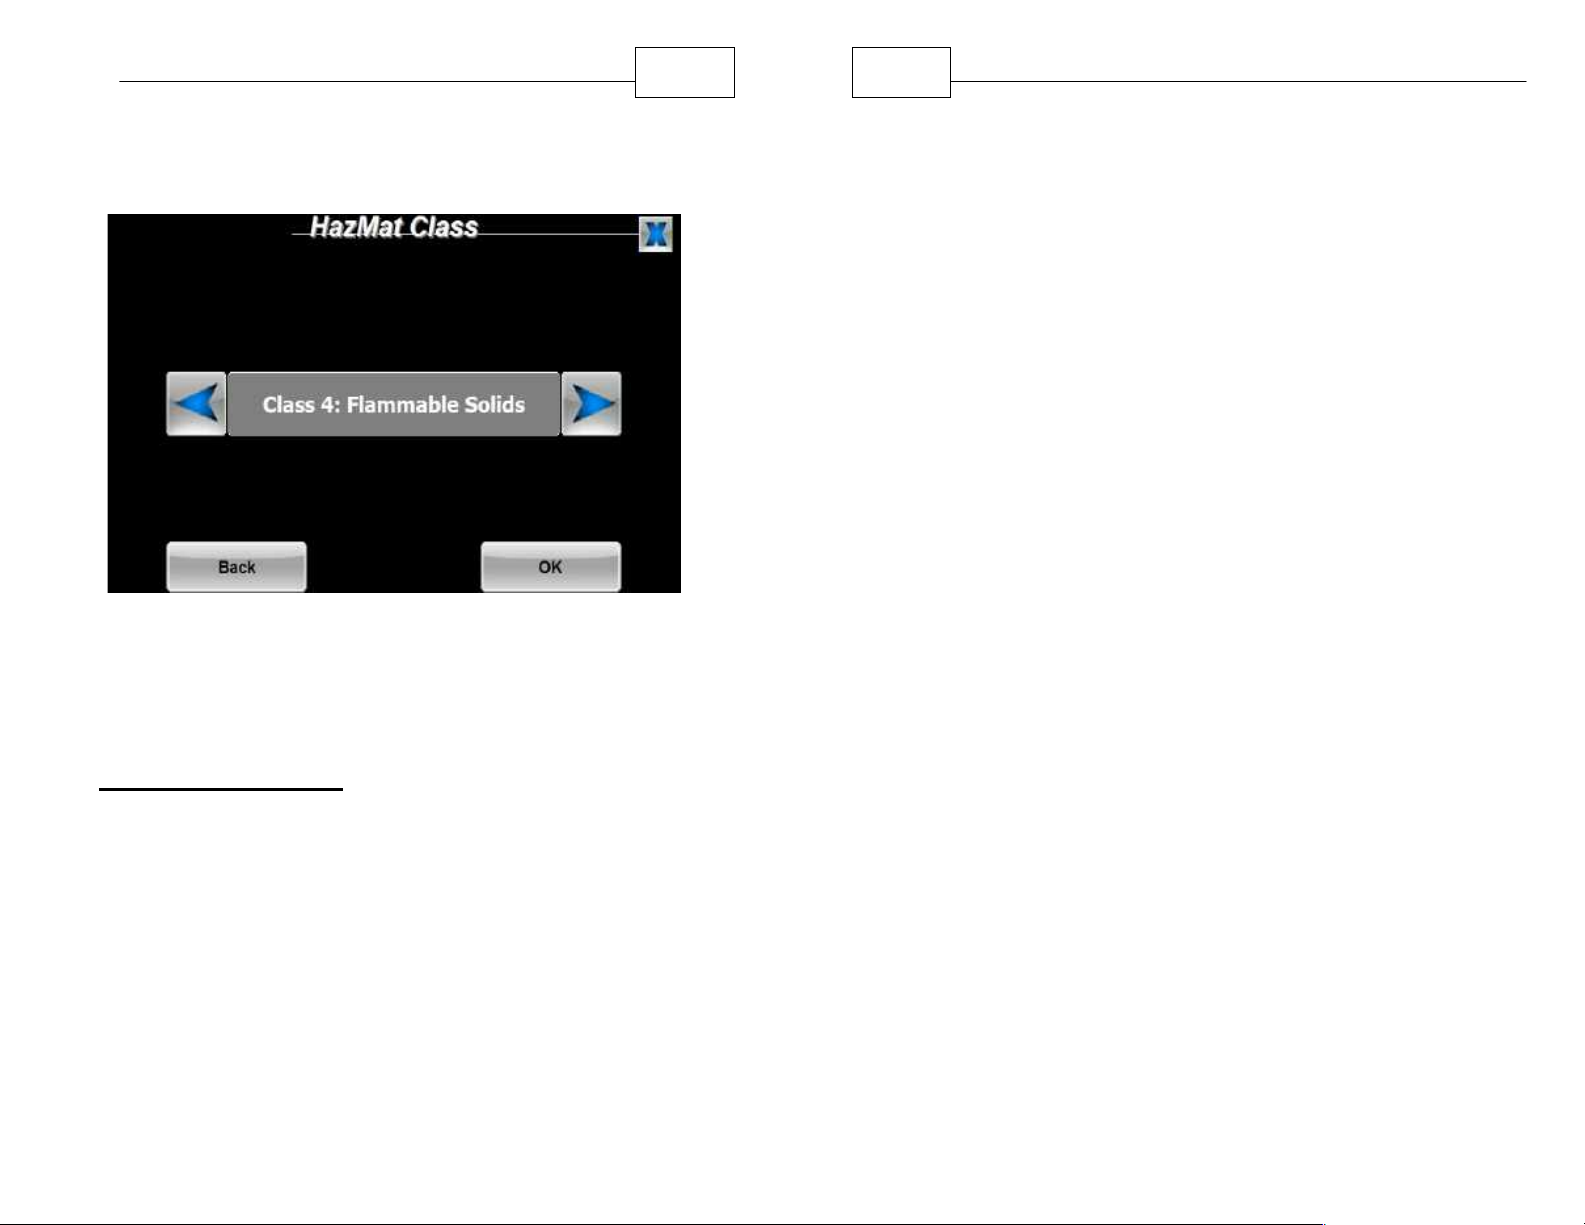
4. The default Hazmat setting is “0” meaning No
Hazmat. To change the Hazmat class, tap the 0,
Page 43
Navigation Preferences
84
85
WorldNav Navigation Software
you will see that it will display “1”. Keep pressing
the number until the proper class number appears.
Truck Settings: Hazmat Class Changed to 4
When the Route Setting screen displays your desired
routing preferences, press <OK> to apply.
4.2 Choosing a System of Units
Specify whether the WorldNav should display
measurements in Metric or English units. The
WorldNav has set up for use in the U.S. therefore
English units are the default value. If you are using
the GPS in Canada you may wish to change to
Metric.
1. Press <Menu>, right arrow icon and then select
<Units>.
2. You can switch between Metric and English units
by pressing the arrow icons. Select one and then
press <OK>.
County Road Setting - On / Off. An "X" next to the
setting indicates that routing will avoid County Roads,
while a check mark indicates that County Roads will
be used if it makes the route significantly shorter. The
default is to avoid county roads as they tend to be
narrow and winding. There are however some county
roads found especially in parts of the Midwest and
Southwest USA which can be suitable for commercial
travel.
Page 44
Navigation Preferences
4.3 Selecting Navigation Panel
Preferences
The GPS will display vital information on the panel.
The name of the next street you must turn onto is
displayed at the top of the Nav Panel. The distance
to your next turn, as well as a directional arrow, are
shown on the upper right section. A checkered flag
will appear in the same section when you reach your
destination. The two other information areas in the
bottom right of the Navigation Panel can be
customized. There are two ways to access your
Navigation Panel Preferences.
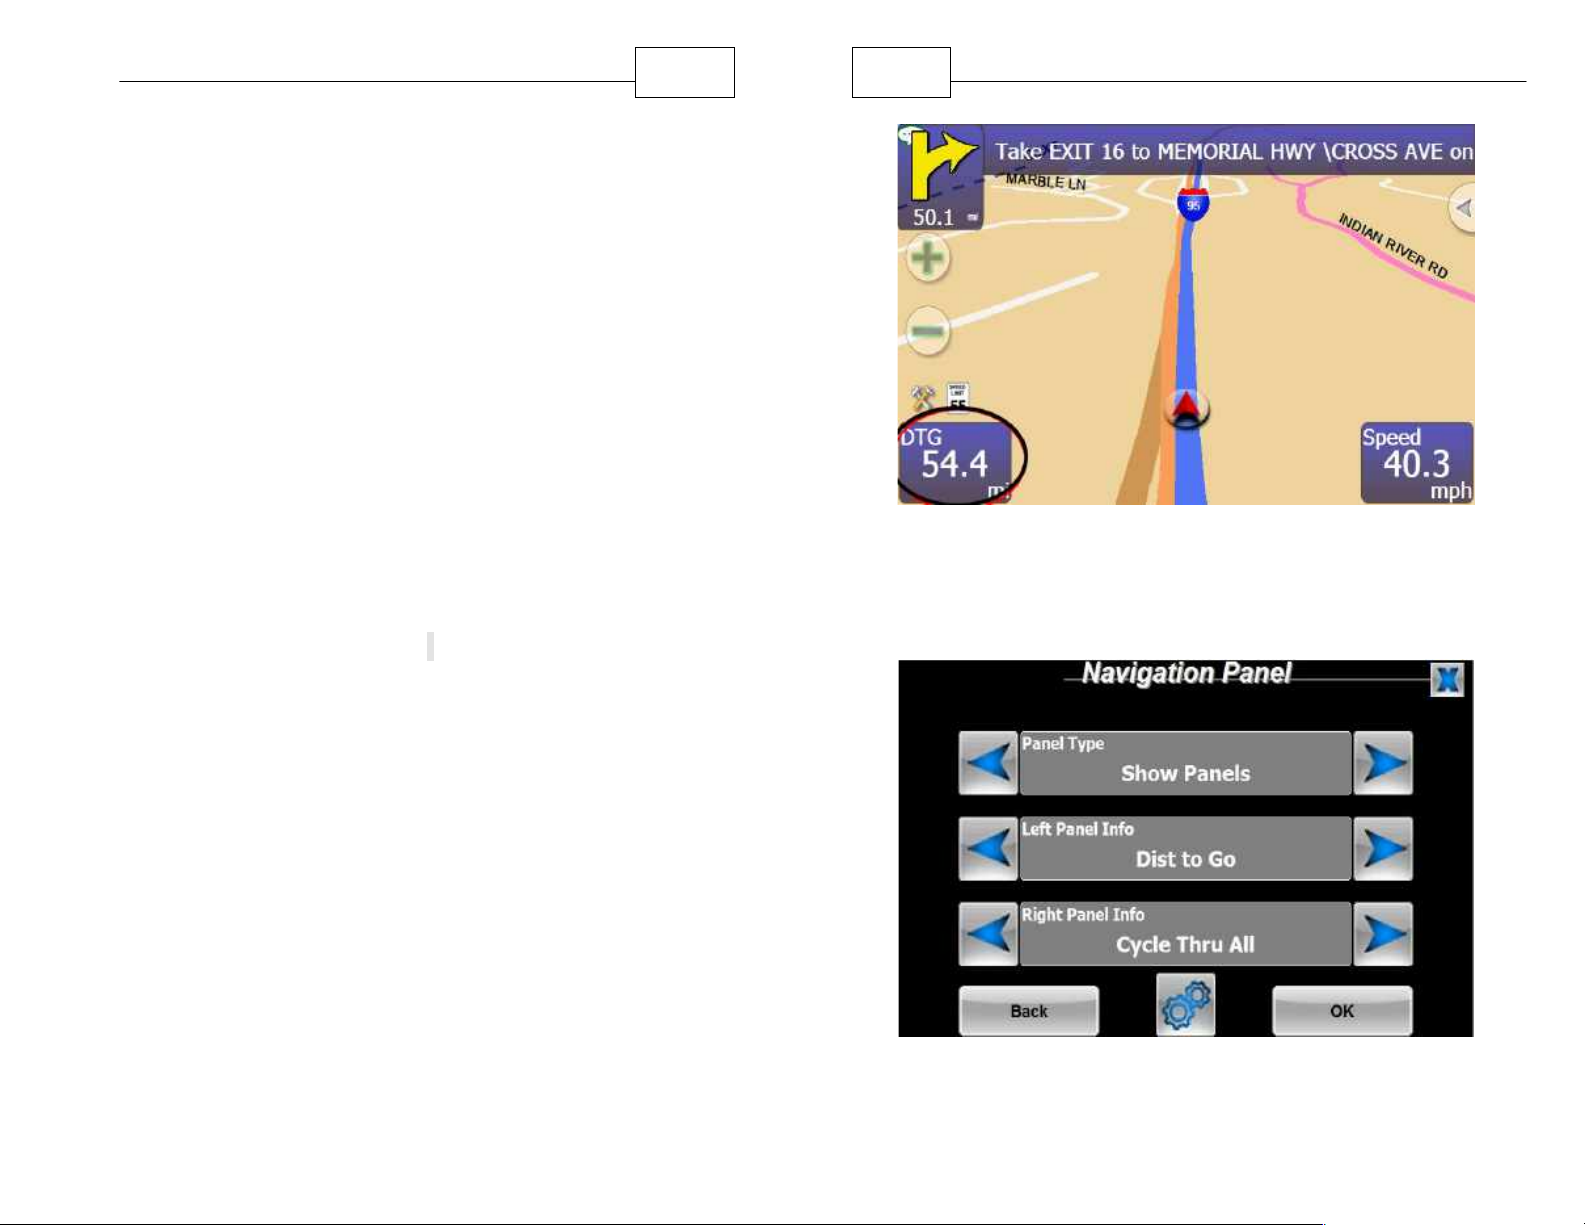
1. Press <Menu>, scroll to the third Menu screen by
pressing the right arrow icons twice, and then
press <Nav Panel>. You can choose to display or
hide the navigation panels. You can also choose
two values to be displayed in the Navigation panel
in either the lower left and lower right panels. For
a quicker way to access your Navigation Panel
Preferences while in navigation mode, tap the
lower left navigation panel (shown circled below) .
86
87
WorldNav Navigation Software
Press Lower Left Panel for Quick Access to the
Navigation Panel Preferences
Navigation Panel Preferences
Page 45
Navigation Preferences
2. In the Navigation Panel Menu, you can scroll the
Upper and the Lower panel to select one of the
following trip information items:
Arrival time: Estimated time of arrival (this is
NOT adjusted for time zone)
Via Arrival time: Estimated time of arrival to
your next Via point, (this is NOT adjusted for
time zone, and will be blank if you are not using
Via points)
Dist to Go: Distance remaining in your current
route
Dist to Via: Distance remaining to your next
Via point (will be blank if you are not using Via
points)
Heading - Degree: Directional heading
focused on degrees, such as 270º (which
means you are traveling West)
Heading - Text: Directional heading focused
on text, such as West)
Odometer1: Odometer 1 - you can decide how
you want to use this setting, you might want to
keep track of miles since your last oil change
Odometer2: Odometer 2 - you can decide
how you want to use this setting, you might
want to keep track of total miles by state
Satellite Info: GPS signal strength
Speed: Current ground speed based on GPS
signal
Time: Current GPS (UTC) time
88
89
WorldNav Navigation Software
Time to Dest: Estimated time until destination
Time to Via: Estimated time until you reach the
next via point. (This will be blank if your are not
using via points).
Time to Turn: Indicates how many minutes or
hours until your next turn
Current Street: Displays the current street you
are traveling on
EOBR Elapsed: If you are using the Electronic
On Board Recording feature it will display the
number of hours you have been driving.
Sunrise/Sunset: Estimated time of each
Battery: Battery power, typically green
indicates that the GPS is charging (this
depends on which WorldNav GPS model you
are using).
Cycle Thru All: Cycles through all trip
information items
Nav Panel: Choose from Show or Hide, the
default is Show so that you can always see the
information as you navigate. If you want more
map area and simply want to hear the
instructions without seeing any information on
the screen, you can select "Hide".
Page 46
Navigation Preferences
TIP - Normally you will keep all the services
turned off and only display Truck Stops and
Weigh Scales at all times. The system will always
be able to find services such as hotels,
restaurants, rest areas, and more. The more
points of interest you display, the slower the
navigation and routing will take.
90
91
WorldNav Navigation Software
4.4 Setting the Services Preferences
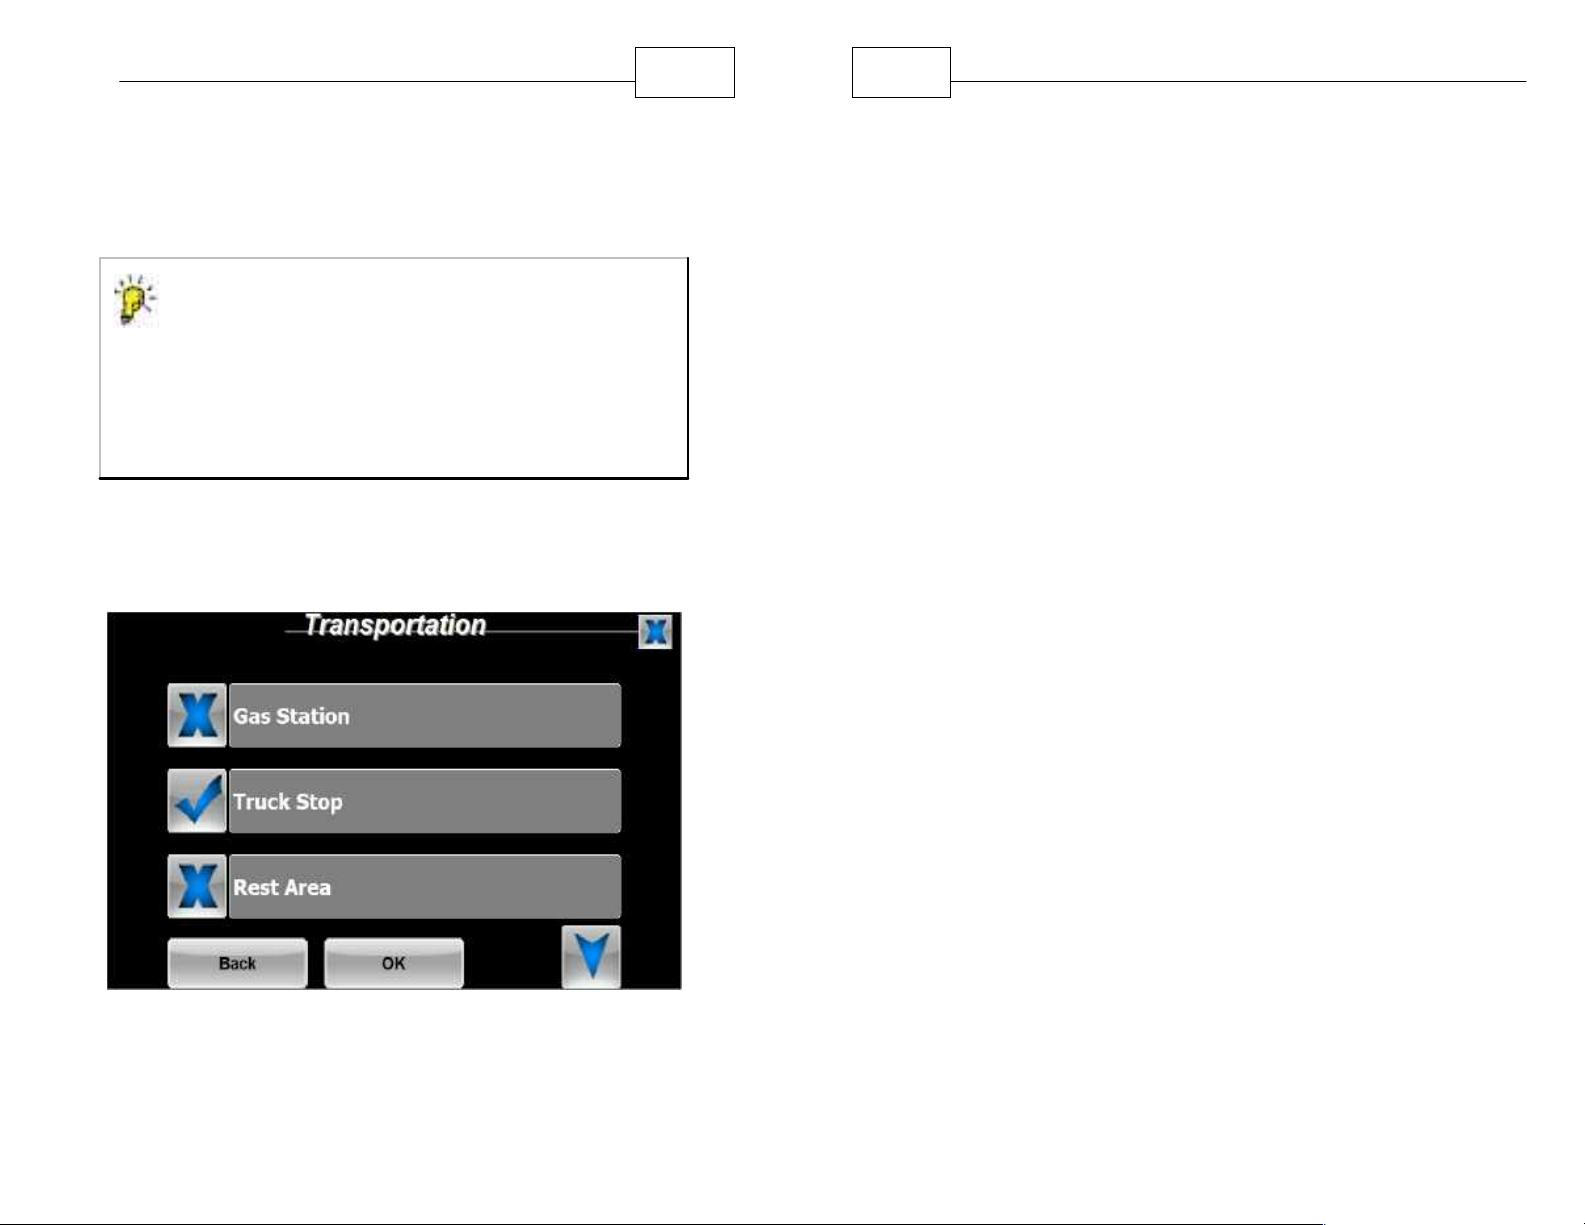
Choose the types of Services that you would like to
appear on the map as you travel.
1.Press <Menu>, right arrow icon, and then
<Services>, <Transportation>.
while traveling, tap the <X> next to the Rest Area
category, a check mark will then be displayed.
When a category has a check mark display then it
will always be displayed on the map as you travel.
2. For example, to display Rest Areas at all times
Select Services to Display
Page 47
Navigation Preferences
92
93
WorldNav Navigation Software
4.5 Voices & Languages
Select the voice that guides you during travel.Press
<Menu>, press right arrow icons twice, press
<Language>. Select the voice and therefore the
language that you would like to hear while navigating.
The Simon and Susan voices are for English, there is
a voice for Spanish and one for French. You can also
choose to Mute the voice so that no voice will be
heard during navigation. You can also choose the
style of keyboard you enter your information with:
QWERTY (Computer style) or Alphabetical. Use the
right and left arrow icons to make your selections.
When your preferred voice is displaying in the text
field press <OK>. Notice that when you change the
voice to another language the menus change to the
corresponding language as well.
4.6 Changing the Time
The GPS has preset time to U.S. East Coast.
Change the time manually if you are in another time
zone or you need to adjust for Daylight Saving Time.
1. Press <Menu>, press the right arrow button twice,
to advance to the third Menu screen, then press
<GPS Status>, GPS information will be displayed.
Voice/Language Selection Screen
Select GPS Status
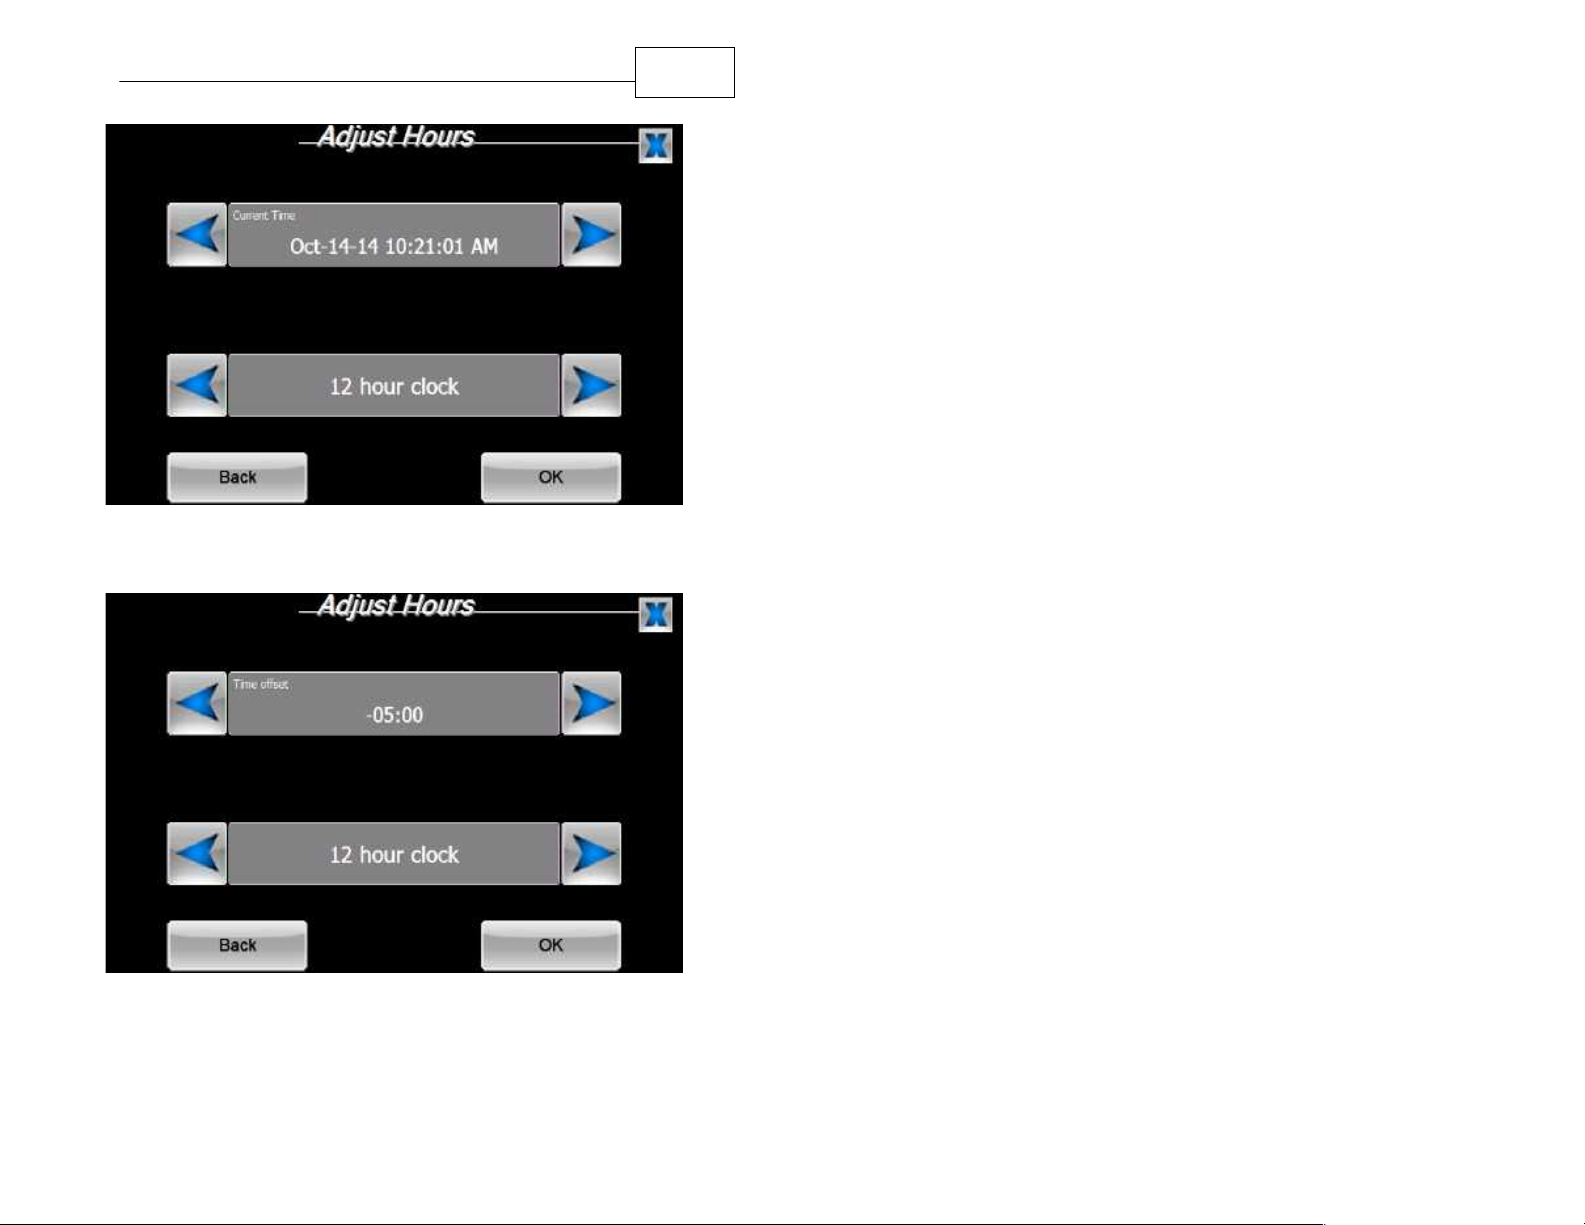
2. Tap the Date/Time field or the triangle under the
word "Change" to adjust the time. Change the time
by pressing the left or right blue triangles. If the
GPS is locked into position you will see the date
and time displayed. If the GPS is not locked in you
can still change the time. See the pictures below.
Page 48
Navigation Preferences
Adjust Time while GPS is Locked Into Position
94
Adjust Time while GPS is Not Locked Into Position
3. Choose between a 12 and 24 hour clock.
Page 49

Part
V
97
WorldNav Navigation Software
5 Special Features
5.1 Truck Restrictions
The WorldNav navigation software will automatically
avoid the map areas shown in bright pink as those
areas are restricted against truck travel. The types of
restrictions include low bridges (height restriction),
weight, No Trucks (no commercial vehicle zones). If
a specific area is restricted at any part of the day we
will show the restriction as valid for the entire day just
to be on the safe side when creating a route for you.
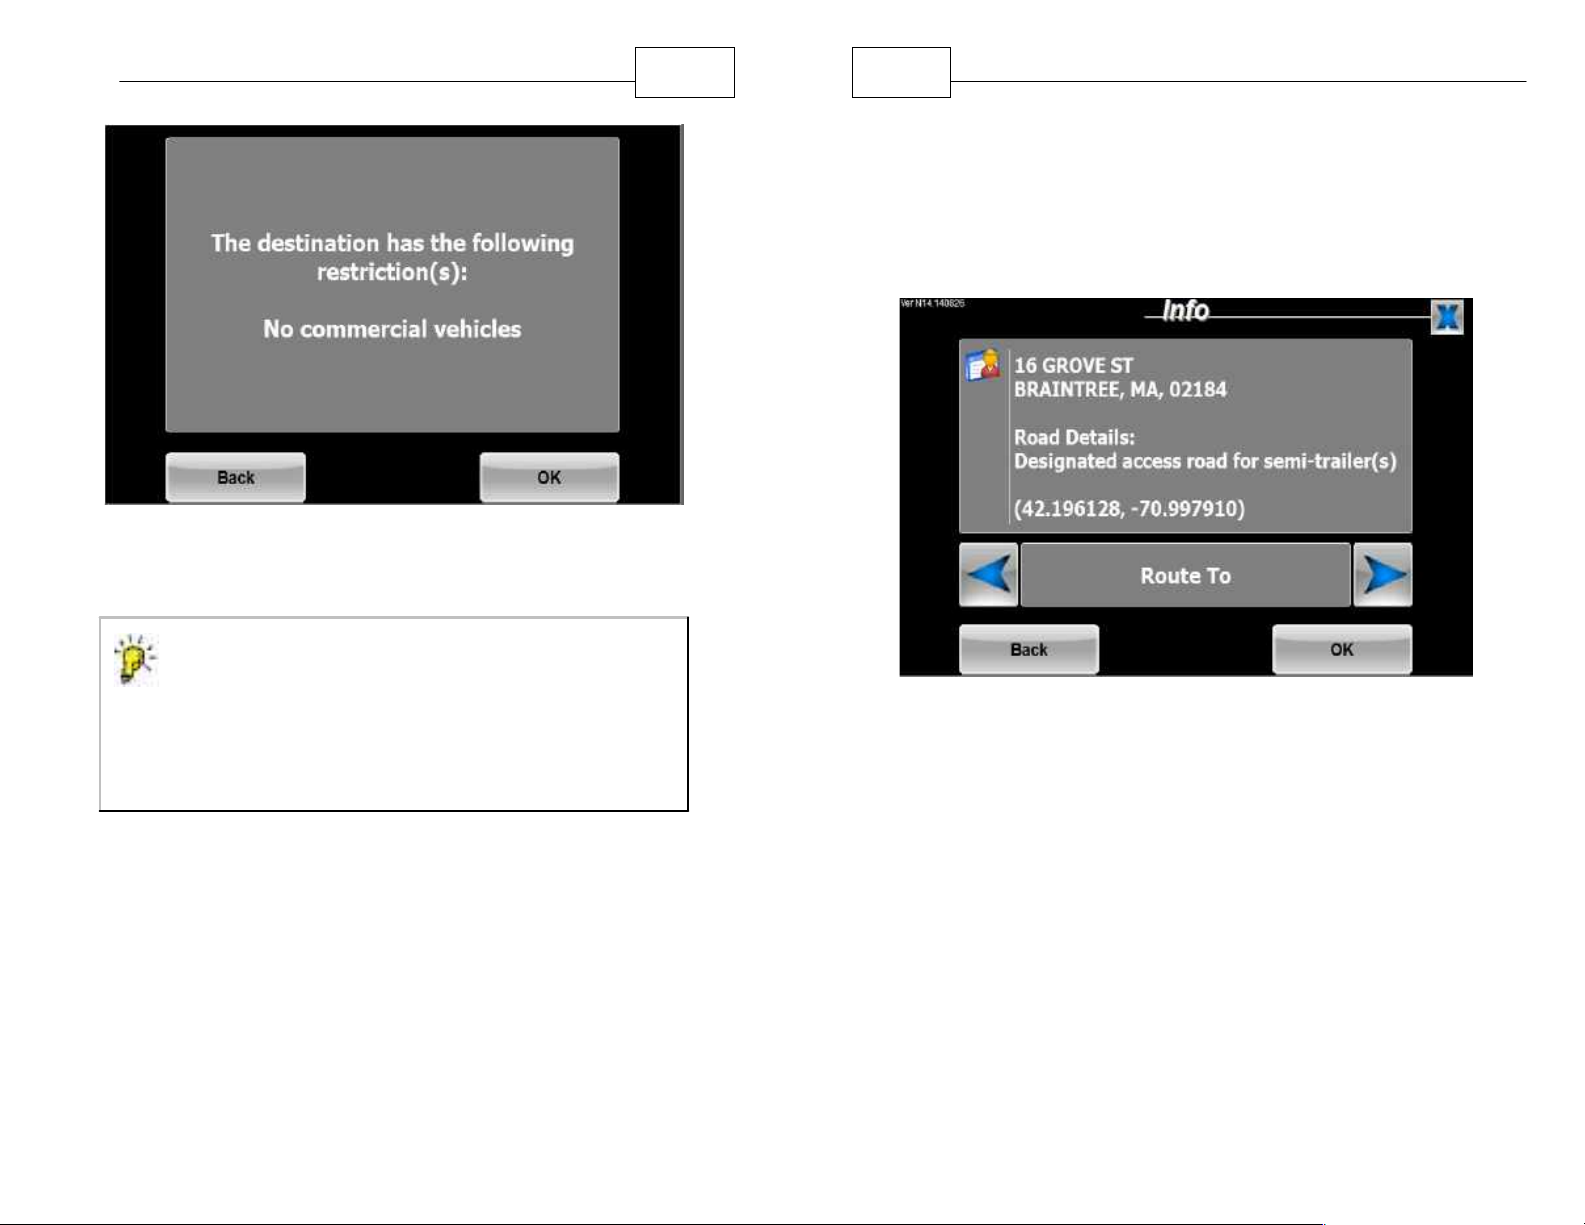
If you must make a delivery to a truck restricted area,
it is best to check ahead with your dispatcher or the
receiver to confirm. WorldNav will warn you by
flashing red (instead of the usual green color of the
navigation information) if you try to enter a truck
restricted area.
Page 50
Special Features
NOTE - If the navigation screen turns red
(instead of green) then you have entered a truck
restricted zone. Due so at your own risk as
WorldNav will keep you away from these areas
unless you specifically decide to disobey the
GPS.
If your destination is restricted, call ahead
to make sure it is ok to deliver.
98
99
WorldNav Navigation Software
5.2 Map Information
Press <Menu>, <Info>, the GPS will display the best
estimate of your current location and program version
number.
Map Information Screen
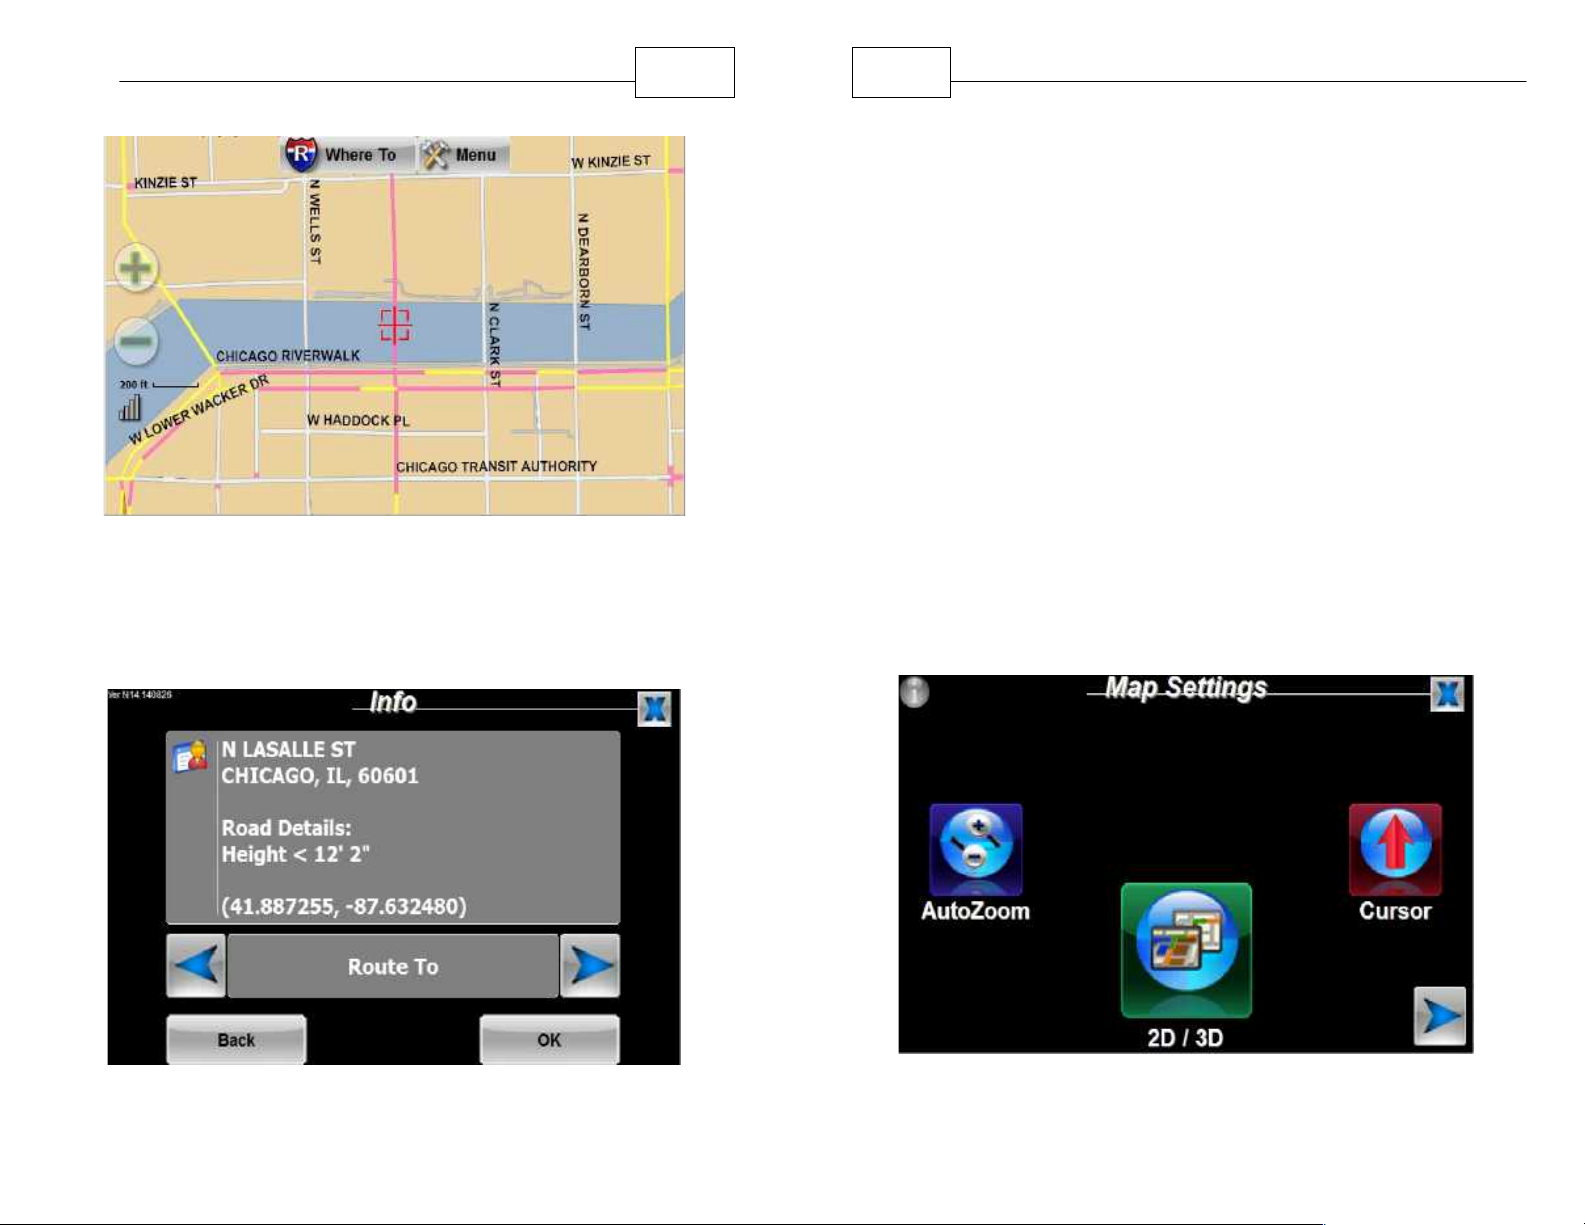
To learn more about the reason for the restriction,
zoom in sufficiently to the map and position your
target point over the pink area of the map. Select
<Menu> then <Info>.
Page 51
Special Features
100
101
WorldNav Navigation Software
5.3 Auto Zoom
Auto-Zoom will automatically change your map zoom
level depending on your speed. It will zoom in when
you slow down and zoom out when you speed up.
Auto-Zoom preference is part of the Map Settings
menu. If you prefer to see the map at a constant
display, select "OFF", then use the zoom buttons to
set the desired map view. An enhanced zoom out
function allows for a more detailed map view and
easier view of the entire route.
Position target for restriction info
The example below shows a 12' 2" height restriction.
Truck Restriction Info
1. Select <Menu>,<Right Blue Arrow>,
<Map Settings>, <AutoZoom>
Map Settings
Page 52
Special Features
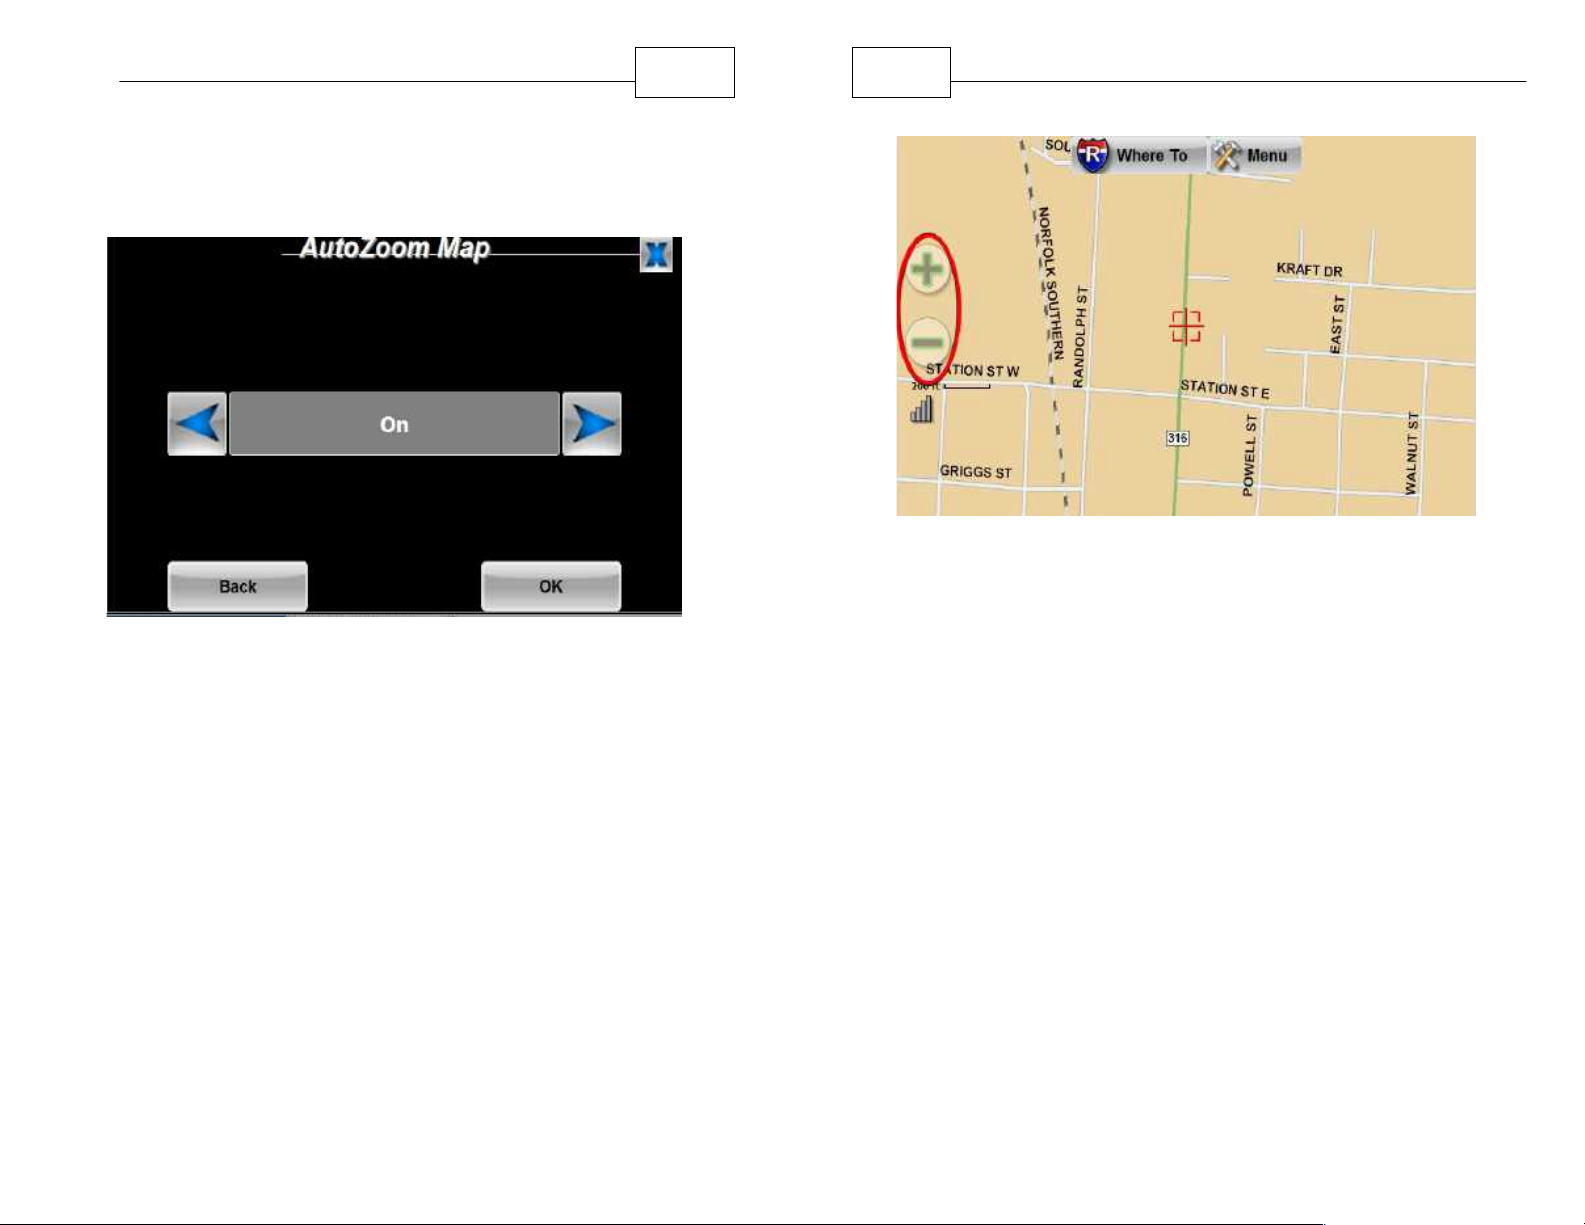
2. Press either the left or the right arrow icon next
to turn on/off the Auto Zoom feature.
Auto Zoom
102
103
WorldNav Navigation Software
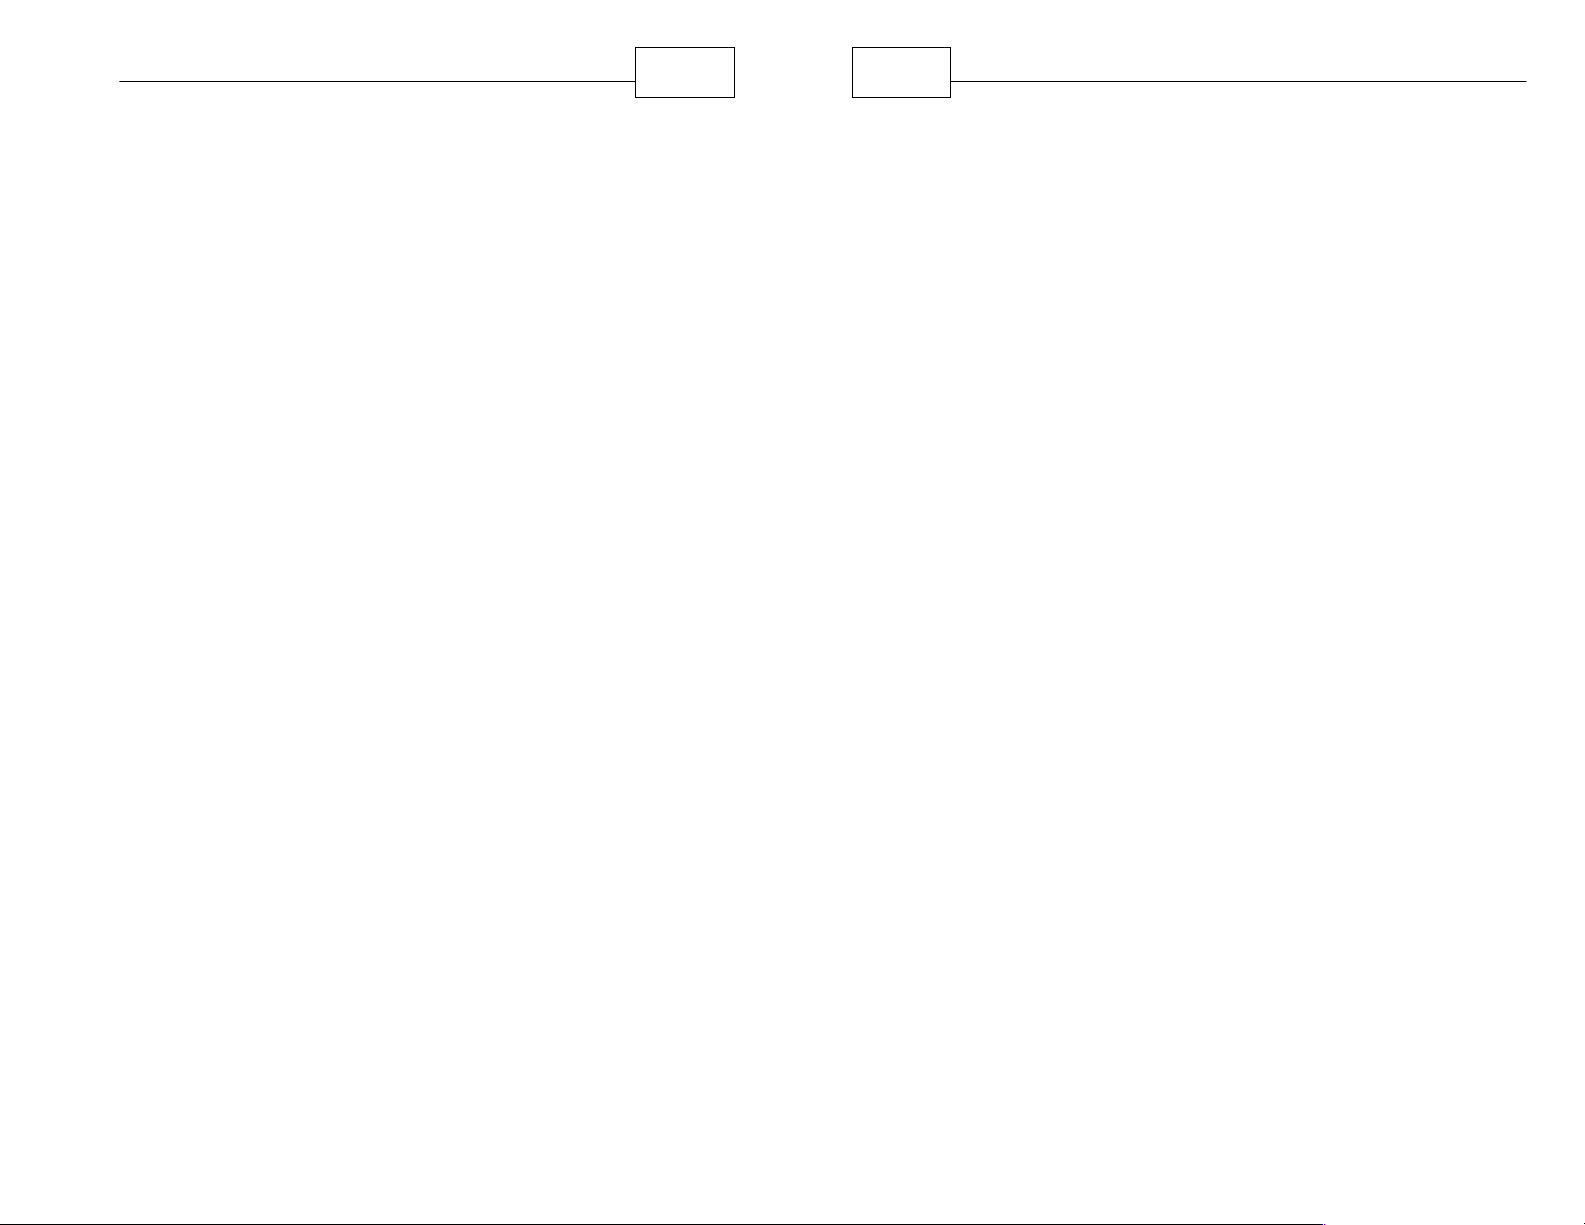
Zoom Buttons in Map Mode
It is also possible to manually control the level of
zoom while in either Map or Navigation mode and 2D
or 3D Mode. Use the "+" and "-" buttons on the left
side of the screen (seen below) to adjust zoom
levels. You can continuously zoom in or out by
holding the the plus or minus zoom buttons. These
buttons are available in both map mode and
navigation mode.
Page 53
Special Features
104
105
WorldNav Navigation Software
5.4 2D/3D Views
Press <Menu>, right arrow icon, <Map Settings> and
then <2D/3D>. This menu also provides access to
the Split Screen view which automatically adjusts the
map to 3D view on the main part of the screen (Left
side) and 2D on the right side of the map screen.
Your map can be shown in two dimensions where the
streets are clearly marked. This looks like a regular
printed paper map. For 3D mode, only the main
streets are labeled but the map more clearly displays
what your route looks like while driving as you can
"see" further ahead. The split screen view allows you
see 3D in the main window and 2D in the smaller
right side window.
Press <OK> to apply your preference.
5.5 Cursor
Through Map Settings you can also choose the style
of Nav Cursor you would like to see when in
Navigation mode. The default cursor shows a red
triangle.
Using the right and left arrows, you can choose
different colors and types of trucks. The cursor (also
called an Avatar in some programs) will indicate your
current position on the map as you drive.
Page 54
Special Features
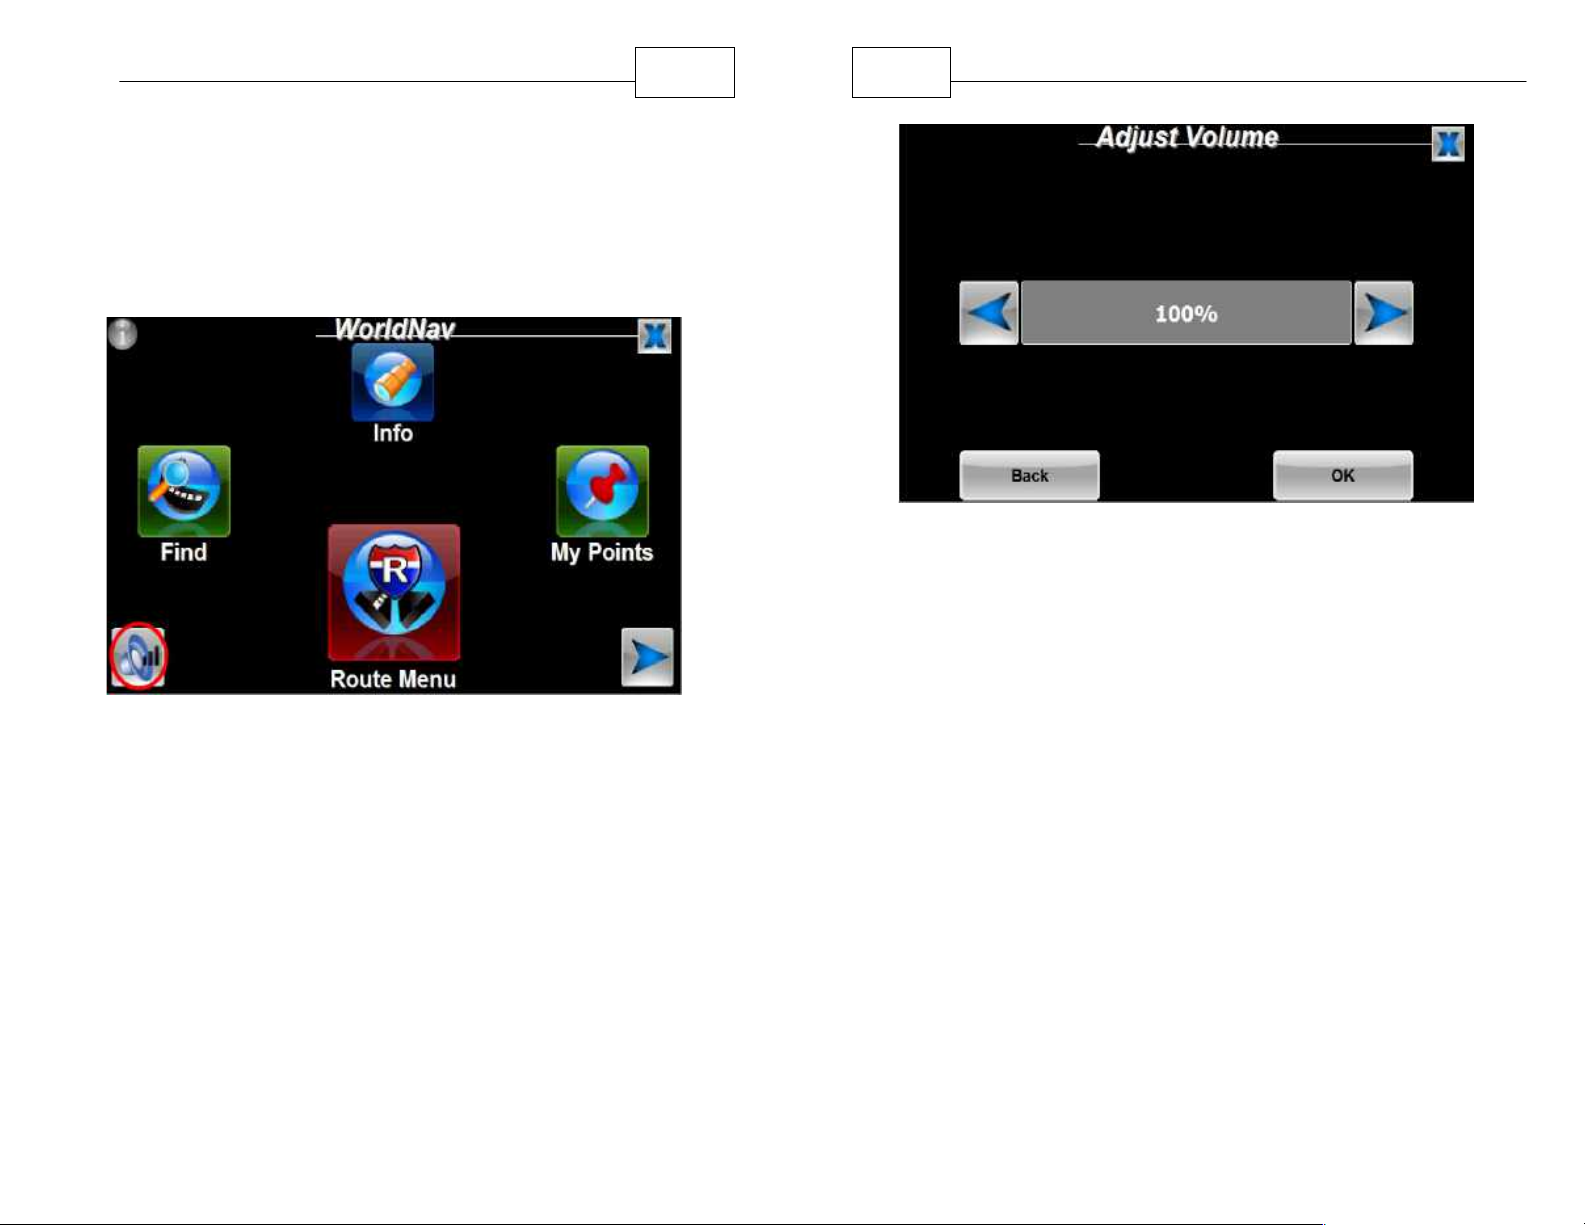
5.6 Adjusting Sound
WorldNav offers a convenient way to adjust the
sound volume within the navigation program (rather
than having to exit navigation and use the hardware
menu). Select the Sound Volume from any screen.
106
107
WorldNav Navigation Software
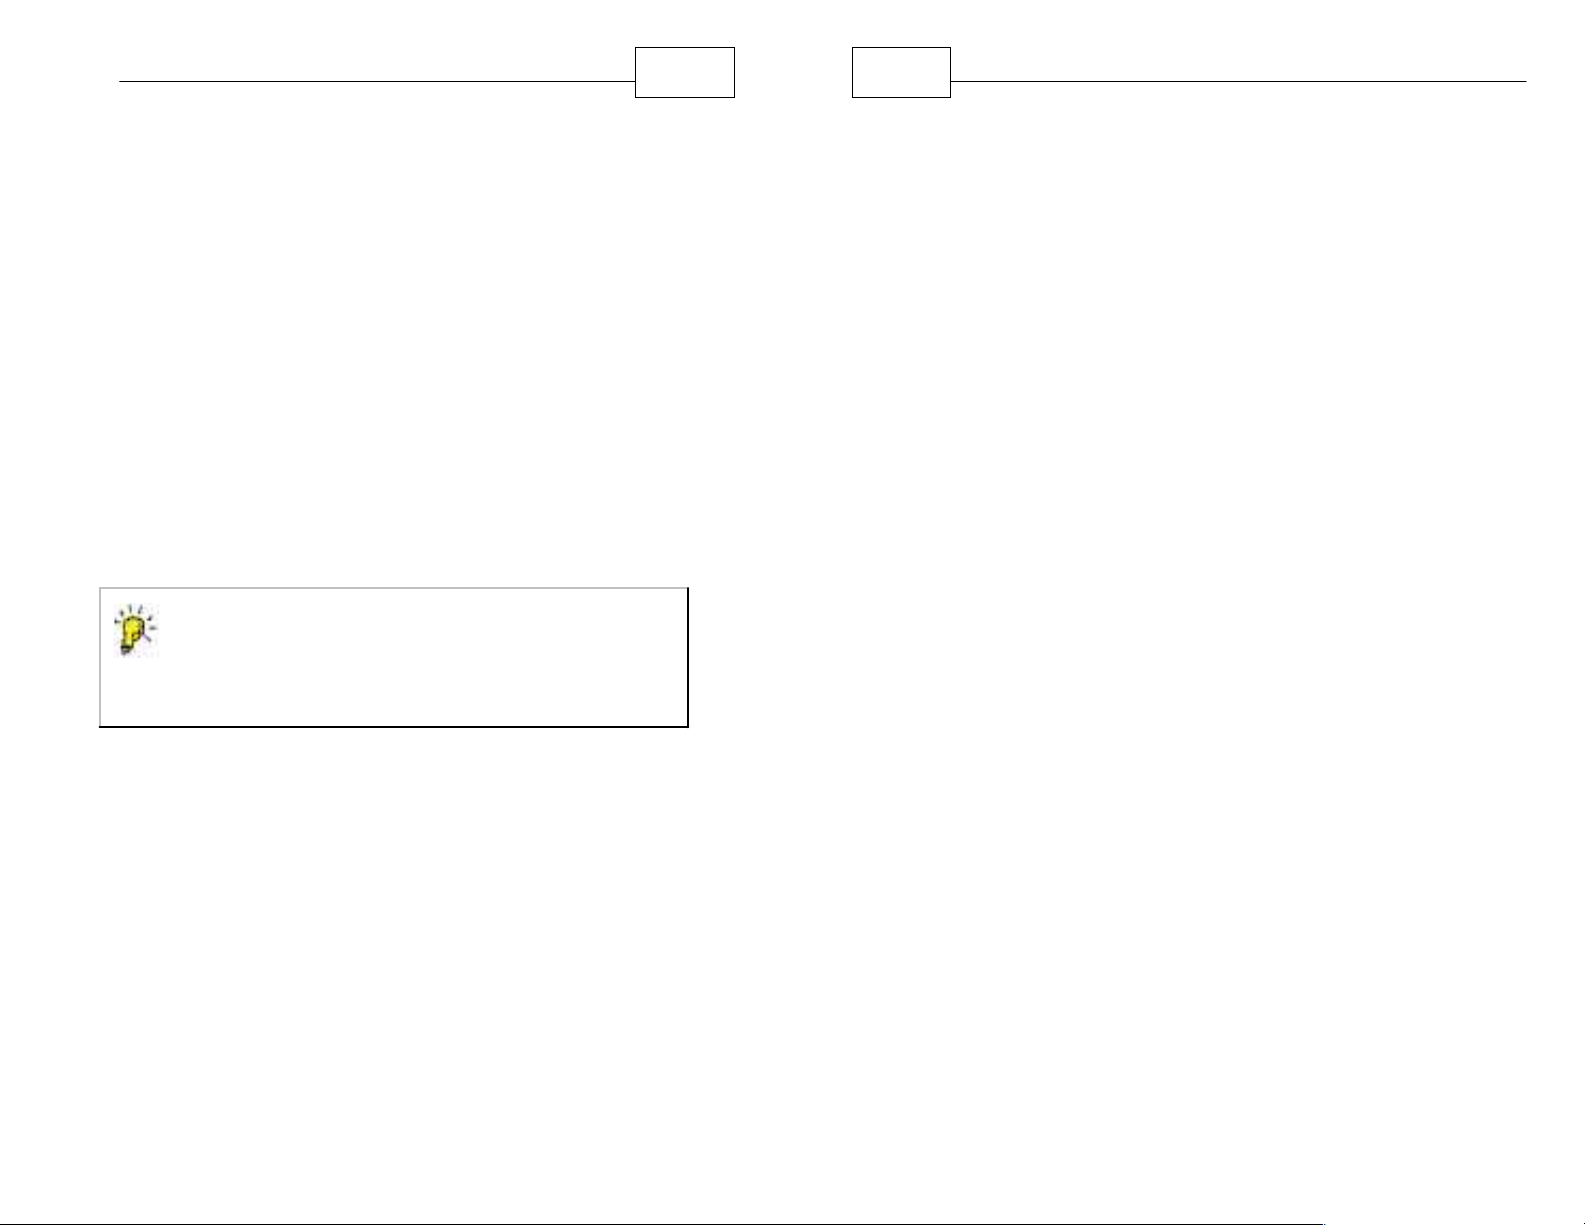
Adjust Volume
Sound Volume
The default volume is set to the highest setting which
is 100%, if you care to lower the volume you can
select another value. Use the arrows to view the
choices. Press <OK> when you are done.
Page 55
Special Features
Note: While the GPS automatically dims the
screen display in night mode, if you wish to adjust
screen brightness manually see the appropriate
Hardware User Guide for your GPS.
108
109
WorldNav Navigation Software
5.7 Day/Night Mode
Your map has the ability to have a black background
and blue streets for improved night vision and a
beige background with gray streets for day vision.
Select <Menu>, right arrow icon and then select
<Day/Night>. You can also select <Auto> mode
which automatically switches from day to night (and
vice versa) based on your current GPS position
(using latitude and longitude coordinates so that
when you are far north the auto night mode would
kick in at a different time from when you are far
south). When your preferred mode is displayed in
the text field press <OK> to apply the setting.
5.8 Trip Information
Review trip statistics including speed, distance to go,
estimated time of arrival, time, odometers and trip
timer simultaneously.
There are two ways to access your current trip
statistics.
1. Press <Menu>, then use the right arrow icon to
get to the third Menu screen and then press
<Trip Stats> to see the Trip Statistics screen.
Note that this screen is a snapshot of the data
within a few seconds of the real time situation.
To configure your navigation screen to show
some of this information, use the Nav Panel
menu to set the desired display.
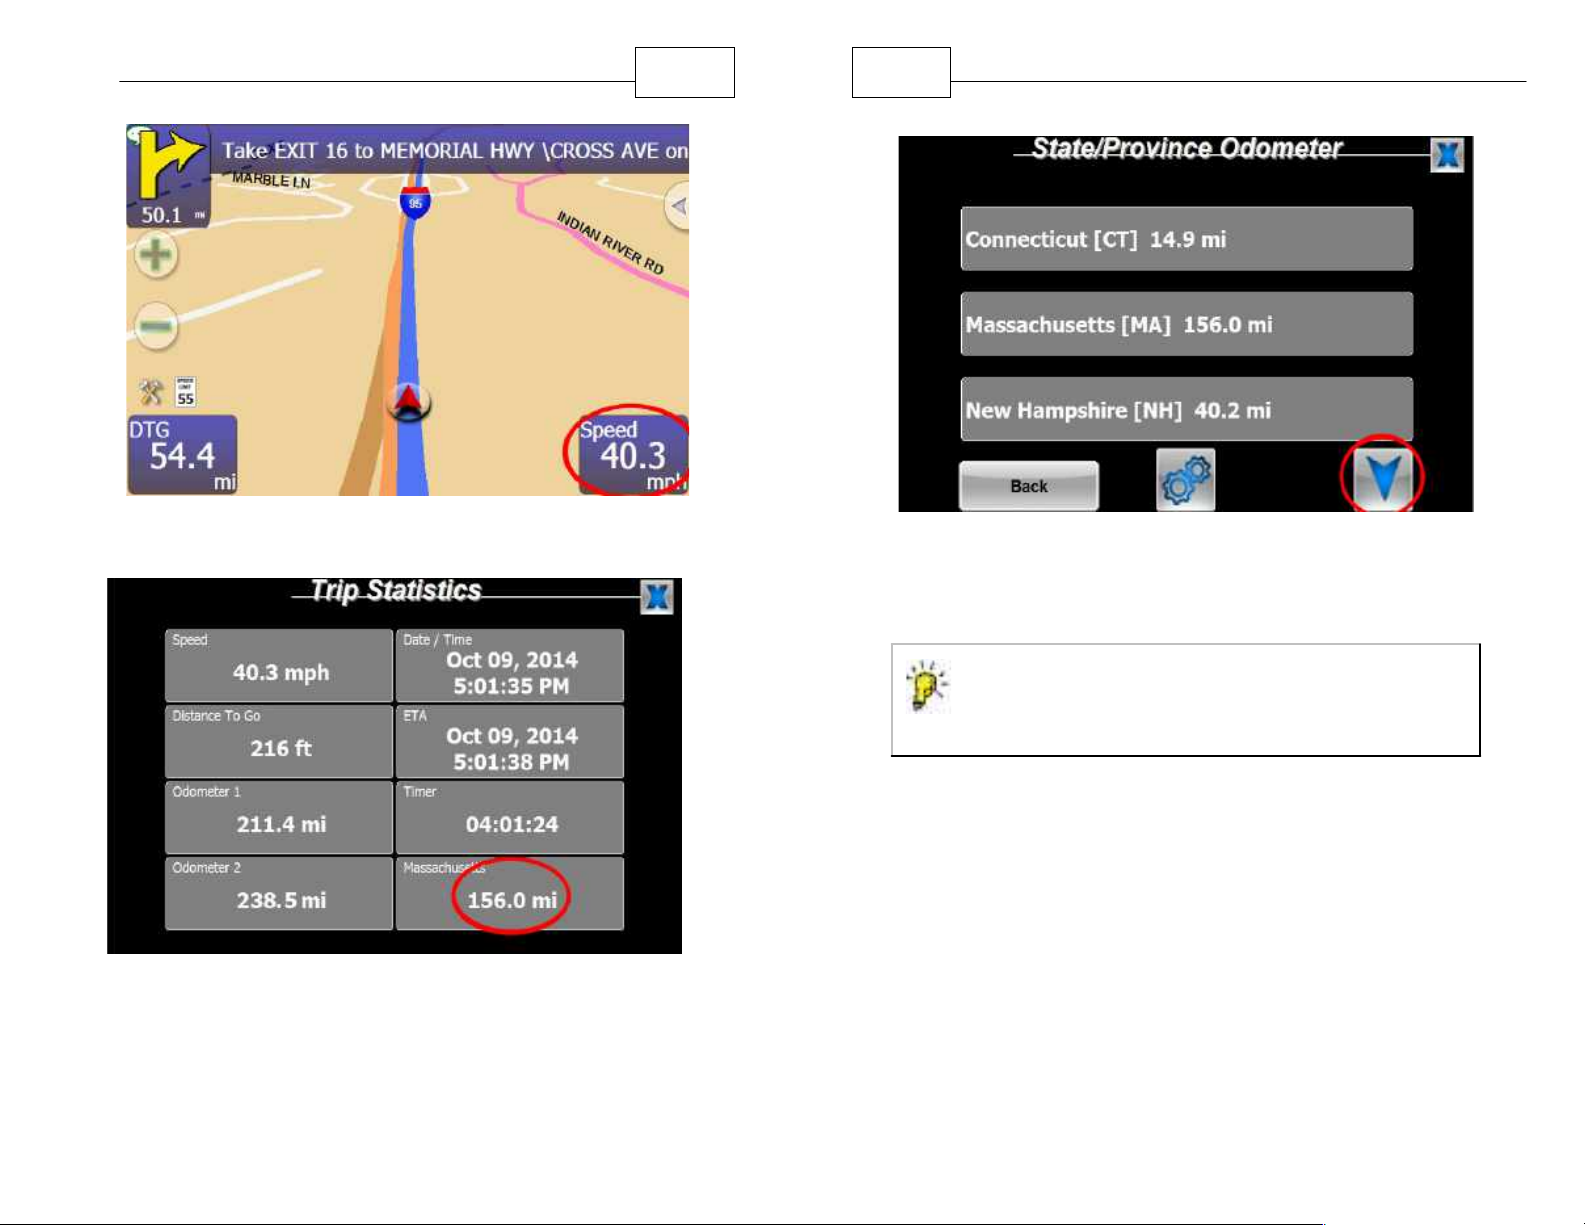
2. For a quicker way to access your Trip Statistics
while in Navigation Mode, tap the bottom right
panel on the right side (indicated below).
Page 56
Special Features
TIP - The Trip Timer can be used to monitor total
drive time. This feature is helpful for drivers
seeking to limit number of hours driven
Press Lower Panel (shown circled above) to quickly
access the Trip Statistics screen shown below.
110
111
WorldNav Navigation Software
State Mileage Log - Press the bottom right arrow
(shown circled above) to scroll down to the next
page of entries).
Trip Statistics Screen - Tap the bottom right area
(shown circled above) to reveal the state mileage log
Page 57
Special Features
112
113
WorldNav Navigation Software
5.9 Simulating a Route
You can simulate a previously created route to
preview what it will look like while you are driving.
The simulation mode is normally used for
demonstration and training purposes. Simulation
mode will automatically turn off if you exit the
navigation program. Your navigation panels will
appear in blue (rather than green) when you are in
simulation mode.
1. Create a route.
2. Press <Menu>, <Route Menu>, right arrow icon
and then press <Simulator>.
3. The simulation will automatically begin.
4. To end the simulation, simply tap the screen once
and a menu will appear allowing you to end the
simulation. You may resume the simulation by
touching the red arrow in the bottom left corner.
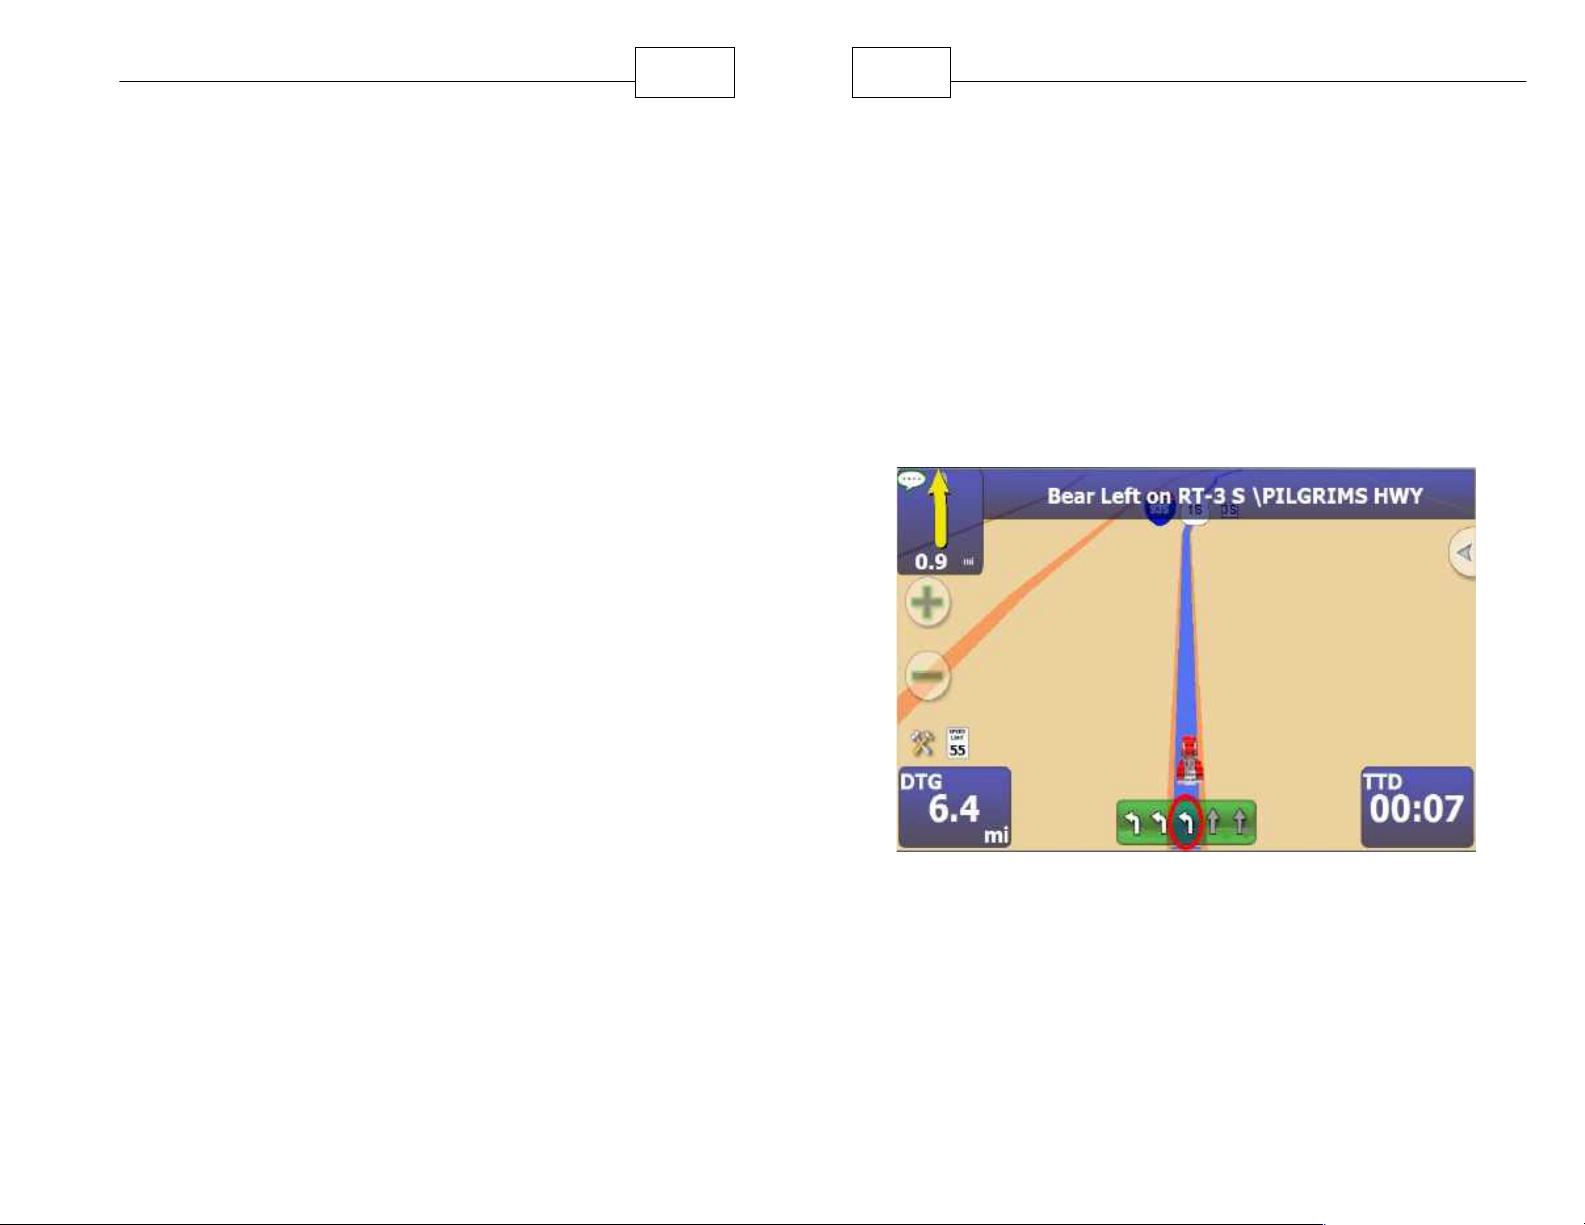
5.10 Lane Assist
Where available, (mostly for interstate travel but also
available for some city roads), you will see gray and
white arrows showing the lane configuration for the
highway. Follow the White arrows to be positioned in
the proper lane for the next turn or exit. In the
example shown below, you will need to travel in the
lane marked with a circle. All three lanes turn to the
left (which is exactly what you want) however trucks
should normally stay in the right lane).
Lane Assist - Follow the white arrows.
Page 58
Special Features
114
115
WorldNav Navigation Software
5.11 Junction View
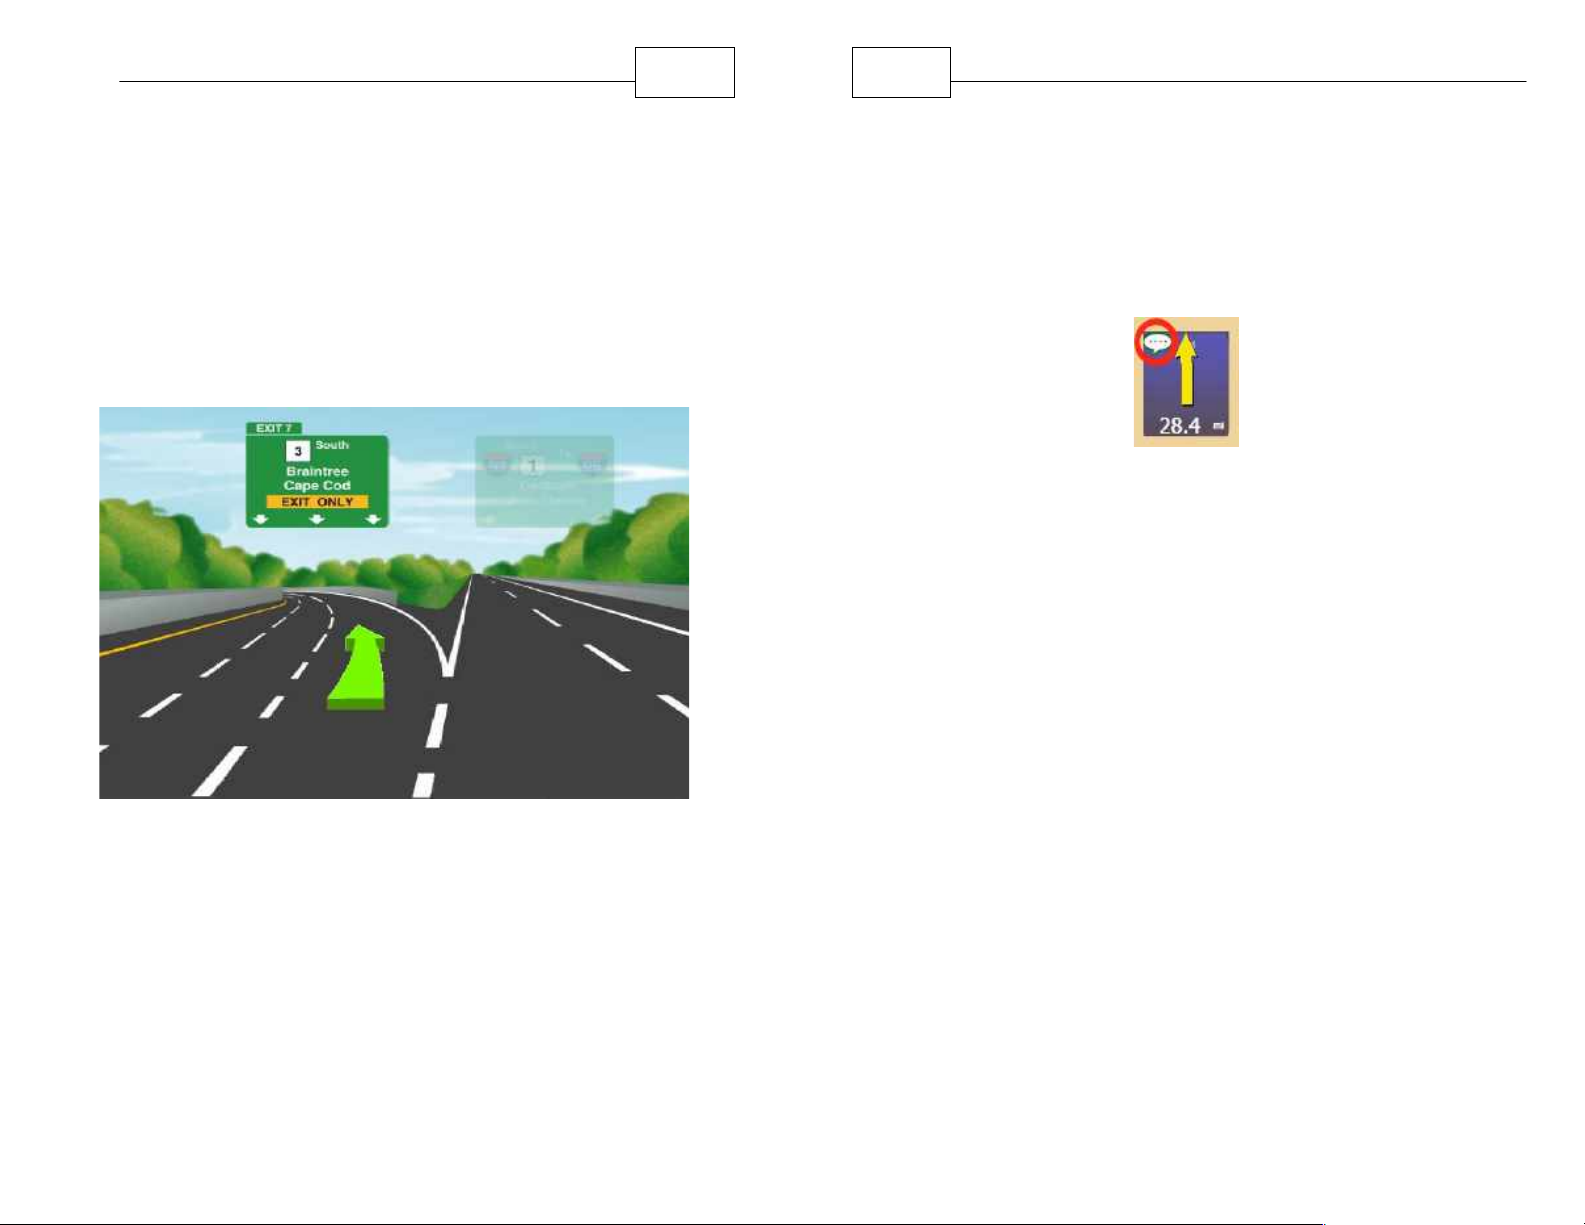
A realistic display of the road signs and a green
arrow indicator showing you which lane you should
use for travel. Available for millions of miles of
junctions and interchanges. Please note that while
there are millions of miles of roads that are covered,
there are some locations where photos are
unavailable.
5.12 Repeat Instruction
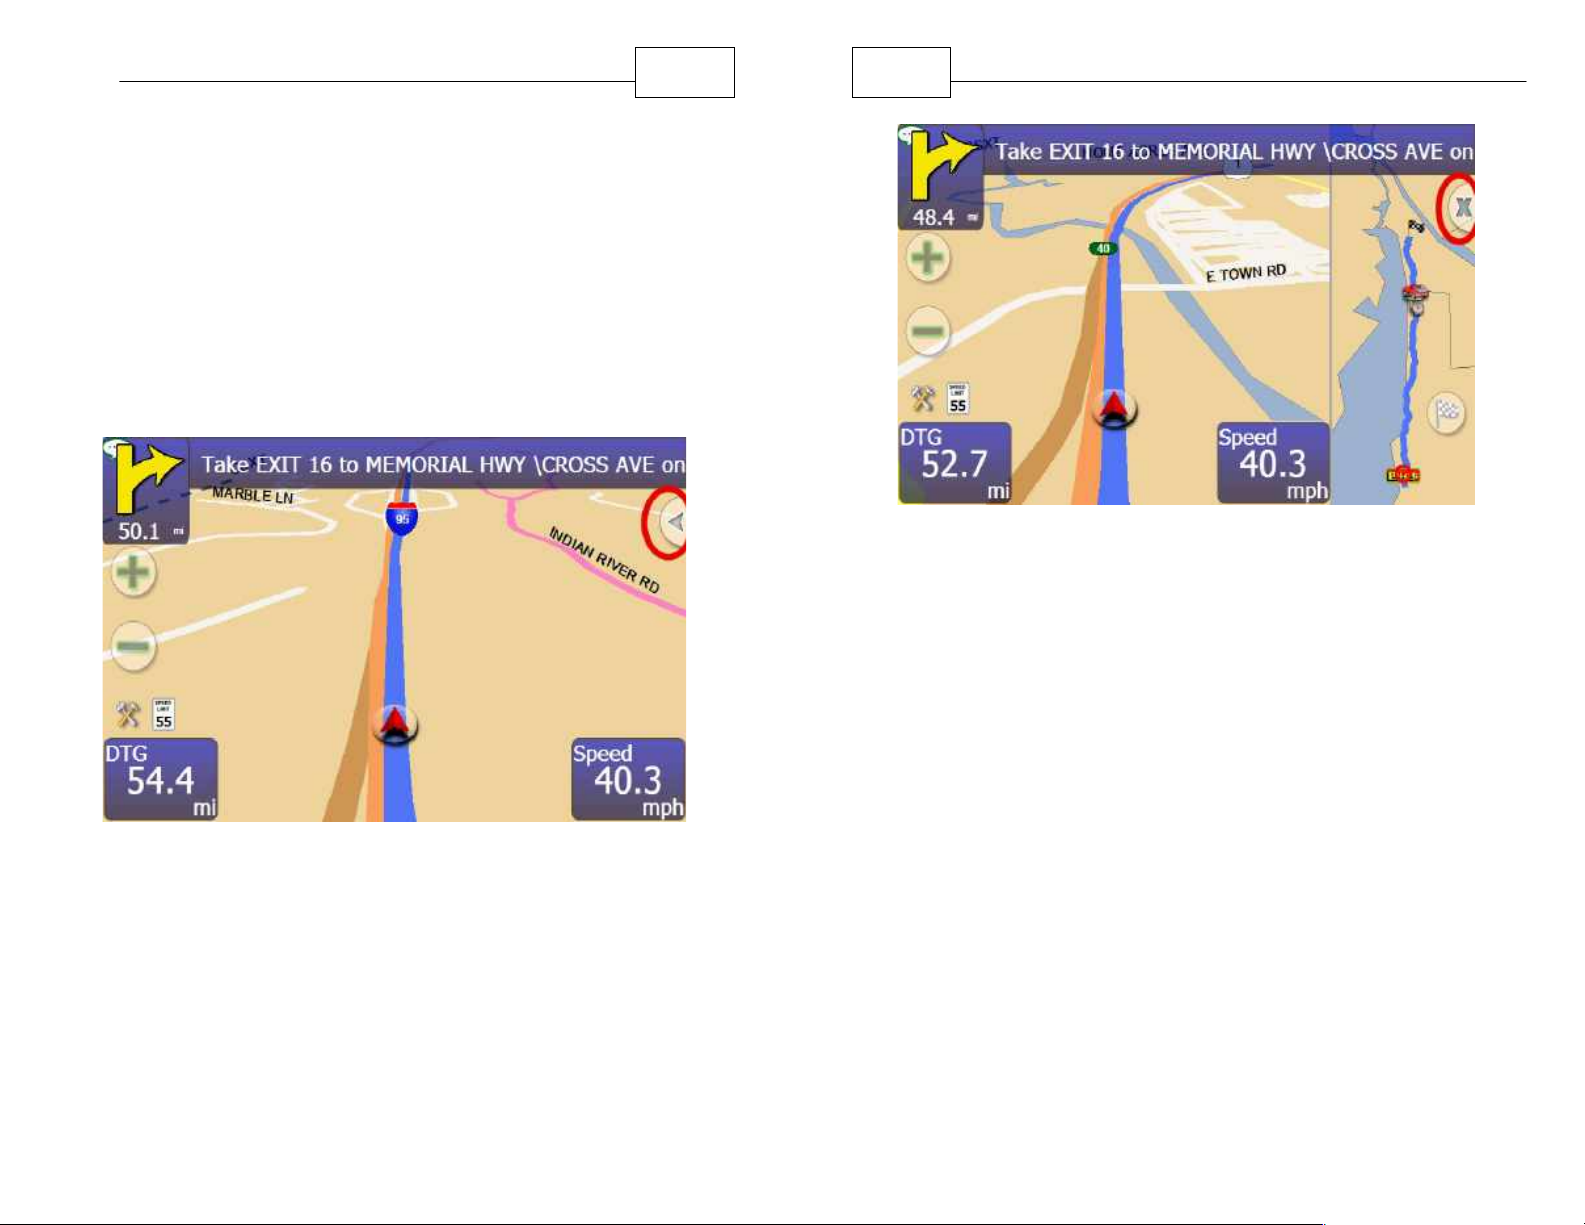
Sometimes you may want to hear the voice
instruction again due to noise in the vehicle. Tap the
bubble to the left of the arrow to repeat the voice
instruction for the upcoming turn.
Tap the voice bubble at the top left portion of the Turn
Arrow screen to repeat the voice instruction.
Junction View
.
Page 59
Special Features
5.13 Split Screen
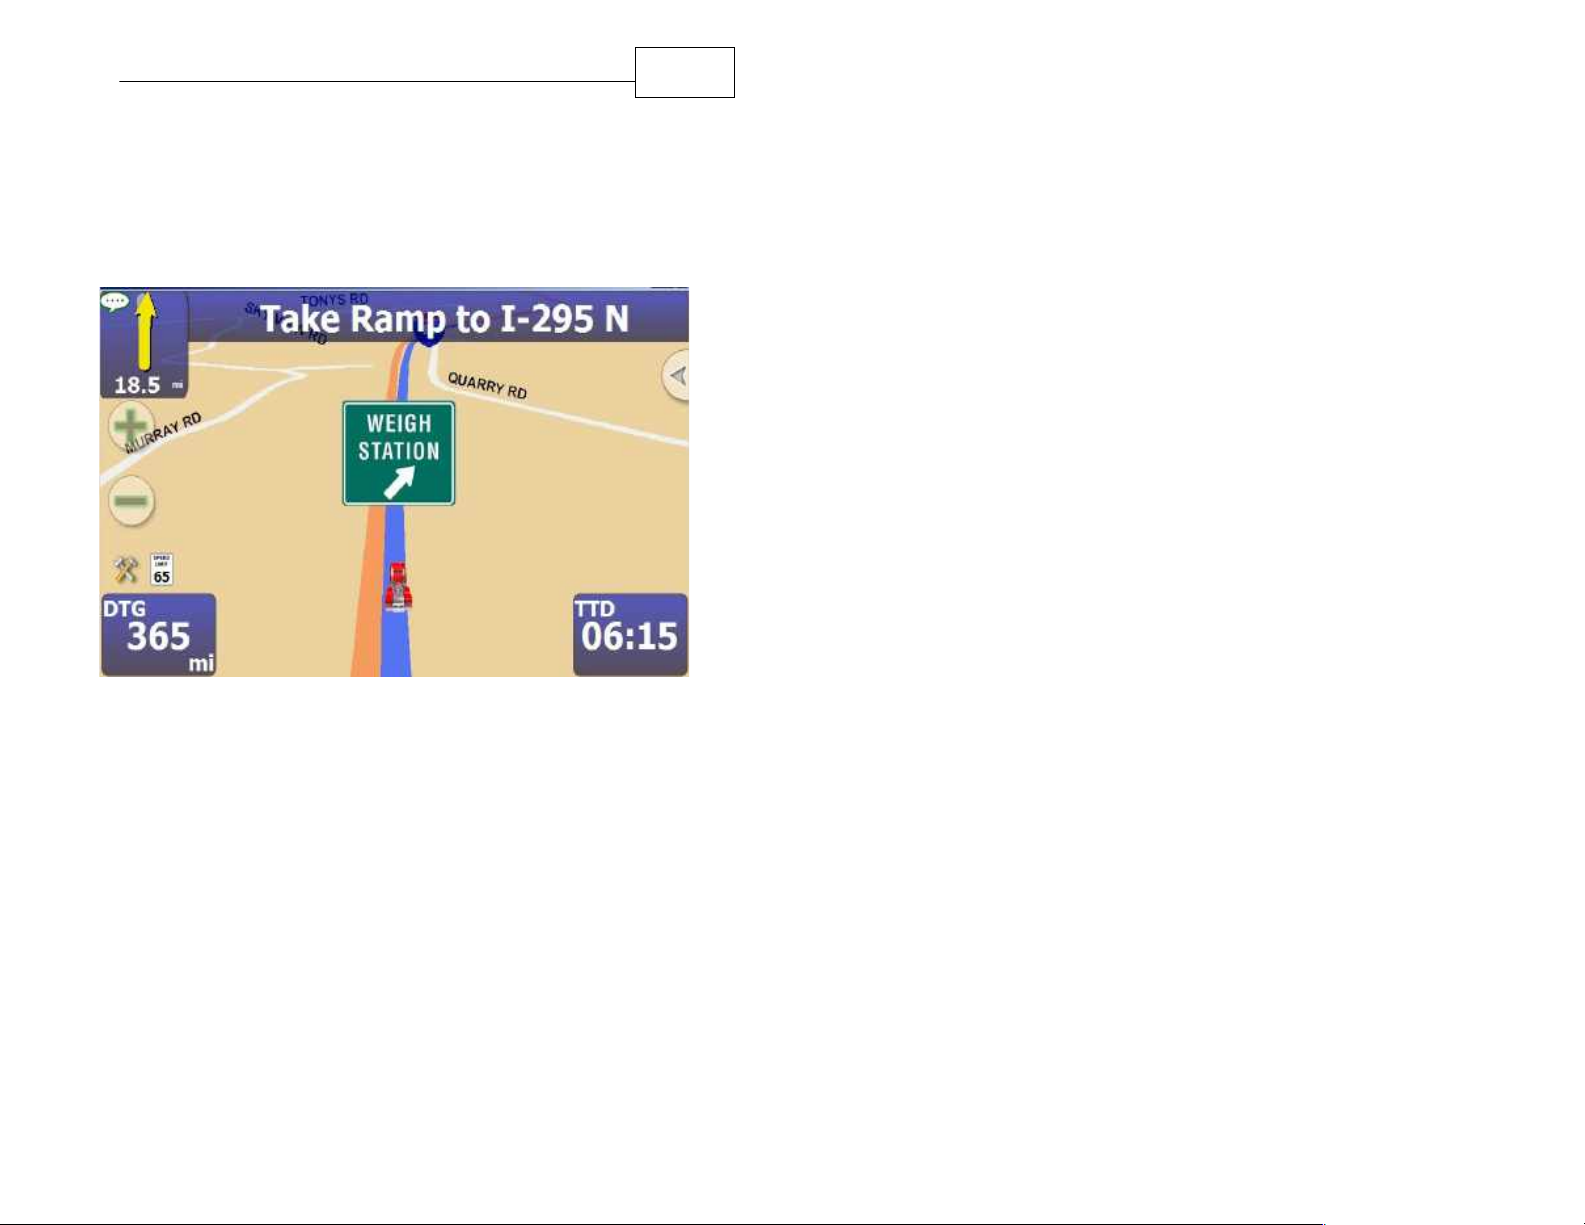
WorldNav offers the unique feature of splitting the
larger screen models to allow the full route to be
seen on the right and use the rest of the space for
normal navigation. To close the view press the gray
"X" shown in the picture below with a circle around
the "X". The Arrow toggles between having the split
screen On or Off.
116
117
WorldNav Navigation Software
Split Screen ON
Split Screen OFF
Page 60
Special Features
5.14 Weigh Station Alert
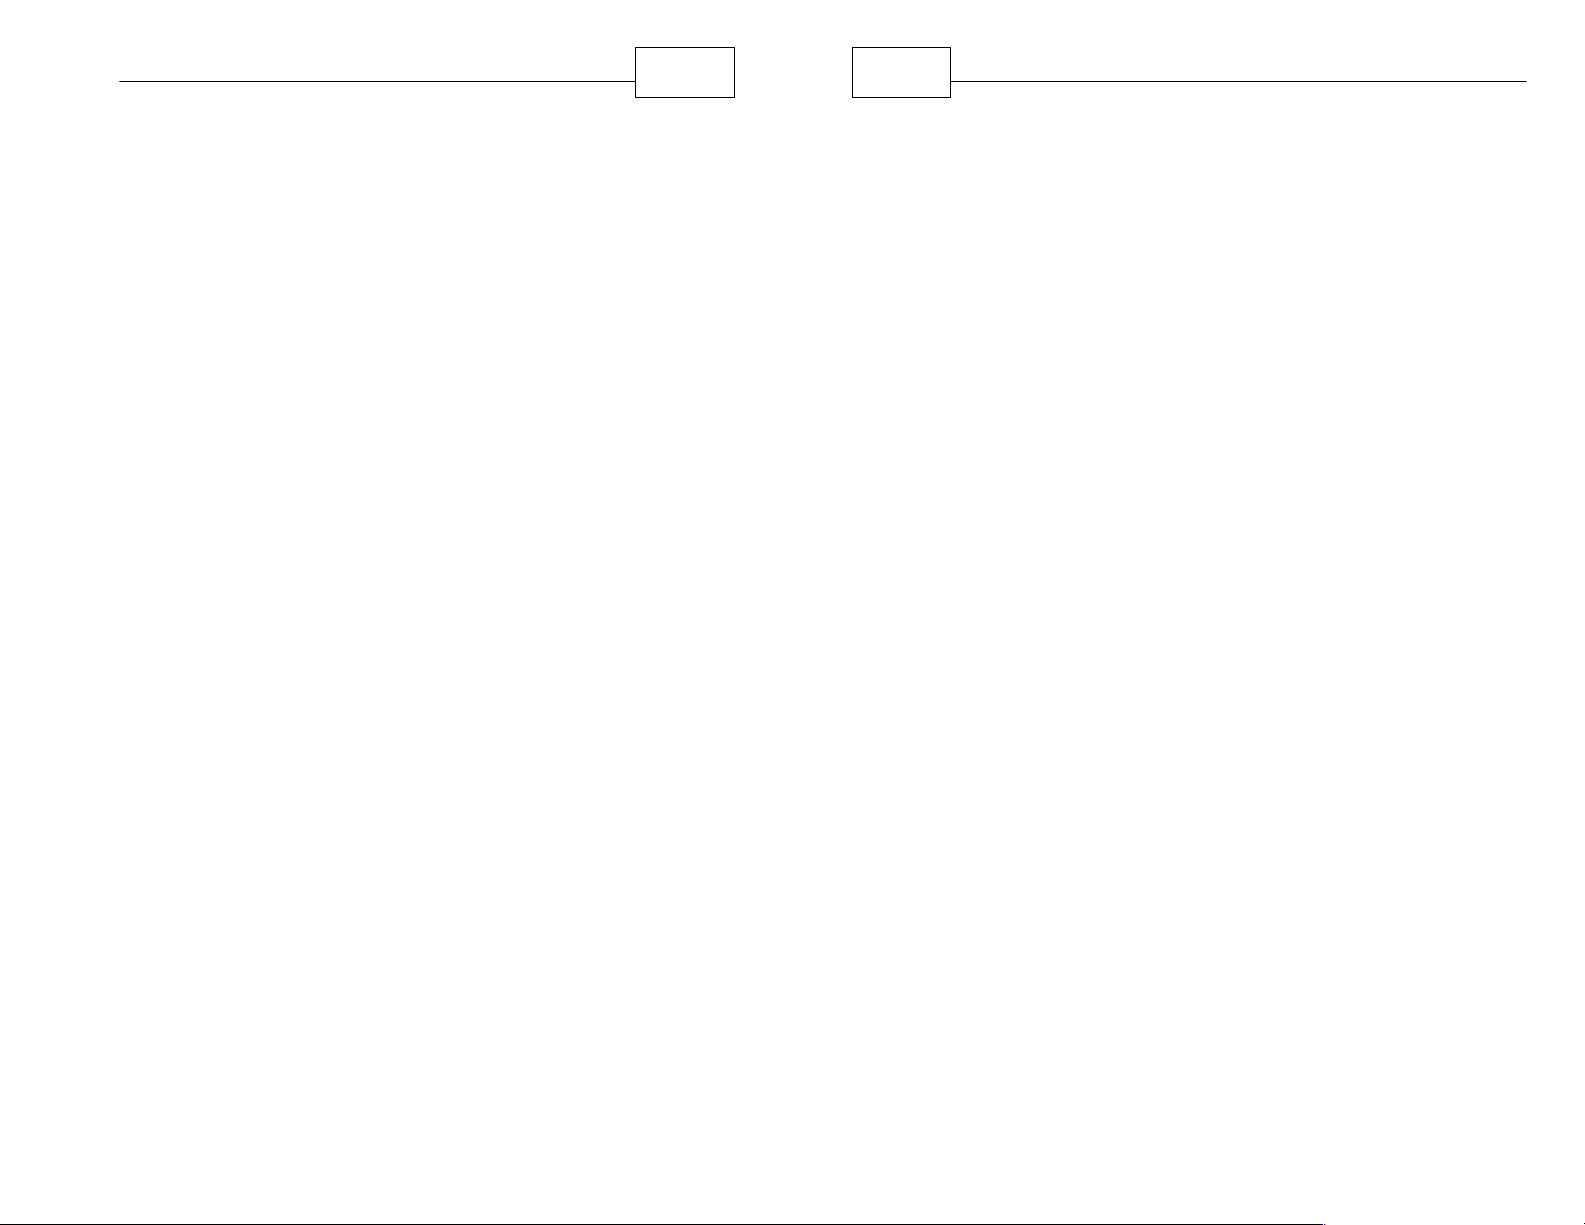
A warning message will appear on your navigation
screen when you are approximately 7 miles away
from a weigh station.
118
Weigh Station Alert
Page 61

Part
VI
121
WorldNav Navigation Software
6 Troubleshooting Questions
1. Why are some streets unlabeled? In 3D
mode, only major thoroughfares are shown.
Change to 2D mode and manually adjust the
zoom level to see more labeled streets.
2. What do I do if I change my destination
during a route? Press <Menu>, then <Route>
and on the second screen, press <Clear
Route>. Alternatively, use the <New Route>
feature to create a new route; the old route will
be cleared from the display automatically.
3. What if the GPS cannot locate my destination
address? Check the town or city name. Often
the street is located in a town (or township)
named differently from what you were provided.
You can also use the "wildcard" search which
means you leave the city name blank and enter
the street name and number. The search will
take longer but it will give you results. Check the
destination zip from the results shown on the
screen, if the zip code matches then the
address is correct. If you still have difficulty,
change the route to locate the nearest
intersection, or nearest town instead.
4. What if it seems the device is not showing
my true location? Sometimes, the device takes
a few minutes to lock in on the satellite signal,
Page 62
Troubleshooting Questions
122
123
WorldNav Navigation Software
after which your true location will be shown.
5. Sometimes the GPS indicates a house
number to be in a different part of the block,
why? House numbers are estimated positions
within the block. Typically the GPS will put you
within a few feet of the actual position. Also, in
some congested or mountainous areas, the
position will be off from true position.
6. Why is my GPS showing several miles to go
to destination and I am already there? Most
likely the address you have entered is on the
other side of a major highway and the GPS is
asking you to go forward, turn around and go
back to the other side of the highway. Be
assured, there is nothing wrong with the GPS
device.
9. How do I transfer maps onto my device? The
WorldNav does not require maps to be
transferred. All maps and services are already
pre-loaded onto your device. To be informed of
future updates please register at
www.teletype.com/register.
10. What are the differences between the routing
preferences? See section 4.1 of this guide.
11. How can I route from point A to point B with
multiple stops in between? You will need to
first look up the addresses of any stopping
points. Use the routing preference called "Truck
Via" to select each point.
12. How do I change text and voice from English
to another language? See Section 4.5.
7. I am near an airport and my GPS is unable to
obtain a position, what is wrong? Due to
increased national security concerns, the GPS
signal is often scrambled or shut down near
airports and military installations.
8. Why when I select “Avoid Tolls” I sometimes
get routed on a toll road? In rare cases where
the avoidance of tolls would be impossible or
result in an extremely long route, the route will
be created ignoring the avoid tolls request. A
warning message will appear.
13. Which entertainment file formats are
supported? See the appropriate hardware
user guide or check the model specification
online at the TeleType website.
14. How do I receive software updates? Visit the
Upgrades page on the TeleType website:
http://www.teletype.com/c/worldnav-upgrades.ht
ml
Page 63
Index
124
125
WorldNav Navigation Software
Index
- 2 -
2D View 104
- 3 -
3D View 104
- A -
Arrival time 86
Automatic Day / Night 108
AutoZoom 101
Avatar 105
Avoid Road Ahead 52
- B -
Bird's eye view 104
Bridge clearance 15
- C -
CAT Scales 45
Change destination 121
Clear route 52
County Roads 79
Create a my point 65
Create a route from home 29
Cursor 105
- D -
Distance to go 86, 109
Driving preferences 86
DTG 109
- E -
Edit a my point 71
Elevation 53
Estimated time of arrival 109
ETA 109
- F -
Find a my point 70
Find a Service 45
Find a street address 30
French 92
- G -
GPS status 53
- H -
hazmat 15, 97
Heading 53, 86
History 50
Hours 93
- I -
Information 99
Intersection 43
- J -
Language 92
Latitude 53
Longitude 53
low bridges 97
- M -
Main menu 25, 58
Main menu buttons 58
Map Information 99
Map Mode 27
Map Transfer 121
Map Updates 121
Mark current position 67
Mark my point 67
Metric 85
Multiple Point Routing 74
My Point 65, 67, 70, 71
- N -
Nav Cursor 105
Nav Panel preferences 86
Navigation Mode 27
Navigation panel 86
Night Mode 108
No power 121
no trucks allowed 97
- O -
Position is off 121
- Q -
Quickest route 79
- R -
Repeat a route 50
Repeat Instruction 115
Repeat Instructions 86
Restrictions 15
Road Color 15, 27
Route preferences 79
Route to 29
Route to a Service 45
Route to a street address 30
Route to an intersection 43
Routing Via My Points 74
- S -
Satellite info 86
Search Along Current Route 49
Service (POI) 45
Service routing 45
Services display 90
Set home address 29
Set Services preferences 90
Set Time 93
Set voice 92
Day Mode 108
Daylight Savings 93
Detour 52
Junction View 114
- L -
Lane Assist 113
Odometer 86, 109
- P -
Panel Colors 27
Shortest route 79
Show true location 121
Simulator 112
Page 64
Index
126
Software Updates 121
Sound 106
Spanish 92
Speed 53, 86, 109
Split Screen 104, 116
Street labels 121
- T -
Time 86, 93, 109
Time Zone 93
Timer 53, 86, 109
Total Drive Time 109
Trip information 109
Troubleshoot 121
truck restrictions 97
Truck Routing 15
Truck Settings 15
- U -
- Z -
Zoom 29, 101
Units 85
Updates 121
- V -
VIA Points 74
Voice 92
Voice preferences 92
- W -
Weigh Station 118
Welcome 11
Windshield Mount 15
Printed in China
 Loading...