

Page 1

TeleType GPS
Mini-Auto USB
GPS
Installation Manual
Version 022005
© 2005 ... Teletype GPS
Page 2

Mini-Auto USB GPS Driver Installation Manual
© 2005 ... Teletype GPS
All rights reserved. No parts of this work may be reproduced in any form or by any means - graphic, electronic, or
mechanical, including photocopying, recording, taping, or information storage and retrieval systems - without the
written permission of the publisher.
Products that are referred to in this document may be either trademarks and/or registered trademarks of the
respective owners. The publisher and the author make no claim to these trademarks.
While every precaution has been taken in the preparation of this document, the publisher and the author assume no
responsibility for errors or omissions, or for damages resulting from the use of information contained in this document
or from the use of programs and source code that may accompany it. In no event shall the publisher and the author be
liable for any loss of profit or any other commercial damage caused or alleged to have been caused directly or
indirectly by this document.
Printed: January 2005 in (Boston, MA USA)
Page 3

Table of Contents
IContents
Part I Introduction
................................................................................................................................... 31 Disclaimer
................................................................................................................................... 32 Welcome
................................................................................................................................... 43 Glossary
Part II
Software and Hardware Installation
................................................................................................................................... 61 Preparation
................................................................................................................................... 62 Windows 98
.......................................................................................................................................................... 6Install USB GPS driver
.......................................................................................................................................................... 11Check Enabled COM Port
.......................................................................................................................................................... 16Un-install USB GPS Driver
................................................................................................................................... 213 Windows XP
.......................................................................................................................................................... 21Install USB GPS driver
.......................................................................................................................................................... 26Check Enabled COM Port
.......................................................................................................................................................... 31Un-install USB GPS Driver
Part III How-To-Guide
................................................................................................................................... 401 Check USB GPS Receiver Functionality
Part IV Other Options
3
6
40
43
................................................................................................................................... 431 Care for your USB GPS receiver
................................................................................................................................... 432 Frequently Asked Questions (FAQ)
................................................................................................................................... 453 Information about the Files in Driver
................................................................................................................................... 464 Contents of Product
................................................................................................................................... 465 Hardware Specifications
................................................................................................................................... 486 Contact Teletype GPS
© 2005 ... Teletype GPS
Page 4

Part
I
Page 5

1 Introduction
It is the user's responsibility to use the product prudently. This product is intended to be used only as a
travel aid and must not be used for any purpose requiring precise measurement of direction, distance,
location, or topography. This product should not be used to determine ground proximity for aircraft
navigation.
For use in vehicles, it is the sole responsibility of the owner/operator of the TeleType GPS to place and
secure the GPS unit so that it will not interfere with the vehicle operating controls and safety devices,
obstruct the driver's view of driving conditions, or cause damage or personal injury in the event of an
accident. Do not mount the GPS equipment or computer in a place where the driver or passengers are
likely to impact it in an accident or collision. The mounting hardware supplied by TeleType Co. is not
warranted against collision damage or the consequences thereof.
When used in vehicles, it is the sole responsibility of the driver of the vehicle to operate the vehicle in a
safe manner, maintain full surveillance of all driving conditions at all times, and not become distracted
by the GPS system to the exclusion of safe driving practices. It is unsafe to operate the controls of the
GPS system while you are driving. Failure by the driver of a vehicle equipped with a TeleType GPS
system to pay full attention to operation of the vehicle and road conditions while the vehicle is in motion
could result in an accident or collision with property damage and personal injury.
IN NO EVENT SHALL TELETYPE CO BE LIABLE FOR ANY INCIDENTAL, SPECIAL, INDIRECT OR
CONSEQUENTIAL DAMAGES, WHETHER RESULTING FROM THE USE , MISUSE, OR INABILITY
TO USE THIS PRODUCT OR FROM DEFECTS IN THE PRODUCT. SOME STATES DO NOT
ALLOW THE EXCLUSION OF INCIDENTAL OR CONSEQUENTIAL DAMAGES, SO THE ABOVE
LIMITATIONS MAY NOT APPLY TO YOU.
Welcome to Teletype GPS installation guide for USB Drivers. Thank you for purchasing Teletype GPS
products.
USB GPS Receiver
1.1 Disclaimer
Introduction 3
1.2 Welcome
© 2005 ... Teletype GPS
Page 6

Mini-Auto USB GPS Driver Installation Manual4
Throughout the manual, you will see icons within the text that denote tips, hints, or warnings that will
help you better understand the software and to use it with maximum efficiency.
Note
- Helpful hints and suggestions.
Tip
- Handy shortcuts, functions, or new features within the program.
Warning
- Advice requiring special attention.
PC -
Personal Computer.
Peripheral device -
a computer device such as mouse, keyboard, printer, or scanner.
USB (Universal Serial Bus) port
- is a computer standard designed to connect peripheral devices to
your PC. A picture of USB ports on a computer is located below.
1.3 Glossary
© 2005 ... Teletype GPS
Page 7

Part
II
Page 8

Mini-Auto USB GPS Driver Installation Manual6
Please do the following before installation to insure proper installation.
1. Please make sure that you have everything you need for the installation. There is a list of the items
that you should have in the Contents of Product page.
2. If you have too many devices using COM ports, it may affect the USB GPS Receiver from working
correctly. Please un-install the devices that you do not use anymore from your computer to free or
open some COM ports.
3. If your system is Windows Millennium, please refer to the Windows 98 installation guide.
4. If your system is Windows 2000, please refer to the Windows XP installtion guide.
Teletype GPS navigational software does not support
Windows 98. However, the USB GPS receiver will support
Windows 98.
To install USB GPS driver...
Steps:
1. Insert the floppy Disk with the USB GPS driver on it.
2. Plug-in the GPS receiver into the USB port of the PC (computer).
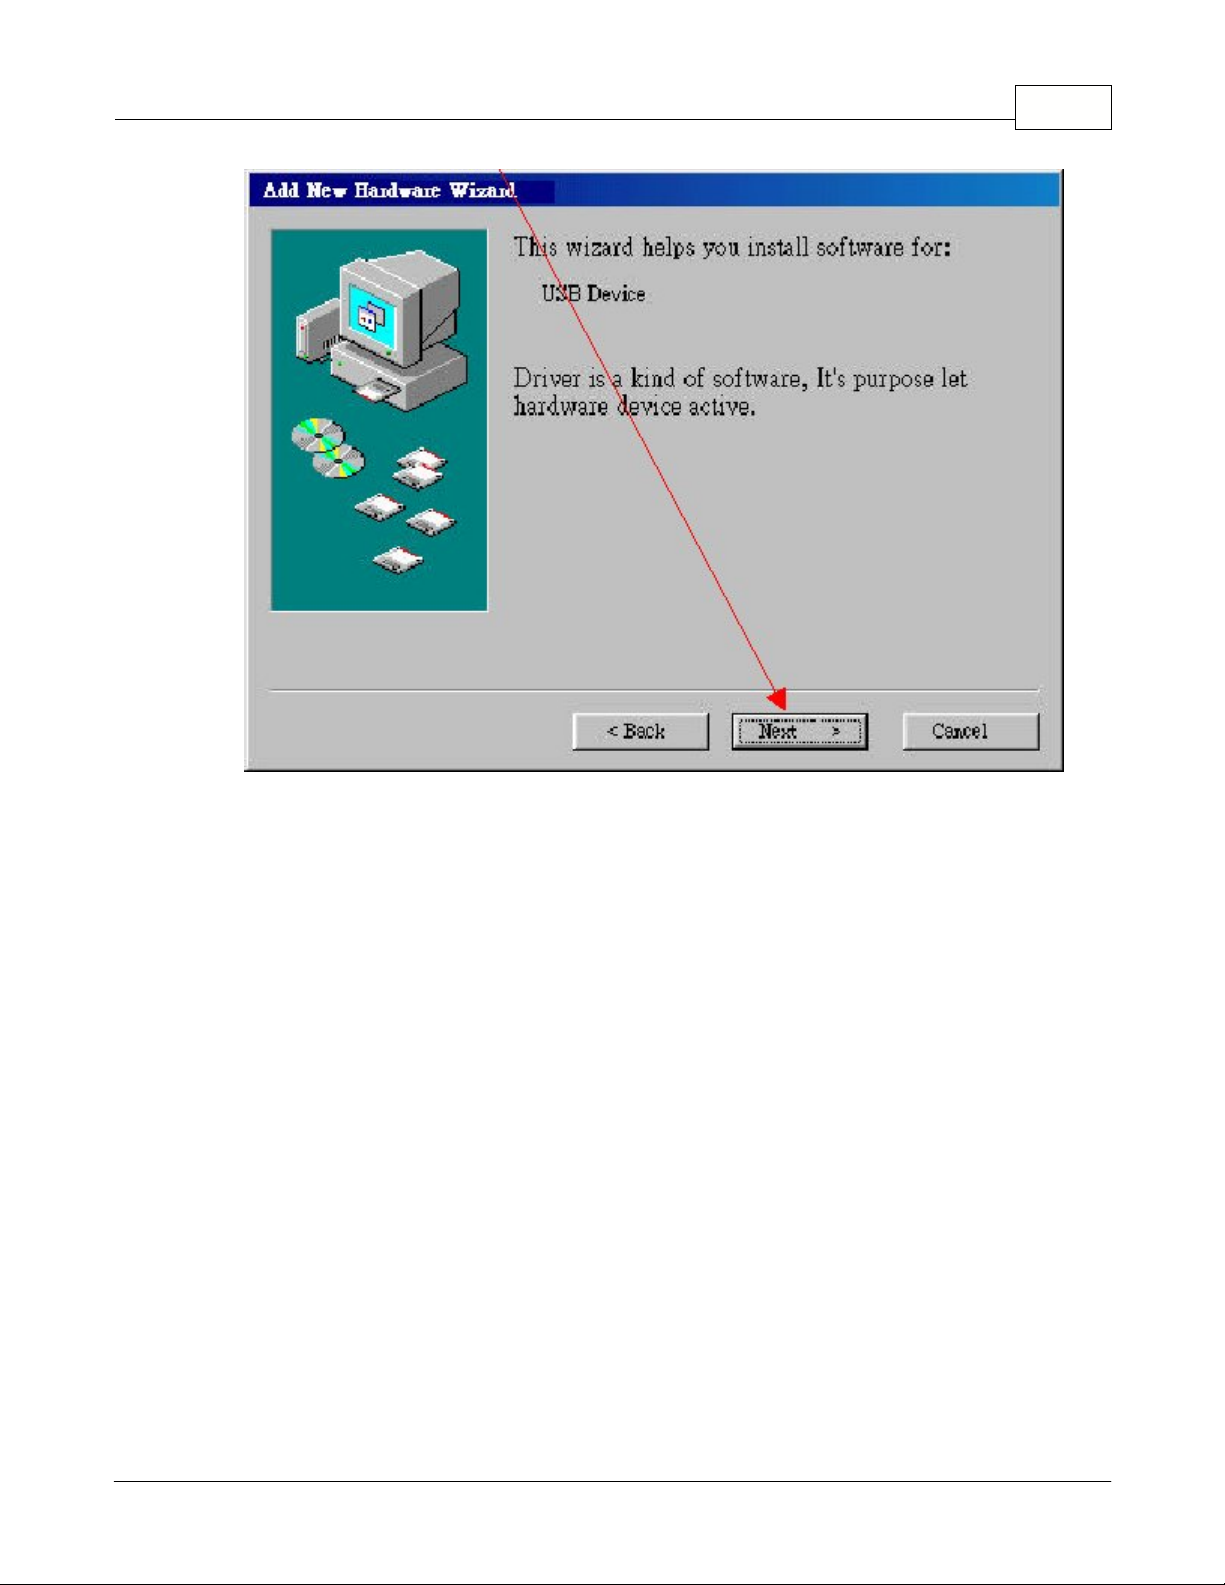
3. A window called "
Add New Hardware Wizard
," should come up the screen automatically. This may
take a few minutes.
4. At the "
Add New Hardware Wizard
" window, please click on
NEXT
to continue with the installation
process.
2 Software and Hardware Installation
2.1 Preparation
2.2 Windows 98
2.2.1 Install USB GPS driver
© 2005 ... Teletype GPS
Page 9
Software and Hardware Installation 7
5. Select the one that states "
Install the software automatically (Recommeded)
" and click on
NEXT
.
© 2005 ... Teletype GPS
Page 10

Mini-Auto USB GPS Driver Installation Manual8
6. Specific driver location and click the
NEXT
button.
© 2005 ... Teletype GPS
Page 11

Software and Hardware Installation 9
Since you are using a floppy drive, by default the specific location
should be A:\\. However, if your computer or if you set it up
differently, the specific location might not be A:\\ anymore.
7. Click on the
NEXT
button.
© 2005 ... Teletype GPS
Page 12

Mini-Auto USB GPS Driver Installation Manual10
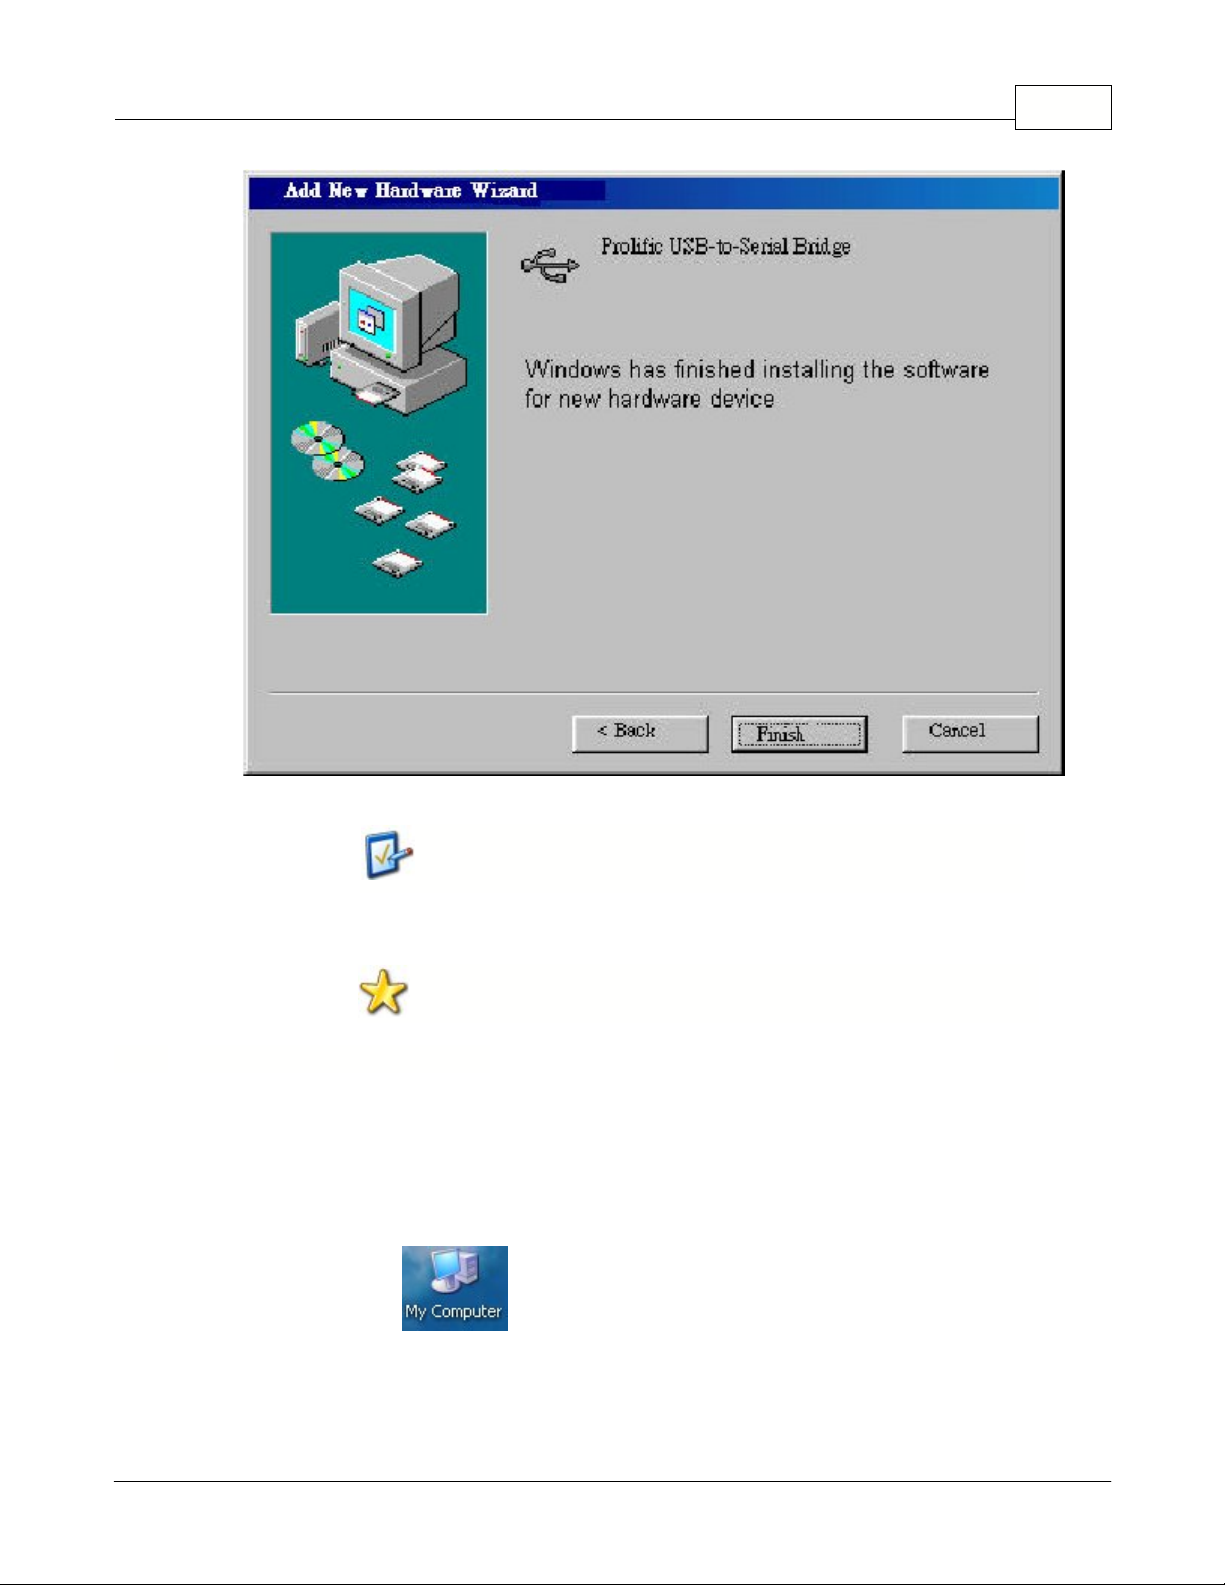
8. Click on the
FINISH
button.
© 2005 ... Teletype GPS
Page 13
Software and Hardware Installation 11
Checking which COM Port the USB GPS receiver is on is
important because you will need to know this information when
configuring map and/or chart software.
9. The installation is now complete and the USB GPS is ready to use.
Please keep the floppy disk in a safe place for future reference.
Checking which COM Port the USB GPS receiver is on is important because you will need to know this
information when configuring map and/or chart software.
To check the COM Port, please follow the steps below:
Steps:
1. Double-click on the
(located at the desktop) and then a window will appear on the
screen.
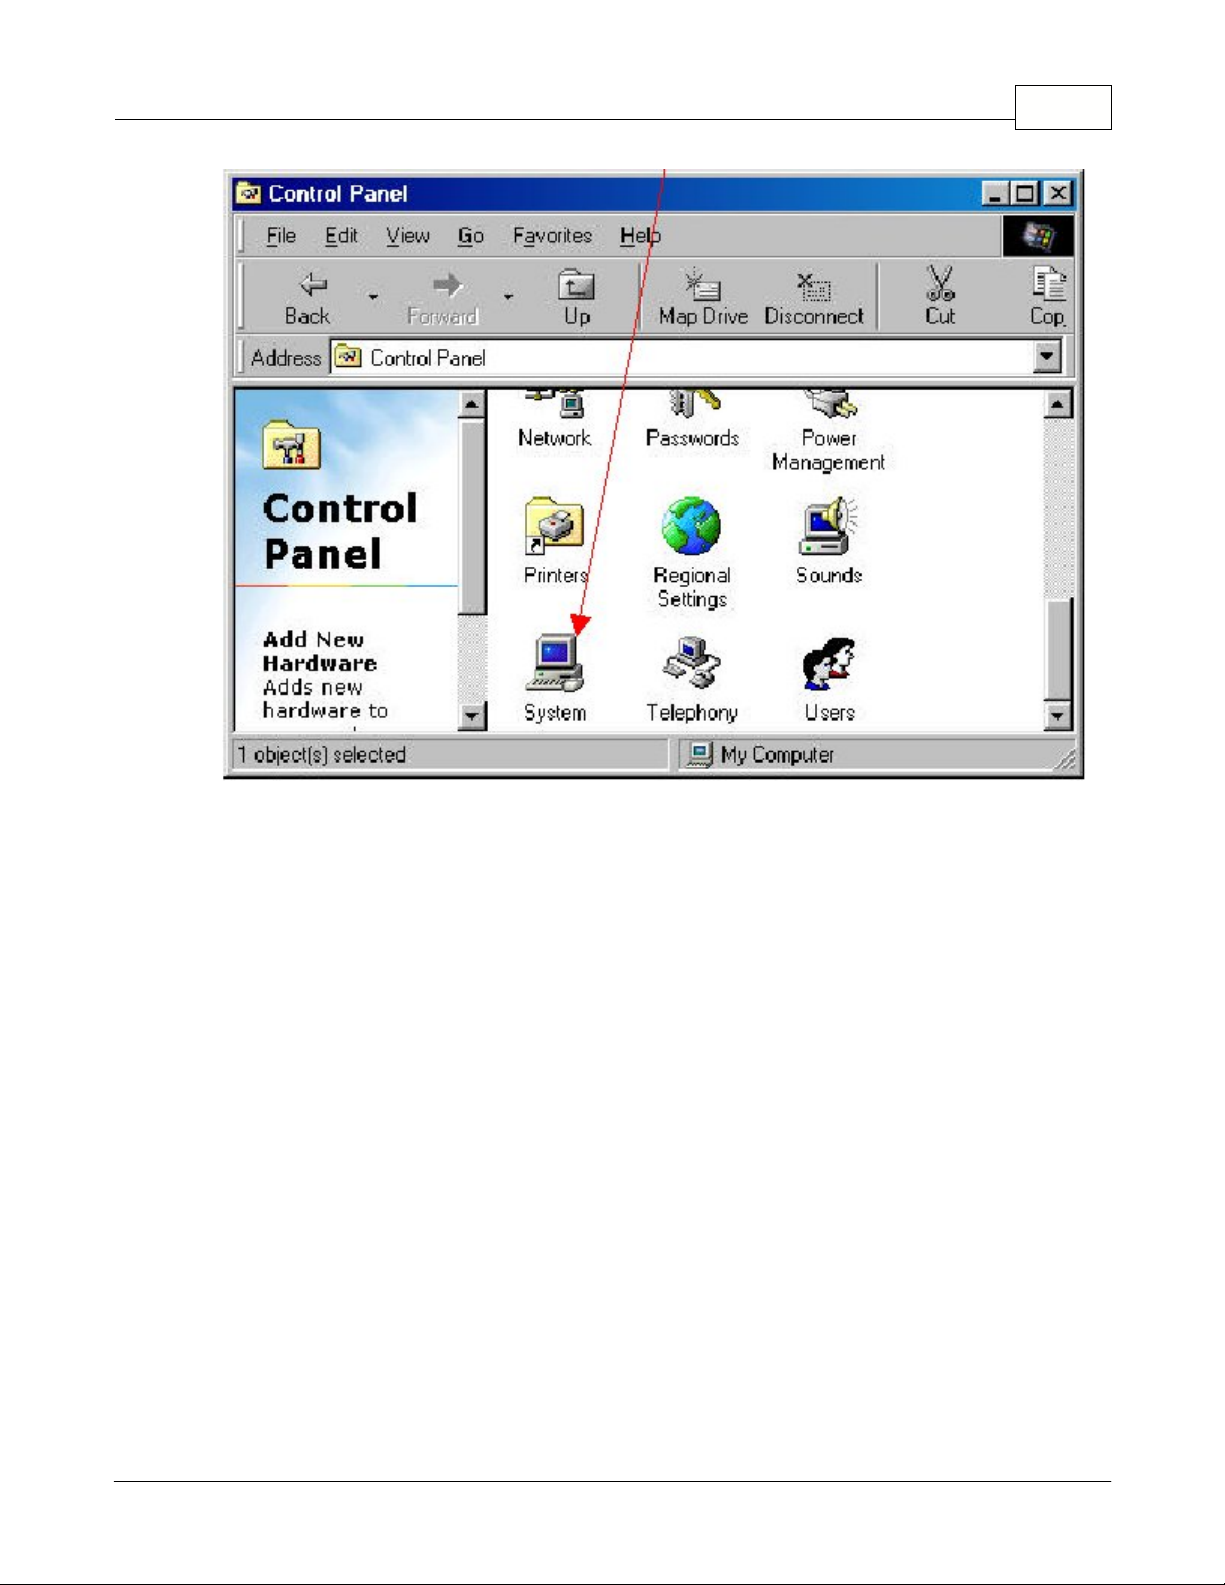
2. From this window, double-click on the
Control Panel
icon.
2.2.2 Check Enabled COM Port
© 2005 ... Teletype GPS
Page 14

Mini-Auto USB GPS Driver Installation Manual12
3. A new window will come up and from here double-clicked on the
System
icon.
© 2005 ... Teletype GPS
Page 15
Software and Hardware Installation 13
4. A new window will come up and from here, click on the tab
Device Manager
.
© 2005 ... Teletype GPS
Page 16

Mini-Auto USB GPS Driver Installation Manual14
6. Double-click on
PORTS (COM & LPT)
. Then Select "
USB to Serial Port
" and click
Properties
button.
© 2005 ... Teletype GPS
Page 17

Software and Hardware Installation 15
7. Browse the properties of COM 3.
© 2005 ... Teletype GPS
Page 18

Mini-Auto USB GPS Driver Installation Manual16
To un-install the USB GPS Driver.....
There are two ways to un-install the USB GPS Driver. If you have the floppy disk that came with your
USB GPS Receiver, you can use
Method 1
otherwise follow the steps in
Method 2
.
Method 1
Steps:
1. Insert the floppy disk that came with the USB GPS Receiver into your floppy drive.
2. Doubled-click on
icon on your desktop and a new window will appear on the screen.
2.2.3 Un-install USB GPS Driver
© 2005 ... Teletype GPS
Page 19

Software and Hardware Installation 17
3. Doubled-click on
icon in the My Computer window.
4. You will see a new window come up displaying what files are on the floppy disk.
5. Copy all the files in the floppy disk to your computer.
If you do not copy the files to your computer before you un-
install, you might have the potential to lose all the data on your
floppy disk. Therefore, you will have no back-up disk.
6.Doubled-click on
icon on your computer (not from the floppy disk) and follow the on-
screen instructions.
Method 2
Steps:
1. Doubled-click on
icon on your desktop and a new window will appear on the screen.
2. Doubled-click on the
CONTROL PANEL
icon and a new window will appear on the screen.
© 2005 ... Teletype GPS
Page 20

Mini-Auto USB GPS Driver Installation Manual18
3. Doubled-click on the
SYSTEM
icon and a new window will appear displaying your system setup.
© 2005 ... Teletype GPS
Page 21

Software and Hardware Installation 19
4. Click on the
DEVICE MANAGER
tab.
© 2005 ... Teletype GPS
Page 22

Mini-Auto USB GPS Driver Installation Manual20
5. Double-click on
PORTS (COM & LPT)
. Then Select "
USB to Serial Port
".
© 2005 ... Teletype GPS
Page 23

Software and Hardware Installation 21
6. Click on the
REMOVE
button and follow the on-screen instructions for un-installation of the USB
GPS Driver.
To install USB GPS driver...
Steps:
1. Insert the floppy Disk with the USB GPS driver on it.
2. Plug-in the GPS receiver into the USB port of the PC (computer).
3. A "
Found New Hardware Wizard
" screen should come up. This may take a few minutes.
4. At the "
Found New Hardware Wizard
" window, please do the follwing in order.
2.3 Windows XP
2.3.1 Install USB GPS driver
© 2005 ... Teletype GPS
Page 24

Mini-Auto USB GPS Driver Installation Manual22
l
Select "
No, not this time
"l C
lick on
NEXT
to continue with the installation process.
5. A new window will come up and please select "
Install from a list or specific location
(Advanced)
." Then click on
NEXT
to continue.
© 2005 ... Teletype GPS
Page 25

Software and Hardware Installation 23
6. A new window will come up and please select "
Search for the best driver in these locations
" and
checked the box that states "
Include this location in the search.
" Then click on
NEXT
to continue.
This search process might take a few minutes.
© 2005 ... Teletype GPS
Page 26

Mini-Auto USB GPS Driver Installation Manual24
Since you are using a floppy drive, by default the specific location
should be A:\\. However, if your computer or if you set it up
differently, the specific location might not be A:\\ anymore.
7. A new window will come up warning you about a compatibility issue, but there is no need to worry.
Just click on the
CONTINUE ANYWAY
button. This search process might take a few minutes.
© 2005 ... Teletype GPS
Page 27

Software and Hardware Installation 25
8. A new window will show up asking you to click on the
FINISH
button.
9. The installation is now complete and the USB GPS is ready to use.
© 2005 ... Teletype GPS
Page 28

Mini-Auto USB GPS Driver Installation Manual26
Checking which COM Port the USB GPS receiver is on is
important because you will need to know this information when
configuring map and/or chart software.
Please keep the floppy disk in a safe place for future reference.
Checking which COM Port the USB GPS receiver is on is important because you will need to know this
information when configuring map and/or chart software.
To check the COM Port, please follow the steps below:
Steps:
1. Click on
START
then click on
CONTROL PANEL
.
2. From here, double-click on the
SYSTEM
icon.
3. Select
HARDWARE
tab.
2.3.2 Check Enabled COM Port
© 2005 ... Teletype GPS
Page 29

Software and Hardware Installation 27
4. From here, select
DEVICE MANAGER
button.
© 2005 ... Teletype GPS
Page 30

Mini-Auto USB GPS Driver Installation Manual28
5. In
DEVICE MANAGER
, select
Ports(COM & LPT)
. And you should see, your newly installed device
(in the
red
circle).
© 2005 ... Teletype GPS
Page 31

Software and Hardware Installation 29
6. Double-click on "
Teleype USB-to-Serial Bridge (COM4)
" (the same one from step 5 above in the
red circle).
7. You will get the property screen for the the
Teleype USB-to-Serial Bridge (COM4).
Click on the
DRIVER
tab.
© 2005 ... Teletype GPS
Page 32

Mini-Auto USB GPS Driver Installation Manual30
8. Now, you see the properties of COM4.
© 2005 ... Teletype GPS
Page 33

Software and Hardware Installation 31
To un-install the USB GPS Driver.....
There are two ways to un-install the USB GPS Driver. If you have the floppy disk that came with your
USB GPS Receiver, you can use
Method 1
otherwise follow the steps in
Method 2
.
Method 1
Steps:
1. Insert the floppy disk that came with the USB GPS Receiver into your floppy drive.
2. Doubled-click on
icon on your desktop and a new window will appear on the screen.
2.3.3 Un-install USB GPS Driver
© 2005 ... Teletype GPS
Page 34

Mini-Auto USB GPS Driver Installation Manual32
3. Doubled-click on
icon in the My Computer window.
4. You will see a new window come up displaying what files are on the floppy disk.
5. Copy all the files in the floppy disk to your computer.
6. Doubled-click on
icon on your computer (not from the floppy disk) and follow the on-
screen instructions.
If you do not copy the files to your computer before you un-
install, you might have the potential to lose all the data on your
floppy disk. Therefore, you will have no back-up disk.
Method 2
Steps:
1. Click on
on your taskbar and go to
SETTINGS
.
2. In
SETTINGS
, click on
CONTROL PANEL
.
3. Click on
in
CONRTOL PANEL
.
© 2005 ... Teletype GPS
Page 35

Software and Hardware Installation 33
4. Click on the
HARDWARE
tab.
© 2005 ... Teletype GPS
Page 36

Mini-Auto USB GPS Driver Installation Manual34
5. Click on the
DEVICE MANAGER
button.
© 2005 ... Teletype GPS
Page 37

Software and Hardware Installation 35
6. Doubled-click on
PORTS(COM & LPT1)
and find "
Teletype USB-to-Serial Bridge(COM4)
" or
Singled-click on the
+
and then find "
Teletype USB-to-Serial Bridge(COM4)
".
The COM4 above varies depending upon what
your computer assigned it as.
© 2005 ... Teletype GPS
Page 38

Mini-Auto USB GPS Driver Installation Manual36
7. Doubled-click on "
Teletype USB-to-Serial Bridge(COM4)
" and you will see a new window that
comes up on your screen.
© 2005 ... Teletype GPS
Page 39

Software and Hardware Installation 37
8. Click on the
DRIVER
tab. Then click on the
UN-INSTALL
button.
© 2005 ... Teletype GPS
Page 40

Mini-Auto USB GPS Driver Installation Manual38
9. A window will come up asking you are sure about un-installing the USB GPS Driver. Click on the
OK
button and follow the on-screen instructions.
© 2005 ... Teletype GPS
Page 41

Part
III
Page 42

Mini-Auto USB GPS Driver Installation Manual40
To check to see if the USB GPS Receiver is working properly, please follow the steps below.
Steps:
1. There should be a blinking red light coming from the inside of the USB GPS receiver. This means
that it is receiving power because the USB GPS receiver does
not
supply its own power. If the USB
GPS receiver is not receiving power, please make sure that it is connected to your computer and that
your computer is also turned on.
2. Check the COM Port of your USB GPS Receiver.
l
If you run Windows 98, please click here ->
Windows 98
.l If you run Windows XP, please click here ->
Windows XP
.
3. Start your Teletype GPS Pro program.
4. Once your Teletype GPS Pro program loads, click on
Tools
and then click on
GPS status
.
5. You should see the GPS status window come up on the screen, click on the button that says
Open
Port
.
6. If your USB GPS Receiver is working, you should see logs in your GPS status window.
3 How-To-Guide
3.1 Check USB GPS Receiver Functionality
© 2005 ... Teletype GPS
Page 43

How-To-Guide 41
Make sure that the chosen port in the GPS status window is the
same as the port that you installed the USB GPS Receiver to.
Make sure that the bps is 9600 in the GPS status window.
The instructions are for Teletype GPS software, therefore it does
not matter are you using Windows 98 or XP.
© 2005 ... Teletype GPS
Page 44

Part
IV
Page 45

4 Other Options
To care for your USB GPS Receiver, please follow the following advice.
1. Please close the GPS program properly by selecting
File -> Exit
.
Question 1:
What happens if I am running Winodws Millennium on my computer and the Installation Guide only has
instructions for Windows 98 and Windows XP?
Answer 1:
If you are running Windows Millennium on your computer, you can refer to the Windows 98 installation
guide.
Question 2:
What happens if I am running Winodws 2000 on my computer and the Installation Guide only has
instructions for Windows 98 and Windows XP?
Answer 2:
If you are running Windows 2000 on your computer, you can refer to the Windows XP installation
guide.
Question 3:
Why does my mouse cusor occasionally not work properly when running Windows 2000 and/or
Windows XP? And the message that is displayed is "The serial device may be detected as a serial
mouse in Windows 2000 and Windows XP.
Answer 3:
Your mouse cursor does not work properly occasionally because there is a problem with the operating
system, Windows 2000 and/or Windows XP. This problem does not has anything to do with the GPS
receiver. To fix this problem, please refer to the answer in question 4.
Question 4:
What do I do if my GPS receiver is recognized as a Microsoft serial mouse?
Answer 4:
4.1 Care for your USB GPS receiver
4.2 Frequently Asked Questions (FAQ)
Other Options 43
© 2005 ... Teletype GPS
Page 46

Mini-Auto USB GPS Driver Installation Manual44
There are two ways to fix the problem. Either methods will work.
First Method
Steps:
1. Unplug the GPS receiver from PC and wait for 5-8 seconds.
2. Replug the GPS receiver into your PC.
3. The problem should be fix now.
Second Method-Disable the Serial Mouse
Steps:
1. Click on
START
and go to
SETTINGS
.
2. Click on
CONTROL PANEL
.
3. Doubled-click on
SYSTEM
icon.
4. Click on
HARDWARE
tab.
5. Click on
DEVICE MANAGER
button.
6. Doubled-click on
MICE AND OTHER POINTING DEVICES
.
7. Select the mouse that is giving you problems.
8. Right-clicked on the selected mouse and disabled it.
Question 5:
Why is my USB GPS receiver not working properly?
Answer 5:
The reason why your USB GPS receiver is not working properly might have to do with your computer
having too many COM ports being used. Therefore, to fix the problem, please un-install the devices
that you do not use anymore to free or open up some COM ports.
Question 6:
Why does it take a long time for my USB GPS receiver to get a fix position?
Answer 6:
The following are the reasons why it might take the USB GPS a long time to get a fix position.
l
The GPS receiver is not in a still position for the first time.
l
Performance of the GPS receiver may be affected by its surroundings.
© 2005 ... Teletype GPS
Page 47

Other Options 45
The following is a list of those surroundings.
=> Cars, boats, and planes equipped with solar control filmed windows.
=> Among high buildings, under bridges or tunnels.
=> Under high voltage cables or nearby radio wave sources, such as mobile
phone base stations
l
Performance of the GPS receiver may be affected by the weather.
If the performance of the GPS receiver is affected by its surrounding and the weather, the following are
the suggested solution for your problem.
l
Move the GPS receiver to another location.
l
Move to an open space.
l
Move away from the sources of interferences.
l
Wait until the weather condition is improved.
Question 7:
Why is my GPS receiver not accurate?
Answer 7:
The GPS receiver's accuracy can be affected by the date and time on your computer. Therefore,
please make sure that the date and time on your computer is less than 1 hour off.
Question 8:
Why is the red light not blinking from the inside of the USB GPS receiver?
Answer 8:
When there is no red light that means that the USB GPS receiver is not receiving any power. To fix
this, please check to see if the USB GPS receiver is connected to your computer. Also check to see if
your computer is turned on.
The following is a description of the Driver files for the USB GPS Receiver.
4.3 Information about the Files in Driver
© 2005 ... Teletype GPS
Page 48

Mini-Auto USB GPS Driver Installation Manual46
Filename
Type
Description
serwpl.inf
Setup Information
Provides major setup information.
ser2pl.sys
System File
Provides Windows 2000 and Windows XP hardware
specific interface.
ser9pl.sys
System File
Provides Windows 98 and Windows Millennium
hardware specific interface.
serspl.inf
Setup Information
Provides Windows 98 and Windows Millennium setup
information.
serspl.vxd
Virtual Device Driver
Provides Windows 98 and Windows Millennium setup
information.
DRemover98_2K.exe
Application
Removes USB GPS driver from the computer.
You can copy the files on the floppy disk to your comptuer for
back up purposes.
The product should include the following:
Name
Quantity
1. USB GPS receiver
1
2. Driver Software on floppy Disk
1
TELETYPE MINI AUTO USB GPS RECEIVER
4.4 Contents of Product
4.5 Hardware Specifications
© 2005 ... Teletype GPS
Page 49

Other Options 47
PERFORMANCE
Antenna
Integrated built-in patch antenna
Frequency
L1 1575.42Mhz, C/A code
Sensitivity
-135dBm (typical)
Channels
12 channels parallel, "all-in-view" tracking
Operation modes
2D/3D automatic selection
Acquisition time
cold start: 48 seconds
warm start: 38 seconds
hot start: 8 seconds
Reacquisition
< 0.1 seconds
Position update
1 Hz
Velocity
0.05 m/sec
Time
+/- 1 us
Accuracy Position
15 m CEP without S/A
INTERFACE
Protocol
NMEA-0183 V2.20, USB
Data Baud rate
9600 bps
NMEA messages
GGA, GLL, GSA, GSV, RMC and VTG
Connector
Standard USB connector
PHYSICAL
Dimension
57 mm x 44 mm x 22mm (2.2" x 1.7" x 0.8")
Weight
46 grams
Cable Length
304.8 cm (120")
ELECTRICAL
Primary Power
via USB connector
Current
120 mA
ENVIRONMENTAL
Temperature
operation: -30 degrees to 75 degrees Celsius
or -22 degrees to 167 degrees Fahrenheit.
Please keep in mind that is your computer might have a different
operating temperature.
industrial storage: -55 degrees to 100 degrees Celsius
Operation Humidity
5% to 95%
Dynamics
altitude: -1000 ~ +18,000m
velocity: 500 m/sec
acceleration: < 4g
* Specifications are subject to be changed without notice *
© 2005 ... Teletype GPS
Page 50

Mini-Auto USB GPS Driver Installation Manual48
If you have any questions or problems regarding Teletype GPS products, please feel free to contact us
using the following methods.
Method 1 - Live Chat
Please click on this link ->
Live Chat
.
Must have Internet connection.
Method 2 - Technical Support web page
This page includes video tutorials, documentations, and FAQ about Teletype GPS products.
Please click on this link ->
Teletype GPS Technical Support
.
Must have Internet connection.
Method 3 - E-mail Teletype GPS Customer Service / Technical Support
E-mail address:
info@teletype.com
Method 4 - Call Teletype GPS Customer Service / Technical Support
Please have your Customer ID ready when calling. No Customer Service/Technical Support Services
will be avail without Customer Identification.
Phone number: 1-800-717-4478 ( Toll free for US only )
For International phone calls: 1-617-542-6220
4.6 Contact Teletype GPS
© 2005 ... Teletype GPS
 Loading...