

Page 1
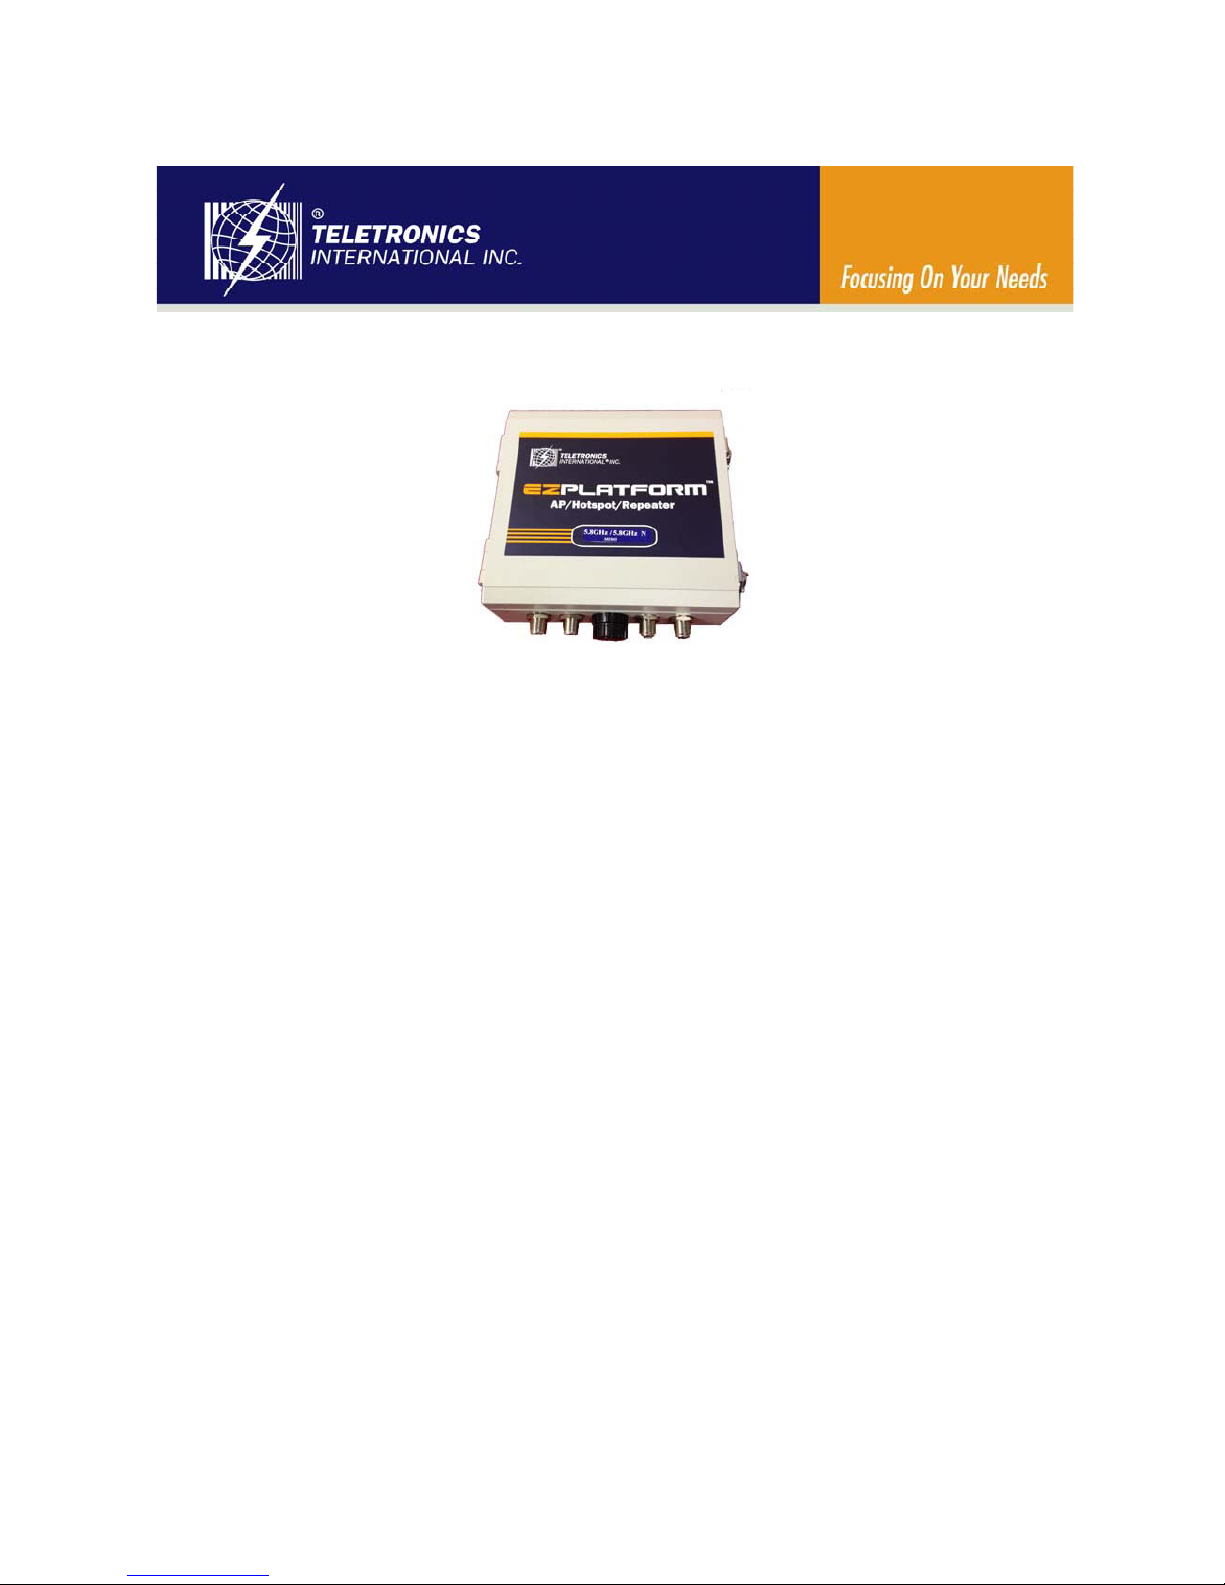
Teletronics EZPlatform Plus™
AP/Hotspot/Repeater
User Manual
2014.5
Version 1.0.0.5
Page 2

Table of Contents
1. PRODUCT OVERVIEW ............................................................................................ 3
1.1 OVERVIEW .......................................................................................................................... 3
1.2
FEATURES AND BENEFITS .................................................................................................... 3
1.3
OPERATION MODES AND CONNECTION EXAMPLES ............................................................... 4
1.3.1 Access Point and Access Point WDS Mode .............................................................. 4
1.3.2 Access Point WDS Mode ........................................................................................... 5
1.3.3 Station Mode .............................................................................................................. 5
1.3.4 Station WDS Mode ..................................................................................................... 6
1.4
SPECIFICATIONS.................................................................................................................. 7
2. HARDWARE SETUP AND STATUS LEDS ................................................................ 8
2.1 HARDWARE SETUP .............................................................................................................. 8
2.2
STATUS LEDS ..................................................................................................................... 9
3. EZMANAGER ............................................................................................................. 9
4. WEB INTERFACE CONFIGURATION1. ................................................................... 11
4.1 LOGIN INFORMATION ........................................................................................................... 11
4.2
STATUS ............................................................................................................................ 1 2
4.2.1 Overview Status .......................................................................................................... 12
4.2.2 Firewall Status .......................................................................................................... 13
5.2.3 Routes list ................................................................................................................ 14
4.2.4 System Log ................................................................................................................. 14
4.3
SYSTEM ............................................................................................................................ 15
4.3.1 System ..................................................................................................................... 15
4.3.2 Administration .......................................................................................................... 17
4.3.3 LED Configuration .................................................................................................... 18
4.3.4 Backup/ Flash firmware ............................................................................................ 18
4.3.5 Reboot ...................................................................................................................... 19
4.5
NETWORK ........................................................................................................................... 20
4.5.1 Interface ...................................................................................................................... 20
5.2 WiFi Configure ............................................................................................................... 23
5. FREQUENTLY ASKED QUESTIONS ....................................................................... 27
Page 3

1. Product Overview
1.1 Overview
Teletronics’ EZPlatform™ Plus AP/Hotspot/Repeater is designed for high-power access
point, hotspot and repeater applications. A powerful end-to-end system for a wireless
Internet network can be built by integrating the EZPlatform™ Plus with Teletronics TT™
subscriber units and other radios. The simplicity of use of the EZPlatform™ Plus allows
operators to quickly bring service to their customers, and with its two serial ports two
Ethernet and 2 USB ports the unit can easily incorporate GPS, GPRS, RFID, VoIP, 3G/4G
network, surveillance cameras, field meters, motion sensors and data networks for multiple
industrial and commercial applications. The EZPlatform™ Plus is available in single or dual
radio configuration, support 2.4 GHz or 5.8 GHz Combanation radio cards at
2T2R/2T3R/4T4R wireless network.
1.2 Features and Benefits
Point-to-Point & Point-to-Multi Point Support
Point-to-Point and Point-to-Multi Point communication between different buildings enables
you to bridge wireless clients that are kilometers apart while unifying the networks.
Virtual AP (Multiple SSID)
Virtual AP implements mSSID (Multi-SSID) This allows a single wireless card to be set up
with multiple virtual AP connections with different SSIDs or BSSID (Basic Service Set
Identifier) and security modes.
Highly Secured Wireless Network
The access point supports the highest available wireless security standard: IEEE802.11i
compliant. The access point also supports IEEE 802.1x for secure and centralized
user-based authentication. Wireless clients are thus required to authenticate through highly
Page 4

secure methods like EAP-TTLS and EAP-PEAP, in order to obtain access to the network.
EzManager™ Utility
The exclusive EzManager utility allows users to access the user-friendly Web configuration
interface of the access point without having to change the TCP/IP setup of the workstation.
Telnet
Telnet allows a computer to remotely connect to the access point CLI (Command Line
Interface) for control and monitoring.
SSH
SSH (Secure Shell Host) establishes a secure host connection to the access point CLI for
control and monitoring.
1.3 Operation Modes and Connection Examples
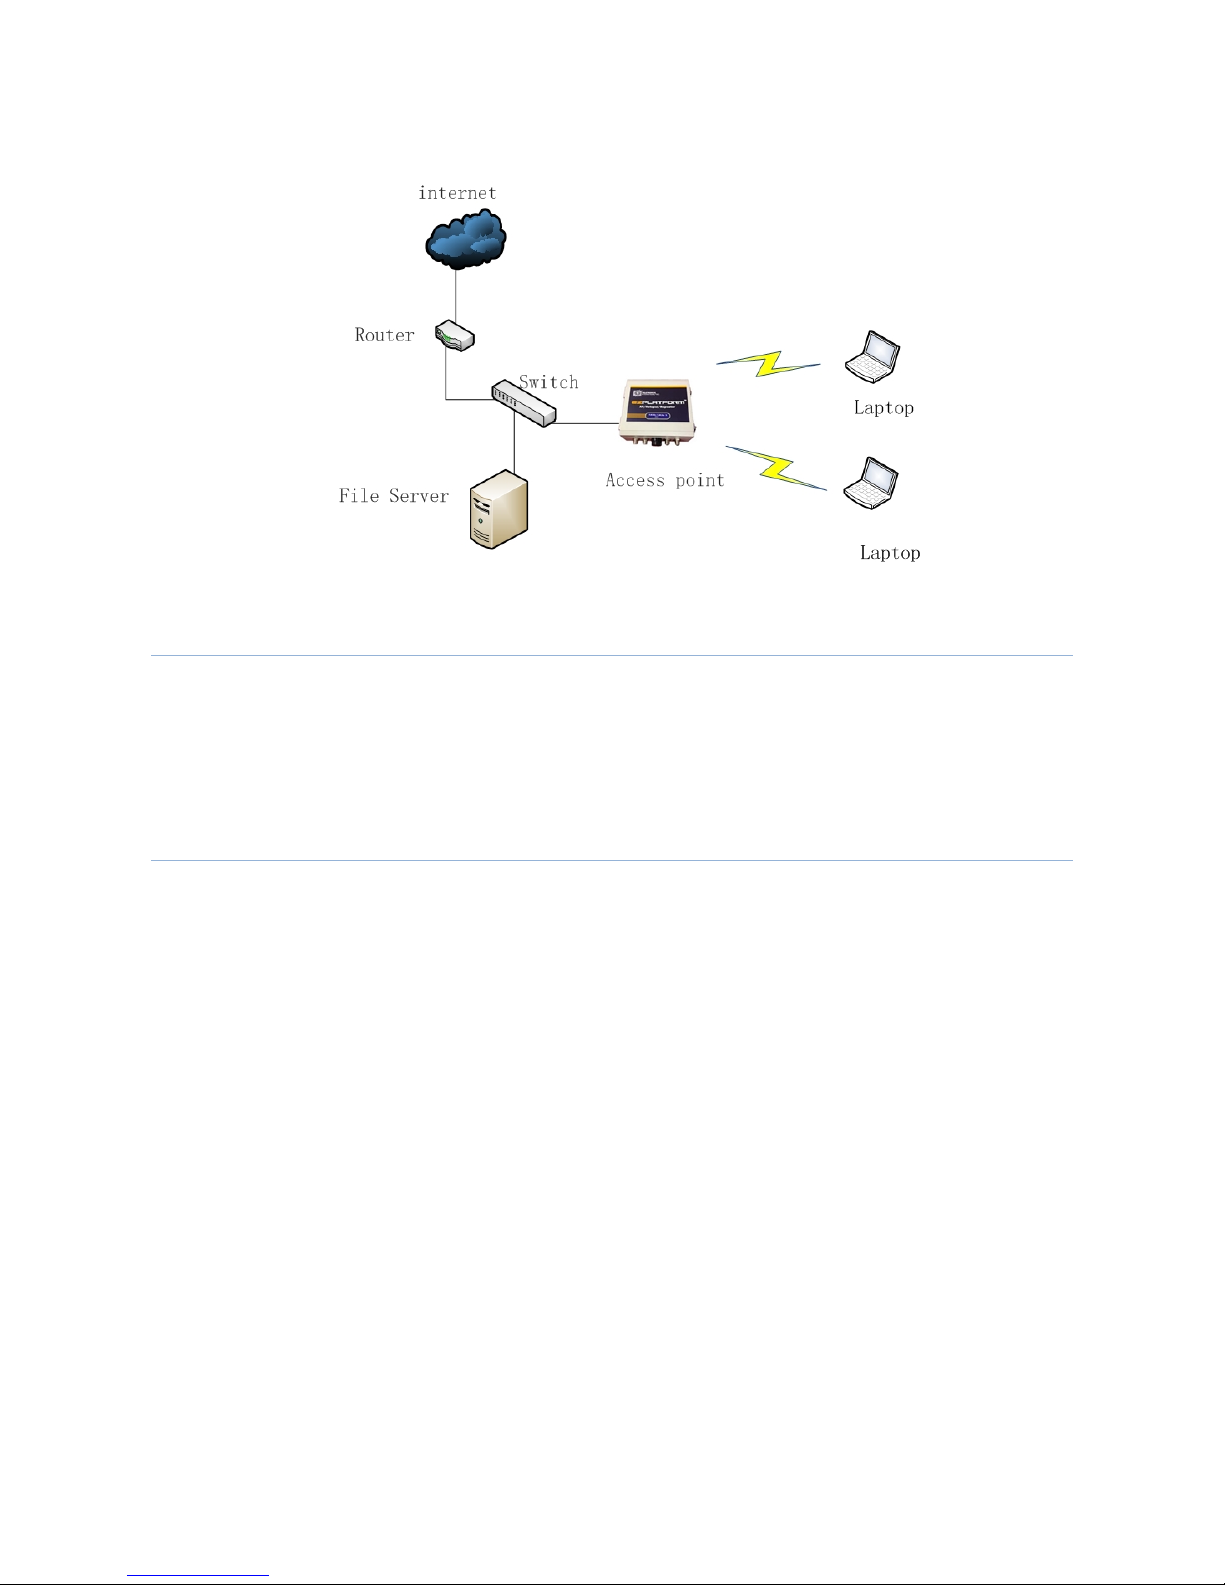
1.3.1 Access Point and Access Point WDS Mode
The Access Point Mode is the default mode of the device. It enables the bridging of
wireless clients to wired network infrastructure and enables transparent access and
communication with each other.
The illustration below shows a typical resources sharing application example using this
device. The wireless users are able to access the file server connected to the switch,
through the access point in Access Point Mode.
Page 5
1.3.2 Access Point WDS Mode
This is mode is generally use for point-to-point or point-to-multi-point connection. It is
mainly use with Station WDS to build the point and multi-point connections.
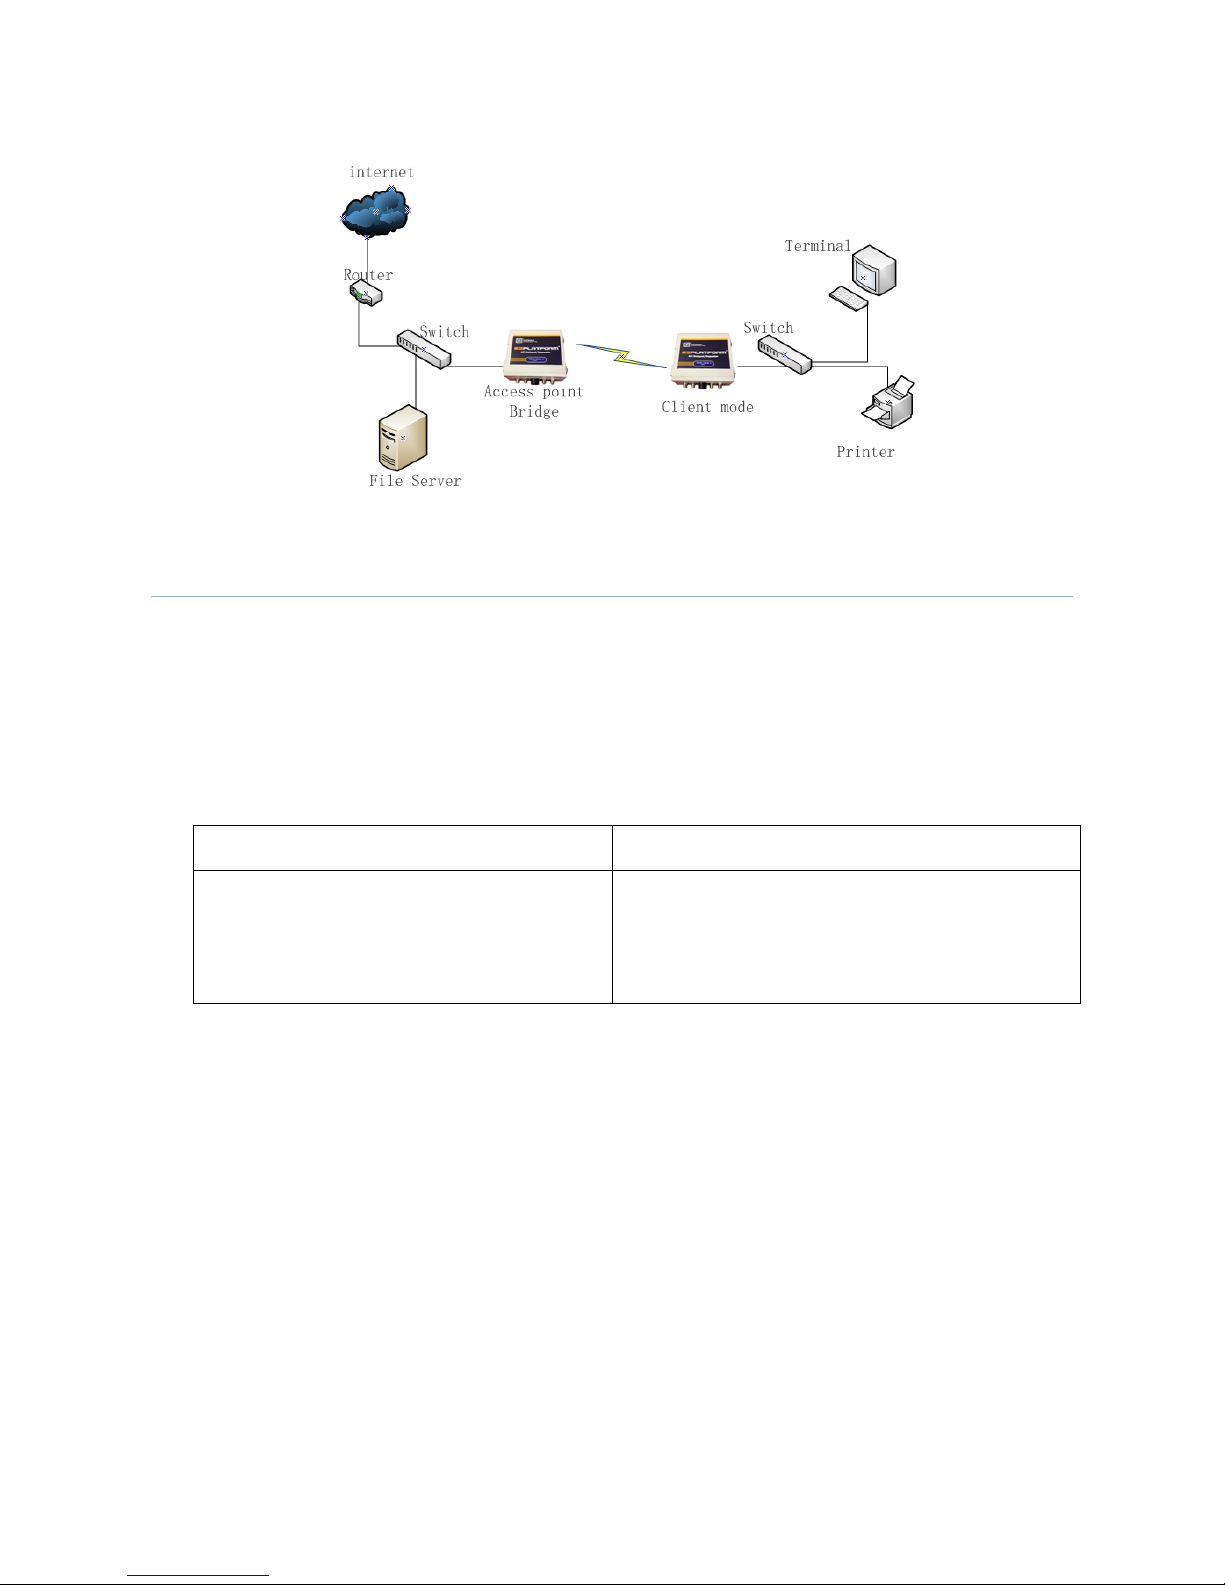
1.3.3 Station Mode
In Station mode the device acts as a wireless client. When connected to an access point,
it creates a network link between the Ethernet network connected at this client device, and
the wireless Ethernet network connected at the access point.
In this example the workgroup PCs on the ethernet network connected to the Station
device can access the printer across the wireless connection to the access point where the
printer is connected.
Page 6
1.3.4 Station WDS Mode
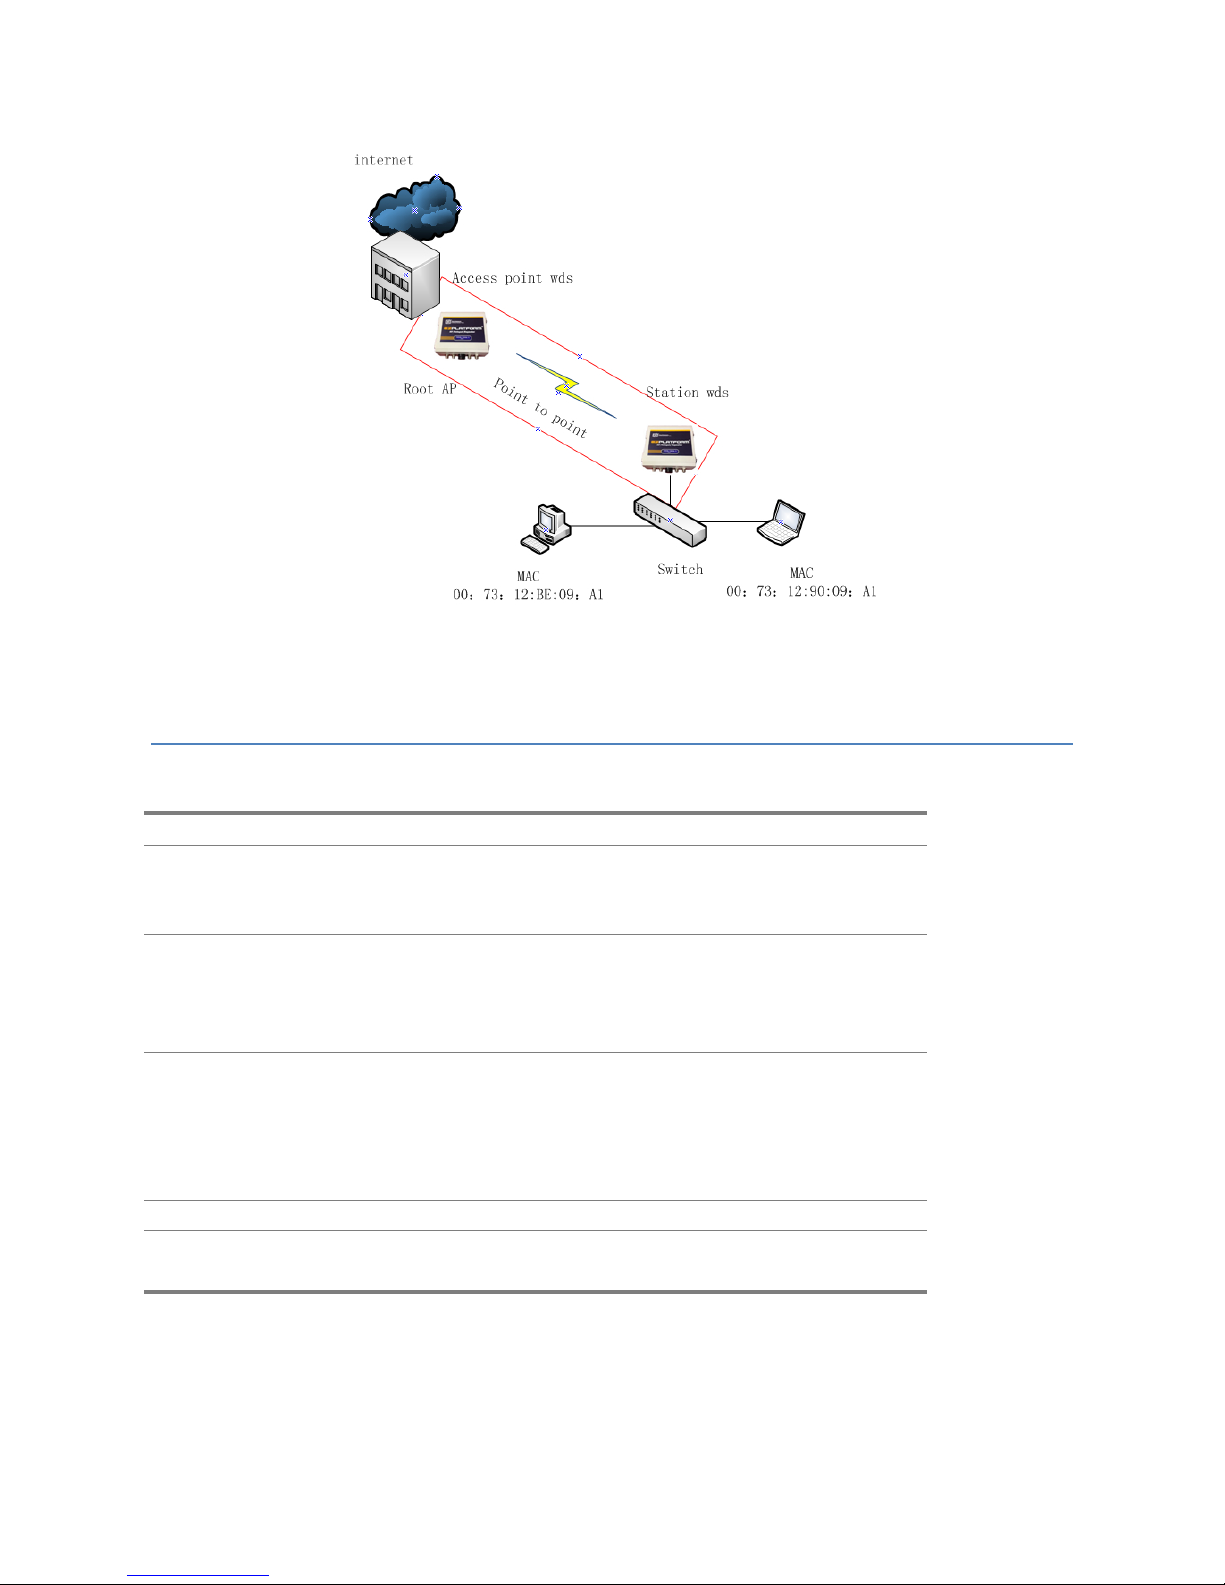
Station WDS mode is similar to Station mode. The difference is Station WDS must
connect to access point configured to Access Point WDS (or RootAP) mode.
Station WDS is mainly use for point-to–point connection between 2 buildings or locations
as far as several kilometer away.
Point-to-Point Point-to-MultiPoint
An access point setup as Access Point
WDS (or RootAP) and other as Station
WDS (Transparent Client).
An access point setup as Access Point WDS
(or RootAP) and several other devices as
Station WDS (or Transparent Client).
This mode is generally used for outdoor connections over long distances, or for indoor
connections between local networks.
Page 7
1.4 Specifications
Hardware Specifications
Ethernet IEEE 802.3af 100BASE-T/1G BASE-TX with autonegotiation
Networking Bridging mode, NAT gateway, static routing. DHCP client,
DHCP server. VLAN, IEEE 802.1Q, SSID-based tagging.
PPPoE, DDNS, STP, QoS, IPv6
Wireless 802.11a/b/g /n (2.4/5.8 GHz), turbo mode. Four SSIDs per
interface, AP/Station mode, WDS. WEP, WPA, WPA2
encryption. Adjustable RF TX power and data rate. Hotspot:
RADIUS authentication
Management HTTP/HTTPS web configuration interface, TELNET.
SNMPv2, remote syslog, local event log. Bandwidth control
with upload/download rates. Configuration backup and
restore, web-based firmware upgrade. Serial port rescue
console, EZManager support
Security IP address, MAC address and SSID filtering Firewall, 802.1X
Operating
System
Linux, 2.6.x kernel
Page 8
Hardware Specifications
CPU Atheros AR7161 network processor, 800 MHz
Memory 64 MB DDR SDRAM (max 128MB optional )
NOR Flash 8 MB (max 16MB optional)
Ethernet 2 X 10/100/1000 T ( with Auto MDI / MDIX)
Serial TTL RS-232 port
Wireless interface Two Mini PCI slots
LED indicators 7 LEDs Power, WLAN1, LAN1, 4 RF strength
Power PoE (24-48 V DC Jack), 802.11 af PoE (48V-56V)
Power consumption 4 W
Dimensions 8 x 7.5 x 2.5 in
Weight 7 lb
Temperature -20 °C to +70 °C, non-condensing
Enclosure NEMA 4, ruggedized and weatherproof
Mounting Wall mount, pole mount
2. Hardware Setup and Status LEDs
2.1 Hardware Setup
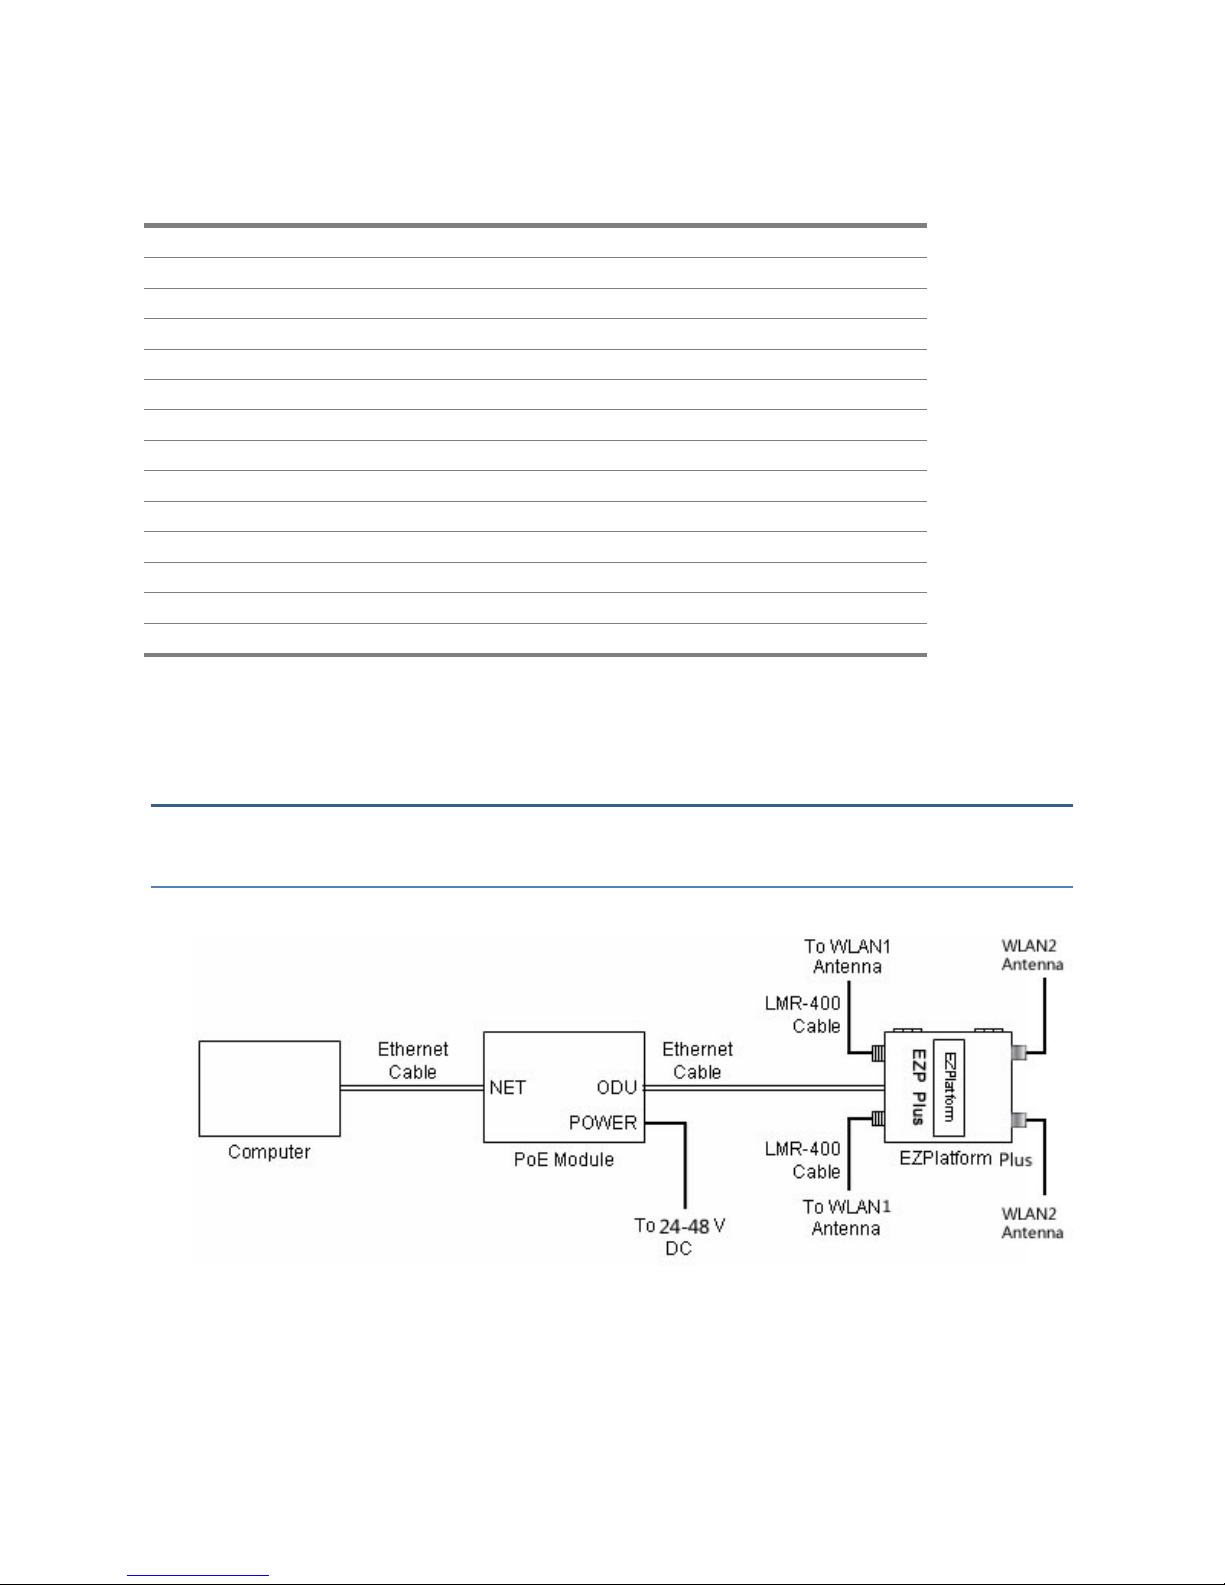
Figure 4 shows how to connect the EZPlatform Plus™
Figure 4. Network and power connections
The purpose of this setup is to connect the EZPlatform™ so that it can be configured with a
computer via the web interface of the EZPlatform™. The power over Ethernet (PoE) module
Page 9

allows you to send/receive data and power the EZPlatform™ with a single cable. When
connecting the antennas, care must be taken so that the antennas are properly mounted to
avoid mutual interference, especially if both wireless interfaces will be operated in the same
802.11 mode.
WLAN1 and WLAN2 are the fixed designations for the two wireless interfaces.
WLAN1 is wired to the antenna port that is closer to the hinges of the NEMA 4 enclosure;
WLAN2 is wired to the antenna port farther from the hinges of the enclosure.
Setup Requirements
CAT5/5e Networking Cable.
At least one computer installed with a web browser and a wired or wireless
network interface adapter.
All network nodes installed with TCP/IP and properly configured IP address
parameters.
2.2 Status LEDs
The behavior of the LEDs mounted on the enclosure is explained in the following table.
LED Position Status Interpretation
Power Left Solid on Power on
Off Power off
Ethernet Center On Ethernet link
Off No Ethernet connection
WLAN1 Center Solid on Associated to an AP (in SU mode)
Solid on (in AP mode)
Off Radio card not detected / wireless off
WLAN2 Center Solid on Associated to an AP (in SU mode)
Solid on (in AP mode)
3. EZManager
To help you administer your network easily and effectively, Teletronics offers free network
administration software called EZManager, which is compatible with virtually all Teletronics
Page 10
radios, including the TT™ series, the TTX™ series, the SLAB™ series, the EZBridge™
series and the EZPlatform™ series. A copy of EZManager can be downloaded from
Teletronics’ website, http://www.teletronics.com/Firmware.html
EZManager does not require installation: you can just uncompress the download file and
execute the file called ‘EZManager.exe’.
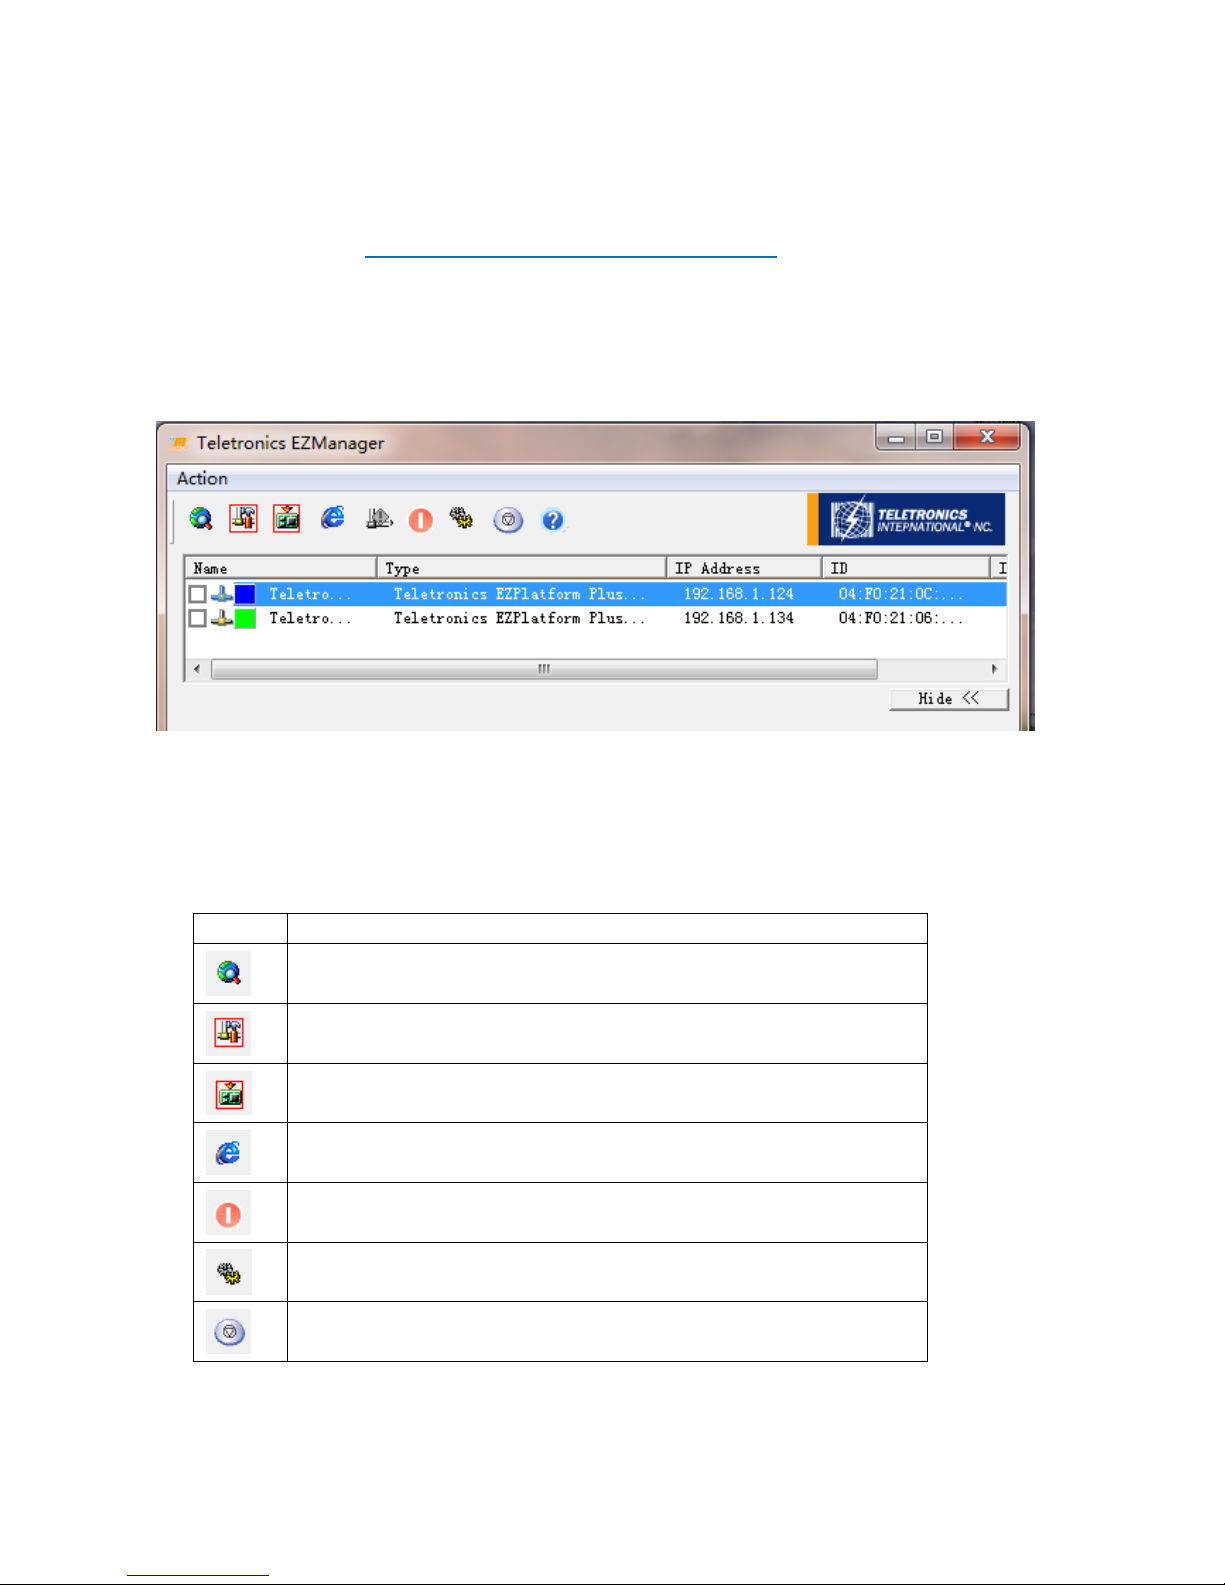
The main interface of EZManager is shown in Figure 26.
Figure 26.
The functions of some of the buttons in EZManager are explained below, as well as how
they can be used with the EZPlatform™.
Icon Function
Scans the network for Teletronics devices and shows their IP addre ss and
MAC address.
Allows you to change the IP address, subnet mask and default gateway of
the EZPlatform Plus
TM
Loads firmware to the EZPlatform Plus
TM
Opens the web interface of the EZPlatform Plus
TM
. The computer needs to
be in the same subnet as the EZPlatform Plus
TM
Reboots the EZPlatform Plus
TM
Application Settings
Resets all settings of the EZPlatform Plus
TM
to factory default
Page 11

Note: Click the Settings button, and display the Configurations dialoge, please enter
theadmin’s password . After that , you can set parameter in EZManger.
4. Web Interface Configuration
The EZPlatform™ can be conveniently configured using its web interface. The web interface
provides intuitive navigation and options for you to easily configure the unit. Figure 2 shows
a sample page of the web interface.
4.1 Login Information
After properly connecting and powering the unit, wait for the unit to finish the boot-up
process.
On the computer connected to the EZPlatform™ via Ethernet, open a browser and point it to
the IP address of the EZPlatform™ (192.168.1.124 by default), as shown in Figure 3.
Page 12
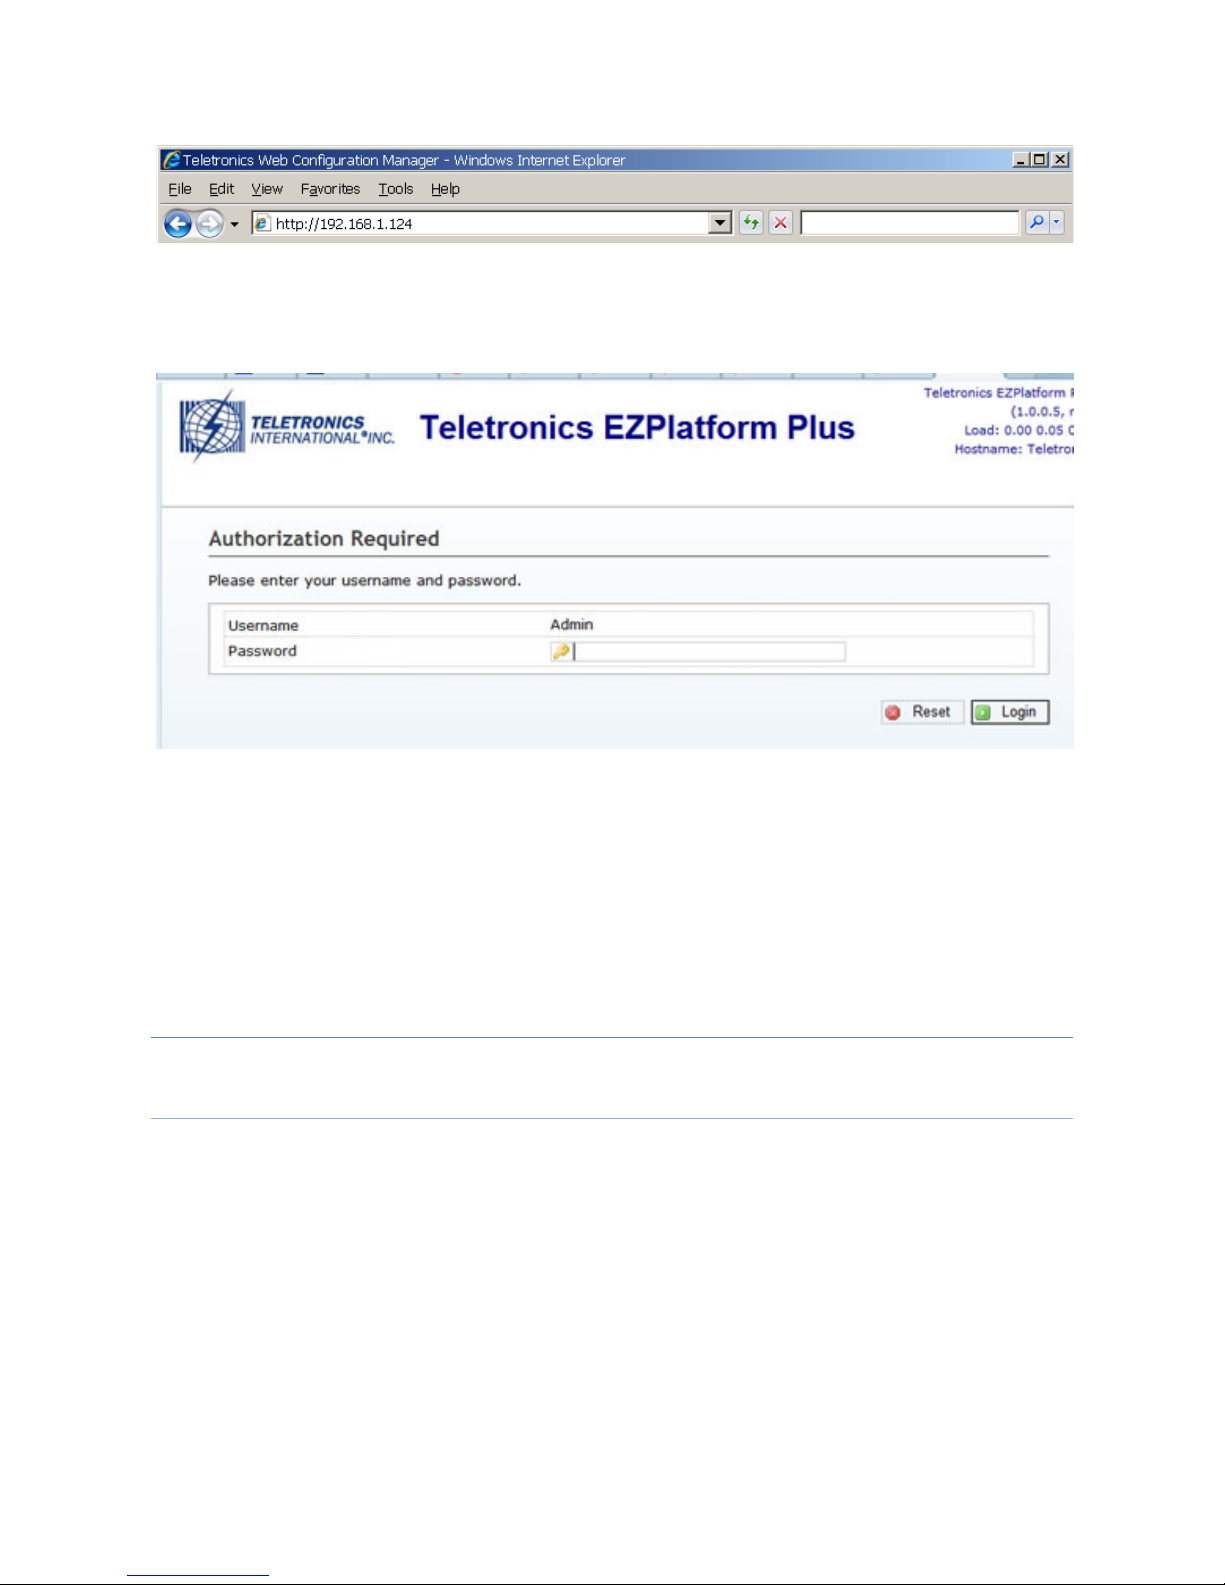
To log in to the web interface, enter the user name and password in the prompt that appears,
as shown in Figure 4.
Figure 4. User name and password
The default user name is “admin“ and the default password is “password“. The password can
be changed once you have logged in. After logging in, you will see the page shown in Figure
5.
Username: admin
Password: password
4.2 Status
4.2.1 Overview Status
The web interface is the home page and thus is the page displayed when you log in. This
page displays a summary of the current configuration and status of the EZPlatform™ Plus,
as shown in Figure 5.
Page 13
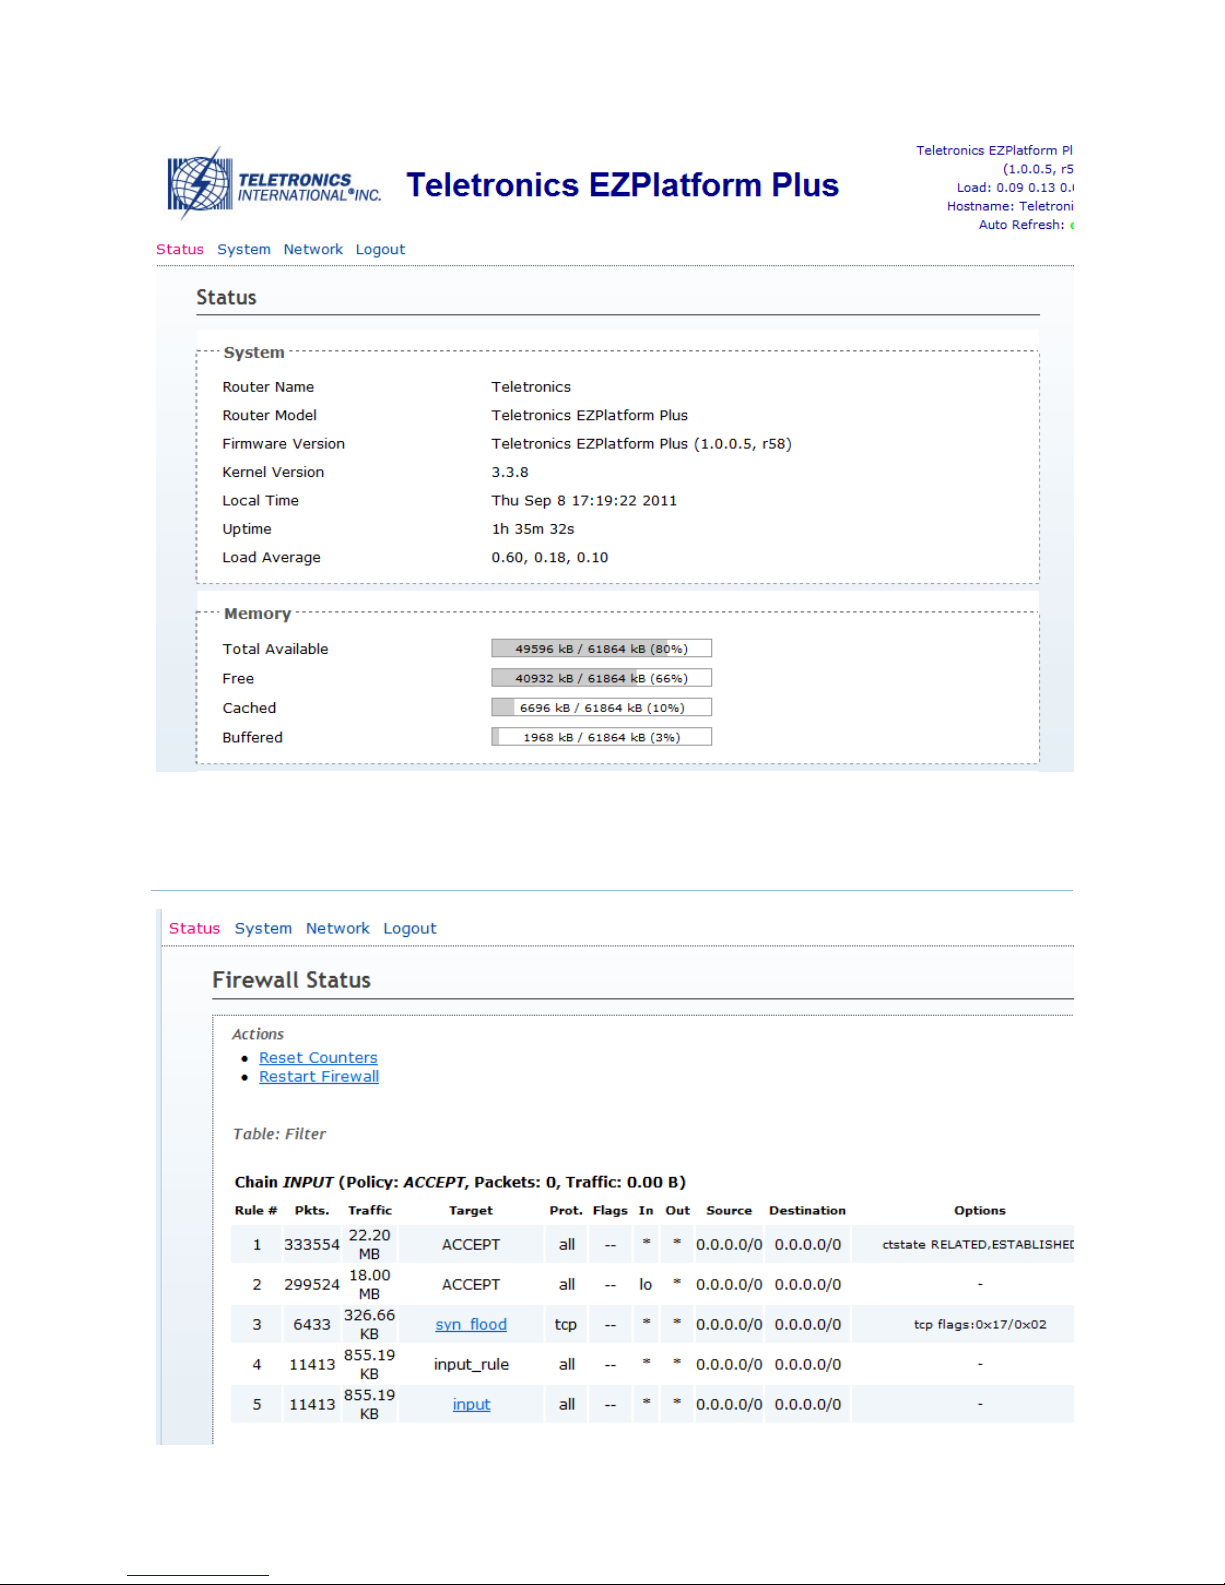
4.2.2 Firewall Status
Page 14
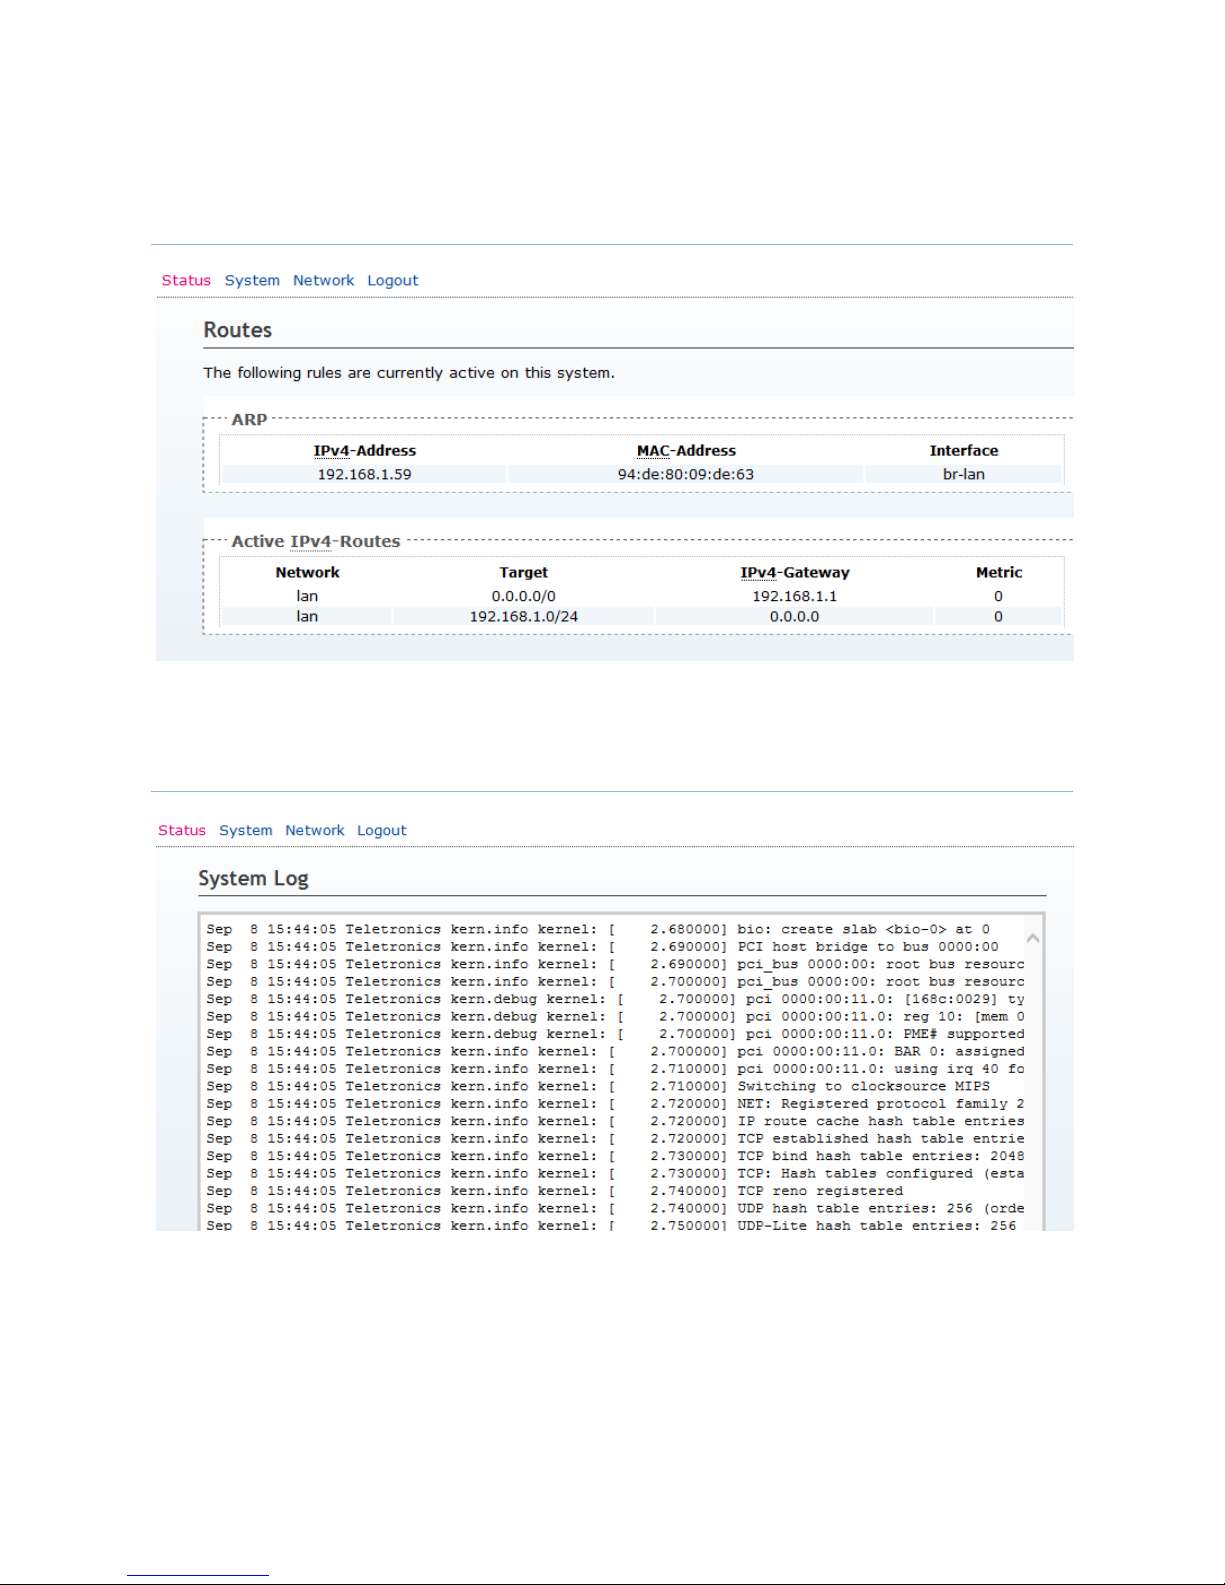
5.2.3 Routes list
This page shows the Route list and ARP list.
4.2.4 System Log
This page shows you important events that have been logged by the EZPlatform™ Plus .
Events are displayed chronologically, with the most recent ones displayed at the bottom of
the list.
Page 15
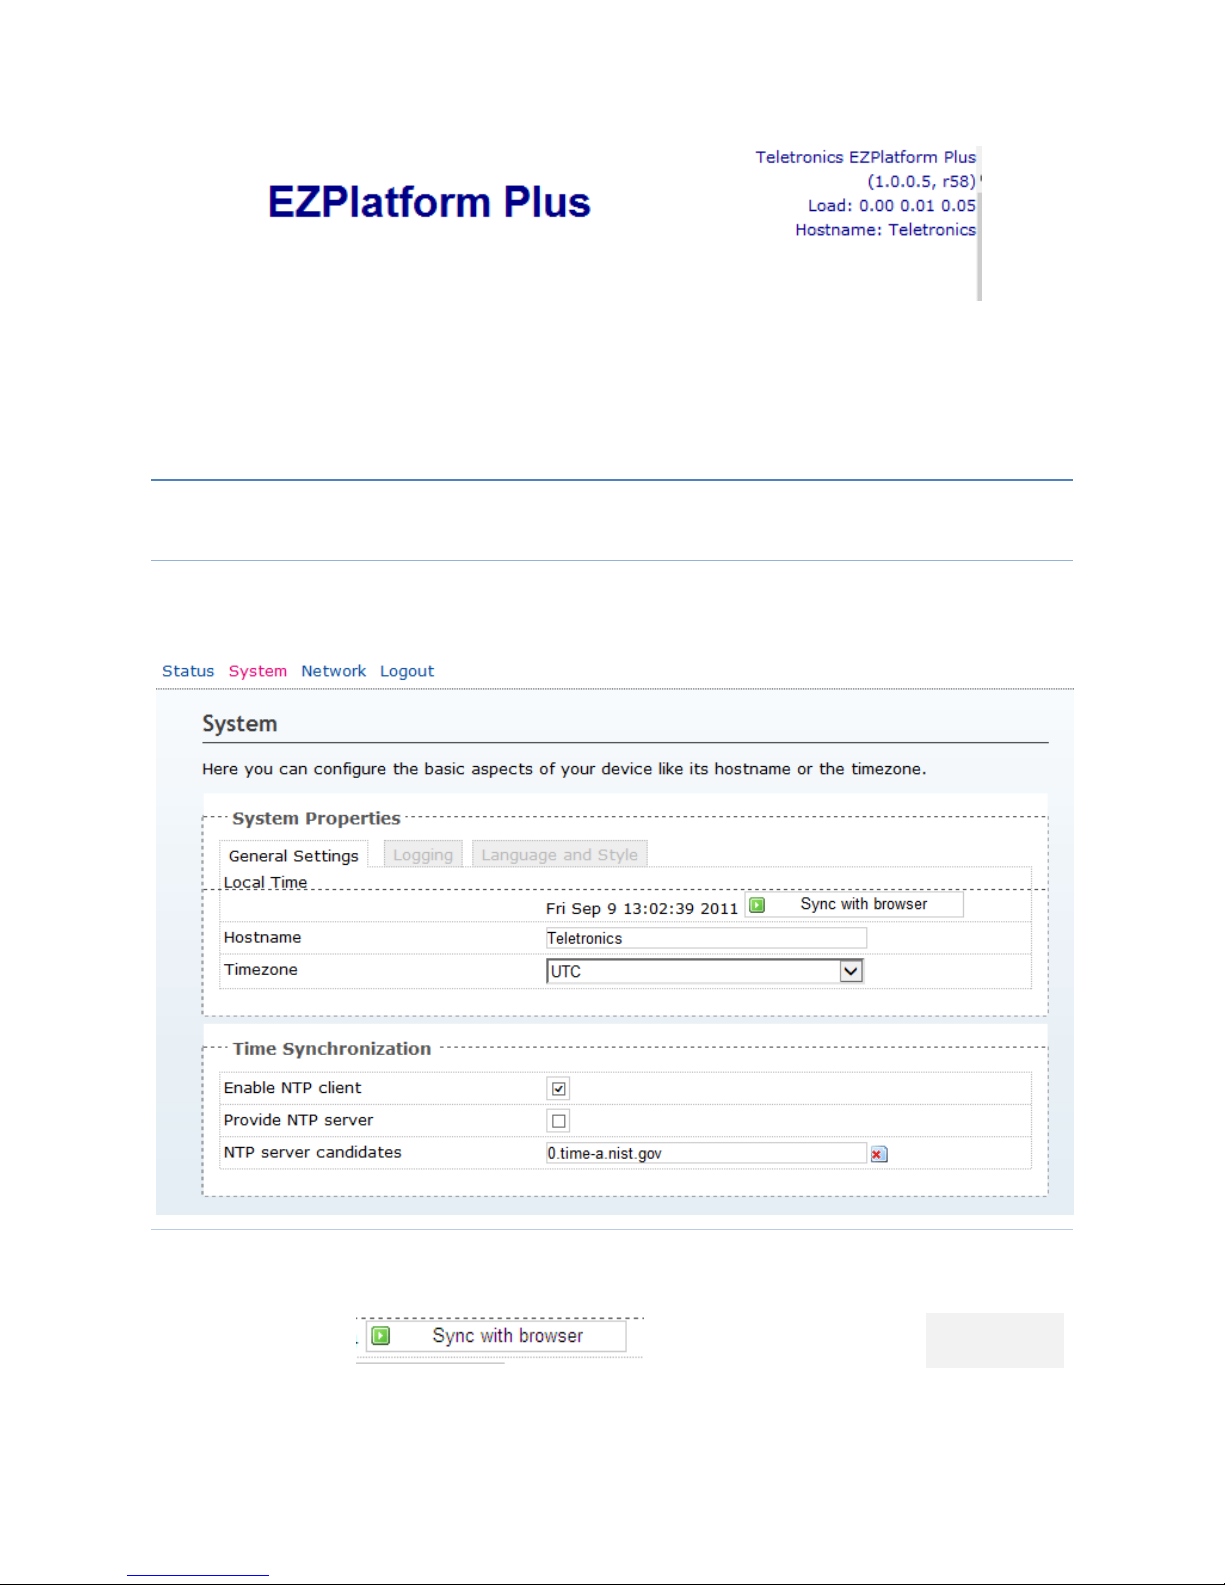
Display the Equipment type, Firmware, Hostname etcs.
4.3 System
4.3.1 System
4.3.1.1 General Settings
In this page , you can change the Timezone , Local Time, Hostname,and the NTP server.
Click the button , the time of EZPlatform will synchronize
to your PC.
Page 16
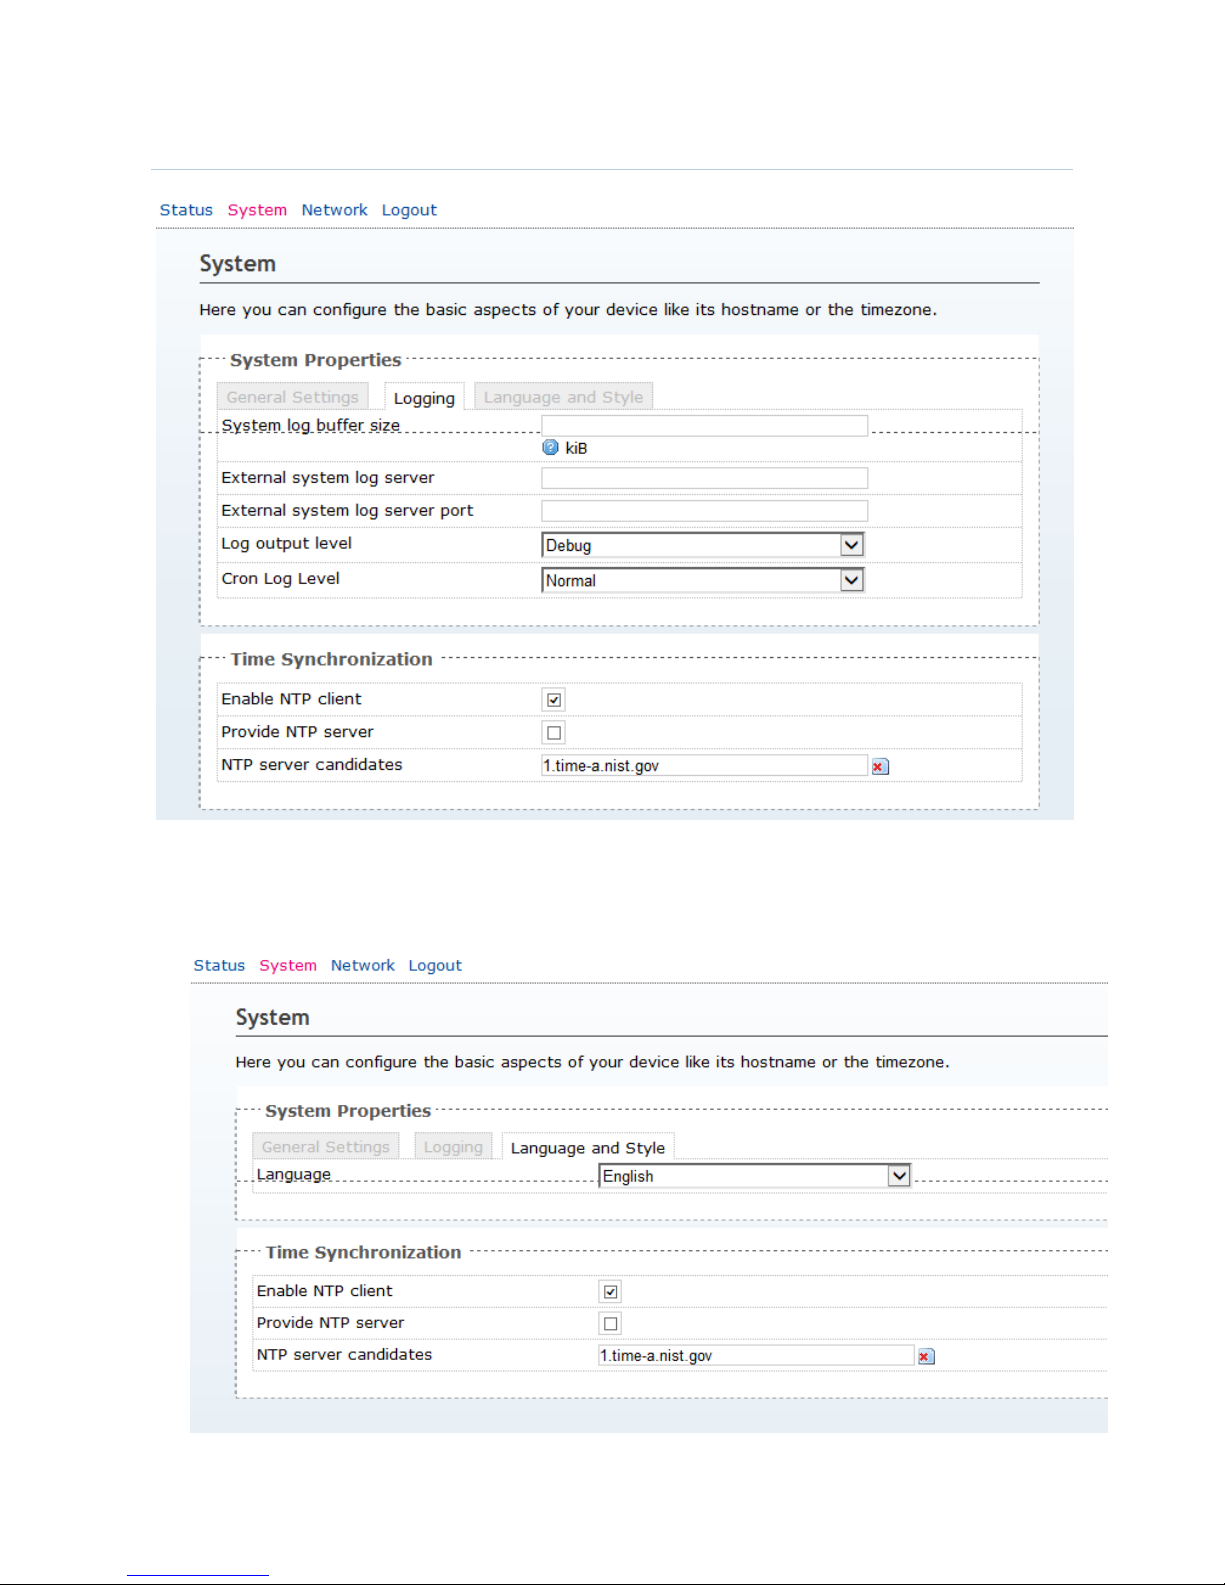
4.3.1.2 System
In this Page , you can config the logbuffer size, log server etcs.
Language and Style Page
Page 17
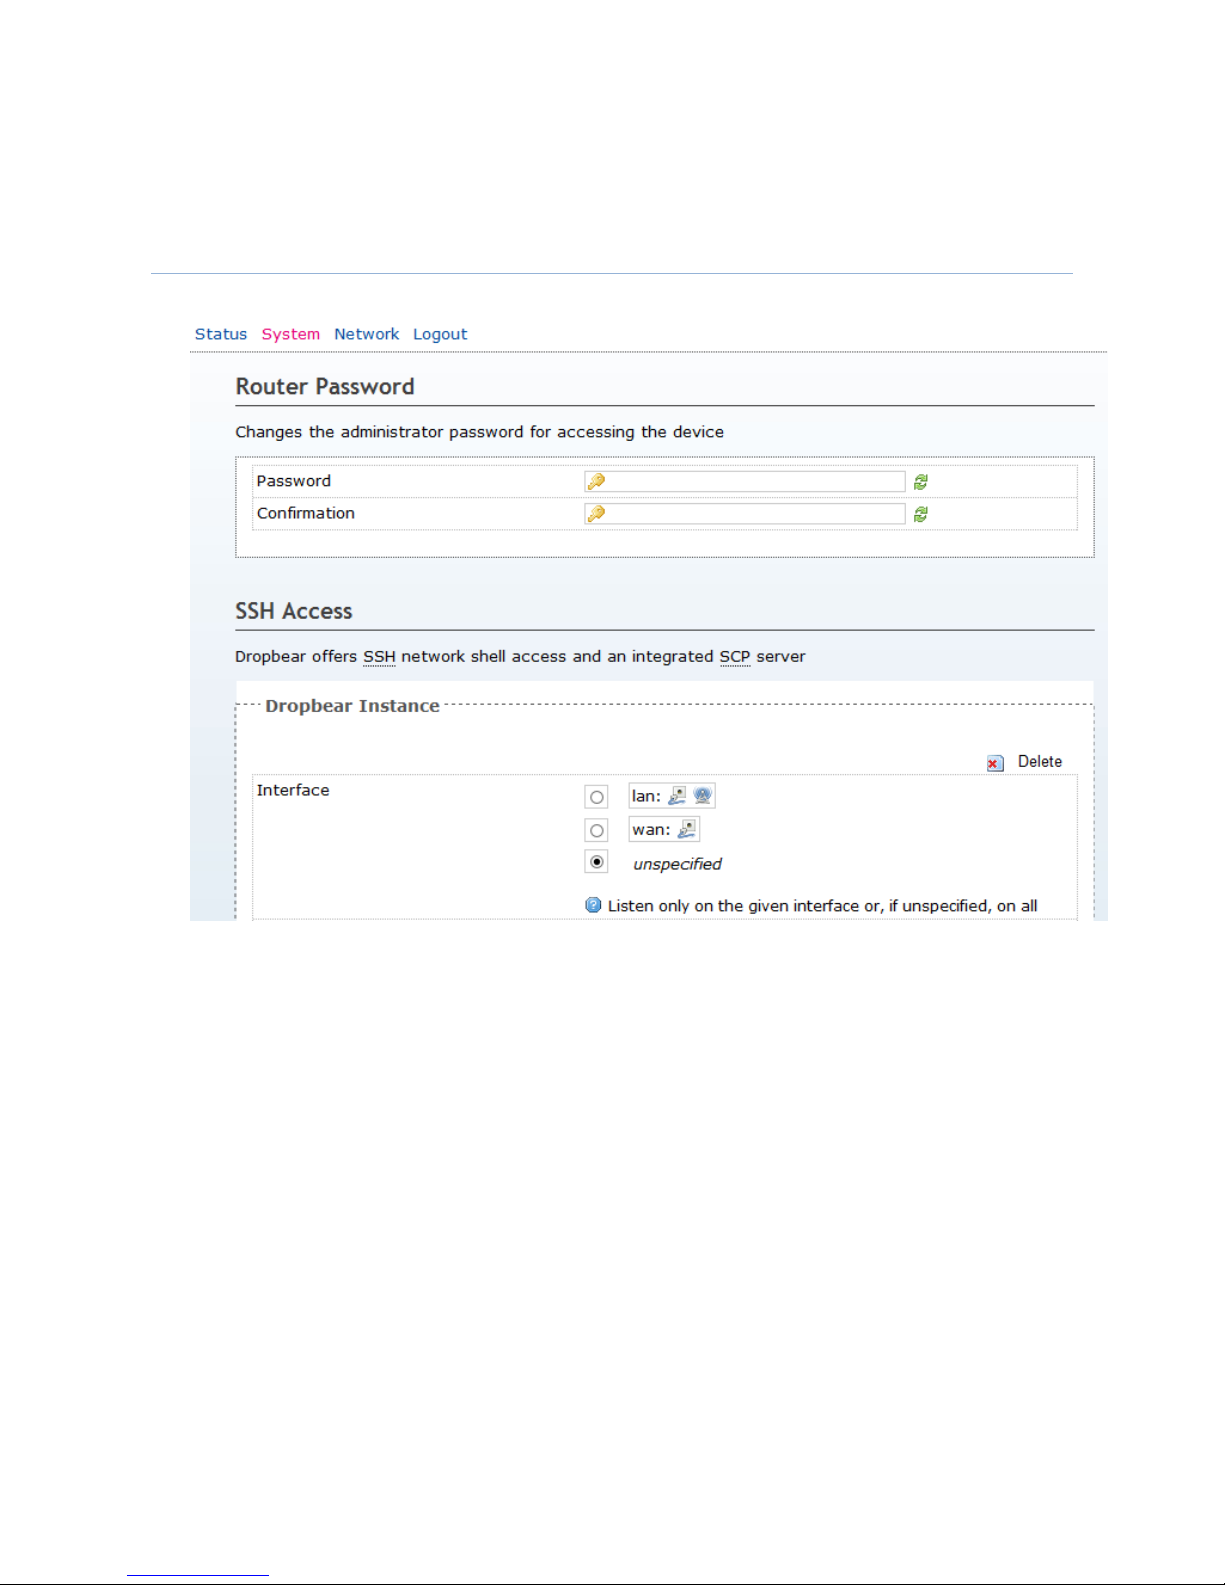
Languages: Select the Chinese/English
4.3.2 Administration
Router Password
Password: enter the new password that you wish to use.
Confirmation: enter once again the new password that you wish to use
SSH Access
Interface: The interface that SSH listen for connection.
Port: Specifies the listening port.
SSH-Keys: public SSHs input area.
Page 18
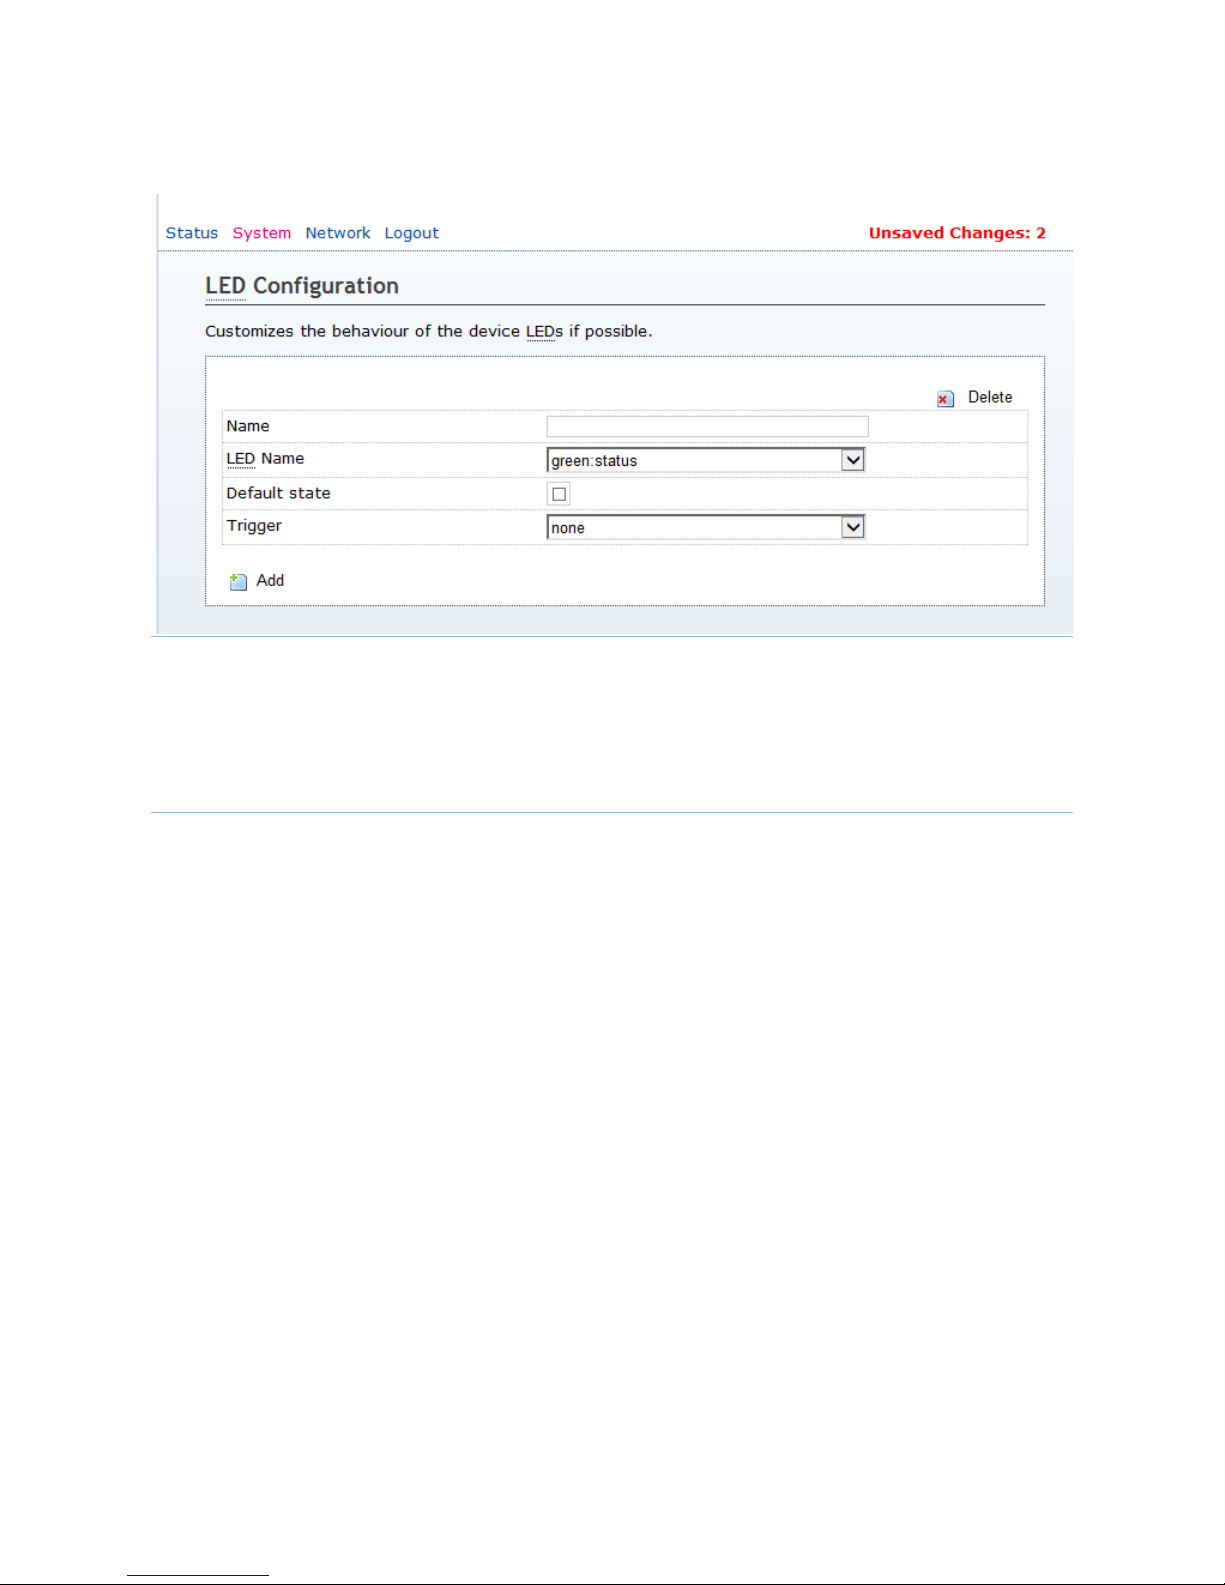
4.3.3 LED Configuration
LED Configuration
Name: Define the name of LED.
4.3.4 Backup/ Flash firmware
The Backup and Flash Firmware page is shown in Figure 21.
Page 19
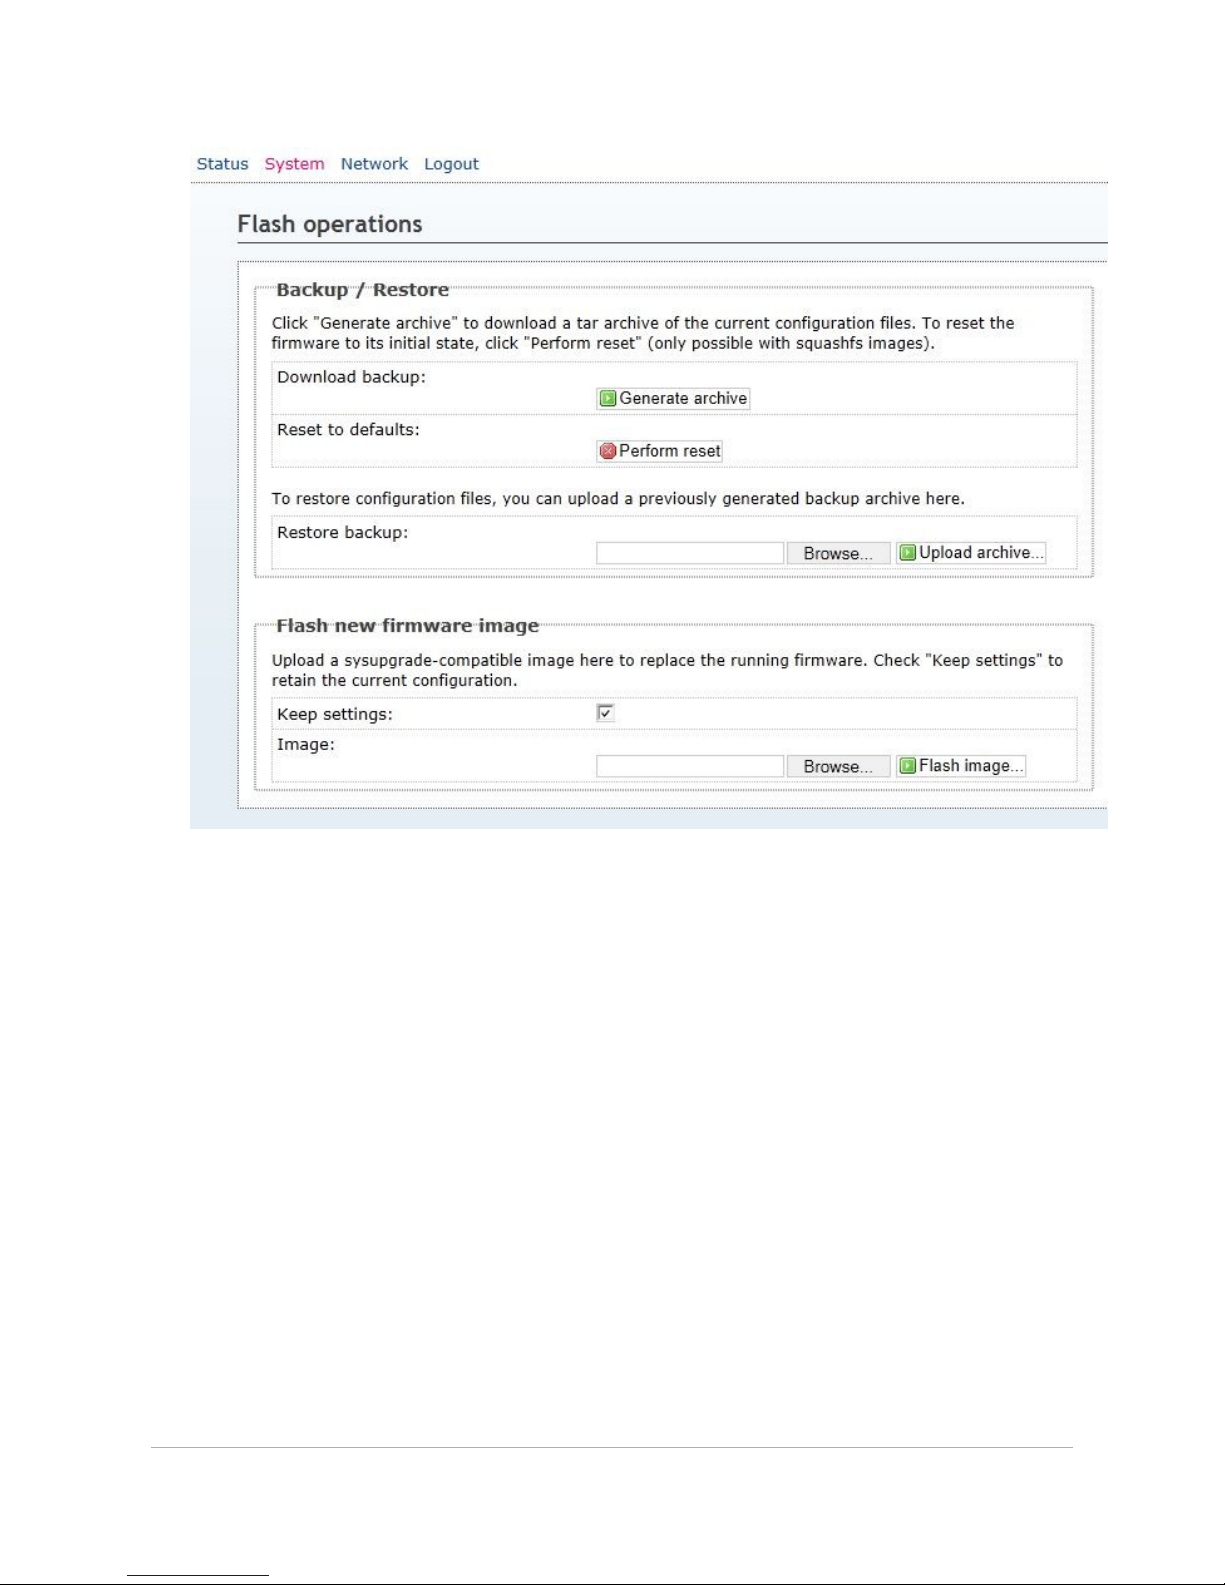
Figure 21. Backup and Flash Firmware Page
Backup / Restore
Generate archive: click on this link to download the current configuration of the
EZPlatform™ Plus to your computer so that you can restore it later if needed.
Perform reset: click on this button to restore all the settings of the EZPlatform™ Plus to
factory default, including the IP address.
Browse: click on this button to browse your local computer and choose the configuration
file which contains the settings that you wish to restore.
Upload archive: after selecting the archive file, click on the ’Upload archive’ to Restore the
configuration saved before.
Firmware Upgrade
Browse: click on this button to browse your local computer and choose the firmware
binary file
you wish to load to the EZPlatform™ Plus.
Flash image: after selecting the binary file, click on the ’Flash image’ to Upgrade firmware.
4.3.5 Reboot
Page 20
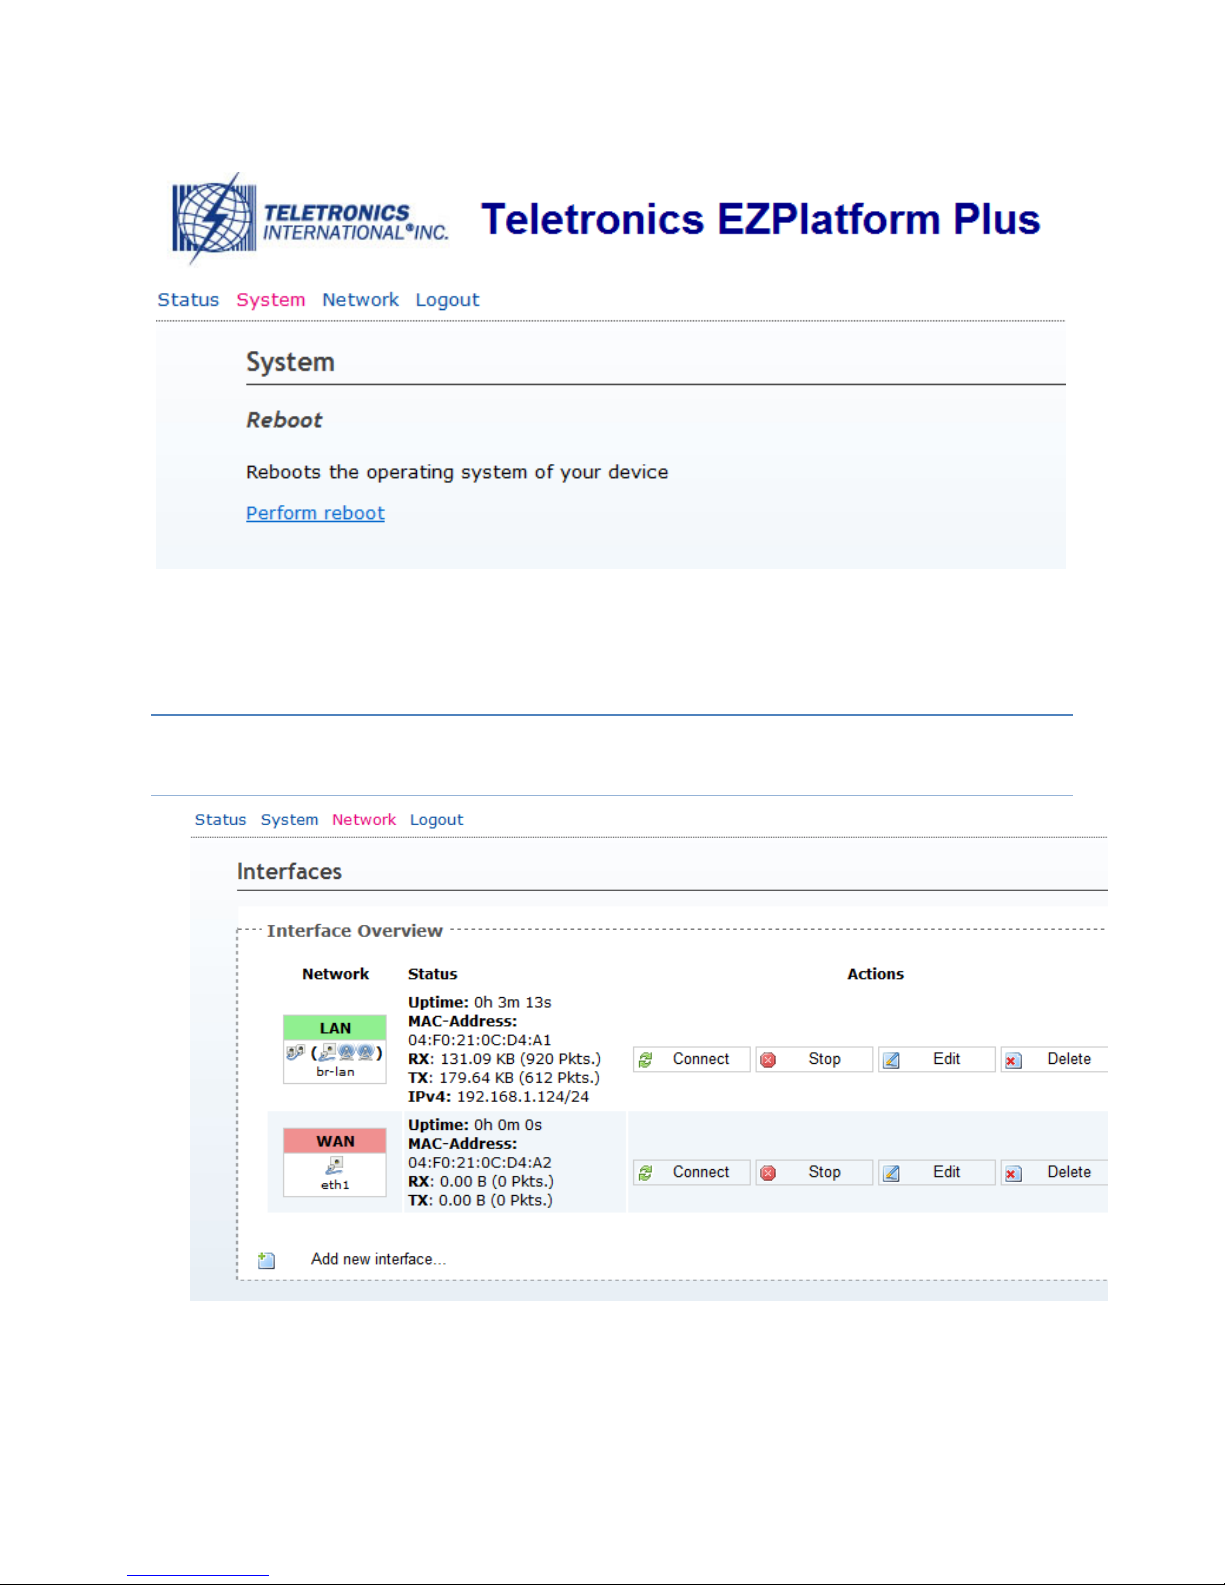
Perform reboot: clicking on this button reboots the EZPlatform™ Plus.
4.5 Network
4.5.1 Interface
Interfaces - LAN
User can add/delete/edit/stop/connect LAN or WAN.
Page 21
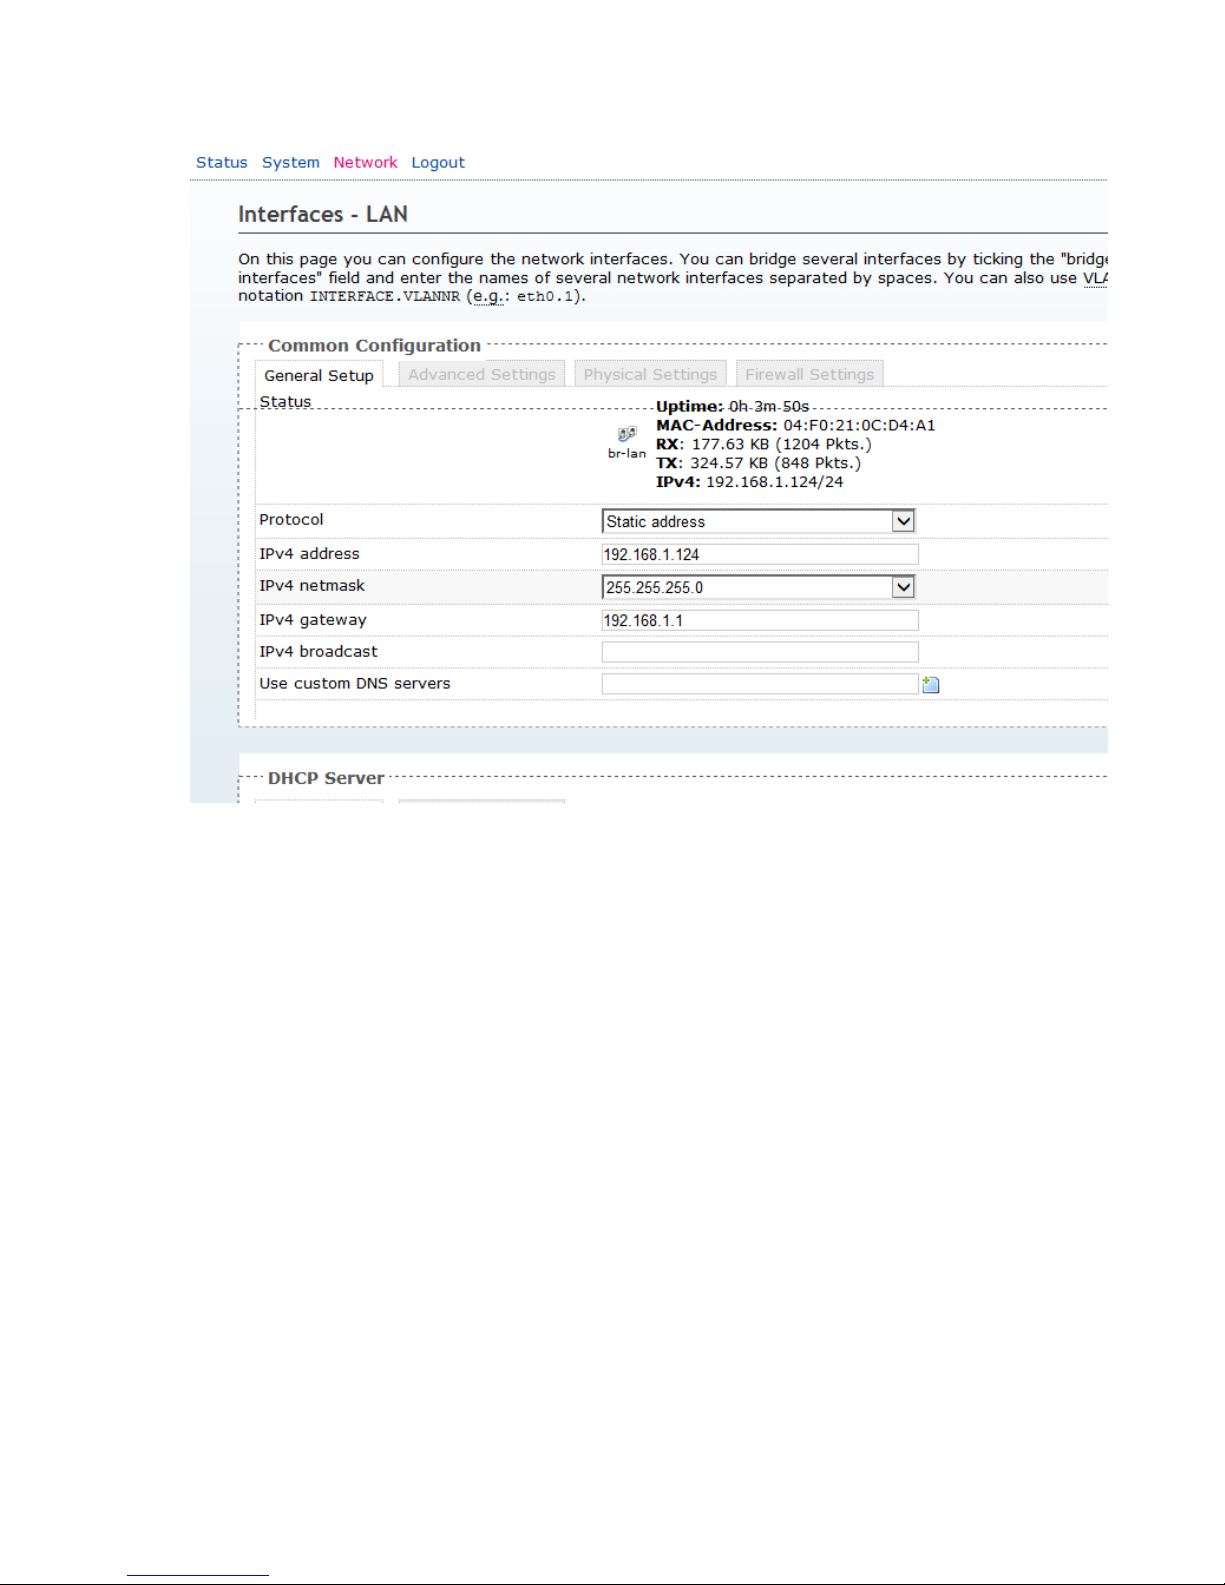
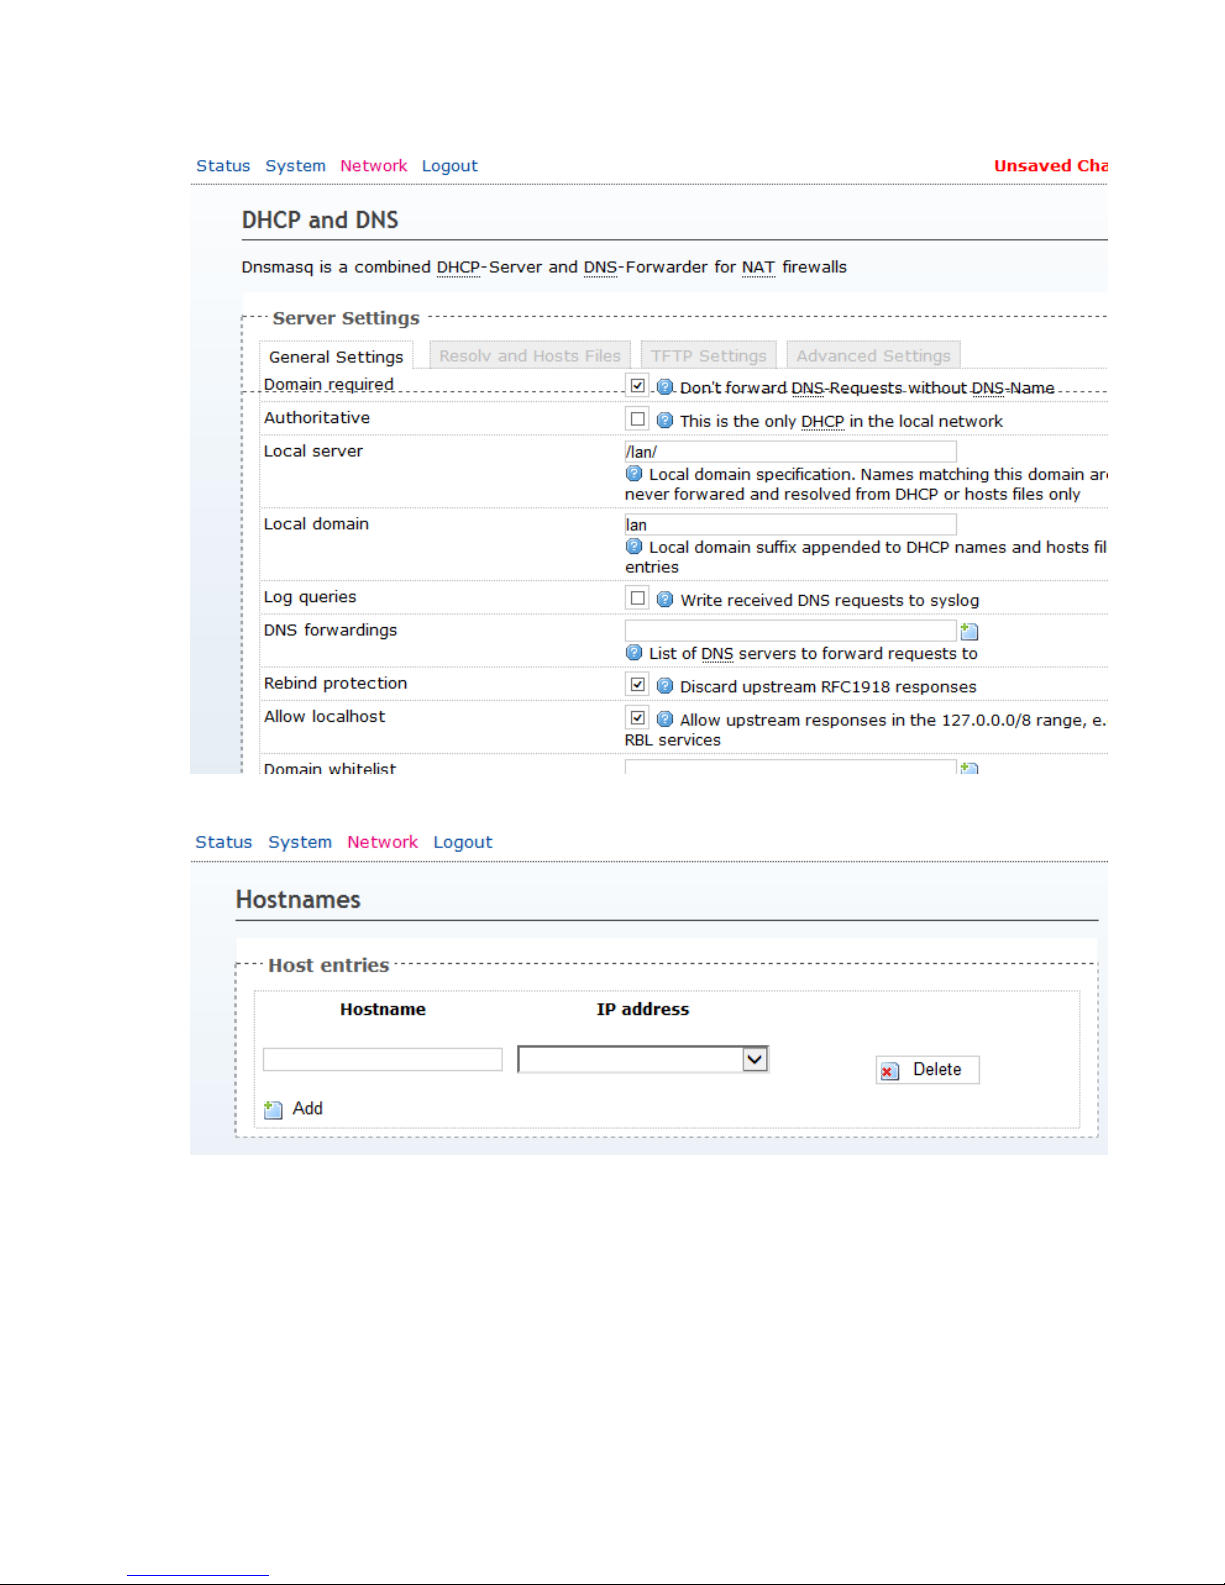
LAN Interface can use pope, static IP, DHCP Client, L2TP, PPP etc. Switch the
DHCP On/Off.
Page 22
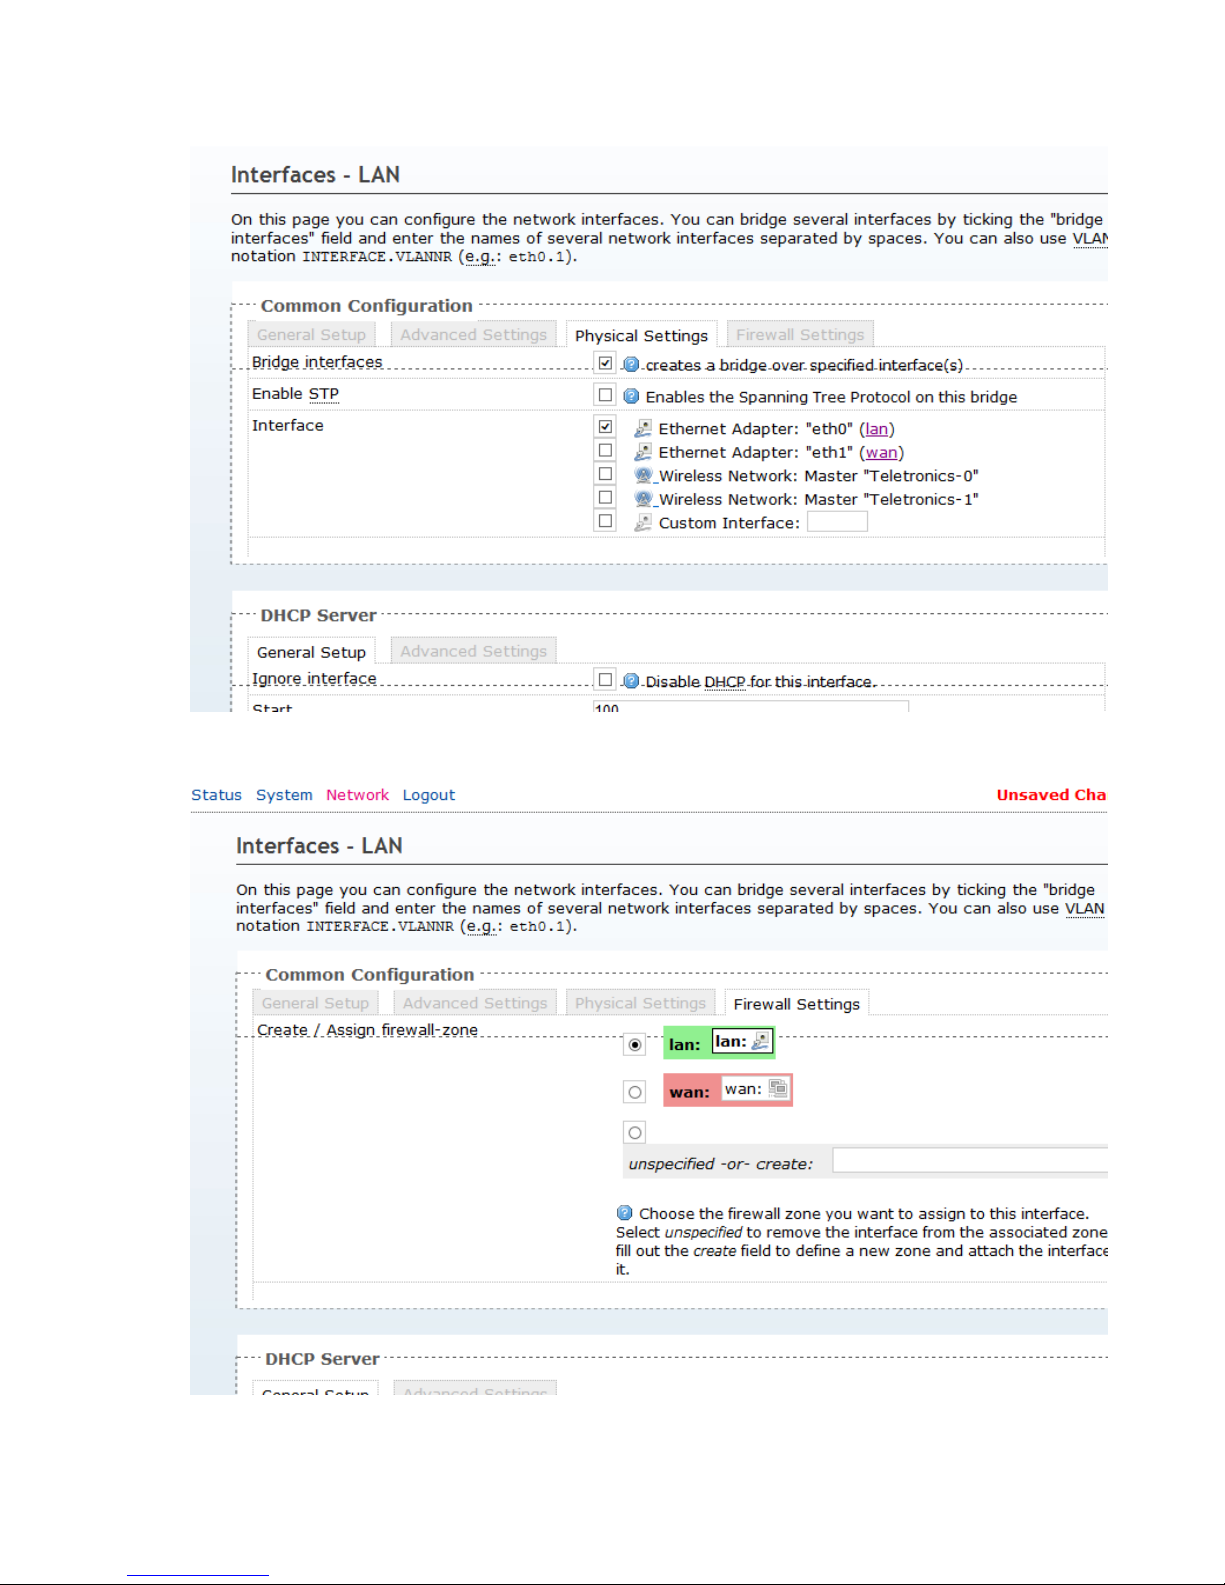
User can Enable/disable STP service and Interfaces.
Page 23
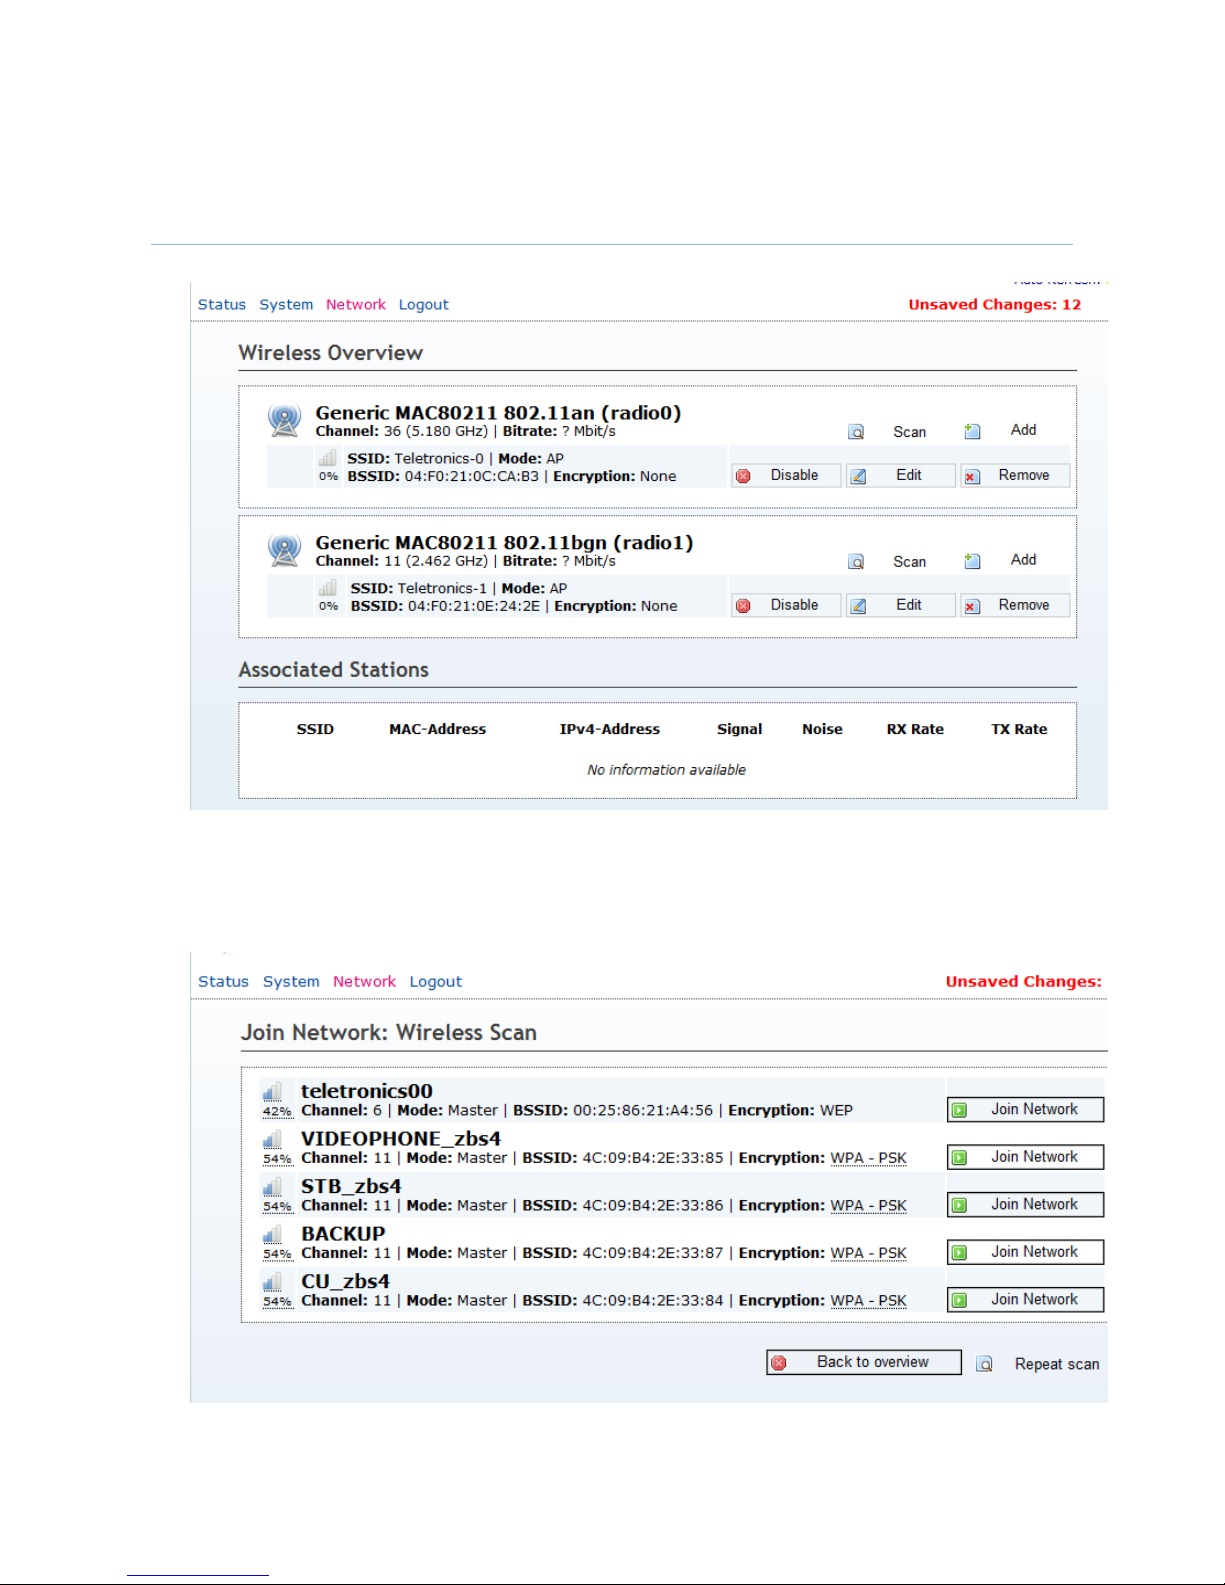
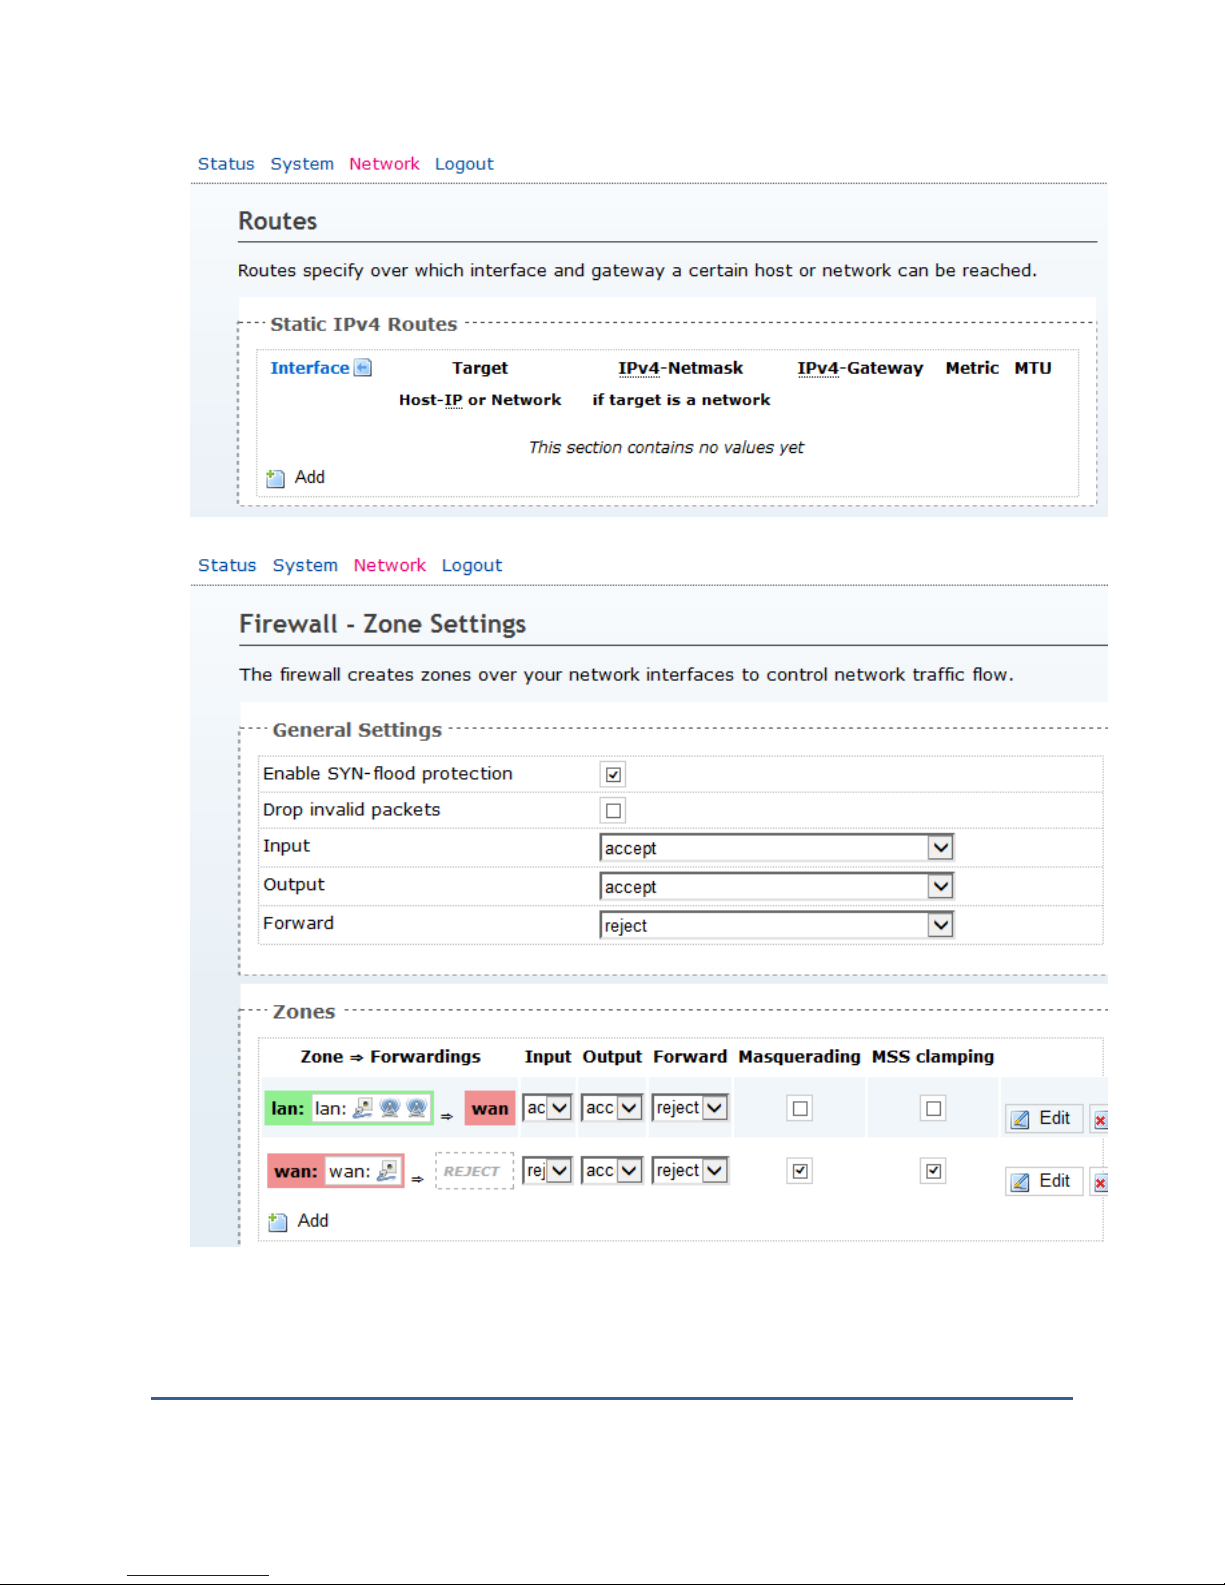
Firewall configure, User can select the ZONE of Firewall and create new one.
5.2 WiFi Configure
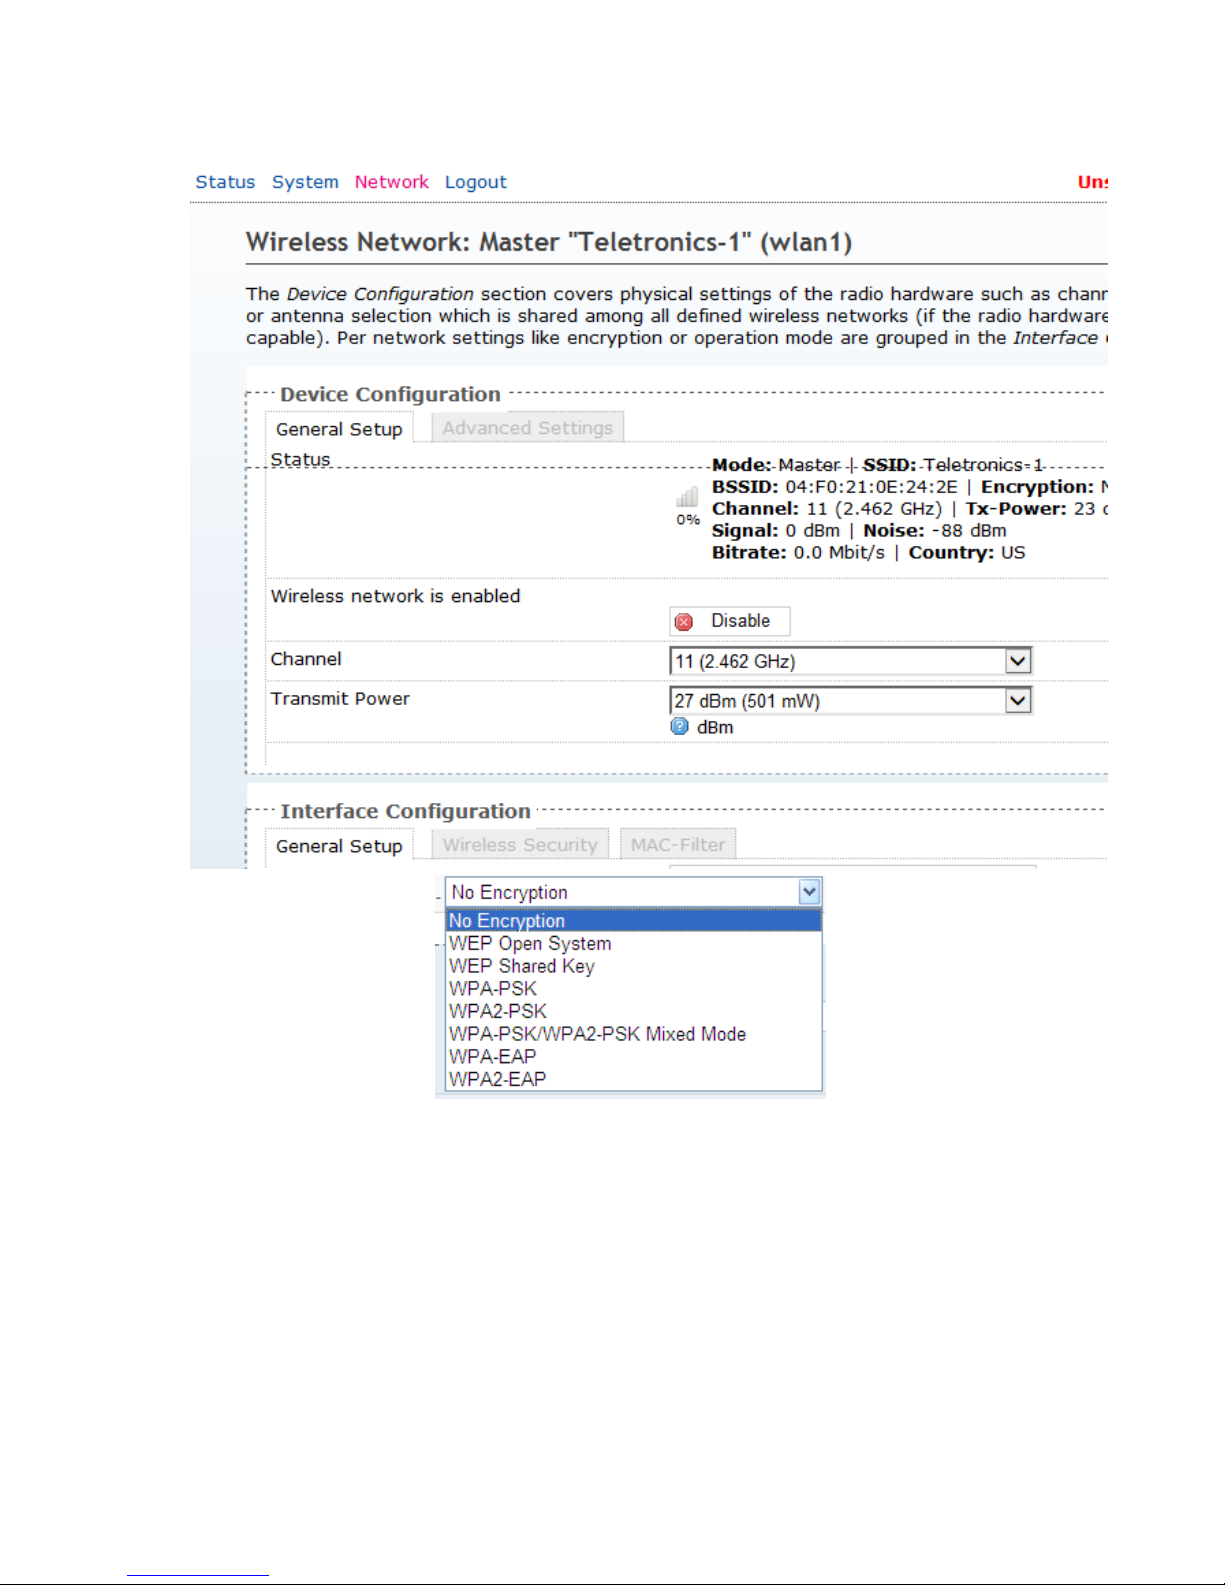
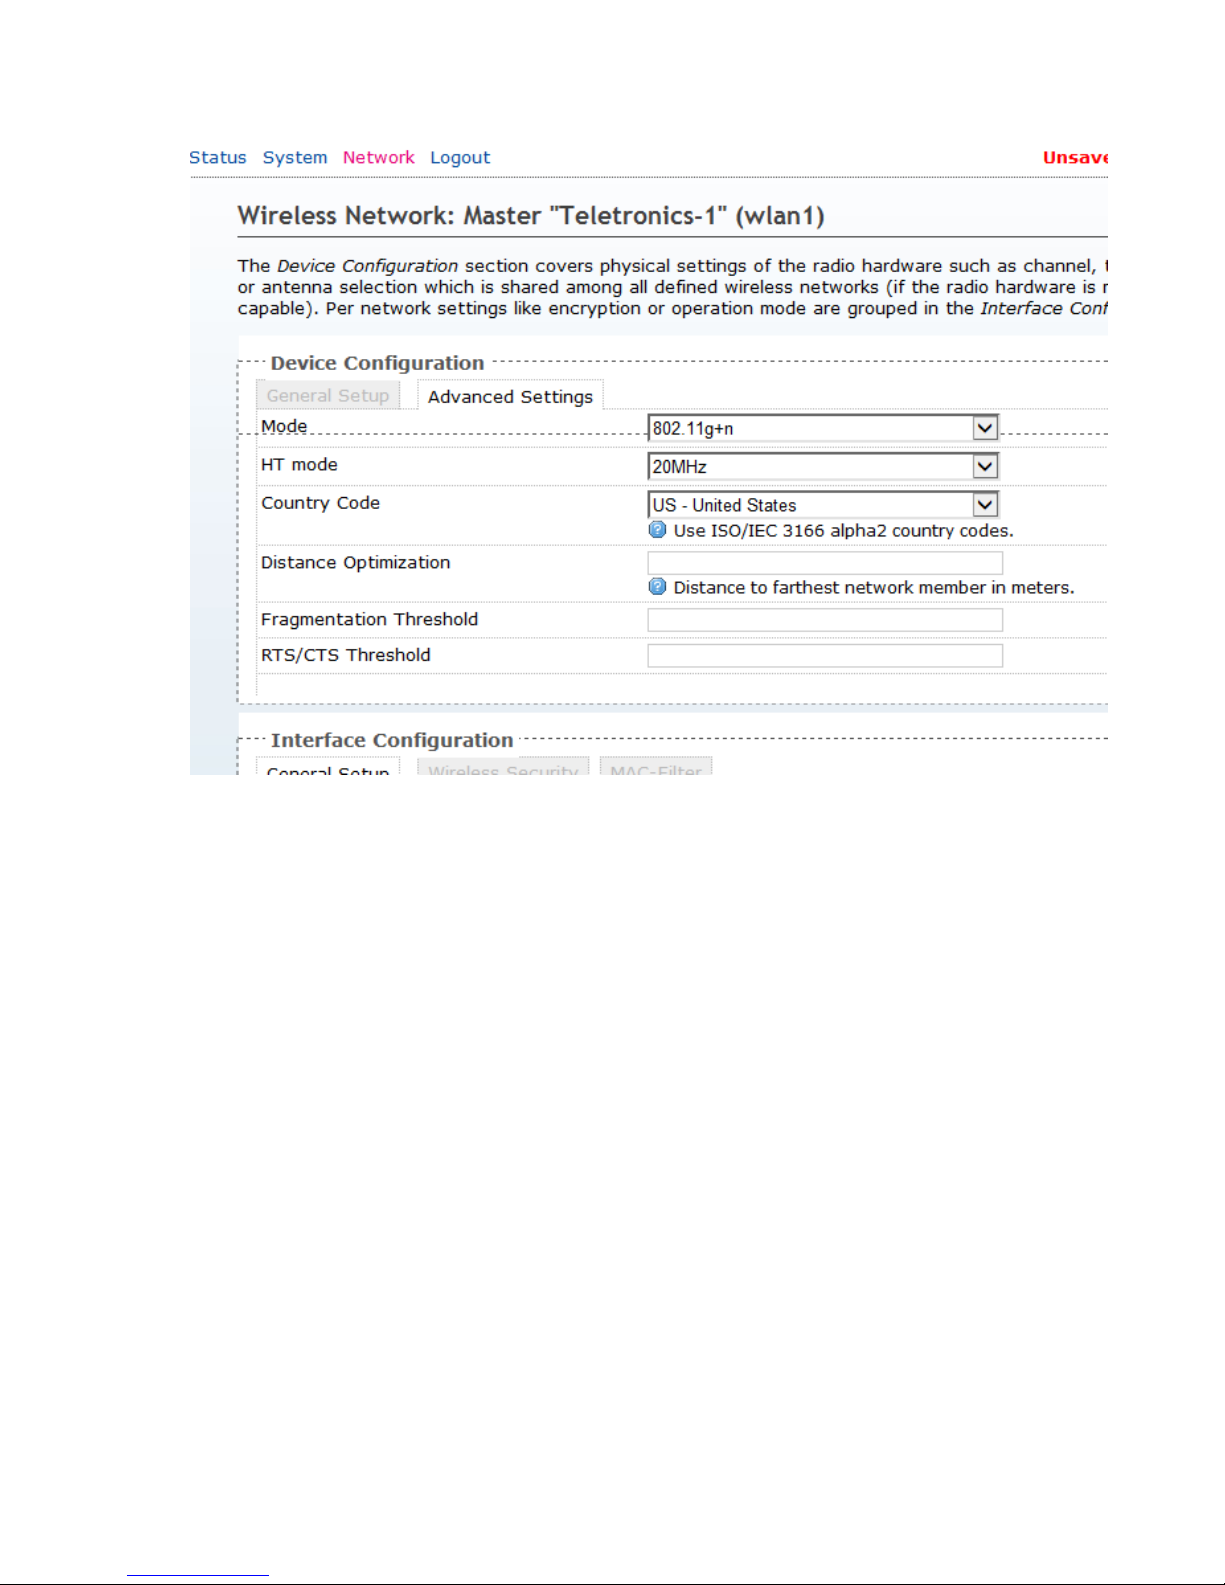
User can add/delete/start/off the Radio , and Edit the Radio, and Create Vitual Wireless
SSID etc.
When click the Scan button , the device will display the Wireless SSID.
User can Click the “Join Network” button , to join the wireless network.
Page 24
Page 25
Page 26
Page 27
5. Frequently Asked Questions
1). What is the default IP address, user name and password of the EZPlatform™ Plus?
Page 28

IP address: 192.168.1.124
User name: admin
Password: password
2). How do I know if the EZPlatform™ Plus has finished booting up?
Normaly the EZPlatform™ Plus takes about 30 seconds to bootup.
You can ping 192.168.1.124 in Console to confirm the connection of the EZPlatform™ Plus.
3). I forgot the IP address of the EZPlatform™.
You can recover the IP address of the EZPlatform™ Plus using EZManager Tools.
EZManager: connect the EZPlatform™ Plus to a computer running EZManager and
scan the network. EZManager will detect the EZPlatform™ Plus and display its IP
address.
4). I forgot the password of the EZPlatform™, or cannot access the web interface.
To access the EZPlatform™ again, you will need to reset all settings to factory default.
EZManager: connect the EZPlatform™ Plus to a computer running EZManager and
scan the network. EZManager will detect the EZPlatform™ Plus. Click on the ‘Set
settings to factory default’ icon.
PCB Reset Button: press the RESET button for about 5 seconds and release off.
EZPlatform™ Plus will ‘Reboot’ as Default settings.
5). I am having trouble establishing a wireless link.
If the access point or the subscriber unit does not appear in the Wireless Status page,
follow these steps:
Test the radios at a close distance (e.g.: on the same tabletop) without amplifiers.
Verify that you are using the correct network configuration at both ends of the link
(AP, AP with WDS, SU or ad hoc).
Make sure the WLAN interface you are using and the other end of the link are
using the same SSID.
Check that the antennas are precisely aligned.
Verify all connections and that all cables and connectors are tightly coupled.
Reset the radios at both ends to factory default and configure both radios again.
6). I was able to establish a wireless link, but I cannot pass any traffic.
If you see correct wireless association in the Wireless Status page, but are unable to
ping the remote site or pass any other traffic, follow these steps:
Make sure the WLAN interface you are using and the other end of the link are on
the same subnet.
Disable encryption at both ends.
Reboot both radios.
7). I can pass traffic but the throughput is very low or I am losing packets.
Follow these steps:
Revise your RF calculations to make sure the equipment you are using can
produce a reliable connection for the current link distance.
Check that the antennas are precisely aligned.
Check that you are not causing self-interference or receiving interference from
your RF environment.
Verify that the radios at both ends have enough vertical clearance to keep the
Page 29

Fresnel zone unobstructed.
8). I have other questions or comments about the EZPlatform™. How can I contact
technical support?
You can contact us by:
Online Helpdesk: http://teletronics.com/Supportform.html
Email: [email protected]
Telephone: 1-301-309-8500
Fax: 1-301-309-8851
Postal mail:
Teletronics International
2 Choke Cherry Rd
Rockville, MD 20850
USA
 Loading...