

Page 1
Limited Warranty Policy
1. All Teletronics products have 1 Year Warranty Period. (Except List of Antennas Attached)
2. Our Warranty Period does not cover physical damages, misuse of the product, and natural disasters.
3. International customers have 60 business days return policy, in order to receive full refund for the
items purchased. Only if the item is consider to be brand new unit. (Unopened Items)
4. Domestic customers have 30 business days return policy, in order to receive full refund for the items
purchased. Only if the item is consider to be brand new unit. (Unopened Items)
5. Within the 30/60 business days, for all used items, there will be a restocking fee charge (0-45%).
Depending on the condition of the item. Restocking Fee might vary.
6. All original materials must be returned in good resalable condition.
7. No refund, exchange or full credit will be issued after the 30/60 business day return policy.
8. Out-of Warranty items are repaired or replaced only with the customer’s prior approval. Labor charges
and freight will vary based on the condition of defective item.
9. Advanced Replacement Cases, must be issued within the 1 Year Warranty Period
10. All RMA numbers automatically expire 30 days after date of issuance.
11. Teletronics reserves the right to refuse any RMA shipment that does not come with RMA Case
Number or an invalid RMA Case Number.
Terms and Conditions
1. REPAIR WARRANTY: All warranties are void if Teletronics finds that the product has been abused,
physically damaged or altered in any way without prior written authorization. 2. OUT OF WARRANTY
PRODUCT: Out-of-Warranty Products are repaired only with the customer’s prior approval. For Out-of-
Warranty repair charges, please contact us at 301.309.8500 x136 or rma@teletronics.com. 3.
PACKAGING: Please clearly mark the RMA number on the outside of the packaging. Damage or loss of
goods during shipment is the sole responsibility of the customer. Product must be returned in original
carton or in packaging of equal or greater quality. 4. RMA NUMBER: Any returned product without a
valid RMA number or no RMA number will be refused and returned to the sender. RMA numbers are
only valid for 30 days from the date they are issued. Please write the RMA number on the box in bold
letters using permanent marker on at least tw o differen t sides of the box. 5. PRODUCT: Ship only the
product(s) specified on the original RMA request and includes any additional items. Any additional
products will require a new RMA number. 6. SHIPPING COST: The customer is responsible for the cost
of shipment to Teletronics and we will be responsible for the cost of shipment back to the customer. Ship
to: Teletronics International, Inc. 2 Choke Cherry Road, Suite 100 Rockville, MD 20850 USA. 7.
SHIPPING METHOD: All the repaired products will be shipping back to customers via UPS/FedEX
Ground service. For International customers via Economic. 8. ADVANCED REPLACEMENT: If you are
requesting Advanced Replacement for the defective product, you must provide us with a valid credit card
number as a guarantee. Please Note: Advanced Replacement charges will be applied to the customer’s
credit card, if the defective product is not received by Teletronics within 21 business days. 9. RMA
REFUND: Customer is required to provide the original invoice /re ceipt to request RMA credit.
Applying for an RMA Case Number
1. Go to: http://www.teletronics.com/RMA.html
2. Download the RMA Form; fill it out the entire fields with the appropriate product information
3. Email the word file to rma@teletronics.com
4. Within 1 Business Day, you will receive an email with the RMA Receipt Confirmation
5. Package the defective unit with the suitable material
6. Identify the outside of the box with the RMA Case # given in the RMA Receipt
7. Ship the package to: Teletronics – RMA Dept 2 Choke Cherry Rd, Suite 100. Rockville, MD – 20850
USA
NOTE: Advanced Replacement Cases must be issued before 4:30pm (Eastern Time),
in order to ship the package the same business day.
*Specifications Subject to Change without Prior Notice!
© Copyright 2008 Teletronics International, Inc. All rights reserved.
2 Choke Cherry Road, Rockville, MD 20850. Tel: 301.309.8500. Fax: 301.309.8851
EZPlatform
AP/Hotspot/Repeater
Quick Start Guide
Package Contents
EZPlatform™ main unit
PoE DC injector
Power adapter for PoE DC injector
Cat 5e Ethernet cables (2)
Waterproof RJ-45 connector
Mounting hardware
Quick start guide
Technical Information
Standard compliance IEEE 802.3 10/100BASE-T with autonegotiation
Bandwidth Control MAC address-based, specific and default upload/download rates
Networking WAN: static IP address/DHCP client
Security Administrator IP address filtering
Management Web-based management
Wireless 802.11a/b/g, 900 MHz/2.4 GHz/5.8 GHz
Enclosure NEMA 4, ruggedized and weather proof
Status monitoring Network status, system log (compact and detailed mode)
Operating temperature-20° C to + 70° C
Hardware Specifications
CPU Intel® IXP422 266 MHz network processor
Memory 64 MB SDRAM, 16 MB flash
Boot loader RedBoot
Ethernet Two 10/100BASE-T ports
Serial port Two RS-232 ports
Mini PCI Two Mini PCI Type III slots
LEDs Power, WLAN1 status, WLAN2 status
Power options Power over Ethernet, 10-48 VDC
Dimensions 8 in x 7.5 in x 2.5 in
Power consumption 25 W maximum
Operating system Linux, 2.6.x kernel
LAN: DHCP server
SNMP, remote syslog, VPN pass-through (IPsec/PPTP), DDNS
HTTP, HTTPS, TELNET
Web-based update, backup and restore
AP/SU mode, adjustable TX power
WEP, WPA, and WPA2 encryption
Turbo mode, WDS, MAC address filtering
TM
Page 2
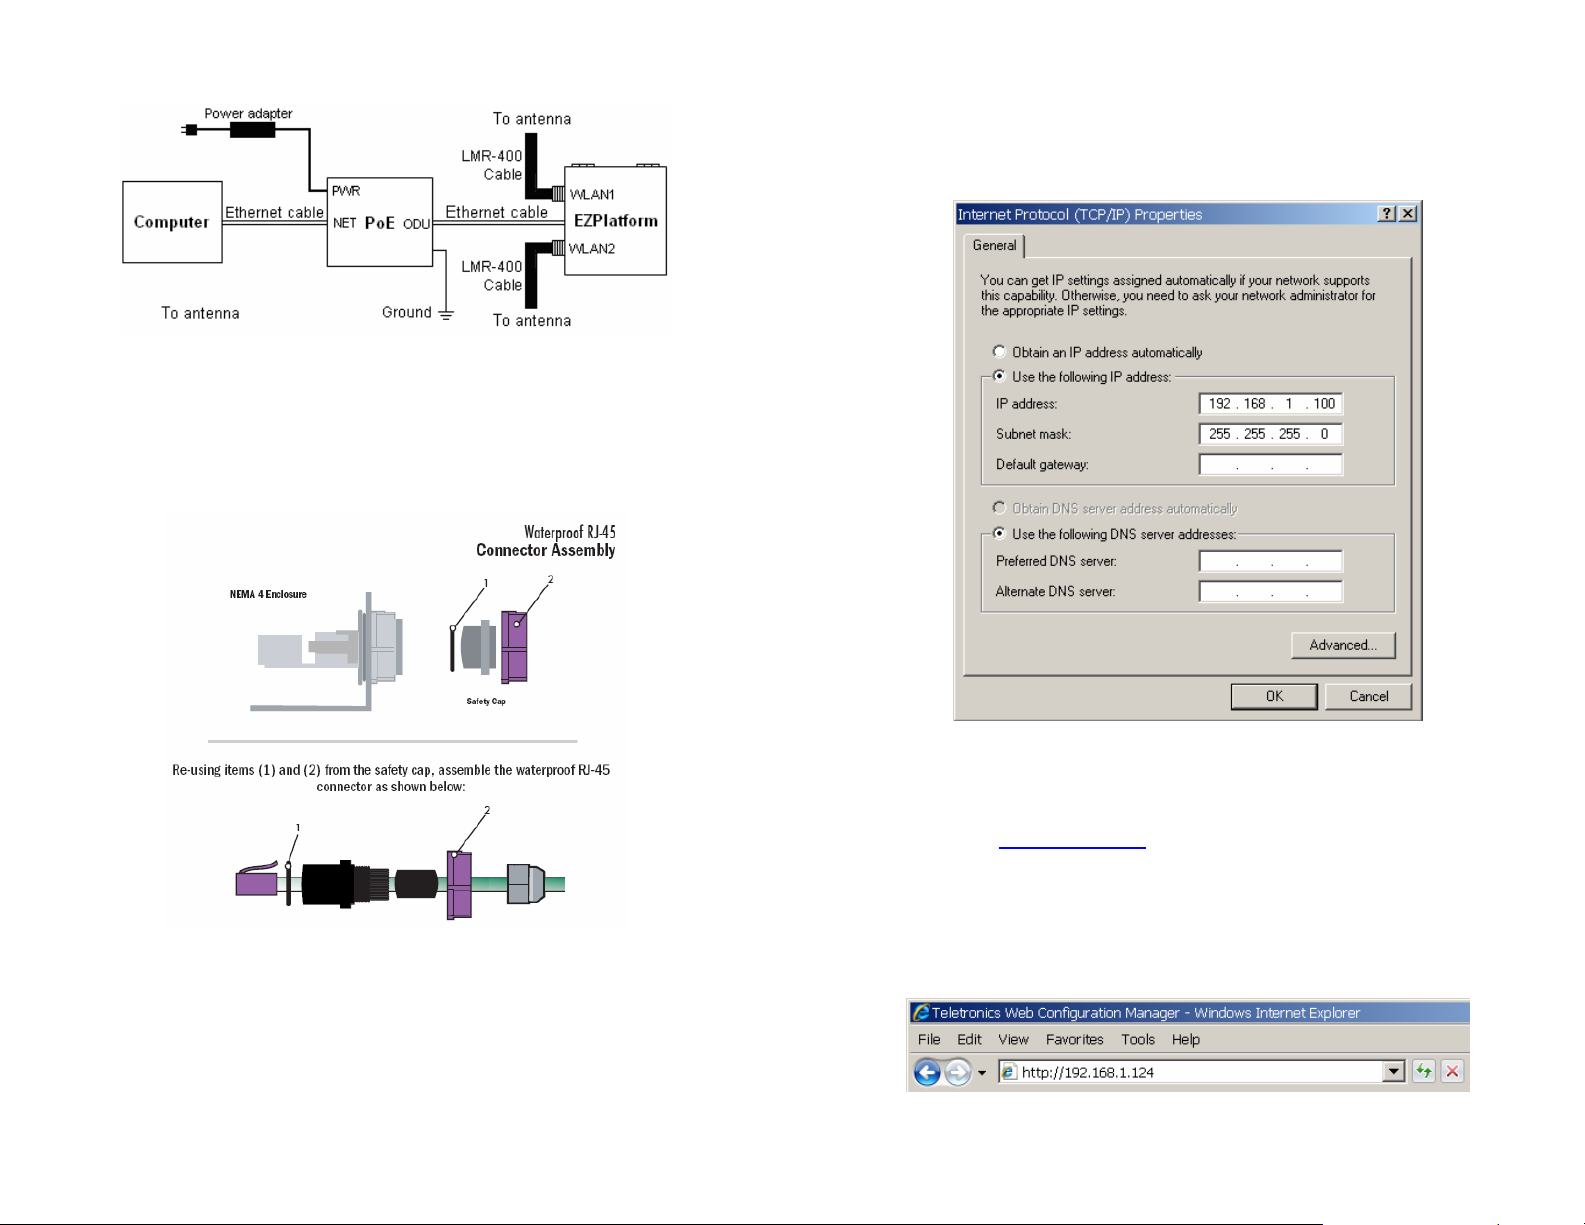
Hardware and Connection Setup
5. Go to Properties Æ Internet Protocol (TCP/IP) and select ‘Use the following IP
address’. Configure the IP settings as follows:
IP address: 192.168.1.100
Subnet mask: 255.255.255.0
6. Click on ‘OK’ in the Internet Protocol (TCP/IP) Properties dialog box.
7. Click on ‘OK’ in the Local Area Connection Properties dialog box.
If you are planning to install the EZPlatform™ outdoors, you need to assemble the
weatherproof the RJ-45 connector. To do so, follow these steps:
1. Remove the existing 8P8C connector from the Ethernet cable.
2. Insert the elements in the Ethernet cable in the order shown below.
3. Crimp on the provided metallic 8P8C connector to the Ethernet cable.
4. Attach the resulting assembly to the Ethernet port of the EZPlatform™ and
tighten the threads.
Logging in to the Web Configuration Interface
To access the EZPlatform™ you need to configure your computer to be in the same
subnetwork as the EZPlatform™:
1. Power on EZPlatform™ and wait for the unit to finish booting (may take up to 2
min).
2. Open the Control Panel (Start Æ Control Panel).
3. Open Network Connections.
4. Open Local Area Connection (or the connection you will be using for the
EZPlatform™)
To access the web configuration interface, do the following:
1. Open a web browser (e.g.: Internet Explorer, Netscape Navigator, Mozilla Firefox,
Opera, etc.).
2. In the address bar of the web browser, type the following address:
http://192.168.1.124
3. If you are prompted for a user name and a password, use the following login
information:
User name: admin
Password: admin
4. You should now be able to see the home page of the web configuration interface
(System Information Æ General). You can configure on EZPlatform™ by
navigating through the different option tabs on the top of the page.
 Loading...