

Page 1

11Mbps Wireless Inter-building Access Point
Quick Start Guide Version 2.9.0
The next-generation wireless LAN device – 11Mbps Wireless Inter-building Access Point,
are specially designed for Point-to-Point and Point-to-Multipoint applications, offering
campus-wide connections between buildings at a speed of up to 11Mbps. Fully compliant
with IEEE802.11b standard, the Wireless Inter-building Access Point provides powerful
features such as Windows-based Access Point Utility, WEB Management, WEP, Access
Control , SNMP and more.
Package Content
11Mbps Wireless Inter -building Access Point….. .x1 AC Power Adapter….. .x1
Default Dipole Antenna……………. ……………x2 AP Stand ………………x1
Product CD or Floppy Diskette………………… .x1 Quick Start Guide……. x1
NOTE: If any of the above items are missing or damaged, please contact your local dealer
for support.
Installing the Wireless Inter-Building Access Point
n Connect the two dipole antennas to the connectors on the two sides of the Access
Point. For inter-building application, however, it is sufficient that an antenna is used.
You may control which antenna to do Tx/Rx for better performance (to avoid
interfering signals). The configuration is as follows:
Ø Assign an IP Address for the Wireless Inter-Building Access Point. (For
instructions please refer to page 6.)
Ø Telnet into the Access Point.
Ø Type the command “
Ø Enter “
back panel of the Access Point.) (Default value: Diversity)
set antenna a_only/b_only
set antenna
”. The following screen shows up.
”. (Antenna A labeled “
ANT. A
” is on the
Ø Type the “save” and “reset” to make the configuration take effect.
Sep./24th/2000 1
Page 2
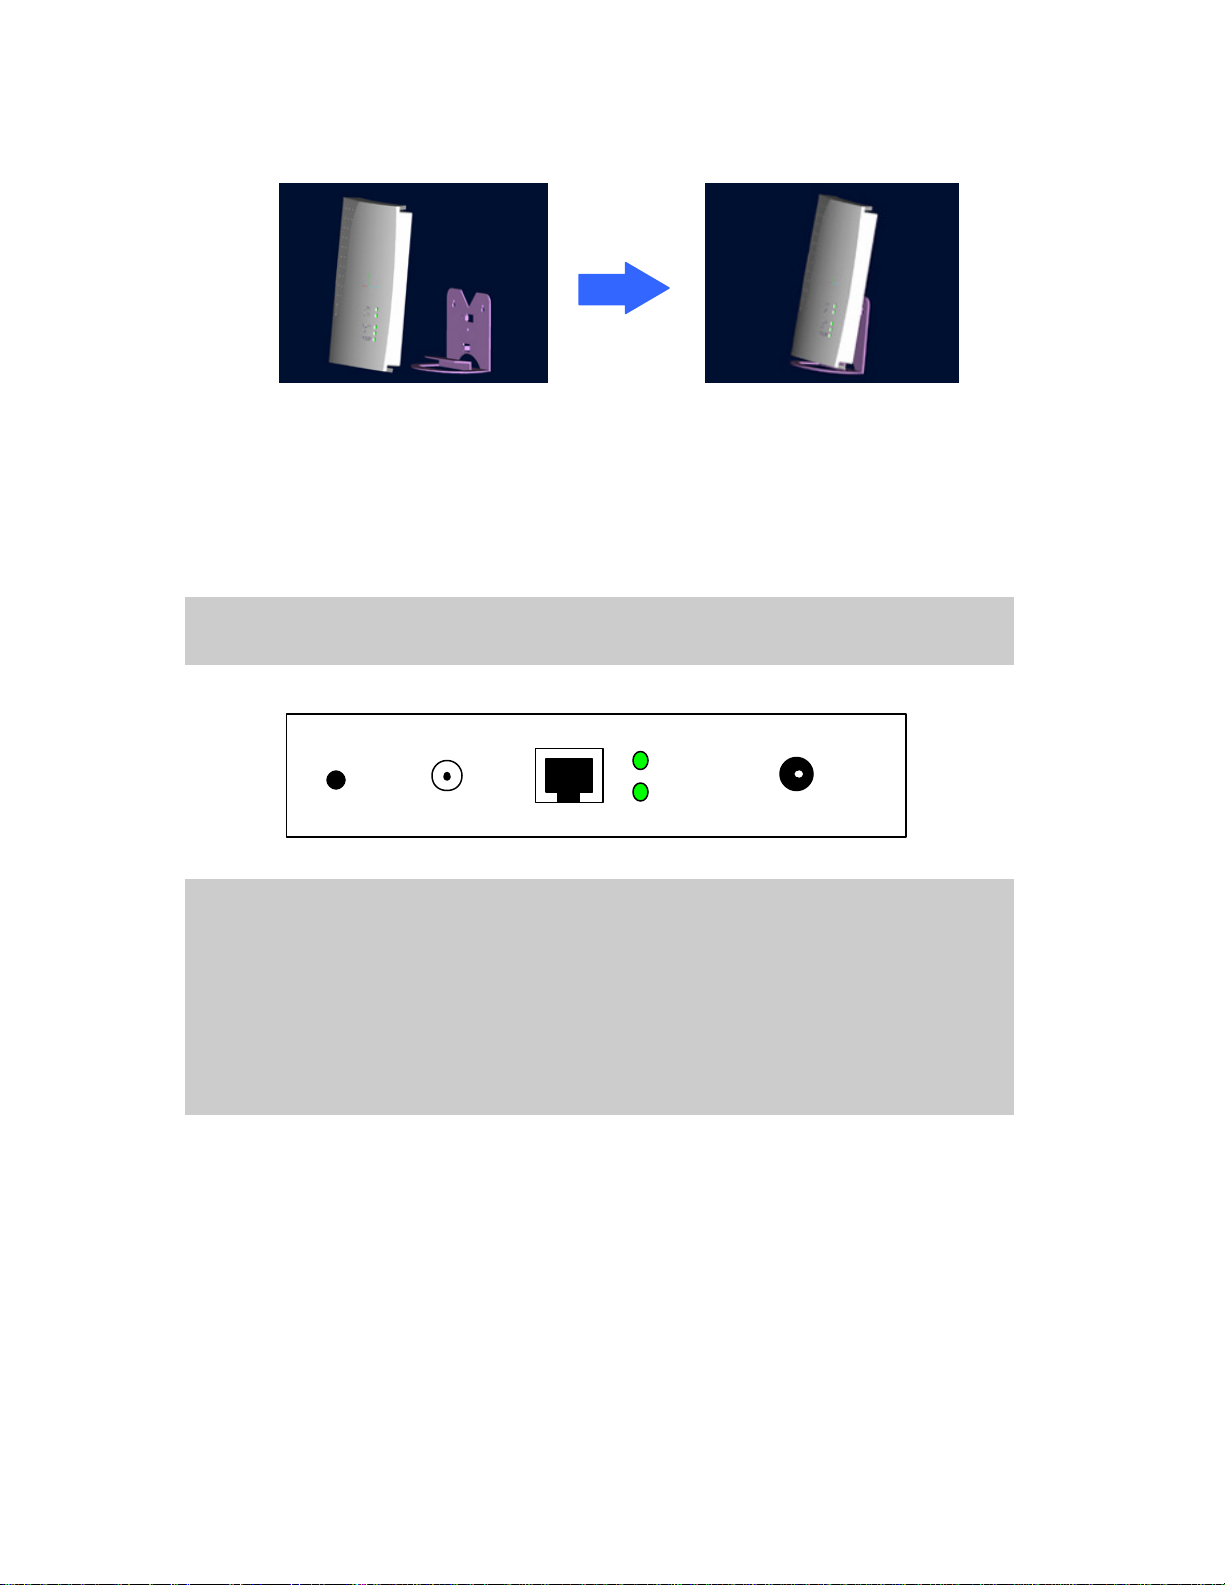
n Insert the stand into the side slot of the Inter-Building Access Point, figured as below:
10/100
ANT. A
n Connect the Wireless Inter-building Access Point to a hub/station with a UTP
Ethernet cable . When connecting the Access Point to a PC, please use a cross-over
RJ-45 cable.
n Connect the power adapter to the power socket on the Access Point, and plug the
other end of the power pack into an electrical outlet.
NOTE: Use ONLY the power adapter supplied with the Wireless Inter -building Access
Point. Otherwise, the product may be damaged.
LINK
DEFAULT
MDI
DC 12V
NOTE: The button , labeled “DEFAULT ” on the back panel of the Access Point, enables
you to retrieve the Access Point’s default setting. This is used when you forget the
password. Please detach the DC power plug and press the “DEFAULT” button on the
back panel of the Access Point. Reconnect the power and keep holding the button in for a
few seconds until the “AP” LED indicator blinks. This will start the Access Point with
default settings and enable you to configure the Access Point via utility, telnet or Web
again.
Sep./24th/2000 2
Page 3
Configuring the Wireless Inter-Building Access Point
The 11Mbps Wireless Inter-building Access Point allows configuration either via the
configuration utility, known as Access Point Utility, Web Management, or remote access
through TCP/IP (Telnet) connection.
Access Point Utility
The following gives instructions guiding you through the installations of the Access Point
Utility.
1. Insert the Software CD-ROM or floppy disk into the corresponding drive on your
computer.
2. Run the setup utility.
3. Follow the on-screen instructions to install the Access Point Utility.
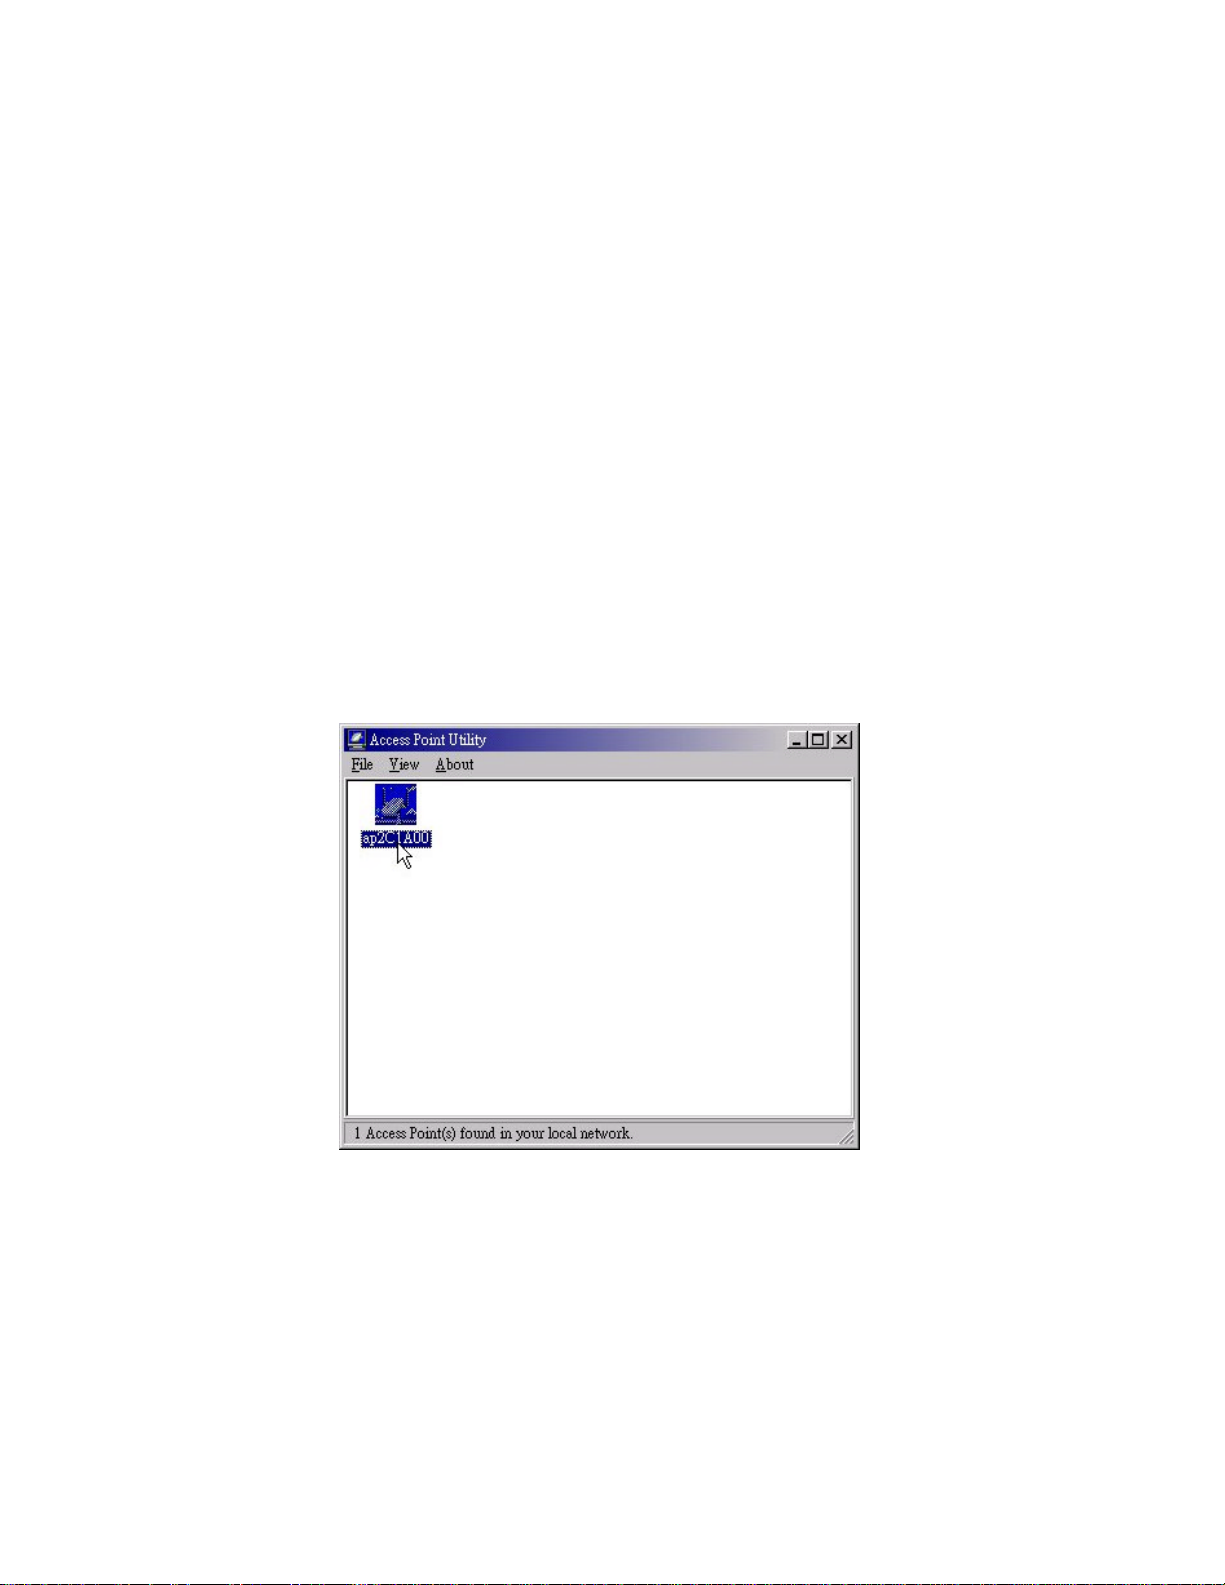
4. Upon completion, execute the Access Point Utility, and it will browse all the Access
Points available on the network.
5. Double click an Access Point icon to access its property dialog box. After entering the
default password, you will be able to view/make configuration of the Wireless
Inter-building Access Point as you desire.
Sep./24th/2000 3
Page 4

NOTE: The default password to get access to the Access Point is “default”.
After you type the password, a main screen shows up.
Sep./24th/2000 4
Page 5

Access Control
Parameter Description
Information
Include Access Point’s MAC address, frequency domain and
firmware version.
Statistics Monitor the Ethernet and wireless network traffic.
Set the Radio mode, IEEE802.11 parameters (ESSID, channel,
Configuration
RTS threshold, fragmentation threshold), password, IP address,
WEP and Access Control.
Upgrade
Upgrade the firmware of the Wireless Inter-building Access
Point.
Restrict the accessibility of the wireless devices.
n Set the Radio Mode
From the Access Point Utility, go to the Configuration tab and select IEEE802.11.
You will see there are 5 choices of operation mode for the Access Point (Default value:
AP mode):
Ø Wireless LAN Access Point (AP) : Enables the Access Point to act as a wireless
bridge connecting to your network backbone.
Ø Inter-building with Repeating (PxP): Allow s for multi-point connection among
buildings.
Ø Station Adapter – Infrastructure (SAI): Served as a wireless station
(infrastructure). Connect the Access Point (SAI) to a PC with a cross over
RJ-45 cable, and it is able to access the network via Access Point (AP).
Sep./24th/2000 5
Page 6

Ø Station Adapter – Ad -Hoc (SAA): Served as a wireless station (Ad-hoc).
Connecting to a PC with a cross-over RJ-45 cable, the station adapter along with
other wireless stations can establish a small wireless network without Access
Points.
Ø Station Adapter – 802.11 Ad-Hoc (SAA2): Similar to SAA, the Access Point acts
as a wireless stations (Ad-Hoc). The only difference is that this Ad-Hoc mode
complies with 802.11 standard.
NOTE: When setting the operation mode to either PxP or SAA, you need to set the
Access Points with the same channel. ESSID however can be ignored. When the
SAA2 is selected, you need to set the Access Point for the same ESSID and channel.
n Assigning the ESSID
The ESSID is a unique ID given to the Wireless Inter-building Access Point. Assign
an ESSID to your Access Point (Default value: My Network). The ESSID can be up
to 32 characters.
n Assigning the Channel
From Configuration ? IEEE802.11, select a clear channel for your Inter-Building
Access Point. You may use the Site Survey tool came with the wireless PC Card
utility to monitor each channel and choose a channel with good quality.
n Assigning IP address (optional)
Assign an IP address to your Access Point if you wish to configure the Wireless
Inter-building Access Point via the Web Management or Telnet. Consult your
network administrator to obtain an available IP address for your Access Point.
n Using the WEP Encryption (optional)
If data transmission with high security is required on your network, it is recommended
that the WEP encryption be used. To activate the WEP encryption, select
Configuration, go to the WEP tab, and do the following:
Ø Pull down the WEP Encryption menu and select WEP40 or WEP128.
Ø From the 4 Key entry field, enter the corresponding key value for each encryption
Sep./24th/2000 6
Page 7

method.
For WEP40 data encryption:
-- 5 alphanumeric characters in the range of “a-z”, “A -Z” and “0-9” (e.g. MyKey).
-- 10 digit hexadecimal values in the range of “A-F” , “a-f” and “0-9”, preceded by
the characters “0x ” values (e.g. 0x11AA22BB33).
For WEP128 data encryption:
-- 13 alphanumeric characters in the range of “a-z”, “A -Z” and “0-9” (e.g.
MyKey12345678 ).
-- 26 digit hexadecimal values in the range of “A-F” , “a-f” and “0-9”, preceded by
the characters “0x ” values (e.g. 0x00112233445566778899AABBCC).
Ø Enter the 4 WEP keys in the Key 1, Key 2, Key 3 and Key 4 entry filed respectively.
Select one WEP key as an active key and click “Apply” to make the setting take
effect.
NOTE: The WEP key must be set up exactly the same on the Access Point as they are on
the wireless client stations. If you set “MyKey” for the Access Point, the same WEP
Key “MyKey” must be assigned to other client stations.
n Using the Access Control (optional)
With the Access Control enabled, you can authorize wireless units to access the Access
Point by identifying the MAC address of the wireless devices that are allowed access
to transmit data . Note that, only when the MAC addresses of the wireless stations are
in the Access Control Table, they will be able to access network via Access Point. To
create or edit the Access Control Table, do the following:
Ø Go to the Access Control tab and check “Enable Access Control”.
Ø Click the “Add” button and enter the MAC addresses of the wireless stations you
allow to access.
Ø Click “Apply” to make the setting take effect.
Sep./24th/2000 7
Page 8

NOTE: Be aware that, when you enable the Access Control Table without any MAC
address in the table, no access is allowed to communicate with the Access Point.
Web Management
The built-in Web Management provides you with a set of user-friendly graphical user
interfaces (web pages) to manage your Wireless Inter-building Access Point. With the
assigned IP address (e.g. http://192.168.1.1) to the Access Point, you may get access to the
Access Point Web Pages via a web browser (Netscape Navigator 3.0 ~ 4.5 or MS Internet
Explorer 4.0 and later) to monitor and configure the Wireless Inter-building Access Point.
Sep./24th/2000 8
Page 9

Access Point Console
The Wireless Inter-building Access Point can be configured via the command prompt
console with Telnet (TCP/IP) connection.
l Telnet (TCP/IP) Connection: Assign an IP address to your Wireless Inter-building
Access Point through Access Point Utility and then telnet to the Access Point
anywhere to get access to the Acc ess Point console. Then, you will be able to make
the configuration via the TCP/IP connection.
NOTE: The default password to get access to the Access Point is “default”.
For detailed configuration procedures under Telnet, please refer to 11Mbps Wireless
Inter-building Access Point User’s Manual.
Technical Support
You can find the most recent software and user documentation will be updated periodically
on the supplier Web site. If you have difficulty resolving the problem while installing or
using the 11Mbps Wireless Micro Access Point, please contact the supplier for support.
Sep./24th/2000 9
Page 10

FCC Information
This equipment generates, uses, and can radiate radio frequency energy and, if not installed
and used in accordance with the instruction manual, may cause harmful interference to
radio communication.
Operation of this equipment in residential area is likely to cause harmful interference in
which case the user will be required to correct the interference at this own expense.
The user should not modify or change this equipment without written approval from
company name. Modification could void authority to use this equipment.
For the safety reason, people should not work in a situation which RF Exposure limits be
exceeded. To prevent the situation happening, people who work with the antenna should
be aware of the following rules:
1. Install the antenna in a location where a distance of 20 cm from the antenna may be
maintained.
2. While installing the antenna in the location, please do not turn on the power of
wireless card.
3. While the device is working, please do not contact the antenna.
Sep./24th/2000 10
 Loading...