

Page 1
CONTROL PANELS
ECLIPSE Series
User and Manager Operation and Programming Short Manual
ENGLISH
GENERAL INFORMATION
This is a short manual describing the programming address and general operation with the ECLIPSE Series
Control panels:
SUPPORTED KEYBOARDS
PROGRAMMING MENUS
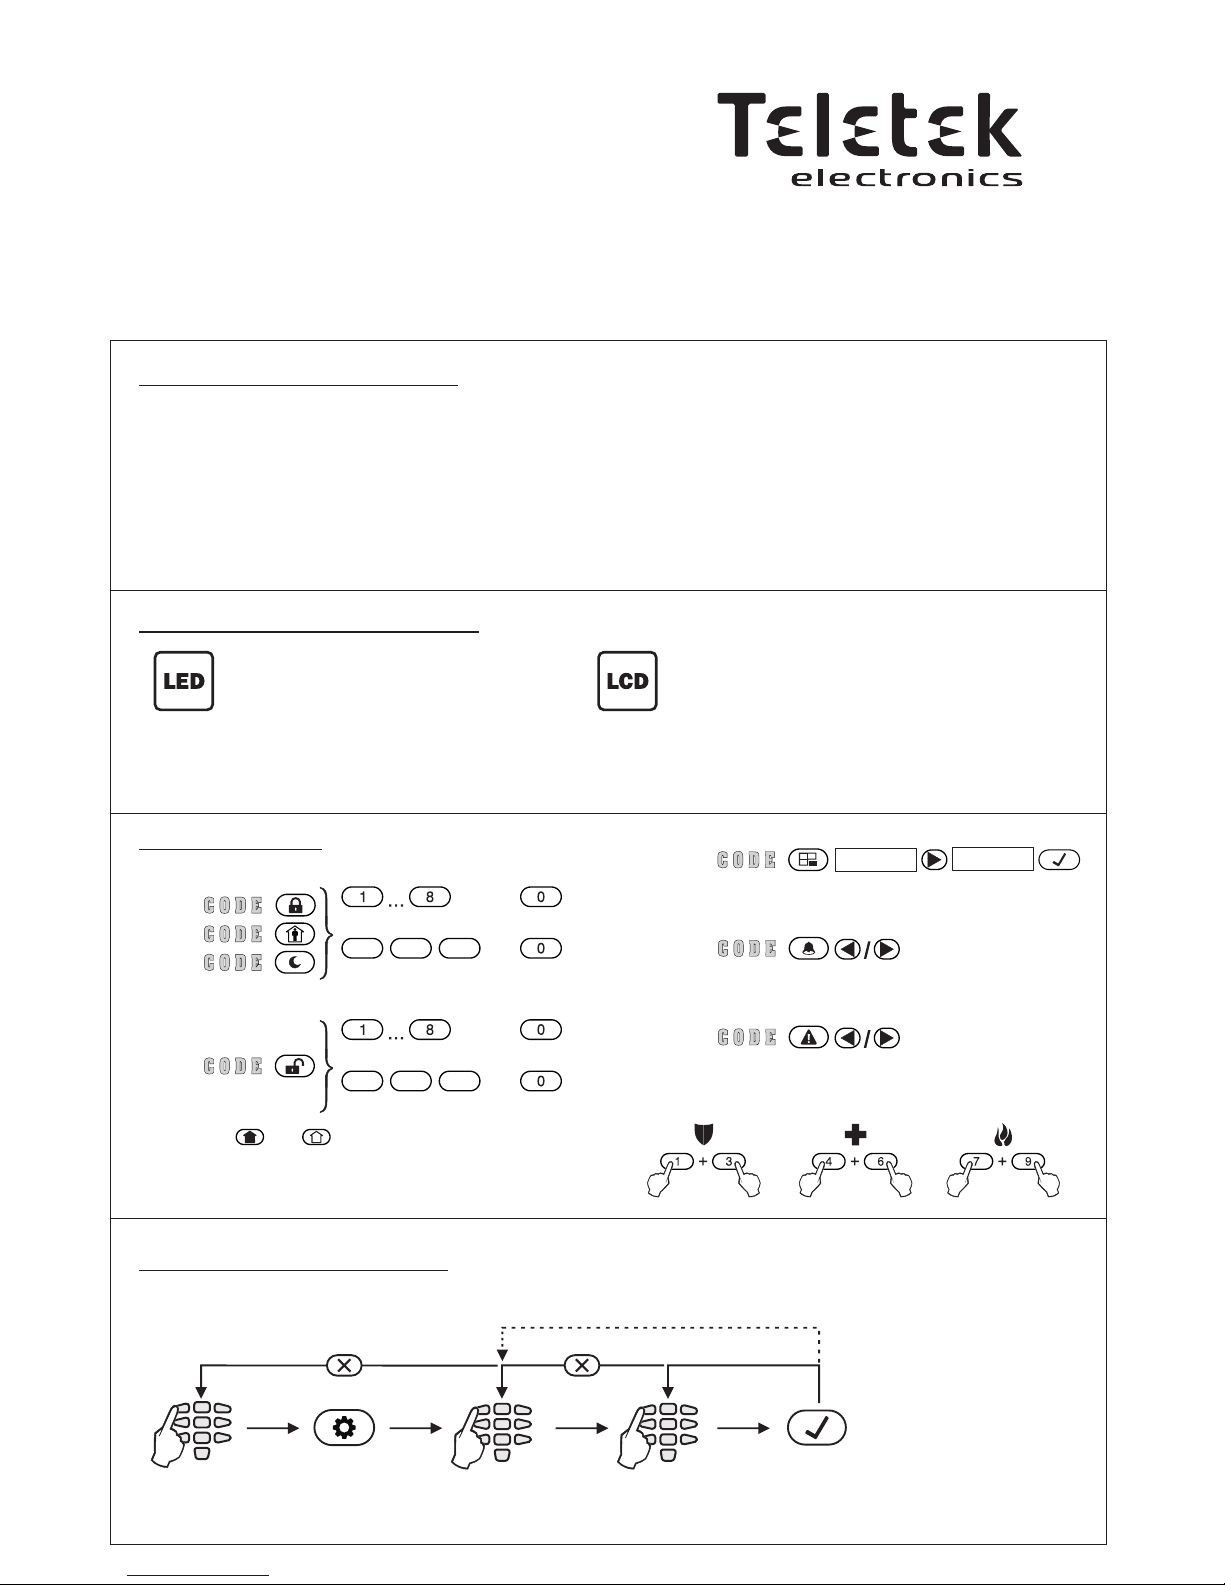
1. How to enter Manager or User Programming Menu:
ECLIPSE 8
- 1 Area
- 8 Zones
- 8 Users
- 256 Events log
- 4+1 PGM Outputs
ECLIPSE 16
- 3 Areas
- 16 Zones
- 32 Users
- 1024 Events log
- 4+1 PGM Outputs
ECLIPSE 32
- 8 Areas
- 32 Zones
- 64 Users
- 1024 Events log
- 4+1 PGM Outputs
• LED 8: 1 Area, 8 Zones
• LED 16A: 3 Areas, 16 Zones
• LED 32: 8 Areas, 32 Zones
• LCD 32: 8 Areas, 32 Zones
• LCD 32S (with sensitive buttons): 8 Areas, 32 Zones
Keyboards with LED display
Keyboards with LCD text display
MODELS: LED 8,
LED16A, LED 32
MODELS: LCD 32, LCD 32S
ARMING:
Full:
Stay:
Sleep:
AREA Number
or
or
or
or
All AREAS
DISARMING:
BYPASS ZONES:
ZONE No
Bypassed
Set zones for bypass during next ARMING.
MEMORY LOG FILE REVIEW:
QUICK GUIDE
NOTE: Arming and Disarming of Eclipse 8
does not require choosing of AREA number.
The buttons and are used in the previous design
of the keyboards and they have the same functionality.
Manger/ User
code
Menu number:
1-digit for Users
2-digit for Manager
Submenu/
Settings
Programming
Mode
Confirmation
PANIC BUTTONS:
Press and hold the buttons together for 2 sec.
18020819, Rev A, 07/2015
ECLIPSE 32
ECLIPSE 32
ECLIPSE 16
ECLIPSE 16
A
A
BBC
C
,
,
,
,
TROUBLES REVIEW AND STOPPING
THE SOUND SIGNALIZATION:
Page 2
Menu Description Settings
Submenu
Default
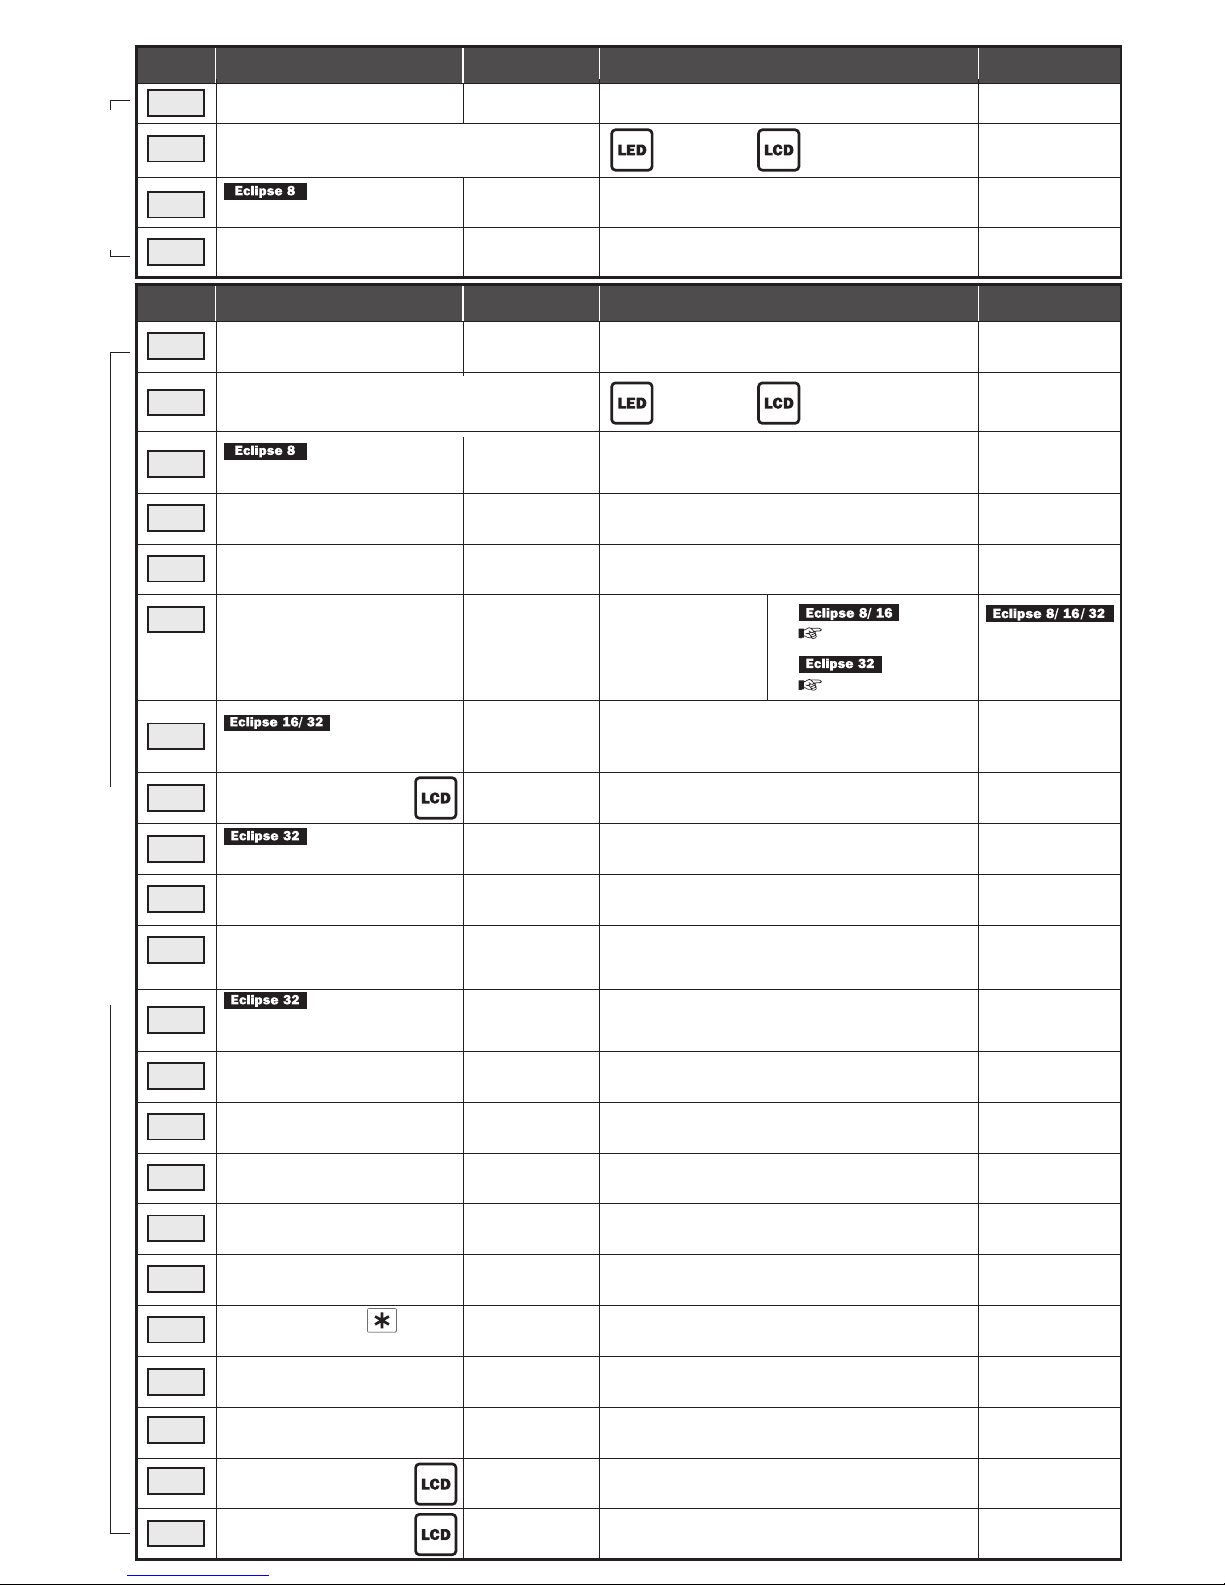
2. Description of the Programming Menus - Address Tables:
01
1
Changing user access codes
Changing own access code
Press button “0” to delete the current code,
enter new access code and confirm
Enter user
number
Manager - 0000
Users - No
02
03
3
04
4
05
06
07
08
09
10
11
13
14
15
16
17
18
21
90
92
91
93
Memory LOG file review
Chime setting
Chime setting
Zone bypassing
Zone bypassing
Engineer access
Attributes for User rights
User areas
User names
User Time Slots
User Porxi card attributes
Adding / Deleting proxi cards
Cloning of user attributes and
rights
Setting the time
Setting the date
Remote access
Remote access attributes
Manual test for communication
Function of button
of BRAVO RC key fob
Buzzer level
Scroll speed setting
Brightness of the buttons and
display backlit
Sensitive buttons
backlit
Enter user
number
Enter user
number
Enter user
number
Enter user
number
Enter user
number
Enter user
number
Manager -
All rights
Users -
Partial Rights
DISABLE - The chime is disabled
ENABLE - The chime is enabled
DISABLE - The chime is disabled
ENABLE - The chime is enabled
NOT BYPASSED - The zone is not bypassed.
BYPASSED - The zone is bypassed
NOT BYPASSED - The zone is not bypassed.
BYPASSED - The zone is bypassed
DISABLED
DISABLED
ENABLED
Enter zone
number
Enter zone
number
DISABLE - The engineer access is disabled.
ENABLE - The engineer access is enabled.
1 - Disarming
2 - Stay/Sleep ARM
3 - Bypass
4 - Programming
8 - Manager
Enter in sequence a user source code, then
first user code to clone, and at the end - the
last user code to clone.
Enter actual hour and minutes using time
format [HH:MM].
Enter actual date using format [DD/MM/YY].
Enter the permissible number of invalid access
codes for remote access - value 000 to 255.
Sending of test messages to central monitoring
station.
Adjust the buzzer volume level from 1 to 4.
Use the arrows to increase or decrease volume.
Enter the scroll speed for displaying text
messages on the LCD - 1 to 7.
Adjust the backlit level from 1 to 7.
Use the arrows to increase or decrease value.
ON - The backlit is enabled.
OFF - The backlit is disabled.
Event code;
Event text description
with date and time
1, 2, 3, 4
1, 2, 3, 4, 8
Enter area numbers associated for the
respective user number.
Enter user name up to 16 symbols use the digit buttons for text enter.
USER XX
0
1, 2, 3
(Sleep Arming)
00:00
01/01/12
10
1, 2, 3, 4, 6
2
0
4
3
OFF
Enter time slot number (1-8) associated for the
respective user number.
1 - Disarming; 2 & 3 - Arming
(2+3 = Sleep; 2 * = Stay; * 3 = Full)
Place the card in front of the proxi reader until
a confirmation signal is heard.
To delete a card press and hold the “0” button.
1 - Disarm; 2 - ARM; 3 - Codes Access;
4 - Programming; 6 - Bypass
0 - Not used; 1 - Sleep ARM; 2 - Stay ARM;
3 - Fire alarm; 4 - Medical alarm; 5 - Police alarm
Menu Description Settings
Submenu
Default
MANAGER Menus USER Menus
Manager:
All Areas
Users:
Area 1
2
Memory LOG file review
Event code;
Event text description
with date and time
Use Button “2” for additional information;
Use button “1” to return to date and time showing screen.
Use Button “2” for additional information;
Use button “1” to return to date and time showing screen.
Press button “0” to delete the current code,
enter new access code and confirm
Enter user
number
Page 3

КОНТРОЛНИ ПАНЕЛИ
ECLIPSE
Кратко ръководство за работа и програмиране от потребители
БЪЛГАРСКИ
ОБЩА ИНФОРМАЦИЯ
Целта на това описание е да представи накратко работата и програмирането от потребители и
мениджъри на контролни панели:
ECLIPSE 8
- 1 Група
- 8 Зони
- 8 Потребители
- 256 Събития в паметта
- 4+1 PGM Изходи
ECLIPSE 16
- 3 Групи
- 16 Зони
- 32 Потребители
- 1024 Събития в паметта
- 4+1 PGM Изходи
ECLIPSE 32
- 8 Групи
- 32 Зони
- 64 Потребители
- 1024 Събития в паметта
- 4+1 PGM Изходи
ПОДДЪРЖАНИ КЛАВИАТУРИ
• LED 8: 1 Група, 8 Зони
• LED 16A: 3 Групи, 16 Зони
• LED 32: 8 Групи, 32 Зони
• LCD 32: 8 Групи, 32 Зони
• LCD 32S (със сензитивни бутони): 8 Групи, 32 Зони
Клавиатури с LED индикация
Клавиатури с LCD текстов дисплей
МЕНЮТА ЗА ПРОГРАМИРАНЕ
1. Вход в режим на програмиране:
Код на
Мениджър/
Потребител
Номер на меню:
1-цифра за Потреб.
2-цифри за Мениджър
Подменю/
Настройки
Режим на
програмиране
Потвърждение
ИЗКЛЮЧВАНЕ:
БАЙПАСИРАНЕ НА ЗОНИ:
ЗОНА No
Байпасирана
Байпасирайте зоните преди следващото
включване под охрана.
ПРЕГЛЕД НА СЪБИТИЯТА:
ЗАБЕЛЕЖКА: При включване и изключване с Eclipse 8
не се изисква въвеждане на номер на група.
Бутони и се използват в предходния дизайн на
клавиатурите и имат същата функционалност.
МОДЕЛИ: LED 8,
LED16A, LED 32
МОДЕЛИ: LCD 32, LCD 32S
ПАНИК БУТОНИ:
Натиснете и задръжте бутоните заедно за 2 сек.
ТИП ВКЛЮЧВАНЕ:
Пълно:
С оста-
ване:
Нощна
охрана:
Номер на ГРУПА
или
или
или
или
Всички ГРУПИ
БЪРЗ СПРАВОЧНИК
ECLIPSE 32
ECLIPSE 32
ECLIPSE 16
ECLIPSE 16
A
A
BBC
C
,
,
,
,
ПРЕГЛЕД НА ПОВРЕДИТЕ И СПИРАНЕ НА
ЗВУКОВАТА СИГНАЛИЗАЦИЯ:
18020819, Rev A, 07/2015
Page 4

0 - Няма; 1 - Нощна охр.; 2 - Охр. С оставане;
3 - Пожар; Мед. помощ 4 - ; 5 - Полиция
Меню Описание Настройки
Подменю
По
подразбиране
2. Описание на менютата за програмиране - Таблици с адреси:
01
1
Промяна на потребителски
кодове
Промяна на собствен код
Въведете номер
на потребител
Мениджър - 0000
Потребители - Не
02
2
03
3
04
4
05
06
07
08
09
10
11
13
14
15
16
17
18
21
90
92
91
93
Преглед на паметта за събития
Преглед на паметта за събития
Функция “Камбанка”
Функция “Камбанка”
Байпасиране на зони
Байпасиране на зони
Достъп на инженера
Атрибути на потребителски
кодове
Асоцииране на групи
Имена на потребители
Асоцииране на графици
Атрибути на карти за
контрол на достъп
Добавяне/ Изтриване на
карта за достъп
Клониране на потребителски
кодове и атрибути.
Настройване на време
Настройване на дата
Блокиране на отдалечен
достъп
Атрибути за отдалечен
достъп
Изпращане на ръчен тест
Настройване силата на
зумера
Скорост на показване
на съобщенията
Настройване яркостта на
подсветката
Подсветка на
сензитивните бутони
Въведете номер
на потребител
Въведете номер
на потребител
Въведете номер
на потребител
Въведете номер
на потребител
Въведете номер
на потребител
Въведете номер
на потребител
Мениджър -
Всички права
Потребители -
Частични права
Изключено - Камбанката е изключена
Включено - Камбанката е включена
Изключено - Камбанката е изключена
Включено - Камбанката е включена
Без байпасиране - Зоната не е байпасирана
Байпасирана - Зоната е байпасирана
Без байпасиране - Зоната не е байпасирана
Байпасирана - Зоната е байпасирана
ИЗКЛЮЧЕНО
ИЗКЛЮЧЕНО
ВКЛЮЧЕНО
Въведете
номер на зона
Въведете
номер на зона
Изключено - Достъпа на инженер е забранен.
Включено - Достъпа на инженер е разрешен.
1 - Изключване
2 - Вкл. с оставане/Нощна
3 - Байпасиране
4 - Програмиране
8 - Мениджър
Въведете последователно номер на код, от
който ще се копират настройките, първи
код за копиране и накрая - последен код.
Въведете актуални час и минути във
формат [ЧЧ:ММ].
Въведете актуална дата във формат
[ДД/ММ/ГГ].
Въведете брой въведени невалидни кодове
за отдалечен достъп от 000 до 255.
Изпращане на тест съобщение за
комуникация към мониторинг станция.
Задаване на силата на зумера от 1 до 4.
За намаляване/ увеличаване използвайте
стрелките.
Въведете скорост на показване на текст.
съобщения на LCD екрана - от 1 до 7.
Задаване на яркостта по скала от 1 до 7.
За намаляване/ увеличаване използвайте
стрелките.
Вкл. - Подсветката е включена.
Изкл. - Подсветката е изключена.
Код на
събитие;
Събитие + час и
дата на възникване
1, 2, 3, 4
1, 2, 3, 4, 8
Въведете номера на групи, с които
потребителя може да работи.
Въведе име до 16 символа - използвайте
цифровите бутони за въвеждане на текст.
Мениджър:
Всички групи
Потребители:
Група 1
USER XX
0
1, 2, 3
(Нощна охрана)
00:00
01/01/12
10
1, 2, 3, 4, 6
2
4
3
Изкл.
Въведете номер на времеви график (1-8) за
потребителя. Ако не се ползва, оставете 0.
1 - Изключване; 2 & 3 - Тип включване
(2+3 = Нощна; 2 * = С оставане; * 3 = Пълно)
Поставете картата пред четеца до издаване
на звуков сигнал за потвърждение. За да
изтриете карта натиснете за 2-3сек бутон “0”.
1 - Изключване; 2 - Включване; 3 - Кодове;
4 - Програмиране; Байпас 6 -
Меню Описание Настройки
Подменю
По
подразбиране
Мениджър Потребител
Код на
събитие;
Събитие + час и
дата на възникване
Използвай бутон “2” за допълнителна информация;
Използвай бутон “1” за връщане към основния екран.
Използвай бутон “2” за допълнителна информация;
Използвай бутон “1” за връщане към основния екран.
Натиснете и задръжте бутон “0”, за да
изтриете текущата кодова конбинация,
въведете нов код за достъп и потвърдете
Въведете номер
на потребител
Функция на бутон
на дистанционно BRAVO RC
0
Натиснете и задръжте бутон “0”, за да
изтриете текущата кодова конбинация,
въведете нов код за достъп и потвърдете
 Loading...