

Page 1
Page | 1
AURUS-OLED
USER MANUAL
EN
Gebruikershandleiding
NL
MANUEL UTILISATEUR
FR
Browse through your house with the AURUS book on your wall
User manual TDS12022xx V12
Page 2
Manual AURUS-OLED TDS12022xx
Page | 2
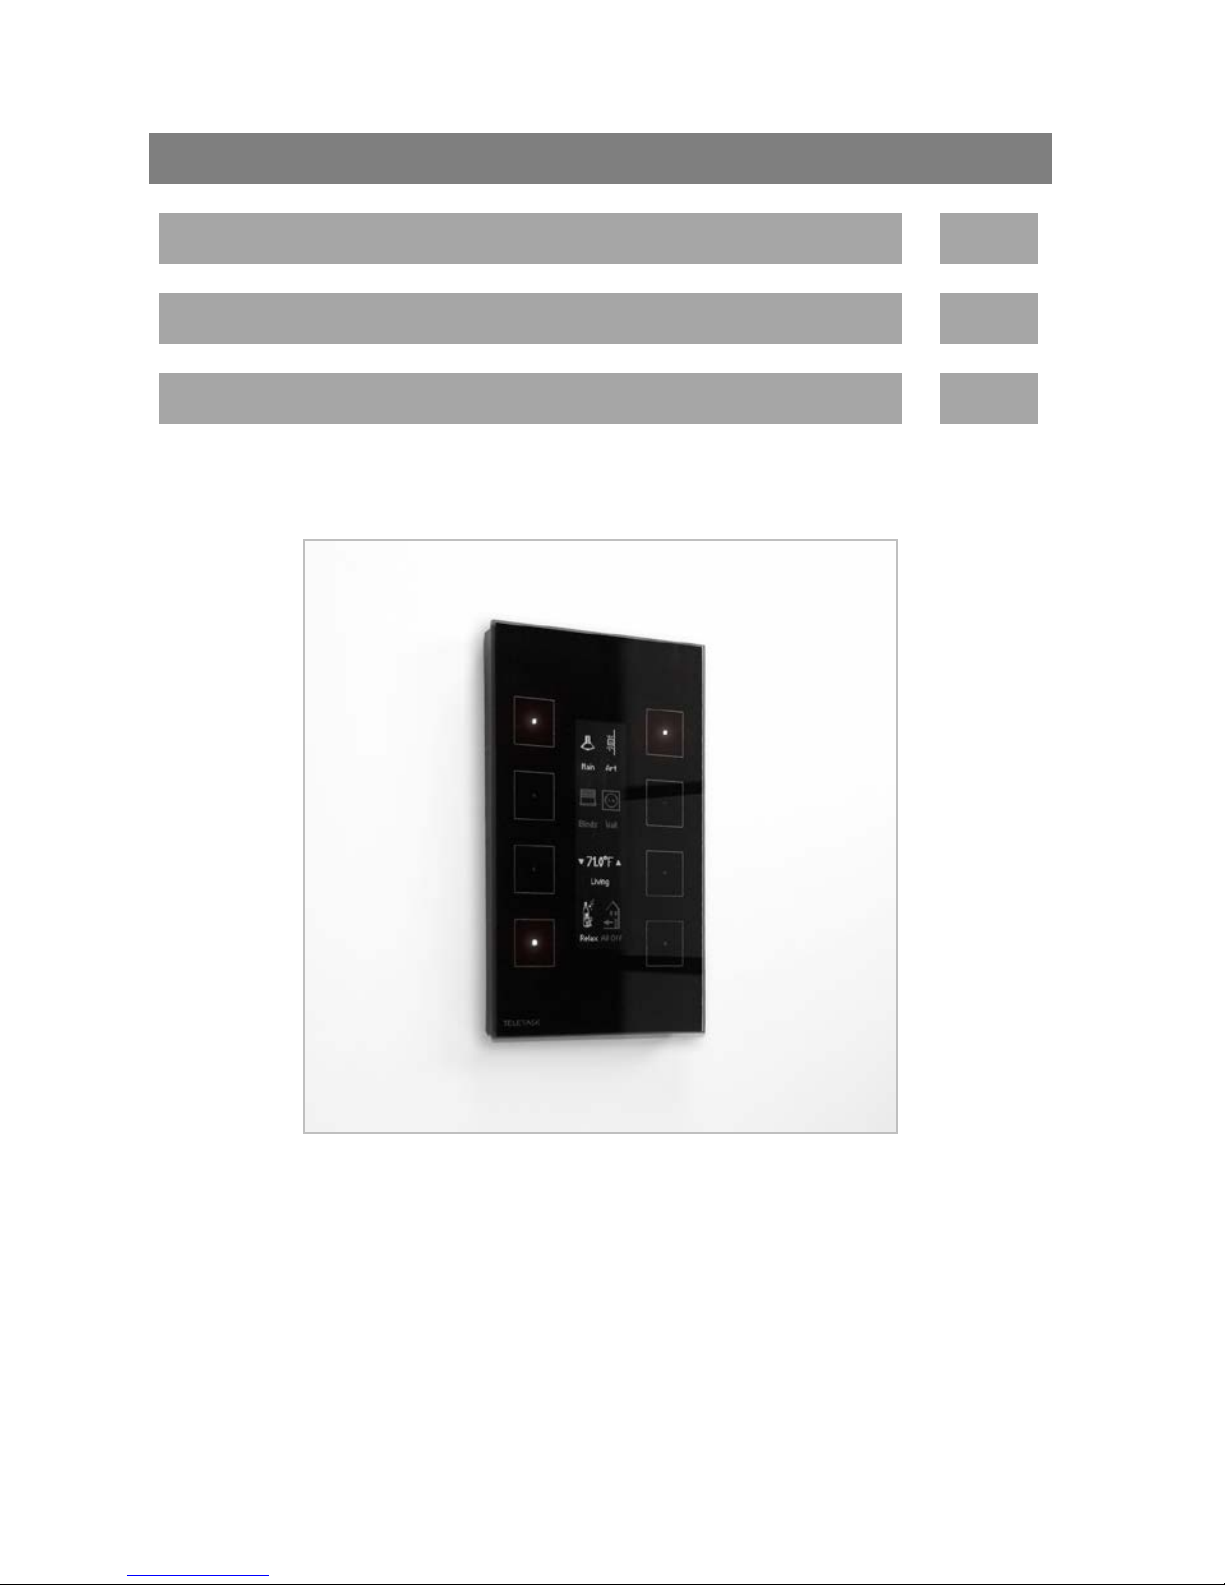
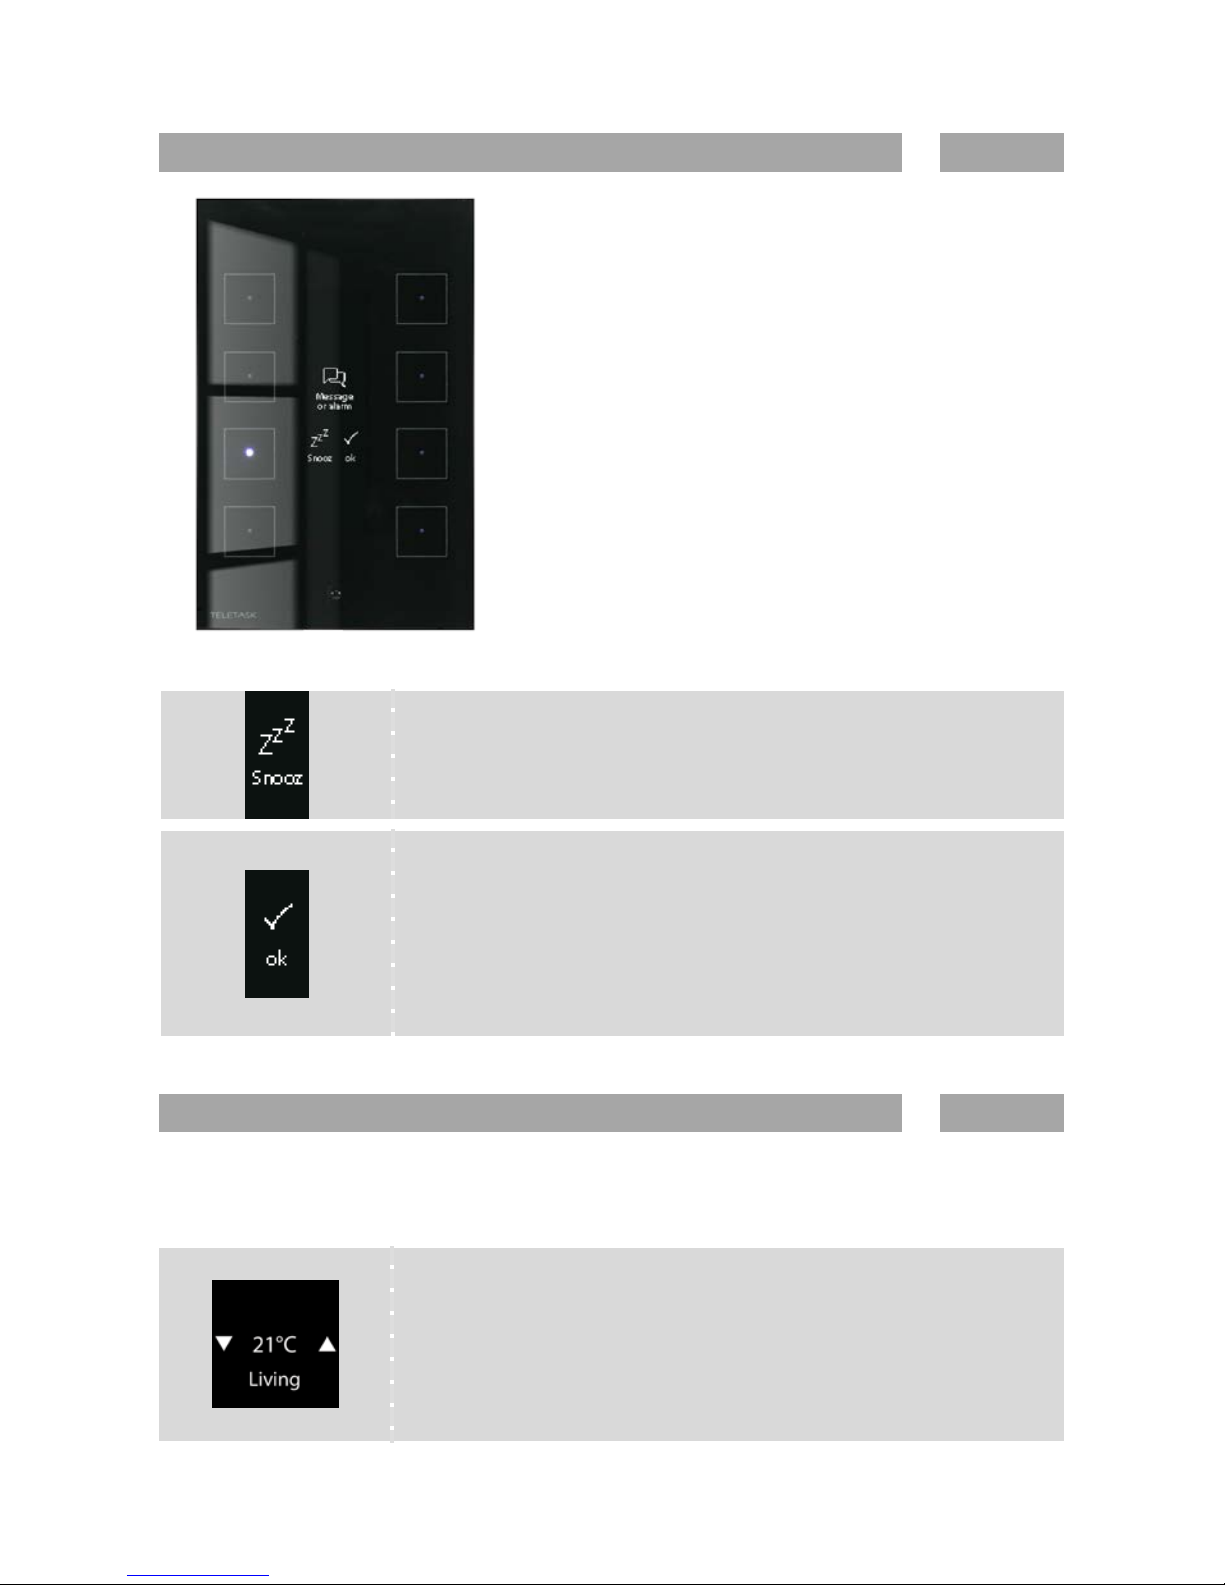
User interface
EN
The AURUS-OLED contains up to 4 pages with each 8 buttons available. You can slide
through the different pages with the hidden menu at the top of the AURUS-OLED.
Use only dry microfiber cloth. Never use liquids or solvents!
Hidden menu:
Thumb to the
previous page
Hidden menu:
Thumb to the
next page
Hidden menu:
Go to main
page
Features:
Infrared receiver for TELETASK
remote controls.
Cleaning mode (LONG):
Push 1,2 sec., all LEDs will
blink as long as panel is
touched with cleaning
cloth.
Night light:
Even when OFF,
all LEDs will shine
soft. This makes it
possible to locate
the panel and the
buttons in the
dark.
Page 3
Manual AURUS-OLED TDS12022xx
Page | 3
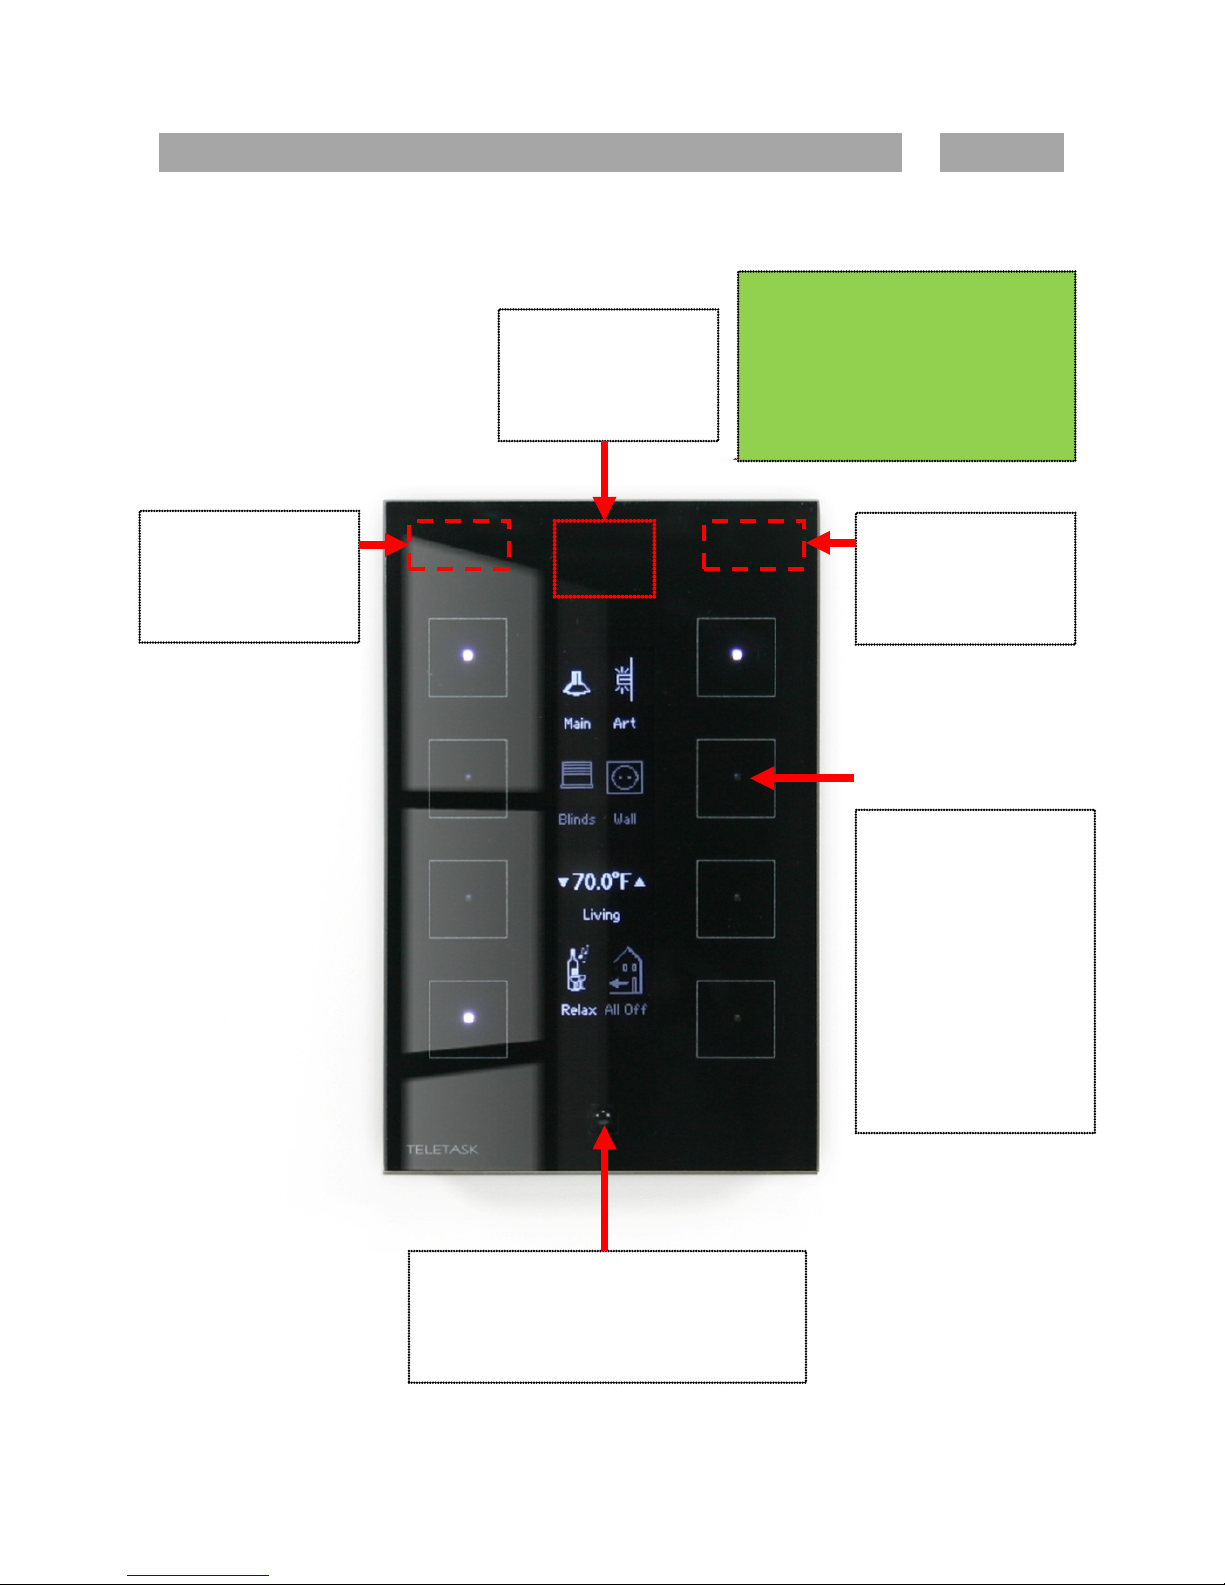
General
EN
As you read this manual, you are the owner of one or more glass design switches by
TELETASK. The AURUS-OLED can be used as a basic eight button controlling touch panel
with clear feedback, or you can explore the many extra features this device can deliver.
Besides the eight main functions, visualised on the central screen, ou can easily monitor
and control the decentralised heating or cooling systems, multimedia systems, weather
stations etc…
Most of the features on this touch panels are designed to be as clear as possible but for
your reference we like to explain some of the general functions on the AURUS-OLED:
Light, device, mood: Any function that can be switch on/off,
can be controlled on the AURUS-OLED. The icon as well as the
indication LED will shine as the light, device
or mood are
switched on.
Dimmer: A dimmer can be controlled on a single button. By a
SHORT push you can switch on/off the dimmer. By pressing
LONG, you can dim up or down.
Dimmer: A dimmer can also be
controlled by double buttons.
Here the LED at the up arrow will
be lit when the light is on, the
LED at the down arrow will be lit
as the light is off!
Motor: A curtain/blind/shade can be controlled by a single
button. With a SHORT push you can close/open. By pressing
LONG, you can gradually open/close (ref. dimmer).
Motor: A curtain/blind/shade
can also be controlled by two
linked buttons. While the motors
run, a pause icon will replace the
arrow.
Page 4
Manual AURUS-OLED TDS12022xx
Page | 4
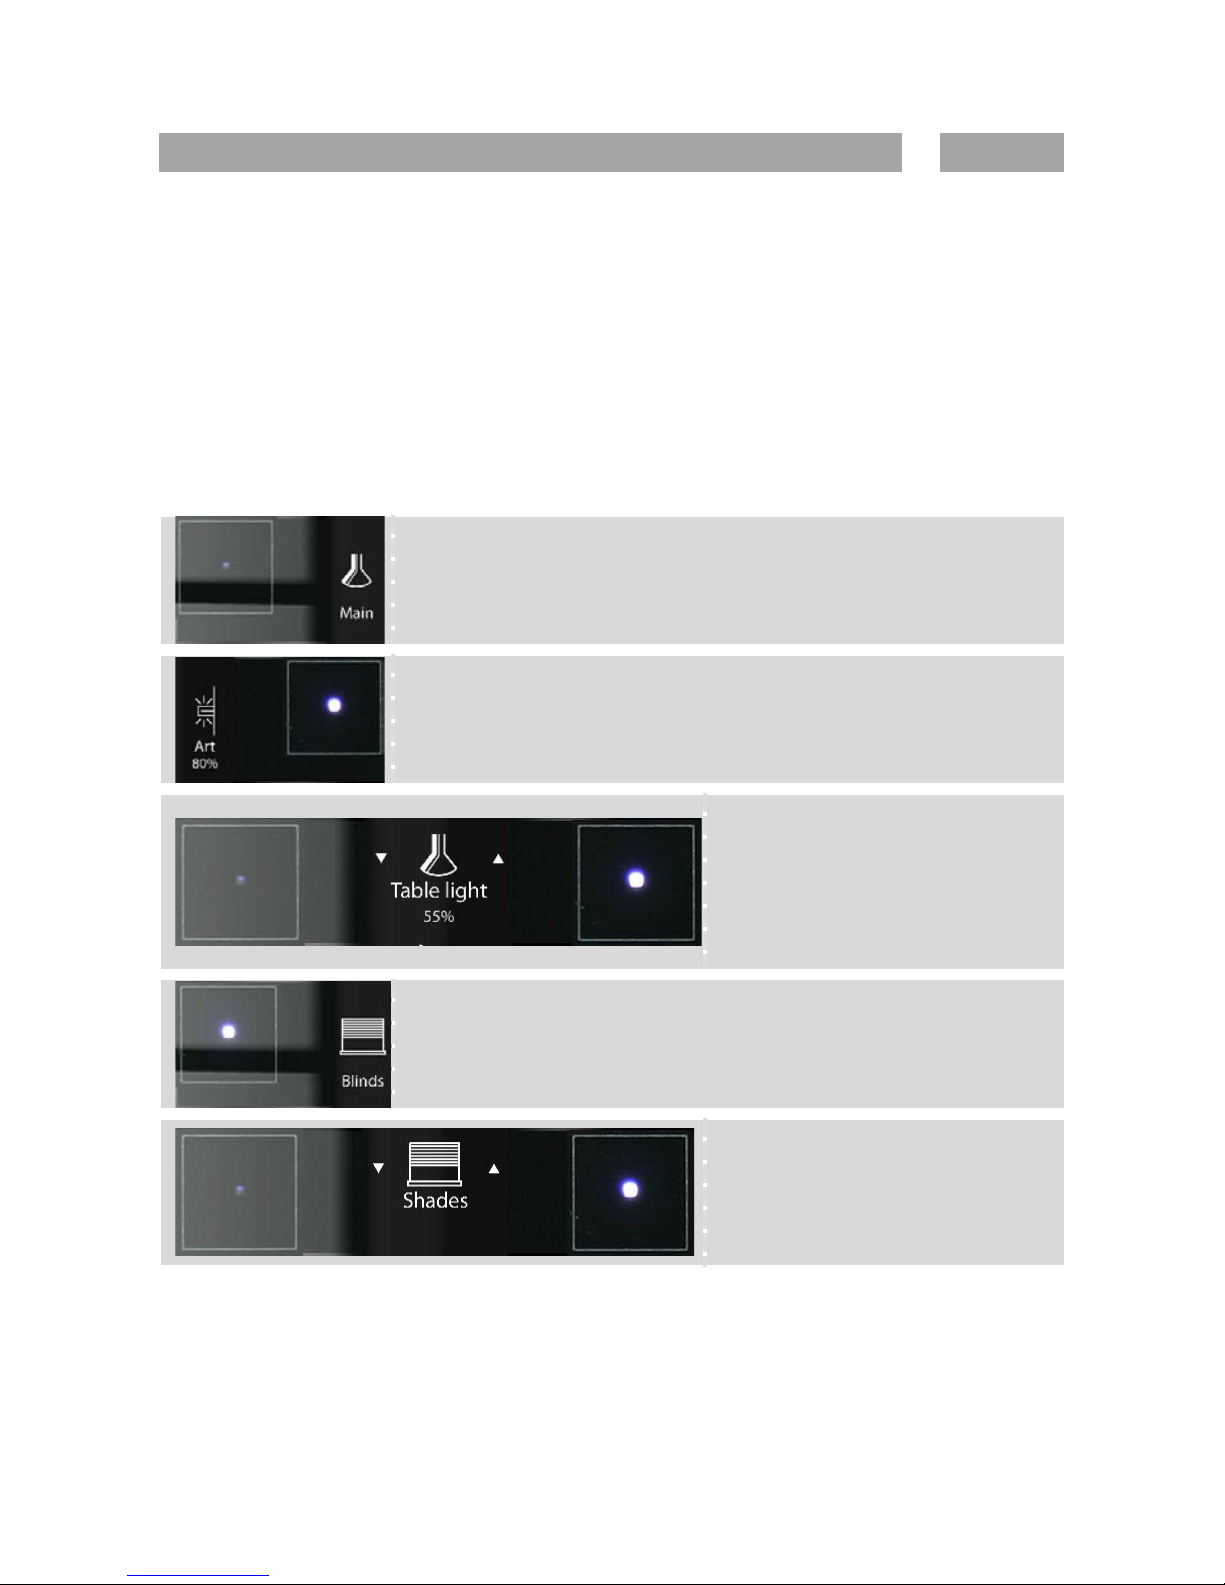
Remote control
EN
TDS12501 Mini IR
Remote Control
Controls the first page on
the AURUS-OLED + the
eight extra available
‘MASTER’ RC-functions.
TDS12502 IR Remote
Control
The large TDS12502
remote control adds
temperature & audio
control functions. For more
info, see the user manual
of your remote control.
Use the left and right
arrows on the RC to scroll
through the different
pages on the AURUSOLED.
Every TELETASK Remote control directly controls the TELETASK touch-panel, mounted in
the room where you are using the remote control!
1
3
5
7 2 4
6
8
Page 5
Manual AURUS-OLED TDS12022xx
Page | 5
Messages & alarms
EN
The functions “Messages and Alarms” contain text
messages and/or beep tones which inform that a
certain situation has occurred.
An “ALARM” always has to be deleted manually. Take
care first that the cause of the alarm is taken away. The
alarm is deleted from the different interfaces as
follows below.
A “MESSAGE” disappears automatically after 30
seconds or as soon as a new action occurs on the
particular panel. (A new action can be activating a
function, receiving another message or alarm, etc…)
Snooze = 3 min postponed so you would have time to thumb
through the AURUS-OLED and do whatever is needed to be
done.
Clear/OK = Remove the current ALARM/MESSAGE. Make sure
the cause of the message/alarm has been taken care of, before
pressing ok.! Depending on the kind of alarm, in some cases,
even when the alarm remains present and you click ‘OK’, the
alarm text may not be displayed again. Clicking ‘OK’ is only
removing the text, not the cause of it.
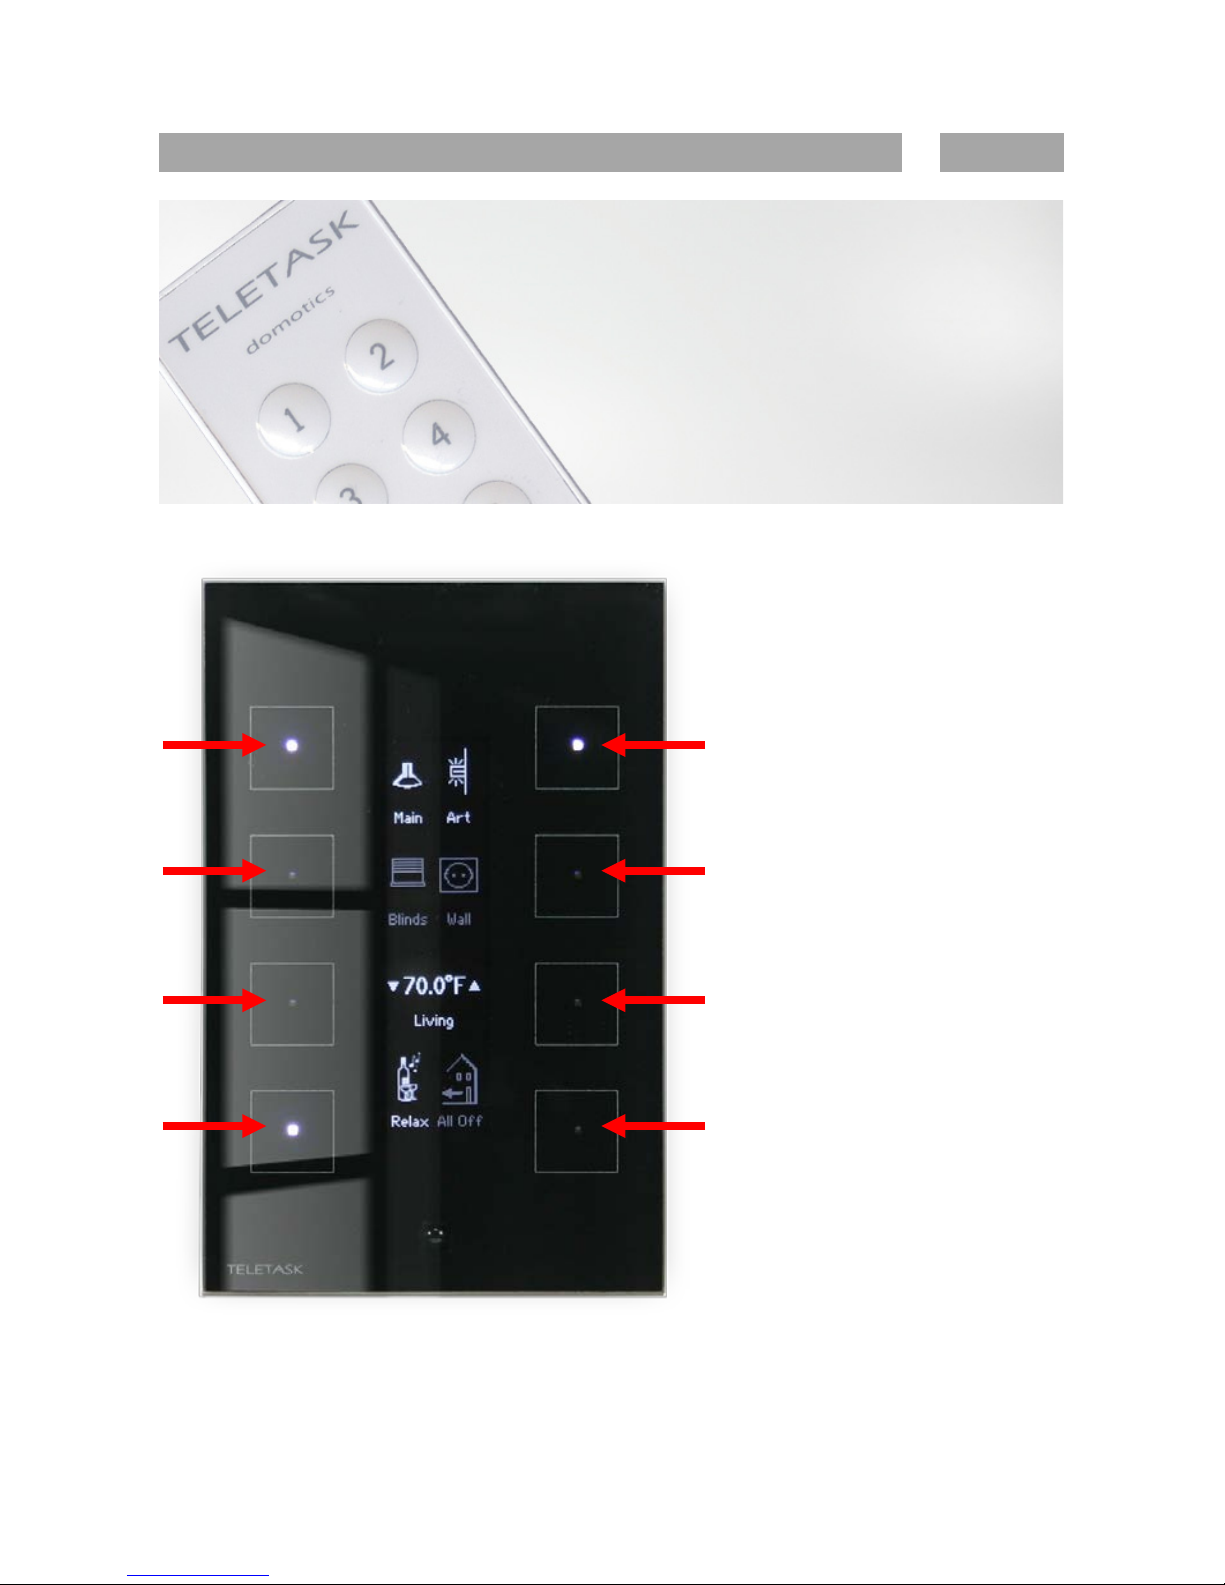
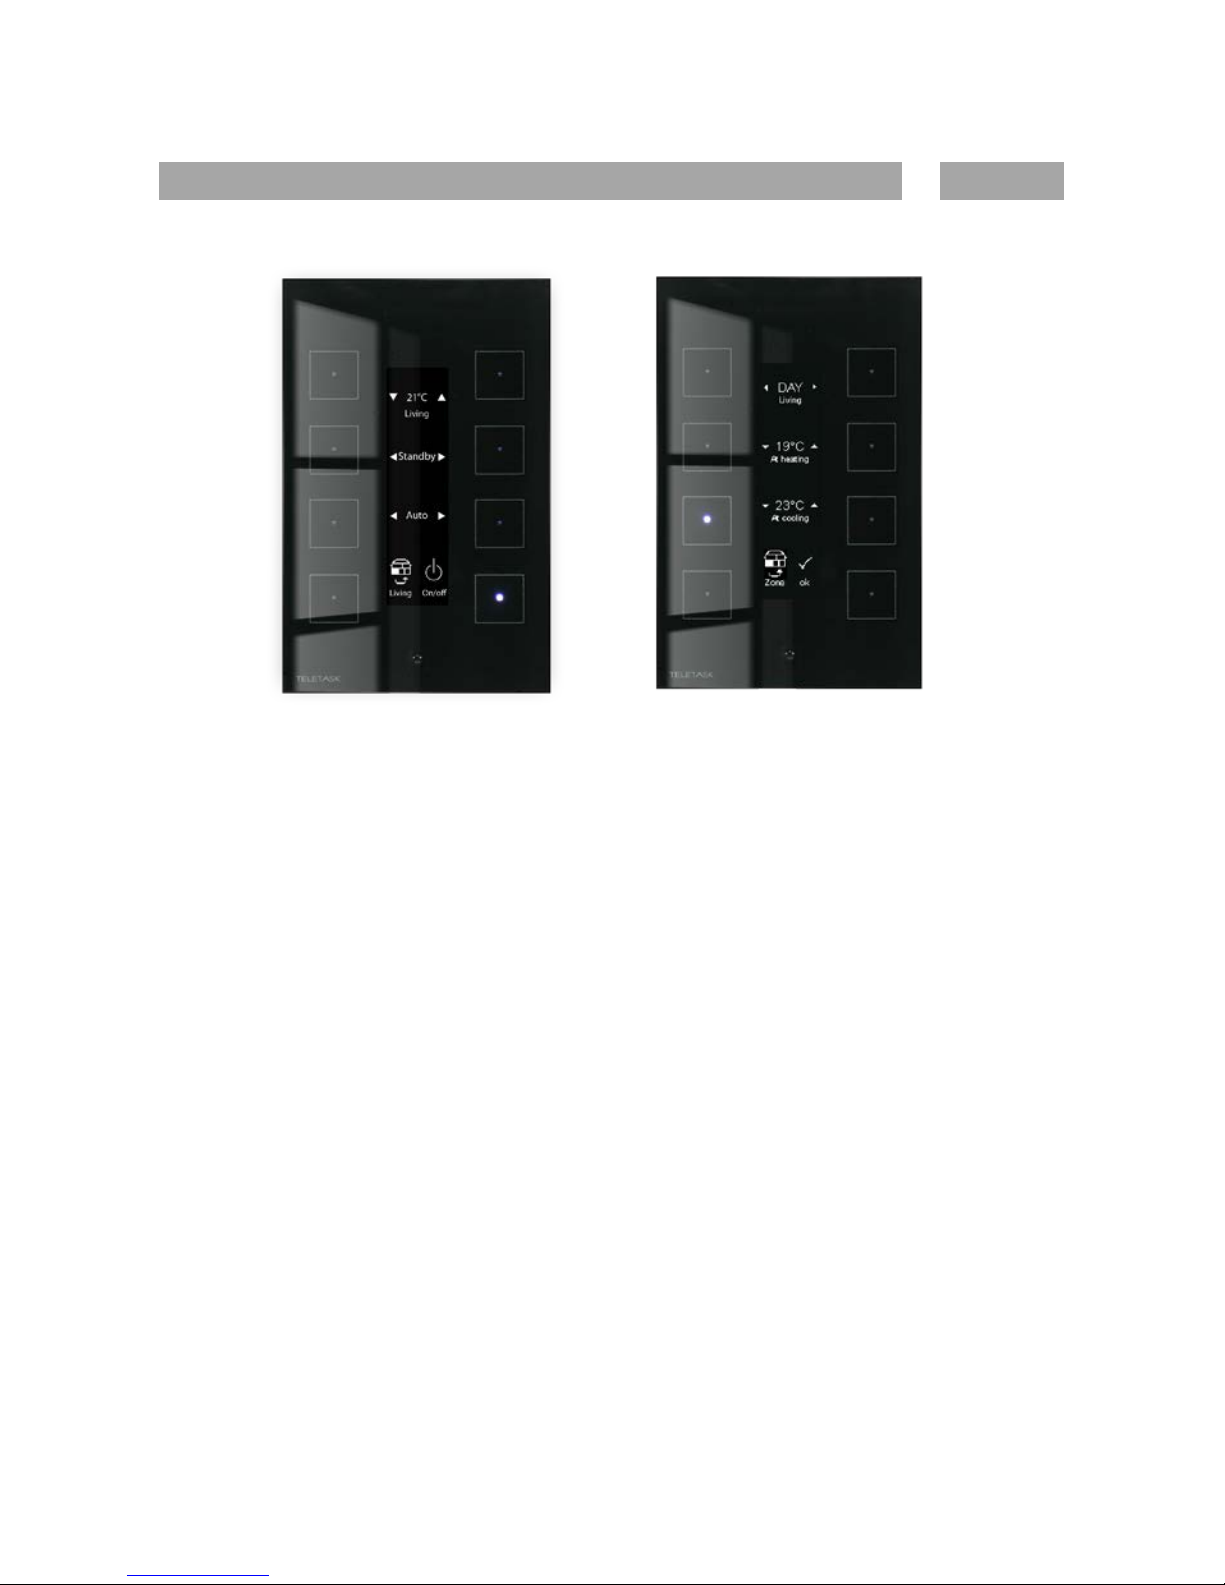
Sensors (if applicable) – measuring and control
EN
In most cases the AURUS-OLED will have a page, dedicated to sensors (temperature, light,
humidity, wind, …).
Selected sensor + zone: This field shows the selected sensor
zone and displays the measured value in that zone.
The target value of the selected sensor can be set using the
up/down arrows. When you click the up or down arrow, the
measured value displayed will change to the target value.
Page 6
Manual AURUS-OLED TDS12022xx
Page | 6
↓ Cooling, now = 21°C
If your system is cooling, the LED at the down arrow will be lit, if
your system is heating, the LED at the up arrow is lit!
After 10 seconds, it shifts back to the measured temperature.
The ‘Presets’ of the Sensor Zone: Here you can select the most
suitable preset. In case of a temperature sensor, you can choose
between: <DAY>, <NIGHT>, <ECO>
Day: This is the normal temperature setting during the day, also
called the ‘comfort’ temperature.
ECO: The ‘ECO’ value is a value which is a predefined number of
degrees different than the ‘day’ preset. In heating mode the ECO
temperature is lower then the ‘day’ preset. In cooling mode the
ECO temperature is higher then the ‘day’ preset. [ENERGY
SAVING PRESET]
Night: In case of cooling/heating this is your preferred
temperature setting during the night.
The ‘Mode’ of the Sensor Zone: With this button you select the
mode of the sensor if applicable. Normally only available when
using cool/heat air-conditioning systems. Mode examples are
“cool/heat/auto…”.
Speed: When your heating or cooling system is equipped with
speed control, you can manually alter the speed by pressing
LONG on the mode selection buttons.
The ‘Zone’ selection: With this button you can scroll through
the different zones (rooms) of your house/building. Every click
jumps to a new zone and the according values for that zone are
displayed and can be changed.
Remark: each panel can be configured to show a limited number
of zones only. Please contact your system integrator for more
information.
Pressing LONG will bring up the "change presets" menu .
Zone On/Off: will switch the displayed sensor zone ON or OFF.
In most case
s this will mean your heating system will be
protected from freezing but will not heat.
This feature is
particularly useful for guest- and rarely occupied rooms (energy
management feature).
Page 7
Manual AURUS-OLED TDS12022xx
Page | 7
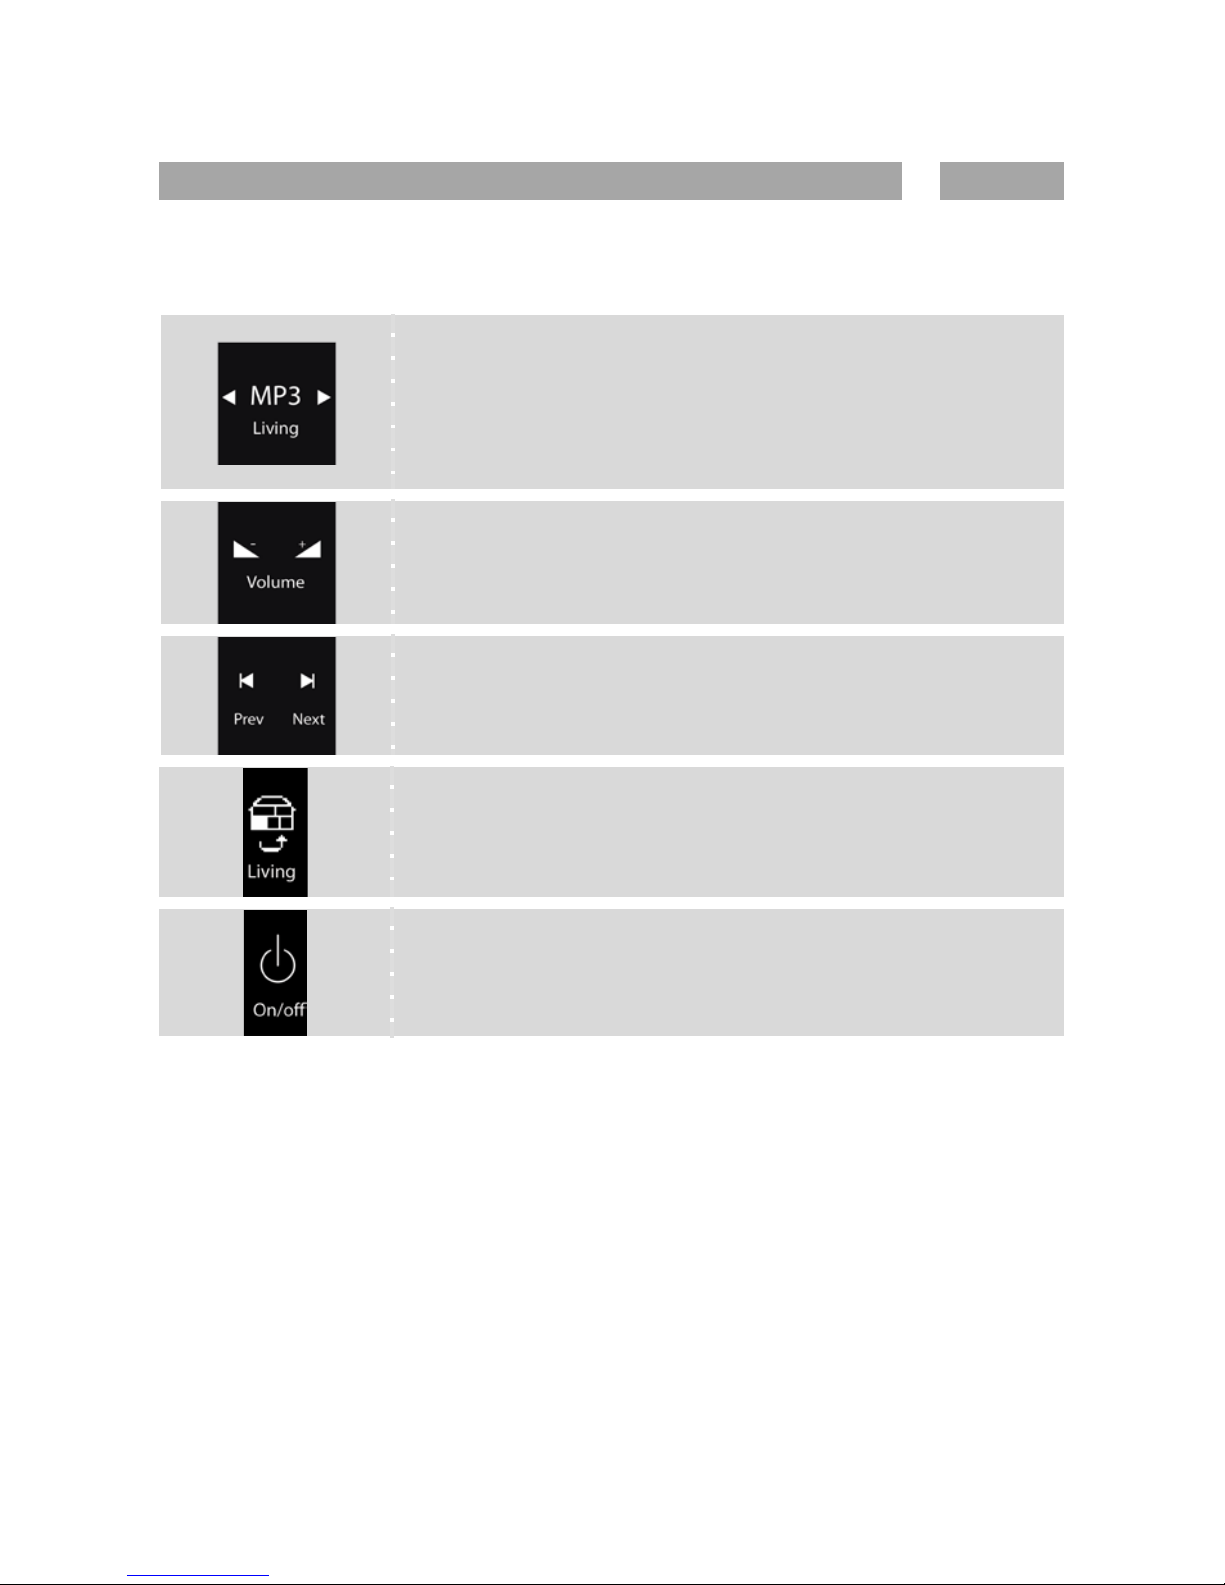
Audio (if applicable)
EN
Your AURUS-OLED may have a page dedicated to audio. Here you can start and edit your
preferred A/V system(s). Choose the source and control the volume, track or station.
Source selection: Here you can choose between the different
sources, available in the selected room/ audio zone.
Below the source name, the selected room/ audio zone is
displayed. Change the zone, using the zone selection button
below.
Volume up/down:
Changing the volume for the selected
room/audio zone.
Previous/Next: Here you can scroll through the different tracks,
stations…
Zone selection: With this button you can scroll through the
different zones integrated in your TELETASK home automation
system. It changes all values on the AUDIOr page you’re on now.
Zone On/Off: will switch your AUDIO zone ON or OFF
Page 8
Manual AURUS-OLED TDS12022xx
Page | 8
Editing zone presets (if applicable)
EN
Press long on the zone-button to go to the preset configuration menu.
If you want to change the presets of another temperature zone/room than the
one you’re in now, first scroll towards the correct zone by short clicking on the
zone selection button (by default in the lower-left corner).
Now press long on the zone-button to go to the preset configuration menu;
Select the desired preset: (predefined) <DAY>, <NIGHT> or <ECO>
Set temperature at heating: if a heating system has been integrated in the
current zone, you can set the preset’s target temperature for heating for he
selected preset..
Set temperature at cooling: if a cooling system has been integrated in the current
zone, you can set the preset’s target temperature for cooling for the selected
preset. (both heating and cooling can be applicable as well)
Press 'OK' or the hidden 'main menu' button to go back.
______________
Page 9

Pagina | 1
AURUS-OLED
Gebruikershandleiding
NL
Blader doorheen je woning met de AURUS-OLED bestseller op
uw wanden.
Gebruikershandleiding TDS12022xx V12
Page 10

Manual AURUS-OLED TDS12022xx
Page | 2
User interface
NL
De AURUS-OLED beschikt over 4 pagina’s met elk 8 beschikbare toetsen. U kunt
doorheen deze verschillende pagina’s bladeren dankzij het verborgen menu bovenaan
de AURUS-OLED.
Gebruik enkel een droge microvezeldoek. Gebruik nooit vloeibare
reinigingsmiddelen!
Verborgen
menu: Blader
naa
r de vorige
Verborgen
menu:Blader
naar de volgende
Verborgen
menu:
Ga naar
hoofdpagina.
Feature:
Infraroodontvanger voor de
TELETASK afstandsbediening..
Poetsstand(LANG):
Druk 1,2 sec., zolang alle
LEDs knipperen kunt u het
paneel poetsen met een
poetsdoek.
Nacht-
verlichting:
Ook bij UIT stand
zullen alle LEDs
zachtjes oplichten.
Hierdoor kunt u het
paneel en de
toetsen makkelijk
terugvinden in het
donker.
Page 11

Manual AURUS-OLED TDS12022xx
Page | 3
Algemeen
NL
Wanneer u deze handleiding leest, bent u de trotse eigenaar van één of meerdere glazen
design schakelaars van TELETASK. De AURUS-OLED kan gebruikt worden als een basis
toetsenpaneel met 8 toetsen of u kunt de vele extra’s van dit toestel ontdekken en
gebruiken.
Naast de acht hoofdfuncties, die op het centrale scherm worden weergegeven, kunt u ook
heel eenvoudig de gedecentraliseerde verwarming- of koelingsystemen, de multimedia
systemen, weerstations enz….controleren en besturen.
De meeste tekeningen werden zo duidelijk mogelijk ontworpen maar graag geven wij u
hieronder meer informatie rond de algemene functies van de AURUS-OLED:
Licht, toestel, sfeer:
Elke functie die AAN/UIT kan worden
gezet, kan door de AURUS-OLED bestuurd worden. Zowel het
icoon als de indicatie LED zal oplichten als het licht, het toestel
of de sfeer worden geactiveerd.
Dimmer: Een dimmer kan bestuurd worden door een enkele
toets. Bij KORT drukken kunt u de dimmer AAN/UIT zetten. Bij
LANG drukken kunt u OP en NEER dimmen.
Dimmer: Een dimmer kan ook
door dubbele toetsen bestuurd
worden. Hier zal de LED van het
pijltje omhoog oplichten
wanneer het licht aan is, de LED
van het pijltje naar beneden zal
oplichten als het licht uit is!
Motor: Een gordijn, zonnewering, luik of rolluik kan bestuurd
worden met een enkele toets. Met een KORTE druk kan u
openen/sluiten. Met een LANGE druk kan u deze geleidelijk
openen/sluiten (zie ook dimmer).
Motor: Een gordijn,
zonnewering, luik kan ook
bestuurd worden door 2 toetsen.
Tijdens het draaien van de motor
zal het pijltje veranderen door
een pauze icoon.
Page 12

Manual AURUS-OLED TDS12022xx
Page | 4
Afstandsbediening
NL
TDS12501 Mini IR
Afstandsbediening
Controleert de eerste
pagina van de AURUSOLED + de acht extra
beschikbare ‘MASTER’ RC
functies.
TDS12502 IR
Afstandsbediening
De grote TDS12502
afstandsbediening voegt
temperatuur & audio
controle functies toe. Voor
meer informatie, zie de
user manual van uw
afstandsbediening.
Scroll met de links- en
rechtspijltjestoetsen door
de verschillende pagina's
op de AURUS-OLED.
Elke TELETASK afstandsbediening bestuurt rechtstreeks het TELETASK toetsenpaneel dat
werd gemonteerd in de kamer waar u de afstandsbediening gebruikt!
1
3
5
7 2 4
6
8
Page 13

Manual AURUS-OLED TDS12022xx
Pagina | 5
Berichten & alarmen
NL
De functies “Berichten en Alarmen” bevatten
tekstberichten en/of pieptonen die u informeren dat
een bepaalde situatie zich heeft voorgedaan.
Een “ALARM” dient altijd manueel verwijderd te
worden. Zorg er eerst voor dat de oorzaak van het
alarm werd opgelost voordat u dit verwijderd. Het
alarm kan verwijderd worden van de verschillende
interfaces volgens de instructies hieronder.
Een “BERICHT” verdwijnt automatisch na 30
seconden of van zodra een nieuwe actie op het
betreffende paneel verschijnt (een nieuwe actie kan
een functie activeren die een ander bericht of alarm
ontvangt enz…)
Snooze = 3 min
uitgesteld zodat u tijd heeft om door de
AURUS-OLED te bladeren en te doen wat nodig is.
Clear/OK = Verwijdert het huidige ALARM/BERICHT. Zorg ervoor
dat de oorzaak van het bericht/alarm werd bekeken en opgelost
voordat u op OK drukt! Afhankelijk van het type alarm zal in
sommige gevallen na het klikken op OK het alarm actief blijven
hoewel de tekst niet zichtbaar meer zal zijn. Op OK klikken,
verwijdert enkel de tekst en niet de oorzaak van het alarm!
Sensoren (indien toepasselijk)
NL
In de meeste gevallen zal de AURUS-OLED een pagina hebben die gewijd is aan sensoren
(temperatuur, licht, vochtigheid, wind,…).
Geselecteerde sensor + zone: Dit veld toont de geselecteerde
sensor zone en geeft de gemeten waarde van deze zone weer.
De gewenste waarde
van de geselecteerde sensor kan
aangepast worden door het gebruik van de omhoog/omlaag
Page 14

Manual AURUS-OLED TDS12022xx
Page | 6
↓ Cooling, now = 21°C
pijltjes, de gemeten waarde zichtbaar op de display zal wijzigen
naar de gewenste waarde.
Indien uw systeem zal koelen, zal de LED van het pijltje omlaag
oplichten, wanneer uw systeem zal verwarmen, zal de LED van
het pijltje omhoog oplichten!
Na 10 sec. verschijnt opnieuw de gemeten waarde.
De ‘Presets’ van de Sensor Zone: Hier kan u de best passende
preset kiezen. In het geval van een temperatuursensor kan u
kiezen tussen: <DAG>, <NACHT>, <ECO>
Dag: Dit is de normale temperatuur gedurende de dag, ook wel
de ‘comfort’ temperatuur genaamd.
ECO: De ‘ECO’ waarde is een waarde die een vooraf bepaald
aantal graden verschilt m
et de ‘dag’ preset. In
verwarmingsstand zal de ECO temperatuur lager zijn dan de
‘dag’ preset. In de koelingstand zal de ECO temperatuur hoger
zijn dan bij de ‘dag’ preset. [EENRGIEBESPARENDE STAND]
Nacht: In het geval van verwarming/koeling is dit de gewenste
temperatuur tijdens de nacht.
De ‘Mode’ van de Sensor Zone: Met deze toets kan u de mode
van de sensor kiezen indien toepasbaar. Normaal alleen
beschikbaar wanneer u de cool/heat air-conditioning systemen
gebruikt. Mode voorbeelden zijn: cool/heat/auto…”.
Snelheid: Wanneer uw verwarming- of koelingsysteem
uitgerust is met snelheidscontrole, kunt u manueel de snelheid
wijzigen door LANG te drukken op de mode selectie toetsen.
De ‘Zone’ selectie: Met deze toets kan u door de verschillende
zones (kamers) scrollen van uw woning/gebouw. Bij elke klik
verspringt u naar een nieuwe zone en de daarbijhorende
waarden worden gevisualiseerd en kunnen worden aangepast.
Opgepast: elk paneel kan geconfigureerd worden om een
beperkt aantal zones te tonen. Voor meer informatie gelieve uw
systeem installateur te contacteren.
LANG drukken brengt je bij het "presets bewerken" menu (zei
verder).
Page 15

Manual AURUS-OLED TDS12022xx
Page | 7
Zone AAN/UIT:
zal de zichtbare sensor zone AAN of UIT
schakelen. In de meeste gevallen
betekent dit dat uw
verwarmingssys
teem beveiligd zal worden tegen vorst maar
niet zal verwarmen.
Deze toepassing is vooral nuttig voor
logeerkamers en niet vaak gebruikte ruimtes in de
woning/gebouw (energie management toepassing).
Audio (indien toepasselijk)
NL
Op uw AURUS-OLED kan een volledige pagina gewijd zijn aan audio. Hier kunt u uw
gewenste A/V syste(e)m(en) starten en bewerken. Kies de bron en bepaal het volume, het
nummer of de zender.
Bron selectie: Hier kunt u kiezen tussen de verschillende
bronnen die beschikbaar zijn in de geselecteerde ruimte/audio
zone.
Onder de bronnaam wordt de geselecteerde ruimte/ audio zone
weergegeven. U kunt de zone wijzigen door de zone selectie
toets hieronder te gebruiken.
Volume luider/stiller:
wijzigen van het volume in de
geselecteerde ruimte/audio zone.
Vorige/Volgende: Hier kunt u scrollen naar de verschillende
nummers, zenders,…
Zone selectie: Met deze toets kunt u door de verschillende
zones scrollen die in uw TELETASK home automation systeem
zijn geïntegreerd. Het wijzigt alle waarden op de AUDIO pagina
waar u zich bevindt.
Zone Aan/Uit: schakelt uw AUDIO zone AAN of UIT
Page 16

Manual AURUS-OLED TDS12022xx
Page | 8
Bewerken van zone presets (indien toepasselijk)
NL
Druk lang op de zone-toets om naar het preset configuratie menu te gaan.
Indien u de presets van een andere temperatuurzone of –kamer dan deze waar u
bent, wenst te wijzigen, scroll dan eerst naar de gewenste zone door kort te
klikken op de zone selectie toets (normaal gezien in de linker onderhoek).
Druk nu lang op de zone-toets om naar het presets configuratie menu te
gaan.
Selecteer de gewenste preset: (voorafbepaald) <DAG>, <NACHT> of <ECO>
Stel de temperatuur in op verwarming: indien een verwarmingssysteem werd
geïntegreerd in de huidige zone, kan u de preset gewenste waarde voor
verwarming bepalen…
Stel de temperatuur in op koeling: indien een koelingssysteem werd
geïntegreerd in de huidige zone, kan u de preset gewenste waarde voor koeling
bepalen. (zowel verwarming als koeling kunnen beiden toepasbaar zijn)
Druk 'OK' of druk op de verborgen ' hoofdmenu' toets om terug te gaan.
______________
Page 17

Page | 1
AURUS-OLED
MANUEL UTILISATEUR
FR
Naviguez dans votre maison grâce au livre AURUS sur votre mur
Manuel utilisateur TDS12022xx V12
Page 18

Manuel AURUS-OLED TDS12022xx
Page | 2
Interface utilisateur
FR
AURUS-OLED contient jusqu’à 4 pages de 8 boutons disponibles chacune. Vous pouvez
naviguer à travers les différentes pages grâce au menu caché en haut de l’AURUS-OLED.
Utilisez uniquement un chiffon doux et sec. N'utilisez jamais de liquide ou de solvant!
Menu caché:
Aller à la page
précédente
Menu cache:
Aller à la page
suivante
Menu caché:
Aller à la page
principale
Fonctionnalités:
Récepteur infrarouge pour les
télécommandes TELETASK.
Mode nettoyage (LONG):
Appuyer 1,2 sec., les LEDs
clignoteront tant que le
chiffon sera au contact du
panneau
Lumière
nocturne:
Les LEDs
brillent
légèrement et
permettent de
localiser le
panneau et les
boutons dans le
Page 19

Manuel AURUS-OLED TDS12022xx
Page | 3
Général
FR
Comme vous lisez ce manuel, vous devez être propriétaire d’un ou plusieurs panneaux en
verre conçus par TELETASK. AURUS-OLED peut être utilisé comme un panneau
basique à huit bou tons tactiles associés à des informations claires ou vous pouvez
explorer les nombreuses fonctionnalités supplémentaires que ce panneau vous offre.
Outre les huit fonctions principales, visualisées sur l'écran central, vous pouvez
facilement surveiller et contrôler le chauffage/climatisation, des systèmes
multimédias, des station s mét éorolo giq ues , etc. ...
La plupart des fonctionnalités de cet écran tactile sont conçues pour être aussi
claires que possible, mais pour votre référence, nous vous expliquons certaines des
fonctions générales des AURUS-OLED:
Eclairage, appareil, scène: Toute fonction qui peut être sous /
hors tension, peut être contrôlée sur AURUS-OLED. L'icône et la
LED brilleront lorsque l’éclairage, l’appareil ou la scène sont
allumés.
Variateur: Un variateur peut être contrôlé par un seul bouton.
En appuyant brièvement vous pouvez allumer / éteindre le
variateur. En appuyant longuement, vous pouvez augmenter ou
diminuer l’intensité.
Variateur: Un variateur peut
aussi être contrôlé par des
doubles boutons.
Ici, la LED
associée à la flèche montante
sera allumée lorsque l’éclairage
est allumé, celle associée
à la
flèche descendante sera allumée
tant que l’éclairage est éteint!
Moteur: Un volet/rideau/store peut être contrôlé par un seul
bouton. Avec un appui bref vous pouvez fermer / ouvrir. En
appuyant longuement, vous pouvez
ouvrir / fermer
progressivement (réf. variateur).
Moteur: un rideau, une
protection solaire et un volet
roulant peuvent être
commandés par deux boutons.
Pendant la rotation du moteur, la
flèche va changer par une icône
de pause.
Page 20

Manuel AURUS-OLED TDS12022xx
Page | 4
Télécommande
FR
Mini télécommande IR
TDS12501
Contrôle la première page
de l’AURUS-OLED + les huit
fonctions MASTER
disponibles
supplémentaires.
Télécommande IR
TDS12502
La grande télécommande
TDS12502 ajoute les
fonctions de contrôle de la
température et de l’audio.
Pour plus d'informations,
consultez le manuel de
votre télécommande.
Utilisez les flèches gauche
et droite sur la
télécommande pour faire
défiler les différentes
pages sur l’AURUS-OLED.
Chaque télécommande TELETASK contrôle le panneau tactile TELETASK, installé
dans la pièce où vous utilisez la télécommande!
1
3
5
7 2 4
6
8
Page 21

Manual AURUS-OLED TDS12022xx
Page | 5
Messages & alarmes
FR
Les fonctions "messages" et "alarmes" génèrent des
messages texte et/ou des bips qui informent qu'un
évènement s'est produit.
Une "alarme" doit toujours être effacée
manuellement. Prenez soin auparavant de supprimer
la cause de l'alarme. L'alarme est effacée sur les
différentes interfaces comme indiqué ci-dessous.
Un «message» disparaît automatiquement après 30
secondes ou dès que survient une nouvelle action sur
le panneau. (Une nouvelle action peut être l'activation
d'une fonction, la réception d’un autre message ou
alarme, etc. ...)
Snooze = report de 3 min afin de vous laissez le temps de
feuilleter l’AURUS-OLED et faire ce qu'il y a à faire.
Clear / OK = effacer l'alarme/message en cours. Assurez-vous
que la cause du message / alarme a été réglée, avant d'appuyer
sur OK.! Selon le type d'alarme, dans certains cas, même lorsque
l'alarme reste présente et que vous cliquez sur "OK", l'alarme ne
s’affiche pas à nouveau. En cliquant sur 'OK', vous effacez
uniquement le texte de l’alarme, pas la cause de celle-ci.
Capteurs (si applicable) – Mesure et contrôle
FR
Dans la plupart des cas, l’AURUS-OLED aura une page, dédiée aux capteurs (température,
luminosité, humidité, vent, …).
Capteur sélectionné + zone: ce champ indique la zone du
capteur sélectionné et la valeur mesurée de cette zone.
La valeur cible du capteur peut être définie en appuyant sur les
boutons associés aux flèches haute/basse. Quand vous appuyez
sur l’un des boutons, la valeur cible est affichée à la place de la
valeur mesurée. Après 10 secondes, la température mesurée est
à nouveau affichée.
Une seule LED est allumée à la fois, indiquant si votre système
Page 22

Manuel AURUS-OLED TDS12022xx
Page | 6
↓ Cooling, now = 21°C
est en train de chauffer ou de refroidir la pièce.
Le ‘Préréglage’ de la zone du capteur vous permet de choisir le
préréglage le
plus approprié. Dans le cas d'un capteur de
température, vous pouvez choisir entre: <JOUR>, <NUIT>,
<ECO>
JOUR: Température demandée pendant la journée
, aussi
appelée température de "confort".
ECO: La température du préréglage "ECO" est
calculée en
enlevant (chauffage) ou en ajoutant (climatisation) un nombre
de degrés prédéfini à la température "jour" afin de réaliser des
économies d’énergie.
NUIT: Température demandée pendant la nuit.
Le ‘Mode’ de la zone du capteur est le mode de
fonctionnement. Normalement, uniquement disponible pour
des systèmes de chauffage/climatisation. Exemples de mode de
fonctionnement: "froid / chaud / auto ...".
Vitesse: Si votre chauffage/climatisation
est équipé d'un
contrôle de vitesse, vous pouvez modifier manuellement la
vitesse en appuyant longuement sur les boutons de sélection du
mode.
La sélection de 'Zone' vous permet de faire
défiler les
différentes zones de votre maison / bâtiment. Chaque clic passe
à la zone suivante et les valeurs de cette zone sont affichées sur
le panneau et peuvent être modifiées.
Remarque: chaque panneau peut être configuré pour afficher un
nombre réduit de zones. Contactez l’intégrateur
de votre
système pour plus d'informations.
Appuyez longuement pour faire appara
ître le menu de
modification des préréglages.
Zone On / Off: bascule la zone du capteur entre MARCHE et
ARRET. Dans la plupart des cas, cela signifie que votre système
de chauffage sera protégé du gel, mais ne chauffera plus. Cette
fonctionnalité est particulièrement utile pour les pièces
rarement occupées (fonction de gestion de l'énergie).
Page 23

Manuel AURUS-OLED TDS12022xx
Page | 7
Audio (si applicable)
FR
Votre AURUS-OLED peut avoir une page dédiée à l’audio. Ici vous pouvez démarrer et
piloter votre système(s) Audio/Vidéo préféré(s). Choisissez la source et réglez le volume, le
morceau ou la station.
Sélection de la source vous permet de choisir entre différentes
sources disponibles dans la pièce / zone audio sélectionnée.
Sous le nom de la source est affichée l
a pièce/zone audio
sélectionnée. Changez
de zone en utilisant le bouton de
sélection de zone au-dessous.
Réglage du volume vous permet de régler le niveau du volume
pour la pièce/zone audio sélectionnée.
Précédent/Suivant vous permet de balayer les différents
morceaux ou stations.
Sélection de zone vous permet de balayer les différentes zones
gérées par votre système domotique TELETASK et d’afficher les
valeurs correspondantes de la zone sur la page AUDIO.
Zone On/Off: vous permet de mettre en marche ou d’arrêter la
diffusion de la zone audio.
Page 24

Manuel AURUS-OLED TDS12022xx
Page | 8
Editer les préréglages d’une zone (si applicable)
FR
Appuyez longuement sur le bouton On/Off de la zone pour aller au menu de
configuration des préréglages.
Si vous voulez changer les préréglages de températures d’une autre zone/pièce
que celle actuellement sélectionnée, appuyez brièvement plusieurs fois sur le
bouton de sélection de zone jusqu’à sélectionner la zone souhaitée. (par défaut
dans le coin gauche en bas).
Maintenant, appuyez longuement sur le bouton Zone On/off pour afficher le
menu de configuration des préréglages;
Sélectionnez le préréglage désiré.
Définissez la température pour le chauffage: Si un système de chauffage a été
intégré pour la zone, vous pouvez définir la température cible du chauffage pour
le préréglage sélectionné.
Définissez la température pour la climatisation: Si un système de climatisation a
été intégré pour la zone, vous pouvez définir la température cible de la
climatisation pour le préréglage sélectionné.
Appuyez sur 'OK' ou sur le bouton “page principale” du menu caché pour quitter.
______________
 Loading...