


Gentile Cliente,
nel ringraziarla per l’acquisto del nostro prodotto, la invitiamo a leggere attentamente le seguenti
istruzioni, prima di mettere in funzione l’apparecchio. Solo così si potrà ottenere il funzionamento
ottimale mantenendo inalterate nel tempo le caratteristiche di affidabilità originali. Suggeriamo
inoltre di conservare questo manuale in previsione di eventuali consultazioni future., Le
suggeriamo, inoltre, di conservare l’imballo del televisore. Per qualsiasi problema si ricordi di
annotare il numero di serie del televisore, riportato nel retro dell'apparecchio.
Lo staff di TELE System
ATTENZIONE!
La ricezione e quindi la visione dei canali in digitale terrestre dipende dal livello e dalla qualità
del segnale d’antenna disponibile. Il segnale varia in funzione della zona di residenza, dal
corretto orientamento/funzionamento dell’impianto d’antenna e dalla qualità del segnale
trasmesso dai ripetitori digitali terrestri.
TELE System Electronic Srl comunica, che a seguito di eventuali modifiche software e/o
hardware aventi l’obiettivo di migliorare il prodotto, si potrebbero evidenziare incongruenze
tra il contenuto di questo manuale ed il prodotto in possesso.
Dear Costumer,
We thank you for purchasing a TELE System product. Please, read carefully the following
instructions leaflet before using this television device. In this way you will censure the best
possibile working of the device maintaining its original reliability characteristics unchanged over
time. We advise to keep this manual for the future use of the device. Furthermore, we suggest
you, to keep the television packaging.
Should you have any problems, please remember to note the serial number of the device
indicated on the back of the television.
The TELE System Team
ATTENTION!
Channel reception and therefore with digital terrestrial broadcasting depends on the level and
qualità of the antenna signal available. The signal changes according to the coverage area, to
the proper pointing / functioning of antenna and to the signal transmitted by digital terrestrial
antenna towers.
TELE System Electronic Srl would you like to inform you, in case any software and/or
hardware changes occurs with the purpose of optimizing this product, there might be
differences beetwen the manual contents and the device.

Italiano - 1 -
Indice
Selezione del programma (Programma
precedente o successivo) .......................... 17
Selezione del programma (Accesso Diretto):. 17
Impostazioni iniziali ............................................. 18
Funzionamento generale .................................... 19
Banner con le informazioni ............................. 19
“Guida programmazione elettronica” (Electronic
Programme Guide (EPG)) ................................ 20
Scarico via etere ............................................ 21
Visualizzazione dei sottotitoli .......................... 21
Televideo......................................................... 21
Sistema Menu IDTV ............................................ 21
Lista dei canali ................................................ 21
Navigazione in tutta la lista dei canali .......... 21
Spostamento dei canali sulla lista ................ 22
Cancellazioni dei canali dalla lista ................ 22
Rinominare i canali ...................................... 23
Aggiungere blocchi ai canali ....................... 23
Impostazione dei preferiti ............................ 23
Come aggiungere un canale a un elenco
preferiti ....................................................... 23
Cancellazioni dei canali dall‘elenco preferiti. 24
Uso del tasto BLU per navigare tra i canali
preferiti: ...................................................... 24
Guida a schermo ......................................... 24
Installazione .................................................... 24
Ricerca automatica ..................................... 24
Ricerca manuale ......................................... 25
Cancella elenco servizi (*) .......................... 26
Prima installazione....................................... 26
Configurazione ............................................... 27
Modalità preferiti .......................................... 27
Audio AC3 (Opzionale) (*) .......................... 27
Problemi di udito (*) ..................................... 27
Impostazione lingua..................................... 28
Lingua sistema ............................................ 28
Lingua audio................................................ 28
Lingua sottotitoli .......................................... 28
Impostazione lingua..................................... 28
Impostazioni genitori .................................... 28
Blocco adulti ......................................... 29
Impostazione chiave di blocco (Set Lock
Key) ...................................................... 29
Impostazioni ora .......................................... 29
Aggiornamento ricevitore ............................ 30
Timer ............................................................... 30
Impostazione TV ............................................. 31
Interfaccia comune ......................................... 31
Navigazione nel sistema menu ........................... 32
Mappa menu TV analogica ................................. 33
Sistema menu TV analogica ............................... 34
Menu Suono.................................................... 34
Funzioni ................................................................ 3
Accessori ............................................................. 3
Introduzione .......................................................... 4
Preparazione ........................................................ 4
Misure di sicurezza .............................................. 4
Fonte di alimentazione ...................................... 4
Cavo di alimentazione ....................................... 4
Umidità e acqua ................................................ 4
Pulizia ............................................................... 5
Ventilazione ...................................................... 5
Calore e fiamme ................................................ 5
Fulmini ............................................................... 5
Pezzi di ricambio ............................................... 5
Assistenza ....................................................... 5
Smaltimento rifiuti .............................................. 5
Informazioni per gli utenti nei paesi dell’Unione
Europea ............................................................ 5
Scollegamento del dispositivo ........................... 6
Volume cuffie.................................................... 6
Installazione ...................................................... 6
Schermo LCD.................................................... 6
Avvertenza ....................................................... 6
Panoramica del telecomando ................................ 7
TV LCD e tasti funzione........................................ 8
Visualizzazione delle connessioni ........................ 9
Collegamento alimentazione................................ 11
Collegamento antenna ........................................ 11
Collegamento di un lettore DVD .......................... 12
Uso di altri connettori .......................................... 13
Collegamento di altri dispositivi via Scart ............ 14
Inserimento delle batterie nel telecomando ......... 15
Gamma di funzionamento del telecomando ......... 15
Accensione/spegnimento della TV ..................... 16
Per accendere l’apparecchio TV: ................... 16
Per spegnere la TV ......................................... 16
Scelta ingresso .................................................. 16
Operazioni di base ............................................. 17
Funzionamento con i tasti della TV ................. 17
Impostazione volume ................................... 17
Selezione programma ................................. 17
Accesso al menu principale ........................ 17
Modalità AV ................................................. 17
Funzionamento con telecomando................ 17
Impostazione volume ................................... 17

Italiano - 2 -
Volume ........................................................ 34
Bilanciamento .............................................. 34
Modalità suono ............................................ 34
AVL ............................................................. 34
Effetto ......................................................... 34
Equalizzatore .............................................. 34
Volume cuffia .............................................. 34
Memorizza .................................................. 34
Menu Imagine .................................................. 35
Modalità immagine ....................................... 35
Luminosità/contrasto/colore/nitidezza/tinta . 35
Temp colore................................................. 35
Illuminazione ambiente................................. 35
Zoom immagine ........................................... 35
Memorizza .................................................. 35
Menu Funzioni................................................. 35
Timer riposo ................................................ 35
Lingua ......................................................... 36
Chiave bambino........................................... 36
Colore Menu ................................................ 36
Mod favoriti ................................................. 36
Menu installazione .......................................... 36
Programmazione ......................................... 36
Programma............................................ 36
Banda ................................................... 36
Canale................................................... 36
Standard ............................................... 36
Sistema colore ...................................... 36
Ricerca ................................................. 37
Modalità VCR ........................................ 37
Decoder ................................................ 37
Memorizza ............................................ 37
A.P.S. .................................................... 37
A.P.S.: ................................................... 37
A.P.S. Paese ............................................... 37
Regione televideo........................................ 38
Menu installazione in modalità AV ................ 38
Programmazione ................................... 38
Sistema colore ...................................... 38
Tabella programmi ....................................... 38
Nome .................................................... 38
Sposta................................................... 38
Cancella ...................................................... 39
APS ...................................................... 39
Modalità preferiti ................................... 39
Blocco Programma ................................ 39
Inserimento PIN ..................................... 39
Modifica PIN .......................................... 39
Visualizzazione delle informazioni TV ................ 39
Funzione muto .................................................... 40
Preferenze personali .......................................... 40
Modalità zoom ..................................................... 40
Auto ............................................................ 40
4:3 ............................................................... 40
16:9 ............................................................. 40
Cinema ........................................................ 40
Sottotitolo .................................................... 40
Televideo ............................................................ 41
Suggerimenti ....................................................... 41
Pulizia dello schermo ...................................... 41
Persistenza dell’immagine ............................... 41
Nessuna accensione ...................................... 41
Immagine di scarsa qualità .............................. 42
Nessuna immagine.......................................... 42
Suono ............................................................. 42
Telecomando................................................... 42
Fonti ingresso ................................................. 42
Modulo CI ........................................................ 42
Specifiche ........................................................... 43
Specifiche Pin ..................................................... 44

Italiano - 3 -
Funzioni
• Televisore a colori con telecomando.
• TV digitale pienamente integrata (DVB-T).
• Possono essere preimpostati 100 programmi
da VHF, bande UHF o canali via cavo.
• Può sintonizzare i canali via cavo.
• Il controllo dell’apparecchio TV è molto facile
con il sistema guidato dal menu.
• Ha una presa scart per i dispositivi esterni
(come video, video giochi, dotazione audio,
ecc).
• Sistema audio stereo (tedesco+Nicam).
• Funzione televideo completa.
• Testo rapido (10 pagine), testo superiore.
• Canale Preferito.
• Blocco canale.
• Collegamento cuffia.
• APS “Sistema Programmazione Automatica”
(Automatic Programming System).
• Tutti i programmi possono avere un nome.
• Sintonizzazione automatica avanti e indietro.
• Timer spegnimento.
• Blocco bambini.
• Audio automatico in modalità muto quando
non c’è trasmissione.
• Riproduzione NTSC.
• Disponibile ingresso AV.
• Ha XQ connettori HDMI per video ed audio
digitali. Questo collegamento è progettato
anche per accettare i segnali ad alta
definizione.
• AVL“limitazione automatica del volume”
(automatic volume limiting).
• Quando non si trova alcun segnale valido,
dopo 5 minuti la TV passa automaticamente
alla modalità stand-by.
• PLL (ricerca frequenza).
Accessori
ABC DE F GHI
JKL MNO PQR
STU VWX YZ
1 2 3
4 5 6
7 8 9
0
AV
SOURCE EXIT
-/--
INFO
I-II
MENU TV/DTV
P/CH
OK
WIDE GUIDE
PP P<P/SWAP
Tel eco mand o
Batterie
2 X AAA
Manuale di istruzioni
Italiano - 4 -
Introduzione
Grazie per aver scelto questo
prodotto Questo manuale intende
essere una guida per il corretto
funzionamento della TV. Prima di
far funzionare la TV si prega di
leggerlo completamente.
Tenere questo manuale in un luogo sicuro
per futuro riferimento.
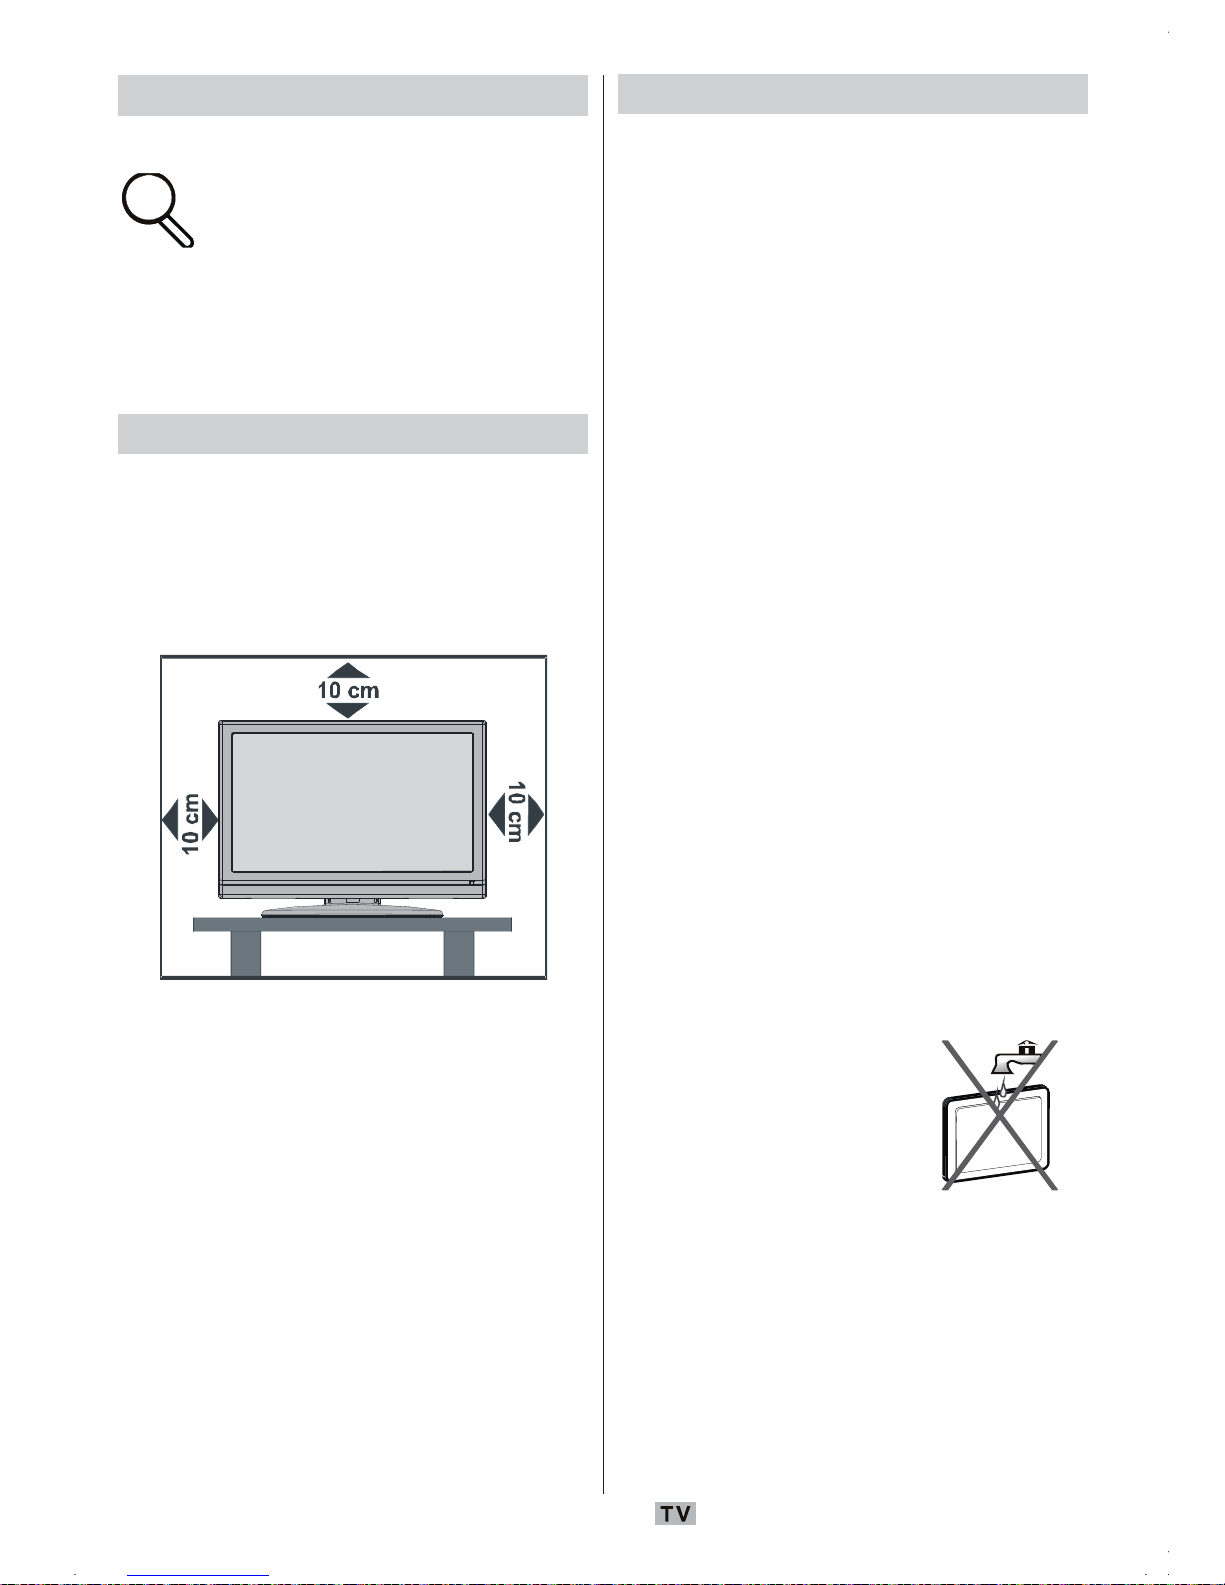
Preparazione
Per la ventilazione, lasciare uno spazio di
almeno 10 cm tutto attorno all’apparecchio.
Per evitare danni e situazioni di pericolo, non
mettere alcun oggetto sull’apparecchio.
Usare l’apparecchio in climi temperati.
Misure di sicurezza
Leggere attentamente le seguenti
precauzioni di sicurezza.
Fonte di alimentazione
La TV deve essere usata solo con una presa
da 220-240 V AC, 50 Hz. Assicurarsi di
selezionare l’impostazione di voltaggio
corretta.
Cavo di alimentazione
Non mettere l’apparecchio, un mobile, ecc.,
sul cavo di alimentazione (il cavo di rete), nè
schiacciare il cavo. Maneggiare il cavo di
alimentazione dalla presa. Non staccare la
presa tirando il cavo e non toccare mai il cavo
di alimentazione con le mani bagnate, perché
questo potrebbe provocare un corto circuito o
shock elettrico. Non fare mai un nodo nel cavo
né legarlo con altri cavi. Il cavo di
alimentazione deve essere instradato in
modo tale da non essere calpestato. Un cavo
di alimentazione danneggiato può causare
incendio o provocare uno shock elettrico.
Quando è danneggiato e deve essere
sostituito, questo va fatto da personale
qualificato.
Umidità e acqua
Non usare questo
dispositivo in luoghi umidi
e bagnati (evitare la stanza
da bagno, il lavello nella
cucina, e le vicinanze della
lavatrice). Non esporre
questo dispositivo alla pioggia o all’acqua,
perché ciò può essere pericoloso e non
posare oggetti pieni di liquido, come vasi di
fiori, su di esso. Evitare spruzzi e gocce
d’acqua
Se un qualunque oggetto solido o liquido cade
nel mobile, staccare la TV e farla controllare

Italiano - 5 -
da personale qualificato prima di farla
funzionare ulteriormente.
Pulizia
Prima di pulire, staccare la
TV dalla presa a parete. Non
usare detergenti liquidi o
aerosol. Usare un panno
morbido e asciutto.
Ventilazione
Le fessure e le aperture sulla TV sono
destinate alla ventilazione e ad assicurare un
funzionamento affidabile. Per evitare il
surriscaldamento, queste aperture non
devono essere bloccate o coperte in alcun
modo.
Calore e fiamme
L’apparecchio non deve
essere messo accanto a
fiamme libere o fonti di calore
intenso, come una stufa
elettrica. Assicurarsi che
nessuna fonte di fiamma viva, come candele
accese, sia posta sulla TV. Le batterie non
devono essere esposte a calore eccessivo,
come luce solare, fuoco o simili.
Fulmini
In caso di temporali e fulmini
o quando si va in vacanza,
scollegare il cavo di
alimentazione dalla presa di
corrente a parete.
Pezzi di ricambio
Quando sono richiesti dei pezzi di ricambio,
assicurarsi che il tecnico del servizio abbia
usato i pezzi di ricambio che sono specificati
dal produttore o abbiano le stesse
specificazioni dell’originale. Le sostituzioni
non autorizzate possono causare incendi,
shock elettrico, o altri rischi.
Assistenza
Per l’assistenza, rivolgersi a
personale specializzato.
Non togliere da soli il
coperchio perché questo
può avere come
conseguenza shock
elettrico.
Smaltimento rifiuti
Istruzioni per lo smaltimento dei rifiuti
• La confezione e i materiali di imballaggio
sono riciclabili e devono essere riciclati. I
materiali di imballaggio, come la pellicola
di rivestimento, devono essere tenuti fuori
dalla portata dei bambini.
• Le batterie, comprese quelle senza metalli
pesanti, non devono essere smaltite con i
rifiuti domestici. Smaltire le batterie usate in
modo rispettoso dell’ambiente. Cercare le
normative che si applicano alla propria zona.
• La lampadina fluorescente a catodo freddo
del PANNELLO LCD contiene una piccola
quantità di mercurio; seguire le ordinanze e
i regolamenti locali per lo smaltimento.
Informazioni per gli utenti nei paesi
dell’Unione Europea
Questo simbolo sul prodotto o
sulla confezione significa che
l’apparecchio elettrico o
elettronico deve essere smaltito,
alla fine del ciclo di esercizio,
separatamente dai rifiuti
domestici. Nella UE ci sono sistemi di raccolta
separati per il riciclo.
Per maggiori informazioni contattare le
autorità locali o il rivenditore presso cui è stato
acquistato il prodotto.

Italiano - 6 -
Scollegamento del dispositivo
La spina di rete si usa per scollegare la TV
dalla rete elettrica e deve quindi rimanere
facilmente raggiungibile.
Volume cuffie
La pressione audio in eccesso da
auricolari e cuffie può causare
perdita dell’udito.
Installazione
Per prevenire danni fisici, quando si monta a
parete (se l’opzione è disponibile) questo
dispositivo deve essere saldamente fissato
alla parete stessa secondo le istruzioni di
installazione.
Schermo LCD
Il pannello LCD è un prodotto di alta tecnologia
con circa un milione di transistor a pellicola
sottile che forniscono precisi dettagli
dell’immagine. Di tanto in tanto, alcuni pixel
non attivi possono comparire sullo schermo
sotto forma di punti fissi blu, verdi o gialli.
Notare che questo non ha conseguenze sul
funzionamento del prodotto.
Avvertenza
Non lasciare la TV in standby o in funzione
quando si esce da casa.
Italiano - 7 -
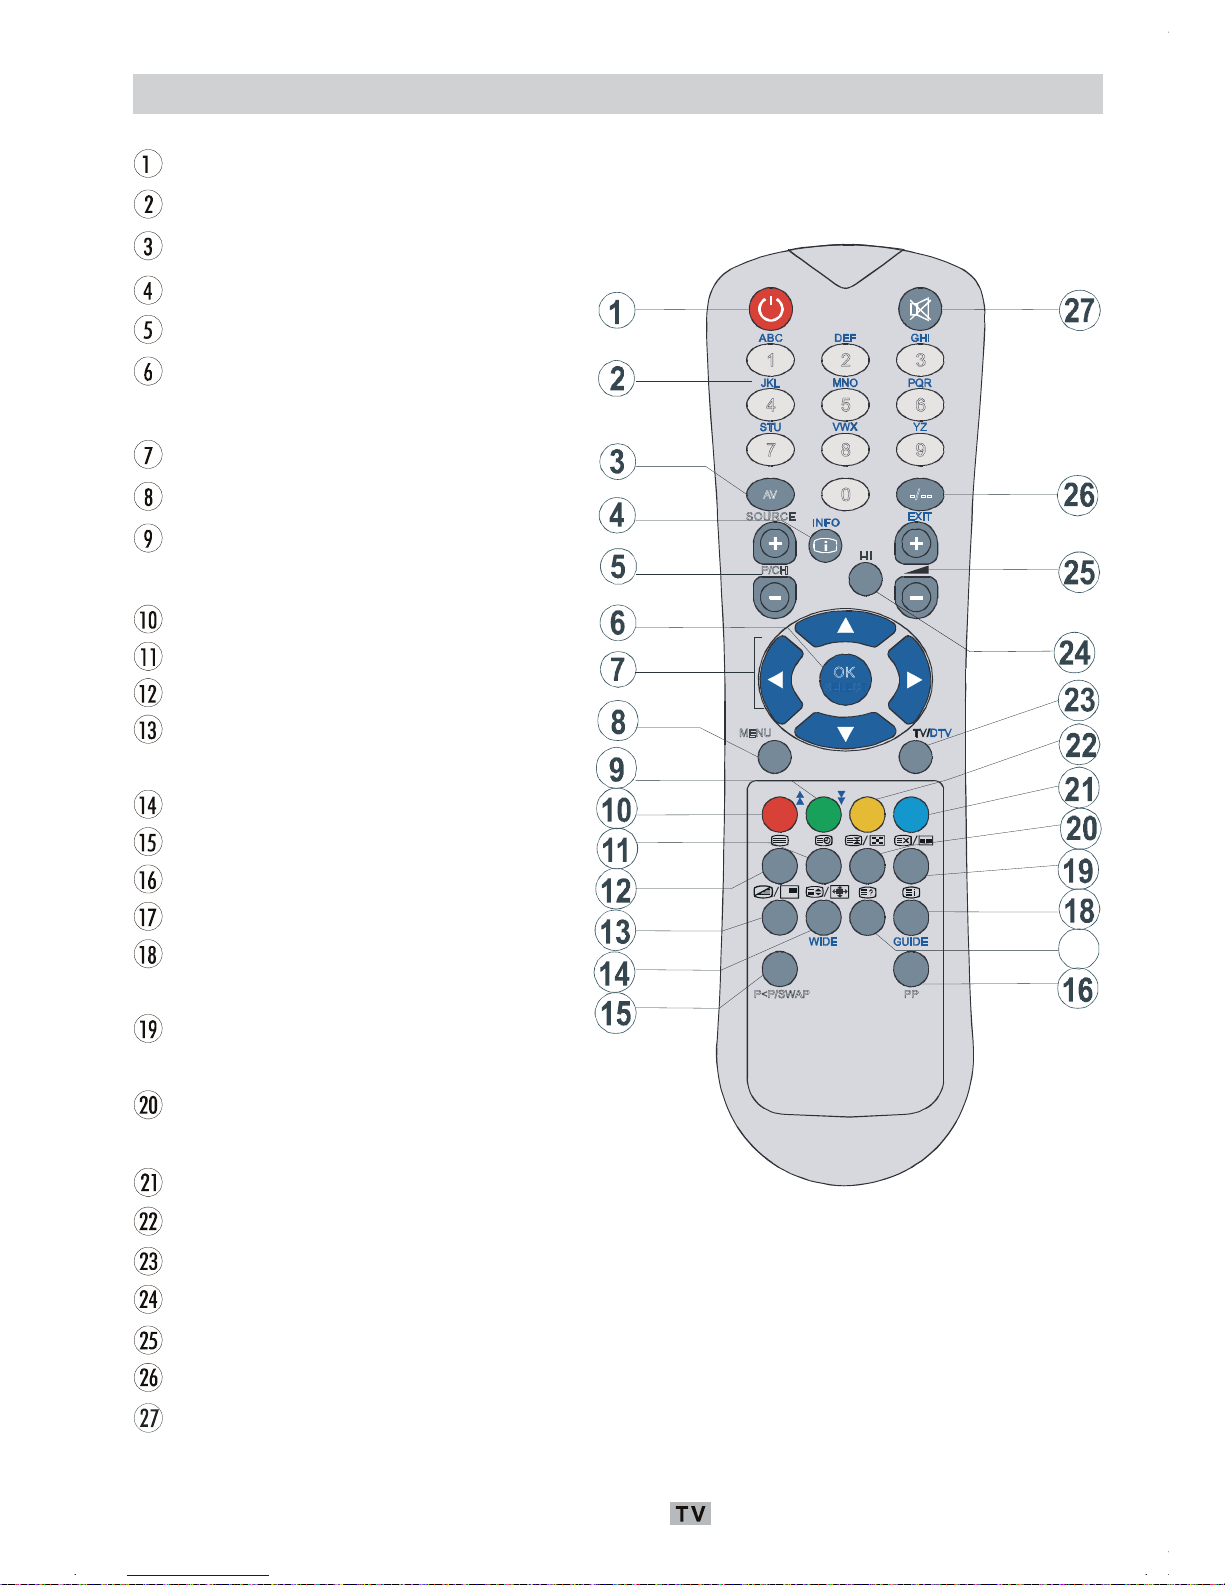
Panoramica del telecomando
* Questa funzione è disponibile solo per modelli digitali.
Standby
Programma diretto
Fonte esterna
Info (tabella programmi)
Programma precedente/successivo
Ok (memorizza)/Seleziona/
Blocca immagine
Tasti cursore
Menu
Tasto verde = immagine/Pagina giù/
Sottotitoli On/Off in modalità digitale
Tasto rosso = audio/Pagina su
Ora
Televideo
Mix (in modalità Televideo) /
Nessuna funzione
Dimensione immagine / espandi
Programma precedente
Preferenze personali
Rivela
Pagina indice/
Guida elettronica ai programmi
Aggiorna (in modalità Televideo) /
Nessuna funzione
Fermo (in modalità Televideo) /
Nessuna funzione
Blu/Installa
Giallo/Funzioni/Lingua audio On/Off in DTV
TV / TV Digitale
Mono-stereo/ Dual I-II
Volume su/giù
Doppia cifra
Muto
ABC DEF GHI
JKL MNO PQR
STU VWX YZ
1 2 3
4
5
6
7 8 9
0
AV
SOURCE
EXIT
-/--
INFO
I-II
MENU TV/DTV
P/CH
OK
WIDE GUIDE
PP P<P/SWAP
17
Italiano - 8 -
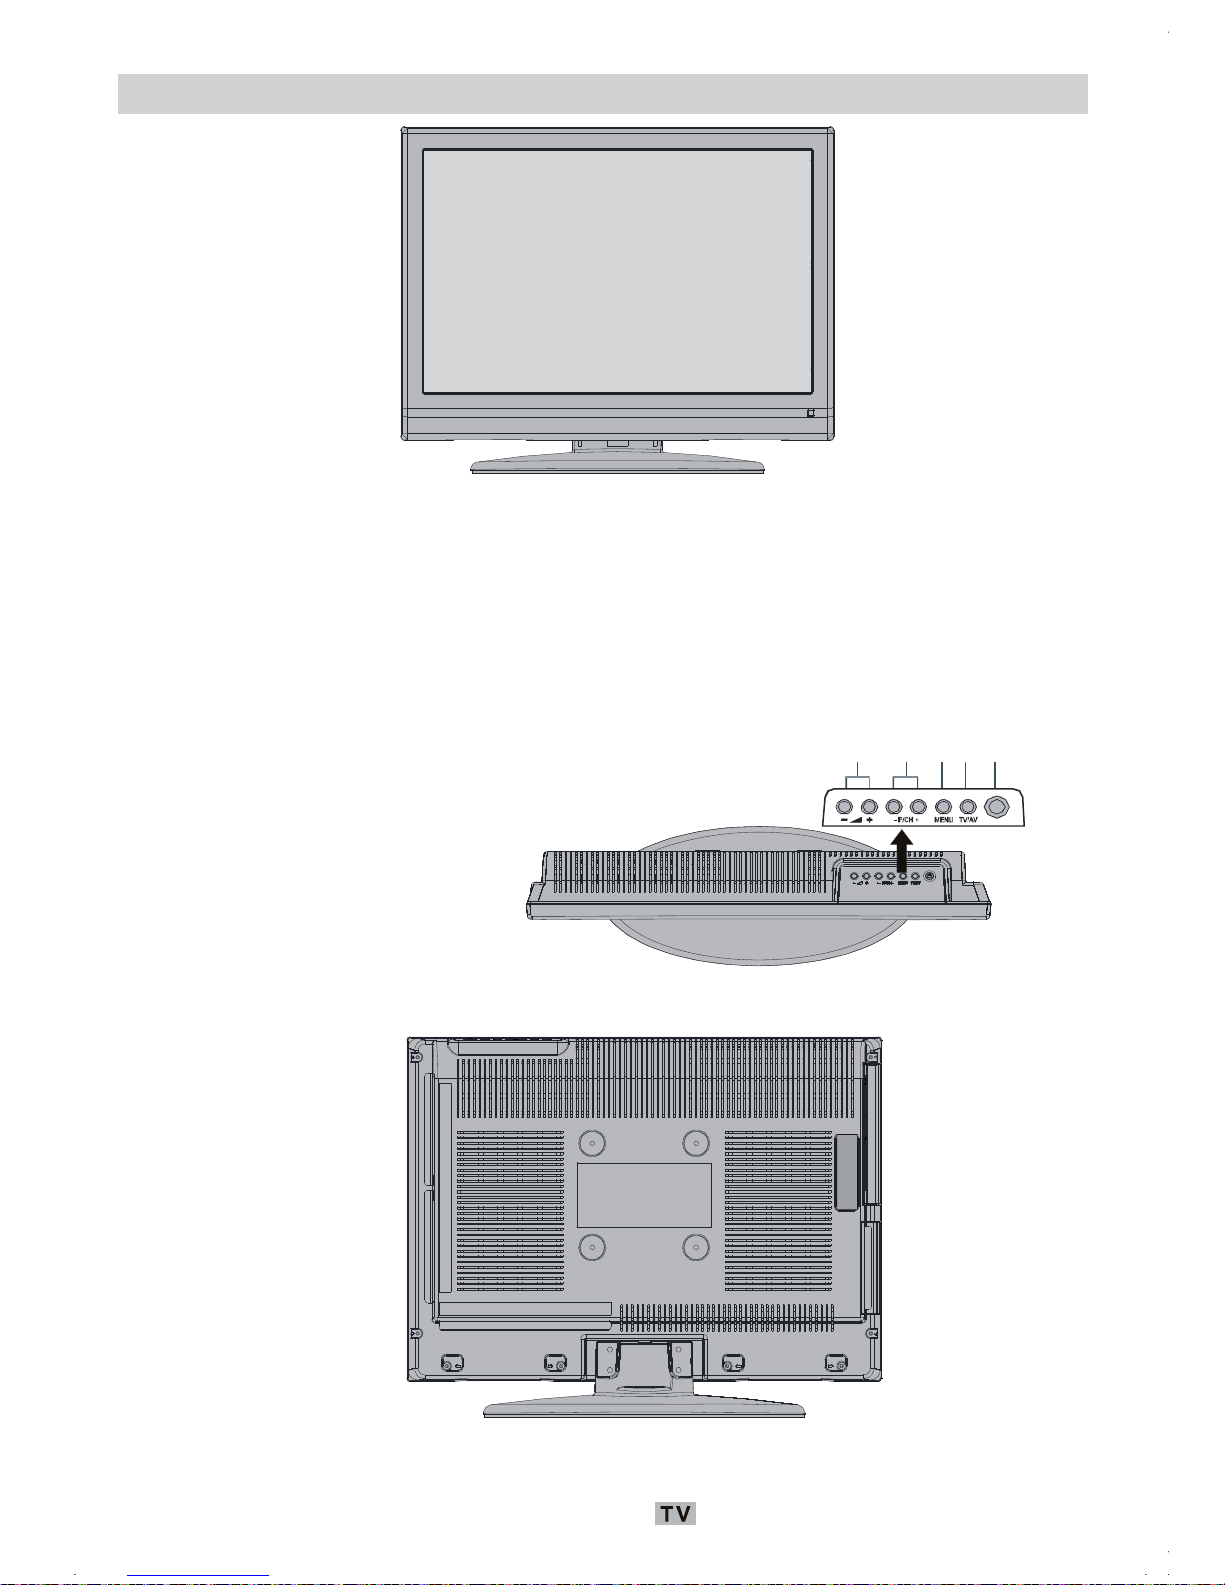
TV LCD e tasti funzione
VISUALIZZAZIONE ANTERIORE
VISUALIZZAZIONE POSTERIORE
VISUALIZZAZIONE DALL’ALTO
Volume più alto/più basso
MENU
Accensione / spegnimento
Pro
g
rammaprecedente/successivo
TV / AV
Italiano - 9 -
Visualizzazione delle connessioni
Gli “Ingressi HDMI” servono a collegare un dispositivo dotato di presa HDMI.
Il televisore LCD è in grado di visualizzare le immagini ad alta definizione da dispositivi come
ricevitore
satellitare ad alta definizione o lettore DVD. Questi dispositivi devono essere collegati
tramite la presa HDMI o la presa componente.
Queste prese possono accettare sia i segnali 720p che 1080i. Nessun collegamento audio è
necessario per HDMI alla connessione HDMI. Se si usa un cavo HDMI a DVI, usare l’ingresso
audio PC per attivare la connessione audio.
Le “Uscite linea audio” inviano i segnali audio ad un dispositivo esterno come a un sistema
audio opzionale.
Per collegare gli altoparlanti esterni alla TV, usare le “USCITE LINEA AUDIO” della TV con un
cavo au
dio.
La presa “Cuffia” si usa per collegare una cuffia esterna al sistema.
Collegare la presa “CUFFIA” per ascoltare l’audio della TV dalle cuffie (opzionale)
“Ingressi audio” si usano per collegare i segnali audio dei dispostivi esterni.
Collegare il cavo audio tra “INGRESSI AUDIO” della TV e “USCITA AUDIO” del dispositivo.
L’ “Ingresso video” si usa per collegare i segnali video dei dispostivi esterni.
Collegare il cavo video tra la presa “INGRESSO VIDEO” della TV e quella “USCITA VIDEO”
del disp
ositivo.
VISUALIZZAZIONE POSTERIORE

Italiano - 10 -
Ingressi audio PC: Collegare il cavo audio tra “INGRESSI AUDIO PC” della TV e “USCITAA
AUDIO” del PC.
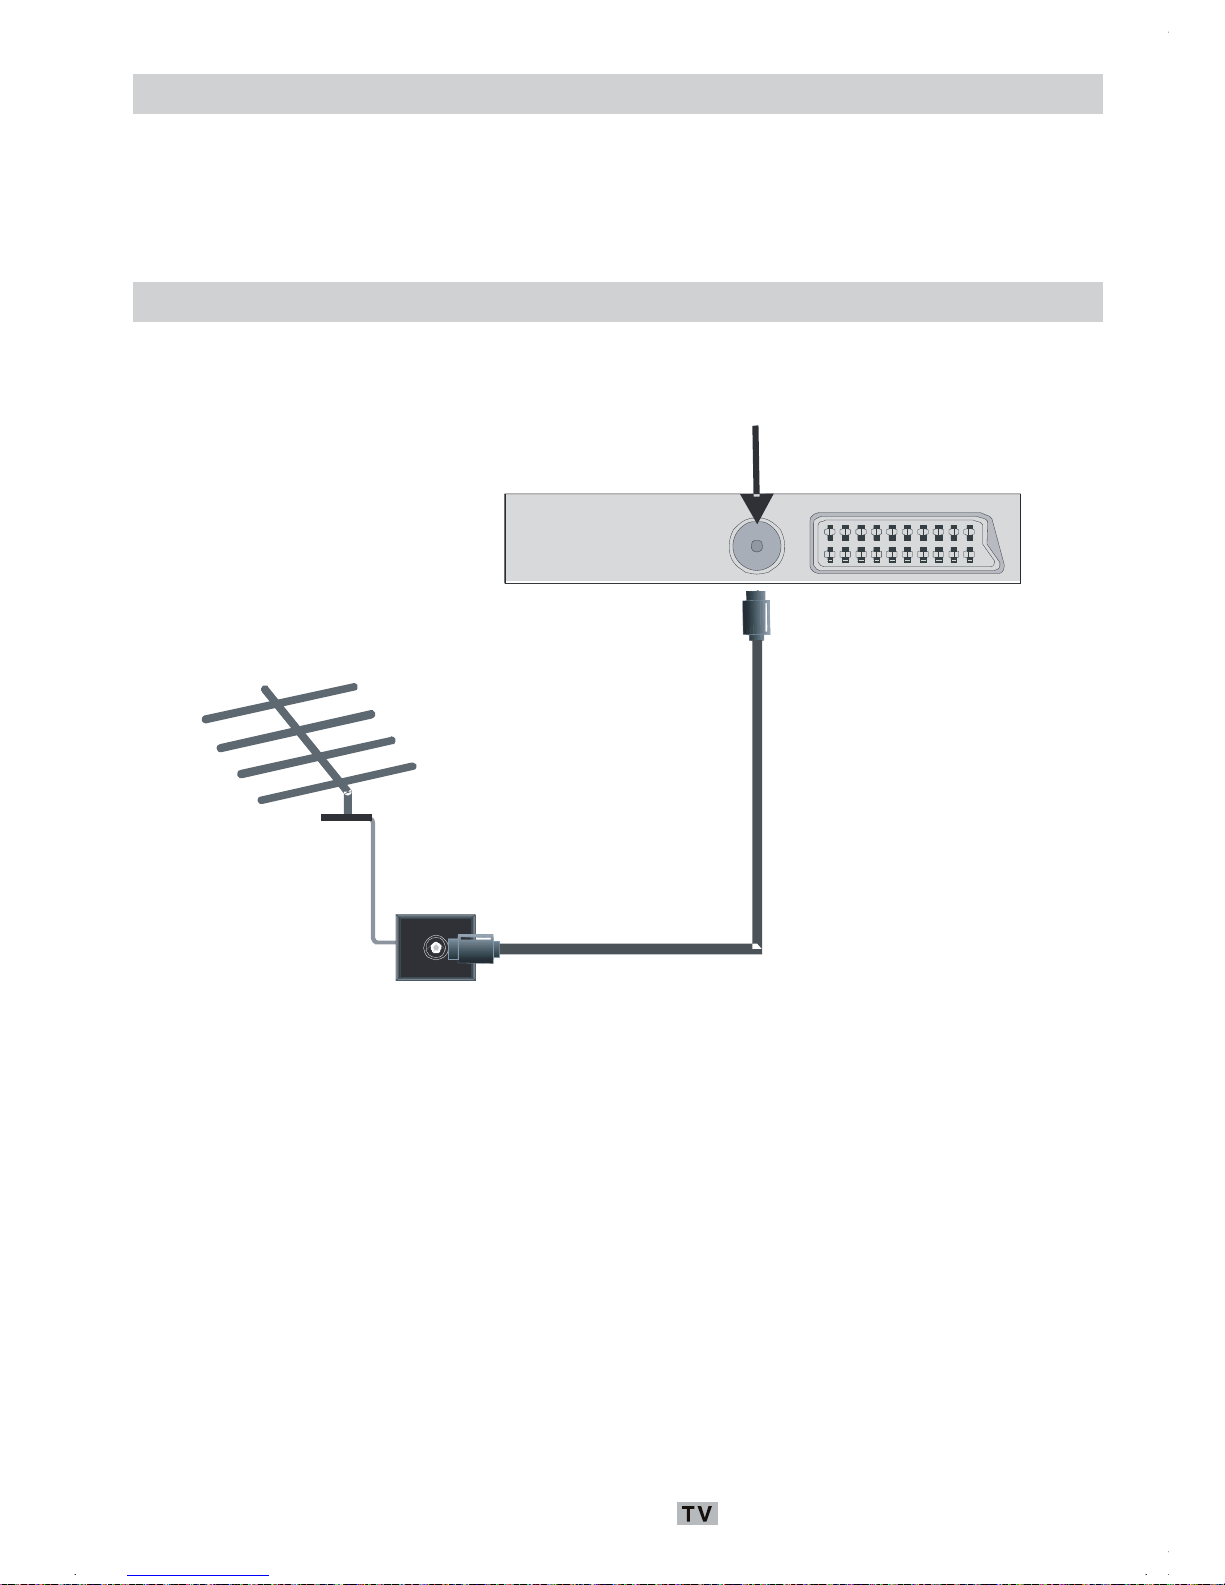
“Ingresso RF” collega a una antenna o a un cavo.
Notare che se si usa un decoder o un registratore di media, bisogna collegare il cavo antenna
attra
verso il dispositivo alla televisione con un cavo antenna appropriato come mostra
l’illustrazione sotto.
Ingressi o uscite SCART per dispositivi esterni.
Collegare il cavo SCART tra le prese SCART della TV e la presa SCART del dispositivo
esterno (co
me decoder, VCR o lettore DVD).
Nota: Se un dispositivo esterno viene collegato tramite la presa SCART, la TV passerà
au
tomaticam
ente alla modalità AV.
Alloggiamento per il modulo CI (interfaccia comune)
L’alloggiamento per il modulo CI serve per inserire una scheda CI. La scheda CI permette
all’utente
di vedere tutti i canali inclusi nell’abbonamento. Per maggiori informazioni vedere la
sezione “Interfaccia comune”.
Italiano - 11 -
Collegamento alimentazione
• DopIMPORTANTE: L’apparecchio TV è progettato per funzionare su 220-240V AC, 50 Hz.
• Dopo aver tolto l’imballaggio, fare in modo che l’apparecchio TV raggiunga la temperatura
ambiente prima di collegarlo all’alimentazione principale.
• Inserire il cavo di alimentazione alla presa della rete elettrica.
Collegamento antenna
• Per collegare l’antenna, inserire nella presa “INGRESSO ANTENNA” sul retro della TV.
Ingresso antenna
Italiano - 12 -
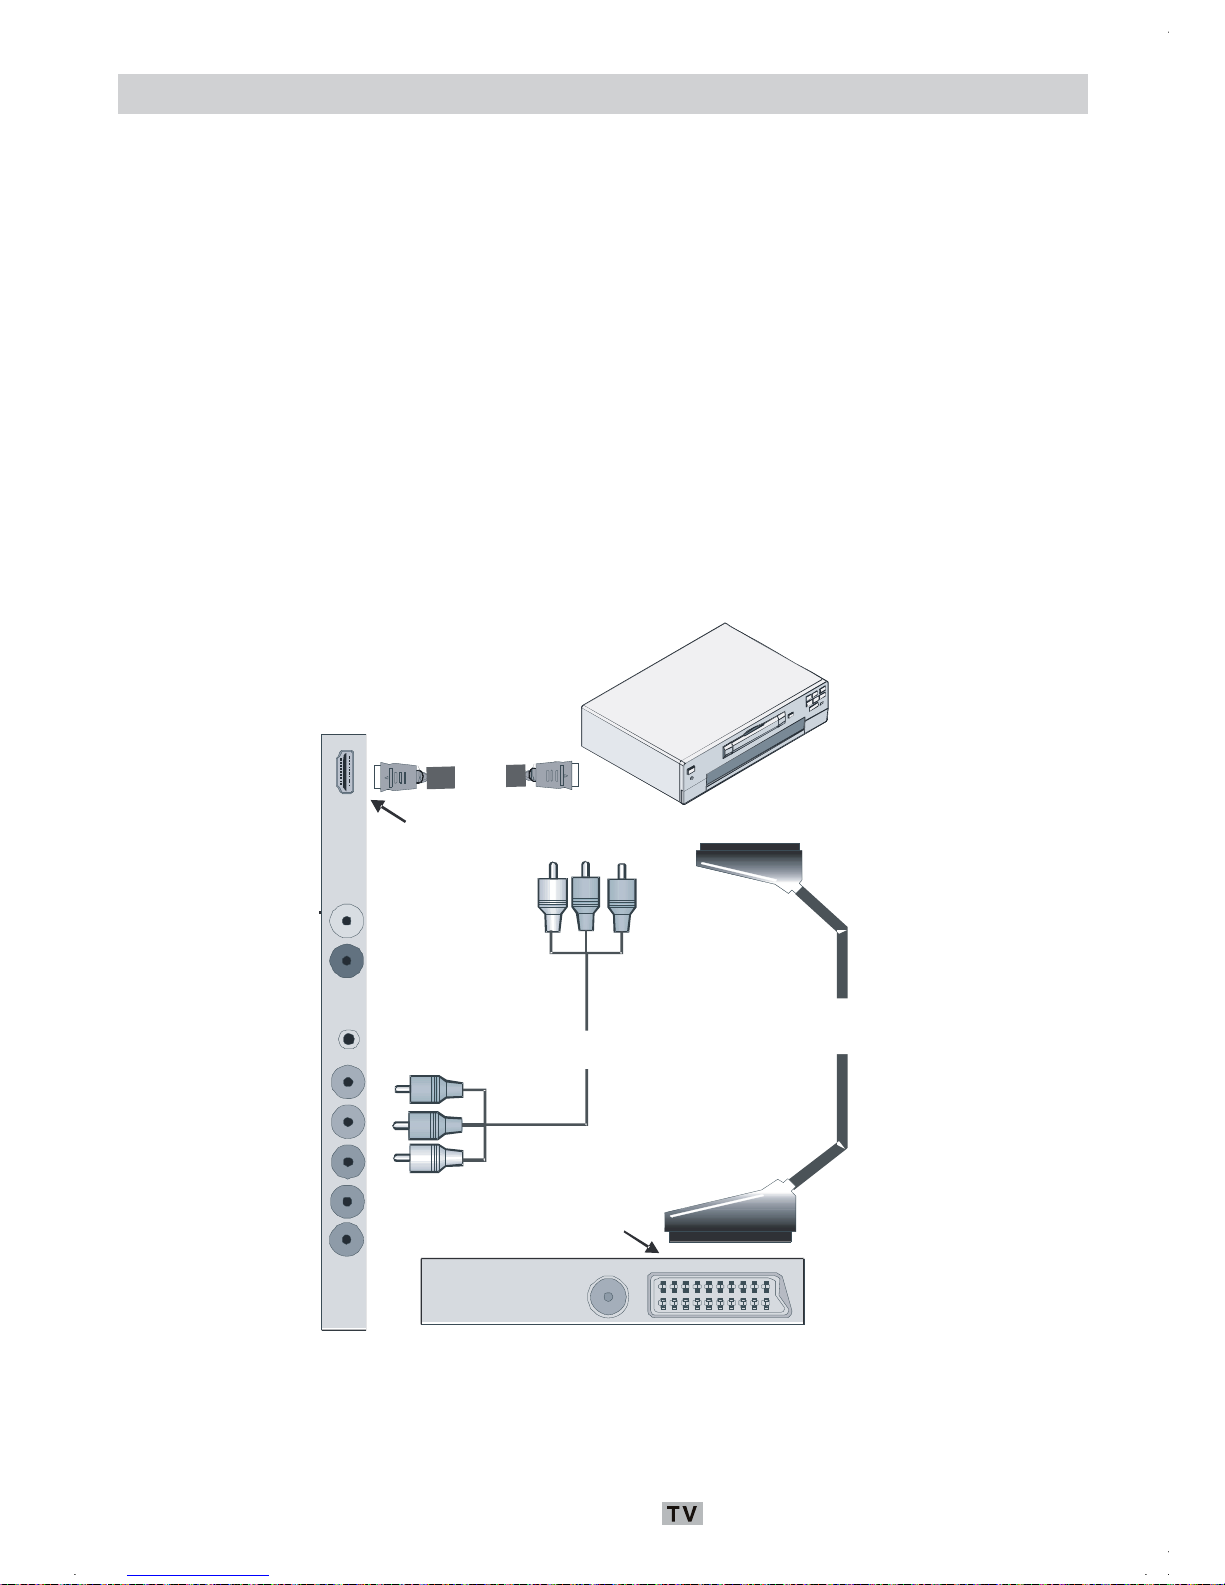
Collegamento di un lettore DVD
Se si desidera collegare un lettore DVD alla TV LCD, è possibile usare i connettori della TV.
I lettori DVD possono avere diversi connettori. Per maggiori informazioni vedere il manuale di
istruzioni del DVD. Spegnere sia la TV che il dispositivo prima di effettuare qualsiasi
connessione.
Nota: I cavi mostrati nella figura non sono in dotazione.
• Se il lettore DVD ha una presa HDMI, è possibile collegarlo tramite HDMI. Quando ci si
collega
al lettore DVD come illustrato sotto, passare alla fonte HDMI. Vedere la sezione
“Scelta ingresso”.
• La maggior parte dei lettori DVD sono collegati tramite le PRESE RCA. Usare un cavo video
RCA per
collegare l’ingresso video. Per attivare l’audio, usare un cavo audio componente
come illustrato sotto. Alla fine, passare alla fonte EXT2. Vedere la sezione “Scelta ingresso”.
• È anche possibile fare il collegamento attraverso SCART. Usare un cavo SCART come
most
rato.
Cavo
HDMI
Ingressi
HDMI
Cavo
RCA
Cavo
SCART
Prese SCART
Nota: Questi tre metodi di connessione svolgono la stessa funzione, ma permettono di ottenere
livelli di qualità diversi. Non è necessario effettuare il collegamento usando tutti e tre i
metodi.
Italiano - 13 -
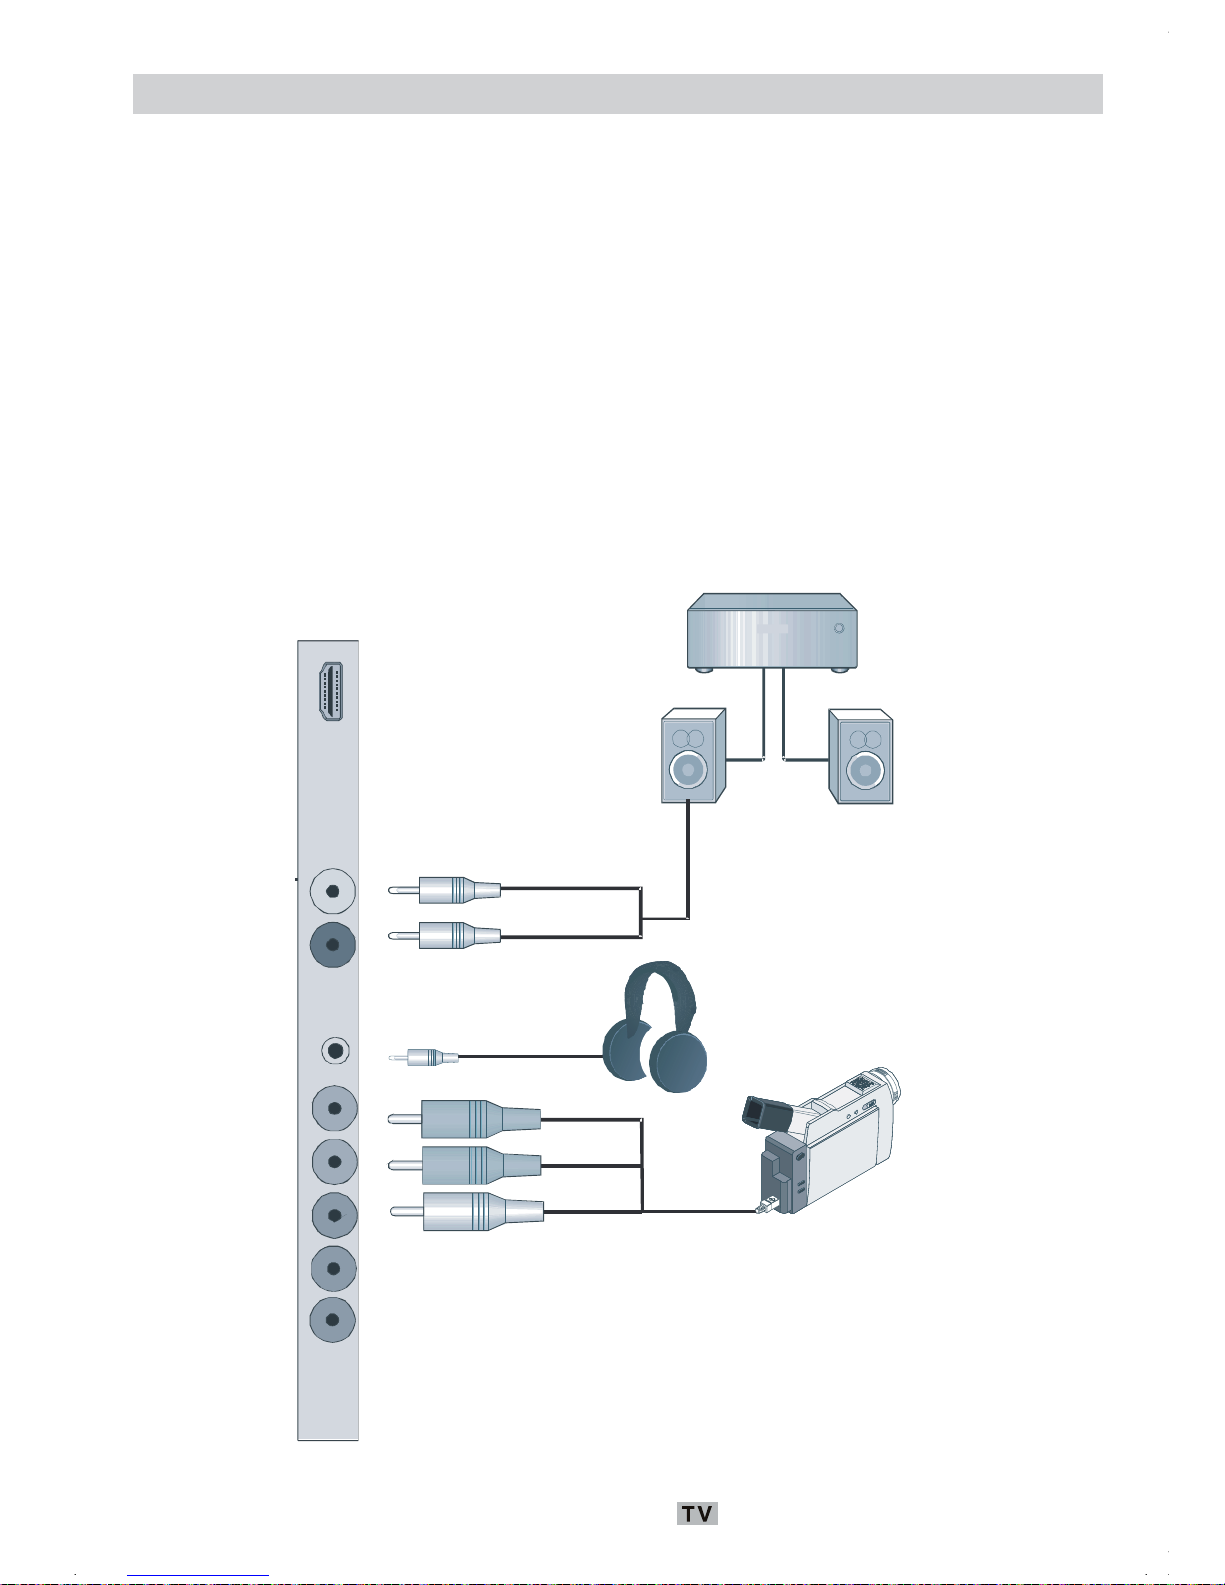
Uso di altri connettori
La TV LCD può essere collegata una serie di dispositivi opzionali. Le connessioni possibili
sono mostrate sotto. Notare che i cavi mostrati nella figura non sono in dotazione.
• Per collegare una videocamera, collegare la presa “INGRESSO VIDEO” e le “PRESE AUDIO”.
Non collegare la videocamera alla presa “INGRESSO VIDEO” contemporaneamente perché
questo può causare disturbi nell’immagine. Per scegliere la fonte relativa, vedere la sezione
“Scelta ingresso” nelle parti che seguono.
• Per collegare gli altoparlanti esterni, usare un cavo audio. Non invertire le prese “AUDIO
SINISTRO” e
“AUDIO DESTRO” Accendere la TV LCD e l’altoparlante esterno dopo aver
effettuato
tutte le connessioni. Per ulteriori informazioni vedere il manuale dell’altoparlante.
• Per ascoltare il suono dalle cuffie, collegare alla presa “CUFFIA” della TV.
Videocamera
Altoparlanti esterni
Cuffie
Italiano - 14 -
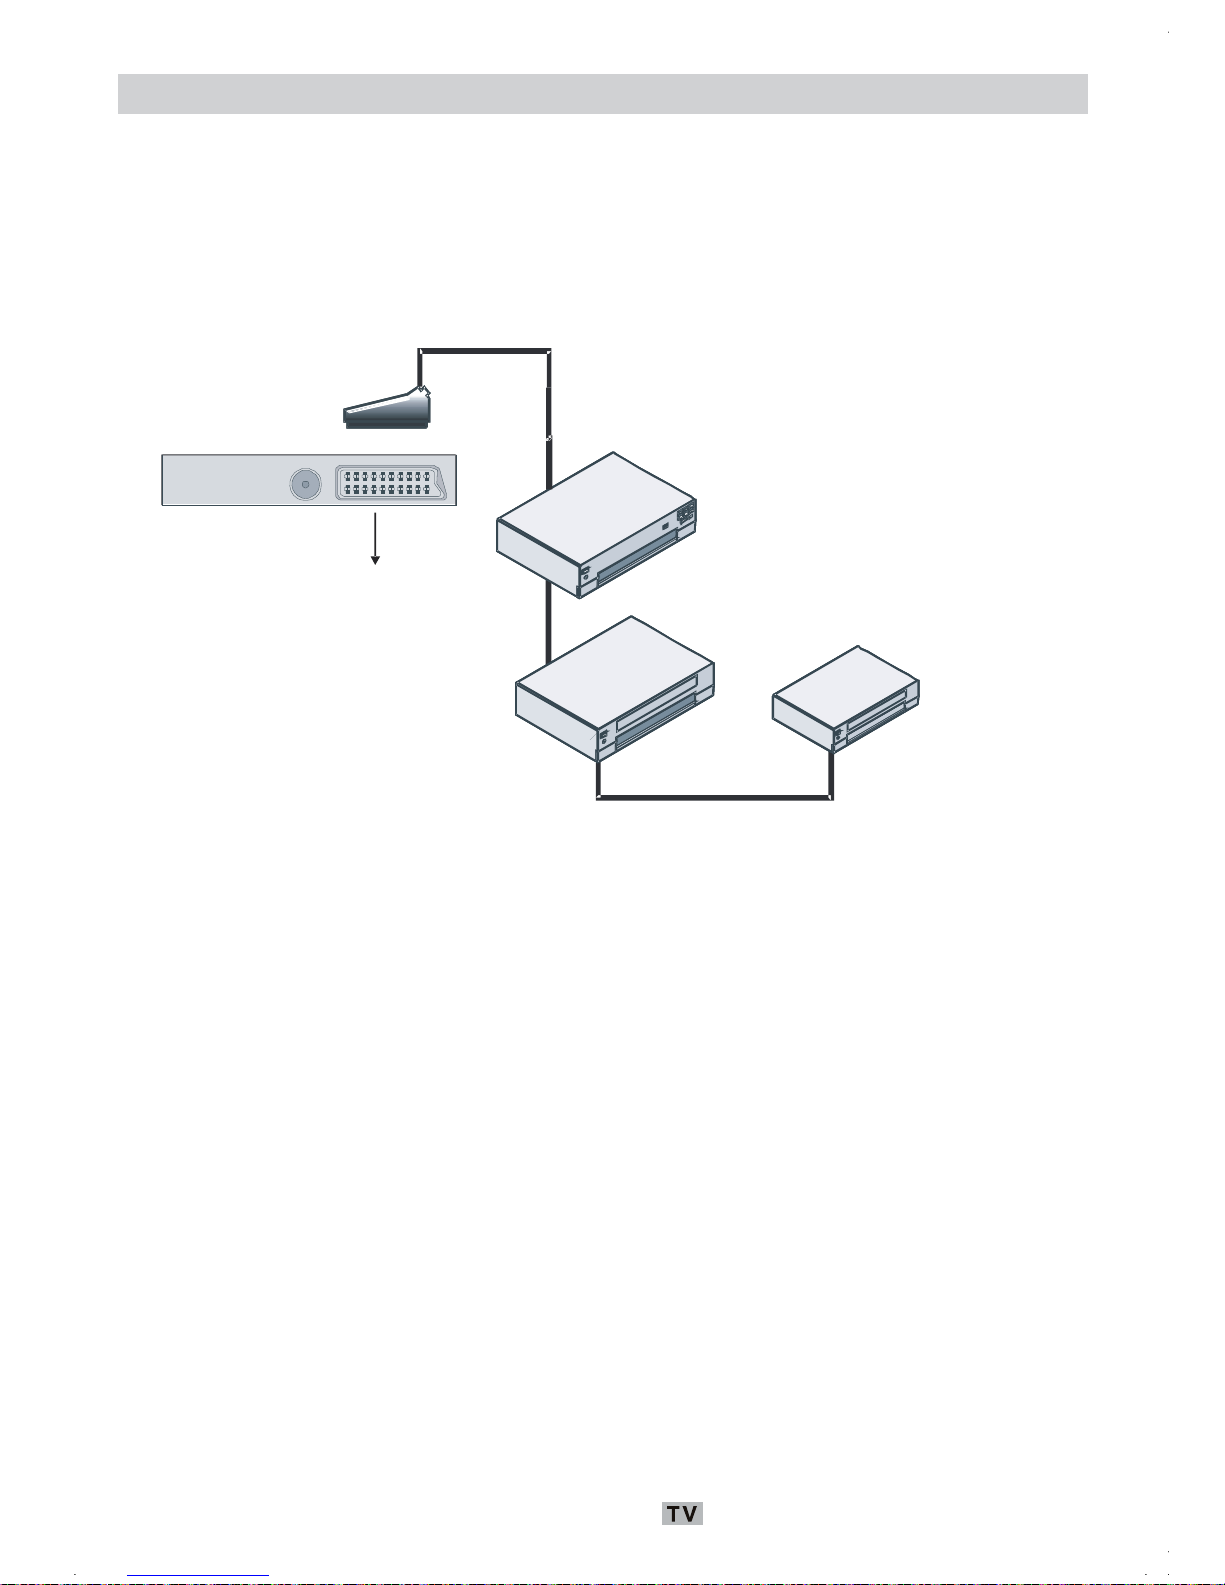
Collegamento di altri dispositivi via Scart
La maggior parte dei dispositivi supporta la connessione SCART. Usando la presa SCART è
possibile collegare alla TV LCD un registratore DVD, un VCR o un decoder. Notare che i cavi
mostrati ne
lla figura non sono in dotazione.
• Spegnere sia la TV che i dispositivi prima di effettuare qualsiasi connessione.
• Per maggiori informazioni vedere il manuale di istruzioni del dispositivo.
Registratore DVD
VCR
Decoder
presa scart
Italiano - 15 -
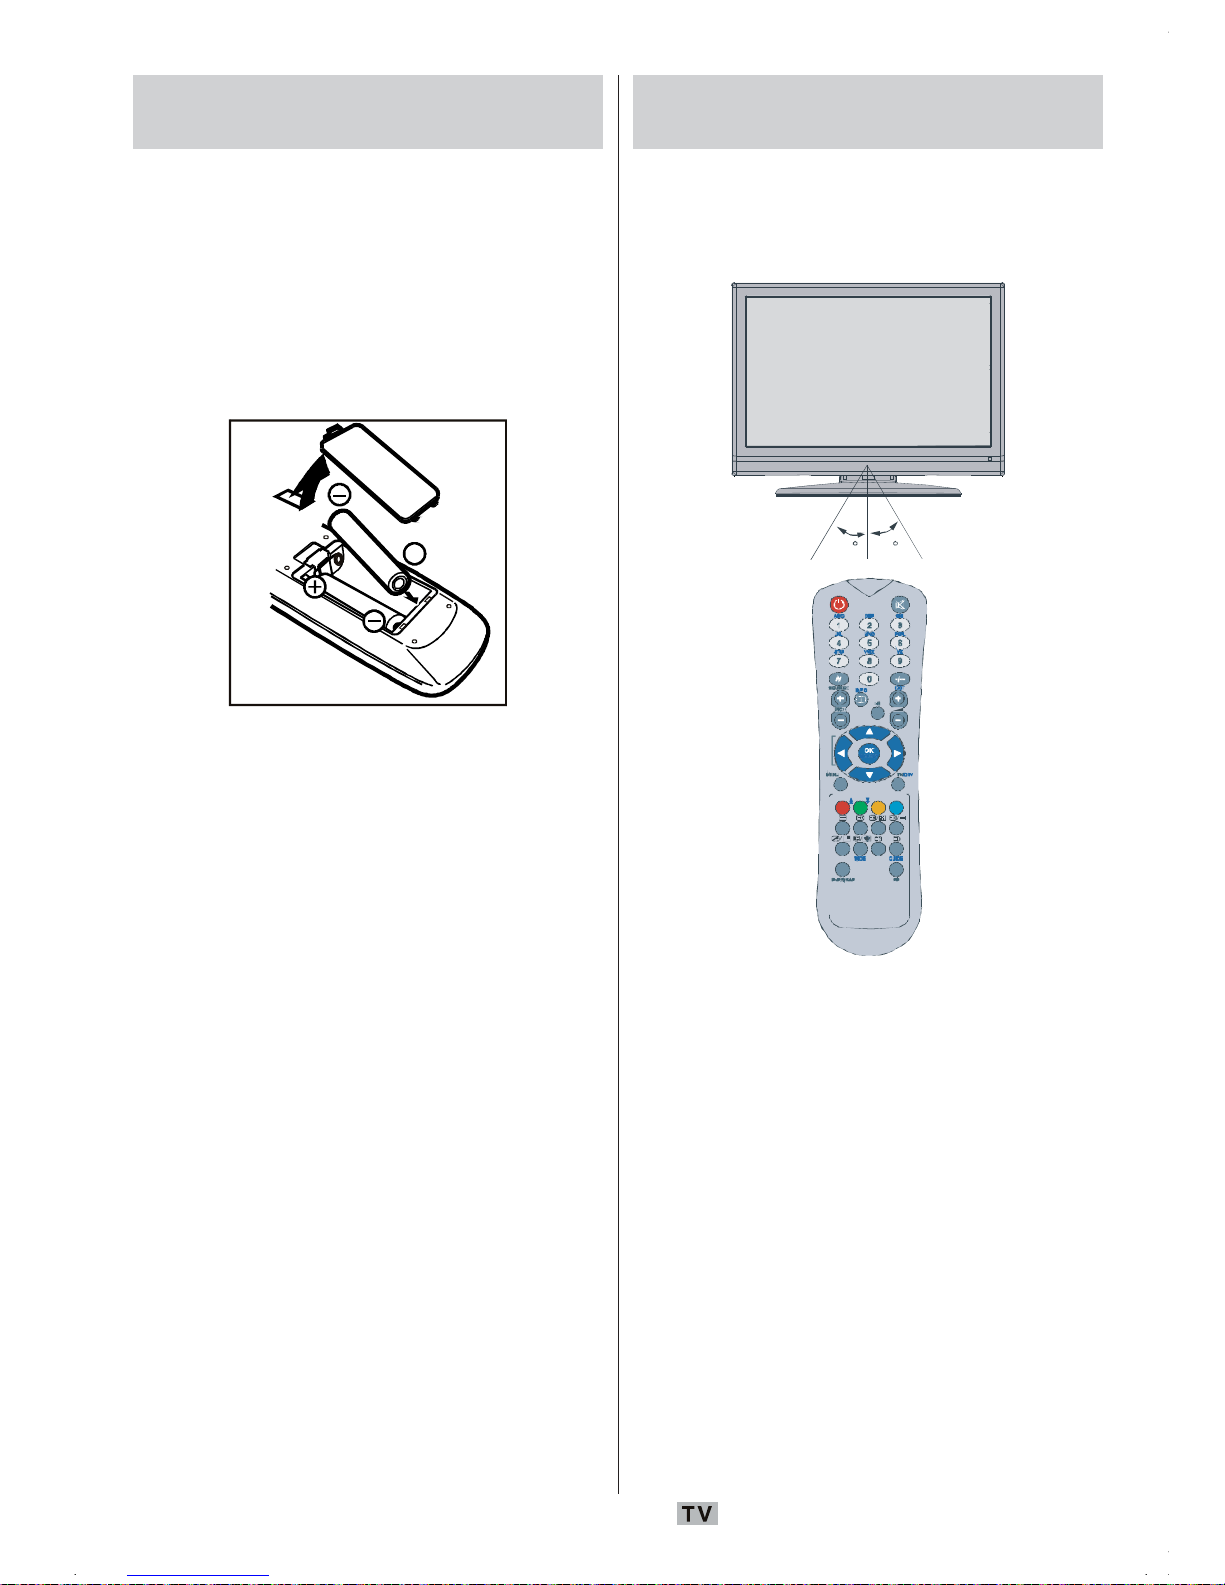
Inserimento delle batterie nel
telecomando
• Togliere il coperchio della batteria situato
sulla parte posteriore del ricevitore, tirando
delicatamente all’indietro dalla parte
indicata.
• Inserire due batterie AAA/R03 o dello stesso
tipo. Mettere le batterie nella giusta direzione
e rimettere il coperchio.
Nota: Togliere le batteria dal telecomando
quando sono inutilizzate da lungo
tempo. In caso contrario, si può
danneggiare il telecomando a causa
di fuoriuscita di liquido dalle batterie.
Gamma di funzionamento del
telecomando
• Dirigere la parte superiore del telecomando
verso il sensore LED a distanza della TV
LCD mentre si preme un tasto.
30
30
A
BC DEF GHI
JKL MNO PQR
STU VWX YZ
1 2 3
4 5 6
7 8 9
0
AV
SOURCE EXIT
-/--
INFO
I-II
MENU TV/DTV
P/CH
OK
WIDE GUID E
PP P<P/SWAP
La distanza di funzionamento è circa 7 m.
Italiano - 16 -
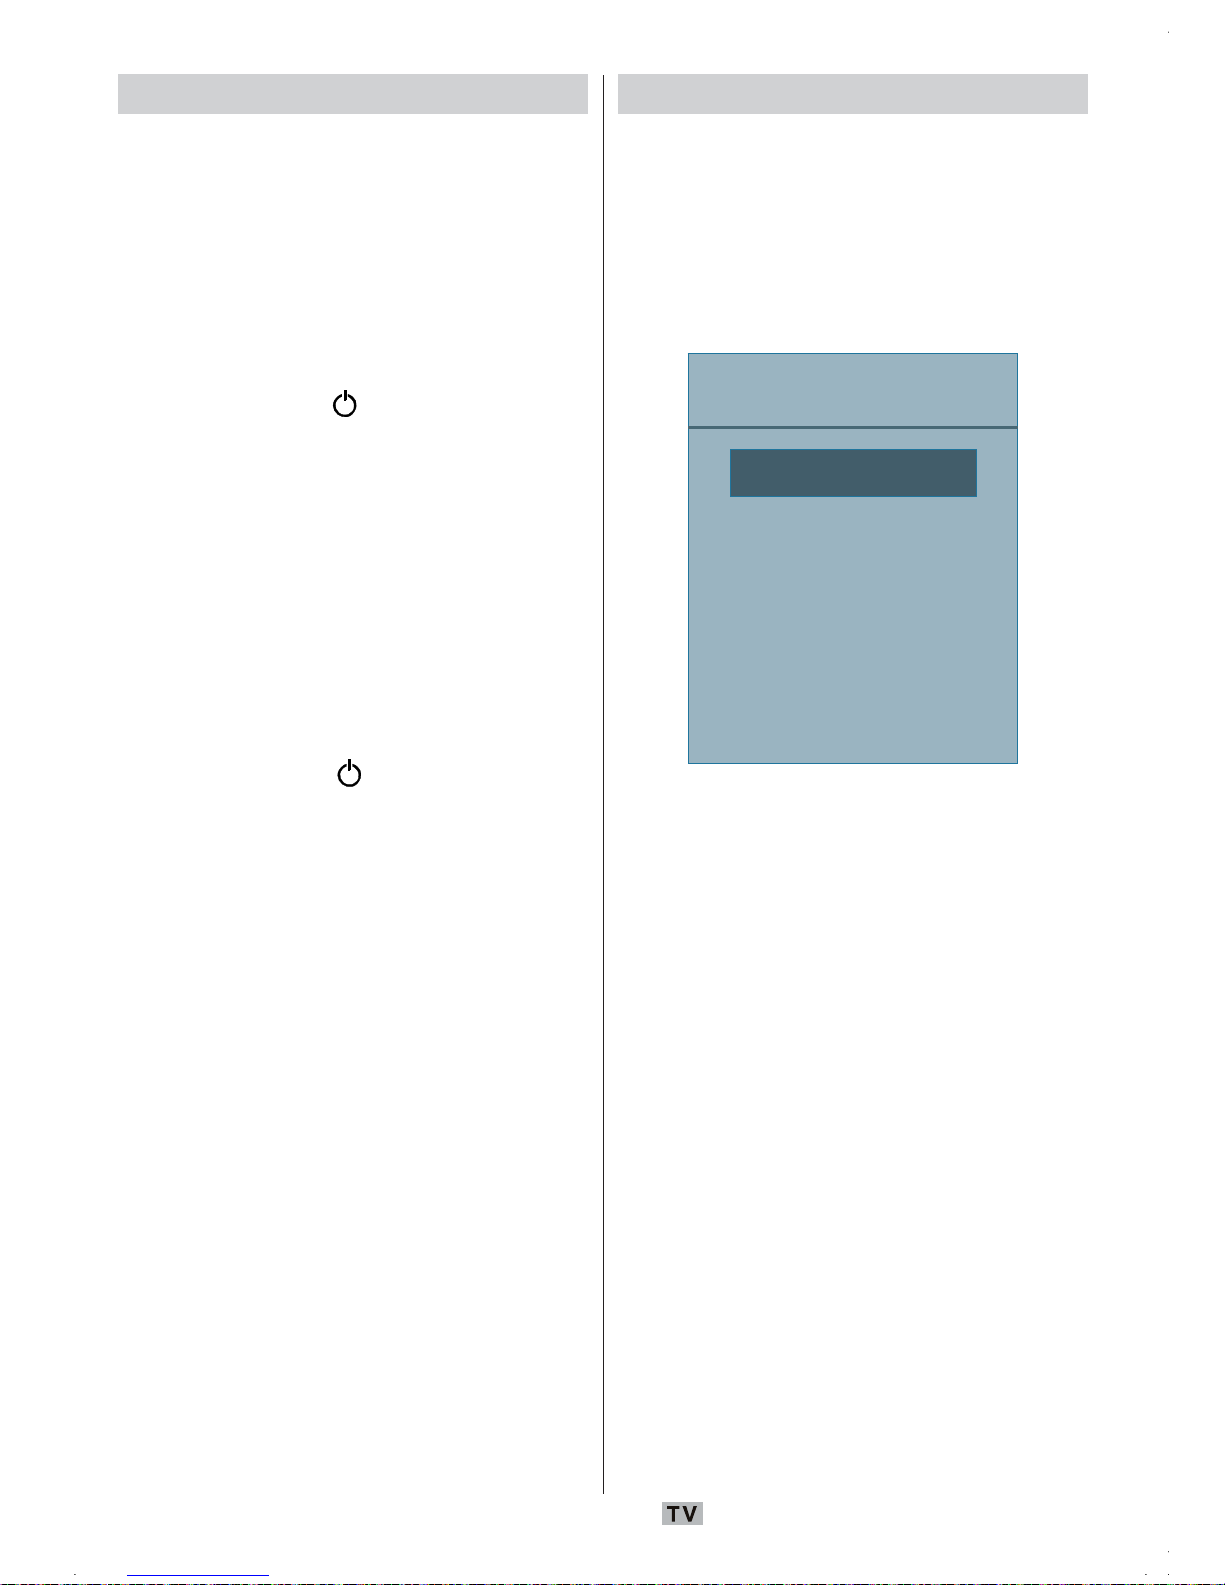
Accensione/spegnimento della TV
Per accendere l’apparecchio TV:
• Collegare il cavo di alimentazione a 220-
240V AC, 50 Hz.
• Premere il tasto STANDBY. A questo punto il
LED di
standby si accende.
• Per accendere la TV dalla modalità standby
è possibile:
• Premere il tasto
, P+ / P- o un tasto
numerico sul telecomando.
• Premere il tasto -P/CH o P/CH+ della TV. La
TV si
accend
e.
Nota: Se si accende la TV attraverso i tasti
“PRO
GRAMMA PRECEDENTE/SUCCESSIVO”
(PROGRAMME UP/DOWN) del telecomando o
della TV, sarà di nuovo selezionato l’ultimo
programma guardato.
Per spegnere la TV
• Premere il tasto sul telecomando o
STANDBY sulla TV, in modo che
l’apparec
chio passi in modalità stand-by.
• Per spegnere completamente la TV, staccare
il cavo di alimentazione dalla presa di rete.
Scelta ingresso
Una volta collegati sistemi esterni alla TV, è
possibile passare a diverse fonti di ingresso.
• Premere il tasto AV sul telecomando fino a
ch
e vien
e evidenziata la fonte desiderata.
Dopo un breve tempo la TV passa alla fonte
selezionata.
Fonte
TV
EXT1
EXT2
DTV
HDMI

Italiano - 17 -
Operazioni di base
È possibile far funzionare la TV sia utilizzando
il telecomando che i tasti sull’apparecchio.
Funzionamento con i tasti della TV
Impostazione volume
• Premere il tasto - per abbassare il volume o
il tasto + per aumentarlo, in modo che una
scala di livello del volume (slider) verrà
visualizzata sullo schermo.
Selezione programma
• Premere il tasto +P/CH per selezionare il
programma successivo o il tasto P/CH - per
selezionare il programma precedente.
Accesso al menu principale
• Premere il tasto MENU per entrare nel menu
principale. Nel menu principale, selezionare
il sottomenu utilizzando il tasto -P/CH o P/
CH+ ed entrare nel sottomenu servendosi
dei
tasti - o + Per imparare ad utilizzare
menu
, si rimanda alle sezioni sistema
menu.
Modalità AV
• Premere il tasto TV/AV sul pannello di
controllo dell’apparecchio TV per commutare
l’apparecchio TV alle modalità AV.
Funzionamento con telecomando
• Il telecomando della TV è stato studiato per
controllare tutte le funzioni del modello scelto.
Le funzioni saranno descritte seguendo il
sistema menu dell’apparecchio TV.
• Le funzioni del sistema menu sono descritte
nelle sezioni che seguono.
Impostazione volume
Premere il tasto V+ per aumentare il volume.
Premere il tasto V - per diminuire il volume.
Una scala di livello del volume (slider) verrà
visualizzata sullo schermo.
Selezione del programma
(Programma precedente o successivo)
• Premere il tasto P - per selezionare il
programma precedente.
• Premere il tasto P + per selezionare il
p
rogr
amma successivo.
SOURCE
P/CH
I-I I
IN FO
EXIT
Selezione del programma (Accesso Diretto):
• Premere i tasti numerici sul telecomando
per selezionare i programmi fra 0 e 9. La TV
passerà al programma selezionato. Per
selezionare programmi fra 10 e 99, premere
come prima cosa il tasto -/-- e quindi i tasti
numerici in modo consecutivo (ad esempio
per il programma 27, premere prima 2 e poi
7) entro 3 secondi. Se si lasciano passare
più di 3 secondi, la TV passerà
automaticamente al canale del primo
numero premuto (nell’esempio precedente
al canale 2).
Italiano - 18 -
Nella parte superiore viene fornita una
mappa dei menu. Per dettag li vedere le
relative spiegazioni in “SISTEMA MENU”.
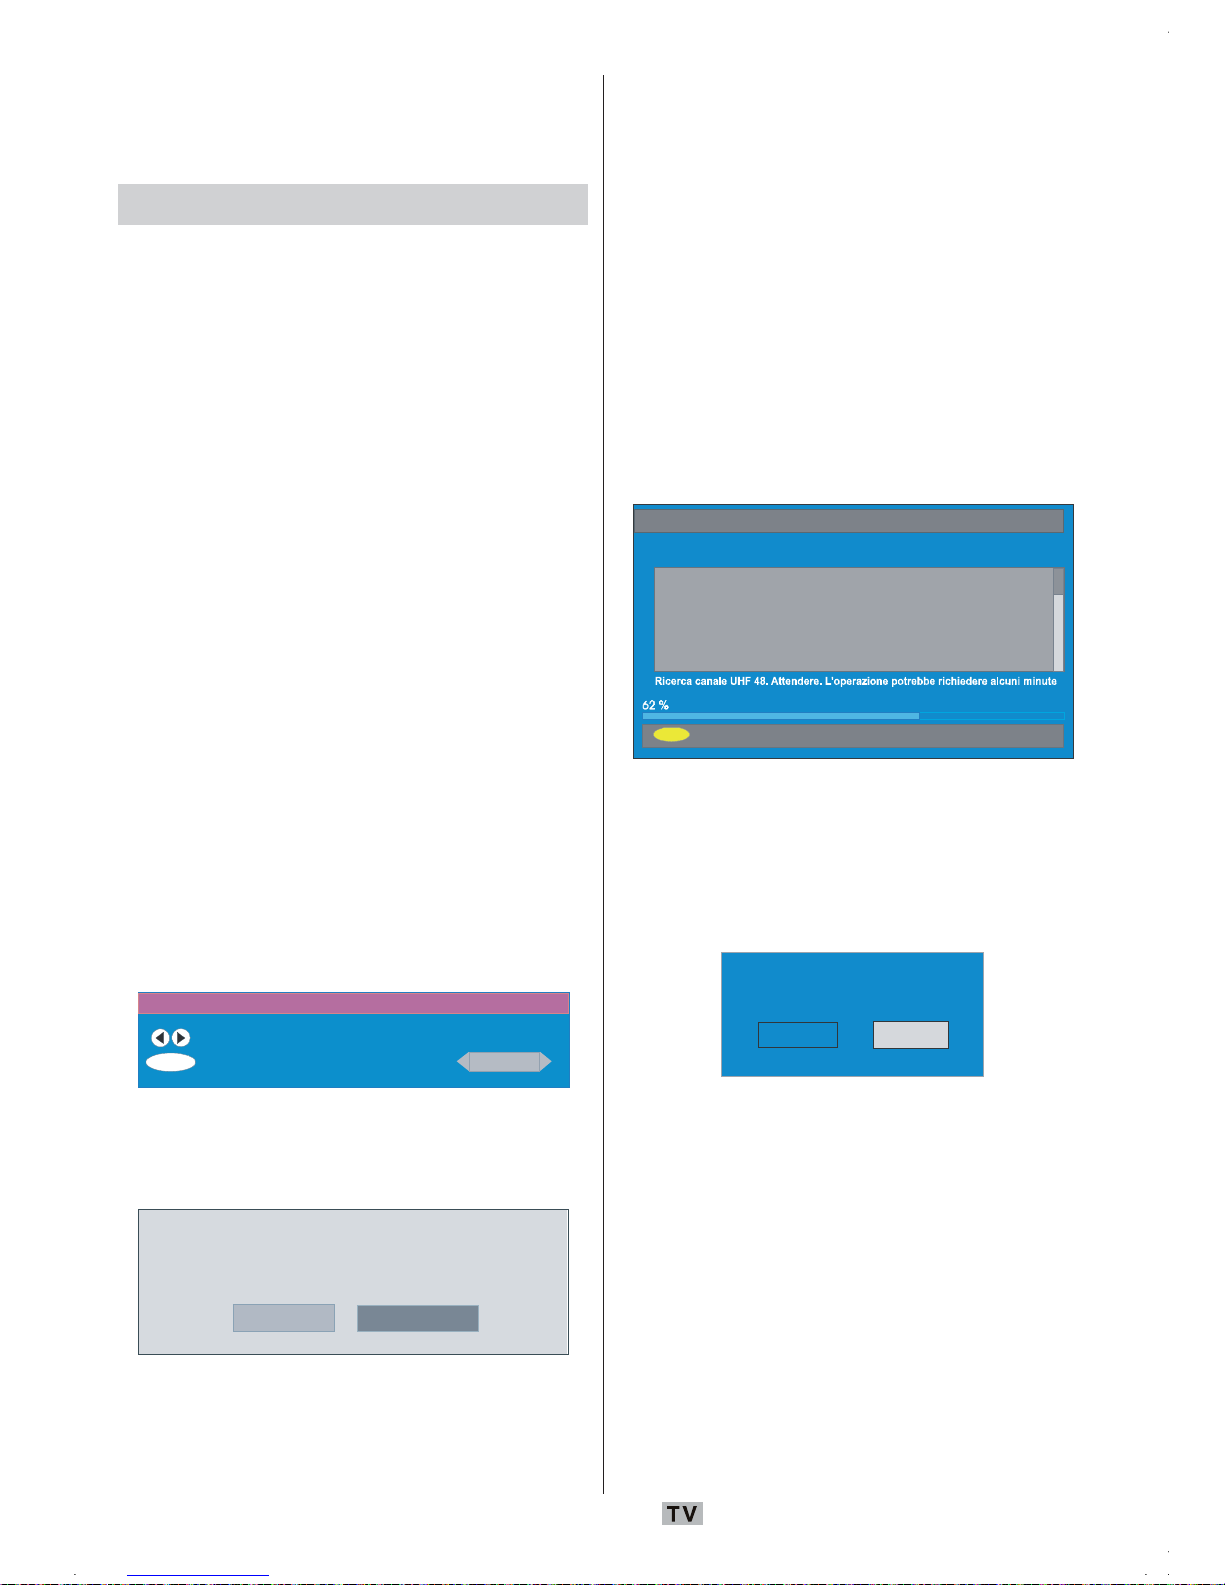
Impostazioni iniziali
Quando si accende la TV per la prima volta, per
prima cosa si attiva IDTV. Al primo utilizzo della
IDTV non ci sono canali salvati in memoria.
Quando si accende la TV per la prima volta, sullo
schermo compare il menu per la scelta della
lingua. Il messaggio “Benvenuti, selezionare la
lingua”,
compare in tutte le lingue che si possono
sceglier
e, in sequenza, nel menu OSD.
Premendo il tasto
a
o b evidenziare la lingua
che si desidera e premere il tasto OK. Nella
finestra di
dialogo “Imposta lingua“ è scritto
accan
to alla voce “OK” per indicare di
“Premere il tasto SELEZIONA per impostare
l’opzione lingua evidenziata”.
Si
possono ottenere informazioni sull’uso del menu
preme
ndo il pulsante INFO. Premere ancora il tasto
INFO per uscire dal menu “guida” (help).
Dopo di ciò sull’ OSD compare “Prima
insta
llazione” (First time Installation). Premendo
il tast
o
_
o ` selezionare il paese che si desidera
impostare e premere il tasto OK.
Prima installazione
Selezionare il paese
Impostare e continuare l'installazione
OK Italia
Dopo “Prima installazione” (First time
installation), sullo schermo compare il
segue
nte messaggio.
A
vviare la ricerca automatica per i canali digitali?
Sì No
• La ricerca automatica può essere avviata
selezionando il tasto “Sì” (Yes) o annullata
selezionan
do “No”.
• Per selezionare l’opzione “Sì” o “No” (Yes -
No), evidenziare la voce usando i tasti
_
o
`
e premere il tasto OK.
IDTV automaticamente si sincronizzerà ai
canali di
trasmissione UHF da 21 a 68 alla
ricerca delle trasmissioni TV del digitale
terrestre, visualizzando i nomi dei canali trovati.
Per questo processo ci vorranno circa cinque
minuti. Per annullare la ricerca, premere il tasto
M in qualunque momento durante il processo.
Durante il processo APS sullo schermo viene
visualizzato il seguente menu OSD:
MENU
Mendip 4:3
Mendip 16:9
Annulla ricerca
Ricerca automatica
Dopo che il processo di “Ricerca automatica”
(Automatic Search) è terminato, sullo
schermo com
pare il seguente messaggio per
la ricerca del canale analogico. La TV passerà
in modalità TV analogica.
Si
Effettuare la ricerca di ca nali
analogici?
No
Per cercare i canali analogici selezionare “Sì”
(Yes). Il menu che segue viene visualizzato
per la ric
erca di canali analogici.

Italiano - 19 -
Programmaz ione Automatica APS
Lingua
Paese
Italiano
Italy
Controllare cavo antenna
TXT Region
Italiano
Scegliere Paese, Lingua e Lingua del
televideo (Country, Language, Txt language)
usando i tasti
a
o b e _ /`. Premere OK o
ROSSO per continuare. Per annullare,
premere il
tasto BLU.
Dura
nte il processo di sintonizzazione
automatica, sullo schermo viene visualizzato
il seguente menu:
Programmaz ione Automatica APS
Esci: TV
Una volta che l’ iniziale è stato finalizzato,
comparirà sullo schermo un elenco dei
programmi. Nell’elenco dei programmi è
possibile visualizzare i numeri dei programmi
ed i nomi a loro assegnati.
Se non si accettano le locazioni e / o i nomi
dei programmi, è possibile cambiarli nella
tabella programmi. Per dettagli vedere la
sezione “Tabella programmi”.
Funzionamento generale
Premendo in qualunque momento il tasto TV/
DTV mentre si guardano i programmi
televisivi,
la TV passerà dalla trasmissione in
digitale terrestre alla trasmissione analogica.
Banner con le informazioni
• Ogni volta che si cambia il canale, usando i tasti P+
o P - o i tasti numerici, la TV visualizza l’immagine
del
canale insieme al banner con le informazioni
nella parte bassa dello schermo. Questa rimarrà
sullo schermo per circa tre secondi.
• Il banner con le informazioni può anche
essere visualizzato in qualunque momento
mentre si guarda la TV, premendo il tasto
INFO. Premendo ancora il tasto INFO si
elimina
il banner.
4 RTL 09:10
CH 48
Ora : NEWS
Succ es... NEWS
Segnale :
04:35-11:00
11:00-17:55
• Il banner con le informazioni dà informazioni sul
canale selezionato ed i programmi nello stesso.
• Il nome del canale è visualizzato, insieme al
suo numero nella lista dei canali e a una
prova della forza del segnale ricevuto su
questo canale sintonizzato.
• Le informazioni sul programma corrente e
su quello successivo vengono date insieme
all’orario di inzio e fine.
• Le informazioni sull’ora corrente sono
visualizzate insieme al nome del canale.
Suggerimento: Non tutti i canali trasmettono i
dati de
l programma. Se il nome e gli
orari del programma non sono
disponibili, viene visualizzato nel
banner con le informazioni il messaggio
“Nessuna Informazione disponibile”
(No Information Available).
Nota: Se il canale selezionato è bloccato,
biso
gna inserire il codice corretto a
quattro cifre per visualizzare il canale.
Italiano - 20 -
In tal caso, è visualizzata una finestra
di dialogo nella quale si richiede di
inserire la chiave di blocco.
Immeti chiave di blocco
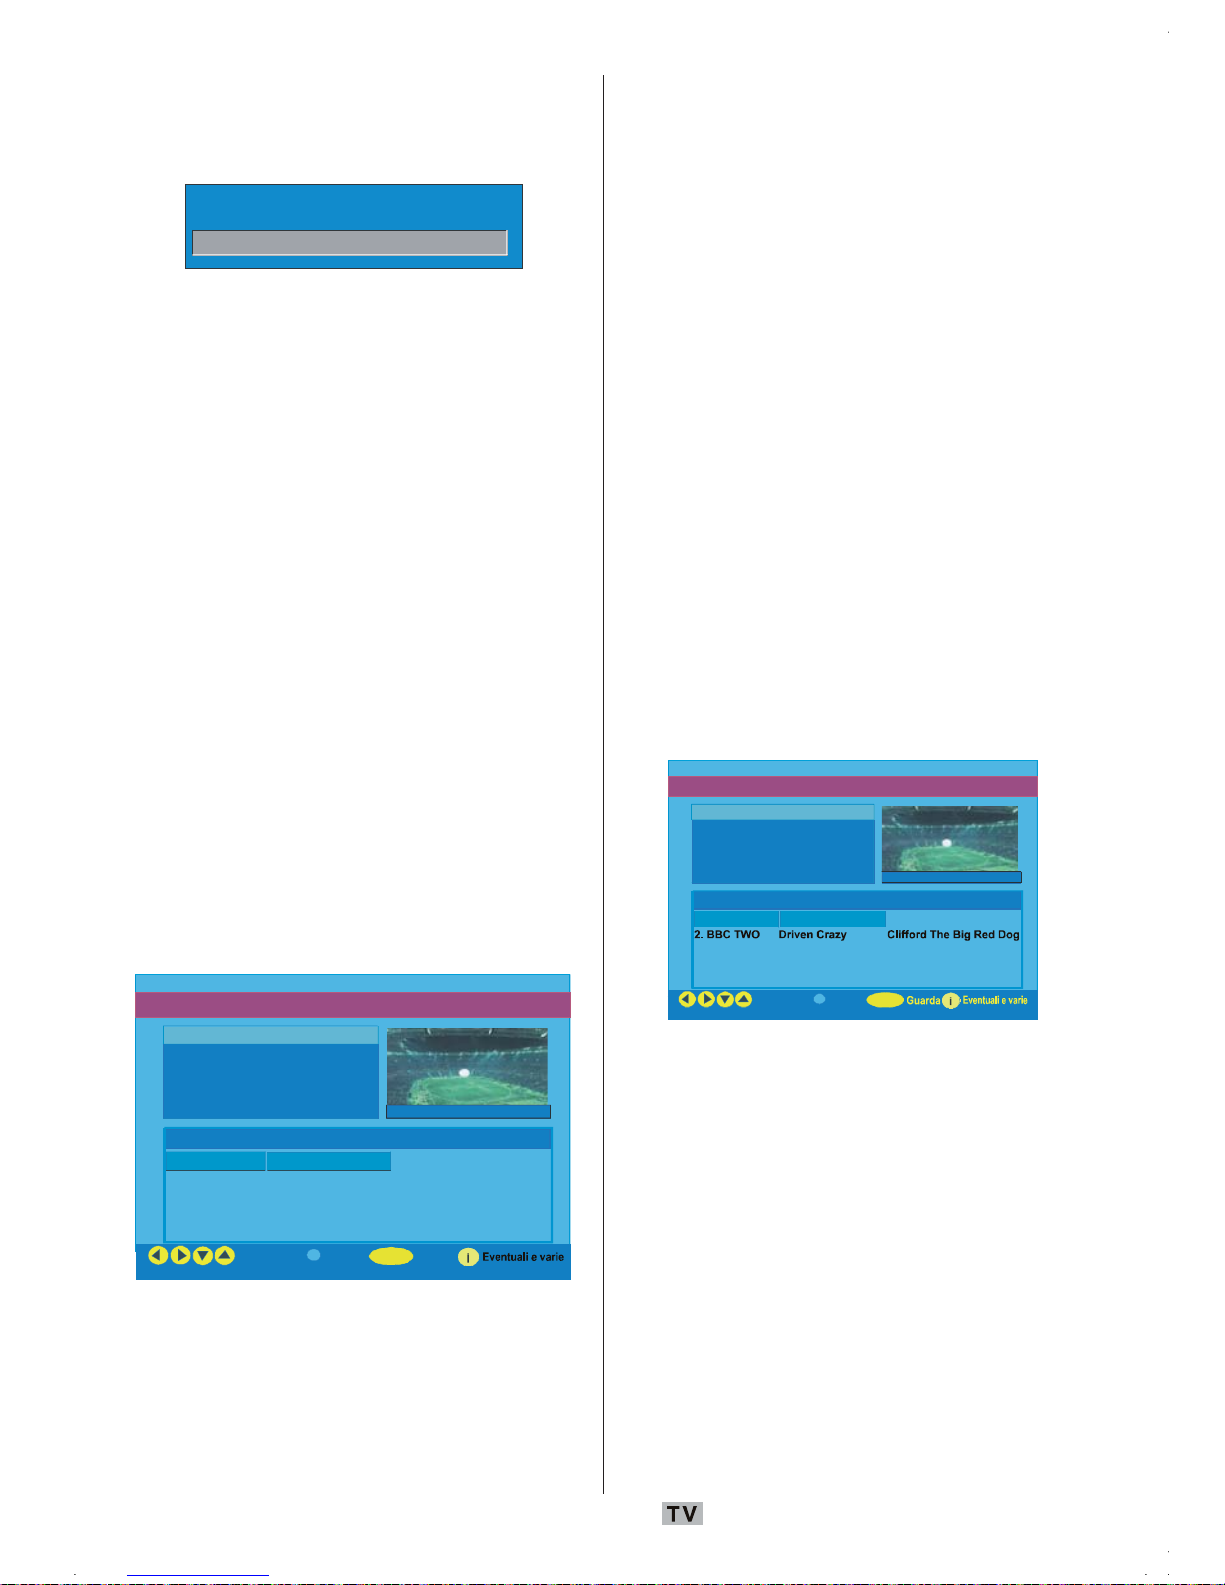
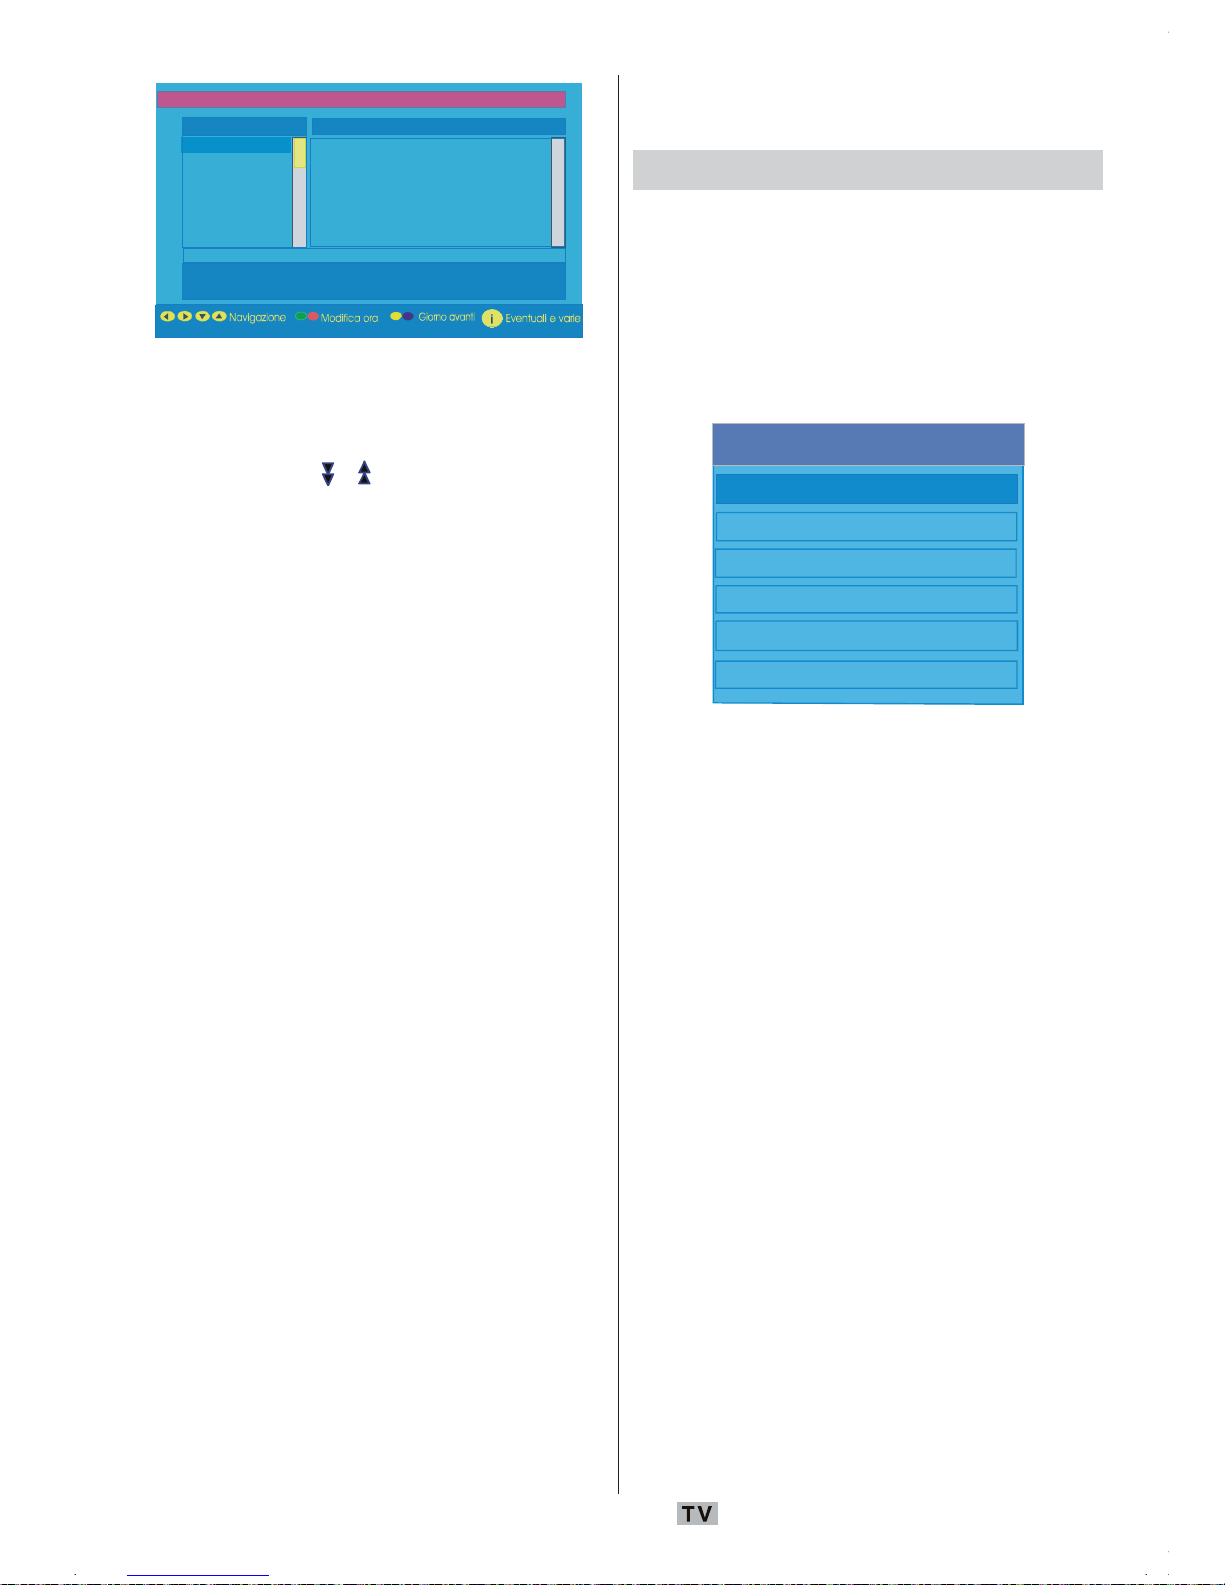
“Guida programmazione elettronica”
(Electronic Programme Guide (EPG))
Alcuni canali, ma non tutti, inviano
informazioni sugli eventi correnti e successivi.
Notare che le informazioni sull’evento
vengono aggiornate automaticamente. Se nei
canali non ci sono dati informativi disponibili
sull’evento, viene visualizzato solo il nome del
canale con la scritta “Nessuna informazione
disponibile” (No Information Available).
• Premere il tasto “GUIDA” (GUIDE) per
visualizzare il menu EPG.
• Premere i tasti
a
o b per navigare tra “Canali”
(Channels) o “Programmi” (Programmes).
• Premere i tasti
_
o ` per navigare tra la lista
dei canali o dei programmi.
• Nel menu EPG possono essere facilmente
viste le informazioni di guida estese
premendo il tasto INFO.
News 10:00-11.00
1. ONE Com monwea lth … Nach righten
2. BBC TWO Drive n Crazy Cliffo rd The B ig Red Dog
5. five The Chart Daws on’s Cree k
Navigazione
Orario
Guarda
Guida programmazione elettronica Wed 31/7 09:13
1 ON E
OK
5. FIVE The Chart Dawson’s Cre ek
• È possibile chiudere questa finestra
premendo di nuovo lo stesso tasto.
• Nel menu EPG vengono visualizzati tutti i
canali, Il canale corrente viene evidenziato
quando si entra nel menu EPG.
• Usare i tasti
a
o b per cambiare i canali.
Prem ere poi i tasti ROSSO o VERDE per
scorrere verso l’alto/il basso le pagine dei canali.
Premere OK per guardare il canale evidenziato
• Se si evidenzia un evento, sullo schermo
vengono visualizzate una breve descrizione
dell’evento, una descrizione estesa
dell’evento, l’ora di inizio e fine dell‘evento.
• Se si preme il tasto OK quando è evidenziato
un even
to successivo, viene impostato un
promemoria per il programma evidenziato e
su di esso compare una icona con un orologio
come mostra la figura del menu EPG che segue.
I promemoria del programma sono impostati
per segnalare che un programma sta per
iniziare quando l’utente sta guardando un altro
canale. Se si imposta un promemoria per un
programma, verrà chiesto di passare al canale
corrispondente una volta raggiunta l’ora fissata.
News 10:00-11.00
1. ONE Commonwealth … Nachrighten
5. five The Chart Dawson’s Creek
Navigazione
Orario
Guida programmazione elettronica Wed 31/7 09:13
1 ONE
OK
5. FIVE The Chart Dawson’s Creek
• Premendo il tasto BLU è possibile vedere la
programmazione estesa dei programmi.
• Premendo il tasto INFO si possono vedere
facilmente le informazioni dettagliate della
guida. Premendo ancora il tasto INFO si esce
dal menu “guida” (help).
• Quando viene premuto il tasto BLU, compare
su
llo sc
hermo il menu EPG di seguito.
Italiano - 21 -
1. BBC ONE
2. BBC TWO
5. Five
7. BBC Choice
11.DISCOVERY
15.BBC NEWS 24
17.BBCi
Guida program mazione e lettronica
We d 21/4 10:12
Nessuna informazione
BBC ONE
TUE 21/4, 20:00-22:00
• Premendo il tasto GIALLO/BLU è possibile
procedere nella programmazione in avanti
o all’indietro di un giorno.
• Premendo i tasti
/ è possibile modificare
l’ora della programmazione.
• Se si preme il tasto INFO si possono vedere
facilmente
le informazioni dettagliate della
guida. Premendo ancora il tasto INFO si esce
dal menu “guida” (help).
Scarico via etere
Per assicurare che la IDTV abbia sempre le
informazioni più aggiornate, assicurarsi che,
dopo l’uso, sia messo in modalità standby. Alle
3 di ogni giorno la IDTV cerca automaticamente
gli aggiornamenti che possono essere
trasmessa e li scaricherà automaticamente
nella IDTV. Questa operazione durerà
normalmente circa 30 secondi.
Visualizzazione dei sottotitoli
Con la trasmissione digitale terrestre (DVB-T),
alcuni programmi sono trasmessi con i
sottotitoli. I sottotitoli possono essere visualizzati
quando si guardano questi programmi.
• Ogni volta che si preme il tasto VERDE, sullo
schermo compare l’OSD di scelta dei
sottotitoli. I sottotitoli possono essere
impostati su On o Off. Per le opzioni della
lingua dei sottotitoli vedere “Impostazione
lingua” nella sezione “Menu configurazione”.
Televideo
L’uso del televideo e delle sue funzioni è
identico a quello del sistema di testo analogico.
Vedere le spiegazioni in “Televideo analogico”.
Sistema Menu IDTV
Il menu IDTV può essere visualizzato solo
quando si guarda una trasmissione digitale
terrestre. Premere il tasto TV/DTV per attivare
IDTV mentre la TV è in modalità analogica.
• Premere il tasto M per visualizzare sullo
schermo il
menu sottostante:
Menu principale
Elenco canali
Installazione
Configurazione
Timer
Impost. TV
Interfaccia comune
Lista dei canali
Usando il tasto a o b del telecomando in
“menu principale” (main menu), assicurarsi
che la prima voce “Lista dei canali” (Channel
List) sia evidenziata e premere OK per
visualizzare la lis
ta dei canali.
In questo menu si possono eseguire le
seguenti operazioni:
• Navigare nella lista completa dei canali
• Spostare i canali
• Cancellare i canali
• Rinominare i canali
• Aggiungere blocchi ai canali
• Impostare i preferiti
• La lista dei canali è il posto in cui vengono
gestiti i canali.
Navigazione in tutta la lista dei canali
• Premere i tasti a o bper selezionare il
canale precedente o successivo.
• Per spostare la pagina in alto o in basso è
Italiano - 22 -
possibile premere il tasto o .
• Per guardare uno specifico canale
evid
enziarlo usando i tasti
a
o bpoi
premere il tasto OK mentre è evidenziata la
voce “Selez
iona” (Select) nel menu “Lista
canali” (Channe
l List) usando i tasti
_
o `.
Spostamento dei canali sulla lista
• Premere i tasti a o bper selezionare il
canale da spostare.
• Premere il tasto
_
o ` per selezionare la
voce “Sposta‘’ (Move) nel menu “Lista canali”
(Channel
List).
•La voce “Sposta” (Move) è visualizzata
ac
canto
a OK ad indicare che la pressione
di OK
sposta il canale evidenziato nella
posizion
e desiderata della lista dei canali.
L’OSD della lista canali è illustrata sotto:
Elenco canali
1. BBC ONE
2. BBC TWO
3. ITV 8
4. Channel 4
5. BBC THREE
6. Teletext
7. BBC FOUR
8. Sky Travel
9. UKHistory
10. RTL
Se l e z i o n a
Sp o .
Funzione
1 BBC ONE
OK
i
Cancella Mod. nome Bloc ca Preferiti
Seleziona canale
Sp o .
Eventuali e varie
Premere il tasto OK per visualizzare l’OSD di seguito:
Edita il numero
Nuovo numero
Immettere un numero usando i tasti numerici
del telecomando, quindi premere OK per
confer
mare.
Nota: Se si immette un numero di programma
identico a quello del canale che si desidera
spostare, è visualizzato l’OSD “....i servizi
del canale saranno ripristinati.
Continuare?” (.... channel services will
be rep
laced. Do you want to continue?)
Premere OK per confermare oppure
selezionare “No” per annullare.
Cancellazioni dei canali dalla lista
• Premere i tasti a o bper selezionare il
canale da cancellare.
• Premere il tasto
_
o ` per selezionare la
voce “Cancella‘’ (Delete) nel menu “Lista
canali”
(Channel List).
Come si vede nel menu Lista canali, l’opzione
“Elimina” (Delete) è visualizzata vicino a OK
nella parte bassa dello schermo, ad indicare
che si può premere il tasto OK per cancellare
il cana
le evidenziato dall’elenco.
Elenco canali
1. BBC ONE
2. BBC TWO
3. ITV 8
4. Channel 4
5. BBC THREE
6. Teletext
7. BBC FOUR
8. Sky Travel
9. UKHistory
10. RTL
Seleziona
Sp o .
Funzione
1 BBC ONE
OK
i
Cancella Mod. nome Blocca Preferiti
Sele zio na c ana le Ca ncella
Eventuali e varie
Premere OK per cancellare il canale
evidenziato dalla lista dei canali. Il messaggio
che segue compare sullo schermo.
Il servizio selezionato sarà cancellato permanentemente
e l'elenco dei preferiti disattivato. Continuare?
Si
No
• Premere il tasto _ o ` per evidenziare
l’opzione desiderata.
• Se viene premuto il tasto OK mentre è
evidenziato “Sì” (Yes), il canale evidenziato
è cancel
lato.
• Se si seleziona “No” l’operazione viene
annullata.
Italiano - 23 -
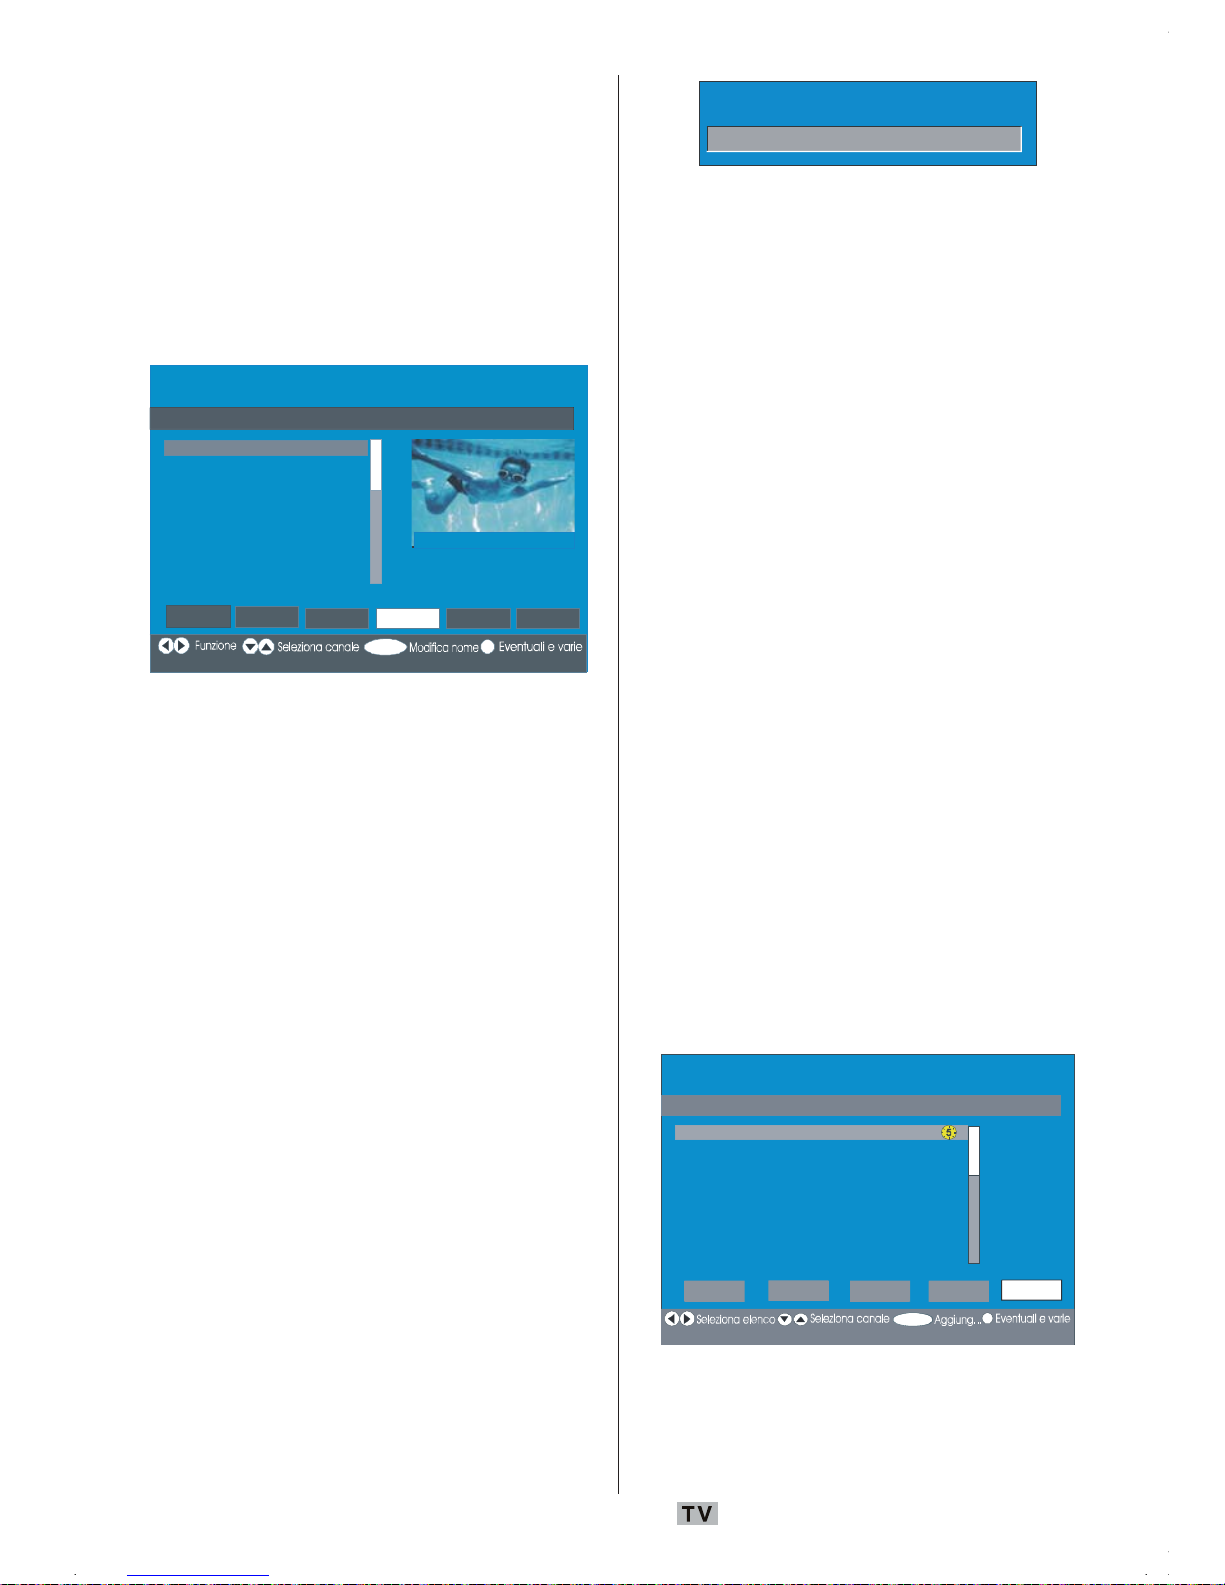
Rinominare i canali
Per rinominare uno specifico canale, esso
deve essere evidenziato premendo i tasti
a
o b. Successivamente, evidenziare la voce
“Modifica nome” (Edit Name), premendo i tasti
_
o `. Premere il tasto OK per attivare la
funzione di modifica del nome. Il menu della
lista canali OSD è illustrato sotto:
Elenco canali
1. BBC ONE
2. BBC TWO
3. ITV 8
4. Channel 4
5. BBC THREE
6. Teletext
7. BBC FOUR
8. Sky Travel
9. UKHistory
10. RTL
Se l e z i o n a
Sp o .
1 BBC ONE
OK
i
Cancella Mod. nome Blo c c a Preferiti
Premendo il tasto _ o `ci si sposta al carattere
precedente/ successivo. Premendo il tasto
a
o b si alterna il carattere corrente cioè ‘b’
diventa ‘a’ su
b
e ‘c’ su a. La pressione dei
tasti numerici ‘0...9’ sostituisce uno alla volta
il carat
tere evidenziato con quelli stampati al
di sopra del tasto.
Premere il tasto M per annullare la modifica
e quello
OK per salvare il nuovo nome.
Aggiungere blocchi ai canali
Il blocco di un canale consente di inserire un
accesso protetto da password ai canali
selezionati dai genitori.
Per bloccare un programma, bisogna
conoscere la password per il blocco genitori
(la cui impostazione di fabbrica è¨ 0000 e che
può
essere modificata solo nel “Menu
configurazione” (Confi
guration Menu)).
Premendo i ta
sti
a
o b, evidenziare il canale
da bloccare e selezionare l’opzione “Blocca”
(Lock) premendo i tasti
_
o `.
Successivamente, premere il tasto OK. È
visualizzat
a la casella della password.
Immeti chiave di blocco
Impostazione dei preferiti
È possibile impostare vari canali come
preferiti in modo che si navighi tra loro.
Per impostare i preferiti bisogna evidenziare
la voce “Preferiti” (Favourites), nella parte
inferiore del menu “Lista canali” (Channel list).
Per
impostare i preferiti bisogna evidenziare
la voce “Preferiti” (Favourites), nella parte
infe
riore del menu “Lista canali” (Channel
list). Poi premere il tasto OK e il menu
“Modifica elenco preferiti” (Edit Favourite
Lists) comp
are sullo schermo.
I ca
nali preferiti possono essere elencati
usando “Lista 1”, “Lista 2”, “Lista 3”, “Lista 4”
o “Lista 5” (List 1, List 2, List 3, List 4, List 5).
L’uso delle 5 liste consente di elencare i
canali per categoria (sport, musica, ecc.).
Attivando il numero della lista dei preferiti nel
sottomenu “Modalità preferiti” (Favourite
Mode)
del “menu configurazione”
(Configu
ration menu), si attivano solo i canali
della lista selezionata.
Sullo schermo comparirà la seguente lista
canali OSD:
SELECT
i
OK
1. BBC ONE
2. BBC TWO
3. ITV 8
4. Channel 4
5. BBC THREE
6. Teletext
7. BBC FOUR
8. Sky Travel
9. UKHistory
Elenco 1 Elen co 2 Elenco 3 Elenc o 4 Elenco 5
Modifica elenco preferiti
Come aggiungere un canale a un
elenco preferiti
• Premendo i tasti a / b, evidenziare il canale
che si desidera aggiungere ai preferiti.

Italiano - 24 -
• Selezionare il numero dell’elenco premendo
i tasti
_
/ `.
• Premendo OK il canale evidenziato è
aggiunto
al numero di lista selezionato.
• Per ciascun canale, un’icona indica in quale
elenco preferiti si trova (per es. nella figura
che precede l’icona
indica che BBC ONE
è aggiunta all’”Elenco 1” (List 1)),
Cancellazioni dei canali dall‘elenco
preferiti
• Evidenziare il canale che si desidera
rimuovere dalla lista preferiti.
• Evidenziare il numero da cui il canale deve
essere rimosso e premere il tasto OK’
L’ico
na indicante la lista che contiene il
canale scompare dal menu.
Nota: Un canale può essere aggiunto a più di
una list
a dei preferiti.
• Per attivare i “Preferiti” (Favourites) andare
a
l men
u “Configurazione” (Configuration),
quindi selezionare il numero della lista nella
“Modalità preferiti” (Favourite Mode) che si
vuole att
ivare premendo il tasto
_
o `. Per
annullare i preferiti, impostare la “Modalità
preferiti” (Fav
ourite Mode) su Off.
Uso del tasto BLU per navigare tra i
canali preferiti:
È possibile navigare tra i canali preferiti
premendo il tasto BLU. Ad ogni pressione del
tast
o BLU, si può navigare in sequenza
attraverso i
canali preferiti che sono in cima a
ciascuna lista dei canali.
Mentre è selezionata la lista canali, è
possibile navigare tra i preferiti di quell’elenco
premendo il tasto P + o - P -.
Guida a schermo
Per tutti i menu, il tasto INFO serve a
visualizzare le informazioni di guida sulle
funzioni del menu. Per il menu “Lista dei
canali” (Channel List) viene visualizzato sullo
schermo
il messaggio che segue.
Preme re il tasto SELECT d el telec om ando p er sintonizzarsi sul cana le evidenziato,
MENU p er uscire da questo sc hermo
Suggerimento: La pressione del tasto INFO
può aiutare a visualizzare informazioni
in IDTV.
Installazione
Il menu “Installazione” (Installation) svolge
principalmente la funzione di aiutare a creare la
“Tabella dei canali” (Channel Table) nella
maniera più efficace. Selezionare la voce
“Installazione” (Installation) dal “menu
principale” (Main menu) premendo il tasto
a
o
b
, come mostrato nell’illustrazione sottostante:
Main Menu
Channel List
Installation
Configuration
Timers
TV Setup
Common Interface
Il menu comprende le seguenti voci:
• “Ricerca automatica” (Automatic Search)
• “Ricerca manuale” (Manual Search)
* Cancella elenco servizi (*)
• “Prima installazione” (First Time Installation)
Installazione
Ricerca automatica
Ricerca manuale
Prima installazione
Elimin lista servizi
Ricerca automatica
La ricerca automatica si avvia premendo il
tasto OK mentre è evidenziata la voce
“Ricerca automatica” (Automatic Search).
Sullo schermo compare il seguente messaggio.

Italiano - 25 -
Controllare il collegamento antenna. Avviare la ricerca
automatica? L'elenco canali precedente viene
sostituito.
Sì No
Evidenziare “Sì” (Yes) o “No” usando il tasto
_
o ` e premere OK per confermare.
Se si seleziona “Sì” (Yes) la ricerca automatica
viene avviata.
Se
si seleziona “No” la ricerca automatica
vie
ne an
nullata.
Dopo che la ricerca è terminata per i canali
digitali, sullo schermo compare un messaggio
che chiede se cercare i canali analogici.
Si
Effettuare la ricerca di canali
analogici?
No
Evidenziare “Sì” (Yes) e premere il tasto OK
per procedere alla ricerca dei canali analogici.
Sullo sc
hermo compare il menu che segue
per la ricerca dei canali analogici.
Programmaz ione Automatica APS
Lingua
Paese
Italiano
Italy
Controllare cavo antenna
TXT Region
Italiano
Scegliere “Paese”, “Lingua” e “Lingua del
televideo” (Country, Language, Txt
lang
uage) usando i tasti
o e _ / `.
Premere OK o ROSSO per continuare. Per
annulla
re, premere il tasto BLU. Durante il
processo d
i sintonizzazione automatica, sullo
schermo viene visualizzato il seguente menu:
Programmaz ione Automatica APS
Esci: TV
Dopo la finalizzazione dell’APS, la tabella
programmi comparirà sullo schermo. Nella
tabella programmi, si vedranno i numeri ed i
nomi dei programmi assegnati agli stessi.
Se non si accettano le locazioni e / o i nomi
dei programmi, è possibile cambiarli nella
“Tabella programmi” (Program Table).
Vedere la sezione “Menu Installazione”.
Tutti i ca
nali trovati vengono memorizzati in
forma ordinata rispetto al numero del canale.
Alcuni servizi possono comparire con il
numero di canale non corretto. Questo accade
perché alcune trasmittenti non hanno
informazioni sul numero del canale.
Ricerca manuale
In “Ricerca manuale” (Manual Search), il
numero dei multipli viene inserito
manualmente e viene cercato solo quel
multiplo per quel canale. Per ogni numero di
canale, vengono visualizzati nella parte bassa
dello schermo il livello di segnale, la qualità
di segnale e il nome di rete validi.
Sia nella ricerca manuale che in quella
automatica, un canale esistente nel database
non viene rimemorizzato per evitare duplicati
del medesimo.

Italiano - 26 -
Cancella elenco servizi (*)
(*) Questa impostazione è visibile solo se
l’opzione “Paese” (Country) è impostata su
“Denmark”, “Sweden”, “Norway” o “Finland”
(Danimarca, Svezia, Norvegia, Finlandia).
Usare questa impostazione per cancellare i
canali memorizzati. Premere il tasto
o
per selezionare “Cancella elenco servizi”
(Clear Service List), quindi premere OK. Sullo
schermo
è visualizzato il seguente OSD:
Si è sicuri di voler cancellare tutti i canali?
Sì No
Premere OK per annullare.
Selezionare “Sì” (Yes) premendo il tasto
_
o `,
quindi premere OK per eliminare tutti i canali.
Prima installazione
L’utente può utilizzare questa voce per
caricare le impostazioni predefinite che erano
state caricate nel ricevitore in fabbrica.
Per installare le impostazioni di fabbrica,
evidenziare il menu “Prima installazione” (First
Time
Installation) e premere il tasto OK;
successivamente, sarà richiesto
se eliminare
o meno le impostazioni. Selezionando la voce
“Sì’” (Yes) evidenziata in precedenza attraverso
la p
ressione del tasto OK, si procede
all’eliminaz
ione della tabella dei canali esistenti.
Canc ellare tutti i canali e le impostazioni per la
prima installazione?
Si No
Dopo aver caricato le impostazioni di fabbrica,
viene visualizzato il menu “Prima
installazione” (First Time Installation).
Per primo viene visualizzato il menu per la
scelta della lingua. Usando il tasto
o
selezionare la lingua che si desidera e
prem ere il tasto OK per attivarla.
Dopo che la lingua è stata selezionata, sullo
schermo compare un messaggio per la
ricerca automatica.
A
vviare la ricerca automatica per i canali digitali?
Sì No
Evidenziare “Sì’” (Yes) premendo il tasto _ o
`
e premere OK per avviare l’installazione. A
ricerca terminata per i canali digitali, sullo
schermo compare un messaggio che chiede
se cercare i canali analogici.
Si
Effettuare la ricerca di ca nali
analogici?
No
Evidenziare “Sì’” (Yes) premendo il tasto _ o
`
e premere OK per avviare la ricerca dei canali
analogici. Sullo schermo compare il menu
che segue per la ricerca dei canali analogici.
Programmazione Automatica APS
Lingua
Paese
Italiano
Italy
Controllare cavo antenna
TXT Region
Italiano
Scegliere “Paese”, “Lingua” e “Lingua del
televideo” (Country, Language, Txt
lang
uage) usando i tasti
o e _ / `.
Premere OK o ROSSO per continuare. Per
annullare
, premere il tasto BLU.

Italiano - 27 -
Configurazione
Premere il tasto M per visualizzare “Menu
Principale” (Main Menu) e due volte il tasto
per
evidenziare “Configurazione” (Configuration).
Successivamente, premere OK per visualizzare
il “Menu configurazione” (Configuration menu).
Premere il tasto M per uscire dal menu.
Menu principale
Elenco canali
Installazione
Timer
Impost. TV
Interfaccia comune
Configurazione
Le diverse funzioni della configurazione sono
visualizzate in un elenco, insieme ad una
immagine ad un quarto di schermo del canale
attualmente selezionato. Ë possibile
selezionare una funzione evidenziando la linea
del menu corrispondente con i tasti
o Il
“Menu Configurazione” (Configuration menu)
si presenta come segue:
Configurazione
Modalità Preferiti
Elenco canali
Impostazioni della lingua
Impostazioni dell' ora
Upgrade Ricevitore
i
Eventuali e varie
Solo Tv
V.5.9 (EU)
Off
Impostazioni protezione bambini
OK
4
A
rte
Paese:
Svezia
MENU
AC3 Audio
Off
Ipoudenti
Off
Modalità preferiti
Questa funzione attiva o disattiva la modalità
lista dei canali preferiti.
Usare il tasto
_
o ` per impostare la modalità
preferiti a”Elenco 1”, “elenco 2”,”…elenco
5” o “Off” (Li
st 1, List 2,..., List 5, Off).
Selezionando “Off” si disattiva la modalità
della list
a dei canali preferiti.
Se la “Modalità preferiti” (Favourite Mode)
viene impostata su On selezionando un
numero della lista dei canali, premendo i tasti
P+ e P- si naviga solo attraverso i canali
precedenteme
nte definiti come preferiti nella
lista selezionata.
Lista dei canali
Nel “Menu configurazione” (Configuration
Menu), evidenziare la voce “Lista dei canali”
(Channel List) premendo il tasto a o b.
Usare il tasto
_
o `per impostare la “Lista
dei canali” (Channel List) su “Solo TV” (TV
only ) o “Solo
radio” (Radio only).
Questa funziona
consente la navigazione solo
attraverso il tipo di lista dei canali selezionati.
Se è impostato “Solo radio”, è possibile
navigare tra i canali della radio contenuti nella
lista premendo il tasto P + o P -.
Audio AC3 (Opzionale) (*)
(*) Questa impostazione è visibile solo se
l’opzione “Paese” (Country) è impostata su
“Denmark”, “Sweden”, “Norway” o “Finland”
(Danimarca, Svezia, Norvegia, Finlandia).
Nel “Menu configurazione” (Configuration
Menu), evidenziare la voce “Audio AC3” (AC3
Audio) premendo il
tasto
a
o b. Usare i tasti
_
o ` per impostare l’”Audio AC3” (AC3 Audio)
su On o Off.
Attivare ques
ta impostazione se il canale in
visione supporta l’audio AC3.
Problemi di udito (*)
(*) Questa impostazione è visibile solo se
l’opzione “Paese” (Country) è impostata su
“Denmark”, “Sweden”, “Norway” o “Finland”
(Danimarca, Svezia, Norvegia, Finlandia).
Usare il tasto
a
o b per selezionare “Problemi

Italiano - 28 -
di udito” (Hard of Hearing), quindi premere
_
o ` per impostare l’opzione su On o Off.
Se la società di radiodiffusione consente
segnali audio speciali, è possibile impostare
l’opzione su On al fine di rendere possibile la
ricezione di questi.
Impostazione lingua
Nel “Menu configurazione” (Configuration
menu), evidenziare la voce “Impostazione
lingua” (Language Settings) premendo il tasto
a
o b. Premere OK e il sotto menu
“Impostazione lingua” (Language Settings)
viene visualizzato sullo schermo.
Lingua audio
Lingua sottotitoli
Lingua del sistema
Italiano
Italiano
Off
Usare il tasto a o b per evidenziare la voce
che si desidera regolare.
Lingua sistema
“Lingua sistema” (System Language)
determina la lingua del menu sullo schermo.
Usare
_
o ` per impostare “Lingua sistema”
(System Language).
Lingua audio
I canali televisivi digitali terrestri possono
trasmettere le colonne sonore simultanee in
più di una lingua. Questa funzione consente
di selezionare la lingua desiderata per i canali
che trasmettono colonne sonore multiple.
Usare il tasto
_
o ` per evidenziare le diverse
opzioni lingua.
Lingua sottotitoli
I canali televisivi digitali terrestri possono
trasmettere con sottotitoli visualizzati sullo
schermo per persone con problemi di udito.
Questa funzione seleziona la lingua del sottotitolo
desiderata ed abilita la visualizzazione automatica
di questo ogni volta in cui disponibile.
Usare il tasto
_
o ` per scorrere tra “Off” e le
opzioni lingua.
Nota: Se l’opzione “Paese” (Country) è impostata
su “Denmark”, “Sweden”, “Norway” o
“Finland” (Danimarca, Svezia, Norvegia,
Finlandia), il menu “Impostazione lingua”
(Language Settings) si presenta come
descritto di seguito:
Impostazione lingua
Nel “Menu configurazione” (Configuration
menu), evidenziare la voce “Impostazione
lingua” (Language Settings) premendo il tasto
a
o b. Premere OK e il sotto menu
“Impostazione lingua” (Language Settings)
viene visualizzato sullo schermo.
Lingua audio primaria
Lingua audio secondaria
Lingua del sistema
Italiano
Italiano
Lingua sottotitoli primaria
Lingua sottotitoli secondaria
Lingua televideo primaria
Lingua televideo secondaria
Italiano
Italiano
Italiano
Italiano
Italiano
Usare i tasti a o b per evidenziare la voce
menu che si desidera regolare, quindi
premere
_
o ` per procedere all’impostazione.
Note:
• “Lingua sistema” (System Language)
determina la lingua del menu a schermo.
• “Lingua
Audio” (Audio Language) si riferisce
al sono
ro dei canali.
• Le impostazioni primarie hanno la massima
priorità in caso di trasmissioni eseguibili
secondo varie impostazioni. Le impostazioni
secondarie rappresentano le alternative in
caso di prime opzioni non disponibili.
Impostazioni genitori
Alcuni canali trasmettono del materiale che non
si desidera sia visto dai membri più piccoli della
famiglia. Ogni canale può essere ‘bloccato’ in
modo che non possa essere selezionato per

Italiano - 29 -
la visualizzazione senza che sia prima inserito
un codice PIN di quattro lettere. In questo modo,
ogni canale non adatto per gli spettatori più
giovani può essere protetto.
Questa funziona attiva o disattiva il sistema
di protezione del menu e consente di
modificare il codice PIN.
Usare il tasto
a
o b per evidenziare “Impostazioni
genitori” (Parental Settings). Premere il tasto OK
per entrare nel menu “Impostazioni genitori”
(Parental Settings). Viene visualizzata una casella
di dialogo per la chiave di blocco:
Immetti chiave di blocco
All’inizio c’è solo una chiave impostata su “0000”
Inserire la chiave di blocco. Se viene inserita una
chiave di blocco errata, sullo schermo compare
il messaggio che segue e si torna indietro.
Chiave di blocc o errata
Se è corretta, viene visualizzato il menu
“Impostazioni genitori” (Parental Settings) che
comprende le seguenti voci:
Menu blocco
Off
Impostazione chiave di blocco
Blocco adulti
Età 5
Usare il tasto a o b per evidenziare la voce
che si desidera regolare.
Blocco adulti
Usare i tasti
_
o ` per impostare il “Blocco
adulti” (Maturity Lock). Da questa posizione è
possibile impostare/reimpostare il blocco del
“Menu principale” (Main menu) o del “Menu
installazione” (Installation menu) per
restringerne l’accesso.
Se il blocco menu è disattivato, ci sarà libero
accesso al sistema menu.
Off : tutti i menu sono sbloccati.
Menu principale (Main Menu): Si può
a
cce
dere al menu principale solo con la
corretta chiave di blocco. Quindi, l’utente non
può aggiungere, cancellare, rinominare,
spostare i canali né impostare i timer.
Installazione (Installation): Il “Menu
installa
zione” (Installation menu) è bloccato,
quindi l’utente non può aggiungere canali.
Le modifiche saranno aggiornate dopo
l’uscita dal “Menu Configurazione”
(Configuration Menu).
Impostazione chiave di blocco (Set Lock Key)
Anche in questo menu è possibile modificare
la
chia
ve di blocco e impostare la modalità
blocco genitori.
Impostazioni ora
Nel “Menu configurazione” (Configuration
menu), evidenziare la voce “Impostazione ora”
(Time Settings) premendo il tasto a o b.
Premere OK e il sottomenu “Impostazione ora”
(Time Settings) viene visualizzato sullo
schermo.
Impostazione del fuso orario
Fuso orario
Ora attuale
14:26
Auto
GMT +0
Usare il tasto a o b per evidenziare
“Impostazioni fuso orario” (Time Zone
Settings). Selezionare il fuso orario usando i
tasti
_
o `. Può essere impostato su “AUTO”
o “MANUALE” (MANUAL). Quando si
sele
ziona AUTO, le opzioni “Ora corrente”
(Current Time) e “Fuso orario” (Time Zone)
non possono essere impostate.
Se come impostazione del fuso orario si
seleziona “MANUALE” (MANUAL), il fuso
orario può essere modificato.
• Premendo il tasto
a
o b, selezionare “Fuso
orario” (Time Zone) Usare i tasti
_
o ` per

Italiano - 30 -
modificare il fuso orario da GMT-12 a GMT+12.
L’ora corrente sulla parte alta del menu
cambierà secondo il fuso orario selezionato.
Aggiornamento ricevitore
IDTV può essere aggiornato attraverso il menu
configurazione a cui si accede dal menu
principale. Premendo il tasto
a
o b,
selezionare “Aggiornamento ricevitore”
(Receiver Upgrade):
Configurazione
Modalità Preferiti
Elenco canali
Impostazioni della lingua
Impostazioni dell' ora
Upgrade Ricevitore
i
Eventuali e varie
Solo Tv
V.5.9 (EU)
Off
Impostazioni protez ione bambini
OK
Ricerca aggiornamenti
Paese Italia
4
A
rte
MENU
Nel “Menu configurazione” (Configuratio
menu), evidenziare “Aggiornamento
ricevitore” (Rec
eiver Upgrade) premendo il
tasto
a
o b e premere “OK” per avviare il
processo di aggiornamento. Sullo schermo
compare il seguente menu.
Upgrade software
Ricerca p er aggiornamento. Attendere o
premere MENU per cancellare.
Ava nza me n t o ric erc a:
Alla fine della ricerca compare il messaggio
“Ricerca completata per l’aggiornamento.
Ness
un nuovo software trovato” (Completed
sear
ching for upgrade. No new software was
found) se non è stato trovato alcun nuovo software.
Timer
Visualizzare il menu principale premendo il
tasto M. Evidenziare la linea “Timer” (Timers)
premendo il tasto a o b e premere OK per
visualizzare il menu timer.
Menu principale
Elenco canali
Installazione
Configurazione
Timer
Impost. TV
Interfaccia comune
Possono essere impostati sino a cinque
eventi con timer distinti e ciascuno è
visualizzato sulla schermata “Timer
programmazione” (Programme Timers) ,
mostrando il numero dell’evento, il canale che
deve essere selezionato, l’ora di inizio, l’ora
di fine, la data e la modalità – se quell’evento
è attivo (e quando sarà attivato) oppure no.
MENU
Timer programmi
Nessun nome programma
1. ITV 1 20:00 21:00 12/05/2005 Inattivo
2. BBC ONE 00:00 00:00 01/01/2005 Inattivo
3. BBC ONE 00:00 00:00 01/01/2005 Inattivo
4. BBC ONE 00:00 00:00 01/01/2005 Inattivo
5. BBC ONE 00:00 00:00 01/01/2005 Inattivo
6. BBC ONE 00:00 00:00 01/01/2005 Inattivo
Sposta/Modifica
Uscita
Modifica timer
OK
10:42
04/07/2005
Inizio Fine Data Modalità
i
Eventua li e va rie
• Per impostare un evento, evidenziare il tasto
della modalità usando i tasti
a
o b, e
premere OK per visualizzare la finestra di
inserime
nto del timer.
Tipo:
Nome:
Inizio:
Fine:
Data:
Modalità:
TV
3. ITV
00:00
00:00
03/06/2005
Una sola volta
• Qui possono essere configurate le sei
impostazioni del tipo e del nome del canale,

Italiano - 31 -
l’ora di inizio, l’ora di fine, la data e la modalità
di frequenza. È possibile spostarsi
liberamente tra ciascuna impostazione,
usando i tasti
a
o b.
• Il tipo di canale si imposta utilizzando il tasto
_
o `. Esso consente di visualizzare i canali
solo del tipo selezionato.
• Il nome del canale è impostato usando i
tasti
_
o `, per visualizzare il canale che
trasmette il programma.
• L’ora di inizio, l’ora di fine e la data sono tutte
impostate con i tasti numerici del
telecomando, nel formato a 24 ore.
• La modalità di frequenza stabilisce con
quale frequenza il ricevitore attiva questo
evento ed è impostata con i tasti
_
o ` a “Una
volta”, “Tutti i giorni” o “Ogni settimana”
(Once, Daily, Weekly).
“Suggerimento
Se viene inserito un num ero non valido
per le ore di avvio e di termine, sullo
schermo compare il messaggio
“Entered time is not valid” (numero inserito
non valido).
Impostazione TV
È possibile usare questa voce per visualizzare
le funzioni della TV.
Si accede alla schermata del menu
“Impostazione TV digitale” (digital TV Setup) dal
menu principale. Premere il tasto M per
visualizzare il menu principale e il tasto
a
o
b
per evidenziare “Impostazione TV” (TV Setup).
Premere il tasto OK per visualizzare la schermata
del men
u “Impostazione TV” (TV Setup).
Menu principale
Elenco canali
Installazione
Configurazione
Timer
Impost. TV
Interfaccia comune
Spiegazioni dettagliate per tutte le voci del
menu si trovano alla sezione “Sistema menu
TV analogica”.
Interfaccia comune
Premere il tasto M per visualizzare il menu
principale e il tasto
a
o b per evidenziare
“Interfaccia comune” (Common Interface) e
premere il
tasto OK.
Menu principale
Elenco canali
Installazione
Configurazione
Timer
Impost. TV
Interfaccia comune
Per vedere i canali delle trasmissioni del
digitale terrestre è necessario abbonarsi ad
una società di canali a pagamento.
Bisogna ricevere il modulo di accesso
condizionato (CAM) e la scheda abbonandosi
ad una società di canali a pagamento, poi

Italiano - 32 -
inserire il tutto nella TV usando la procedura
che segue.
• Spegnere la TV e staccarla
dall’alimentazione di rete.
• Inserire la CAM e la scheda nell’apertura
situata nella copertura terminale sulla
sinistra della TV (guardando dalla parte
anteriore).
• La CAM deve essere inserita correttamente,
non è possibile inserirla al contrario. La CAM
o il terminale della TV possono subire danni
se la CAM medesima è inserita a forza.
• Collegare la TV all’alimentazione di rete,
accendere ed attendere qualche secondo
fino a che la scheda si attiva.
• Alcune CAM richiedono la seguente
impostazione. Impostare la CAM accedendo
al menu “IDTV”, “Interfaccia comune”
(Common Interface) e poi premendo OK. (Il
me
nu “im
postazione CAM” (CAM setup) non
è visualizzato se non è richiesto).
• Per vedere le informazioni di contatto:
•Accedere a IDTV premere il tasto M, quindi
evidenziare “Interfaccia
comune” (Common
Interface)
e premere OK.
• Se non è inserito alcun modulo, sullo
schermo compare il messaggio “Nessun
modulo int
erfaccia comune rilevato” (No
Common Int
erface module detected).
• Pe
r dettagli sull’impostazione vedere il
manuale di istruzioni del modulo.
NOTA: Inserire o rimuovere il modulo CI solo
quan
do la TV si trova in modalità
STAND-BY o è SPENTA.
Navigazione nel sistema menu
MENU TV/DTV
OK
Per visualizzare
le opzioni menu
Per navigare
Per confermare le scelte
• Premere MENU per visualizzare il menu
principale.
• Premere il tasto
o per selezionare una
icona. Premere
o OK per altre opzioni.
• Usare il tasto
o per evidenziare.
• Premere il tasto
o per cambiare
l’impostazione. Premere OK per impostare
come pr
edefinito.
• Per uscire dal menu o tornare dalla
schermata del sotto-menu, premere MENU.
Nota: Queste spiegazioni sono valide per la
n
avigazi
one in tutto il sistema menu.
Per selezionare le opzioni spiegate
nelle parti che seguono, fare riferimento
a “Navigazione nel sistema menu”.

Italiano - 33 -
Mappa menu TV analogica
FUNZIONE
Timer riposo Off
Lingua Italiano
Chiave bambino Off
Colore menu Grigio
Mod favoriti Off
Indietro: Menu Esci: TV
INSTALLAZIONE
Programma zione
A.P.S.
Area televideo Europa Occident.
Tabella Programmi
Indietro: Menu Esci: TV
IMMAGINE
Modo Immagine Utente
Luminosita
Contrasto
Colore
Definizione
Indietro: Menu Esci: TV
SUONO
Volume
Bilancia. 0
Modo Suono Stereo
AVL On
Effetto Off
Indietro: Menu Esci: TV
MENU SUONO
(SOUND)
MENU IMMAGINE (PICTURE)
MENU FUNZIONI
(FEATURES)
MENU INSTALLAZIONE
(INSTALL)
-Volume
- Bilanciamento (Balance)
- Modalità suono (Sound Mode)
-AVL
- Effetto (Effect)
- Equalizzatore (Equalizer)
- Modalità (Mode)
- Volume HP
- Memorizza (Store)
- Modalità immagine (Picture Mode)
-Luminosità (Brightness)
- Contrasto (Contrast)
- Colore (Colour)
- Nitidezza (Sharpness)
- Temp colore (Colour Temp)
- Illuminazione ambiente (Room Lightning)
- Zoom immagine (Picture zoom)
- Memorizza (Store)
- Timer spegnimento (Sleep Timer)
-Lingua (Language)
-Blocco bambini (Childlock)
- Colore menu (Menu Colour)
-Modalità preferita (Favorite Mode)
- Programmazione (Programming)
- Programma (Programme)
- Banda (Band)
- Canale (Channel)
- Standard
- Sistema colore (Colour System)
- Ricerca (Search)
- Modalità VCR (VCR Mode)
- Decoder
- Memorizza (Store)
-APS
- Sistema Programmazione Automatica
(Auto Programming System)
-Regione televideo (Txt Region)
- Tabella programmi (Program Table)

Italiano - 34 -
Sistema menu TV analogica
Menu Suono
Volum e
Una volta entrati nel menu suono, prima
opzione selezionata è Volume. Premere il
tasto
_
/ ` per modificare il livello di volume.
Bilanciamento
Questa impostazione si usa per enfatizzare il
bilanciamento dell’altoparlante sinistro o destro.
Premendo il tasto
o selezionare
“Bilanciamento”. Premere il tasto
_
/ ` per
modificare il livello di bilanciamento. Il livello di
bilanciamento può essere regolato tra -32 e + 32.
Modalità suono
Premere il tasto o per selezionare
“Modalità suono”. Premendo il tasto
_
/ `, è
possibile selezionare la modalità Mono,
Stereo,
Dual I o Dual II, solo se il canale
selezionato supporta
quella modalità.
AV L
La funzione “Limitazione automatica volume”
(Automatic Volume Limiting (AVL)) regola il suono
per ottenere il livello di produzione fissa tra i
programmi (per esempio gli spot pubblicitari
tendono ad avere un audio più alto dei programmi).
Premendo il tasto
o selezionare AV LVL
Premere il tasto
_
/ ` per impostare AVL su
Acceso o Spento.
Effetto
Se si guarda una trasmissione mono, attivare
“Effetto” per ottenere un miglior effetto audio,
più simi
le a quelo stereo.
Se l’audio corrente è stereo, l’attivazione di
questo effetto produrrà un effetto più spaziale.
Premendo il tasto
o selezionare “Effetto”.
Premere il tasto
_
/ ` per impostare Effetto su
Acceso o Spento.
Equalizzatore
Premendo il tasto o selezionare
“Equalizzatore”. Premere il tasto
_
/ ` per
cambiare l’impostazione dell’equlizzatore. Nel
menu equalizzatore, le modalità possono
essere “Normale, parlato, musica, personale
e jazz” (Fl
at, Speech, Music, Personal e Jazz).
Selezionare la frequ
enza desiderata con il tasto
/ e aumentare o diminuire lil guadagno di
frequenza, premendo il tasto
_
/ `.
Nota: Le impostazioni del menu equalizzatore
possono essere cambiate solo quando la
modalità è personale.
Volume cuffia
Per regolare il livello del volume premere il
tasto
o per selezionare Volume cuffia.
Premere il tasto
_
/ ` per modificare il livello
di volume cuffia.
Memorizza
Premendo il tasto a / b, selezionare
“Memorizza”. Premere il tasto
`
o OK (SELECT)
per memorizzare le regolazioni. “Memorizzato”
sarà visualizzato sullo schermo.

Italiano - 35 -
Illuminazione ambiente
Premendo il tasto / , selezionare
”Illuminazione ambiente”. Premere il tasto
_
/
`
per impostare l’illuminazione ambiente su
“Normale, Luminoso o Filmato”.
Zoom immagine
Premendo il tasto / selezionare “Zoom
immagine”. Usare i tasti
_
/ ` per modificare
lo zoom dell’immagine in “Automatico, 4:3,
16:9, cinem
a o sottotitoli” (Auto, 4:3, 16:9,
Cinema o Subtitle).
Memorizza
Premendo il tasto / , selezionare
“Memorizza”. Premere il tasto
`
o OK (SELECT)
per memorizzare le impostazioni.
“Memorizzat
o” sarà visualizzato sullo schermo.
Menu Funzioni
Timer riposo
Premere il tasto o per selezionare “Timer
riposo”. Premere il tasto
_
/ ` per impostare il
timer di spegnimento.
Il timer può essere programmato tra Spento
e 120 minuti in fasi di 10 minuti.
Se viene att
ivato il timer di spegnimento, alla
fine
del tempo selezionato, la TV va
automaticamente in modalità stand-by.
Menu Imagine
IMMAGINE
Modo Immagine Utente
Luminosita
Contrasto
Colore
Definizione
Indietro: Menu Esci: TV
Modalità immagine
Per le proprie esigenze di visualizzazione, si
può impostare la relativa opzione di modalità.
Prem
ere il tasto
o per selezionare
“Modalità immagine”. Premere il tasto
o
per scegliere una di queste opzioni.
“Luminoso, standard, tenue, manuale”.
Luminosità/contrasto/colore/nitidezza/
tinta
Premere il tasto o per evidenziare
l’opzione desiderata. Premere il tasto
_
/
`
per impostare il livello.
Suggerimento: “Tinta” (Tint (Hue)) viene
visualizzato nel menu immagine
quando l’apparecchio TV riceve un
segnale NTSC.
Temp colore
Premendo il tasto o , selezionare “Temp
colore”. Premere il tasto
_
/ ` per scegliere una
di queste opzioni. “Freddo, Normale e Caldo”.
Nota:
• L’impostazione dell’opzione Cool dà ai
bianchi una leggere accentazione blu.
• L’imp ostazione dell’opzione Warm dà ai
bianchi una leggere accentazione rossa.
• Per colori normali, selezionare l’opzione
Normal.

Italiano - 36 -
Lingua
Premendo il tasto o , selezionare “Lingua”.
Usare il tasto
_
/ ` per selezionare la lingua.
Chiave bambino
Premendo il tasto o selezionare “Chiave
bambino”.
Premere il
tasto
_
/ ` per impostare il blocco
bambini su Acceso o Spento. Quando è
sele
zionato Acceso, l’apparecchio TV può
solo
essere controllato manualmente dal
telecomando. In tal caso, i tasti del pannello
frontale (tranne il tasto STANDBY), non
funzion
eranno.
Se viene premuto uno di questi tasti, sullo
schermo comparirà “Blocco bambinbi attivo”
quando
non è visibile la schermata menu.
Colore Menu
Premendo il tasto o , selezionare “Colore
menu”.
Usare il
tasto
_
/ ` per modificare lo sfondo
dei menu in trasparente o grigio.
Mod favoriti
Premere il tasto o per selezionare “Mod
favoriti”.
Usare il
tasto
_
/ ` per impostare la modalità
preferiti su Acceso o Spento (per dettagli
vedere la sezione “Tabella programmi”).
Menu installazione
INSTALLAZIONE
Program mazione
Area telev ideo Eur opa Occident.
Tabella Programmi
Indietro: M enu Esc i: TV
MEMOR. AUTOMATICA
Programmazione
Premendo il tasto / , selezionare
“Programmazione”. Poi premere il tasto
per visualizzare il menu programmazione.
PROGRAMMAZIONE
Programma 4
Banda S
Canale 30
Standard BG
Sistema colore PAL
Indietro: Menu Esci: TV
Programma
Premendo il tasto
/ , selezionare
“Programmazione”.
Premere il tasto
/ per selezionare il
numero del programma. Si può anche inserire
un numero usando i tasti numerici sul
telecomando. Ci sono 100 programmi
memorizzati tra 0 e 99.
Banda
La banda può essere selezionata sia C che
S. Premere il tasto
/ per selezionare la
Banda.
Canale
Premendo il tasto
/ , selezionare Canale. Il
canale può essere cambiato con il tasto
/
o con i tasti numerici.
Standard
Premendo il tasto
/ , selezionare Standard.
Usare il tasto
/ per modificare lo standard
in B/G, D/K, I or L/L'.
Sistema colore
Premendo il tasto
/ , selezionare “Sistema
colore”. Usare il tasto
_
/ ` per cambiare il
sistema colore in PAL, SECAM o AUTO.

Italiano - 37 -
Ricerca
Premendo il tasto
/ , selezionare Ricerca.
Premere il tasto
_
/ ` per avviare la ricerca.
La ricerca si fermerà quando si trova un
segnale.
Note: Se si premono i tasti con spostamenti di una
fase, la frequenza avanza di 0,25 Mhz. Se
però tasti si premono tutti assieme
l’avanzamento sarà automatico. Per
interrompere la ricerca a un certo momento
premere i tasti
/ .
Modalità VCR
Premendo il tasto
/ selezionare “Modalità
VCR”. Usare il tasto
_
/ `per impostare VCR
su Acceso o Spento.
Suggerimento: Se si desidera guardare un
D
VD, si
deve impostare questa voce su
Spento.
Decoder
E’ possibile usare questa modalità per
co
llegare
ogni tipo di decoder al televisore.
Premendo il tasto
/ , selezionare Decoder..
Premere il tasto
/ per impostarlo su
Acceso o Spento.
Quando si passa all’impostazione decoder
Spento, l’uscita EXT-1 sarà annullata. In tal caso,
l’usc
ita EXT-1 non sarà disponibile per
visual
izzare un video. Se è impostata su Acceso,
l’uscita EXT-1 sarà la fonte video selezionata.
Ogni decoder può essere connesso a EXT-1
per decodificare il segnale video richiesto.
Suggerimento: L’impostazione del decoder
dovrebbe essere memorizzata separatamene per
ciascun programma.
Memorizza
Premendo il tasto
a
/ b, selezionare
“Memorizza”(Store). Premere il tasto
OK per
memorizzare le impostazioni. “Memorizzato”
(Stored) sarà visualizzato sullo schermo.
A.P.S.
Premendo il tasto
a
/ b, selezionare A.P.S.
Premere il tasto
per accedere al sottomenu
A.P.S.:
Programmazione Automatica APS
Paese
Italy
Tutti i prog memorizzati
saranno cancelati
Avvio: Ok
Indietro: Menu
Esci: TV
A.P.S. Paese
Premere il tasto / per impostare il paese
(country).
Se si desidera uscire dalla funzione A.P.S.,
premere il tasto
TV
. Per tornare indietro,
premere M.
Quando si pr
eme il tasto OK per avviare A.P.S.,
tutti i progr
ammi memorizzati saranno cancellati
e sarà visualizzata la seguente schermata.
Programmaz ione Automatica APS
Esci: TV
Ogni volta che si preme il tasto TV, la funzione
A.P.S. si interrompe e la tabella programmi
compare sullo schermo.
Se si attende la fine di A.P.S., la tabella

Italiano - 38 -
programmi viene visualizzata con i programmi
trovali e localizzati.
Regione televideo
Premendo il tasto a / b, selezionare “Regione
televideo” (Txt. region) . Premendo il tasto
/ , selezionare la regione del televideo. Ci
sono cinque opzioni da scegliere: “Europa
occidentale, Europa orientale, Turco/greco,
cirillico e arabo/e
braico” (West Europe, East
Europe, Turk/Gre, Cyrillic e Arabic/Hebrew).
Menu installazione in modalità AV
La schermata che segue compare nel menu
installazione:
INSTALLAZIONE
Prog rammazione
Area telev ideo Europa Occident.
Indietro: Menu
Esci: TV
Programmazione
Premendo il tasto
a
/ b, selezionare
“Programmazione” (Programming). Dopo
aver
premuto il tasto
il menu
programmazione compare sullo schermo.
PROGRAMMAZIONE
Sistema colore PAL
Modo VCR
Memorizza
Off
Indietro: Menu Esci: TV
Sistema colore
Premendo il tasto
a
/ b, selezionare
“Sistema colore” (Colour System). Premere
il tasto / per cambiare il sistema colore
in PAL, SECAM o AUTO.
Tabella programmi
Tabella Programmi
P01
P01 BBC 1
P02 C 04
P03 P13
P12
P11
P04 P14
P05 P15
P06 P16
P07 P17
P08 P18
P09 P19
P10 P20
Cancella
Nome
Sposta
APS
Esci: TV
La tabella programmi elenca i canali salvati
in memoria. Muovendo il cursore in quattro
direzioni, è possibile raggiungere 20
programmi nella stessa pagina. E’ anche
possibile scorrere in alto e in basso per
vedere tutti i programmi in modalità TV
premendo i tasti di navigazione. Per mezzo
del cursore, la selezione dei programmi è
fatta automaticamente.
Nome
Per cambiare il nome di un programma,
sele
zionare il programma desiderato e
premere il tasto GIALLO.
La prima lettera del nome selezionato inizia a
lampeggiare. Premere il tasto
a
/ b per
cambiare quella lettera e il tasto
_
/ ` per
selezionare le altre lettere. Premendo il tasto
GIALLO, è possibile memorizzare il nome.
Sposta
Selezionare il programma che si desidera
inserire
con i tasti di navigazione. Premere il
tasto VERDE. Per mezzo dei tasti di
navigazione, spostare il programma
selezionato allo spazio del programma
stabilito e premere ancora il tasto VERDE.

Italiano - 39 -
Cancella
Per cancellare un programma, premere il
tasto ROSSO. Premendo ancora il tasto
ROSSO si elimina il programma selezionato
dall’elenco dei programmi, e i programmi di
sotto si spostano di uno verso l’alto.
APS
Quando si preme il tasto BLU per APS, sullo
schermo
il menu APS.
Modalità preferiti
È possibile impostare vari canali come
preferiti
in modo che si navighi tra loro. Per
impostarne uno preferito, usare i tasti di
navigazione per selezionare un canale e
premere
. Un canale selezionato come
preferito compare nella tabella programmi
con una icona dei preferiti ( ) sullo sfondo
del nome del canale. Per eliminare in canale
preferito, eseguire la stessa operazione. Per
uscire premere M.
Blocco Programma
Blocco programma
Immetti PIN
Cambio PIN
Indietro: Menu Esci: TV
Il blocco di un programma dà un accesso
protetto da password ai canali selezionati dai
genitori. Per bloccare un canale, bisogna
conoscere la password del blocco
programma (il cui valore predefinito in
fabbrica è 0000 e che può essere modificata
solo ne
l menu “Blocco programma”.
Inserimento PIN
Selezi
onare il canale che si desidera bloccare
evidenziandol
o e premere il tasto
. Quando
viene premuto il tasto
, sullo schermo
comparirà il menu Program lock. Dopo aver
inserito il codice pin, il canale desiderato sarà
bloccato. L’icona del blocco programma
comparirà accanto al nome del canale.
Quando il canale bloccato viene selezionato
con i tasti P+ o P-, sullo schermo compare il
seguente avvertimento:
Programma bloccato
Per sbloccare questo progr
da tabella programmi
Modifica PIN
Premendo il tasto
/ , selezionare “Modifica
PIN”. Usare il tasto
per cambiare il codice
PIN. Dopo aver premuto il tasto
, il seguente
messaggio compare sullo schermo.
Blocco programma
Immetti PIN preced.
Indietro: Menu Esci: TV
Inserire il vecchio codice PIN con i tasti
numerici e poi il nuovo codice PIN. Sullo
schermo sarà visualizzato il menu Program
Lock quando si inserisce il nuovo codice PIN.
Blocco programma
Immetti nuovo PIN
Indietro: Menu Esci: TV
Il menu Program Lock verrà visualizzato di nuovo
subito dopo l’identificazione del nuovo PIN.
Suggerimento: Se ci si dimentica la password del
blocco programma, il blocco può
essere disattivato usando il codice
7910 e si può impostare una nuova
password da usare in seguito. Tenere quindi questo codice in un luogo
sicuro per futuro riferimento.
Visualizzazione delle
informazioni TV
“Numero Programma, Nome Programma,
Indicatore Suono e Modalità Zoom”sono
visu
alizzate sullo schermo quando un è
inserito nuovo programma o si preme il tasto
INFO.

Italiano - 40 -
Funzione muto
Premere il tasto per disattivare il suono.
L’indicatore mute sarà visualizzato nella parte
alta dello schermo.
Per cancellare mute, ci sono due alternative;
la prima è premere il tasto
e la seconda è
aumentare il livello del volume.
Preferenze personali
Premere il tasto PP per adottare le
impostazioni memorizzate in precedenza.
Modalità zoom
È possibile modificate il rapporto di aspetto
della TV per visualizzare l’immagine in diverse
modalità di zumata.
Prem ere il tasto WIDE per cambiare
direttamente la modalità di zumata. Le
modalità di zumata disponibili sono elencate
sotto.
Auto
Quando un segnale WSS “Segnalazione
schermo ampio” (Wide Screen Signalling),
che most
ra la proporzione dell’immagine, è
presente nel segnale di trasmissione o il
segnale da un dispositivo esterno,
l’apparecchio TV cambia automaticamente la
modalità ZOOM a seconda del segnale WSS.
• Quando la modalità AUTOMATICO non
funziona correttamente a causa della scarsa
qualità del segnale WSS o quando si
desi
dera cambiare la modalità ZOOM,
cambiare ad un’altra modalità ZOOM
manualmente.
4:3
Usare per visualizzare una immagine
normale (rapporto di aspetto 4:3) come se
fosse la sua dimensione originaria.
16:9
Questo estende in modo uniforme i lati
sinistro e destro di una immagine normale
(rapporto di aspetto 4:3) fino a riempire
completamente lo schermo TV.
• Per le immagini con rapporto di aspetto 16:9
che sono state ridimensionate in
un’immagine normale (rapporto di aspetto
4:3), usare la modalità 16:9 per ripristinare
l’immagi
ne alla sua forma originale.
Cinema
Questo zooma la larghezza dell’immagine
(rapporto di aspetto16:9) allo schermo pieno.
Sottotitolo
Questo zooma la larghezza dell’immagine
(rapporto di aspetto 16:9) con i sottotitoli allo
schermo pieno.

Italiano - 41 -
Televideo
Il sistema televideo trasmette sulla TV
informazioni quali notizie, sport e previsioni
del tempo. Notare che se il segnale diventa
insufficiente si potrà uscire dalla modalità
televideo.
tasti funzione del televideo sono elencati di
seguito:
“Televideo Acceso-Spento /modalità PAT”
Attiva la modalità televideo quando è premuto
una volta.
Premendo questo tasto, lo schermo
sarà diviso in due finestre una che visualizza
il televideo e l’altra che visualizza il canale
corrente. Premere nuovamente il tasto per
uscire dalla modalità televideo.
“Indice”
Seleziona la pagina dell’indice del televideo.
“Misto”
Mette la schermata televideo al di sopra del
progr
amma.
“Allarga”
Premere una volta per allargare la metà
superiore
della pagina e premere di nuovo
per allargare la metà inferiore. Premere
ancora per tornare alla dimensione normale.
“Mostra”
Mostra informazioni nascoste (per esempio
soluzioni
di giochi)
“Fermo”
Ferma una pagina quando serve. Premere di
nuovo per
riiprendere.
“Pagine sub-codice / ora”
Seleziona le pagine di sub-codice se
disponibili, quando il televideo è
attivo. Quando
il televideo non è attivo, visualizza l’ora se il
programma non ha trasmissione televideo.
P+ / P- e numeri (0-9)
Premere per selezionare una pagina.
Nota: La maggior parte delle stazioni TV usando il
codice 100 per le pagine dell’indice.
Tasti colorati
(ROSSO/VERDE/GIALLO/BLU)
L’apparecchio TV supporta i sistemi FASTEXT e
TOP text. Quando questi sistemi sono disponibili,
le pa
gine sono divise per gruppi o argomenti.
Quando è disponibile il sistema FASTEXT, le
sezioni della pagina del televideo sono codificate
a colore e possono essere selezionate
premendo i tasti colorati. Premere il tasto colorato
corrispondente alle proprie richieste.
Compaiono le scritte colorate che mostrano
quali tasti colorati usare quando è presente
la trasmissione TOP text. Premendo P - o
P + i comandi richiederanno la pagina
successiva
o precedente rispettivamente.
Suggerimenti
Pulizia dello schermo
Pulire lo schermo con un panno soffice
leggermente umido. Non utilizzare solventi
abrasivi poiché potrebbero danneggiare il
rivestimento esterno dello schermo del televisore.
Per sicurezza, staccare la spina dalla rete
quando si pulisce l’apparecchio. Quando si
sposta la TV tenerla corretttamente dal basso.
Persistenza dell’immagine
Notare che può presentarsi l’effetto fantasma
se si visualizza un’immagine persistente. La
persistenza dell’immagine della TV LCD può
scomparire dopo breve tempo. Provare a
spegnere la TV per un po’.
Per evitarlo, non lasciare lo schermo con
immagine ferma per lunghi periodi.
Nessuna accensione
Se la TV non si accende, verificare il cavo di
alimentazione e la connessione con l’uscita
della presa di rete.

Italiano - 42 -
Immagine di scarsa qualità
E’ stato selezionato il sistema TV corretto?
L’apparecchio TV o l’antenna della casa sono
situati troppo vicino a dotazioni audio senza
messa a terra o a luci al neon, ecc.?
Montagne o palazzi alti possono causare uno
sdoppiamento delle immagini o delle ombre
attorno all’immagine. A volte è possibile
migliorare la qualità dell’immagine
modificando la direzione dell’antenna.
L’immagine o il televideo sono irriconoscibili?
Controllare se è stata inserita la frequenza
corretta.
La qualità dell’immagine può risultare
scadente quando vi sono due apparecchiature
contemporaneamente collegate al televisore.
In tal caso, scollegare una delle periferiche.
Nessuna immagine
L’antenna è stata collegata in modo corretto?
Gli spinotti sono inseriti a fondo nella presa
per antenna? Il cavo dell’antenna è
danneggiato? Sono state usate le spine
giuste per collegare l’antenna? In caso di
dubbio, contattare il rivenditore.
Nessuna Immagine significa che la TV non
rice
ve alcuna trasmissione. Sono stati
selezionati i tasti giusti sul telecomando?
Provare ancora una volta.
Suono
Non si sente alcun suono. E’ stato forse
interrotto il suono, premendo il tasto
?
Il suono proviene solo da uno degli
altoparlanti. Il bilanciamento è impostato solo
ad un estremo? Vedere il menu audio.
Telecomando
L’apparecchio TV non risponde più al
telecomando. Le batterie potrebbero essere
esaurite. Se è così è possibile ancora usare
i tasti locali nella parte posteriore
dell’apparecchio TV.
Fonti ingresso
Se non è possibile selezionare una fonte di
ingresso è possibile che non sia collegato
alcun dispositivo.
Controllare i cavi AV e le connessioni se si è
cercato di collegare un dispositivo.
Modulo CI
Se si è verificato un problema con il modulo
CI, è possibile che questo non sia stato
inserito correttamente. Rimuovere la scheda
CI dal dispositivo e reinserirla.
Se il problema persiste, può darsi che il
dispositivo non riconosca il modulo CI.
Provare a inserire un altro modulo CI.

Specifiche PALCO19/L02
TRASMISSIONE TV
PAL/SECAM B/G D/K K’ I/I’ L/L’
CANALI RICEVENTI
VHF (BAND I/III)
UHF (BAND U)
HYPERBAND
TV VIA CAVO (S1-S20/S21-S41)
NUMERO DI CANALI PREIMPOSTATI
100
INDICATORE DI CANALE
Display sullo schermo
INGRESSO ANTENNA RF
75 Ohm (non bilanciato)
TENSIONE OPERATIVA
220-240V AC, 50 Hz.
AUDIO
German + Nicam Stereo
ALIMENTAZIONE USCITA AUDIO (WRMS.)
(10% THD)
2x2W
CONSUMO ENERGETICO (W)
60 W
Meno di 1W (Standby)
PANNELLO
Ampio monitor da 19"
DIMENSIONI (m m )
P L H Peso
155 457 365 5.75
Con base
77 457 330 5.5
Senza
base
Specifiche PALCO22/L02
TRASMISSIONE TV
PAL/SECAM B/G D/K K’ I/I’ L/L’
CANALI RICEVENTI
VHF (BAND I/III)
UHF (BAND U)
HYPERBAND
TV VIA CAVO (S1-S20/S21-S41)
NUMERO DI CANALI PREIMPOSTATI
100
INDICATORE DI CANALE
Display sullo schermo
INGRESSO ANTENNA RF
75 Ohm (non bilanciato)
TENSIONE OPERATIVA
220-240V AC, 50 Hz.
AUDIO
German + Nicam Stereo
ALIMENTAZIONE USCITA AUDIO (WRMS.)
(10% THD)
2x5W
CONSUMO ENERGETICO (W)
65 W
Meno di 1W (Standby)
PANNELLO
Ampio monitor da 22"
DIMENSIONI (m m )
P L H Peso
155 525 406 4.80
Con base
80 525 307 4.50
Senza
base
Italiano - 43

Italiano - 44 -
Specifiche Pin
Specifiche pin connettore HDMI
Pin Segnale ingre sso Pin Segnale ingresso
1 TMDS Dati
2+ 11 Scudo orologio TMDS
2 TMDS scudo dati2 12 Orologio TMDS
3 TMDS Dati 2- 13 CEC
4 TMDS Dati 1+ 14 Riservato (N.C. su dispositivo)
5 TMDS scudo dati1 15 SCL
6 TMDS Dati1- 16 SDA
7 TMDS Dati0+ 17 DDC/CED terra
8 TMDS scudo dati0 18 Potenza +5V
9 TMDS Dati0- 19 Rilvamente spina calda
10 Orologio TMDS +
Specifiche pin connettore SCART
Pin Segnale ingre sso Pin Segna le ingresso
1AUDIO
OUT (DESTRA) 12 Non in uso
2 AUDIO IN (DESTRA) 13 RGB-R TERRA
3 AUDIO OUT (SINISTRA/MONO) 14 GND
4 AUDIO TERRA 15 RGB-R / S.VHS CROMINANZA IN
5 RGB-B TERRA 16 SEGNALE BLANKING
6 AUDIO IN (SINISTRA/MONO) 17 VIDEO COMPOSITO TERRA
7 RGB-B IN 18 SEGNALE BLANKING TERRA
8
TERRUTTORE AUDIO / RGB / 1
6
19 USCITA VIDEO COMPOSITO
9 RGB-G TERRA 20 VIDEO COMPOSITO / LUMINANZA S.VHS IN
10 Non in uso 21 TERRA / SCUDO (TELAIO)
11 RGB-G IN

English - 45 -
Contents
Features ............................................................. 47
Accessories ....................................................... 47
Introduction ......................................................... 48
Preparation ......................................................... 48
Safety Precautions ............................................. 48
Power Source ................................................ 48
Information for Users in European Union
Countries ........................................................ 49
LCD Screen .................................................... 50
Overview of the Remote Control ........................ 51
LCD TV and Operating Buttons .......................... 52
Viewing the Connections ................................... 53
Power Connection .............................................. 55
Aerial Connection ............................................... 55
Connecting to a DVD Player ............................... 56
Using Other Connectors ..................................... 57
Connecting Other Equipment via Scart ............... 58
Inserting Batteries in the Remote Control Handset . 59
Operating Range for the Remote Control ............ 59
Switching the TV On/Off .................................... 60
To Switch the TV On ...................................... 60
To Switch the TV Off ...................................... 60
Input Selection .................................................... 60
Basic Operations ................................................ 61
Operation with the Buttons on the TV ............ 61
Volume Setting ............................................ 61
Programme Selection .................................. 61
Entering Main Menu ..................................... 61
AV Mode ..................................................... 61
Operation with the Remote Control ................. 61
Volume Setting ............................................ 61
Programme Selection (Previous or Next
Programme)................................................. 61
Programme Selection (Direct Access) ........ 61
Initial Settings ...................................................... 62
General Operation .............................................. 63
Information Banner ......................................... 63
Electronic Programme Guide (EPG) ................. 63
Over Air Download ..................................... 64
Displaying the Subtitles ................................... 65
Teletext ........................................................... 65
IDTV Menu System ............................................. 65
Channel List .................................................... 65
Navigating the Entire Channel List ............... 65
Moving the Channels in the Channel List ..... 65
Deleting the Channels in the Channel List ... 66
Renaming channels ..................................... 66
Adding Locks to Channels .......................... 66
Setting Favourites ....................................... 67
How to Add a Channel to a Favourites List . 67
Removing a Channel from a Favourite List .. 67
Using BLUE Button to Navigate through the
Favourite Channels ..................................... 67
On Screen Help ........................................... 67
Installation ....................................................... 68
Automatic Search ....................................... 68
Manual Search ............................................ 69
Clear Service List (*) ................................... 69
First Time Installation ................................... 69
Configuration .................................................. 70
Favourite Mode ........................................... 70
Channel List ................................................ 70
AC3 Audio (Optional) (*) ............................. 70
Hard of Hearing (*) ...................................... 71
Language Settings ...................................... 71
System Language ....................................... 71
Audio Language.......................................... 71
Subtitle Language ....................................... 71
Language Settings ...................................... 71
Parental Settings ......................................... 71
Maturity Lock ........................................ 72
Set Lock Key ........................................ 72
Time Settings............................................... 72
Receiver Upgrade ....................................... 72
Timers ............................................................. 73
TV Setup......................................................... 73
Common Interface ........................................... 74
Navigating the Menu System .............................. 74
Analogue TV Menu Map ..................................... 75
TV Menu System ................................................ 76
Sound Menu.................................................... 76
Volume ........................................................ 76
Balance ....................................................... 76
Sound Mode ................................................ 76
AVL ............................................................. 76
Effect .......................................................... 76
Equalizer ..................................................... 76
HP Volume ................................................... 76
Store ........................................................... 76
Picture Menu ................................................... 76
Picture Mode ............................................... 76
Brightness/Contrast/Colour/ ........................ 77
Sharpness/Tint ............................................ 77
Colour Temp ................................................ 77
Room Lighting.............................................. 77
Picture Zoom ............................................... 77
Store ........................................................... 77
Features Menu ................................................ 77
Sleep Timer ................................................. 77
Language .................................................... 77
Child Lock ................................................... 77
Menu Colour ................................................ 77
Favourite Mode ........................................... 77
Install Menu ..................................................... 78
Programming ............................................... 78
Programme............................................ 78
Band ..................................................... 78
Channel................................................. 78
Standard ............................................... 78
Colour System ...................................... 78
Search .................................................. 78

English - 46 -
VCR Mode............................................. 78
Decoder ................................................ 78
Store ..................................................... 78
A.P.S. .......................................................... 79
A.P.S. Country ............................................. 79
Teletext Region ............................................ 79
Install menu in AV modes ............................ 79
Programming ......................................... 79
Colour System ...................................... 79
Program Table ............................................. 79
Name .................................................... 80
Move ..................................................... 80
Delete.................................................... 80
APS (Auto Programming System) ......... 80
Favourite Mode ..................................... 80
Program Lock ........................................ 80
Enter PIN ............................................... 80
Change PIN ........................................... 80
Displaying TV Information ................................... 81
Mute Function ..................................................... 81
Personal Preference .......................................... 81
Zoom Modes ....................................................... 81
Auto ............................................................ 81
4:3 ............................................................... 81
16:9 ............................................................. 81
Cinema ........................................................ 81
Subtitle ........................................................ 81
Teletext ............................................................... 82
Tips .................................................................... 82
Screen Care ................................................... 82
Image Persistence .......................................... 82
No Power........................................................ 82
Poor Picture .................................................... 83
No Picture ....................................................... 83
Sound ............................................................. 83
Remote Control ............................................... 83
Input Sources ................................................. 83
CI Module ........................................................ 83
Specifications ..................................................... 84
Pin Specifications ............................................... 85

English - 47 -
Accessories
ABC DE F GHI
JKL MNO PQR
STU VWX YZ
1 2 3
4 5 6
7 8 9
0
AV
SOURCE EXIT
-/--
INFO
I-II
MENU TV/DTV
P/CH
OK
WIDE GUIDE
PP P<P/SWAP
Remote Controller
Batteries
2 X AAA
Instruction Book
Features
• Remote controlled colour television.
• Fully integrated digital TV (DVB-T).
• 100 programmes from VHF, UHF bands or
cable channels can be preset.
• It can tune cable channels.
• Controlling the TV is very easy by its menu
driven system.
• It has a scart socket for external devices (e.g.
video games, audio set, etc.).
• Stereo sound system (German+Nicam).
• Full function teletext .
• Fastext (10 pages), top text.
• Favourite channel.
• Channel lock.
• Headphone connection.
• A.P.S. (Automatic Programming System).
• All programmes can be named.
• Forward or backward automatic tuning.
• Sleep timer.
• Child lock.
•Automatic sound mute when no transmission.
• NTSC playback.
• AV in is available.
• It has one HDMI connectors for digital video
and audio. This connection is also designed
to accept high definition signals.
• AVL (automatic volume limiting).
• When no valid signal is detected, after 5
minutes the TV switches itself automatically
to standby mode.
• PLL (frequency search)..

English - 48 -
Introduction
Thank you for choosing this product. This
manual will guide you for the proper operation
of your TV. Before operating the TV, please
read this manual throughly.
Please do keep this manual in a safe place
for future references.
Preparation
For ventilation, leave a free space of at least
10 cm all around the set. To prevent any fault
and unsafe situations, please do not place
any objects on top of the set.
Use this device in moderate climates.
Safety Precautions
Please read the following recommended
safety precautions carefully for your safety.
Power Source
The TV set should be operated only from a
220-240 V AC, 50 Hz outlet. Ensure that you
select the correct voltage setting for your
convenience.
Power Cord
Do not place the set, a piece of furniture, etc.
on the power cord (mains lead) or pinch the
cord. Handle the power cord by the plug. Do
not pull out the plug by tugging the cord and
never touch the power cord when your hands
are wet as this could cause a short circuit or
electric shock. Never make a knot in the cord
or tie it with other cords. The power cords
should be placed in such a way that they are
not likely to be stepped on. A damaged power
cord can cause fire or give you an electric
shock. When the power cord is damaged and
needs to be replaced, it should be done by
qualified personnel.
Moisture and Water
Do not use this device in a
humid and damp place
(avoid the bathroom, the
sink in the kitchen, and near
the washing machine). Do
not expose this equipment
to rain or water, as this may
be dangerous and do not place objects filled
with liquids, such as flower vases, on top of
the set. Avoid from dripping or splashing.
If any solid object or liquid falls into the cabinet,
unplug the set and have it checked by qualified
personnel before operating it any further.

English - 49 -
Cleaning
Before cleaning, unplug the
adaptor from the wall outlet.
Do not use liquid or aeresol
cleaners. Use soft and dry
cloth.
Ventilation
The slots and openings on the back cover are
intended for ventilation and to ensure reliable
operation. To prevent overheating, these
openings must not be blocked or covered in
anyway.
Heat and Flames
The set should not be placed
near to open flames and sources
of intense heat, such as an
electric heater. Ensure that no
open flame sources, such as
lighted candles, are placed on top of the set.
Batteries shall not be exposed to excessive
heat such as sunshine, fire or the like.
Lightning
In case of storm and lightning
or when going on holiday,
disconnect the power cord
from the wall outlet.
Replacement Parts
When replacement parts are required, make
sure that the service technician has used
replacement parts, which are specified by the
manufacturer or have the same specifications
as the original one. Unauthorized substitutions
may result in fire, electrical shock or other
hazards.
Servicing
Please refer all servicing to
qualified personnel. Do not
remove the cover yourself as this
may result in an electric shock.
Waste Disposal
Instructions for Waste Disposal
• Packaging and packaging aids are recyclable
and should principally be recycled.
Packaging materials, such as foil bag, must
be kept away from children.
• Batteries, including those which are heavy
metal-free, should not be disposed of with
household waste. Please dispose of used
battery in an environment friendly manner.
Find out about the legal regulations which
apply in your area.
• Cold cathode fluorescent lamp in LCD
PANEL contains a small amount of mercury;
please follow the local laws or regulations
for disposal.
Information for Users in European
Union Countries
This symbol on the product
or on its packaging means
that your electrical and
electronic device should be
disposed at the end of its
service life separately from
your household wastes.
There are separate
collection systems for
recycling in EU.
For more information, please contact the local
authority or the dealer where you purchased
the product.
Disconnecting the Device
The mains plug is used to disconnect TV set
from the mains and therefore it must remain
readily operable.

English - 50 -
Headphone Volume
Excessive sound pressure from
earphones and headphones can
cause hearing loss.
Installation
To prevent injury, this device must be securely
attached to the wall in accordance with the
installation instructions when mounted to the
wall (if the option is available).
LCD Screen
The LCD panel is a very high technology
product with about a million thin film
transistors, giving you fine picture details.
Occasionally, a few non-active pixels may
appear on the screen as a fixed blue, green
or red point. Please note that this does not
affect the performance of your product.
Warning
Do not leave your TV in standby or operating
mode when you leave your house.

English - 51 -
Overview of the Remote Control
*This feature is available in Digital mode only
ABC DEF GHI
JKL MNO PQR
STU VWX YZ
1 2 3
4
5
6
7 8 9
0
AV
SOURCE
EXIT
-/--
INFO
I-II
MENU TV/DTV
P/CH
OK
WIDE GUIDE
PP P<P/SWAP
17
Standby
Direct programme
External Source
Info (program table)
Programme Up / Programme Down
Okay (store) / Select
Cursor buttons
Menu
Green / Picture Menu/Page down/
Subtitle on-off*
Red / Sound Menu/Page Up
Time/Sub-page
Teletext
Mix
Expand/Image size
Previous Programme
Personal preferences
Reveal
Index page/Electronic Programme
Guide (EPG)
Update
Hold
Blue / Install Menu
Yellow / Feature Menu/Audio Language*
Switch to DTV mode
Mono/Stereo - Dual I-II
Volume + / Volume Double Digit
Mute

English - 52 -
LCD TV and Operating Buttons
FRONT VIEW
REAR VIEW
TOP VIEW
Power on/off
TV / AV
MENU
Programme Up / Down
Volume Up / Down

English - 53 -
Viewing the Connections
HDMI Input are for connecting a device that has an HDMI socket.
Your LCD Television is capable of displaying High Definition pictures from devices such as a
High Definition Satellite Receiver or DVD Player. These devices must be connected via the
HDMI sockets or Component Socket. These sockets can accept either 720p or 1080i signals.
No sound connection is needed for an HDMI to HDMI connection. If you use HDMI to DVI
cable, use PC audio in input to enable sound connection.
Audio Line Outs output audio signals to an external device such as an optional sound
system.
To connect the external speakers to your TV, use AUDIO LINE OUTS of the TV with an audio
cable.
Headphone jack is used for connecting an external headphone to the system.
Connect to the HEADPHONE jack to listen to the TV from headphones (optional).
Audio Inputs are used for connecting audio signals of external devices.
Connect the audio cable between the AUDIO INPUTS on the TV and the AUDIO OUTPUT
jacks on your device.
Video Input is used for connecting video signals of external devices.
Connect the video cable between the VIDEO IN socket on the TV and the VIDEO OUT jack on
your device.

English - 54 -
PC sound inputs: Connect the audio cable between the PC SOUND INPUTS on the TV and
the AUDIO OUTPUT jacks on your PC.
CI Slot
CI Slot is used for inserting a CI card. A CI card allows you to view all the channels that you
subscribe to. For more information, see “Common Interface” section.
SCART inputs or outputs for external devices.
Connect the
SCART cable between SCART sockets on TV and SCART socket on your external
device (such as a decoder, a VCR or a DVD player).
Note: If an external device is connected via the SCART sockets, the TV will automatically
switch to AV mode.
RF Input connects to an antenna or a cable.
Note that if you use a decoder or a media recorder, you should connect the aerial cable
through the device to the television with an appropriate antenna cable, as shown in the
illustration below.

English - 55 -
Power Connection
IMPORTANT: The TV set is designed to operate on 220-240V AC, 50 Hz.
• After unpacking, allow the TV set to reach the ambient room temperature before you
connect the set to the mains.
• Plug the power cable to the mains socket outlet.
Aerial Connection
• Connect the aerial or cable TV plug to the AERIAL INPUT socket located at the rear of the TV.
Aerial Input

English - 56 -
Connecting to a DVD Player
If you want to connect a DVD player to your LCD TV, you can use connectors of the TV set. DVD
players may have different connectors. Please refer to your DVD player’s instruction book for
additional information. Power off both the TV and the device before making any connections.
Note: Cables shown in the illustration are not supplied.
• If your DVD player has an HDMI socket, you can connect via HDMI. When you connect to DVD
player as illustrated below, switch to HDMI source. See, “
Input selection” section.
• Most DVD players are connected through RCA SOCKETS. Use a RCA video cable to connect
video input. For enabling audio, use a component audio cable as illustrated below. When
done, switch to EXT2 source. See, “Input selection” section.
• You may also connect through the SCART (EXT1). Use a SCART cable as shown below.
Note: These three methods of connection perform the same function but in different levels of
quality. It is not necessary to connect by all three methods.

English - 57 -
Using Other Connectors
You can connect a range of optional equipment to your LCD TV. Possible connections are
show n below . Note that cables shown in the illustration are not supplied.
• For connecting a camcorder, connect to the VIDEO IN socket and the AUDIO SOCKETS. Do
not connect the camcoder to VIDEO IN socket at the same time since it can cause noise in
the picture. For selecting the related source, see the section “
Input selection” in the following
parts.
• To connect external speakers, use an audio cable. Do not reverse the
AUDIO LEFT and
AUDIO RIGHT jacks. Turn on the LCD TV and external speaker set after all connections are
made. Refer to your speaker set’s manual for further queries.
• To listen the sound from headphones, connect to the HEADPHONE jack of theTV.
Headphones
External speakers

English - 58 -
Connecting Other Equipment via Scart
Most devices support SCART connection. You can connect a; DVD recorder, a VCR or a
decoder to your LCD TV by using the SCART socket. Note that cables shown in the illustration
are not supplied.
• Power off both the TV and the devices before making any connections.
• For more information, refer to your device’s own instruction book.
VCR
DVD Recorder
Decoder
scart
socket

English - 59 -
Inserting Batteries in the
Remote Control Handset
• Remove the battery cover located on the back
of the handset by gently pulling backwards
from the indicated part.
• Insert two AAA/R3 or equivalent type batteries
inside. Place the batteries in the right
directions and replace the battery cover.
Note: Remove the battery from remote control
handset when it is not to be used for a
long period. Otherwise, it can be
damaged due to any leakage of
batteries.
Operating Range for the
Remote Control
• Point the top of the remote control toward
the LCD TV's remote sensor LED while
pressing a button.
30
30
A
BC DEF GH I
JKL MNO PQR
STU VWX YZ
1 2 3
4 5 6
7 8 9
0
AV
SOURCE EXIT
-/--
INFO
I-II
MENU TV/DTV
P/CH
OK
WIDE GUID E
PP P<P/SWAP
Remote range is approximately 7m/23ft.

English - 60 -
Switching the TV On/Off
To Switch the TV On
• Connect the power cord to the 220-240V AC,
50 Hz.
• Press STANDBY button. Then the standby
LED lights up.
• To switch on the TV from standby mode either:
• Press the
button, P+ / P- or a numeric
button on the remote control.
• Press the
-P/CH or P/CH+ button on the TV.
The TV will then switch on.
Note: If you switch on your TV via
PROGRAMME UP/DOWN buttons on the
remote control or on the TV set, the
programme that you were watching last
will be reselected.
To Switch the TV Off
• Press the button on the remote control or
STANDBY button on the TV, so the TV will
switch to standby mode.
• To power down the TV completely, unplug
the power cord from the mains socket.
Input Selection
Once you have connected external systems
to your TV, you can switch to different input
sources.
• Press the AV button on your remote control
until the desired source is highlighted. The
TV will then switch to the selected source
after a short while.
Source
TV
EXT1
EXT2
HDMI
DTV
• Depending on your selection of working
mode, the remote control buttons’ functions
will change accordingly.

English - 61 -
Basic Operations
You can operate your TV using both the
remote control and onset buttons.
Operation with the Buttons on the TV
Volume Setting
• Press - button to decrease volume or
+ button to increase volume, so a volume
level scale (slider) will be displayed on the
screen.
Programme Selection
• Press P/CH + button to select the next
programme or P/CH - button to select the
previous programme.
Entering Main Menu
• Press the MENU button to enter main menu.
In the Main menu select sub-menu using P/
CH -
or P/CH + buttons and enter the sub-
menu using
- or + buttons. To learn
the usage of the menus, refer to the menu
system sections.
AV Mode
• Press the TV/AV button at the control panel
on the the TV to switch your TV to AV modes.
Operation with the Remote Control
• The remote control of your TV is designed to
control all the functions of the model you
selected. The functions will be described in
accordance with the menu system of your
TV.
• Functions of the menu system are described
in the following sections.
Volume Setting
Press V + button to increase the volume.
Press
V - button to decrease the volume. A
volume level scale (slider) will be displayed
on the screen.
Programme Selection (Previous or
Next Programme)
• Press P - button to select the previous
programme.
• Press P + button to select the next programme.
Programme Selection (Direct Access)
•Press numeric buttons on the remote control
to select programmes between 0 and 9. The
TV will switch to the selected programme.
To select programmes between10-99, first
press the -/-- button; then numeric buttons
consecutively (e.g. for programme 27, first
press 2 and then 7). When the pressing time
is due for the second numeric button, only
the first digit programme will be displayed.
The limit of the delay time is 3 seconds.
• Press directly the programme number to
reselect single digit programmes.

English - 62 -
Initial Settings
When the TV set is operated for the first time,
the IDTV turns on first. Because this is the
first time that the IDTV has been used, there
are no channels stored in the memory.
When the TV is turned on for the first time, the
menu for the language selection appears on
the screen. The message
“Welcome please
select your language!” is displayed in all
language options sequentially in the OSD.
By pressing the
a
or b buttons highlight the
language you want to set and press OK button.
In the dialog box “
Set Language” is displayed
next to “
OK” item to indicate that “Press
SELECT button to set the highlighted
language option.”
You can get information about the menu
usage by pressing
button. Press
button again to exit the help menu.
After then, “First time installation” OSD will
appear on the screen. By pressing
_
or
`
buttons, select the country you want to set and
press OK button.
First time installation
Choose country
Set country and continue installation
OK
Finland
After the “First time installation” is
performed, the following message appears
on the screen:
Do you want to start automatic search for DIGITAL channels?
Yes No
• To start automatic search, select “Yes”, to
cancel select “No”.
• To select the “Yes” or “No” option, highlight
the item by using
_
or ` buttons and press
OK button.
The IDTV will automatically tune to the UHF
transmission channels 21 to 68, searching for
digital terrestrial TV broadcasts and displaying the
names of channels found. This process will take
about five minutes. To cancel searching, you can
press M button at any time during the process.
The following OSD will be displayed during
the automatic search:
MENU
Codec 4:3
Codec 16:9
Searching Channel: UHF 62. Please wait. This will take a few minutes
Cancel search
Automatic Search
After Automatic Search is completed, the
following message asking for analogue
channel search appears on the screen. TV
switches to the analogue TV mode.
Yes
To search for analogue channels, select “Yes”.
The following menu will be displayed to search
for analogue channels:
Auto. Programming System
Country
U.K.
Check the antenna cable
Start : Ok
Exit : TV
Language
English
Txt. Region
West Europe
Set Language item by pressing _ or ` button.
Press
a
or b button to highlight Country item
and then use
_
or ` to set. Press a or
b
button to highlight Txt. Region. Select a region

English - 63 -
by using _ or ` button. To cancel, press the
TV
DTV
button.When finished, press OK
button to continue and the following OSD will
be displayed:
Auto. Programming System
Automatic tuning runs at: 78 %
State: Fine scanning ...
Exit : TV
After initial aps is finalized, a programme list
will appear on the screen. In the programme
list you will see the programme numbers and
names assigned to the programmes.
If you do not accept the locations and/or the
names of the programmes, you can change
them in Program table. For details, see the
section, “Program table”.
General Operation
Pressing the TV/DTV button at any time while
watching television programmes will switch
the TV set between the digital terrestrial
television broadcasting and the analogue
broadcasting.
Information Banner
• Whenever you change the channel using the
P/CH + or P/CH - buttons or the numeric
buttons, the TV displays the broadcast picture
along with an information banner at the
bottom of the screen. This will remain on the
screen for approximately three seconds.
• The information banner can also be
displayed by pressing the
button at any
time while watching the TV. Pressing
button again removes the banner.
4 RTL 09:10
CH 48
Now: NEWS
Next: NEWS
Signal :
04:35-11:00
11:00-17:55
• The information banner gives information
on the channel selected and the programme
on it.
• The name of the channel is displayed along
with its channel list number and with an
indication of the strength of the signal
received on this tuning channel.
• The current and next programme information
are given with the beginning and ending
time.
• The current time information is displayed
along with channel name.
Hint: Not all channels broadcast the
programme data. If the name and times
of the programme are not available then
“
No Information Available” is displayed
in the information banner.
Note: If the selected channel is locked, you
must enter the correct four digit key to
view the channel. In such a situation, a
dialog box asking for the lock key will
be displayed:
Enter Lock Key
Electronic Programme Guide (EPG)
Some, but not all, channels send information
about the current and next events. Please note
that event information is updated automatically.
If there are no event information data available
for channels, only channel name with
“No
Information Available” banner is displayed.
• Press GUIDE button to view the EPG menu.
• Press
a
or b buttons to navigate in
Channels or Programmes.

English - 64 -
• Press _ or ` buttons to navigate through the
channel and programme list.
• In EPG Menu, you can easily see the extended
help information by pressing the
button.
News 10:00-11.00
1. ONE Commonwealth … Nachrighten
2. BBC TWO Driven Crazy Clifford The Big Red Dog
5. five The Chart Dawson’s Creek
Navigate
Schedule
Watch
More
Electronic Programme Guide Wed 31/7 09:13
1 ONE
OK
5. FIVE The Chart Dawson’s Creek
• You can close this window by pressing the
same button again.
• In the EPG menu all channels are displayed.
The current channel is highlighted when you
enter the EPG menu.
• Use
a
or b buttons to change the channel.
Also press
RED or GREEN buttons to scroll
up/down the pages for the channels. Press
OK button to watch the highlighted channel.
• If you highlight an event, short event
description, extended event description, start
and end time of the event are displayed on
the screen.
• If you press
OK button when a next event is
highlighted, a reminder is set for the
highlighted programme and a clock icon
appears across the highlighted channel line
as shown in the following EPG menu figure.
Programme reminders is set to signal that a
programme is about to start when you are
watching another channel. If you set reminder
for a programme, then you will be asked for
switching to that channel when the reminder
time is due.
News 10:00-11.00
1. ONE Commonwealth … Nachrighten
2. BBC TWO Driven Crazy Clifford The Big Red Dog
5. five The Chart Dawson’s Creek
Navigate
Schedule
Reminder
More
Electronic Programme Guide Wed 31/7 09:13
1 RTL
OK
5. FIVE The Chart Dawson’s Creek
I
I
• When you press the BLUE button you can
view the extended schedule of the
programmes.
• By pressing the
button you can see the
detailed help information easily. By pressing
button again you can exit help menu.
• By pressing the
BLUE button, the following
EPG menu appears on the screen:
1. BBC ONE
2. BBC TWO
5. Five
7. BBC Choice
11.DISCOVERY
15.BBC NEWS 24
17.BBCi
I
More
A
dvance Day
Electronic Programme Guide
Wed 21/4 10:12
No Information Available
BBC ONE
TUE 21/4, 20:00-22:00
Navigate
Change Time
• By pressing YELLOW/BLUE button, you can
advance the schedule of a day backwards/
forwards.
• By pressing
/ buttons you can change
the schedule time.
• If you press
button you can see the
detailed help information easily. By pressing
button again you can exit help menu.
Over Air Download
To ensure that your IDTV always has the most
up-to-date information, please ensure that, after
use, it is set to standby mode. At 3 A.M. each day,
the IDTV automatically searches for any updates
which may be broadcast and will download this

English - 65 -
to your IDTV automatically. This operation will
normally take approximately 30 minutes.
Displaying the Subtitles
With digital terrestrial broadcasting (DVB-T),
some programmes are broadcast with
subtitles. Subtitles can be displayed when
watching these programmes.
• Whenever
GREEN button is pressed, subtitle
selection OSD will be displayed on the screen.
You can set subtitles as On or Off. For subtitle
language options, refer to “Language
Settings” in the “Configuration Menu” section.
Teletext
Use of teletext and its functions are identical
to the analogue text system. Please do refer
to the “Analogue teletext” explanations.
IDTV Menu System
The IDTV menu can only be shown when
watching digital terrestrial broadcasting. Press
the TV/DTV button to turn the IDTV on while the
TV is in the analogue mode.
• Press M button and the menu below appears
on the screen:
Main Menu
Channel List
Installation
Configuration
Timers
TV Setup
Common Interface
Channel List
Using a or b buttons on the remote control in
main menu, make sure that the first item,
Channel List, is highlighted and press the OK
button to display the Channel List.
The following operations can be performed
in this menu:
• Navigating the entire list of channels
• Moving channels
• Deleting channels
• Renaming channels
• Adding locks to channels
• Setting favourites
• Channel List is the place where the channels
are managed.
Navigating the Entire Channel List
• Press a or bkeys for selecting the previous
or next channel.
• You can press
or buttons to move
pageup or page down.
• To watch a specific channel, highlight it using
a
or bbuttons and then press OK button,
while the “Select” item on Channel List
menu is highlighted via _ or `buttons.
Moving the Channels in the Channel
List
• Press a or bbuttons to select the channel
that will be moved.
• Press
_
or ` buttons to select the ‘’Move’’
item on Channel List menu.
• “
Move” is displayed next to OK item to indicate
that you can press OK to move the
highlighted channel to the desired position
on the channel list. Channel list OSD is
illustrated below:
SELECT
i
OK
CHANNEL LIST
1. BBC ONE
2. BBC TWO
3. ITV 8
4. Channel 4
5. BBC THREE
6. Teletext
7. BBC FOUR
8. Sky Travel
9. UKHistory
10. RTL
Function Select Channel Move More
1 BBC ONE
Selec t Delete Edit Nam e Lo ck Fa vourites Move

English - 66 -
Press OK button and the following OSD will
be displayed:
Edit number
New number
Enter a number by using the numeric buttons
on the remote control and press
OK to confirm.
Note: If you enter the same programme
number of the channel that you want to
move, “.... channel services will be
replaced. Do you want to continue?
”
OSD will be displayed. Press
OK to
confirm or select “
No” to cancel.
Deleting the Channels in the Channel
List
• Press a or bbuttons to select the channel
that will be deleted.
• Press
_
or ` buttons to select the “Delete’’
item on Channel List OSD.
As seen on Channel List menu, “Delete” is
displayed next to OK item at the bottom of the
screen to indicate that you can press
OK
button to delete the highlighted channel in the
channel list:
SELECT
i
OK
CHANNEL LIST
1. BBC ONE
2. BBC TWO
3. ITV 8
4. Channel 4
5. BBC THREE
6. Teletext
7. BBC FOUR
8. Sky Travel
9. UKHistory
10. RTL
Function Select Channel Delete More
1 BBC ONE
Select Delete Edit Name Lock Favouri tesMove
Press OK button to delete the highlighted
channel in the channel list. Then the message
below appears on the screen:
The selected service will be p ermanently deleted, and
favourite list will be turne d off. Are you sure?
Ye s
No
• Press _ or ` buttons to highlight the desired
option.
• If OK button is pressed while “Yes” is
highlighted, the highlighted channel will be
deleted.
• Selecting “
No” cancels the deletion.
Renaming channels
To rename a specific channel, the channel must
be highlighted by pressing
a
or bbuttons.
Then highlight the
“Edit Name” item by pressing
_
or ` buttons. Press OK button to activate
rename feature. Channel list menu OSD is
shown below:
SELECT
i
OK
CHANNEL LIST
1. BBC ONE
2. BBC TWO
3. ITV 8
4. Channel 4
5. BBC THREE
6. Teletext
7. BBC FOUR
8. Sky Travel
9. UKHistory
10. RTL
Function Select Channel Edit Name More
1 BBC ONE
Select De lete Loc k Favo uritesEdit Name Move
Now pressing _ or `buttons moves to the
previous/next character. Pressing
a
or
b
buttons toggles the current character, i.e., ‘b’
character becomes ‘a’ on
b
and ‘c’ on a.
Pressing the numeric buttons ‘0...9’ replaces
the highlighted character with the characters
printed above the key one by one as the button
is pressed.
Press the M button to cancel the editing or OK
button to save the new name.
Adding Locks to Channels
Channel Locking provides a passwordprotected access to channels selected by
parents.
In order to lock a channel you should know
the Parental Lock password (default value is
set to 0000 in the factory and can only be
changed from the Configuration menu).

English - 67 -
By pressing a or b buttons, highlight the
channel to be locked and select the “Lock”
option by pressing
_
or ` buttons. Then press
the OK button and a password box is
displayed:
Enter Lock Key
Setting Favourites
You can set various channels as favourites
so that only the favourite channels are
navigated. To set a favourite you should
highlight the “
Favourites” item at the bottom
of the Channel List menu.
To set a favourite you should highlight the
“
Favourites” item at the bottom of the Channel
List menu. Then press OK button and Edit
Favourite Lists menu appears on the screen.
You can list your favourite channels using List
1, List 2, List 3, List 4 or List 5.
Using 5 lists enables listing channels for
different categories (sport, music etc.). And
by activating the favourites list number that
you want in
Favourite Mode submenu of
Configuration menu, you enable only the
channels in the selected list.
Channel list OSD will look like this:
SELECT
i
OK
CHANNEL LIST
1. BBC ONE
2. BBC TWO
3. ITV 8
4. Channel 4
5. BBC THREE
6. Teletext
7. BBC FOUR
8. Sky Travel
9. UKHistory
Select List Select Channel Add/Remove More
List 1 List 2 List 3 List 4 List 5
How to Add a Channel to a Favourites
List
• By pressing a / bbuttons, highlight the
channel that you want to add to the favourite
list.
• Select the list number by pressing
_
/
`
buttons.
• By pressing OK button, the highlighted
channel is added to selected list number.
• For each channel, an icon indicates which
favourite list a channel is in. (i.e. In figure
above,
icon indicates that BBC ONE is
added to
List 1.)
Removing a Channel from a Favourite
List
• Highlight the channel that you want to remove
from the favourite list.
• Highlight the list number from which the
channel will be removed, and press
OK
button. The icon indicating the list that
contains the channel disappears on the
menu.
Note: A channel can be added to more than
one favourite list.
• To activate Favourites, go to the Configuration
menu and select the list number in Favourite
Mode
you want to activate by pressing
_
or
`
buttons. To cancel Favourites, set Favourite
Mode
to Off.
Using BLUE Button to Navigate
through the Favourite Channels
You can navigate through the favourite channel
lists by pressing
BLUE button. Each time you
press the BLUE button, you can navigate
through the favourite channels that are top of
the each channel list, sequentially.
While a channel list is selected, you can
navigate through the favourite channels in that
list by pressing
P/CH + or P/CH - buttons.
On Screen Help
For all menus press button to display the
help information about the menu functions.
For Channel List menu the following
message is displayed on the screen:

English - 68 -
highlighted channel.
MENU to exit this screen.
Hint: Pressing button can help you for
displaying information in IDTV.
Installation
The Installation menu is mainly intended to
help you for creating a Channel Table in most
efficient way. Select Installation from the main
menu by pressing
a
or b buttons as
illustrated below:
Main Menu
Channel List
Installation
Configuration
Timers
TV Setup
Common Interface
This menu includes the following items:
• Automatic Search
• Manual Search
* Clear Service List (*)
• First Time Installation
Installation
Automatic search
Manual Search
First Time Installation
Clear Service List
Automatic Search
Automatic search is started by pressing OK
button while Automatic Search item is
highlighted.
The following message appears on the
screen:
Please check antenna connection. Do you want
to start automatic search? Your previous...
Yes No
Highlight “Yes” or “No” by using _ or ` buttons
and press OK button to confirm.
If “Yes” is selected, automatic search starts.
Selecting “No” cancels automatic search.
After search is completed for digital channels,
a message asking whether to search for
analogue channels appears on the screen:
Yes
Do you want to search for
analogue channels?
No
Highlight “Yes” and press OK button to search
for analogue channels. The following menu
appears on the screen for analogue channel
search:
Auto. Programming System
Country
U.K.
Check the antenna cable
Start : Ok
Exit : TV
Language
English
Txt. Region
West Europe
Set Language item by pressing _ or ` button.
Press
a
or b button to highlight Country item
and then use
_
or ` to set. Press a or
b
button to highlight Txt. Region. Select a region
by using
_
or ` button. When finished, press
OK button to continue. To cancel, press the
TV
DTV
button.
Auto. Programming System
Automatic tuning runs at: 78 %
State: Fine scanning ...
Exit : TV

English - 69 -
After APS is finalized, the programme table
will appear on the screen. In the programme
table you will see the programme numbers
and names assigned to the programmes.
If you do not accept the locations and/or the
programme names, you can change them via
Program Table. See “Install Menu” section.
All channels found are stored in a sorted form
with respect to their channel numbers. Some
services may not appear with the correct
channel number. This is because some
broadcasters have no channel number
information.
Manual Search
In Manual Search, the number of the multiplex
is entered manually and only that multiplex is
searched for the channels. For every valid
channel number, signal level, signal quality
and network name are shown at the bottom
of the screen.
In both manual and auto search any existing
channel in the database is not re-stored to
avoid redundant duplicates of that channel.
Clear Service List (*)
(*) This setting is visible only when the Country
option is set to Denmark, Sweden, Norway or
Finland.
Use this setting to clear channels stored.
Press
a
or b button to select Clear Service
List and then press
OK. The following OSD
will be displayed on the screen:
Are you sure you want to delete all channels?
Yes No
Press OK to cancel.
Select Yes by pressing
_
or ` button and
press OK to delete all of the channels.
First Time Installation
The user can use this item to load default
settings, which were loaded to the receiver at
the factory.
To install factory settings, highlight “First Time
Installation” menu item and press OK button,
then you will be asked whether or not to delete
the settings. Selecting “Yes” by pressing OK
button while the “Yes” is highlighted will delete
the existing channel table.
A
re you sure you want to delete all channels and
settings for first time installation?
Yes No
After factory settings are loaded, “First Time
Installation
” menu will be displayed.
The menu which is displayed for language
selection appears on the screen at first. By
using
a
or b buttons, select the desired
language option, and press
OK button to
activate.
After the language is selected, a message
asking for automatic search appears on the
screen:
Do you want to start automatic search for DIGITAL channels?
Yes No
Highlight “Yes” item by pressing _ or ` buttons
and press
OK button to start installation. After
search is completed for digital channels, a
message asking whether to search for
analogue channels appears on the screen:
Yes
Do you want to search for
analogue channels?
No

English - 70 -
Highlight “Yes” item by pressing _ or ` buttons
and press OK button to search for analogue
channels. The following menu appears on
the screen for analogue channel search:
Auto. Programming System
Country
U.K.
Check the antenna cable
Start : Ok
Exit : TV
Language
English
Txt. Region
West Europe
Set Language item by pressing _ or ` button.
Press
a
or b button to highlight Country item
and then use
_
or ` to set. Press a or b button
to highlight Txt. Region. Select a region by using
_
or ` button. To cancel, press the
TV
DTV
button.When finished, press OK button to
continue and the following OSD will be displayed:
Configuration
Press M button to display the main menu and
the
b
button twice to highlight Configuration,
then press OK button to display the Configuration
menu. Press
M button to exit the menu.
Main Menu
Channel List
Installation
Configuration
Timers
TV Setup
Common Interface
The various configuration functions are
displayed in a list, along with a quarter-screen
image of the currently selected channel. You
can select a function by highlighting the
corresponding menu line using the
a
or
b
buttons. Configuration menu will look like this:
Configuration
Favourite Mode
Channel List
Language Settings
Time Settings
Receiver Upgrade
i
Change Favourite Mode
More
Tv Only
V.5.9 (EU)
Off
Parental Settings
OK
Select Mode
4
A
rte
Country:
Germany
MENU
Exit
AC3 Audio
Off
Hard of Hearing
Off
Favourite Mode
This function enables or disables the favourite
channel list mode.
Use
_
or ` buttons to set Favourite Mode to
List 1, List 2,..., List 5 or Off.
Selecting
“Off” disables the favourite channel
List mode.
If the “Favourite Mode” is set On by selecting a
channel list number, pressing
P/CH+ and P/CH-
buttons in normal operating mode will only navigate
through the channels that were previously defined
as favourites in the selected channel list.
Channel List
In the Configuration Menu, highlight the Channel
List
item by pressing
a
or b buttons.
Use the
_
or ` buttons to set the Channel List
to “TV only” or “Radio only”.
This feature enables navigation only through
the selected channel list type.
If “Radio only” is set, you can only navigate
through the Radio channels in the channel
list by using
P + or P - buttons.
AC3 Audio (Optional) (*)
(*) This setting is visible only when the Country option
is set to Denmark, Sweden, Norway or Finland.
In the Configuration Menu, highlight the AC3
Audio
item by pressing
a
or b buttons. Use the
_
or ` buttons to set the AC3 Audio as On or Off.
If the channel that you are watching supports
AC3 Audio, turn this setting on.

English - 71 -
Hard of Hearing (*)
(*) This setting is visible only when the Country option
is set to Denmark, Sweden, Norway or Finland.
Use
a
or b button to select Hard of Hearing
and then press
_
or ` button to set this setting
as On or Off.
If the broadcaster enables any special signal
concerning the audio, you can set this setting
as On to receive such signals.
Language Settings
In the configuration menu, highlight the
Language Settings item by pressing
a
or
b
buttons. Press OK and Language Settings sub
menu will be displayed on the screen:
Audio Language
Subtitle Language
System Language
EnglishEnglish
English
Off
Use a or b buttons to highlight the menu
item that will be adjusted.
System Language
System Language determines the on-screen
menu language.
Use
_
or ` buttons to set the System
Language setting.
Audio Language
Digital terrestrial television channels can
broadcast simultaneous sountracks in more
than one language. This function selects
which language soundtrack you will hear
when switching to a channel broadcasting with
the multiple soundtracks.
Use
_
or ` buttons to cycle through the
language options.
Subtitle Language
Digital terrestrial television channels can
broadcast with subtitles displayed on the
screen for hard-of-hearing people. This
function selects the desired subtitle language
and enables the automatic display of subtitles
whenever subtitle information is broadcast.
Use
_
or ` buttons to cycle through “Off” and
language options.
Note: If the Country option is set to Denmark, Sweden,
Norway or Finland the Language Settings
menu will function as described below:
Language Settings
In the configuration menu, highlight the
Language Settings item by pressing
a
or
b
buttons. Press OK and Language Settings sub
menu will be displayed on the screen:
Primary Audio Language
Secondary Audio Language
System Language
EnglishEnglish
English
Primary Subtitle Language
Secondary Subtitle Language
Primary Teletext Language
Secondary Teletext Language
English
English
English
English
English
Use a or b buttons to highlight the menu
item that will be adjusted and then press
_
or
`
button to set.
Notes:
• System Language determines the on-screen
menu language.
• Audio Language is used for selecting the
soundtrack of a channels.
• Primary settings are the first priority when
multiple choices are available on a broadcast.
Secondary settings are the alternatives when
the first options are not available.
Parental Settings
Some channels broadcast material which you
do not want younger members of the family to
watch. Any channel can be ‘locked’ so that it cannot
be selected for viewing unless a four-digit PIN
code is entered. In this way any channel not
suitable for younger viewers can be prohibited.
This function enables or disables the menu

English - 72 -
protection system and allows the PIN code to
be changed.
Use
a
or b buttons to highlight Parental
Settings. Press OK button to enter Parental
Settings menu. A dialog box asking for the
lock key is displayed:
Enter Lock Key
There is only one key which is set to “0000” initially.
Enter lock key. If wrong Lock Key is entered, the
following message is displayed on the screen
and the TV returns to the previous menu:
Wrong Lock Key
If it is correct, the Parental Settings menu
including following items will be displayed:
Menu Lock Installation
Set Lock Key
Maturity Lock
Age 12
Use a or b buttons to highlight the menu
item that will be adjusted.
Maturity Lock
Use
_
or ` buttons to set Maturity Lock.Here,
you can set/reset locking function for the Main
Menu or the Installation Menu to restrict
access. If the menu lock is disabled, there
will be free access to the menu system.
Off: All menus are unlocked.
Main Menu: Main menu is accessible only with
the correct lock key. So the user cannot add,
delete, rename or move the channels and
cannot set the timers.
Installation: Installation menu is locked, so
the user cannot add channels.
Changes will be updated after exiting
Configuration Menu.
Set Lock Key
Also in this menu you can change the lock key
and set/change parental lock mode.
Time Settings
In the configuration menu, highlight the Time
Settings item by pressing
a
or b buttons.
Press OK and Time Settings sub menu will
be displayed on the screen:
Time Zone Setting
Time Zone
Current Time
14:26
Auto
GMT +0
Use a or b buttons to highlight the Time Zone
Setting. Time Zone Setting is set using
_
or
`
buttons. It can be set to AUTO or MANUAL. When
AUTO is selected, Current Time and Time Zone
options will not be available to be set.
If MANUAL option is selected as the Time
Zone Setting, Time Zone can be altered:
• By pressing
a
or b buttons select Time
Zone. Use
_
or ` buttons to change the Time
Zone between GMT-12 or GMT+12. Current
Time on the top of the menu list will then
change according to the selected Time
Zone.
Receiver Upgrade
The IDTV can be upgraded via the
configuration menu, entered from the main
menu. Select Receiver Upgrade by pressing
a
or b buttons:
Configuration
Favourite Mode
Channel List
Language Settings
Time Settings
Receiver Upgrade
i
More
Tv Only
V.5.9 (EU)
Off
Parental Settings
OK
Search for Upgrade
4
A
rte
Country Germany

English - 73 -
In the configuration menu, highlight the “Receiver
Upgrade” item by pressing
a
or b buttons and
press “OK” button to start upgrade process. The
following menu appears on the screen.
Software Upgrade
Searching for upgrade. Please wait, or press
MENU to cancel.
Search Progress:
After the search progress is completed, the
message
“ Completed searching for upgrade.
No new software was found” appears on the
screen if no new software is found.
Timers
Display the main menu by pressing the M
button. Highlight the Timers line by pressing
a
or b buttons and press OK button and the
Timers menu OSD will be displayed.
Main Menu
Channel List
Installation
Configuration
Timers
TV Setup
Common Interface
Up to five separate timer events can be set
and each is displayed in the Programme
Timers screen, showing the event number,
the channel to be selected, the start time, end
time, date and the mode - whether that event
is active (and will be acted on) or not.
i
MENU
Programme Timers
No Channel Name Start End Date Mode
1. ITV 1 20:00 21:00 12/05/2005 Active
2. BBC ONE 00:00 00:00 01/01/2005 Inactive
3. BBC ONE 00:00 00:00 01/01/2005 Inactive
4. BBC ONE 00:00 00:00 01/01/2005 Inactive
5. BBC ONE 00:00 00:00 01/01/2005 Inactive
6. BBC ONE 00:00 00:00 01/01/2005 Inactive
Move/Change
Exit
Edit Timer More
OK
10:42
04/07/2005
• To set an event, highlight its mode button
using
a
or b buttons and press OK button
to display the timer entry window.
Type:
Name:
Start:
End:
Date:
Mode:
TV
3. ITV
00:00
00:00
03/06/2005
Once
• Here, the six settings consisting of the channel
type, channel name, start time, end time, date
and frequency mode can be set. You can move
freely between each setting using
a
or b buttons.
• The channel type is set using
_
or ` buttons.
It enables displaying the channels only with
the selected type.
• The channel name is set using
_
or ` buttons to display
the channel which broadcasts the programme.
• The start time, end time and date are each
set with the numeric buttons on the remote
control in 24-hour format.
• The frequency mode determines how often
the receiver operates this event and is set
with the
_
or ` buttons to be either Once,
Daily, or Weekly.
Hint
If an invalid number for the start or end times
or the date is entered, “Entered time is not
valid” message appears on the screen.
TV Setup
You can use this item to display the TV functions.
The digital TV Setup menu screen is
accessed from the main menu. Press the M
button to display the main menu and use
a
or b buttons to highlight “TV Setup”. Press
OK button to display TV Setup menu screen.

English - 74 -
Main Menu
Channel List
Installation
Configuration
Timers
TV Setup
Common Interface
You can find detailed information for all menu
items in “
Analogue TV Menu System” section.
Common Interface
Press M button to display the main menu and
use the
a
or b buttons to highlight the
“Common Interface” line and press OK button.
Main Menu
Channel List
Installation
Configuration
Timers
TV Setup
Common Interface
It is required to subscribe to a pay channel
company to view the pay channels of the
Digital Terrestrial broadcasting.
Obtain the Conditional Access Module (CAM)
and the viewing card by subscribing to a pay
channel company, then insert those to the
Television using the following procedure.
• Switch off the TV and unplug from the mains.
• Insert the CAM, and then the viewing card to
the slot that is located in the terminal cover at
the left-hand side of the TV (from front view).
• The CAM should be correctly inserted, it is
impossible to insert fully if reversed. The
CAM or the TV terminal may be damaged if
the CAM is forcefully inserted.
• Connect the TV to the mains supply, switch on and
then wait for few moments until the card is activated.
• Some CAMs may require the following set up. Please
set the CAM by entering the IDTV menu, Common
Interface then pressing OK button. (CAM set up menu
is not displayed when it is not required.)
•To see the viewing contract information:
• Enter IDTV; press
MENU button, then highlight
Common Interface and press OK button.
• When no module is inserted, “
No Common Interface
module detected
” message appears on the screen.
• Refer to the module instruction manual for
details of the settings.
NOTE: Insert or remove the CI module only
when the TV is in
STAND-BY mode or
SWITCHED OFF.
Navigating the Menu System
MENU TV/DTV
OK
For Displaying
Menu Options
For Navigation
To Confirm Choices
• Press MENU to display the main menu.
• Press
or button to select an icon. Press
or OK button for more options.
• Use
or button to highlight.
• Press
or buttons to change the settings.
Press OK to set as default.
• To exit the menu or return from sub-menu
screen, press MENU.
Note: These explanations are valid for the
navigation of the whole menu system.
To select options that are explained in
the following parts, refer to “Navigating
the Menu System”.

English - 75 -
Analogue TV Menu Map
INSTALL
Programming
A.P.S.
Txt. region West Europe
Program Table
Back : Menu Exit : TV
FEATURES
Sleep Timer Off
Language English
Child Lock Off
Menu Colour Gray
Favourite Mode Off
Back : Menu Exit : TV
PICTURE
Picture Mode Bright
Brightness
Contrast
Colour
Sharpness
Back : Menu Exit : TV
SOUND
Vol u me
Balance 0
Sound Mode Stereo
AVL On
Effect Off
Back : Menu Exit : TV
SOUND MENU PICTURE MENU
FEATURES MENU INSTALL MENU
-Volume
-Balance
-Sound Mode
-AVL
-Effect
-Equalizer
-Mode
-HP Volume
-Store
-Picture Mode
-Brightness
-Contrast
-Colour
-Sharpness
-Colour Temp
-Room Lighting
-Picture zoom
-Store
-Sleep Timer
-Language
-Childlock
-Menu Colour
-Favorite Mode
-Programming
-Programme
-Band
-Channel
-Standard
-Colour System
-Search
-VCR Mode
-Decoder
-Store
-APS
-Auto Programming System
-Txt. Region
-Program Table
A menu map is provided above. For details of the items,
refer to relevant explanations in the “MENU SYSTEM”.

English - 76 -
TV Menu System
Sound Menu
SOUND
Volume
Balance 0
Sound Mode Stereo
AV L On
Effect Off
Back : Menu Exit : TV
Volum e
When you enter the sound menu, Volume will
be the first selected option. Press
_
/ ` button
to change the level of the Volume.
Balance
This setting is used for emphasizing the left
or right speaker balance.
Press or button to select Balance. Press
_
/ ` button to change the level of the balance.
Balance level can be adjusted between
-32
and + 32.
Sound Mode
Press or button to select Sound Mode.
Using
_
/ ` button, you can select Mono,
Stereo, Dual I or Dual II mode, only if the
selected channel supports that mode.
AV L
Automatic Volume Limiting (AVL) function adjusts
the sound to obtain fixed output level between
programmes (For instance, volume level of
advertisements tends to be louder than
programmes).
Press
or button to select AV LVL. Press _ /
`
button to set the AVL as On or Off.
Effect
If you are watching a mono broadcast, set
Effect on to obtain a better sound effect which
will be more stereo-like. If the current sound
system is stereo, switching this effect on will
give a more spatial effect.
Press
or button to select Effect. Press
_
/ ` button to set Effect as On or Off.
Equalizer
Press or button to select Equalizer. Press
_
/ ` button to change the Equalizer setting. In
equalizer menu, the mode can be changed to
Flat, Speech, Music, Personal and Jazz.
Select the desired frequency by pressing
/
button and increase or decrease the frequency
gain by pressing
_
/ ` button.
Note: Equalizer menu settings can be changed only
when the mode is in Personal.
HP Volume
To adjust headphone volume level, press
or button to select HP Volume. Press _ /
`
button to change the level of the HP Volume.
Store
Select Store by pressing a / b button. Press
`
or OK button to store the settings. “Stored”
will be displayed on the screen.
Picture Menu
PICTURE
Picture Mode Bright
Brightness
Contrast
Colour
Sharpness
Back : Menu Exit : TV
Picture Mode
For your viewing requirements, you can set
the related
mode option.
Press
or button to select Picture Mode.
Press
or button to choose from one of these
options:
Bright, Standard, Soft and Manual.

English - 77 -
Brightness/Contrast/Colour/
Sharpness/Tint
Press or button to select the desired
option. Press
_
/ ` button to set the level.
Hint: Tint (Hue) is displayed in picture menu when
the TV receives an NTSC signal.
Colour Temp
Press or button to select Colour Temp.
Press
_
/ ` to choose from one of these
options:
Cool, Normal and Warm.
Note:
• Setting
Cool option gives white colours a
slight blue stress.
• Setting Warm option gives white colours a
slight red stress.
• For normal colours, select Normal option.
Room Lighting
Select Room Lighting by pressing the /
button. Press / button to set Room
Lighting as Normal, Bright or Movie.
Picture Zoom
Picture Zoom setting enables you to select
the aspect ratio of the broadcast.
Select Picture Zoom by pressing
/ button.
Use
_
/ ` buttons to change Picture Zoom to
Auto, 4:3, 16:9, Cinema or Subtitle.
Store
Select Store by pressing a / b button. Press
`
or OK button to store the settings. “Stored”
will be displayed on the screen.
Features Menu
FEATURES
Sleep Time r Off
Language English
Child Lock Off
Off
Back : M enu Exit : TV
Favorite m ode
Gray
Menu Colo ur
Sleep Timer
Press or button to select Sleep Timer.
Use
_
/ ` button to set the Sleep Timer.
The timer can be programmed between Off
and 120 minutes in steps of 10 minutes.
If
Sleep Timer is activated, at the end of the
selected time, the TV goes automatically to
standby mode.
Language
Press or button to select Language. Use
_
/ ` button to select the Language.
Child Lock
Press or button to select Child Lock.
Use
_
/ ` button to set the Child Lock On or
Off. When On is selected, the TV can only be
controlled by the remote control handset. In
this case the control panel buttons (except for
the
STANDBY button) will not work.
Hence, if one of those buttons is pressed,
“Child Lock On” will be displayed on the
screen when the menu screen is not visible.
Menu Colour
Press or button to select Menu Colour.
Use
_
/ ` button to change menu background
to Transparent or Gray.
Favourite Mode
Press or button to select Favourite Mode.
Use
_
/ ` button to set Favourite mode On or Off
(See the “Program Table” section for details).

English - 78 -
Install Menu
INSTALL
Programming
A.P.S.
Txt. region West Europe
Program Table
Back : Menu Exit : TV
Programming
Select Programming by pressing / button.
Then press
button to display Programming
menu:
PROGRAMMING
Programme 4
Band S
Channel 30
Standard BG
Colour System PAL
Back : Menu Exit : TV
Programme
Select Programme by pressing
/ button.
Press
/ button to select the programme
number. You can also enter a number via the
numeric buttons on the remote control. There
are 100 programme storage between 0 and 99.
Band
Band can be selected either C or S. Press
/ button to select Band.
Channel
Select Channel by pressing
/ button.
Channel can be changed by pressing
/
button or the numeric buttons.
Standard
Select Standard by pressing
/ button. Use
/ button to change the standard to B/G,
D/K, I or L/L'.
Colour System
Select Colour System by pressing
/ button.
Use
_
/ ` button to change the colour system
to PAL, SECAM or AUTO.
Search
Select Search by pressing
/ button. Press
_
/ ` button to start search. The search will
stop when a signal is found.
Note: If you press the buttons with one-step moves,
a frequency of 0.25 Mhz will be advanced.
However if you press the buttons all at once, it
will advance automatically. To stop searching
at a certain time, you may press
/ buttons.
VCR Mode
Select VCR Mode by pressing
/ button.
Use
_
/ ` buttons to set VCR Mode as On or Off.
Hint: If you want to watch a DVD , then you
have to set this item as Off.
Decoder
You can use this mode to connect any decoder to
your TV.
Select Decoder by pressing / button. Press
the
_
/ ` buttons to turn it On or Off.
When you switch the Decoder setting to
Off,
EXT-1 output will be muted. In this case, EXT-
1
output will not be available to display video.
If it is switched on, the EXT-1 output will be the
selected video source. Any decoder can be
connected to EXT-1 to unscramble required
video signals.
Hint: Decoder setting should be stored separately
for each programme.
Store
Select Store by pressing
a
/ b button. Press
`
or OK button to store the settings. “Stored”
will be displayed on the screen.

English - 79 -
A.P.S.
Select A.P.S. by pressing a / b button. Press
button to enter the A.P.S. submenu:
Auto. Programming System
Country
U.K.
Warning! All prestored programs
will be deleted
Start : Ok
Back : Menu
Exit : TV
A.P.S. Country
Press / button to set your country..
If you want to exit from A.P.S. function, press
the
TV
DTV
button. For going back, press M.
When you press OK button for starting APS,
all stored programs will be erased and the
following screen will be displayed:
Auto. Programming System
Automatic tuning runs at: 78 %
State: Fine scanning ...
Exit : TV
Whenever you press the
TV
DTV
button, A.P.S.
function stops and program table appears on
the screen.
If you wait until the end of A.P.S., Program Table
is displayed with the programmes found and
located.
Teletext Region
Select Txt. region by pressing a / b button. Using
_
/ ` buttons, select your teletext region. There are
five options to select: West Europe, East Europe,
Turk/Gre, Cyrillic and Arabic/Hebrew.
Install menu in AV modes
The following screen appears in the install menu:
INSTALL
Programming
Txt. Region
West Europe
Back : Menu Exit : TV
Programming
Select Programming by pressing
a
/
b
button. After pressing button, programming
menu appears on the screen:
PROGRAMMING
Colour System PAL
VCR Mode
Store
Off
Back : Menu Exit : TV
Colour System
Select Colour System by pressing
a
/
b
button. Press / button to change the colour
system to PAL, SECAM or AUTO.
Program Table
Program Table
P01
P01 BBC 1
P02 C 04
P03 P13
P12
P11
P04 P14
P05 P15
P06 P16
P07 P17
P08 P18
P09 P19
P10 P20
Delete
Name
Move
A.P.S
Exit: TV

English - 80 -
Program Table lists the channels that are
stored in the memory. By moving the cursor in
four directions, you can reach 20 programmes
in the same page. You can scroll up or scroll
down to see all the programmes while in TV
mode by pressing the navigation buttons. By
cursor action, programme selection is done
automatically.
Name
To change the name of a programme, select
the desired programme and press the
YELLOW button.
The first letter of the selected name starts to
blink. Press
a
/ b button to change that letter
and
_
/ ` button to select the other letters. By
pressing the
YELLOW button, you can store
the name.
Move
Select the programme that you want to insert
by using the navigation buttons. Press the
GREEN button. Using navigation buttons, move
the selected programme to the decided
programme space and press the GREEN
button again.
Delete
To delete a programme, press the RED button.
Pressing the
RED button again erases the
selected programme from the programme list
and the programmes below shift one line up.
APS (Auto Programming System)
When you press the BLUE button for APS, Auto
Programming System menu will appear on
the screen.
Favourite Mode
You can set various channels as favourites
so that only the favourite channels are
navigated. To set a favourite, use the navigation
buttons to select a channel and then press
the
item. The channel selected as a
favourite appears in the Program Table with a
favourites icon (
) against the channel
name. For removing a favourite, carry out the
same operation. To exit, press M.
Program Lock
Program Lock
Enter PIN
Change PIN
Back : Menu Exit : TV
Program Locking provides a passwordprotected access to channels selected by
parents. In order to lock a channel you should
know the Program Lock password (default
value is set to 0000 in the factory and can only
be changed from the
Program Lock menu).
Enter PIN
Select the channel that you desire to lock by
highlighting it and then press the
button.
When the
button is pressed, Program Lock
menu will be displayed on the screen. After
entering the pin code, desired channel will be
locked. The program lock icon will appear next
to the channel name. When the locked
channel is selected through
P+ or P- buttons,
the following warning screen will be
displayed:
Program Is Locked!
You May Unlock this Program
from Program Table.
Change PIN
Select Change PIN by pressing
/ button.
Use
button to change the PIN code. After
pressing
button, the following message
appears on the screen:
Program Lock
Enter old PIN
Back : Menu Exit : TV
Enter old PIN code through the numeric

English - 81 -
buttons and then enter your new PIN code.
Program Lock menu will be displayed on the
screen when you enter the new PIN code:
Program Lock
Enter new PIN
Back : Menu Exit : TV
Program Lock Menu will again be displayed after
a short while of the identification of new PIN.
Hint: If you forget your Program Lock password, you
can deactivate the Program Lock by using the
code 7910 and be able to set new password for
future use. Thus, do keep this code in a safe
place for future reference.
Displaying TV Information
Programme Number, Programme Name,
Sound Indicator and Zoom Mode information
are displayed on the screen when a new
programme is entered or
button is pressed.
Mute Function
Press button to disable sound. Mute
indicator will be displayed in the upper side
of the screen.
To cancel mute, there are two alternatives; the
first one is pressing the
button and the
second one is increasing the volume level.
Personal Preference
Press PP button to adopt the previous settings
that you had stored before.
Zoom Modes
You can change the aspect ratio of the TV for
viewing the picture in different zoom modes.
Press
WIDE button to directly change the zoom
mode. Available zoom modes are listed below:
Auto
When a WSS (Wide Screen Signalling)
signal, which shows the aspect ratio of the
picture, is included in the broadcast signal or
the signal from an external device, the TV
automatically changes the ZOOM mode
according to the
WSS signal.
• When the AUTO mode does not function
correctly due to poor
WSS signal quality or
when you want to change the ZOOM mode,
change to another
ZOOM mode manually.
4:3
Use to view a normal picture (4:3 aspect ratio)
as this is its original size.
16:9
This uniformly stretches the left and right sides
of a normal picture (4:3 aspect ratio) to fill the
wide TV screen.
• For 16:9 aspect ratio pictures that have been
squeezed into a normal picture (4:3 aspect
ratio), use the 16:9 mode to restore the
picture to its original shape.
Cinema
This zooms up the wide picture (16:9 aspect
ratio) to the full screen.
Subtitle
This zooms up the wide picture (16:9 aspect
ratio) with subtitles to the full screen.

English - 82 -
Teletext
Teletext system transmits information such
as news, sports and weather on your TV. Note
that if the signal becomes insufficient, some
text errors may occur or the teletext mode may
be quitted.
Teletext function buttons are listed below:
Teletext On-Off / PAT mode
Activates teletext mode when pressed once.
Pressing this button again will split the screen
into two windows, one displaying the teletext
and the other displaying the current channel.
Pressing again will quit the teletext mode.
Index
Selects the teletext index page.
Mix
Places the teletext screen over the programme.
Expand
Press once to enlarge top half of the page,
press again to enlarge the bottom half of the
page. Press again to revert back to normal
size.
Reveal
Shows hidden information (e.g. solutions of
games).
Hold
Holds a text page when convenient. Press again to
resume.
Subcode Pages / Time
Selects subcode pages if available when the
teletext is activated. When the teletext is not
activated, displays time info if the programme
has teletext transmission.
P+ / P- and numbers (0-9)
Press to select a page.
Note: Most TV stations use code 100 for their
index pages.
Coloured Buttons
(RED/GREEN/YELLOW/BLUE)
Your TV supports both FASTEXT and TOP text
systems. When these systems are available,
the pages are divided into groups or topics.
When FASTEXT system is available, sections
in a teletext page will become colour-coded
and can be selected by pressing the coloured
buttons. Press a coloured button that
corresponds to with your needs.
The coloured writings will appear, showing
you, which coloured buttons to use when
TOP
text transmission is present. Pressing P - or
P + commands will request the next or
previous page respectively.
Tips
Screen Care
Clean the screen with a slightly damp, soft
cloth. Do not use abrasive solvents as they
may damage the coating layer of the TV screen.
For your safety, unplug the mains plug when
cleaning the set. When moving the TV, hold it
properly from the bottom part.
Image Persistence
Please note that ghosting may occur while
displaying a persistent image. LCD TVs’
image persistence may disappear after a short
time. Try turning off the TV for a while.
To avoid this, do not leave the screen in still
picture for extended periods.
No Power
If your TV system has no power, please check
the main power cable and connection to the
mains socket outlet.

English - 83 -
Poor Picture
Have you selected the correct TV system? Is
your TV set or house aerial located too close
to a non-earthed audio equipment or neon
lights, etc.?
Mountains or high buildings can cause double
pictures or ghost images. Sometimes you can
improve the picture quality by changing the
direction of the aerial.
Is the picture or teletext unrecognisable? Check if
you have entered the correct frequency.
The picture quality may degrade when two
peripherals are connected to the TV at the
same time. In such a case, disconnect one of
the peripherals.
No Picture
Is the aerial connected properly? Are the plugs
connected tightly to the aerial socket? Is the
aerial cable damaged? Are suitable plugs
used to connect the aerial? If you are in doubt,
consult your dealer.
No Picture means that your TV is not receiving
a transmission. Have you selected the correct
button on the remote control? Try once more.
Sound
You cannot hear any sound. Did you perhaps
interrupt the sound, pressing the
button?
Sound is coming from only one of the
speakers. Is the balance set to one extreme?
See
Sound menu.
Remote Control
Your TV no longer responds to the remote
control. Perhaps the batteries are exhausted.
If so you can still use the local buttons at the
bottom of the TV.
Input Sources
If you cannot select an input source, it is
possible that no device is connected.
Check the AV cables and connections if you
have tried to connect a device.
CI Module
If you are experiencing a problem with the CI
module, it is possible that CI module is not
properly inserted. Remove the CI card and
then reinsert.
If the problem persists, it is possible that your
CI module is not recognized. Try inserting a
different CI module.

Specifications PALCO19/L02
TV BROADCASTING
PAL/SECAM B/G D/K K' I/I' L/L'
RECEIVING CHANNELS
VHF (BAND I/III)
UHF (BAND U)
HYPERBAND
CABLE TV (S1-S20 / S21-S41)
NUMBER OF PRESET CHANNELS
100
CHANNEL INDICATOR
On Screen Display
RF AERIAL INPUT
75 Ohm (unbalanced)
OPERATING VOLTAGE
220-240V AC, 50 Hz.
AUDIO
German + Nicam Stereo
AUDIO OUTPUT POWER (W
RMS.
) (10%
THD)
2x2W
POWER CONSUMPTION (W)
60W
Less than 1W (Standby)
PANEL
19” Wide display
SIZE (mm)
D W H Weight
155 457 365 5.75
With stand
77 457 330 5.5
W/o stand
Specifications PALCO22/L02
TV BROADCASTING
PAL/SECAM B/G D/K K' I/I' L/L'
RECEIVING CHANNELS
VHF (BAND I/III)
UHF (BAND U)
HYPERBAND
CABLE TV (S1-S20 / S21-S41)
NUMBER OF PRESET CHANNELS
100
CHANNEL INDICATOR
On Screen Display
RF AERIAL INPUT
75 Ohm (unbalanced)
OPERATING VOLTAGE
220-240V AC, 50 Hz.
AUDIO
German + Nicam Stereo
AUDIO OUTPUT POWER (W
RMS.
) (10%
THD)
2x5W
POWER CONSUMPTION (W)
65W
Less than 1W (Standby)
PANEL
22” Wide display
SIZE (mm)
D W H Weight
155 525 406 4.80
With stand
80 525 307 4.50
W/ostnd
Italiano - 84

English - 85 -
HDMI connector pin specifications
Pin Input signal Pin Input signal
1 TMDS Data2+ 11 TMDS Clock Shield
2 TMDS Data2 Shield 12 TMDS Clock3 TMDS Data 2- 13 CEC
4 TMDS Data 1+ 14 Reserved (N.C. on device)
5 TMDS Data1 Shield 15 SCL
6 TMDS Data1- 16 SDA
7 TMDS Data0+ 17 DDC/CED Ground
8 TMDS Data0 Shield 18 +5V Power
9 TMDS Data0- 19 Hot Plug Detect
10 TMDS Clock +
SCART connector pin specifications
Pin Input signal Pin Input si gnal
1 AUDIO OUT (RIGHT) 12 Not used
2 AUDIO IN (RIGHT) 13 RGB-R GND
3 AUDIO OUT (LEFT/MONO) 14 GND
4 AUDIO GND 15 RGB-R / S.VHS CHROMINANCE IN
5 RGB-B GND 16 BLANKING SIGNAL
6 AUDIO IN (LEFT/MONO) 17 COMPOSITE VIDEO GND
7 RGB-B IN 18 BLANKING SIGNAL GND
8 AUDIO / RGB SWITCH / 16:9 19 COMPOSITE VIDEO OUT
9 RGB-G GND 20 COMPOSITE VIDEO / S.VHS LUMINANCE IN
10 Not used 21 GND / SHIELD (CHASSIS)
11 RGB-G IN
Pin Specifications

Codice Prodotto 28000037 TV LCD PALCO19/L02
Codice Prodotto 28000038 TV LCD PALCO22/L02
Dichiarazione di conformità CE
TELE System Electronic dichiara sotto la propria
responsabilità che questi prodotti soddisfano i requisiti
fondamentali delle direttive europee 2004/108/CE (EMC Electromagnetic Compatibility) e 2006/95/CE (LVD - Low
Voltage Directive) rispettando le seguenti normative
tecniche:
Product code 28000037 TV LCD PALCO19/L02
Product code 28000038 TV LCD PALCO22/L02
CE conformity declaration
TELE System Electronic states that these products meet
the basic European requirements of 2004/108/EC (EMC Electromagnetic Compatibility) and 2006/95/EC (LVD - Low
Voltage Directive), following the technical standards:
Compatibilità Elettromagnetica / Electromagnetic Compatibility:
EN55013 2001+A1:2003+A2:2006
EN55020: 2002+A1:2003+A2:2005
EN55022: 1998+A1:2001+A2:2003
EN55024: 1998+A1:2001+A2:2003
EN61000-3-2: 2000+A2:2005
EN61000-3-3: 1995+A1:2001+A2:2005
Sicurezza / Low Voltage:
EN 60065: 2002+A1:2006
TELE System Electronic Srl dichiara inoltre, sotto la propria responsabilità, che il prodotto in questione risulta essere
conforme al D.M. 26-03.92.
Bressanvido, lì 18.10.2008 / 18
th
October 2008
Flavio De Poli
Direzione Generale
ITALY
TELE System Electronic
Via S. Benedetto, 14 Q/M
36050 Bressanvido (VI)
Internet: www.telesystem.it
Tel. Assistenza Guasti / Customer assistance tel.:
199 214 444 (solo da Italia / Italy only)
Rev.00 del 01/10/2008
 Loading...