

Page 1
TELE System
1
Page 2

Page 3

Page 4

TELE System
2
Gentile Cliente,
nel ringraziarla per l’acquisto del nostro prodotto, la invitiamo a leggere attentamente
le seguenti istruzioni, prima di mettere in funzione l’apparecchio. Solo così si potrà
ottenere il funzionamento ottimale mantenendo inalterate nel tempo le caratteristiche
di affidabilità originali. Suggeriamo inoltre di conservare questo manuale in previsione di
eventuali consultazioni future., Le suggeriamo, inoltre, di conservare l’imballo del
televisore. Per qualsiasi problema si ricordi di annotare il numero di serie del televisore,
riportato nel retro dell'apparecchio.
Lo staff di TELE System
ATTENZIONE!
La ricezione e quindi la visione dei canali in digitale terrestre e/o satellitare dipende dal
livello e dalla qualità del segnale d’antenna disponibile. Il segnale varia in funzione della
zona di residenza, dal corretto orientamento/funzionamento dell’impianto d’antenna e
dalla qualità del segnale trasmesso dai ripetitori digitali terrestri e/o satellitari.
TELE System Digital Srl comunica, che a seguito di eventuali modifiche software e/o
hardware aventi l’obiettivo di migliorare il prodotto, si potrebbero evidenziare
incongruenze tra il contenuto di questo manuale ed il prodotto in possesso.
Prodotto su licenza di Dolby Laboratories. Dolby e il simbolo della doppia D sono marchi
di Dolby Laboratories.
Page 5

ITALIANO
Indiceπ
1! Sicurezza ............................................................................................................ 4!
2! Descrizione TV .................................................................................................... 6!
2.1! Frontale ............................................................................................................. 6!
2.2! Tastiera ............................................................................................................. 6!
2.3! Connessioni posteriori ...................................................................................... 6!
3! Collegamenti ...................................................................................................... 7!
3.1! Connessione antenna / emittente via cavo ...................................................... 7!
3.2! Connessione ad un dispositivo esterno ............................................................ 7!
4! Telecomando ..................................................................................................... 8!
4.1! Telecomando standard ..................................................................................... 8!
4.2! Telecomando semplificato ................................................................................ 8!
4.3! Inserimento batterie ......................................................................................... 9!
5! Modalità PC ...................................................................................................... 10!
5.1! MENU PER MODALITÀ PC ............................................................................... 10!
6! Funzioni di base ................................................................................................ 10!
6.1! Accensione / Standby ..................................................................................... 10!
6.2! Selezione programma ..................................................................................... 10!
6.3! Regolazione del volume .................................................................................. 10!
6.4! Esclusione audio (temporanea) ...................................................................... 11!
6.5! Richiamo programma ..................................................................................... 11!
6.6! Selezione sorgente .......................................................................................... 11!
6.7! Descrizione Menu principale .......................................................................... 11!
6.8! Prima installazione .......................................................................................... 11!
6.9! Ricerca automatica dei canali. ........................................................................ 12!
7! Modalità DVB ................................................................................................... 12!
7.1! Ricerca manuale .............................................................................................. 12!
7.2! Guida elettronica TV (EPG) ............................................................................. 13!
7.3! Organizzazione lista canali. ............................................................................. 13!
7.4! Lista Favoriti .................................................................................................... 13!
8! Modalità Satellite ............................................................................................. 13!
8.1! Impianto Semplice .......................................................................................... 14!
8.1.1! Configurazione antenna e satellite ......................................................... 14!
8.1.2! Ricerca canali per satellite ...................................................................... 15!
8.2! Impianto SCR/Unicable ................................................................................... 15!
8.3! Impianto DiSEqC 1.0/1.1 ................................................................................. 16!
8.3.1! Configurazione antenna e satellite ......................................................... 16!
8.3.2! Ricerca canali per satellite ...................................................................... 16!
8.4! Impianto Motorizzato ..................................................................................... 16!
8.4.1! DiSEqC 1.2 .............................................................................................. 16!
8.4.2! DiSEqC 1.3 .............................................................................................. 17!
8.5! Scansione Automatica .................................................................................... 18!
3
Page 6

TELE System
4
9! Sicurezza – Blocco sistema ................................................................................ 18!
10! Menu Immagine ............................................................................................ 19!
11! Menu Audio ................................................................................................... 19!
12! Impostazioni orario ........................................................................................ 20!
13! Menu Impostazioni ........................................................................................ 20!
14! USB Mediaplayer ........................................................................................... 20!
15! Risoluzione problemi ..................................................................................... 22!
16! Specifiche tecniche ........................................................................................ 24!
1 Sicurezza
ATTENZIONE: PER RIDURRE RISCHI DI SHOCK ELETTRICO, NON RIMUOVERE IL
COPERCHIO POSTERIORE NON USATE ATTREZZI METALLICI ALL’INTERNO.
Prima di connettere il cavo d’alimentazione alla presa dell’adattatore DC, assicuratevi
che il voltaggio indicato corrisponda a quello utilizzato nella vostra zona.
Assicurativi che il televisore sia spento prima di inserire la spina d’alimentazione nella
presa di corrente. Prestate attenzione affinché il cavo elettrico e gli altri cavi di
collegamento risultino connessi in modo stabile e sicuro.
Sovraccarichi di tensione e prolunghe di alimentazione possono risultare pericolosi,
come cavi logori o prese/spine rotte; queste condizioni possono causare scosse
elettriche o incendio. Contattate un tecnico di fiducia per sostituire le parti danneggiate.
Non inserite oggetti metallici all’interno del televisore, pericolo di elettro shock.
Per evitare scariche elettriche non toccate parti interne del televisore LED, solo
personale qualificato può intervenire per aprire il televisore.
Il televisore è provvisto di fessure per il ricircolo dell’aria. Per evitare surriscaldamento
queste aperture non devono essere coperte ne ostruite. Se posizionate il TV in spazi
ristretti (librerie, mobili…), assicuratevi che vi sia un adeguata ventilazione.
Non utilizzate il televisore con temperature estreme, umidità o in ambienti polverosi.
Temperatura consigliata. 5 – 35° C
Umidità relativa: 30 – 80RH
Non esponete il TV alla pioggia o a spruzzi d’acqua; non installate vicino a cucine, piscine
etc… Se accidentalmente del liquido penetra all’interno del televisore, scollegate
immediatamente il cavo di alimentazione e contattate un tecnico.
Potete pulire lo schermo LED/LCD se necessario con un panno morbido leggermente
umido, ricordatevi di scollegare il televisore prima di pulirlo.
Non usate solventi come benzene per pulire il televisore, danneggereste la superficie
dello schermo.
Posizionate il televisore su di una superficie solida e maneggiatelo con attenzione.
lo schermo è formato da un vetro sottile e protetto da una lamina di plastica, liquidi
abrasivi o strisciate rovinano in modo permanente il pannello LED/LCD.
Non pulite lo schermo con sostanze quali: acetone, alcol etilico, toluene, acido etilico,
metilico o cloridrico; queste sostanze rovinano il pannello LED/LCD.
Page 7

ITALIANO
Posizionate il televisore in modo che sia facilitato l’accesso alla presa di corrente.
Non ponete fonti di calore o fiamma come ad esempio candele, sopra il televisore.
Nessun oggetto contenente liquidi come vasi o bottiglie, deve essere posizionato sopra
o nelle vicinanze del TV.
Il simbolo del bidoncino sbarrato indica che è vietato disperdere questo
prodotto nell’ ambiente o gettarlo nei comuni rifiuti urbani misti. Chi non
rispetta tale regola è sanzionabile secondo legislazione vigente.
Un corretto smaltimento dell’apparecchio consente di evitare potenziali
danni all’ambiente e alla salute umana, nonché di facilitare il riciclaggio dei
componenti e dei materiali contenuti in esso, con un conseguente
risparmio di energia e risorse.
Il produttore istituisce un sistema di recupero dei Rifiuti da Apparecchiature Elettriche
ed Elettroniche (RAEE) del prodotto oggetto di raccolta separata e sistemi di
trattamento, avvalendosi di impianti conformi alle disposizioni vigenti in materia.
Portare il prodotto non più utilizzabile (ed eventuali suoi accessori, ivi comprese le
batterie) presso un centro di raccolta autorizzato a gestire rifiuti di apparecchiature
elettriche ed elettroniche. In alternativa, è possibile riconsegnare al rivenditore
l’apparecchiatura usata o a fine vita, all’atto dell’acquisto di una nuova di tipo
equivalente oppure a titolo gratuito in caso di apparecchi ad uso domestico di dimensioni
esterne inferiori a 25 cm.
5
Page 8

TELE System
6
1
2 Descrizione TV
2.1 Frontale
LED: indicatore di stato, Rosso = Standby, Verde = Acceso
IR sensor: sensore ricevente del telecomando
Attenzione! La posizione del led e del sensore IR può non corrispondere esattamente a
quella riportata nell’immagine.
2.2 Tastiera
La tastiera con i comandi sul TV si trova sul lato destro TV stesso. I tasti disponibili sono
(dall’alto al basso):
Vol+: aumenta il volume
Vol-: diminuisce il volume
CH+: cambio canale successivo
CH-: cambio canale precedente
Menu: accede al menu principale
Source: seleziona sorgente
Power: modo Standby (OFF/ON)
2.3 Connessioni posteriori
Nel lato posteriore del TV sono disponibili le connessioni e gli ingressi A/V; lato
orizzontale (da sinistra a destra):
Alimentazione 220V
Porta VGA (PC)
Ingresso audio PC (PC Audio IN)
Ingresso SCART1
Ingresso Antenna SATELLITE RF (Tipo F)
Ingresso Antenna TERRESTRE RF (IEC)
Uscita audio digitale coassiale (COAXIAL)
Ingresso HDMI1
Sul lato verticale (dall’alto al basso)
Uscita Cuffie (jack 3,5 mm)
Ingresso SCART può essere sostituito da ingresso RCA (3 connettori), collegare il cavo adattatore
SCART/RCA in dotazione
Page 9

ITALIANO
2
Porta USB (Funzione Mediaplayer)
Ingresso Component (YPbPr, necessario adattatore)
Ingresso RCA Video + Audio (AV, necessario adattatore)2
Slot Common Interface (compatibile con modulo CI+)
Uscita audio digitale coassiale (COAXIAL)
Ingresso HDMI3
Ingresso HDMI2
3 Collegamenti
3.1 Connessione antenna / emittente via cavo
Per vedere i canali televisivi, potete collegare il televisore ad uno dei seguenti apparati:
Un’impianto di antenna terrestre e/o un’impianto di antenna satellitare.
In entrambi i casi collegate il cavo d’antenna (75 Ω) alle prese coassiali collocate nel retro
del televisore.
3.2 Connessione ad un dispositivo esterno
Via SCART: accertatevi che sia il TV che il dispositivo siano spenti. Collegate il cavo SCART
dalla sorgente al TV. Accendete i due dispositivi. Se il TV dispone di ingresso RCA (vedi
nota1) a 3 connettori, utilizzare il cavo adattatore RCA /SCART in dotazione. Premete il
tasto Source del telecomando e selezionate SCART.
Via RCA (ATT! Vedi nota2): accertatevi che sia il TV che il dispositivo siano spenti. Per
collegare un apparecchio all’ingresso AV/RCA è necessario utilizzare un adattatore
RCA/Jack3.5mm.
Accendete i due dispositivi. Premete il tasto Source del telecomando e selezionate AV
come sorgente.
Via YPbPr (Component): accertatevi che sia il TV che il dispositivo siano spenti. Per
collegare un apparecchio all’ingresso AV/RCA è necessario utilizzare un adattatore
RCA/Jack3.5mm rispettando i colori seguendo come da indicazioni sotto riportate:
Giallo – Verde
Rosso – Rosso
Bianco – Blu
Accendete i due dispositivi.
Premete il tasto Source del telecomando e selezionate YPbPr.
Ingresso RCA laterale non disponibile se presente ingresso RCA (3 connettori) nel lato inferiore in
sostituzione dell’ingresso SCART
7
Page 10
TELE System
8
Via HDMI: accertatevi che sia il TV che il dispositivo siano spenti. Collegate il cavo dalla
sorgente al TV. Accendete i due dispositivi.
Premete il tasto Source del telecomando e selezionate HDMI.
4 Telecomando
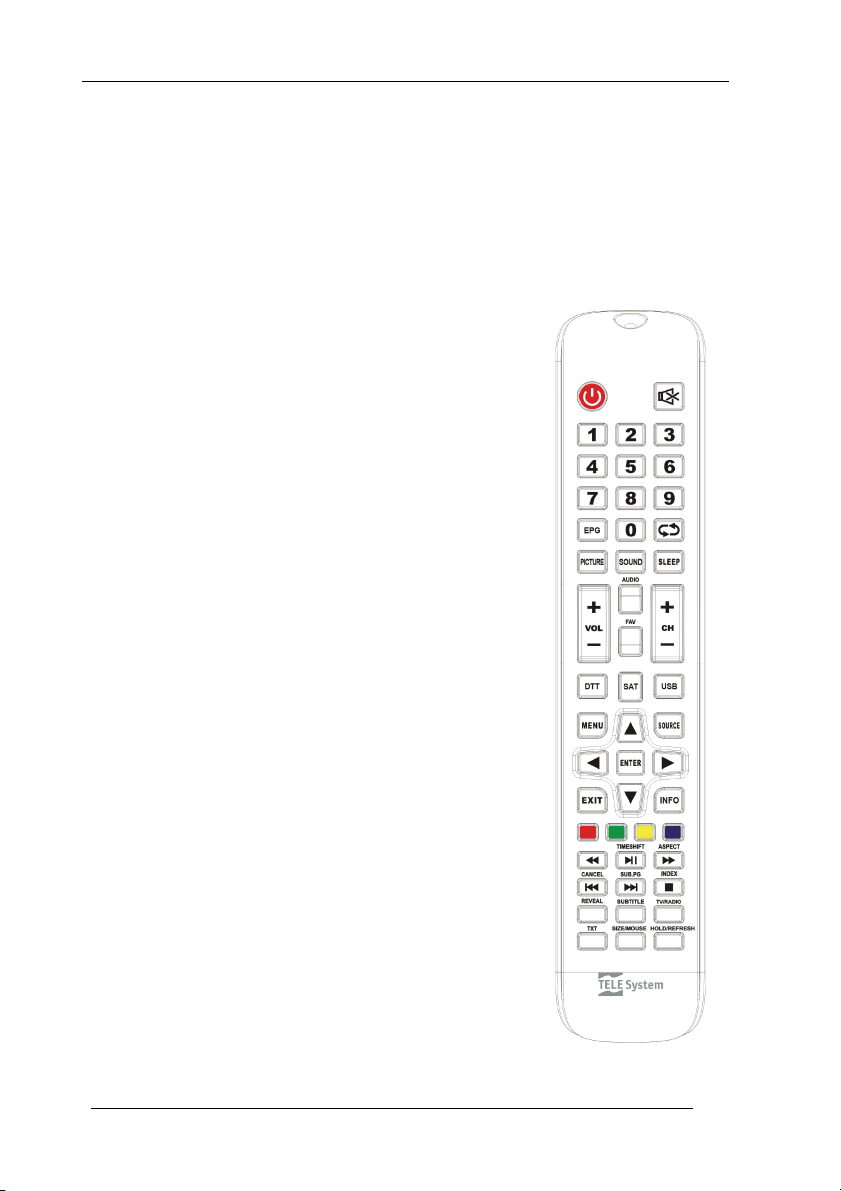
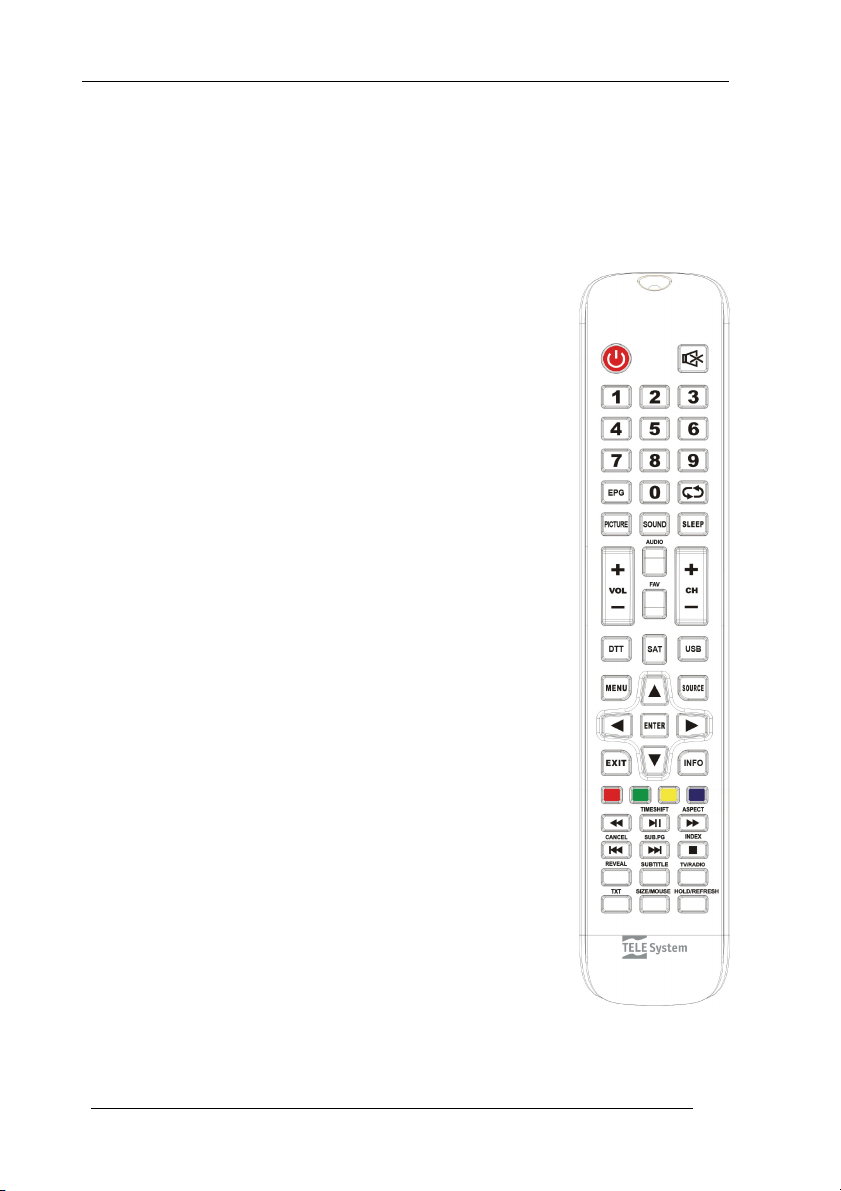
4.1 Telecomando standard
POWER: attivazione/disattivazione Stand-by
Mute: interruzione temporanea dell’Audio.
TASTI NUMERICI: selezione diretta dei canali.
EPG: Guida elettronica dei programmi (EPG)
Recall: ritorno all’ultimo programma selezionato.
PICTURE: cambia la modalità video.
SOUND: cambia la modalità audio.
SLEEP: imposta il timer per lo spegnimento.
V -/+: Diminuisce/aumenta il volume.
AUDIO: scelta dell’audio.
FAV: visualizza la lista dei canali favoriti.
CH -/+: cambio canale precedente/successivo.
DTT: passa alla modalità DVBT
SAT: passa alla modalità DVBT
USB: passa alla modalità USB (Media)
MENU: richiama il MENU principale.
Source: scelta della sorgente.
TASTI FRECCE: consentono la navigazione all’interno dei menu
OK: Conferma o seleziona un sub-menu/ Accede alla lista
canali
EXIT: uscita dal menù.
INFO: visualizza informazioni inerenti canale sintonizzato.
TASTO FASTEXT ROSSO
TASTO FASTEXT VERDE
TASTO FASTEXT GIALLO
TASTO FASTEXT BLU
REWIND: riavvolgimento (modalità multimedia)
PLAY&PAUSE/TIMESHIFT: avvia/mette in pausa la
riproduzione / attiva la funzione Timeshift
FAST FORWARD/Aspect: avanti veloce (multimedia) / scelta
del formato immagine (DTV/Sat).
Back Skip / Cancel: indietro di una traccia/brano/foto
(Multimedia)/ Trasparenza Televideo.
Page 11
ITALIANO
Skip /SUB PG: avanti di una traccia/brano/foto (Multimedia) / sottopagina Televideo.
STOP/INDEX: ferma la riproduzione/registrazione / Index in Televideo mode.
REVEAL: funzione teletext
DTV/RADIO: cambia la modalità di visione, tra i programmi TV a quelli Radio
SUBTITLE: attiva i sottotitoli (se presenti)
TXT: accede al Televideo.
SIZE: funzione teletext
HOLD: funzione teletext
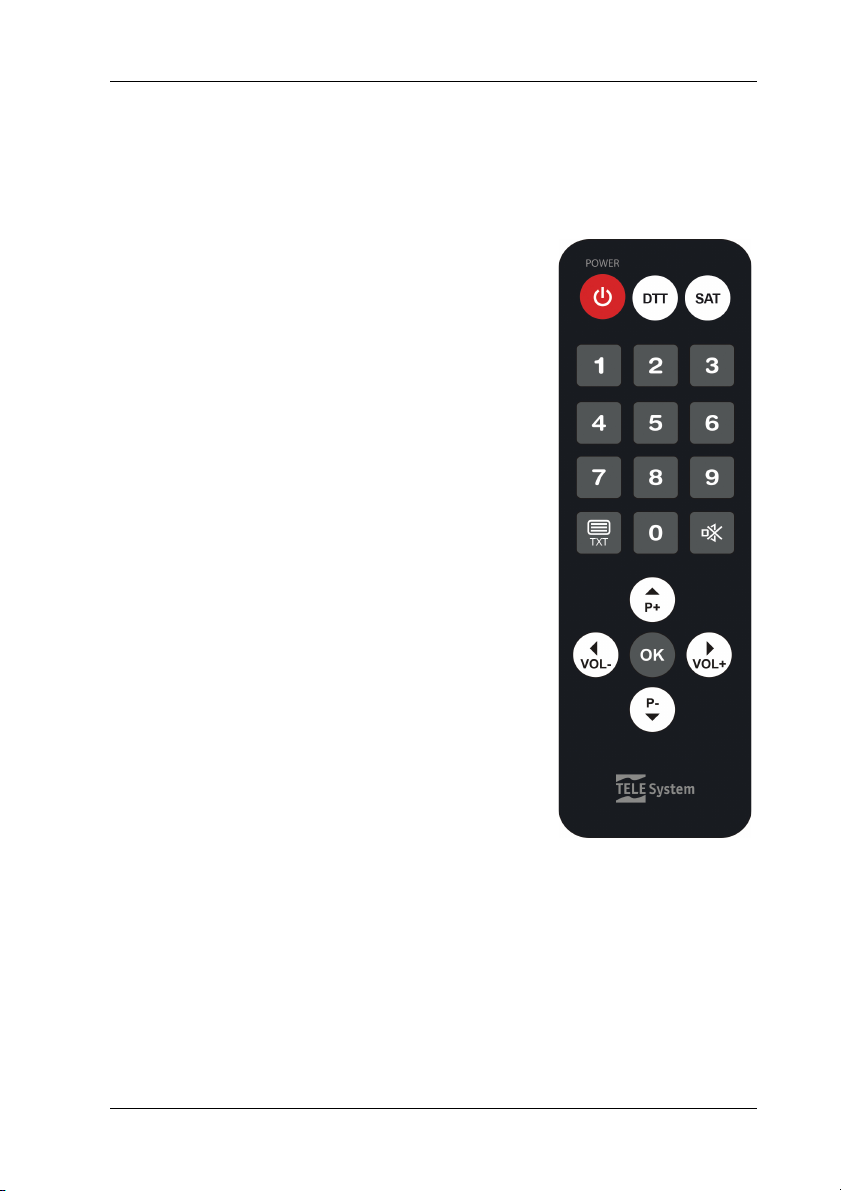
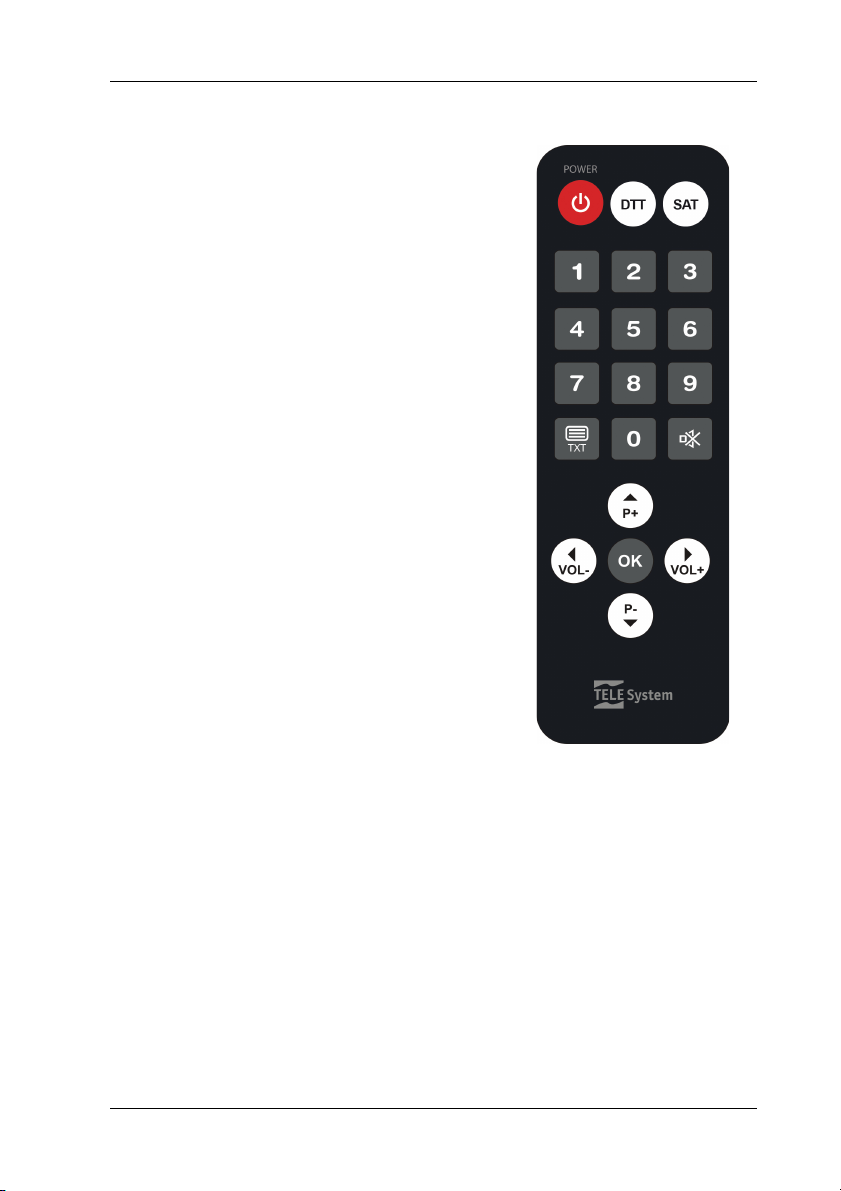
4.2 Telecomando semplificato
POWER: attivazione/disattivazione Stand-by
DDT: passa alla modalità DVBT
SAT: passa alla modalità DVBT
TASTI NUMERICI: selezione diretta dei canali.
TXT: accede al Televideo.
Mute: interruzione temporanea dell’Audio.
TASTI FRECCE: consentono la regolazione volume e cambio
canale sequenziale
OK: Conferma o seleziona un sub-menu/accede alla lista
canali
4.3 Inserimento batterie
Dovete sostituire o inserire le batterie quando:
• acquistate il prodotto.
• il telecomando non funziona correttamente.
Una volta aperto lo sportellino delle batterie posto sul
retro del telecomando, inserite le 2 batterie (formato AAA)
nel vano, facendo attenzione nel rispettare le corrette
polarità come indicate.
Rimuovere le batterie esaurite, che dovranno essere smaltite separatamente dai rifiuti
domestici portandole ad un qualsiasi punto vendita o di raccolta, ripetendo le operazioni
svolte per l’inserimento.
Per evitare che la perdita di liquido corrosivo danneggi il telecomando, vi consigliamo di
togliere le pile se pensate di non utilizzare il dispositivo per un lungo periodo. Evitate di
usare differenti tipi di batterie o batterie scariche e nuove allo stesso tempo.
9
Page 12

TELE System
10
5 Modalità PC
Il TV può essere usato come schermo per il PC essendo dotato di una scheda video VGA
seguendo la seguente procedura:
Con gli apparecchi spenti collegate i due apparati tramite un cavo D-SUB (15 poli), per la
parte Video e un cavo audio per la parte audio.
Ripristinate il collegamento elettrico del TV e del PC. Accendete il televisore.
Dal vostro telecomando premete il tasto AV. Scegliere quindi la modalità PC.
Accedente il computer.
5.1 MENU PER MODALITÀ PC
Dopo essere passati alla modalità PC, è possibile regolare vari parametri premendo il
tasto MENU nel pannello frontale o del telecomando: comparirà il consueto Menu, che
avrà alcune funzioni attive solo in questa modalità: per navigare nel menu usate i tasti
▲/▼. Modificate i valori usando i tasti t / u.
6 Funzioni di base
6.1 Accensione / Standby
Mentre il TV è in funzionamento, per spegnere, premete il tasto Power dal vostro
telecomando. Il led presente sul pannello frontale del TV cambierà da verde a rosso.
Per accendere nuovamente il televisore, premere il Tasto Power (sul telecomando o sul
TV).
6.2 Selezione programma
Per selezionare un programma, premete i tasti P+ / P- oppure i tasti ▲/▼ del
telecomando standard per la selezione sequenziale; usate i tasti numerici per la
selezione diretta dei canali.
6.3 Regolazione del volume
Premete i tasti V- / V+ oppure i tasti t / u dal telecomando standard per
diminuire/aumentare il volume.
Page 13

ITALIANO
6.4 Esclusione audio (temporanea)
Premendo il tasto MUTE il suono viene interrotto e a video compare il simbolo della
funzione. Per riattivare l’audio potete premere nuovamente il tasto MUTE o agire
mediante uno dei tasti volume V- / V+.
6.5 Richiamo programma
È possibile richiamare il programma precedentemente selezionato premendo il tasto
BACK Premendolo nuovamente si ritorna al programma che si stava guardando.
6.6 Selezione sorgente
Premendo il tasto Source è possibile selezionare la modalità di funzionamento del TV:
DTV: per attivare la modalità TV digitale e permettere la ricezione dei programmi TV
digitali;
SCART: per attivare ingresso SCART
AV: per attivare ingresso AV (RCA)
YPbPr: per attivare l’ingresso YPbPr.
HDMI: per attivare l’ingresso HDMI.
PC: per attivare modalità PC
USB: per accedere ai contenuti caricati nella memoria USB. (vedi capitolo 16)
6.7 Descrizione Menu principale
Premere il tasto MENU per far apparire il menù principale e usare i tasti direzionali ▲/▼
e t / u per navigare attraverso i titoli del menu. Premere il tasto MENU per tornare al
menu precedente o EXIT per uscire. I menù sono: Canali, Immagine, Suono, Orario,
Sicurezza, Impostazioni.
6.8 Prima installazione
Quando il televisore viene acceso per la prima volta o dopo un reset di fabbrica una
procedura guidata permetterà l’installazione semplice ed ottimale del TV:
Selezionare la lingua d’installazione (Lingua OSD) con i tasti direzionali ◄/► (predefinito
Italiano). Passare al passo successivo con il tasto ▼.
Selezionare quindi il Paese d’installazione (predefinito Italia) con i tasti direzionali ◄/►.
Premere OK per passare al passo successivo.
Selezionare il tipo di segnale (DVB-T2 o Satellite) del sintonizzatore per avviare la ricerca
dei canali e premere OK per iniziare la scansione automatica.
Al termine della scansione DVB-T2 verranno elencati i conflitti LCN da risolvere
manualmente, l’utente sceglierà il canale a cui assegnare la posizione LCN contesa,
oppure automaticamente in unica soluzione (scelta consigliata).
11
Page 14

TELE System
12
Nel caso si scelga Satellite, sarà possibile scegliere se caricare una lista canali satellitari
predefinita premendo OK e confermando Sì (freccia sinistra) alla richiesta di conferma;
oppure procedere con l’installazione tradizionale, una volta impostati i parametri
Satellite, tipo scansione, tipo canale e tipo di servizio, premendo OK e scegliendo No
(freccia destra) nella schermata successiva.
6.9 Ricerca automatica dei canali.
Premete il tasto MENU; nel menù CANALE usando ▼, selezionate la voce Scansione
Automatica e confermate con il tasto OK.
Selezionare il Paese di installazione (predefinito Italia).
Usando il tasto ▼ spostatevi su Avvia e premere OK per avviare la ricerca
In qualsiasi momento si può:
Premere EXIT oppure Menu per concludere la ricerca
ATTENZIONE!
La ricerca automatica cancella tutti i canali precedentemente memorizzati.
È possibile utilizzare lo standard DVB-C (via cavo) per la ricezione dei canali digitali,
selezionare tipo DVB-C e premere OK per la scansione automatica
ATTENZIONE! La trasmissione dei canali via cavo (DVB-C) non è normalmente utilizzata
sul territorio italiano. Fare attenzione a non selezionarla in caso di scansione canali con
impianto antenna terrestre tradizionale.
7 Modalità DVB
Per attivare la modalità di ricezione dei canali digitali, premere il tasto Source, scegliere
DTV.
Potete effettuare la scansione delle frequenze disponibili nella vostra zona, ricercando
tutti i canali digitali in modo automatico (vedi paragrafo 6.9) oppure manualmente.
ATTENZIONE!
La ricezione e quindi la visione dei canali in digitale terrestre dipendono dal livello e dalla
qualità del segnale d’antenna disponibile. Il segnale varia in funzione della zona di
residenza, dal corretto orientamento/funzionamento dell’impianto d’antenna e dalla
qualità del segnale trasmesso dai ripetitori digitali terrestri.
7.1 Ricerca manuale
Premete il tasto MENU; nel menù CANALE, usando ▼ selezionate la voce Scansione
manuale e confermate con il tasto OK
Inserire il canale (frequenza) da cercare tramite i tasti direzionali ◄ / ► del telecomando
e confermate con il tasto OK.
Premere il tasto EXIT per annullare la ricerca manuale in qualsiasi momento.
Page 15

ITALIANO
7.2 Guida elettronica TV (EPG)
La guida elettronica TV, se supportata dall’emittente, offre le informazioni sui
programmi TV dei successivi 7 giorni. Per attivare tale funzione (solo in modalità DTV)
premere il tasto Guide del telecomando.
Usare i tasti frecce per posizionarsi sul canale e/o sul programma per visualizzare una
breve descrizione dell’evento.
Usare i tasti P+ e P- nel caso la descrizione dell’evento preveda più pagine.
Posizionarsi su “Orario” e utilizzare le frecce ◄ / ► per cambiare modalità di
visualizzazione.
Premere il tasto Blu “Promemoria” per creare un promemoria dell’evento, un messaggio
d’avviso apparirà a schermo per informare l’utente dell’imminente inizio del programma
evidenziato.
7.3 Organizzazione lista canali.
Premete il tasto MENU; nel menù CANALE, usando ▼ selezionate la voce, Modifica
Programma e confermate con il tasto OK.
Verrà visualizzata la lista dei canali, con le seguenti opzioni disponibili:
Tasto Rosso (Cancella): per cancellare uno o più canali, selezionate il canale con i tasti
▲ / ▼, premete il tasto Rosso per confermarne la cancellazione.
Tasto Blu (Salta): selezionate il canale e premere il tasto Blu; se attivato il canale potrà
essere visualizzato solo se richiamato utilizzando i tasti numerici del telecomando.
Tasto Giallo (Sposta): per effettuare uno spostamento dei canali selezionare il canale
che si desidera spostare, premere il tasto Giallo, usare i tasti frecce per spostare il canale
sulla posizione desiderata oppure inserire il numero della posizione desiderata, premere
quindi OK per confermare.
7.4 Lista Favoriti
È possibile creare una lista canali Favoriti per i canali DTV (segnale terrestre): una volta
selezionato l’opzione Modifica Programma ed il canale che si desidera aggiungere alla
lista Favoriti premere il tasto FAV; ripetere l’operazione per ogni canale che si desidera
aggiungere.
Una volta creata la lista, per accedervi è sufficiente premere il tasto FAV e selezionare il
canale con i tasti freccia ▲ / ▼ e OK per confermare.
È possibile, sucessivamente, rimuovere uno o più canali dalla stessa eseguendo la stessa
procedura, selezionando il canale che si vuole cancellare e premere, quindi, il tasto FAV.
8 Modalità Satellite
Per attivare la modalità di ricezione dei canali digitali, premere il tasto Source, scegliere
Satellite.
13
Page 16

TELE System
14
Potete effettuare la scansione delle frequenze disponibili con il vostro impianto di
antenna satellitare, ricercando tutti i canali satellitari in modo automatico da prima
installazione (vedi paragrafo 6.8) oppure tramite la scansione automatica disponibile nel
menu Canali.
Impostazione Antenna: le impostazioni di base permettono l’utilizzo del TV con un
impianto a singolo LNB (Low Noise Block converter) Universale (comunemente usato per
gli impianti satellitari in Italia); nel caso il vostro impianto sia realizzato con una diversa
configurazione, è necessario modificare opportunemente le impostazioni antenna.
ATTENZIONE!!!
L’errata configurazione dell’antenna può comportare il mancato caricamento di alcuni o
tutti i canali. Se non si conoscono le caratteristiche del proprio impianto d’antenna e/o
non si è in grado di configurare propriamente il ricevitore da soli, si consiglia di rivolgersi
ad un installatore professionista di fiducia.
Gli indicatori di Potenza e Qualità del segnale si riferiscono al primo trasponder della lista
del satellite scelto.
Cambiando i parametri DiSEqC 1.0/1.1, DiSEqC 1.2/ DiSEqC 1.3, si otterranno tre diverse
modalità di configurazione.
8.1 Impianto Semplice
Per impianti d’antenna a singolo convertitore (LNB)/satellite, con collegamento diretto
tra televisore ed antenna, non vengono utilizzati comandi DiSEqC o altri particolari
protocolli di comunicazione.
8.1.1 Configurazione antenna e satellite
Dal menu Impostazione Antenna effettuare le seguenti scelte:
1. Satellite: scelta del satellite d’interesse. Evidenziare il satellite confermare con OK
e premere ►.
1. Tipo LNB: Tipo di convertitore (Low Noise Block converter - LNB) associato al
satellite scelto. Per gli impianti satellitari comuni in Italia viene usato quello
Universale (9750/10600).
2. Alimentazione LNB: alimentazione LNB per la commutazione tra polarizzazione
orizzontale e verticale. Generalmente essa deve essere mantenuta attiva (13/18V).
La sua disattivazione è invece utile quando si realizzano impianti di distribuzione IFIF (per utenti esperti).
3. 22KHz: segnale a 22KHz di commutazione tra banda alta e bassa
2. Tone burst: nessuno
3. DiSEqC 1.0: nessuno
4. DiSEqC 1.1: nessuno
5. Motore: nessuno
Page 17
ITALIANO
Canale IF
1 2 3
4
Freq.
1210
1420
1680
2040
8.1.2 Ricerca canali per satellite
Una volta impostata la configurazione, per eseguire una ricerca canali sul satellite scelto
premere il tasto BLU Scansione e definire nella finestra di dialogo Ricerca canali i
seguenti parametri:
1. Tipo scansione: modalità di scansione seguendo il database dei transponder
(opzione default) o blind-scan a passi di frequenza (opzione Cieca-Accurata) o
tramite network (opzione rete) che effettua la scansione dei transponder attivi.
2. Tipo Canale: scegliere Canali free to air per ricercare solo i canali gratuiti
(consigliato), Criptati per i soli canali codificati oppure Tutti per la scansione di
entrambe le tipoligie.
3. Tipo servizio: scegliere DTV per ricercare solo i canali TV, Radio per ricercare solo i
canali radio o Tutti.
4. Premere OK per avviare la scansione.
8.2 Impianto SCR/Unicable
Per impianti d’antenna a singolo convertitore (LNB)/satellite con tecnologia
SCR/Unicable per la distribuzione del segnale satellitare su più punti di utilizzo (ricevitori)
con un singolo cavo, si deve impostare il tipo LNB con il valore Unicable e inserire la
configurazione oppurtuna:
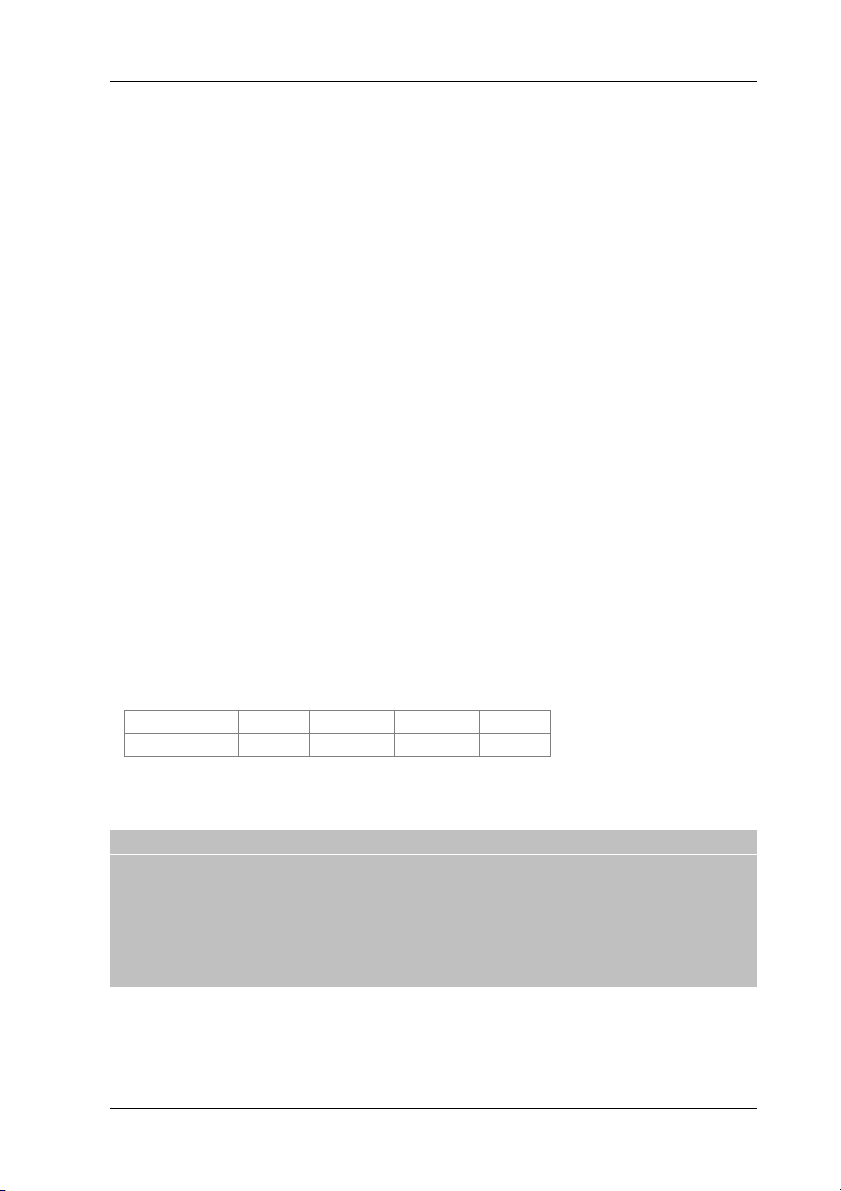
Canale IF: Numero utenza corrispondente al canale assegnato al televisore/ricevitore
interessato nell’impianto SCR. Ogni ricevitore collegato allo stesso impianto deve usare
un canale IF diverso.
Freq. Centrale: Frequenza centrale della banda/canale SCR assegnata all’utente. Valori
tipici per l’interfacciamento con altri ricevitori/sintonizzatori sono:
Premere Exit per salvare le impostazioni e tornare alla schermata precedente e
proseguire con la ricerca canali come illustrato al paragrafo 8.1.2.
AVVERTENZA
Se due ricevitori sono collegati al segnale d’antenna in cascata tramite il connettore
passante LNB OUT, essi non possono funzionare contemporaneamente. Quando un
ricevitore è acceso, l’altro deve essere posizionato in stand-by (con il tuner non
alimentato) e viceversa.
Per il collegamento di più ricevitori ad un impianto SCR, non utilizzare il collegamento
antenna passante del ricevitore, ma servirsi di un apposito partitore di segnale esterno.
15
Page 18

TELE System
16
8.3 Impianto DiSEqC 1.0/1.1
Il protocollo DiSEqC 1.0/1.1 è stato sviluppato per la ricezione di più satelliti, tramite
impianti d’antenna con più convertitori, detti anche multi-feed, fino a quattro diverse
posizioni orbitali per il DiSEqC 1.0 e fino a sedici per il DiSEqC 1.1.
8.3.1 Configurazione antenna e satellite
Dal menu Impostazione antenna effettuare le seguenti opzioni:
1. Satellite: scelta del satellite d’interesse. Evidenziare il satellite confermare con OK
e premere ►.
2. Tipo LNB: frequenza inferiore/superiore dell’oscillatore locale del convertitore
3. Alimentazione LNB: alimentazione LNB per la commutazione tra polarizzazione
orizzontale e verticale
4. 22KHz: segnale a 22KHz di commutazione tra banda alta e bassa
5. Tone burst: nessuno.
6. DiSEqC 1.0 o DiSEqC 1.1: selezionare il numero LNB sulla base del proprio
impianto d’antenna (p.e. Dual-feed: HotBird 13°E su LNB1 e Astra 19.2°E su LNB2)
7. Motore: nessuno
NOTA
Ripetere la procedura di cui sopra per ogni satellite cui si desidera effettuare una ricerca
canali
8.3.2 Ricerca canali per satellite
Vedi procedura illustrata al paragrafo 8.1.2
8.4 Impianto Motorizzato
La configurazione cambia in base al tipo di motore utilizzato per realizzare l’impianto, il
televisore è in grado di pilotare lo spostamento/rotazione della stessa antenna in modo
manuale (DiSEqC 1.2) o semi-automatico (DiSEqC 1.3 detto anche USALS).
8.4.1 DiSEqC 1.2
Dal menu Impostazione Antenna effettuare le seguenti scelte:
1. Satellite: scelta del satellite di interesse. Evidenziare il satellite, confermare con
OK e premere ►.
2. Tipo LNB: frequenza inferiore/superiore dell’oscillatore locale del convertitore
3. Alimenta LNB: alimentazione LNB per la commutazione tra polarizzazione
orizzontale e verticale
Page 19

ITALIANO
4. 22KHz: segnale a 22KHz di commutazione tra banda alta e bassa
5. Tone burst: nessuno
6. DiSEqC 1.0: nessuno
7. DiSEqC 1.1: nessuno
8. Motore: DiSEqC 1.2
In seguito, è necessario configurare i limiti Ovest ed Est di rotazione dell’impianto
premendo il tasto ROSSO Imposta limite:
1. Movim. Continuo: sposta il motore a Ovest/Est tramite le frecce ◄/►.
2. Movim. a passo: sposta il motore con movimento a passi.
3. Imposta limite Ovest: definisce il limite Ovest del motore
4. Imposta limite Est: definisce il limite Est del motore
5. Vai a riferimento: richiama la posizione di default del motore (normalmente
coincidente con “0” gradi)
6. Disabilita limiti: azzera le selezioni Imposta limiti Ovest/Est
Premere EXIT per salvare le impostazioni e tornare alla schermata precedente. Impostati
i limiti è necessario definire la posizione esatta del satellite selezionato; premere il tasto
GIALLO Imp. posizione:
1. Movim. Automatico: sposta il motore in automatico
2. Movim. Continuo: sposta il motore a Ovest/Est tramite le frecce ◄/►.
3. Movim. a passo: sposta il motore con movimento a passi.
4. Memorizza posizione: memorizza la posizione del motore per il satellite
selezionato
5. Vai a posizione: sposta il motore alla posizione memorizzata per il satellite
selezionato
6. Vai a riferimento: richiama la posizione di default del motore (normalmente
coincidente con “0” gradi)
Premere Exit per salvare le impostazioni e tornare alla schermata precedente e
proseguire con la ricerca canali come illustrato al paragrafo 8.1.2.
8.4.2 DiSEqC 1.3
Dal menu Impostazione antenna effettuare le scelte come al punto 8.4.1 ad eccezione
del punto 8 in cui si deve impostare il valore DiSEqC 1.3. Quindi è necessario configurare
il motore definendo i limiti Ovest ed Est, la posizione del satellite e la posizione
geografica dell’impianto d’antenna.
I limiti Ovest/Est s’impostano esattamente come al punto precedente (premendo il tasto
ROSSO Imposta limite).
La posizione del satellite si imposta anch’essa come al punto precedente (premendo il
tasto GIALLO Imposta posizione).
17
Page 20

TELE System
18
La posizione geografica si configura premendo il tasto VERDE Località:
Posizione: selezionare una delle opzioni disponibili o Manual per inserire la posizione
manualmente
Direz Longitudine: selezionare Est o Ovest
Angolo Longitudine: immettere i gradi relativi alla longitudine
Direz Latitudine: selezionare Nord o SUD
Angolo Latitudine: immettere i gradi relativi alla latitudine
Premere Exit per salvare le impostazioni e tornare alla schermata precedente e
proseguire con la ricerca canali come illustrato al paragrafo 8.1.2.
8.5 Scansione Automatica
In caso si voglia eseguire una scansione canali satellitari (ad esempio per aggiornare la
lista canali) e l’impianto antenna è del tipo Semplice oppure già configurato in
precedenza, nel menu Canali è disponibile l’opzione Scansione Automatica; tramite essa
(come descritto nel paragrafo 6.8), una volta impostato il Paese ed il Satellite desiderato,
si possono definire i parametri di ricerca come illustrato al al paragrafo 8.1.2. e
premendo OK avviare il caricamento della lista canali preconfigurata o la scansione
canali.
9 Sicurezza – Blocco sistema
Per accedere al menù è necessario inserire la password impostata al momento della
prima installazione.
Blocca sistema
Se impostato in ON l’accesso ad alcune funzioni viene protetto da password.
Canale Bloccato
Se attivato su uno o più canali, la visione degli stessi è permessa solo dopo l’immisione
della password. Per attivare la funzione selezionate il canale con i tasti ▲ / ▼ e premete
il tasto Ok (l’icona “lucchetto” apparirà vicino al canale bloccato).
Parental control: permette di attuare un controllo sulla visione di alcuni eventi sensibili.
Se il canale sintonizzato trasmette un evento con informazione di protezione di visione
da parte di un pubblico di età superiore al livello scelto, il TV bloccherà il canale. Apparirà
a video la richiesta di sblocco canale tramite inserimento password.
Blocco tastiera: una volta abilitato, l’utente potrà interagire con il TV solo tramite
telecomando in dotazione.
Nuova password: permette di cambiare la password preimpostata.
Cancella Blocco: rimuove tutti i blocchi impostati dall’utente.
Page 21

ITALIANO
Impostazione Hotel mode: Attiva la funzione Hotel, che permette di personalizzare il
menu e alcune funzioni autorizzando l’accesso tramite l’inserimento di Password.
ATTENZIONE!
Annotare e conservare il nuovo codice PIN in un luogo sicuro. Nel caso lo si dimenticasse,
utilizzare il codice universale “4711”, col quale si potrà accedere al menu Password e
quindi impostare una nuova password.
10 Menu Immagine
Da questo menù è possibile regolare i livelli di: Luminosità, Contrasto e Nitidezza
dell’immagine.
Modalità immagine: Si può selezionare una delle impostazioni predefinite, non regolabili
(Dinamico Standard o Soft) o l’opzione “Personale” che consente le regolazioni
sopraccitate.
Temperatura Colore: Questa funzione consente di regolare l’intensità del colore
dell’immagine
Aspect Ratio: permette di variare il rapporto d’aspetto dello schermo, le opzioni
disponibili sono: Auto, Full (16:9), Zoom1, Zoom2 e 4:3
Impostazioni avanzate: nel sottomenu sono disponibili le impostazioni Riduzione del
disturbo (NR), NR MPEG e Contrasto Dinamico; usando queste funzioni, si possono
ridurre le interferenze e il rumore che si forma nell’immagine.
11 Menu Audio
Da questo menù è possibile regolare i livelli audio ALTI, BASSI e BILANCIAMENTO del
suono.
Modalità Suono: Si può selezionare una delle impostazioni predefinite, non regolabili
(Standard, Musica, Movie) o l’opzione Utente; che consente le regolazioni di Alti e Bassi.
Bilanciamento: è possibile regolare il volume del suono in uscita dagli altoparlanti di
destra/sinistra, facendo prevalere uno sull’altro.
Suono Surround: attiva o disattiva il Surround mode
Volume automatico (AVL): se impostato su ON mantiene in memoria i livelli audio dopo
lo spegnimento e li ripropone alla riaccensione.
SPDIF: definisce la modalità di uscita dell’audio dal connettore “Coaxial”. OFF = sempre
spento, PCM = stereo e AUTO = mantiene il formato originale del segnale audio.
Descrizione Audio: attiva e regola il volume dell’audio descrittivo (se disponibile su
programma) per utenti ipovedenti.
Tipo si suono: le modalità disponibili sono: Stereo, Dual I, Dual II e Mix.
19
Page 22

TELE System
20
12 Impostazioni orario
Da questo submenu (all’interno del menu Impostazioni) è possibile impostare l’ora
tramite la scelta del Fuso Orario (GMT) corrispondente al paese di installazione e in più
sono presenti le seguenti opzioni:
Fuso orario: permette di impostare/modificare il fuso orario di riferimento.
Data e Ora: permette di impostare la data e ora.
Timer spegnimento: consente di passare automaticamente alla modalità di stand-by allo
scadere di un tempo impostato.
Auto spegnimento: se attivo il televisore passa automaticamente allo stato si Standby
dopo il periodo impostato (3, 4, 5 ore o spento) dall’ ultimo comando ricevuto.
Tempo OSD: imposta il timeout uscita da OSD menu in caso di mancata interazione con
lo stesso.
13 Menu Impostazioni
Da questo menù è possibile impostare la lingua dell’OSD, dell’audio e dei sottotitoli, della
durata della visione delle informazioni (banner del canale, menu, …) e in più:
Aggiornamento Canali: funzione che consente di abilitare/disabilitare la scansione canali
automatica quando il TV è in modalità operativa. Durante il normale funzionamento, nel
caso la funzione sia attiva (ON), il televisore esegue un’aggiornamento dinamico della
lista canali DVB-T (terresti) nell’eventualità che siano stati introdotti cambiamenti
all’interno della frequenza sintonizzata.
Reset di fabbrica: Questa funzione consente di ripristinare le impostazioni di fabbrica.
Per farlo, selezionare Reset di fabbrica e sulla nuova schermata selezionare SI. La
televisione torna alle impostazioni di fabbrica
ATTENZIONE!
Il ripristino delle impostazioni di fabbrica riavvia la procedura guidata di installazione
(vedi paragrafo “Prima Installazione”), inoltra cancella tutti i canali precedentemente
memorizzati e le impostazioni personalizzate.
14 USB Mediaplayer
Da questo menu è possibile visualizzare i vostri file personali contenuti all’interno del
dispositivo di memoria collegato al TV tramite l’ingresso USB.
La funzione Mediaplayer è accessibile dall’elenco delle sorgenti (tasto Source) oppure
premendo il tasto USB.
Una volta scelto il tipo file che si desidera riprodurre, verranno proposti a video solo i file
di tale tipologia; utilizzare i tasti “◄/►/▼/▲” per spostarsi all’interno delle cartelle/file
e OK per confermare ed iniziare la riproduzione.
Page 23

ITALIANO
Durante la riproduzione è possibile gestire il contenuto con i consueti tasti Play/Pause,
Stop, Fast Rewind, Fast Forward, Previous e Next (per maggiori dettagli rileggere il
paragrafo. 4.1) oppure premendo i tasti OK e/o INFO è possibile richiamare tutte le
funzioni disponibili per il tipo di file multimediale.
Durante la riproduzione video, premere il tasto Subtitle abilitare/scegliere i sottititoli
della traccia (il file che contiene i sottotitoli esterni deve essere nominato esattamente
come il file video).
Durante la riproduzione dei file premere il tasto INFO per far apparire/scomparire la
barra degli strumenti attivi a seconda del tipo di file riprodotto.
AVVERTENZE
Non è garantita la compatibilità con tutti i dispositivi di memoria USB presenti sul
mercato. La rimozione della memoria durante la scrittura o lettura dati, può danneggiare
i contenuti e i dispositivi coinvolti; spegnere il TV prima di scollegare la memoria
21
Page 24
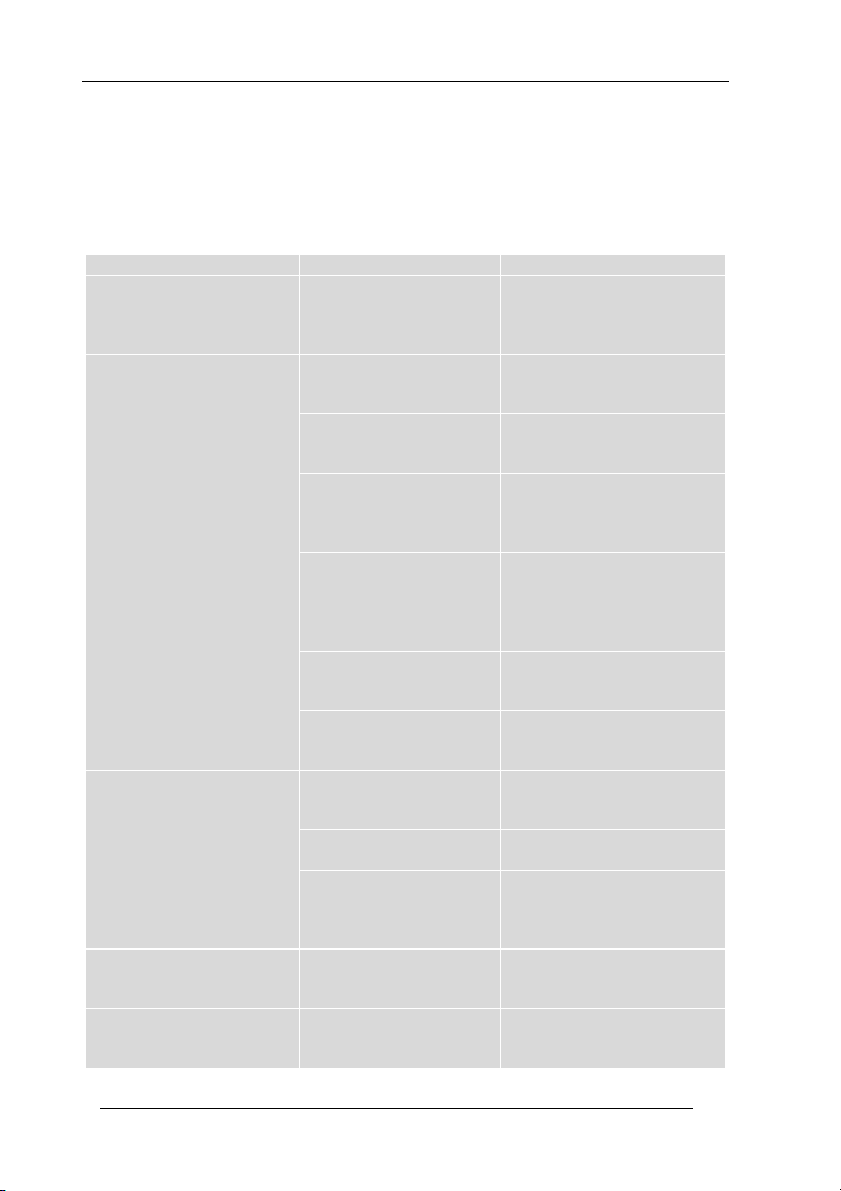
TELE System
22
Problemi
Possibili cause
Cosa fare
il LED On/Stand.by sul
pannello frontale del TV non è
acceso.
Il cavo di alimentazione non
è collegato alla presa
elettrica.
Verificare che il televisore sia
correttamente alimentato, poi
premere il tasto q del TV o del
telecomando per accenderlo.
Nessun segnale/video/audio.
Il segnale d’antenna è
assente o debole.
Controllare la configurazione
dell’antenna e la presenza del
segnale a menu
Il canale sintonizzato non
sta trasmettendo o è
obsoleto.
Cambiare canale e/o eseguire
una nuova ricerca canali
Il cavo audio-video (es.
HDMI, SCART, etc) non è
collegato correttamente o è
guasto.
Verificare la connessione audiovideo e il funzionamento del
relativo cavo.
La risoluzione video di un
dispositivo esterno collegato
via HDMI non è compatibile
con quella dello schermo
TV.
Regolare propriamente la
risoluzione dell’uscita video del
dispositivo HDMI esterno.
Volume audio basso o muto.
Aumentare il livello di volume
audio del TV e/o del dispositivo
AV esterno connesso al TV.
TV non commutato sull’
ingresso audio-video o sulla
modalità corretta.
Selezionare correttamente la
sorgente del TV desiderata
I canali non vengono caricati.
Segnale d’antenna assente o
debole.
Verificare l’impostazione
antenna e la presenza di
segnale.
Il transponder/la frequenza
selezionato è obsoleto.
Scegliere un transponder/la
frequenza valida.
Il trasponder del canale
desiderato non è presente
nel database o non è
aggiornato.
Aggiungere o aggiornare il
trasponder a mano.
Le regolazioni effettuate a
menu non sono state
memorizzate.
Mancata conferma dopo la
modifica delle impostazioni.
Confermare ogni modifica
premendo l’eventuale tasto di
salvataggio.
Il telecomando non funziona.
Il telecomando non è
puntato correttamente
verso il TV.
Verificare che non vi siano
ostacoli tra telecomando e il
sensore IR frontale del TV.
15 Risoluzione problemi
Se riscontrate problemi nell’utilizzo del televisore, in questa sezione avete modo di
risolverli da soli. Prima di contattare il servizio di assistenza (garanzia), provate ad
effettuare alcune prove come suggerito nella tabella.
Page 25
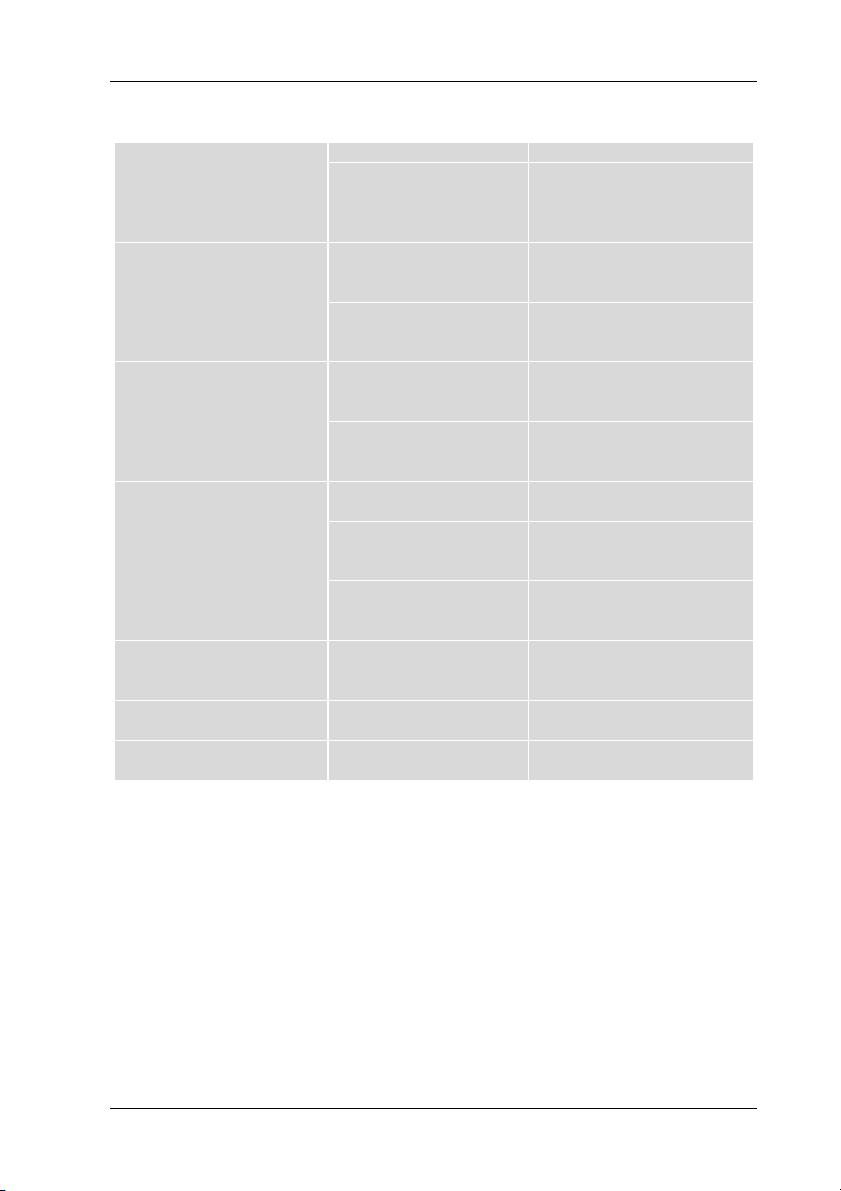
ITALIANO
Le batterie sono scariche.
Sostituire le batterie.
Il telecomando vi è caduto e
i componenti interni si sono
danneggiati.
Rivolgersi al proprio rivenditore
per l’acquisto di un nuovo
telecomando.
Le informazioni del
programma non vengono
visualizzate.
Il programma interessato
non trasmette informazioni
sull’evento.
L’orario del ricevitore non è
impostato correttamente.
Accertarsi di aver selezionato il
Paese ed il Fuso orario corretti
in prima installazione
Il televisore non risponde
all’azione dei tasti del
telecomando o della tastiera
frontale.
Blocco temporaneo del
televisore.
Scollegare il televisore dalla
presa elettrica e ricollegarla
dopo qualche istante.
Problemi con il
telecomando.
Consultare i suggerimenti
relativi al telecomando di
questa tabella.
La memoria USB non viene
riconosciuta.
Memoria USB non
formattata propriamente.
Formattare la memoria con File
System FAT32 o NTFS.
Memoria USB non
compatibile.
Provare con un’altra memoria
USB o utilizzare l’eventuale
alimentatore esterno del disco.
La sola porta USB del TV non
è sufficiente ad alimentare
la memoria.
Il contenuto multimediale non
viene riconosciuto.
Formato file e/o tipo di
codec audio-video non
compatibili.
Utilizzare solamente file e codec
compatibili con TV.
È stato dimenticato il PIN.
Vedi par. 10
Il televisore si spegne da solo.
Spegnimento automatico
attivato.
Consultare le impostazioni del
menu Config. Timer.
AVVERTENZA
Generalmente, in caso di comportamento anomalo del televisore, un completo riavvio
del sistema (rimuovere la spina e ridare alimentazione al televisore dopo una decina di
secondi) o un ripristino delle impostazioni di fabbrica tramite reset può aiutare a
risolvere il problema riscontrato.
23
Page 26
TELE System
24
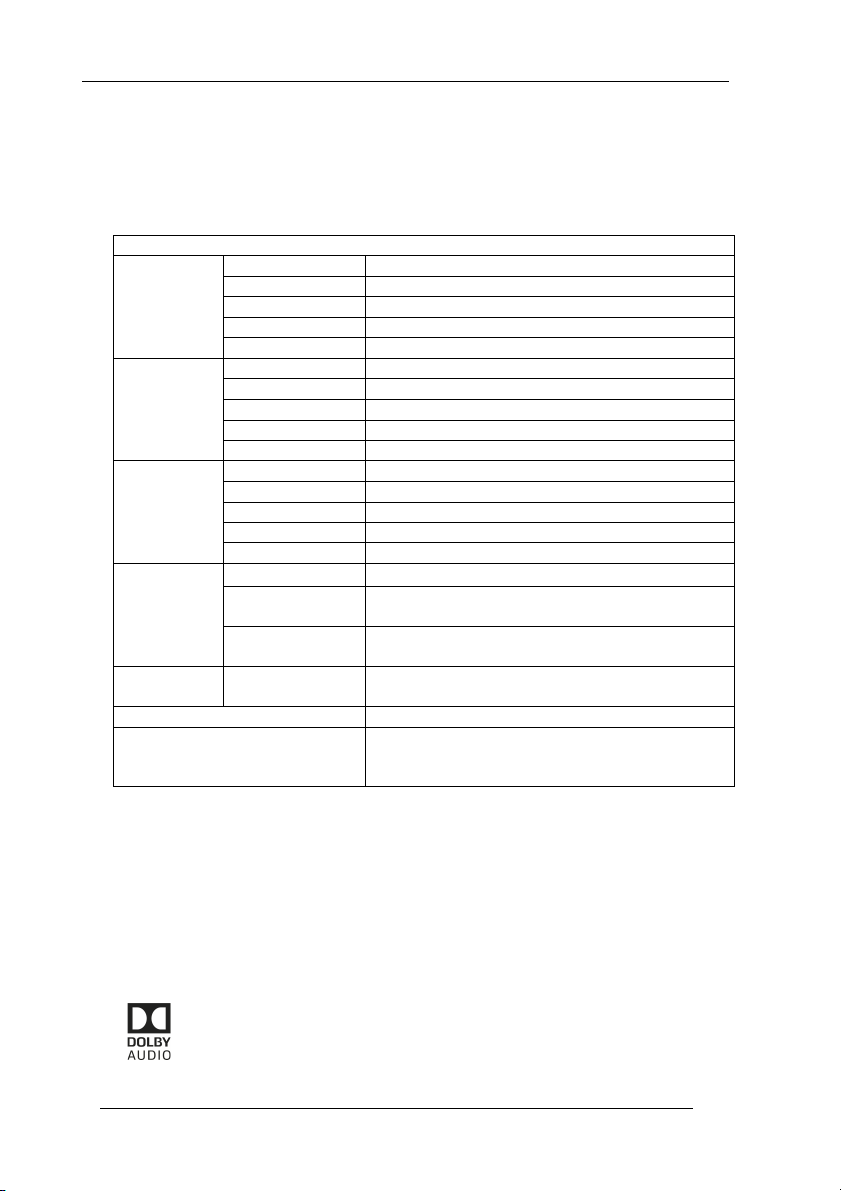
Modello
PALCO32 FL09
Pannello
Display
Diagonale 31,5” (80 cm) 16:9 Wide
Risoluzione
1366(H) x 768(V)
Contrasto
3000:1
Luminosità
200 (cd/m2)
Angolo di visione
178°/178° (H/V)
Ingressi
Component
(YPbPr) + Audio (adattore non in dotazione)
HDMI / Scart
(1)
3/ 1
A/V in
(2)
1 (adattore non in dotazione)
USB
1 – Funzione Mediaplayer
VGA
DSUB15 + Audio PC
Segnale TV
RF input DVB-T
75 Ω – VHF/UHF - 7MHz/8MHz
RF input DVB-S
1 tipo F
Video
MPEG2, MPEG4 H.264/AVC e H.265/HEVC
Audio
MPEG1 layer1/2; DD; DD+; AAC; HE-AAC
Speaker
10Watt x 2
Generalità
Alimentazione
100V - 240V, 50/60Hz
Consumo
0,5W in Stand-by;
56W consumo max
Formati
supportati USB
AVI/MP4/MKV (compatibile H.265)
Misure
(l x a x p)
Con supporto
Senza supporto
720 x 466 x 225 mm
720 x 431 x 78 mm
Standard supporto a muro
VESA 200/100
Accessori
Telecomando standard, telecomando semplificato,
alimentatore, Adattatore RCA/SCART, manuale
istruzioni.
16 Specifiche tecniche
(1)
Ingresso SCART può essere sostituito da ingresso RCA (3 connettori) sul lato inferiore della scheda
madre. Per collegare un cavo SCART esterno, utilizzare l’adattore RCA/SCART in dotazione.
(2)
Ingresso AV in non disponibile nel caso l’ingresso SCART sia stato sostituito da ingresso RCA (3
connettori)
I termini HDMI e High-Definition Multimedia Interface HDMI e il logo HDMI sono marchi o marchi
registrati di HDMI Licensing, LLC negli Stati Uniti e in altri paesi.
Prodotto su licenza di Dolby Laboratories. Dolby, Dolby Audio e il simbolo
della doppia D sono marchi di Dolby Laboratories.
Page 27

ENGLISH
Dear Customer,
in thanking you for purchasing our product, please read the following instructions before
attempting to operate the unit. This is the only way to achieve the best results over time
while maintaining the original reliability. We also suggest that you keep this manual for
any future reference. We also suggest that you keep the original packaging of the TV
and, in the event of any problem, remember to take note of the serial number of the TV
which is shown on the back of the device.
The TELE System staff
ATTENTION!
The reception and therefore the viewing of channels in digital terrestrial and/or satellite
depends on the level and quality of the available antenna signal. The signal varies
depending on the area of residence, the correct orientation/functioning of the antenna
system, and the quality of the signal transmitted by digital terrestrial repeaters and/or
satellites.
TELE System Digital Srl announces that due to software and/or hardware changes that
aim to improve the product, you may find inconsistencies between the contents of this
manual and the product in your possession.
1
Page 28

Page 29

ENGLISH
17 Index
!
Index 1!
Safety 2!
Description of the TV ................................................................................................. 4!
1.1! Front ................................................................................................................. 4!
1.2! Keyboard ........................................................................................................... 4!
1.3! Rear panel connections .................................................................................... 4!
Connections ............................................................................................................... 5!
1.4! Antenna connections/cable TV channel ........................................................... 5!
1.5! Connection to an external device ..................................................................... 5!
Remote Control ......................................................................................................... 6!
1.6! Standard remote control .................................................................................. 6!
1.7! Simplified remote control ................................................................................. 7!
1.8! Inserting batteries ............................................................................................. 7!
PC Mode .................................................................................................................... 7!
1.9! Menu for PC mode ............................................................................................ 8!
Basic Function ............................................................................................................ 8!
1.10! Power / Standby ............................................................................................. 8!
1.11! Program selection ........................................................................................... 8!
1.12! Volume regulation .......................................................................................... 8!
1.13! Mute (temporary) ........................................................................................... 8!
1.14! Program recall ................................................................................................. 8!
1.15! Source selection .............................................................................................. 9!
1.16! Main Menu description .................................................................................. 9!
1.17! First installation .............................................................................................. 9!
1.18! Automatic channel search. ............................................................................. 9!
DVB Mode ............................................................................................................... 10!
1.19! Manual search .............................................................................................. 10!
1.20! Electronic TV guide (EPG) ............................................................................. 10!
1.21! Organization of channel list. ......................................................................... 11!
1.22! Favorites list .................................................................................................. 11!
Satellite mode ......................................................................................................... 11!
1.23! Simple installation ........................................................................................ 12!
1.23.1! Antenna and satellite configuration ..................................................... 12!
1.23.2! Channel search for satellite .................................................................. 12!
1.24! SCR/Unicable System .................................................................................... 13!
1.25! System DiSEqC 1.0/1.1 .................................................................................. 13!
1.25.1! Antenna e satellite configuration ......................................................... 13!
1.25.2! Channel search for satellite .................................................................. 14!
1.26! Motorized System ......................................................................................... 14!
1
Page 30

TELE System
2
1.26.1! DiSEqC 1.2 ............................................................................................. 14!
1.26.2! DiSEqC 1.3 ............................................................................................. 15!
1.27! Automatic scanning ...................................................................................... 15!
Security – System Block ........................................................................................... 15!
Image Menu ............................................................................................................ 16!
Audio Menu ............................................................................................................. 16!
Time settings ........................................................................................................... 17!
Settings Menu ......................................................................................................... 17!
USB Media player .................................................................................................... 18!
18
19 Safety
ATTENTION: TO REDUCE RISK OF ELECTRIC SHOCK, DO NOT REMOVE THE BACK COVER
AND DO NOT USE METAL TOOLS.
Before connecting the power cord to the DC adapter outlet, make sure that the voltage
corresponds to the one used in your area.
Make sure your TV is switched off before inserting the mains plug into the wall socket.
Be careful to ensure that the electrical cable and other connecting cables are firmly
connected and secure.
Voltage overload and power extension cables can be dangerous, just as frayed wires or
broken sockets/plugs; These conditions may cause electric shock or fire. Contact a
trusted technician to replace the damaged parts.
Do not insert metal objects into the TV; there is a danger of electric shock.
To avoid electric shocks, do not touch the internal parts of the LED TV; only qualified
personnel can open the television.
The TV is equipped with slots for air circulation. To prevent overheating, these openings
must not be covered or obstructed. If you place the TV in confined spaces (within
libraries or other furniture), make sure that there is adequate ventilation.
Do not use the television with extreme temperatures, humidity, or in dusty
environments.
The recommended use temperature: 5-35 ° C
Relative humidity: 30 – 80RH
Do not expose your TV to rain or splashing water; do not install it near kitchens,
swimming pools etc ... If liquid accidentally gets inside the TV, unplug the power cord
immediately and contact a technician.
You can clean the LED/LCD screen if necessary with a damp soft cloth, remember to
unplug the TV before cleaning.
Do not use solvents such as benzene to clean the device, because you will damage the
screen surface.
Place the TV on a firm surface and handle with care.
Page 31
ENGLISH
The screen is formed by a thin glass and protected by a plastic foil, liquid abrasives or
streaks will permanently ruin the LED/LCD panel.
Do not clean the screen with substances such as acetone, ethyl alcohol, toluene, ethyl
acid, methyl or hydrogen; these substances ruin the LED/LCD panel.
Position the TV so that it is easier to access the power outlet.
Do not put heat or flame such as candles near/on the TV.
No object filled with liquids such as vases or bottles should be placed on or near the TV.
The checked bin symbol indicates that you should not dispose of this product
in the environment or throw it in the mixed municipal waste. Whoever does
not respect this rule is punishable according to current legislation.
A proper disposal of the appliance enables you to avoid potential damage to
the environment and human health as well as to facilitate recycling of components and
materials contained in it and save enery and resources.
The manufacturer provides a system for recovery of electric and electronic appliances
(RAEE or REEE) such as this product which is collected separately and subject to
treatment systems with equipment in accordance with current provisions.
Take the unusable product (and any accessories, including the battery) to a recycling
center authorized to handle electrical and electronic equipment waste, as it cannot be
combined with other waste. You can always return the used or dead device to the same
distributor who sold it to you while buying a new equivalent product or free of charge if
the equipment is for home use and is smaller than 25cm.
The terms HDMI and High-Definition Multimedia Interface HDMI and the HDMI logo
are trademarks or registered trademarks of HDMI Licensing, LLC in the United States
and other countries.
Manufactured under license from Dolby Laboratories. Dolby, Dolby
Audio and the double-D symbol are trademarks of Dolby
Laboratories.
3
Page 32

TELE System
4
3
20 Description of the TV
20.1 Front
LED: Status Indicator, Red = Standby, Green = Power
IR sensor: remote control receiving sensor
Warning! The position of the LED and IR sensor may not correspond exactly to the one
shown in the picture.
20.2 Keyboard
The TV keyboard controls is on the right side of TV itself. The available keys are (from
left to right):
Vol-: increase volume
Vol+: decreases the volume
CH-: change to the next channel
CH+: change to the previous channel
Menu: access the main menu
Source: select source
Power: Standby mode (OFF/ON)
20.3 Rear panel connections
On the back side of the TV, there are connections and A/V inputs.
Horizontal side (from left to right):
220V AC power supply
VGA port (PC)
Audio PC input (PC Audio IN)
SCART input3
SATELLITE Antenna RF (Tipo F)
TERRESTRIAL Antenna RF (IEC)
HDMI1 input
On the vertical side (from top to bottom):
Headphone output (jack 3,5 mm)
SCART input could be substituted by a RCA input + Audio
Page 33

ENGLISH
4
USB port (Mediaplayer)
Component input (YPbPr, adapter not included)
RCA Video + Audio input (AV, adapter required)4
Slot Common Interface (CI+)
COAXIAL audio output
HDMI3 input
HDMI2 input
21 Connections
21.1 Antenna connections/cable TV channel
To view the television channels, you can connect the TV to one of the following devices:
A terrestrial antenna and/or a satellite antenna system.
In either case, connect the antenna cable (75 Ω) to the coaxial jacks located in the rear
of the TV.
21.2 Connection to an external device
Via SCART: make sure that both the TV and the device are turned off. Connect the SCART
cable from the source to the TV. Turn on the two devices. Press the Source button on
the remote control and select SCART.
Via RCA: make sure that both the TV and the device are turned off. It is necessary to use
an RCA/Jack3.5mm adapter to connect the device to the AV/RCA input. Turn the two
devices on. Press the Source button on the remote control and select AV as the source.
Via YPbPr (Component): make sure that both the TV and the device are turned off. It is
necessary to use an RCA/3.5mm jack adapter to connect the device to the AV/RCA,
respecting the colors as per the following instructions:
Yellow - Green
Red - Red
White - Blue
Turn on the two devices.
Press the Source button on the remote control and select YPbPr.
Via HDMI: make sure that both the TV and the device are turned off. Connect the cable
from the source to the TV. Turn on the two devices. Press the Source button on the
remote control and select HDMI.
Not available, if SCART input has been substituted by RCA input
5
Page 34
TELE System
6
22 Remote Control
22.1 Standard remote control
POWER: On / Off Stand-by
Mute: temporary interruption of audio.
Numeric keys: direct channel selection.
EPG: electronic program guide (EPG)
BACK: back to the last selected program.
Picture: change the video mode.
Sound: change the audio mode
Sleep: sets the sleep timer.
V -/+: Decrease / increase volume.
AUDIO: audio choice.
FAV: Displays the favorite channel list.
CH -/+: change previous / next channel.
DTT: switches to DVBT mode
SAT: switches to DVBT mode
USB: switches to USB (Media) mode
MENU: display the main MENU.
Source: source selection
ARROW KEYS: are used to browse through the menu / regulate
volume / change sequential channels
OK: Confirm or select a sub-menu/Access the channel list
EXIT: exit the menu.
INFO: displays information of current channel.
RED FASTEXT KEY
GREEN FASTEXT KEY
YELLOW FASTEXT KEY
BLUE FASTEXT KEY
REWIND: rewind (multimedia function)
PLAY&PAUSE / TIMESHIFT: starts / pauses playback / Timeshift
Fast Forward / Aspect: fast forward / choice of image format.
Back skip / Cancel: back forward one track
Skip / SUB.PG: forward one track /subpage teletext
STOP / INDEX: stop playback/recording / Index in Televideo
mode.
REVEAL: Teletext function
TV/RADIO: change type TV service /Radio service
SUBTITLE: enable subtitle (if available)
Page 35
ENGLISH
TXT: access Teletext.
SIZE: Teletext function
HOLD: Teletext function
22.2 Simplified remote control
POWER: Stand-by On/Off
DTT: switches to DVBT mode
SAT: switches to DVBT mode
EXIT: exit the menu.
NUMERIC BUTTONS: direct selection of channels.
TXT: access Televideo
Mute: temporary interruption of audio.
ARROW KEYS: are used to browse through the menu /
regulate volume / change sequential channels
OK: Confirm or select a sub-menu. Access the channel
list
22.3 Inserting batteries
You have to replace or install the batteries when:
• You buy the product.
• the remote control does not work properly.
Once you open the battery door located on the back of
the remote, insert the 2 batteries (AAA) in the
compartment, making sure to respect the correct
polarity as indicated.
Remove the used batteries, which must be disposed of separately from household waste
taking them to any store or collection point and then repeat the operations for insertion.
To avoid damaging the remote control with the leakage of corrosive liquid, you should
remove the batteries if you plan not to use the device for a long period of time. Avoid
using different types of batteries or dead and new batteries at the same time.
23 PC Mode
Since it is equipped with a VGA video card, the TV can be used as a PC screen following
this procedure:
With the equipment turned off, connect the two devices via a D-SUB cable (15-pin) for
the Video part and an audio cable for the audio portion.
7
Page 36

TELE System
8
Reset the electrical connection of the TV and PC. Turn on the TV and from your remote
control, press the AV button. Select the PC mode. Turn your computer on.
23.1 Menu for PC mode
After switching to PC mode, you can adjust various settings by pressing the MENU button
on the front panel or the remote control: the usual menu will appear, which will have
some functions active only in this mode: to navigate through the menu use the ▲ / ▼
keys. Change the values using the t / u buttons.
24 Basic Function
24.1 Power / Standby
While the TV is in operation, to turn it off, press the Power button on your remote
control. The LED on the front panel of the TV will change from green to red.
To switch the TV on again, press the Power button (on the remote control or on the TV).
24.2 Program selection
To select a program, press the P+/P- buttons or use the numeric keys for direct channel
selection.
24.3 Volume regulation
Press the V- / V+ buttons on the standard remote control to increase / decrease the
volume.
24.4 Mute (temporary)
Pressing the MUTE button, any sound is stopped and the video shows the symbol of the
function. To reactivate the sound, you can press the MUTE button again or one of the
volume buttons V- / V +.
24.5 Program recall
You can recall the previously selected program by pressing the BACK button and by
pressed it again, it returns to the program you were watching.
Page 37

ENGLISH
24.6 Source selection
By pressing the Source button, you can select the TV mode:
DTV: To activate the Digital TV mode and allow the reception of digital TV programs;
SCART: To enable SCART input
AV: to enable the AV input (RCA)
YPbPr: to activate the YPbPr input.
HDMI: to activate the HDMI input.
PC: to activate the PC mode
USB: to access content loaded on a USB memory. (See Chapter 16)
24.7 Main Menu description
Press the MENU key to bring up the main menu and use the arrow keys ▲ / ▼ and t /
u to navigate through the titles of menu. Press the MENU button to return to the
previous menu or EXIT to exit. The menus are: Channels, Images, Sound, Time, Security,
Settings.
24.8 First installation
When the TV is turned on for the first time or after a factory reset, a wizard will allow
the simple and optimal installation of the TV:
Select the installation language (OSD Language) with the t / u arrow keys (default
Italian). Go on to the next step by pressing the ▼ button.
Then select the installation country (Italy default) using the arrow keys t / u. Press OK
to move on to the next step.
Select the tuner signal type (DVB-T2 or Satellite) to start searching for channels and press
OK to start an auto scan.
At the end of the DVB-T2 scan, a list of LCN conflicts to be resolved manually will appear.
The user can choose the channel to be assigned to each disputed LCN position manually
or automatically all at once (recommended).
If you choose satellite, you can choose to load a default satellite channels list by pressing
OK and confirming Yes (left arrow) to the confirmation request; or proceed with normal
installations, once the satellite parameters are set, scan type, channel type and type of
service, by pressing OK and choosing No (right arrow) on the next screen.
24.9 Automatic channel search.
Press the MENU button; in CHANNEL menu, select the entry Automatic search and
confirm with the OK button.
Select the country of installation (default Italy).
9
Page 38

TELE System
10
Using the button position yourself on Start and press OK to start an automatic channel
search.
In any moment you can: Press EXIT or Menu to terminate the search
ATTENTION!
The automatic channel search cancels all the previously memorized channels.
25 DVB Mode
To activate the reception mode for digital channels, press the Source button, choose
DTV.
You can scan the frequencies available in your area, searching all digital channels
automatically (see section 6.9) or manually.
ATTENTION!
The reception and therefore the viewing of digital terrestrial channels depends on the
level and the quality of the antenna signal available The signal varies according to the
area in which you live, to the correct orientation/functioning of the antenna system and
to the quality of the signal transmitted by the digital terrestrial repeaters.
25.1 Manual search
Press the MENU button; in the CHANNEL menu select the item Manual Scan and confirm
with the OK button
Enter the channel (frequency) to be searched for through the t / u buttons on the
remote and confirm with the OK button.
Press the EXIT button to cancel manual search at any time.
25.2 Electronic TV guide (EPG)
The Electronic TV Guide, if supported by the broadcaster, offers information on the TV
programs shown for the subsequent 7 days. To activate this feature (only in DTV mode)
press Guide on the remote control.
Use the arrow keys to select the channel and/or program to view a brief description of
the event.
Use the P + and P- if the event description provides more pages.
Position yourself on "Time" and use the arrows keys t / u to switch the display mode.
Press the blue "Reminder" button to create an event reminder, a warning message will
appear on the screen informing you of the imminent start of the highlighted program.
Page 39

ENGLISH
25.3 Organization of channel list.
Press the MENU button; in CHANNEL menu, select the item Edit Program and confirm
with the OK button.
You will see the channel list with the following options available:
Red button (Delete): to delete one or more channels select the channel with the
UP/Down buttons and press the red button to confirm the cancellation.
Blue button (Skip): select the channel and press the Blue button; if activated, the channel
can only be displayed when recalled by using the number buttons on the remote.
Yellow button (Move): to move a channel, select the channel you want to move, press
the Yellow button, use the arrow keys to move the channel to the desired position or
enter the desired position number, then press OK to confirm.
25.4 Favorites list
You can create a favorite channels list for DTV channels (terrestrial signal): Once the
option Program Edit and the channel you want to add to the Favourites list has been
selected, press the FAV button; Repeat for each channel you want to add.
After you create the list, to access it, simply press the FAV button and select the
channel with the arrow keys UP/Down and OK to confirm.
You can later remove one or more channels by performing the same procedure,
selecting the channel you want to delete, and pressing the FAV button.
26 Satellite mode
To activate the digital channel reception mode, press the Source button, select Satellite.
You can scan the frequencies available with your satellite antenna system, automatically
searching for all the satellite channels from the first installation (see paragraph 6.8) or
through an automatic scanning available in the Channels menu.
Antenna setting: the basic settings to allow the use of the TV with a single Universal LNB
(Low Noise Block converter) system (commonly used for satellite systems in Italy); in the
event your system is done with a different configuration, you must appropriately change
the antenna settings.
ATTENTION!!!
The wrong antenna configuration can result in the failure to load some or all channels. If
you do not know the characteristics of your antenna system and/or are unable to
properly configure the receiver yourself, you may want to consult a professional installer
for advice. The power and signal quality indicators refer to the first transponder of the
chosen satellite list.
Changing the DiSEqC 1.0 / 1.1 parameters, DiSEqC 1.2 / DiSEqC 1.3, you will get three
different configuration modes.
11
Page 40

TELE System
12
26.1 Simple installation
For the single inverter antenna (LNB)/satellite with direct connection between the TV
and antenna, they DiSEqC commands or other special communication protocols are not
used.
26.1.1 Antenna and satellite configuration
From the Antenna setup menu make the following choices:
7. Satellite: Satellite choice of interest. Highlight the Satellite confirm by pressing OK
and press ►.
1. LNB type: Type of converter (Low Noise Block converter - LNB) associated to the
chosen satellite. For common satellite systems used in Italy, The Universal
(9750/10600) is used.
2. LNB supply: LNB power supply for switching between horizontal and vertical
polarization. Generally it must be maintained active (13 / 18V). Its inactivation is
rather useful when you realize IF-IF distribution plants (for Expert users).
3. 22KHz: 22KHz signal switching between high and low band
8. Tone burst: none
9. DiSEqC 1.0: none
10. DiSEqC 1.1: none
11. Motore: none
26.1.2 Channel search for satellite
After setting the configuration, to search channels on the chosen satellite press the BLUE
button Scan and define the following parameters in the Channel Search dialogue
window:
12. Scan type: scanning mode following the transponder database (default option) or
blind-scan frequency steps (Blind-Accurate option) or via network (network
option) that scans the active transponders.
13. Channel type: choose free to air channels to only search for free channels
(recommended), Encrypted only for encrypted channels or All to scan both types.
14. Service type: choose DTV to only search for TV channels, Radio to only search for
radio All
15. Press OK to start scanning.
Page 41
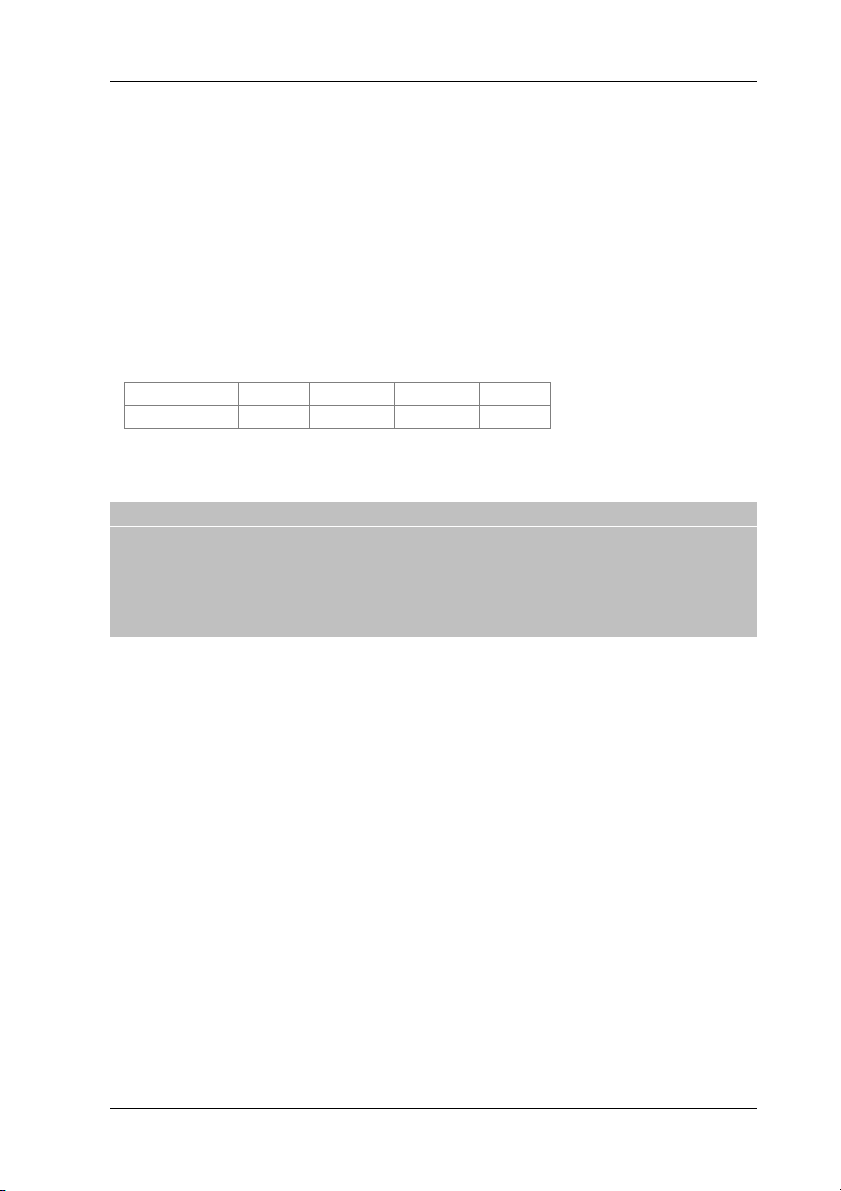
ENGLISH
IF Channel
1 2 3
4
Freq.
1210
1420
1680
2040
26.2 SCR/Unicable System
For single-antenna converter (LNB) / satellite installations with SCR / Unicable
technology for the distribution of satellite signals to multiple points of use (receivers)
with a single cable, you must set the LNB type with the Unicable value and enter the
appropriate configuration:
Canale IF: User number corresponding to the channel assigned to the TV/Receiver
regarding the SCR system. Each receiver connected to the same system must use a
different IF channel.
Central Freq.: main frequency of the band/SCR channel assigned to the user. Typical
values for interfacing with other receivers/tuners are
Press Exit to save settings and return to the previous screen and continue with the
channel search as shown in paragraph 8.1.2.
CAUTION
If two receivers are connected in cascade to the antenna signal via the LNB OUT pass-
through connector, they cannot operate simultaneously. When a receiver is switched on,
the other must be placed in stand-by (not supplied with the tuner) and vice versa
To connect multiple receivers to a SCR system, do not use the connection through
antenna receiver, but use a suitable divider external signal.
26.3 System DiSEqC 1.0/1.1
The DiSEqC 1.0 / 1.1 protocol has been developed for receiving multiple satellites via
antenna systems with multiple converters, also known as multi-feed, and up to four
different orbital positions for the DiSEqC 1.0 and up to sixteen for DiSEqC 1.1.
26.3.1 Antenna e satellite configuration
From the Antenna Set Up perform the following options:
16. Satellite: chose the desired satellite. Highlight the satellite and press OK to
confirm and press ►.
17. LNB type: inferior/superior frequency of the local oscillator of the converter
18. LNB supply: LNB supply for switching between horizontal and vertical polarization
19. 22KHz: signal at 22KHz switching between high and low band
20. Tone burst: none.
21. DiSEqC 1.0 o DiSEqC 1.1: select the LNB number based on its aerial system (i.e.
Dual-feed: Hot Bird 13°E on LNB1 and Astra 19.2°E on LNB2)
22. Motor: none.
13
Page 42

TELE System
14
NOTE
Repeat the above procedure for each satellite for which you want to perform a channel
search
26.3.2 Channel search for satellite
Se the procedure illustrated in paragraph 8.1.2
26.4 Motorized System
The configuration differs depending on the type of engine used to implement the
system, the TV is able to control the movement/rotation of the antenna manually
(DiSEqC 1.2) or semi-automaticlly (also known as DiSEqC 1.3 USALS).
26.4.1 DiSEqC 1.2
From the Antenna Setting menu, make the following choices:
23. Satellite: chose the desired satellite. Highlight the satellite and press OK to
confirm and press ►.
24. LNB type: inferior/superior frequency of the local oscillator of the converter
25. LNB supply: LNB supply for switching between horizontal and vertical polarization
26. 22KHz: signal at 22KHz switching between high and low band
27. Tone burst: none
28. DiSEqC 1.0: none
29. DiSEqC 1.1: none
30. Motor: DiSEqC 1.2
Subsequently, you need to configure the Western and Eastern limits of the system
rotation by pressing the RED button Set limit:
31. Continuous movement: moves the motor West/East via the◄/► arrows.
32. Step motion: moves the motor with an indexing motion.
33. Set West limit: defines the Western limit of the motor
34. Set East limit: defineds the Eastern limit of the motor
35. Go to reference: recalls the default position of the motor (usually coinciding with
"0" degrees)
36. Disable limits: resets the West/East limits previously set
Press EXIT to save your settings and return to the previous screen. Once you have set the
limits, you also need to define the exact position of the selected satellite; press YELLOW
Position setting:
37. Automatic movement: automatically moves the motor
38. Continuous movement: moves the motor West/East via the ◄/► arrows.
Page 43

ENGLISH
39. Step motion: moves the motor with an indexing motion.
40. Memorize location: stores the motor position for the selected satellite
41. Go to the position: moves the motor to the memorized position for the selected
satellite
42. Go to reference: recalls the default position of the motor (usually coinciding with
"0" degrees)
Press Exit to save settings and return to the previous screen and continue searching
channels like illustrated in paragraph 8.1.2.
26.4.2 DiSEqC 1.3
From the Antenna Setup menu make choices according to point 8.4.1 with the exception
of item 8 in which you have to set the DiSEqC 1.3 value. So it is necessary to configure
the motor defining the Western and Eastern limits, the position of the satellite, and the
geographic position of the antenna.
The Eastern and Western limits are set exactly as above (by pressing the RED button Set
limit).
The satellite position is also set as above (by pressing the YELLOW button Set Position).
The geographical location is configured by pressing the GREEN button Location:
Position: select one of the available options or Manual to enter the location manually
Longitude Direction: Choose East or West
Longitude Angle: Enter the degrees longitude
Latitude Direction: Select North or South
Latitude Angle: Enter the relative latitude degrees
Press Exit to save settings and return to the previous screen and continue searching
channels like illustrated in paragraph 8.1.2.
26.5 Automatic scanning
In the event you want to scan satellite channels (for example to update the channel list)
and the antenna system is a Simple type or a previously configured one, in the Channels
menu you have the Automatic Scan option; through it (as described in section 6.8), once
you set the country and the desired satellite, you can define search parameters as
described in paragraph 8.1.2 and press OK to start loading the pre-configured channel
list or channel scan.
27 Security – System Block
To access the menu you must enter the password set at the time of initial installation.
System block
If set on ON, the access to some functions is password protected.
15
Page 44

TELE System
16
Blocked channel
If activated on one or more channels, vision of these channels is permitted only after
entering a password. To activate the function, select the channel with the ▲ / ▼ buttons
and press OK (the "lock" icon will appear next to the locked channel).
Parental control: allows the user to control the viewing of sensitive events.
If the selected channel transmits an event with vision protection information for a public
older than a specific age, then the TV will block the channel. A password request to
release the channel will appear on the screen.
Keyboard lock: Once enabled, the user can interact with the TV only via the supplied
remote control.
New Password: Allows you to change the default password.
Clear Lock: removes all user-set blocks.
Hotel setting mode: Activates the Hotel function, which enables the user to customize
the menu and some functions authorizing access by password.
ATTENTION!
Write down and preserve the new PIN code in a safe place. In the event that you forget
the password, use the universal code "4711", which will grant you access to the
Password menu, and allow you to set a new password.
28 Image Menu
From this menu you can adjust the Brightnees, Contrast and Sharpness levels.
Picture Mode: You can select one of the default settings, which are not adjustable
(Dynamic Standard or Soft) or the "Custom" option which allow you to regulate the
above mentioned levels.
Color Temperature: This function allows you to adjust the intensity of the color of the
image
Aspect Ratio: Allows you to change the screen aspect ratio, the available options are:
Auto, Full (16: 9), Zoom1, Zoom2 and 4: 3
Advanced settings: in the submenu, Noise Reduction (NR), MPEG NR and Dynamic
Contrast settings are available; using these functions, you can reduce interference and
noise formed in the picture.
29 Audio Menu
From this menu you can adjust the TREBLE, BASS, and Sound BALANCE audio levels.
Sound Mode: You can select one of the default settings, not adjustable (Standard, Music,
Movie) or the User option; that allows the settings of Treble and Bass.
Page 45

ENGLISH
Balance: You can adjust the volume from the left/right speakers, giving precedence to
one another.
Surround sound: turn on or off the Surround mode
Auto Volume (AVL): If set to ON, it memorizes the audio levels after powering down and
plays them again when you turn the device on.
SPDIF: Defines the audio output mode from "Coaxial" connector. OFF = always off, PCM
= stereo and AUTO = keeps the original format of the audio signal.
Description Audio: actives and adjusts the descriptive audio volume (if available on
program) for visually impaired users.
Sound types: the available modes are: Stereo, Dual I, Dual II and Mix.
30 Time settings
From this submenu (in the Settings menu) you can set the time by selecting Time Zone
(GMT) corresponding to the country of installation and in addition there are the
following options:
Time Zone: Allows you to set / change the reference time zone.
Date and Time: allows you to set the date and time.
Off Timer: allows you to automatically switch to standby mode after a set time.
Auto power off: if activated, the TV automatically switches to standby after the set
period from last command received (3, 4, 5 hours or off).
OSD Time: Sets the time-out exit from the OSD menu if no interaction with the same.
31 Settings Menu
From this menu you can set the OSD language, audio and subtitles, the duration of
viewing of the information (the channel banner, menu ....) And more:
Channels update feature allows you to enable / disable the automatic scanning channels
when the TV is in operating mode. During normal operation, if the function is active (ON),
the TV dynamically performs an update of the DVB-T channel list (terrestrial) in the event
that changes have been introduced within the tuned frequency.
Restore Factory Settings: This function allows you to restore factory settings. To do so,
select Restore settings ... and on the new screen, select YES. The television will be
restored to its factory settings.
17
Page 46

TELE System
18
ATTENTION!
Restoring the factory settings starts the installation wizard (see section "First
Installation"), and also clears all previously memorized channels and settings set by the
user.
32 USB Media player
From this menu, you can view your personal files contained within a memory device
connected to the TV via the USB input.
The media player function is accessible from the Source (Source) key or by pressing the
USB button.
Once you choose the file type you want to play, the device will only show video files of
that type; use "◄ / ► / ▼ / ▲" to navigate through folders / files, and OK to confirm
and start playback.
During playback, you can handle the content with the usual Play / Pause, Stop, Fast
Rewind, Fast Forward, Previous and Next (for details read Section 4.1) or by pressing
the OK button and/or INFO you can recall all the functions available for the media type.
During video playback, press the Subtitle button to enable / choose the subtitles for
the track (the file that contains external subtitles must be named exactly as the video
file).
During playback of the files, press the INFO button to show/close the bar of
instruments active according to the type of file played.
WARNING
Compatibility with all USB storage devices on the market is not guaranteed.
Page 47
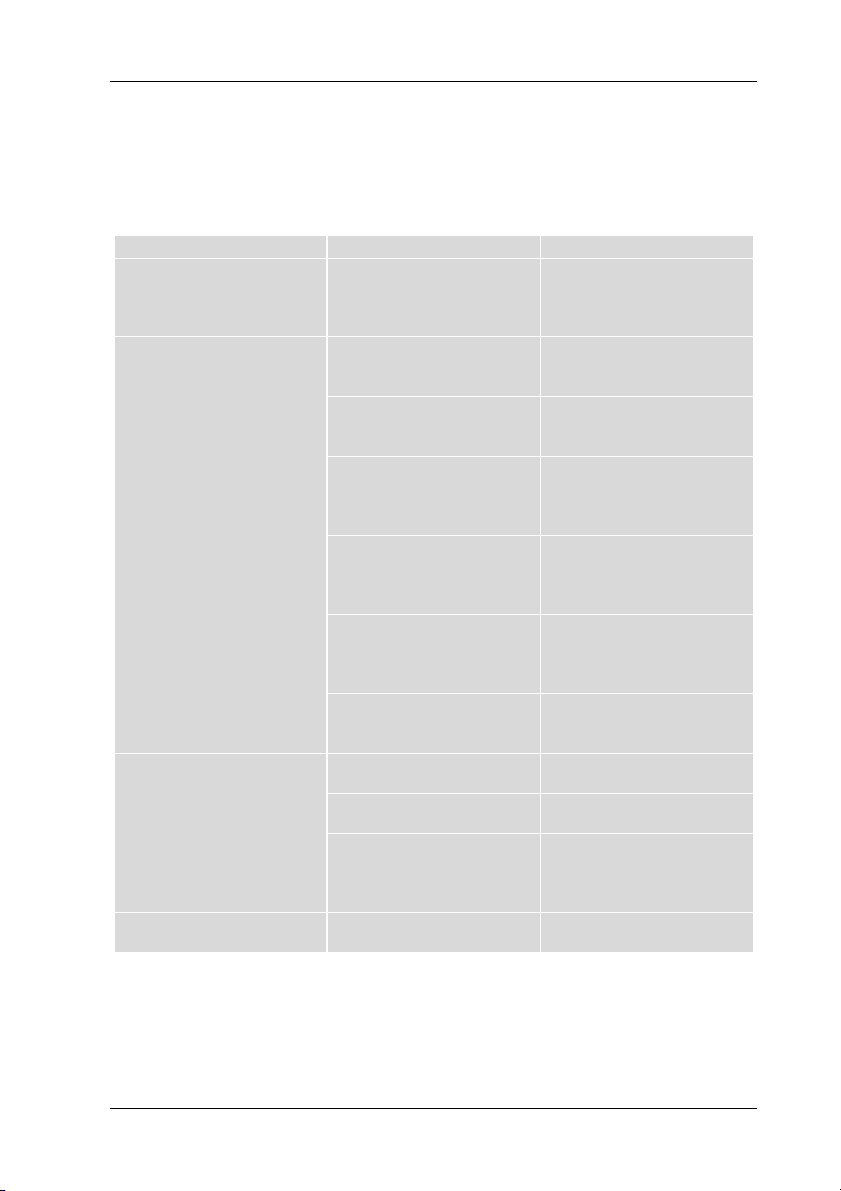
Problems
Possible Causes
What to do
The On / Standby LED on the
front panel of the TV is not lit.
The power cord is not
connected to the electrical
outlet.
Make sure the TV is properly
powered, then press the
POWER key on the TV or
remote control to turn it on.
No Audio/Video signal
The antenna signal is absent
or weak.
Check the antenna
configuration and the
presence of the menu signal.
The tuned channel is not
broadcasting or is obsolete.
Change channel and / or
perform a new channel
search.
The audio-video cable (e.g.
HDMI, RCA, etc.) is not
connected correctly or is
faulty.
Check the audio-video
connection and the operation
of the corresponding cable.
The video resolution of an
external device connected via
HDMI is not compatible with
that of the TV screen.
Properly adjust the resolution
of the video output of the
external HDMI device.
Low or mute audio volume.
Increase the audio volume
level of the TV and/or external
AV device connected to the
TV.
TV is not switched to the
correct audio-video input or
mode.
Select the desired TV source
correctly.
The channels are not loading.
Antenna signal absent or
weak.
Check the antenna setting and
the presence of a signal.
The selected transponder/
frequency is obsolete.
Choose a valid transponder/
frequency.
The desired channel
transponder is not present in
the database or is not
updated.
Add or update the
transponder manually.
Settings made in the menus
have not been memorized.
Failure to confirm after
changing settings.
Confirm each change by
pressing the final save button.
33 Troubleshooting
ENGLISH
19
Page 48
LVD
EN 60065:2014
EMCD
EN 55032:2015
EN 55020: 2007 + A12:2006
EN 55024: 2010 + A1:2015
EN 61000-3-2:2014
EN 61000-3-3:2013
Health
EN 62479:2010
Terrestre
ETSI EN 303 340 V1.1.2 (2016-09)
Satellite
ETSI EN 303 372-2 v1.1.1 (2016-04)
Rev01 23/07/2019
28000157 PALCO32 FL09 T2S2HEVC
Dichiarazione di conformità EU
Tele System Digital dichiara sotto la propria responsabilità che questo prodotto soddisfa i requisiti
fondamentali delle direttive europee, rispettando le normative tecniche elencate.
2014/53/EU (Radio Equipment Directive - RED)
2014/30/EU (Electromagnetic Compatibility - EMC)
2014/35/EU (Low Voltage Directive - LVD)
2009/125/EC (Ecodesign Directive) reg. 642/2009 e 801/2013 - Energy labelling regulation reg. EU
2017/1369
2011/65/EU (RoHS - Restriction of use of certain hazardous substances Directive) reg EU 2015/863
REACH regulation Nr 1907/2006
Tutta la documentazione a supporto della Conformità rispetto alle direttive e al decreto citato è
disponibile presso TELE System Digital Srl.
Bressanvido (VI), 19 Aprile 2019
Flavio de Poli - Amministratore Delegato
TELE System Digital Srl
Via dell’Artigianato, 35
36050 Bressanvido (VI)
Internet: www.telesystem-world.com
 Loading...