

Tele System Palco19 LED07 T2S2HEVC, Palco22 LED07 T2S2HEVC, Palco24 LED07 T2S2HEVC User Manual
TELE System
1


1
Dear Customer,
in thanking you for purchasing our product, please read the following
instructions before attempting to operate the unit. This is the only way to
achieve the best results over time while maintaining the original reliability. We
also suggest that you keep this manual for any future reference. We also
suggest that you keep the original packaging of the TV and, in the event of any
problem, remember to take note of the serial number of the TV which is shown
on the back of the device.
The TELE System staff
ATTENTION!
The reception and therefore the viewing of channels in digital terrestrial and/or
satellite depends on the level and quality of the available antenna signal. The
signal varies depending on the area of residence, the correct
orientation/functioning of the antenna system, and the quality of the signal
transmitted by digital terrestrial repeaters and/or satellites.
TELE System Digital Srl announces that due to software and/or hardware
changes that aim to improve the product, you may find inconsistencies between
the contents of this manual and the product in your possession.

2
Index
1! Safety ......................................................................................................................... 3!
2! Description of the TV ........................................................................................... 5!
2.1! Front ......................................................................................................... 5!
2.2! Keyboard ................................................................................................... 5!
2.3! Rear panel connections ............................................................................ 6!
3! Connections .............................................................................................................. 7 !
3.1! Antenna connections/cable TV channel ................................................... 7!
3.2! Connection to an external device ............................................................. 7!
4! Remote Control ....................................................................................................... 8!
4.1! Standard remote control .......................................................................... 8!
4.2! Simplified remote control ........................................................................ 9!
4.3! Inserting batteries .................................................................................. 10!
5! PC Mode .................................................................................................................. 10!
5.1! MENU FOR PC MODE ............................................................................. 10!
6! Basic Function ....................................................................................................... 11!
6.1! Power / Standby ..................................................................................... 11!
6.2! Program selection .................................................................................. 11!
6.3! Volume regulation .................................................................................. 11!
6.4! Mute (temporary) .................................................................................... 11!
6.5! Program recall ....................................................................................... 11!
6.6! Source selection ..................................................................................... 11!
6.7! Main Menu description ........................................................................... 12!
6.8! First installation ..................................................................................... 12!
6.9! Automatic channel search. .................................................................... 12!
7! DVB Mode ............................................................................................................... 13!
7.1! Manual search ........................................................................................ 13!
7.2! Electronic TV guide (EPG) ....................................................................... 13!
7.3! Organization of channel list. .................................................................. 14!
7.4! Favorites list ........................................................................................... 14!
8! Satellite mode ...................................................................................................... 14!
8.1! Simple installation ................................................................................. 15!
8.1.1! Antenna and satellite configuration ............................................... 15!
8.1.2! Channel search for satellite ........................................................... 15!
8.2! SCR/Unicable System ............................................................................. 16!
8.3! System DiSEqC 1.0/1.1 ........................................................................... 16!
8.3.1! Antenna e satellite configuration ................................................... 16!
8.3.2! Channel search for satellite ........................................................... 17!
8.4! Motorized System ................................................................................... 17!
8.4.1! DiSEqC 1.2 ...................................................................................... 17!
8.4.2! DiSEqC 1.3 ...................................................................................... 18!

3
8.5! Automatic scanning ................................................................................ 19!
9! Security – System Block .................................................................................... 20!
10! Image Menu ......................................................................................................... 20!
11! Audio Menu .......................................................................................................... 21!
12! Time settings ...................................................................................................... 21!
13! Settings Menu .................................................................................................... 21!
14! USB Media player ............................................................................................... 22!
15! Troubleshooting ................................................................................................. 23!
16! Technical Specifications .................................................................................. 25!
1 Safety
ATTENTION: TO REDUCE RISK OF ELECTRIC SHOCK, DO NOT REMOVE THE
BACK COVER AND DO NOT USE METAL TOOLS.
Before connecting the power cord to the DC adapter outlet, make sure that the
voltage corresponds to the one used in your area.
Make sure your TV is switched off before inserting the mains plug into the wall
socket. Be careful to ensure that the electrical cable and other connecting
cables are firmly connected and secure.
Voltage overload and power extension cables can be dangerous, just as frayed
wires or broken sockets/plugs; These conditions may cause electric shock or
fire. Contact a trusted technician to replace the damaged parts.
Do not insert metal objects into the TV; there is a danger of electric shock.
To avoid electric shocks, do not touch the internal parts of the LED TV; only
qualified personnel can open the television.
The TV is equipped with slots for air circulation. To prevent overheating, these
openings must not be covered or obstructed. If you place the TV in confined
spaces (within libraries or other furniture), make sure that there is adequate
ventilation.
Do not use the television with extreme temperatures, humidity, or in dusty
environments.
The recommended use temperature: 5-35 ° C
Relative humidity: 30 – 80RH
Do not expose your TV to rain or splashing water; do not install it near kitchens,
swimming pools etc ... If liquid accidentally gets inside the TV, unplug the power
cord immediately and contact a technician.
You can clean the LED/LCD screen if necessary with a damp soft cloth,
remember to unplug the TV before cleaning.
Do not use solvents such as benzene to clean the device, because you will
damage the screen surface.
Place the TV on a firm surface and handle with care.
4
The screen is formed by a thin glass and protected by a plastic foil, liquid
abrasives or streaks will permanently ruin the LED/LCD panel.
Do not clean the screen with substances such as acetone, ethyl alcohol, toluene,
ethyl acid, methyl or hydrogen; these substances ruin the LED/LCD panel.
Position the TV so that it is easier to access the power outlet.
Do not put heat or flame such as candles near/on the TV.
No object filled with liquids such as vases or bottles should be placed on or near
the TV.
The checked bin symbol indicates that you should not dispose of this
product in the environment or throw it in the mixed municipal waste.
Whoever does not respect this rule is punishable according to current
legislation.
A proper disposal of the appliance enables you to avoid potential damage to the
environment and human health as well as to facilitate recycling of components
and materials contained in it and save enery and resources.
The manufacturer provides a system for recovery of electric and electronic
appliances (RAEE or WEEE) such as this product which is collected separately
and subject to treatment systems with equipment in accordance with current
provisions.
Take the unusable product (and any accessories, including the battery) to a
recycling center authorized to handle electrical and electronic equipment waste,
as it cannot be combined with other waste. You can always return the used or
dead device to the same distributor who sold it to you while buying a new
equivalent product or free of charge if the equipment is for home use and is
smaller than 25cm.

5
2 Description of the TV
2.1 Front
LED: Status Indicator, Red = Standby, Green = Power
IR sensor: remote control receiving sensor
Warning! The position of the LED and IR sensor may not correspond exactly to
the one shown in the picture.
2.2 Keyboard
The TV keyboard is on the right side of TV itself. The available keys are (from left
to right):
Vol-: increase volume
Vol+: decreases the volume
CH-: change to the next channel
CH+: change to the previous channel
Menu: access the main menu
Source: select source
Power: Standby mode (OFF/ON)
6
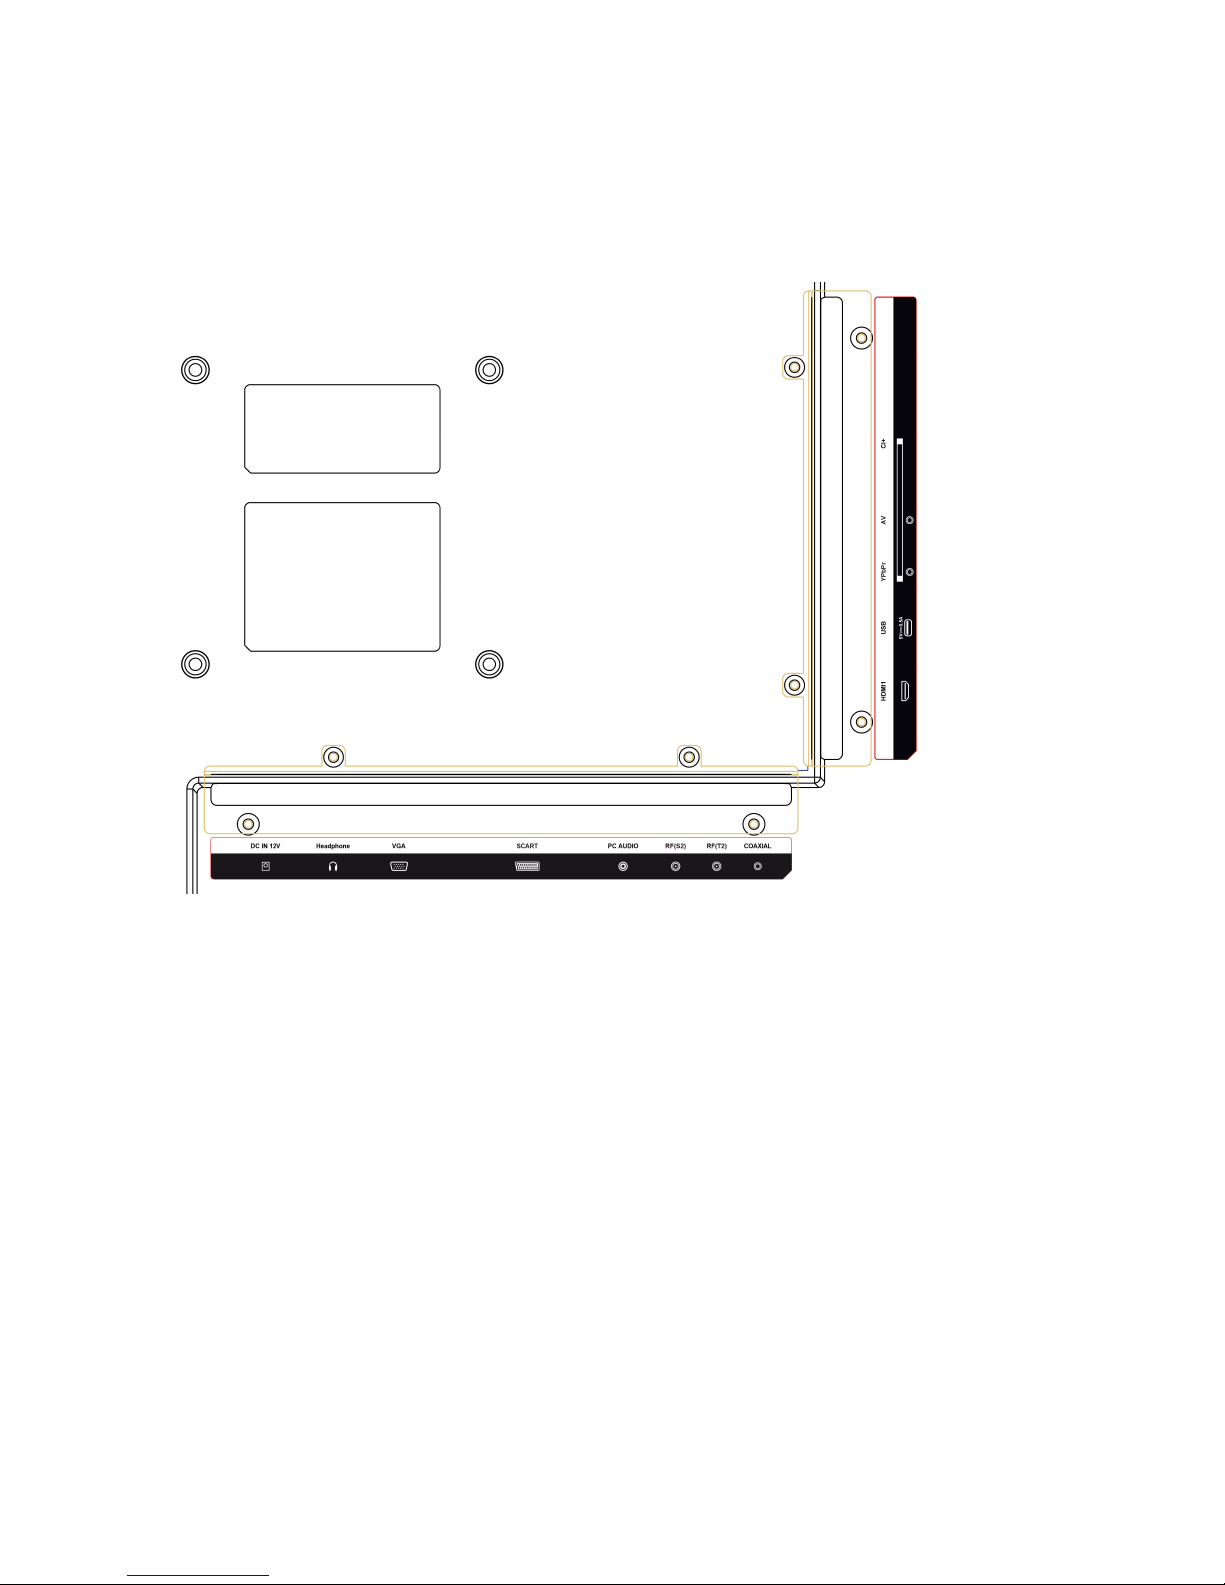
2.3 Rear panel connections
On the back side of the TV, there are connections and A/V inputs; horizontal side
(from left to right):
12V power supply (DC IN 12V)
Headphone output (3.5 mm jack)
VGA port (PC)
SCART input
PC Audio input (PC Audio IN)
SATELLITE RF Antenna Input (Type F)
TERRESTRIAL Antenna RF input (IEC)
Coaxial digital audio output (COAXIAL)
On the verticle side (from top to bottom):
Component input (YPbPr, adapter required)
RCA Video + Audio input (AV, adapter required)
Common Interface slot (compatibile with CI+ module)
USB port (Media Player Fuction)
HDMI input

7
3 Connections
3.1 Antenna connections/cable TV channel
To view the television channels, you can connect the TV to one of the following
devices:
A terrestrial antenna and/or a satellite antenna system.
In either case, connect the antenna cable (75 Ω) to the coaxial jacks located in
the rear of the TV.
3.2 Connection to an external device
Via SCART: make sure that both the TV and the device are turned off. Connect
the SCART cable from the source to the TV. Turn on the two devices.
Press the Source button on the remote control and select SCART.
Via RCA: make sure that both the TV and the device are turned off. It is
necessary to use an RCA/Jack3.5mm adapter to connect the device to the
AV/RCA input. Turn the two devices on. Press the Source button on the remote
control and select AV as the source.
Via YPbPr (Component): make sure that both the TV and the device are
turned off. It is necessary to use an RCA/3.5mm jack adapter to connect the
device to the AV/RCA, respecting the colors as per the following instructions:
Yellow - Green
Red - Red
White - Blue
Turn on the two devices.
Press the Source button on the remote control and select YPbPr.
Via HDMI: make sure that both the TV and the device are turned off. Connect
the cable from the source to the TV. Turn on the two devices.
Press the Source button on the remote control and select HDMI.
 Loading...