

Page 1
Page 2

Page 3

Italiano
Indice
1 Norme di sicurezza..................................................................................................................................... 2
2 Descrizione del prodotto e dei possibili collegamenti................................................................................. 3
2.1 Contenuto della confezione................................................................................................................. 3
2.2 Di cosa altro hai bisogno..................................................................................................................... 3
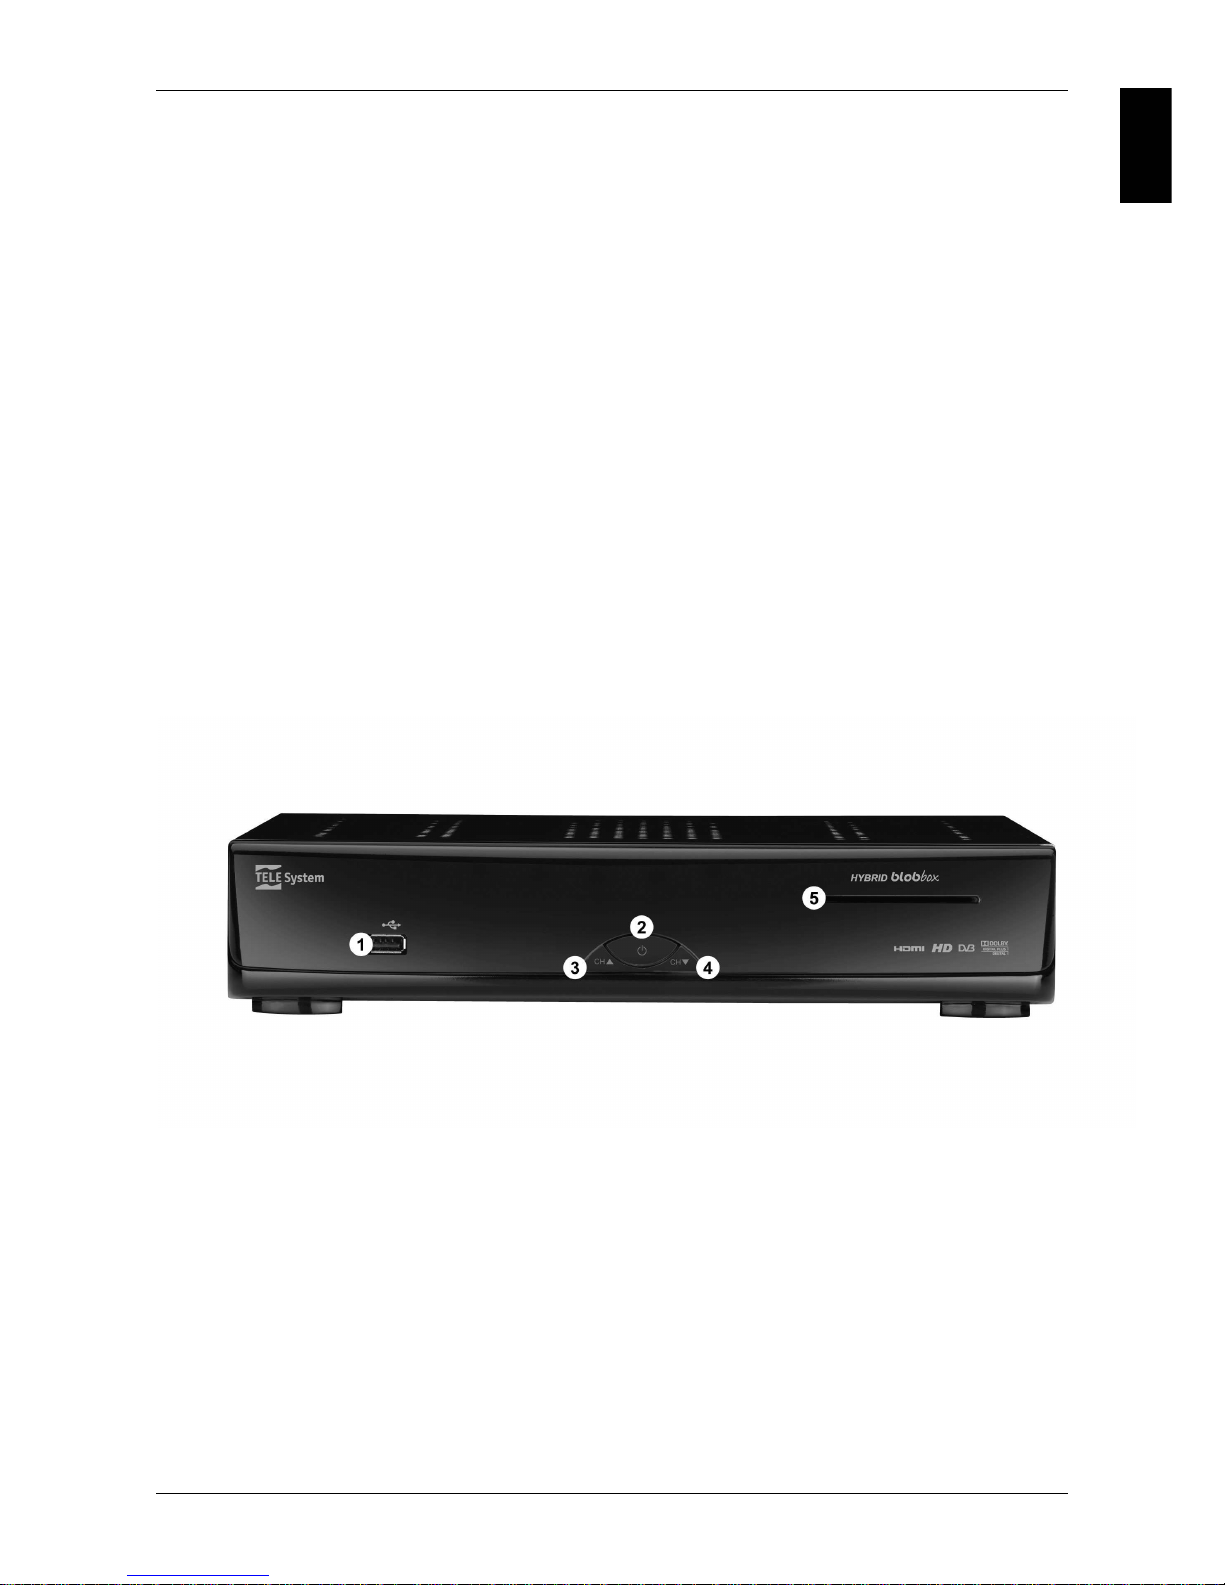
2.3 Pannello frontale ................................................................................................................................. 3
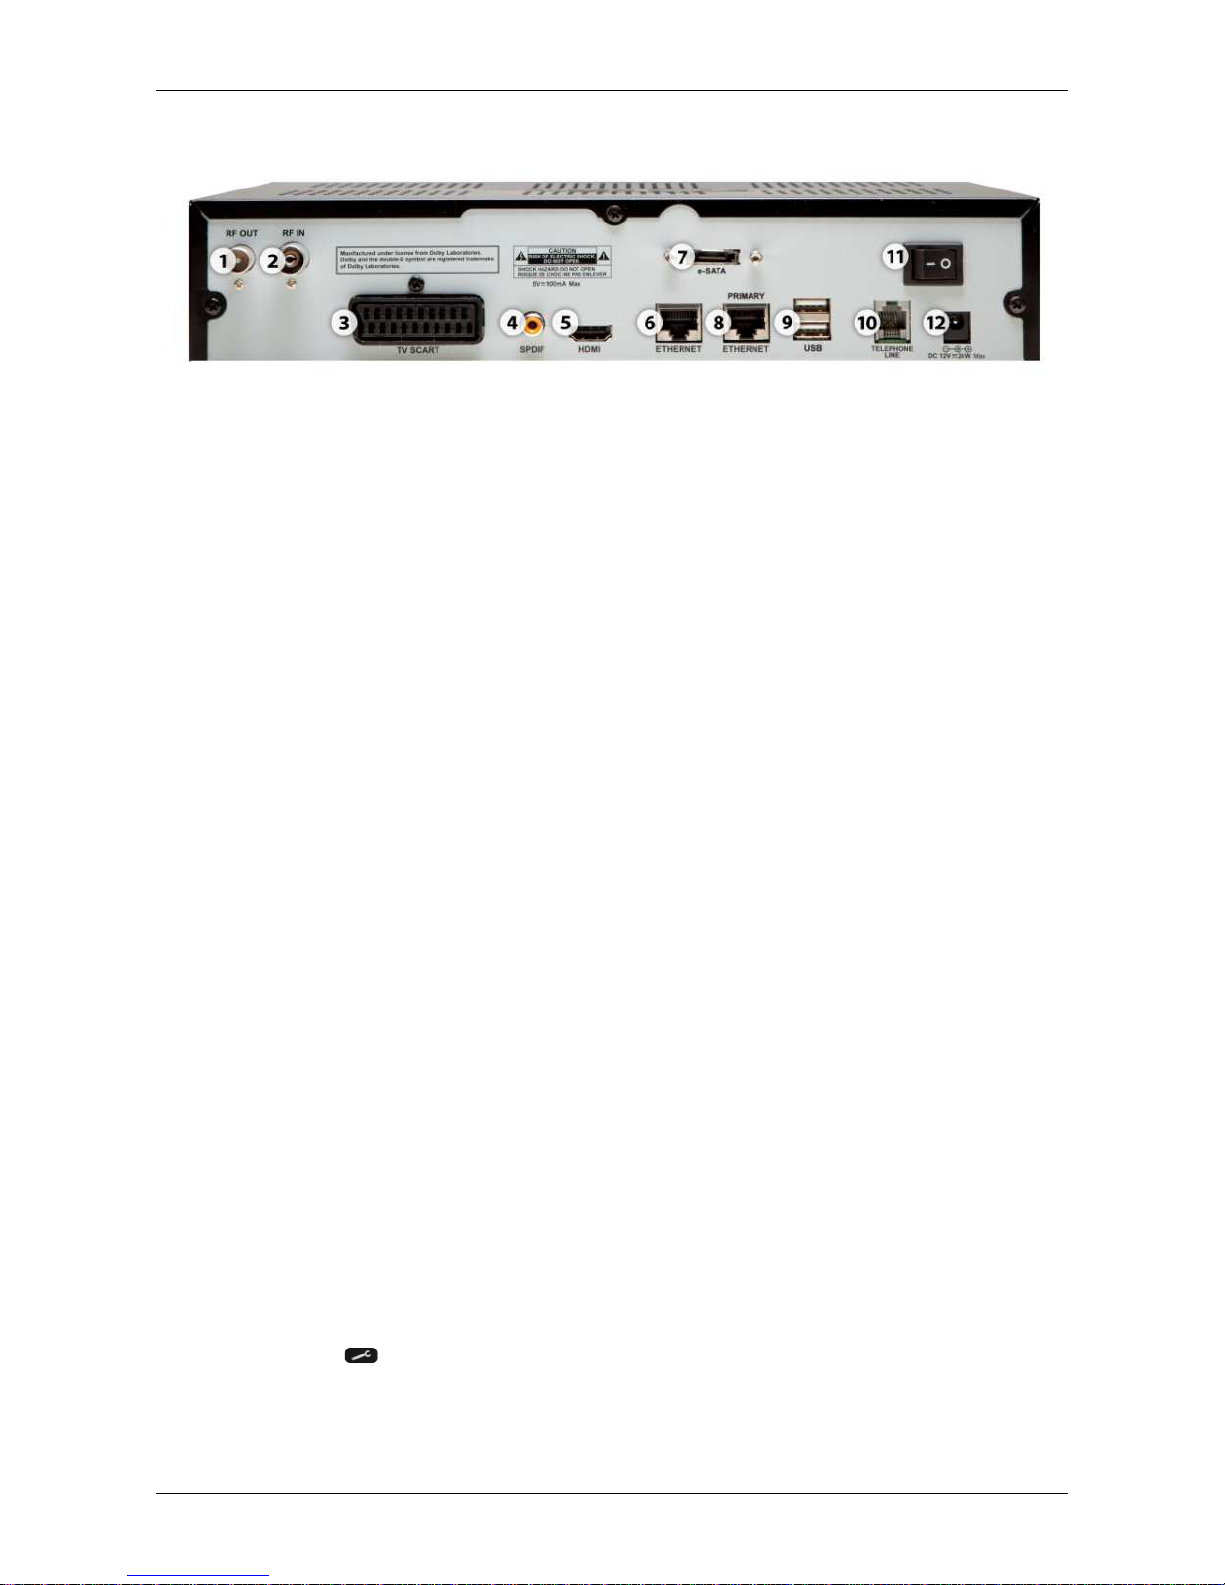
2.4 Pannello posteriore ............................................................................................................................. 4
2.5 Come collegare e accendere la BLOBbox.......................................................................................... 4
2.6 Telecomando.......................................................................................................................................5
2.6.1 Batterie......................................................................................................................................... 5
2.6.2 Tasti del telecomando..................................................................................................................5
2.6.3 Come inserire il testo ................................................................................................................... 5
3 Guida alla risoluzione dei problemi............................................................................................................ 6
4 Caratteristiche tecniche.............................................................................................................................. 7
5 Uso di software sotto licenza GPL ............................................................................................................. 7
6 Safety regulation.........................................................................................................................................8
7 Product description and possible connections........................................................................................... 9
7.1 What’s in the package......................................................................................................................... 9
7.2 What else you need ............................................................................................................................ 9
7.3 Front panel..........................................................................................................................................9
7.4 Back panel.........................................................................................................................................10
7.5 How to connect and turn on the BLOBbox........................................................................................ 10
7.6 Remote control.................................................................................................................................. 11
7.6.1 Batteries.....................................................................................................................................11
7.6.2 Remote control buttons.............................................................................................................. 11
7.7 How to insert text............................................................................................................................... 11
8 Problems solver........................................................................................................................................ 12
9 Technical specifications ........................................................................................................................... 13
10 GPL and LGPL software .......................................................................................................................... 13
Page 4
TELE System Hybrid BLOBbox
2
1 Norme di sicurezza
Per un utilizzo sicuro dell’apparecchio e per la vostra incolumità, vi preghiamo di leggere attentamente le
seguenti avvertenze riguardanti le misure di sicurezza.
ALIMENTAZIONE
• Utilizzando l’alimentatore in dotazione, esso deve essere collegato esclusivamente ad una presa di corrente
da 230V ~, 50Hz.
• Non rimuovere il coperchio del ricevitore. All’interno dell’apparecchio possono essere presenti tensioni
superiori a quella di alimentazione che potrebbero mettere a repentaglio la sicurezza dell’utente. L’alta
tensione è presente anche quando l’apparecchio è in modalità standby. Prima di intervenire sul ricevitore è
necessario scollegarlo dalla rete elettrica. La rimozione non autorizzata del coperchio farà decadere
immediatamente la garanzia!
CAVO DI ALIMENTAZIONE
• Prima di installare l’apparecchio controllare l’integrità del cavo di alimentazione, prestando particolare
attenzione al punto in cui entra nella presa di rete e a quello in cui esce dal ricevitore. In caso il cavo risultasse
danneggiato, non collegare l’apparecchio e rivolgersi al centro assistenza.
• Installare il cavo di alimentazione dell’apparecchio in modo da non causarne lo schiacciamento con oggetti
collocati sopra o accanto ad esso. Evitare inoltre di posizionarlo vicino a zone di passaggio dove possa essere
accidentalmente calpestato, strappato o comunque danneggiato.
• In caso di danneggiamento del cavo, scollegare con attenzione l’apparecchio dalla presa di alimentazione e
rivolgersi esclusivamente a personale specializzato o al centro assistenza per la sostituzione.
LIQUIDI
• Tenere il ricevitore lontano da qualsiasi tipo di liquido. Non collocare sull’apparecchio oggetti contenenti liquidi
come vasi, umidificatori ecc. L’apparecchio non deve essere installato in luoghi in cui possa venire a contatto
con spruzzi o schizzi di liquidi o in ambienti con alto tasso di umidità dove possano formarsi condense.
• Nel caso in cui il ricevitore venga accidentalmente in contatto con liquidi, togliere immediatamente la spina
dalla presa di corrente. Non toccare il ricevitore con le mani prima che sia stato scollegato.
PICCOLI OGGETTI
• Tenere lontano dal ricevitore aghi o altri piccoli oggetti. La caduta di oggetti all’interno dell’apparecchio,
attraverso le fessure per la ventilazione, può causare seri danni.
PULIZIA
• Prima di procedere a operazioni di pulizia, staccate il ricevitore dalla presa di corrente.
• Per pulire l’esterno del ricevitore, usare un panno morbido e asciutto o leggermente inumidito. Evitare l’uso di
prodotti chimici o solventi.
VENTILAZIONE
• Assicurarsi che nel luogo di installazione dell’apparecchio ci sia una buona circolazione d’aria per consentire
una sufficiente dissipazione del calore ed evitare surriscaldamenti.
• Per consentire una ventilazione sufficiente è opportuno predisporre una distanza minima di 10 cm da entrambi
i lati ed una distanza di 15 cm sopra l’apparecchio.
• Le fessure per la ventilazione devono essere libere, non ostruite dalla presenza di oggetti tipo giornali,
tovaglie, stoffe da arredamento, tendine, tappeti ecc.
• Evitate di installare il ricevitore vicino a fonti di calore (termosifoni, stufe, ecc) o sopra ad altre apparecchiature
che producono calore (videoregistratori, lettori DVD, ecc).
ATTENZIONE!
• Tenere l’apparecchio fuori dalla portata dei bambini.
• I sacchetti di plastica degli imballaggi possono essere pericolosi. Per evitare soffocamenti, tenere i sacchetti
lontani dalla portata dei bambini.
• Non esporre il ricevitore o il telecomando alla luce diretta del sole.
• L’apparecchio deve essere posto su una base solida e sicura.
• Collegare il ricevitore alla presa di corrente solo dopo aver completato tutti gli altri collegamenti necessari
all’installazione.
• Non disperdere il prodotto nell’ ambiente per evitare potenziali danni per l’ambiente stesso e la salute umana
e per facilitare il riciclaggio dei componenti/materiali contenuti in esso. Chi disperde il prodotto nell’ambiente o
lo getta insieme ai rifiuti comuni è sanzionabile secondo legislazione vigente.
• Il produttore istituisce un sistema di recupero dei RAEE del prodotto oggetto di raccolta separata e sistemi di
trattamento avvalendosi di impianti conformi alle disposizioni vigenti in materia.
• Portare il prodotto non più utilizzabile (ed eventuali suoi accessori, ivi comprese le batterie) presso
un centro di raccolta autorizzato a gestire rifiuti di apparecchiature elettriche ed elettroniche in
quanto non può essere unito ai rifiuti comuni oppure è sempre possibile riconsegnare allo stesso
distributore l’apparecchiatura usata o a fine vita all’atto dell’acquisto di una nuova di tipo
equivalente.
Page 5
Italiano
TELE System Hybrid BLOBbox
3
2 Descrizione del prodotto e dei possibili collegamenti
2.1 Contenuto della confezione
TELE System Hybrid BLOBbox™
Alimentatore universale 100/240V
Cavo di alimentazione con spina standard “europlug” (2 poli)
Telecomando
Batterie per telecomando
Questa guida rapida
Garanzia
2.2 Di cosa altro hai bisogno
Un TV o monitor con ingresso HDMI o SCART
Un cavo audio-video HDMI o SCART
Un attacco all’impianto di antenna terrestre
Un cavo di antenna
Un disco rigido esterno con attacco USB 2.0 oppure e-Sata
Una connessione a Internet a banda larga (Adsl o fibra ottica con router Ethernet o Wi-Fi)
Uno di questi accessori per la connessione di rete (acquistabili separatamente)
o cavo Ethernet RJ45
o chiavetta USB Wi-Fi TP-LINK modello TL-WN821N
o bridge Wi-Fi HUAWEI modello EchoLife WS311
2.3 Pannello frontale
1. USB: porta USB 2.0
2. POWER: tasto per accendere/spegnere la BLOBbox
3. CH▲: tasto per passare al canale successivo
4. CH▼: tasto per passare al canale precedente
5. SLOT SMART CARD: lettore smart card per futuri servizi web
Page 6
TELE System Hybrid BLOBbox
4
2.4 Pannello posteriore
1. RF OUT: uscita passante segnale d’antenna per collegare un TV o altro decoder
2. RF IN: ingresso segnale TV proveniente dall’antenna
3. TV SCART: uscita analogica per collegare un TV di vecchia generazione
4. SPDIF: uscita audio digitale coassiale S/PDIF per collegare l’amplificatore home-theatre
5. HDMI: uscita digitale ad alta definizione per collegare TV HD-Ready o FullHD
6. ETHERNET: porta di rete ausiliaria per collegamento ad altri dispositivi di rete (es. PC, console di
gioco, ecc.)
7. e-SATA: connettore per collegare hard-disk esterno con connettore e-SATA
8. PRIMARY ETHERNET: porta di rete principale da usare per il collegamento a Internet
9. USB: doppia porta USB 2.0 per collegare chiavette, hard-disk esterni, tastiere USB, ecc.
10. TELEPHONE LINE: non utilizzata
11. INTERRUTTORE ON/OFF: interruttore per attivare/disattivare completamente l’alimentazione da
rete elettrica
12. DC 12V: ingresso alimentazione 12V DC per il collegamento dell’alimentatore in dotazione.
2.5 Come collegare e accendere la BLOBbox
1. Inserisci le batterie nel telecomando (guarda paragrafo 2.6.1).
2. Collega la BLOBbox alla TV o al monitor utilizzando il cavo HDMI oppure il cavo SCART. Nel caso il
TV abbia entrambi gli ingressi, ti consigliamo di usare HDMI.
3. Connetti la BLOBbox a Internet in uno dei seguenti modi:
a. Se disponi di una presa di rete Ethernet usa il cavo Ethernet RJ45 per collegare la porta
Ethernet primary della BLOBbox al tuo router
b. Se disponi di accesso Wi-Fi e possiedi la chiavetta USB TP-LINK modello TL-WN821N,
inseriscila in una porta USB posteriore
c. Se hai il bridge Wi-Fi HUAWEI modello EchoLife WS311, collegalo a una presa elettrica con
il suo alimentatore e utilizza il cavo Ethernet RJ-45 per collegarlo alla porta Ethernet primary
della BLOBbox
4. Connetti la BLOBbox all’antenna collegando il cavo antenna dalla BLOBbox alla presa dell’antenna
(assicurati che il tuo impianto sia compatibile a ricevere il segnale digitale terrestre).
5. Collega l’hard-disk esterno ad una porta USB o al connettore e-SATA sul retro della BLOBbox.
6. Inserisci il cavo di alimentazione nell’apposito alimentatore, collega il connettore alla box e la spina
del cavo di alimentazione alla presa di corrente.
7. Accendi la BLOBbox utilizzando l’interruttore ON/OFF posizionato sul pannello posteriore. La
BLOBbox necessita di circa un minuto per diventare operativa. Durante tale periodo non togliere
l’alimentazione e non agire sui tasti frontali e del telecomando.
8. Se visualizzi correttamente l’interfaccia grafica della BLOBbox passa direttamente al punto 9, se
invece non visualizzi nulla sullo schermo segui questa procedura:
a. Assicurati che il cavo HDMI o SCART sia connesso correttamente dalla BLOBbox alla TV
b. Assicurati di aver acceso la TV sull’ ingresso HDMI o AV sul quale hai collegato la BLOBbox
c.
Premi
sul telecomando e poi premi il tasto verde, una seconda spia rossa si accenderà
sul frontale della BLOBbox. Premi nuovamente il tasto verde ad intervalli di 10sec fino a
visualizzare l’interfaccia sullo schermo. Premi SALVA (tasto rosso) per applicare la nuova
impostazione video
9. Segui le istruzioni della configurazione guidata sullo schermo.
Page 7
Italiano
TELE System Hybrid BLOBbox
5
2.6 Telecomando
La buona conoscenza del telecomando è la base per poter navigare facilmente all’interno dei vari menu. Le
funzioni dei tasti sono semplici ed intuitive.
2.6.1 Batterie
Batterie compatibili: 2 x AAA, 1.5V.
Una volta aperto lo sportellino delle batterie posto sul retro del telecomando, inserisci le 2 batterie (formato
AAA) rispettando le corrette polarità come indicato all’interno del vano. Chiudi lo sportellino.
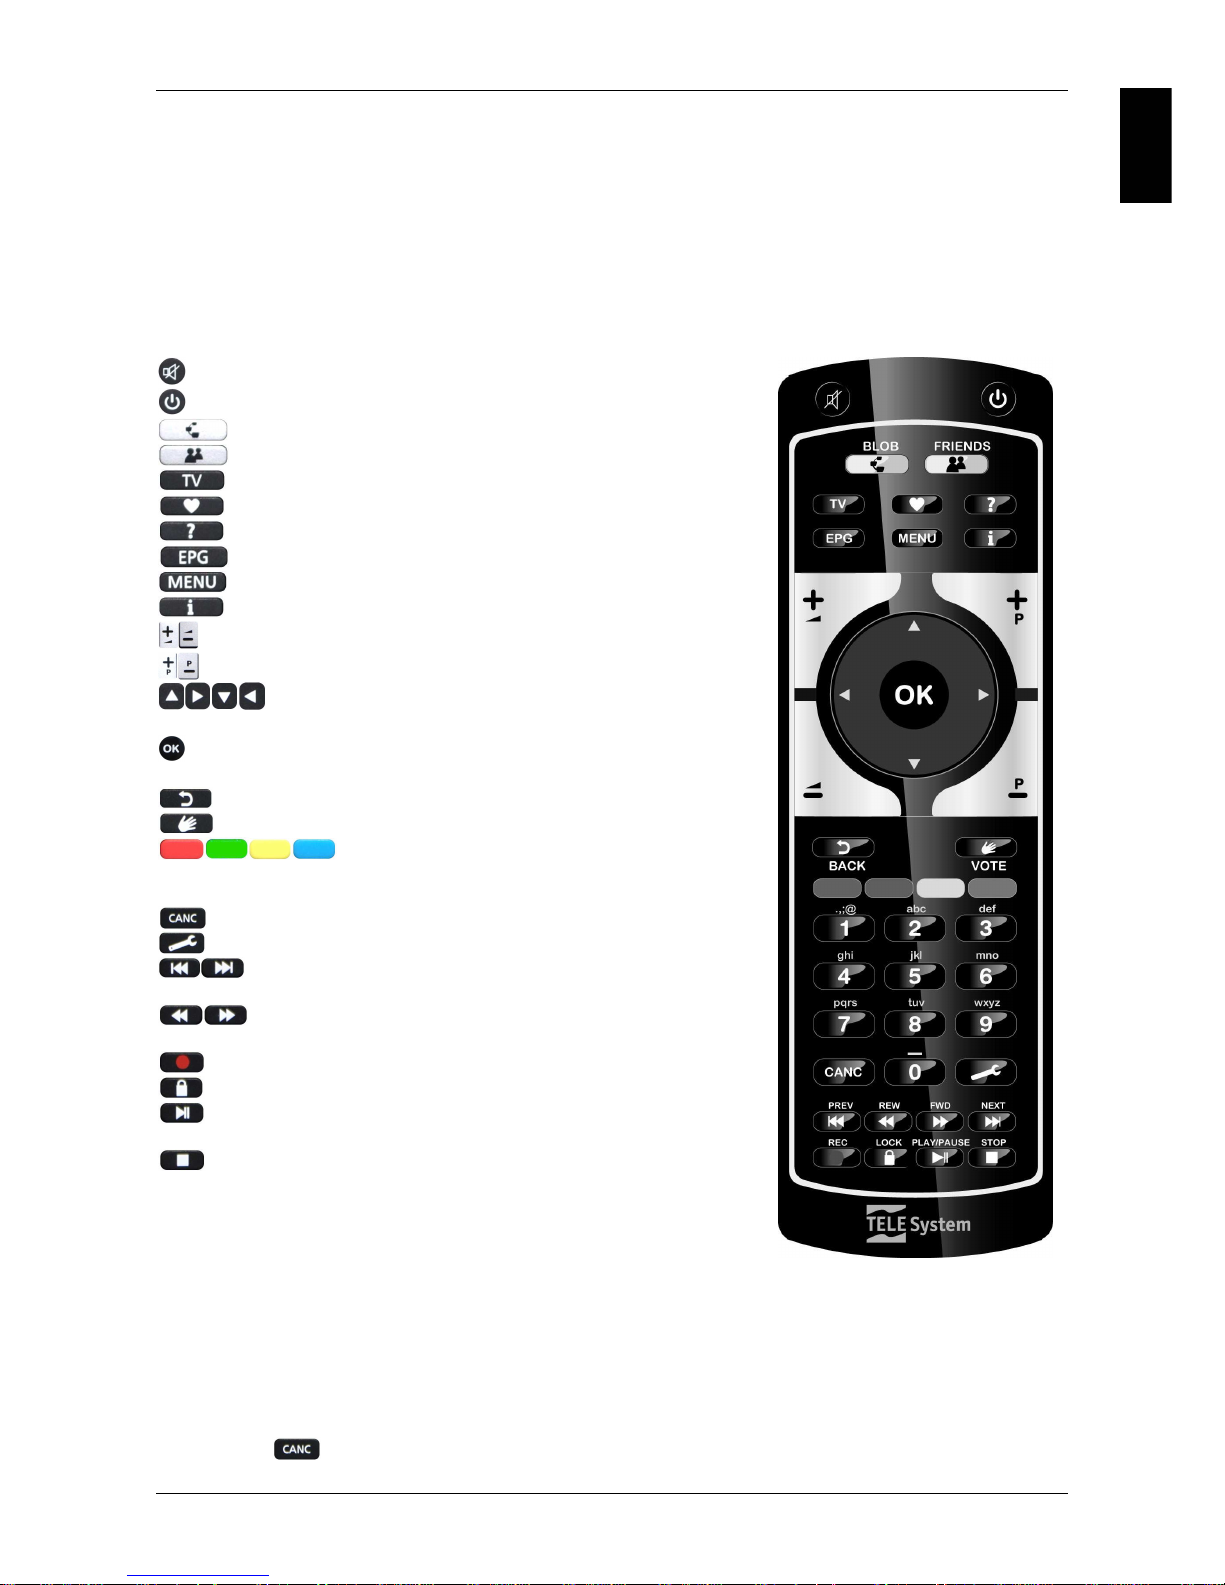
2.6.2 Tasti del telecomando
azzera/ripristina il volume
mette in standby la tua BLOBbox
porta alla pagina di ricerca “BLOBword”
richiama l’elenco dei propri amici online*
porta alla visione dei canali TV
porta alla pagina dei tuoi siti preferiti
visualizza spiegazioni sull’applicazione in cui ti trovi
visualizza la guida programmi (EPG)
visualizza il menu principale della BLOBbox
mostra eventuali dettagli dell’oggetto selezionato
aumenta/diminuisce il volume *
cambia canale o scorre le liste una pagina alla volta
muovono il cursor
e all’interno delle schermate
dell’interfaccia
conferma la scelta di una voce nei menù / fa partire la riproduzione
di un file multimediale
riporta alla schermata precedente
esprimi un voto su quello che stai guardando
pulsanti “variabili” per compiere azioni specifiche
in base alla schermata in cui ti trovi (quando sono attivi le azioni
associate vengono mostrate nella parte inferiore dello schermo)
durante l’inserimento di testo cancella l’ultimo carattere
porta al menù di configurazione
riproduce il file multimediale precedente/successivo a quello
che stai guardando
manda indietro/avanti veloce la riproduzione di un file
multimediale o salta alcuni secondi avanti o indietro
fa partire la registrazione del canale che stai guardando
verifica se stai navigando in un sito sicuro
fa partire la riproduzione di un file multimediale o ne mette in
pausa la riproduzione
interrompe la riproduzione di un file multimediale
2.6.3 Come inserire il testo
Per inserire il testo all’interno dell’interfaccia si utilizza la tastiera alfanumerica del telecomando come nei
telefoni cellulari. Ad esempio, per inserire la lettera “c” devi premere 3 volte il tasto “2”, per inserire il numero
“2” devi premere 4 volte il tasto “2”. Premendo ripetutamente il tasto “1” si immettono i seguenti caratteri:
. / @ 1 - , _ ? ! : ; ( ) ' " ~ + * = < > € # & % $ \ ^ { }
Premi il tasto
sul telecomando per cancellare l’ultimo carattere inserito.
Page 8
TELE System Hybrid BLOBbox
6
3 Guida alla risoluzione dei problemi
PROBLEMI POSSIBILI CAUSE COSA FARE
1. Il LED ON/ST.BY sul pannello
frontale del ricevitore non è acceso.
-L’alimentatore non è inserito nella
presa di corrente o nella BLOBbox.
-L’alimentatore è inserito ma non
funziona ugualmente.
-Il tasto O/I posteriore è in posizione O.
-Controlla che l’alimentatore sia
inserito correttamente.
-Accertati che l’alimentatore sia
funzionante.
-Sposta il tasto O/I in posizione I.
2. Nessun segnale / Video / Audio.
-Il cavo SCART o HDMI non è
collegato correttamente o è guasto.
-La risoluzione dell’uscita HDMI non è
compatibile con quella dello schermo.
-Volume audio basso o muto.
-TV non commutato nel canale audio /
video corretto.
-Verifica la connessione
SCART/HDMI e il funzionamento del
cavo SCART/HDMI.
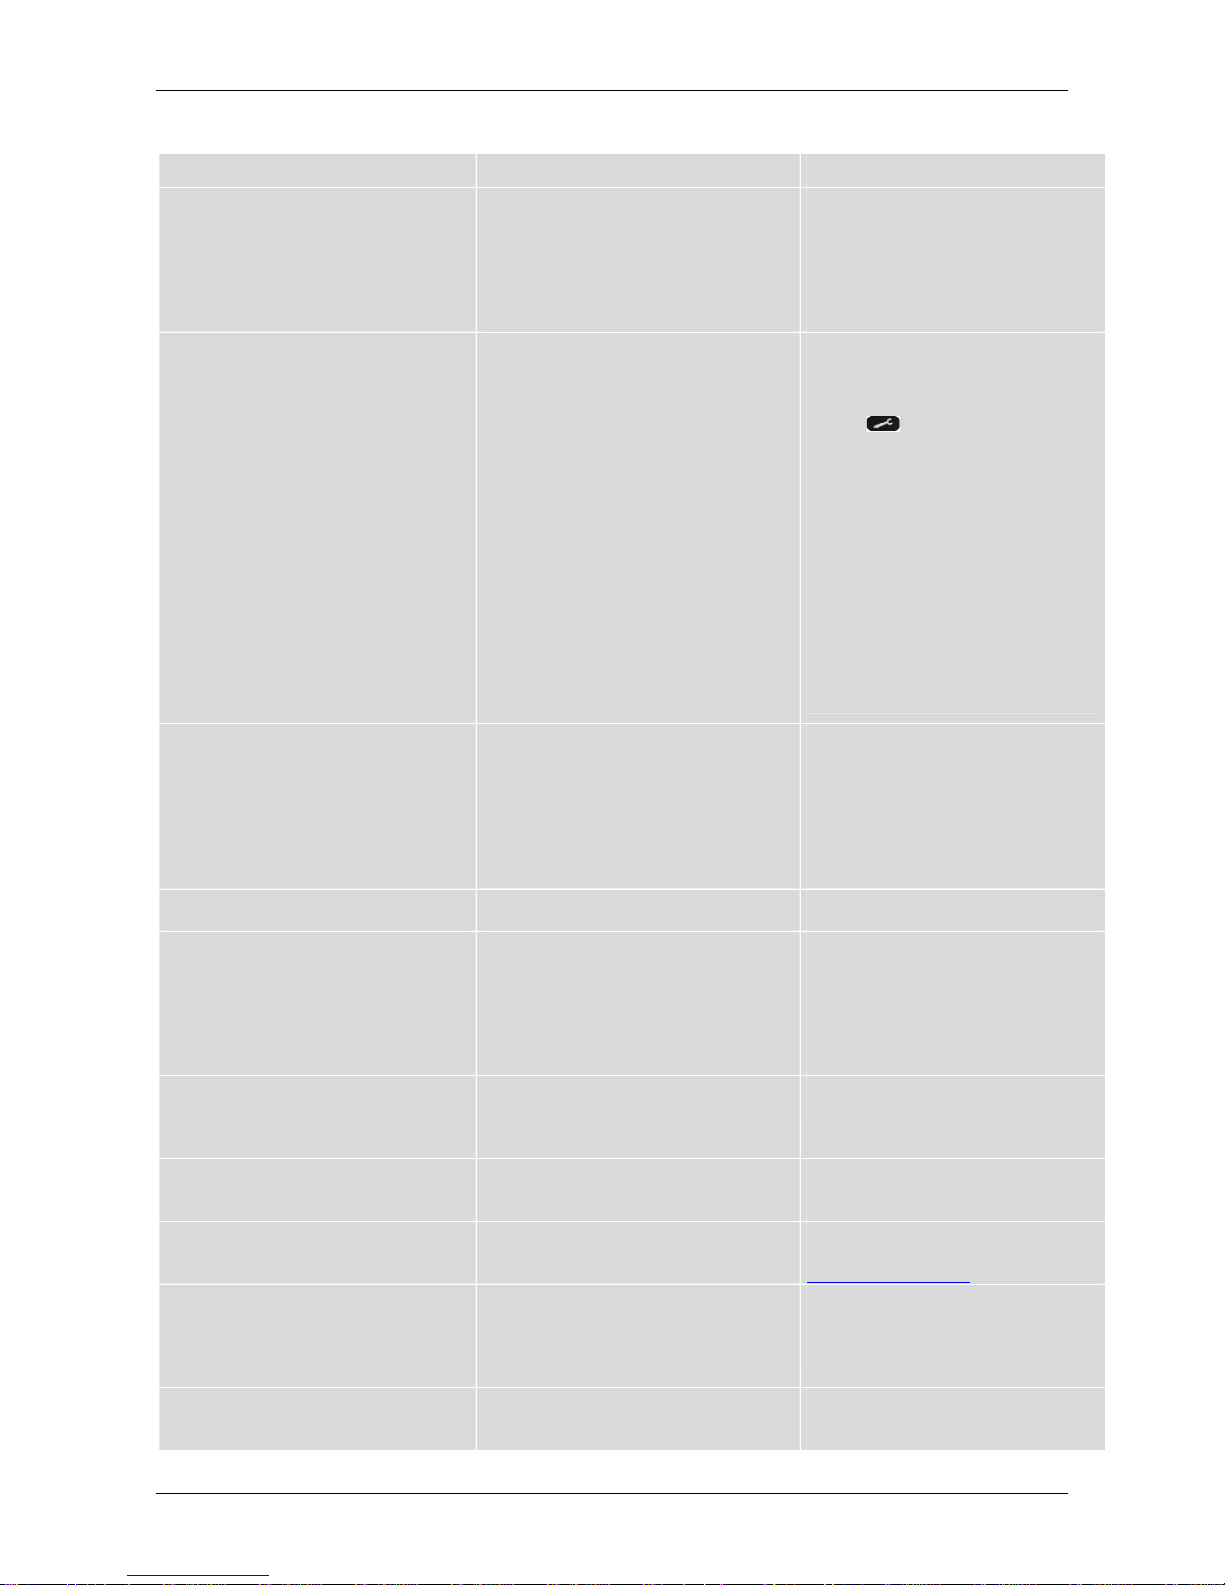
-Premi
sul telecomando e poi
premi il tasto verde, una seconda
spia rossa si accenderà sul
frontale della BLOBbox. Premi
nuovamente il tasto verde ad
intervalli di 10sec fino a
visualizzare l’interfaccia sullo
schermo. Premi SALVA (tasto
rosso) per applicare la nuova
impostazione video.
-Aumenta il volume della TV e della
BLOBbox.
-Seleziona il corretto ingresso
HDMI/AV sulla TV.
3. I canali non vengono sintonizzati.
-Segnale d’antenna assente o debole.
-Il vostro impianto d’antenna non è
ancora compatibile con il segnale
digitale terrestre presente nella vostra
zona.
-Si sta utilizzando un’antenna attiva da
interno da alimentare.
-Contatta l’antennista per un
controllo del tuo impianto antenna.
-Verifica che l’antenna sia
alimentata.
4. Le impostazioni effettuate a menu
non sono state memorizzate.
-Mancata conferma dopo la modifica
delle impostazioni.
-Dopo ogni modifica, premi
l’apposito tasto conferma/salva.
5. Il telecomando non funziona.
-Il telecomando non è puntato
correttamente verso la BLOBbox.
-Le batterie sono scariche.
-Le batterie sono inserite con la
polarità scorretta.
-Verifica che non vi siano ostacoli
davanti al pannello frontale.
-Sostituisci le batterie .
-Controlla la polarità corretta come
indicato all’interno del vano batterie.
6. La BLOBbox non interagisce con i
tasti del telecomando.
-Blocco momentaneo della BLOBbox.
-Problemi con il telecomando (vedi
punto 5).
-Scollega e ripristina nuovamente
l’alimentazione del ricevitore.
7. Le registrazioni TV risultano tagliate
(es. mancano gli ultimi minuti del
programma registrato)
- Le emittenti televisive non rispettano
gli orari di trasmissione dei programmi
-Quando programmi una
registrazione, modificala
aggiungendo 15 minuti alla fine.
8. È stato dimenticato il Numero
TVBLOB e il PIN.
-Contatta il supporto tecnico
scrivendo un e-mail a
9. La memoria USB non viene
riconosciuta.
-Memoria USB non formattata in
FAT32/NTFS/EXT2 o EXT3.
-Memoria USB non compatibile con il
ricevitore.
-Formatta la memoria con file
system FAT32/NTFS/EXT2 o EXT3.
-Prova un’altra memoria USB.
10. I file video/audio/immagine non
vengono riprodotti/visualizzati.
-Tipo di file non supportato.
-Converti i file in un formato
compatibile.
Page 9

Italiano
TELE System Hybrid BLOBbox
7
4 Caratteristiche tecniche
Processore: BROADCOM BCM7413DP @400MHz Dual Core
Memoria RAM: DDR2 512Mbyte
Memoria NAND Flash: 1 GByte
Sintonizzatori TV: doppio tuner DVB-T HD (Mpeg2, H264)
Connessioni audio/video: HDMI v1.3 con HDCP, SCART, uscita audio digitale SPDIF elettrica
Connessioni di rete: 2x Ethernet 10/100 RJ45 con switch integrato
Connessioni periferiche: 3 porte USB 2.0 e 1 porta e-SATA (per collegare chiavette e Hard-Disk)
Smart card: 1 lettore smart card per futuri servizi web
Formati uscita video: PAL, NTSC, HDTV (720p, 1080i)
Digitale Terrestre: Riproduzione, registrazione manuale e programmata su chiavetta o disco esterno,
scansione e ricerca automatica dei canali, ordinamento automatico dei canali (LCN), guida elettronica ai
programmi (EPG) via internet
Formati audio/video/immagini supportati: MPEG-TS, PS, AVI, MP4, MOV, ASF, WMV, MKV, MP3, JPG,
BMP
Codec video supportati: MPEG2, MPEG4 part 2, MPEG4 part 10 (AVC, H264), VC-1 (WMV9), DIVX, XVID
Codec audio supportati: MPEG1 L2, AAC, AAC-HE, WMA, Dolby Digital, Dolby Digital Plus
Protocolli di rete: UPnP, DHCP, Samba, HTTP, HTTPS, FTP, BitTorrent
Protocolli di Streaming: HTTP progressive, Adobe Flash RTMP, MMS, Smooth Streaming
Servizi Web: YouTube, FaceBook, Reeplay.it, Picasa, Flickr, Miro, Vcast, Meteo.it, Streamit, Wikipedia,
Servizi Google, Shoutcast radio, Web TV, Podcast e molti altri.
Preferiti: salvataggio dei servizi web preferiti per aprirli velocemente
Download: download manager via HTTP, FTP e BitTorrent®
Aggiornamento software: aggiornamenti gratuiti periodici con nuove funzionalità (via internet)
Controllo da PC: controllo della box e dei dischi connessi da un web browser installato su un PC in rete
locale
Menu OSD: illustrato e multilingua
Diagnostica: test automatico di rete, internet e servizi con aiuto guidato alla risoluzione dei problemi
Assistenza remota: sistema di accesso remoto sul box per eventuali attività di supporto tecnico
Browser web: HTML4, XHTML 1.0, CSS2, Javascript 1.5, SSL/TLS
Sistema operativo: Linux
Kit di sviluppo: Software by TVBLOB con toolkit scaricabile gratuitamente dal sito www.blobforge.com
5 Uso di software sotto licenza GPL
Il presente prodotto include software sviluppato da terze parti, comprendente codice soggetto a licenze GNU
General Public License ("GPL") e GNU Lesser GPL ("LGPL").
Il codice GPL e LGPL usato in questo prodotto è ridistribuito senza alcuna garanzia ed è soggetto a
copyright di uno o più autori. Per maggiori dettagli è possibile consultare direttamente il codice sorgente e i
termini di licenza GPL e LGPL.
Il testo completo di tutte le licenze citate è leggibile su schermo TV mediante il prodotto stesso andando nel
menu di configurazione e selezionando la voce "Licenze di Terze Parti".
Il codice sorgente del software soggetto a licenze GPL e LGPL vi può essere fornito dietro richiesta scritta a
un costo nominale per coprire le eventuali spese di supporto e spedizione, come consentito da GPL e LGPL.
Siete pregati di inviare tutte le richieste relative a GPL al seguente indirizzo e-mail: [email protected]
TELE System Electronic Srl comunica, che a seguito di eventuali modifiche software e/o hardware aventi
l’obiettivo di migliorare il prodotto, si potrebbero evidenziare incongruenze tra il contenuto di questo manuale
ed il prodotto in possesso.
NOTE
Prodotto su licenza di Dolby Laboratories.
Il simbolo Dolby e la doppia D sono marchi registrati dalla Dolby Laboratories Inc.
Page 10
TELE System Hybrid BLOBbox
8
6 Safety regulation
We advise you to read the following advice concerning the safety regulations carefully in order to ensure
ELECTRICAL SUPPLY
• The appliance should only be supplied by a current of 230 Volt AC, 50Hz.
• Do not remove the cover. The inside of the appliance could contain higher voltages than that of the supply
voltage which could endanger the user. High voltage is also present when the appliance is on standby. The
receiver should be disconnected from the electrical supply before performing any intervention. Non-authorized
removal will mean that the warranty is no longer valid!
POWER CABLE
• Before installing the appliance make sure that the cable is intact, paying particular attention to its connection
to the power supply and to the receiver. If the cable is damaged do not attempt to connect the appliance and
refer the problem to an authorized center for assistance.
• When installing the cable make sure that it can not be flattened in any way by items placed above or next to
the appliance. Avoid placing the cable in an area where it could accidentally be stepped on, removed from the
wall or damaged in any way.
• If the cable is damaged in any way carefully disconnect from the appliance and refer to specialized
technicians.
LIQUIDS
• Keep the appliance far from any liquids. Do not place any objects containing liquids on the appliance, such as
vases, humidifiers etc. The appliance must not be installed in areas where it could come into contact with
sprays or drops of water or in an environment with a high level of humidity where condensation could occur.
• If the receiver should accidentally come into contact with liquids, disconnect immediately from the wall.
SMALL OBJECTS
• Keep the receiver away from coins or other small objects. Objects which fall into the appliance via the
ventilation gaps could cause serious damage.
CLEANING
• Before cleaning, disconnect the device from the power supply.
• To clean the outside of the receiver use a soft and dry or slightly damp cloth. Avoid using products which
contain chemicals or solvents.
VENTILATION
• Make sure that the area where the appliance is to be installed has good air circulation so that the heat can be
dissipate well in order to avoid overheating.
• In order to allow enough ventilation it is necessary to have a distance of at least 10 cm on either side of the
appliance and 15cm above the appliance.
• The vents must be kept clear from any obstructions such as newspapers, table cloths, furnature material,
curtains, carpets etc.
• Avoid installing the receiver close to any heat sources (i.e. radiators, stoves etc) or on top of any other
appliances which omit heat (Video players, DVD, etc)
WARNING!!!
• Keep the appliance out of reach of children.
• The plastic bags used for packaging can be dangerous. To avoid suffocating keep the bags out of reach of
children.
• Do not expose the receiver or remote control to direct sunlight.
• The appliance must be placed on a solid and stable base.
• Connect the device to the power supply only after installation is complete.
• Dispose of the product correctly so as to avoid damage to the environment and human health as well as to
facilitate recycling of the components/materials used in the appliance. If the product is not disposed of properly
this could be punishable according to the involved law.
• The manufacturers recommend that the parts are recycled separately and are taken to sites which conform to
current regulations.
• Take the product when no longer usable to a collection point which is authorised to handle waste
from electrical or electronic appliances that should be kept separate from regular household waste.
• In case of fire or blaze danger, the main plug/switch and other devices must be completely
disconnected from the receiver
•
Page 11
English
TELE System Hybrid BLOBbox
9
7 Product description and possible connections
7.1 What’s in the package
TELE System Hybrid BLOBbox™
AC universal adapter 100/240V
AC standard power cord “europlug” (2 prongs)
Remote control
Batteries
Quick start guide
Warranty
7.2 What else you need
One TV or monitor with HDMI or SCART input
One HDMI or SCART audio-video cable
One terrestrial antenna (aerial) connection
One antenna cable
One external hard-disk with USB 2.0 or e-SATA interface
One internet connection (Adsl or fiber with Ethernet or Wi-Fi router)
One of these accessories for Internet connection (sold separately)
o Ethernet cable RJ45
o Wi-Fi USB Key TP-LINK model TL-WN821N
o Wi-Fi bridge HUAWEI model EchoLife WS311
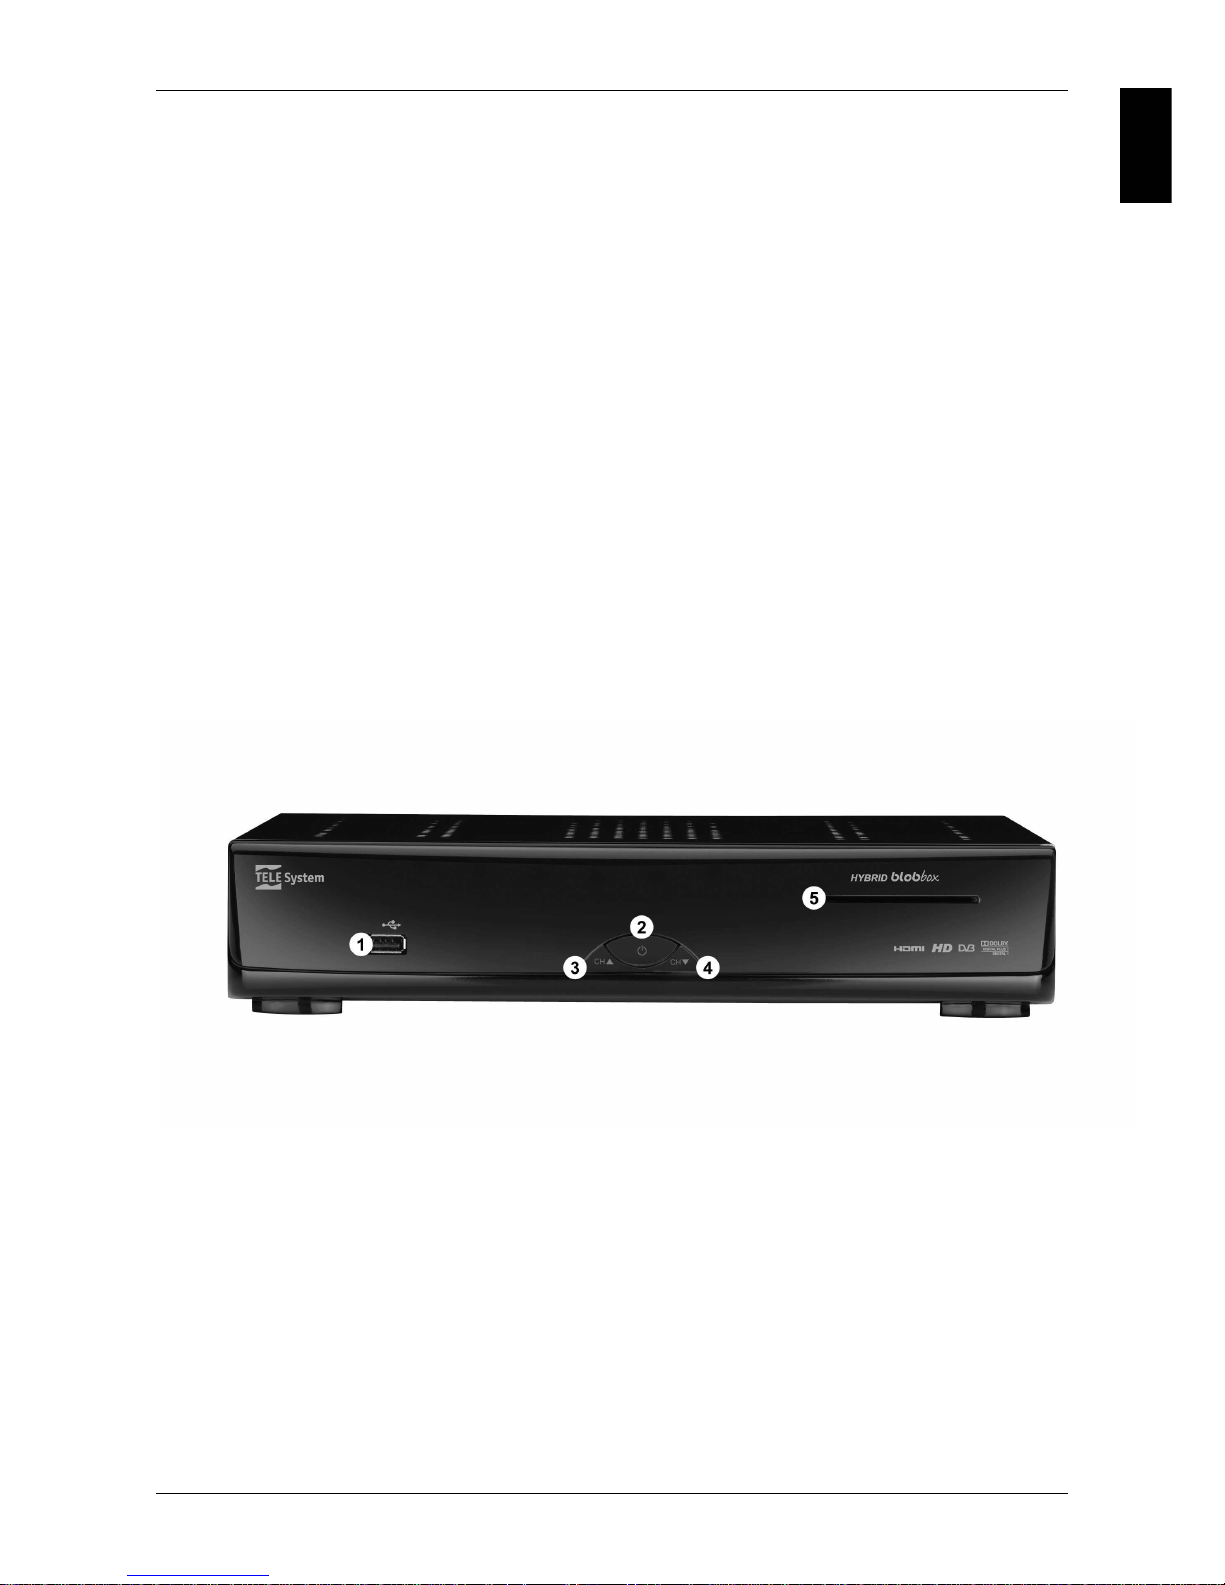
7.3 Front panel
1. USB: USB 2.0 port
2. POWER: ON/OFF (Standby) button
3. CH▲: next channel button
4. CH▼: previous channel button
5. SMART CARD SLOT: not used
Page 12
TELE System Hybrid BLOBbox
10
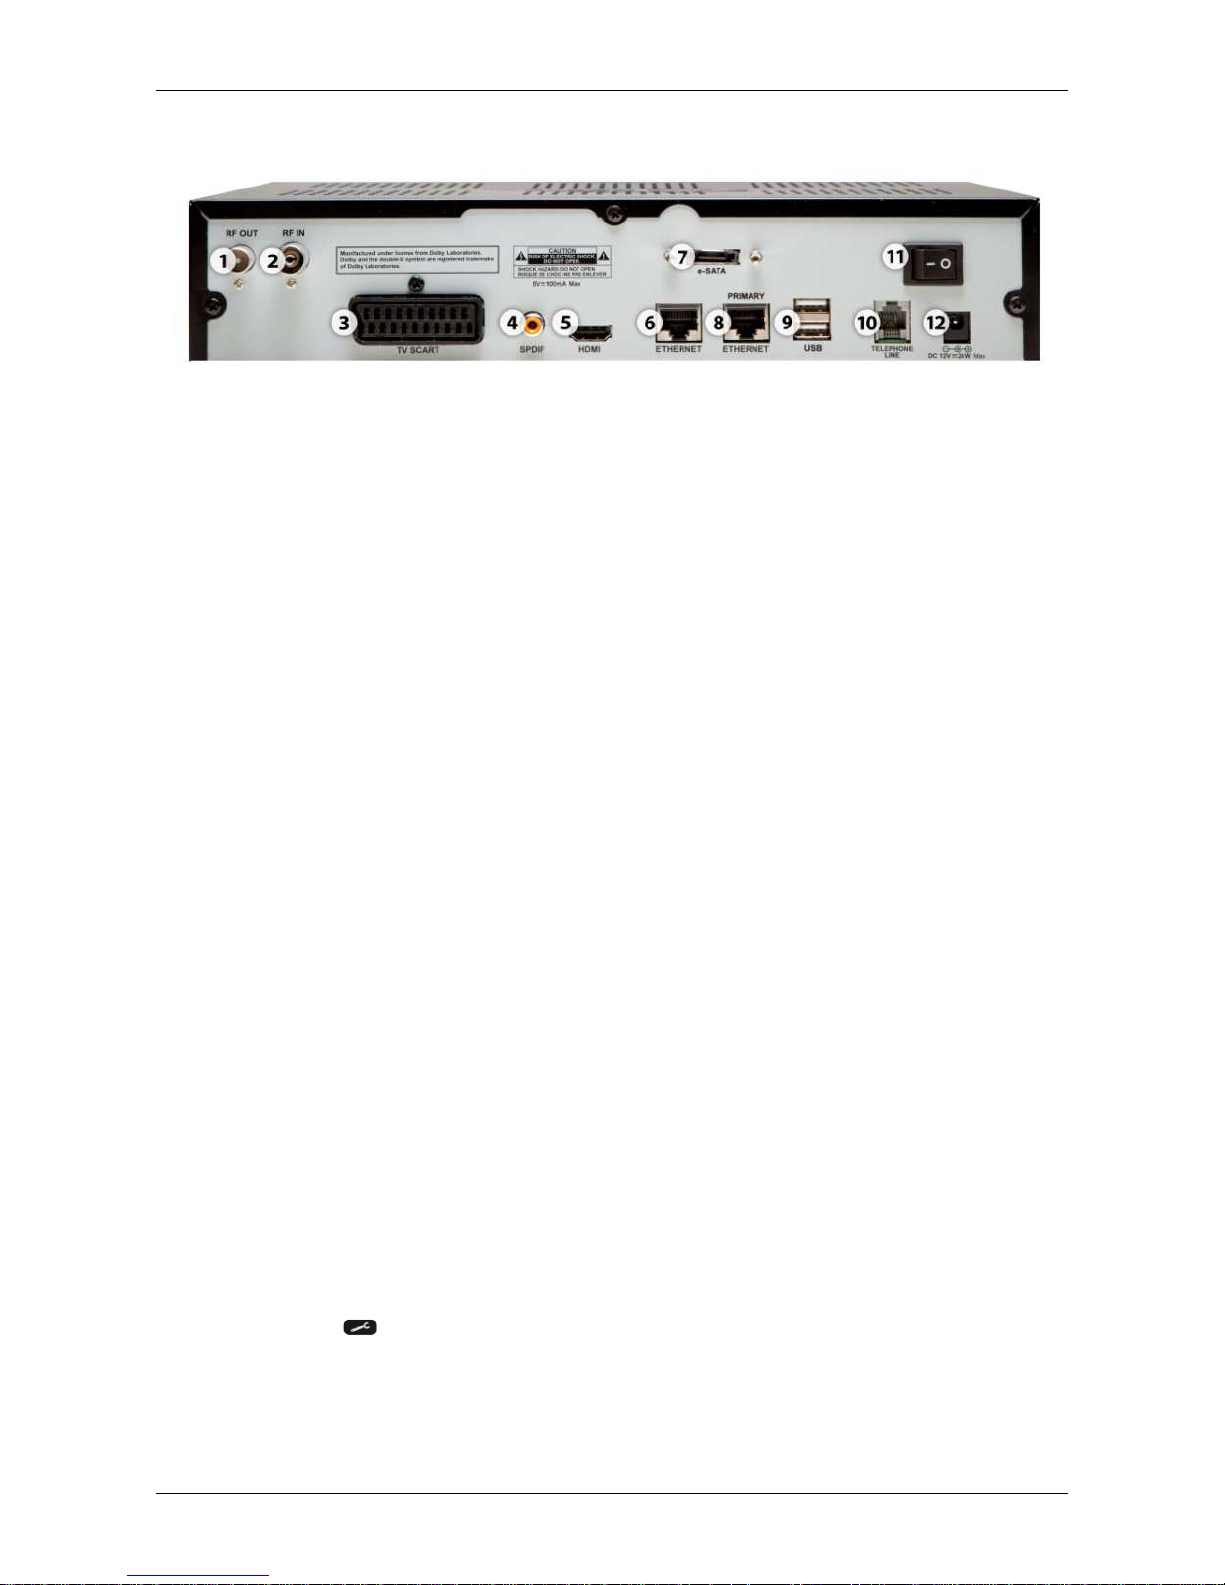
7.4 Back panel
1. RF OUT: pass-through antenna signal output to connect a TV or other decoder
2. RF IN: TV signal input from antenna
3. TV SCART: analog audio-video output to connect an old generation TV
4. SPDIF: digital coaxial S/PDIF audio output to connect home-theatre system
5. HDMI: high definition digital output to connect HD-Ready or FullHD TV
6. ETHERNET: auxiliary Ethernet port to connect other network devices (ex. PC, games console,...)
7. e-SATA: port to connect external hard-disk with e-SATA interface
8. PRIMARY ETHERNET: main Ethernet port used to connect the BLOBbox to Internet
9. USB: double USB 2.0 port to connect USB Key, external hard-disk, USB Keyboards,..
10. TELEPHONE LINE: not used
11. POWER ON/OFF: switch to completely activate/disactivate the power supply
12. DC 12V: 12V DC power supply input to connect the supplied adaptor
7.5 How to connect and turn on the BLOBbox
1. Insert the batteries into the remote control.
2. Connect the BLOBbox to the TV using the HDMI or SCART cable. If your TV has both inputs, we
recommend to use HDMI.
3. Connect the BLOBbox to Internet in one of these three ways:
a. If your router has a Ethernet port, use the RJ45 Ethernet cable to connect the BLOBbox from
its PRIMARY ETHERNET port to the router.
b. If you have a Wi-Fi Internet access and the TP-LINK model TL-WN821N USB Wi-Fi key,
plug it in one of the USB 2.0 ports on the back of the BLOBbox.
c. If you have the HUAWEI model EchoLife WS311 Wi-Fi bridge, connect it to the electrical
socket using the supplied adaptor, then connect RJ-45 Ethernet cable to the PRIMARY
ETHERNET port on BLOBbox’s back panel.
4. Plug the antenna cable from the BLOBbox to the aerial socket (make sure that your antenna is
compatible with the digital terrestrial signal).
5. Connect an external hard-disk to the USB or e-SATA connector on the back of the BLOBbox
6. Plug the AC power cord into the AC adapter, then connect the AC adapter connector to the
BLOBbox and the AC power cord to the electrical socket.
7. Turn on the BLOBbox using the power switch on the back of the BLOBbox. The BLOBbox will take
about 1 minute to become operative. Do not unplug the power supply and do not use the remote
control during start up.
8. If the BLOBbox interface is displayed correctly go directly to step 9, if you display a black screen on
your TV follow these steps:
a. Make sure that the HDMI or SCART cable is correctly connected from the BLOBbox to the
TV.
b. Make sure that you selected the HDMI or AV input in which the BLOBbox is connected.
c.
Press
on the remote control and then press the green button, a second LED will light up
on the BLOBbox’s front panel. Press the green button repeatedly with an interval of about 10
seconds each time until you see the interface on the screen. Press SAVE (red button) to
apply the new resolution video output.
9. Follow the first setup wizard on the TV screen to get the BLOBbox up and running in a few minutes.
Page 13
English
TELE System Hybrid BLOBbox
11
7.6 Remote control
Get well acquainted with your remote control and you will find it much easier to navigate through the various
menu options and to take advantage of the special functions that can only be selected by remote control.
7.6.1 Batteries
Compatible batteries: 2 x AAA, 1.5V.
Open the batteries cover on the back of the remote control and insert the 2 batteries making sure that the
polarities matches the diagram inside the battery compartment.
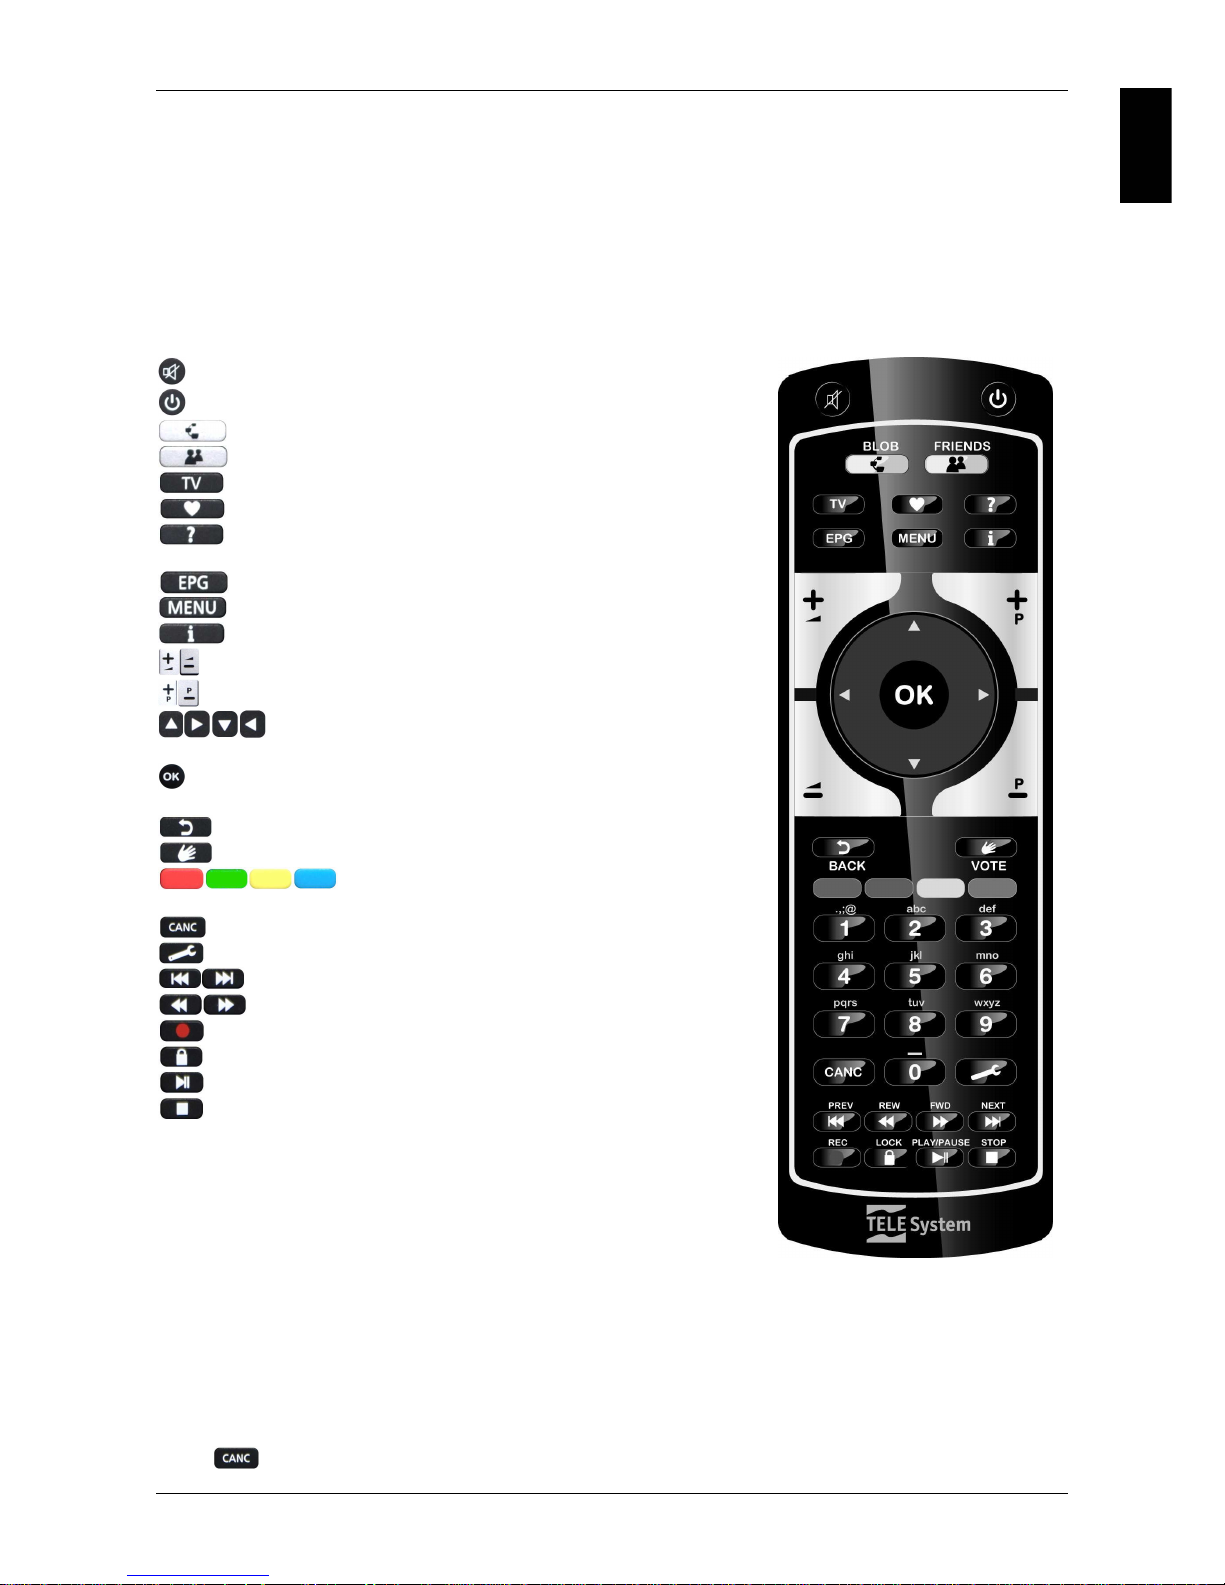
7.6.2 Remote control buttons
turns off/restores the audio
enter/exit STANDBY mode
takes you directly to the “BLOBword” page
opens the online friends list
takes you directly to the last viewed TV channel
takes you directly to your page of saved favorites
displays information (if available) about the page you are
viewing
takes you directly to the EPG (electronic program guide)
takes you directly to the BLOBbox main menu
displays information (if available) about the selected item
increases/decreases the volume
advances/returns to the next/previous channel
move the cursor around navigation options in the interface
screens
confirms a menu/navigation choice and also initiates playback of a
media file
takes you to the previous interface screen
allows you to vote in the web pages where requested/possible
indicates additional functionalities available in
individual screens (i.e., displayed at the bottom of the screen)
deletes characters during text input
takes you directly to the configuration menu
plays the next/previous media file that you are watching
fast forward/rewind during playback of a media file
records the channel that you are watching
verifies if the web page you are viewing is safe (i.e., identifiable)
starts/pauses the playback of a media file playback
stops the playback of a media file
7.7 How to insert text
You can insert text using the remote control just as you would text on a mobile phone. For example, if you
want to insert the letter “c”, simply press button number “2” three times. To insert the number “2”, press
button number “2” four times. Repeatedly pressing the button number “1” allows you to insert the following
characters:
. / @ 1 - , _ ? ! : ; ( ) ' " ~ + * = < > € # & % $ \ ^ { }
Press on the remote control to delete the last character.
Page 14
TELE System Hybrid BLOBbox
12
8 Problems solver
PROBLEM POSSIBLE CAUSES COSA FARE
1
. The ON/ST.BY LED on the front
panel does not light up
-The AC adaptor is not plugged in to
the electrical socket or to the
BLOBbox.
-The AC adaptor is not working.
-The power switch is turned off.
-Check that the AC adaptor is
properly plugged in.
-Check that the AC adaptor is wellfunctioning.
-Turn on the power switch..
2. No sound and/or image
-The SCART/HDMI cable is not
properly connected or is not working.
-The HDMI resolution output is not
compatible with your TV.
-Mute or low volume
-Wrong AV/HDMI video input selected
on TV
-Check the SCART/HDMI
connection and that the cable is
well-functioning.
-Press
on the remote control
and then press the green button, a
second LED will light up on the
BLOBbox’s front panel. Press the
green button repeatedly with an
interval of about 10 seconds each
time until you see the interface on
the screen. Press SAVE (red
button) to apply the new resolution
video output.
-
Increase the volume of the TV and
BLOBbox.
-Select the AV/HDMI input in which
the BLOBbox is connected.
3. The channels are not tuned.
-Antenna signal is absent or low.
-Your antenna system is not
compatible to receive the digital
terrestrial signal transmitted in your
area.
-You are using an antenna that needs
to be powered.
-Call the aerial technician to check
your antenna system.
-Check that the antenna is powered.
4. The menu settings have not been
saved.
-Missed confirmation after a setting
change.
-After every setting change, press
the button SAVE.
5. The remote control does not work.
-The remote control is not pointed at
the BLOBbox.
-Flat or no batteries.
-
The batteries are inserted with
their polarities the wrong way.
-Check that there are no obstacles
in front of the BLObbox.
-Insert new batteries.
-
Check the polarity of the batteries
as indicated inside the batteries
compartment.
6. The BLOBbox does not respond
when remote control button is
pressed.
-Momentary freeze of the BLOBbox.
-Remote control problems (see point
5).
-Unplug and restore the power
supply.
7. TV recordings are cutted (ex. Last
minutes of registration are missed)
- Broadcasters do not respect the
programs schedules.
-When you schedule a recording,
add about 15 minutes to the end.
8. The TVBLOB number and PIN
have been forgotten.
-Contact the technical support
writing an e-mail to
9. The USB memory is not
recognized.
-USB memory is not formatted in
FAT32/NTFS/EXT2 or EXT3
-USB memory not compatible with the
BLOBbox.
-Format the USB memory using one
of these filesystems:
FAT32/NTFS/EXT2 or EXT3.
-Try another USB memory.
10. Video/audio/image files are not
played correctly.
-File not supported.
-Convert the file to a compatible
format.
Page 15

English
TELE System Hybrid BLOBbox
13
9 Technical specifications
CPU: BROADCOM BCM7413DP @400MHz Dual Core
RAM: DDR2 512Mbyte
NAND Flash: 1 GByte
Tuner: double DVB-T HD tuner (Mpeg2, H264)
Audio/video connections: HDMI v1.3 with HDCP, SCART, digital audio output SPDIF
Network connections: 2x Ethernet 10/100 RJ45 with integrated switch
Peripheral devices ports : 3 USB 2.0 and 1 e-SATA connector (to connect USB key and hard-disk)
Smart card: 1 smart card slot for future web services
Output video formats: PAL, NTSC, HDTV (720p, 1080i)
Digital terrestrial: Watch, scheduled and manual recording to external storage devices (USB key or hard-
disk), automatic channel scan, logical channel number (LCN), electronic program guide (EPG) via internet.
Supported audio/video/image formats: MPEG-TS, PS, AVI, MP4, MOV, ASF, WMV, MKV, MP3, JPG,
BMP
Supported video codecs: MPEG2, MPEG4 part 2, MPEG4 part 10 (AVC, H264), VC-1 (WMV9), DIVX,
XVID
Supported audio codecs: MPEG1 L2, AAC, AAC-HE, WMA, Dolby Digital, Dolby Digital Plus.
Network protocols: UPnP, DHCP, Samba, HTTP, HTTPS, FTP, BitTorrent
Streaming protocols: HTTP progressive, Adobe Flash RTMP, MMS, Smooth Streaming
Web services: YouTube, FaceBook, Reeplay.it, Picasa, Flickr, Miro, Vcast, Meteo.it, Streamit, Wikipedia,
Google services, Shoutcast radio, Web TV, Podcast and much more
Favorities: quick access to your favorite web services
Download: download manager via HTTP, FTP e BitTorrent
Software update: periodical free updates with new features (via internet)
Remote access via PC: Use a PC with a web browser to access the box and connected disks
OSD menu: Illustrated and multilanguage
Diagnostics: Automatic testing of Network, Internet and on-screen help services.
Remote assistance: box remote assistance system to perform possible technical support operations.
Browser web: HTML4, XHTML 1.0, CSS2, Javascript 1.5, SSL/TLS
Operative system: Linux
Development Kit: Software by TVBLOB with downloadable free toolkit on www.blobforge.com
10 GPL and LGPL software
This product includes software code developed by third parties, including software code subject to the GNU
General Public License (“GPL”) or GNU Lesser General Public License (“LGPL”).
The GPL code and LGPL code used in this product are distributed WITHOU ANY WARRANTY and is
subject to the copyrights of one or more authors. For details, see the GPL code and the LGPL code for this
product and the terms of the GPL and LGPL.
You can read all the licenses directly on TV using this product by going in the settings menu and selecting
“Third Parties Licences”.
The GPL and LGPL source code files can be requested writing an e-mail to [email protected] for a nominal
cost to cover shipping and media charges as allowed under the GPL and LGPL.
WARNING!
TELE System Electronic Srl communicates that it could change software and/or hardware to get
quality improvement of product, so it could happen incongruity between the manual content and the
product in your ownership.
NOTE
Manufactured under license from Dolby Laboratories.
Dolby and the double-D symbol are trademarks of Dolby Laboratories.
Page 16
21005180 TELE System Ricevitore Hybrid BLOBbox
Dichiarazione di conformità CE
Tele System Electronic dichiara sotto la propria responsabilità che questo prodotto soddisfa i requisiti
fondamentali delle direttive europee 2004/108/EC (Electromagnetic Compatibilità - EMC), 2006/95/EC (Low
Voltage Directive - LVD), 1999/05/EC (Radio & Telecommunication Terminal Equipments - R&TTE) e
2009/125/CE reg 1275/2008 (ecodesign requirements for energy-related products - ErP) rispettando le
seguenti normative tecniche:
• Compatibilità elettromagnetica:
EN 55013: 2001 + A1:2003 + A2:2006
EN 55020: 2007
EN 61000-3-2: 2006
EN 61000-3-3: 2008
• Bassa Tensione / Low Voltage:
EN 60065: 2002 + A1:2006 + A11:2008
Bressanvido, Luglio 2010
Flavio de Poli
Direzione generale
ITALY
TELE System Electronic
Via S. Benedetto, 14/M
36050 Bressanvido (VI)
Internet: www.telesystem-world.com
Tel. assistenza guasti: 199 214 444
Rev.00 22/07/2010
 Loading...