

Page 1
Page 2

TELE System
Descrizione TV
Nel lato posteriore del TV sono disponibili le connessioni e gli ingressi A/V;
1. Slot Common Interface (compatibile con modulo CI+)
2. Porta USB x2 (Funzione Mediaplayer)
3. Ingresso Antenna SATELLITE RF (Tipo F)
4. Ingresso Antenna TERRESTRE RF (IEC)
5. Ingresso HDMI x3
6. Ingresso RCA Video + Audio (SCART)
7. Uscita audio digitale coassiale (COAXIAL)
8. Uscita cuffie (jack 3,5mm)
9. Alimentazione 220V AC
Collegamenti
Connessione antenna / emittente via cavo
Per vedere i canali televisivi, potete collegare il televisore ad uno dei seguenti
apparati:
Un impianto di antenna terrestre e/o un impianto di antenna satellitare.
In entrambi i casi collegate il cavo d’antenna (75 Ω) alle prese coassiali collocate nel
retro del televisore.
Connessione ad un dispositivo esterno
Via RCA/SCART:
un apparecchio dotato di SCART all’ingresso AV/RCA è necessario utilizzare un
adattatore.
Accendete i due dispositivi. Premete il tasto
AV come sorgente.
Via HDMI:
dalla sorgente al TV. Accendete i due dispositivi.
Premete il tasto
Inserimento batterie
Dovete sostituire o inserire le batterie quando:
• acquistate il prodotto.
• il telecomando non funziona correttamente.
Una volta aperto lo sportellino delle batterie posto sul retro del telecomando, inserite
le 2 batterie (formato AAA) nel vano, facendo attenzione nel rispettare le corrette
polarità come indicate.
Rimuovere le batterie esaurite, che dovranno essere smaltite separatamente dai
rifiuti domestici portandole ad un qualsiasi punto vendita o di raccolta, ripetendo le
operazioni svolte per l’inserimento.
Per evitare che la perdita di liquido corrosivo danneggi il telecomando, vi consigliamo
di togliere le pile se pensate di non utilizzare il dispositivo per un lungo periodo.
accertatevi che sia il TV che il dispositivo siano spenti. Per collegare
Source
del telecomando e selezionate
accertatevi che sia il TV che il dispositivo siano spenti. Collegate il cavo
Source
del telecomando e selezionate HDMI.
Page 3

ITALIANO
Evitate di usare differenti tipi di batterie o batterie scariche e nuove allo stesso
tempo.
Descrizione Menu principale
Premere il tasto
e
▲/▼
tornare al menu precedente o
t / u per navigare attraverso i titoli del menu. Premere il tasto
Suono, Orario, Sicurezza, Impostazioni
MENU
per far apparire il menù principale e usare i tasti direzionali
EXIT
per uscire. I menù sono:
.
Canale, Immagine,
MENU
per
Prima installazione
Alla prima accensione scegliere Lingua (OSD) e Paese d’installazione, inserire il
codice PIN (4 cifre) e confermarlo nuovamente per procedere.
Selezionare il tipo di segnale (DVB-T2 o Satellite) del sintonizzatore per avviare la
ricerca dei canali e premere
Ricerca automatica dei canali.
Premete il tasto
OK.
tasto
Selezionare il Paese di installazione (predefinito Italia) e premere OK per avviare la
ricerca
In qualsiasi momento si può Premere
ATTENZIONE! La ricerca automatica cancella tutti i canali precedentemente
memorizzati.
È possibile utilizzare lo standard DVB-C (via cavo) per la ricezione dei canali digitali,
selezionare tipo DVB-C e premere OK per la scansione automatica
ATTENZIONE! La trasmissione dei canali via cavo (DVB-C) non è normalmente
utilizzata sul territorio italiano. Fare attenzione a non selezionarla in caso di
scansione canali con impianto antenna terrestre tradizionale.
Al termine della scansione DVB-T2 verranno elencati i conflitti LCN da risolvere
manualmente, l’utente sceglierà il canale a cui assegnare la posizione LCN contesa,
oppure automaticamente in unica soluzione (scelta consigliata).
ATTENZIONE! La ricezione e quindi la visione dei canali in digitale terrestre
dipendono dal livello e dalla qualità del segnale d’antenna disponibile. Il segnale varia
in funzione della zona di residenza, dal corretto orientamento/funzionamento
dell’impianto d’antenna e dalla qualità del segnale trasmesso dai ripetitori digitali
terrestri.
MENU
Organizzazione lista canali.
Premete il tasto
OK.
tasto
Verrà visualizzata la lista dei canali, con le seguenti opzioni disponibili:
Tasto
premete il tasto
Rosso
MENU
Cancella
(
Rosso
OK
per iniziare la scansione automatica.
CANALE à Scansione Automatica
à
EXIT
oppure
CANALE à Modifica Programma
à
): per cancellare uno o più canali, selezionate il canale,
.
Menu
e confermate con il
per concludere la ricerca.
e confermate con il
Page 4

TELE System
Blu (Salta
Tasto
potrà essere visualizzato solo se richiamato utilizzando i tasti numerici del
telecomando.
Giallo (Sposta):
Tasto
che si desidera spostare, premere il tasto
canale sulla posizione desiderata oppure inserire il numero della posizione
desiderata, premere quindi OK per confermare.
): selezionate il canale e premere il tasto
per effettuare uno spostamento dei canali selezionare il canale
Giallo
, usare i tasti frecce per spostare il
Blu
; se attivato il canale
Modalità Satellite
Nel caso si scelga Satellite, sarà possibile scegliere se caricare una lista canali
satellitari predefinita premendo OK e confermando Sì (freccia sinistra) alla richiesta
di conferma; oppure procedere con l’installazione tradizionale, una volta impostati i
parametri Satellite, tipo scansione, tipo canale e tipo di servizio, premendo OK e
scegliendo No (freccia destra) nella schermata successiva.
Per attivare la modalità di ricezione dei canali digitali, premere il tasto
Satellite
Potete effettuare la scansione delle frequenze disponibili con il vostro impianto di
antenna satellitare, ricercando tutti i canali satellitari in modo automatico da prima
installazione oppure tramite la scansione automatica disponibile nel menu Canali.
Impostazione Antenna
Le impostazioni di base permettono l’utilizzo del TV con un impianto a singolo LNB
(Low Noise Block converter) Universale (comunemente usato per gli impianti
satellitari in Italia); nel caso il vostro impianto sia realizzato con una diversa
configurazione, è necessario modificare opportunemente le impostazioni antenna.
ATTENZIONE! L’errata configurazione dell’antenna può comportare il mancato
caricamento di alcuni o tutti i canali. Se non si conoscono le caratteristiche del
proprio impianto d’antenna e/o non si è in grado di configurare propriamente il
ricevitore da soli, si consiglia di rivolgersi ad un installatore professionista di fiducia.
Ripristina Impostazioni di fabbrica
Questa funzione consente di ripristinare le impostazioni di fabbrica. Per farlo,
selezionare Ripristina impostazioni… e sulla nuova schermata selezionare SI. La
televisione torna alle impostazioni di fabbrica
ATTENZIONE! Il ripristino delle impostazioni di fabbrica riavvia la procedura guidata
di installazione (vedi paragrafo “Prima Installazione”), inoltra cancella tutti i canali
precedentemente memorizzati e le impostazioni personalizzate.
.
Source
à
Page 5
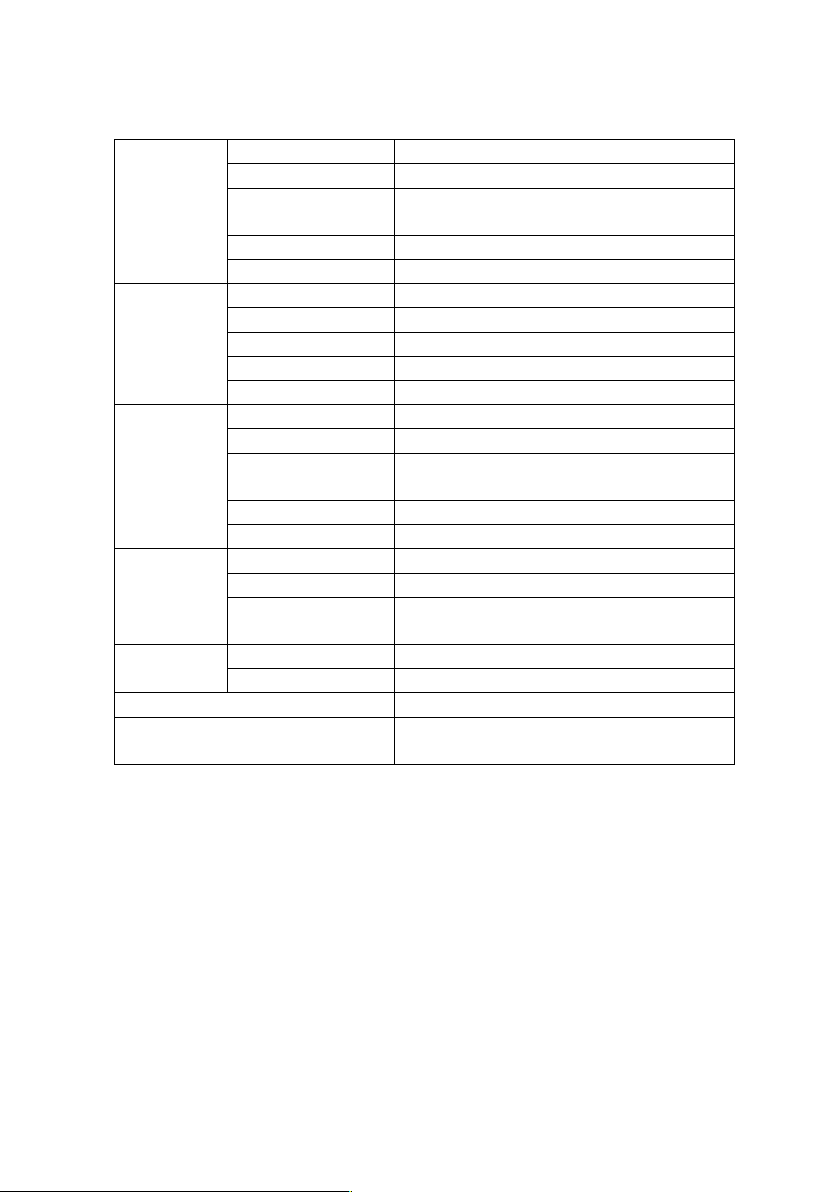
Specifiche tecniche
Display
Diagonale 31,5” (80 cm) 16:9 Wide
Risoluzione
1366(H) x 768(V) – HD READY
Rapporto di
contrasto
3000:1
Luminosità
200 (cd/m2)
Angolo di visione
178°/178° (H/V)
Ingressi
HDMI
3
A/V in
1 (adattore non in dotazione)
USB
2 – Funzione Mediaplayer
Audio output
Coaxial + ciffie 3,5mm
Segnale TV
RF input DVB-T
75 Ω – VHF/UHF - 7MHz/8MHz
RF input DVB-S
1 tipo F
Video
MPEG-2, MPEG-4, H.265.Main@L4.11920*1080@60fps
Audio
MPEG1 layer1/2; DD; DD+; AAC; HE-AAC
Speaker
2 x 5 Watt
Generalità
Alimentazione
100V – 240V ~ 50/60Hz
Consumo
<0,5W in Stand-by; <56W Max
Formati
supportati USB
AVI/MP4/MKV (compatibile H.265)
Misure
(l x a x p)
Con supporto
720 x 465 x 225 mm
Senza supporto
720 x 420 x 80 mm
Standard supporto a muro
VESA 200 / 100
Accessori
Telecomando standard, Telecomando
semplificato, Manuale istruzioni.
ITALIANO
Dichiarazione di conformità EU semplificata
Il fabbricante, TELE System Digital s.r.l., dichiara che il tipo di apparecchiatura radio
TV denominata PALCO32 FL13 è conforme alla direttiva 2014/53/UE. Il testo completo
della dichiarazione di conformità UE è disponibile al seguente indirizzo Internet:
https://www.telesystem.it/CE
Page 6

TELE System
TV description
On the rear side of TV, the available I/O connections are:
1. Slot Common Interface (CI / CI+ plus)
2. USB port x2 (Mediaplayer function)
3. SATELLITE RF Antenna (Tipo F)
4. TERRESTRIAL RF Antenna (IEC)
5. HDMI input x 3
6. RCA Video + Audio (SCART)
7. Coaxial digital audio output (COAXIAL)
8. Headphone output (3,5mm)
9. Power supply 220V AC
Connections
Antenna Connection
In order to watch live TV programs, connect the TV to an terrestrial and/or satellite
antenna. In both cases, connect the antenna cable (75 Ω) to RF inputs on the rear of
TV set.
External device connection
Via RCA:
to connect the external device via SCART to the AV input of TV set. Turn on the devices,
press SOURCE à AV.
Via HDMI:
source to TV set and turn on the devices; Turn on the devices, press SOURCE à HDMI.
Batteries insertion
You have to replace or install the batteries when:
Once you open the battery door located on the back of the remote, insert the 2
batteries (AAA) in the compartment, making sure to respect the correct polarity as
indicated.
Remove the used batteries, which must be disposed of separately from household
waste taking them to any store or collection point and then repeat the operations for
insertion.
To avoid damaging the remote control with the leakage of corrosive liquid, you should
remove the batteries if you plan not to use the device for a long period of time. Avoid
using different types of batteries or dead and new batteries at the same time.
Main menu description
Press the MENU key to bring up the main menu and use the arrow keys ▲ / ▼ and
t / u to navigate through the titles of menu. Press the MENU button to return to the
be sure that both TV and external device are off. Use RCA/SCART adaptor
be sure that both TV and external device are off. Connect the cable from
• You buy the product.
• the remote control does not work properly.
Page 7

ENGLISH
previous menu or EXIT to exit. The menus are:
Security, Settings
.
Channels, Images, Sound, Time,
First Installation
At the first installation, select the OSD language and the country, enter the PIN (4
digits) and confirm it to proceed. Select the signa type (DVB-T2 or Satellite) to launch
the channel scanning and press OK.
Automatic channel search
MENU
Press
country (default ITALY) and press OK to launch the scanning.
At any time, pressing EXIT or Menu, the scanning can be stopped.
WARNING! Automatic channel searching deletes all channel lists previously saved.
DVB-C mode (via cable) is available to receive the digital channels, select DVB-C and
press OK to launch the scanning.
WARNING! Make sure to not select this mode in case of traditional terrestrial
antenna system.
WARNING! The reception and therefore the viewing of digital terrestrial channels
depends on the level and the quality of the antenna signal available The signal varies
according to the area in which you live, to the correct orientation/functioning of the
antenna system and to the quality of the signal transmitted by the digital terrestrial
repeaters
Channel à Auto Tuning
à
and confirm with OK button. Select the
Channel list editing.
MENU
Press
the list, the options are:
RED (Delete
Blue (Skip
can be selected with the numeric keys of remote control unit.
Yellow (Move):
Yellow
button, use arrow keys to move the channel to the desired position or enter
the desired position number, then press
Channel à Edit Program
à
): select one or more channels, delete them pressing RED button.
): select the channel and press BLUE button, once activated the channel
to move a channel, select the channel you want to move, press the
and confirm pressing OK. Once displayed
OK
to confirm.
Satellite mode
If you choose satellite, you can choose to load a default satellite channels list by
pressing OK and confirming Yes (left arrow) to the confirmation request; or proceed
with normal installations, once the satellite parameters are set, scan type, channel
type and type of service, by pressing OK and choosing No (right arrow) on the next
screen.
To activate the digital channel reception mode, press the
can scan the frequencies available with your satellite antenna system, automatically
searching for all the satellite channels from the first installation or through an
automatic scanning available in the Channels menu.
Source
à
Satellite
. You
Page 8
TELE System
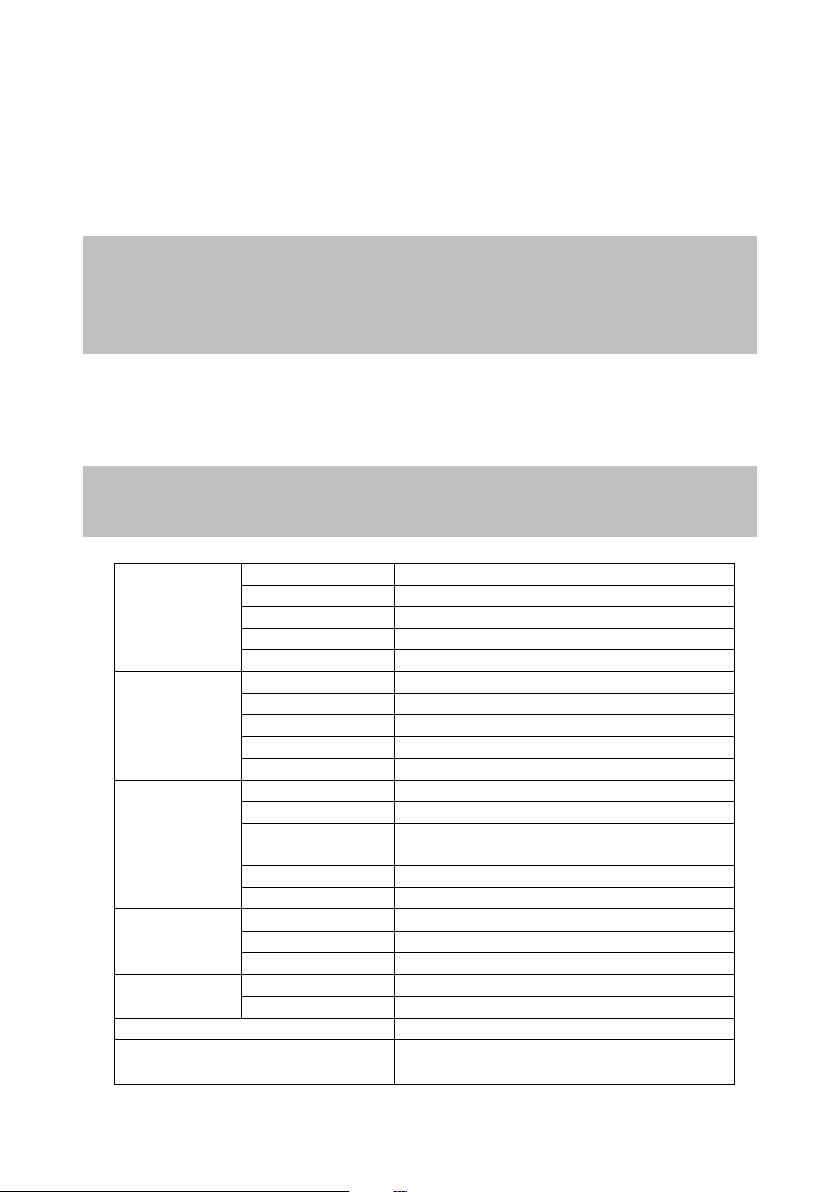
Display
Diagonal 31,5” (80 cm) 16:9 Wide
Resolution
1366(H) x 768(V) – HD READY
Contrast ratio
3000:1
Brightness
200 (cd/m2)
Angle of view
178°/178° (H/V)
Inputs
HDMI
3
A/V in
1
USB
2 –Mediaplayer
Audio output
Coaxial + headphone (3,5mm)
TV Signal
RF input DVB-T
75 Ω – VHF/UHF - 7MHz/8MHz
RF input DVB-S
1 tipo F
Video
MPEG-2, MPEG-4, H.265.Main@L4.11920*1080@60fps
Audio
MPEG1 layer1/2; DD; DD+; AAC; HE-AAC
Speaker
2 x 5 Watt
Specs
Power supply
100V – 240V ~ 50/60Hz
Consumption
<0,5W in Stand-by; <56W Max
Supported format
AVI/MP4/MKV (compatible H.265)
Size (w x h x d)
With stand
720 x 465 x 225 mm
Without stand
720 x 420 x 80 mm
Wall mount support
VESA 200 / 100
Accessories
Standard Remote control unit, Easy remote
control, User manual.
Impostazione Antenna
the basic settings to allow the use of the TV with a single Universal LNB (Low Noise
Block converter) system (commonly used for satellite systems in Italy); in the event
your system is done with a different configuration, you must appropriately change the
antenna settings.
WARNING! The wrong antenna configuration can result in the failure to load some or
all channels. If you do not know the characteristics of your antenna system and/or
are unable to properly configure the receiver yourself, you may want to consult a
professional installer for advice. The power and signal quality indicators refer to the
first transponder of the chosen satellite list
Restore Factory Settings
This function allows you to restore factory settings. To do so, select
... and on the new screen, select YES. The television will be restored to its factory
settings.
WARNING! Restoring the factory settings starts the installation wizard (see section
"First Installation"), and also clears all previously memorized channels and settings
set by the user.
Restore settings
Technical specs
Page 9

ENGLISH
Simplified EU conformity declaration
The manufacturer, TELE System Digital s.r.l., states that the radio equipment type
of TV named PALCO32 FL13 complies with the 2014/53/EU directive. The full text of
the EU compliance declaration is available at the following Internet address:
https://www.telesystem.it/CE
Page 10

TELE System
Description TV
Les connexions d'Entrée / Sortie disponibles à l'arrière du téléviseur sont les
suivantes :
1. Slot Common Interface (CI / CI+ plus)
2. USB port x2(Mediaplayer function)
3. SATELLITE RF Antenna (Tipo F)
4. TERRESTRIAL RF Antenna (IEC)
5. HDMI input x3
6. RCA Video + Audio (SCART)
7. Coaxial digital audio output (COAXIAL)
8. Power supply 220V AC
Connexions
Connexion d'antenne
Pour regarder des programmes TV en direct, connectez le téléviseur à une antenne
terrestre et / ou satellite. Dans les deux cas, connectez le câble d'antenne (75 Ω) aux
entrées RF à l'arrière du téléviseur.
Connexion de périphérique externe
Via RCA:
Utilisez l’adaptateur RCA / SCART pour connecter le périphérique externe via SCART
à l’entrée AV du téléviseur. Allumez les appareils, appuyez sur SOURCEà AV.
Via HDMI:
Connectez le câble de la source au téléviseur et allumer les appareils; appuyez sur
SOURCE à HDMI.
Insertion des piles
Vous devez remplacer ou installer les piles lorsque :
Une fois que vous avez ouvert le compartiment des piles à l’arrière de la
télécommande insérez les 2 piles (AAA) dans le compartiment en veillant à corriger
la polarité indiquée.
Retirez les piles usagées. Celles-ci doivent être éliminées séparément des déchets
ménagers en les emmenant dans un magasin ou à un point de collecte, puis répétez
les opérations pour les insérer.
Pour éviter d’endommager la télécommande en cas de fuite de liquide, vous devez
retirer les piles si vous prévoyez de ne pas utiliser l'appareil pendant une longue
période. Évitez d’utiliser différents types de piles ou des piles épuisées.
Description du menu principal
Appuyez sur la touche
fléchées ▲ / ▼ et / t / u pour parcourir les titres du menu. Appuyez sur le bouton
assurez-vous que le téléviseur et les périphériques externes sont éteints.
assurez-vous que le téléviseur et les périphériques externes sont éteints.
• Vous achetez le produit.
• la télécommande ne fonctionne pas correctement.
MENU
pour afficher le menu principal et utilisez les touches
Page 11

FRANÇAIS
MENU
pour revenir au menu précédent ou sur
Chaînes, Images, Son, Heure, Sécurité, Paramètres.
EXIT
pour quitter. Les menus sont:
Première installation
Lors de la première installation, sélectionnez la langue OSD et le pays, entrez le code
PIN (4 chiffres) et confirmez-le pour continuer. Sélectionnez le type de signal (DVBT2 ou Satellite) pour lancer le balayage des chaînes et appuyez sur
OK
.
Recherche automatique de chaînes
Appuyez sur
touche
numérisation.
À tout moment, en appuyant sur
ATTENTION! La recherche automatique de chaînes supprime toutes les listes de
chaînes précédemment enregistrées.
Le mode DVB-C (par câble) est disponible pour recevoir les chaînes numériques,
sélectionnez DVB-C et appuyez sur OK pour lancer la numérisation.
ATTENTION! Assurez-vous de ne pas sélectionner ce mode dans le cas d'un système
d'antenne terrestre traditionnel.
ATTENTION! La réception et donc la visualisation des chaînes numériques
hertziennes dépendent du niveau et de la qualité du signal d'antenne disponible. Le
signal varie en fonction de la région où vous habitez, de la bonne orientation / du bon
fonctionnement du système d'antenne et de la qualité de l'affichage du signal
transmis par les répéteurs numériques terrestres.
MENUà Chaîne à Recherche automatique
OK
. Sélectionnez le pays (ITALIE par défaut) et appuyez sur OK pour lancer la
EXIT
ou sur
Menu
, le balayage peut être arrêté.
et confirmez avec la
Modification de la liste de chaînes
Appuyez sur
OK
. Une fois la liste affichée, les options sont les suivantes:
ROUGE
appuyant sur le bouton ROUGE.
Bleu
(Passer): sélectionnez la chaîne et appuyez sur la touche BLEUE. Une fois
activée, la chaîne peut être sélectionnée à l'aide des touches numériques de la
télécommande.
Jaune
souhaitez déplacer, appuyez sur la touche jaune, utilisez les touches fléchées pour
déplacer la chaîne à la position souhaitée ou entrez le numéro de la position
souhaitée, puis appuyez sur OK pour
confirmer.
MENU àChaîne àModifier programme
(Supprimer): sélectionnez un ou plusieurs canaux, supprimez-les en
(Déplacer): pour déplacer une chaîne, sélectionnez la chaîne que vous
et confirmez en appuyant sur
Mode satellite
Si vous choisissez satellite, vous pouvez choisir de charger une liste de chaînes
satellite par défaut en appuyant sur OK et en confirmant Oui (flèche vers la gauche)
à la demande de confirmation. ou procédez aux installations normales, une fois les
Page 12

TELE System
paramètres satellite définis, le type de balayage, le type de chaîne et le type de
service, en appuyant sur OK et en choisissant Non (flèche vers la droite) à l’écran
suivant.
Pour activer le mode de réception de chaînes numériques, appuyez sur
Satellite
d'antenne satellite, en recherchant automatiquement tous les canaux satellites à
partir de la première installation ou via un balayage automatique disponible dans le
menu Chaînes.
Configuration de l'antenne
Les réglages de base autorise l’utilisation du téléviseur avec un seul système
Universal LNB (Low Noise Block converter) (couramment utilisé pour les systèmes
par satellite en Italie); dans le cas où votre système est configuré avec une
configuration différente, vous devez modifier les paramètres de l’antenne de manière
appropriée.
ATTENTION! Une mauvaise configuration d'antenne peut empêcher le chargement
de certains ou de tous les canaux. Si vous ne connaissez pas les caractéristiques de
votre système d'antenne et / ou si vous êtes incapable de configurer vous-même le
récepteur correctement, vous voudrez peut-être consulter un installateur
professionnel pour obtenir des conseils. Les indicateurs de puissance et de qualité
du signal se rapportent au premier répéteur de la liste de satellites choisie.
. Vous pouvez balayer les fréquences disponibles avec votre système
Source à
Rétablir la configuration d'usine
Cette fonction vous permet de restaurer les paramètres d'usine. Pour ce faire,
sélectionnez Restaurer les paramètres ... et sur le nouvel écran, sélectionnez OUI.
Le téléviseur sera restauré à ses paramètres d'usine.
ATTENTION! La restauration des paramètres d'usine lance l'assistant d'installation
(voir la section "Première installation") et efface également tous les canaux
précédemment mémorisés et les réglages définis par l'utilisateur.
Page 13

écran
Diagonale 31,5” (80 cm) 16:9 Wide
Résolution
1366(H) x 768(V) – HD READY
Contraste
3000:1
Luminosité
200 (cd/m2)
Angle de vision
178°/178° (H/V)
Inputs
HDMI
3
Entrée A/V
1
USB
2 –Lecteur multimédia
Audio output
Coaxial
Signal TV
Entrée RF DVBT
75 Ω – VHF/UHF - 7MHz/8MHz
Entrée RF DVBS
1 type F
Video
MPEG-2, MPEG-4, H.265.Main@L4.11920*1080@60fps
Audio
MPEG1 layer1/2; DD; DD+; AAC; HE-AAC
Haut-parleur
2 x 5 Watt
Spécification
s
Source de
courant
100V – 240V ~ 50/60Hz
Consommation
<0,5W en veille; <56W Max
Format pris en
charge
AVI/MP4/MKV (compatible H.265)
Dimensions
(l x a x p)
Avec support
720 x 465 x 225 mm
Sans stand
720 x 420 x 80 mm
Support de montage mural
VESA 200 / 100
Accessoires
Télécommande standard,
telecommande simplifiée, manuel
d'utilisation.
Spécifications techniques
FRANÇAIS
Déclaration de conformité UE simplifiée
Tele System Digital déclare, sous sa propre responsabilité, que ce produit répond
aux exigences essentielles des directives européennes. La déclaration de conformité
UE complète est disponible sur: https://www.telesystem.it/CE
Page 14

TELE System
Beschreibung des Fernsehergeräts
Auf der Rückseite des Fernsehergeräts stehen folgende Anschlüsse zur Verfügung:
1. Slot Common Interface (CI / CI + plus)
2. USB-Anschluss x2 (Mediaplayer-Funktion)
3. Satelliten-RF-Antenne (Typ F)
4. Terrestrische RF-Antenne (IEC)
5. HDMI-Eingang x3
6. RCA Video + Audio (SCART)
7. Koaxialer digitaler Audioausgang (COAXIAL)
8. Stromversorgung 220V AC
Verbindungen
Antennenanschluss
Schlieβen Sie das Fernsehgerät an eine terrestrische und / oder Satellitenantenne
an, um Live-Fernsehprogramme zu sehen. Schlieβen Sie in beiden Fällen die
Kabelantenne (75 Ω) an die RF-Eingänge an der Rückseite des Fernsehgeräts an.
Externer Geräteanschluss
Über RCA: Vergewissern Sie sich, dass sowohl das Fernsehgerät als auch die
externen Geräte ausgeschaltet sind. Verwenden Sie den RCA/SCART-Adapter, um
das externe Gerät über SCART an den AV-Eingang des Fernsehgerätes
anzuschlieβen. Schalten Sie die Geräte ein und drücken Sie QUELLE à AV.
Über HDMI: Vergewissern Sie sich, dass sowohl das Fernsehgerät als auch die
externen Geräte ausgeschaltet sind. Verbinden Sie den Kabel von der Quelle an das
Fernseher und schalten Sie die Geräte ein; Schalten Sie die Geräte ein und drücken
Sie QUELLE à HDMI.
Batterien einlegen
Sie müssen die Batterien ersetzen oder installieren, wenn:
• Sie das Produkt kaufen.
• Die Fernbedienung nicht richtig funktioniert.
Legen Sie nach dem Öffnen des Batteriefachs auf der Rückseite der Fernbedienung
die 2 Batterien (AAA) in das Fach ein und achten Sie dabei auf die angegebene
Polarität.
Entfernen Sie die verbrauchten Batterien, die getrennt vom Hausmüll entsorgt
werden müssen, und bringen Sie sie zu einem Laden oder einer Sammelstelle.
Wiederholen Sie dann die Schritte zum Einsetzen.
Um eine Beschädigung der Fernbedienung durch austretende korrosive Flüssigkeit
zu vermeiden, sollten Sie die Batterien herausnehmen, wenn Sie das Gerät längere
Zeit nicht benutzen. Vermeiden Sie es, verschiedene Batterietypen oder leere und
neue Batterien gleichzeitig zu verwenden.
Page 15

DEUTSCH
Beschreibung vom Hauptmenü
Drücken Sie die Taste MENU, um das Hauptmenü aufzurufen, und verwenden Sie die
Pfeiltasten ▲ / ▼ und t / u, um durch die Menütitel zu navigieren. Drücken Sie die
MENU-Taste, um zum vorherigen Menü zurückzukehren, oder EXIT, um das Menü zu
verlassen. Die Menüs sind: Kanäle, Bilder, Ton, Zeit, Sicherheit, Einstellungen.
Erste Installation
Wählen Sie bei der ersten Installation die OSD-Sprache und das Land aus, geben Sie
die PIN (4 Ziffern) ein und bestätigen Sie diese, um fortzufahren. Wählen Sie den
Signaltyp (DVB-T2 oder Satellit), um den Sendersuchlauf zu starten, und drücken Sie
OK.
Automatischer Sendersuchlauf
Drücken Sie MENU à Kanal à Auto Tuning und bestätigen Sie mit OK Taste. Wählen
Sie das Land aus (Standard ITALIEN) und drücken Sie OK, um das Scannen zu starten
Durch Drücken von EXIT oder Menu kann der Scanvorgang jederzeit abgebrochen
werden.
ACHTUNG! Die automatische Kanalsuche löscht alle zuvor gespeicherten
Kanallisten.
Der DVB-C-Modus (über Kabel) ist verfügbar, um digitale Kanäle zu empfangen.
Wählen Sie DVB-C und drücken Sie OK, um den Scanvorgang zu starten.
ACHTUNG! Stellen Sie sicher, dass Sie diesen MODUS bei herkömmlichen
terrestrischen Antennensystemen nicht auswählen.
ACHTUNG! Der Empfang und damit die Anzeige von digitalen terrestrischen Kanälen
hängt vom Pegel und von der Qualität des verfügbaren Antennensignals ab. Das
Signal variiert je nach Ihrem Wohnort, der korrekten Ausrichtung / Funktion des
Antennensystems und der Qualität des von den digitalen terrestrischen Repeatern
übertragenen Signals.
Bearbeitung einer Kanalliste
Drücken Sie MENUà Kanal à Programm bearbeiten und bestätigen Sie mit OK.
Sobald die Liste angezeigt wird, sind die Optionen:
ROT (Löschen): Wählen Sie einen oder mehrere Kanäle aus und löschen Sie sie durch
drücken der ROTEN-Taste
Blau (Überspringen): Wählen Sie den Kanal aus und drücken Sie die BLAUE Taste.
Nach dem aktivieren kann der Kanal mit den Zifferntasten der Fernbedienung
ausgewählt werden.
Gelb (Verschieben): um einen Kanal zu verschieben, wählen Sie den zu
verschiebenden Kanal aus, drücken Sie die gelbe Taste, verschieben Sie den Kanal
mit den Pfeiltasten an die gewünschte Position oder geben Sie die gewünschte
Positionsnummer ein, dann drücken Sie die OK-Taste zur Bestätigung.
Page 16

TELE System
Satellitenmodus
Wenn Sie Satellit wählen, können Sie eine Standardliste der Satellitenkanäle laden,
indem Sie OK drücken und Ja (linker Pfeil) zur Bestätigungsanforderung bestätigen;
oder Sie fahren Sie mit der normalen Installation fort, sobald die Satellitenparameter
eingestellt sind: Suchlaufart, Kanaltyp und Art des Dienstes. Drücken Sie OK und
wählen Sie im nächsten Bildschirm Nein (Pfeil nach rechts). Drücken Sie die Taste
Quelle à Satellit, um den digitalen Kanalempfangsmodus zu aktivieren. Sie können
die mit Ihrem Satellitenantennensystem verfügbaren Frequenzen scannen, indem
Sie bei der ersten Installation automatisch nach allen Satellitenkanälen suchen oder
im Menü Kanäle automatisch nach Kanälen suchen.
Einstellung der Antenne
Die Grundeinstellungen ermöglichen die Verwendung des Fernsehgeräts mit einem
einzigen Universal-LNB-System (Low Noise Block Converter) (das in Italien
üblicherweise für Satellitensysteme verwendet wird). Falls Ihr System anders
konfiguriert ist, müssen Sie die Antenneneinstellungen entsprechend ändern.
WARNUNG! Die falsche Antennenkonfiguration kann dazu führen, dass einige oder
alle Kanäle nicht geladen werden. Wenn Sie die Eigenschaften Ihres
Antennensystems nicht kennen und / oder den Empfänger nicht ordnungsgemäß
konfigurieren können, wenden Sie sich an einen professionellen Installateur. Die
Anzeigen für Leistung und Signalqualität beziehen sich auf den ersten Transponder
der ausgewählten Satellitenliste.
Werkseinstellungen zurücksetzten
Mit dieser Funktion können Sie die Werkseinstellungen wiederherstellen. Wählen Sie
dazu Einstellungen wiederherstellen ... und wählen Sie auf dem neuen Bildschirm
JA. Das Fernsehgerät wird auf die Werkseinstellungen zurückgesetzt.
WARNUNG! Das Wiederherstellen der Werkseinstellungen startet den
Installationsassistenten (siehe Abschnitt "Erste Installation") und löscht auch alle
zuvor vom Benutzer gespeicherten Kanäle und Einstellungen.
Page 17

Technische Daten
Bildschirm
Diagonale 31,5” (80 cm) 16: 9 breit
Auflösung
1366 (H) x 768 (V) - HD READY
Kontrastverhältnis
3000:1
Helligkeit
200 (cd / m 2)
Betrachtungswinkel
178°/178° (H/V)
Eingänge
AV in
CVBS + L/R audio
HDMI
3
Audio out
Coaxial
USB
2 –Mediaplayer
TVSignal
RF-Eingang DVB-T
75 Ω - VHF / UHF - 7 MHz / 8 MHz
RF-Eingang DVB-S
1 Typ F
Video
MPEG-2, MPEG-4, H.265.Main@L4.11920*1080@60fps
Audio
MPEG1 layer1 / 2; DD; DD +; AAC; HEAAC
Lautsprecher
2 x 5 Watt
Technisc
he Daten
Netzteil
100V - 240V ~ 50 / 60Hz
Verbrauch
<0,5W im Stand-by; <56W Max
Unterstützte
Formate
AVI / MP4 / MKV (H.265 kompatibel)
Grösse
(LxHxB)
mit Standfuß
720 x 465 x 225 mm
ohne Standfuß
720 x 420 x 80 mm
Wandhalterung Unterstützung
VESA 200 / 100
Zubehör
Standard und Easy Fernbedienung,
Bedienungsanleitung.
DEUTSCH
Vereinfachte EU-Konformitätserklärung
Tele System Digital erklärt in eigener Verantwortung, dass dieses Produkt die
grundlegenden Anforderungen der europäischen Richtlinien erfüllt. Die vollständige
EU-Konformitätserklärung finden Sie unter: https://www.telesystem.it/CE
Page 18

TELE System
Popis TV
Na zadní straně televizoru, k dispozici I / O spojení jsou:
1. Slot Společné rozhraní (CI / CI + a)
2. USB port x2 (funkce Mediaplayer)
3. SATELITNÍ RF anténa (Typ F)
4. POZEMNÍ RF anténa (IEC)
5. vstup HDMI x3
6. RCA Video + Audio (SCART)
7. Koaxiální digitální audio výstup (koaxiální)
8. Napájení 220V AC
připojení
Připojení antény
Aby bylo možné sledovat živé televizní vysílání, připojte televizor k pozemní a / nebo
satelitní anténě. V obou případech, připojte anténní kabel (75Ω) Na RF vstupy na zadní
straně televizoru.
Externí připojení zařízení
Připojování a odpojovaní zařízení provádějte ve vypnutém stavu.
Přes RCA: ujistěte se, že oba TV a externí zařízení jsou vypnuty. Použijte RCA / SCART
adaptér pro připojení externího zařízení přes SCART na AV vstup z televizoru. Zapněte
zařízení, stiskněte
Přes HDMI: ujistěte se, že oba TV a externí zařízení jsou vypnuty. Připojte kabel od
zdroje k televizoru a zapnutí zařízení; Zapněte zařízení, stiskněte SOURCE HDMI.
Vložení baterií
Budete muset vyměnit nebo instalovat baterie, pokud:
• si koupíte výrobek.
• dálkový ovladač nefunguje správně.
Po otevření krytu baterie umístěný na zadní straně dálkového ovladače, vložte 2
baterie (AAA) v prostoru, ujistěte že dodržujete správnou polaritu, jak je uvedeno.
Vyjměte použité baterie, které musí být likvidovány odděleně od komunálního odpadu
berou je na každém obchodě nebo sběrného místa a opakujte operace pro vložení.
Aby nedošlo k poškození dálkového ovládání s únikem korozivní kapaliny, měli byste
vyjmout baterie, pokud máte v úmyslu nepoužívat přístroj po delší dobu. Vyhněte se
použití různých typů baterií nebo starých a nových baterie současně.
Hlavní popis nabídky
Stiskněte tlačítko MENU pro vyvolání hlavního menu a pomocí šipek ▲ / ▼ a t/u
procházet tituly menu. Stiskněte tlačítko MENU pro návrat do předchozího menu
nebo EXIT pro ukončení. Nabídky jsou: TV, obraz, zvuk, čas, zabezpečení, nastavení.
SOURCE à AV
.
Page 19

CESKY
První instalace
Při první instalaci zvolte požadovaný jazyk OSD a zemi, po zadání PIN (4 číslice- 0000)
a potvrďte ji pokračovat. Vyberte typ signálu (DVB-T2, nebo satelit) a spusťte
vyhledávání kanálů - stiskněte tlačítko OK. Automatické vyhledávání kanálů
Stisknutím tlačítka
MENU à Kanál à Auto Tuning
a potvrďte tlačítkem OK. Vyberte
zemi (výchozí Itálie) a stiskněte tlačítko OK pro spuštění skenování.
Kdykoli stisknutím tlačítka EXIT nebo Menu, skenování lze zastavite
VAROVÁNÍ! Automatické vyhledávání kanálů vymaže všechny seznamy kanálů dříve uložené.
režim DVB-C (přes kabel) je k dispozici pro příjem digitálních kanálů, zvolte DVB-C a
stiskněte tlačítko OK pro spuštění skenování.
VAROVÁNÍ! Ujistěte se, že nevyberete tento režim v případě, že tradiční pozemní antény.
VAROVÁNÍ! Příjem a tedy i zobrazování digitálních pozemních kanálů závisí na úrovni a kvalitĚ
anténního signálu k dispozici signál liší v závislosti na oblasti, ve které žijete, správné orientace
/ fungování anténního systému a ke kvalitě z signálU přenášenÉHO prostřednictvím pozemních
digitálních opakovačů
Úprava seznamu kanálů
Stisknutím tlačítka
MENUà Kanál à editovat programa
Jakmile se zobrazí seznam, možnosti jsou:
ČERVENÉ (Delete-smazat): vyberte jeden nebo více kanálů, mazat stiskem červeného
tlačítka.
Modrý (Skip-přeskočit): vyberte kanál a stiskněte tlačítko BLUE-Modré, jakmile je
aktivován kanál lze zvolit pomocí číselných tlačítek na dálkovém ovladači.
Žluté (Move- přesun): přesunout kanál, vyberte kanál, který chcete přesunout,
stiskněte tlačítko Žluté, pomocí šipek přesuňte kanál na požadovanou pozici nebo
zadat požadované číslo pozice a stiskněte tlačítko OK pro potvrzení.
potvrďte tlačítkem OK.
Režim Satelit
Zvolíte-li satelit, můžete si vybrat pro načtení výchozí seznam satelitních kanálů
stiskem tlačítka OK a potvrzením Ano (šipku vlevo) na žádost o potvrzení; nebo
pokračovat v běžných zařízeních, jakmile budou družicové parametry nastaveny, Typ
skenování, typ kanálu a typ služby, stisknutím tlačítka OK a volbou No (šipka vpravo),
na další obrazovce.
Chcete-li aktivovat režim digitálního příjmu kanálu, stiskněte Zdroj à Satelit. Můžete
prohledávat frekvence které jsou k dispozici u Vašeho anténního systému,
automaticky vyhledávat pro všechny satelitní kanály od první instalace nebo
prostřednictvím automatického skenování k dispozici v nabídce Kanály.
Nastavení sat antény
základní nastavení umožňují použití televizoru s jedinou univerzálním LNB (Low
Noise Block konvertor) systému (běžně používané pro satelitní systémy); V případě,
váš systém je provedeno s jinou konfigurací, je nutné odpovídajícím způsobem změnit
nastavení antény.
Page 20

TELE System
parametry
Zobrazit
Úhlopříčka 31,5” (80 cm) 16: 9 Wide
Rozlišení
1366 (H) x 768 (V) - HD READY
Kontrastní poměr
3000:1
Jas
200 (cd / m2)
Úhel pohledu
178°/178° (H/V)
Vstupy
/výstupy
HDMI
3
A / V v kroku
(1)
1
USB
2 -Mediaplayer
Audio output
Coaxial
TV signál
RF vstup DVB-T
75 Ω - VHF / UHF - 7 MHz / 8 MHz
RF vstup DVB-S
1 Tipo F
Video
MPEG-2, MPEG-4, H.265.Main@L4.11920*1080@60fps
Zvuk
MPEG1 vrstva1 / 2; DD; DD +; AAC; HEAAC
Výkon
5 Watt x 2
Spotřeba
Zdroj napájení
100V - 240V ~ 50 / 60Hz
Spotřeba
<0,5 W v pohotovostním režimu; <56W
Max
podporovaný formát
AVI / MP4 / MKV (H.265 kompatibilní)
rozměry
s podstavcem
720 x 465 x 225 mm
bez podstavce
720 x 420 x 80 mm
Podpora pro montáž na zeď
VESA 200 / 100
Příslušenství
Standardní Dálkové ovládání,
zjednodušené dálkové ovládání,
Uživatelský manuál.
VAROVÁNÍ! Špatná konfigurace antény může mít za následek selhání zavést některé nebo
všechny kanály. Pokud nechcete znát charakteristiky vašeho anténního systému a / nebo nejsou
schopny správně nakonfigurovat přijímač sami, můžete chtít konzultovat profesionální
instalátor pro radu. Indikátory napájení a kvalita signálu se vztahují k prvnímu transpondéru
vybraného satelitní seznamu
Obnovit tovární nastavení
Tato funkce umožňuje obnovení do továrního nastavení. Chcete-li tak učinit, zvolte
Obnovit nastavení ... a na nové obrazovce, vyberte YES-ANO. Televizor se vrátí do
továrního nastavení.
VAROVÁNÍ! Obnovení továrního nastavení se spustí průvodce instalací (viz kapitola „První
instalace“), a také vymaže všechny dříve uložených kanálů a nastavení nastavené uživatelem.
Technické specifikace
Page 21

CESKY
Zjednodušené prohlášení o shodě EU
Tele Systém Digital prohlašuje na svou vlastní odpovědnost, že tento výrobek splňuje
základní požadavky evropských směrnic, Kompletní prohlášení o shodě EU je k
dispozici na: https://www.telesystem.it/CE
Page 22

TELE System
TV beschrijving
Aan de achterzijde van de tv,De beschikbare I / O-aansluitingen zijn:
1. Slot Common Interface (CI / CI + plus)
2. USB-poort x2(Mediaplayer-functie)
3. SATELLITE RF antenne (Tipo F)
4. DVBT-2 RF-antenne (IEC)
5. HDMI-ingang x3
6. RCA Video + Audio (SCART)
7. Coaxiale digitale audio-uitgang (COAXIAL)
8. Voeding 220V AC
Aansluitingen
Antenne aansluiting
Om live-tv-programma's te kunnen kijken via een DVBT-2 en/of satelliet antenne.
In beide gevallen dient u de antennekabel (75Ω) aan te sluiten op ingangen RF,
aan de achterzijde van het tv-toestel.
Aansluiting extern apparaat
Via RCA Controleer of zowel de TV als het externe apparaat zijn uitgeschakeld!
Gebruik de RCA/SCART-adapter om het externe apparaat via SCART aan te
sluiten op de AV-ingang van het tv-toestel. Zet beide apparaten op SOURCEà AV.
Via HDMI: Controleer of zowel de TV als het externe apparaat zijn uitgeschakeld!
Sluit de kabel van de bron op het TV-toestel aan en zet de apparaten op SOURCEà
HDMI.
Batterijen
U moet de batterijen vervangen of installeren wanneer:
• U het product gekocht hebt
• de afstandsbediening niet goed werkt.
Open de batterijdeksel aan de achterkant van de afstandsbediening en plaats 2
batterijen (AAA) in het compartiment en let op de polariteit (zoals aangegeven).
Verwijder de lege batterijen, die afzonderlijk moeten worden afgevoerd en lever
ze af bij een winkel of verzamelpunt en volg vervolgens de procedure voor het
inbrengen van de batterijen.
Om beschadiging van de afstandsbediening door lekkage van corrosieve
vloeistoffen te vermijden, dient u de batterijen te verwijderen als u het apparaat
gedurende langere tijd niet gebruikt. Vermijd tevens het gebruik van
verschillende soorten batterijen of oude en nieuwe batterijen tegelijkertijd.
Page 23

NEDERLANDS
Beschrijving van het hoofdmenu
Druk op de MENU-toets om het hoofdmenu van de pijltjestoetsen op te roepen en
te gebruiken ▲/▼ en t/uom te navigeren door de titels van het menu. Druk op
de Menu-knop om terug te keren naar het vorige menu of EXIT om af te sluiten.
De menu's zijn: Kanalen, Afbeeldingen, Geluid, Time, Beveiliging, Instellingen.
Eerste installa
Bij de eerste installatie, selecteert u de OSD-taal en het land, voert u de PIN-code
(4 cijfers) in en bevestig om verder te gaan. Selecteer het signaal (DVBT-2 of
satelliet) en begin het scannen van de kanalen. Druk op OK om te starten.
Automatisch zoeken van kanalen
Druk op MENU à Kanaal à Auto tuning en bevestig met OK. Selecteer het land
(het staat standaard op ITALIË) en druk op OK om de scan te starten.
Op elk moment, via EXIT of Menu, kan het scannen worden gestopt.
WAARSCHUWING! bij Automatisch kanaal zoeken worden alle eerdere
zenderlijsten opgeslAGEN!
DVB-C-modus (via de kabel) is beschikbaar om de digitale kanalen te selecteren,
DVB-C en druk op OK om de scan te starten.
WAARSCHUWING! Zorg ervoor dat u deze modus niet selecteert in het geval van
het traditionele DVTB-2 antennesysteem!
WAARSCHUWING! De ontvangst en daarom het bekijken van digitale dvbt-2
zenders is afhankelijk van het niveau en de kwaliteit van het beschikbare
antennesignaal. dit signaal is afhankelijk van het gebied waarin u woont, de juiste
stand/ functioneren van het antenne systeem en de kwaliteit van het signaal dat
door de digitale dvbt-2 repeaters wordt uitgezonden!
Kanaallijst bewerken.
Druk op MENUà Kanaal à Program Edit en bevestig met OK. Zodra deze wordt
weergegeven in de lijst, zijn de opties:
ROOD (Wissen): Selecteer een of meer kanalen, deze kunt u verwijderen door op
de rode knop te drukken.
Blauw (Springen): Selecteer het kanaal en druk op de blauwe knop. Na activering
zal het kanaal worden geselecteerd met de cijfertoetsen van de
afstandsbediening.
Geel (Verplaatsen): Om een kanaal te verplaatsen selecteert u het kanaal dat u
wilt verplaatsen, drukt u op de gele knop en gebruik de pijltjestoetsen om het
kanaal te verplaatsen naar de gewenste positie of voer de gewenste positie in en
druk vervolgens op OK om te bevestigen.
Page 24

TELE System
Satellietmodus
Als u kiest voor satelliet, kunt u ervoor kiezen om een standaard
satellietkanalenlijst te laden door te drukken op OK en de bevestiging Ja (pijl naar
links), of om door te gaan met normale installatie.
Zodra de satelliet parameters worden ingesteld (scantype, kanaaltype en het type
dienst) drukt u op OK en kies Nee (pijl naar rechts) in het volgende scherm.
Om de digitale kanaal ontvangst modus te activeren, drukt u op de Source
àSatelliet. U kunt de frequenties die beschikbaar zijn vinden door te scannen, dit
automatisch naar alle kanalen van de satelliet van de eerste installatie of via een
automatische scan in het menu Kanalen.
Basisinstelling antenne
Om de basisinstellingen voor het gebruik van de TV met een Universeel LNBsysteem (vaak gebruikt voor satellietsystemen in Nederland) mogelijk te maken.
In het geval uw systeem is voorzien van een andere configuratie, moet u op de
juiste wijze de antennepositie wijzigen.
WAARSCHUWING! De verkeerde antenne instellingen kunnen ertoe leiden DAT
sommige of alle kanalen niet laden. Als u zelf niet in staat bent uw
antennesysteem goed te configureren, kunt u een professionele installateur
raadplegen voor advies.
evt. via WWW.TELESYSTEM.NL KUNT U EEN BEVOEGDE INSTALLATEUR BIJ U
IN DE BUURT VINDEN.
Herstel naar fabrieksinstellingen
Met deze functie kunt u de fabrieksinstellingen herstellen.
Om dit te doen, selecteert u "Instellingen herstellen" en op het nieuwe scherm
selecteert u YES. De televisie zal worden hersteld naar de fabrieksinstellingen.
WAARSCHUWING! De "fabrieksinstellingen herstellen" start de installatiewizard
(zie hoofdstuk "Eerste installatie") en WIST OOK alle eerder opgeslagen kanalen
en instellingen die door de gebruiker ZIJN INGESTELD!
Page 25

Tonen
Diagonaal 31,5” (80 cm) 16: 9 Wide
Resolutie
1366 (H) x 768 (V) - HD READY
Contrast ratio
3000:1
Helderheid
200 (cd / m2)
Kijkhoek
178°/178° (H/V)
Ingangen
HDMI
3
A / V in
1
USB
2 -Mediaplayer
Audio output
Coaxial
Tvsignaal
RF ingang DVB-T
75 Ω - VHF / UHF - 7MHz / 8MHz
RF ingang DVB-S
1 tipo F
Video
MPEG-2, MPEG-4, H.265.Main@L4.11920*1080@60fps
Audio
MPEG1 layer1 / 2; DD; DD +; AAC; HEAAC
Speaker
2 x 5 Watt
Verbruik
Stroomvoorziening
100V - 240V ~ 50 / 60Hz
Consumptie
<0,5 W in stand-by; <56W Max
Ondersteund
formaat
AVI / MP4 / MKV (compatible H.265)
Maten
(lxaxp)
Met standaard
720 x 465 x 225 mm
Zonder standaard
720 x 420 x 80 mm
Muur steun support
VESA 200 / 100
Accessoires
Standaard/Easy afstandsbediening,
gebruiksaanwijzing.
Technische specificaties
NEDERLANDS
Vereenvoudigde EU-verklaring conformiteit
Tele System Digital verklaart onder eigen verantwoordelijkheid dat dit product
voldoet aan de essentiële eisen van de Europese richtlijnen. De volledige EUverklaring conformiteit is beschikbaar op: https://www.telesystem.it/CE
Page 26

Page 27

Page 28

28000217 LED TV PALCO32 FL13
QSG_REV.01 - 23/06/2023
Per informazioni dettagliate, si invita a visitare il sito di TELE System Digital Srl
For detailed information, please visit the TELE System Digital Srl website
Ausführliche Informationen finden Sie auf der Website von TELE System Digital
Srl
Coperto da una o più rivendicazioni dei brevetti elencati in
patentlist.accessadvance.com.
Covered by one or more claims of the patents listed at
patentlist.accessadvance.com.
TELE System Digital Srl
Via dell’Artigianato, 35
36050 Bressanvido (VI)
Website:
www.telesystem-world.com
 Loading...