


User Guide
Wirecast User Guide | 240979
May 2018
Wirecast 9.0 User Guide for Mac


Preface 11
Copyright and Trademark Notice 11
MPEG-2 License Requirements 11
Customer Support 12
We'd Like to Hear from You! 12
Limited Warranty and Disclaimers 12
Warranty Remedies 12
Software Updates 13
Restrictions and Conditions of Limited Warranty 13
Limitations of Warranties 13
3
Contents
Introduction 15
Introduction 15
Topics 15
Wirecast Versions 15
Wirecast Workflow 16
Tutorials 17
Two Ways to Use this Application 17
Presenter Is Operator 17
Presenter Plus Operator 18
Startup 18
Main Window Layout 19
Using AutoLive 21
Preview 22
Master Audio 24
Main Shot List 25
Control/Status Bar 25
Layers 27
Layer Windows 27
Installation 29
Introduction 29

4
Contents
Topics 29
Installing 29
Activating 30
Uninstalling 31
System Requirements 31
Tutorials 35
Introduction 35
Tutorials 35
Tutorial 1: Basic Concepts 36
Tutorial Prep 37
The Main Window 38
What Is a Shot? 38
Switching Between Shots 39
Transitions 40
Transition Speed 42
Go Button 43
Layers 43
Auto Live 45
Turn AutoLive Off 45
Multiple Changes 46
Preview 47
Tutorial 2: Editing Shots 51
Tutorial 3: Broadcasting 53
Streaming 54
Main Window 57
Introduction 57
Topics 57
Overview 57
Control/Status Bar 58
Preview/Live Broadcast Area 59
Countdown Clock Display 60
Transition Controls 61
Changing Transitions 61
Transition Speed 62
Go Button 62
Add Shot Menu 62
Shot Selection Area 66
Changing Shots 67
Moving a Shot to Another Layer 69
Resizing the Shot Icons 70
Layers 70
What is a Layer? 71
Changing Layers 72
Moving a Shot to Another Layer 72

AutoLive 73
Live Icons 73
Keyboard Shortcuts 75
Introduction 75
General Shortcuts 75
Wirecast Menu 75
File Menu 76
Edit Menu 76
Switch Menu 76
Media Menu 76
Output Menu 76
Layout Menu 76
Replay Menu 76
Twitter Menu 76
Window Menu 76
Help Menu 76
Contents
5
Adding Media 79
Introduction 79
Topics 79
Images/Opacity 79
GIF and Transparency 79
Keynote Movies 80
Using Movies 80
Windows Media 80
Real Media 80
Supported Codecs 80
Shot Editor 83
Introduction 83
Topics 83
Overview 84
Shot Layers Tab 85
Replay Layer 85
Shot Layer Properties Tab 88
Audio Properties Tab 90
Chroma Key Properties Tab 92
Additional Properties Tab 93
Capture Devices Properties 94
RealTek Example 94
NDI™ Sources 94
Rendezvous Properties 96
Creating a Rendezvous Session 96
Joining a Rendezvous Session 98

6
Contents
Adding a Participant Shot 99
Participant Options 103
Ending a Rendezvous Session 104
Clock Properties 106
Image Carousel Properties 109
Media File Properties 110
Remote Desktop Presenter Properties 111
Scoreboard Properties 112
Screen Capture Properties 114
Solid Color Properties 115
Text Shot Properties 117
Web Display Properties 120
Web Stream Properties 121
Titles Properties 122
Twitter Feed Properties 126
New Virtual Set Properties 129
SyphonInject™ Sources 129
PTZ Controller 133
Introduction 133
Topics 133
Setting Up PTZ Optics Camera 134
Configuring Wirecast 135
Setting Up Wirecast Shots 136
PTZ Controller Panel 138
PTZ Control in the Shot Editor 142
Playlist 143
Introduction 143
Topics 143
Creating a Playlist 144
Adding Clips 145
Playing Playlists 148
Playlist Controls 148
Countdown Clock Options 150
Twitter 151
Introduction 151
Topics 151
Settings 151
Create Shot 153
Message Feed 154

Replay + ISO 157
Introduction 157
Topics 157
Replay + ISO Menu 158
Configuring Replay 160
Replay Activation 161
Preferences 165
Introduction 165
Topics 165
Accessing Preferences 165
Resetting Preferences 166
General 167
Performance 168
Licenses 168
Serial Numbers 168
Manual Activation 169
Deactivate Serial Numbers 169
Demonstration Mode 169
Software Update 170
Hot Keys 170
Controllers 172
MIDI Control Assignments 173
MIDI Control Descriptions 174
X-keys Control Assignments 176
General Key Operations 176
Key Descriptions 176
Advanced 178
Contents
7
Audio Mixer 181
Introduction 181
Topics 181
Overview 181
Asset Manager 187
Introduction 187
Topics 187
Documents 187
Reassigning Media 187
Menus and Windows 189
Introduction 189
Topics 189

8
Contents
Wirecast Menu 189
File Menu 190
Edit Menu 190
Switch Menu 191
Media Menu 192
Output Menu 192
Layout Menu 198
Replay + ISO Menu 199
Twitter Menu 200
Window Menu 200
Help Menu 201
Broadcasting 203
Introduction 203
Topics 203
Canvas Size 204
Virtual Camera 205
Output Settings 206
Multiple Output Settings 207
Configuration 207
Encoder Presets 208
Multicast and Unicast 211
RTMP Server 211
CDN Partners 213
Bambuser, Churchstreaming.tv, Dailymotion, DaCast Streaming Services, ESE Net-
works, Lightcast, Livestream, Meridix Live Sports Platform, Onstream media,
Pitchtime, SermonAudio, StreamingChurch.tv, StreamShark.io, StreamSpot,
Streaming Media Hosting, StreamVu, Stretch Internet, Sunday Streams, The
Cube, Titled Globe, Tulix Streaming, Ustream, WebCast-TV, WorshipStream,
213
Azure Media Services, Sermon.net, Verizon Digital Media Services. 215
Brightcove, Limelight 216
Akamai 217
Twitter/Periscope 219
Twitch 221
Vimeo 223
Wowza Streaming Engine. 226
Zixi 227
Facebook Live 229
Facebook Live - With User Code 235
YouTube 243
Streaming 244
Record To Disk 246
Encoder Presets 249
Introduction 249

Topics 249
The Encoder Presets Window 250
Creating New Presets 251
Profile Options 251
MainConcept H.264 252
x264 255
Making Great Broadcasts 259
Introduction 259
Topics 259
Overview 259
High Quality Audio 260
Good Lighting 260
Triangular Lighting 261
Broadcast Settings 262
Bandwidth 262
Motion 262
Encoder Settings 262
Contents
9
Acknowledgements 263
Acknowledgements 263
Overview 263
Steinberg VST Plug-In SDK Licensing Agreement
(Version "3.6.6- 17.06.2016")
FFmpeg Project 265
Syphon 273
263

10
Contents

Copyright and Trademark Notice
Copyright 2018 Telestream, LLC. All rights reserved. No part of this publication may be
reproduced, transmitted, transcribed, altered, or translated into any languages without
written permission of Telestream, LLC. Information and specifications in this document are
subject to change without notice and do not represent a commitment on the part of
Telestream.
11
Preface
Telestream, CaptionMaker, Episode, Flip4Mac, FlipFactory, Flip Player, Lightspeed,
ScreenFlow, Switch, Vantage, Wirecast, Gameshow, GraphicsFactory, MetaFlip, and
Split-and-Stitch are registered trademarks and MacCaption, e-Captioning, Pipeline, Post
Producer, Tempo, TrafficManager, Vidchecker, and VOD Producer are trademarks of
Telestream, LLC. All other trademarks are the property of their respective owners.
QuickTime, Mac OS X, Final Cut Pro, and Safari are trademarks of Apple, Inc. Bonjour,
the Bonjour logo, and the Bonjour symbol are trademarks of Apple, Inc.
Wirecast® and Gameshow® both support the use of NewTek NDI™ technology; "NDI™" is
a trademark of NewTek, Inc. For information about NDI™ visit http://NDI.NewTek.com/
All other brand, product, and company names are property of their respective owners, and
are used only for identification purposes.
MPEG-2 License Requirements
Telestream has obtained a license from MPEG LA, to produce MPEG-2 video, to meet the
following requirement on behalf of its FlipFactory and Pipeline licensees: The use of this
product in any manner that complies with the MPEG-2 standard is expressly prohibited

12
Preface
Customer Support
without a license under applicable patents in the MPEG-2 patent portfolio, which license is
available from MPEG LA, L.L.C., 250 Steele Street, Suite 300, Denver, Colorado 80206.
Customer Support
Telestream offers technical support through our Website and Email.
Email contacts:
• Sales: sales@telestream.net
• Support: desktopsupport@telestream.net
Website Links:
• How to Buy: http://www.telestream.net/purchase/store.htm
• Support:
http://www.telestream.net/telestream-support/wire-cast/support.htm
– View our Library of Tutorials & Webinars
– Browse our Knowledge Base
– Explore our Community Forum
We'd Like to Hear from You!
Telestream welcomes comments, feedback, and suggestions about your experience with
Wirecast. You can reach us at
If you have suggestions about improving the tutorials or this guide, other Telestream
documents, or our Website, please Email us at techwriter@telestream.net.
desktopsupport@telestream.net
Limited Warranty and Disclaimers
Telestream, LLC. (the Company) warrants to the original registered end user that the
product will perform as stated below for a period of one (1) year from the date of shipment
from factory:
Hardware and Media. The Product hardware components, including equipment supplied
but not manufactured by the Company but NOT including any third party equipment that
has been substituted by the Distributor for such equipment (the “Hardware”), will be free
from defects in materials and workmanship under normal operating conditions and use.
Software. If software is supplied as part of the product, the software will operate in
substantial conformance with specifications set forth in its product user's guide. The
Company does not warrant that the software will operate uninterrupted or error-free, will
meet your requirements, or that software errors will be corrected.
Warranty Remedies
Your sole remedies under this limited warranty are as follows:
Hardware and Media. The Company will either repair or replace (at its option) any
defective Hardware component or part, or Software Media, with new or like new Hardware

components or Software Media. Components may not be necessarily the same, but will be
of equivalent operation and quality.
Software. If software is supplied as part of the product and it fails to substantially conform
to its specifications as stated in the product user's guide, the Company shall, at its own
expense, use its best efforts to correct (with due allowance made for the nature and
complexity of the problem) such defect, error or nonconformity.
Software Updates
If software is supplied as part of the product, the Company will supply the registered
purchaser/licensee with maintenance releases of the Company’s proprietary Software
Version Release in manufacture at the time of license for a period of one year from the
date of license or until such time as the Company issues a new Version Release of the
Software, whichever first occurs. To clarify the difference between a Software Version
Release and a maintenance release, a maintenance release generally corrects minor
operational deficiencies (previously non-implemented features and software errors)
contained in the Software, whereas a Software Version Release adds new features and
functionality. The Company shall have no obligation to supply you with any new Software
Version Release of Telestream software or third party software during the warranty period,
other than maintenance releases.
Preface
Limited Warranty and Disclaimers
13
Restrictions and Conditions of Limited Warranty
This Limited Warranty will be void and of no force and effect if (i) Product Hardware or
Software Media, or any part thereof, is damaged due to abuse, misuse, alteration, neglect,
or shipping, or as a result of service or modification by a party other than the Company, or
(ii) Software is modified without the written consent of the Company.
Limitations of Warranties
THE EXPRESS WARRANTIES SET FORTH IN THIS AGREEMENT ARE IN LIEU OF
ALL OTHER WARRANTIES, EXPRESS OR IMPLIED, INCLUDING, WITHOUT
LIMITATION, ANY WARRANTIES OF MERCHANTABILITY OR FITNESS FOR A
PARTICULAR PURPOSE. No oral or written information or advice given by the Company,
its distributors, dealers or agents, shall increase the scope of this Limited Warranty or
create any new warranties.
Geographical Limitation of Warranty. This limited warranty is valid only within the
country in which the Product is purchased/licensed.
Limitations on Remedies. YOUR EXCLUSIVE REMEDIES, AND THE ENTIRE
LIABILITY OF TELESTREAM, LLC. WITH RESPECT TO THE PRODUCT, SHALL BE AS
STATED IN THIS LIMITED WARRANTY. Your sole and exclusive remedy for any and all
breaches of any Limited Warranty by the Company shall be the recovery of reasonable
damages which, in the aggregate, shall not exceed the total amount of the combined
license fee and purchase price paid by you for the Product.
Damages. TELESTREAM, LLC. SHALL NOT BE LIABLE TO YOU FOR ANY DAMAGES,
INCLUDING ANY LOST PROFITS, LOST SAVINGS, OR OTHER INCIDENTAL OR
CONSEQUENTIAL DAMAGES ARISING OUT OF YOUR USE OR INABILITY TO USE
THE PRODUCT, OR THE BREACH OF ANY EXPRESS OR IMPLIED WARRANTY,

14
Preface
Limited Warranty and Disclaimers
EVEN IF THE COMPANY HAS BEEN ADVISED OF THE POSSIBILITY OF THOSE
DAMAGES, OR ANY REMEDY PROVIDED FAILS OF ITS ESSENTIAL PURPOSE.
Further information regarding this limited warranty may be obtained by writing:
Telestream, LLC.
848 Gold Flat Road
Nevada City, CA 95959
You can call Telestream, LLC. via telephone at (530) 470-1300.

Introduction
STUDIO
This guide is intended to help you understand how each feature of Wirecast operates
and to provide you with information to help you make the best presentations possible.
15
Introduction
Topics
Wirecast Versions
Wirecast Workflow
Tu tor ia ls
Two Ways to Use this Application
Using AutoLive
Main Window Layout
Wirecast Versions
Wirecast is available in two versions: Studio and Pro.
Wirecast Studio provides you with live video streaming that enables two guests on
Rendezvous, unlimited capture, live production, and encoding of HD and SD sources
for live streams broadcast to multiple servers and platforms simultaneously. Wirecast
streams to Facebook, YouTube, Twitter and more.
Features that pertain specifically to Wirecast Studio are indicated by the Studio icon
(shown below):
Wirecast Pro is the professional edition and includes all the features of Wirecast Studio.
It adds, up to seven guests on Rendezvous, 8-track audio output, Replay, support for
more capture devices and IP cameras, web stream input, program feed output, live

16
Introduction
Wirecast Workflow
scoreboards, 3D virtual sets, and ISO recording. Features that pertain specifically to
Wirecast Pro are indicated by the Pro icon (shown below):
PRO
Wirecast Workflow
Wirecast is a powerful cross-platform live video switching, production, and encoding
software. Because of its versatility in handling a variety of inputs and outputs, it
typically fits in the middle of your broadcasting workflow. Wirecast can take the place
of more traditional T- bar hardware switchers, graphics and title generators, or simply
act as the back-end encoder for large switching systems.
Below is a diagram of the basic Wirecast workflow. In general, you will capture your live
input devices (such as live camera feeds, iOS cameras, computer desktop, web feeds
and more), produce your show using the full range of Wirecast production features
(chroma key, graphics, titles, scoreboards, etc.), and then stream it live to web, LAN, or
record locally.

Wirecast works with cameras, capture cards, and audio devices. It prepares media and
then outputs it either by streaming to the Internet, CDNs, multicast/unicasts via LAN,
locally via virtual output or second display.
Tutorials
It is suggested that you first work through the tutorials in the Tutorials section. They are
quick, informative, and the easiest way to become familiar with Wirecast.
Wirecast also provides a built-in tutorial environment that corresponds with the
tutorials provided in Tutorials. The tutorials take about thirty minutes and provide a
brief overview of how to set up a basic presentation and create your own broadcast.
It is also suggested that you read Making Great Broadcasts. This topic shows you how
you can easily make changes in your setup and improves the quality of your
presentations.
Two Ways to Use this Application
Introduction
Tut or ial s
17
There are two different ways you can use Wirecast:
• Presenter Is Operator The person conducting the presentation also operates
Wirecast.
• Presenter Plus Operator The presenter concentrates on the content and someone
else operates Wirecast. In this mode, the presenter never needs to know in detail
how Wirecast works.
Presenter Is Operator
In this mode of operation, the person conducting the presentation simultaneously
operates Wirecast.
Here are some suggestions for using Wirecast when you are both the presenter and
operator:
• Keep it simple Set up Wirecast to make it easy for you to be the operator and the
presenter. Set up your logo and titles so that you need to make very few changes
during your presentation. Use a minimum number of shots so it’s easy for you to
see which shot to choose.
• Keep the AutoLive feature on This enables you to present your shots with just one
click. Though this limits your ability to perform complex presentations, it is the best
way when the presenter is also the operator. To turn AutoLive on or off, select it
under the Switch menu.
• Pre-configure your shots Make sure that all the shots are created prior to your
presentation. Do not try to create or modify shots while broadcasting them.
• Use hot-keys for switching shots Wirecast provides a hotkey editor that enables
you to easily assign hotkeys to your shots.

18
Double-click
Wirecast icon
Introduction
Startup
Presenter Plus Operator
In this mode of operation, an engineer (or operator) is responsible for using Wirecast,
and the presenter concentrates on the content of the presentation.
Here are some suggestions for using Wirecast when you have both an operator and a
presenter:
• Keep the AutoLive feature off This enables you to make several changes at one
time before taking the changes live. However, to quickly make a shot live, press the
Command+Ctrl keys and click the shot. The AutoLive control is located under the
Switch menu
• Open the Preview window The operator should use Preview mode to examine
everything before it becomes live. The Preview display control is located under the
Layout menu.
• Use the Layer Windows to make more shots available Select New Layer Window
from the Window menu to open additional layer windows so you can quickly flip
between shots on several layers.
Startup
To start Wirecast, double-click the Wirecast icon that was placed on your desktop
during installation.

Introduction
Click the play button
Click Continue
Main Window Layout
When Wirecast starts up, you can (optionally) view the new features by clicking on the
play button. Click Continue when you are finished.
19
Main Window Layout
Wirecast enables you to select which functions are displayed in the Main window.
These functions are added or removed from the main window using the Layout menu.

20
Master Audio controls
Both
Preview only
Live only
Preview Only button
Introduction
Main Window Layout
Master Audio Displays or hides the Master Audio controls. (A check mark to the left of
the menu item indicates that the audio controls are displayed.) Master Audio controls
are located on the left and right sides of the Main window.
Show Live and Preview Enables you to select between displaying: the Preview
Window only, the Live Window only, or both. A check mark to the left of the menu item
indicates which of these three modes are active. You can also select one of these three
modes by clicking on the mode selection buttons in the top right corner of the screen.
Show Preview Only selection:

Show Live Only selection:
Live Only button
Live and Preview button
Go button
Show Live and Preview selection:
Introduction
Using AutoLive
21
Using AutoLive
Some users of Wirecast may want to single-click a shot to make it become live. Other
users may want to make several changes to the broadcast before making them live. You
can use both methods in Wirecast.
The AutoLive feature is designed to offer a single-click operation for those users who
want to simply click from shot to shot. The Edit window (or other windows) is not
affected by the status of AutoLive.
When AutoLive is on, clicking a shot in the Main window automatically places the shot
in the Live window. As a result, the Go button becomes inactive.

22
Preview window
Go button
Live window
Introduction
Using AutoLive
Preview
When AutoLive is off, clicking on a shot displays it in the Preview window, then clicking
the Go button is required to place the shot in the Live window.
Preview displays what the broadcast will look like when you click the Go button. (The
Go button is only active when AutoLive is off.) To display the Preview window, select
Layout > Show Live and Preview, or Layout > Show Preview Only.
Introduction
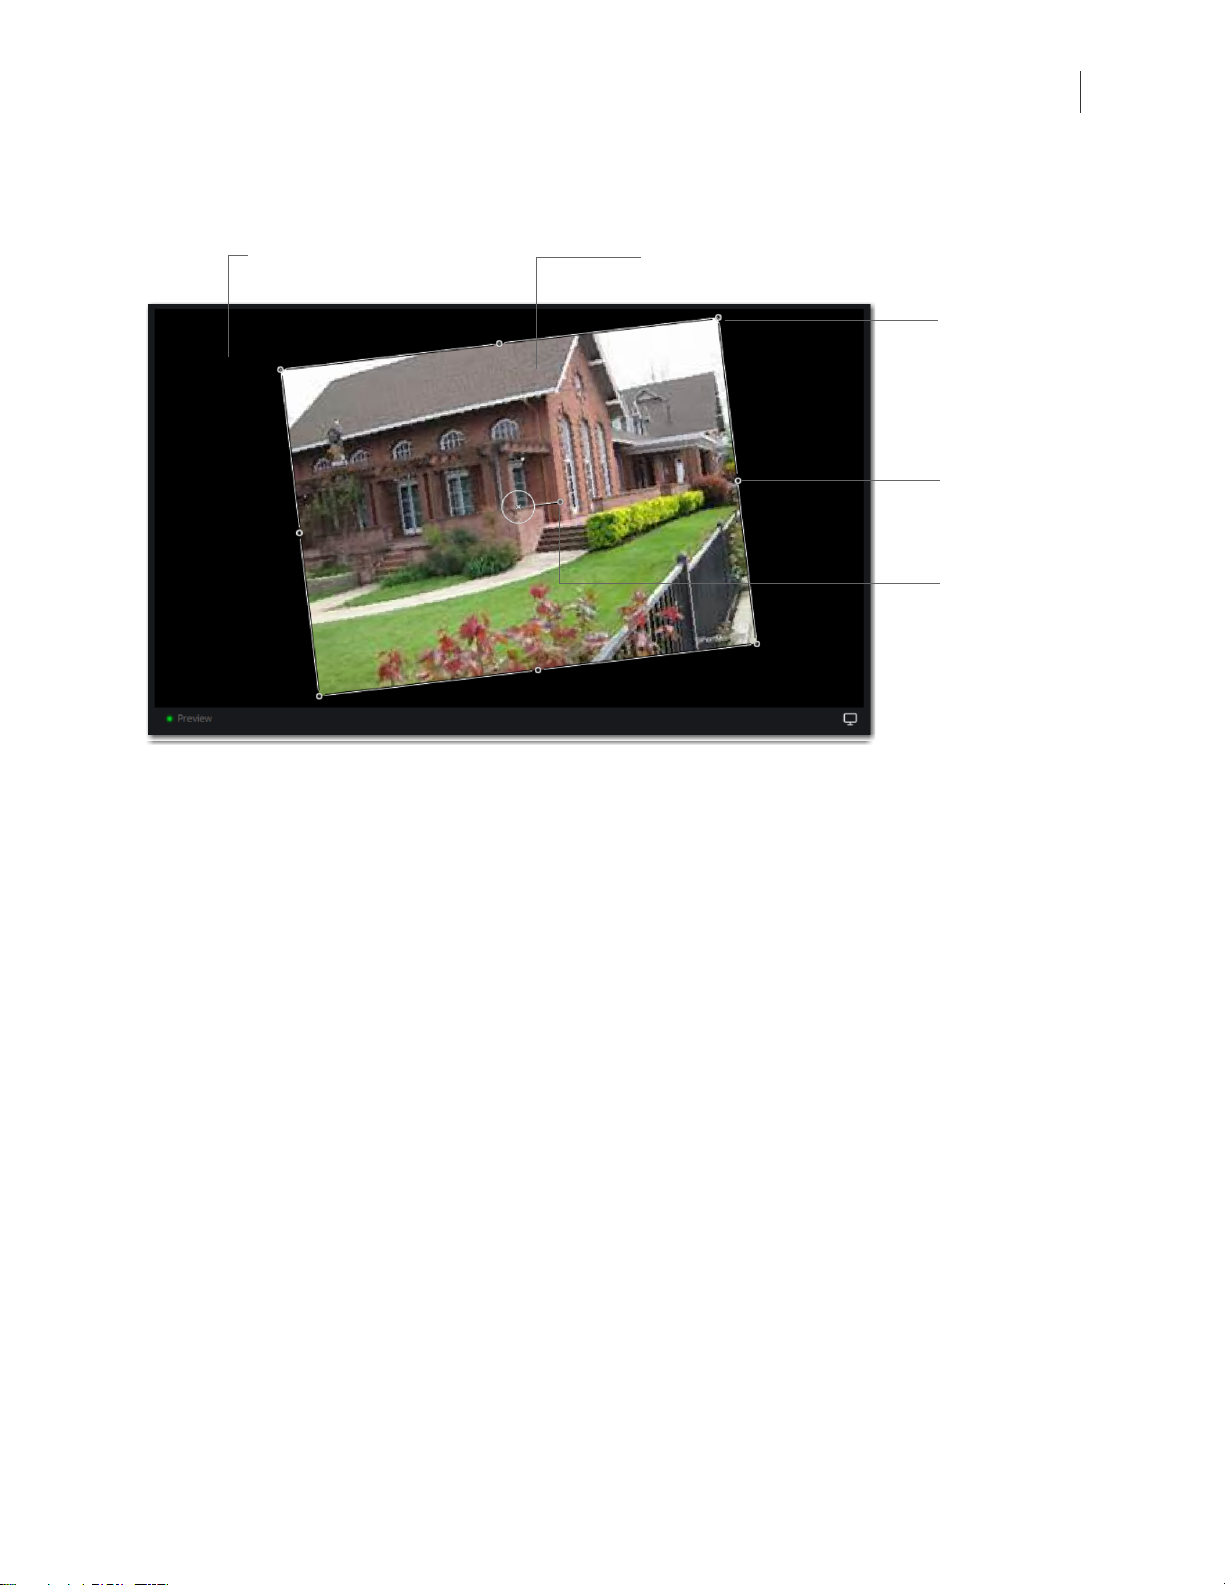
Preview window
Rotate handle
Preview image
Resize handle
Resize handle
Using AutoLive
When you select an image in the Preview window, Resize and Rotate handles appear.
Click and drag any of these handles to resize or rotate your image.
23
You can also snap an image in the Preview window to various alignments: Snap to
Center, Snap to Edge, Snap to Corner, or Snap to an Image. The yellow guide lines
appear when the image is ready to snap into place. To temporarily disable the snap
action, hold down the Command key while moving an image into place (the yellow

24
Snap to Center
Snap to Corner
Snap to Edge
Snap to an Image
Live Master
Volume
Live Master
Mute button
Live Line-Out
Mute button
Live Decibel scale
Preview Master
Volume
Preview Line-Out
Mute button
Preview Decibel
scale
Introduction
Using AutoLive
snap lines will not appear). Additionally, after selecting an image, the arrows keys can
be used to nudge it into placement.
Master Audio
The Master Audio panel enables you to control the output volume level, mute audio
output, and mute the line-out feed for Preview and Live windows. To display Master
Audio for Preview and Live displays, click Layout > Master Audio. Click again to hide the
Master audio controls.

The Preview and Live Master Volume control enables you to adjust the master audio
Main shot list
Stream button
Recording time
ISO record time
Record button
Streaming time
ISO Record
Display
Preview Only
Display Live
Only
Display Preview
and Live
FPS/Dropped
Bitrate
CPU Usage
volume for Preview and Live separately. Click and drag the slider control up or down to
set the volume. The decibel scale next to the slider indicates the audio level. When you
take a Preview shot live, the Live audio controls are set to the levels set in Preview.
The Master Mute button mutes the Live window audio (what your viewers hear). Even
when you mute the output, the encoder still generates audio but it is silent. If you do
not want to broadcast audio, modify the Encoder Presets to not process audio through
the encoder.
The Preview Line-Out Mute button and Live Line-Out Mute button control local volume
(what you hear), not broadcast volume. When Line-Out is muted, audio is not sent to
your headphones or speakers, but your viewers still hear the audio. The two controls
are mutually exclusive -- you cannot have both on at the same time, but you can mute
both.
Main Shot List
The Main window displays the Shot List at the bottom of the window.
Introduction
Using AutoLive
25
Control/Status Bar
Control buttons and status information are displayed at the top of the Main window.

26
Introduction
Using AutoLive
Wirecast displays the following controls and statistics:
• Stream button Click to begin streaming.
• Streaming time Displays how long you have been streaming. This value does not
reset when you start/stop the broadcast. It is cumulative, which enables you to save
portions of a broadcast to disk and still know the total amount of time.
• Record Button Click to begin recording.
• Recording Time This displays how long you have been recording. This value does
not reset when you start/stop the broadcast. It is cumulative, which enables you to
save portions of a broadcast to disk and still know the total amount of time.
• ISO Record Click to begin ISO recording.
• ISO Record Time Displays the ISO recording time.
• FPS/Dropped Displays the current FPS (frames per second) rate, or the number of
frames dropped while streaming. Click on display to toggle between FPS and
Dropped Frames modes. (Displayed only while streaming.)
• Bitrate Displays the streaming bitrate. (Displayed only while streaming.)
• CPU Usage Displays the usage of the CPU in percent. (Displayed only while
streaming.)
• Display Buttons These three buttons enable you to choose to display the Preview
window, the Live window, or both in a divided display.
Note: To avoid decrease in video quality, Wirecast should not be used at CPU usage
above 80%. See the Telestream Website for suggested configurations. You can also
view streaming statistics by selecting Output > Show Statistics.

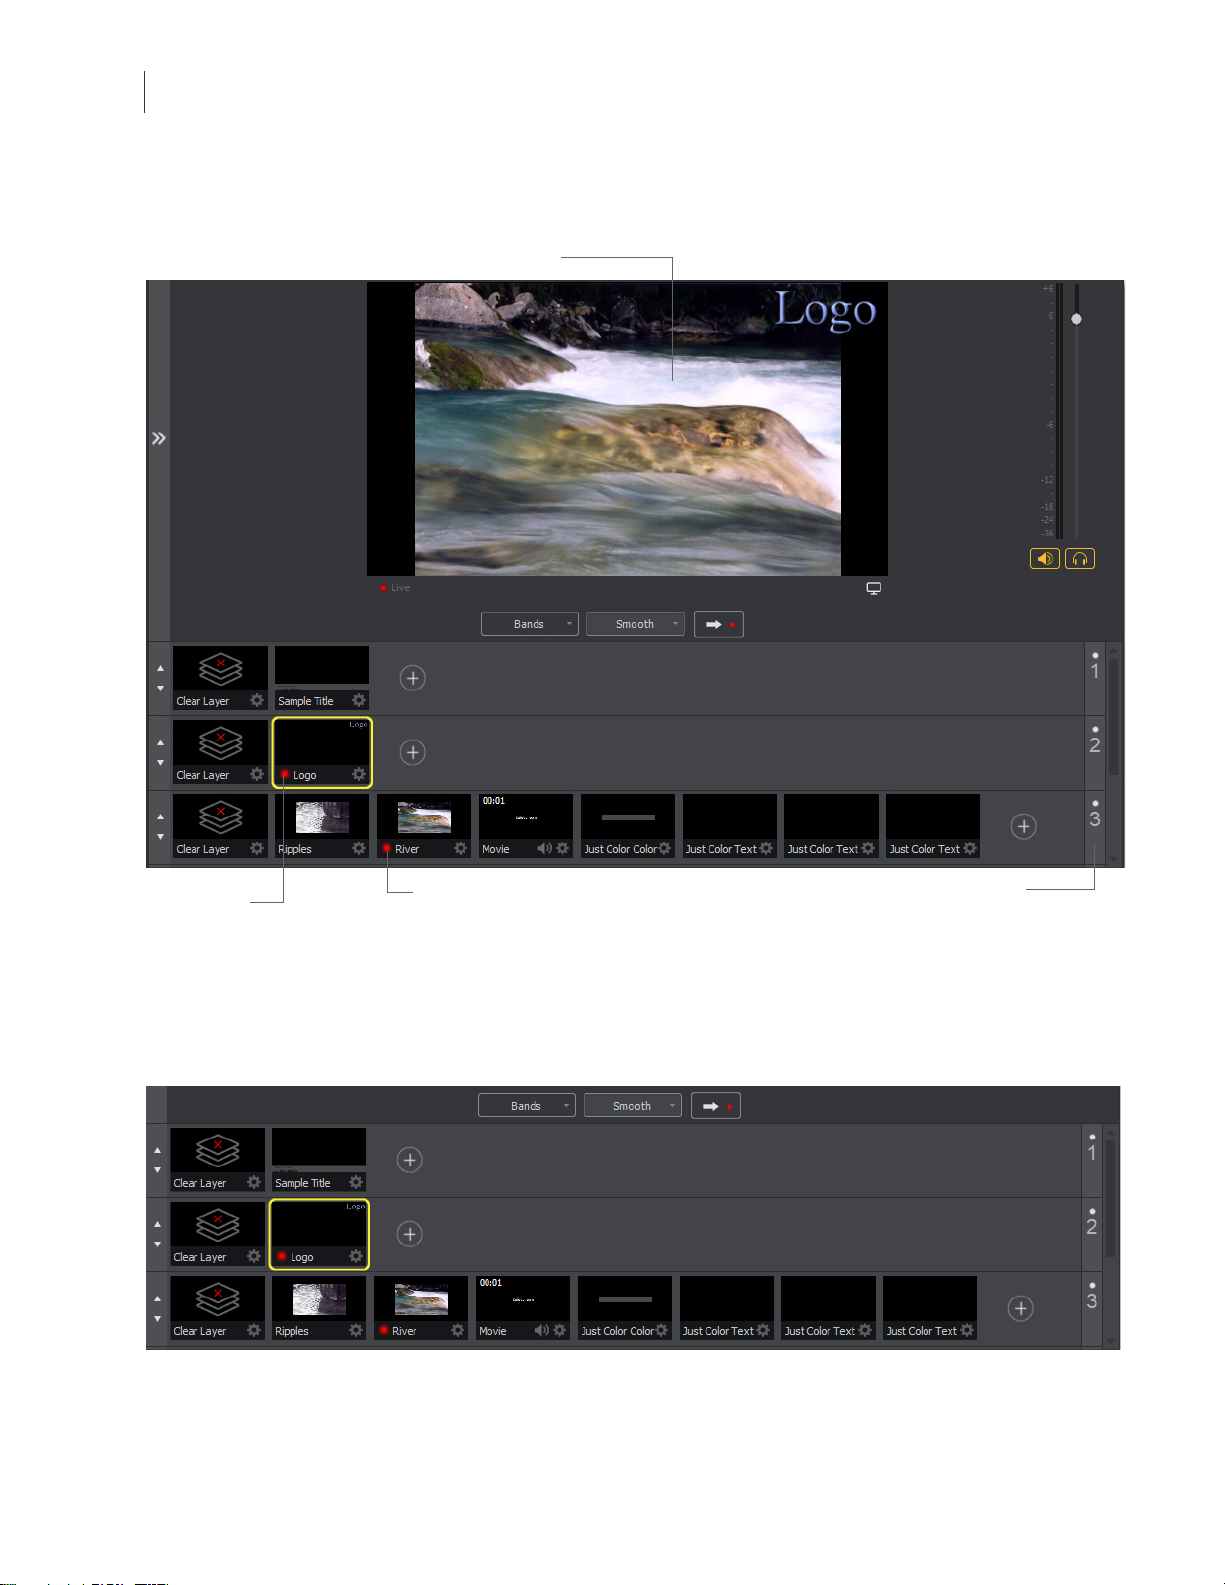
Layers
Layer numbers
Red LED
Layered shot
Introduction
Using AutoLive
Wirecast displays five layers in the Main Shot List window. They are numbered 1
through 5 along the right side of the window. Each layer contains multiple shots that
can be selected by clicking one. A red LED indicates that a shot is Live. (If AutoLive is
turned on, when a shot is selected it is displayed in the Live window.) If you select
multiple shots -- by selecting shots on multiple layers -- they will all be displayed in the
Live window. But the shots are displayed in a layering manner, where layer 1 is on top
and layer 5 is at the bottom (and layers 2 through 4 are layered in between). In the
example below, the Logo in layer 2 is displayed on top of the River shot in layer 3.
27
Layer Windows
You can also open the Shot List in a separate window. Select Window > New Layer
Window to display a list of the layer windows you can open (Master Layer 1 through 5).
Select the layer you want to open and a new, separate layer window is displayed.
+

28
Introduction
Using AutoLive
This separate Shot List window works exactly like the Shot List panel in the Main
window, except it enables you to open multiple Shot List panels.
+

Introduction
This topic guides you through installing (or upgrading) and activating Wirecast.
29
Installation
Topics
Installing
To install Wirecast, follow these steps:
1. Download the installer from the Website at: http://www.telestream.net/wirecast/
Note: During installation, you will be asked if you want to install the Virtual
Microphone feature. If you do (recommended), check the displayed check box and
continue the installation. Installing Virtual Microphone requires administrative rights.
2. Run the installer (.dmg) program.
3. Click Agree to the license terms.
Installing
Activating
Uninstalling
System Requirements
overview.htm

30
Select License
Click Purchase
Click Activate
Enter serial
number
Installation
Activating
4. Open the Wirecast in the downloads folder, then click and drag the icon into the
Applications folder. If a version of Wirecast already exists, the installer asks you if
you want to replace the previous version.
Activating
When you purchased Wirecast a serial number was provided. This serial number must
be registered in the Wirecast program to unlock the features of Wirecast. To register
Wirecast follow these steps:
1. Run the Wirecast program.
2. Select Preferences from the Wirecast menu, select Licenses, then click Purchase. Once
you purchase and obtain your license number, enter it into the Serial Number field
and click Activate.
3. Close the Preferences window.
Your Wirecast program should now be fully activated.

Uninstalling
1. To uninstall Wirecast, place the Wirecast program in the Trash folder.
System Requirements
Operating System
• Minimum: MacOS Sierra, Mac OS X El Capitan
• Recommended: MacOS Sierra
• (Wirecast does not support OS X Yosemite or previous versions)
Processor
• Minimum: i5 dual-core @ 2.3GHz
NOTE: May be insufficient for 1080p+ or 60 fps workflows
• Recommended: i7 quad-core @ 2.8GHz+
Memory
Installation
Uninstalling
31
• Minimum: 4GB RAM
• Recommended: 16GB+ RAM
Hard Drive
• Minimum: 2GB, 7200 RPM for record to disk
NOTE: Additional hard disk space required for record to disk
• Recommended: 500GB+, Solid State OS Drive
Graphics Card
• Minimum: Intel HD, DirectX 11 capable
NOTE: Insufficient for advanced Multi-Viewer workflows
• Recommended: Nvidia GeForce or AMD Radeon, 1GB+ video memory
Internet Connectivity
• Minimum: Open HTTP/HTTPS port 80, RTMP port 1935,
port 7272 for Remote Desktop Presenter
• Recommended: If behind a firewall, check with your CDN for any sites to whitelist
Desktop Presenter
Use the remote version of Desktop Presenter 2.0.8 with Wirecast. It is available as a
separate download at: http://dynamic.telestream.net/downloads/download-desktop-
presenter.asp?prodid=desktoppresenter.
Rendezvous
Wirecast Rendezvous uses WebRTC technology that can be very resource intensive. For
the best experience, we suggest considering the following when choosing hardware.

32
Installation
System Requirements
Note: The following recommendations are based on a single simultaneous stream of
720p30 x264 @ 4.0Mbps.
Bandwidth
• Add 4 Mbps
• Add 5+ Mbps
NOTE: To maintain reliability, bandwidth per guest decreases as more are added
Processor
• i5 quad-core
• i7 quad-core
Note: These are minimum recommended processors. More demanding workflows
may require a more capable CPU.
Internet Connectivity
• Requires internet connectivity with HTTP/HTTPS port 80, and RTMP port 1935 open
for streaming, Remote Desktop Presenter requires opening port 7272.
• An internet connection is recommended for Wirecast license activation.
• For lowest quality (240p) streaming an upload rate of at least 650Kbps is required.
• 720p streaming requires an upload rate of at least 2500 Kbps.
• 1080p streaming requires an upload rate of at least 4500 Kbps.
• Consider lowering your canvas frame rate and/or streaming resolution to lower
CPU usage.
• It is recommended that an upload rate of at least double the desired rate be avail-
able.
• Solid State Drive or fast RAID array recommended for ISO Recording and Replay
functionality. Actual data rates will vary depending on quality level selected for ProRes recording, as well as the resolution and frame rate selected.
• For ProRes recording please refer to Apple’s ProRes data rate specifications
Recommended Hardware Specifications
• Intel Core i3 CPU @ 1.7 Ghz or higher recommended for 540p streaming with x264
@ 30 fps.
• Intel Core i5 CPU @ 2.5 Ghz or higher recommended for 720p streaming with x264
@ 30 fps.
• Intel Core i7 CPU @ 3.0Ghz or higher recommended for 1080p streaming with x264
@ 30fps.

Installation
System Requirements
Note: 60 FPS streaming will result in increased CPU usage and a high bit rate (4Mbps
or higher) for good quality.
• Minimum 4GB RAM, 2GB free hard disk space. Additional hard disk space required
for recording to disk.
Hardware Accelerated Encoding Requirements
• Intel Quick Sync Video encoding requires an Intel CPU with an Intel® QuickSync
Video core. List of Intel CPUs supporting QuickSync.
• NVIDIA NVENC encoding requires an nvidia GPU with Kepler architecture or newer.
NVIDIA only maintains a general list of supported GPUs.
• Apple Hardware Accelerated H.264 encoding requires a Mac with an integrated
Intel GPU.
33

34
Installation
System Requirements

Introduction
The best way to get started using Wirecast is to quickly work through all its main
features. This tour presents a series of three tutorials, each designed to help you
understand how to create and stream presentations using Wirecast.
35
Tutorials
Tutorials
As you work through these tutorials, you will also become familiar with important
Wirecast concepts and how you can use them to deliver high quality broadcasts. The
more you know about Wirecast, the better it will serve your streaming objectives.
Because each tutorial builds on the skills and knowledge you learn in the previous
tutorials, it is recommended that you take the tutorials in succession. Working through
all the tutorials takes about thirty minutes.
As you gain hands-on experience creating video and audio presentations - which leads
to a working knowledge of Wirecast and its components and architecture - you will
gain proficiency in using Wirecast.
Tutorial 1: Basic Concepts
Tutorial 2: Editing Shots
Tutorial 3: Broadcasting
Note: You can run all of the tutorials without a license. However, a watermark on the
video and an occasional voice-over on the audio are present until a valid license is
activated.
Note: For licensing information, select Preferences from the Wirecast menu, select
License, then click Purchase. Or, you can contact Telestream at:
desktopsales@telestream.net.

36
Tuto rial s
Tut ori al 1 : Bas ic C onc ept s
Tutorial 1: Basic Concepts
The goal of this tutorial is to provide you with a quick but successful experience
creating and streaming a presentation using Wirecast.
This tutorial requires that you open the tutorial document in Wirecast. To do this, select
Create Document for Tutorial from the Help menu in Wirecast.
Note: If you are running the tutorial with Wirecast in demonstration mode, the
Wirecast logo appears from time to time and audio output has a periodic voice-over.

Tutorial Prep
Live Broadcast window displayed
AutoLive LED on
To prepare for this tutorial you need to make several changes. Under the Switch menu,
make sure Smooth and AutoLive options are turned on (check mark displayed), and
Live/Preview Swap is turned off (no check mark displayed).
Under the Layout menu, make sure Show Live Only is selected (check mark displayed).
Tutorials
Tut ori al 1 : Bas ic C oncepts
37
All of these options will be changed later in the tutorial.
The Wirecast Main window shows the AutoLive LED turned on and the Live Broadcast
window (only) displayed.

38
Live Broadcast Area
Shot List
Tuto rial s
Tut ori al 1 : Bas ic C onc ept s
The Main Window
Wirecast has two main display areas: Live Broadcast area and the Shot List. The Live
Broadcast area is in the upper portion of the window displaying what Wirecast streams
to your viewers (or what it records to disk). The Shot List, in the lower half of the
window, displays the shots available for streaming.
What Is a Shot?
Wirecast uses the concept of a “shot” to construct presentations. A shot contains some
form of media (picyures, video, etc.), along with any settings for that media. In its
simplest form, a shot contains one piece of media such as a photo or a video clip. But it
can also be something more complex, like a live camera with a title and background
music. Or a shot can even be something even more complex like a Playlist of shots.
A shot can be edited and its settings can be changed (See Tutorial 2: Editing Shots).
Shots are important because they enable you to configure a lot of information before
you stream your presentation. This enables you to concentrate on creating a good
production during your broadcast.

Tutorials
Shot in Live Broadcast Area
Click Ripples shot
Tut ori al 1 : Bas ic C oncepts
Switching Between Shots
Individual shots are displayed in the Shot List. Click the Ripples shot in the Shot List area
and the image fades into the Live Broadcast Area display. This is called “taking a shot
live”.
39

40
Blank shot in Live Broadcast Area
Click Clear Layer
Tuto rial s
Tut ori al 1 : Bas ic C onc ept s
Click the shot labeled Clear Layer and the Ripples image fades to a blank screen. The
Clear Layer shot enables you to display a blank shot, which is sometimes needed.
Transitions
In the previous examples, a “fade action” occurred when you clicked on a shot. This is
because the smooth transition is the default.
Transition controls are located just below the Live Broadcast Area where the two
default transitions are shown: Cut and Smooth.
When Cut is selected, transitions are executed immediately. When Smooth is selected,
transitions fade in and out (as demonstrated above).
But there are more than just two kinds of transitions, and only two transitions can be
assigned to the Transition Panel. To select a different transition, click the small arrow on
the right side of either transition button. When the list appears, select a new transition

Tutorials
Click arrow to open menu
Select a
transition
new Bands button
Tut ori al 1 : Bas ic C oncepts
to be assigned to that button. You can also click the transition button itself and drag the
mouse downward until the menu of selections is displayed.
41
For example, to change the left transition button from Cut to Bands, click the Cut
button and drag downward until the menu appears. Select Bands from the menu.
Bands should now be displayed as the left button.

42
Bands transition
Tuto rial s
Tut ori al 1 : Bas ic C onc ept s
Now click back and forth between the River and Ripples shots using Bands (Bands
button selected).
These two transition buttons can also be selected by using the following key
combinations: Command+1 and Command+2.
Transition Speed
You can also control how fast a transition occurs, by selecting Switch >Transition Speed.
Your choices range from Slowest to Fas test.

Layers
Go button
Tutorials
Tut ori al 1 : Bas ic C oncepts
Go Button
The Go Button (or Command+G) enables you to make a transition.
Clicking the Go button does nothing when Wirecast is in AutoLive mode. The only
exception is that it will update a live shot if you have made changes to it using the Shot
Editor. Later in this tutorial you will discover how to use the Go button to transition
between different shots when AutoLive is off.
Note: Before you start this section, please select Smooth as your transition.
Wirecast enables you display several shots in the Preview and Live windows at the same
time by rendering them one on top of another according to Wirecast's Layer system.
This is an excellent way to add and remove objects in your broadcast.
43
Wirecast displays five layers in the Main Shot List window. They are numbered 1
through 5 along the right side of the window. Each layer contains shots that can be
selected by clicking a shot. A red LED indicates that a shot is selected. When a shot is
selected it is displayed in the Live Broadcast window. If you select multiple shots (by
selecting a shot on more than one layer) they will all be displayed in the Live Broadcast
window. The shots are displayed in a layering manner, where layer 1 is on top and layer
5 is at the bottom (and layers 2 through 4 are layered in between).
44
Layer numbers
Select River
shot
Layered shot
Select Logo
shot
Tuto rial s
Tut ori al 1 : Bas ic C onc ept s
Select the Logo shot in layer 2 and the River shot in layer 3. The result is a layered shot
containing both images.
Layers are displayed in a particular order: Layer 1 is on top, Layer 2 below it, Layer 3
below Layer 2, etc. This tutorial, so far, has been operating on Layers 2 and 3. Clear
Layer, Ripples, River shots (and more) are on Layer 3, but Layer 2 has only a logo and a
Clear Layer shot.

Tutorials
Click white dot to
turn Layer 2 off
Logo removed
AutoLive LED
Tut ori al 1 : Bas ic C oncepts
Each layer can be turned on or off by clicking the white LED light on the far right side of
the layer window. Click the Layer 2 LED to remove the Logo shot.
45
Auto Live
Click the LED again to turn Layer 2 back on and restore the Logo image.
So far in this Tutorial, Wirecast has been running in AutoLive mode. This means that any
selection you make in the Shot List is automatically placed into your Live Broadcast
window. This mode is very useful for those users who want to set up all of their shots at
once and then single-click them as they run their presentation. But the disadvantage of
this single-click method is that you can only see one shot change at a time. Once you
click a shot, your viewers also see it (with no preview for you of how it looks before
broadcasting the new shot).
Turn AutoLive Off
An red LED, next to the Go button is lit when you are in AutoLive mode.

46
Select Sample
Title shot
Select Ripples
shot
Layered shots
Click Go button
Select Clear
Layer shot
Tuto rial s
Tut ori al 1 : Bas ic C onc ept s
For this tutorial, make sure AutoLive is off by un-checking AutoLive in the Switch menu.
When you do this a dialog box is displayed informing you that AutoLive is off and
transitions must be made using the Go button. Click OK in the dialog box to continue.
Try clicking the Ripples and River shots, and notice that nothing happens in the Live
Broadcast window because AutoLive is turned off. Now click the Ripples shot and then
click the Go Button. The Ripples shot is immediately placed into the Live Broadcast
window. Click the River shot and, as expected, nothing happens. Click the Go button
and the River shot replaces the Ripples shot in the Live Broadcast window.
Note: When AutoLive is off, you must always click the Go button (or press the
Command+G keys) to display the selected shot in the Live Broadcast Area.
Multiple Changes
The benefit of having AutoLive off is that you can make several changes to your shot
first, and then have all changes placed into the Live Broadcast window at the same
time. To do this, first verify that AutoLive is off. Click Sample Title in layer 1, click Clear
Layer Shot in Layer 2, and then click the Ripples Shot in Layer 3. Click the Go button (or
Command+G) to make the Ripples and Sample Title shots live at the same time.

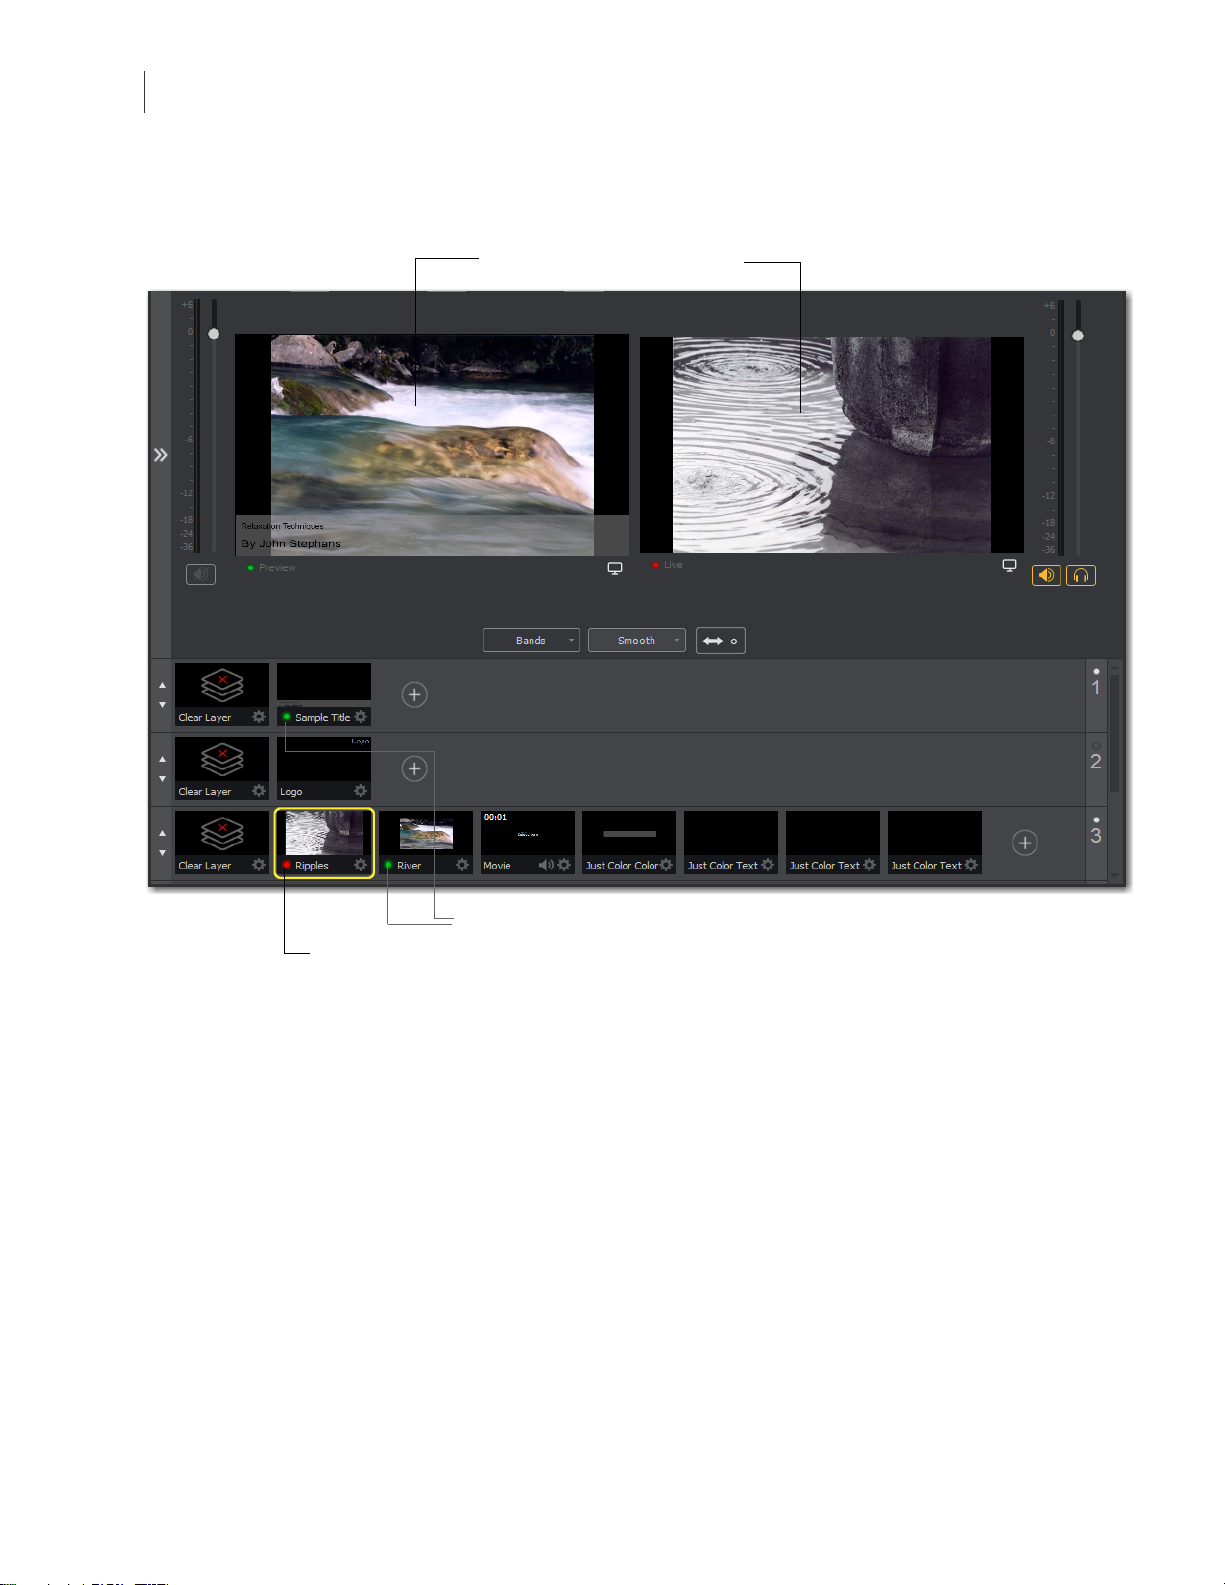
Preview
Green LED
Red LED
Tutorials
Tut ori al 1 : Bas ic C oncepts
One problem you may have noticed while running this tutorial is that you cannot see
the changes you are making before broadcasting them. To solve this problem, Wirecast
enables you to see a preview of what you broadcast.
Select Layout > Show Live and Preview from the Main menu. A preview window is
displayed to the left of the Live Broadcast window. The Preview window uses a green
LED to identify it. The Live Broadcast window uses a red LED to identify it. These two
colors (green and red) are also used to identify which shots are associated with the
Preview or Live windows.
47

48
Preview window
Live window
Red LED (Live window)
Green LED (Preview window)
Tuto rial s
Tut ori al 1 : Bas ic C onc ept s
Click the River shot on Layer 3. The River shot is displayed in the Preview window. When
shots are selected they display a green or red LED to indicate selection for Preview or
Live windows.

Tutorials
Click Clear Layer Shot
Click Go button
Preview shot became Live shot
Double-arrow
Tut ori al 1 : Bas ic C oncepts
Now click the Go button to place the River shot into the Live window. Click the Clear
Layer shot in Layer 1 to remove the title from the River shot in the Preview window.
49
Turn on the Live/Preview Swap option by selecting Switch > Live/Preview Swap (check
mark displayed). Notice that the Go Button displays a double-arrow, indicating that the
Live/Preview Swap option is on.
Select the Ripples shot and click the Go button to place the Ripples Shot into the Live
window. Notice that the Ripples and River shots have swapped (between Preview and
Live windows). The shot LED’s have also changed color. The green shot LEDs indicate all
shots included in the Preview window and the red LEDs indicate the shots included in
50
Red LEDs show Live window shots
Ripples and River shots swapped
Green LEDs show Preview window shots
Tuto rial s
Tut ori al 1 : Bas ic C onc ept s
the Live window. This lets you know what your last Live window looked like as you
prepare your next shot in the Preview window.

Tutorial 2: Editing Shots
Double-click
a shot
Shot Editor panel
The first tutorial used only the Main window, and explained various ways in which you
can use an existing shot. But shots can also be created and edited. This tutorial
demonstrates how to edit your shots.
To edit a shot, double-click its icon in the Shot List. This opens the Shot Editor panel.
Tutorials
Tutorial 2: Editing Shots
51

52
Shot Layers tab
Chroma Key Properties tab
Additional Properties tab
Shot Layer Properties tab
Audio Properties tab
Tuto rial s
Tut ori al 2 : Ed iti ng S hot s
The shot editor has five tabs: Shot Layers, Shot Layer Properties, Audio Properties,
Chroma Key Properties, and Additional Properties.
Shot Properties Enables you to add and delete sources and change the display order
(change layering within the shot).
Shot Layer Properties Enables you to change the size, position, and other properties
of a shot source.
Audio Properties Enables you to set audio levels and other controls. You can also
monitor audio levels.
Chroma Key Properties If a source in your shot uses a chroma key, this tab enables you
to configure the chroma key settings. Each source in a shot can have its own chroma
key settings.
Additional Properties Enables you to set any additional properties for a source in your
shot: System Device properties, Screen Display properties, Twitch Widgets (Chat and
Followers), etc.
See Shot Editor for details on how to use the Shot Editor.

Tutorial 3: Broadcasting
This tutorial demonstrates how to setup and broadcast your Wirecast presentations.
You can broadcast to a specific computer (Unicast), multiple viewers (Multicast), or
even record your broadcast to disk.
There are two main components for broadcasting your presentation (or saving it to
disk): Encoding and Selecting a Destination.
You need to decide how you are going to encode your broadcast. Encoding is the type
of compression used (JPEG, MPEG4, etc.). Wirecast comes configured with many
common encoding options. (Dee The Encoder Presets Window for details.)
A destination for the broadcast must be selected. You can send it to a server for
broadcast or save it to disk.
Tutorials
Tutorial 3: Broadcasting
53

54
Click Stream
Click Record
Select Destination
Click OK
Green Stream icon
Green connection
strength bars
Tuto rial s
Tutorial 3: Broadcasting
Streaming
Select Output > Output Settings to open the Output Settings window. When the dialog
box displays, select a Destination and click OK.
You can stream your broadcast to any streaming service provider you choose. The
Broadcasting section of this user guide provides details on how to do this for many
popular providers. This tutorial will show how to stream to Facebook.
Go to Facebook Live in the Broadcasting section for steps on how to stream to
Facebook.
Once you have set up your Facebook Destination, you are ready to start streaming your
broadcast. To do this, click the Stream button at the top of the Main window. You can
also record your streaming by clicking the Record button.
If you have not already selected a destination and logged into it, a dialog box displays.
Select a destination, log in when asked to do so, then click OK.
The Stream icon will blink until a connection is made. Once you are connected the
Stream icon turns green. If you cannot connect an error message will display.
Connection strength is indicated by how many bars are displayed in the Stream icon.
Fewer bars indicates a weaker (slower) connection.

Tutorials
No connection icon
Tutorial 3: Broadcasting
If the connection is ever broken, a no connection icon is displayed in place of the bars.
When the connection is recovered, the no connection icon is replaced with the green
bars.
Click Stream again to stop streaming.
You can also record your broadcast by clicking Record. When you stop streaming, if your
event is still live, you will be asked if you want to complete the event.
55

56
Tuto rial s
Tutorial 3: Broadcasting

Introduction
This section describes in detail how to use Wirecast’s main window.
57
Main Window
Topics
Overview
Control/Status Bar
Preview/Live Broadcast Area
Countdown Clock Display
Transition Controls
Add Shot Menu
Shot Selection Area
Layers
AutoLive
Live Icons
Overview
Wirecast’s main window is comprised of these display areas:
• Controls/Status Area The top area with the Stream and Record buttons.
• Preview/Live Broadcast Area The large area in the center.
• Transition Controls The area with the Transition (Cut and Smooth) and Go buttons.

58
Preview/Live
Broadcast Area
Tra nsiti on
Controls
Shot Selection
Area
Control/
Status Area
Stream button
Recording time
ISO record time
Record button
Streaming time
ISO Record
Display
Preview Only
Display Live
Only
Display Preview
and Live
FPS/Dropped
Bitrate
CPU Usage
Main Window
Control/Status Bar
• Shot Selection Area The area displaying the shot icons (available shots).
Control/Status Bar
Control buttons and status information are displayed at the top of the Main window.
Wirecast displays the following controls and statistics:
• Stream button Click to begin streaming.

Main Window
Preview/Live Broadcast Area
• Streaming time This displays how long you have been streaming. This value does
not reset when you start/stop the broadcast. It is cumulative. This enables you to
save portions of a broadcast to disk and still know the total amount of time.
• Record Button Click to begin recording.
• Recording Time This displays how long you have been recording. This value does
not reset when you start/stop the broadcast. It is cumulative.
• ISO Record Click to begin ISO recording.
• ISO Record Time Displays the ISO recording time.
• FPS/Dropped Displays the current FPS rate or the number of frames dropped
while streaming. Click on display to toggle between FPS and Dropped. (Displayed
only while streaming.)
• Bitrate Displays the streaming bitrate. (Displayed only while streaming.)
• CPU Usage Displays the usage of the CPU in percent. (Displayed only while
streaming.)
• Display Buttons These three buttons enable you to choose to display the Preview
window, the Live window, or both in a divided display.
59
Note: To avoid decrease in video quality, Wirecast should not be used at CPU usage
above 80%. See the Telestream Website for suggested configurations.
Preview/Live Broadcast Area
When you open a new document, the Live area shows what is broadcast to your
viewers before the encoding or compression. When AutoLive is off, you can make
several changes without your viewers seeing the change. This is most useful when you
are using an engineer to run your broadcast. When you are making changes to your
broadcast, you may want to see those changes before broadcasting them. Preview
allows you to do this.

60
Preview Area
Live Broadcast Area
Click Go button
Gear icon
Countdown clock
Main Window
Countdown Clock Display
To see the preview, select Preview from the Layout menu. This sets up the Main Window
with the Preview Area on the left and the Live Broadcast Area on the right. Clicking the
Go button makes the preview shot become Live.
Countdown Clock Display
The Main window displays a countdown clock whenever a video shot is playing. If you
have multiple video shots playing, click the gear menu icon to select which shot will be
associated with the countdown clock.

Transition Controls
Click arrow to open menu
Select a
transition type
The transition area is in the middle of the Main Window:
There are two Transition buttons, but each can be configured to present one of many
possible transition types. In the image above, the two configured transitions are: Cut
and Smooth. Since Smooth is selected (button darkened), any transition executed by
clicking Go is a smooth transition.
Changing Transitions
If you click the Cut button, it becomes selected and making it the current transition
type:
Main Window
Tra nsi tio n Co ntrols
61
You always have two different transition types available. You can also select one of the
two buttons by pressing Command+1 or 2 keys for the two transition types displayed.
If you click the down-arrow on the right side of either transition button, you can select a
new transition to assign to that button.

62
Go button
Main Window
Add Shot Menu
Transition Speed
The transition speed is set by selecting Switch > Transition Speed. There are five settings:
Slowest, Slow, Normal, Faster, and Fastest.
Go Button
The Go Button (or Command+G) enables you to make a transition occur at any time.
Clicking the Go button does nothing when Wirecast is in AutoLive mode, except to
update a live shot if you have made changes to it using the Shot Editor.
Add Shot Menu
The Add Shot menu provides a way to add live sources, file sources, the Desktop
Presenter program, shot graphics, shot audio, and shot templates, etc. Click the Plus
Button (+) to open the Add Shot menu.
When the Add Shot menu displays, select a shot category, select the type of shot to
add, then click the Add button.
To add a media file, click the Add Media File button., navigate to a media file, click Open,
then click the Add button.

Main Window
Click Add
Shot button
Select shot
category
Select
shot type
Select as
favorite
Click Add Media
File button
Click Add
Add Shot Menu
To select a source as a Favori te (cause it to display in the Favorites menu) click the star
icon to turn it white.
63
Video Capture
• System Device Select a system device and click the Add button. (See Capture
Devices Properties).
Audio Capture
• System Device Select a system device and click the Add button. (See Capture
Devices Properties).
• ASIO Audio Capture Select an ASIO audio capture device and click the Add button.
• System Audio Capture Select an audio capture device and click the Add button.
• WASAPI Audio Capture Select a WASAPI capture device and click the Add button.
Network
• IOS Cam Select an ISO Camera device and click the Add button.
• Rendezvous Select to create a new Rendezvous session, or select to reconnect to a
previously created session. Click the Add button when finished.
• Web Display Creates a new Web Display shot. Select and click the Add button. (See
Web Display Properties).

64
Main Window
Add Shot Menu
• Web Stream Creates a new Web Stream shot. Select and click the Add button. (See
Web Stream Properties).
Screen Capture
• Remote Desktop Presenter Creates a new Remote Desktop Presenter shot. Select
and click the Add button. (See Remote Desktop Presenter Properties).
• Screen Capture Creates a new Screen Capture shot of any monitor or window on
your computer. You can also capture your iPhone or iPad in Wirecast by connecting
your device using an Apple certified lightening cable, and then adding it as a
source by selecting Screen Capture from the Source menu. Select and click the Add
button. (See Screen Capture Properties).
Note: Some apps when screen captured, take control of your mouse and the cursor is
not displayed. You can, at any time, press command + Tab keys to reduce the capture
window size and enable you to use your mouse. You must be using an iOS device
running 8.x connected to your Mac OSX 10.10 Yosemite computer with a lightening
cable. The cable should be Apple certified to guarantee proper detection. You will
need to "trust" the computer in order for it to be detected.
Overlays
• Clock Creates a new Clock shot that displays time. Select and click the Add button.
(See Clock Properties).
• Image Carousel Creates a new Image Carousel shot that shows a sequence of
images. Select and click the Add button.(See Image Carousel Properties).
• Scoreboard Creates a new Scoreboard shot. Select and click the Add button. (See
Scoreboard Properties).
• Text Creates a new Text shot. Select and click the Add button. (See Text Shot Proper-
ties).

Main Window
Add Shot Menu
• Title Creates a new Title shot. When the window of titles displays, select a title and
click OK. Click the Add button when finished. (See Titles Properties).
65
• Twitter Feed Creates a Twitter Feed shot. Select and click the Add button. (See
Twitter Feed Properties).
Backgrounds
• Web Display Creates a new Web Display shot. Select and click the Add button. (See
Web Display Properties).
• Solid Color Creates a new Solid Color shot. Select and click the Add button. (See
Solid Color Properties).
• Virtual Set Creates a new Virtual Set shot. When the window of sets displays, select
a set and click OK. When finished, click the Add button. (See New Virtual Set Proper-
ties).

66
Select as
favorite
Shot selection area
Main Window
Shot Selection Area
Shots
• New Shot Creates a new shot. Select and click the Add button.
• New Playlist Shot Creates a new Playlist shot. Select and click the Add button.
• New Shots From Clipboard Creates a new shot that has been copied to the clip-
board. This is how you duplicate a shot. Select and click the Add button.
Favorites Displays a list of shots that have been marked as a Favorite by clicking on the
star on the right side of each shot in the Add Shot Menu.
All Displays all sources in one list.
Add Media File Creates a Media File shot (video clip or picture). When selected, a
navigation widow displays. Navigate to a media file location, select a media file, and
click Open. (See Media File Properties).
Shot Selection Area
The bottom part of the Main Window contains the Shot Selection Area, also called the
Shot List.

The shot icons can be made to display any live activity in the source it represents
Right-click shot
(cameras, streaming, etc.). See Performance in the Preferences section for turning on
Live Icons.
Changing Shots
Right-click on any shot to display the shot menu.
Main Window
Shot Selection Area
67
Change Source Select Change Source to change the source of your shot. Upon
selection, a menu of sources will display enabling you to make a selection.
Change Audio Select Change Audio to change the audio of your shot. Upon selection,
a menu of audio sources will display enabling you to make a selection.
Change Template Select Change Template to change the template of your shot. Upon
selection, a menu of templates will display enabling you to make a selection.

68
Select Keyboard Shortcut
Select a menu number
Menu item checked
Menu number displayed
Main Window
Shot Selection Area
Keyboard Shortcut You can create a keyboard shortcut to any shot. To do this, select
Keyboard Shortcut, then select a menu number to associate with that shot. After you
have selected a menu number, that menu item is checked and the number is displayed
in the shot icon.
To take a shot using the assigned hotkey, press the number key assigned to that shot.
You can assign multiple shots to the same menu number as long as they are on
different layers. When you use the assigned hotkey all the shots assigned to it will be
taken. Selecting a checked menu item will uncheck it and unassign the shot.
Select Unmap All Keys to remove all hotkey assignments.
Note: See also the section on Hot Keys for Hot Key management.
Edit Shot You can edit a shot by clicking the double arrows (located on the left side of
the Preview window) to the right, revealing the shot editing panel. You can also e dit a
shot by double-clicking on it, by right-clicking it and selecting Edit Shot, by selecting
Edit Shot from the Edit menu, or by selecting it and pressing the Command+E keys.
Rename Shot You can rename a shot by right-clicking it and selecting Rename Shot, or
by selecting Rename Shot from the Edit menu. You can also rename a shot by selecting
it and pressing the Command+R keys.
Duplicate Shot You can duplicate a shot by right-clicking it and selecting Duplicate
Shot, or by selecting Duplicate Shot from the Edit menu. You can also duplicate a shot
by selecting it and pressing the Command+D keys.

Shot Selection Area
Click Playlist tab
Duplicate Shot Options Check a source to create a new instance of it when
duplicating the shot containing it. Multiple selection is allowed.
Main Window
69
Delete Shot You can delete a shot by right-clicking it and selecting Delete Shot, or by
selecting Delete Shot from the Edit menu. You can also delete a shot by selecting it and
pressing the Command+Backspace keys.
Move to Playlist Moves this shot to the selected playlist. If you have existing playlists,
that can be viewed by selecting the Playlist tab. You can move a shot to another playlist,
back to the main layer, by right-clicking the shot and selecting Move to Playlist.
Moving a Shot to Another Layer
You can move a selected shot to another layer by selecting Move to Layer from the Edit
menu, then selecting the target layer from the drop-down menu. You can also move
the cursor to the bottom of a shot icon (until the cursor becomes a hand), and then
drag the shot icon to a different layer.
When shots are created, they are assigned to a specific layer. They exist on that layer
until they are moved or deleted. (See Layers.)

70
Click up or
down arrow
to resize
Click side
arrow
Click down arrow
repeatedly
Main Window
Layers
Resizing the Shot Icons
You can resize the shot icons on any layer by clicking the up or down arrow on the left
side of the layer window. Click the up arrow to make all the icons larger; click the down
arrow to make them smaller. Clicking the down arrow when the shot icons are in their
smallest state causes the layer window to become hidden.
To show or hide a layer, click the down arrow until layer is hidden. To show a layer, click
the side arrow that represents a hidden layer.
Layers
Wirecast allows you to put shots on any of five different layers. Layering shots enables
Wirecast to merge them together, from back (lowest layer) to front, to form a single
visual image during broadcast.

Main Window
Shot Layer 1
Shot Layer 2
Shot Layer 3
Layers
When Wirecast first opens, all of the five layers of shots are displayed. You must scroll
down (or expand the window) to see the other layers.
71
What is a Layer?
Layers are, by default, named 1 through 5. Layers determine the order when presenting
images in the Live Broadcast Area. The Bottom layer (5) is drawn first, then the other
layers are added, in order, up to Layer 1. Using multiple layers is a powerful way to show
a company logo, a background, or a title, independent from each other.

72
Click LED to
select layer
Shot Title Bar
Hand icon
Main Window
Layers
Changing Layers
To select a layer, click its LED to turn it on (click it again to turn if off). When a layer is
selected, the selected shot in that layer is displayed in the Preview/Live Broadcast area.
If multiple layers are selected all selected shots are displayed.
Moving a Shot to Another Layer
A shot can be moved to another layer by clicking and dragging the shot from one layer
to another within the Main Shot window. To do this, hover over the shot Title Bar with
the mouse until the hand icon displays, then click and drag the shot to another layer.
When shots are created, they are assigned to a specific layer. They exist on that layer
until you move them or delete them.

AutoLive
Live source icon
Live source
AutoLive is turned on and off by selecting Switch > AutoLive. When AutoLive is on,
changes made in the Shot List are automatically taken Live in the broadcast (using the
current transition and duration). If you click a shot when AutoLive is off, the shot is not
sent to live broadcast. In this mode you take the shot live manually, by clicking the Go
button, or by pressing the Command+G keys.
Live Icons
You can, optionally, make your live source icon display its source (camera, Web stream,
etc.) in real time. This means that inside the icon, you will see what the live source sees.
Main Window
AutoLive
73
To turn on the Live Icon option (default is off ), select the Performance tab in Preferences,
then check the Live Icons checkbox. You can also adjust the frames per second rate of
the display using the slider. Lower fps (frames per second) rates reduce the time taken

74
Check to turn on
Slide to set fps
Main Window
Live Icons
to adjust the live icon display. Higher fps rates provides a smoother display of the live
icon source.
Note: There tends to be a degrading quality when an icon is live. So, if the CPU is
reaching its maximum, turn off Live Icons to reduce CPU usage.

Keyboard Shortcuts
Introduction
This section provides a list all of keyboard shortcuts used in Wirecast. They are arranged according to
how they appear in the drop-down menus in the main window.
75
Note: See also the section on Hot Keys for Hot Key management.
General Shortcuts
Misc Shortcuts Keyboard Shortcut
Display Shot <shot number key*>
Enter Selects left-hand transition
button and clicks Go button
Space bar Selects right-hand transition
button and clicks Go button
i Sets the media IN point
o Sets the media OUT point
e Sets the Replay IN point
= Increments Home score
- Decrements Home score
] Increments Visitor score
[ Decrements Visitor score
* See Keyboard Shortcut in Changing Shots.
Wirecast Menu
Menu Keyboard Shortcut
Preferences command+comma
Hide command+H
Hide Others control+command+H
Quit command+Q

76
Keyboard Shortcuts
Introduction
File Menu
File Menu Keyboard Shortcut
New command+N
Open command+O
Import Media command+Shft+I
Save command+S
Save As command+Shft+S
Close Window command+W
Edit Menu
Edit Menu Keyboard Shortcut
Undo command+Z
Redo command+Shft+Z
Cut command+X
Copy command+C
Paste command+V
Select All command+A
Edit Shot command+E
Rename Shot command+R
Duplicate Shot command+D
Delete Shot command+Delete
Layout Menu
Layout Menu Keyboard Shortcut
Master Audio control+command+M
Main Shot List control+command+L
Go to Layer > Master Layer 1 Shift+command+T
Go to Layer > Master Layer 2 Shift+command+F
Go to Layer > Master Layer 3 Shift+command+N
Replay Menu
Replay Menu Keyboard Shortcut
NO SHORTCUTS
Twitter Menu
Twitter Menu Keyboard Shortcut
NO SHORTCUTS
Window Menu
Switch Menu
Switch Menu Keyboard Shortcut
Go command+G
Cut command+1
Smooth command+2
AutoLive command+L
Live/Preview Swap control+command+W
Media Menu
Media Menu Keyboard Shortcut
Start Playing All Movies command+P
Pause All Movies command+Shft+P
Output Menu
Output Menu Keyboard Shortcut
Output Settings command+Y
Start/Stop Broadcasting > Start All command+B
Start/Stop Recording > Start All command+K
Window Menu Keyboard Shortcut
Minimize command+M
Inspector command+I
Encoder Presets control+command+E
Audio Mixer command+U
Help Menu
Help Menu Keyboard Shortcut
NO SHORTCUTS

Keyboard Shortcuts
Introduction
77

78
Keyboard Shortcuts
Introduction

Introduction
In addition to live video from your cameras, Wirecast enables you to work with media
created outside of Wirecast. This section introduces some common media types you
can use with Wirecast. You can add media by selecting Import Media from the File
menu.
79
Adding Media
Topics
Images/Opacity
Supported Codecs
Images/Opacity
Wirecast supports a wide variety of still images types (TIFF, GIF, JPEG, PNG, etc.). Some
of these formats offer some form of opacity (or transparency). This is often called an
Alpha Channel. Wirecast works seamlessly with these formats making them the
preferred methods for using graphics and logos which have transparency.
GIF and Transparency
GIF files are a special case because they only offer transparency and not a true Alpha
Channel. The GIF format enables you to define part of the image as transparent
(completely invisible), but does not enable you to define it as partially transparent.
Some GIF images use transparency for much of the image. However, near the edges of
the visible data, transparency cannot be used. This happens quite often when there is a
shadow near the edges of the visible data. The author of the GIF often assumes a
certain background color (white, for example) and that color becomes embedded in
the actual image.
When Wirecast displays these types of images, the edges of the visible data shows the
background that was saved in the GIF. This is not a defect in Wirecast and, therefore,
Wirecast can only present the data as it exists in the GIF. The solution is to obtain the

80
Adding Media
Keynote Movies
original image and re-save the image as either TIFF or PNG. Both of these formats offer
full Opacity.
Keynote Movies
Wirecast supports some special features of Keynote Movies which enable you to move
back and forth between the pages from within Wirecast. With this feature you can
visually annotate and walk through your Keynote for your viewers.
Using Movies
To use the movie in Wirecast, follow these steps:
1. Drag & drop the Keynote movie into the Shot List in the Main Window.
2. Click the movie to take it live in the Live Broadcast Window. (Or, if you have
AutoLive off, click the Go button.)
3. To go forward in the Keynote movie, select Play to next point from the Media menu
(or, press the Command+Right Arrow keys). The Keynote movie plays to the next
section using the transition you selected in Keynote.
4. To go backward in the Keynote movie, select Jump to previous point from the Media
menu (or, press the Command+Left Arrow keys). All media in the Live area jumps to
the previous point.
Windows Media
Windows Media Files (WMV and WMA) are not supported by Wirecast. The solution is to
convert the media into a different type, such as MPEG-4.
Real Media
Real Media Files (.RM) are not supported by Wirecast. The solution is to convert the
media into a different type such as MPEG-4.
Supported Codecs
Shownbelowisalistofsupportedvideoandaudiocodecs.
VideoCodec MOV
(M4V)
AVC YES NO YES NO NO NO
H264 YES NO YES NO NO NO
DVC25 YES NO NO NO NO NO NO
DVCPRO50 YES NO NO NO NO NO NO
MP3MPEG‐4
ISO(MP4)
WAVAIFF
(AIFF,AIF)
ASF
(WMV)
WEBM

DVCPRO100 YES NO NO NO NO NO NO
MJPEG YES NO NO NO NO NO NO
ProRes YES
NO NO NO NO NO NO
(maconly)
QuickTime
YES NO NO NO NO NO NO
Animation
VP8 NO NO NO NO NO NO YES
VP9 NO NO NO NO NO NO YES
WindowsMedia
Video
NO NO NO NO NO YES
(windows)
NO
AudioCodecs
AAC YES NO YES NO NO NO NO
MP3 YES YES NO NO NO NO NO
Opus NO NO NO NO NO NO YES
PCM YES NO NO YES YES NO NO
Vorbis NO NO NO NO NO NO YES
WindowsMedia
Audio
NO NO NO NO NO YES
(windows)
NO
Adding Media
Supported Codecs
81

82
Adding Media
Supported Codecs

Introduction
The Shot Editor is used to view a shot, edit it, or create a new one. This section
describes how to use the Shot Editor.
83
Shot Editor
Topics
Overview
Shot Layers Tab
Shot Layer Properties Tab
Audio Properties Tab
Chroma Key Properties Tab
Additional Properties Tab
– Capture Devices Properties
– Rendezvous Properties
– Image Carousel Properties
– Clock Properties
– Media File Properties
– Remote Desktop Presenter Properties
– Scoreboard Properties
– Solid Color Properties
– Text Shot Properties
– Web Display Properties
– Web Stream Properties
– Titles Properties
– Twitter Feed Properties
– New Virtual Set Properties
– SyphonInject™ Sources

84
Click doublearrow
Select a shot
Double-click
a shot
Shot Layers tab
Chroma Key Properties tab
Additional Properties tab
Shot Layer Properties tab
Audio tab
Shot Editor
Overview
Overview
To edit a shot, double-click the shot to open the shot editor. You can also single-click
the shot to select it, then click the double-arrow on the left of the Main window to open
the shot editor panel.
The shot editor has five tabs: Shot Layers, Shot Layer Properties, Audio, Chroma Key
Properties, and Additional Properties.

Shot Layers Enables you to add and delete sources and to change the display order
Click to select
a source
Click to move
up or down
Click the eye or
speaker icon
Click to add or
remove source
(layering within the shot).
Shot Layer Properties Enables you to change the size, position, and other properties
of a shot.
Audio Enables you to set and monitor the audio level.
Chroma Key Properties If a source in your shot uses a chroma key, this tab enables you
to configure the chroma key settings. Each source in a shot can have its own chroma
key settings.
Additional Properties Enables you to set any additional properties for a source in your
shot: System Device properties, Screen Display properties, Twitch Widgets (Chat and
Followers), Text properties, etc.
Shot Layers Tab
The Shot Layers tab lists all of the sources in the shot. You can add sources by clicking
the plus (+) button, or delete a sources by select selecting it and clicking the minus (-)
button. You can also reorder the sources in the list by selecting a source then clicking
the up or down arrow to move it. Additionally, you can toggle (on or off) the visibility of
a source by clicking the eye icon, or toggle the source audio by clicking the speaker
icon.
Shot Editor
Shot Layers Tab
85
Replay Layer
The Replay Layer is a placeholder layer that can be added to any Shot for the purpose of
creating a Replay Template Shot. Once the Shot is selected in the Replay Settings it can
be used as a template for any created Replay Shot.
To configure and use a Replay Layer, follow these steps:

86
Click plus (+) button
Select Replay Layer
Other sources
added
Replay Layer
added
Shot Editor
Shot Layers Tab
1. Create a new shot, then click the plus (+) button and select Replay Layer to add a
source.
2. Add additional graphics, titles or other sources to the shot as needed.

Shot Editor
select Replay
Settings
Check Program Replay
Select Replay
Shot Template
Click the Update
Replay Shot button
Newly created Replay
shot
Shot Layers Tab
3. Select Replay+ISO > Configure, then select Replay Settings. Select a Replay Shot
Template (the newly created shot with Replay Layer), check Program Replay, and
click OK.
87
4. Enable the Replay system by selecting Replay+ ISO > Start All.
5. Click the Update Replay Shot button to create a Replay shot using the new
template.
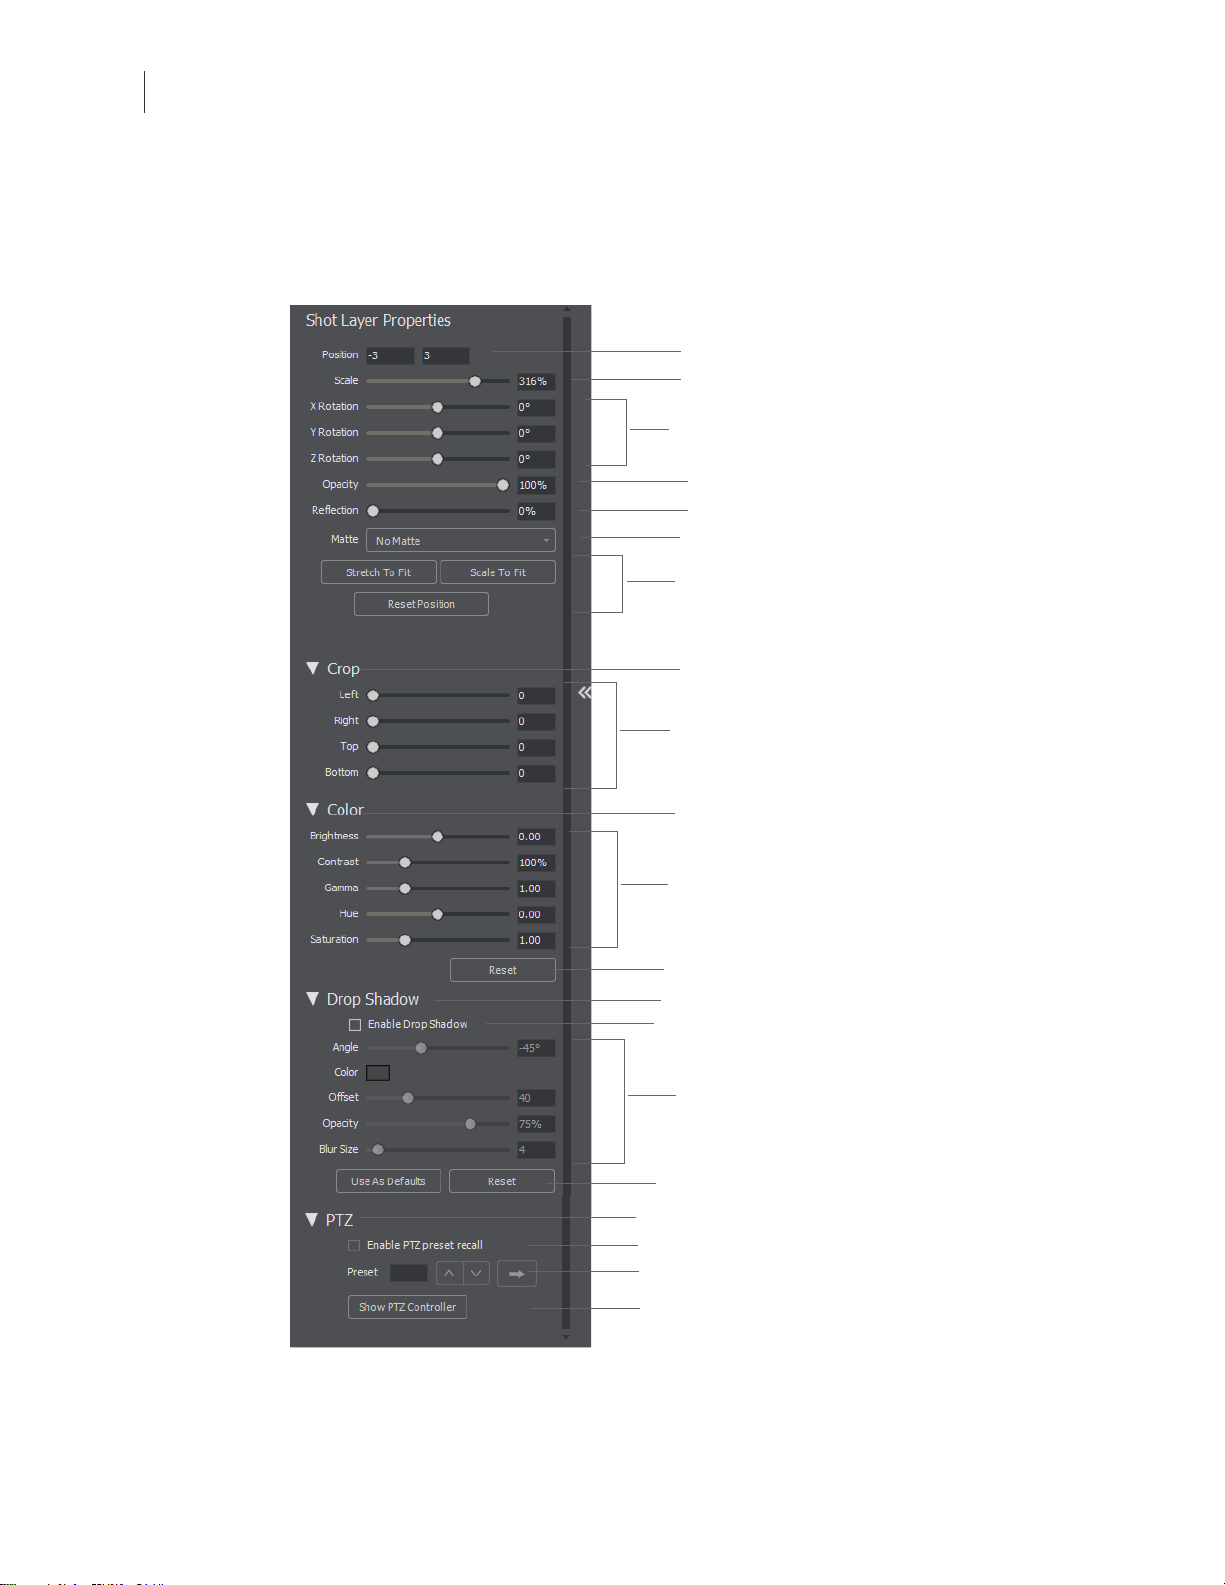
88
Position fields
Rotation sliders
Matte selector
Stretch, Scale and Reset
Position buttons
Click Crop arrow
Click Color arrow
Color adjustments
Opacity slider
Crop adjustments
Reset button
Scale slider
Drop Shadow
adjustments
Reflection slider
Click Drop Shadow arrow
Check to enable
Defaults and Reset buttons
Click PTZ arrow
Check Preset recall (optionally)
Recall a PTZ preset
Click to open PTZ control panel
Shot Editor
Shot Layer Properties Tab
Shot Layer Properties Tab
The Shot Layer Properties tab enables you to make adjustments to the sources in your
shot.

Shot Editor
Shot Layer Properties Tab
Position Displays the position of the selected source in your shot. Position “0 0”
represents the middle of the shot area. To move a source, click and drag it to a new
location in the shot.
Scale Slide the Scale slider to change the size of your source. (See also Scale To Fit
below).
X Y Z Rotation Slide the X (Horizontal), Y (Vertical), or Z (Straight-through) axis sliders
to rotate the source. (See also Reset Position below).
Opacity Slide the Opacity slider to adjust the degree of transparency of your image.
Reflection Slide the Reflection slider to adjust the degree of reflection below your
image.
Matte A Matte is the boarder around a shot. Select a matte to be used by clicking the
down-arrow on the Matte menu. Default is No Matte. You can also use any media file as
a custom matte. To do this, create a new shot of the media file you want to use as a
matte. This file now appears in the Matte drop-down menu where you can select it.
89
Stretch to Fit Click the Stretch to Fit button to stretch the source to expand to its
maximum size in the shot. This may distort the display of the source.
Scale to Fit Click the Scale to Fit button to force the source to expand to its maximum
size in the shot.
Reset Position Click the Reset Position button to force the source to return to its
original size (scale) and rotation positions.
Crop Click the Crop triangle to open the cropping adjustment pane. Slide the Left,
Right, Top, and Bottom sliders to crop your source image.
Color Click the Color triangle to open the color adjustment pane. Slide the color
controls to adjust the color.
Reset Click the Reset button to reset the color controls to their default settings.

90
Map button
Meter control
Volume slider
Pan control
Speaker icon
Shot Editor
Audio Properties Tab
Drop Shadow Click the Drop Shadow triangle to open the Drop Shadow adjustment
pane. Check the checkbox to enable the controls.
– Angle Move the slider to change the angle of the Drop Shadow.
– Color Click in the color field to open the color palette. Select a shadow color and
luminance by sliding the vertical and horizontal sliders. Click outside the color
edit box to close the palette.
– Offset Move the Offset slider to adjust the direction (0 to 360 degrees) the
shadow text is offset from the actual text.
– Opacity Slide the Opacity slider to adjust the degree of transparency of your
source.
– Blur Size Move the slider to adjust the amount of blur in the drop shadow.
Use As Defaults Click to set the current drop shadow configuration as the default
setting. All future enabled drop shadows will be set this by default. Clicking this button
does not retroactively update previously created shots. Drop shadow settings on
individual shots can still be changed.
Reset Click to restore the drop shadow settings back to the default values. You can also
restore the drop shadow settings to Wirecast application defaults by holding the Shift
key down and clicking Reset.
PTZ Click the PTZ triangle to open the PTZ control panel.
Enable PTZ Preset Recall Check the checkbox to enable the PTZ recall controls.
Preset Click the up and down arrows to find a PTZ preset to recall, then click the Right
Pointing Arrow button to recall the preset.
Show PTZ Controller Click to display the PTZ Controller panel. (See PTZ Controller).
Audio Properties Tab
The Audio Properties tab enables you to control and monitor audio. You can set the
audio level, mute and monitor the audio, and map channel outputs.
Volume Adjust the slider to set the audio volume level.

Shot Editor
Audio Properties Tab
Pan Adjust the slider to pan between left and right audio.
Meter Monitors the audio level. You can also mute the audio by clicking the audio icon.
Speaker Click to mute the audio output. Icon turns gray when muted. Click the icon
again to un-mute the audio.
Map Click to open the audio mapping window. Check a square to map an audio
channel to an audio track. Any audio can be tracked to any or all tracks. However, you
will typically assign a group of channels to one track and other groups to other tracks.
91
If you have created a shot using a 16 input device, the mapping window will display all
16 channels.

92
Audio Track menu
Multiple audio
tracks selected
Shot Editor
Chroma Key Properties Tab
The audio track that is actually used is selected from the Audio Track menu in the
Output Settings window. Unlike recording (below), only one track can be selected.
If you are recording, you can select multiple audio tracks.
Chroma Key Properties Tab
Chrome Key (also called “green screen”) enables you to replace all green areas of your
display (or any other color you choose) with a background image. For example, if you

Shot Editor
Check to use mouse color selection
Click Defaults to reset controls
Check Use Chroma Key
Set chroma key adjustments
Click to set defaults
Additional Properties Tab
are in front of the traditional green screen, by “keying out” the green and leaving the
background transparent, you will appear to be in front of your background.
The Chroma Key Properties tab enables you to turn on/off chroma keying and make
chroma key adjustments.
93
Use Chroma Key Check to turn on chroma keying. Uncheck to turn it off. Click the
Defaults button to reset all Chroma Key controls.
Pick key color with mouse Check to use your mouse to select a chroma key color.
Hover over the a desired color in the selected source, and click the left mouse button to
select that color. All adjustments will be made using the selected color as the key.
Color Click the color square to open the Color Pallet. Select a color to use as the chroma
key color and click OK.
Key Threshold Slide the Key Threshold slider to adjust the amount of keying in your
source.
Black Clip Slide the Black Clip slider to adjust the black threshold level (how much black
is used in keying).
White Clip Slide the White Clip slider to adjust the white threshold level (how much
white is used in keying).
Set As Default Click to set the current Chroma Key configuration as the default setting.
All future Chroma Keys will be set this by default. Clicking this button does not
retroactively update previously created shots. Chroma Key settings on individual shots
can still be changed.
Additional Properties Tab
The Additional Properties tab provides various adjustments to your selected source,
depending on the kind of source selected. There are many kinds of sources: System
Devices, Screen Captures, Web Displays, Scoreboards, etc.

94
NDI source
Shot Editor
Additional Properties Tab
Capture Devices Properties
Capture Device enables you to capture just the audio of the output. Capture Devices
have a variety of settings. To open a Capture Device source, select Capture Devices from
the source menu in the shot window.
RealTek Example
Here is an example of a Realtek High microphone array.
Source Name Displays the name of the source. To change the source name, enter a
new one.
Audio Delay Enter the amount of time (in seconds, as short as 1 ms) to delay the audio
signal to sync it up with a video source.
Monitor Click the Monitor icon to cause audio to play through your monitor output.
The icon is gold when selected (turned on). If unselected, audio will not play through
the monitor output for this source. Selected is the default.
NDI™ Sources
Any NewTek NDI™ sources on your local network will be discovered by Wirecast and
listed as an NDI™ Source under Capture Devices in the Source Input Menu.

Shot Editor
New NDI source
Additional Properties Tab
Adding an NDI™ source will create a new shot for that source.
If you have selected an NDI™ source, the NDI™ Source Properties tab will display. In
addition to the controls above, an NDI™ source has the following controls.
95
Video Delay Enter the amount of time (in seconds, as short as 1 ms) to delay video.
Bandwidth Select the bandwidth to use: Highest (max quality), Lowest (max efficiency),
or Audio Only (video bandwidth not applicable).
Reconnect Click to reconnect the NDI™ source.
Channel Select Stereo, Left, or Right to determine the audio source for both channels.
Stereo sends the left audio source to the left channel and the right audio source to the
right channel. Left sends the left audio source to the both channels (left and right).
Right sends the right audio source to the both channels (left and right).
Monitor Check the Monitor check box to cause audio to play through your monitor
output. If the check box is unchecked, audio will not play through the monitor output
for this source. Checked is the default.
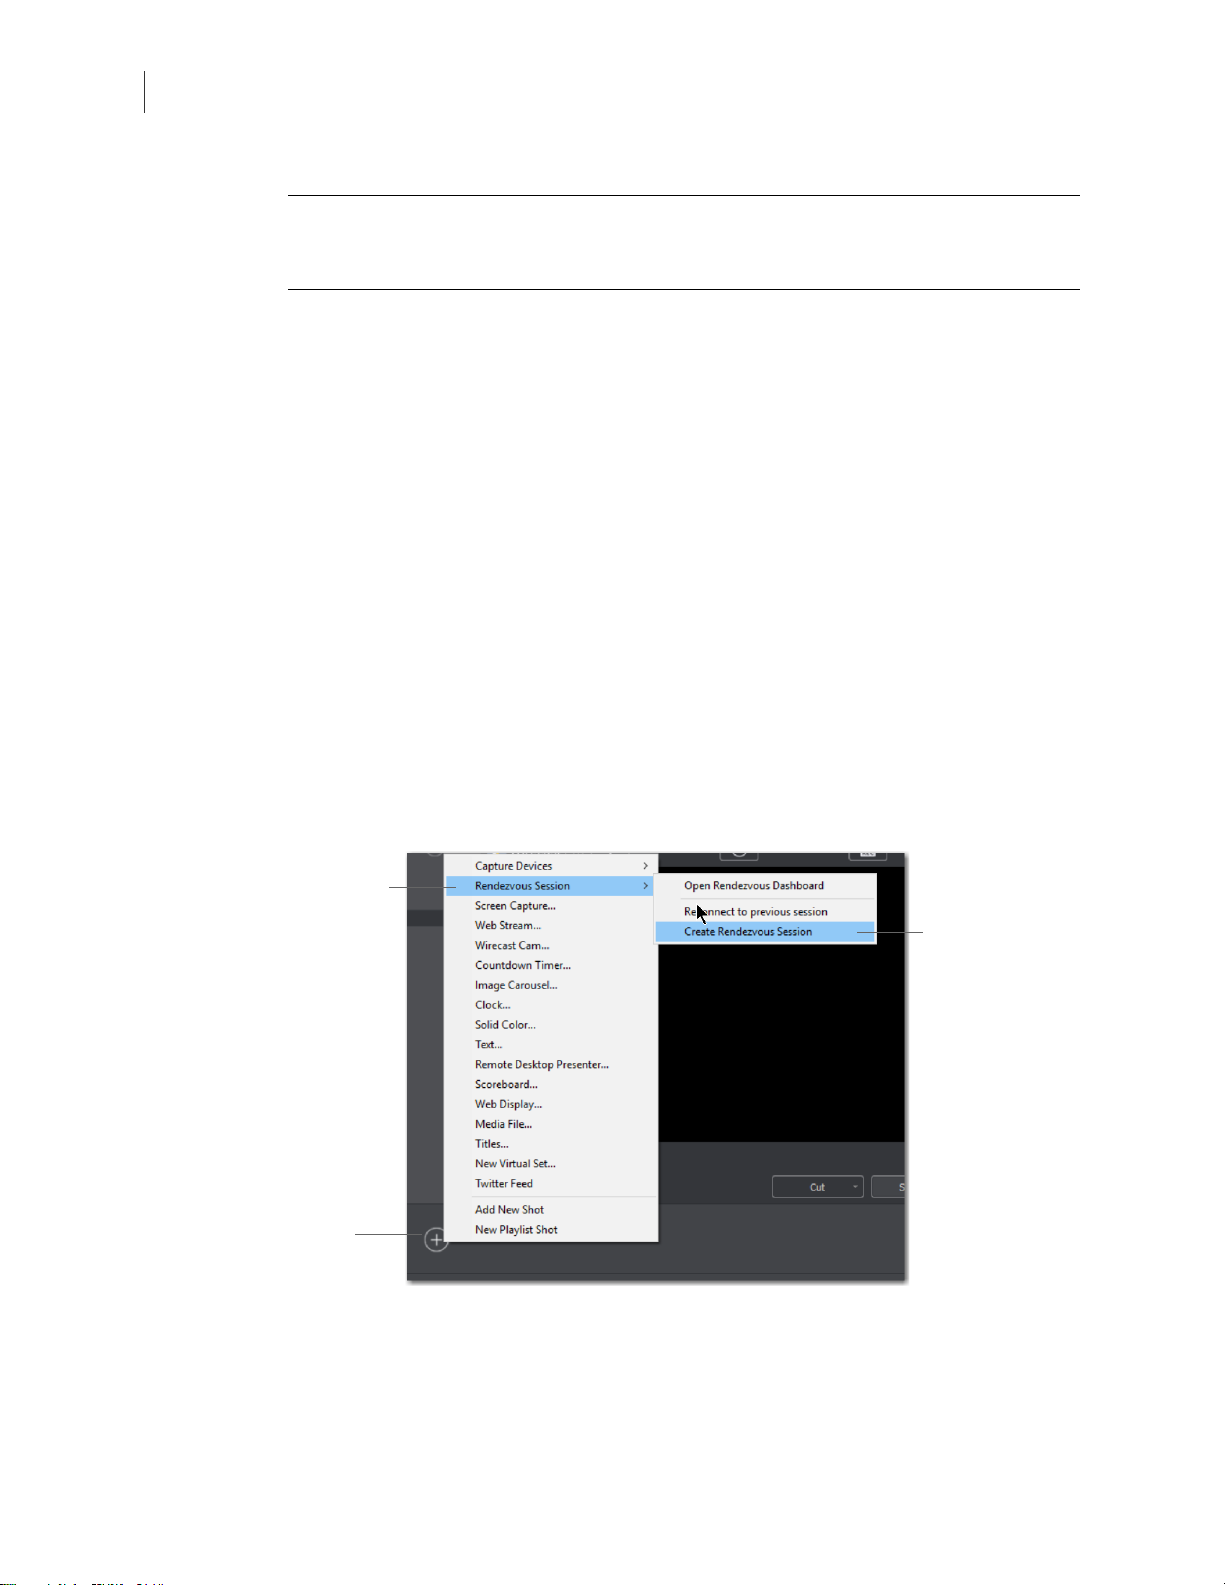
96
Click Create
Shot
Menu
Select
Rendezvous
Session
Shot Editor
Additional Properties Tab
Note: NDI™ networking requires that your network has port 5353 open for mDNS
device discovery, as well as one port per video channel (starting from port 5960 and
onward) transmitted by an NDI™ source, plus one additional port for messaging.
Rendezvous Properties
Rendezvous provides an easy way to organize a video conference with up to two
guests in Wirecast Studio, and up to seven guests in Wirecast Pro. You can bring in live
video feeds from a computer or smart device running a supported web browser, or
from iOS devices running the Wirecast Go app.
• Creating a Rendezvous Session
• Joining a Rendezvous Session
• Adding a Participant Shot
• Participant Options
• Ending a Rendezvous Session
Creating a Rendezvous Session
To open a Rendezvous session, select Rendezvous from the Shot Menu, then select
Create Rendezvous Session.

Shot Editor
Click the “Click to
copy” button
Click OK
Select Sources
Click gear icon
Additional Properties Tab
In the Create Session window click on the Click to Copy button to copy the Rendezvous
URL to the clipboard. Send this URL to the participants that you want to invite to the
broadcast. Click OK when finished.
97
When the Rendezvous Dashboard displays, select a local video and audio source by
clicking the gear icon. You can also make a copy of the participant URL (if you have not
already done so).
Send the session URL (copied above) to your participants and instruct them to use this
URL in a browser to join the Rendezvous session you just created.
Note: The only browsers supported by Wirecast for joining a Rendezvous session are
Chrome and Firefox.
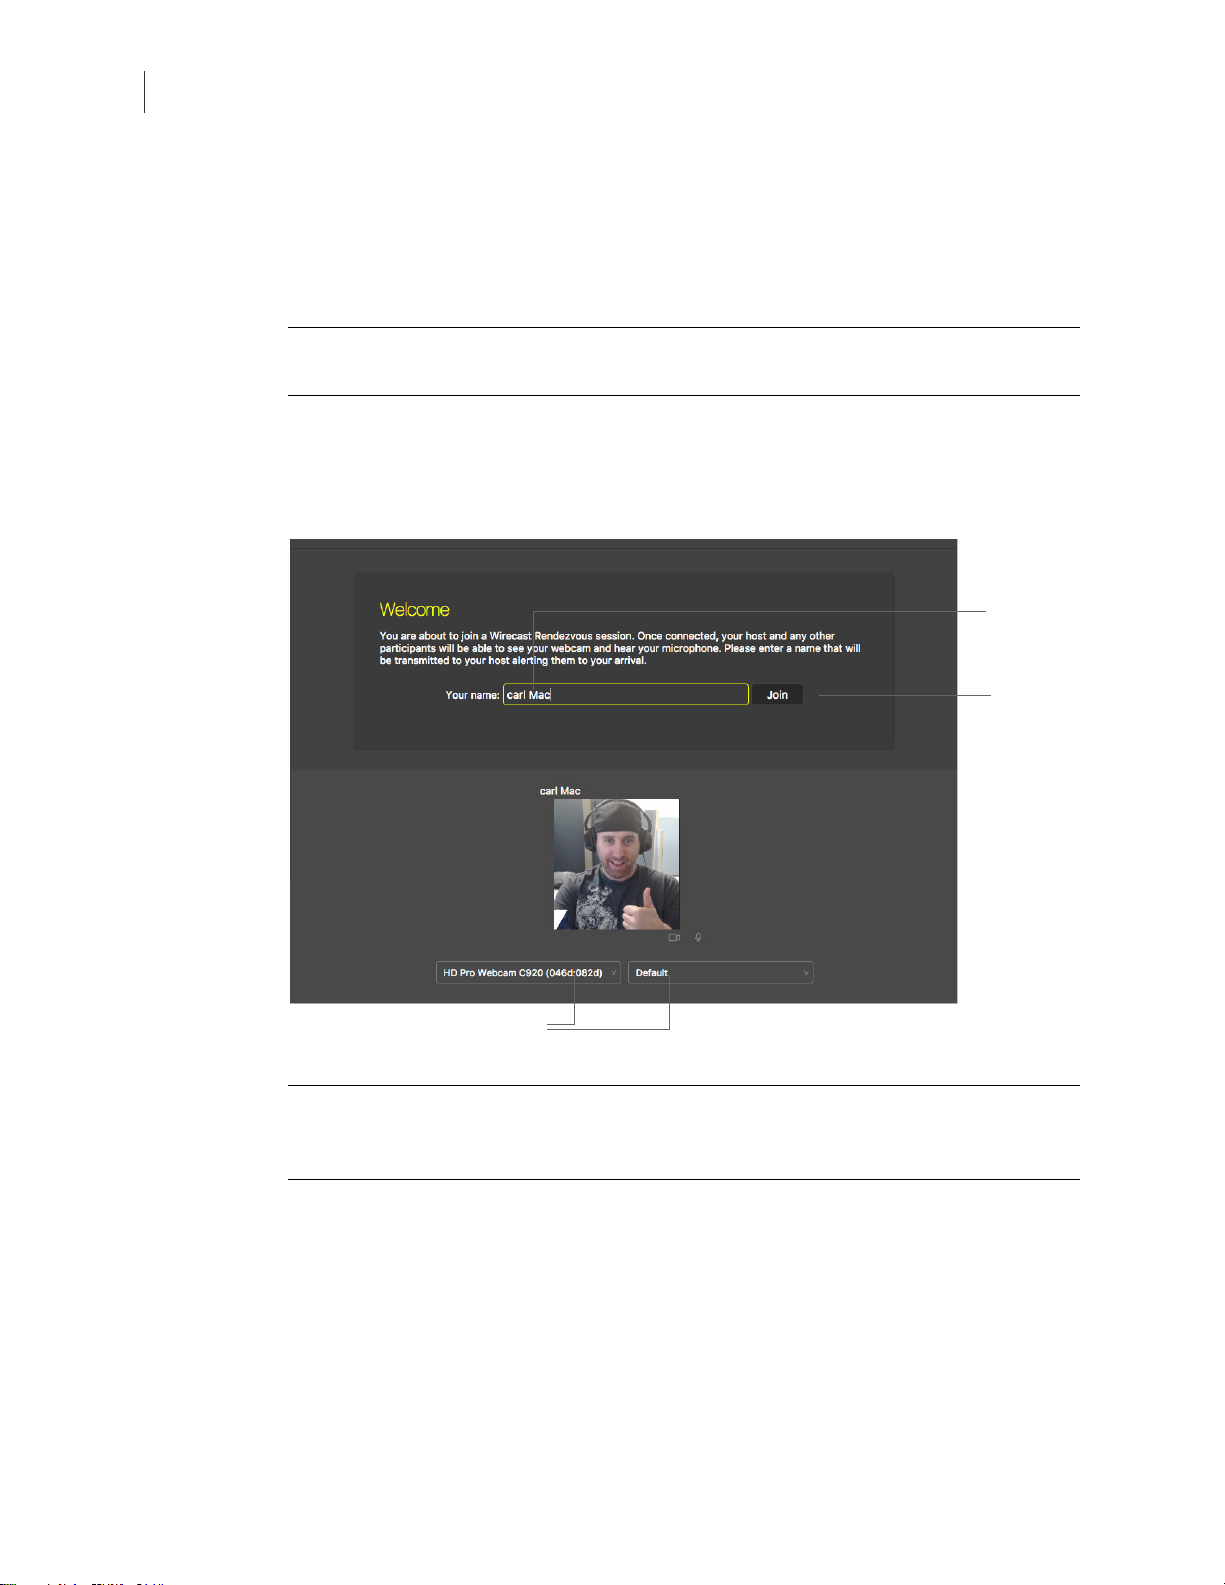
98
Enter an ID.
Click Join
Select camera and mic
Shot Editor
Additional Properties Tab
Joining a Rendezvous Session
To join a Rendezvous session on a remote computer (or smart device), paste the
obtained URL into a browser and press the Enter key to initiate a connection with
Wirecast.
Note: The only browsers supported by Wirecast for joining a Rendezvous session are
Chrome and Firefox.
When the Wirecast Rendezvous window appears, select a camera and microphone
from the drop-down menus at the bottom of the window (if a camera and mic are not
automatically chosen, or if you want to use others that are available). Enter an
identification in the Your Name field and click Join.
Note: Wirecast Go, running on iOS devices, can join a Rendezvous Session by opening
the URL. Android devices can join a session by opening a Session URL (sent to them)
using a Chrome browser.

Shot Editor
Participant icons
Click icon to
add participant
Additional Properties Tab
After you click Join, the Rendezvous window will display a Waiting to join message until
the Wirecast host has added you as a participant.
Adding a Participant Shot
Whenever participants are waiting to join the Rendezvous session, a participant icon
displays in both the Wirecast Main window and the Rendezvous Dashboard. Click on
the icon and select a participant to add it to the session.
99
Note: You can skip this step and go directly to creating a shot of a participant, which
will automatically add them when the shot is created.

100
Select
participant
Shot Selection menu
Shot Editor
Additional Properties Tab
Create a shot of a participant by selecting Rendezvous Session > Add <target ID> to
Rendezvous from the Shot Selection menu. The participant is automatically added
when you create this shot.
 Loading...