


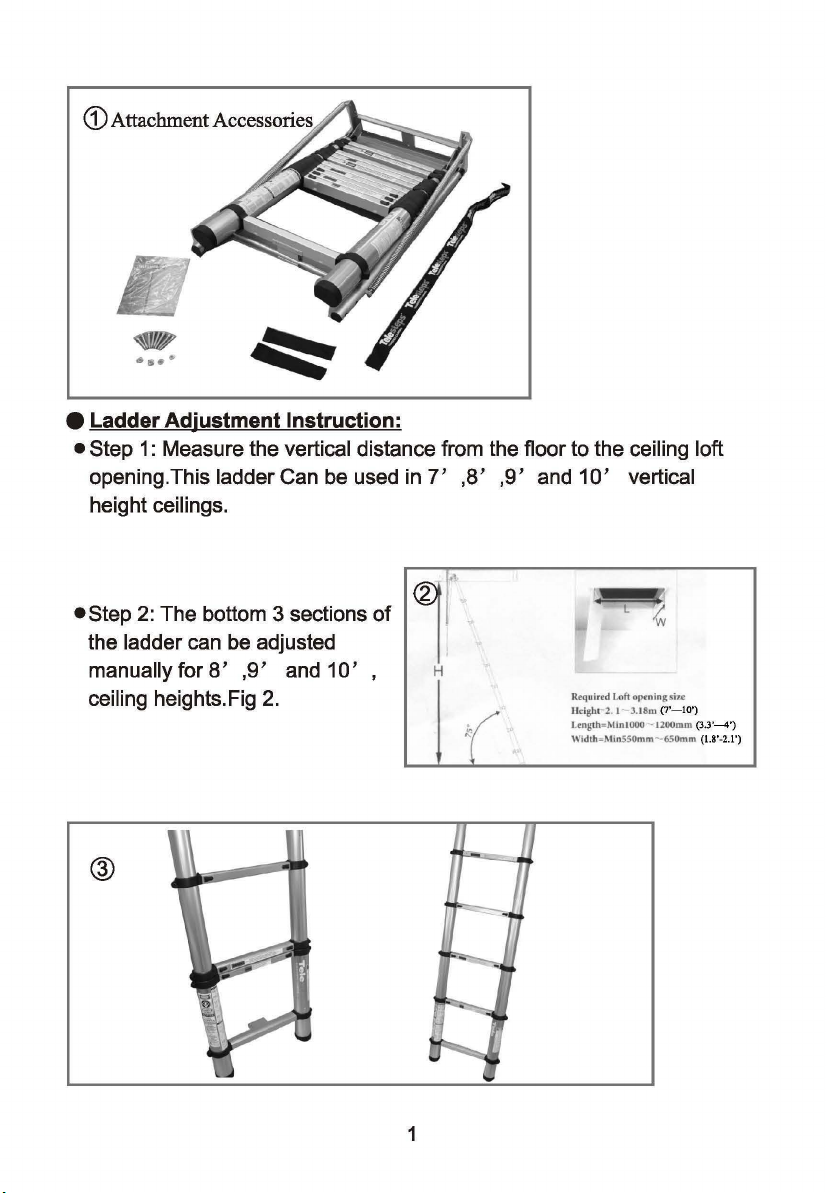
e Ladder
•Step
Adjustment
1:
Measure the vertical distance from the floor to the ceiling loft
opening.This ladder Can
height ceilings.
Instruction:
be
used in
7'
,8' ,9'
and
10'
vertical
•Step
2:
The bottom 3 sections
the ladder
can
manually for
8'
ceiling heights.Fig
@
be
adjusted
,9'
2.
and
10'
,,
of
,
H
1
Required
Loft
Hdgb
1 2. I - 3.18m
l.cnglh=
Minl000
Width=Min5 5
L )
w
opieningsi'I.£
(7'-10')
- 1200mm (3.3'---4')
0mm--650mm
(l.8'-2.1')
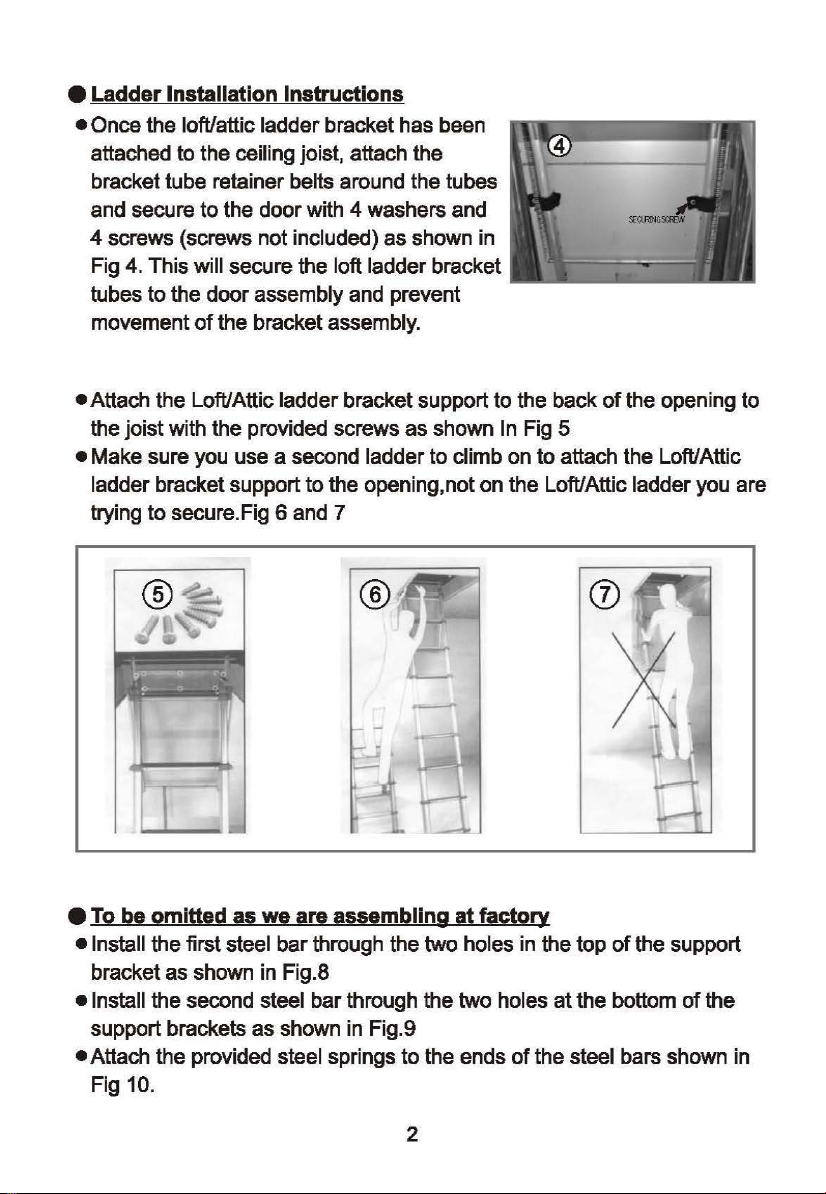
• Ladder Installation Instructions
•Once
the loft/attic ladder bracket has been
attached to the
bracket tube retainer
and secure
4 screws (screws not included)
4.
This will secure the loft ladder bracket
Fig
tubes
to
the
movement
ceiling joist, attach the
belts around the tubes
to
the door with 4 washers and
door
assembly and prevent
of
the bracket assembly.
as
shown in
•Attach
the
•Make
ladder bracket support
trying
e
To
• Install
bracket as shown in Fig.8
• Install
support brackets
•Attach
Fig
the
Loft/Attic ladder bracket support
joist
with the provided screws as shown In Fig 5
sure you use a second ladder
to
secure.Fig 6 and 7
~J
••
be
omitted
the
the
the
10.
..
l
as
we
first steel
second steel
as
provided steel springs
to
the back
to
climb
on
to
the opening, not
are assembling
bar
through the two holes in the top
bar
through the two holes
shown in Fi
g.9
to
on
at
factory
the ends
the LofUAttic ladder you are
of
of
the opening to
to
attach the Loft/Attic
x
of
the support
at
the bottom
the steel bars shown in
of
the
2

®
•The
Attic/Loft ladder should be
attached to the door and be
available for use once the door
has been
pulled open Fig.12.
• Operation-Opening
• Open the Attic/Loft ladder door by
pulling on the hanging rope
Fig
11.
or
cable
@
• Open the Attic/Loft ladder by
gripping the outside tubes with both
hands and
and
allowing it to open down to the
floor. Fig 13
lifting it off the pothook
3

•The
ladder should come to rest
floor at a 75 degree
opened.Fig 15
•You
will notice that there are windows on each
side
of
the rungs/step
windows turn from the color red to the color
green as they are extending indicating that the
sections are
Fig 14
angle when
locking and are safe for use
on
the
of
the ladder.These
•If
the Attic/Loft ladder does not meet the floor when retracted there are
3
additional sections that can be retracted manually to be able to meet
the floor
in
8'
,9'
,10'
applications.Fig 16
4

• Once the Attic/Loft ladder feet are
firmly positioned against the floor
at 75 degrees and
locked by ensuring that the
locking indicator windows on each
of
side
from the
is safe to climb.Fig 18
the rungs/steps have turned
colorred to green.the ladder
all sections are
• Open
the additional section(s)
manually by pressing the button on
the outside
middle to release the locking
mechanism
of
the rungs toward the
of
the section. Fig 17
• Climbing the Attic/Loft ladder is done
in
front
of
by standing
by gripping the outside tubes
ladder while climbing the rungs one
step at a time. Fig19
the ladder and
of
the
5

• Do not climb the ladder from the
back side.Fig
20
• Closing the Ladder
•To
close the Attic/Loft ladder you must first ensure that all
manually opened bottom rungs are closed manually by pressing the
of
2 buttons on the outside
rung/step to
release the locking mechanism.Fig
the rungs/steps towards the center
21
of
the
6
of
the

• Once these rungs have been
unlocked simply push up on the
ladder with both hands firmly on
of
the outside tubes
until all
have retracted.Fig 22
sections
the ladder
of
the ladder
• Once ladder is closed simply move it over to the frame and place the
ladder back
in
the pothook to lock it in place.Fig 23
7
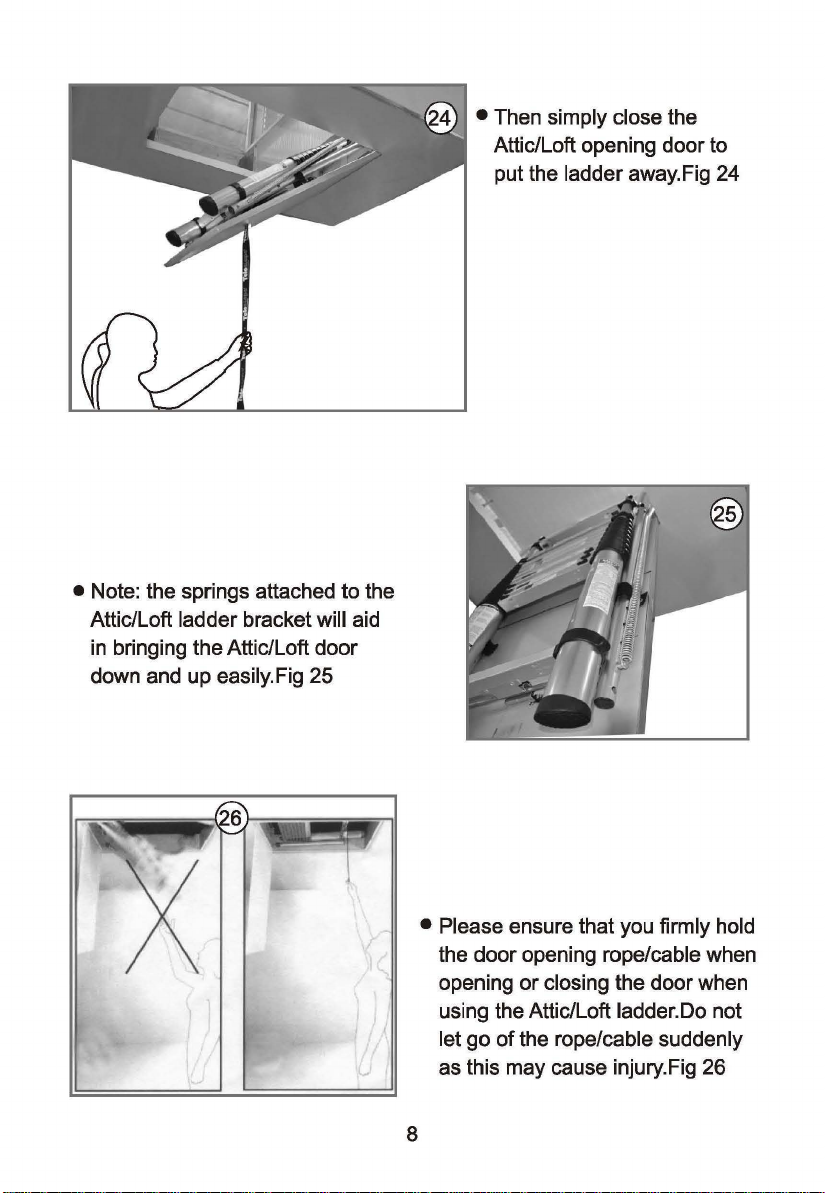
• Note: the springs attached to the
Attic/Loft
in
bringing the Attic/Loft door
down and up
ladder bracket will aid
easily.Fig 25
• Then simply close the
Attic/Loft opening door to
put the
ladder away.Fig 24
• Please ensure that you firmly hold
the door opening rope/cable when
opening
using the Attic/Loft
let
as this may cause injury.Fig 26
or
closing the door when
ladder.Do not
go
of
the rope/cable suddenly
8
 Loading...