

Page 1

OPTIMO SERVER
Installation Guide and Release
Notes v2.0.2
March 5, 2013
Page 2

2
CONTENTS
Introduction .................................................................................................................................................. 3!
Documentation standards ............................................................................................................................ 3!
First time installation .................................................................................................................................... 3!
Configuring the keyboard layout for system console ............................................................................... 7!
First time installation of multiple servers ...................................................................................................... 7!
Release Notes ............................................................................................................................................. 8!
New Product Features 2.0.2 .................................................................................................................... 8!
New Product Features 2.0.1 .................................................................................................................... 8!
New product features 2.0 ......................................................................................................................... 9!
Appendix A: Configure details ................................................................................................................... 12!
Appendix B: Using a second network interface ......................................................................................... 13!
The management node .......................................................................................................................... 14!
The worker node .................................................................................................................................... 15!
Copy-local location ................................................................................................................................. 15!
Upgrading a cluster from a previous version .......................................................................................... 15!
Configuring a worker node using a configuration file ............................................................................. 16!
Optimo server web user interface .............................................................................................................7!
Appendix C: Optimo Server clusters ......................................................................................................... 14!
Copyright © 2013 Teleste Corporation Optimo Server Installation Guide and Release Notes v2.0.2
Page 3
3
INTRODUCTION
Note that text in this font must be typed exactly as is. Text in angle brackets (‘<’ or ‘>’) indicates
substitution.
For example, to show the contents of a file, you should use the cat command with the filename that you
want to view. This is documented as follows: cat <filename>
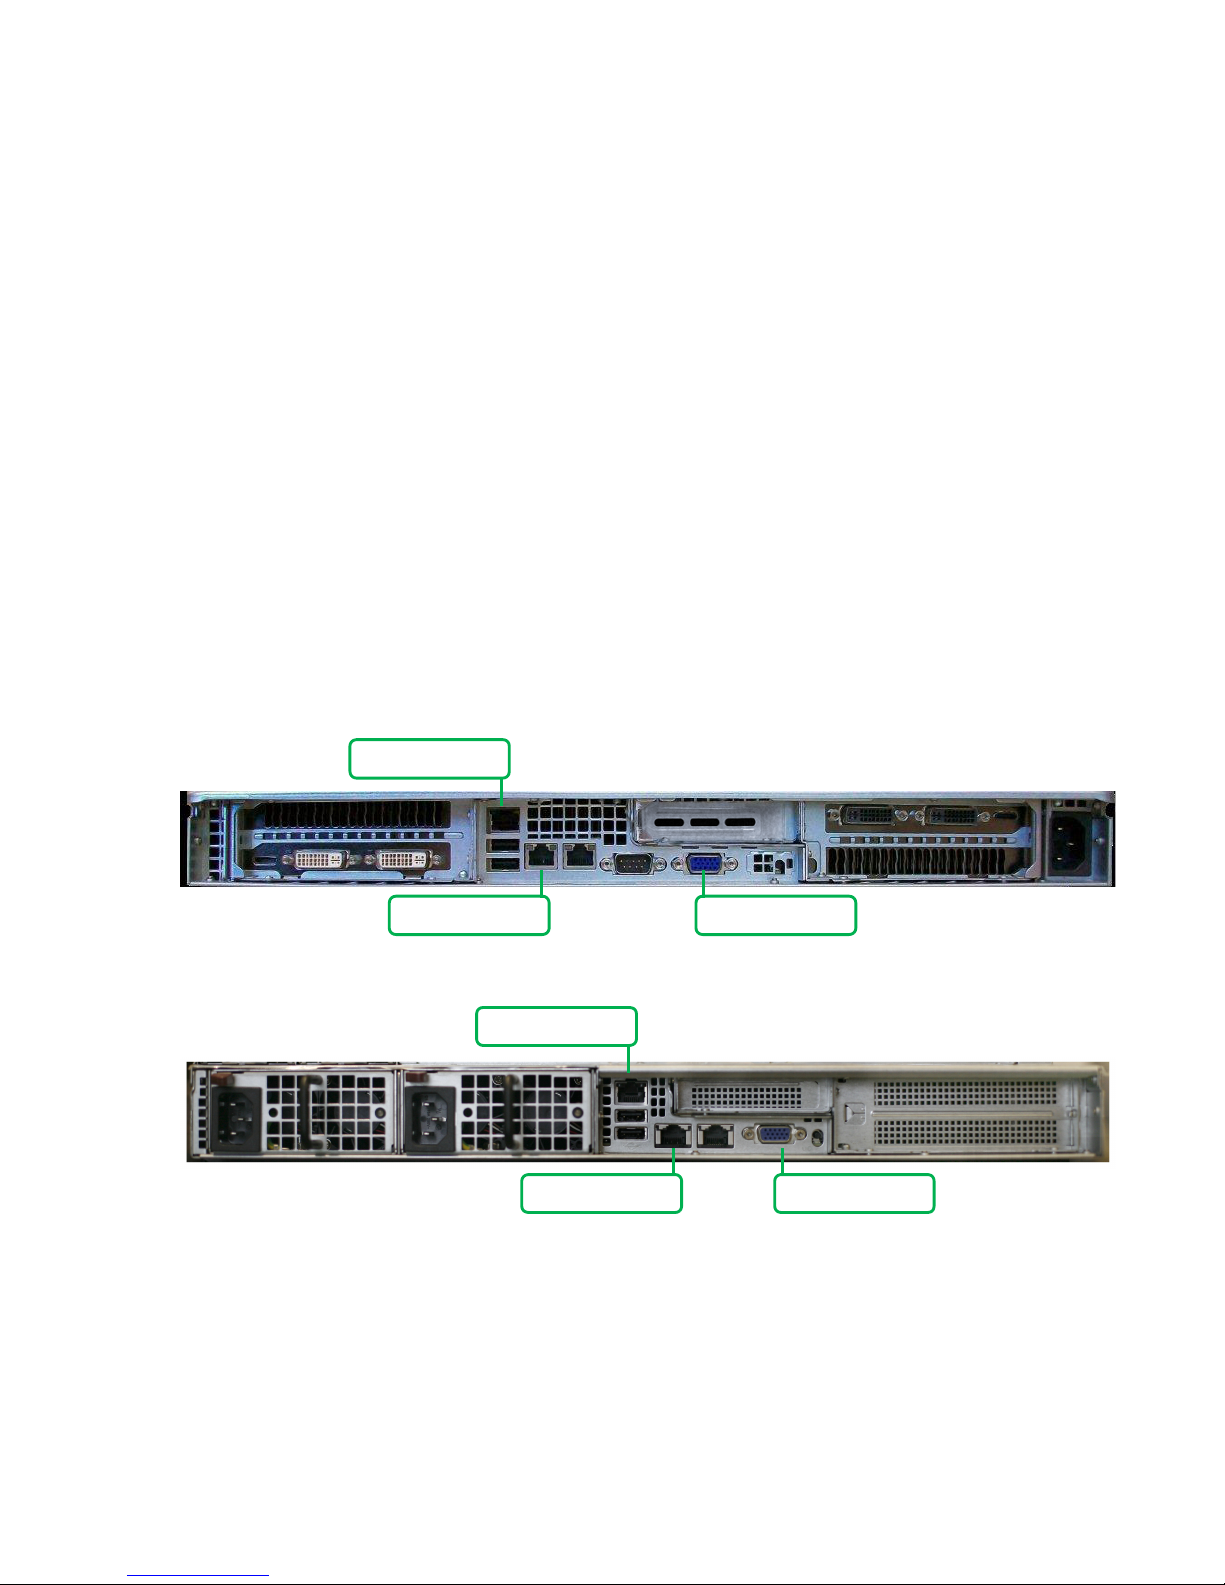
1. Before turning on the system, connect a keyboard, power cable, monitor, and Ethernet cable to the
system as shown in the diagrams below. Note that a USB keyboard will work for all systems.
a. In a 1RU and 2RU systems, the Ethernet cable should be connected to eth0, the left-most LAN
port before powering the system on.
Ethernet (eth0)
VGA
Ethernet (eth0)
VGA
IPMI
IPMI
This guide describes how to turn on the Optimo Server hardware and connect to the system for the
first time.
DOCUMENTATION STANDARDS
FIRST TIME INSTALLATION
Optimo(R) Server S200AE
Optimo(R) Server S220AE
Copyright © 2013 Teleste Corporation Optimo Server Installation Guide and Release Notes v2.0.2
Page 4
4
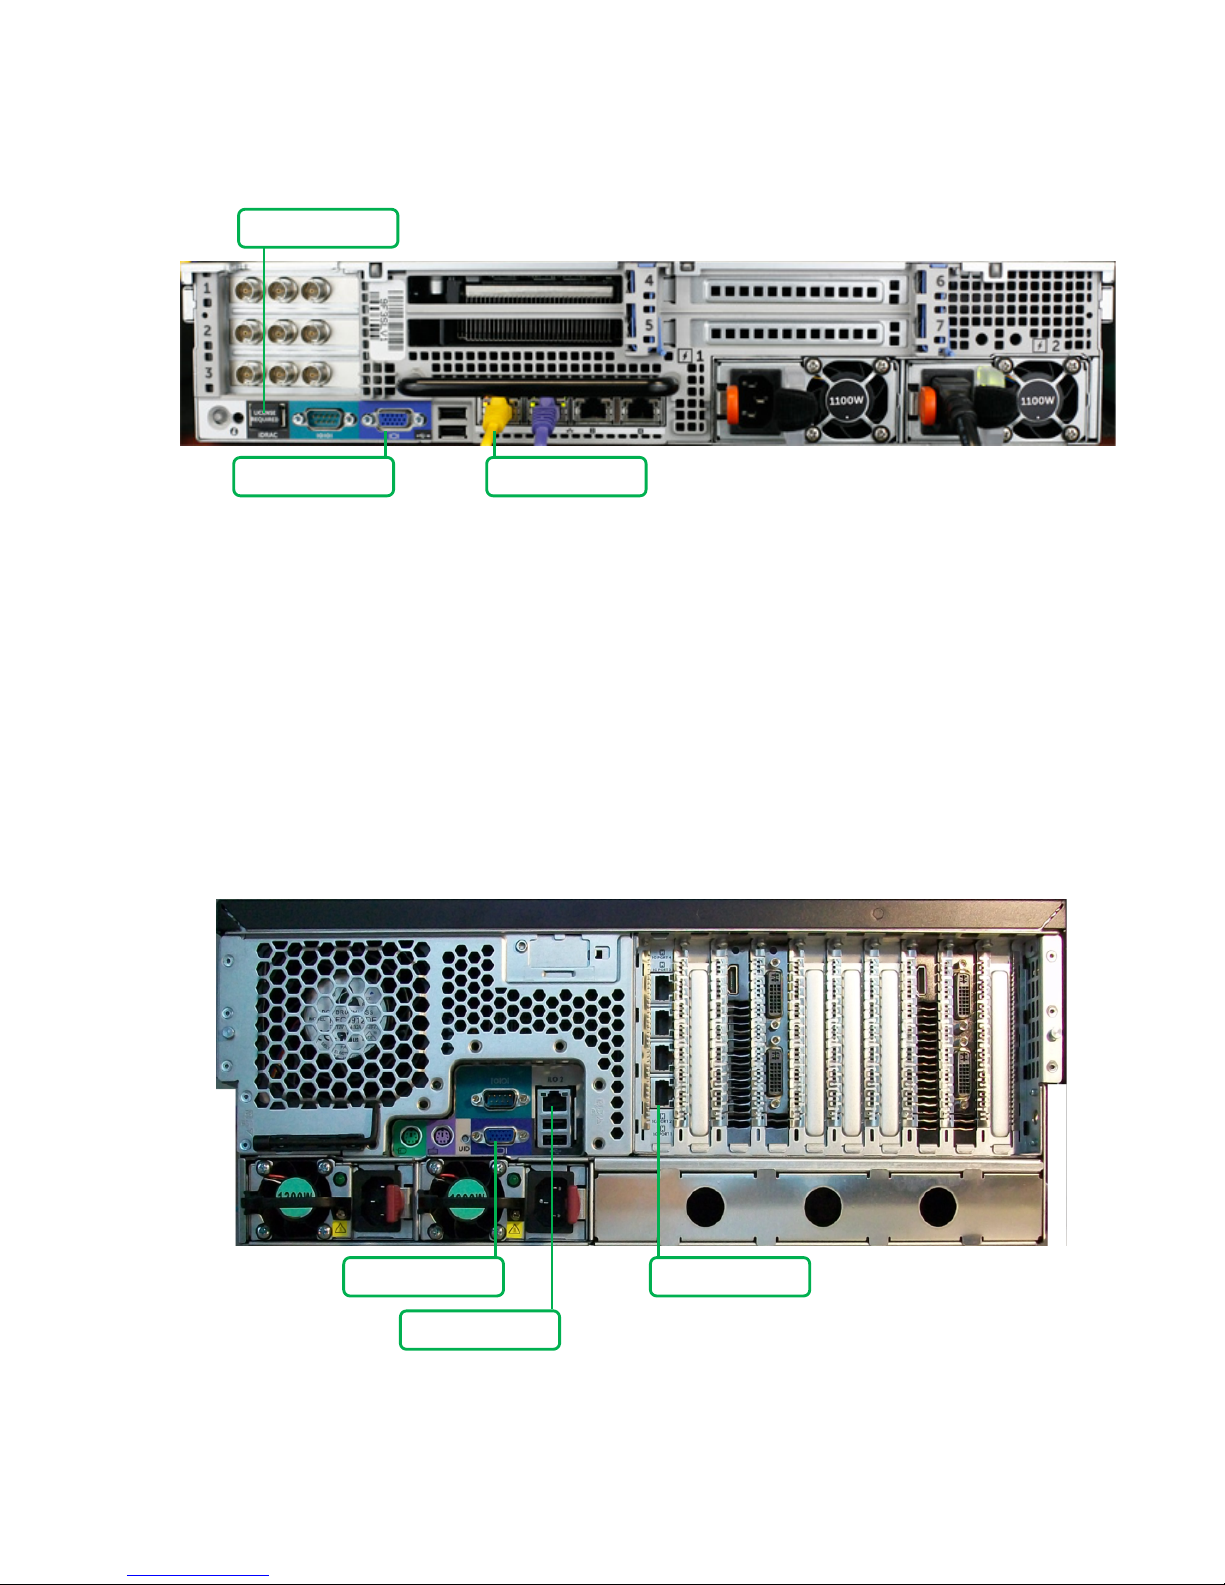
Optimo(R) Server S234AE
b. The monitor should be connected to the center VGA connector (the monitor is only needed to run
the initial configuration script and determine the IP address).
c. In a 4RU system, the Ethernet cable should be connected to eth0, the bottom-most LAN port
before powering the system on.
d. The monitor should be connected to the VGA connector.
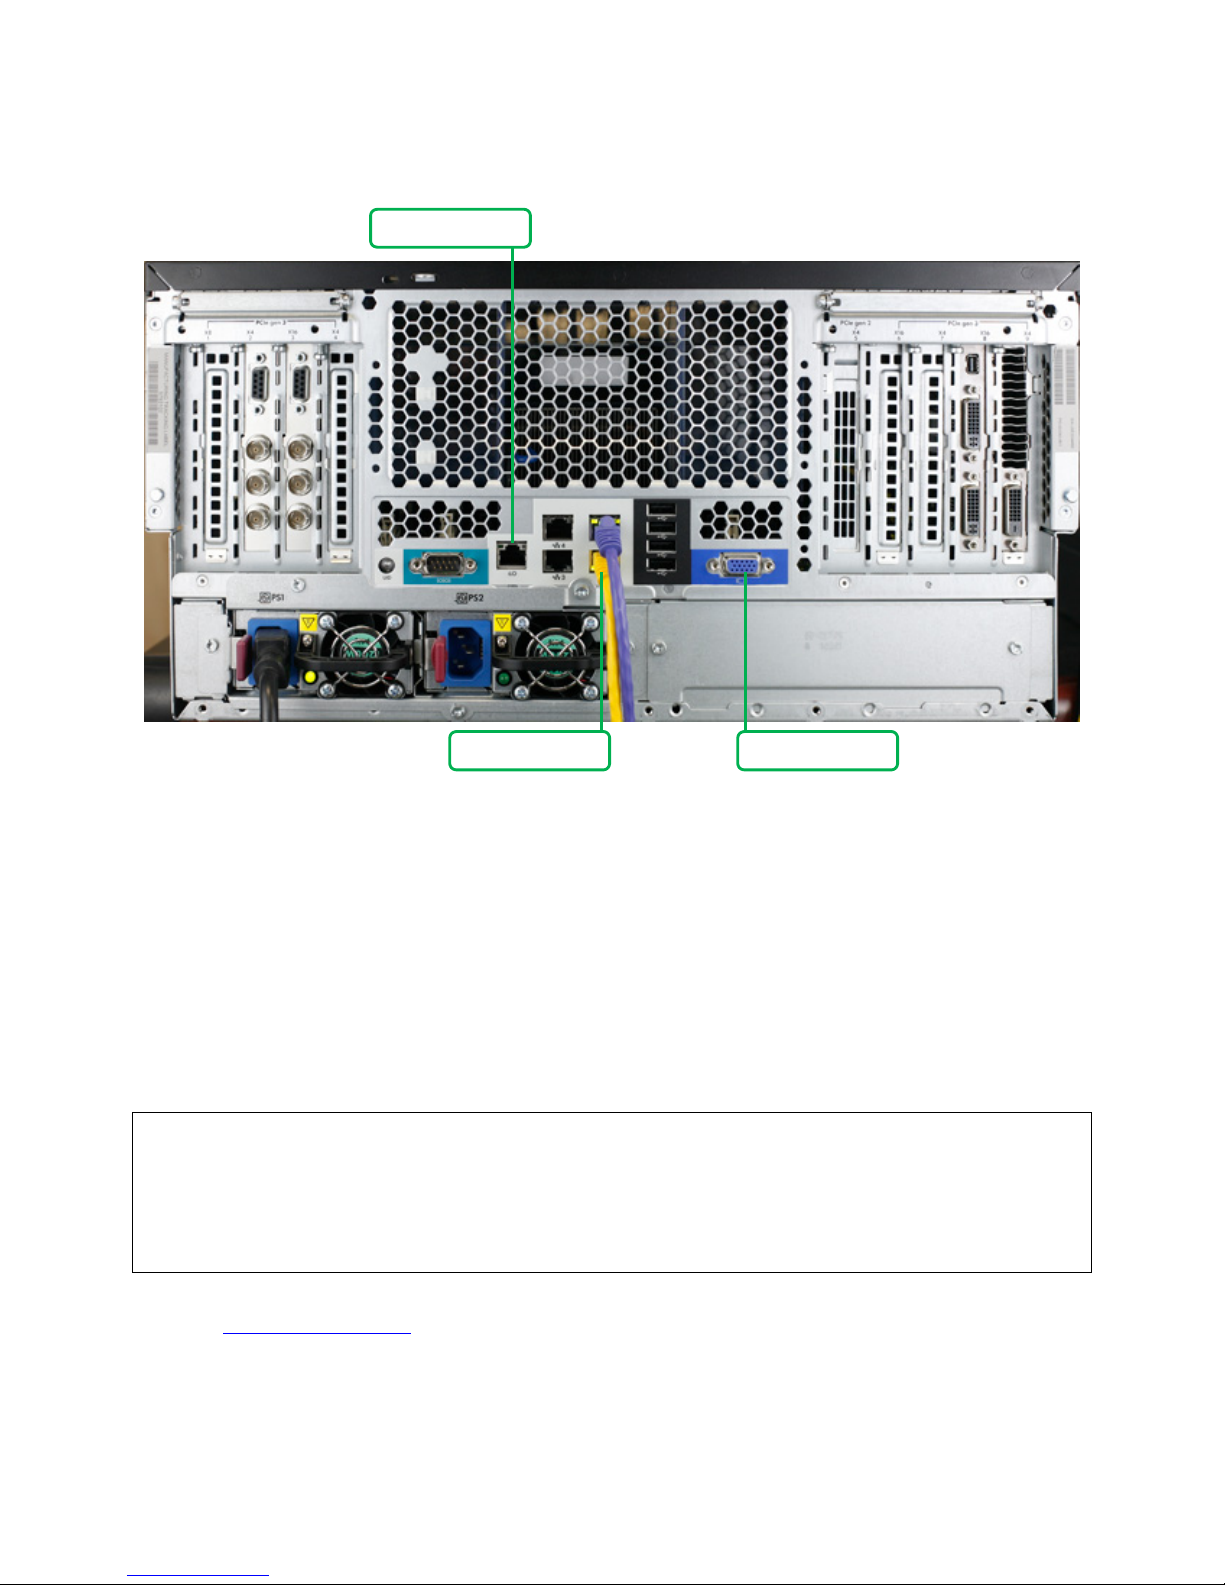
e. In a 5 RU system, the Ethernet cable should be connected to eth0, the bottom-right Ethernet port,
before powering the system on.
VGA
Ethernet (eth0)
Ethernet (eth0)
iDRAC
VGA
ILO
Optimo(R) Server S206AE (*representation)
Copyright © 2013 Teleste Corporation Optimo Server Installation Guide and Release Notes v2.0.2
Page 5
5
Optimo(R) Server S230AE
2. Power on the machine.
3. Log into the system with the username “elemental” and password “elemental”.
4. Type the following command to see the software versions available for installation:
ls ~/elemental_production_*
5. Run the installer and follow the prompts to set up the software, replacing the #### placeholder
characters with the version number shown in the prior step:
sudo ./elemental_production_server_2.0.2.####.run
When the installation completes, you should see the following:
Installation and configuration complete!
Starting elemental_se: [ OK ]
Please open a web browser and point it to: http://<your ip address> to get to
the web interface.
Please contact [email protected] if you are having
difficulties.
Enjoy!
For more information on the configuration script, please see Appendix A – Configuration details.
At this point, you can determine the IP address of your system by typing:
VGA
Ethernet (eth0)
ILO
If you do not see successful output after running the configure script, please contact Optimo
support ([email protected]).
NOTE: follow the prompts to set up a static IP or use DHCP. The system ships from Teleste
Corporation with DHCP enabled.
Copyright © 2013 Teleste Corporation Optimo Server Installation Guide and Release Notes v2.0.2
Page 6

6
ifconfig
The IP address of the system is listed next to the inet addr field in the eth0 section.
Copyright © 2013 Teleste Corporation Optimo Server Installation Guide and Release Notes v2.0.2
Page 7

7
OPTIMO SERVER WEB USER INTERFACE
When the basic system parameters have been configured, you can connect to the web-based user
interface by entering the IP address into a web browser. Firefox is recommended.
To access the system home page and to view current jobs, navigate to:
http://<ip address>
For more information about the system and specifically for details about how to use the web-based or
REST interfaces, navigate to the “Support” page:
cat /opt/elemental_se/versions.txt
After typing the command, the currently installed version is displayed just above the dashed line.
CONFIGURING THE KEYBOARD LAYOUT FOR SYSTEM CONSOLE
1. Log in as the “elemental” user.
2. Run the command:
sudo ./kp-config.sh
Choose the appropriate settings. If unsure, choose the default setting.
In order to make it easier to configure multiple servers, the configure script accepts an XML file of settings
parameters. This feature is especially helpful if the servers to be configured require similar settings or are
part of a Cluster. For configuring servers into a Cluster using this feature, please read the Configuring a
Worker Node using a Configuration File section of Appendix C.
These instructions assume that an initial server has already been configured. The settings XML file may
be queried via the REST interface from this initial server:
curl -H 'Accept: application/xml' http://<initial_server>/settings.xml >
settings.xml
This creates a settings.xml file. This file should be reviewed for accuracy and updated as necessary. In
particular, the hostname and any static IP configuration must be changed to the values desired for the
second server.
Next, configure the second server using the following command:
sudo ./elemental_production_server_2.0.2.####.run -i settings.xml
This step assumes that the settings.xml file has been copied to the /home/elemental/ directory.
http://<ip address>/help
Note that you can find the currently installed version of Optimo Server at the bottom of the user
interface or by typing the command:
Optimo systems ship with the default keyboard layout set to US. To change the keyboard layout for the
system console, follow these steps:
FIRST TIME INSTALLATION OF MULTIPLE SERVERS
Copyright © 2013 Teleste Corporation Optimo Server Installation Guide and Release Notes v2.0.2
Page 8

8
RELEASE NOTES
cat /opt/elemental_se/versions.txt
NEW PRODUCT FEATURES 2.0.2
! SCC files can be created as caption outputs from SCC or embedded (608) inputs
! DVB subtitles can be a source for burn-in captions
! Quality improvements at lower bitrates for MPEG-2 encoder
o Minimum I-frame interval prevents regular GOP I-frames from being created near scene
change I-frames
o Framing quantization reduces QP near the center of the image for better visual quality
o Softness varies the quantizer matrix for improved visual quality at higher quantization levels
! Added SubContentType for Irdeto so the same content key can be used for Smooth Streaming and
HLS
! Writes IV to HLS manifest when iv_follows_segment_number is true for later manifest manipulation
! Permissions on log files and content files are now set to 0664
! Updated HDS onCaptionInfo capabilities for compatibility with existing players
! Updated Smooth Streaming and Apple output group validation for GOP alignment when using frame
rate follow source
! Fixed common encryption playback issue with UltraViolet files in Silverlight-based players
! Nielsen ID3 support is incompatible with manual audio remixing
! When a job is cancelled or stopped for any reason then the parts of the upload that were successfully
sent to the S3 bucket will now be deleted from the bucket before the job ends
NEW PRODUCT FEATURES 2.0.1
! SMI and SRT are valid caption source formats
o Function with text-based outputs (non-Embedded)
! Smooth Streaming output groups can produce audio-only .isma files to separate video and audio
outputs
! Updated Nielsen metadata library to collect input metadata from subaudible cue tones and separate
id3 track
o Note that outputs with neilsen_id3_passthrough enabled should contain audio output tracks
! Support for Adobe ad messaging in HLS streams
o
functionally equivalent to selecting SCTE-35 in Metadata settings of individual streams in
previous versions
! Adobe HDS support is now production ready
o Support for stream-level manifest versions 1.0, and 3.0 (for Primetime players)
o smpteTimecode elements moved from set-level manifests to stream-level manifests
! Support for Encoder Boundary Point segmentation/fragmentation markers in MPEG Transport Stream
outputs
! Support for periodic database backups. Backup frequency and number of backups to keep can be
configured in the Settings -> General tab
This section describes new features, improvements and known issues in Optimo Server release 2.0.
You can find the currently installed version of Optimo Server at the bottom of the user interface or by
typing the command:
Copyright © 2013 Teleste Corporation Optimo Server Installation Guide and Release Notes v2.0.2
Selector for ad marker style is
in output group settings. Selecting “Optimo” ad markers is
Page 9

9
Optimo Cloud Changes
! S3 output integrated into Elemental Media Engine for better performance and progressive (multipart)
upload
! S3 input performance is much improved due to much faster transfer engine
! Support for IAM instance roles for more secure data transfer in and out of the instance (S3
credentials are no longer needed in the Job / Event XML)
NEW PRODUCT FEATURES 2.0
User Interface Changes
! Multiple output groups allowed in a single job
o Destination field has moved to individual output groups
o Video, audio, and caption streams are configured separate from outputs, and can be used in
multiple output files
o The maximum character length of profile names has been extended to 200 characters
! Unicode file names and directories are supported
REST Interface Changes
! The object model for Job XMLs has changed to reflect multiple output groups. This change is not
o <profile> has been changed to <job_profile>
o <watch_folder> has been changed to <job_watch_folder>
Pre and Post Processing Script Changes
! The format for passing arguments to pre- and post- processing scripts has changed to JSON
o
Server 1.x format
o Existing profiles and jobs have been updated to use this script
Licensing Changes
! There are no longer separate installers for Cable Pack customers. Access to Cable Pack features is
controlled with a valid cable.lic license file.
! Codecs and containers which the user does not have a license to will appear greyed out in the user
interface
o
configuration
Beta Adobe HDS Support
! Added support for Adobe HTTP Dynamic Streaming
! onCaption support added for HDS outputs
backwards compatible with previous versions of Optimo Server; automation systems should be
updated
to reflect the new XML structure.
! REST endpoints have been updated to be prefixed by /api (for example, http://<server ip>/api/
)
jobs
! A REST command has been added to return the version of the current Teleste product
A compatibility script has been provided which translates script arguments to the Optimo
Multiple Optimo Server units should have the same licensing if used in a clustered
Copyright © 2013 Teleste Corporation Optimo Server Installation Guide and Release Notes v2.0.2
Page 10

10
! onCuePoint ad messages added to HDS outputs
Microsoft Smooth Streaming Changes
! Updated default fragment size to 2 seconds to match Microsoft recommendations
o Updated ISMV presets to have 2 second GOP lengths
! Updated language descriptor to be compatible with additional players
! Manifests are selectable as either UTF-16 or UTF-8 encoding
! Updated PlayReady encryption has an option for 64 bit IV or 128 bit IV
o
the 128 bit option
o
recommends changing any profiles to use 64 bit IV
Apple HLS Changes
! The Base URL field is available to create playlists with absolute URLs
! Support added for Apple’s new Enhanced Encryption technology
! Support added for WebVTT outputs
! Added user selectable EXT-X-PROGRAM-DATE-TIME tags into HLS manifest files
! White spaces in manifests will be represented as %20 for conformance to the Pantos specification
! Added the ability to specify external outputs to the variant playlist
Quicktime Changes
! An option for including or omitting the CLAP atom has been added
Timecode Changes
! Burn in Time Code (BITC) is supported for all output types
! The ability to specify a user defined starting timecode value has been added
Captioning Changes
! Open Captions are supported for all output types
o All caption inputs except DVB-Sub function with open captions
! WebVTT captions are available for Apple HLS outputs
! onCaption support available for Adobe HDS outputs
! Added support for STL inputs when going to text-based output captions such as TTML, WebVTT,
Open captions, etc
UltraViolet Changes
! Corrected calculated SegmentSize as stored in final .xml
! smpteTimecode element added to HDS outputs
! Flash Access support added for HDS outputs
! Final release of HDS support in January 2013
NOTE Previous versions of Optimo Server always
used 64 bit IV, despite the presence of
128 bit IV is known to cause playback problems on many Silverlight players; Teleste
Copyright © 2013 Teleste Corporation Optimo Server Installation Guide and Release Notes v2.0.2
Page 11

11
! CFF-TT language codes set to 2 characters
! Improved fragment ordering for decimate 0.15 compliance
! Support for full Ultraviolet metadata pass-through
o Metadata is now validated against the UVU Metadata XSD 1.0.3
o XSD's used for validation can by changed by replacing
/opt/elemental_se/config/uvu_schema.xsd with a different version of the Ultraviolet Metadata
schema from http://www.uvvu.com/schema/
! Support for 8-byte IV's in CFF Encryption
! Multiple subtitle track support for Ultraviolet outputs
! Leading or trailing whitespace in captions is stripped for CFF-TT outputs for specification compliance
Other Changes
! "Max total CPU threads" has been changed to "CPU Load Factor"
! Message of the day updates provide additional details about the system and its configuration
! Partial files resulting from aborted copy to local requests are removed
! Max bitrate field is applied to ABR rate control mode
Known Issues
! EXT-X-PROGRAM-DATE-TIME will use the date the file was encoded on
! A name modifier is required for proper playback of WebVTT caption outputs in HLS, however the user
interface will not mark jobs missing this invalid
Copyright © 2013 Teleste Corporation Optimo Server Installation Guide and Release Notes v2.0.2
Page 12

12
APPENDIX A: CONFIGURE DETAILS
The configure program is run to configure a new system or upgrade an existing system with new
software. It behaves like a standard command line utility. It is interactive by default, requesting simple
input from the user. However, there are command line options you can enter to install automatically,
which is important when installing multiple machines over ssh.
The following is the command for usage help:
./elemental_production_server_2.0.2.####.run --help
OPTIONS:
-i <filename>: Use the configuration XML <filename> to configure
-h, --help : Show this help message
-v, --version: Show version information
-s, --start: Start the services once installed without asking
-c, --cleandb: Clean out databases before updating
-t, --skip-tz Bypass entering time zone settings
-n, --skip-net: Bypass entering network settings
-l, --skip-cluster: Bypass entering cluster settings
-z, --skip-auth: Bypass entering authentication settings
-a, --config-auth: Configure authentication settings only (does not run
full configure)
-e <port@host>: Set license server location port@host. For example:
2701@licserv1
--skip-all Bypasses time zone, network and authentication
settings
-ns, --no-start: Don't ask to start the service at the end of
installation
-xeula: Bypass the display and prompting for acceptance of
the End User License Agreement. By
using this option, you indicate that you have read
and accept the License Agreement contained in the
file
opt/elemental_se/doc/ESAE_EULA.txt and in the About
section of the user interface
--install-driver <driver>: Install one of the following drivers during a
system update: celerity8fc
Copyright © 2013 Teleste Corporation Optimo Server Installation Guide and Release Notes v2.0.2
Page 13

13
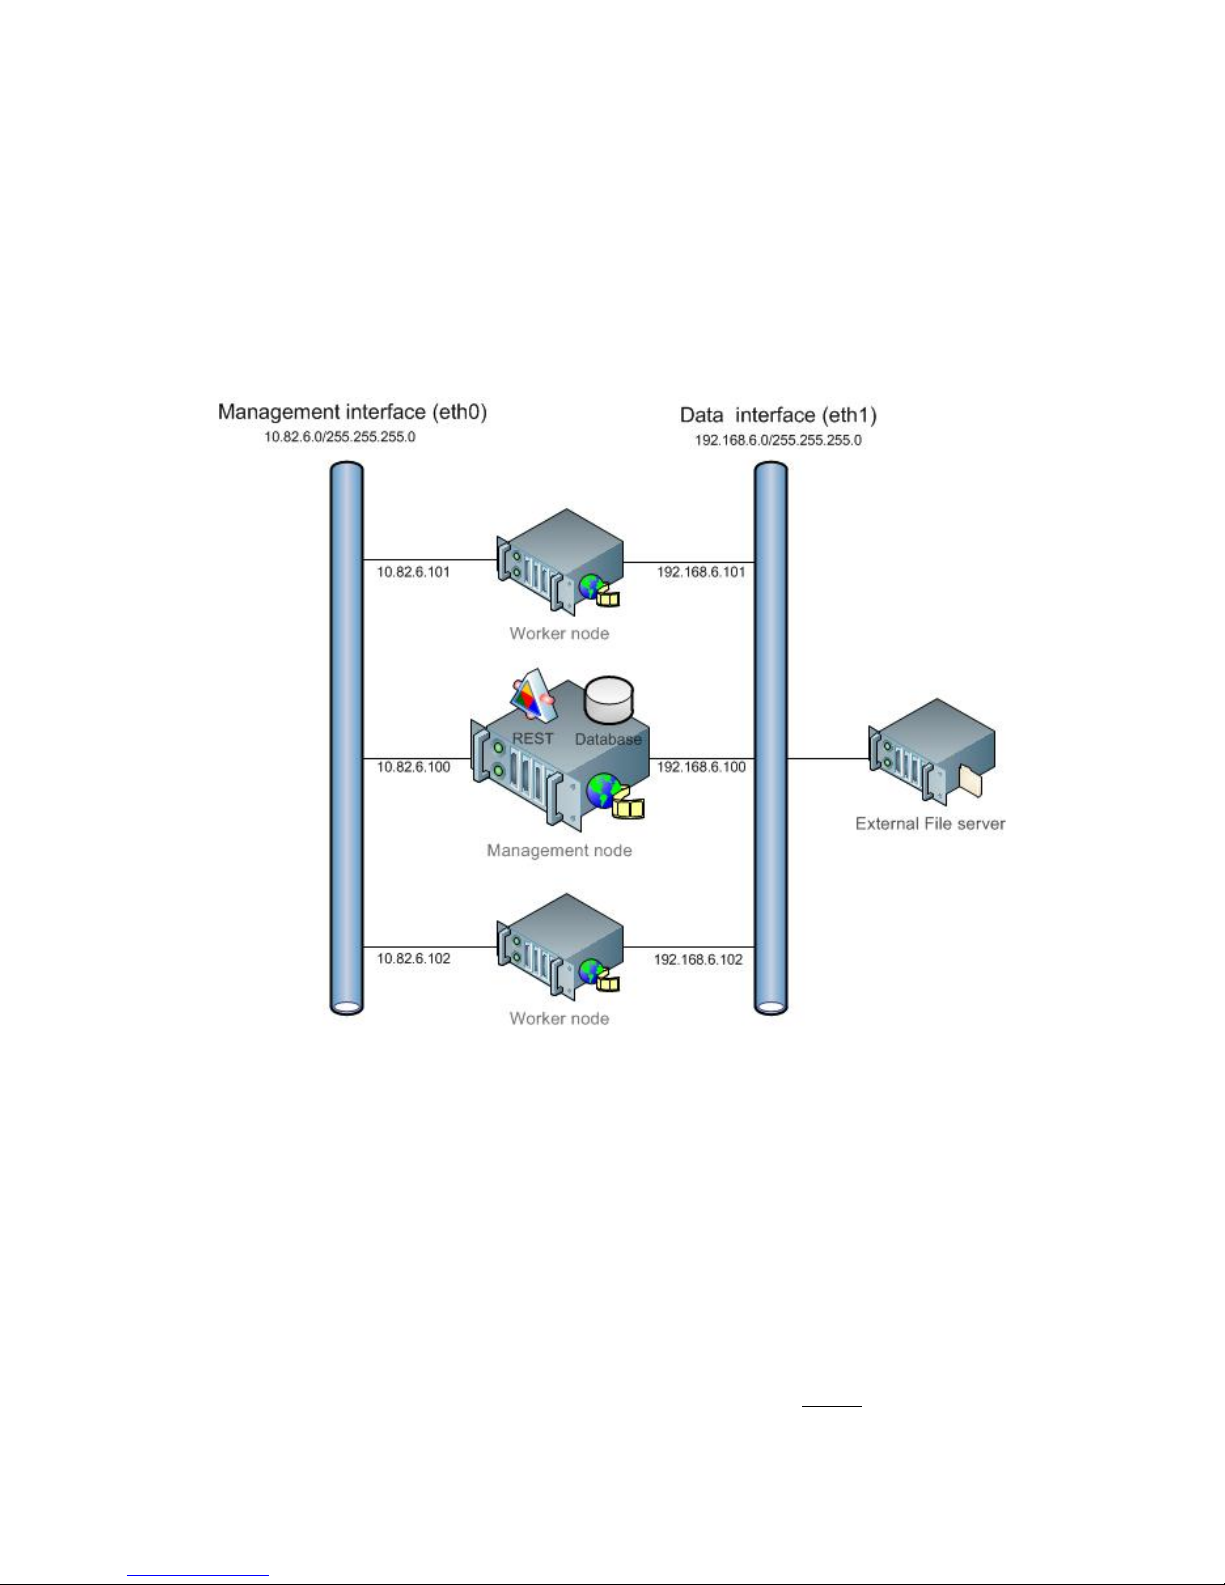
APPENDIX B: USING A SECOND NETWORK INTERFACE
The configure script will assume the first network interface (i.e., eth0) will manage control data, and the
second (eth1) will be used for file system traffic.
If you choose to configure a second network device using a static IP address, then all required
information will be queried during configuration. Any valid IP address may be specified.
Optimo Server supports using a second network interface card (NIC) to partition cluster data traffic
between the database (control) and the file system (data). Partitioning network traffic allows a physical
separation between server data and outputs, helps alleviate network bottlenecks, and is useful for
installations where file storage may be maintained independently of Optimo Server. The Optimo
Server user interface and database will always use the control interface.
Each Optimo Server node is pre-configured using the subnet configuration specified above. The
onfiguration of subnets beyond the server’s default is left as the responsibility of the customer. This
c
includes both software (file servers) and any additional hardware devices (switches, routers, etc.).
Copyright © 2013 Teleste Corporation Optimo Server Installation Guide and Release Notes v2.0.2
Page 14
14
APPENDIX C: OPTIMO SERVER CLUSTERS
THE MANAGEMENT NODE
! Maintains and runs the server database.
! Provides the server’s REST web service interface.
! Maintains and exports a file system share that contains the server’s incoming, outgoing and
completed file locations, as well as the pre-configured watch folder directories.
! NTP time server to synchronize system time with all worker nodes.
If a management node is configured with dual network interfaces, the REST web service and database
traffic use the first (control) NIC.
A cluster of Optimo Servers is comprised of a single management server, or node, and one or more
worker servers (nodes). A cluster functions as a single transcoding engine, distributing the total workload
to available nodes. Nodes in a cluster share a single, common database, common system time, and file
system share. All cluster nodes execute transcoding jobs, and each provides an identical user interface to
the cluster. Both management and worker nodes require NAS/SAN connectivity.
Optimo Server Cluster Configuration
The!management!node!of!a!cluster!is!the!Optimo!Server!installation!that:!
When preparing an Optimo Server cluster, the management node should always be configured before
any worker
Copyright © 2013 Teleste Corporation Optimo Server Installation Guide and Release Notes v2.0.2
nodes.
Page 15

15
THE WORKER NODE
! Connects to the management node’s database.
! Mounts the management node’s file share.
The configure script will prompt for the name or IP address of the cluster’s management node:
What is the hostname or IP address of the management node you'd like to connect to?
If the IP address is given, the management node should always be specified as the first network interface,
i.e. 10.82.6.100.
COPY-LOCAL LOCATION
Since a worker node mounts the file share of the management node at /data/server, an additional
directory outside of this tree is created for jobs that specify “copy to local” in the Pre Processing options of
a job’s configuration.
The default location is /data/local_sources, but any file location may be used that is read and writable by
the “elemental” user. This value is stored in the <sequencer_config> section of the settings.xml file.
(In the case of the settings.xml file, text in angle brackets (‘<’ or ‘>’) does not indicate substitution except
in the command below <full path to local file store>.)
<copy_local_dir> <full path to local file store> </copy_local_dir>
These controls are also available from the user interface by navigating to the Settings tab and selecting
Advanced.
UPGRADING A CLUSTER FROM A PREVIOUS VERSION
! Stop each node’s elemental_se service in the cluster (the order in which nodes are stopped is not
important). From a secure (ssh) shell, enter: /sbin/service elemental_se stop
! Stop each node’s httpd service in the cluster (the order in which nodes are stopped is not
important). From a secure (ssh) shell, enter: /sbin/service httpd stop
for more information.
! Update each cluster node (again, order is not important).
A worker node is any Optimo Server that:
Worker nodes can be added to a cluster anytime after the management node is configured. The cluster
will come on-line as each node is added. Jobs will be distributed to worker nodes as soon as they are
configured and the Optimo service is started.
When upgrading an Optimo Server cluster:
! Update the management node with version 2.0.2 software. See the$Optimo Server$Upgrade$Guide
Copyright © 2013 Teleste Corporation Optimo Server Installation Guide and Release Notes v2.0.2
Page 16

16
CONFIGURING A WORKER NODE USING A CONFIGURATION FILE
After the Management Node has been configured, a special settings XML file may be queried via the
REST interface that will help with the configuration of any worker nodes.
curl -H 'Accept: application/xml' http://<management_node ip
address>/settings.xml?cluster=true > settings.xml
This creates a settings.xml file that contains the default cluster settings already filled out for the given
master node. This file should be reviewed for accuracy and updated as necessary. In particular, the
hostname and any static IP configuration must be updated to the values desired for this worker node.
Next, configure the worker node using the command:
sudo ./elemental_production_server_2.0.2.####.run -i settings.xml
This step assumes that the settings.xml file has been copied to the /home/elemental/ directory.
Copyright © 2013 Teleste Corporation Optimo Server Installation Guide and Release Notes v2.0.2
 Loading...