

Page 1
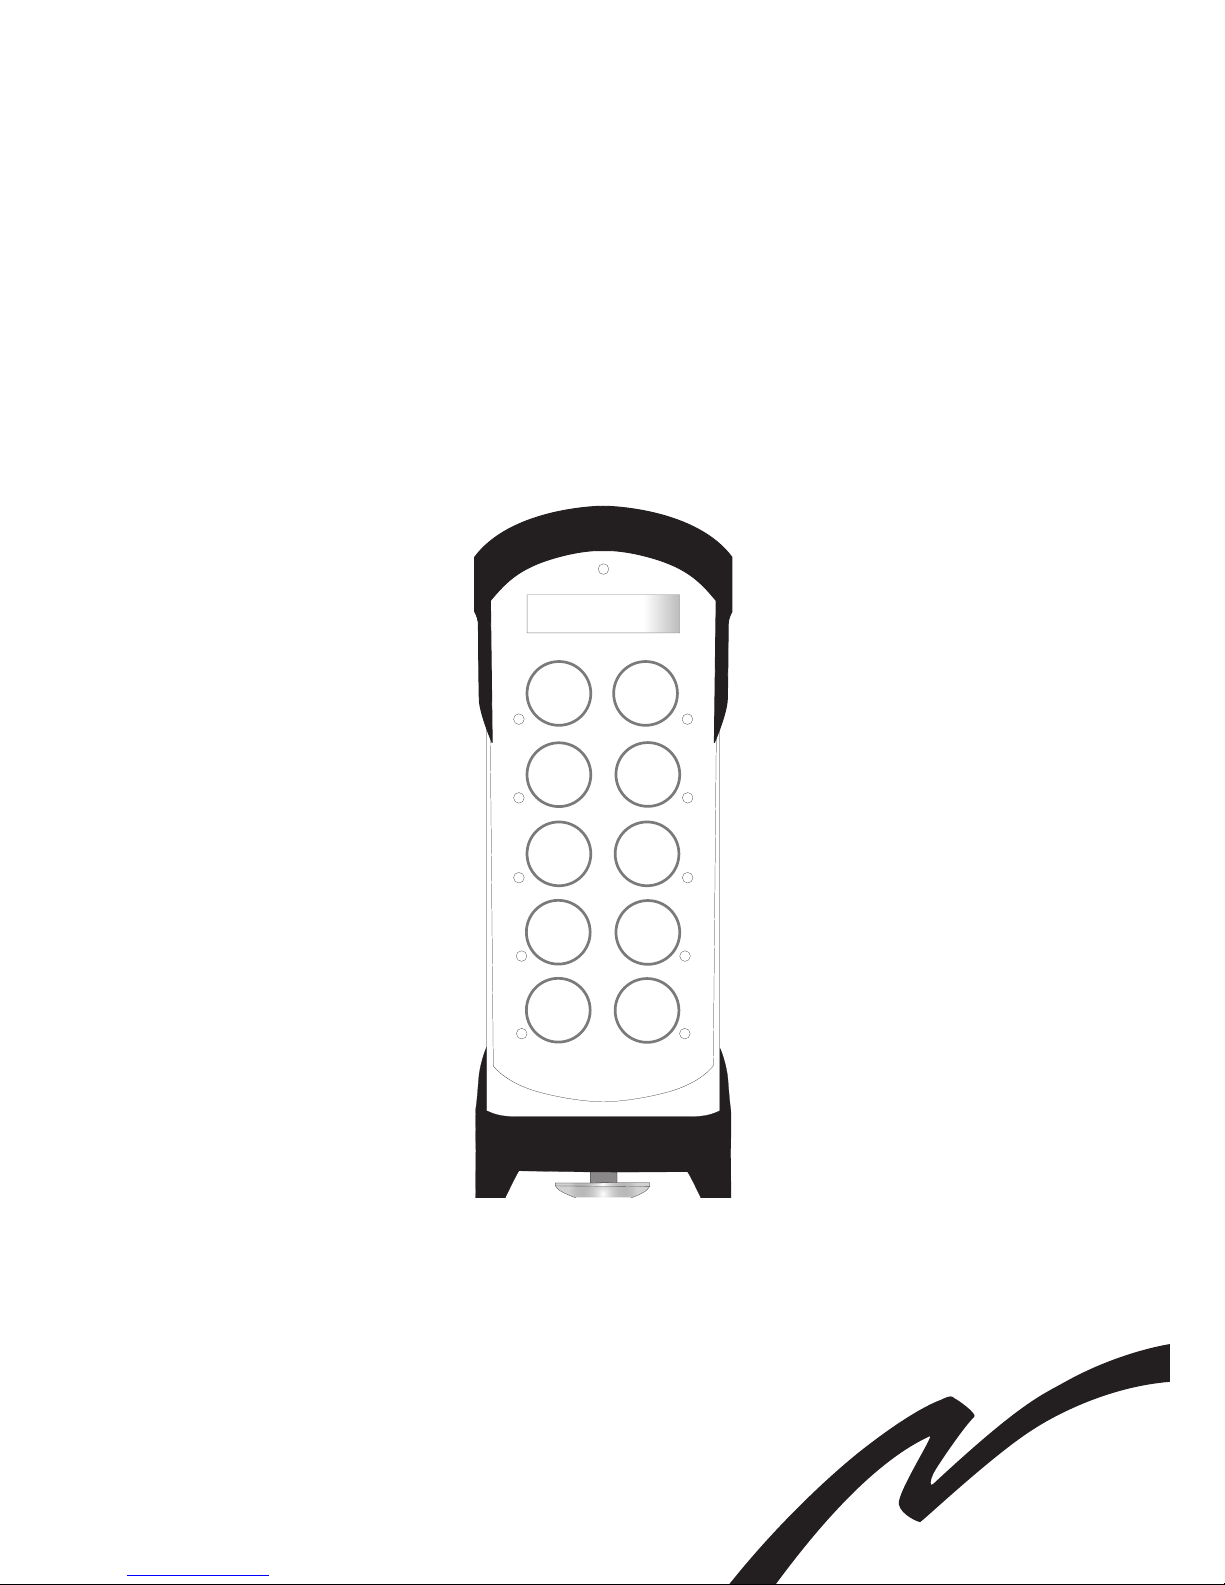
Tele Radio Tiger
END USER INSTRUCTIONS
FOR 10-BUTTONS TRANSMITTER
IM-TG-TX003-A01-EN
ARTICLE CODE: RX1-A, RX2-A, RX3-A, TX1-A,
TG-R1-1-0000, TG-R1-11-0000, TG-R1-6-0000, TG-T3-4-0000
START, TURN OFF, LOG IN, LOG OUT, TROUBLE SHOOTING,
EXCEPTIONAL SITUATIONS
ETTING
S
Ex
it
1 2
3 4
6
8
10
5
7
9
TIGER
1
3
5
7
9
8
10
6
4
2
ENGLISH (ORIGINAL)
Page 2

Thank you for using a Tele Radio product
RX1-A, RX2-A, RX3-A + TX1-A
READ ALL INSTRUCTIONS CAREFULLY BEFORE STARTING TO USE THE PRODUCT.
These instructions are published by Tele Radio AB without any guarantee. These
instructions are solely directed towards end users. The instructions may be removed or
revised by Tele radio AB at any time and without any further notice. Corrections and
additions will be added to the updated versions of the instructions.
Tele Radio AB products are covered by a guarantee against material, construction or
manufacturing faults. During the guarantee period, Tele Radio AB may replace the product
or faulty parts with new. Work under guarantee must be carried out by Tele Radio AB
or by an authorized service centre specied by Tele Radio AB. Make sure that repairs and
maintenance are only carried out by qualied personnel. Use only spare parts from Tele
Radio AB. Contact your Tele Radio representative if you want to make a complaint about
a product or require other service.
©Tele Radio AB, 2009
TELE RADIO AB
Datavägen 21, SE-436 32 Askim. Sweden
Tel: +46 (0)31-748 54 60
Fax: +46 (0)31-68 54 64
www.tele-radio.com.
[email protected]
The helpdesk group is able to help you when you have qestions
regarding service and technical support.
Page 3

3
CONTENTS
THE TRANSMITTER 4
THE TRANSMITTER MENU 5
HOW TO NAVIGATE IN THE TRANSMITTER MENU 5
START UP IN TRANSMITTER MENU MODE 6
START THE TRANSMITTER IN OPERATING MODE 6
LOG THE TRANSMITTER OUT 7
CHANGE AUTOMATIC SHUTDOWN TIME 7
SWITCH CHANNEL/FREQUENCY 7
TROUBLE SHOOTING 8
EXCEPTIONAL SITUATIONS 9
Page 4
4
THE TRANSMITTER
ETTING
S
Ex
it
1 2
3 4
6
8
10
5
7
9
TIGER
1
3
5
7
9
8
10
6
4
2
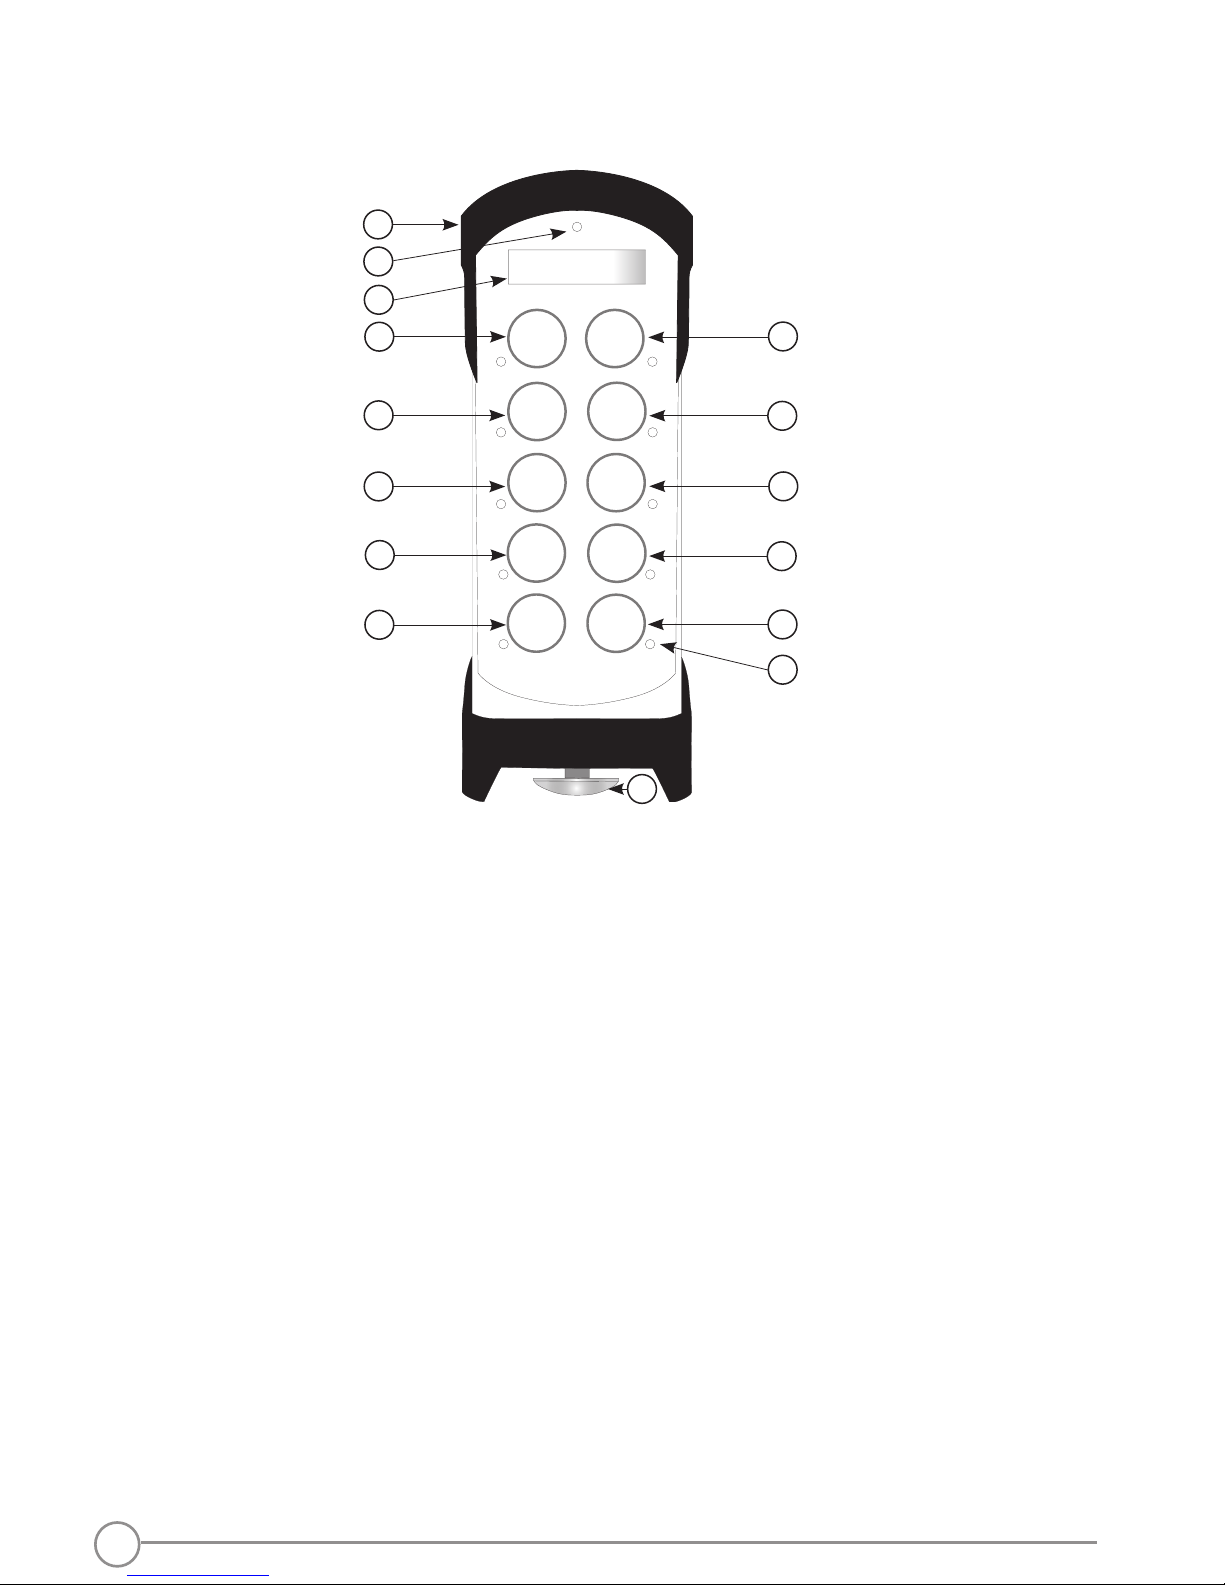
1.Rubber cover 7. Button 7-Safe button 13. Button 10-Start button
2. Top LED 8. Button 9-Start button 14. LEDs 1-10
3.Display 9. Button 2 15. STOP button
4.Button 1 10.Button 4
5.Button 3 11.Button 6
6.Button 5 12.Button 8-Safe button
1
2
3
4
5
10
11
12
13
14
15
9
6
7
8
TECHNICAL DATA
DEGREE OF PROTECTION: IP 65
OPERATING FREQUENCY: 433.075-434.775 MHz
CHANNELS: 69
SIZE: 200 x 70 x 35 mm./ 7.9 x 2.8 x 1.4 in.
WEIGHT: 400 g./ 14.1 oz.
BATTERY: 1 external, rechargeable battery (li-ion)
Page 5
5
THE TRANSMITTER MENU
HOW TO NAVIGATE IN THE TRANSMITTER MENU
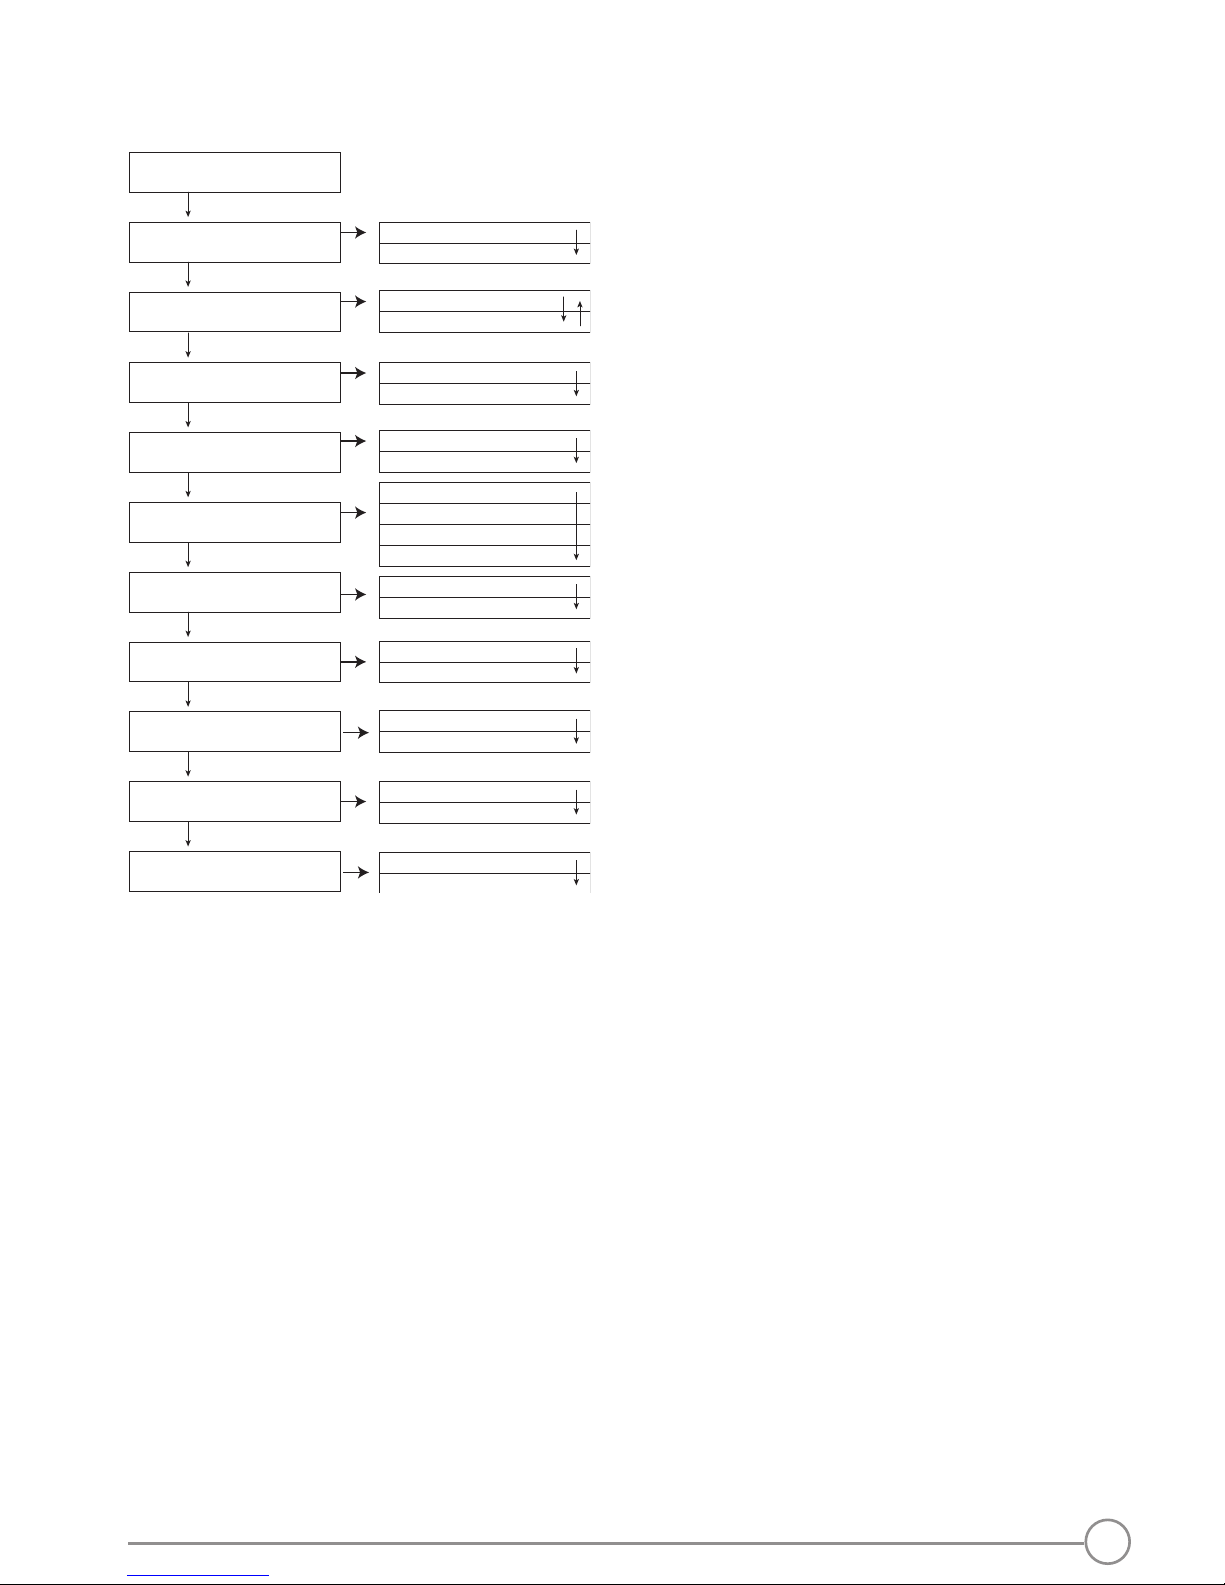
• TO MOVE UP AND DOWN: Press button 1 (down) or 2 (up)
• TO SELECT: Press button 9
• TO GO BACK: Press button 3
• TO EXIT: Press button 10
SETTINGS
>Exit
>Channel
>Show receivers
>Logout
>Auto shutdown
>Register
>Erase
>Replace
>Show SW version
>Test Mode
No
1: 433.075MHz...
69: 434.775MHz...
Yes
No
Yes
No
Yes
No
Yes
No
Yes
6 min
2 min
Off
12 min
E.g. 1: 92041
E.g. 2: 90088...
E.g. 1: 92041
E.g. 2: 90088...
E.g. 1: 92041
E.g. 2: 90088...
Page 6

6
START UP IN TRANSMITTER MENU MODE
1. Pull out the STOP button.
2. Enter your PIN code if you have one.
If you need to enter a PIN code to start, you will get a warning message in the display.
3. Press button 10. Keep pressed.
4. Press the STOP button.
5. Release button 10.
6. The transmitter menu displays.
START THE TRANSMITTER IN OPERATING MODE
1. Pull out the STOP button.
If you need to enter a PIN code to start, you will get a warning message in the display.
2. Enter your PIN code if you have one.
A. Enter the 4 digits PIN code with the buttons 1-4.
B. Conrm by pressing button 9.
See ”How to use the Settings Manager PC program” separate instruction for how to disable and use
PIN codes.
3. Select what receiver(s) to control during the session by toggling button 1-8 ON
and OFF. LED 1-8 light up to show what receiver(s) that are selected. This can also
be set in advance in the PC program Settings Manager. If no receiver has been
selected, the transmitter can not be operated.
4. Press the start buttons 9+10 at the same time for about 1 second.
The top LED starts ashing and the buzzer sounds when the start buttons are pressed. When
communication is established the top LED lights continuously.
TURN THE TRANSMITTER OFF
1. Press the STOP button.
IMPORTANT! All relays disconnect when the STOP button is pressed.
LOG THE TRANSMITTER IN
When you have operated a receiver with a transmitter, that transmitter must be logged
out from the receiver before another transmitter can be used. The new transmitter must
be registered in the receiver before automatically logging on to the receiver when being
started. See ”Register the transmitter in the receiver”.
Page 7

7
LOG THE TRANSMITTER OUT
1. Start up in transmitter operating mode.
See ”Start the transmitter in operating mode”.
2. Press button 9. Keep pressed.
3. Press the STOP button.
The transmitter can also be logged out from [Logout] in the transmitter menu.
The transmitter displays the text [Logging out..]. If the logout fails, the transmitter displays the text [Fail].
4. The transmitter conrms by [OK] and turns itself off.
CHANGE AUTOMATIC SHUTDOWN TIME
The factory default setting for automatic shutdown is 6 minutes.
1. Start up the transmitter in menu mode. See ”Start up the transmitter in menu mode”.
2. Select [Auto shutdown]. Scroll to:
• 6 min
• 2 min
• Off
• 12 min
3. Select by pressing button 9.
4. The automatic shutdown time is now changed.
5. Write down the new settings in the Settings document.
(Download and print from our download website).
SWITCH CHANNEL/FREQUENCY
The transmitters are pre-programmed to transmit at various frequencies. You only have
to switch channel/ frequency in the transmitter. The receiver detects and uses the same
frequency as the transmitter.
1. Start up the transmitter in menu mode. See ”Start up the transmitter in menu mode”.
2. Select [Channel].
3. Scroll up with button 1 and down with button 2 to nd a channel/frequency.
The transmitter displays the text [Erasing..]. If the erasing fails, the transmitter displays the text [Fail].
4. Select by pressing button 9.
5. The channel is now changed and the receiver will nd the same frequency.
6. Write down the new settings in the Settings document.
(Download and print from our download website).
Page 8
8
TROUBLE SHOOTING
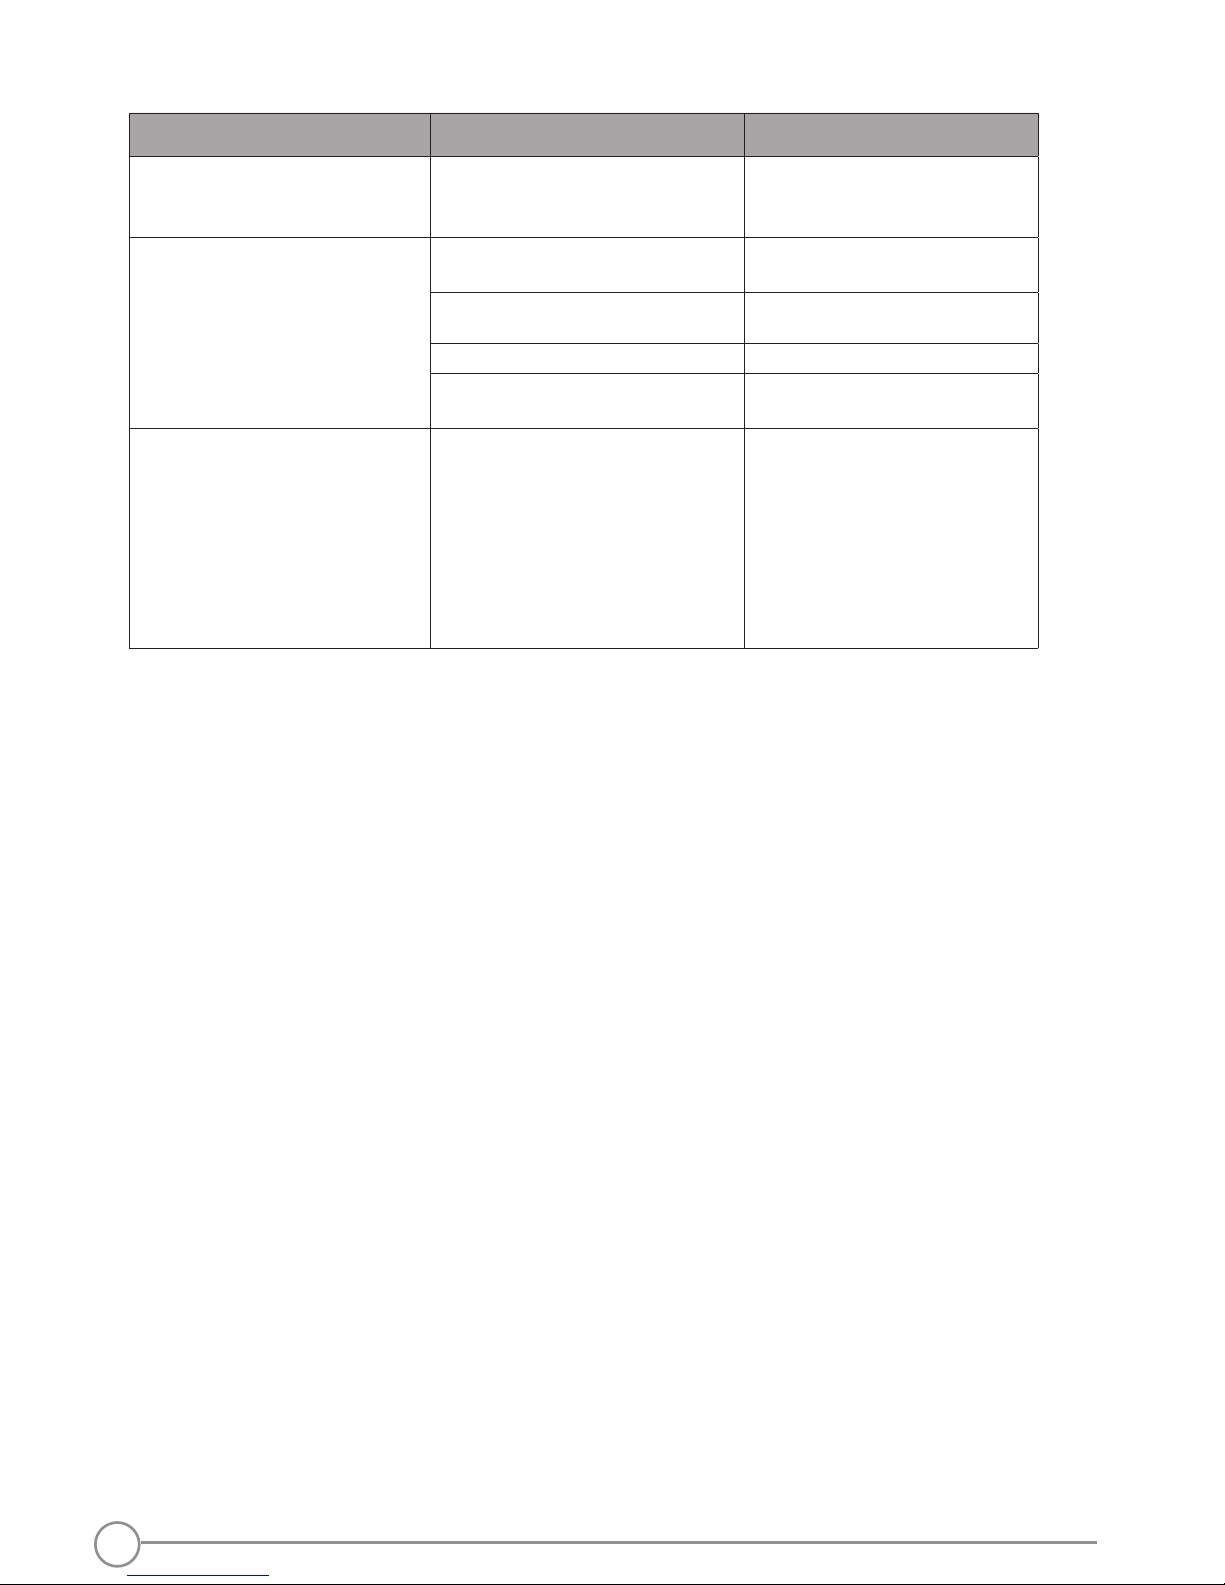
What is your problem What might have caused it What to do
There are no registered transmitters in the receiver display list
[Show TX].
No transmitter has been registered
in the receiver.
Register the transmitter in the
receiver.
The transmitter does not start
when the start buttons are
pressed at the same time for
approx. 1 sec. and then released.
The battery has been discharged. Charge the battery.
The hardware may be broken. Contact your representative.
Error message in display. Contact your representative.
No receiver has been
selected.
Restart and select a receiver
before pressing the start buttons.
The range is too short. The antenna or the
antenna cables are
damaged or incorrectly installed.
1. Change the position of the
antenna.
2. Replace the antenna cable.
Someone else may be transmitting
on the same channel.
Switch channel.
Page 9
9
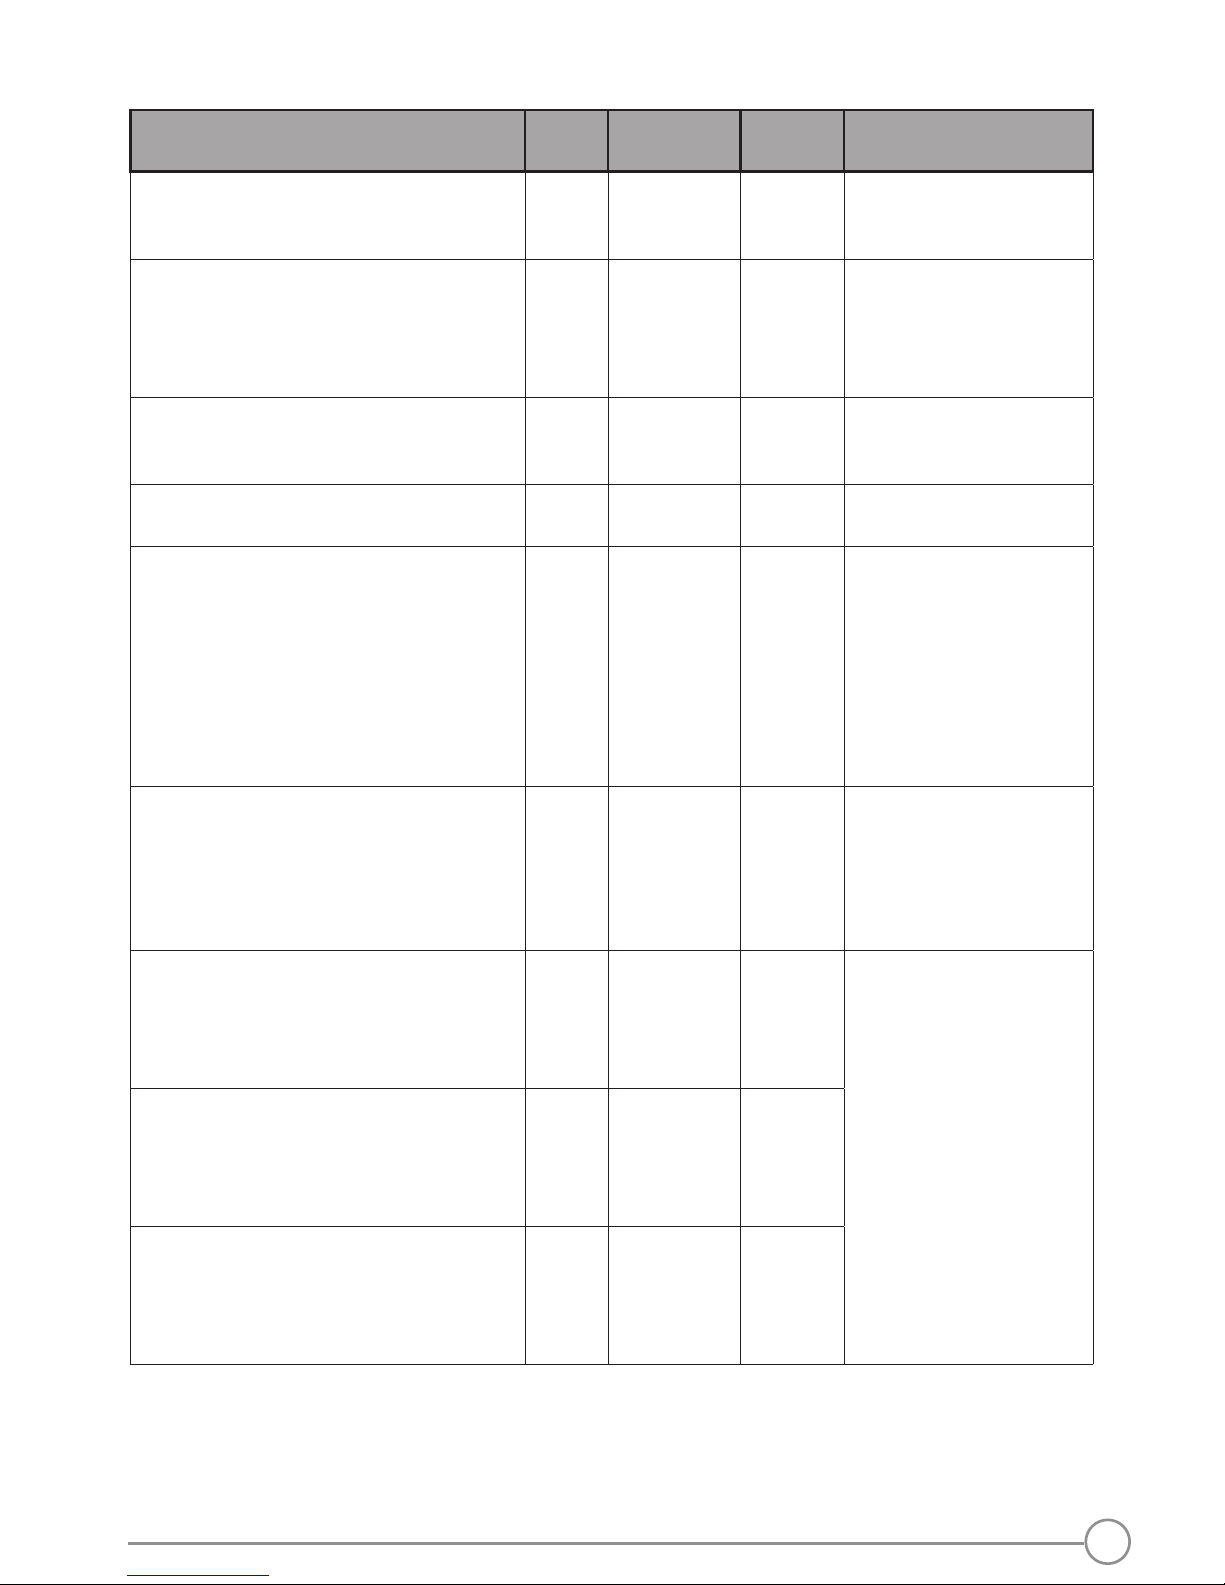
EXCEPTIONAL SITUATIONS
Description of situation Stop
relays
Safe function
relays
Standard
relays
Comment
Transmitter moved outside of the range
of the radio while transmitter button is
pressed or relay is toggled on.
OFF OFF OFF Radio communication is
lost. Move the transmitter
back within range.
Transmitter moved back into the range
of the radio while transmitter button is
pressed,
OFF OFF OFF The radio communication
is re-established, but all
buttons have to be
released to be able to
start.
Transmitter moved outside of the range of
the radio. Transmitter button not pressed,
OFF OFF OFF Radio communication is
lost. Move the transmitter
back within range.
Transmitter moved back into the range of
the radio. Transmitter button not pressed.
OFF OFF OFF The radio communication
is re-established,
A session of a transmitter and a
receiver is currently running. A secondnot registered-transmitter is started up on
the same (or close) radio channel. The
connection between the rst transmitter
and the receiver is broken.
OFF OFF OFF The connection between
the rst transmitter and
the receiver will re-establish automatically when
the radio signal from the
second transmitter stops.
Make sure to turn off the
second transmitter
or switch channel.
A session consisting of a transmitter and
a receiver is currently running. A secondregistered- transmitter is started up on the
same (or close) radio channel. The connec-
tion between the rst transmitter and the
receiver is broken.
OFF OFF OFF Restart the rst
transmitter. Make sure to
turn off the second transmitter or switch channel.
A session consisting of a transmitter and
a receiver is currently running. A second
transmitter is started up in registering
mode. The connection between the rst
transmitter and the receiver is broken.
OFF OFF OFF Do not make any
settings during a
running session.
A session consisting of a transmitter and
a receiver is currently running. A second
transmitter is started up in erasing mode.
The connection between the rst transmitter and the receiver is broken.
OFF OFF OFF
A session consisting of a transmitter and
a receiver is currently running. A second
transmitter is started up in replacing mode.
The connection between the rst transmitter and the receiver is broken.
OFF OFF OFF
Page 10

TELE RADIO SVERIGE
Sweden
Tel. +46 (0)31-724 98 00
e-mail: [email protected]
TELE RADIO GmbH
Germany
Tel. +49 (0)94 51-944 8 550
e-mail: [email protected]
TELE RADIO ASIA
China
Tel. +86-(0)592-3111168
e-mail: [email protected]
TELE RADIO TURKEY
Turkey
Tel. +90 216 574 22 94
e-mail: [email protected]
TELE RADIO LTD
England
Tel. +44 (0) 1625 509125
e-mail: [email protected]
TELE RADIO LLC
North America & Latin America
Tel. +1 (305) 459 0763
e-mail: [email protected]
TELE RADIO BV
Benelux
Tel. +31-(0)70-419 41 20
e-mail: [email protected] m
TELE RADIO AS
Norway
Tel. +47-6933 4900
e-mail: [email protected]
TELE RADIO AB
Sweden, Main office
Tel. +46 (0)31-748 54 60
e-mail: [email protected]
www.tele-radio.com
 Loading...