

Page 1

1
B8 Quick Start Guide
Page 2
2
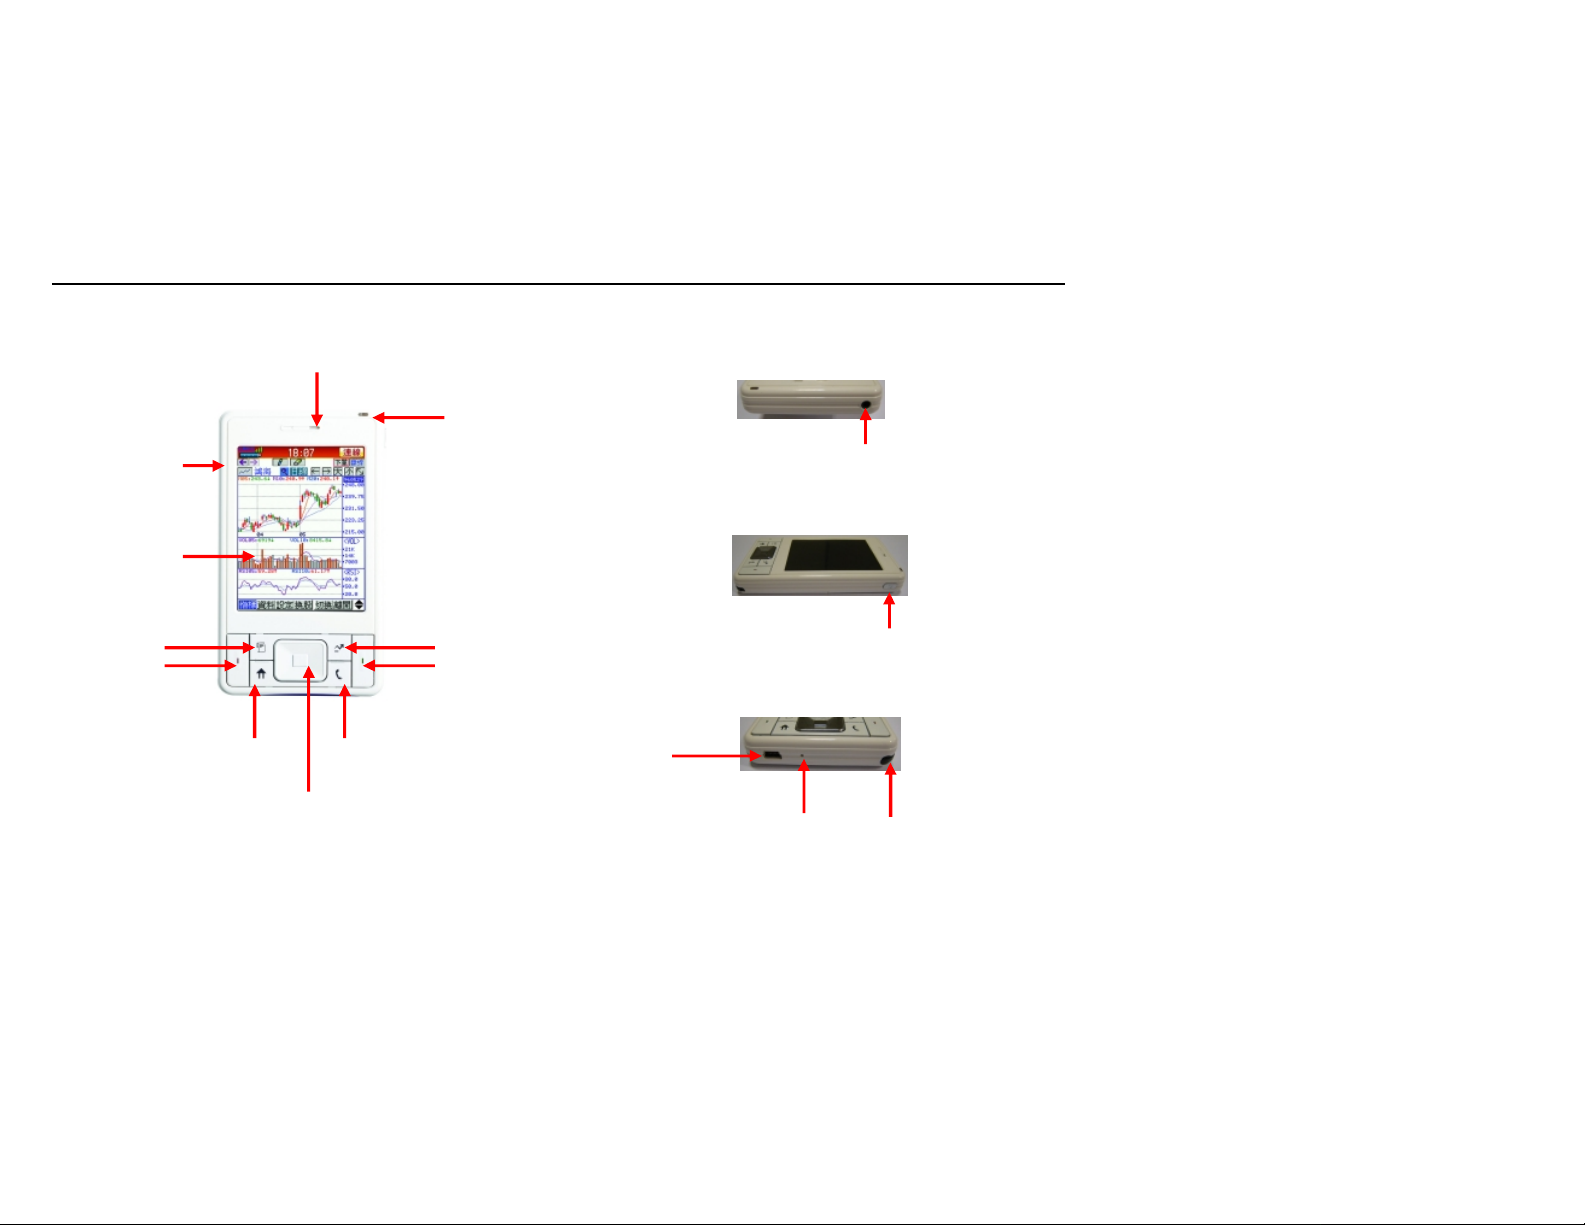
Getting to know your phone
Charger / USB
Receiver
Volume Control
Touch Screen
News
Cancel
MainMenu Phone
Navigator
LEDIndicator
Earphone Jack
Stock
OK
Power On
Stylus Pen Mic-In
Page 3
3
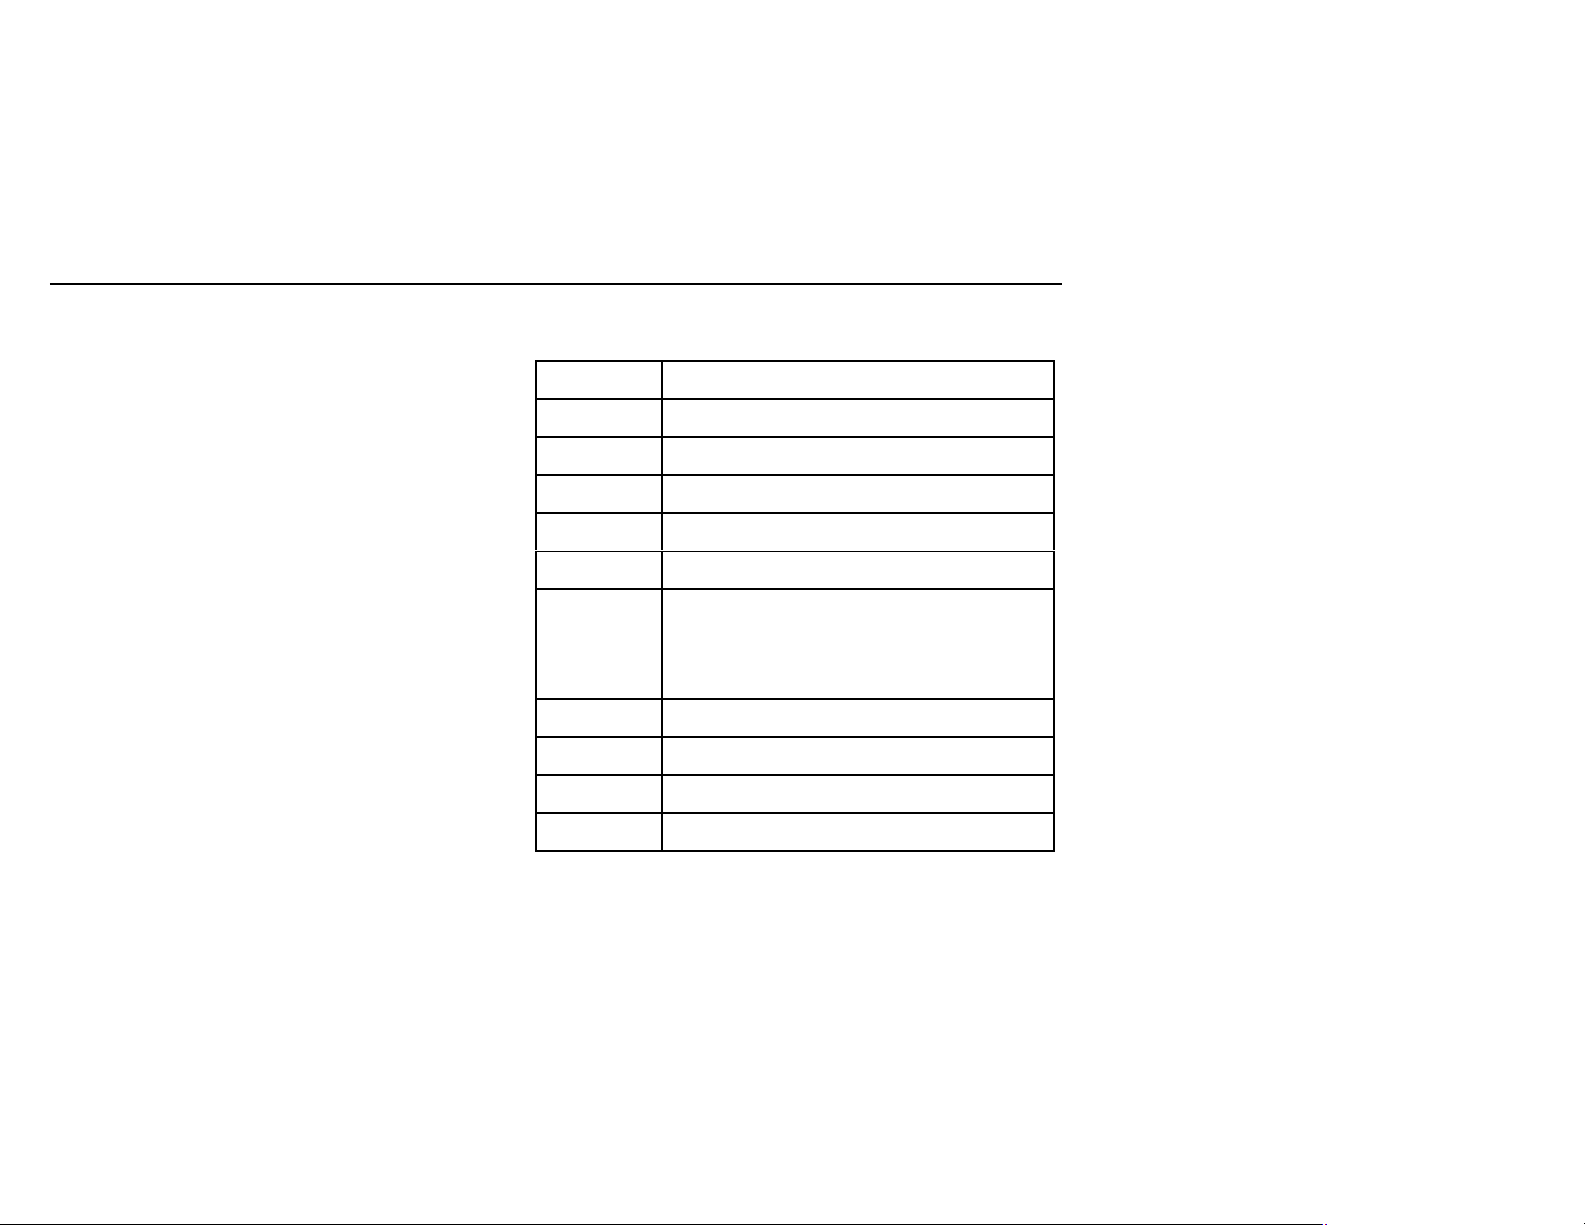
Hardware Specification
Package
and
Optional Acce
ssories
Package Content:
B8 ………………………………………… 1
Stylus …………………………………….. 1
Rechargeable Lithium Battery ………… 1
DC Power Adapter ……………………... 1
USB Cable ………………………………. 1
PC Toolkit CD …………………………… 1
User Guide and Warranty ……………… 1
Headset ………………………………….. 1
Optional Accessories:
B8 Stylus
B8 Leather Case
B8 Rechargeable Lithium Battery
CPU 32Bit CPU
Memory 64MB FLASH / 32MB SDRAM
Display 3.2" 65K QVGA TFT LCD with Touch Panel
Communication Quad-band GSM/GPRS (850 / 900 / 1800 / 1900 MHz)
Audio 32 polyphony (MIDI)
Connector Mini USB
(Up, Down, Left, Right) x 4
Button
Antenna Internal
Battery Li-ion Battery Pack(1100mAH)
Dimension 68 x 118 x 16 mm
Weight 140g Including Battery
Function Key x 4
Power on Key x 1
Page 4
4
1 Calling
My
Phone
The B8 is a full-featured color PDA phone having full
integration with other functions of the device, including
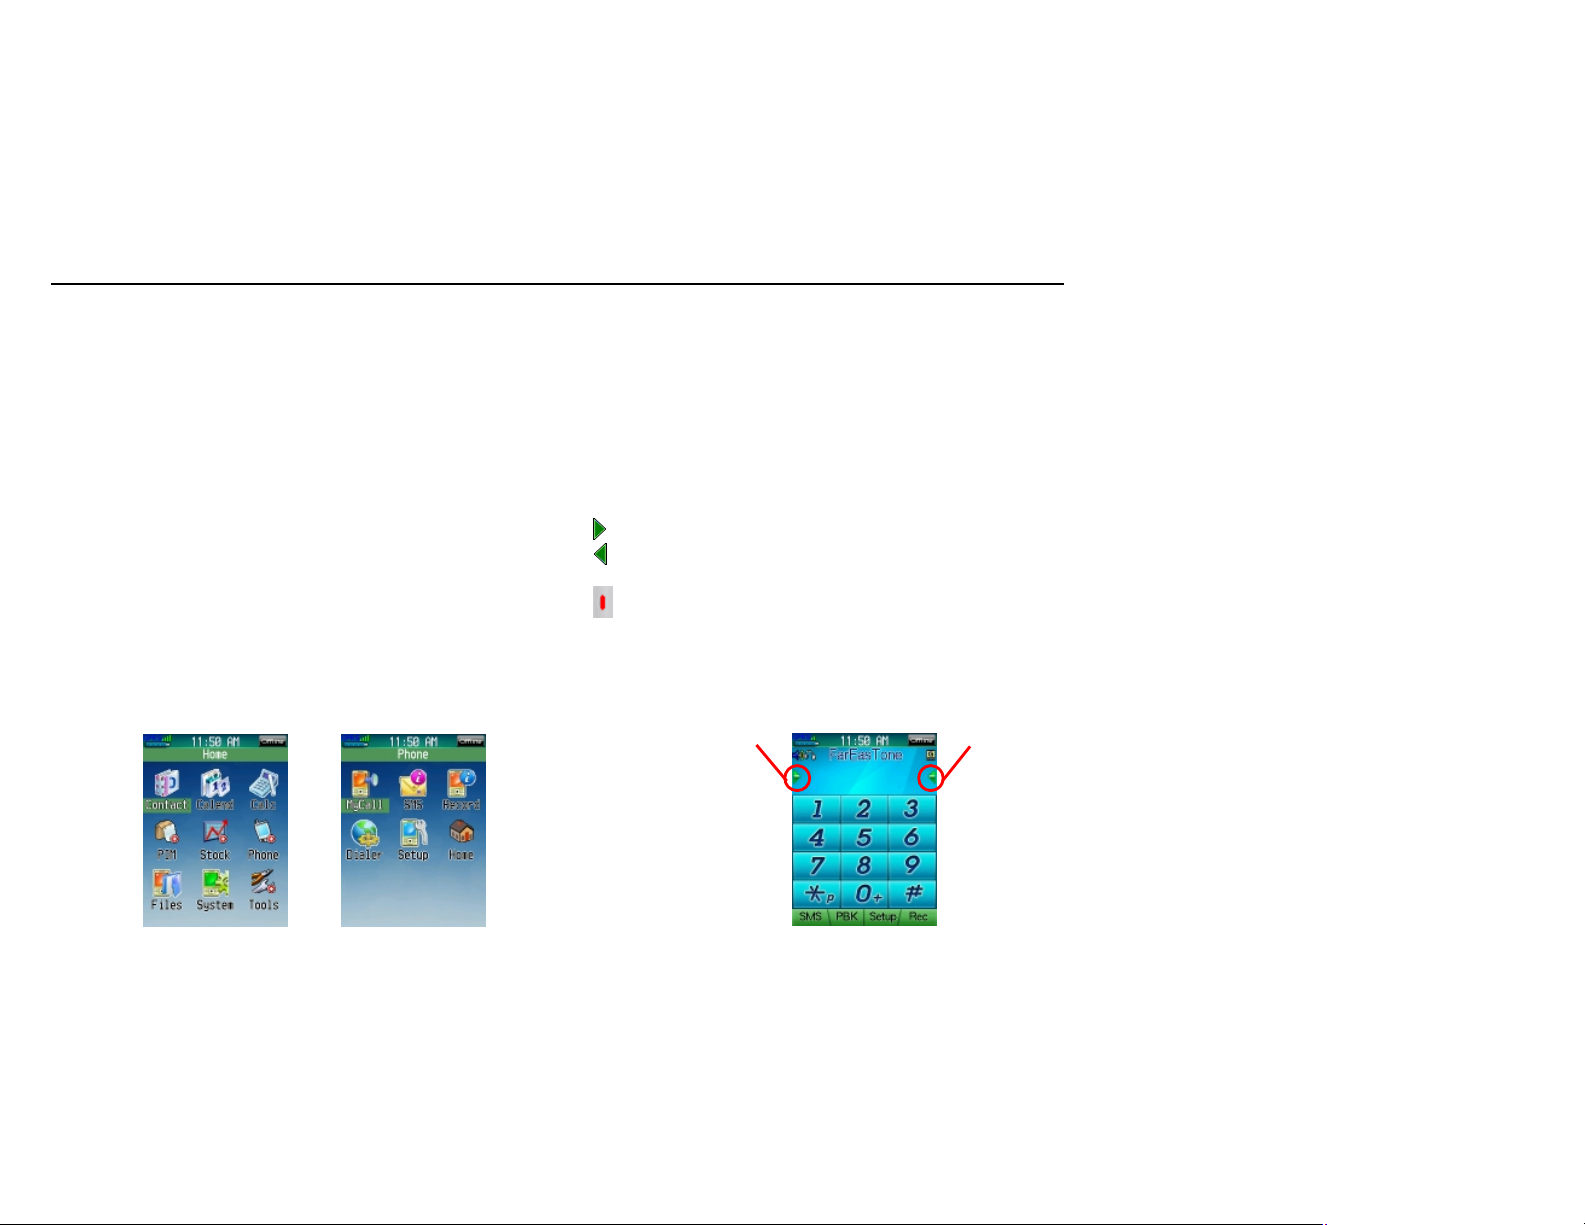
applications from third-parties. Tap Home > Phone (fig.0.1)
to enter mobile phone (fig.0.2).
You can only make a call when your B8 is turned on and you
have coverage from a GSM Network.
1. Press the Power On key Fig. for two to three seconds to
turn on your B8.
2. Tap Home > Phone (fig.0.1) > MyCall (fig.0.2).
1.1 Dailing and operational instructions
The second line from the status indicator bar shows the
service provider's name.
Delete button: Deleting the digits on the right of the cursor.
Backspace button: Deleting the digits on the left of the
cursor.
: Perform clear function during idle and hand up during a
call. Press two to three seconds to turn on/off
the B8.
(Fig.0.1)
(Fig.0.2)
Delete the
digits on
the right of
(Fig.1.1)
Delete the
digits on
the left of
the cursor
Please use the
4-way navigation
key or the stylus
to move the
cursor
Page 5
5
: Send and Action/Send key for dialing or
1.2 Making a call
answering a call.
Number keys: Input 1 to 9, * and #.
0: Press 1.5 seconds to enter plus (+) sign for international
calls.
*: Press 1.5 seconds to enter "p" for pause. You can use it
while dialing an extension number, e.g.
0226576883p123.
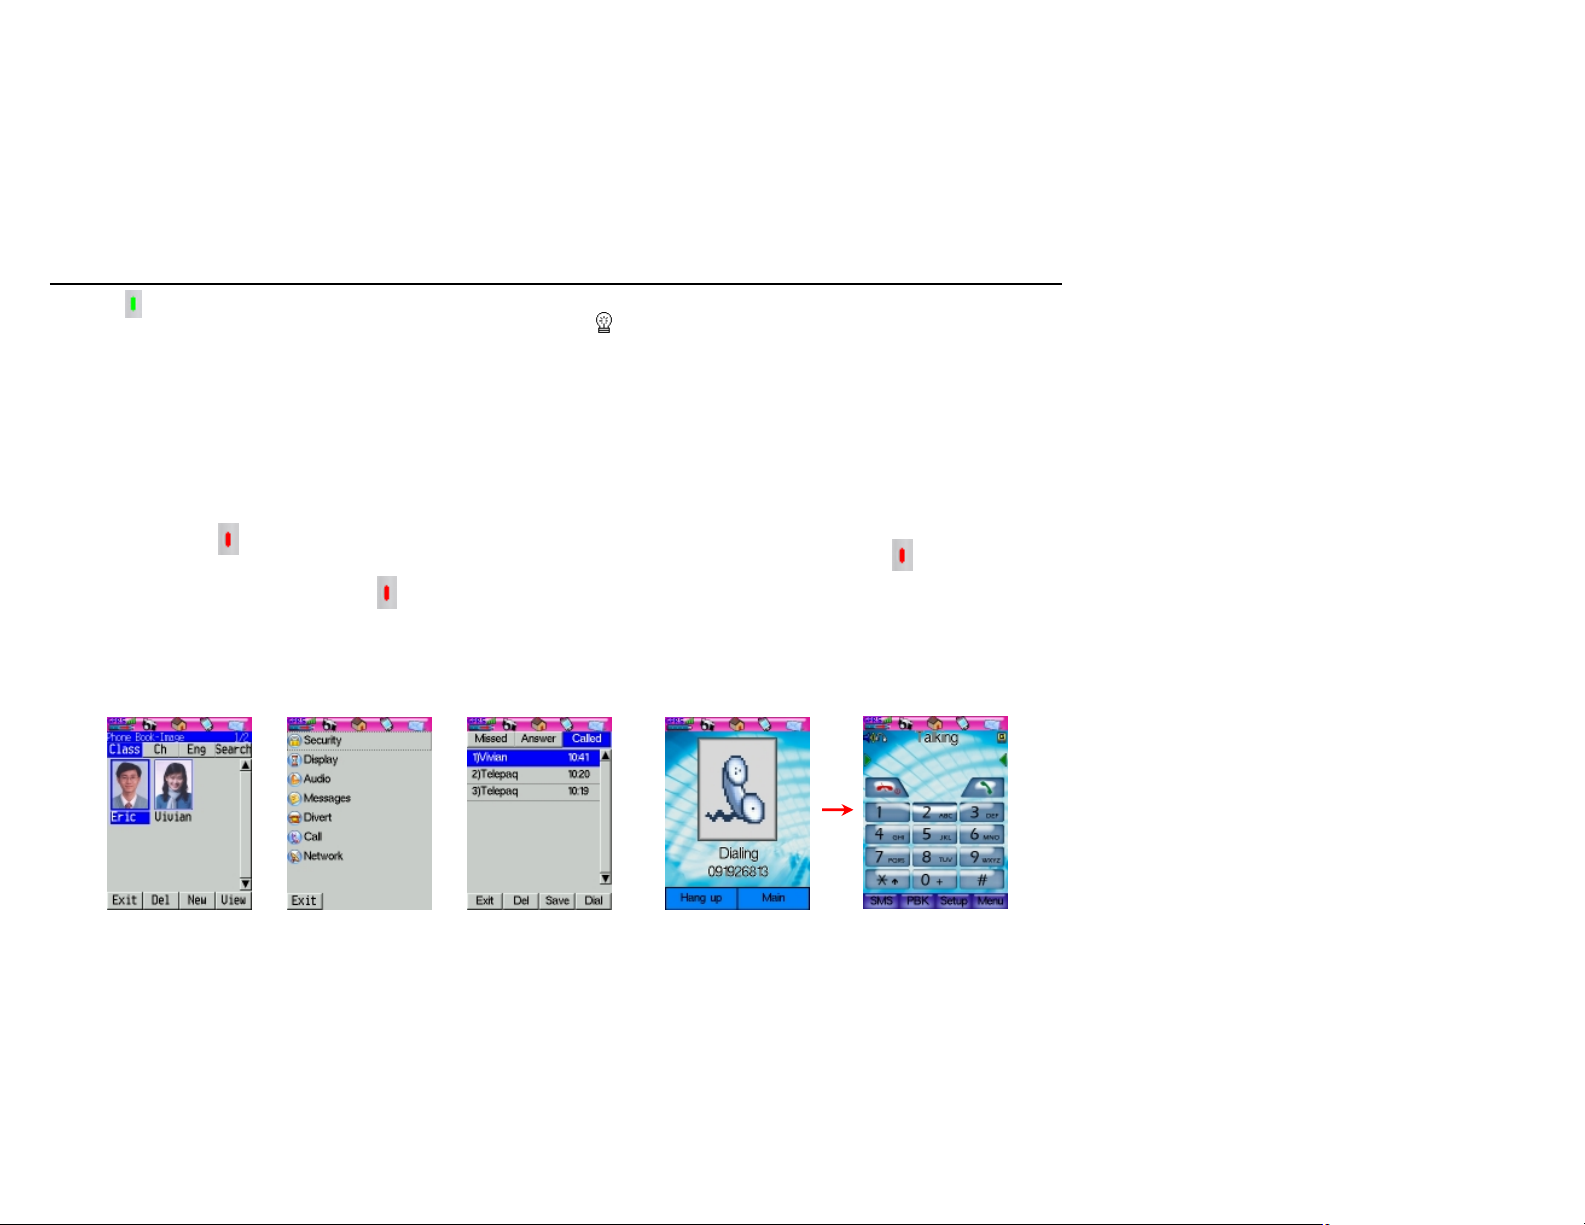
SMS: Tap this button to go to SMS message (as fig.2.2).
PBK: Tap this button to go to Contacts (as fig.1.2).
You can select a phone number in the Contacts.
Setup: Tap this button to enter Setup (as fig.1.3). Press
The red-key to go back to the previous screen.
Rec.: Tap this button to enter Call list (as fig.1.4) and check
your call history. Press the red-key to go back to the
previous screen.
Tip: Your B8 allows you to making a call in several
ways. It also keeps the most recent 100 call records.
l Making a domestic call
Please make sure your B8 is turned on and within
Network coverage before making a call.
1. Tap the numeric keys to enter a phone number.
2. Press / to dial out the number. A dialogue window will
show that it's dialing (as fig.1.5).
3. If the call is successfully connected, and during a call,you
can see the Phone screen will show “Talking” (as fig.1.6).
4. To end a call, press Hang up / red-key
(Fig.1.2)
(Fig.1.3) (Fig.1.4)
(Fig.1.5)
(Fig.1.6)
Page 6
6
l Making an international call
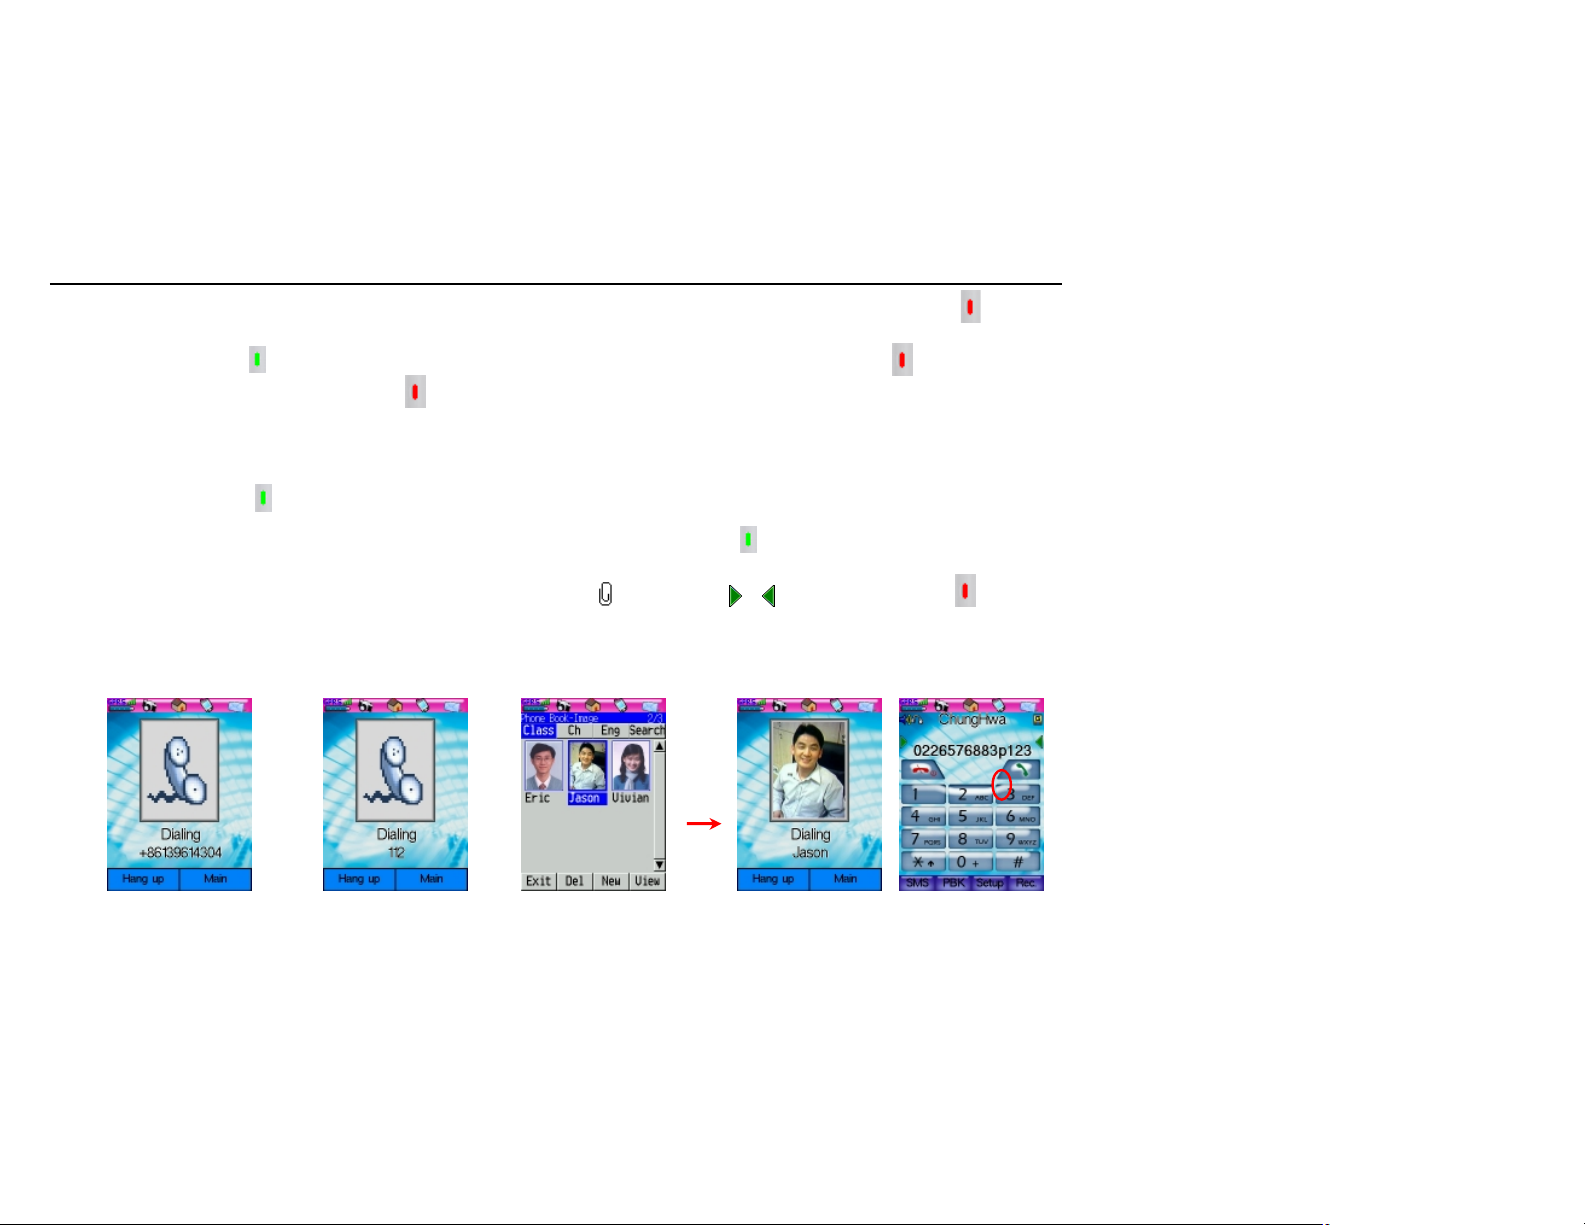
1. Press 0 for 1.5 seconds to enter the plus (+) sign.
2. Enter the country code, area code and the phone number.
3. Press green-key to dial the number (as fig.1.7).
4. To end a call, press Hang up / red-key .
l Making an emergency call
The international emergency number is "112".
1. Enter "112".
2. Press green-key to dial the number. It is possible to
make an emergency call without a SIM card (as fig.1.8).
l Making a call from Contacts
1. Tap MyPhone > Contacts to enter the Contacts. Select a
contact to highlight it (as fig.1.9).
2. Tap the contact again to start dialing (as fig.1.10).
3. During dialing, you can press Hang up / red-key to
cancel dialing.
4. To end a call, press Hang up / red-key .
l Dialing an extension using Pause
For example, if you want to dial 0226576883 ext. 123, the
process is as follows:
1. Enter "0226576883".
2. Press "*" for 1.5 seconds until the display area shows a
"p".
3. Enter "123" (as fig.1.11).
4. Press green-key to dial the number.
Remark: Tap / to delete errors or tap to
clear all digits.
(Fig.1.7)
(Fig.1.8)
(Fig.1.9)
(Fig.1.10)
(Fig.1.11)
Page 7
7
l Making a conference call
Connecting all existing calls if you have subscribed to this
service.
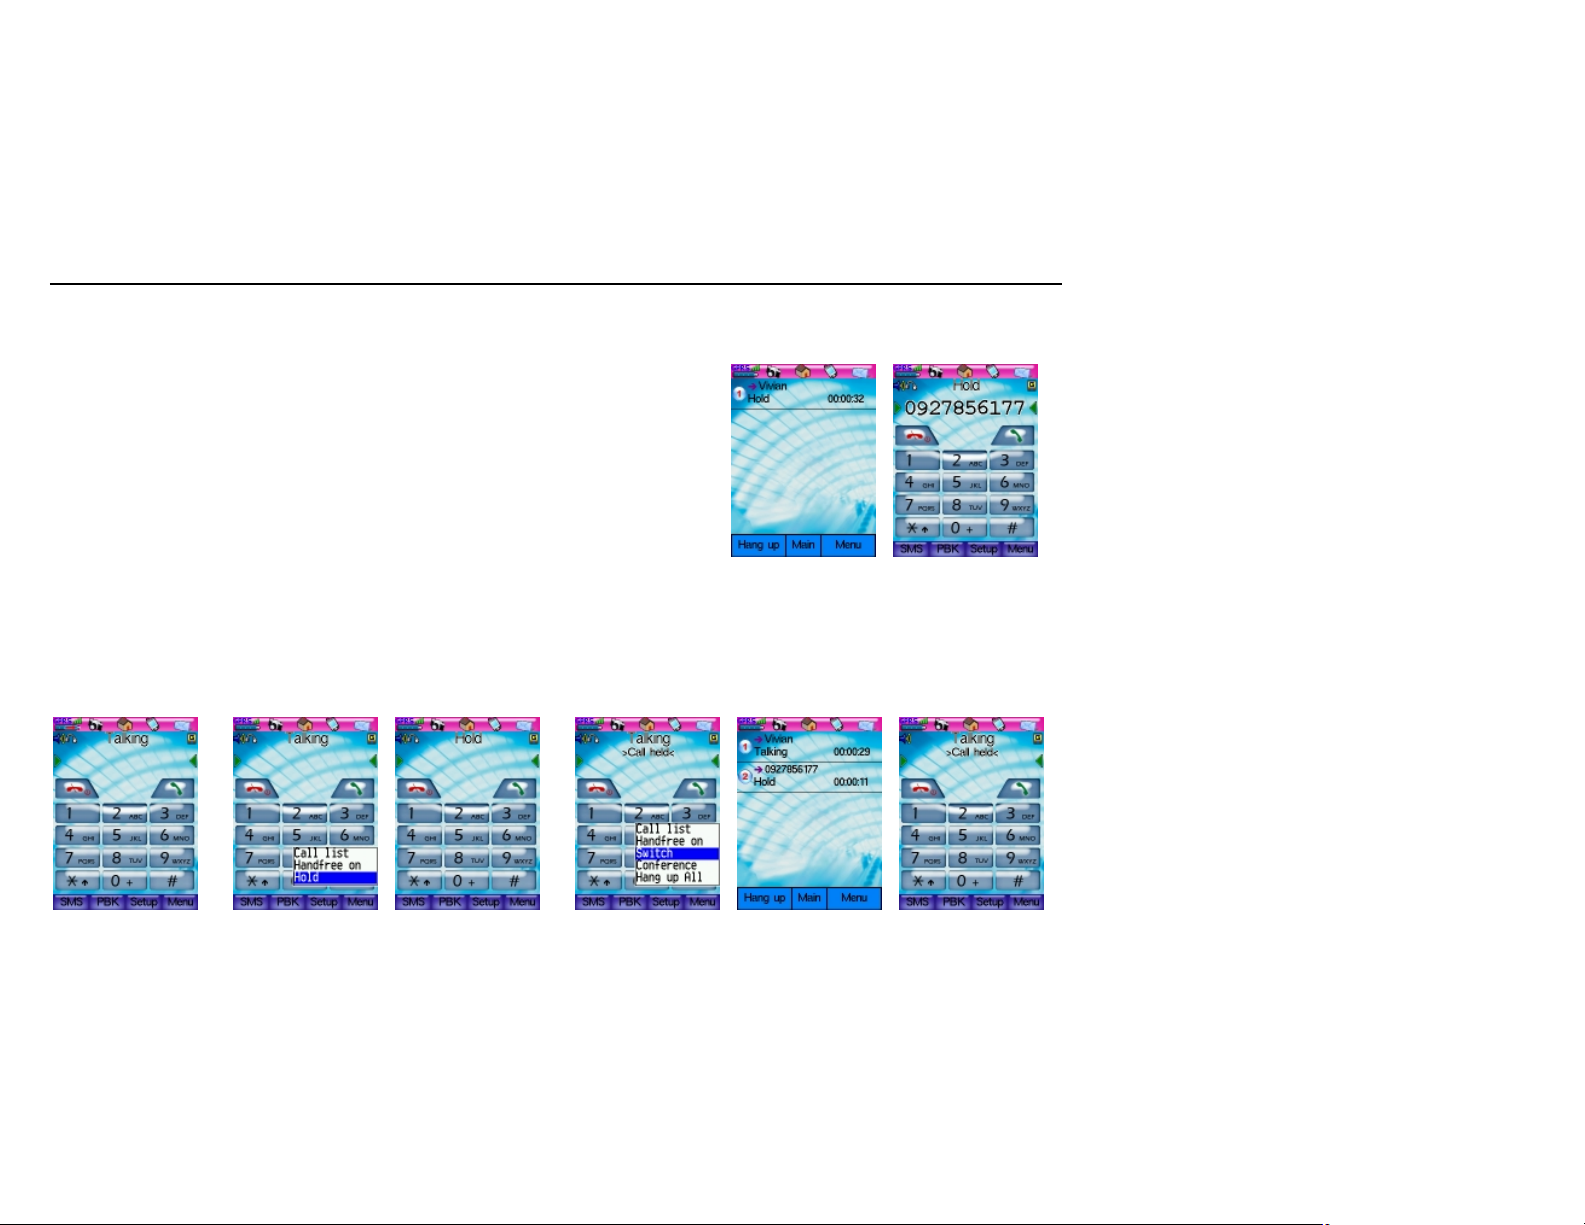
1. Tap Menu during a call, you will see a pop-up menu as
fig.1.12.
2. Select “Hold” if you want to make the second or the third
call (as fig.1.14). You will see a display as fig.1.13. Or tap
Menu > Call list to check the status of every outcalls as
fig. 1.15.
3. Press Phone again to enter the Phone screen to start
dialing (as fig.1.16). When the second call is connected,
tap Menu > Switch (as fig.1.17) to talk to the first person
and put the second call on hold (as fig.1.18). If you check
the Phone screen, you will see a message telling you that
there is a call on hold (as fig.1.19).
(Fig.1.15)
(Fig.1.16)
(Fig.1.12)
(Fig.1.13)
(Fig.1.14)
(Fig.1.17)
(Fig.1.18)
(Fig.1.19)
Page 8
8
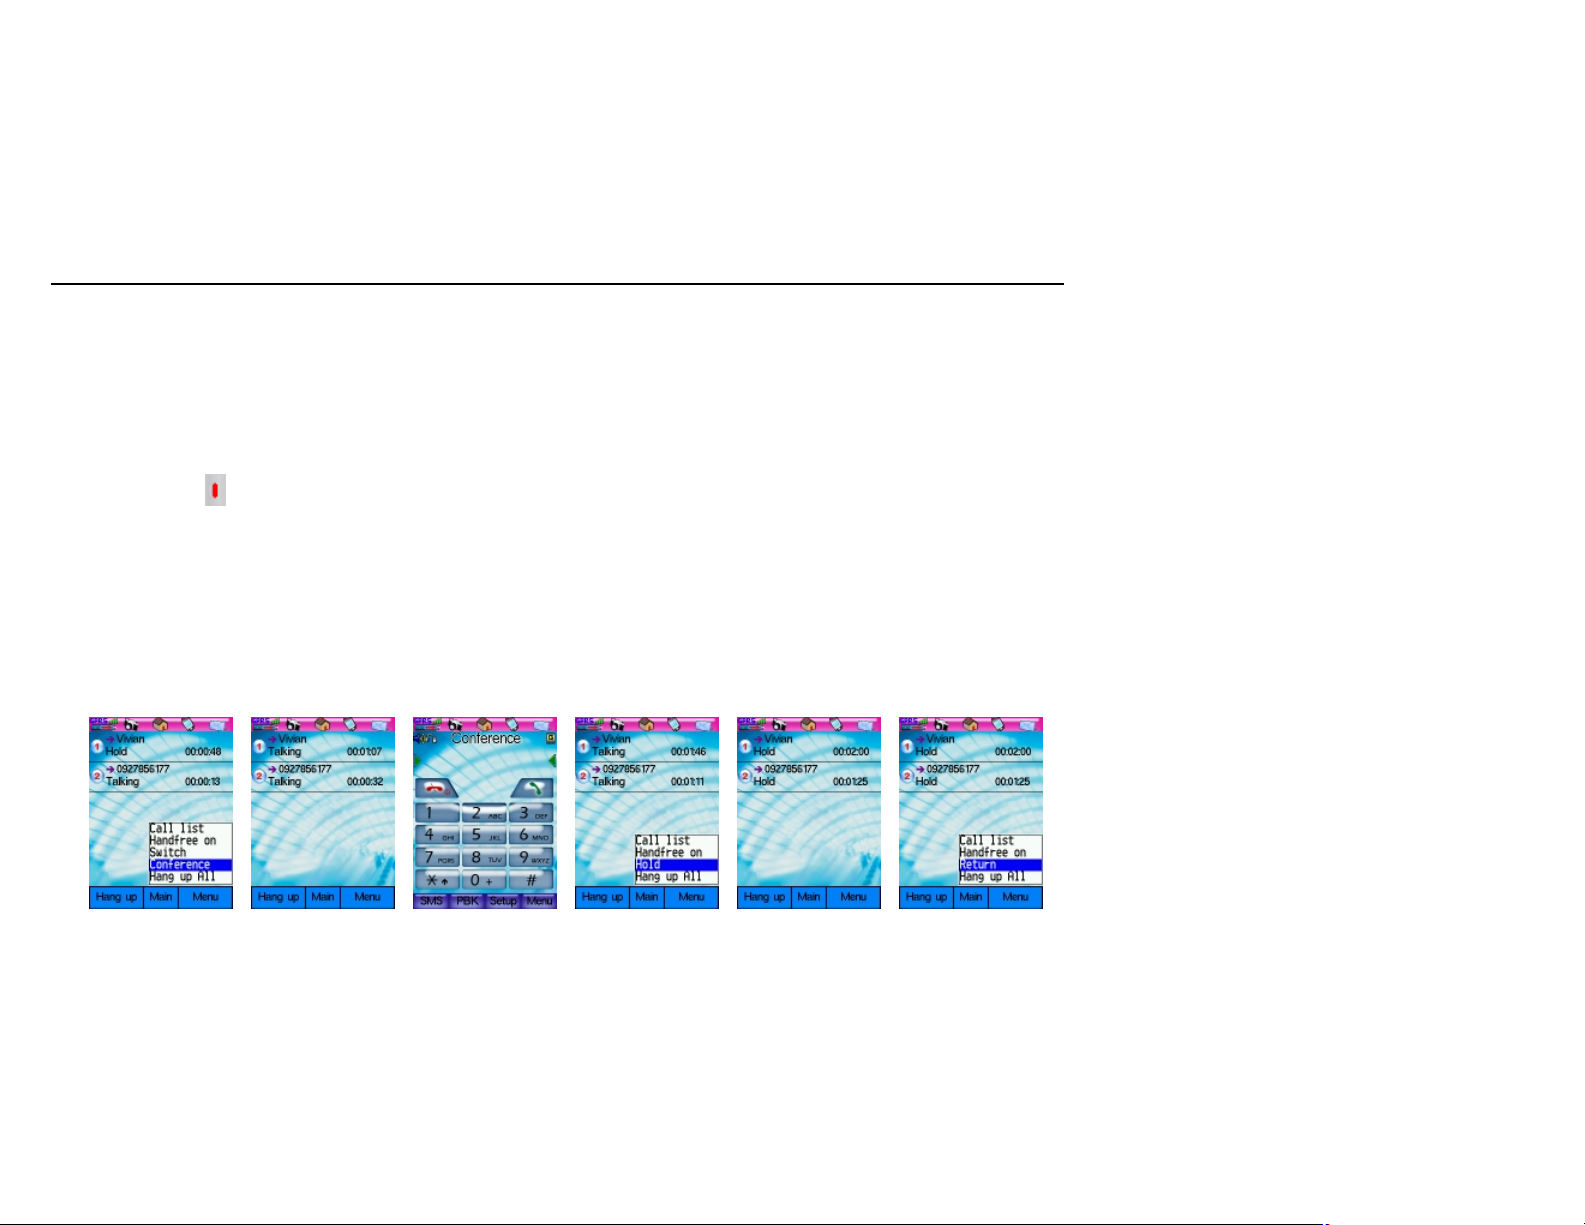
4. Tap Phone > Conference (as fig.1.20) and you can join all
existing calls to make a conference call (as fig.1.21).
5. If you go back to the Phone screen again, you will see a
message showing “Conference” on the display area (as
fig.1.22).
6. If you want make the third call, select Phone > Hold (as
fig.1.23) to put all the existing calls on hold (as fig.1.24). To
release hold, simply tap Phone > Reture (as fig.1.25).
7. You can select Handsfree on anytime during a call.
8. To end a certain call, select the call on the call list and tap
Hang up / or tap Hang up All to end the conference.
(Fig.1.20)
(Fig.1.21)
(Fig.1.22)
(Fig.1.23)
(Fig.1.24)
(Fig.1.25)
Page 9
9
1.3 Answering a call
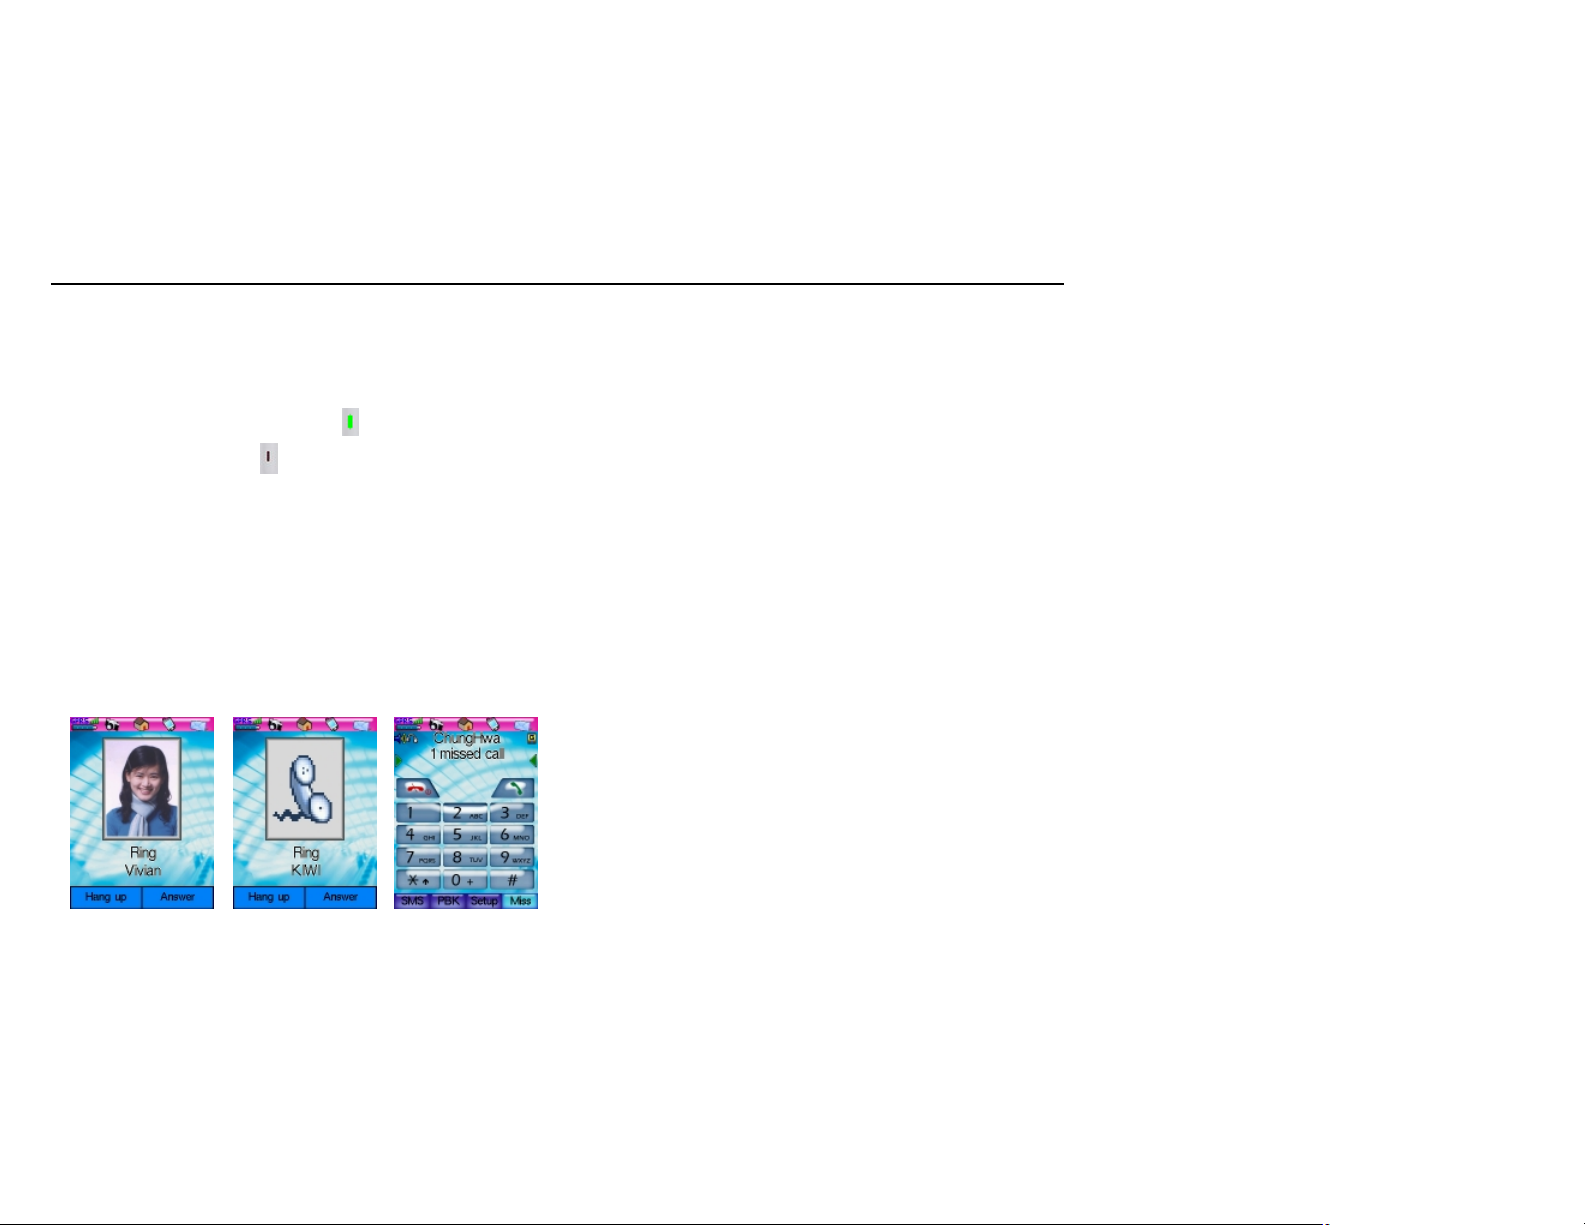
1. When you receive a call, your phone rings and/or vibrates
and displays an incoming call message (as fig.1.26 and
fig.1.27).
2. Tap Answer or press green-key to answer the call, or
tap Hang up or press to hang up the call.
3. If you did not answer the call, there will be a message on
the Phone screen showing the number of answered calls
as fig.1.28.
(Fig.1.26)
(Fig.1.27)
(Fig.1.28)
Page 10
10 2 SMS message
With B8 messages you can create, send, and receive the
2
1
following types of messages: SMS (Short Message Service).
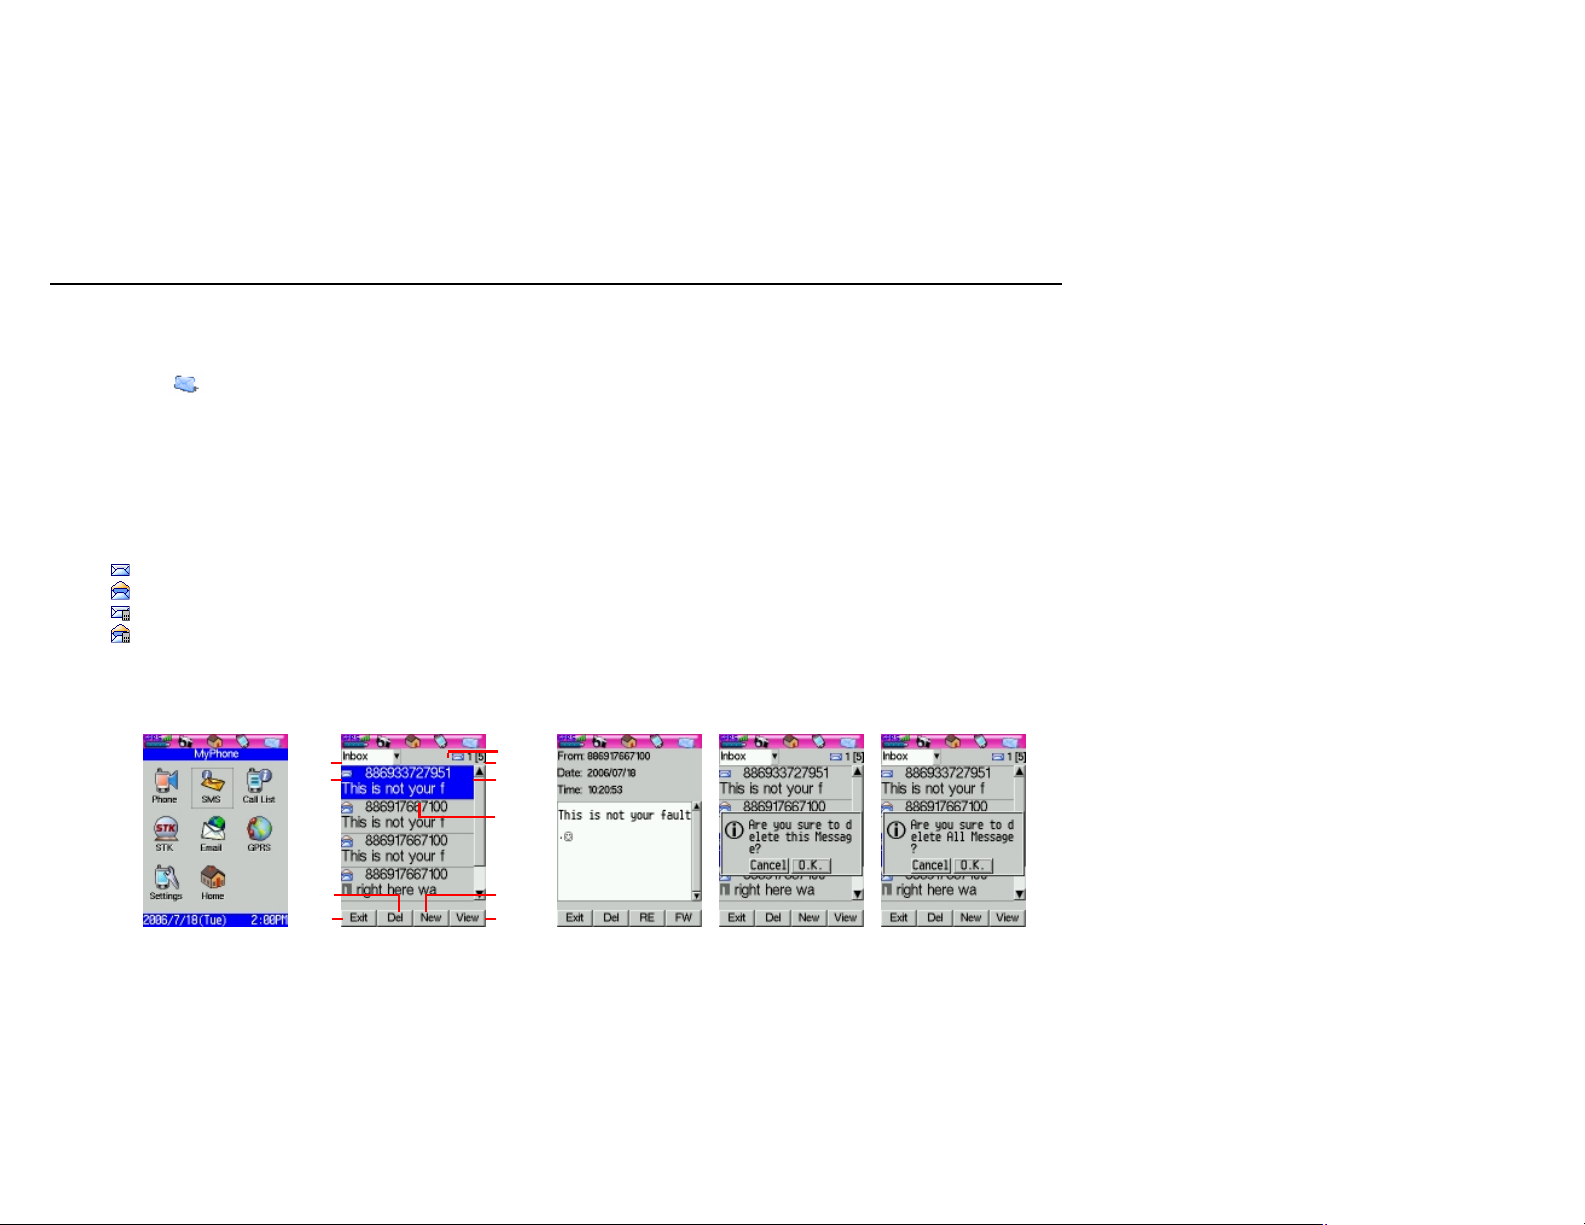
1. Tap Home > MyPhone (Fig.2.1) > SMS (Fig.2.2)。
2. Or tap on the right side of the status indicator bar
(Fig.2.1).
2.1 SMS message and operational instructions
(Fig.2.2)
1. Messaging accounts can have the following folders: Inbox,
Sent and Draft.
2. Total number of unread messages.
3. Total number of saved messages in the B8 and SIM card.
4. Status:
“ ”: Unread messages
“ ”: Read messages
“ ”: Unread SIM card messages
“ ”: Read SIM card messages
(Fig.6.2.1)
(Fig.2.2)
5. From: The source of message or phone number.
6. The message content.
7. Exit: Exit SMS and go back to “MyPhone”.
8. Del: Delete one or all message. Please see “Deleting SMS
messages”.
9. New: Add a new message. Please see “Adding/sending SMS
messages”.
10. View: View the message. Please see “Reading SMS
messages”.
2.2 Reading SMS messages
Select a message on the SMS screen and tap View, or tap the
message twice to open the message (as fig.2.3).
2.3 Delete SMS messages
1. Delete one message: Select a message on the SMS screen and
tap Del.Select “one” and you will see a dialogue window asking
whether you want to delete this message (as fig.2.4). Tap O.K. to
delete the message or tap Cancel to exit without deleting.
2. Delete all: Tap Del and Select “all” ,you will see a dialogue
window asking whether you want to delete all messages (as
fig.2.5). Tap O.K. to delete all messages or tap Cancel to exit
without deleting.
(Fig.2.3) (Fig.2.4)
(Fig.2.5)
4
8
7
3
5
6
9
10
Page 11
11
2.4 Adding/sending SMS messages
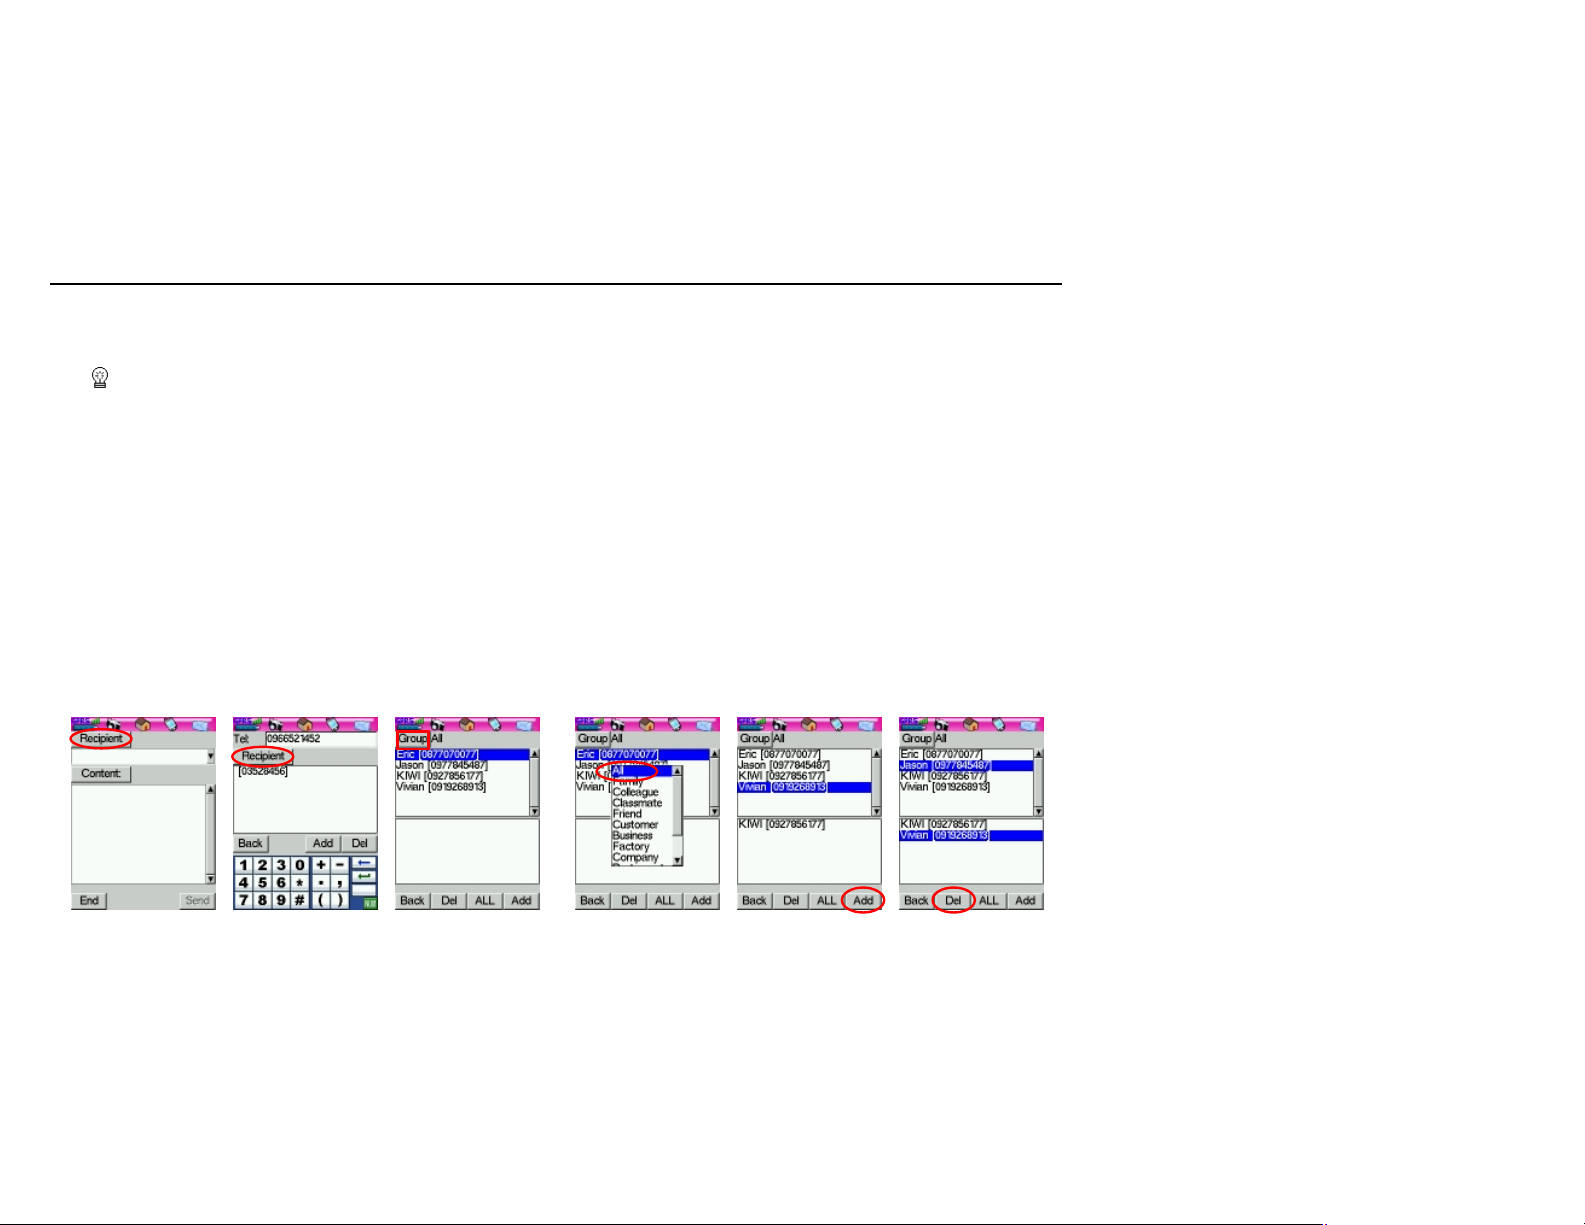
Tap New and you will see an editing screen as fig.2.6. You can
edit SMS here.
Tip:
1. Make sure SMSC number is ok before sending.
2. You can send the same message to 10 recipients at a
time.
2.5 Quick access to a contact
Tap Recipient to enter the phone number (as fig.2.7), or tap
Recipient on the recipient editing screen to display Contacts
list as fig.2.8.
1. Tap Group and you will see a list of groups as fig.2.9.
Select the group and find your contact to highlight it. Tap
Add to add your contact to the list of recipients (as fig.2.10).
2. You can tap Del to remove the unwanted recipient (as
fig.2.11). After entering all the contact numbers, tap Back
to go back to the recipient editing screen (as fig.2.12).
Your B8 can send a message to multiple recipients.
3. You can send up to 10 recipients at a time. In case you
enter more than 10 recipients, a dialogue window will
appear and ask whether you want to choose the top10
recipients (as fig.2.14).
4. Tap O.K. to go back to the message editing screen (as
fig.2.13) and edit the content.
5. To delete a recipient, tap Recipient to enter the recipient
screen, select a recipient and tap Del to remove it from
the list (as fig.2.11).
(Fig.2.6)
(Fig.2.7)
(Fig.2.8)
(Fig.2.9)
(Fig.2.10)
(Fig.2.11)
Page 12
12
2.6 Sending
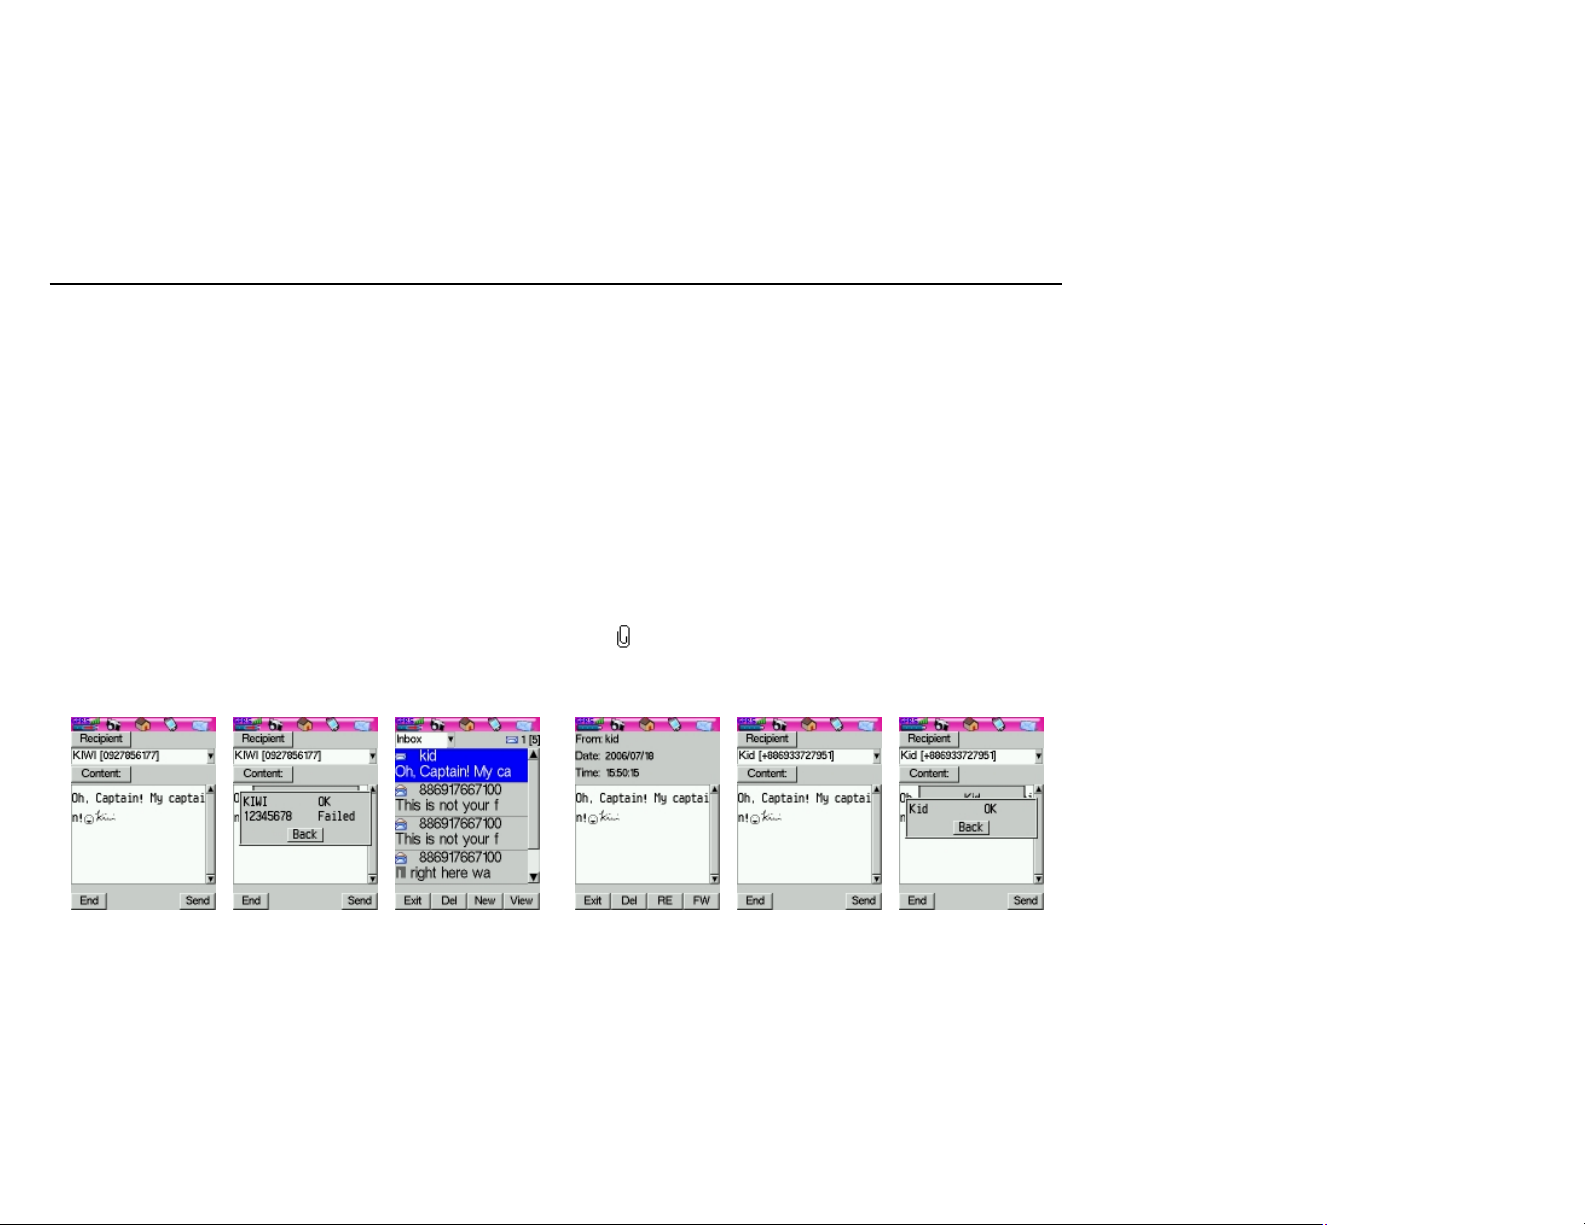
1. Tap Send to send out the message.
2.7 Forwarding/replying SMS messages
2. Before sending, you will see a dialogue window asking
whether you want to confirm sending or not Tap O.K. to
start sending
3. No matter the message is successfully sent out or not, the
screen will show the result with a dialogue window
4. After sending the message, tap Back and the message
will be automatically saved in the Backup folder.
(Fig.2.34)
(Fig.2.35)
(Fig.2.36)
You can forward or reply a message by using the messages
stored in your SIM card or any read messages.
Forwarding:
1. Select a message in any folder on the SMS screen (as
fig.2.31) and tap View on the lower right hand side or tap a
message directly to enter fig.2.32.
2. Tap FW and tap Content to enter the message editing
screen (as fig.2.33). After editing the message,tap Back to
go back to the previous screen.
3. Input the recipient’s number and tap Send to sent out the
message (as fig.2.34 and fig.2.35).
2. Replying:
1. Select a message in the Inbox folder (as fig.2.36). Tap
View on the lower right hand side or tap a message
directly to enter fig.2.37.
2. Tap RE to enter the message editing screen (as fig.2.38).
3. Tap Send to send out the reply (as fig.2.39).
Remark: You can always edit a message in the
message editing screen to rewrite or modify it.
(Fig.2.37)
(Fig.2.38)
(Fig.2.39)
Page 13
13 3 Call history
You can check the “Missed” , “answer” or “Called” phone
9
8
3
1
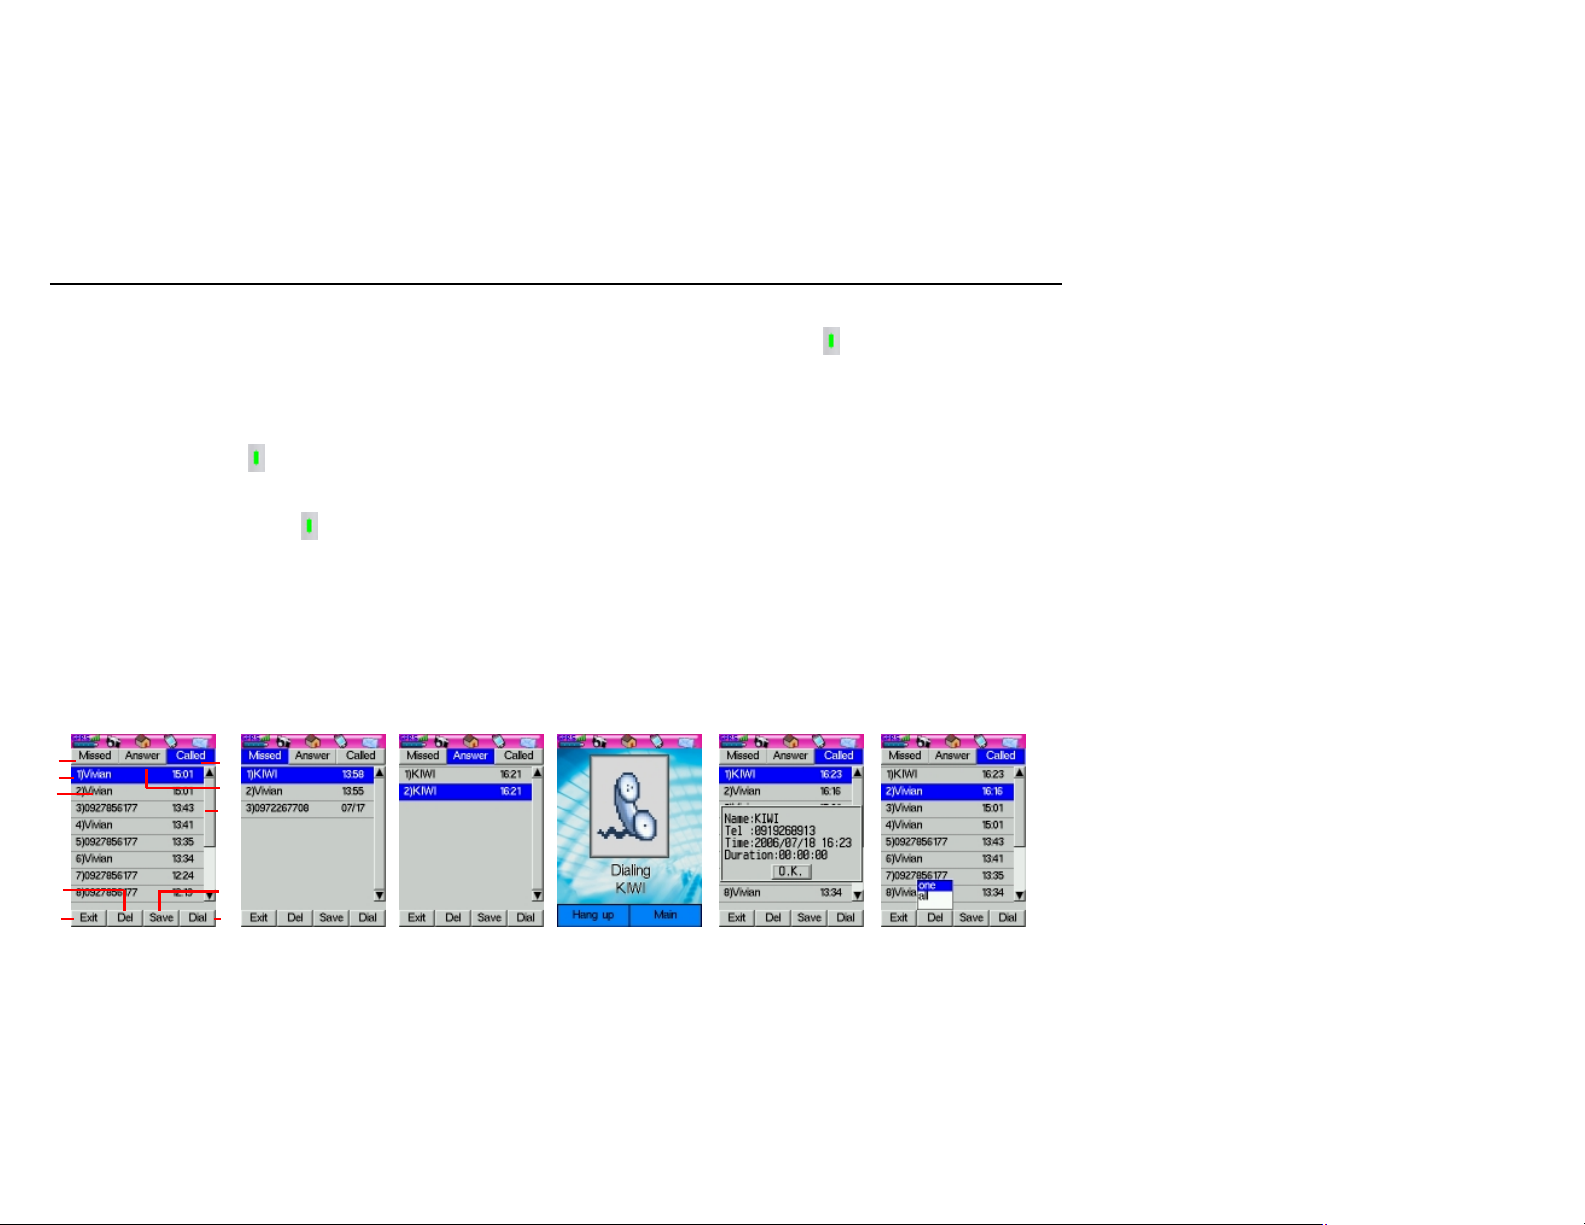
numbers in “Call list”. To enter this screen, tap Home >
MyPhone > Call list.
3.1 Call history and operational instructions
1. Missed calls: Listing out all the missed calls (as fig.3.2).
Tap a contact or number from the list, then tap Dial or
press green-key to make a call.
2. Answer calls: Listing out all the answered calls (as
fig.3.3). Tap a contact or number from the list, then tap
Dial or press green-key to make a call (as fig.3.4).
Select a contact or number from the list, then tap it to
display detail information such as name,tel,time and
duration (as fig.3.5).
3. Called: Listing out all the called phone numbers (as
fig.3.1). Tap a contact or number from the list, then tap
Dial or press green-key to make a call.
4. Items.
5. Phone number/Contact.
6. Time.
7. Exit: Exit Call list and back to “MyPhone”.
8. Del: Press this button and you will see a dialogue window
asking whether you want to delete one or all (as fig.3.6).
Tap O.K. to delete one or all (fig.3.7) or tap Cancel to
exit.
9. Save: If you want to save the missed/answered/called
phone numbers, please check “Saving phone numbers”.
10. Dial: You can tap this button to dial out from the
missed/answered/called phone number lists.
(Fig.3.1)
4
5
7
(Fig.3.2)
2
6
10
(Fig.3.3)
(Fig.3.4)
(Fig.3.5)
(Fig.3.6)
Page 14
14
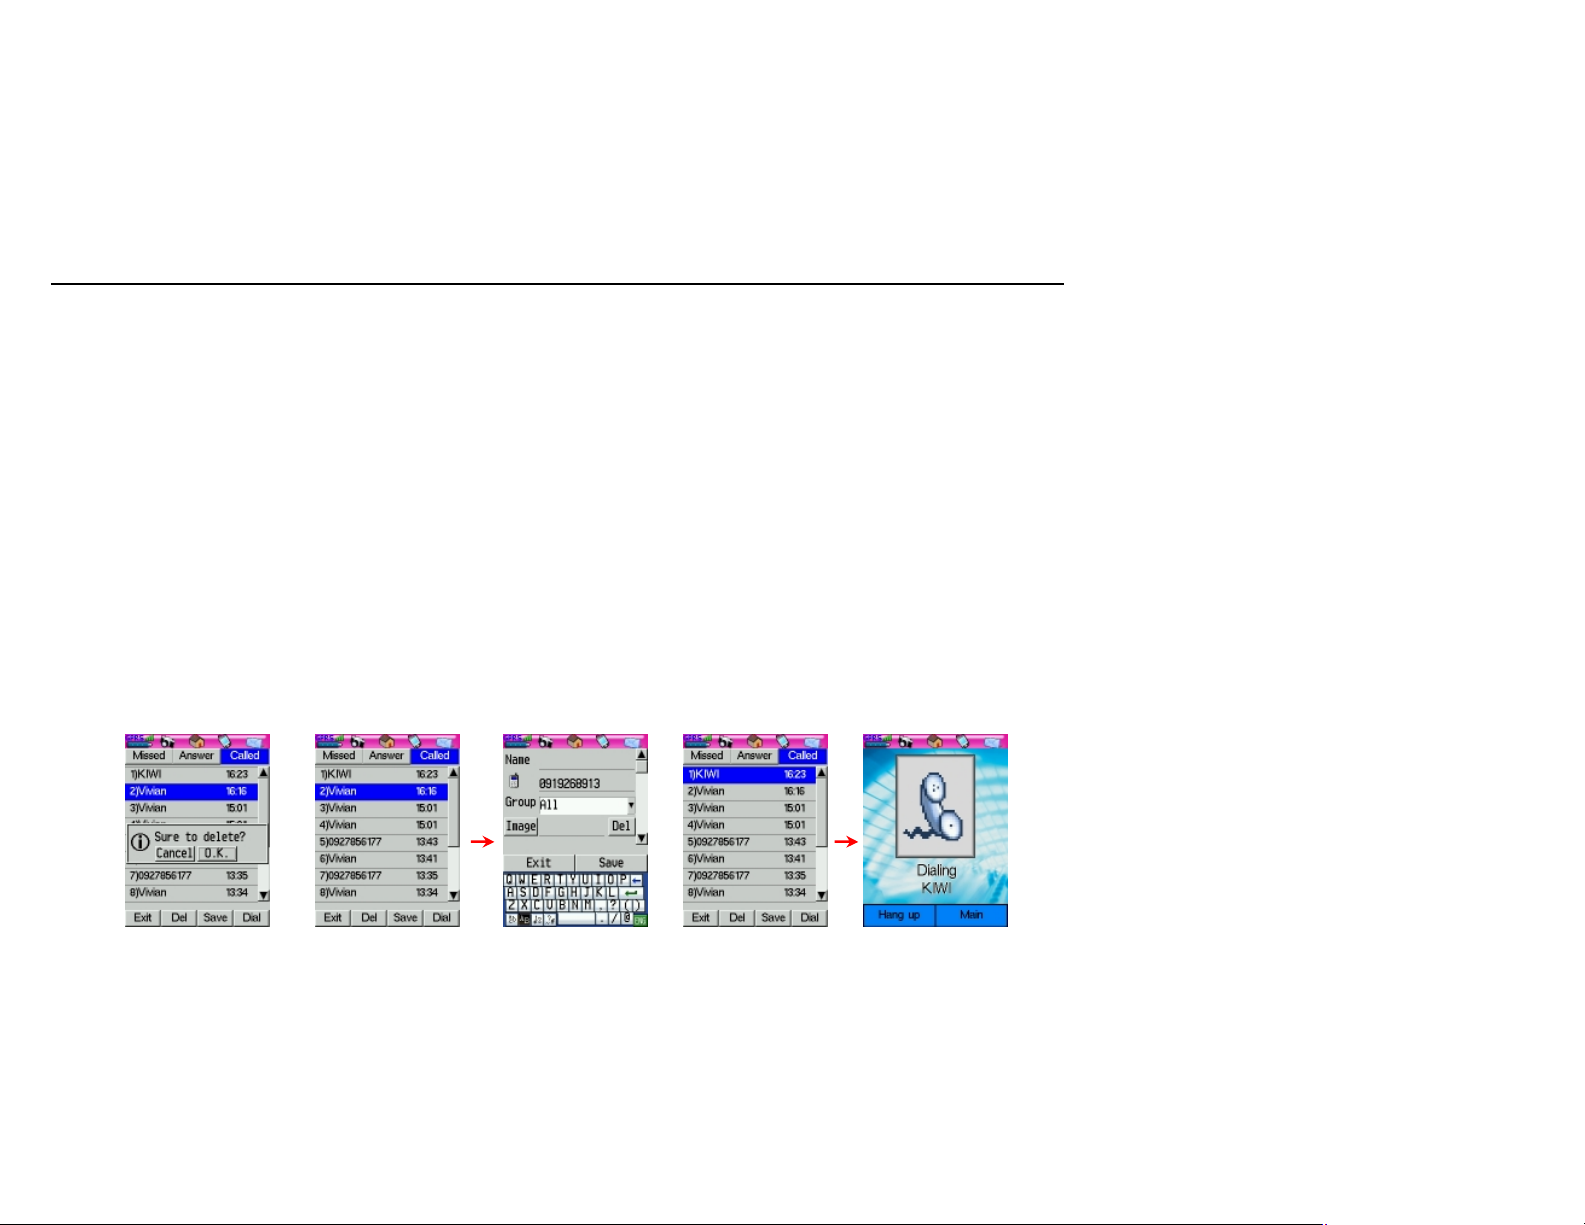
3.2 Saving phone numbers
1. Tap a record to highlight it (as fig.3.8).
2. Select Save to enter the edit screen (as fig.3.9).
3. Edit contact information then tap Save to save the
contact.
3.3 Making a call from the call history list
1. Tap a record to highlight it (as fig.3.10).
2. Tap Dial or press to make a call (as fig.3.11).
(Fig.3.7)
(Fig.3.8)
(Fig.3.9)
(Fig.3.10)
(Fig.3.11)
Page 15
15 4 Mobile phone settings
There are a number of ways you can give your B8 a personal
touch and change its settings to suit your requirements, such
as security, screen display, sound, message, call divert, call,
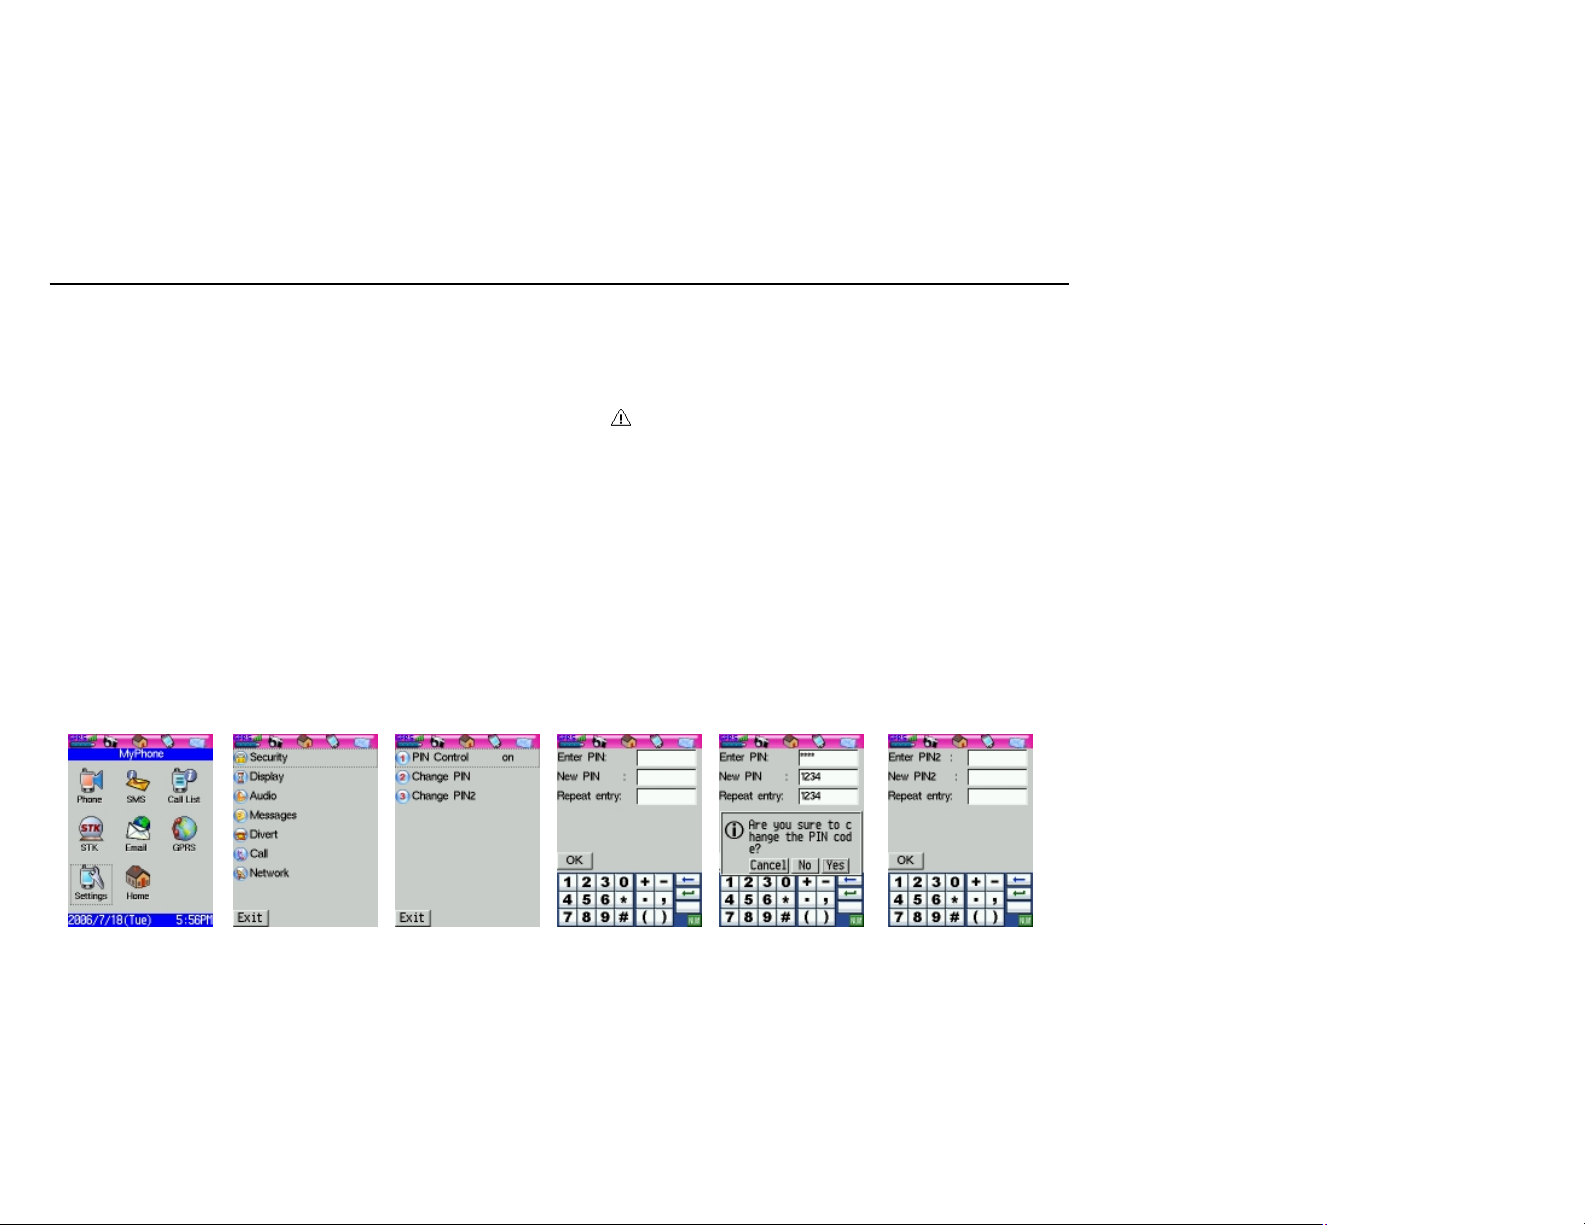
and network. To set up, tap Home > MyPhone (Fig.4.0.1) >
Settings (Fig.4.0.2)。
4.1 Security settings
Tap Home > MyPhone > Settings and select Security to
enter security settings as fig.41.1.
1. PIN control: Enable or disable PIN control. Enter your (or
default) PIN code to change the protection status before
modification.
2. Change PIN: If you want to change the PIN code, tap this
button to set up a new code (as fig.4.1.2 and fig.4.1.3).
3. Change PIN2: If you want to change the PIN2 code, tap
this button to set up a new code(as fig.4.1.4).
Note:
1. If there is an error message that means the input
PIN code is wrong or inconsistent. Please re-enter
again or call your service provider for assistance.
2. Usually the SIM card will be blocked after three
wrong attempts (the number of attempts is SIM-card
dependent), and you need to enter the PUK code to
unlock it. Please check with your service provider for
the PUK code.
(Fig.4.0.1)
(Fig.4.0.2)
(Fig.4.1.1)
(Fig.4.1.2)
(Fig.4.1.3)
(Fig.4.1.4)
Page 16
16
4
.2
Display settings
4
.3
Audio settings
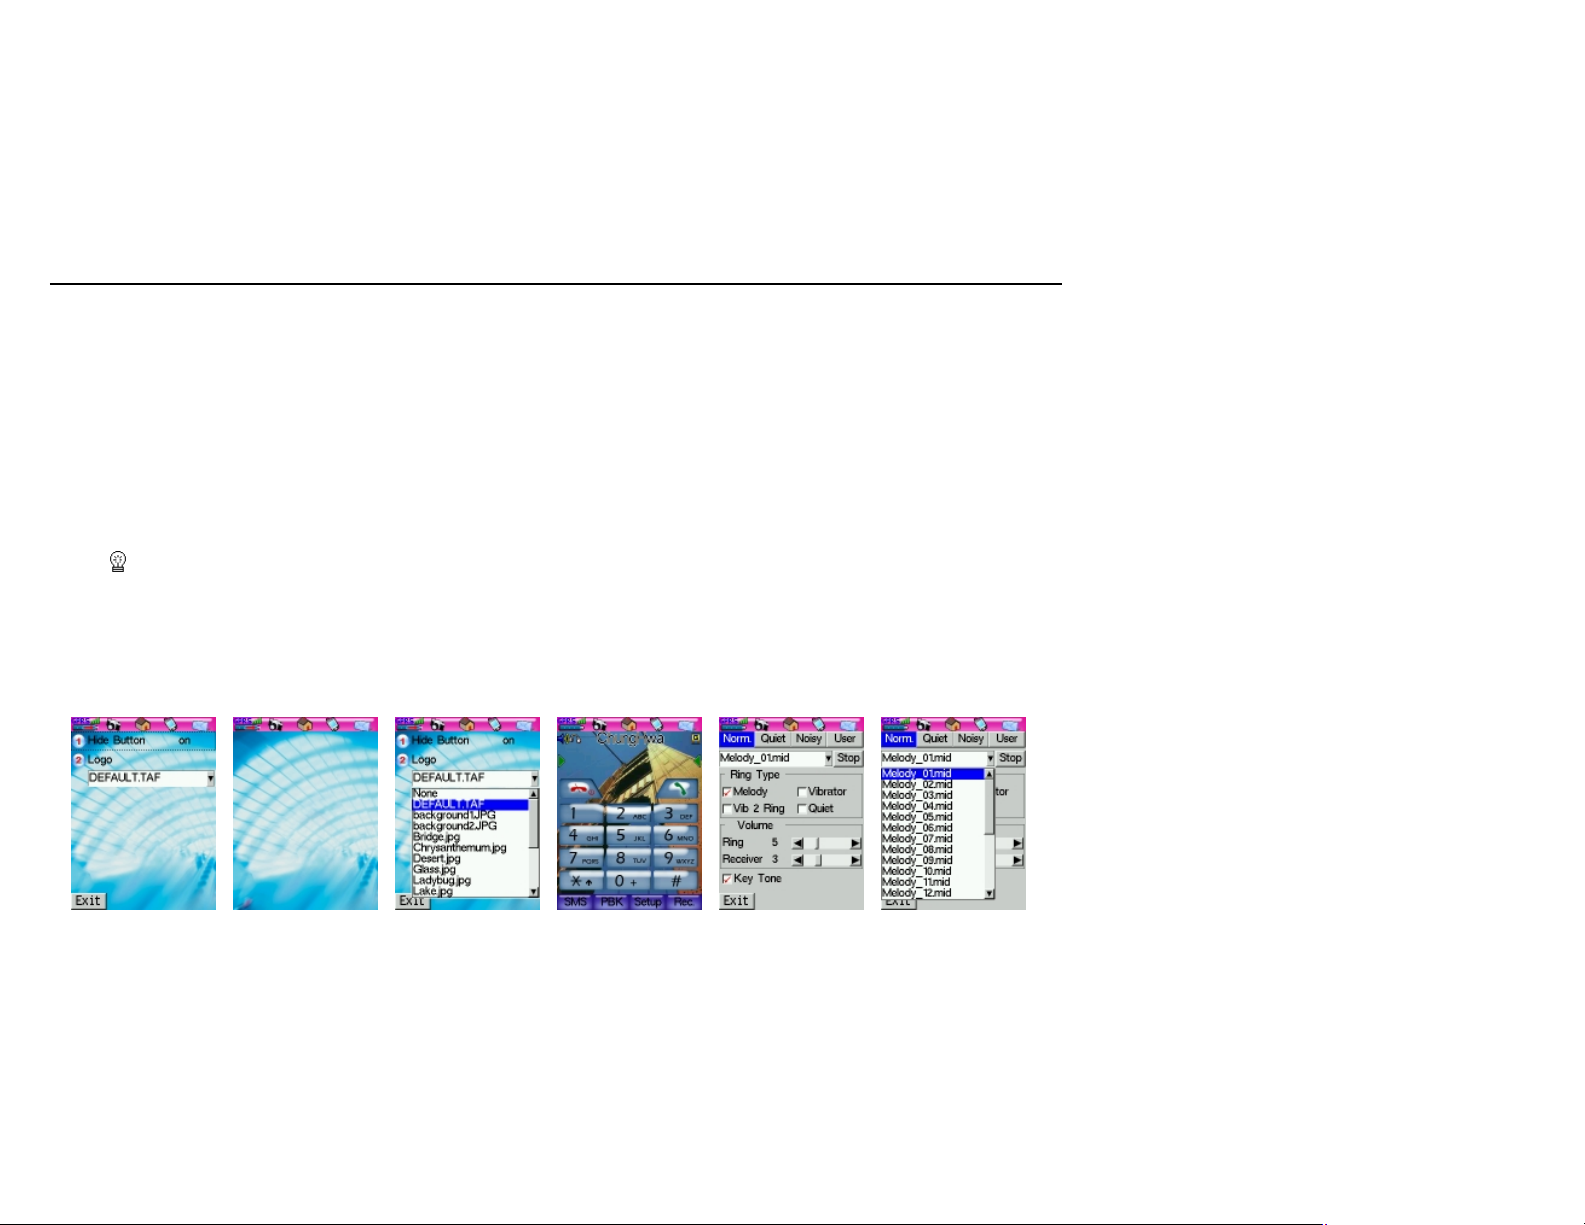
Tap Home > MyPhone > Settings and select Display to
enter the display settings as fig.4.2.1.
1. Hide buttons: You can choose to hide the dial buttons
and display the wallpaper after 15 seconds of inactivity on
the Phone screen (as fig.4.2.2). If the original status is
“On”, tap this button to switch to “Off”, or tap again to
switch to “On”.
2. Logo: You can change the wallpaper for the Phone
screen. Tap the drop-down menu (as fig.4.2.3) and select
a picture to be the wallpaper (as fig.4.2.4).
Tip: Simple tap the screen again to show the hidden
dial buttons when you want to make a call.
Tap Home > MyPhone > Settings and select Audio to enter
the audio settings as fig.4.3.1. Your B8 provides ring
melodies for incoming calls, new message notifications,
alarms and also offers Eight profiles: Norm., Quiet, Noisy
and User.
1. Ring Type: There are several default melodies that you
can choose from. You can also personalize your ring tone
by loading melodies to the Music folder in your B8. To
choose an incoming call melody, tap the drop-down menu
and select file (Fig.4.3.2), the file will be played
automatically. To stop playing, tap Stop on the right hand
side.
2. Melody: Check Melody to set the ring melody as the
incoming call notification.
3. Vibrator: Check Vibrating to set vibrating as the
incoming call notification.
(Fig.4.2.1)
(Fig.4.2.2)
(Fig.4.2.3)
(Fig.4.2.4)
(Fig.4.3.1)
(Fig.4.3.2)
Page 17
17
4. Vib 2 ring: Check Vibrating before ring to
4
.4
Messages settings
set vibrating before ring as the incoming call
notification.
5. Quiet: Check Quiet and there will be no signals for
notification except showing a message when there
is an incoming call.
6. Ring volume: There are 16 levels for adjusting the ring
volume. You can scroll the adjusting bar, or tap the left
button or the right button to set up the ring
volume.
7. Receiver volume: There are Eight levels for adjusting
the receiver volume. You can scroll the adjusting bar, or
tap the left button or the right button to set up
the receiver volume.
8. Key tone: Check Key tone to turn on or turn off the key
tone.
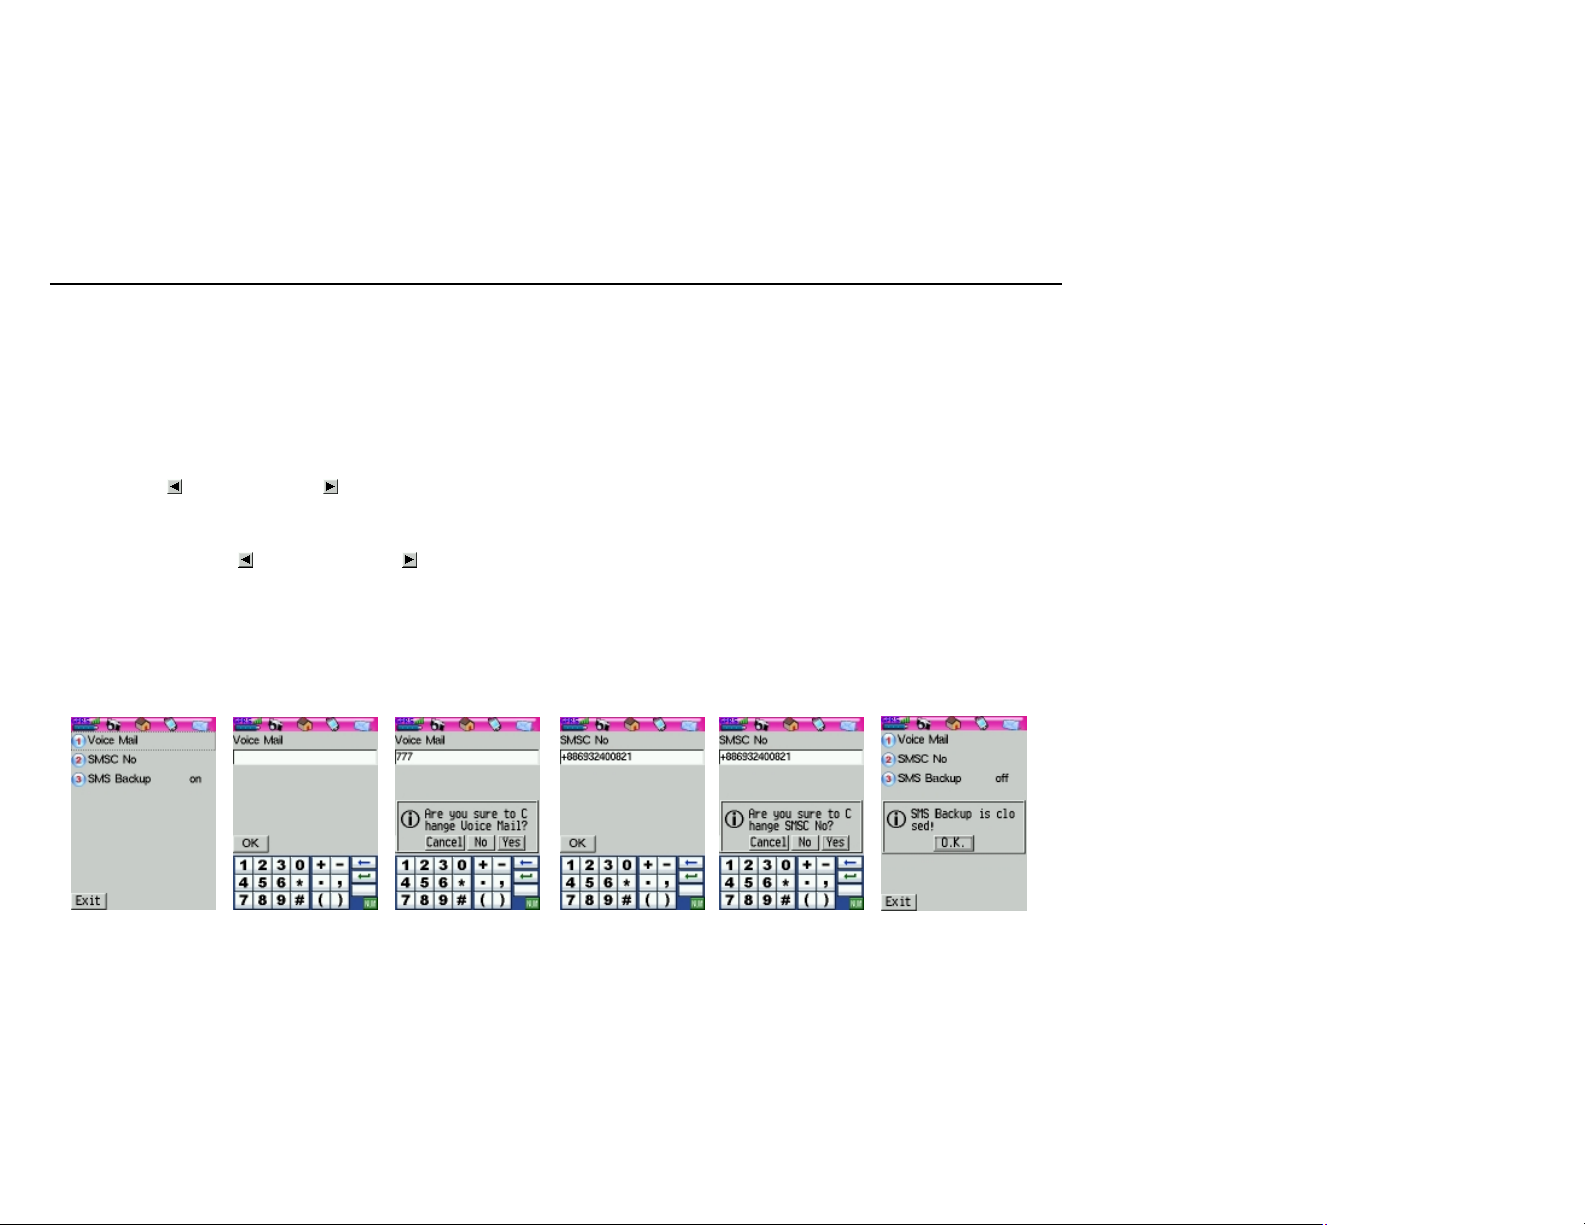
Messages settings include Voice mail, SMS center and SMS
backup. Tap Home > MyPhone > Settings and select
Messages to enter messages settings as fig.4.4.1.
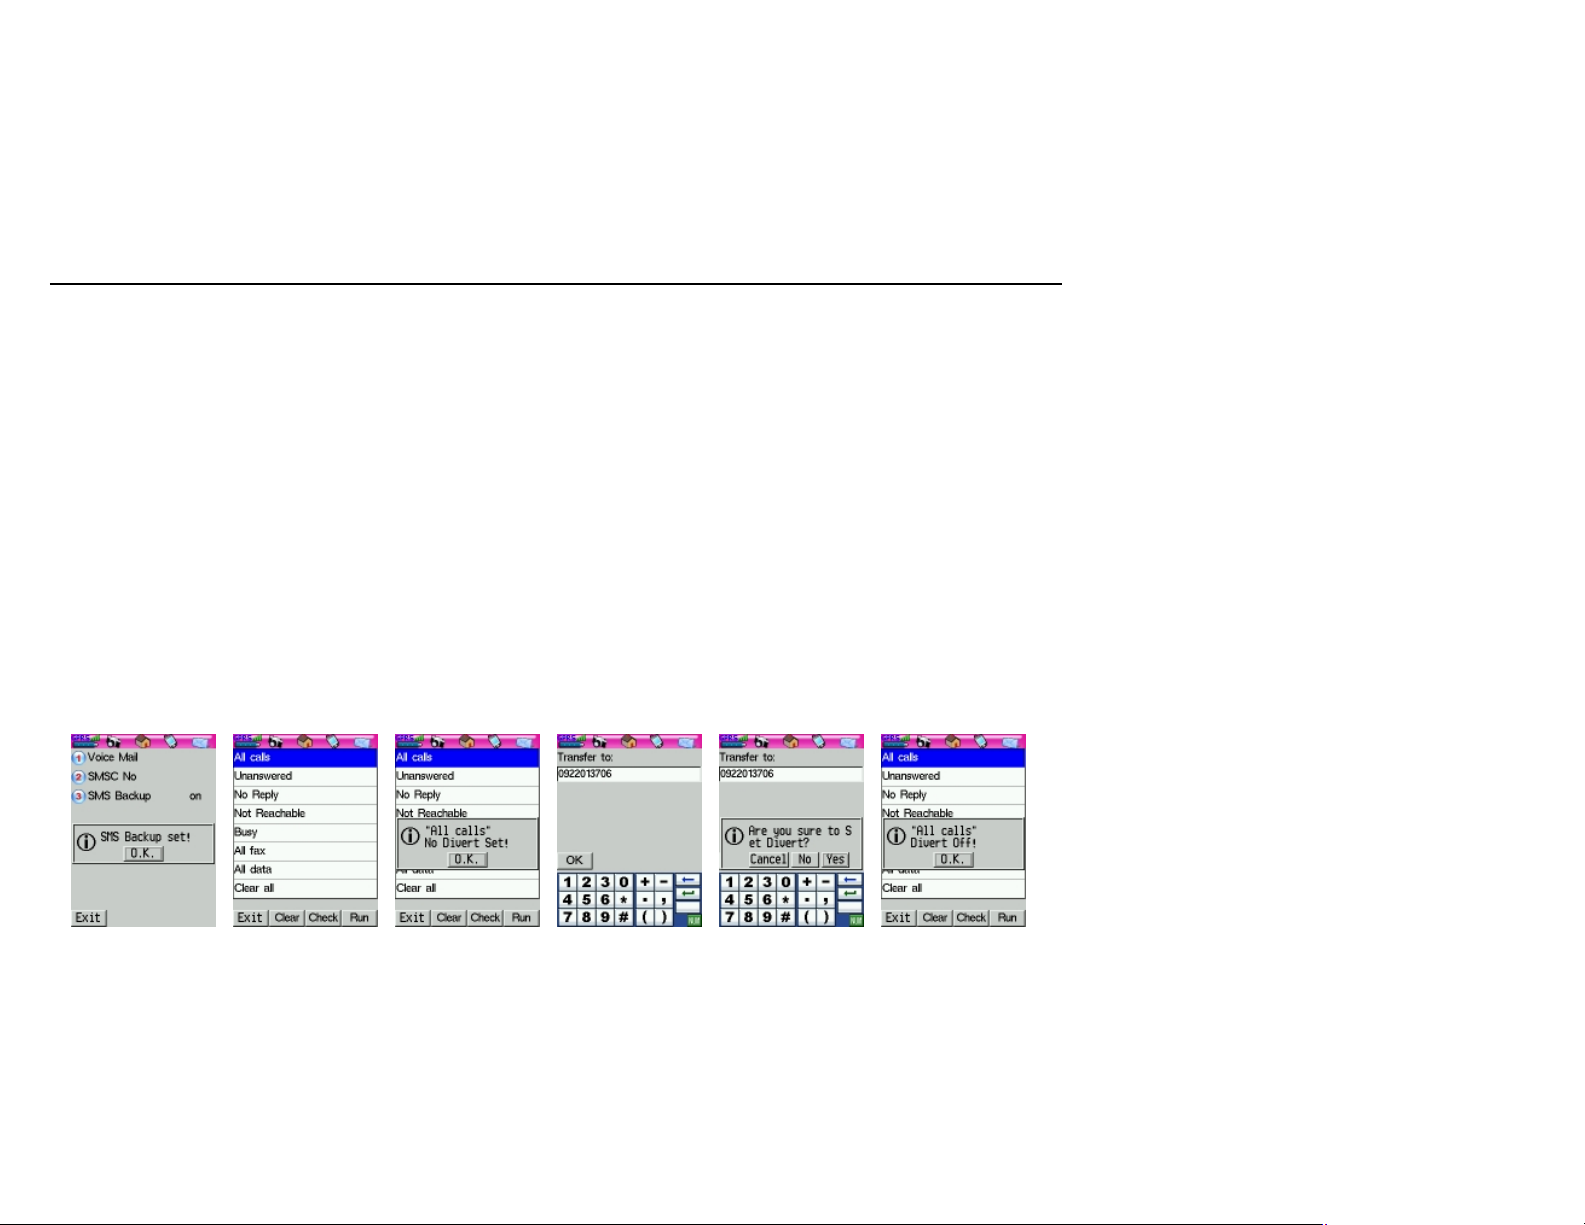
1. Voice Mail: Tap this item to change your voice mail
number (as fig.4.4.2). Enter your voice mail number and
tap OK . You will see a dialogue window asking whether
you want to change the number (as fig.4.4.3). Tap Yes to
save the new number and go back to the previous page,
or tap No to exit without saving the new number. You can
also tap Cancel to go back and enter a new number.
(Fig4.4.1)
(Fig.4.4.2)
(Fig.4.4.3)
(Fig.4.4.4)
(Fig.4.4.5)
(Fig.4.4.6)
Page 18
18
2. SMSC no.: Please check with your service provider for
4
.5
Call divert settings
the SMS center number. Tap this item to enter the number
(as fig.4.4.4) and tap OK. There will be a dialogue window
asking whether you wan to change the number (as
fig.4.4.5). Tap Yes to save the new number and go back to
the previous page, or tap No to exit without saving the
new number. You can also tap Cancel to go back and
enter a new number.
3. SMS Backup: Tap this item to set up SMS backup as
“On” or “Off”. A dialogue window will also appear and ask
you to confirm (as fig.4.4.6 and fig.4.4.7).
You can divert incoming calls to another number if for any
reason you are unable to answer them. You will have to
apply this function with your service provider before starting
to use it. Your B8 allows the type of call you want to divert,
such as “All calls”, “Unanswered”, “No Reply”, “Not
reachable”, “Busy”, “All faxes”, “All data” and “Clear all” (as
fig.4.5.1). Tap Home > MyPhone > Settings and select
Divert to enter call divert settings as fig.4.5.1. For every
mode, you can select Run, Check or Clear. For example, if
you want to divert all calls, please follow the instructions as
below:
1. Check: Select “All calls” and tap Check, you will see a
message asking you to wait for the service provider while
the network is negotiating. Then another message will
appear to tell you if divert is set or not (as fig.4.5.2).
(Fig.4.4.7)
(Fig.4.5.1)
(Fig.4.5.2)
(Fig.4.5.3)
(Fig.4.5.4)
(Fig.4.5.5)
Page 19
19
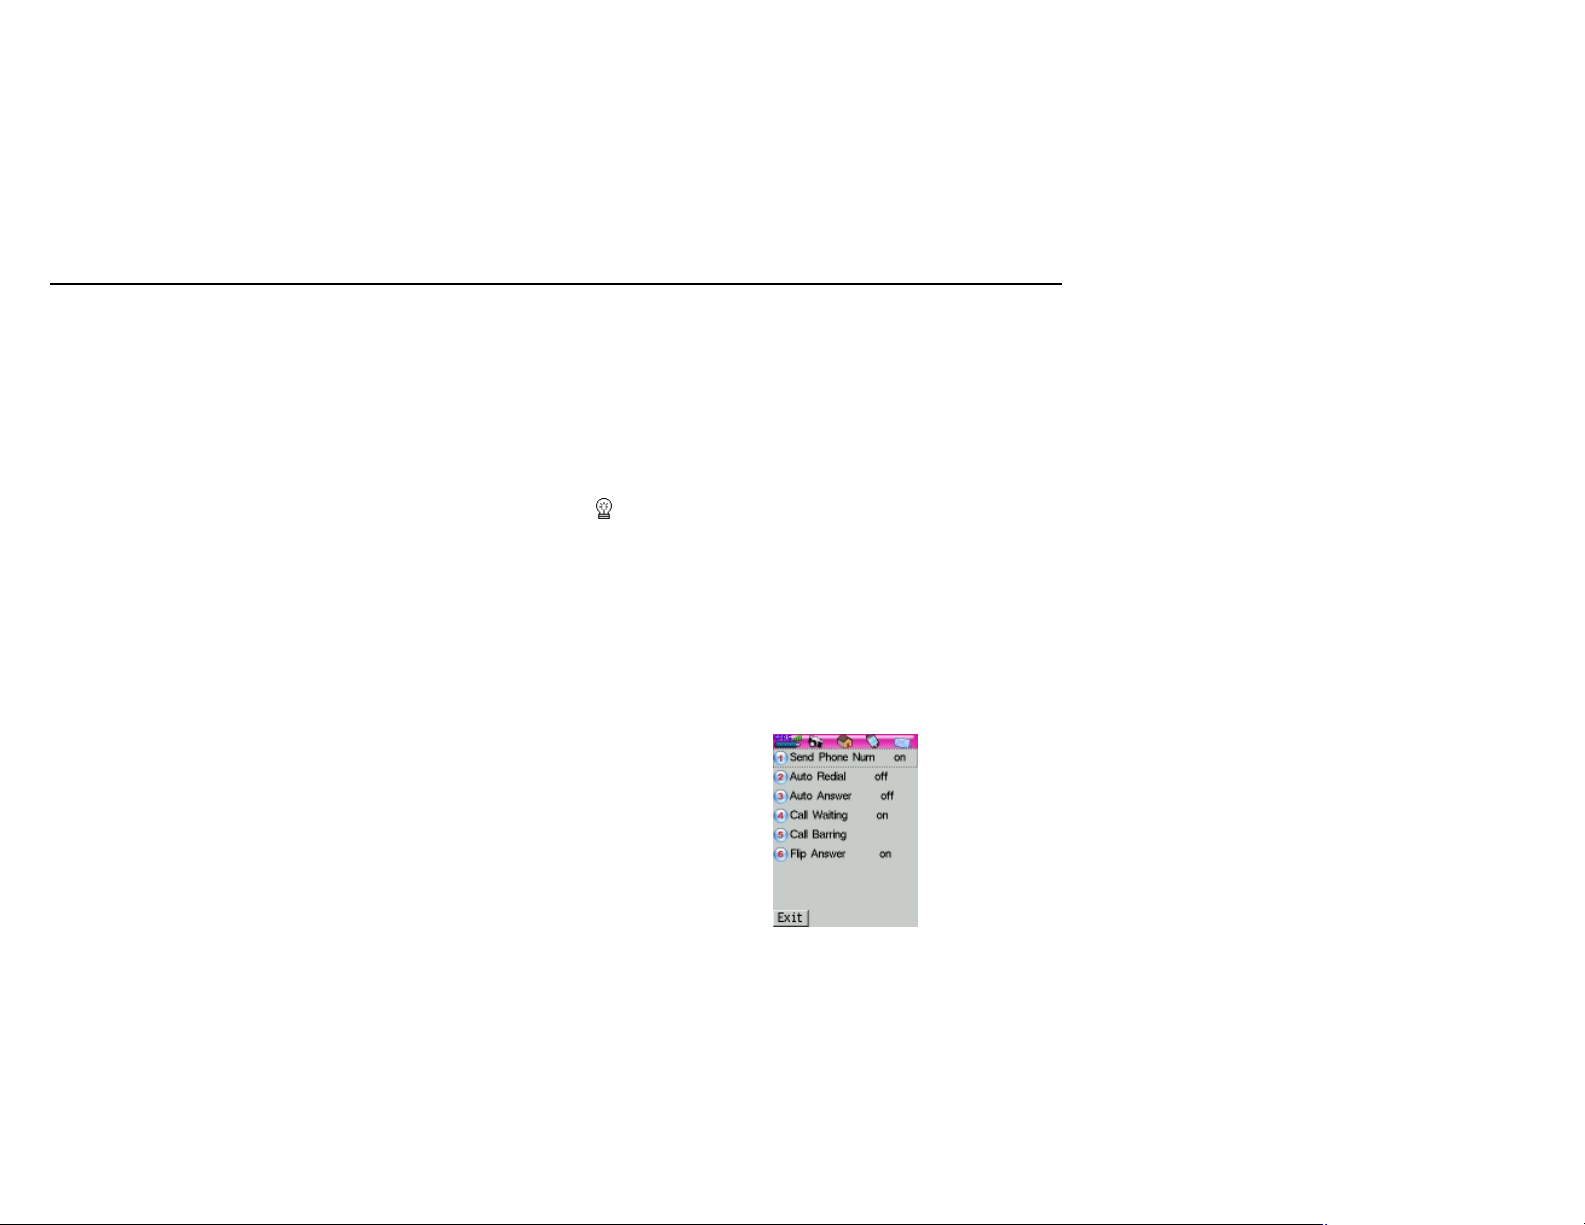
2. Run: Select “All calls” and tap Run, you will enter an
4
.6
Call settings
editing screen for you to input the phone number to divert
(as fig.4.5.3). After inputting a number, tap OK and you
will see a dialogue window asking whether you want to
divert all calls (as fig.4.5.4). Tap Yes to save the number
and go back to the previous screen, or tap No to exit
without saving. You can also tap Cancel to go back and
change the diverting number.
3. Clear: Select “All calls” and tap Clear to cancel diverting
all calls (as fig.4.5.5).
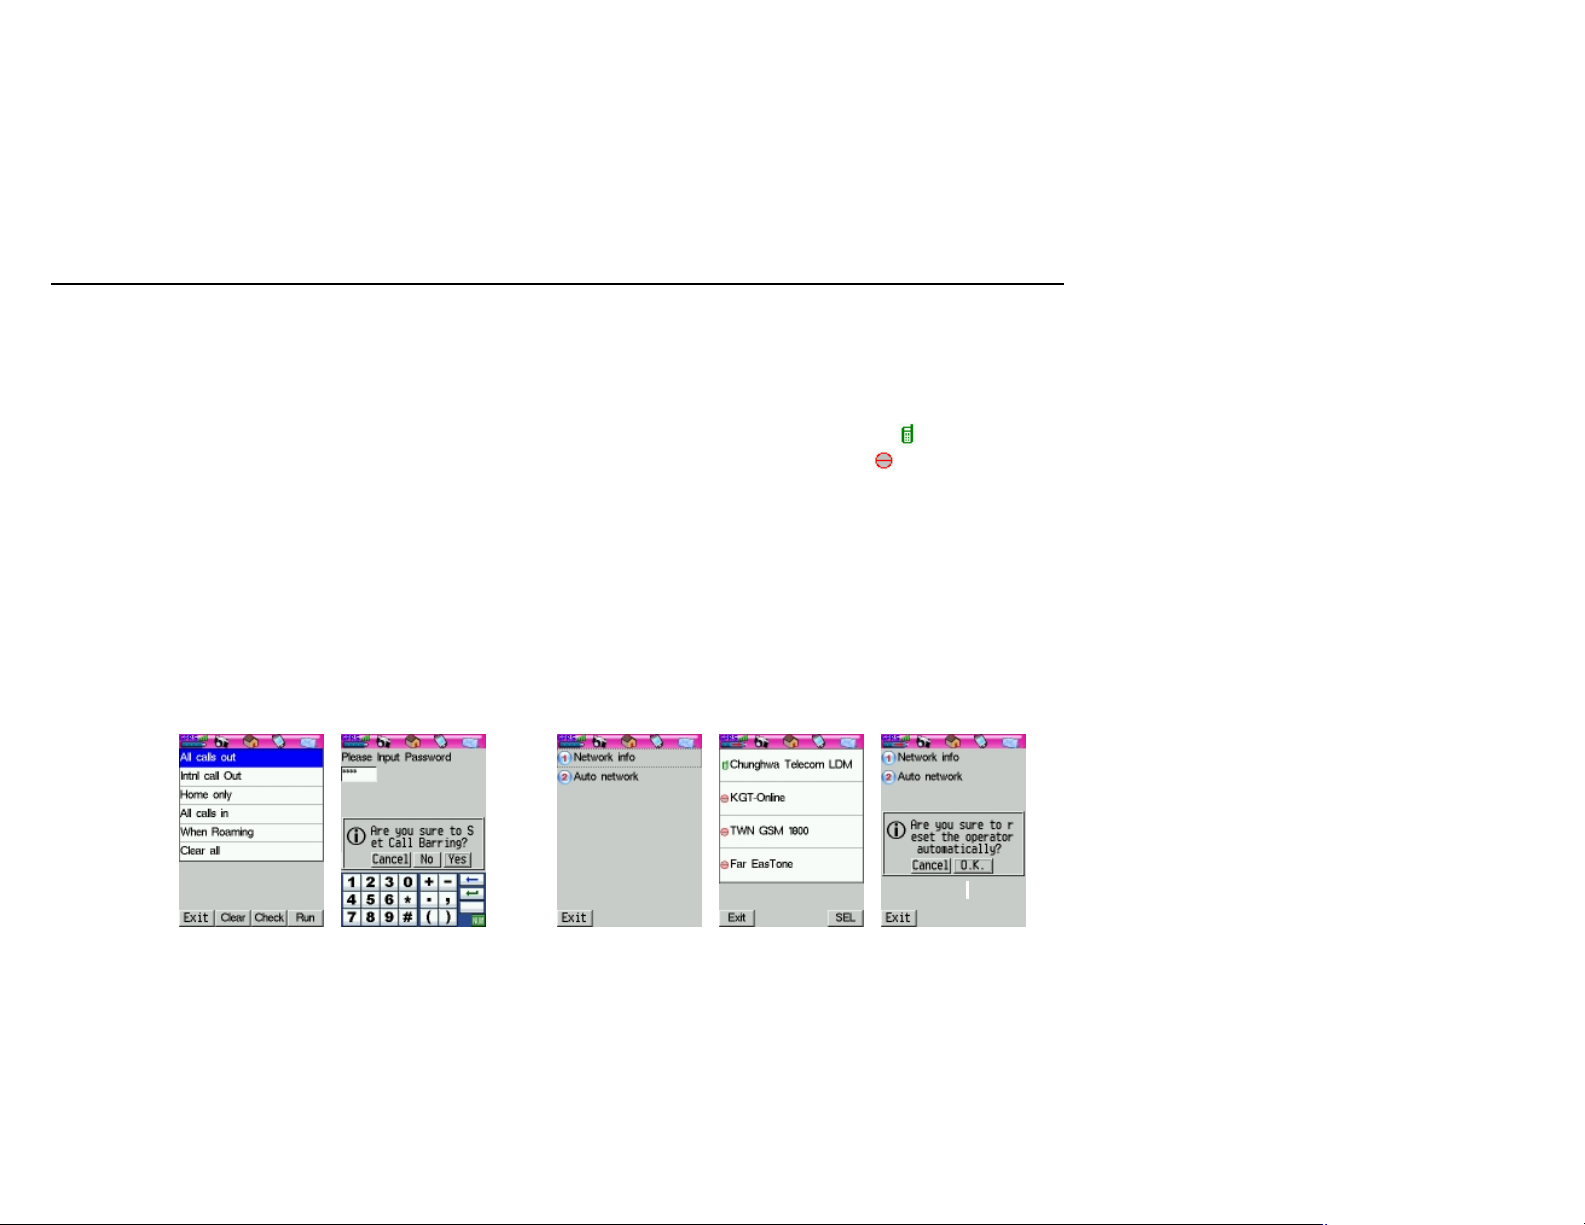
Tap Home > MyPhone > Settings and select Call to enter
call settings as fig.4.6.1.
1. Send Phone Num: You can choose whether you want to
display your phone number on recipient’s phone screen.
Tap this item to set this function as “On” or “Off”.
2. Auto Redial: You can choose whether you want to redial
the most recent call. Tap this item to set this function as
“On” or “Off”.
Tip: Your A8 can auto redial for 30 times.
3. Auto Answer: You can choose whether you want your A8
to answer an incoming call automatically. Tap this item to
set this function as “On” or “Off”.
(Fig.4.6.1)
Page 20
20
4
.7 Network settings
4. Call Waiting: Use the setting to control how A8 handles
incoming calls during an already ongoing call. Tap this
item to set this function as “On” or “Off”.
5. Call Barring: You can set restrictions for calls made from
or to your B8 (as fig.4.6.2). You can, for example, protect it
from being used for long-distance calls. Select an item
and tap Check to check the current setting. To activate,
select an item and tap Run. You will have to input a
password (as fig.4.6.3). Tap OK and you will see a
dialogue window (as fig.4.6.3) asking you to confirm it.
Tap Yes to activate the restriction.
6. Flip Answer: When “Flip answer” is enabled, you can
open the flip to answer the call. Tap this item to set the
function as “On” or “Off”.
You can get network information or set up auto network by
tapping Home > MyPhone > Settings and select Network
to enter a setup screen as fig.4.7.1.
1. Network info: Tap this item and you will see a list of
network service providers (as fig.4.7.2). means the
network is providing service for you. means the
network is not providing service for you.
2. Auto network: When the radio signal is weak or if you are
roaming outside of your Home network, select “Auto
network” to improve the radio signal strength (as fig.4.7.3).
(Fig.4.6.2)
(Fig.4.6.3)
(Fig.4.7.1)
(Fig.4.7.2)
(Fig.4.7.3)
Page 21
21
Guidelines for Safe and Efficient Use
Please read this information carefully before using your mobile
phone:
Mobile Phone
1. In US GSM Can be used 850/1900MHz Band only.
2. Do not expose this product to extreme high or low
temperatures, or directly under the sun.
3. Do not expose this product to open flames.
4. Do not keep this product in a potentially explosive
environment.
5. Do not expose this product to liquid or moisture or humidity.
6. Do not paint this product. The paint may clog the receiver, the
microphone and other components.
7. Do not put pressure on the screen of this product as it may
damage the screen.
8. Do not wipe this product with corrosive or volatile liquid so as to
prevent any damage to the outer casing. Use a clean and soft
cloth or paper towel to wipe it if necessary.
9. Do not attempt to disassemble this product. Please send this
product directly back for maintenance. Tampering with any of
the seals on the product will void the warranty.
Antenna
1. Do not remove the antenna.
2. Only use an antenna specifically designed by TelePaq for your
mobile phone. Use of unauthorized or modified antennas could
damage your mobile phone, cause RF (radio frequency) levels
above the recommended limits, and even violate local
regulations.
3. Do not hold the antenna while using your mobile phone as this
affects call quality and may cause the phone to operate at a
higher power level than needed, thus shortening talk and
standby times.
Battery Use
1. Fully charge the battery before you use your mobile phone for
the first time.
2. Use only original batteries and chargers.
3. Turn off your mobile phone before removing the battery.
4. Do not let the metal contacts on the battery touch another metal
object. This could short-circuit your battery and cause sparks.
Please separate your mobile phone from your keys, necklaces,
paper clips or jewelry when you place it in your bags.
5. Please check your local regulations for disposal of batteries.
Areas Where Using Mobiles Phones Are Restricted
Aircraft: The use of mobile phones is forbidden on aircraft during
flight as to avoid interfering with the radio-based communication of
the aircraft.
Medical Environment: Most electronic devices have proper
protective shields in order to avoid interference from RF. However,
not all devices have this function, especially for pacemakers, hearing
aids and medical equipment.
Traveling Vehicles: Please abide by your local regulations. Do not
use mobile phones or other handsfree devices while driving.
Airbag: Airbags have powerful pressures. Do not install this product
or other radio equipment in the area above the airbag or in the airbag
deployment area. If an in-vehicle mobile phone is improperly installed
and the airbag inflates, it could result in serious injury.
Explosive Environments: Never use the mobile phone where
blasting work is in progress. Observe all restrictions and follow any
regulations or rules.
Potentially Explosive Environments: Areas with a potentially
explosive environment are often, but not always, clearly marked. Do
not use the mobile phone while at a gas station. Do not use near
fuel or chemicals or any other area where restrictions are marked.
Note: Please use cautiously to reduce the possible harm
caused by electromagnetic wave emission.
Page 22

22
Federal Communication Commission Interference
Statement
This equipment has been tested and found to comply with the limits for a
Class B digital device, pursuant to Part 15 of the FCC Rules. These limits
are designed to provide reasonable protection against harmful
interference in a residential installation.
This equipment generates, uses and can radiate radio frequency energy
and, if not installed and used in accordance with the instructions, may
cause harmful interference to radio communications. However, there is
no guarantee that interference will not occur in a particular installation. If
this equipment does cause harmful interference to radio or television
reception, which can be determined by turning the equipment off and on,
the user is encouraged to try to correct the interference by one of the
following measures:
. Reorient or relocate the receiving antenna.
. Increase the separation between the equipment and receiver.
. Connect the equipment into an outlet on a circuit different from that to
which the receiver is connected.
. Consult the dealer or an experienced radio/TV technician for help.
FCC Caution: To assure continued compliance, any changes or
modifications not expressly approved by the party responsible for
compliance could void the user's authority to operate this equipment.
(Example - use only shielded interface cables when connecting to
computer or peripheral devices).
"For body-worn operation, this device has been tested and meets the
FCC RF exposure guidelines for use with an accessory that contains
no metal and the positions the handset a minimum of 1.5 cm from the
body. Use of other enhancements may not ensure compliance with
FCC RF exposure guidelines. If you do no t use a body-worn
accessory and are not holding the device at the ear, position the
handset a minimum of 1.5 cm from your body when the device is
switched on."
This device complies with Part 15 of the FCC Rules. Operation is
subject to the following two conditions:
(1) This device may not cause harmful interference, and (2) This
device must accept any interference received, including interference
that may cause undesired operation.
 Loading...