

Telemic HouseControl E+ Installation Manual

+
INSTALLATION MANUAL
1.0
HOME ENERGY SAVINGS
REMOTE CAMERA
INTERNET USER INTERFACE
TEMPERATURE ALARMS
BURGLARY PROTECTION
DOOR SECURITY
FIRE SAFETY
SECURITY KEYPAD WITH PROXIMITY TAGS
PREVENTION OF WATER DAMAGES
WIRELESS EXTENSIONS

Installation Certificate
This certificate states that Telemic Oy’s HouseControl remote control and alarm system has been
installed in the real estate mentioned below.
Property holder / holder of real estate
Location of the real estate
Real estate
Alarm system type
Central unit’s serial number
SIM card phone number
Smoke detector model
Motion sensor model
Magnetic door switches
Remote camera
Security keypad
Siren
Installed by
We assure
- that the alarm system was installed in accordance with the manufacturer’s instructions.
- that the alarm system has been tested and it works as documented.
- that the end user has received guidance as to how to use the alarm system.
Location and date
Installed by / Signature
This form needs to be filled and signed in order to apply for possible refund from your insurance company and
before contacting product support.


1
1. INTRODUCTION....................................................................................................................... 2
2. PREPARATION........................................................................................................................ 2
2.1
R
EQUIRED TOOLS
............................................................................................................... 2
2.2
P
ACKAGE CONTENTS
.......................................................................................................... 3
2.3
A
CCESSORIES
.................................................................................................................... 3
3. INSTALLATION........................................................................................................................ 4
3.1
O
PENING UNIT’S COVER
..................................................................................................... 4
3.2
HCE+
FROM INSIDE
............................................................................................................ 4
3.3
C
ONNECTORS
.................................................................................................................... 4
3.4
C
ENTRAL UNIT
................................................................................................................... 5
3.5
R
EMOTE CAMERA
............................................................................................................... 6
3.6
I
NDOOR TEMPERATURE SENSOR
.......................................................................................... 6
3.7
O
UTDOOR TEMPERATURE SENSOR
...................................................................................... 6
3.8
W
ATER TEMPERATURE SENSOR
.......................................................................................... 7
3.9
S
IREN
............................................................................................................................... 7
3.10 M
AGNETIC DOOR SWITCHES
................................................................................................ 7
3.11 M
OISTURE SENSOR
............................................................................................................ 8
3.12 M
OTION SENSOR
................................................................................................................ 8
3.13 S
MOKE DETECTOR
............................................................................................................. 9
3.14 S
ECURITY KEYPAD
........................................................................................................... 10
3.15 H
EATER RELAY
................................................................................................................ 11
3.16 EXT R
ELAY
..................................................................................................................... 11
3.17 P
OWER SUPPLY AND BATTERY BACKUP UNIT
...................................................................... 12
3.18 SIM C
ARD
....................................................................................................................... 12
3.19 W
IRELESS EXTENSION
...................................................................................................... 13
4. SETUP AND TESTING........................................................................................................... 13
4.1
T
ESTING
.......................................................................................................................... 13

2 HouseControl E+ Installation Manual
1. INTRODUCTION
This manual describes the installation of HouseControl remote control and alarm system. The
instructions in this manual can be applied to many kinds of houses.
It is important that you plan carefully how you are going to install HouseControl. For example, to achieve
finished look make sure the cables run inside the walls and other structures. This requires that you have
a plan for where you are going to install smoke detectors, motion sensors, and other accessories as you
are building your house.
You can connect up to three temperature sensors, a siren, a magnetic door switch, a moisture sensor, a
smoke detector, a motion sensor, a security keypad, a remote camera and a control panel to the central
unit. You can connect several motion sensors, magnetic door switches, smoke detectors and moisture
sensors to one input. Always connect the sensors according to the separate wiring diagram.
The central unit contains two relay outputs 230VAC/AC (6A and 10A). The 10A relay can be controlled
thermostatically.
2. PREPARATION
You need a GSM subscription and a SIM card from a telecommunications operator for testing and using
HouseControl. You must disable the PIN code request from the SIM card before inserting the card in the
central unit. It is recommended that testing is conducted with the same SIM card that will remain in the
central unit after the installation is complete.
If a camera is installed, you should make sure that MMS messages (messages that contain pictures)
can be sent from the subscription. Some operators require that the service is activated before it can be
used. You can activate MMS by inserting the SIM card in an MMS compatible phone and sending an
activation message to your operator. Please consult your telecommunications operator for more
information. Before inserting the SIM card in HouseControl make sure that you indeed can send MMS
messages with that SIM card by testing it with your mobile phone.
Use an unlisted phone number in your HouseControl so that it is not publicly available. However,
make sure that the HouseControl’s phone number is displayed on the screen of your mobile
phone when it calls you (i.e. HouseControl’s phone number is sent with the call and is not
hidden).
2.1 Required Tools
You will need the following tools:
• Side cutters for cables
• Pointed pliers to help you connect wires to connectors
• Electrical drill and drill bits of various sizes
• Screwdriver
PREPARATION 3
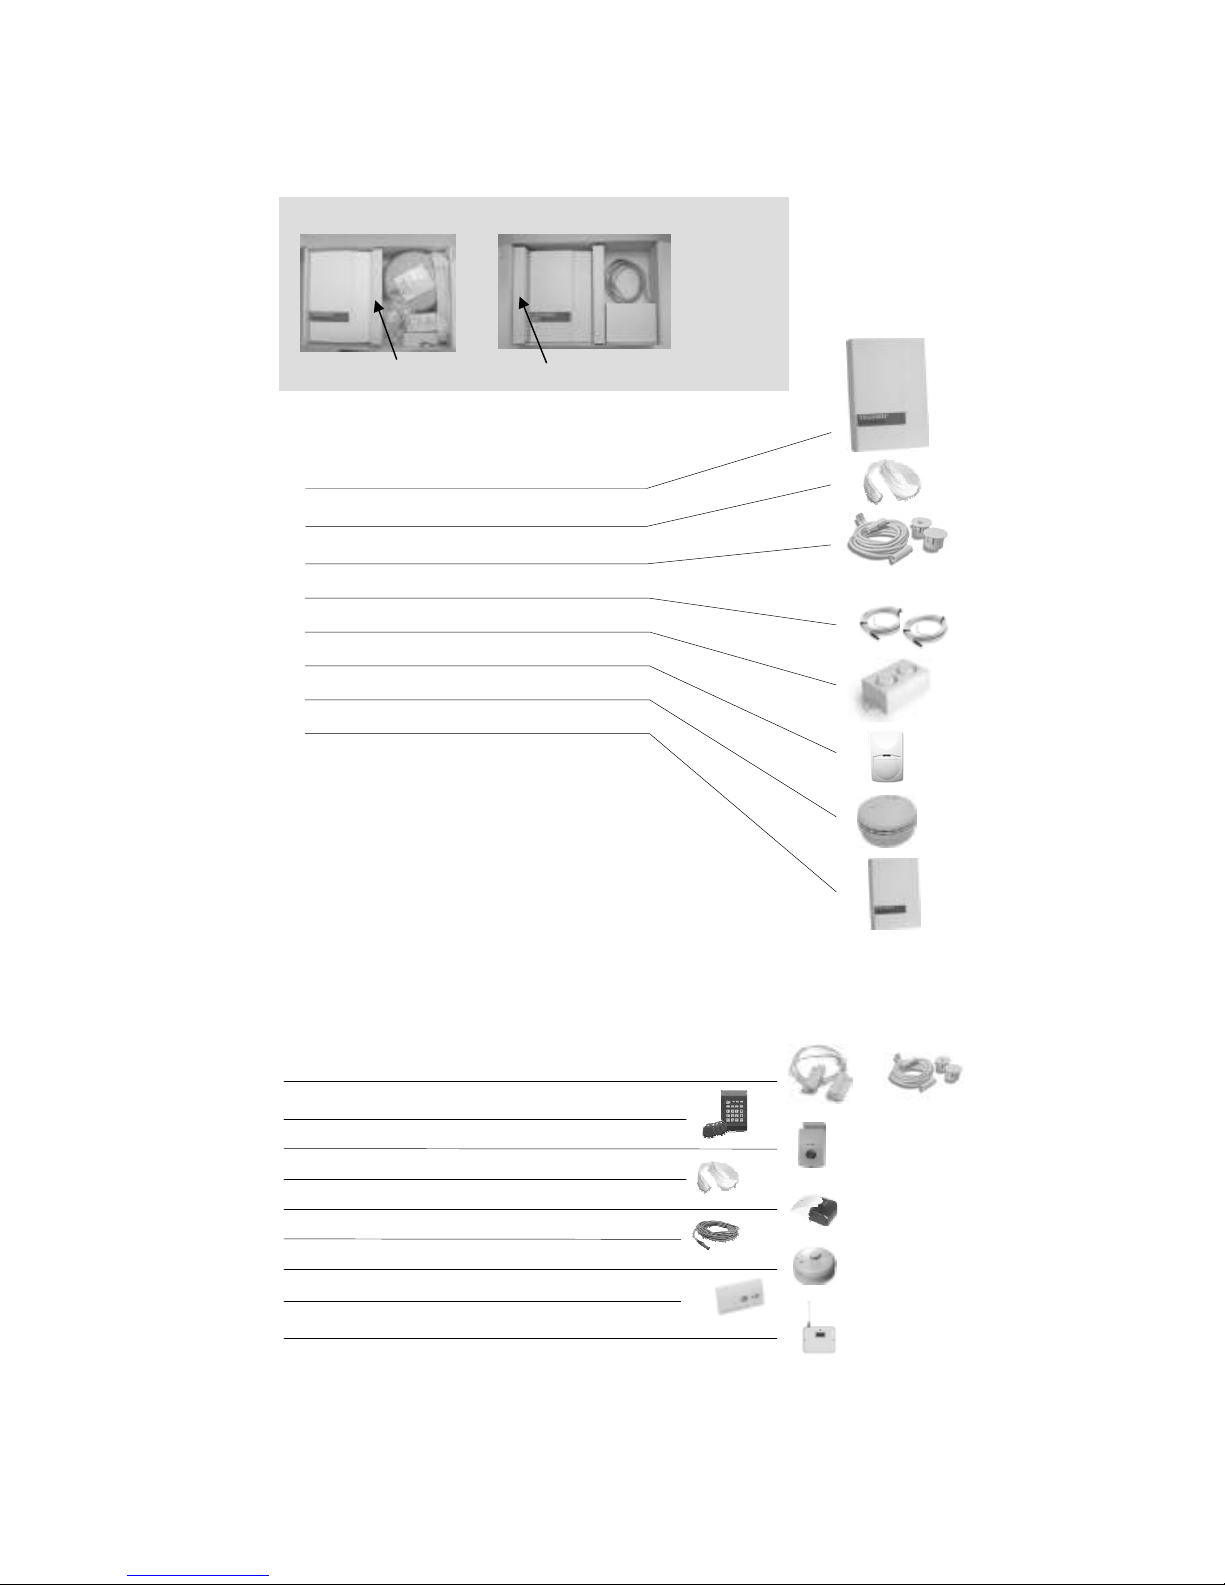
2.2 Package Contents
2.3 Accessories
The following accessories are available to HouseControl:
Security keypad with proximity tags
Remote camera
Moisture sensor
Siren with light
Temperature sensor
Heat detector
Carbon monoxide detector
HCE Wireless extension: detectors and remote controls
Magnetic door switch (flush and surface mounting)
Temperature sensors
Battery
Moisture sensor
Battery backup unit package
Central unit package
Check the package contents:
Central unit
Magnetic door switch (flush mounting)
2 temperature sensors
Siren
Motion sensor
Smoke detector
Battery backup unit
And:
- Materials needed in installation
- Installation cable
- User’s Manual and Installation Manual
 Loading...