

Telemate TE1208PM User Manual

MODEL
TEIPMPM
1.9GHr
DECT PHONE
WrrH
DIGITAL
ANSWERING MACHINE
USERa MANUAL
-
PLEASE
RW
FULLY

CONTENTS
USE
~~~.~~
1
-.-..,,.-
CONTENTS

TECHNICAL INFORMATION
lhk
you
for
Chmsing
to
plrehase
sne
of
wr
TelaMt.
pmduots
we
appreci*
your
business
and
balm
Dst
we
haw
Wed
you
wim
a
product
lhat
k
bolh
mliable
and
value
far
nmey.
We
anmumge
you
and
your
knds
to
chmse
horn
Our
range
ofTelmate
pmduekagain
In
Wre.
..
.
.
on lhe
DC
adaptor
kbm
use.
hpr
Manssupplj:
230V-
SoHz
Adaptor
W
Pow
9VDC
300m41.8VA
&Lry:
9v
Feablres:
FuI
fame
DECTPhmemlh
Internal
Arswerilg
Madline
1.9GHz
Operating
Fraquency
Hand&mIhm$Ik timeof 12
hrs.
Handsetrtandbvtimeof
l20hnrr
Adplabie Vdurnemm
Revlaw
Dialling
fadlure
Stm
of
leal
10
dl
numb
PmM
functm
to
find
iwl
hadset
B&
level mdlcator
MpEmerpncy
Call
fumbcm
Internal
Phmebmk
ofM
numben
Caller ID
funcbm
'
Remoleemsmae.chackm
Wl Baning
opfnn
Register
up
to 6 Tei&
or
GAP
m~l'bla
phones
InImam
funm
Conferencecailcllcbon
OAP
COmpabM
NI-MH
550mAh
3
6V
BaHely
10
MW
remrdlng
time
fa
lnmmng massage
and
memo
remrding
(msx
50
..T,
Dgel
OGh:
mrdrg
w
Ln
artcna'c
ieybac*(CGU€Mw
np
M-J
2
034
madas
snmngremn
mode
mo
anwnngal
I,
n~&
Base
swakerfn pla@il k of
aaredmes.~~
SAFETY INSTRUCTIONS
Keep
awayhom children. ~&mg children
cr
firm
p-
should
nd
ball&
b
play
vim
the
equpmenl.
If
the
equipnent
pww
supply adaptot
rn
supply
md
em
damaged,
rs(wn
he
eqGpment to
h
retailer b repkmmml
or
repair.
Do
not
ahnpl
to
wk?
His
equipment youd.
instali his pmdud
an
a
stsbk
swface.
Keep
all cab
fdy
b
mid
acdmld
damage
M
We
equipment or cable8 and
lo
avdd
anyom
fmm
Wng
on
or
~pping
over
any
cable orIdaphone line.
Do not
affix
Me
AC
pnuer
supply adaptor or
mrd
to
any
psmt
buildhg
su*Ces.
This pmdudshould be
operaw
only ham he
l)p
of
par
source
indicated
on
he
~roduct.
Do
not use this product near waler, or hn your hands are
wet
If
the
mud
mmes
into wntact with any liquids, diswnnsct he
pawer
supply
hmedi!
and
mnfadsn
authonsed repajr cenbe or your retailer
To prevent
Rre
or
elecMcai shock hazard do
not
expose h~s pmducl to
raln
or
rnOlSIure
Beim
daanmg ha product, d~swnnect it
horn
me telephone lack
and
gower
wrce
Use
a
soff
damp cloth to clean the product Do not use l~qu~d cleaner,
am
cesnets orabras
.a
pond%,
w
cean
m
s
2rrn.n
Amd
using
or
nots.lng
m
r
pvcdd o.rng lirioet or 9nl1 rg
swrrrs
as
were
na,
beanrkofeamcsrm
~~..
~..
Donot- he
banery
by any devicesother than
h
charging base supplied wilh
hk
pmdua
NFWHusnordinaw ImhaweaM) banehs. Only use appoved batteries of the
Wydspasedany damapd
wwry
pope*, do m lnawrer
Do
nm
buch
any damsged caos
or
terminas
~nIess
m
Wpmne
I
ne
an?
mr
oam
has
been
blv
oismn~
Do
nd
overlmdwliou4etsand
exten4on
mbs
as
this
can
legd
to eMcal
shock
uhilure.
KBBp
amyh
all medical
equipmnt
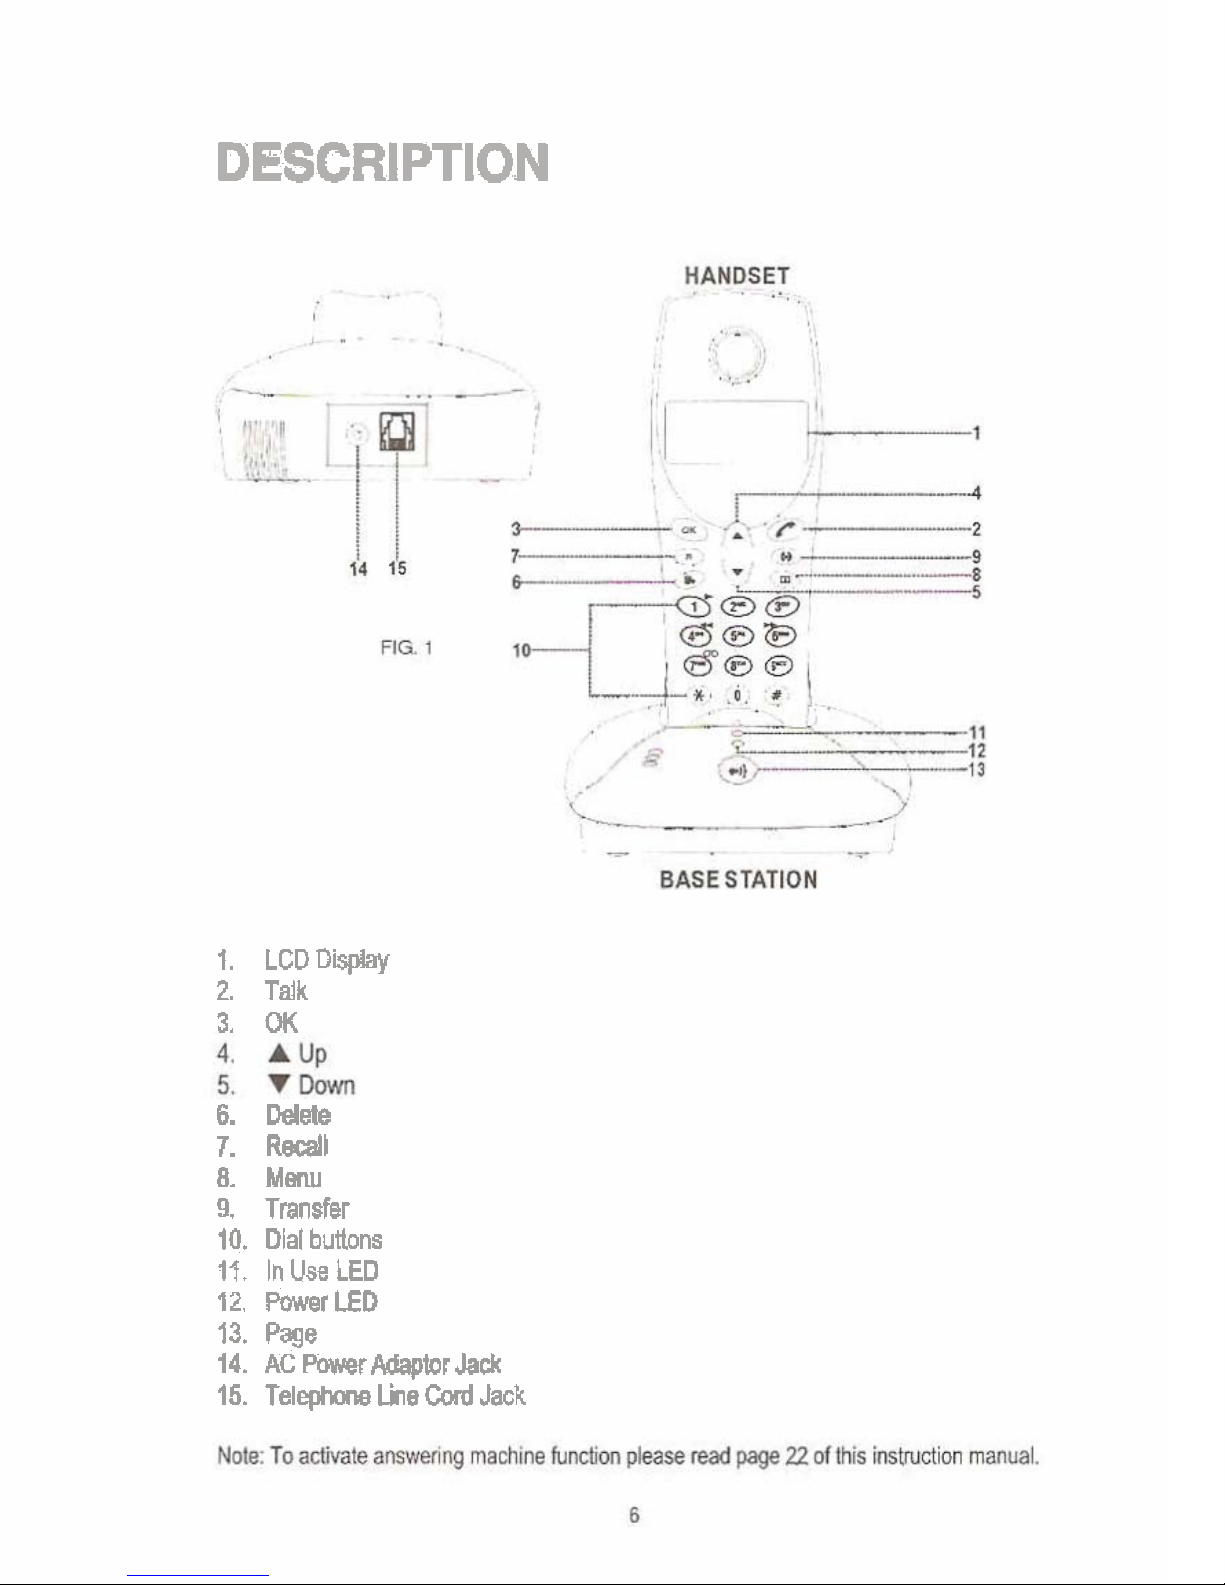
DESCRIPTION
1.
LCDD'+by
2.
Talk
3.
M(
6.
Delete
7.
Recall
8.
Msn"
9
~mnster
10.
Dial
bubns
11
In Use LED
12
POwerlED
13.
Page
14.
ACRwrAdapt0r.Jac.k
15.
Telephone
LheCard
Jack
Thm
rehab
POduct
~d.
hp$d
ham cur
fa*
In
$ccd
wmg
order
W
i&
wrtm
or
w+llpnent
be
damages,
wet or haw a
mabnchon
in any
way
@ease
mywr
mtaler hmedialelybrreplamment or repair.
Caw
unpadr
pur
Tkmate
product
Ensure
that
yw
da
nat
dl
any
srpplled
pawmg
material
unUl all components of
the
epufprmnl
have
been
ammW
for
CamfuUv
wine
the mrmr of the eoulDment W a dam
ddh
to
m
anvdun
ma
m&
hdve
amlaled.
Dr,
a'..;
a
ar,
M.
Da
'mt
use
ab&
&.
&nls
u
my
0G-e
.qu
0 :hat ma{
:amape
Yul
wpnan(.
W*RNIWO:
W
NOl
IYERSE
M
ANY
UQUO.
USE
Thls
equpmenthasbeeodedpa3for
gsnsral indowhowehold usem.
mi3
eebrment
has
beendewned
for
asml
h&dd
phme
m.
Ti-a
anm
lradrne
funibon
hai
been
ddgnsd
W
b
b
pupma
of
remrdhg phone
messages
and
must
mt
be
used
h
any
ahr
cam.
Tk
DC
paw
adaplDt
rmsl
be
mnneded
to a oultable
mains
wibl
mraspmdig
mme
swty
requirem
of
yew
applm,
mvdok
CARE
AND
CLEANING
Always
d~smnned
mmm
fmm
boM
6e
mans
su~h
and pbne Imss
before
dean@.
New
in-
my
pad
of
ha
equlmt
m
wah
or
oth
Muid
vnpeb
Wuof
bqumpment~ad~~.DlyM~adrytowel.
Do
mt
us
abrasivs
dsaners,
solvenb
or
any
elk
ltquld
that
may
damage
sslipmnt
Slow he phone
and
the manual Dgefher in a dry cupboard
not
h
use.
Always
&cmnectfmntk
ponersupply and phone llnsbeforestoage.

INSTALLATION
ConnecIthtekphons llne
cord.
Plug one&in@the wall
socket,
anolhw
s&
la
the base station &t (Fig.28).
bw-uo
th
b-
sbtton.
~ ~ ~~~~~
~~~
Gwd
the
AC
pouer
adapmr
to
a suitable
mins
mkd
and
the other*
to
he
plwer
!ark
of
the
base statim(FIG.W. The green
Fwm
LED
D
at
the
base
...
Mmhl
lum
on.
tostall
Battery.
Open
the tandset's bamv dwr and
Mhe
mchargeabie batterfto
Gw
handret,
ensuring
mrred
po$My
(FIG.3).
Replaes
be
belterf dwr
New
upe
my
mn-
rechameabk
L%tw.
ALBl
5
-nos
W
h&el
ml
emn
a
greet
tap
b
lndrate
pwr
.p
reset
1s
mar&
Ra:e'?e hand-! onto
ms
base
nc
n
lor
charging
(am.1
10
?o,nl
bebre
srsl
nme
ooerarol
The
Barn
Imn%
nl
Stan
m
roo1
and
rsd
LED
rl
R*er
Note:
B~N
s
ComDletelVfiatnodsPlav wlfl be seen
unhl
the kry has
.
.
.
.
disrgd
to
a
minimum
Nne:
When
the
Msal
babv k fuib
dirchargad,
be
b88e
slation Will
&we
the
basrf quickly
for
few
hrs
and men change
to
dour
Ehaglng. The handset
bemme~
warm during fast &qing. This is nml and
mt
dangerow. It mols
dm gradualhl when
krf
balmostfully charged.
The
handset
ir
already
regirterad
to the
base
station
when
shipped.
The
henna
Icon
Y
shwld
be
in
steady
sWe
to
showthalha
handset
is
synchmnhed
wlVl
the
base
lfha
Antenna
lmny is flsshlng
,
press
ha
0
buitao
to
a-
lhe
Jyrahmnization.
me2
Ronwk.
This
pmductapemts
atfrequew
1.SGHr
Place
Ih
babaae Mon in a
high
location
to
wm
a
maximum
Operating
range.
DO not insll thebare r$b'on
in
bathmansor
dampsibmhm.
The
opemting range
of
the equipment may varf depm5ng on
the
envimmosot
in
which
the
phane
is
usad.
BASIC FEATURES
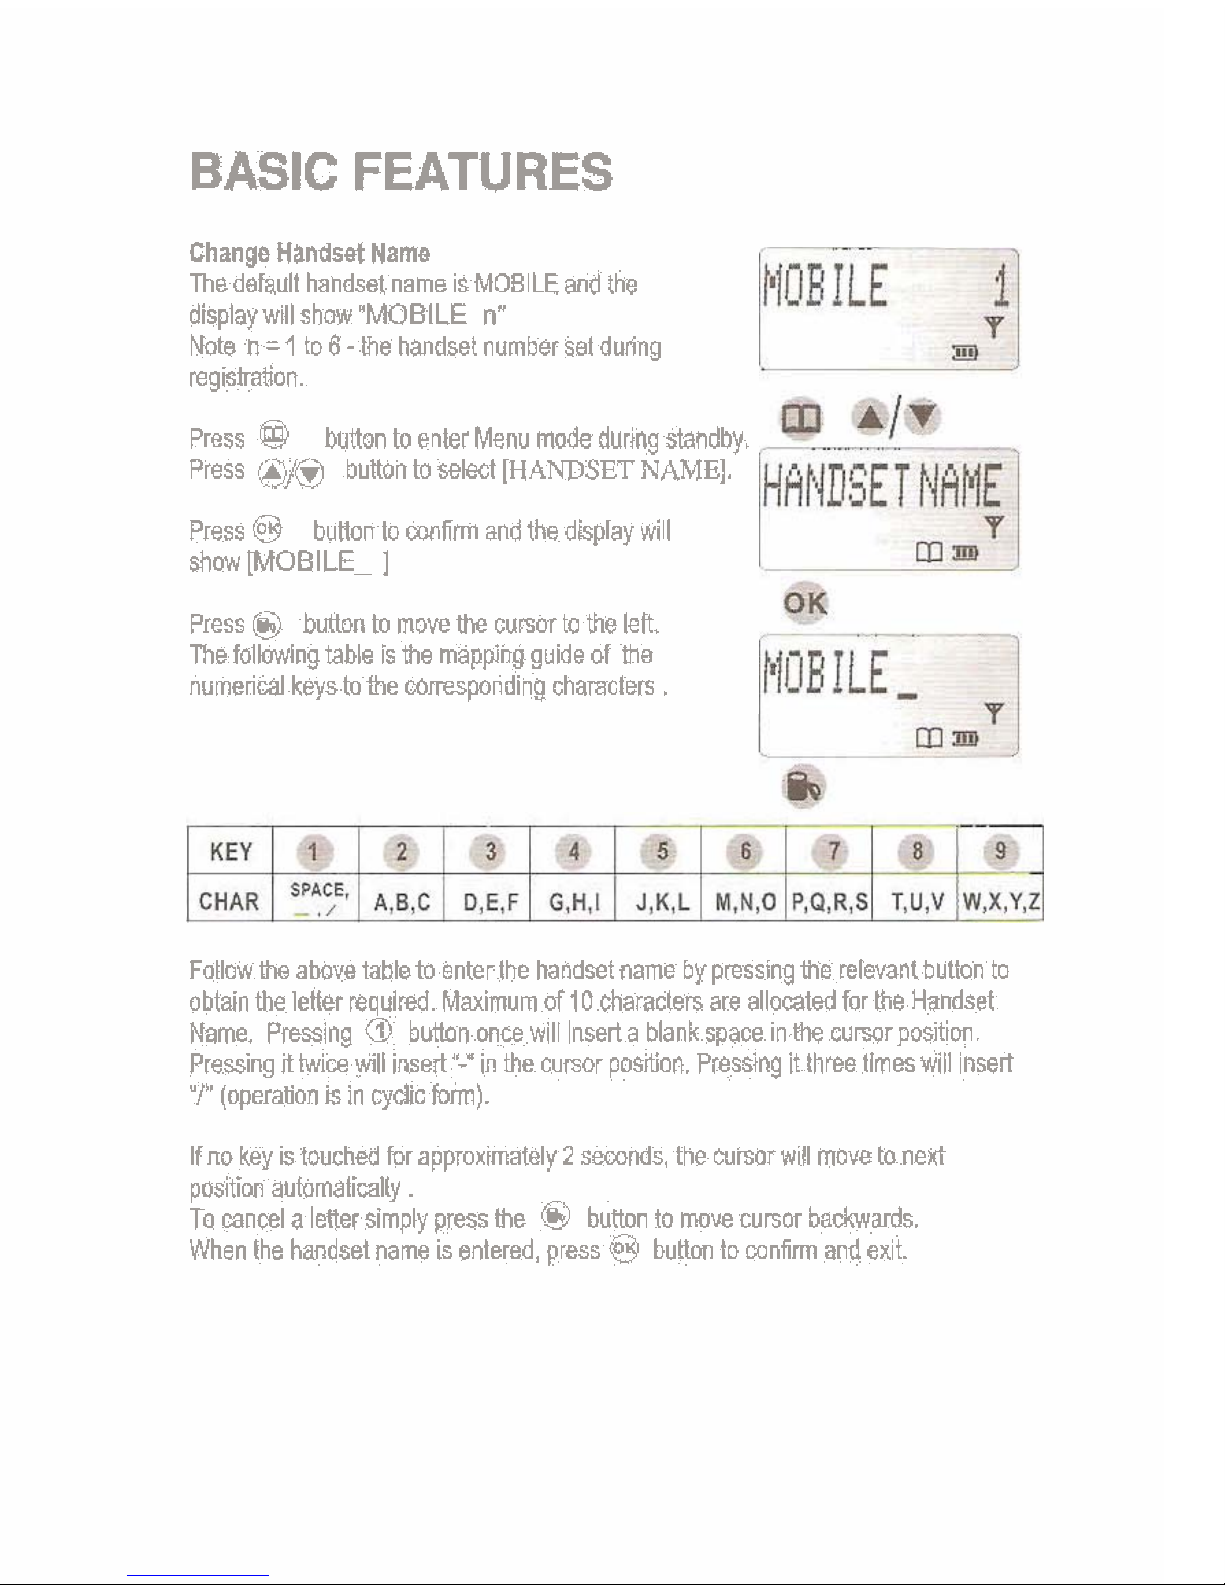
Change
Handset
Name
Thedefault handset name isMOBLEmd the
displaywill
show
'MOBILE
n"
Nate
n
=I
to
6-
Vle
handset number set during
regishation.
Press
@
bunon to
enter
Menu
modeduring standby.
Press
@/@
b~ttonto
Select
[HANDSET
NAMW
Press
@
bunan to
mofiim
and the display will
show[MOBILE_
I
Press @ bunon to moveme cunor to the ieh
The follawlng table
is
the
mapping guide
of
me
numerid
keystothe corresponding chamcten
.
Fallow be abovetableto enterthe handsetoame by pressing the relevantbutton
to
obtain
the
letter required. Maximum
of10
characten
are
allocated
for
the
Handset
Name. Pressing
@I
bunDn once will nserta blankspace in% cuwrpo$tim.
Pressing fibice *li inseit'pin
ihe
cunor
posnion. Pressing it three times wiii insert
"P
(operation
is
in
cydic
form).
Ifno keys touched
for
approxrmataly
2
sands
the
Wnar
wll move
tanexl
posit~on aubmat~wlty
TP
cancel a ener
simply
prws
the
@
bum to
move
cursor
backwards
When the handset names
entered
press
@
bunm to
confirm
and
ex~t
BASIC
FEATURES
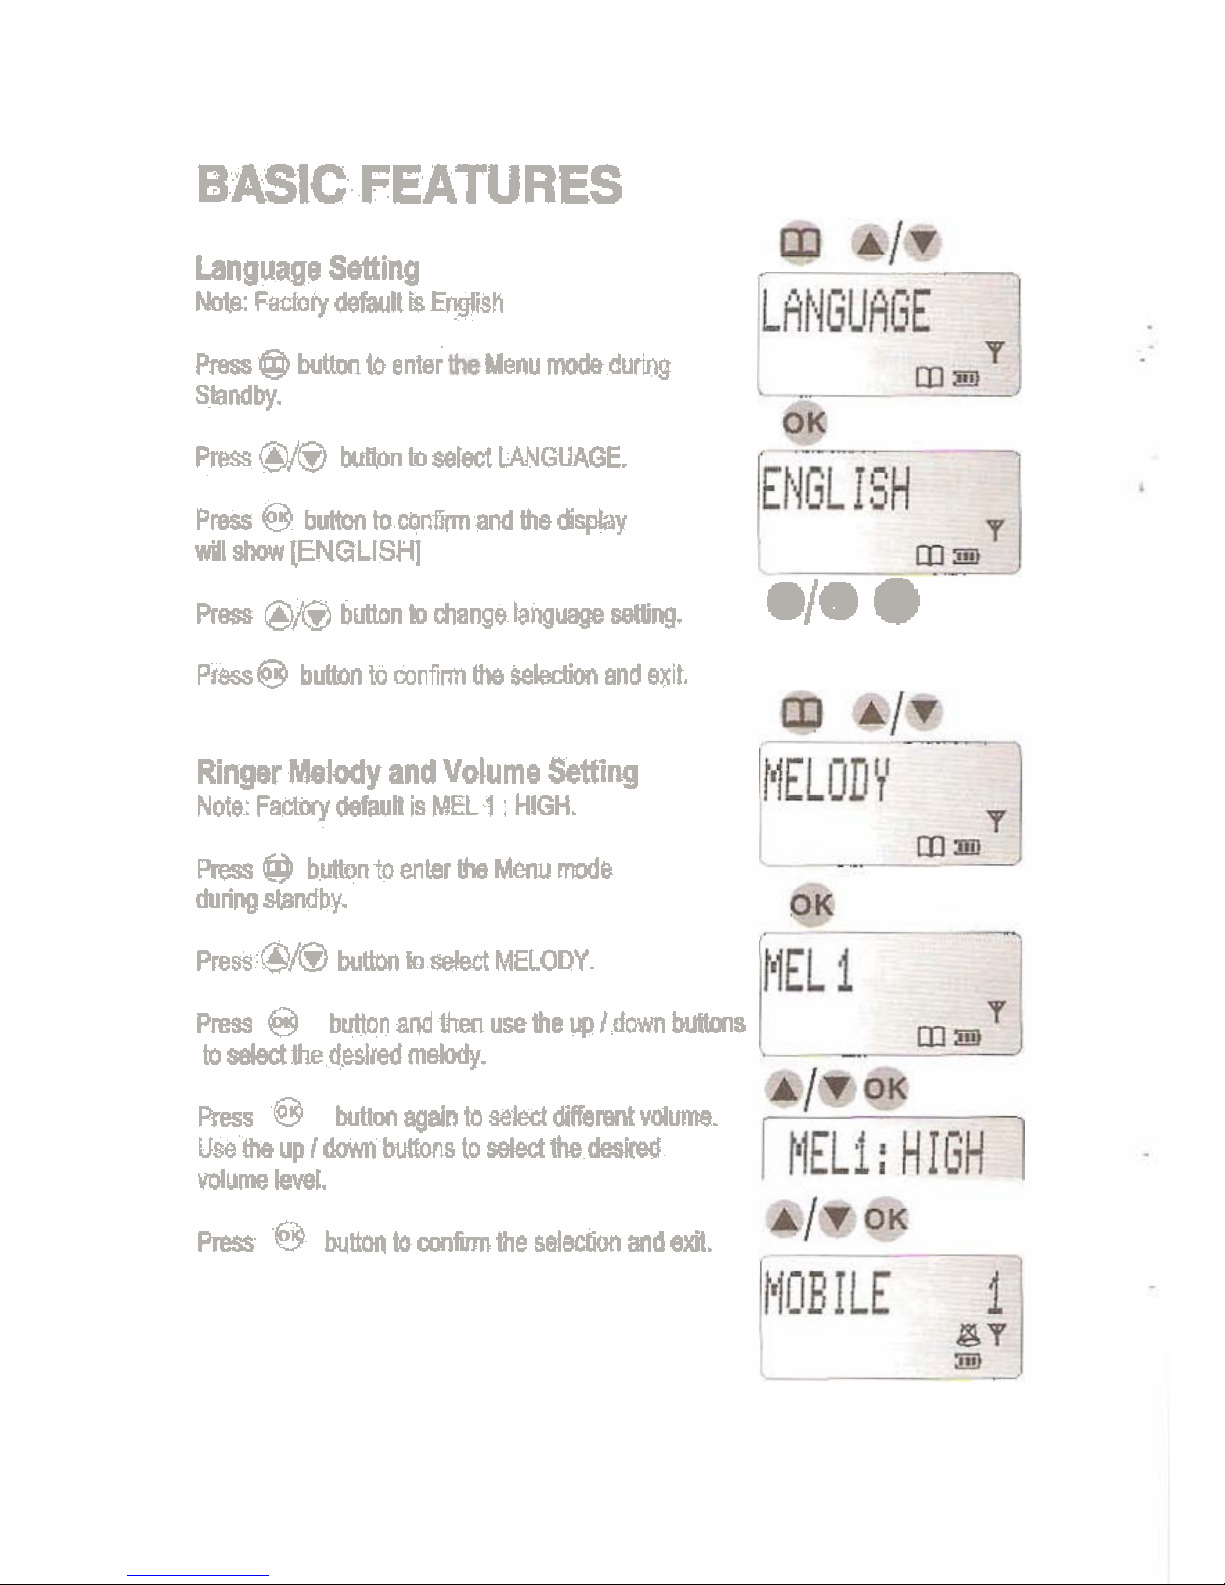
Language
Setting
NO$.
F&V
mu
is
wsn
Press
@
butlm
to
enter
Menu
mDde
durb
sandby.
press
@@
button
to
aelecl
WGUAGE.
Pw
@
bm
to
mnm
and
the
de&y
will
shav[ENGLlSHl
Ress
@/0
bmn
b
mange
bnguage
&W.
./a
Ptw@
bYtmn
b
mnilrm
Uw
$$!+dm
and
exit.
Ringer
Melaly
and
Volume
Setting
Nofe:
Fa*
Maul
is
MEL
1
:HIGH.
Press@
buKontoentarhMenumoda
during
Why.
Press
@/0
button
toded
MELODY.
Pm
@
b~n8CdthenUseth8upldMm~8
to
&the
d.d&
mW.
~ress
@
buttm
again
to
se~di~sw~v~lumt.
UseUwupldownbunMsto&Ih?~
volume
M.
PRsr
@
bum
to
mm
the
sdec6an
and
em?.

BASIC
FEATURES
ReceverVa?lume Control
Press
@
butlon
io
gel
he
dial lone
Press@@ bultontaadjustthe
receiver
volume
Theieaa
4
levels
e
Once
selected,
press
@
buiion
again
Lo
disconnect
be
line.
Key
Beep
Setting
Note:
Factolydefault
1s
BEEP
ON.
You
may select lo turn
on
or
offthe keypad tone.
Press
@
bunon
toenter
Menu
mode during
shndby.
Press
010
bunonto
select
KEY
BEEP.
Press
@
button ta
conarm
and
the
dispiay
Willshow
BEEP
ON
PWSS
010
bmon
to
select
beep
on
or
off
P~ess
@
buttan to confirm
the
seledlon and
exit
BASIC
FEATURES
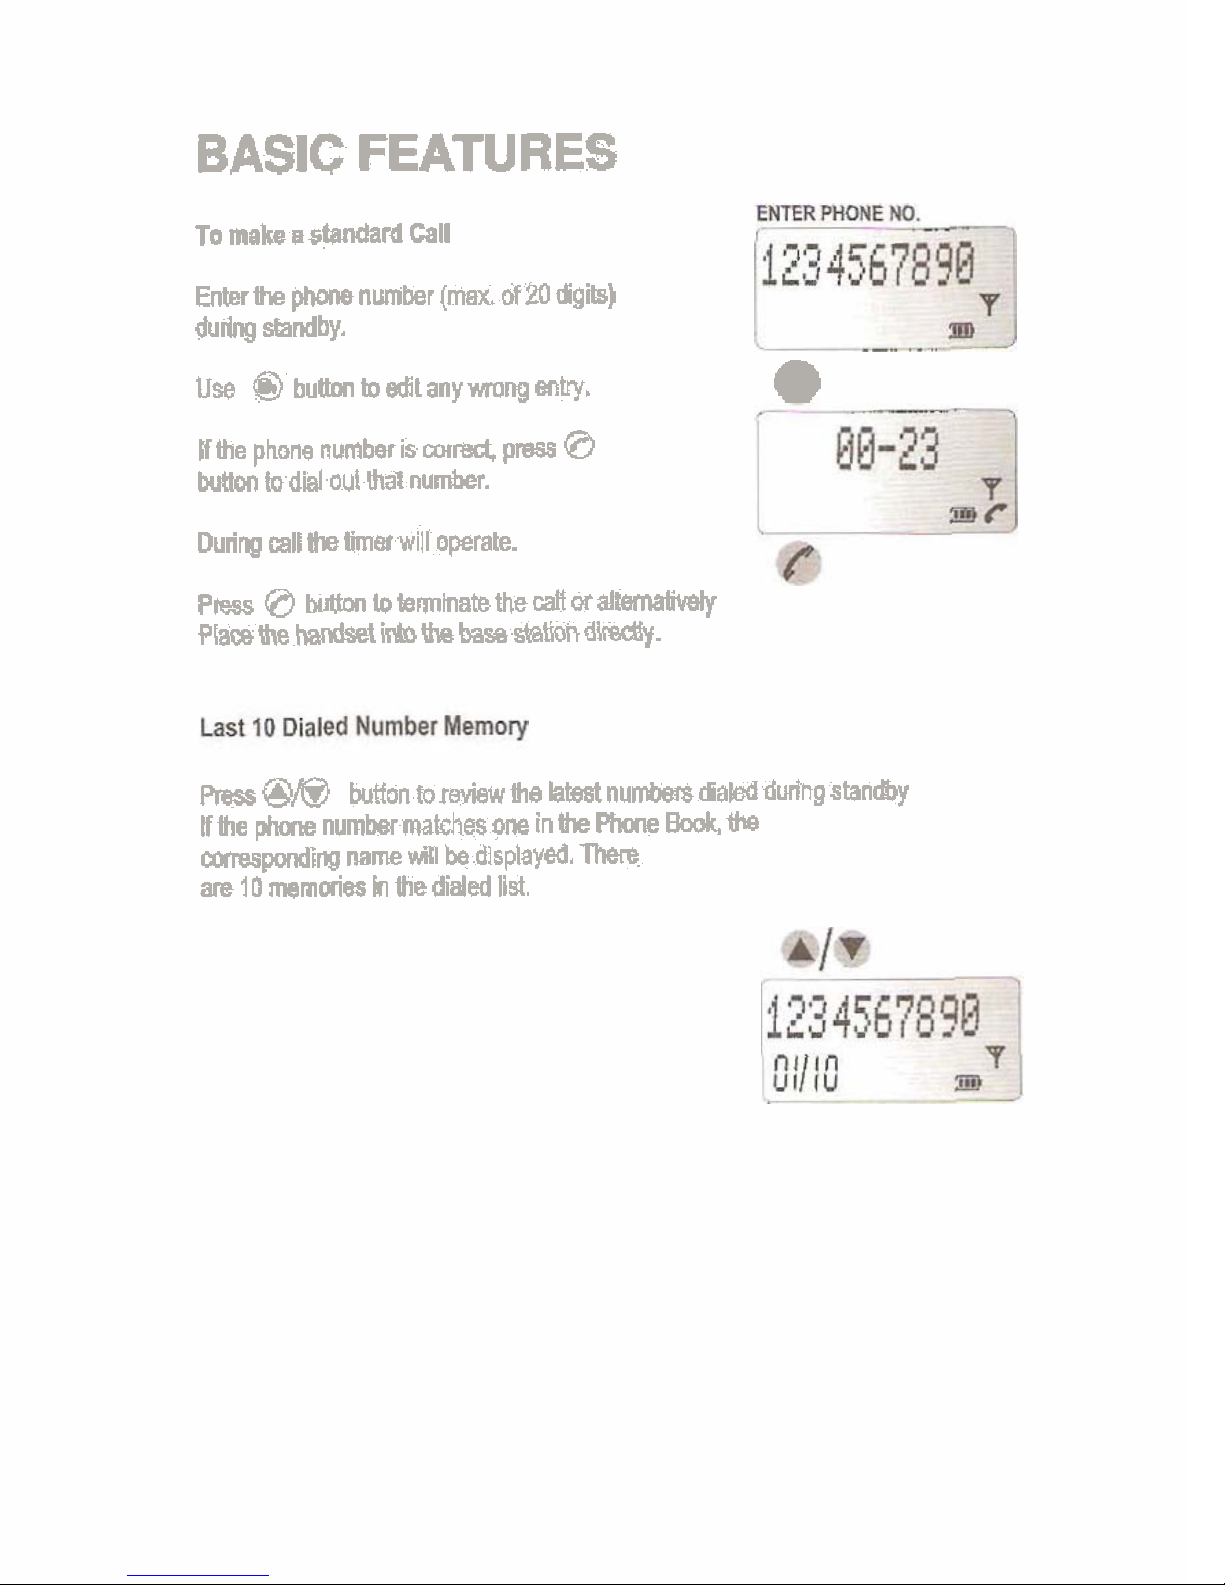
To
makeastMdafd
Call
€mihe
pMnenumber
(mar
of20
dgii)
durn
standby
Use
@
butImlo&lanynrmngemUv.
•
lithe
phone numbwis
wrecL
presr
0
butmn
to
did
nu!
Iha1
number.
Durirg
calihelimarwill
opnle.
Press
0
buttontotarmmatatheca8a~
PlmWhandsetiriuthebasapta8mdW.
Presr
@/a
bunon
toranaw
ne
tam
num
dalkd
dudng
standby
IfBephcnenumbermatdlesonemihePhmeBadLhe
mnsspondirg
mm
b
displayed
lhxe
are
10
mernmes
h
the
d~aled
Ilst

BASIC
FEATURES
To
Receive A Standard Call
When
thek&t
n
nng~ng,
press
any
key
on
the
handset
and
Start
wnvewhon.
Cali Waiting Anwr
and
Rdi
Call
waiUng
1
Redl
can
be
used
if
yar
subaoibeto
an
opbbml
Ca
IYa
~ng'ss~ee
horn
your
local
Mpmw
company.
If anolmr
pa*
cats
m
e
la
are
nanng
amnverra(on
and
yo2
hear
he
speua
'Cai
Wal
lg
me
zeSI
a
o~hon
ro
had
va
fusl
a,
and
the
-d
call
can
oe
ansrered
Yo.
nai
,~
~~~
--~~~~
~~
~
~ ~
then
nessm
bvtbon
main
la
hdd
the
seand
&I
and
resume
wur
wnversation
'
with
ie
fi~G~ler.
-
Paging Handsel
Ressthe
@
bubn
on
the
bs
unil
to
iocate
a
handst
An
theregistered
handsels
Wilhln
the
en
rangewill
ring
and
thedlspbywill
show
BASE.
Press*
@
bvtton On the base again
lo
*the
pqing.
 Loading...