

Page 1

USER GUIDE
Page 2

FCC NOTICE
This device complies with Part 15 of the FCC Rules.
Operation is subject to the following two conditions:
(1) This Device may not cause harmful interference, and
(2) This device must accept any interference received,
including interference that may cause undesired
operation.
This equipment has been tested and found to comply with the limits for a Class B digital device, pursuant to part 15 of the FCC
Rules. These limits are designed to provide reasonable protection against harmful interference in a residential installation. This
equipment generates, uses and can radiate radio frequency energy and, if not installed and used in accordance with the
instructions, may cause harmful interfe rence to radio communication. However, there is no guarantee that interference will not
occur in a particular installation. If this equipment does cause harmful interference to radio or television reception, which can
be determined by turning the equipment off and on, the user is encouraged to try to correct the interference by one or more of
the following measures :
- Reorient or relocate the receiving antenna.
- Increase the separation between the equipment and receiver.
- Connect the equipment into an outlet on a circuit difference from
that to which the receiver is connected.
- Consult the dealer of an experienced radio/TV technician for help.
NOTE : The manufacturer is not responsible for any radio or TV interference caused by unauthorize d modifications to this
equipment. Such modifications could void the user's authority to operate the equipment.
Page 3
USER GUIDE
1. What is ?
“V-Drive Key” is a compact, light-weight, and slim device. It is perfect for carrying around in your pocket, on a key
chain, or even around your neck. It is the most easily transportable memory storage device around.
By using the USB port, V-Drive Key is capable of extremely quick data transfer. In addition, the transportable disk
does not require any extra cables nor does it require any additional power (i.e. batteries).
As soon as you plug the device into a computer(Desktop or Notebook and etc..) with
a USB port, the device is ready to be used. In other words, you do not need to install any additiona l software to use
V-Drive Key.
2. Operating System Environment
- Windows 98
- Windows 98SE
- Windows ME
- Windows 2000
- Windows XP
3. Installation Guide for Windows '98
A. When using the extension cable, insert the cable into the computer before ins erting V-Drive Key into the cable.
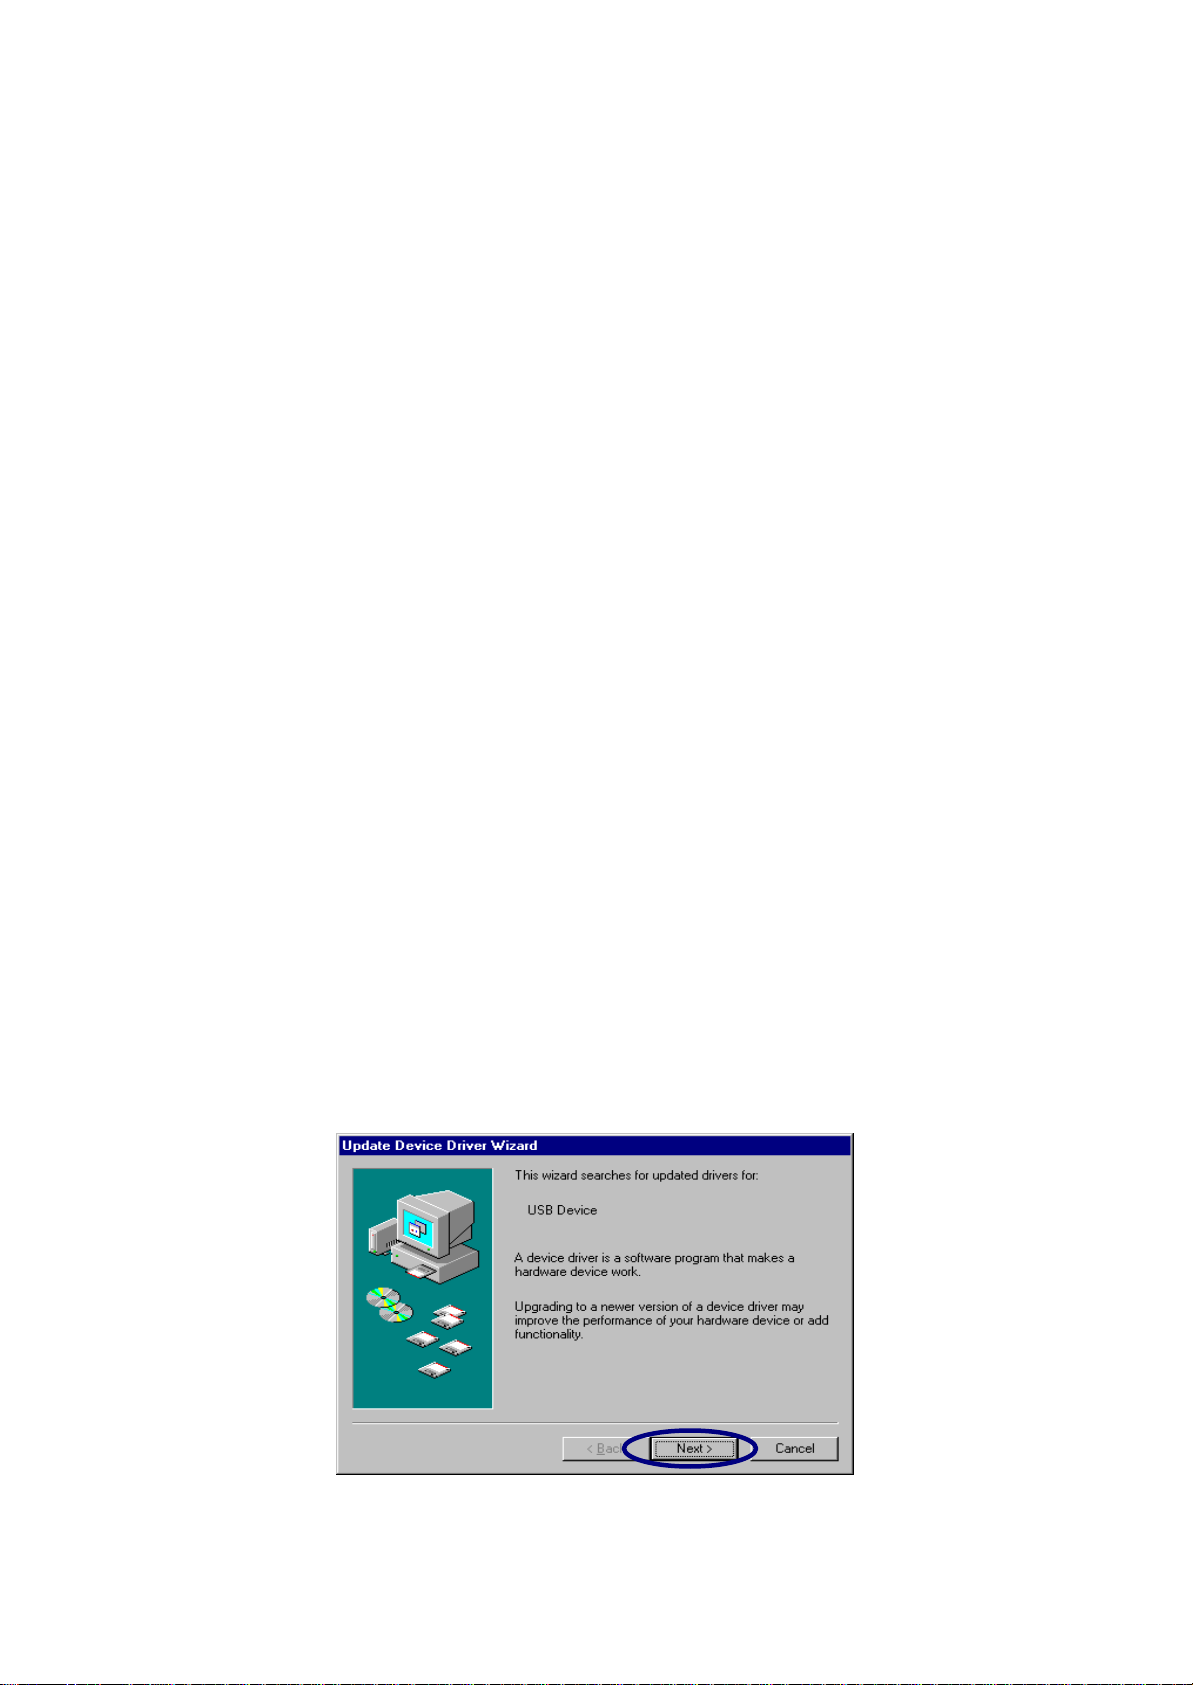
B. After inserting V-Drive Key, Windows will automatically detect the new hardware and hardware installation will
begin.
<Appendix 2> Windows New Hardware Installation Wizard will begin.
Page 4
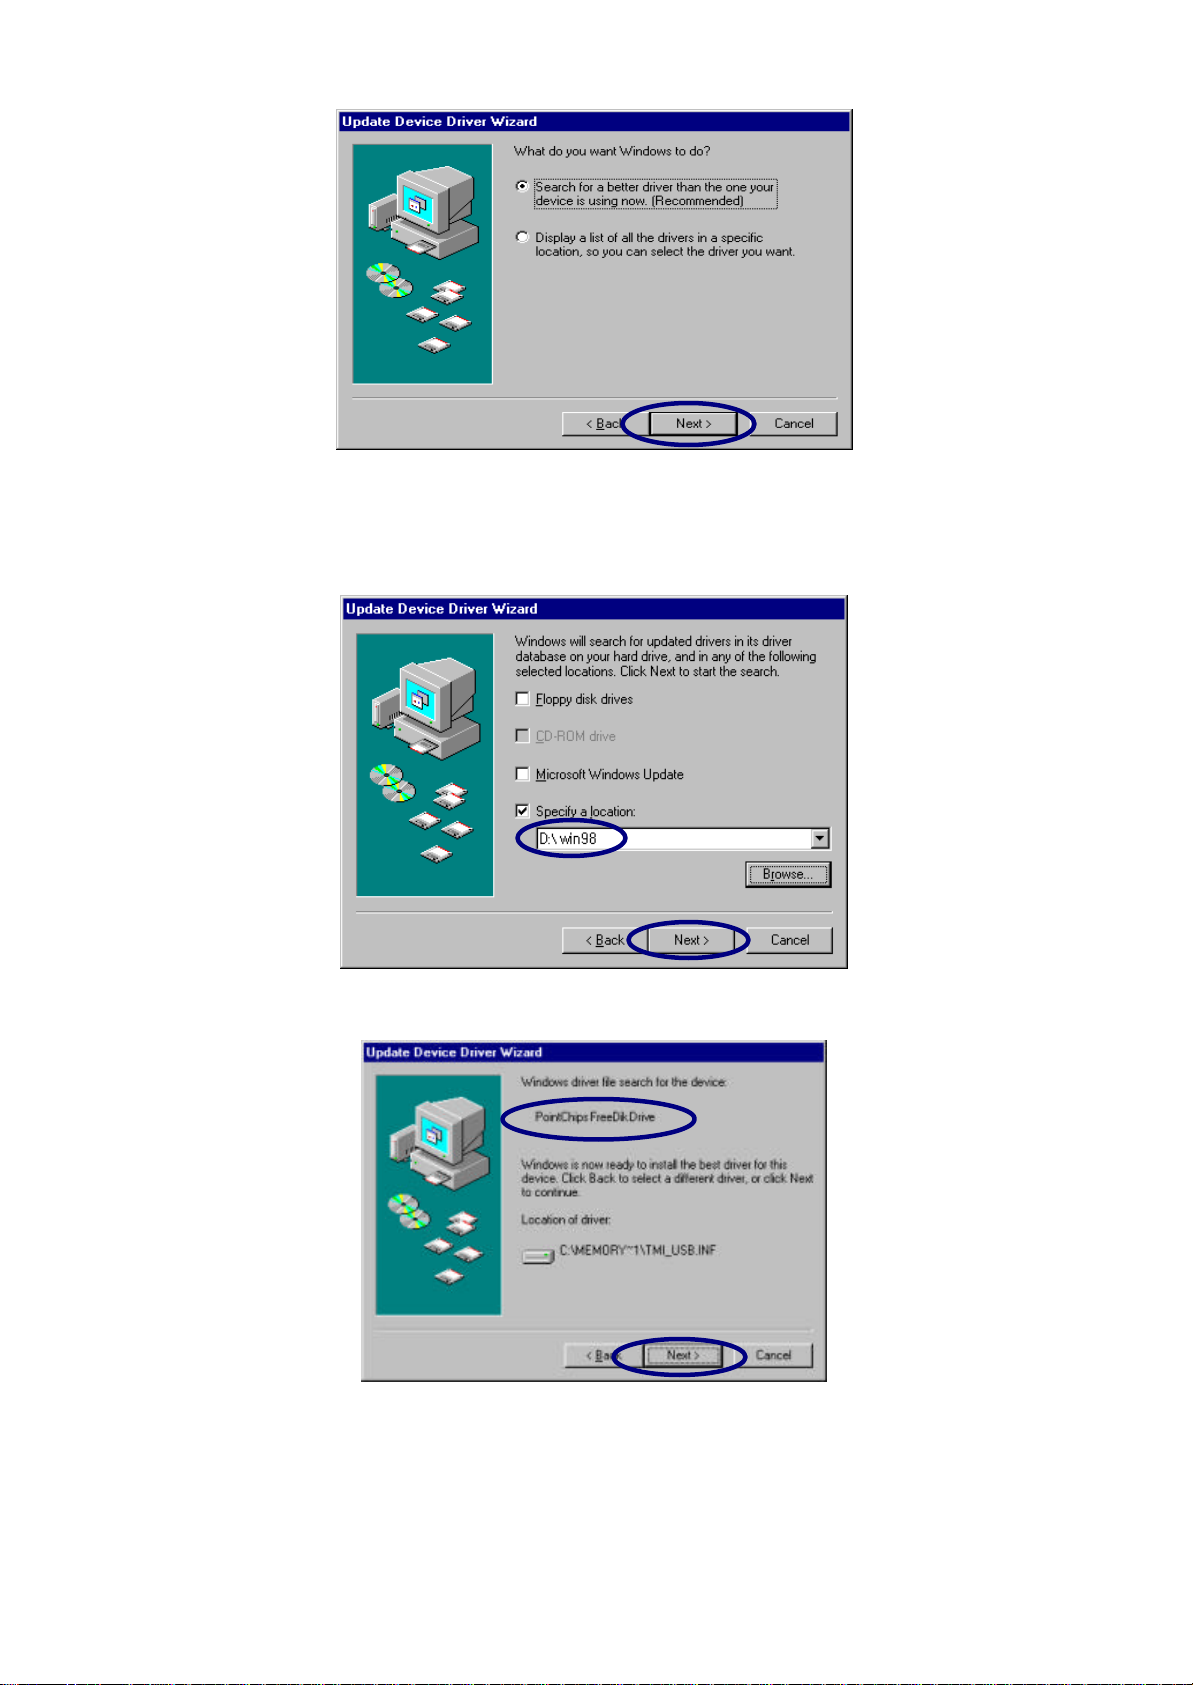
<Appendix 3> Windows New Hardware Installation Wizard will begin
C. After inserting the CD that is included in the V-Drive Key package, choose "browse" and select the Win98
Directory from the CD.
<Appendix 4> Select the appropriate CD path (i.e. drive D) and choose the appropriate setting
<Appendix 5> Windows will designate the USB device drive, and it will prepare for installation
Page 5
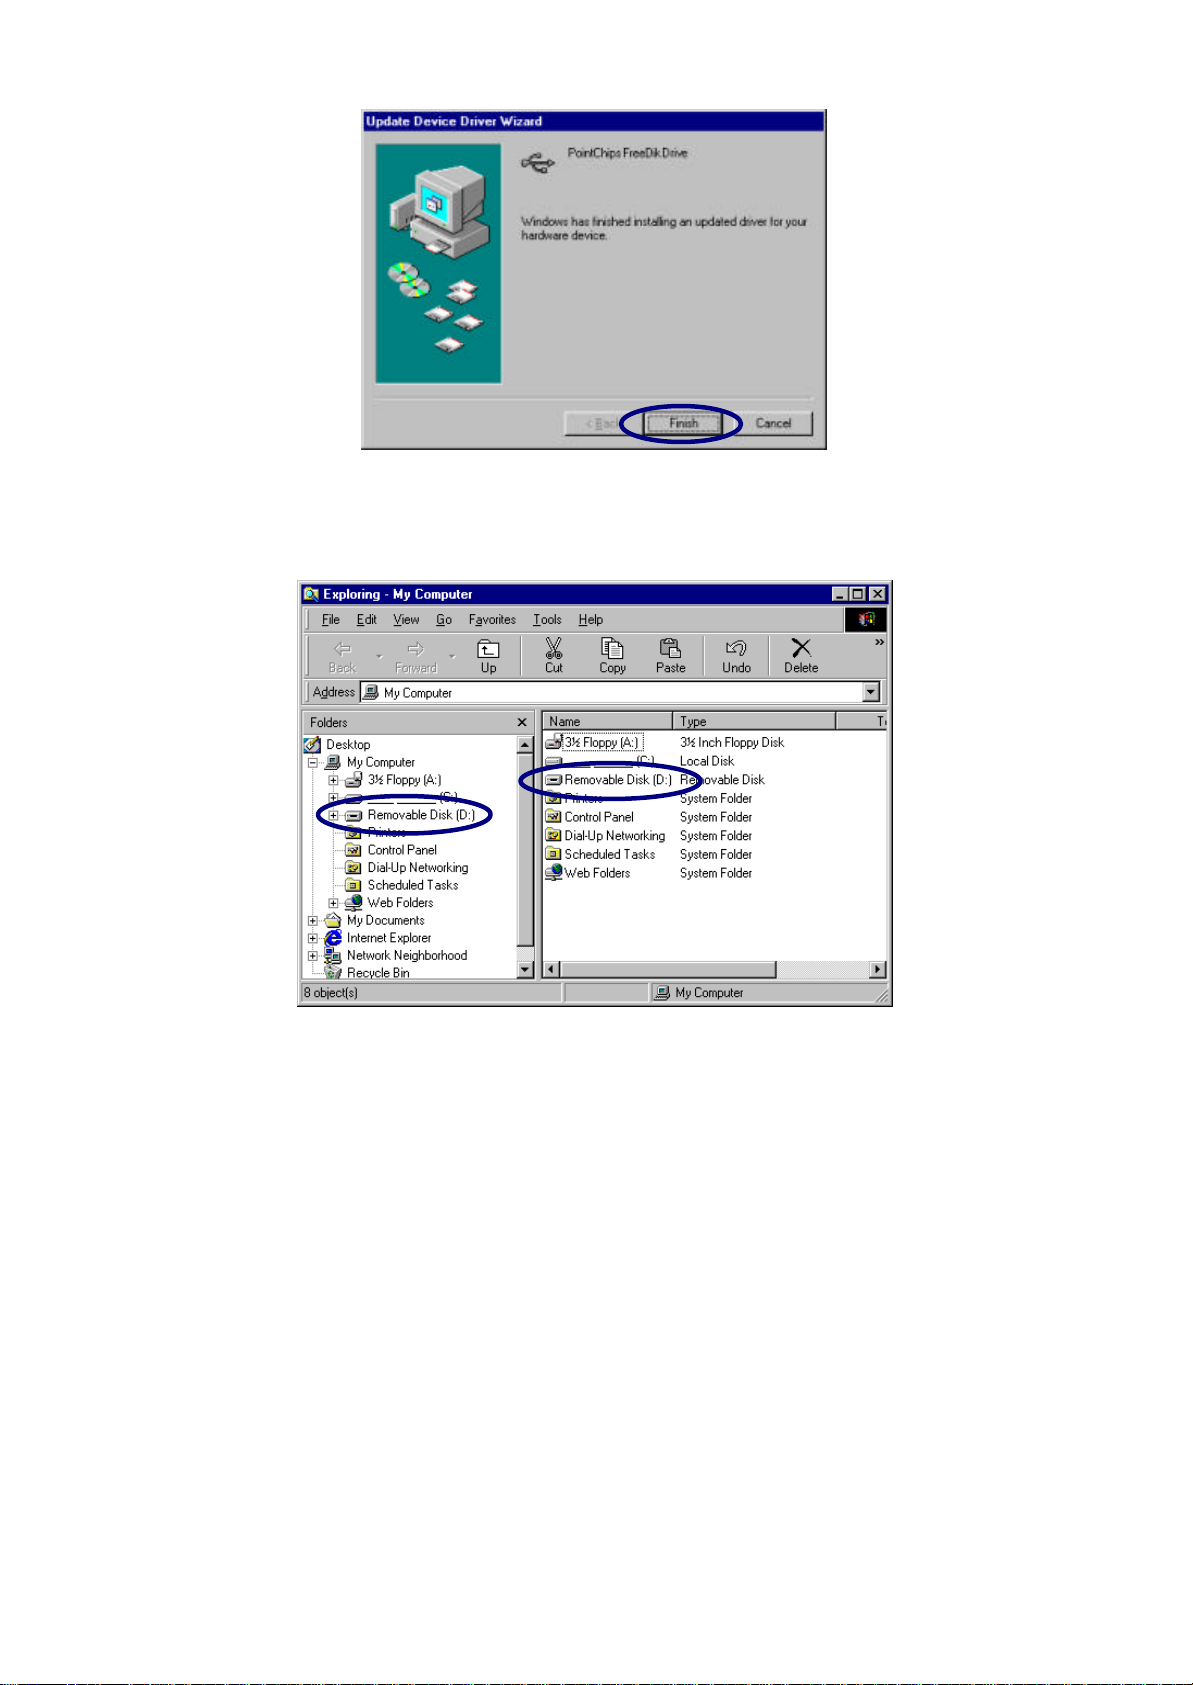
<Appendix 6> Installation is complete
D. Open Windows Explorer (see image below)
<Appendix 7> The circled items represent removable drives within Windows Explorer.
Page 6

FORMAT and PASSWORD SETTING
Manager Program Manual (Version 1.11)
1. In a case that format is needed.
- In a case that a product made using a Uni Drive is first time.
- In a case that Uni Drive is need for disk arrangement.
- In a case that the password is newly set. (Formatting will erase ALL data on this disk.)
1-1. Connect the device to the USB port
1-2. Execute “Manager.exe’ in the utility files, so that the following window will appear.
Execute ‘Manager.exe file into Utility file.
“Please connect your Device” since your device did not connect your computer properly.
The Program shall be closed automatically. Check your device connection & start again from 1-1.
“Please select your device” since device are connected more than one using same chip.
1-3. Please select ‘Quick Format’ or ‘Full Format’ and then click on a ‘Format’ button.
1-4. Use the device after finish Format.
1-5. Disconnect the device from the USB port.
1-6. Connect the device and the USB port again.
Page 7

2. In case that the password is set and the device is then used
2-1. Connect the device for which the format is completed to the USB port.
2-2. Execute “Manager.exe’ in the utility files, so that the following window will appear.
2-3. In case that the device is used with the password set, check a ”Using Password’ box, click on the
‘Exit’ button and then finish the Manager Program. Disconnect the device from the USB port.
Connect the de vice and the USB port again.
(Shall be found “Please log-In first” in the Password Mode.)
2-4. Execute windows explorer program. Click removable device.
2-5. Execute “Passman.exe” in the windows of right side. Enter your password, Click “Apply” button
2-6. Use the driver after log-in properly.
3. In case that the password is changed
3-1. Connect the Device settl ed Password to USB Port in your Computer after the format.
3-2. Execute “Passman.exe”. Click “Change password”, then change your password.
(In case that the Password Mode)
3-3. Execute “Passman.exe”. Click “Change password”, then change your password.
(In case that the Non-Password Mode.)
4. In case that the safety remove Device.
Windows 98 or 98 SE : Confirm turn off LED.
Windows ME, 2000 : after execute hardware remove menu in left bottom of windows.
Mac : After throw the Icon Wastebasket.
Linux : Execute ‘unmount’ quarry.
 Loading...