

Page 1
By Ian Aikman at 5:27 pm, Mar 09, 2006
Page 2
Before using this product, read and follow all warnings and instructions.
This product is not intended for use by young children or infirm persons unless they are adequately
supervised by a responsible person to ensure that they use this product safely.
Young children should be supervised to ensure that they do not play with this product.
This symbol indicates "dangerous voltage" inside the product that presents a risk of electric shock
or personal injury.
This product is intended for household use only and not for commercial or industrial use.
Always power this product from an outlet with the same rating (voltage and frequency) as indicated
on the rating label in the back of the product.
If this product has been damaged (including cord or plug) take it to an accredited service
technician for inspection, and if necessary, repair.
Turn off and disconnect the power cable before cleaning or storing this product.
Ensure this product does not get wet or splashed.
Only use the A/C power adapter supplied with your product, or a replacement recommended by a
qualified technician.
Do not place naked flames, such as lighted candles, on the unit.
Do not place objects filled with liquids, such as vases on the unit.
Do not install this product on top of other electrical equipment, on uneven surfaces
Do not use or store this product in a place where it is subject to direct sun, heat, excessive dust or
vibration.
Do not use this product with wet hands.
Do not clean this product with water or other liquids.
Do not block or cover these slots and holes in the cabinet.
Do not push foreign objects into cabinet slots or holes.
The screen surface is easily scratched. Do not touch the screen with hands or any hard object.
Do not pull the power cord when disconnecting power. Turn off the switch on the socket and pull
the plug not the cord.
Do not attempt to open this product yourself. There are no user serviceable parts inside.
2
Page 3
Notes:
The lightningflash with arrowheadsymbol, within anequilateral
triangle, isintended to alertthe user tothe presence ofinsinuated
dangerous voltage within the product's enclosure that may be
of sufficient magnitudeto constitute arisk of electricshock to
persons.
The exclamationpoint within anequilateral triangles isintended
to alertthe user tothe presence ofimportant operating and
maintenance (servicing) instructions in the literature
accompanying the appliance
TO REDUCE THE RISK OF FIRE OR ELECTRIC SHOCK, DO NOT EXPOSE THIS APPARATUS TO RAIN
OR MOISTURE.
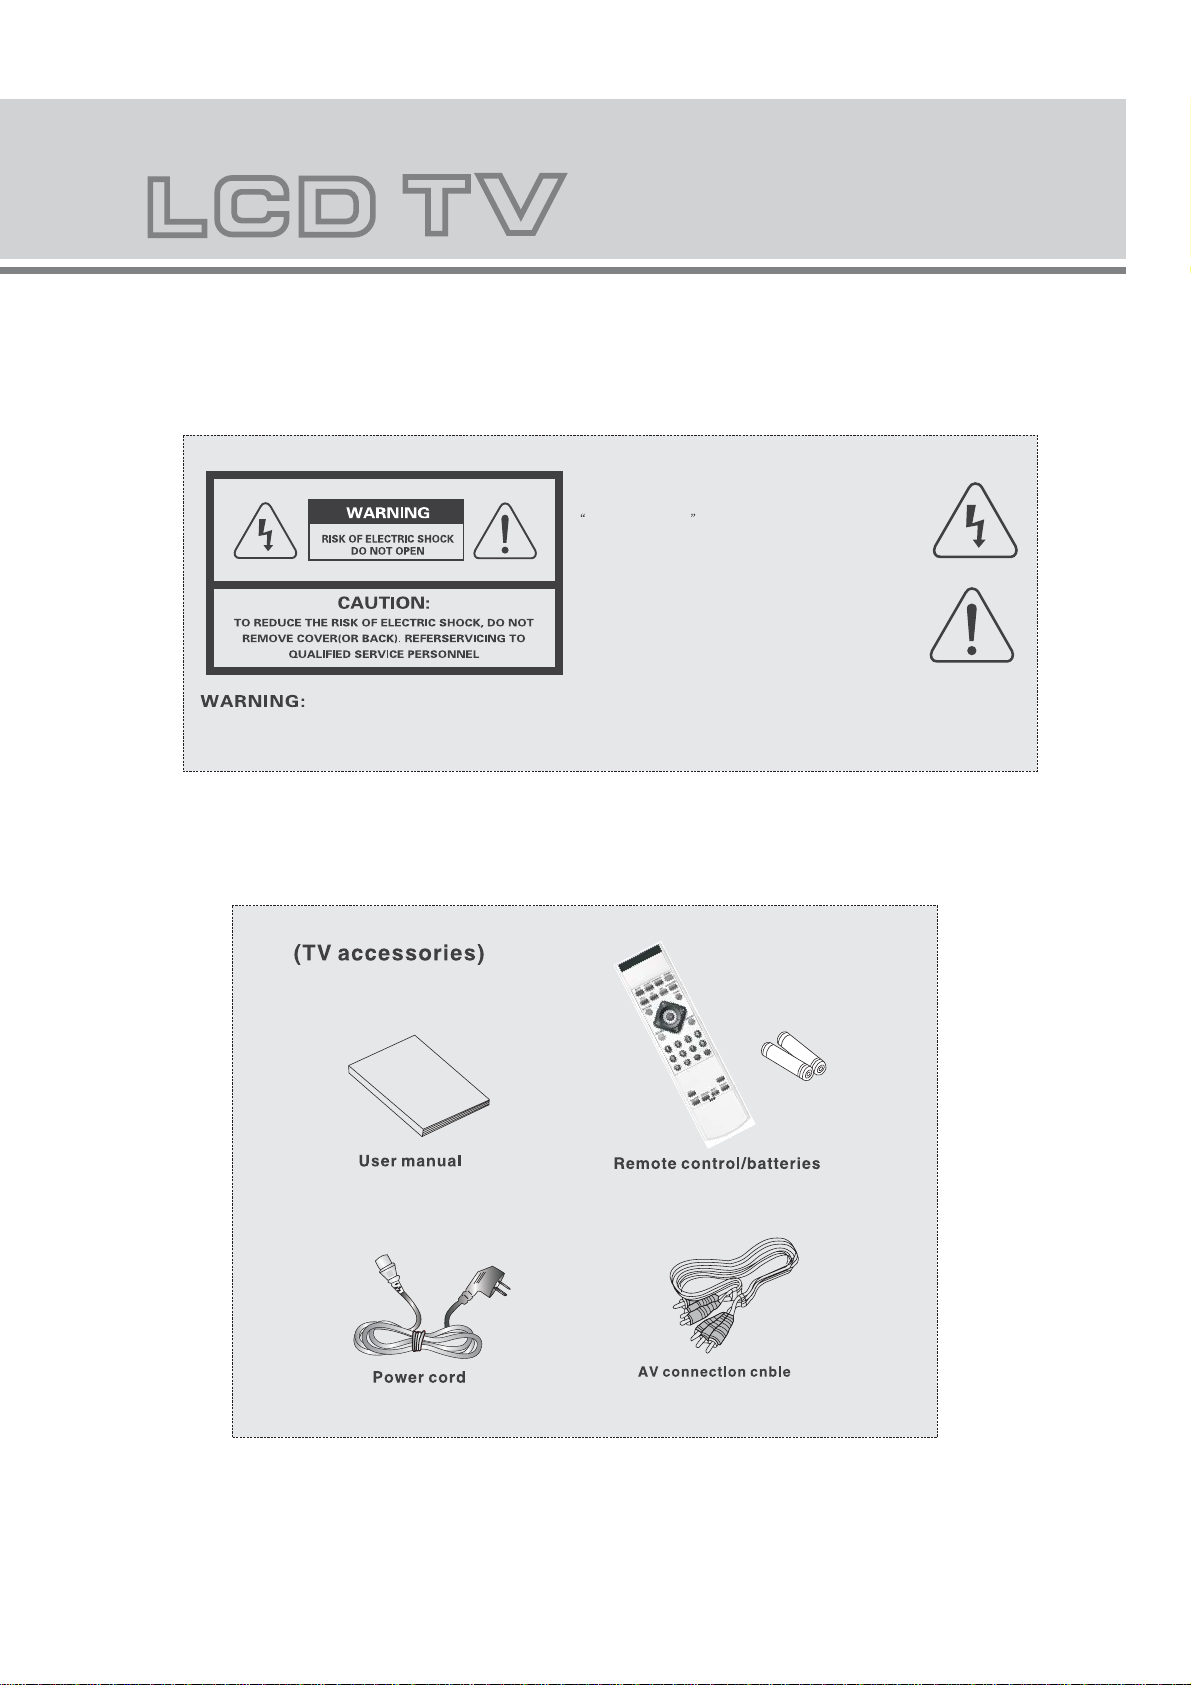
Check the accessories
3
Page 4

Safety precaution................................................................ 2
Basic operation................................................................... 2
Notes................................................................................. 3
Contents.............................................................................. 4
LCD TV panel.................................................................... 5
LCD TV panel(continue)..................................................... 6
Remote control.................................................................... 7
Remote control.................................................................... 8
Connecting to antenna or TV radio network............................. 9
Picture........................................................... .................... 10
Sound............................................................................... 13
PIP................................................................................... 15
Function........................................................................... 17
TV channel........................................................................ 20
Connecting to devices.................................................. 24other
Trouble shooting................................................................ 25
Warranty........................................................................... 26
4
Page 5
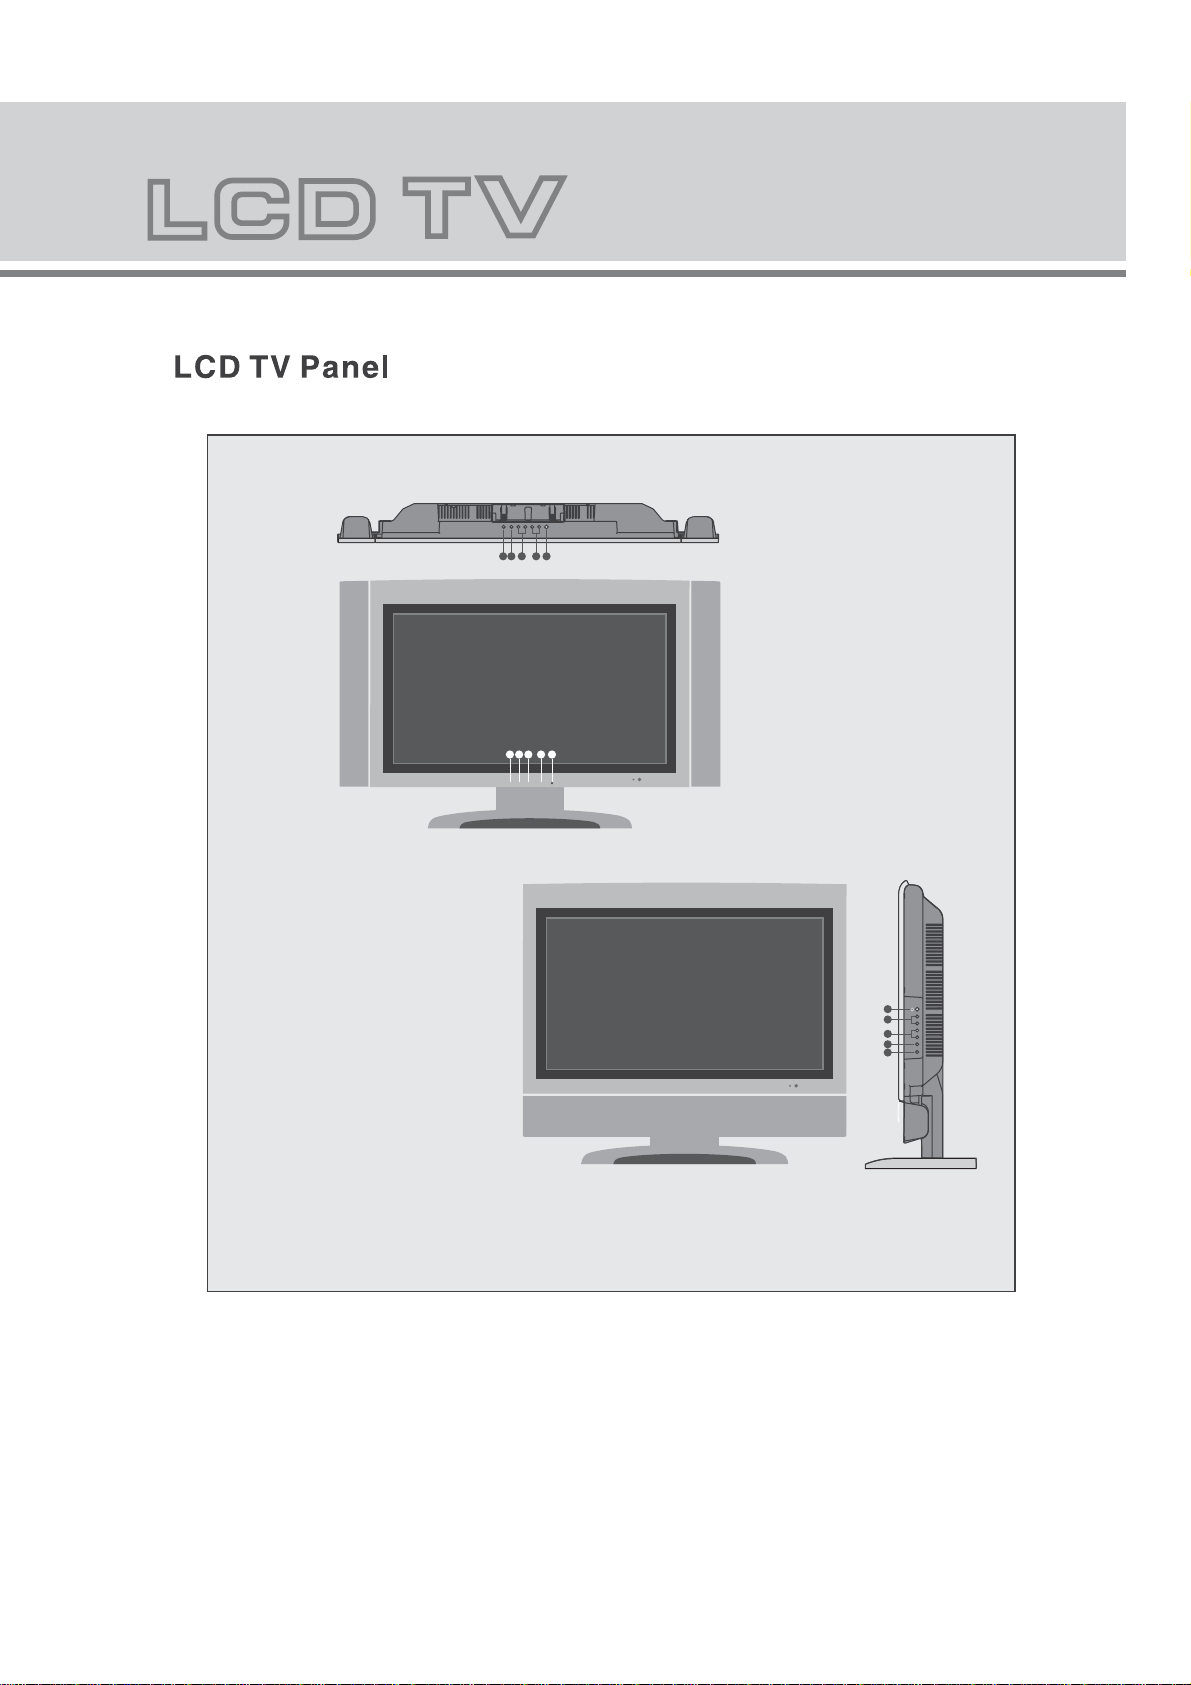
adc
adc
SOURCE
e
b
e
b
MENU
-VOL+CH +
e
CH+
d
CH-
VOL+
c
VOL-
MENU
b
SOURCE
a
a) Selecting exterior signal input
b) Main menu display and confirm
c) Volume adjusting
d) Channel selection
e) On/off button
5
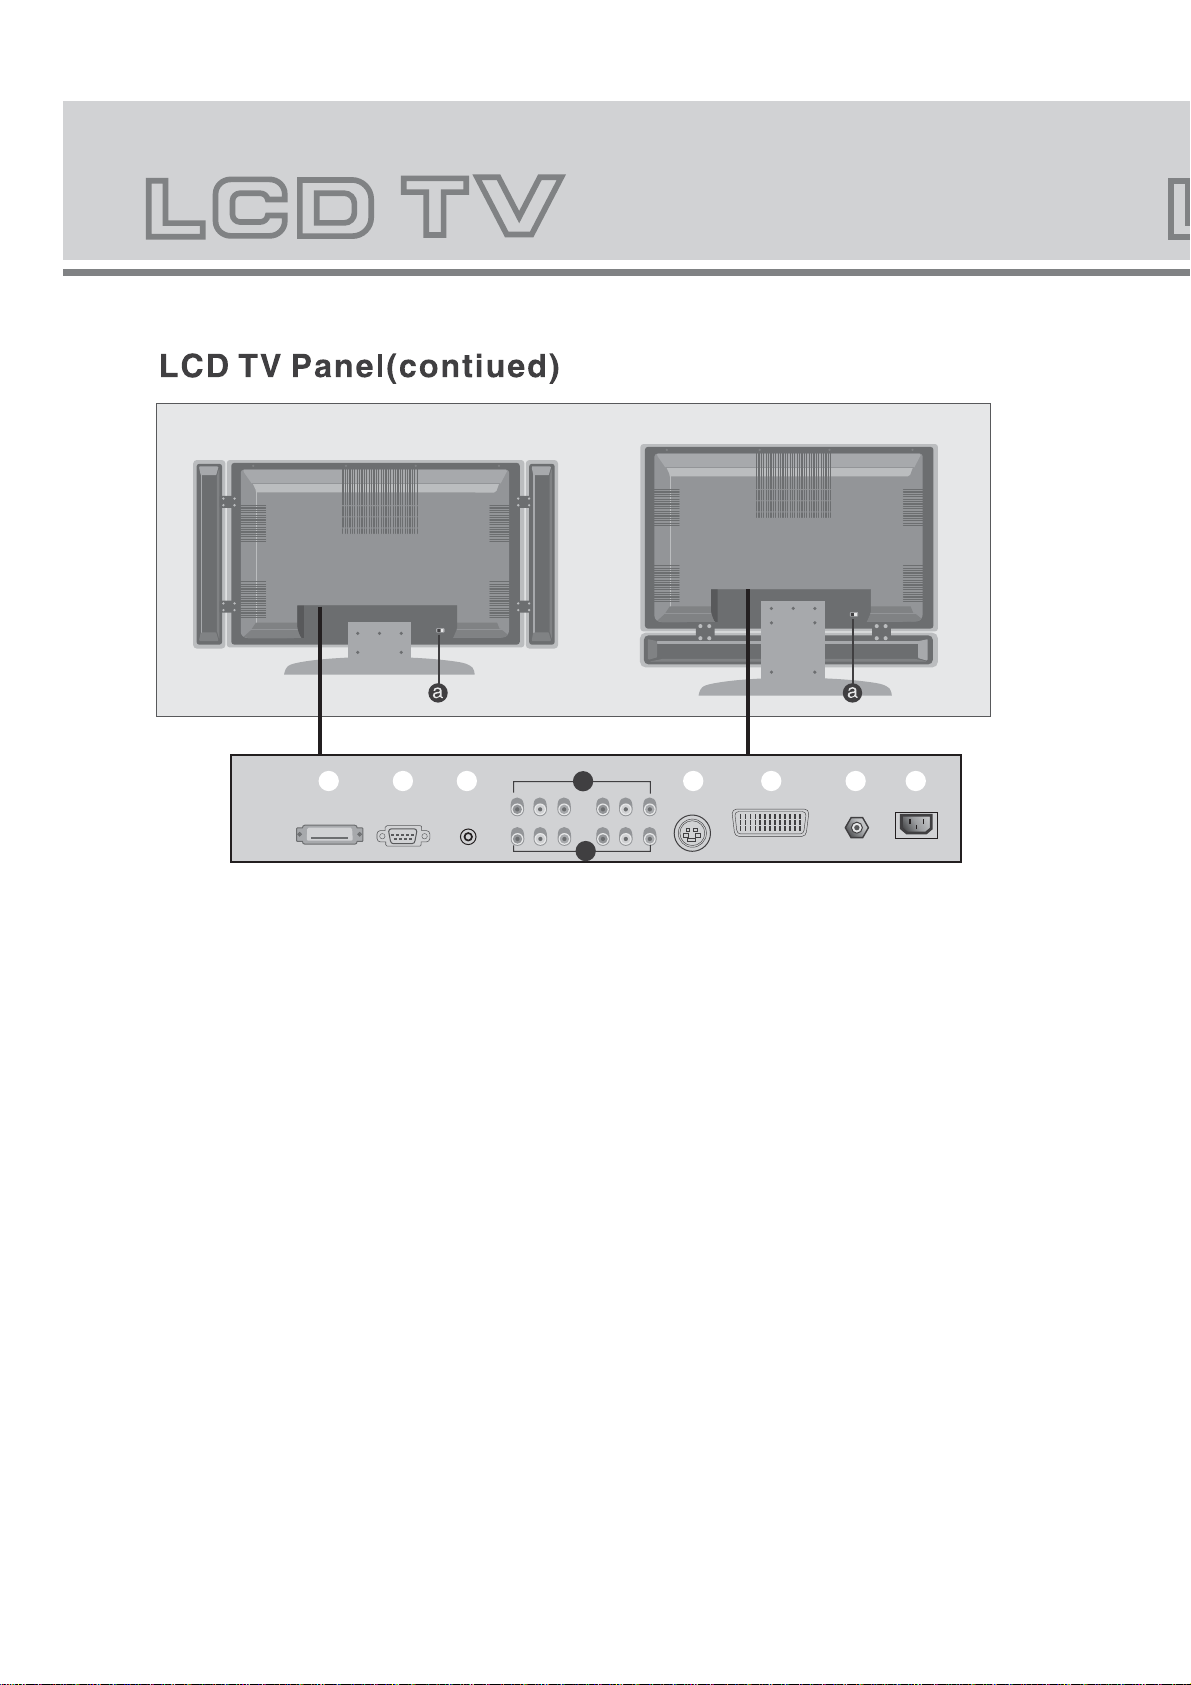
Page 6
b
c
d
e
g
h
f
Power On/Off
a)
Power On/Off
b)HDMI
High definition multi media interface
c)VGA
Input terminal of simulation signal of PC
d)PC Audio
Sound input terminal of RGB input
Av2 L/R2, YPbPr2
e)
Color difference component input terminal and AV2 input terminal and audio input terminal
Av1 L/R1 YPbPr1
f)
Color difference component input terminal and AV1 input terminal and audio input terminal
g)S-Video
Color and brightness separation input terminal
h)SCART IN
SCART input terminal ,suit for European export machine.
i)VHF/UHF
Antenna/close circuit TV network port(75 Ohm VHF/UHF)
j)POWER
AC power input terminal
and HDMI Audio
and HDMI
i
j
6
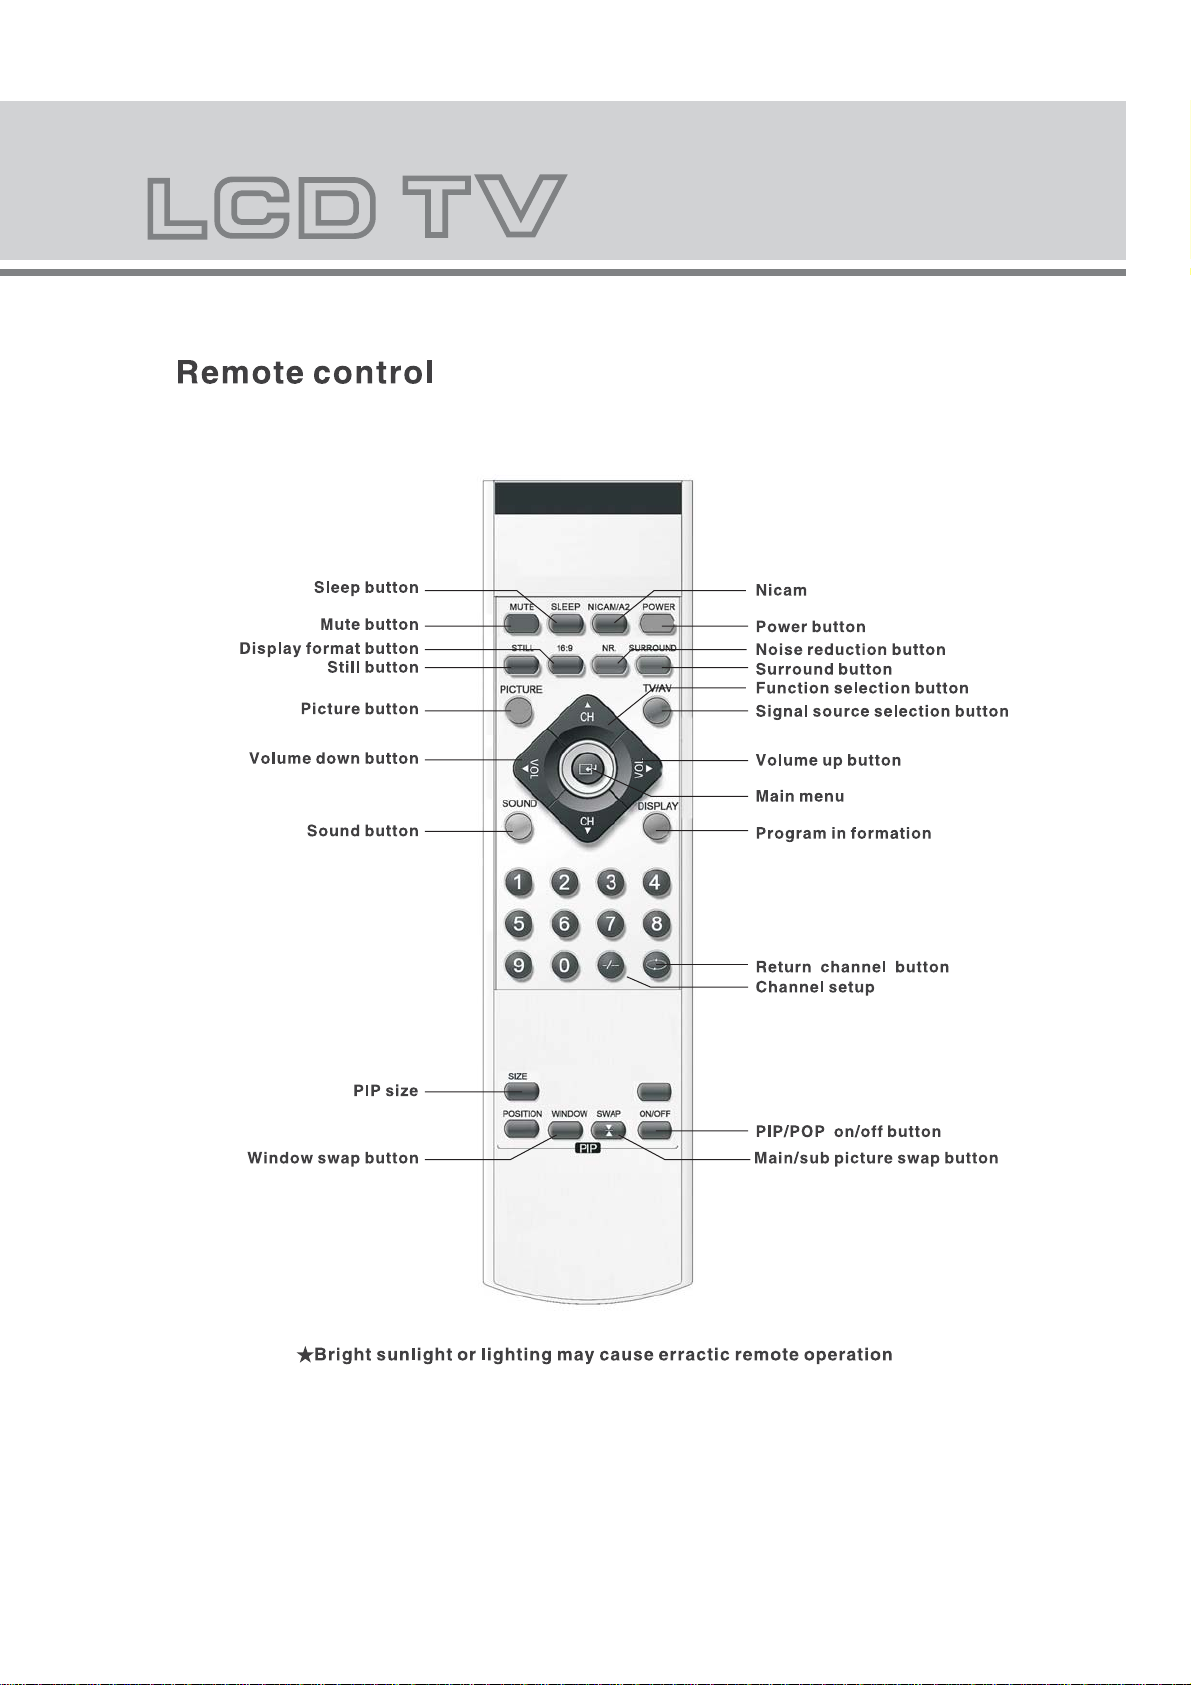
Page 7
7
Page 8

Application instruction of remote control
Power (POWER):
the TV off.
Signal (AV/TV)
signal source input.
Mute (MUTE):
speaker.
Sleep (SLEEP):
power off time according to
NICAM/A2 NICAM button of TV, which allows the customer select the different
sound systems (Australia ONLY uses A2 sound).
Still (STILL):
to release.
16: 9:
different sizes (16:9 4:3 zoom1 and 2).
Noise reduction (NR.):
different 3D noise reduction mode.
Surround (SORROUND):
sound function.
Picture (PICTURE):
picture modes.
Sound (SOUND):
modes.
Display (DISPLAY):
channel, input status of TV.
0,1~9:
nine.
-/--:
one hundred
Volume (VOL) / :
decrease the volume.
Channel(CH) / :
decrease the channel.
(MENU):
Size (SIZE):
Position (POSITION):
secondary window.
Window (WINDOW):
window.
Swap (SWAP):
swap between main window and sub-window.
programs
On/Off (ON/OFF):
of TV.
(NICAM/A2):
Picture size swap button, which allows the customer to swap the picture between
TV channel selection button, which allows the customer to select the channel one to
TV channel selection button, which allows the customer to select TV channels ten
Channel revert button of TV, which allows the customer to watch the last TV channel.
:
OSD menu button, which allows the customer to enter the TV setup menu.
Power on/off button; press once to turn the TV on and press again to turn
:
Signal source selection button, which allows the customer to select the
Mute button, press once to disable the speaker and press again to enable the
Scheduled power off time button, which allows the customer to set the TV
the preset times displayed.
Still button of TV menu, the TV picture will be frozen after pressing, press again
Picture noise reduction button, which allows the customer to select
Surround button. Which allows the customer to select surround
Picture mode button of TV, which allows customer to select different
Sound mode button of TV, which allows customer to select different sound
Message display button of TV, which allows the customer to view the
Volume up and down button, which allows the customer to increase or
Channel up and down button, which allows the customer to increase or
PIP size selection button, which allows the customer to select different PIP size
PIP position selection button, which draws a border around the
Focus window button, which draws a border around the secondary
Main window and sub-window swap button, which allows the customer to
PIP on/off button, which allows the customer to turn on/off the PIP function
to
8
Page 9
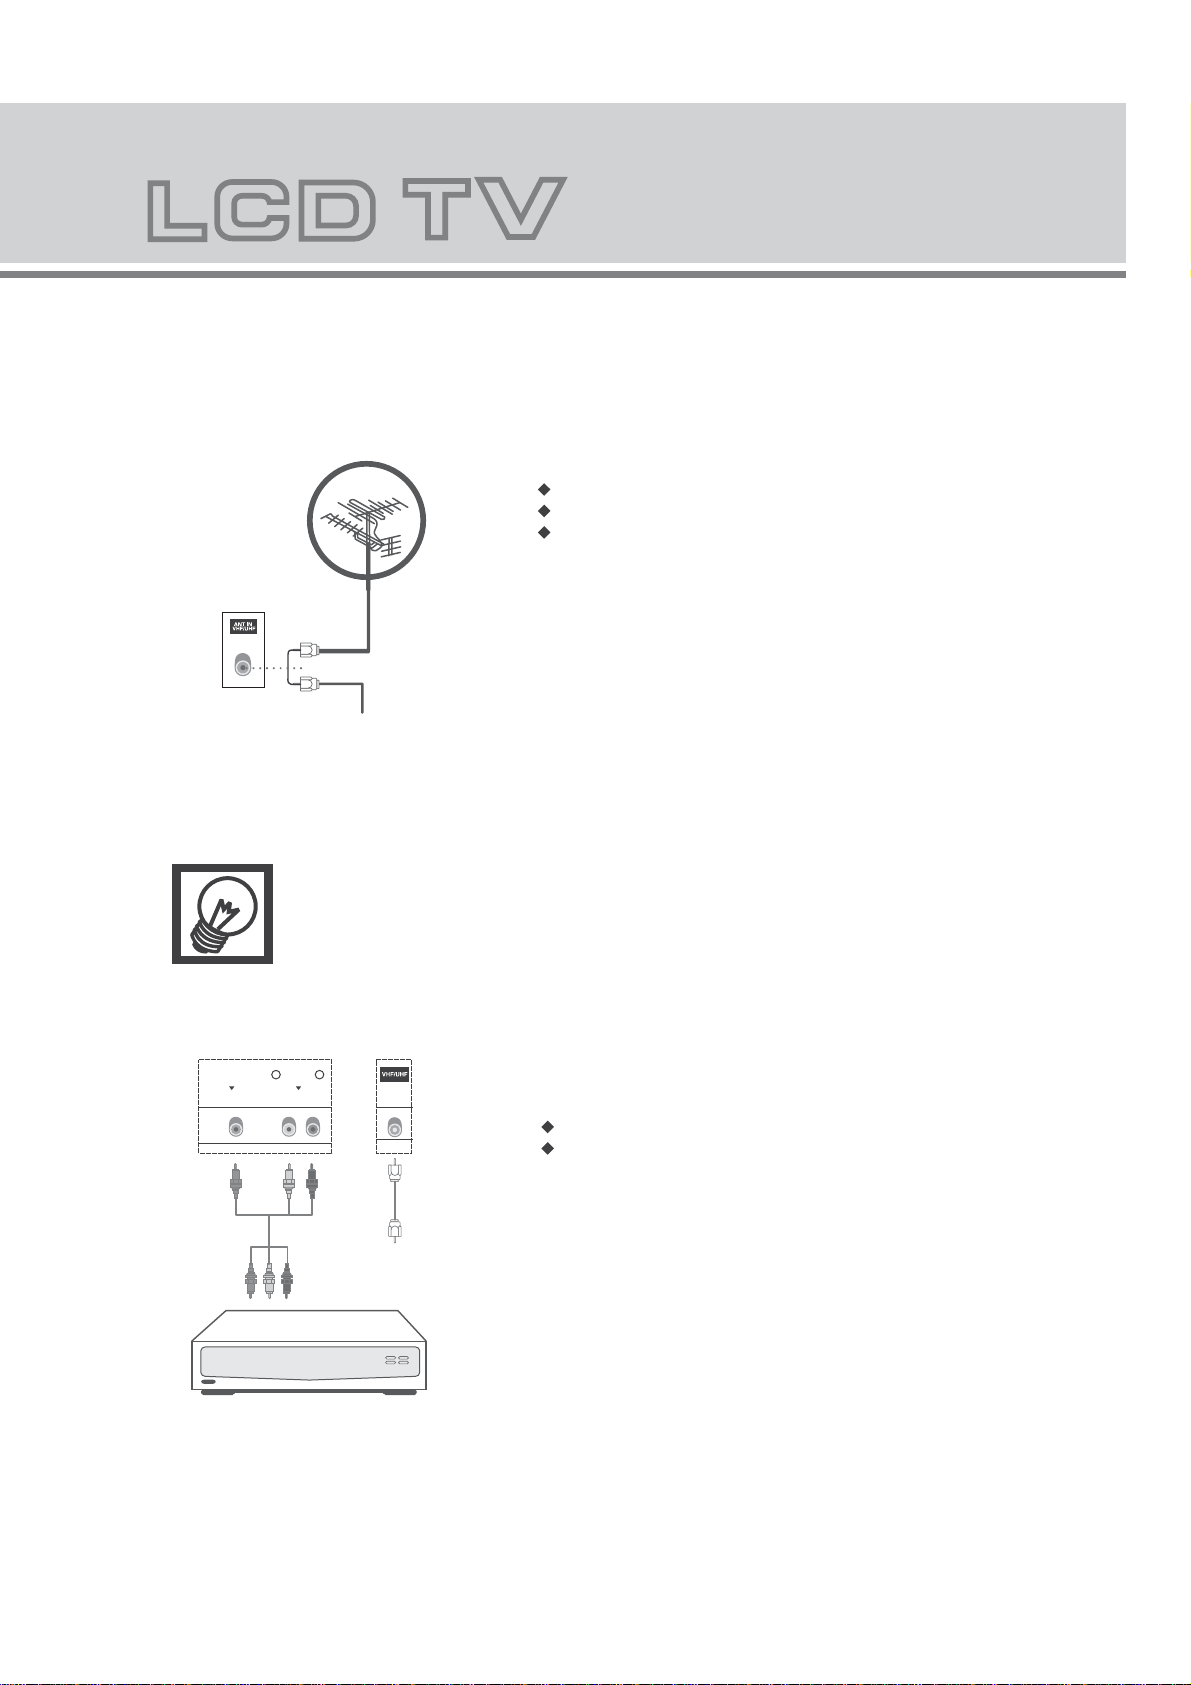
Connecting to antenna or TV radio network
In order to receive TV program, signal should be received from
one of the following signal sources:
Outdoor antenna.
Cable TV network.
Satellite broadcast network
TherearofLCDTV
Connecting digital TV Set Top Box
The of LCD TVmust be used
LR
Video
Audio
Or
CableTVnetwork
1.In these three cases, the input cable of antenna or TV
network should be plugged in the 75 Ohm coaxial cable jack
at the rear side of LCD TV.
Indoor antenna is NOT recomended for this TV
2.
When installing LCD TV , 75 Ohm coaxial Cable must
be used. If other coaxial cable is used, there may be noise and
image disturbances.
In order to receive digital TV programs, a Digital TV STB
MUST be connected to the rear of the LCD TV.
Connect the coaxial cable connector to
The output terminal.
The antenna input terminal.
quality
DigitalTVreceiver
For further instruction refer to the receiver instruction manual
9
Page 10

Move
Move
Exit
Exit
Exit
1.Press the MENU button on the remote control to
enter the OSD menu, then press CH / button to
select the Picture menu.
2.Press the VOL button on the remote control to enter
the Picture menu, then press CH /CH button
to select Picture mode and press VOL /
button to select the picture mode such as standard, soft,
vivid and user.
3.
Press the MENU button on the remote control to
return to upper menu.
1.Press the MENU button on the remote control to
enter the OSD menu, then press CH /CH button
to select the Picture menu .
2.press the VOL button on the remote control to enter
the Picture menu, then press CH /CH
button to select brightness
3.Press the VOL / button on the remote control
button to enter brightness adjustment menu to adjust
Brightness
4.Press the MENU button on the remote control to
return to upper menu.
10
Move
Exit
Exit
1.Press the MENU button on the remote control to enter
the OSD menu, then press CH /CH button to
select the Picture menu.
2.Press the VOL button on the remote control to enter
the Picture menu, then press CH /CH button
to select Contrast
3.Press the VOL / button on the remote control
button to enter Contrast adjustment menu to adjus
Contrast
4.Press the MENU button on the remote control to
return to upper menu.
Page 11

Move
Move
Exit
Exit
Exit
Exit
1.Press the MENU button on the remote control to enter
the OSD menu, then press CH /CH button to
select Picture menu.
2.Press the VOL button on the remote control to enter
the Picture menu, then press CH /CH button
to select Saturation
3.Press the VOL / button on the remote control
button to enter Saturation adjustment menu to adjust
Saturation
4.Press the MENU button on the remote control to
return to upper menu.
1.Press the MENU button on the remote control to
enter the OSD menu, then press CH /CH button
to select the Picture menu.
2.Press the VOL button on the remote control to enter
the Picture menu, then press CH /CH button
to select Sharpness
3.Press the VOL / button on the remote control
button to enter Sharpness adjustment menu to adjust
Sharpness
4.Press the MENU button on the remote control to
return to upper menu.
Move
Exit
1.Press the MENU button on the remote control to
enter the OSD menu, then press CH /CH button
to select the Picture menu.
2.Press the VOL button on the remote control to
enter the Picture menu, then press CH /CH
button to select Hue
11
Page 12

Move
Move
Exit
Exit
Exit
3.Press the VOL / button on the remote control
button to enter Hue adjustment menu to adjust Hue
4.Press the MENU button on the remote control to
return to upper menu.
1.Press the MENU button on the remote control to
enter the OSD menu, then press CH /CH button to
select the Picture menu.
2.Press the VOL button on the remote control to enter
the Picture menu, then press CH /CH button
to select Color Temp. and press VOL / button
to select color temperature mode(cool, warm, normal
and user).
3.Press the MENU button on the remote control to
return to upper menu.
1.Press the MENU button on the remote control to enter
the OSD menu, then press CH /CH button to
select the Picture menu.
2.Press the VOL button on the remote control to enter
the Picture menu, then press CH /CH button to
select Scale press VOL / button to select
display mode such as (16:9, 4:3, ZOOM1, ZOOM2).
3.Press the MENU button on the remote control to
return to upper menu.
12
Page 13

Move
Move
Exit
Exit
Exit
1.Press the MENU button on the remote control to
enter the OSD menu, then press CH /CH button to
select The Sound menu.
2.Press the VOL button on the remote control to enter
the Sound menu, then press CH /CH button to
select Sound Mode and press VOL / button to
select sound mode such as standard, news, movie and
user.
4.Press the MENU button on the remote control to
return to upper menu.
1.Press the MENU button on the remote control to
enter the OSD menu, then press CH /CH button to
select The Sound menu.
2.Press the VOL button on the remote control to
enter the Sound menu, then press CH /CH
button to select Volume
3.Press the VOL / button on the remote control
button to enter Volume adjustment menu to adjust
Volume
4.Press the MENU button on the remote control to
return to upper menu.
Move
Exit
Exit
1.Press the MENU button on the remote control to
enter the OSD menu, then press CH /CH button to
select the Sound menu.
2.Press the VOL button on the remote control to
enter the Sound menu, then press CH /CH
button to select Bass .
3.Press the VOL / button on the remote control
button to enter Bass adjustment menu to adjust Bass
4.Press the MENU button on the remote control to
return to upper menu.
13
Page 14

Move
Move
Exit
Exit
Exit
Exit
1.Press the “MENU” button on the remote control to enter
the OSD menu, then press “CH /CH ” button to select
the “Sound” menu.
2.Press the “VOL ” button on the remote control to enter
the “Sound” menu, then press “CH /CH ” button to
select “Treble”.
3.Press the “VOL / ” button on the remote control button
to enter Treble adjustment menu to adjust “Treble”.
4.Press the “MENU” button on the remote control to return
to upper menu.
1.Press the “MENU” button on the remote control to enter
the OSD menu, then press “CH /CH ” button to select
The “Sound” menu.
2.Press the “VOL ” button on the remote control to enter
the “Sound” menu, then press “CH /CH ” button to
select “Balance”
3.Press the “VOL / ” button on the remote control button
to enter Balance adjustment menu to adjust “Balance”.
4.Press the “MENU” button on the remote control to return
to upper menu.
14
Move
Exit
1.Press the “MENU” button on the remote control to enter
the OSD menu, then press “CH /CH ” button to select
the “Sound” menu.
2.Press the “VOL ” button on the remote control to enter
the “Sound” menu, then press “CH /CH ” button to
select “Surround” and press “VOL / ” button to select
surround on/off.
3.Press the “MENU” button on the remote control to return
to upper menu.
Page 15

Move
Move
Move
Exit
Exit
Exit
1.Press the “MENU” button on the remote control to enter
the OSD menu, then press “CH /CH ” button to select
the “PIP” menu.
2.Press the “VOL ” button on the remote control to enter
the “PIP” menu, then press “CH /CH ” button to select
“Window” and press “VOL / ” button to select the main
window and sub-window in the window.
3.Press the “MENU” button on the remote control to return
to upper menu.
1.Press the “MENU” button on the remote control to enter
the OSD menu, then press “CH /CH ” button to select
the “PIP” menu.
2.Press the “VOL ” button on the remote control to enter
the “PIP” menu, then press “CH /CH ” button to select
“Main Source” and press “VOL / ” button to select the
signal input terminal of main window.
3.Press the “MENU” button on the remote control to return
to upper menu.
1.Press the “MENU” button on the remote control to enter
the OSD menu, then press “CH /CH ” button to select
the “PIP” menu.
2.Press the “VOL ” button on the remote control to enter
the “PIP” menu, then press “CH /CH ” button to select
“PIP Source” and press “VOL / ” button to select the
signal input terminal of main window.
3.Press the “MENU” button on the remote control to return
to upper menu.
Move
Exit
1.Press the “MENU” button on the remote control to enter
the OSD menu, the press “CH /CH ” button to select
the “PIP” menu.
2.Press the “VOL ” button on the remote control to enter
the “PIP” menu, then press “CH /CH ” button to select
PIP
“ Size” and press “VOL / ” button to adjust the
size of the sub-window.
3.Press the “MENU” button on the remote control to return
to upper menu.
15
Page 16

Move
Move
Move
Exit
Exit
Exit
1.Press the “MENU” button on the remote control to enter
the OSD menu, then press “CH /CH ”button to select
the “PIP” menu.
2.Press the “VOL ” button on the remote control to enter
the “PIP” menu, then press“CH /CH ” button to select
“PIP position” and press “VOL / ” button to adjust the
position of the sub-window.
3.Press the “MENU” button on the remote control to return
to upper menu
1.Press the “MENU” button on the remote control to enter
the OSD menu, then press “CH /CH” button to Select
the “PIP” menu.
2.Press the “VOL ” button on the remote control to enter
the “PIP” menu, then press “CH /CH ” button button to
select “PIP Mode” and press “VOL / ” button to select
pip mode such as pip, pop, 9WIN and OFF.
3.Press the “MENU” button on the remote control to return
to upper menu
1.Press the “MENU” button on the remote control to enter
the OSD menu, then press “CH /CH ”button to select
the“PIP” menu
2.Press the “VOL ” button on the remote control to enter
the “PIP” menu, then press “CH /CH ” button to select
“PIP Swap” and press “VOL / ” button to swap picture
between main window and sub-window.
3.Press the “MENU” button on the remote control to return
to upper menu
16
Move
Exit
1.Press the “MENU” button on the remote control to enter
the OSD menu, then press “CH /CH ” button to select
‹
the “PIP” menu
2.Press the “VOL ” button on the remote control to enter
the “PIP” menu, then press “CH /CH ” button to select
“3D NR” and press “VOL / ” button to select 3D NR
function such as high, mid,low and off
3.Press the “MENU” button on the remote control to return
to upper menu
Page 17

Function
Move
Move
Exit
Exit
1.Press the “MENU” button on the remote control to enter
the OSD menu, then press “CH /CH ” button to select
the “Function” menu.
2.Press the “VOL ” button on the remote control to enter
the “Function” menu, then press “CH /CH ”button to
select “Language” and press “VOL / ” button to select
the desired language.
3.Press the “MENU” button on the remote control to return
to upper menu.
1.Press the “MENU” button on the remote control to enter
the OSD menu, then press “CH /CH ” button to select
the “Function” menu.
2.Press the “VOL ” button on the remote control to enter
the “Function” menu, then press “CH /CH ”button to
select “OSD H Position” and press “VOL / ” button to
adjust the horizontal position of OSD.
3.Press the “MENU” button on the remote control to return
to upper menu.
Move
Move
Exit
Exit
1.Press the “MENU” button on the remote control to enter
the OSD menu, then press “CH /CH ” button to select
the “Function” menu.
2.Press the “VOL ” button on the remote control to enter
the “Function” menu, then press “CH /CH
”button to
select “OSD V Position” and press “VOL / ” button to
adjust the vertical position of OSD.
3.Press the “MENU” button on the remote control to return
to upper menu.
1.Press the “MENU” button on the remote control to enter
the OSD menu, then press “CH /CH ” button to select
the “Function” menu.
2.Press the “VOL ” button on the remote control to enter
the “Function” menu, then press “Ch /CH ”button to
select OSD Duration ”.
17
Page 18

Function
Move
Exit
Exit
Exit
3.Press the VOL / button on the remote control
button to enter OSD Duration adjustment menu to adjust
OSD Duration .
4.
Press the MENU button on the remote control to return
to upper menu
1.Press the MENU button on the remote control to enter
the OSD menu, then press “CH /CH button to select
The Function menu.
2.Press the VOL button on the remote control to enter
the Function menu, then press “CH /CH button
to select OSD Halftone
3.Press the VOL / button on the remote control
button to enter OSD Halftone adjustment menu to adjust
OSD Halftone
Press the MENU button on the remote control to return
to upper menu.
18
Move
Move
Exit
Exit
1.Press the MENU button on the remote control to enter
the OSD menu, then press CH /CH button to
select the Function menu.
2.Press the VOL button on the remote control to enter
the Function menu, then press CH /CH button
to select Blue Back and press VOL / button to
select blue back on/off function.
Press the MENU button on the remote control to return
to upper menu.
1.Press the MENU button on the remote control to
enter the OSD menu, then press CH /CH button to
select the Function menu .
2.Press the VOL button on the remote control to enter
the Function menu, then press CH /CH button
to select Timer
Page 19

Move
Move
Exit
Exit
3.Press the “VOL / ” button on the remote control button
to enter Timer setting menu, then press “CH / Ch ”
button to select different items, and press “VOL / ”
button to adjust Current, Off Time, On time and On
Channel.
4.Press the “MENU” button on the remote control to return
1. Press the “MENU” button on the remote control to enter
the OSD menu, then press
“CH / CH ” button to select The “Function” menu.
2.Press the “ VOL ” button on the remote control to enter
the “Function” menu, then press “Ch Ch ” button to
select “Reset” and press “VOL / ” button to reset
factory default.
3.Press the “MENU” button on the remote control to return
to upper menu.
19
Page 20

Move
Move
Search
Store
Move
1.Press the “MENU” button on the remote control to enter
the OSD menu, then press “CH /CH ” button to select
The “TV ” menu.
2.Press the “VOL ” button on the remote control to enter
Exit
the “TV ” menu, then press “CH /CH ” button to select
“Auto Tune”.
3.Press the “VOL / ” button on the remote control button
to enter Auto Tune adjustment menu to adjust “Auto
Tune”.
4.Press the “MENU” button on the remote control to return
Exit
to upper menu.
1.Press the “MENU” button on the remote control to enter
the OSD menu, then press “CH /CH ” button to select
The “TV ” menu.
2.Press the “VOL ” button on the remote control to enter
Exit
the “TV ” menu, then press “CH /CH ” button to select
“Manual Tune”.
3.Press the “VOL / ” button on the remote control button
0
to enter Manual Tune adjustment menu to adjust “Manual
Tune”.
4.Press the “MENU” button on the remote control to return
Exit
to upper menu.
20
Move
Exit
1.Press the “MENU” button on the remote control to enter
the OSD menu, then press “CH /CH ” button to select
The “TV ” menu.
2.Press the “VOL ” button on the remote control to enter
the “TV ” menu, then press “CH /CH ” button to select
“Fine Tune”.
Page 21

Store
Move
Move
Channel swap
Swap
Move
Move
3.Press the “VOL / ” button on the remote control button
to enter Fine Tune adjustment menu to adjust “Fine
Tune”.
Exit
4.Press the “MENU” button on the remote control to return
to upper menu.
1.Press the “MENU” button on the remote control to enter
the OSD menu, then press “CH /CH ” button to select
The “TV” menu.
2.Press the “VOL ” button on the remote control to enter
Exit
the “TV” menu, then press “CH /CH ” button to select
“Channel Swap”.
3.Press the “VOL / ” button on the remote control button
to enter Channel Swap adjustment menu to adjust
2
2
Exit
“Channel Swap”.
4.Press the “MENU” button on the remote control to return
to upper menu.
1.Press the “MENU” button on the remote control to enter
the OSD menu, then press “CH /CH ” button to select
the “TV ” menu.
2.Press the “VOL ” button on the remote control to enter
the “TV ” menu, then press “CH /CH ” button to select
“Skip” and press “VOL / ” button to select on/off.
3.Press the “MENU” button on the remote control to return
to upper menu.
Exit
Move
Exit
1.Press the “MENU” button on the remote control to enter
the OSD menu, then press “CH /CH ” button to select
the “TV ” menu.
2.Press the “VOL ” button on the remote control to enter
the “TV ” menu, then press “CH /CH ” button to select
“Color system” and press “VOL / ” button to select
proper color system mode.
3.Press the “MENU” button on the remote control to return
to upper menu.
21
Page 22

PC
Move
Move
Move
Exit
Exit
Exit
1.Press the “MENU” button on the remote control to enter
the OSD menu, then press “CH /CH ” button to select
the “TV ” menu.
2.Press the “VOL ” button on the remote control to enter
the “TV” menu, then press “CH /CH ” button to select
“Sound system” and press “VOL / ” button to select
proper sound system mode.
3.Press the “MENU” button on the remote control to return
to upper menu.
1.Press the “MENU” button on the remote control to enter
the OSD menu, then press “CH /CH ” button to select
the “TV ” menu.
2.Press the “VOL ” button on the remote control to enter
the “TV ” menu, then press “CH /CH ” button to select
“NICAM” Select
and press “VOL / ” button to adjust
NICAM.
3.Press the “MENU” button on the remote control to return
to upper menu.
1.Press the “MENU” button on the remote control to enter
the OSD menu, then press “CH /CH ” button to select
the “PC ” menu.
2.Press the “VOL ” button on the remote control to enter
the “PC ” menu, then press “CH /CH ” button to select
H Position Select
“ ” and press “VOL / ” button to adjust
“”
H Position
3.Press the “MENU” button on the remote control to return
to upper menu.
22
Move
Exit
1.Press the “MENU” button on the remote control to enter
the OSD menu, then press “CH /CH ” button to select
the “PC ” menu.
2.Press the “VOL ” button on the remote control to enter
the “PC ” menu, then press “CH /CH ” button to select
Position Select
“V ” and press “VOL / ” button to adjust
“V ”
Position
3.Press the “MENU” button on the remote control to return
to upper menu.
Page 23

Move
Move
Move
Exit
Exit
Exit
1.Press the “MENU” button on the remote control to enter
the OSD menu, then press “CH /CH ” button to select
the “PC ” menu.
2.Press the “VOL ” button on the remote control to enter
the “PC ” menu, then press “CH /CH ” button to select
Clock Select
”
“ and press “VOL / ” button to adjust
“
Clock”
3.Press the “MENU” button on the remote control to return
to upper menu.
1.Press the “MENU” button on the remote control to enter
the OSD menu, then press “CH /CH ” button to select
the “PC ” menu.
2.Press the “VOL ” button on the remote control to enter
the “PC ” menu, then press “CH /CH ” button to select
Phase Select
“ ” and press “VOL / ” button to adjust
“”
Phase
3.Press the “MENU” button on the remote control to return
to upper menu.
1.Press the “MENU” button on the remote control to enter
the OSD menu, then press “CH /CH ” button to select
the “PC ” menu.
2.Press the “VOL ” button on the remote control to enter
the “PC ” menu, then press “CH /CH ” button to select
Auto Select
”
“ and press “VOL / ” button to adjust
“
Auto”
3.Press the “MENU” button on the remote control to return
to upper menu.
Press “TV/AV” key to enter the signal source menu.
Press “CH /CH ” key to select signal source.
Press VOL “ / ” key to sure.
TV/AV
Press “ ” key to exit signal source menu.
23
Page 24

RCA terminal is used to connect the output device of DVD (480I/480p/576I/576p/720P/1080I)
Pb2
Y2
Pb1
Y1
HDMI
HDMI
HDMI DVI
Pr2
Pr1 R1
R2
R L
AUDIO
Av2
L2
Av1
L1
VGA
VGA
PC AUDIO
Pb2
Y2
Pr2 R2
Pb1
Y1
Pr1 R1
Av2
L2
SCART
Av1
L1
SCART
SCART
VGA
Notes:
1.Y-Pb-Pr1 /Av1/ S-Video use a common Audio in.
2.Y-Pb-Pr2 / Av2 use a common Audio in.
3.Y-Pb-Pr of DVD is corresponding to Y-Pb-Pr of LCD TV.
24
4.Scart to Scart from a VCR
5.DVI to HDMI and using the PC audio
6.PC to VGA also using the PC audio
7.AV IN and YPbPr from a DVD
Page 25

Perform some basic troubleshooting procedures as the following before you contact your local
support center . If the problem still exists, please record the model and serial number of your TV,
and contact your local support center.
Check if power cord is properly connected to the wallAC outlet and the outlet is electrified.
Make sure you have pressed power on/off button on the front panel
Check brightness and contrast setting.
Checking volume setting.
Check volume setting.
Check if Mute button on remote controller is pressed
Check color system setting
Sound system
Try to find out the equipment that brings interference and keep it away.
Try to plug power cord into another AC outlet
Check the antenna (direction and location) and /or cable connection.
Replace batteries with new ones
Clean the upper edge of remote controller (IR transmitter)
Check contacts of the battery box.
25
Page 26

Attach purchase
receipt here
~~Warranty
IMPORTANT: PLEASE RETAIN THIS WARRANTY CARD
WITH YOUR PURCHASE RECEIPT
This product is covered by a 12 month warranty from the date of purchase when the
appliance is used solely for domestic purposes. For commercial use, the product is covered
by a 90 day warranty from the date of purchase.
The warranty is valid against mechanical or electrical defects if the product is used in
accordance with the instructions and provided that it is not connected to an unsuitable
supply, dismantled or interfered with or damaged in any way.
Under this warranty any parts found to be defective will be repaired or replaced free of
charge, or the unit will be exchanged with like or similar, solely at the discretion of Prima
Australasia.
To obtain service under warranty, purchase receipt is required. This warranty in no way
affects your rights under statutory law.
Retailer:
Date of purchase:
Name of product:
Model number:
If the product you have purchased is/becomes faulty, please contact the place of
purchase for their returns policy and procedure. You must retain your proof of
purchase for your warranty to be valid.
WARRANTY SERVICES:
PO BOX 326, BRAESIDE, VIC, 3195
TEL: 1300 366 155
26
Page 27

STOP
No product will be accepted at the store without a
reference number issued by the Customer Care Centre
above,along with your original store receipt.
Monday-Friday 8.30am-5.00pm(AEST)
27
Page 28

DISTRIBUTED IN AUSTRALIA BY:
Prima Australasia Pty Ltd.
PO BOX 326,Braeside,Vic 3195
TEL:1300 366 155
www.primaaustralasia.com.au
SOUTHERN AFRICA DISTRIBUTION BY:
Nu World lndustries Pty Ltd.
PO BOX 8964,JHB 2000
TEL:(011)321-2111/Service:0800 110 812
www.nuworld.co.za
 Loading...