

Page 1

TELEFUNKEN TD 251 Colombo
USER’S MANUAL
Page 2

2
Welcome!
Welcome to your new TELEFUNKEN TD
251 / TD 252 Colombo wireless phone.
Discover its main features below:
All handsets are completely wireless,
with the freedom to move around the
base.
Phonebook of 250 names.
Possibility of copying the phonebook
between different handsets.
Digital voicemail with 12 minutes
recording capacity.
Caller ID display and display of the
details of the last 30 1.
Up to 5 handsets on a single base.
Internal calls, transfer of external calls,
3-way calling (between two internal
parties and an external caller).
1. You must subscribe to Caller ID service, call
waiting or three-way conference with your
telephone service provider for these features.
In addition, a Caller ID service is required for
SMS and you should not hide your telephone
number. Some lines of the telephone service
provider may not be compatible with the SMS
feature on this product. Registration fees may
be charged for part or all of these services.
Contents of the box
Handset.
Telephone base.
2 rechargeable AAA NiMH batteries.
An AC adapter and a telephone cord.
If you have purchased a TD 252, you
have the following additional features:
Handset and charger.
2 rechargeable AAA NiMH batteries.
An AC adapter
This guide will provide you all the
information you need to make the most
of your phone.
Before your first phone call, you need to
configure your phone. Follow the
instructions in the Installation and initial
setup chapter on page 10.
Page 3

3
Your safety
IMPORTANT
This equipment is not designed for making
emergency telephone calls in case of power
failure. Other arrangements should be made for
access to emergency services.
This product is designed for connection to
standard switched telephone networks, public
and private, on French territory.
Safety-related information
When you use your phone, it is
recommended to follow simple safety
precautions to prevent any risk of fire,
electric shock or other incidents:
Read and follow the instructions
contained in this manual.
Follow all the warnings mentioned in
this manual as well as on the product.
Disconnect the power plug of the
product before cleaning. Do not use
liquid or aerosol cleaners; use a lintfree cloth.
In case of danger, or to interrupt the
power supply of the base, disconnect
the power adapter from the 230 V
power outlet. It should preferably be
installed near the base and be easily
accessible.
In case of failure of the power adapter,
the latter should be replaced by an
identical model.
In the absence of power supply or in
case of power failure, the handset can
no longer receive nor make calls.
Emergency calls cannot be made nor
received. Thus, it is recommended to
have a conventional telephone unit
that does not require power.
Do not overload electrical outlets or
extension cords as this may cause fire
or electric shock.
Unplug the phone from the power
outlet and contact Technical Support
at +33 5 45 60 82 51 (Internationl
number) or [email protected] in
the following cases:
- When the power cord or the
electrical outlet is damaged or
frayed.
- If the product does not operate
normally by following the
instructions in this manual.
- If the product has been dropped and
some parts are broken.
- If the product shows obvious signs
of change in its performance.
Avoid using a telephone during a
thunderstorm; there may be a
significant risk of electric shock
caused by lightning.
Do not use the telephone to report a
gas leak in the vicinity of the gas leak.
Do not use this product near a water
source (sink, tub, faucet, pool, etc.).
Use only the rechargeable batteries
supplied.
Using any other type of battery or non-
rechargeable batteries can be
dangerous; it may cause interference
or damage to the phone.
The manufacturer is not obliged to
repair or replace the product if other
types of batteries or batteries as
originally provided were used.
Page 4

4
Recharge the batteries by leaving
them in the handset and placing it on
the base. Any other method of
charging could damage the product.
Please observe the proper polarity
when installing the batteries in the
battery compartment of the handset.
Do not immerse the batteries in water
nor throw them into fire.
Do not open the handset (except to
replace the handset batteries) or the
base. This could expose you to high
voltages or other risks.
The radio signal transmitted between
the handset and base may cause
interference to hearing aids.
It is recommended to have an expert
opinion before using this product near
medical equipment for emergencies or
intensive care.
Cleaning
Clean the handset and the base (or
the charger) with a damp cloth, not
wet, or an antistatic wipe.
Never use household polish to avoid
damaging the product. Never use a
dry cloth to avoid a shock of static
electricity.
Environment
Do not expose the product to direct
sunlight.
Do not expose the product to fire, or
other hazardous conditions.
The handset may become warm when
the batteries are charged or during
prolonged periods of use. This is
normal. However, to avoid damage,
we recommend not placing the
product on wooden surfaces.
Do not place your product on carpets
or other surfaces which generate
fibers, or in places where it could
hinder the free flow of air over its
surface. Do not submerge any part of
the product in water and do not use it
in wet areas such as bathrooms.
Page 5

5
Table of contents
Welcome! .................................... 2
Contents of the box ...................................... 2
Your safety ................................. 3
Safety-related information ............................ 3
Cleaning ....................................................... 4
Environment ................................................. 4
Table of contents ....................... 5
Discover your telephone ........... 7
Handset ........................................................ 7
Handset icons .............................................. 8
Base ............................................................. 9
Installation and initial setup ... 10
Location of the base ................................... 10
Radio coverage .......................................... 10
Signal strength ........................................... 10
Which adapter? .......................................... 10
Connecting the base .................................. 10
Recharging the handset ............................. 11
Checking the line ....................................... 11
Setting the language .................................. 11
Setting the date and time ........................... 11
Managing the alarm function ...................... 12
Use your telephone ................. 13
Activating/deactivating the handset ............ 13
Calling ........................................................ 13
Ending a call .............................................. 13
Internal calls / internal call .......................... 13
Transfering a call ....................................... 13
3-way conference ....................................... 13
Receiving a call .......................................... 14
Adjusting the volume .................................. 14
Secret......................................................... 14
Handsfree .................................................. 14
Redialing a number .................................... 14
Locking / unlocking the keypad .................. 14
Finding the handset.................................... 14
Your phonebook ...................... 15
Displaying the phonebook and calling ....... 15
Storing an entry ......................................... 15
Entering a name ........................................ 15
Entering a pause ....................................... 15
Displaying an entry .................................... 16
Editing an entry .......................................... 16
Speed dialing ............................................. 16
Deleting an entry ....................................... 16
Deleting all entries ..................................... 16
Copying a phonebook entry to another
handset ...................................................... 17
Copying all phonebook entries to another
handset ...................................................... 17
Call register .............................. 18
Displaying the call register ......................... 18
Calling from the call register ...................... 18
Storing a number from the call register to the
phonebook ................................................. 18
Sending an SMS to a number in the call
register....................................................... 19
Deleting an entry from the call register ...... 19
Deleting all entries from the call register .... 19
Calendar .................................... 20
Adding a new event ................................... 20
Stopping the calendar alarm ...................... 20
Showing the details of the calendar ........... 20
Editing an event in the calendar ................ 20
Sending a calendar event as SMS ............ 21
Deleting an event from the calendar .......... 21
Deleting all events from the calendar ........ 21
Clock and alarm ....................... 22
Manually adjusting the date and time ........ 22
Setting the alarm ....................................... 22
Activating/deactivating the alarm ............... 22
Time format ............................................... 22
Stopping the alarm .................................... 22
Handset settings ...................... 23
Page 6

6
Handset melody ......................................... 23
Ringing volume .......................................... 23
Earpiece volume ........................................ 23
Handset name ............................................ 23
Language selection .................................... 23
Screen saver .............................................. 24
Illumination time ......................................... 24
Automatic answer....................................... 24
Keypad tones ............................................. 24
PABX access code..................................... 24
Base settings ........................... 25
Base melody .............................................. 25
Base ringing volume................................... 25
Dialing mode .............................................. 25
Callback mode ........................................... 25
PIN code .................................................... 25
Resetting .................................................... 26
Economy mode .......................................... 26
SMS ........................................... 27
Number of messages ................................. 27
Memory full alert ........................................ 27
Subscribing to SMS service ....................... 27
Cost of SMS to landlines ............................ 27
Sending an SMS ........................................ 27
Standard text input ..................................... 28
Receiving and reading SMS ....................... 28
Reading a new SMS .................................. 28
Reading, forwarding, deleting, viewing and
knowing a list of SMS in the Inbox ............. 28
Editing or sending SMS in the Drafts folder 28
Forwarding or deleting SMS in the Outbox 29
Editing templates ....................................... 29
Deleting SMS ............................................. 29
SMS center numbers ................................. 29
Adding or editing the SMS center numbers 29
Setting the sending center ......................... 29
SMS alert melody ....................................... 30
Setting the length of SMS .......................... 30
Subscription ............................. 31
Subscribing a handset................................ 31
Selecting a base ........................................ 31
Unsubscribing a handset ........................... 31
Use your voicemail .................. 32
Activating/deactivating the voicemail ......... 32
Response time ........................................... 32
"Economy" Mode ....................................... 32
Activating/deactivating the message alert.. 32
Indication of the presence of messages on
the screen .................................................. 33
Greetings - Generalities ............................. 33
Managing the personal greeting from the
handset ...................................................... 33
Managing the personal greeting from the
base ........................................................... 34
Recording a memo .................................... 34
Call screening ............................................ 34
Message playback via the base ................. 34
Message playback using the handset ........ 35
Shortcut keys on the handset .................... 35
Deleting all old messages .......................... 35
Remote access .......................................... 35
Activating or deactivating the remote access
PIN code .................................................... 35
Changing the remote access PIN code ..... 36
Listening to messages remotely ................ 36
Memory full ................................................ 36
Warranty ................................... 37
Items guaranteed ....................................... 37
Warranty period ......................................... 37
Warranty coverage .................................... 37
Warranty disclaimer ................................... 37
Technical service ....................................... 37
Technical information ............. 38
RTTE directive ........................................... 38
Connecting to a telephone switchboard ..... 38
Inserting a pause ....................................... 38
Callback ..................................................... 38
Compliance with the regulations in force ... 38
Page 7
7
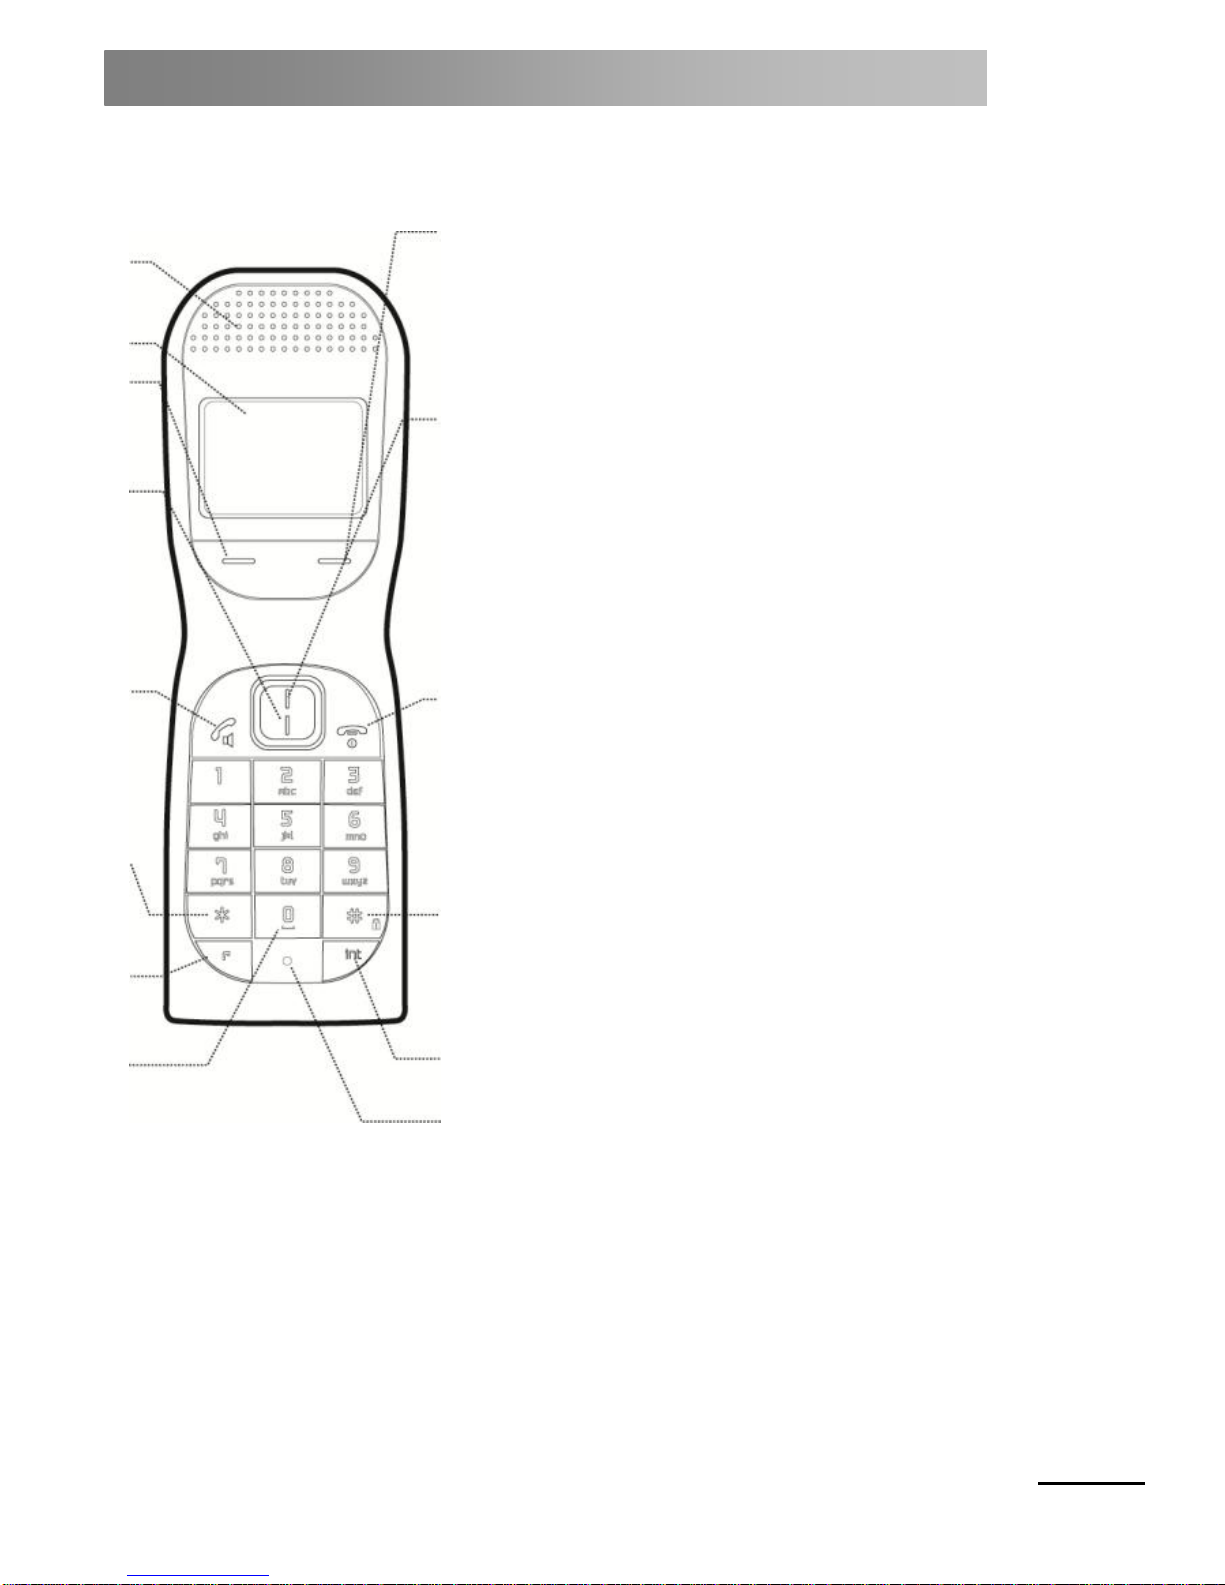
Discover your telephone
Handset
1. Earpiece
2. LCD Display
3. Option button (left)
Press to open the Menu.
Press to select the options displayed on the screen.
4. / Phonebook
In standby, press to open and scroll through the list of
names.
In conversation, press to decrease the volume.
In a menu, press to scroll through the options.
5. Answer / Loudspeaker
In standby, press to make and receive calls.
In conversation, press to enable or disable the
handsfree mode.
6. *
Hold the “ * ” key to switch between Tone and Pulse
7. R (redial)
For use with a standard PBX and some network
services.
8. 0
To insert a space
9. Option button (right)
Press to select the options displayed on the screen.
In a menu, press to return to the previous level.
In standby, press Names to open the phonebook
menu.
10. Recomposition /
In standby, press to open and scroll through the Redial
list.
In conversation, press to increase the volume.
When you store a name in the phonebook, press and
hold to enter a pause.
11. End call / On-Off
Press to end a call.
In Menu, press to return to standby.
In standby, press and hold to turn off the
handset.
When it is turned off, press to activate the
handset.
12. # / Lock
Hold the button to lock the keypad.
To unlock it, select Unlock. followed by '#'.
13. Intercom
Used for internal calls
14. Microphone
1
2
3
4
5
6
7 8 9
10
11
12
13
14
Page 8
8
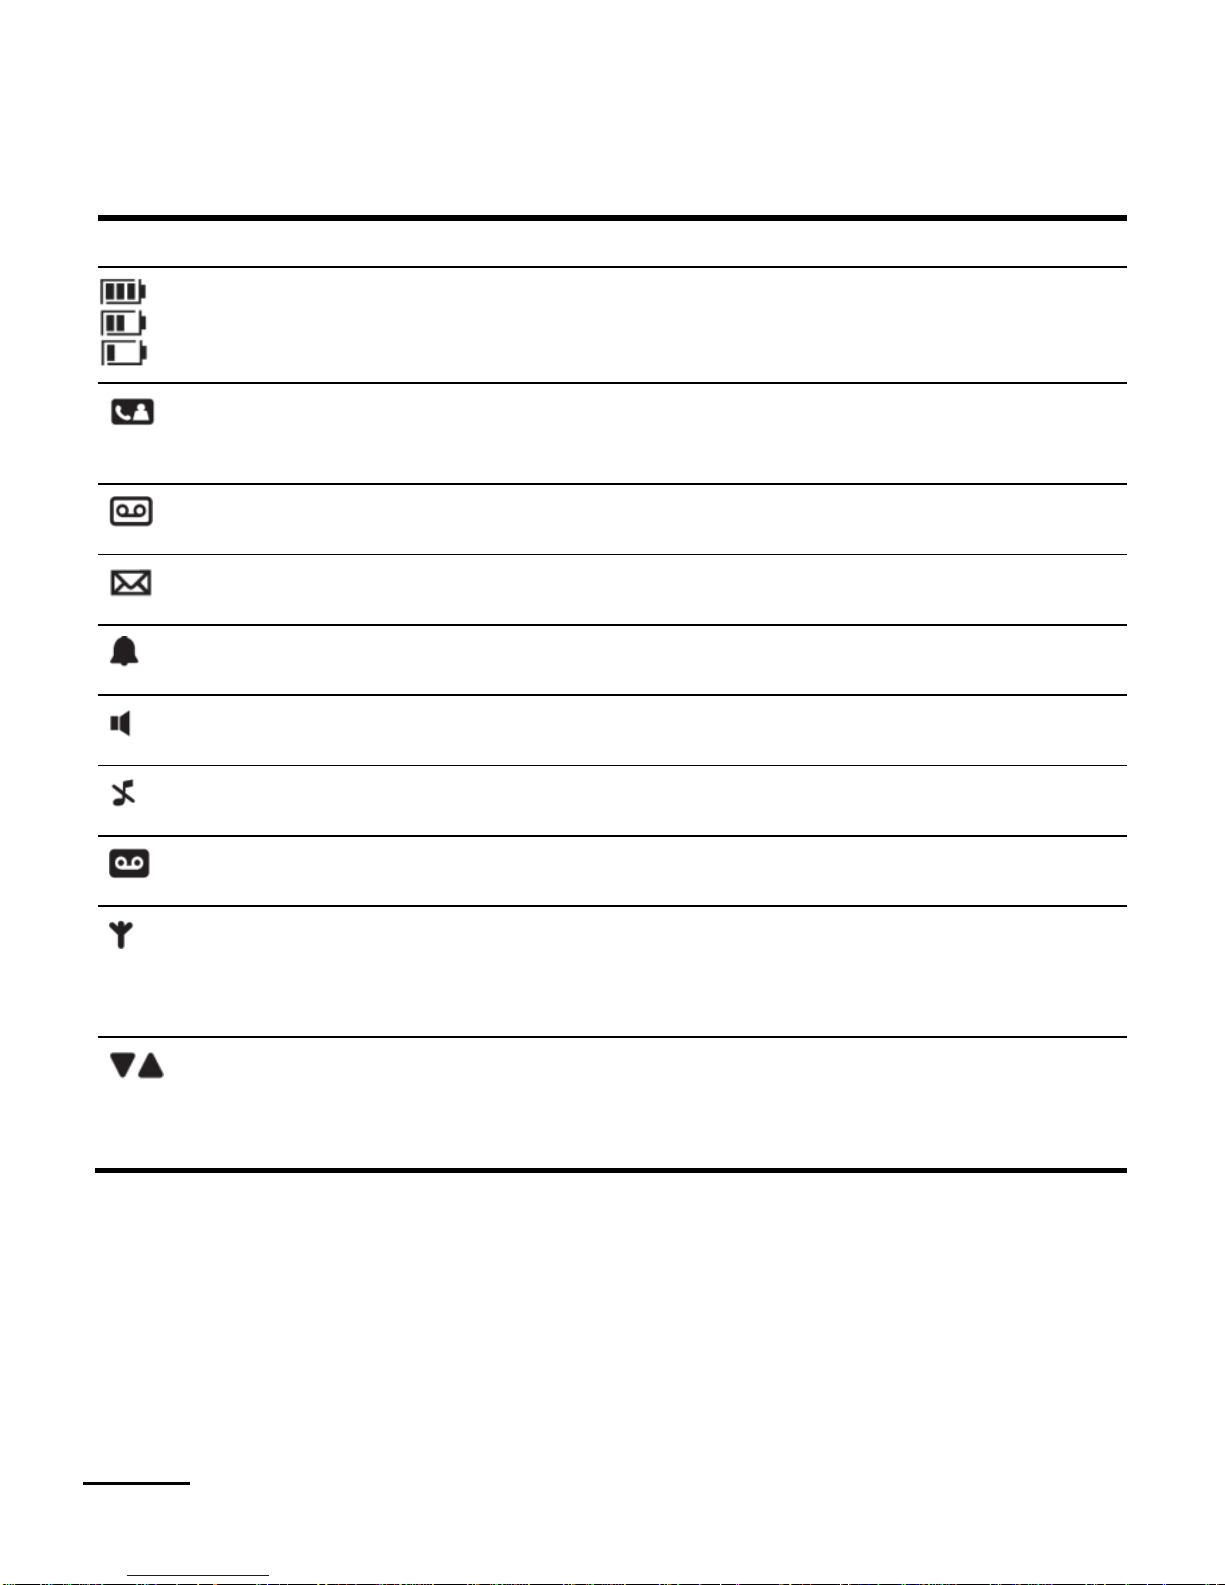
Handset icons
Meaning
Page
Battery charge level
Displays the current charge level of the handset batteries.
11
Missed calls *
Displayed when phone calls were missed and one or more new
numbers are present in the call log.
18
Messages present in voicemail
Displayed when new calls were stored by the voicemail.
33
Text messages (SMS) *
Displayed when new SMS messages have been received.
28
Alarm
Displayed when the alarm has been activated.
12
Handsfree
Displayed in handsfree mode.
14
Silent
Displayed when the ringer is turned off.
-
Voicemail activated
Displayed when the voicemail is activated.
32
Signal
Fixed when the handset is stored and is within range of the base.
Flashing when the handset is out of range of the base or searching
for it.
10
High / low
Press the or keys to navigate through the menu options, to
open the phonebook or view the list of dialed numbers in standby
mode.
15
(*) This option requires the subscription of the Caller ID option with your telephone operator.
A surcharge may be applied.
Page 9
9
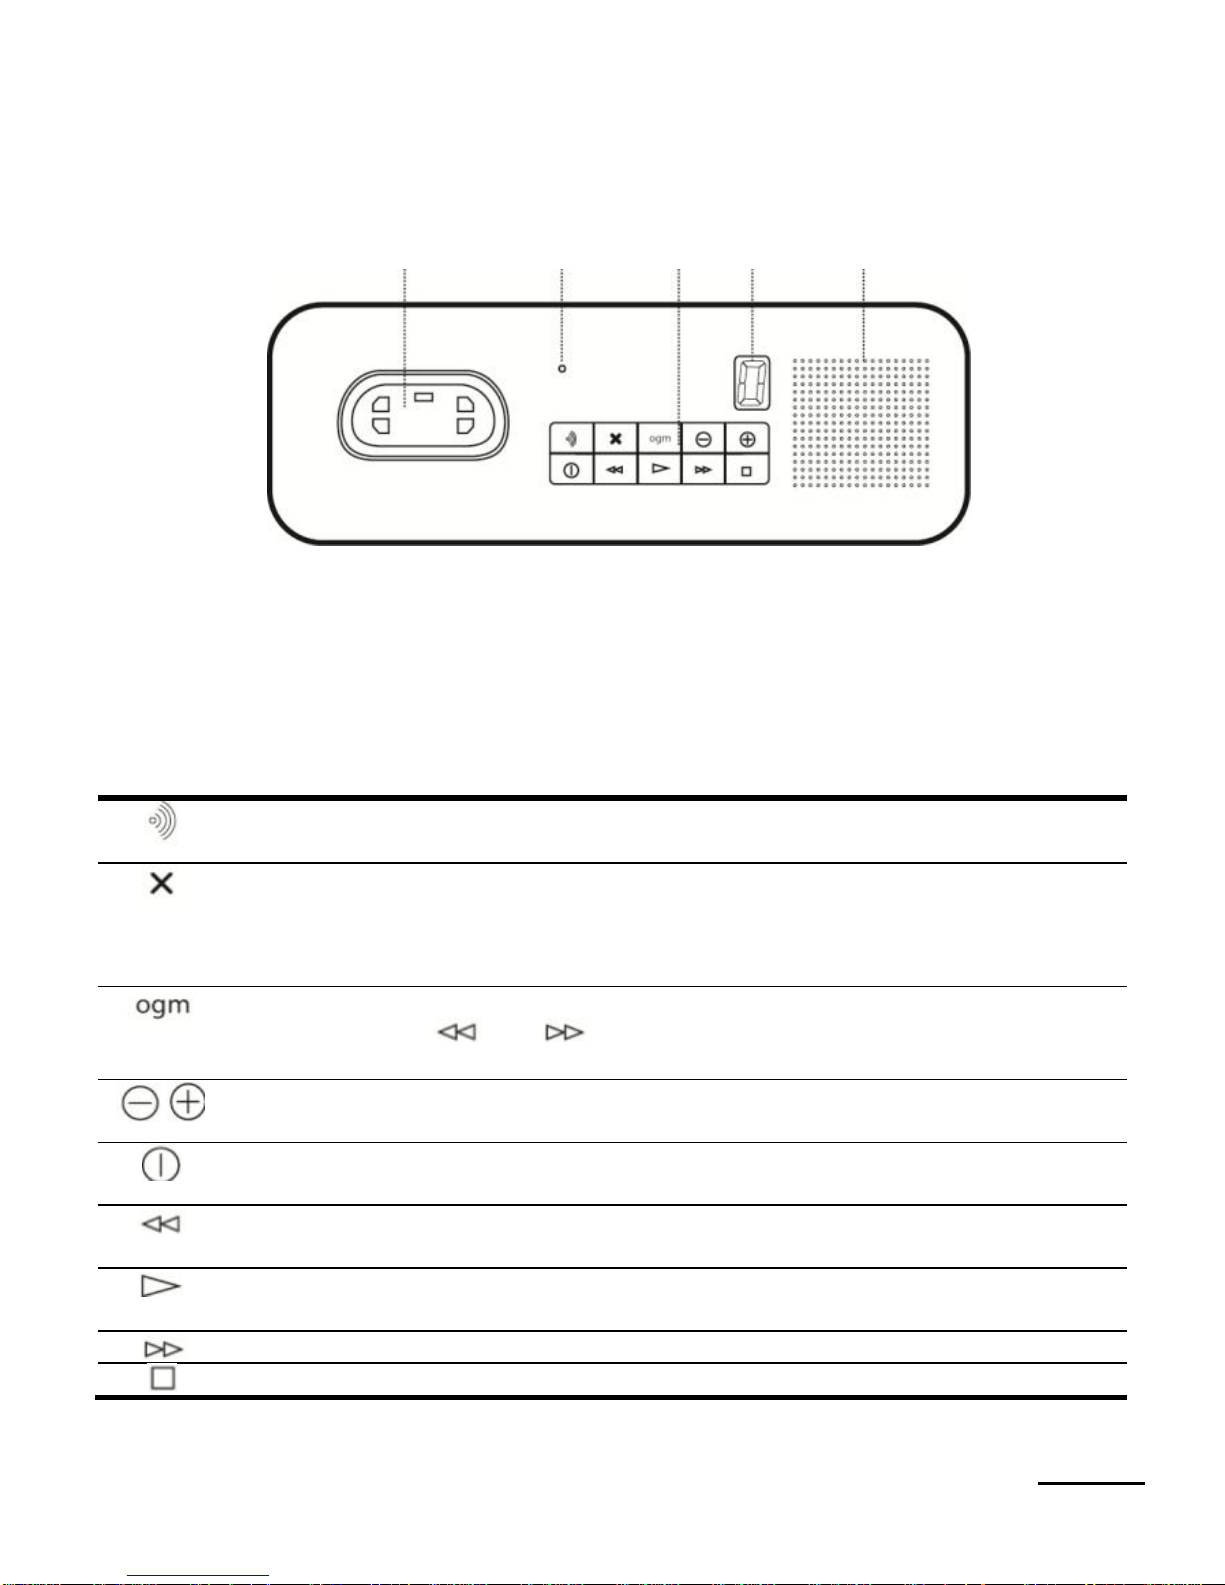
Base
1
2
3
4
5
1. Handset support
2. Indicator light (DEL)
3. See table below
4. Display
5. Loudspeaker
Find handset / Page
Press to ring all registered handsets. Useful if you misplace a handset.
Delete
Press once to delete the current message.
After reading all the messages, press once within 8 seconds to delete all
messages.
Greeting
For use with the or keys to select and listen to your outgoing
message.
Loudspeaker volume
Decreases or increases the volume of the loudspeaker during playback.
Voicemail on/off
Enables or disables the voicemail.
Press once to repeat the current message, press twice to play the previous
message
Play / Pause
Play messages / Pause
Proceed to the next message
Stop playback of the message
Page 10

10
Installation and initial setup
Note: Do not install the TD 251/252 (base or
handset) in a bathroom or a wet room.
Location of the base
The base should be located less than 2
meters from a power outlet and
telephone.
Moreover, the TD 251/252 using radio
frequencies, the quality of
communication is highly dependent on
the radio environment and the position of
the base; it should be located at least 1
meter from an electrical appliance
(television, fluorescent tube, halogen
lamp, microwave oven, computer) or
from a reinforced concrete wall. In
addition, a maximum quality of the radio
signal will be obtained by positioning the
base at a height.
Radio coverage
The TD 251-252 has a range of about
300 meters in line of sight between the
base and the telephone. Any obstruction
significantly reduces this distance. Thus,
with a base inside a building and the
handset outdoors, the range is only 50
meters. Thick walls greatly reduce this
range.
A cut of the telephone communication
can be established following a move.
Signal strength
The icon on your device indicates
when you are within range of the base.
Once out of range of the base, the
flashes and the handset emits a "out of
reach" warning signal every minute. This
tone is repeated until you return to the
coverage area of the base.
If you are out of reach of the base during
a call, the call is disconnected. Return to
the coverage area of the base before
making a new call. The handset will be
automatically reconnected to the base.
Important
The base station must be continuously
connected to the power outlet. Do not plug the
phone cord into the wall outlet until the handset
is fully charged. Use only the power and
telephone cables provided with the product.
Which adapter?
The power adapter with a clear
connector is intended for the base unit
and the power adapter with a red
connector is intended for the charger
(TD 252 only).
Connecting the base
1. Under the base, plug the power cord
holding a clear connector in the plug
labeled .
2. Connect the other end of the power
cord into the power wall outlet. The
device switches on, as indicated by
the green light from the base.
3. Under the base, connect the
telephone jack to the plug labeled
and the other end into the telephone
connector plug. Then plug the
connector to the telephone wall jack.
4. Verify that the green light of the base
is lit.
Page 11

11
Recharging the handset
1. On the handset, slide the cover and
insert the 2 NiMH batteries supplied.
Always observe the direction of
insertion. Close the lid.
2. Place the handset on the base and
allow to charge for at least 24 hours
before its first use, until the handset
icon indicates .
3. If necessary, do the same for other
handsets.
Note on the batteries
The icon on the display flashes
when batteries are discharged. It is
imperative to allow the handset to
charge before use. The icon is
animated during charging.
Once charged, the batteries provide a
range of approximately 10 hours of
talk and 100 hours of standby. Note
that new batteries do not have their full
capacity after normal use for several
days.
For optimal conservation of batteries,
leave the handset off the base for a
few hours.
A complete discharge of the batteries
once a week will prolong their lifespan.
The charge capacity of the batteries
will decrease over time, reducing the
range of the handset. A change of
batteries may eventually be necessary.
The handset and the batteries may
become warm during charging.
Batteries that are inserted incorrectly,
exposed to heat or damaged may leak.
Use only rechargeable batteries
recommended. Their replacement by
non-rechargeable or non-conforming
batteries may damage the handset.
Never dispose of batteries in fire. Use
the recycling system.
Checking the line
Once the is displayed on the
handset, lift the handset and check for
the dial tone.
Setting the language
To facilitate the following settings,
proceed first to the selection of menus in
French.
1. Press Menu. Using , go to Settings
and press Select.
2. Handset Settings will be highlighted,
press Select.
3. Using , highlight Language and
press Select.
4. Using or , select the desired
language. Press Select to confirm.
5. Press Back to return to the previous
level.
Setting the date and time
If Caller ID was purchased from your
service provider, the date and time are
automatically displayed on the handset.
If the Caller ID function has not been
purchased, proceed as follows to set the
date and time.
Page 12

12
Manual setting
1. Press Menu to display the menu.
2. Using , search for Clock and alarm.
Date & time will be highlighted, press
Select.
3. Enter the date in DD/MM/YY format
and the time before pressing Save.
4. Press Back to return to the previous
level.
Managing the alarm function
Setting the time format (12 or 24)
1. Press Menu to display the menu.
2. Using , select Clock and alarm and
press Select.
3. Using , select Time format and
press Select.
4. Using or , select 12 hours or 24
hours and press Select.
5. Press Back to return to the previous
level.
Select the periodicity
If necessary, adjust the alarm time as
follows:
1. Press Menu to display the menu.
2. Using , select Clock and alarm and
press Select.
3. Using , select Alarm and press
Select.
4. Using or , select Activated and
press Select.
5. Using or , select Once, Monday-
Friday or Everyday and press Select.
6. Enter the alarm time and press Save.
7. Press Back to return to the previous
level.
Activating or deactivating the alarm
1. Press Menu to display the menu.
2. Using , select Clock and alarm and
press Select.
3. Using , select Alarm and press
Select.
4. Using or , select Activated or
Deactivated and pressSelect.
5. Press Back to return to the previous
level.
Stopping an activated alarm
1. When the alarm is activated, press
Stop.
Page 13

13
Use your telephone
Activating/deactivating the
handset
1. Press and hold until the handset
is turned off.
2. Press again and hold until the
handset is activated.
Calling
In direct dialing
1. Press .
2. Wait for the dial tone and then dial the
number.
In pre-dialing
1. Then dial the number. In case of error,
press Delete.
2. Press : the number is dialed.
Ending a call
1. Press .
Once the handset is replaced, the call
duration is displayed for 5 seconds.
If automatic hang-up is activated, the call is
terminated when the handset is returned to
its base.
Internal calls / internal call
Calling another handset
If you have more than one handset
registered to the database, you can
make internal calls between two
handsets.
1. Press the int button (bottom right of
keypad) followed by the number of the
handset number (1 to 5) that you wish
to call.
2. Press OK to dial.
Note
When receiving an internal call, the
display shows Internal call handset X
(where X is the calling handset number).
Transfering a call
You can transfer an external call to
another handset registered on the base.
During the call:
1. Press the int button (bottom right of
keypad) followed by the number of the
handset number (1 to 5) that you wish
to call.
2. Press OK to dial or press End pour to
cancel the call request and return to
the caller.
3. When the other handset answers, you
can announce the caller.
4. Press to end the transfer or press
int to switch between the two callers.
3-way conference
You can hold a 3-way conference call,
between two internal callers and one
external.
During your call to an external caller:
1. Press the int button (bottom right of
keypad) followed by the number of the
handset number (1 to 5) that you wish
to call.
2. Press OK to dial.
3. When the other handset answers, you
can announce the caller.
Page 14

14
4.Press Join to begin the conference call.
Conference is displayed.
4. Press to end the call.
Receiving a call
Upon receipt of an external call, the
handset rings. The screen displays
External call and the subscriber number
or, if the number is stored in the
phonebook, the caller's name.
1. When the handset rings, press .
Adjusting the volume
1. During the conversation, press or
to adjust the volume of the earpiece
or loudspeaker.
The sound level is shown on the
handset display.
Secret
Allows queuing of the person you are
calling with microphone mute.
1. During the conversation, pressSecret.
The display shows Secret activated.
2. Press Deact. to resume the
conversation with the person you are
calling.
Handsfree
Calling
1. Dial the number and press twice.
You will then hear the dialing in the
handset's speaker.
2. Press to switch between the
speaker and the handset.
3. Press to hang up.
Answering / Hanging Up
1. When the handset rings, press .
Switching to handsfree mode
1. During a call, appuyez sur to
switch to handsfree mode.
Press again to reactivate the
handset.
Redialing a number
1. Press .
The last number called is displayed.
2. Press or to navigate through the
list of numbers called and the selected
number to call.
The last number called is displayed.
3. Press to dial the number.
Locking / unlocking the keypad
Locking the keypad
1. Press and hold the # button.
The display shows Keypad locked.
Unlocking the keypad
1. Within one second, press Unlock
followed by pressing the # button.
The display shows Keypad unlocked.
Finding the handset
1. Press the button of the base. The
handsets registered on the base will
ring and display Finding handset.
2. Press the button of the base again
to stop the ringing or, on any handset,
press the Stop button or again on any
button of the handset to stop the
ringing of all the handsets having the
ringing activated.
Page 15

Your phonebook
The phonebook of the TD 251/TD 252
Colombo handset can contain up to 250
names and telephone numbers.
Note: the telephone numbers can contain up to
24 numbers and the names up to 12 characters.
The entries are stored alphabetically.
Displaying the phonebook and
calling
1. Press .
The display shows the first entry.
2. Using or , navigate through the
phonebook and select the desired
name.
To directly find a name, press and
enter the first letter of the name. The
display shows the first name beginning
with the letter entered. If necessary,
use or to select the name.
3. If necessary, press to call the
selected name.
Storing an entry
1. Press Names.
The display shows the phonebook.
2. Search is highlighted. Using , select
Add a name and press Select.
3. Enter the name and press OK.
4. Enter the number and press Save.
Using , select the desired melody for
this entry and press Select. The
display shows <NAME> saved and
returns to the phonebook.
5. Press to return to standby mode.
Entering a name
The name of a contact is entered in the
phonebook by successively pressing the
keys on the keypad.
For example, to enter Paul:
P Press once.
A Press once.
U Press twice.
L Press thrice.
The keys have the following functions:
0
Space between words.
1
Punctuation marks.
Moving backward or forward in
the entry.
#
Switching between uppercase
and lowercase letters.
Erase
Deleting a character or a digit.
Entering a pause
If your phone is connected to a PBX, you
may be required to insert a pause in a
stored number. This allows the PBX to
find an outside line. A pause is normally
inserted after the standard access
number, for example after 9.
1. When storing a number, press and
hold until the display shows P. You
can then continue to save your
number.
Page 16

16
Displaying an entry
In standby mode
1. Press .
2. Enter the first letter to search
alphabetically, and then use or to
access the desired entry.
The name is displayed.
3. Press Options. The display highlights
View details. Press Select. to display
the name, number and the melody.
4. Press to return to standby mode.
During a call
1. Press Names.
2. Enter the first letter of the desired
name. If necessary, use or to
access the exact name.
Press Options to display the
phonebook menu.
3. Use to find View details and press
Select.
4. Press to hide the phonebook.
5. Press again to end the call.
Editing an entry
1. Press .
2. Using or , access the entry to be
edited and press Options. Using ,
access Modify a name and press
Select.
3. Press Delete to erase characters. Use
the keypad to enter new ones and
press OK.
4. Press Delete to erase digits. Use the
keypad to enter new ones and press
OK.
5. Using or , access the desired
melody and press Select. to save the
entry.
6. Press Back to return to the previous
level.
Speed dialing
This feature allows you to assign the
keys 1, 2 and 3 to frequently used
numbers. Once stored, just press and
hold the corresponding button to start
dialing.
1. Press .
2. Using or , access the desired
entry and press Options. Using ,
access Speed call and press Select.
3. Choose the desired button: Button 1,
Button 2 or Button 3 and press Select.
4. The display shows Assign. Press
Select to confirm or Delete entry to
free up the corresponding button.
6. Press Back to return to the previous
level.
Deleting an entry
1. Press .
2. Using or , access the entry to be
deleted and press Options. Using ,
access Delete name and press Select.
3. Press Yes to confirm or No to cancel.
4. Press Back to return to the previous
level.
Deleting all entries
1. Press Names.
2. Using or , access Delete
phonebook and press Select.
3. The display shows Delete all names ?.
Press Yes to confirm or No to cancel.
4. Press Back to return to the previous
level.
Page 17

17
Copying a phonebook entry to
another handset
1. Press .
2. Using or , access the entry to be
copied. Press Options and using ,
access Copy a name and press Select.
3. To handset is displayed. Press Select.
4. The available handsets are displayed.
Use or to access the desired
handset and press Select. Copy
phonebook is displayed on the
destination handset. Press Yes to
confirm or No to cancel. Once the
copy is made, the display shows 1
entry copied.
5. Press Back to return to the previous
level
Note: if an entry with the same name and
number is already stored in the destination
handset, the entry will not be copied.
Copying all phonebook entries to
another handset
1. Press Names.
2. Using or , access Copy
Phonebook and press Select.
3. To handset is displayed. Press Select.
4. The available handsets are displayed.
Use or to access the desired
handset and press Select. Copy
phonebook is displayed on the
destination handset. Press Yes to
confirm or No to cancel. Once the
copy is made, the display shows the
number of entries copied.
5. Press Back to return to the previous
level
Page 18

18
Call register
If you subscribed to the Caller ID service
and the identity of the caller is not hidden,
the number of the caller is displayed.
Note: If the caller's number is stored in your
phonebook with a name, the name will also be
displayed. If the phone number is not available
for incoming calls, the handset will display
Unavailable.
The information on incoming calls vary by
country and network operator. Some operators
may charge a subscription to Caller ID.
The call register contains details of missed,
received and dialed calls. The details include
the dateand the time of the call. Entries are
displayed in chronological order with the most
recent call at the top of the list.
When the call register is full, a new call
replaces the oldest in the list.
Each handset can hold details of thirty
answered or unanswered calls and the last
twenty dialled numbers.
When you have missed calls (incoming calls not
answered) the screen displays You have X
missed calls. If you press Back, the screen
returns to standby mode and the icon is
displayed.
If a handset is used to display the call log, the
other handsets will continue to display the
number of missed calls (multi-user handsets
only).
Displaying the call register
1. When you see that there were missed
calls, press Show. Using or , you
can then scroll or list Missed calls.
2. Press Options. Show details is
displayed. Press Select to display
them.
3. Press Back to return to the previous
level.
Calling from the call register
1. Press Menu. Using , find Call log
and press Select. Using or ,
select Missed calls, Received calls or
Dialed calls.
2. Press Select. You can then browse
the list using or .
3. Press Options. Show details is
selected Press Select to display the
details.
4. Press Call to dial the number.
5. Press Back to return to the previous
level.
Storing a number from the call
register to the phonebook
1. Press Menu. Using , find Call log
and press Select. Missed calls is
selected. If necessary, access
Received calls or Dialed calls using
or and press Select.
2. Using or , select the desired entry
and press Options.
3. Using , find Save number and press
Select.
4. Enter the name and press OK. The
number is displayed. Press Save.
5. Using or , select the desired
melody.
6. Press Back to return to the previous
level.
Page 19

19
Sending an SMS to a number in
the call register
1. Press Menu. Using , find Call log
and press Select. Missed calls is
selected. If necessary, access
Received calls or Dialed calls using
or and press Select.
2. Using or , select the desired entry
and press Options.
3. Using , find Send SMS and press
Select.
4. Enter the message and press Options.
5. Send is highlighted. Press Select.
(You can save, insert a symbol, an
icon or a template).
6. The number is pre-entered on the
screen. Press Enter number to send
the message.
7. Press Back to return to the previous
level.
Important: You must subscribe to Caller ID
service with your service provider in order to
use SMS and you should not hide your phone
number.
Deleting an entry from the call
register
1. Press Menu. Using , find Call log
and press Select. Missed calls is
selected. If necessary, access
Received calls or Dialed calls using
or and press Select.
2. Using or , select the desired entry
and press Options.
3. Using , find Delete call and press
Select.
4. Press Back to return to the previous
level.
Deleting all entries from the call
register
1. Press Menu. Using , find Call log
and press Select. Missed calls is
selected. Access Delete calls using
and press Select.
2. Missed calls is highlighted. Using ,
select All calls and press Select.
3. The display shows Delete all calls.
Press Yes to confirm or No to cancel.
4. Press Back to return to the previous
level.
Page 20

20
Calendar
You can use your TD251/252 to remind
you of various events such as birthdays
or appointments. The entry can have up
to 24 characters.
Adding a new event
1. Press Menu. Using , access
Calendar and press Select.
2. If no entry is present, Add event is
highlighted; press Select.
Or
If events are already present, these
are displayed. Press Options; Add
event is highlighted. PRess Select.
3. Enter the subject and press Save.
4. Enter the date (DD.MM) and press
Save.
5. Enter the time (HH:MM) and press
Save.
6. If the current timestamp format has
been set to 12 hours, select am
(before noon) or pm (afternoon) by
pressing or .
7. Using or , select Silent or Alarm
and press Select.
If you press Alarm:
Use or to select Once or Yearly
and press Select.
Using or , select the desired
reminder At event time or 30 minutes
before and press Select.
Saved is displayed.
8. Press Back to return to the previous
level.
Note: If you select a silent reminder, the subject
of the event is displayed but no alarm sound
is emitted. When the event memory is full,
the display shows Memory full. You must
delete an event before you can add a new
one.
Stopping the calendar alarm
1. The event is displayed. Press Show to
stop the alarm and display the details
of the event. Or press Back to stop the
alarm and return to the standby screen.
If no button is pressed, the alarm
stops after one minute.
Showing the details of the
calendar
1. Press Menu. Using , access
Calendar and press Select.
2. The stored events are displayed. If
necessary, using , access the
desired event and press Options.
3. Using , access Show details et and
press Select.
The description, the date and the time
of the reminder are displayed.
4. Press Back to return to the previous
level.
Editing an event in the calendar
1. Press Menu. Using , access
Calendar and press Select.
2. The stored events are displayed. If
necessary, using , access the
desired event and press Options.
3. Using , access Edit Event and press
Select.
4. Edit the subject and press Save.
5. Edit the date and the time and press
Save.
Page 21

21
6. Press or to select Silent or Alarm
and press Select.
If you select Alarm:
Using or , select Once or Yearly
and press Select.
Using or , select the desired
reminder At event time or 30 minutes
before and press Select.
Saved is displayed.
7. Press Back to return to the previous
level.
Sending a calendar event as SMS
1. Press Menu. Using , access
Calendar and press Select.
2. The stored events are displayed. If
necessary, using , access the
desired event and press Options.
3. Using , access Send by SMS and
press Select.
4. The event is displayed. Press Options
to select Send and enter the
destination number.
5. Press Send to send the message.
Deleting an event from the
calendar
1. Press Menu. Using , access
Calendar and press Select.
2. The stored events are displayed. If
necessary, using , access the
desired event and press Options.
3. Using , access Delete Event and
press Select.
4. Press Yes to confirm or No to cancel.
5. Press Back to return to the previous
level.
Deleting all events from the
calendar
1. Press Menu. Using , access
Calendar and press Select.
2. The stored events are displayed.
Press Options.
3. Using , access Delete all and press
Select.
4. Press Yes to confirm or No to cancel.
5. Press Back to return to the previous
level.
Page 22

\
Clock and alarm
If you subscribed to Caller ID service
with your operator, the date and time
displayed on your TD251/252 can be
automatically updated, depending on the
options provided by your operator. You
can also set or adjust the date and time
using the Clock and alarm menu.
Manually adjusting the date and
time
1. Press Menu. Using , access Clock
and alarm and press Select. Date &
time are highlighted.
2. Enter the date using the DD/MM/YY
format and press Save.
4. Enter the time using the HH:MM
format and press Save.
5. Press Back to return to the previous
level.
Setting the alarm
1. Press Menu. Using , access Clock
and alarm and press Select.
2. Using , select Alarm and press
Select.
3. Using or , select Activated and
press Select.
4. Using or , select Once, Monday-
Friday or Everyday and press Select.
5. Enter the alarm time and press Save.
6. Press Back to return to the previous
level.
Activating/deactivating the alarm
1. Press Menu. Using , access Clock
and alarm and press Select.
2. Using , select Alarm and press
Select.
3. Using or , select Activated o
Deactivated and press Select.
Time format
Sets the time display format to 12 or 24
hours.
1. Press Menu. Using , access Clock
and alarm and press Select.
2. Using , select Time format and
press Select.
3. Using or , select 12 hours or 24
hours and press Select.
4. Press Back to return to the previous
level.
Stopping the alarm
1. When the alarm sounds, press Stop.
Page 23

23
Handset settings
Attention: When your phone rings, do not hold
the handset too close to your ear, which may
affect your hearing.
Handset melody
1. Press Menu. Using , access
Settings and press Select.
2. With Handset settings highlighted,
press Select.
3. With Melody highlighted, press Select.
4. Using or , highlight External call
or Internal calls. Press Select to
confirm.
5. Using or , highlight the desired
melody among the 20 suggestions.
Confirm using Select.
6. Press Back to return to the previous
level.
Ringing volume
1. Press Menu. Using , access
Settings and press Select.
2. With Handset settings highlighted,
press Select.
3. Using or , highlight Melody
volume and press Select.
4. Display the desired volume using or
. Press Save to confirm.
5. Press Back to return to the previous
level.
Earpiece volume
1. Press Menu. Using , access
Settings and press Select.
2. With Handset settings highlighted,
press Select.
3. Using highlight Earpiece volume
and press Select.
4. Using or , display the desired
volume level. Press Save to confirm.
5. Press Back to return to the previous
level.
Handset name
You can equip the handset with a name,
such as Marie or Room, with a maximum
of 10 characters.
1. Press Menu. Using , access
Settings and press Select.
2. With Handset settings highlighted,
press Select.
3. Press to find Handset name and
press Select.
4. Enter the name using the keypad.
Press Save to confirm.
5. Press Back to return to the previous
level.
Language selection
1. Press Menu. Using , access
Settings and press Select.
2. With Handset settings highlighted,
press Select.
3. Using highlight Language and
press Select.
4. Using or , select the desired
language. Press Select to confirm.
5. Press Back to return to the previous
level.
Page 24

24
Screen saver
1. Press Menu. Using , access
Settings and press Select.
2. With Handset settings highlighted,
press Select.
3. Using highlight Screen saver and
press Select.
4. Select Clock or Deactivated using
or . Press Select to confirm.
5. Press Back to return to the previous
level.
Illumination time
1. Press Menu. Using , access
Settings and press Select.
2. With Handset settings highlighted,
press Select.
3. Using highlight Illumination time
and press Select.
4. Using or , select the desired
duration. Press Select to confirm.
5. Press Back to return to the previous
level.
Automatic answer
With this option enabled, you can
answer calls simply by lifting the handset
from its base or charger.
1. Press Menu. Using , access
Settings and press Select.
2. With Handset settings highlighted,
press Select.
3. Find Auto answer using and press
Select.
4. Using or , select Activated or
Deactivated. Press Select to confirm.
5. Press Back to return to the previous
level.
Keypad tones
1. Press Menu. Using , access
Settings and press Select.
2. With Handset settings highlighted,
press Select.
3. Find Keypad tones using and press
Select.
4. Using or , select Activated or
Deactivated. Press Select to confirm.
5. Press Back to return to the previous
level.
PABX access code
1. Press Menu. Using , access
Settings and press Select.
2. With Handset settings highlighted,
press Select.
3. Find PABX access code using and
press Select.
4. Using or , select Activated,
Deactivated or Set code. Press Select
to confirm.
If you select Set code, enter the
standard access number, for example
9 and press Save
5. Press Back to return to the previous
level.
Page 25

25
Base settings
Base melody
1. Press Menu. Using , access
Settings and press Select.
2. Using , access Base Settings and
press Select.
3. With Melody highlighted, press Select.
4. Using or , highlight the desired
melody among the 5 suggestions.
Press Select to confirm.
5. Press Back to return to the previous
level.
Base ringing volume
1. Press Menu. Using , access
Settings and press Select.
2. Using , access Base Settings and
press Select.
3. Using , highlight Ringing volume
and Melody, press Select.
4. Using or , display the desired
volume level. Five (5) levels are
suggested as well as Silence. Press
Select to confirm.
5. Press Back to return to the previous
level.
Dialing mode
Your TD251/252 is set on voice
frequencies. You need not normally
change this setting. The options are
Voice Frequencies or Decimals.
1. Press Menu. Using , access
Settings and press Select.
2. Using , access Base Settings and
press Select.
3. Using , access Dialing mode and
press Select.
4. Using or , highlight Voice
Frequencies or Decimal number.
Press Select to confirm.
5. Press Back to return to the previous
level.
Callback mode
The callback duration of TD251/252 is
consistent with that required for your
country and operator and set at 100 ms
(Callback1).
1. Press Menu. Using , access
Settings and press Select.
2. Using , access Base Settings and
press Select.
3. Using , access Callback mode and
press Select.
4. Using or , highlight Callback1
(100 ms) or Callback 2 (250 ms).
Press Select to confirm.
5. Press Back to return to the previous
level.
PIN code
The PIN code is used to modify certain
settings and for the subscription and
unsubscription of the base and handset.
The default setting is 0000, but you can
change it to create your own PIN code of
8 numbers maximum.
When you enter a PIN code, the display
shows "****".
1. Press Menu. Using , access
Settings and press Select.
Page 26

26
2. Using , access Base Settings and
press Select.
3. Using , access PIN Code and press
Select.
4. Enter the old PIN code (original code
0000) and press OK.
5.Enter the new PIN code and press OK.
Re-enter the same new PIN code and
press OK.
6. Press Back to return to the previous
level.
Resetting
You can restore the original settings of
your TD251/252. The Phonebook, the
Call log, the voicemail messages and the
Greetings will not be affected.
All handsets registered to the base will
remain registered. All settings for SMS,
voicemail, handset and base settings,
such as ring volume, etc., will be reset.
1. Press Menu. Using , access
Settings and press Select.
2. Using , access Base Settings and
press Select.
3. Using , access Resetting and press
Select.
4. Are you sure is displayed. Select Yes
to confirm or No to cancel.
5. Enter the PIN code (the original code
is 0000) and press OK. Reset
completed is displayed and the
handset returns to standby.
Economy mode
To reduce the level of transmission
power, you can select the Economy
mode. With this mode activated, the
transmission power of the base is
reduced.
1. Press Menu. Using , access
Settings and press Select.
2. Using , access Base Settings and
press Select.
3. Using , access Economy mode et
and press Select.
4. Using or , select Activated or
Deactivated. Press Select to confirm.
5. Press Back to return to the previous
level.
Note: When the Eco mode is enabled, the
range of your phone is reduced.
Page 27

27
SMS
Your TD251/252 can send and receive
SMS from corresponding networks.
Contact your operator for terms of
access to this service.
Number of messages
Your TD 251 / 252 can store up to 50
SMS in Outbox, Inbox or Drafts.
Memory full alert
If the SMS memory is full when you try to
write a new message, the display shows
Memory full. Delete message for 2
seconds. You must delete messages
before you can write or send a new one.
Subscribing to SMS service
When you send your first SMS from your
TD251/252, you will be automatically
registered for this service.
You must subscribe to this service
with your operator before you can use
the SMS service and you should not
hide your phone number.
A subscription may be required.
Contact your operator for more
information.
You can also send SMS to landline
phones that are not compatible with
SMS. Messages to non-compatible
landline phones will be connected to
the voice service and delivered in the
form of audio messages.
Cost of SMS to landlines
There is no charge other than the
subscription to Caller ID service.
Sending an SMS
1. Press Menu, SMS is displayed. Press
Select.
2. With Write SMS highlighted, press
Select.
3.Use the keypad to enter your message.
The maximum number of characters is
160.
Press # to switch between capitals
(ABC), lowercase (abc) and numbers.
4. Press Options.
Send is displayed.
Press Select to send the message.
Enter the telephone number pr press
Search. To open your phonebook.
Access the desired number and press
Select. Then press Send.
You can also use or to:
Save
Press Select to save the
SMS in the Drafts folder.
Insert symbol
Press Select. The table
of symbols is displayed.
Using or , select the
required symbol and
press Insert.
Insert an icon
Press Select. The table
of icons is displayed.
Using or , select the
required icon and press
Insert.
Insert
template
Press Select. The table
of templates is displayed.
Using or , select the
required template and
press Insert.
Page 28

28
5. When sending a message, Sending
SMS … is displayed, followed by SMS
sent.
Standard text input
With the standard text, you can enter a
word by pressing each letter button until
the desired letter is displayed.
Receiving and reading SMS
When you receive an SMS, the icon is
displayed with the message You have x
new messages.
Reading a new SMS
1. The Inbox is open and the message
list is displayed. If you press Back, the
message is saved in the Inbox for later
access.
2. In the Inbox use (the most recent
messages) or (to older messages)
to browse the list of messages.
3. Highlight the message to be read and
press Read or press Back to return to
the SMS menus.
4. Press to return to standby mode.
Note: if you write a SMS and you receive a call,
the SMS text will be lost.
Reading, forwarding, deleting,
viewing and knowing a list of
SMS in the Inbox
When you see the new message alert,
pressing Back saves the message in
your inbox so you can view it later.
1.After pressing Menu, SMS is displayed.
If you have new messages, you will be
directed to the Inbox. Otherwise, use
to access the inbox and press
Select.
2. Find the message to be read using
or . Read the message using or
.
3. Press Options and use or to:
Reply
Press Select. Write your
reply. Then press
Options and select Send.
Forward
Press Select. The
message is displayed.
Press Options. Enter a
number or search for the
number and then press
Send.
SMS details
You can display the
sender of the message
and call back. Press
Select, the number of the
sender is displayed.
Press Call to contact the
number.
Use number
To call the sender, press
Select. Call is displayed.
Press Select to call the
sender OR to save the
number, use to find
Save and press Select.
Enter a name and press
OK, edit the number if
requested and press
Select. Use or to
select the ringer and
press Select. The
number is saved in the
phonebook.
Delete
Press Select. Press Yes
to confirm or No to
cancel.
Editing or sending SMS in the
Drafts folder
1. To open the Drafts folder, press Menu,
SMS is displayed. Press Select.
Page 29

29
2. Find the Drafts folder using and
press Select.
3. Press Edit to write your message.
4. Press Options and use or to find
Send, Save, Insert symbol, Insert icon
or Insert template.
Forwarding or deleting SMS in
the Outbox
1. To open the Outbox folder, press
Menu, SMS is displayed. Press Select.
2. Use to find Outbox and press
Select.
3. Find the message using or and
press Read. Read the message using
or .
4. Press Options and use or to find
Forward or Delete.
5. Press to return to standby mode.
Editing templates
1. Press Menu, SMS is displayed. Press
Select.
2. Use to find Templates and press
Select.
3. Find the desired template using or
and press Options. Navigate the
message using or .
4. Press Options and find Edit or Delete
using or .
5. Press to return to standby mode.
Deleting SMS
1. To open the Drafts folder, press Menu,
SMS is displayed. Press Select.
2. Find Delete SMS using and press
Select.
3. Select Inbox, Drafts, Outbox or All
SMS using or and press Select.
4. Press Yes to confirm or No to cancel.
5. Press Back to return to standby mode.
SMS center numbers
To send and receive SMS, you need the
phone number of your SMS Central
Network. If you accidentally delete the
numbers of inbound or outbound call
centers, you will have to re-enter them
so that the service will be operational
again. You can enter up to 4 numbers,
two incoming and two outgoing
Adding or editing the SMS center
numbers
1. Press Menu, SMS is displayed. Press
Select. Find SMS settings using or
and press Select.
2. With SMS centers highlighted, press
Select.
3. Select Receiving center or Sending
center using or and press Select.
4. Select Center 1 or Center 2 using
or and press Select.
5. Enter the center number and press
Save
6. Press Back to return to the previous
level.
Setting the sending center
1. Press Menu, SMS is displayed. Press
Select. Find SMS settings using or
and press Select.
2. With SMS centers highlighted, press
Select.
3. Press Select again and select Sending
number.
Page 30

30
4. Using or , select and press
Center 1 or Center 2 or Sending
number 1 or Sending number 2 and
press Select.
5. Press Back to return to the previous
level.
SMS alert melody
1. Press Menu, SMS is displayed. Press
Select. Using or , find SMS
settings and press Select.
2. Using , find SMS alert and press
Select.
3. Using or , select Activated or
Deactivated and press Select.
4. Press Back to return to the previous
level.
Setting the length of SMS
1. Press Menu, SMS is displayed. Press
Select. Using or , find SMS
settings and press Select.
2. Using , find SMS length and press
Select.
3. Using or , select 160 or 612
characters and press Select.
4. Press Back to return to the previous
level.
Note: the standard size of SMS is 160
characters. You can set the length of a
message to 612 characters, but the
message will be sent in a maximum of 4
messages, each up to 160 characters.
Page 31

31
Subscription
Up to 5 handsets can be subscribed
(registered) on a base.
The steps described below apply
specifically to your TD 251/252
handset. If you wish to subscribe
handsets from other manufacturers,
the instructions may vary. In this case,
refer to the manual of the
corresponding additional handset.
The master PIN code is required to
subscribe or unsubscribe handsets.
The default PIN code is 0000.
Subscribing a handset
1. Press and hold the button of the
base for at least 3 seconds, until the
little green LED blinks. You have 60
seconds to register the handset.
On the handset:
2. If the handset is new and the display
shows Subscribe handset. Press
Menu. Subscription is displayed, press
Select.
Or
If the handset has already been
subscribed on another base, the
waiting display is presented. Press
Menu and using or , select
Subscription and press Select.
3. Subscribe handset is displayed and
press Select.
4. If necessary, and using or , select
the new base on which you wish to
subscribe your handset and press
Select.
5. Enter the PIN code (the original code
is 0000) and press OK.
6. Find base X (where X is the number of
the selected base) and then Handset
subscribed are displayed.
The handset is automatically assigned
the next available handset number, for
example 2.
Selecting a base
You can subscribe your TD 251/252
handset on a maximum of 3 bases. You
can switch from one base to another, for
example, home and office bases.
1. Press Menu and using or , select
Subscription and press Select.
2. Using , select Select base and press
Select.
3. All base numbers are displayed.
(Assigned) is added to the bases on
which the handset was previously
subscribed. Using or , select the
desired base and press Select.
4. Find base… is displayed followed by
the waiting display of this base.
Unsubscribing a handset
1. Press Menu and using or , select
Subscription and press Select.
2. Using , select Unsubscribe and
press Select.
3. Enter the PIN code (original code
0000) and press OK.
4. Using or select the handset to
unsubscribe and press Select.
5. Press Yes to confirm or No to cancel.
The display confirms the
unsubscription.
Page 32

32
Use your voicemail
When activated, the voicemail of the
TD 251 / TD 252 stores messages for
unanswered calls. A maximum of 59
messages can be stored, for a total
recording time of 15 minutes; each
message can last 3 minutes maximum.
Your greetings can be 3 minutes
maximum.
Activating/deactivating the
voicemail
From the handset
1. Press Menu to display the menu.
2. Use to find Voicemail and press
Select.
3. Use to find Voicemail On/Off and
press Select.
4. Using or , select Activated or
Deactivated and press Select.
When the voiemail is activated from
the handset, the icon is displayed
in standby mode.
From the base
1. Press ON/FF. The new setting is
announced.
Response time
The response time defines the number
of rings before the voicemail locks and
broadcasts the announcement.
You can set the number of rings
between 2 and 9 (the default value is 5)
or Economy (see next paragraph).
1. Press Menu.
2. Find Voicemail using and press
Select.
3. Find Voicemail settings and press
Select.
4. Find Number of rings using or
and press Select.
5. Using or , select the number of
rings and and press Select.
6. Press Back to return to the previous
level.
"Economy" Mode
When you call your voicemail to read
your messages, and if your voicemail is
in Economy mode and you have new
messages, the voicemail will respond
after 5 rings. If no new message is
stored, it will respond after 3 rings. This
means that you can hang up after 3 rings,
knowing that you have no new
messages, saving waiting time.
Activating/deactivating the
message alert
To configure the voicemail in Message
alert mode:
1. Press Menu to display the menu.
2. Use to find Voicemail and press
Select.
3. Use to find Voicemail settings and
press Select.
4. Use or , to find Message alert
and press Select.
5. Use or , to highlight Activated or
Deactivated and press Select.
6. Press Back to return to standby mode.
Page 33

33
Indication of the presence of
messages on the screen
When you have new messages in the
voicemail, the screen displays You have
x new messages. All new messages are
marked with a dot.
1. Press Play or browse the list of
messages using or . Press Play
to listen to the selected message.
Greetings - Generalities
An announcement is the message which
will first be heard by the caller after the
call is detected by the voicemail. You
can select one of two pre-recorded
messages or similarly record your own
message of a maximum length of 3
minutes. Your own announcement
cannot be saved by using the handset.
In addition, two modes are available:
Response and recording
In this mode, the caller can listen to your
greeting and leave you a message.
The pre-recorded message is "Hello,
your call cannot be answered at this time,
you can leave a message after the
beep."
Simple response
In this mode, the caller can listen to your
greeting, but cannot leave you a
message.
The pre-recorded message is "Hello,
your call cannot be answered at this time
and you can not leave a message,
please call back later."
Managing the personal greeting
from the handset
Recording
1. Press Menu.
2. Find Voicemail using and press
Select.
3. Find Welcome greeting using and
press Select.
4. With Record highlighted, press Select.
5. Use or to scroll through the list
until Response and recording or
Simple voicemail and press Select.
6. Speak after the tone.
7. After the tone, speak clearly in front of
the handset and press Save to end
recording.
8. Your greeting is heard automatically. If
you wish to erase it, press Delete
during playback. If you press Save or
wait until the end of the recording, the
message will be saved.
Verifying or erasing
The deletion of your personal greeting
automatically reactivates the prerecorded greeting. You cannot delete a
pre-recorded greeting.
1. Press Menu.
2. Find Voicemail using and press
Select.
3. Find Greeting using and press
Select.
4. Find Play using and press Select.
5. Use or to scroll through the list
until Response and recording or
Simple voicemail and press Select.
6. Find Personalized greeting using
and press Select.
Page 34

34
7. The greeting is played. Press OK to
stop playback or Delete to erase your
personal greeting.
8. Press Back to return to the previous
level.
Selecting the greeting
1. Press Menu.
2. Find Voicemail using and press
Select.
3. Find Voicemail settings using and
press Select.
4. With Voicemail mode displayed, press
Select.
5. Use or to scroll through the list
until Response and recording or
Simple voicemail and press Select.
6. If a personal greeting has been
recorded, use or to scroll through
the list until Predefined greeting or
Personalized greeting and press
Select. If no personal greeting is
present, Predefined greeting will be
selected.
7. Press Back to return to the previous
level.
Managing the personal greeting
from the base
1. Press and hold the Greeting button.
The message "Select the outgoing
message" will be heard.
2. Press << to hear Response and
recording or >> to hear Simple
response.
Recording a memo
1. Press Menu.
2. Find Voicemail using and press
Select.
3. Find Record Reminder using and
press Select.
4. Speak after the tone.
5. After the tone, record your memo and
press Save to end recording.
6. Your memo is heard automatically. If
you wish to erase it, press Delete
during playback. If you press Save or
wait until the end of the recording, the
memo will be saved.
7. Press Back to return to the previous
level.
Call screening
When your voicemail is on and responds
to a call, you can use the loudspeaker to
listen as the caller leaves a message.
You can then identify the caller and
decide to take the call in person.
During call screening, you can adjust the
volume on the base using the " vol + "
and " vol – " buttons.
1. When the TD 251 / TD 252 rings, wait
for the voicemail to take the call. When
the caller starts recording his message,
the handset displays Recording. Press
Screen to listen to the caller.
2. To interrupt recording and
communicate with the caller, press
or, after the caller hangs up and the
display shows You have a new
message, press Play to listen to the
new messages.
3. Press Back to return to the previous
level.
Message playback via the base
1. Press . The new messages
are played first.
Page 35

35
During playback, press:
Delete
Deletes the current
message.
Press once to repeat
the message.
Press twice to read
the previous
message.
Reads the following
message.
Pause and resume
playback.
Stop playback.
Vol+
Vol+-
Adjusts the speaker
level.
After playback, press and hold Delete to
erase all the messages.
Message playback using the
handset
1. Press Menu and using , find
Voicemail and press Select.
2. Play is highlighted. Press Select to
select which messages to listen to or
using find Play all and press Select
to listen to all messages.
3. Press to switch between the
earpiece and loudspeaker of the
handset.
During playback, press Options and
using , find Pause, Repeat message,
Next, Previous, Delete.
4. Press Select. After playback, press
Back to return to the previous menu.
Shortcut keys on the handset
During playback:
1
Pause.
2
Resume.
3
Repeat the message.
4
Play the previous message.
5
Erase the current message.
6
Play the next message.
Deleting all old messages
1. Press Menu, find Voicemail using
and press Select.
2. Using , find Delete message and
press Select.
3. Delete read messages ? is displayed.
Press Yes to confirm or No to cancel.
4. Press Back to return to the level of the
previous menu.
Remote access
You can control your voicemail from any
phone by calling your TD 251/252 and
enter a 4-digit security code (original
code 0000).
Activating or deactivating the
remote access PIN code
1. Press Menu and using , find
Voicemail and press Select.
2. Using , find Voicemail settings and
press Select.
3. Using or , find Remote access
and press Select.
4. Using or , find Activated or
Deactivated and press Select.
5. Press Back to return to standby mode.
Page 36

36
Changing the remote access PIN
code
You must change your remote PIN code
from the original value of 0000 to a more
personal code. Keep this new PIN code
in a safe place.
1. Press Menu, find Voicemail using
and press Select.
2. Using , find Voicemail settings and
press Select.
3. Using or , find Remote access
and press Select.
4. Using or , find Set PIN code and
press Select.
5. Enter the old 4-digit PIN code and
press Save (original PIN code 0000).
6. Enter the new 4-digit PIN code and
press Save. Re-enter the new PIN
code and press Save.
7. Press Back to return to the level of the
previous menu.
Listening to messages remotely
1. Dial your telephone number and let it
ring. When you hear your outgoing
message, press '*'.
2. Enter your 4-digit PIN code.
If you enter an incorrect PIN, you hear
"incorrect security code". You can try
to enter the PIN code again. If it is still
not correct, you will hear the voice and
the TD 251/252 will terminate the call.
3. If no button is pressed for 8 seconds
or more, your TD 251/252 will
terminate the call.
4. Use your keypad to configure your
phone recorder.
1
Listen to the main menu.
2.
Listen to messages.
3
Listen to new messages.
4
Reverse during message
playback.
5
Delete messages during
playback.
6
Advance during message
playback.
7
Adjust the only response (or
response and recording)
according to the current status
Response mode of the product.
8
Record a new outgoing message
(welcome).
9
To deactivate the voicemail.
0
To activate the voicemail.
Memory full
The memory is full if less than 10
seconds of recording time or if the
maximum 59 messages have been
reached.
When the memory is full:
Your caller will be invited to record his
message in 10 seconds. If he speaks
until the memory limit, "Thank you for
calling" will be announced and the
voicemail hangs up.
The voicemail will automatically switch
to Simple response mode and you
need to delete some messages before
new messages can be recorded.
Page 37

37
Warranty
This equipment is approved in
accordance with European
regulations certified by the
marking.
You get what is a legal guarantee on this
product regardless of the legal
guarantee on this product, described
below.
Items guaranteed
The warranty covers the phone and does
not include accessories. The following
are considered accessories:
The rechargeable batteries,
The power supply unit,
The telephone line cord.
However, these accessories can be
ordered from our technical service
(+33(0)5-45-60-82-51, price of a
international call or
[email protected]).
Warranty period
This phone has a warranty period of 12
months. The warranty period begins on
the date of purchase of the phone.
The guarantee must be proven by
presenting the original invoice or receipt
which displays the date and model
purchased.
Warranty coverage
A faulty phone should be returned in full
to your distributor with an explanatory
note.
If this phone has a defect during the
warranty period, the After-Sales Service
will repair any defective parts or
manufacturing defects.
The After-Sales Service will decide
unilaterally to repair or replace the
telephone in whole or in part.
The original purchase date determines
the start date of warranty period. The
warranty period is not extended if we
repair or exchange the phone through
our After-Sales Service.
Warranty disclaimer
Damage or defects caused by improper
use or handling of the telephone and use
of accessories other than the original or
not recommended by this manual are not
covered by the warranty.
The warranty does not cover damage
caused by external factors such as
lightning, water or fire or other damage
caused during transportation.
No warranty issue may be claimed if the
serial number of the phone has been
changed, removed, erased or defaced.
Or if the phone has been repaired,
altered or modified by the purchaser or
any other repairer not officially approved
and qualified.
Technical service
Our technical department can be
contacted by phone at 05-45-60-82-51 or
by email to [email protected].
Page 38

38
Technical information
RTTE directive
This product is intended for use in
France for connection to the public
telephone network; it is compatible with
telephone switchboards.
This equipment complies with essential
requirements for radio equipment and
telecommunications terminals of the
1999/5/CE directive.
Connecting to a telephone
switchboard
This product is intended for use in
France for connection to the public
telephone network and compatible
switchboards, in tone or switched mode.
If in doubt, consult your service provider.
Inserting a pause
With some switchboards, after dialing
the access code, you may have to wait
several seconds before the switchboard
takes an outside line. A pause needs to
be defined in the dialing sequence.
Press and hold until the display shows
" P " to insert a pause before entering
the telephone number.
You may also need to define a pause
when storing international numbers or
card numbers.
Callback
You may need to use the callback
function if you are connected to a
switchboard / PABX. Contact your PABX
provider for more information.
Compliance with the regulations
in force
This phone complies with CE standards
in force:
Page 39

39
 Loading...