

Page 1
Page 2

1
Document non contractuel soumis à modifications en cas d’erreurs typographiques (Mktg0609)
FRANCAIS
MODE D’EMPLOI CADRES PHOTO NUMERIQUES
TELEFUNKEN SERIE « STYLE »
(DPF 7901, DPF 7911, DPF 7321, DPF 7331, DPF 9321, DPF
9331, DPF 10331)
I. Découvrez et installez votre cadre ........................................................ 2
1. Contenu de la boîte ........................................................................................................... 2
2. Schémas du cadre ............................................................................................................ 2
3. Installation ........................................................................................................................... 2
II. Utilisez votre cadre ................................................................................... 3
1. Sélection de la langue ....................................................................................................... 3
2. Lecture d’une carte mémoire ou d’une clé USB .......................................................... 3
3. Copie de photos vers la mémoire interne ..................................................................... 3
4. Suppression de photos .................................................................................................... 4
III. Sélection du type de fichiers à lire ......................................................... 5
1. Les photos .......................................................................................................................... 5
2. Les vidéos (uniquement sur DPF 7911, DPF 7331, DPF 9331, DPF 10331) ........... 5
3. La musique (uniquement sur DPF 7911, DPF 7331, DPF 9331, DPF 10331) ......... 6
IV. Les réglages .............................................................................................. 6
1. Configuration Photo .......................................................................................................... 6
2. Configuration Calendrier .................................................................................................. 6
3. Réglages vidéo (uniquement DPF 7911, DPF 7331, DPF 9331, DPF 10331) ......... 7
4. Réglages musique (uniquement DPF 7911, DPF 7331, DPF 9331, DPF 10331) .... 7
5. Configuration système ...................................................................................................... 7
V. Pour aller plus loin .................................................................................... 7
VI.
Instructions de sécurité ........................................................................... 8
VII.
Garantie ...................................................................................................... 8
VIII.
Caractéristiques techniques ........................................................... 10
Page 3
2
Document non contractuel soumis à modifications en cas d’erreurs typographiques (Mktg0609)
FRANCAIS
I. Découvrez et installez votre cadre
Vous venez d’acheter un cadre photo numérique TELEFUNKEN « Série STYLE» et nous vous en
remercions. Avant d’utiliser votre appareil, veuillez consulter le présent mode d’emploi et le conserver
afin de pouvoir vous y reporter ultérieurement.
1. Contenu de la boîte
- 1 Cadre photo numérique
- 1 Adaptateur secteur
- 1 Télécommande
- 1 Chiffonette
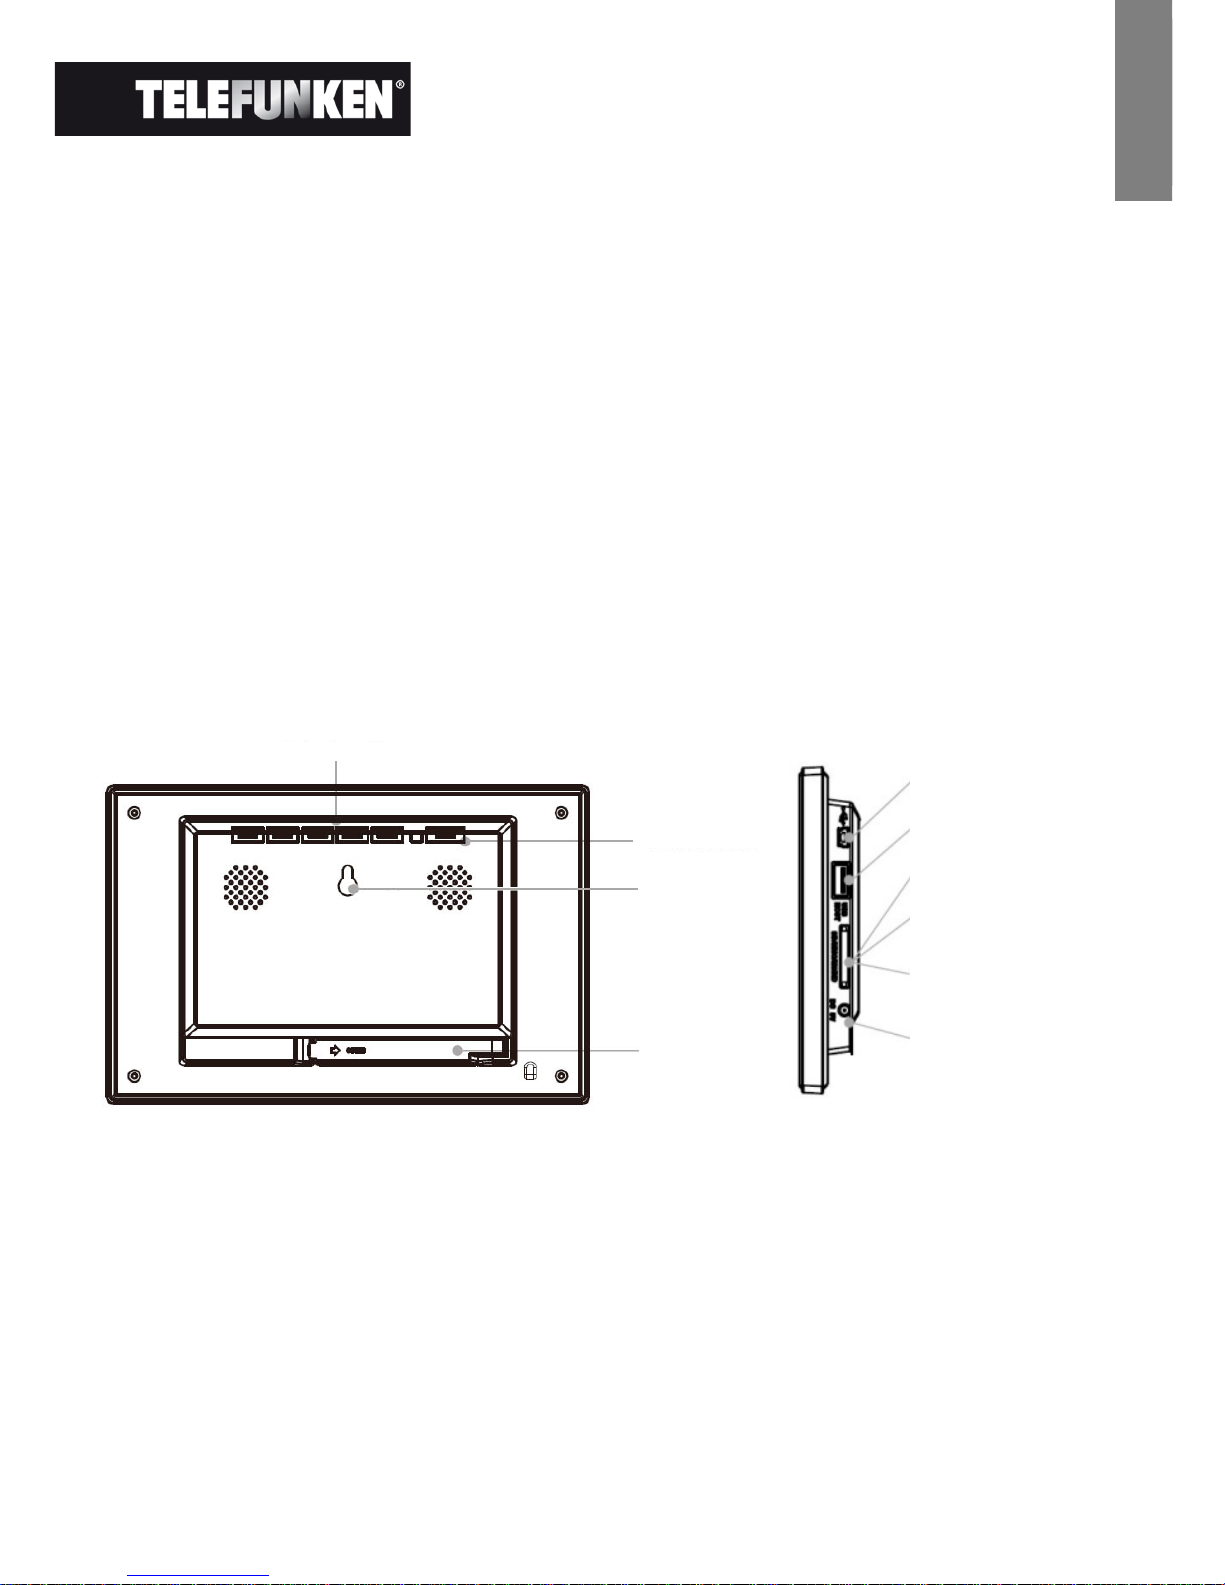
2. Schémas du cadre
3. Installation
- Sortez votre cadre et ses accessoires de leur emballage
- Otez le film plastique de protection sur la façade du cadre
- Tirez sur la languette plastique destinée à protéger les contacts de la télécommande
- Posez le cadre à l’endroit souhaité en tirant vers vous le pied ajustable (voir schéma ci-dessus)
- Connectez le cordon secteur au cadre à l’emplacement prévu à cet effet.
- Branchez votre cadre sur une prise de courant. Votre cadre se met en route
automatiquement.
Page 4

3
Document non contractuel soumis à modifications en cas d’erreurs typographiques (Mktg0609)
FRANCAIS
II. Utilisez votre cadre
1. Sélection de la langue
Lors de la première utilisation, le cadre affiche tout d’abord un écran permettant de choisir la langue
d’utilisation du cadre.
- Sélectionnez votre langue à l’aide des touches fléchées de la télécommande puis appuyez sur
« ENTER ».
Une fois votre langue sélectionnée, votre cadre commencera à lire les photos contenues dans la
mémoire interne.
2. Lecture d’une carte mémoire ou d’une clé USB
Si votre cadre est éteint :
- Insérez votre carte ou votre clé USB à l’emplacement prévu à cet effet.
- Mettez votre cadre sous tension : Le diaporama lit automatiquement le contenu de votre carte
mémoire ou de votre clé USB.
Si votre cadre est allumé :
- Appuyez sur la touche « Exit» de votre télécommande autant de fois que nécessaire pour
afficher l’écran de choix des modes.
- A l’aide des touches « Haut/Bas » de votre télécommande, sélectionnez la carte ou la clé que
vous souhaitez lire. (Internal memory pour mémoire interne, SD, XD, MS ou USB pour une clé)
- Appuyez sur la touche « Enter » de votre télécommande pour valider votre choix, puis sur la
touche « Slide Show » pour lancer le diaporama.
Si votre support (carte, clé ou mémoire interne ) contient de la musique et que vous désirez un
diaporama musical, appuyez sur la touche « Enter » de la télécommande pendant la lecture du
diaporama. L’écran affichera alors « Musique auto ».
3. Copie de photos vers la mémoire interne
Il existe deux méthodes pour copier des images de votre carte mémoire vers la mémoire interne du
cadre.
- Copier vos photos à partir du gestionnaire de fichiers
Si vous utilisez cette méthode, vous ne pourrez copier les fichiers que un par un et n’aurez pas la
possibilité de les redimensionner à la résolution du cadre.
1. Appuyez sur la touche « Exit » de votre télécommande autant de fois que nécessaire pour
afficher l’écran de choix des modes.
2. A l’aide des touches « Droite/Gauche » de la télécommande, sélectionnez l’icône « Fichiers » et
appuyez sur « Enter ».
Page 5

4
Document non contractuel soumis à modifications en cas d’erreurs typographiques (Mktg0609)
FRANCAIS
3. Sélectionnez la photo (ou le fichier musical ou vidéo pour les versions 7911, 7331, 9331, DPF
10331) à l’aide des touches « Haut/Bas » de la télécommande et appuyez sur la touche
« Copy/Del ». L’écran affiche « Copier fichier ?-Oui/Non ». Choisissez l’option souhaitée et
appuyer sur « Enter ». Votre fichier est copié.
- Copier vos photos à partir du mode vignettes
Avec cette méthode, vous pouvez copier une sélection de photos en ayant la possibilité de les
redimensionner à la définition du cadre afin d’optimiser la capacité de la mémoire interne.
1. Appuyez sur la touche « Exit » de votre télécommande autant de fois que nécessaire pour
afficher l’écran de choix des modes.
2. Sélectionnez le support amovible sur lequel se trouvent les photos à copier (carte mémoire ou
clé USB), à l’aide des touches « Haut/Bas » de la télécommande. Appuyez sur « Enter ».
3. A l’aide des touches « droite gauche », sélectionnez le mode photo et appuyez sur « Enter ». Le
diaporama se lance.
4. Appuyez sur la touche « Exit » de la télécommande pour accéder aux vignettes.
5. Appuyez sur la touche « Copy/Del ». L’écran affiche « Copier fichiers ? » (Sélection ou tout)
Sélectionnez l’option choisie et appuyez sur « Enter ».
6. Les vignettes s’affichent de nouveau avec dans le coin supérieur droit de chacune d’entre elles
un petit carré blanc. Sélectionnez les photos à copier à l’aide des touches « Droite/Gauche-
Haut/Bas » de la télécommande en appuyant sur « Enter » à chaque photo sélectionnée. Le
petit carré blanc est alors coché pour chaque image sélectionnée. (Si vous avez choisi « tout
copier », toutes les vignettes sont cochées
7. Appuyez sur la touche « Copy/Del ». Sélectionnez ensuite le répertoire dans lequel vous
souhaitez copier vos images puis appuyez sur « Enter ».
8. L’écran affiche une boîte de dialogue vous demandant si vous souhaitez redimensionner vos
images.
9. Sélectionnez l’option choisie à l’aide des touches « Haut/Bas » de la télécommande et
confirmez en sélectionnant « Confirmer ». Appuyez sur « Enter ». Vos photos sont maintenant
copiées dans la mémoire interne et dimensionnées à la définition du cadre.
4. Suppression de photos
Vous pouvez supprimer des photos qui se trouvent dans la mémoire interne de votre cadre.
- Supprimez vos photos à partir du gestionnaire de fichiers
Si vous utilisez cette méthode, vous ne pourrez supprimer les fichiers que un par un.
1. Appuyez sur la touche « Exit » de votre télécommande autant de fois que nécessaire pour
afficher l’écran de choix des modes.
2. A l’aide des touches « Droite/Gauche » de la télécommande, sélectionnez l’icône « Fichiers » et
appuyez sur « Enter ».
Page 6

5
Document non contractuel soumis à modifications en cas d’erreurs typographiques (Mktg0609)
FRANCAIS
3. Sélectionnez la photo (ou le fichier musical ou vidéo pour les versions 7911, 7331, 9331, 10331)
à l’aide des touches « Haut/Bas » de la télécommande et appuyez sur la touche « Copy/Del ».
L’écran affiche « Supprimer fichier ?- Oui/Non ». Choisissez l’option souhaitée et appuyer sur
« Enter ». Votre fichier est supprimé.
- Supprimer vos photos à partir du mode vignettes
Avec cette méthode, vous pouvez supprimer une sélection ou toutes les photos de la mémoire interne.
1. Appuyez sur la touche « Exit » de votre télécommande autant de fois que nécessaire pour
afficher l’écran de choix des modes.
2. Sélectionnez la mémoire interne à l’aide des touches « Haut/Bas » de la télécommande.
Appuyez sur « Enter ».
3. A l’aide des touches « Droite/Gauche », sélectionnez le mode photo et appuyez sur « Enter ».
Le diaporama se lance.
4. Appuyez sur la touche « Exit » de la télécommande pour accéder aux vignettes.
5. Appuyez sur la touche « Copy/Del ». L’écran affiche « Supprimer ? » (Sélection ou tout)
Sélectionnez l’option choisie et appuyez sur « Enter ».
6. Les vignettes s’affichent de nouveau avec dans le coin supérieur droit de chacune d’entre elles
un petit carré blanc. Sélectionnez les photos à copier à l’aide des touches « Droite/Gauche-
Haut/Bas » de la télécommande en appuyant sur « Enter » à chaque photo sélectionnée. Le
petit carré blanc est alors coché pour chaque image sélectionnée. (Si vous avez choisi l’option
« tout supprimer », les vignettes sont toutes cochées)
7. Appuyez sur la touche « Copy/Del » puis appuyez sur « Enter ».
8. L’écran affiche « Supprimer ? ».
9. Sélectionnez l’option choisie à l’aide des touches « Haut/Bas » de la télécommande. Appuyez
sur « Enter ». Vos photos sont maintenant supprimées de la mémoire interne
III. Sélection du type de fichiers à lire
1. Les photos
- Appuyez deux fois sur la touche « Exit » pour afficher l’écran principal.
- A l’aide des flèches « Gauche/Droite » de la télécommande, sélectionnez l’icône « Photo ».
- Appuyez sur la touche « Enter » : la lecture commence.
2. Les vidéos (uniquement sur DPF 7911, DPF 7331, DPF 9331, DPF 10331)
- Appuyez deux fois sur la touche « Exit » pour afficher l’écran principal.
- A l’aide des flèches « Gauche/Droite » de la télécommande, sélectionnez l’icône « Vidéo ».
- Appuyez sur la touche « Enter » : la lecture commence
Page 7

6
Document non contractuel soumis à modifications en cas d’erreurs typographiques (Mktg0609)
FRANCAIS
3. La musique (uniquement sur DPF 7911, DPF 7331, DPF 9331, DPF 10331)
- Appuyez deux fois sur la touche « Exit » pour afficher l’écran principal.
- A l’aide des flèches « Gauche/Droite » de la télécommande, sélectionnez l’icône « Musique ».
- Appuyez sur la touche « Enter » : la lecture commence.
IV. Les réglages
Lorsque vous êtes sur l’écran principal, Sélectionnez l’icône « Regl. » à l’aide des touches
« Droite/Gauche » et « Haut/Bas » de votre télécommande pour accéder aux différents réglages de
votre cadre.
Si votre diaporama défile, appuyez simplement sur la touche « Setup » de votre télécommande pour
accéder aux menus de réglage.
Lorsque vous êtes dans les menus de réglage, les touches « Haut/Bas » de la télécommande vous
permettent de sélectionner le paramètre à régler, et les touches « Droite/Gauche » vous permettent de
choisir le réglage adéquat pour le paramètre sélectionné.
1. Configuration Photo
Sélectionnez cette ligne à l’aide des touches « Haut/Bas » de la télécommande pour accéder à ce
menu.
Vous aller pouvoir régler avec les touches fléchées de la télécommande :
- Le mode d’affichage
- Le rapport d’affichage
- La durée du diaporama
- La lecture en boucle du diaporama
- Les effets de transition
- L’affichage multiple
- L’horloge
- Le redimensionnement des images
2. Configuration Calendrier
Lorsque vous êtes dans le menu de réglage, sélectionnez la ligne à l’aide des touches « Haut/Bas » de
la télécommande pour accéder à ce menu et appuyez sur «Enter ».
Vous pourrez alors régler à l’aide des touches fléchées de la télécommande :
- Le mode d’affichage du calendrier (Journalier, mensuel ou horloge)
- La date
- Le mode d’affichage de l’heure (24h ou 12h)
Page 8

7
Document non contractuel soumis à modifications en cas d’erreurs typographiques (Mktg0609)
FRANCAIS
- L’heure
- Le statut de l’alarme (Marche/Arrêt) (uniquement sur DPF 7911, DPF 7331, DPF 9331, DPF
10331)
- L’heure de l’alarme (uniquement sur DPF 7911, DPF 7331, DPF 9331, DPF 10331)
- La fréquence de l’alarme (une fois, quotidien, du lundi au vendredi) (uniquement sur DPF 7911,
DPF 7331, DPF 9331, DPF 10331)
3. Réglages vidéo (uniquement sur DPF 7911, DPF 7331, DPF 9331, DPF 10331)
Dans le menu de réglage, sélectionnez la ligne « Réglages vidéo » à l’aide des touches « Haut/Bas »
de votre télécommande et appuyez sur «Enter».
Vous pouvez choisir dans ce menu :
- Le mode d’affichage (Plein écran ou taille originale)
- Le mode de lecture (une fois ou en boucle)
- L’activation de la lecture automatique
4. Réglages musique (uniquement sur DPF 7911, DPF 7331, DPF 9331, DPF 10331)
Lorsque vous êtes dans le menu de réglage, sélectionnez la ligne « Réglages musique » à l’aide des
touches « Haut/Bas » de votre télécommande puis appuyez sur «Enter».
Vous pouvez paramétrer :
- Le mode de lecture (aléatoire, lecture en boucle, répétition une fois)
- Les effets musicaux (Rock, Pop, Classique, Jazz…)
- L’affichage de l’égaliseur pendant la lecture
- La lecture automatique
5. Configuration système
Ce menu vous permet de régler les paramètres de fonctionnement de votre cadre.
- La langue (anglais, français, espagnol, portugais, italien, allemand, néerlandais)
- La luminosité, le contraste, la couleur et la teinte du cadre
- La mise en route automatique programmée
- L’arrêt automatique programmé
- La fréquence d’allumage et d’arrêt automatique (Du lundi au vendredi, le week-end, une fois ou
tous les jours)
- La réinitialisation de votre cadre
V. Pour aller plus loin
Il est possible de transférer des fichiers dans le cadre en reliant celui-ci à votre micro-ordinateur. Pour
en savoir plus, vous pouvez télécharger le mode d’emploi complet sur le site :
http://www.telefunken-digital.fr
Page 9

8
Document non contractuel soumis à modifications en cas d’erreurs typographiques (Mktg0609)
FRANCAIS
VI. Instructions de sécurité
Manipulez le cadre photo numérique avec précaution et évitez de toucher l’écran ; les traces de doigts
sont difficiles à enlever.
Placez toujours le cadre photo numérique sur une surface plane et stable pour éviter qu’il ne tombe et
ne soit endommagé.
Évitez d’exposer le cadre photo numérique au soleil ou aux températures élevées car ceci peut
endommager le cadre ou réduire sa durée d’utilisation. Ne le placez pas près de sources de chaleurs
telles que les radiateurs, les chauffages d’appoints… Ne positionnez pas le cadre face aux rayons du
soleil pour éviter les reflets.
Évitez d’exposer le cadre photo numérique à la pluie, l’eau ou l’humidité. Ne le placez pas dans un
évier ou dans un bassin où il pourrait entrer en contact avec l’eau.
Ne placez jamais d’objets lourds ou coupants sur le cadre, l’écran ou l’alimentation du cadre.
Veillez à ne pas brancher le cadre photo numérique sur une prise ou un cordon à l’alimentation trop
puissante. Ceci pourrait provoquer une surchauffe, un feu ou un choc électrique.
Veillez à l’emplacement du cordon d’alimentation ; celui-ci ne doit pas être piétiné ou en contact avec
d’autres objets. Ne placez pas le cordon sous un tapis. Vérifiez régulièrement l’état du cordon pour
éviter tout dommage. Si le cordon est endommagé, débranchez-le et remplacez-le.
Ventilation
Les emplacements pour cartes mémoires et les ouvertures permettent de ventiler le cadre.
Pour assurer une utilisation optimale du cadre et pour empêcher toute surchauffe, ces ouvertures ne
doivent pas être obstruées ou couvertes.
Gardez le cadre numérique à une distance suffisante du mur pour assurer sa ventilation.
Ne placez pas le cadre photo numérique sur un lit ou un canapé pour éviter toute surchauffe.
Attention !
Ne retirez jamais le capot en plastique situé à l’arrière du cadre. Le cadre photo numérique comporte
des circuits électriques et vous pouvez être blessé si vous les touchez.
Ne tentez pas de réparer votre cadre numérique seul.
VII. Garantie
La garantie ne couvre pas les dommages causés si vous (ou toute personne non habilitée) avez tenté
de réparer le cadre.
Si le cadre émet de la fumée, un bruit ou une odeur inhabituelle, éteignez-le et débranchez-le
immédiatement. Contactez votre magasin.
Si vous n’utilisez pas le cadre numérique pendant quelques temps, veillez à débrancher le cordon
d’alimentation.
La garantie porte sur le cadre photo numérique et n’inclut pas les accessoires. Sont considérés comme
accessoires :
Le bloc d’alimentation secteur,
La télécommande (selon modèle).
Toutefois, ces accessoires peuvent être commandés auprès de notre service technique :
(05-45-60-82-51 prix d’un appel local) ou par mail :
Page 10

9
Document non contractuel soumis à modifications en cas d’erreurs typographiques (Mktg0609)
FRANCAIS
Période de garantie
Ce cadre numérique bénéficie d’une durée de garantie de 12 mois. La période de garantie débute à la
date d’achat du cadre.
La garantie doit être prouvée par la présentation de la facture d’origine ou du reçu sur lesquels
apparaissent la date et le modèle acheté.
Couverture
Un cadre numérique défectueux doit être retourné complet auprès de votre distributeur avec une note
explicative.
Si ce cadre numérique présente une défectuosité pendant la période de garantie, le Service Après
Vente agréé réparera tous les éléments défectueux ou tout défaut de fabrication. Le Service Après
Vente décidera unilatéralement de la réparation ou du remplacement du cadre numérique en intégralité
ou en partie.
La date d’achat initiale détermine la date de début de période de garantie
La période de garantie n’est pas prolongée en cas de réparation ou d’échange du cadre numérique par
notre Service Après vente.
Exclusion
Les dommages ou défauts causés par une mauvaise utilisation ou manipulation du cadre numérique et
par l’utilisation d’accessoires autres que ceux d’origine ou non recommandés par la présente notice ne
sont pas couverts par la garantie.
La garantie ne couvre pas les dommages causés par des éléments extérieurs comme la foudre, l’eau
ou le feu ou tout autre dommage causé pendant un transport.
Aucune prise sous garantie ne pourra être réclamée si le numéro de série du cadre numérique a été
modifié, enlevé, effacé ou rendu illisible.
Aucune prise sous garantie ne pourra être réclamée si le cadre numérique a été réparé, altéré ou
modifié par l’acquéreur ou tout autre réparateur non officiellement agréé et qualifié.
Le fabricant ne garantit pas les propriétés techniques décrites dans ce manuel. Le matériel et les
accessoires décrits dans ce manuel sont sujets à modification sans préavis. Pour cette raison, le
fabricant se réserve le droit de modifier les composants, les options, les caractéristiques et les
documents s’y rattachant sans préavis.
Conformité au règlement en vigueur :
Ce cadre numérique est conforme aux normes CE en vigueur et compatible avec la norme RoHS.
Page 11
10
Document non contractuel soumis à modifications en cas d’erreurs typographiques (Mktg0609)
FRANCAIS
Recyclage des équipements électriques et électroniques en fin de vie.
Les appareils électriques et électroniques usagés ne doivent pas être éliminés avec les déchets
ménagers ordinaires. La présence de ce symbole sur le produit ou son emballage vous le
rappelle.
Certains matériaux composants ce produit peuvent être recyclés si vous le déposez auprès d’un centre
de recyclage approprié. En réutilisant les pièces et matières premières des appareils usagés, vous
apportez une contribution importante à la protection de l’environnement.
Pour plus d’informations sur les lieux de collecte des équipements usagés, vous pouvez vous adresser
à votre mairie, au service de traitement des déchets usagés ou au magasin où vous acheté le produit.
VIII. Caractéristiques techniques
Caractéristiques DPF 7901 DPF 7911 DPF 7321 DPF 7331 DPF 9321 DPF 9331 DPF 10331
Taille
7 ˝ 7 ˝ 7 ˝ 7 ˝ 8,4 ˝ 8,4 ˝ 10,4
Définition
480 x 234 480 x 234 800 x 600 800 x 600 800 x 600 800 x 600 800 x 600
Ratio image
16/9
16/9
4/3
4/3
4/3
4/3
4/3
Mémoire interne
128 Mo 128 Mo 2 Go 2 Go 2 Go 2 Go 2 Go
Audio/vidéo
NON OUI NON OUI NON OUI OUI
Cartes compatibles
SD/MMC,
MS, XD,
Clés USB
SD/MMC,
MS, XD,
Clés USB
SD/MMC,
MS, XD,
Clés USB
SD/MMC,
MS, XD,
Clés USB
SD/MMC,
MS, XD,
Clés USB
SD/MMC,
MS, XD,
Clés USB
SD/MMC,
MS, XD,
Clés USB
Redimensionnement
auto
OUI OUI OUI OUI OUI OUI OUI
Rotation auto
OUI
OUI
OUI
OUI
OUI
OUI
OUI
Entrée alimentation
100-240
V AC
50/60 Hz
100-240
V AC
50/60 Hz
100-240
V AC
50/60 Hz
100-240
V AC
50/60 Hz
100-240 V
AC 50/60
Hz
100-240 V
AC 50/60
Hz
100-240 V
AC 50/60
Hz
Sortie alimentation
5V DC
2Ah
5V DC
2Ah
5V DC
2Ah
5V DC
2Ah
5V DC
2Ah
5V DC 2Ah
9V DC 2Ah
Dimensions
205 x 135
x 20 mm
205 x 135
x 20 mm
195 x 149
x 20 mm
195 x 149
x 20 mm
225 x 178
x 20 mm
225 x 178
x 20 mm
264 x 210 x
25mm
Poids
362 g 362 g 424 g 424 g 520 g 520 g 900 g
Compatibilité
système
Windows
XP, Vista,
Mac OS
9.0 et
suivants
Windows
XP, Vista,
Mac OS
9.0 et
suivants
Windows
XP, Vista,
Mac OS
9.0 et
suivants
Windows
XP, Vista,
Mac OS
9.0 et
suivants
Windows
XP, Vista,
Mac OS
9.0 et
suivants
Windows
XP, Vista,
Mac OS
9.0 et
suivants
Windows
XP, Vista,
Mac OS
9.0 et
suivants
Page 12

1
Non contractual document subject to change in case of typographical errors (Mktg0309)
ENGLISH
DIGITAL PHOTO FRAME OPERATING INSTRUCTIONS
TELEFUNKEN “STYLE” SERIES
(DPF 7901, DPF 7911, DPF 7321, DPF 7331, DPF 9321, DPF 9331, DPF 10331)
I. Learn about and install your frame ........................................................ 2
1. Box contents ...................................................................................................................... 2
2. Frame diagrams ................................................................................................................. 2
3. Installation ........................................................................................................................... 2
II. Use your frame .......................................................................................... 3
1. Selecting a language ......................................................................................................... 3
2. Reading a memory card or a USB key .......................................................................... 3
3. Copying photos to the internal memory ........................................................................ 3
4. Deleting photos .................................................................................................................. 4
III. Selecting the type of files to play ........................................................... 5
1. Photos ................................................................................................................................. 5
2. Videos (only on DPF 7911, DPF 7331, DPF 9331, DPF 10331) ................................. 6
3. Music (only on DPF 7911, DPF 7331, DPF 9331, DPF 10331) .................................. 6
IV. Settings ...................................................................................................... 6
1. Configuring photos ............................................................................................................ 6
2. Configuring the calendar .................................................................................................. 7
3. Video settings (only on DPF 7911, DPF 7331, DPF 9331, DPF 10331) .................... 7
4. Music settings (only on DPF 7911, DPF 7331, DPF 9331, DPF 10331) ................... 7
5. System configuration ........................................................................................................ 7
V. Other information ..................................................................................... 8
VI.
Safety instructions .................................................................................... 8
VII.
Warranty ..................................................................................................... 9
VIII.
Specifications ..................................................................................... 10
Page 13
2
Non contractual document subject to change in case of typographical errors (Mktg0309)
ENGLISH
I. Learn about and install your frame
Thank you for your recent purchase of a TELEFUNKEN "STYLE Series" digital photo frame. Before using
your device, please consult these operating instructions and keep them so you may refer to them later on.
1. Box contents
- 1 digital photo frame
- 1 AC adaptor
- 1 remote control
- 1 dust cloth
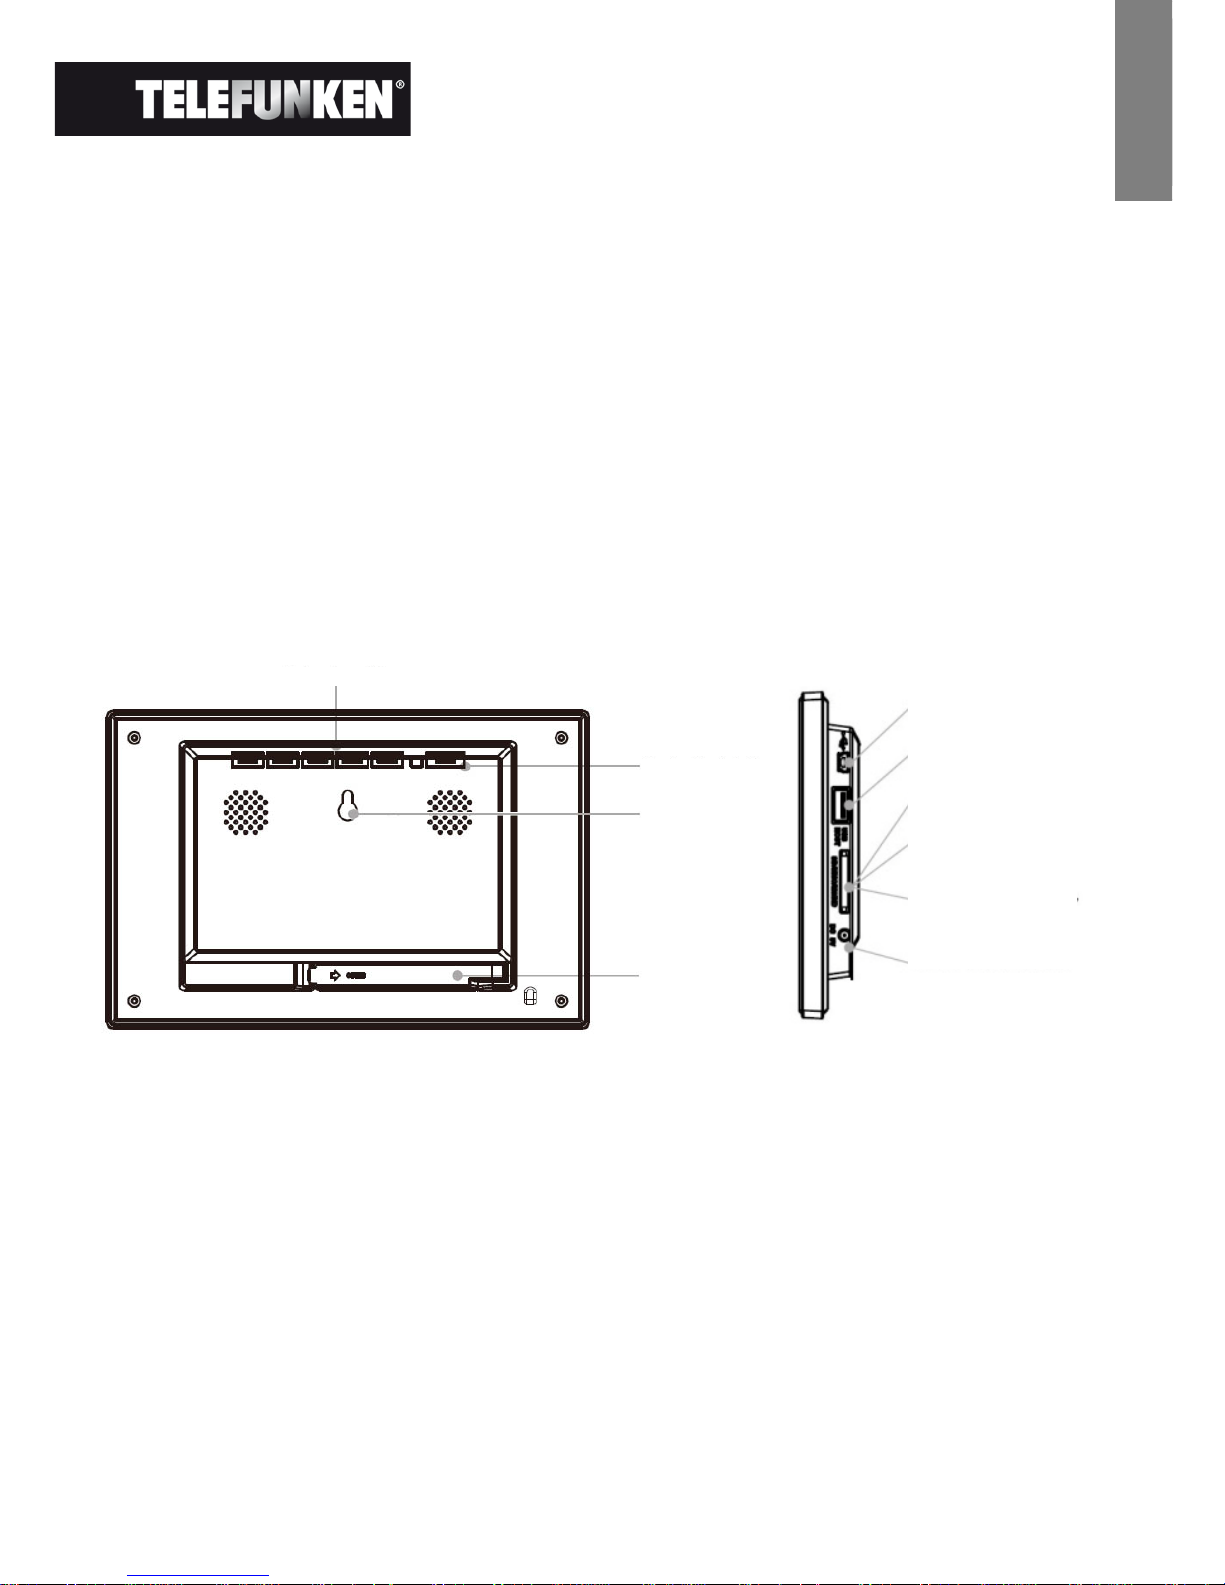
2. Frame diagrams
3. Installation
- Take your frame and its accessories out of their packaging.
- Remove the plastic film protecting the front of the frame.
- Pull the plastic tab protecting the contacts in the remote control.
- Stand the frame in the desired location, pulling the adjustable stand towards you (see diagram
above).
- Connect the electrical cord to the frame in the space provided.
- Plug your frame into an outlet. Your frame will start up automatically.
Control buttons
On/Off button
Wall hanger
Adjustable stand
Mini USB port
USB port
SD/MMC card port
XD card port
MS, MSPro, MS Duo, MS
Pro Duo card port
Power input plug
Page 14

3
Non contractual document subject to change in case of typographical errors (Mktg0309)
ENGLISH
II. Use your frame
1. Selecting a language
During its first use, the frame will display an initial screen allowing you to choose the language.
- Select your language using the arrow keys on the remote control, then press "ENTER".
Once you have selected your language, your frame will begin to read the photos contained in its internal
memory.
2. Reading a memory card or a USB key
If your frame is off:
- Insert your card or USB key in the space provided.
- Switch on your frame: The slideshow will automatically play the contents of your memory card or
USB key.
If your frame is on:
- Press the "Exit" key on your remote as many times as necessary for the mode selection screen to
come up.
- Using the “Up /Down” keys on your remote, select the card or key you want to read. (Select
Internal Memory or SD, XD, MS or USB for a key.)
- Press the “Enter” key on your remote to confirm your choice, then the “Slideshow” key to launch
the slideshow.
If your media (memory card, USB key or built-in memory) contains music and if you want to play a musical
slideshow, press the ”
Enter” key during the slideshow. The digital frame will display “Slide with music”.
3. Copying photos to the internal memory
There are two methods for copying images from your memory card to the frame's internal memory.
- Copy your photos from the file manager
If you use this method, you can only copy files one at a time, and you will not be able to resize them to the
frame's resolution.
1. Press the "Exit" key on your remote as many times as necessary for the mode selection screen to
come up.
2. Using the "Left/Right" keys on the remote, select the "Files" icon and press "Enter".
3. Select the photo (or music or video file for versions 7911, 7331, 9331 & 10331) using the
"Up/Down" keys on the remote, and press the "Copy/Del" key. The screen will display "Copy file?
YES/NO". Choose the desired option and press "Enter". Your file has been copied.
Page 15

4
Non contractual document subject to change in case of typographical errors (Mktg0309)
ENGLISH
- Copy your photos from the thumbnail mode
Using this method, you can copy all or a selection of photos, with the ability to resize them to the frame's
resolution in order to optimize internal memory capacity.
1. Press the "Exit" key on your remote as many times as necessary for the mode selection screen to
come up.
2. Select the removable medium (memory card or USB key) storing the photos to be copied using the
"Up/Down" keys on the remote. Press "Enter".
3. Using the "Left/Right" keys, select photo mode and press "Enter". The slideshow will then launch.
4. Press the "Exit" key on the remote to access the thumbnails.
5. Press the "Copy/Del" key. The screen will display "Copy files?" Select "Yes" and press "Enter".
6. The thumbnails will again be displayed, with a small white square in the upper right corner of each.
Select the photos to be copied using the
"Left/Right - Up/Down" keys on the remote, pressing
"Enter" for each photo you wish to select. The small white square then shows a tick mark for each
image you select. (If you choose “Copy all”, all the white squares show a tick mark)
7. Press the "Copy/Del" key. Next, select the directory into which you want to copy your images, then
press
"Enter".
8. The screen will show a dialog box asking you if you want to resize your images.
9. Select the desired option using the "Up/Down" keys on the remote and confirm the choice by
selecting
"Confirm". Press "Enter". Your photos are now copied into the internal memory and sized
to the frame's resolution.
4. Deleting photos
You can delete photos that are in your frame's internal memory.
- Delete your photos from the file manager
If you use this method, you can only delete one file at a time.
1. Press the "Exit" key on your remote as many times as necessary for the mode selection screen to
come up.
2. Using the "Left/Right" keys on the remote, select the "Files" icon and press "Enter".
Page 16

5
Non contractual document subject to change in case of typographical errors (Mktg0309)
ENGLISH
3. Select the photo (or music or video file for versions 7911, 7331, 9331, 10331) using the "Up/Down"
keys on the remote, and press the
"Copy/Del" key. The screen will display "Delete file? YES/NO".
Choose the desired option and press
"Enter". Your file has been deleted.
- Delete your photos from the thumbnail mode
With this method, you can delete all or a selection of photos in the internal memory.
1. Press the "Exit" key on your remote as many times as necessary for the mode selection screen to
come up.
2. Select the internal memory using the "Up/Down" keys on the remote. Press "Enter".
3. Using the "Left/Right" keys, select the photo mode and press "Enter". The slideshow will then
launch.
4. Press the "Exit" key on the remote to access the thumbnails.
5. Press the "Copy/Del" key. The screen will display "Delete?" Select "Yes" and press "Enter".
6. The thumbnails will again be displayed, with a small white square in the upper right corner of each.
Select the photos to be copied using the
"Left/Right - Up/Down" keys on the remote, pressing
"Enter" for each photo you wish to select. The small white square then shows a tick mark for each
image you select. (If you choose “Delete all”, all the white squares show a tick mark)
7. Press the "Copy/Del" key, then press "Enter".
8. The screen will display "Delete?"
9. Select the desired option using the "Up/Down" keys on the remote. Press "Enter". Your photos
have now been deleted from the internal memory
III. Selecting the type of files to play
1. Photos
- Press the "Exit" key twice to display the main screen.
- Using the "Left/Right" arrows on the remote, select the "Photo" icon.
- Press the "Enter" key: playing will begin.
Page 17

6
Non contractual document subject to change in case of typographical errors (Mktg0309)
ENGLISH
2. Videos (only on DPF 7911, DPF 7331, DPF 9331, DPF 10331)
- Press the "Exit" key twice to display the main screen.
- Using the "Left/Right" arrows on the remote, select the "Video" icon.
- Press the "Enter" key: playing will begin.
3. Music (only on DPF 7911, DPF 7331, DPF 9331, DPF 10331)
- Press the "Exit" key twice to display the main screen.
- Using the "Left/Right" arrows on the remote, select the "Music" icon.
- Press the "Enter" key: playing will begin.
IV. Settings
On the main screen, select the "Settings" icon using the "Left/Right" and "Up/Down" keys on your remote
to access the different settings for your frame.
If your slideshow is playing, simply press the "Setup" key on your remote to access the settings menus.
When you are in the settings menus, the "Up/Down" keys on the remote allow you to select the parameter
to adjust, and the
"Left/Right" keys allow you to choose the appropriate setting for the selected parameter.
1. Configuring photos
Select this line using the "Up/Down" keys on the remote in order to access this menu.
You will then be able to make adjustments with the remote's arrow keys:
- Display mode
- Display ratio
- Duration of slideshow
- Slideshow loop
- Transition effects
- Magic window
- Clock
- Resize
- Cut out when copy
- Show tip when copy
Page 18

7
Non contractual document subject to change in case of typographical errors (Mktg0309)
ENGLISH
2. Configuring the calendar
When you are in the settings menu, select the line using the "Up/Down" keys on the remote in order to
access this menu and press
"Enter".
You can then make adjustments using the remote's arrow keys:
- The calendar's display mode (day, month, or clock)
- Date
- Clock mode (12- or 24-hour)
- Clock Time
- Alarm status (only on DPF 7911, DPF 7331, DPF 9331, DPF 10331)
- Alarm time (only on DPF 7911, DPF 7331, DPF 9331, DPF 10331)
- Alarm frequency (only on DPF 7911, DPF 7331, DPF 9331, DPF 10331)
3. Video settings (only on DPF 7911, DPF 7331, DPF 9331, DPF 10331)
In the settings menu, select the "Video settings" line using the "Up/Down" keys on your remote and press
"Enter".
In this menu you can choose:
- Display mode (full screen or original size)
- Play mode (once or looped)
- Auto play
4. Music settings (only on DPF 7911, DPF 7331, DPF 9331, DPF 10331)
In the settings menu, select the "Music settings" line using the "Up/Down" keys on your remote, and then
press
"Enter".
You can set:
- Play mode (random, looped, one repetition)
- Musical effects (rock, pop, classical, jazz, etc.)
- Equalizer display during playback
- Automatic play
5. System configuration
This menu allows you to set the operating parameters of your frame.
- Language (English, French, Spanish, Portuguese, Italian, German, Dutch)
- Brightness
- Contrast
- Saturation
- Ttint
- Power on
- Auto boot time
Page 19

8
Non contractual document subject to change in case of typographical errors (Mktg0309)
ENGLISH
- Power off
- Auto shut time
- Auto power frequency (Monday-Friday, weekends, once, or every day)
- Reset
V. Other information
It is possible to transfer files into the frame by connecting it to your personal computer. For more
information, you can download the complete operating instructions at:
http://www.telefunken-digital.com
VI. Safety instructions
Handle the digital photo frame with care, and avoid touching the screen; fingerprints are difficult to remove.
Always set the digital photo frame on a flat and stable surface to prevent it from falling and being damaged.
Avoid exposing the digital photo frame to the sun or high temperatures, as these may damage the frame or
reduce its operational life. Do not place it near heat sources like radiators or space heaters. Do not position
the frame facing direct sunlight in order to avoid reflections.
Avoid exposing the digital photo frame to rain, water, or moisture. Do not place it in a sink or basin where it
may come in contact with water.
Never place heavy or sharp objects on the frame, the screen, or the frame's power supply.
Make sure not to plug the digital photo frame into an outlet or cord with a power supply that is too high.
This may cause overheating, a fire, or electrical shock.
Be careful of the location of the power cord; it must not be walked on or come in contact with other
objects. Do not place the cord under a rug. Regularly check the condition of the cord to prevent damage. If
the cord is damaged, unplug it and replace it.
Ventilation
The openings and spaces for memory cards allow the frame to vent.
To ensure optimal use of the frame and to prevent overheating, these openings must not be covered or
blocked.
Keep the digital frame at a sufficient distance from the wall to ensure it vents.
Do not place the digital photo frame on a bed or sofa so that it does not overheat. Caution!
Never remove the plastic cover on the back of the frame. The digital photo frame has electrical circuits and
you could be hurt if you touch them.
Do not try to repair the digital photo frame by yourself.
Page 20

9
Non contractual document subject to change in case of typographical errors (Mktg0309)
ENGLISH
VII. Warranty
The warranty does not cover damage caused if you (or any unauthorized person) tried to repair the frame.
If the frame is emitting smoke, noise, or an unusual smell, immediately turn it off and unplug it. Contact your
store.
If you do not use the digital frame for a while, make sure to unplug the power cord.
The warranty concerns the digital photo frame and does not include the accessories. The following are
considered accessories:
The power supply unit,
The remote (according to model).
However, these accessories may be ordered from our technical division:
By email:
Warranty period
This digital frame is under warranty for 12 months. The warranty period begins on the date the frame is
purchased.
The warranty must be proven by presenting the original invoice or receipt on which the date and model
purchased appear.
Coverage
A defective digital frame must be returned complete to your distributor with an explanation.
If this digital frame presents a defect during the warranty period, the authorized After-Sales Service will
repair any defective component or manufacturing defect. The After-Sales Service will unilaterally decide
whether to repair or replace the digital frame, in part or in whole.
The initial purchase date will determine the starting date for the warranty period.
If the digital frame is repaired or exchanged by our After-Sales Service, the warranty period is not extended.
Exclusions
Damage or defects caused by the improper use or handling of the digital frame, or by the use of
accessories, which are not original or not recommended in these instructions, are not covered by the
warranty.
The warranty does not cover damage caused by outside elements, like lightning, water, or fire, or any other
damage caused during transport.
No warranty coverage may be claimed if the digital frame's serial number has been modified, removed,
erased, or made illegible.
No warranty coverage may be claimed if the digital frame has been repaired, altered, or modified by the
buyer or any repair personnel not officially qualified and authorized.
The manufacturer does not guarantee the technical properties described in this manual. The hardware and
accessories described in this manual are subject to change without advance notice. For this reason, the
manufacturer reserves the right to change the related documents, components, options, and characteristics
without advance notice.
Page 21
10
Non contractual document subject to change in case of typographical errors (Mktg0309)
ENGLISH
Compliance with current regulations:
This digital frame complies with current CE marking standards, and is compatible with the RoHS standard.
Recycling end-of-life electrical equipment and electronics
Used electrical and electronic devices must not be discarded with ordinary household refuse.
The presence of the symbol on the product or its packaging serves as a reminder of this.
Some materials constituting this product may be recycled if you take them to an appropriate recycling
centre. By reusing the components and raw materials of old devices, you contribute significantly to
protecting the environment.
For further information on collection sites for used equipment, you can enquire at your city hall, the waste
treatment department, or the shop where you purchased the product.
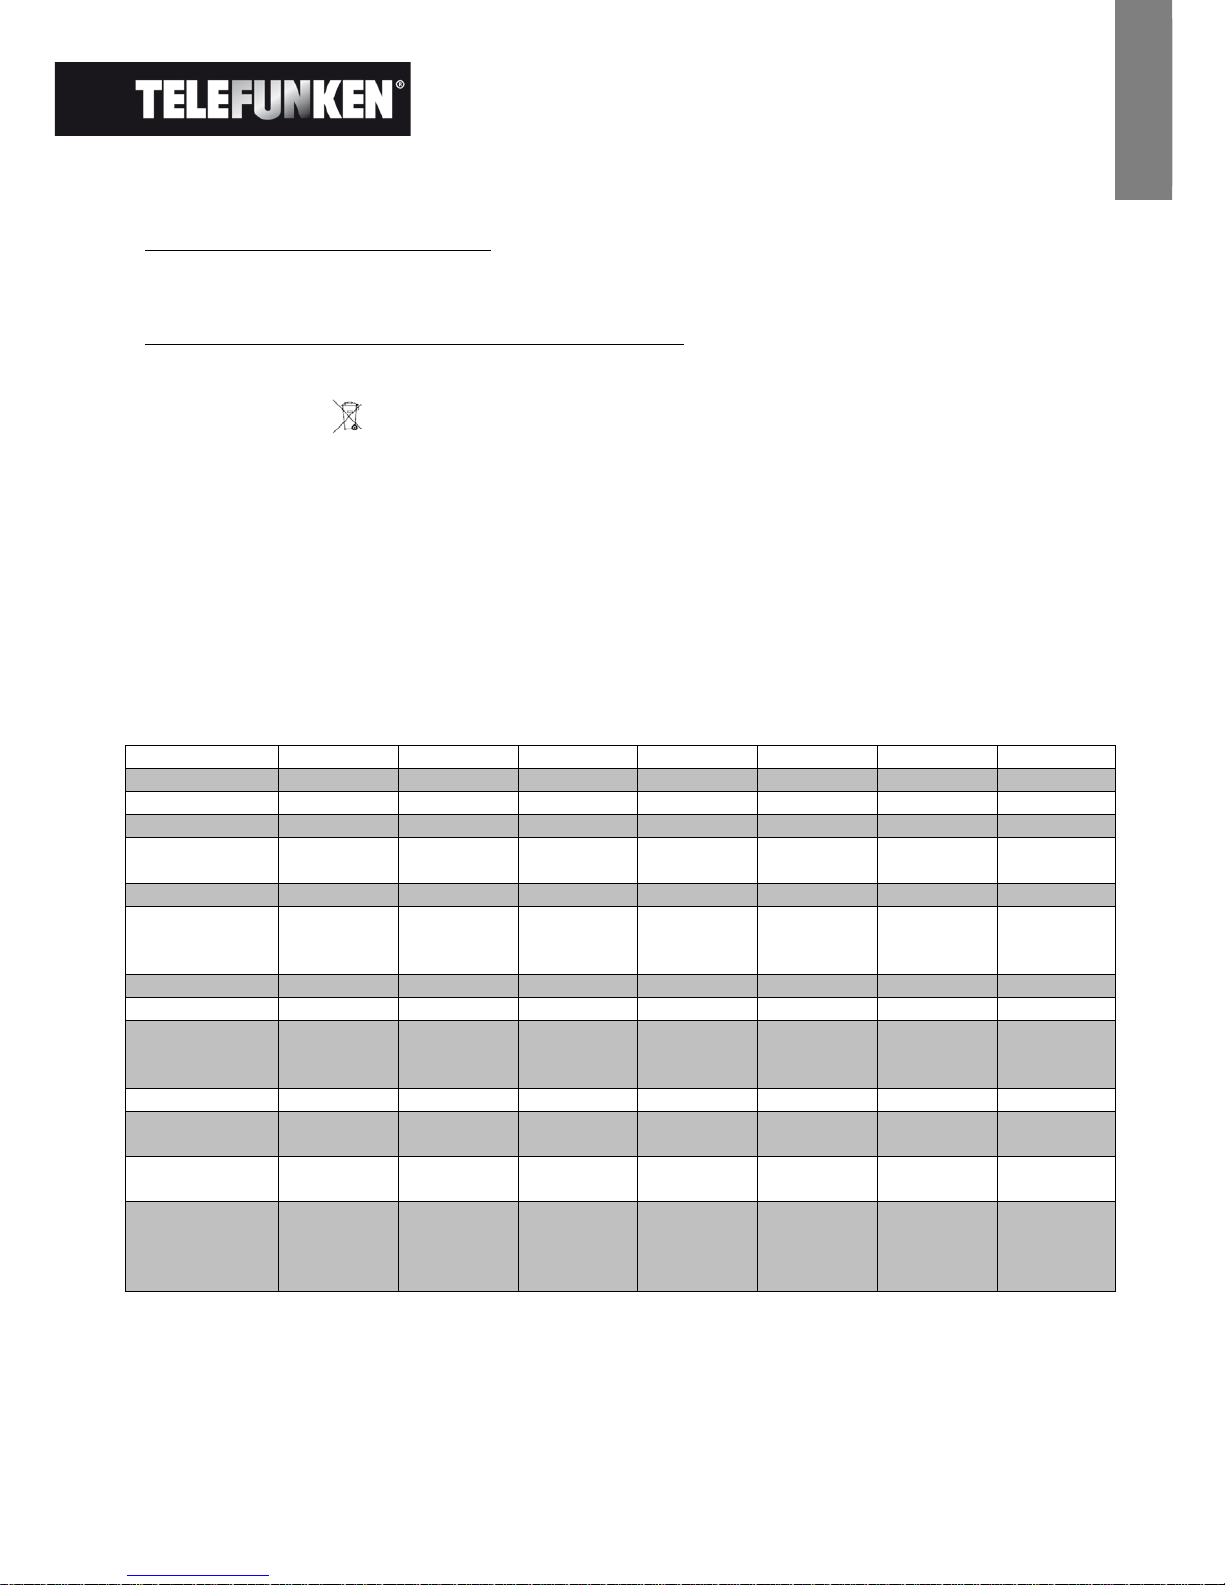
VIII. Specifications
Characteristic
DPF 7901
DPF 7911
DPF 7321
DPF 7331
DPF 9321
DPF 9331
DPF 10331
Dimensions
7 ˝ 7 ˝ 7 ˝ 7 ˝ 8.4 ˝ 8.4 ˝ 10,4’’
Resolution
480 x 234 480 x 234 800 x 600 800 x 600 800 x 600 800 x 600 800 x 600
Image ratio
16/9 16/9 4/3 4/3 4/3 4/3 4/3
Internal
memory
128 MB 128 MB 2 GB 2 GB 2 GB 2 GB 2 GB
Audio/Video
NO YES NO YES NO YES YES
Compatible
cards
SD/MMC,
MS, XD,
USB keys
SD/MMC,
MS, XD,
USB keys
SD/MMC,
MS, XD,
USB keys
SD/MMC,
MS, XD,
USB keys
SD/MMC,
MS, XD,
USB keys
SD/MMC,
MS, XD,
USB keys
SD/MMC,
MS, XD,
USB keys
Auto resizing
YES
YES
YES
YES
YES
YES
YES
Auto rotation
YES YES YES YES YES YES YES
Power input
100-240V
AC 50/60
Hz
100-240V
AC 50/60
Hz
100-240V
AC 50/60
Hz
100-240V
AC 50/60
Hz
100-240V
AC 50/60
Hz
100-240V
AC 50/60
Hz
100-240V
AC 50/60
Hz
Power output
5V DC 2Ah 5V DC 2Ah 5V DC 2Ah 5V DC 2Ah 5V DC 2Ah 5V DC 2Ah 9V DC 2Ah
Dimensions
205 x 135 x
20 mm
205 x 135 x
20 mm
195 x 149 x
20 mm
195 x 149 x
20 mm
225 x 178 x
20 mm
225 x 178 x
20 mm
264 x 210 x
25 mm
Weight
362 g (0.8
lb)
362 g (0.8
lb)
424 g (0.9
lb)
424 g (0.9
lb)
520 g (1.1
lb)
520 g (1.1
lb)
900 g (1.98
lb)
System
compatibility
Windows
XP, Vista,
Mac OS 9.0
and later
Windows
XP, Vista,
Mac OS 9.0
and later
Windows
XP, Vista,
Mac OS 9.0
and later
Windows
XP, Vista,
Mac OS 9.0
and later
Windows
XP, Vista,
Mac OS 9.0
and later
Windows
XP, Vista,
Mac OS 9.0
and later
Windows
XP, Vista,
Mac OS 9.0
and later
Page 22

1
Documento no contractual que puede sufrir modificaciones en caso de errores tipográficos (Mktg0309)
ESPAÑOL
INSTRUCCIONES DE USO MARCOS DE FOTOS DIGITALES
TELEFUNKEN SERIE “STYLE”
(DPF 7901, DPF 7911, DPF 7321, DPF 7331, DPF 9321, DPF 9331, PF 10331)
I. Descubra e instale su marco .................................................................. 2
1. Contenido de la caja ......................................................................................................... 2
2. Esquemas del marco ........................................................................................................ 2
3. Instalación ........................................................................................................................... 2
II. Utilice su marco ........................................................................................ 3
1. Selección del idioma ......................................................................................................... 3
2. Lectura de una tarjeta de memoria o de una llave USB ............................................. 3
3. Copia de fotos en la memoria interna ............................................................................ 3
4. Supresión de fotos ............................................................................................................ 4
III. Selección del tipo de archivos a leer .................................................... 6
1. Fotos .................................................................................................................................... 6
2. Vídeos (sólo en DPF 7911, DPF 7331 DPF 9331 y DPF 10331) ................................ 6
3. Música (sólo en DPF 7911, DPF 7331 DPF 9331 y DPF 10331) ............................... 6
IV. Ajustes ........................................................................................................ 6
1. Configuración de las fotos ............................................................................................... 7
2. Configuración del calendario ........................................................................................... 7
3. Ajustes de vídeo (sólo en DPF 7911, DPF 7331 DPF 9331 y DPF 10331) .............. 7
4. Ajustes de la música (sólo en DPF 7911, DPF 7331 y DPF 9331) ............................ 7
5. Configuración del sistema ............................................................................................... 8
V. Funciones adicionales ............................................................................. 8
VI.
Instrucciones de seguridad .................................................................... 8
VII.
Garantía ...................................................................................................... 9
VIII.
Características técnicas .................................................................. 11
Page 23
2
Documento no contractual que puede sufrir modificaciones en caso de errores tipográficos (Mktg0309)
ESPAÑOL
I. Descubra e instale su marco
Le agradecemos la compra de un marco de fotos digital TELEFUNKEN «Serie STYLE». Antes de utilizar el
aparato, lea las presentes instrucciones de uso, y luego guárdelas para poder consultarlas posteriormente.
1. Contenido de la caja
- 1 marco de fotos digital
- 1 adaptador de corriente
- 1 mando a distancia
- 1 gamuza
2. Esquemas del marco
3. Instalación
- Saque el marco y sus accesorios de su embalaje
- Retire la lámina de plástico de protección de la pantalla del marco
- Tire de la lengüeta de plástico que protege los contactos del mando a distancia
- Coloque el marco en el lugar deseado tirando hacia usted de la base ajustable (véase el esquema
más arriba)
- Conecte el cable de alimentación al marco en el punto previsto a tal efecto.
- Enchufe el marco a una toma de corriente. El marco se pondrá en marcha automáticamente.
Botones de control
Botón de
encendido/apagado
Gancho de pared
Base ajustable
Puerto Mini USB
Puerto USB para llaves
Puerto para tarjetas
SD/MMC
Puerto para tarjetas XD
Puerto para tarjetas MS,
MS Pro, MS Duo, MS Pro
Duo
Entrada de alimentación
Page 24

3
Documento no contractual que puede sufrir modificaciones en caso de errores tipográficos (Mktg0309)
ESPAÑOL
II. Utilice su marco
1. Selección del idioma
La primera vez que se enciende, el marco muestra inicialmente una pantalla donde se puede escoger el
idioma de uso.
- Seleccione su idioma por medio de los botones de flecha del mando a distancia y luego pulse
«Enter».
Una vez seleccionado el idioma, el marco empezará a leer las fotos existentes en la memoria interna.
2. Lectura de una tarjeta de memoria o de una llave USB
Si el marco está apagado:
- Inserte la tarjeta o la llave USB en el punto previsto a tal efecto.
- Conecte el marco a la red eléctrica: La presentación de diapositivas lee automáticamente el
contenido de la tarjeta de memoria o la llave USB.
Si el marco está encendido:
- Pulse el botón «Exit» del mando a distancia tantas veces como sea necesario hasta ver la pantalla
de selección de modos.
- Por medio de los botones «Arriba/Abajo» del mando a distancia, seleccione la tarjeta o la llave que
desea leer. (
Internal memory para memoria interna, SD, XD, MS o USB para una llave)
- Pulse el botón «Enter» del mando a distancia para confirmar su opción, y luego el botón «Slide
Show» para iniciar la presentación de diapositivas.
Si su soporte (carta, llave o memoria interna) contiene música y que usted desea un diaporama musical,
pulse el botón
« Enter » del mando a distancia durante el diaporama. La pantalla fijara entonces
“musica auto”.
3. Copia de fotos en la memoria interna
Existen dos métodos para copiar imágenes de su tarjeta de memoria a la memoria interna del marco.
- Copiar sus fotos a través del administrador de archivos
Si opta por este método, sólo podrá copiar los archivos de uno en uno, y no tendrá la posibilidad de ajustar
su tamaño a la resolución del marco.
1. Pulse el botón «Exit» del mando a distancia tantas veces como sea necesario hasta ver la pantalla
de selección de modos.
2. Por medio de los botones «Derecha/Izquierda» del mando a distancia, seleccione el icono
«Archivos» y pulse «Enter».
Page 25

4
Documento no contractual que puede sufrir modificaciones en caso de errores tipográficos (Mktg0309)
ESPAÑOL
3. Seleccione la foto (o el archivo de música o vídeo para las versiones 7911, 7331, 9331 y 10331)
mediante los botones
«Arriba/Abajo» del mando a distancia, y luego pulse «Copy/Del». En la
pantalla aparecerá el mensaje
«¿Copiar archivo?-SÍ/NO». Escoja la opción deseada y pulse
«Enter». Su archivo se copiará.
- Copiar sus fotos mediante el modo de viñetas
Con este método, puede copiar una selección de fotos teniendo la posibilidad de ajustar su tamaño al del
marco, a fin de optimizar la capacidad de la memoria interna.
1. Pulse el botón «Exit» del mando a distancia tantas veces como sea necesario hasta ver la pantalla
de selección de modos.
2. Seleccione el soporte extraíble en que se encuentran las fotos para copiar (tarjeta de memoria o
llave USB), mediante los botones
«Arriba/Abajo» del mando a distancia. Pulse «Enter».
3. Por medio de los botones «Derecha/Izquierda», seleccione el modo de foto y pulse «Enter». Se
iniciará la presentación de diapositivas.
4. Pulse el botón «Exit» del mando a distancia para acceder a las viñetas.
5. Pulse el botón «Copy/Del». Aparecerá en la pantalla el mensaje «¿Copiar archivos? » Seleccione
«Sí» y pulse
«Enter».
6. Volverán a aparecer las viñetas con una pequeña casilla blanca en la esquina superior derecha de
cada una de ellas. Seleccione las fotos que desea copiar mediante los botones
«Derecha/Izquierda-Arriba/Abajo» del mando a distancia, y pulse «Enter» después de seleccionar
cada foto. Se marcarán entonces las casillas blancas de las imágenes seleccionadas.
7. Pulse el botón «Copy/Del». Seleccione a continuación el directorio donde desea copiar sus
imágenes y pulse
«Enter».
8. Aparecerá en la pantalla un cuadro de diálogo preguntándole si desea cambiar el tamaño de sus
imágenes.
9. Seleccione la opción deseada mediante los botones «Arriba/Abajo» del mando a distancia y
confírmela seleccionando
«Confirmar». Pulse «Enter». Sus fotos se copiarán en la memoria interna
y su tamaño se ajustará a la definición del marco.
4. Supresión de fotos
Puede suprimir fotos que se encuentren en la memoria interna de su marco.
Page 26

5
Documento no contractual que puede sufrir modificaciones en caso de errores tipográficos (Mktg0309)
ESPAÑOL
- Suprima sus fotos a través del administrador de archivos
Si opta por este método, sólo podrá suprimir los archivos de uno en uno.
1. Pulse el botón «Exit» del mando a distancia tantas veces como sea necesario hasta ver la pantalla
de selección de modos.
2. Por medio de los botones «Derecha/Izquierda» del mando a distancia, seleccione el icono
«Archivos» y pulse «Enter ».
3. Seleccione la foto (o el archivo de música o vídeo para las versiones 7911, 7331, 9331 y 10331)
mediante los botones
«Arriba/Abajo» del mando a distancia, y luego pulse «Copy/Del». En la
pantalla aparecerá el mensaje
«¿Suprimir archivo?-Sí/No». Escoja la opción deseada y pulse
«Enter». Su archivo se suprimirá.
- Suprima sus fotos mediante el modo de viñetas
Mediante este método, puede suprimir una selección de fotos de la memoria interna o bien todas ellas.
1. Pulse el botón «Exit» del mando a distancia tantas veces como sea necesario hasta ver la pantalla
de selección de modos.
2. Seleccione la memoria interna mediante los botones «Arriba/Abajo» del mando a distancia. Pulse
«Enter».
3. Por medio de los botones «Derecha/Izquierda», seleccione el modo de foto y pulse «Enter». Se
iniciará la presentación de diapositivas.
4. Pulse el botón «Exit» del mando a distancia para acceder a las viñetas.
5. Pulse el botón «Copy/Del». Aparecerá en la pantalla el mensaje «¿Suprimir? » Seleccione «Sí» y
pulse
«Enter».
6. Volverán a aparecer las viñetas con una pequeña casilla blanca en la esquina superior derecha de
cada una de ellas. Seleccione las fotos que desea copiar mediante los botones
«Derecha/Izquierda-Arriba/Abajo» del mando a distancia, y pulse «Enter» después de seleccionar
cada foto. Se marcarán entonces las casillas blancas de las imágenes seleccionadas.
7. Pulse el botón «Copy/Del», y luego pulse «Enter».
8. Aparecerá en la pantalla «¿Suprimir?».
9. Seleccione la opción deseada mediante los botones «Arriba/Abajo» del mando a distancia. Pulse
«Enter». Sus fotos se suprimirán de la memoria interna
Page 27

6
Documento no contractual que puede sufrir modificaciones en caso de errores tipográficos (Mktg0309)
ESPAÑOL
III. Selección del tipo de archivos a leer
1. Fotos
- Pulse dos veces el botón «Exit» para ver la pantalla principal.
- Por medio de los botones «Izquierda/Derecha» del mando a distancia, seleccione el icono «Foto» .
- Pulse el botón «Enter» para iniciar la lectura.
2. Vídeos (sólo en DPF 7911, DPF 7331 DPF 9331 y DPF 10331)
- Pulse dos veces el botón «Exit» para ver la pantalla principal.
- Por medio de los botones «Izquierda/Derecha» del mando a distancia, seleccione el icono «Vídeo»
- Pulse el botón «Enter» para iniciar la lectura
3. Música (sólo en DPF 7911, DPF 7331 DPF 9331 y DPF 10331)
- Pulse dos veces el botón «Exit» para ver la pantalla principal.
- Por medio de los botones «Izquierda/Derecha» del mando a distancia, seleccione el icono
«Música» .
- Pulse el botón «Enter» para iniciar la lectura.
IV. Ajustes
Desde la pantalla principal, seleccione el icono «Ajustes» mediante los botones «Derecha/Izquierda» y
«Arriba/Abajo» del mando a distancia para acceder a los distintos ajustes de su marco.
Si está activada la presentación de diapositivas, basta con pulsar el botón «Setup» del mando a distancia
para acceder a los menús de ajuste.
Una vez dentro de los menús de ajuste, los botones «Arriba/Abajo» del mando a distancia le permitirán
seleccionar el parámetro que desea ajustar, y los botones
«Derecha/Izquierda» le permitirán escoger el
ajuste adecuado para el parámetro seleccionado.
Page 28

7
Documento no contractual que puede sufrir modificaciones en caso de errores tipográficos (Mktg0309)
ESPAÑOL
1. Configuración de las fotos
Seleccioné esta opción mediante los botones «Arriba/Abajo» del mando a distancia para acceder al menú
correspondiente.
Con los botones de flecha del mando a distancia puede ajustar:
- El modo de visualización
- La relación de visualización
- La duración de la presentación de diapositivas
- La repetición de la presentación de diapositivas
- Los efectos de transición
- La visualización múltiple
- El reloj
- El cambio de tamaño de las imágenes
- Cortar al copiar
- Mostrar tip al copiar
2. Configuración del calendario
Desde el menú de ajuste, seleccione la opción mediante los botones «Arriba/Abajo» del mando a distancia
para acceder a este menú y pulse
«Enter».
Mediante los botones de flechas del mando a distancia podrá ajustar:
- El modo de visualización del calendario (diario, mensual o reloj)
- La fecha
- El modo de visualización de la hora (24 h o 12 h)
- La hora
- Estado de alarma (sólo en DPF 7911, DPF 7331 DPF 9331 y DPF 10331)
- Hora de alarma (sólo en DPF 7911, DPF 7331 DPF 9331 y DPF 10331)
- Frecuencia de alarma (sólo en DPF 7911, DPF 7331 DPF 9331 y DPF 10331)
3. Ajustes de vídeo (sólo en DPF 7911, DPF 7331 DPF 9331 y DPF 10331)
En el menú de ajuste, seleccione la opción «Ajustes de vídeo» mediante los botones «Arriba/Abajo» del
mando a distancia y pulse
«Enter».
En este menú puede escoger:
- El modo de visualización (pantalla completa o tamaño original)
- El modo de lectura (una vez o repetida)
- La activación de la lectura automática
4. Ajustes de la música (sólo en DPF 7911, DPF 7331 y DPF 9331)
Desde el menú de ajuste, seleccione la opción «Ajustes de música» mediante los botones «Arriba/Abajo»
del mando a distancia y luego pulse
«Enter».
Page 29

8
Documento no contractual que puede sufrir modificaciones en caso de errores tipográficos (Mktg0309)
ESPAÑOL
Puede ajustar:
- El modo de lectura (aleatorio, lectura repetida, repetición una vez)
- Los efectos musicales (Rock, Pop, Clásica, Jazz…)
- La visualización del ecualizador durante la lectura
- La lectura automática
5. Configuración del sistema
Este menú le permite ajustar los parámetros de funcionamiento de su marco.
- El idioma (inglés, francés, español, portugués, italiano, alemán, holandés)
- La luminosidad,
- El contraste
- El color
- La tonalidad del marco
- Encendido
- La puesta en marcha automática programada
- Apagado
- El apagado automático programado
- La frecuencia de encendido y apagado automático (de lunes a viernes, el fin de semana, una vez o
todos los días)
- La reinicialización del marco
V. Funciones adicionales
Se pueden transferir archivos al marco conectándolo a su ordenador personal. Para obtener más
información al respecto, puede descargar las instrucciones de uso completas del sitio:
http://www.telefunken-digital.com
VI. Instrucciones de seguridad
Manipule el marco de fotos digital con precaución y evite tocar la pantalla; las marcas de dedos son difíciles
de limpiar.
Coloque en todo caso el marco de fotos digital sobre una superficie plana y estable para evitar que se caiga
y se dañe.
Evite exponer el marco de fotos digital al sol o a temperaturas elevadas, ya que podrían dañarlo o reducir
su vida útil. No lo coloque sobre fuentes de calor como radiadores, estufas… Para evitar reflejos, no
coloque el marco de cara al sol.
Evite exponer el marco de fotos digital a la lluvia, el agua o la humedad. No lo coloque sobre fregaderos ni
pilas donde podría mojarse.
No coloque en ningún caso objetos pesados o cortantes sobre el marco, la pantalla ni el cable de
alimentación.
Page 30

9
Documento no contractual que puede sufrir modificaciones en caso de errores tipográficos (Mktg0309)
ESPAÑOL
No enchufe el marco de fotos digital a una toma de corriente o un cable de alimentación demasiado
potentes. Ello podría dar lugar a sobrecalentamientos, incendios o electrocuciones.
Vigile la ubicación del cable de alimentación, que no deberá poder pisarse ni estar en contacto con otros
objetos. No coloque el cable sobre un tapete. Compruebe periódicamente el estado del cable para prevenir
cualquier daño. Si el cable está dañado, desconéctelo y sustitúyalo.
Ventilación
Las ranuras de tarjetas de memoria y las aberturas permiten ventilar el marco.
Para garantizar un uso óptimo del marco y para evitar un sobrecalentamiento, hay que evitar obstruir o
tapar dichas aberturas.
Mantenga el marco digital a una distancia suficiente de la pared para asegurar la ventilación.
Para evitar sobrecalentamientos, no coloque el marco de fotos digital sobre una cama o un sofá. ¡Atención!
No retire en ningún la tapa de plástico de la parte posterior del marco. El marco de fotos digital contiene
circuitos eléctricos, y si los toca podría sufrir daños.
No intente reparar el marco digital por su cuenta.
VII. Garantía
La garantía no cubre los daños ocasionados si usted (u otra persona no capacitada) intenta reparar el
marco.
Si el marco emite humo, un ruido o un olor no habitual, apáguelo y desenchúfelo de inmediato. Póngase en
contacto con la tienda donde lo ha comprado.
Si no utiliza el marco digital durante un tiempo, recuerde desenchufar el cable de alimentación.
La garantía cubre el marco de fotos digital, pero no incluye los accesorios. Se consideran accesorios:
El adaptador de corriente,
El mando a distancia (según modelo).
Sin embargo, estos accesorios se pueden pedir a nuestro servicio técnico:
Por e-mail:
Periodo de garantía
Este marco digital cuenta con una garantía de 12 meses. El periodo de garantía comienza en el momento
de la compra del marco.
La garantía debe probarse mediante la presentación de la factura original o el recibo de compra donde
aparezcan la fecha y el modelo adquirido.
Cobertura
Si el marco digital es defectuoso, debe devolverlo completo a su distribuidor con una nota explicativa.
Si el marco digital presenta un defecto durante el periodo de garantía, el servicio posventa oficial reparará
todos los elementos defectuosos o los defectos de fabricación. El servicio posventa decidirá de forma
unilateral sobre la reparación o sustitución del marco digital, en su totalidad o en parte.
La fecha de compra inicial determina la fecha en que comienza el periodo de garantía.
Page 31
10
Documento no contractual que puede sufrir modificaciones en caso de errores tipográficos (Mktg0309)
ESPAÑOL
El periodo de garantía no se prolongará en caso de reparación o sustitución del marco digital por parte de
nuestro servicio posventa.
Exclusión
Los daños o defectos ocasionados por el mal uso o la manipulación del marco digital o bien por la
utilización de accesorios no originales o no recomendados por el presente aviso no están cubiertos por la
garantía.
La garantía no cubre los daños ocasionados por elementos exteriores como rayos, inundaciones o
incendios, ni ningún otro daño ocasionado durante un transporte.
No se podrá hacer ninguna reclamación de garantía si el número de serie del marco digital ha sido
modificado, eliminado o borrado, o es ilegible.
No se podrá hacer ninguna reclamación de garantía si el marco digital ha sido reparado, alterado o
modificado por su propietario o por cualquier otra persona no capacitada y cualificada oficialmente.
El fabricante no garantiza las propiedades técnicas descritas en este manual. El material y los accesorios
descritos en este manual pueden sufrir modificaciones sin previo aviso. Por este motivo, el fabricante se
reserva el derecho de modificar los componentes, las opciones, las características y los documentos
relacionados sin previo aviso.
Conformidad a la normativa en vigor:
Este marco digital se ajusta a las normas CE vigentes, y es compatible con la norma RoHS.
Reciclaje de equipos eléctricos y electrónicos al final de su vida útil.
Los aparatos eléctricos y electrónicos usados no deben eliminarse junto con los residuos domésticos
ordinarios. La presencia de este símbolo en el producto o en el embalaje del mismo se lo recuerdan.
Algunos de los materiales de los que está hecho este producto se pueden reciclar si se llevan a un centro
de reciclaje adecuado. Al reutilizar las piezas y las materias primas de los aparatos usados, hace una
contribución importante a la protección del medio ambiente.
Para obtener más información sobre los lugares de recogida de equipos usados, puede dirigirse a su
ayuntamiento, al servicio de tratamiento de residuos o al establecimiento donde ha adquirido el producto.
Page 32
11
Documento no contractual que puede sufrir modificaciones en caso de errores tipográficos (Mktg0309)
ESPAÑOL
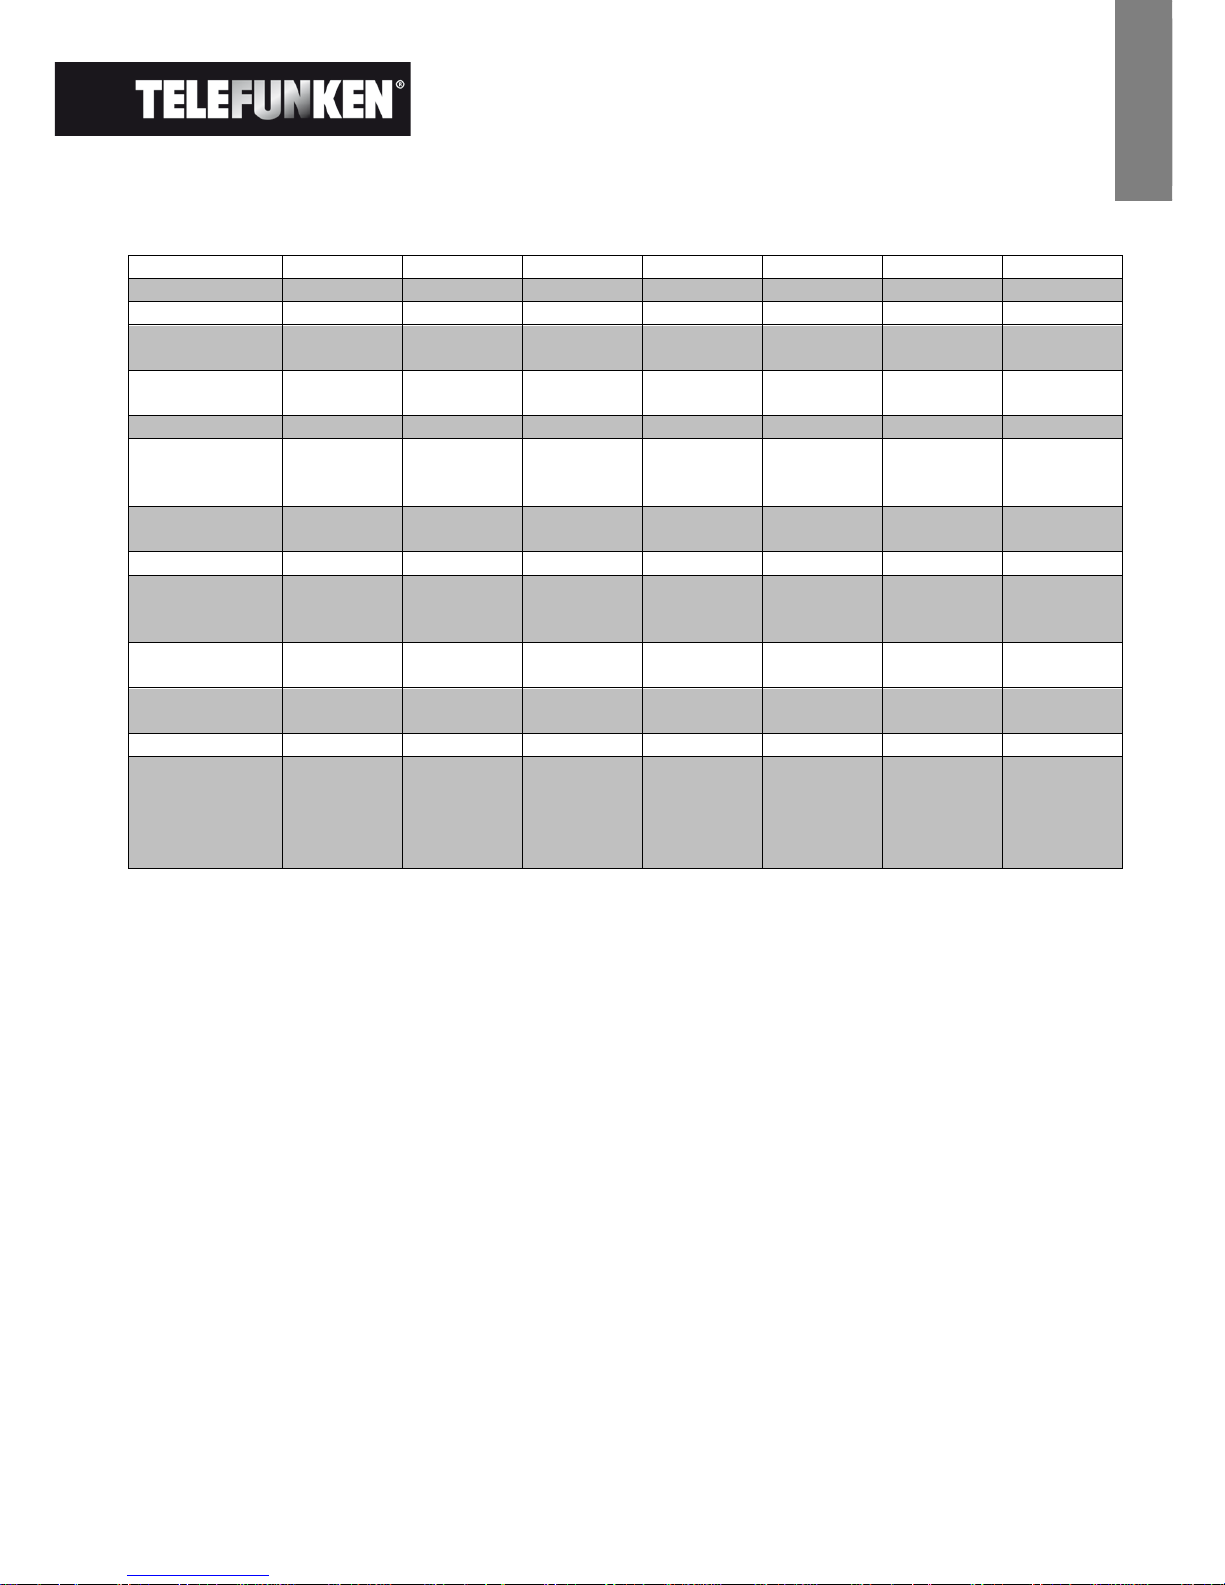
VIII. Características técnicas
Características
DPF 7901
DPF 7911
DPF 7321
DPF 7331
DPF 9321
DPF 9331
DPF 10331
Tamaño
7 ˝ 7 ˝ 7 ˝ 7 ˝ 8,4 ˝ 8,4 ˝ 10,4”
Definición
480 x 234 480 x 234 800 x 600 800 x 600 800 x 600 800 x 600 800 x 600
Relación de
imagen
16/9 16/9 4/3 4/3 4/3 4/3 4/3
Memoria
interna
128 MB 128 MB 2 GB 2 GB 2 GB 2 GB 2 GB
Audio/vídeo
NO SÍ NO SÍ NO SÍ SÍ
Tarjetas
compatibles
SD/MMC,
MS, XD,
llaves USB
SD/MMC,
MS, XD,
llaves USB
SD/MMC,
MS, XD,
llaves USB
SD/MMC,
MS, XD,
llaves USB
SD/MMC,
MS, XD,
llaves USB
SD/MMC,
MS, XD,
llaves USB
SD/MMC,
MS, XD,
llaves USB
Cambio de
tamaño auto.
SÍ SÍ SÍ SÍ SÍ SÍ SÍ
Rotación auto.
SÍ SÍ SÍ SÍ SÍ SÍ SÍ
Entrada
alimentación
100-240
V CA
50/60 Hz
100-240 V
CA 50/60
Hz
100-240 V
CA 50/60
Hz
100-240 V
CA 50/60
Hz
100-240 V
CA 50/60
Hz
100-240 V
CA 50/60
Hz
100-240 V
CA 50/60
Hz
Salida
alimentación
5 V CC
2 Ah
5 V CC 2
Ah
5 V CC 2
Ah
5 V CC 2
Ah
5 V CC 2
Ah
5 V CC 2
Ah
9 V CC 2
Ah
Dimensiones
205 x 135 x
20 mm
205 x 135 x
20 mm
195 x 149 x
20 mm
195 x 149 x
20 mm
225 x 178 x
20 mm
225 x 178 x
20 mm
264 x 210 x
25 mm
Peso
362 g 362 g 424 g 424 g 520 g 520 g 900 g
Sistemas
compatibles
Windows
XP, Vista,
Mac OS 9.0
y
posteriores
Windows
XP, Vista,
Mac OS 9.0
y
posteriores
Windows
XP, Vista,
Mac OS 9.0
y
posteriores
Windows
XP, Vista,
Mac OS 9.0
y
posteriores
Windows
XP, Vista,
Mac OS 9.0
y
posteriores
Windows
XP, Vista,
Mac OS 9.0
y
posteriores
Windows
XP, Vista,
Mac OS 9.0
y
posteriores
Page 33

1
Dokument ohne vertraglichen Charakter. Änderungen aufgrund von Druckfehlern bleiben vorbehalten (Mktg0309).
DEUTSCH
GEBRAUCHSANWEISUNG FÜR DIGITALE BILDERRAHMEN
TELEFUNKEN „STYLE“-SERIE
(DPF 7901, DPF 7911, DPF 7321, DPF 7331, DPF 9321, DPF 9331, DPF 10331)
I. Auspacken und Installieren Ihres Bilderrahmens ............................... 2
1. Inhalt der Verpackung ....................................................................................................... 2
2. Abbildungen des Bilderrahmens ..................................................................................... 2
3. Installierung ........................................................................................................................ 2
II. Benutzung Ihres Bilderrahmens ............................................................. 3
1. Sprachauswahl .................................................................................................................. 3
2. Lesen einer Speicherkarte oder eines USB-Sticks ...................................................... 3
3. Kopieren von Fotos in den internen Speicher .............................................................. 4
4. Löschen von Fotos ............................................................................................................ 5
III. Auswahl des zu lesenden Dateityps ...................................................... 6
1. Fotos .................................................................................................................................... 6
2. Videos (nur bei DPF 7911, DPF 7331, DPF 9331 und DPF 10331) ........................... 6
3. Musik (nur bei DPF 7911, DPF 7331, DPF 9331 und DPF 10331) ............................ 6
IV. Einstellungen ............................................................................................. 6
1. Fotoeinstellung ................................................................................................................... 7
2. Kalendereinstellung ........................................................................................................... 7
3. Videoeinstellungen (nur bei DPF 7911, DPF 7331, DPF 9331 und DPF 10331) ..... 7
4. Musikeinstellungen (nur bei DPF 7911, DPF 7331, DPF 9331 und DPF 10331) ..... 8
5. Systemeinstellung ............................................................................................................. 8
V. Weitere Funktionen .................................................................................. 8
VI.
Sicherheitshinweise ................................................................................. 8
VII.
Garantie ...................................................................................................... 9
VIII.
Technische Merkmale ...................................................................... 11
Page 34
2
Dokument ohne vertraglichen Charakter. Änderungen aufgrund von Druckfehlern bleiben vorbehalten (Mktg0309).
DEUTSCH
I. Auspacken und Installieren Ihres Bilderrahmens
Vielen Dank für Ihren Kauf eines digitalen Bilderrahmens der „STYLE-Serie“ von TELEFUNKEN. Bevor Sie Ihr
Gerät benutzen, lesen Sie bitte die vorliegende Gebrauchsanweisung durch und bewahren Sie sie gut auf,
um später auf sie zurückgreifen zu können.
1. Inhalt der Verpackung
- 1 digitaler Bilderrahmen
- 1 Netzadapter
- 1 Fernbedienung
- 1 Reinigungstuch
2. Abbildungen des Bilderrahmens
3. Installierung
- Nehmen Sie Ihren Bilderrahmen und sein Zubehör aus der Verpackung.
- Entfernen Sie die Schutzfolie von der Vorderseite des Bilderrahmens.
- Ziehen Sie den Plastikstreifen zum Schutz der Kontakte der Fernbedienung ab.
- Stellen Sie den Bilderrahmen an der gewünschten Stelle auf, indem Sie den justierbaren Ständer in
Ihre Richtung ziehen (s. Abbildung oben).
Wandaufhänger
An/Aus-Taste
Kontrolltasten
Justierbarer
Ständer
Mini-USB-Anschluss
Anschluss für USB-Sticks
Anschluss für SD/MMCSpeicherkarten
Anschluss für XDSpeicherkarten
Anschluss für
Speicherkarten MS, MS Pro,
MS Duo, MS Pro Duo
Anschluss für die
Netzspannung
Page 35

3
Dokument ohne vertraglichen Charakter. Änderungen aufgrund von Druckfehlern bleiben vorbehalten (Mktg0309).
DEUTSCH
- Schließen Sie das Netzkabel an der vorgesehenen Stelle am Bilderrahmen und an einer Steckdose
an.
- Ihr Bilderrahmen schaltet sich automatisch ein.
II. Benutzung Ihres Bilderrahmens
1. Sprachauswahl
Bei der ersten Benutzung des Bilderrahmens erscheint zunächst ein Bildschirm für die Auswahl der
Benutzersprache.
- Wählen Sie Ihre Sprache mithilfe der Pfeiltasten der Fernbedienung aus und drücken Sie auf
„Enter“.
Sobald Sie Ihre Sprache ausgewählt haben, beginnt der Bilderrahmen, die im internen Speicher befindlichen
Fotos abzuspielen.
2. Lesen einer Speicherkarte oder eines USB-Sticks
Falls Ihr Bilderrahmen ausgeschaltet ist:
- Führen Sie Ihre Speicherkarte oder Ihren USB-Stick an der hierfür vorgesehenen Stelle ein.
- Schalten Sie Ihren Bilderrahmen ein. Die Diashow spielt den Inhalt Ihrer Speicherkarte oder Ihres
USB-Sticks automatisch ab.
Falls Ihr Bilderrahmen eingeschaltet ist:
- Drücken Sie so häufig auf die „Exit“-Taste Ihrer Fernbedienung, bis die Modus-Auswahl auf dem
Bildschirm angezeigt wird.
- Wählen Sie mithilfe der Tasten „Hoch/Runter“ Ihrer Fernbedienung die Speicherkarte oder den
USB-Stick, von der/dem abgespielt werden soll. (
Internal memory für internen Speicher, SD, XD,
MS oder USB für einen USB-Stick)
- Drücken Sie auf die „Enter“-Taste Ihrer Fernbedienung, um Ihre Wahl zu bestätigen, und
anschließend auf die Taste
„Slide Show“, um die Diashow zu starten.
Falls auf Ihre Datenspeicher, USB Schlüssel oder internen Speicher Musik gespeichert ist, und falls
Sie ein musikales Diaporama wünschen, dann drücken Sie bitte die 'Enter' Taste der
Abstandsbedienung, während das Lesen vom Diaporama. Auf Ihr Bildschirm sehen Sie dann 'Musik
Auto'.
Page 36

4
Dokument ohne vertraglichen Charakter. Änderungen aufgrund von Druckfehlern bleiben vorbehalten (Mktg0309).
DEUTSCH
3. Kopieren von Fotos in den internen Speicher
Es gibt zwei Methoden, um die Bilder Ihrer Speicherkarte in den internen Speicher des Bilderrahmens zu
kopieren.
- Kopieren Ihrer Fotos über den Dateimanager
Falls Sie diese Methode anwenden, können Sie die Dateien nur eine nach der anderen kopieren und haben
nicht die Möglichkeit, sie auf die Auflösung des Bilderrahmens zu skalieren.
1. Drücken Sie so häufig auf die „Exit“-Taste Ihrer Fernbedienung, bis die Modus-Auswahl auf dem
Bildschirm angezeigt wird.
2. Wählen Sie mithilfe der Tasten „Rechts/Links“ der Fernbedienung das Symbol „Dateien“ aus und
drücken Sie auf
„Enter“.
3. Wählen Sie das Foto (oder die Musik- oder Videodatei für die Versionen 7911, 7331, 9331 und
10331) anhand der Tasten
„Hoch/Runter“ der Fernbedienung aus und drücken Sie auf die Taste
„Copy/Del“. Auf dem Bildschirm erscheint „Datei kopieren? – Ja/Nein“. Wählen Sie die
gewünschte Option und drücken Sie auf
„Enter“. Ihre Datei wird kopiert.
- Kopieren Ihrer Fotos über den Miniatur-Modus.
Mit dieser Methode können Sie eine Auswahl an Fotos kopieren und haben dabei die Möglichkeit, sie auf
die Auflösung des Bilderrahmens zu skalieren, um die Kapazität des internen Speichers zu optimieren.
1. Drücken Sie so häufig auf die „Exit“-Taste Ihrer Fernbedienung, bis die Modus-Auswahl auf dem
Bildschirm angezeigt wird.
2. Wählen Sie anhand der Tasten „Hoch/Runter“ der Fernbedienung den mobilen Datenträger, auf
dem sich die zu kopierenden Fotos befinden (Speicherkarte oder USB-Stick). Drücken Sie auf
„Enter“.
3. Wählen Sie mithilfe der Tasten „Rechts/Links“ den Fotomodus und drücken Sie auf „Enter“. Die
Diashow startet.
4. Drücken Sie auf die „Exit“-Taste der Fernbedienung, um zu den Miniaturbildern zu gelangen.
5. Drücken Sie die Taste „Copy/Del“. Auf dem Bildschirm erscheint „Dateien kopieren?“. Wählen Sie
„Ja“ und drücken Sie auf
„Enter“.
6. Die Miniaturbilder werden erneut angezeigt mit jeweils einem kleinen weißen Kästchen in ihrer
rechten oberen Ecke. Wählen Sie die zu kopierenden Fotos anhand der Tasten
„Rechts/Links –
Hoch/Runter“ der Fernbedienung aus, indem Sie für jedes ausgewählte Foto auf „Enter“ drücken.
Das kleine weiße Kästchen der ausgewählten Bilder wird dadurch markiert.
7. Drücken Sie die Taste „Copy/Del“. Wählen Sie anschließend den Ordner, in den Sie Ihre Bilder
kopieren möchten, und drücken Sie auf
„Enter“.
Page 37

5
Dokument ohne vertraglichen Charakter. Änderungen aufgrund von Druckfehlern bleiben vorbehalten (Mktg0309).
DEUTSCH
8. Auf dem Bildschirm erscheint eine Dialogbox, die Sie fragt, ob Sie Ihre Bilder skalieren möchten.
9. Wählen Sie die gewünschte Option anhand der Tasten „Hoch/Runter“ der Fernbedienung aus und
„bestätigen“ Sie. Drücken Sie auf „Enter“. Ihre Fotos werden nun in den internen Speicher kopiert
und auf die Auflösung des Bilderrahmens skaliert.
4. Löschen von Fotos
Sie können Fotos löschen, die sich im internen Speicher Ihres Bilderrahmens befinden.
- Löschen Ihrer Fotos über den Dateimanager.
Falls Sie diese Methode anwenden, können Sie die Dateien nur eine nach der anderen löschen.
1. Drücken Sie so häufig auf die „Exit“-Taste Ihrer Fernbedienung, bis die Modus-Auswahl auf dem
Bildschirm angezeigt wird.
2. Wählen Sie mithilfe der Tasten „Rechts/Links“ der Fernbedienung das Symbol „Dateien“ aus und
drücken Sie auf
„Enter“.
3. Wählen Sie das Foto (oder die Musik- oder Videodatei für die Versionen 7911, 7331, 9331 und
10331) anhand der Tasten
„Hoch/Runter“ der Fernbedienung aus und drücken Sie auf die Taste
„Copy/Del“. Auf dem Bildschirm erscheint „Datei löschen? –Ja/Nein“. Wählen Sie die gewünschte
Option und drücken Sie auf
„Enter“. Ihre Datei wird gelöscht.
- Löschen Ihrer Fotos über den Miniatur-Modus.
Mit dieser Methode können Sie eine Auswahl oder alle Fotos aus dem internen Speicher löschen.
1. Drücken Sie so häufig auf die „Exit“-Taste Ihrer Fernbedienung, bis die Modus-Auswahl auf dem
Bildschirm angezeigt wird.
2. Wählen Sie mithilfe der Tasten „Hoch/Runter“ der Fernbedienung den internen Speicher. Drücken
Sie auf
„Enter“.
3. Wählen Sie anhand der Tasten „Rechts/Links“ den Fotomodus und drücken Sie auf „Enter“. Die
Diashow startet.
4. Drücken Sie auf die „Exit“-Taste der Fernbedienung, um zu den Miniaturbildern zu gelangen.
5. Drücken Sie die Taste „Copy/Del“. Auf dem Bildschirm erscheint „Löschen?“. Wählen Sie „Ja“ und
drücken Sie auf
„Enter“.
6. Die Miniaturbilder werden erneut angezeigt mit jeweils einem kleinen weißen Kästchen in ihrer
rechten oberen Ecke. Wählen Sie die zu kopierenden Fotos anhand der Tasten
„Rechts/Links –
Page 38

6
Dokument ohne vertraglichen Charakter. Änderungen aufgrund von Druckfehlern bleiben vorbehalten (Mktg0309).
DEUTSCH
Hoch/Runter“ der Fernbedienung aus, indem Sie für jedes ausgewählte Foto auf „Enter“ drücken.
Das kleine weiße Kästchen der ausgewählten Bilder wird dadurch markiert.
7. Drücken Sie auf die Taste „Copy/Del“ und anschließend auf „Enter“.
8. Auf dem Bildschirm erscheint „Löschen?“.
9. Wählen Sie anhand der Tasten „Hoch/Runter“ der Fernbedienung die gewünschte Option. Drücken
Sie auf
„Enter“. Ihre Fotos werden nun aus dem internen Speicher gelöscht.
III. Auswahl des zu lesenden Dateityps
1. Fotos
- Drücken Sie zweimal auf die „Exit“-Taste, um den Hauptbildschirm aufzurufen.
- Wählen Sie mithilfe der Pfeiltasten „Links/Rechts“ der Fernbedienung das Symbol „Foto“.
- Drücken Sie auf die „Enter“-Taste: das Abspielen beginnt.
2. Videos (nur bei DPF 7911, DPF 7331, DPF 9331 und DPF 10331)
- Drücken Sie zweimal auf die „Exit“-Taste, um den Hauptbildschirm aufzurufen.
- Wählen Sie mithilfe der Pfeiltasten „Links/Rechts“ der Fernbedienung das Symbol „Video“.
- Drücken Sie auf die „Enter“-Taste: das Abspielen beginnt
3. Musik (nur bei DPF 7911, DPF 7331, DPF 9331 und DPF 10331)
- Drücken Sie zweimal auf die „Exit“-Taste, um den Hauptbildschirm aufzurufen.
- Wählen Sie mithilfe der Pfeiltasten „Links/Rechts“ der Fernbedienung das Symbol „Musik“.
- Drücken Sie auf die „Enter“-Taste: das Abspielen beginnt.
IV. Einstellungen
Wenn Sie sich auf dem Hauptbildschirm befinden, wählen Sie das Symbol „Einst.“ anhand der Tasten
„Rechts/Links“ und „Hoch/Runter“ Ihrer Fernbedienung, um zu den verschiedenen
Einstellungsmöglichkeiten für Ihren Bilderrahmen zu gelangen.
Page 39

7
Dokument ohne vertraglichen Charakter. Änderungen aufgrund von Druckfehlern bleiben vorbehalten (Mktg0309).
DEUTSCH
Falls Ihre Fotos abgespielt werden, drücken Sie einfach auf die „Setup“-Taste Ihrer Fernbedienung, um auf
die Einstellungsmenüs zuzugreifen.
Wenn Sie sich in den Einstellungsmenüs befinden, ermöglichen die „Hoch/Runter“-Tasten der
Fernbedienung es Ihnen, die einzustellenden Parameter auszuwählen. Mithilfe der Tasten
„Rechts/Links“
können Sie den ausgewählten Parameter dann passend regeln.
1. Fotoeinstellung
Um zu diesem Menü zu gelangen, wählen Sie die entsprechende Zeile mithilfe der Tasten „Hoch/Runter“
der Fernbedienung.
Mit den Pfeiltasten der Fernbedienung können Sie Folgendes einstellen:
- Den Anzeigemodus
- Das Anzeigeverhältnis
- Die Dauer der Diashow
- Den Endlosmodus für die Diashow
- Die Übergangseffekte
- Das gleichzeitige Anzeigen mehrerer Bilder
- Die Uhr
- Die Skalierung der Bilder
- Auschneiden bem kopier
- Tipp anzeigen beim kopier
2. Kalendereinstellung
Wenn Sie sich im Einstellungsmenü befinden, wählen Sie mithilfe der Tasten „Hoch/Runter“ der
Fernbedienung die entsprechende Zeile, um zu diesem Menü zu gelangen, und drücken Sie auf
„Enter“.
Mit den Pfeiltasten der Fernbedienung können Sie Folgendes einstellen:
- Den Anzeigemodus des Kalenders (Tagesansicht, Monatsansicht oder Uhr)
- Das Datum
- Den Anzeigemodus der Uhrzeit (24 oder 12 Stunden)
- Die Uhrzeit
- Alarmstatus (nur bei DPF 7911, DPF 7331, 9331 und DPF 10331)
- Alarmzeit (nur bei DPF 7911, DPF 7331, 9331 und DPF 10331)
- Alarmfrequenz (nur bei DPF 7911, DPF 7331, 9331 und DPF 10331)
3. Videoeinstellungen (nur bei DPF 7911, DPF 7331, DPF 9331 und DPF 10331)
Wählen Sie im Einstellungsmenü anhand der Tasten „Hoch/Runter“ Ihrer Fernbedienung die Zeile
„Videoeinstellungen“ und drücken Sie auf „Enter“.
In diesem Menü können Sie wählen:
- Den Anzeigemodus (Vollbildschirm oder Originalgröße)
- Den Abspielmodus (einmalig oder endlos)
Page 40

8
Dokument ohne vertraglichen Charakter. Änderungen aufgrund von Druckfehlern bleiben vorbehalten (Mktg0309).
DEUTSCH
- Die Aktivierung des automatischen Lesens
4. Musikeinstellungen (nur bei DPF 7911, DPF 7331, DPF 9331 und DPF 10331)
Wenn Sie sich im Einstellungsmenü befinden, wählen Sie anhand der Tasten „Hoch/Runter“ Ihrer
Fernbedienung die Zeile
„Musikeinstellungen“ und drücken Sie auf „Enter“.
Sie können einstellen:
- Den Abspielmodus (zufällig, endlos, einmal wiederholen)
- Die Musikeffekte (Rock, Pop, Klassik, Jazz…)
- Die Anzeige des Equalizers während des Abspielens
- Das automatische Abspielen
5. Systemeinstellung
Dieses Menü ermöglicht es Ihnen, die Funktionsparameter Ihres Bilderrahmens einzustellen.
- Die Sprache (Englisch, Französisch, Spanisch, Portugiesisch, Italienisch, Deutsch, Niederländisch)
- Die Helligkeit
- Den Kontrast
- Die Farbe
- Die Sättigung des Bildschirms.
- Farbton
- Power aus
- Auto boot zeit
- Power ein
- Auto Schlieβ zeit
- Auto power frequenz
- Reset
V. Weitere Funktionen
Es ist möglich, Dateien auf den Bilderrahmen zu übertragen, indem Sie ihn an Ihren PC anschließen. Mehr
dazu erfahren Sie in der kompletten Gebrauchsanweisung, die Sie auf der folgenden Website herunterladen
können.
http://www.telefunken-digital.com
VI. Sicherheitshinweise
Behandeln Sie den digitalen Bilderrahmen mit Vorsicht und vermeiden Sie es, den Bildschirm zu berühren,
denn Fingerabdrücke lassen sich nur schwer entfernen.
Stellen Sie den digitalen Bilderrahmen stets auf einer ebenen und stabilen Fläche auf, um Schäden durch
Herunterfallen zu vermeiden.
Page 41

9
Dokument ohne vertraglichen Charakter. Änderungen aufgrund von Druckfehlern bleiben vorbehalten (Mktg0309).
DEUTSCH
Setzen Sie Ihren Bilderrahmen nicht der Sonne oder hohen Temperaturen aus, da er hierdurch beschädigt
oder seine Gebrauchsdauer verringert werden könnte. Stellen Sie ihn nicht in der Nähe von Hitzequellen wie
Heizkörper oder Zusatzheizgeräte auf … Richten Sie ihn nicht gegen das Sonnenlicht, um Reflektionen zu
vermeiden.
Vermeiden Sie es, den Bilderrahmen Regen, Wasser oder Feuchtigkeit auszusetzen. Stellen Sie ihn nicht in
ein Spül- oder anderes Becken, in dem er in Kontakt mit Wasser kommen könnte.
Stellen Sie niemals schwere oder scharfe Objekte auf den Bilderrahmen, den Bildschirm oder sein
Stromkabel.
Achten Sie darauf, den digitalen Bilderrahmen nicht an eine Steckdose oder an ein Stromkabel mit zu hoher
Spannung anzuschließen. Dies könnte zu Überhitzung, Feuer oder einem Elektroschock führen.
Achten Sie auf den Verlauf des Netzkabels; es darf nicht daraufgetreten werden und es darf nicht in Kontakt
mit anderen Gegenständen kommen. Verlegen Sie das Kabel nicht unter einem Teppich. Überprüfen Sie
regelmäßig den Zustand des Kabels, um Schäden zu vermeiden. Sollte das Kabel beschädigt sein, ziehen
Sie es aus der Steckdose und tauschen Sie es aus.
Belüftung
Die Schlitze für die Speicherkarten und die Öffnungen dienen der Belüftung des Bilderrahmens.
Um eine optimale Funktion des Bilderrahmens zu gewährleisten und jegliches Überhitzen zu vermeiden,
dürfen diese Öffnungen nicht blockiert oder abgedeckt werden.
Achten Sie auf genügend Abstand zwischen dem Bilderrahmen und der Wand, um für eine ausreichende
Belüftung zu sorgen.
Stellen Sie den digitalen Bilderrahmen nicht auf ein Bett oder ein Sofa, um Überhitzung zu vermeiden.
Achtung!
Nehmen Sie in keinem Fall die Plastikhaube auf der Rückseite des Bilderrahmens ab. Der digitale
Bilderrahmen enthält Stromkreise, an denen Sie sich verletzen können, falls Sie sie anfassen.
Versuchen Sie nicht, Ihren digitalen Bilderrahmen selbst zu reparieren.
VII. Garantie
Die Garantie deckt keine Schäden ab, die durch einen Reparaturversuch durch Sie (oder eine andere nicht
autorisierte Person) entstanden sind.
Sollte der Bilderrahmen Rauch, ein ungewöhnliches Geräusch oder einen ungewöhnlichen Geruch
abgeben, schalten Sie ihn unverzüglich aus und ziehen Sie das Kabel aus der Steckdose. Kontaktieren Sie
Ihren Händler.
Falls Sie den digitalen Bilderrahmen längere Zeit nicht benutzen, achten Sie darauf, das Stromkabel aus der
Steckdose herauszuziehen.
Die Garantie gilt für den digitalen Bilderrahmen, nicht jedoch für die Zubehörteile. Als Zubehörteile gelten:
Das Netzteil,
Die Fernbedienung (je nach Modell).
Diese Zubehörteile können jedoch über unseren technischen Dienst bestellt werden:
Per E-Mail:
Page 42
10
Dokument ohne vertraglichen Charakter. Änderungen aufgrund von Druckfehlern bleiben vorbehalten (Mktg0309).
DEUTSCH
Garantiezeitraum
Die Garantiedauer für diesen digitalen Bilderrahmen beträgt 12 Monate. Der Garantiezeitraum beginnt mit
dem Kaufdatum.
Die Garantie muss durch die Vorlage der Originalrechnung oder des Kassenbelegs bewiesen werden, auf
denen das Datum und die Modellnummer angegeben sind.
Deckung
Ein defekter digitaler Bilderrahmen muss komplett und zusammen mit einer Erläuterung an Ihren Händler
zurückgebracht oder -gesendet werden.
Falls der digitale Bilderrahmen während des Garantiezeitraums einen Defekt aufweist, repariert der
anerkannte Kundendienst alle defekten Elemente oder Fabrikationsfehler. Allein der Kundendienst
entscheidet darüber, ob der Bilderrahmen repariert oder ganz oder teilweise ausgetauscht wird.
Das ursprüngliche Kaufdatum bestimmt den Beginn des Garantiezeitraums.
Der Garantiezeitraum verlängert sich im Falle einer Reparatur oder eines Austauschs des Bilderrahmens
durch unseren Kundendienst nicht.
Ausschluss
Schäden oder Defekte, die durch eine unsachgemäße Benutzung oder Handhabung des digitalen
Bilderrahmens oder durch die Verwendung von nicht originalen Zubehörteilen oder von Zubehörteilen, die
von der vorliegenden Gebrauchsanweisung nicht empfohlen werden, entstehen, sind von der Garantie
ausgeschlossen.
Die Garantie deckt keine Schäden ab, die durch äußere Einflüsse wie Blitz, Wasser oder Feuer verursacht
werden oder während eines Transports entstehen.
Es besteht kein Garantieanspruch, sollte die Seriennummer des digitalen Bilderrahmens abgeändert,
entfernt oder unlesbar gemacht worden sein.
Es besteht kein Garantieanspruch, falls der digitale Bilderrahmen durch den Käufer oder durch einen
anderen nicht offiziell anerkannten und qualifizierten Reparateur repariert oder verändert wurde.
Der Hersteller gibt keine Garantie für die in dieser Gebrauchsanweisung beschriebenen technischen Daten.
Das Gerät und die in dieser Gebrauchsanweisung beschriebenen Zubehörteile können ohne
Vorankündigung geändert werden. Aus diesem Grund behält sich der Hersteller das Recht vor, die
Bestandteile, Optionen, Merkmale und zugehörigen Dokumente ohne Vorankündigung zu ändern.
Konformität mit den geltenden Vorschriften:
Dieser digitale Bilderrahmen entspricht den geltenden CE-Normen und ist mit dem RoHS-Standard
kompatibel.
Recycling von elektrischen und elektronischen Geräten am Ende ihrer Lebensdauer.
Gebrauchte elektrische und elektronische Geräte dürfen nicht im normalen Haushaltsmüll entsorgt werden.
Dieses Symbol auf dem Produkt oder seiner Verpackung erinnert Sie daran.
Page 43
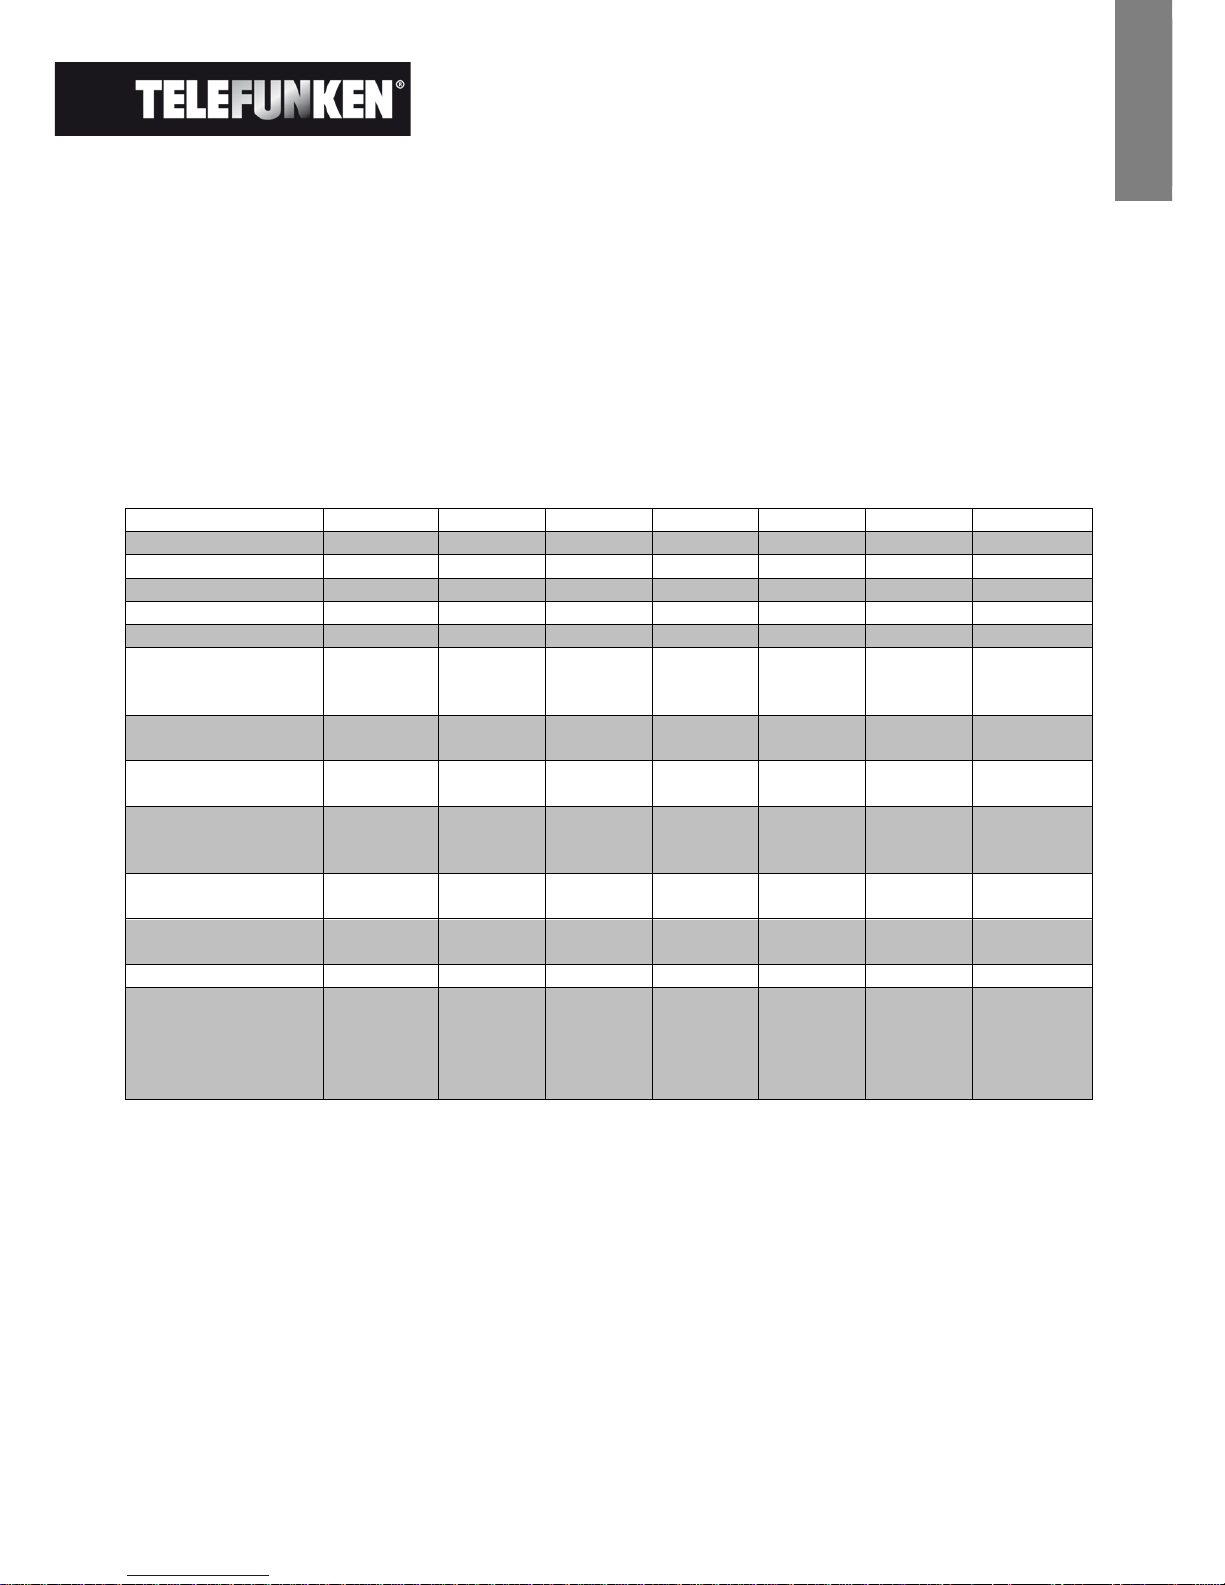
11
Dokument ohne vertraglichen Charakter. Änderungen aufgrund von Druckfehlern bleiben vorbehalten (Mktg0309).
DEUTSCH
Einige Bestandteile dieses Produkts können recycelt werden, wenn Sie es zu einem entsprechenden
Recyclingzentrum bringen. Durch die Wiederverwertung der Teile und Rohstoffe gebrauchter Geräte leisten
Sie einen wichtigen Beitrag zum Umweltschutz.
Für weitere Informationen zu den Sammelstellen für gebrauchte Geräte können Sie sich an Ihre
Stadtverwaltung, an den Altschrottentsorgungsdienst oder an das Geschäft, in dem Sie das Produkt
gekauft haben, wenden.
VIII. Technische Merkmale
Merkmale
DPF 7901
DPF 7911
DPF 7321
DPF 7331
DPF 9321
DPF 9331
DPF 10331
Größe
7 ˝ 7 ˝ 7 ˝ 7 ˝ 8,4 ˝ 8,4 ˝ 10,4“
Auflösung
480 x 234 480 x 234 800 x 600 800 x 600 800 x 600 800 x 600 800 x 600
Bildratio
16/9 16/9 4/3 4/3 4/3 4/3 4/3
Interner Speicher
128 MB
128 MB
2 GB
2 GB
2 GB
2 GB
2 GB
Audio/Video
NEIN JA NEIN JA NEIN JA JA
Kompatible Karten
SD/MMC,
MS, XD,
USB-Stick
SD/MMC,
MS, XD,
USB-Stick
SD/MMC,
MS, XD,
USB-Stick
SD/MMC,
MS, XD,
USB-Stick
SD/MMC,
MS, XD,
USB-Stick
SD/MMC,
MS, XD,
USB-Stick
SD/MMC,
MS, XD,
USB-Stick
Automatische
Skalierung
JA JA JA JA JA JA JA
Automatisches
Drehen
JA JA JA JA JA JA JA
Eingangsspannung
100-240 V
AC 50/60
Hz
100-240 V
AC 50/60
Hz
100-240 V
AC 50/60
Hz
100-240 V
AC 50/60
Hz
100-240 V
AC 50/60
Hz
100-240 V
AC 50/60
Hz
100-240 V
AC 50/60
Hz
Ausgangsspannung
5V DC 2Ah 5V DC
2Ah
5V DC
2Ah
5V DC
2Ah
5V DC
2Ah
5V DC
2Ah
9V DC 2Ah
Maße
205 x 135
x 20 mm
205 x 135
x 20 mm
195 x 149
x 20 mm
195 x 149
x 20 mm
225 x 178
x 20 mm
225 x 178
x 20 mm
264 x 210 x
25 mm
Gewicht
362 g 362 g 424 g 424 g 520 g 520 g 900 g
Systemkompatibilität
Windows
XP, Vista,
Mac OS
9.0 und
folgende
Windows
XP, Vista,
Mac OS
9.0 und
folgende
Windows
XP, Vista,
Mac OS
9.0 und
folgende
Windows
XP, Vista,
Mac OS
9.0 und
folgende
Windows
XP, Vista,
Mac OS
9.0 und
folgende
Windows
XP, Vista,
Mac OS
9.0 und
folgende
Windows
XP, Vista,
Mac OS 9.0
und
folgende
Page 44

1
Documento non contrattuale soggetto a modifiche in caso di errori tipografici (Mktg0609)
ITALIANO
ISTRUZIONI PER L'USO DELLE CORNICI DIGITALI
TELEFUNKEN SERIE “STYLE”
(DPF 7901, DPF 7911, DPF 7321, DPF 7331, DPF 9321, DPF 9331, DPF 10331)
I. Descrizione e installazione della cornice ............................................. 2
1. Contenuto della confezione ............................................................................................. 2
2. Schemi della cornice ......................................................................................................... 2
3. Installazione ........................................................................................................................ 2
II. Utilizzo della cornice ................................................................................ 3
1. Selezione della lingua ....................................................................................................... 3
2. Lettura di una scheda di memoria o di una chiave USB ............................................ 3
3. Copia di foto nella memoria interna ............................................................................... 3
4. Eliminazione di foto ........................................................................................................... 5
III. Selezione del tipo di file da leggere ....................................................... 6
1. Foto ...................................................................................................................................... 6
2. Video (solo sui modelli DPF 7911, DPF 7331, DPF 9331, DPF 10331) .................... 6
3. Musica (solo sui modelli DPF 7911, DPF 7331, DPF 9331, DPF 10331) ................. 6
IV. Impostazioni .............................................................................................. 6
1. Configurazione Foto .......................................................................................................... 6
2. Configurazione Calendario ............................................................................................... 7
3. Impostazioni video (DPF 7911, DPF 7331, DPF 9331, DPF 10331) ......................... 7
4. Impostazioni musica (DPF 7911, DPF 7331, DPF 9331, DPF 10331) ...................... 7
5. Configurazione sistema .................................................................................................... 8
V. Altre funzionalità ....................................................................................... 8
VI.
Istruzioni di sicurezza .............................................................................. 8
VII.
Garanzia ..................................................................................................... 9
VIII.
Caratteristiche tecniche .................................................................. 11
Page 45
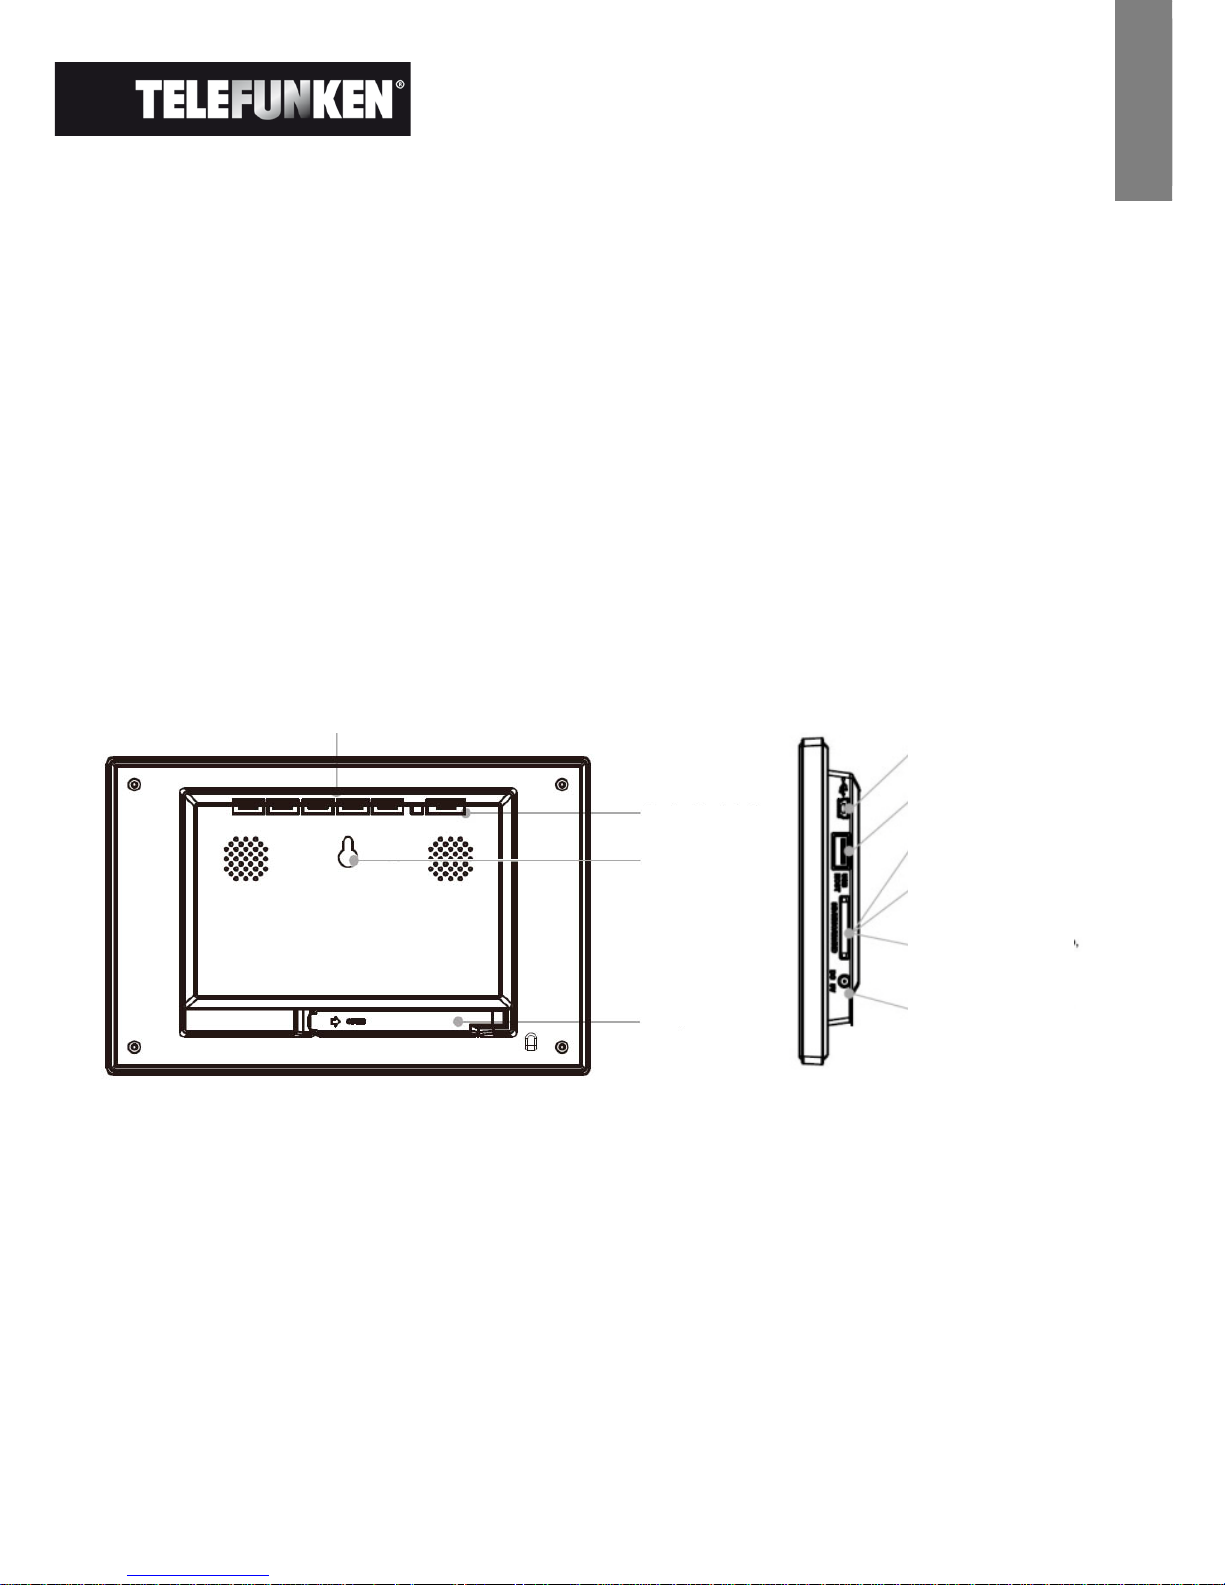
2
Documento non contrattuale soggetto a modifiche in caso di errori tipografici (Mktg0609)
ITALIANO
I. Descrizione e installazione della cornice
Grazie per aver acquistato una cornice digitale TELEFUNKEN "Serie STYLE". Prima di utilizzare questa
apparecchiatura, consultare le presenti istruzioni per l'uso e conservarle per riferimento futuro.
1. Contenuto della confezione
- 1 cornice digitale
- 1 adattatore di rete
- 1 telecomando
- 1 panno per la pulizia
2. Schemi della cornice
3. Installazione
- Estrarre la cornice e gli accessori dall'imballaggio
- Rimuovere la pellicola in plastica che protegge la parte anteriore della cornice
- Tirare la linguetta di plastica che protegge i contatti del telecomando
- Poggiare la cornice nella posizione desiderata tirando verso di sé il piedino regolabile (vedere
schema seguente)
- Collegare il cavo di alimentazione alla cornice utilizzando l'apposito spinotto.
Pulsanti di comando
Tasto Avvio/Arresto
Attacco a muro
Piedino regolabile
Porta mini USB
Porta USB per chiavi
Porta per schede SD/MMC
Porta per schede XD
Porta per schede MS, MS
Pro, MS Duo, MS Pro Duo
Ingresso alimentazione
di rete
Page 46

3
Documento non contrattuale soggetto a modifiche in caso di errori tipografici (Mktg0609)
ITALIANO
- Collegare la cornice a una presa di corrente. La cornice si accende automaticamente.
II. Utilizzo della cornice
1. Selezione della lingua
Al primo utilizzo, la cornice visualizza inizialmente una schermata che consente di scegliere la lingua di
utilizzo.
- Selezionare la propria lingua con i tasti freccia del telecomando e premere "Enter".
Una volta selezionata la lingua, la cornice inizia a leggere le foto contenute nella memoria interna.
2. Lettura di una scheda di memoria o di una chiave USB
Se la cornice è spenta:
- Inserire la scheda o la chiave USB nell'apposito slot.
- Collegare l'alimentazione della cornice: Lo slideshow legge automaticamente il contenuto della
scheda di memoria o della chiave USB.
Se la cornice è accesa:
- Premere il tasto "Exit" del telecomando fino a visualizzare la schermata di selezione delle modalità.
- Con i tasti "Su/Giù" del telecomando, selezionare la scheda o la chiave da leggere. (Internal
memory in caso di memoria interna, SD, XD, MS o USB in caso di chiave)
- Premere il tasto "Enter" del telecomando per confermare la scelta, quindi il tasto "Slide Show" per
avviare lo slideshow.
Se il vostro appoggio (scheda, chiave o memoria interna) contiene della musica e che desiderate un
diaporama musicale, sostenete sul tasto “Enter„ del telecomando durante la lettura del diaporama. Lo
schermo pubblicherà allora “musica auto„
3. Copia di foto nella memoria interna
Sono disponibili due modi per copiare le immagini dalla scheda di memoria alla memoria interna della
cornice.
- Copia delle foto dall'utilità di gestione file
Se si utilizza questo metodo, i file possono essere copiati solo una alla volta e non è possibile adattarli alla
risoluzione della cornice.
Page 47

4
Documento non contrattuale soggetto a modifiche in caso di errori tipografici (Mktg0609)
ITALIANO
1. Premere il tasto "Exit" del telecomando fino a visualizzare la schermata di selezione delle modalità.
2. Con i tasti "Destra/Sinistra" del telecomando, selezionare l'icona "File"e premere "Enter".
3. Selezionare la foto (o il file musicale o video per le versioni 7911, 7331, 9331, 10331) con i tasti
"Su/Giù" del telecomando e premere il tasto "Copy/Del". Sullo schermo viene visualizzato il
messaggio
"Copiare il file? Sì/No". Scegliere l'opzione desiderata e premere "Enter". Il file viene
copiato.
- Copia delle foto dalla modalità thumbnail
Con questo metodo è possibile copiare una selezione di foto ridimensionandole in base alla definizione della
cornice, per ottimizzare la capacità della memoria interna.
1. Premere il tasto "Exit" del telecomando fino a visualizzare la schermata di selezione delle modalità.
2. Selezionare il supporto rimovibile sul quale si trovano le foto da copiare (scheda di memoria o chiave
USB) utilizzando i tasti
"Su/Giù" del telecomando. Premere "Enter".
3. Con i tasti "Destra/Sinistra", selezionare la modalità foto e premere "Enter". Viene avviato lo
slideshow.
4. Premere il tasto "Exit" del telecomando per accedere ai thumbnail.
5. Premere il tasto "Copy/Del". Sullo schermo viene visualizzato il messaggio "Copiare i file?"
Selezionare
"Sì" e premere "Enter".
6. Vengono nuovamente visualizzati i thumbnail, con un quadratino bianco nell'angolo superiore
destro. Selezionare le foto da copiare utilizzando i tasti
"Destra/Sinistra-Su/Giù" del telecomando e
premendo
"Enter" per ogni foto selezionata. Per ogni immagine selezionata, il quadratino bianco
viene contrassegnato da un segno di spunta.
7. Premere il tasto "Copy/Del". Selezionare quindi la directory nella quale si desidera copiare le
immagini e premere
"Enter".
8. Sullo schermo viene visualizzata una finestra di dialogo che chiede se si desidera ridimensionare le
immagini.
9. Selezionare l'opzione scelta utilizzando i tasti "Su/Giù" del telecomando e confermare selezionando
"Conferma". Premere "Enter". Le foto sono state copiate nella memoria interna e ridimensionate in
base alla definizione della cornice.
Page 48

5
Documento non contrattuale soggetto a modifiche in caso di errori tipografici (Mktg0609)
ITALIANO
4. Eliminazione di foto
È possibile eliminare delle foto dalla memoria interna della cornice.
- Eliminazione delle foto dall'utilità di gestione file
Se si utilizza questo metodo, i file possono essere eliminati solo uno alla volta.
1. Premere il tasto "Exit" del telecomando fino a visualizzare la schermata di selezione delle modalità.
2. Con i tasti "Destra/Sinistra" del telecomando, selezionare l'icona "File"e premere “Enter”.
3. Selezionare la foto (o il file musicale o video per le versioni 7911, 7331, 9331, 10331) con i tasti
"Su/Giù" del telecomando e premere il tasto "Copy/Del". Sullo schermo viene visualizzato il
messaggio
"Eliminare il file? Sì/No". Scegliere l'opzione desiderata e premere "Enter". Il file viene
eliminato.
- Eliminazione delle foto dalla modalità thumbnail
Con questo metodo è possibile eliminare una selezione o tutte le foto della memoria interna.
1. Premere il tasto "Exit" del telecomando fino a visualizzare la schermata di selezione delle modalità.
2. Selezionare la memoria interna utilizzando i tasti "Su/Giù" del telecomando. Premere "Enter".
3. Con i tasti "Destra/Sinistra", selezionare la modalità foto e premere "Enter". Viene avviato lo
slideshow.
4. Premere il tasto "Exit" del telecomando per accedere ai thumbnail.
5. Premere il tasto "Copy/Del". Sullo schermo viene visualizzato il messaggio "Eliminare?" Selezionare
"Sì" e premere
"Enter".
6. Vengono nuovamente visualizzati i thumbnail, con un quadratino bianco nell'angolo superiore
destro. Selezionare le foto da copiare utilizzando i tasti
"Destra/Sinistra-Su/Giù" del telecomando e
premendo
"Enter" per ogni foto selezionata. Per ogni immagine selezionata, il quadratino bianco
viene contrassegnato da un segno di spunta.
7. Premere il tasto "Copy/Del" e quindi "Enter".
8. Sullo schermo viene visualizzato il messaggio "Eliminare?".
9. Selezionare l'opzione desiderata utilizzando i tasti "Su/Giù" del telecomando. Premere "Enter". Le
foto sono state eliminate dalla memoria interna
Page 49

6
Documento non contrattuale soggetto a modifiche in caso di errori tipografici (Mktg0609)
ITALIANO
III. Selezione del tipo di file da leggere
1. Foto
- Premere due volte il tasto "Exit" per visualizzare la schermata principale.
- Con le frecce "Sinistra/Destra" del telecomando, selezionare l'icona "Foto".
- Premere il tasto "Enter": la lettura ha inizio.
2. Video (solo sui modelli DPF 7911, DPF 7331, DPF 9331, DPF 10331)
- Premere due volte il tasto "Exit" per visualizzare la schermata principale.
- Con le frecce "Sinistra/Destra" del telecomando, selezionare l'icona "Video".
- Premere il tasto "Enter": la lettura ha inizio
3. Musica (solo sui modelli DPF 7911, DPF 7331, DPF 9331, DPF 10331)
- Premere due volte il tasto "Exit" per visualizzare la schermata principale.
- Con le frecce "Sinistra/Destra" del telecomando, selezionare l'icona "Musica".
- Premere il tasto "Enter": la lettura ha inizio.
IV. Impostazioni
Dalla schermata principale, selezionare l'icona "Impost." con i tasti "Destra/Sinistra" e "Su/Giù" del
telecomando per accedere alle diverse impostazioni della cornice.
Se lo slideshow continua a scorrere, premere il tasto "Imposta" del telecomando per accedere ai menu di
impostazione.
All'interno del menu di impostazione, i tasti "Su/Giù"» del telecomando consentono di selezionare il
parametro da impostare, mentre i tasti
"Destra/Sinistra" consentono di scegliere l'impostazione adeguata
per il parametro selezionato.
1. Configurazione Foto
Selezionare questa riga con i tasti "Su/Giù" del telecomando per accedere al menu.
Page 50

7
Documento non contrattuale soggetto a modifiche in caso di errori tipografici (Mktg0609)
ITALIANO
È possibile effettuare le seguenti impostazioni con i tasti freccia del telecomando:
- Modalità di visualizzazione
- Rapporto di visualizzazione
- Durata dello slideshow
- Visualizzazione continua dello slideshow
- Effetti di transizione
- Visualizzazione multipla
- Orologio
- Ridimensionamento delle immagini
2. Configurazione Calendario
All'interno del menu di impostazione, selezionare la riga con i tasti "Su/Giù" del telecomando per accedere
al menu e premere
"Enter".
Sarà quindi possibile effettuare le seguenti impostazioni utilizzando i tasti freccia del telecomando:
- Modalità di visualizzazione del calendario (giornaliero, mensile o orologio)
- Data
- Modalita orologio (24 o 12 ore)
- Orologio
- Condizione di allarme (solo sui modelli DPF 7911, DPF 7331, DPF 9331, DPF 10331)
- Ora di allarme (solo sui modelli DPF 7911, DPF 7331, DPF 9331, DPF 10331)
- Frequenza allarme (solo sui modelli DPF 7911, DPF 7331, DPF 9331, DPF 10331)
3. Impostazioni video (solo sui modelli DPF 7911, DPF 7331, DPF 9331, DPF 10331)
All'interno del menu di impostazione, selezionare la riga "Impostazioni video" con i tasti "Su/Giù" del
telecomando e premere
"Enter".
In questo menu è possibile scegliere le seguenti impostazioni:
- Modalità di visualizzazione (schermo intero o dimensione originale)
- Modalità di lettura (singola o continua)
- Attivazione della lettura automatica
4. Impostazioni musica (solo sui modelli DPF 7911, DPF 7331, DPF 9331, DPF
10331)
All'interno del menu di impostazione, selezionare la riga "Impostazioni musica" con i tasti "Su/Giù" del
telecomando e premere
"Enter".
È possibile impostare i seguenti elementi:
- Modalità di lettura (casuale, continua, ripetizione singola)
- Effetti musicali (rock, pop, classica, jazz, ecc.)
- Visualizzazione dell'equalizzatore durante la lettura
- Lettura automatica
Page 51

8
Documento non contrattuale soggetto a modifiche in caso di errori tipografici (Mktg0609)
ITALIANO
5. Configurazione sistema
Questo menu consente di impostare i parametri di funzionamento della cornice.
- Lingua (inglese, francese, spagnolo, portoghese, italiano, tedesco, olandese)
- Luminosità
- Contrasto
- Colore
- Tinta
- Accensione automatica programmata
- Ora di riavvio automatico
- Spegnimento
- Ora di spegnimento automatico
- Frequenza di accensione
- Resettare
- Versione
V. Altre funzionalità
È possibile trasferire dei file nella cornice collegandola al portatile. Per ulteriori informazioni, scaricare le
istruzioni complete sul sito:
http://www.telefunken-digital.com
VI. Istruzioni di sicurezza
Manipolare con attenzione la cornice digitale, evitando di toccare lo schermo: le impronte digitali sono
difficili da togliere.
Posizionare sempre la cornice digitale su una superficie piana e stabile, per evitare cadute o danni.
Non esporre la cornice digitale ai raggi del sole o a temperature elevate, per evitare di danneggiarla o di
ridurne la durata. Non posizionare la cornice vicino a fonti di calore quali radiatori o unità di riscaldamento
integrativo. Non esporre ai raggi diretti del sole per evitare riflessi
Non esporre la cornice digitale a pioggia, acqua o umidità. Non posizionarla vicino a lavabi o lavandini, dove
potrebbe entrare in contatto con l'acqua.
Non posizionare oggetti pesanti o taglienti sulla cornice, sullo schermo o sull'alimentatore della cornice.
Non collegare la cornice digitale a una presa o a un cavo di alimentazione troppo potente, per evitare
surriscaldamento, incendi o scosse elettriche.
Prestare attenzione alla posizione del cavo di alimentazione, che non deve essere calpestato o in contatto
con altri oggetti. Non mettere il cavo sotto a tappeti. Ispezionare regolarmente il cavo per verificare che non
sia danneggiato. In tal caso, scollegarlo e sostituirlo.
Page 52

9
Documento non contrattuale soggetto a modifiche in caso di errori tipografici (Mktg0609)
ITALIANO
Ventilazione
Gli slot per schede di memoria e le aperture permettono di ventilare la cornice.
Per garantire un utilizzo ottimale della cornice ed evitare surriscaldamenti, le aperture non devono essere
ostruite o coperte.
Conservare la cornice digitale a una distanza sufficiente dal muro per assicurarne la corretta ventilazione.
Non posizionare la cornice digitale su letti o divani, per evitare il surriscaldamento. Attenzione!
Non estrarre la copertura di plastica posta sul retro della cornice La cornice digitale contiene dei circuiti
elettrici: l'utente potrebbe riportare ferite se tocca tali circuiti.
Non tentare di riparare da soli la cornice digitale.
VII. Garanzia
La garanzia non copre i danni causati dai tentativi di riparazione della cornice da parte dell'utente o di
persone non autorizzate.
Se la cornice emette fumo, rumori o odori inusuali, spegnerla e scollegarla immediatamente. Rivolgersi al
rivenditore.
Se non si utilizza la cornice digitale per un periodo prolungato, scollegare il cavo di alimentazione.
La garanzia copre la cornice digitale e non include gli accessori. Si considerano accessori:
Il blocco alimentatore di rete,
Il telecomando (a seconda dei modelli).
Tuttavia, è possibile ordinare tali accessori presso il nostro servizio di assistenza tecnica:
Via e-mail:
Durata della garanzia
Questa cornice digitale è coperta dalla garanzia per 12 mesi. La durata della garanzia decorre a partire dalla
data di acquisto della cornice.
La garanzia deve essere comprovata dalla presentazione della fattura originale o di una ricevuta recanti
l'indicazione della data e del modello acquistato.
Copertura
In caso di guasti, la cornice digitale deve essere rispedita al distributore accompagnata da una nota
esplicativa.
Se la cornice digitale presenta dei malfunzionamenti durante il periodo di garanzia, il servizio di assistenza
riparerà gli elementi difettosi o i difetti di fabbricazione. Il servizio di assistenza deciderà a propria discrezione
se riparare o sostituire totalmente o parzialmente la cornice digitale.
La data d'acquisto determina l'inizio del periodo di garanzia
La durata della garanzia non viene prolungata in caso di riparazione o sostituzione della cornice digitale da
parte del nostro servizio di assistenza.
Page 53
10
Documento non contrattuale soggetto a modifiche in caso di errori tipografici (Mktg0609)
ITALIANO
Esclusioni
I danni o i difetti provocati da utilizzo o manipolazione non corretti della cornice digitale nonché dall'utilizzo di
accessori non originali o non consigliati nelle presenti istruzioni non sono coperti dalla garanzia.
La garanzia non copre i danni provocati da agenti esterni quali fulmini, acqua, fuoco e i danni provocati
durante il trasporto.
Non sono ammessi interventi in garanzia se il numero di serie della cornice digitale è stato modificato,
rimosso, cancellato o reso illeggibile.
Non sono ammessi interventi in garanzia se la cornice digitale è stata riparata, alterata o modificata
dall'acquirente o da un altro riparatore non autorizzato e qualificato ufficialmente.
Il fabbricante non garantisce le proprietà tecniche descritte in questo manuale. L'hardware e gli accessori
descritti in questo manuale sono soggetti a modifica senza preavviso. Pertanto, il fabbricante si riserva il
diritto di modificare componenti, opzioni, caratteristiche e documentazione senza preavviso.
Conformità alle normative in vigore:
Questa cornice digitale è conforme alle direttive CE vigenti ed è compatibile con la normativa RoHS.
Riciclo delle apparecchiature elettriche ed elettroniche al termine della loro durata utile.
Le apparecchiature elettriche ed elettroniche usate non vanno smaltite con i rifiuti domestici comuni. La
presenza del simbolo sul prodotto o sull'imballaggio lo ricorda.
Alcuni materiali che compongono questo prodotto possono essere riciclati, se il prodotto viene consegnato
a un centro di riciclo autorizzato. Riutilizzando i pezzi e i materiali delle apparecchiature usate è possibile
contribuire in modo significativo alla tutela dell'ambiente.
Per ulteriori informazioni sui punti di raccolta delle apparecchiature usate, rivolgersi al proprio comune di
residenza, al servizio di smaltimento dei rifiuti o al negozio presso cui è stato acquistato il prodotto.
Page 54
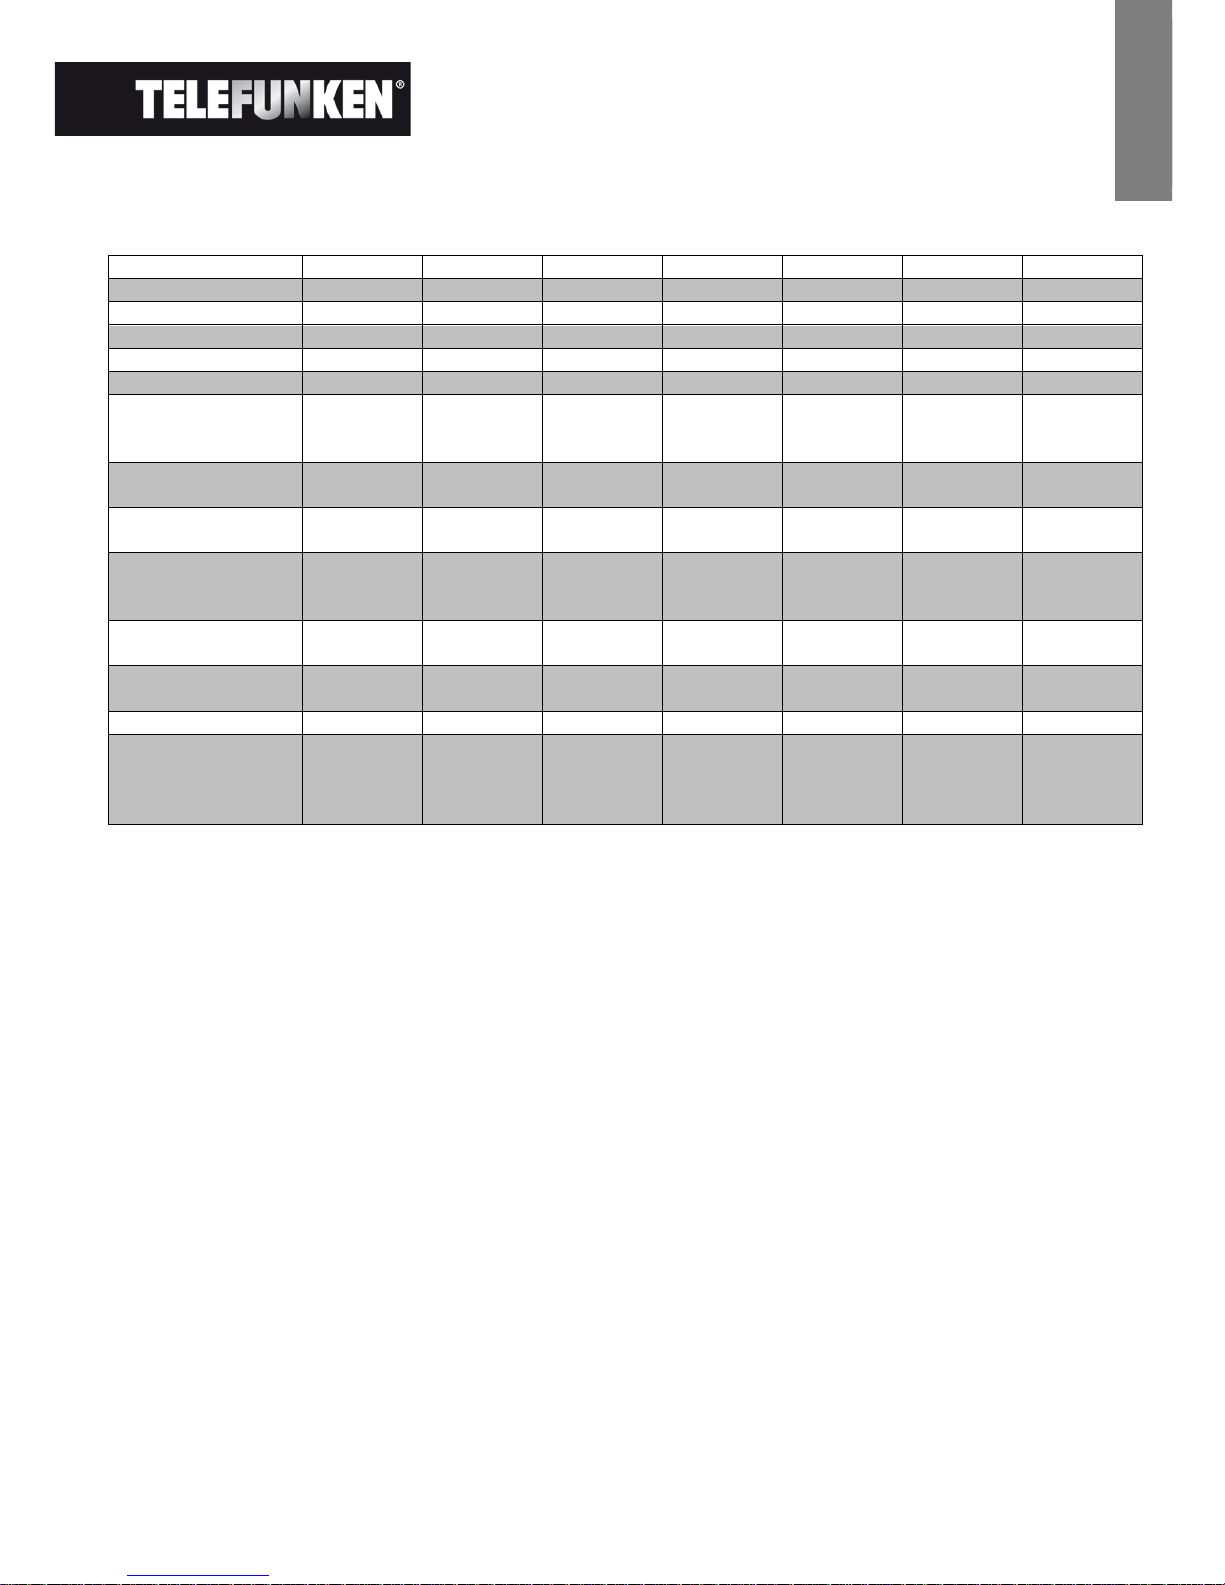
11
Documento non contrattuale soggetto a modifiche in caso di errori tipografici (Mktg0609)
ITALIANO
VIII. Caratteristiche tecniche
Caratteristiche
DPF 7901
DPF 7911
DPF 7321
DPF 7331
DPF 9321
DPF 9331
DPF 10331
Dimensioni
7 ˝ 7 ˝ 7 ˝ 7 ˝ 8,4 ˝ 8,4 ˝ 10,4”
Definizione
480 x 234 480 x 234 800 x 600 800 x 600 800 x 600 800 x 600 800 x 600
Rapporto immagine
16/9 16/9 4/3 4/3 4/3 4/3 4/3
Memoria interna
128 MB 128 MB 2 GB 2 GB 2 GB 2 GB 2 GB
Audio/video
NO SÌ NO SÌ NO SÌ SÌ
Schede compatibili
SD/MMC,
MS, XD,
chiavi USB
SD/MMC,
MS, XD,
chiavi USB
SD/MMC,
MS, XD,
chiavi USB
SD/MMC,
MS, XD,
chiavi USB
SD/MMC,
MS, XD,
chiavi USB
SD/MMC,
MS, XD,
chiavi USB
SD/MMC,
MS, XD,
chiavi USB
Ridimensionamento
automatico
SÌ SÌ SÌ SÌ SÌ SÌ SÌ
Rotazione
automatica
SÌ SÌ SÌ SÌ SÌ SÌ SÌ
Ingresso
alimentazione
100-240 V
c.a. 50/60
Hz
100-240 V
c.a. 50/60
Hz
100-240 V
c.a. 50/60
Hz
100-240 V
c.a. 50/60
Hz
100-240 V
c.a. 50/60
Hz
100-240 V
c.a. 50/60
Hz
100-240 V
c.a. 50/60
Hz
Uscita
alimentazione
5V c.c. 2 Ah 5V c.c. 2 Ah 5V c.c. 2
Ah
5V c.c. 2 Ah 5V c.c. 2 Ah 5V c.c. 2 Ah 9V c.c. 2 Ah
Dimensioni
205 x 135 x
20 mm
205 x 135 x
20 mm
195 x 149 x
20 mm
195 x 149 x
20 mm
225 x 178 x
20 mm
225 x 178 x
20 mm
264 x 210 x
25 mm
Peso
362 g 362 g 424 g 424 g 520 g 520 g 900 g
Compatibilità
sistema
Windows
XP, Vista,
Mac OS 9.0
e successivi
Windows
XP, Vista,
Mac OS 9.0
e successivi
Windows
XP, Vista,
Mac OS 9.0
e successivi
Windows
XP, Vista,
Mac OS 9.0
e successivi
Windows
XP, Vista,
Mac OS 9.0
e successivi
Windows
XP, Vista,
Mac OS 9.0
e successivi
Windows
XP, Vista,
Mac OS 9.0
e successivi
Page 55

1
Niet-contractueel document onderworpen aan wijzigingen in geval van drukfouten (Mktg0309)
NEDERLAND
GEBRUIKSAANWIJZING DIGITALE FOTOLIJST
TELEFUNKEN “STYLE”-SERIE
(DPF 7901, DPF 7911, DPF 7321, DPF 7331, DPF 9321, DPF 9331, DPF 10331)
I. Uw fotolijst uitpakken en installeren ..................................................... 2
1. Inhoud van de doos .......................................................................................................... 2
2. Uitzicht van de fotolijst ..................................................................................................... 2
3. Installatie ............................................................................................................................. 2
II. Uw fotolijst gebruiken .............................................................................. 3
1. Selecteren van de taal ...................................................................................................... 3
2. Lezen van een geheugenkaart of een USB-stick ............................................................ 3
3. Kopiëren van foto’s naar het interne geheugen ........................................................... 3
4. Foto’s verwijderen ............................................................................................................. 5
III. Selecteren van het type te lezen bestanden ........................................ 6
1. Foto’s ................................................................................................................................... 6
2. Video’s (alleen op de DPF 7911, DPF 7331, DPF 9331, DPF 10331) ....................... 6
3. Muziek (alleen op de DPF 7911, DPF 7331, DPF 9331, DPF 10331) ....................... 6
IV. Instellingen ................................................................................................. 6
1. Fotoconfiguratie ................................................................................................................. 7
2. Kalenderconfiguratie ......................................................................................................... 7
3. Video-instellingen (alleen op de DPF 7911, DPF 7331, DPF 9331, DPF 10331) .... 7
4. Muziekinstellingen (alleen op de DPF 7911, DPF 7331, DPF 9331, DPF 10331) ... 8
5. Systeemconfiguratie ......................................................................................................... 8
V. Andere functies ......................................................................................... 8
VI.
Veiligheidsinstructies ............................................................................... 8
VII.
Garantie ...................................................................................................... 9
VIII.
Technische specificaties ................................................................. 11
Page 56
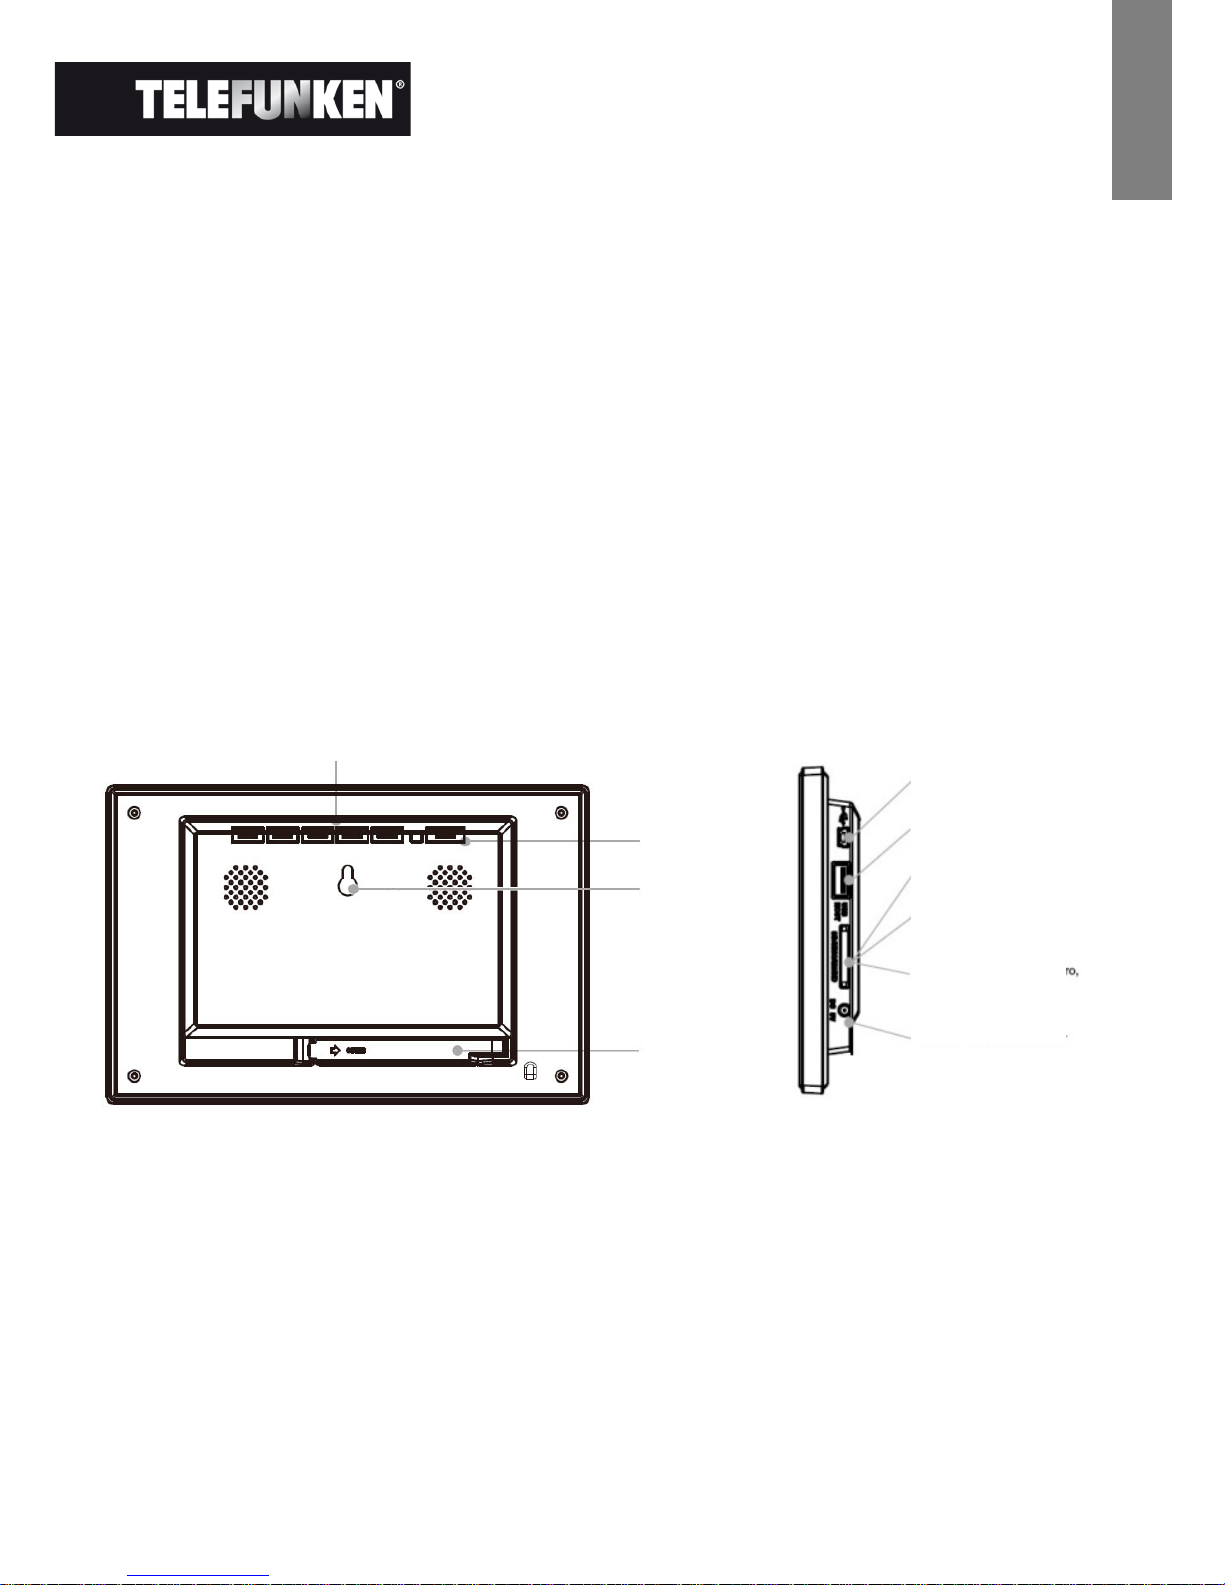
2
Niet-contractueel document onderworpen aan wijzigingen in geval van drukfouten (Mktg0309)
NEDERLAND
I. Uw fotolijst uitpakken en installeren
U hebt zonet een digitale fotolijst uit de STYLE-serie van TELEFUNKEN aangekocht, waarvoor onze dank.
Wij raden u aan deze gebruiksaanwijzing grondig door te nemen alvorens uw apparaat in gebruik te nemen
en ze daarna te bewaren voor toekomstig gebruik.
1. Inhoud van de doos
- 1 digitale fotolijst
- 1 stroomadapter
- 1 afstandsbediening
- 1 reinigingsdoekje
2. Uitzicht van de fotolijst
3. Installatie
- Verwijder de fotolijst en de accessoires uit hun verpakking.
- Verwijder de plastic beschermfolie van de voorkant van de fotolijst.
- Verwijder het plastic lipje dat de contacten van de afstandsbediening beschermt.
- Plaats de fotolijst op de gewenste plaats door de instelbare voet naar u toe te trekken (zie
afbeeldingen hierboven).
- Sluit het netsnoer aan op de fotolijst in de daarvoor voorziene aansluiting.
Bedieningsknoppen
Aan/uit-knop
Gaatje voor
muurbevestiging
Instelbare voet
Mini USB-poort
USB-poort voor USBsticks
Poort voor SD/MMCkaarten
Poort voor XD-kaarten
Poort voor MS/MS
Pro/MS Duo/MS Pro Duokaarten
Voedingsingang
Page 57

3
Niet-contractueel document onderworpen aan wijzigingen in geval van drukfouten (Mktg0309)
NEDERLAND
- Sluit uw fotolijst aan op een stopcontact. De fotolijst zal automatisch opstarten.
II. Uw fotolijst gebruiken
1. Selecteren van de taal
Wanneer u de fotolijst de eerste keer gebruikt, wordt er een scherm weergegeven waar u de interfacetaal
kunt kiezen.
- Selecteer uw taal met behulp van de pijltjestoetsen op de afstandsbediening en druk vervolgens op
‘Enter’.
Zodra de taal is geselecteerd, begint uw fotolijst de foto’s in het interne geheugen te lezen.
2. Lezen van een geheugenkaart of een USB-stick
Als uw fotolijst is uitgeschakeld:
- Voer uw kaart of USB-stick in op de daartoe voorziene plaats.
- Schakel uw fotolijst in: de diashow leest automatisch de inhoud van uw geheugenkaart of uw
USB-stick.
Als uw fotolijst is ingeschakeld:
- Druk zo vaak als nodig is op de toets ‘Exit’ op uw afstandsbediening om het scherm
modusselectie weer te geven.
- Selecteer met behulp van de toetsen ‘Omhoog/Omlaag’ van uw afstandsbediening de
geheugenkaart of de USB-stick die u wilt lezen. (Internal memory voor intern geheugen, SD,
XD, MS of USB voor een USB-stick)
Druk op de toets ‘ENTER’ van uw afstandsbediening om uw keuze te bevestigen en vervolgens op
‘Slide Show’ om de diashow te starten.
Indien uw datakaart, USB sleutel of intern geheugen muziek bevat, en indien U een muzikaal diashow
wenst, druk dan op de 'Enter' toets van de afstandsbediening gedurende het lezen van de het
diashow. Op het scherm zal dan 'Muziek auto' verschijnen.
3. Kopiëren van foto’s naar het interne geheugen
Er zijn twee methodes om foto’s van uw geheugenkaart naar het interne geheugen van de fotolijst te
kopiëren.
- Uw foto’s kopiëren vanuit bestandsbeheer
Als u deze methode gebruikt, kunt u de bestanden slechts één voor één kopiëren en hebt u niet de
mogelijkheid om hun formaat aan te passen aan de resolutie van de fotolijst.
Page 58

4
Niet-contractueel document onderworpen aan wijzigingen in geval van drukfouten (Mktg0309)
NEDERLAND
1. Druk zo vaak als nodig is op de toets ‘EXIT’ op uw afstandsbediening om het scherm
modusselectie weer te geven.
2. Selecteer met behulp van de toetsen ‘Links/Rechts’ op de afstandsbediening het pictogram
‘Bestand’ en druk op ‘Enter’.
3. Selecteer de foto (of het muziek- of videobestand bij de versies 7911, 7331, 9331, DPF 10331) met
behulp van de toetsen
‘Omhoog/Omlaag’ op de afstandsbediening en druk vervolgens op de toets
‘Copy/Del’. Het scherm geeft ‘Best. kopiëren?- JA/NEE’ weer. Kies de gewenste optie en druk
op
‘Enter’. Uw bestand wordt gekopieerd.
- Uw foto’s kopiëren vanuit miniatuurmodus
Met deze methode kunt u een selectie van foto’s kopiëren en hebt u de mogelijkheid om hun formaat
daarna aan te passen aan de resolutie van de fotolijst teneinde de capaciteit van het interne geheugen te
optimaliseren.
1. Druk zo vaak als nodig is op de toets ‘Exit’ op uw afstandsbediening om het scherm modusselectie
weer te geven.
2. Selecteer de verwijderbare drager waarop zich de te kopiëren foto’s bevinden (geheugenkaart of
USB-stick) met behulp van de toetsen
‘Omhoog/Omlaag’ op de afstandsbediening. Druk op
‘Enter’.
3. Selecteer met behulp van de toetsen ‘Links/Rechts’ de fotomodus en druk op ‘Enter’. De diashow
start.
4. Druk op de toets ‘Exit’ op de afstandsbediening om toegang te krijgen tot de miniaturen.
5. Druk op de toets ‘Copy/Del’. Het scherm geeft ‘Best. kopiëren?’ weer. Selecteer ‘Ja’ en druk op
‘Enter’.
6. De miniaturen worden opnieuw weergegeven, ditmaal met een klein wit vierkantje in de
rechterbovenhoek. Selecteer de foto’s die u wilt kopiëren met behulp van de toetsen
‘Links/Rechts-Omhoog/Omlaag’ op de afstandsbediening en druk telkens op ‘Enter’. Bij elke
geselecteerde foto zal het kleine witte vierkantje worden aangevinkt.
7. Druk op de toets ‘Copy/Del’. Kies vervolgens de map waarnaar u uw foto’s wenst te kopiëren en
druk vervolgens op
‘Enter’.
8. Het scherm geeft een dialoogvenster weer waarin u wordt gevraagd of u het formaat van uw foto’s
wenst aan te passen.
9. Selecteer de gewenste optie met behulp van de toetsen ‘Omhoog/Omlaag’ op de
afstandbediening en klik op
‘Bevest.’. Druk op ‘Enter’. Uw foto’s worden nu gekopieerd naar het
interne geheugen en aangepast aan de resolutie van de fotolijst.
Page 59

5
Niet-contractueel document onderworpen aan wijzigingen in geval van drukfouten (Mktg0309)
NEDERLAND
4. Foto’s verwijderen
U kunt foto’s uit het interne geheugen van uw fotolijst verwijderen.
- Uw foto’s verwijderen via bestandsbeheer
Als u deze methode gebruikt, kunt u de bestanden slechts één voor één verwijderen.
1. Druk zo vaak als nodig is op de toets ‘Exit’ op uw afstandsbediening om het scherm modusselectie
weer te geven.
2. Selecteer met behulp van de toetsen ‘Links/Rechts’ op de afstandsbediening het pictogram
‘Bestand’ en druk op “Enter”.
3. Selecteer de foto (of het muziek- of videobestand bij de versies 7911, 7331, 9331, 10331) met
behulp van de toetsen
‘Omhoog/Omlaag’ op de afstandsbediening en druk vervolgens op de toets
‘Copy/Del’. Het scherm geeft ‘Best. verwijderen?-Ja/Nee’ weer. Kies de gewenste optie en druk
op
‘Enter’. Uw bestand wordt verwijderd.
- Uw foto’s verwijderen vanuit miniatuurmodus
Met deze methode kunt u een selectie van foto’s of alle foto’s uit het interne geheugen verwijderen.
1. Druk zo vaak als nodig is op de toets ‘Exit’ op uw afstandsbediening om het scherm modusselectie
weer te geven.
2. Selecteer het interne geheugen met behulp van de toetsen ‘Omhoog/Omlaag’ op de
afstandsbediening. Druk op
‘Enter’.
3. Selecteer met behulp van de toetsen ‘Links/Rechts’ de fotomodus en druk op ‘Enter’. De diashow
start.
4. Druk op de toets ‘Exit’ op de afstandsbediening om toegang te krijgen tot de miniaturen.
5. Druk op de toets ‘Copy/Del’. Het scherm geeft ‘Verwijderen?’ weer. Selecteer ‘Ja’ en druk op
‘Enter’.
6. De miniaturen worden opnieuw weergegeven, ditmaal met een klein wit vierkantje in de
rechterbovenhoek. Selecteer de foto’s die u wilt kopiëren met behulp van de toetsen
‘Links/Rechts-Omhoog/Omlaag’ op de afstandsbediening en druk telkens op ‘Enter’. Bij elke
geselecteerde foto zal het kleine witte vierkantje worden aangevinkt.
7. Druk op de toets ‘Copy/Del’ en vervolgens op ‘Enter’.
8. Het scherm geeft ‘Verwijderen?’ weer.
9. Selecteer de gewenste optie met behulp van de toetsen ‘Omhoog/Omlaag’ op de
afstandsbediening. Druk op
‘Enter’. Uw foto’s worden nu uit het interne geheugen verwijderd.
Page 60

6
Niet-contractueel document onderworpen aan wijzigingen in geval van drukfouten (Mktg0309)
NEDERLAND
III. Selecteren van het type te lezen bestanden
1. Foto’s
- Druk twee keer op de toets ‘Exit’ om het hoofdscherm weer te geven.
- Selecteer met behulp van de pijltjestoetsen ‘Links/Rechts’ op de afstandsbediening het pictogram
‘Foto’.
- Druk op de toets ‘Enter’: het lezen start.
2. Video’s (alleen op de DPF 7911, DPF 7331, DPF 9331, DPF 10331)
- Druk twee keer op de toets ‘Exit’ om het hoofdscherm weer te geven.
- Selecteer met behulp van de pijltjestoetsen ‘Links/Rechts’ op de afstandsbediening het pictogram
‘Video’.
- Druk op de toets ‘Enter’: het lezen start
3. Muziek (alleen op de DPF 7911, DPF 7331, DPF 9331, DPF 10331)
- Druk twee keer op de toets ‘Exit’ om het hoofdscherm weer te geven.
- Selecteer met behulp van de pijltjestoetsen ‘Links/Rechts’ op de afstandsbediening het pictogram
‘Muziek’.
- Druk op de toets ‘Enter’: het lezen start.
IV. Instellingen
Wanneer u zich in het hoofdscherm bevindt, selecteer dan het pictogram ‘Inst.’ met behulp van de toetsen
‘Links/Rechts’ en ‘Omhoog/Omlaag’ op uw afstandsbediening om toegang te krijgen tot de verschillende
instellingen van uw fotolijst.
Als uw diashow bezig is, druk dan gewoon op de toets ‘Setup’ op uw afstandsbediening voor toegang tot
het menu Instellingen.
Page 61

7
Niet-contractueel document onderworpen aan wijzigingen in geval van drukfouten (Mktg0309)
NEDERLAND
Wanneer u zich in de instellingsmenu’s bevindt, kunt u met behulp van de toetsen ‘Omhoog/Omlaag’ op
de afstandsbediening de parameter selecteren die u wilt instellen en met de toetsen
‘Links/Rechts’ de
juiste instelling voor de geselecteerde parameter.
1. Fotoconfiguratie
Selecteer deze regel met behulp van de toetsen ‘Omhoog/Omlaag’ op de afstandsbediening om toegang
te krijgen tot dit menu.
U kunt de instellingen regelen met de pijltjestoetsen op de afstandsbediening:
- Weergavemodus
- Weergave ratio
- Tijd diashow
- Diashow herh.
- Diashow effect
- Magic window
- Klok
- Afb.wijz. tijdens kopieren
- Uitsn. Tijdens kopieren
- Tip weerg. Tijdens kopieren
2. Kalenderconfiguratie
Wanneer u zich in het instellingsmenu bevindt, selecteer dan deze regel met behulp van de toetsen
‘Omhoog/Omlaag’ op de afstandsbediening om toegang te krijgen tot dit menu en druk op ‘Enter’.
U kunt vervolgens de instelling selecteren met behulp van de pijltjestoetsen op de afstandsbediening:
- Weergavemodus (Kalender, maandelijks of klok)
- Datum
- Klokmodus (24u of 12u)
- Kloktijd
- Alarm status (alleen op de DPF 7911, DPF 7331, DPF 9331, DPF 10331)
- Alarm tijd (alleen op de DPF 7911, DPF 7331, DPF 9331, DPF 10331)
- Alarm frequentie (alleen op de DPF 7911, DPF 7331, DPF 9331, DPF 10331)
3. Video-instellingen (alleen op de DPF 7911, DPF 7331, DPF 9331, DPF 10331)
Selecteer in het instellingsmenu de regel ‘Video-instellingen’ met behulp van de toetsen
‘Omhoog/Omlaag’ op uw afstandsbediening en druk op ‘Enter’.
In dit menu hebt u de keuze uit:
- Weergavemodus (volledig scherm of origineel formaat)
- De afspeelmodus (één keer of herhaaldelijk)
- Activering van automatisch afspelen
Page 62

8
Niet-contractueel document onderworpen aan wijzigingen in geval van drukfouten (Mktg0309)
NEDERLAND
4. Muziekinstellingen (alleen op de DPF 7911, DPF 7331, DPF 9331, DPF 10331)
Wanneer u zich in het instellingsmenu bevindt, selecteer dan de regel ‘Muziekinstellingen’ met behulp van
de toetsen
‘Omhoog/Omlaag’ op uw afstandsbediening en druk vervolgens op ‘Enter’.
U kunt volgende zaken instellen:
- Weergavemodus (willekeurig, herhaaldelijk, één keer herhalen)
- Muziekeffecten (Rock, Pop, Klassiek, Jazz …)
- Weergave van de equalizer tijdens het afspelen
- Automatisch afspelen
5. Systeemconfiguratie
In dit menu kunt u de werkingsparameters van uw fotolijst instellen.
- De taal (Engels, Frans, Spaans, Portugees, Italiaans, Duits, Nederlands)
- Helderheid
- Contrast
- kleur
- Tint
- Inschakelen
- Auto opst.tijd
- Uitschakelen
- Auto afsl.tijd
- De frequentie van automatisch starten en stoppen (van maandag tot vrijdag, in het weekend, één
keer of elke dag)
- Herinitialisering van uw fotolijst
V. Andere functies
Het is mogelijk om bestanden over te zetten naar de fotolijst door deze aan te sluiten op uw pc. Voor meer
informatie hierover kunt u de volledige gebruikshandleiding downloaden op de site:
http://www.telefunken-digital.com
VI. Veiligheidsinstructies
Hanteer de fotolijst voorzichtig en vermijd het aanraken van het scherm. Vingerafdrukken zijn moeilijk te
verwijderen.
Plaats de digitale fotolijst altijd op een vlak en stabiel oppervlak om vallen en beschadiging te voorkomen.
Vermijd het blootstellen van de digitale fotolijst aan de zon of aan hoge temperaturen aangezien de lijst
hierdoor beschadigd kan raken of de gebruiksduur erdoor beperkt kan worden. Plaats de fotolijst niet in de
buurt van warmtebronnen zoals radiatoren, verwarmingstoestellen en niet in direct zonlicht om reflecties te
vermijden.
Page 63

9
Niet-contractueel document onderworpen aan wijzigingen in geval van drukfouten (Mktg0309)
NEDERLAND
Vermijd blootstelling aan regen, water of vochtigheid. Plaats de fotolijst niet in een gootsteen of een bad
waar ze in contact kan komen met water.
Plaats nooit zware of scherpe voorwerpen op de fotolijst, het scherm of de voeding van de lijst.
Sluit de digitale fotolijst niet aan op een stopcontact of netsnoer met een te hoge spanning. Dit kan leiden
tot oververhitting, brand of elektrische schok.
Let goed op de plaatsing van het netsnoer; er mag niet op getrapt worden en het mag niet in contact
komen met andere voorwerpen. Plaats het snoer niet onder een tapijt. Controleer regelmatig de staat van
het snoer om schade te voorkomen. Als het snoer beschadigd is, koppel het dan los en vervang het.
Ventilatie
De sleuven voor de geheugenkaarten en de openingen maken het mogelijk om de fotolijst te ventileren.
Om een optimaal gebruik van de lijst te garanderen en om oververhitting te voorkomen, mogen deze
openingen niet versperd of afgedekt worden.
Bewaar voor een goede ventilatie voldoende afstand tussen de digitale fotolijst en de muur.
Plaats de digitale fotolijst niet op een bed of een zitbank om oververhitting te voorkomen. Opgelet!
Verwijder nooit het plastic paneel op de achterkant van de lijst. De digitale fotolijst bevat elektrische
schakelingen die letsels kunnen veroorzaken als u ze aanraakt.
Probeer uw digitale fotolijst nooit op eigen houtje te repareren.
VII. Garantie
De garantie dekt geen schade die voortvloeit uit pogingen om de fotolijst zelf te repareren (of pogingen door
niet-bevoegde personen).
Als de fotolijst een ongewone geur afgeeft of een vreemd geluid maakt of als er rook uit de fotolijst komt,
schakel deze dan onmiddellijk uit en trek de stekker uit. Neem in dat geval contact op met uw winkel.
Als u de digitale fotolijst gedurende een bepaalde tijd niet gebruikt, koppel dan het netsnoer los.
De garantie heeft alleen betrekking op de digitale fotolijst, niet op de accessoires. Worden beschouwd als
accessoires:
De netadapter;
De afstandsbediening (in functie van het model).
Deze accessoires kunnen echter worden besteld bij onze technische dienst:
via e-mail:
Garantieperiode
Op deze digitale fotolijst wordt een garantie geboden van 12 maanden. De garantieperiode vangt aan op de
aankoopdatum van de fotolijst.
Om van de garantie te kunnen genieten, moet u de originele factuur of het kassaticket met daarop de
aankoopdatum en het gekochte model tonen.
Page 64
10
Niet-contractueel document onderworpen aan wijzigingen in geval van drukfouten (Mktg0309)
NEDERLAND
Dekking
Een defecte digitale fotolijst moet in haar geheel worden teruggestuurd naar uw distributeur inclusief een
briefje met uitleg over het defect.
Als de digitale fotolijst een defect vertoont tijdens de garantieperiode, zal de erkende Servicedienst alle
defecte onderdelen of fabrieksfouten repareren. De Servicedienst zal eenzijdig beslissen of de fotolijst wordt
gerepareerd of volledig of gedeeltelijk wordt vervangen.
De aanvangsdatum van de garantie is de oorspronkelijke aankoopdatum.
De garantieperiode wordt niet verlengd in geval van een reparatie of vervanging van de digitale fotolijst door
onze Servicedienst.
Uitsluiting
Schade of defecten veroorzaakt door een foutief gebruik of hanteren van de digitale fotolijst en door het
gebruik van andere dan de oorspronkelijke accessoires of accessoires die niet worden aanbevolen door
deze instructies worden niet gedekt door de garantie.
De garantie dekt geen schade die veroorzaakt wordt door externe elementen zoals bliksem, water, brand of
alle andere schade veroorzaakt tijdens transport.
De garantie zal vervallen als het serienummer van de digitale fotolijst is gewijzigd, verwijderd, gewist of
onleesbaar is geworden.
De garantie zal vervallen als de digitale fotolijst is gerepareerd, gewijzigd of veranderd door de koper of door
een andere niet officieel erkende en gekwalificeerde reparateur.
De fabrikant geeft geen garanties met betrekking tot de technische eigenschappen beschreven in deze
handleiding. Het toestel en de accessoires beschreven in deze handleiding kunnen worden gewijzigd
zonder voorafgaande kennisgeving. Om deze reden behoudt de fabrikant zich het recht voor om
onderdelen, opties, kenmerken en de documenten die ermee verband houden zonder voorafgaande
kennisgeving te wijzigen.
Conformiteit met de geldende wetgeving:
Deze digitale fotolijst voldoet aan de geldende CE-normen en is compatibel met de RoHS-norm.
Recyclage van elektrische en elektronische uitrusting op het einde van de levensduur.
Gebruikte elektrische en elektronische apparaten mogen niet worden meegegeven met het gewone huisvuil.
De aanwezigheid van het symbool op het product of de verpakking herinnert u hieraan.
Bepaalde materialen die deel uitmaken van dit product kunnen worden gerecycleerd als u ze brengt naar
een daarvoor geschikt recyclagecentrum. Door onderdelen en grondstoffen van de gebruikte toestellen te
hergebruiken, draagt u bij tot de bescherming van het milieu.
Voor meer informatie over de plaatsen voor inzameling van gebruikte apparatuur, kunt u terecht in uw
gemeentehuis, de afvalverwerkingsdienst of de winkel waar u uw product gekocht hebt.
Page 65
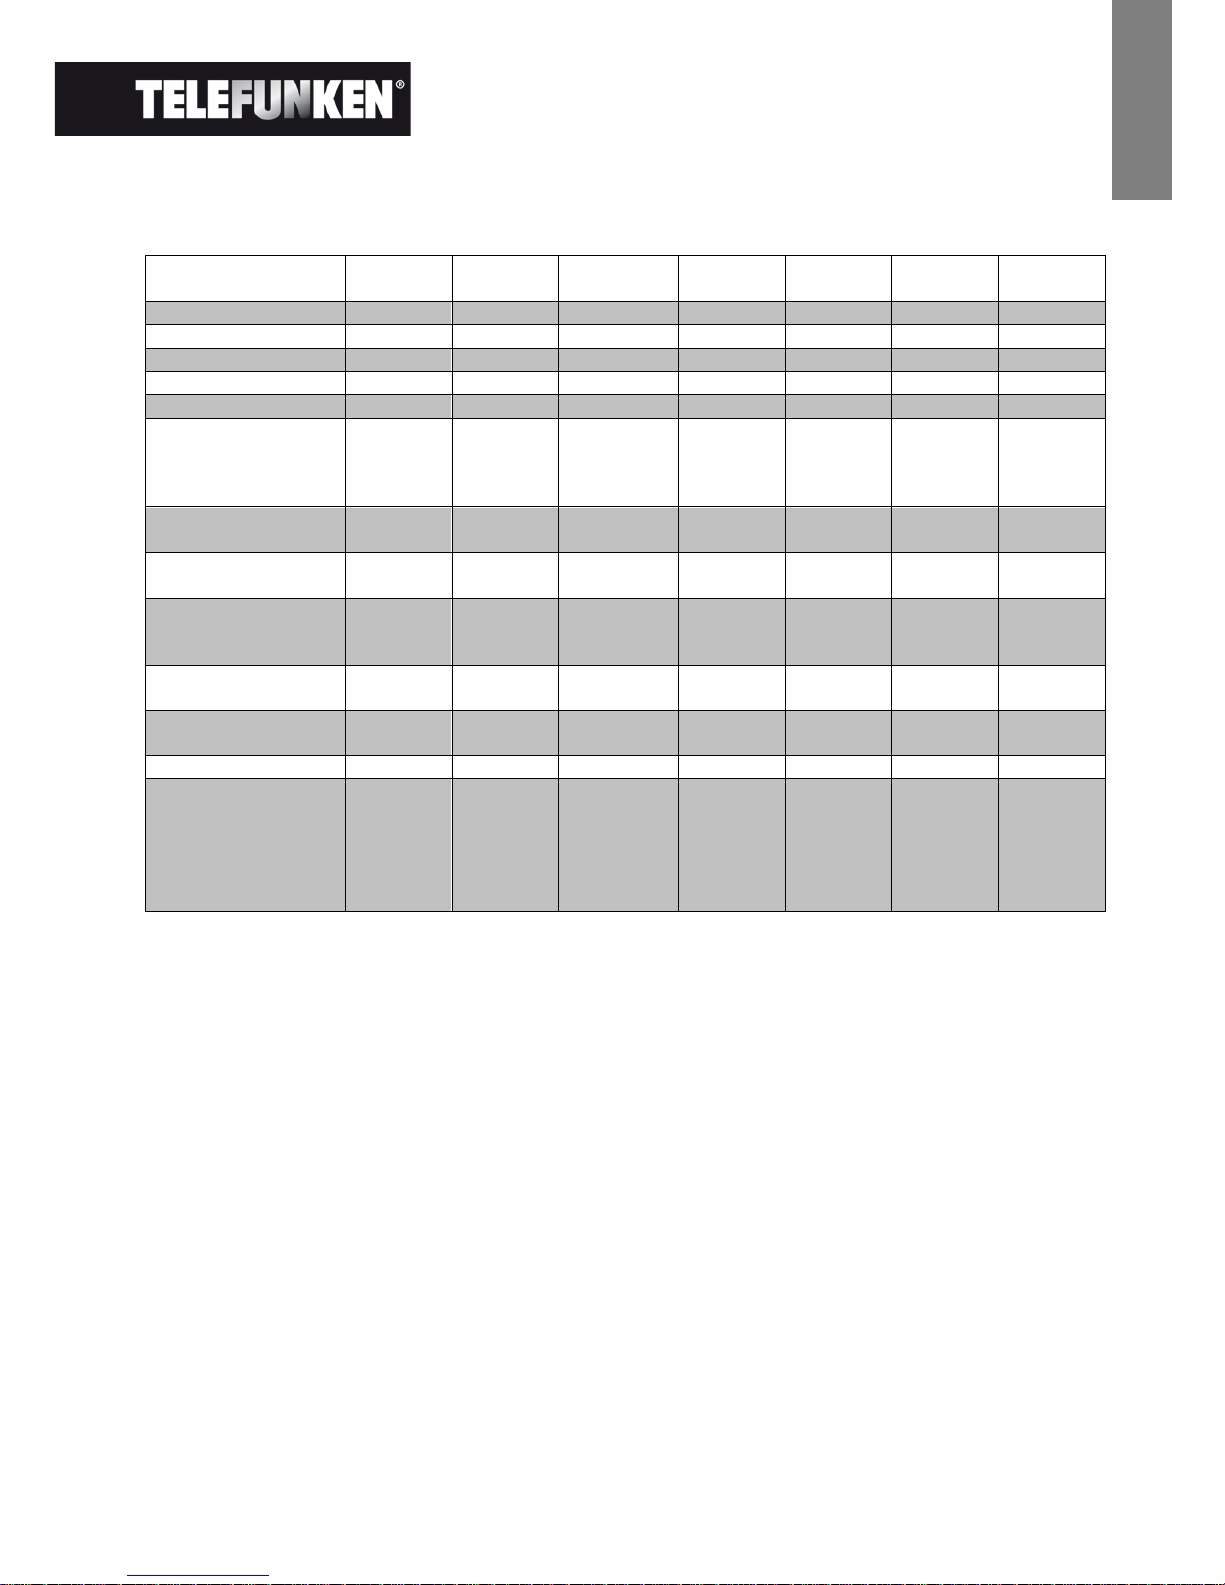
11
Niet-contractueel document onderworpen aan wijzigingen in geval van drukfouten (Mktg0309)
NEDERLAND
VIII. Technische specificaties
Kenmerken DPF 7901 DPF 7911 DPF 7321 DPF 7331 DPF 9321 DPF 9331 DPF
10331
Diagonaal
7 ˝ 7 ˝ 7 ˝ 7 ˝ 8,4 ˝ 8,4 ˝
10,4’’
Resolutie
480 x 234 480 x 234 800 x 600 800 x 600 800 x 600 800 x 600 800 x 600
Beeldverhouding
16/9 16/9 4/3 4/3 4/3 4/3 4/3
Intern geheugen
128 MB 128 MB 2 GB 2 GB 2 GB 2 GB 2 GB
Audio/video
NEE
JA
NEE
JA
NEE
JA
JA
Compatibele
kaarten
SD/MMC,
MS, XD,
USB-
sticks
SD/MMC,
MS, XD,
USBsticks
SD/MMC,
MS, XD,
USB-sticks
SD/MMC,
MS, XD,
USBsticks
SD/MMC,
MS, XD,
USB-
sticks
SD/MMC,
MS, XD,
USB-
sticks
SD/MMC,
MS, XD,
USBsticks
Automatische
formaataanpassing
JA JA JA JA JA JA JA
Automatisch
roteren
JA
JA
JA
JA
JA
JA
JA
Stroomingang
100-240
V AC
50/60 Hz
100-240
V AC
50/60 Hz
100-240 V
AC 50/60
Hz
100-240
V AC
50/60 Hz
100-240
V AC
50/60 Hz
100-240
V AC
50/60 Hz
100-240
V AC
50/60 Hz
Stroomuitgang
5V DC
2Ah
5V DC
2Ah
5V DC 2Ah 5V DC
2Ah
5V DC
2Ah
5V DC
2Ah
9V DC
2Ah
Afmetingen
205 x 135
x 20 mm
205 x 135
x 20 mm
195 x 149 x
20 mm
195 x 149
x 20 mm
225 x 178
x 20 mm
225 x 178
x 20 mm
264 x 210
x 25 mm
Gewicht
362 gram 362 g 424 g 424 g 520 g 520 g 900 g
Systeem-
compatibiliteit
Windows
XP, Vista,
Mac OS
9.0 en
latere
versies
Windows
XP, Vista,
Mac OS
9.0 en
latere
versies
Windows
XP, Vista,
Mac OS
9.0 en
latere
versies
Windows
XP, Vista,
Mac OS
9.0 en
latere
versies
Windows
XP, Vista,
Mac OS
9.0 en
latere
versies
Windows
XP, Vista,
Mac OS
9.0 en
latere
versies
Windows
XP, Vista,
Mac OS
9.0 en
latere
versies
Page 66

1
Documento não contratual submetido a modificações em caso de erros tipográficos (Mktg0309)
PORTUGUESE
MANUAL DE UTILIZAÇÃO MOLDURAS FOTOGRÁFICAS DIGITAIS
TELEFUNKEN “STYLE SÉRIE”
(DPF 7901, DPF 7911, DPF 7321, DPF 7331, DPF 9321, DPF 9331, DPF 10331)
I. Conheça e instale a sua moldura ........................................................... 2
1. Conteúdo da embalagem ................................................................................................. 2
2. Esquema da moldura ........................................................................................................ 2
3. Instalação ............................................................................................................................ 2
II. Utilização da moldura .............................................................................. 3
1. Selecção do idioma ........................................................................................................... 3
2. Leitura de um cartão de memória ou de um disco USB (pen drive) ......................... 3
3. Cópia de fotos para a memória interna ......................................................................... 3
4. Eliminação de fotos ........................................................................................................... 5
III. Selecção do tipo de ficheiros a serem lidos ........................................ 6
1. As fotos ............................................................................................................................... 6
2. Os vídeos (unicamente para DPF 7911, DPF 7331, DPF 9331, DPF 10331) .......... 6
3. A música (unicamente para DPF 7911, DPF 7331, DPF 9331, DPF 10331) ........... 6
IV. Os ajustes .................................................................................................. 6
1. Configuração foto .............................................................................................................. 7
2. Configuração calendário .................................................................................................. 7
3. Ajustes vídeo (unicamente para DPF 7911, DPF 7331, DPF 9331, DPF 10331) .... 7
4. Ajustes música (unicamente para DPF 7911, DPF 7331, DPF 9331, DPF 10331) . 7
5. Configuração sistema ....................................................................................................... 8
V. Outras funções .......................................................................................... 8
VI.
Instruções de segurança ......................................................................... 8
VII.
Garantia ...................................................................................................... 9
VIII.
Características técnicas .................................................................. 11
Page 67
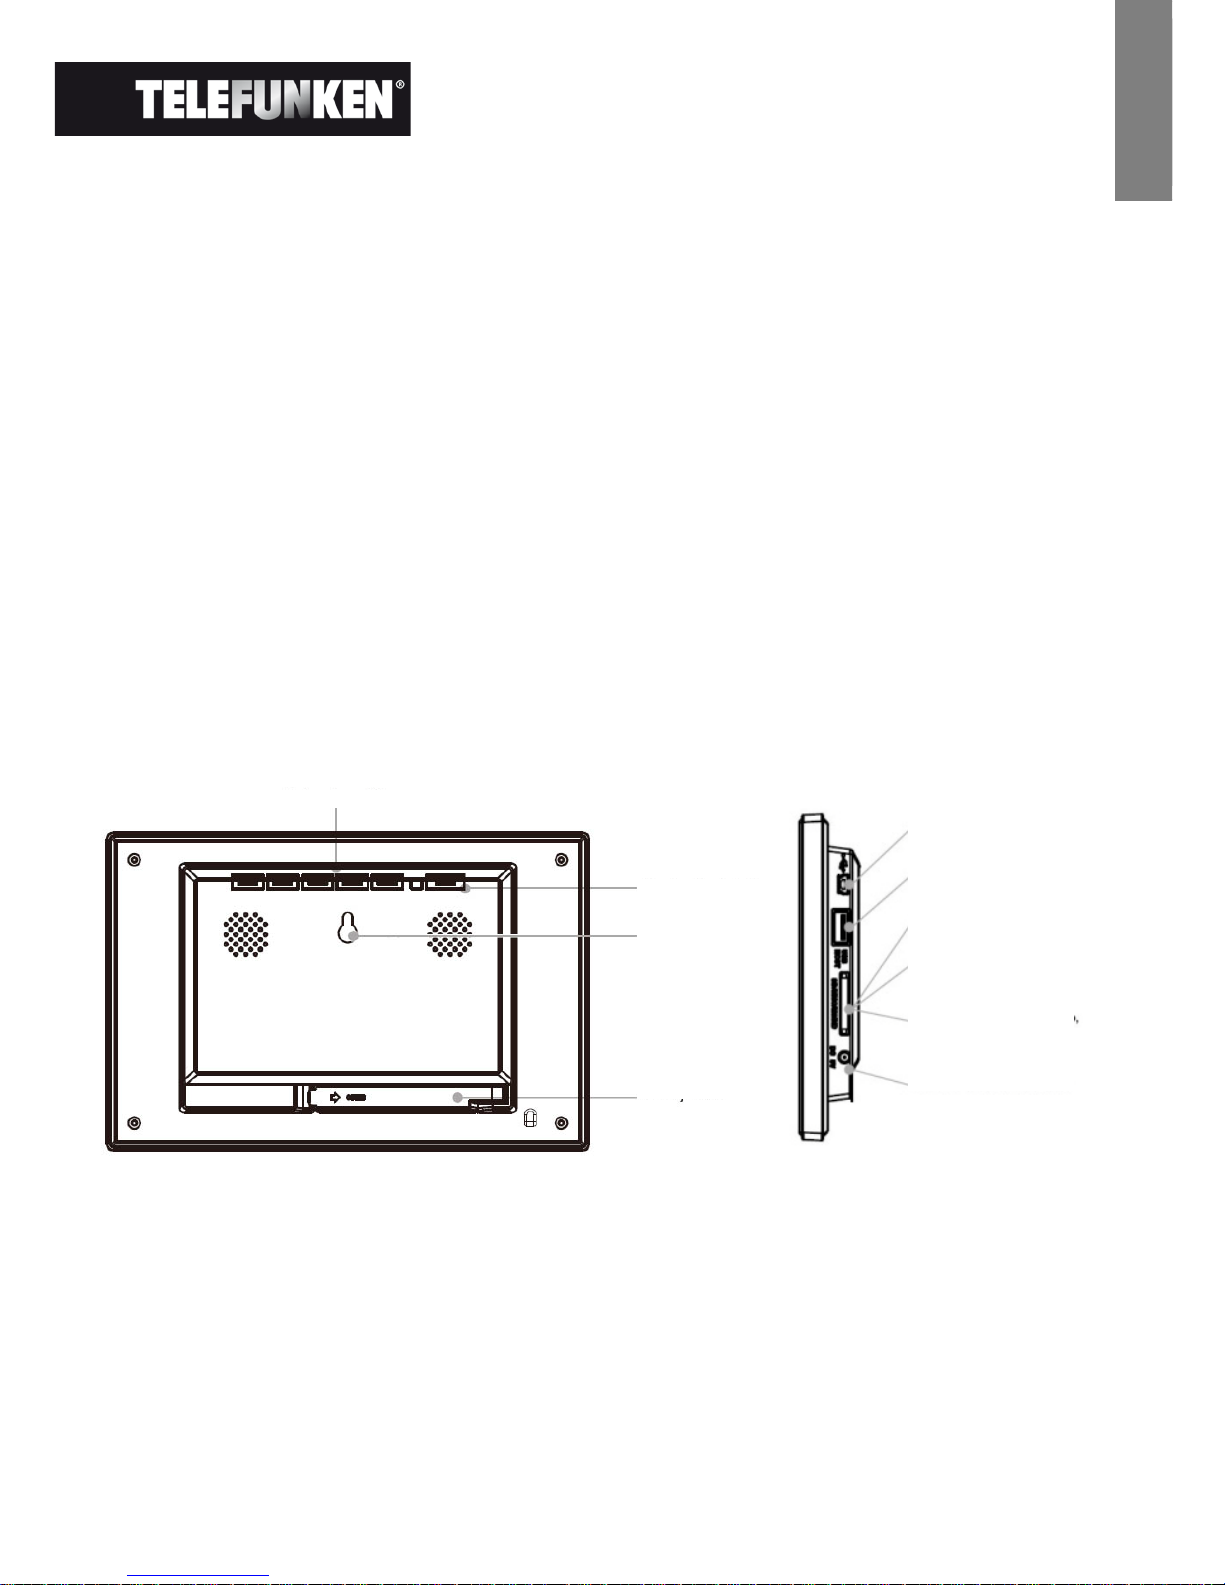
2
Documento não contratual submetido a modificações em caso de erros tipográficos (Mktg0309)
PORTUGUESE
I. Conheça e instale a sua moldura
Acaba de adquirir uma moldura fotográfica digital TELEFUNKEN "STYLE Série", pelo que lhe estamos
gratos. Antes de utilizar o seu dispositivo, queira consultar este manual de utilização, conservando-o para
futuras consultas.
1. Conteúdo da embalagem
- 1 Moldura fotográfica digital
- 1 Adaptador de alimentação
- 1 Telecomando
- 1 Toalhete
2. Esquema da moldura
3. Instalação
- Retire a moldura e respectivos acessórios da embalagem
- Retire o filme plástico de protecção da parte da frente da moldura
- Puxe a fita plástica destinada a proteger os contactos do telecomando
- Coloque a moldura no local pretendido puxando para si o suporte ajustável (ver ilustração a seguir)
Botões de controlo
Tecla
Ligar/Desligar
Fixação mural
Suporte ajustável
Porta Mini USB
Porta USB para pen
drives
Porta para cartões
SD/MMC
Porta para cartões XD
Porta para cartões MS,
MS Pro, MS Duo, MS Pro
Duo
Entrada alimentação
Page 68

3
Documento não contratual submetido a modificações em caso de erros tipográficos (Mktg0309)
PORTUGUESE
- Ligue o cabo de alimentação à moldura no ponto previsto para este efeito.
- Ligue a sua moldura a uma tomada eléctrica. A moldura liga-se automaticamente.
II. Utilização da moldura
1. Selecção do idioma
Aquando da primeira utilização, a moldura apresenta inicialmente um ecrã que permite escolher o idioma
de utilização da moldura.
- Seleccione o seu idioma através das teclas com setas do telecomando e depois prima "Enter".
Depois de seleccionado o seu idioma, a moldura começará a ler as fotos contidas na memória interna.
2. Leitura de um cartão de memória ou de um disco USB (pen drive)
Caso a sua moldura esteja desligada:
- Insira o cartão ou disco USB no local apropriado.
- Ligue a moldura: O diaporama lê automaticamente o conteúdo do seu cartão de memória ou do
seu disco USB.
Caso a sua moldura esteja ligada:
- Prima a tecla "Exit" do seu telecomando tantas vezes quantas necessárias para visualizar o ecrã de
escolha dos modos.
- Através das teclas “Cima/Baixo” do telecomando, seleccione o cartão ou o disco que pretende ler.
(
Internal memory para memória interna, SD, XD, MS ou USB para um disco)
- Prima a tecla “Enter” do telecomando para validar a sua escolha e depois prima a tecla “Slide
Show” para iniciar o diaporama.
Se o vosso apoio (cartão, disco USB ou memória interna) contem da música e que deseja um diaporama
musical, apoia sobre o toque “Enter” do telecomando durante a leitura do diaporama. O ecrã apresentará
então “Música auto”
3. Cópia de fotos para a memória interna
Existem dois métodos para copiar imagens do seu cartão de memória para a memória interna da moldura.
- Copiar as suas fotos a partir do gestor de ficheiros
Se utilizar este método, poderá copiar os ficheiros apenas um a um e não poderá redimensioná-los
relativamente à resolução da moldura.
Page 69

4
Documento não contratual submetido a modificações em caso de erros tipográficos (Mktg0309)
PORTUGUESE
1. Prima a tecla "Exit" do seu telecomando tantas vezes quantas necessárias para visualizar o ecrã de
escolha dos modos.
2. Através das setas "Direita/Esquerda" do telecomando, seleccione o ícone "Ficheiros" e prima
"Enter".
3. Seleccione a fotografia (ou o ficheiro de música ou vídeo nas versões 7911, 7331, 9331, 10331)
através das teclas
"Cima/Baixo" do telecomando e prima a tecla "Copy/Del". O ecrã apresenta
"Copiar ficheiro?-Sim/Não". Escolha a opção pretendida e prima "Enter". O seu ficheiro está
copiado.
- Copiar as suas fotos a partir do modo miniaturas
Com este método, pode copiar uma selecção de fotos com a possibilidade de as redimensionar
relativamente à definição da moldura, de forma a optimizar a capacidade da memória interna.
1. Prima a tecla "Exit" do seu telecomando tantas vezes quantas necessárias para visualizar o ecrã de
escolha dos modos.
2. Seleccione o suporte amovível no qual se encontram as fotos a copiar (cartão de memória ou disco
USB) através das teclas
"Cima/Baixo" do telecomando. Prima "Enter".
3. Através das setas "direita esquerda", seleccione o modo foto e prima "Enter". É iniciado o
diaporama.
4. Prima a tecla "Exit" do telecomando para aceder às miniaturas.
5. Prima a tecla "Copy/Del". O ecrã apresenta "Copiar ficheiros?" Seleccione "Sim" e prima "Enter".
6. As miniaturas são novamente apresentadas com um pequeno quadrado branco no canto superior
direito de cada uma delas. Seleccione as fotos a copiar através das teclas
"Direita/EsquerdaCima/Baixo" do telecomando premindo "Enter" para cada foto seleccionada. O pequeno quadrado
branco fica então marcado para cada imagem seleccionada.
7. Prima a tecla "Copy/Del". Seleccione de seguida o directório para o qual pretende copiar as
imagens e prima
"Enter".
8. O ecrã apresenta uma caixa de diálogo que lhe pergunta se pretende redimensionar as suas
imagens.
9. Seleccione a opção escolhida através das teclas "Cima/Baixo" do telecomando e confirme
seleccionando
"Confirmar". Prima "Enter". As suas fotos estão agora copiadas na memória interna
e dimensionadas para a definição da moldura.
Page 70

5
Documento não contratual submetido a modificações em caso de erros tipográficos (Mktg0309)
PORTUGUESE
4. Eliminação de fotos
Pode eliminar fotos que se encontram na memória interna da sua moldura.
- Eliminar as suas fotos a partir do gestor de ficheiros
Se utilizar este método, poderá eliminar os ficheiros apenas um a um.
1. Prima a tecla "Exit" do seu telecomando tantas vezes quantas necessárias para visualizar o ecrã de
escolha dos modos.
2. Através das setas "Direita/Esquerda" do telecomando, seleccione o ícone "Ficheiros" e prima
"Enter".
3. Seleccione a fotografia (ou o ficheiro de música ou vídeo nas versões 7911, 7331, 9331, 10331)
através das teclas
"Cima/Baixo" do telecomando e prima a tecla "Copy/Del". O ecrã apresenta
"Eliminar ficheiro?-Sim/Não". Escolha a opção pretendida e prima "Enter". O seu ficheiro está
eliminado.
- Eliminaras suas fotos a partir do modo miniaturas
Com este método, pode suprimir uma selecção ou todas as fotos da memória interna.
1. Prima a tecla "Exit" do seu telecomando tantas vezes quantas necessárias para visualizar o ecrã de
escolha dos modos.
2. Seleccione a memória interna através das teclas "Cima/Baixo" do telecomando. Prima "Enter".
3. Através das setas "Direita/Esquerda", seleccione o modo foto e prima "Enter". É iniciado o
diaporama.
4. Prima a tecla "Exit" do telecomando para aceder às miniaturas.
5. Prima a tecla "Copy/Del". O ecrã apresenta "Eliminar?" Seleccione "Sim" e prima "Enter".
6. As miniaturas são novamente apresentadas com um pequeno quadrado branco no canto superior
direito de cada uma delas. Seleccione as fotos a copiar através das teclas
"Direita/EsquerdaCima/Baixo" do telecomando premindo "Enter" para cada foto seleccionada. O pequeno quadrado
branco fica então marcado para cada imagem seleccionada.
7. Prima a tecla "Copy/Del" e depois prima "Enter".
8. O ecrã apresenta "Eliminar?".
Page 71

6
Documento não contratual submetido a modificações em caso de erros tipográficos (Mktg0309)
PORTUGUESE
9. Seleccione a opção escolhida através das teclas "Cima/Baixo" do telecomando. Prima "Enter". As
suas fotos estão agora eliminadas da memória interna
III. Selecção do tipo de ficheiros a serem lidos
1. As fotos
- Prima duas vezes a tecla "Exit" para visualizar o ecrã principal.
- Através das setas "Esquerda/Direita" do telecomando, seleccione o ícone "Foto".
- Prima a tecla "ENTER": a leitura começa.
2. Os vídeos (unicamente para DPF 7911, DPF 7331, DPF 9331, DPF 10331)
- Prima duas vezes a tecla "Exit" para visualizar o ecrã principal.
- Através das setas cdo telecomando, seleccione o ícone "Vídeo".
- Prima a tecla "ENTER": a leitura começa.
3. A música (unicamente para DPF 7911, DPF 7331, DPF 9331, DPF 10331)
- Prima duas vezes a tecla "Exit" para visualizar o ecrã principal.
- Através das setas "Esquerda/Direita" do telecomando, seleccione o ícone "Música".
- Prima a tecla "ENTER": a leitura começa.
IV. Os ajustes
Estando no ecrã principal, seleccione o ícone "Ajust." através das teclas "Direita/Esquerda" e
"Cima/Baixo" do telecomando para aceder aos diversos ajustes da moldura.
Caso o diaporama esteja a correr, prima simplesmente a tecla "Def" do telecomando para aceder aos
menus de ajuste.
Estando nos menus de ajustes, as teclas "Cima/Baixo" do telecomando permitem-lhe seleccionar o
parâmetro a ser ajustado e as teclas
"Direita/Esquerda" permitem-lhe escolher o ajuste adequado para o
parâmetro seleccionado.
Page 72

7
Documento não contratual submetido a modificações em caso de erros tipográficos (Mktg0309)
PORTUGUESE
1. Configuração foto
Seleccione esta linha através das teclas"Cima/Baixo" do telecomando para aceder a este menu.
Poderá proceder aos ajustes através das teclas com setas do telecomando:
- O modo de visualização
- A relação de visualização
- A duração do diaporama
- A leitura em circuito do diaporama
- Os efeitos de transição
- A visualização múltipla
- O relógio
- O redimensionamento das imagens
- Recortar ao copiar
- Mostrar dicas ao copiar
2. Configuração calendário
Estando no menu de ajustes, seleccione a linha através das teclas "Cima/Baixo" do telecomando para
aceder a este menu e prima
"Enter".
Poderá então proceder aos ajustes através das teclas com setas do telecomando:
- O modo de visualização do calendário (diário, mensal ou relógio)
- A data
- O modo de visualização das horas (24 h ou 12 h)
- As horas
- Status de alarme (unicamente para DPF 7911, DPF 7331, DPF 9331, DPF 10331)
- Horario de alarme (unicamente para DPF 7911, DPF 7331, DPF 9331, DPF 10331)
- Frequencia de alarme (unicamente para DPF 7911, DPF 7331, DPF 9331, DPF 10331)
3. Ajustes vídeo (unicamente para DPF 7911, DPF 7331, DPF 9331, DPF 10331)
No menu de ajustes, seleccione a linha "Ajustes vídeo" através das teclas "Cima/Baixo" do seu
telecomando e prima
"Enter".
Neste menu, poderá escolher:
- O modo de visualização (ecrã pleno ou tamanho original)
- O modo de leitura (uma vez ou em circuito)
- A activação da leitura automática
4. Ajustes música (unicamente para DPF 7911, DPF 7331, DPF 9331, DPF 10331)
Estando no menu de ajustes, seleccione a linha "Ajustes música" através das teclas « Cima/Baixo » do
seu telecomando e depois prima
"Enter".
Pode parametrizar:
Page 73

8
Documento não contratual submetido a modificações em caso de erros tipográficos (Mktg0309)
PORTUGUESE
- O modo de leitura (aleatório, leitura em circuito, repetição uma vez)
- Os efeitos musicais (rock, pop, clássica, jazz, etc.)
- A visualização do equalizador durante a reprodução
- A reprodução automática
5. Configuração sistema
Este menu permite-lhe regular os parâmetros de funcionamento da sua moldura.
- O idioma (inglês, francês, espanhol, português, italiano, alemão, holandês)
- A luminosidade
- O contraste
- A cor
- Cromatico
- Ligar
- A activação automática programada
- Desligar
- O desligamento automático programado
- A frequência de activação e de desligamento automático (de segunda-feira a sexta-feira, durante o
fim de semana, uma vez ou todos os dias)
- A reinicialização da sua moldura.
V. Outras funções
É possível transferir ficheiros para a moldura ligando-a ao seu microcomputador. Para mais informações,
poderá descarregar o manual de utilização completo no site :
http://www.telefunken-digital.comr
VI. Instruções de segurança
Manipule a moldura fotográfica digital com precaução para evitar tocar no ecrã; é difícil retirar as marcas de
dedos.
Posicione sempre a moldura digital sobre uma superfície plana e estável para evitar que caia e possa
danificar-se.
Evite expor a moldura digital ao sol ou a temperaturas elevadas, porque tal poderia danificar a moldura ou
reduzir a sua vida útil. Não o coloque próximo a fontes de calor tais como radiadores, caloríferos, etc. Não
posicione a moldura voltada para os raios do Sol para evitar reflexos.
Evite expor a moldura digital à chuva, água ou humidade. Não o coloque num lavatório nem numa bacia
onde poderia entrar em contacto com a água.
Nunca coloque objectos pesados ou cortantes sobre a moldura, o ecrã ou a alimentação da moldura.
Tenha o cuidado de não ligar a moldura fotográfica digital a uma tomada ou um cabo com alimentação
demasiado potente. Isto poderia provocar um sobreaquecimento, um incêndio ou um choque eléctrico.
Page 74

9
Documento não contratual submetido a modificações em caso de erros tipográficos (Mktg0309)
PORTUGUESE
Escolha cuidadosamente a localização do cabo de alimentação; este não deve ser pisado nem estar em
contacto com outros objectos. Não coloque o cabo debaixo de um tapete. Examine regularmente o estado
do cabo para evitar quaisquer danos. Caso o cabo esteja danificado, desligue-o e substitua-o.
Ventilação
Os pontos para cartões de memória e as aberturas permitem ventilar a moldura.
Para garantir um funcionamento óptimo da moldura e para evitar qualquer sobreaquecimento, estas
aberturas não devem ser obstruídas nem cobertas.
Mantenha a moldura digital a uma distância suficiente da parede para permitir a ventilação.
Não coloque a moldura fotográfica digital sobre uma cama ou um sofá para evitar qualquer
sobreaquecimento.
Atenção!
Nunca retire a tampa de plástico situada na parte de trás da moldura. A moldura fotográfica digital inclui
circuitos eléctricos e poderá lesionar-se caso os toque.
Não tente consertar por si mesmo a sua moldura digital.
VII. Garantia
A garantia não cobre os danos provocados caso o adquirente (ou qualquer pessoa não qualificada) tenha
tentado consertar a moldura.
Caso a moldura liberte fumo, um ruído ou um odor não habitual, desligue-a e desligue imediatamente o
cabo da tomada. Contacte o local onde adquiriu o dispositivo.
Caso não utilize a moldura digital durante algum tempo, queira desligar o cabo da tomada.
A garantia incide sobre a moldura fotográfica digital e não inclui os acessórios. São considerados
acessórios:
O bloco de alimentação da rede eléctrica,
O telecomando (conforme o modelo).
Contudo, estes acessórios podem ser encomendados junto do nosso Serviço Técnico:
Por e-mail:
Período de garantia
Esta moldura digital dispõe de uma garantia com duração de 12 meses. O período de garantia tem início à
data de compra da moldura.
A garantia deve ser comprovada pela apresentação da factura original ou recibo em que a data e o modelo
adquirido estão especificados.
Cobertura
Page 75
10
Documento não contratual submetido a modificações em caso de erros tipográficos (Mktg0309)
PORTUGUESE
Uma moldura digital com defeito deverá ser devolvida completa ao seu distribuidor com uma nota
explicativa.
Caso a moldura digital apresente um defeito durante o período de garantia, o Serviço Pós-Venda
autorizado irá consertar todos os elementos com defeito ou qualquer defeito de fabrico. O Serviço PósVenda decidirá de forma unilateral quanto à reparação ou substituição da moldura digital integralmente ou
em parte.
A data de aquisição inicial determina a data de início do período de garantia
O período de garantia não é prolongado em caso de conserto ou de substituição da moldura digital pelo
nosso Serviço Pós-Venda.
Exclusão
Os danos ou defeitos provocados por uma utilização ou manipulação incorrecta da moldura digital e pela
utilização de acessórios que não sejam aqueles de origem ou não recomendados pela presente nota não
estão cobertos pela garantia.
A garantia não cobre os danos provocados por elementos externos, tais como relâmpagos, água ou
incêndio ou qualquer outro dano ocorrido durante transporte.
Nenhuma garantia poderá ser reivindicada caso o número de série da moldura digital tenha sido
modificado, retirado, apagado ou tornado ilegível.
Nenhuma garantia poderá ser reivindicada caso a moldura digital tenha sido reparada, alterada ou
modificada pelo comprador ou por qualquer técnico que não seja oficialmente aprovado e qualificado.
O fabricante não garante as propriedades técnicas descritas neste manual. O material e os acessórios
descritos neste manual estão sujeitos a modificação sem aviso prévio. Por este motivo, o fabricante
reserva-se o direito de modificar os componentes, as opções, as características e os documentos
respectivos sem aviso prévio.
Conformidade com a regulamentação em vigor:
Esta moldura digital está conforma às normas CE em vigor e é compatível com a norma RoHS.
Reciclagem de equipamentos eléctricos e electrónicos em fim de vida.
Os aparelhos eléctricos e electrónicos usados não devem ser eliminados juntamente com os resíduos
domésticos comuns. A presença do símbolo no produto ou respectiva embalagem visa recordar-lhe tal
facto.
Alguns dos materiais que compõem este produto podem ser reciclados caso os entregue a um centro de
reciclagem apropriado. Ao reutilizar as peças e as matérias-primas dos aparelhos usados, está a dar uma
importante contribuição à preservação do ambiente.
Para mais informações sobre os locais de recolha dos equipamentos usados, pode informar-se junto da
câmara municipal, no serviço de tratamento de resíduos ou na loja onde adquiriu o produto.
Page 76
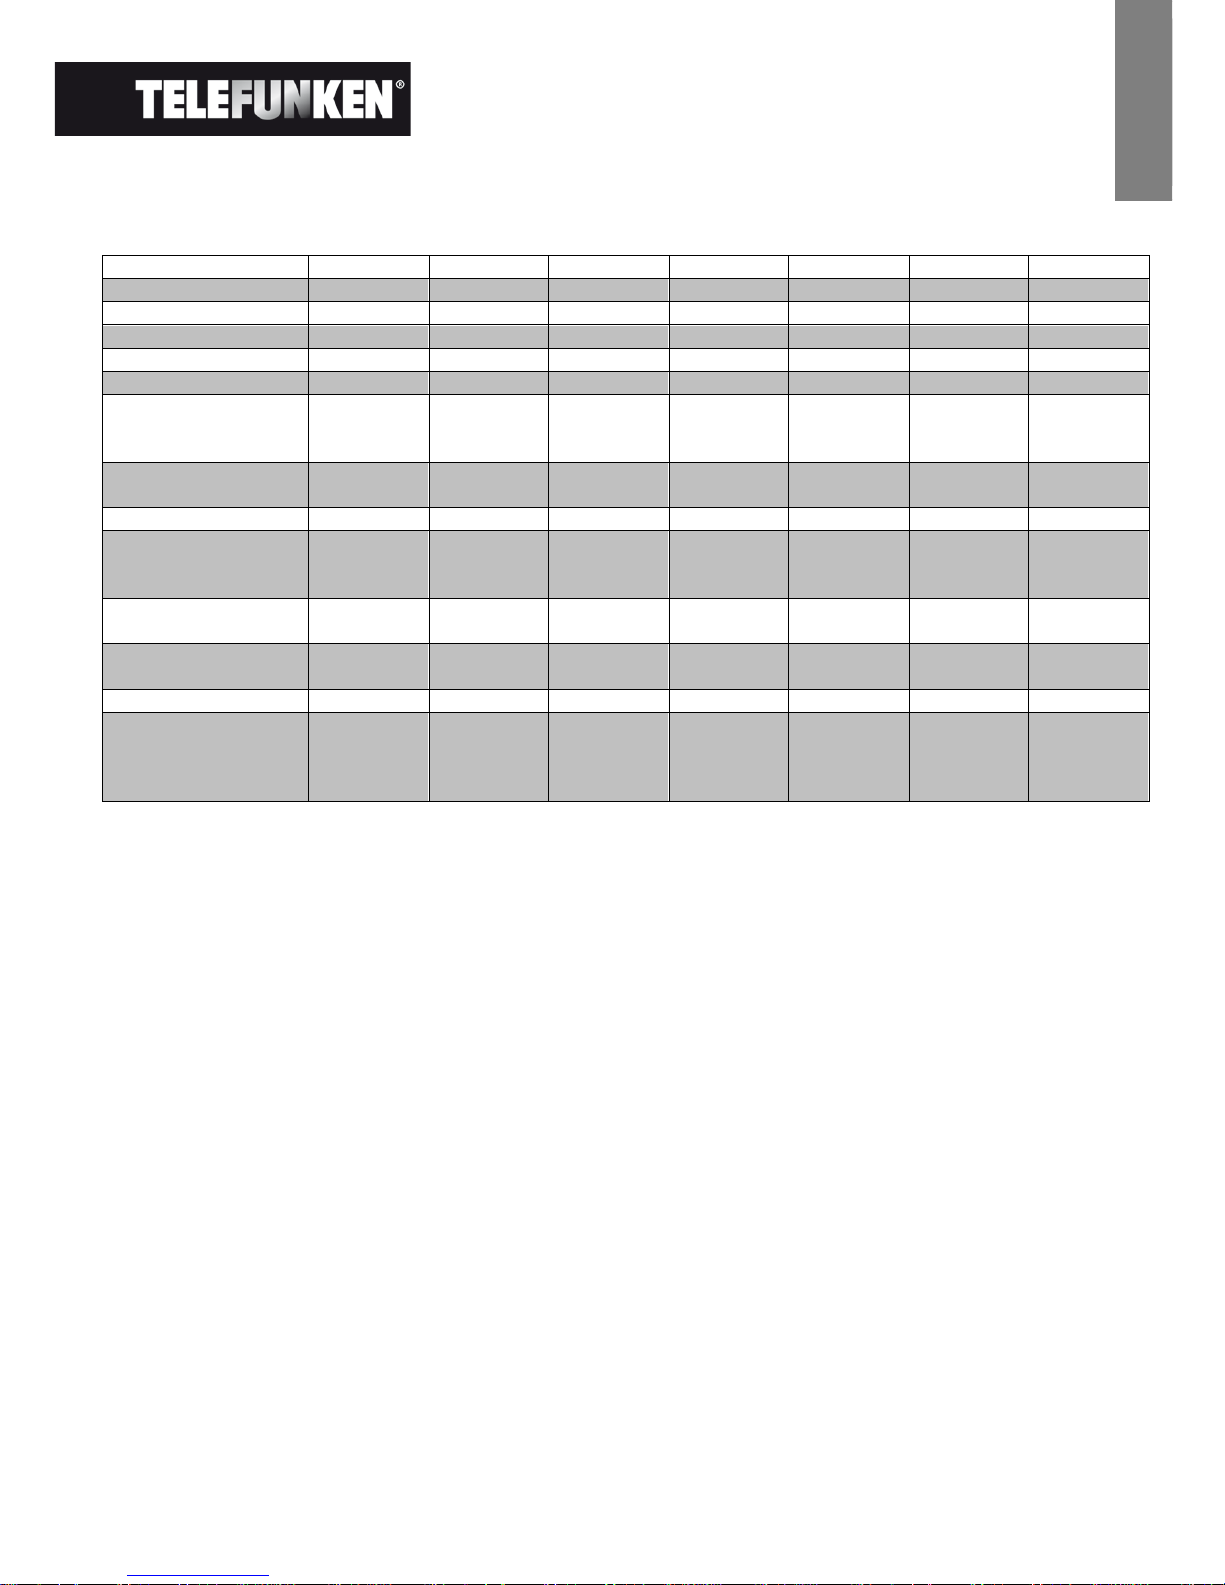
11
Documento não contratual submetido a modificações em caso de erros tipográficos (Mktg0309)
PORTUGUESE
VIII. Características técnicas
Características
DPF 7901
DPF 7911
DPF 7321
DPF 7331
DPF 9321
DPF 9331
DPF 10331
Tamanho
7 ˝ 7 ˝ 7 ˝ 7 ˝ 8,4 ˝ 8,4 ˝ 10,4”
Definição
480 x 234 480 x 234 800 x 600 800 x 600 800 x 600 800 x 600 800 x 600
Rácio imagem
16/9 16/9 4/3 4/3 4/3 4/3 4/3
Memória interna
128 MB 128 MB 2 GB 2 GB 2 GB 2 GB 2 GB
Áudio/vídeo
NÃO SIM NÃO SIM NÃO SIM SIM
Cartões compatíveis
SD/MMC,
MS, XD,
Discos USB
SD/MMC,
MS, XD,
Discos USB
SD/MMC,
MS, XD,
Discos USB
SD/MMC,
MS, XD,
Discos USB
SD/MMC,
MS, XD,
Discos USB
SD/MMC,
MS, XD,
Discos USB
SD/MMC,
MS, XD,
Discos USB
Redimensionamento
automático
SIM SIM SIM SIM SIM SIM SIM
Rotação automática
SIM SIM SIM SIM SIM SIM SIM
Entrada alimentação
100-240 V
CA 50/60
Hz
100-240 V
CA 50/60
Hz
100-240 V
CA 50/60
Hz
100-240 V
CA 50/60
Hz
100-240 V
CA 50/60
Hz
100-240 V
CA 50/60
Hz
100-240 V
CA 50/60
Hz
Saída alimentação
5 V CC 2
Ah
5 V CC 2
Ah
5 V CC 2
Ah
5 V CC 2
Ah
5 V CC 2
Ah
5 V CC 2
Ah
9 V CC 2
Ah
Dimensões
205 x 135 x
20 mm
205 x 135 x
20 mm
195 x 149 x
20 mm
195 x 149 x
20 mm
235 x 178 x
20 mm
235 x 178 x
20 mm
264 x 210 x
25 mm
Peso
362 g 362 g 424 g 424 g 520 g 520 g 900 g
Compatibilidade
sistema
Windows
XP, Vista,
Mac OS 9.0
e seguintes
Windows
XP, Vista,
Mac OS 9.0
e seguintes
Windows
XP, Vista,
Mac OS 9.0
e seguintes
Windows
XP, Vista,
Mac OS 9.0
e seguintes
Windows
XP, Vista,
Mac OS 9.0
e seguintes
Windows
XP, Vista,
Mac OS 9.0
e seguintes
Windows
XP, Vista,
Mac OS 9.0
e seguintes
Page 77

 Loading...