

Telefunken Digiframe 7112 User Manual

User guide
Digiframe
g
g
Model 7112

[Type some text]
1
Non binding document, subject to modification in the event of
misprint(s) – MKG0308
Digiframe
Digital photo frame
I. INSTALLATION ................................................................................ 3
1. Contents ............................................................................................................. 3
2. Description of the frame ..................................................................................... 4
3. Installing the frame............................................................................................. 9
a. Adjusting the stand ............................................................................................ 9
b. Wall fixing ........................................................................................................... 9
II. USING YOUR DIGIFRAME ............................................................ 10
1. Inserting a card ................................................................................................ 10
2. Switching on the power .................................................................................... 11
3. Selecting the picture source ............................................................................ 11
4. Photo, music, video selection ................................................... ....................... 12
5. Choosing a slideshow ...................................................................................... 13
6. Multiple display ................................................................................................ 14
7. Enabling/disabling sound ................................................................................. 15
III. SETTINGS ...................................................................................... 17
1. Main menu ....................................................................................................... 17
a. Image size ........................................................................................................ 18
b. Transitions ....................................................................................................... 19
c. Display time ..................................................................................................... 20
d. Musical slideshow ............................................................................................ 22
e. Random slideshow ........................................................................................... 23
f. Video repeat ..................................................................................................... 24
g. Audio repeat ..................................................................................................... 25
h. Energy saving .................................................................................................. 26

[Type some text]
2
Non binding document, subject to modification in the event of
misprint(s) – MKG0308
Digiframe
Digital photo frame
i. Reset ................................................................................................................ 27
2. Photo menu ...................................................................................................... 28
a. Thumbnails menu ............................................................................................ 29
b. Images menu ................................................................................................... 33
3. Music menu .......................................................................................... ............ 39
a. Selecting files ................................................................................................... 40
b. Copying files .................................................................................................... 40
c. Deleting a file ................................................................................................... 41
4. Video menu ...................................................................................................... 43
a. Selecting files ................................................................................................... 43
b. Copying files .................................................................................................... 44
5. Files menu ....................................................................................................... 46
a. Selecting files ................................................................................................... 47
b. Copying files .................................................................................................... 48
c. Deleting files .................................................................................................... 49
6. Calendar/Clock menu ...................................................................................... 50
IV. CONNECTING TO A COMPUTER ................................................ 52
V. MAINTENANCE .............................................................................. 54
VI. F.A.Q. .............................................................................................. 55
VII. SAFETY AND GUARANTEE .......................................................... 56
VIII. TECHNICAL SPECIFICATION ...................................................... 60
IX. GLOSSARY .................................................................................... 61

[Type some text]
3
Non binding document, subject to modification in the event of
misprint(s) – MKG0308
Digiframe
Digital photo frame
Congratulations! You have just purchased a TELEFUNKEN DIGIFRAME 7’’.
Please read the instructions and advice contained in this document carefully
before using your digital photo frame.
Important: keep the packaging and all the items it contains.
Also keep these instructions so that you can refer to them again if need be.
I. INSTALLATION
1. Contents
• A digital photo frame
• A black acrylic front
• A mains adaptor
• A remote control
• A set of instructions
• A USB cable
• A cleaning cloth
• A CD-Rom containing software and the instructions

[Type some text]
4
Non binding document, subject to modification in the event of
misprint(s) – MKG0308
Digiframe
Digital photo frame
2. Description of the f rame
Your TELEFUNKEN DIGIFRAME is composed of a removable acrylic front, a
mains adaptor, a remote control and an LCD screen equipped with 2 USB ports
and a multi-card reader that is compatible with most memory cards on the market.

[Type some text]
5
Non binding document, subject to modification in the event of
misprint(s) – MKG0308
Digiframe
Digital photo frame
Slot 2 CF cards
Slot 1 SD, mini SD, MMC,
X
D, MS cards
USB Port
Mini USB port
Socket for mains power
supply
reade
r
Card

[Type some text]
6
Non binding document, subject to modification in the event of
misprint(s) – MKG0308
Digiframe
Digital photo frame
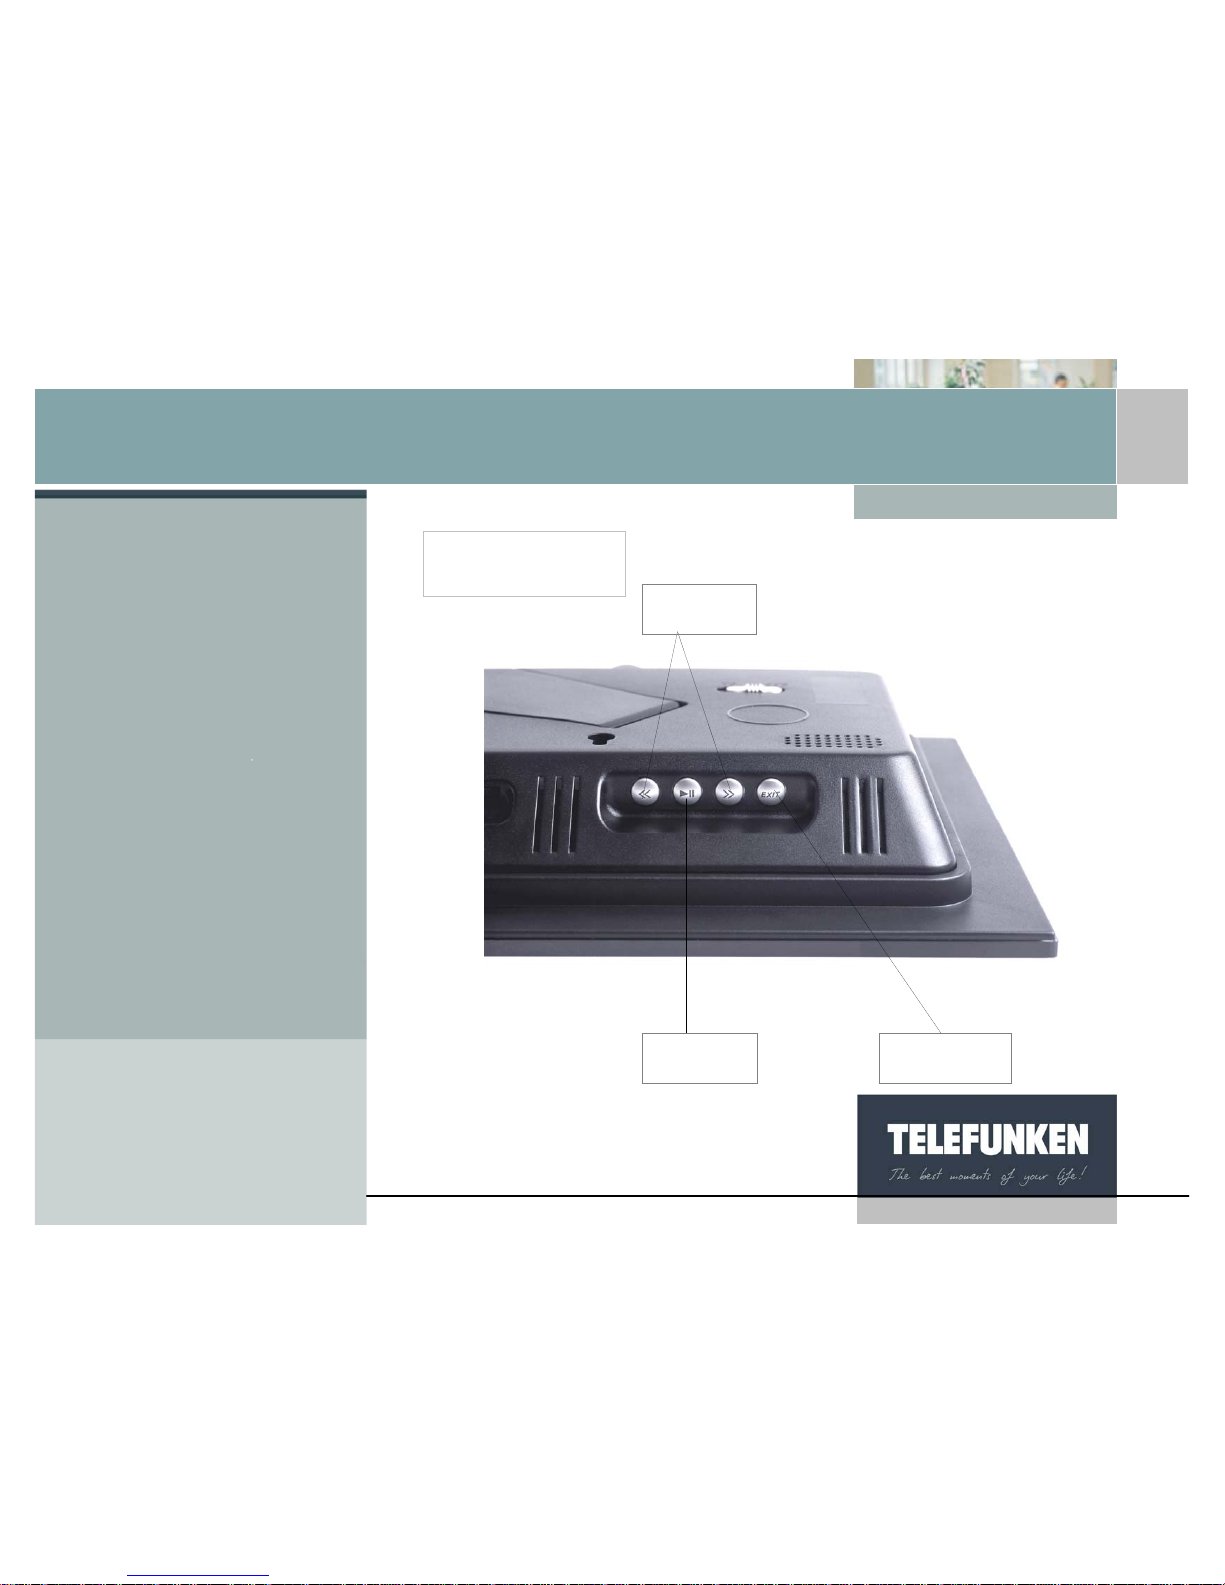
Back of frame
Cursor On/Of
f
Menu access buttons
A
djustable stand
Contrast
Loud speakers
[Type some text]
7
Non binding document, subject to modification in the event of
misprint(s) – MKG0308
Digiframe
Digital photo frame
Validation
ke
y
Frame
ke
y
s
Scrolling
keys
Exit
ke
y
[Type some text]
8
Non binding document, subject to modification in the event of
misprint(s) – MKG0308
Digiframe
Digital photo frame
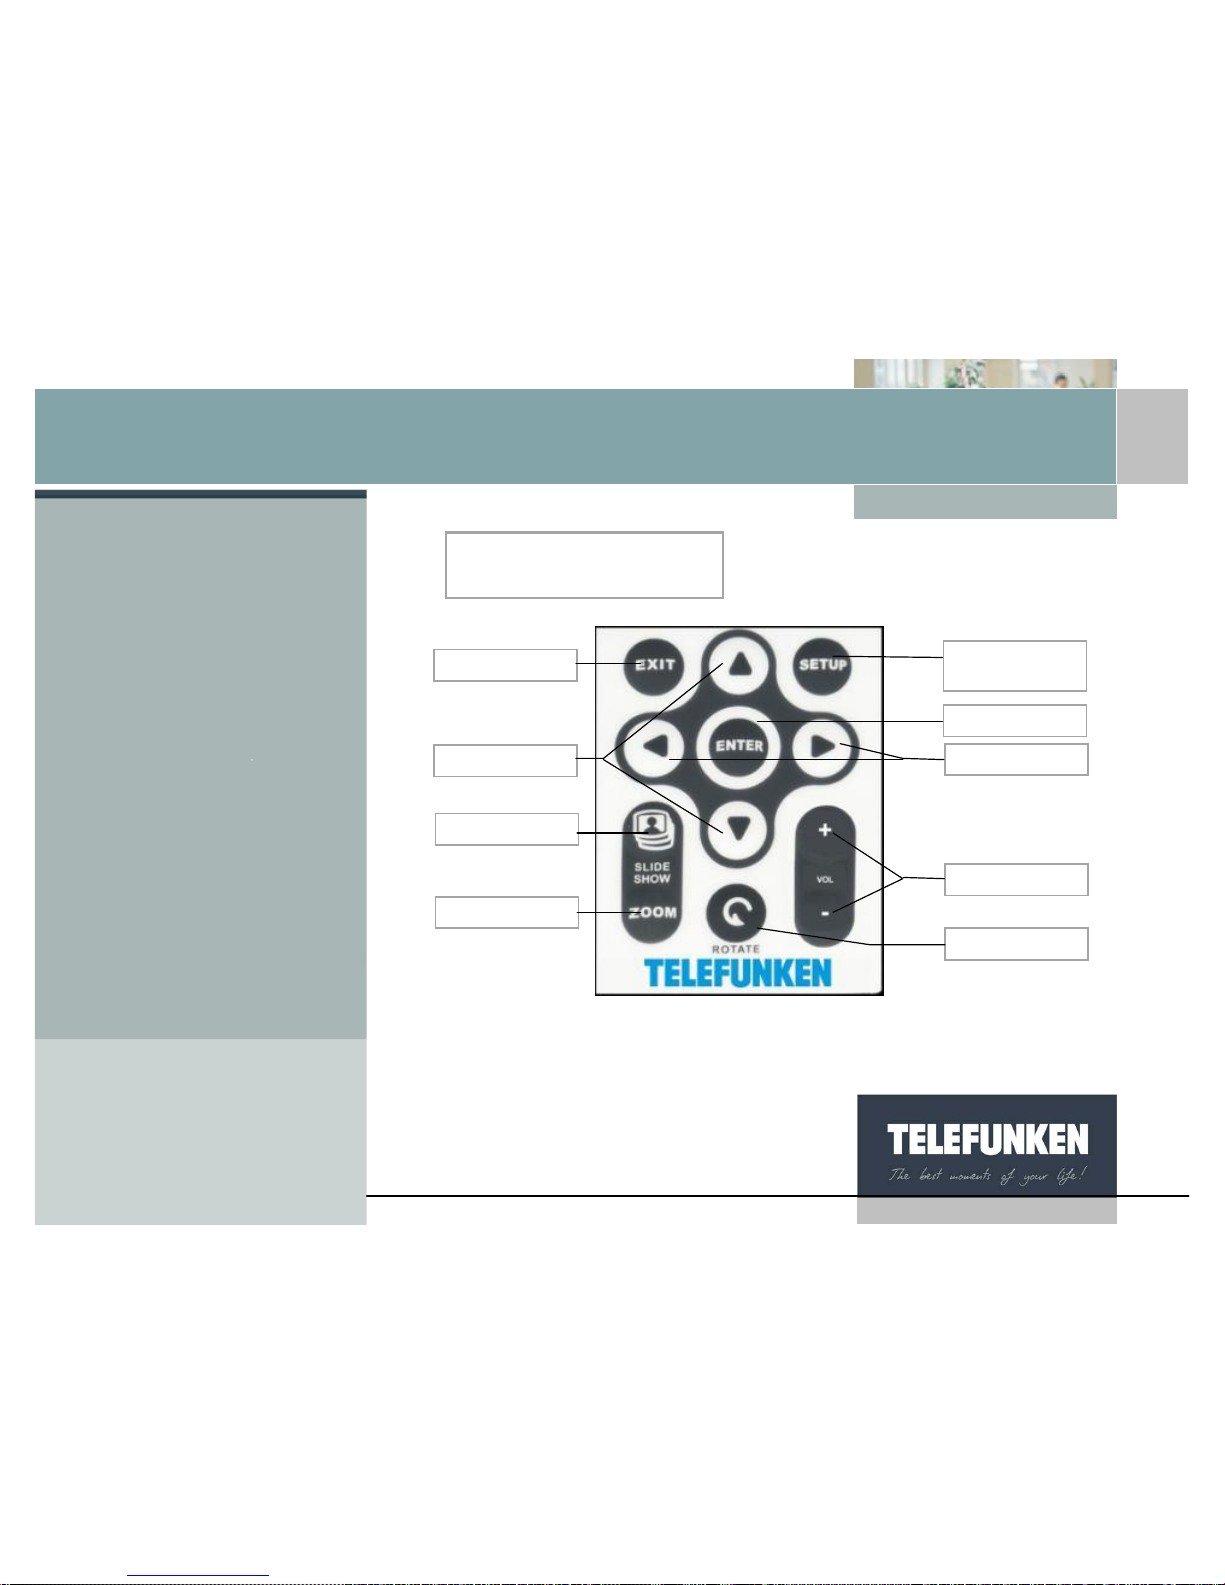
Access to the
menu
Exit
A
ccept
Right/Left
Up/Down
Start slideshow
Zoom
Volume
Rotation
Description of the
remote control

[Type some text]
9
Non binding document, subject to modification in the event of
misprint(s) – MKG0308
Digiframe
Digital photo frame
3. Installing the frame
a. Adjusting the stand
You can adjust the angle of your DIGIFRAME by pulling on the adjustable stand.
Choose the angle that suits you from 6 different levels (fig. 1).
To do this, lift the support, squeeze the notches and pull on the support to
achieve the angle of your choice.
b. Wall fixing
You can also hang your DIGIFRAME on a wall using the wall slot on the back of
the frame. (Arrow fig.1)

[Type some text]
10
Non binding document, subject to modification in the event of
misprint(s) – MKG0308
Digiframe
Digital photo frame
II. USING YOUR DIGIFRAME
1. Inserting a card
Insert the memory card containing the pictures you want to display into one of
the slots provided (fig 2).
Slot 1: for SD, mini SD, MMC, XD, Memory Stick, Memory Stick Pro, Memory
Stick Duo or Memory Stick Pro Duo or MMC cards
Slot 2: for Compact Flas h or MD cards
DIGIFRAME reads basis JPEG images, that is to say images as taken by digital
cameras.
If you use image editing software (Photoshop, Paint Shop Pro,…etc), make sure
you save your work in basic JPEG format only and not in progressive JPEG or
any other JPEG format.
If you want to display black and white pictures on your DIGIFRAME, make sure
they are in RGB mode and not greyscale. If they aren’t, you will be able to
display these images as thumbnails but not in full-screen.
DIGIFRAME’s screen resolution is 800 x 400 pixels. You can display images of a
higher resolution but this may slow down the time taken to display the photos.
Fig.2
1
2
[Type some text]
11
Non binding document, subject to modification in the event of
misprint(s) – MKG0308
Digiframe
Digital photo frame
DIGIFRAME can also read MP3 audio files, as well as video files in the Motion
JPEG, AVI formats.
2. Switching on the po wer
Plug one end of the mains adaptor into the socket provided on the DIGIFRAME
then plug the other end into your power outlet.
Press the ON/OFF button located at the back of the frame: the slideshow will
start after a few seconds.
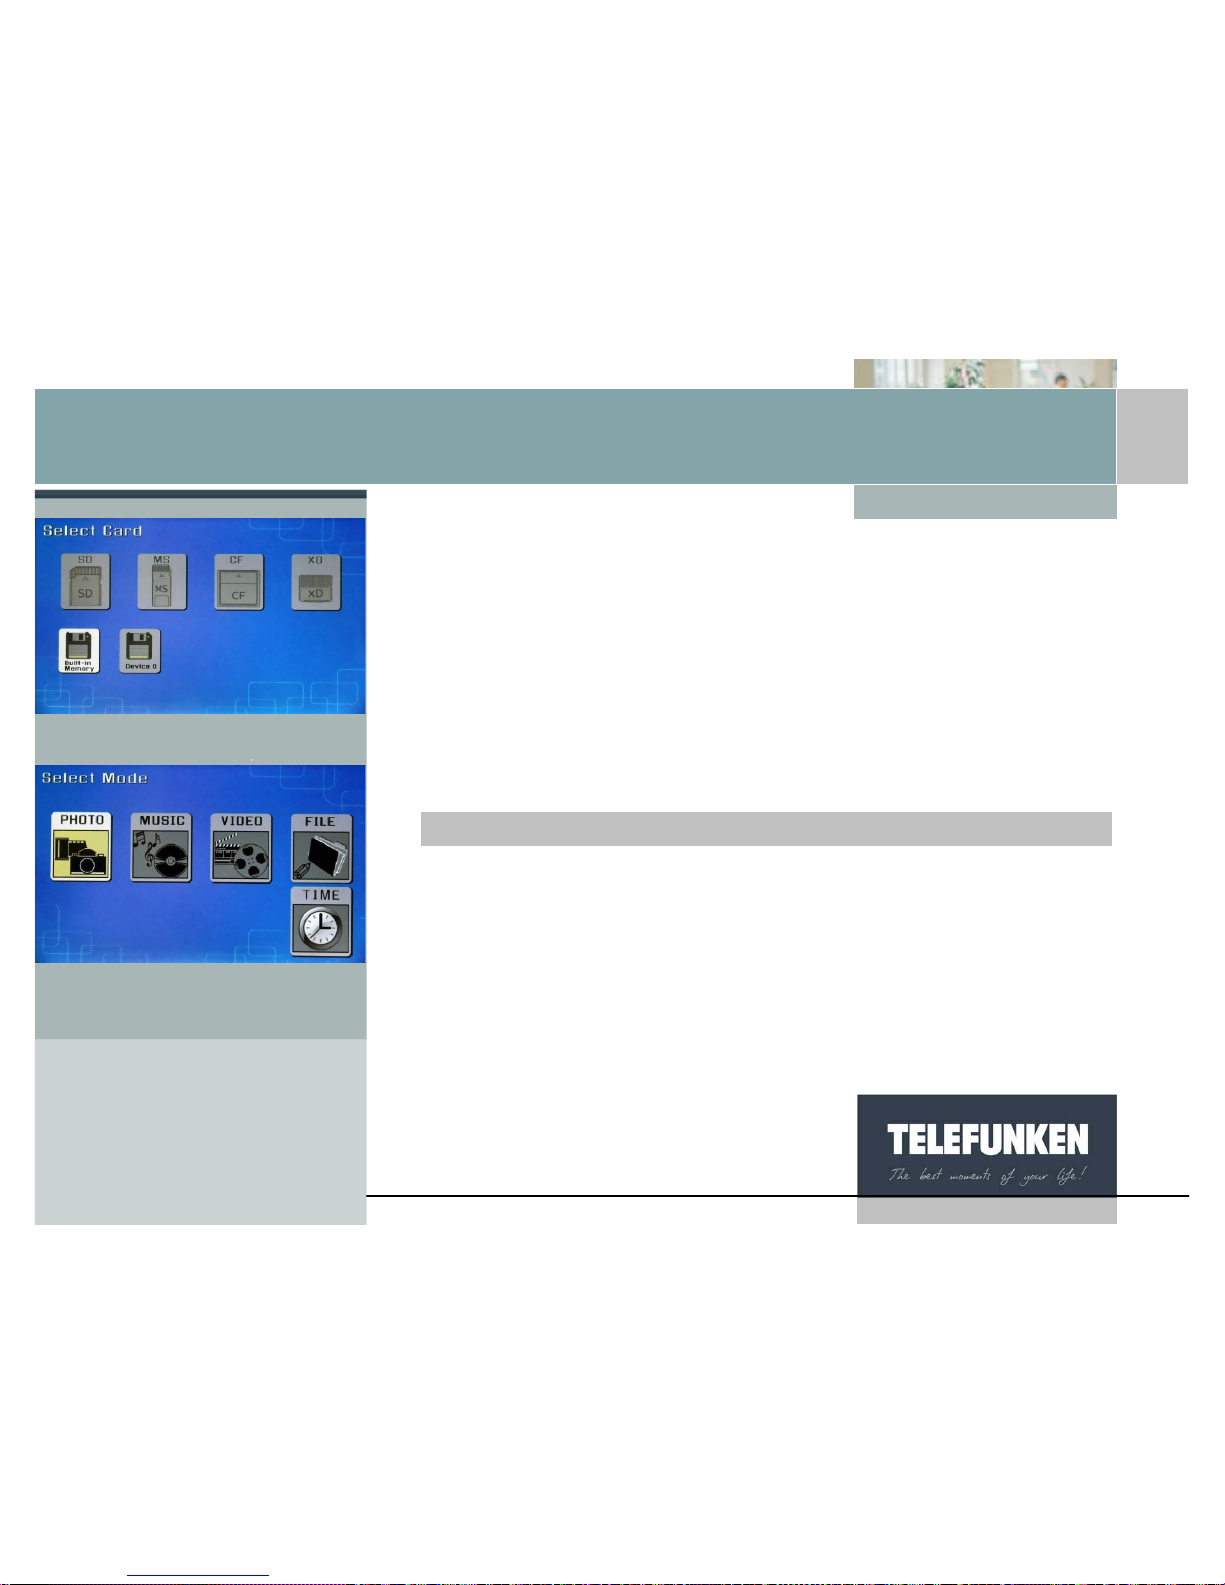
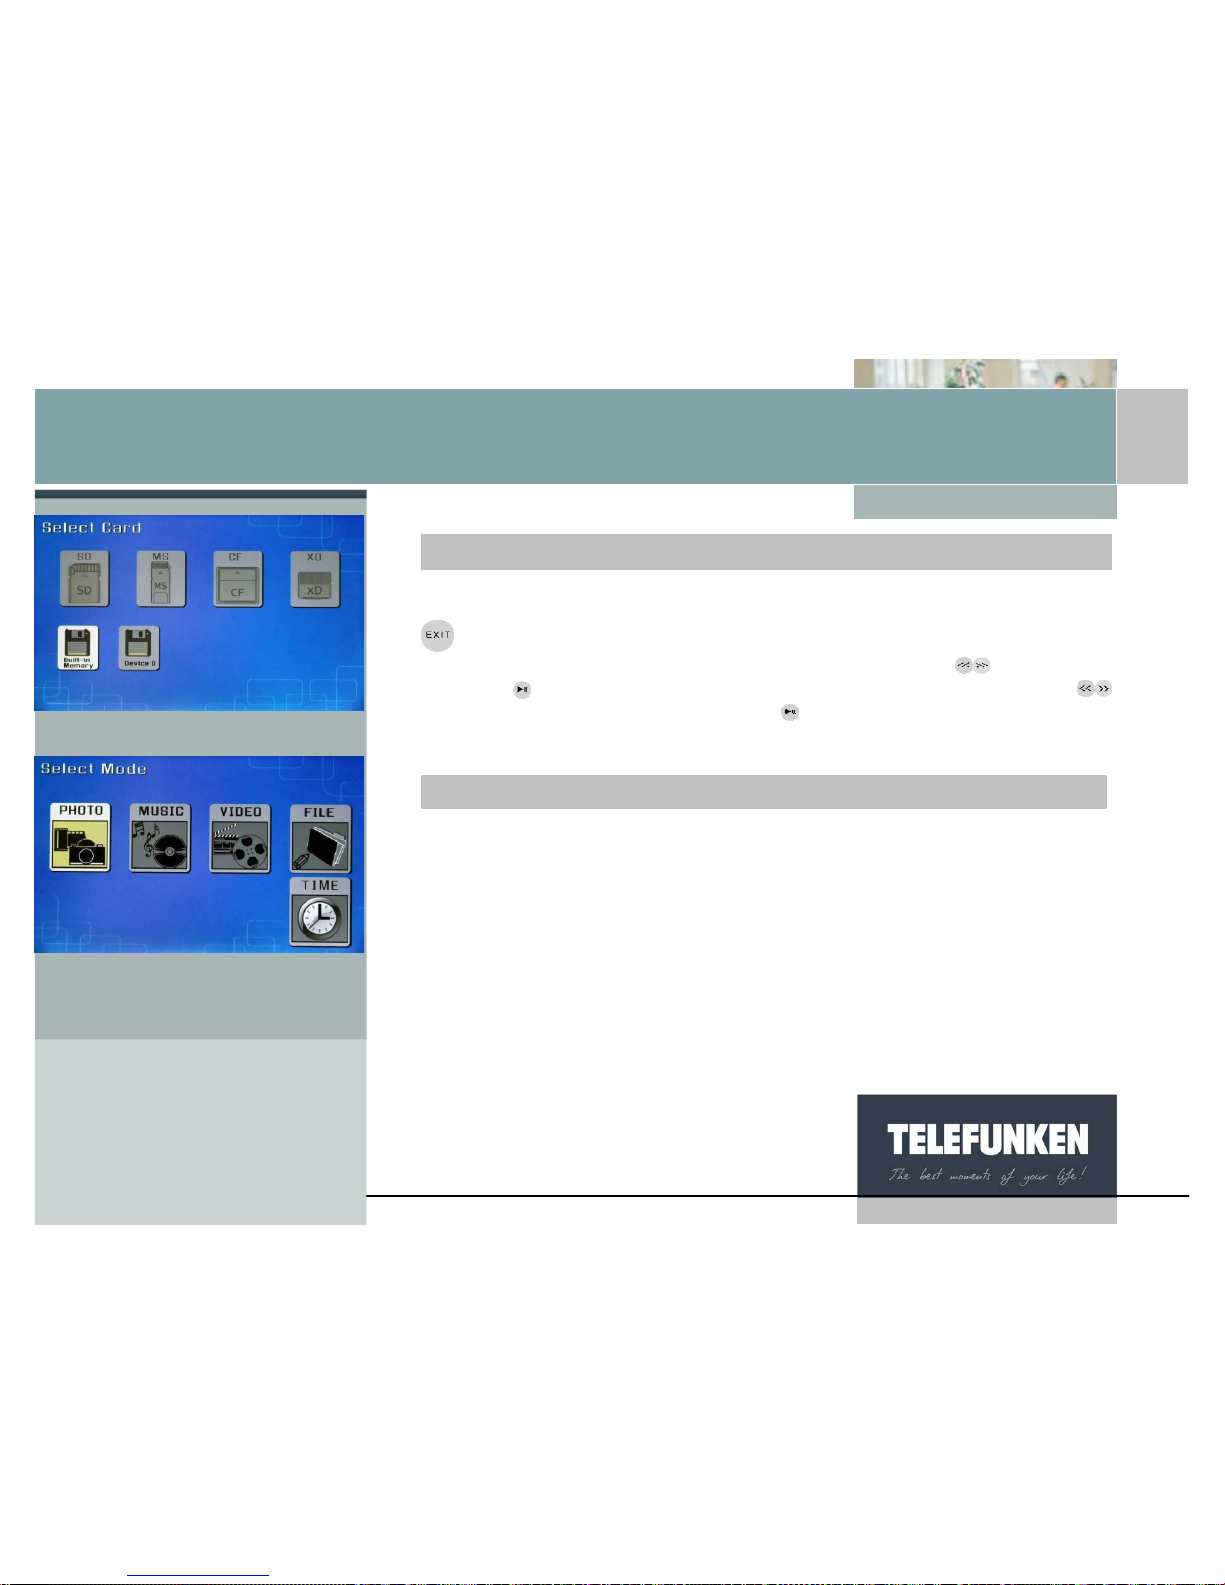
3. Selecting the picture source
When the frame is in slideshow mode and is displaying your photos, point the
remote control towards your DIGIFRAME and press the “Exit” key three times.
Using the “Right/Left” keys, select the desired medium, (Fig. 3) then press the
"Enter" key. The mode selection screen is displayed (Fig 4). Using the "Right/Left
keys, select the desired mode, then press "Enter".
With the remote contro
l
Fig.3
Fig.4
[Type some text]
12
Non binding document, subject to modification in the event of
misprint(s) – MKG0308
Digiframe
Digital photo frame
When the frame is in slideshow mode and is displaying your photos, press the
key three times. The screen opposite appears (fig. 3). Select the source for
the slideshow you want (card or internal memory) with the
buttons, then
press the
key: the mode selection screen is displayed (Fig 4). Using the
keys, select the desired mode, then press
.
4. Photo, music, video selection
When the frame is in slideshow mode and is displaying your photos, point the
remote control towards the frame and press the “Exit” key twice. The frame then
displays the mode selection screen (Fig. 4). Select the mode you want using the
“Right/Left” keys on the remote control, then press the "Enter" key. A screen
presenting a list of files (Audio and video) or thumbnails (photos) is displayed.
Select the file to be played or displayed using the “Up/Down-Right/Left” keys,
then press "Enter".
With the fram
e
With the remote contro
l
Fig.3
Fig.4
[Type some text]
13
Non binding document, subject to modification in the event of
misprint(s) – MKG0308
Digiframe
Digital photo frame
When the frame is in slideshow mode and is displaying your photos, point the
remote control towar ds the frame and press the
key twice: the frame then
displays the mode selection screen (Fig. 4). Select the mode you want using the
keys on the remote control, then press the key. A screen presenting a list
of files (Audio and video) or thumbnails (photos) is displayed. Select the file to be
played or displayed using the
keys, then press .
5. Choosing a slideshow
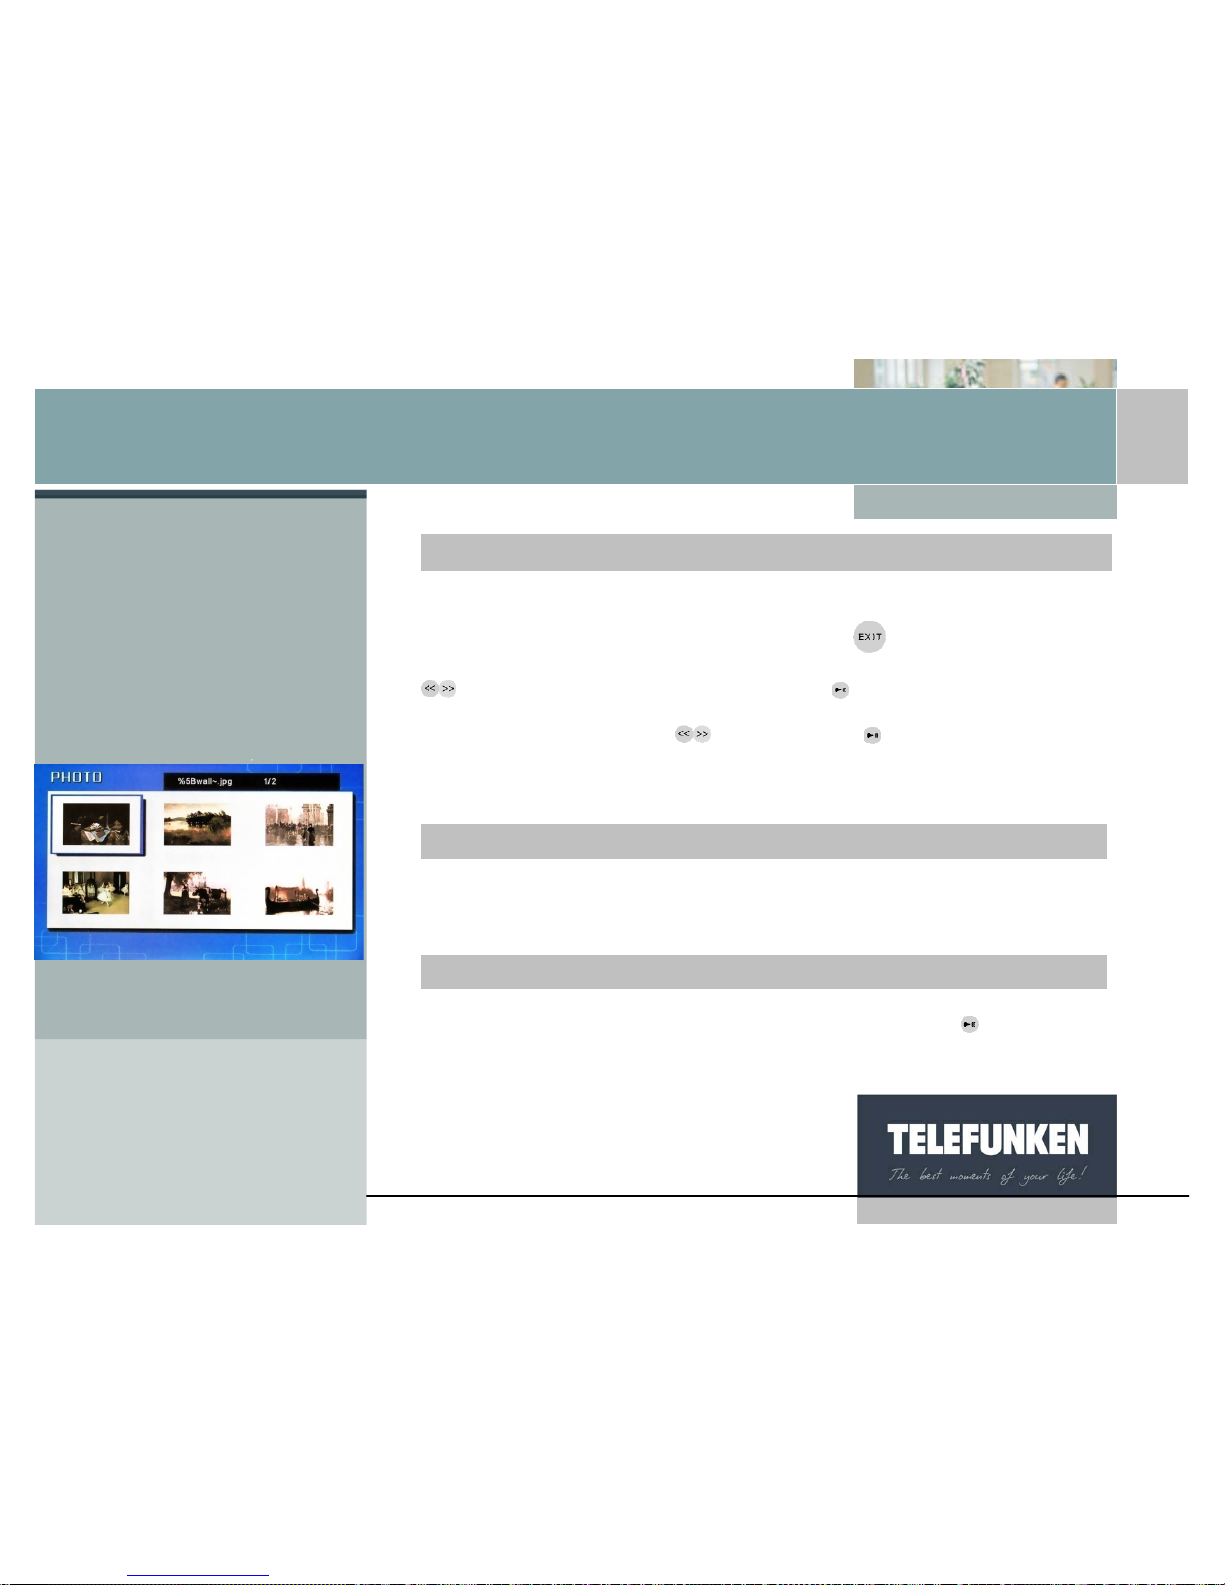
When the frame is in thumbnail display mode (Fig 5), press the "Slideshow" key
on the remote control once.
When the frame is in thumbnail display mode (Fig 5), press the key twice.
With the fram
e
With the remote contro
l
With the frame
Fig.5

[Type some text]
14
Non binding document, subject to modification in the event of
misprint(s) – MKG0308
Digiframe
Digital photo frame
6. Multiple display
The TELEFUNKEN DIGIFRAME has an exclusive function: multiple display. This
mode allows you to display 2, 3 or 4 pictures simultaneously depending on their
orientation (vertical or horizontal).
When the menu is displayed, select the "Multiple display" line using the
"Up/Down" keys on your remote control (Fig.6), then press the "Enter" key. Two
lines appear: "Enable" and "None".
Using the "Up/Down" arrows, select the option you want.
If you choose the "Enable" opt ion, multiple display will be selected.
If you choose the "None" option, standard full-screen display will be enabled.
Press the "Enter" key to confirm your choice, then twice on the "Exit" key to ex it
the menu. Then press the "Enter" key, then "Slideshow" to restart the slideshow.
When the menu is displayed, select the "Multiple display" line (Fig.6) using the
keys, then press the key.
Two lines appear: "Enable" and "None".
With the remote contro
l
With the fram
e
Fig.6

[Type some text]
15
Non binding document, subject to modification in the event of
misprint(s) – MKG0308
Digiframe
Digital photo frame
Using the arrow keys, select the option you want.
If you choose the "Enable" option, multiple displa y will be selected. If you choose
the "None" option, standard full-screen display will be enabled. Press the
key
to confirm your choice, then twice on the
key to exit the menu. Press the
key for 5 seconds to restart the slideshow.
7. Enabling/disabling sound
The simplest method of enabling or disabling sound is to use the volume keys on
the remote control. However, your DIGIFRAME does have a musical slideshow
function that you can enable or disable from the main menu.
When the frame is in slideshow mode and is displaying your photos, press the
"Exit" key twice to display the mode selection screen. Then press the "Menu"
key: this is then displayed.
Use the "Up/Down" keys, until the "Musical slideshow" line (fig. 7) is highlighted
in blue.
Press the "Enter" key to display the options, then using t he "Up/Down" arrows,
select the option you want. Press "Enter" to confirm your choice, then twice on
the "Exit" key to exit the menu. Then press the "Slideshow" key to restart the
slideshow.
With the remote control
Fig.7

[Type some text]
16
Non binding document, subject to modification in the event of
misprint(s) – MKG0308
Digiframe
Digital photo frame
When the frame is in slideshow mode and is displaying your photos, press the
key twice to display the mode selection screen, then once more for one
second to display the menu.
Use the
keys until the "Musical slideshow" line (fig. 7) is highlighted in blue.
Press the
key to display the options, then using the arrows, select the
option you want. Press
to confirm your choice, then twice on the key to exit
the menu. Then press the
key for 5 seconds to restart the slideshow.
With the fram
e

[Type some text]
17
Non binding document, subject to modification in the event of
misprint(s) – MKG0308
Digiframe
Digital photo frame
III. SETTINGS
1. Main menu
When the frame is in slideshow mode and is displaying your photos, press the
"Exit" key twice to display the mode selection screen.
Then press the "Menu" key: this is then displayed.
When the frame is in slideshow mode and is displaying your photos, press the
key twice to display the mode selection screen.
Then press the
key for one second in order to display the main menu.
With the remote contro
l
With the fram
e

[Type some text]
18
Non binding document, subject to modification in the event of
misprint(s) – MKG0308
Digiframe
Digital photo frame
a. Image size
The height/width ratio of the DIGIFRAME 7 inch frame is 16:9. This means
that pictures with another ratio (4:3 for photos taken using compact digital
cameras, or 3:2 for most digital SLR cameras) will not be fully displayed. The
top and bottom of the image will be cropped.
Using the image size menu, you have the option of adjusting the display to
the size of your photos:
-Original: the whole of your photo will be displayed, but with black bands at
the sides.
-Optimal: the image will be resized so that it is displayed full-screen (but be
careful, the top and bottom of the image will be cropped).
Attention: do not conf us e resizing images with the zoom. Resizing applies to all
the images, while zooming only applies to the image on the screen.
When the menu is displayed, use the "Up/Down" keys, until the "Image size" line
(fig. 8) is highlighted in blue.
Press the "Enter" key to display the options, then using the "Up/Down" arrows,
select the desired image size. Press "Enter" to confirm your choice, then twice on
the "Exit" key to exit the menu. Then press the "Slideshow" key to restart the
slideshow.
With the remote contro
l
Fig.8
[Type some text]
19
Non binding document, subject to modification in the event of
misprint(s) – MKG0308
Digiframe
Digital photo frame
When the menu is displayed, use the keys, until the "Image size" line (fig. 8)
is highlighted in blue.
Press the
key in order to display the options, then using the keys, select
the option you want. Press
to confirm your choice, then twice on the key to
exit the menu. Then press the "Enter" key. Press the
key for 5 seconds to
restart the slideshow.
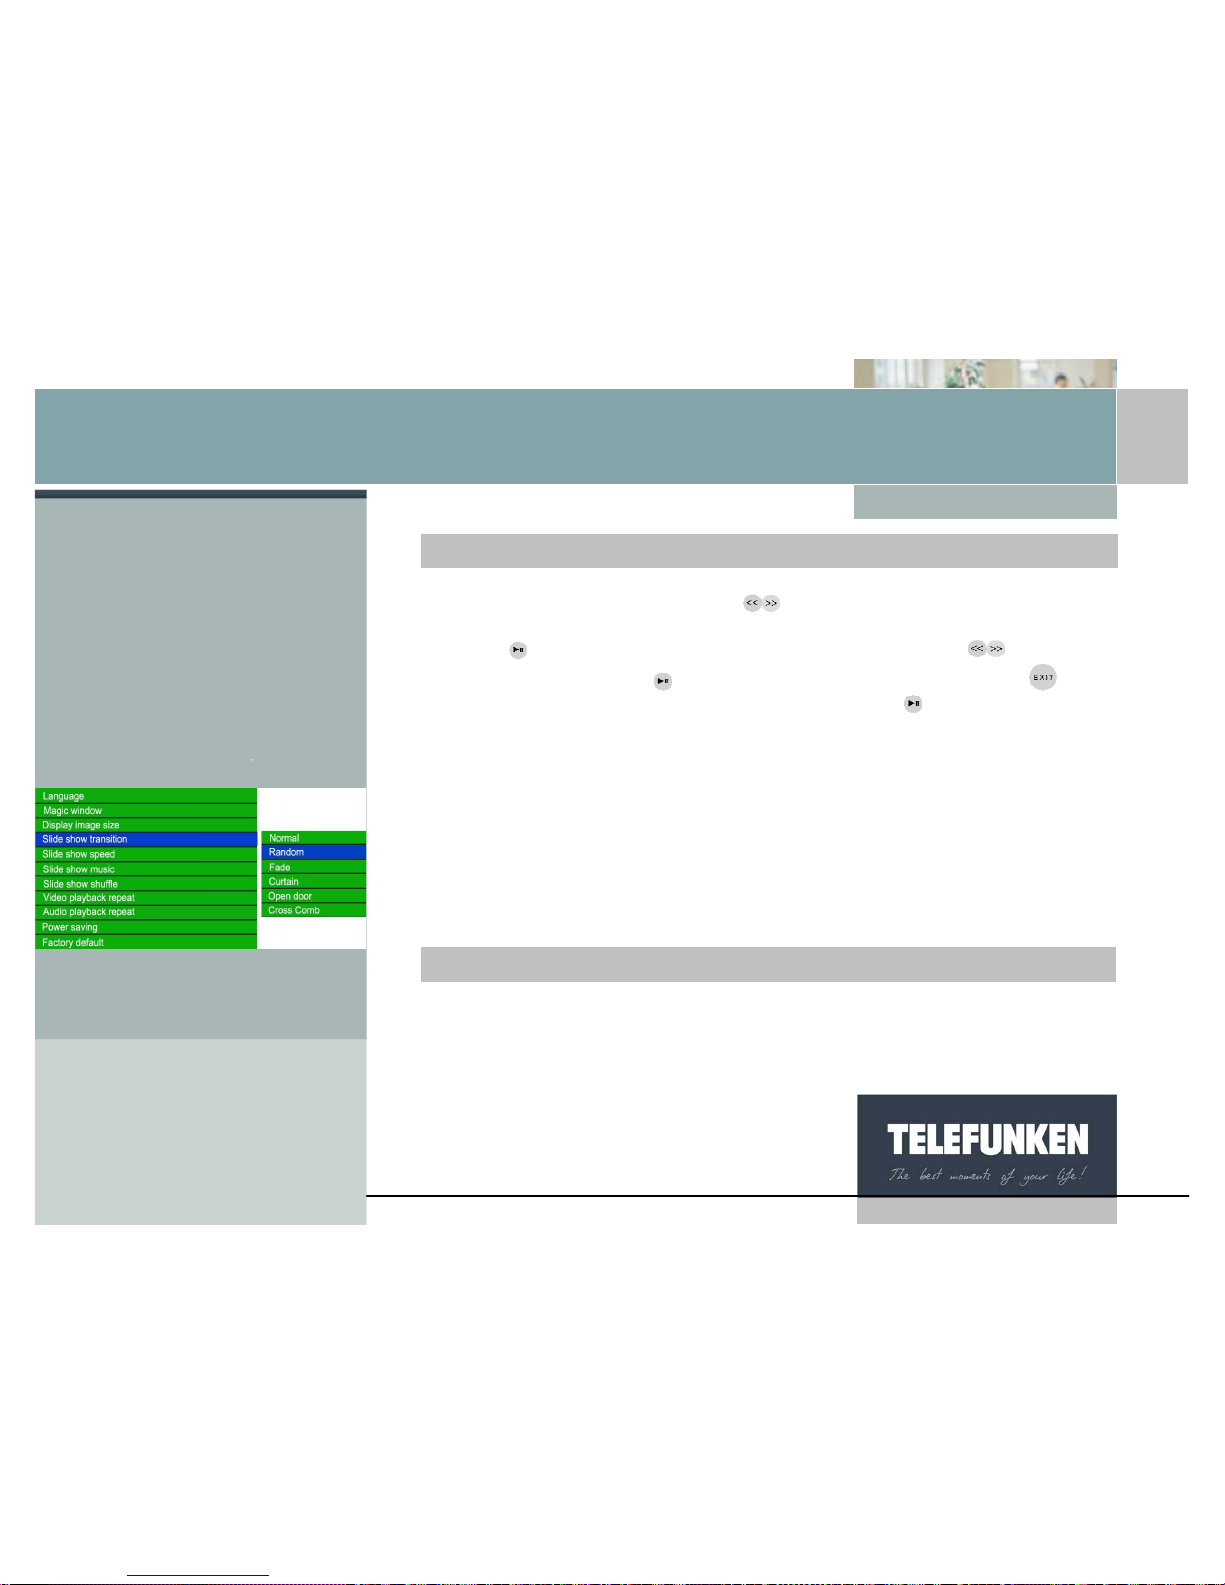
b. Transitions
You have the option of choosing the type of transition used between each of the
images in your slideshow.
There are 4 different transitions (fade, blind, chequer, aperture), to which can be
added "no transition" and "random".
"Random" mode is the mode programmed by default.
When the menu is displayed, use the "Up/Down" keys, until the "Image
transitions" line (fig. 9) is highlighted in blue.
With the fram
e
With the remote contro
l
Fig.9
 Loading...