

Page 1

Manuel
d’utilisation
Bedienungsanleitung
Manuale di
utilizzazione
User
manual·
Manual de
utilización
·
·
·
·
Gebruiksaanwijzing
Bruksanvisning
Betjeningsvejledning
DF321E / DF421E
·
·
·
Folheto de
utilização
·
Page 2
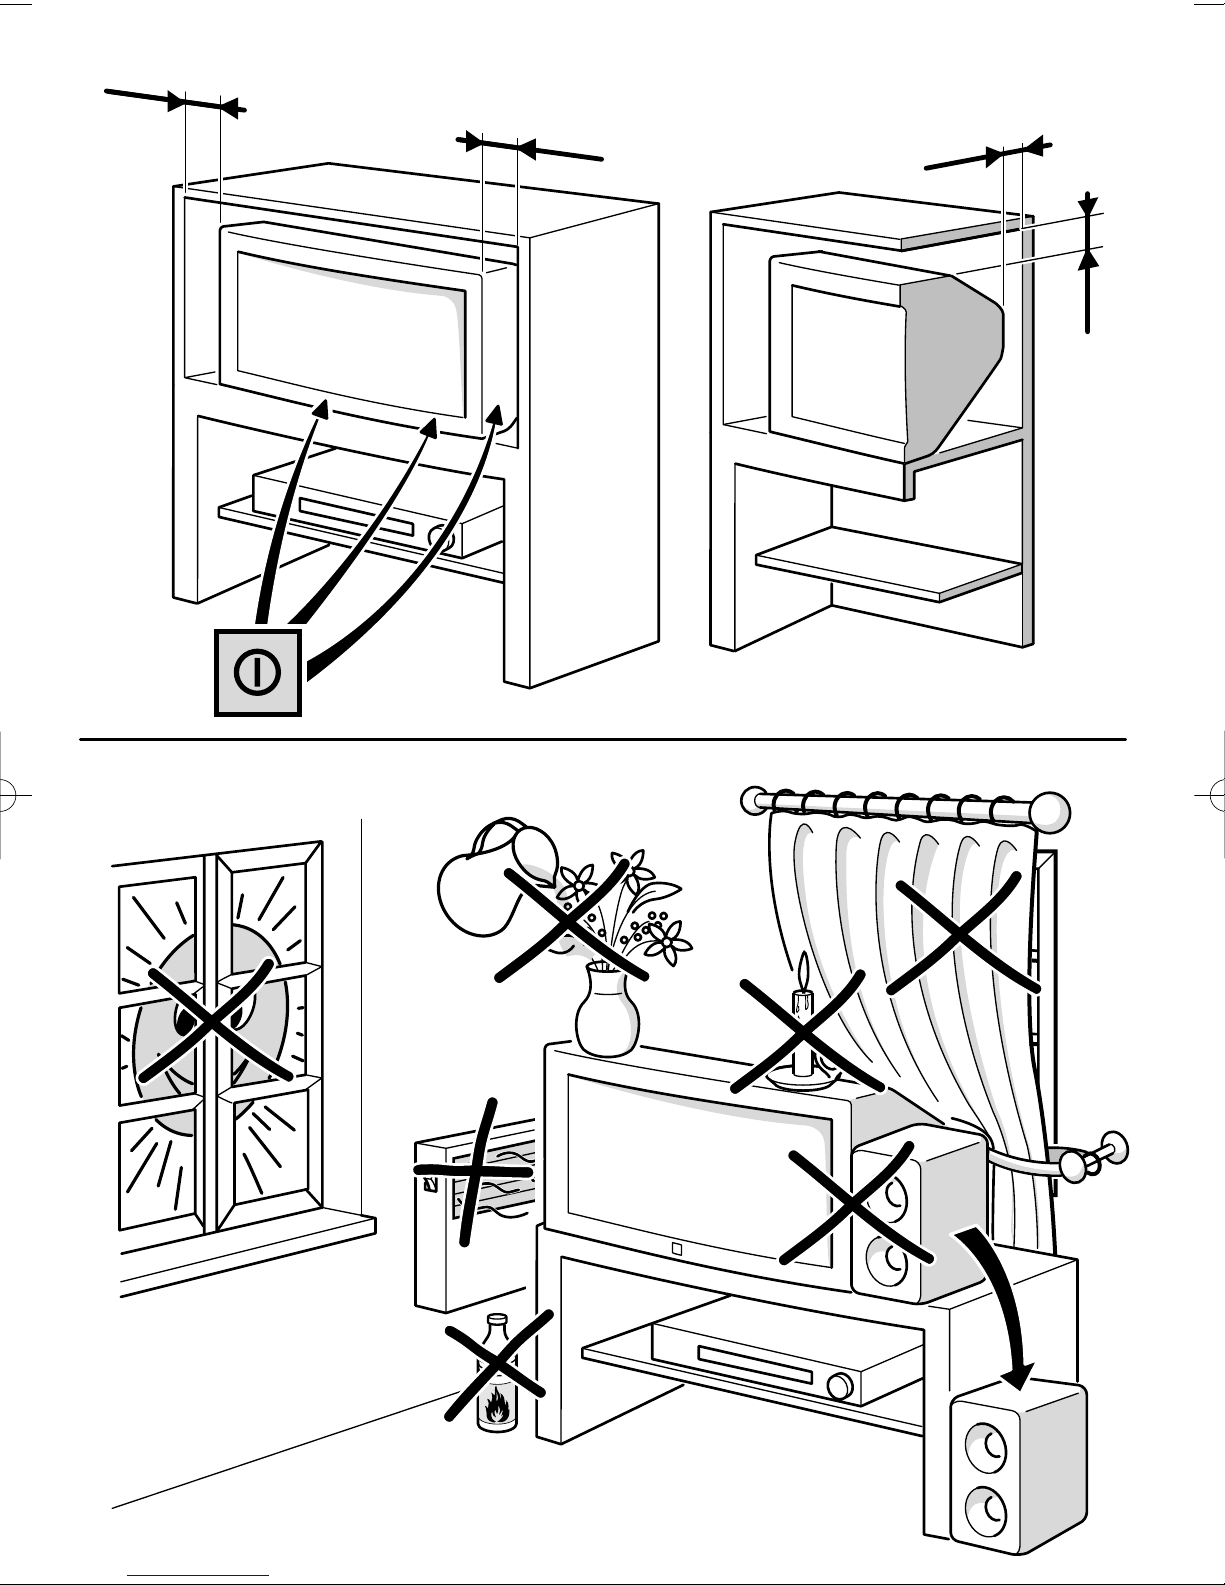
10 cm
10 cm
5 cm
10 cm
Page 3
About this manual
This document is common to several television models. Therefore, certain functions or settings may not apply to
the model you have purchased
About the switch
The position of the ON/OFF switch differs depending on the model. It may be located on the front or on the
right-hand side of your set (see the drawing inside the cover page of your manual).
About safety
To ensure your own safety and safe operation of the equipment, observe the following instructions
thoroughly.
TV sets require sufficient ventilation topreventtheircomponents fromoverheating, whichwill cause failure. Do not
block the ventilation openings at the rear . If you place your TV set in a special piece of furniture, make sure there
is enough space for unhindered air circulation. Do not place the TV set in the close vicinity of a heater.
The TV set has been designed for use in dry rooms. Should you use it, in exceptional
circumstances in the open air (example: on the balcony, in the veranda or tent), you must absolutely protect it
against moisture (dew,rain, splash water). Before switching on a cold TV set in a warm room, youshould wait until
any condensation in the screen has dried by itself.
Maximum ambient temperature: 35°C
Maximum humidity: 85%
By the end of your TV evening or when away from home for a longer period, we recommend that you turn off the
TV set with the On/Off-switch.
Even when the On/Off-switch is in the Off-position, your TV set is not fully disconnected from the mains. To
disconnect the set completely , the mains plug must be pulled out.
The mains plug must be easily accessible.
In the following cases, we recommend that you pull out the mains connector:
1. During athunderstorm. In such acase, it is advisablethat youalso disconnect the TV set from the aerialsocket.
2. When odour or smoke emanates from the set.
Never attempt to open your TV set yourself.
Further information:
The TV set shielding is sufficient to prevent X-radiation to the exterior.
Any operation performed by a non skilled person, change of high voltage or replacement of the picture tube by a
model not complying with the manufacturer specification are likely to cause considerable increase in X-radiation.
A TV set modified in such a way no longer complies with the manufacturers’ specification and must not be used.
GB
About cleaning
The screen is to be cleaned with liquid glass cleaners.
:
Never use abrasive products.
:
Clean the cabinet with a soft cloth soaked with neutral cleaner. Do not use solvents, such as white spirit or
alcohol-based cleaning products since they may damage your television.
:
At regular intervals, clean the ventilation grids at the rear of the TV set.
About degaussing
The terrestrial magnetic field may have an influence on your TV set. This influence is revealed by the coloured
spots, which appear on the screen.
Should this be the case:
:
Turn the equipment off by means of the On/Off-switch.
:
Wait about one hour before switching the set on again.
This procedure performs automatic degaussing of the screen. Should there still be coloured spots on the screen,
repeat the operation.
1
Page 4
Contents
GB
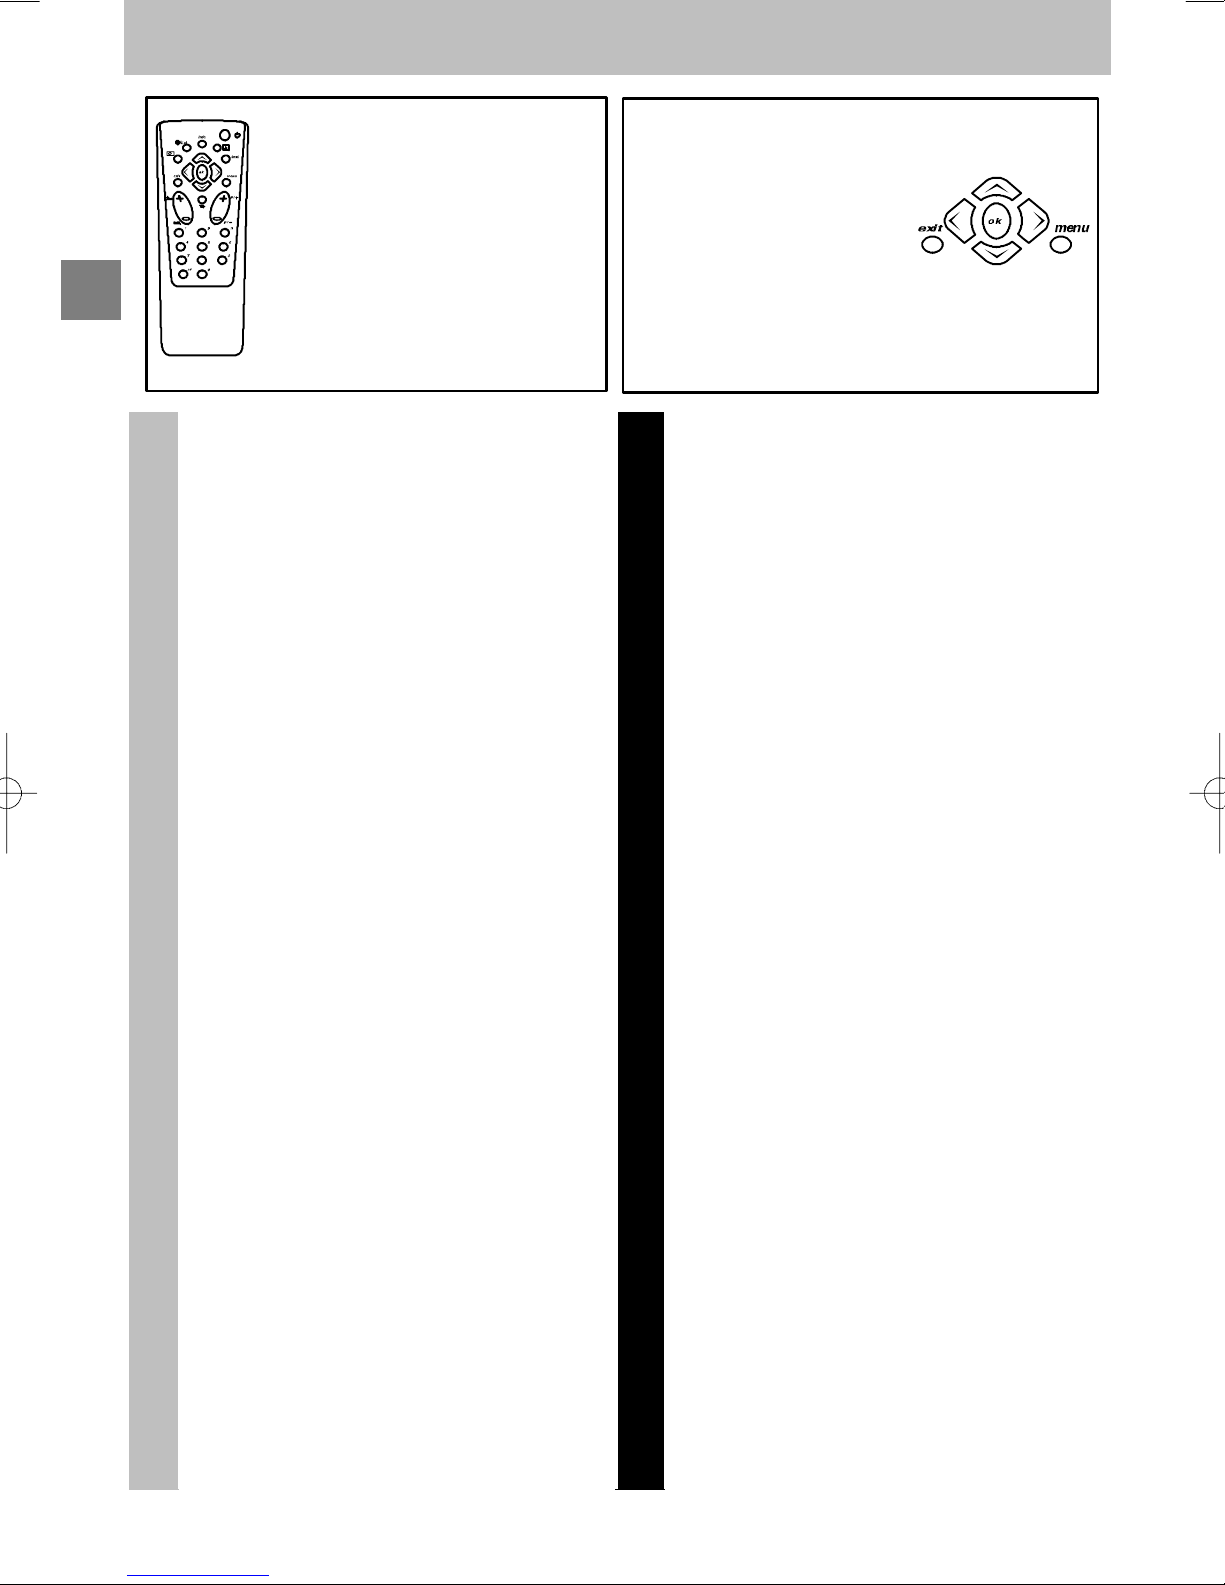
Using the remote control
and fitting the batteries.
Page 4
About this manual 1...................
About the switch 1.....................
About safety 1........................
About cleaning 1......................
About degaussing 1...................
Basic connections 3....................
Installation
Remote control 4.......................
Navigation principles 5.................
How to call up a menu
and how to select a
function, a setting or an
option.
Page
Daily viewing 12.......................
Picture Adjustment 12................
Sound Settings 12....................
Time 13.............................
List of Channels 14...................
Selecting Programmes 15.............
Scrolling the Programmes 15...........
Audio-visual (AV) Programmes 15......
Volume Control 15....................
5
Calling up the Installation main menu 5...
Calling up the Settings summary 5.......
Calling up a Menu 5...................
Navigating within the Menus 5...........
Installing your television for the
first time 6.............................
Automatic installation 7.................
Programme organisation 8..............
Manual programming 9.................
Personal settings 10...................
Preferences 11........................
Muting the Sound 15..................
Zoom (16/9 models only) 15...........
Instructions for Use
Displaying Information 15..............
Tele vision Lock 15....................
Switching Off the Television 15.........
Teletext 16............................
Standard Functions 16................
Other Connections 17..................
Other Possibilities 17.................
Connecting a HiFi or AV amplifier 17....
2
Page 5
Basic connections
Basic conn ection s
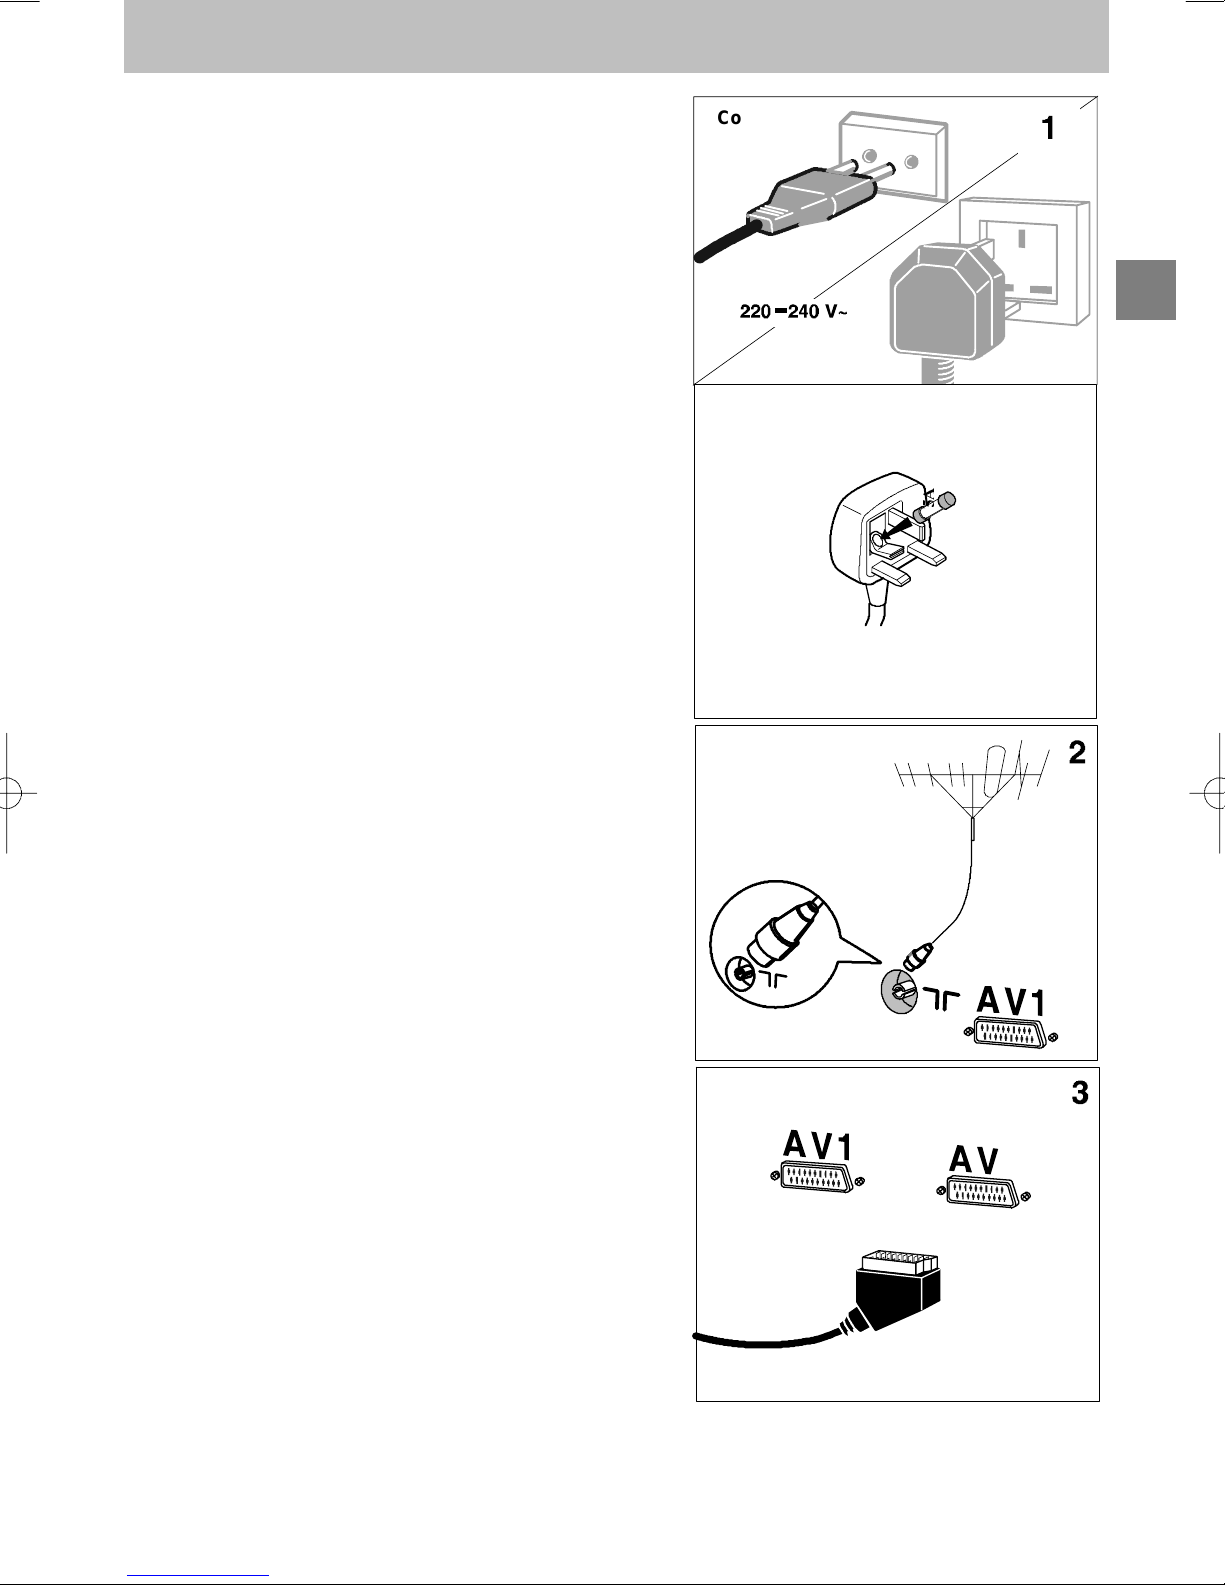
The mains plug (1) supplies power to the television. The
television must only be plugged in to a 220-240 V - 50 Hz
power supply . It must never be plugged in to a DC source. If
the plug comes away from the lead, never attempt to plug it
in: this could cause electrocution.
Theaerialsocket(2), located ontherear ofthetelevision, can
be used to connect an external aerial or other appliance
equipped with a modulator such as a VCR, satellite receiver,
etc.
Continental
Europe
GB
If you connect an appliance to the aerial jack, you must give
it achannel number. To dothis, switch on the appliance, then
use the television to find the modulator channel (see the
appliance manual). Now give it a programme number and
memorise it (see Manual Programming of channels). Then,
when you wish to use the appliance, simply select its
programme number on the television. This procedure is not
required for VCR’s not equipped with a modulator.
The SCART socket AV1 (3), located on the rear of the
television, is intended to connect a VCR or a camcorder
(VHS, 8 mm), a Canal+ decoder, a video games console or
RGB-signal emitting appliances.
The SCART socket AV2 (3), located on the rear of the
television, is intended to connect a VCR or a camcorder
(VHS, 8 mm, S-VHS or Hi-8).
We strongly recommend the use of this type of connection,
which gives a better picture quality. To use the peripheral
appliance that you haveconnected, press the AVkey onyour
remote control (press once to select AV1; twice to select
AV2; three times for AV3: see ”Other Connections”). This
selection is automatic for some appliances. Pressing “”play”
on a VCR, or switching on a satellite receiver connected to
AV1 or AV2 will automatically switch on your television.
When you stop the VCR, if you have not changed channels
while watching the VCR, the television automatically
switches back to the channel you were watching beforehand.
If the television has been switched on from the VCR, it
switches to standby when the VCR is switched off. The
television automatically switches to 16/9 format if the
connected appliance delivers the corresponding signal.
United Kingdom
The plugis fitted with a fuse which protects your
television.If your television does not work, the fuse may
be blown. In this cas e, replace it with an identical5 Amp
ASTA or lr BSI (BS 1362) certifiedfuse.
$
Note: the mains lead of your television is fitted with a
moulded plug. This lead contains all the safety equipment,
so y ou are advised when r eplacing it not to use a
non-specific commercially-available model.
2
3
Page 6
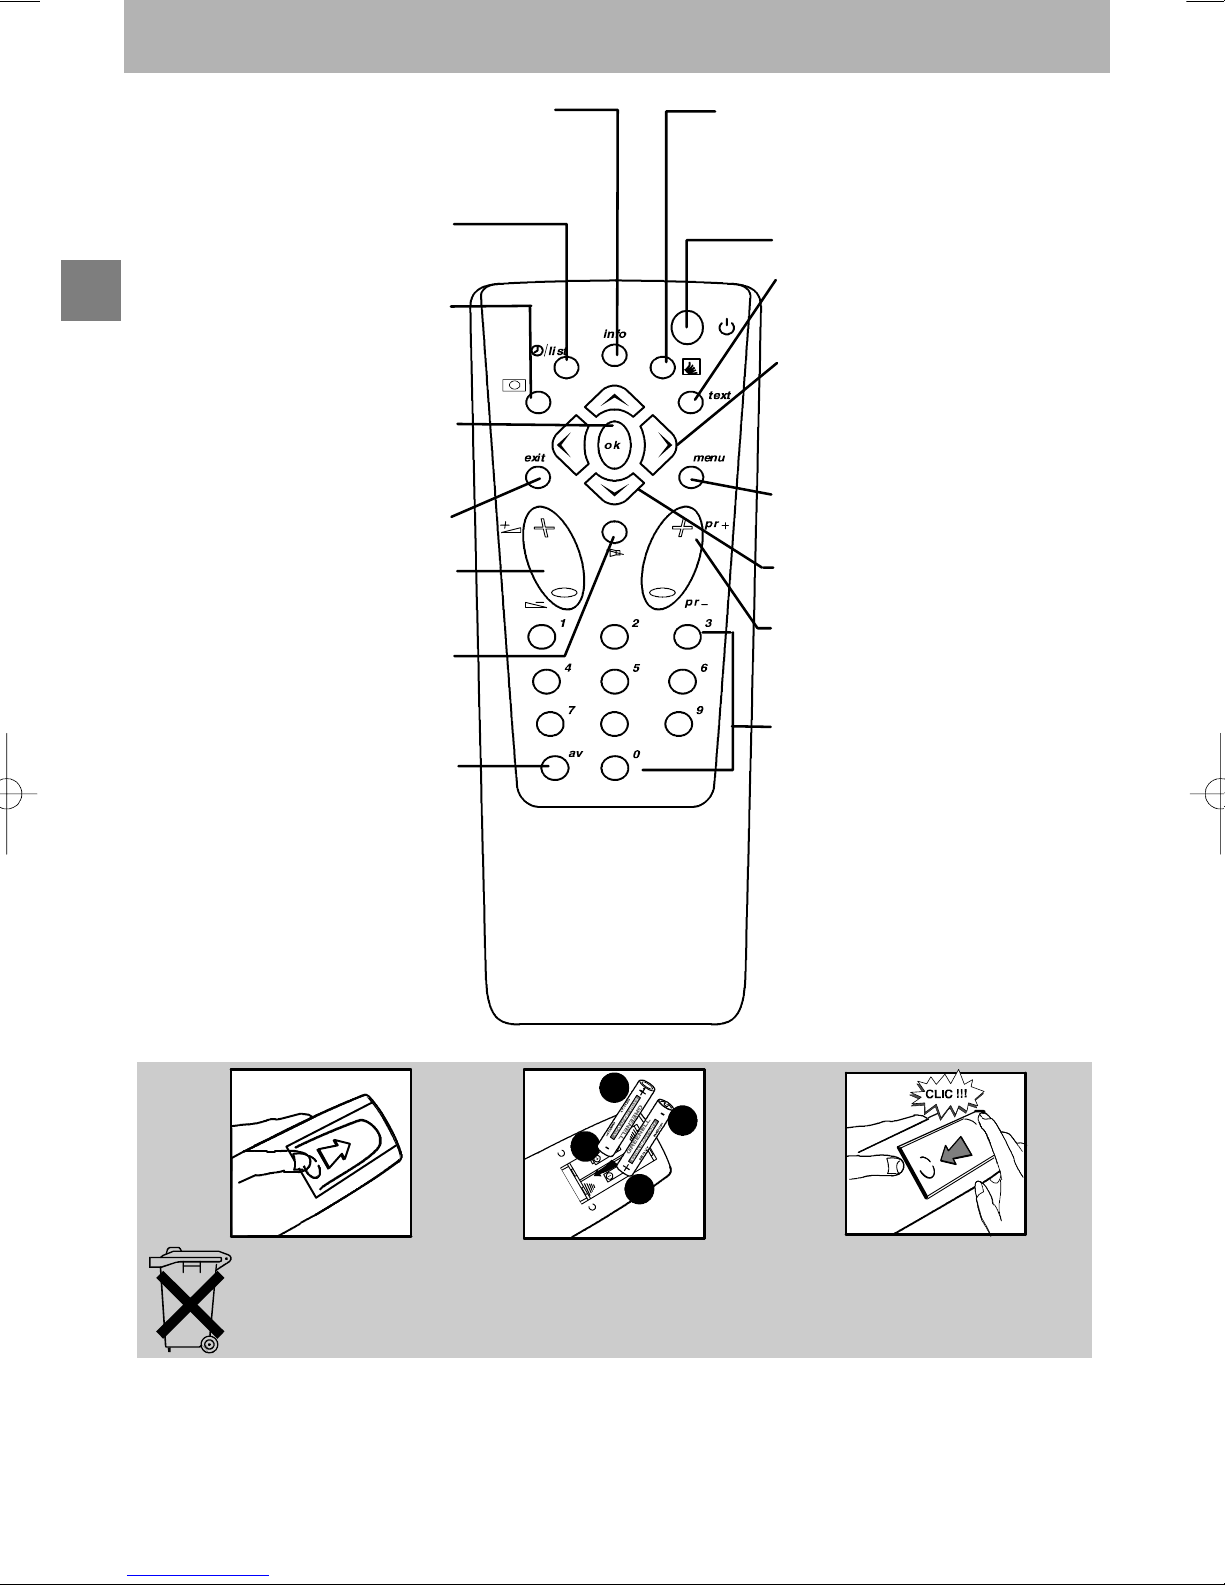
Remote control
Display of channel, time, sound (yellow
button) (and zoom for models with zoom)
Remote control
This key is active only when using
the Teletext
(bluekey)
GB
Call up programme list
(green button)
Reminder of picture
preferences
Confirm an action or validate a
To leave a menu or Teletext
Volume adjustment
Selecting appliances
connected to the television
The red, green, yellow and
blue keys are also used for
the Teletext.
(red button)
menu option
Sound mute
(AV1, AV2 ...)
Standby
Call up Teletext / Toptext /
Fastext function
Right/Left Selection within
menus and
Zoom Function (for models with
this function)
Go to adjustment function MENU
Move Up/Down in menus
Change programme
8
Go to programmes and enter
numerical values
For programme numbers higher
than 10, press the
remote control: ”- -” appears on
the screen. Now use the
number keys on the remote
control to enter first the tens
digit then the units digit.
(purple button)
in menus
0
key on the
Please respect the environment! Before throwing any batteries away, consult your
distributor who may be able to take them back for specific recycling.
4
Page 7
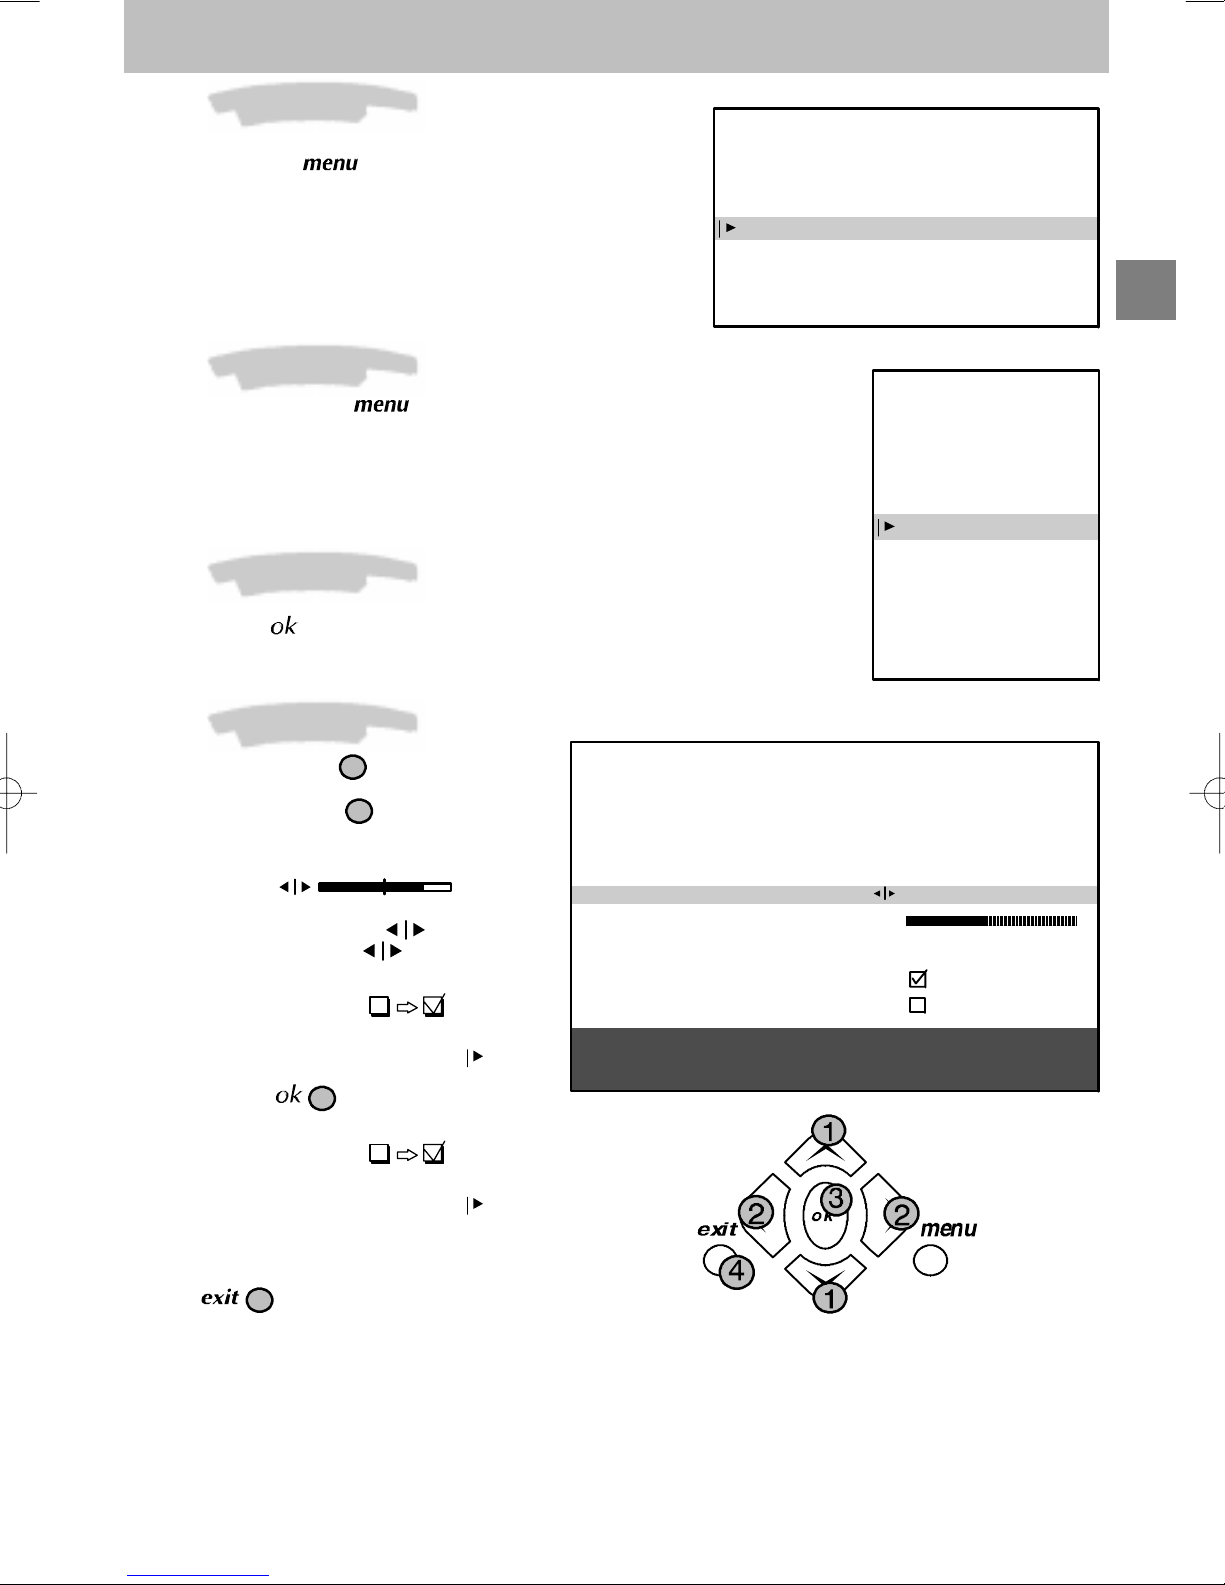
Navigation principles
Navigationprinciples
Calling up the Installation main menu
If there is no menu displayed on the screen,
press and hold the
control. The settings SUMMARY is displayed
first, followed by the INSTALLATION MAIN
MENU which you can use to operate your
television.
Calling up the Settings summary
Press and release the key on the
remote control to display the list of menus
available for using your television functions or
adjusting your television
Calling up a Menu
SelectthemenuyouwishusingtheUp/Down
keys. Press the
key to validate..
key on the remote
INSTALLATION MAIN MENU
Exit
Manual programming
Auto installation
Programme organisation
Personal settings
SUMMARY
Exit
Teletext
Picture
Sound
List
Time
Preferences
GB
Navigating within the Menus
Use the Up/Down keys 1 to select a line.
3
2 to:
Aerial
Cable
key to:
Use the Left/Right keys
- Increase or decrease a value:
for example:
Fine tuning
- Select an option:
for example: Reception
Reception
- Activate or deactivate an option:
for example: Decoder
- Access a sub-menu:
for example: Picture preferences
You can use the
- Activate or deactivate an option:
for example: Decoder
- Access a sub-menu:
for example: Picture preferences
- Validate an action:
for example: Store on PR number
Use the
key to exit a menu.
4
MANUAL PROGRAMMING
Return
Standard
Reception
Autosearch
Fine tuning
Store on PR number
Name
Decoder
External sound path
Enter channel number or start
autosearch with < or >.
EURO BG
Cable
CH- -
--
----
5
Page 8
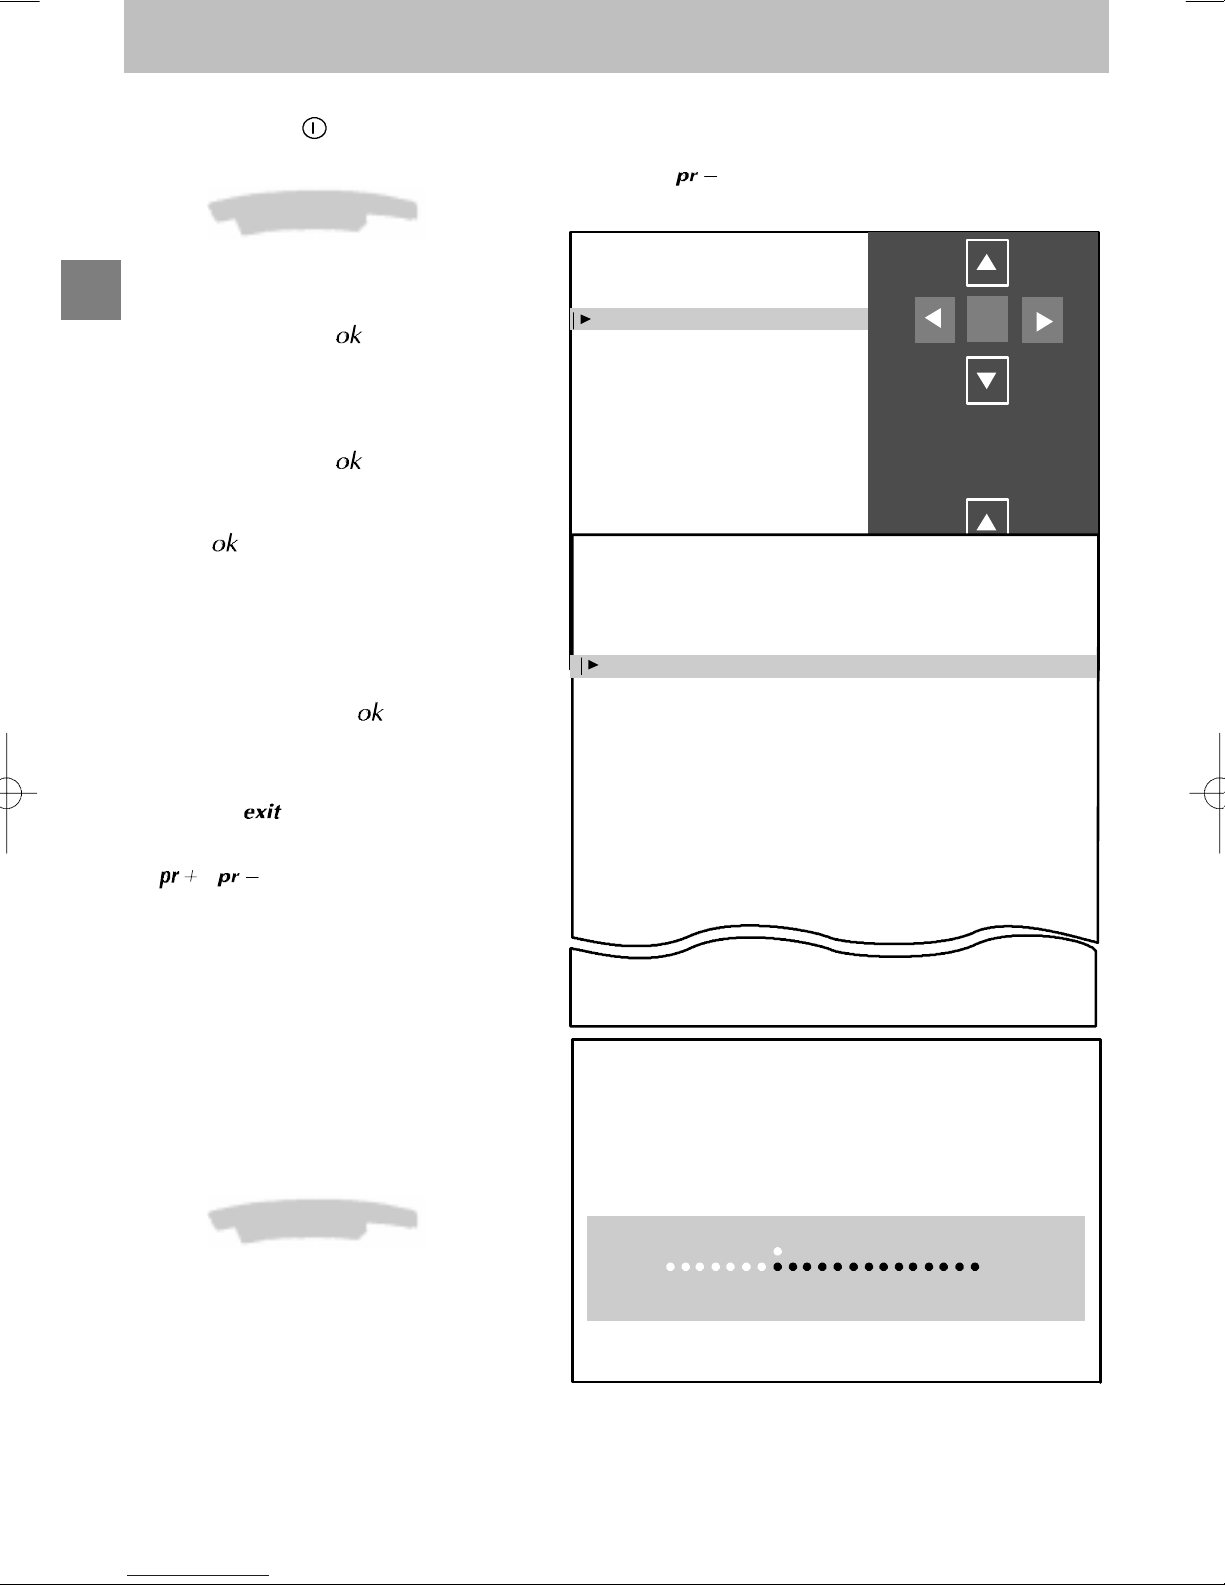
Installing your television for the first time
Installing your television fo r the first time
First plug the televisioninto amains poweroutlet and to the external aerial or a cablenetwork, thenswitch on using
the ON/OFF switch
Whenyou switch on yourtelevision forthe first time, the languageselection menu* is displayed(Fig. 1). If this does
not happen, set the televisiontostandby thenpress andhold the
Installation Instructions (start)
located on the front or the side of your set.
keyonthe televisionuntilthis menuappears.
1. Use the Up/Down keys to select the
GB
language in which you wish the menus tobe
displayed.
2. Then validate using
3. A list of countries* is now displayed (Fig. 2).
Select the country in which you live, or the
country from which you wish to receive the
broadcasts if you live in a border area.
4. Then validate using
5. A welcome message is displayed.
6. Run the automatic installation sequence
using
7. A message appears to inform you that
automatic installation has started (Fig. 3).
Wait for a few minutes.
A new message will inform you when
automatic installation is completed.
8. If you wish to check or modify the channel
organisation, press
Programme organisation chapter.
If you do not wish to modify the channel
organisation, you can exit the menu by
pressing
your choice. Choose the desired channel
using the number keys (1, 2, 3, ...) and the
If you have a decoder, see the Manual
programming chapter.
.
then watch the channel of
/ keys.
.
.
and see the
(Fig. 1)(Fig. 1)
English
Français OK
Deutsch
Italiano
Español
Português
Nederlands
Svenska
Dansk
Norwisch
(Fig. 2)
Exit
United Kingdom
Eire
France
Germany
Italy
Spain
Portugal
Holland
Belgium and Luxembourg
Switzerland
Austria
Sweden
Denmark
Norway
COUNTRY SELECTION
Your television will only search for channels
corresponding to the country you have
selected. See the Manual channel
programming chapter to install any channels
not found.
For cable networks, read the Automatic
channel installation chapter to install any
channels not found.
*The list of languages and countries may vary
from one model to another.
Installation Instructions (end)
6
Other
Select your country and press OK
(Fig. 3)
SEARCHING
AUTO INSTALLATION
003 STATIONS FOUND
Searching for TV stations.
Please wait. To cancel press EXIT.
Page 9
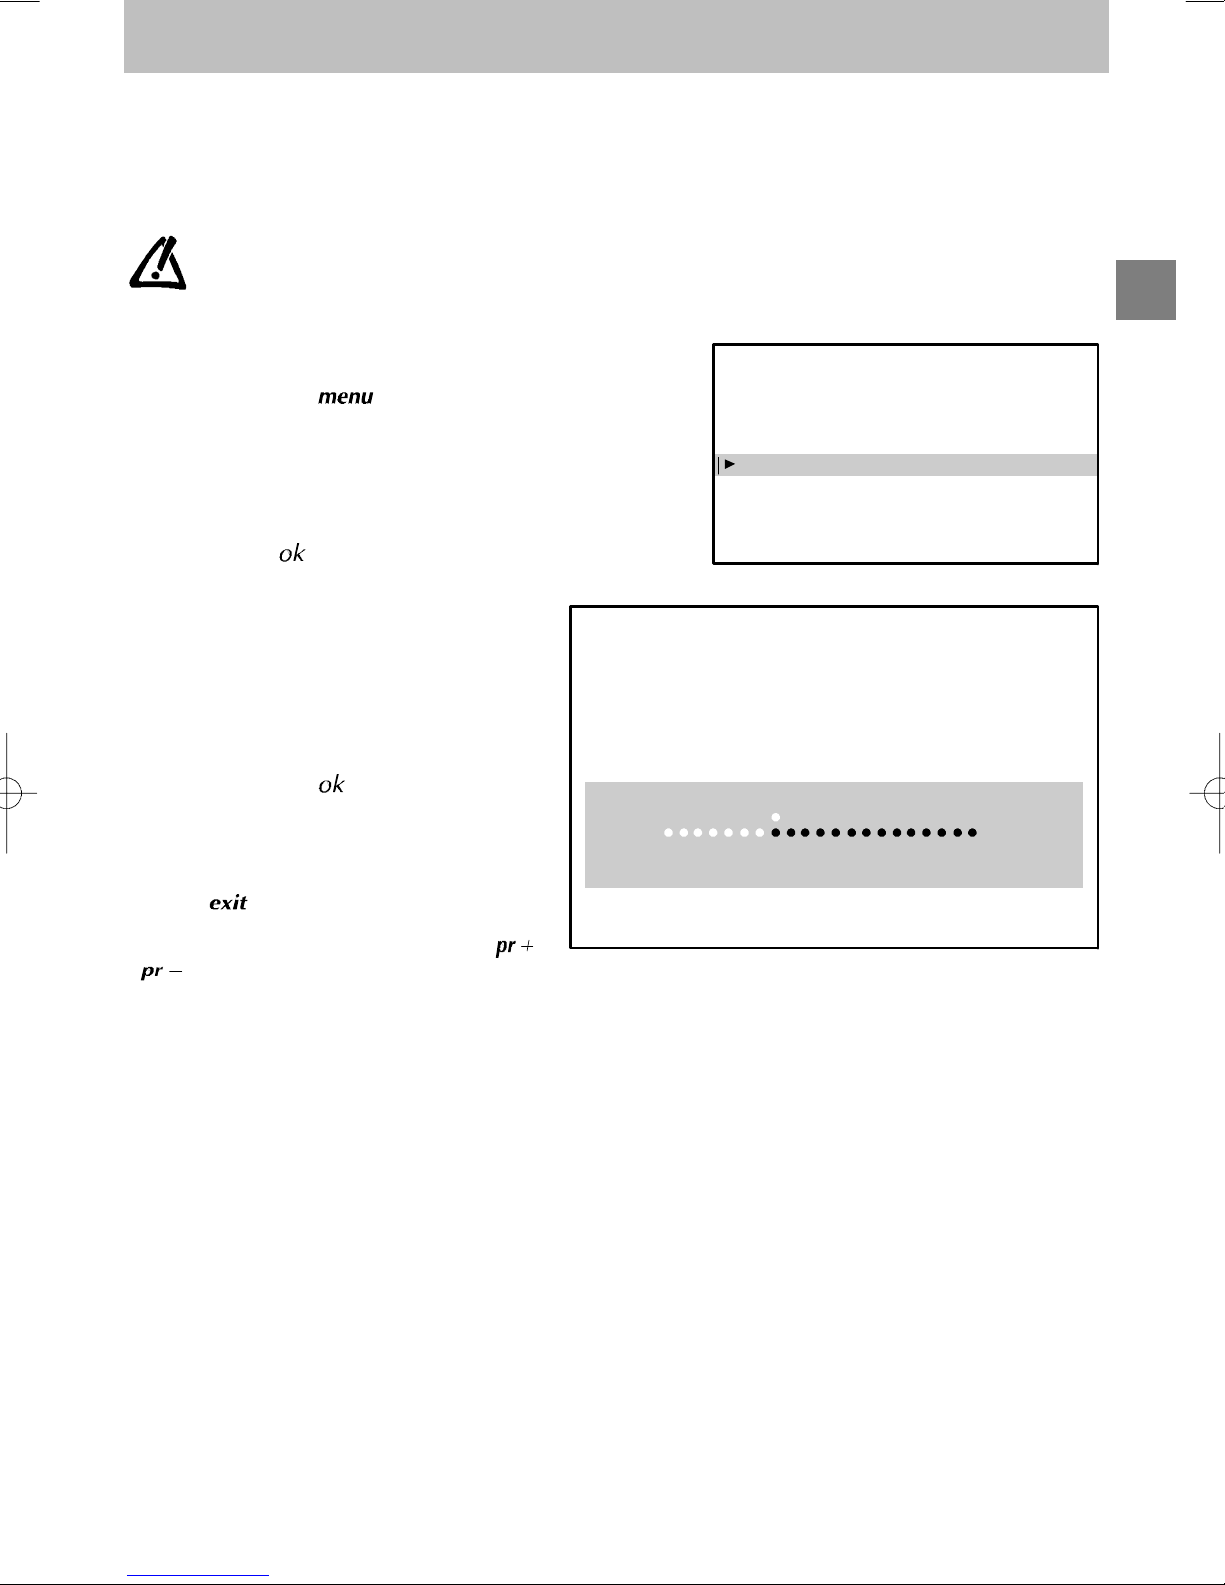
Automatic installation
Automatic installation
The Automatic installation function is useful if you have to go through the installation procedure again, such as
when moving house. This function deletes all previously memorised programmes. To install a new channel, you
should use the Manual programming function.
Before running AUTO I NSTALLATION, check the PERSONAL SETTINGS menu to ensure that the country
displayed is correct.
Your television will only search for channels corresponding to the selected country, so see the Manual
programming chapter to install any channels not found. For cablenetworks, if you havenot found certain
Other
channels, select
installation again.
instead ofacountry nameinthe
PERSONAL SETTINGS
INSTALLATION MAIN MENU
menu,thenrun automatic
GB
1. Press and hold the key on the remote
control to display the INSTALLATION MAIN
MENU (The SUMMARY appears first,
followed by the INSTALLATION MAIN
MENU).
2. Select the Auto installation line.
3. Validate using
A message will inform you that Automatic
installation has begun.
Wait for a few minutes.
A new message will inform you when
Automatic installation is completed.
If you wish to check or reorganize your channel
display, press the
Programme organisation chapter.
If you do not wish to reorganize your
programmes, you can exit this menu by
pressing
your choice. Choose the desired programme
usingthenumberkeys (1,2, 3, ...)and the
/ keys.
.
key and see the
, then watch the programme of
Exit
Manual programming
Auto installation
Programme organisation
Personal settings
SEARCHING
AUTO INSTALLATION
003 STATIONS FOUND
Searching for TV stations.
Please wait. To cancel press EXIT.
7
Page 10
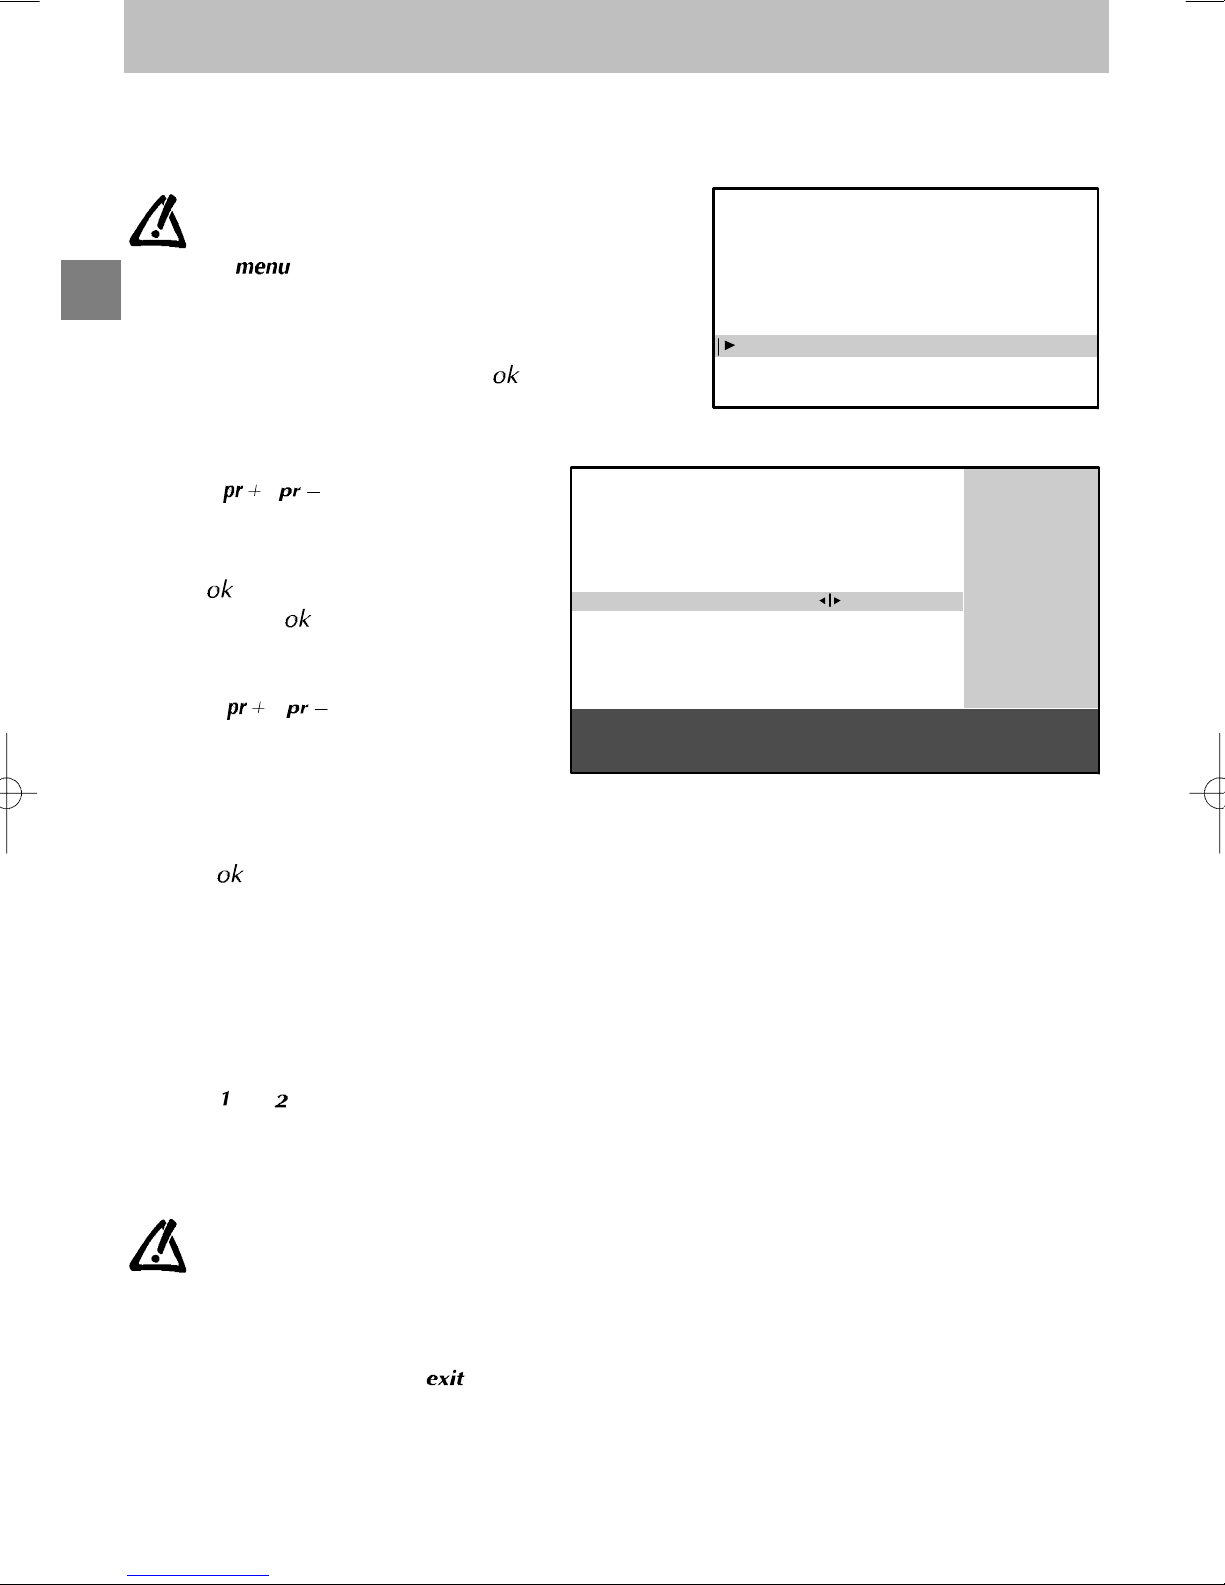
Programme organisation
Programmeorganisation
During automatic installation, your television will search for the channel name and assign it a programme number
according to the selected country. You can use the PROGRAMME ORGANISATION menu to name any channel
name not found, to changethe orderin which the channels are displayed,or todelete channels for whichreception
is too poor. Follow the messages at the bottom of the screen. For further details, read the information below.
If you wish to access the
PROGRAMME ORGANISATION
menu thereafter, first press and hold
the
GB
display the
MENU
first, followed by the
MAINMENU
organisation
- Todelete aprogramme for whichreception
is too poor:
1. Select the line marked Select program.
2. Use the
your channels.
3. Whenyou gettoa channel youwish todelete,
select the line marked Delete program.
4. Press
5. .Validate using
- To organize your channels to suit you:
1. Select the line marked Select program..
2. Use the
the programmes logos to find the programme
to which you wish to give the No.1.
Its present number appears on the line
markedSelect program..
3. Select the line marked Swap with PR.
4. Enter 01.
5. Press
position and the desired programme
becomes N°1.
6. Repeat the above procedure for the other
channels.
key on the remote control to
INSTALLATION MAIN
(the
SUMMARY
)thenselect
is displayed
INSTALLATION
Programme
and validate using .
/ or Left/Right keys to list
to delete the programme.
.
/ or Left/Right keys and
. The two programmes swap
,
INSTALLATION MAIN MENU
Exit
Manual programming
Auto installation
Programme organisation
Personal settings
PROGRAMME ORGANISATION
Return
Select program.
Swap with PR.
Change pr. name
Delete program.
Select programme number using
PR-/PR+ or </> or 0 to 9 keys.
Select the line marked Return to return to the previous
menu.
13
-EURO
13
10 MTV
11 FR2
12 TF1
13 EURO
14 CH40
15 CC01
16 ARTE
17 CART
18 ---19 ARD
- To name your channels:
1. Select the line marked Change pr. name
2. Select thecharacter you wish to modify using
the Left/Right keys.
3. Use the
require.
The name you have entered will be
memorised when you move to another lineor
exit the menu.
and keys to displaythe letter you
If you wish to change the orderinwhich
your programmes are displayed or if
you wish to name other programmes,
repeat the procedures described
above.
When you have finished organizing the
programmes, exit the menu using
8
.
Page 11
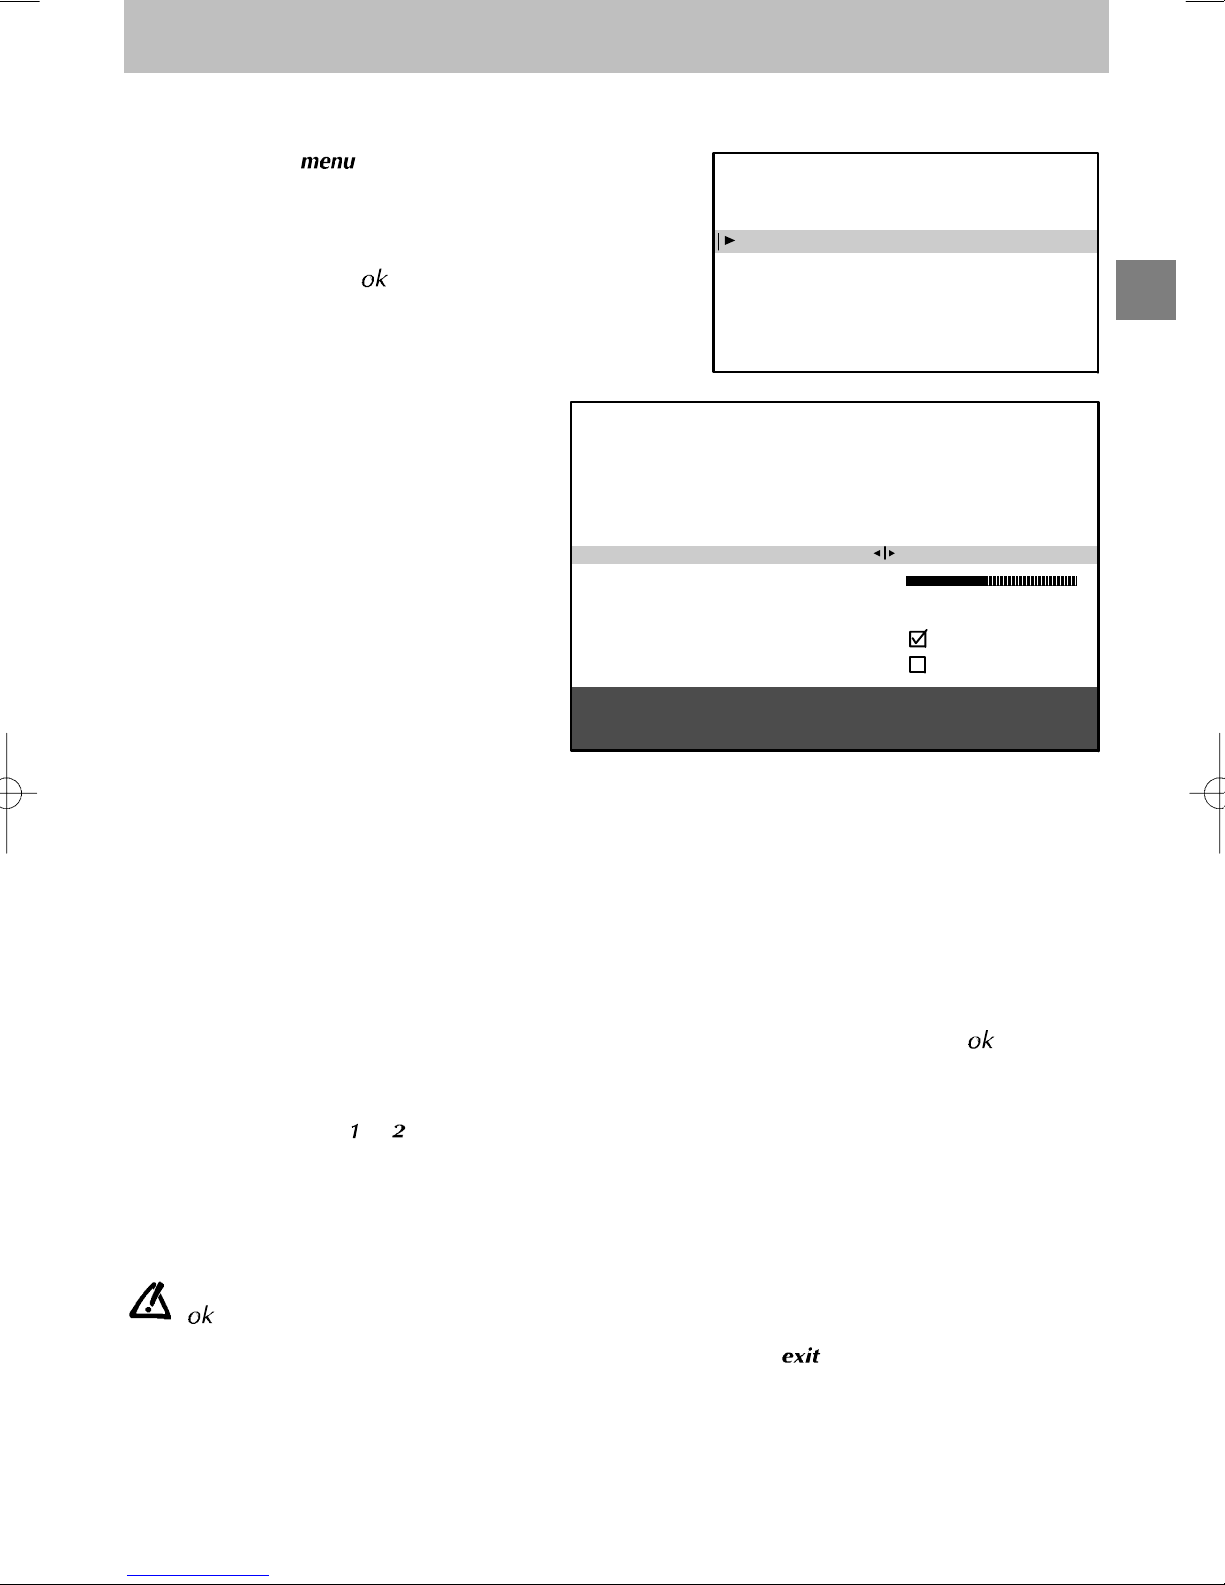
Manual programming
Manualprogramming
The manual installation function is useful if some programmes have not been installed even after AUTOMATIC
INSTALLATION.
1. Press and hold
displayed first, followed by the
INSTALLATION MAIN MENU.
2. Select the line marked Manual
programming.
3. Display the menu using
4. Now continue by following the messages at
the bottom of the screen. For further details,
read the information below.
Standard :
Select the standard using Left/Right keys that
corresponds to your country from the list of
standards.
The number of standards proposed will differ
,theSUMMARY is
.
INSTALLATION MAIN MENU
Exit
Manual programming
Auto installation
Programme organisation
Personal settings
MANUAL PROGRAMMING
Return
from one model to another.
France for France and Luxemburg
DKK’ eg. for Eastern Europe and
the Middle-East
I for the United Kingdom and
Ireland
Euro BG for Western Europe
Reception :
Your television can pick up channels either via
an aerial (RF channels) or via a cable network.
Certain cable networks use the same
frequencies as the RF channels. If this is the
case, you must select Aerial instead of Cable.
Autosearch :
Enter the programme number if you know it. If
not, search using the Left/Right keys. Your
television will stop at the first channel it tunes
into. If you wish to memorize it , go to the line
marked Store on PR number. If not, resume
the search using the Left/Right keys.
Fine tuning :
You can use this to improve the picture if the transmitter frequency is out of adjustment. Use the Left/Right keys
to obtain the best possible picture and sound.
Store on PR number :
Enter the programme number you wish to give the channel (e.g.: 01 for BBC1). Memorise using
Name :
If the station has been identified by the transmitter, its name will be inscribed automatically. Youcan change the
proposed name or enter it if it has not already been identified. Select the character you wish to modify using the
Left/Right keys. Use the
Decoder :
Use the Left/Right keys to tick the box if the channel is coded and if a decoder is connected to the AV1 jack.
External sound path :
Switch on your decoder. If the sound is coded or if you have no sound, activate or deactivate the box as required
using the Left/Right keys.
or keys to display the character you desire.
Standard
Reception
Autosearch
Fine tuning
Store on PR number
Name
Decoder
External sound path
Enter channel number or start
autosearch with < or >.
Select the line marked Return to return to the previous
EURO BG
Cable
CH- -
--
----
.
GB
Once you have made all the adjustments you wish to a programme, go to
to memorise these. Then move on to the next channel.
Once you have completed your Manual Programming, exit the menu using .
Store on PR number
andpress
9
Page 12
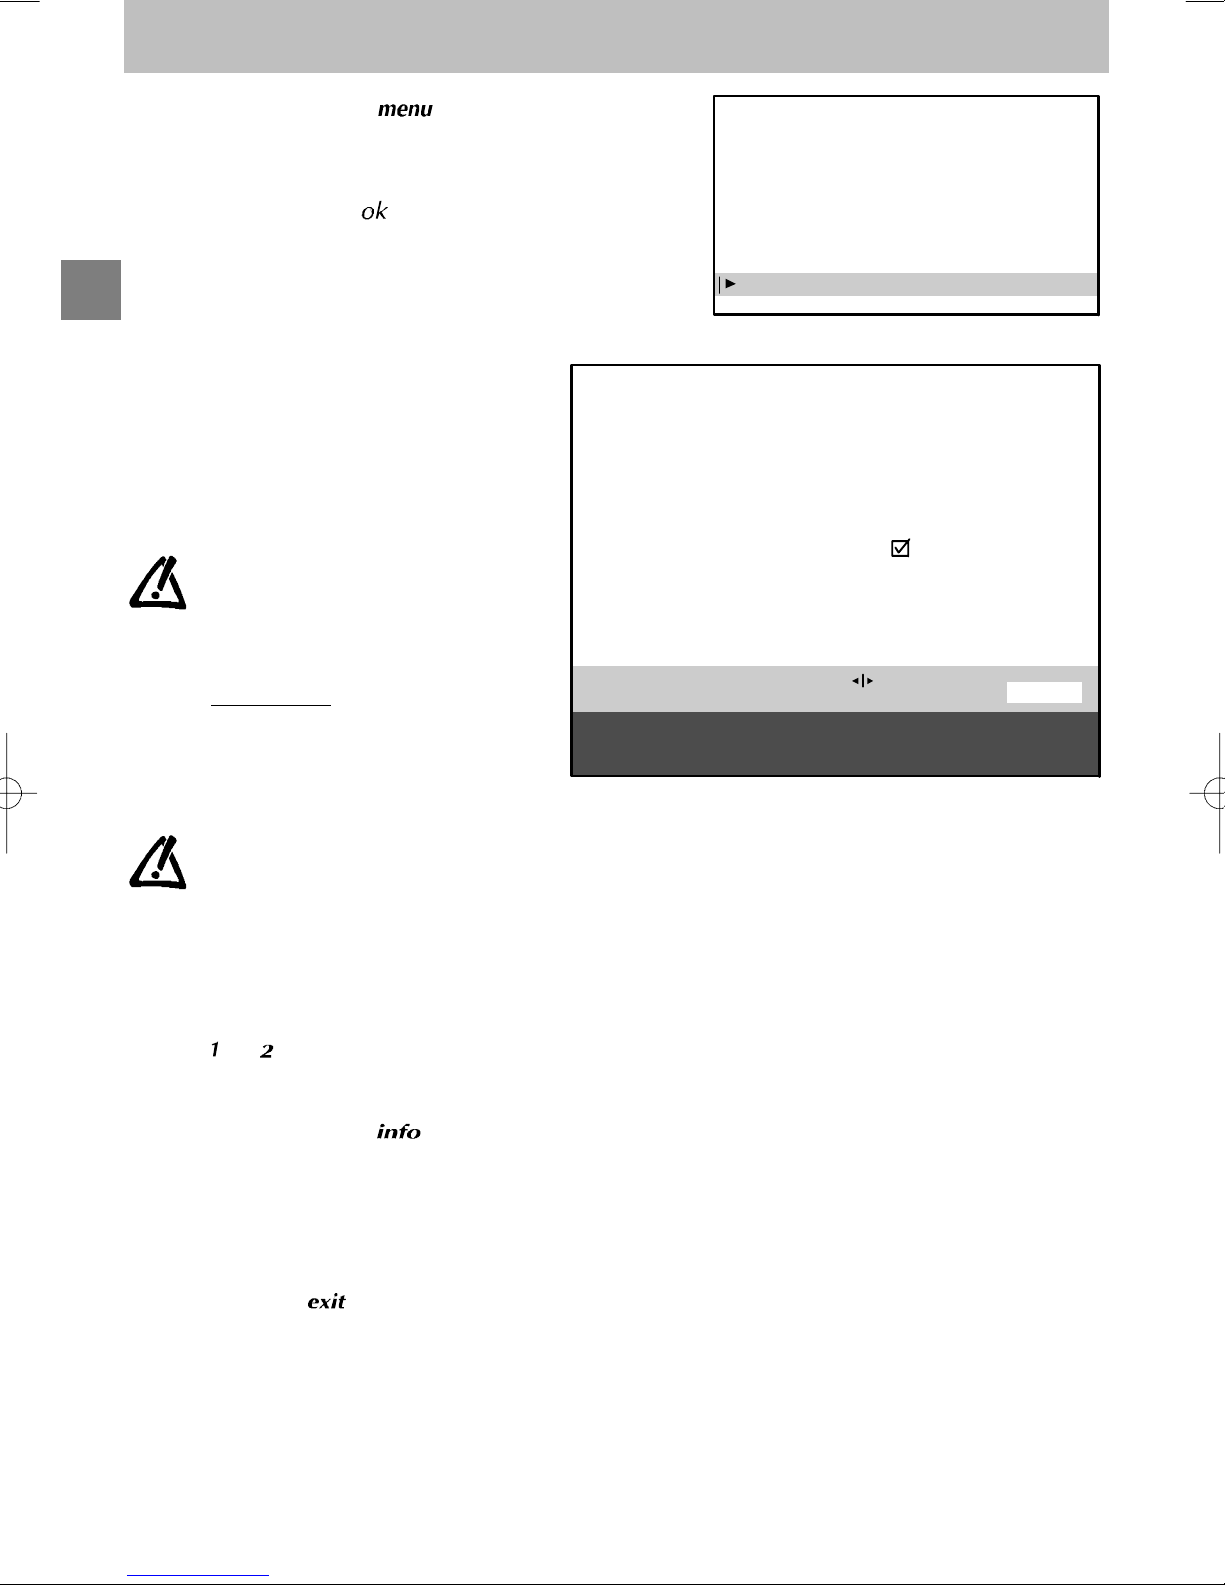
Personal settings
1. Press and hold the key: the
SUMMARY is displayedfirst, followed bythe
INSTALLATION MAIN MENU.
2. Select the line marked Personal settings.
3. Display the menu using
4. Continue by following the messages at the
bottom of the screen.
For further details, read the information below.
GB
Menu language :
Select the language in which the menus are to
be displayed.
Country :
Indicate the country in which you are if you wish
to rerun Automatic Programming.
.
For cable networks, if certain channels
have not been found, select
instead ofthe country name beforerunning automatic installation again.
Youmay find that thecharacters of certain teletext languages are inaccessible for the selected country.
Personal settings
Exit
Manual programming
Auto installation
Programme organisation
Personal settings
PERSONAL SETTINGS
Return
Menu language
Country
Other
Auto volume level
AV1 name
AV2 name
AV3 name
INSTALLATION MAIN MENU
English
UK
VCR
---CAMC
Auto volume level :
This is a sound control
equalise the volume level between different
channels, and between different programmes
on the same channel.
Activate or deactivate the auto volume level as
required.
function which aims to
Onmodels equippedwithVirtual Dolby
Surround, this function remains
inactive if
Dolby Virtual
selected in the
SOUND
has been
menu (see
Volume Control).
AV1, AV2, AV3 name :
Usethesetogiveanametoeachofyour
audio-visual programmes. Select the character
youwishtomodifyusingtheLeft/Right keys.
Use the
character .
Prog. to be used for reference time :
To display the time using the
the alarm function, the television clock must be
set to the correct time. Select the line marked
Prog. to be usedfor reference time andselect
a channel which broadcasts teletext. The time
is set automatically and is displayed after the
channel number.
or keys to display the desired
key or to use
Prog. to be used
for reference time
Select a station from which you want
to get the reference time.
Select the line marked Return to return to the previous
menu.
06
13:15
Exit the menu using
.
10
Page 13
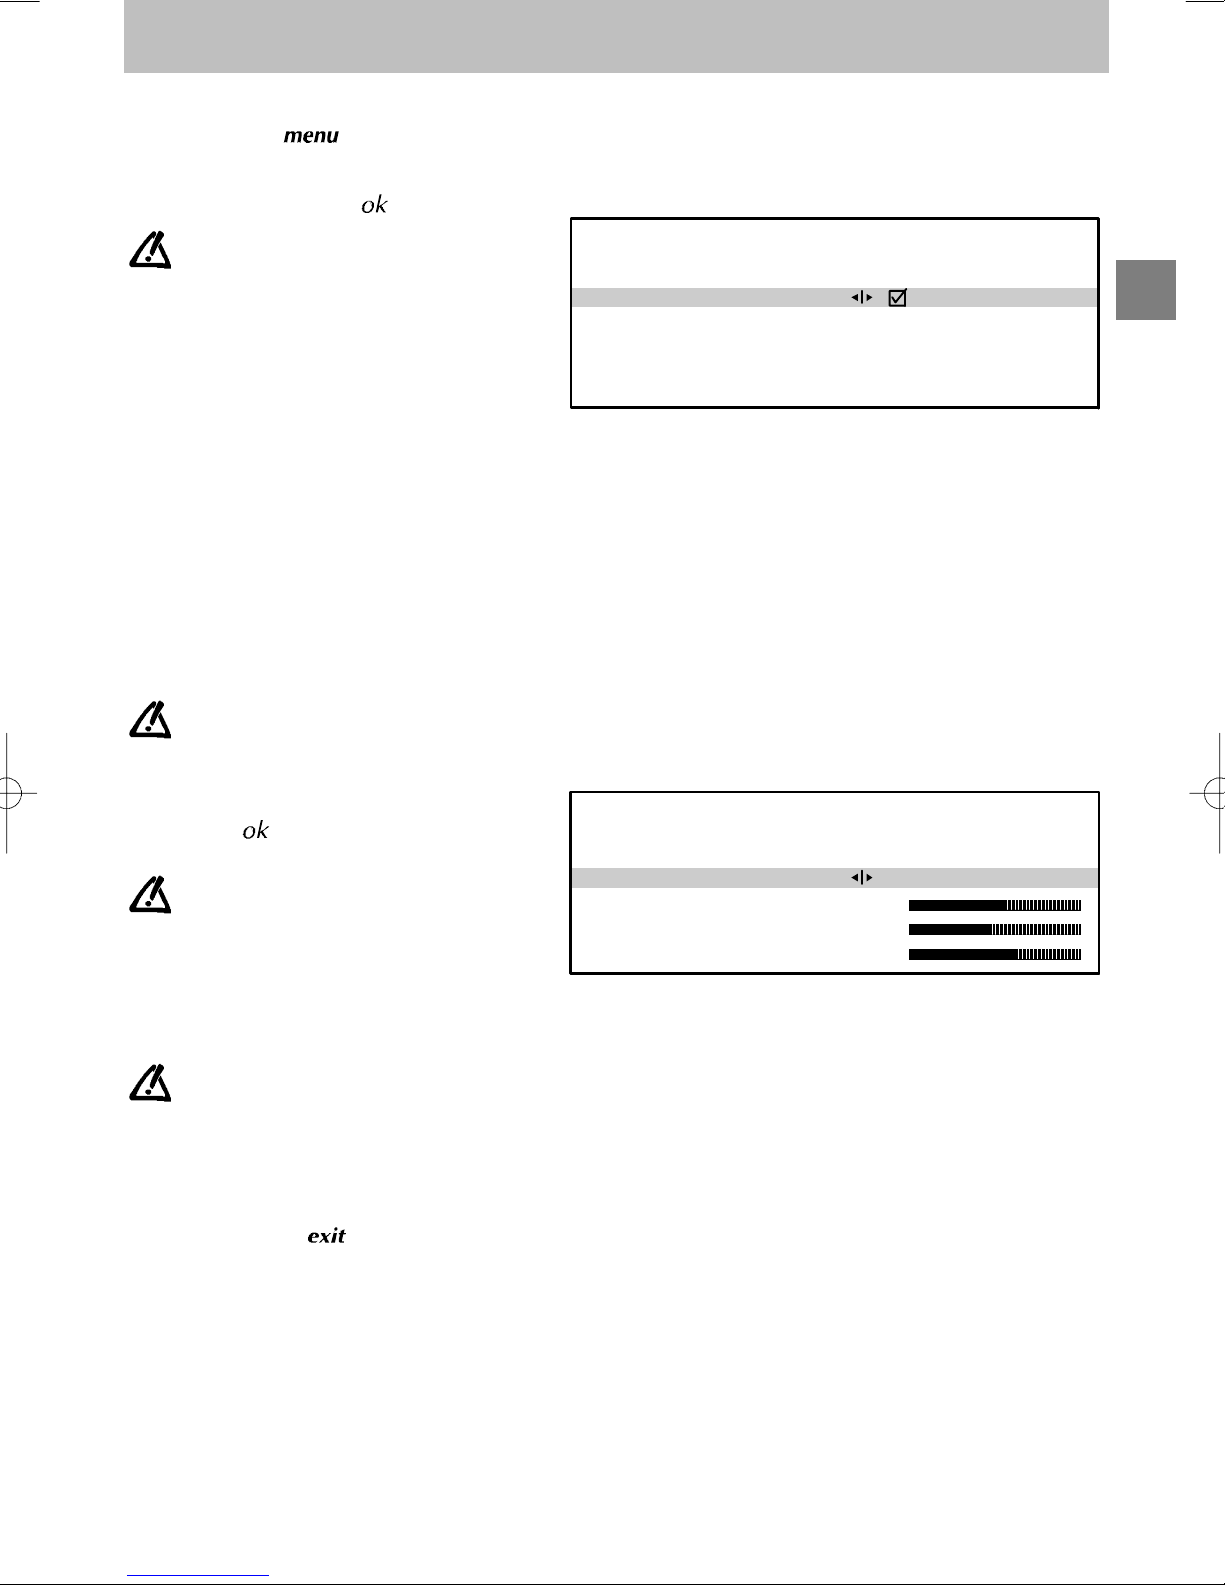
Preferences
Preferen ces
1. Display the SUMMARY by pressing and
releasing the
control .
2. Select the line marked Preferences.
3. Display the menu using
Make your choice from the proposed
options. Usetheinformationbelowto help
you.
Show program. number :
If you wish to permanently display the number
of theprogramme youare watching, tick thebox
using the Left/Rightkeys. Press the Left/Right
keys again to deactivate this function.
AV2 video input :
Use the Left/Right keys to select the type of video signal received at the AV2 SCART socket (Video or S-Video).
AV3 video input :
Use the Left/Right keys to select the type of video signal received at the AV3 sockets (these sockets are located
on the front or the side of the television).
Format control :
Use the Left/Right keys to select the desired picture format:
Auto : if the transmitter (for 16/9 format TV’s) or the appliance connected to one of the peripheral jacks delivers
the switching signal, the television automatically adapts to the transmitted picture format.
16/9 : manually selects widescreen picture format.
4/3 : manually selects this picture format.
If you have selected
switch off.
key on the remote
.
16/9or4/3
, the televisionwill switchback to
PREFERENCES
Return
Show program. number
AV2 video input
AV3 video input
Format control
Picture preferences
Auto
Video
S-Video
Auto
when you change channels or you
GB
Picture preferences :
To access the PICTURE PREFERENCES
menu, press
.
If you wish, you can personalize certain
picture settings. Select and set the
proposed options. Use the information
below to help you.
Settings :
Select Standard or Personal.
Standardcorresponds to the factory settings.
Personalcorresponds to the settings thatyou
have entered yourself.
The lines
Contrast
selected
Select each line one after the other and enter
your required settings. You can recall these
picture settings by pressing the red key on the
remote control.
Exit the menu using
Brightness,Colour
and
are displayed only if you have
Personal
on the
.
Settings
line.
PICTURE PREFERENCES
Return
Settings
Brightness
Colour
Contrast
Select the line marked Return to return to the previous
menu.
Personal
11
Page 14
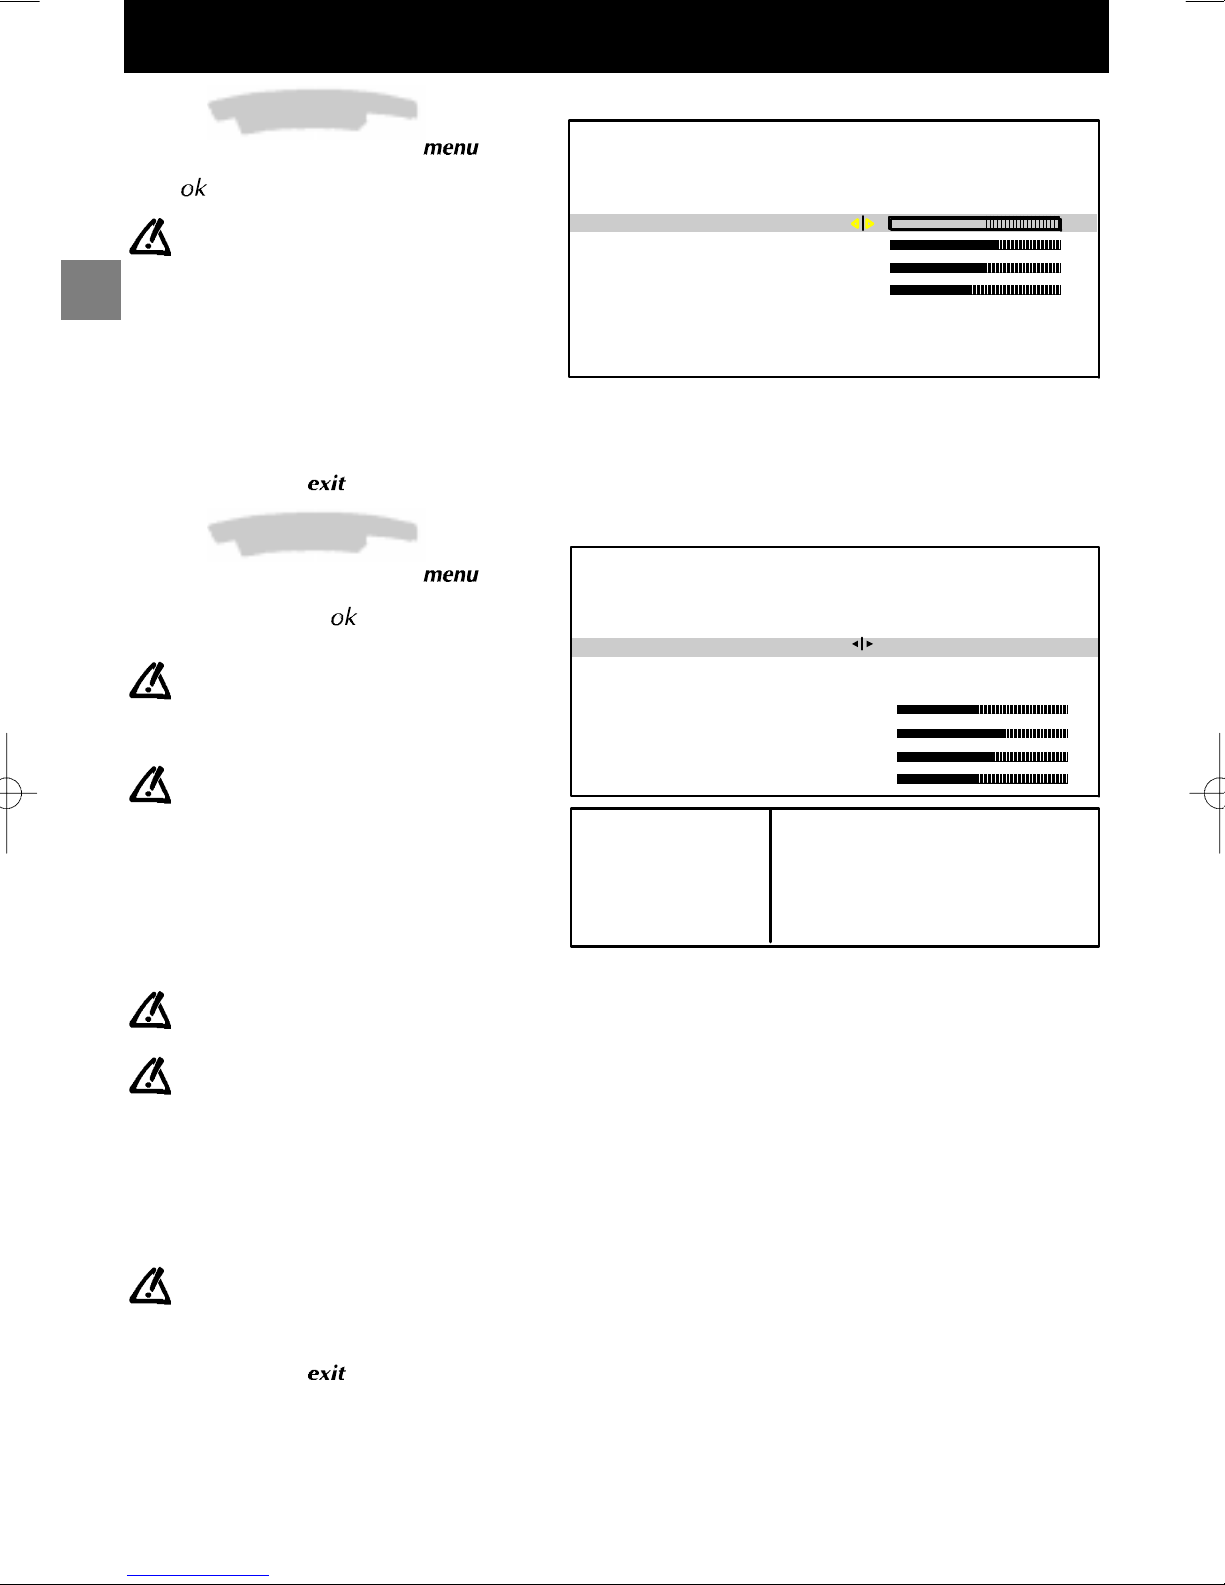
Dailyviewing
Picture Adjustment
Display the SUMMARY using the key on
the remote control. Select Picture. Validate
using
.The PICTURE menu is displayed.
Select and set the proposed options. Use
the information below to help you.
Brightness, Colour, Contrast, Sharpness:
Select eachof theselines oneafter theotherand
GB
set as required.
Contrast expand :
Select this line then choose the desired Contrast
expand setting (High or Low).
Tone :
Select this line then choose the desired colour
tone (Warm, Neutral or Cold).
Exit the menu using
.
Sound Settings
Display the SUMMARY using the key on
the remote control. Select the line marked
Sound
is displayed.
Sound type :
Select this line, then select thetype of sound you
desire.
Sound mode :
Select this line, then choose the desired mode
using the Left/Right keys.
Balance L/R :
Select this line, then balance the soundbetween
the Left and Right loudspeakers.
Treble, Bass :
Select each of these lines and adjust to suit you.
Surround effect :
Select this line and adjust the surround effect to
suit you.
Exit the menu using
. Validate using .The SOUND menu
Select and set the proposed options. Use
the information below to help you.
The choices available to you depend on
your television model and the broadcast.
Stereo, Dual or NICAM reception and the
corresponding choices are only available
on Stereo or NICAM Stereo televisions.
The choices available to you depend on
your television model and the type of
sound.
Magic
and
Dolby Virtual
are only available in stereo on TV’s
equipped with Virtual Dolby Surround.
Stereo wide
is only available on Stereo or
Nicam televisions not equipped with
Virtual Dolby Surround.
This line appears only if you have selected
Dolby Virtual
on the
Sound mode
.
Daily viewing
Return
Brightness
Colour
Contrast
Sharpness
Contrast expand
Tone
Select the line marked Return to return to the previous
menu.
Return
Sound type
Sound mode
Balance L/R
Treble
Bass
Surround effect
Broadcast
mono
stereo
dual
NICAM-3
AV
Mode Effect
modes
line.
Normal : reproduces the original sound (
Wide : gives a stereo effect on mono sounds.
Stereo wide : accentuates the stereo effect.
Magic : accentuates the stereo effects and
Dolby Virtual: Virtual Dolby Surround.
Virtual Surround Dolby is based on Dolby Pro Logic
decoding for the reproduction of the Left, Right, Centre and
Virtual Surround sound channels using two loudspeakers.
“”Dolby”, “”Pro Logic” and the double -D symbol are trademarks of the
Dolby Laboratories Licensing Corporation.
Manufactured under licence from Dolby Laboratories Licens ing
Corporation.
PICTURE
Neutral
Cold
SOUND
Automatic
Normal
Choice
automatic - mono
mono - stereo
sound 1 - sound 2
sound 1 - sound 2 - sound 3
stereo - sound 1 - sound 2
mono or stereo).
adds echo.
12
Page 15
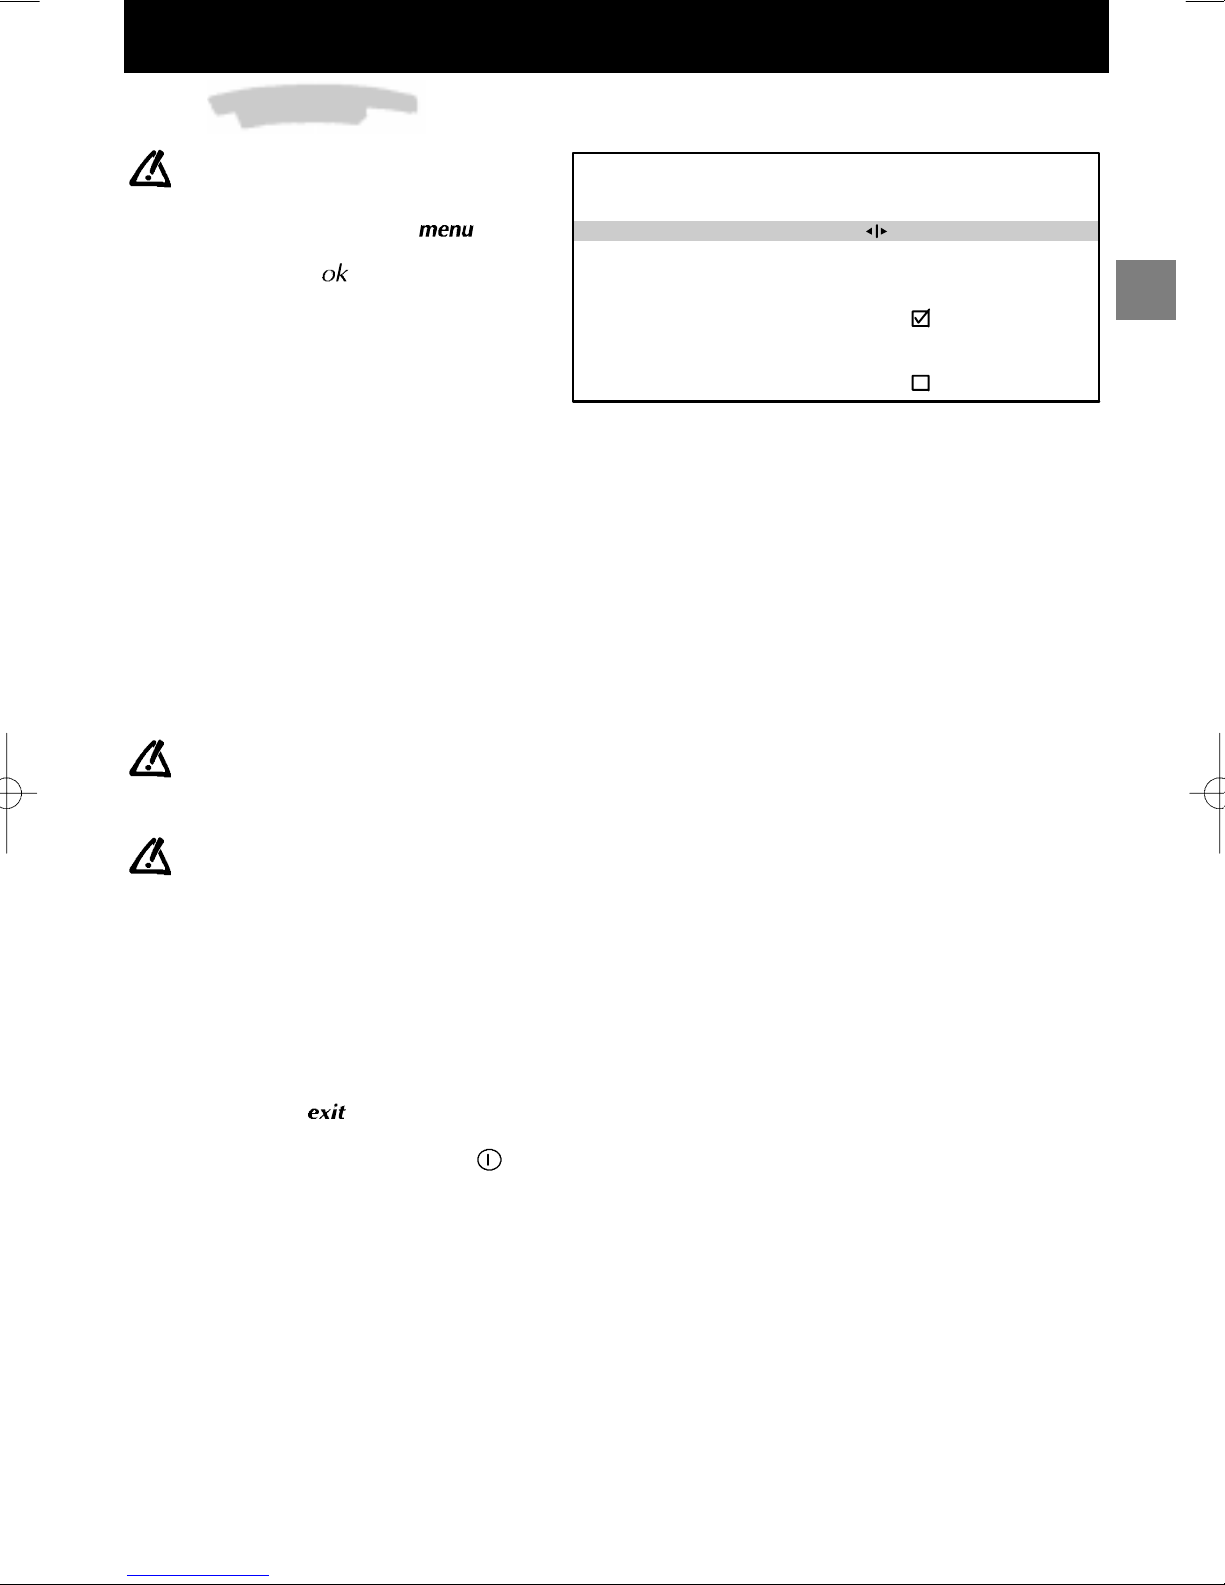
Time
Daily viewing
You can use this menu to switch your
television onor off automatically at aset
time.
Display the SUMMARY using the key on
the remote control. Select the line marked
Time. Validate using
displayed.
Sleep timer :
Use theLeft/Rightkeys tochoosehow longyou
wish to view before the television switches off.
Thetelevisionwillswitch offautomatically atthe
end of this period. To cancel, set to 00:00.
Oneminute before switching off, a messagewill
inform you that the television is about to go off.
If you wish to keep it on, press any key on the
remote control or the local keyboard.
Thetelevision switches to Child lock modeafter
an automatic stop. It can only be switched on
again from the remote control.
Current time :
The current time is given by the Teletext(see PERSONALSETTINGS menu). You can also set the time manually
using the number keys (0 to 9) on your remote control.
Wake-up timer :
If you wish to be woken upby yourtelevisiononthe channel of yourchoice, you must first set the television
clock to the correct time (see above).
.TheTIME menu is
Return
Sleep timer
Current time
Wake-up timer
Wake-up time
Programme number
Daily
Select the line marked Return to return to the previous
menu.
TIME
00 : 00
11 : 28
07 : 07
01 BBC1
GB
Use the Left/Right keys to tick the box and display the Wake-up timer menu.
The
lines Wake-up time, Programme number and Daily only appear if you have ticked the box on the
line marked Wake-up timer.
Wake-up time :
Use the number keys (0 to 9) on the remote control to set the time at which you wish to be woken.
Programme number :
Selecttheprogrammeyouwishtobewokenby.
Daily :
Tickthis boxif youwish to beawakenedat this time everyday.
Exit the menu using
Set the television to standby using the
flashes.
The television will come on automatically at the programmed time and will go off one hour later if you do not use
the remote control.
.
key on the remote control. The red indicator light on the television
13
Page 16
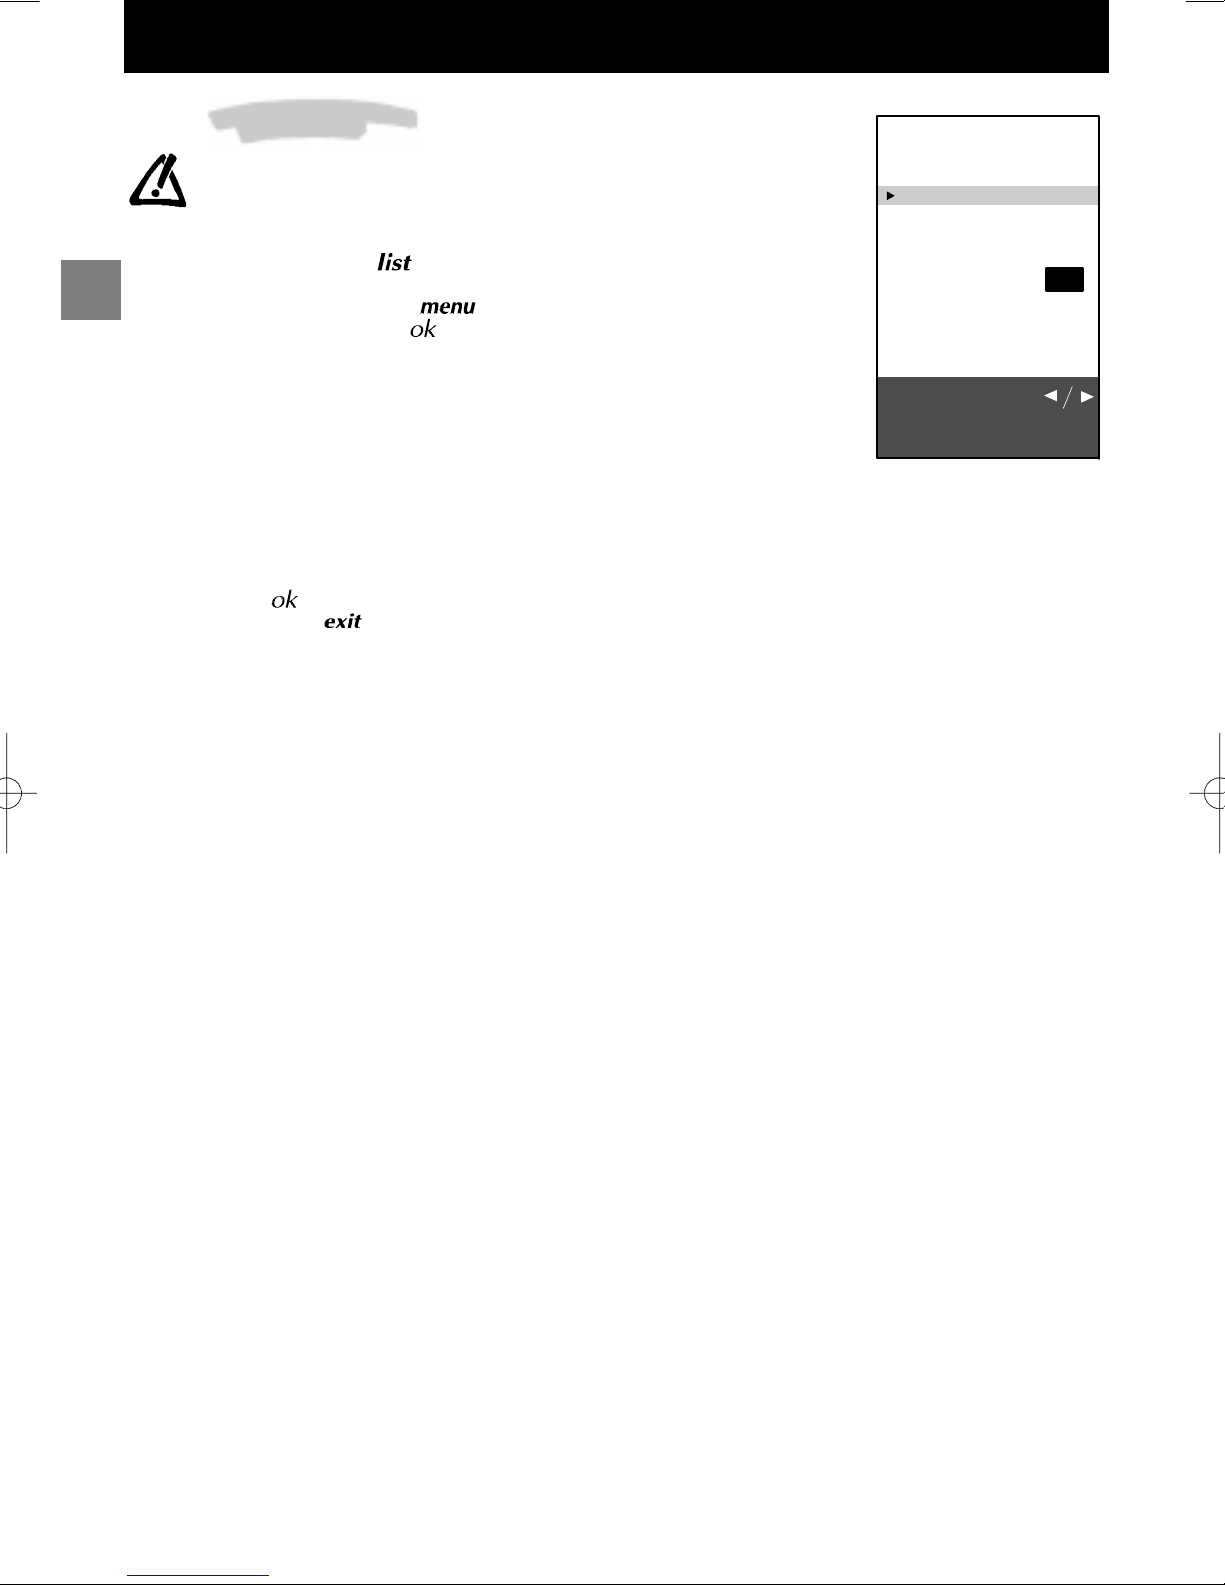
Daily viewing
List of Channels
This list contains up to 10 pages. The number of pages depends on
the number of programmes memorized. For each programme, the list
indicates the station name or type and the programme number. The
3 AV programmes are listed on page 11.
To display the list, press the key on the remote control
or
GB
Display the SUMMARY using the
line marked List. Validate using
The page displayed is the page containing the programme you are watching.
It is identified in the list by the symbol TV.
To display the next page, press the Right key .
To display the previous page, press the Left key.
If you wish to watch one of the programmes on the page displayed:
Enter the last digit of the programme number (e.g. for 25 simply enter 5) on the
remote control. The list disappears and your programme is selected.
Or ,
- Select the programme using the Up/Down keys.
- Validate using
- Exit the menu using
.
.
key on the remote control. Select the
.
LIST
Exit
01 BBC 1
02 BBC 2
03 FR 3
04 CC19
05 ARTE TV
06 M6
07 CNN
08 PREM
09 EURO
Page -/+
Programme:0-9
14
Page 17
Daily viewing
Selecting Programmes
For channels 1 to 9, press the number key corresponding to the desired channel on the remote control. For
programme numbers higher than 10, press the
the number keys on the remote control to enter first the tens digit then the units digit.
If you press while ”--” is already displayed, the display returns to 0- , in which case you can only select
programmes 1 to 9.
keyon the remote control: ”--” appears on the screen. Nowuse
Scrolling the Programmes
You can scroll through the programmes using the / keys.
Audio-visual (AV) Programmes
Press the keyto call the last audio-visual(AV) programme watched. Press repeatedly toscroll theaudio-visual
(AV) programmes on the screen.
Volume Control
Use the volume +/- keys to increase or decrease the volume.
Muting the Sound
Press the key to mute the sound. Press again to restore the sound.
Zoom
(16/9 models only)
This function is useful for 4/3 or letterbox pictures (black bands at the top and bottom of the screen).
Use the Left/Right keys to select the desired zoom position:
ZOOM 0: 4/3 picture (black bands at the sides).
FULL SCREEN: for a 4/3 pic ture that fills the screen.
ZOOM 1: for letterbox pictures.
Displaying Information
GB
Press the keyto display the following information onthe screen: channel numberand name,time, zoom, type
of sound.
Television Lock
You can use this function to prevent anyone from switching on the television using the buttons on the
television set.
The buttons on the television set are locked in the following cases:
- If you switch off the set by pressing and holding the
- After a programmed stop,
- If the television is set to standby when the alarm has been set.
When the television is locked the red power will be light flashing.
The television can now only be operated from the remote control.
To release the lock, press any number key on the remote control.
key on the remote control for more than 3 seconds,
Switching Off the Television
To switch off the television, press the Standby key on the remote control or press the ON/OFF switch on the
television set.
15
Page 18
Teletext
Teletext
Certainchannelsbroadcast anelectronic newspage servicewith arange ofdifferent informationservices.
The presentation and use of the Teletext differ from one country to another and from one programme to
another (Teletext, Fastext or Toptext).
Press the key to display the Teletext Index (page 100).
A message will inform you if the programme you are watching has no Teletext service.
To call up a page:
Enter the 3 digits of the page number you wish to consult (for example, 150 or 170).
After a moment, the page appears.
GB
Use the Left/Right keys to consult the next or the previous page.
Standard Functions
Rolling pages:
Some information is displayed over several sub-pages. It is scrolled on your screen as it is received.
To stop scrolling, select STOP using the Up/Down keys and validate using
scrolling.
Masked text:
To reveal a hidden answer (for example in a quiz programme), select ??? using the Up/Down keys and validate
using
.Press again to hide the answers.
Zoom :
Select ZOOM using the Up/Down keys then press the key once to magnify the top of the screen, twice to
magnify the bottom of the screen (the page will scroll from top to bottom) and a third time to return to the normal
display.
Display:
You can superpose the Teletext page over the TV picture. To do this, select MIX using the Up/Down keys then
validate by pressing the
key. Press again to return to the normal display.
Sub-code:
You can use this to access a sub-page directly.
Select “----”usingtheUp/Down keys. Then enter the four digits of the required sub-page number.
Certain programmes have Alarm pages that you can set to appear at the time you require. For example:
for 15h30 enter 1530 as the sub-page number then press
. You must of course leave the television
on the programme which is to transmit the Alarm page.
Index:
To call up the index page, select 100 using the Up/Down keys then validate using
Direct access:
You can use the yellow and blue keys to directly access the pages indicated in the bar at the bottom of the screen.
Fastext functions:
If the Teletext you receive is Fastext, a sub-menu at the bottom of the screen appears which you can use to select
from the 4 headings according to its colour.
To select a heading, press the key of the corresponding colour.
Toptext functions:
If the Teletext you receive is TOPtext, the pages are arranged into headings and sub-headings by subject.
You can select the first page of a heading directly by pressing the blue key, or the first page of a sub-heading by
pressing the yellow key.
Other functions:
With certain Teletext channels, it is possible to havesub-titles overlaid onthe screen for certain broadcasts as well
as certain news flash updates.
The corresponding page number is indicated in the Telextext index.
Once you have found the page, the sub-title or the news flash will be overlaid onto the TV picture.
The navigation status bar disappears after a few seconds. To display it again, press the
To exit Teletext, press
or .
.Press again to continue
.
key.
16
Page 19
Other Connections
CAL
L
OtherConnections
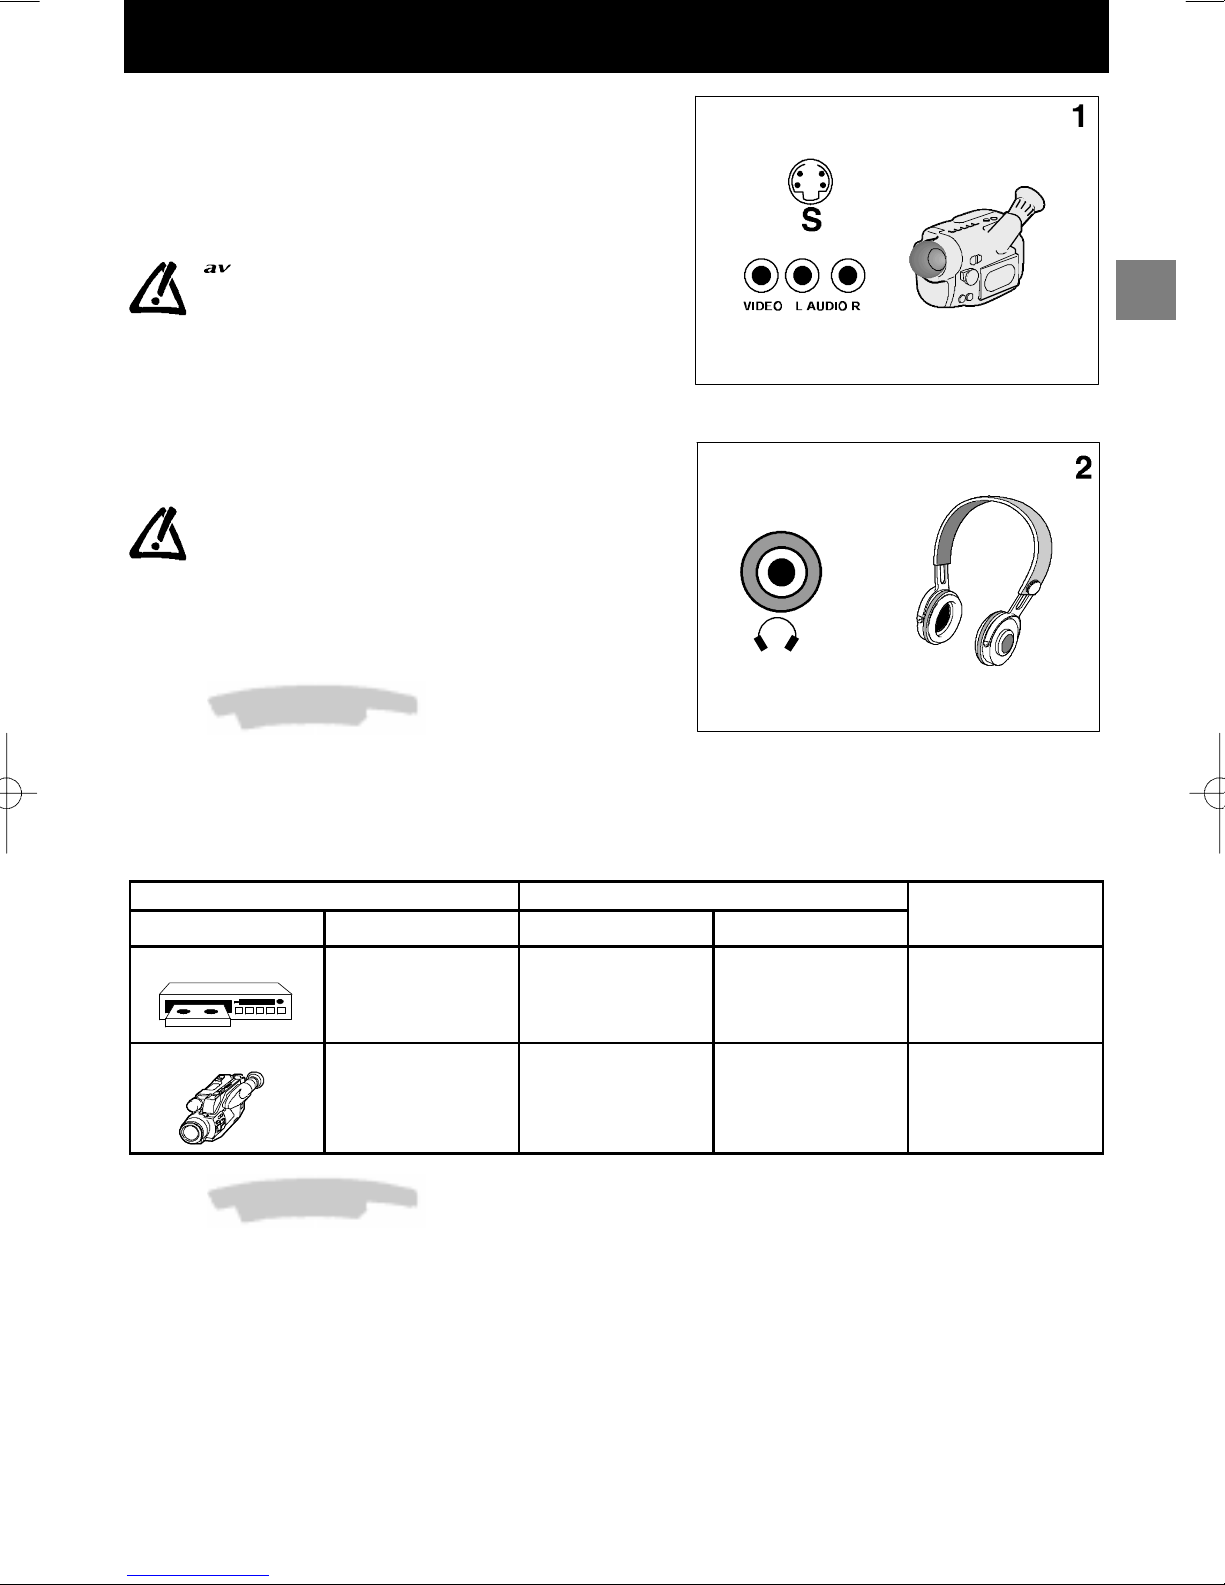
The CINCH Video and Audio sockets (1)* are provided to
connect a VHS or 8mm camcorder.
TheS and CINCHAudio sockets (1)* are provided to connect
a S-VHS or Hi-8 camcorder.
Tousetheappliance you have connected, press the
key several times until the AV3 programme is
selected on the screen. When you switch off the
connected appliance, the television will remain on
theAV3programme andyou must use thenumerical
keys on the remote control to select a programme.
The headphone socket (2)* is provided to connect a
headphone or earphones.
Connecting headphones mute the sound from the
television loudspeakers.
GB
* on models equipped with this function
Other Possibilities
Copying a cassette:
Plugthe VCRyou wish to record to into the SCARTsocket
AV2.
Plug the appliance youwishtocopyfromas follows: into
the peripheral jack AV1 for a VCR; into the CINCH AV3jacks
for a camcorder (see table below).
PLAY
Appliance SCART Socket Appliance SCART Socket
VCR
Peripheral
AV1
Camcorder
Cinches or
S-Video
AV3
VCR
ou
Camcorder
VCR
ou
Camcorder
* on models equipped with this function
RECORD
Connecting a HiFi or AV amplifier
If you wish to connect a HiFi or AV amplifier, plug it into the
peripheral jack AV2 using a SCART-CINCH type lead.
CALL
PROGRAMME
AV2
AV2 AV3
AV1
17
Page 20
THOMSON multimedia
46/47 Quai A. Le Gal lo 92648 Bo ulogn e Cedex France
RCS Nanter re B 3220194 64
06 - 98 - 253 534 70
 Loading...