

Page 1

User
guide
Model 8001
Page 2

INDEX
I. Contents of the box..……………………………..………....…….06
II. Description of the frame.............……………………...….……...06
III. Description of the remote control………......……....……...……10
IV. Installing the frame..………………………………...……..…..…11
V. Starting up........………………………………..…………………..12
1. Which images are read by the DIGICADRE...................................12
2. Inserting a card…………........…………………………….....….……12
3. Switching on…….........………………………………….....….………13
4. Choosing the image source…….………………….……….………...13
5. Selecting a fixed image………….....……….…..………….….….….14
6. Selecting a slide show……………….......………….……..…….…...15
3
Non binding document, subject to modification in the event
of misprint(s) – MKG0207
Page 3

INDEX
Fig.8
VI. Using the menu……………………………..………………..…...16
1. Choosing the language………………………………..….…...……...16
2. Selecting the display type…………………….......………….……….17
3. Transitions between images…………………..........……….……….18
4. Display duration of the photos…..………..……….………...……….20
5. Slide show type………………………………………….............…….21
6. Image operations..........……………………………….…...…........…23
a. Copying photos…………………………………………………..………...…23
b. Deleting photos….............………………….……………………..….……..25
c. Rotating images…………........………………………………..……….……27
d. Zoom………………………….……………………………….……….……...29
4
Non binding document, subject to modification in the event
of misprint(s) – MKG0207
Page 4

INDEX
e. Selecting favourite images ………………..........……………..…………………..…30
f. Reinitialising…………………………………..............………....……………….……32
g. Brightness adjustment..…………………………..…..........……..….……….………33
h. Contrast adjustment……………………………..…………..........…………….…….34
i. Colour adjustment……………………..……………..………….........……...……….35
j. Hue adjustment……………………..………………..……………..…..............…….36
VII. Connecting to a computer……...............………………...…..…37
1. Transferring images from the computer to the Digicadre...............39
2. Transferring images from the Digicadre to the computer……...….39
VIII. Removing the back cover and cleaning...........……...…….......40
IX. F.A.Q………….…………………………......……………….…….41
X. Safety…………..........………………………………….…..……..42
XI. Warranty…………….......………………………………......…….44
XII. Technical properties…….....................…………….…..….……47
5
Non binding document, subject to modification in the event
of misprint(s) – MKG0207
Page 5
Congratulations on your purchase of the TELEFUNKEN Digicadre 8’’. Please read the
instructions and advice contained in this manual carefully before using the digital photo
frame.
Important: keep the packaging and all objects contained therein.
Also keep this user manual for your own reference when needed.
I. CONTENTS OF THE BOX
• One digital photo frame
• One black acrylic back cover
• One mains voltage adaptor
• One remote control
• One user manual
• One USB lead
• One cleaning swab
II. DESCRIPTION OF THE FRAME
6
Your TELEFUNKEN Digicadre includes an acrylic back cover that can be removed, a
main voltage adaptor, a remote control and an LCD screen equipped with 2 USB ports,
and a multiple card reader that is compatible with most memory cards available on the
market.
Non binding document, subject to modification in the event
of misprint(s) – MKG0207
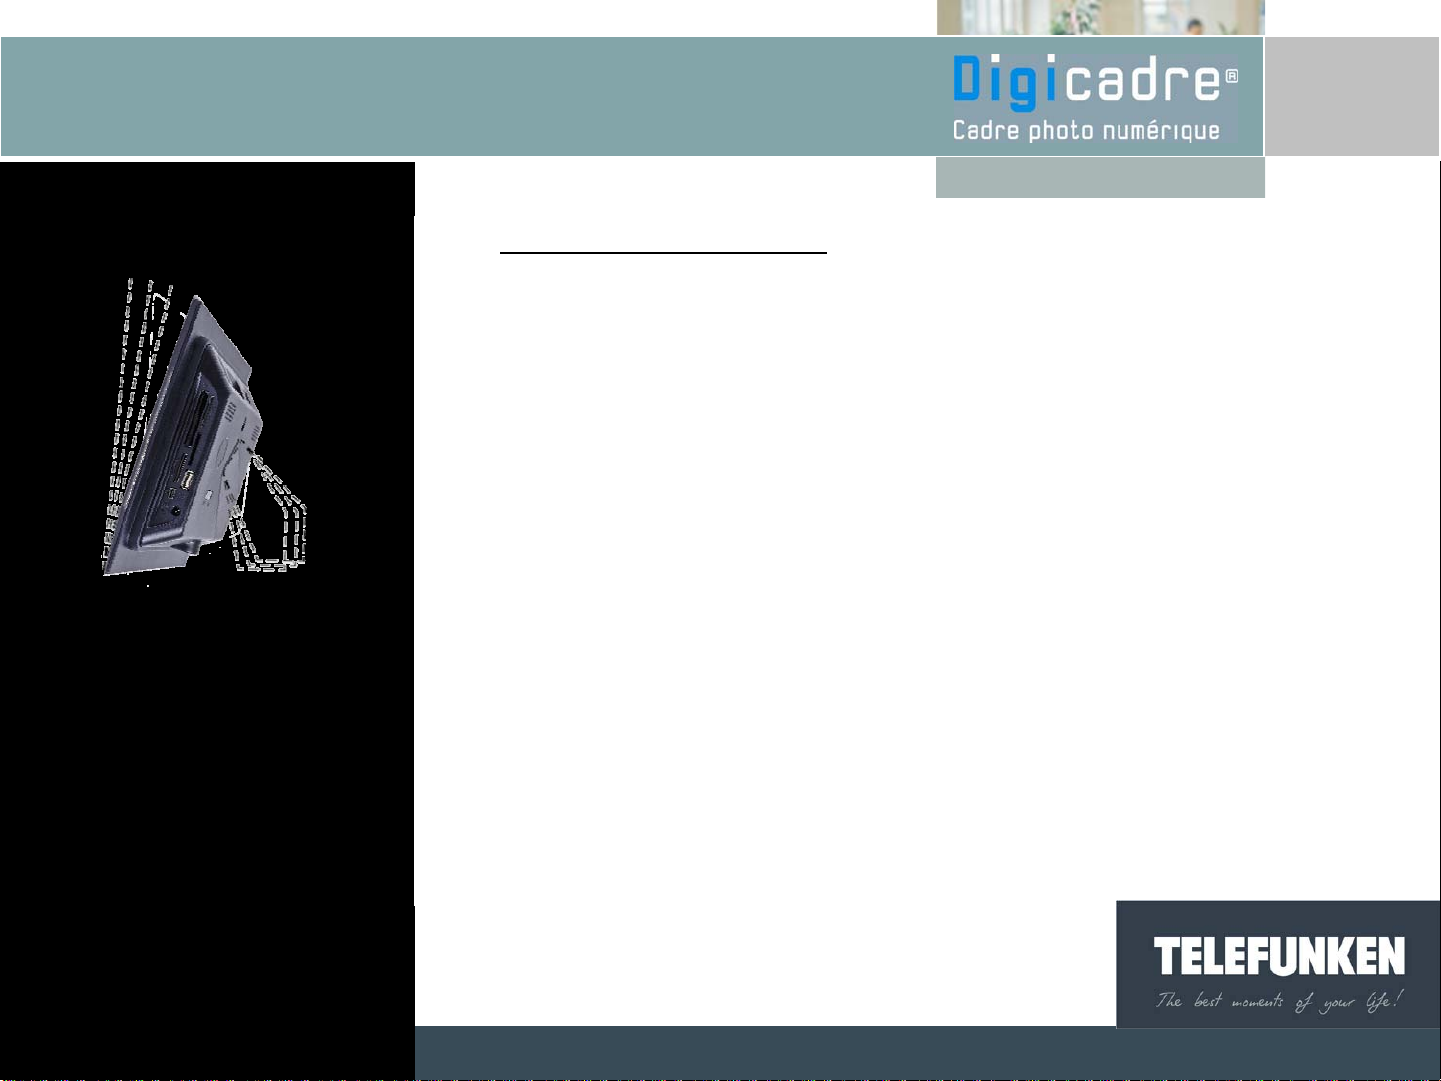
Page 6
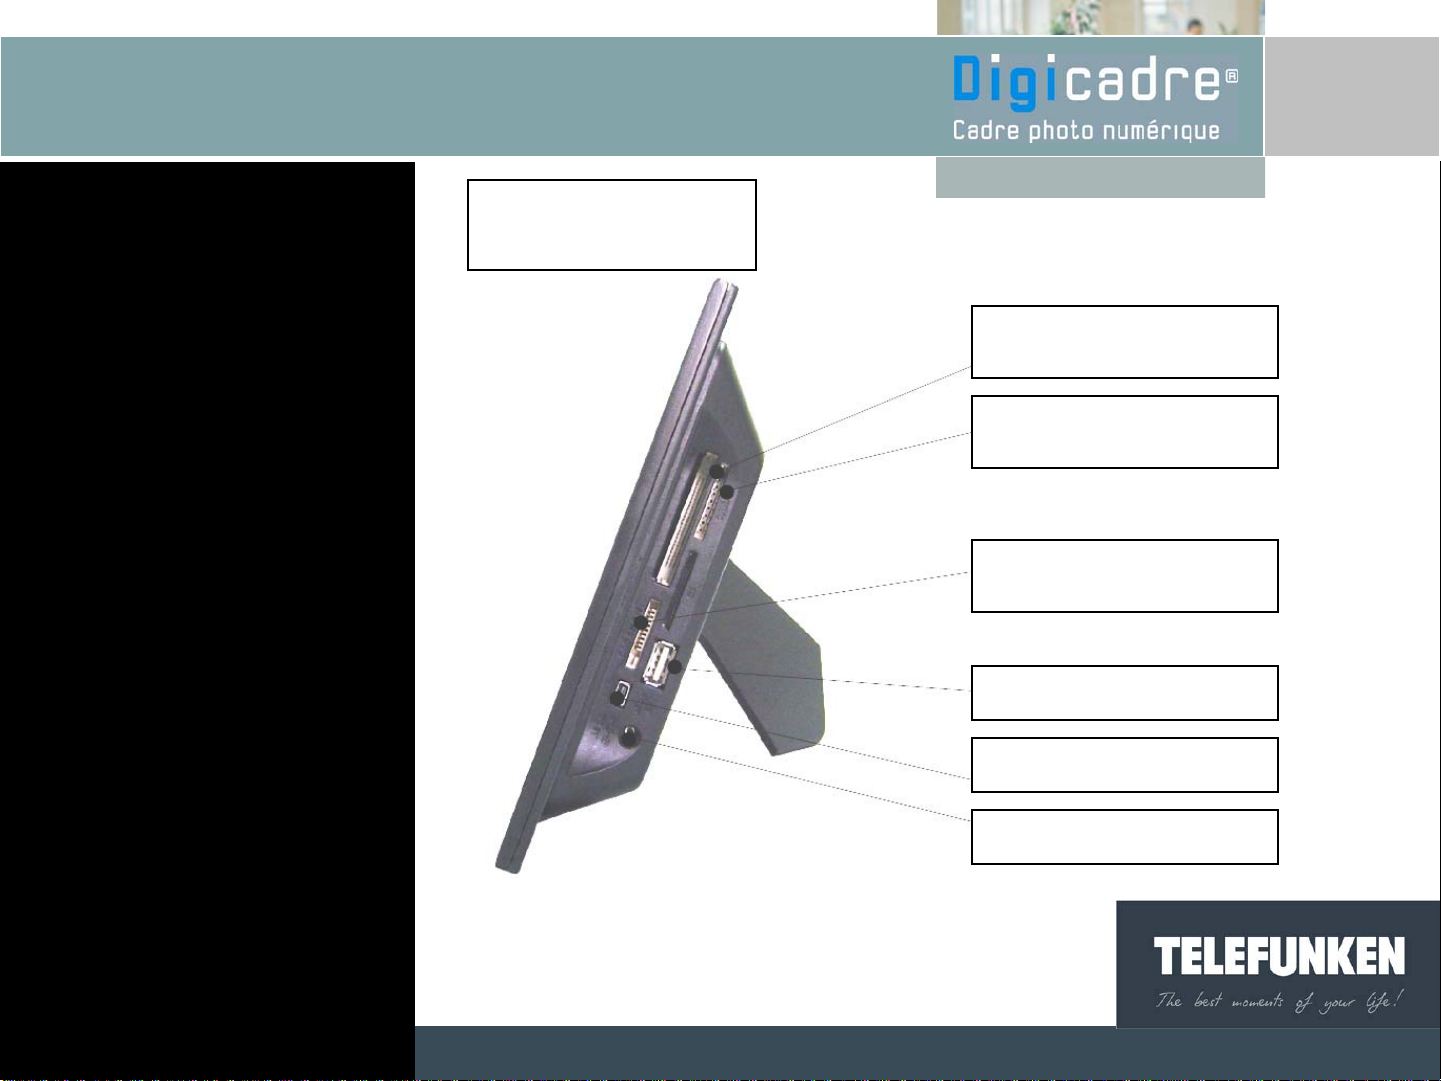
Lecteur de
Card reader
Card reader
cartes
7
CF cards – slot 2
SD cards, mini SD cards –
slot 1
Memory stick card
- slot 3
USB HOST port
USB mini port
Mains voltage socket
Non binding document, subject to modification in the event
of misprint(s) – MKG0207
Page 7
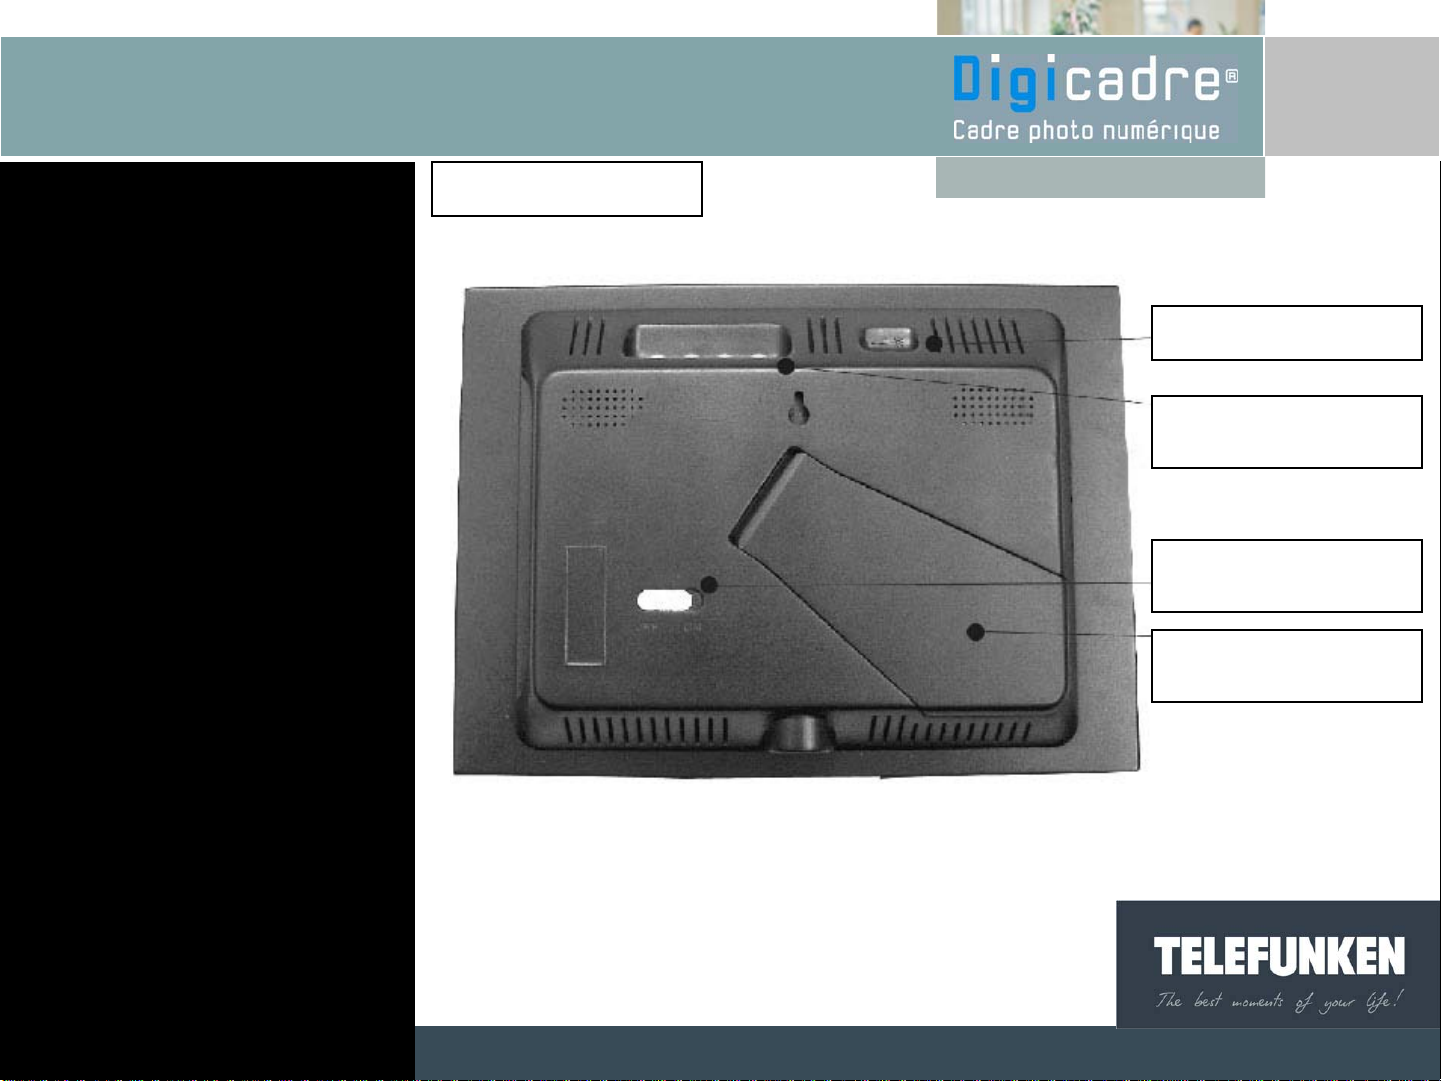
Back of the frame
8
Brightness button
Menu access buttons
On/off button
Adjustable support
Non binding document, subject to modification in the event
of misprint(s) – MKG0207
Page 8
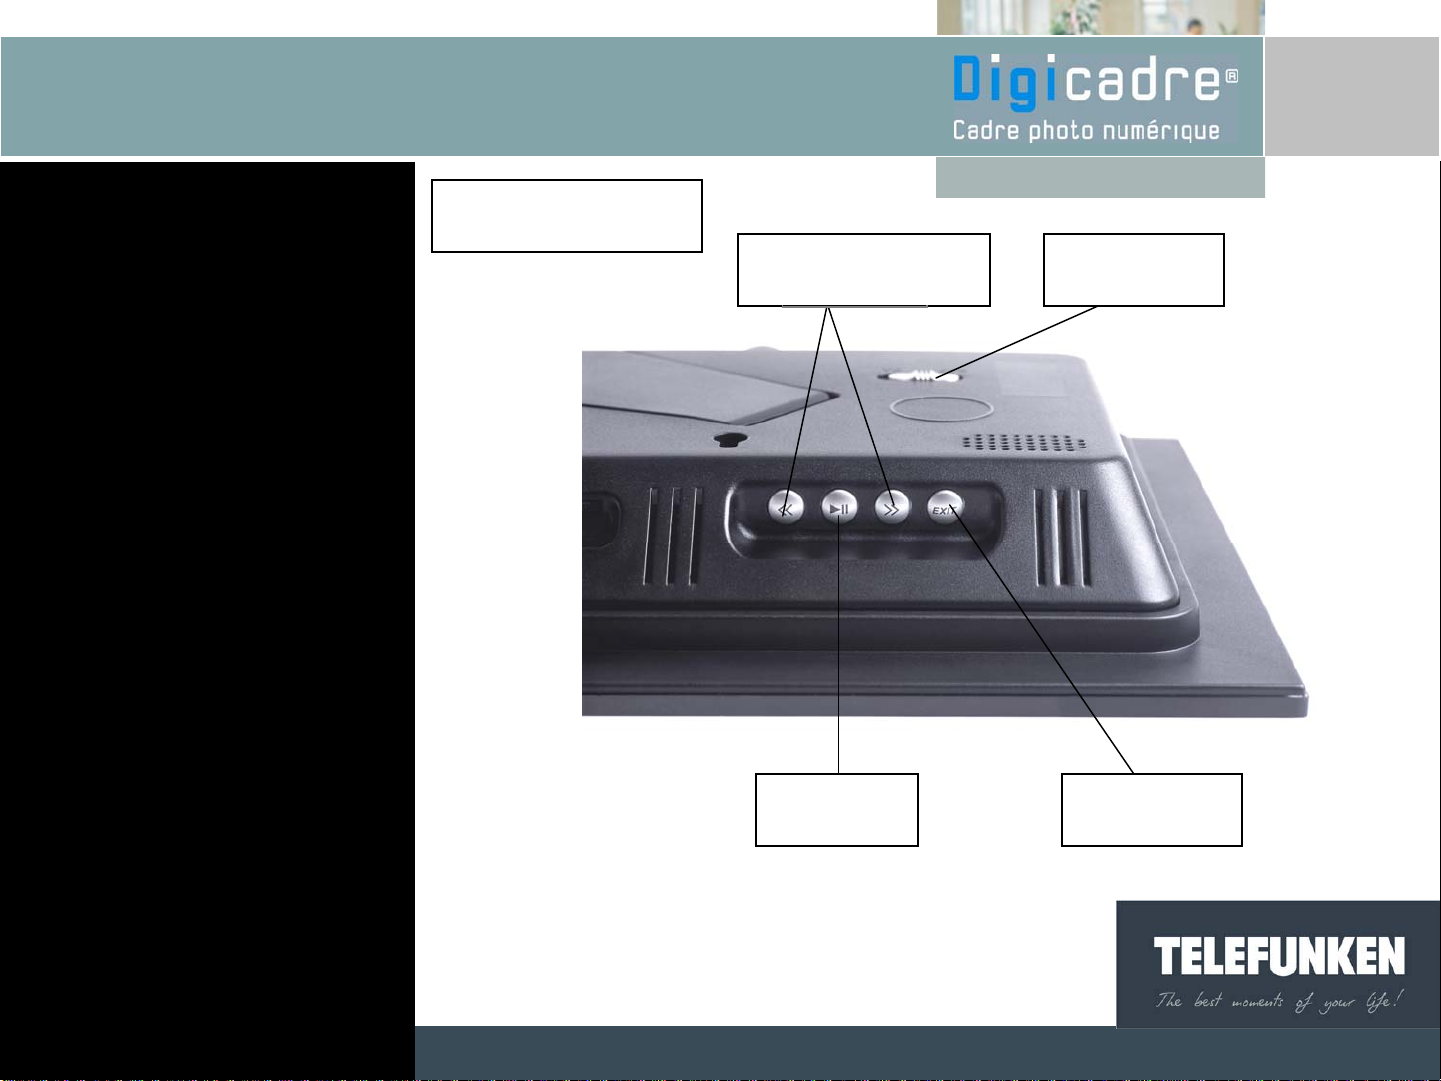
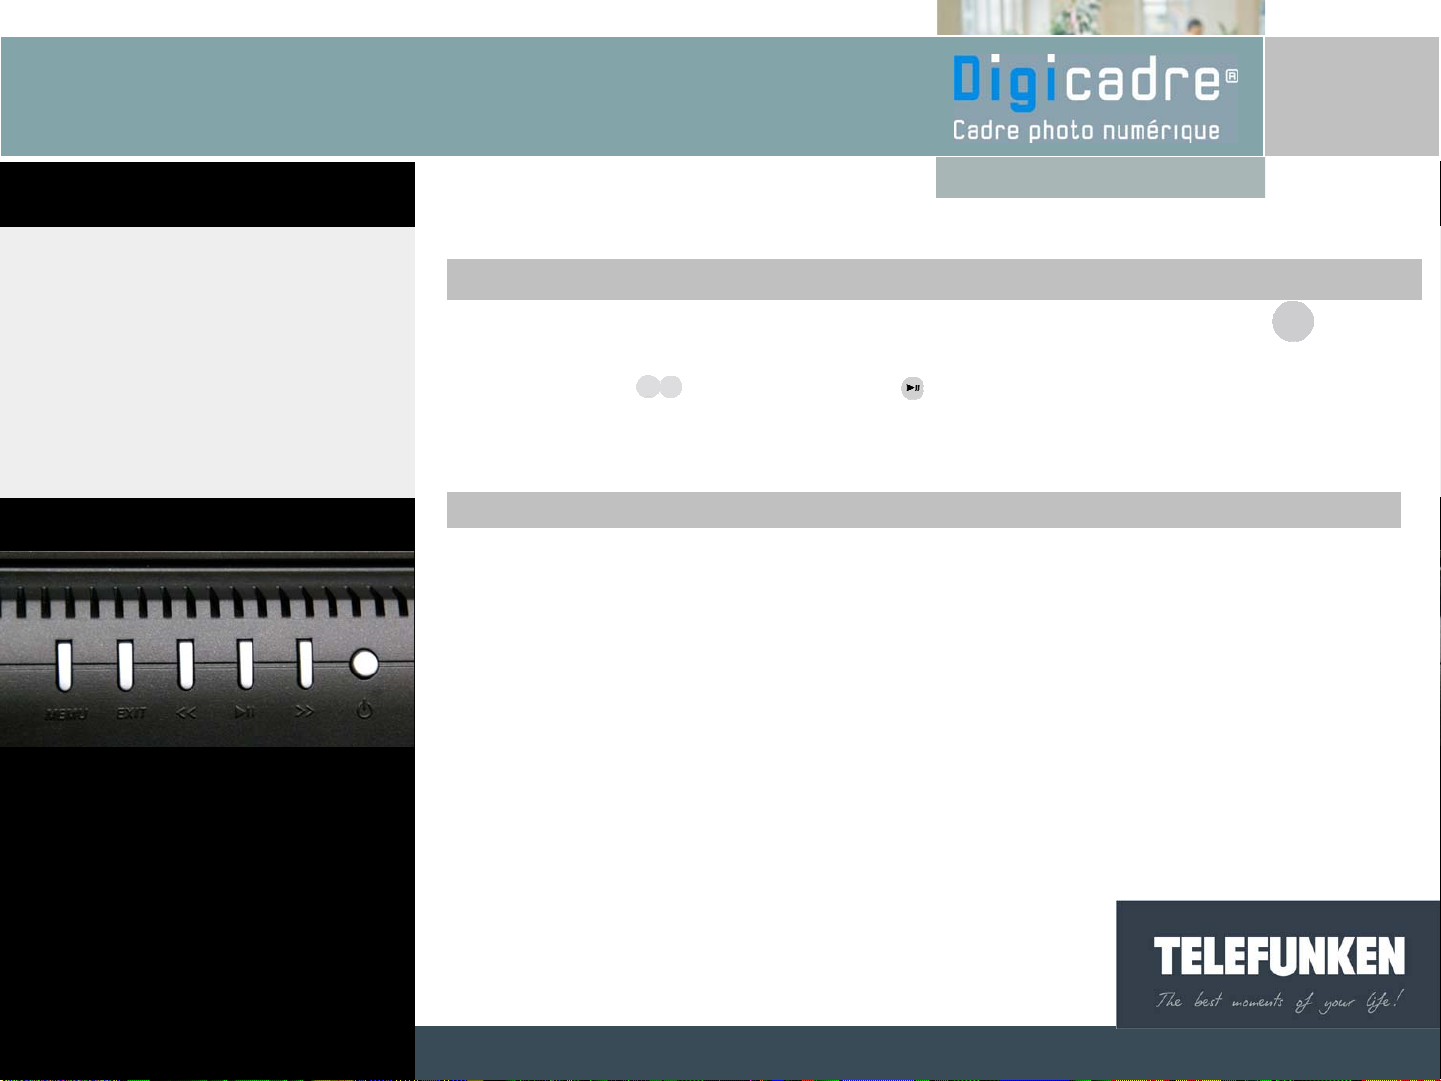
Frame’s buttons
Backward/Forward
buttons
9
On/off button
Confirmation
button
Exit button
Non binding document, subject to modification in the event
of misprint(s) – MKG0207
Page 9
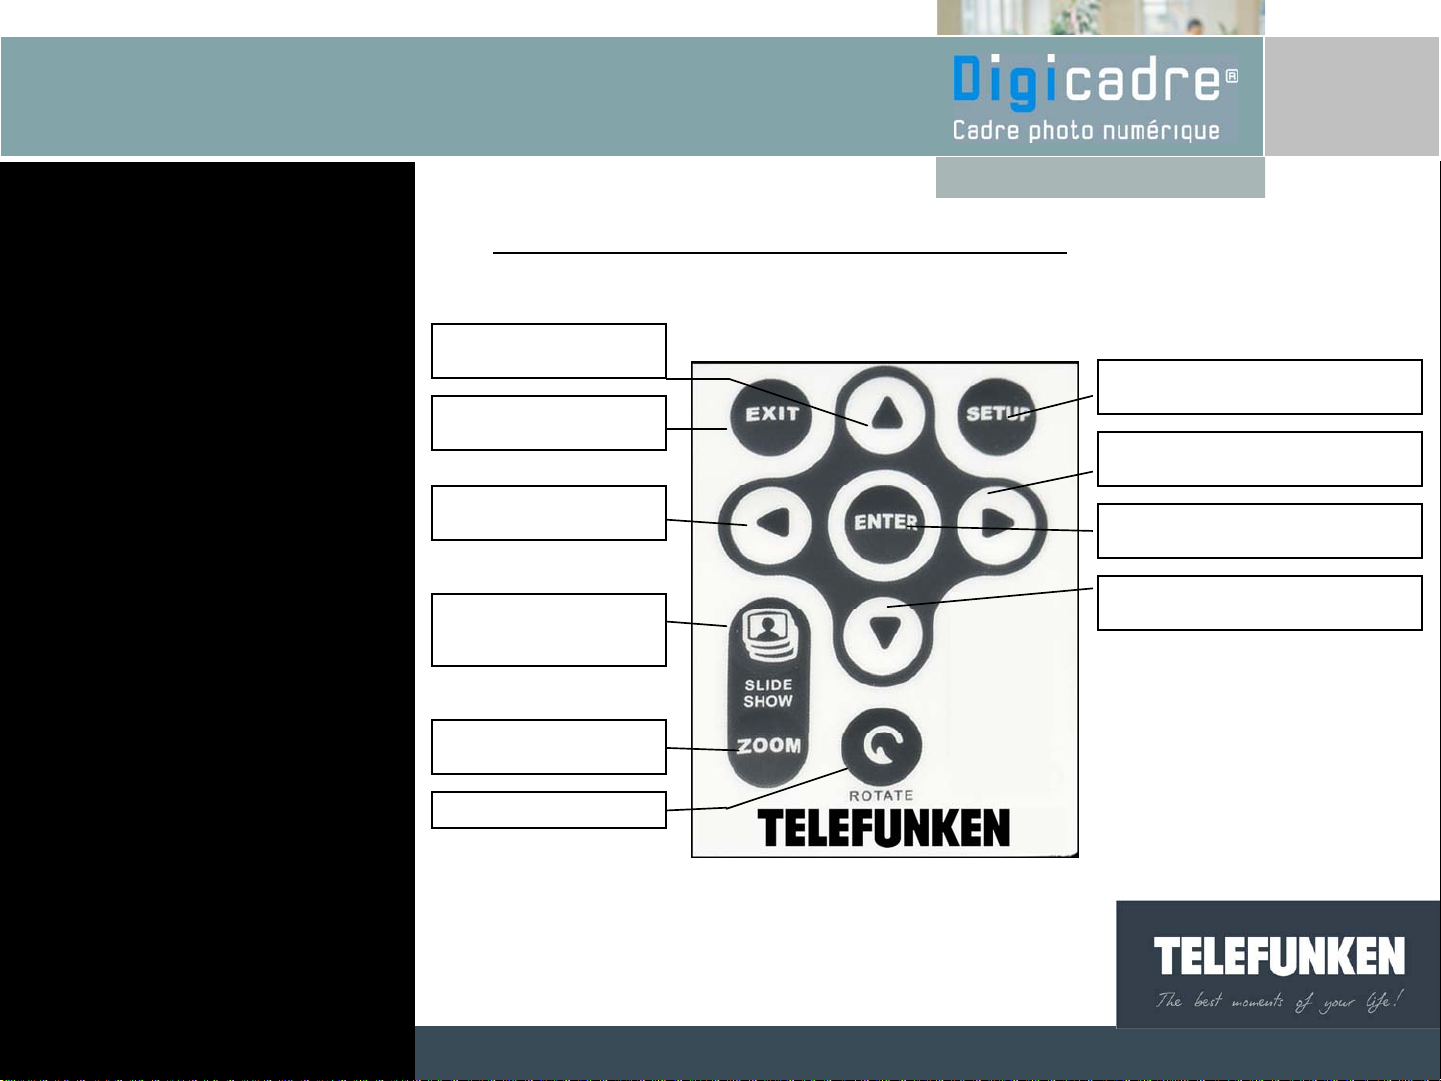
III. DESCRIPTION OF THE REMOTE CONTROL
Up
Exit
10
Menu access
Right
Left
Launch the Slide
Show
Zoom
Confirmation button
Down
Non binding document, subject to modification in the event
of misprint(s) – MKG0207
Page 10
IV. INSTALLING DIGICADRE
1. Inclining the frame
Your Digicadre’s inclination can be adjusted by pulling on the adjustable support down.
Choose the inclination that suits you best among the 6 different levels (fig. 1).
To do it, lift the support, pinch notches and pull on the support to reach the slope of your
choice.
2. Electrical connection
Plug the end of the mains adaptor into its socket and then connect the other end to the
wall-socket.
11
Fig.1
Non binding document, subject to modification in the event
of misprint(s) – MKG0207
Page 11
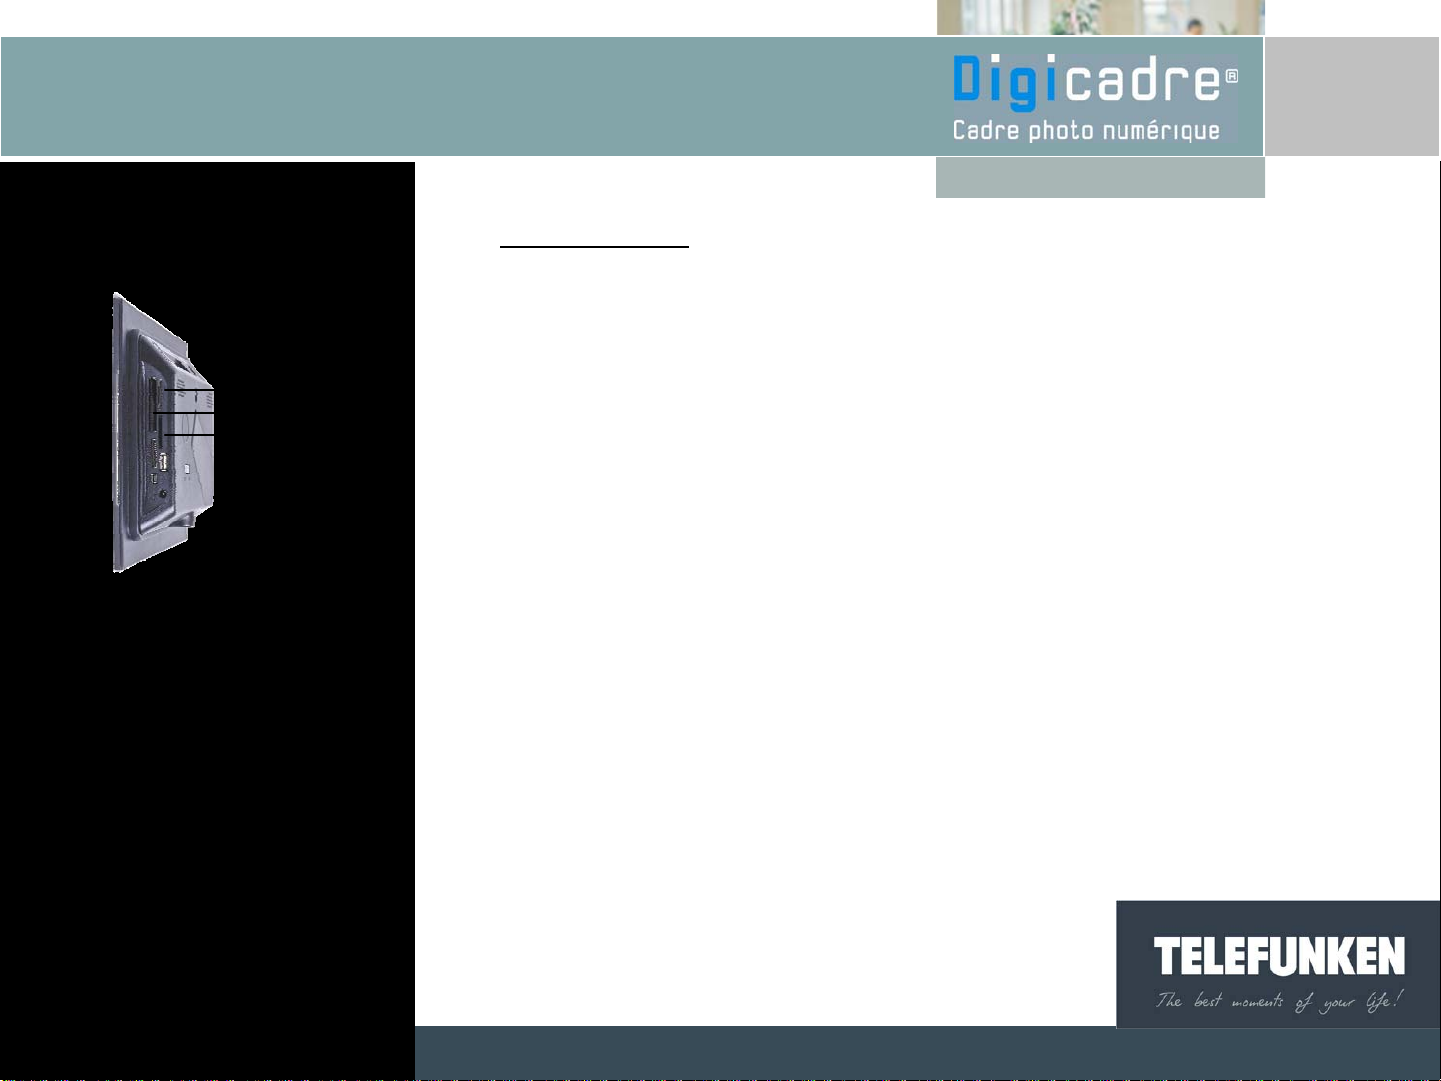
Fig.2
12
V. STARTING UP
1. Which images can be read by DIGICADRE?
1
2
3
DIGICADRE reads JPEG images, i.e. images from digital cameras.
If you use image editing software (Photoshop, Paint shop pro, etc.), make sure to save
only as an entry-level JPEG and not as a progressive JPEG, or any other type of JPEG.
If you want to view images in black and white on your DIGICADRE, make sure that they
are in RGB format and not in grey-level format. If they are saved in grey-level format,
you can display these as thumbnail images, but not in full-screen
DIGICADRE’s screen resolution is 800 x 600 pixels. You can read images with a higher
resolution but the display time may be slowed down.
2. Inserting a memory card
Insert the memory card containing images to be read into its intended slot.
Slot 1: for SD, mini SD or MMC cards
Slot 2: for Compact Flash or MD cards
Slot 3: for Memory Stick, Memory Stick Pro, Memory Stick Duo or Memory Stick Pro
Duo cards.
Non binding document, subject to modification in the event
of misprint(s) – MKG0207
Page 12

l
l
Fig.3
13
3. Switching on
With the remote contro
Press the ON/OFF button at the back of the frame : the slide-show begins after a few
seconds
4. Choosing the image source
With the frame
With the remote contro
When the frame is in slide-show mode and photos are being displayed, point the remote
control (fig.3) at the frame and then press EXIT twice. The screen on the left appears
(fig.4). Select the desired source (memory card or internal memory) with the left and right
arrows of the remote control (fig 3), then press the remote control’s "ENTER" button to
confirm your choice. Press “ENTER” again to launch the slide show that you have
chosen.
Fig.4
Non binding document, subject to modification in the event
of misprint(s) – MKG0207
Page 13
l
Fig.4
14
With the frame
When the frame is in slide-show mode and photos are being displayed, press twice.
The screen on the left appears (fig. 4). Select the desired slide-show (card or internal
memory) with the buttons; then press twice (fig. 5)
5. Selecting a fixed image
With the remote contro
When the frame is in slide-show mode and photos are being displayed, point the remote
control at the frame and then press EXIT once. The frame then displays the image’s
thumbnails. Select the desired photo using the remote control’s arrow buttons (left, right,
up and down), then press ENTER. The selected image is displayed and doesnot change.
If you press ENTER once more, the slide show begins again.
Fig.5
Non binding document, subject to modification in the event
of misprint(s) – MKG0207
Page 14
l
15
With the frame
When the frame is in slide-show mode and photos are being displayed, press once:
the images are displayed in thumbnail form. Select the desired photo using the
buttons, and then press ENTER. The selected image is displayed and does not
change. To return to the slide show, press and the slide show begins again.
6. Selecting a slide show
With the remote contro
When the frame is in thumbnail display mode, press the remote control’s “Slide show”
button once.
With the frame
When the frame is in thumbnail display mode, press the button twice.
Non binding document, subject to modification in the event
of misprint(s) – MKG0207
Page 15

l
Fig.6
USING THE MENU
VI.
1. Choosing the language
The default language is French. To choose another one, the menu must first be
accessed.
With the remote contro
When the frame is in slide show mode and photos are being displayed, press the EXIT
button to leave the slide show, and then press SETUP to display the menu screen. On the
thirteenth line, the language is displayed (fig. 6). If you would like to change it, use the
remote control’s UP or DOWN buttons, until the language line is highlighted (in blue), then
press ENTER. Every time this button is pressed, a different language is displayed.
(French, Spanish, Portuguese, Dutch, English, Italian, German). Once the menu is
displayed in the desired language, press EXIT followed by ENTER.
16
With the frame
When the frame is in slide show mode and photos are being displayed, press to leave
the slide show, then press second time for 3 seconds.
The menu screen is displayed.
Non binding document, subject to modification in the event
of misprint(s) – MKG0207
Page 16

Press the buttons, until the language line (fig.6) is highlighted, then press as many
l
times as needed until accessing the desired language. Finally press , then .
2. Selecting the display type
TELEFUNKEN DIGICADRE offers an exclusive function: Multiple display mode. This
mode allows you to simultaneously display 2, 3 or 4 images depending on their orientation
(vertical or horizontal).
With the remote contro
When the frame is in slide-show mode and photos are being displayed, press the remote
control’s EXIT button once, and then press SETUP. The menu is displayed. Use the UP
and DOWN buttons, until the “Multiple display” line (fig. 7) is highlighted. Press ENTER.
Two lines appear:
"Activate" and "None"
With the up/down arrows, highlight the option that you are interested in. If you highlight
the “Activate” option, multiple-display will be selected. If you select the “None” option, the
standard full-screen display will be activated. Press ENTER to confirm your choice, and
then EXIT to leave the menu. Press ENTER to launch the slide-show again.
17
Non binding document, subject to modification in the event
of misprint(s) – MKG0207
Page 17

e
18
With the fram
When the frame is in slide-show mode and photos are being displayed, press the
button to leave the slide show, then press second time for 3 seconds.. Using the
buttons, highlight the “Multiple display” line. Press to display the options. Using the
buttons, highlight the option that you are interested in (“None” or “Activate”), then
press . Next press to exit the menu, followed by to launch the slide-show again.
Fig.7
Fig.7
3. Transition between the images
You are able to choose the transition type between each of the images of your slide-show.
There are 9 different possible transitions (fade in/out, vertical stripes, cross, mosaic, blocks,
dimming, lines, enlargement, silk-screen) to which “no transition” and “random” are added.
“Random” mode is programmed by default.
Non binding document, subject to modification in the event
of misprint(s) – MKG0207
Page 18

l
e
19
With the remote contro
When the frame is in slide-show mode and photos are being displayed, press the remote
control’s EXIT button once to leave the slide-show, and then press SETUP. The menu is
displayed.
Using the remote control’s UP/DOWN buttons, highlight the “transition effects” line, and
the press ENTER. The different transitions appear on screen (fig. 8).
Select the desired transition using the UP/DOWN buttons, and then press ENTER to
confirm. Press EXIT to leave the menu, and then ENTER to launch the slide-show again.
With the fram
Fig.8
When the frame is in slide-show mode and photos are being displayed, press the
button to leave the slide show, then press second time for 3 seconds. Using the
buttons, highlight the "transition effects" line, and then press . The different transitions
are displayed (fig. 8). Select the desired transition using the buttons, and then press
to confirm your choice.
Press to leave the menu, and then press to launch the slide-show again.
Non binding document, subject to modification in the event
of misprint(s) – MKG0207
Page 19

l
e
Fig.9
20
4. Display duration of photos
You can adjust the display duration of your slide-shows images with 5 different
possibilities (3s, 5s, 10s, 30s, 60s). The default is 3s.
With the remote contro
When the frame is in slide show mode and photos are being displayed, press the remote
control’s EXIT button once to leave the slide show, and then press SETUP. The menu is
displayed. Using the remote control’s UP/DOWN buttons, highlight the “display time” line,
and then press ENTER. The different durations appear (fig. 9).
Select the desired duration using the UP/DOWN buttons, and then press ENTER to
confirm your choice. Next press EXIT to leave the menu, and then ENTER to launch the
slide show again.
With the fram
When the frame is in slide show mode and photos are being displayed, press to leave
the slide show, then press second time for 3 seconds.
Non binding document, subject to modification in the event
of misprint(s) – MKG0207
Page 20

l
Highlight the “Display time” line, using the buttons then press . The different
durations appear (fig. 9).
Select the desired duration using the buttons, and then press to confirm your
choice.
Press to leave the menu, and then press to launch the slide-show again.
5. Slide show type
By default, DIGICADRE displays images during the slide show, in the order in which they
were introduced into or saved onto the internal memory.
If you prefer, you can select “random slide show” to randomly select the photo order in the
slide show.
With the remote contro
When the frame is in slide show mode, press the remote control’s EXIT button once to
leave it, and then press SETUP. The menu is displayed.
Highlight the “Random slide-show” line with the remote control’s UP/DOWN buttons and
then press ENTER. Two options are then displayed (fig.10).
21
Non binding document, subject to modification in the event
of misprint(s) – MKG0207
Page 21

e
Fig.10
22
Select the desired option using the UP/DOWN buttons, and then press ENTER to confirm
your choice.
Press EXIT to leave the menu, and then ENTER to launch the slide-show again.
With the fram
When the frame is in slide show mode and photos are being displayed, press the
button to leave the slide show, then press second time for 3 seconds.
Highlight “Random slide show” using the buttons, and then press . Two options
then appear (fig.10).
Select the desired option using the buttons, and then press to confirm your
choice.
Press to leave the menu and then to launch the slide show again.
Fig.11
Non binding document, subject to modification in the event
of misprint(s) – MKG0207
Page 22

l
Fig.11
23
6. Image operations
a. Copying photos
Copying a photo from the memory card to the internal memory is possible with
DIGICADRE.
When the frame is in slide show mode and photos are being displayed, insert your card
and press the EXIT button twice. The screen (fig. 11) is displayed. With the remote
control’s RIGHT/LEFT buttons, select the memory card and then press ENTER twice. The
memory card’s images are then displayed in the slide show.
With the remote contro
When the frame is in slide show mode and photos are being displayed, press EXIT. The
image’s thumbnails appear. Select the image you wish to copy using the remote control’s
RIGHT/LEFT UP/DOWN arrows (the selected image is outlined in blue). After making the
choice, press the remote control’s SETUP button to display the menu.
Non binding document, subject to modification in the event
of misprint(s) – MKG0207
Page 23

e
Fig.12
24
Highlight “Copy photo”, using the UP/DOWN buttons, and then press ENTER to display
the options (fig. 12). Select the desired option and then press ENTER and the image will
then be copied onto internal memory. Repeat this procedure for any images that you wish
to copy.
Press the EXIT button once to leave the menu, and then press “Slide show” to launch the
slide-show again.
With the fram
When the frame is in slide show mode and photos are being displayed, press . The
images are then displayed in thumbnail form. Select the image that you wish to copy with
the buttons (the selected image will be outlined in blue).
After making this choice, press the button for 3 seconds to display the menu. Highlight
the “Copy photo” line, using the buttons and then press to display the options (fig.
12).
Select the desired option and then press . The image is then copied to the internal
memory. Repeat this procedure for any images that you wish to copy.
Press to leave the menu and then press twice to launch the slide-show again.
Non binding document, subject to modification in the event
of misprint(s) – MKG0207
Page 24

l
Fig.13
25
Warning! Copying an image from the internal memory to a memory card is not possible. It
is also not possible to copy several photos at the same time.
When you wish to copy several images, we recommend connecting the DIGICADRE to
the PC (see page 40).
b. Deleting photos
Deleting a photo from the internal memory is also possible. To achieve this, switch off your
DIGICADRE, remove the card, and switch the frame back on. The images in the internal
memory are then displayed.
With the remote contro
When the frame is in slide show mode and photos are being displayed, press EXIT. The
image’s thumbnails appear. Select the image you wish to delete using the RIGHT/LEFT
UP/DOWN arrows (the selected image is outlined in blue).
Non binding document, subject to modification in the event
of misprint(s) – MKG0207
Page 25

e
26
When the choice has been made, press the remote control’s SETUP button to display
the menu. Highlight the “Delete photo” line with the UP/DOWN buttons, then press
ENTER to display the options (fig.13). Select the desired option and then press ENTER.
The image is then deleted from the internal memory. Repeat this procedure for all
images that you wish to delete.
Press EXIT to leave the menu and then press the “Slide show” button to launch the
slide-show again.
With the fram
Fig.13
When the frame is in slide show mode and photos are being displayed, press . The
images are then displayed in thumbnail form.
Select the image that you wish to delete using the buttons.
When the choice has been made, press the button for 3 seconds to display the
menu. Highlight the “Delete photo” line with the buttons, then press to display
the options (fig.13).
Select the desired option and then press . The image is then deleted from the internal
memory. Repeat this procedure for all images that you wish to delete.
Press to leave the menu and then press twice to launch the slide-show again.
Warning! Deleting an image from a memory card is not possible.
Non binding document, subject to modification in the event
of misprint(s) – MKG0207
Page 26

l
e
Fig.14
27
c. Rotating an image
An image can be rotated when it is not correctly orientated for example.
With the remote contro
When the frame is in slide show mode and photos are being displayed, press the EXIT
button to display the thumbnails. Select the photo that you wish to rotate using the remote
control’s UP/DOWN RIGHT/LEFT buttons.
Press ENTER to display it in full screen, and then press the remote control’s ROTATE
button as many times as is needed to rotate the image to the correct orientation (fig. 14).
Then press EXIT, followed by “Slide show” to launch the slide show again.
With the fram
When the frame is in slide show mode and photos are being displayed, press to
leave the slide show and to display the thumbnails.
Non binding document, subject to modification in the event
of misprint(s) – MKG0207
Page 27

Fig.14
28
Select the photo that you wish to rotate, using the buttons.
Press to display the image in full screen mode and then press press the button for
3 seconds to display the menu (fig.14).
Highlight “Rotation” using the buttons, and then press to rotate the image by 90°.
If you wish to rotate it again, press followed by .
Press to leave the menu, and then press twice to launch the slide show again.
Non binding document, subject to modification in the event
of misprint(s) – MKG0207
Page 28

l
e
Fig.15
29
d. Zoom
Thanks to the zoom function, you can enlarge a part of your image to fit the entire screen
(1x, 2x, 4x, 8x).
With the remote contro
When the frame is in slide show mode and photos are being displayed, press EXIT to
display the thumbnails. Select the photo that you wish to enlarge with the remote control’s
UP/DOWN RIGHT/LEFT buttons.
Press ENTER to display it full-screen, and then press the remote control’s ZOOM button
as many times as needed to zoom into the image (fig. 15). Next press EXIT followed by
“Slide show” to launch the slide show again.
With the fram
When the frame is in slide show mode and photos are being displayed, press to leave
the slide show and to display the thumbnails.
Non binding document, subject to modification in the event
of misprint(s) – MKG0207
Page 29

l
30
With the buttons, select the photo that you wish to zoom into.
Press the button to display the image in full-screen mode, and then press press the
button for 3 seconds to display the menu (fig.15).
Highlight the “Zoom” line, using the buttons, and then press to zoom into the
image. If you would like to zoom in again, press the button again, followed by .
Press to leave the menu, and then press to launch the slide show again.
e. Image selection
With DIGICADRE, you can select the images that will make up your slideshow among all
of your card’s or internal memory’s images.
With the remote contro
When the frame is in slide show mode and photos are being displayed, press EXIT to
leave the slide show. The images are displayed in thumbnail form. Using the RIGHT/LEFT
UP/DOWN arrows, choose the first image of your selection (the chosen image is outlined
in blue), and then press the SETUP button.
Non binding document, subject to modification in the event
of misprint(s) – MKG0207
Page 30

e
31
Highlight the “Image selection” line using the UP/DOWN keys, and then press ENTER.
The image that you selected is then ticked (top-right corner of the image). Choose a
second image using the RIGHT/LEFT UP/DOWN buttons. The “image selection” line is
still highlighted. Press ENTER to confirm. Repeat the procedure for all images that you
wish to select. Once you have finished selecting, press EXIT and then “Slide Show”. The
slide show will only display the images that you have selected.
With the fram
When the frame is in slide show mode and photos are being displayed, press to leave
the slide show. The images are displayed in thumbnail form. Using the buttons,
select the first image and then press the button for 3 seconds to display the menu.
Press the buttons until the “Image selection” line is highlighted, and then press .
Your image is now selected. Select a second image with the buttons, and then
press . The “image selection” line is still highlighted. Press to confirm. Repeat the
procedure for all images that you wish to select. Once you have finished selecting, press
and then press twice. The slide show will only display the images that you have
selected.
To deselect the images, the procedure is identical.
Non binding document, subject to modification in the event
of misprint(s) – MKG0207
Page 31

l
Fig.16
32
f. Reinitialising
This function allows you to reinitialise the frame. Thus, all parameters that you have
programmed will be replaced with the default parameters.
Multiple display: deactivated, transitions: random, display duration: 3s, random slideshow:
activated, language: French
To access this function, press the remote control’s EXIT button to leave the slide-show
and then press SETUP. The menu is displayed.
With the remote contro
Using the remote control’s UP/DOWN buttons, highlight “Reinitialise” and then press
ENTER. The two options appear (fig. 16).
Select the desired option using the UP/DOWN buttons and then press ENTER to confirm
your choice.
Press EXIT to leave the menu, and then press SLIDE SHOW to launch the slide-show
again.
Non binding document, subject to modification in the event
of misprint(s) – MKG0207
Page 32

e
l
B
Fig.17
Fig.18
33
With the fram
Press the button once to leave the slide-show and then then press second time for 3
seconds. Highlight “Reinitialise” using the buttons, and then press . The two
options are displayed (fig.16).
Select the desired option using the buttons and then press to confirm your
choice.
Press to leave the menu, and then press to launch the slide-show again.
. Brightness
With the remote contro
Press the remote control’s EXIT button and then press SETUP.
The menu is displayed (fig. 17). Using the UP/DOWN arrows, highlight “Brightness” and
+ -
then press ENTER. An adjustable brightness bar is displayed on screen (fig.18).
Press the RIGHT/LEFT arrows to adjust the brightness. Then press EXIT twice followed
by the “Slide show” button to launch the slide show again.
Non binding document, subject to modification in the event
of misprint(s) – MKG0207
Page 33

e
l
C
Fig.19
Fig.20
34
With the fram
Press and then then press second time for 3 seconds.
The menu is displayed (fig.17). Highlight Brightness and then press . An adjustable
brightness bar is displayed on the screen (fig.18).
Press to adjust the brightness. Next press twice to return to the thumbnails. Press
to launch the slide-show again.
h. Contrast
With the remote contro
Press the remote control’s EXIT button and then press SETUP. The menu is displayed
(fig.19). Highlight “Contrast” with the UP/DOWN arrows and then press ENTER. An
adjustable contrast bar is displayed on screen (fig.20). Press the RIGHT/LEFT arrows to
adjust the contrast. Next press EXIT twice and then “Slide show” to launch the slide-show
+ -
again.
Non binding document, subject to modification in the event
of misprint(s) – MKG0207
Page 34

e
l
C
Fig.21
Fig.22
35
With the fram
Press and then then press second time for 3 seconds.
The menu is displayed (fig.19). Highlight “Contrast” using the keys and then press
. An adjustable contrast bar is displayed on the screen (fig.20).
Press the arrows to adjust the contrast. Next press twice, followed by twice
to launch the slide-show again.
i. Colour
With the remote contro
Press the remote control’s EXIT button and then press SETUP.
The menu is displayed (fig.21). Highlight “Colour” using the UP/DOWN arrows and then
press ENTER. An adjustable colour bar is displayed on screen (fig.22).
Press the RIGHT/LEFT keys to adjust the colour. Next press EXIT twice followed by
+ -
“slide show” to launch the slide show again.
Non binding document, subject to modification in the event
of misprint(s) – MKG0207
Page 35

e
l
T
Fig.23
Fig.24
36
With the fram
Press the button, then press second time for 3 seconds.
The menu is displayed (fig.23). Highlight “Colour” using the buttons. Press . An
adjustable colour bar is displayed on the screen (fig.24).
Press the arrows to adjust the colour. Next press followed by twice to launch
the slide show again.
j. Hue
With the remote contro
Press the remote control’s EXIT button and then press SETUP.
The menu is displayed (fig.23). Highlight “hue” using the UP/DOWN arrows and then
press ENTER. An adjustable hue bar is displayed on the screen (fig.24).
+ -
Press the RIGHT/LEFT arrows to adjust the hue. Next press EXIT twice followed by “Slide
show” to launch the slide show again.
Non binding document, subject to modification in the event
of misprint(s) – MKG0207
Page 36

e
With the fram
Press the button and then then press second time for 3 seconds.
The menu is displayed (fig.23). Highlight “hue”. Press . An adjustable hue bar appears
on the screen (fig.24).
Press the arrows to adjust the hue. Next press twice, followed by twice to
launch the slide show again.
VII. CONNECTING TO A COMPUTER
Thanks to USB ports, you can transfer photos from your computer onto your DIGICADRE,
and vice versa.
1. System compatibility and connection
The following system is compatible with DIGICADRE: WINDOWS XP
To connect DIGICADRE directly to a microcomputer, it should have an available USB port.
37
Non binding document, subject to modification in the event
of misprint(s) – MKG0207
Page 37

p
38
Make sure that your computer’s configuration is compatible with DIGICADRE. Software
incompatibilities or hardware conflicts can arise when connecting. TELEFUNKEN can not
in any case be held responsible if the configuration does not conform.
The USB 2.0 port offers the optimal transfer speed, however DIGICADRE will also work
with a USB 1.1 port. In this case the following message may appear when connecting
DIGICADRE to the PC:
“This device can perform faster if you connect it to a high-speed USB port”
Make sure to keep this in mind.
Turn on the computer, leave the DIGICADRE turned on.
Connect the small USB connector cable to DIGICADRE. Check that it is well connected.
Connect the other end of the USB cable to a USB port on your computer.
Switch on DIGICADRE.
After a few seconds, the message “New device detected” appears on the computer
screen. Wait a few moments until the installation has completed. As soon as the message
“your hardware has been installed and is ready for use” appears, double click on the “My
computer” icon: 6 new removable hard-disks can be seen (fig.25).
Fig.25
Non binding document, subject to modification in the event
of mis
rint(s) –MKG0207
Page 38

2. Transferring images from the computer to the internal memory
Double click on the icon of the last reader (fig.25). The images appear. Open the folder
containing the documents that you want to transfer from your computer. Next select the
images:
Press Ctrl and A simultaneously if you want to select all images.
OR
Hold the Ctrl key down and click on all desired photos.
Drag the images to the image window of the frame’s internal memory.
3. Transferring images from the internal memory to the computer
Double click on the icon of the last reader (fig.25). The images appear. Open the folder
into which you want to transfer the images. Next select the images:
Press Ctrl and A simultaneously if you want to select all images.
OR
Hold the Ctrl key down and click on all desired photos. Drag the images from the internal
memory to the chosen folder.
39
Non binding document, subject to modification in the event
of misprint(s) – MKG0207
Page 39

Fig.26
40
VIII. REMOVING THE BACK COVER AND CLEANING
Warning! Make sure that the Digicadre has been switched off before cleaning it. Never use
spray or liquid cleaner directly on the frame or on the plastic housing.
To clean your Digicadre, you can remove the back cover. To achieve this, press the notch
situated on the left side of your frame (fig.26) and gently remove the screen. To replace
the screen, place it in the frame.
To clean the screen:
Wipe the screen with the supplied swab to remove dust and other particles. If the screen is
still not clean, apply a window cleaner (without ammoniac or alcohol) onto a soft and clean
cloth.
To clean the plastic case: Use a dry and soft cloth.
Non binding document, subject to modification in the event
of misprint(s) – MKG0207
Page 40

41
IX. F.A.Q.
Q: I put a memory card into my Digicadre but the frame does not read it. What
should I do?
A: Make sure that the card format is compatible with the frame. Next, make sure that the
card has been inserted correctly into the corresponding slot. Finally, switch off and switch
back on your Digicadre so that the card is recognised by the reader.
Q: Why do some photos load quicker than others?
A: High resolution photos load slower. To reduce the loading time, it is better to adapt the
resolution of your images to that of the cadre, i.e. 800 x 600 pixels. You can also use
lower resolution photos.
Q: Why can I not display a photo in black-and-white?
A: The Digicadre can read black-and-white photos only if they are in RVB mode, and not
in grey-scale format. To keep black-and-white images in RVB, all you have to do is desaturate the colours using image editing software.
Q: Why are my images slower to load with certain cards?
A: There are different card technologies. Certain cards are slower than others when being
read. If you are loading into internal memory, card reading occurs faster.
Non binding document, subject to modification in the event
of misprint(s) – MKG0207
Page 41

42
X. SAFETY
Handle the digital photo frame with precaution and avoid touching the screen; fingerprints
are difficult to remove.
Always place the digital photo frame on a flat and stable surface to make sure that it does
not fall and get damaged.
Avoid exposing the digital photo frame to the sun or elevated temperatures as this can
damage the frame or reduce its lifespan. Do not place it near heat sources such as
radiators, heating attachments, etc. Do not place the frame facing sunlight, so that
reflections can be avoided.
Do not expose the digital photo frame to rain, water or humidity. Do not place it inside a
sink or basin where it could come into contact with water.
Never place heavy or sharp objects on the frame, the frame’s screen, or the power supply.
Try to avoid connecting the digital photo frame onto a high-powered cable. This can cause
overheating, fire or an electric shock.
Non binding document, subject to modification in the event
of misprint(s) – MKG0207
Page 42

Be careful when connecting the power supply cable; this should not be leaned on or in
contact with other objects. Do not place the lead under a carpet. Check the lead’s
condition regularly to avoid any damages. If the lead is damaged, disconnect it and
replace it.
Ventilation
The memory card slots and the device openings are used for frame ventilation.
To ensure optimal use of the frame and to prevent any overheating, these openings
should not be obstructed or covered.
Keep the digital frame at a sufficient distance from the wall to ensure ventilation. Do not
place the digital photo frame on a bed or couch, so that any overheating can be avoided.
Warning!
Never remove the plastic housing found at the back of the frame. The digital photo frame
is made up of electric circuits and they can injure you if touched.
Do not try to repair your digital frame alone.
43
Non binding document, subject to modification in the event
of misprint(s) – MKG0207
Page 43

XI. WARRANTY
The warranty does not cover damages caused if you (or any unauthorised technician)
have tried to repair the frame.
If the frame produces smoke, a noise or an unusual smell, turn it off and disconnect it
immediately and then contact your shop.
If you are not using the digital frame for some time, make sure to disconnect the power
cable.
The warranty applies to the digital photo frame and does not include accessories. The
following are considered as accessories:
The mains voltage adaptor block,
The remote control (according to model).
Warranty period
This digital frame includes a 12-month duration warranty beginning on the purchase date.
The warranty should be proved by showing the original invoice or the receipt on which the
date and model bought appear.
44
Non binding document, subject to modification in the event
of misprint(s) – MKG0207
Page 44

45
Cover
A defective digital frame should be returned complete, to your supplier with a note
explaining the problem.
If this digital frame shows a defect during the warranty period, the authorised After Sales
service will repair all defects or any manufacturing imperfections. The After Sales Service
will decide unilaterally to entirely or partially repair or replace the digital frame.
The initial purchase date determines the date that the warranty period begins.
The warranty period is not prolonged if the digital frame is repaired or replaced by our after
sales service.
Exclusion
Damages or faults caused by misuse or mishandling the digital frame and by using
accessories other than the original ones, or ones that are not recommended in this
manual, are not covered by the warranty.
The warranty does not cover damages caused by outer elements such as lightning, water
or fire or any other damage caused during any transport.
The warranty cannot be reclaimed if the digital frame’s serial number has been modified,
removed, faded or made illegible.
The guarantee cannot be reclaimed if the digital frame has been repaired, altered or
modified by the purchaser or any other person who repairs it and is not authorised and
qualified.
Non binding document, subject to modification in the event
of misprint(s) – MKG0207
Page 45

The manufacturer does not guarantee the technical properties described in this manual.
The hardware and accessories described in this manual are subject to modification
without notice. Because of this, the producer reserves the right to modify the contents, the
options, the properties and the documents linked to it without notice.
46
Non binding document, subject to modification in the event
of misprint(s) – MKG0207
Page 46

XII. TECHNICAL PROPERTIES
Model N°: 8001
Product: Digital photo frame with 8” screen
Resolution: 800 x 600 pixels
JPEG compatible
*Compatible cards: Memory Stick, Memory Stick Pro, SD, Mini SD, Compact Flash and
MMC.
128 MB Internal memory
Menu in 7 languages: FR, GB, I, P, Nl, D, E
Position of the screen adjustable on 6 levels
Adjustable contrast, brightness, colour and hue
Adjustment buttons on the frame
Nine transition effects of the slide show viewer
Adjustable display times
Storage temperature: -25 °C to +70°C
Operation temperature: 0 ° C to 55 °C
Viewing angle: CR>5
Power supply:
Input: 100V-240V AC, 50-60 Hz
Output: 9V DC, 2A
Weight: 738 g
Dimensions: 252 x 210 x 39 mm
System compatibility: Windows XP
47
Non binding document, subject to modification in the event
of misprint(s) – MKG0207
Page 47

Accordance with the rules in force:
This digital frame conforms to EC standards in force and is compatible with the RoHS
standard.
Recycling electrical and electronic equipment at the end of its life.
Worn out electrical and electronic devices should not be disposed of with ordinary
household waste. The presence of this symbol on the product or its packaging is to
remind you of this.
Certain materials that this product is composed of, can be recycled if you dispose of them
in their associated recycling centre. By using the parts and raw materials of the worn out
devices, you make an important contribution to protecting the environment.
For more information on collection locations of worn out equipment, you can contact your
town hall, for worn out waste treatment services or at the shop where you bought the
product.
48
Non binding document, subject to modification in the event
of misprint(s) – MKG0207
Page 48

 Loading...