

Page 1

Installation guide
Wireless Router
Hablamos de
Calidad de Vida
Page 2

2
Page 3
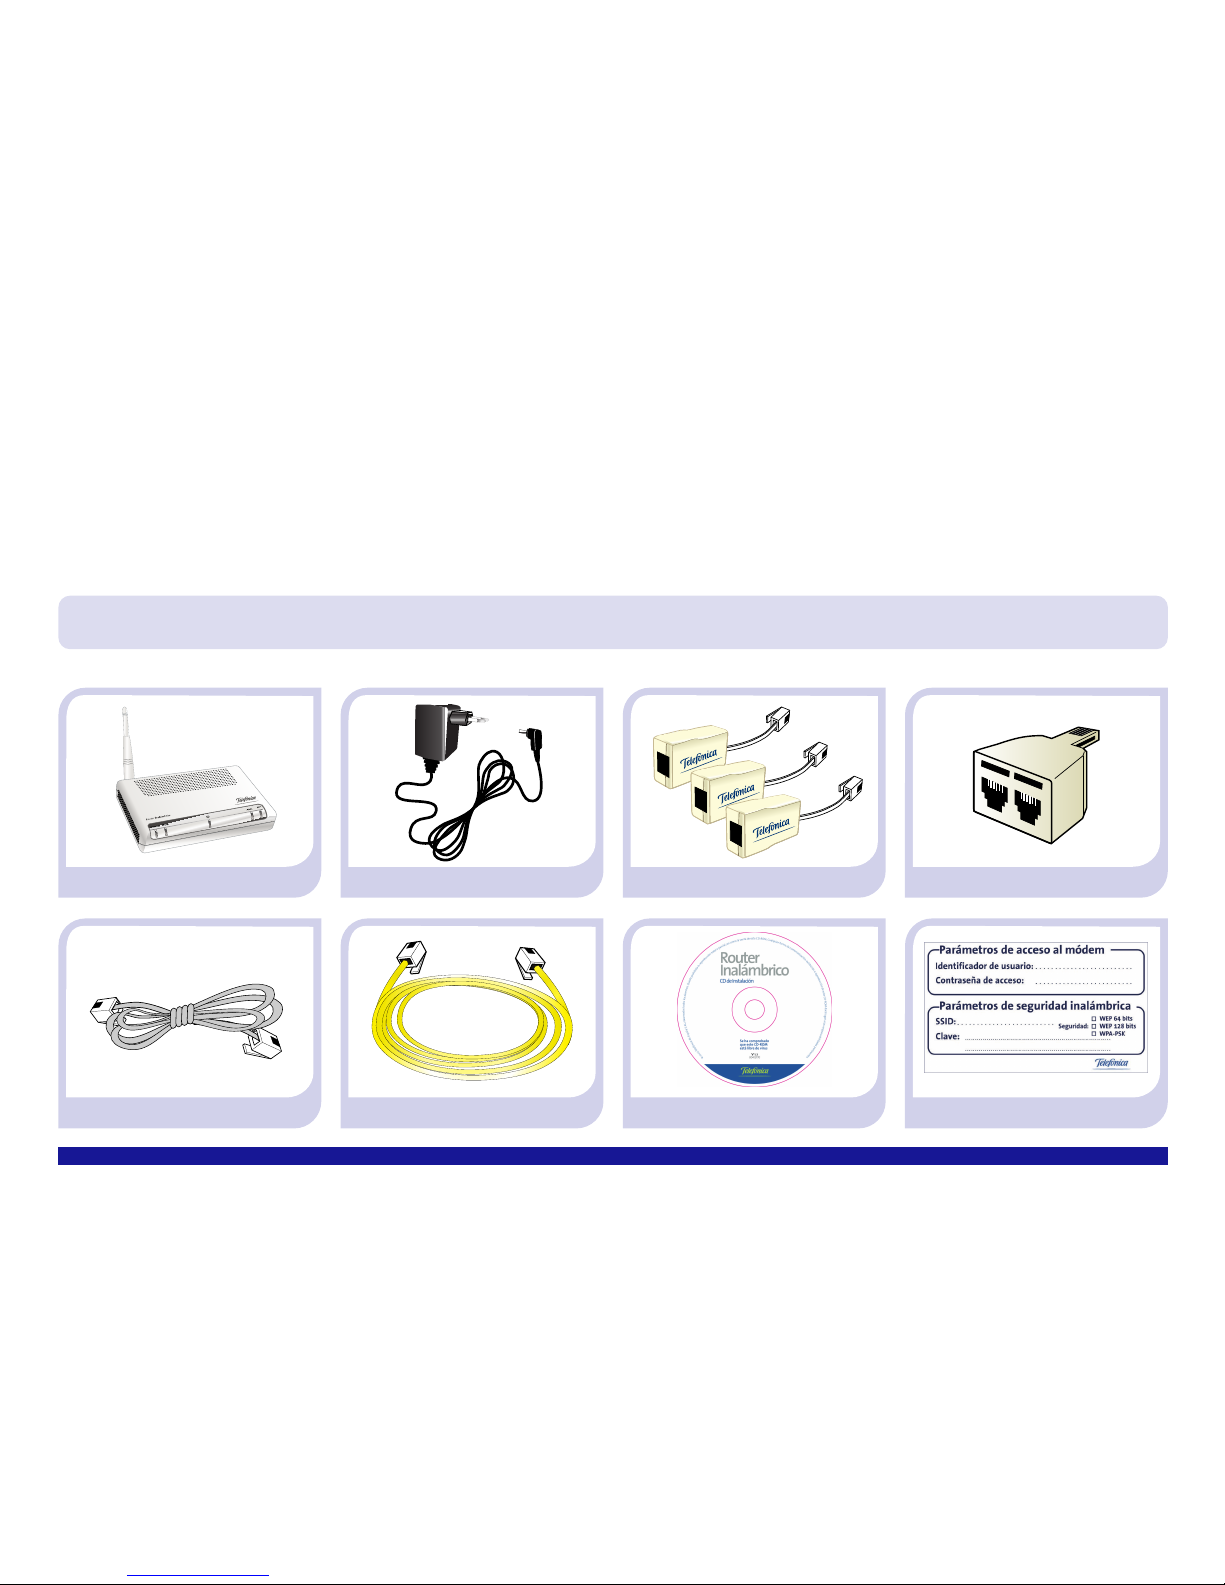
packaging
This installation guide describe the Wireless Router installation process. Please, follow the instructions step by step.
For more detailed information consult in “Manual_usuario.pdf” which is included in the “Ayuda” folder of the CD. Furthermore,
the CD includes a video file (AyudaGrafica.exe) with a graphic help of the installation and configuration process.
(6) Ethernet Cable (7) Installation CD (8) Configuration label
(1) Wireless Router (2) Power Adapter (3) Three ADSL microfilters (4) Multiple Adapter
(5) Telephone line cable
3
For additional information, please consult the User Manual: chapter 2
Page 4
Start using your ADSL …
4
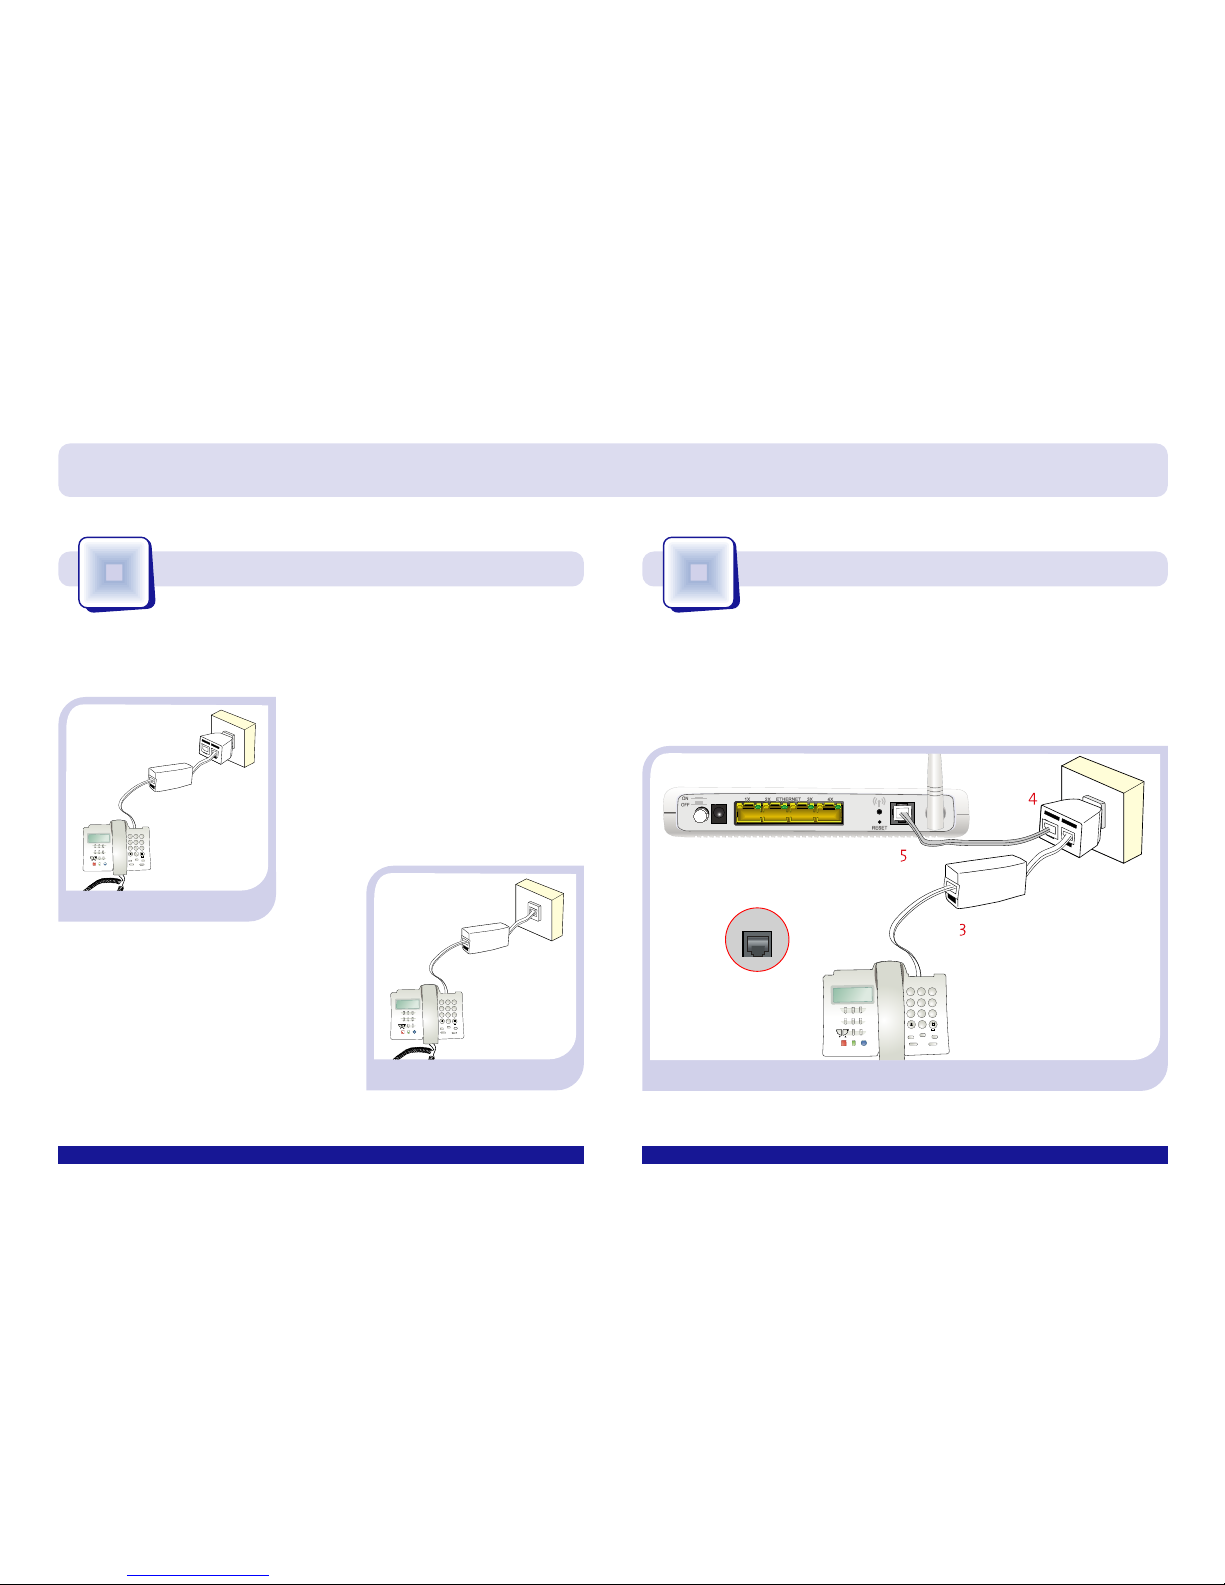
Connect a microfilter between each telephony device
(telephones, faxes, …) and the telephone socket.
1
Microfilters installation
Connect the multiple adapter (4)
and the microfilter (3) to the
selected telephone socket where
the router will be connected, as
shown in the figure.
ContestadorMensajesDesactivar
LL. EsperaDesvio LL. a Tres
AceptarSalir
LLamadas
Marcar/
Menu
Borrar
Mute
Grabar
Agenda
Rellamada
Pausa
R/A----a
@
112
1
2
3
4
5
6
7
8
9
0
ABC
DEF
GHI
JKL
MNÑO
PQRS
TUV
WXYZ
Telephone line connection
Connect the grey telephony line cable (5) to the free outlet
(without microfilter) of the multiple adapter (4) and to the
ADSL router labeled as LINEA.
ContestadorMensajesDesactivar
LL. EsperaDesvio LL. a Tres
Aceptar Salir
LLamadas
Marcar/
Menu
Borrar
Mute
Grabar
Agenda
Rellamada
Pausa
R/A----a
@
112
1
2
3
4
5
6
7
8
9
0
ABC
DEF
GHI
JKL
MNÑO
PQRS
TUV
WXYZ
For the rest of the telephone
sockets, where there is connected
a telephony terminal, you will just
have to connect a microfilter (3).
For additional information, please consult the User Manual: section 3.2 For additional information, please consult the User Manual: section 3.3
2
ContestadorMensajes Desactivar
LL. Espera Desvio LL. a Tres
Aceptar Salir
LLamadas
Marcar/
Menu
Borrar
Mute
Grabar
Agenda
Rellamada
Pausa
R/A----a
@
112
1
2
3
4
5
6
7
8
9
0
ABC
DEF
GHI
JKL
MNÑO
PQRS
TUV
WXYZ
ADSL
ADSL
12V-1A
3
4
3
Page 5
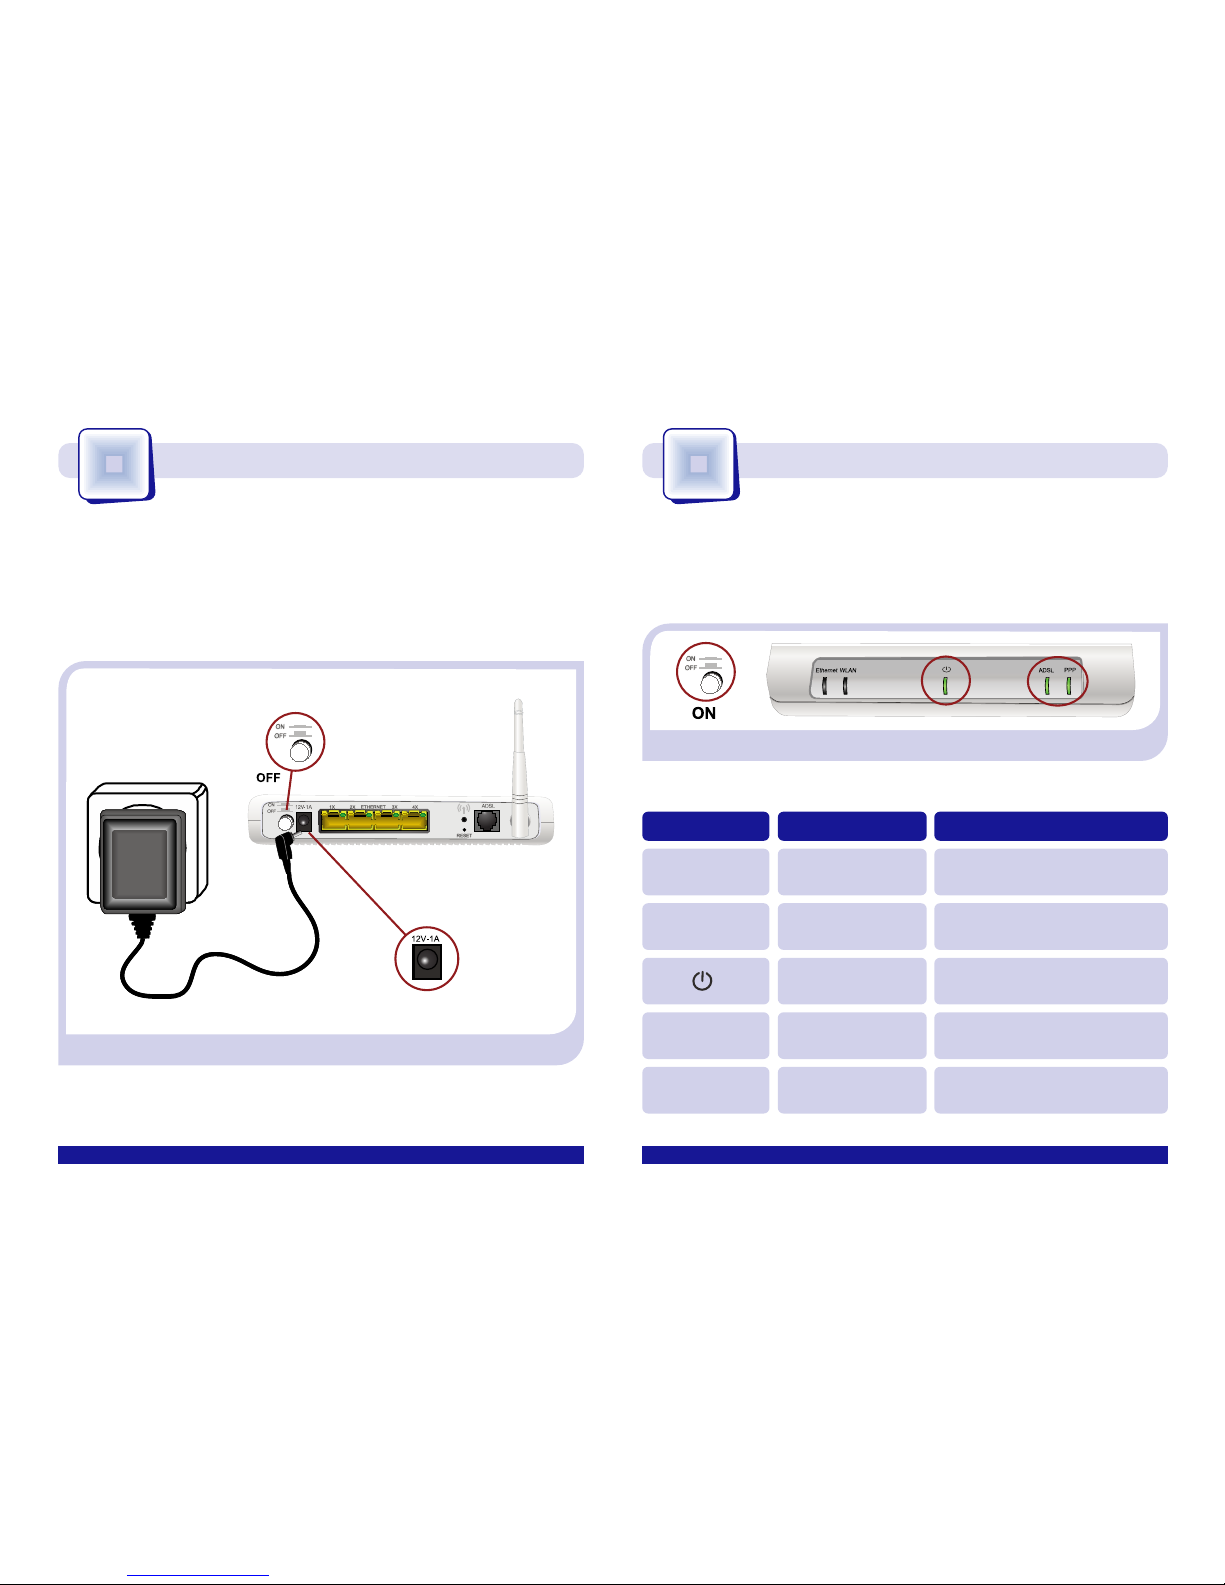
Plug the power adapter (2) into the mains supply and into
the 12V-1A connector of the ADSL router.
Turn the router on by putting the switch into the ON position.
Wait for a few minutes until the LEDs shine as shown below.
For additional information, please consult the User Manual: section 3.3 For additional information, please consult the User Manual: section 3.4
Indicators DescriptionCurrent Status
Ethernet
WLAN
ADSL
PPP
Status of the
Ethernet connection
Status of the
wireless network
Status of the
power supply
ADSL Connected
Internet Connected
OFF
OFF
ON (green)
ON (green)
ON (green)
5
3
Power adapter connection
Switching on the Router
4
Page 6
6
For additional information, please consult the User Manual: section 3.3 For additional information, please consult the User Manual: section 3.5
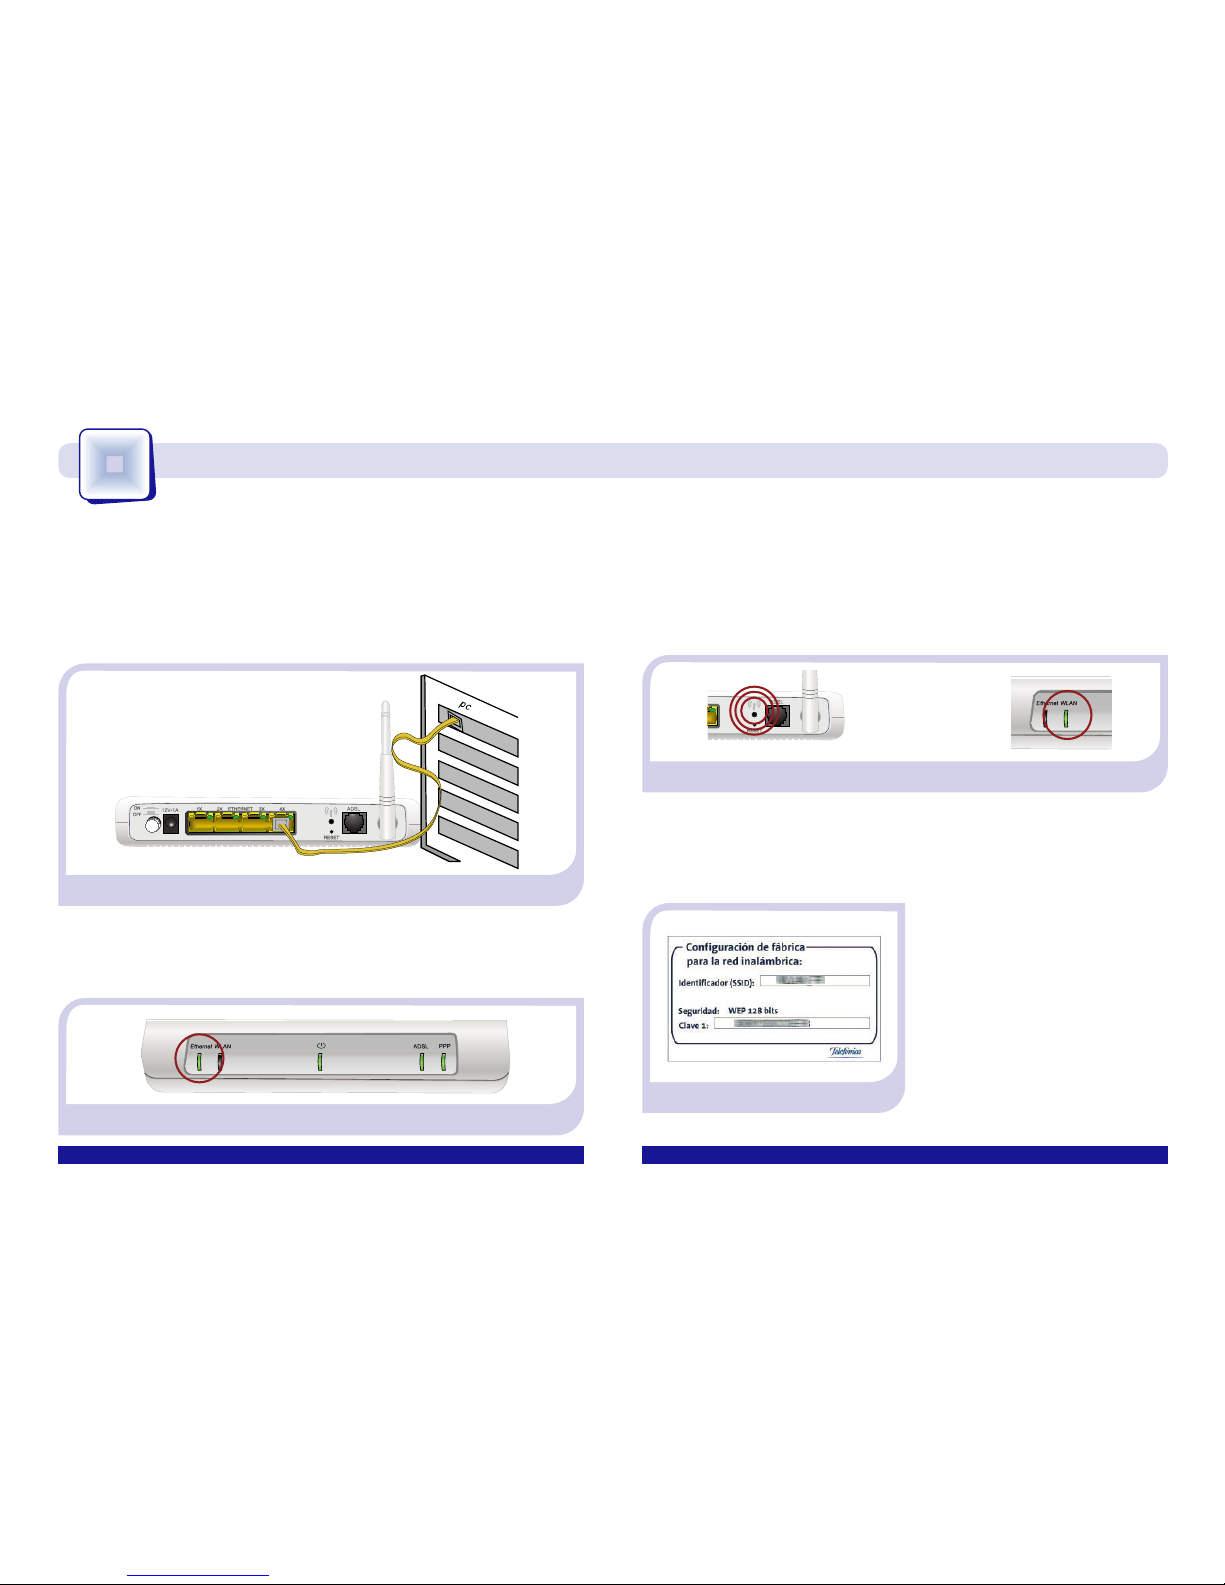
Connect the yellow Ethernet cable (6) to the PC’s Ethernet
card and to one of the router´s connectors labeled as
ETHERNET 1x to 4x.
A. Connection using Ethernet cable
B. Connection using wireless network
Activate the wireless network of your ADSL router. To do this,
press the WLAN button located at the back of the router, the
green WLAN indicator light will shine.
Start your PC. The Ethernet indicator will be green after a few
seconds.
You will find the default configuration settings for your
wireless network on the label located below your router.
You must configure your PC
wireless client according to
these settings. Consult the
following page for further
information.
1
6
Connecting the Router to your PC. There are two options
5
Page 7
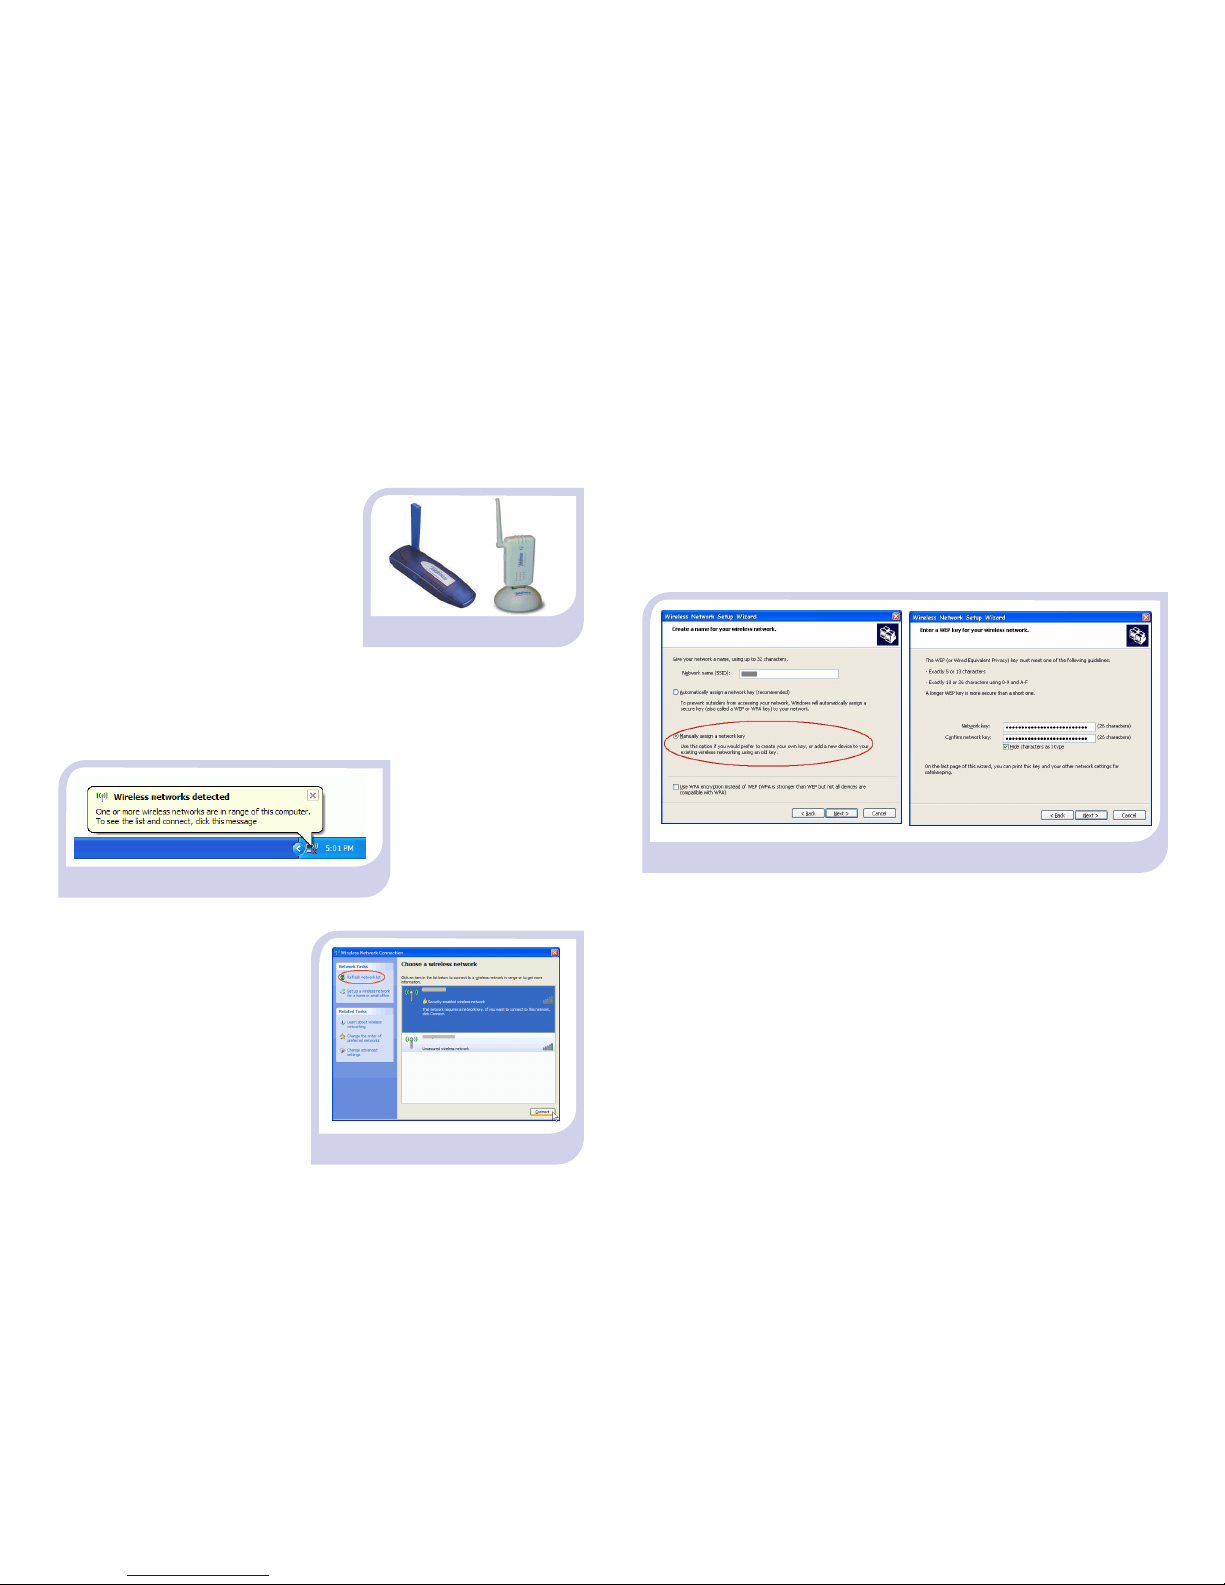
Connection using wireless network (continued)
1. If you have an external
wireless device (PCMCIA or USB),
you must install it previously
using the manufacturer drivers
CD. If you have an internal device,
verify it is enabled.
2. Access the wireless device management application. To do
this, you must look for the icon in the system tray (next to the
clock). Right click on it and select “View Available Wireless
Networks”. For different operating systems than Windows XP
SP2 or Vista, consult
the device help.
3. Search the available
wireless networks. You can
update this list by using the
button Refresh network list.
Select the network whose
identifier (SSID) matches
the one on the router label
and click on “Connect”.
4. Use the password which you can find on the label as
“Clave 1”.
IMPORTANT. The encryption key (WEP) is alphanumeric. Be
sure to enter it exactly as it appears on the label.
5. Connect to the wireless network (use the Connect button
or similar) and check it works correctly.
7
Page 8

8
Now you can access to Internet if the ADSL router default settings fit your needs. To check it works correctly, open your navigator
and go to the following web address: www.telefonicaonline.com
Activate your e-mail accounts and your web site
Once you have accessed www.telefonicaonline.com, select the option "Activar ADSL". After typing in the initial username and
password (in the service data letter or the one obtained calling 900 50 20 10 from the telephone line where you have installed
the ADSL service), you will access a web site where you can activate your e-mail accounts and your website, where you can
publish your personal web pages.
Protect your PC
Once connected to the ADSL service we strongly recommend you to protect your PC against Internet viruses or attacks. If you
wish to do so, you can contract these services (Antivirus PC, Anti-Intrusos PC, Pack Seguridad PC, ...) at www.telefonicaonline.com,
by calling 1004 or through your usual channel.
For additional information, please consult the User Manual: section 3.6
Congratulations, you have completed your wireless router installation !
Page 9
9
Router configuration
If you have a static IP address (in which case, the router default settings would not be valid) or you wish to make advanced
operations on your ADSL router (such as opening ports, configure the wireless network, change the password…), you can use
the Configuration Wizard included in the provided installation CD. It will help you to make these operations easily, and will
ensure the correct configuration of the equipment and the PC.
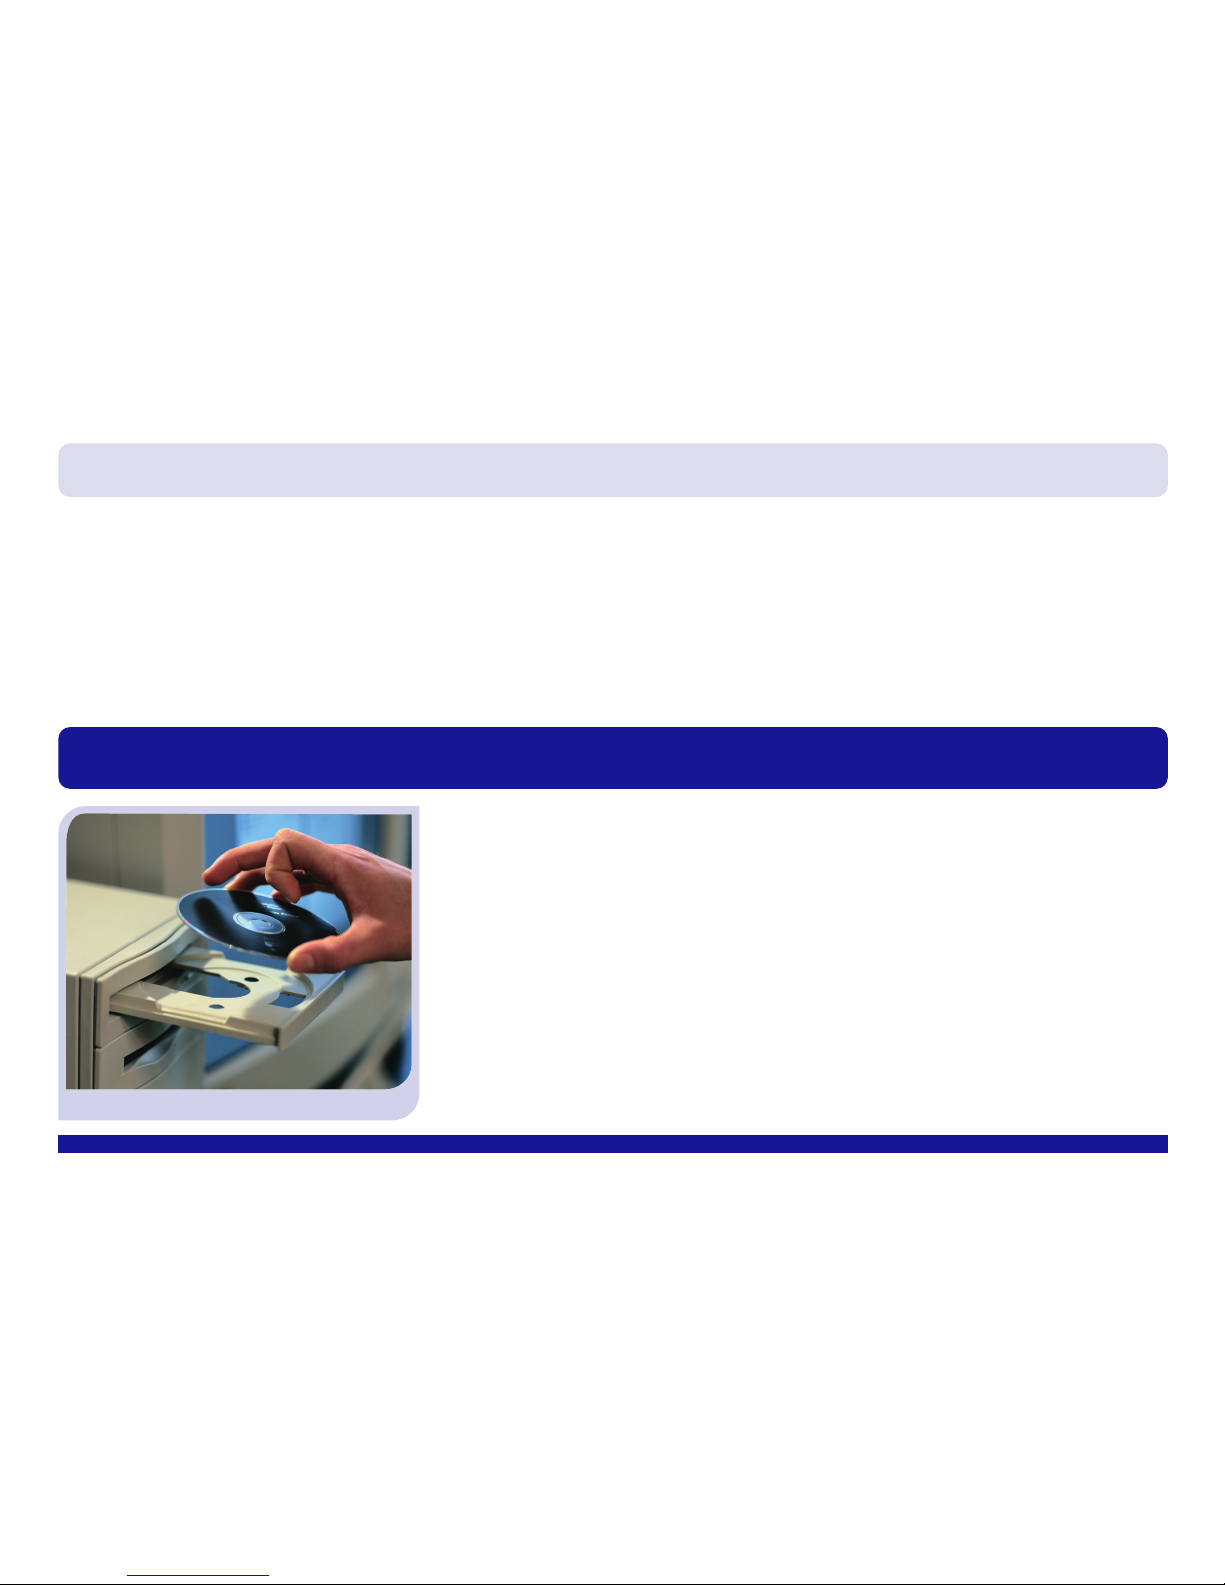
In order to using the Configuration Wizard, insert the provided CD in the CD-ROM
and follow the instructions on screen.
Besides the Telefónica ADSL Technical Wizard is included in the installation CD
provided, and it will allow you to detect and solve potential problems. We recommend
you to install both wizards.
NOTA. For further information on the Technical Wizard, please consult the file
Funcionalidad_Asistente_Tecnico_Telefonica.pdf in “AT” folder of the installation CD.
VERY IMPORTANT: The Configuration Wizard provided in the installation CD is not valid for the Imagenio service. For further
information, consult the user manual: Appendix VI.
For additional information, please consult the User Manual: chapter 4
NOTE. The installation and/or configuration process described in this guide can vary slightly depending on your operating
system. For detailed information, please consult the User Manual.
Page 10
10
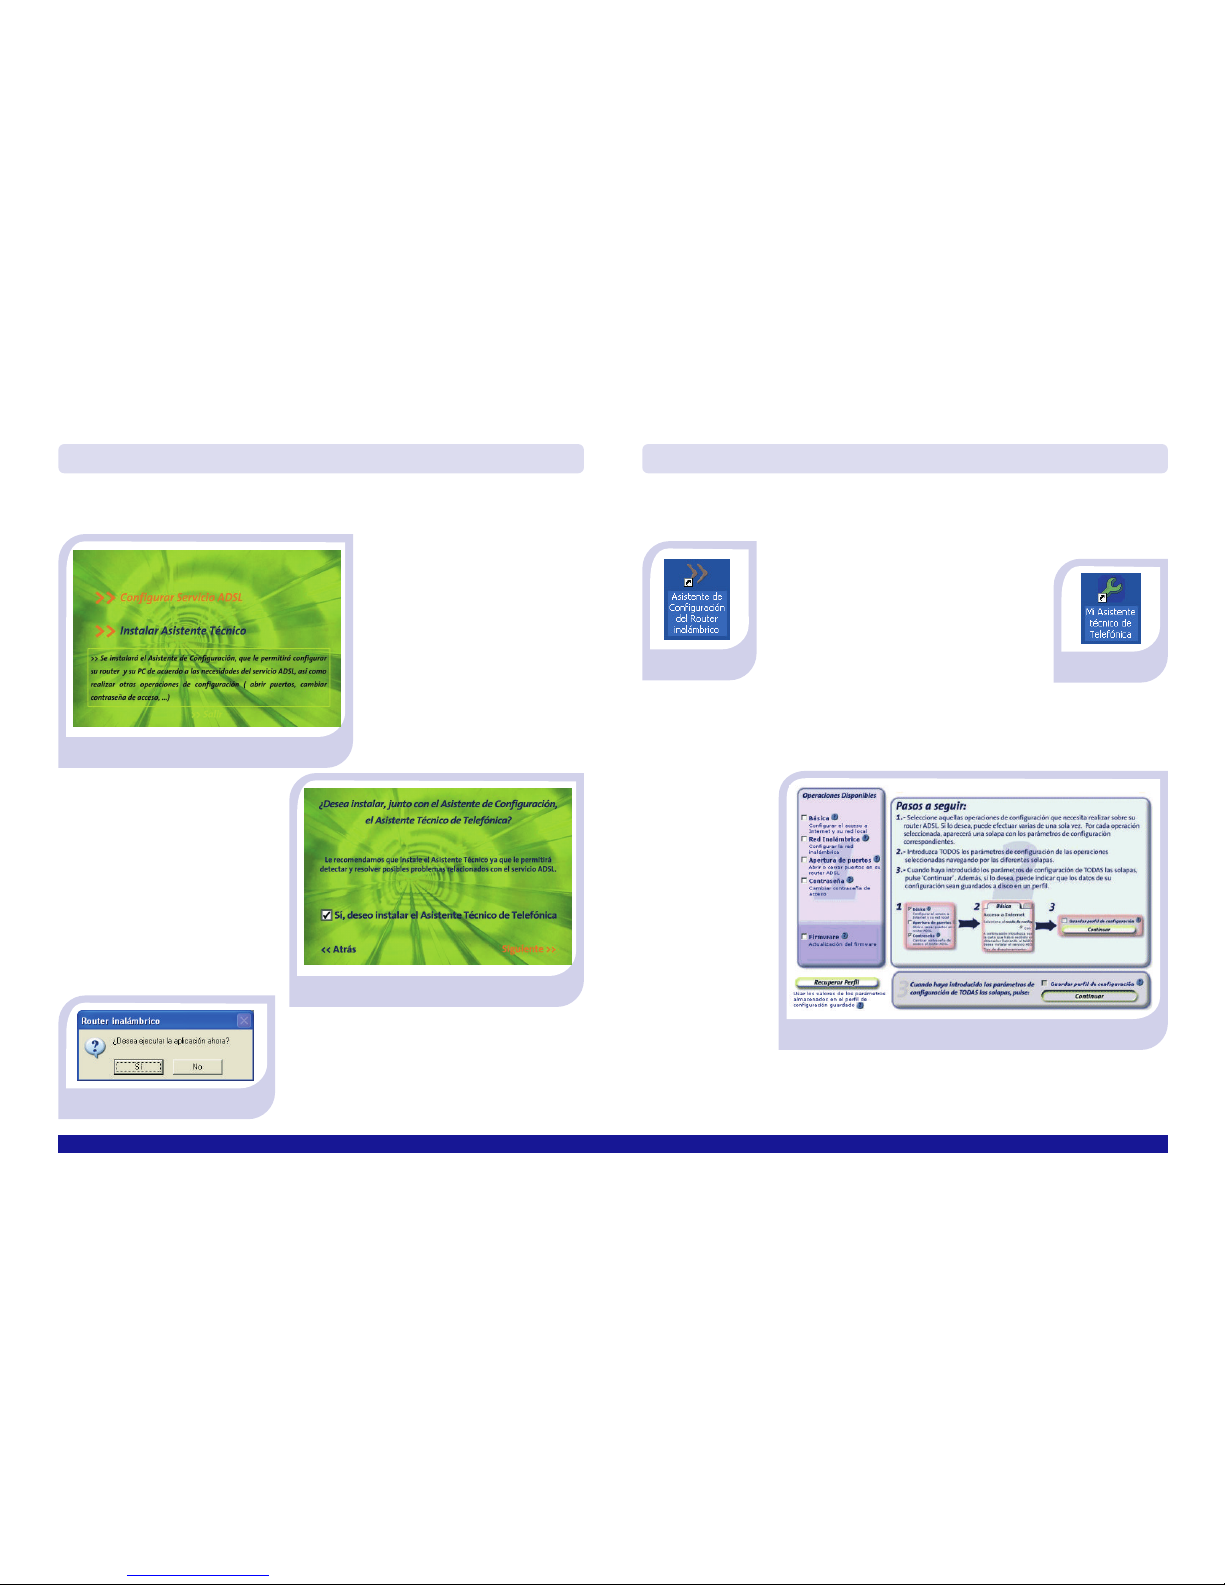
The CD welcome screen will be launched automatically after
a few seconds.
Wizards installation
For additional information, please consult the User Manual: chapters 4 and 5
Configuration
The installation creates two desktop shortcuts which will
allow you to execute the installed Wizards.
1. Select “Configurar
Servicio ADSL”
Configuration Wizard
shortcut
Technical Wizard
shortcut
2. Select “Sí, deseo instalar
el Asistente Técnico de
Telefónica”
3. Follow the instructions on the
next screens until finish the
installation
The Configuration Wizard will allow you to make several
operations. Follow the instructions indicated on the wizard´s
screens.
You can access an online help for every screen, which will
show you more detailed information about it.
Page 11

11
Customer Care
The customer care service is available via telephone as well as via Internet. For further information, please consult chapter 6
in the User Manual.
All the information on ADSL can be found in the “Todo ADSL” section at telefonicaonline.com:
www.telefonicaonline.com/adsl
Telefónica Technical Customer Care Centers
Home users: 902 357 000
Enterprises and Professionals: 902 357 022
Customer Care to execute the equipment warranty: 902 275 012
To execute more advanced operations, obtain more accurate information about the Wireless Router or help to solve any
problem, consult the User Manual which you will find in the “Ayuda” folder of the installation CD.
A video file (AyudaGrafica.exe) is also included in the installation CD with a detailed graphic help about the installation
and configuration processes.
Page 12
12
Solutions to frequent problems
PROBLEM SOLUTION
Verify that the telephone cable is correctly connected to the ADSL
connector and to the socket WITHOUT microfilters.
The ADSL indicator does not light up.
Telephone calls are dropped or too much noise is heard.
Verify that a microfilter has been installed between each telephony device
(telephones, faxes…) and the socket.
Verify that you have not installed a firewall which may inhibit the Internet
connections.
Consult Appendix I in the User Manual.
I cannot access to Internet.
I cannot see any wireless client icon.
Make sure that your wireless client is correctly installed and available. For
further information, consult the device manual.
Verify that the wireless network of your ADSL router is enabled: the WLAN
indicator must be shining in green.
The wireless client management application does not show the ADSL
router wireless network (the one that appears on the label) among the
networks available.
I cannot connect to my ADSL router wireless network.
Verify that the configuration of your wireless client matches your router
settings. Specially check the following:
- That you are using the same network identifier (SSID) in the entire
network. Remember that the SSID is case sensitive.
- That you are using the same type of encryption and the same password
in every network component. Remember that if you are using WEP
encryption, you will have to select and set the key number 1 in the
wireless client settings section.
Make sure that the TCP/IP properties of your network wireless client are
configured correctly to accept a dynamic IP address (via DHCP). Check your
operating system help.
Page 13

13
Solutions to frequent problems (continued)
PROBLEM SOLUTION
The connection with the wireless network fails frequently.
The connection quality is poor.
If there are interferences in this channel, set a different one.
If there are other wireless networks operating in the same
area, we recommend you to configure the networks with a
gap of 4 or 5 channels. For example, if there is a wireless
network operating in channel 6 and you want to install an
additional wireless network, select channel 1, 2, 10, 11, 12 or 13.
If this is not possible, select the one with the least impact
(for the least saturated channel, in other words, the one that
has the least number of wireless networks).
Place your ADSL router in an unobstructed space. If you have
network coverage problems, it is recommended to change
the position of the antenna. It is recommended to minimize
obstacles between the router and the wireless client.
Page 14
14
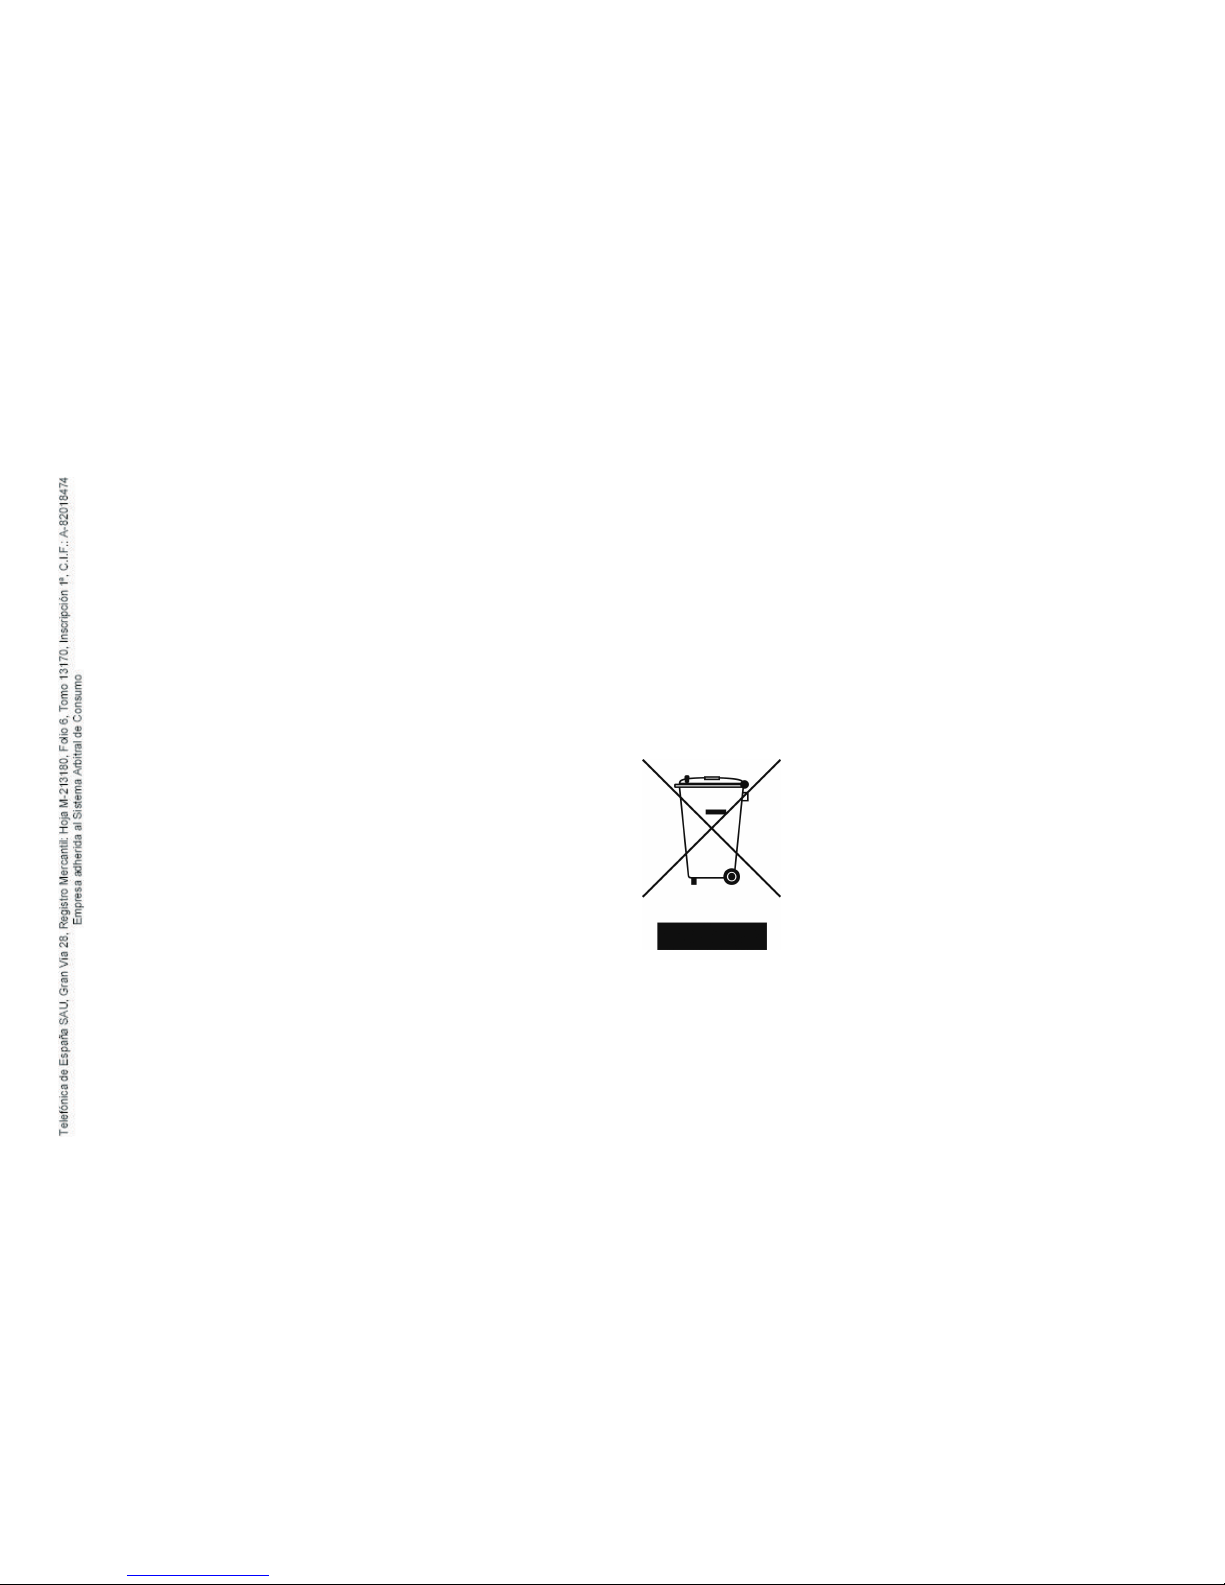
ENVIRONMENT RECYCLING
Do not dispose this ADSL router with your normal household
waste. Ask your local authority about the opportunities
available to dispose correctly and avoid damages to the
environment. Always comply with the legal regulations
regarding this matter.
All transgressors will be prosecuted.
Cardboard boxes, packaging plastics and the pieces that form
the device can be recycled according to the legal rules in
Spain with regards to recycling matters.
The cross symbol over the container that
can be found printed on the device means
that when the equipment has arrived to
the end of its lifespan, it must be
transferred to a special collection centre,
and its processing must be separated from
the household waste.
TELEFÓNICA DE ESPAÑA, S.A.U. INFORMA
Deseamos agradecerle la confianza depositada en
Telefónica de España al haber adquirido uno de
nuestros equipos y le informamos que para cualquier
aclaración, consulta o reclamación, puede llamar de
forma gratuita a:
•Línea de Atención Personal (1004)
•Centro de Atención al Cliente Pymes
(900 555 022)
•Centro de Atención de Empresas (900 120 900)
Donde será atendido por nuestros asesores, o si Ud.
lo prefiere, visite la página comercial de Telefónica:
www.telefonicaonline.com.
Para obtener información sobre el Servicio Postventa,
consulte la Tarjeta de Garantía del Equipo.
Por último indicarle que, para reclamaciones por
escrito referidas a esta venta, puede dirigirse a
Telefónica de España S.A.U, Gran Vía 28, 28013 Madrid.
Page 15
15
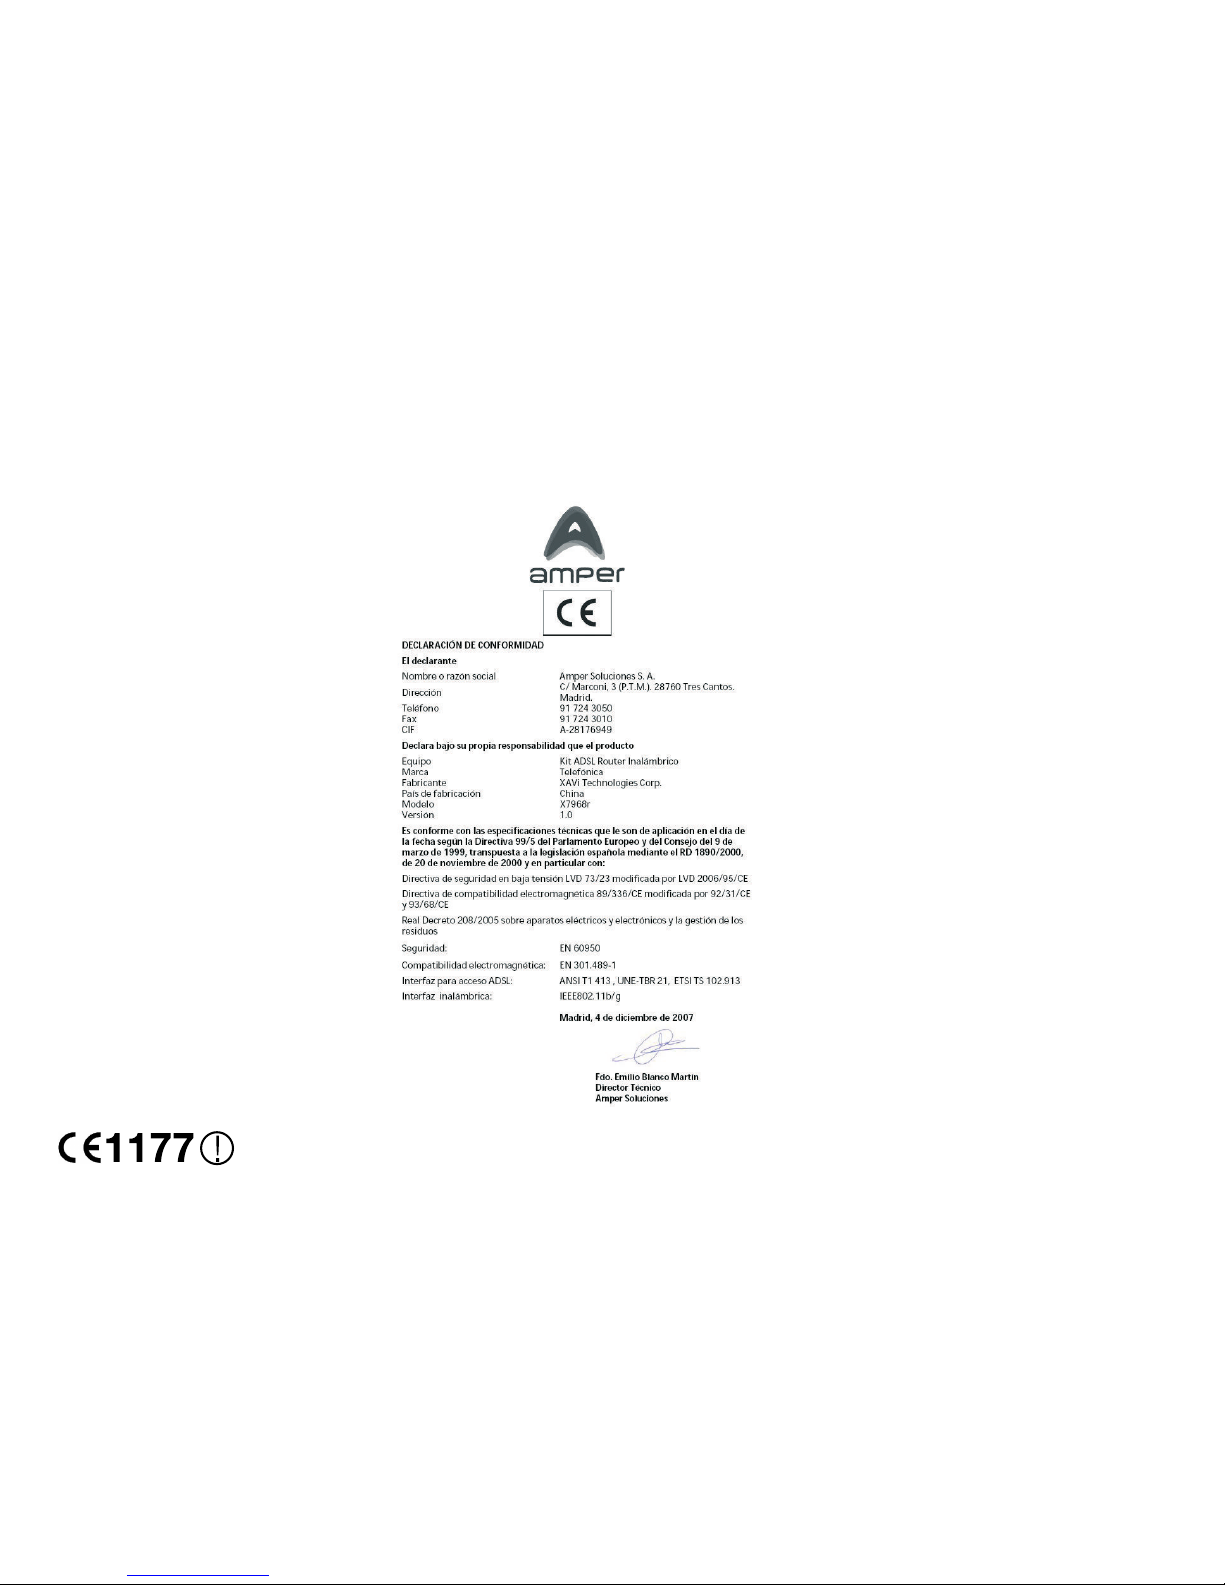
This equipment is ready to be connected to the analogue network of Telefónica de España, S.A.U., with access to ADSL service. Its
use is allowed exclusively in Spain.
Page 16
Equipo suministrado por:
C.I.F.: A-28176949
Código REI-RAEE: 000409
VERSION 1.0
 Loading...