

Page 1
IP Phone
IP150
Page 2
Equipment Approval Information
Your telephone equipment is approved for connection to the Public Switched Telephone
Network and is in compliance with parts 15, FCC Rules and Regulations and the
Technical Requirements for Telephone Terminal Equipment published by ACTA.
Notication to the Local Telephone Company
On the bottom of this equipment is a label indicating, among other information, the
US number and Ringer Equivalence Number (REN) for the equipment. You must, upon
request, provide this information to your telephone company.
The REN is useful in determining the number of devices you may connect to your tele-
phone line and still have all of these devices ring when your telephone number is called.
In most (but not all) areas, the sum of the RENs of all devices connected to one line
should not exceed 5. To be certain of the number of devices you may connect to your
line as determined by the REN, you should contact your local telephone company.
A plug and jack used to connect this equipment to the premises wiring and telephone
network must comply with the applicable FCC Part 68 rules and requirements adopted
by the ACTA. A compliant telephone cord and modular plug is provided with this prod-
uct. It is designed to be connected to a compatible modular jack that is also compliant.
See installation instructions for details.
Notes
• This equipment may not be used on coin service provided by the telephone company.
• Party lines are subject to state taris, and therefore, you may not be able to use your
own telephone equipment if you are on a party line. Check with your local telephone
company.
• Notice must be given to the telephone company upon permanent disconnection of your
telephone from your line.
• If your home has specially wired alarm equipment connected to the telephone line, en-
sure the installation of this product does not disable your alarm equipment. If you have
questions about what will disable alarm equipment, consult your telephone company or
a qualied installer.
US Number is located on the cabinet bottom
REN number is located on the cabinet bottom
Rights of the Telephone Company
Should your equipment cause trouble on your line which may harm the telephone
network, the telephone company shall, where practicable, notify you that temporary
discontinuance of service may be required. Where prior notice is not practicable and the
circumstances warrant such action, the telephone company may temporarily discon-
tinue service immediately. In case of such temporary discontinuance, the telephone
company must: (1) promptly notify you of such temporary discontinuance; (2) aord
you the opportunity to correct the situation; and (3) inform you of your right to bring a
2
Page 3
com plaint to the Comm ission pursuant to procedures set forth in Sub part E of Part 6 8,
FCC Rules and R egulations.
The telep hone company may make c hanges in its communications fa cil ities, equipment,
operat ions or proce dures where s uch action is required in the operatio n of it s business
and not inconsistent with FCC R ules and Regulations. I f the se changes are expected to
affect the use or performance of your telephone equipment, th e tel eph one company
must give you adeq uate not ice, in wr iti ng, to allow you to maintain uninter rup ted
Servi ce.
Interference Information
Thi s dev ice c omp lies with Par t 15 of the FCC Ru les. Ope rat ion is subject to the following
two c ond itions: (1) This device may not cause har mful interference; and (2) This device
must accept any inter feren ce received, including interference that may cause undesired
operat ion.
If these measures do not elimi nate the i nte rference, p lease consult your dealer or an experi enced ra dio/television technician for addition al suggestions. Also, th e Federal Communications Co mmission has prepared a helpful book let, “How To Identify and Resolve Ra dio/T V
Inter ference Prob lems.” This booklet i s availa ble from t he U.S. Government Printing O ffice,
Washington, D.C. 204 02. P lease specify stock number 004- 000-00345-4 when ordering
Copies.
3
Page 4
Page 5
FCC RF Radiation Exposure Statement
Thi s equ ipment complies with FCC RF radiation exposure limits set forth for a n
Uncont rol led e nvironment. This equ ipm ent should be installed and op erated with
a minimum distance of 20 centimeters between t he ra diator a nd yo ur body. This
tra nsmitter must not be co-l oca ted o r operated in conj unction with any other
antenn a or transmitter.”
Thi s Cla ss B digital apparatus complies with Canadia n ICES-003.
Cet appa reil num érique de la classe B est conforme à la n orme NMB-003 du
Can ada .
Thi s produ ct meet s the app licable Ind ustry Cana da tech nical speci fications . / Le prése nt
mat ériel e st conforme a ux spec ifications tec hniqu es appl icable s d’Ind ustri e Canad a.
Licensing
Licensed under US Patent 6,427,0 09.
Hearing Aid Compatibility
Thi s tel eph one system meets FCC st andard s for Hear ing Aid Co mpatibility.
4
Page 6

Table of Contents
Table of Contents 2
Welcome to the Phone of the Future! 6
Copyright Statement 7
About This Manual 8
Conventions 8
Unpacking your Phone 9
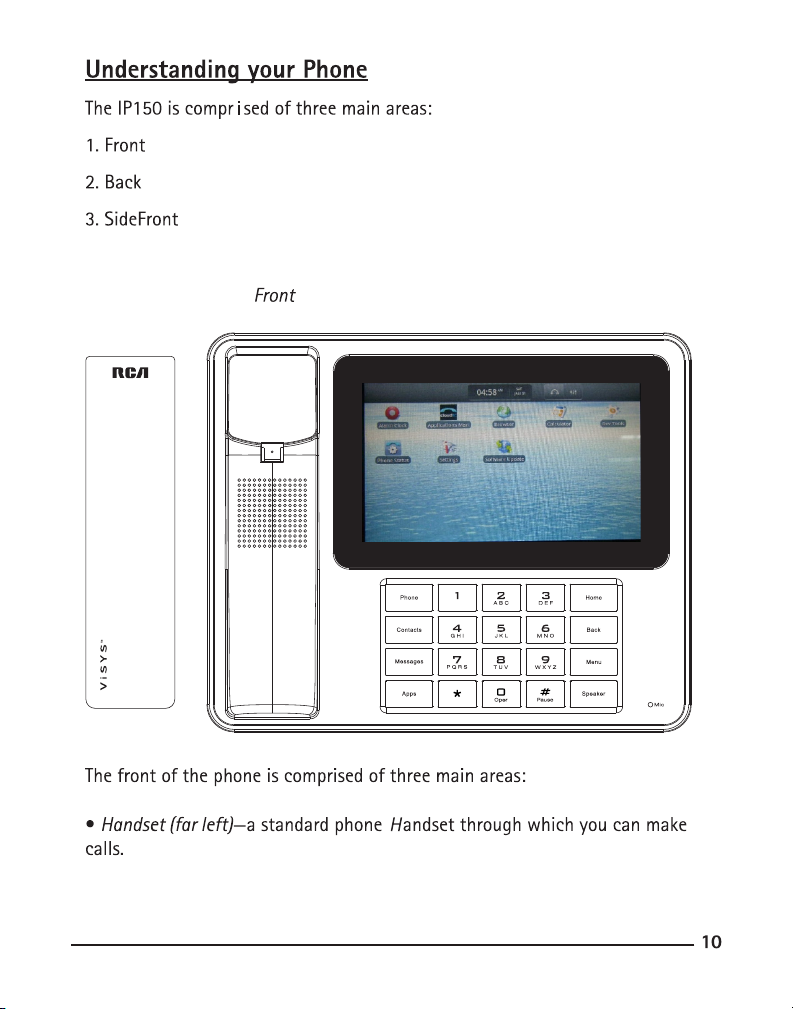
Understanding your Phone 10
Front 10
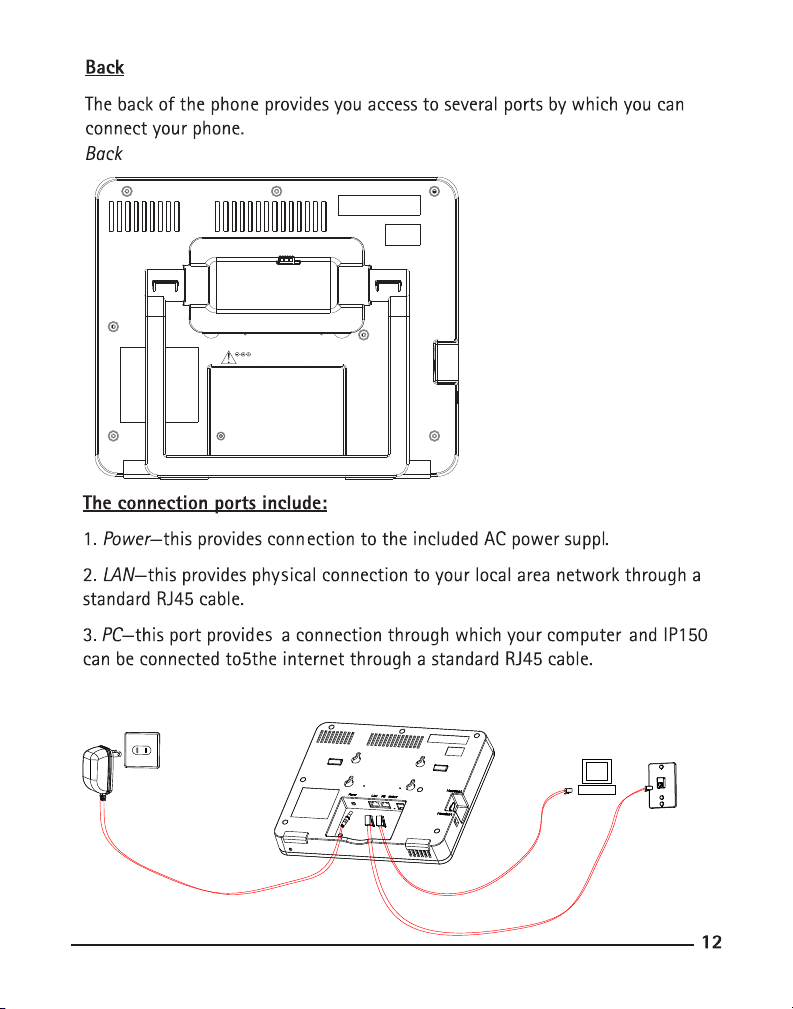
Back 11
Side 12
LCD Screen 12
The Glass Interface 13
Left-hand navigation bar 13
Top Information bar 14
Right-hand navigation bar 15
Main area 16
Bottom information bar 17
On-Screen Keyboard 18
Applications 18
Getting Started 19
Step 1: Unpack it 19
Step 2: Power it Up 19
Step 3: Connect it to your Network 19
Step 4: Conguring it for Phone Calls 19
Step 5: Make a call! 19
Glass and your Phone System 20
Connecting to a SIP Provider on
your Phone 20
Connecting to a SIP Provider on your
Computer 20
Setup Your Device 22
Basic Phone Features 23
Initiating a call 23
Using the Contacts 23
Using the on-screen keypad 23
Ending a call 23
Adjusting call volume 24
55
Muting a call volume 24
Conference call 25
Transferring a call 25
Redialing 25
Putting a call on hold 25
Speakerphone 25
Headset 26
Accessing voicemail 26
Using Glass 27
Phone Status 27
Managing notications 29
Notications Window 29
Icon-Status Indicators 30
Making a Call 30
Direct Dial Number 31
Dialing from the Contacts Window 31
Dialing from the Call Log 32
Call Log 33
Working with the Call Log 33
Clearing Logs 33
Keypad 34
Search 35
Contacts 36
Filter contacts 37
Search contacts 38
Add a contact 39
Edit a contact 42
Delete a contact 44
Contact details 45
Making a call from a Contact 45
Sharing a Contact 46
Making a Contact a “Favorite” 46
Applications 47
Alarm clock 48
Browser 48
Calculator 49
Phone Status 50
Page 7

Table of Contents
Settings 50
Software Update 51
Cloud TC App Market 52
Adding applications from the App
Market 56
Removing applications 56
Adding an Application Icon to your Home
Screen 57
Conguring Glass 60
The Home Screen 60
Shortcuts 60
Widgets 62
Folders 62
The Wallpaper 63
Phone Settings 63
Network Settings 64
DHCP 64
Manual 65
Sound & Display 66
Location & Security 67
Applications 68
Privacy 70
Search 71
Language and Keyboard 72
Date and Time 73
Automatic 74
Manual 74
Other Settings 75
Information About Glass 77
Browsing the Web on Glass 79
Entering a URL 79
Windows 80
Bookmarks 82
Search 83
Zooming 84
Download history 85
Settings 86
Updating Glass 89
Table of Illustrations 90
Index 93
6
Page 8

Copyright Statement
Android and the Android Operating System are copyright © Google and are used under the
terms of their agreement.
Any other references to brands, products, or services are copyright their respective owners.
About This Manual
This manual is your user’s guide to your IP150. It contains all the information you’ll
need to congure, maintain, and use your new Android-based phone. In order to
help you nd information quickly, we’ve organized the manual as follows:
1. First, we’ve provided information about the phone itself. Ports, jacks, plugs, and
a host of other information to help you connect your new IP150 and get up-andrunning.
2. Second, we’ve provided a basic “Getting Started” section so that you understand
how to get your phone unpacked, plugged in, and turned on.
3. Third, you’ll nd information about how to congure your IP150 with your ex-
isting VoIP or SIP provider. The IP150 is built to work with existing Internet-based
phone services so this will help you start making calls as quickly as possible.
4. Fourth, we’ve organized much of the manual around understanding how to nav-
igate through the phone’s menus, features, and settings. This part of the manual is
where you’ll nd specic information on how to use your phone.
5. Finally, we’ve provided you some additional resources to help in case you get
stuck.
77
Page 9

Parts Checklist
Make sure your package includes the following items:
1. IP150 desktop phone
2. Corded handset
3. Handset cord
4. Power adapter
5. Ethernet cable
8
Page 10

Important Installation Information
• Never install network wiring during a lightning storm.
• Never install network jacks in wet locations unless the jack is specically designed for
wet locations.
• Never touch non-insulated network wires or terminals, unless the telephone line is dis-
connected from the network.
• Use caution when installing or modifying network lines.
• Temporarily disconnect any equipment connected to the phone such as PCs, switches,
routers or other phones.
99
Page 11
Page 12

• Screen—the primary portion of the phone’s front is comprised of the large,
touchscreen LCD screen.
• Buttons—the action buttons allow you to interact with the IP150 interface
without touching the screen. These buttons are:
• Phone
– this button brings up the dialing screen and will allow you to choose
which line you would like to dial from.
• Contacts
– this button will bring up your phone book of contacts.
• Messages
– this button will access your voicemail and call log.
• Apps
– this button will bring you to the Applications menu where you can
congure your apps or buy new ones at the Applications market
• Home
—this button will return you to the home screen.
• Back
—this button will take you back one screen.
• Menu
—this button will display a menu if one is available for the
application you are currently using.
• Speaker
– this button will activate your speakerphone before or during a call.
1111
Page 13
Heads et
POWER
9V DC
RESETLAN PC
Hands et
Page 14

Side
The side of the phone also provides access to several ports for connection
accessories:
1. Headset—this port supports a standard 2.5mm headset jack.
2. Handset this provides connection to the included phone handset.
LCD Screen
The IP150 is equipped with a touchscreen LCD that provides access to all of the
phone’s features. To access a feature, simply tap on it on the screen. There is no
need to push very hard against the screen.
Top Information
Bar
The top information bar provides basic status information about your phone:
•On the left, you will see the name and phone number associated with
this phone.
• In the center is the date and time, as well as the volume and headset
control panel.
• The space on the right is where notications will appear.
1313
Page 15
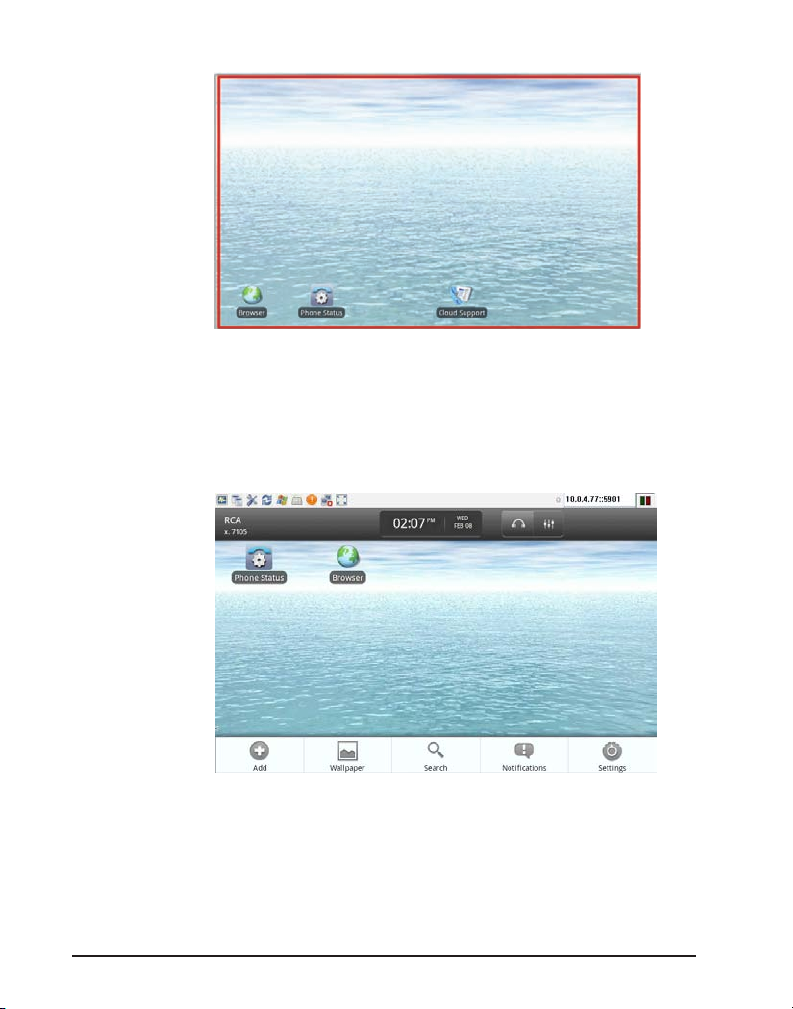
Desktop
The desktop area displays phone features as they are initiated. For example, a variety of windows and content can appear in this area including (but not limited to):
• Browser • Phone keypad
• Call Log • Applications
Bottom
Information Bar
The bottom information bar is a “context-sensitive” menu area meaning that it
only appears when the menu button is pressed (right side, second from the bottom). The buttons shown on the menu bar will change dynamically depending on
what application or function you are currently using. For example, in the above
image, while on the desktop, if you press the menu button you have options to:
add an icon, change your wallpaper, perform a search, review your notications
and change your settings.
14
Page 16
On-Screen
Keyboard
Anytime you activate a feature that requires text (i.e., searching contacts) you will
be provided with an on-screen keyboard. This keyboard will be how you will enter
most text, numbers and symbols when interacting with your IP150.
Applications
Because the IP150 is based on Android, you can install a variety of applications
including web-browsers, oce productivity software, and helpful utilities. These
applications are often built by 3rd party developers, not RCA, so be sure you trust
the source of any software before you install it.
1515
Page 17

Getting Started
Whether this is your rst IP phone or you are a seasoned IP professional, we’re
here to help! The steps below will make your set-up process as quick and painless
as possible. You’ll be making calls in no time.
Step 1: Unpack it
Remove the phone base and all of the other parts from the box. This would be a
good time to do an inventory to ensure you have all the required parts. You should
have one IP150 phone base, a telephone handset, a handset cord, a power adaptor
and a length of Ethernet cable.
Step 2: Power it Up
Attach the handset cord to the handset and to the base. Plug the power adaptor
into the back of the IP150. Choose a location for your phone that has close access
to a power outlet and a connection to your Local Area Network (LAN). Plug in the
power adaptor, and the IP150 will automatically power up.
Step 3: Connect it to your Network
The IP150 needs to be connected to a Local Area Network (LAN) in order to make
and receive calls. Plug the included Ethernet cable into the “LAN” port on the back
of the IP150, connecting the other end of that cable to your Local Area Network.
For most oces, this will mean simply plugging into the Ethernet plug on the wall
where you might plug in a PC for internet access.
Note: If there is a PC or other device already using this connection, don’t worry.
There is a pass-through port on the back of the IP150. Plug the computer’s Ethernet
cable into the port labeled “PC” on the back of the phone and plug the Ethernet
cable going to the network into the port labeled “LAN”
Step 4: Conguring it for Phone Calls
Once your IP150 is powered up and connected to the Local Area Network, it will
acquire an IP address. This process is automatic if your network has a DHCP server,
which most do. If you do not, please see the Network Settings Section of this
manual for instructions on how to set a static IP address.
Before you can use the IP150 to make a call, you need to set it up with your service
provider.
The IP150 supports SIP congurations:
• SIP—you can connect to a local SIP server. This is most often for
companies that have an existing SIP-based PBX that handles all VoIP
calling over the network.
The next step is called Provisioning your phone. That means taking information
from your service provider and entering it into your phone, which will give your
phone its identity and its ability to send and receive calls.
16
Page 18
Press the Apps button on the left-hand side of the dial pad. Tap the Settings icon
to enter the Settings Menu.
The very top option on the list is Phone Settings.
1717
Page 19
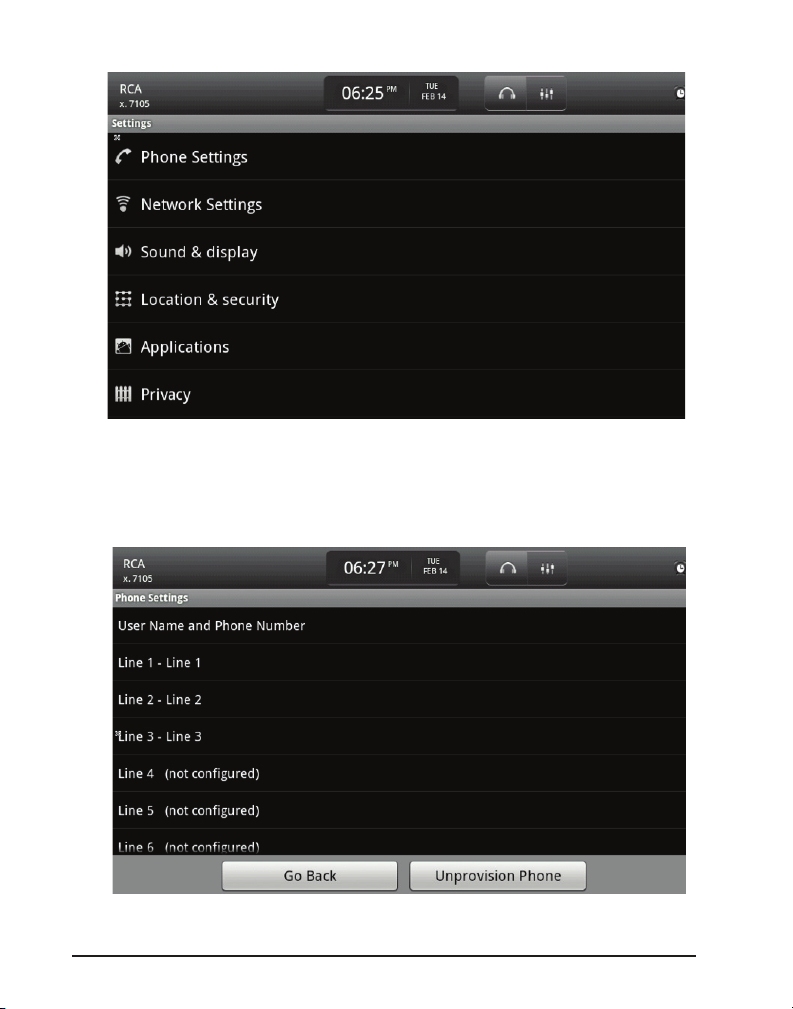
Tapping that option will bring up a list of Lines.
18
Page 20
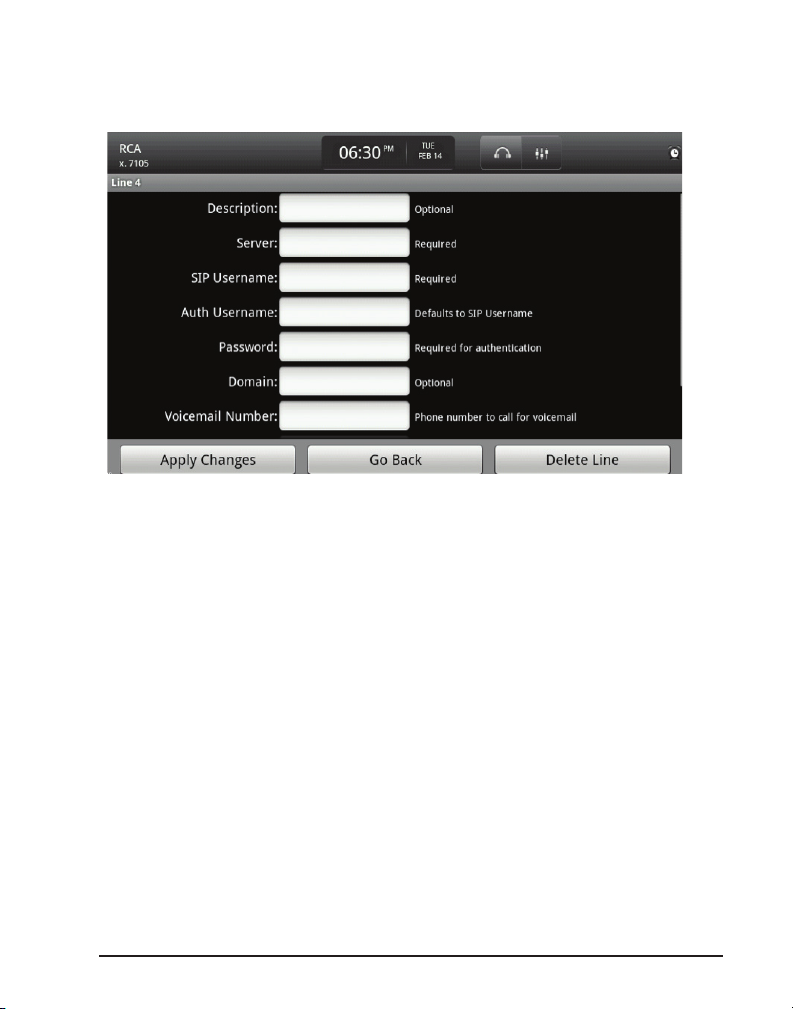
Select a line and you will be prompted to enter the following information: Server,
SIP Username, Auth Username, and Password.
This information will be given to you by your service provider. The Description,
Domain, Voicemail Number and SIP Registration Interval entries are optional. For
more information on those entries please see the The IP150 and Your Phone System section of this manual.
Tapping the white space on each line will bring up an on-screen keyboard to allow
you to enter the information on your phone. Once you have entered the information from your service provider into the correct places, tap “Apply Changes.”
1919
Page 21
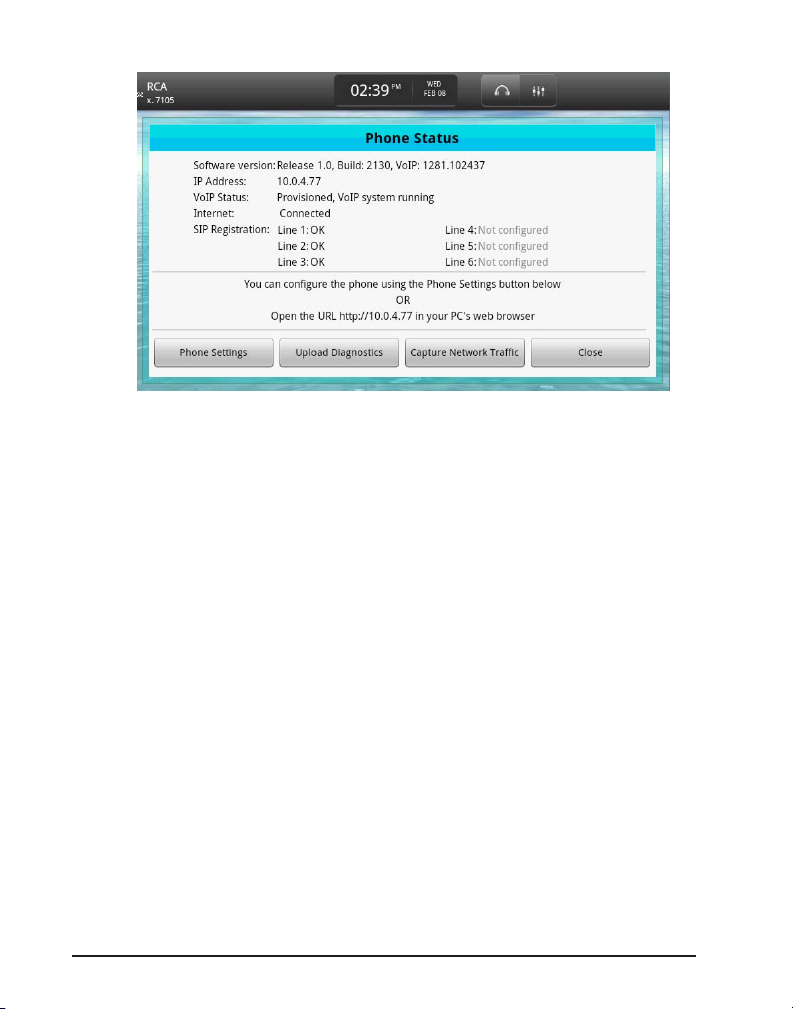
The phone will take you to the “Phone Status” window, showing you all the important details of your phone. It may take a moment for your phone to contact your
service provider’s server, but once it does, the lines you provisioned will read “OK”.
Congratulations, you are now ready to make a call!
Step 5: Make a call!
Once the phone has been congured for use with a SIP or VoIP service, making a call
is as simple as picking up the handset. If you want to make a call using the speakerphone, simply tap the Speaker Button on the right-hand side of the dial pad. Now,
just dial the number as you normally would. Happy calling!
Provisioning the phone for connecting to a service is carried out through the
Phone Settings window or on a computer on the same LAN through the Web
Portal.
20
Page 22

The IP150 and your Phone System
Your IP150 phone is intended to be connected to an existing internet-based phone
system such as an IP-PBX (a SIP-based phone system).
Provisioning the phone for connecting to a service is carried out through the
Phone Settings window or on a computer on the same LAN through the Web
Portal.
Connecting to a SIP Provider on your Phone
On the phone, the Phone Settings can be accessed by tapping on the Phone Status
icon on the main screen or in the Applications Menu and then the Phone Settings
Button. When you access the Phone Settings, you will see a list of available lines
on your phone. Each IP150 phone supports a maximum of 6 lines.
To congure a single line, tap on it. This will bring up the conguration screen for
that line.
For each line you can specify the following:
• Description—an optional description of the line. This will default to the
phone number that will be automatically provided by the SIP provider.
• Server—the fully-qualied domain name (i.e., pbx.yoursipprovider.com)
or an IP address. Please contact your network administrator or your SIP
service provider for this information.
• SIP Username—the username provided to you by your network
administrator or SIP service provider to access the SIP services.
• Auth Username—this defaults to your SIP username.
• Password—your password to access the SIP services.
• Domain—an optional domain. Contact your network administrator or
SIP service provider for this information.
• Voicemail Number—the number to dial for your voice mail. This will be
dialed automatically when you tap your voicemail box in the Messages
menu , accessed by pressing the Messages button.
2121
Page 23
When you are nished, tap the Apply Changes button. This will commit the
changes and return you to the list of lines.
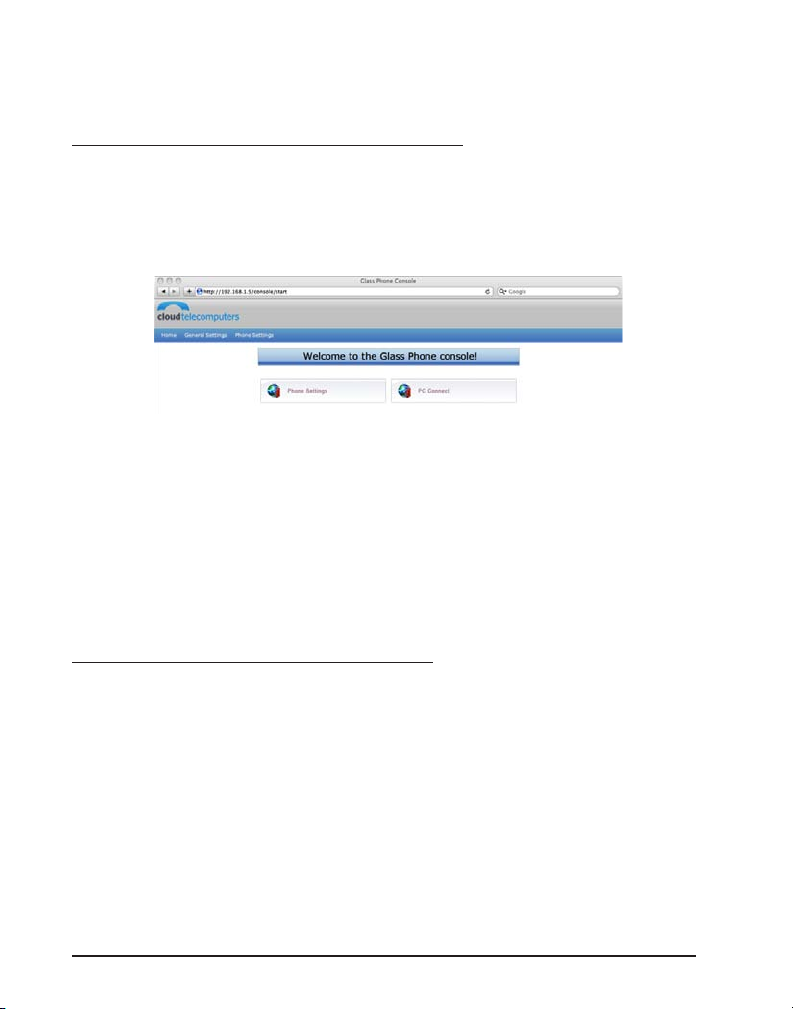
Connecting to a SIP Provider on your Computer
While on a computer connected to the same LAN as your IP150 phone, enter your
phone’s IP address (your phone’s IP address can be located in the Phone Status
screen). This will take you to the homepage for your RCA IP150 Web Portal.
Click on the Phone Settings button. You will be prompted to enter a username
and password to continue. The default username is “admin” and the default password is “admin” (both without the quotation marks). Press Login to proceed.
You should see two sections, General Settings and Line 1 Settings. General Settings is optional, but feel free to enter your name and a phone number here for
display in the top left corner of your IP150 phone. Line 1 Settings are the settings for you rst phone line. To add a new line, press the Add Line button at the
bottom of this page.
For each line you can specify the following:
• Line Description—an optional description of the line. This will default
to the phone number that will be automatically provided by the SIP
provider.
• SIP Username—the username provided to you by your network
administrator or SIP service provider to access the SIP services.
• Auth Username—this defaults to your SIP username.
• Password—your password to access the SIP services.
• SIP Server—the fully-qualied domain name (i.e., pbx.yoursipprovider.
com) or an IP address. Please contact your network administrator or your
SIP service provider for this information.
22
Page 24

• SIP Domain—an optional domain. Contact your network administrator
or SIP service provider for this information.
• Voicemail Number—the number to dial for your voice mail. This will be
dialed automatically when you tap your voicemail box in the Messages
menu , accessed by pressing the Messages button.
• SIP Registration Interval – Optional registration interval, in seconds.
When you are nished, click the Apply Changes button.
.
2323
Page 25

Basic Phone Features
The IP150 has a variety of powerful features for you to use…all with just a tap of
your nger:
• Initiating a call
• Ending a call
• Adjusting call volume
• Muting a call
• Conference call
Initiating a call
There are two ways to initiate a call:
• Using the contacts (if you have contacts on your IP150 phone).
• Using the dial pad.
Using the Contacts
To initiate a call using the contacts:
• Tap the Contacts button on the left side of the dial pad.
• To make the call, simply tap the contact you would like to call to
display the Contact Details screen, then tap the phone number you
would like to call for that contact. The phone will immediately engage
the speakerphone. To take the call using the handset (and disengage the
speakerphone) simply pickup the handset.
• Transferring a call
• Redialing
• Putting a call on hold
• Speakerphone
• Headset
• Accessing voicemail
Using the dial pad
To initiate a call using the dial pad:
• Using the dial pad is no dierent than any other phone you’ve used
before. Simply begin dialing!
• To make the call, enter the number on the dial pad and tap the CalL
Button. The phone will immediately engage the speakerphone. To take
the call using the handset (and disengage the speakerphone) simply
pickup the handset.
24
Page 26
Ending a call
To end a call:
• Tap the End Call button on the on-screen keypad.
• Alternatively, if you are using the handset, simply hang up the handset.
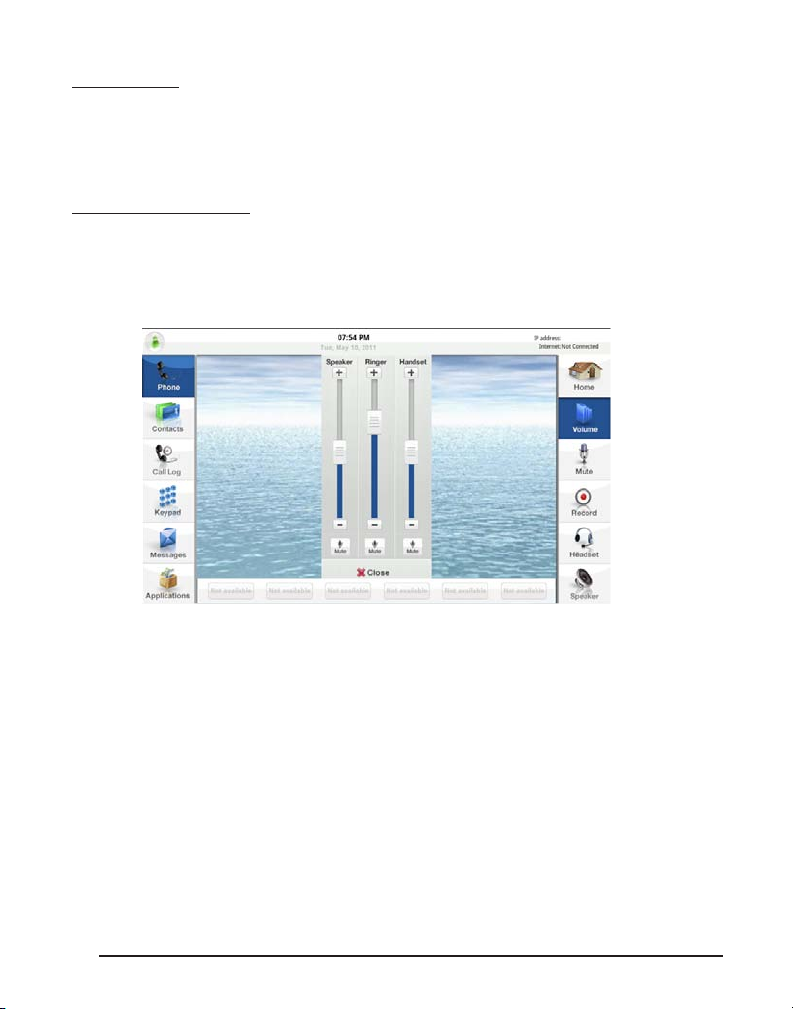
Adjusting call volume
To adjust the volume using the volume icon:
• Tap the Volume Icon in the top navigation bar. This will open the
Volume Slider Bars.
Adjust
Volume
• There are ve volumes you can adjust:
-Speaker
-Ringer
-Handset
-Headset
-Media
• Depending upon with whom you are engaging via the phone (either
through speaker or handset), tap your nger on the appropriate button
either up or down to adjust the volume.
• If you wish to mute the call, press the Mute Button underneath the
appropriate column.
2525
Page 27

Muting a call volume
To mute an active call:
• Tap the Mute Button in the right-hand navigation bar during an active
call. This will turn the button red to indicate that it is active.
• To unmute the call, simply tap the Mute Button again.
Conference call
To perform a conference call:
• Tap the Add Caller Button in the Active Call Menu. This will provide you
three options:
• Keypad
—tap this option to enter the number to which you wish to
transfer using the keypad;
• Contacts
—tap this option to select a contact (and a number) to which
to transfer the call; and
• Call log
—tap this option to search for a number in the call logs to
which to transfer the call.
When the other phone answers, they will be added to the Active Call Menu.
To remove a person from a conference call, tap the X Button of the
number you wish to remove.
Transferring a call
To transfer a call:
• Tap the Transfer Button in the Active Call Menu. This will provide you
three options:
• Keypad
—tap this option to enter the number to which you wish to
transfer using the keypad.
• Contacts
—tap this option to select a contact (and a number) to which to
transfer the call.
• Call log
—tap this option to search for a number in the call logs to
which to transfer the call.
26
Page 28

Redialing
To redial a number that you previously dialed:
• Tap on the Messages button on the left-hand side of the dial pad. This
will open the Call Logs Window.
• You can re-dial any number in your call logs (missed, answered, or
dialed) by tapping on the Call Button of the number you wish to dial.
Putting a call on hold
To put a call on hold:
• Tap the Hold Button in the Active Call Menu. Once a call is on hold,
you can press the Hold Button again to retrieve the call, or press the End
Call Button to disconnect it. If you take the call o of Hold while the
handset is still in the cradle, the call defaults to speakerphone.
Speakerphone
To engage the speakerphone:
• Tap the Speaker Icon in the right-hand side of the dial pad.
Note: if you are already on a call using the handset or headset, the call will immediately be transferred to the speakerphone. If you press the Speaker Icon prior
to placing a call, the On-screen Keypad will appear and a dialtone will be active
through the speaker.
Headset
To engage the headset:
• Tap the Headset Icon in the top navigation bar.
Note: if you are already on a call using the handset or speakerphone, the call will
immediately be transferred to the attached headset. If you press the Headset Icon
prior to placing a call, the On-screen Keypad will appear and a dial-tone will be active through the headset.
Note: prior to using the Headset feature you will need to connect either a 2.5mm
headset or a standard telephone-jack headset to the appropriate headset port on
the side of the phone.
2727
Page 29

Accessing voicemail
To access voicemail:
• Tap the Messages button on the left-hand side of the dial pad, and
then tap the Voicemail tab. This will give you a summary of your
voicemail boxes. Tapping on will immediately engage a call (using
the speaker-phone if you do not pick up the handset rst) to the
congured voice mail number. For more information about conguring
voicemail settings, see the appropriate section in this manual.
Note: navigating through your voicemail and accessing messages is handled
through your voicemail system. If you have questions about how to navigate your
voicemail system, you should speak to your SIP or VoIP provider.
Using the IP150
The IP150, the next generation in business telephony, is a powerful desktop phone
to rival any that you’ve had before. But in order to get the most from your new
Android-based device, you need to understand how to use it.
Listed below are the core groups of features. Mastering these will help you get the
most out of your IP150 business phone.
• Phone Status
• Managing notications
• Making a Call
• Call Log
• Keypad
• Search
• Contacts
Phone Status
This menu allows you to determine the status of your phone and aid in diagnosing any problems you might have. Sometimes it’s a user error and sometimes it
a problem with a service provider or the Internet. The IP150 includes a built-in
status tool to help you quickly troubleshoot (and forward information to RCA
when required).
To access the phone status tool:
• Press the Apps button on the left hand side of the dial pad. This will
open the Applications Window.
28
Page 30

Application
Window
• Within the Applications Window, tap the Phone Status Icon. This will
open the Phone Status Window.
Phone Status
• The Phone Status Window provides the following information:
• Software Version
—the current version of the IP150 Phone software that you have
installed on the phone. For more information about how to
update your phone, see the appropriate section in this manual.
• IP Address
—the current IP address of your phone.
2929
Page 31

• VoIP Status
—this is an indication that the phone is properly provisioned to make and
receive calls with a SIP provider;
• Internet
—this will tell you if your phone has an active connection to the internet
• SIP Registration
—when connected to an IP-PBX that supports SIP, you can have one or more
lines on your phone registered and congured for service. The IP150 supports
up to 6 lines congured on a single phone. The number of lines that you can
congure depends upon the conguration of your IP-PBX or SIP provider.
You can also carry out a number of actions from the Phone Status Window by tapping the appropriate button:
• Phone Settings—tap this button to access the phone settings s of
each SIP account.. For more information about conguring your
phone settings, see the appropriate section in this manual.
• Upload Diagnostics
—tap this button to send diagnostic information to RCA Business Phones.
This information can help us diagnose information.
Note: as per our privacy policy, we do not share any of this data with any outside compa-
nies unless requested and required to by a court order. We only use this information in the
diagnosis of phone-related issues. In order to send the diagnostic information, you will
need to provide a username and brief description of the issue.
• Capture Network Trac
Managing notications
Your IP150 phone captures messages and notications about a variety of activities
such as missed calls, new voicemails, and system status. These notications are
displayed in two places—the Notications Window and icon-status indicators.
Notications Window
To access the Notications Window:
• Press the Menu Button on the right-hand side of the dial pad. This will
display the bottom-navigation bar.
• From the bottom-navigation bar, tap the Notications Icon. This will
open the Notications Window.
• Alternatively, you can tap the Notication Message Indicator on
the right side of the top bar of the interface. This indicator appears when
there is a notication.
30
Page 32

Notications
• The Notications Window provides detailed information about missed
calls and other phone activity.
Making a Call
Making a call can be handled through one of three mechanisms:
• Direct dial number—this can be handled through one of three methods:
-Handset
-Speaker
-Headset
• Dialing from the Contacts Window
• Dialing from the Call Log.
Direct Dial Number
Handset
To place a call using the handset:
• Pick up the handset and begin dialing normally. This will bring up the
Dialing Prompt.
• Then, simply enter the phone number on the dial pad and tap
the Call Button.
3131
Page 33

Speaker
To place a call using the speaker:
• Press the Speaker Button on the right hand side of the dial pad. This
will engage the speakerphone.
• Then, simply enter the phone number on the dial pad and tap the Call
Button.
Headset
To place a call using the headset:
• Tap the Headset Icon, located on the bar on the top of the main screen.
This will engage the headset.
• Then, simply enter the phone number on the dial pad and tap the Call
Button.
Dialing from the Contacts Window
Dialing directly from your Contacts makes it far easier to initiate calls to people
you already know.
To dial from the Contacts:
• Tap the Contacts Button on the left-hand side of the dial pad. This will
open the Contacts Window.
Contacts
Window
32
Page 34

• Each contact that is displayed has one of three icons to quick dial phone
numbers:
- Work
- Home
- Mobile
• To initiate a call simply tap the appropriate icon.
Note: if you need to nd a contact quickly, you can either search or lter the list. For
more information about these features available in the Contacts Window, see
the appropriate section in this manual.
Dialing from the Call Log
You can also quickly dial numbers that are captured in your call log (missed calls,
answered calls, and dialed calls).
To dial a number from the Call Log:
• Press the Messages Button on the left hand side of the dial pad. This
will open the Call Log Window.
Call Log
Window
3333
Page 35

• To dial the number, tap on the Call Button of the number you wish to
call. This will initiate the call immediately using the speakerphone.
Clearing Logs
To clear logs from the Call Log:
• Press the Messages Button on the left hand side of the dial pad. This
will open the Call Log Window.
• Tap the Menu Button, the middle hard button on the phone. This will
open the Bottom Menu Bar with the following options:
-Clear Logs
Clear
Logs
• To clear all logs, tap the Clear Logs Button in the Bottom Menu Bar.
Note: this will clear all logs.
Warning: there is no way to recover logs once they have been cleared.
34
Page 36

Search
The IP150 includes a built-in search feature for nding information on your phone.
To access the Search feature:
• Make sure that you are on the home screen.
• Press the Menu Button on the right-hand side of the dial pad, then tap
the Search Button from the menu that pops up at the bottom of the
screen. This will open the QuickSearch Window and the on-screen keyboard.
Home Screen
with Search
Button
• To carry out a search:
- Enter the search text in the Search Window. You can use the
on-screen keyboard to do this.
- When you have entered the information, press the Magnifying
Glass Icon at the end of the search bar to carry out the search.
Note: you can congure what information is searchable through the Search Set-
tings. For more information about specifying searchable data on the IP150, see the
appropriate section in this manual.
3535
Page 37

Contacts
The integrated Contacts Address Book on the IP150 makes it easy to quickly initiate
calls and enables you to import contacts from Microsoft® Outlook™ on your PC.
The Contacts feature on the IP150 is composed of the following functionality:
-Filter contacts
-Search contacts
-Add a contact
-Edit a contact
-Delete a contact
Filter contacts
To lter contacts:
• Tap the Contacts Icon in the left-hand navigation bar to open the
Contacts Window.
Home Screen
with Search
Button
-Importing contacts
-Contact details
-Making a call from a Contact
-Sharing a contact
-Making a contact a “favorite”
• The Contacts Window supports the following types of ltering:
- Outlook
- Mobile
- Google
- Favorites
36
Page 38

Mobile
To lter your contacts by those from your mobile phone:
• Tap on the Mobile Button at the top of the Contacts Window. This
will lter all contacts to show only those that were imported from your
Android-based mobile phone.
Outlook
To lter your contacts by those imported from Microsoft® Outlook™:
• Tap on the Outlook Button at the top of the Contacts Window. This
will lter all contacts to show only those that were imported from
Microsoft® Outlook™.
Google
To lter your contacts by those imported from your Google® account,
• Tap on the Google Button at the top of the Contacts Window. This
will lter all contacts to show only those that were imported from your
Google® account.
Favorites
To lter your contacts by those marked as a favorite:
• Tap on the Favorites Button at the top of the Contacts Window. This
will lter all contacts to show only those that you have marked as a
“favorite.”
Alphabetical
The contacts in the Contacts Window are, by default, displayed alphabetically.
To lter by a specic last name letter:
• Tap the appropriate letter along the left-hand side of the
Contacts Window. This will jump forward/back on the list to show those
contacts with a last name starting with that letter.
Search contacts
To search for a specic contact:
• While the Contacts Window is displayed, Press the Menu Buttonon
the right-hand side of the dial pad. This will open the Bottom Menu Bar
with the following options:
- Search
- New Contact
-Display Options
3737
Page 39

• Tap the Search Button from the Bottom Menu Bar to open the Search
Window.
Search Contacts
• To carry out a search:
-Enter the search text in the Search Window. You can use the
on-screen keyboard to do this.
- As you enter information, suggestions that match (from the
data sources congured in the Search Settings) will appear
below the search eld. Tap on any of them to navigate to that
item.
- If nothing appears, you can press the Magnifying Glass Icon at
the end of the search bar or the Magnifying Glass Button on the
on-screen key board to carry out the search in the web browser.
Add a contact
To add a contact:
• While the Contacts Window is displayed, press the Menu Buttonon the
right-hand side of the dial pad. This will open the Bottom Menu Bar
with the following options:
- Search
- New Contact
- Display Options
• Tap the New Contact Button from the Bottom Menu Bar to open the
New Contacts Window.
38
Page 40

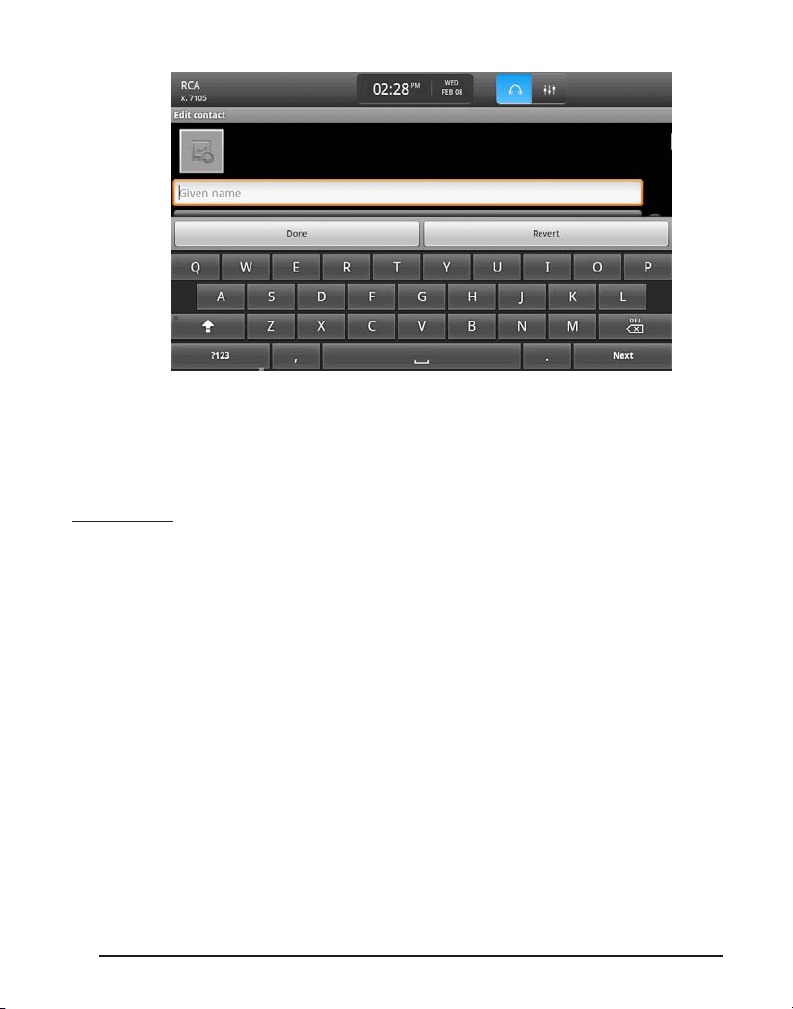
Add New Contacts
• To create a new contact, you can specify the following information:
- Given Name—this is the contact’s rst name
- Family Name—this is the contact’s last name
- You can tap the Arrow to expose additional elds including
• Name prex—such as Mr., Mrs., etc.
• Middle name
• Name Sux—such as “III” or “Esquire”
• Phonetic given name—in the event that the contact’s given name is in
a foreign language, this is a great way to phonetically spell out
how to say their given name properly.
• Phonetic middle name—in the event that the contact’s middle name is
in a foreign language, this is a great way to phonetically spell out how to
say their middle name properly.
• Phonetic last name—in the event that the contact’s name is in a foreign
language, this is a great way to phonetically spell out how to say
their last name properly.
• Tapping the More Arrow again will remove these additional elds.
• Home Phone—the contact’s home phone number (note: you can
tap Home to change the eld type from Home to Mobile to Work or to
another custom-dened eld); you can tap the Plus Icon to add another
phone number:
• Mobile
• Work
• Other
3939
Page 41

• Home Email—the contact’s email address (note: you can tap Home to change
the eld type from Home to Mobile to Work or to another custom-dened eld);
you can tap the Plus Icon to add additional email addresses including:
• Work
• Other
• Mobile
• IM—the contact’s Instant Messaging name (note: you can tap Home to change
the eld type from Home to Mobile to Work or to another custom-dened eld).
Tap the Plus Icon to add one or more IM names including (note: the following IM
sources are listed in order of tapping the Plus Icon):
• AIM
• Windows Live
• Yahoo!
• Skype
• QQ
• Google Talk
• ICQ
• Jabber
• Postal Address—the contact’s physical address. Tap the Plus Icon to add a postal
address for the following:
• Home
• Work
• Other
- For each type of address, you can specify the following data:
• Street
• City
• State
• Zipcode
• Organization—where the contact works or other organizations to which the
contact belongs. Tap the Plus Icon to add an organization for the following:
• Work
• Other
- For each organization, you can specify the following data:
• Organization name
• Position.
• You can provide additional information by tapping the More Arrow at the bot-
tom of the New Contact Window:
40
Page 42

• Notes—tap the Plus Icon to add a Notes Field. Tap in the Notes Field to
bring up the On-Screen Keyboard and enter text for this contact;
• Nickname—tap the Plus Icon to add a Nickname Field. Tap in the
Nickname Field to bring up the On-Screen Keyboard and enter the con
tact’s nickname; and
• Website—tap the Plus Icon to add a Website Field. Tap in the Website
Field to bring up the On-Screen Keyboard and enter the URL;
• Tapping the More Arrow again will remove these additional elds.
• When you are nished, tap the Done Button to save the contact. Alternatively,
you can tap the Revert Button at any time to close the New Contact Window
(without saving any information) and return to the Contacts Window.
Edit a contact:
To edit a contact:
• Tap on the Contacts Button on the left-hand side of the dial pad. This
will open the Contacts Window.
• Filter or search the contacts to nd the contact you wish to edit and
tap that contact. This will display the Contact Details Window.
Contact
Details
• While the Contacts Detail Window is displayed, press the Menu Button
on the right-hand side of the dial pad. This will open the Bottom Menu
Bar with the following options:
• Edit Contact
• Share
• Options
4141
Page 43

• Delete Contact
• Tap the Edit Contact Button from the Bottom Menu Bar to open the
Edit Contacts Window.
• For each contact, you can modify the following information:
• Given Name—this is the contact’s rst name
• Family Name—this is the contact’s last name
• You can tab the More Arrow to expose additional elds including:
-Name prex—such as Mr., Mrs., etc.
-Middle name
-Name Sux—such as “III” or “Esquire”
-Phonetic given name
—in the event that the contact’s givenname is in a foreign
language, this is a great way to phonetically spell out how
to say their given name properly
-Phonetic middle name
—in the event that the contact’s middle name is in a foreign
language, this is a great way to phonetically spell
out how to say their middle name properly
-Phonetic last name
—in the event that the contact’s name is in a foreign lan
guage, this is a great way to phonetically spell out
how to say their given last properly;
• Tapping the More Arrow again will remove these additional elds
• Home Phone—the contact’s home phone number; you can tap the Plus
Icon to add another phone number:
• Mobile
• Work
• Other
• Home Email—the contact’s email address; you can tap the Plus Icon to
add additional email addresses including:
• Work
• Other
• Mobile
42
Page 44

• IM—the contact’s Instant Messaging name. Tap the Plus Icon to add
one or more IM names including (Note: the following IM sources are
listed in order of tapping the Plus Icon):
• AIM
• Windows Live
• Yahoo!
• Skype
• QQ
• Google Talk
• ICQ
• Jabber
• Postal Address—the contact’s physical address. Tap the Plus Icon to
add a postal address for the following:
• Home
• Work
• Other
• For each type of address, you can specify the following data:
-Street
- City
- State
- Zipcode
• Organization—where the contact works or other organizations to
which the contact belongs. Tap the Plus Icon to add an organization for
the following:
• Work
• Other
• For each organization, you can specify the following data:
- Organization name
- Position
• You can provide additional information by tapping the More Arrow at
the bottom of the New Contact Window:
• Notes—tap the Plus Icon to add a Notes Field. Tap in the Notes Field to
bring up the On-Screen Keyboard and enter text for this contact
• Nickname—tap the Plus Icon to add a Nickname Field. Tap in the Nick
name Field to bring up the On-Screen Keyboard and enter the contact’s
nickname
• Website—tap the Plus Icon to add a Website Field. Tap in the Website
4343
Page 45

Field to bring up the On-Screen Keyboard and enter the URL.
• Tapping the More Arrow again will remove these additional elds.
• When you are nished, tap the Done Button to save the contact.
Alternatively, you can tap the Revert Button at any time to close the
New Contact Window (without saving any information) and return to the
Contacts Window.
Delete a contact
To delete a contact:
• While the Contacts Detail Window is displayed, press the Menu Button
on the right-hand side of the dial pad. This will open the Bottom Menu
Bar with the following options:
Delete a
Contact
• Edit Contact
• Share
• Options
• Delete Contact
• Tap the Delete Contact Button from the Bottom Menu Bar. This will
display a conrmation dialogue box. Tap the OK Button to conrm the
deletion or the Cancel Button to close the dialogue and return to the
Contact Details Window.
Warning: deleted contacts cannot be recovered.
Contact details
To view a contact’s details:
44
Page 46

• While the contacts window is being displayed, lter or search the
contacts to nd the contact you wish to edit and tap that contact. This
will display the Contact Details Window.
• Through the Contact Details Window, you can directly call the
contact by tapping the number that you wish to call. You can
pick up the handset prior to doing this or simply default to the
speakerphone
Making a call from a Contact
To make a call from a contact:
• With the contacts window being displayed, lter or search the
contacts to nd the contact you wish to edit and tap that contact. This
will display the Contact Details Window.
• To make the call, tap the number that you wish to call. You can pick up
the handset prior to doing this or simply default to the speakerphone.
Making a Contact a “Favorite”
Marking a contact as a Favorite makes it easy to nd the by using the Contacts
Window Filters.
Favorite
Contacts
To enable a contact as a Favorite:
• With the Contacts window being displayed, lter or search the contacts
to nd the contact(s) you wish to mark as Favorites.
• For each contact, tap on the Star next to their name. The star will
change to yellow indicating that the contact is now agged as a “Favorite.”
To see all of your Favorites, tap on the Favorites Button at the top of the Contacts
4545
Page 47

Importing Your Contacts
The IP150 is capable of importing your contacts from the Microsoft® Outlook™
program on your PC and syncing with your Google® account contacts through the
internet.
Outlook
To import your contacts from Microsoft® Outlook™, you must rst log in to the
IP150 Web Portal through an internet browser on your PC. While on a computer
connected to the same LAN as your IP150 phone, enter your phone’s IP address
(your phone’s IP address can be located in the Phone Status screen). This will take
you to the homepage for your RCA IP150 Web Portal.
46
Page 48

Once you’ve logged in, click the PC Connect link.
Clicking on the PC Pairing Download link will download a le called CloudPhoneSetup.msi. Once you’ve downloaded and installed this program, run it. It will
prompt you to input the IP address of the phone you wish to pair with.
Google
To lter your contacts by those imported from your Google® account,
• Tap on the Google Button at the top of the Contacts Window. This
will lter all contacts to show only those that were imported from your
Google® account.
4747
Page 49

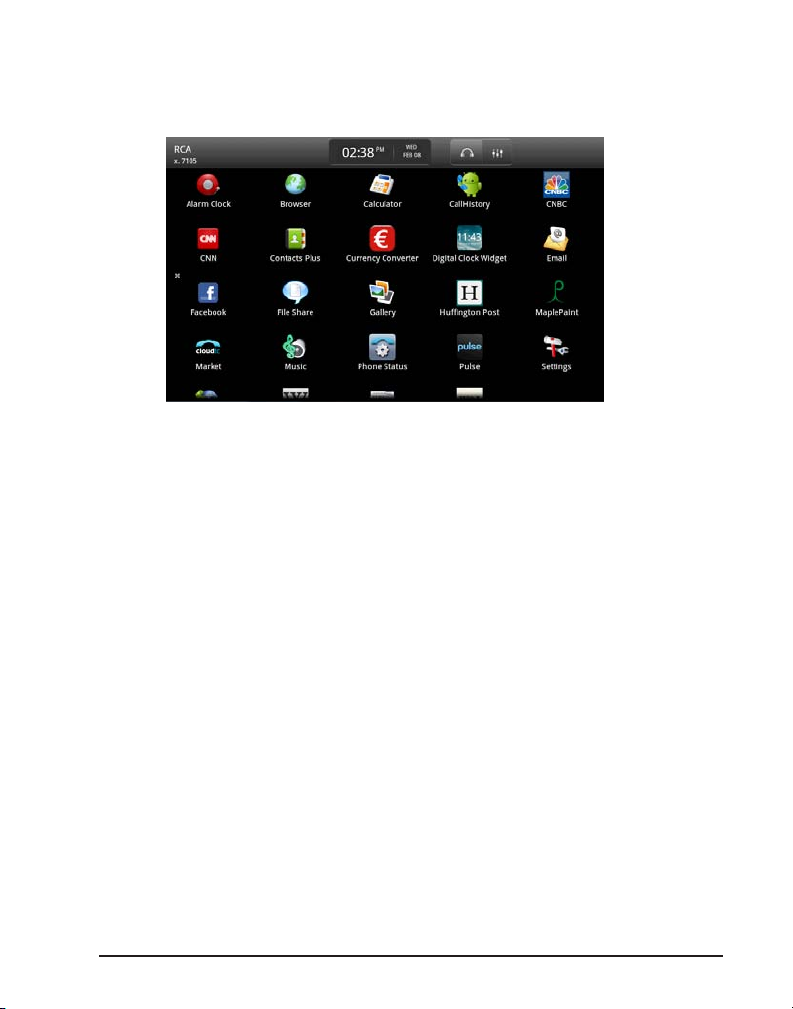
Applications
One of the many features that dierentiates the IP150 from other, ordinary desktop phones is the ability to add applications. Because the phone is based on the
Android Operating System, you have access to many of the same applications that
Android-based mobile phone users do.
Your IP150 phone comes pre-installed with a number of powerful applications
including:
• Alarm clock
• Browser
In addition to the above, pre-installed applications, you can also add your own applications (through the RCA App Market), remove applications, and modify specic
application settings.
To access an application,
• Press the Applications Button on the left-hand side of the dial pad. This
will open the Applications Window.
Applications
Window
• Calculator
• Phone Status
• Settings
• Software Update
• Applications
Market
• To launch an application, simply tap on its icon.
Note: RCA Business Telephones or Teleeld NA, Inc is not responsible for the installation, maintenance, or troubleshooting of any third party applications installed beyond those that come pre-installed with the IP150. RCA/Teleeld NA, Inc makes no
representation or warranty as to any third party content, applications or services,
and you agree that RCA/Teleeld NA, Inc shall not be responsible or liable, directly
or indirectly, for any damage or loss caused or alleged to be caused by or in connection with use of or reliance on any such third-party content, applications or services
available on or through any such site or resource.
48
Page 50

Alarm clock
The Alarm Clock Application allows you to set one or more times at which time
the IP150 will sound an alarm.
To access the Alarm Clock Application:
• Tap on the Applications button on the left-hand side of the dial pad.
This will open the Applications Window.
• Tap on the Alarm Clock Icon. This will open the Alarm Clock Window.
• The Alarm Clock comes with three alarms. To edit an alarm, tap on it.
This will open the Set Alarm Window.
• For each alarm, you can specify the following:
• Time—tap on this option to set the time of the alarm.
• Ringtone—tap on this option to select a ringtone for the alarm
from the Ringtones Popup Window. When you have selected a
ringtone, tap the OK Button.
• Repeat—tap this option to set the repeat frequency of the
alarm in the Repeat Popup Window. Options include:
- Monday
- Tuesday
- Wednesday
- Thursday
- Friday
- Saturday
- Sunday
• To enable the alarm to repeat on a day, simply tap its checkbox.
• Label—enter a label for the alarm in the Label Popup Window.
• Tap the Done Button to save the alarm settings or the Revert Button to
discard changes and revert to the Alarm list.
Browser
The Browser allows you to visit websites and other HTTP resources as you would
from your desktop computer.
To access the Browser Application:
• Press the Applications Button on the left-hand side of the dial pad. This
will open the Applications Window. Alternatively, just tap the
Applications Icon on the main screen.
4949
Page 51

• Tap on the Browser Icon. This will open the Browser Window.
Web Browser
• To interact with the Browser:
• Tap on the URL Field. This will display the on-screen keyboard
through which you can type a URL. Tap the Enter Key on the
onscreen keyboard to conrm the URL and navigate to that web
resource.
• Tap the X Button to stop any page that is currently loading.
• A progress indicator at the right-end of the URL Field will tell you the
browser is working to retrieve the web resource indicated in the URL Field.
Calculator
The calculator allows you to perform basic mathematical functions such as adding,
subtracting, multiplying, and dividing.
To access the Calculator Application:
• Press the Applications Button on the left-hand side of the dial pad. This
will open the Applications Window.
• Tap on the Calculator Icon. This will open the Calculator Window.
50
Page 52

Calculator
Application
Phone Status
The phone status application provides information about your current phone provisioning and its connectivity to congured service providers.
To access the Phone Status Application:
• Press the Applications Button on the left-hand side of the dial pad. This
will open the Applications Window.
• Tap on the Phone Status Icon. This will open the Phone Status Window.
• For more information about the Phone Status Window, see the appro
priate section in this manual.
Settings
The settings application provides you access to many of your phone’s congurations.
To access the Settings Application:
• Press the Applications Button on the left-hand side of the dial pad. This
will open the Applications Window.
• Tap on the Settings Icon. This will open the Settings Window.
5151
Page 53

Settings
• The specic settings available to you as part of conguring your phone are cov-
ered under the “Conguring Your Phone” section of this manual.
Software Update
The software update application allows you to update the IP150 Phone OS. This is
similar to updating the operating system software on your personal computer.
To access the Software Update Application:
• Press the Applications Button on the left-hand side of the dial pad. This
will open the Applications Window.
• Tap on the Software Update Icon. This will open the Software Update
Window.
Software
Update
52
Page 54

•To begin the update process, tap the Check For Update Button.
Note: the Use Update Server Field is pre-populated with “Glass”. It is not
recommended that you change this eld.
• If there is an available update, you will be prompted to install the
update. If you elect to install an update, you will be unable to use your
phone until the installation/update process has completed.
• If there is no update available, tap the Close Button to return to the
Applications Window.
RCA App Market
The RCA App Market enables you to nd, review, and install third-party applications onto your IP150 desktop phone much like you would on an Android-enabled
mobile phone.
To access the RCA App Market:
• Visit market.cloudtc.com in your internet browser. This will open the
Cloud TC App Market.
Market.cloudtc.
com App Market
5353
Page 55

• To login:
• Click on the Login Link at the top of the screen. This will open
the Login Window.
Login to market.
cloudtc.com
• Username—enter the username you have been provided;
• Password—enter your password
• When you are nished, click the Login Button. You can also check the
Remember Me Checkbox to have your browser remember your username
the next time you visit the Cloud TC App Market.
Note: you must rst register before you can login and make application purchases.
To register, click on the Register Link.
Once you have been authenticated to the market, selecting applications to make
available on your phone is simple:
• In order to add applications to you phone, you need to “purchase” them
from the Cloud TC App Market. Some applications are free while others
may cost a nominal fee. Note: even if an app is free, you must still “pur-
chase” application.
54
Page 56

• To “purchase” an application:
• Find the application by navigating through the categories on the left.
When you nd the application you want, simply click the Add to Cart
Button. This will add the application to your cart.
• When you have nished adding applications, you can click on the
Check out Link at the top to nalize your purchases or the Shopping Cart
Link to review what you have added to your cart.
Market.cloudtc.
com Shopping
Cart
• The purchase process for applications is similar to other online e-commerce
websites. If you have made a purchase previously, your billing information will
be automatically populated for you. Regardless of your purchase history, you will
need to re-enter your credit card information.
• Once you have submitted your purchase method and the Cloud TC App Market
has authorized your purchase, your applications will be available from your phone
for download and installation. For more information about installing applications
from the Cloud TC App Market on your phone, see the appropriate section in this
manual.
5555
Page 57

Adding applications from the App Market
Through the Cloud TC App Market on your phone, you can add new applications to
your phone.
Once you have purchased (note: even if the app is free, you must still go through
“purchasing” process) one or more applications online, you will proceed to your
IP150 device for download and installation.
To download and install an application:
• Tap on the Applications Icon in the left-hand navigation bar. This will
open the Applications Window.
• Tap on the Market Icon. This will open the App Market.
• In order to see applications recently purchased from the Cloud TC App
Market online, you will need to provide your Cloud TC App Market user
name and password. Note: if you have entered this previously, you will
not need to enter it again.
• When you are authenticated, the list of available applications will dis-
play. To install an application from the market, tap the download button.
• Once downloaded, you will see the Application Installation
Conrmation Window.
• This window provides you details on what the application will access
on your phone. If you are satised with the level of access, tap the Install
Button to install the application. Otherwise, tap the Cancel Button.
• Once the application has been installed, you will be notied. Tap the
Open Button to open the application or the Done Button to return to the
marketplace.
Removing applications
Applications can be removed through the Applications Settings Window.
To access the Applications Settings Window:
• Press the Applications Button on the left-hand side of the dial pad. This
will open the Applications Window.
• Tap on the Settings Icon. This will open the Settings Window.
• Tap on the Applications Option from the Settings Window. This will
open the Application Settings Window.
56
Page 58

Application
Settings
• Tap on the Manage Applications Option from the Application Settings
Window. This will open the Manage Applications Window.
• To remove an application, tap on it. This will open the Application
Details Window.
• Tap on the Uninstall Button. This will remove the application and all
associated data from your phone.
Adding an Application Icon to your Home Screen
Application icons can be easily added to your home screen for quick access.
To add an application icon to your home screen:
• Press the Applications Button on the left-hand side of the dial pad. This
will open the Applications Window.
• Press and hold your nger on the icon of the application you wish to
add to your home screen. After a few seconds, you will be returned to
your home screen with the application icon “oating” where your nger
is pressed.
5757
Page 59

Adding Application
to Home Screen
• To add the application, simply move it to where you want on your
home screen and release your nger. Note: this will NOT remove the
application from the Applications Window. You can still access the
application from there as well.
To remove an application icon from your home screen:
• Return to your home screen if you are not already there by pressing the
Home Button on the right-hand side of the dial pad.
Remove Application
from Home Screen
58
Page 60

• Press and hold your nger on the icon of the application you wish to
remove from your home screen. After a few seconds, a Trash Can Tab will
appear on the right of the home screen. Simply drag the icon until it is
touching the tab at which time the tab will turn red. Release your nger
to delete the icon.
Note: this will NOT delete the application from your phone, only from your home
screen. The application will still be available on the Applications Screen.
Conguring Your IP150
The IP150 has a number of conguration settings that you can make to better
personalize the phone environment to your liking and needs.
Below is the list of elements that you can customize:
• The Home Screen
• Phone Settings
• Network Settings
• Sound & Display
The Home Screen
There are several elements on the home screen that you can congure:
• Shortcuts
• Widgets
• Folders
• The Wallpaper
Through the touchscreen interface, you can also remove items on your home
screen quickly.
• Location & Security
• Applications
• Privacy
• Search
• Language and Keyboard
• Date and Time
Shortcuts
A shortcut allows you to quickly access a piece of information from the home
screen of your phone. You can add a shortcut that links to an application, a website bookmark, a contact, a direct dial, and the settings.
5959
Page 61

To add a shortcut:
• Make sure you are on the home screen.
• Press the Menu Button on the right-hand side of the dial pad. This will
open the bottom bar menu.
• Select the Add Option. This will open the Add to Home Screen Popup
Window.
Add Item to
Homepage
• Select the Shortcuts Option. This will display the list of shortcut types. Tap on a
type to add that shortcut:
• Applications—a list of the applications will appear. Tap the
application to which you wish to add a shortcut. This will return you to
the home screen where the shortcut to will be visible.
• Bookmark—selecting this option will open the Bookmarks Window
through which you can select a bookmark. This will return you to the
home screen where the shortcut to will be visible.
• Contacts—tapping this option will bring up the Contacts Window. Use
the lters and search to nd the contact to which you wish to add a
shortcut. Once you have located the contact, tap the contact. This will
return you to the home screen where the shortcut to will be visible.
• Direct Dial—select this option to add a shortcut to a specic number
of a contact. When you tap the Direct Dial Shortcut Option, the Contacts
Window will open. Use the lters and search to nd the contact to which
you wish to add a shortcut to one of their numbers. Once you have located
the contact, it will display all of their available numbers. Tap the number.
This will return you to the home screen where the shortcut to will be
visible, identied with an “H,” “W,” or “M” for Home, Work, or Mobile number.
60
Page 62

• Settings—tapping this option will open the Settings Window. Select the
setting to which you wish to add a shortcut. This will return you to the
home screen where the shortcut to will be visible.
Widgets
Widgets provide features right on your home screen. Some of the widgets that
come preinstalled on the IP150 (although more available in the RCA App Market)
include:
• Analog clock
• IP and Phone Status
• Power Control
• Search
To add a widget:
• Make sure you are on the home screen, and
• Press the Menu Button on the right-hand side of the dial pad. This will
open the bottom bar menu.
• Select the Add Option. This will open the Add to Home Screen Popup
Window.
• Select the Widget Option. This will display the list of widget types. Tap
on a type to add that widget to the home screen.
Folders
Folders enable you to organize the icons and other items on your home screen.
There are several types of folders you can add including:
• A new, blank folder
• All contacts
• Contacts with phone numbers
• Starred contacts
To add a folder:
• Make sure you are on the home screen.
• Press the Menu Button on the right-hand side of the dial pad. This will
open the bottom bar menu.
• Select the Add Option. This will open the Add to Home Screen Popup
Window.
• Select the Folder Option. This will display the list of folder types. Tap on
a type to add that folder to the home screen.
6161
Page 63

Once you have added a folder to the home screen, you can access it by tapping on
it. This will open the folder in a pop-up window. If you wish to add something to a
folder, simply tap and hold your nger on the item you wish to the folder then you
can drag it to the folder and release it.
The Wallpaper
You can customize the background of your IP150 with any JPEG picture. It comes
pre-loaded with a number of vibrant pictures that you can choose as your background.
To change the wallpaper:
• Make sure you are on the home screen.
• Press the Menu Button on the right-hand side of the dial pad. This will
open the bottom bar menu.
• Tap the Wallpaper Option in the bottom menu bar. This will open the
Select Wallpaper Window.
• To select a wallpaper, simply browse through the pictures using your
nger. When you have stopped on the picture you would like as your
background, tap the Select as Wallpaper Button. This will return you to
the home screen with the new wallpaper set.
Phone Settings
Through the phone settings, you can congure each line of your phone when connected to a SIP provider such as an IP-PBX.
To congure your phone settings:
• Press the Applications Button on the left-hand side of the dial pad. This
will open the Applications Window.
• From the Applications Window, select the Settings Application. This
will open the Settings Window.
• Once in the Settings Window, tap on the Phone Settings Option. This
opens the Phone Settings Window.
• To congure a line, simply tap on that line. This will open Line # Win-
dow.
• For each line, you can specify the following:
-Description—enter text to identify this line from the others. It
can be the extension or a name
62
Page 64

-Server—enter the fully-qualied domain name or IP address
of the SIP server
-SIP Username—enter your username that has been cong-
ured for you by the SIP provider
-Auth Username—enter the username you use to authenticate
for SIP services
-Password—enter the password you use to authenticate for SIP
services
-Domain—the domain of the SIP server (optional);
-Voicemail Number—this is the number to access your
voicmail. This is the number that will be dialed when you tap
your voicemail box in the Messages menu , accessed by
pressing the Messages button
-Tap the Apply Changes Button to commit the changes to the
line
Note: it may take up to a minute for the IP150 to contact the SIP server, authenticate, and provision the lines. Please be patient. If there is an error, a dialog box will
appear informing you of such.
Network Settings
The Network Settings allows you to specify how your phone will gain access to the
Internet. There are two options:
• DHCP
• Manual
DHCP
To set the IP150 to receive an IP address from a DHCP server on your local area
network.
• Press the Applications Button on the left-hand side of the dial pad. This
will open the Applications Window.
• From the Applications Window, select the Settings Application. This
will open the Settings Window.
• Once in the Settings Window, tap on the Network Settings Option. This
opens the Network Settings Window.
6363
Page 65

Network
Settings
• By default, the IP150 will come pre-congured to obtain an IP address
from a DHCP Server. In the event that it is not provisioned as such or
has been changed to a manual IP address, you can just tap on the Use
DHCP For Ethernet Address Checkbox.
• Tap the Apply Changes Button to commit the change.
Note: your phone will become unavailable for a short time as it tries to contact a
DHCP server on your LAN to obtain an IP address.
Manual
To manually set your IP address and other network settings:
• Press the Applications Button on the left-hand side of the dial pad. This
will open the Applications Window.
• From the Applications Window, select the Settings Application. This
will open the Settings Window.
• Once in the Settings Window, tap on the Network Settings Option. This
opens the Network Settings Window.
• In order to activate the manual settings, you need to ensure that the
Use DHCP For Ethernet Address Checkbox is unchecked. When
that checkbox is unchecked, the following options will become available:
-IP Address—tap the More Arrow to reveal the IP Address
Popup Window. Tap on the text eld to bring up the on-
screen keyboard so that you can enter an IP Address. It must be
in standard IP Address format of: xxx.xxx.xxx.xxx.
64
Page 66

Note: if you have questions about what IP address to use or need assistance, you
should contact your network administrator.
-Subnet Mask— tap the More Arrow to reveal the Subnet Mask
Popup Window. Tap on the text eld to bring up the on-screen
keyboard so that you can enter a subnet mask. It must be in
standard IP Address format of: xxx.xxx.xxx.xxx.
Note: if you have questions about what IP address to use or need assistance, you
should contact your network administrator.
-Gateway— tap the More Arrow to reveal the Gateway Address
Popup Window. Tap on the text eld to bring up the on-screen
keyboard so that you can enter a Gateway IP Address. It must
be in standard IP Address format of: xxx.xxx.xxx.xxx. Note: if
you have questions about what IP address to use or need as-
sistance, you should contact your network administrator.
-DNS1— tap the More Arrow to reveal the DNS 1 Address
Popup Window. Tap on the text eld to bring up the
onscreen keyboard so that you can enter an IP Address for your
primary domain name server. It must be in standard IP Address
format of: xxx.xxx.xxx.xxx. Note: if you have questions about
what IP address to use or need assistance, you should contact
your network administrator.
-DNS2— tap the More Arrow to reveal the DNS 2 Address
Popup Window. Tap on the text eld to bring up the on-screen
keyboard so that you can enter an IP Address for your secondary
domain name server. This is optional. It must be in standard IP
Address format of: xxx.xxx.xxx.xxx. Note: if you have question
about what IP address to use or need assistance, you should
contact your network administrator.
-When you are nished, tap the Apply Changes Button to com-
mit the changes to your phone.
6565
Page 67

Sound & Display
To congure your phone’s sound and display setting:
• Press the Applications Button on the left-hand side of the dial pad. This
will open the Applications Window.
• From the Applications Window, select the Settings Application. This
will open the Settings Window.
• Once in the Settings Window, tap on the Sound & Display Option. This
opens the Sound & Display Window.
Sound & Display
Settings
• You can congure the following settings for how your phone’s sound
and display:
-Silent Mode—tap this checkbox to silence all activity on your
phone except for media and alarms;
-Ringer Volume—tap the More Arrow to open the Ringer
Volume Pop-up Window. To set the volume, hold your nger on
the slider bar and drag left or right. You can also opt to have
this volume apply to all notications by tapping the Use
Incoming Call Volume for Notications Checklist. Tap the Ok
Button to commit the changes.
-Media Volume— tap the More Arrow to open the Media
the slider bar and drag left or right. Tap the OK Button to com-
mit the changes
66
Page 68

-Phone Ringtone— tap the More Arrow to open the Ringtones
Pop-up Window. Select the ringtone for your phone from the
list. Tap the OK Button to commit the changes
-Notication Ringtone— tap the More Arrow to open the Ring-
tones Pop-up Window. Select the ringtone for your phone from
the list. Tap the OK Button to commit the changes
-Audible touchtones—tap the checkbox to either enable or dis-
able sound when you tap buttons and other interface elements
on your phone
-Audible selection— tap the checkbox to either enable or dis-
able sound when you switch screens
-Animations— tap the More Arrow to open the Animations
Pop-up Window. Select one of the animation options (No ani-
mations, Some animations, All animations) this will conrm the
choice and close the pop-up window
-Brightness— tap the More Arrow to open the Brightness Pop-
up Window. To set the brightness, hold your nger on the slider
bar and drag left or right. Tap the OK Button to commit the
changes
-Screen Saver Timeout— tap the More Arrow to open the Screen
Saver Timeout Window. This will set how long your phone will
wait in idle mode before going into screen saver mode
Location & Security
To congure your phone’s location and security settings:
• Press the Applications Button on the left-hand side of the dial pad. This
will open the Applications Window.
• From the Applications Window, select the Settings Application. This
will open the Settings Window.
• Once in the Settings Window, tap on the Location & Security Option.
This opens the Location & Security Window.
6767
Page 69

Location and
Security
Settings
• There are several settings that you can congure:
-Visible Passwords—tap the checkbox to enable to disable
showing your password as you type. If this is disabled (not
checked), your password will be represented as a series of dots.
Applications
To set the global settings for applications on your phone:
• Press the Applications Button on the left-hand side of the dial pad. This
will open the Applications Window.
• From the Applications Window, select the Settings Application. This
will open the Settings Window.
• Once in the Settings Window, tap on the Application Option. This opens
the Applications Window.
• There is one setting that you can congure for how applications oper-
ate on your phone:
68
Page 70

-Unknown Sources—enable or disable your ability to install
third-party software on the phone. If this checkbox is enabled
then you can install any application, including many of those
from the RCA App Market. If this is disabled, you will not be
able to install any software that is not provided by RCA Busi-
ness Phones.
• In addition to that setting, the Applications Settings Window enables
you to manage any third-party applications you have installed on your
phone:
-Quick Launch – tapping this option will allow you to set key
board shortcuts to launch your applications.
-Manage Applications—tapping this option will open the Man-
age Applications Window.
-In the Manage Applications Window, you can see a list of the
third-party applications you currently have installed (Note: if
you do not have any installed, you will see a message stating
such). To manage an application, simply tap its icon. This will
open the Application Info Window.
-The Application Info Window allows you to carry out three
actions on a third-party application:
• Uninstall—tap this button to uninstall the applica-
tion. Note: any saved data is also removed. This cannot
be undone.
• Clear cache—if the application has any data stored in
cache, you can tap this button to clear it.
• Clear defaults—if you have this application set to
launch by default, tapping this button will remove
that
• Controls—you can tap the Force Stop Button to
immediately end the application and any associated
processes.
-Running Services—tapping this option will display a
list of the services that are currently running on your
phone.
6969
Page 71

Running
Services
• To end a service, simply tap it. This will open the Stop Service Popup
Window. Tap the Stop Button to stop the service.
Note: if you stop a service that is running which is vital to the operation of the
phone, the phone may stop functioning properly. At that time you will be required to
reboot the phone by unplugging it and plugging it back in.
Privacy
There may be a time when you need to erase all of the data on the phone, such
as when someone else is taking possession of your phone or you are leaving the
company. This feature is handled in the Privacy Settings.
To reset all data on your phone:
• Press the Applications Button on the left-hand side of the dial pad. This
will open the Applications Window.
• From the Applications Window, select the Settings Application. This
will open the Settings Window.
• Once in the Settings Window, tap on the Privacy Option. This opens the
Privacy Settings Window.
70
Page 72

Privacy
Services
• To reset your data, tap the Factory Data Reset Option. You will be
prompted with a dialogue box to conrm the reset. Tap OK to conrm or
Cancel to return to the Privacy Settings Window.
Warning: resetting your phone to factory data (i.e., erasing any data you had on
the phone including third-party applications, call logs, contacts, etc.) cannot be
undone.
Search
There are two kinds of search supported by the IP150:
• Web (Google)
• Phone data
To congure how these search features work on your phone:
• Press the Applications Button on the left-hand side of the dial pad. This
will open the Applications Window.
• From the Applications Window, select the Settings Application. This
will open the Settings Window.
• Once in the Settings Window, tap on the Search Option. This opens the
Search Settings Window.
7171
Page 73

Search
Services
• Google Search Settings—tap this option to open the Google Search
Settings Window. In this window, you can set the Show Web Suggestions
that either enables or disables showing suggestions from Google when
you type a search term in the browser.
• Searchable Items—tap this option to open the Searchable Items
Window. In this window, you can specify which data to allow to be
searched by the QuickSearch Window that is accessible through the
bottom menu bar of the home screen. Options include:
-Contacts (names only)
-Browser (bookmarks and web history),
-Apps (names of installed applications)
-Tap the appropriate checkbox of the above to either include or
exclude this data in the search results.
Language and Keyboard
Through the Language and Keyboard settings, you can specify the regionalization
of your phone as well as the Android keyboard.
To congure how these search features work on your phone:
• Press the Applications Button on the left-hand side of the dial pad. This
will open the Applications Window.
• From the Applications Window, select the Settings Application. This
will open the Settings Window.
• Once in the Settings Window, tap on the Language & Keyboards
Option. This opens the Language & Keyboards Options Settings Window.
72
Page 74

Language and
Keyboard
Settings
• Select Locale—select this option to choose a locale. At this time, the
only supported locale is English.
• Android Keyboard—select this option to open the Android Keyboard
Settings. You can check or uncheck the following options:
-Sound on keypress—to enable a sound every time you tap a
key on the keyboard, tap on the checkbox
-Auto-capitalization—to enable words to automatically be
capitalized (when rst typing in a text eld and after typing a
period), tap on the checkbox
-Quick xes—enable this setting to correct commonly mistyped
words
-Show Suggestions—enable this setting to have words
suggested based on what you are typing. You can then select
the suggested word instead of typing the rest
-Auto-complete—when you have enabled the Show
Suggestions setting, you can enter a period or press the
spacebar to accept the suggested word.
Date and Time
The Date and Time Settings allows you to specify how the IP150 will get the date
and time. By default, the IP150 will come pre-congured to obtain the date and
time automatically from an NTP server.
7373
Page 75

Date and Time
Settings
Date and Time Settings
You can specify several settings for how the phone displays the date and time.
These include:
• Time Zone
• NTP Server
• Use 24-Hour Format
• Select Date Format
Time Zone
To set the time zone:
• Press the Applications Button on the left-hand side of the dial pad. This
will open the Applications Window.
• From the Applications Window, select the Settings Application. This
will open the Settings Window.
• Once in the Settings Window, tap on the Date & Time Option. This
opens the Date & Time Settings Window.
• Tap on the Select Time Zone Option. This will display a list of time
zones. Simply tap on the timezone that you wish to represent the
location of your phone. This will return you to the Date & Time Settings
Window.
74
Page 76

NTP Server
The NTP Server is required to automatically provide the date and time to your
phone. To set the NTP Server:
• Press the Applications Button on the left-hand side of the dial pad. This
will open the Applications Window.
• From the Applications Window, select the Settings Application. This
will open the Settings Window.
• Once in the Settings Window, tap on the Date & Time Option. This
opens the Date & Time Settings Window.
• Tap on the NTP Server Option. This will display a NTP Server Popup
Window. Simply enter the domain name or IP address of a NTP server.
Note: The IP150 will come pre-congured with an address. It is not recommended
that you change this.
Use 24-Hour Format
To set the phone to utilize a 24-hour format:
• Press the Applications Button on the left-hand side of the dial pad. This
will open the Applications Window.
• From the Applications Window, select the Settings Application. This
will open the Settings Window.
• Once in the Settings Window, tap on the Date & Time Option. This
opens the Date & Time Settings Window.
• Tap on the Use 24-Hour Format Checkbox. The time will now be dis-
played in 24-hour format.
7575
Page 77

Select Date Format
To set the format of the date:
• Press the Applications Button on the left-hand side of the dial pad. This
will open the Applications Window.
• From the Applications Window, select the Settings Application. This
will open the Settings Window.
• Once in the Settings Window, tap on the Date & Time Option. This
opens the Date & Time Settings Window.
• Select the Select Date Format Option. This will open the Select Date
Format Popup Window from which you can specify the format of the
dates. Options include:
-Normal (mm/dd/yyyy)
-dd/mm/yyyy
-yyyy/mm/dd
76
Page 78

Information About Your IP150
If you need detailed technical information about the IP150, you can get it through
the settings menu.
To access the Phone Details:
• Press the Applications Button on the left-hand side of the dial pad. This
will open the Applications Window.
• From the Applications Window, select the Settings Application. This
will open the Settings Window.
• Once in the Settings Window, tap on the About Phone Option. This
opens the About Phone Window.
About Your
Phone
• The About Phone Window provides the following details about your
phone:
-Model number
-Firmware version
-Kernel version
-Build number
-Up time
-Ethernet MAC address
-Legal Information
• You can tap on the Legal Information option to access the open source
licenses that are part of the IP150 Phone OS.
7777
Page 79

Browsing the Web on Your IP150
The IP150 includes a built-in, full-featured web browser that includes a number of
powerful features including:
-Windows
-Bookmarks
-Search
-Zooming
-Download history
-Settings
Entering a URL
Before you begin to use the advanced browser features, you need to understand
the basics—like how to enter a URL.
To enter a URL to which to browse to:
• First, open the browser. You can either tap on the Browser Icon on the
home screen or you can access it via the applications.
-Press the Applications Button on the left-hand side of the dial
pad. This will open the Applications Window.
-Select the Browser Icon from the Applications Window. This
will open the browser.
Enter a URL in
the Browser
78
Page 80

• Tap on the URL eld at the top. This will open the on-screen keyboard
into which you can type the URL.
• When you are nished, tap the Go Button on the on-screen keyboard.
Windows
You can open multiple browser windows, allowing you to keep a page that has
already loaded quickly accessible.
To open a window:
-Press the Applications Button on the left-hand side of the dial
pad. This will open the Applications Window.
-Select the Browser Icon from the Applications Window. This
will open the browser.
• Press the Menu Button on the right-hand side of the dial pad. This will open the
bottom menu bar. Select the New Window option. This will open a new window
with the default web page, Google.com.
To access your open windows:
• First, open the browser. You can either tap on the Browser Icon on the
home screen or you can access it via the applications.
-Press the Applications Button on the left-hand side of the dial
pad. This will open the Applications Window.
-Select the Browser Icon from the Applications Window. This
will open the browser.
• Press the Menu Button on the right-hand side of the dial pad. This will
open the bottom menu bar.
Browser Bottom
Bar Options
7979
Page 81

• Select the Windows option. This will open the Windows Window.
Browser
Windows
• The Windows Window displays all of the current windows you have
opened. Through this Window you can:
-Tap a window to open it
-Delete a window by tapping the X Button to the right of the
window you wish to close
-Open a new window by tapping the New Window Option at
the top of the window.
Bookmarks
Bookmarks enable you to capture the URL of a page you wish to access later on.
Rather than remembering what might be a long URL, you can quickly jump to the
page just by tapping on its bookmark.
To create a bookmark:
• First, open the browser. You can either tap on the Browser Icon on the
home screen or you can access it via the applications:
-Press the Applications Button on the left-hand side of the dial
pad. This will open the Applications Window.
-Select the Browser Icon from the Applications Window. This
will open the browser.
Once you have the browser open, you need to navigate to a URL:
80
Page 82

• Tap on the URL eld at the top. This will open the on-screen keyboard
into which you can type the URL.
• When you are nished, tap the Go Button on the on-screen keyboard.
After the page has loaded, a Bookmark Button will appear to the right of the URL
Field. Tap on this button to bookmark the current URL. This will open the Bookmarks Window.
Browser
Bookmarks
• The URL that you wanted to bookmark is displayed on the far left as
the rst icon labeled “Add.” Tap on this icon to open the Add Bookmark
Popup Window through which you can specify the following information
about the bookmark:
-Name—enter a name for the bookmark. This is automatically
pulled from the title of the page.
-Location—the URL you wish to bookmark. This is automatically
pulled from the URL Field when you tapped the Bookmark button.
• Tap the Ok Button to save the bookmark. This will return you to the
Bookmarks Window.
The Bookmarks Window also allows you to view other information about your
bookmarks, including:
• Most Visited—tapping on this option will display a list of the most
visited URLs. You can tap on one to immediately open the URL in the
browser.
8181
Page 83

• History—tapping on this option will display a history of visited URLs.
You can tap on one to immediately open the URL in the browser.
Search
The browser also includes integrated search capabilities to nd text on the webpage currently loaded into the browser.
To access the browser search feature:
• First, open the browser. You can either tap on the Browser Icon on the
home screen or you can access it via the applications.
-Press the Applications Button on the left-hand side of the dial
pad. This will open the Applications Window.
-Select the Browser Icon from the Applications Window. This
will open the browser.
• Press the Menu Button on the right-hand side of the dial pad. This
will open the bottom menu bar. Select the More option. This will open
a secondary menu list. Tap the Find on Page Option. This will display the
Find on Page Text Field as well as the on-screen keyboard.
Browser Search
Options
• To search for text on the page, simply enter what you are looking for
and tap the Done Button on the on-screen keyboard.
• As you type in the eld, matching text will immediately be highlighted
on the page. When you have nished, whole worlds only will be high
lighted. You can move forwards and backwards through the words that
have been found to match on the page with the Forward Arrow and
Backward Arrow to the left of the Find on Page Text Field.
82
Page 84

Download history
You can download les to your phone through the browser (such as third-party
applications).
To see the download history:
• First, open the browser. You can either tap on the Browser Icon on the
home screen or you can access it via the applications,
-Press the Applications Button on the left-hand side of the dial
pad. This will open the Applications Window.
-Select the Browser Icon from the Applications Window. This
will open the browser.
• Press the Menu Button on the right-hand side of the dial pad. This
will open the bottom menu bar. Select the More option. This will open a
secondary menu list. Tap the Downloads Option. This will display a list of
les you have downloaded. Tapping on a le will make the phone
attempt to open it.
Settings
The built-in browser includes a variety of settings to better customize the browsing experience for your needs.
To access the browser settings:
• First, open the browser. You can either tap on the Browser Icon on the
home screen or you can access it via the applications.
-Press the Applications Button on the left-hand side of the dial
pad. This will open the Applications Window.
-Select the Browser Icon from the Applications Window. This
will open the browser.
• Press the Menu Button, the middle hard button on the phone. This will
open the bottom menu bar. Select the More option. This will open a
secondary menu list. Tap the Settings Option. This will open the Browser
Settings Window.
8383
Page 85

Browser
Settings
• There are a variety of browser settings you can specify:
-Text size—tap this option to set the size of the text. This will
open the Text Size Popup Window from which you can select a
text size. Options include:
• Tiny
• Small
• Normal
• Large
• Huge
-Default Zoom—tap this option to set the default zoom level of
webpages opened in the browser. This will open the Default
Zoom Popup Window from which you can select a default.
Options include:
• Far
• Medium
• Close
-Open Pages in Overview—enable or disable showing a small
thumbnail of the page in the Bookmarks Window;
-Text encoding—tap this option to select the text encoding of
all webpages. This will open the Text Encoding Popup Window
from which you can select a text-encoding. Options include:
• Latin-1 (ISO-8859-1)
• Unicode (UTF-8)
84
Page 86

• Japanese (ISO-2022-JP)
• Japanese (SHIFT_JIS)
• Japanese (EUC-JP)
-Bock pop-up windows—tap this option to enable or disable the
browser from automatically blocking pop-up windows.
-Load Images—tap this open to enable or disable loading
images in webpages. If you choose not to load images, the web
page will load faster.
-Auto-t pages—some webpages will not be formatted to t
into the screen size of your phone. Enabling this option will
force the page to t into the screen size.
-Landscape-only display—enable this option to only display web
pages in landscape mode.
-Enable Javascript—tap this option to enable or disable the
javascript support in the browser. Note: disabling this will
impact the functionality available on websites that use
javascript.
-Enable plug-ins—tap this option to enable plug-ins, such as
Flash.
-Open in background—enable or disable how new windows are
open.
-Set home page—tap this option to open the Set Home Page
Popup Window into which you can type a URL that will be
automatically opened whenever you open the browser or a new
browser window.
-Clear Cache—tap this option to clear the cache of any les
stored temporarily.
-Clear history—tap this option to clear the browsing history
within the browser.
-Accept cookies—cookies are a way for websites to gather
information, personalize the site, and provide interaction. Tap
this to either enable or disable cookie support.
Note: if you disable cookie support, some webpages may not operate properly.
8585
Page 87

-Clear all cookie data—it may be a good idea from time to
time, for privacy reasons, to remove all of the data in the
cookies stored on your phone. Tap this option to remove all
cookie data.
-Remember form data—if you enter a lot of data in forms (i.e.,
addresses, names, etc.) you can tap this option to enable the
browser to save that information so that you don’t have to keep
entering it.
-Clear form data—much like cookies, it may be good from time
to time to delete all of the stored form data from your web
browsing. Tap this option to delete any stored form data.
-Enable location—many sites have begun to access the location
of the browser (region of the world, timezone, etc.) as part of
the browsing experience in order to better personalize the web
page. Tap this setting to either enable or disable that;
-Clear location access—tapping this option will remove all URLs
that have saved location information.
-Remember passwords—if you visit sites frequently that require
you to enter a username and password, it is sometimes
convenient to have the browser remember those so that you
don’t have to enter them again.
-Clear passwords—if multiple people are using your phone, it
may be a good idea to clear your passwords from time-to-time.
-Show Security Warnings—there may be times that a website
is having issues with its security (i.e., certicate, access, etc.).
Enabling this option allows the browser to display a pop-up
window warning you of the issue.
-Reset to Default—tap this option to reset all browser settings
back to their default value.
86
Page 88

Index
About, 8
About Glass, 77
Accessing Voicemail, 26
Adjusting the call volume, 24
Applications, 18, 47
Applications, Adding, 56
Applications, Adding to Home Screen, 57
Applications, Alarm Clock, 48
Applications, Browser, 48
Applications, Calculator, 49
Applications, Phone Status, 50
Applications, Removing, 56
Applications, Settings, 50
Applications, Software Update, 51
Basic Features, 23
Browsing the Web, 79
Browsing the Web, Bookmarks, 82
Browsing the Web, Download History, 85
Browsing the Web, Entering a URL, 79
Browsing the Web, Search, 83
Browsing the Web, Settings, 86
Browsing the Web, Windows, 80
Browsing the Web, Zooming, 84
Call Log, 33
Calling with a Handset, 23
8787
Calling with the On-screen Keypad, 23
Clearing Call Logs, 33
Cloud TC App Market, 52
Conguring The Phone, 60
Conguring, Applications, 68
Conguring, Date & Time, 73
Conguring, Date & Time
Automatically, 74
Conguring, Date & Time Date Format,
76
Conguring, Date & Time
Manually, 74
Conguring, Date & Time NTP
Server, 75
Conguring, Date & Time Other
Settings, 75
Conguring, Date and Time 24-hour
Format, 76
Conguring, Date and Time
Timezone, 75
Conguring, Home Screen, 60
Conguring, Home Screen Folders, 62
Conguring, Home Screen Shortcuts, 60
Conguring, Home Screen Wallpaper, 63
Conguring, Home Screen Widgets, 62
Conguring, Language & Keyboard, 72
Conguring, Location & Security, 67
Page 89

Conguring, Network Settings, 64
Conguring, Network Settings Manually, 65
Conguring, Network Settings via DHCP, 64
Conguring, Phone Settings, 63
Conguring, Privacy, 70
Conguring, Search, 71
Conguring, Sound & Display, 66
Contact Details, 45
Contacts, 36
Contacts, Add, 39
Contacts, Delete, 44
Contacts, Direct Dial, 45
Contacts, Edit, 42
Contacts, Making Favorite, 46
Contacts, Search, 38
Contacts, Sharing, 46
Conventions, 8
Copyright, 7
Dialing from the Call Log, 32
Dialing from the Contacts Window \i, 31
Direct Dial, 31
Direct Dial using a Headset, 31
Direct Dial using Speaker Phone, 31
Direct Dial with a Handset, 31
Ending a call, 23
Filter Contacts, 37
Getting Started, 19
Step 1, 19
Step 2, 19
Step 3, 19
Step 4, 19
Step 5, 19
Keypad, 34
Make a Call, 30
Making a Call, 23
Making a Conference Call, 25
Muting a Call, 24
Navigation
Bottom Information
Bar, 17
Left Bar, 13
Main Area, 16
On-screen Keyboard, 18
Right Bar, 15
Top Information Bar, 14
Notication Window, 29
Notications, 29
Phone Back, 11
Phone Front, 10
Phone Interface, 13
Phone LCD Screen, 12
Phone Provisioning, 20
SIP Provider, 20
88
Page 90

Phone Setup, 22
Phone Side, 12
Phone Status, 27
Putting a Call on Hold \i, 25
Redialing, 25
Search, 35
Speaker Phone \i, 25
Status Indicator Icons, 30
Transferring a Call, 25
Understanding Your Phone, 10
Unpacking Your Phone, 9
Update Your Phone, 89
Using a Headset, 26
Using your Phone, 27
Welcome, 6
8989
Page 91

Causes of Poor Reception
• Aluminum siding.
• Foil backing on insulation.
• Heating ducts and other metal construction that can shield radio signals.
• You ’re too close to appliances such as microwaves, stoves, computers, etc.
• Atmospheric conditions, such as strong storms.
• Base is installed in the basement or lower oor of the house.
• Base is plugged into AC outlet with other electronic devices.
• Baby monitor is using the same frequency.
• Handset battery is low.
• You’re out of range of the base.
Service
If trouble is experienced with this equipment, for repair or warranty information, please
contact customer service at 1-800-511-3180. If the equipment is causing harm to the
telephone network, the telephone company may request that you disconnect the equipment
until the problem is resolved.
This product may be serviced only by the manufacturer or its authorized service agents.
Changes or modications not expressly approved by Teleeld NA Inc. could void the user’s
authority to operate this product. For instructions on how to obtain service, refer to the
warranty included in this guide or call customer service at 1-800-511-3180.
Or refer inquires to:
Teleeld NA Inc.
Manager, Consumer Relations
4915 SW Grith Dr. #205
Beaverton, Or 97005
Attach your sales receipt to the booklet for future reference or jot down the date this
product was purchased or received as a gift. This information will be valuable if service
should be required during the warranty period.
Purchase date ________________________________________________
Name of store ________________________________________________
90
Page 92

Warranty
Limited Warranty
What your warranty covers:
• Defects in materials or workmanship
For how long after your purchase:
• Two years, from date of purchase
What we will do:
• Provide you with a replacement unit. The exchange unit is under warranty for the
remainder of
the original product’s warranty period.
How you get service:
• Locate your proof of purchase in the form of a bill of sale or receipted invoice which is
evidence
that the product is within the warranty period. Proof of warranty eligibility is required and
must be presented to obtain warranty service.
• Contact RCA Customer Care at (800) 511-3180. Our representatives will help you
troubleshoot and diagnose the problem. As you may be asked to disconnect your RCA
telephone from it’s power source, you must call from another telephone. If the issue cannot
be resolved by our Customer Care Team, you will be issued an RMA (Return Merchandise
Authorization) number and be given instructions on how to submit your proof-of-purchase
paperwork and where to send your defective merchandise.
• You will be responsible for shipping the defective unit back to our warranty fulllment
center at your own expense. You are responsible for damage or loss during shipment so
insuring the product during return shipping is highly recommended.
• We will ship a replacement to you freight pre-paid.
What your warranty does not cover:
• Customer instruction. (Your Instruction Book provides information regarding operating
instructions and user controls. Additionally, our Customer Care Center is staed 24x7 with
product experts that can assist you with any questions that may arise during setup and use
of your RCA telephone.
• Installation and setup service adjustments
• Batteries
• Damage from misuse or neglect
• Products that have been modied of serviced outside the USA
• Products purchased from non-authorized retailers, dealers or resellers
9191
Page 93

• Products purchased or serviced outside the USA
• Acts of nature, such as, but not limited to lightning damage
Product Registration:
• Please complete and mail the Product Registration Card packed with your unit. It will
make it easier to contact you should it ever be neccessary. The return of the card is not
required for warranty coverage.
Limitation of Warranty:
• THE WARRANTY STATED ABOVE IS THE ONLY WARRANTY APPLICABLE TO THIS
PRODUCT. ALL OTHER WARRANTIES, EXPRESS OR IMPLIED
(INCLUDING ALL IMPLIED WARRANTIES OF MERCHANTABILITY OR FITNESS FOR
A PARTICULAR PURPOSE) ARE HEREBY DISCLAIMED. NO VERBAL OR WRITTEN
INFORMATION GIVEN BY TELEFIELD NA INC., ITS AGENTS, OR EMPLOYEES SHALL
CREATE A GUARANTY OR IN ANY WAY INCREASE THE SCOPE OF THIS WARRANTY.
•REPAIR OF REPLACEMENT AS PROVIDED UNDER THIS WARRANTY IS THE EXCLUSIVE
REMEDY OF THE CONSUMER. TELEFIELD NA INC. SHALL NOT BE LIABLE FOR
INCIDENTAL OR CONSEQUENTIAL DAMAGES RESULTING FROM THE USE OF THIS
PRODUCT OR ARISING OUT OF ANY BREACH OF ANY EXPRESS OR IMPLIED WARRANTY
ON THIS PRODUCT. THIS DISCLAIMER OF WARRANTIES AND LIMITED WARRANTY
ARE GOVERENED BY THE LAWS OF THE STATE OF OREGON. EXCEPT TO THE EXTENT
PROHIBITED BY APPLICABLE LAW, ANY IMPLIED WARRANTY OF MERCHANTABILITY
OR FITNESS FOR A PARTICULAR PURPOSE ON THIS PRODUCT IS LIMITED TO THE
APPLICABLE WARRANTY PERIOD SET FORTH ABOVE.
How state law relates to this warranty:
• Some states do not allow the exclusion nor limitation of incidental or consequential
damages, or limitations on how long an implied warranty lasts so the above limitations or
exclusions may not apply to you.
• This warranty gives you specic legal rights, and you also may have other rights that vary
from state to state.
If you purchased your product outside the USA, Mexico or Canada:
This warranty does not apply. Contact your dealer for warranty information.
92
Page 94

Visit the RCA web site at www.rca4business.com
Please do not send any products to the Oregon address listed in this manual or on the
carton. This will only add delays in service for your product.
Teleeld NA Inc.
4915 SW Grith Dr. #205
Beaverton, Or 97005
RCA is a trademark of RCA Trademark Management S.A.,
Used under license.
© 2011. All rights reserved.
9393
 Loading...