

Page 1

MX Series
HD Network Camera
MX810-HD / MX820-HD
MX833-HD / MX873-HD / MX763-HD
Installation Guide
Page 2

Notice:
Signal Communications Limited reserves the right to make improvements
to the product described in this manual at any time and without notice.
This manual is copyrighted. All rights are reserved. This manual should
not be copied, reproduced or translated in whole or part without prior consent
from Signal Communications Limited.
TeleEye is a trademark of Signal Communications Limited and is registered in
China, European Communities, Hong Kong, US and other countries.
All other trademarks are the property of their respective owners.
Copyright (c) 2011 Signal Communications Limited (A member of TeleEye
Group). All rights reserved.
Version 0.12
Limits of Liability and Disclaimer of Warranty
Signal Communications Limited has taken care in preparation of this
manual, but makes no expressed or implied warranty of any kind and
assumes no responsibility for errors or omissions. No liability is assumed for
incidental or consequential damages in connection with or arising out of the
use of the information or accessories contained herein.
Features and specifications are subject to change without prior notice.
Page 3

Contents
1. Package Contents ................................................................................................... 6
1.1. MX810-HD ............................................................................................ 6
1.2. MX820-HD / MX823-HD ..................................................................... 7
1.3. MX833-HD ............................................................................................ 8
1.4. MX873-HD ............................................................................................ 9
1.5. MX763-HD .......................................................................................... 10
2. Hardware Installation ........................................................................................... 11
2.1. MX810-HD .......................................................................................... 11
2.1.1. Features ........................................................................................ 11
2.1.2. Installation.................................................................................... 11
2.2. MX820-HD / MX823-HD ................................................................... 14
2.2.1. Features ........................................................................................ 14
2.2.2. Installation.................................................................................... 14
2.3. MX833-HD .......................................................................................... 17
2.3.1. Features ........................................................................................ 17
2.3.2. Installation.................................................................................... 17
2.4. MX873-HD .......................................................................................... 20
2.4.1. Features ........................................................................................ 20
2.4.2. Installation.................................................................................... 20
2.5. MX763-HD .......................................................................................... 23
2.5.1. Features ........................................................................................ 23
2.5.2. Installation.................................................................................... 23
3. Software Installation ............................................................................................ 25
3.1. PC Requirements ................................................................................. 25
3.2. sureSIGHT Installation ........................................................................ 25
4. Network Configuration ........................................................................................ 28
4.1. Connect Camera to the Network .......................................................... 28
4.2. Change the IP address .......................................................................... 29
5. Video Monitoring ................................................................................................. 31
5.1. sureSIGHT ........................................................................................... 31
5.2. Web Browser ........................................................................................ 34
6. Appendix .............................................................................................................. 36
6.1. Functional Features .............................................................................. 36
Page 4

6.2. Specifications ....................................................................................... 38
6.3. Dimension ............................................................................................ 40
6.3.1. MX810-HD .................................................................................. 40
6.3.2. MX820-HD .................................................................................. 40
6.3.3. MX823-HD .................................................................................. 40
6.3.4. MX833-HD .................................................................................. 41
6.3.5. MX873-HD .................................................................................. 41
6.3.6. MX763-HD .................................................................................. 41
Page 5

MX User Guide PAGE 5
Introduction
TeleEye MX Series is a complete portfolio of professional and
practical HD network camera utilizing our proprietary HD SMAC-M
compression technology. The MX series offers the balanced
combination of high-quality video, mobility, scalability and cost
effectiveness. By using TeleEye MX, users can build an integrated,
scalable, wired or wireless IP & mobile video surveillance solution
over existing network infrastructure. With the support of TeleEye
versatile back-end applications, users can gain extra control over
their TeleEye business management beyond security.
Safety Cautions
Do not install the camera in extreme temperature conditions. Use
the camera under conditions where temperatures are within +0C
~ +40C: (32F ~ 104F)
Do not install the camera under unstable lighting conditions.
Severe lighting change or flicker can cause the camera to work
improperly.
Do not install or use the camera in an environment where
humidity is high. This can result in poor-quality image.
Do not disassemble the camera. There are no user serviceable
parts inside it. Opening or removing the camera‟s cover may
expose you to dangerous voltage or other hazards. Refer all
servicing to qualified personnel only.
Do not touch the imaging surface of sensor. Use a soft cloth with
alcohol to clean the surface if it is touched accidentally.
The camera may be damaged by electrical and physical shock.
Use regulated 12V DC, 1.25A power supply. Do not throw or
drop it onto the floor.
The camera can be used outdoor. But if it is used outdoor, it is
required to avoid direct light from the sun. Do not use it under
water.
Page 6
MX User Guide PAGE 6
1. Package Contents
After removing the package, make sure you have the following items:
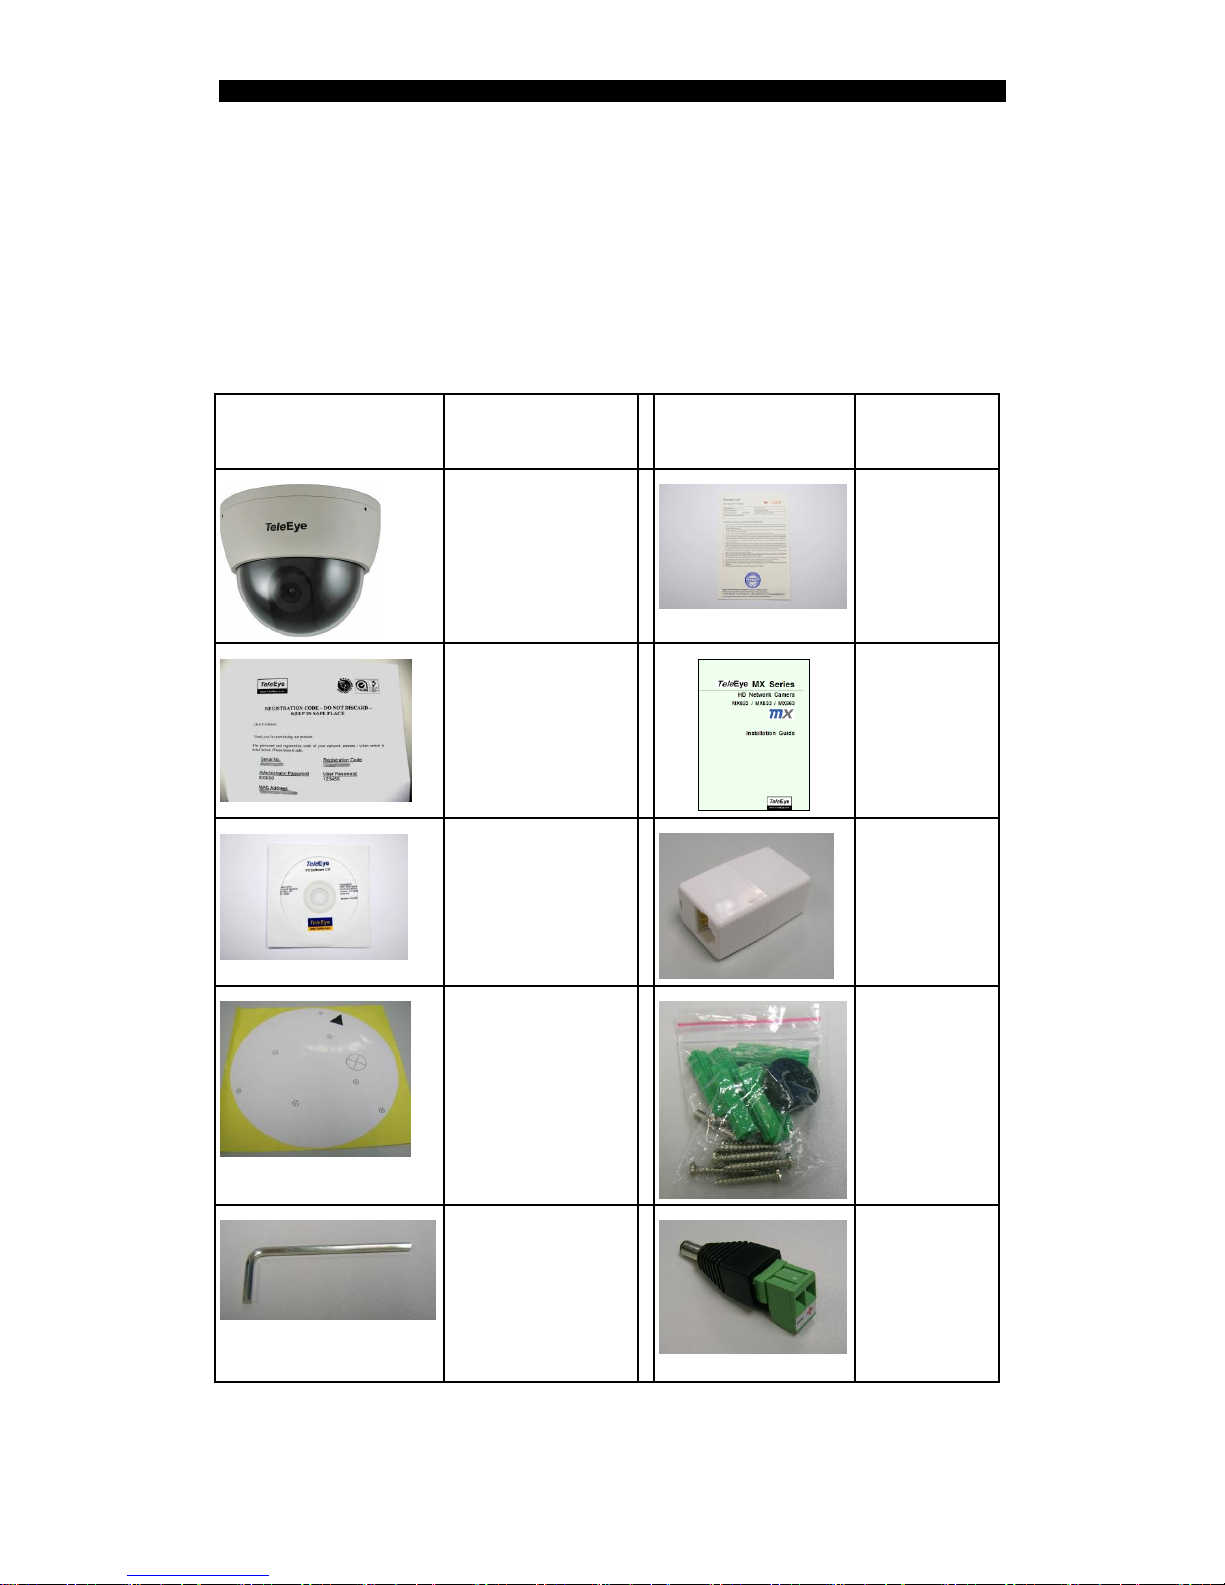
1.1. MX810-HD
MX810-HD High Definition Fixed Dome
Package Contents
Description
Package
Contents
Description
MX810-HD
network camera
Warranty
Card
Registration Code
Sheet
Installation
Guide
Software CD
RJ-45
Ethernet
Adapter
Label
Wall Mount
Screws and
plastic wall
plugs
Hexagon Wrench
Power Jack
Converter
Page 7
MX User Guide PAGE 7
1.2. MX820-HD / MX823-HD
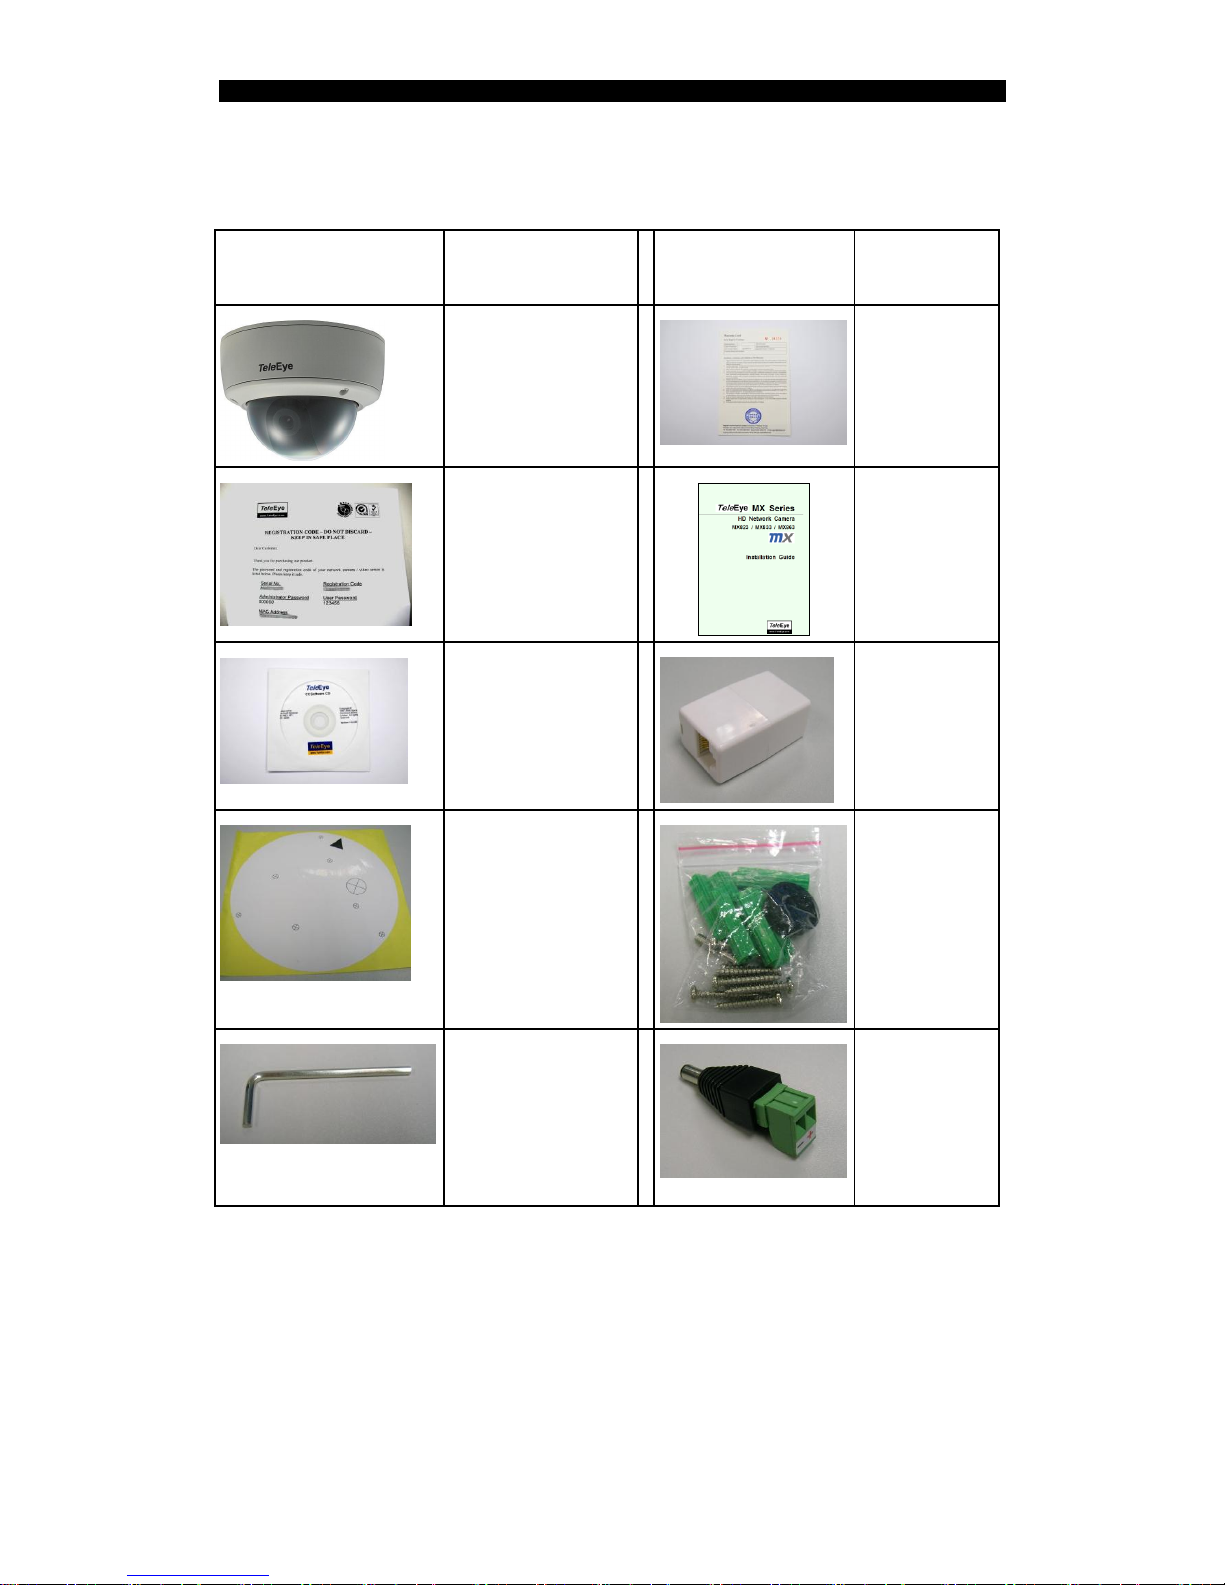
MX820-HD Outdoor & Vandal Resistant Fixed Dome
Package Contents
Description
Package
Contents
Description
MX820-HD
network camera
Warranty
Card
Registration Code
Sheet
Installation
Guide
Software CD
RJ-45
Ethernet
Adapter
Label
Wall Mount
Screws and
plastic wall
plugs
Hexagon Wrench
Power Jack
Converter
Page 8
MX User Guide PAGE 8
1.3. MX833-HD
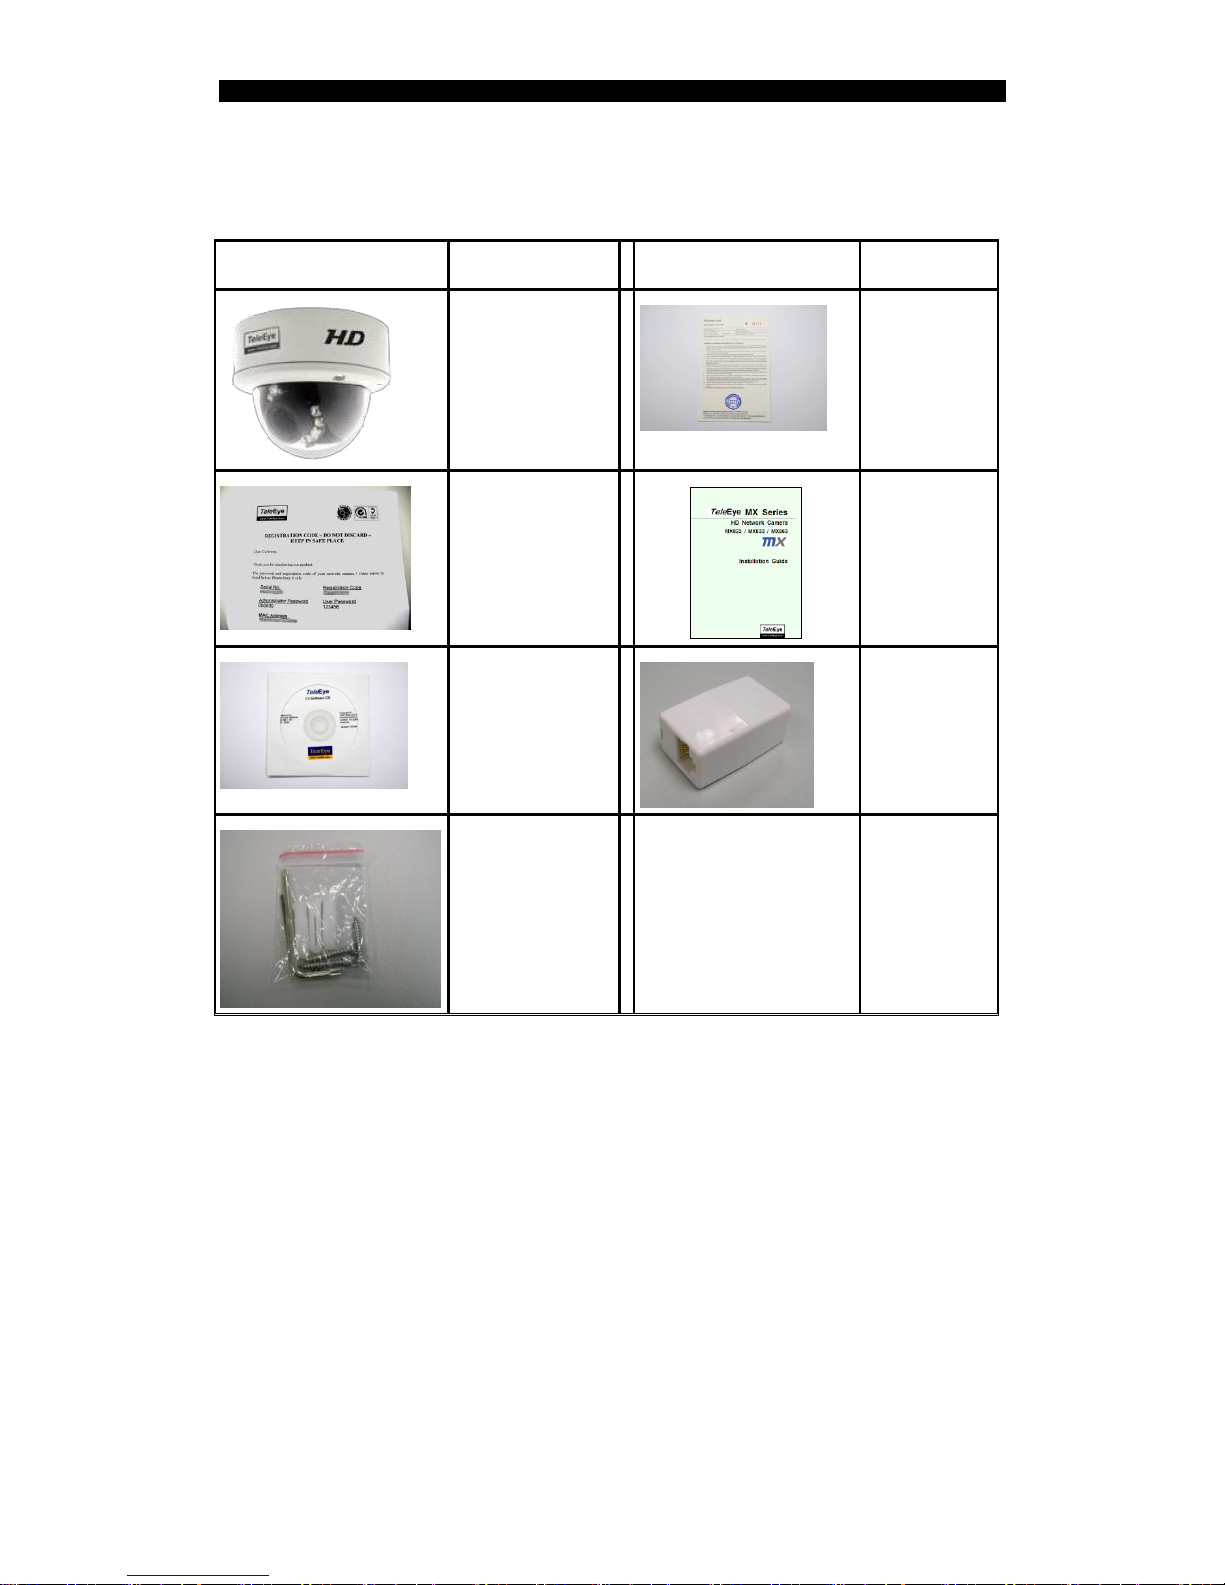
MX833-HD IR Vandal Resistant HD CCTV Camera
Package Contents
Description
Package Contents
Description
MX833-HD
network
camera
Warranty
Card
Registration
Code Sheet
Installation
Guide
Software CD
RJ-45
Ethernet
Adapter
Screw driver,
wall mount
screws and
plastic wall
plugs
Page 9
MX User Guide PAGE 9
1.4. MX873-HD
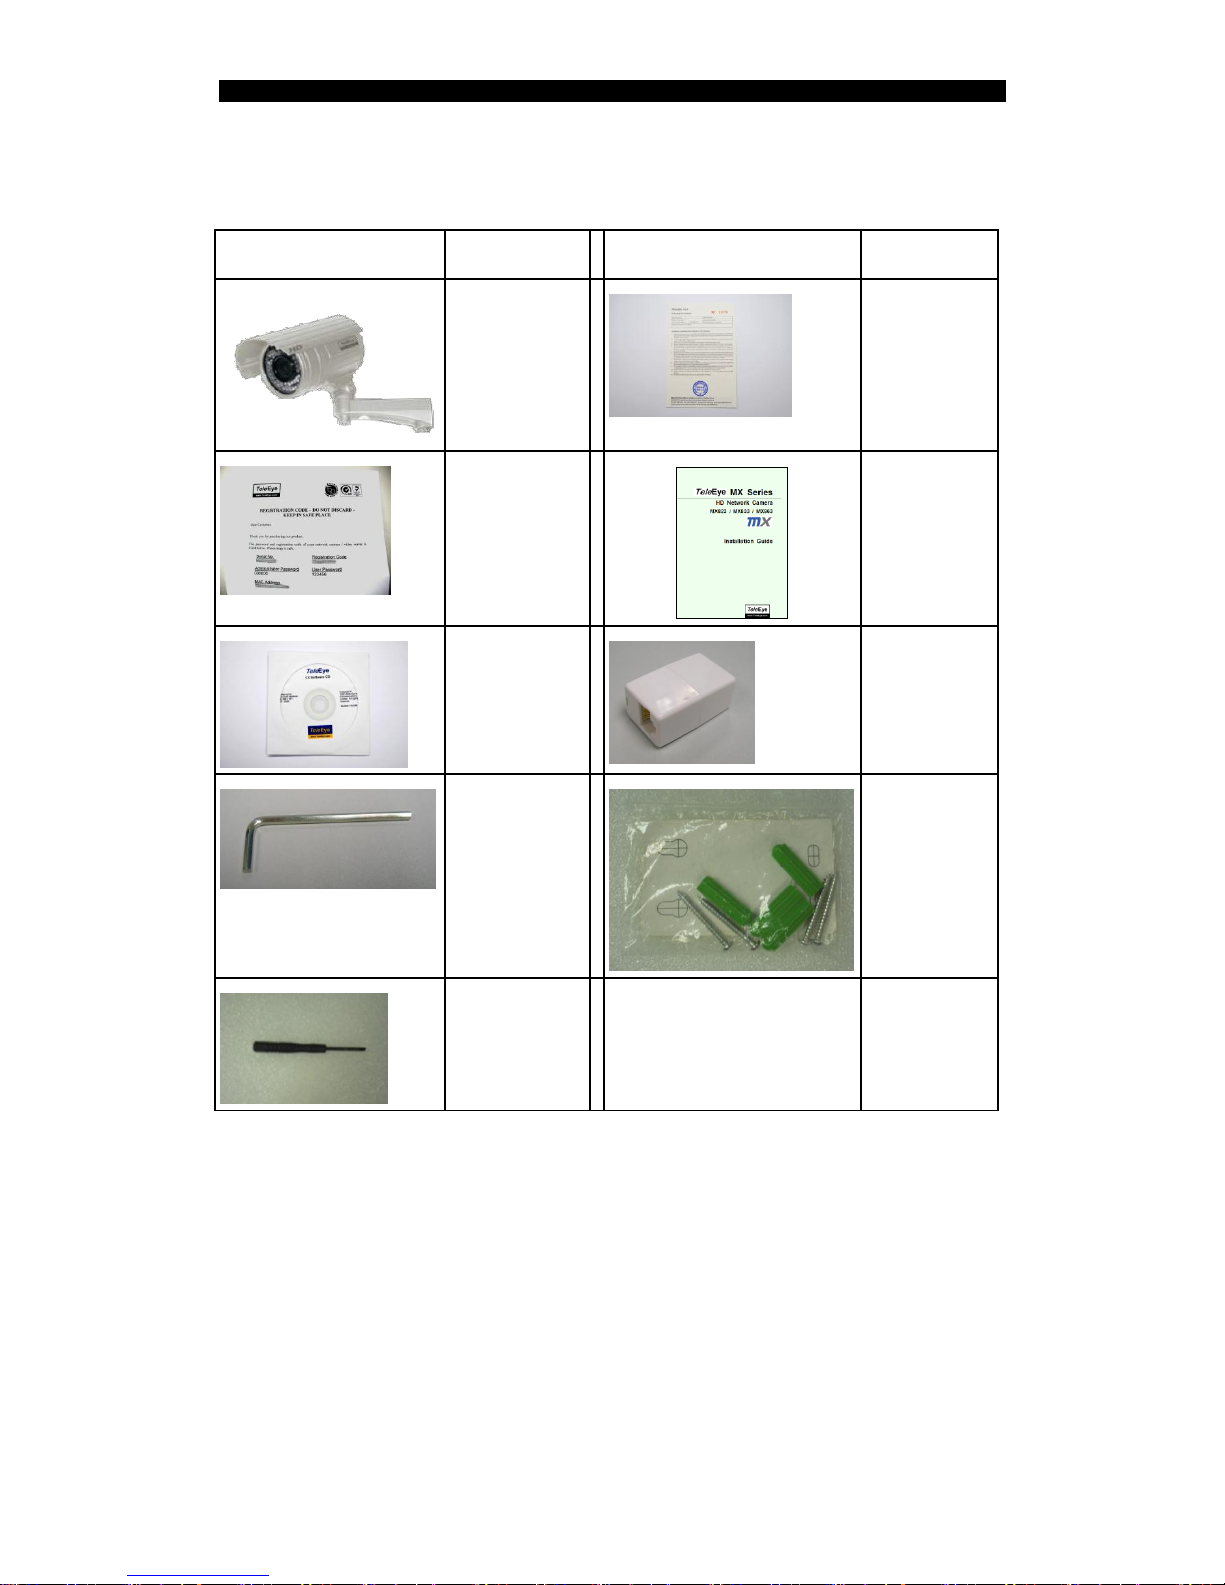
MX873-HD IR Vari-focal HD CCTV Camera
Package Contents
Description
Package Contents
Description
MX873-HD
network
camera
Warranty
Card
Registration
Code Sheet
Installation
Guide
Software CD
RJ-45
Ethernet
Adapter
Hexagon
Wrench
Wall hole
label, Wall
mount
screws and
plastic wall
plugs
Screw Driver
Page 10
MX User Guide PAGE 10
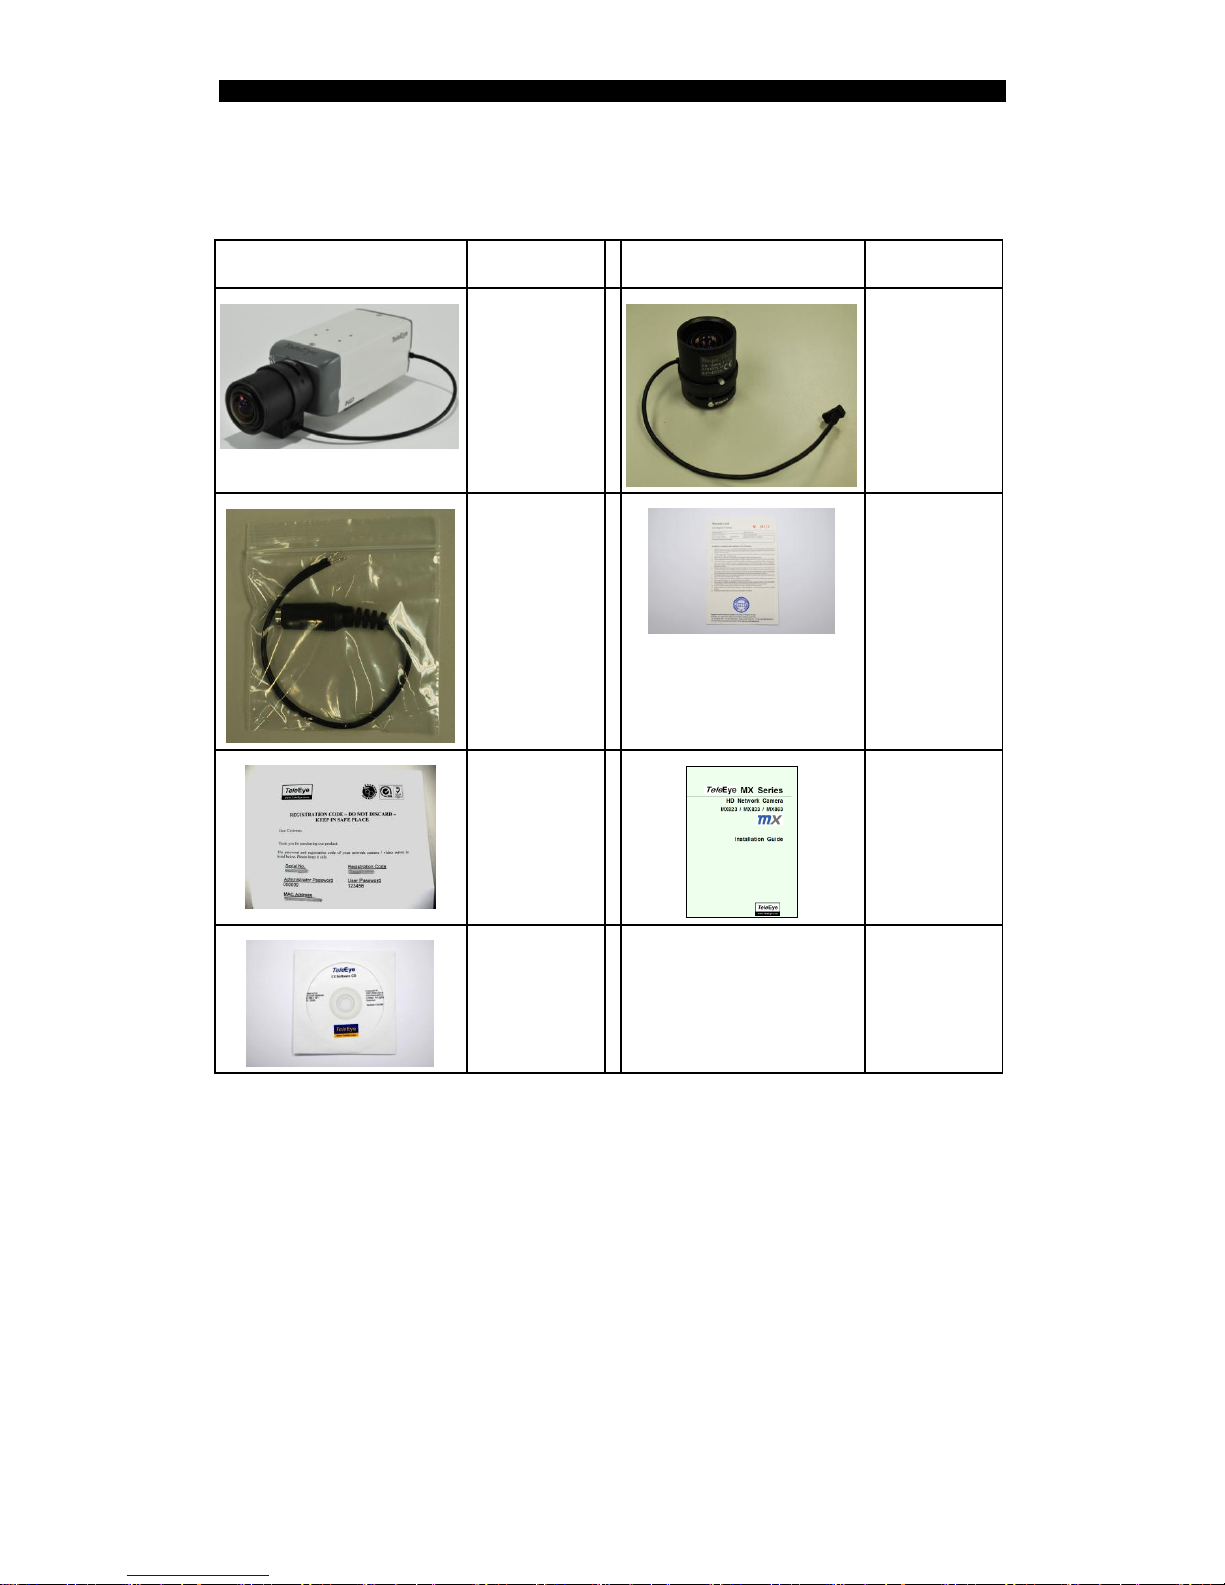
1.5. MX763-HD
MX763-HD Day & Night HD CCTV Camera
Package Contents
Description
Package Contents
Description
MX763-HD
network
camera
CS mount
CCTV Lens
(Optional)
Power
Converter
Cable
Warranty
Card
Registration
Code Sheet
Installation
Guide
Software
CD
Page 11
MX User Guide PAGE 11
2. Hardware Installation
In this chapter, it will show you how to setup and adjust the MX series
cameras.
2.1. MX810-HD
2.1.1. Features
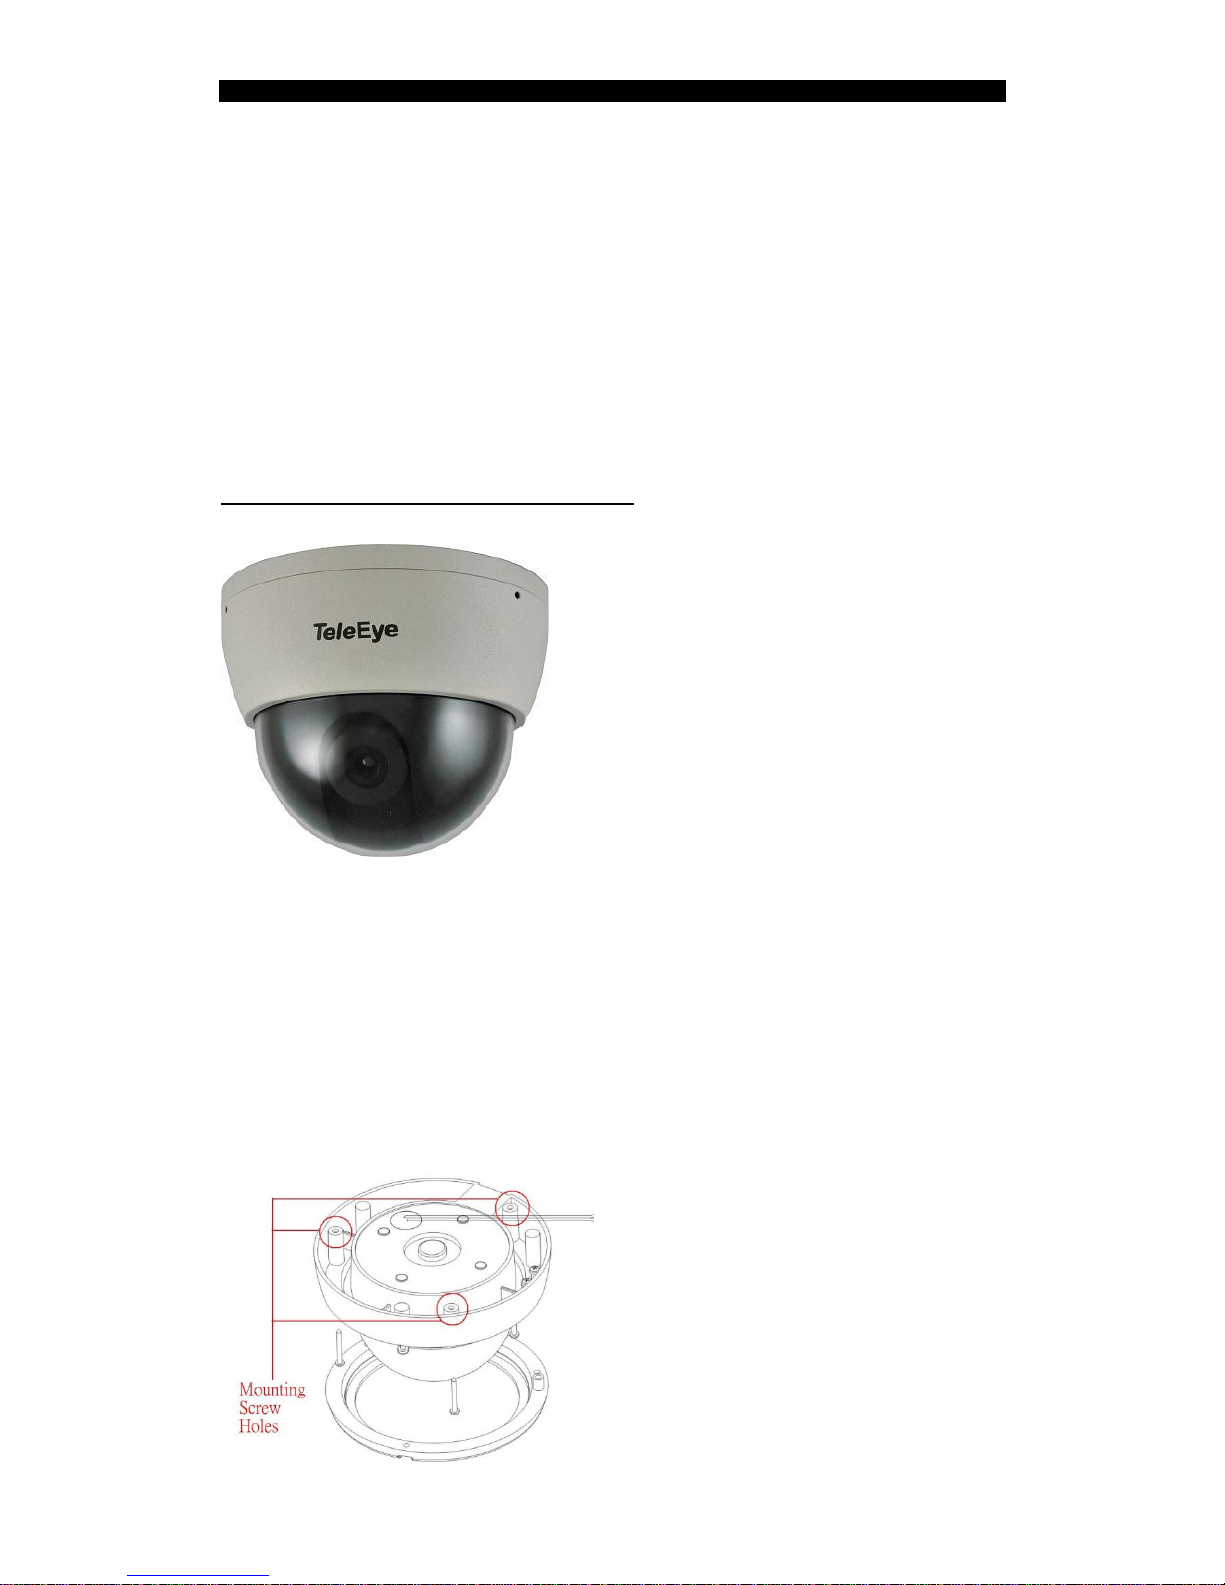
MX810-HD High Definition Fixed Dome
Weather Proof and Vandal Resistance
1/3.2” CMOS sensor
f=3.6mm or 6mm fixed iris lens
720p, 15fps
Max. Resolution: 1600 x 900p
IP66 weather proof and Vandal Resistant
HD SMAC-M multi-stream coder for HD video
Independent HD video recording stream
Independent mobile stream for mobile phone viewing
Optional sureREC HD Video Recording Solution
Optional sureSIGHT Integrated Video Management Solution
2.1.2. Installation
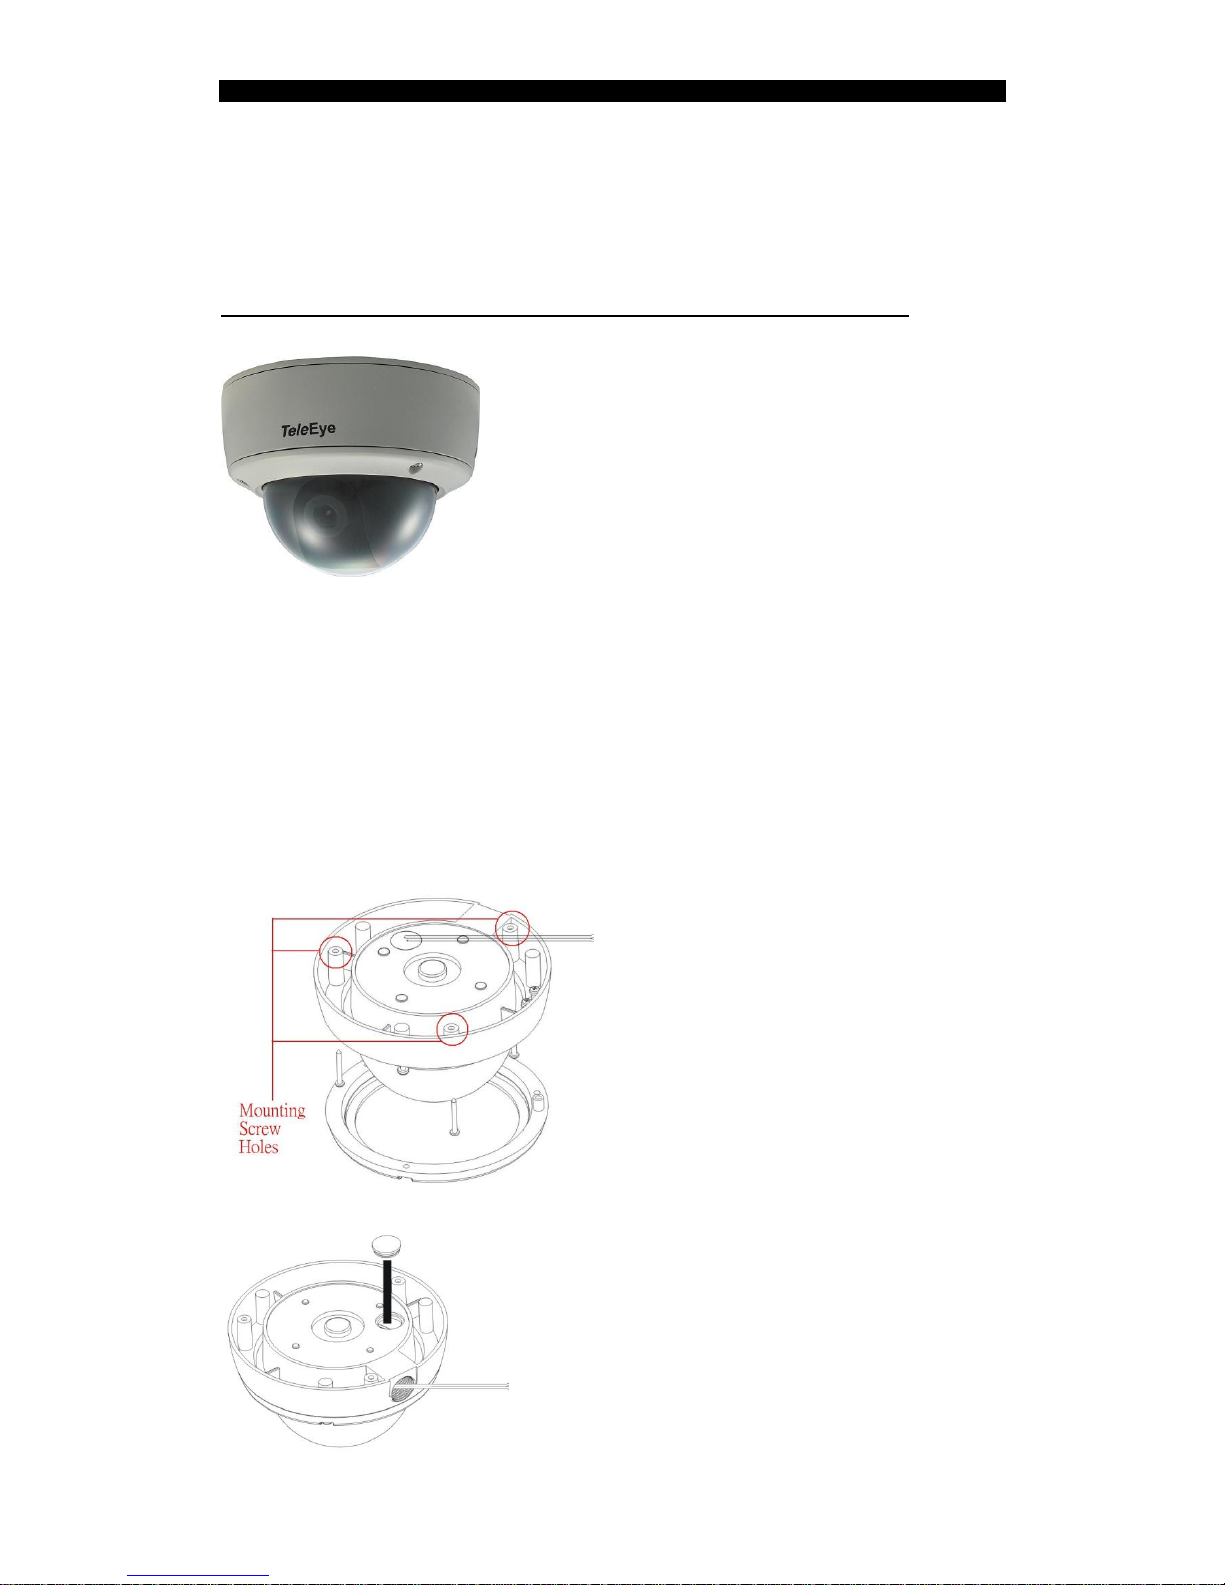
The positions marked with circles
show the holes for mounting screw.
Page 12
MX User Guide PAGE 12
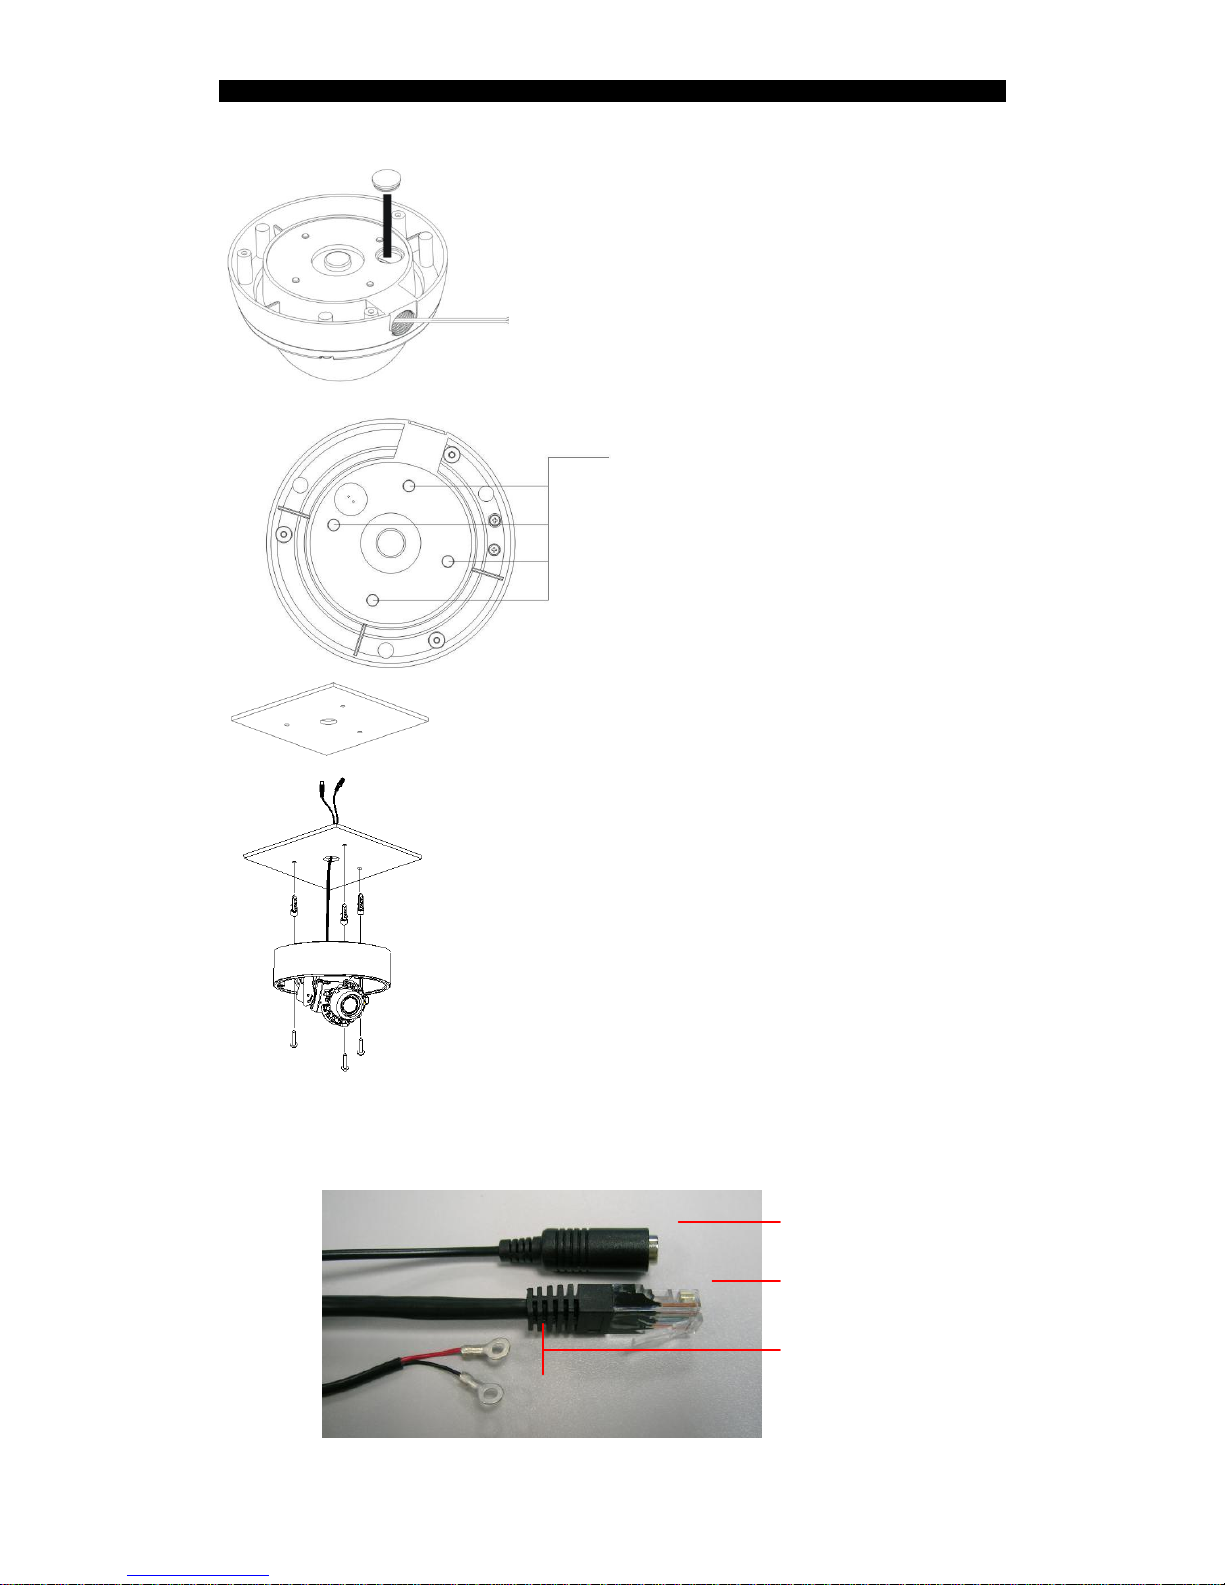
There is an alternate hole for the
power cable, Ethernet cable and alarm
cable. When this hole is used, the
upper hole has to be sealed with the
plastic cork.
These 4 plastic corks should never be
removed when waterproof is a critical
requirement.
Drill a ф25mm hole on the ceiling for
video and power connector cable to
pass through.
Take off the dome cover from the
camera. Use specified holes inside the
camera base for installation.
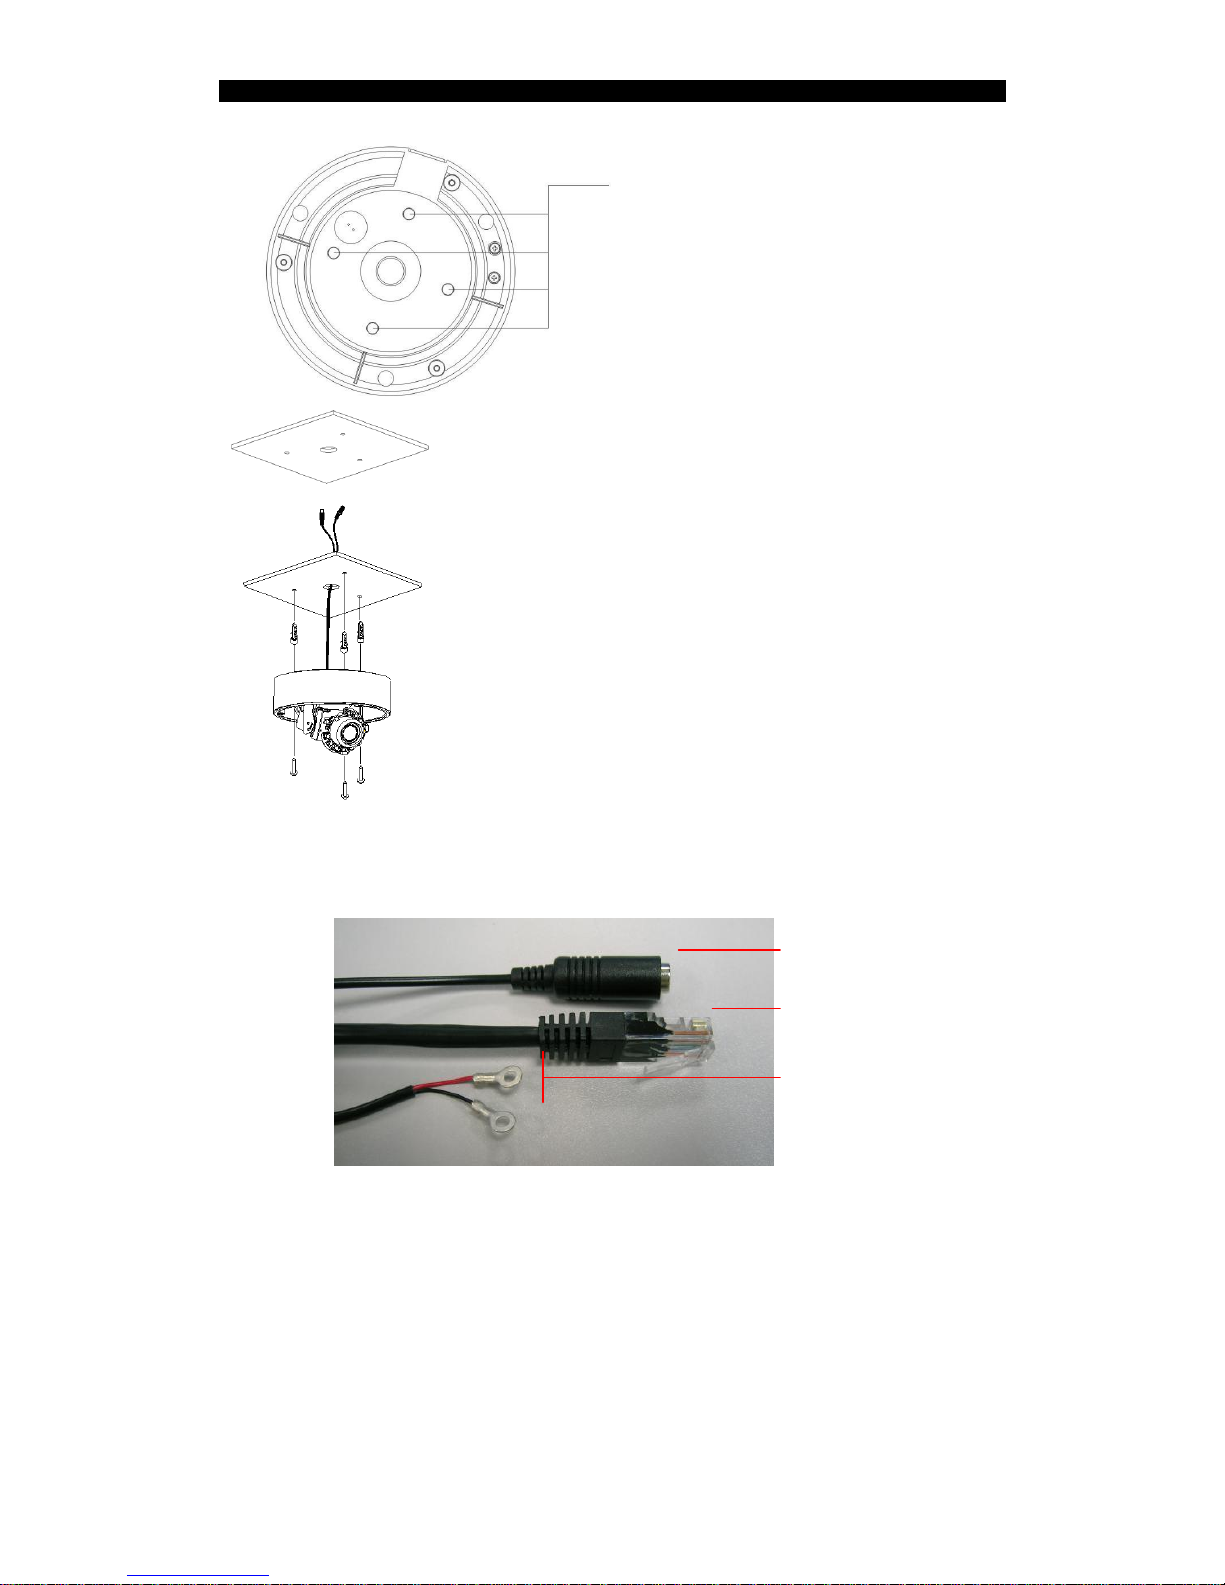
With reference to the following figure, connect the power cable with a 12V DC
supply, Ethernet cable through the LAN adapter and alarm cable to the
camera.
Power cable (DC12V IN)
Ethernet cable
Alarm cable
Page 13
MX User Guide PAGE 13
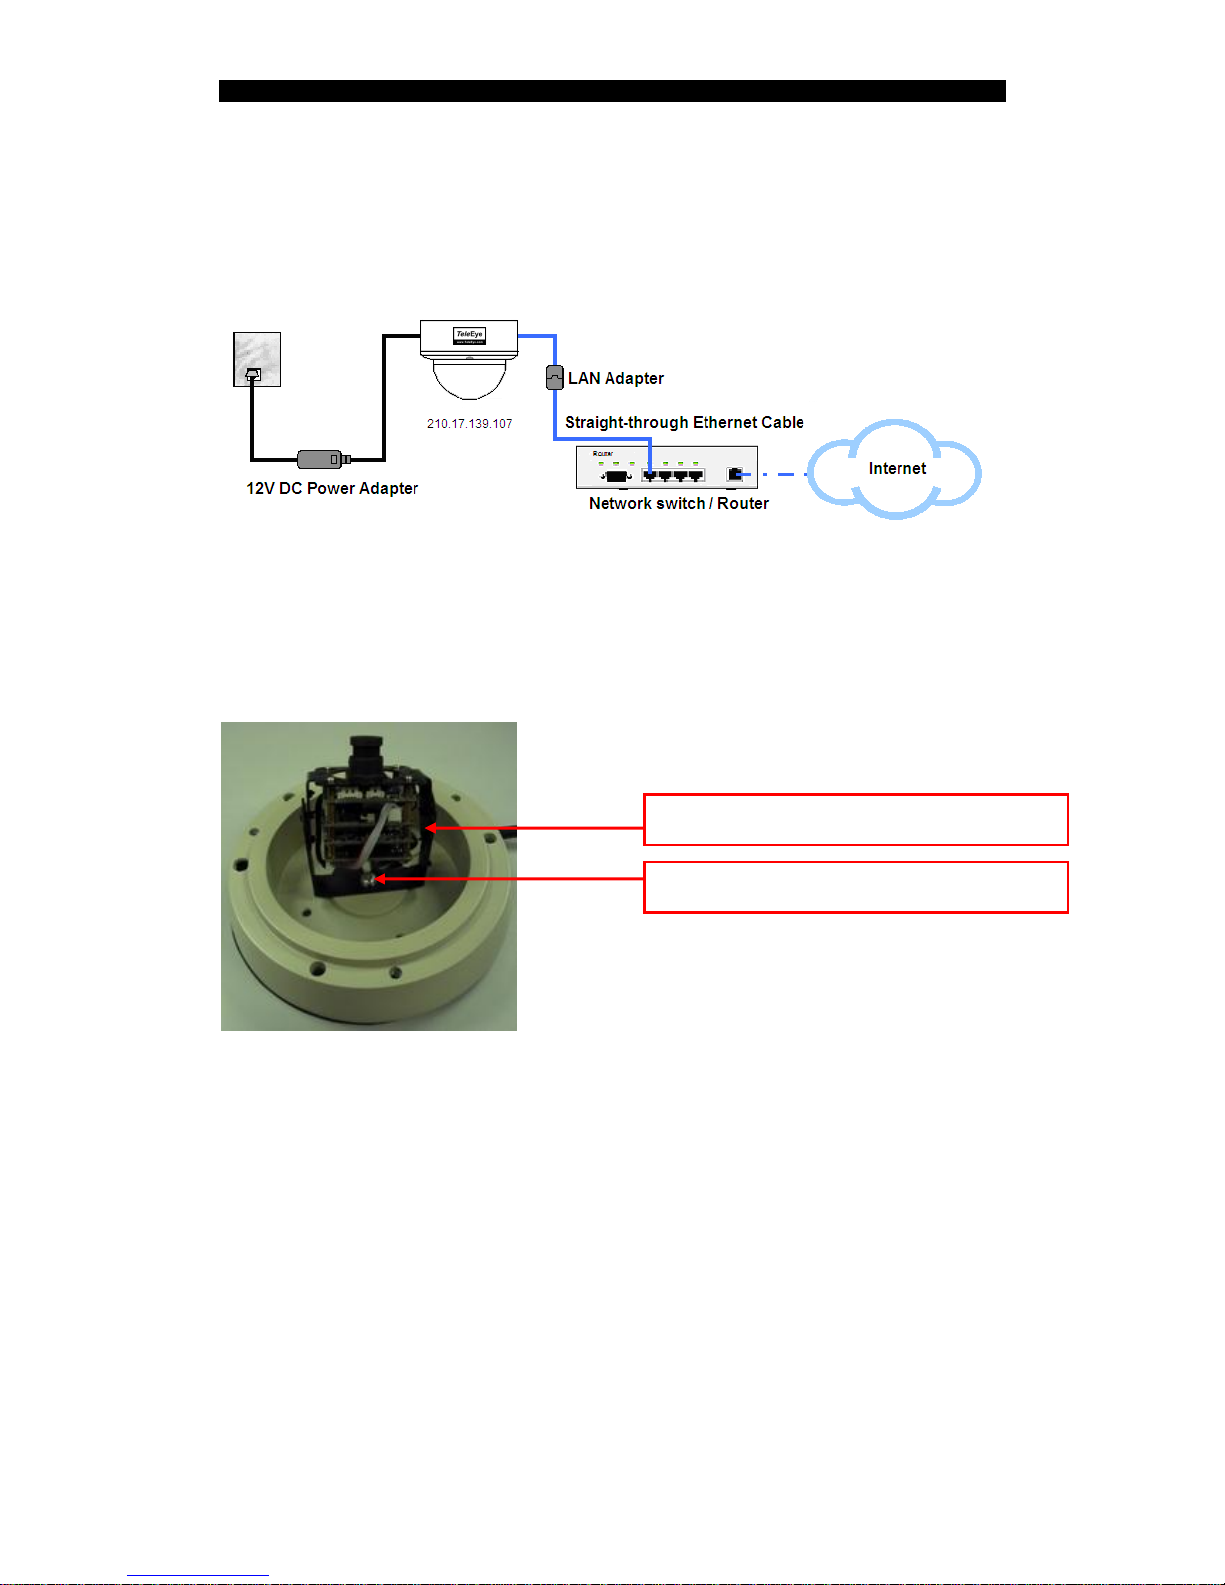
After mounting the camera on the wall or the ceiling, connect the power cable
with a 12VDC supply and connect the Ethernet cable to the LAN adapter as
the follows:
Run sureSIGHT or Web browser (Please refer to chapter 5 for more details)
to start the live video monitoring in order to tune the camera. Then loose the
screws to adjust the camera‟s direction (pan/tilt).
Tighten the screws to fix the direction of the camera module. Finally, close the
camera cover.
Loose this screw for adjusting tilt position
Loose this screw for adjusting pan position
MX810-HD
Page 14
MX User Guide PAGE 14
2.2. MX820-HD / MX823-HD
2.2.1. Features
MX820-HD / MX-823-HD Outdoor & Vandal Resistant Fixed Dome
Outdoor and Vandal Resistant
1/3.2” CMOS sensor
f=3.6mm or 6mm fixed iris lens
720p, 15fps
Max. Resolution: 1600 x 900p
IP66 weather proof and Vandal Resistant
HD SMAC-M multi-stream coder for HD video
Independent HD video recording stream
Independent mobile stream for mobile phone viewing
Optional sureREC HD Video Recording Solution
Optional sureSIGHT Integrated Video Management Solution
2.2.2. Installation
The positions marked with circles
show the holes for mounting screw.
There is an alternate hole for the
power cable, Ethernet cable and alarm
cable. When this hole is used, the
upper hole has to be sealed with the
plastic cork.
Page 15
MX User Guide PAGE 15
These 4 plastic corks should never be
removed when waterproof is a critical
requirement.
Drill a ф25mm hole on the ceiling for
video and power connector cable to
pass through.
Take off the dome cover from the
camera. Use specified holes inside the
camera base for installation.
With reference to the following figure, connect the power cable with a 12V DC
supply, Ethernet cable through the LAN adapter and alarm cable to the
camera.
After mounting the camera on the wall or the ceiling, connect the power cable
with a 12VDC supply and connect the Ethernet cable to the LAN adapter as
the follows:
Power cable (DC12V IN)
Ethernet cable
Alarm cable
Page 16
MX User Guide PAGE 16
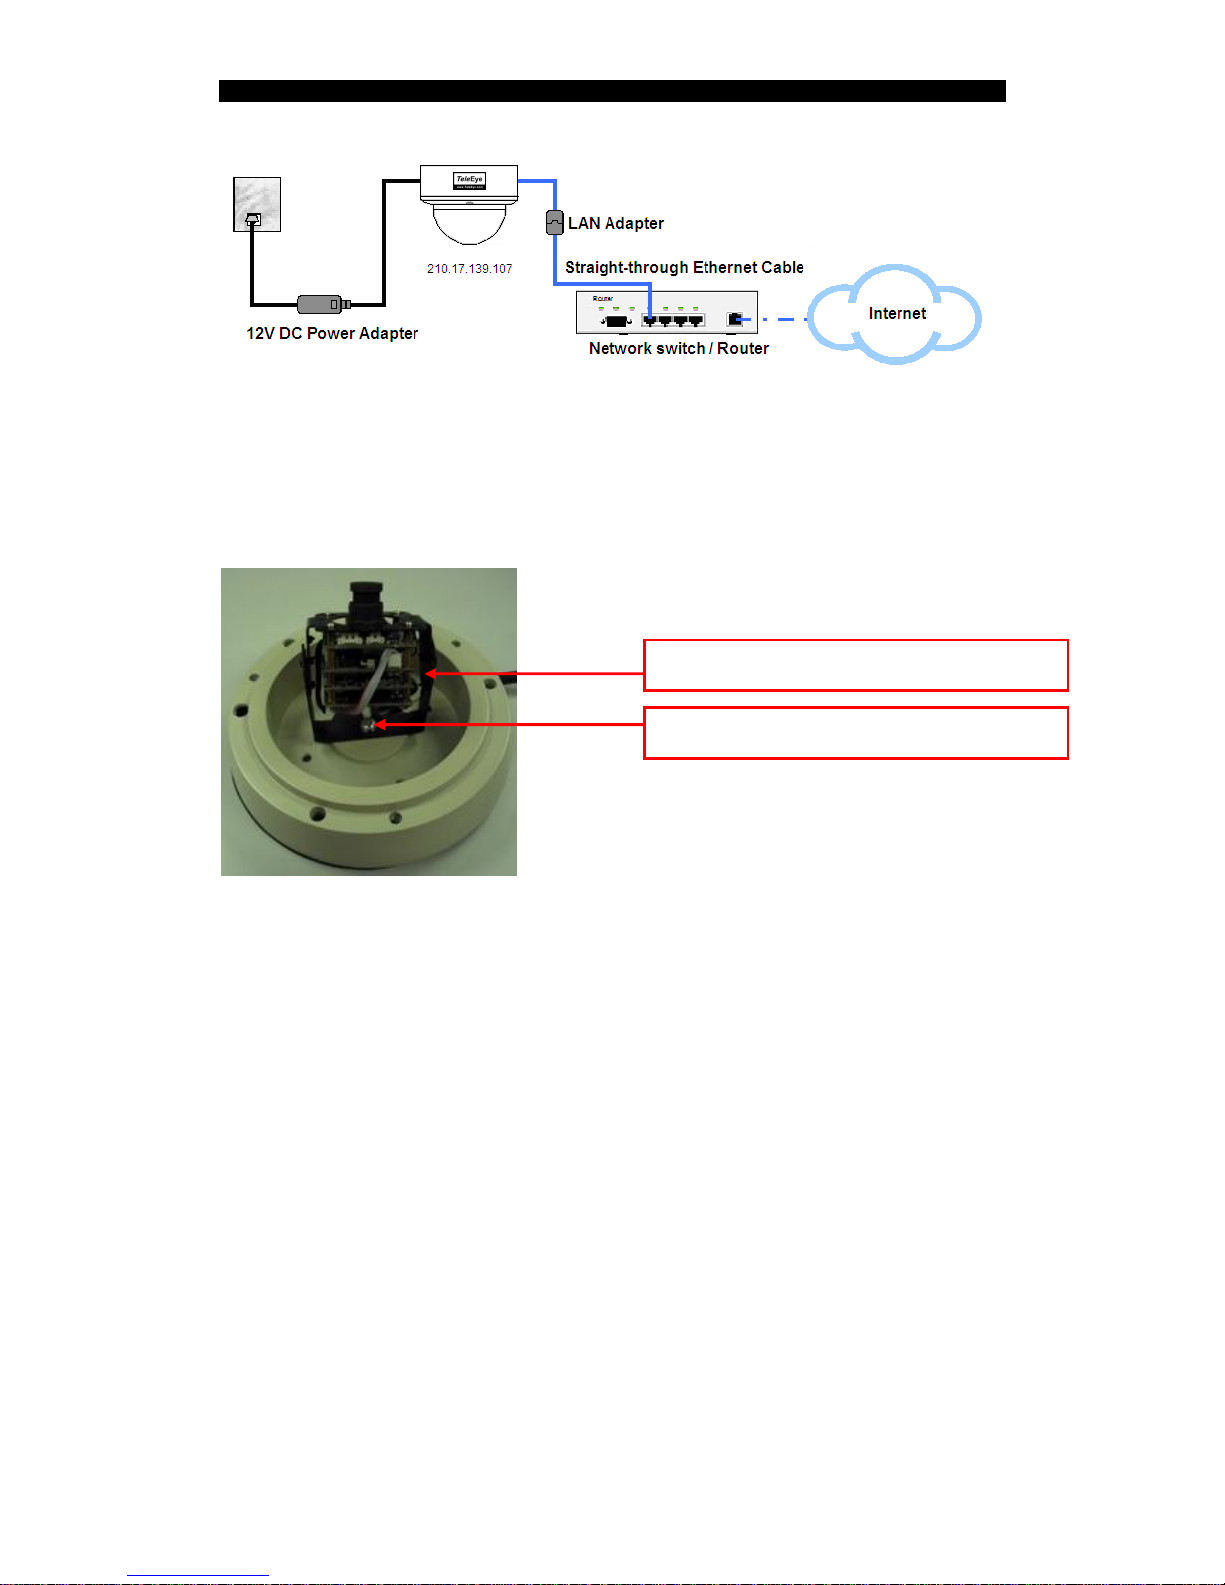
Run sureSIGHT or Web browser (Please refer to chapter 5 for more details)
to start the live video monitoring in order to tune the camera. Then loose the
screws to adjust the camera‟s direction (pan/tilt).
Tighten the screws to fix the direction of the camera module. Finally, close the
camera cover.
Loose this screw for adjusting tilt position
Loose this screw for adjusting pan position
MX820-HD
Page 17
MX User Guide PAGE 17
2.3. MX833-HD
2.3.1. Features
MX833-HD IR Vandal Resistant HD CCTV Camera
HD CCTV Camera with Focus Assist Function
1/3.2” CMOS sensor
f=2.7 - 9mm Vari-focal auto-iris IR lens
720p, 15fps
Max. Resolution: 1600 x 900p
~15m IR illumination range
True day & night operation with auto IR-cut filter
IP66 Weather Proof and Vandal Resistant
Power over Ethernet – IEEE 802.3af
HD SMAC-M multi-stream coder for HD video
Independent HD video recording stream
Independent mobile stream for mobile phone viewing
Optional sureREC HD Video Recording Solution
Optional sureSIGHT Integrated Video Management Solution
2.3.2. Installation
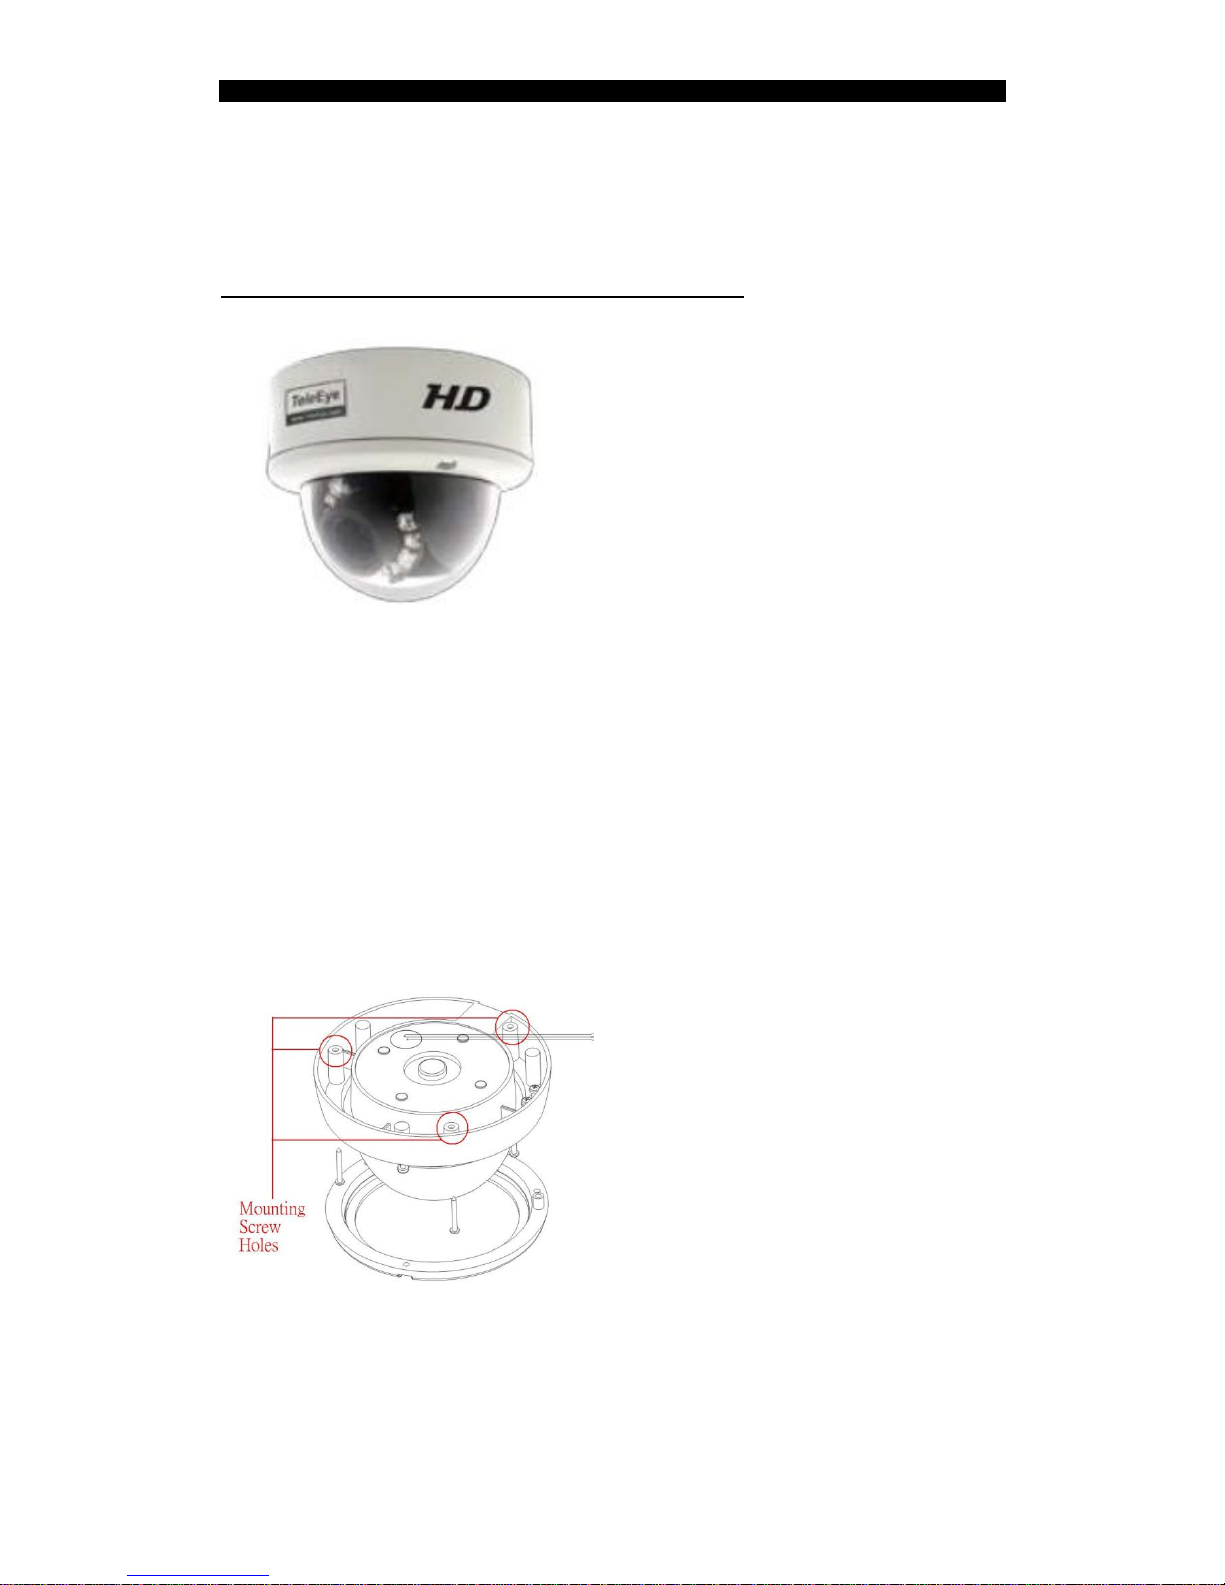
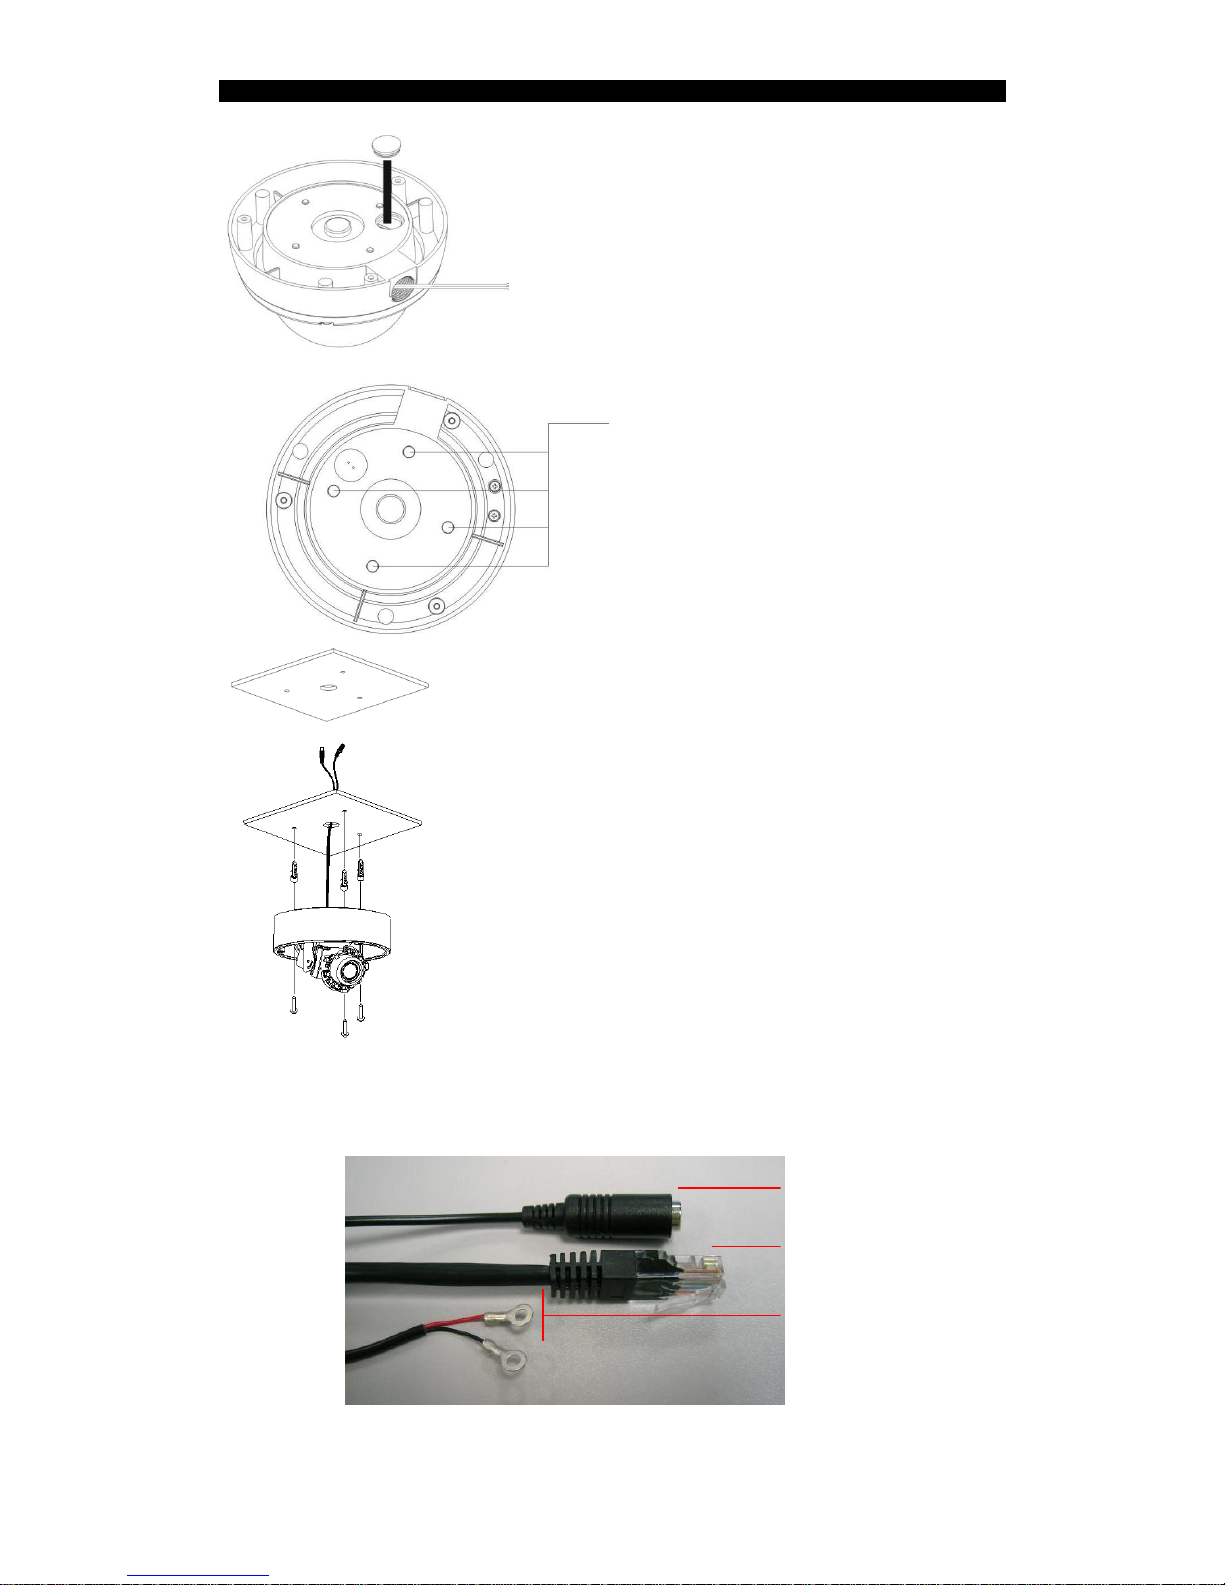
The positions marked with circles
show the holes for mounting screw.
Page 18
MX User Guide PAGE 18
There is an alternate hole for the
power cable, Ethernet cable and alarm
cable. When this hole is used, the
upper hole has to be sealed with the
plastic cork.
These 4 plastic corks should never be
removed when waterproof is a critical
requirement.
Drill a ф25mm hole on the ceiling for
video and power connector cable to
pass through.
Take off the dome cover from the
camera. Use specified holes inside the
camera base for installation.
Finally, with reference to the following figure, connect the power cable with a
12V DC supply, Ethernet cable through the LAN adapter and alarm cable to
the camera.
Power cable (DC12V IN)
Ethernet cable
Alarm cable
Page 19
MX User Guide PAGE 19
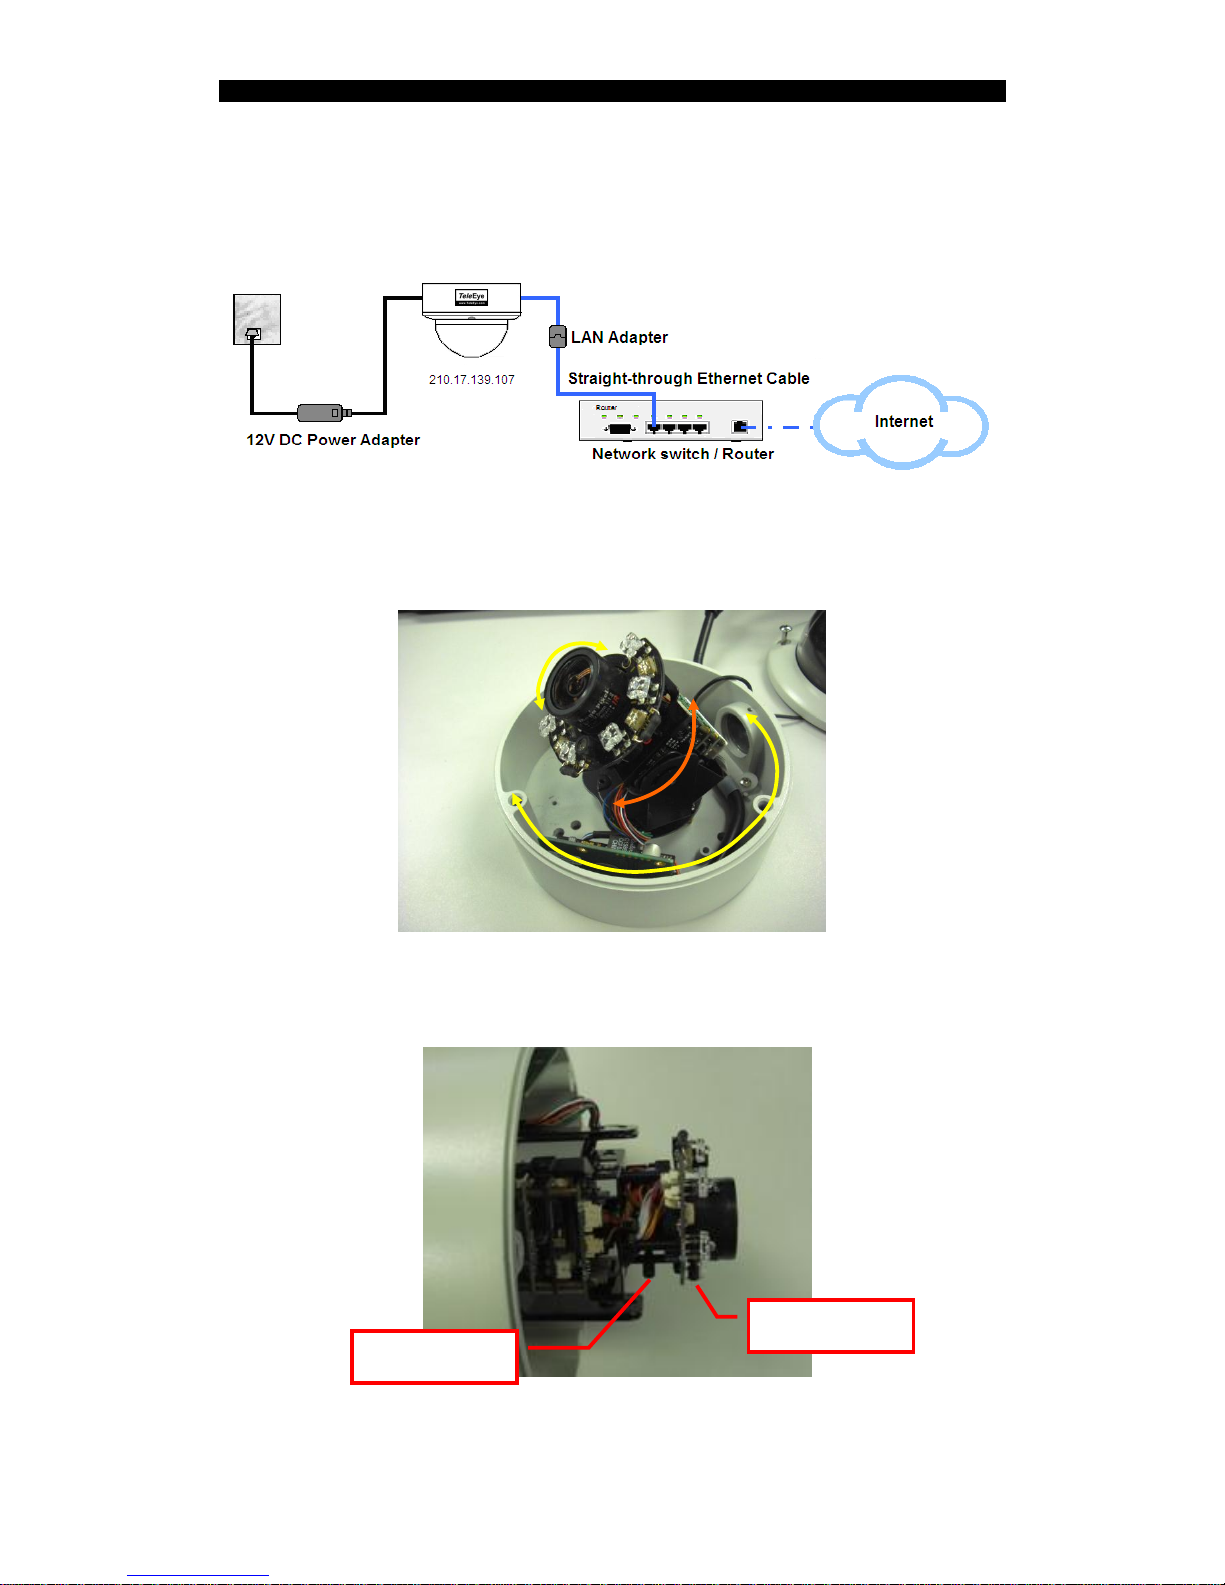
After mounting the camera on the wall or ceiling, connect the power cable with
a 12VDC supply and connect the Ethernet cable to the LAN adapter as the
follows:
Run sureSIGHT or Web browser (Please refer to chapter 5 for more details)
to start the live video monitoring in order to adjust the camera focus, zoom
ratio and view area. Then adjust the direction (pan/tilt/rotation) of the camera.
Adjust the zoom and the focus by sliding the sticks at the side of the lens.
Finally, tighten the screws and close the camera cover.
Adjust Zoom
Adjust Focus
MX833-HD
90°
Page 20
MX User Guide PAGE 20
2.4. MX873-HD
2.4.1. Features
MX873-HD IR HD CCTV Camera
Ultra-high Resolution Recording in Darkness.
1/3.2” CMOS sensor
f=2.7 - 9mm, Vari-focal auto-iris lens
720p, 15fps
Max. Resolution: 1600 x 900p
~15m IR illumination range
True day & night operation with auto IR-cut filter
IP66 weather proof
HD SMAC-M multi-stream coder for HD video
Independent HD video recording stream
Independent mobile stream for mobile phone viewing
Optional sureREC HD Video Recording Solution
Optional sureSIGHT Integrated Video Management Solution
2.4.2. Installation
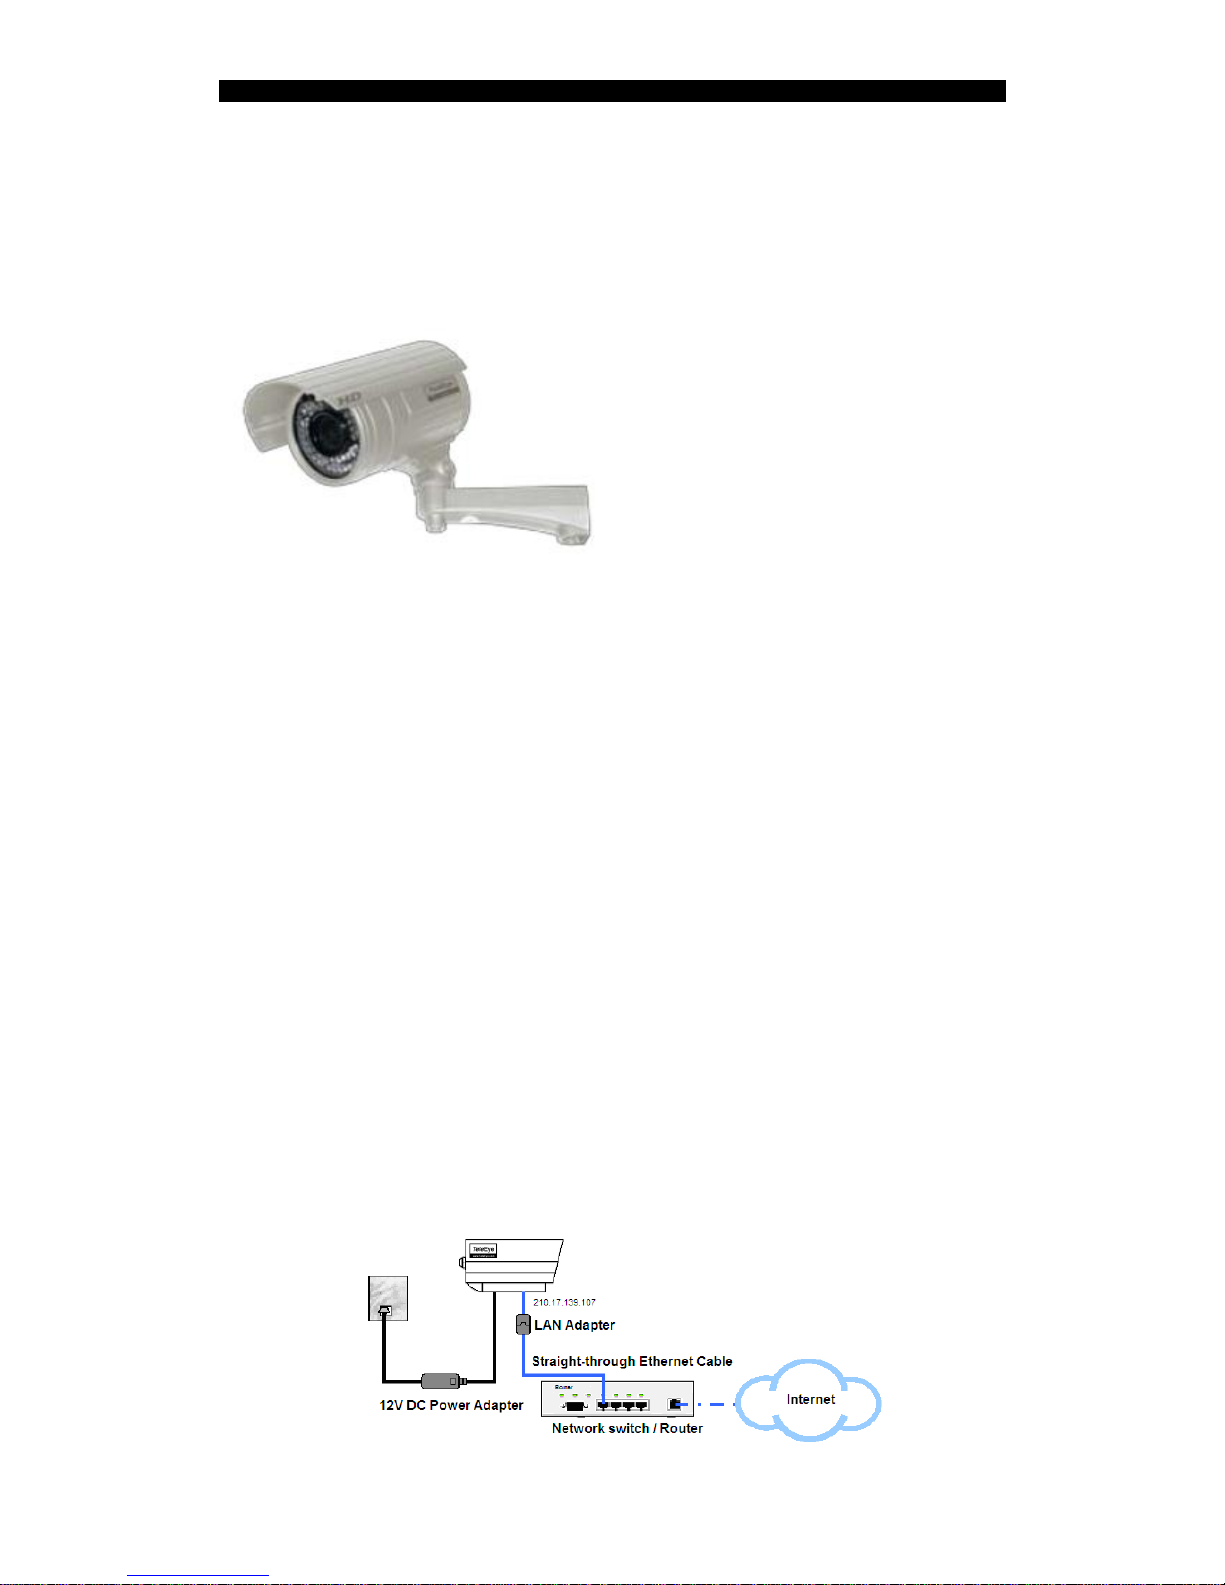
First, mount the camera on the wall or ceiling as the following steps:
1. Using the mount holes label, drill four holes on the wall or ceiling.
2. Insert the plastic wall plugs into the holes.
3. Fix the screws into the plugs with the camera.
After mounting the camera on the wall or ceiling, connect the power cable with
a 12V DC supply and connect the Ethernet cable to the LAN adapter as the
follows:
MX873-HD
Page 21
MX User Guide PAGE 21
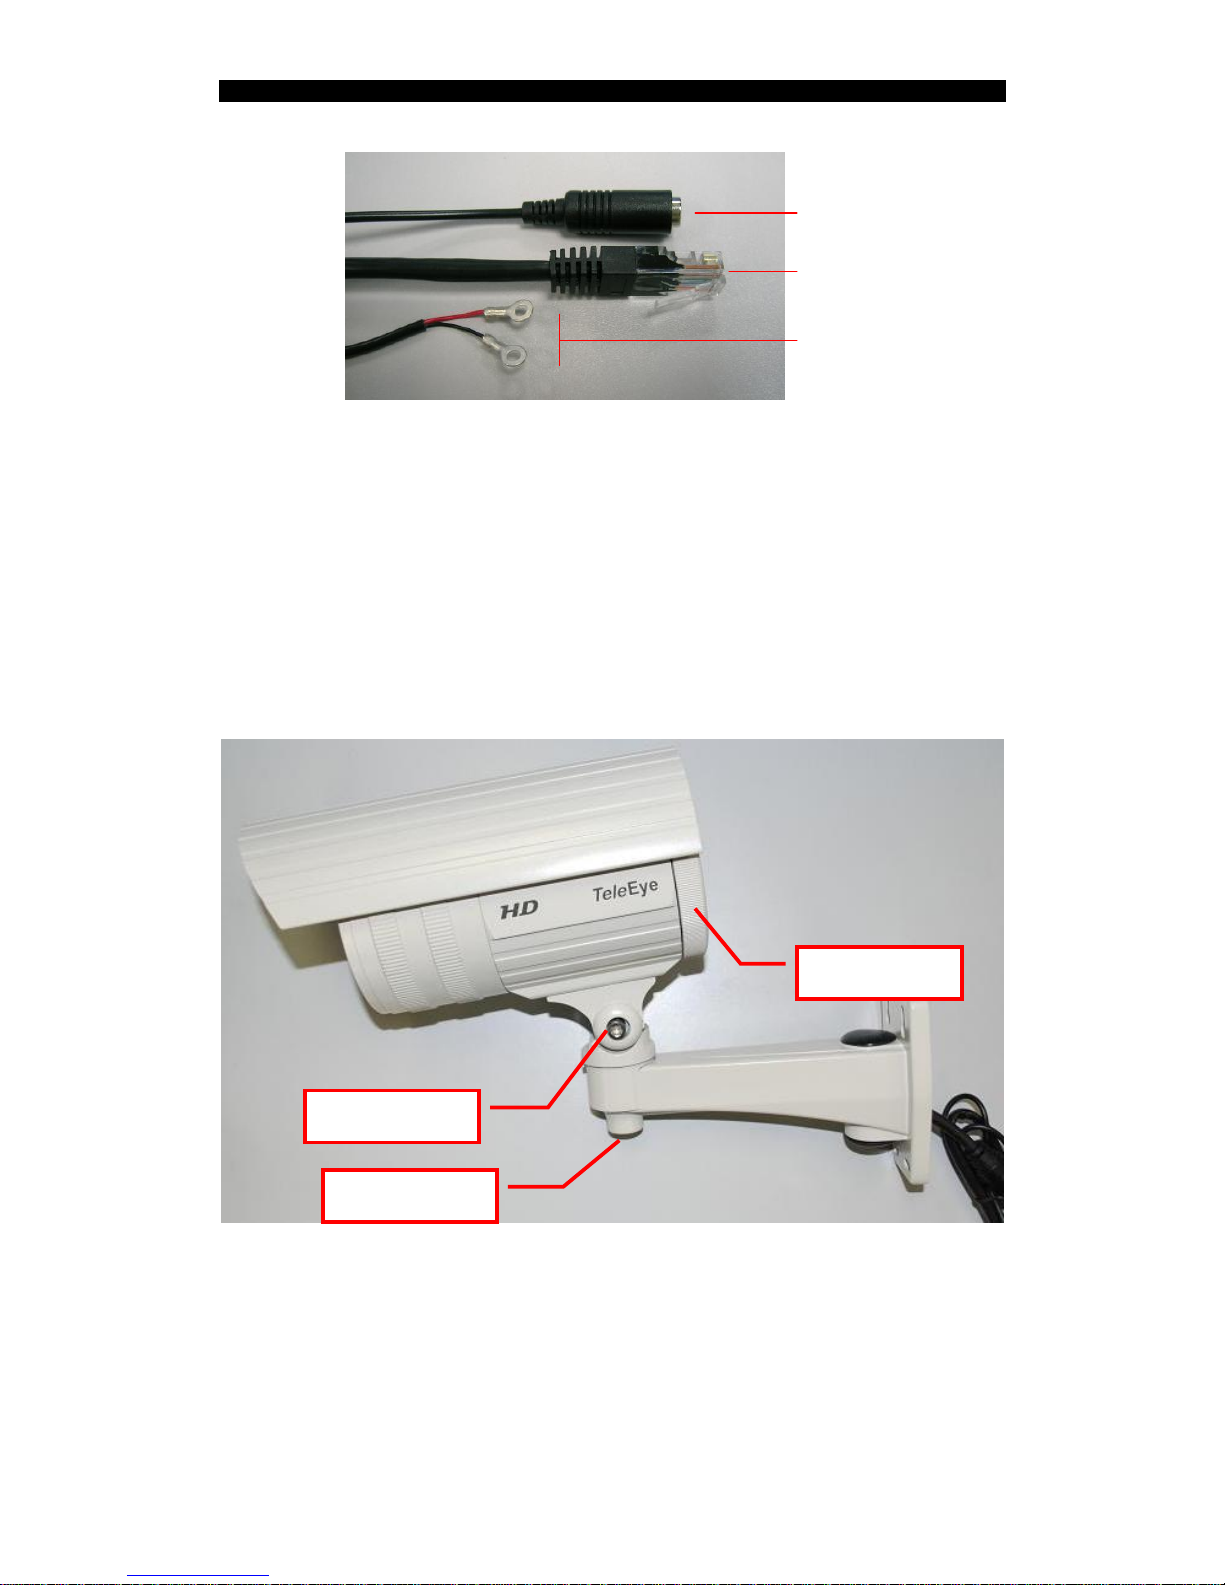
Finally, run sureSIGHT or Web browser (Please refer to chapter 5 for more
details) to start the live video monitoring in order to adjust the camera focus,
zoom ratio and view area.
For adjusting the horizontal and view angle:
1. Loosen a bolt to adjust horizontal and vertical angle of the camera
2. Use the wrench to tighten a bolt after adjusting the camera
Power cable (DC12V IN)
Ethernet cable
Alarm cable
Horizontal bolt
Vertical bolt
Back Cover
Page 22
MX User Guide PAGE 22
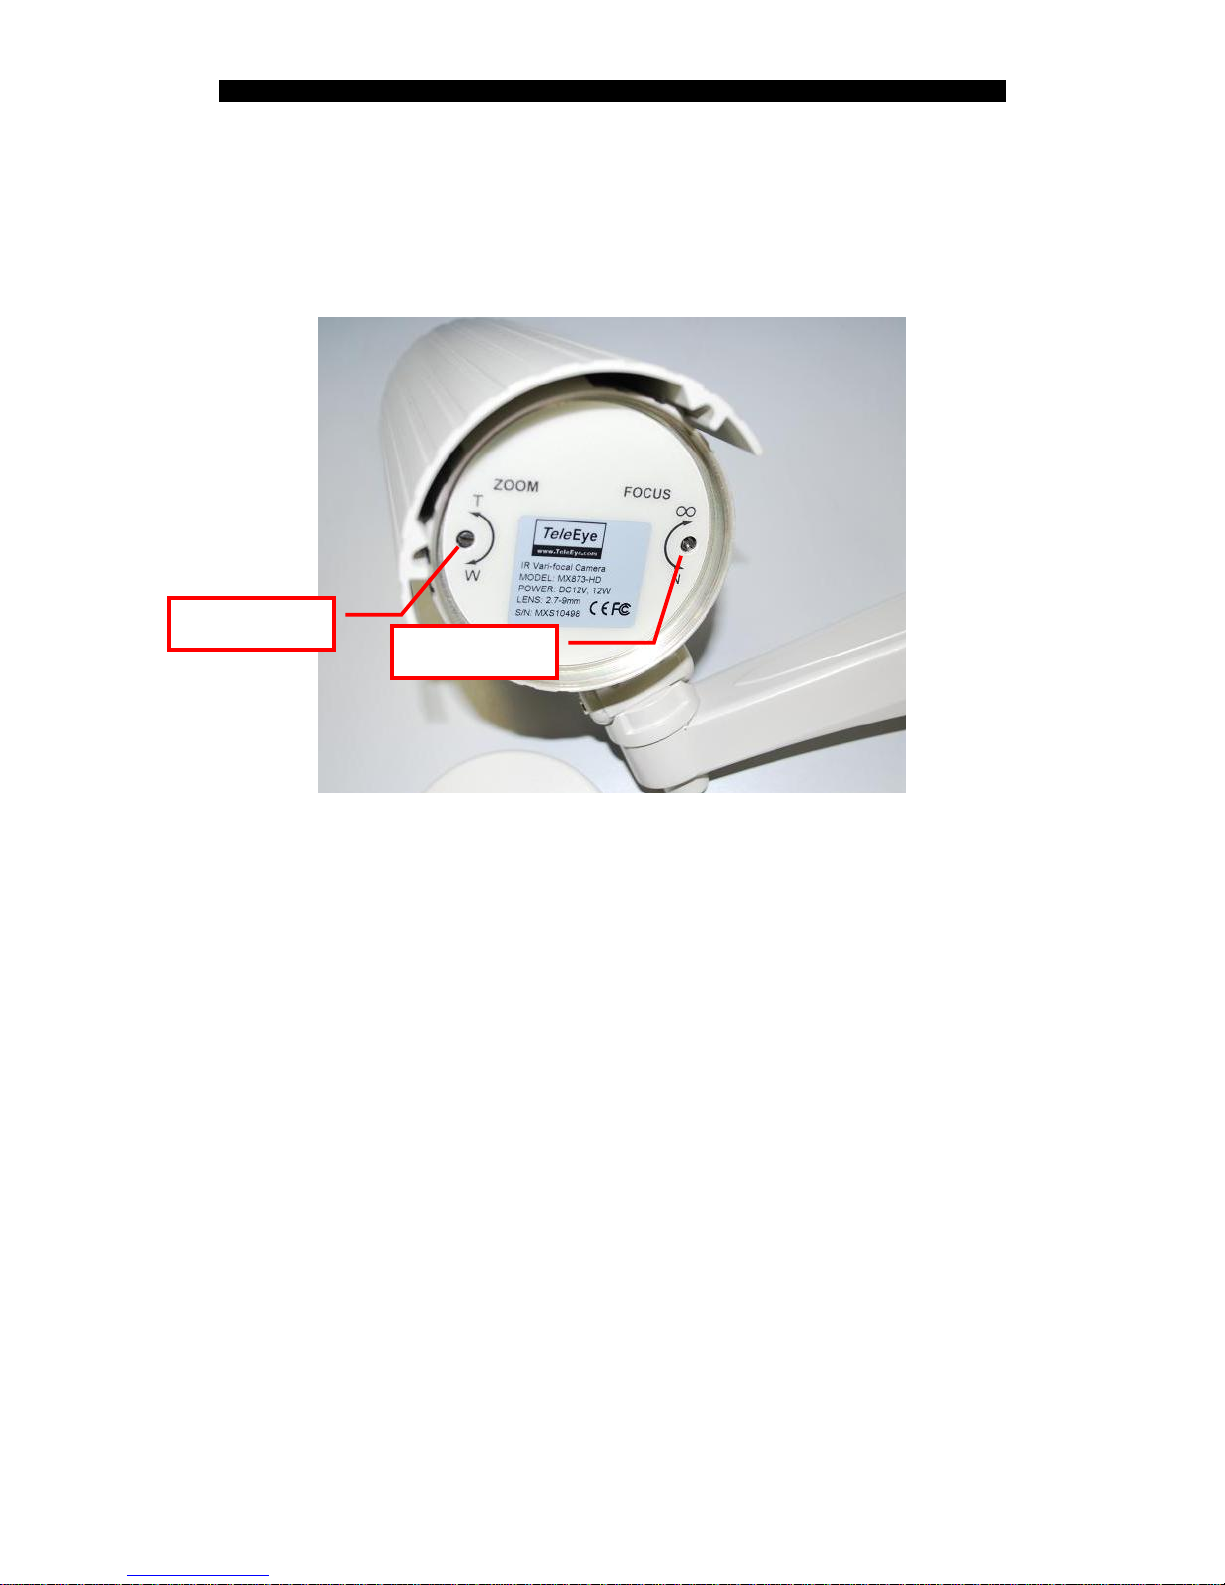
For adjusting the zoom ratio and focus:
1. Open the back cover.
2. Use the screwdriver to adjust the focus and the zoom ratio.
3. Close the back cover after adjusting the camera
Adjust Zoom
Adjust Focus
Page 23
MX User Guide PAGE 23
2.5. MX763-HD
2.5.1. Features
MX763-HD Day/Night Box Camera
Day & Night Box Camera
1/3” SONY CMOS sensor
720p, 25fps
CS-mount
True day & night operation with auto IR-cut filter
Power over Ethernet – IEEE 802.3af
HD SMAC-M multi-stream coder for HD video
Independent HD video recording stream
Independent mobile stream for mobile phone viewing
Optional sureREC HD Video Recording Solution
Optional sureSIGHT Integrated Video Management Solution
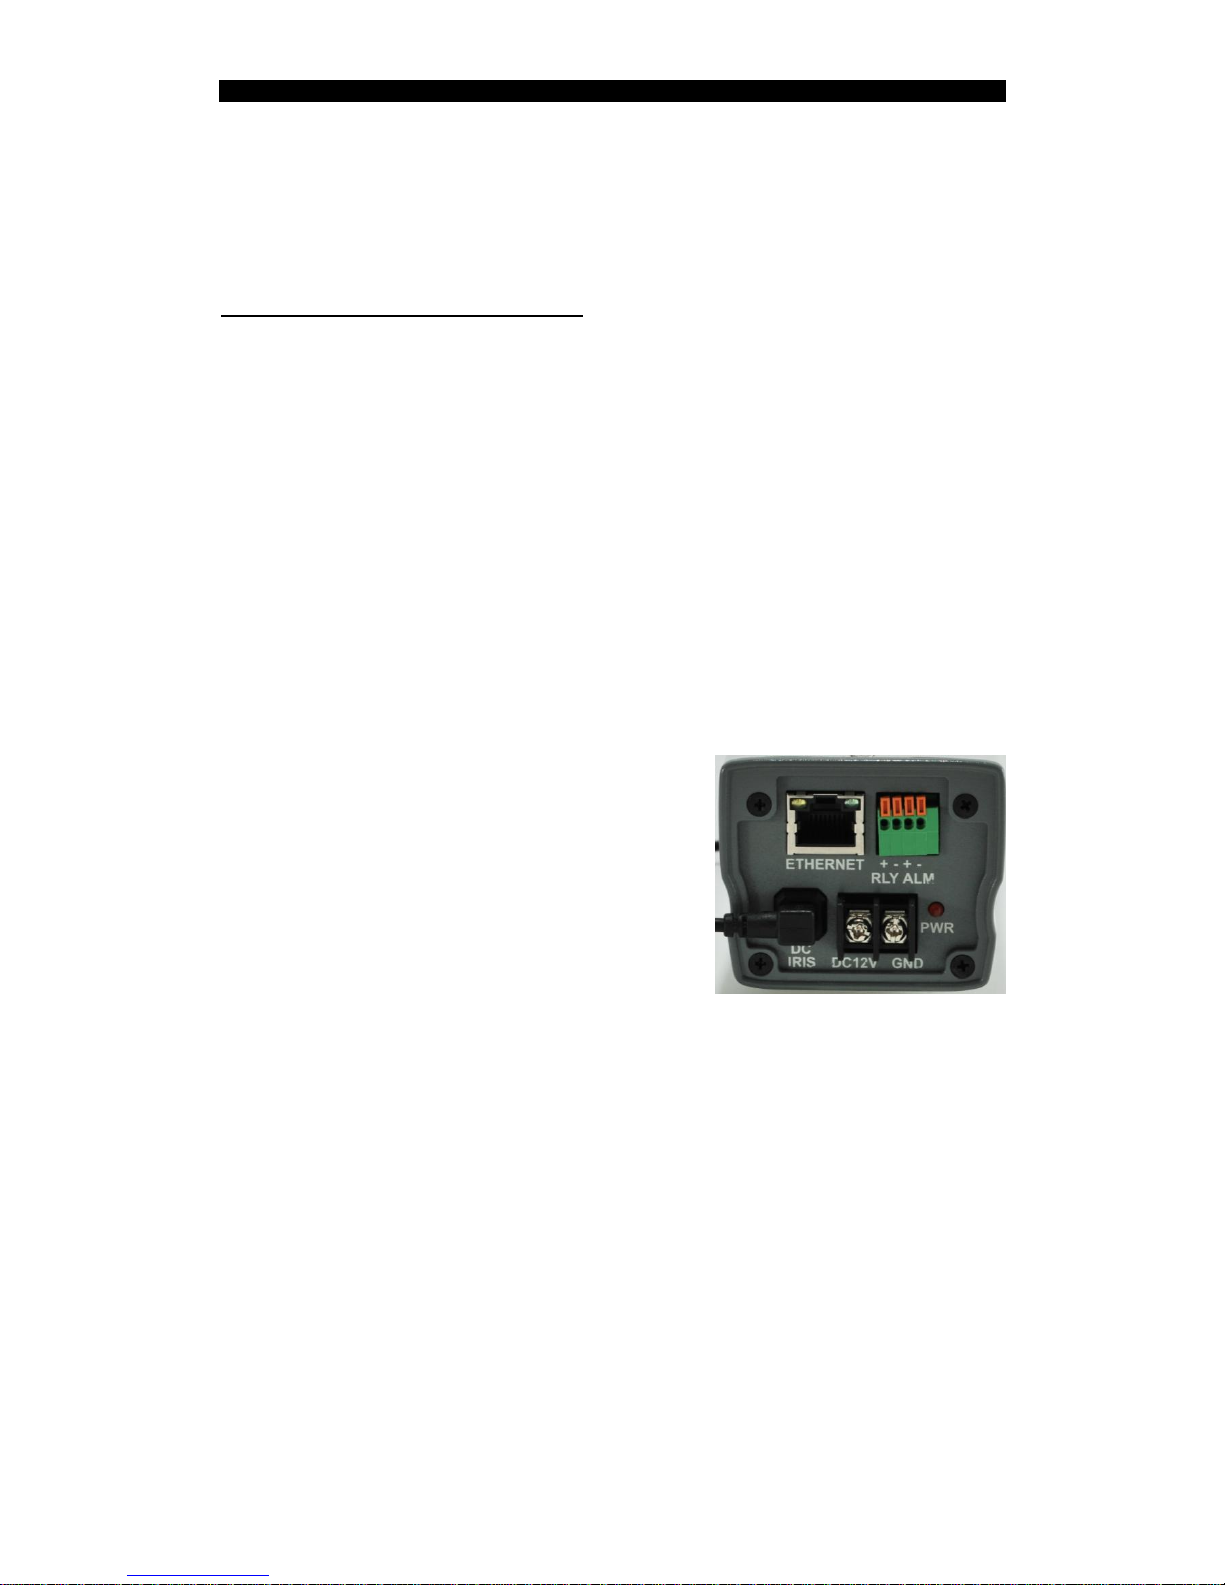
2.5.2. Installation
1. Install the CCTV Lens (CS mount) and
connect its DC Iris Cable to the back of the
camera.
2. Mount the camera onto the wall or ceiling.
3. Connect the Ethernet Cable to the Ethernet
Port of the camera.
4. Connect the power cable with a 12VDC
supply (if PoE is not available)
Page 24
MX User Guide PAGE 24
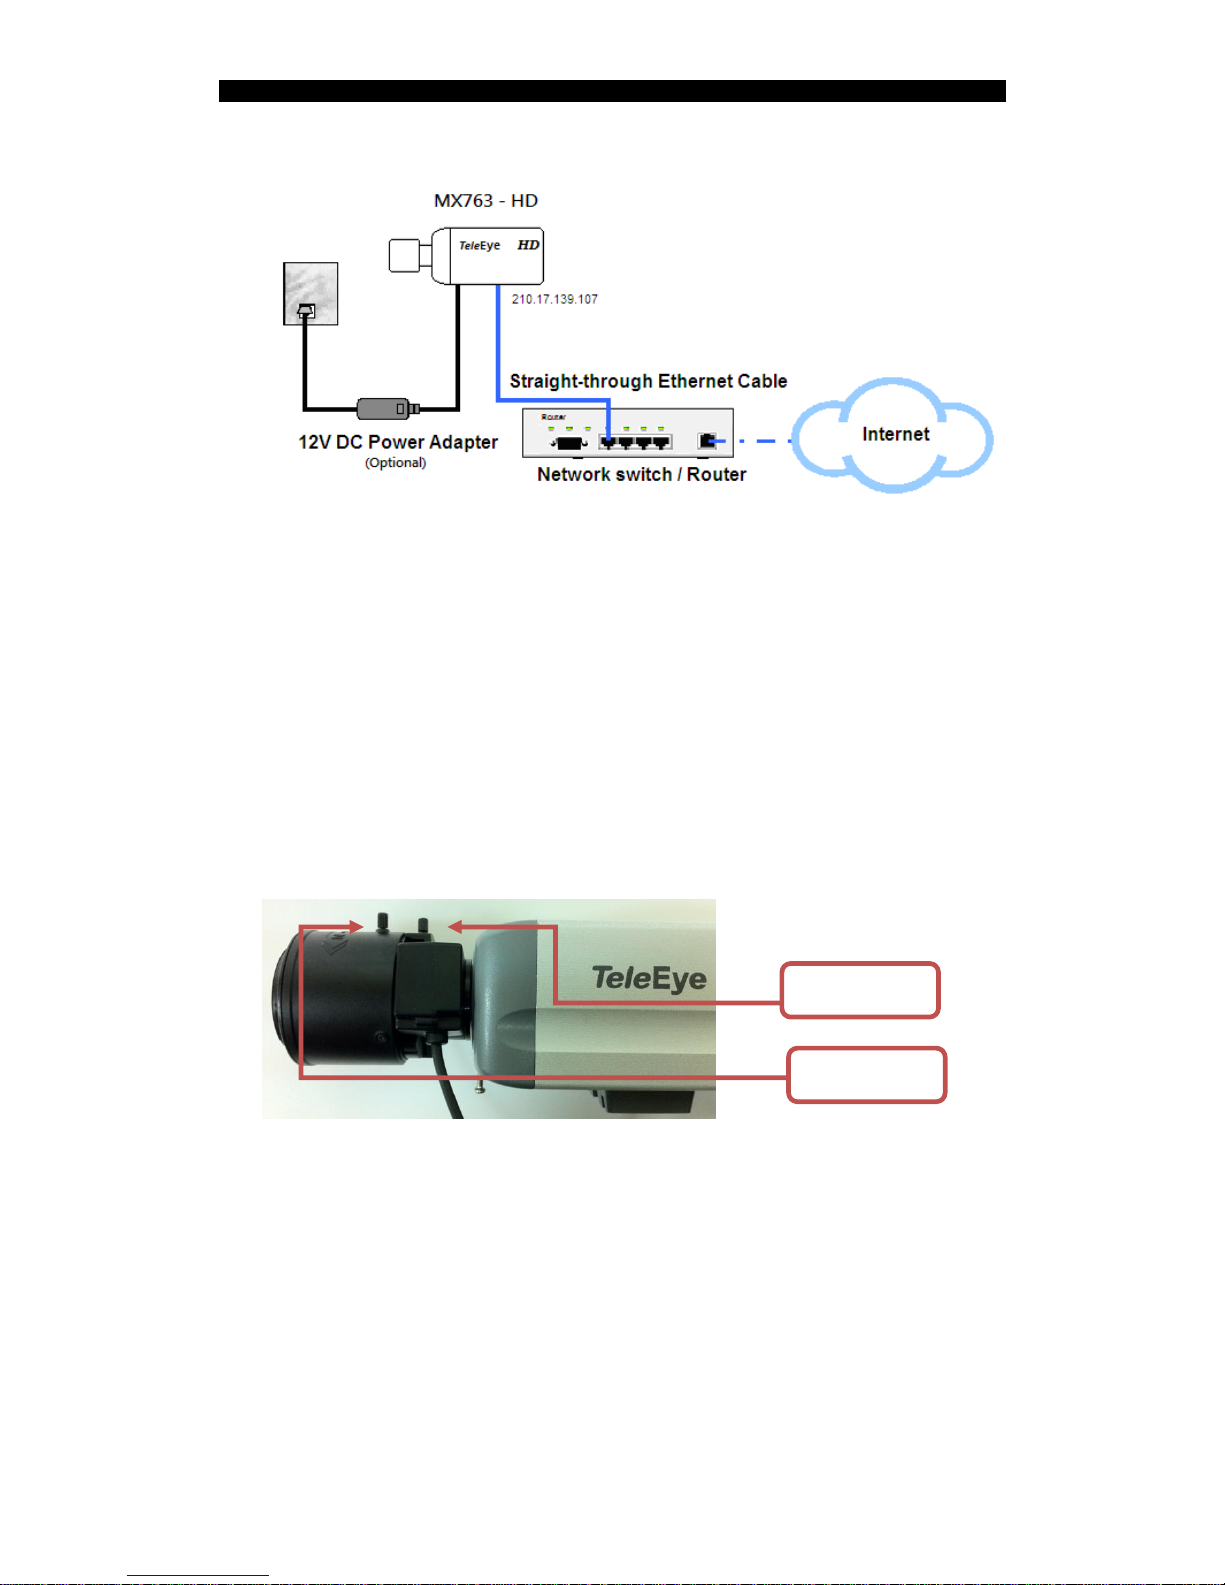
Zoom Ring
Run sureSIGHT or Web browser (Please refer to chapter 5 for more details)
to start the live video monitoring in order to tune the camera according to the
steps listed as below:
1. Use the Zoom Ring to adjust the viewing angle of the camera
2. Fine adjust the Focus Ring until a clear and sharp image is obtained.
3. Repeat step 1 and 2 until the viewing angle is satisfactory and the image is
clear enough.
Focus Ring
Page 25
MX User Guide PAGE 25
3. Software Installation
In this chapter, it will guide you how to install the sureSIGHT software.
3.1. PC Requirements
sureSIGHT Lite
sureSIGHT
Business
sureSIGHT Pro
Processor:
Intel® Core™ 2 Duo
Processor
Intel® Core™ 2 Quad Processor
Memory:
2 GB or above
Hard Disk:
2 GB of free space or above
Drive:
CD-ROM or DVD-ROM
Display:
1280 x 800 resolution, Direct 3D supported
Sound:
Sound card is required
Ethernet
10/100 Mbps or above
Port:
Serial Port
OS:
Microsoft Windows XP SP3, Vista SP1 and Windows 7
(32-bit Edition)
3.2. sureSIGHT Installation
sureSIGHT is an integrated video management platform for IP cameras and
Video Recording Servers. Its modular design allows customers to scale up
easily and add functional modules to suit specific requirements.
For the sureSIGHT installation, please refer to the following steps:
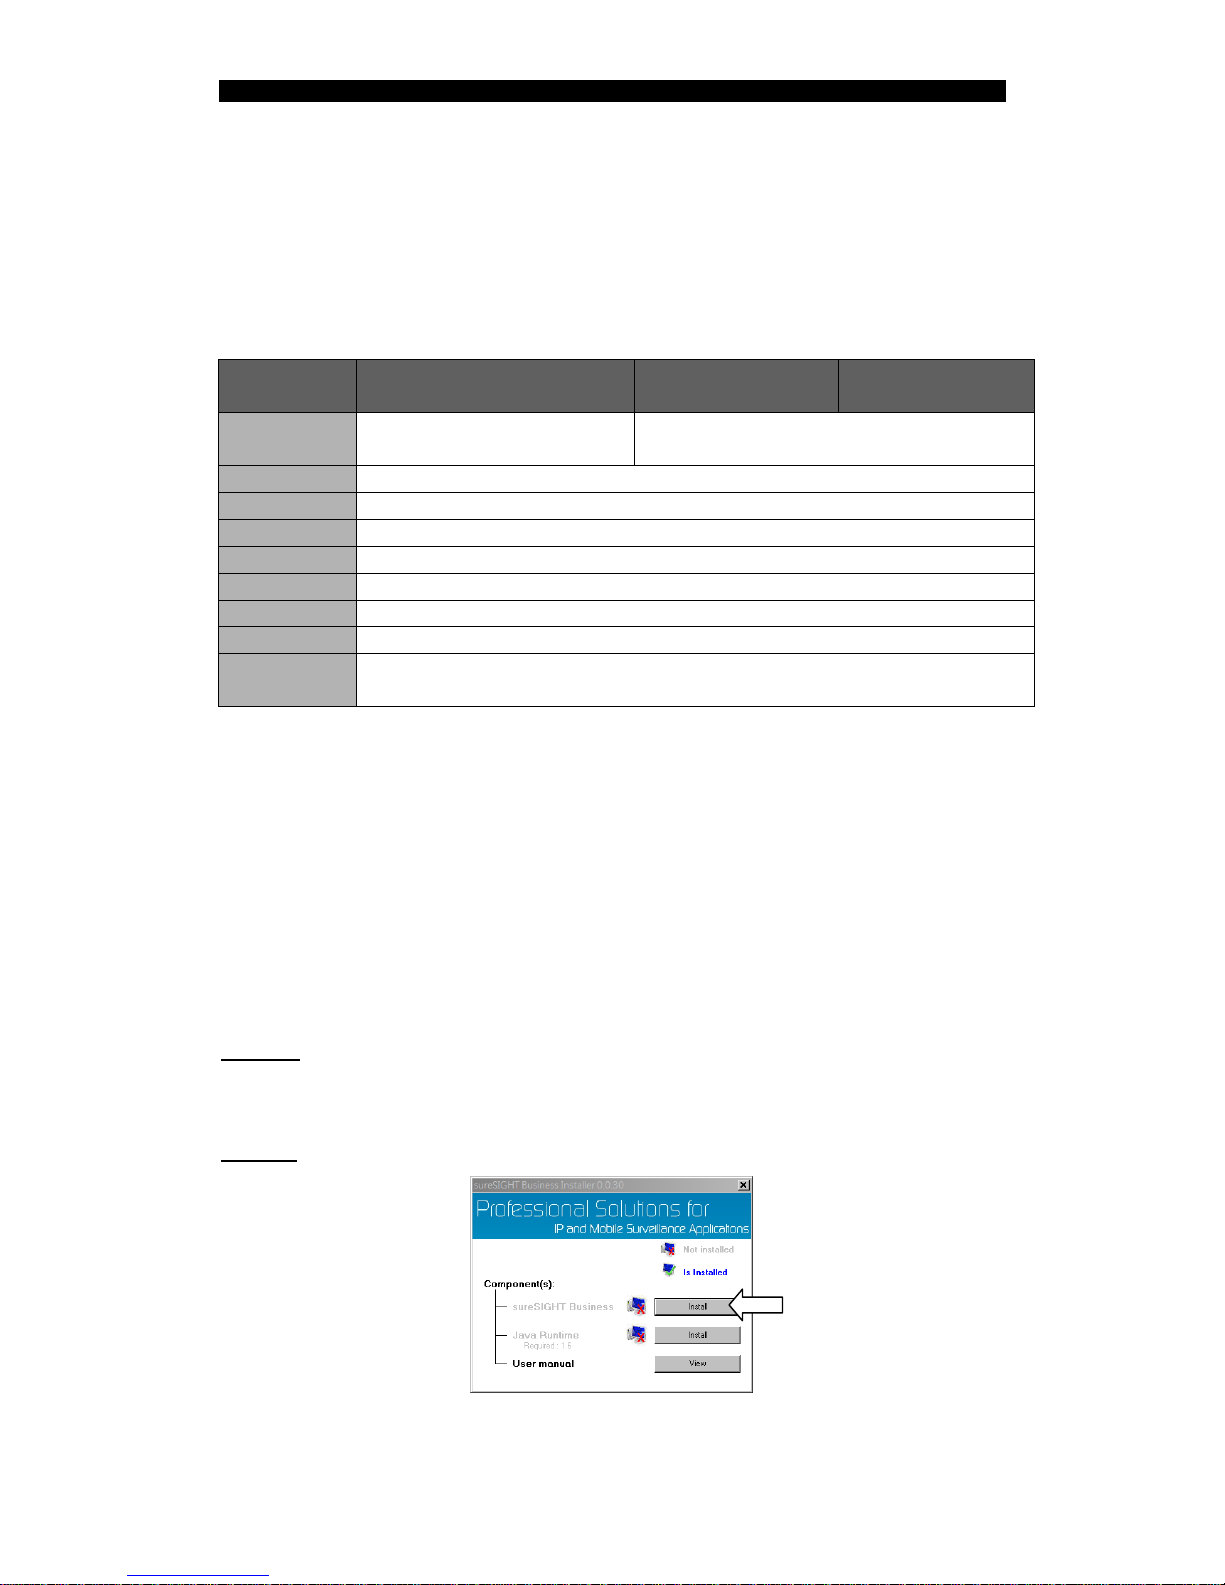
Step 1: Put the installation CD into a CD-ROM, the installer should be run
automatically. If not, open the CD-ROM manually and run the "Installer.exe".
Step 2: Click the [Install] button next to "sureSIGHT" in the installation menu.
Page 26
MX User Guide PAGE 26
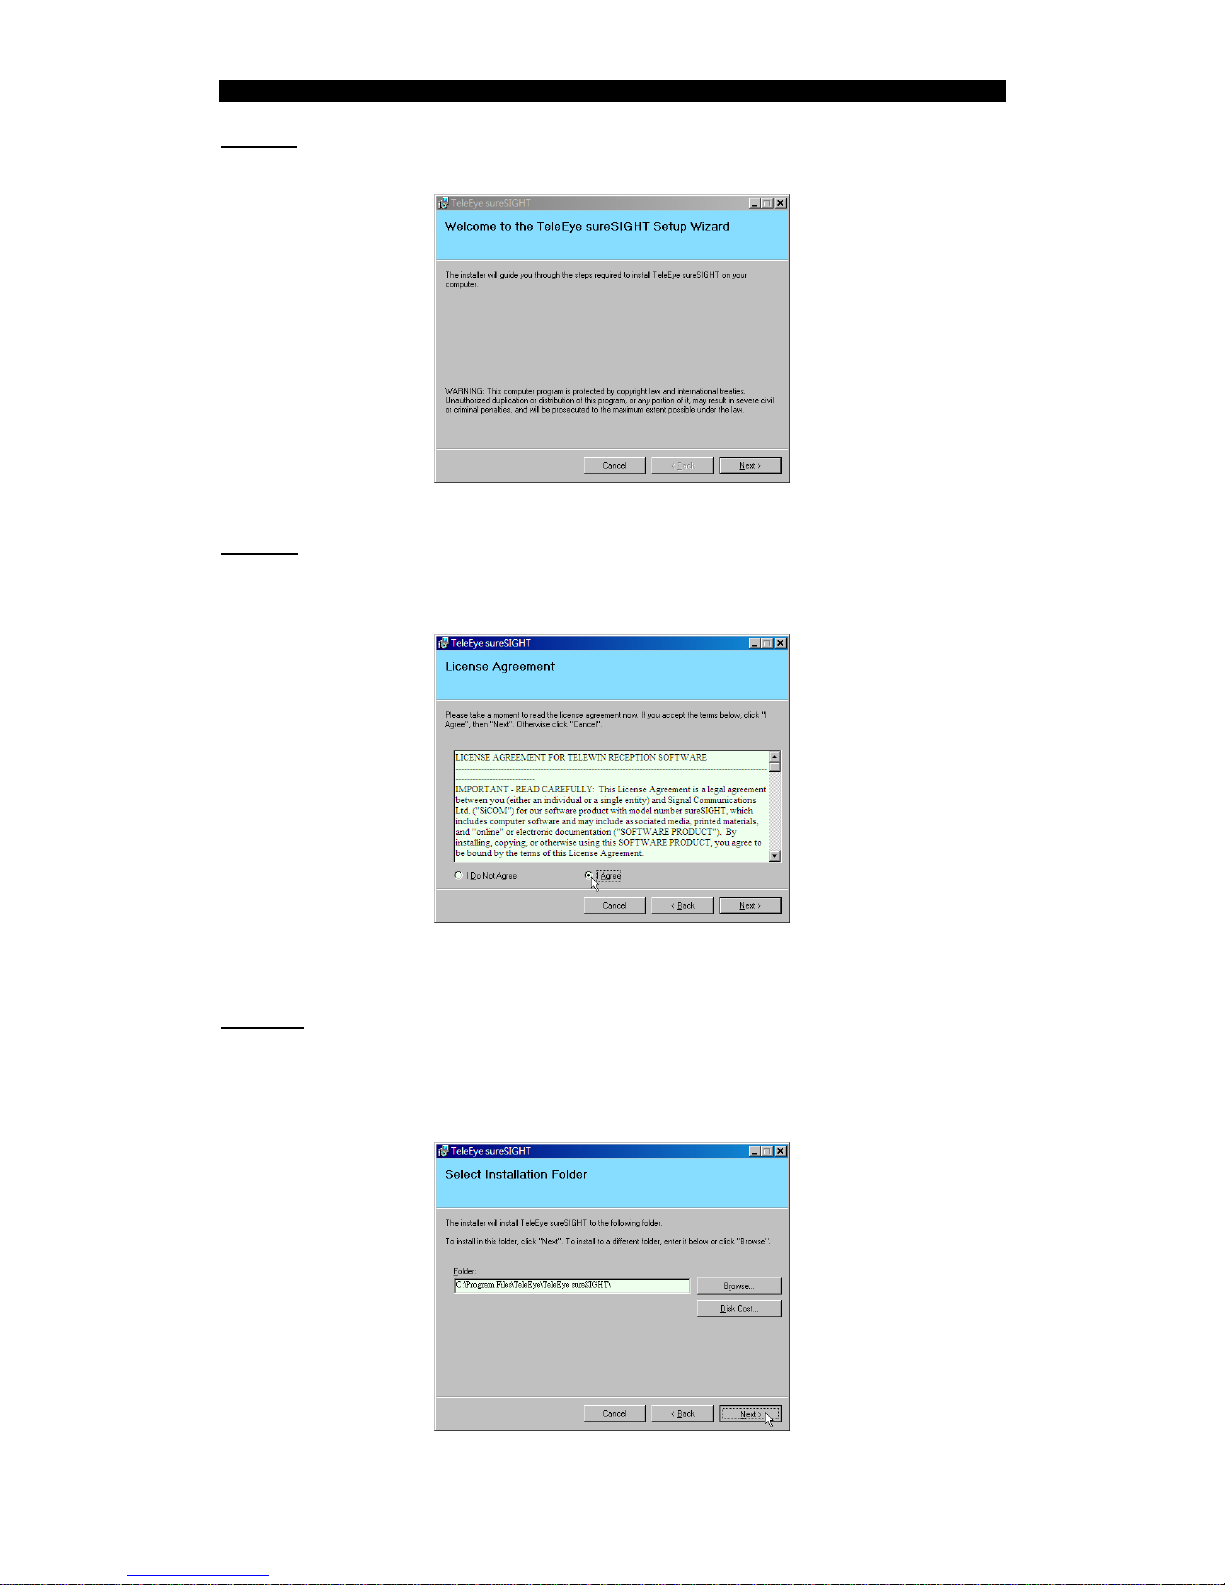
Step 3: Click the [Next >] button in the welcome window.
Step 4: After reading the license agreement, select "I Agree" to confirm, and
then click the [Next >] button.
Step 5: [Browse] the installation path for sureSIGHT, [Disk Cost…] is
available for user to check the available space for installation, then click the
[Next >] button.
[Note] The default path “C:\Program Files\TeleEye\TeleEye sureSIGHT\” is recommended
Page 27
MX User Guide PAGE 27
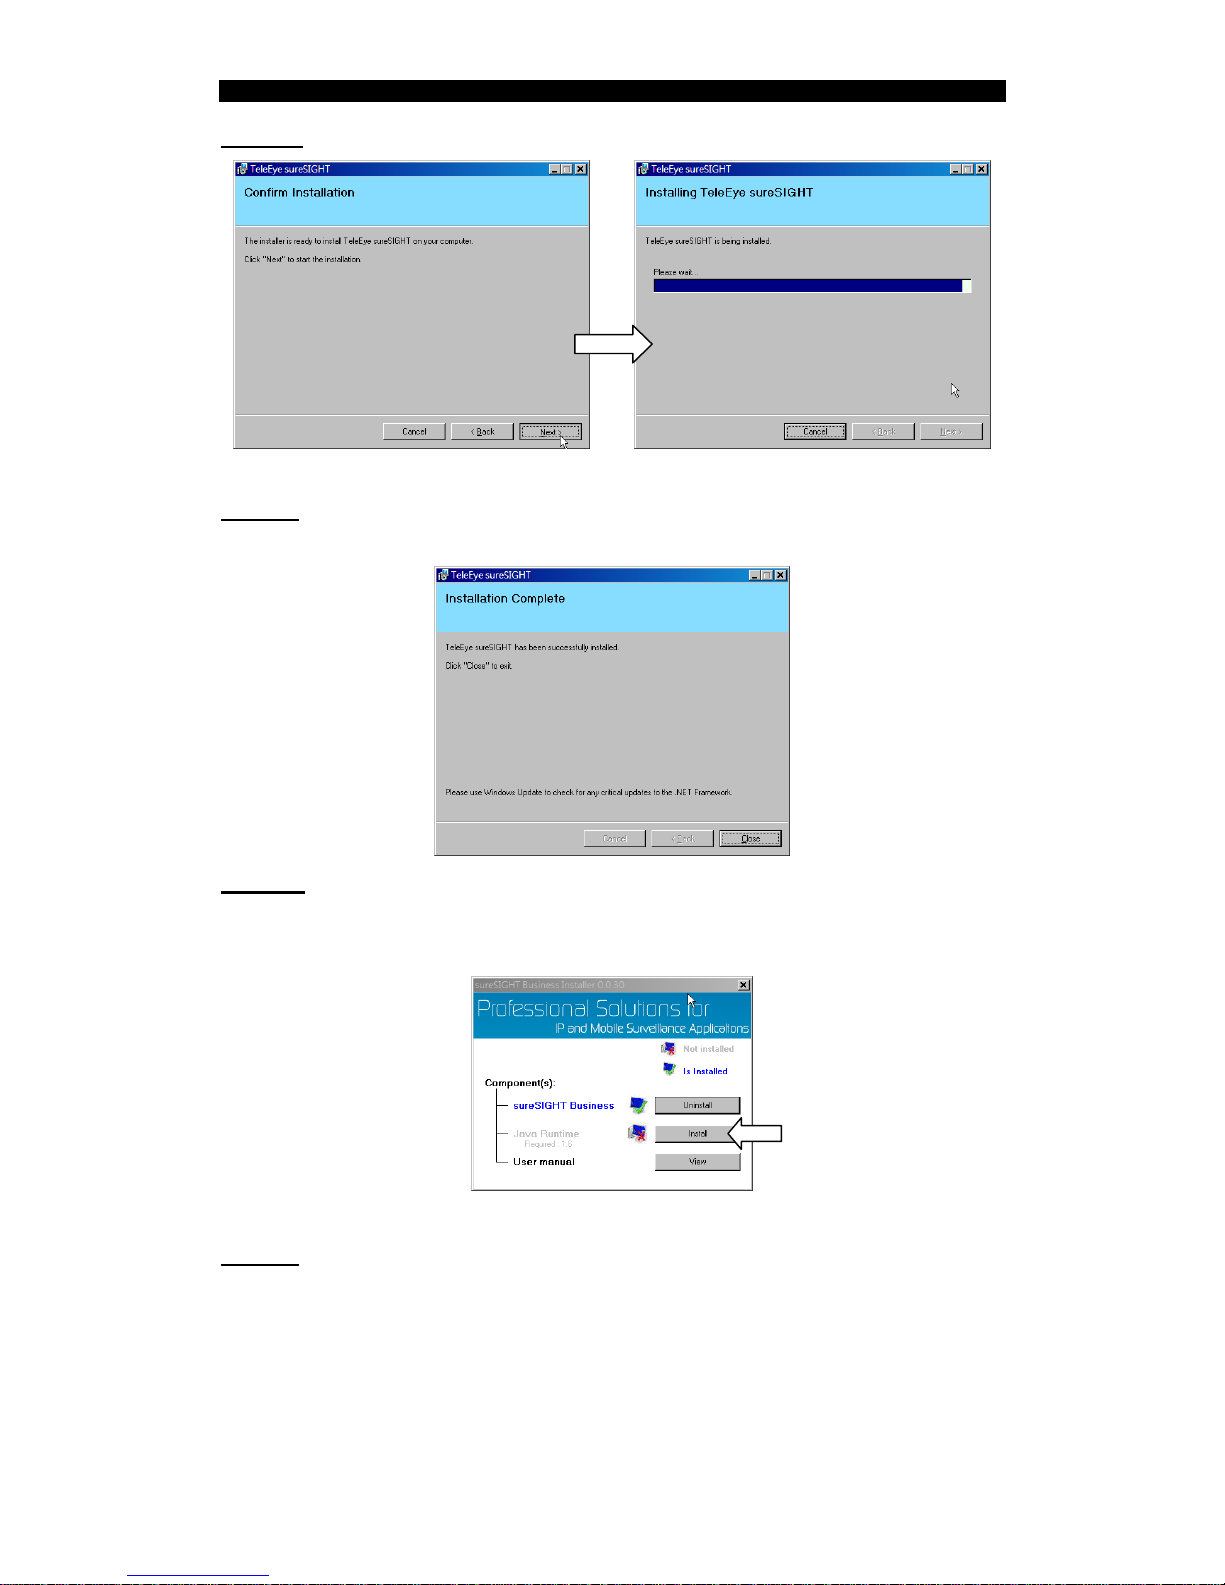
Step 6: Click the [Next >] button to confirm the installation.
Step 7: When the installation is completed, click the [Close] button to close
the window.
Step 8: If the PC does not have Java runtime installed, return to the
installation menu and click the [Install] button next to “Java Runtime” to install
it.
Step 9: After completing all the installation, sureSIGHT is ready on the start
menu.
Page 28
MX User Guide PAGE 28
4. Network Configuration
In this chapter, it will guide you how to setup the target camera IP address.
4.1. Connect Camera to the Network
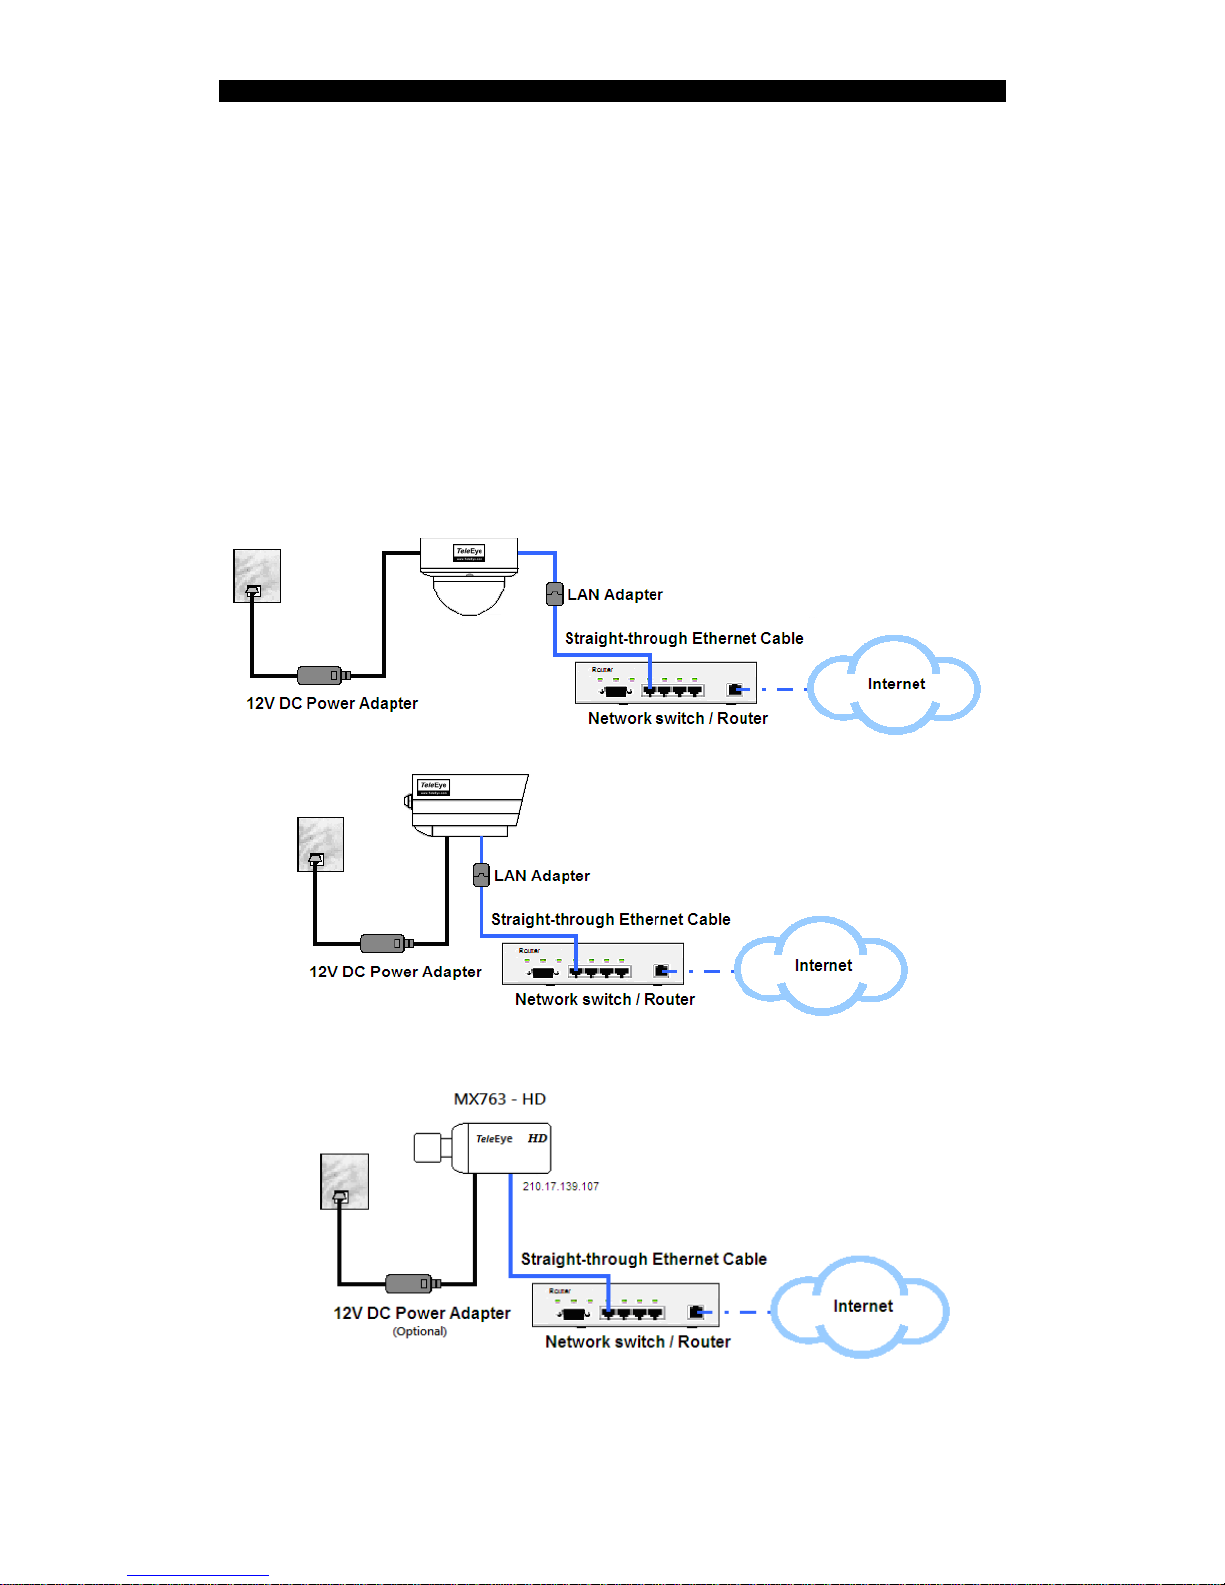
Before setting the IP address, please make sure the network connection is
correct as following diagram:
MX810-HD / MX820-HD / MX833-HD
MX873-HD
Page 29
MX User Guide PAGE 29
4.2. Change the IP address
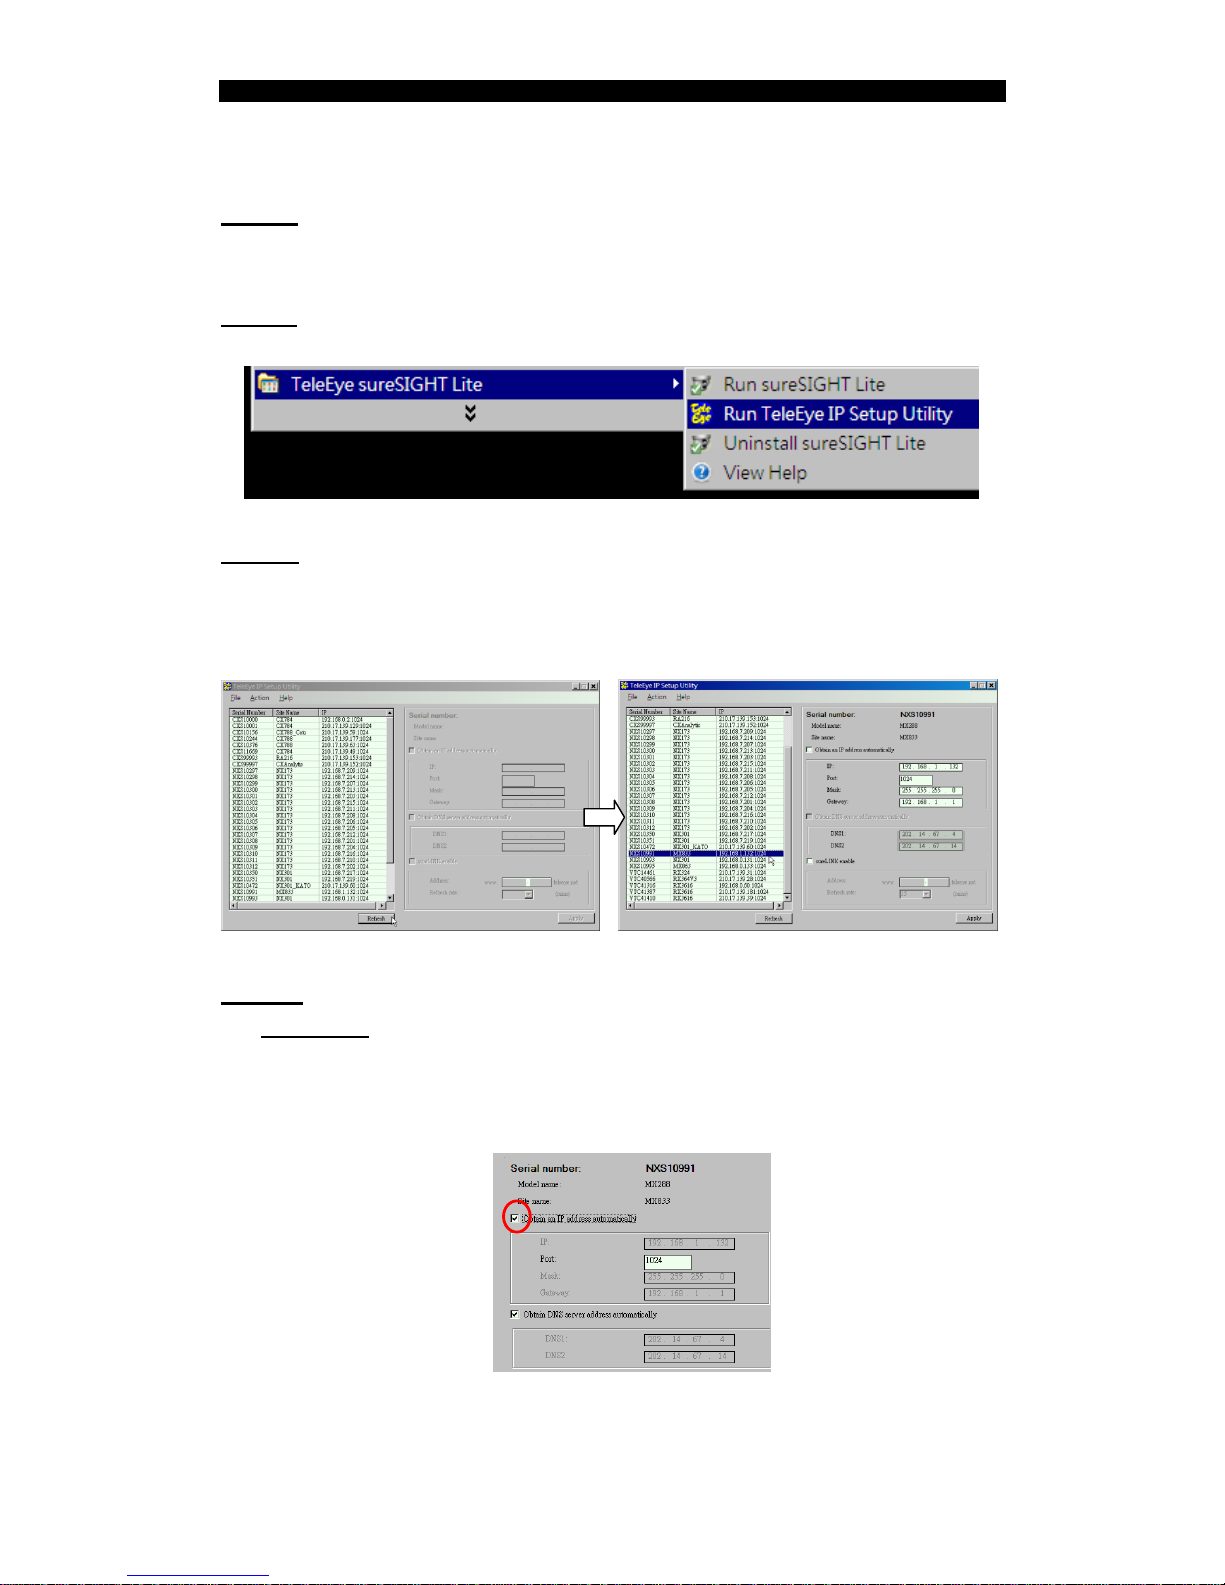
Step 1: Before running the IP Setup Utility, turn on the IP camera and make
sure the connection is correct.
Step 2: Select the “Run TeleEye IP setup utility” from the start menu.
Step 3: By comparing the serial number, select the corresponding row from
the list table on the left window. If the serial number cannot be found, click the
[Refresh] button to try to find it again.
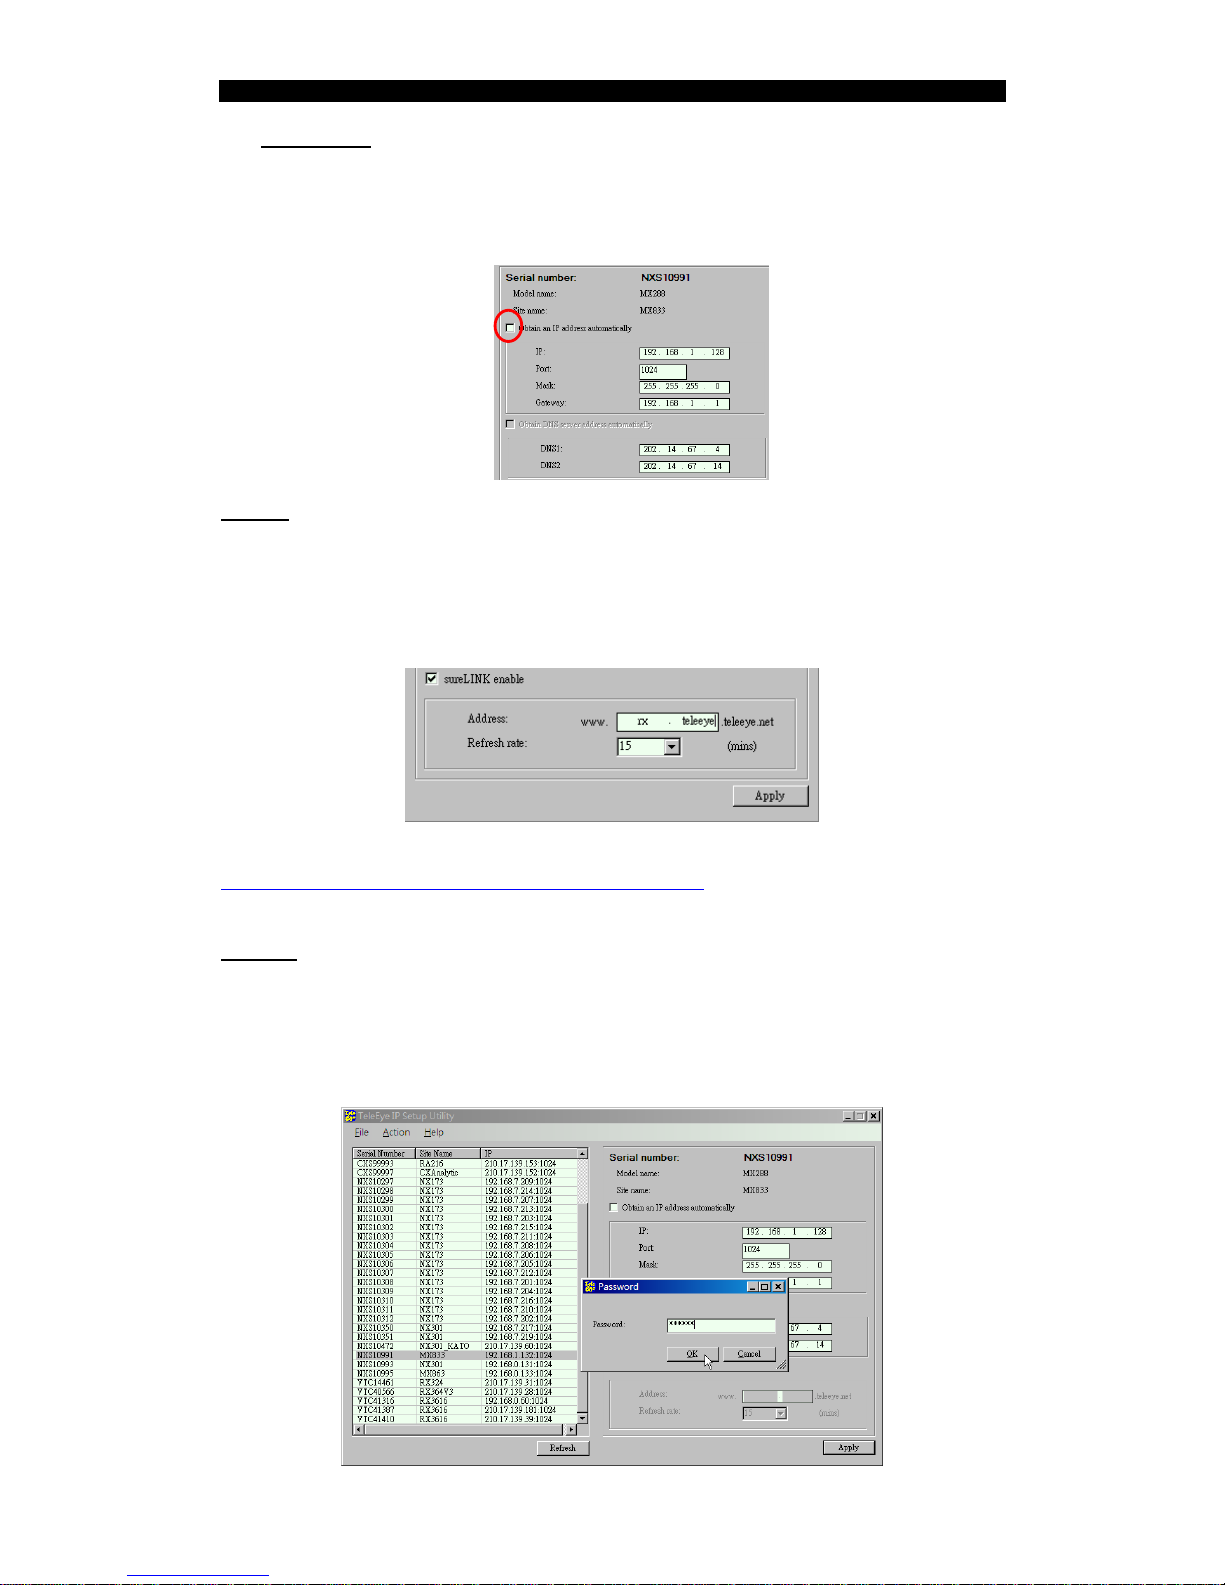
Step 4: There are two methods to assign the IP address for the camera:
Method 1: For automatically assigning the IP address, select the “Obtain
an IP address automatically” to assign the IP address by the DHCP server.
Using this method, user only chooses which port they want to use.
Page 30
MX User Guide PAGE 30
Method 2: For manually assigning the IP address, unselect the "Obtain
an IP address automatically". And input the specified IP address, port,
network mask address and default gateway address.
Step 5. If user wants to enable the dynamic IP connection, select the
"sureLINK enable" to enable sureLINK and input the registered sureLINK
address and the refresh rate. For example, if the registered sureLINK address
is “www.rx.teleeye.teleeye.net” and the refresh rate is 15 minutes, please
input them to the corresponding textbox as follows:
[Note] If user dose not know any sureLINK address, please go to
http://www.teleeye.com/softreg/customer/s_domainreg.jsp for sureLINK registration.
Step 6: Click the [Apply] button to apply all the settings. Then, the password
dialogue box will be shown. Input the correct camera password and then click
the [OK] button.
[Note] Default camera password is "000000".
Page 31
MX User Guide PAGE 31
5. Video Monitoring
In this chapter, it will guide you how to do the video monitoring in a few steps.
For more detailed procedures or operations, please refer to the relevant
documents.
5.1. sureSIGHT
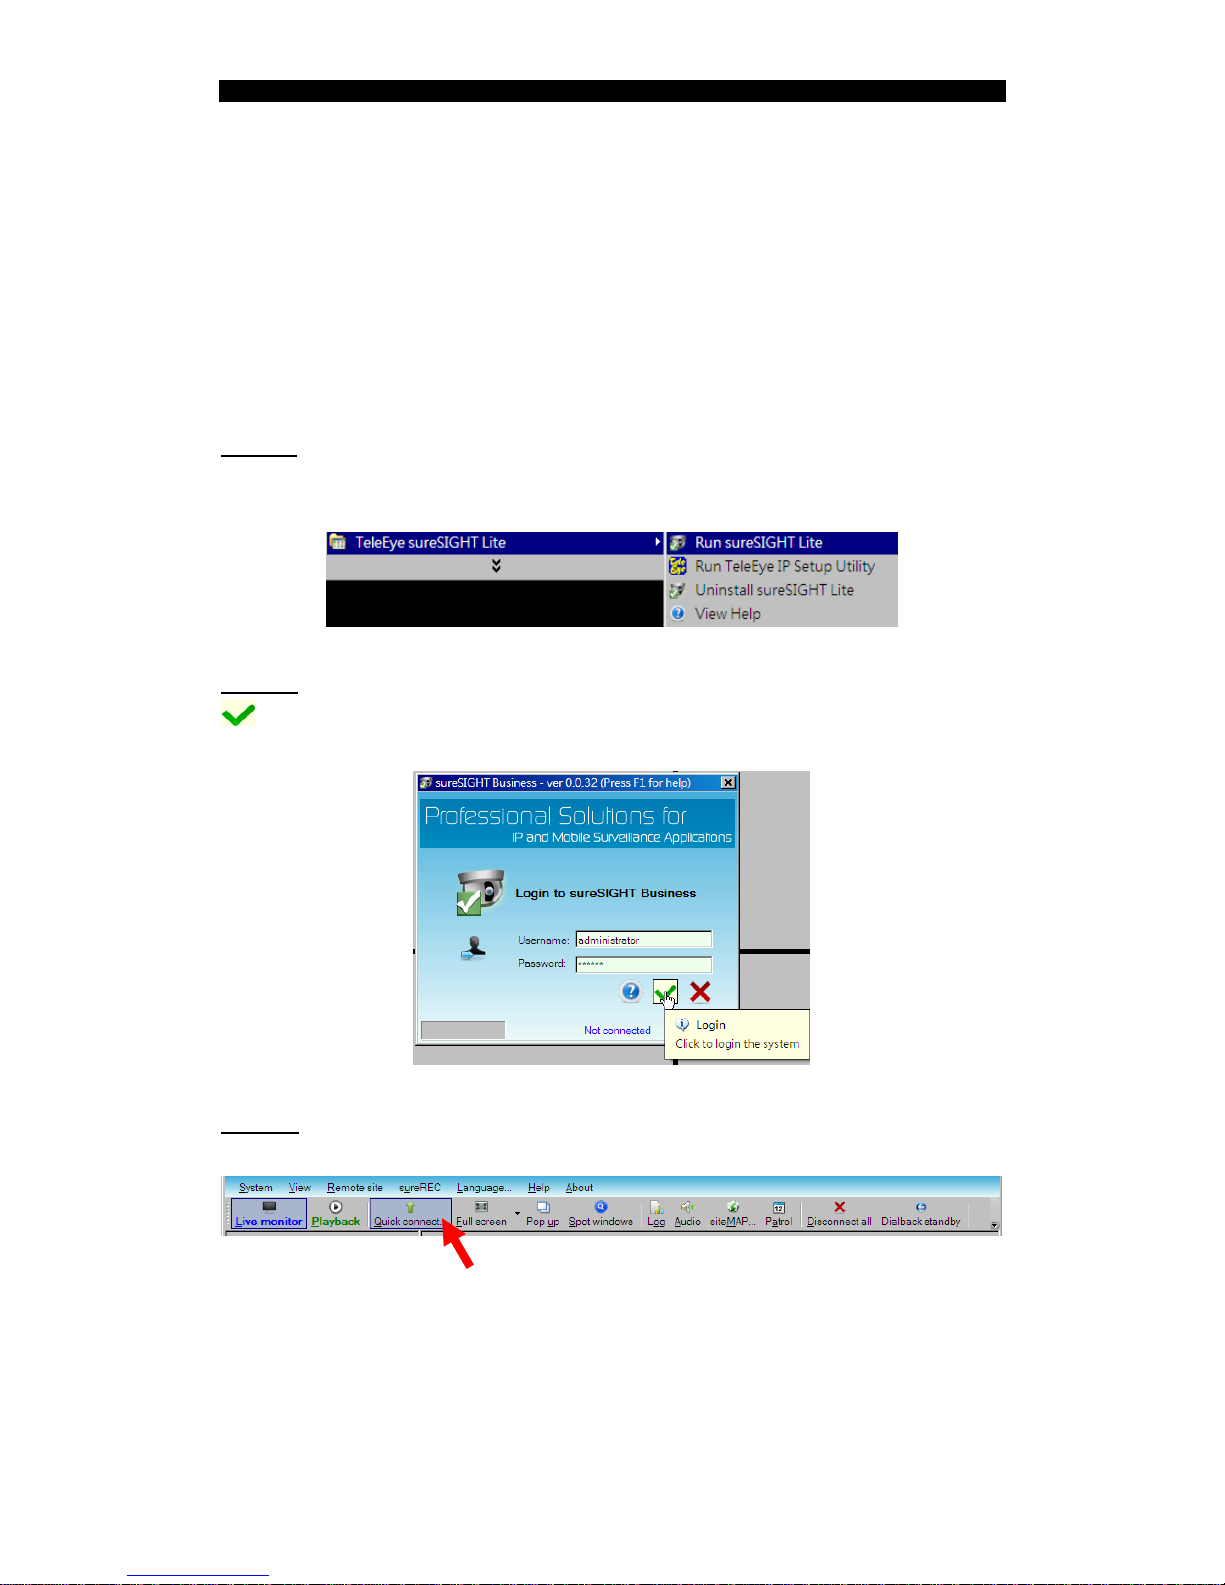
Step 1: Turn on the IP camera and make sure the connection is correct. Then
select the "Run sureSIGHT Lite" from the start menu.
Step 2: Input the password in the password dialogue box, and then click the
button.
[Note] Default password for administrator is "000000".
Step 3: Click the [Quick connect] button on the main toolbar to connect to
the IP camera.
Page 32
MX User Guide PAGE 32
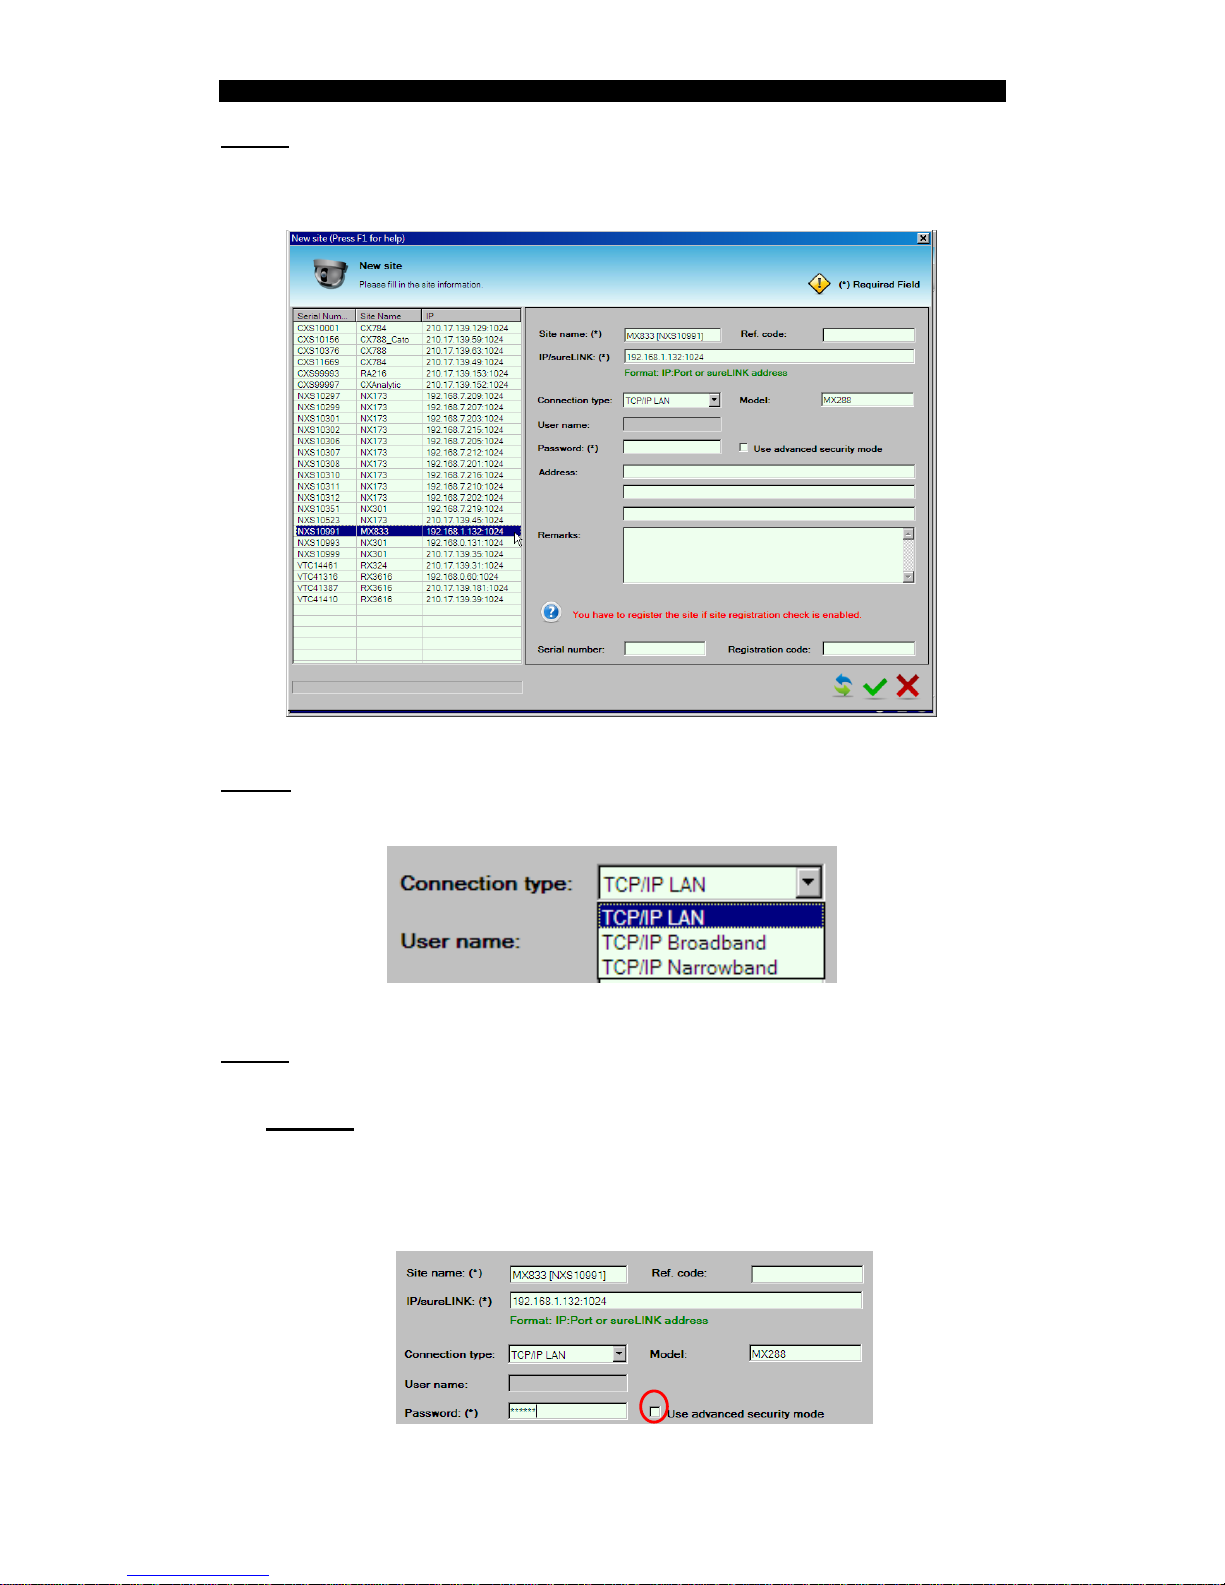
Step 4: Select the target camera by its serial number or site name from the list
table on the left.
Step 5: After selecting the camera, choose the connection type from the list.
[Notes] TCP/IP LAN is recommended.
Step 6: There are two security modes for user to make a connection:
Mode 1: For normal security mode, only password is required. Unselect
the "Use advanced security mode". Then input the password in the
"Password:(*)" field.
[Note] Default password is "000000".
Page 33
MX User Guide PAGE 33
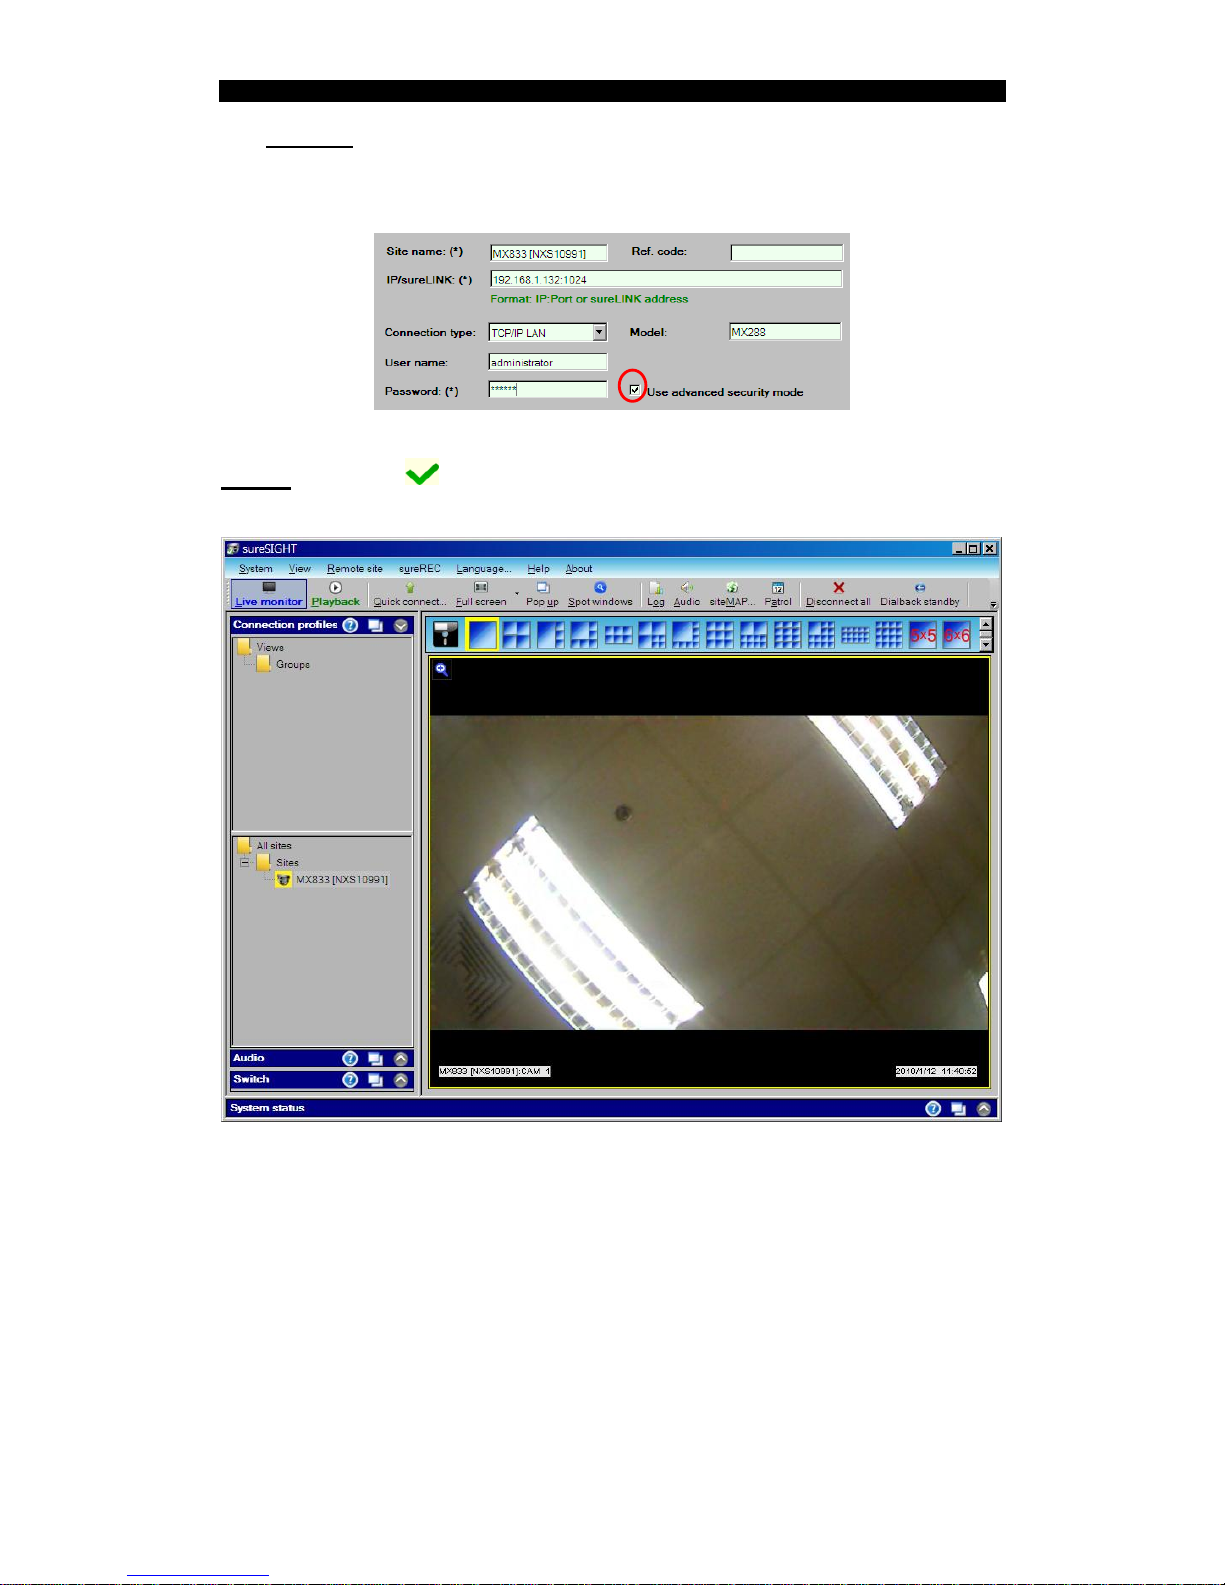
Mode 2: For advanced security mode, both password and user name are
required. Select the "Use advanced security mode". Then input the user
name and password in the corresponding textboxes.
Step 7: Click the button to confirm all the site information. And then the
sureSIGHT will connect to the target camera.
[Reference] For more details of the operations, please refer to the sureSIGHT user manual.
Page 34
MX User Guide PAGE 34
5.2. Web Browser
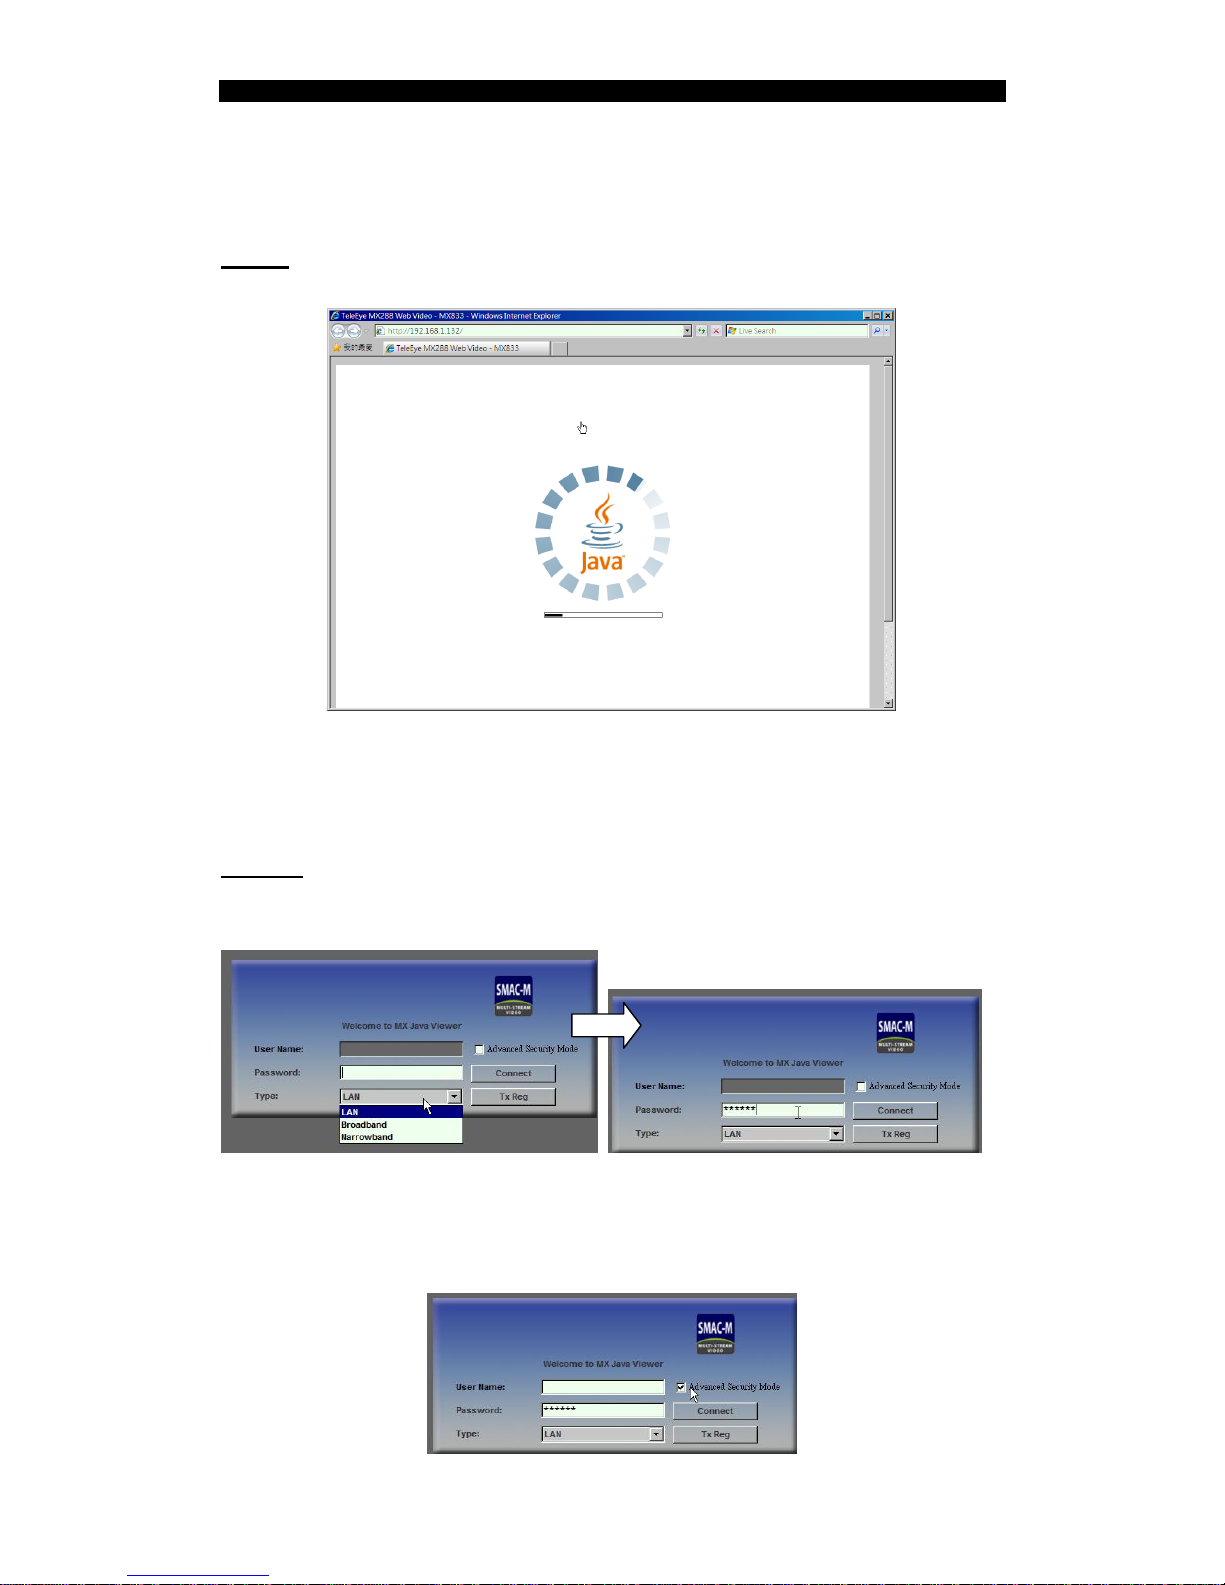
Step 1: Run a web browser such as Internet Explorer. Enter the IP address or
the sureLINK address in the address bar.
[Note] Java Runtime Environment (JRE) is required for the web browser to run the application.
If the PC does not have JRE, please go to the http://www.java.com to download the latest
version.
Step 2: Select the connection type in the connection dialogue box. Then enter
the password in the "Password:" field.
[Note] Default password is "000000" for normal security mode.
For normal security mode, only password is required, but for advanced
security mode, both password and user name are required to be input.
Page 35
MX User Guide PAGE 35
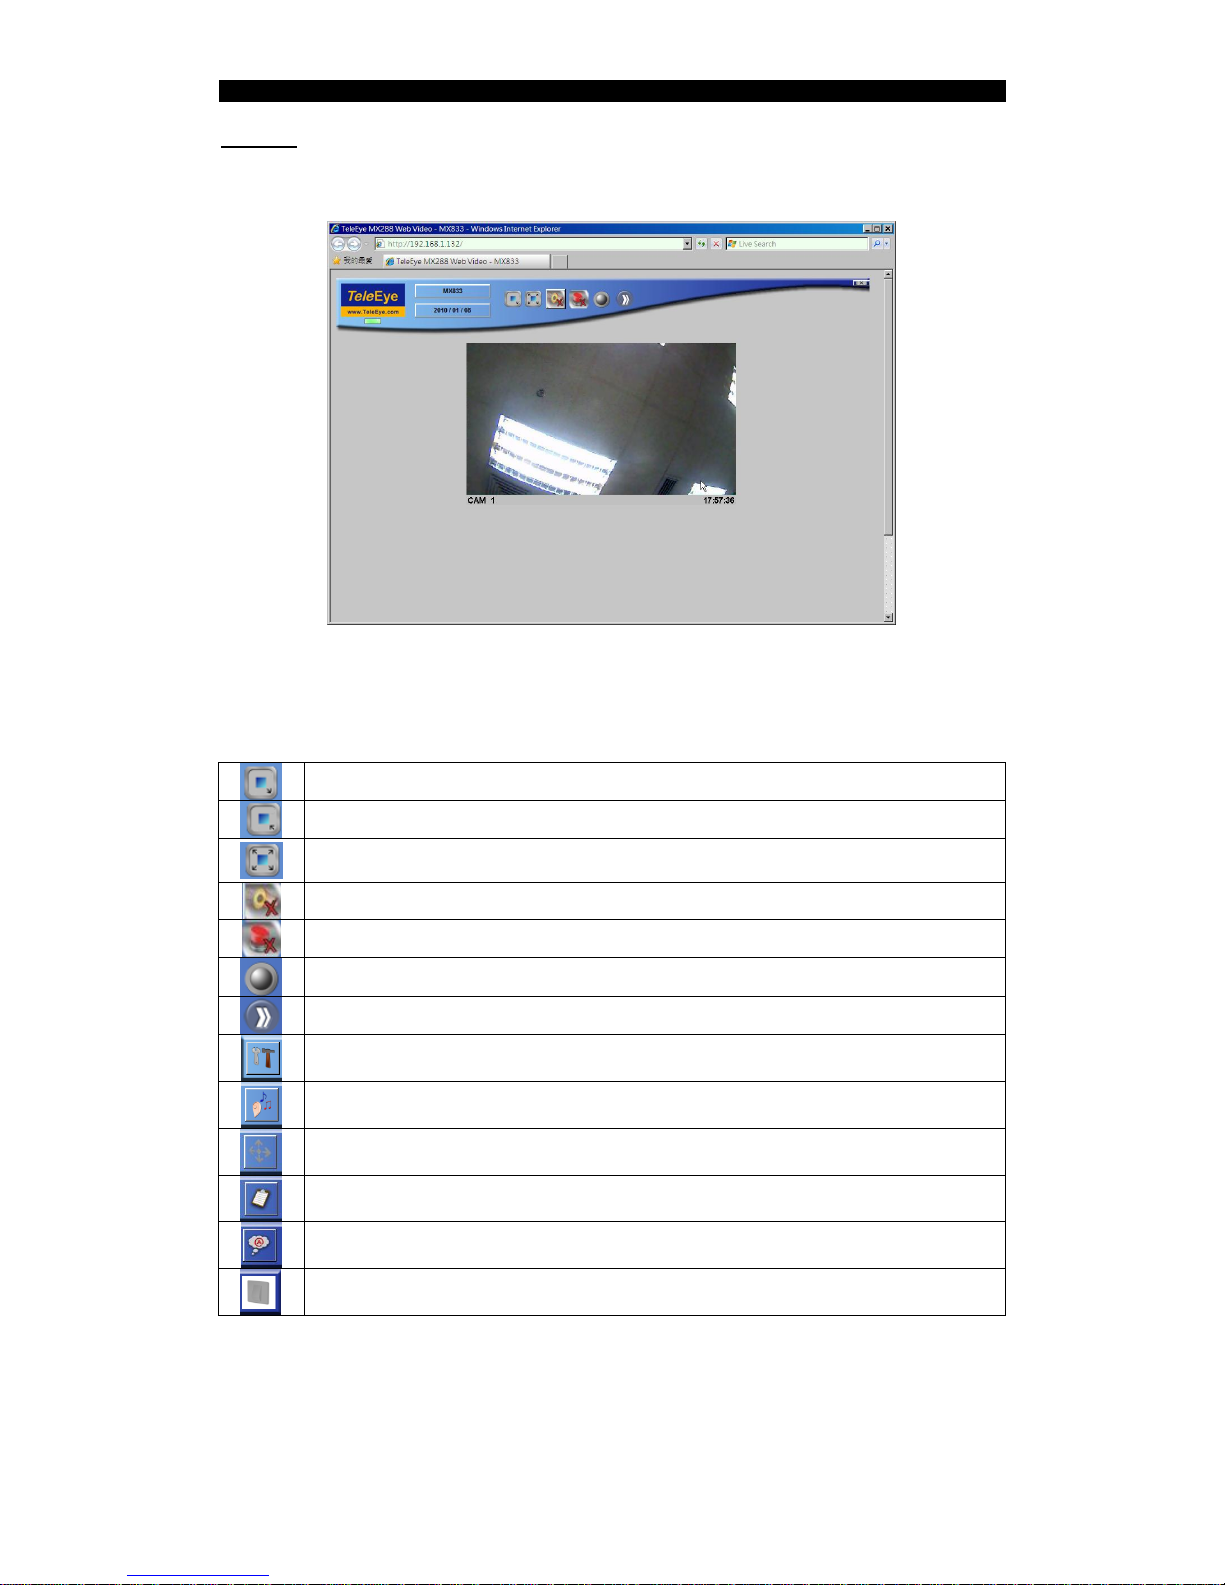
Step 3: Click the [Connect] button to connect the video stream. And the video
stream will be displayed on the browser as below:
There are several buttons on the top of the video screen. The function of each
button is described as follows:
In normal display mode, enlarge the video resolution.
In normal display mode, shrink the video resolution.
Change the video resolution to the full screen size. Press „ESC‟ to return back to
the normal display size.
When an event is triggered, click on this button to mute the event alert sound.
When an event is triggered, click on this button to clear the event.
If an alarm is triggered, it will be turned on. Otherwise, it will be off.
After clicking on this button, the following buttons will be shown.
This button is for general setting.
This button is for audio control.
This button is for Pan-Tilt-Zoom control.
This button is for checking the log files.
This button is for advanced setting. (e.g. Video quality)
This button is for controlling the switch.
#
# MX series does not support this feature
Page 36
MX User Guide PAGE 36
6. Appendix
6.1. Functional Features
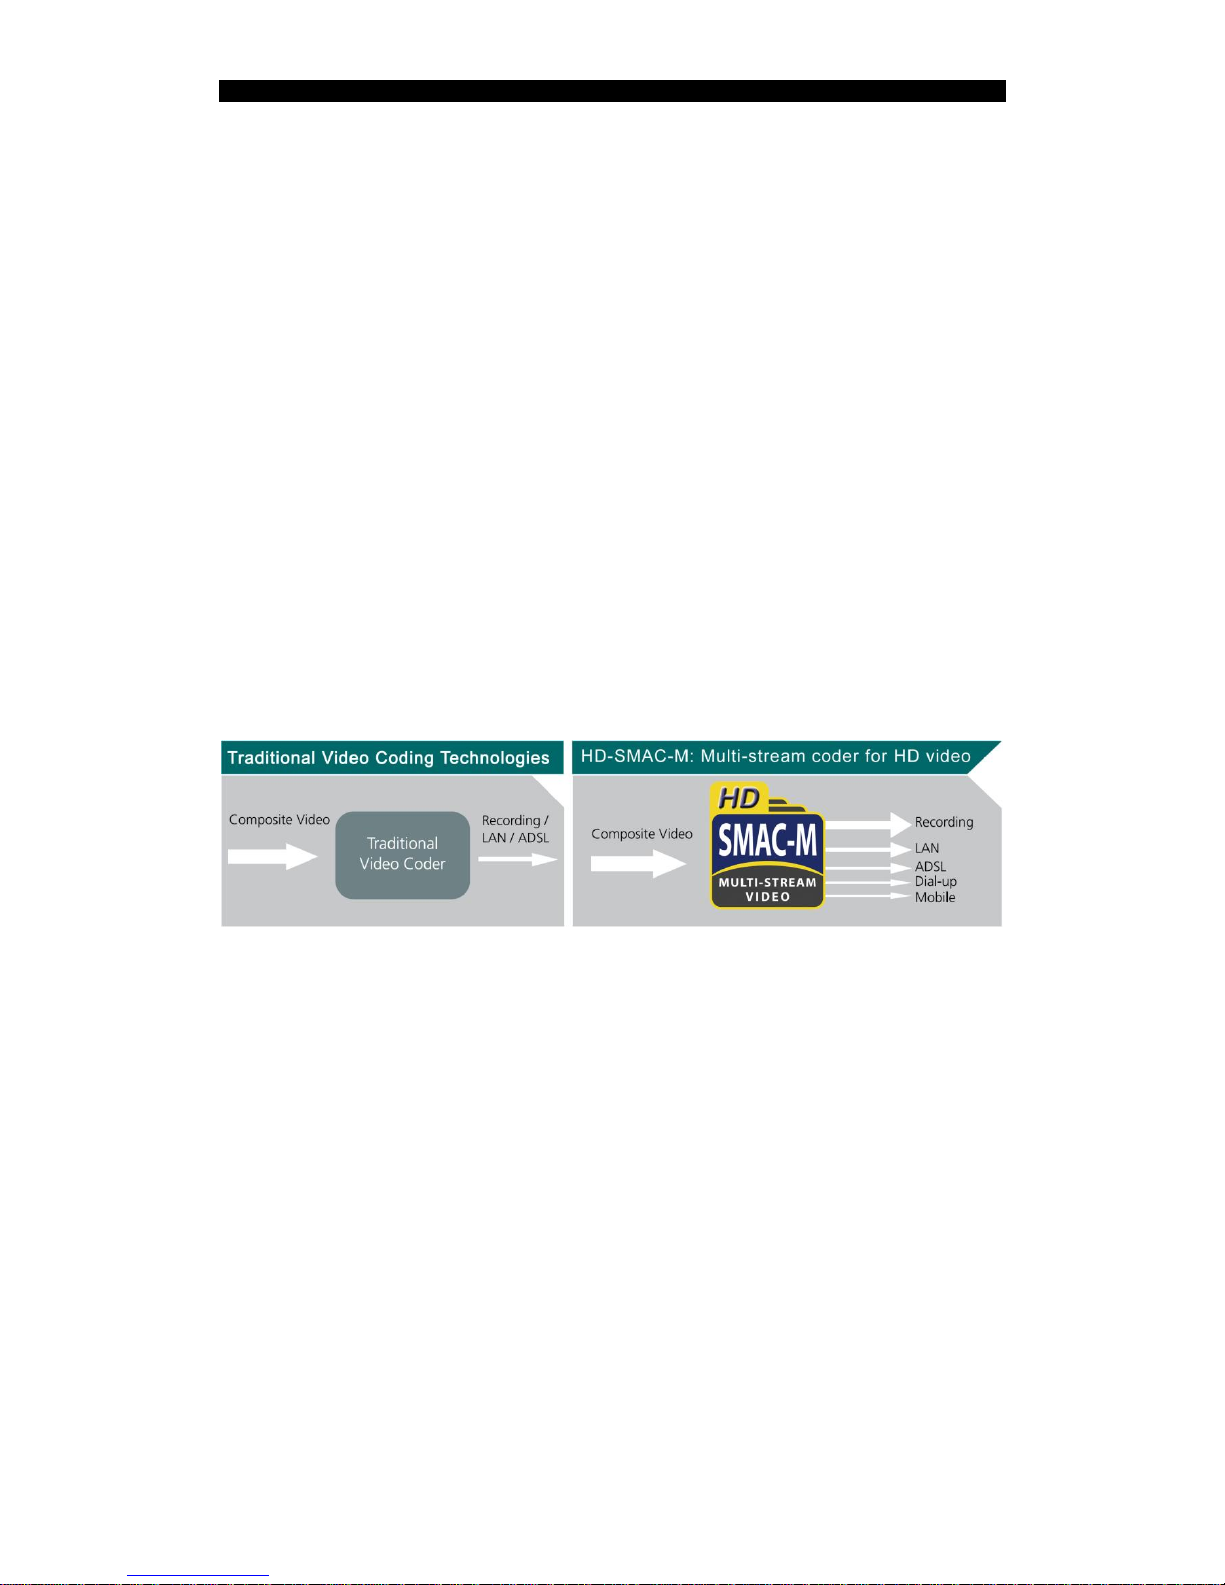
HD SMAC-M – Revolutionary multi-stream coder for HD video
HD SMAC-M is the world‟s first multi-stream coder developed by TeleEye for HD video
recording & transmission. It is specially designed for IP & mobile surveillance application.
HD SMAC-M features an independent HD recording stream to facilitate undisturbed recording
of HD video while viewing through Internet or mobile devices.
Providing four independent video streams covering different bit rates
Offering simultaneous video surveillance and high quality HD video recording
functions
Transmitting 80% faster than H.264 on ADSL
Recording 29% longer than H.264
16:9 Aspect Ratio Providing Wider View
TeleEye MX Series records the HD video with the aspect ratio of 16:9. There is a significant
advantage over conventional camera, which provides the 4:3 aspect ratio of video. The wide
screen format of TeleEye MX provides 33% more viewing area than conventional cameras
with much better clarity. Hence, it gives user a wider view, and greatly reduces the blind spot
of surveillance system.
Superb Video Quality with Great Details
TeleEye MX Series HD CCTV provides ultra-high resolution video quality. Its resolution is
greatly increased to over 800 TVL which exceeds conventional cameras that usually provide
maximum resolution with 540 TVL.
Page 37

MX User Guide PAGE 37
High Definition Progressive Scan Video
TeleEye MX Series HD CCTV Cameras come with high definition Progressive Scanning
Technology. Its image is scanned line by line, instead of using the interlaced scanning
method to interlace two groups of lines. The images have less distortion and jaggedness
especially for the fast image movement.
IP-based Video Surveillance Solution
TeleEye High Definition Video Surveillance system is an IP-based solution. With the features
of IP-based transmission, i.e. packet switching, versatile media and digital transmission, the
TeleEye HD CCTV system can utilize the network resources, immune to high noise and
transmit video through different media, such as CAT5 cable, Wi-Fi or mobile network.
Total Solution for HD Video Surveillance
TeleEye MX is capable of HD live video recording and multi-site viewing by using TeleEye
sureREC HD Video Recording Solution and sureSIGHT Integrated Video Management
Solution. sureREC is specifically designed for recording the independent HD video stream
of up to 64 MX cameras. sureSIGHT HD supports HD live video viewing from up to 64
TeleEye MX Series HD CCTV simultaneously. Its modular design allows customers to scale
up easily and add functional modules to suit specific requirements.
Video Surveillance Everywhere
By using TeleEye M-monitoring Solution (M-303), users can view live video through mobile
phone. The M-303 software supports HSPA, 3G, EDGE and GPRS network. Users can also
receive the event alerts of remote sites through the mobile phone immediately.
Page 38
MX User Guide PAGE 38
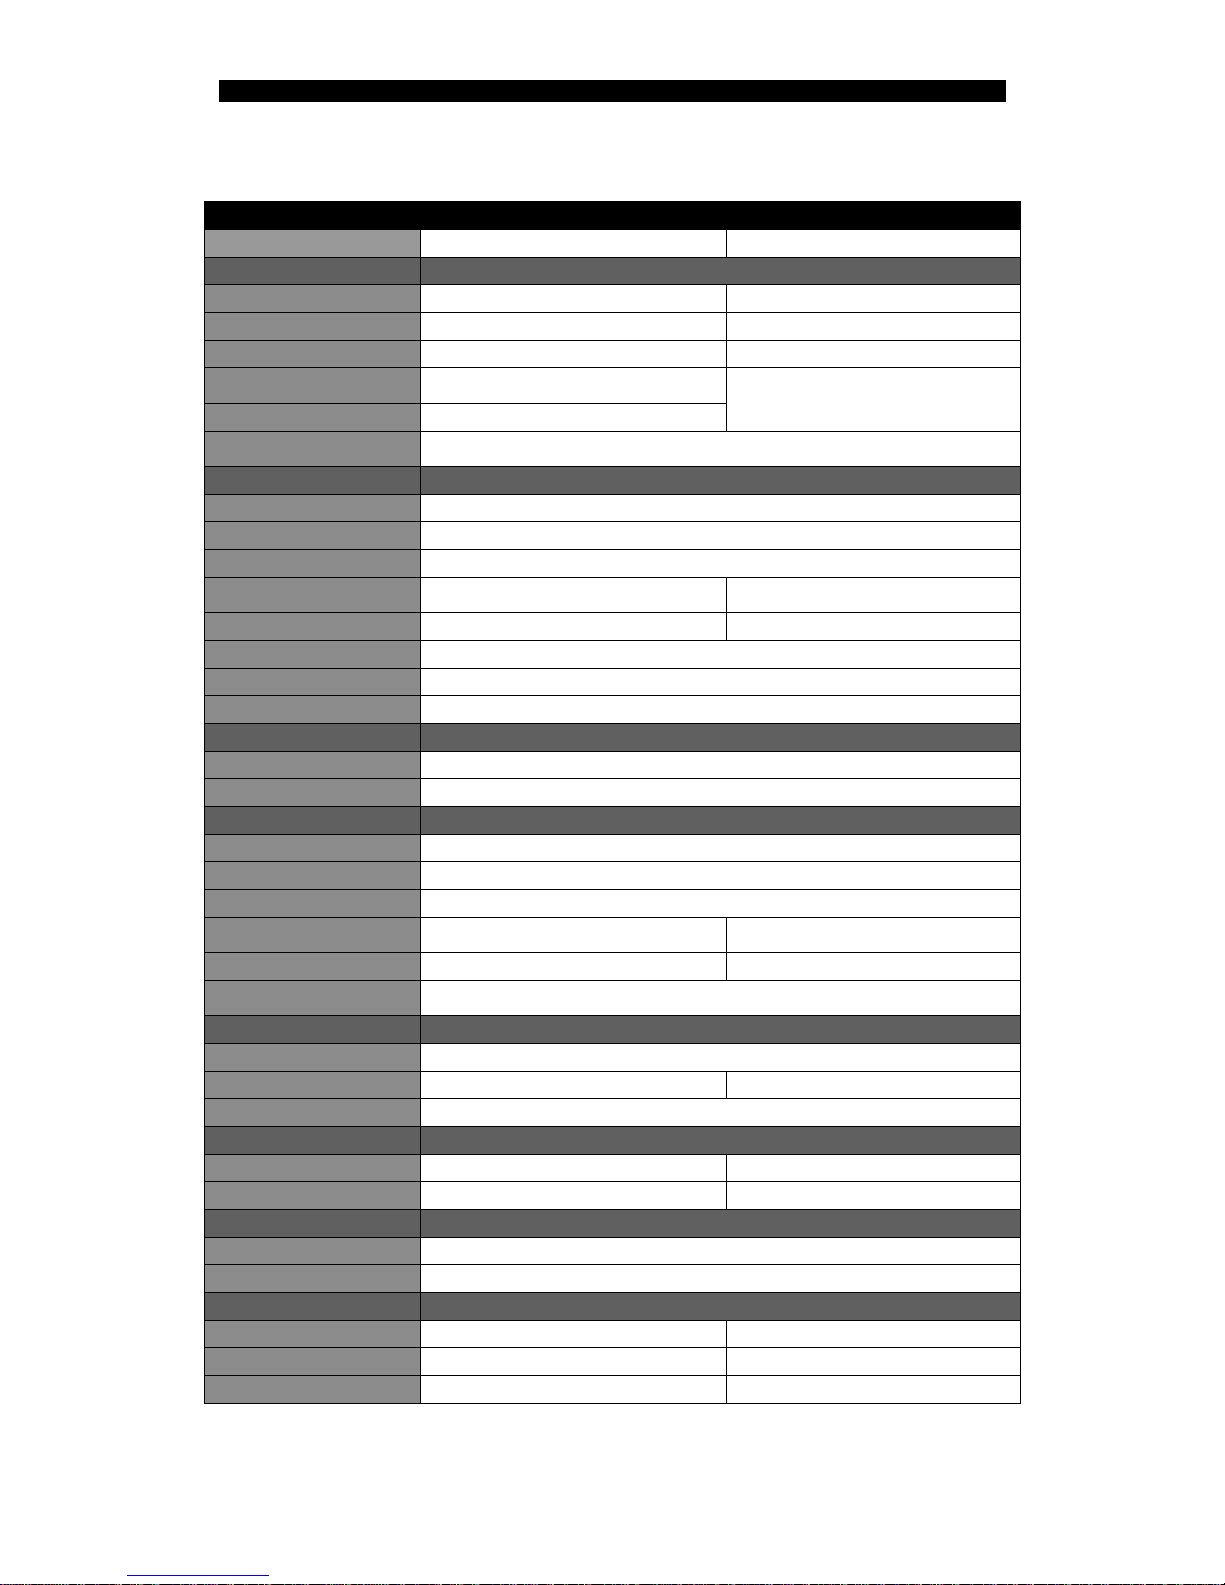
6.2. Specifications
MODEL
MX810-HD
MX820-HD / MX823-HD
MX833-HD
High Definition Fixed Dome
Outdoor & Vandal Resistant
Fixed Dome
IR Vandal Resistant
Vari-focal Dome
VIDEO
IMAGE SENSOR
1/3.2”, 2 megapixel CMOS Sensor
RESOLUTION
1600x1200 pixels (UXGA)
MINIMUM ILLUMINATION
0.5 Lux @ F1
0.0 Lux (~15m)
LENS
f=3.6mm or 6mm
fixed iris lens
f=2.7-9mm
Vari-focal auto-iris lens
VIEW ANGLE (HORIZONTAL)
41° / 64°
25° - 77°
MECHANICAL REMOVABLE
IR-CUT FILTER
No
Yes
CONNECTIVITY
NETWORK INTERFACE
RJ-45, 10/100 Base-T Ethernet (Auto-Sensing)
NETWORK PROTOCOL
HTTP, uPnP, DHCP
DYNAMIC IP
sureLink, DDNS
LIVE RESOLUTION
1600x900, 1280x720, 960x540, 640x360, 480x270, 320x180
LIVE FRAME RATE
Up to 15 fps
CONCURRENT USERS
6 (Independent)
SECURITY
Multiple user access levels with password protection
WEB SERVER
Built-in
VIDEO COMPRESSION
COMPRESSION
HD SMAC-M multi-stream
VIDEO STREAMING
4 simultaneous streams for recording, LAN, ADSL and mobile
RECORDING
SOFTWARE
sureREC
STREAM
Independent recording stream, independent resolution, frame rate with live
monitoring
MODE
Manual, Schedule Motion, Schedule Event
RESOLUTION
1600x900, 1280x720, 960x540, 640x360, 320x180
FRAME RATE
Up to 15 fps
PLAYBACK
Forward, Backward, Pause,
Step Forward, Step Backward, x10 Fast Forward, x100 Fast Forward
EVENT HANDLING
EVENT
External Alarm, Video Motion Detection
ACTION
E-mail, Dial Back, Alarm Image Recording
EXTERNAL ALARM INPUT
1 x NC/NO
POWER
POWER IN
DC 12V
DC 12V
DC 12V, PoE
MAXIMUM RATING
7.4W
7.4W
12W
OPERATING ENVIRONMENT
AMBIENT TEMPERATURE
0°C - 40°C
RELATIVE HUMIDITY
<85% (no condensation)
MECHANICAL DESIGN
WEATHER PROFF
IP66
VANDAL RESISTANT
Yes
Yes
Yes
NET WEIGHT
0.45g
1kg
1kg
Page 39
MX User Guide PAGE 39
MODEL
MX873-HD
MX763-HD
IR Vari-Focal
Day/Night Box Camera
VIDEO
IMAGE SENSOR
1/3.2”, 2 megapixel CMOS Sensor
1/3”, 1.3 megapixel CMOS Sensor
RESOLUTION
1600x1200 pixels (UXGA)
1280x720 pixels
MINIMUM ILLUMINATION
0.0 Lux (~15m)
0.1Lux
LENS
f=2.7-9mm
Vari-focal auto-iris lens
Depends on Lens used
(CS mount)
VIEW ANGLE (HORIZONTAL)
25° - 77°
MECHANICAL REMOVABLE
IR-CUT FILTER
Yes
CONNECTIVITY
NETWORK INTERFACE
RJ-45, 10/100 Base-T Ethernet (Auto-Sensing)
NETWORK PROTOCOL
HTTP, uPnP, DHCP
DYNAMIC IP
sureLink, DDNS
LIVE RESOLUTION
1600x900, 1280x720, 960x540
640x360, 480x270, 320x180
1280x720, 640x360, 320x180
LIVE FRAME RATE
Up to 15 fps
Up to 25 fps
CONCURRENT USERS
6 (Independent)
SECURITY
Multiple user access levels with password protection
WEB SERVER
Built-in
VIDEO COMPRESSION
COMPRESSION
HD SMAC-M multi-stream
VIDEO STREAMING
4 simultaneous streams for recording, LAN, ADSL and mobile
RECORDING
SOFTWARE
sureREC
STREAM
Independent recording stream, independent resolution, frame rate with live monitoring
MODE
Manual, Schedule Motion, Schedule Event
RESOLUTION
1600x900, 1280x720, 960x540
640x360, 320x180
1280x720, 640x360, 320x180
FRAME RATE
Up to 15 fps
Up to 25 fps
PLAYBACK
Forward, Backward, Pause
Step Forward, Step Backward, x10 Fast Forward, x100 Fast Forward
EVENT HANDLING
EVENT
External Alarm, Video Motion Detection
ACTION
E-mail, Dial Back, Alarm Image Recording
E-mail, Dial Back, Relay Switch
EXTERNAL ALARM INPUT
1 x NC/NO
POWER
POWER IN
DC 12V
DC 12V, PoE
MAXIMUM RATING
12W
12W
OPERATING ENVIRONMENT
AMBIENT TEMPERATURE
0°C - 40°C
RELATIVE HUMIDITY
<85% (no condensation)
MECHANICAL DESIGN
WEATHER PROFF
IP66
No
VANDAL RESISTANT
Yes
No
NET WEIGHT
1.2kg
0.6kg
Page 40
MX User Guide PAGE 40
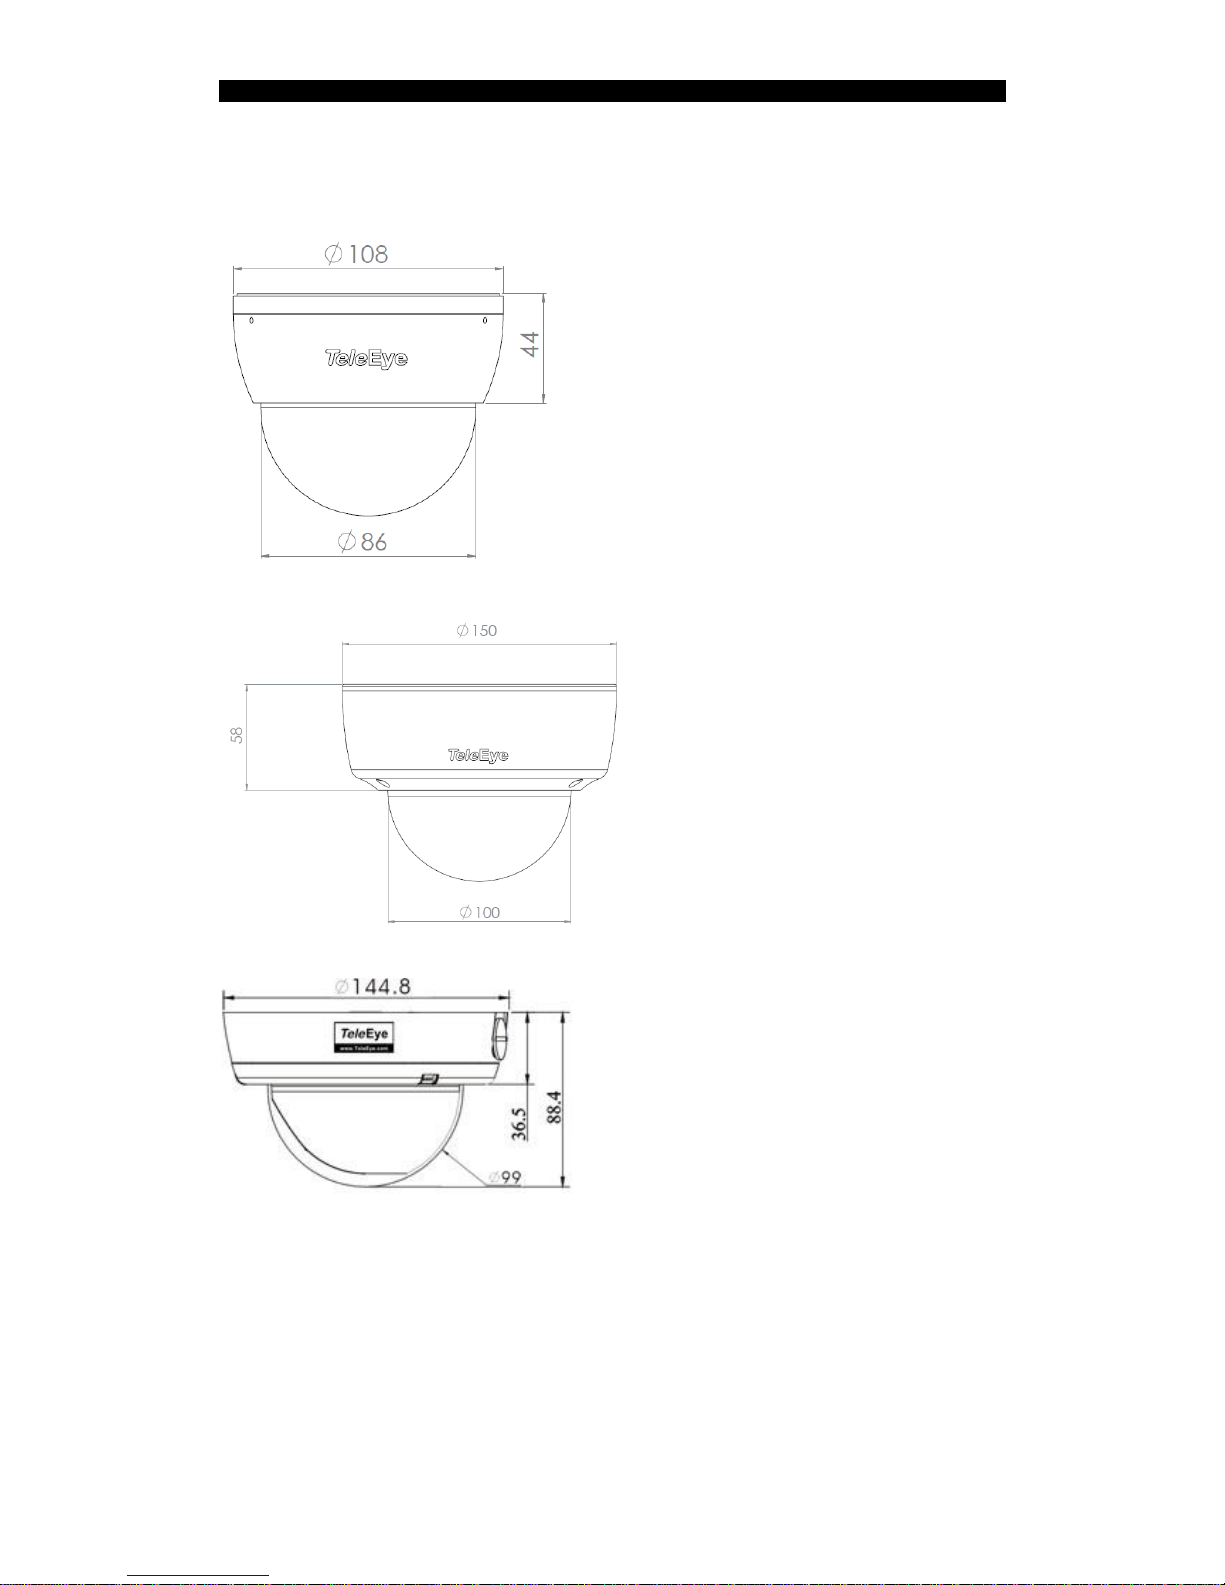
6.3. Dimension
6.3.1. MX810-HD
6.3.2. MX820-HD
6.3.3. MX823-HD
Page 41
MX User Guide PAGE 41
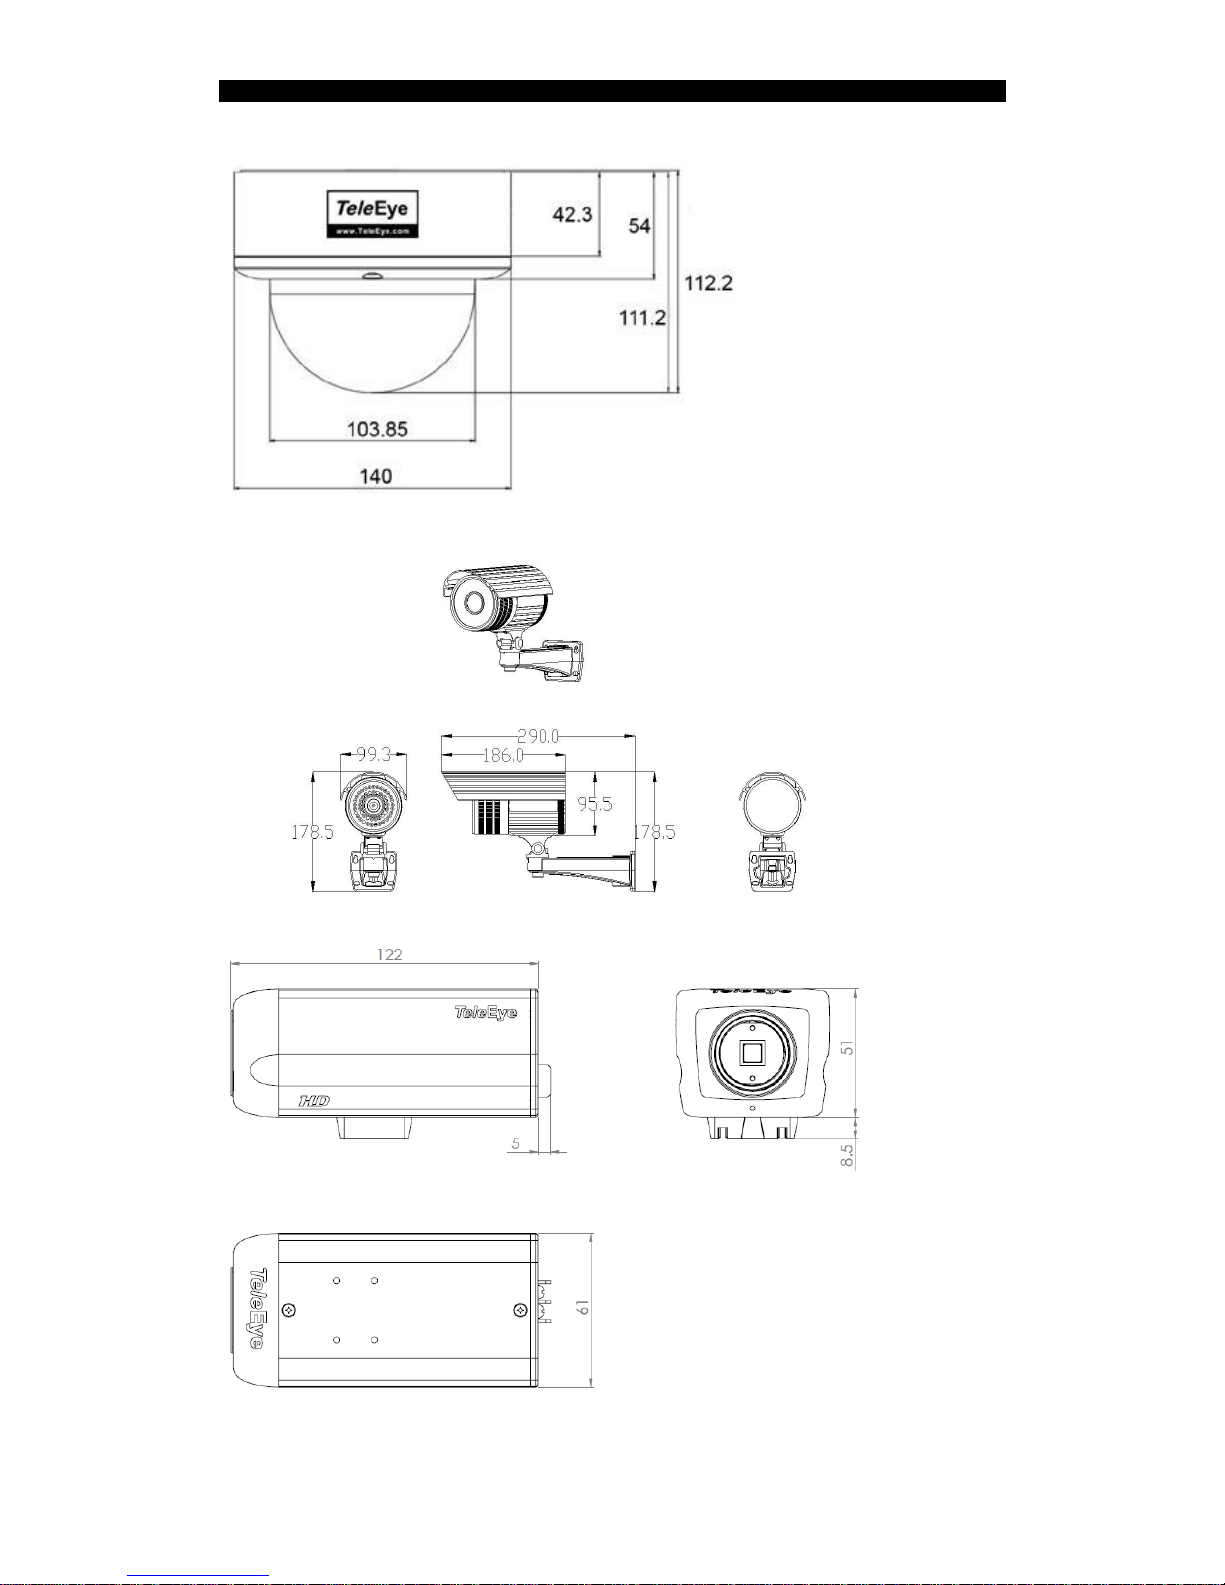
6.3.4. MX833-HD
6.3.5. MX873-HD
6.3.6. MX763-HD
 Loading...